
About this presentation / manual
This presentation …
was created by Dr. Günther Rezniczek and uses a (modified) slideshow template of
Ruhr-Universität Bochum
is openly shared for use by others – feel free to modify (including removal of
branding)
was first shown at the Feb 23, 2022, REDCap Africa monthly call
All screenshots are from REDCap v12.2.4
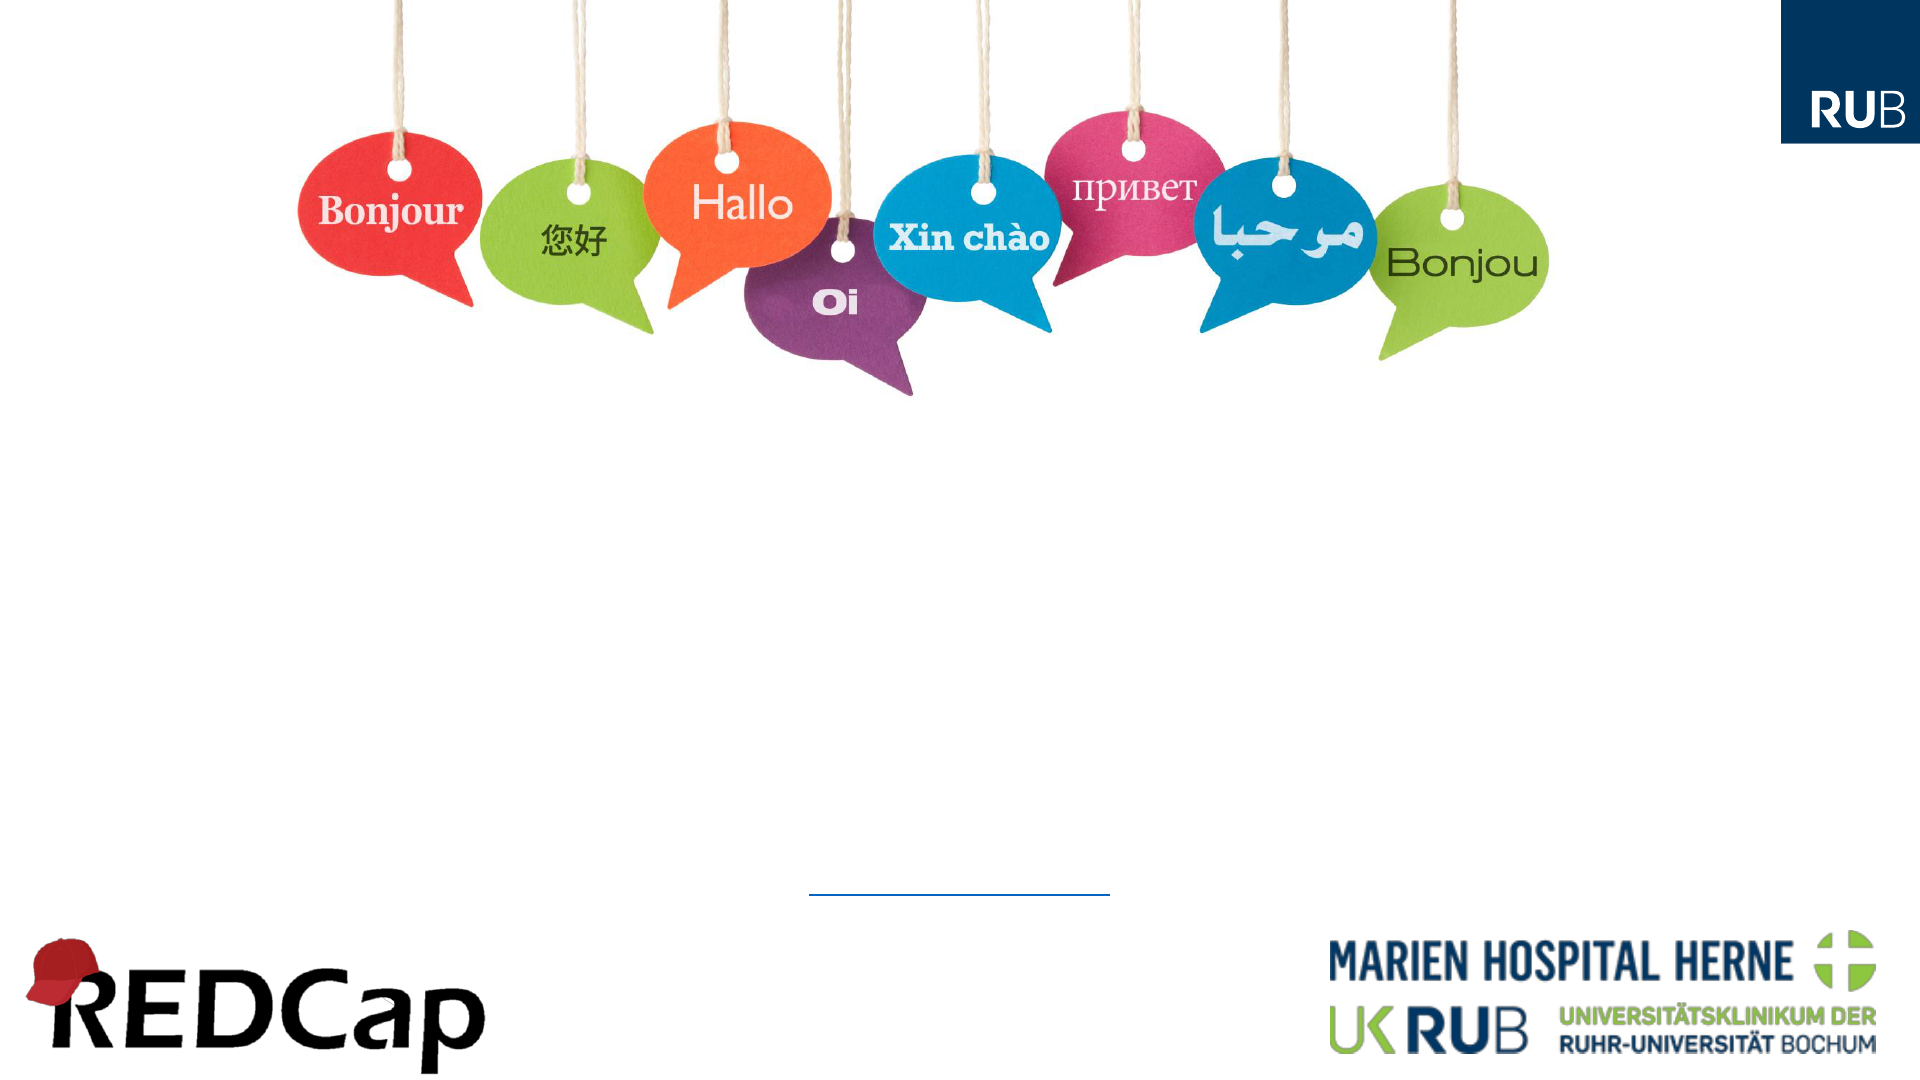
Multilingual support in REDCap before v12
Native
Language files and
different projects for
different languages
Branching logic
External Modules
Multilingual
Second Language
Language Switcher
(Babel)
(Right-to-Left Module)
A better solution was needed!
<i class="fas fa-globe"></i>
https://fontawesome.com/license
Enter …
Native Multi-Language Support in REDCap

What is Multi-Language Management (MLM)?
New feature in REDCap v12+
Provides the ability to present REDCap data entry interfaces
in multiple languages
Data Entry Pages
Questions/Choices
Survey Settings
ASIs and Alerts & Notifications
PDFs
Compatible with piping, field embedding, branching logic
What is Multi-Language Management (MLM)?
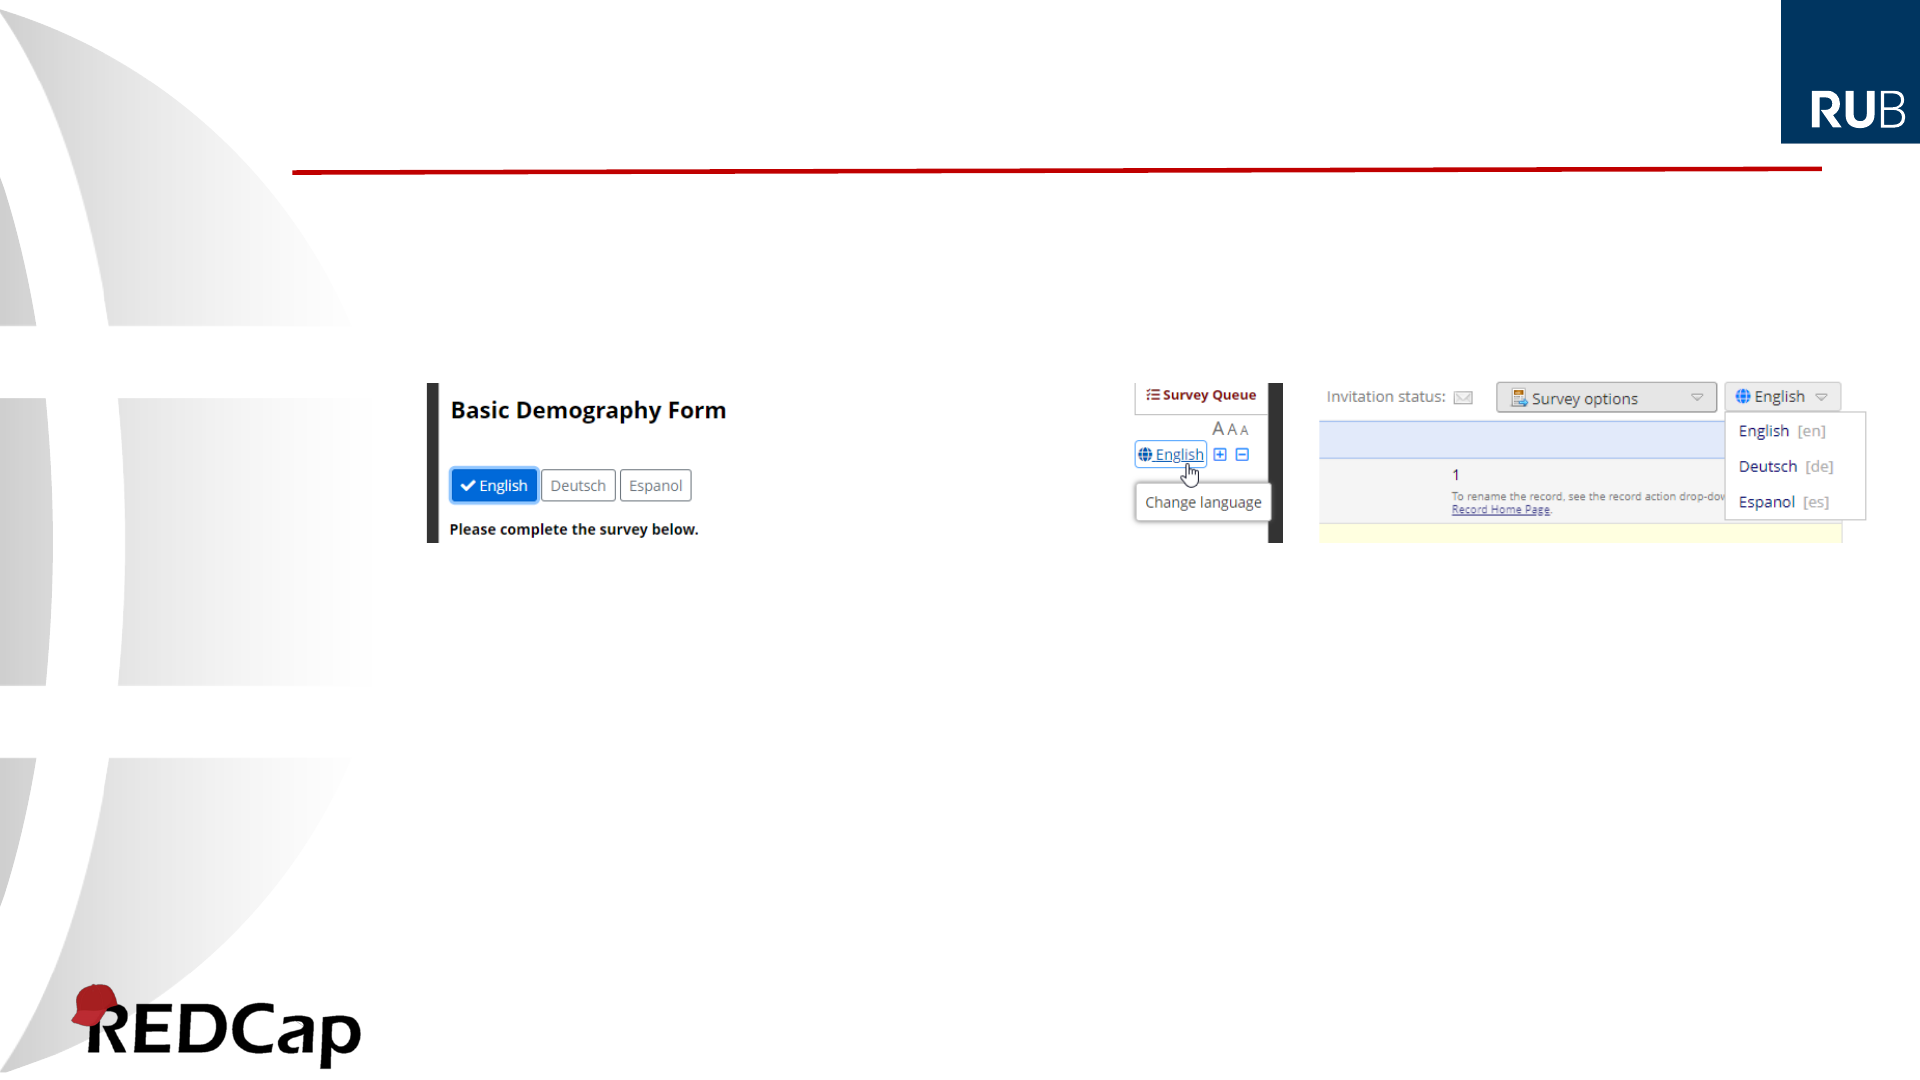
Users / survey respondents can switch among the available
languages at will
Easy to administer, purely opt-in

How does it work? – Basic concepts
There are two primary translation components for each
language:
User interface language
i.e., all the strings that are
displayed by REDCap in the
context of data entry or surveys,
the default values of which
originate from a Language.ini file
(as set in Control Center or
Project Settings)
(can/should be) provided as
SYSTEM LANGUAGES
Project-specific language
i.e., all data dictionary items
(questions/field labels, choice
labels, etc.), survey settings
(survey title, survey instructions,
etc.), survey queue custom
message, ASI and alert message
subjects and contents, etc.
(can override user interface items)

How does it work? – System languages
What are “system” languages?
Languages that are configured in a REDCap instance’s Control Center
They provide translations for the stock user interface strings
They are the best way to initialize a language inside a project
And last but not least:
They provide a language choice for survey respondents on general
pages (i.e. pages that cannot be linked with a specific project)
Generic survey endpoint (access code page)
Error messages
Thus, the system languages should always be a superset of all project languages
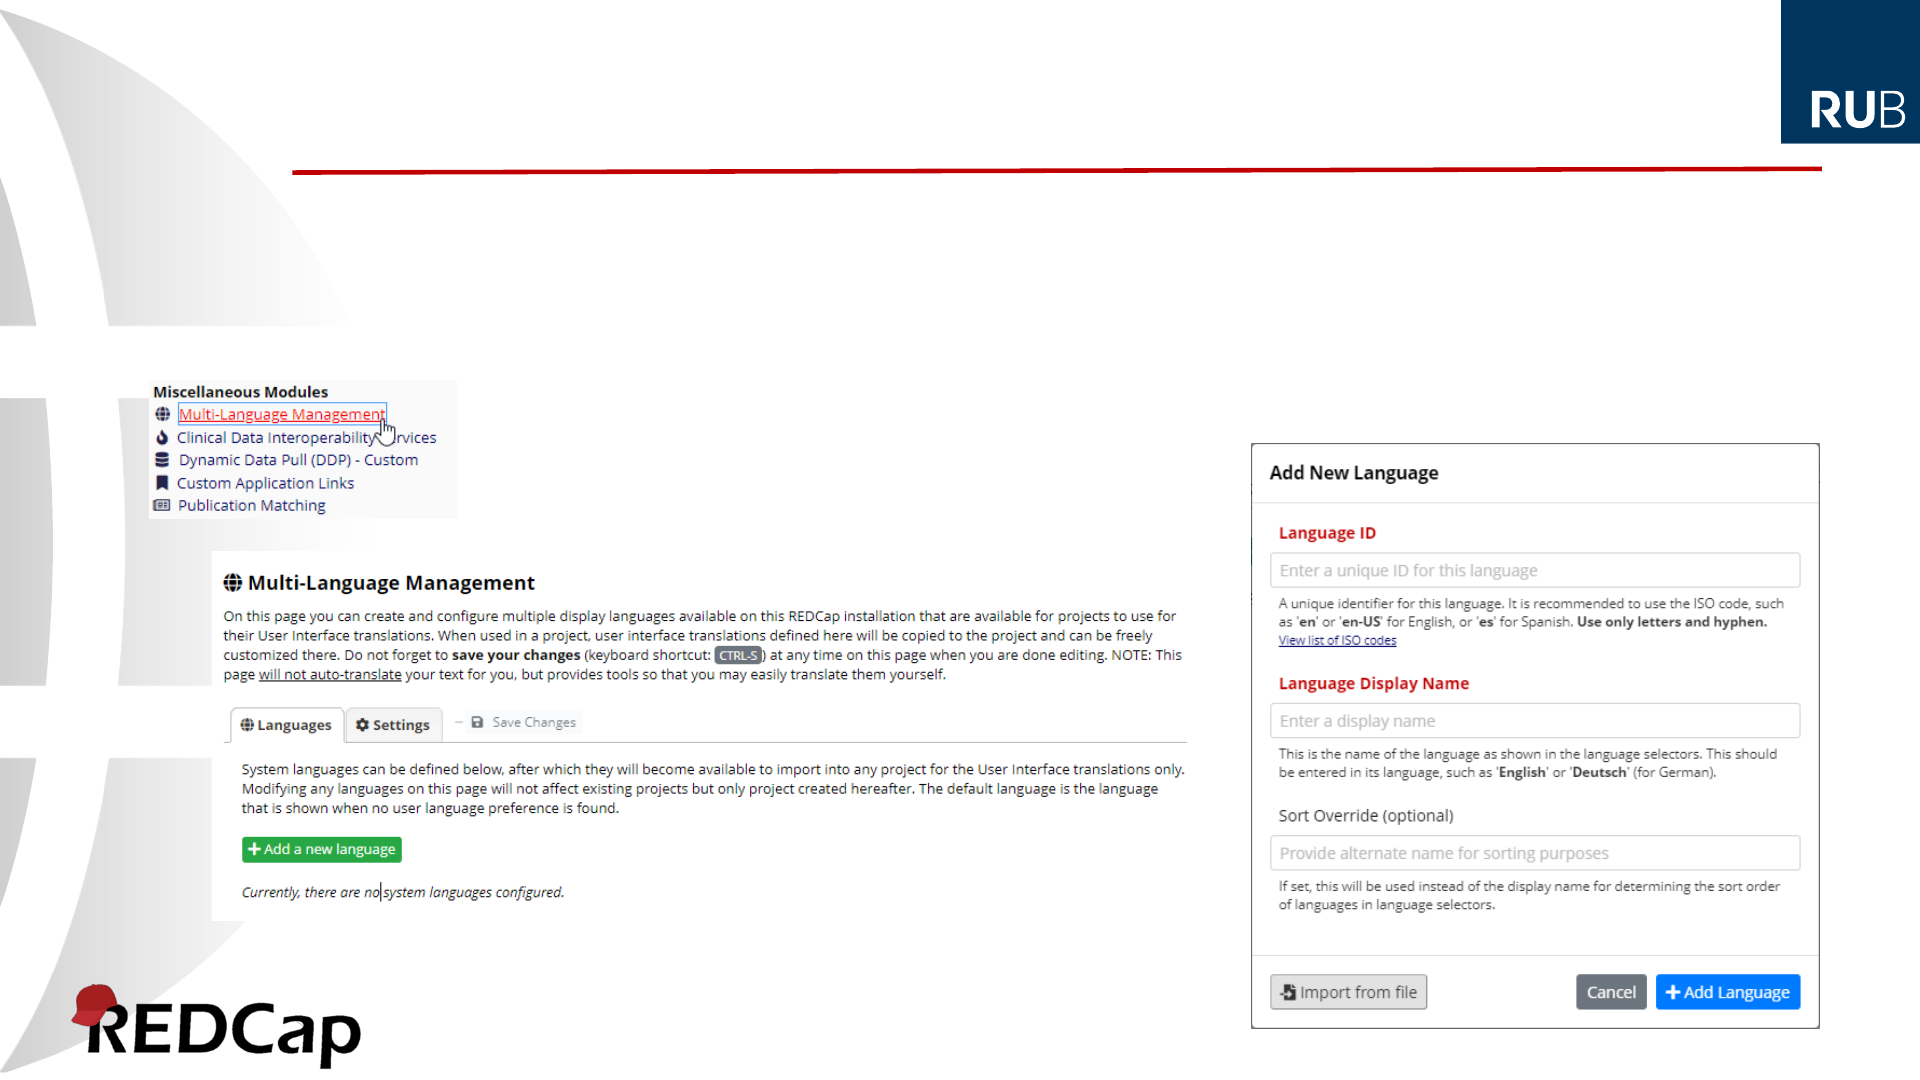
Setting up system languages
1. Go to Control Center and bring up the Multi-Language Management page
2. Click the Add a new language button
3. Click the Import from file button
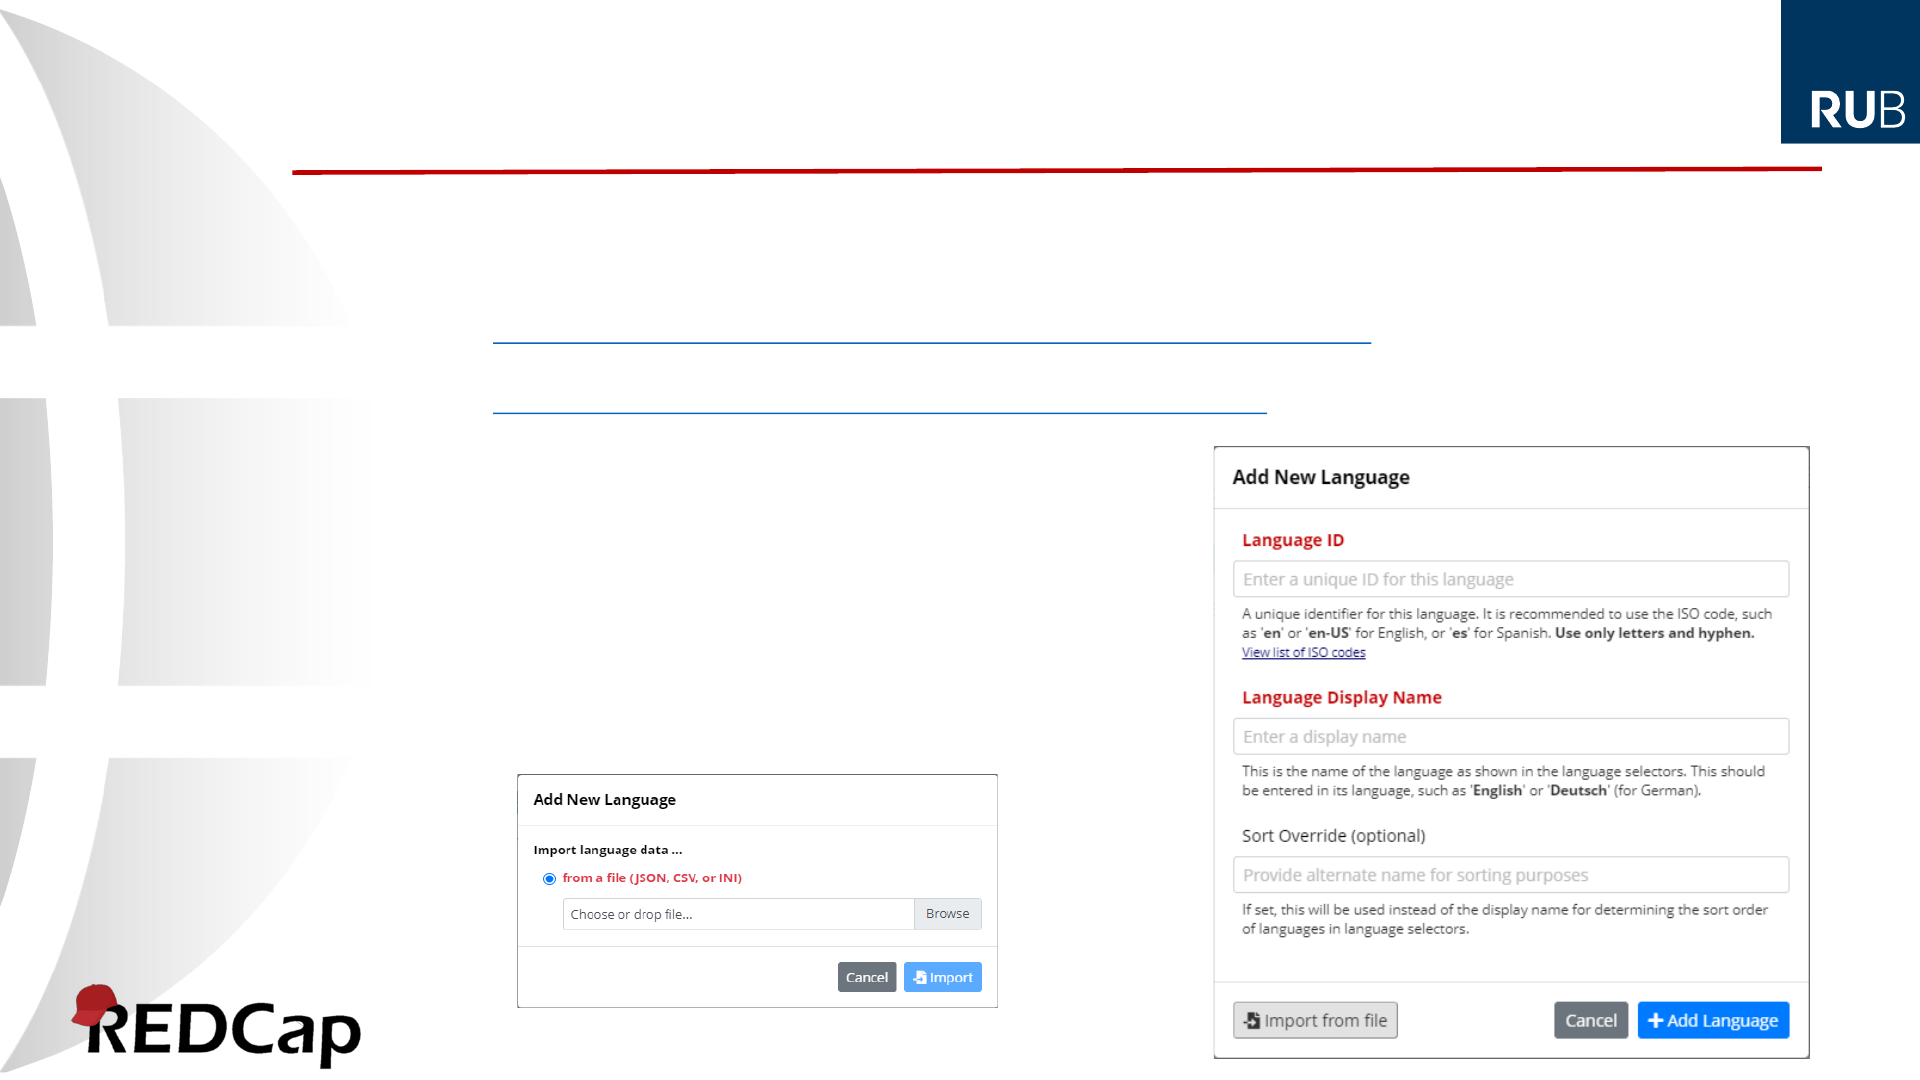
Setting up system languages (ctd.)
4. Drop a file containing UI translations onto the Choose or drop file… input (or click Browse)
This can be …
A Language.ini file from REDCap Language Center
https://redcap.vanderbilt.edu/plugins/redcap_consortium/language_library.php
A translation file from the Multi-Language Management (MLM) Translations Repository
https://redcap.vanderbilt.edu/surveys/?__report=7LEEXCTLYA7TJDJ3
5. Click Import
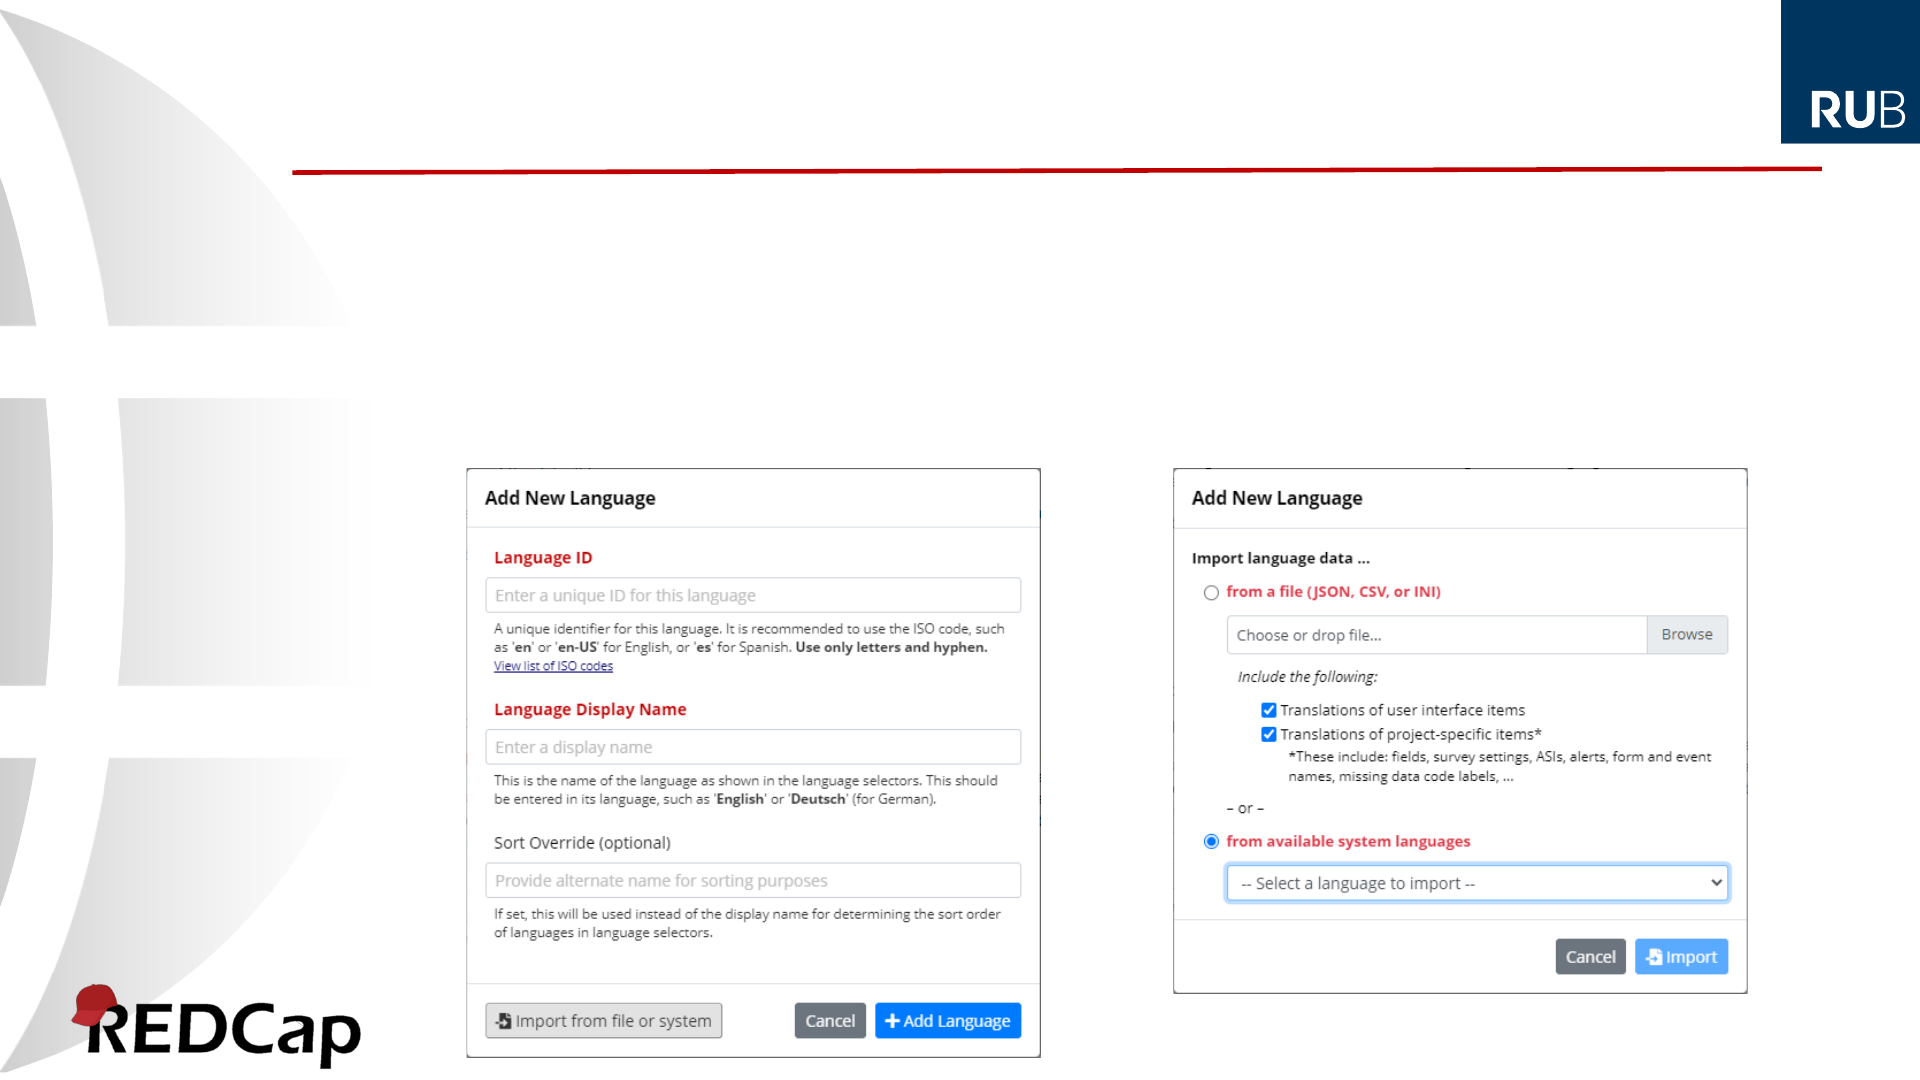
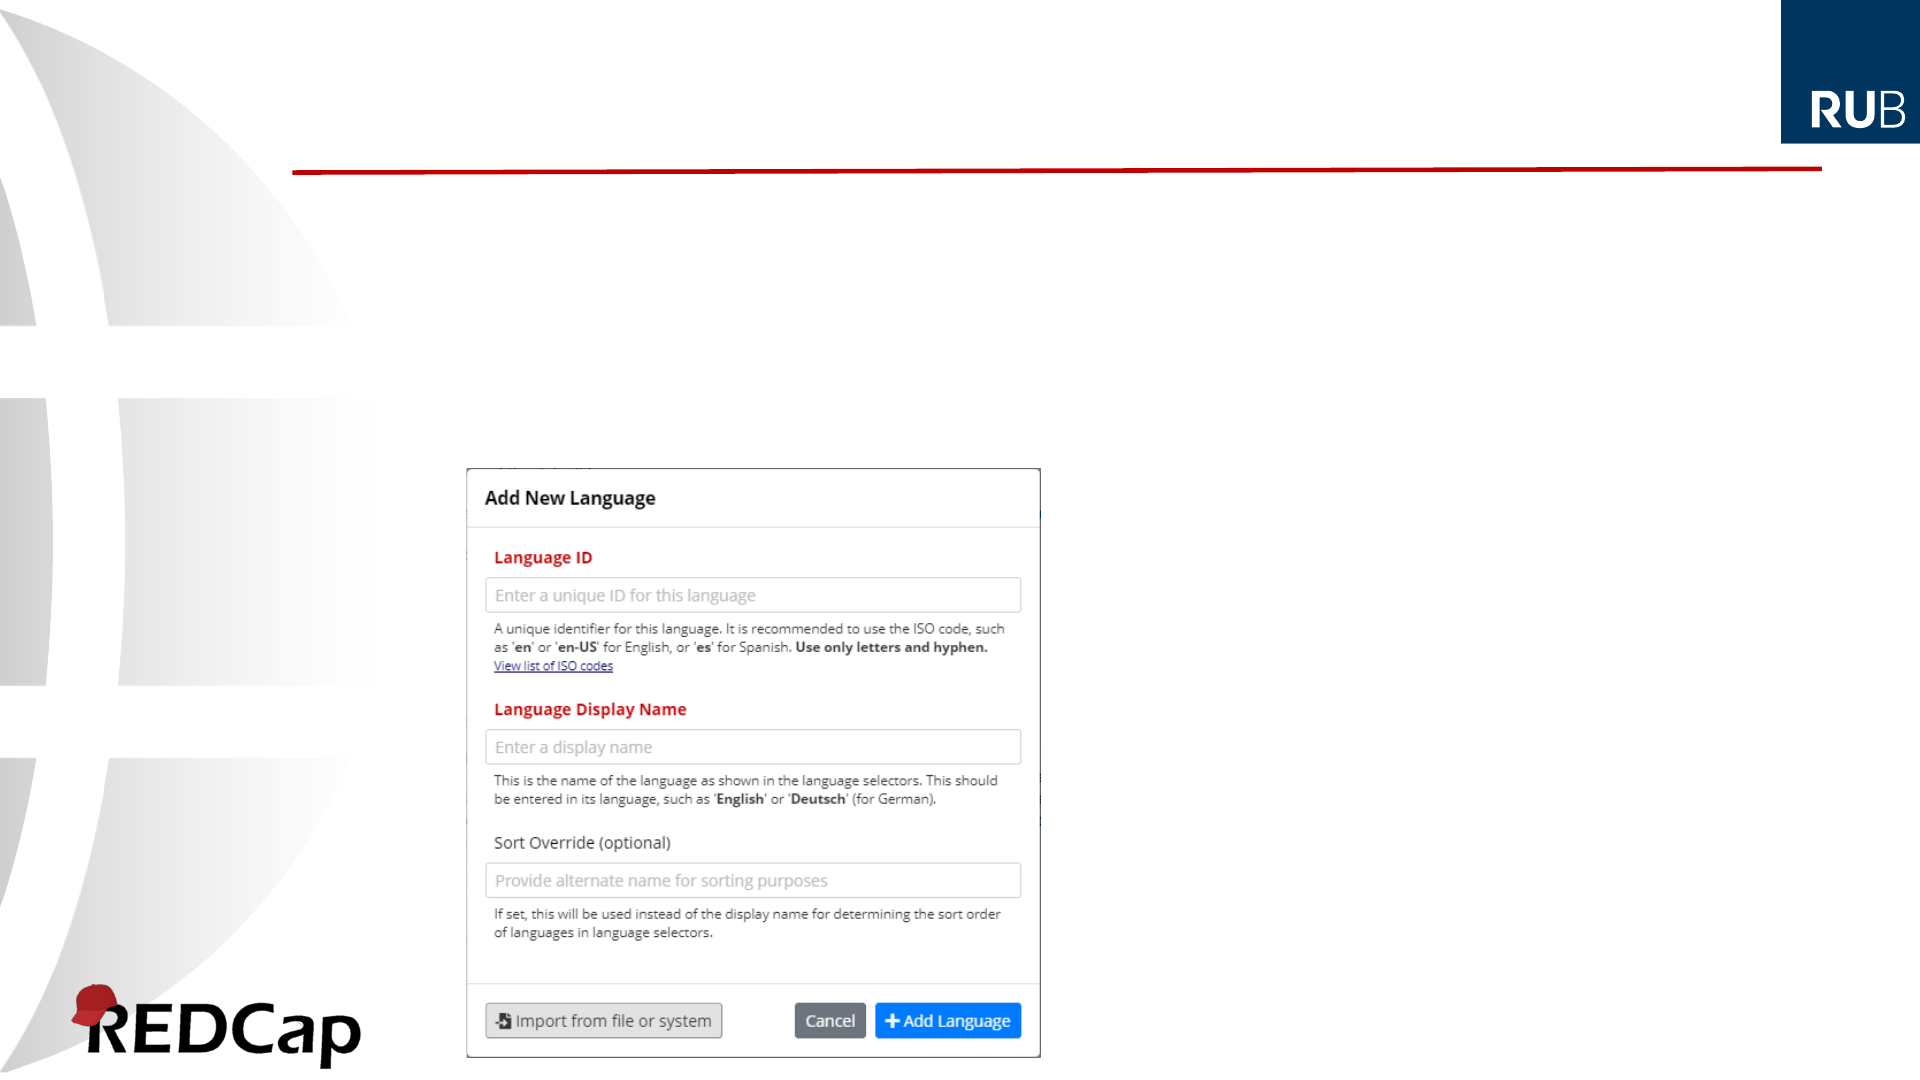
6. Back on the Add New Language dialog, enter
an ID and a Display Name (if not already set) and
optionally a Sort Override
7. Finally, click the Add Language button
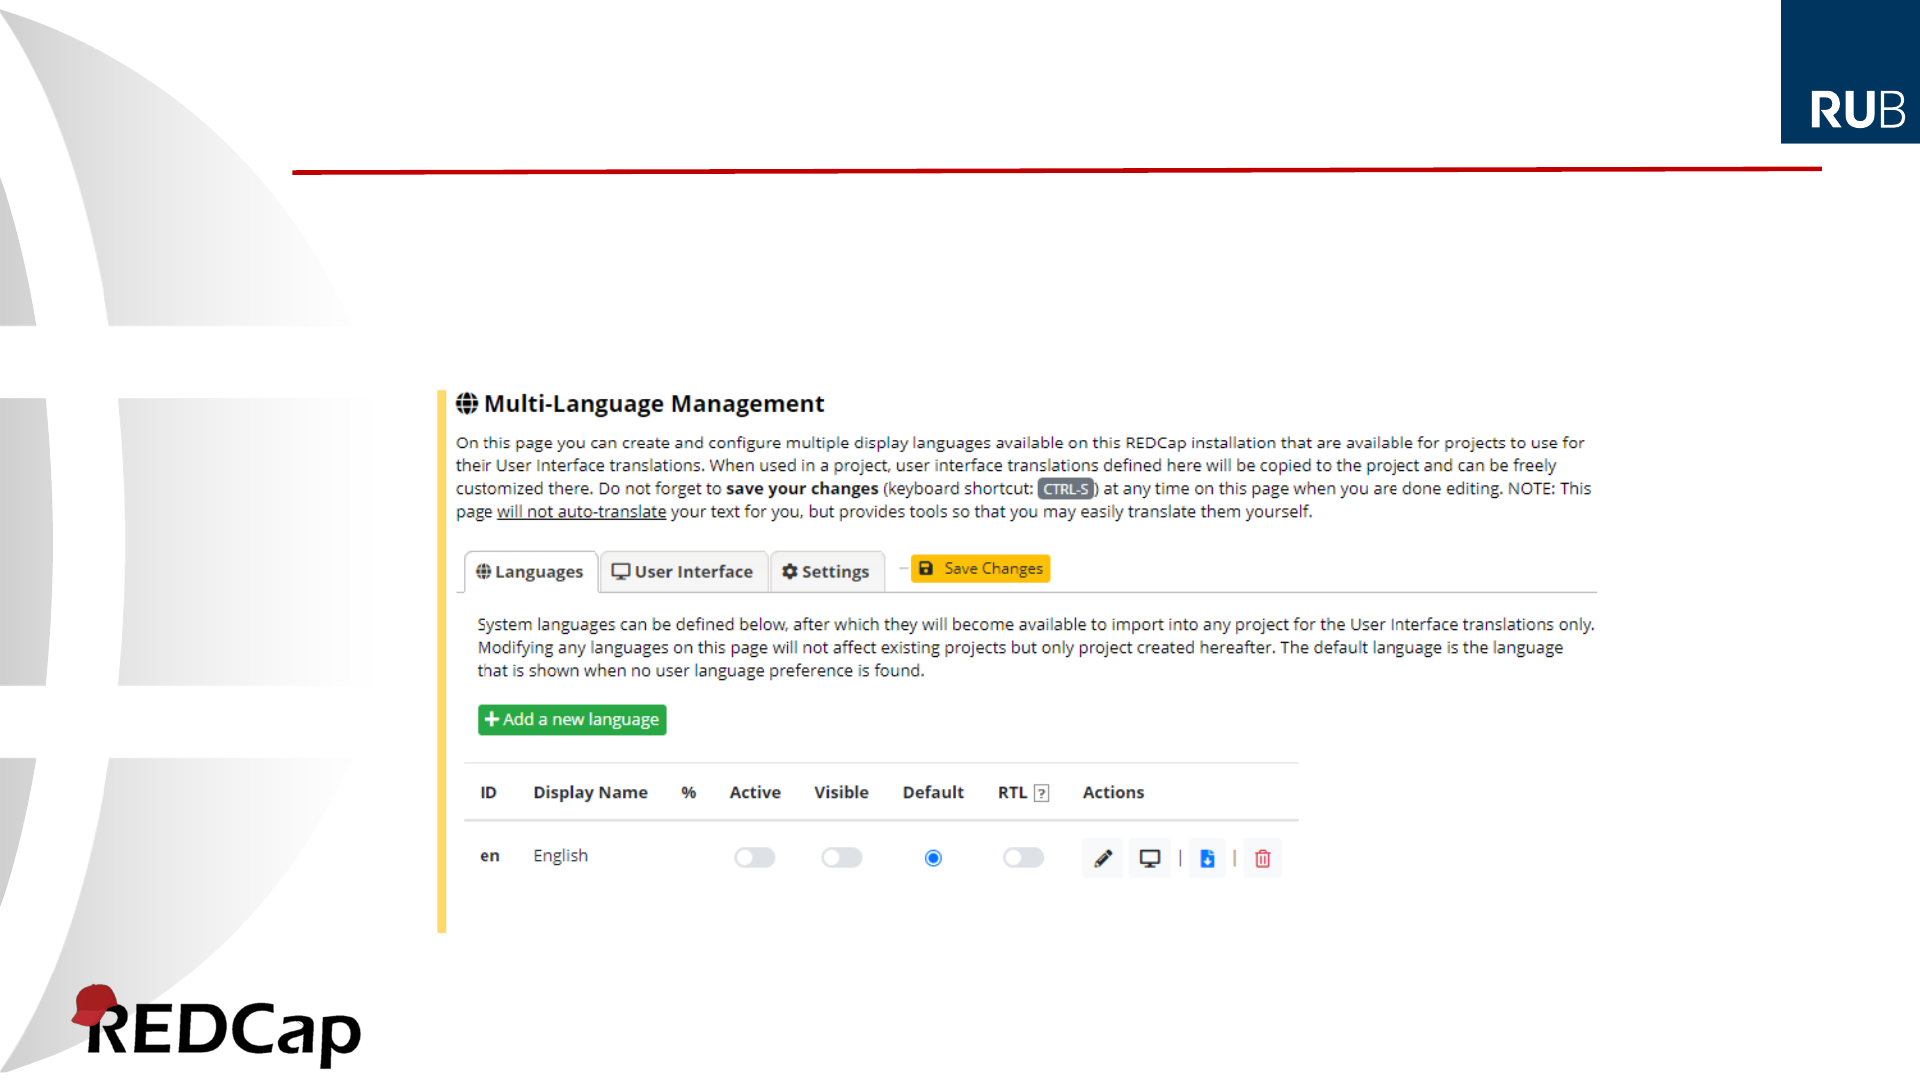
Setting up system languages (ctd.)
8. Set whether this language is Active* and Visible*
9. If this is a right-to-left language (such as Arabic or Hebrew), turn on RTL
10. Finally, click Save Changes to commit all changes to the database
Active = The language is available for selection on non-project pages seen by survey respondents
Visible = The language is listed as an available language on a project‘s import dialog
*

Getting started with MLM in projects
There are 3 methods for initializing languages within projects:
1. Build from scratch (not recommended)
2. Import form a file (.csv, .json, .ini)
3. Import from the SYSTEM LANGUAGES (preferred)
Then, data dictionary (and other items) can be translated
On the project’s MLM setup page
Offline (by a professional translator)
1.Export all items that need to be translated
2.Import the translations
Note:
The MLM setup page is locked
in production projects. Switch
to draft mode first.
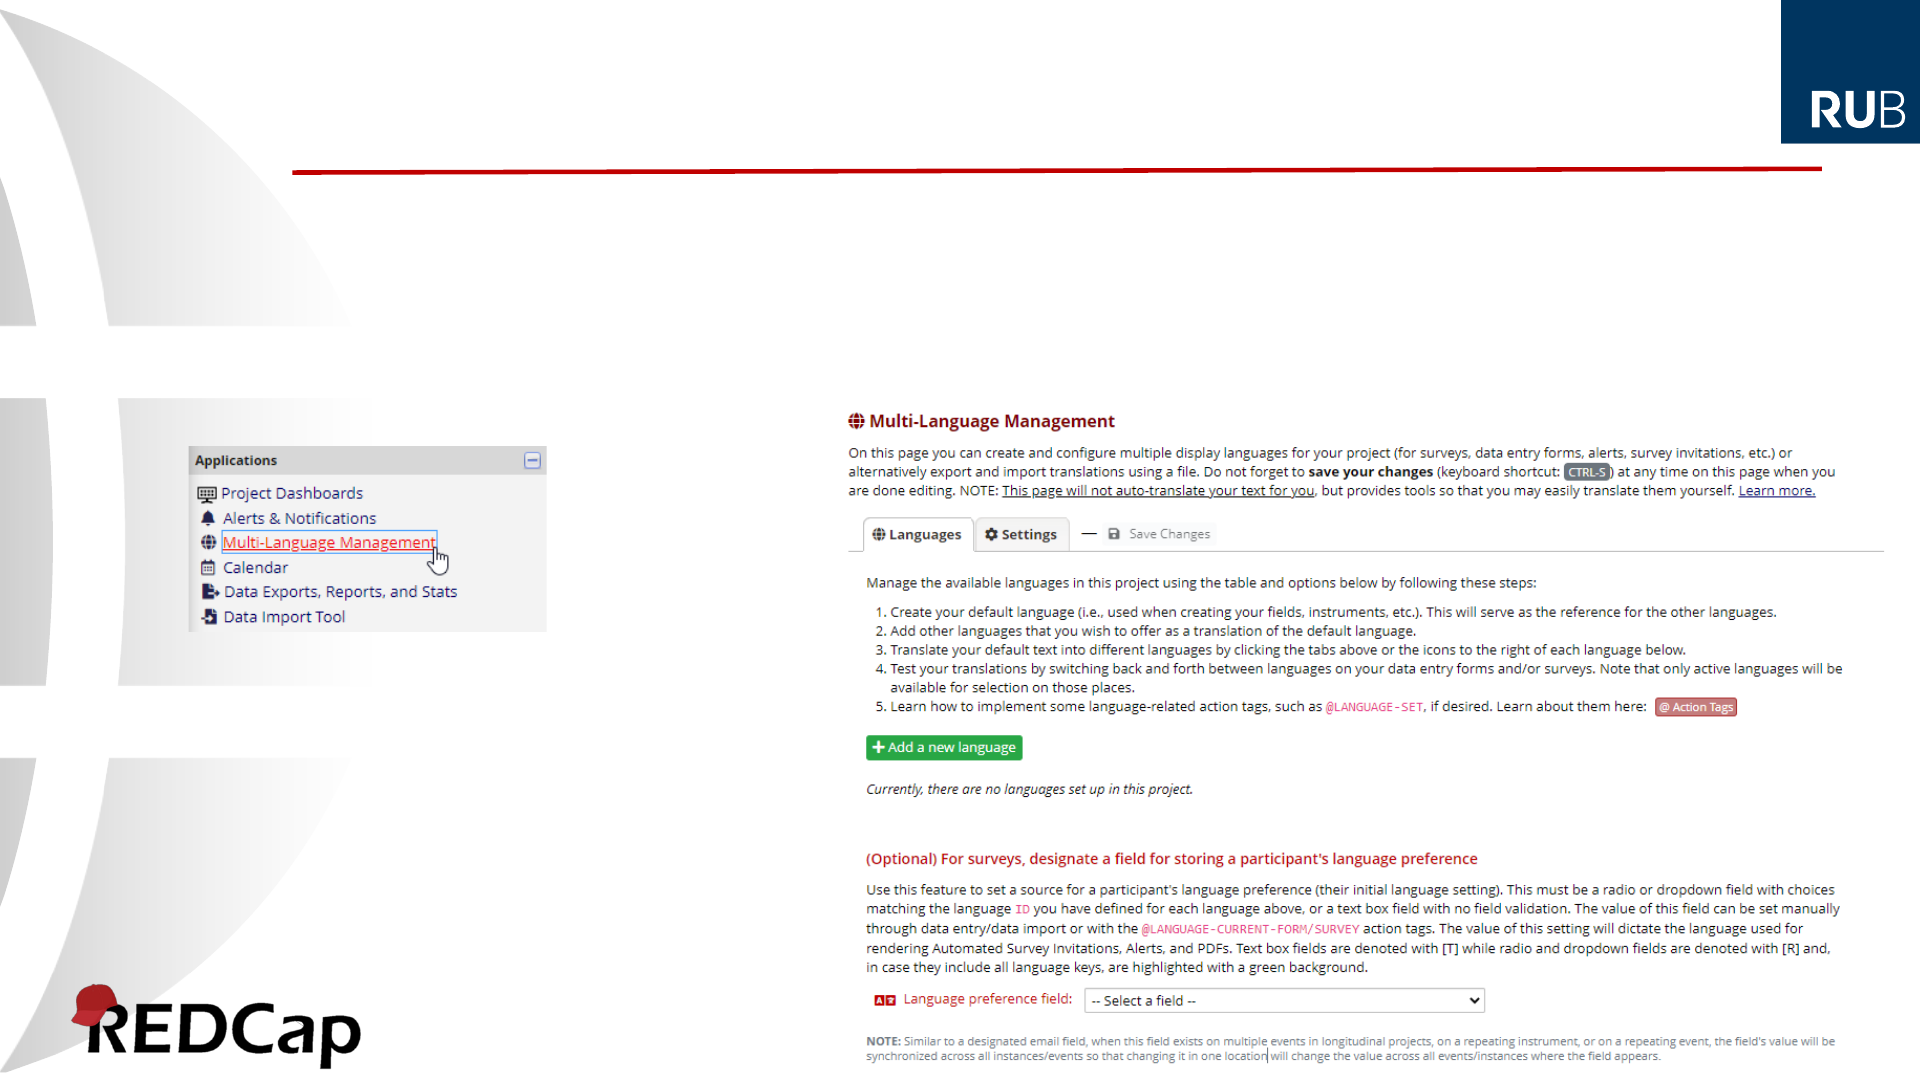
Adding languages to projects
1. Bring up the Multi-Language Management page by clicking the link in the
Applications men
2. Click the Add a new language button
Note: Project Design
user rights are required
to be able to access the
MLM setup page (this
may change in future
versions)
Adding languages to projects (ctd.)
3. Click the Import from file or system button
(unless you want to start translating everything from scratch – then skip to step 7)
4. Select a language from the available system languages (or import from a file)
5. Click the Import button
6. Back on the Add New Language dialog, enter
an ID and a Display Name (if not already set) and
optionally a Sort Override
7. Click the Add Language button
Adding languages to projects (ctd.)
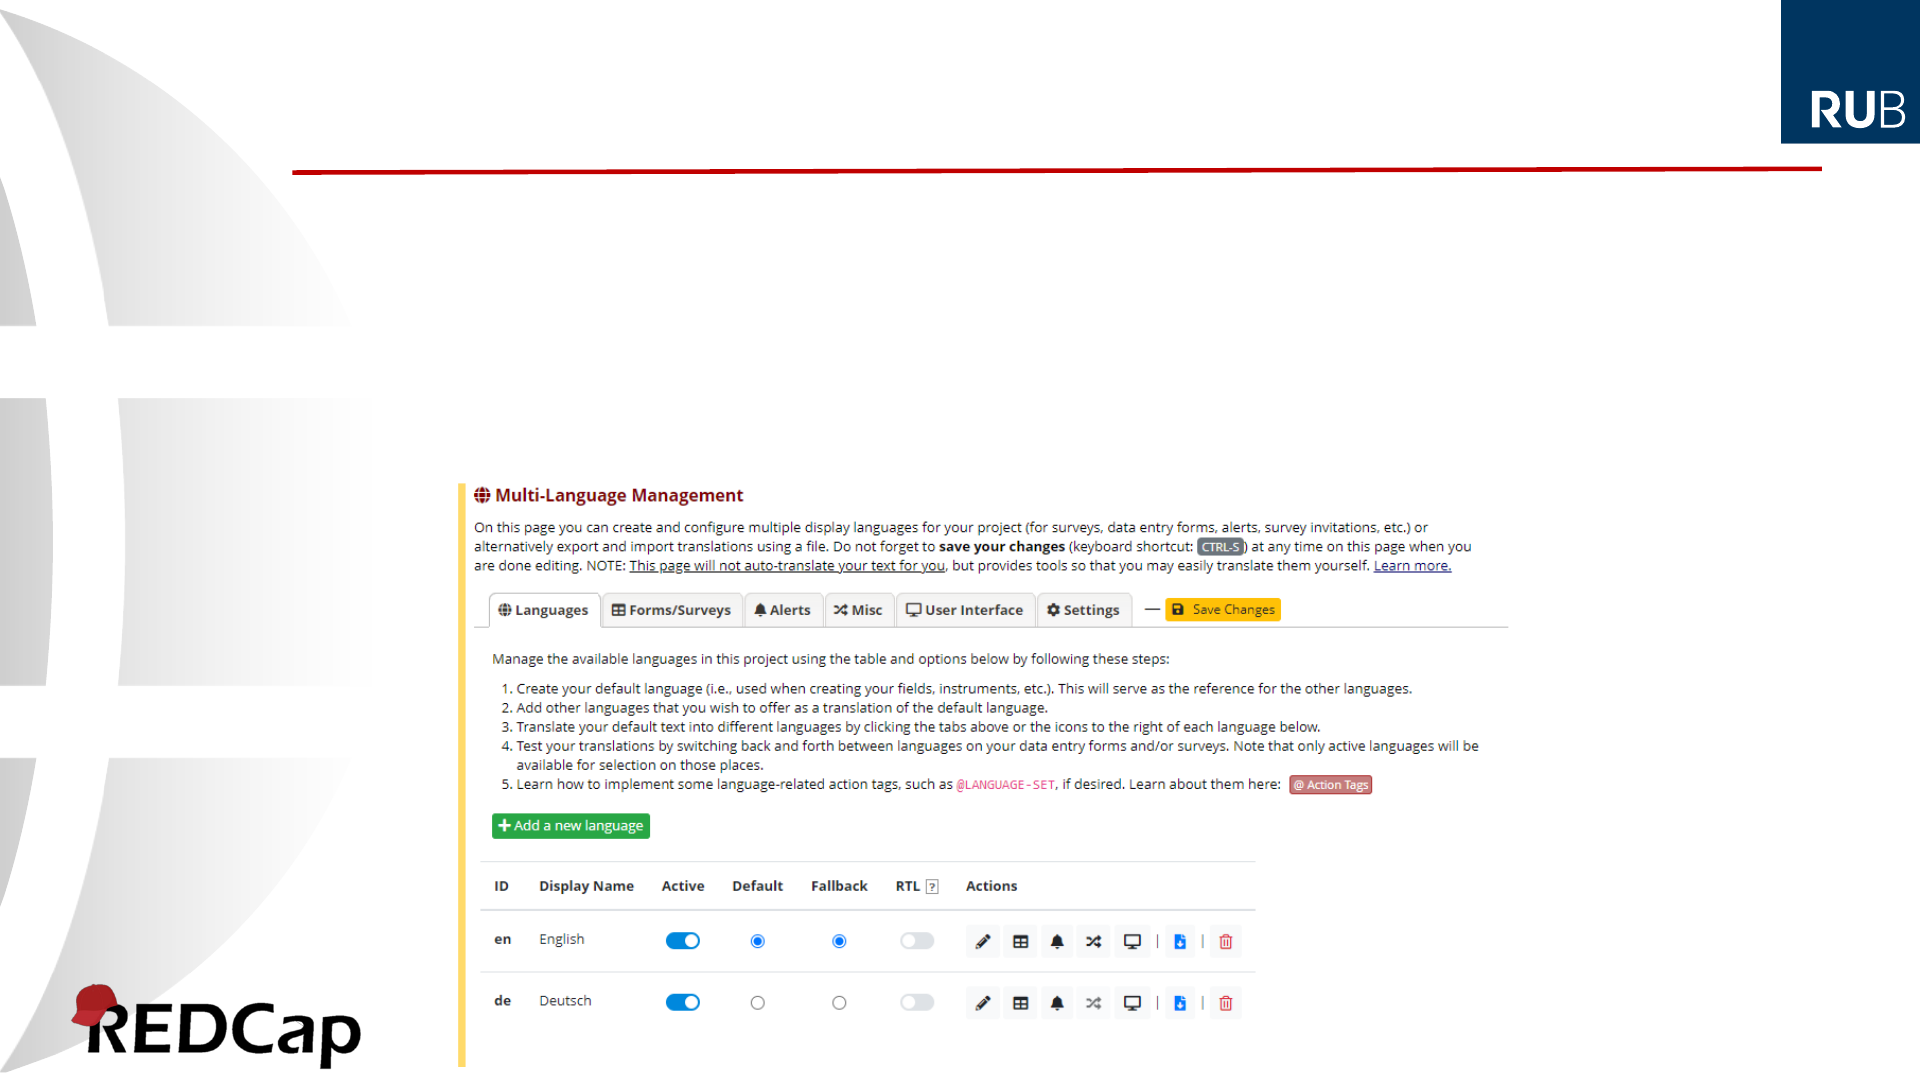
8. Turn on/off languages by setting their Active state
9. Set whether a language represents the Default or should serve as Fallback, and
whether it’s a right-to-left (RTL) language
10. Finally, click the Save Changes button to commit your changes
Adding languages to projects (ctd.)

Understanding Default and Fallback
Default (also named Reference)
This is the language used during project design, i.e. for all data dictionary items
such as field labels, choice labels, etc., as well as for survey settings, ASI or Alerts
messages, Missing Data Code labels, etc.
This usually corresponds (but not necessarily) with the language set as the project
language (on the Project Settings page) by an admin.
There must always be a default language, but this does not mean that it needs to
be shown (i.e. it’s Active state can be off).
Fallback
This is the language that should be used in case a translation is not available in the
language that currently should be displayed on a (data entry or survey) page.
In case there is no fallback translation available, the item will be shown in the
default language.
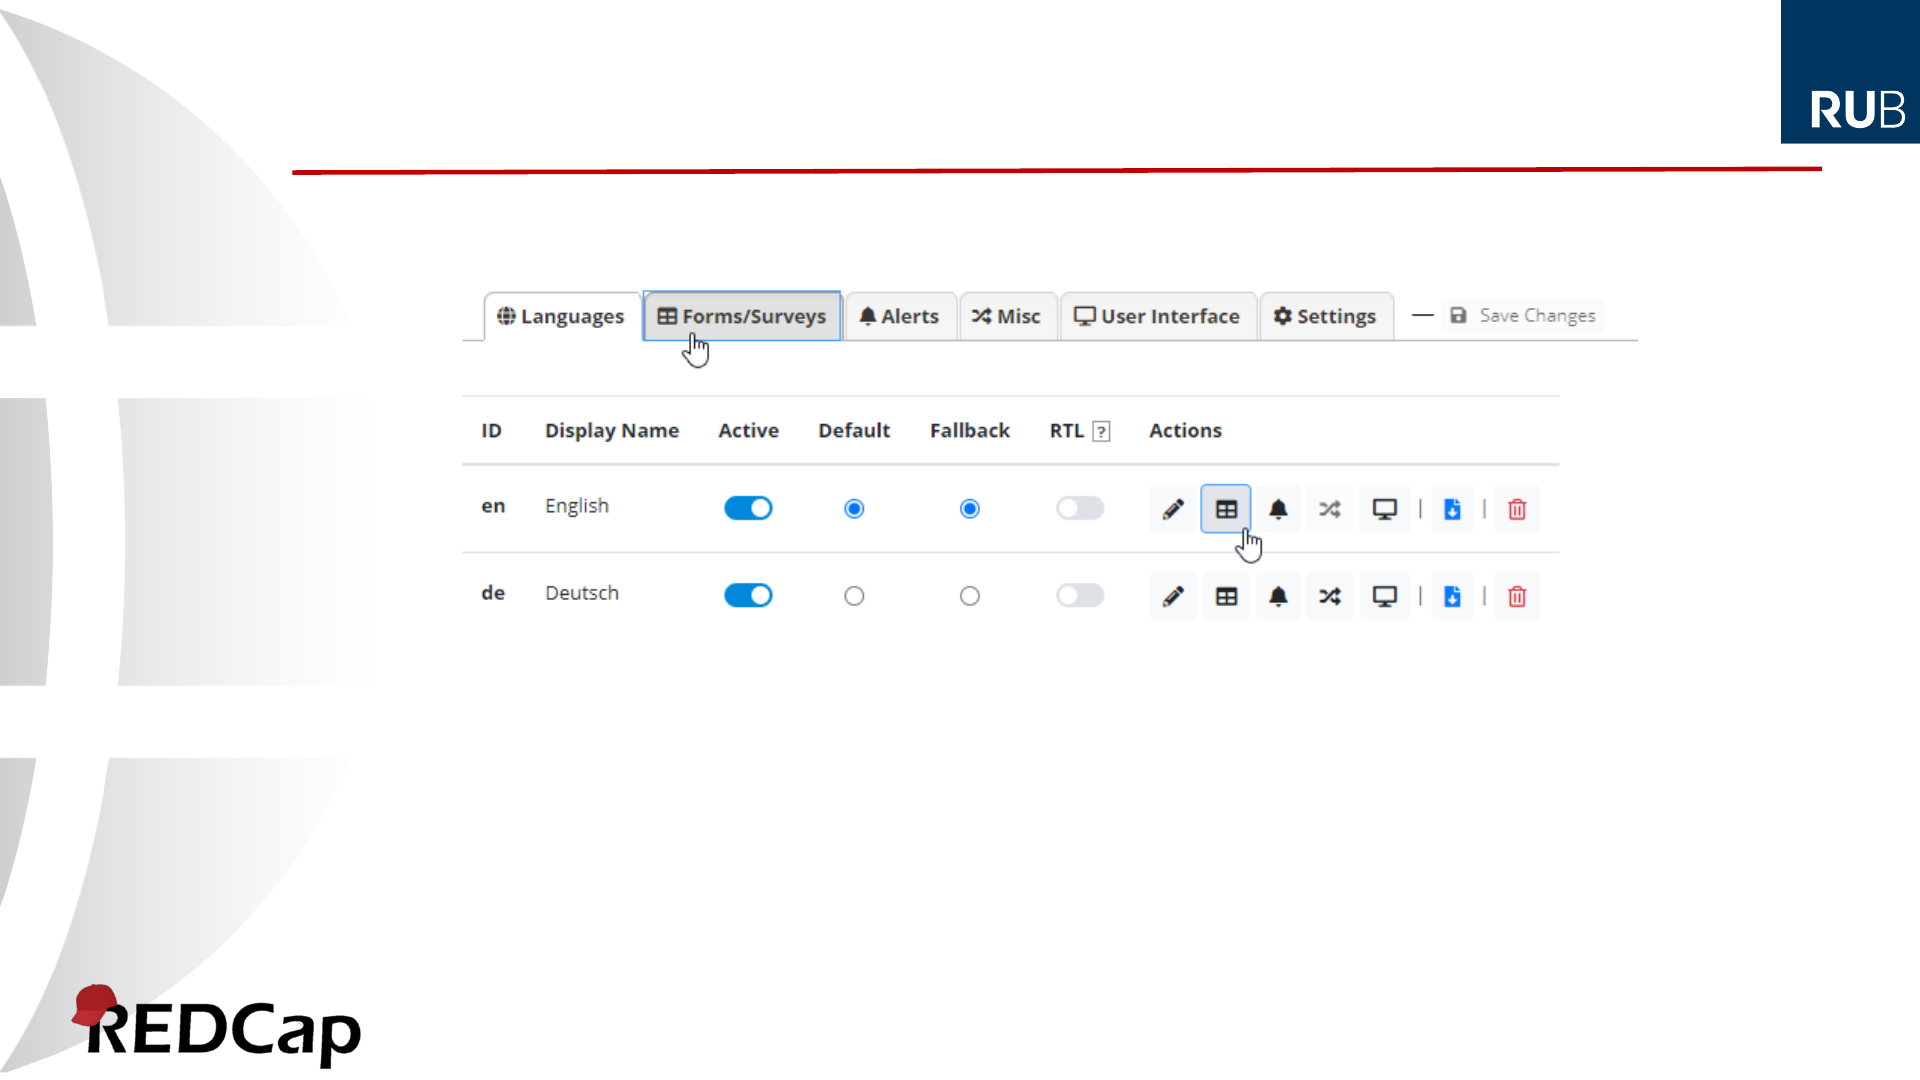
1. Click on tab or the corresponding icon in the languages table
Forms / Surveys (fields, survey settings, ASIs, survey queue customizations)
Alerts
Misc (Missing Data Codes, PDF customizations, Protected Email customizations)
User Interface – usually set from a system language, but allows project-specific overrides
Translating project items
1. On each language’s tab, control whether this languages is available for selection,
separately for data entry forms and surveys.
2. The default language tab (indicated by an asterisk) is special.
3. There is nothing to translate, but fields can be excluded from translation (i.e., they
won’t show up on the other languages’ tabs)
Note, a common pitfall
is to forget to enable
languages!
(Full control comes at a price!)
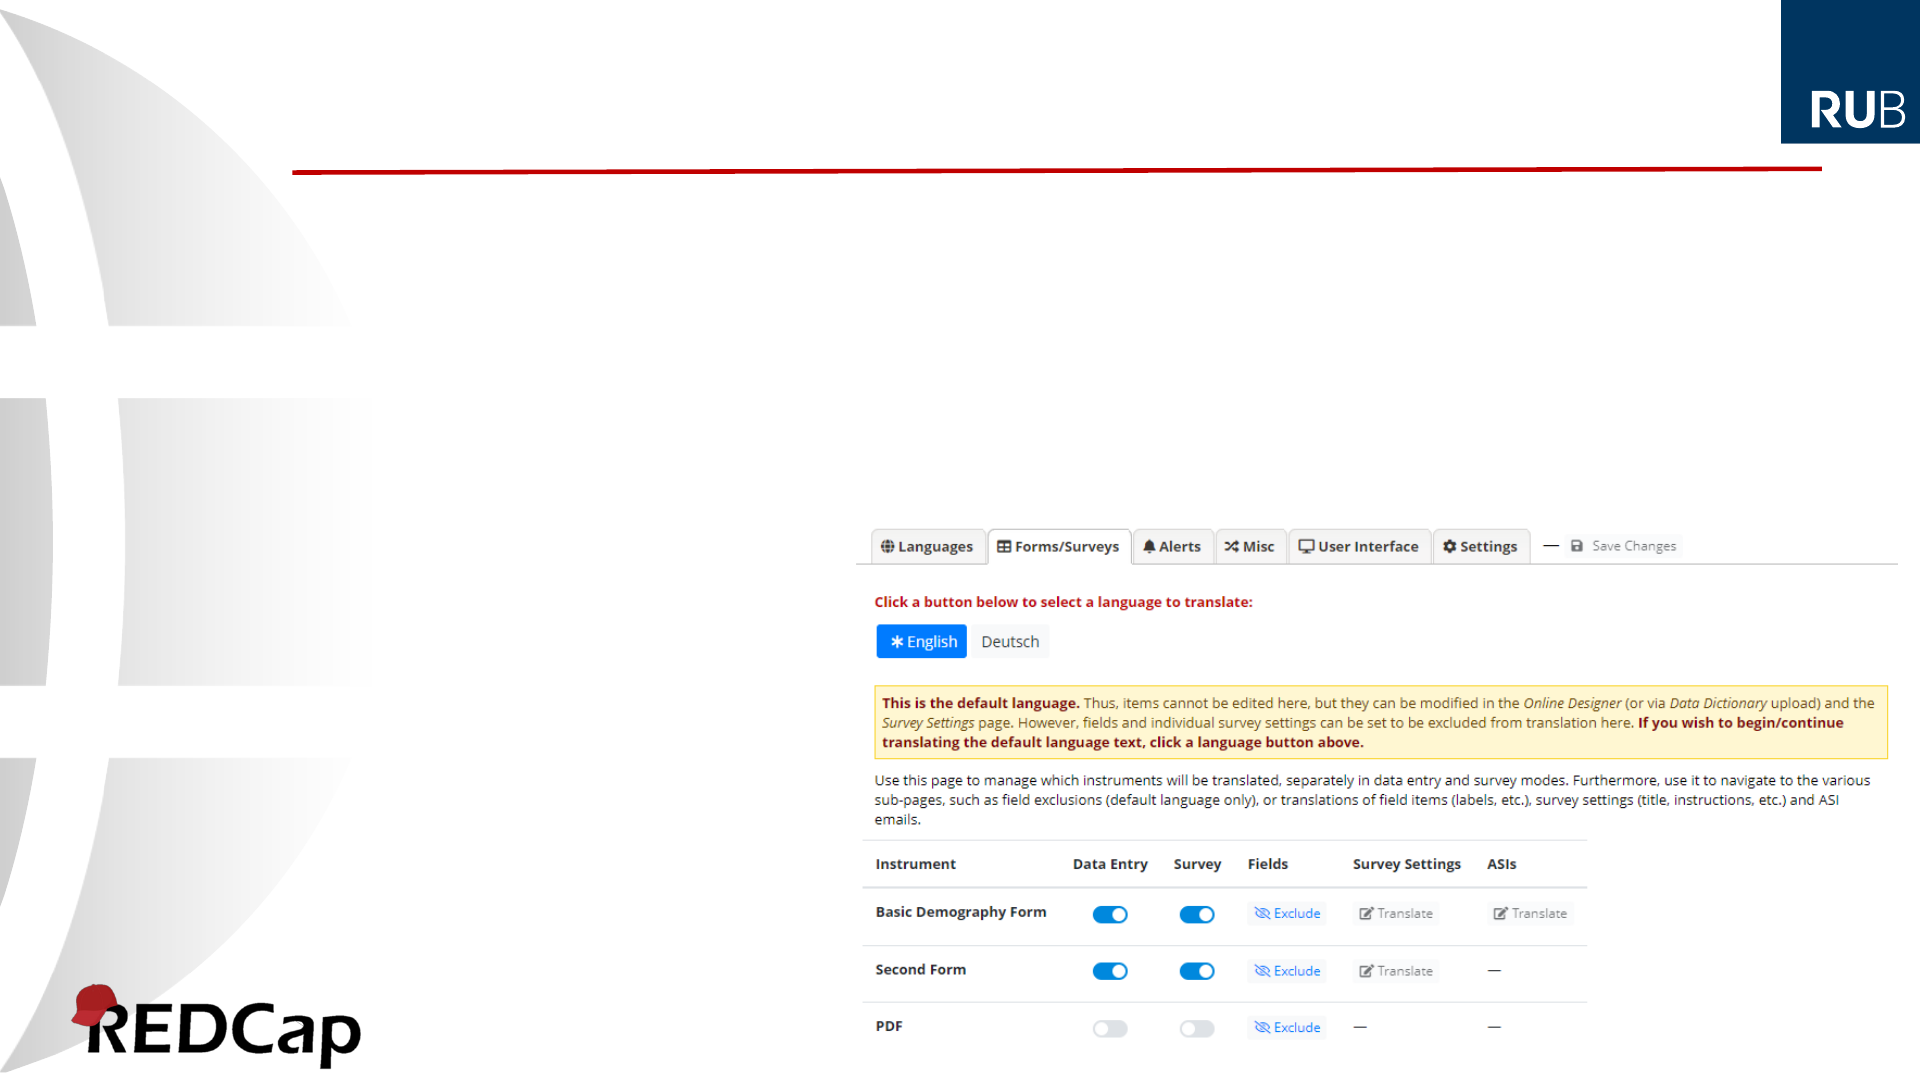
Forms/Surveys (default language)
1. On each language’s tab, control whether this languages is available for selection,
separately for data entry forms and surveys.
2. Depending on whether an instrument is enabled as a survey and has ASIs, Translate
buttons are available.
3. In case the Survey Queue is enable with custom texts, translation buttons are available
Note, a common pitfall
is to forget to enable
languages!
(Full control comes at a price!)
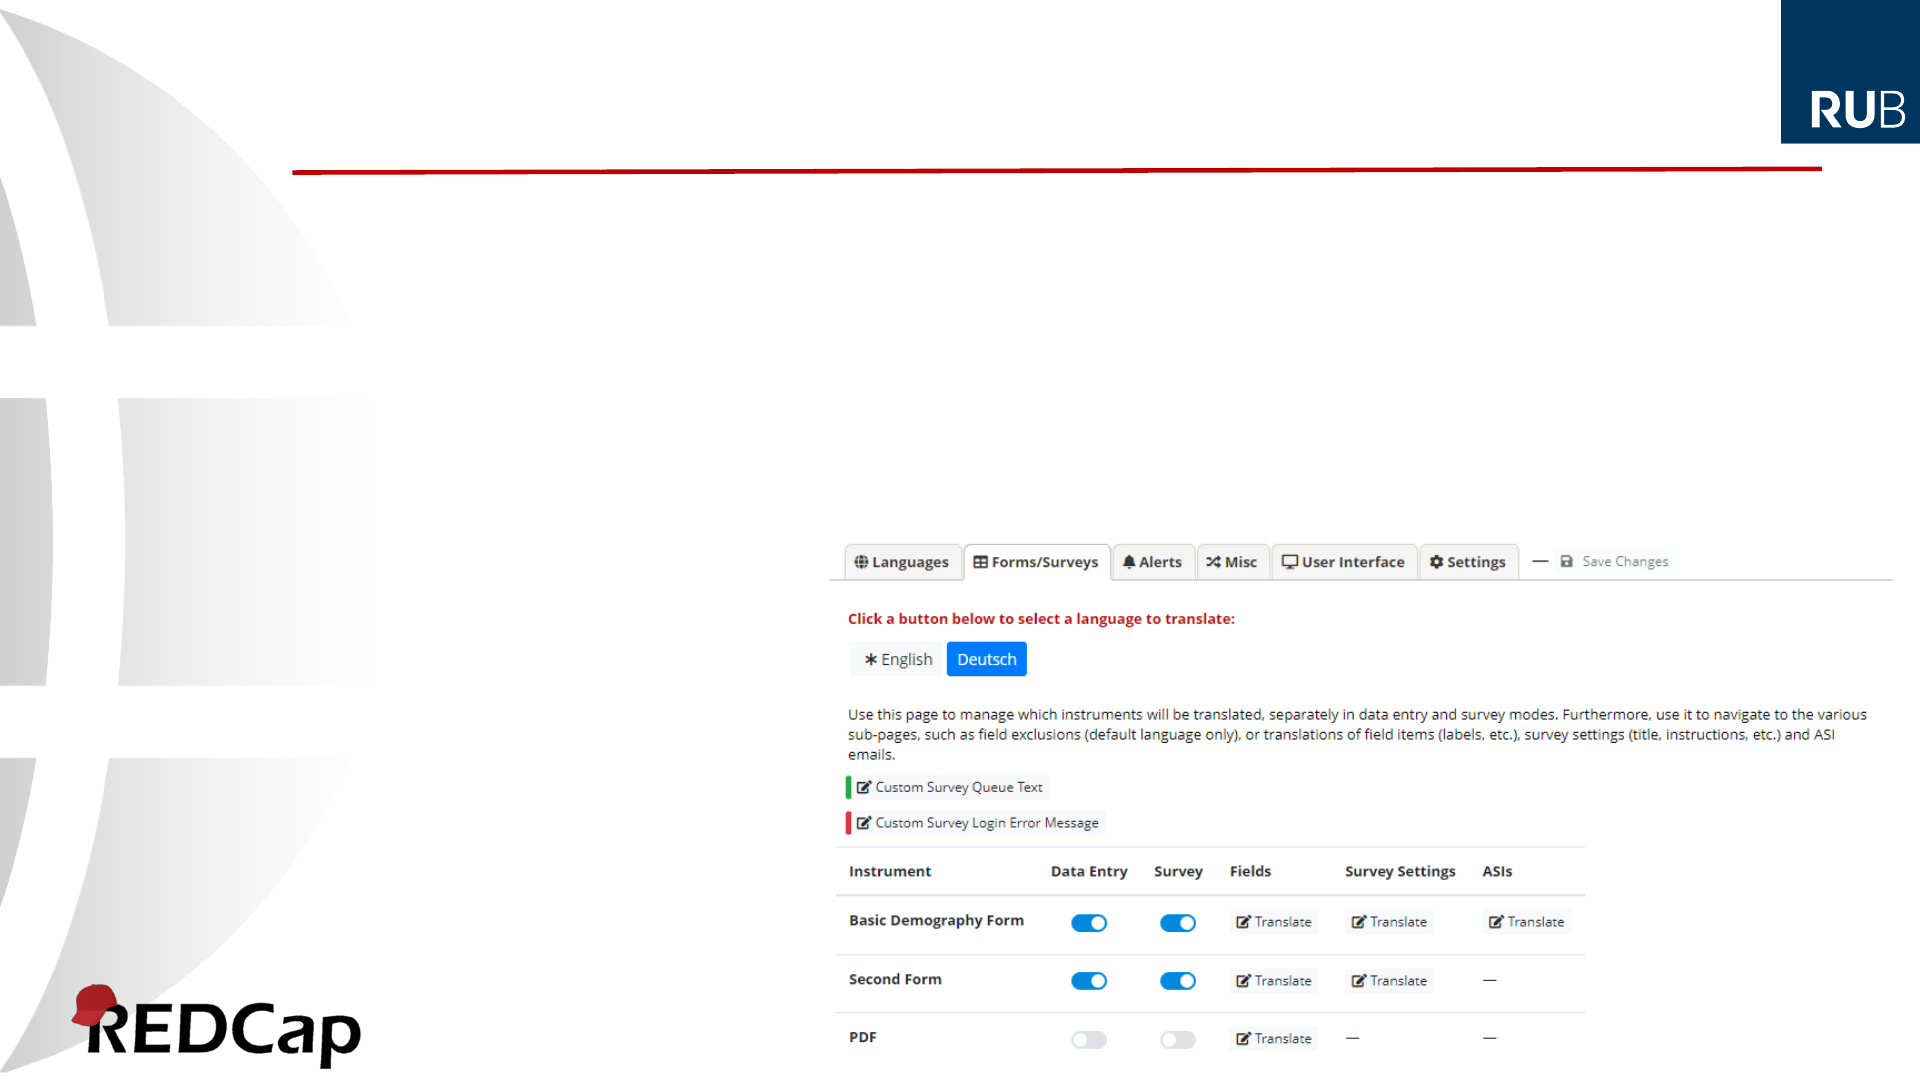
Forms/Surveys (other languages)
1. Use the Go to field dropdown to quickly navigate to a specific field
2. Enter translations. When appropriate, a Rich Text Editor button is available
3. Indicators reflect the translation status of items/subitems (green = complete)
Hints:
The copy icons next to the
default text can be used to
quickly copy/paste them to
translation tools
In case an item changes after
having been translated, this will
be indicated:
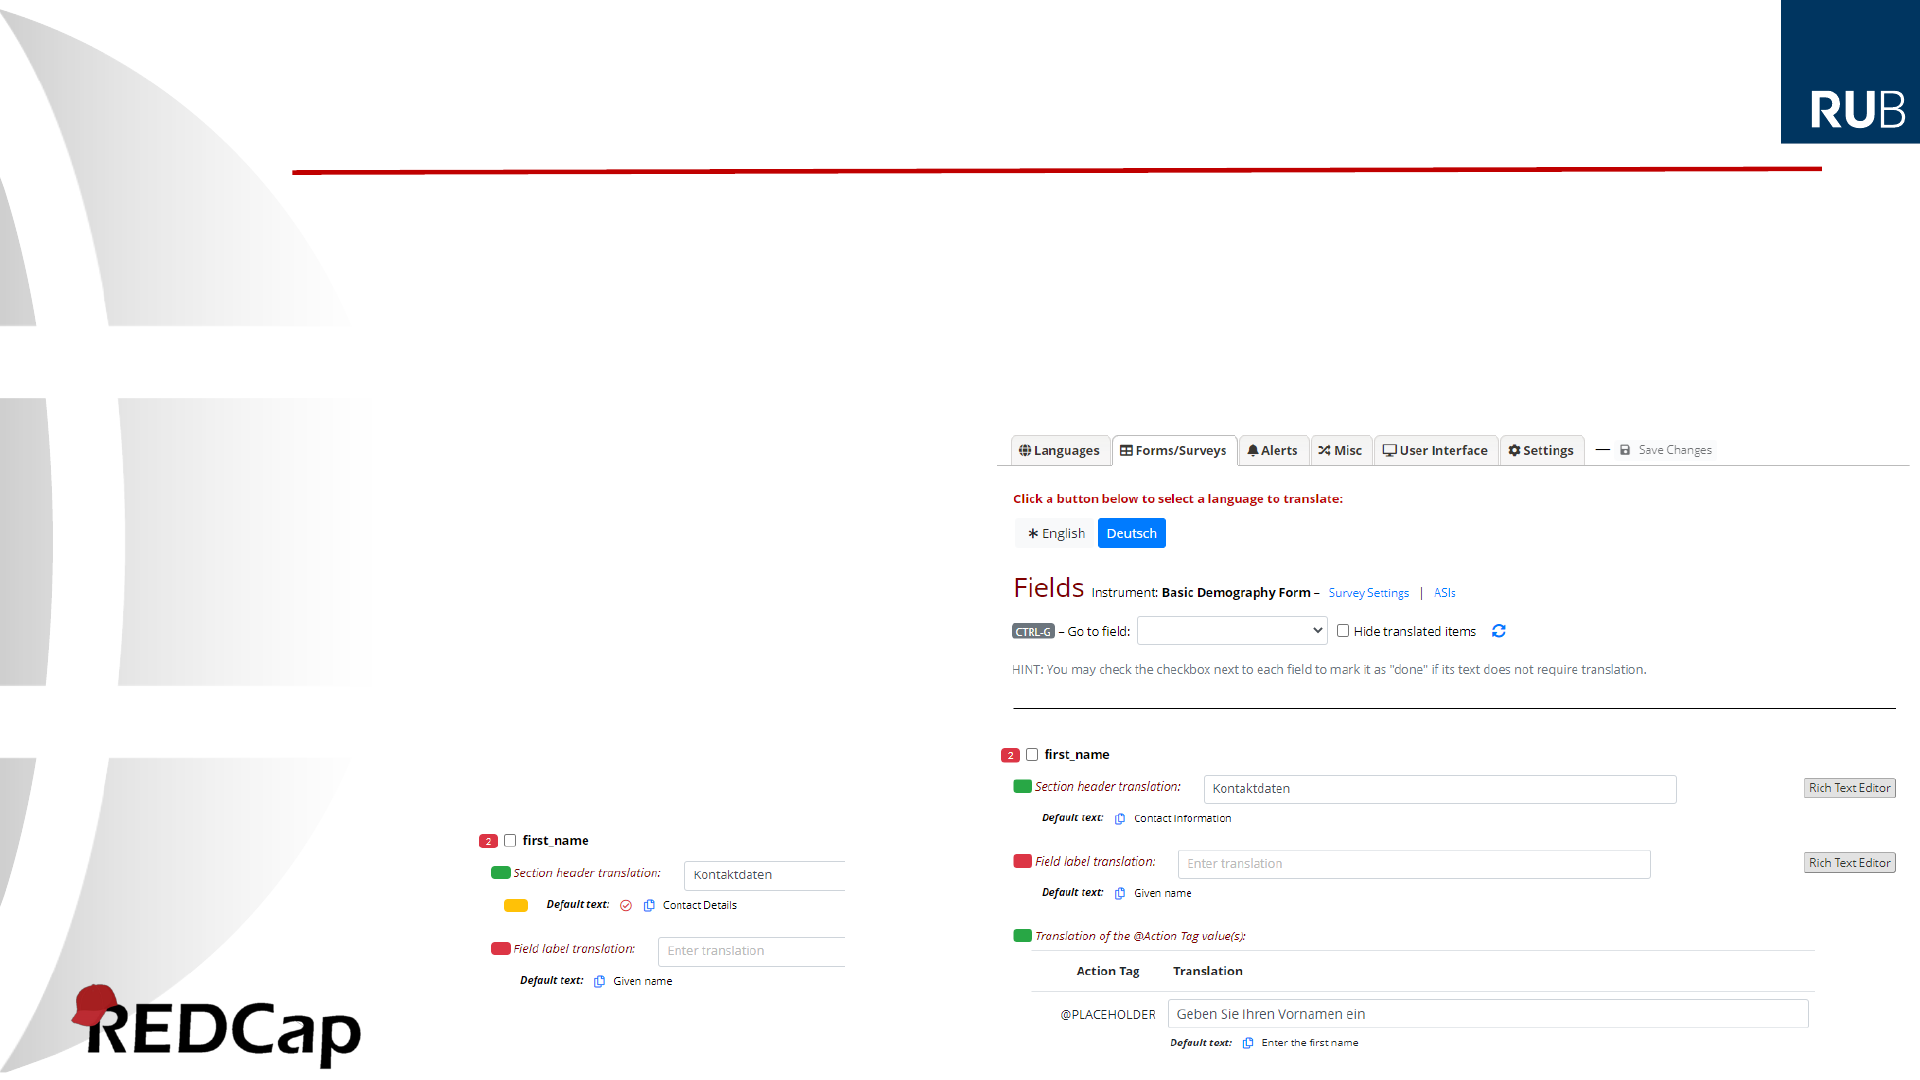
Forms/Surveys – Fields
1. Translate each item
2. Use the Rich Text Editor for any settings supporting HTML
Note, there is nothing to
translate for the default
language (marked with an
asterisk). When clicked,
this will take you to the field
exclusion page)
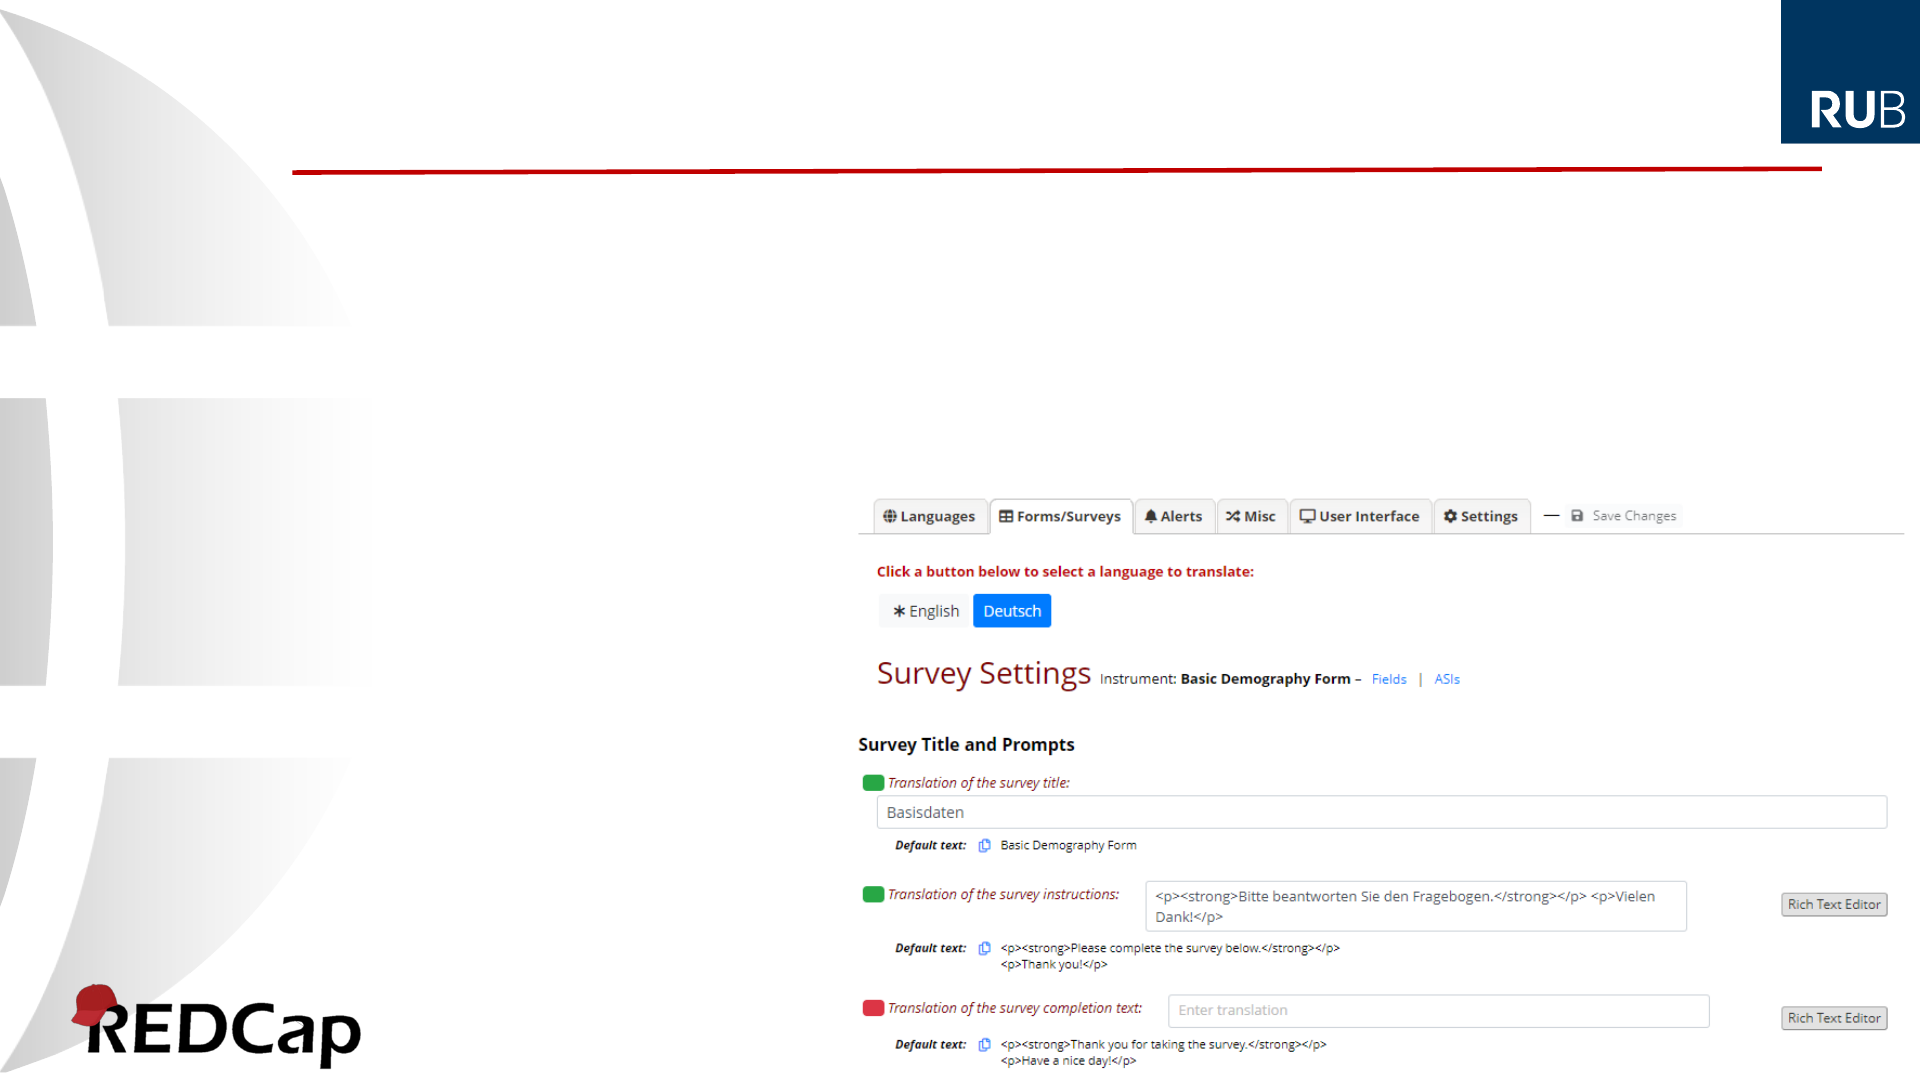
Forms/Surveys – Survey settings

1. Translate each item
2. Use the Rich Text Editor for any settings supporting HTML
Note, ASIs for each event must
be translated separately
Make sure that piping is replicated
faithfully in the translations!
Forms/Surveys – ASIs
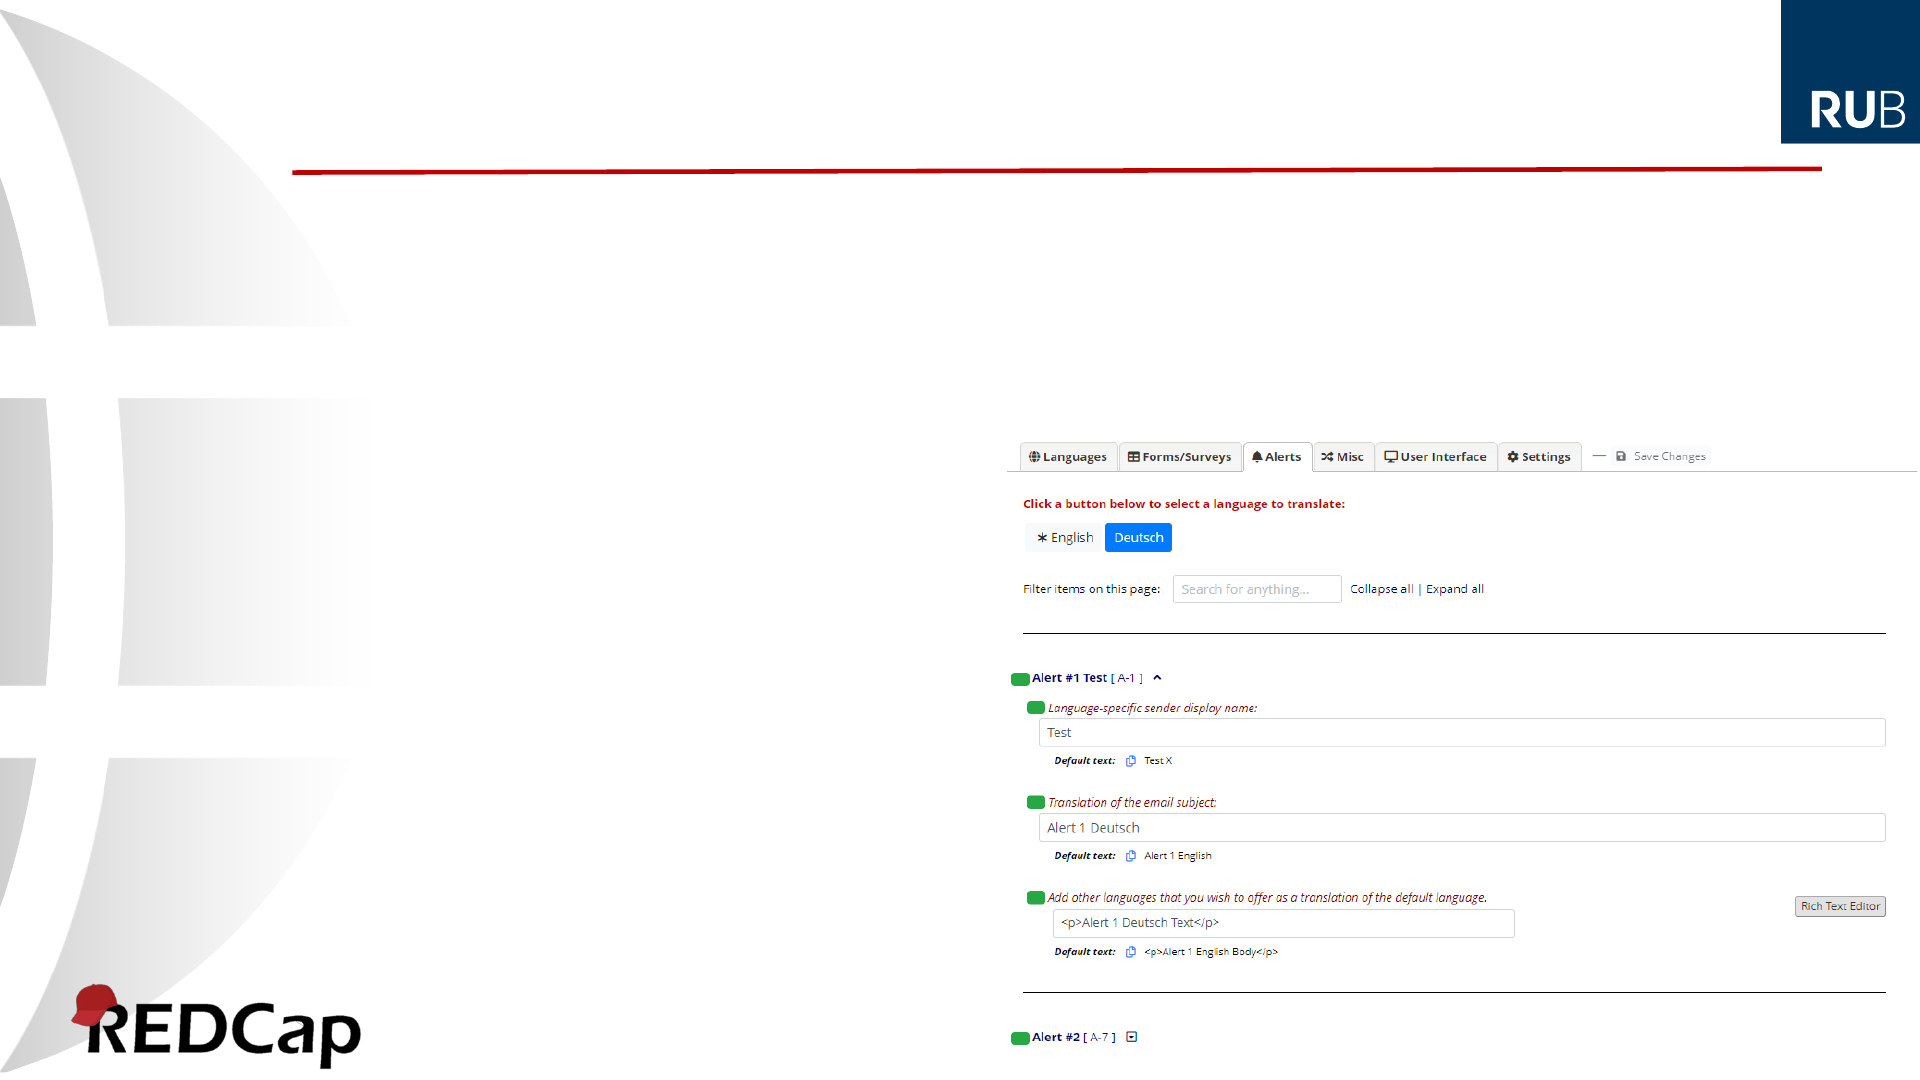
1. Use the search box to quickly find the item you would like to translate / edit.
2. Use the Rich Text Editor for any settings supporting HTML
For Alerts, there are important
settings to be made on the
default language’s page!
Make sure that piping is replicated
faithfully in the translations!
Alerts
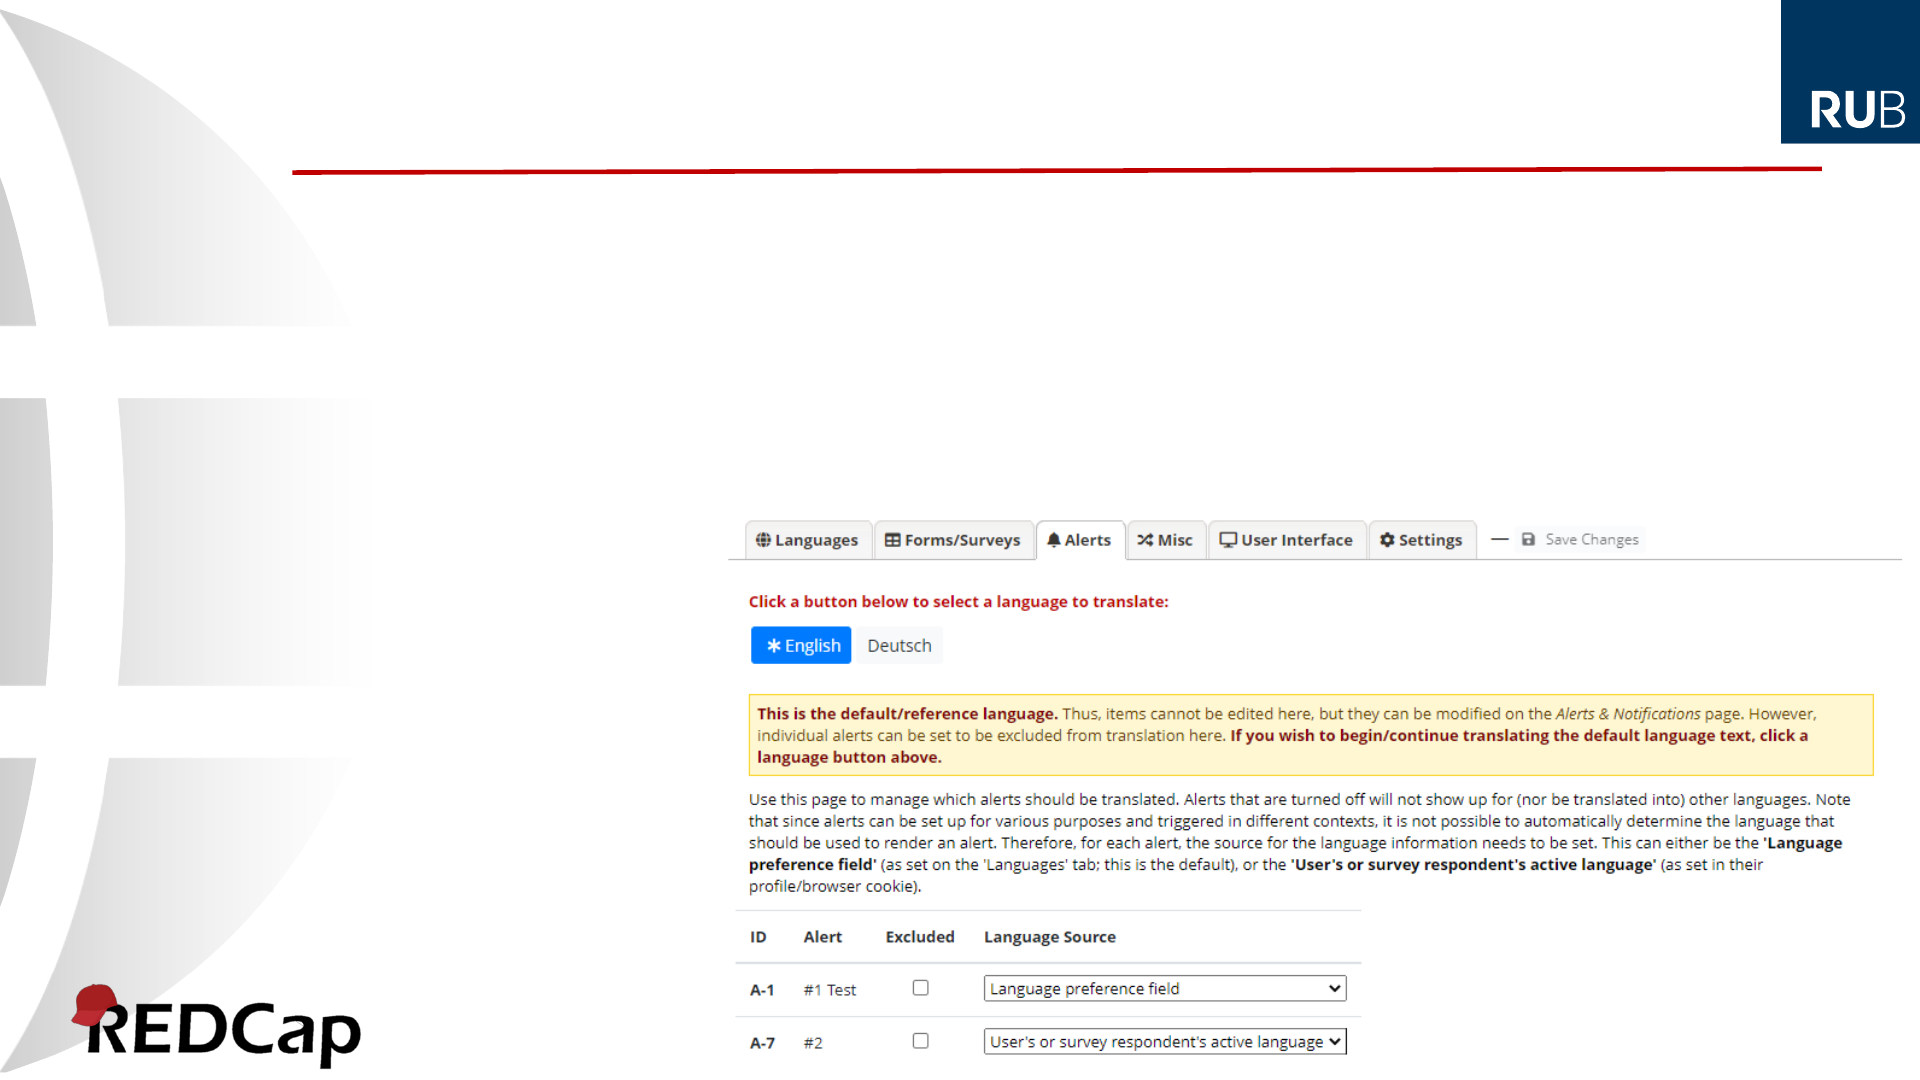
1. Individual alerts can be excluded from translation
2. Since alerts may trigger under circumstances when no language can be determined
automatically, set a Language Source for each event.
Language preference field or User’s or survey respondent’s active language
What to choose will depend on how the alert is triggered
Select the default
language to get
to this page!
Alerts – Default language special options
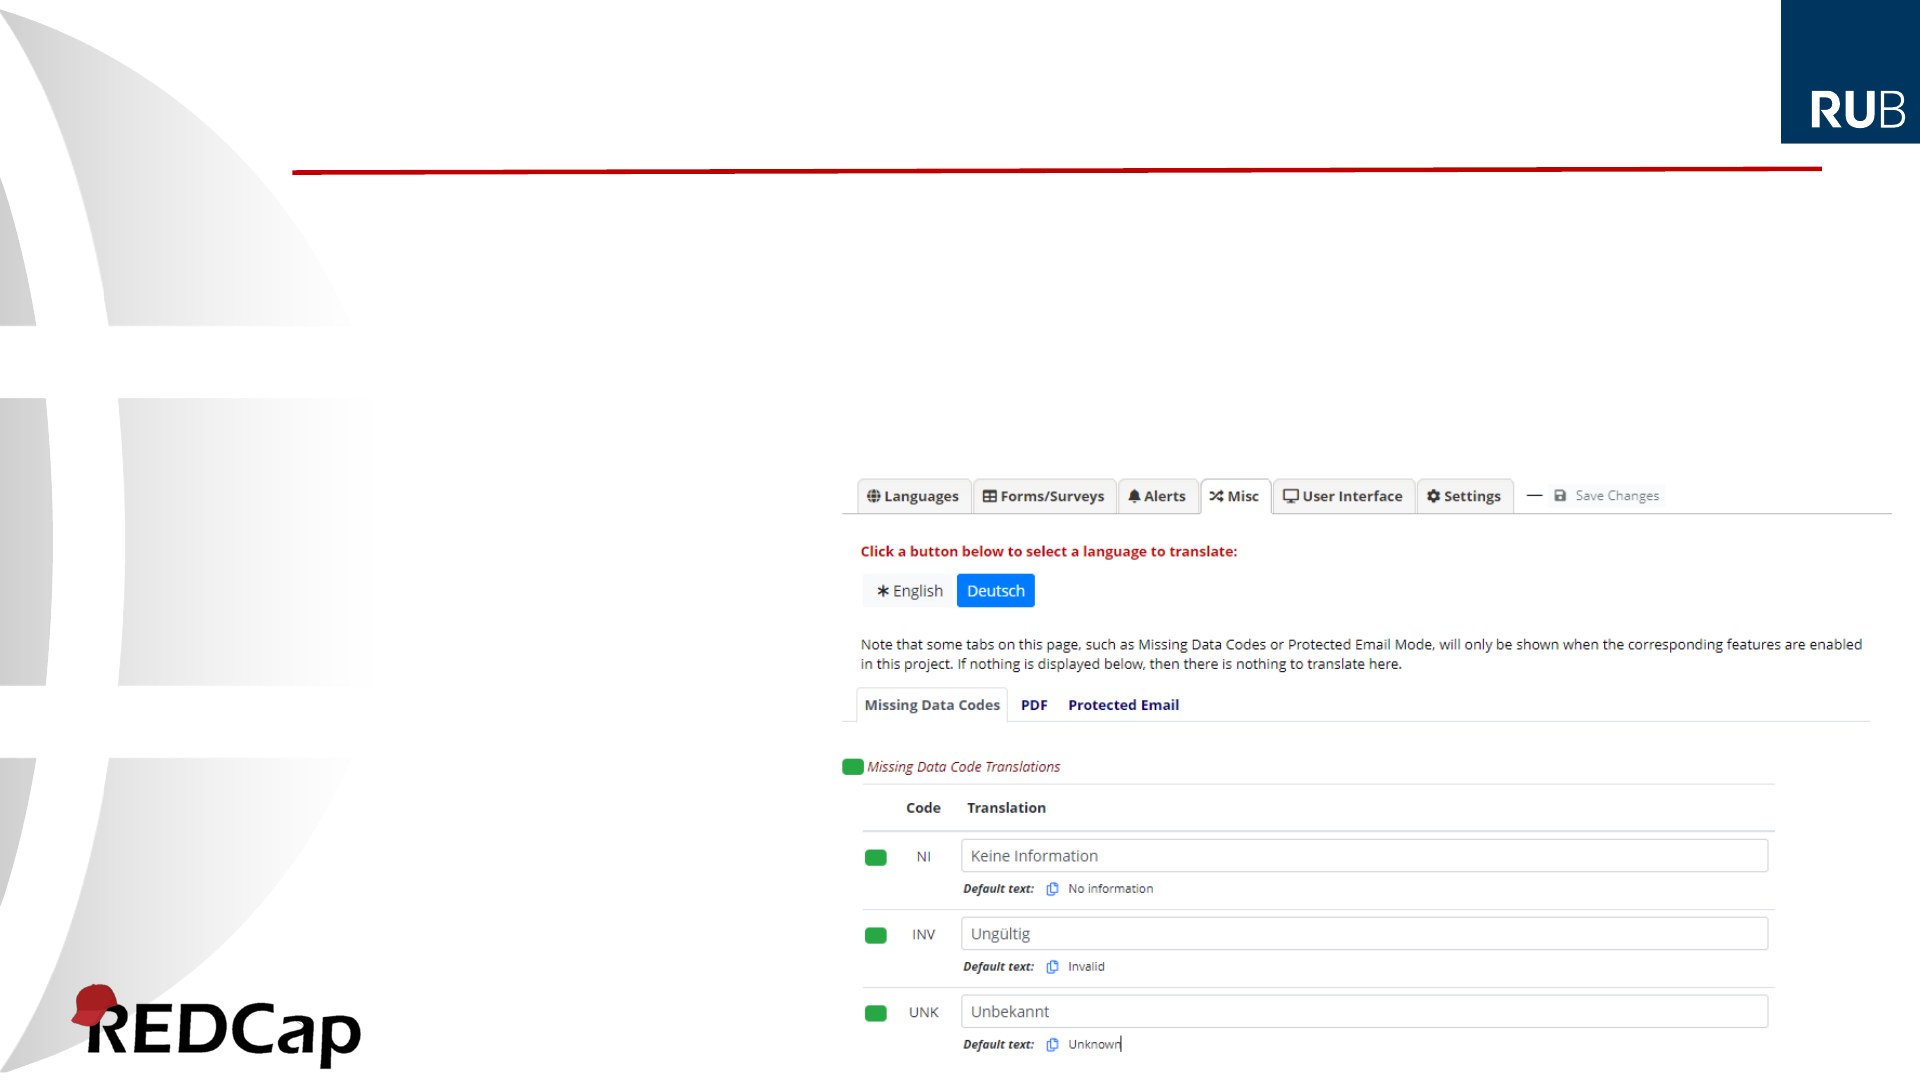
Missing Data Codes
PDF customizations
Protected Email customizations
For the default language, there
is nothing to translate.
Tabs will only show when there
are customizations set outside
of MLM. This means, it is not
possible to add new text using
MLM, only replace text (with
translations).
Miscellaneous items
What determines the currently active* language?
* i.e., the language a page, email, PDF is rendered in
Generally:
A user’s (survey respondent’s) choice:
Set via the language selection widget (or a radio field when used with the
@LANGUAGE-SET action tag)
On repeat visits through a cookie value (surveys, non-authenticated users) or
user setting (data entry pages, authenticated users)
When this is not available, e.g., in a process triggered by ASI logic:
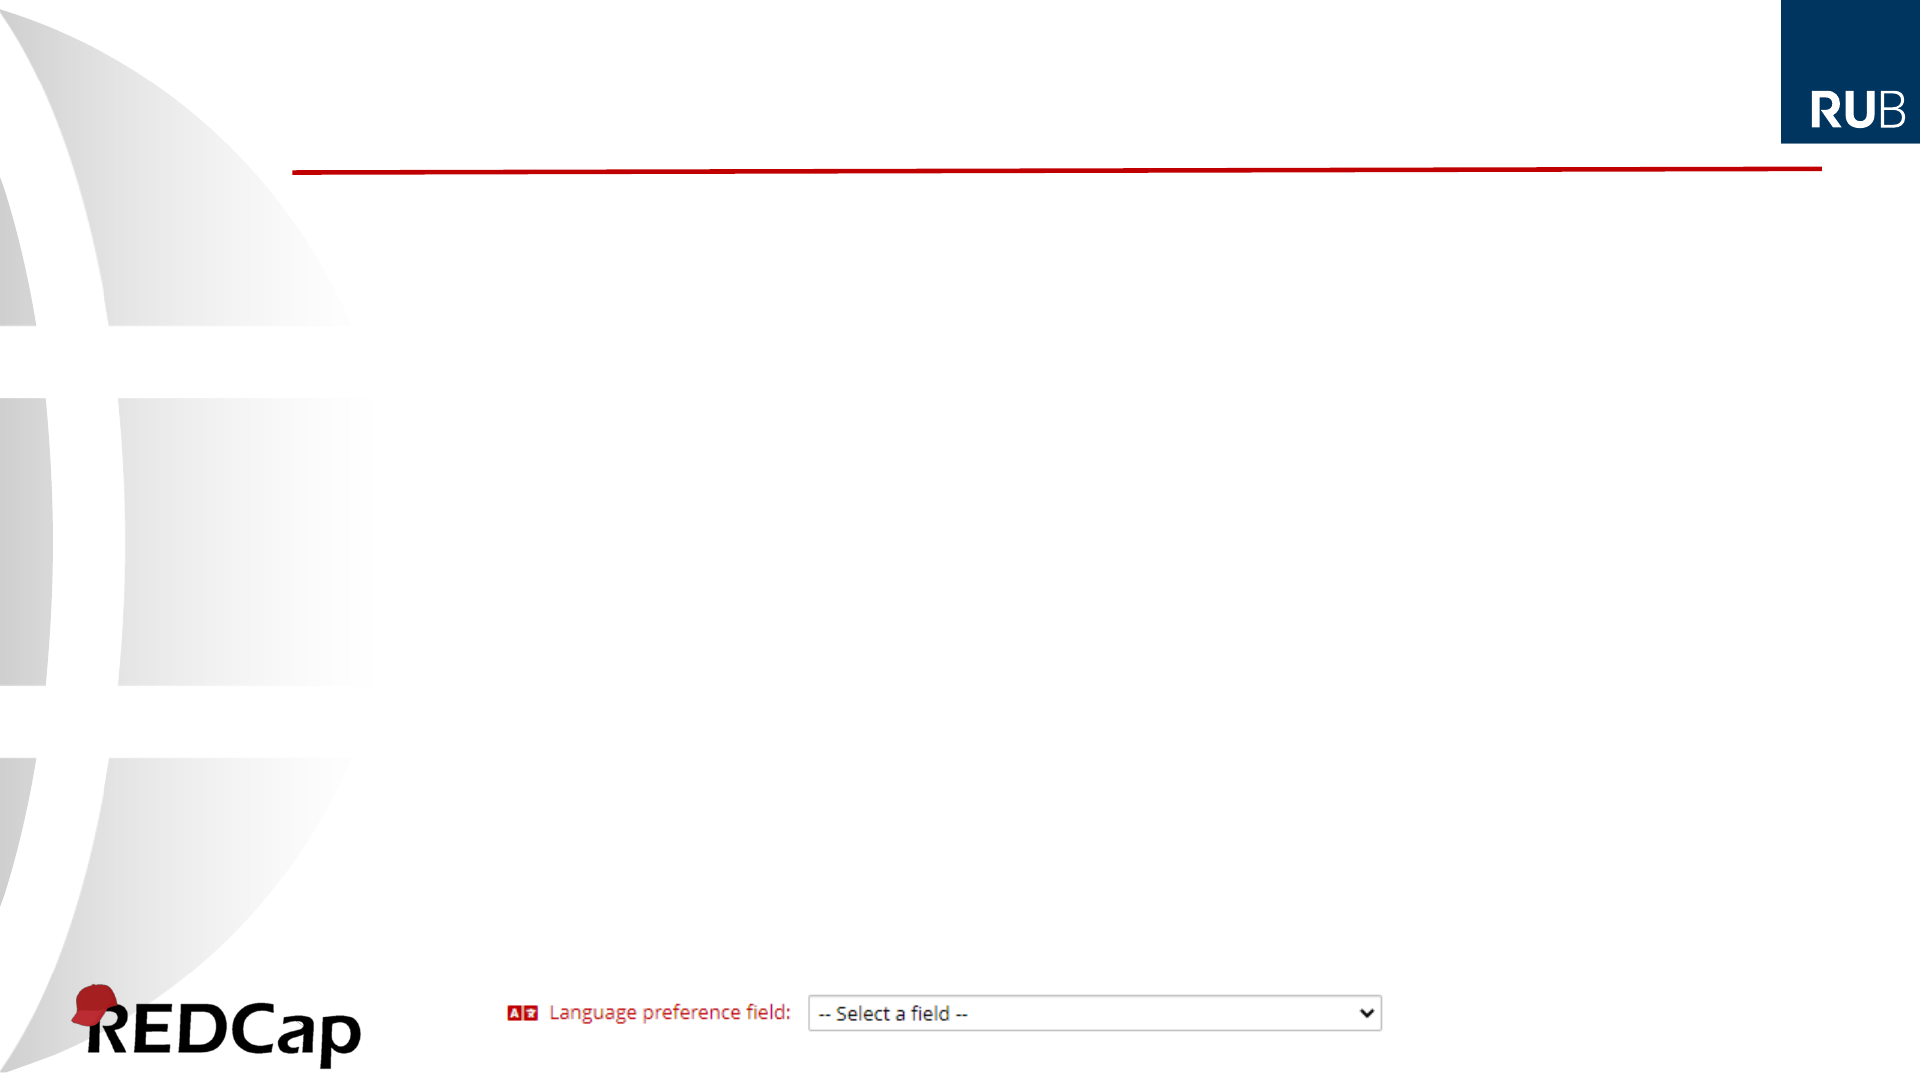
By a field in the project:
Set through the Language preference field option on the MLM setup page
Its value must correspond to the ID of an active language
Can be set manually (e.g., on an intake form) or captured into a field with
@LANGUAGE-CURRENT-FORM/SURVEY action tag
Can force a language with the @LANGUAGE-FORCE action tags
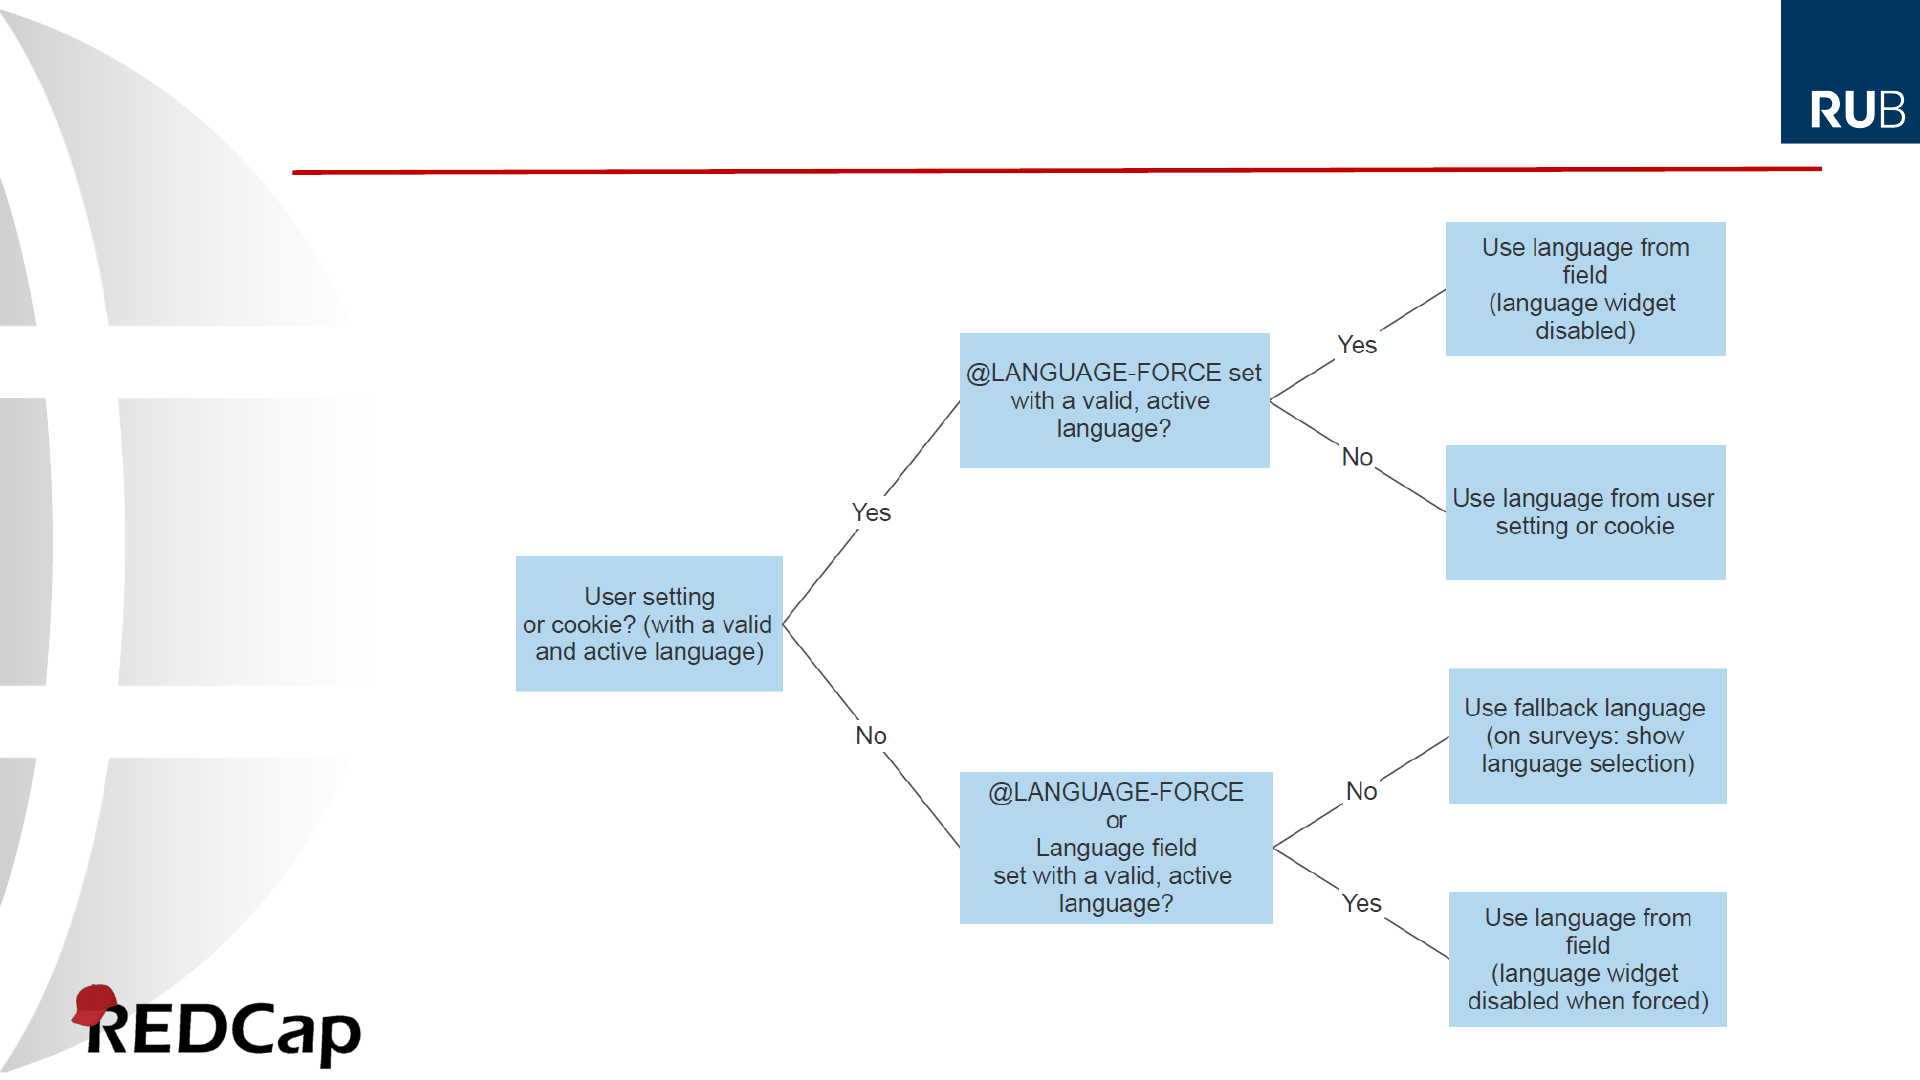
Language determination algorithm
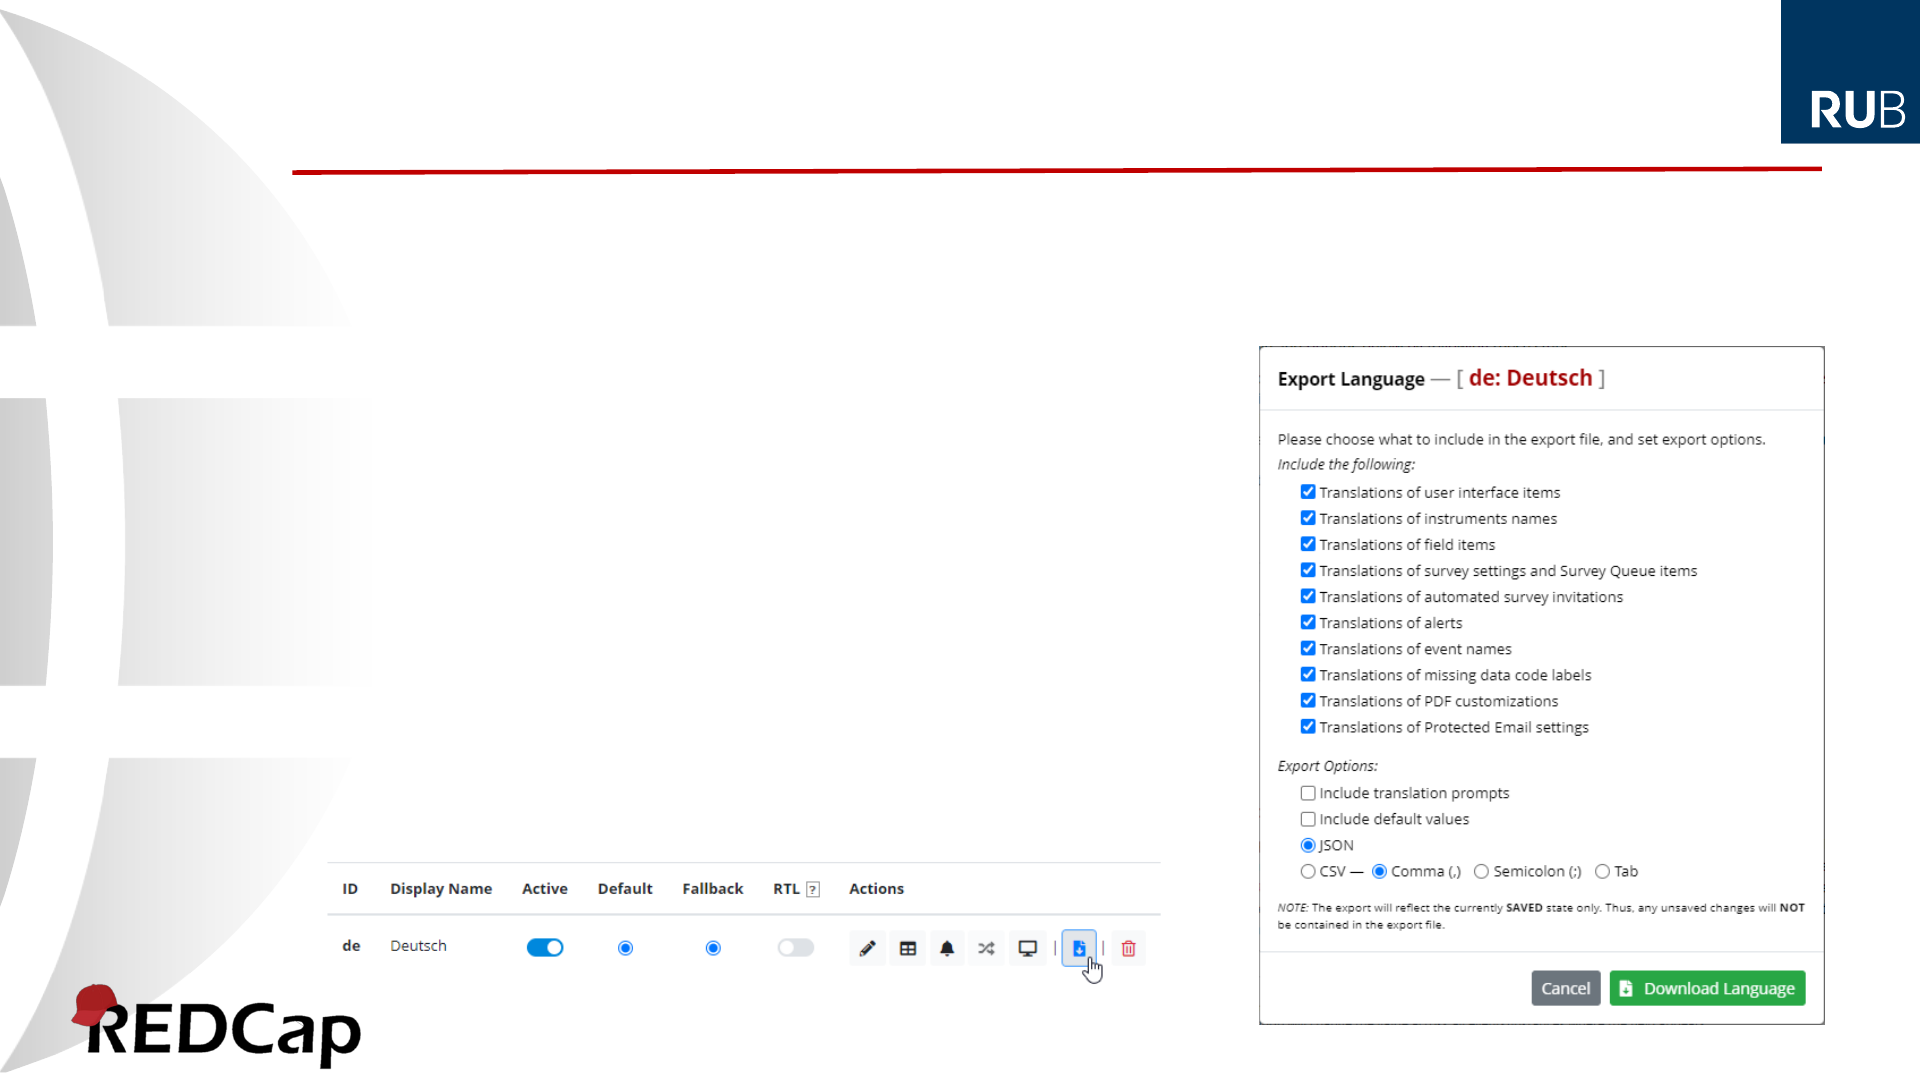
1. Click on the Export button in the language’s row in the languages table
2. Choose the items that should be included
in the export
3. Choose whether to include translation prompts
and/or default values, as well as the file
format (JSON or CSV)
4. Click the Download Language button
For offline translation, include prompts and default values!
For transfers or backups, these are not needed.
Exporting languages (for re-use/offline translation)
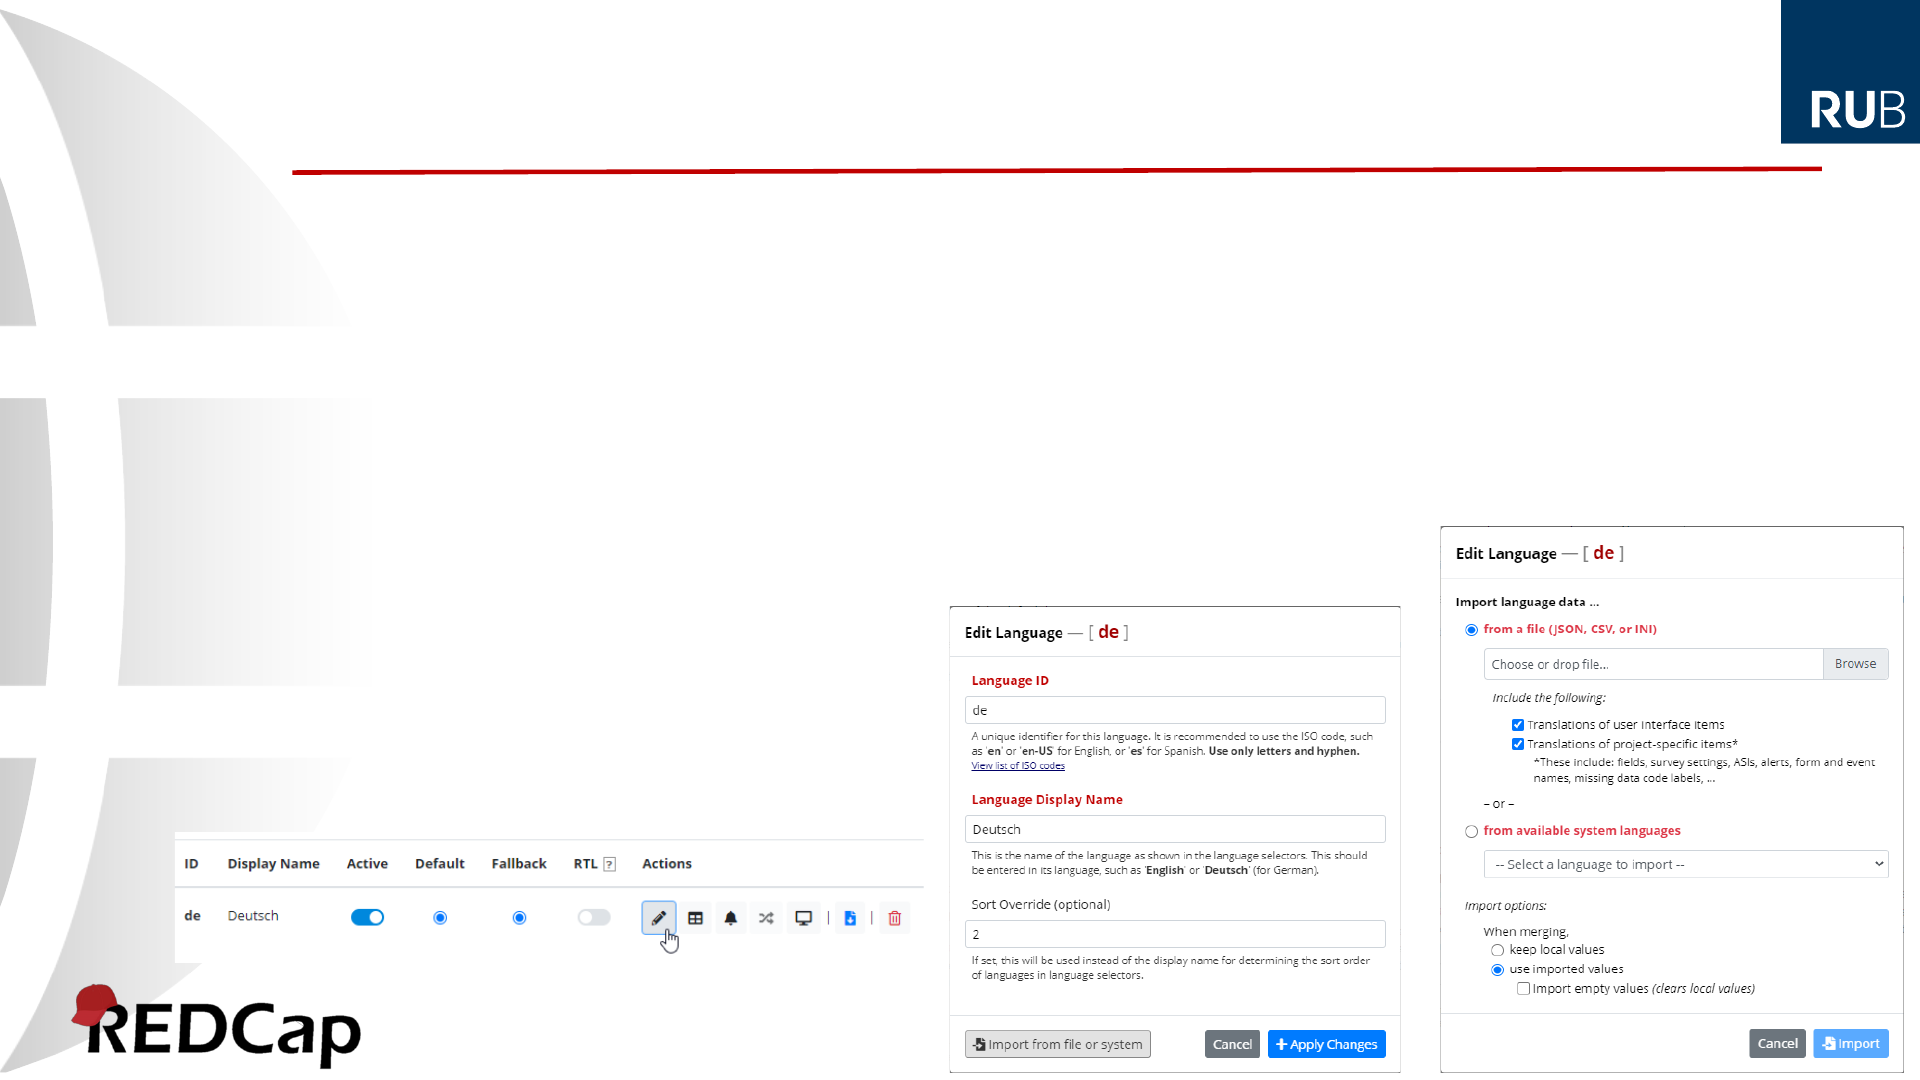
1. Click on the Edit language button in the corresponding row in the languages table
2. Click on the Import from file or system button
3. Drag the translation file into the Choose or drop file… box (or click Browse)
4. Make sure to select use imported values
5. Click the Import button
6. Click the Apply Changes button
7. Save your changes
Importing (updated) translations
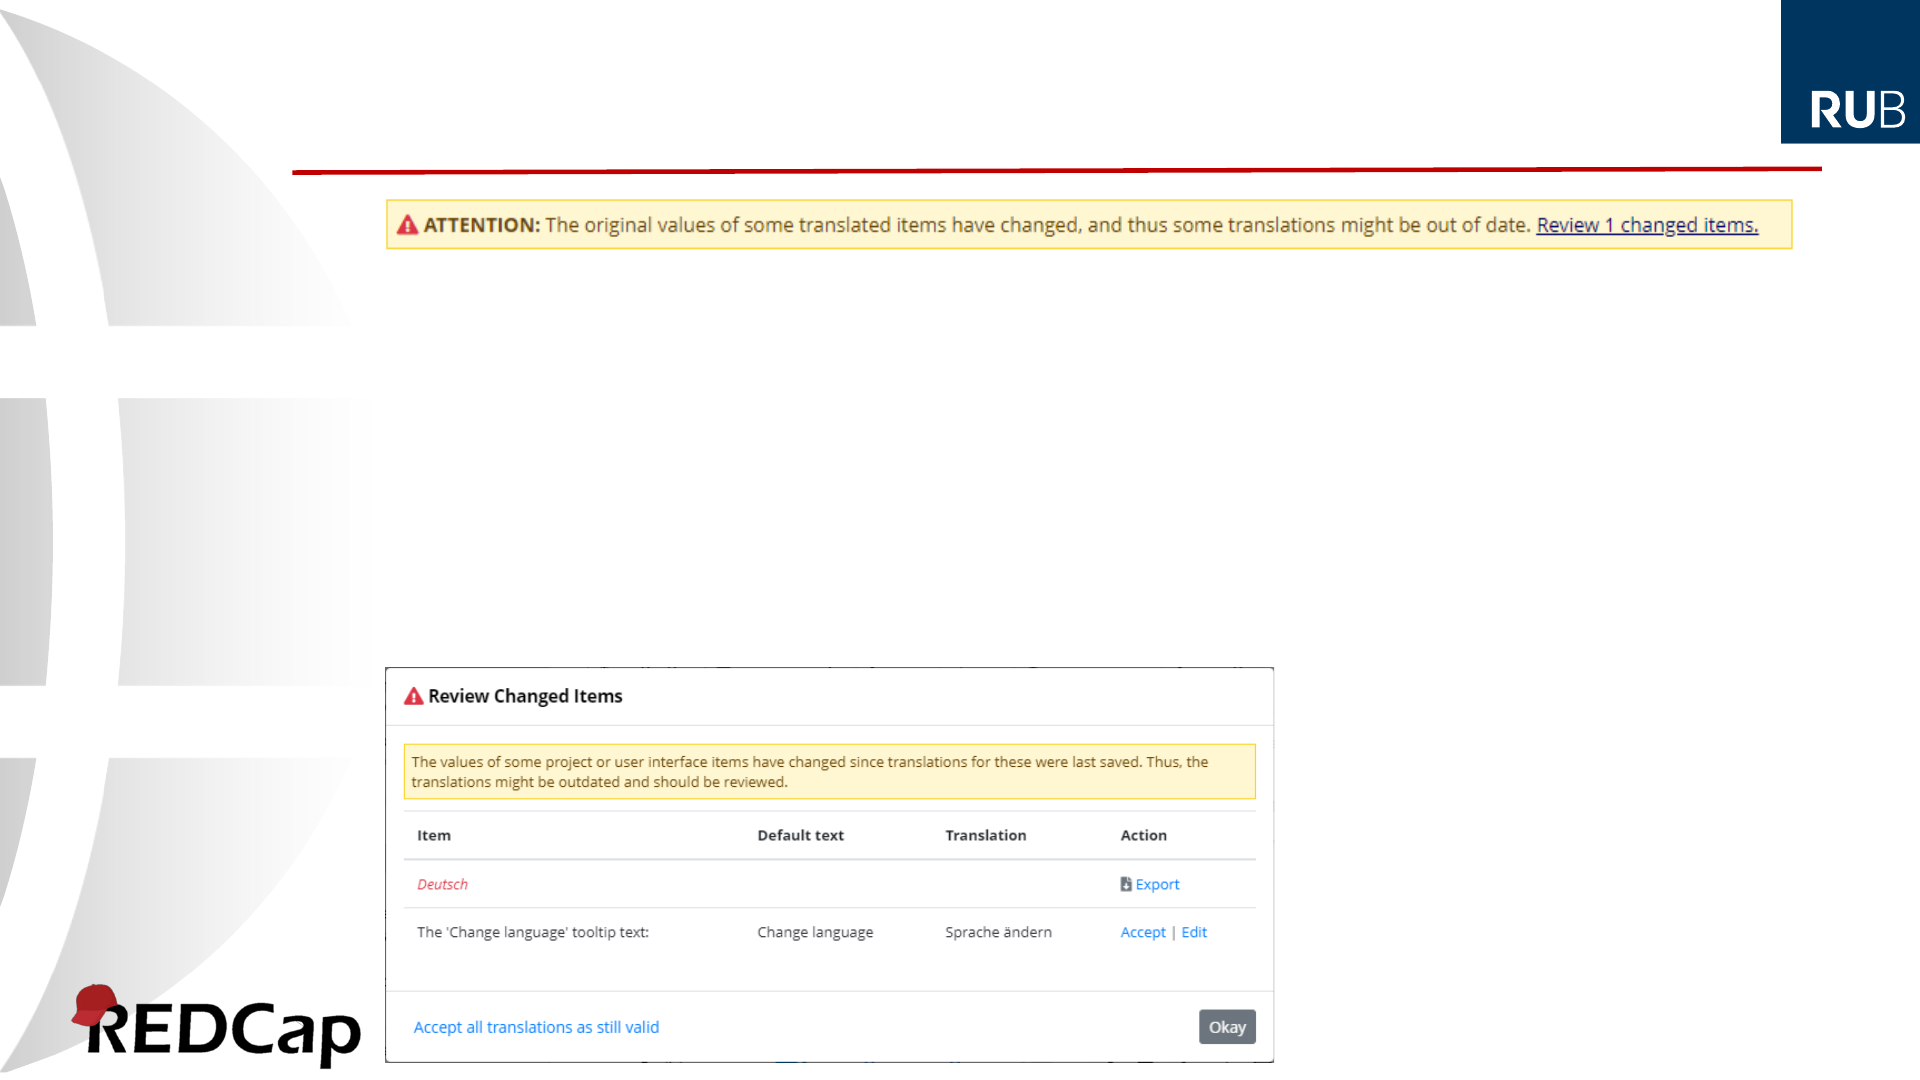
MLM has a change tracking mechanism built in. This will detect changes in items that
occurred after such an item had been translated. When the MLM setup page is
accessed, such items will be displayed in the Review Changed Items popup.
1. Accept an individual item as still valid or Edit an item to update its translation, or
2. Accept all translations as still valid, or
3. Export all items of a language for offline revision (and re-import later)
Change tracking
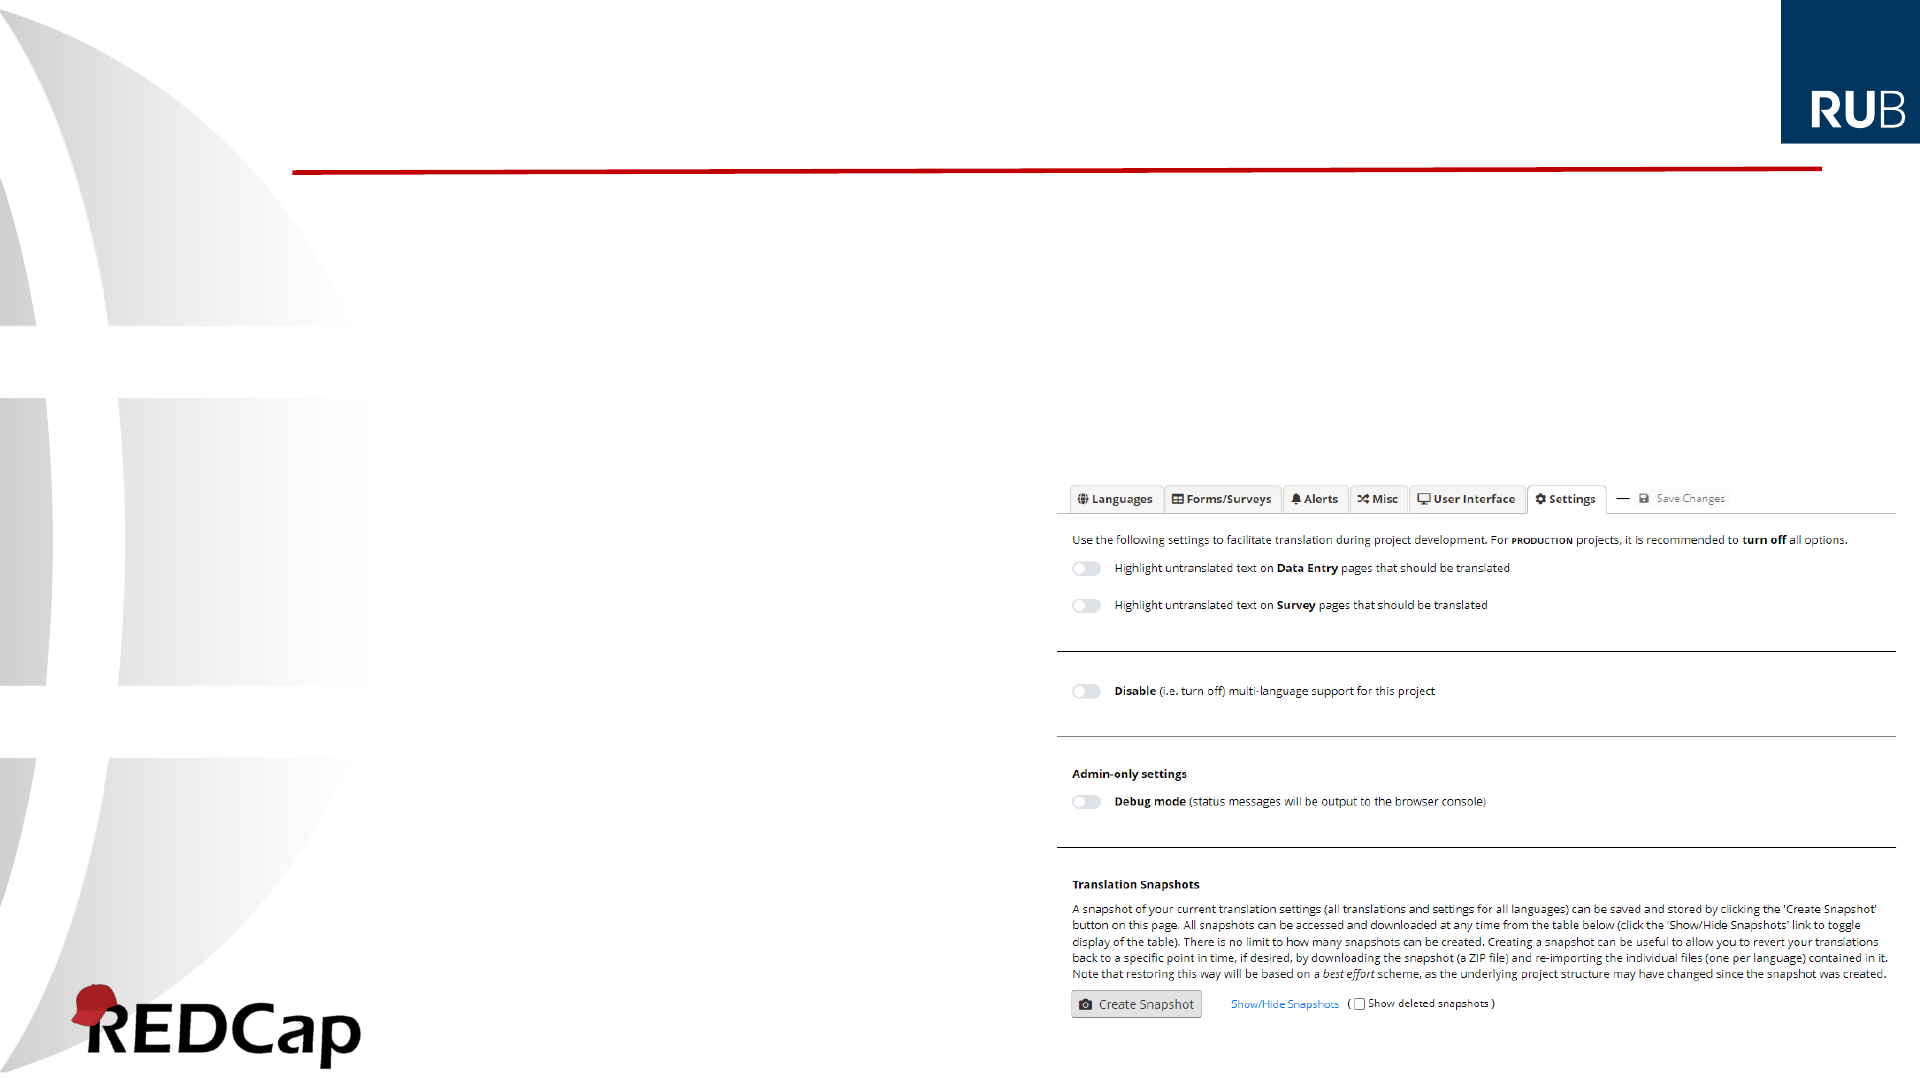
There are a number of options available under the Settings tab, such as the option to …
1. Highlight untranslated text (this is useful during development as a visually check for items
missing translations in the set language on data entry form and surveys)
2. Disable multi-language support in the project (this can be useful for troubleshooting a
suspected bug)
3. Enable Debug mode (for
admins only; a lot of data is output
to the browser console)
4. Create Snapshot (this will archive
a ZIP with export files for all languages)
Other MLM settings / Translation snapshots
