
1
UTAPSWEB INSTRUCTION SHEET,
VERSION 112012 System Access Instructions
IMPORTANT REMINDER:
IDTs must be scheduled and approved by assigned supervisor in UTAPS by 15 Aug each FY per AFI 36-2254v1
a. Obligates the DoD funding to IMA program
b. Ensures contact with assigned supervisor to discuss ARCNet report and proposed schedule dates to
complete ALL required items
c. Allows opportunity to discuss other days assigned supervisor would like support utilizing remaining
IDTs and 12 days of Annual Tour.
UTAPSWEB DIRECT
LINK AROWS
DIRECT LINK
UTAPS HELP DESK
AROWS HELP DESK
https://utapsweb.afrc.af.mil/utapsweb/
https://arowsr.afrc.af.mil/arows-r/
Voice contact: 877-294-5822, Option 1 is AROWS and Option 2 is UTAPS
Use the UTAPS direct link above when logging in on a DoD installation ONLY. If you are accessing UTAPS from a dot com
domain (home), login to AROWS, select UTAPS from the menu and follow the prompts.
NOTE: This installation executable (.EXE) may not be available for download from a .MIL computer.
You will need to use Internet Explorer. Make sure that the “DoD Root CA 2” is listed under “Trusted Root
Certifications Authorities” in Internet Explorer (internet options, Content, Certificates). If you do not have this
certificate then download and install the DoD root certificates.
1. MS Windows Internet Explorer users can download the certificate installation application located at:
http://iase.disa.mil/pki-pke/function_pages/tools.html#trust.
2. Look for “Trust Store Management”.
3. Click the + next to “InstallRoot 3.16A”.
4. Right click the hyperlink “(ZIP Download) Size: 1,803 KB” and then select “Save Target As”.
5. Save this file to your desktop or any folder on your computer.
6. Right click the zip file and select “Extract All”.
7. Select the folder “unclass_installroot_v3.16a”.
8. Select the subfolder “InstallRoot_v3.16A”.
9. Select subfolder “Windows”.
10. Double click on “InstallRoot_v3.16A.exe” to execute the application and install the certificates.
Open Internet Explorer:
1. Clear the SSL State (Tools, Internet options, Content, Clear SSL State).
2. Select “Every Time I visit the webpage” (Tools, Internet options, Browsing history, settings).
3. You may have to reboot the PC after the settings have been updated as above.
4. Log into AROWS-R using: https://arowsr.afrc.af.mil/arows-r/ . Then, follow the menu to UTAPS.
If you are trying to access UTAPS from home, you will have to go through AROWS-R.
2
If you get an error message such as 'Internet Explorer cannot display the web page...', follow the instructions below to clear
your SSL state and select the correct certificate. Steps to clear SSL State:
1. Open Internet Explorer
2. Select Tools
3. Select Internet Options
4. Select the Content tab
5. Under certificates, select Clear SSL state
6. Close Internet Explorer and reopen
Select the DOD-CA certificate with highest number (Do not use EMAIL certificate), continue your login
Things to remember:
1. UTAPS emails are courtesies; emails are not required to process transactions in the system.
2. To access future or previous calendars in UTAPS, click the BLACK arrow above the calendar.
3.
UTAPS operates with Internet Explorer 8 or higher only.
3
IMA/PIRRs
IMA TASK 1 – Set your Supervisor or Tour of Duty Certifier (TODC)
1. To set your Supervisor, go to Configuration then click IMA/PIRR Member Editor
2.
If your supervisor is listed under Available (scroll the listing), select the name and click Save Changes
3. The Current Supervisor will be displayed to the left of the listing under Assigned
4. If your supervisor is NOT listed under Available listing, click Add New Supervisor, fill in first
name, last name, phone number, email address and click Save. NOTE: IMA Supervisors can
approve schedules, disapprove schedules, validate work and send to pay.
NOTE: TODCs are limited to validating work then Exporting validation to the Supervisor only.
**If you receive a warning message that the person is already in the system– contact the UTAPSWEB
HELP DESK for assistance. DO NOT try to add the person under another name if they are listed under
another role in the system.**
IMA TASK 2 – Build your projected schedules
1. Go to IMA/PIRR Schedule to bring up your calendar.
2.
Click on the SECOND icon above the calendar, the pencil with black notepad is ‘Build IDT Period’
3. Click on the date to open the ‘Build IDT Schedules’ box, verify the date
4. To the right of Number of Consecutive Periods, enter the number of periods you want to build from
one (half-day) to up to yearly limit.
NOTE: When building consecutive periods UTAPS treats the IDTs as one, any deletions or
reschedules will affect entire group.
5. To the right of Starting Schedule to Work Period, enter whether you want your IDT periods to
begin with the Period 1 (morning) or Period 2 (afternoon). Default is Period 1.
6.
Select location by clicking Search by city/base or zip-code. (Use Home of Record for telecommuting)
7. To the right of Comment, enter the comment that you want to appear on the Training Location/Remarks
area of the Form 40A (50 character limit).
8. Select an answer Require Subsistence and Require Lodging
9.
To the right of Select a Validator click on the down arrow to select a validator, default is your supervisor.
10. Click OK.
11. The IMA Schedule Editor box will open, verify the data then click on Save and Close. The built
dates will appear WHITE (Built status) on the calendar.
12. Once you’ve built your yearly limit, click on the Submit Schedules button to submit schedules for
approval. All schedules will turn from WHITE to YELLOW indicating they are in Pending status.
DELETIONS: The sixth icon (pencil w/pink eraser) above the calendar, deletes the IDT date. Click the icon
then click the date you want to delete. Answer ‘Yes’ to dialog box question then UTAPS will clear the
calendar.
NOTE: You cannot proceed to IMA TASK 3 until your supervisor approves your schedule.
4
IMA TASK 3 – Put IDTs in Worked (GREY) status (Final Step)
1. Go to IMA/PIRR Schedule to bring up your calendar.
2. Click the WHITE arrow above the calendar then click on a GREEN date to sign in.
3. The Schedule Editor will open to display the IDT periods built on that date.
4.
Click the Work Date column for Period 1. This triggers the Sign Member In dialog box, answer Yes.
NOTE: If the Schedule Editor or dialog box does not open, check to insure your pop up blocker is OFF.
5. Repeat the above instructions for Period 2
6. Click Save and Close when finished, a successful sign in will turn the date GREY.
7. Repeat the steps above for all dates you have worked, your Supervisor will receive an email message
there are schedules to validate.
NOTE: Never sign in for a future date, at the end of the day on the last day of consecutive duty you can sign
in to each IDT then your supervisor can submit all the days, at one time for pay.
5
IMA/PIRR SUPERVISOR
SUPV TASK 1 – Access the system
Supervisors who ARE NOT AFRC personnel should receive an email containing the UTAPSWEB DIRECT
LINK and SSN Identifier to use as a login ID. You will use the Identifier for the FIRST access then the
Identifier number will bind to your CAC card. Non-CAC users must use their Identifier each time they
access the system.
NOTE: If you have not received the access email or you are not accessing UTAPSWEB from a .MIL
location, contact the UTAPSWEB HELP DESK.
Some users have more than one role; make sure that you are in the correct role before processing IDTs.
UTAPS Roles are located on the upper left portion of the Home Page, click the down arrow to view and select
other roles.
SUPV TASK 2 – Approve IDTs
1.
Go to the IMA/PIRR Supervisor Calendar and select the name of the IMA to view the calendar.
The IDT dates will appear YELLOW on the calendar.
2. Verify the dates and click on Approve All Schedules, a dialog box will open ‘… are you sure
you want to Approve All Schedules?’, answer ‘Yes’ the IDT dates will change to GREEN.
NOTE: If the dialog box does not open, check to insure your pop up blocker is OFF.
3.
To approve individual IDTs click the WHITE arrow above the calendar then click on the IDT date.
4. Click the box next to the Period column (in bold), this will cause the period(s) to be checked.
5. Click the Approve button above the Period column, the Status column will change to Approved.
6. Finally, click Save and Close, the IDT will change to GREEN on the calendar.
SUPV TASK 3 – Validate and Send to Pay IDTs
1. Click Validate Work on the Home Page menu.
2. There are two buttons,
a.
First, Preview Form 40 allows you to verify the Form 40s that will be exported BEFORE you
export it.
b.
Second, the Export button is the action button (red asterisk) that allows you to export to Send to
Pay, click Export. UTAPS will notify you when the file is exported.
NOTE: Only IDT dates that are GREY on the calendar can be validated and sent to pay.
After files are exported,
Click Send to Pay, you will see one or more Form 40 (pay files) listed as a blue hyperlink and the Send to
Pay button.
NOTE 1: You can click on the blue listed Form 40s if you want to view them BEFORE you send them to pay.
The Send to Pay button sends the schedules forward to the Reserve Pay Office (RPO) for pay and points.
NOTE 2: IDT dates that are successfully sent to pay will appear BLACK on the calendar.

6
TOUR OF DUTY CERTIFIERS (TODCs)
TODC Task 1 – Validate your IMA’s worked IDTs
1. Click Validate Work on the Home Page.
2. There are two buttons,
a.
First, Preview Form 40 allows you to verify the Form 40s that will be exported to the IMA
Supervisor.
b. Second, the Export button is the action button (red asterisk) that allows you to validate the
schedules as worked, click Export. (You must Export so the IDTs are forwarded to the
Supervisor)
NOTE: Only IDT dates that are in Worked (GREY) status on the calendar can be validated.
Accessing Form 40As
If you have questions regarding travel reimbursement, contact the Dobbins Travel Pay Office toll free at
800-808-5942, commercially at 678-655-5800, or DSN 625-5800. You can email questions to
IMPORTANT: Form 40As will be available for each IDT built AFTER they are approved (GREEN) by the
supervisor.
1.
Go to Reports, then Automated Form 40s to bring up the Form 40As viewing tree.
2.
Click on the plus sign next to your name, you’ll see a Form 40A for each period built.
3.
Click on a date and period to highlight it then prepare your 40A for printing:
a.
Tab one to update, select the Personal Data and select whether you require lodging or subsistence.
b. Tab two to update, select the Signing Officials tab and select an Authorizing Official.
c. Tab three to update, you can combine periods for the date highlighted by clicking Combine
Form 40As tab, verify the periods to be combined, then highlight the first period displayed in
the box and click the Combine/Save button.
4.
To save 40As, click Save in the top left corner. (GREY discs are unsaved, YELLOW discs are saved).
5. To print 40As, click Print at the top left corner then click Print Preview or Print Individual 40A,
a PDF window will open to view the 40A. Click the printer icon to print from PDF.
NOTE: You must save any changes made to the 40A before printing.

7
UTAPS Frequently Asked
Questions For IMAs
Updated December 2015
IMPORTANT REMINDER:
IDTs must be scheduled and approved by assigned supervisor in UTAPS by 15 Aug each FY per AFI 36-2254v1
a. Obligates the DoD funding to IMA program
b. Ensures contact with assigned supervisor to discuss ARCNet report and proposed schedule
dates to complete ALL required items
c. Allows opportunity to discuss other days assigned supervisor would like support utilizing
remaining IDTs and 12 days of Annual Tour.
Q - How do I sign in my IDTs?
A – From the “Legacy View” (You can see the
entire year) Right Click on day
Select View Schedule
Left Click in “Work Date” box
A – From the “New Calendar View” (You can only see one
month) Left Click on day
Select “Edit Schedule”
Left Click in “Work Date” box
Q – I am trying to add my new supervisor and I cannot see him/her
A – Verify with your supervisor to see if they supervise any other IMAs. If they do, retrieve the email
they use and select that from the list. Sometimes IMAs build supervisors in the system using their
supervisors nick name or preferred name. We do not recommend that. The main point to take home is
DO NOT create a NEW account for your supervisor without verifying he/she currently exists in UTAPS.
Q – How do I update my Supervisor’s Email Address?
A- Only your Supervisor may update their
address Go to Configuration
Click on User Editor
Update Email address
Hit SAVE
Q – May I use Chrome?
A – UTAPS is not compatible with Chrome, please use Internet Explorer. We have work arounds for Windows
Q – I receive a 403 Error or Page Cannot be displayed Error
8
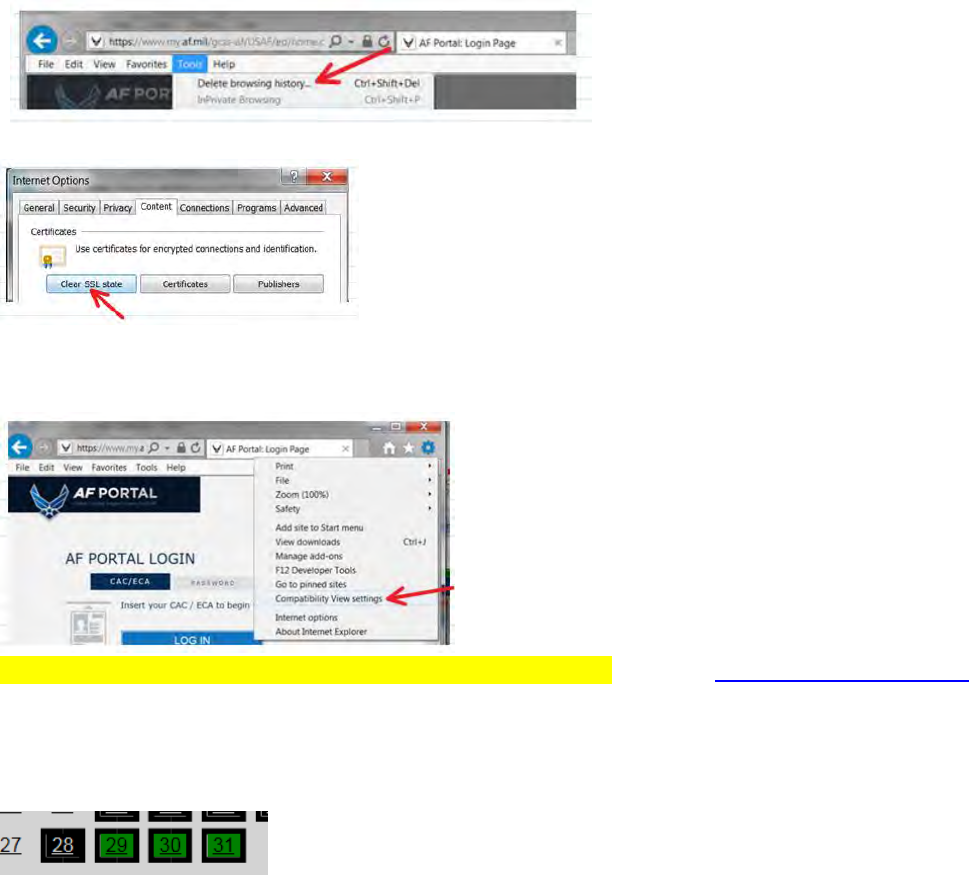
A – Delete Browsing History: From Internet Explorer’s Menu Bar (hold down ALT key if menu bar is not
visible) select Tools and “Delete browsing history”
Clear Cache: Select “Clear SSL state” under the “Content” tab in Internet Options
Add “af.mil” to Compatibility View Settings:
Email the Help Desk for additional internet browser work arounds. [email protected]
Q – Can I re-schedule an IDT that has already been re-scheduled and one day in that week has been paid?
A – UTAPS only allows ONE Re-Schedule. Once you have re-scheduled an IDT, your Supervisor may re-
schedule that IDT one last time. Keep in mind when you build a group of IDTs, altering one day affects the
entire group. We suggest building your IDTs individually, never re-schedule, delete and re-build.
Q – I am a new IMA and my supervisor cannot see my account
A- You are most likely in the “Transferred Folder.” Email the help desk to inquire and request to be
removed from the “Transferred Folder.” After this action is completed, your supervisor will be able to
see your account.
Q – My account is locked.
A – Please email the Help Desk with the last 4 of your
SSAN.

9
In the future, to prevent further delay in logging into the system, please setup your UTAPSWeb
security challenge questions.
Q – Do I need to set a TODC in my account?
A - Your Supervisor can perform all roles needed to validate and send IDTs to pay. In addition, Supervisors
may perform any task an IMA does within their calendar. TODCs can only validate work. They cannot send
them to pay. Lastly, TODCs aren’t required in most cases.
** Suggestions ONLY
1. Build your IDTs individually and NOT as a group.
2. Do not reschedule IDTs. If IDTs are not in worked (GREY) status, delete and build again.
3. Sign in IDTs the last hour of the last day of duty week.
4.
If you change supervisors after an IDT has been approved, delete and re-build for visibility of new supervisor
5. Please include a contact number within all emails sent to the Help Desk.
6.
For IDTs that have not been worked - DELETE, DELETE, DELETE – We recommend to Rebuild and not
Reschedule
IDTs.
7. A Form 40A is not needed for IDT Pay.
8. Access UTAPS directly from a .mil computer
9. You may access the Form 40A from e-pubs or Google (both forms are acceptable)
