
© 2024 Titanium Software
Titanium Schedule
User Manual

2
© 2024 Titanium Software
Table of Contents
Section I Overview
5
Section II Billing
8
................................................................................................................................... 81 Add/Edit Charges
................................................................................................................................... 122 Add/Edit Payments
................................................................................................................................... 163 Find Invoices
................................................................................................................................... 174 Generate/Process Insurance Claims
................................................................................................................................... 225 Billing Notes
................................................................................................................................... 226 Write Offs and Adjustments
................................................................................................................................... 257 Print Account Records
Section III Client Import
28
Section IV Clients
29
................................................................................................................................... 301 Add/Edit/Delete Client
................................................................................................................................... 352 Add/Edit/Delete Client Photo
................................................................................................................................... 373 Add/Edit/Remove Flags
................................................................................................................................... 384 Add/Edit Demographics
................................................................................................................................... 395 Disabled Clients
................................................................................................................................... 426 Add Form to Client File
................................................................................................................................... 457 Email Clients
................................................................................................................................... 458 Text Clients
................................................................................................................................... 469 Review Client File
................................................................................................................................... 4910 Search for Clients
................................................................................................................................... 4911 Form Letters
Section V My Clients List
52
Section VI Electronic Prescribing
54
................................................................................................................................... 561 Add Prescriptions
................................................................................................................................... 592 Edit Prescriptions
................................................................................................................................... 623 Refill Requests
Section VII Notes
63
................................................................................................................................... 641 Add/Edit/Delete Note
................................................................................................................................... 672 Add Attachment to Other Appointment
................................................................................................................................... 673 Group Notes

3Contents
3
© 2024 Titanium Software
................................................................................................................................... 704 Supervisor Review
................................................................................................................................... 705 Document Prescriptions
................................................................................................................................... 746 Make Diagnosis
Section VIII Outreach and Non-Clients
76
................................................................................................................................... 761 Add/Edit/Delete Non-Client Notes
................................................................................................................................... 782 Add Non-Client Note to Client File
................................................................................................................................... 793 Schedule/Document Outreach
Section IX Printer Settings
81
Section X Reports
82
Section XI Scheduling
85
................................................................................................................................... 861 Add/Edit Appointment
................................................................................................................................... 892 Add/Edit Recurring Appointment
................................................................................................................................... 913 Appointment Reminders
................................................................................................................................... 944 Search for Appointment
................................................................................................................................... 945 Groups
................................................................................................................................... 966 Mark Attendance
................................................................................................................................... 977 Placeholders
................................................................................................................................... 998 Schedule Groups
................................................................................................................................... 1009 Using Online Scheduling
................................................................................................................................... 10110 Waitlist
Section XII Supervision
104
Section XIII Task List
107
Section XIV User Settings
108
................................................................................................................................... 1081 User Defaults Tab
................................................................................................................................... 1102 User Schedule Viewer Layout
................................................................................................................................... 1123 User Schedule Viewer Colors
................................................................................................................................... 1144 User Interface Tab
................................................................................................................................... 1155 Calendar Sync
................................................................................................................................... 1186 CCMH
Section XV User Permissions
120
Section XVI Web Component
122
Section XVII Accessibility Tips
127

Overview 5
© 2024 Titanium Software
1 Overview
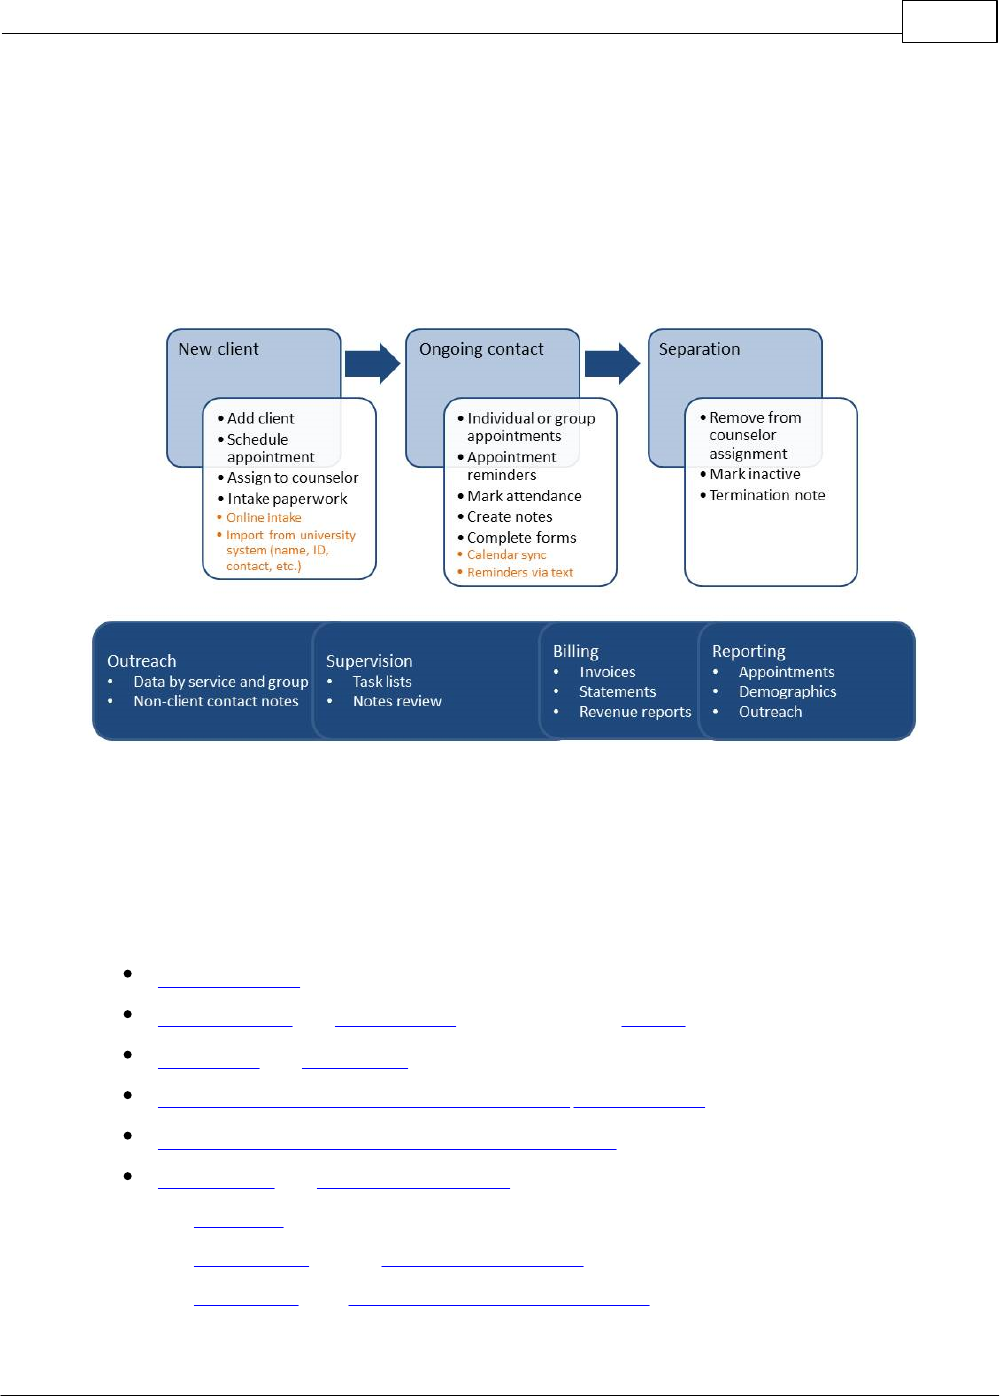
Titanium is an EMR software designed for counseling centers and other facilities that have a
similar work flow like psychology department teaching clinics, disability centers, etc. The model
below shows the basic client life cycle supported by center operations. The bulleted items are
the key functions in Titanium (items in orange are optional features available for additional fees).
Titanium has a user friendly interface, with built-in tool tips that pop up when you mouse over
items in the program. You can also access many command menus by right clicking on the schedule
items and headers, and free text fields. Titanium allows users to copy and paste text in a variety
of areas by highlighting the text and using keyboard commands (Ctrl+C to copy and Ctrl+V to
paste).
The main sections of Titanium are:
User Schedules
Appointments and Placeholders for individuals or groups
Reminders and attendance
Clients (contact information, assign to users, demographics)
Client File (appointment history and client notes)
Client Notes and Group Session Notes
o Diagnosis (DSM 5, ICD 10)
o Medications (Note, electronic prescribing is also available.)
o Data Forms (e.g. client demographic information, assessments, checklists, user
defined questionnaires, etc.)
6
© 2024 Titanium Software
o Attachments
o Supervisor reviews
Outreach activities/Non-client notes
Billing
Reports
In addition, Titanium contains productivity tools to help you with your daily work flow.
User Settings: Customizable settings for appearance (fonts, colors, schedule days, pop-up
windows) and behaviors (appointment announcements, note and report defaults
My Clients: list of all your active clients which allows at-a-glance appointment statistics
for each client and access to client files
Task List: reminders to complete tasks assigned by your center administrator (e.g. mark
attendance, create note, sign note, etc.)
Waitlist: highly customizable feature allows creation of one or more waitlists
Client Flags: set alerts for at-risk or special needs clients, which will appear in various
screens in the program
Client Appointment Reminders: send reminders via email or text message (additional fee
for text messaging) to help reduce client no show rates. Message content is customized
by your center administrator.
The following are add-on features to Titanium and have an extra fee.
Web Component: allows clients to complete forms online, including intake forms,
assessments, and surveys, and to make appointments online
Client Import: allows clients to be added/edited by importing information from an
external data source (i.e., school’s student registration system). Can also be used to verify
enrollment.
Calendar Sync: Copies non-confidential appointment information from Titanium to
Microsoft Exchange (Outlook) or Google calendar. This feature is commonly used to show
“busy” times on external calendars, and to allow Titanium users to view their
appointment schedules when they are out of the office.
Titanium has been customized for use by your center's administrator.
We encourage new users to view the complete suite of training videos available on our website
at www.TitaniumSchedule.com. The Getting Started with Titanium video on our website contains
a demonstration of commonly used features. Our website has contact information for the

Overview 7
© 2024 Titanium Software
Titanium team, link to our Knowledge Base, and system/hardware requirements. For user
questions, email is often the best contact method because you can include a screen shot and
details. To discuss best practices, processes, and collaborate with other users, you can join the
users Listserv. A link to the Listserv is available on our website. We encourage the system
administrator at new facilities to sign up for the Listserv.

8
© 2024 Titanium Software
2 Billing
The Billing feature allows you to create track charges and payments for clients. Depending on
settings chosen by your center administrator, users can create insurance claim forms, and export
print image files for uploads to clearinghouses or print hard copy CMS 1500s. Titanium can be
used to generate invoices, statements and client account reports.
If your center administrator chooses, the Invoices Needed list may be used to review
appointments for which invoices or insurance service lines should be prepared. You can also
document billing agreements made with clients.
Your center administrator may limit users who have access to billing.
2.1 Add/Edit Charges
Users can add charges for clients by using invoices or adding service lines for insurance claims
using the billing file screen. Centers that are not using Titanium to generate insurance claim
forms should use invoices to enter charges. Centers that are generating claim forms using
Titanium should enter charges from the billing file.
What would you like to do?
o Add charge to an invoice
o Edit charge on an invoice
o Add charge to bill insurance
o Edit insurance billing charge
Add Charge to an Invoice
1. Open the Invoice screen:
o On the calendar screen, right click on the appointment and click Billing, or
o On the clients tab of group appointments, click the desired client and click Billing, or
o On the calendar screen, click to open an appointment and click the Billing icon on the menu
bar, or
o From the calendar screen, click Open > Invoices Needed, double click on a list item to open
the appointment screen, and click the Billing icon on the menu bar or billing button on the
clients tab for group appointments, or

Billing 9
© 2024 Titanium Software
o From the calendar screen, click Open > Billing, and click Find to search for the client as you
normally would.
2. Add Invoice Items.
o Click Add to create a line item for the service.
o Choose a billing code from the pull down menu.
o If necessary, click in the date, description or amount fields to edit them.
o Repeat these steps to add additional invoice items. Click a line and click Remove to remove
the line.
3. If necessary, use the pull down menus on the invoice screen to select other information to be
added to the invoice. (Note: Your center administrator may not have enabled all of these items).
o Provider
o Supervisor
o Diagnosis (Note: Titanium will not automatically enter a diagnosis on the invoice screen from
the client's file.)
4. Click the check box to set the charge and diagnosis selections as the default for invoices for the
client. (Note: If checked, charges and diagnosis will automatically populate on subsequent
invoices for the client. Depending on settings chosen by your center administrator, clicking the
default box may also result in prompts to populate the supervisor field.)
5. Click Save.
6. Click Exit.
Edit Charge on an Invoice
Note: You may be unable to edit charges that have been used to generate insurance claims.
1. From the calendar screen, click Open > Billing.
2. Click the Find icon on the menu screen.
3. To see invoices from the current day, click Show Today's Invoices.
4. To see a client's invoices, click Select Client and search for the client. All invoices for the client
are shown.

10
© 2024 Titanium Software
5. Double click to open the desired invoice.
6. Click Edit on the menu bar. (Note: To delete the invoice, click Delete on the menu bar. If the
invoice charges have been used to create an insurance claim, you may be unable to edit the
charges or delete the invoice.)
7. Make desired changes.
8. Click Save.
9. Click Exit.
Add Charge to Bill Insurance
These steps allow you to add charges from the Billing File screen for the purpose of billing
insurance. An invoice is created at the same time, and can be viewed/printed using the Print >
Invoice option from the menu bar.
1. Navigate to the billing file screen by:
o On the calendar screen, right click on the appointment and click Billing File, or
o On the clients tab of group appointments, click the desired client and click Billing File, or
o Search for the desired client, and click the Billing File icon on the menu bar, or
o From the calendar screen, click Open > Billing File, and click Find to search for the client.
(Note: You can work with multiple client accounts by clicking Find Clients, setting the filters
and clicking Search. Click Ok to view the accounts of all clients who match the search criteria.)
2. Open the service lines window by clicking New, or clicking Selection Actions or right clicking in
the account and choosing Post New Services. (Note: You may be prompted to associate the
charge with an appointment, by selecting it from the list and clicking Ok.)
3. On the service line window, add charges by:
o Use the pull down menus to choose counselor and supervisor, if not associated with an
appointment.
o Check the box to indicate that the service charge and diagnosis entries on the screen will be
the default for the client, if appropriate. (Note: If checked, charges and diagnosis will
automatically populate on subsequent service lines for the client. Depending on settings
chosen by your center administrator, clicking the default box may also result in prompts to
populate the supervisor field.)
o Click Add, and use the pull down menus to choose service date, and billing code from the list
created by your center administrator.

Billing 11
© 2024 Titanium Software
o If necessary, click in the description or amount fields to edit them.
o Check the box to indicate that the item will be billed to insurance.
o Repeat these steps to add additional service lines. Click a service line and click Remove to
remove the line.
4. Edit the default insurance items chosen by your center administrator as necessary (days/units,
emergency, HCPCS/CPT code, place of service, Early & Periodic Screening, Family Planning,
Supplemental Information, Outside Lab).
5. Click Add and then use the search function to find and select the desired diagnosis. (Note:
Titanium will not automatically add the diagnosis from the client's file.)
6. Click Save.
7. Click Exit.
Edit Insurance Billing Charge
Note: If a charge has been used to generate an insurance claim, it may not be possible to edit the
service line.
1. Navigate to the billing file screen by:
o On the calendar screen, right click on the appointment and click Billing File, or
o Search for the desired client, and click the Billing File icon on the menu bar, or
o From the calendar screen, click Open > Billing File, and click Find to search for the client.
(Note: You can work with multiple client accounts by clicking Find Clients, setting the filters
and clicking Search. Click Ok to view the accounts of all clients who match the search criteria.)
2. Double click on the desired service line.
3. On the service line window, click Edit on the menu bar. (Note: To delete the service line, click
Delete on the menu bar.)
4. Use the pull down menus and buttons to make desired changes.
5. Click Save.
6. Click Exit.

12
© 2024 Titanium Software
2.2 Add/Edit Payments
What would you like to do?
o Add payment to the client account
o Add payment to an invoice
o Add insurance payment
o Edit payment on the client account
o Edit payment on an invoice
o Edit insurance payment
o Allocate account credit
Add Payment to the Client Account
These steps allow you to add payments from the Billing File screen. Payments will be reflected
on the invoices to which the payment is allocated.
1. Navigate to the billing file screen by:
o On the calendar screen, right click on the appointment and click Billing File, or
o On the clients tab of group appointments, click the desired client and click Billing File, or
o Search for the desired client, and click the Billing File icon on the menu bar, or
o From the calendar screen, click Open > Billing File, and click Find to search for the client.
(Note: You can work with multiple client accounts by clicking Find Clients, setting the filters
and clicking Search. Click Ok to view the accounts of all clients who match the search criteria.)
2. Open the payment window by clicking Selection Actions and choose Post Payment, or right
clicking in the account and choosing Post Payment.
3. On the payment window, add payment by:
o For centers that use Titanium to generate insurance claims, review the CoPay column(s) in the
table. (Note: The co-pay amount is based on the entries made in the client's insurance
information.)
o Use the pull down menus to choose payment date and payment type. (Note: Click here for
instructions to post an insurance payment for a claim created using Titanium. Use the
insurance payment type in this window only to record payments for claims generated outside
Titanium.)
o Type in payment amount and description. (Note: If you right clicked on an existing service
line to open the payment window, the payment amount will default to match the service line

Billing 13
© 2024 Titanium Software
amount.)
o Click in the Allocated Amount column, and type in the amount of the payment to be allocated
to unpaid charges. (Note: Payments can be used to pay any unpaid charges showing in the
window, in any combination. If you right clicked on an existing service line to open the
payment window, the payment will default to that service line.)
4. Click Ok to save the payment. (Note: If the payment is not fully allocated to existing charges, a
pop-up warning will be shown notifying the user that there is a credit. Click No to return to the
payment window and allocate the entire payment. Click Yes if the client is pre-paying for services
not yet rendered.)
5. Click Exit.
Add Payment to an Invoice
These steps allow you to add payments on the invoice screen. The payments created on the
invoice screen will be visible on the Client Billing File screen.
1. Open the Invoice screen:
o On the calendar screen, right click on the appointment and click Billing, or
o On the clients tab of group appointments, click the desired client and click Billing or
o On the calendar screen, click to open an appointment and click the Billing icon on the menu
bar, or
o From the calendar screen, click Open > Billing, and click Find to search for the client. Select
the desired invoice and click Ok. Click Edit on the menu bar.
2. Click Add in the payments section.
3. On the payment window, add payment by:
o Use the pull down menus to choose payment date and payment type. (Note: Click here for
instructions to post an insurance payment for a claim created using Titanium. Use the
insurance payment type in this window only to record payments for claims generated outside
Titanium.)
o Type in payment amount and description. (Note: The payment amount will default to the
amount of the invoice charges.)
o Click in the Allocated Amount column, and type in the amount of the payment to be allocated
to unpaid charges. (Note: Payments can be used to pay any unpaid charges showing in the
window, in any combination. Titanium will default to showing payments in the charges for
the current invoice.)

14
© 2024 Titanium Software
4. Click Ok to save the payment. (Note: If the payment is not fully allocated to existing charges, a
pop-up warning will be shown notifying the user that there is a credit. Click No to return to the
payment window and allocate the entire payment. Click Yes if the client is pre-paying for services
not yet rendered.)
5. Click Save.
6. Click Exit.
Add Insurance Payment
1. Navigate to the billing file screen by:
o On the calendar screen, right click on the appointment and click Billing File, or
o On the clients tab of group appointments, click the desired client and click Billing File, or
o Search for the desired client, and click the Billing File icon on the menu bar
2. Click the service line and click Selection Actions, or right click on a service line used to create
the insurance claim and choose Post Primary Insurance Payment. (Note: The claim must be
marked Complete before a payment can be posted. If payment is for the client's secondary
insurance, choose Post Secondary Insurance Payment.)
3. Use the insurance company explanation of benefits to enter the amounts in payment and
contractual adjustments for the service lines on the insurance claim.
4. Click Ok.
5. Click Exit.
Edit Payment on the Client Account
1. Navigate to the billing file screen by:
o On the calendar screen, right click on the appointment and click Billing File, or
o On the clients tab of group appointments, click the desired client and click Billing File or
o Search for the desired client, and click the Billing File icon on the menu bar, or
o From the calendar screen, click Open > Billing File, and click Find to search for the client.

Billing 15
© 2024 Titanium Software
(Note that you can work with multiple client accounts by clicking Find Clients, setting the
filters and clicking Search. Click Ok to view the accounts of all clients who match the search
criteria.)
2. Double click on the payment or right click in the account and choose Edit Payment. (Note: To
delete a payment, choose Delete Payment and click Ok.)
3. On the payments window, make desired changes and click Ok.
4. Click Exit.
Edit Payment on an Invoice
1. From the calendar screen, click Open > Billing.
2. Click the Find icon on the menu screen.
3. To see invoices from the current day, click Show Today's Invoices.
4. To see a client's invoices, click Select Client and search for the client. All invoices for the client
are shown.
5. Double click to open the desired invoice.
6. Click Edit on the menu bar.
7. Click the payment and click View/Edit. (Note: To delete the payment, click Remove.)
8. Make desired changes on the edit payment window and click Ok.
9. Click Save.
10. Click Exit.
Edit Insurance Payment
1. Navigate to the billing file screen by:
o On the calendar screen, right click on the appointment and click Billing File, or
o On the clients tab of group appointments, click the desired client and click Billing File or
o Search for the desired client, and click the Billing File icon on the menu bar, or
o From the calendar screen, click Open > Billing File, and click Find to search for the client.

16
© 2024 Titanium Software
(Note that you can work with multiple client accounts by clicking Find Clients, setting the
filters and clicking Search. Click Ok to view the accounts of all clients who match the search
criteria.)
2. Double click on the payment, or right click on a service line used to create the insurance claim
and choose Edit Primary Insurance Payment. (Note: If payment is for the client's secondary
insurance, choose Edit Secondary Insurance Payment. To delete payments, click Delete Insurance
Payment.)
3. Use the insurance company explanation of benefits to edit the payment amounts and required
contracted adjustments for the service lines on the insurance claim. (Note: If a secondary
insurance claim has been generated, you may be unable to edit primary insurance payment.)
4. Click Ok.
5. Click Exit.
Allocate Account Credit
1. Navigate to a client invoice or client's billing file screen.
2. Click on the Unallocated Payments link (blue underline).
3. Click to select the payment to be allocated.
4. Click Allocate.
5. On the Edit Payment window, click in the Allocated Amount column and enter the desired
amount.
6. Click Ok.
2.3 Find Invoices
1. From the calendar screen, click Open > Billing.
2. To see invoices from the current day, click Show Today's Invoices.
3. To see a client's invoices, click Select Client and search for the client. All invoices for the client
are shown.

Billing 17
© 2024 Titanium Software
4. Double click to open the desired invoice. (Note: There is an Outstanding Accounts report
available in the reporting feature of Titanium.)
2.4 Generate/Process Insurance Claims
Titanium allows users to print hard copy insurance claim forms using pre-printed CMS 1500 paper.
This feature is activated and set up by your center administrator. Prior to generating claims, users
who bill insurance may also have to update their user settings, depending on choices made by the
center administrator.
Titanium does not electronically interface with any third-party insurance clearinghouses, but
claim information can be exported as print image files which might be suitable for upload to some
third-party clearinghouses.
What would you like to do?
o Add client insurance information
o Edit client insurance information
o Review client insurance information
o Generate bulk claims
o Generate claims for single client
o Process claims
Add Client Insurance Information
1. Navigate to the billing file screen or client record by:
o From the calendar screen, click Open > Billing File, and click Find to search for the client, or
o Search for the desired client
2. Click the Client Insurance icon on the menu bar or button on the client screen.
3. Click Edit.
4. Click Select to enter the insurance carrier:
o Click the carrier from the list or (Note: Enter search criteria if the list is long.)

18
© 2024 Titanium Software
o Click the Add New Carrier radio button and click Ok. Then enter insurance carrier information
on the pop up window and click Ok.
5. Use the pull down menus and text boxes to enter the client's insurance information.
6. Enter a prior authorization number and number of visits, if applicable. (Note: Titanium will not
perform any automatic calculations using this information.)
7. Enter the client's co-pay type (flat rate or percentage) and rate or percent. (Note: Titanium will
not use this information to automatically calculate the client's co-payments.)
8. Click the Other Insurance Details tab, and use the pull down menus and text boxes to enter
information required on insurance claims. (Note: You should consult with your center
administrator or use the state or federal guidelines for CMS 1500 claim forms to learn more about
these fields.)
9. If the client has secondary insurance, click the Secondary Insurance tab and enter information.
10. If desired, attach a scanned copy of the client's insurance card by clicking Insurance Cards, and
using the Windows interface to navigate to the desired file. Enter the file name, and click Ok.
(Note: To manage insurance cards, right click on the card and choose Delete, Edit Description,
Open or Print.)
11. Click Save.
12. Click Exit.
Edit Client Insurance Information
1. Navigate to the billing file or client record screen by:
o From the calendar screen, click Open > Billing File, and click Find to search for the client.
(Note that you can work with multiple client accounts by clicking Find Clients, setting the
filters and clicking Search. Click Ok to view the accounts of all clients who match the search
criteria.) or
o Search for the desired client
2. Click the Client Insurance icon on the menu bar or button on the screen.
3. Click Edit.
4. Click the desired tab, and edit the information. (Note: Click Clear All on the menu bar to
remove all client insurance information. To clear information for a single tab, delete the carrier.
If the secondary coverage has become primary, click Swap on the menu bar to switch the order in
which claims will be submitted.)

Billing 19
© 2024 Titanium Software
5. Click Save.
6. Click Exit.
Review Client Insurance Information
o On the invoice screen, click Insurance CoPays or Client Insurance icon on the menu bar to
review client insurance information.
o On the Billing File screen, click Client Insurance to review insurance information.
Generate Bulk Claims
1. From the schedule screen, click Open > Insurance Claims Needed.
2. If desired, used the date filters to search for desired claims (e.g., last month).
3. Click on the Claim Issues tab to resolve problems with claims:
o Click the Issue/Resolution column.
o For each item, click Fix Issue.
o If Titanium redirects to a screen, click Edit on the menu bar, make changes, and click Save and
Exit.
o For issues in system settings, user settings or client insurance information, review the pop-up
message to determine the issue. Then exit the billing file, and navigate to the correct screen
in Titanium to fix the problem.
4. When the Pending Claim Issues tab is blank, click the Ready for Generation tab. Click the check
box next to the desired claims from the list or the Select All icon on the menu bar.
5. To preview claims, click the Preview icon on the menu bar.
6. To generate claims, click the pull down arrow next to the Generate Claims icon on the menu bar
and choose whether to export or print claims
o To print claims
Insert CMS 1500 printer paper.
Click Ok.
20
© 2024 Titanium Software
Click Exit.
o To export a print image file, use the Windows interface to save the file to your computer.
(Note: You can upload the print image file to the clearinghouse of your choice that accepts
this file type. There is no automatic e-filing available in Titanium.)
Generate Claims for One Client
1. Navigate to the billing file screen by:
o From the calendar screen, click Open > Billing File, and click Find to search for the client.
(Note that you can work with multiple client accounts by clicking Find Clients, setting the
filters and clicking Search. Click Ok to view the accounts of all clients who match the search
criteria.) or
o Search for the desired client, and click the Billing File icon on the menu bar
2. Click on the Pending Claim Issues tab to resolve problems with claims:
o Click the Issue/Resolution column.
o For each item, click Fix Issue.
o If Titanium redirects to a screen, click Edit on the menu bar, make changes, and click Save and
Exit.
o For issues in system settings, user settings or client insurance information, review the pop-up
message to determine the issue. Then exit the billing file, and navigate to the correct screen
in Titanium to fix the problem.
3 When the Pending Claim Issues tab is blank, click the Claims Pending Generation tab. Click the
desired claims from the list.
4. To preview claims, click the Preview icon on the menu bar.
5. To generate claims, click the pull down arrow next to the Generate Claims icon on the menu bar
and choose whether to export or print claims
o To print claims
Insert CMS 1500 printer paper.
Click Ok.
Click Exit.
o To export a print image file, use the Windows interface to save the file to your computer.

Billing 21
© 2024 Titanium Software
(Note: You can upload the print image file to the clearinghouse of your choice that accepts
this file type. There is no automatic e-filing available in Titanium.)
Process Claims
Titanium contains claim actions that you will use to track claim status. On the Record of Account
tab, each service line used to generate a claim will show the claim action or amount paid by
insurance after the claim is marked complete. On the Insurance Claims tab, each insurance claim
shows the status, as well as subsequent related claims (e.g. resubmit, cancel/void).
Claim actions mirror the claim life cycle and include:
Action
Reason
Next Step
Pending
Service lines marked insurance
billable have been entered
Generate and print
Submitted
Generated and printed from
Titanium
Use explanation of benefits to
determine next steps
Complete
Explanation of benefits has been
received from insurance, and claim
won’t be resubmitted
Add insurance payment and/or
adjustments
Cancel/Void
Claim was sent to insurance in error.
This status generates a new CMS-
1500 claim form with cancel/void
code in box 22.
Make changes to claim items and
information, and a generate new
claim
Reject/Deny
Claim was rejected or denied by
insurance.
If desired, mark claim resubmit
and make desired changes to
claim items and information.
Resubmit
If reject/deny was due to an error
that can be corrected, this action
will create a new claim to be
submitted.
Use explanation of benefits to
determine next steps
Delete
If the claim was created in error,
click Delete to remove it from
Titanium and enter the reason.
Generate and print new claims, if
desired
The current claim action will be displayed next to the claim, and on the Record of Account under
the insurance column(s) for each service line item included in the claim. To change a claim

22
© 2024 Titanium Software
action:
1. Navigate to the billing file screen by:
o From the calendar screen, click Open > Billing File, and click Find to search for the client.
(Note that you can work with multiple client accounts by clicking Find Clients, setting the
filters and clicking Search. Click Ok to view the accounts of all clients who match the search
criteria.) or
o Search for the desired client, and click the Billing File icon on the menu bar
2. Click the Insurance Claims tab.
3. Right click on the insurance claim, and choose the desired claim action. If required, enter a
reason for the action and click Ok. (Note: If the claim action does not follow the claim life cycle,
you will see an information window explaining the next step. Click Ok to close the window.)
4. To undo a claim action, right click on the claim and click Undo. The claim will be returned to its
former state. If required, enter a reason for the action.
2.5 Billing Notes
Titanium allows center administrators to set up a tab on the client screen (bottom of the Contact
Information tab) for users to enter notes about billing agreements made with clients. Those
notes will be visible at the bottom of the invoice and service line screens, so that users preparing
invoices and service lines can manually calculate required changes to charges or add write offs
(e.g. sliding scale billing).
2.6 Write Offs and Adjustments
What would you like to do?
o Adjust charge
o Write off charge
o Write off account balance

Billing 23
© 2024 Titanium Software
o Document a Refund
Adjust Charge
To add an adjustment based on an explanation of benefits for an insurance claim, the claim status
must be complete . Titanium will automatically prompt users to enter insurance payments when
a claim is marked complete, so a separate adjustment is unlikely to be needed.
1. Navigate to the billing file screen by:
o On the calendar screen, right click on the appointment and click Billing File, or
o On the clients tab of group appointments, click the desired client and click Billing File, or
o Search for the desired client, and click the Billing File icon on the menu bar, or
o From the calendar screen, click Open > Billing File, and click Find to search for the client.
(Note: You can work with multiple client accounts by clicking Find Clients, setting the filters
and clicking Search. Click Ok to view the accounts of all clients who match the search criteria.)
2. Right click on the service line and choose Post Payment.
3. If required, choose Insurance payment type.
4. Enter the amount paid by insurance, if any.
5. Enter the amount of the adjustment.
6. Click Ok to save.
Write off Charge
Your center administrator may have chosen to restrict the ability to enter write offs to only users
with system administrator security access.
1. Navigate to the billing file screen by:
o On the calendar screen, right click on the appointment and click Billing File, or
o On the clients tab of group appointments, click the desired client and click Billing File, or
o Search for the desired client, and click the Billing File icon on the menu bar, or
o From the calendar screen, click Open > Billing File, and click Find to search for the client.
(Note: You can work with multiple client accounts by clicking Find Clients, setting the filters
and clicking Search. Click Ok to view the accounts of all clients who match the search criteria.)

24
© 2024 Titanium Software
2. Right click on the charge and choose Write Off.
3. Enter the amount and reasons, if desired.
4. Click Ok.
5. Click Exit.
Write off Account
Your center administrator may have chosen to restrict the ability to enter write offs to only users
with system administrator security access.
1. Navigate to the billing file screen by:
o On the calendar screen, right click on the appointment and click Billing File, or
o On the clients tab of group appointments, click the desired client and click Billing File, or
o Search for the desired client, and click the Billing File icon on the menu bar, or
o From the calendar screen, click Open > Billing File, and click Find to search for the client.
(Note: You can work with multiple client accounts by clicking Find Clients, setting the filters
and clicking Search. Click Ok to view the accounts of all clients who match the search criteria.)
2. Click the Write Off icon on the menu bar.
3. Click Write Off Client Balance button.
4. Click Ok.
5. Click Ok.
6. Click Exit.
Document a Refund
1. Navigate to the billing file screen by:
o On the calendar screen, right click on the appointment and click Billing File, or
o On the clients tab of group appointments, click the desired client and click Billing File, or
o Search for the desired client, and click the Billing File icon on the menu bar, or
o From the calendar screen, click Open > Billing File, and click Find to search for the client.

Billing 25
© 2024 Titanium Software
(Note: You can work with multiple client accounts by clicking Find Clients, setting the filters
and clicking Search. Click Ok to view the accounts of all clients who match the search criteria.)
2. Click the Invoices tab.
3. Double click to open the invoice with the payment to be refunded.
4. Click Edit on the menu bar.
5. Enter a charge in the amount of the refund:
o Choose the billing code created by your system administrator for use to document refunds
o Enter a description, if desired
o Edit the amount to the amount to be refunded.
6. Click Save.
7. Click Exit.
2.7 Print Account Records
Titanium allows users to print invoices, statements or account transactions shown in the billing
file, for single clients or in bulk. Some invoice and statement information is created by the center
administrator.
What would you like to do?
o Print client invoice/statement/account transactions
o Print bulk invoices
o Print bulk statements
o Print bulk account transactions
Print Client Invoice/Statement/Account Transactions
This process uses the billing file screen. Individual invoices and client statements can also be
printed from the invoice screen, by using the icons on the menu bar.
1. Navigate to the billing file screen by:
26
© 2024 Titanium Software
o From the calendar screen, click Open > Billing File, and click Find to search for the client.
(Note: You can work with multiple client accounts by clicking Find Clients, setting the filters
and clicking Search. Click Ok to view the accounts of all clients who match the search criteria.)
or
o Search for the desired client, and click the Billing File icon on the menu bar.
2. Use the filters to limit the transactions shown by date, status or insurance claim. Use the
collapse/expand all controls in the upper right corner to hide or show transactions.
3. Click the Print icon on the menu bar and choose to print invoices, statements or the view
displayed on the screen.
o The invoices printed will include transactions selected on the Record of Account tab.
o Use the filters on the statement window to select the desired time frame, and click Print.
o Use the printer icon on the report viewer window to print or export the report.
Print Bulk Invoices
1. From the schedule screen, click the Reports icon.
2. Click Print Invoices.
3. Use the filter to set the desired date range when invoices were created.
4. Click Print. (Note: Click Preview and use the Export options to save the file to your computer.)
Print Bulk Statements
1. From the schedule screen, click the Reports icon.
2. Click Print Statements.
3. Use the filter to set the desired transaction date range.
4. Click Print. (Note: Click Preview and use the Export options to save the file to your computer.)
Print Bulk Account Transactions
1. From the schedule screen, click the Reports icon.

Billing 27
© 2024 Titanium Software
2. Click Billing File report.
3. Use the filters to select the desired content (transactions, transaction detail, list of invoices, list
of insurance claims) and date.
4. Click Select to search for clients. Set filters and click Search. Click Ok to use the clients in the
report.
5. Click Print. (Note: Click Preview and use the Export options to save the file to your computer.)

28
© 2024 Titanium Software
3 Client Import
This feature will import some client data from an external data source, like a university
registration system. It can be used to update existing clients or add new clients. The data
imported is chosen by your center administrator, and may include the information on the Contact
Information tab on the client screen, and a data form. There is an additional fee for this feature.
This feature is set up by your center administrator.
Update an Existing Client
1. Search for the client.
2. Click the Edit icon on the menu bar.
3. Click the Import icon on the menu bar.
4. Click OK on the warning message and to update the client's information.
5. Click OK to confirm that the client has been updated.
6. Click Save.
7. Click Exit.
Adding a New Client
1. From the calendar screen, click Open > Client.
2. Enter the unique identifying information required for the client import (most likely the student
ID number).
3. Hit the tab key. If a match is found in the external system, a green information message will
appear at the top of the search screen.
4. Click New Client.
5. Click Yes to add the client using the imported data. The client screen for the new client opens.
6. Complete your center's process for adding new clients. (Note: It is likely that the client's
information and form are not complete, and remaining data must be entered manually.)
Clients 29
© 2024 Titanium Software
4 Clients
Client information can be found on the client screen or in the client file. Depending on your user
permissions, you may be unable to view notes for clients who have not been assigned to you.
The client screen includes:
Contact Information tab: Full name, date of birth, Student ID number, contact methods.
Depending on how your center administrator has set up the system, you may also see other
identification numbers, preferred name, preferred pronoun, client photo, sex at birth and pull
down menus for whether it is okay to contact the client using those methods and tabs with free
text fields (i.e., comments, billing comments, etc.).
Medical Information tab: Depending on how your center administrator set up the system, you
may see the medical information tab which contains client pharmacies and allergies.
Disability tab: If your center administrator chooses, disabilities and accommodations are added
and removed on this tab. Non-confidential comments about the items can also be added to this
tab.
Client Security Tab: Security access level for the client and users assigned to the client.
Client Flags Tab: Your center administrator may choose to use flags to communicate
information at a glance. Flags are assigned, deactivated and removed on this tab. Flag colors,
descriptions, and behaviors are set by your center administrator. The Flags button appears on
the menu bar of several screens in Titanium (e.g., appointment, client file, client screen). If a
flag has been assigned for a client, the Flags button will be colored and a small flag icon will
appear throughout the program when the client's name is shown (e.g., My Clients list,
appointment screen/blocks, on search lists, etc.).
Menu Bar Icons
o Med Log: If your center administrator chooses to use the feature, click to access compiled
information from medication notes in the client's file.
o eRx: If your center has purchased electronic prescribing, users with sufficient permission can
click this icon to open the electronic prescribing portal.
o Client file: The client file contains appointment history and notes. Double click any item in
the client file to open it.
Entries for client allergies, medications, and disabilities / accommodations are shown at
the top of the client file. Calendar icons in the client file represent appointments. Yellow
notebook icons represent notes. Items that are contained within others are indented and
connected with a dotted line. For instance, diagnoses, medications, data forms and
attachments will always appear indented under notes because they are part of the note.
Notes may be indented under appointments if they are associated with the appointment.
Invoices may be indented under appointments, if they are associated with an

30
© 2024 Titanium Software
appointment.
o Billing File: The client billing file contains all charges and payments. If your center is using
Titanium to generate insurance claims, claim activity is also shown.
o Waitlist: If your center administrator chooses to use the feature, click to add entries for
clients on center waitlist(s)
o Demographics: Data form containing information about client background/characteristics
attached to a note in the client's file.
o Shortcuts: Drop down menu with shortcuts to one or more data forms chosen by your center
administrator.
o Client Insurance: If your center is using insurance billing, click to add insurance information,
and attach scanned copies of insurance cards.
4.1 Add/Edit/Delete Client
What would you like to do?
o Add a client
o Edit a client
o Terminate user assignment to a client
o Deactivate client
o Delete a client
Add a Client
1. Navigate to the Find/Add client screen by:
o Right click on the schedule to add an individual appointment.
o From the calendar screen, click Open > Clients
2. Enter the Student ID and press the tab key, or enter the full or partial last name and click Find.
3. If the client is not found, enter the last and first name, and click New Client.
4. Click Yes to confirm.
5. The client screen opens in a new window. Enter information required by your center. (Note: If
you are entering a client to make an appointment, you will most likely enter a contact method and

Clients 31
© 2024 Titanium Software
set that method as "Ok to Contact", and then edit the client after record the first appointment.
You may see a prompt to add yourself as an assigned user on the client security tab.
6. Click Save.
7. Click Exit.
Edit a Client
1. Navigate to client screen from:
o Any screen that has Client icon on the menu bar (e.g., appointment screen, My Clients list)
o From the calendar screen, click Open > Clients and search for the client
2. Click Edit on the menu bar on the client screen.
3. Add or change information as required. (Note: Use the termination or deactivation processes
to change user assignment to a client or the client status. Click here for information about
working with client photos.)
4. Click Save.
5. Click Exit.
Terminate User Assignment to a Client
Your center administrator may have chosen to use the Titanium termination feature. The
termination feature creates a work flow process of tasks, notes and prompts to end a user's
assignment to a client, and allow the user to document the change in user assignment in the client
file. Terminating user assignment to the client may not necessarily mean that treatment in the
center is being terminated. For instance, the user may be leaving the center, or intake may be
done by a user who doesn't provide ongoing service. In both of these examples, the user no
longer needs to be actively assigned to the client so the user assignment is terminated.
Click here if your center is not using the termination feature. If your center is using this feature,
follow the steps below to terminate user assignment to a client.
1. Double click the termination task on your task list. (Note: If you create a note using the note
type designated by your center administrator for termination notes, you will see prompts to guide
you through the process.)
2. Click Yes on the pop-up box to remove the user assignment to the client. If you click No, the
task will remain on your task list.

32
© 2024 Titanium Software
3. Handle termination note creation:
o If your center administrator requires a termination note, click Ok on the pop-up box to create
a note. Add the note as you normally would, including signing and locking the note. (Note:
The termination note type and any required data forms were selected by your center
administrator.)
o If a termination note is optional, click Yes on the pop-up box to create a termination note.
Add the note as you normally would, including signing and locking the note.
o If a termination note is optional and you do not want to create a note, click No to skip creating
a termination note.
4. Click Yes to confirm that the user assignment is being terminated. If you click No, the task will
remain on your task list.
5. Depending on the settings chosen by your center administrator, if all users have been
unassigned from the client, a pop up box will appear prompting you to deactivate the client. Click
Yes to change the client status to inactive. Click No to leave the client's status active.
6. Depending on the settings chosen by your center administrator, a pop up box will appear
prompting you to restrict access to the client file. Click Yes to restrict the client file to assigned
users. Click No to make no changes.
7. Handle deactivation note creation:
o Depending on the settings chosen by your center administrator, a pop up box will appear
prompting you to create a deactivation note.
o Click Yes on the pop-up box to create a deactivation note. Add the note as you normally
would, including signing and locking the note. (Note: The deactivation note type and any
required data forms were selected by your center administrator.)
o Click No to skip creating the deactivation note.
To terminate assignments to clients without the termination feature:
1. Search for the client.
2. Click the Edit icon on the menu bar on the client screen.
3. Click on the client security tab.
4. Click to uncheck the Active boxes for the desired users.
5. Click Save.
Clients 33
© 2024 Titanium Software
6. Click Exit.
7. Add a note to the client file as you normally would, if required by your center administrator.
Deactivate a Client
Your center administrator may have chosen to use the Titanium deactivation feature. The
deactivation feature creates a work flow of tasks, prompts and notes to deactivate the client, and
allow the user to document the deactivation in the client's file. Click here if your center is not
using the deactivation feature in Titanium. If your center is using this feature, follow the steps
below to deactivate a client.
1. Navigate to the client screen.
2. Click Edit on the menu bar.
3. Click the Client Security Tab. If users are assigned to the client, for each user:
o For each users, click uncheck the box in the Active column.
o Click Yes on the pop up box to terminate the user assignment to the client.
o Click Ok on the pop-up box.
o Handle creating a termination note.
If your center administrator requires a termination note, click Ok on the pop-up box to
create a note. Add the note as you normally would, including signing and locking the note.
(Note: The termination note type and any required data forms were selected by your
center administrator.)
If a termination note is optional, click Yes on the pop-up box to create a termination note.
Add the note as you normally would, including signing and locking the note.
If a termination note is optional and you do not want to create a note, click No to skip
creating a termination note.
o Repeat for all remaining users.
4. If no users are actively assigned to the client, click to uncheck the Active box on the Contact
Information tab.
5. Click Yes to deactivate the client.
6. Depending on the settings chosen by your center administrator, a pop up box will appear
prompting you to restrict access to the client file. Click Yes to restrict the client file to assigned
users. Click No to make no changes.
7. Depending on the settings chosen by your center administrator, a pop up box will appear

34
© 2024 Titanium Software
prompting you to create a deactivation note. Click Yes on the pop-up box to create a deactivation
note. Click No to skip writing the deactivation note.
8. Add the note as you normally would, including signing and locking the note. (Note: The
deactivation note type and any required data forms were selected by your center administrator.
If you create a note using the note type designated by your center administrator for deactivation
notes, you will see prompts to guide you through the deactivation process.)
To deactivate clients without the termination feature:
1. Search for the client.
2. Click the Edit icon on the menu bar on the client screen.
3. Click in the Active box.
4. Click Save.
5. Click Exit.
6. Add a note to the client file as your normally would, if required by your center administrator.
Delete a Client
You can delete a client if you have sufficient permission. It is recommended that clients be
deactivated instead of deleted in order to retain a record.
To delete a client:
1. Navigate to the client screen from:
o Any screen that has the Client icon on the menu bar (e.g., appointment screen, My Clients
list)
o From the calendar screen, click Open > Clients and search for the client
2. Click Delete on the menu bar on the client screen.
3. If prompted, type the message "DELETE ALL DATA FOR THIS CLIENT" and click Ok.
4. Click Yes to confirm.

Clients 35
© 2024 Titanium Software
4.2 Add/Edit/Delete Client Photo
Your center administrator may choose to activate the client photo feature. If this feature is active,
users can add, edit or delete a photo on the Contact Information tab of the client screen.
Some institutions that use the Client Import feature may be able to import client photos along
with other client data. You should check with your center administrator to determine whether
client photos will be added via client import or manually.
What would you like to do?
o Add a photo
o Edit a photo
o Delete a photo
Add a Photo
1. Place the client photo on your computer or in a shared folder. The photo must meet the
following minimum criteria:
o Format: .jpg, .jpeg, .png, .gif, .wmf, .emf
o At least 78 x 77 pixels (Note: If the photo is larger than 1024 x 768, it will be automatically
resized to 1024 x 768.)
2. Navigate to the Contact Information tab of the client's screen.
3. Click Edit on the menu bar.
4. To add the photo either:
o Click and drag the client photo onto the photo place holder square at the right side of the
Contact Information tab. (Note: If you hover your mouse over the photo, a pop-up window will
appear showing a larger version of the photo.)
o Click in the photo box to open the photo window. Click Open Image on the menu bar, and use
the Windows interface to locate and select the photo. Click Open. Click Ok.
5. Click Save.
6. Click Exit.

36
© 2024 Titanium Software
Edit a Photo
1. Navigate to the Contact Information tab of the client's screen.
2. Click Edit on the menu bar.
3. Click the photo place holder square.
4. Edit by:
o Crop: Click and drag on the photo with your mouse to select a rectangular area to be displayed
on the Contact Information tab. (Note: If the area you drew is incorrect, click Clear Selection on
the menu bar and repeat this step.)
o Rotate: Click the Rotate Left or Rotate Right icons on the menu bar.
o To replace: Click Open Image on the menu bar, and use the Windows interface to locate and
select the photo. Click Open.
5. When finished editing, click Ok.
7. Click Save.
8. Click Exit.
Delete a Photo
1. Navigate to the Contact Information tab of the client's screen.
2. Click Edit on the menu bar.
3. Right click on the client photo.
4. Click Clear Image.
5. Click Save.
6. Click Exit.

Clients 37
© 2024 Titanium Software
4.3 Add/Edit/Remove Flags
Your center administrator may choose to use flags to communicate vital client information at a
glance. Flag descriptions, and behaviors are set by your center's administrator. Flags set as
"critical" by your center administrator will show as white flag on a red background throughout the
program. Other flags will show as white flag on a green background.
The Flags button appears on the menu bar of several screens in Titanium (e.g., appointment,
client file, client screen). If a flag has been assigned for a client, the Flags button will be colored
and a small flag icon will appear throughout the program when the client's name is shown (e.g.,
My Clients list, appointment screen/blocks, on search lists, etc.). You can hover your mouse over
the flag icons to read the flag descriptions.
What would you like to do?
o Add a flag
o Edit a flag
o Remove a flag
Add a Flag
1. Click the Flags button on the menu bar on any screen on which it appears.
2. Click Manage Flags. The client screen will open with the Client Flags tab selected.
3. Click Add.
4. On the Add Client Flag pop-up window, use the pull down menu to select the desired flag, and
enter a description if desired.
5. Click OK.
6. Click Save.
7. Click Exit.
Edit a Flag
1. Click the Flags button on the menu bar on any screen on which it appears.
2. Click Manage Flags. The client screen will open with the Client Flags tab selected.
3. Click on the desired flag.

38
© 2024 Titanium Software
4. Click View/Edit.
5. Make desired changes, and click OK.
Remove a Flag
Deleting flags will remove them from Titanium and they will not be available for reporting
purposes. Unless the flag was entered in error, it is recommended that flags be deactivated when
no longer applicable.
1. Click the Flags button on the menu bar on any screen on which it appears.
2. Click Manage Flags. The client screen will open with the Client Flags tab selected.
3. Click on the desired flag.
4. To deactivate the flag, click Deactivate. Enter the reason and click OK.
5. To delete the flag, click Delete.
6. Click Yes.
4.4 Add/Edit Demographics
Demographic information for clients is recorded on a data form which is attached to a note in the
client's file. The data form was created or chosen by your center's administrator. The instructions
on this page are for use of the demographics icon on the menu bar on the client screen. If your
center administrator has not enabled the icon, you can work with the data form by manually
attaching it to a note in the client file.
What would you like to do?
o Add a new demographics form
o Edit a demographics form
Add a New Demographics Form
1. Search for the desired client.
2. Click the Demographics icon on the menu bar on the client screen.

Clients 39
© 2024 Titanium Software
3. To copy and edit a prior form, click Copy (latest date) demographics to new. To add a new
demographics form from scratch, click Add new.
4. Enter (or edit) required information.
5. Click Save.
6. Click Exit.
Edit a Demographics Form
If your center has clients complete paperwork via the online web component or uses the client
import feature, some or all of the demographics data form may be completed using these tools. If
some data has already been entered, you may be able to edit the demographics form if the form
and note have not been locked.
1. Search for the desired client.
2. Click the Demographics icon on the menu bar on the client screen.
4. Click Open Latest.
5. Click Edit.
6. Make desired changes.
7. Click Save.
8. Click Exit.
4.5 Disabled Clients
Your center administrator may choose to activate the disability tab for clients. On the disability
tab, users can track disabilities and accommodations using the lists created by your center
administrator. If your center has a third-party document creation/editing software like Microsoft
Word, you might be able to create bulk accommodation letters for your clients by exporting this
data.
What would you like to do?
o Add Disabilities/Accommodations
o Delete Disabilities/Accommodations

40
© 2024 Titanium Software
o Create Accommodation Letters
Add Disabilities/Accommodations
1. Navigate to client screen from:
o Any screen that has the Client icon on the menu bar (e.g., appointment screen, My Clients
list)
o From the calendar screen, click Open > Clients and search for the client
2. Click Edit on the menu bar on the client screen.
3. Click the Disability tab.
4. Click in the text boxes to record the name and email address of the client's advisor, if desired.
5. Click the Add button next to either the disabilities or accommodations section.
6. Use the pull down menus to select the desired disability/accommodation. (Note: These lists
were created by your center administrator.)
7. For disabilities, select the desired status from the pull down menu.
8. For accommodations, click to enter the effective and expires dates for the accommodation.
9. Click in the text box to add a brief comment or description regarding the disability/
accommodation. (Note: Do not enter confidential information in these fields. The information
on this tab is viewable by all users.)
10. Repeat steps 5-9 to add additional disabilities/accommodations as desired.
11. Click Save.
12. Click Exit.
Delete Disabilities/Accommodations
1. Navigate to client screen from:
o Any screen that has Client icon on the menu bar (e.g., appointment screen, My Clients list)
o From the calendar screen, click Open > Clients and search for the client
2. Click Edit on the menu bar on the client screen.
3. Click the Disability tab.

Clients 41
© 2024 Titanium Software
4. Click on the desired disability or accommodation.
5. Click the Delete button.
6. Repeat Steps 4-5 as desired.
7. Click Save.
8. Click Exit.
Create Accommodation Letters
This process is recommended for centers that need to create accommodation letters for multiple
clients at the same time. You can use Titanium's form letter process to create accommodation
letters for one client at a time.
The process detailed here requires the use of Microsoft Excel and Word, third-party software, but
other software might be used. You will be unable to follow this process unless your center
administrator has given you sufficient permission to export raw data from Titanium.
1. From the schedule screen, click Reports on the menu bar.
2. Click Export Data.
3. For data to export, use the pull down menu to choose Client Accommodations.
4. Choose the date range. (Note: This is the date when the accommodation was marked as
effective on the disability tab in the client screen.)
5. Click the check boxes to include client identifying information.
6. Use the pull down menu to choose .csv as the Export Data type.
7. Use the windows interface to save the .csv file on your computer.
8. Open the .csv file to review/change the names of the column headers.
9. Create the accommodation letter as a Word template, using the desired column headers as
data fields. (Note: Titanium Support cannot provide assistance with Word or Excel. You should
use the Help in Word for more information about Steps 8-11. (https://support.microsoft.com/en-
us/kb/294683)
10. Use the mail merge function in Word, by choosing the .csv file as the data source for the
merge.
11. Save the new Word file containing the accommodation letters.
42
© 2024 Titanium Software
12. Distribute accommodation letters as desired.
4.6 Add Form to Client File
You can add data forms created or approved by your center administrator (e.g., intake,
assessment, survey) or scanned hard copy documents or electronic files to a client's file as part of
a note.
What would you like to do?
o Add a data form to a client file
o Add a hard copy document to a client file
o Print data form for client
Add a Data Form
Depending on your center's settings, you can click the Demographics or Shortcuts icons on the
menu bar on the client screen to choose data forms to be added to the client file, including
copying and updating a prior form. Complete the form, and click Save and Exit. If the forms that
you want are not available from the icons, follow the steps below:
1. Add a note as you normally would.
2. Click the Data Forms icon on the note menu bar.
3. Click the desired form from the list. (Note: If your center administrator has grouped data
forms into categories, hover over the category name to view and click data forms in that category.)
4. Complete the data form.
o Enter the desired information on the form.
o Update prior data form:
Click Copy on the menu bar.
Hover over "Copy Data From Previously Entered Data Form." (Note: Data entered on one
form cannot be copied to a different form, only to a new instance of the same data form.)
Click to select the prior version.
Edit the desired information on the new data form.

Clients 43
© 2024 Titanium Software
5. Click Save. (Note: if your center is using an optional scored data form, the scoring will be
added when you save the completed form. If your center is using the Pearson Assessments, an
interpretive report in .pdf format will also be attached to the note when the form has been
saved.)
6. Click Exit.
7. Complete the note as you normally would.
(If your center uses CCAPS data forms, you should consult the CCAPS manuals available from the
Help menu in Titanium or from CCMH for more information.)
Add Hard Copy Document
Documents cannot be directly scanned into a client's file. Because documents cannot be scanned
to a client's file, there are no specifications or recommendations regarding the type of scanner
used. Any file type can be attached to notes in Titanium, including emails, text files, and .pdfs.
To add scanned documents to a client file, first scan the documents and save in a location on your
computer or shared folder. Then follow the steps below.
1. Add a note as you normally would.
2. Click the Attach icon on the note menu bar.
3. Click Attach a File.
4. Use the Windows interface on your computer to locate the file(s) to be attached. (Note: File
size is limited to 16 mb.)
5. Click the file(s) to select, and click Open.
6. Use the pull down menu to select a description, or type in a description of the file. (Note: If
multiple files have been selected, then no description box will be displayed. To add descriptions,
complete Step 7, click on the Attach icon, hover over the desired attachment and click Edit
Description.)
7. Click Close to return to the note.
8. Complete the note as you normally would.
9. Delete the files from your computer. (Note: Files are stored in the secure Titanium database
after being attached to the note, and do not need to be stored in a separate location. Depending
on the settings chosen by your center administrator, files may automatically be moved from one
system file to another when they are attached to notes. If files seem to disappear after this
process, consult with your center administrator regarding system settings.)

44
© 2024 Titanium Software
Print Data Form for Client
Centers that do not use the web component might want to print a data form for a client to
complete manually. Then the client's answers can be added to the client file by transcribing their
answers, or scanning and attaching to a note. A form printed using this process will have the
client's name at the top, so it should be used only for that client. Contact your center
administrator for assistance in printing blank data forms that do not have a client name.
Printing blank forms requires a third party program which can be used to manipulate images.
Instructions are given here for use of Adobe Acrobat and MS Excel.
1. Add a note as you normally would.
2. Click the Data Forms icon on the note menu bar.
3. Click the desired form from the list available for your use.
4. Click the Copy icon for the pull down menu.
5. Choose Copy screen capture of data form to clipboard.
6. Click Save and Exit. (Note: If there are required questions on the data form, you will not be
allowed to save the blank form. Instead, click Cancel to leave the screen without saving the form
and click Yes on the pop up box to confirm.)
7. To save the note to enter the data form later, click Save and Exit. (To leave the screen without
saving the note, click Cancel, and click Yes on the pop-up box to confirm.)
8. To use Adobe Acrobat:
o Open Acrobat.
o Click File > Create > PDF from Clipboard
o Click File > Print
o Look at the print preview to ensure that multiple pages are shown. If not, under Page
Sizing and Handling, click Poster.
o Click Print.
9. To use Microsoft Excel:
o Open a blank workbook in Excel.
o Right click on cell A1, and choose Paste.
o Click Page Layout > Margins, and choose Narrow
o Click View ribbon > Page Layout

Clients 45
© 2024 Titanium Software
o If the image is too wide, scroll down to find a circle control. Click and drag to the left to
resize to a single page.
o Click File > Print, and click Print.
4.7 Email Clients
1. Navigate to a screen with an Email All icon on the menu bar (e.g. My Clients, Advanced Client
Search, clients tab of a group appointment screen, etc.).
2. If necessary, use the function on that screen to search for the desired clients.
3. Click the Email All icon.
4. On the pop-up screen, you will see information about the client's email address/preferences.
o Click Yes to open a new message in your email program and copy client email addresses to the
bcc field (Note: If you are emailing more than 100 clients, this may not be successful and you
should choose No and follow the instructions below.)
o Click No to copy the client email addresses to your computer's clipboard
o Click Cancel to stop the email function (i.e., to edit client screens with email addresses/
preferences)
5. If you clicked No on the information message:
o Open your email program.
o Open a new email message.
6. Use your email program as you normally would to create and send the email message.
Click here for instructions to send appointment reminders via email.
4.8 Text Clients
Your center may have purchased the ability to send SMS text messages to clients. Each text will
incur a charge. To view your credit balance, from the calendar screen, click Open > Client
Appointment Reminders. The remaining balance is in the lower left corner. Your center
administrator should visit our website to add credit to the SMS text account. If a center exceeds

46
© 2024 Titanium Software
its credit, they will not be allowed to send SMS text messages.
Clients can stop receiving text messages by replying STOP, UNSUBSCRIBE, CANCEL OR QUIT.
Clients can resume receiving text messages by replying START or YES. Client responses do not
affect any "ok to contact" settings on the client contact tab of the client screen. The center will
not be notified of these changes. Replies sent to text messages will not be received by the
center.
Click here for instructions to send appointment reminders via text.
Text a Group of Clients
1. From the calendar screen, click Open > Advanced Client Search. (Note: If you do not have
sufficient permission, you will be unable to use this feature.)
2. Choose Client Fields, and check "Exclude non-SMS-able."
3. Choose other desired filters (e.g. appointment dates, attendance status)
4. Click Search on the menu bar.
5. Click arrow next to SMS (Text) All on the menu bar.
6. Choose the desired message from the list created by your center administrator.
7. Click Yes.
8. Click Ok on the confirmation message.
4.9 Review Client File
The client file contains appointments and notes. Entries for client allergies, MedLog, diagnoses,
disabilities and invoices will be shown at the top of the client file, if they have been activated by
your center administrator. If your center is not using these features, these entries will not be
displayed. The remainder of the file will be entries for appointments and notes. The diagnoses,
medications, data forms and attachments that are part of the note will be displayed as icons
associated with the note.
Items placed in the wrong client file cannot be moved. They must be manually recreated in the
correct client file.
If you are not assigned to a client, you may not have rights to view the client's file, or may view

Clients 47
© 2024 Titanium Software
only limited content.
What would you like to do?
o Open a Client's File
o Search for Items in a Client's File
o Print a Client's File
o Export an Electronic Copy of a Client's File
Open a Client's File
1. Right click on an appointment for the desired client, and choose client file from the menu, or
2. From your My Clients list, click to select the desired client and click the Client File icon on the
menu bar, or
3. Search for the client. Open the client screen and click on the Client File icon on the menu bar.
Search for Items in a Client's File
1. To expand or collapse an entry, click the plus and or minus sign to the left of it.
2. To expand or collapse all entries, click the Expand All and Collapse All buttons.
3. To search for specific types of entries, choose them from the Filter pull down menu.
Print a Client's File
1. Open a client's file.
2. Click the Print icon on the menu bar.
3. Use the check boxes and pull down menus to select the items to be printed.
4. Click Print.
(Note: There are no print set up options for client files. To print with your institution or center
logo, use pre-printed letterhead paper.)

48
© 2024 Titanium Software
Export Electronic Copy of Client's File
To respond to a client's request to receive their records in electronic format, users can export the
client file in several formats.
1. Open a client's file.
2. To export the file in Word, Excel or .pdf format.
o Click the Print icon on the menu bar.
o Use the check boxes and pull down menus to select the items to be printed.
o Click Preview.
o On the report viewer window, click Export and choose the desired format.
o Click Ok on the messages.
o Use the Windows interface to save the files.
3. To export the file in machine readable format:
(Note: This can only be done by users with system administrator or provider 1 security level. The
export is limited to appointments, note type /author / date, allergies, diagnoses, medlog entries
and data form responses.)
o Click Data Extract on the menu bar.
o Click Yes to confirm the export.
o Click Ok.
o User the Windows interface to choose the desired location to export the data. Click Select
Folder.
o Click Ok on the export message.

Clients 49
© 2024 Titanium Software
4.10 Search for Clients
My Clients list
1. On the calendar screen, click Open > My Clients
2. If you have permission as a supervisor, use the pull down menu to change the user to see
o Clients assigned to other users
o Clients assigned to your trainees
Single Client Search
1. From the calendar screen, click Open > Clients
2. Enter the Student ID and press the tab key, or enter the full or partial last name, or email or
phone number and click Find.
3. If required, double click on the client from the search results list. (Note: If you right click on an
entry, it will open. When you click Exit, you will be returned to the search screen.)
Multiple Clients: Advanced Client Search feature
1. From the calendar screen, click Open > Advanced Client Search.
2. Set the search filters (e.g., users, appointment types, attendance, dates, client flags, data
forms, invoices, disabilities, accommodations, etc.)
3. Click Search.
4. Click a client in the search results, and click the Client or Client File icons to see their
information.
4.11 Form Letters
Titanium allows users to populate selected fields in a Word template using the data from the
client record. You can only generate one form letter at a time, for one client at a time. You must
have Word installed on your computer. Click here for instructions on how to create multiple
letters at the same time.
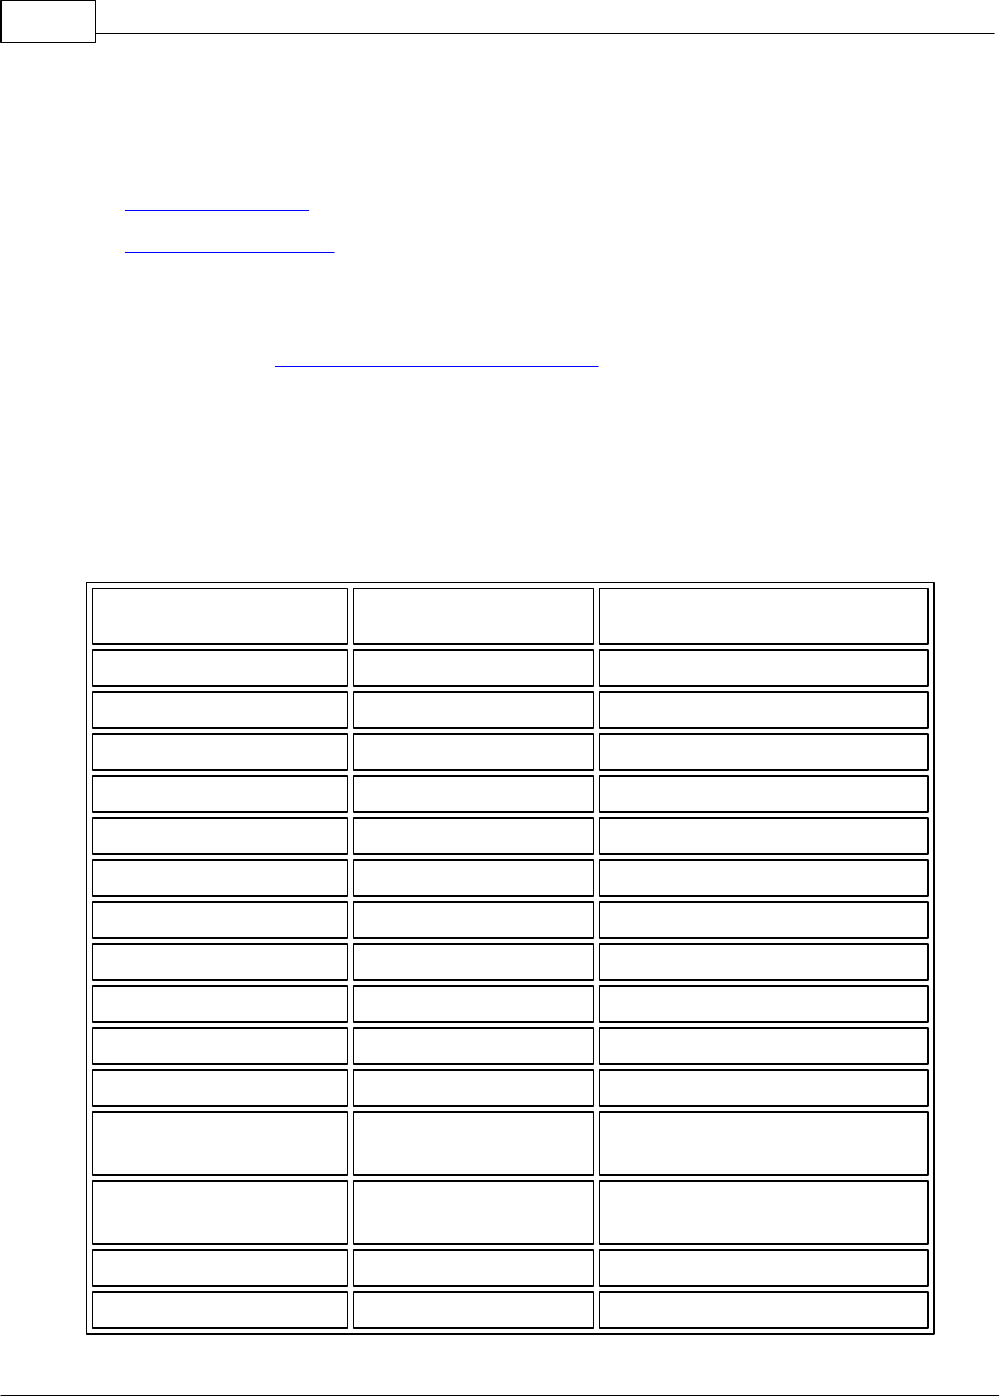
50
© 2024 Titanium Software
What would you like to do?
o Create a form letter
o Generate a form letter
Create a Form Letter
(Note: Click here to create bulk accommodation letters for clients with disabilities.)
1. Open Word.
2. Use Word to create a form letter. (Note: If you need assistance, click Help inside Word and
search for mail merge or form fields. To use fields multiple times in the same template, navigate
to Insert > Field > Quick Parts > ‘Ref’. This will list all of the bookmarks available for this
reference.) The following Titanium fields are available for use:
Description
Field Name
Example
Student ID
R_STUDENTID
JC123
File Number
R_FILENO
FNJC123
Date of Birth
R_DOB
01/01/1998
Age
R_AGE
20
First Name
R_FNAME
Joseph
Middle Name
R_MNAME
D
Last Name
R_LNAME
Client
First and Last Name
R_FULLNAME
Joseph Client
Last Name, First Name
R_LASTFIRST
Client, Joseph
Phone 1
R_PHONE1
7135551212
Phone 2
R_PHONE2
4095551212
Address 1
R_ADDRESS1
5678 University Drive Apt. 23
Collegetown, TX 77999
Address 2
R_ADDRESS2
123 Parent's House Lane
Hometown, TX 77555
Registration Date
R_REGDATE
08/31/2019
Status
R_STATUS
Enrolled
Clients 51
© 2024 Titanium Software
Comment
R_COMMENT1
Free Text
User defined Comment 1
R_COMMENT2
Free Text
User defined Comment 2
R_COMMENT3
Free Text
User defined Comment 3
R_COMMENT4
Free Text
Accommodations
R_ACCOMMODATIONS
30 minutes extra test time (all
accommodations will be listed,
separated by a comma)
3. Save the template.
4. In Titanium, navigate to Open > Form Letters.
5. Click Manage Form Letters.
6. Click Import and use the Windows interface to select the form letter.
7. Click Save and Exit.
Generate a Form Letter
1. In Titanium, click Open and Form Letters.
2. Use the pull down menu to select the desired form letter.
3. Click Select Client.
4. Use the Find/Add screen to locate and select the desired client.
5. Click Load Form and Client. (Note: Word will automatically open the completed form letter.)
6. Click Exit on the form letter menu bar.
7. Use Word to finish desired actions like printing or saving the form letter.

52
© 2024 Titanium Software
5 My Clients List
The My Clients list provides the user with a personal list of clients to whom they are assigned. To
open your My Clients list, from the calendar screen, click Open > My Clients.
If a user is listed on the security tab of the client record, then the client will be shown on that
user's My Clients list. By default, only active clients are displayed. Additionally, the list shows
only clients for whom the user is actively assigned. If you have been given permission as a
supervisor, you can view another user's My Clients list by selecting their name from the pull down
menu.
The screen also provides appointment statistics for your clients, which can be hidden by
unchecking the Statistics box in the upper, right corner of the screen. To filter the list to view
clients who have attended a certain type of appointment, select the appointment code from the
pull down menu and set the attended appointments to a number greater than 0. Right click on the
column headers for options to sort, rearrange columns, choose columns or save/export the table.
You can click to select a client, and then use the menu bar icons to navigate to the client's record
or file. You also have the option to email all clients from the list who have email addresses
entered and for whom email is set as "ok to contact."
If a check mark appears in the Active column, it means that the user appears on the Security tab of
the client record with a check mark. Usually this means that the user is providing services to the
client. If no check mark appears in the active column, then the user is still shown on the client's
Security tab, but there is no check mark. This means that the user is inactively assigned. Usually
this means that the user previously provided services but is no longer doing so. If you click the
"terminate" button for a client and click Ok, then your active assignment to the user is changed to
inactive. If your center administrator has activated the termination features, you may be
prompted to write notes.
To locate specific groups of clients, use the following filter settings:
Clients who are active but not assigned to any user:
Show clients for: All
Include clients that are: Active
Include clients with users that are: Not assigned
All active clients:
Show clients for: All
Include clients that are: Active
Include clients with users that are: Actively assigned, inactively assigned, not assigned
All clients:
Show clients for: All

My Clients List 53
© 2024 Titanium Software
Include clients that are: Active, inactive
Include clients with users that are: Actively assigned, inactively assigned, not assigned

54
© 2024 Titanium Software
6 Electronic Prescribing
Electronic prescribing is an optional feature which may have been purchased by your center. This
feature is available to clients in the United States only. It allows prescribers to access a third party
portal in which prescriptions can be written and reviewed. Limited client information is
transferred into the portal from Titanium (client name, date of birth, sex, address).
You should ask your center administrator whether you have rights as a transcriber or a prescriber.
Set Up Prescribing
Prescribers will use one of their own cell phones for two factor authentication.
1. On a computer, click the link in the email from Change Healthcare inviting you to set up an
identity verification account with ID.me. (Note: If you never received the email, contact
Titanium Support for the link.)
2. Click to sign up for a new account. (Note: If you already have an ID.me account, click to sign in
with your existing credentials. If you already have a medical card in your ID.me wallet, you will
see a Congratulations message. If not, skip to Step 9 below.)
3. Open your email, and click on the link in the email to verify your account. Then close the email
tab on your browser.
4. Click to select the ID.me authenticator and enter your phone number.
o Open your text messages and click the link in the new message.
o Click to download the app from Google Play or the Apple app store.
o When the app opens, click to Allow the authenticator notifications.
o Click the green check mark to approve the sign in.
o Close the app on your phone.
5. On the web browser, click Generate Recovery Code. Write down and store the code, and click
the I Have Copied the recovery code button on your browser. (Note: The recovery code will allow
you to log into your account if your phone is lost or stolen, or your switch to a new phone. You
will be unable to get back into your account without it.)
6. On the verification screen, click to use your driver's license or other state ID, or your passport.
o Click Take Picture with My Phone.
o Enter your phone number and click Continue.
o Open your text messages and click the link in the new message. A new app opens on your
phone.
o Position your ID horizontally on a dark, non-reflective surface. Tap I'm Ready to Take a Photo.
o Tap Take a Photo of the Front. Position your phone directly over your ID and click on your

Electronic Prescribing 55
© 2024 Titanium Software
phone's picture app to take the photo.
o Tap Continue with this photo, and tap Take Photo of Back.
o Turn over your ID and take the photo.
o Tap the Look Good button.
o Close the phone app.
7. On your web browser, you should see confirmation of your photo upload. Fill in any missing
personal information and click Continue.
8. Enter your phone number and click Continue. Then check the box next to the "I Attest"
statement and click Continue. (Note: You may be prompted to enter your Social Security number
as part of the verification.)
9. Click Begin on the Medical ID verification. Enter your NPI and DEA numbers and click Continue.
(Note: If you are using an institutional DEA number, check the box to switch to that format.)
10. Click Continue and wait until the verification is complete.
11. Click Allow. You should see a confirmation screen and receive an email. If your identity is not
verified, follow the online prompts to try again or set up a help session with ID.me.
(Note: Steps 12 - 20 are only required for providers who will be e-prescribing controlled
substances.)
12. Get your EPCS PIN number from your center administrator. (Note: This is NOT the PIN
number that you created on the Universal Identity website.)
13. In Titanium, navigate to Open > eRx.
14. On the portal window, click Admin > Account Management > Manage Caregiver.
15. Click the Approve button on the row with your name.
16. Enter the EPCS PIN number received from your center administrator.
17. If you chose to use a code generator, open the app on your phone and enter the one time
code into the website. If you chose to receive push notifications, click the Push button and tap
the notification to approve sign in on your phone.
18. Click Close on the confirmation message on the computer.
Manage Preference Lists
Lists of commonly used diagnoses, pharmacies and prescriptions can be created to simplify data
entry. Center administrators can create lists for the facility. Prescribers can create lists for their

56
© 2024 Titanium Software
own use. When a list has been created, it can be accessed by pull down menu or on the search
window for various fields on the prescription.
1. Click Open > eRx.
2. On the menu bar, click Admin > Preference Lists.
3. Choose the desired list.
4. Use the screen to search for items to add to the list, and enter preference.
5. Click Select to add to the list. Click an item and click Remove to remove it from the list.
6.1 Add Prescriptions
What would you like to do?
o Document medicine that a client reports taking
o Document a medicine that I'm prescribing
o Prepare prescription to be issued
Document a Medicine that a Client Reports Taking
1. Navigate to the eRx portal by:
o Right click on an individual appointment, and click Client Medical, or
o From the client screen or client file, click eRx on the menu bar, or
o Click Open > eRx, click Find Patient on the menu bar, and search for the client (Note:
Electronic prescribing does not support special characters or punctuation marks in the name
field like tildes. If your client's name has special characters, those characters must be
removed to prescribe medications.)
(Note: You may see a message that some fields are required. If so, edit the field on the client
record, and then return to the eRx portal.)
2. Click the Rx History tab. (Note: The drop down menu defaults to active prescriptions. Click All
Prescriptions to see the client's history associated with Titanium users.)
3. Click External Drug History.
4. If the prescription(s) being reported by the patient are listed, click to select the prescriptions

Electronic Prescribing 57
© 2024 Titanium Software
and click Add Selected to History. If not, click Close. (Note: Only prescriptions paid for with
insurance plans will be shown.)
5. Click Reported Rx.
6. Add information for the prescription (e.g. date, drug, SIG, quantity, fill date, refills, pharmacy,
and prescriber etc.) (Note: The magnifying glass allows searching for items. The pull down
arrow allows access to the saved favorites list or recommended items, depending on the
field.)
7. Click Save to save the prescription to the patient history.
Document a Medicine that I'm Prescribing
1. Navigate to the eRx portal by:
o Right click on an individual appointment, and click Client Medical, or
o From the client screen or client file, click eRx on the menu bar, or
o Click Open > eRx, click Find Patient on the menu bar, and search for the client (Note:
Electronic prescribing does not support special characters or punctuation marks in the name
field like tildes. If your client's name has special characters, those characters must be
removed to prescribe medications.)
(Note: You may see a message that some fields are required. If so, edit the field on the client
record, and then return to the eRx portal.)
2. Click the Rx History tab. (Note: The drop down menu defaults to active prescriptions. Click All
Prescriptions to see the client's history associated with Titanium users.)
3. Click New Rx.
4. On the Benefit Plan, click the Select button next to the patient's insurance plan. Click Use None
if the patient does not have insurance or you aren't certain which option is correct.
5. Add information for the prescription (e.g. date, drug, SIG, quantity, fill date, refills, pharmacy,
and prescriber etc.) (Note: The magnifying glass allows searching for items. The pull down
arrow allows access to the saved favorites list or recommended items, depending on the
field.)
o Depending on the insurance plan, you may see a list of preferred medications, generics,
copays, and drug tiers. Select the desired medication, or click Keep Current Drug.
o Choices on "issue via" depend on your permission level. For controlled substances,
prescribers must be set up for EPCS to issue electronically. After clicking issue, users will
be prompted to enter the passphrase they created and either open the app on their cell

58
© 2024 Titanium Software
phone or enter a passcode from their phone app. (If you forget your passphrase, contact
your system administrator to ask that it be reset.)
o Depending on the patient history, DUR warnings may appear. Enter override reasons for
each warning and click "Accept & Return". Or click Close and issue a different medication.
6. Click Issue.
7. Click Exit to return to the eRx portal home screen.
Prepare a Prescription to be Issued
Transcribers can prepare prescriptions to be issued by prescribers.
1. Navigate to the eRx portal by:
o Right click on an individual appointment, and click Client Medical, or
o From the client screen or client file, click eRx on the menu bar, or
o Click Open > eRx, click Find Patient on the menu bar, and search for the client (Note:
Electronic prescribing does not support special characters or punctuation marks in the name
field like tildes. If your client's name has special characters, those characters must be
removed to prescribe medications.)
(Note: You may see a message that some fields are required. If so, edit the field on the client
record, and then return to the eRx portal.)
2. Click the Rx History tab. (Note: The drop down menu defaults to active prescriptions. Click All
Prescriptions to see the client's history associated with Titanium users.)
3. Click New Rx.
4. On the Benefit Plan, click the Select button next to the patient's insurance plan. Click Use None
if the patient does not have insurance or you aren't certain which option is correct.
5. Add information provided by the prescriber (e.g. date, drug, SIG, quantity, fill date, refills,
pharmacy, and prescriber etc.) (Note: The magnifying glass allows searching for items. The
pull down arrow allows access to the saved favorites list or recommended items, depending
on the field.)
6. Click Hold.
(Remaining steps are completed by a prescriber.)
7. From the Titanium schedule screen, click Open > eRx.

Electronic Prescribing 59
© 2024 Titanium Software
8. Click the underlined number next to New Rx(s) on the home screen of the portal.
9. Click to check the prescription.
10. Click Authorize.
11. If the prescription is for a controlled substance, enter your pass phrase and either the code
from the generator app or your phone, or tap the push notification on your phone to approve.
6.2 Edit Prescriptions
What would you like to do?
o Edit a prescription that has been placed on hold
o Edit a prescription that has been issued (renew)
o Void a prescription
o Cancel a prescription
o Discontinue a prescription
Edit a Hold Prescription
These steps will allow you to edit a prescription created by a transcriber and placed on hold to be
issued.
1. From the schedule screen, click Open > eRx.
2. Click the underlined number next to New Rx(s) on the home screen of the portal.
3. Click to check the prescription.
4. Click Details.
5. Edit the prescription, as desired.
6. Issue the prescription as you normally would.

60
© 2024 Titanium Software
Edit an Issued Prescription
Prescriptions that have been issued can be discontinued or voided. To change an issued
prescription, it must be renewed.
1. Navigate to the eRx portal by:
o Right click on an individual appointment, and click Client Medical, or
o From the client screen or client file, click eRx on the menu bar, or
o Click Open > eRx, click Find Patient on the menu bar, and search for the client
(Note: You may see a message that some fields are required. If so, edit the field on the client
record, and then return to the eRx portal.)
2. Click the Rx History tab. (Note: The drop down menu defaults to active prescriptions. Click All
Prescriptions to see the client's history associated with Titanium users.)
3. Click to select the desired prescription in the list.
4. Click Renew.
5. Make the desired changes.
6. Issue the prescription as you normally would.
Void
1. Navigate to the eRx portal by:
o Right click on an individual appointment, and click Client Medical, or
o From the client screen or client file, click eRx on the menu bar, or
o Click Open > eRx, click Find Patient on the menu bar, and search for the client
(Note: You may see a message that some fields are required. If so, edit the field on the client
record, and then return to the eRx portal.)
2. Click the Rx History tab. (Note: The drop down menu defaults to active prescriptions. Click All
Prescriptions to see the client's history associated with Titanium users.)
3. Click to select the desired prescription in the list.
4. Click the Void button.

Electronic Prescribing 61
© 2024 Titanium Software
5. Click Ok.
Cancel
1. Navigate to the eRx portal by:
o Right click on an individual appointment, and click Client Medical, or
o From the client screen or client file, click eRx on the menu bar, or
o Click Open > eRx, click Find Patient on the menu bar, and search for the client
(Note: You may see a message that some fields are required. If so, edit the field on the client
record, and then return to the eRx portal.)
2. Click the Rx History tab. (Note: The drop down menu defaults to active prescriptions. Click All
Prescriptions to see the client's history associated with Titanium users.)
3. Click to select the desired prescription in the list.
4. Click the Cancel button.
5. Click Ok.
Discontinue
1. Navigate to the eRx portal by:
o Right click on an individual appointment, and click Client Medical, or
o From the client screen or client file, click eRx on the menu bar, or
o Click Open > eRx, click Find Patient on the menu bar, and search for the client
(Note: You may see a message that some fields are required. If so, edit the field on the client
record, and then return to the eRx portal.)
2. Click the Rx History tab. (Note: The drop down menu defaults to active prescriptions. Click All
Prescriptions to see the client's history associated with Titanium users.)
3. Click to select the desired prescription in the list.
4. Click the Discontinue button.

62
© 2024 Titanium Software
5. Enter a reason.
6. Click Ok.
6.3 Refill Requests
If your center administrator set up electronic refill requests, prescribers can authorize requests in
the electronic prescribing portal. To authorize electronic requests from pharmacies:
1. From the schedule screen, click Open > eRx.
2. Click the underlined number next to Renewal Rx(s) on the home screen of the portal.
3. Click to check the desired prescription.
4. Click Match and search for the client. (Note: This will add the renewal to the client's RX
history.)
5. To edit the refill request, click Review and then edit the prescription.
5. Click Authorize. (Note: To deny, click the renewal request, click Deny and enter a reason.)
Notes 63
© 2024 Titanium Software
7 Notes
Notes are stored in the client file. Notes can be associated with appointments, but notes can be
also be unrelated to appointments. Non-client notes can be created to track interactions with and
information about individuals who are not clients of the center. There are three types of notes in
Titanium:
o General use notes: Normally used for file maintenance (e.g., add intake paperwork or forms
completed by clients to file), can be viewed by all users
o Progress notes: Confidential note that can only be created/viewed by users with sufficient
permissions. Used to document appointments, diagnoses, medications, or to add forms or
attachments to client files.
o Process/Psychotherapy: Confidential note that can only be created/viewed by users with
sufficient permissions. Used to document treatment process.
Your user and supervisor permission levels will affect the notes that you can create, sign, view
and edit.
Notes include the following sections:
o Narrative (free text area; information entered in the narrative is not searchable/reportable)
o Data forms (i.e., assessments, checklists, intake forms, etc. used to capture searchable/
reportable data)
o Attachments
o Depending on the settings chosen by your center administrator:
Diagnosis
Medication (document medications prescribed by a Titanium user or reported by clients)
o Signature (3 blocks that users can click to add their digital signature to the note)
Your center administrator has designated the notes required for various types of appointments,
and sections available for each type of note.

64
© 2024 Titanium Software
7.1 Add/Edit/Delete Note
What would you like to do?
o Add a note
o Edit an unlocked note
o Edit a locked note
o Delete a note
Add a Note
You do not have to complete notes all at once. Click Save and Exit to save changes to your note.
Open the note and click Edit to continue writing. Depending on the settings chosen by your
center administrator, Titanium will create note back ups periodically, and back ups can be
recovered in the event of system failure. (Note: Click here for the process to create termination
or deactivation notes, if your center is using this feature.)
1. To open a note:
o Double click the note task on your task list, or
o Right click on the appointment and click Client Note, or
o Click on the appointment to open it, and click the Client Note icon on the menu bar, or
o Open the client file, click the New Note icon on the menu bar, and click Yes to confirm that
you are creating a note not related to an appointment
2. On the Narrative tab, choose the note type from the pull down menu. (Note: Depending on
the settings chosen by your center administrator, the note type may default.)
3. Complete the note narrative.
o Date and time: If the note is associated with an appointment, the date and time of the
appointment will be entered. If not, then the date and time the note was created will be
entered. Use the controls to make desired changes. (Note: Your center administrator may
choose to not display note date and time.)
o Enter desired information in the text box on the Narrative tab.
o If desired, right click to choose to add one or more note templates. Note templates are
outlines or blocks of text created by your center's administrator. (Note: Your center
administrator may have chosen a default template which will appear in the narrative tab.)
o If desired, right click to open to full screen view, use the spell check function, or to use the
text editing features like copy and paste. (Note: Users can click Options on the Spell Check

Notes 65
© 2024 Titanium Software
tab to change the color used to indicate misspelled words. Titanium will retain the user
settings. This is useful for users who are red/green color blind.)
4. To review or copy/paste narrative text from prior notes:
o Click the Save icon on the menu bar.
o Click Navigate.
o Choose the desired note to review.
o Click and drag with your mouse to highlight the desired text and press Ctrl + C on your
keyboard
o Click Navigate to return to the current note.
o Click Edit on the menu bar.
o Click in the narrative text box, and press Ctrl + V on your keyboard (or right click and choose
Paste from the menu).
5. If desired, click the Diagnosis tab and add a diagnosis.
6. If desired, click the Data Form icon on the menu bar and add data form(s).
7. If desired, click the Attach icon on the menu bar and add attachments.
8. On the narrative tab, click the highest number available to you to sign the note. If you signed
on Line 3, click Yes to confirm that you want to lock the note. (Note: Your center administrator
may choose to require attachments, data forms, diagnoses or medical information as part of
specific note types. If you do not include the required elements, you will see a warning that the
required element must be added before the note can be signed.)
9. If you signed on Line 1 or 2, forward the note for review:
o If necessary, use the pull down menu to select the reviewer.
o If desired, add a Forward To message.
10. Click Save.
11. Click Exit.
Edit an Unlocked Note
Unlocked notes are either unsigned, or signed on Lines 1 or 2.
1. From the client file or appointment, open the note.

66
© 2024 Titanium Software
2. Click the Edit icon on the menu bar. (Note: If the note has been signed on Line 1 or 2, the user
who signed the note must click on the signature block to remove their signature before the note
can be edited.)
3. Make desired changes.
4. Sign the note as you normally would, including forwarding the note for signature.
Edit a Locked Note
Locked notes (signed on Line 3) cannot be changed by users, including information on the
narrative and diagnosis tabs, data forms, attachments, and medication tab (if being used).
However, addenda can be added to the narrative text.
1. From the client file or appointment, open the note.
2. Click the Edit icon on the menu bar.
3. Click the Addendum icon on the menu bar. (Note: The original signature information will be
added under the original narrative, and the addendum narrative box will appear below.)
4. Type the desired narrative in the addendum. The addendum text box has the same
functionality as the note narrative text box.
5. Sign the addendum in the same way that you sign notes, including forwarding for signature.
Delete a Note
Locked notes (signed on Line 3) cannot be deleted.
1. From the client file or appointment, open the unlocked note.
2. If the note has been signed on Line 1 or 2, the user who signed the note must click to remove
their signature.
3. Click the Delete icon on the menu bar.
4. Click Yes to confirm.
(Note: If a note has been signed and locked in error, consult with your center administrator for
assistance.)

Notes 67
© 2024 Titanium Software
7.2 Add Attachment to Other Appointment
Notes cannot be associated with "other" appointment types. Users can add attachments to
"other" appointments for documentation purposes (e.g. staff meeting agendas.)
To add an attachment to an other appointment:
1. Double click to open the appointment.
2. Click Edit on the menu bar.
3. Click the Attach icon on the menu bar.
4. Use the Windows interface on your computer to locate the file(s) to be attached and click
Open. (Note: File size is limited to 16 mb.)
5. Click the file(s) to select, and click Open.
6. Use the pull down menu to select a description, or type in a description of the file.
7. If multiple files have been selected, then no description box will be displayed. To add
descriptions, click on the Attach icon, hover over the desired attachment and click Edit
Description.
7.3 Group Notes
Group notes are created for group appointments and distributed to place copies in the files of the
clients associated with the group appointment. After a group note has been distributed to client
files, it cannot be edited but client-level addenda to the note narrative can be added.
What would you like to do?
o Add a group note
o Add a client note related to a group note
o Edit an unlocked, undistributed group note
o Edit a locked, undistributed group note
o Delete a group note

68
© 2024 Titanium Software
Add a group note
1. To open a note:
o Double click the note task on your task list, or
o Right click on the appointment and click Group Note, or
o Double click on the appointment to open it, and click the Group Note icon on the menu bar.
2. If it has not already been done, mark attendance for the appointment.
3. Create and sign the note as you normally would.
4. After the note has been signed on Line 3 and saved, click the Distribute icon on the group note
menu bar.
5. On the pop-up box, click a button to select the client files to which to distribute the group note.
6. Click OK to confirm.
Add a Client Note Related to a Group Note
1. Open the group note in the client's file by:
o Click on the clients tab in the group appointment screen, select the desired client and click
the Client Note button or
o Open the client's file and double click on the group note inside the client's file.
2. Click the Edit icon on the menu bar.
3. Click the Addendum icon on the menu bar.
4. Add an addendum to edit the note as you normally would.
Edit an Unlocked and Undistributed Group Note
Unlocked notes are either unsigned, or signed on Lines 1 or 2.
1. Open the note:
o Right click on the appointment and click Group Note, or
o Double click on the appointment to open it, and click the Group Note icon on the menu bar.

Notes 69
© 2024 Titanium Software
2. Click the Edit icon on the menu bar. (Note: If the note has been signed on Line 1 or 2, the user
who signed the note must click to remove their signature.)
3. Make desired changes.
4. Sign the note as you normally would, including forwarding it for signature.
Edit a Locked and Undistributed Group Note
Locked notes (signed on Line 3) cannot be changed, including information on the narrative tab,
data forms, and attachments. However, addenda can be added to the narrative text if the note
has not been distributed. If a note has been distributed, it cannot be edited at the group level,
but a related client-level note narrative addendum can be added.
1. Open the note:
o Right click on the appointment and click Group Note, or
o Double click on the appointment to open it, and click the Group Note icon on the menu bar.
2. Click the Edit icon on the menu bar. (Note: If the note has been signed on Line 1 or 2, the user
who signed the note must click to remove their signature.)
3. Click the Addendum icon on the menu bar. (Note: The original signature information will be
added under the original narrative, and the addendum narrative box will appear below.)
4. Type the desired narrative in the addendum. The addendum text box has the same
functionality as the note narrative text box.
5. Sign the addendum the same way that you sign notes, including forwarding for signature.
Delete a Group Note
Locked notes (signed on Line 3) and distributed group notes cannot be deleted.
1. Open the note:
o Right click on the appointment and click Group Note, or
o Double click on the appointment to open it, and click the Group Note icon on the menu bar.
2. Click the Delete icon on the menu bar. (Note: If the note has been signed on Line 1 or 2, the
user who signed the note must click to remove their signature.)
3. Click Yes to confirm.

70
© 2024 Titanium Software
(Note: If a note has been signed and locked in error, consult with your center administrator for
assistance.)
7.4 Supervisor Review
1. From the calendar screen, click Open > Task List.
2. Double click on the Review Note or Sign Note task on your task list to open the note.
3. Review the note.
4. If necessary, return the note for revision by:
o Select your supervisee's name in the Forward To drop down list.
o Enter desired text in the Forward To Note box.
o Click Save.
o Click Exit.
5. To sign the note, click on Line 3 and click Yes to confirm that the note will be locked.
6. Click Exit.
Depending on the settings chosen by your center administrator, it may be possible to forward
signed/locked notes in order to teach via example, or consultation between qualified providers.
7.5 Document Prescriptions
The MedLog feature allows users to create special notes to document prescriptions that clients
report that they are taking, or that Titanium users prescribe to them. A summary of the
medication notes is displayed on the MedLog window for the client.
If your center's administrator chooses to use the Medication Log (MedLog) feature, you will be
assigned rights to as a transcriber or a prescriber. The prescription information from medication
notes is summarized on the MedLog screen accessed via the MedLog icon on the menu bar of the
client screen or client file. From the MedLog screen, you can create new notes, and view notes
which were created to document medications.
This feature is set up by your center administrator.

Notes 71
© 2024 Titanium Software
(Note: The MedLog is not eprescribing. Click here for information about eprescribing.)
What would you like to do?
o Document medicine that a client reports taking
o Document a medicine (prescription/sample) that I'm prescribing
o Document a medicine that our psychiatrist (or doctor/nurse practitioner) is prescribing
Document a Medicine that a Client Reports Taking
1. Open a note:
o Click the note task on your task list, or
o Right click on the appointment and click Client Note, or
o Click on the appointment to open it, and click the Client Note icon on the menu bar, or
o Open the client file or client screen, click the MedLog icon on the menu bar, and click New
Medication Note icon on the menu bar
2. Choose a note type that includes the medication tab.
3. Click the medication tab for the note.
4. To note a newly reported medication:
o Click Add > Client Reported Medication.
o On the prescription pop-up window, add information about the prescription. (Note:
Consult with your center administrator if you need instructions (Sigs) or medications that
are not on the pre-populated lists.)
o Click OK.
5. To note that a prescription has been renewed:
o Click on the medication in the Active medications window.
o Click Renew > as Client Reported Medication.
o Make edits on the prescription pop-up window.
o Click OK.
6. To note that a prescription has been discontinued:
o Click on the medication in the Active medications window.
o Click Discontinue
o On the pop-up window, choose a reason and date.
o Click OK.
7. Add as many new reports, renewals and discontinues as desired.
72
© 2024 Titanium Software
8. When the medication tab is correct, complete the note as you normally would.
Document a Medicine that I'm Prescribing
1. Open a note:
o Click the note task on your task list, or
o Right click on the appointment and click Client Note, or
o Click on the appointment to open it, and click the Client Note icon on the menu bar, or
o Open the client file or client screen, click the MedLog icon on the menu bar, and click New
Medication Note icon on the menu bar
2. If required, choose a note type that includes the medication tab.
3. Click the medication tab for the note.
4. To note a new medication that is being prescribed:
o Click Add, and choose Sample Provided or Prescription
o On the prescription pop-up window, add information about the prescription. (Note:
Consult with your center administrator if you need instructions (Sigs) or medications that
are not on the pre-populated lists.)
o Click OK.
o Click OK on the acknowledgment.
5. To note that a prescription has been renewed:
o Click on the medication in the Active medications window.
o Click Renew > and choose As Sample Provided or As Prescription
o Make edits on the prescription pop-up window.
o Click OK.
o Click OK on the acknowledgment.
6. To note that a prescription has been discontinued:
o Click on the medication in the Active medications window.
o Click Discontinue.
o On the pop-up window, choose a reason and date.
o Click OK.
7. Add as many new medications, renewals and discontinues as desired.
8. When the medication tab is correct, complete the note as you normally would.

Notes 73
© 2024 Titanium Software
Document a Medicine that is Being Prescribed
This is the process for a transcriber to prepare and save a note for review and signature by a
prescriber.
1. Open the client screen or client file.
2. Click the MedLog icon on the menu bar.
3. Click the New Medication Note icon on the menu bar.
4. On the pop-up window:
o Click the Transcribe radio button
o Choose the prescriber from the pull down list.
o Enter a note in the text box.
o Click OK.
5. To note a new medication that is being prescribed:
o Click Add, and choose Sample Provided or Prescription
o On the prescription pop-up window, add information about the prescription. (Note:
Consult with your center administrator if you need instructions (Sigs) or medications that
are not on the pre-populated lists.)
o Click OK.
o Click OK on the acknowledgment.
6. To note that a prescription has been renewed:
o Click on the medication in the Active medications window.
o Click Renew > and choose As Sample Provided or As Prescription
o Make edits on the prescription pop-up window.
o Click OK.
o Click OK on the acknowledgment.
7. To note that a prescription has been discontinued:
o Click on the medication in the Active medications window.
o Click Discontinue.
o On the pop-up window, choose a reason and date.
o Click OK.
8. As instructed by the prescriber, complete the remainder of the note (narrative, diagnosis, data
forms, attachments). (Note: Multiple medications, renewals and discontinues can be

74
© 2024 Titanium Software
documented using a single note, including renewals and discontinued medications.)
9. Click Save.
10. Click Exit.
A task to review/sign the note is added to the prescriber's task list.
7.6 Make Diagnosis
Your center administrator will choose whether to use a diagnosis classification system (e.g. DSM-
5TR, or ICD-10 or ICD-11). Depending on how your center administrator has set up Titanium, you
may be able to select the diagnosis classification system that you want to use for your notes (e.g.,
DSM-5TR, or ICD-10 or ICD-11). From the calendar screen, click , you may be able to select the
diagnosis classification system that you want to use for your notes (e.g., DSM-5TR, or ICD-10 or
ICD-11). From the calendar screen, click , and select the desired classification from the pull down
menu on the Defaults tab.
1. Add a note as you normally would.
2. Click the Diagnosis tab.
3. To add a new diagnosis:
o Click Add.
o On the diagnosis pop-up window, enter the full or partial diagnosis code or search term, and
click Find.
o Click on the desired diagnosis.
o On the pop-up window, use the pull down menu to select certainty, enter any specifiers, and
click OK.
4. To copy a prior diagnosis:
o Click Copy From.
o Choose the desired diagnosis from the list. (Note: If a diagnosis was made in a classification
system that is different than that being used in the current note, it will not be available to be
copied.)
5. To edit a diagnosis, click the item and click View/Edit.
6. To remove a diagnosis, click the item and click Remove.

76
© 2024 Titanium Software
8 Outreach and Non-Clients
Your administrator will choose the definition of "client" to be used in your center (i.e., visited the
center, completed intake paperwork, and attended at least one appointment). To track
interactions with people who are not clients without adding them to your client database, use
the non-client note feature in Titanium. Your user and supervisor permissions for non-client
notes will be the same as for client notes. If necessary, non-client notes can later be added to
client files, and non-client notes placed in the client file. Clients in Titanium cannot be converted
to non-clients.
Outreach refers to services provided to individuals or groups who aren't "clients" as defined by
your center administrator. Examples might include workshops or lectures to community or
campus groups. Outreach activities can be added to your Titanium schedule. Your center
administrator may set up Titanium so that outreach activities can be documented on the
appointment for reporting purposes.
8.1 Add/Edit/Delete Non-Client Notes
What would you like to do?
o Add a non-client note
o Edit an unlocked non-client note
o Edit a locked non-client note
o Delete a non-client note
Add a Non-Client Note
1. From the calendar screen
o Click Open > Non-Client Notes, click the New Non-Client Note button, and enter the non-
client information or
o Click Client, enter the non-client information and choose Non-Client Note from the pull
down menu
2. Complete the note as you normally would, including signing and forwarding for signature if
required.

Outreach and Non-Clients 77
© 2024 Titanium Software
Edit an Unlocked Non-Client Note
Unlocked notes are either unsigned, or signed on Lines 1 or 2.
1. From the calendar screen, click Open > Non-Client Notes.
o Click Open > Non-Client Notes. Enter the non-client information and click Find, or
o Click Client, enter the non-client information and choose Non-Client Note from the pull
down menu.
2. Double click to open the non-client note.
3. Edit the note as you normally would.
Edit a Locked Non-Client Note
Locked notes (signed on Line 3) cannot be changed, including information on the narrative and
diagnosis tabs, data forms, attachments, and medication tab (if being used). However, addenda
can be added to the narrative text.
1. From the calendar screen, click Open > Non-Client Notes.
o Click Open > Non-Client Notes. Enter the non-client information and click Find.
o Click Client, check "Also Find Non-Client Notes". Enter the non-client information and
click Find.
2. Double click to open the non-client note.
3. Edit the note as you normally would.
Delete a Non-Client Note
Locked notes (signed on Line 3) cannot be deleted.
1. From the calendar screen, click Open > Non-Client Notes.
o Click Open > Non-Client Notes. Enter the non-client information and click Find.
o Click Client, check "Also Find Non-Client Notes". Enter the non-client information and
click Find.
2. Double click to open the non-client note.
3. Delete the note as you normally would.

78
© 2024 Titanium Software
(Note: If a note has been signed and locked in error, consult with your center administrator for
assistance.)
8.2 Add Non-Client Note to Client File
In the event that the person who is the subject of a non-client note becomes a client of the
center, the non-client note can be placed in the client's file.
What would you like to do?
o Add a client and place a single non-client note in the client's file
o Add a non-client note to an existing client file
Add a Client and Place a Single Non-Client Note in the Client's File
1. From the calendar screen:
o Click Open > Non-Client Notes. Enter the non-client information and click Find or
o Click Client, check "Also Find Non-Client Notes". Enter the non-client information and
click Find.
2. Double click to open the non-client note.
3. Click the File icon on the menu bar.
4. Click Yes.
5. Enter the Student ID and press the tab key, or enter the full or partial last name and click Find.
6. If the client is not found, enter the last and first name from the non-client note, and click New
Client.
7. Click Yes to confirm.
8. The client screen will open in a new window. Enter information required by your center.
8. Click Save.
9. Click Exit.

Outreach and Non-Clients 79
© 2024 Titanium Software
Add a Non-Client Note to an Existing Client File
If you don't have sufficient permission to view/edit the client, you may see an error message at
Step 7. Additionally, you may be unable to see the non-client note after it has been added to the
client file, even if you created the note.
1. From the calendar screen:
o Click Open > Non-Client Notes. Enter the non-client information and click Find or
o Click Client, check "Also Find Non-Client Notes". Enter the non-client information and
click Find.
2. Double click to open the non-client note.
3. Click the File icon on the menu bar.
4. Click Yes.
5. Enter the Student ID and press the tab key, or enter the full or partial last name and click Find.
6. Double click the client.
7. Click Save.
8. Click Exit.
8.3 Schedule/Document Outreach
To add an outreach activity to your schedule, add an "other" appointment using an outreach
appointment code. Be sure to include all users/resources who will be part of the appointment by
clicking on the Scheduling tab.
If your center administrator has set up Titanium to capture details of outreach activity:
1. Mark attendance for the users/resources associated with the outreach activity.
2. If not already open, double click on the appointment to open it.
3. Click the Edit icon on the menu bar.
4. Click the Additional Information tab. (Note: Your center administrator may have chosen to not
use this tab to capture outreach information or may have chosen to require information on this
tab.)
5. Enter the information required by your center administrator (e.g., number attended, service
provided to, etc.)

80
© 2024 Titanium Software
6. Click Save.
7. Click Exit.
Printer Settings 81
© 2024 Titanium Software
9 Printer Settings
When you click the print icon or button on any screen in Titanium, the selection will be sent to
your default printer for your work station. To switch to a different printer while logged into a
Titanium work session:
1. Open the printer setup by:
o From the calendar screen, click File > Pinter Setup.
o From the calendar screen, click Reports > Printer Setup. (Note: Depending on your user
permissions, you may be unable to access the Reports feature.)
2. Click to select your desired printer from the list. (Note: The list contains printers mapped on
your computer. If you do not see your desired printer, use the Windows control panel to locate
and add the printer, or contact your IT group for assistance.)
3. Click the Preferences button.
4. On the pop-up window, set desired preferences, and click Ok.
5. Click Ok.

82
© 2024 Titanium Software
10 Reports
There are a variety of reports in Titanium. The data in the reports can be customized using the
filters on the report windows. If your center administrator has given you access, you will be able
to view and save reports and/or export raw data to create custom reports, charts and graphs.
(Note: By default, all users can view and save reports, but only center administrators can export
raw data.)
What would you like to do?
o Generate a report
o Export data
o Review report FAQs
o Review frequently used reports
Generate a Report
1. From the calendar screen, click the Reports icon on the menu bar. (Note: If the icon is grayed
out, your center administrator has not given you access to reporting.)
2. Hover over report titles to see previews and locate the report that you want.
3. Click on the desired report title.
4. Use the options on the pop-up window to set preferences for the report.
5. Click the Preview button. (Note: The formulas used to calculate the report data are shown at
the bottom of the first page of the report. Report calculations vary even though similar labels may
be used across reports.)
6. Use the menu bar on the report viewer to review, save or print the report.
Export Data
1. From the calendar screen, click the Reports icon on the menu bar.
2. Choose Data Form Statistics, Data Form Statistics by Appointment, or Export Data.
3. Use the pop-up window to set preferences for the data export. (Note: Users should only
export client identifying information if absolutely necessary. Users are responsible for
maintaining the privacy and security of data after it has been exported.)
4. Click Export.
5. Use the Windows interface to save the exported data file.

Reports 83
© 2024 Titanium Software
6. Use a third party spreadsheet software like Excel to open the data file, and create desired
reports/charts/graphs.
Reports FAQs
1. How do I find the report that I need? Hover over the report title to see a preview.
2. How do I see the names of clients who were on the report? For most reports, you can't.
However, you can use Advanced Client Search to search for a set of clients.
3. How do I run reports for only some Titanium users? The center administrator can create user
and schedule groups in System Settings. Choose the desired group from the pull down menu on
the report filter screen. The center administrator can also create appointment code groups to
aggregate data across appointment codes.
4. Why are the numbers different on these reports? If you are looking at two different reports,
then calculations are not be the same, even if the labels are. Check the calculation notes in the
report to learn how the numbers were calculated. If you ran the same report at two different
times, users may have made changes in things like appointment attendance or notes.
5. The numbers on the report aren't right. Help! Check the following:
o If using user and schedule or appointment code groups, have your center administrator check
the groups to be sure that all users, schedules or appointment codes are included in the
groups. When adding or deactivating users or appointment codes, it is easy to overlook
updating groups.
o Check the report dates. Dates for semester and year are based on reports settings in system
settings.
o If attempting to compare across reports, check that you are using the same groups, dates,
attendance statuses, notes and other filters for both reports.
o Run the Outstanding Tasks report to be sure that all attendance and note-related tasks have
been completed.
o Spot check a few client files to be sure that the expected data forms, notes or appointments
are actually in the file.
o Review the calculation notes in the report. The report may not be calculated the way that you
are calculating other data sources.
Frequently Used Reports
84
© 2024 Titanium Software
Question or Data
Report
New clients over period of time
Monthly Statistics
Number of hours and types of service
Appointment Statistics
Who was outreach provided to
Services Provided To
Reasons for Treatment
Diagnosis Prevalence
Counselor Caseload
Counselor Case Load
Billing Activity
Revenue Summary
Disability Centers
Disability and Accommodations Reports
Count and Names of Client who meet criteria
Advanced Client Search
Responses of Clients who had Appts on Data
Forms
Data Form Statistics by Appointment Report
Custom charts, graphs, analysis
Export Data

Scheduling 85
© 2024 Titanium Software
11 Scheduling
The calendar can contain appointments and placeholders. Appointments can be for individual
clients, or multiple clients (group/couple). "Other" appointments are those that don't involve
clients (i.e., outreach, vacations, staff meetings, etc.). Each of the three appointment types can
be created using recurring settings. Hover over items on the screen to see more information. To
view an appointment, double click on the appointment on the calendar screen or right click and
choose View.
For ease of use, you can search for open appointment slots or for appointments already scheduled
for a client. You can also add a new client in Titanium while in the process of making an
appointment. To assist with scheduling, your center administrator may choose to use one or
more waitlists. Group sign up sheets can be created to track group members.
Scheduling appointments requires choosing appointment codes from the list created by your
center administrator. Also attendance status can be marked for each appointment. If your center
administrator chooses to use them, appointment reminders can be sent to clients via email (and
SMS text if purchased by your center).
Placeholders are used to add information to the schedule without scheduling appointments. For
example, placeholders can be used to "pencil in" appointments for clients, or to communicate
among staff members, like to indicate working hours for part time users or staff who are on call
for certain appointment types like walk ins. Placeholders can also be used like post it notes as
reminders to perform tasks, and to open time slots for online appointment scheduling.
For user convenience, you can right click on items and empty areas on the schedule to access
action menus. Users can drag and drop items on the schedule to edit them. Users can also click
and drag items to change their duration.
What does everything on the calendar mean?
Some of the settings on the schedule can be changed by clicking Settings > User Settomgs >
Schedule Viewer Layout and Schedule Viewer Colors tabs.
What do the appointment block colors mean? Appointment and placeholder block colors are
set by your center administrator.
What do the icons on the appointment block mean? Five icons may be displayed on the
appointment block: appointment type, appointment mode, comments from the appointment
screen, attendance status, client flags (if used in your center). Your center administrator will set
the default icons to be displayed, and you can alter these settings in user settings.
Why are the days different colors? By default, Mondays and weekend days are a different color
than the rest of the week, but this setting can be changed on the Schedule Viewer Color tab.

86
© 2024 Titanium Software
Why can't I see weekends? Your center administrator may choose to not show weekends on
the schedule. You can add weekends to your schedule in user settings.
Why can't I see the times when I want to schedule appointments? Your center administrator
sets the default schedule times. You can scroll up or down to set appointments for earlier or
later times. You can also set your schedule to view earlier or later daily times in User Settings.
What does the lock icon mean at the top of a schedule? Either you do not have access to the
schedule, or the day you are reviewing is in the past and cannot be changed.
Why are there two appointments in a time slot? Titanium will not prevent scheduling two
appointments in a time slot. Users will see a warning message when attempting to schedule
appointments that overlap on the schedule, or when scheduling overlapping appointments for
a client. By default, appointments shown with strike through font have been canceled, but they
can also be displayed in italic font. If you do not want to see canceled appointments, change
the setting in user settings.
How do I see only my schedule? Right click on the header for your column on the schedule. If
you want to see only your schedule by default, change the setting in user settings.
What is a schedule group? A group of users/resources. These groups can be created by your
center administrator or by users with sufficient permission.
Why is the schedule blank? This might occur for a number of reasons including:
o You're looking at a weekend, or other day/time that has no appointments scheduled.
o The user group you've chosen has no users.
o You've chosen to view recurring definitions, placeholders or canceled appointments only, and
there aren't any to be displayed. Click View > Normal to return to the default view.
11.1 Add/Edit Appointment
What would you like to do?
o Add an appointment
o Copy an appointment
o Edit an appointment
Note: Your center's administrator has set permissions and rights for schedules. If you do not have
sufficient privileges, you may be unable to view, add, edit or delete appointments on any other
schedules, or view appointments or information on schedules for other users.

Scheduling 87
© 2024 Titanium Software
Click here for information about recurring appointments.
Add Appointment
1. On the calendar screen, right click in the time slot/schedule where you want to add the
appointment. (Note: By default, weekend days are not displayed but this setting can be changed
by your center administrator. To navigate to days not displayed from the calendar screen, click
the Go To button on the menu bar and use the calendar pop-up window to select the desired day,
or use the arrow navigation icons.)
2. Click Add > type of appointment to be added
o Individual: One client
o Group/Couple: Multiple clients
o Other: Does not involve clients (e.g., outreach, holidays, vacation, staff meetings, etc.)
3. For individual appointments:
o Enter the Student ID and hit the tab key, or
o Enter the full or partial last name and click Find. Double click the client from the search list.
4. Enter Appointment Information:
o Choose an appointment code.
o Add mode, location, description and comments as desired. (Note: Do not put confidential
information in these fields. Your center administrator may make mode and location required
fields for some appointment codes.)
5. If desired, click the Scheduling tab to add other users or resources (e.g. rooms, equipment) so
the appointment is added to these schedules.
6. For group appointments, click the Clients tab:
o Click Add to search for individual clients one at a time, or
o Choose a group sign up sheet from the pull down menu, and click Copy Members. (Note: It is
recommended that the group sign up sheet be copied the day before the appointment to
ensure the most current sheet is used. Appointment reminders are based on clients added to
the appointment, not the group sign up sheet.)
7. Click Save. (Note: Depending on the settings chosen by your center administrator, you may
see prompts to add the appointment to your schedule, that either you or the client has a
conflicting appointment, or to assign clients to users on the appointment.)
8. Click Exit.
Copy an Existing Appointment
1. Right click the appointment and choose Copy or Copy to Next Week.

88
© 2024 Titanium Software
2. Make any desired changes on the appointment screen.
3. Click Save.
4. Click Exit.
Edit Appointment
How do I change the appointment type? You can't switch among individual, group or other
appointment types after an appointment has been created, or create a recurring appointment
from a single instance appointment.
How do I change user, day, time, length? Drag and drop the appointment on the calendar, or click
and drag the bottom border of the appointment. if the appointment is on multiple schedules,
click to confirm the changes in the dialog box.
How do I change appointment code, client(s), add users/resources?
1. Double click the appointment on the schedule and click Edit on the menu bar, or right click on
the appointment and click Edit.
2. Click Edit on the menu bar.
3. Make desired changes.
4. Click Save.
5. Click Exit.
What does the padlock icon mean on the appointment screen? The appointment is locked or you
don't have rights to change it. This may also occur because your center administrator has chosen
to not allow appointments in the past to be edited. Contact your center administrator to request
changes to locked appointments.
How do I delete an appointment? Deleting appointments will remove them from Titanium, so
they will not be included in reports. You should only delete appointments made in error. For
cancellations, right click on the the appointment block, hover over attendance and choose the
desired attendance status. To delete an appointment made in error, right click on the
appointment and click delete. If a note is associated with an appointment, the appointment
cannot be deleted without deleting the note first.
Scheduling 89
© 2024 Titanium Software
11.2 Add/Edit Recurring Appointment
What would you like to do?
o Add recurring appointment definition
o Edit all recurring appointments in the series
o Edit some recurring appointments in the series
o Edit one recurring appointment in the series
o Delete recurring appointments
Titanium automatically creates recurring appointments from the settings chosen by users. The
"recurring appointment definition" refers to the settings that users choose. After Titanium has
created appointments, those appointments can be changed by editing either the recurring
appointment definition or individual appointments in the series.
Add Recurring Appointment Definition
1. On the calendar screen, right click in the time slot/schedule where you want to add the first
appointment. (Note: By default, weekend days are not displayed but this setting can be changed
by your center administrator. To navigate to days not displayed from the calendar screen, click
the Go To button on the menu bar and use the calendar pop-up window to select the desired day,
or use the arrow navigation icons.)
2. Click Add > type of appointment to be created
o Recurring Individual Definition: One client
o Recurring Group/Couple Definition: Multiple clients
o Recurring Other Definition: Does not involve clients (e.g., outreach, holidays, vacation, staff
meetings, etc.)
3. For recurring individual appointments:
o Enter the Student ID and hit the tab key, or
o Enter the full or partial last name and click Find. Double click the client from the search list.
4. Enter Appointment Information:
o Set the end date for the series or number of appointments to be scheduled.
o Use the filters to set frequency and recurrence.
o Choose an appointment code.
o Add mode, location, description and comments as desired. (Note: Do not put confidential
information in these fields. Your center administrator may make mode and location required
fields for some appointment codes.)
5. If desired, click the Scheduling tab to add other users or resources (e.g. rooms, equipment) so
the appointment is added to these schedules.

90
© 2024 Titanium Software
6. For recurring group appointments, click the Clients tab:
o Click Add to search for individual clients one at a time, or
o Choose a group sign up sheet from the pull down menu, and click Copy Members.
7. Click Save.
8. Click Exit.
Titanium will create appointments that match the definition, and place those appointments on
the schedule.
Edit All Recurring Appointments in Series
1. To edit all future appointments in a series:
o Right click on an appointment in the series and click Edit Recurring Series Definition, or
o Double click on an appointment in the series, and click the Recurring icon on the menu bar.
3. Make the desired changes. (Note: Appointment type cannot be changed.)
4. Click Save.
5. Click Exit.
Edit Some Recurring Appointments in Series
To edit only some appointments in a series:
1. Right click on an appointment in the series.
2. Click Split Series Definition.
3. Click Yes.
4. Right click on the appointment.
5. Click Edit Recurring Series Definition.
6. Make desired changes. (Note: Appointment type cannot be changed.)
7. Click Save.

Scheduling 91
© 2024 Titanium Software
8. Click Exit.
Edit A Single Recurring Appointment
1. Double click the appointment on the schedule and click Edit, or right click and click Edit.
2. Make desired changes. (Note: Appointment type cannot be changed.)
3. Click Save.
4. Click Exit.
Delete Recurring Appointments
Deleting appointments will remove them from Titanium, so they will not be included in reports.
You should only delete appointments made in error. To delete appointments made in error:
1. Right click on the appointment.
2. Click Delete.
3. On the pop up window, choose whether to delete the current appointment, all appointments
in the series, or only appointments after a certain date.
4. Click Ok.
5. Click Exit.
11.3 Appointment Reminders
If your center administrator chooses to use this feature, they will assign some users rights to use
the appointment reminder function. Only the center administrator can edit email/text messages.
This feature is set up by your center administrator.
Appointment reminders are automated, but cannot be set to be sent automatically. They must be
sent by a Titanium user.
Your center may have purchased the ability to send reminders via SMS text message. Each

92
© 2024 Titanium Software
reminder sent via text will incur a charge. To view your credit balance, from the calendar screen,
click Open > Client Appointment Reminders. The remaining balance is in the lower left corner.
Your center administrator should visit our website to add credit to the SMS text account. If a
center exceeds their credit, they will not be allowed to send SMS text messages.
Clients can stop receiving text messages by replying STOP, UNSUBSCRIBE, CANCEL OR QUIT.
Clients can resume receiving text messages by replying START or YES. Other responses will not be
received or processed. Client responses do not affect any "ok to contact" settings on the client
contact tab of the client screen.
What would you like to do?
o Send bulk reminders
o Send single reminder
o Resend bulk reminders
o View sent reminders
Send Bulk Reminders
Note: Reminders must be sent a minimum of one hour in advance of the scheduled appointment
time.
1. From the calendar screen, click Open > Client Appointment Reminders.
2. Set the desired search preferences. (Note: You can search from 1-14 calendar days in the
future.)
3. Click Search on the menu bar.
4. Edit clients with no set reminder preferences by:
o Click to select the client in the list, and click the Client icon on the menu bar to edit the
client screen.
o Click View/Modify Reminder Preferences for Clients (Note: If your center uses both SMS
text and email, and clients have information and permission for both, then reminders will
be sent using both methods.)
Click Edit on the menu bar
Use the pull down menus and text fields to enter client reminder preferences and
information
Click Save.
Click Exit.
5. Click Send Reminders on the menu bar.
6. Review the summary results to view the reminders that were sent/processed. Click Ok.
7. Click Exit.

Scheduling 93
© 2024 Titanium Software
(Note: If you receive an error message that you have exceeded your SMS text credit limit, contact
your center administrator. Your center must pay for additional text messages before more
reminders can be sent via text message. The amount of credit remaining on your account is
shown in red text in the lower, left corner of the appointment reminder screen.)
Send Single Reminder
Depending on the settings chosen by your center administrator, you may be able to send single
reminders for specific appointments, instead of reminders to all clients. To send a single
reminder, navigate to the appointment and click Send Reminder on the menu bar.
Resend Bulk Reminders
If you want to send multiple bulk reminders about a single appointment, you must reset the
reminder:
1. From the calendar screen, click Open > Client Appointment Reminders.
2. To see the most recent reminder sent, set the filters.
3. Uncheck the box in the upper right corner for hide results for reminders already sent.
4. Click Search on the menu bar.
5. Click on the client for whom you want to reset the reminder.
6. Click the Reset Status button on the menu bar.
7. Use the pull down menu to choose whether to reset the email, SMS text or both reminders for
the selected client/appointment.
8. Repeat steps 5-7 for all desired clients.
9. Send reminders as you normally would.
View Sent Reminders
You can view the reminders that have already been sent by:
1. From the calendar screen, click Open > Client Appointment Reminders.

94
© 2024 Titanium Software
2. To see the most recent reminder sent, click History on the menu bar. Set the filters and click
Search.
3. Click Search on the menu bar.
4. To view the email or text reminder, click the desired line, and click View Email or View SMS
from the menu bar.
11.4 Search for Appointment
How do I find scheduled appointments for a client? From the calendar screen, click Find on the
tool bar. Search for the client.
How do I find open appointment slots? From the calendar screen, click Find Open on the tool bar,
and enter search criteria. If searches have been saved, use the pull down menu to select a prior
search. Double click on any entry to be redirected to the appointment on the schedule. (Note: To
search for all available openings, set schedules and appointment type search filters to Group:
All.)
If you frequently perform the same search, you can save your search by:
1. Set search filters.
2. Select Manage Saved Searches to save settings for your own future searches. (Note: Center
administrators can save searches to be used by all staff.)
3. On the pop-up window, click Edit on the menu bar and enter a name for the search. (Note: You
can also delete searches that are no longer required by selecting the search from the list, and
clicking Delete on the menu bar.)
4. Click Save.
5. Click Exit.
11.5 Groups
Group sign up sheets allow you to create a list of planned groups and workshops, and maintain the
client roster for each group. They also allow you to efficiently add clients to appointments for
groups who will have appointments regularly over a period of time. Group sign up sheets can be
printed, if desired. Printed sheets include email addresses and phone numbers for clients who
have approved being contacted via these methods.

Scheduling 95
© 2024 Titanium Software
What would you like to do?
o Create a group sign up sheet
o Edit a group sign up sheet
o Use a group sign up sheet for a group appointment
Create a Group Sign Up Sheet
1. From the calendar screen, click Open > Group Sign Up Sheets.
2. Click New Group Sign Up Sheet.
3. On the Group Information tab, enter information about the group (name, status, code, users,
group size, etc.).
4. On the Group Member Sign Up tab, add group members by:
o Click Add.
o Search for the client.
o Click OK.
o Continue adding members as desired.
5. Click Save.
6. Click Exit.
Edit a Group Sign Up Sheet
1. From the calendar screen, click Open > Group Sign Up Sheets.
2. Double click on a sign up sheet to open it.
3. Click the Edit icon on the menu bar.
4. Make desired changes.
5. Click Save.
6. Click Exit.

96
© 2024 Titanium Software
Delete a Group Sign Up Sheet
1. From the calendar screen, click Open > Group Sign Up Sheets.
2. Double click on a sign up sheet to open it.
3. Click the Delete icon on the menu bar.
4. Type in "DELETE THIS CLIENT GROUP" and click the Delete Client Group button.
5. Click Exit.
11.6 Mark Attendance
Your center administrator may have set Titanium to automatically mark all "other" appointment
types as "attended."
Mark Attendance from the Calendar Screen
1. If displayed on the appointment block, click on the attendance icon shown on the appointment
block, and choose the desired status from the menu, or
2. Right click on the appointment block, click Attendance, and choose the desired status.
3. If the appointment is on multiple schedules, on the pop up window, choose whether to mark
attendance on all schedules or only the schedule from which the appointment was accessed.
Mark Attendance for a Group Appointment from the Calendar Screen
1. If displayed on the appointment block, click the attendance icon, or right click on the
appointment block to click Attendance.
2. Choose the desired status from the menu.
3. On the pop-up warning box, click to confirm the desired status for all users and attendees.
(Note: If all users and attendees do not have the same status, you must mark attendance from the
appointment screen.)

Scheduling 97
© 2024 Titanium Software
Mark Attendance from the Appointment Screen
1. Click on the appointment block to open the appointment screen.
2. Click the Edit icon on the menu bar
3. For an individual appointment with one user, use the pull down menu to change the status
from Scheduled to the desired status.
4. If there are multiple users assigned to the appointment:
o Click the Scheduling tab
o Click All Attendance and choose the desired status and/or
o Use the pull down menus to mark attendance for each resource
5. For group appointments:
o Click the Clients tab
o Click All Attendance and choose the desired status
o Use the pull down menus to set the attendance for each client
6. Click Save.
7. Click Exit.
11.7 Placeholders
What would you like to do?
o Schedule a placeholder
o Edit a placeholder
o Schedule an appointment based on a placeholder
Schedule a Placeholder
1. On the calendar screen, right click in the time slot/schedule where you want to add the
placeholder.
98
© 2024 Titanium Software
2. Click Add > Placeholder for
o Individual: One client
o Group/Couple: Multiple clients
o Other: Does not involve clients (e.g., outreach, vacation, staff meetings, etc.)
o Online appointment scheduling: If activated by your center administrator, specifies
appointment time slots that clients can choose when scheduling online
3. Enter placeholder Information:
o Set the end date for the series or number of placeholders to be scheduled.
o Choose an appointment code
o Add location, description and comments as desired.
4. If desired, associate client(s) with placeholder by:
o Individual: Click Select Client and search for the client as you normally would
o Group: Click the Clients tab and click Add to search for individual clients or choose a group
sign up sheet and click Copy Members
5. If desired, change the display to Duplicate Header on Every Line to display the appointment
code repeatedly on the block.
6. If desired, click the Scheduling tab to add other users or resources (e.g. rooms, equipment) so
the placeholder is added to these schedules.
7. Click Save.
8. Click Exit.
Titanium will create placeholders that match the definition, and place them on the schedule.
Edit a Placeholder
If the start date for the series has passed, the prior placeholders cannot be edited. Instead, right
click to split the series and edit the remaining placeholders. To split every placeholder in the
series, right click on the placeholder and choose Create Separate Placeholders from Series.
How do I change the placeholder type? Placeholder type (individual, group, other) cannot be
changed after the placeholder has been created.
How do I change user, day, time, length? Drag and drop the placeholder on the calendar, or click
and drag the bottom border of the placeholder. If the placeholder is on multiple schedules, click
to confirm the changes in the dialog box.
How do I change appointment code, client(s), add users/resources?
1. Click the placeholder on the schedule.

Scheduling 99
© 2024 Titanium Software
2. Click Edit on the menu bar.
3. Make desired changes.
4. Click Save.
5. Click Exit.
What does the padlock icon mean on the placeholder screen? The placeholder is locked or you
don't have rights to change it.
How do I delete a placeholder? Right click on the placeholder and click delete. Click to select to
delete just the selected placeholder, or only future placeholders. Use the calendar pull down to
select future placeholders to be deleted.
Schedule an Appointment Based on a Placeholder
1. Right click on the placeholder.
2. Click Add > Appointment Based on Placeholder.
3. Add the appointment as you normally would.
11.8 Schedule Groups
The center administrator can create users and schedule groups to serve several purposes
including:
o View only a subset of schedules (i.e., senior staff, interns reporting to a given supervisor,
resources, rooms, staff working at different campus locations, etc.)
o Filter for openings for appointments
o Filter and summarize data for reports
o Filter for advanced client search
Users with sufficient permission can create their own users and schedules groups. These groups
can be used only by the user who creates the group and are used to restrict views to a subset of
schedules. Groups created by users cannot be used for reporting purposes or by other users.
What would you like to do?
o Create a group

100
© 2024 Titanium Software
o Manage saved groups
Create a Group
1. From the calendar screen, click the Schedules pull down menu and choose Create/Manage Your
Groups.
2. Use the list screen to add users/schedules to the group. To add all of the group members of an
existing users and schedules group created, click Add Members from Group and choose the
desired group.
3. Click the check box "Set Number of Columns Displayed to Match Selected Schedule Count" to
stretch or shrink
4. Click the check box to save the group. Type the name of the group in the Description box.
(Note: If you only need the group once, click Ok to display the group members chosen).
5. Repeat Steps 2 - 5 for all desired groups.
6. Click Save.
7. Click Exit.
Manage Saved Groups
1. From the calendar screen, click the Schedules pull down menu and choose Create/Manage Your
Groups.
2. Click the Manage Your Groups button.
3. Use the list screen to edit or delete list items.
4. Click Save.
5. Click Exit.
6. Click Ok.
11.9 Using Online Scheduling
Your center administrator may choose to activate online appointment scheduling, if your center
uses the optional web component feature. To use the feature:

Scheduling 101
© 2024 Titanium Software
1. Add online appointment scheduling placeholders to desired schedules. These will be the
days/times/schedules displayed to clients to select appointment slots.
2. Direct clients who want to use online scheduling to your center's web component URL. (Note:
Your center administrator may have created several options for online scheduling, and should
provide instructions for use.)
3. After clients select appointment slots, a locked appointment block will be placed on the
schedule. The appointment may not be edited or deleted until after it has been approved. The
appointment block will be marked with a yellow and black U icon. (Note: If a user is authorized to
approve incoming data and attempts to edit a locked appointment, they can click "yes" on the
prompt to open the Approve Incoming Data screen.)
4. After the Approve Incoming Data process has been run, the appointment block will be
unlocked. (Note: At the bottom of the appointment screen, added by Client will appear to show
that the appointment was scheduled online.)
11.10 Waitlist
Your center administrator may choose to use one or more waitlists. You should check with your
center administrator to learn about your permissions for waitlists (view only, add clients, manage
lists or none). This feature is set up by your center administrator.
What do you want to do?
o See if the client is on the waitlist
o Add a client to the waitlist
o Edit a waitlist entry
o Manage the waitlist
o Re-open a waitlist entry
See if a Client is on the Waitlist
The waitlist icon appears on multiple screens in Titanium (e.g. client screen, client file,
appointment, etc.). If the waitlist icon is green, the client has an entry on a waitlist. If there is
more than one center waitlist, hover over the wiatlist icon or click the icon to open the waitlist
entry window to view the lists with entries for the client.
Add a Client to the Waitlist
1. Click the waitlist icon on any screen for the client. (Note: Users can also click Open > Waitlist
Management, and click the New icon on the menu bar.)

102
© 2024 Titanium Software
2. Use the pull down menu to select the desired list.
2. Click the Add to Selected Waitlist button.
3. Complete the entries on the waitlist pop-up window as required by your center's
administrator.
4. Click Save.
5. Click Exit.
Edit a Waitlist Entry
Unless you are designated as a waitlist manager, you are only able to edit entries that you created
within 24 hours after you create them.
1. Click the waitlist icon on any screen for the client.
2. Click Open Existing Waitlist Entry.
If it has been less than 24 hours since the waitlist entry was added by a user with "add"
permission:
3. Click Edit.
4. Make desired changes.
If it has been longer than 24 hours since the waitlist entry was added by a user with "add"
permission:
5. Click New Line above the notes box to add notes to the entry or click in the note box to add a
note. (Note: Your center administrator may have disabled this option.)
6. Click Save.
7. Click Exit.
Manage the Waitlist
1. From the calendar screen, click Open > Waitlist Management.
2. Use the pull down menus on the Listing tab of the waitlist management screen to change the
waitlist entries that are displayed. (Note: Your center administrator may have chosen a cut off
date so that older entries are not displayed.)

Scheduling 103
© 2024 Titanium Software
3. Double click an entry on the waitlist to view the waitlist details tab for the entry.
4. Click Edit on the menu bar.
5. Edit information on the waitlist details tab.
6. Click Mark Complete to remove an entry from the waitlist.
7. Click Save.
8. Depending on the settings chosen by your center administrator, click Yes on the prompt to
create a Completion Note. Information about the waitlist entry will be copied into the note
narrative. Complete the note as you normally would.
Re-Open a Waitlist Entry
1. From the calendar screen, click Open > Waitlist Management
2. Use the pull down menus on the Listing tab of the waitlist management screen to view
Completed waitlist entries. (Note: Your center administrator will set the date after which
completed entries can no longer be viewed.)
3. Double click an entry on the waitlist to view the waitlist details tab for the entry.
4. Click Edit on the menu bar.
5. Click Re-Open.
6. Enter a reason in the pop-up window.
7. Click OK.
8. Click Save.

104
© 2024 Titanium Software
12 Supervision
Titanium contains features that allow teaching or training clinics to create appointments, records
and files for their interns. These features allow information about programs to be kept separate
from information about clients. Your center administrator may choose to activate these features
for use in your center.
By default, Titanium displays the term "intern." All instructions and documentation use this term.
Your center administrator may change this term as desired (i.e., trainee, supervisee, student
clinician, etc.) and all displays in Titanium will be changed. Your center administrator has created
the appointments, notes, data forms, and screens for interns.
Add an Intern Record
After adding interns as users and setting up supervision features, center administrators can add
interns by:
1. From the calendar screen, click Open > Interns.
2. Click the Add New Intern radio button, and click Ok.
3. Use the pull down menu to select a user for whom to create an intern record and file.
4. Use the pull down menu to select the assigned supervisor(s).
5. Enter an ID for the intern.
6. Enter the name that will be displayed in the intern record. Middle name is an optional field.
7. Click Ok. Click Yes. Click Ok.
8. The intern screen will open in a new window. Enter the desired information:
o Contact Information tab: preferred name, date of birth, email address, phones, addresses,
photo
o Intern Information tab: program information including name, adviser name and contact
information, supervision dates
o Disability tab: If you have chosen to use the disabilities features in Titanium, disabilities and
accommodations of the intern may be listed on this tab
o Security tab: By default, intern files are restricted to only the intern and supervisor(s) chosen
when the intern record was created. Changes in assignment can be made on this tab. If the
intern is removed, they will be unable to view their own file.
o Flags tab: If you have chosen to use flags for interns, flags can be added/edited on this tab

Supervision 105
© 2024 Titanium Software
9. Click Save.
10. Click Exit.
My Interns List
The My Interns list provides the user currently logged into Titanium with their personal list of
interns assigned to them. To open your My Interns list, from the calendar screen, click Open > My
Interns. The screen also provides statistics for your interns, and access to the intern screen and
intern file:
o Next Appt: This is the date of the next intern appointment with the supervisor
o # Clients: This is the number of clients to whom the intern has been assigned as a user on the
client security tab (e.g., count of clients on the intern's My Clients list)
o # Attended Appts Year: This is the number of client appointments the intern has attended
during the year. (Note: Dates that define the year are set by the center administrator in
system settings.)
o # Hours Attended Year: This is the amount of time that the intern has attended client
appointments during the year. (Note: Dates that define the year are set by the center
administrator in system settings.)
Right click on the column headers for options to sort, rearrange columns, choose columns or save/
export the table.
Working with Interns
Most features available in intern screens and files are identical to those in client screens/files,
and function in the same way. The links below will redirect to the instructions for working with
clients which are the same as for interns:
Editing, deactivating and deleting intern records, short cuts, disabilities / accommodations,
photos, flags, files
Scheduling appointments, group appointments, creating recurring appointments, marking
attendance
Creating notes, adding attachments, and group notes

106
© 2024 Titanium Software

Task List 107
© 2024 Titanium Software
13 Task List
Your center's administrator has established a set of required record keeping activities related to
appointments. Depending on the settings chosen by your center administrator, there may also be
termination or client deactivation tasks for the center. The task list shows the activities that users
should complete and provides a single window from which to work.
Users cannot add items to the task list. Instead, consider using placeholders as "post-it" notes on
the schedule as reminders to complete tasks. The only way to remove an item from your task list
is to complete it. When a task is completed, it will automatically be removed from the task list.
Depending on your permissions and settings in Titanium, you can remove tasks to sign notes by
double clicking the task list item, and choosing another user in the Forward To: section of the
note, and clicking Save and Exit.
Complete Items on the Task List
1. From the calendar screen, click Open > Task List.
2. Review the item on the task list to determine what needs to be done. (Note: Your center
administrator may choose to use a color coding scheme to indicate the number of days since the
task was added to the list. You should ask your center administrator the meaning of color
highlights seen on this screen.)
3. Double click the item on the task list to open the screen where you need to complete the task.
(Note: You can only complete one task at a time.)
4. Complete the required action (e.g. mark attendance, add a note, sign a note), or respond to the
prompts.
5. Close the screen to return to the task list.
Monitor my Supervisee's Task List
If you have been given permission as a supervisor, you can view another user's task list by
selecting their name from the pull down menu. If your center administrator has chosen to use
supervision features, you can also navigate to Open > My Interns. Click the intern name on the
list, and click the Intern Task List icon on the menu bar.

108
© 2024 Titanium Software
14 User Settings
You are able to override some of those settings to personalize Titanium displays and functions.
You are able to override some of those settings to personalize Titanium displays and functions.
The settings that you choose are linked to your user account, so they'll only apply when you are
logged in. Options for each of the user settings tabs are shown below.
To change settings:
1. From the calendar screen, click Settings > User Settings.
2. On the tabs, use the pull down menus, check boxes and text boxes to set desired options.
3. Click:
o Apply to see the effects of your changes.
o OK to save changes and exit settings.
o Cancel to exit settings without saving changes.
14.1 User Defaults Tab
1. Use the pull down menu to select the default users and schedules group for which reports will
be generated.
2. Use the pull down menu to select the default single user or schedule for which reports will be
generated.
3. Use the pull down menu to select the user to whom notes will be forwarded by default.
4. Use the pull down menu to change the default diagnostic code set for your notes, if available.
5. If your center administrator has implemented termination features, use the spinner to increase
the number of days between last appointment and the generation of termination tasks.
6. Enter how frequently notes will be saved when you are creating them. (Note: This will provide
a back up in the event of computer failure, so that notes can be recovered.)
7. Click in the check box to display a screen showing the number of tasks on your task list after log
in.
8. Click in the check box to turn on a prompt when making individual appointments for other
users to add the appointment to your schedule as well.
9. To change your password, click log in account status and change the password button.
o Click change password.
o Enter your new password twice and click OK. (Note: Titanium requires strong passwords of 8-
32 characters, containing at least one upper case and one lower case letter and a number.
Your center administrator may require use of symbols. Passwords cannot be reused until 50

User Settings 109
© 2024 Titanium Software
password changes have occurred.)
o Click save
(Note: Titanium Support is unable to log onto your Titanium application, if passwords are
forgotten. We cannot reset passwords. If you are locked out of Titanium, contact your center
administrator for assistance.)
10.Click the Reset your spell check dictionary to default button to remove anything that you added
to the spell check dictionary. (Note: Spell check is based on the regional and language settings
chosen in Windows. The default is US English.)
11.If your center is using insurance billing, click the Billing Settings button:
o Use the pull down menus and text boxes to enter insurance billing information for the user.
(Note: You should consult with your center administrator or use the state or federal
guidelines for claim forms to learn more about these fields.)
o If desired, use the mouse or touch pad to enter a signature to be added to insurance claims.
o Click Close.
12.If desired, change appointment notifications (pop up window and chimes) which will notify
you when appointments on your schedule have been marked as attended, canceled or
rescheduled. (Note: Your computer speakers and volume must also be set to enable you to
hear audio. Chimes only notify of arrivals, not when appointments end.)
o Click in the check boxes to turn on/off notifications when appointment attendance is marked
as "attended" or as "canceled" or "rescheduled"
o Use the pull down menus to change the sound file used for notifications.
o Use the pull down menu to change the volume, if desired.
11. For users granted sufficient permission by the center administrator to approve incoming web
component data, if desired, change new incoming data notification. (Note: Your computer
speakers and volume must also be set to enable you to hear audio.)
o Click in the check boxes to turn notification on/off.
o Use the pull down menu to change the sound file used for notifications.
o Use the pull down menu to change the volume, if desired.
110
© 2024 Titanium Software
14.2 User Schedule Viewer Layout
On this tab, you can set defaults for the layout of the calendar (schedule) screen. Options on this
screen include:
Start time: Click in this box to change the time that shows at the top of the schedule. (Note:
Users are able to scroll up on the schedule to set earlier appointments can be added to the
schedule.)
Interval time: Click in this box to change the time intervals (in minutes) displayed on the
schedule.
Number of rows: Click in this box to change the number of rows which will appear on the
schedule. (Note: The amount of time will vary based on intervals and number of rows. So, if
intervals are set for 30 minutes, and rows are set for 24, then 12 hours will be displayed on the
schedule.)
Alternate time display: Check the box to change the format of the time line displayed at the
left of the schedule screen.
Number of columns: Click in this box to change the number of columns that will appear on the
schedule. (Note: The green arrow buttons at the top of the calendar screen can be used to
navigate among columns that are not displayed by default.)
Weekly format: Use the pull down menu to show or suppress weekends. (Note: The Go To
button on the menu bar can be used to navigate directly to a weekend day, even if weekends
are suppressed.)
Day header format: Click in this box to change from the standard day header format of
"Weekday, Month Date" to a different Windows standard format.
Schedule header font: Click the ellipse button (3 dots) to open the font selection window to
choose a different font for the top header row on the schedule when viewing multiple user
schedules for a single day.
Day header font: Click the ellipse button (3 dots) to open the font selection window to choose a
different font for the second row on the schedule when viewing multiple user schedules for a
single day.
Swap header fonts: When viewing a single schedule over multiple days, there will be only one
header row. Click this check box to use the Schedule Header Font as the header row font in
single schedule view.
Enable refresh: If desired, click the check box to refresh the screen when working in Titanium
and set the refresh interval in seconds. (Note: If you do not check this box, you are working in
Titanium for a long period of time, they will not see updated data).
User Settings 111
© 2024 Titanium Software
Limit refresh: If you clicked to refresh user screens, click in the next check box to limit refresh
to when you do not have a window open (i.e., when only the calendar screen is displayed).
Enable quick date navigation: This control will prevent appointments and placeholders from
being displayed on the schedule when the user presses and holds a shortcut key to navigate
through successive days on the schedule. Not displaying schedule items until the shortcut key
is released results in faster scrolling.
Schedule to be displayed on log in: Click one of the radio buttons to set the default schedule
display when a user logs in to either their own schedule, or schedules for a group. If you choose
to display schedules for a user group, click the pull down menu to choose from among the
groups that you created.
Appointment block font: Click the ellipse button (3 dots) to open the font selection window to
choose a different font for the text displayed on appointment blocks.
Bold for attendance: Check this box to change the appointment block font to bold type if any
attendance option is chosen other than scheduled.
Appointment block information display format: Use the pull down menu to choose the
information shown on schedule blocks.
Appointment icons: Click in the check boxes to choose the icons that will be displayed in
appointment blocks.
Non-attended appointment format: Use the pull down menu to select whether/how non-
attended appointments will be displayed on the schedule.
Display appointment start time: Check in the box to display the start time of the appointment
on the appointment block.
Display appointment length: Use the pull down menu to choose whether appointment length
will be displayed in the appointment block. (Note: Because you will be able to see the start/
end times for appointments on the schedule, this option is not used often.)
Append the appointment Description field to the text displayed: Text in the description field
on the appointment will be displayed on the appointment block.
Mouse-over display: Click in these check boxes if you want provider appointment count for the
client, center appointment count for the client, or client student ID to display with the user
hovers over the appointment with their mouse.
Intake appointments in count: If you click in this check box, intake appointments will not be
counted in the mouse-over displays for appointment counts.
Appointment Count Start Date: By default, appointment counts in Titanium are aligned to the

112
© 2024 Titanium Software
year start date that your center administrator chooses. To use a different date, enter it in the
date window.
Common options for Windows standard formats:
Desired format
Enter in Day header format box
Thursday, August 07 (Titanium default)
dddd, MMMM dd, yyyy
Thu, Aug 07
ddd, MMM dd
August 07
MMMM dd
August 7
MMMM d
August 7, 2014
MMMM d, yyyy
08-07-2014
MM-dd-yy
dd = day of the month
dddd = day of the week
MM = number of the month
MMMM = name of the month
yyyy = year
14.3 User Schedule Viewer Colors
On this tab, you can set the default colors for your schedule. This is much like creating a theme in
Windows. The colors of appointment and placeholder blocks are set by your center administrator
User Settings 113
© 2024 Titanium Software
and cannot be changed. To set colors:
1. Click in the colored box for the item that you want to change. (Note: See list of items below.)
2. If required, choose an option from the menu. (Note: Foreground is text color, and background
is item color.)
3. On the color picker window, choose a new color. (Note: Click the Define Custom Colors button
for more color options.)
4. Click OK.
5. Click Apply to see the effects of your changes.
6. If you don't like your changes, click the Reset to System Colors colors button to return to
settings chosen by your center administrator. (Note: In 2022, a new, modern set of default
colors was released. Click Reset to Default Colors to choose the modern color scheme. If you
prefer the classic Titanium color palette, you can click Reset to Classic Colors.)
Item List:
Schedule header: Top row on the schedule screen
Selected schedule header: Top row on the schedule screen for the schedule where your mouse
is located
Day header: Second row on the schedule screen
Selected day header: Second row on the schedule screen for the schedule where your mouse is
located
Default background: Schedule where no appointments are shown
Weekend background: Schedule where no appointments are shown on weekend days as
designated on the Schedule Viewer Layout tab
First weekday background: Schedule where no appointments are shown on Mondays
Cursor box: Box that appears around the space on which your mouse is located on the schedule
Appointment border: Box that appears around the appointment block
Appointment highlight: Box that appears around the appointment block when you hover over it
with your mouse
Vertical grid lines: Lines that appear between user schedules or days of the week
Horizontal grid lines 1: Lines that appear before hours on the schedule
Horizontal grid lines 2: Lines that appear before interval times chosen on the Schedule Viewer
Layout tab
Foreground 1: Color of the font of hours that appear on the time line at the left of the schedule
Foreground 2: Color of the interval times that appear on the time line at the left of the
schedule
114
© 2024 Titanium Software
Background view normal: Color in the background of the time line at the left of the schedule
Background canceled view: Background color of the schedule time line at the left of the
schedule when viewing only canceled appointments on the schedule. (Note: To display only
canceled appointments, from the calendar screen, click View > View Only Canceled
Appointments).
Background placeholder view: Background color of the schedule time line at the left of the
schedule when viewing only placeholders or recurring appointments on the schedule. (Note:
To display only canceled appointments, from the calendar screen, click View > View Recurring
Definitions and Placeholders Only).
14.4 User Interface Tab
On this tab, you can set defaults for the way Titanium behaves when you are logged in. Options
on this screen include:
Default application font: Click the ellipse button (3 dots) to open the font selection window to
choose a different font for the screens in Titanium. (Note: Some font type and size selections
may result in display problems on some windows.)
Default application toolbar font: Click the ellipse button (3 dots) to open the font selection
window to choose a different font for the tool bars in Titanium.
Screen font for note narrative: Click the ellipse button (3 dots) to open the font selection
window to choose a different font for the narrative tab in notes.
Remember and reuse last report viewer zoom settings: Click in the check box to have Titanium
re-use the viewer settings on the preview screen for reports (Note: Zoom settings are accessed
on the Page Width pull down menu of the report preview screen.)
Show advanced export options: Users with permission to generate reports can export some
reports if this box is checked.
Alternate sound player: Click in this check box to use an alternate sound player, instead of your
computer's speakers
Show tooltip: Click the check box to see tool tips about right click menus when working with
narrative text boxes
Display first line of note narrative: Check this box to view the first line of a note in the client
file view with the date and note author to label notes.
Show confirmation prompt for edit mode: Click the check box if you want Titanium to show a
prompt if you click escape or cancel without saving changes.
Show confirmation prompt for overlapping appointments: Click the check box if you want

User Settings 115
© 2024 Titanium Software
Titanium to prompt you if changes to an appointment will cause an overlap with another
appointment.
Show confirmation prompt for appointments moved using drag and drop. Click the check box if
you want Titanium to prompt you if you edit appointments by using a mouse (drag, drop).
Number of items in drop down box: Enter the number of items that should be displayed in drop
down boxes (pull down menus) throughout the program.
Find Client Initially Active Field: Use the pull down menu to choose the field where the cursor
will be when the Find/Add client window opens.
Client / Intern File Default Behavior: Choose whether client and intern files will open with all
entries expanded, all entries collapsed or remember your last setting.
Default source folder for files to attach: Depending on the settings chosen by your center
administrator, you may be able to set the default folder for attachments. When you click to add
attachments to notes, this is the folder that will open, and you will be able to navigate to other
locations on your computer. To set, click the ellipse (3 dots) button and use the Windows
interface to browse to the folder.
Window settings persistence: If you resize Titanium windows while working and want the
windows to retain your custom sizing, click in the Remember and reuse window check box and
click size and/or position to indicate what you want the program to remember. To return to
Titanium defaults, click in the Forget window settings check box and forget window settings
now button.
14.5 Calendar Sync
Calendar Sync is an optional feature which may have been purchased by your center. This feature
copies non-confidential appointment information from Titanium to Microsoft Exchange (Outlook)
or Google calendars. Placeholders will not be copied to your external calendar.
This feature is commonly used to show “busy” times on Outlook or Exchange calendars, and to
allow Titanium users to view their Titanium schedules when they are out of the office. You
should ask your center administrator how calendar sync will function in your center, including
type of external calendar you can use, when calendar sync will occur, and whether you can create
appointments on your external calendar to be copied into Titanium.
This feature is set up by your center administrator.
Notes: If you want to sync to a Google web mail calendar, create your Google account before
proceeding.
116
© 2024 Titanium Software
What would you like to do?
o Set up Calendar Sync
o Create Appointments to be Copied into Titanium
o Manually Sync Calendars
Set Up Calendar Sync
1. Ask your center administrator whether sync will be to Exchange, Google or both.
2. From the calendar screen, click Settings > User Settings.
3. Click the Calendar Sync tab. (Note: If your center is not using this feature, the tab will not be
visible.)
4. For Exchange calendar sync:
o Enter your email address.
o Click Ok.
o Exit Titanium and log back in.
o Exit Titanium and log back in.
o Click Ok on the message and click to accept the permissions prompt or to request approval,
and click Accept.
5. For Google calendar sync:
o Click Authorize.
o If necessary, click to allow your web browser to open.
o Log into your Google account.
o Click Accept.
o Close your browser window.
o In Titanium, click OK on the "Authorization request successfully completed" window.
o Use the pull down menu to select the calendar to sync with Titanium. (Note: You can stop the
sync to the Google calendar in the future by clicking Revoke.)
o Click Ok.
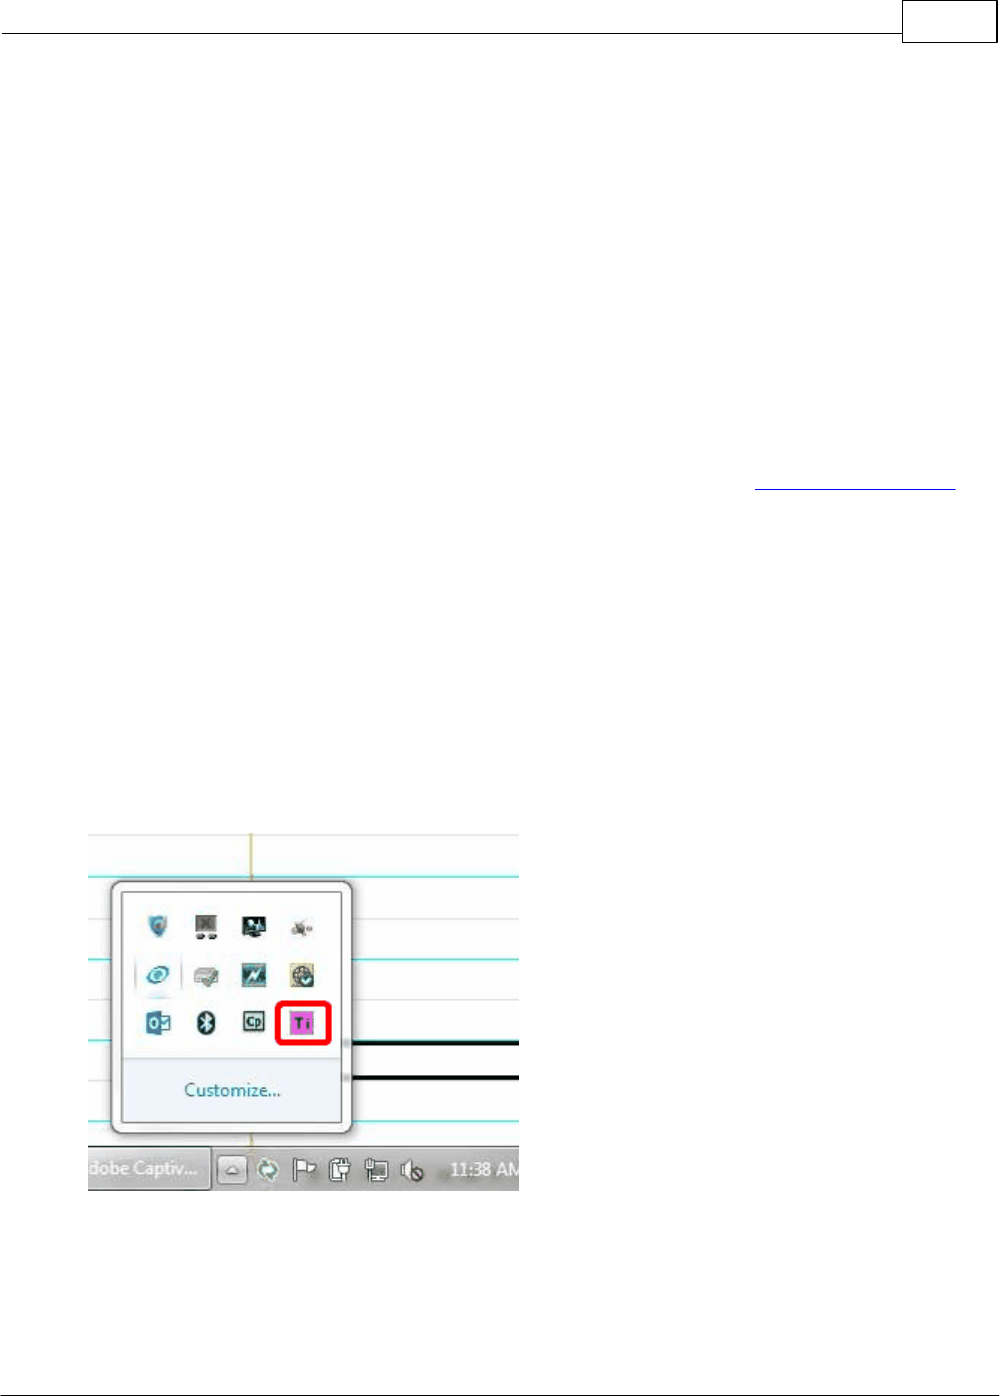
User Settings 117
© 2024 Titanium Software
Create Appointments to be Copied into Titanium
If your system administrator chooses to do so, it is possible for appointments created on external
calendars to be copied into Titanium. If your system administrator has chosen to use this feature,
they should provide a subject prefix. To create an external appointment that will be copied into
Titanium:
1. On your external calendar, open a new appointment.
2. In the subject field, enter the prefix provided by your system administrator.
3. Enter the rest of the subject.
4. Enter the appointment information and save as you normally would.
5. After the next full calendar sync copies the appointment to Titanium, edit the appointment to
make required changes to appointment type, appointment code, and client information.
Note: Recurring meetings or those with multiple attendees will not automatically be synced to
Titanium. Users must manually create or copy these appointments. If you accept a meeting
notice from someone else, you must either manually add the prefix in Step 2 above (for Outlook)
or duplicate the appointment and enter the prefix (Google).
Manually Sync Calendar
1. Click the Titanium Calendar icon on your system tray.
2. Choose Open.
3. On the pop-up window, click Synchronize > Start a Full Sync now.
4. Click File > Minimize to Tray.

118
© 2024 Titanium Software
5. If an error occurs indicating that the sync failed, contact your center administrator for
assistance.
Using Google Accounts
Note: If you have a Google account already, you can use it with Calendar Sync. However, if you
keep personal items on the calendar, you may wish to create a secondary calendar (Step 13).
1. Use your web browser to navigate to the Google accounts page.
2. Click Create an Account.
3. Enter the information to create an account (i.e., name, password, accept terms of service).
4. Click Next Step.
5. On the next screen, click No Thanks.
6. On the next screen, click Get Started.
7. Click the Settings icon in the upper, right corner, and choose Calendar.
8. Click the calendar settings gear icon, and choose Settings from the drop down menu.
9. Click the Calendars tab.
10. Click the name of the calendar in the list.
11. If desired, change the name of the calendar to make it easier to find in user settings in
Titanium. (Note: The calendar will default to your user name. Consider renaming it something
like TitaniumYourName.)
12. Click Save.
13. To create a secondary calendar, click Create New Calendar.
o Enter the desired calendar name.
o Click Create Calendar.
14. Log out.
14.6 CCMH
The Center for Collegiate Mental Health (CCMH) is a multi-disciplinary, member-driven research
center focused on providing accurate and up-to-date information about the mental health of
today's college students. Their mission is to bridge the gap between the science and practice of
providing college student mental health services. CCMH has created a national database using de-
identified data from college counseling centers nationwide. Centers that choose to participate in
this initiative transmit data to CCMH and are allowed to access for research purposes.

User Settings 119
© 2024 Titanium Software
If your center administrator chooses to participate in the initiative, your demographic data will be
transmitted. To enter demographic data:
1. Navigate to User Settings > CCMH tab.
2. Click Enter Information About Yourself button.
3. Click Edit on the menu bar.
4. Use the radio buttons, check boxes, text boxes and pull down menus to enter information.
5. Click Save.
6. Click Exit.

120
© 2024 Titanium Software
15 User Permissions
The information below is for default permissions. Some settings can be changed on tabs
throughout the system settings screen.
User Security Levels assigned by System Administrator:
Provider 1: View/modify all schedules, create/access all data for all clients and non-clients, assign
clients to counselors, automatically added to client screen when creating clients, view/create
invoices
Provider 2: View all schedules, modify only assigned schedules, create/access all data for all
clients and non-clients, assign clients to counselors
Provider 3: View all schedules, modify only assigned schedules, see client names on
appointments only on own schedule, create/access all data for assigned clients (Note: Provider 3
users may be restricted to viewing only their own schedules. If so, then they will be unable to use
the Find Open feature to search for appointments.), create/access group notes for group
appointments on which they are a resource, create/access non-confidential non-client notes or
assigned confidential non-client notes
Support Staff: View/modify all schedules, create/access non-confidential data for all clients and
non-clients, assign clients to counselors, view/create invoices
IT Staff: View version information, complete some diagnostic checks, and check for and install
software updates
Temporary Emergency Access: Allows access in the event that no System Administrator can log on
(forgotten passwords, unavailable). This level allows a one-time access to the Users and
Schedules tab in system settings, for the purpose of resetting a System Administrator password.
Titanium strongly recommends creating at least one Temporary Emergency Access account, and
storing the information securely in the center.
Temporary Delegate: Does not allow users to log into Titanium. This security level is used by IT
staff when performing department import, under the instruction of Titanium Support. The
account is automatically deleted when the department import function is completed.
SystemAdmin: Unabridged rights to perform any action throughout the entire system including
but not limited to activate and set up the system, create all user accounts, view/modify all
schedules, create/access all data for all clients, combine clients, delete and purge clients from
system (electronic shred), export raw data and billing using Reports function.
Note: Titanium Support is unable to log onto your Titanium application, if passwords are
forgotten. We cannot reset passwords. Only users that you designate as System Administrators
are able to do this. Therefore, Titanium strongly recommends creating at least two System
Administrator accounts, to allow access to the system if one user is unavailable, and creating at
least one Temporary Emergency Access account, and storing the information securely in the
center.
User Permissions 121
© 2024 Titanium Software
Supervision Levels assigned by System Administrator:
Supervisor: Can sign notes on Lines 1, 2 and 3, able to view My Clients/task lists of other users
Supervisor in Training 1: Can sign notes on Line 2, and Line 3 if Line 1 is not blank, able to view My
Clients/task lists of other users
Supervisor in Training 2: Can sign notes on Lines 1 and 2, able to view My Clients/task lists of
other users
Unsupervised: Can sign notes on Lines 2 or 3, but only if Line 1 is blank
Under Supervision: Can sign notes on Line 1
N/A: Cannot sign notes
Client-Level Security Settings:
System Administrator users can change client-level security settings from standard to more
restricted settings.
Standard: User settings above apply to the client
Confidential: Restricts access to the client’s confidential notes to only the System Administrator
user and the users assigned to the client
Entire case file: Restricts access to the entire client file (including non-confidential notes and
appointment history) to only the System Administrator user and the users assigned to the client
Reports:
By default, all users can view and save reports. By default, only System Admin users can export
raw data. System Administrators can change these defaults on the Security tab in system settings,
and make per user changes on the Details tab in Users and Schedules in system settings.
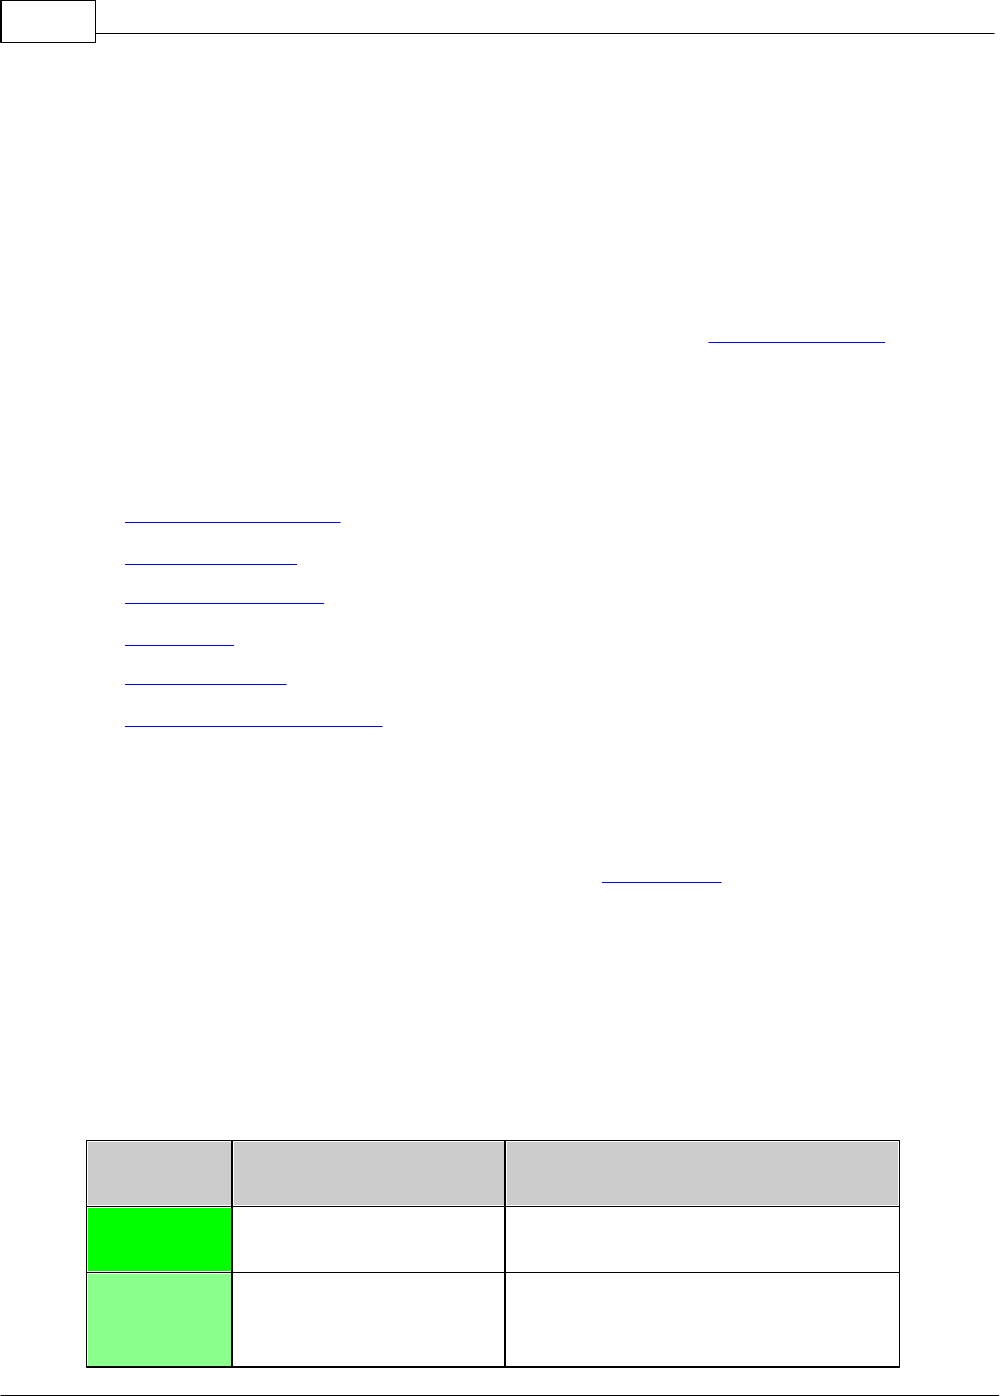
122
© 2024 Titanium Software
16 Web Component
The online web component feature allows clients to complete forms (e.g. consent and privacy
notices, demographics, treatment outcome measures, health history, etc.) via an internet
browser running on a computer or tablet. It may also be used for online appointment scheduling.
This feature is set up by your center administrator. If clients enter contact information on the
web component, it will overwrite any information already in their client screen.
(Note: To have clients of the center complete anonymous surveys, create a new client called
Survey and set the student ID to an easily recalled number. When clients complete the survey on
the web component, have them enter the ID number of the survey client, and then complete the
survey. The surveys will be added to the file of the Survey client.)
What would you like to do?
o Approve incoming data
o Edit incoming data
o Delete incoming data
o End session
o Find missing data
o Web component passwords
Approve Incoming Data
After clients enter complete forms, a Titanium user must approve the incoming data to ensure
that it is valid and correct. If you activated the notice in user settings, you will see a pop-up notice
and hear a chime when new submissions are created. If your center administrator has given you
permission to do so, approve incoming data by:
1. From the calendar screen, click Open > Approve Incoming Data.
2. Review the entries based on the following table. (Note: These are the system default colors.
To change colors, click on Grid Colors on the menu bar. Click on the colored boxes to change the
foreground and background colors, as desired.)
Status
Column
Meaning
User Action
MATCH
Incoming data is an exact
match for an existing client
Process the entry if it appears to be valid
NO MATCH
No matching client in
Titanium.
If this is a new client, then process the
data to create the client in Titanium. If it
is an existing client, edit the student ID
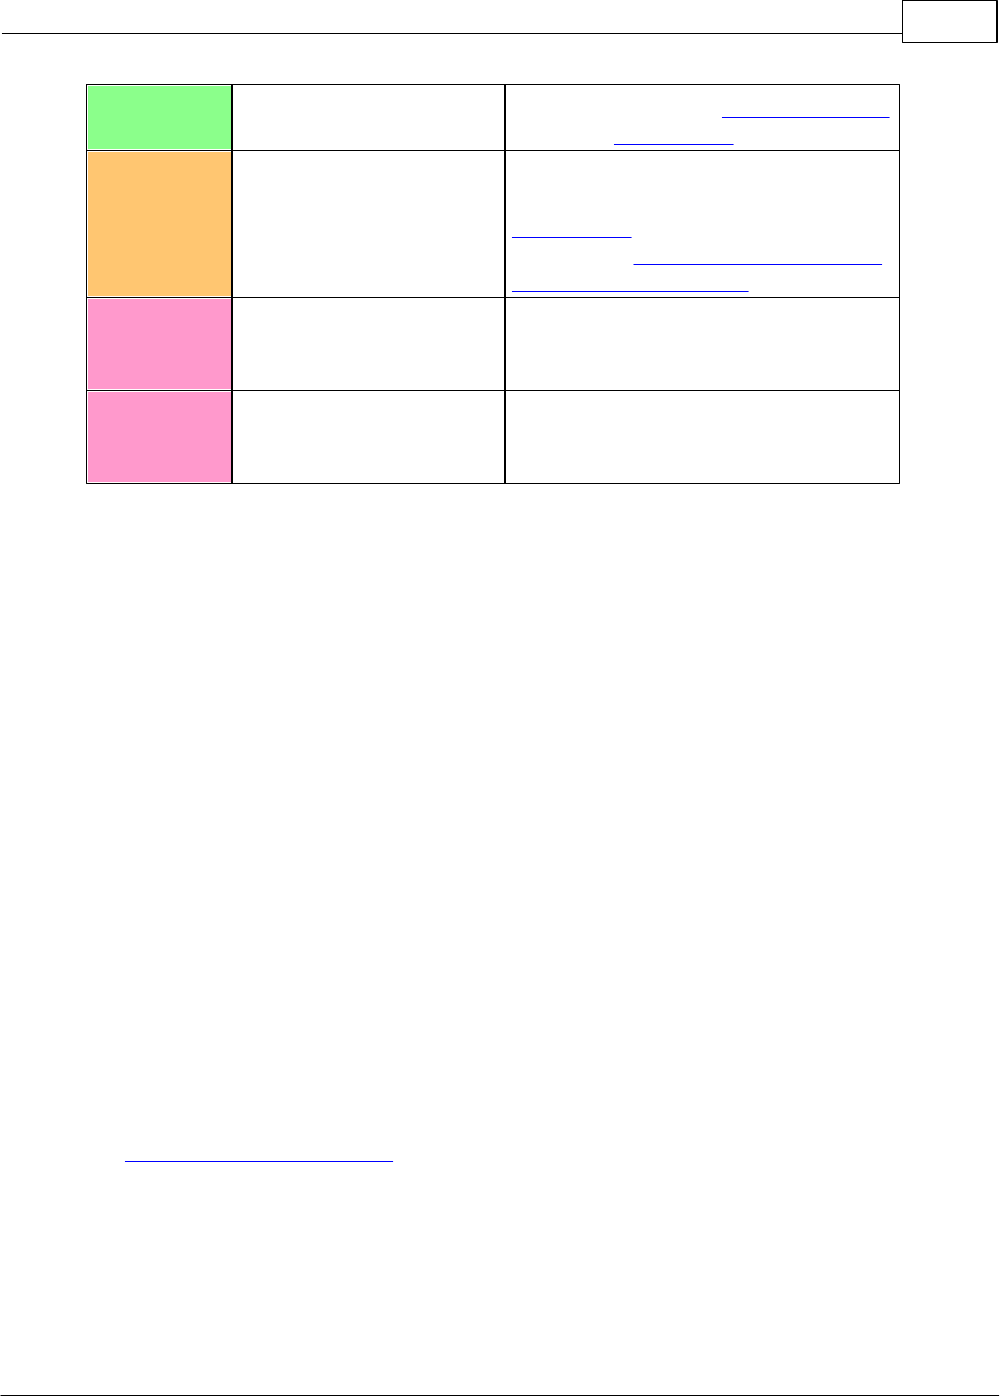
Web Component 123
© 2024 Titanium Software
or birth date on either the incoming data
or existing client screen.
NAME
MISMATCH
There is a client with the
same Student ID and birth
date but the names do not
match.
If the names are similar, then edit the
names on incoming data or existing
client screen. If the names are not
similar, then edit the student ID or birth
date in the incoming data.
MULTIPLE
MATCH
Multiple clients with the
same Student ID and birth
date
Combine clients in Titanium to remove
the duplicate entries or edit client
records in Titanium to correct errors.
NO STUDENT
ID OR BIRTH
DATE
There's no incoming data to
match to a client in
Titanium
Open incoming data and edit it to enter
the information.
3. If necessary, edit incoming data:
o Click on the desired entry to select it.
o Click the Incoming Data icon on the menu bar.
o From the drop down menu, choose Open Incoming Client
o Click Edit icon on the menu bar.
o Make the desired changes.
o Click Save.
o Click Exit.
4. If necessary, manually match incoming data to an existing client:
o Click on the desired entry to select it.
o Click the Matching in Titanium icon on the menu bar.
o Choose Assign a matching Titanium client to the incoming client
o Search for the desired client.
o Click Yes to confirm.
5. Click the Reset/Refresh icon.
6. Select entries to be processed by clicking check boxes to the left of desired entries or using the
Select icon on the menu bar.

124
© 2024 Titanium Software
7. Click Process Selected.
8. Depending on the settings chosen by your center administrator, use the pop-up window to
determine whether to associate the incoming data forms with an appointment
o Uncheck the box to review appointments not on the current day
o Click on the desired appointment with which to associate the forms
o Click the blank entry to create a note in the client file that is not associated with an
appointment.
o Edit the attendance option.
Edit Incoming Data
If a client states that they made a mistake when completing a data form, you may be able to edit
the form, depending on the settings chosen by your center administrator.
1. From the calendar screen, click Open > Approve Incoming Data.
2. Click to select the entry.
3. Click the Incoming Data icon on the menu bar.
4. From the drop down menu, click Open Incoming Data and choose the form.
5. Click Edit on the menu bar, and make required changes.
6. Click Save.
7. Click Exit.
Delete Incoming Data
If incoming entries were created in error or are not valid:
1. From the calendar screen, click Open > Approve Incoming Data.
2. Click to select the entry.
3. Click the Incoming Data icon on the menu bar.

Web Component 125
© 2024 Titanium Software
4. From the drop down menu, click Delete Selected.
5. Click Ok.
End Session
If a client only partially completes data forms due to a session time out or error, the approve
incoming data window will show that the session is in progress in the data forms column. To end
the session:
1. From the calendar screen, click Open > Approve Incoming Data.
2. Click to select the row.
3. Click the Incoming Data icon on the menu bar.
4. Choose End Client Session from the pull down menu.
Find Missing Data
If forms do not appear in the client file:
1. Perform a client search using a partial name to determine whether a duplicate client was
created. If a duplicate client was created, contact your system administrator to combine the
clients.
2. Perform an advanced client search for data forms added to Titanium on the day the data was
processed. If the data form was placed in the wrong client file, a user can recreate the form as
part of a note, or the client can complete the web component form again.
3. Notify your center administrator that the forms may have been deleted. Ask the center
administrator to run an audit on the actions associated with that client. If the forms have been
deleted, a user can recreate the form as part of a note, or the client can complete the web
component form again.
4. CCAPS 2015 or newer will not be placed in client files unless your center administrator has
entered CCMH membership information in the System Settings in Titanium. If CCAPS forms are
not being placed in client files, contact your center administrator for assistance.

126
© 2024 Titanium Software
Web Component Passwords
Depending on the settings chosen by your center administrator, clients may be unable to enter
data without a password. To provide a password:
1. From the calendar screen, click Open > Approve Incoming Data.
2. Click the Security icon on the menu bar.
3. Choose an unexpired password from the table, and provide to client. (Note: If all passwords
are expired, contact your center administrator for assistance.

Accessibility Tips 127
© 2024 Titanium Software
17 Accessibility Tips
There are several program settings and navigation tips that can be useful to Titanium Schedule
users who also use assistive technology. System and user settings, job responsibilities, workflow,
and access may all interact to affect the performance of assistive technology with Titanium
Schedule.
We are committed to ensuring the best possible experience for all users, and will comply with all
of our legal requirements under applicable federal accessibility standards (WCAG Guidelines 2.0
Levels A and AA and Revised Section 508). Any customer can contact us to obtain our Voluntary
Product Assessment Report. If you are having difficulty using the software with assistive
technology, please contact Titanium Support to report the issue and obtain one-on-one assistance
at either Support@TitaniumSoftware.com or 281-443-3544, menu option 2.
What would you like to learn about?
o User Settings
o Keyboard Shortcuts
o System Settings
User Settings
These tips can be helpful for users who are blind or vision impaired.
1. Defaults tab. There are 3 different audio chimes available to turn on. One for when
appointments are marked attended, one for attendance being changed to canceled or
rescheduled, and one for incoming data from the web component. The chimes can be tested on
this screen, so that users know the sound that corresponds with each notification.
2. Schedule viewer layout tab.
o Interval: If there is a typical appointment length in your center, consider changing the
interval to match that length. Navigation on the schedule screen with the up/down arrow
keys will match that interval.
o Alt Row Time Display: Checking this box will change the size, font and content of the time
line on the left side of the screen which may improve screen reader performance.
o Enable Quick Date Navigation: Check this box to allow schedule navigation using short cut
keys, the list of navigation short cuts is available from the Navigate menu on the schedule
screen.
o Display Schedule: You might consider choosing the default to be your schedule over multiple
days. In this display, the tab key can be used to focus the cursor on placeholders and
appointments in schedule order (down the current day, then to the next column, and the
next). Use the arrow keys to navigate to blank schedule times in order to make new

128
© 2024 Titanium Software
appointments. Use the F8 key to open the window to navigate to schedules of other users in
single schedule view, and to return to your own schedule.
o Display Appointment Format: Choose a format that includes the client name and description.
Then when tabbing on the schedule screen, screen readers will speak the client name and
appointment code.
If you are using a magnification program:
o Number of rows / columns: Consider reducing the number of rows and columns to be
displayed on the schedule screen so that schedule items are displayed in larger blocks.
o Display Appointment Start Time: This can be helpful because the start time of the
appointment will be displayed on the appointment block itself.
o Font sizes: Schedule and day header fonts can be changed to a font that is easier to read, put
in bold and enlarged.
3. Schedule viewer color tab. You can change the schedule colors for higher contrast. Contact
your center administrator about color contrast problems with appointments and placeholders.
(Note: The High Contrast tool in Windows will have an effect on tool bars and screens in Titanium,
and may make the screens easier to see for vision impaired users.)
4. User interface tab. Fonts for the application, tool bars and screen can be changed to font type
that is easier to read, put in bold and enlarged.
5. Accessibility tab. (Note: Accessibility features require Windows 10 version 1709 or newer.)
o Check to turn on the alternate user interfaces and allow tab key to be used in informative text
fields.
o Set desired keyboard short cuts to hear broadcast messages about the keyboard shortcuts to
operate various fields in the program (container context), whether or not screens are in edit
mode, and to turn off the "edit mode" announcement on screens that can be edited. User can
uncheck control, alt and shift options and change the keyboard keys.
o Set keyboard short cuts for showing header menus on search grids and tables, and the menu
to add flags.
o Set color for when there is related data (e.g. data forms attached to a note, client has a
waitlist entry) or red font. Users can change the color to accommodate their needs for
contrast.
o Set colors used on the to be used in the program. Users can change the colors to
accommodate their needs for contrast.
Accessibility Tips 129
© 2024 Titanium Software
Keyboard Shortcuts
Titanium is a Windows program, so standard Windows shortcuts can be used throughout the
program. Shortcuts for some specific functions are listed below. Voice recognition programs can
also be used to navigate in Titanium.
Keyboard Sequence
Action
F1
Help
ALT + F4
Exit report windows in the program
F7
In text boxes, opens spell check function.
F8
On the schedule screen, opens the Go To Date navigation. Select date
and schedule, and hit enter. Cursor will highlight the time block on the
selected schedule that it occupied when search was initiated.
F9
Highlight second menu bar, if one appears on the screen
F10
Highlight menu bar. On schedule screen, use to toggle between the
two tool menu bars.
Shift + F10
In text boxes, perform the equivalent of right clicking on the mouse to
bring up the menu
Alt + Underlined letter
On multiple screens, buttons on menu bars and menu items have
underlined letters. Press ALT and the underlined letter to select the
button.
Enter
Select an item. If the cursor is on an empty block on the schedule
screen, pressing enter will open the Add menu which can also be
accessed by right clicking.
Space bar
If in a table list, pressing will select the item.
Tab
Move forward among fields or elements on a window. Putting windows
in edit mode changes tab order and improves performance on some
screens (e.g. client record, appointments).
Use the tab key on the schedule screen to highlight appointments and
placeholders on the schedule screen. Tabbing will move from schedule
column top to bottom and then to the next column to the right at the
top.
Shift + Tab
Move backward among tab stops on a window.
Control + Tab
If in a narrative box, the cursor / focus will move to the next control on
130
© 2024 Titanium Software
the screen. If on a screen with multiple tabs, the cursor / focus will
move to the next tab.
Arrow keys
Navigate time slots on the schedule screen. Note that arrow keys
cannot be used to select appointments and placeholders for screen
readers. Can be used to navigate drop down menus and lists. If on a
window with multiple tabs, right and left keys can be used to highlight
tabs.
Left arrow key
Switches among options in sets of radio buttons.
Down arrow
On the task list, press F10 to highlight the menu bar. Then press the
down arrow to access the Show Tasks For menu.
Alt + right / left arrow
key
On schedule screen, will move the schedule forward or back one day at
a time.
Control + right / left
arrow key
On schedule screen, will move the display over by the number of
columns displayed. (For instance, if 5 columns are displayed, pressing
Control and right arrow, will move the view to the 6th column.)
Control + A
If cursor is in a narrative box, the entire content of the box will be
selected.
Control + P
Access the print window on the Reports preview screen.
Control + X
Access the export window on the Reports preview screen.
Esc
Depending on the screen and mode, can select cancel, close a window,
or select the schedule screen from the menu bars.
Control + C
In text boxes, allows copy selected text. From the schedule screen,
opens the Find Clients menu.
Control + P
In text boxes, allows paste of copied text.
Control + Up or Down
Arrows
Allows individual entries to be moved up or down in the list on screens
where single entry movement to reorder is possible (e.g. selecting data
forms to display on web component menu, ordering user and schedule
group entries, ordering appointment code group entries).
Shift + arrow key
In text boxes, selects text.
ALT + Down Arrow
Opens drop down menus
Esc
On some windows, can be used to close the window.
Navigation shortcuts
If enabled by the System Admin or user, there are keyboard shortcuts
available to navigate the schedule screen. These shortcuts are shown
on the Navigate menu on the schedule screen. Click Alt + N on the

Accessibility Tips 131
© 2024 Titanium Software
schedule screen to review the shortcuts, or review the list below.
Home
On the schedule screen, will return the schedule to the current day, left
column of the display, and earliest time slot on the schedule
Page Up
On the schedule screen, will move the schedule to the previous day.
Page Down
On the schedule screen, will move the schedule to the next day.
Shift + F3
On the schedule screen, will move the schedule back one week.
F3
On the schedule screen, will move the schedule forward one week.
Shift + F4
On the schedule screen, will move the schedule back four weeks.
F4
On the schedule screen, will move the schedule forward four weeks.
Control + F
On the schedule screen, opens the find clients window.
Control + O
On the schedule screen, opens the find open appointments window.
Accessibility key
combinations
On the accessibility tab in system and user settings, set desired
keyboard combinations to open various menus and control broadcast
messages throughout the program.
System Settings
Program settings can make Titanium less accessible for users of assistive technology. You should
review and consider the following tips:
User Settings - When adding the user, preset their settings as suggested above by clicking
Change User Settings.
Appointment Codes -
o Choose descriptive titles that are as short as possible.
o Choose block and text colors that have high contrast.
o Where possible, set a default note type and template so users don't have to select them.
Flags - If using flags, consider setting to "notification" so the flag alert pops up when users
interact with the client record. Screen readers will refocus to the notification screen and read
the content, so that users know that the client is flagged.
Notes & Data Forms - Do not check the box to automatically tab to the next field when
completing data forms. This feature causes the cursor to automatically refocus without
announcement, which may cause issues for users of either screen readers or magnification
132
© 2024 Titanium Software
programs.
Data Forms -
o Alternate text signature. Users who cannot operate a mouse won't be able to fill in the data
form element "signature." Plan to either use a short text box with statement that this is the
user's signature either instead of or as an alternative to signatures.
o Format order. Test your data forms by tabbing through them to ensure that the focus order is
as intended. Data forms formatted with multi-column layout may not be navigated as
intended when using a keyboard only.
Task List -
o Consider changing default colors for higher contrast.
o Check the setting to show task list count on log in to notify users of tasks to be completed.
Insurance Billing - Users who cannot operate a mouse won't be able to fill in the "signature" for
insurance billing. An alternative signature should be used.
Web Component -
o Click Adjust Approve Incoming Data colors to select colors that have high contrast.
o Click the Messages and Security button to access the color adjustment and indicator for
required items that have been left blank. By default, those are displayed in red font which
may not be visible to some users.
o Auto complete is an option for users with limited mobility but should never be used at
centers where clients are completing forms on shared computers or tablets, or on public
computers in other places. Doing so might reveal the personal information of clients who
used the devices previously. Because of the potential security risk, you must contact
Titanium Support to obtain a special code to allow this feature to be activated.

Building Lists 133
© 2024 Titanium Software
18 Building Lists
Throughout Titanium, you will encounter screens on which you will build lists for various
purposes. These screens mostly have the same menu options and functionality.
What would you like to do?
o Add list item
o Edit list item
o Delete list item
o Reorder list items
o View only active items
o Select columns shown on screen
o Table controls
Add List Items
1. Click the New icon on the menu bar.
2. Click on the name or description field to enter text.
3. Use the pull down menus and check boxes to select desired settings.
4. Click the Active check box to make the item available for use.
5. Click Save.
6. Click Exit
Edit List Items
After a list item has been used, best practice is to uncheck the Active check box to discontinue use
of the item, and create a new item.
1. Click on the list item to select it.
2. Click Edit icon on the menu bar.
3. Make desired changes.
4. If entering new entries on a Listing tab, click on the Details tab to make settings or add
information, if required.

134
© 2024 Titanium Software
5. Click Save.
6. Click Exit.
Delete List Items
After a list item has been used, you will probably be unable to delete it. Instead, uncheck the
Active check box to discontinue use of the item, and create a new item.
1. Click on the list item to select it.
2. Click the Delete icon on the menu bar.
3. If a pop-up warning appears, click OK or Yes to delete the item.
4. Click Save.
5. Click Exit.
Reorder List Items
Note: Many lists are used to create pull down menus from which users will choose. The items
will appear on the user pull down menu in the order shown on the list that you are creating.
1. Click the Reorder icon on the menu bar.
2. Click on the gray square to the left of the item to be moved.
3. Drag the item to the new location.
4. Click Save.
5. Click Exit.
Custom Order
1. Click in the gray square to the left of the desired list item.
2. Drag it to the desired position.
Building Lists 135
© 2024 Titanium Software
View Only Active Items
Click the Hide Inactive Records check box at the top of the screen, or
Use Show pull down menu to select a filter option
Select Columns Shown on Screens
Note: Only items shown in the Selected pane will be seen on the screen. The first item in the
Selected pane will appear at the left of the Titanium user screen.
1. Click a list item in the Not Selected pane. (Note: Click in the Display Alphabetically check box
to show items in alphabetical order.)
2. Click the Add button in the center of the window to move the list item to the Selected pane.
3. Click a list item in the Selected pane.
4. Click the Remove button in the center of the window to move the list item to the Not Selected
pane.
5. Repeat Steps 1-4 until all desired headings are shown in the Selected pane.
6. To reorder items, click in the gray square to the left of an item in the Selected pane and drag to
the desired position. (Note: Items will appear on Titanium user screens in order from left to
right. If you click Sort Alphabetically, items will be shown in alphabetical order on both the
settings and user screens. Therefore, alphabetical sort may not be the best choice for selected
items.)
7. Click OK to save changes.
Table Controls
Throughout the program, data is displayed in tables (e.g. find client search, advanced client
search, waitlist listing tab, etc.). On the heading row of any table, users can right click to access a
set of controls. The controls vary by table and include:
Sort Ascending - Sorts the table display in ascending order based on the data in the column
where the user clicked.
Sort Descending - Sorts the table display in descending order based on the data in the column
where the user clicked.
Customize Sort - Opens a new window where users can create a custom multi-level sort by
adding columns and then select the soft order. Titanium will sort using the first select, then the
136
© 2024 Titanium Software
second selection and so on.
Clear Sorting - This returns to the default sort order.
Remove This Column - Removes the column where the user right clicked from the display.
Field Chooser - Opens new window with options for additional columns that the user can have
displayed on the table. Click the desired data from the list.
Reset Columns - This returns to the default column display.
Export - Hovering over this option will open a fly out menu with export formats. Users with
sufficient security rights can click on the desired option, and use the Windows interface to
export and save the display.
Print Preview - This opens the display in the report preview screen. Users can use the icons on
the preview screen to view and print the display, or export in the report preview.
Reorder - Opens a new window. Users can click in the gray squares to the left of the entries and
drag the entries into the desired order.

Index
137
© 2024 Titanium Software
Index
- 2 -
21st Century CURES Act
Export Client File 46
Records Request 46
- A -
Accessibility 127
Accommodation 29, 39
Accommodation Letters 39
Accommodations 29, 39
Add client to waitlist 101
Allocate Payments 12
Anonymous Surveys 122
Applied Credit 12
Apply Credit 12
Appointment
Add 86
Copy 86
Copy to Next Week 86
Delete 86
Edit 86
Recurring 86, 89
Appointment icons
User Settings 110
Appointment Reminders 85
Resend 91
Send 91
Appointments 85
Add 86
Copy 86
Copy to Next Week 86
Delete 86
Edit 86
Recurring 86, 89
Approve Incoming Data 122
Assistive Technology 127
Attendance 85
Mark 96
Track 96
- B -
Background color
User Settings 112
Billing
Charges 8
Client Billing Note 22
Credits 8
Invoices 8
Sliding Scale 22
Statements 8
Billing File
Add charges 8
Add insurance payments 12
Add payments 12
Adjustment 22
Edit charges 8
Edit insurance payments 12
Edit payments 12
Refund 22
Write off 22
- C -
Calendar Sync
External appointments 115
Manual sync 115
User settings 115
CCAPS 122
CCMH 122
User Demographics 118
User Settings 118
Change password 108
Chimes
User settings 108
Client 29
Add 30
Advanced client search 49
Client file 46
Client flags 37
Deactivate 30
Delete 30
Demographics 38
Edit 30
Email 45
Find 49

138
© 2024 Titanium Software
Client 29
Flags 37
Forms 42
My Clients List 49
Search 49
Security 30
Terminate 30
Text 45
Client Account
Add charges 8
Add insurance payments 12
Add payments 12
Edit charges 8
Edit insurance payments 12
Edit payments 12
Client file 29
Export 46
Forms 42
Open 46
Print 46
Scanning 42
Search 46
Client flags 29, 37
Client Import
Add new client 28
Update client 28
Client Insurance Information
Add 17
Edit 17
Review 17
Client Photo 35
Client screen 29
Clients List 52
CMS 1500 17
Colors
User Settings 112
Couple Appointment 86
- D -
Data Forms
Print for client 42
Deactivate clients 30
Default Printer 81
Delete clients 30
Demographics 29
Add 38
Edit 38
Diagnosis
Make diagnosis 74
Notes tab 63
Disabilities 29, 39
Disability 29, 39
Display weekends
User Settings 110
- E -
Electronic Prescribing
Authentication 54
Cancel 59
Client reported medication 56
Controlled Substances 54
Create prescription 56
Discontinue 59
Edit 59
EPCS 54
Hold prescription 56
Issue prescription 56
New prescription 56
Passphrase 56
Preferences 54
Refills 62
User setup 54
Void 59
Emails
Clients 45
eprescribing
Authentication 54
Cancel 59
Client reported medication 56
Controlled Substances 54
Create prescription 56
Discontinue 59
Edit 59
EPCS 54
Hold prescription 56
Issue prescription 56
New prescription 56
Passphrase 56
Preferences 54
Refills 62
User setup 54
Void 59
eRx
Authentication 54

Index
139
© 2024 Titanium Software
eRx
Cancel 59
Client reported medication 56
Controlled Substances 54
Create prescription 56
Discontinue 59
Edit 59
EPCS 54
Hold prescription 56
Issue prescription 56
New prescription 56
Passphrase 56
Preferences 54
Refills 62
User setup 54
Void 59
Expand full screen 64
- F -
Find Client Appointment 94
Find Open 94
Flags
Add 37
Colors 37
Delete 37
Edit 37
Fonts
User Settings 110
Form Letters 49
- G -
Grid line color
User Settings 112
Group
Appointment 94
Sign Up Sheet 94
Group Appointment 86
Group Appointments 85
Group Notes
Add 67
Addendum 67
Distribute 67
Edit 67
Group Sign Up Sheet
Add 94
Edit 94
Use 94
Groups 94
- H -
Holidays 86
- I -
Individual Appointment 86
Insurance
Provide signature 108
Provider details 108
Insurance Claims
Electronic 17
File 17
Generate 17
Print 17
Process 17
Intern 104
Intern file 104
Intern screen 104
Invoice
Adjustment 22
Write off 22
Invoices 25
Add charges 8
Add payments 12
Edit charges 8
Edit payments 12
Find 16
IT Staff 120
- L -
Lists
Add Item 133
Delete Item 133
Edit Item 133
Reorder List 133
Lock notes 64
- M -
Mark Attendance 85, 96
Medication 63

140
© 2024 Titanium Software
Medication Log
Edit 70
Review 70
Medication Notes
Add 70
Client reported medications 70
Edit 70
Prescriber 70
Prescriptions 70
Samples 70
Transcriber 70
MedLog 29, 70
Multiple Match 122
My Clients List 52
- N -
Name Mismatch 122
Non-Client Notes
Add 76
Add to Client File 78
Addendum 76
Delete 76
Edit 76
Lock 76
Sign 76
Unlock 76
Non-Clients 76
Note Templates 64
Note Types 63
Notes
Add 64
Addendum 64
Attachments 63
Data forms 63
Delete 64
Diagnosis 63, 74
Edit 64
Group notes 67
Lock 64
Medication 63, 70
Narrative 63
Non-client 76
Other Appointments 67
Sign 64
Supervisor review 70
Types 63
Unlock 64
- O -
Online Appointment Scheduling 100
Online Scheduling 100
Other Appointment 86
Outreach 76
Document 79
Schedule 79
- P -
Password reset
Turn off chimes 108
Photo
Add 35
Delete 35
Edit 35
Placeholders 85
Add 97
Appointment based on 97
Delete 97
Edit 97
Prescriber 70
Print
Accounts 25
Invoices 25
Statements 25
Print image file 17
Print Schedule 85
Printer Settings 81
Provider 1 120
Provider 2 120
Provider 3 120
- R -
Recurring Appointment 86
Add 89
Delete 89
Edit 89
Recurring Appointment Definition
Edit 89
Recurring Appointments
Add 89
Delete 89
Refund 22

Index
141
© 2024 Titanium Software
Reports
Export Data 82
FAQs 82
Frequently Used 82
Generate 82
Preview 82
Print 82
Run 82
Troubleshooting 82
Resize windows 114
- S -
Scanner 42
Scanning 42
Schedule Viewer Colors
User Settings 112
Scheduling 85
Search for appointment 94
Search for open appointment 94
Sign notes 64
SMS Credit 91
Start time
User Settings 110
Statements 25
Supervision 104
Notes 70
Trainee task list 107
Supervisor 120
Supervisor in Training 1 120
Supervisor in Training 2 120
Support Staff 120
System Settings
User Permissions 120
SystemAdmin 120
- T -
Table Controls
Export Table 133
Field Chooser 133
Print Table 133
Sort Order 133
Task List
Add items 107
Complete items 107
User 107
Terminate clients 30
Text
Account Balance 45
Clients 45
Text Account 45
Text Balance 45
Text boxes
Enlarge 64
Expand 64
Transcriber 70
Turn off chimes 108
- U -
Unassigned Clients 52
Under Supervision 120
Unlock notes 64
Unsupervised 120
User Permissions
IT Staff 120
Provider 1 120
Provider 2 120
Provider 3 120
Supervisor 120
Supervisor in Training 1 120
Supervisor in Training 2 120
Support Staff 120
SystemAdmin 120
Under Supervision 120
Unsupervised 120
User Settings
Appointment icons 110
CCMH 118
Change password 108
Defaults tab 108
Display weekends 110
Fonts 110, 114
Resize windows 114
Schedule colors 112
Schedule Layout 110
Start time 110
User interface tab 114
Users and Schedules Groups 99
- V -
Vacation 86

142
© 2024 Titanium Software
- W -
Waitlist 29, 85
Add client 101
Complete entry 101
Edit entry 101
Manage 101
Re-open entry 101
View entry 101
Web Component
Anonymous surveys 122
Approve incoming data 122
Delete incoming data 122
Edit incoming data 122
End session 122
Multiple Match 122
Name Mismatch 122
No Student ID or Birth Date 122
Passwords 122
Session time out 122
Troubleshooting 122
Window size 114
Write Off
Account balance 22
Charge 22
