IK Multimedia MODO Bass
A Technical Article and Sort of Review
Mike Rivers © 2017
Prologue
If you follow my reviews and technical articles, you might well ask “What the heck
is he doing reviewing a software plug-in?” To tell the truth, I’ve wondered the
same thing myself, which is why this article has been a long time coming. Nearly
everything that I record involves real instruments played by real musicians, so
other than just messing around or experimenting, I don’t use virtual instruments,
particularly those of the DAW (Digital Audio Workstation – I used Reaper v5 for
my experiments here) plug-in variety. When I record something with a bass, it’s
nearly always an acoustic bass. I don’t play bass (I’ve played at bass, but that
doesn’t really count) so I don’t really know all the subtleties that a real player
would recognize or find lacking, and I don’t really design sounds, I just make
recordings that sound real.
When my friendly IK Multimedia marketing manager let me know that MODO
Bass was about to be released and asked if I’d like to write a review, I was about
to say “no, thanks” for all of the above reasons, but when I took a closer look, it
occurred to me that it might be a good tool for learning how stringed instruments
make their sounds and what makes one instrument sound different from a similar
one. I figured that the usual reviewers and forum posters would be pretty quick to
tell readers if the program’s sounds were good and useful, something that there’s
no particularly good reason to trust me about. Rather, I could write about the
modeling technology and the flexibility that it offers over conventional synthesizer
or sample-based instruments. So that’s where I’ll be going here.
What It Is
The simple description of MODO Bass (which I’ll occasionally shorten to MODO
here to save my fingers) is that it’s a MIDI-driven synthesizer for electric bass
instruments. It’s a 64-bit application so it requires a 64-bit operating system,
Windows Vista, Mac OS-X 10.9 or newer versions. In the DAW environment, it
runs as a VST2, VST3, AAX, or Audio Units (Mac) plug-in, or it can run as a
stand-alone program for live playing or off-line sound tweaking. What makes
MODO special is that instead of employing samples or conventional synthesis
techniques to produce its sounds, it works by modeling, in real-time, the behavior
of a vibrating string. What this buys you is more accurate response to your
playing that affects the timbre and dynamic characteristics of the notes. Beyond
response to playing techniques, tweaks to the instrument sounds themselves are
in terms of physical things like touch, picking position, string gauge and amount
of wear, rather than boosts or cuts in frequency bands and decays in
milliseconds. Further you can virtually modify the instrument itself in ways that, in
real life, would involve woodworking tools soldering irons.
One thing to know right up front is that it only models “iconic” (IK’s description,
not mine) electric basses – there are no acoustic basses included, hence no
doghouse (upright) bass, no washtub bass, no guitarrón, not even an acoustic
bass guitar. I asked if there was a possibility of adding acoustic models in the
future, and the answer was a pretty straightforward “no.” Acoustic instruments
have more and different variables than what the algorithms used here can model,
so a MODO Acoustic Bass would really be a very different animal. That’s not to
say that it will never happen, but don’t expect an acoustic upgrade to this version.
Modal Non-Linear Physically Modeling Synthesis
This mouthful is the process upon which MODO Bass is based. “Modal,” because
there are several parts that go in to the complete model, and “Non-linear” (that’s
the hard part) because the parts of the instrument that make the sound behave in
a non-linear manner. Here’s an example: The fundamental frequency of a
vibrating string is fixed by its length, mass, and tension – that’s basic physics –
but the overtone structure, and particularly the rate at which individual overtones
decay over time, depend on how the string is excited. The string could be
plucked with a finger, picked with a plectrum (that’s the fancy word for “pick”),
smacked, or even bowed. Each playing technique introduces its own harmonic
signature, and how that varies is interactive with the position along the string’s
length where it’s plucked. Then, since we’re modeling an electric bass here,
there’s a pickup or two. The pickup’s position and its electrical characteristics
affect its signal output, and, to close the circle, the pickup’s magnetic field affects
the vibration of the string.
When a luthier designs a bass, he makes a set of choices based on the sound he
wants to get from the instrument, and hopefully someone else will like that sound
and buy his instruments. What IK has done in developing MODO Bass is to
create a set of mathematical models of the physical parameters that go into
building and playing a bass and how they react to both external stimuli and to
each other. Then, they put a musician-friendly user interface on the tools so that
you can easily experiment with things that affect the sound and put together your
favorite combinations.
The Brass Tacks
I’ll get into how the tools work shortly, but first I’d like to suggest that there are
two ways that you can work with MODO Bass, both equally valid and important.
Twelve instrument models form the basis for all of the sounds in MODO - most
players will recognize most or all of their names. IK has provided 115 preset
combinations of instruments, pickups, amplifiers and effects, built around three
playing styles – finger, pick, or slap, plus a totally off-the-wall set. The partial
listing of presets in the appendix here will give you a sense of the scope and
level of detail that went into preparing them. So one approach is simply to
audition the presets and either choose one and go with it or use it as a starting
point for some further tweaking.
Another approach to using MODO Bass is to build the bass of your dreams using
the tools provided. This is what I find most interesting about this program, so that
will be the focus of this article. But before digging into the toolbox, you’ll need to
what’s available how to find your way around. The most organized way I can
describe MODO’s features and options is through the user interface. So here’s
the $20 tour.
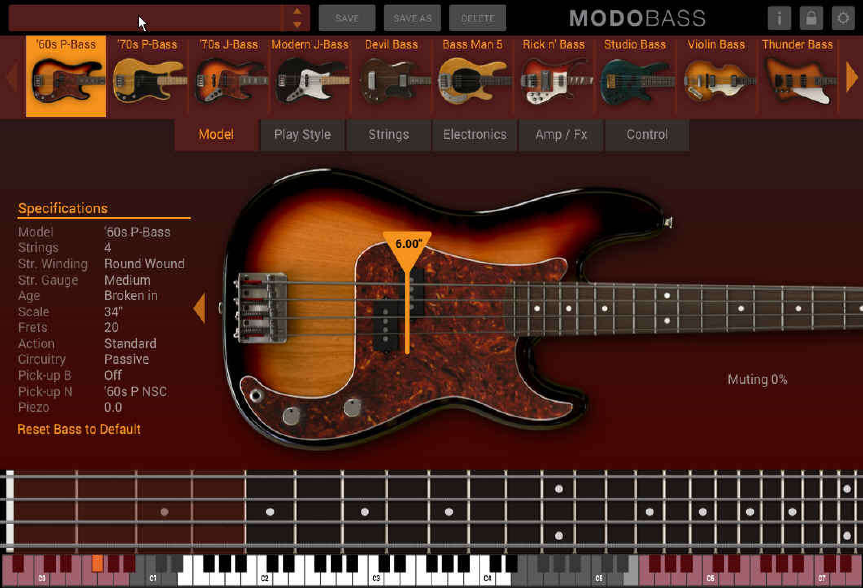
Screens and Controls
This is what you see when you first open the program in both the plug-in and
stand-along mode. The tabs below the row of instruments get you into the inner
workings. The top row of the screen is where presets are selected, loaded, and
new or modified presets saved. By the way, while I’ve reduced these screen
shots to fit the page layout, the full resolution is there. If you can’t read something
clearly on the page of text, zoom in.
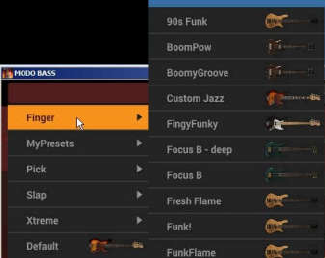
The box in the upper left corner normally shows
the currently active preset, but it’s blank when
the program is first opened. Clicking on the
Preset box brings up the alphabetized category
menu (these are actually folder names), each
containing a bunch of named preset
configurations displayed to the right. From the
factory, the preset categories are defined by the
playing styles - Finger, Pick, and Slap, plus the
wacky Xtreme presets. There’s also Default,
which is a stock ‘60s Fender Precision bass. MyPresets is a folder that I created
to save configurations I used while working on this article.
Clicking on a listed preset loads all of its settings – model, play style, strings,
pickups, and amplifiers – the whole enchilada. The up and down arrows at the
right-hand edge of the Preset box are for scrolling through the whole preset list,
going from one style right on to the next. The SAVE, SAVE AS and DELETE
buttons manage the presets. A word to the wise here: When you come up with a
sound that you like, save it as a preset!!!!
When you begin your sound quest by selecting one of the presets, its name
appears in the box in the upper left corner. If you change anything, an asterisk (*)
follows the preset name to indicate that it’s no longer exactly what you selected.
It’s also a reminder to save your work as you go. There’s no A/B button here, nor
is there a timed auto-save, so if you want to compare your modified preset to the
original or to another preset, If you haven’t saved your work and you select
another preset, your tweaks and trials will go straight to the bit bucket. SAVE AS
prompts you for a new name, while SAVE will ask if you want to replace the
selected preset with your variation – that’s all the warning you get, so heed it.
At the bottom of the screen, there’s the bass fret board and, below it, a piano
keyboard. The lowest octave purple-colored piano keys are notes lower than any
of the modeled basses can play, but they can be used as controls. Stay tuned for
the Control Tab explanation. The gray keys upscale from the purple ones are
inactive for a standard 4-string bass, but switch to white and become playable for
a 5-string bass or one with the E string dropped down to D.
The Tabs
All of the settings and tweaks are presented as tabbed pages, with the tabs
located below the window showing all of the options and controls available within
that page.
The Model tab
MODO opens in the Model page, displaying the music store’s bass department
stock. Click to select one and the big center window fills with a picture of your
bass along with a list of its default specifications. You can choose an instrument
and just start playing it “off the shelf” but this program is really a tweaker’s
delight. For starters, the yellow triangle with the descending line that you can see
in the overview a page back indicates the picking position, dimensioned in inches
from the bridge. You can drag this around which, as in real life, around alters the
tone, but that’s just a starter.
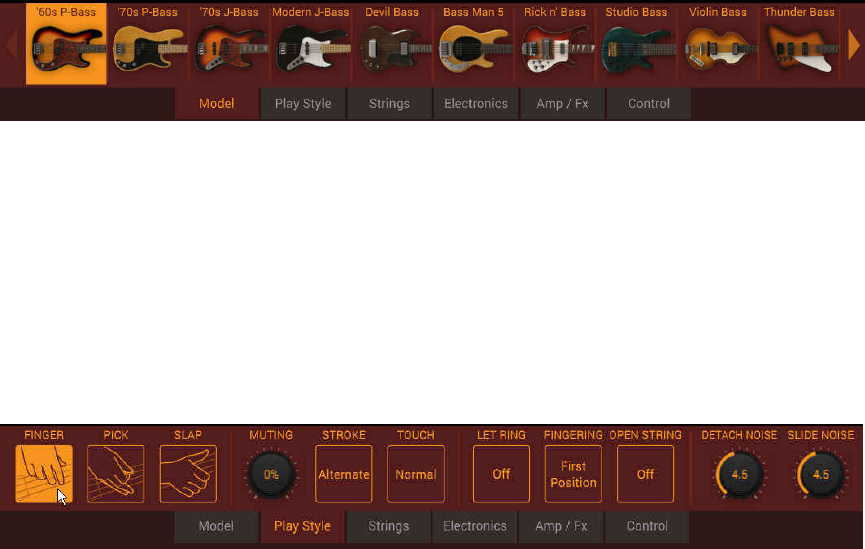
The Play Style tab:
Like many of the control panels in MODO Bass, this one is interactive, with the
choices under the Stroke and Touch buttons changing to go along with the
selected style. For example, for FINGER style, the STROKE button gives you the
choice of plucking the string with the index finger, the middle finger, or alternating
between the two. Clicking on the TOUCH button selects soft, medium or hard.
When the PICK style is selected, your STROKE choices become up, down, or
alternating, and TOUCH becomes SCRATCH, with choices of hard or normal.
From what I hear and knowing something about playing guitar, Scratch seems to
be related to the stiffness of the pick.
SLAP gives you a choice of slapping the string with a thumb, pulling the string
with an index finger, or a combination of both, with MIDI velocity determining
when pulling gets priority over slapping. Play position isn’t defined for the Slap
style – you just wham away anywhere, so the play position marker disappears
from pages that normally show it.
LET RING is an on/off toggle. When it’s off, notes decay pretty rapidly, 25
milliseconds or so, when released. With it turned on, the note will sustain for
several seconds after release, though cuts it cuts off when the next note is
played. This becomes part of a saved preset, and can be pretty annoying for
many styles, so use it frugally. If you like the idea of an occasional sustaining
string as a performance technique, there’s a way to do that under the Control tab,
so stay tuned.

FINGERING translates playing on a linear keyboard to how a real bass player
might get from one note to another. Your three choices are First Position, Easy,
and Nearest. First Position plays everything within the first five frets for
everything below C on the 1
st
string, then plays outside of first position any higher
notes. Easy and Nearest are two different schemes for determining on which
string the next note is played. OPEN STRING allows you to use an open string
rather than fretting the note on a lower string. There are subtle and some not-so-
subtle differences in the harmonic content of a note depending on where it’s
played on the fingerboard, and these two controls offer a degree of
humanization.
DETACH NOISE and SLIDE NOISE are small, adjustable fingering noises that
make your bass less than perfect – or closer to perfect if you look at it another
way. MUTING lays a virtual palm of the playing hand gently on the strings.
The Strings tab:
The STRING button has three options - 4 represents the conventional 4-string
bass standard EADG tuning, 5 adds a low B string, and Drop D switches the
tuning to DADG. The graphics at the bottom of the page change accordingly with
a fifth string appearing when selected, and the white keys (which represent the
notes that you can play) extending downward for the Drop D and 5 string
settings. TYPE selects Round or Flat Wound strings, GAUGE can be Light,
Medium or Heavy, and the AGE of the strings can be New, Broken in, or Old.
Finally, A4 REFERENCE is where you can tune the bass to match tracks that are
off concert pitch. The range is 430 to 450 Hz, or about ±39 cents, not much, but
hopefully enough to get in tune with the piano.
The Electronics tab is about the electronics within the instrument itself:
If you’re building a bass from scratch, this tab opens with the setup for the model
that you select as your foundation. Alternatively, if you’ve started with a preset, it
opens with that preset’s settings. Any bass can have one or two conventional
pickups plus an under-the-bridge piezoelectric pickup, something that’s not
commonly found on a bass, at least not common enough to be on any of the
stock models, though it’s turned up in some presets.
Each pickup including the piezo has its own volume control. For passive
electronics, there’s a single treble-cut Tone control. Active electronics replaces
the single control with individual Bass, Mid, and Treble tone controls.
As in real life, you don’t have to use the
stock pickups. While there aren’t any
aftermarket boutique pickups to choose
from, you can put a pickup from any of the
models on any other model, as well as
adding active electronics to pickups that
were designed before anyone thought to
build a preamp into the instrument body.
Within the physical limits, when this tab is
open, you can drag the pickup positions
around with the mouse.
There’s some fudging (or rather, extended modeling) going on since there’s only
one apparent 5-string pickup, yet when you add the fifth string, the strings are still
evenly balanced with any pickup. There are some restrictions in that some bridge
pickups can’t be installed in the neck position and vice versa. This might be a
mechanical limitation, or it could be that the developers said “Aw, geez, if we
have to model that many combinations we’ll never get the job finished.” Still,
there’s a lot of flexibility here, and one that clearly makes a difference in tone.
The Amp/FX tab:
While these aren’t integral parts of the physical model of the bass, an amplifier
and effect pedals are often integral parts of a bassist’s sound. IK Multimedia has
many years experience in modeling instrument amplifiers and effect pedals, and
while they aren’t giving away their Amplitube amplifier models here, MODO
includes two generic amplifier simulators based on the Amplitube modeling
technology. One is a tube amplifier graphically reminiscent of the Ampeg B-15.
The other is a solid state amp that doesn’t really remind me of anything in
particular. In addition, there’s a virtual pedal board consisting of four effect
processors selectable from a collection of seven.
Among the two amplifiers and seven effect pedals, there are a lot of different
controls here. What confused me at first was that sometimes it appeared that the
amplifier had a graphic equalizer, sometimes it had a compressor, sometimes
not, and occasionally I found a control that I didn’t expect on an amplifier. It
turned out that sometimes I didn’t notice that what I was seeing was controls for
a pedal rather than the amplifier. It took me a while to recognize what was
selected for control and how to select the controls that I wanted to adjust.
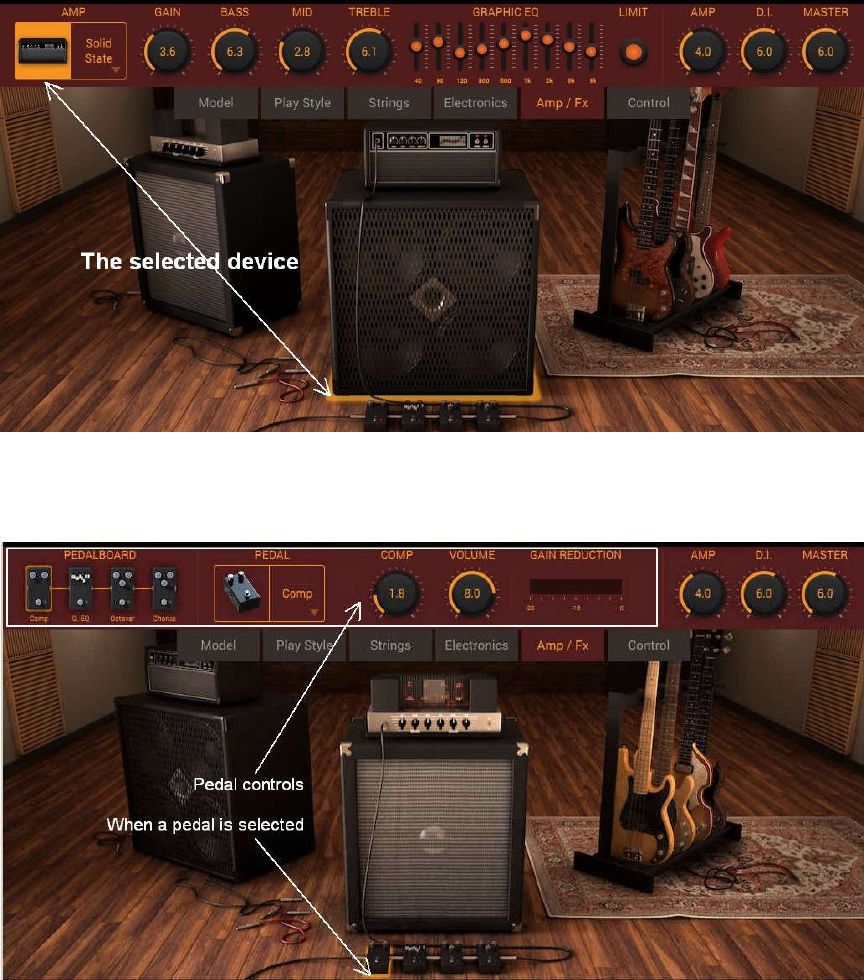
Here’s the big picture for the Amp/FX tab:
And for the effects:
In order to switch between amplifier and effect controls you have to go to the big
picture and click on what you want to adjust. Thinking about this as I’m writing, I’d
find it less confusing if, rather than the combined Amp/FX tab, there was one tab
for amplifiers and another for effects.
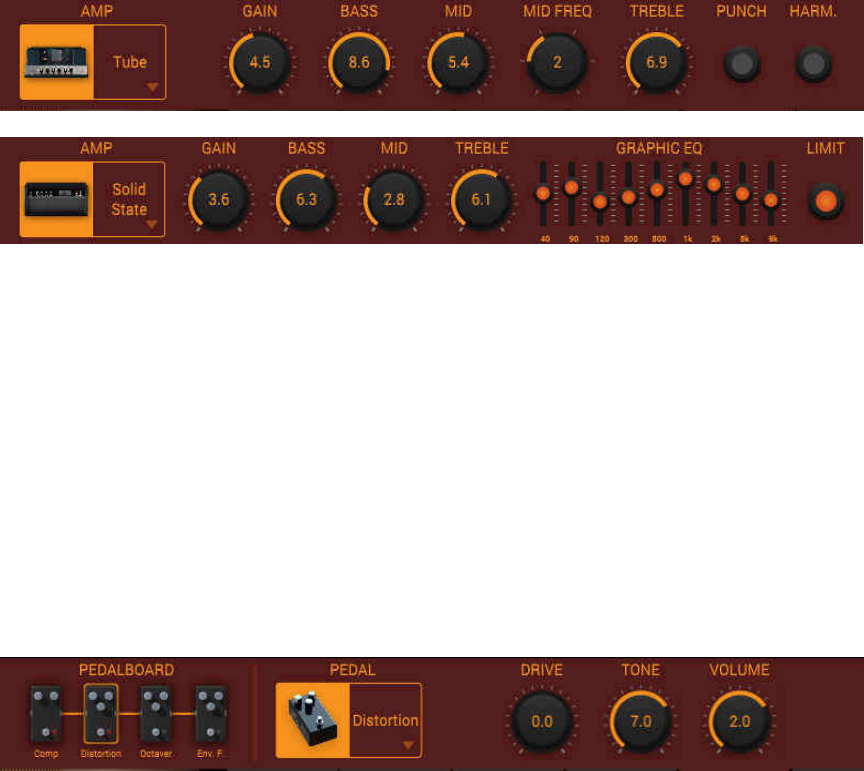
Here are the control panels for the two amplifiers:
When working in this panel, you can switch between the tube and solid state
amplifier by from the choices in the AMP box, or, from the big picture, you can
just click on the other amplifier. Either way, the control panel displays the controls
for the amplifier you’ve selected. As a reminder here (to myself, included),
MODO Bass is an instrument modeling program, and the amplifier, while an
important part of the system, is an accessory. The amplifiers work fine and offer
generic control sets, but the models don’t offer the extent of control that’s found
on a more sophisticated amplifier simulator such as microphone type and
position or the load impedance presented to the pickup. But if this isn’t your first
rodeo, you probably already have a couple of amp modelers you like that you
like, and it’s easy to bypass the MODO Bass amplifier and add your favorite to
the DAW’s plug-in chain.
As an FX example, here’s the control panel for the Distortion pedal:
Mouse-clicking on any pedal, either in the big picture or the PEDALBOARD
section of the control panel, displays its controls. A pedal can be engaged or
bypassed by clicking in any of three different places, on the floor, in the
PEDALBOARD section of the control panel, or on the picture in the PEDAL
section of the control panel. A too-tiny virtual red LED indicates that a pedal is
active. The effects offered here cover a pretty wide range of basic functions, but
nothing exotic. There’s distortion, chorus, compressor, delay, envelope filter,
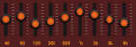
octave divider, and an 8-band graphic EQ.
To arrange the processing order of the pedal board, rather than dragging the
chosen pedals around, it’s necessary to click on a pedal in the chain, then select
the pedal you want in that position. Clicking on the pedal name in the PEDAL box
brings up your list of choices. You can put the pedals in any order, and you can
have multiple instances of the same pedal. You can, for example, run the bass
through four delays if you wish, and in fact there are a couple of presets that
involve multiple delays. There are always four slots and there’s no “blank” pedal.

If you want only one pedal, you have to fill the other three slots and bypass the
unneeded pedals.
Just as in real life, gain structure of the pedal chain matters – you can overdrive a
pedal by turning up the output of the pedal ahead of it. You can also overdrive
the amplifier from the pedal chain. Fortunately, unlike real life, hum and buzz
doesn’t increase when you crank the level in or out of a pedal or amplifier.
The Mixer section (my name for it) is at the far
right end of the Amp/FX control panel. AMP is
the master gain for the amplifier. It interacts with
the amplifier’s input GAIN control in the
conventional manner - turn the input gain up and
the master down for crunch, turn the input gain
down and the master up for clean tones. And before you ask, the controls only
go to 10, not to 11.
Turning up the D.I. knob blends some direct signal in with the amplifier as you
might do in the studio or on stage. The DI output is post-pedals rather than
straight out of the instrument’s jack, and there doesn’t seem to be a way to
change that. Sometimes it’s what you want, or its what you get when plugging in
a hardware DI box just ahead of the amplifier’s input jack (or perhaps the
amplifier has a DI output itself). But in the studio, I generally to take the DI output
directly from the instrument, pre-processing, in order to have complete freedom
to add effects and re-amp it after tracking. When experimenting with pickups and
positioning, I wanted to hear just the direct output. When I was switching from
model to model and comparing sounds, I had to remember to check to be sure all
of the effects were bypassed, since some models have different preset settings,
all of them including a compressor that’s turned on.
Finally, the MASTER knob controls the volume of the amplifier + DI mix.
The Control tab
This one is very different from those we’ve discussed thus far. It offers real time
control of several playing style parameters.
Each of the parameters in this control panel can be assigned to a MIDI
Continuous Controller number. Most have continuous control, and working these
controls while playing can really be fun.
Pitch BEND has a fixed range of a half step up or down with the pitch controlled
by the assigned controller, usually the pitch bend wheel. Adjusting the controller
assigned to SLIDE slides up or down from the currently played note by the
number of frets set by the RANGE control. It’s not a “fretless” slide, however,
since it’s not a fretless bass (that’s on my wish list). VIBRATO depth is adjusted
by its assigned controller, with the vibrato RATE set by its knob.
MUTING applies a bit of virtual palm pressure to the strings. PLUCK POS adjusts
where you’re plucking the string. It’s identical to the dragging the pluck position
pointer with a mouse that’s displayed in the Model, Play Style, and Strings tabs.
If you have one of those screens open and a controller assigned to Pluck Pos,
when you adjust the MIDI controller, the position pointer moves. Cool!
According to the manual, LEFT HAND “controls the left hand position in the neck”
and it seems to come into play when Play Style FINGERING is set to Nearest.
Changing the Left Hand controller moves the block where it tries to find the
nearest place to play the next note to a position of your choosing rather than the
program’s choosing. It’s useful if you want to play a phrase with all of the strings
fretted within a specific area of the fingerboard.
When playing legato, with LEGATO SLIDE engaged (this is an on/off switch, not
a continuous control), you get a slide (again, over the frets) from a held note to
the next note. The speed of the slide is a function of the velocity of the next note.
When CHORD is engaged, it tries to find a way to finger a chord without trying to
play two notes on the same string.
Finally, MASTER is the master volume control, the same control as MASTER in
the Amp/FX tab.
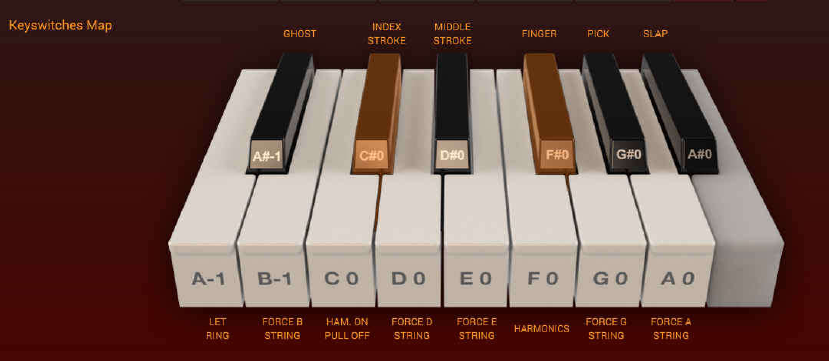
Many of the playing parameters can be controlled by MIDI notes on keys that are
outside the playing range of the bass. These are the purple keys I mentioned
earlier, the lowest octave on the virtual keyboard at the bottom of the main
window. In addition to playing those notes on a MIDI keyboard, you can click on
the on-screen keyboard at the bottom of the screen or you can click on a key in
the key map in the Control tab.

Since several of the Play Style controls are duplicated (sort of) in the Control tab,
here’s the Play Style tab again for reference.
The FINGER, PICK, SLAP, STROKE, and LET RING controls in this panel have
direct equivalent functions in the Control Key Map. The difference between how
the functions work in the Play Style and Control tabs is this: Properties selected
from the Play Style tab are static – they’re stored when you save a preset, and
they stay that way as long as you’re using that preset. Suppose you’ve recorded
a track in your DAW using a Finger style preset and decide that playing the last
chorus with a pick sounds better. One way to accomplish this is to select that
portion of the MIDI track, move it to a new MIDI track with MODO Bass plugged
in, and then select a MODO Pick-based preset for it.
I didn’t intend to get very far into DAW usage here, but since I brought it up, I’ll
tell you that with Reaper, and I suppose any other popular DAW, when you save
a project file with tracks that contain plug-ins, the plug-in settings are saved along
with the project. So if you split a track into tracks that have different presets or
custom settings, they’ll still be there next time you open that project.
But there’s another way to accomplish this.
The control keys can be used to temporarily switch the playing style, which finger
you’re picking with, and whether strings sustain or not. This is really handy when
you’re playing on a full sized MIDI keyboard. Pressing one of these mapped keys
changes the setting to which it’s assigned for as long as the control key is
pressed. When the key is released, setting returns to its previously configured
state. Furthermore, since these controls are sent to the program as MIDI note
messages, they can be embedded in a MIDI track in your DAW.
The Control keys offer a couple of functions that don’t appear in other control
panels. Hammer-on/Pull-off add a bit of extra noise to the attack and release of
notes, but it also does something else. When you play a note, hold it, and
hammer-on the next note, it plays that hammer-on on the same string as the note
you’re coming from, and when you release the hammered-on note, it returns to
the first note if you’re still holding it. It makes for a very accented trill. But even
with OPEN STRINGS engaged, you can’t hammer on from an open string nor
pull off to an open string. As a folk guitarist who plays a lot in first position and
often hammers on to played open string, I found this kind of odd, but then, I’m not
a bass player. What do I know?
The HARMONICS key produces the harmonics you get from plucking a string
while lightly touching it with a fingertip, typically half way between the fret and
bridge. GHOST is kind of a pitched light thump. FORCE _STRING forces notes
to be played on the string you choose rather than moving to another string that
might be a closer reach.
One thing I learned, or rather remembered, from my MIDI experience from 30
years ago, is that not everybody uses the same octave numbering scheme.
When I was trying to switch between fingering and slapping in the middle of a
recorded MIDI bass track as I described previously, I was able to do this using
the keyboard as I was playing, but when I inserted an A#0 note (slap) into the
sequence using Reaper’s MIDI editor, although I could see the control note in the
MIDI track, the picking didn’t change. After tearing out a bit of hair, I tried
recording my live playing, including pressing the low A# key at the appropriate
time. Sure enough, the track played back just what I heard when playing live.
When I looked at the sequence with the MIDI editor, I discovered that Reaper
called that control note A#1 rather than A#0.
A Look Into What Makes It Tick – String Physics
At this point, I could probably simply say: “It works fine and sounds fantastic. Go
play some bass tracks and use your imagination.” But the reason why I chose to
look at this program was because I was intrigued with the method of sound
generation, and what effect changing something had on something that I could
both see and hear. When I review a product, I like to throw some test equipment
at it and learn what’s happening under the hood. Being software, and me being a
hardware guy, there isn’t much in MODO Bass I could put under a microscope.
Two things came to mind, both in relation to the overtones. One was in the way
that changing parameters affected which overtones were most prevalent. This is
a function of resonance, both mechanical and electrical. The other was how
various settings affected the rate at which the different overtones decayed. This
one proved to be most interesting.
In my 1958 high school physics class, when we studied sound, we had a wire
stretched between two hooks on a board, and could observe its vibration under
the illumination of a stroboscope adjusted to flash at the vibrating frequency.
Tuning the strobe light so that the string motion appeared to stop gave us the
frequency. Doubling the strobe frequency made the string’s 2
nd
harmonic come
into view as two stationary nodes. That was pretty cool, but today we have more
sophisticated tools.
A real time spectrum analyzer (RTA) displays what frequencies are present in a
signal, and their relative amplitudes. You’ve no doubt seen such a plot – it looks
like a frequency response graph or sometimes a bar graph. Real time spectrum
analysis is a great tool for frequency analysis when you have a steady input
signal, but, with a plucked string, everything changes, and continues changing,
once the string is left free to vibrate.
One of the ways that a spectrum that changes over time can be displayed is
what’s often called a “waterfall” plot. This is a family of frequency versus
amplitude plots drawn 3-dimensional style as multiple time slices. It’s a good tool
for analyzing the transient response of a loudspeaker or the reverberant
acoustical characteristics of a room, but it became too messy when the time
slices were close enough together to catch the behavior of the vibrating bass
string. So I started looking at spectrograms.
A real time spectrum plot looks like a frequency response curve with frequency
on the horizontal axis and amplitude on the vertical axis, while a spectrogram
plots time on the horizontal axis, frequency on the vertical axis, and indicates
relative amplitude by color or, if in black-and-white, shades of gray.
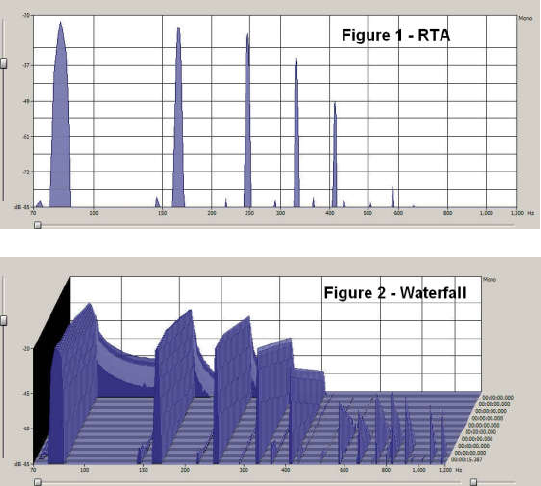
Here are the three views of a single note, E, played on the 2
nd
fret of the 2
nd
(D)
string, approximately 82 Hz. The model is the 60s P-Bass with the standard
pickup arrangement, plucked with the index finger with a medium touch, direct
output, no amplifier, no pedals engaged.
Figure 1 is the RTA plot
averaged over a 5-second
period. Note that the
fundamental frequency,
second, and third harmonics
are nearly the same
amplitude, with the upper
harmonics dropping off fast.
Figure 2 is a 64 time slice
waterfall plot of the same 5-
second note, with each slice
representing a look at the
RTA approximately every
tenth of a second. The slice
in front is the initial attack,
and time moves back toward
the rear of the plot. If you
look along the top of the peaks, you’ll see that the fundamental frequency doesn’t
decay much over the measured time interval – the top of that wedge is fairly flat.
But the 2
nd
and 3
rd
harmonics actually increase a bit after the initial attack before
dropping off. Harmonics beyond the 3
rd
drop off pretty quickly and are more than
60 dB down after the first couple of seconds.
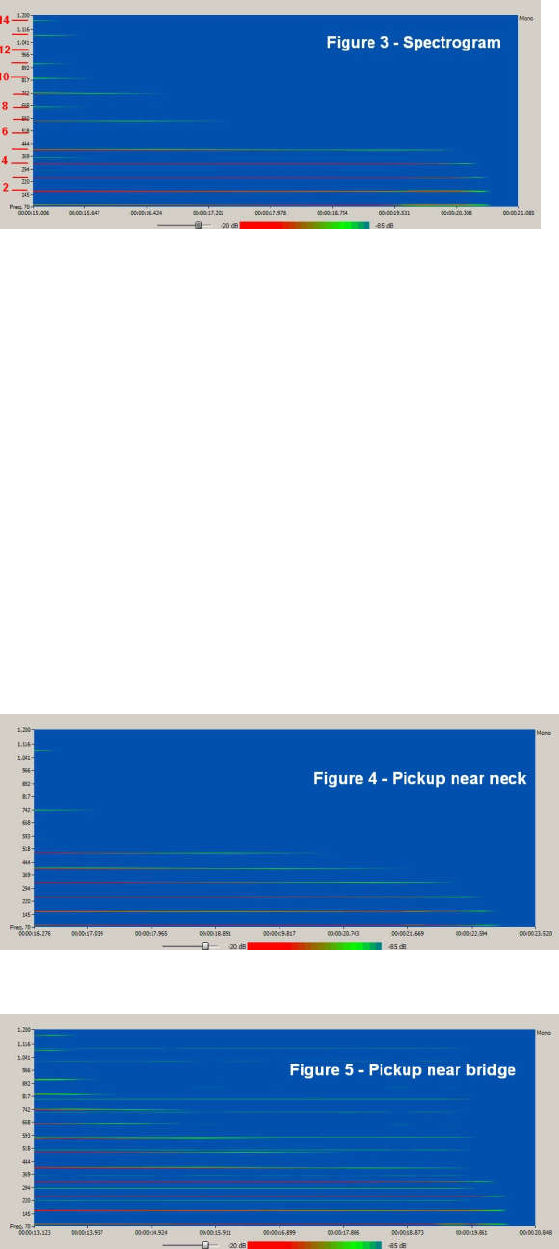
Figure 3 is the spectrogram
of that same note.
Remember that you can
zoom in for more detail, and
there’s more to see here.
Time is on the horizontal
axis, frequency is on the
vertical axis, and amplitude
is represented by the color
with red being loudest and blue being quietest, essentially the noise floor. The
fact that the lines look a little fuzzy and some are mixed colors results from the
string not being mechanically perfect; it’s vibrating frequency varies very slightly
over time. But what’s interesting here is that initially the 2nd harmonic is a little
stronger than the fundamental (more red), the 6
th
and 12
th
harmonics are down in
the noise, and the 8
th
and 10
th
harmonics are stronger than the 9
th
.
Something evident in all of these graphs that I glossed over are the little blips
starting just below the fundamental tone and appearing between all of the
harmonics. That’s D, and it’s not a glitch – it’s repeatable. I suspect that it’s the
sound of the open string before it hits the fret. Lifelike? You bet!
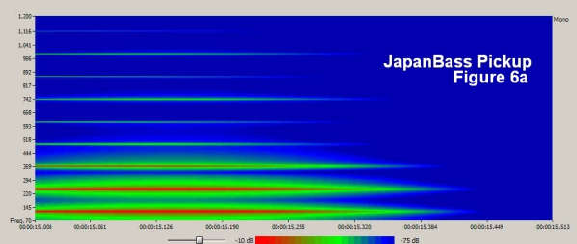
So much for a stock instrument, now let’s look at what happens when we change
something. With so many combinations, I chose to take a close look at
something that’s easy to hear and see, the pickup position.
With the pickup moved as
close to the neck as it will
go (Figure 4), you can see
that there isn’t much
audible above the 6
th
harmonic. There’s quite a
bit of 2
nd
and 3
rd
harmonic,
with the 3rd
nd
harmonic
being stronger than the 2
nd
over much of the sustain period.
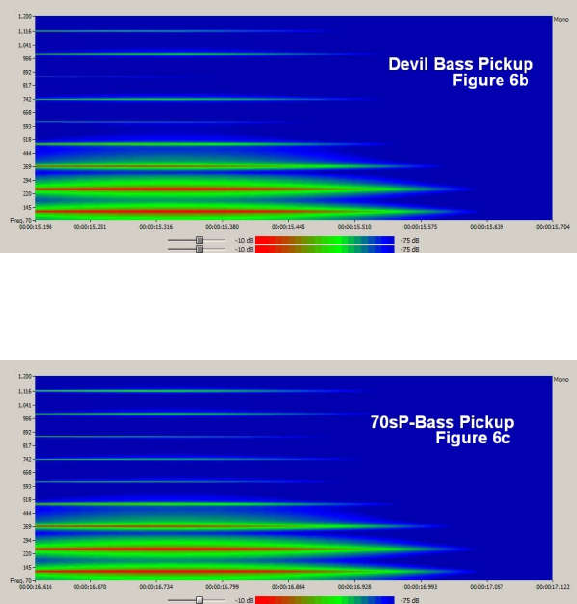
When the pickup is moved
as close to the bridge as
possible (Figure 5), the
output is much richer in
harmonics. This translates
to a brighter and harder
tone. Also, not that you’d
really hear it, but notice
that that ghost of a D note
and its harmonics are about 6 dB higher than with the pickup near the neck, and
that they extend out further in the frequency spectrum.
While I don’t encourage anyone to get out a router and start moving pickups
around on your prized ‘60s Precision bass, this is something that you can do in
MODO Bass with just a click and a drag. It also offers some insight in what you
can expect on a two-pickup bass when you start with one pickup off and then
blend it in with the other pickup.
Since IK gave us so many choices for pickups, I thought I’d try a few different
ones on the same body using the same settings as in the pickup position
experiment – direct output, no processing, passive electronics, single direction
pluck with the index finger. For this experiment, I started with the Japan Bass
body with its stock pickup, then swapped it out for the Devil Bass pickup, and
finally the 70s P-bass pickup, all in the neck position, 6 inches from the bridge.
On my first try, I was rather underwhelmed when listening to single notes with
each pickup, held until they died out. While I could hear subtle differences
between the pickups, their spectrograms looked nearly identical. What was most
telling, though, was when I listened to an actual bass track while swapping
pickups – the differences in tone, particularly the attack, were quite dramatic.
What I discovered here was something that probably every bass player knows -
that the most apparent difference in tonal properties occurs at the start of a note,
and five seconds after the attack, every bass sounds about the same.
Furthermore, more aggressive playing makes everything sound brighter. So I
modified my test file to play notes at a pretty brisk MIDI velocity of 100 (range is 0
to 127), and looked at just the first half-second of the note. Some might call this
cheating by adjusting the experiment to achieve the expected result, but it more
accurately reflects what you hear when actually playing the instrument in context.
Figure 6 shows the sonograms of a note (in this case B-2, played on the 1
st
string) using each of the three pickups:
Figure 6a is the stock
Japan Bass, but with
passive electronics and
only the neck pickup. It’s
a pretty fat bass sound
with the fundamental,
second and third
harmonics predominant.
Note that the second
harmonic hangs in a bit longer than the others.
The Devil bass (Figure
6b) pickup’s 2
nd
5
th
and
7
th
harmonics are weaker
the Japan pickup but
there’s some noticeable
9
th
harmonic. This
suggests a slightly
boomier tone than the
Japan pickup due to the
equally strong
fundamental and lower harmonics, but weaker mid-range harmonics, and indeed
it does have a stronger bottom end.
To my ear, the 70s
Precision Bass pickup
(Figure 6c) was the most
balanced of them all,
with a fairly even
distribution of harmonics
over the full range of the
spectrum. Note, also,
that in all of these
examples, the amplitude
peaks about 80 milliseconds after the initial attack.
Latency and the Lightness of Being
Whenever there’s a virtual instrument involved, someone will always ask: “what’s
the latency?” Assuming that you’re playing from a MIDI keyboard, it takes a finite
amount of time for the key press to be converted to MIDI data, then there’s the
time it takes the data to pass through the MIDI driver and get into the workings of
the computer, how long the computer takes to translate the MIDI data into audio
data (that’s MODO Bass’ job), and how long it takes the audio data to get out of
the computer, back to the interface, through its analog-to-digital converter, and
finally out to a loudspeaker. Some of these times are dictated by the hardware,
others by the software, usually expressed casually as “the quality of the drivers,”
and the user-determined size of the ASIO and USB buffers. The data crunching
time is a function of the computer hardware and operating system and will be
faster on some systems than others. What you really want to know, though, is
how long after you’ve pressed a key do you hear the note sound. Many reviews,
or the manufacturer’s data sheet, will state simply that latency is “very low,” but I
like to be more specific than that if I can.
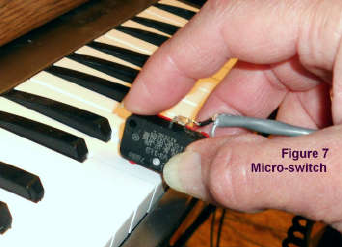
Measuring total latency of this system is
complicated by the fact that the input is
mechanical (a keyboard) and the output is
electrical (audio). In order to try to put a
number on it, I cobbled up a simple test rig
(Figure 7) to generate an electrical pulse when
I hit a key. It consists of a microswitch, a
battery, a resistor and an XLR connector.
Using MODO as a virtual instrument in a
Reaper track, I set up an outboard recorder
(best practice is not to use the system under test as your test equipment if you
can avoid it) to record Reaper’s monitor output on one channel of a stereo track
and the pulse from the microswitch on the other channel. The time between the
starting time of each would be the true latency.
After whacking a few keys with the microswitch, I opened the recording in Sound
Forge, zoomed in on the waveform, and measured the time between the pulse
and where the audio starts as planned. The problem was that I couldn’t get
consistent results because handholding the switch just wasn’t repeatable. It was
a good idea that didn’t work out, but too good of a story to leave behind. Back to
the drawing board.
Next I tried what seemed like an obvious and less complicated procedure. The
plan was to record a MODO Bass MIDI track and, temporarily setting aside my
scruples about using external test equipment, while playing, record the monitor
output of the bass track on an adjacent audio track. With some creative patching
and muting to exterminate feedback loops, I had two adjacent tracks, one with
straight lines indicating the MIDI notes, the other with the bass audio.
With a little cursor dragging, I was able to measure the time between the start of
the MIDI note and the start of the audio. But there was a problem. The audio that
came out while I was hitting the keys was delayed by the latency that I was trying
to measure, but the recorded audio track had the system’s input latency added to
it. I could (and did) measure the full round trip audio latency of the interface going
through Reaper, but I didn’t know how much of that was from the gozouta (that I
wanted to measure) and how much was from the (gozinta), which doesn’t count.
So I rigged up a different way to get an analog pulse at the precise time that I hit
a key. I split the MIDI output from the keyboard with one branch going to the
computer’s MIDI interface to play the plug-in and the other branch connected
directly to one channel of my handy TASCAM DR-44WL recorder. I recorded the
MODO audio output on the other channel of the recorder. Now I had a recording
of what I really wanted – when the key was hit and when the audio started.
The analog signal
derived from the
keyboard’s MIDI Out
was pretty messy due
to the keyboard
sending Active Sense
and me not being able
to find the manual to
see if it could be turned
off. Active Sense is a continuous string of “I’m still here” pulses on the MIDI track,
but zooming in on the recorded waveform made it easy to find the start of the
MIDI note that triggered MODO Bass.
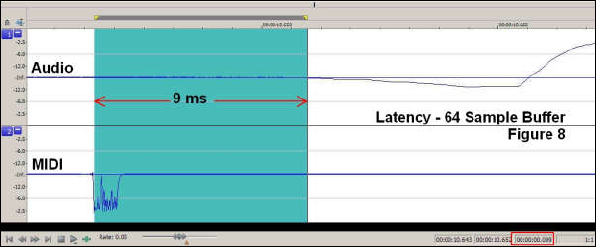
With the computer I was using for my MODO tests, I need an ASIO buffer of at
least 256 samples in order to be confident of stability when recording and mixing.
Since as a rule I don’t monitor through the computer, I usually leave it set up for
512 samples just for safety. I dropped back to 256 samples when I set up MODO
Bass, and that worked just fine. However, this gave me a latency of nearly 30
milliseconds when playing MODO, long enough to be unacceptable to some
players. Reducing the buffer size to 64 samples brought the measured latency
down 9 milliseconds. Latency’s effect on a player’s performance is very
subjective – some are distracted by just a few milliseconds of delay, while others
can tolerate what’s practically an echo. Understand that these measurements are
probably near worst case since I have a pretty slow computer by today’s
standards. Latency through your system will likely be different, probably better.
Other reviewers who are better players and more experienced DAW users than I
have given it good marks in this regard so I’ll proclaim it acceptable.
In order to see how well the plug-in delay compensation worked, I rendered a
MODO MIDI track, creating a new bass audio track from the MIDI track. Latency
compensation is a normally transparent part of the MIDI track rendering process
incorporated into practically DAW these days. It works by delaying all of the other
tracks to match the amount of time the plug-in tells the computer that it needs to
do its thing. Some plug-ins require just a couple of samples worth of time to work,
others, like a convolution reverb, can take tens of thousands. I checked the time
alignment between the original MIDI track and the MODO Bass rendered audio
version and found that the audio was 1 millisecond behind the MIDI track. That’s
enough to get some comb filtering if they’re mixed together, but that’s not
something you’d likely do.
In theory, delay compensation should be perfect, in practice sometimes it isn’t.
Reaper displays the number of samples the plug-in tells it to delay, and with
MODO Bass (as well as for a number of other plug-ins I looked at) it’s zero,
which doesn’t mean that the plug-in is lightning-fast, it just means that Reaper
isn’t displaying a realistic value. There are ways to fine-tune latency
compensation, but I didn’t bother with it here.

I should add that all of these latency measurements were made at a sample rate
of 44.1 kHz. I did some quick checks at 96 kHz and things were about 30%
brisker for the larger buffer sizes, but with a 64 sample buffer, at least on my
system, 9 milliseconds seems to be as short at it can go.
MODO Bass is fairly small and loads quickly, even on my cranky old computer, a
2.8 GHz Core 2 Duo CPU with 4 GB RAM running Windows 7. While the
Windows Task Manager CPU and memory usage monitors aren’t very
sophisticated, it’s comforting to see that with eight tracks of Reaper running
MODO Bass, CPU usage increased by only about 3.5% when playing. Memory
usage is harder to determine since Windows is always doing something and the
memory usage monitor goes wild at random times. As an eyeball average,
playing a fairly busy track with eight instances of MODO Bass with no signs of
stumbling increased the memory usage by about 0.8 gigabytes.
In Use
Every review needs an “In Use” section, but there really isn’t too much to say
here that I haven’t already written in my detailed description of its workings. You
plug it in and it works, just like a refrigerator or a TV set. If I was a normal user
(whatever that means) instead of a reviewer, I’d likely just pick one of the models
that seemed appropriate for the character of the song, load it up, and go.
Everything sounds very good to me right out of the box, but since so often
modern music calls on sound design to make it interesting, the possibilities with
MODO Bass for a unique and Grammy-grabbing bass sound are wide open.
What I can comment on here are some things that I think would make things go a
little smoother when diving into the big pool of modifications.
Presets and Defaults or Presets vs. Defaults
There’s a list of specifications on all of the tabbed pages that show the selected
model bass displayed in big window. At the bottom of the specifications list is a
“Reset Bass to Default” link, which does just that. If anything
that’s on this list has been changed from its original setting,
the “Specifications” title gets an asterisk added to it. Clicking
on Reset Bass to Default restores that model’s original
specifications and clears the asterisk. But be aware that
there are some things on the list that you can’t change, and
things you can change that aren’t on the list. You can’t
change the scale length or number of frets.
If you change the playing position from the standard 6” from
the bridge, the new position sticks for all models. However,
when you switch Play Style from Finger to Pick, the playing position jumps to the
default setting for Pick style, and this sticks for all models until you change it.
All of the models initialize to their defaults (including finger style played 6” from
the bridge) when the program is opened. Closing and re-opening it is the only
way to assure that all defaults are restored. If you want to save a custom playing
position, you can save it with a Preset, but remember that a preset includes the
model, so it will only be that playing position for that particular model with that
particular preset. Due to physical restrictions, not all models can accommodate
the same range of playing positions. If you’re playing one model in a position
that’s too far away from the bridge for another model, it does the best it can by
setting the playing position at the end of that model’s playing range. However,
that playing position sticks for that style on all of the other models until you
stretch it out again. We’re talking about a half-inch difference here, not likely to
matter in practice, but just something to make you wonder if you notice it.
To add a bit of chaos to the confusion, if you’ve saved a preset with a custom
playing position, open that preset, and then change the model, your custom
playing position sticks until you either close and re-open the program or select
the “Default” preset, which takes you back to the ‘60s P-Bass with its defaults.
However, if your preset includes changes that are on the Specifications list,
clicking on Reset Bass to Default resets the strings to their defaults but not the
play style or play position. So the lesson here is that “Default” is for the
instrument itself, and only the instrument.
I’d like to see a “Reset everything” button that gives me the equivalent of a fresh
restart without having to close and re-open the program. Or maybe an “Undo the
last thing you did” button. Sometimes you can get so deep down the rabbit hole
that you don’t know how you got there.
When you recall a Preset, everything is as you’ve saved it, including any pickup
swaps. If you change to a different model, your preset’s strings, playing style and
position settings, as well as the Amp/FX settings are retained, but the pickups
revert to the stock ones on the model to which you’ve just selected. One might
ask: “Why would you want to switch models?” and an appropriate answer would
be “Why not?” Well, one reason why not is that when I played with switching
bodies while keeping everything else including the pickups constant, I didn’t hear
any difference that would make me care. Most of the models have a 34” scale
length, but a couple are shorter, which, it seems, might make a difference since
the vibrating length of the string is different. I didn’t follow through on this and I’m
leaving it as an exercise for the student.
From a cold start, all of the models have strings of the same type and condition,
the same playing style (fingering, stroke, and playing position, and everything
goes through the solid state amplifier with the same settings. However, most
changes that you make with one model are retained when you switch to a
different model.
An oddity with the Amp/FX settings is that, while pedal settings are retained
when switching between the solid state and tube amplifiers, selecting the
alternate amplifier returns its settings to the defaults. If you’ve adjusted the solid
state amplifier to your liking and then want to hear what your bass sounds like
through the tube amplifier, after switching amplifiers, listening, then switching
back to the solid state amp for an A/B comparison, unless you saved a preset
with the amp settings that you liked, you’ll have to reset the amplifier. A notebook
is a good thing to have beside you here to jot down your settings until you decide
to make them permanent with a preset.
Perhaps a method of saving amplifier settings independent of the instrument
settings is in order – or maybe this is IK’s way of encouraging you to buy into
their Amplitube amplifier modeling plug-in (or somebody else’s), which does
provide a place for saving amplifier settings.
The files that define the presets (*.mbp) are stored in folder (for Windows) below
YourUserName\Documents\IK Multimedia\MODO BASS\Presets. You can add,
delete, or rename a preset, but it requires navigating to the Presets folder,
something that users who aren’t terribly computer-savvy might find daunting.
Also, if you rename or add a preset while the program is open, it won’t appear on
the Presets list until MODO Bass is closed and re-opened. I expect that users will
want to share presets, and, in fact I discovered someone who has a set of
presets for sale, so in order to use presets that aren’t installed with the program,
you need to be able to find the folder and not be afraid to change its contents.
Additional buttons to import or delete presets might be a good addition.
Somebody out there must not like dynamics, because the default Amp/FX setup
has the compressor pedal engaged, and the solid state amplifier’s limiter is
switched on. With that as a starting point, setting the amplifier gain structure
(input and output gains) might not work as you expect. Perhaps it’s my studio
bias, but I’d prefer to start with clean amplifier settings, dirty that up first if that’s
what I’m after, and then add the effects.
I’d like to better annotation of the equalizers and tone controls. While it’s not very
common to see meaningful numbers on an instrument amplifier’s tone controls, it
would be nice to see them here, particularly for the tube amplifier’s mid frequency
settings. The frequencies of the graphic equalizer bands on the solid state
amplifier and the graphic EQ pedal are identified, but you have to actually move
a slider in order to see that band’s gain setting. Since I’ve mentioned both
graphic equalizers in the same paragraph, I’ll point out that their frequency bands
are different (the pedal has 8 bands, the amp has 9) and they have only one
frequency, 500 Hz, in common. So if you need some really goofy equalization,
there’s a case for using both.

The Wrap
MODO Bass sounds great, it can be made to sound downright weird, and it offers
ways to adjust tonal characteristics that aren’t possible with samples or
conventional waveform synthesis can’t. But complexity has its price. There’s a lot
to learn here, and, as I discovered while writing the article, it can be an incredible
time sink. There were afternoons when I sat down with the program to check a
function to be sure I remembered it correctly, got sidetracked with something
interesting, and didn’t get away for the next three hours – by which time I’d
forgotten why I dove in initially. I’m easily distracted by toys.
As I mentioned at the opening of this article, you can learn a whole lot about what
goes into making the tone of a string instrument by experimenting with the many
variables that are just a mouse click away. You might be surprised at the
difference new strings make, and how the tone changes as they break in. Some
producers insist on starting a session with brand new strings, others demand
broken-in strings, but you can be the producer with just a few mouse clicks. If you
play bass, MODO Bass might inspire you to pay more attention to where you
pluck the strings and which finger you use, or to consider replacing a pickup or
adding active electronics to a passive instrument.
This plug-in has me dreaming of physically modeled acoustic and fretless
basses, but at this point, I don’t know how far IK is willing to take this concept.
There’s a lot of work involved, and a whole different set of parameters to model
in an acoustic instrument. In the mean time, there’s a lot of fun and great sounds
to be had with the program’s present capabilities.
If you haven’t yet visited the MODO Bass web page, do so, and listen to the
examples there. That’s the best place I can send you to get an idea of the range
of sounds that are possible with this cool program.
IK Multimedia
http://www.ikmultimedia.com/products/modobass/
Retail price: $300 download only, $330 on a USB thumb drive, boxed
If you own certain IK Multimedia software products, there’s a crossgrade deal
that shaves $100 off the cost of MODO Bass, and they sometimes have sale
prices, so check on line for other deals.
Appendix 1 – System Requirements
MODO BASS is a 64-bit application and requires a 64 bit CPU and Operating System.
Mac
®
(64-bit)
Minimal: Intel
®
Core
™
2 Duo, 4 GB of RAM (8 GB suggested), Mac OS X
10.9 or later.
Supported Plug-in formats (64-bit): Audio Units, VST 2, VST 3, AAX.
Windows
®
(64-bit)
Minimal: Intel
®
Core
™
2 Duo or AMD Athlon
™
64 X2, 4 GB of RAM (8 GB
suggested), Windows
®
7, Windows
®
8 or Windows
®
10. Requires an ASIO
compatible sound card.
Supported Plug-in formats (64-bit): VST 2, VST 3, AAX.
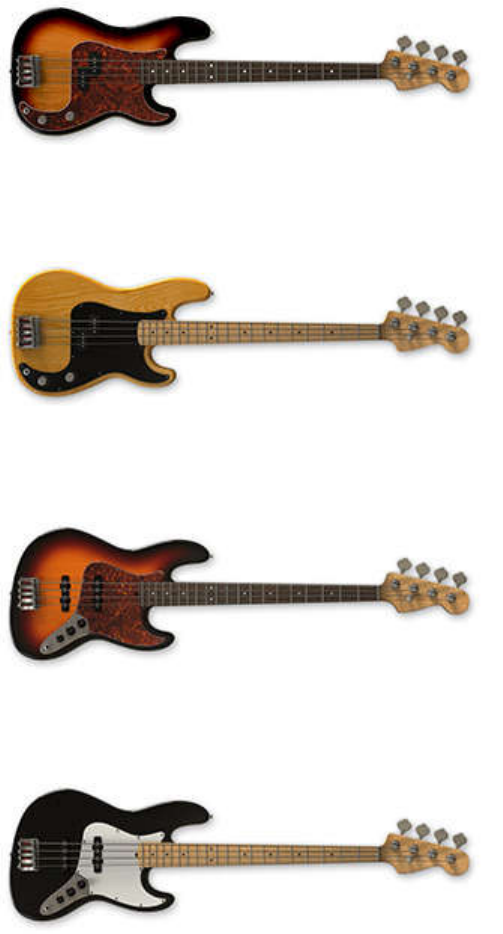
Appendix 2 – The Iconic Bass Library
60’s P-Bass
based on Fender Precision Bass®, Alder body
70’s P-Bass
based on Fender Precision Bass®, Ash body
70’s J-Bass
based on Fender Jazz Bass®, Alder body
Modern J-Bass
based on Fender Jazz Bass®, Alder body

Devil Bass
based on Gibson® EB-0
Bass Man 5
based on Music Man® StingRay 5-string
Rick n’ Bass
based on Rickenbacker® 4003
Studio Bass
based on Yamaha® TRB5P
Violin Bass
based on Hofner® Violin
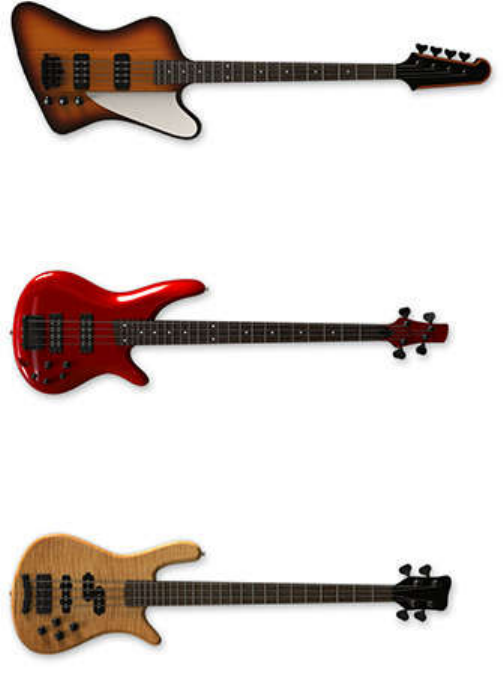
Thunder Bass
based on Gibson® Thunderbird
Japan Bass
based on Ibanez® Soundgear
Flame Bass
based on Warwick® Streamer
Appendix 3 - MODO Bass Presets
- An Abbreviated List of Details
This is a list of all of the 115 preset names. The first group is broken down into
full detail, showing its settings for all of the adjustable parameters. After the first
two in the Finger group, I knew I wasn’t going to last through typing up the whole
set, but I’ve listed all of the categories and their subsets to give you a sense of
how the factory presets are organized and what goes into making your own
presets.
A. Finger – 38 Subsets
1. 90’s Funk
(a) Model - Flame Bass
(b) Play Style – Finger
Muting – 0%
Stroke – Alternate
Touch – Normal
Let Ring – off
Fingering – Easy
Open String – Off
Detach Noise – 3.8
Slide Noise – 1.7
(c) Strings – 4
Standard action
Round wound
Medium Gauge
Broken in
440 Hz pitch
(d) Electronics
Bridge Pickup – Flame BSC
(i) Volume - 0
Neck pickup - Flame NSC
(i) Volume - 10
Piezo
(i) Volume - 0
Active
Tone controls: Bass – 5.0, Middle – 5.0, Treble – 2.8
(e) Amp/FX
Pedal Board
(i) Compressor: On, Comp - 1.8, Volume – 8.0
(ii) Graphic EQ: Bypassed
(iii) Octaver – Bypassed, Blend - 6.0, Volume - 6.2, Texture - 3.0
(iv) Envelope Filter – Bypassed, Frequency – 100, Depth – 10,
Resonance – 5.0, LP – On, BP – Off, HP - Off
Solid State
Gain - 8.3
Tone controls: Bass – 5.5, Mid – 2.8, Treble – 6.1
Graphic EQ
Limiter – On
Mix: Amp – 0.9, DI – 6.4, Master – 8.1
(f) Control – Typical setup
2. BoomPow
(a) Model - Devil Bass
(b) Play Style – Finger
Muting – 0%
Stroke – Alternate
Touch – Normal
Let Ring – Off
Fingering – First Position
Open String – On
Detach Noise – 4.5
Slide Noise – 9.6
(c) Strings – 4
Standard action
Round wound
Medium Gauge
Broken in
440 Hz pitch
(d) Electronics
Bridge Pickup – Devil SC
(i) Volume - 10
Neck pickup – Devil SC
(i) Volume - 10
Piezo
(i) Volume - 0
Passive
Tone: 10
(e) Amp/FX
Pedal Board
(i) Compressor: On, Comp - 5.7, Volume – 5.0
(ii) Graphic EQ: Bypassed
(iii) Octaver – Bypassed, Blend - 6.0, Volume - 6.2, Texture - 3.2
(iv) Envelope Filter – Bypassed, Frequency – 100, Depth – 10,
Resonance – 5.0, LP – On, BP – Off, HP - Off
Solid State
Gain – 5.0
Tone controls: Bass – 6.3, Mid – 2.8, Treble – 6.1
Graphic EQ: Not specified
Limiter – On
Mix: Amp – 6.0, DI – 5.0, Master – 4.8
(f) Control – Typical setup
3. BoomyGroove
4. Custom Jazz
5. FingerFunky
6. Focus B – deep
7. Focus B
8. Fresh Flame
9. Funk!
10. FunkFlame
11. FusionRide
12. Going Grunge
13. Jaco
14. Leeland Softy
15. Metallic
16. Modern Vintage
17. Motown
18. New Bass
19. OctoEagle
20. Old, But Good
21. P-Jam-a
22. PJ Bassy
23. Practice Bass
24. ProPrecision
25. R&B 5-String JB
26. RageFive
27. Really Low
28. RoadWorn
29. StageMaster
30. Stepanyan 5
31. Studio LX
32. StudioSession
33. Sub Violin
34. The ‘50s
35. The Amp Destroyer
36. The Stream
37. Try This
38. Useful
39. Youth
B. Pick – 38 subsets
1. ‘80s Taste
2. Aggressive Pick
3. Anger Increaser
4. BadJazz
5. Bass’aBilly
6. Be A Bit Punk
7. BuzzBuzz
8. Call The Police
9. Can I Call You Floyd_
10. CyberDuck
11. Disco Phunk
12. FarFarAway
13. Fully Loaded
14. Give it up
15. Indi Pendent
16. Jeremy’s Bass
17. Just Works
18. Kick Violin
19. Metallic Side
20. Nasty Punky
21. Near Sine
22. Noisemaker
23. Old Rocker
24. PickNick
25. PowerBall
26. Simple Pick
27. Solid Muted Pbass
28. Solid Picking
29. Stoned
30. Studio Starting Point
31. Teen Garage
32. That 70’s Piece of Ash
33. The Panther
34. Tired Precision
35. TripHop Vintage
36. Try Chords
37. UFO
38. West Coast
C. Slap – 22 subsets
1. 70’s Pump
2. AAA Wanted Slap Bass
3. Acoustic Slap
4. Aggressive Slap
5. Atmo Slap
6. Get Funky!
7. Ghost Notes
8. Gritty Slap
9. Grooovy
10. Growl
11. Jaguar Slap
12. Learning Slap
13. Low End Presence
14. Magnetic
15. ModernSlap
16. Nu Soul Slap JB
17. Precise
18. Simply Good
19. Slap_
20. Slarpeggio
21. Strange Slap
22. Sub Slap
D. Xtreme – 16 subsets
1. Add Vibrato…
2. Attila
3. Broken Amp
4. DnBass
5. Dynotor
6. Hit A Piano
7. InfraViolin
8. Monster Low
9. Near Kick
10. Presynthion
11. Psycodelic
12. SubMarine
13. Synth Funk
14. Triple Chorus
15. Velocity Alien
16. Whales
E. Default
