
Provided by APA Formatting in Word for Apple Products
The Academic Center for Excellence 1 Revised May 2020
Instructions for Formatting APA Style Papers in Microsoft Word for
Apple Products
Over time, different citation styles have been created to establish a standardized way of citing
and documenting sources in accordance with various academic disciplines. APA style refers to
one of these citation formats that designates the rules and guidelines for referencing sources in
research papers. This citation style was created by the American Psychological Association
(APA) and is mainly used for disciplines within the sciences and the social sciences.
Although the Microsoft Word programs on Windows computers and Apple computers serve the
same function and utilize the same tools, the locations of the various tools in Word are
different in the Apple version when compared with the Windows version. This handout covers
the procedures for formatting an APA Citation Style paper in Microsoft Word for Apple
Products.
If Microsoft Word appears on the desktop:
If Microsoft Word appears on the desktop, double-click the icon in order to open it.
Provided by APA Formatting in Word for Apple Products
The Academic Center for Excellence 2 Revised May 2020
If Microsoft Word is not on the desktop:
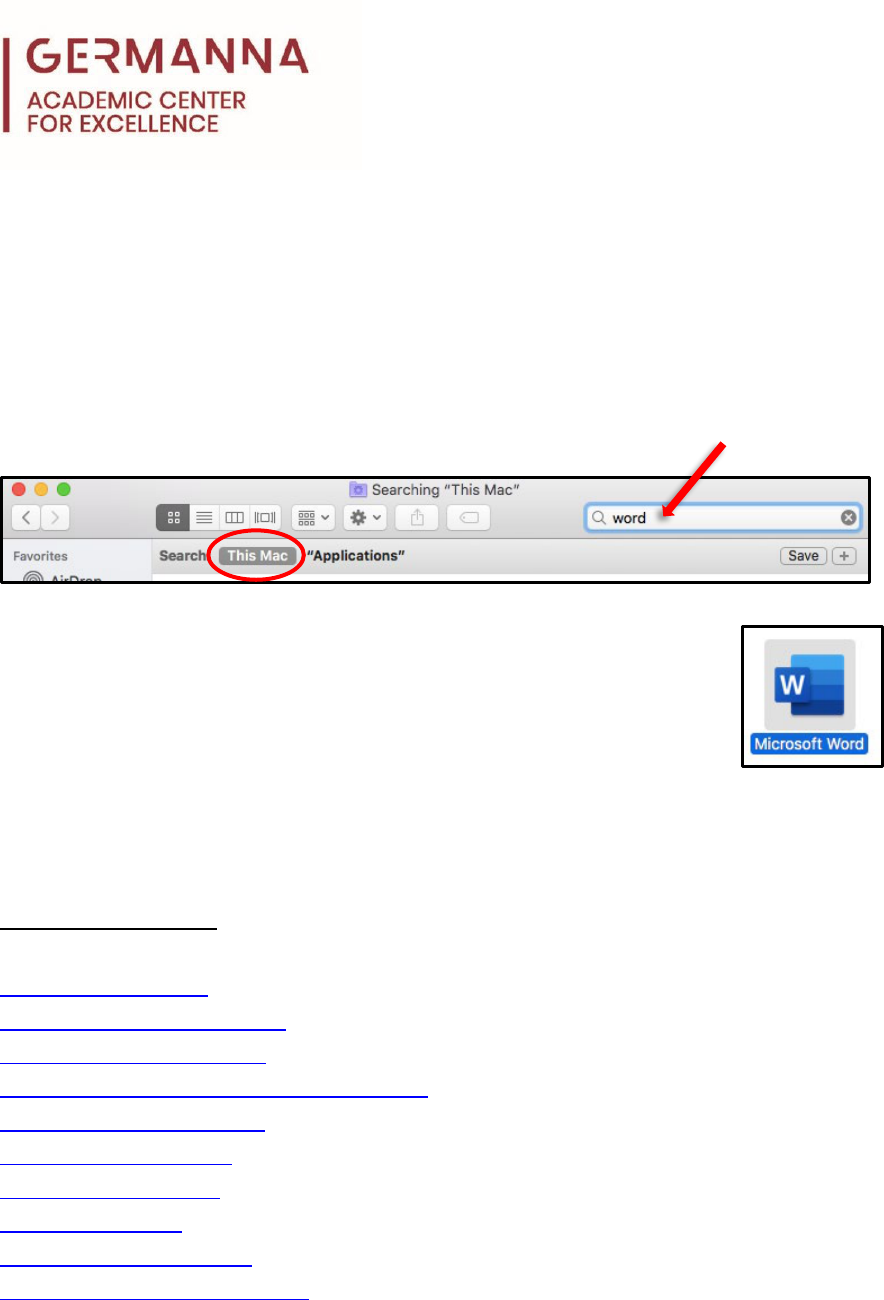
1. Open the “Finder” program, which shows all the files and applications an Apple
computer has.
2. In the Finder window, make sure the “Search” criteria is set for “This Mac,” and type
“Microsoft Word” in the search bar to look for the application.
3. Double-click the application icon for “Microsoft Word” to open it.
The following steps detail how to correctly format the document.
APA Formatting Guide:
Navigate to specific sections of this handout by clicking the links below.
Step 1: Choose a font: pg. 3
Step 2: Add one-inch margins: pg. 4
Step 3: Select double space: pg. 5
Step 4: Remove extra space after paragraph: pg. 5
Step 5: Insert page number: pg. 6
Step 6: Set up title page: pg. 7
Step 7: Set up abstract: pg. 8
Step 8: Create title: pg. 9
Step 9: Indent paragraphs: pg. 9
Step 10: Set up references page: pg. 10
Provided by APA Formatting in Word for Apple Products
The Academic Center for Excellence 3 Revised May 2020
Step 1: Choose a font
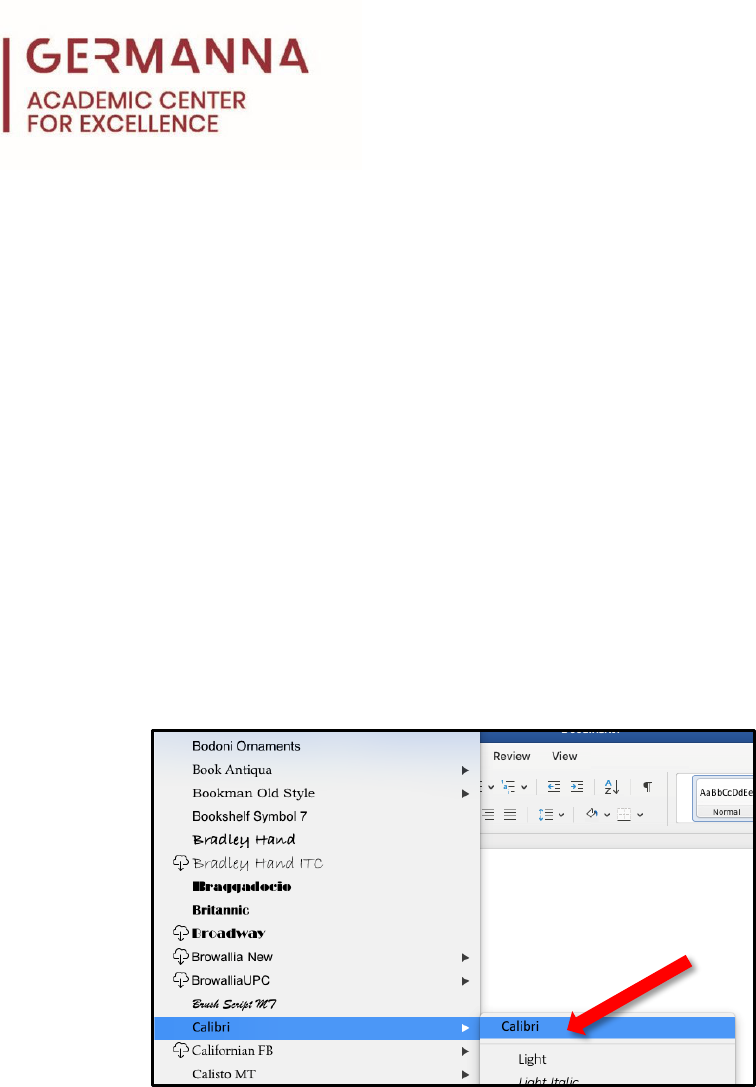
On the “Home” ribbon, in the “Font” group, click on the font drop-down menu (the small
arrow next to the word “Calibri (Body)”) to show available fonts. Use the drop-down menu
to scroll down and select your font of choice. These are the fonts you can use for an APA
paper:
• Arial (font size 11)
• Calibri (font size 11)
• Lucida Sans Unicode (font size 10)
• Times New Roman (font size 12)
• Georgia (font size 11)
*Note: There will be different options listed under certain fonts, such as bold and italic, but
selecting the first option of the font name will change the font without bolding or italicizing it.
Provided by APA Formatting in Word for Apple Products
The Academic Center for Excellence 4 Revised May 2020
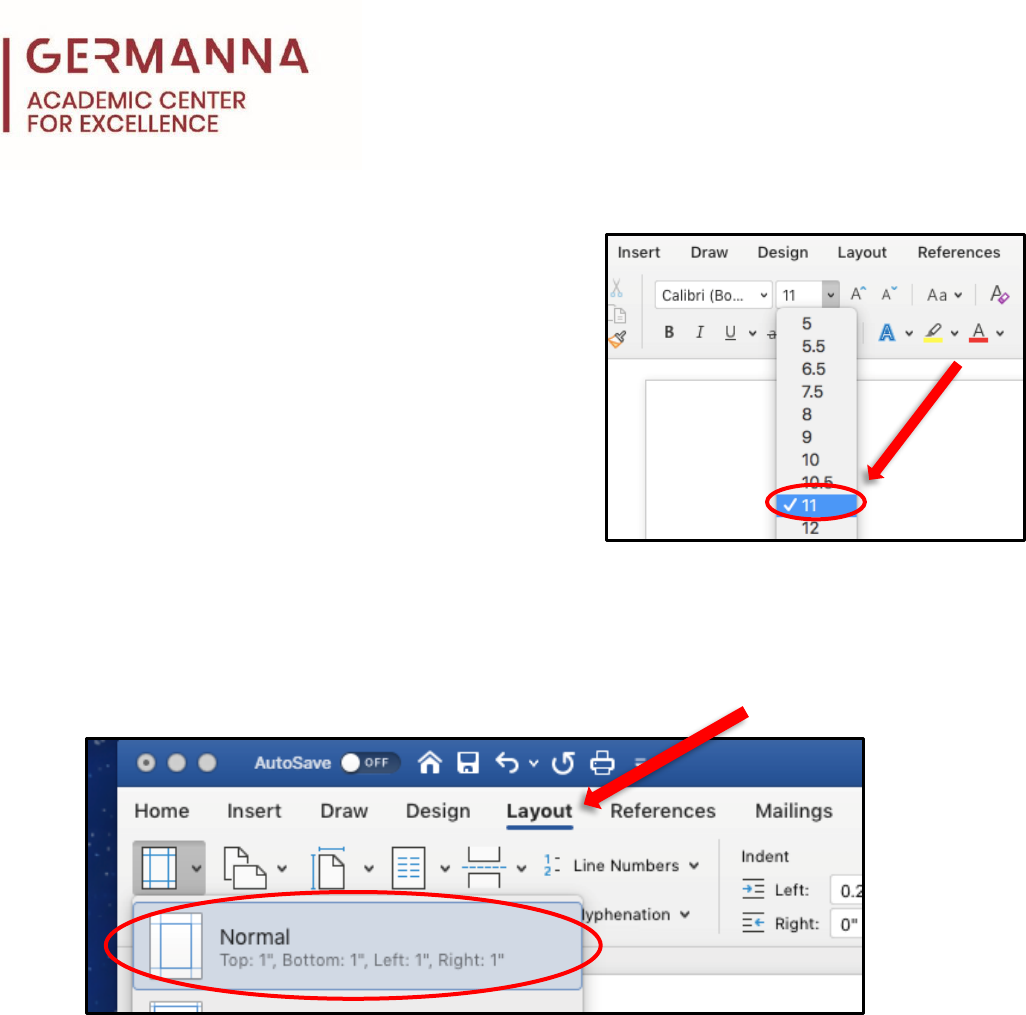
On the “Home” ribbon, in the “Font” group, click on the
small arrow next to the box displaying a number. Using the
drop-down menu, scroll down and select the font size for
the document.
Step 2: Add 1-inch margins
To set one-inch margins, click on the ribbon that is labeled “Layout.” In the “Margins”
group, click on the icon labeled “Margins.” Next, select the “Normal” setting.
Provided by APA Formatting in Word for Apple Products
The Academic Center for Excellence 5 Revised May 2020
Step 3: Select double space
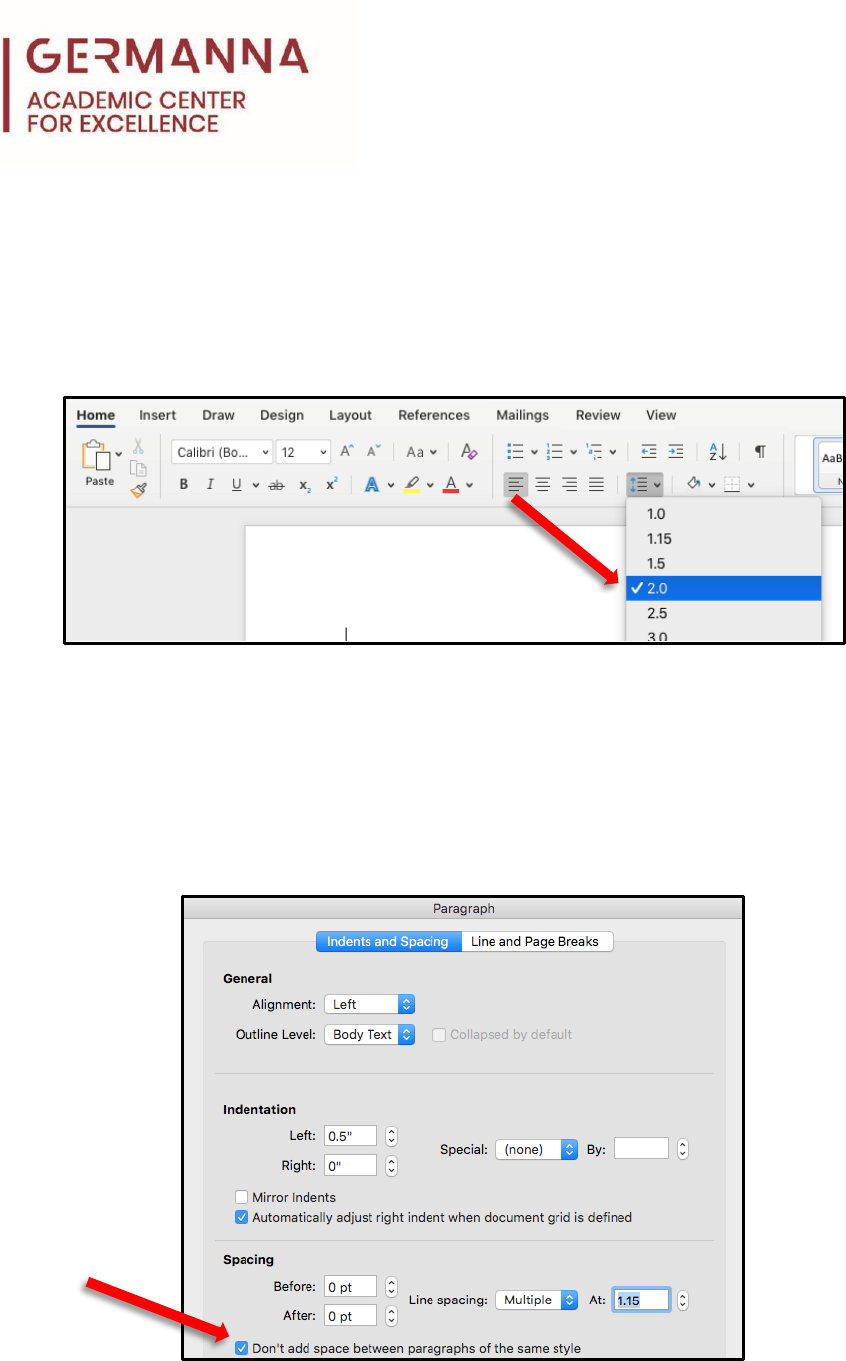
On the “Home” ribbon in the “Paragraph” group, select the “Line Spacing” icon with the
blue arrows pointing up and down next to four horizontal lines. On the drop-down
menu, select “2.0” for double spacing.
Step 4: Remove extra space after paragraph
On the “Home” ribbon under the “Paragraph” group, select the “Line Spacing” icon
again. At the bottom of the drop-down menu, select “Line Spacing Options…” When the
Paragraph dialog box appears, check the box for “Don’t add space between paragraphs
of the same style” in the “Spacing” area, if it is not already checked. Then, click the “OK”
button.
Provided by APA Formatting in Word for Apple Products
The Academic Center for Excellence 6 Revised May 2020
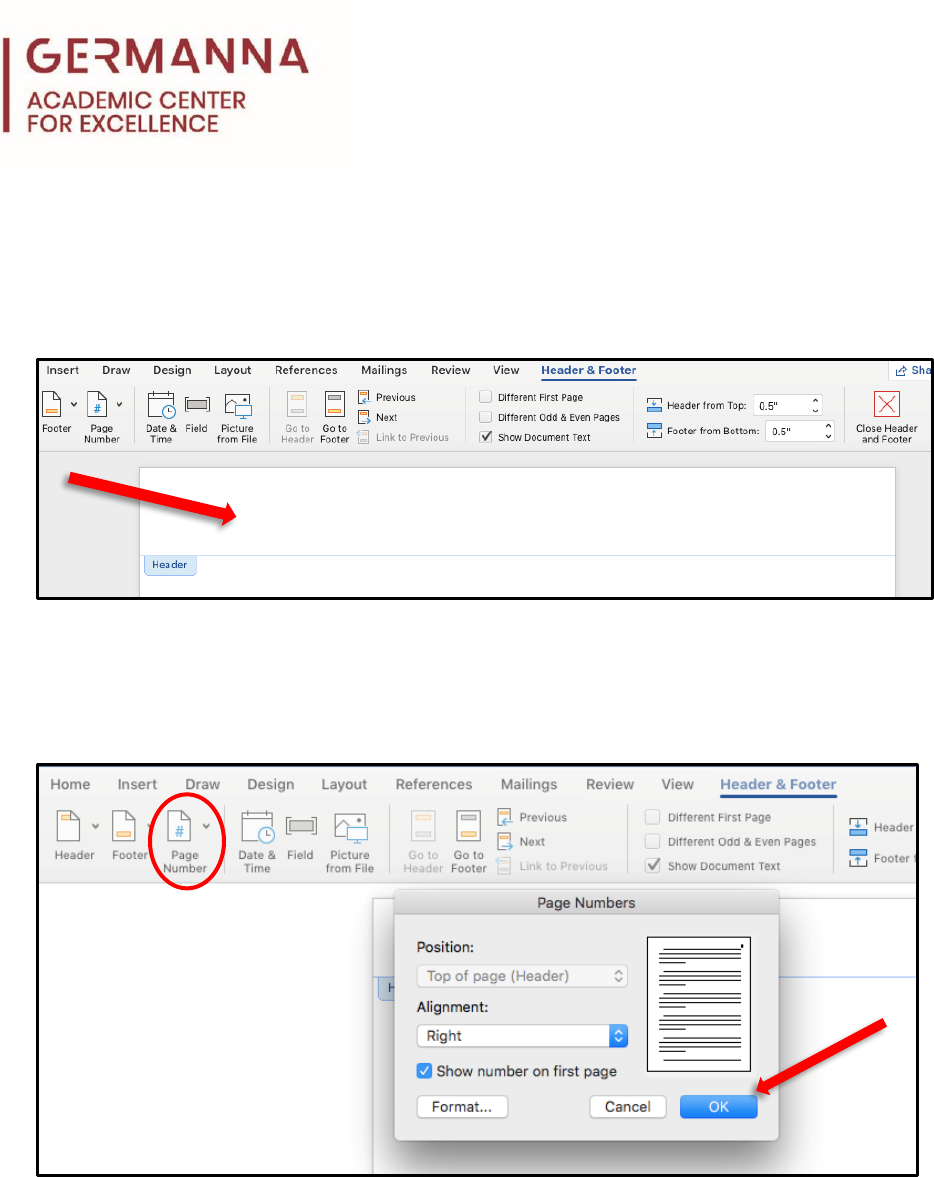
Step 5: Insert page number
To insert a page number, double-click the blank space at the top of the page within the top
margin. This will also automatically open the “Header & Footer” ribbon.
Then, within the “Header & Footer” ribbon, click the “Page Number” tab. Select “Page
Number,” then click “OK” on the pop-up. The correct page number should automatically
appear at the top right corner of every page.
Finally, be sure to change the page number to the font and font size that you chose
earlier, following Step 1. Then, double-click outside of the header to close it.
Provided by APA Formatting in Word for Apple Products
The Academic Center for Excellence 7 Revised May 2020
Step 6: Set up title page
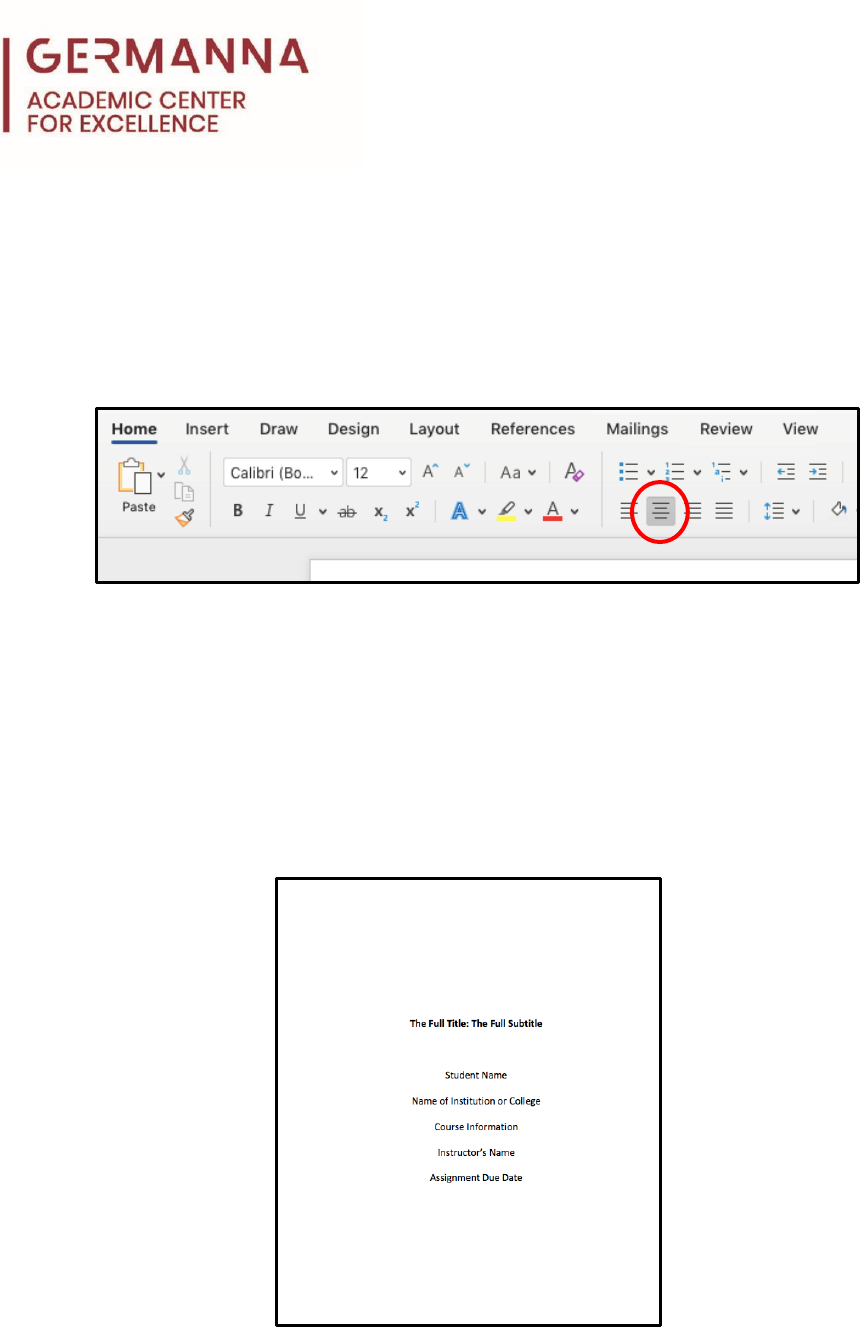
After all of the page specifications are set, the next step is to set up the title page. First,
select the “Home” ribbon, and locate the “Paragraph” group. Press the “Center Text”
button on the bottom row in order to center the title horizontally. Then, hit enter four
times, which will position the identification information in the upper half of the page.
On the first line, type the full title of the essay, and make sure to bold the text of the title
only. Hit the return key twice (to insert a blank double-space between the title and the
identification information), and on the second line, type your name. Press return again, and
on the third line, type the name of your college. Press return again, and on the fourth line,
type your course information (ex. ENG 111: College Composition I). Press return again, and
on the fifth line, type your instructor’s name. Press return again, and on the sixth and final
line, type the assignment due date (in month, day, year format – ex. November 21, 2019).
Provided by APA Formatting in Word for Apple Products
The Academic Center for Excellence 8 Revised May 2020
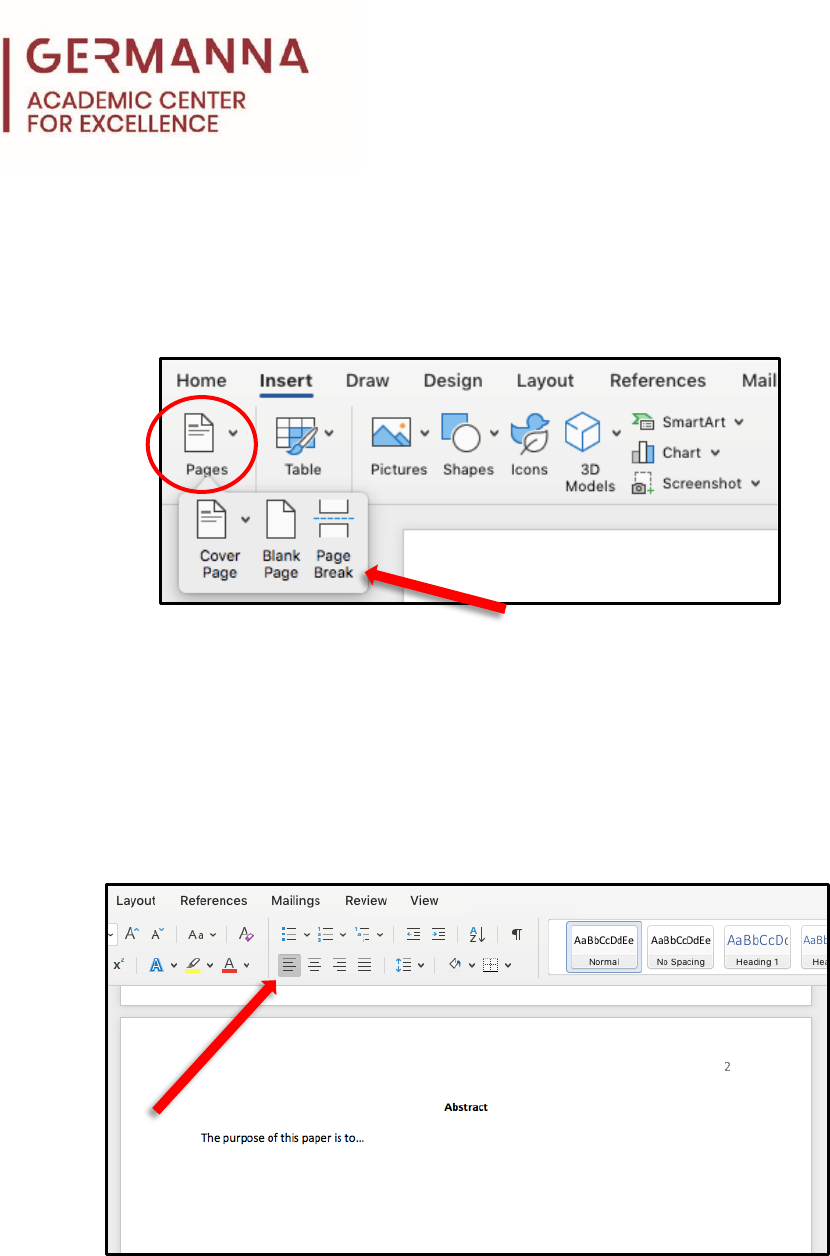
In order to continue with the essay, click the “Insert” ribbon, and select the “Pages” tab to
show the drop-down menu. On the menu, select the “Page Break” option to insert a page
break (Alternatively, click Command + Enter after Assignment Due Date).
Step 7: Set up abstract
Instructors may require students to include an abstract. Because the insertion point should
already be in the center, simply type the word “Abstract.” To type the content of the
abstract, press the return key. Click on the “Align Text Left” button in the “Paragraph” group
on the “Home” ribbon.
Provided by APA Formatting in Word for Apple Products
The Academic Center for Excellence 9 Revised May 2020
Step 8: Create title
After finishing the abstract, insert a page break using the same method detailed at the end
of Step 6. The insertion point should now be left-aligned on page three. Click on the “Home”
ribbon and select the “Center Text” button from the “Paragraph” group. Type the full title
of the essay. Make sure the title is bolded, but the text following it is not.
When finished, hit the return key, and then select “Align Text Left” to move the insertion
point back to the left.
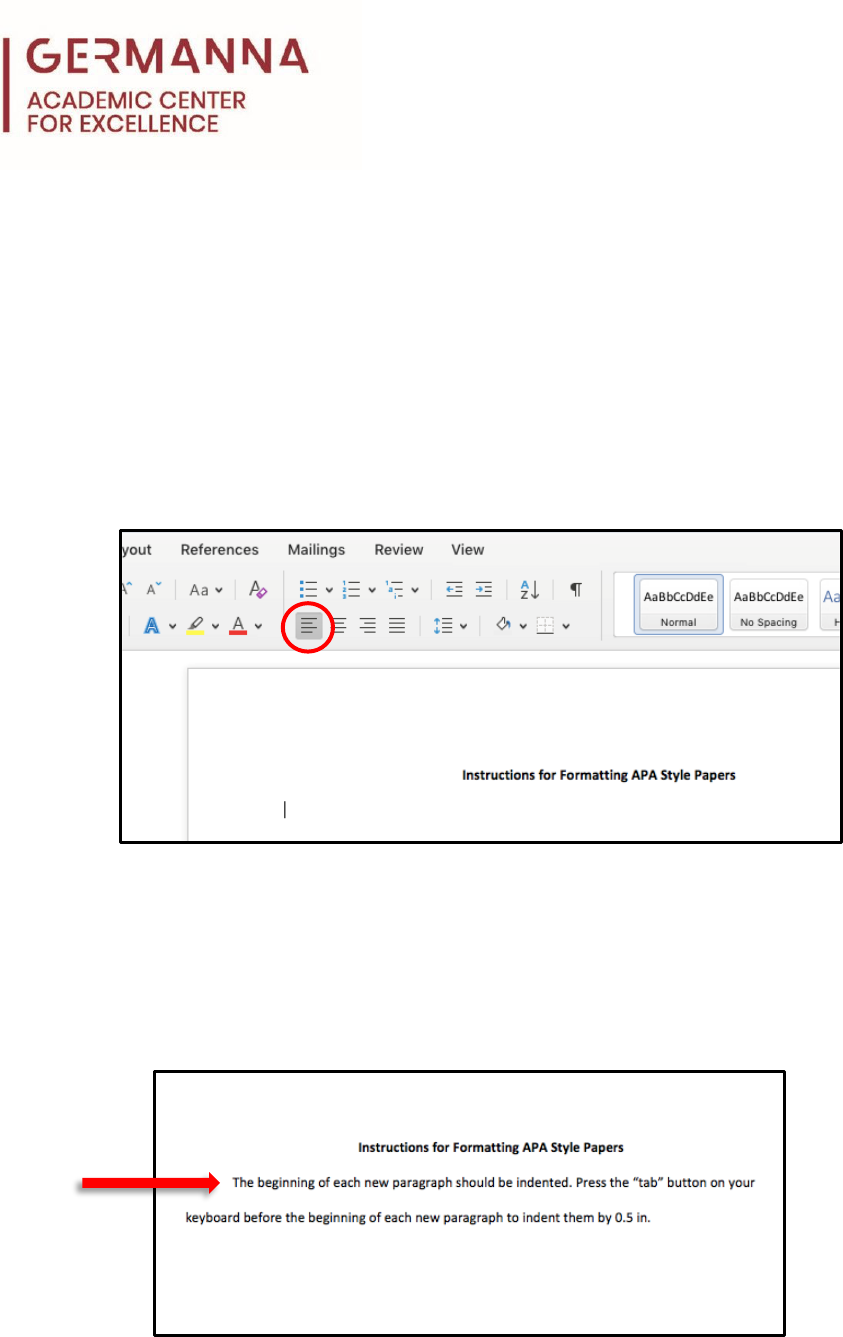
Step 9: Indent paragraphs
The beginning of each new paragraph should be indented. Press the “tab” button on your
keyboard before the beginning of each new paragraph to indent them by 0.5 in. Do not add
an additional indent if new paragraphs are indented automatically.
Provided by APA Formatting in Word for Apple Products
The Academic Center for Excellence 10 Revised May 2020
Step 10: Set up references page
To create a Reference page, a page break needs to be inserted (see the last section of
Step 6 for inserting a page break).
Click on the “Home” ribbon, go to the “Paragraph” group, and click the “Center Text”
button. Type the page title “References,” bold the text, and hit the return key. Go to the
“Paragraph” group once again and click the “Align Text Left” button.
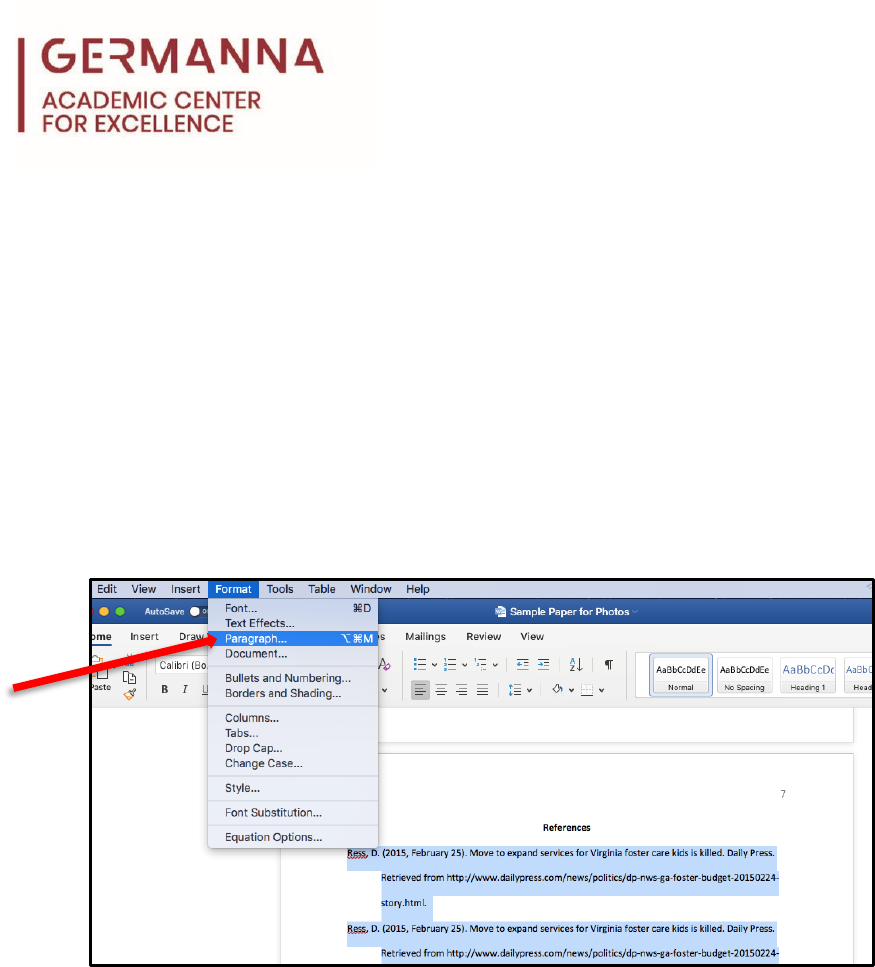
Complete and highlight your citations. On the bar at the top of your screen, click
“Format.” In the drop-down menu, select “Paragraph…”.
Provided by APA Formatting in Word for Apple Products
The Academic Center for Excellence 11 Revised May 2020
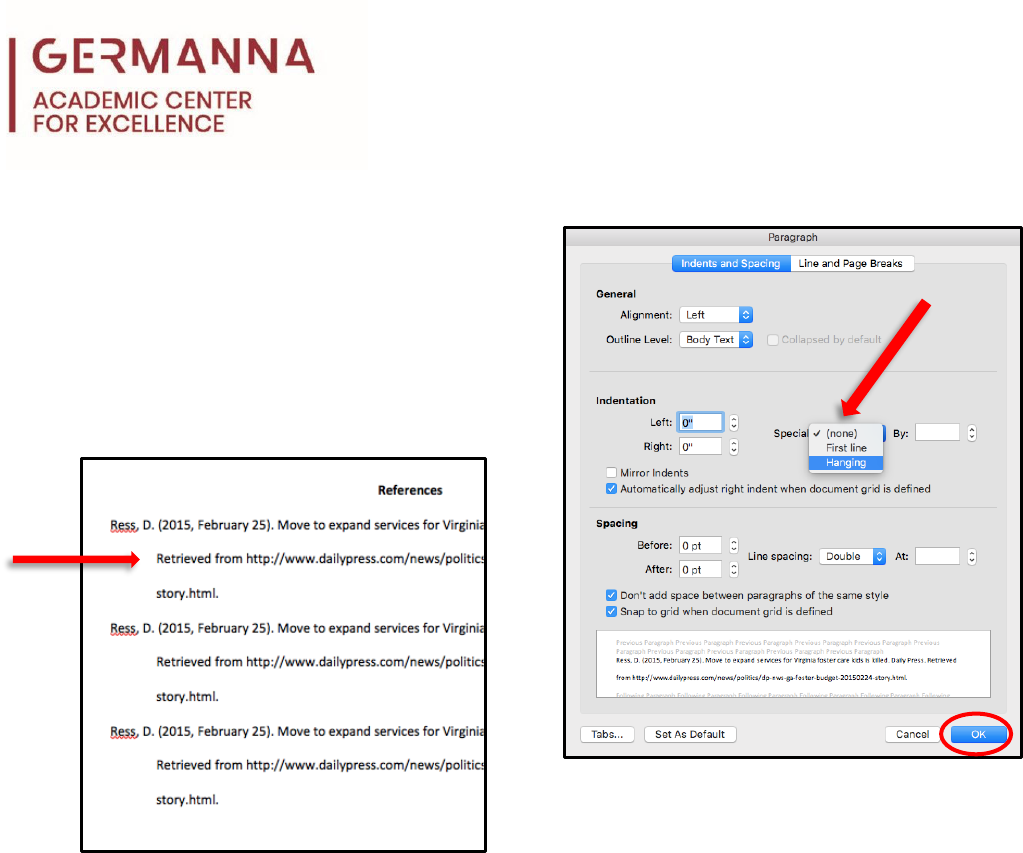
In the pop-up window, click the “Special” tab
within the Indentation section. In the drop-
down menu, select “Hanging.” Then click “OK”
to close the pop-up window. This will apply a
hanging indent to all of your selected citations.

Provided by APA Formatting in Word for Apple Products
The Academic Center for Excellence 12 Revised May 2020
For further information about the APA Style, please see the following the Academic Center for
Excellence’s resources:
• APA Format handout
• APA Sample Paper handout
• APA Paper Checklist for College Writers handout
• APA Format and Citation Style interactive, online module
• APA Format and Citation Style video
Additionally, the Academic Center for Excellence offers informational workshops on APA
format on-campus and online. To schedule an on-campus workshop, contact Academic
Center for Excellence’s Locust Grove center at (540) 423-9148, the Fredericksburg center at
(540) 891-3017, or the Barbara J. Fried Center in Stafford at (540) 834-1993.
