Based on the Home Scientist badge
for Brownies, this event toolkit is
designed to show Brownies and
Juniors that science is all around
you. In Ooey Goey Science, you’ll
combine messy science fun with
hands-on experiments - all while
nding out where science has been
hiding in your own home.
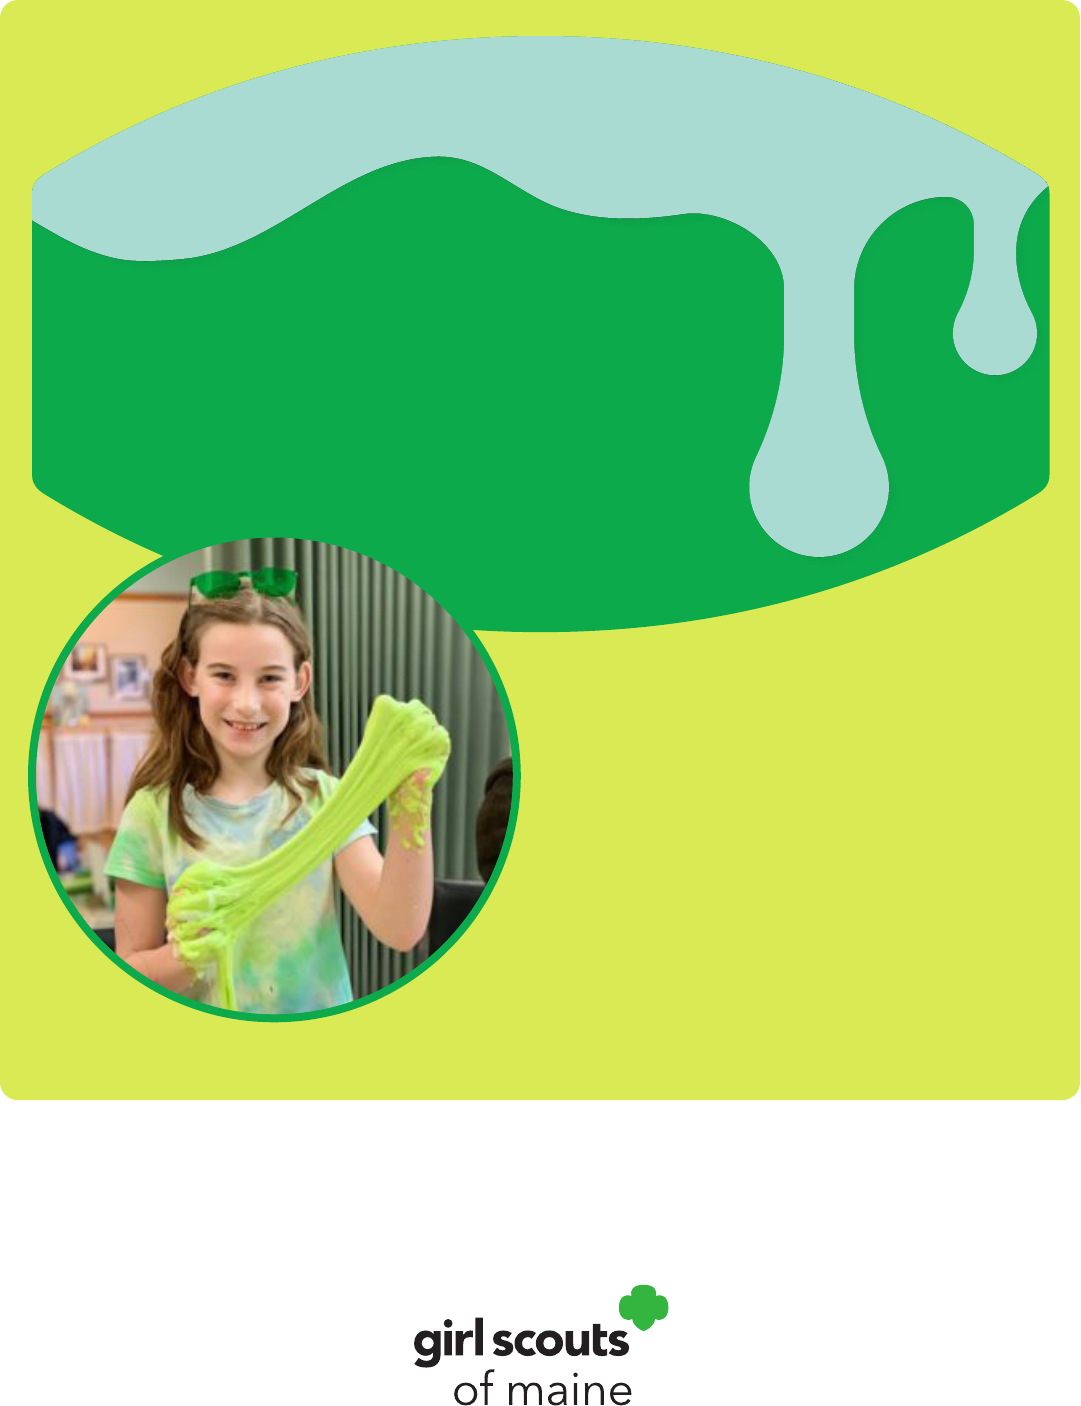
Ooey Gooey
Science Toolkit

2
Introduction .......................................................3
Planning Your Event .........................................4
Materials List .....................................................7
Start Up Activities and Opening ......................10
Activity Options ................................................14
Be a Kitchen Chemist ...............................14
Dive Into Density ....................................... 17
Make Something Bubble Up ....................19
Play with Science ......................................22
Kapers and Evaluation .............................25
Closing ................................................................26
Appendix ...........................................................27
Table Of Contents
3
About the Ooey Goey Science Toolkit
The event will focus on the steps for the Brownie Home Scientist badge. As a three-hour event, you
will not have time to complete all the steps of the Home Scientist badge while still allowing for an
opening, closing, and transition times. While the girls will not complete all the steps, they will be
well on their way to understanding how science is all around us. Since this event is for Brownies and
Juniors, there are adaptations to deepen and enhance the experience for the Juniors. However, keep
in mind that Juniors are not eligible to earn the Home Scientist badge as this badge is for Brownies.
As a committee, select up to 4 activities to complete at your event. Be sure to tell your leaders/parents
which steps they completed at the event and what step(s) remain for them to complete if they want to
nish the badge requirements.
Step 1 - Be a kitchen chemist
Step 2 - Create static electricity
Step 3 - Dive into density
Step 4 - Make something bubble up
Step 5 - Play with science
About The Ooey
Gooey Science
Event Toolkit
This toolkit is designed to help
make planning a successful
STEM event for Brownies and
Juniors as simple as can be.
The goal is not only to help
you plan a STEM themed
event utilizing the Brownie
Home Scientist badge, but also
to help you plan a hands-on
event that will get the girls
excited about science.
Introduction
4
Planning Your Event
General Planning Resources
Planning your Ooey Goey Science event does take time. To help
keep organized during the planning process, please refer to
these useful resources:
• Event Planning Checklist, Materials Planner, Event
Budget, and other planning documents from your Let’s
Plan Events workshop. Be sure to give yourselves ample
time to notify troops of the event prior to the registration
deadline.
• Safety Activity Checkpoints and other safety guidelines:
https://www.girlscoutsofmaine.org/en/for-volunteers/
volunteer/resources.html
Promoting Your Event
Deciding how to promote your event is key to its success. Think
about the best venues and platforms within your Girl Scout
community to get the word out. Be creative as you think about
what works best in your local area. You will want to give troops
at least 3-4 weeks notice of the event so that they have time to
talk about it as a troop and provide time for parents/guardians
to sign up. Remember, troops do not always meet every week.
Registration
We recommend you set your registration deadline at least
2 weeks prior to your event so that your team has time to
purchase supplies, plan nal rotations and schedules, and
complete any remaining tasks that need to be done.
To ensure there is some nancial buy-in to attend the event,
we also recommend charging at least a small fee to attend the
event to be paid upon registration. There tends to be a higher
no-show rate when events are free or payment is not due until
event check-in.
When planning your event, please be sure to have a
cancellation policy established for various scenarios including
weather (full event is canceled) and illness. This cancellation
policy can be used across multiple events and can help
alleviate some questions from troops, parents, and even the
event planning committee.
5
Sample Event Schedule
This event is scheduled to last 3 hours plus set up and clean up time to allow for enough time in each
of the 4 rotations to make it meaningful for the girls. If you anticipate having a large number of girls,
you might consider having multiple rotations to reduce the number of girls at each station and to allow
for more participation from each girl.
Time Activity Description
1 hour + Set up venue
Organize check-in area, arrange tables, chairs, stations,
orient your volunteers and ensure any last minute details
are completed.
25-30 min
Check-In and Start-
Up Activity
Using your pre-determined check-in procedures, check-
in the troops as they arrive. Give any special instructions
as needed. Hand out start-up activity and provide
instructions as needed.
5-10 min Opening
Start the event with an opening ag ceremony. Introduce
yourself and volunteers, briey go over what will happen
at the event, make sure everyone knows where the
bathrooms are and go over any special instructions for
the day.
30 min + 5 min transition
time
Activity 1
Girls will rotate through the stations as assigned.
30 min + 5 min transition
time
Activity 2
Girls will rotate through the stations as assigned.
30 min + 5 min transition
time
Activity 3
Girls will rotate through the stations as assigned.
30 min + 5 min transition
time
Activity 4
Girls will rotate through the stations as assigned.
10 min Kapers & Evaluations
Each troop should be assigned an area to help clean up.
Remember to include common areas in addition to station
locations.
5-10 min Closing
Thank participants for coming, have a Friendship circle
(optional), end with a closing ag ceremony, and have
troops return their evaluations.
30 min + Final Clean-Up
Remember, a Girl Scout always leaves a place better than
she found it. Make sure you remove your items, put tables
and chairs back (if applicable), check the bathrooms, and
collect any lost and found items.
Here is a sample schedule:

6
Things to Think About
Where should we have the event? Here are some things to consider:
• You will need a space that is large enough for the number of girls and adults you anticipate will
attend with break out rooms for the stations. If you plan on having the event in one large space,
think about how loud the room will get. Break out rooms would help contain the activities as
well as the noise.
• Since this is a STEM event, consider the floor at your proposed location. Does it have carpet? Is
it easy to clean?
• If your event is in the warmer months, you might consider finding a location where you could go
outside if the weather cooperates.
• You might also want to consider the ease of the location, parking, whether or not your space
allows food and drinks, if there a fee for the space, and whether or not the space has tables and
chairs for you to use.
Who will help run the Ooey Goey Science event?
• Think about who you may ask to help at the stations. Cadette, Senior, and Ambassador troops
are great resources for younger girl events. Younger girls love seeing older girls in action, and
the older girls could use this time as part of their Service to Girl Scouting Award or community
service hours for school.
• In addition to older girls and Girl Scout volunteers, don’t hesitate to recruit volunteers from the
community. Are there professionals connected to any of the troops that would be interested
in volunteering? A mom that is an engineer? An uncle who is a chemist? Bringing in people
from the community is a great way for the girls to learn, and it shows them some of the career
opportunities available.
Check-In
As a committee, you will want to decide what your check-in process will be. If you have run events in
the past and have a check-in process that works for your Service Unit, continue to use what is familiar.
If this is your first event, here is a sample check-in procedure:
• Set up two tables for check-in. (You may decide one is enough if this will be a small event).
• Divide the troops so that troops 1-X go to one table, and troops X-Z go to the
other table. This will cut down on how long it takes to check in the troops.
• When they check in, they should tell you how many are present that
day from the total number they registered. This will allow you to get an
accurate count of how many girls and adults attended your event, which
helps with planning and evaluation purposes.
• Once they check-in, you can give them their packet for the day and give
them any instructions they need to know.
Ceremonies
Ceremonies are an important part of Girl Scout traditions. Each event
should start and end with a flag ceremony. Additional information
about indoor flag ceremonies and flag care can online:
• https://www.girlscoutsofmaine.org/content/dam/girlscoutsofmaine-redesign/documents/
volunteer-support/Girl_Scout_Traditions_and_Ceremonies.pdf
• https://www.girlscoutsdiamonds.org/docs/2024%20Flag%20Protocol%20and%20
Ceremonies%20Guide.pdf
Helpful Tip:
Color code the
name tags so the girls
know which group
they belong in.

7
General Materials
• Name tags
• Pencils/pens
• Markers
• Tables
• Chairs
• First aid kit
• Tape
• Scissors
• Paper
• Flags and ag stands
• Color Guard uniforms
Start-Up Materials
Poke a Potato
• Stiff plastic drinking straws of various sizes
• Raw potatoes
• Activity directions for display
Follow the Balloon Leader
• Balloons–one per girl plus extras
• Ping-pong balls–one per pair of girls
Soda Geyser
• 2-liter bottles of diet cola – one bottle per type
of candy – see below (diet cola is less sticky
and can create a bigger reaction)
• Candy: 1 roll of mint Mentos, 1 – 3 other kinds
of candy (skittles, jellybeans, M&Ms, tick
Tacs, etc…)
• Paper towels/wipes to help with clean up
• Poster paper or butcher paper with kinds of
candy written/drawn on them
• Pencils/pens
• Post-it notes
• Paper tubes the size of the bottle opening – to
save time you can pre-load the candy into the
tubes
Be a Kitchen Chemist
Materials
Ice Cream
• Ice
• Duct tape
• Ice-cream toppings (optional)
• Gloves or hand towels (optional)
• A pair of scissors (one for the whole group)
• Bowls-one per girl
• Spoons-one per girl
• Music (optional)
• Rock salt
For each girl, you will need:
• 1 Tablespoon sugar
• 1/2 Cup whipping cream or half & half
• 1/4Teaspoon vanilla
• 6 Tablespoons rock salt
• 1 Pint-size ziplock bag
• 2 Gallon-size ziplock bags – have more
handy in case of leaks
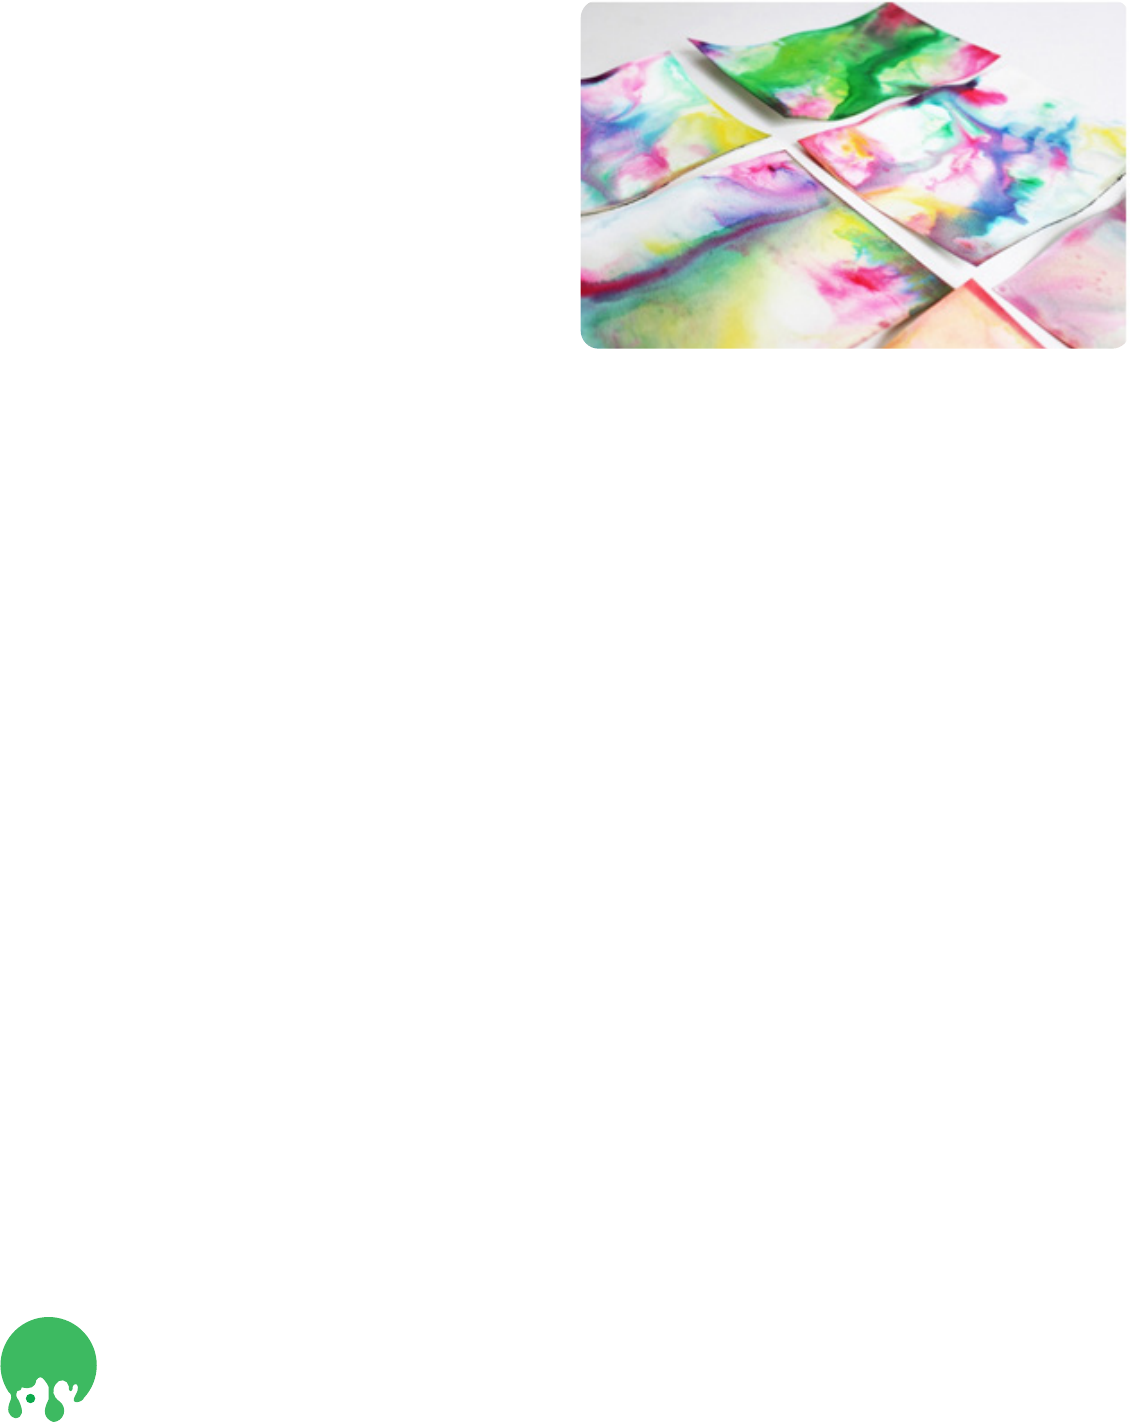
Marbled Milk Paper
• Whole milk
• Dish soap
• Q-tips
• Food coloring
• Shallow plate or tray
• 3-4 pieces of postcard size watercolor paper
for each girl (or group/pairs if you have a large
event)
• Pens
• Almond, rice, or coconut milk (optional Junior
extension)
Based on the activities your committee chooses, use the following materials list when
shopping for or acquiring your materials.
Materials List
8
Dive into Density Materials
Magic Ketchup
• Several clear 1 liter plastic bottles - labels removed
• Water
• Ketchup packets (like the ones you get at a fast
food restaurant)
• Salt - preferably kosher salt (it helps keep the
water clear)
• Tablespoons
• Small bowls (to put the salt in so it is easier for
the girls to scoop)
• Bucket(s) for the used water
• Several smaller bottles and several 2 liter bottles
• Different kinds of food packets such as mayo,
mustard, soy sauce
• Lemon
• Lime
• Clear deep container
DIY Lava Lamp
• Empty clear bottle – one per girl
• Water
• Oil (vegetable or other liquid oil)
• Food coloring
• Glitter (optional)
• Alka-Seltzer or other effervescent tablets
Make Something Bubble Up
Materials
Elephant Toothpaste
• Yeast
• Hydrogen peroxide (as close to 6% as you can
nd. Although the regular hydrogen peroxide
you can get at the pharmacy will work, you just
won’t have as strong of a reaction.)
• Dish soap
• Empty, rinsed 16-24 oz soda/water bottles - 1
per small group
• Additional bottles in varied sizes (optional)
• Food coloring
• Small roasting pans - 1 per small group
• Warm water
• Small cups
• Spoons or popsicle sticks to stir with
• Safety goggles (optional - one per girl)
Film Canister Rockets
• Paper or index cards
• Tape
• Film canister – one per girl (must be pop-off
lids, not screw on lids)
• Scissors
• Water
• Paper Towels
• Effervescing antacid tablet (Alka-Seltzer)
Blow Up a Balloon Without Using
Your Breath
• Empty 12-16 oz soda or water bottle – one per
girl (you can rinse and reuse them)
• Balloon -one per girl, but have extras
• Baking Soda
• Vinegar
• Small funnel – several for each group
• Teaspoons – one per girl in each group
• Small measuring cup – several per group
9
Play with Science Materials
Slime
• School glue
• Water
• Liquid starch
• Small cups
• Permanent marker
• Stirring sticks or spoons
• Food coloring
• Small Ziplock bags (one per person)
Bubbleology
• Pennies
• Eye droppers
• Small cups
• Cups or jars
• Measuring cups
• Measuring spoons
• Water
• Liquid dish soap
• Glycerin
• Light corn syrup
• Permanent markers
• Masking tape
• Popsicle sticks, spoons, or other ways to stir
• Stopwatch
• Wide and shallow bowls (optional)
• Pencils
• Rulers
• Clipboards (optional for the groups to use to
record their results)
• Butcher paper or poster paper
• Pipe cleaners, water bottles with the bottom
cut off, straws, and other items to use to blow
bubbles
• Our Bubble Results handout - see appendix
• Bubbleology Bubble Solution Recipes handout
- see appendix

10
Start-Up Activities
As troops/girls arrive, encourage them to work on one of the provided start-up activities while they wait
for the opening. The start-up activity is designed to help warm up their minds for some science fun.
Depending on the size of your event, you may want to have multiple stations for the start-up activity.
Poke a Potato
Girls will see if it is possible to stab a potato with a drinking straw. This experiment shows that air
pressure can be used in surprising ways.
Materials
• Stiff plastic drinking straws of various sizes
• Raw potatoes (can be used multiple times)
• Directions handout - see appendix
Directions
• Holding a plastic drinking straw by the sides, see if you can poke a potato by quickly stabbing the
potato with the straw. What happens? (Make sure you are not covering the top of the straw.)
• Repeat the experiment with a new straw, but this time cover the top hole of the straw with
your thumb. What happens?
What Happens?
When you rst tried to stab the potato, the air in the straw rushed out so the straw wasn’t strong
enough to pierce the potato. Covering the straw with your thumb traps the air inside the straw. As you
stab the straw into the potato it makes that air pack closely together. This is called compression. The
compressed air makes the straw strong enough to pierce the potato.
Follow the Balloon Leader
A balloon charged with static electricity can make a lot of different things follow it around the room.
In this activity girls will experiment with static electricity and complete step 2 of the Home Scientist
badge.
GSLE
• Learning by Doing
• Cooperative Learning
Materials
• Balloons – one per girl plus extras
• Ping-pong balls – one per pair of girls
Start Up Activities
and Opening

11
Directions
• Give each girl a balloon and have them blow up the balloons and tie the end. You may wany to
have some extras should they struggle to blow up the balloons themselves.
• Have each girl rub the balloon on their hair to see what happens.
• Now, hold the balloon close to the ping-pong ball. Have them move the balloon and see what
happens to the ping-pong ball.
• For extra fun see if they can make the ping-pong ball roll across the oor or to a partner. Can
they make the balloon stick to the wall or another surface?
What Happens?
How static electricity works.
Static electricity is created when objects get an electrical charge. They get this charge when two
objects are rubbed together. Rubbing causes tiny particles called electrons to move from one object
to another. The object that loses electrons gets a positive charge, and the one that gains them gets a
negative charge. Objects with the same charge repel each other. Objects with opposite charges attract.
When you rub the balloon against your hair, you give it a negative charge. The balloon takes some of
the electrons from your hair, which leaves your hair positively charged.
Your positively charged hair is not attracted to the negatively charged balloon, so your hair starts
to rise up to meet it. This is similar to the ping-pong ball, which is drawn to the negatively charged
balloon as the area near it becomes positively charged – opposite charges attract.
Soda Geyser
Girls will experience the power of chemical reactions by making a geyser with soda. Through a
reaction between the candy and the soda, carbon dioxide sends soda shooting into the air. This is
denitely an outdoor activity!
Materials
• 2-liter bottles of diet cola – one bottle per type of candy – see below (diet cola is less sticky and
can create a bigger reaction)
• Candy: 1 roll of mint Mentos, 1 – 3 other kinds of candy (skittles, jellybeans, M&Ms, tick Tacs, etc…)
• Paper towels/wipes to help with clean up
• Poster paper or butcher paper with kinds of candy written/drawn on them
• Pencils/pens
• Post-it notes
• Paper tubes the size of the bottle opening – to save time you can pre-load the candy into the tubes
Directions
During the start-up activity time
• Have posters out for girls to make their predictions as to what will happen when you mix the
various candies with the soda. Girls can write or draw on a post-it note and then stick it to a
poster paper under the following headings: mentos and cola, skittles and cola, jelly beans and
cola (or any combination of Mentos and 1-3 other candies).
During the Opening
• After the ag ceremony and other housekeeping items, show the girls what happens when
you mix the various candies with the soda.

12
• Ask the girls if they have ever heard of or seen a geyser. Explain that a geyser is a hole in the earth
that sprays out hot water and steam. One of the most famous geysers is Old Faithful in Yellowstone
National Park. Explain that today they are going to explore making a geyser from soda.
• Show the girls a 2-liter bottle of diet soda and Mentos candy. Share some of the predictions the
girls came up with during the pre-opening.
• If not done previously, put one kind of candy into each of the tubes.
• Take the tops off the soda bottles and place them on a level surface on the ground with
nothing else around them.
• One at a time, drop each kind of candy into their bottles of soda. Allow time in between for the
girls to observe what happened. You may want to start with the non-mentos candy. Drop the
candy into the soda as quickly as possible and move away quickly to avoid getting sticky and wet.
• After the girls have enjoyed the entertainment, ask them what happened. Lead a short
discussion about what happened and why.
What’s Happening?
Soda is made with carbon dioxide which is what makes it bubbly. Through carbonation, the carbon dioxide
gas is dissolved into the liquid. When you open a bottle of soda, the carbon dioxide slowly escapes, creating
a zz. However, when you drop the Mentos candy into the soda, a rapid physical reaction is created
between the candy and the soda. This is due to nucleation - when bubbles form on the surface of the
candy. To increase this reaction, the surface of the Mentos candy is actually pitted with tiny holes, resulting
in more surface area. When the candy hits the bottom of the bottle, the gas is released. Since there is
nowhere for the gas and liquid to go, it shoots up out of the bottle, creating a geyser.
Opening
The opening will be the ofcial start of the Ooey Goey Science event. This is a time to welcome
everyone, get the girls excited about exploring the Home Scientist badge, and discuss any
housekeeping items.
Materials
• Flag stands
• Flags - American ag and possible Service Unit ag
• Flag Ceremony Uniforms for each of the girls in the Color Guard (white gloves, red sash)
Directions
• Prior to the event, ask one of the troops to lead the group in an opening ag ceremony.
• Gather everyone in the designated space for the opening. This could be an auditorium, large
room, the middle of a gym, or other large space.
• Welcome everyone to the event and introduce yourself.
• Ask everyone to stand for the ag ceremony.

13
Flag Ceremony
For directions on how to conduct a ag ceremony, please refer to the Girl Scout Traditions and
Ceremonies information here: https://www.girlscoutsofmaine.org/content/dam/girlscoutsofmaine-
redesign/documents/volunteer-support/Girl_Scout_Traditions_and_Ceremonies.pdf
Materials
• Flag stands
• Flags- Preferably an American ag, WAGGGS ag, Girl Scout ag, and possible Service Unit ag
• Flag Ceremony Uniforms for each of the girls in the Color Guard- white gloves, red sash
(available by reservation in the South Portland Ofce)
Directions
To begin…Girls that are calling are waiting quietly “off stage” ready to come when called. Flag Bearers
wait with ags ready and in line at back or room or in next room/hallway (avoid having girls and ags
having to pass through doorways at the start of the ceremony).
When caller is called forward she proceeds to podium/position in the front of room to get ready.
Day of Event Information to Share
• Review any safety or housekeeping items:
• Fire exits
• First aid station
• Bathrooms
• Walking and other safety items for the space
• Explain the rotations and stations.
• Have any committee members present raise their hands, stand up, or in another way show
themselves. Explain that if anyone has any questions, they can ask any of the committee
members. If you are doing the Soda Geyser activity at an outdoor event, you may decide to do it
here to kick off the event.
• Dismiss the girls for their rst rotations.
14
Be a Kitchen Chemist
Girls will experiment with one of the coolest places in your house for science, the kitchen!
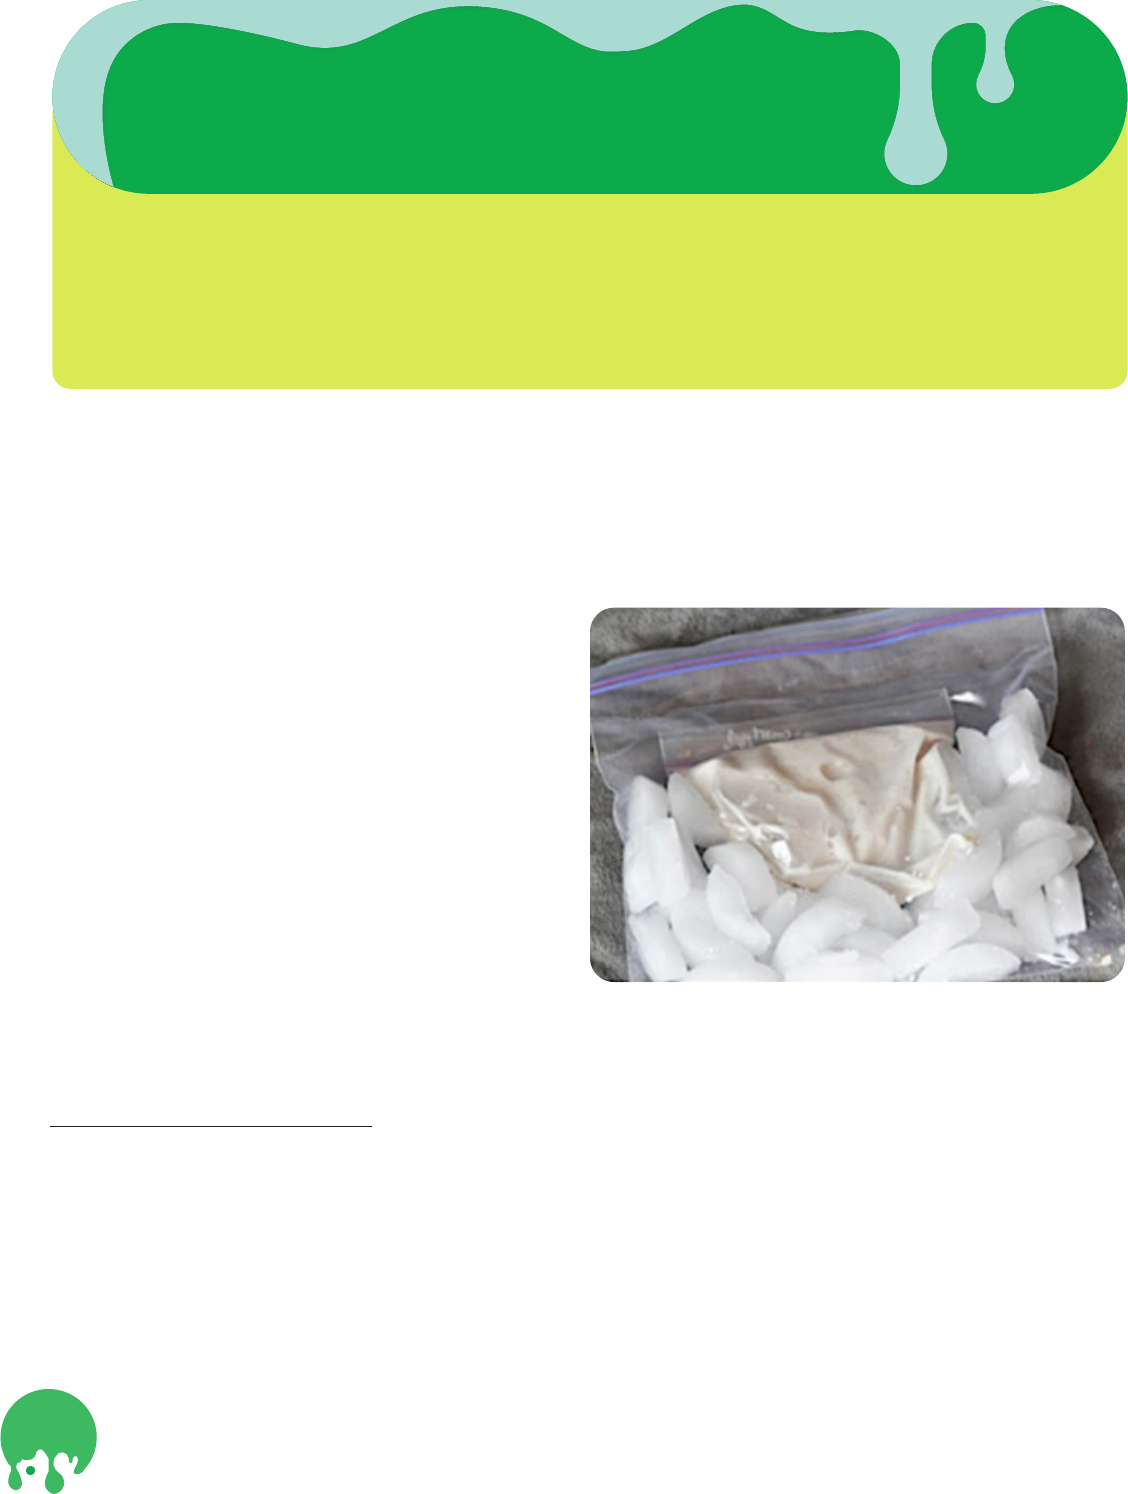
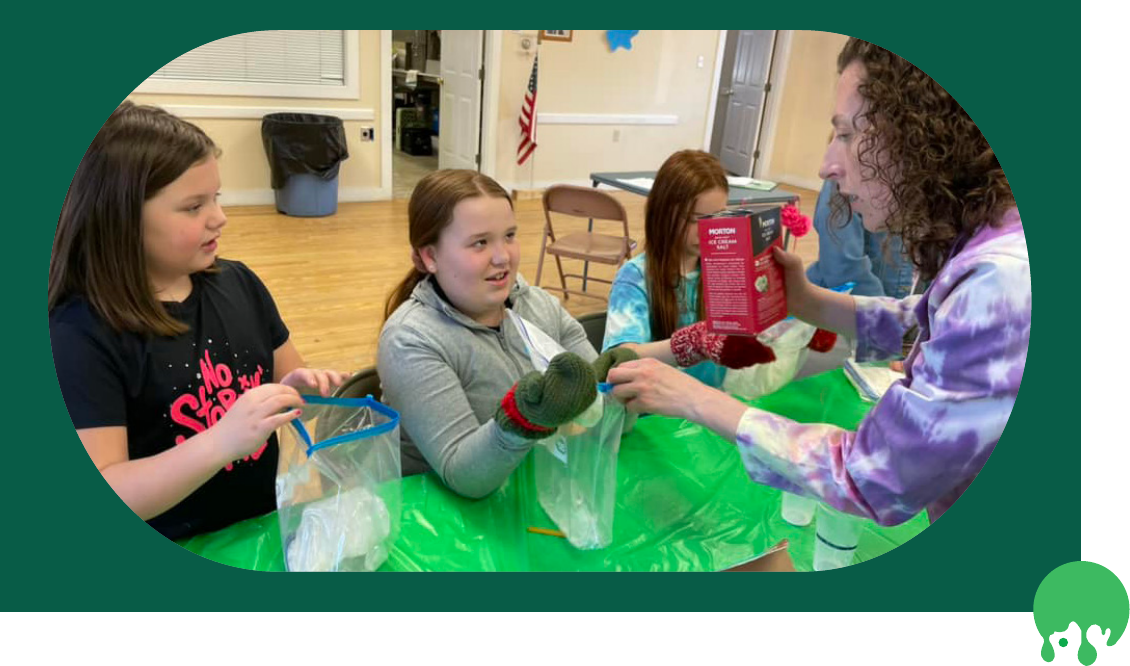
Ice Cream
Girls will explore the freezing properties of cream and discover that with the help of salt, ice cream
stays creamy instead of turning into a block of ice. This is a great activity to do outside if you are able.
GSLE
• Learning by Doing
• Cooperative Learning
• Girl-led
Materials
• Ice
• Duct tape
• Ice-cream toppings (optional)
• Gloves or hand towels (optional)
• A pair of scissors (one for the whole group)
• Bowls- one per girl
• Spoons- one per girl
• Music (optional)
• Rock salt
For each girl, you will need:
• 1 Tablespoon sugar
• 1/2 cup whipping cream or half & half
• 1/4 Teaspoon vanilla
• 6 Tablespoons rock salt
• 1 Pint-size ziplock bag
• 2 Gallon-size ziplock bag(s) – have more handy in case of leaks
Select up to four activities to offer at your event. The activities are organized by badge steps.
The activities you select should be based on the location of your event, what you feel the
girls would most enjoy, and your event budget. Remember to tell troop leaders and parents
what badge steps the girls completed at the event and which steps remain if they wanted to
earn the badge (Brownies only).
Activity Options
15
Directions
• Have the girls measure their sugar, cream, and vanilla into their pint-size bag. Seal the bag with
duct tape and double bag if necessary.
• Fill the gallon-size bag half way with ice and then add the salt. What do you think the salt will do?
• Place the pint bag inside the gallon bag, and make sure it is sealed completely. Double bag if
necessary.
• Shake the bags for about 5 minutes. You can also play music, and make it into a dance party
to help pass the time. What does the ice cream look like after 5 minutes? What happens to the
ingredients as you shake them in the bag? What about the ice cubes - how do they change and
what do they look like? You should start to see ice cream forming in the small bag.
• If you are satised with the consistency of the ice cream, you may cut open the small bag and
scoop out the ice cream into the girls’ bowls. Alternatively, the girls can also eat the ice cream
out of the bag.
• If you do not have ice cream yet, continue to shake the ice cream bags as needed. You may need
to add more ice and/or salt.
• Remind the girls that a Girl Scout always leaves a place better than she found it, so they should
help clean up their space and the common spaces
Discussion
Lead a discussion about what happened in the bags to create ice cream. What did the girls notice?
How did the salt affect the ice cream?
What’s Happening?
In the winter, the snow plows spread salt on the roads. This helps lower the temperature in which
water freezes. For the roads, this means that the ice will melt even if the temperature is lower than the
freezing point, making the roads less slick. For ice cream, the salt helped keep the temperature low
enough to freeze milk so that it hardened and turned into ice cream.
16
Marbled Milk Paper
Girls will create colorful creations using the power of molecules.
GSLE
• Learning by Doing
• Cooperative Learning
Materials
• Whole milk
• Dish soap
• Q-tips
• Food coloring
• Shallow plate or tray
• Water color paper cut into post card size
pieces - 3 to 4 pieces for each girl (or group/
pair if you have a large event)
• Pens
• Almond, rice, or coconut milk (optional Junior extension)
Directions
• If you have a large event, divide the girls into pairs or small groups.
• Give each group their watercolor papers and have them write their names on the back of the
paper. Place the paper near the working area, once you start swirling the colors, you will have to
work quickly to get the best results.
• Give each group a shallow tray or pan (like a baking sheet), and ll the tray with whole milk so
that it just covers the bottom. You do not need the milk to be very deep.
• Have the girls add about 6-8 drops of food coloring onto the milk in different spots. Try to use
at least 2 different colors of food coloring. More colors will result in a greater marbled effect.
• Carefully drop about 5 drops of dish soap onto the drops of food coloring. If you have young
girls,they might nd it easier to dip Q-tips into the dish soap so that the tip is generously
covered in soap and then dip the Q-tip into the milk near/on the food coloring. Watch the fun
show as the color “bursts”. This fun effect does not last long, though.
• Gently swirl the Q-tip through the different colors to add to the marbled effect. Remind the girls
to do this gently and to only swirl a little bit. Too much swirling will end up in a brown muddled
mess of milk.
• Once the desired look is accomplished, lay a piece of watercolor paper on top of the milk
mixture and gently press down. Carefully lift the paper and set aside to dry. Continue with the
additional sheets of paper.
• Let everything dry completely.
• Remind the girls that a Girl Scout always leaves a place better than she found it, so they should
help clean up their space and the common spaces.
Discussion
Lead a short discussion about what happened. What did the girls notice when they added the dish
soap? Explain the science behind this activity.
17
Junior Extension
After the girls have tried this experiment with whole milk and you have had a short discussion about
what happened, encourage them to think about what would happen if they used different kinds of
milk. Does it make a difference? If time allows, girls may test another form of milk to see if it impacts
the reaction that occurs. This can also be done as a large group to save time.
What’s Happening?
The purpose of dish soap is to break up fat so that it can be washed away. Since there is fat is whole
milk, the molecules in the dish soap are attracted to the fat molecules in the milk. When you drop the
dish soap onto the milk, the molecules race around trying to bond causing the fat in the milk to break
down and produce a “burst” as the color gets pushed around.
Dive into Density
How come some things oat while others sink? It’s all about density.
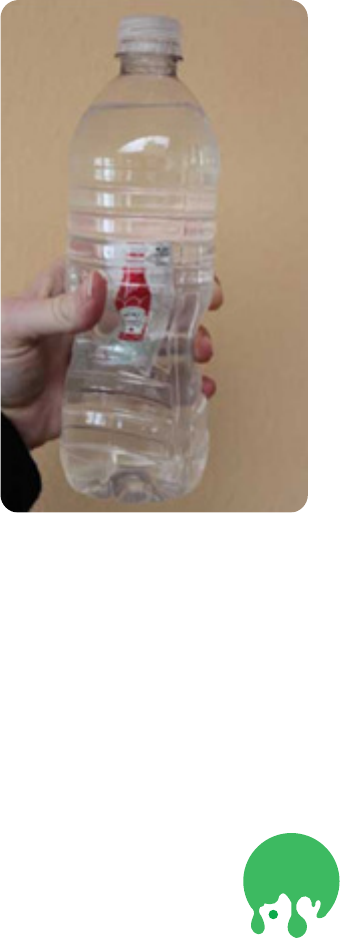
Magic Ketchup
Girls will work individually or pairs to try to make a pack of ketchup oat and sink while it is sealed
inside a bottle.
GSLE
• Learning by Doing
• Cooperative Learning
• Girl-Led
Materials
• Several clear 1 liter plastic bottles - labels removed
• Water
• Ketchup packets (like the ones you get at a fast food restaurant)
• Salt - preferably kosher salt (it helps keep the water clear)
• Tablespoons
• Small bowls (to put the salt in so it is easier for the girls to scoop)
• Bucket(s) for the used water
• Several smaller bottles and several 2 liter bottles
• Different kinds of food packets such as mayo, mustard, soy sauce
• Lemon
• Lime
• Clear deep container
Directions
• Prior to the start of the event, ll the bottles almost to the top with water.
Introduction
• Lead a short introduction about the concepts behind this experiment- density and buoyancy.
• Density- deals with the amount of mass an item has
• Buoyancy- describes whether or not something sinks or oats
• To help explain the concept of density, use a lemon and a lime that are around the same size.
Ask the girls to make a prediction about whether they oat or sink. Pass them around for the
girls to see and feel. Put the lemon in the water and ask them if it sinks or oats (oats). Put

18
Make the ketchup pack oat AND sink
• Once the ketchup packet is oating in the bottle, make sure the bottle is lled to the top with
water and cap it tightly.
• Squeeze the bottle. The magic ketchup should sink when you squeeze the bottle and oat up
when you release it.
• Try to get the ketchup to stop in the middle of the bottle.
Discussion
• Lead a short discussion about what happened during this activity.
Junior Extension
After the girls try their experiment with room temperature water, encourage them to think about
what they would want to change in their experiment to see if they get the same result. Options might
include:
• Using warm or cold water - Does this affect how the ketchup oats?
• Using a different size bottle - Does this affect how much you have to squeeze the bottle to get
the packet to sink?
• Do different types of food packets have different densities? What happens if you try the same
activity with different kinds of food packets like soy sauce, mayo, or mustard?
• Lead a short discussion about what the girls decided to test, what happened, and why. Allow
the girls to lead the discussion, giving them prompting questions if needed.
What’s Happening?
Although you can’t see it, there is actually a little air bubble inside of the ketchup packet. Much like the
pool oaties you might wear on your arms when you swim, the air bubble helps the ketchup packet
oat. If you had to add salt to the water, you were adjusting the water’s density to make the ketchup
oat. When you squeeze the bottle hard enough, it puts pressure on the packet. This makes the air
bubble become smaller and the entire packet become denser than the water around it and the packet
sinks. When you release the pressure, the air bubble expands, making the ketchup packet less dense,
and the packet oats back up.
DIY Lava Lamp
In this activity, girls will explore the idea of density by observing the properties of oil and water. For
added fun, they will then turn it into a DIY lava lamp.
the lime in the water and ask them if it sinks or oats (sinks). Ask the girls why they think this
happened. Ask the girls which was heavier, the lemon or the lime (lime) Explain that the lime is
denser than the water but the lemon is not.
Make the ketchup packet oat:
• Add a ketchup packet to a bottle lled with water.
• If the ketchup packet oats, go on to the next section.
• If the packet sinks, add about 3 tablespoons of salt to the bottle. Cap it and shake it up until the
salt dissolves.
• Continue adding salt, a few tablespoons at a time, until the ketchup oats.

19
GSLE
• Learning by Doing
• Cooperative Learning
Materials
• Empty clear bottle – one per girl
• Water
• Oil (vegetable or other liquid oil)
• Food coloring
• Glitter (optional)
• Alka-Seltzer or other effervescent tablets
Directions
See the directions outlined by the Connecticut Science Center. Adapt as needed to suit the needs of
your group. https://ctsciencecenter.org/blog/science-at-play-homemade-lava-lamp/
Make Something Bubble Up
When mixed, some household items can have a fun reaction. Check out how much fun you can have
with chemical and physical reactions.
Elephant Toothpaste
Girls have some ooey goey fun as they explore chemical reactions.
GSLE
• Learning by Doing
• Cooperative Learning
• Girl-Led (Junior extension)
Materials
• Yeast
• Hydrogen peroxide
• Dish soap
• Empty, rinsed 16-24 oz soda/water bottles- 1 per small group
• Additional bottles in varied sizes (optional)
• Food coloring
• Small roasting pans - 1 per small group
• Warm water
• Small cups
• Spoons or popsicle sticks to stir with
• Safety goggles (optional - one per girl)
Directions
• Just before the program, heat water so that it is warm. Store it in a thermos or nd a way to
heat the water before every workshop session.
• Explain that water is a very important part of everyday life and is important in chemistry as
well. It helps mix things together. Scientists name chemicals using numbers and letters. Ask if
anyone knows the scientic term for water (H2O). Explain that the H stands for hydrogen, and

20
the O stands for oxygen. The number 2 after the H means that there are 2 pieces of hydrogen
connected to every piece of oxygen.
• Show the girls the hydrogen peroxide bottle and ask if anyone knows what it is used for. If they
don’t know, state that hydrogen peroxide is used as a disinfectant or as a kind of beach. Explain
that just like water, hydrogen peroxide can also be named with numbers and letters- H2O2.
Ask the girls if they know what that means; it is water with an extra oxygen.
• Explain that the extra oxygen can be “kicked out” of the H2O with a special kind of energy.
Today, we are going to see what happens when you cause a reaction to create that energy.
• Divide the girls into pairs or groups of 3. Give each group a pan, bottle, cup, and something to
stir with.
• In their groups, girls should put their bottle in their pan and take turns holding and measuring
their ingredients.
• Measure a 1/2 cup of hydrogen peroxide and pour it into their bottle.
• Add up to 4 drops of food coloring into the bottle and give the bottle a little swish.
• Add about 1 tablespoon of dish soap into the bottle and give it another little swish.
• Show the girls the yeast. Ask them what yeast is used for (making bread rise and be
uffy). In the cup, measure about 3 tablespoons of warm water then add 1 tablespoon of
yeast. Stir the mixture to dissolve the yeast in the water.
• When the yeast is fully dissolved, carefully, but quickly, pour the yeast mixture into the
hydrogen peroxide mixture in the bottle.
• Watch the foaminess begin! Encourage them to use their senses to explore the reaction
that is occurring. Girls may play in the foam, but remind them that they wouldn’t want to
eat the foam because it has soap in it.
• Lead a short discussion about what happened in the activity. Make sure to reference the What’s
Happening information.
• Remind the girls that a Girl Scout always leaves a place better than she found it, so they should
help clean up their space and the common spaces.
Junior Extension
Encourage the girls to think like a scientist. What happened? Why did it happen? What questions do
they have about the experiment? If they could redo the experiment, what would they want to test?
Encourage them to think of one thing they would change in the experiment to see if it affects the
result. For example:
• Does the amount of yeast change the amount of foam created?
• Does it work to add just dry yeast instead of mixing it with water?
• Does the size of the bottle make a difference in the amount of foam created?
What’s Happening?
When the girls added the yeast to the hydrogen
peroxide, it created foam. The bubbles in the foam
are lled with oxygen. The yeast helped remove the extra oxygen from the hydrogen peroxide (H2O2).
Since this happened very fast, it created lots of bubbles, which was increased by adding the dish soap
(to make it more visible). The foam that was created was due to an exothermic reaction; this means it
created heat in addition to foam.

21
Film Canister Rockets
Girls will experience the pressure that builds with the gas that is created when water mixes with an
effervescing tablet. This is denitely an outdoor activity.
GSLE
• Learning by Doing
• Cooperative Learning
• Girl-Led (if you choose to do the additional extension activities)
Materials
• Paper or index cards
• Tape
• Film canister – one per girl (must be pop-off lids, not screw on lids)
• Scissors
• Water
• Paper Towels
• Effervescing antacid tablet (Alka-Seltzer)
Directions
See the directions outlined by the Imagination Station. You may decide to skip measuring how long it
takes for them to come back to the ground as this can be a very quick process.
https://www.imaginationstationtoledo.org/education/diy-activities/alka-seltzer-rockets
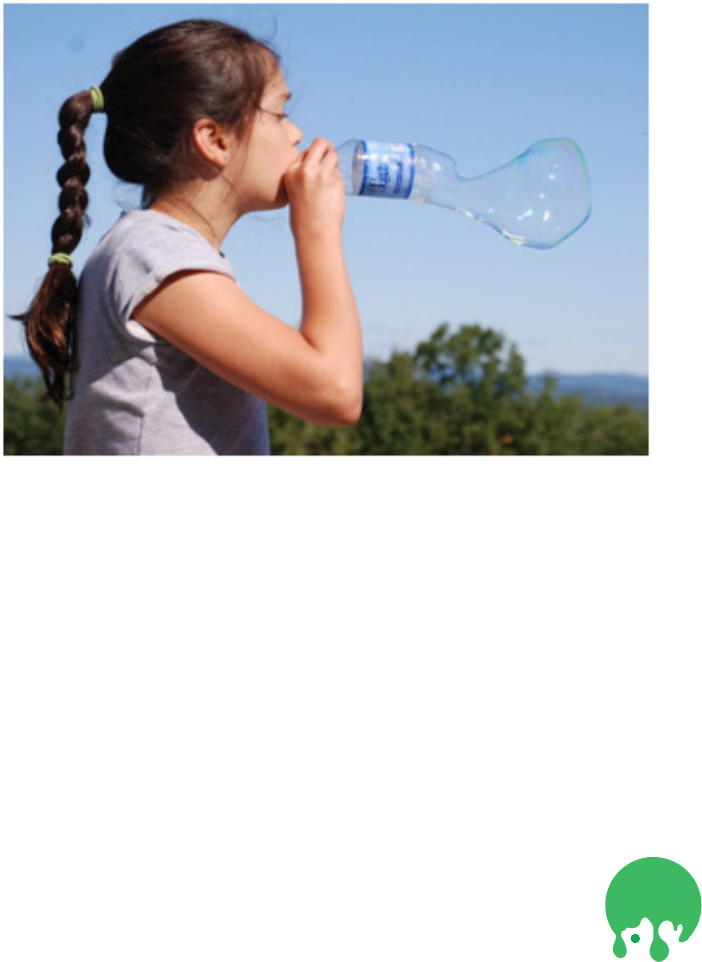
Blow Up a Balloon Without Using Your Breath
Baking soda and vinegar can create a fun reaction in this playful take on the baking soda and vinegar
volcano activity.
GSLE
• Learning by Doing
• Cooperative Learning
Materials
• Empty 12-16 oz soda or water bottle – one per girl (you can rinse and reuse them)
• Balloon -one per girl, but have extras
• Baking Soda
• Vinegar
• Small funnel – several for each group
• Teaspoons – one per girl in each group
• Small measuring cup – several per group
Directions
• Start the activity by asking girls if they have ever seen what happens when you mix baking soda
and vinegar. Allow time for responses.
• On a plate, pour some baking soda. Then add vinegar. Allow the girls to feel, listen, look, and use
their senses to see what happens. Lead a discussion about what they noticed.
• Explain the science behind what happens when you mix baking soda and vinegar (see notes in
the following website as needed). Make sure girls understand that a gas is created in addition to
the baking soda and vinegar bubbling up.
• Give each girl their materials and conduct the activity found here: https://www.cmosc.org/
balloon-blow-up-science-experiment/

22
Play With Science
Science can be used to make things that are just plain fun!
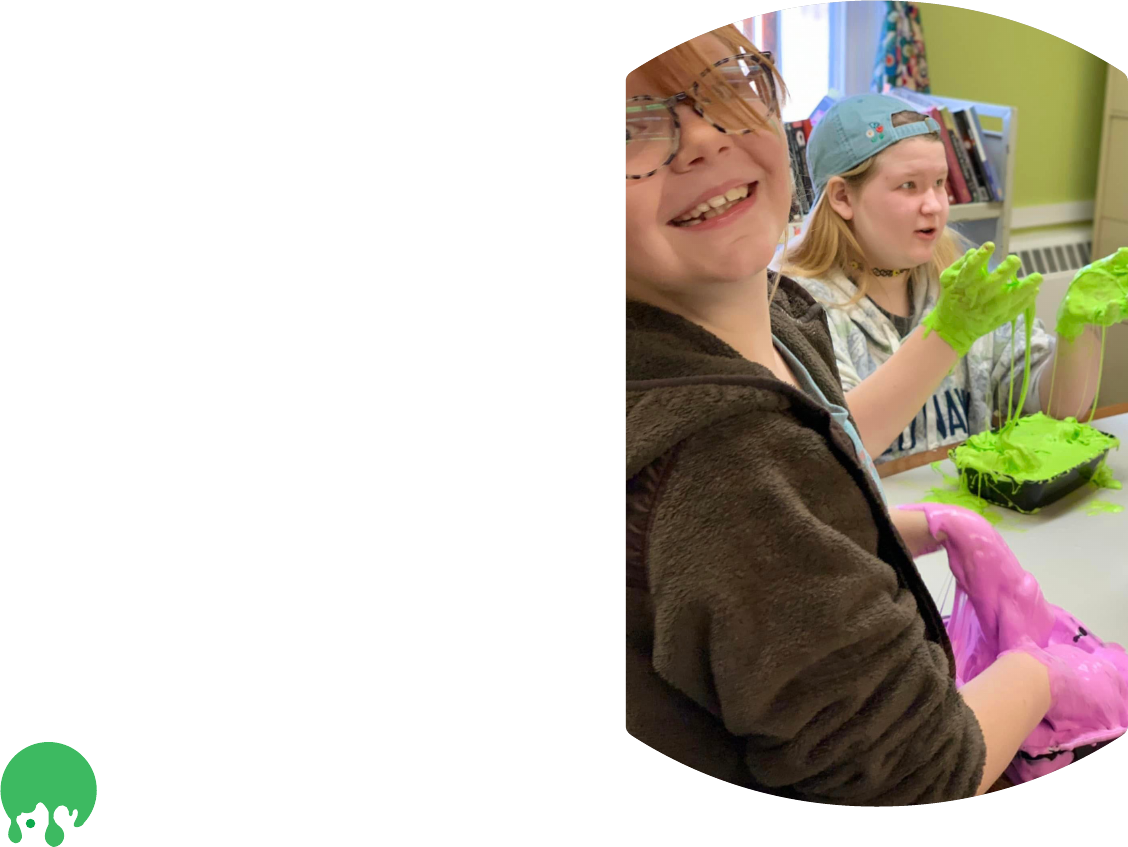
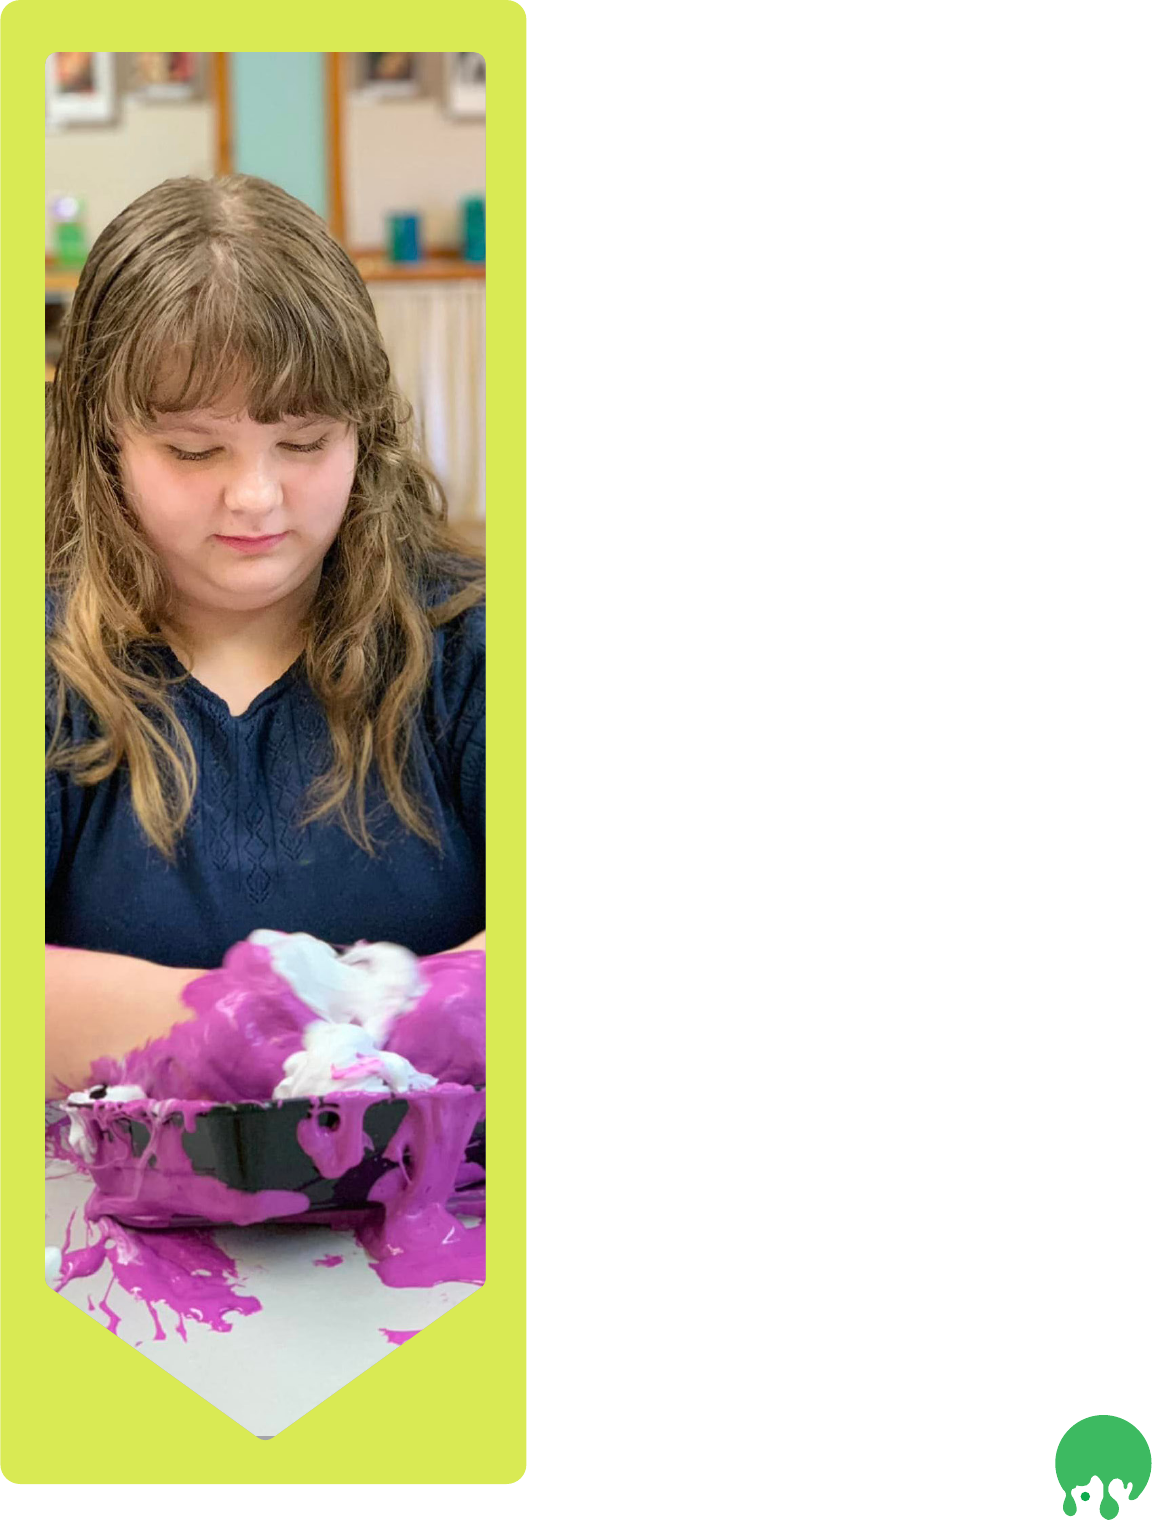
Slime
Girls will explore the properties of liquid polymers by making slime/silly putty. This slime is a fun goo
that you can stretch, stamp, and play with.
GSLE
• Learning by Doing
Materials
• School glue
• Water
• Liquid starch
• Small cups
• Permanent marker
• Stirring sticks or spoons
• Food coloring
• Small Ziplock bags (one per person)
• Balloons (optional)
Directions
• Before the girls arrive, mark off the cups into 3 even sections, leaving room at the top of the cup
for mixing.
• Ask the girls if they have ever made slime or silly putty before. Explain that today they will have
a chance to make their own silly putty that they can take home. Go over the ingredients needed
to make the slime and talk to the girls about what these ingredients are commonly used for.
• Give each girl a cup, and have her pour glue into the cup up to the rst line.
• Then, pour water up to the second line and stir. If you would like to add color, this is the time.
Add 2 or 3 drops of food coloring to the glue and water mixture.
• Once you have added your food coloring, pour liquid starch to the third line and stir.
• As you stir, the liquid starch will mix with the glue polymer and start to create the strands of
polymer molecules, causing the putty/slime to start to form.
• Once the putty/slime starts to form into a ball, girls may take it out of the cup and work it in
their hands. This is where the fun really begins!
• Girls may play with their putty until it is time to clean up. When they are nished, they should
write their names on a bag with a permanent marker and then put their silly putty in their bag.
• If their slime came out harder than they would like, encourage them to put it into a balloon to
make a stress ball. Simply hold the balloon open as wide as possible, help them put the slim in
the balloon, and tie the end.
• If there is extra time, and if they are interested, girls can test the viscosity of their slime.
Viscosity deals with how fast or easily the slime oozes or ows. A thick and gooey putty/slime
has a high viscosity and ows slowly. A slime/putty with a low viscosity will seem very runny
and will spread quickly. To test the viscosity of their slime, the girls can place a piece of slime
on their ngertip or the corner of a table/desk. How quickly does it spread or drip?
• Remind the girls that a Girl Scout always leaves a place better than she found it, so they should
help clean up their space and the common spaces.
23
Bubbleology
What makes the best bubbles? Experiment with different bubble solutions to see which solution
works best. This is a great outdoor activity!
GSLE
• Learning by Doing
• Cooperative Learning
• Girl-Led
Materials
• Pennies
• Eye droppers
• Small cups
• Cups or jars
• Measuring cups
• Measuring spoons
• Water
• Liquid dish soap
• Glycerin
• Light corn syrup
• Permanent markers
• Masking tape
• Popsicle sticks, spoons, or other ways to stir
• Stopwatch
• Wide and shallow bowls (optional)
• Pencils
• Rulers
• Clipboard (optional for the groups to use to record their results)
• Butcher paper or poster paper
• Pipe cleaners, water bottles with the bottom cut off, straws, and other items to use to blow
bubbles
• Glue (optional)
Directions
• Divide the girls into small groups of 2 or 3 depending on the size of the group. If it is a small
group, the girls may work independently for this activity. Give each group a penny, an eye
dropper, and small cup lled with water.
What’s Happening?
Matter is what everything is made of, and it exists in one of three states: solid, liquid, and gas.
Sometimes, something isn’t completely in one state or another. Take silly putty or slime for example.
Is it a solid or a liquid? It is actually both! Slime is a colloid- a mixture of one substance suspended (or
oating) in another. The suspended bits are so tiny that they don’t sink in the other substance. Some
examples of colloids are smoke, fog, mayonnaise, and butter.
Glue has an ingredient called polyvinyl acetate which is a liquid polymer. A polymer is a long chain
of identical, repeating molecules. The solution of school glue with liquid starch and water produces a
putty-like material that’s elastic and ows very slowly. The liquid starch links the polymer molecules
in the glue to each other, creating one large, exible polymer. This process is called cross-linking. This
kind of slime will get stiffer and more like putty the more you play with it as the polymer molecules
link together more and more

24
• Give the girls the challenge to see how many drops of water they can hold on the top of their
penny. Give girls a few moments to try this out.
• Lead a short discussion about what happened. What did they notice about the water as they
added more drops to the penny? Explain that the reason the water made a dome on top of the
penny is due to surface tension. Surface tension is an invisible bond between the molecules in
the water. The surface tension of water tends to hold it in a round shape. That is why the water
created a dome on top of the penny.
• Now, have the girls rub a small amount of dish soap on the surface of their penny and repeat
the activity. How many drops of water could they t on top of the penny?
• Bring the girls together again and ask them what they noticed in the second activity (the penny
held fewer drops of water). Explain that when you added the dish soap it relaxed the surface
tension of the water so it did not have as strong of a bond and couldn’t hold as many drops of
water.
• Explain that the secret to a good bubble is getting the right surface tension. Ask the girls if
they have ever tried to blow bubbles with only water or have tried to blow bubbles in a glass of
water? Did it work?- no. This is because the surface tension of water is too strong to create a
bubble. In order to make a bubble, you need to help relax the surface tension of the water. This
can be done in many ways, but typically this is done by adding soap or detergent to the water,
much like we did with the penny activity. There are many different recipes for making a bubble
solution. Today we are going to test different ingredients to see which ones make the best
solution.
• For this activity, the Brownies will make two bubble solutions and test them and Juniors can
make 3 solutions if time allows.
• In groups of 2 or 3, allow the girls to make their bubble solutions according to the recipe in the
appendix.
• Give the girls the pipe cleaners or other items to make their bubble wands. To make a wand
from a pipe cleaner, take one end of the pipe cleaner and bend it to form a circle. Make sure the
circle can t inside the container you are using for your bubble solution. When you have the
shape you want, twist the pipe cleaner so that it stays in place. Brownies should make 2 wands
each (one for each bubble solution) and Juniors should make 3 wands each (one for each
solution). Each wand should be approximately the same shape and size.
• Explain that they will have a chance to play with their bubble solution, but they should also test
their solutions. As a group, they will need to determine which solution will make the biggest
bubbles and which bubbles will last the longest. Encourage the girls to record their results on
the handout provided in the appendix.
• To test which solution makes the biggest bubbles, one person should blow bubbles at a
time and have a partner observe. The person blowing the bubbles should try to catch
a bubble on the wand so that everyone in the group can observe how big the bubble is.
Switch back and forth, allowing all members of the group the chance to blow bubbles
several times. It is best to have all girls experiment with one bubble solution before moving
on to the next. Girls may try to measure the bubbles with a ruler, but remind them that
they can’t touch the bubbles or they will pop.
• To test which bubble lasts the longest, have the girls take turns blowing bubbles and
catching them on a bubble wand. One of the girls will start timing the bubble as soon as
another girl catches one on her wand. Using a stopwatch, girls will take turns timing one
another to see how long their bubbles last. It is best to have all girls experiment with one
bubble solution before moving on to the next.
25
• Give the girls time to test their bubble solutions before bringing everyone back together for
a discussion. Ask groups to report out about what they discovered. Which bubble solution
worked best? Lead a short discussion about why.
• If there is time left, allow girls time to test other items to see how they stand up for blowing
bubbles. Make sure to allow enough time to clean up for the next group.
Junior Extension
Juniors will have the opportunity to test three different bubble solution recipes to see which one
created the biggest bubbles and which bubbles lasted the longest. If time allows, they can try to create
their own magic bubbles with the solution that they decided worked the best. Magic bubbles are so
strong and stable you can touch them without popping them. To make magic bubbles, the bubble
solution includes a polymer (like glue) which adds elasticity. Girls can try making their own magic
bubbles by adding a small amount of glue to their bubble solution.
What’s Happening?
The secret to a good bubble is surface tension. Surface tension is an invisible bond that holds water
molecules together. The surface tension of water itself is too strong to make a bubble. This is why
you can’t blow a bubble when you blow into a cup of water. However, by adding the liquid soap to the
bubble solution, you are relaxing the surface tension so that it can stretch more and create a bubble.
Bubbles pop when the water molecules evaporate. Glycerin and corn syrup help prevent this from
happening by forming weak bonds with the water molecules to slow down evaporation.
Kapers and Evaluations
Before the closing, troops should help clean up their nal station. Remember, a Girl Scout always
leaves a place better than she found it! Troops should also take this time to complete their evaluations.
26
Materials
• Flag stands
• Flags - American ag and possible Service Unit ag
• Flag Ceremony Uniforms for each of the girls in the Color Guard (white gloves, red sash)
Directions
• Gather everyone into a big circle. Thank everyone for coming and remind them to turn in
theirevaluations. End the event with a song and a friendship squeeze. If it is a large group,
position a volunteer half way around the circle. Send the squeeze around in both directions.
The volunteer will receive the squeeze from both sides but not pass it around the circle
completely to save time. If it is a smaller group, the friendship squeeze will go completely
around the circle.
• End the event with a closing ag ceremony to retire the colors. Ask everyone to stand in a
horseshoe formation.
Clean Up
Remind troops that they are responsible for cleaning their own space and to help clean
common areas. Girl Scouts leave the space better than they found it.
Girls will gather once more as a large group and end with a closing friendship squeeze, a
song, and a ag ceremony.
Closing
27
Poke a Potato
Directions
• Holding a plastic drinking straw by the
sides, see if you can poke a potato by
quickly stabbing the potato with the
straw. What happens? (Make sure you
are not covering the top of the straw.)
• Repeat the experiment with a new
straw, but this time cover the top hole
of the straw with your thumb. What
happens?
• For additional fun, try different kinds
of straws. Does the size of the straw
make a difference?
What’s Happening?
When you rst tried to stab the potato, the air in the straw rushed out so the straw wasn’t strong
enough to pierce the potato. Covering the straw with your thumb traps the air inside the straw. As you
stab the straw into the potato, it makes that air pack closely together. This is called compression. The
compressed air makes the straw strong enough to pierce the potato.
Appendix
28
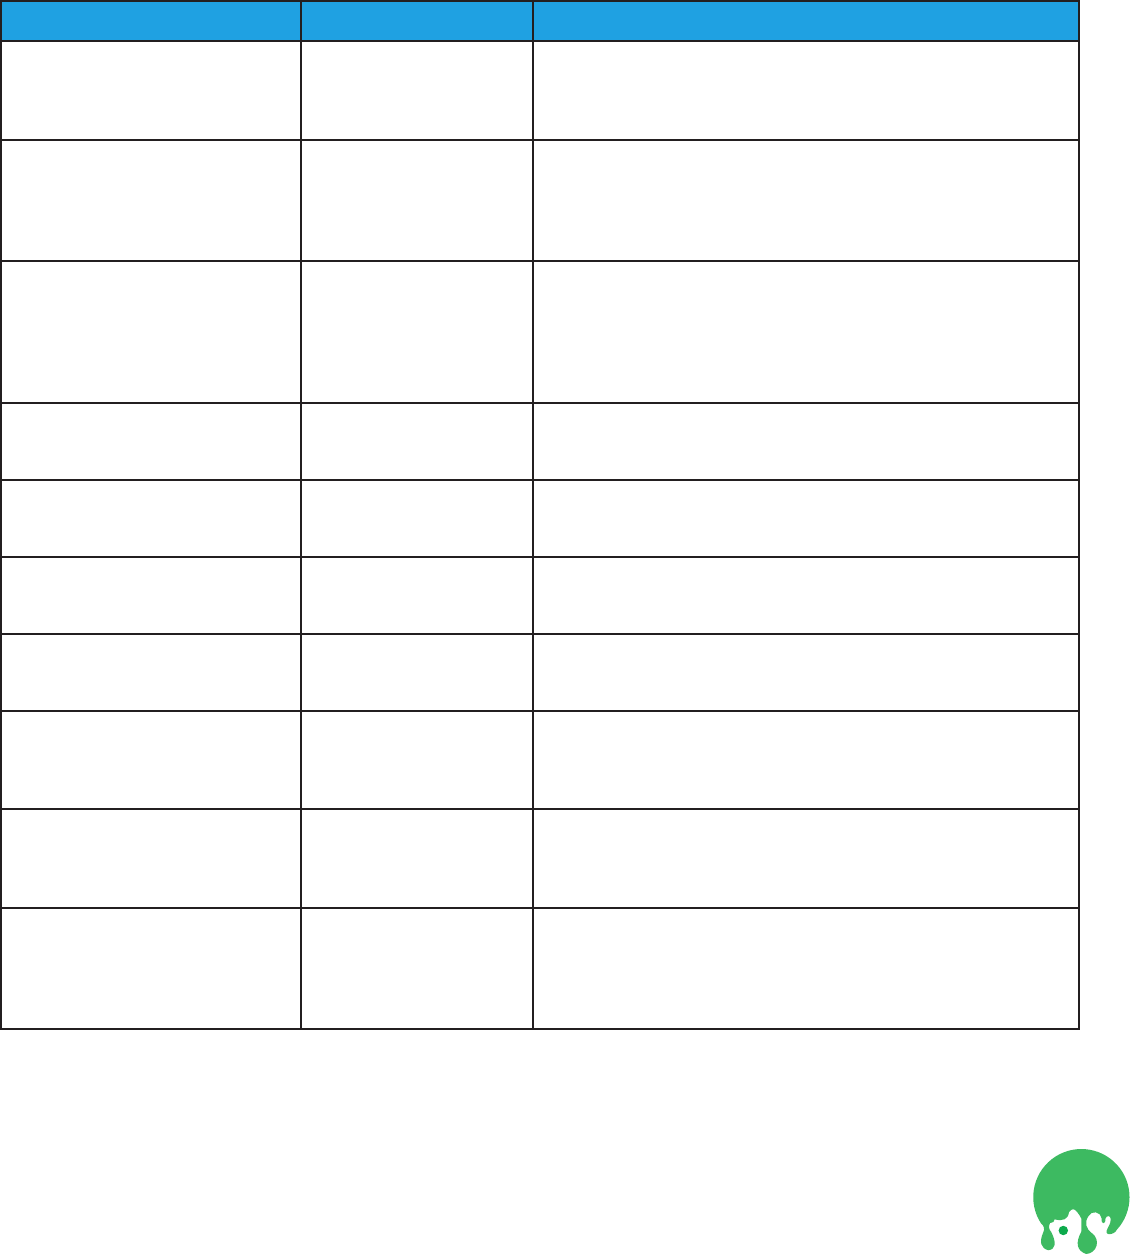
Bubbleology Bubble Solution Recipes
Ingredient
Solution #1
dish soap only
Solution #2
dish soap +
glycerin
Solution #3
dish soap + corn syrup
Water 1 Cup 1 Cup 1 Cup
Liquid Dish Soap 2 TBS 2 TBS 2 TBS
Glycerin 1 TBS
Corn Syrup 1 TBS
Brownies will make solution #1 and solution #2. Juniors will make all 3 solutions.
Directions
1. Write the solution number and ingredients on a piece of masking tape with a permanent marker.
Tape each label to a cup or jar.
2. Carefully measure and pour the ingredients for the solutions one at a time. Pour them into the
appropriate cup and give them a gentle stir. Be careful not to stir them too fast or you’ll have a bunch
of bubbles in your bubble mix.
Our Bubble Results
For each bubble solution, record your results.
Solution #1 -
Bubble Time
(in seconds)
Solution #2 -
Bubble Time
(in seconds)
Solution #3 -
Bubble Time (in
seconds)
Trial 1
Trial 2
Trial 3
Trial 4
Trial 5
Trial 6
Trial 7
Trial 8
Trial 9
Trial 10
Total Bubble Time in
Seconds (optional)
