
Blocksi Teacher Dashboard Guide
Table of Contents
Logging into Blocksi Teacher Dashboard & Rostering Classes……………………………………….. 2-3
Setting Automatic Start for Classes…………………………………………………………………………… 4
Selecting / Changing a Classroom Policy……………………………………………………………………. 5
Creating a Block / Allow List……………………………………………………………………………………. 6
HEADS UP Function………………………………………………………………………………………………. 7
SHARE / ENFORCE Function…………………………………………………………………………………. 8-9
MESSAGE Function……………………………………………………………………………………………... 10
ASSESSMENT Function…………………………………………………………………………………….. 11-15
(Teacher) SHARE SCREEN Function………………………………………………………………………16-17
(Student) SHARE SCREEN Function…………………………………………………………………………. 18
INSIGHTS……………………………………………………………………………………………………… 18-22
Retrieving Insights from Previous Class Sessions……………………………………………………….. 23
Individual Student Tile Functionality……………………………………………………………………... 23-26
Creating Groups within a Class……………………………………………………………………………….. 27
Adding a Second Teacher……………………………………………………………………………………… 28
Video Conference Mode…………………………………………………………………………………..... 29-34
I. Conference Mode: Dominant Speaker Layout………………………………………………… 29-32
II. Conference Mode: Tile Layout……………………………………………………………………….. 33
III. Recording……………………………………………………………………………………………. 34-35
IV. Video Conference Troubleshooting………………………………………………………………… 36
1
Logging into Blocksi Teacher Dashboard & Rostering Classes
**Note The students just have to be logged into their device via their school credentials and Blocksi will
automatically work. They do not need to login separately to Blocksi and we do not notify the students that
they are being monitored.
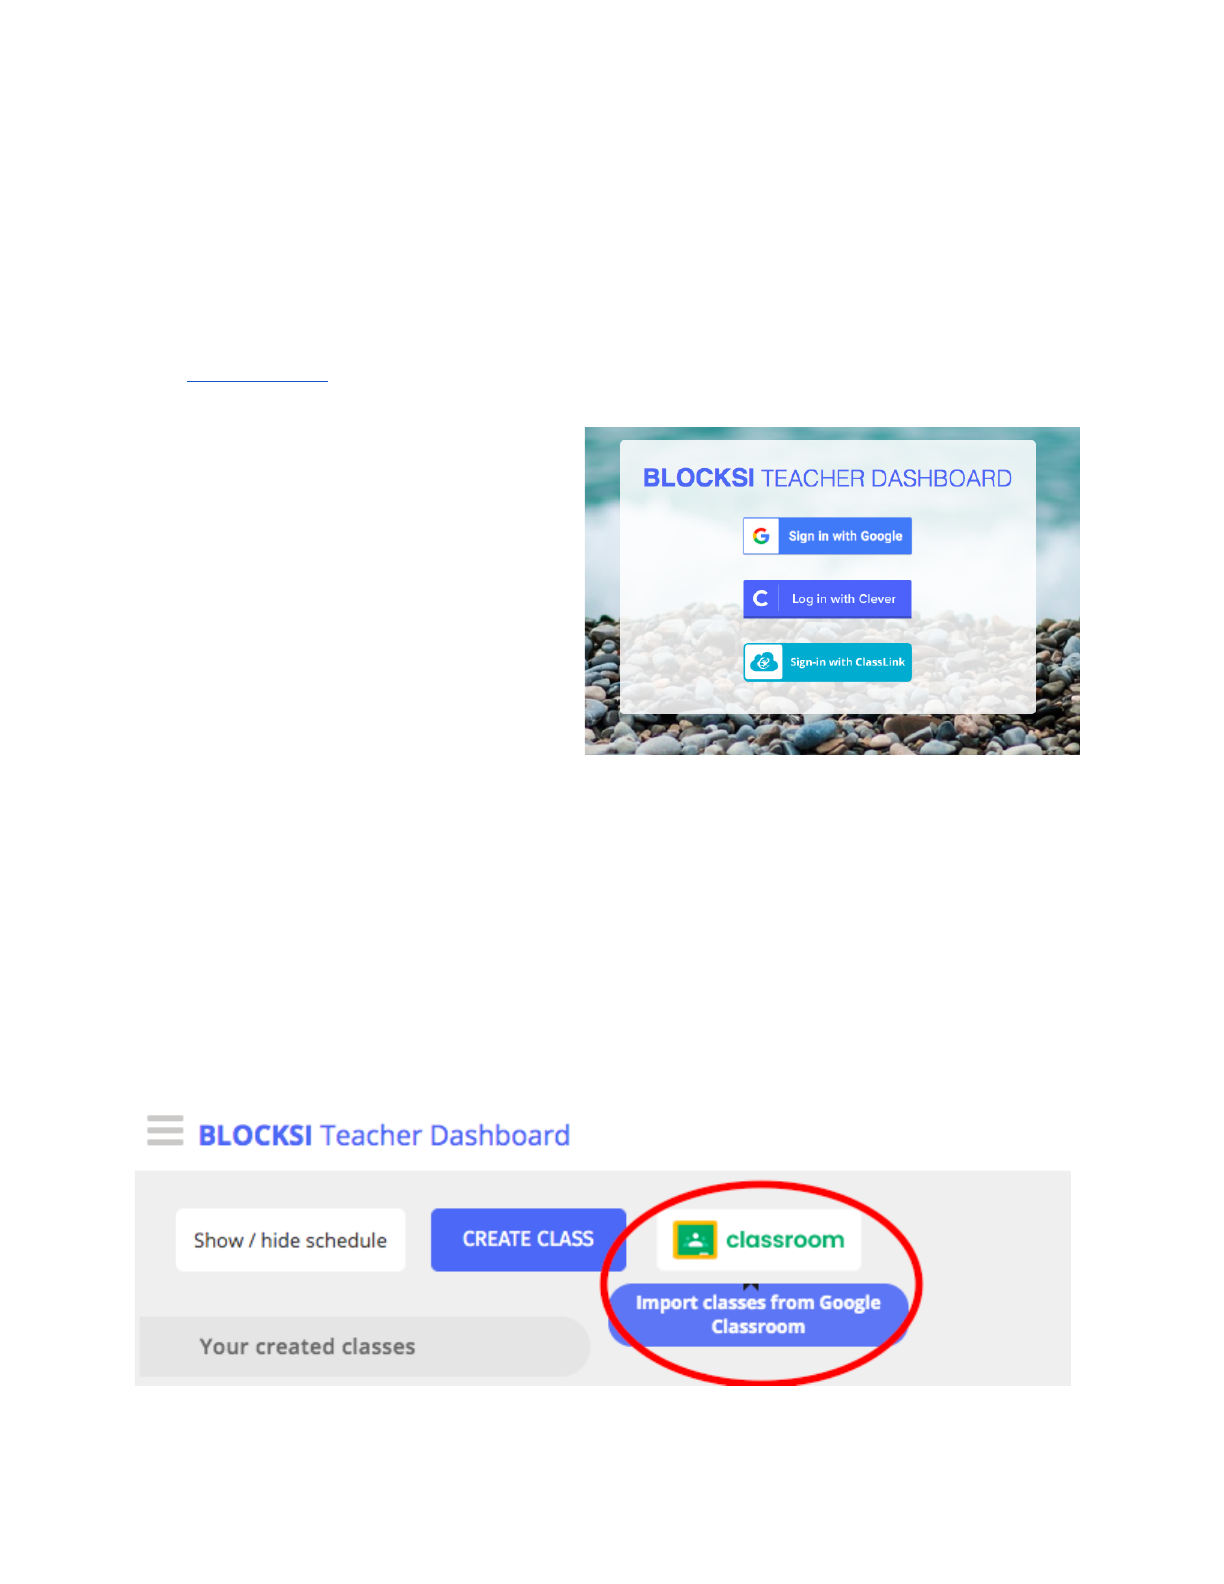
Teacher Login:
Visit www.blocksi.net and click on the yellow Login at the top right of the page.
Click the blue Teacher icon.
You will be prompted to login via three options:
Google, Clever, ClassLink.
If your classes are rostered in Clever , choose to sign in with Clever and your roster will automatically
sync with Blocksi Teacher Dashboard.
If your classes are rostered in ClassLink , choose to sign in with ClassLink and your roster will
automatically sync with Blocksi Teacher Dashboard.
If your classes are rostered in Google Classroom or you need a fourth option to roster your classes in
Blocksi Teacher Dashboard, choose to sign in with Google.
To roster your classes via Google Classroom , click the icon below to import your classes.
2
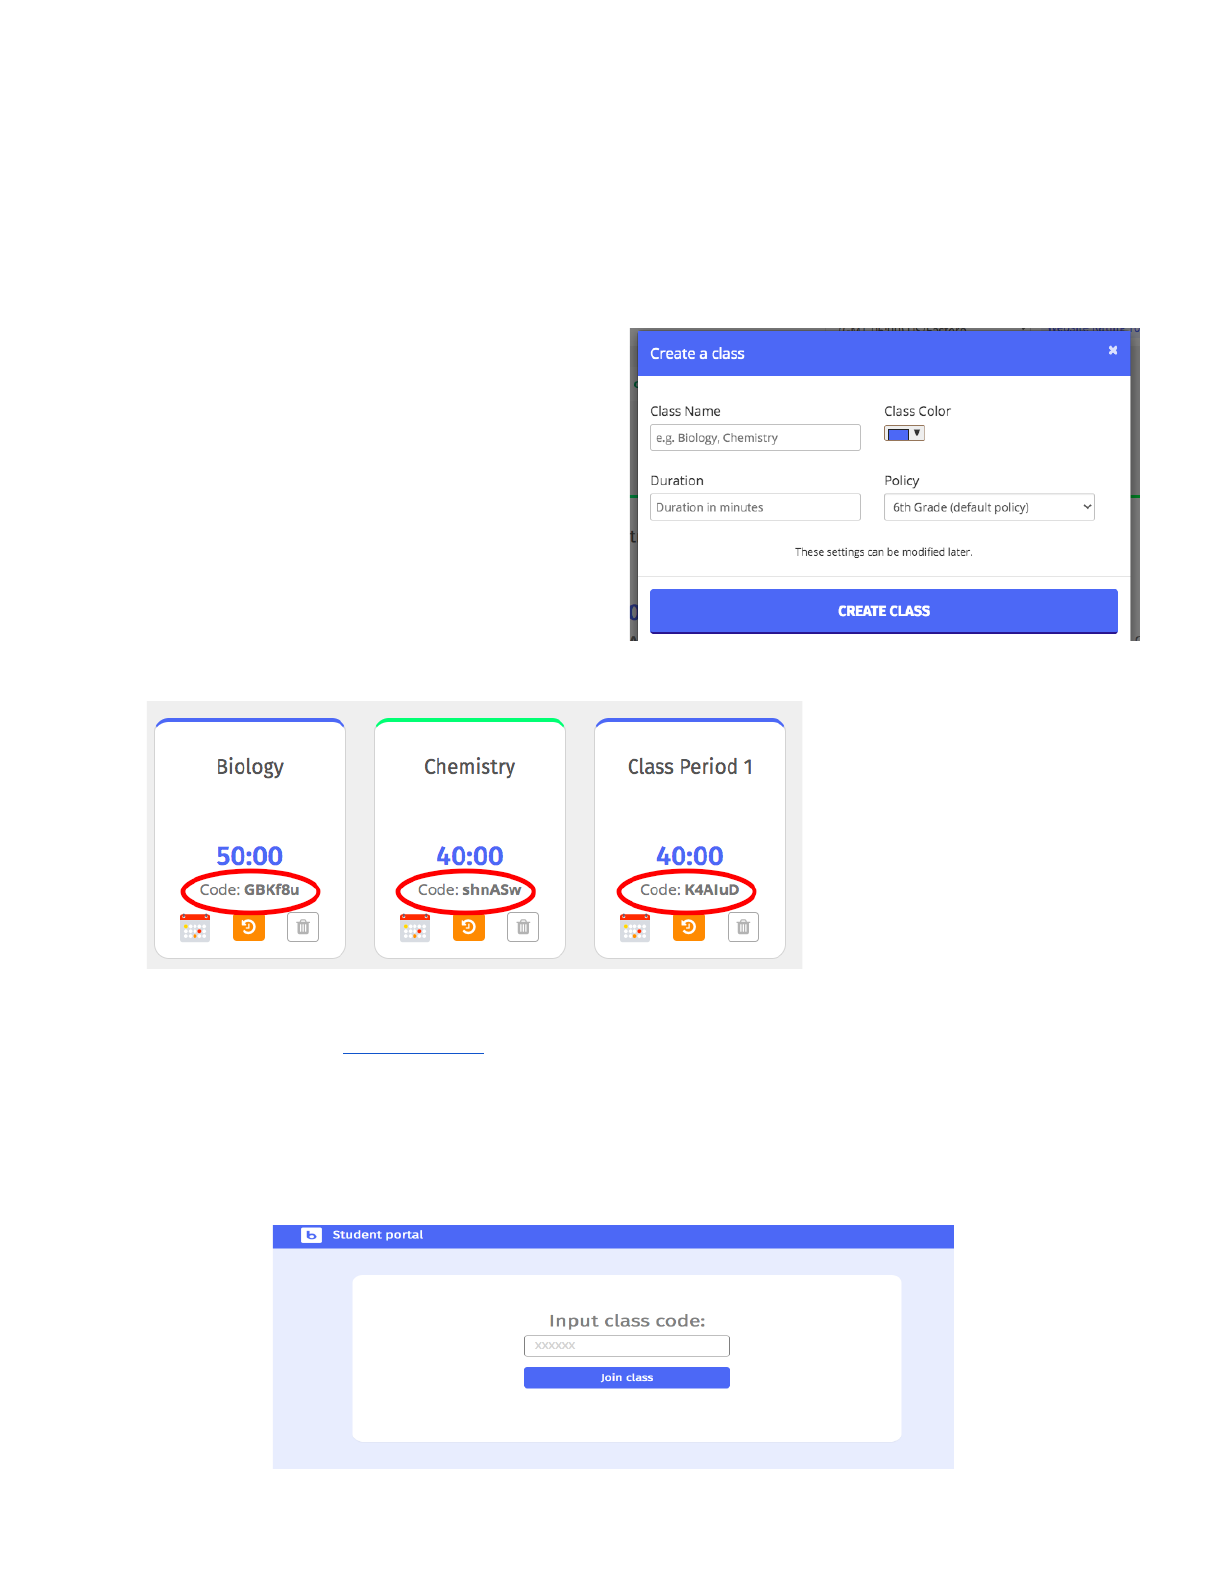
If you do not use any of the aforementioned rostering, you can create a class manually by clicking on
‘CREATE CLASS.’
Name your class, assign a color (optional), enter the duration of the class period and leave the policy as
default (assigned by your Administrator) or if your Admin has pushed out a list of alternative policies you
may choose a different policy to assign to that class from the list.
Click ‘CREATE CLASS.’
Each class has a unique code (circled in red).
The students can visit www.blocksi.net and click the yellow Login at the top right of the page.
Then click the green Student icon and login via Google with their school login credentials.
The students will then be prompted to input class code that you give them for the class they need to be
placed into. The students only have to enter this code one time and they are put in the class for the rest of
the year. From there, the students just login to their device with their school credentials and that is all.
3
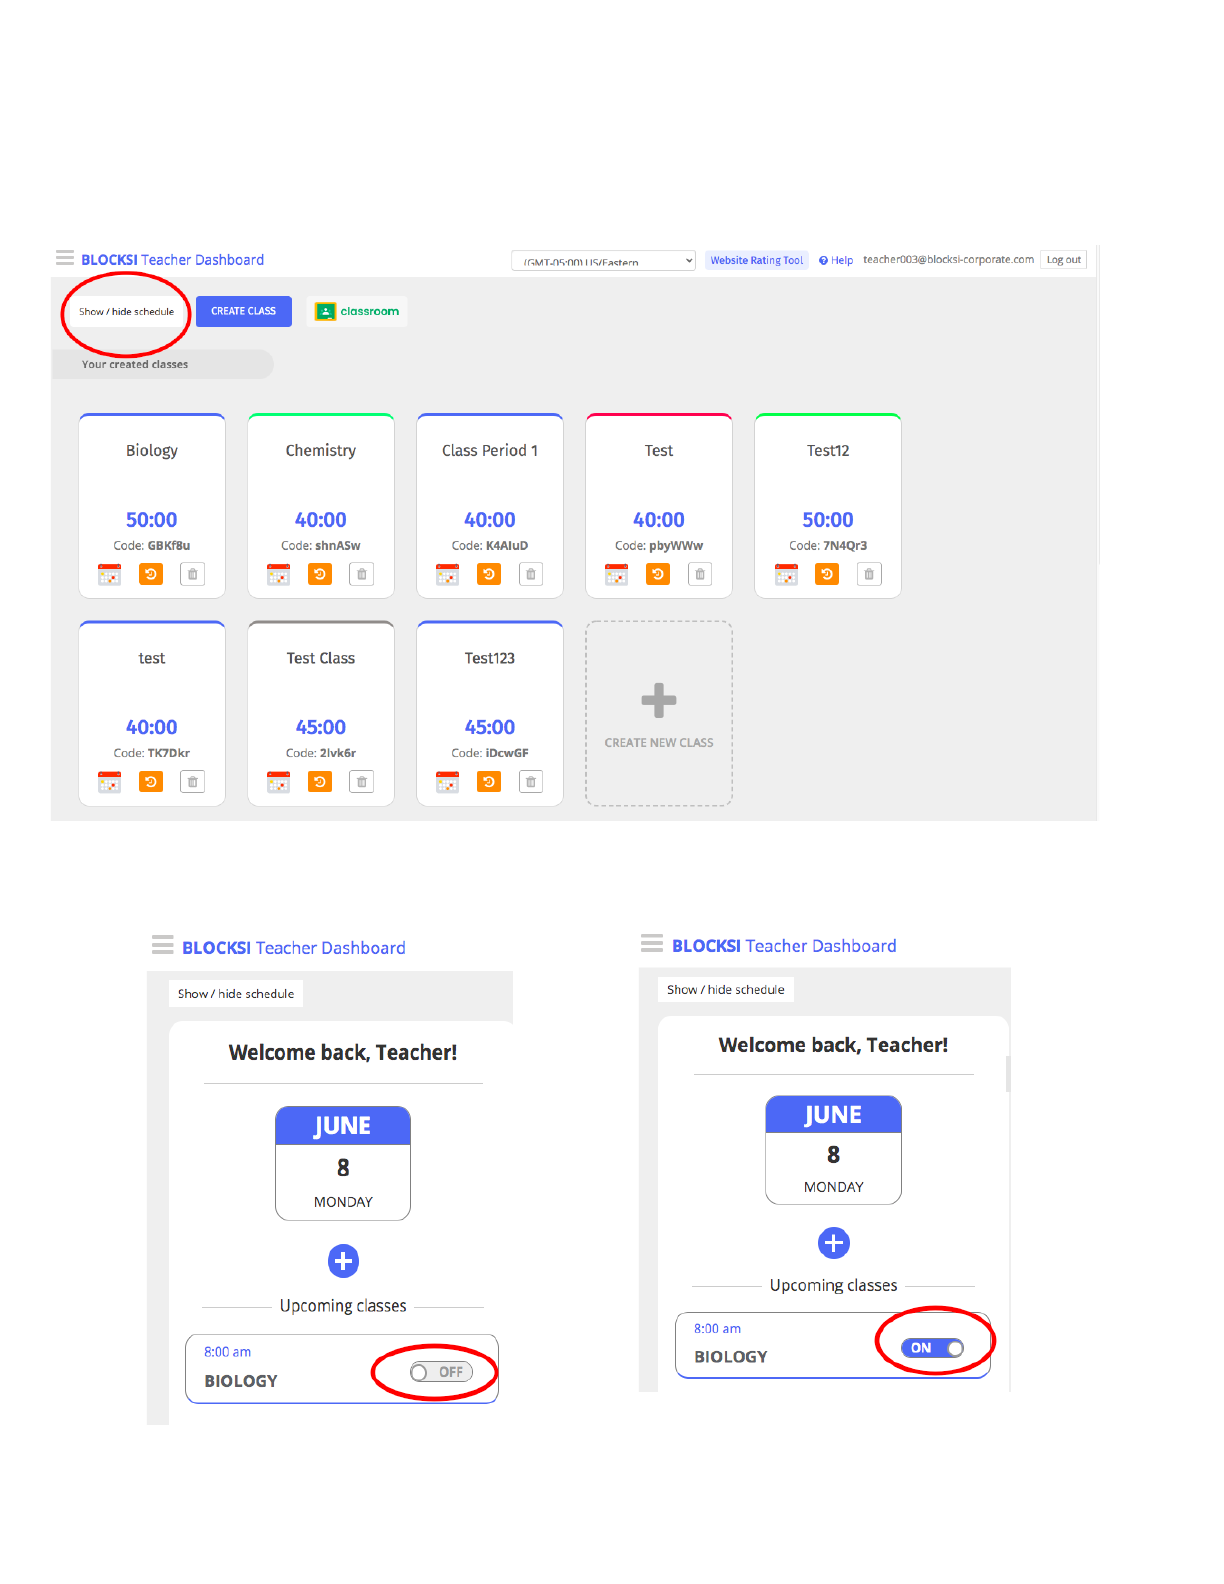
Setting classes to automatically start for each designated class time period.
Click on ‘Show/hide schedule.’
Switch the toggle from “OFF” to “ON.”
4
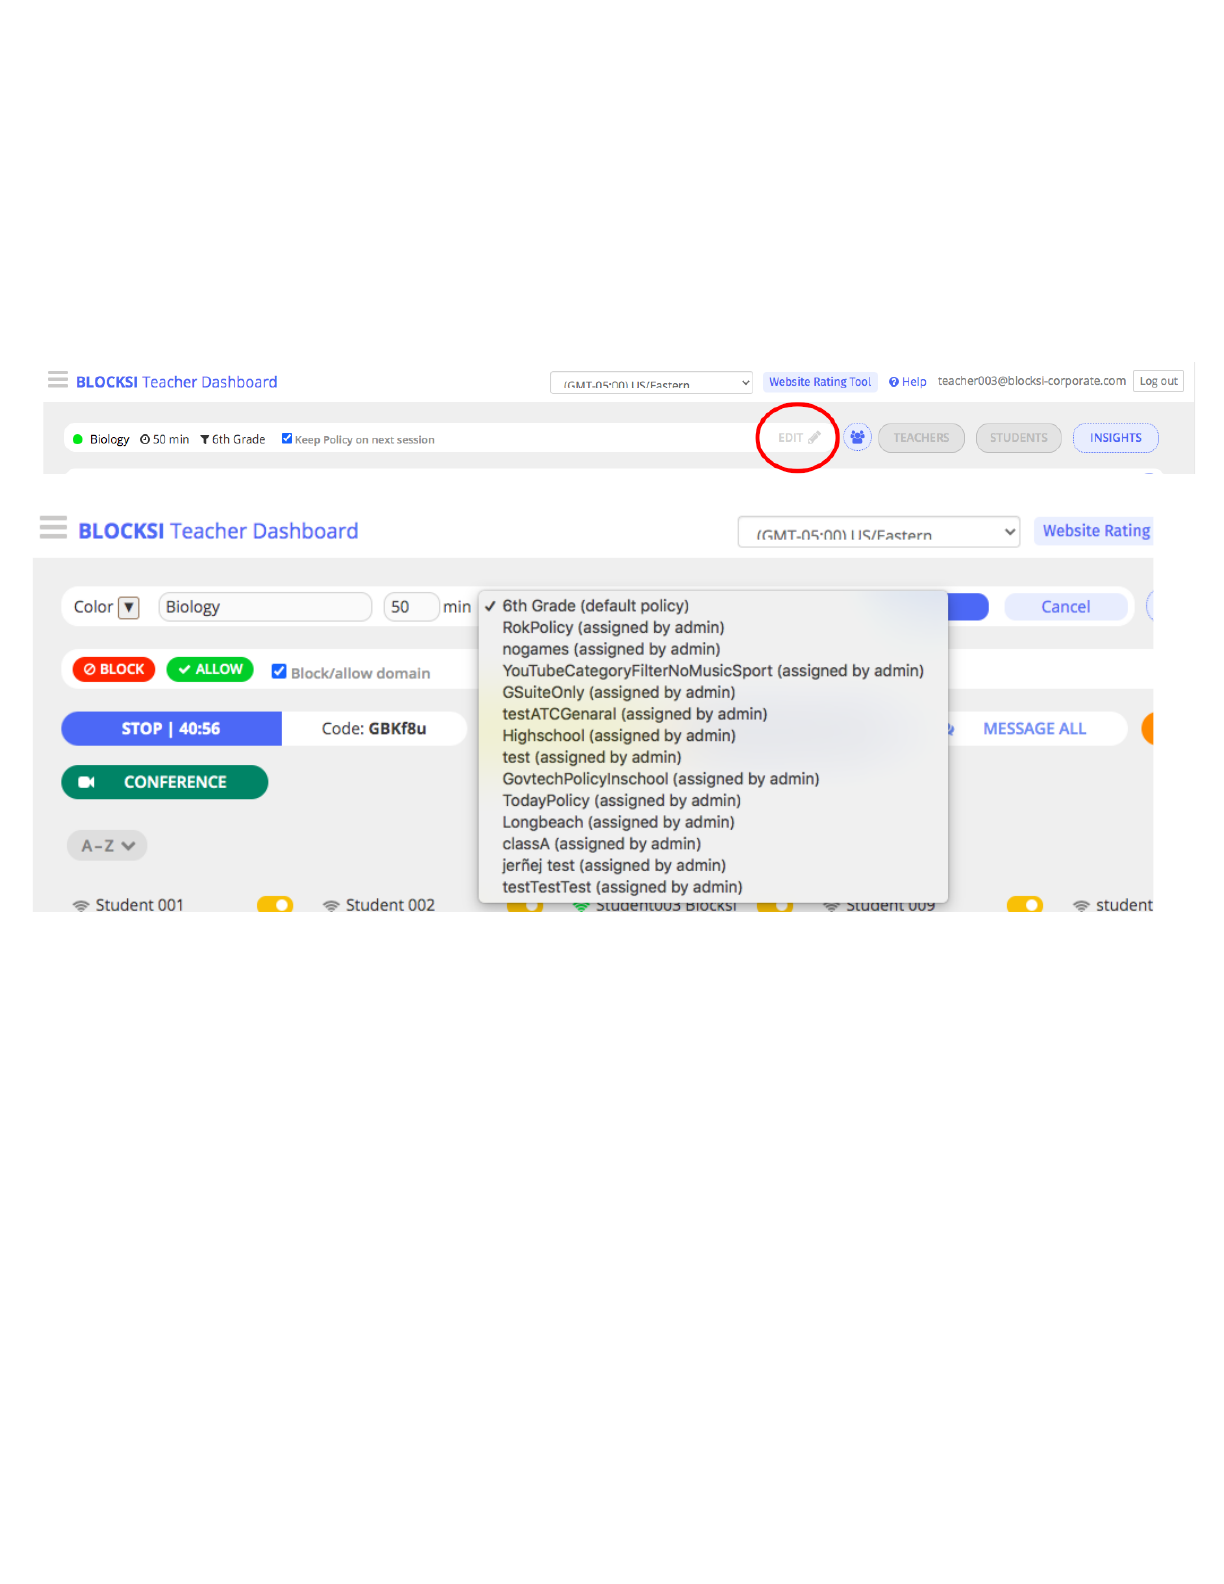
How to Select / Change a Policy (pushed out by the Admin) for Active Class
Click the edit pencil at the top right of the dashboard. Select the desired policy which will take effect
immediately.
From the dropdown arrow, select the desired policy and click the blue ‘Save’ button.
5
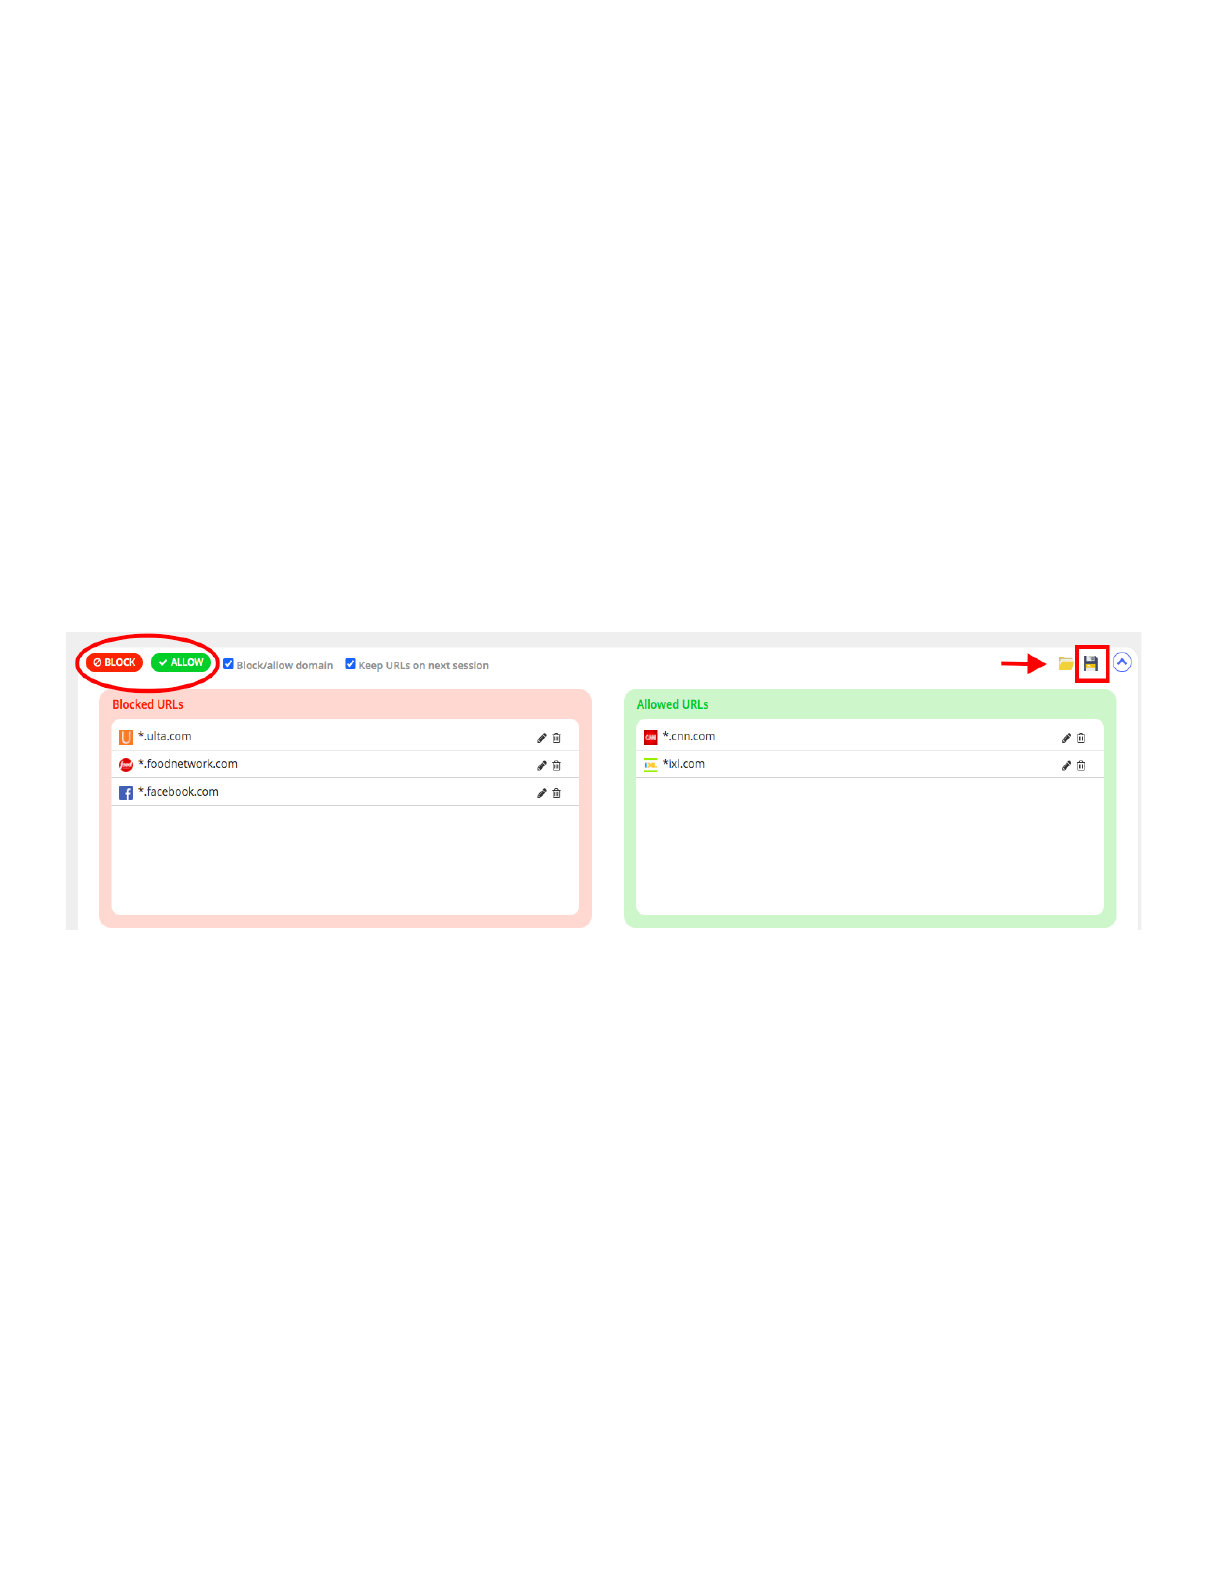
Creating a Block / Allow List
Click on the Block or Allow icon and add the entire URL to add to the block/allow list for that class
session.
To reuse the list created for other classes or for that particular class future sessions, make sure to click
the save icon at the top right (outlined in red rectangle). When the next class session starts, click the
folder icon (where the red arrow is pointing) to load that list. You can always delete or add to the custom
list that you have created, just be sure to save changes. You can create and save as many block/allow
lists desired.
**Note if the list is not saved, the next time a class is started, the list will not be available
to choose from. A new list will then have to be created from a blank canvas.
6
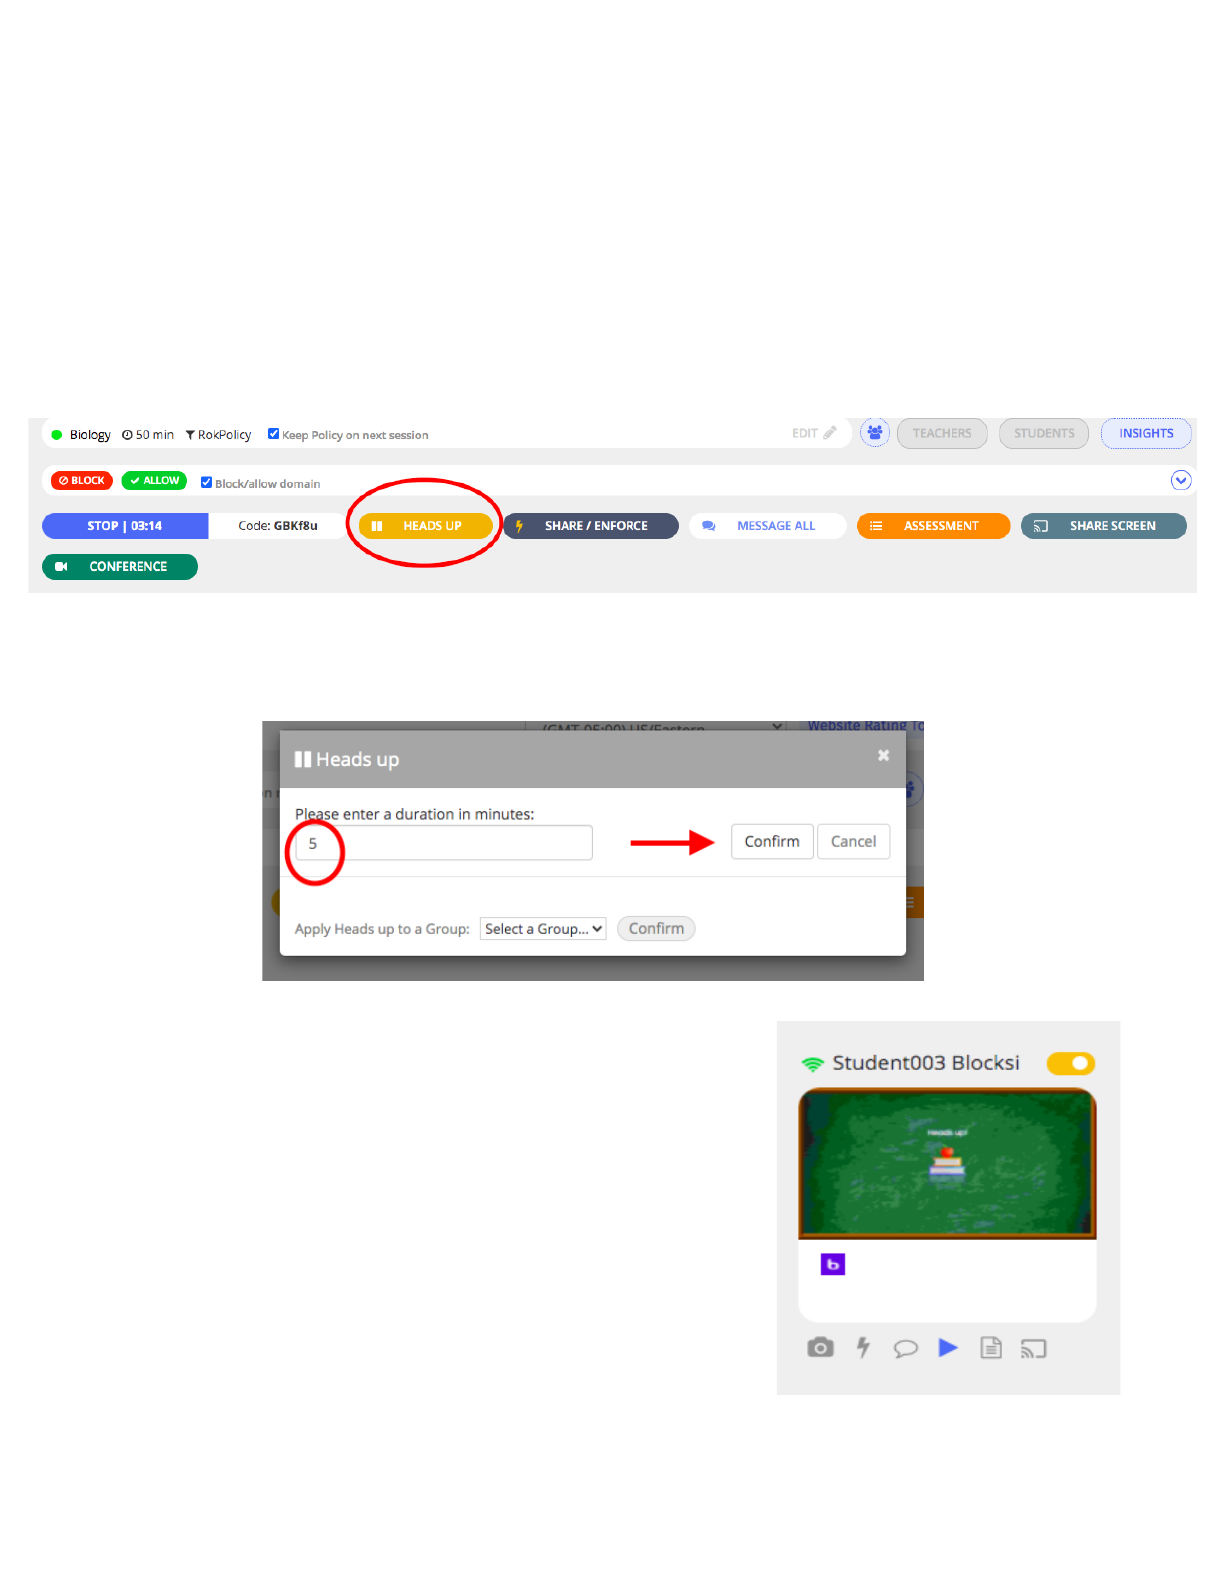
HEADS UP Function
This function will lock down the students’ device and present a green ‘HEADS UP’ screen which will
disallow the students from accessing anything on their device until the duration that you enter elapses or
you cancel the ‘HEADS UP.’ Once the designated time elapses or the ‘HEADS UP’ is canceled, all of the
tabs that were opened on the students’ device prior to the heads up will be restored and able to be
accessed again.
Click the ‘HEADS UP’ icon.
Once clicked, a window will prompt a time duration (in minutes) to be entered for the duration of the
students’ devices to be locked down in the HEADS UP mode. Enter the desired time and select ‘Confirm.’
Once confirmed, the students will see the image to the right on their
screen and all previous tabs will be closed (for that duration) as they
will be locked to the green heads up screen only.
7
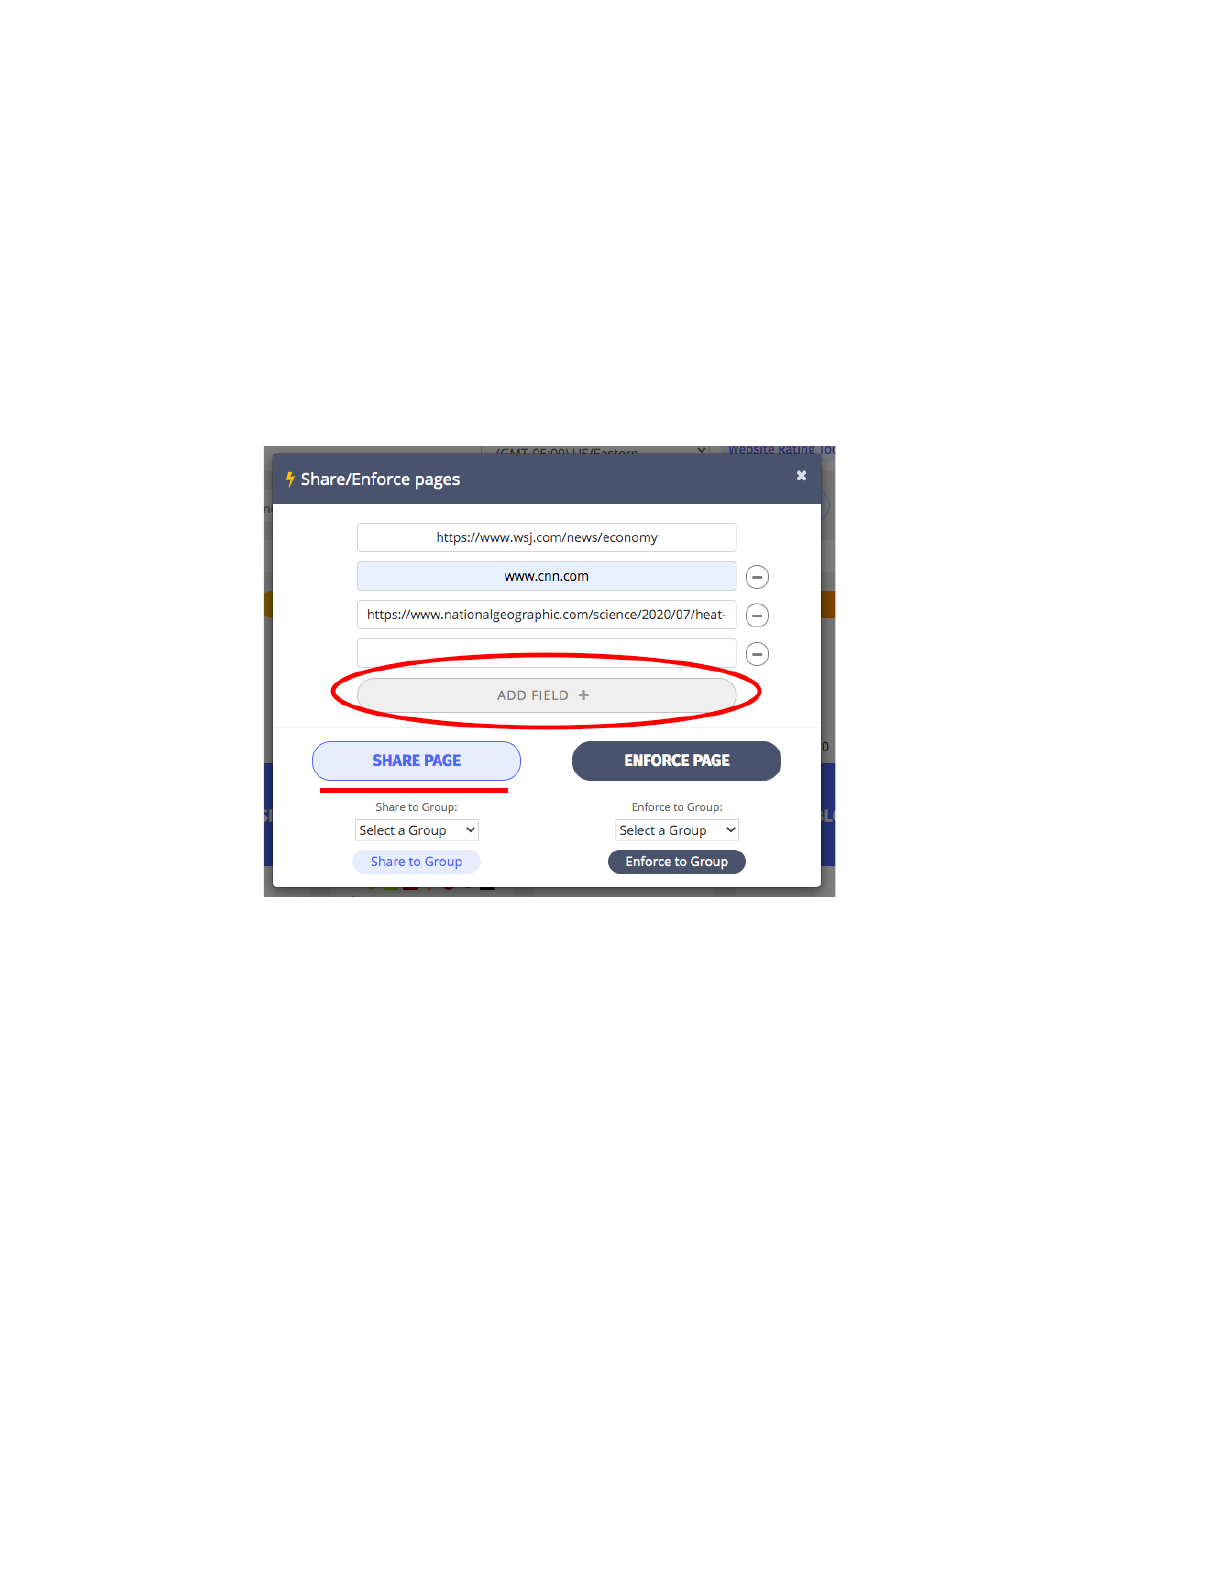
SHARE / ENFORCE Function
This function will allow URLs to be pushed out to the students. You can choose to share content to the
entire class, groups or individually.
To share content while still allowing students to keep other tabs open, use the Share functionality.
Enter the URL and click ‘SHARE PAGE’ to push out a single URL.
To push out multiple URLs simultaneously, click ‘ADD FIELD +’ and enter as many URLs desired.
8
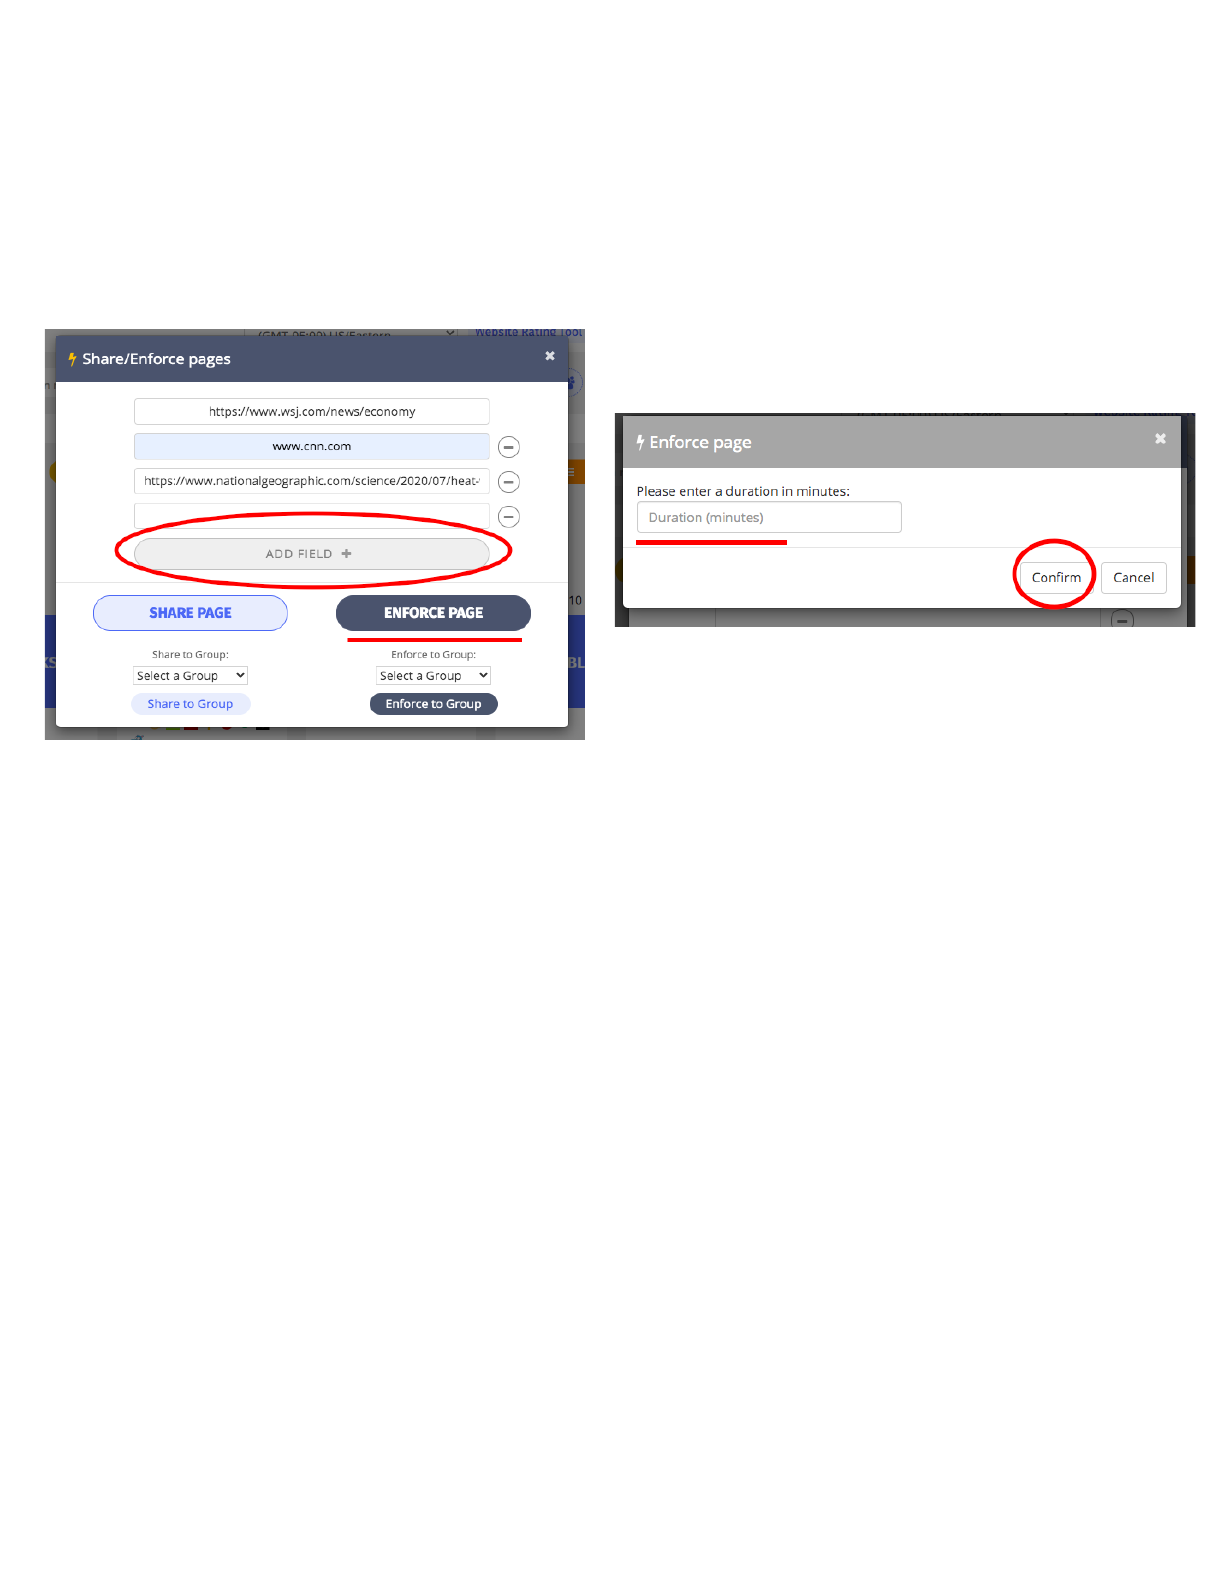
To restrict the students to a specific URL or multiple URLs, use the Enforce functionality.
Enter the URL or multiple URLs and click on ‘ENFORCE PAGE’ where a window will prompt an entry for
a duration of time for the students to be locked down to only the enforced URL(s) and will close down
current tabs open for that duration of time or until you cancel the enforcement.
Once the enforce mode is confirmed the students will not be able to search or access any other sites
except for the URL(s) that have been enforced.
When the time entered elapses or you click ‘STOP ENFORCE’ all of the previous tabs the students had
open on their device will be restored and students will be able to search and access other sites and
content as before.
9
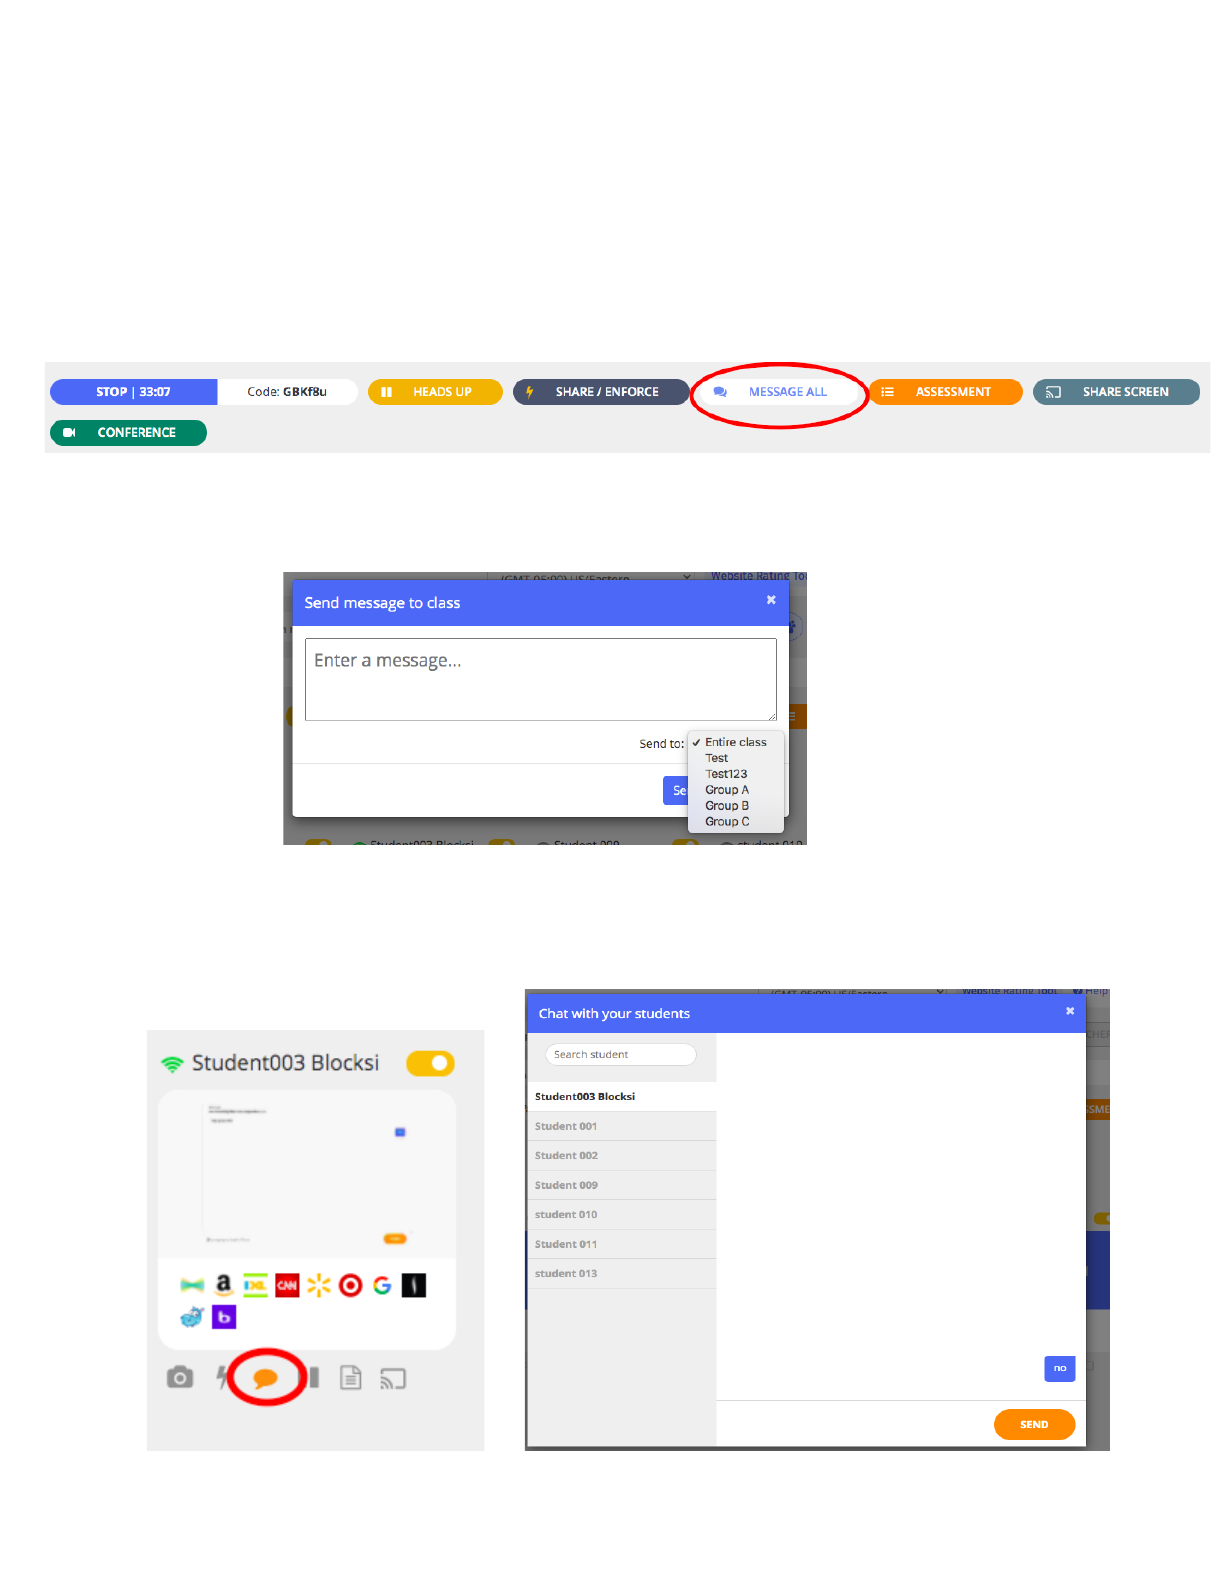
MESSAGE Function
The message function is between Teacher and Student only. The students cannot message amongst
each other. You can message the entire class, a group of students and individual students.
Click the “MESSAGE ALL’ icon.
Enter your message and choose to send to the entire class or to a specific group from the drop down
menu beside ‘Send to:’ Click send. (See page# 24 for individual messaging)
The student will see the message immediately and have the ability to respond. Once a student responds,
the chat bubble icon under their student tile will blink in orange to signify response. Click on the blinking
icon to see the response and continue
messaging if desired.
10
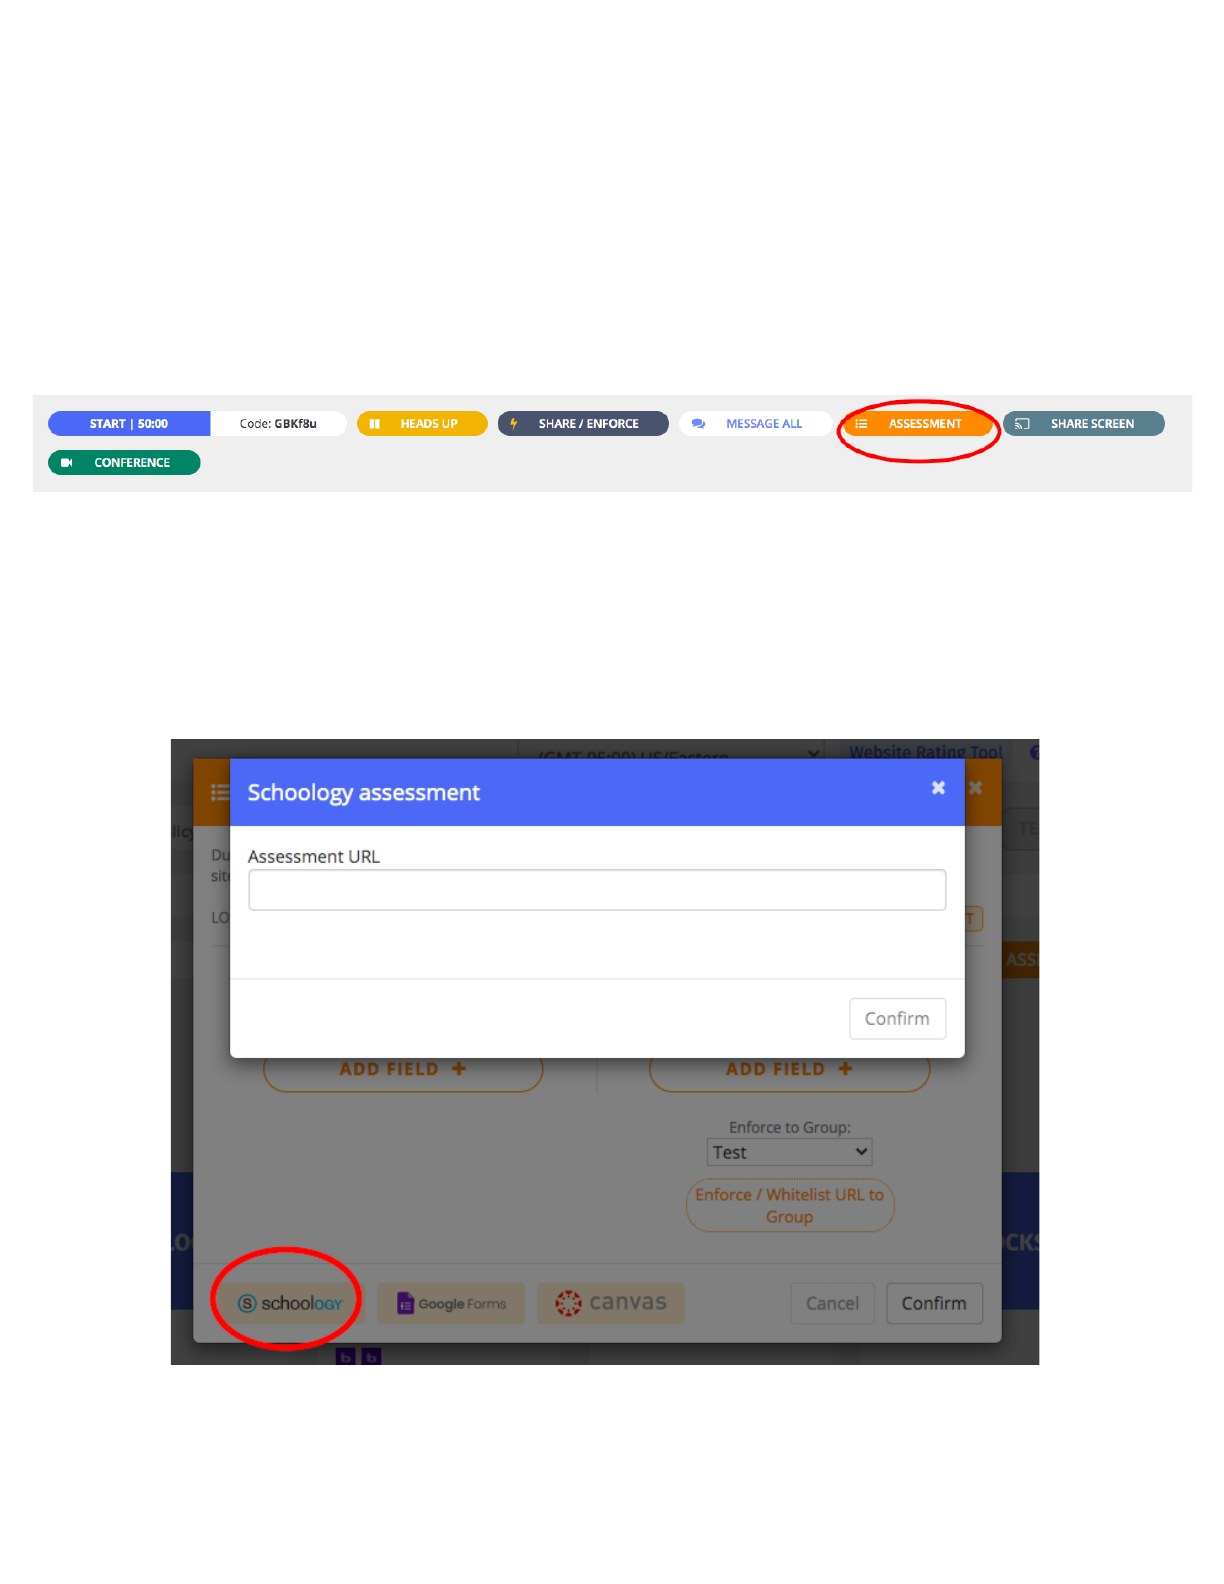
ASSESSMENT Function
The Assessment function is used to push out a quiz, assessment or LMS for a secure testing/assessment
environment. This function will lock the students down to the quiz, assessment or LMS environment that
you push out, so they may not access any other sites or searches while under the assessment mode.
Click ‘ASSESSMENT.’
There are three presets at the bottom for those using schoology, google forms and/or canvas.
If using schoology , click on the schoology icon and copy the assessment URL from schoology. Paste the
URL into the Blocksi’s schoology assessment URL field. Then, click confirm to push out that assessment
which will close all of the students’ current open tabs and lock them down to that schoology assessment
only.
11
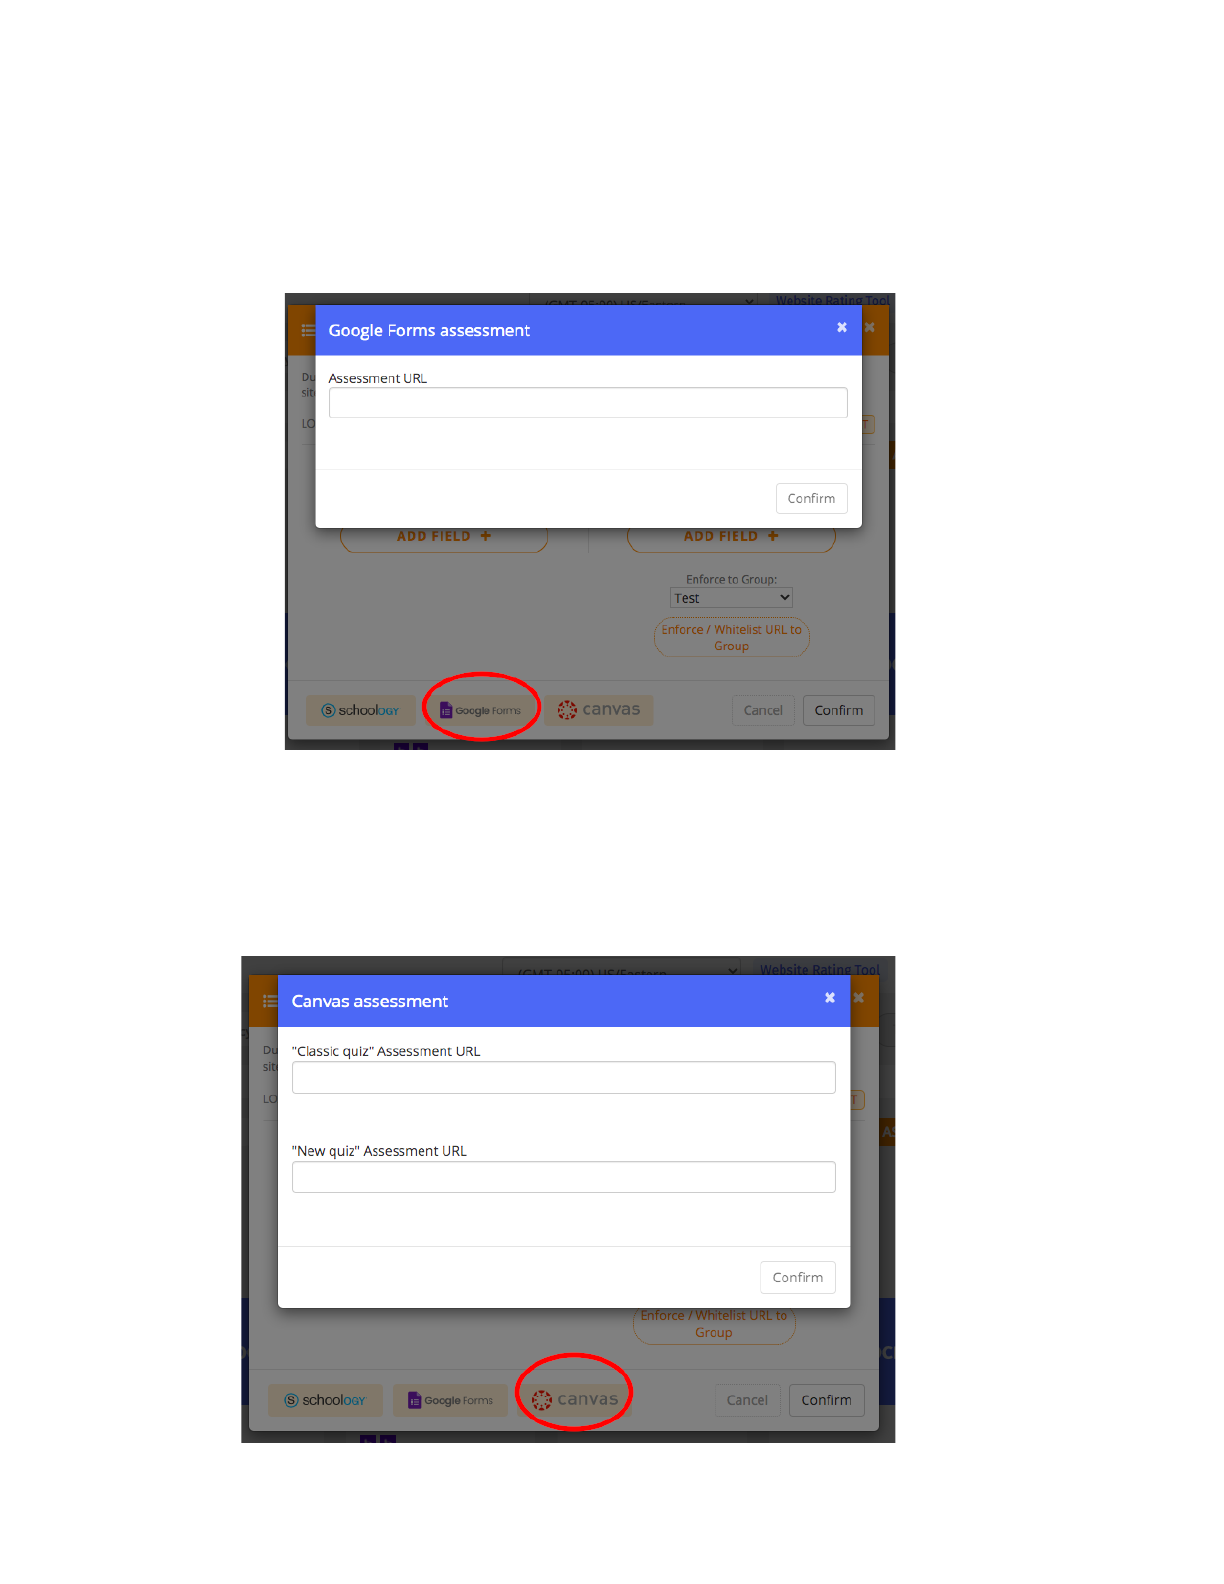
If using Google Forms, click on the Google Forms icon and copy the assessment URL from the Google
Form created. Paste the URL into Blocksi's Google Form assessment URL field. Then, click confirm to
push out that assessment which will close all of the students’ current open tabs and lock them down to
that Google Form only.
If using Canvas , click on the canvas icon and copy the “Classic quiz” assessment URL or “New quiz”
assessment URL from canvas. Paste into Blocksi’s canvas assessment URL. Then, click confirm to push
out that assessment which will close all of the students’ current open tabs and lock them down to that
canvas assessment only.
12
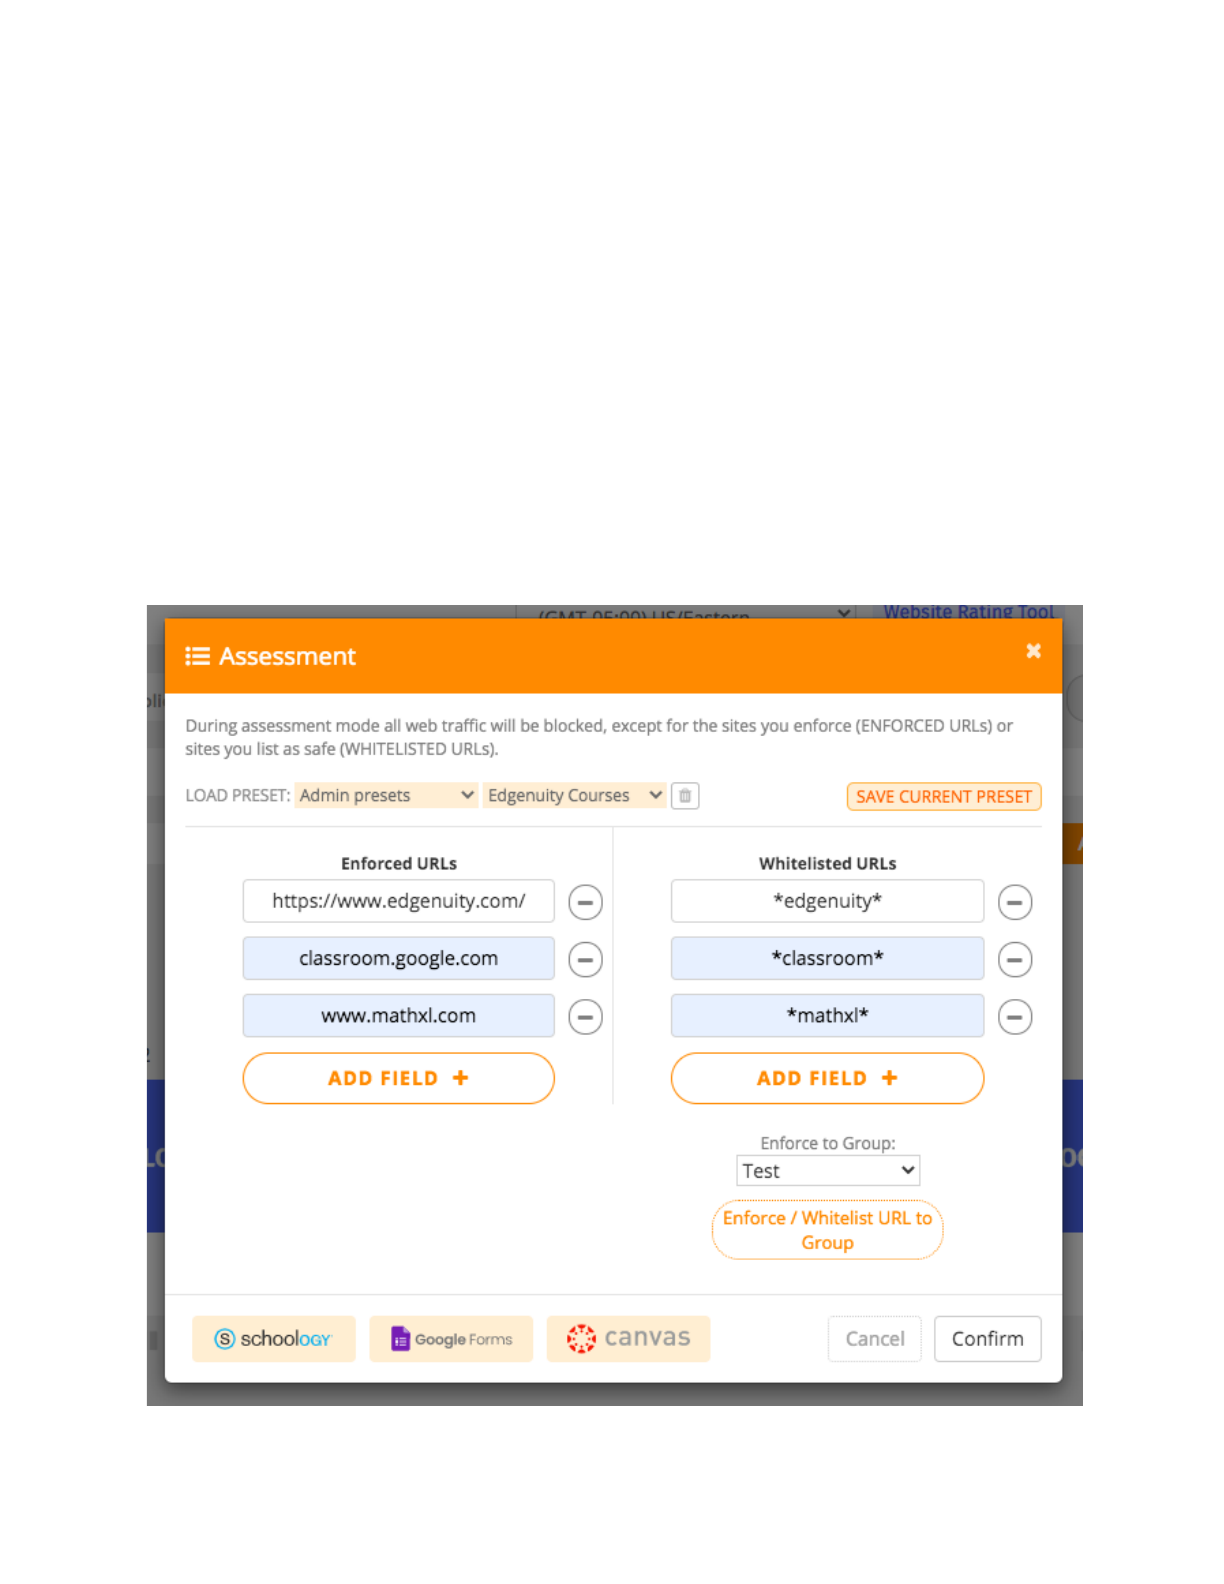
During Assessment mode you can enforce certain sites and all web traffic will be blocked, except for the
sites you list and push out. You can push out one or multiple sites at a time. The main difference between
the Share / Enforce mode and Assessment mode is that with Share / Enforce mode, you are pushing out
a single URL which means that other links within that page may not be accessible. Using assessment
mode, you can push out an entire domain which allows the student to access a login page (if redirected
and required), click on all links, tabs, content, videos, etc. within that site only.
For the example shown below, Google Classroom, Edgenuity and MathXL are being pushed out which
will lock the students to those three sites only but allow them to access everything within those three
environments.
Enter the entire URL on the right hand side under ‘Enforced URLs’ (you can choose ‘Add Field’ to push
out multiple sites simultaneously).
On the right hand side under ‘Whitelisted URLs,’ whitelist the domain of the URLs by using an asterisk
symbol before and after the domain name. (i.e. *edgenuity*; *classroom*; *mathxl*).
13
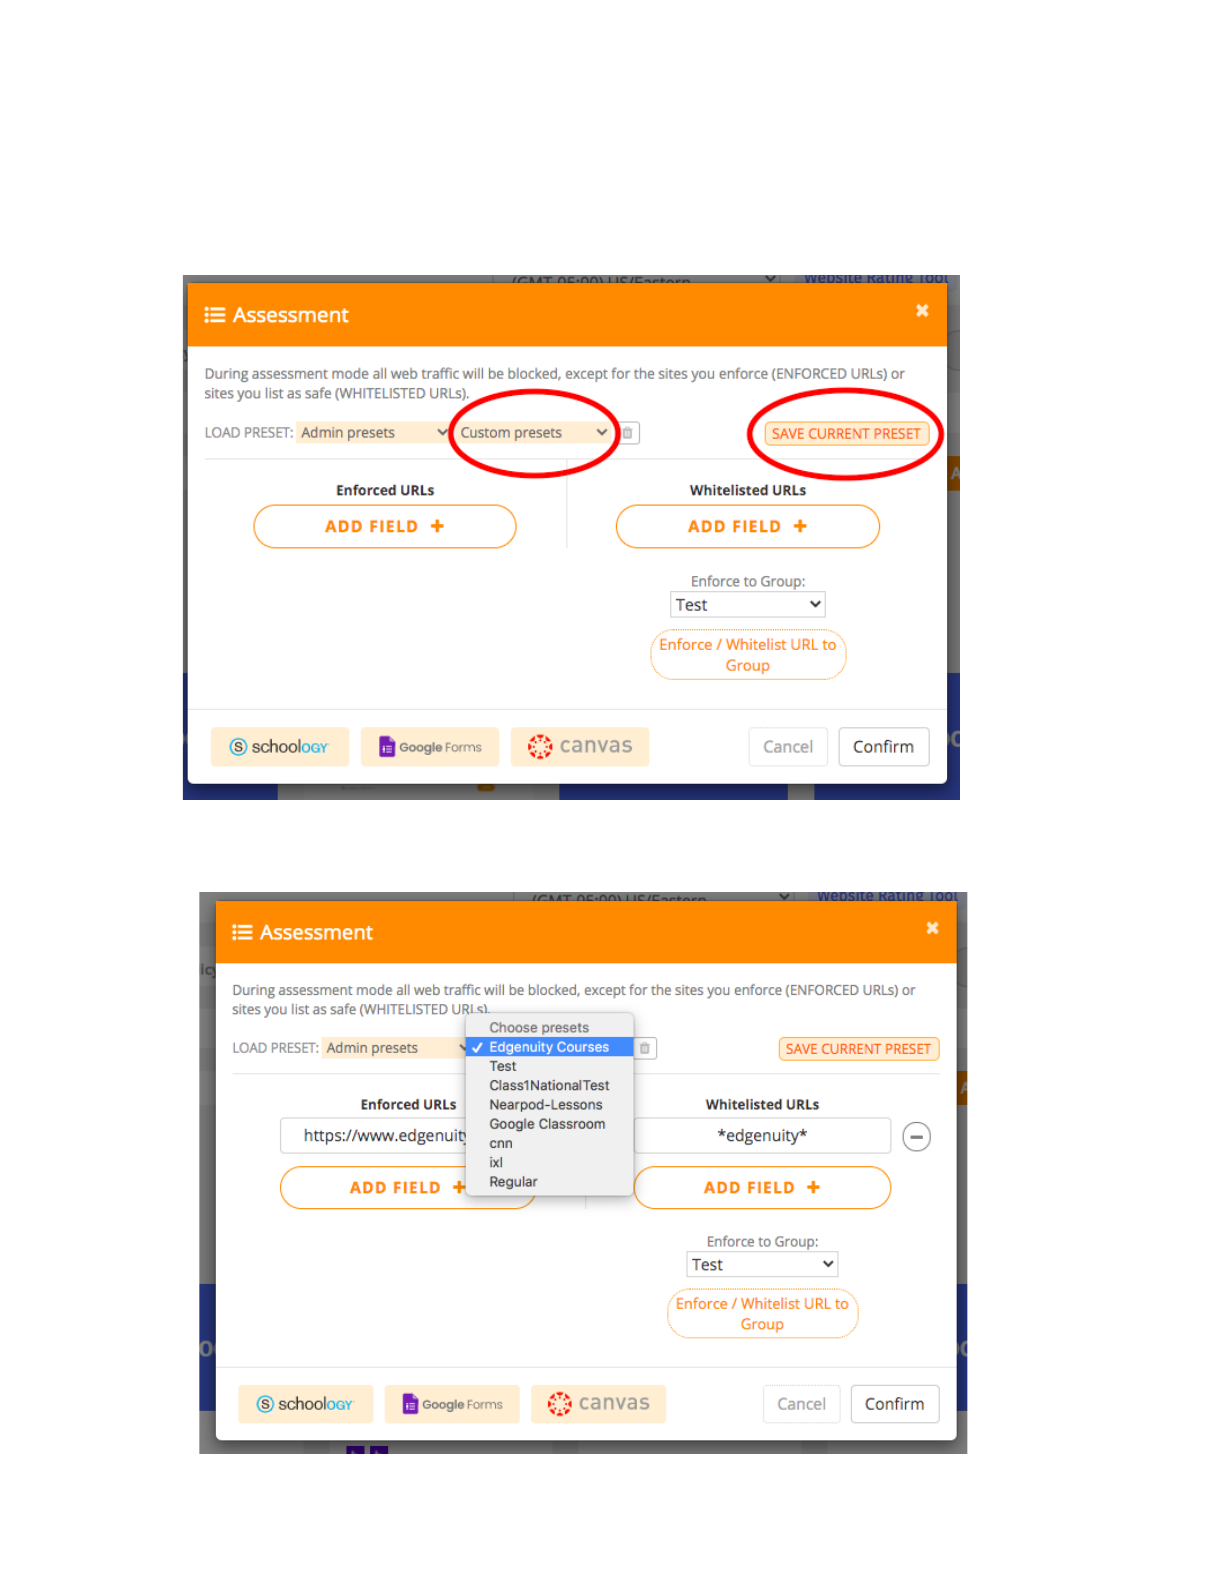
You can save your presets so that you do not have to type them out each time by clicking on the ‘Save
Current Preset.’ The next time you use the Assessment mode, you can click on custom presets and see
your saved lists. Click on the list you want to use and it will auto populate. Then click ‘Confirm’ to push
out.
14
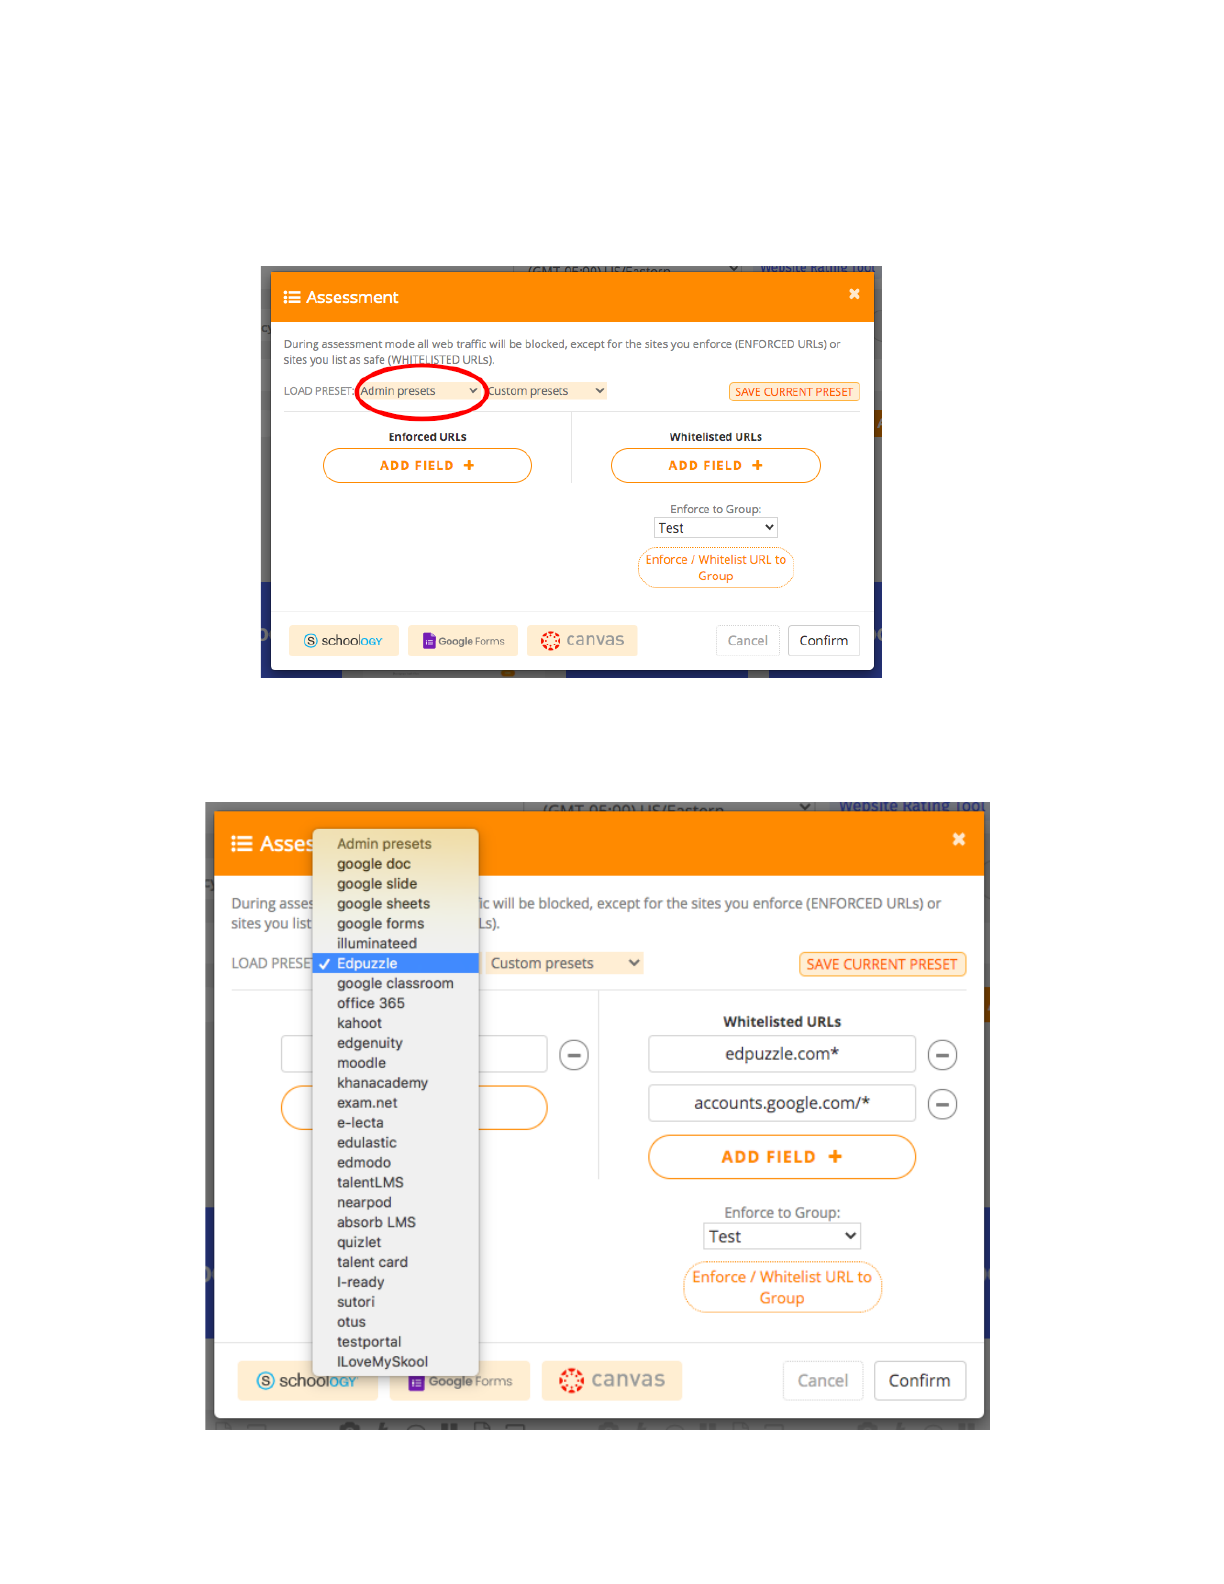
Your Administrators may also create presets for you to choose from that you can access the list by
clicking on ‘Admin Presets.’ Once you choose from the list, the sites will auto populate for you. Then click
‘Confirm’ to push out.
15
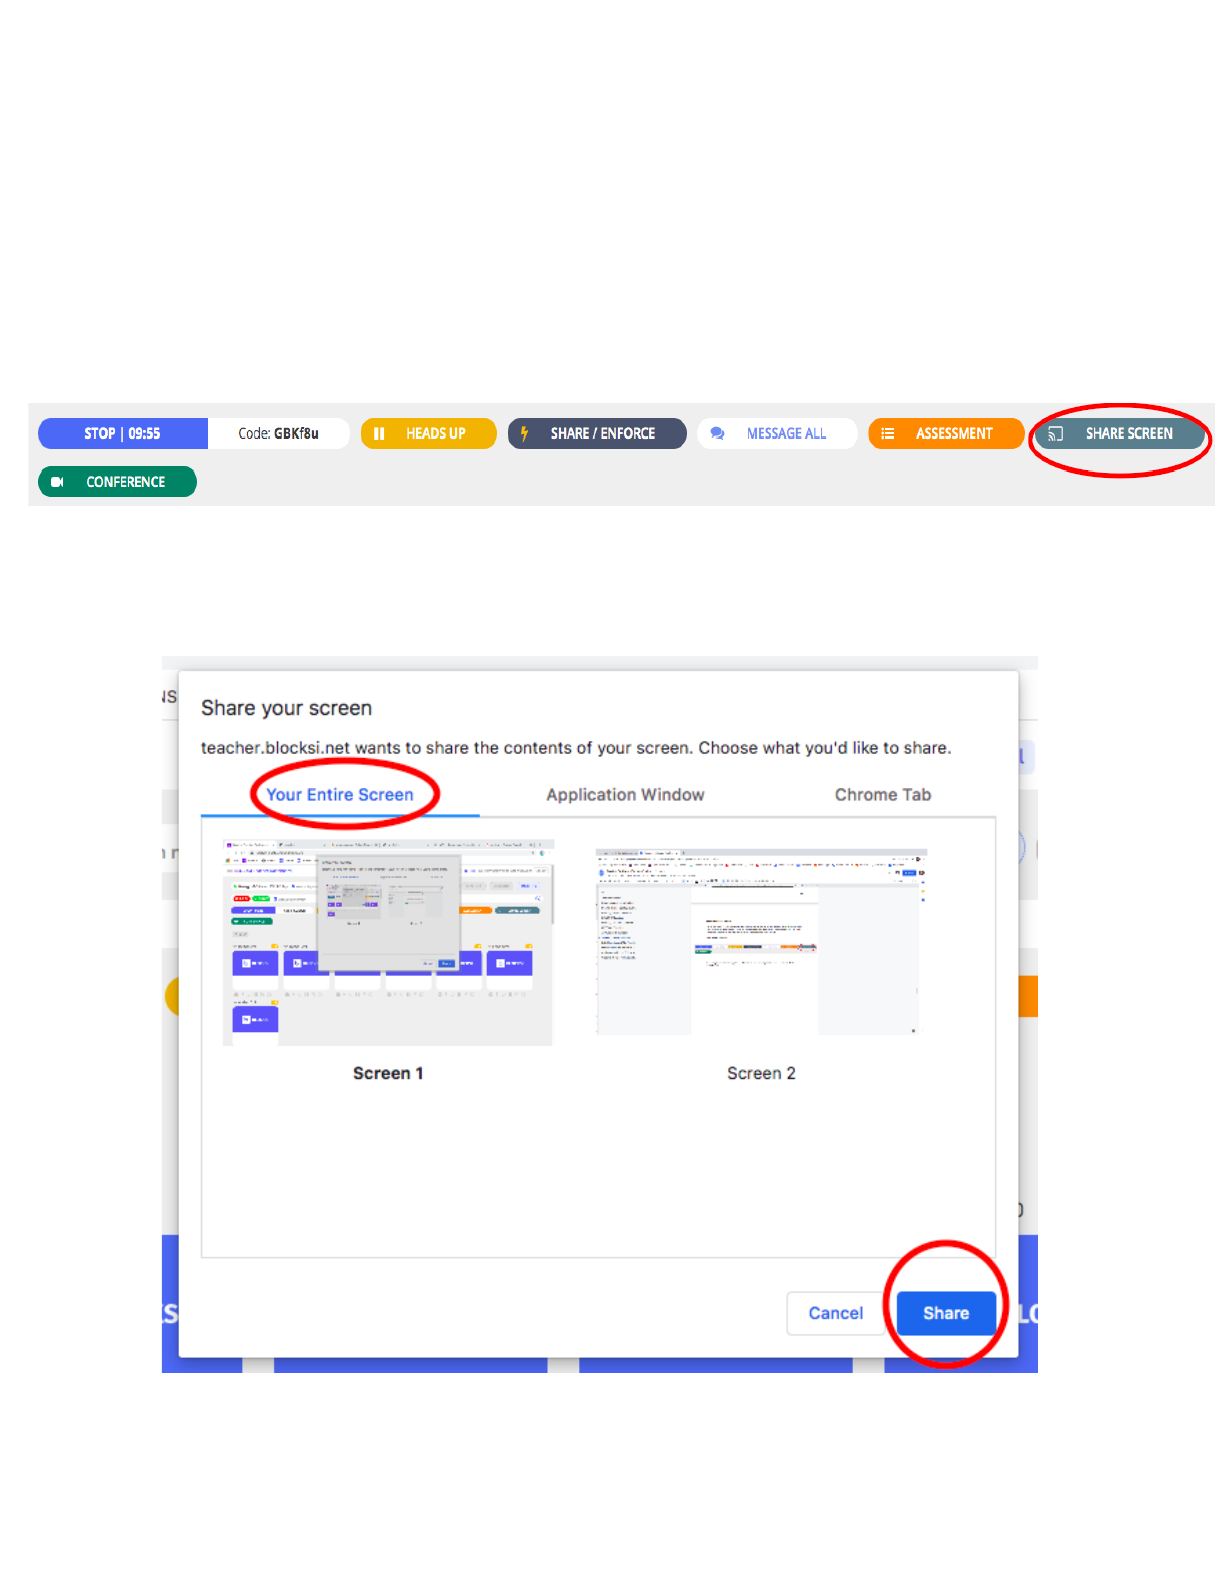
(Teacher) SHARE SCREEN Function
The screen share function allows you to share your entire screen, an application window, or a tab to the
students’ screens. When you enter into share screen mode, the students are locked down to what you
are displaying and cannot go elsewhere on their device. From their device they will see everything you do
on your screen in real time.
Click ‘SHARE SCREEN.’
To share your entire screen, choose the screen you want to project onto the students’ devices and click
‘Share.’
16
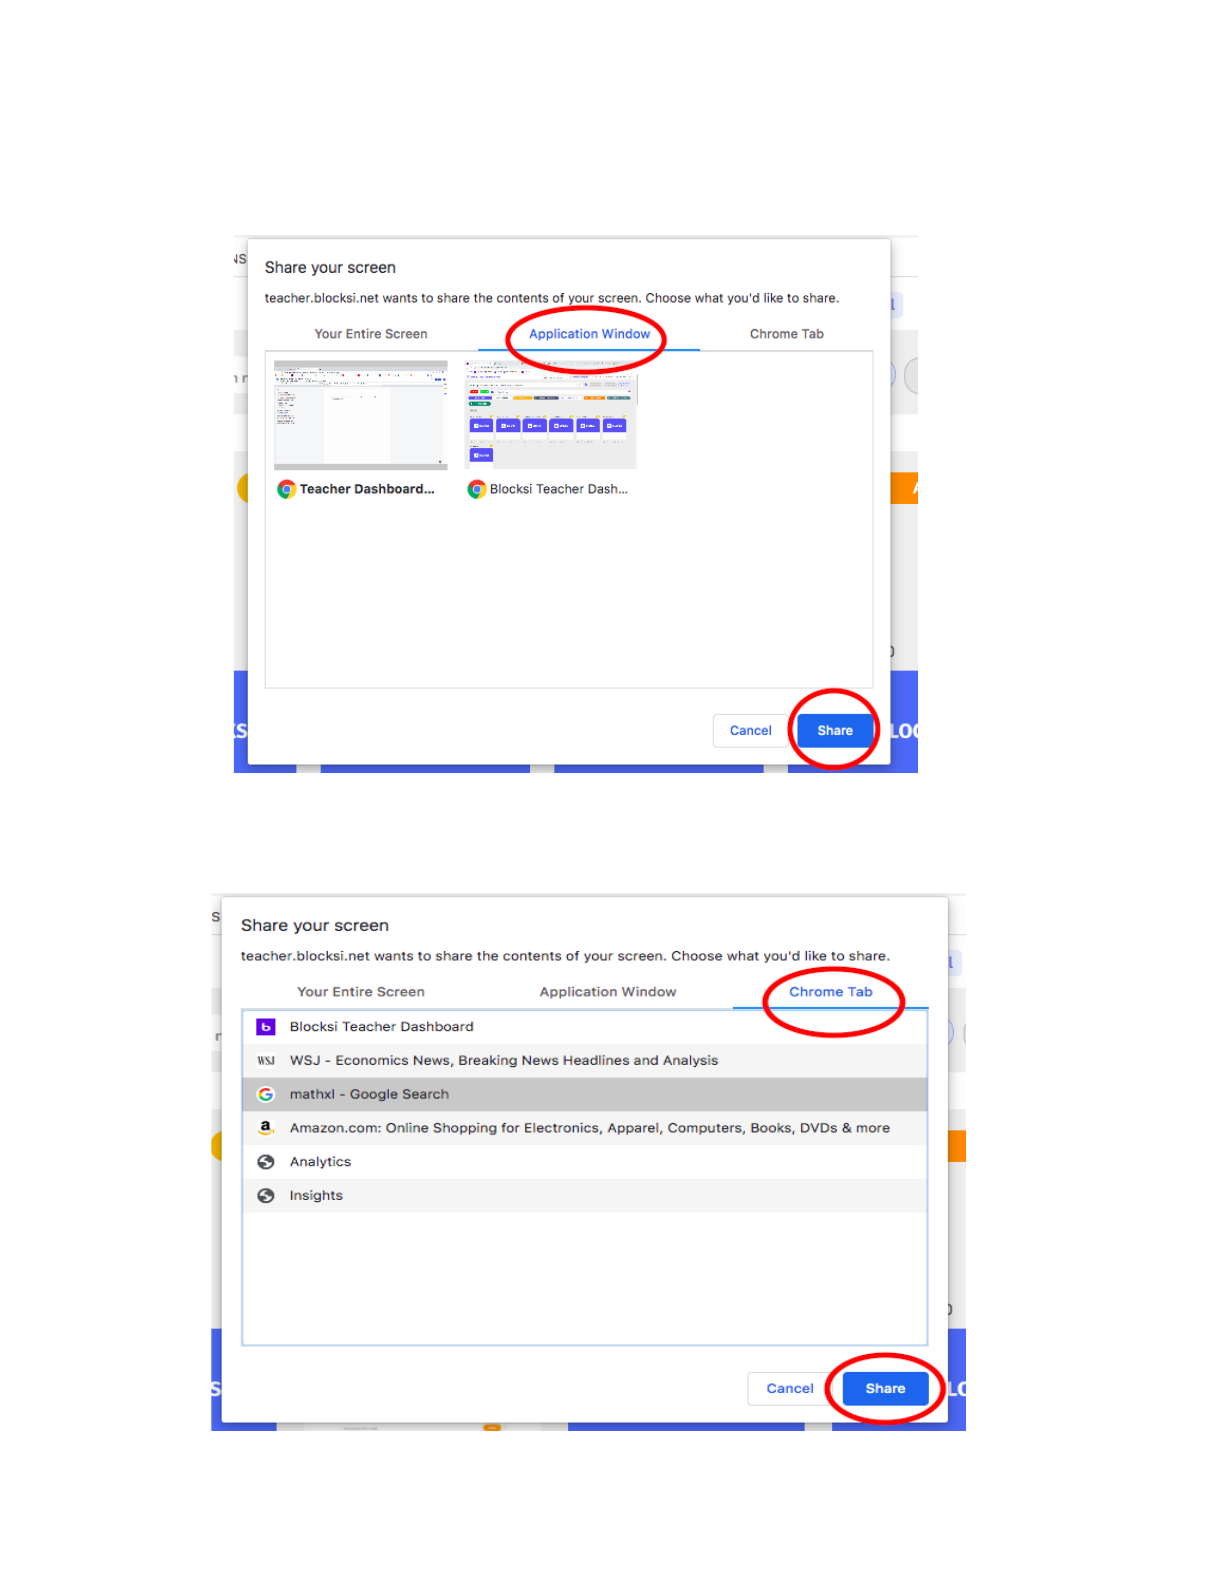
To share your application window, choose the application window you want to project onto the students’
devices and click ‘Share.’
To share your tab, choose the tab you want to project onto the students’ devices and click ‘Share.’
17
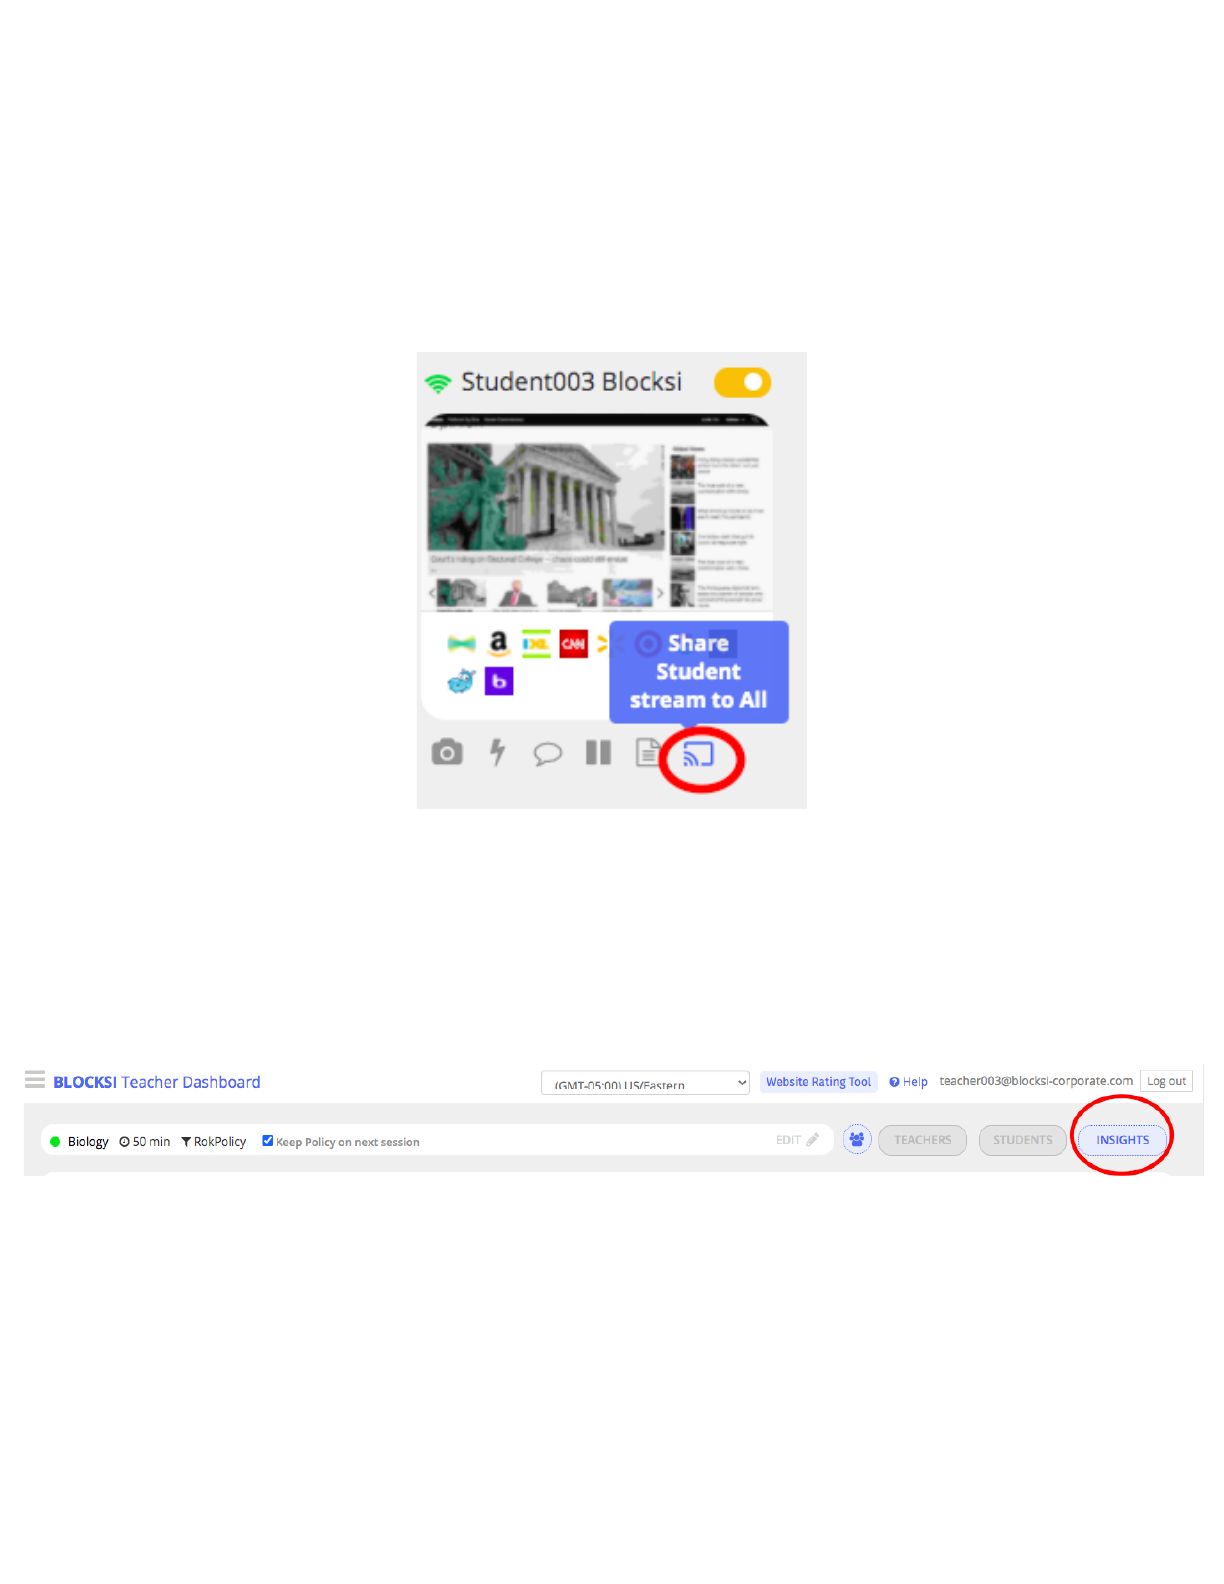
(Student) SHARE SCREEN Function
You can choose an individual student’s screen to share with the entire class.
Click the screen icon under the student’s tile. The student will get a notification on their device to share
their screen and they will need to click ‘share’ from their device. Once they click share from their device,
their screen will be displayed with the entire class.
INSIGHTS
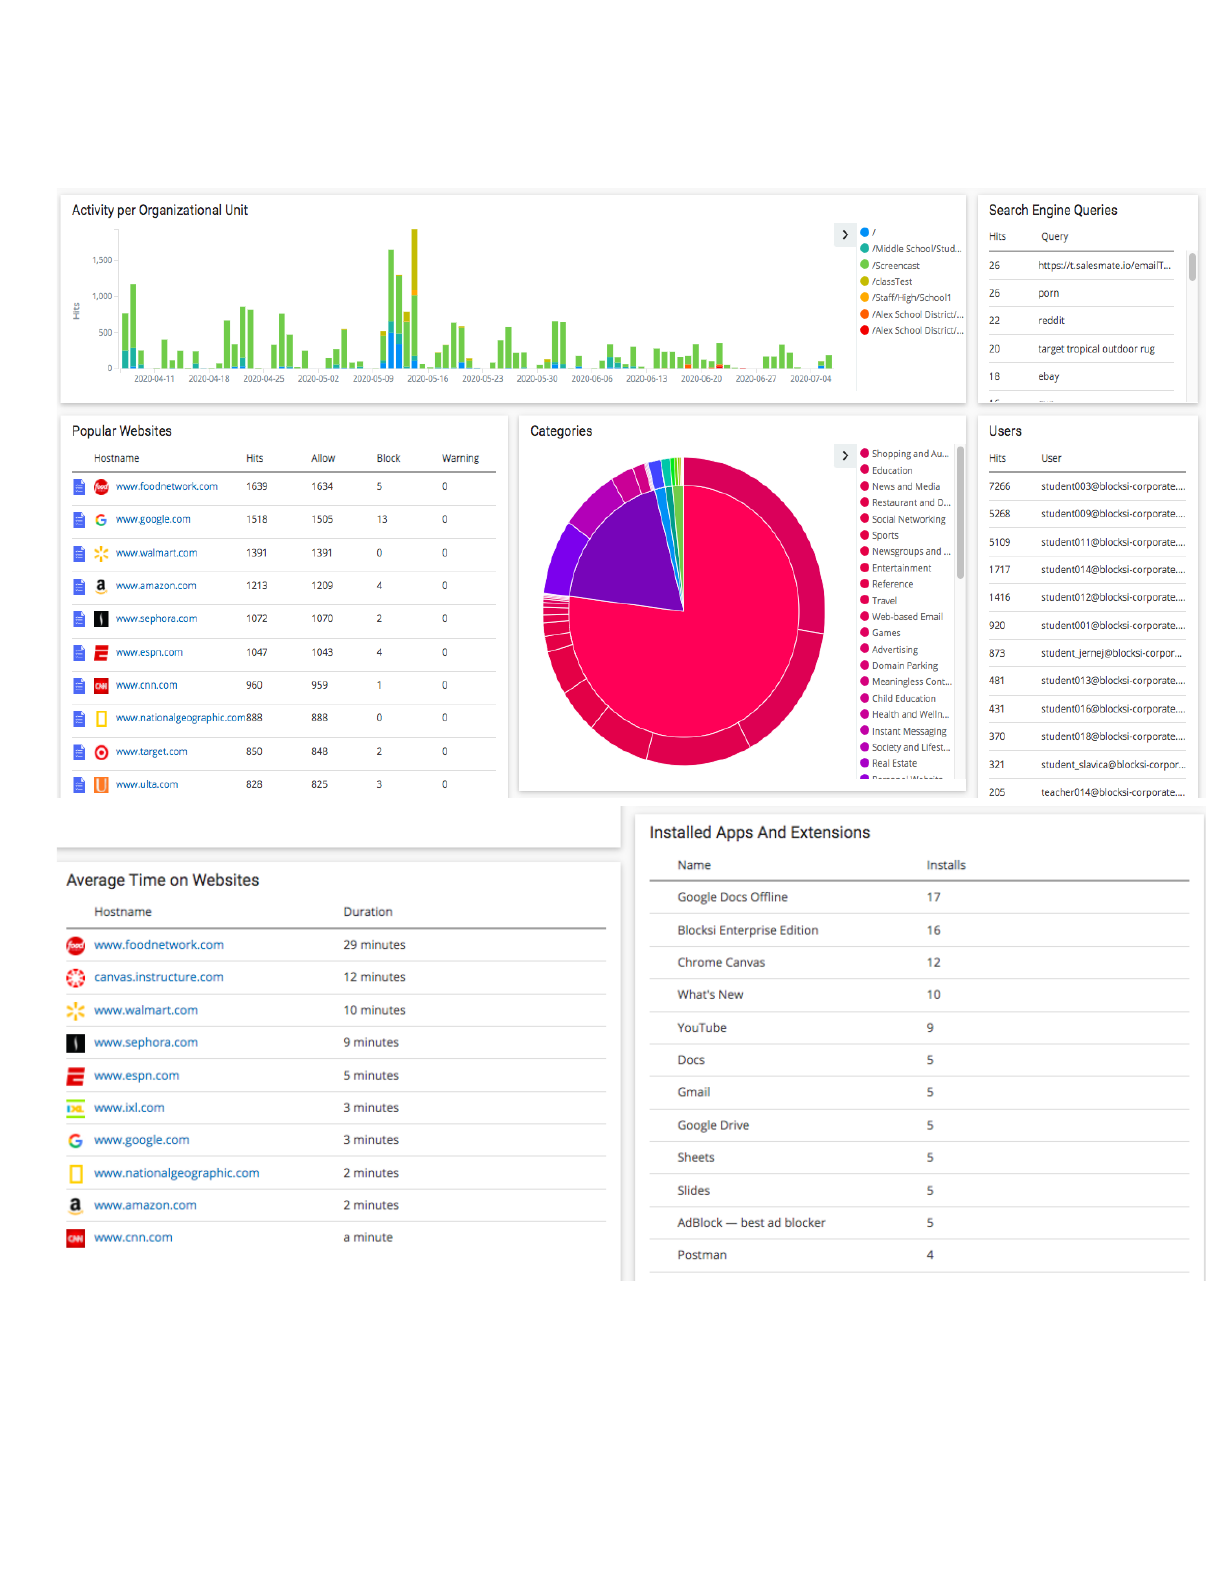
The Insights show per class session Web and Youtube history.
The Web Analytics reported are: Activity per Organizational Unit, Search Engine Queries, Popular
Websites, Average Time on Websites, Installed Apps and Extensions, and a pie chart that breaks down
the categories of where most of the time was spent during the class session. On the right hand side will
be a list of all of the students in that class session which you can click on the student to see that particular
student’s data only.
18
19
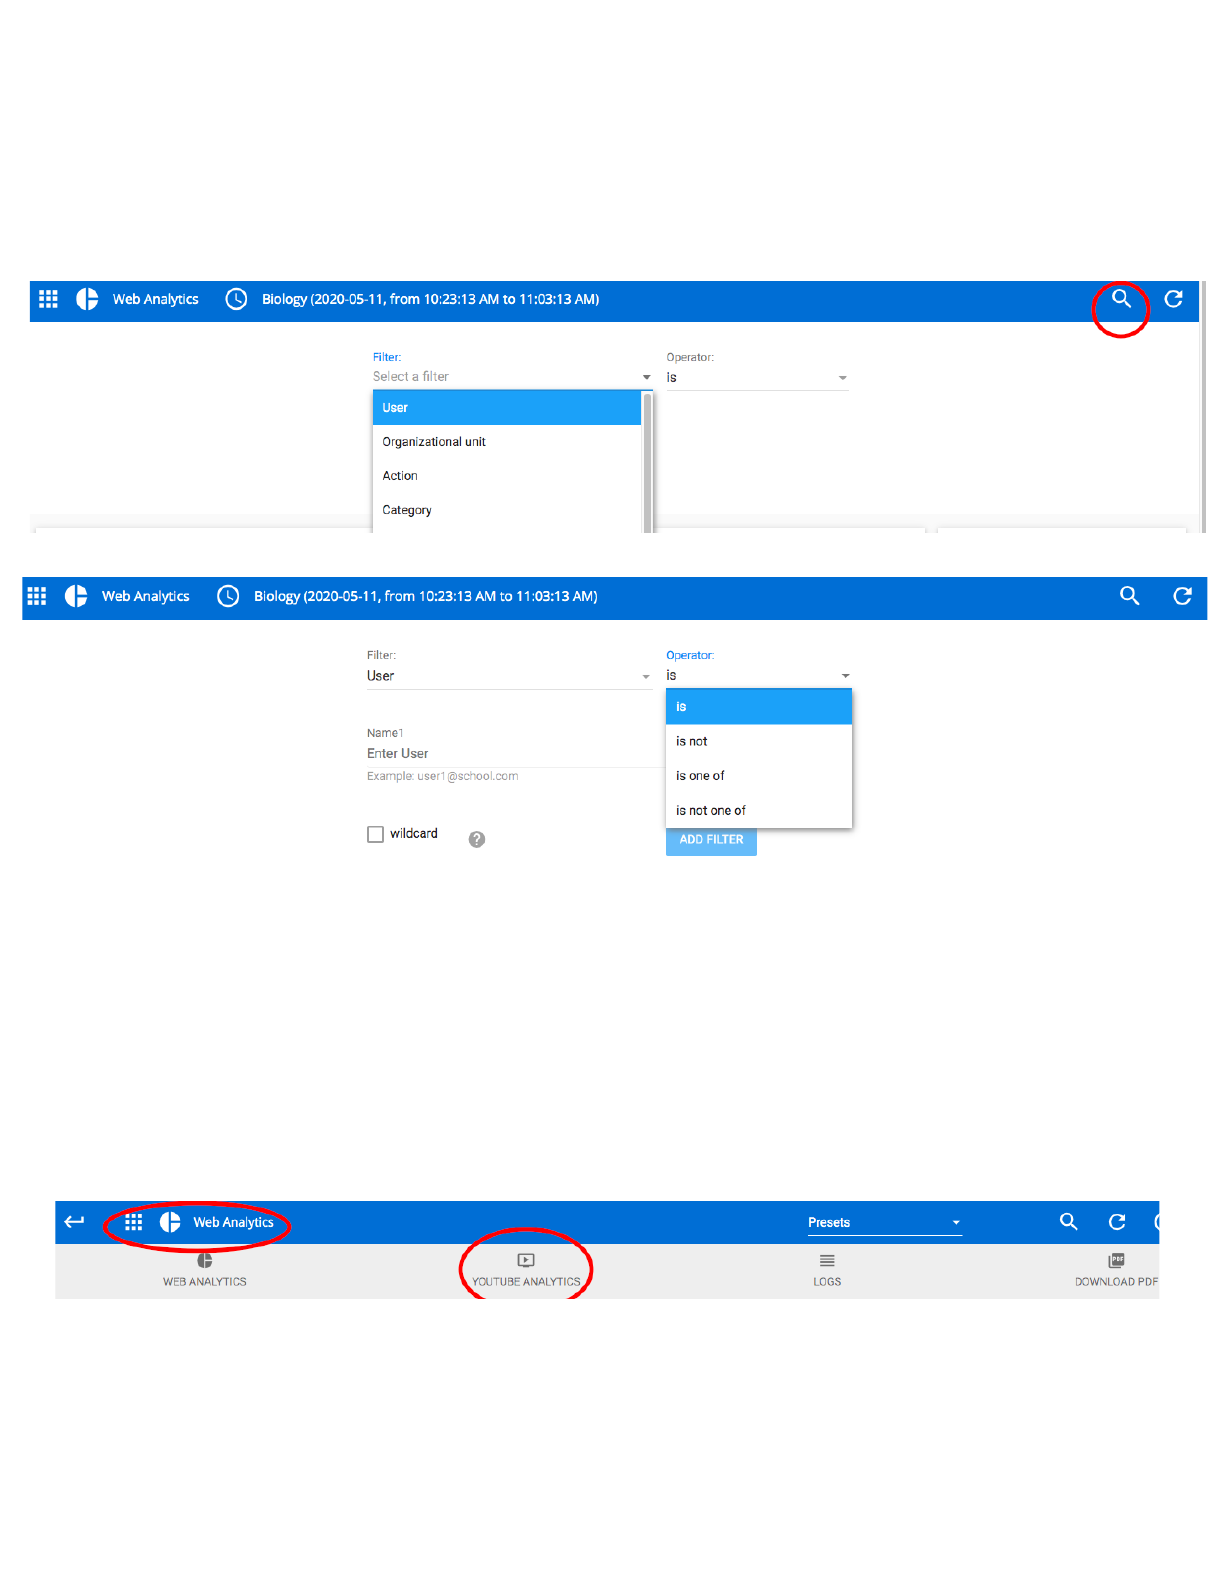
To filter through your analytics, use the magnifying glass to set filters.
The example shown below is setting a filter to search for a specific student’s data.
Then enter the student email or check the ‘wildcard’ box and type the student’s name and click ‘ADD
FILTER.’
To view the Youtube Analytics, click the top left corner ‘Web Analytics’ and you will see a gray drop down
bar. Click ‘YOUTUBE ANALYTICS.’
20
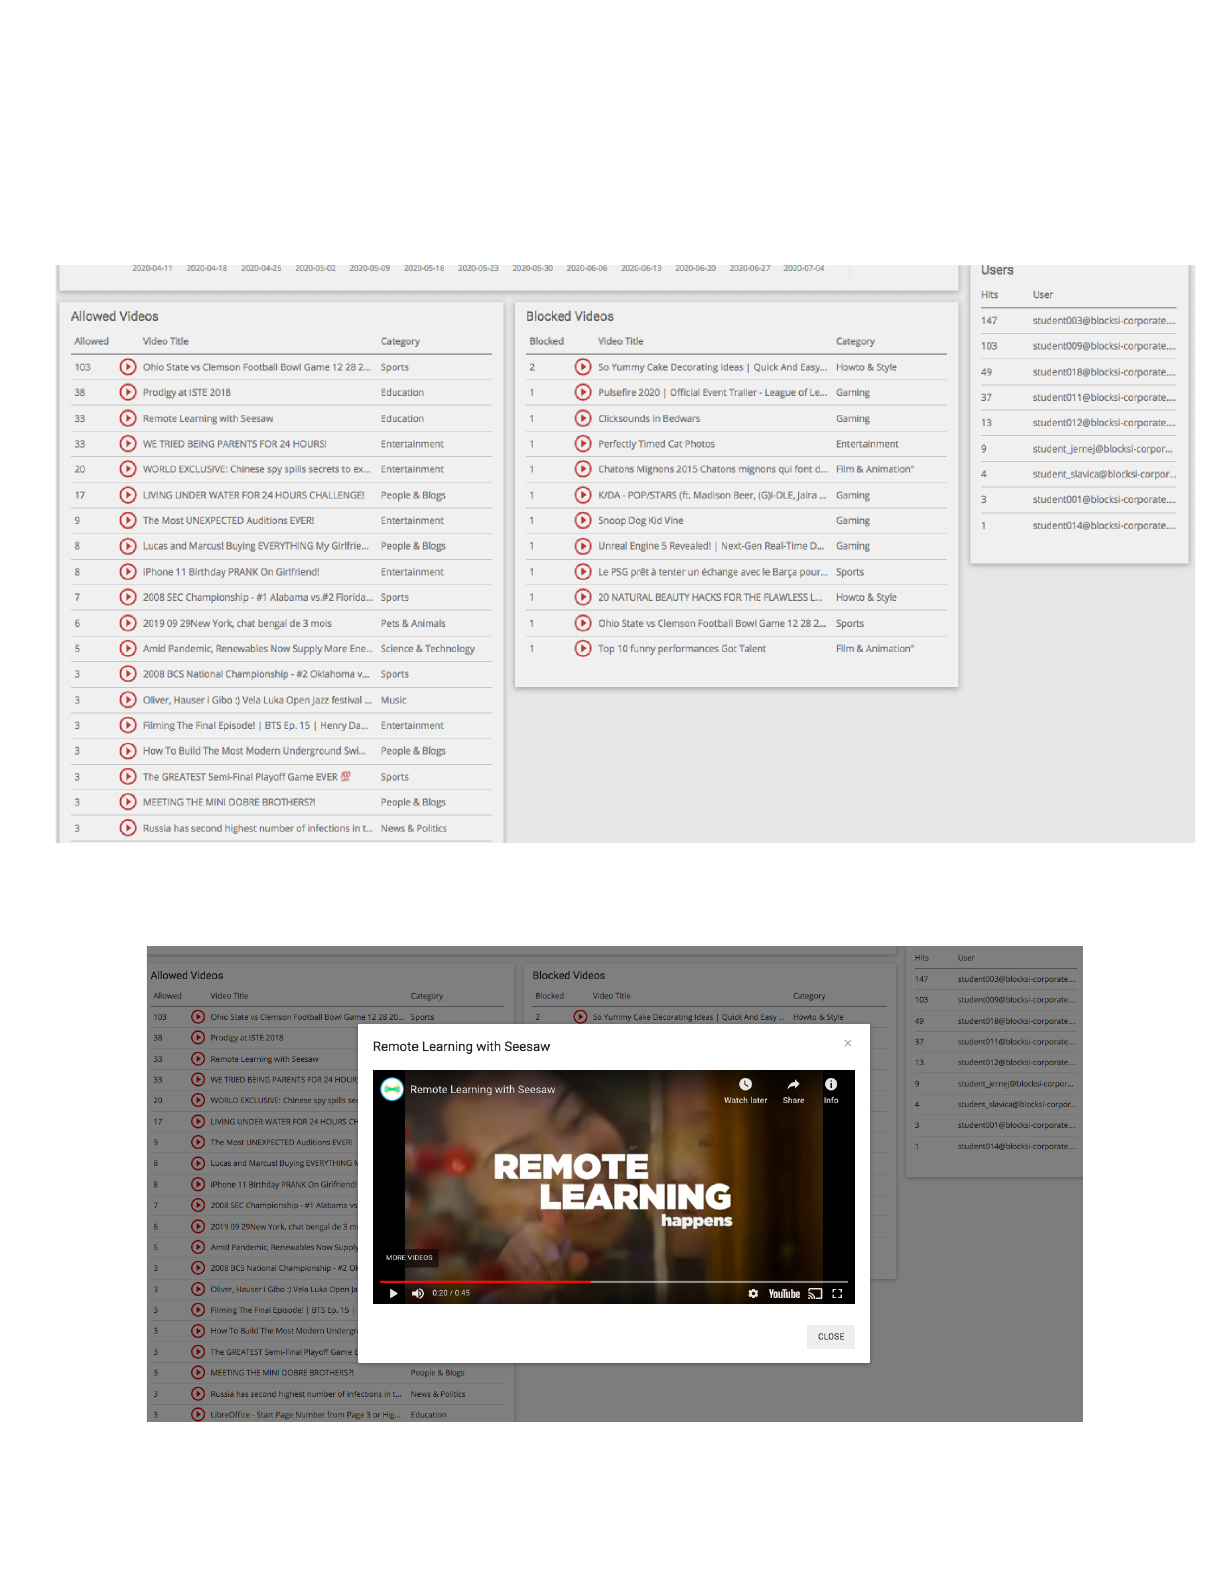
The list of ‘‘Allowed Videos’ are all videos that were viewed during the class session. The list of ‘Blocked
Videos’ are those searched by the student but unable to be viewed because those were blocked by the
policy or Teacher during that class session.
Click the red “play” thumbnail beside the video title to bring up the actual video the students’ viewed.
21

LOGS are the detailed timeline of reporting per class session that can be exported as a CSV file or
download in pdf format.
Data Reported:
● Date
● Timestamp
● IP Address
● User
● Org. Unit
● URL
● Category
● Action (blocked or allowed)
● Policy
● Location (in or out of school)
22
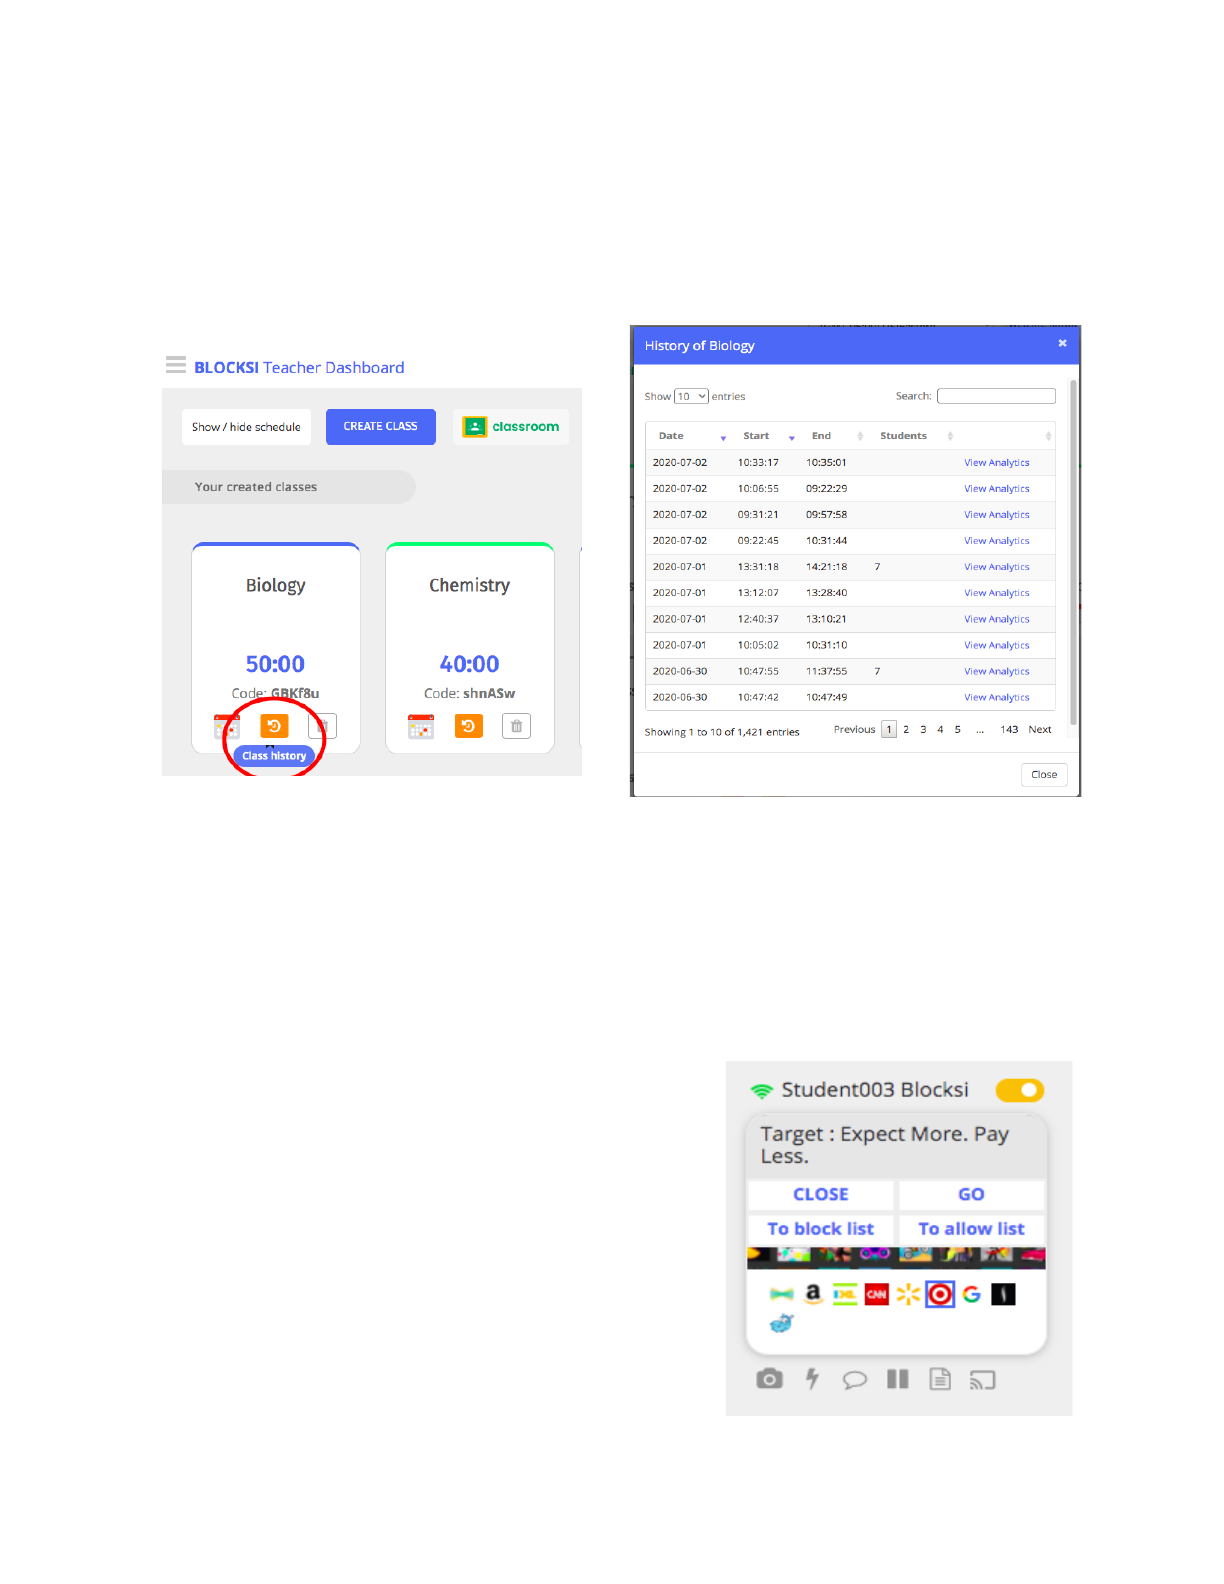
Retrieving Insights from Previous Class Sessions
From the main screen of the Blocksi Teacher Dashboard with your class schedule, click on the orange
arrow ‘Class history’ icon for the class you want to retrieve previous analytics. The analytics from every
class session you run within Blocksi will appear under class history for the length of one full school year.
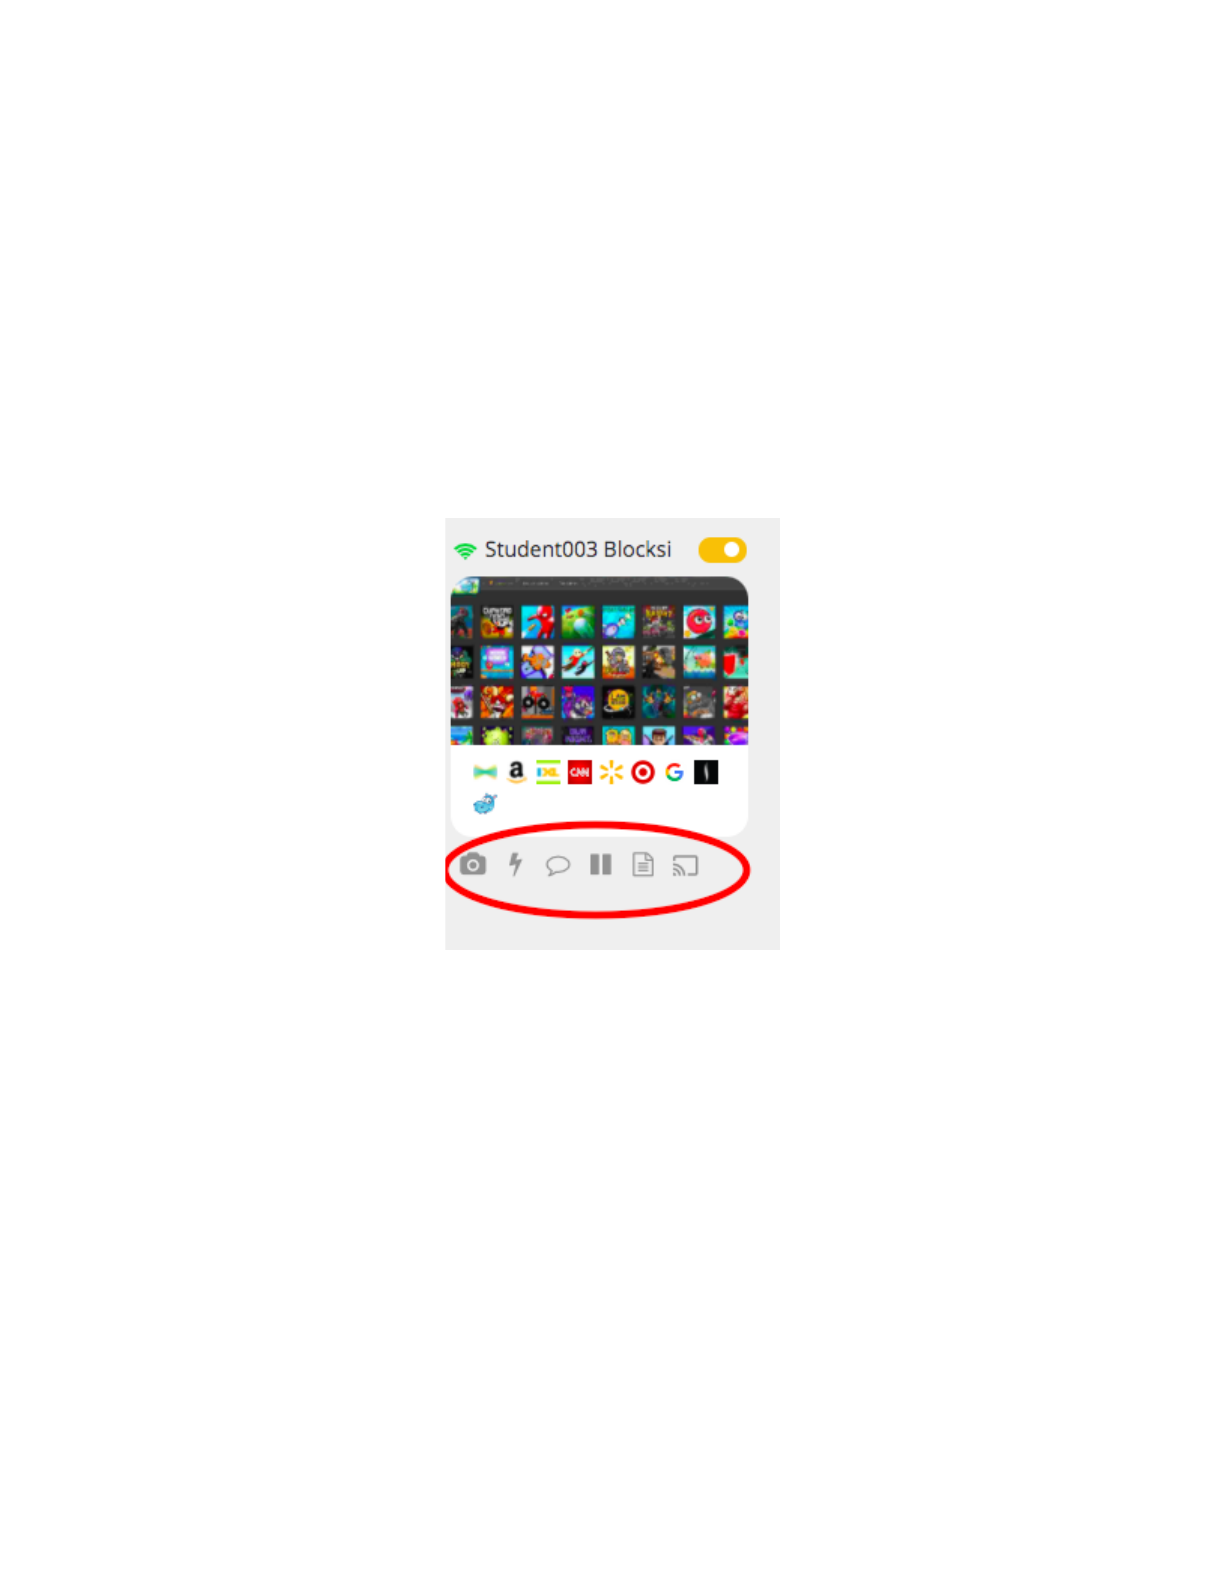
Individual Student Tile Functionality
The content the student is actively on will show on each individual student tile and will show less than a
two second update of the activity of each student.
By clicking and dragging the individual student tile, this will arrange the tiles in any position desired for
them to be arranged. To re-order the student tile arrangement, click the gray ‘A-Z’ button on the left hand
side and this will reorder the students in alphabetical order.
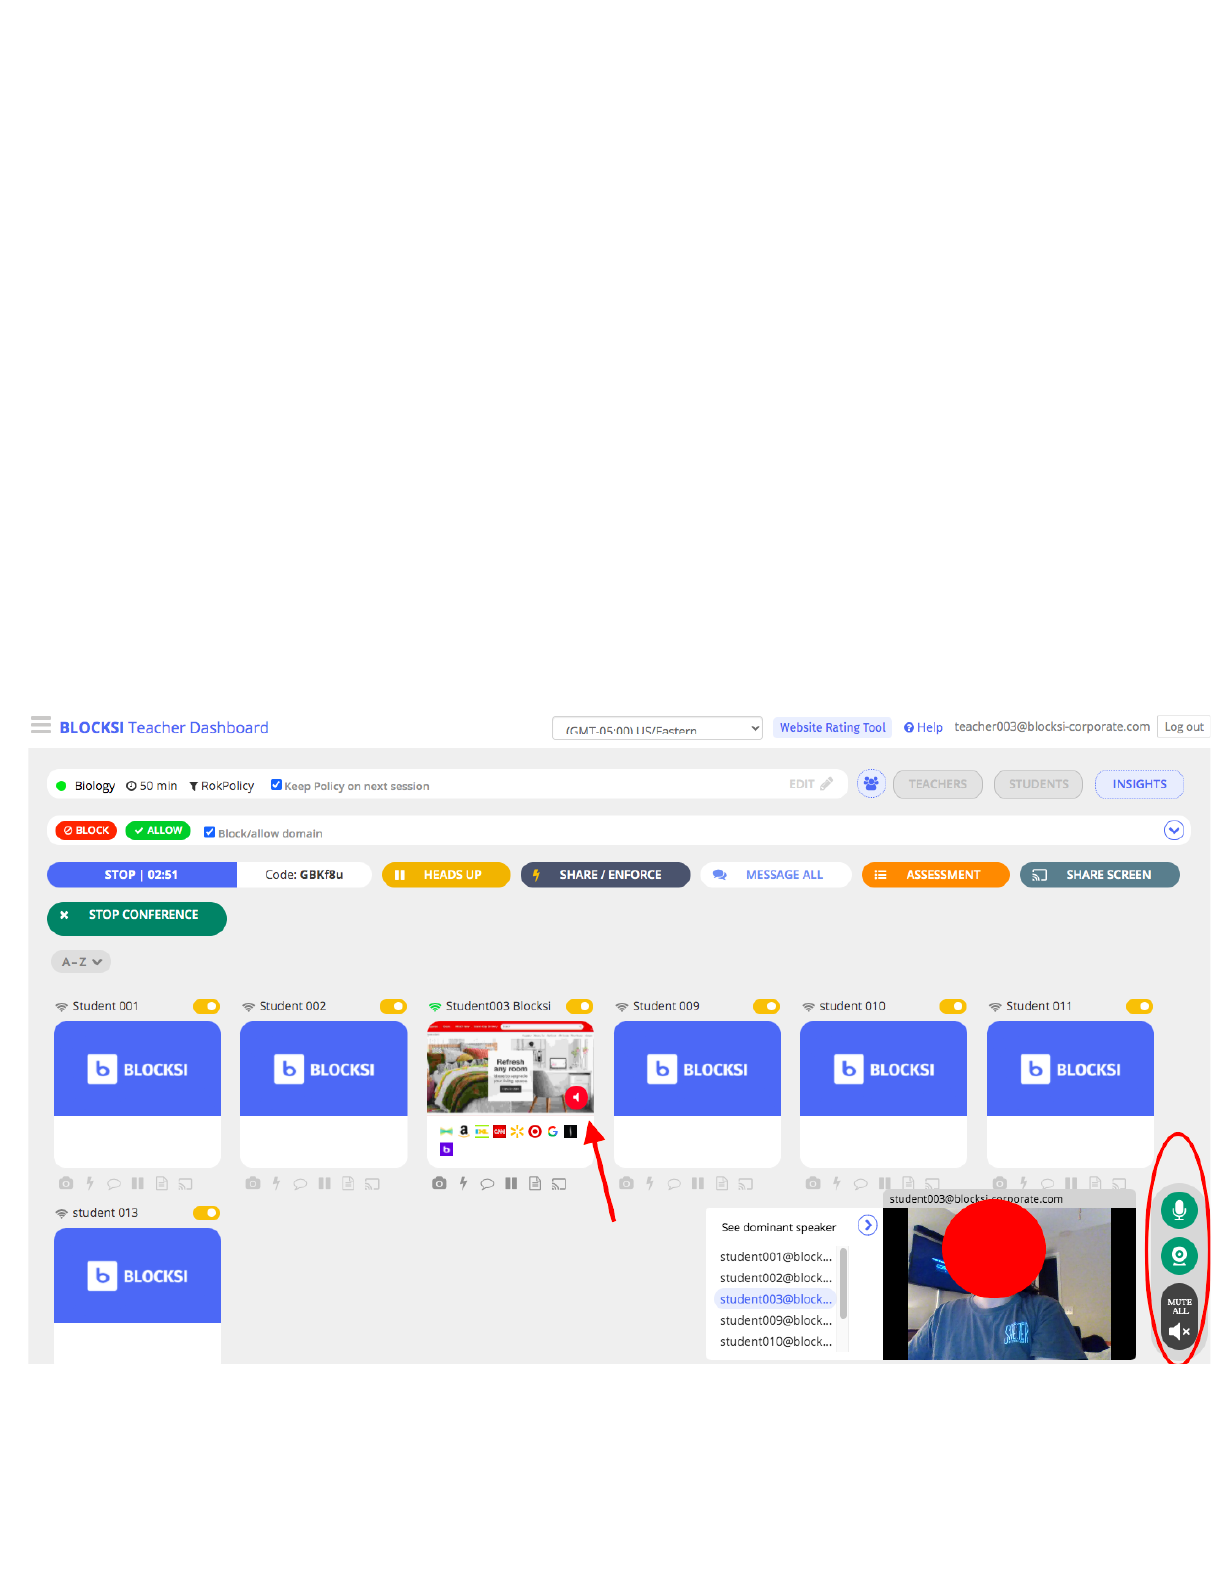
All of the small icons on the student tile are the tabs the student
currently has open. Hover over a tab to see four options of
action to take: ‘CLOSE;’ ‘GO;’ ‘To block list;’ ‘To allow list.’
23
CLOSE: Immediately closes that tab on the students’ device.
GO: Opens the same tab on your device so to view exactly what URL that student has open.
To block list: Immediately adds that URL to the class block list on the fly where that student nor the
entire class can access that URL.
To allow list: Immediately adds that URL to the class allow list on the fly where that URL is allowed
access for the entire class.
Icons listed under each students’ tiles are all functionalities that can be done to an individual student
without affecting the rest of the class. Hover over each icon to see the function description.
Camera icon: Takes a screenshot of exactly what the individual student is on that downloads immediately
to your device with the date and timestamp that can be saved as a file.
Lightning bolt icon: Share or enforce specific URLs to the individual.
Chat bubble icon: Message that student directly.
Pause icon: ‘Heads Up’ function that locks that individual student’s screen so they are unable to access
anything during that time.
Document icon: ‘Assessment Mode’ to push out an assessment or particular LMS environment to the
individual student.
Screen icon: Share that individual student’s screen with the entire class.
24
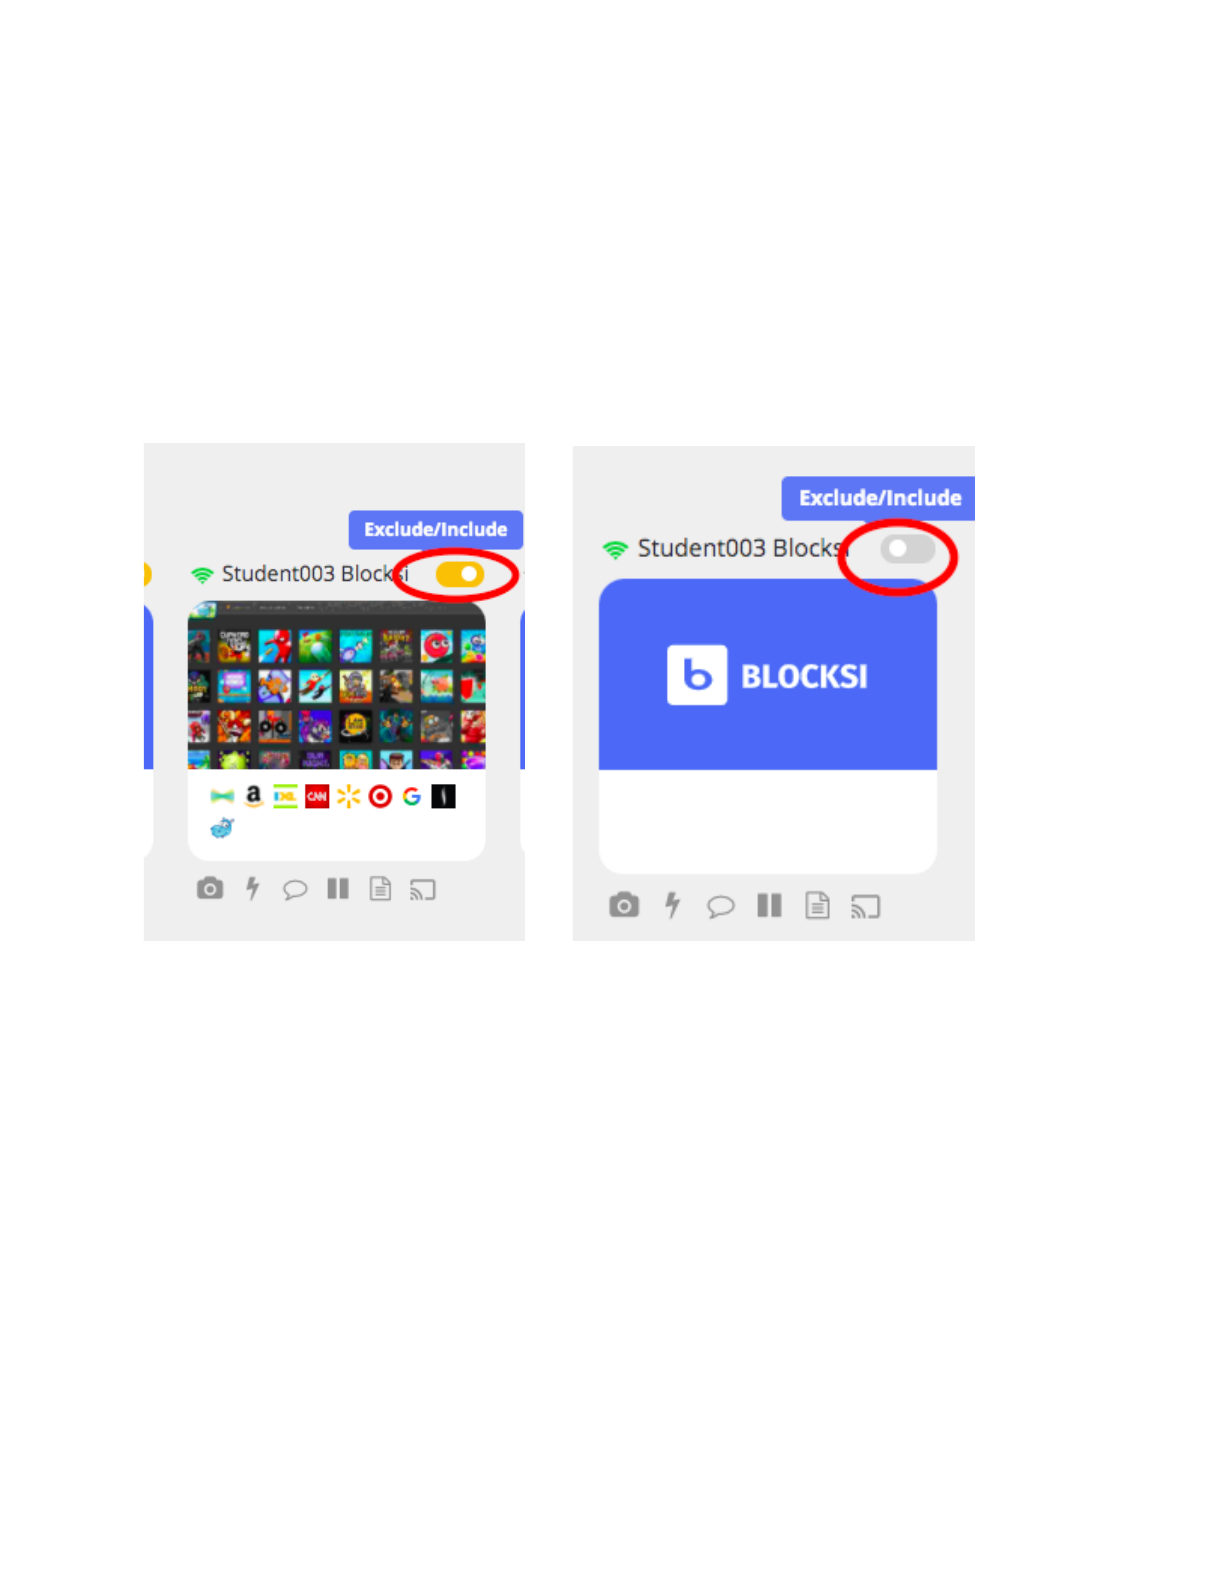
Exclude / Include Individual Student
To exclude a student from the class, toggle the yellow icon circled below. This will release the student
from the restrictions/policies placed during that class session.
To include the student toggle the button back to yellow. This will place the student back to the active
class session and all restrictions/policies will apply to that student.
**Note this does not dismiss the student from the class permanently. (See page# 25 for that
function).
25

Assign an Individual Policy, Quick View of Individual History, & Live Stream for Individual Student
Click the student tile to enlarge it.
Here you can:
● Assign an individual student a separate policy from the rest of the class (circled in red)
● See a quick view of all of the URLs that the individual visited/currently visiting, the timestamp and
if it is/was an allowed or blocked site.
● Click the play button (outlined in red rectangle) to have the student share their screen with the
Teacher. This will allow you to have a real time view of what the student is doing on their screen
and assist if the student needs guidance on navigating, searching, etc.
● Dismiss the student from the class permanently (underlined in red).
26
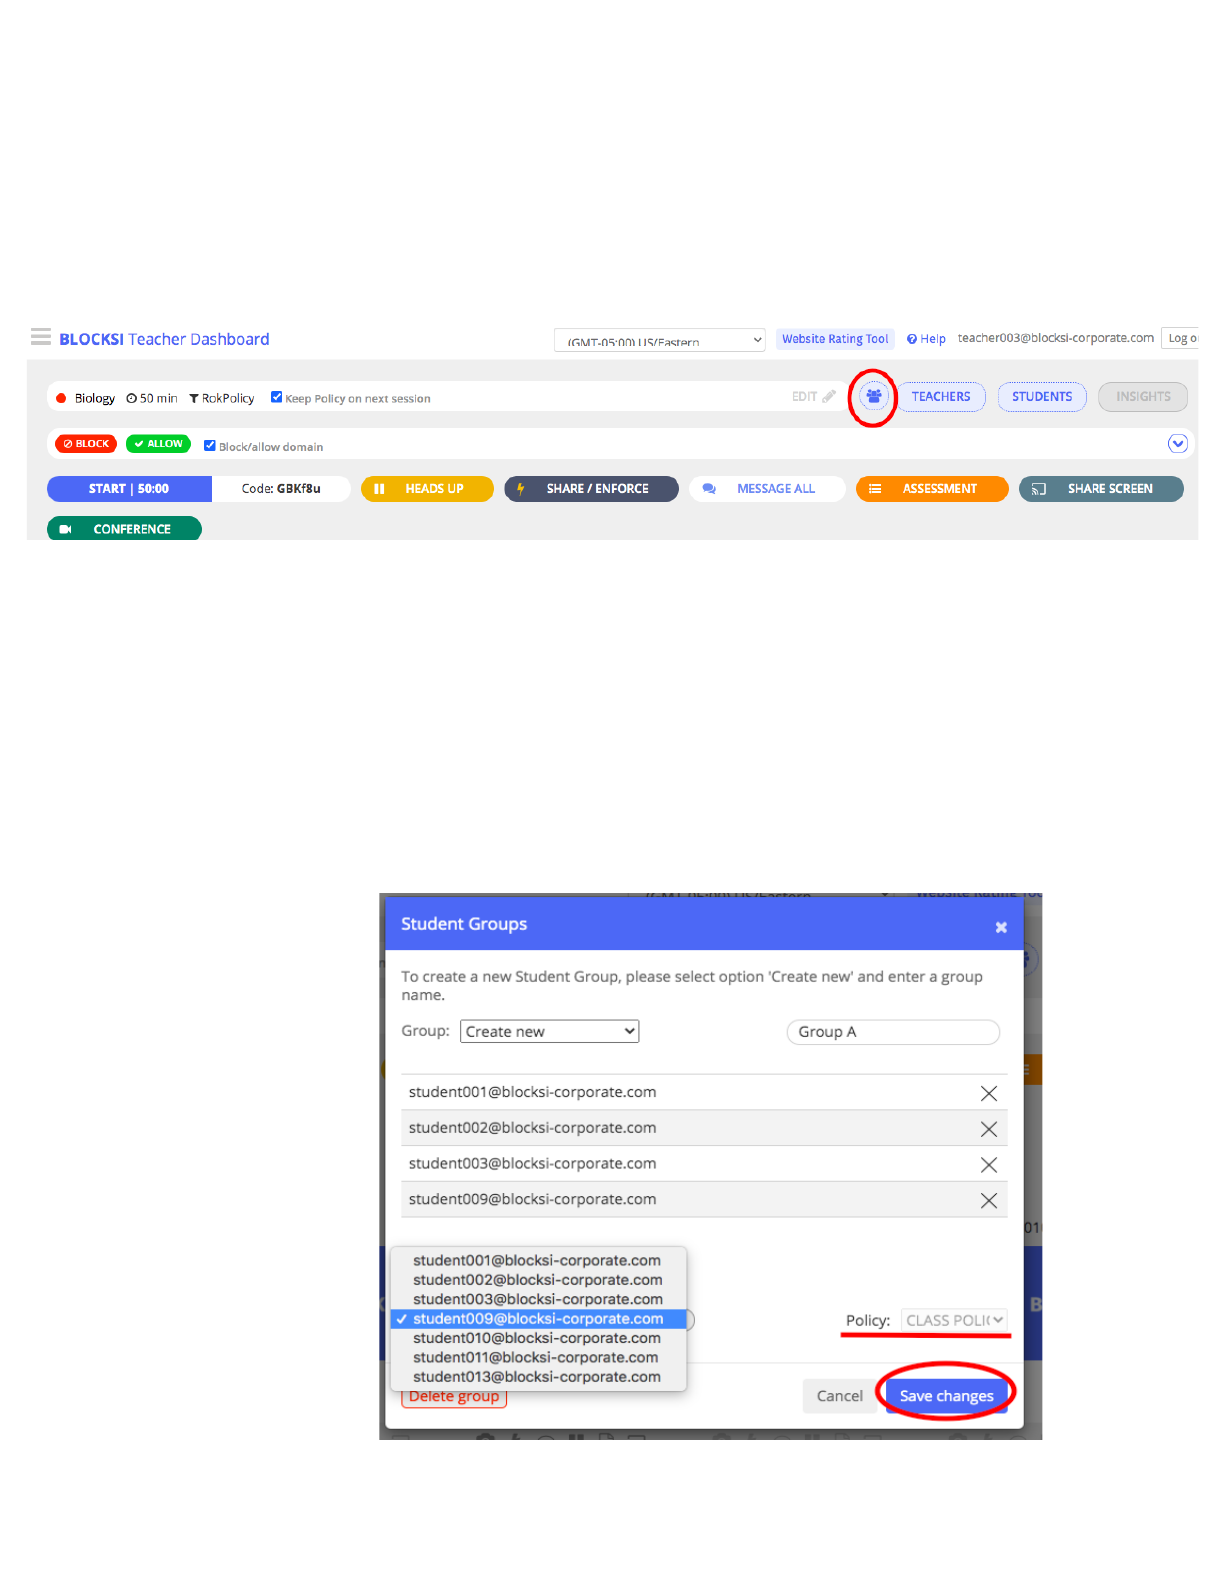
Creating Groups within a Class
The group functionality allows you to give commands (i.e, Heads Up, Share/Enforce, Message, Push
Assessments, Assign Policies) to specific groups that only affect the students in that group.
Click the group icon at the top right.
Click ‘Create new’ from the drop down menu.
Enter a name for the group in the top right field (i.e. Group A).
The drop down menu at the bottom of the window will list all of the students in that class. Choose the
students you want to add to that group.
You can choose to give groups their own policies that are different from the rest or you can choose to
leave the policy as the default classroom policy.
Save changes.
27
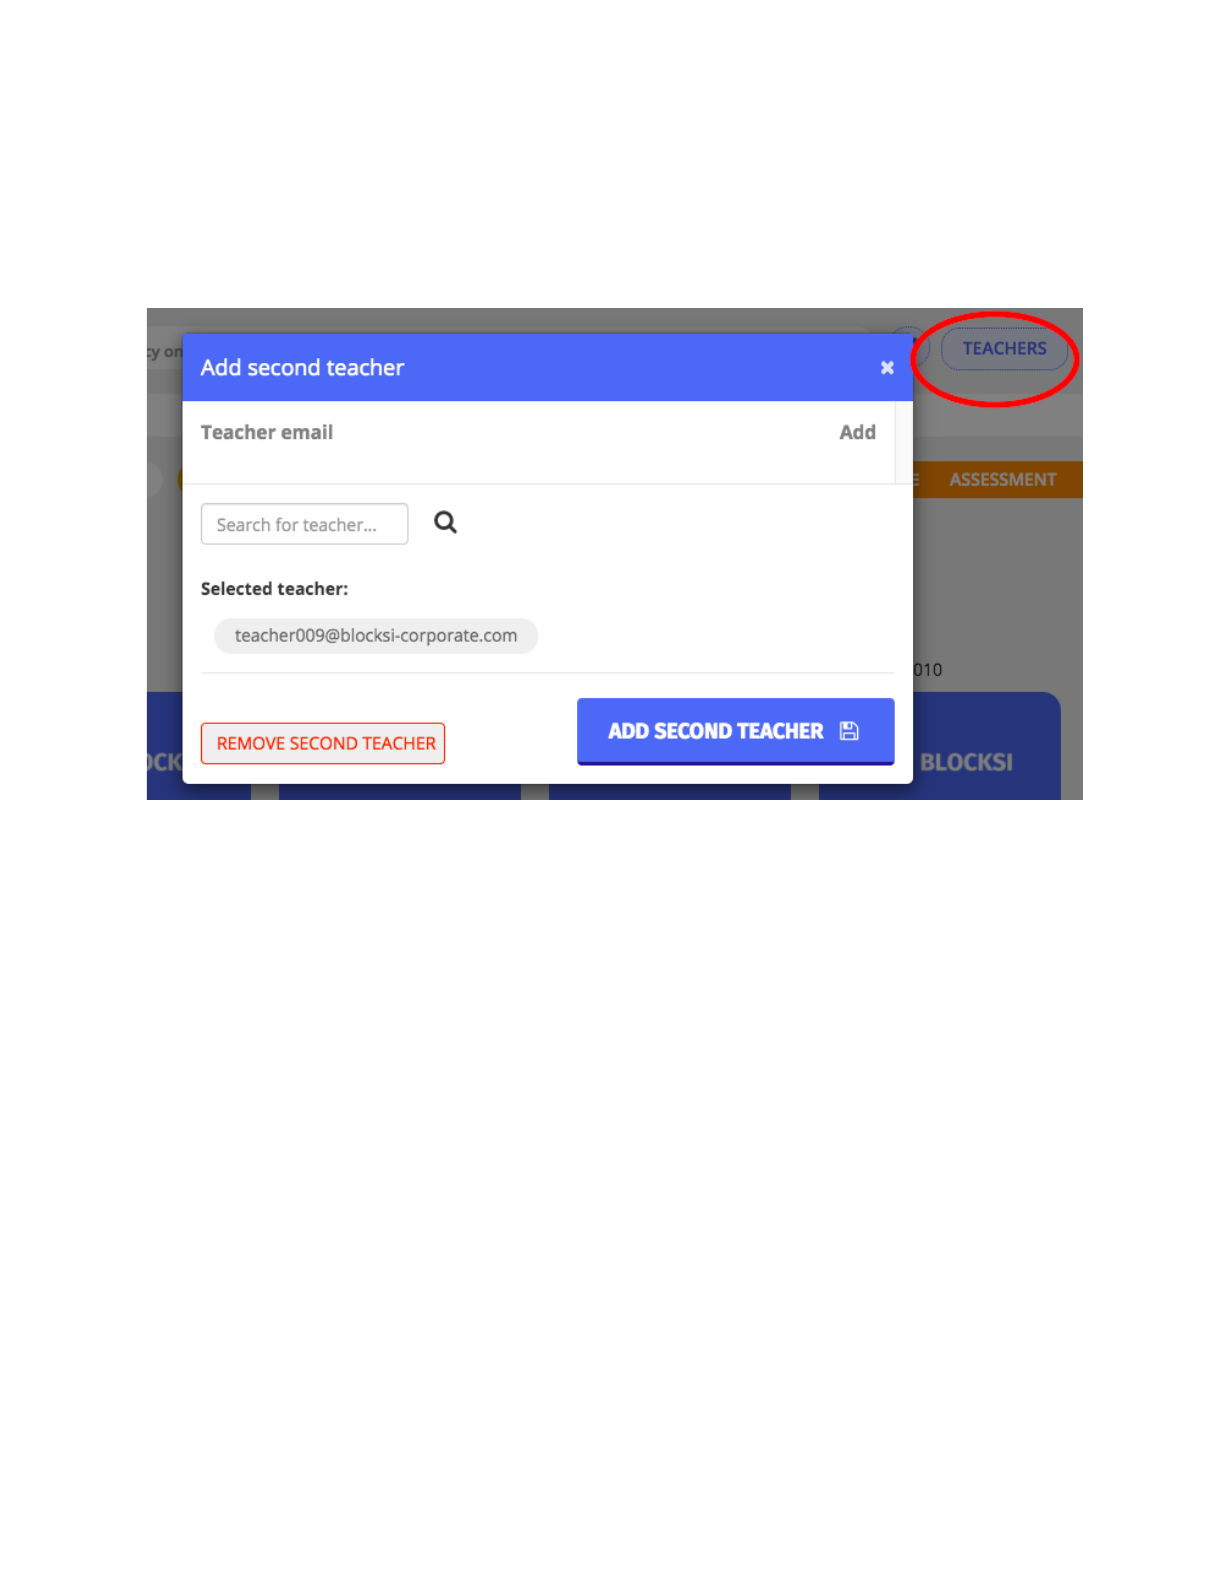
Adding a Second Teacher
To add a second teacher to help monitor, the class must not be active.
Click ‘TEACHERS’ at the top right corner of the inactive class.
28

VIDEO CONFERENCE Function
The Conference function allows you to hold a virtual remote class session with audio and video
capabilities while simultaneously managing student activity with all of the Blocksi Teacher Dashboard
functions all in one place.
There are two conferencing layout options: Dominant Speaker Layout & Tile Layout.
Dominant Speaker Layout
Click ‘CONFERENCE’ and choose ‘Dominant Speaker Layout.’
The notification pop-up window will appear once the Conference Mode feature is initialized.
29
Teacher View in Dominant Speaker Layout:
The Conference video and audio controllers will appear at the bottom right corner of the Teacher
Dashboard. This allows the Teacher to Mute/Unmute their audio, Enable/Disable their webcam as well as
control the audio of the students.
Once the Teacher and Students have enabled the webcam and microphone on their devices, both parties
will be able to communicate and see each other’s video feed. In Dominant Speaker Layout, the Teacher
will see their students one at a time and can switch between students via the side window of their
conference’s video screen. At the same time the Teacher is seeing the students’ webcam they can also
see what that student is actively working on as well as push out any function commands from the Teacher
Dashboard.
The Teacher has the control of the students’ audio (where the red arrow points) to mute or unmute that
student.
30
Student View in Dominant Speaker Layout:
In the Dominant Speaker Layout, the student will see the Teacher only. The conference window will pop
up in the bottom right corner of the screen where the student will need to click the red audio button and
the red webcam button to turn on their audio/video.
31

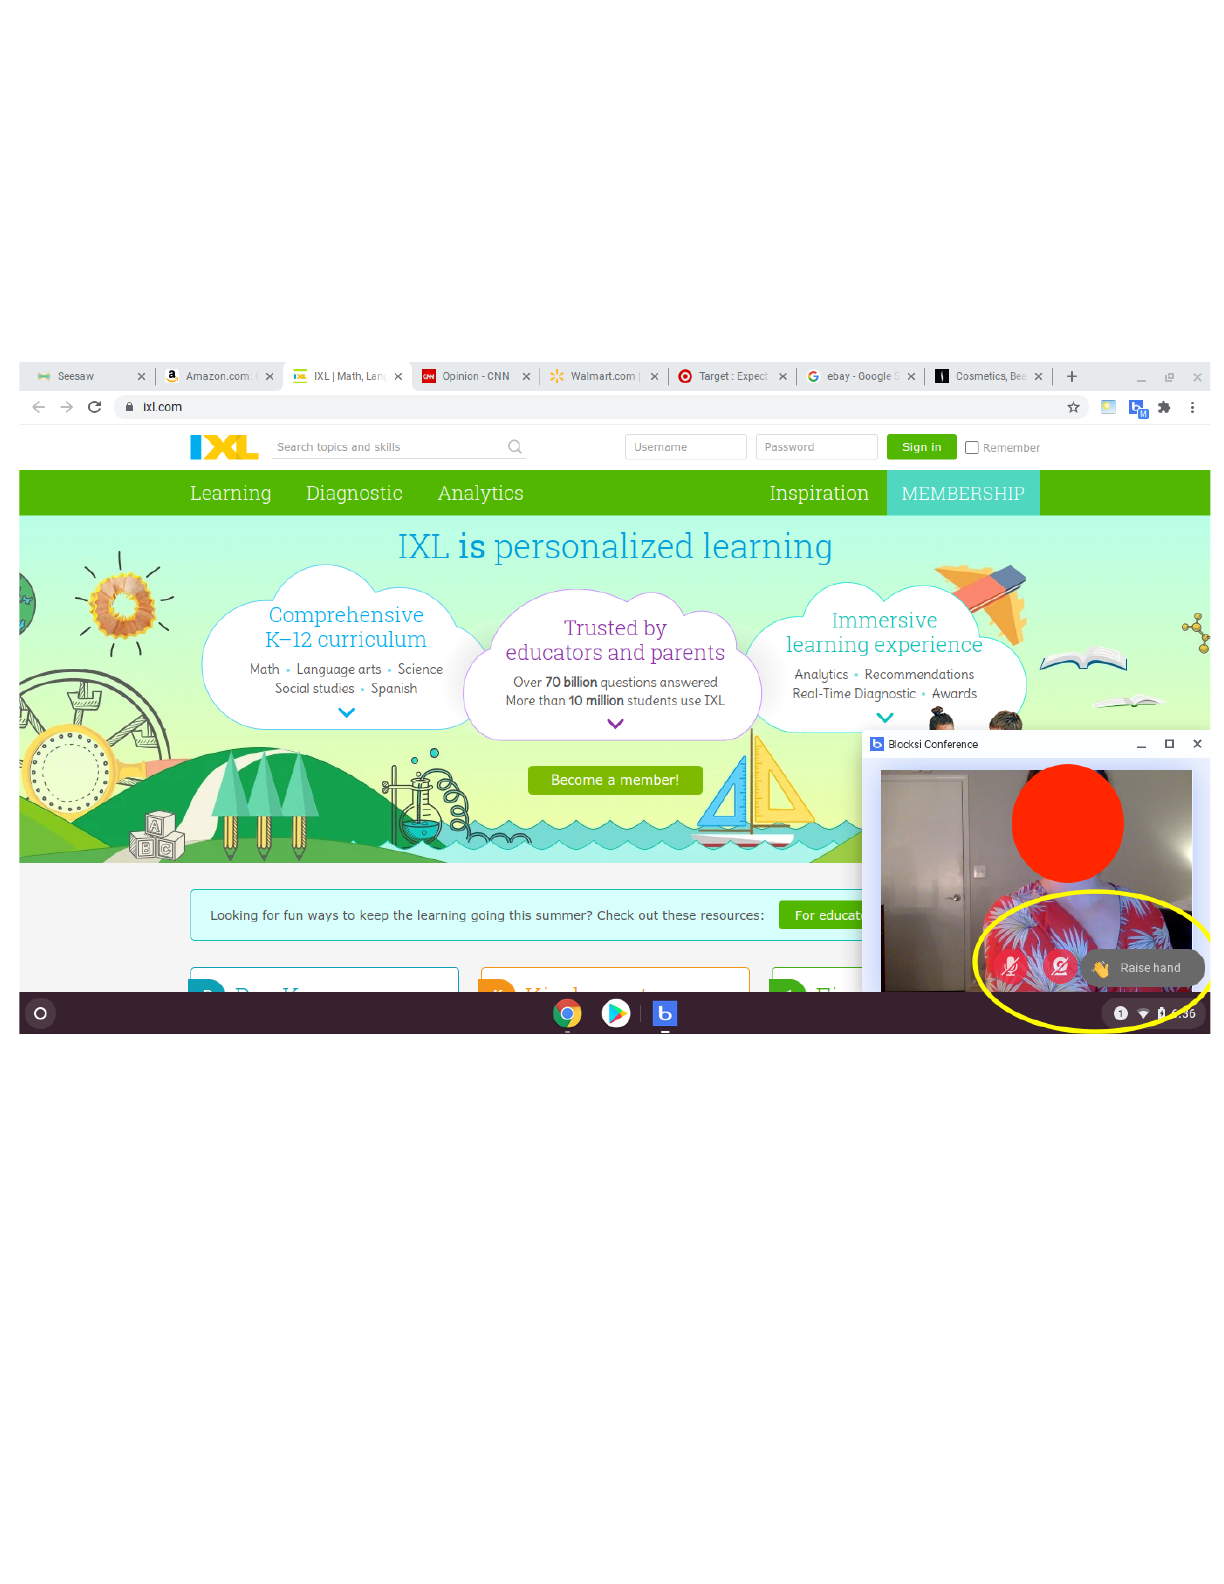
The students can also make the Teacher’s video full screen view by clicking the maximize full screen icon
on the Blocksi Conference window. In addition to the audio and video controls, the students have the
option to “raise hand” which shows on the Teacher’s Dashboard letting them know a student has
questions or requests to speak (if muted).
The students can
minimize the
Teacher’s video
completely and to
get the Teacher’s
video back on their
screen, they
simply click the
blue “b” at the
bottom of their
task bar.
32
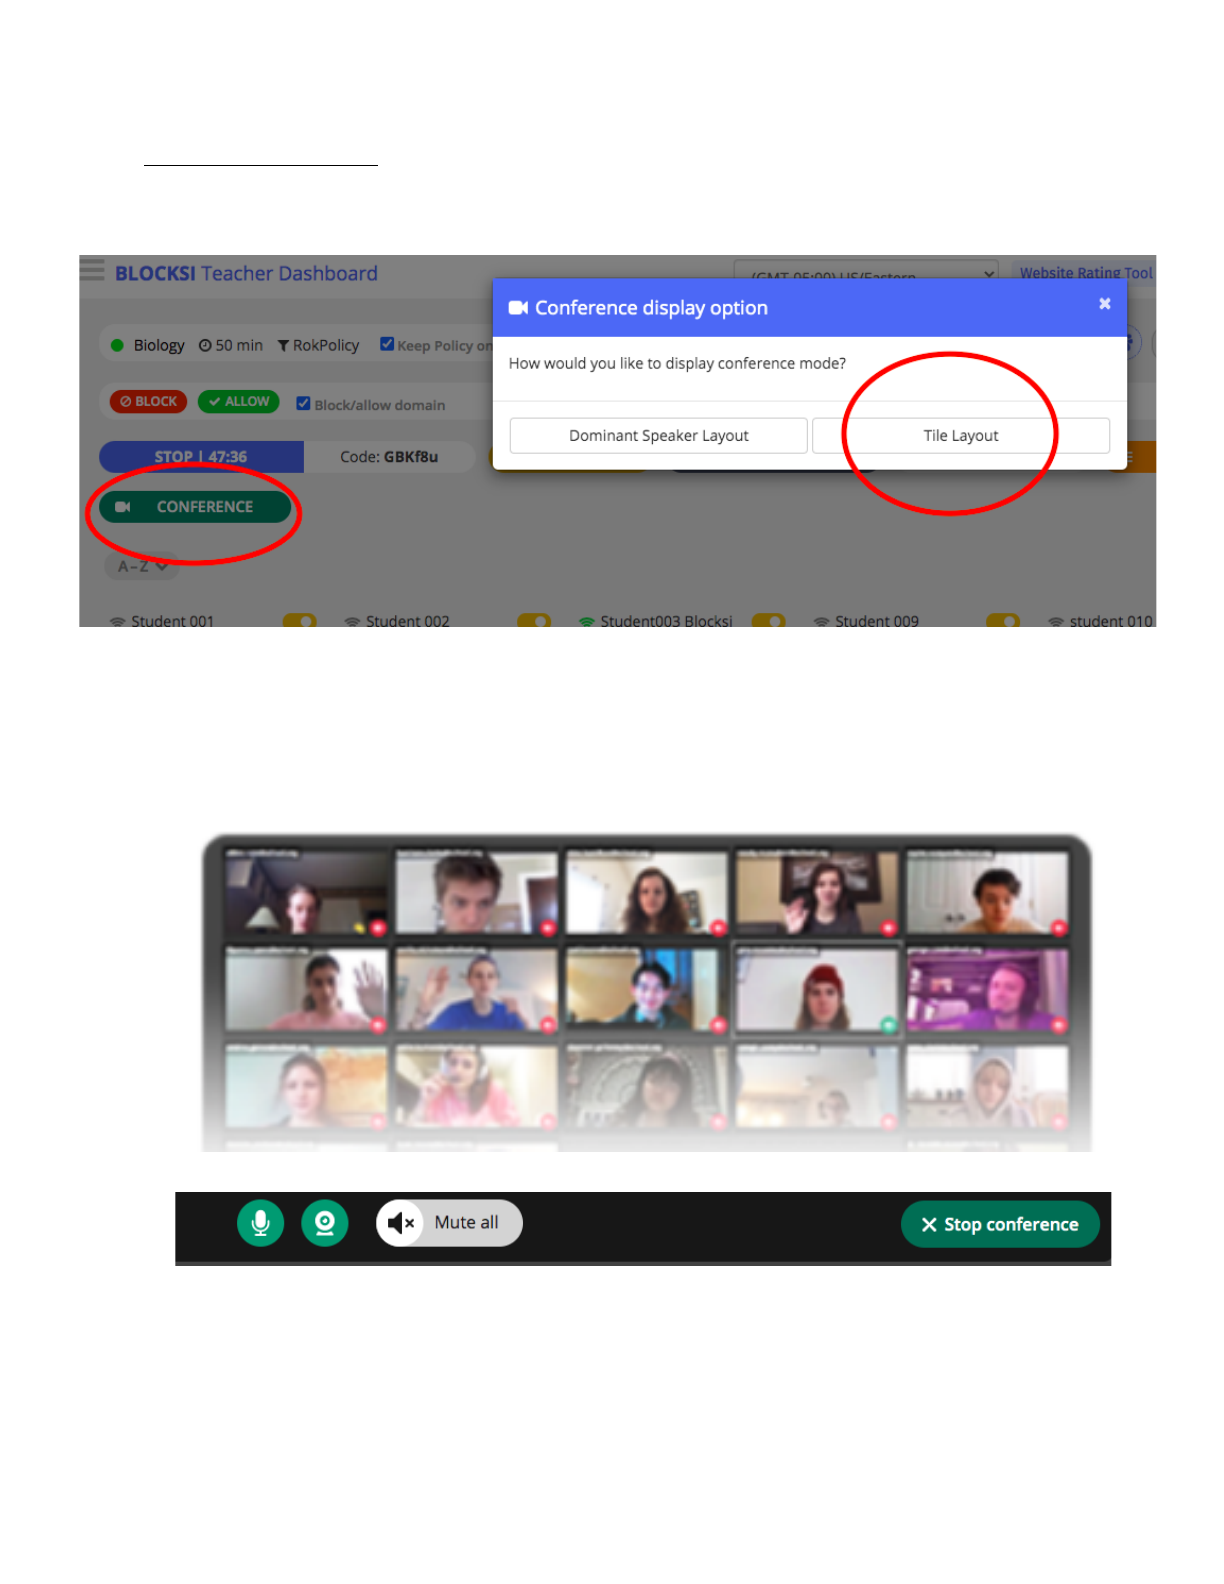
(Conference) Tile Layout
Click ‘CONFERENCE’ and choose ‘Tile Layout.’
The conference will open up a window with the tile layout which will show all of the students at once along
with theTeacher. With the Tile Layout, the students will be able to see and hear the Teacher as well as
their peers. Again, the students must enable their audio and video to be heard and seen. The students
will also have the “raise hand” feature to show the teacher when they have questions or requests to speak
(if muted).
As well, the Teacher will have the audio controls to have everyone unmuted or ‘Mute All’ and use the
individual audio mute/unmute options on each of the students’ tiles. While the conferencing is running the
Teacher has the ability to physically see the students as well as monitor what the students are doing, and
manage commands offered on the Teacher Dashboard (i.e. push out assessments, share/enforce
content, share screen, close tabs, etc.)
33
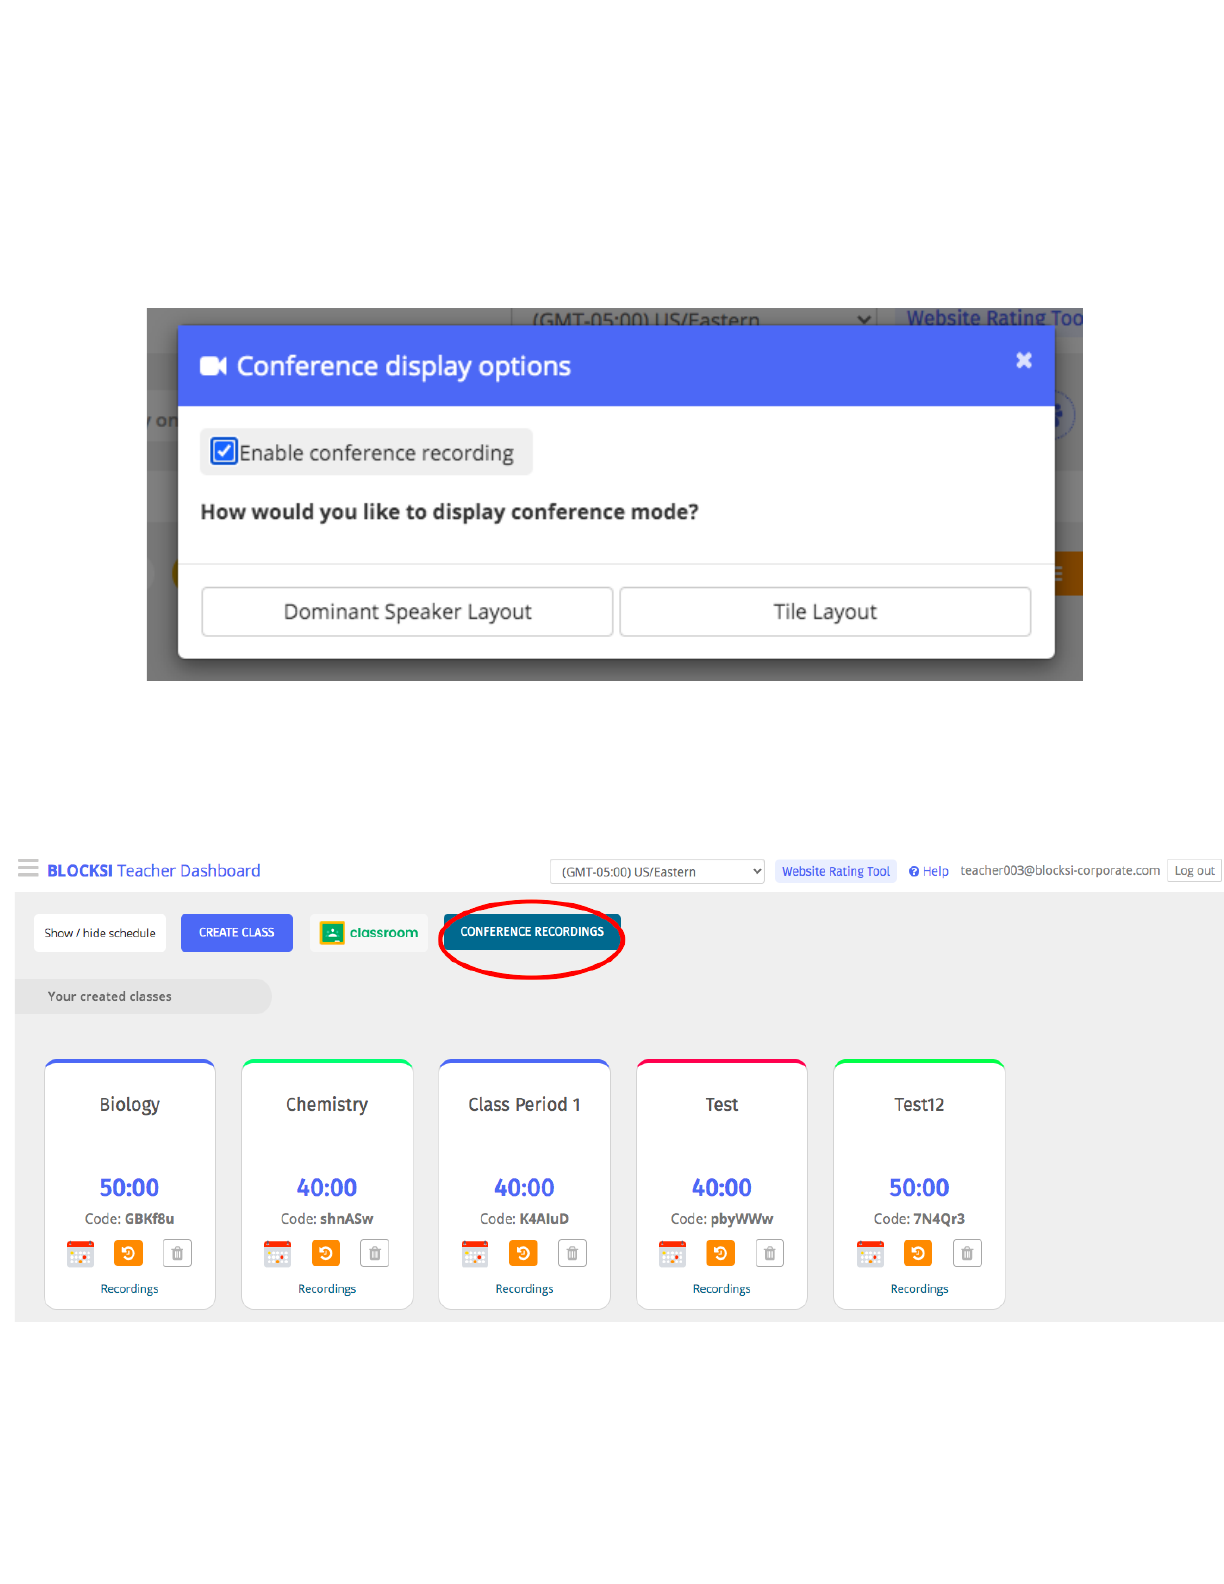
Recording / Pre Recording Conference Room Sessions
To record or pre record conference sessions, check the box next to ‘Enable conference recording.’
To retrieve the recording, go back to your main Blocksi Teacher Dashboard page and click on
‘CONFERENCE RECORDINGS.’
34
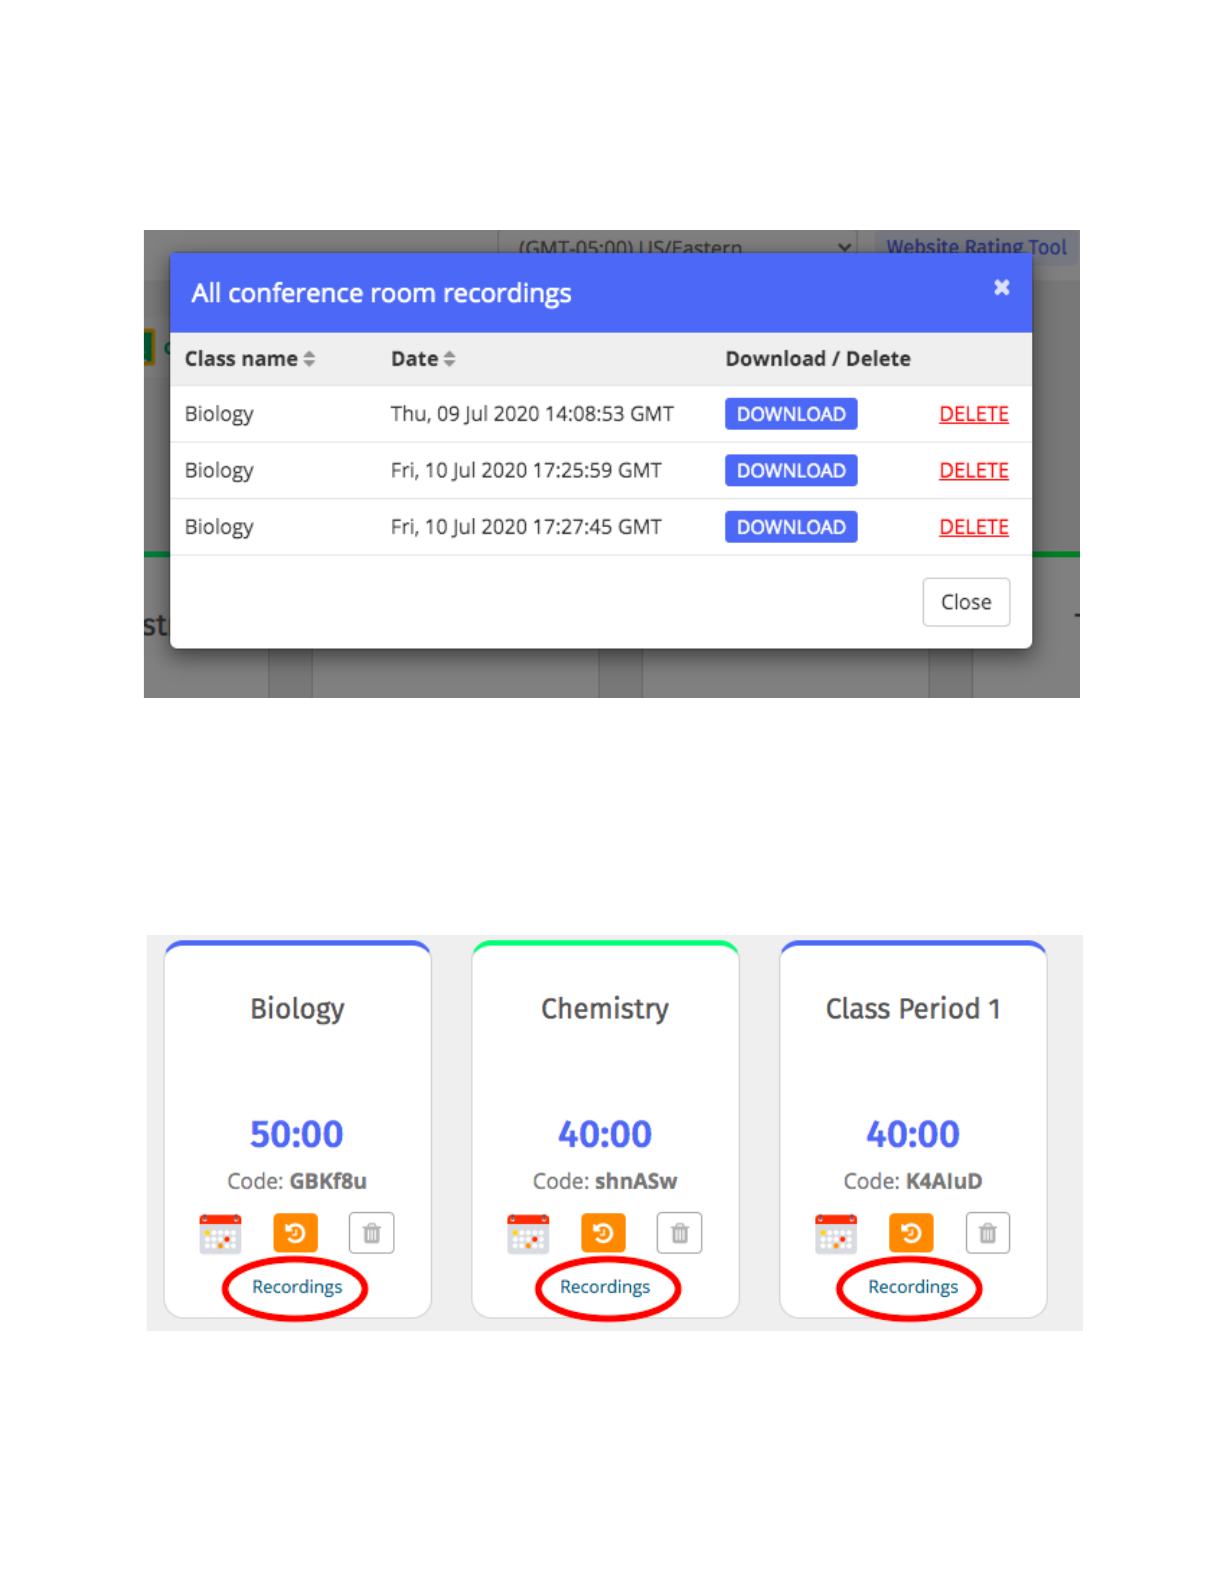
You will then have the option to Download or Delete your conference room recordings.
All of your conference recordings will be listed under ‘Recordings’ for each of your classes.
35

Video Conferencing Troubleshooting
The Blocksi extension version must be verified with the 3.2.34 version particularly on the students’
Chromebooks.
This can be verified by checking the Chromebook browser settings (3 dots located at the top right corner
of the browser) then hover over the “More tools” ---> click on “Extensions” ---> “Details” button within the
Blocksi extension to verify its current version.
If the current version is showing the earlier version (3.2.27 and below), the extension can be updated by
rebooting the Chromebook or by clicking on the update button if the “Update” button is present within the
‘Extensions’ page.
36
