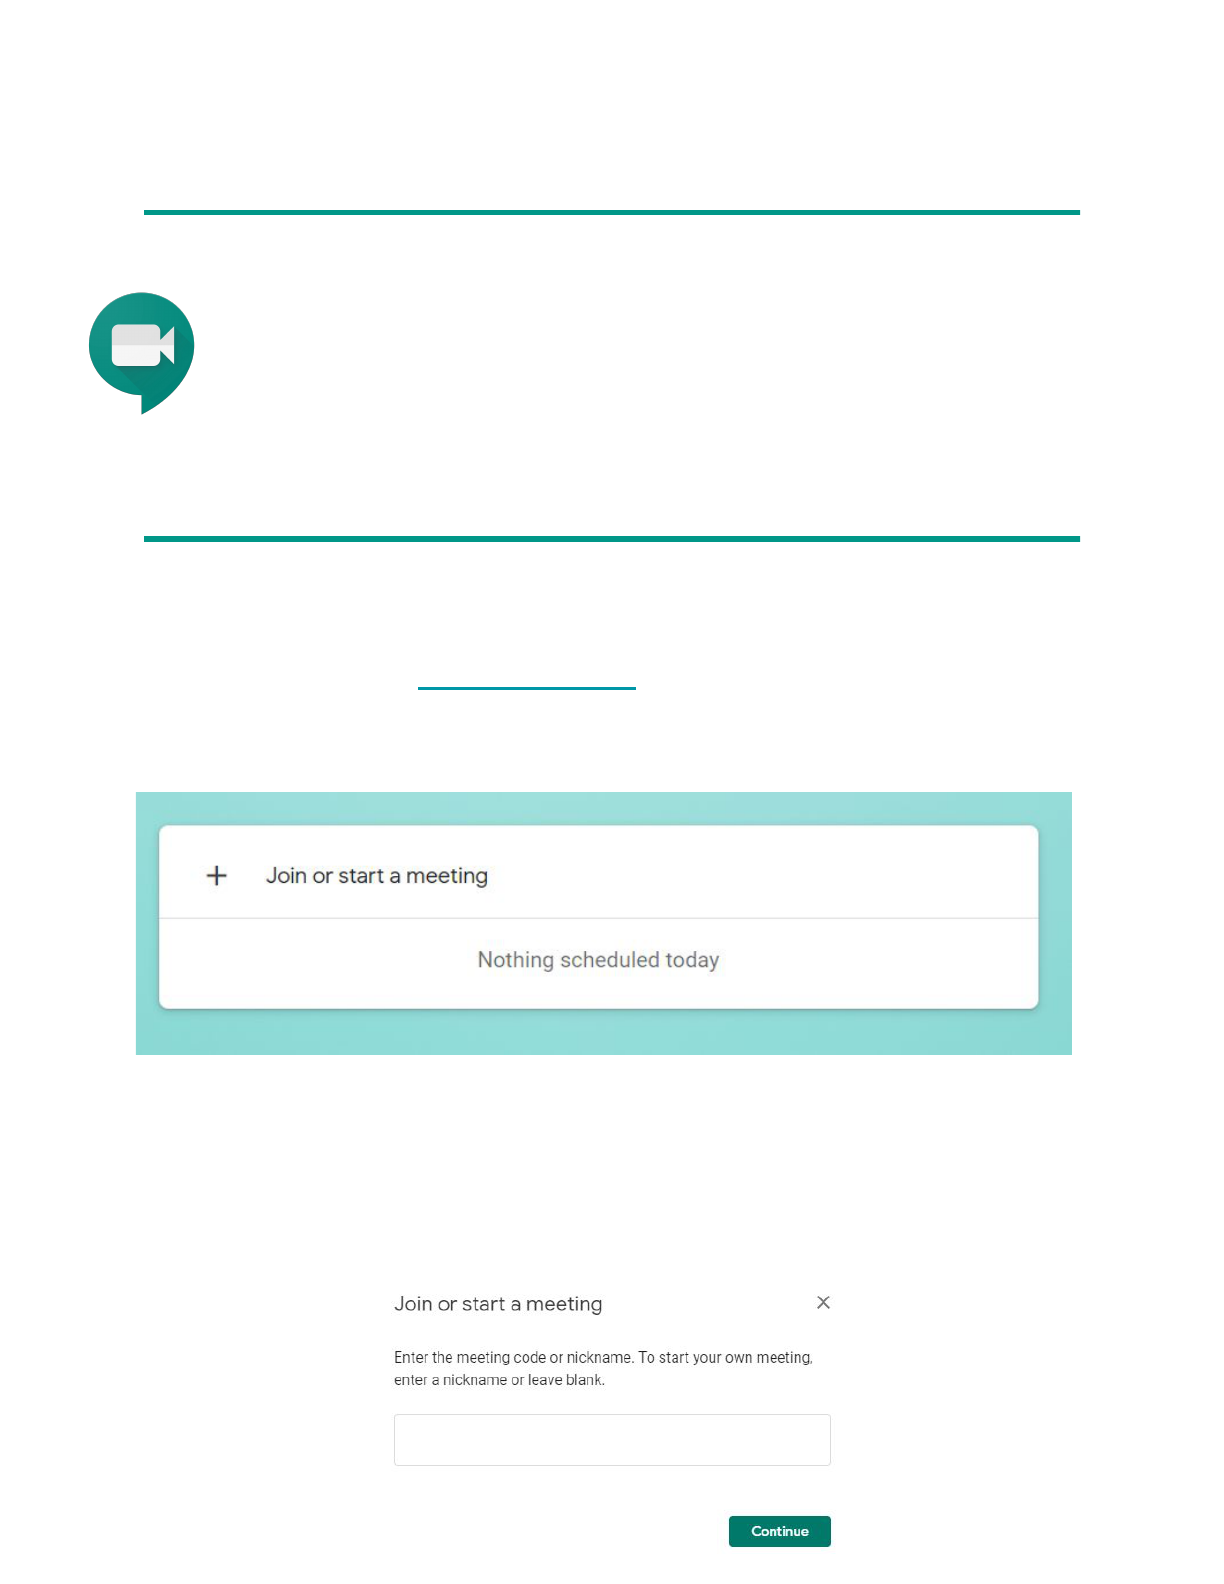
Setting Up a Google Meet with a Link
● Hold real-time video meetings with up to 250 participants at a
time.
● Record meetings for students who can’t login in real-time or
would benefit from watching multiple times.
● Communicate to your students what time they should join
your meeting.
To start a video meeting that will connect you with students in real-time:
1. Using Chrome, go to meet.google.com
2. Click the + Join or start meeting.
3. Do not enter a nickname if you want students to be able to join without you. (ie:
one-on-one office hours) Click continue.
*See document: Prevent Students from Joining or Rejoining a Meet if you don’t
want student in a Meet without you.
*Using these directions will allow students to enter a Meet before the instructor
and will allow them to rejoin a meet even after everyone has left.
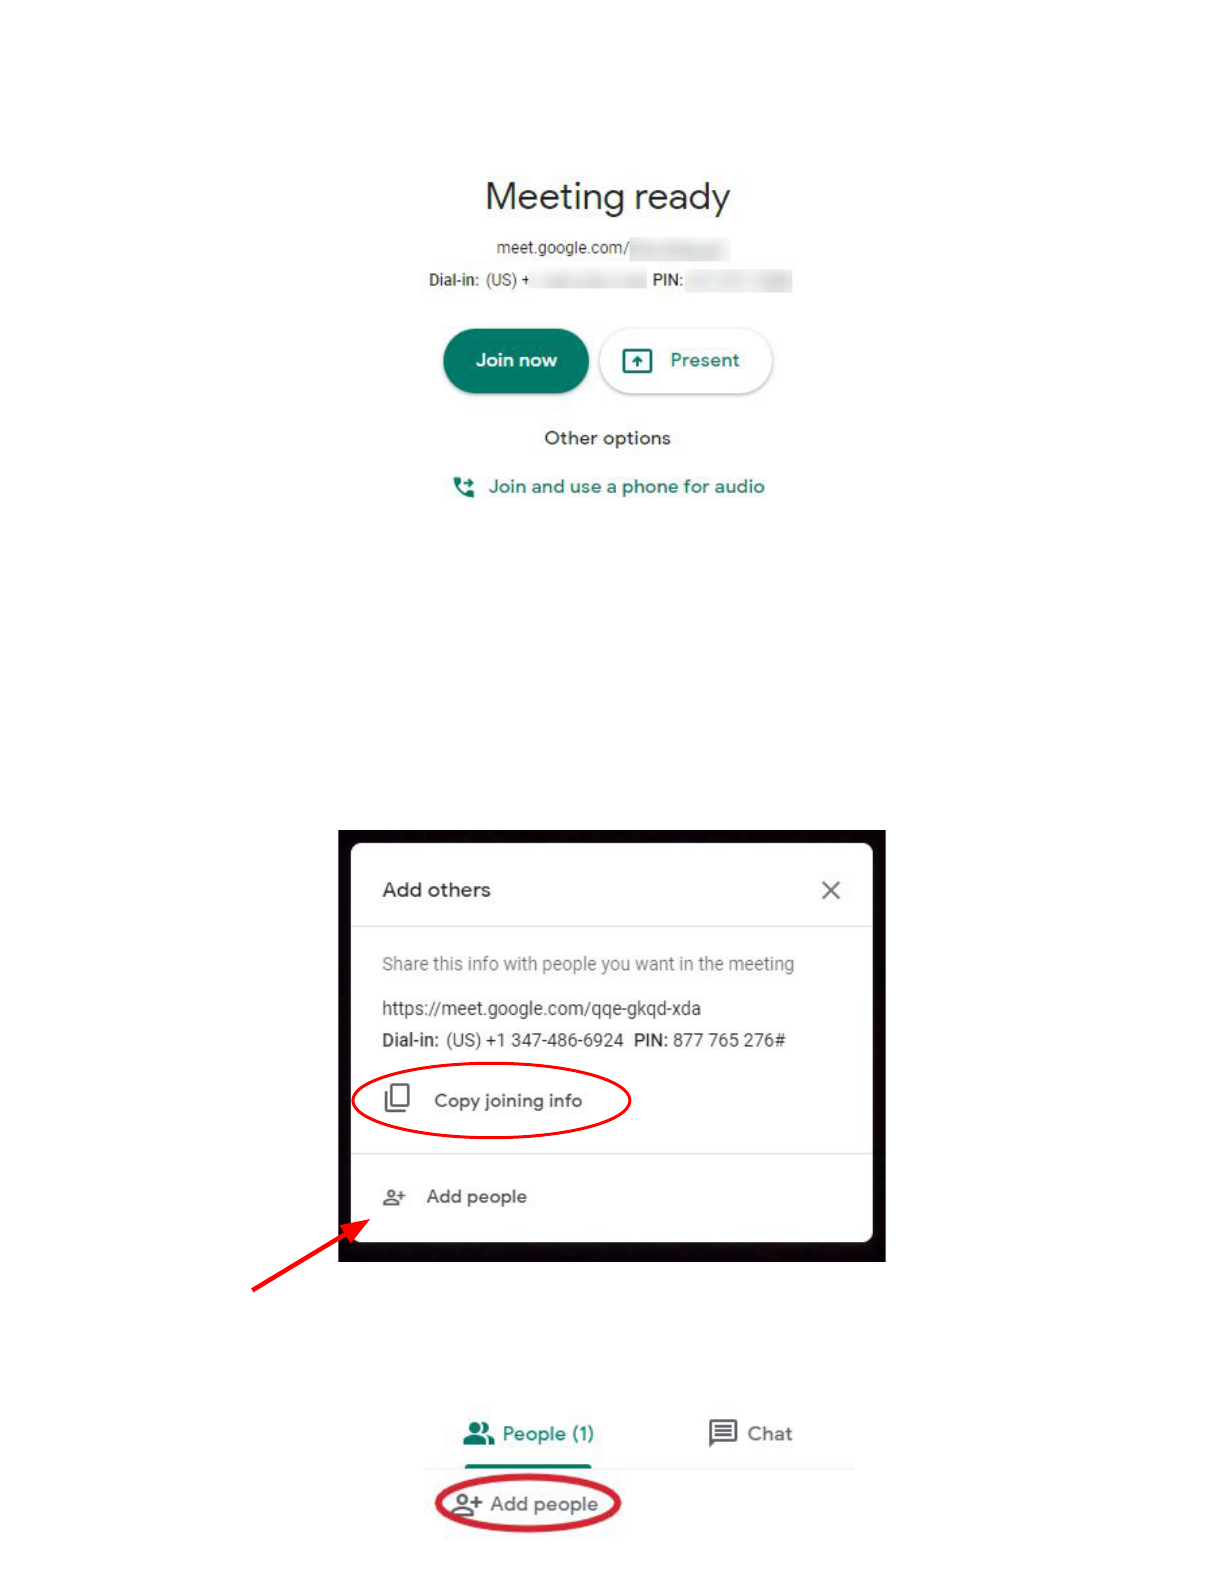
4. Click the “Join now” button.
To share your meeting details so students can connect:
5. Click on the “Copy joining info” option and then paste it where students
can access it (Schoology, Google Classroom, etc). You can delete the
phone number and PIN information. Students will be able to access the
meeting with the link.
IMPORTANT: You need to add your admin to all Google Meet calls. You can do
this as you are setting up your Meet (see “Add people” above) or immediately
after starting your Meet by going to the “People” tab in the upper right corner and
clicking on “Add people.”
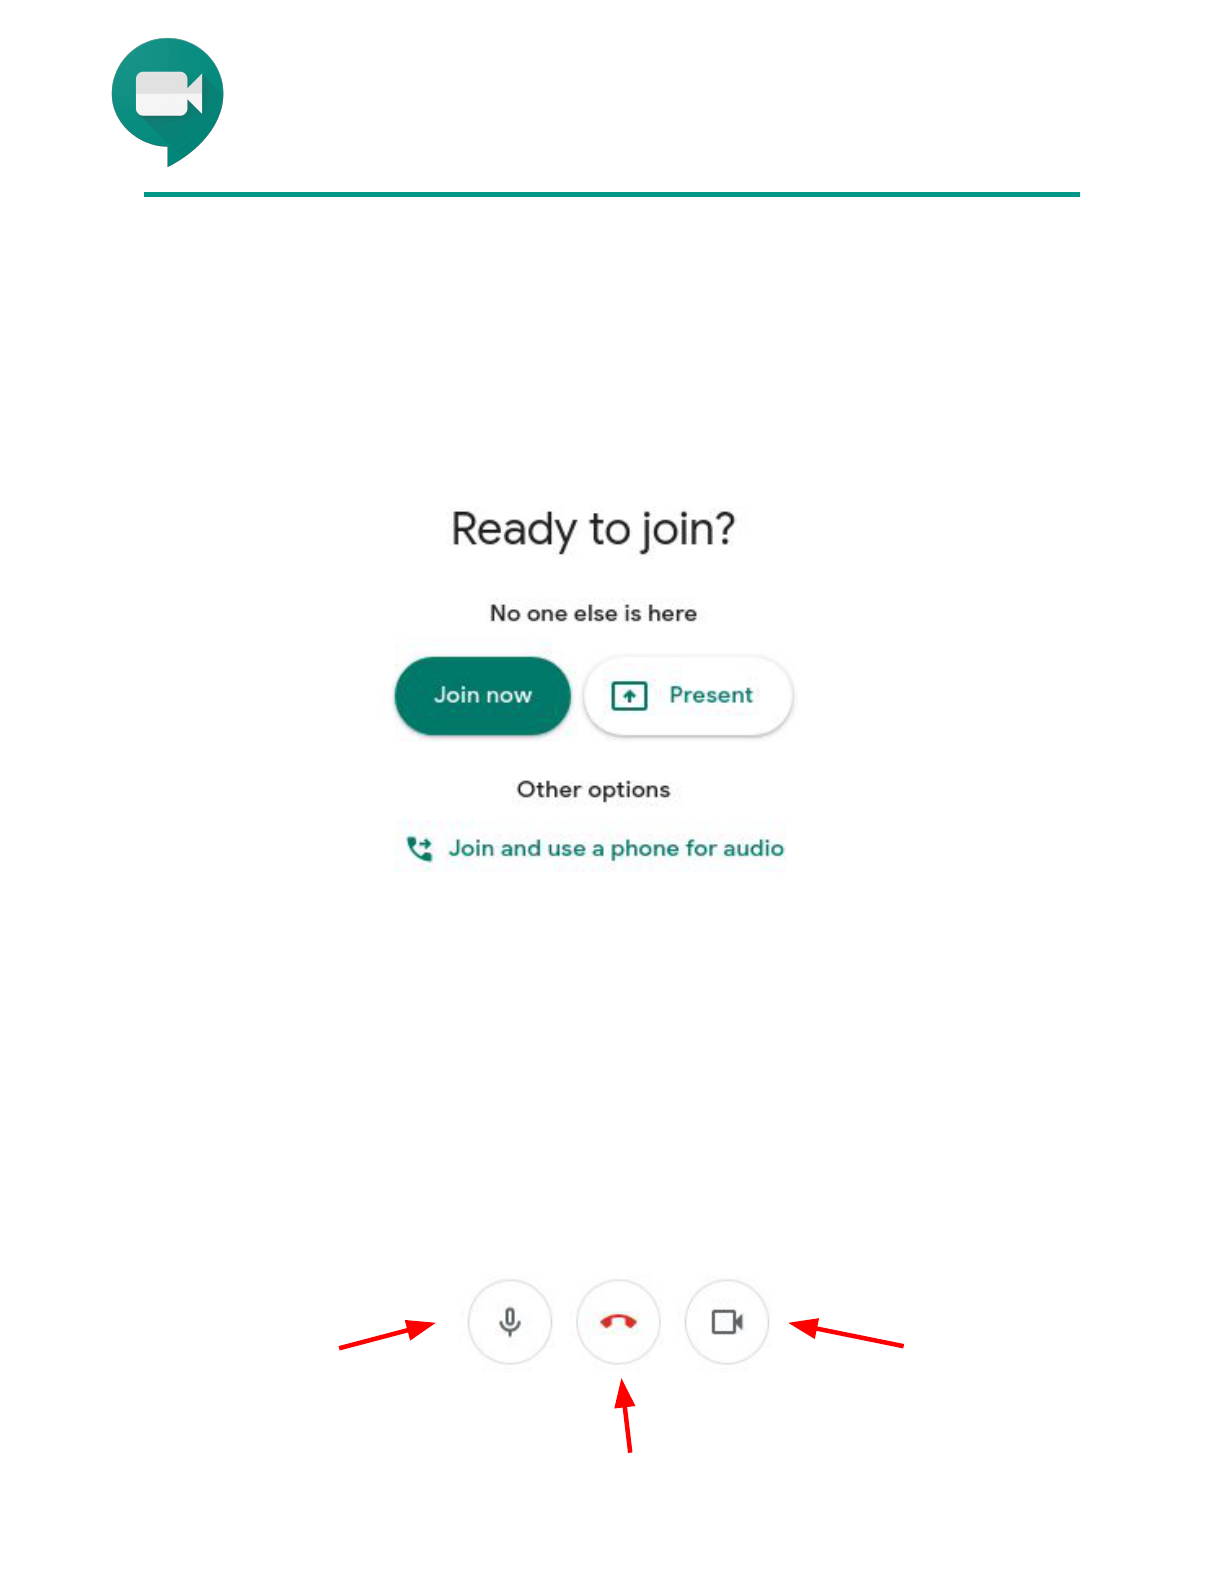
To join a Meet, click on the link provided by the host and then
click on the “Join now” button.
Joining a Google Meet
Once you have joined the meeting you will see 3 buttons
along the bottom of the screen. You can hover your cursor
at the bottom of the screen anytime to get these buttons to
reappear.
Toggle to mute or
activate your
microphone
Leave the meeting
Toggle to turn your
webcam on or off
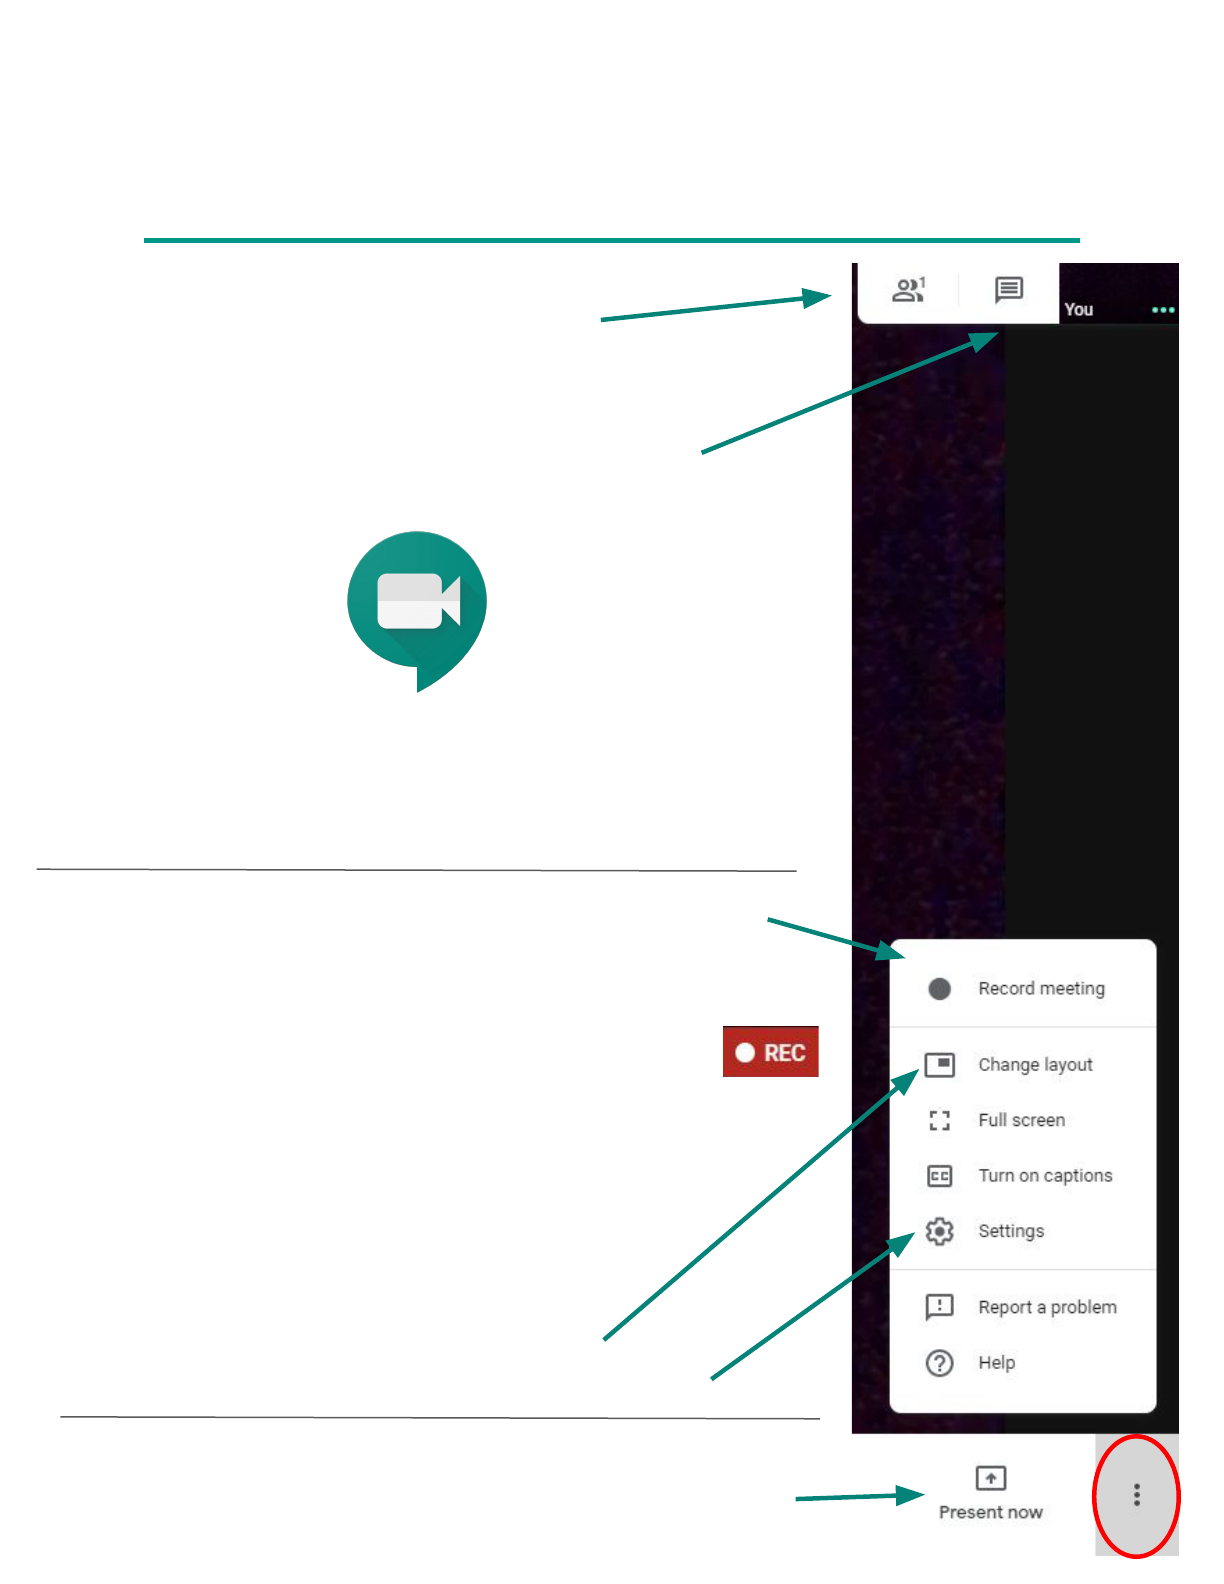
Using Google Meet Features
during a Video Call
See who is connected
Chat with those who are connected
Record a meeting to be viewed at a later time
Make sure everyone knows you are going to
record before clicking on “accept” in the
consent window. It may take a few seconds for the
recording to begin. You will know it has started when
you see “REC” icon in the upper left corner. Click
the 3 dots again to stop the recording. The
recording is saved to a “Google Recordings” folder
in your Google Drive and can be shared with a link
in the “Share” settings found when you click on the
3 dots of the saved video window.
Change the layout of your screen
Settings for your microphone and webcam
Present your entire screen or just one window
Click the 3 dots in the lower right hand
corner of the screen to display this menu.
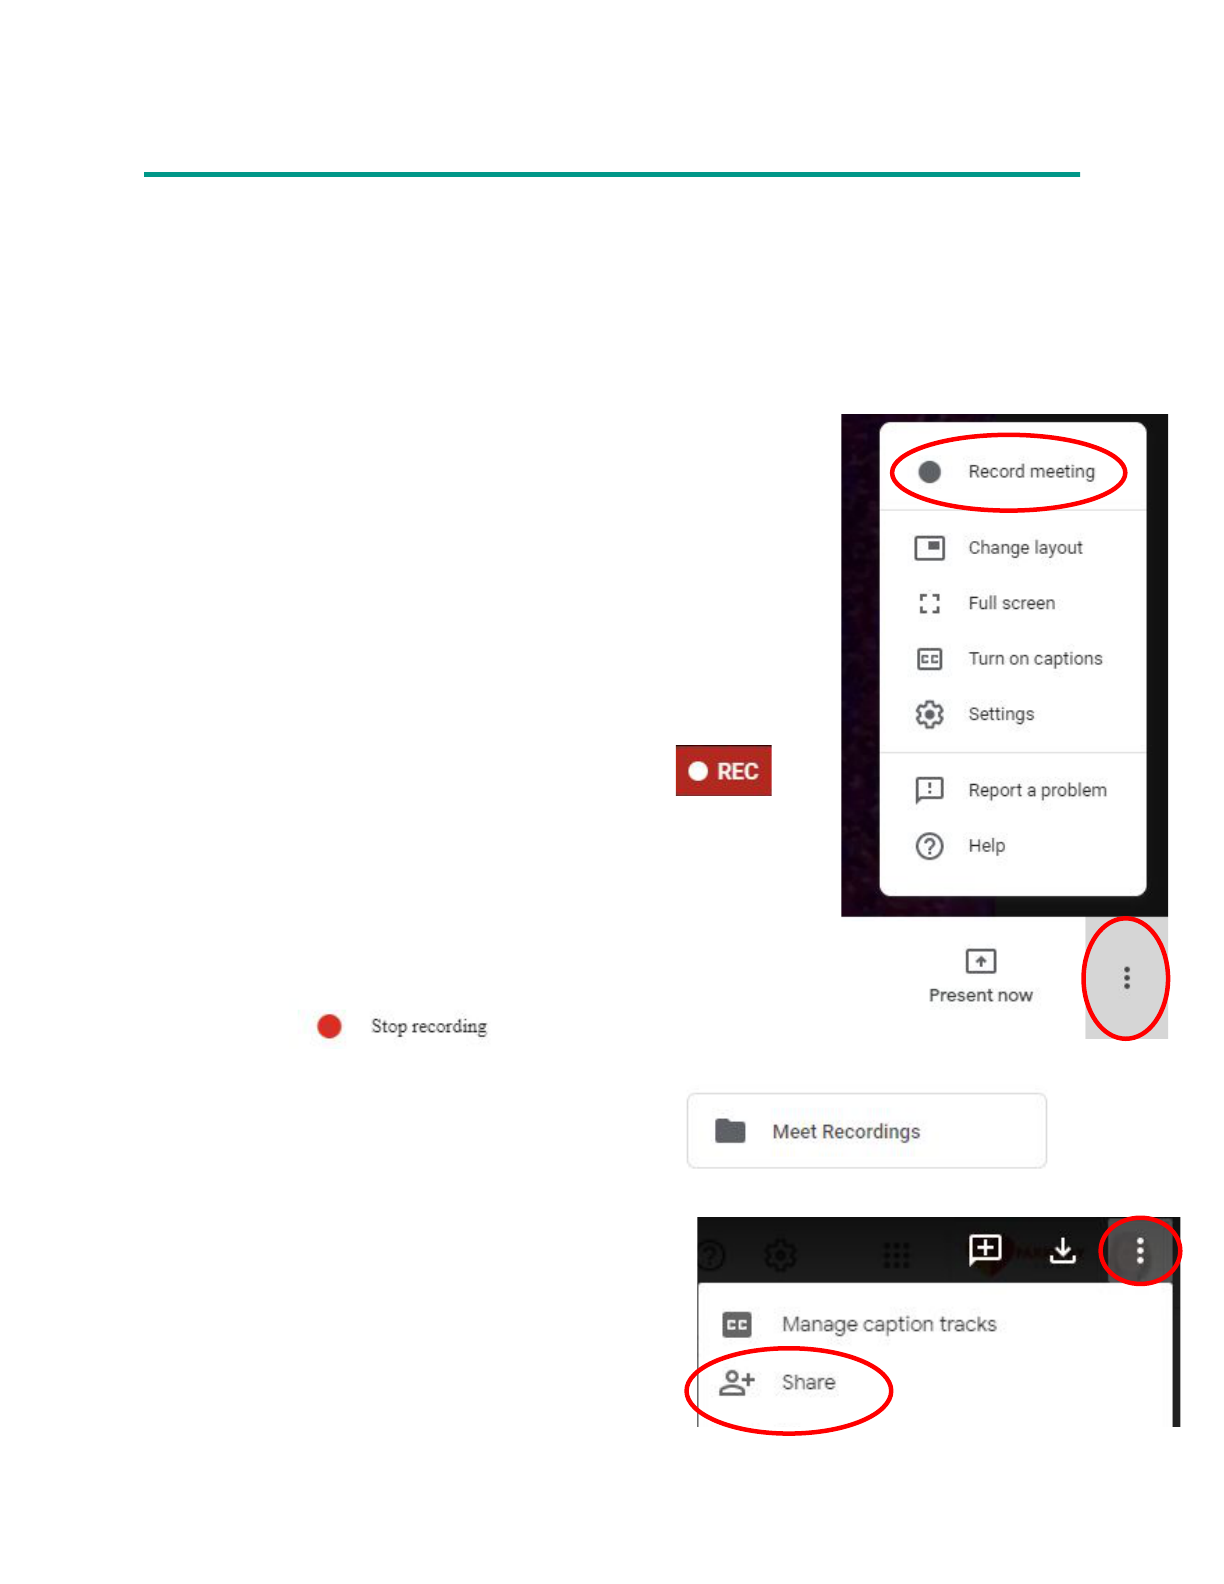
Record a Google Meet
1
2
In Google Meet you can record a video call to be viewed at a later time. The recording
automatically saves to a folder in your Google Drive that is created the first time you
record a meeting. The folder is called “Meet Recordings.” You can share your
recorded meet from the share settings in Google Drive.
1. Click on the 3 dots in the lower right corner
of your Google Meet.
2. Click on the Record Meeting option at the
top of the list.
3. To stop the recording, click on the 3 dots in
the lower right again and select “Stop
Recording” at the top of the list.
4. The recording will automatically save to
your Google Drive in a folder that is
created the first time you record a Meet.
It is called “Meet Recordings.”
Make sure everyone knows you are
going to record before clicking on
“accept” in the consent window. It
may take a few seconds for the recording
to begin. You will know it has started
when you see “REC” icon in the upper
left corner.
5. After opening the video in your Google
Drive, click on the 3 dots in the upper
right hand corner and select “Share.”
To share, go to Google Drive:
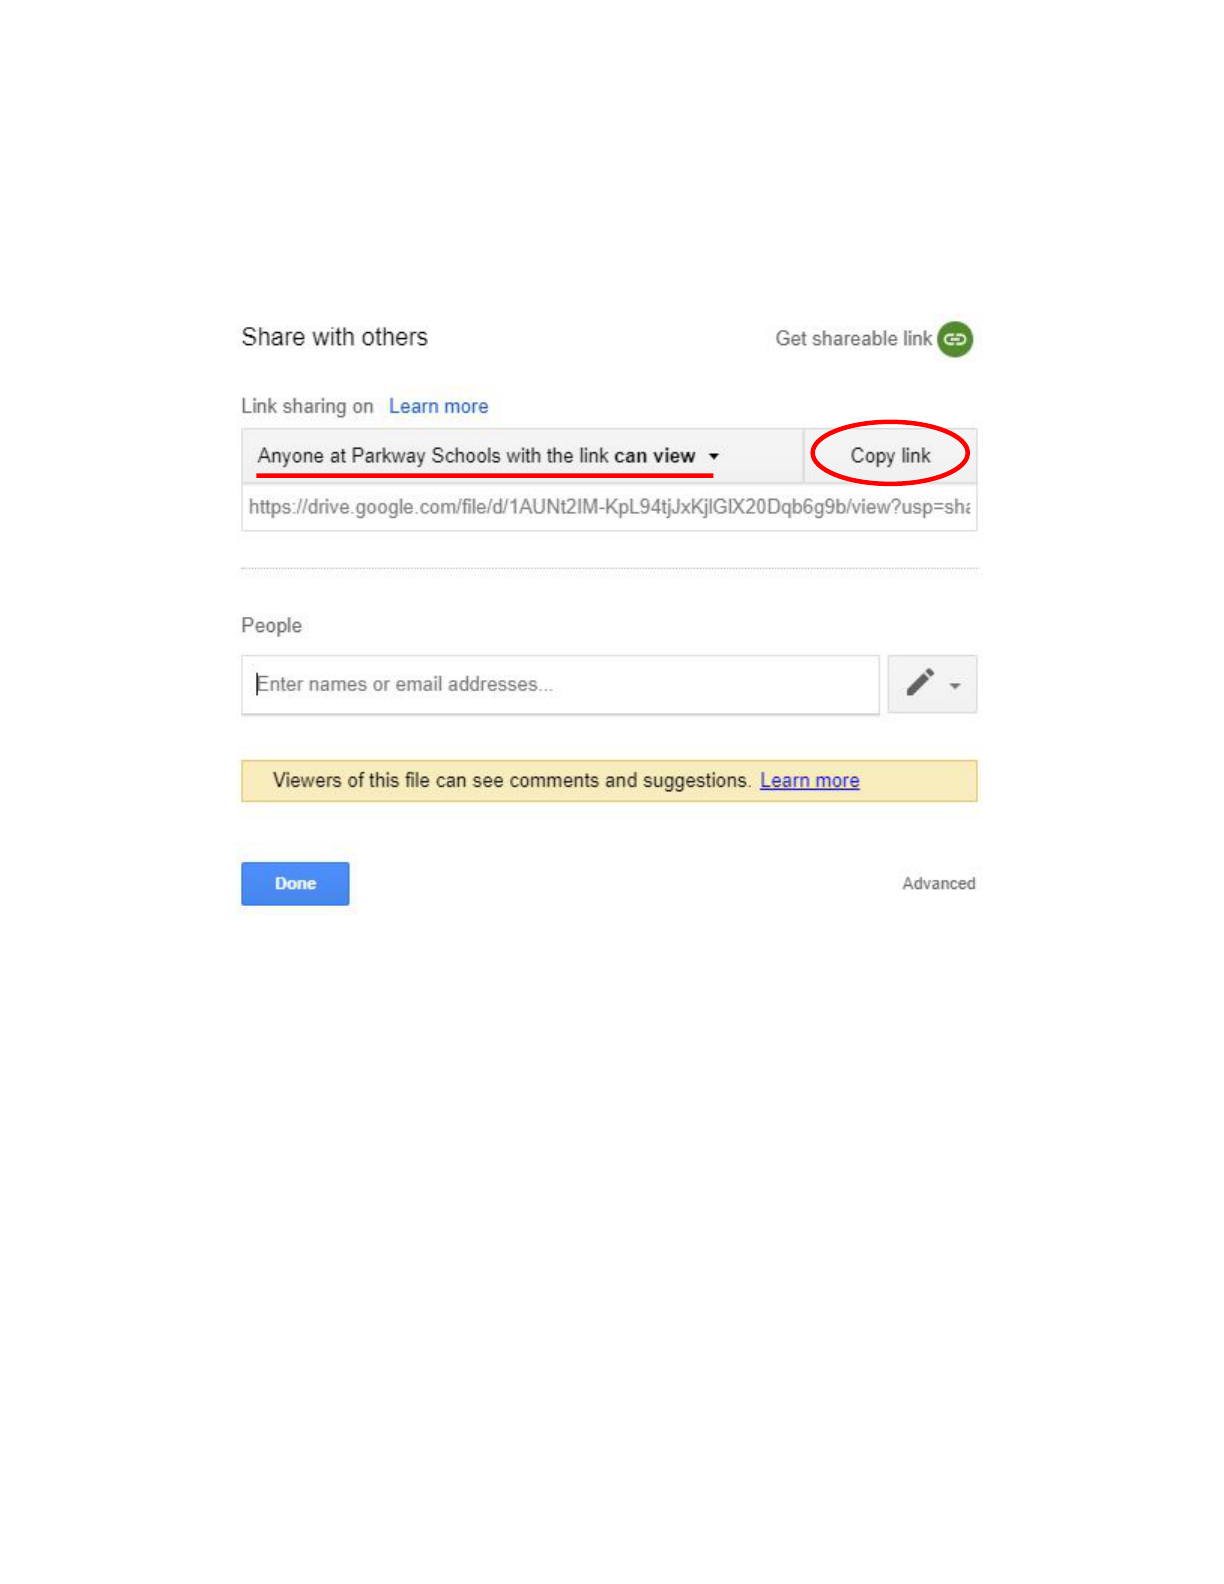
6. In the share window, make sure “Anyone at Parkway Schools with
the link can view” is selected and click on “copy the link” to share
with students.
Protecting Student Privacy:
When you do a recording in Google Meet, be sure that you know which
students are able to be recorded and which are not. If a student cannot be
recorded, they can simply be instructed to turn off their camera but still
participate in the Meet.
When sharing your recording, be aware of copyright and conscious of
where you post your video. Linking to the video in Schoology or sharing
directly is your best option.
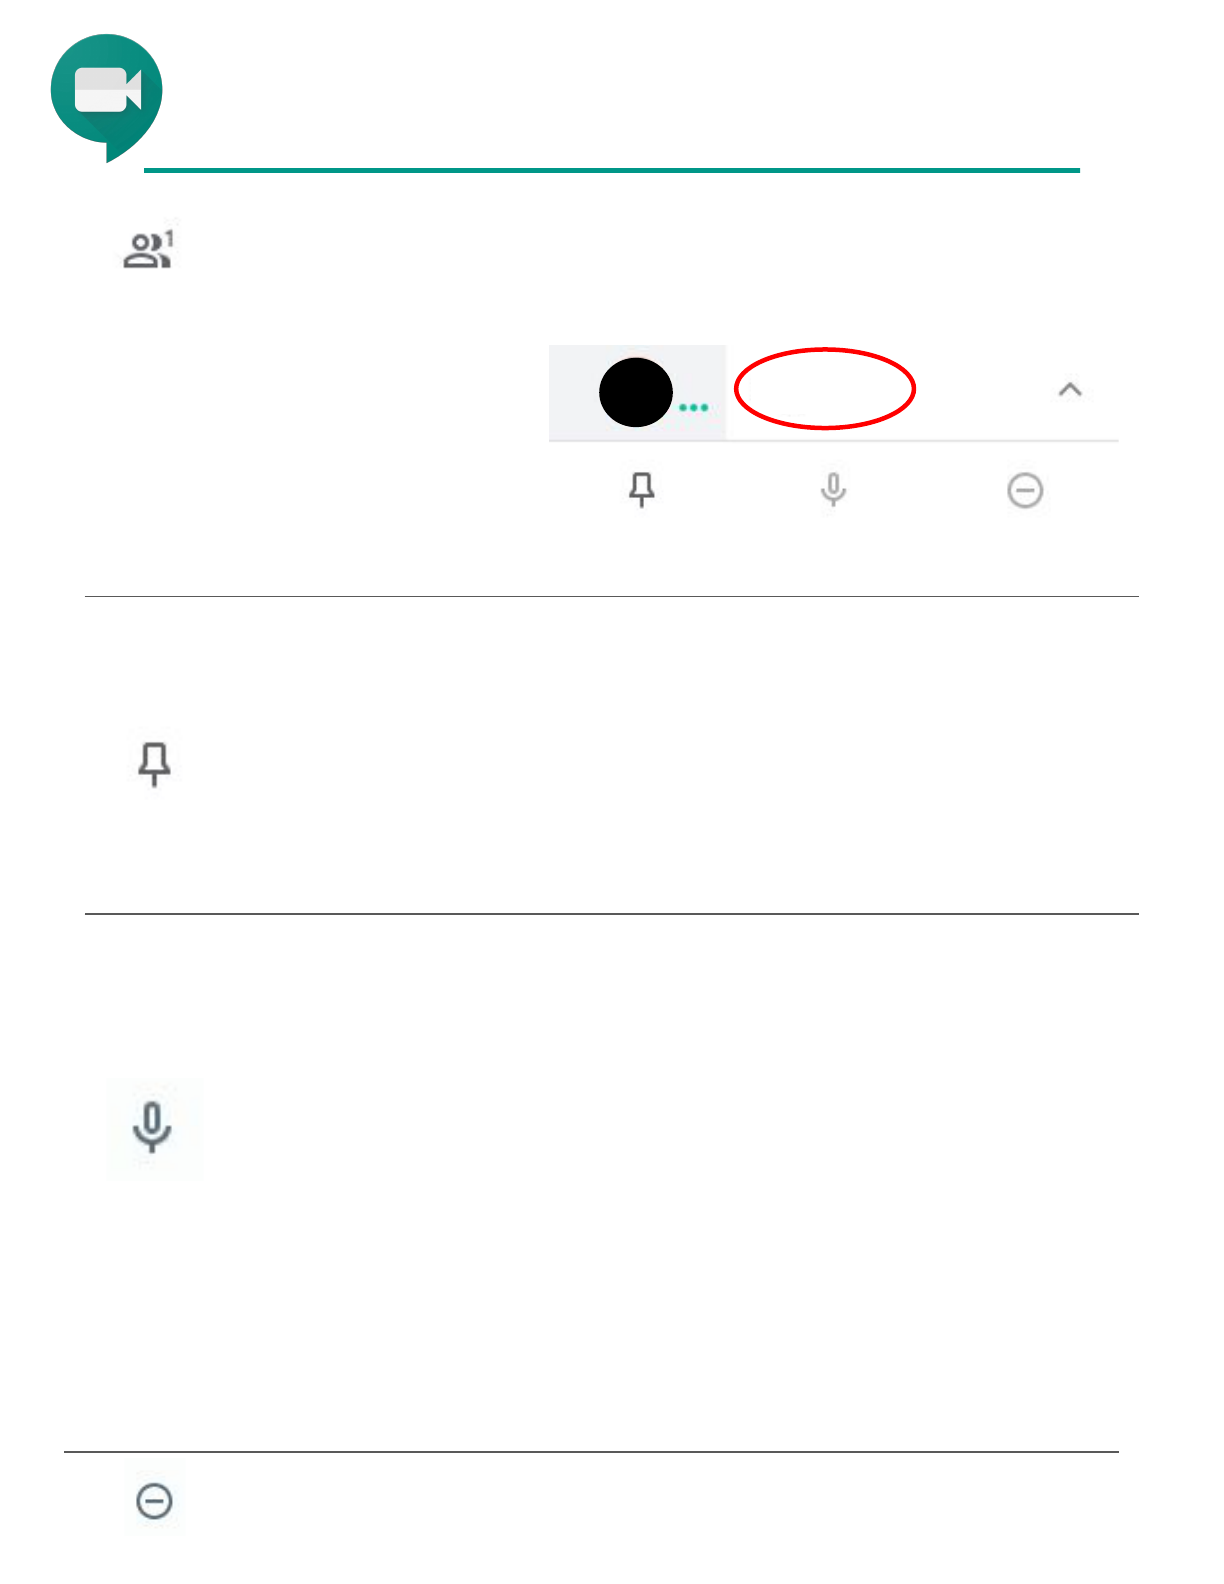
Pin, Mute and Remove Features
Only the host can mute other people. Note: once a
Meet has 5 participants, anyone who joins after will
be automatically muted.
Mute Tips:
● For privacy reasons, you cannot unmute
another person. Ask the participant to unmute
their audio.
● To mute or unmute yourself, at the bottom of the
video window click Mute.
Anyone can pin another person. When you “pin”
someone, your view will not change based on who it
talking. The pin feature only applies to your own
screen and will not affect others. Click the pin again
to unpin.
Only the host can remove participants.
In the “people” tab of Google Meet, click on a name
to get the option to pin, mute, or remove that person.
Note: If you click on a
picture it will automatically
pin the person. Warn
students of this also. Click
again to unpin.
Name
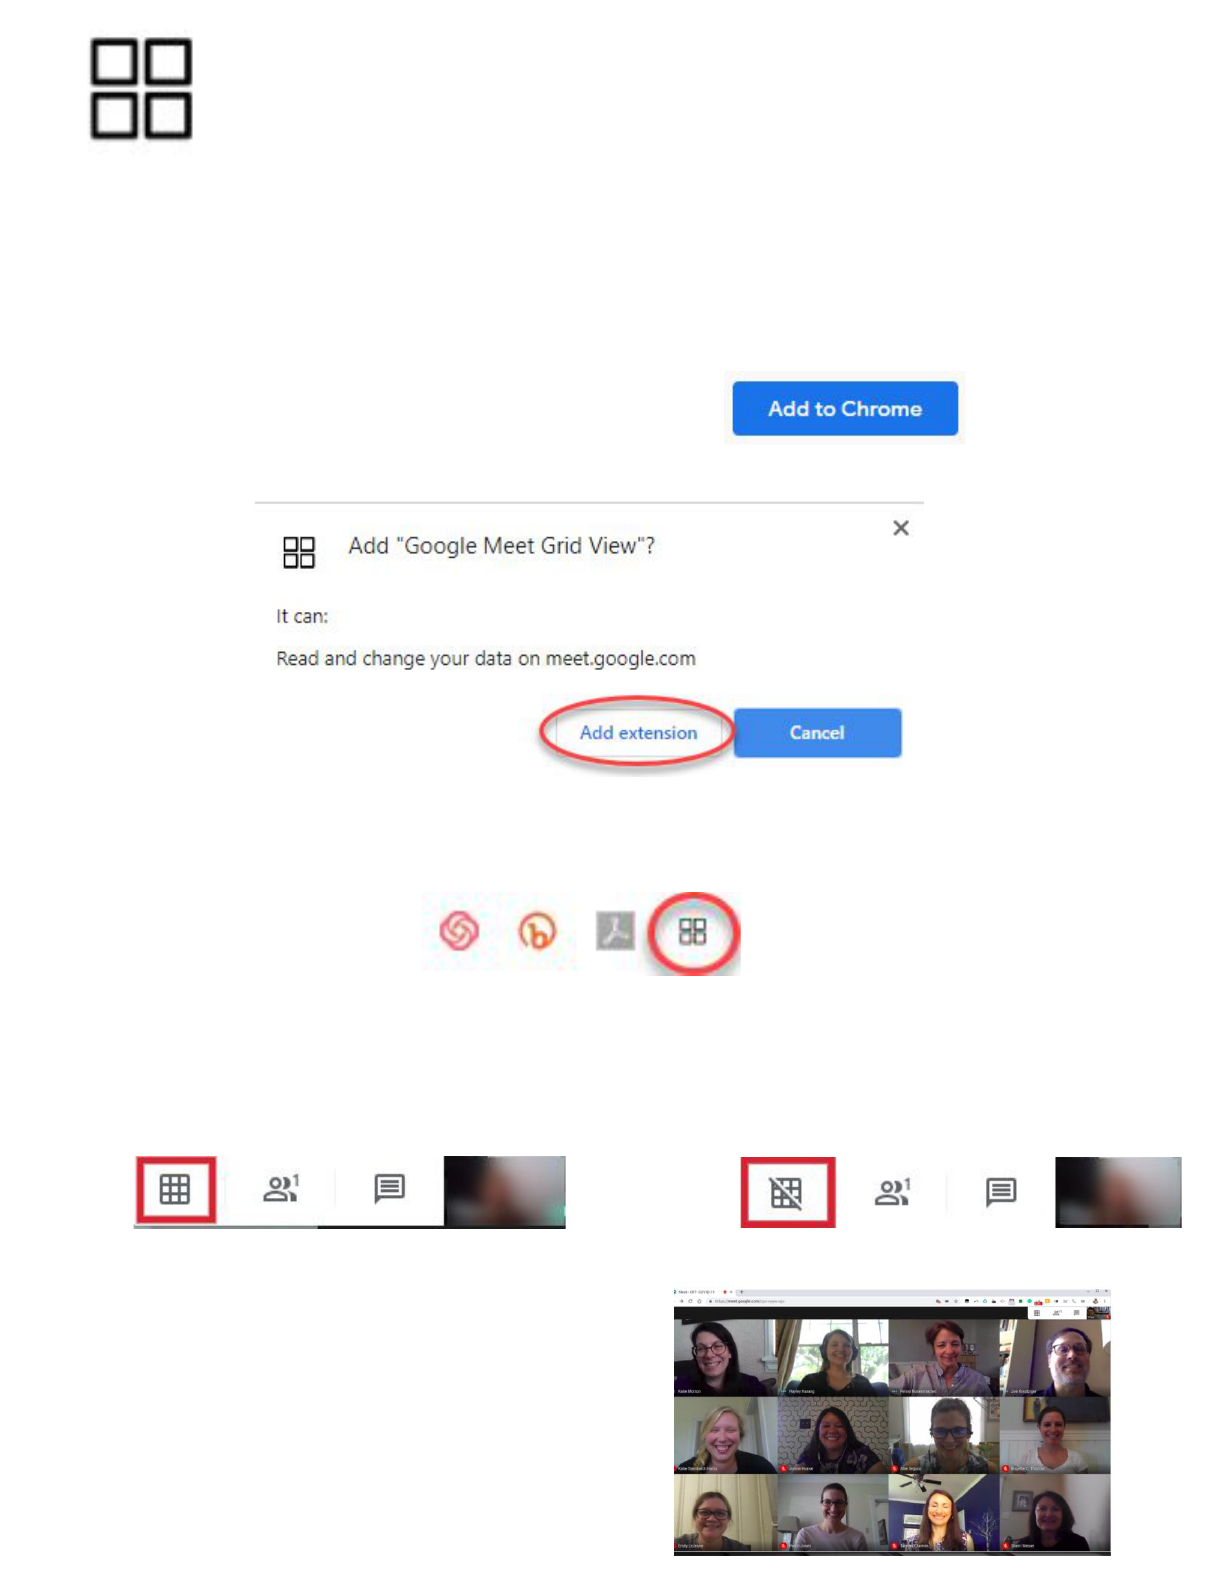
Using the Google Meet Grid View
Extension for Google Chrome
1. Click on or type in bit.ly/gmgridview in Chrome
2. Click on the “Add to Chrome” button.
Note: You must use the Chrome Browser. This tool does not work on tablets or mobile
devices. Steps 1-3 only have to be done once. This extension has been pushed out to
Parkway Student Google accounts and they should not have to install if they are logged
into Chrome with that account.
3. Click on the “Add Extension” button.
4. You will now see the Google Meet Grid View extension to
the right of your Chrome url bar.
5. In a Google Meet you will now see a grid button in the
upper right hand corner that toggles to turn it on or off as
you click it.
On
Off
When you turn it on you will see all
participants in a grid view.
Note: The host can mute people in
grid view.
