Google Meet
For teachers and educators
Google Meet provides a safe and secure way for educators to host video sessions with a group of
students in real-time from a computer or mobile device. Google Meet is an approved CPS tool and is in
compliance with our Acceptable Use Policies for communication between a teacher and a group of
students. However, one-to-one Google Meet video sessions between an adult and an individual student
that is not accessible to other students or staff are prohibited.
When using Google Meet, teachers and other educators should utilize the recording feature within the
tool to archive the lesson for future use. Teachers and educators should make sure all participants have
left the Google Meet session before ending the recording and closing the session. When recording a
Google Meet lesson, teachers and other educators must notify students that the lesson will be recorded
and archived for future viewing.
This guide provides step-by-step instructions on how to create and join, record, and manage
participants in a Google Meet with students.
*Please note that as we receive input from our educators and Google makes updates to better
ensure the safety of our students and educators, these instructions are subject to change and
should be reviewed frequently for new information.
Table of Contents
Getting Started with Google Meet
System Requirements
New Meet Features
Quick Access
Locking Feature
Knocking Feature
Creating a Google Meet in Classroom
Creating a Google Meet with a Nickname
Calling Participants from a Google Meet
Join a Google Meet Session
Join a Google Meet from Google Calendar
On the web
On mobile devices
1
Back to top
Join from the Google Meet Website or App
On the web
On mobile devices
Join by Phone
On the web
On mobile devices
Record a Google Meet Session
Managing Participants in Google Meet
Mute a Participant
View a Participant List
Remove a Participant
Getting Started with Google Meet
Google Meet enables teachers and other educators to host video sessions with a group of their
students. One-to-one Google Meet video sessions between a teacher and an individual student are
prohibited. However, we understand that there may be a need for exceptions to this rule. Given the
unique challenges posed by the COVID-19 public health emergency, the district is developing
exceptions for one-to-one video sessions to support student learning and afford school communities the
necessary flexibility to respond to their students’ needs. Updated guidance is forthcoming to ensure the
safety and security of students.
It is important that teachers and other educators remain in the video session until all students have left
the Google Meet before leaving the session themselves to ensure students do not continue to engage
with one another unsupervised. After the last participant leaves the Meet, wait another two minutes
before ending the session.
System Requirements
Before you create a Google Meet video session, make sure that your computer meets these system
requirements.
2
Back to top
New Meet Features
Please note that you must be logged into your CPS account and use Google Chrome as
your browser to access these features. You must be signed out of all personal Google accounts
and personal Chrome accounts. Turn off all additional Meet extensions such as Grid View and
Attendance. The following features are not yet available on iPads.
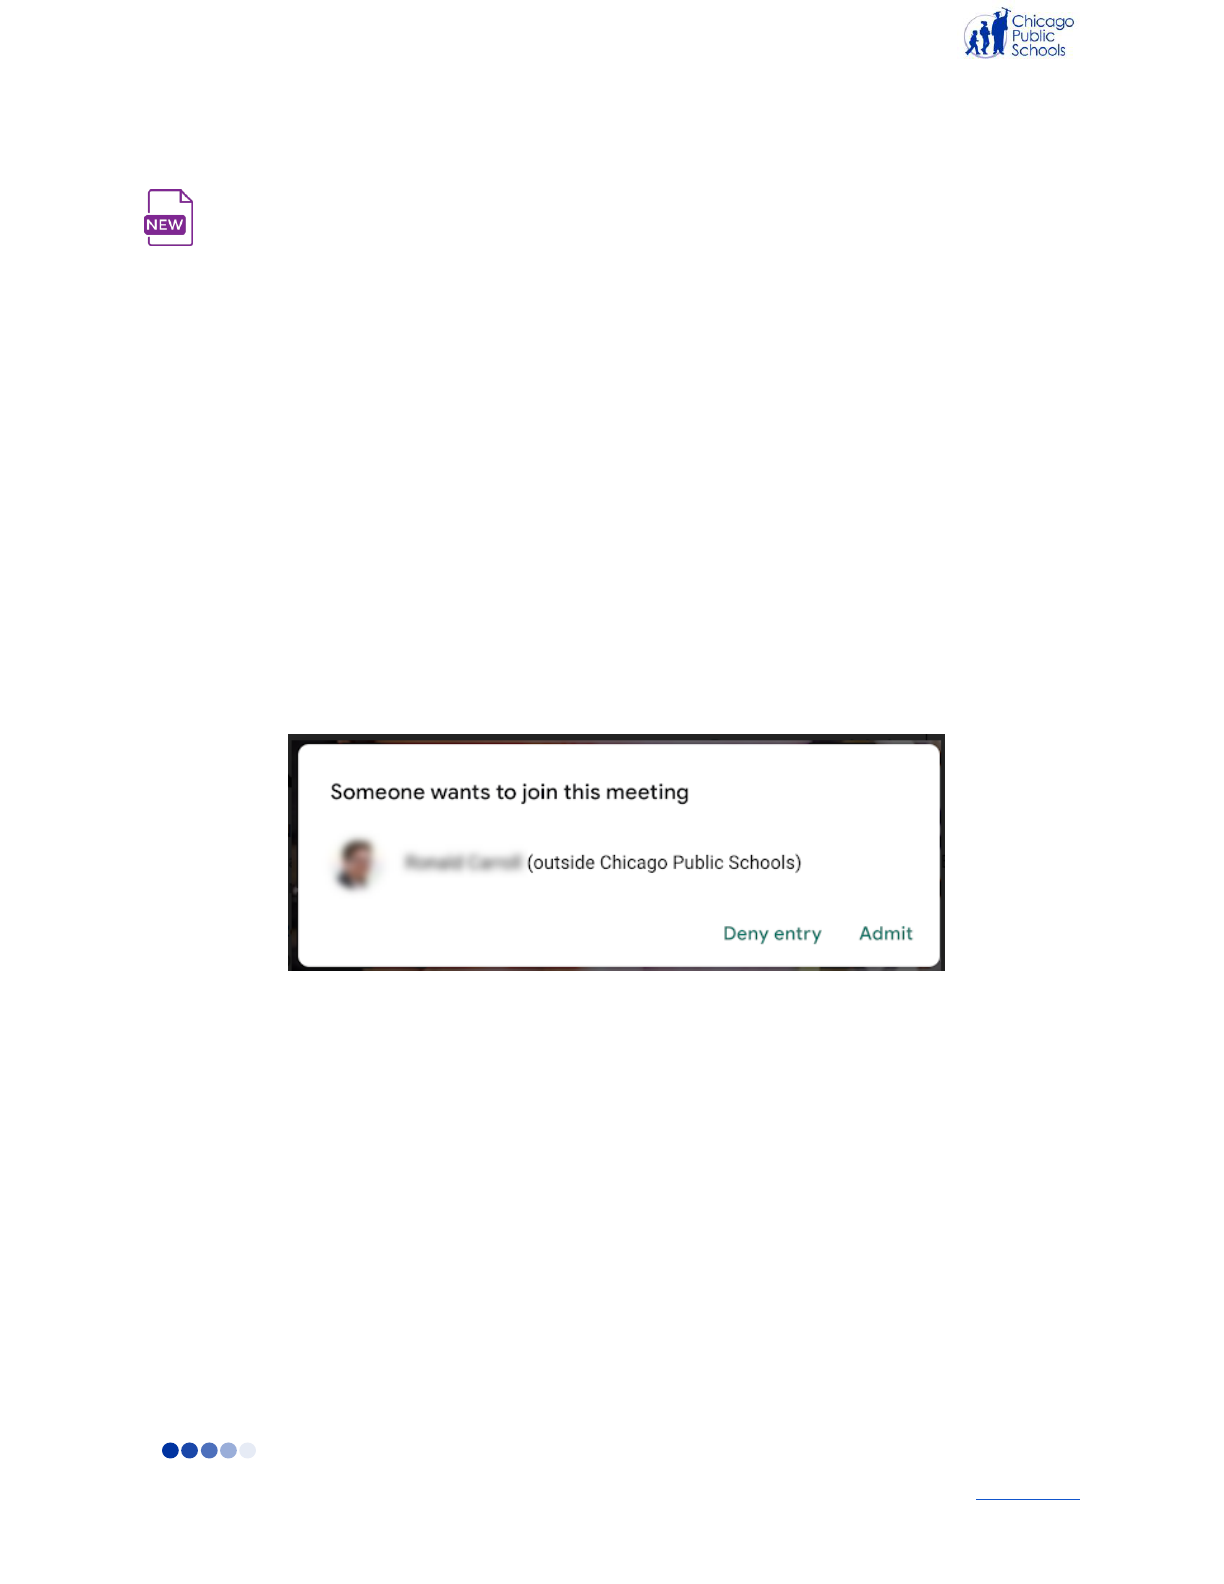
Quick Access
Turning off Quick Access provides added security by allowing you to control who is admitted
into the meeting. With this feature you can:
● Block dial-in access
● Block anonymous joining
● Restrict dial-out access to the teacher/moderator only
● Create a “waiting room” for students until the teacher/moderator joins
■ Students will be unable to join until the host admits them into the Meet session.
NOTE: The message may indicate that the participant is outside of CPS even if
they are logged in to their CPS account. See image below.
Locking Feature
You can use the locking feature to control who can access a Google Meet and how they are
able to participate. With this feature you can:
● Lock the chat feature to the teacher/moderator only
● Lock presenting mode to the teacher/moderator only
Knocking Feature
With this feature, you can require users to knock if they aren’t on the calendar invite and join by
phone. Additional functionality includes:
● The ability to block a user after they are ejected
● The ability to automatically block a user after two knock denials
3
Back to top
Creating a Google Meet in Classroom
When you generate a Meet link in your class, a unique video meeting link is created and students use
the link to join your class Meet session. Only the teacher can create, hide, start or reset the meeting link
for your class and start the Meet. Teachers should make sure all other participants have left the Meet
then wait another two minutes before exiting the session themselves to prevent students from being able
to rejoin the Meet without a teacher present.
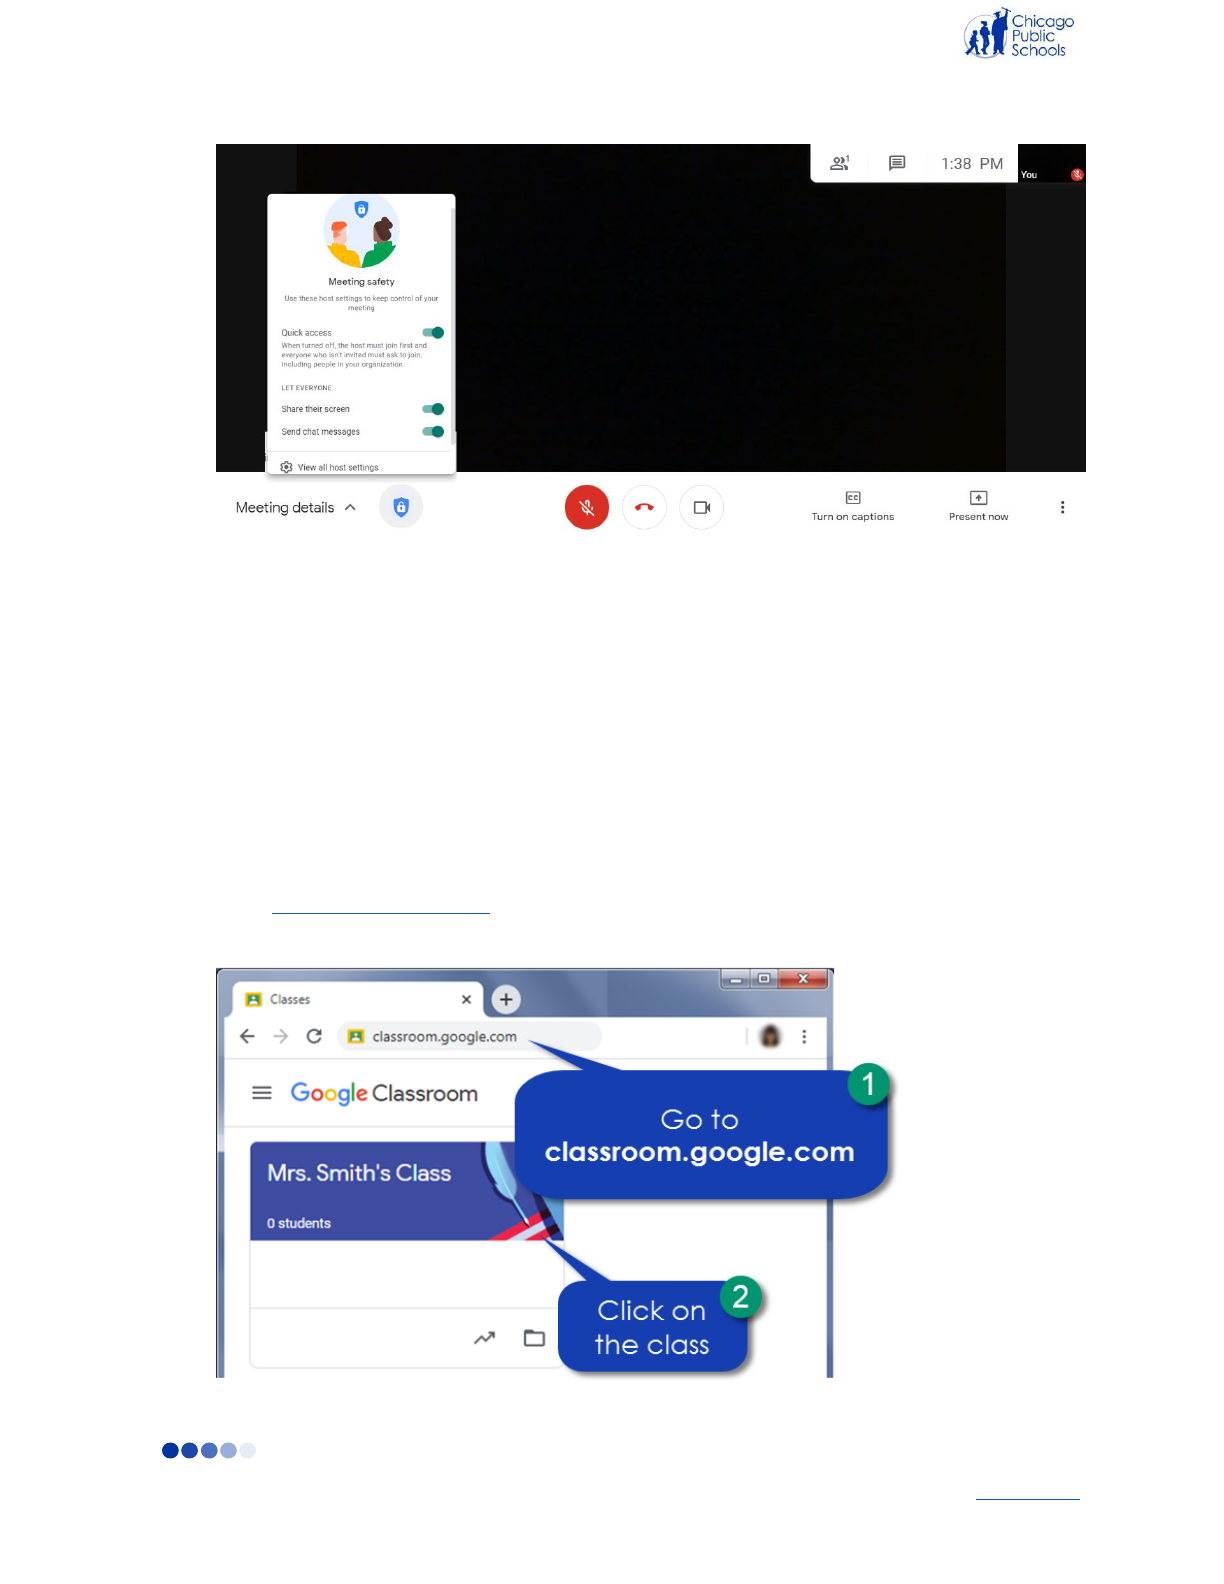
1. Go to classroom.google.com.
2. Click on the class.
3. Click Settings (gear icon).

4
Back to top

5
Back to top
4. Under General, click Generate video call link to create a unique Meet link.
5. Tap Save.
6. Share the Meet link by toggling the Visible to students button on or clicking on the drop down
menu and selecting Copy to later add the link to an Classroom assignment or question or in
Calendar.
NOTES:
● Students will be able to see the link on the Stream page of your class when you toggle
the Visible to students button on.
● You can add the copied link to an Assignment or Question on the Classwork page.
● If you have issues with the link or believe the Meet has been compromised, you can
reset it and get a new one by selecting Reset in the drop down menu of the link. After
you reset the link, the old link no longer works.
7. Click the X to leave the Class settings.
6
Back to top
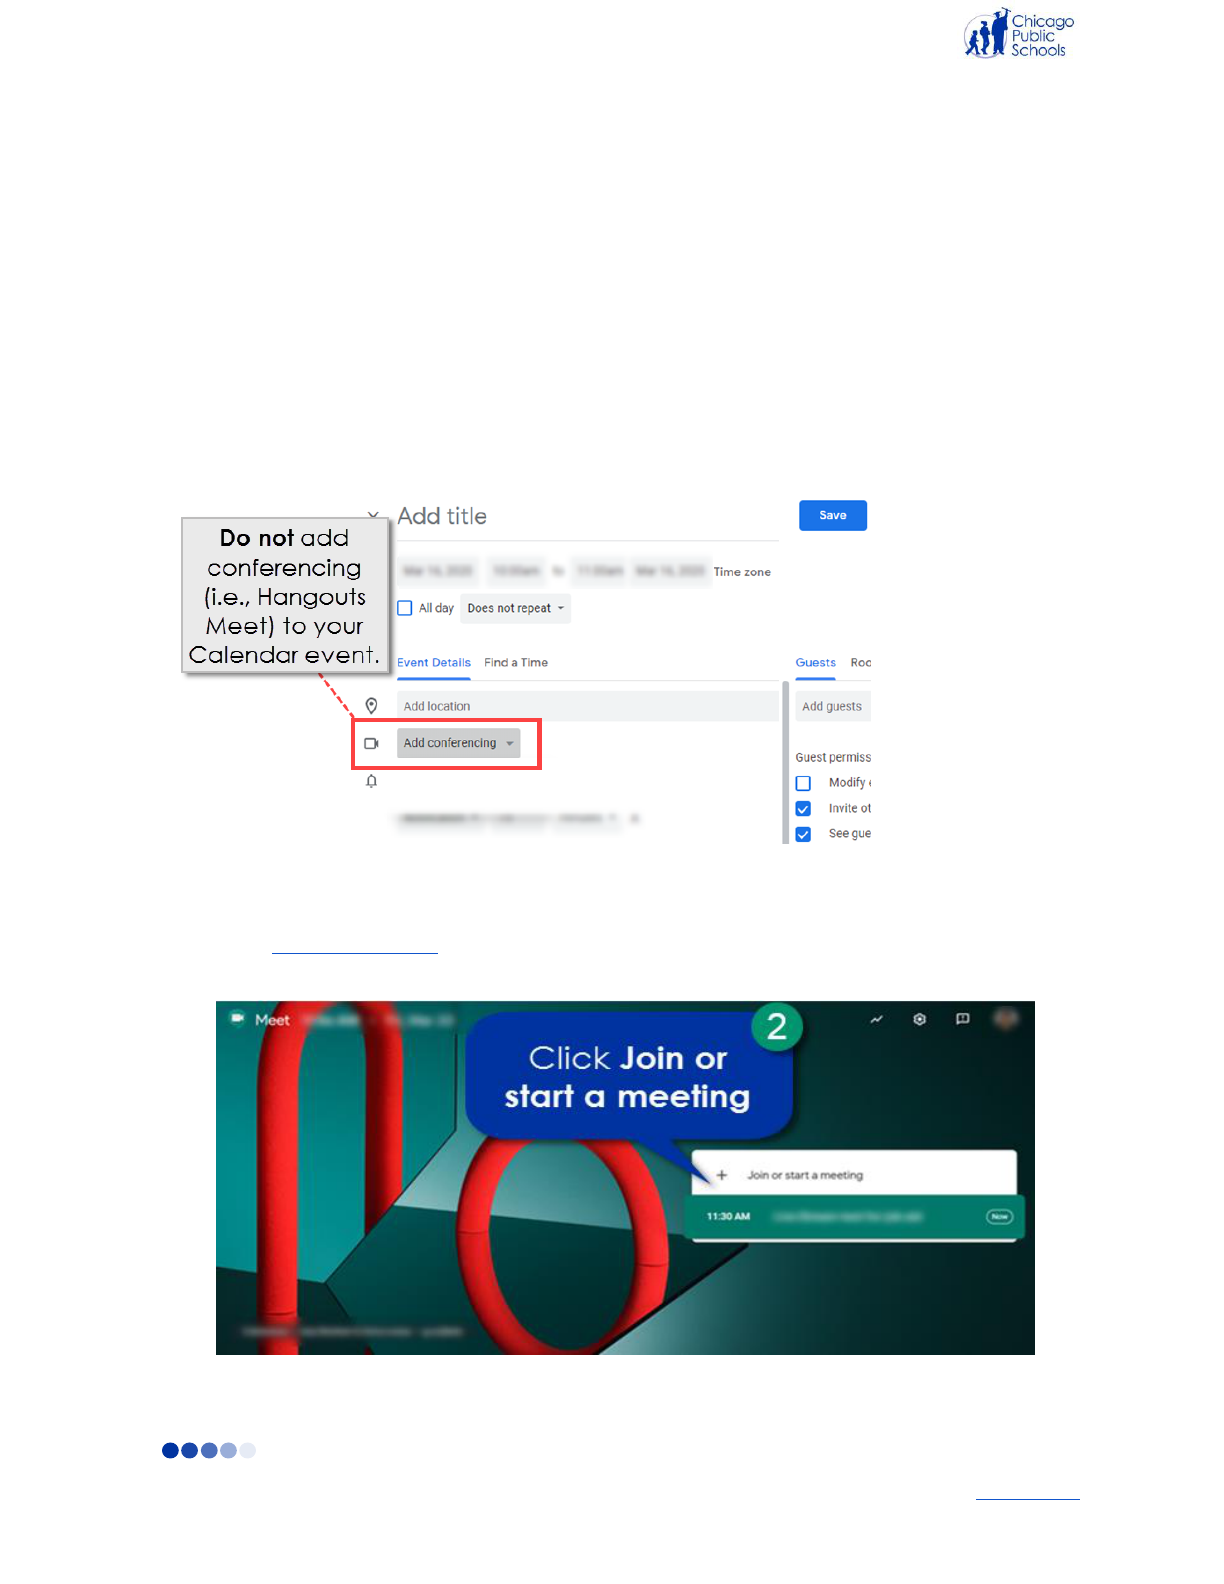
Creating a Google Meet with a Nickname
If a teacher does not use Google Classroom, they can create a Google Meet short link with a nickname
to prevent students from joining a new or old Meet without a teacher present. Teachers can share that
short link with students via email, Chat, Classroom or Calendar. Do not create an event in Calendar with
Google Meet video conferencing. Use the following short link naming convention:
● g.co/meet/[insert nickname of Meet]
○ E.g., g.co/meet/mssmithgeography
Teachers should make sure all other participants have left the Meet then wait another two minutes
before exiting the session themselves.
Follow the instructions below to create a Meet using a nickname:
1. Go to meet.google.com.
2. Click Join or start a meeting.
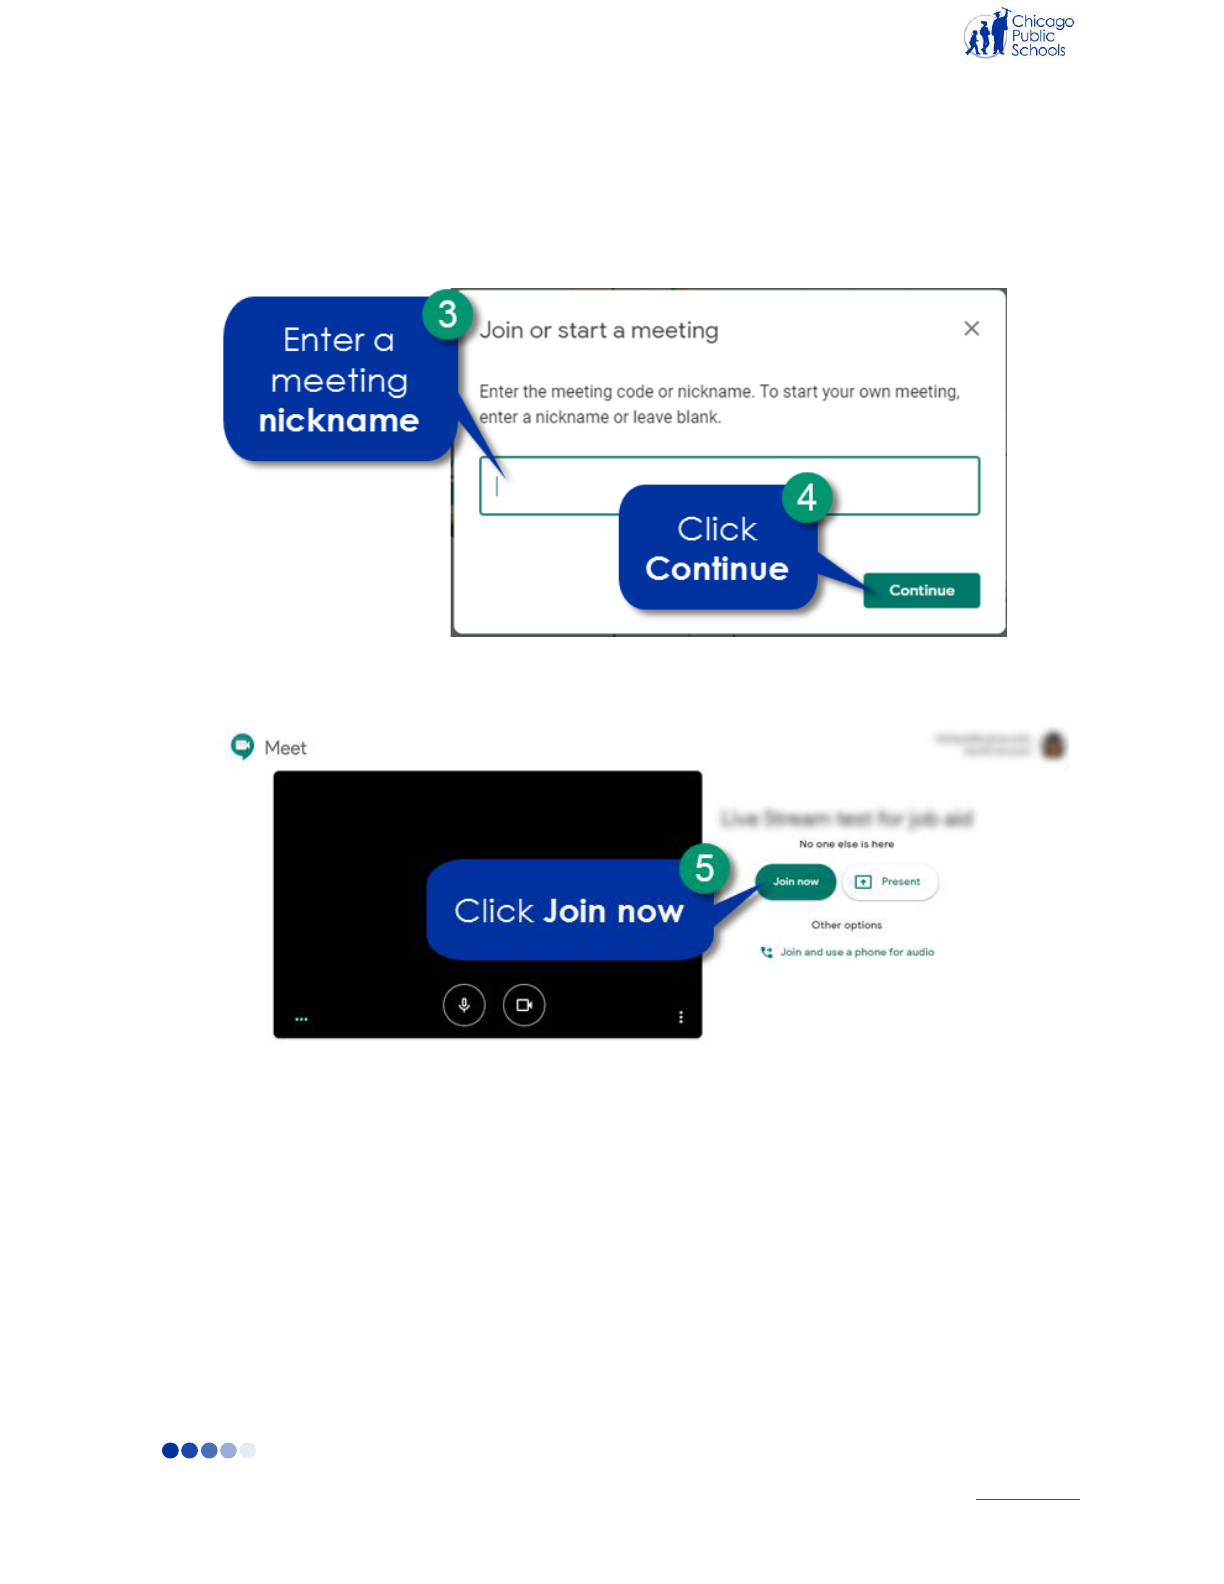
3. Give the meeting a Nickname.
7
Back to top
NOTE: You must add a nickname to the meeting in order for students to access the meeting.
E.g., MsSmithGeography
4. Click Continue.
5. Click Join Now.
8
Back to top
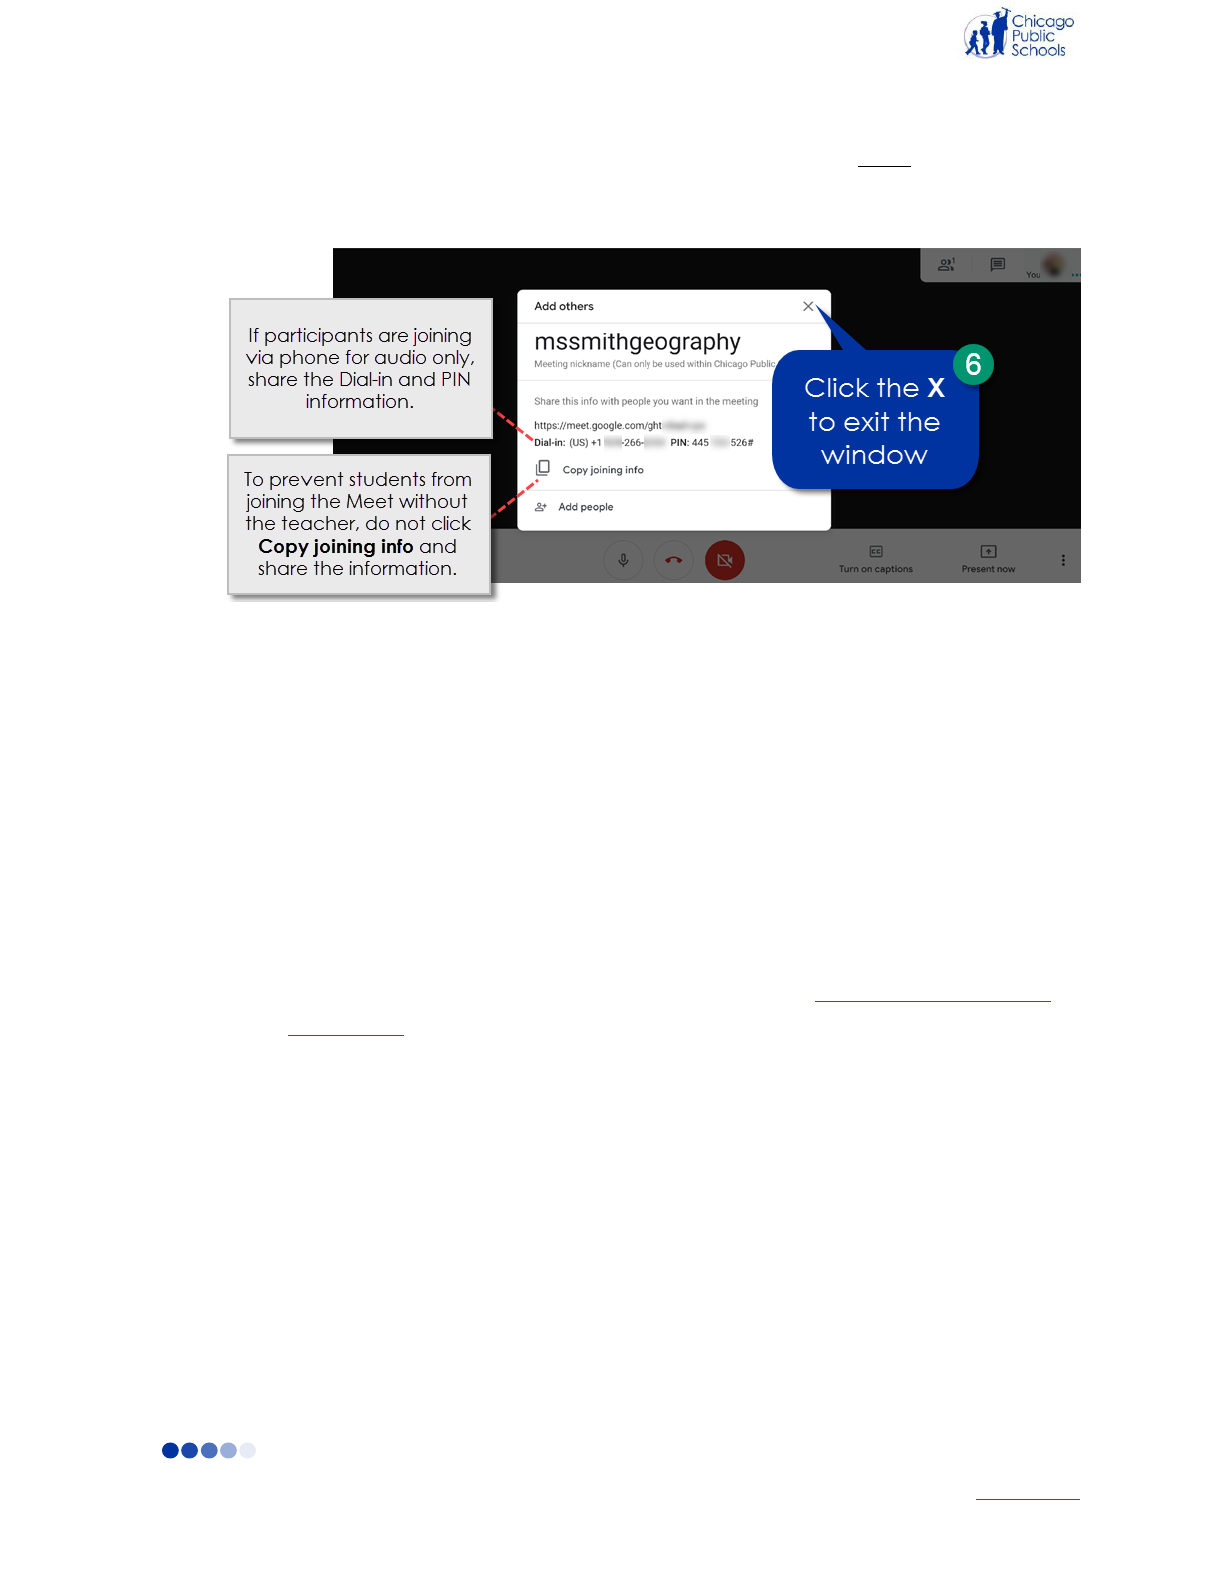
6. After you click Join now, you will see a pop-up window to Add others. Do not add participants
here. Instead, click on X to close the window.
To prevent students from joining the Meet without a teacher present, you must create a short link for the
Meet and share that short link with your students. Via email, Chat, Classroom or Calendar, send your
students the short link for the Meet using the following naming convention:
● g.co/meet/[insert nickname of Meet]
○ E.g., g.co/meet/mssmithgeography
NOTES:
● Students will be able to join the Meet without teacher supervision if you share the info
from the Copy joining info.
● Teachers and other educators can invite students and parents to a Google Meet via
phone number for audio only conferencing. Please see the Calling Participants from a
Google Meet section of this document.
9
Back to top
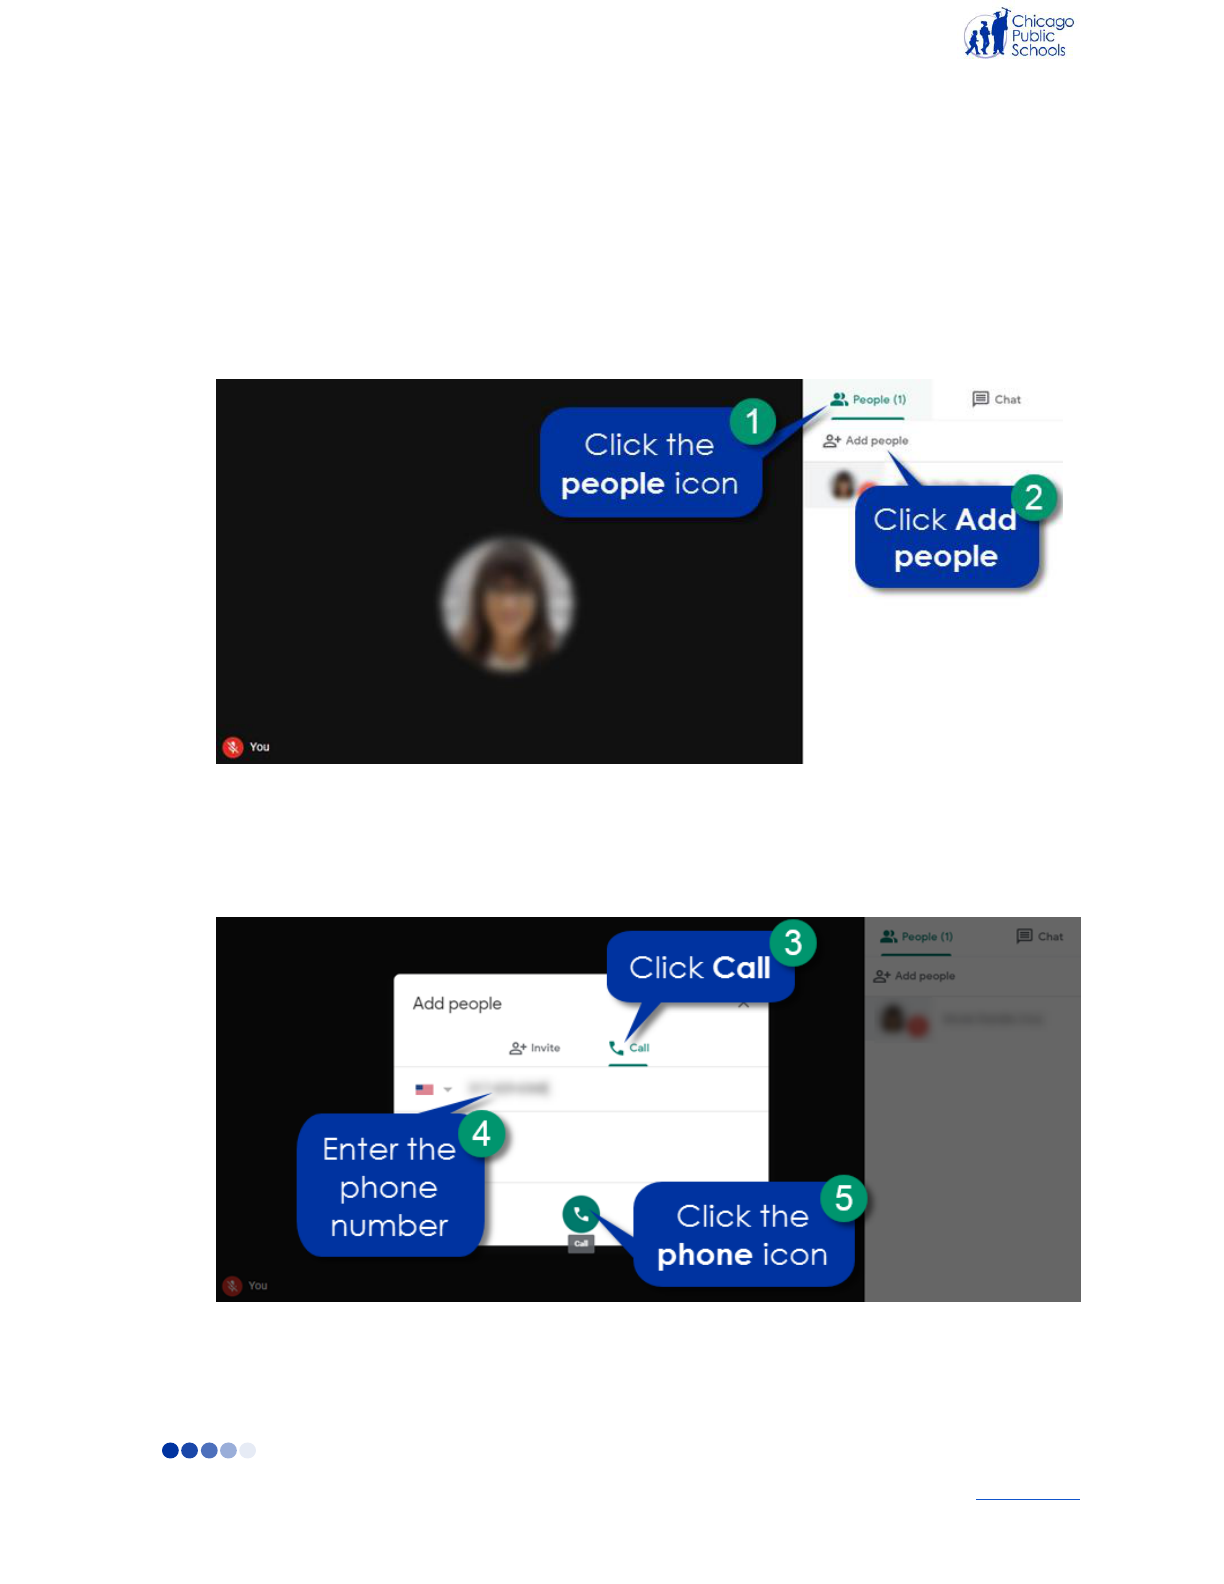
Calling Participants from a Google Meet
Teachers and other educators can invite students or parents via phone number to a Google Meet for
audio only conferencing. You should not allow users without CPS emails to join your Meet unless you
are expecting them.
1. While in the Google Meet, click the people icon.
2. Click Add people.
3. Click Call.
4. Enter the phone number.
5. Click the phone icon.

10
Back to top
NOTE: You can share the Google Meet Dial-In phone number and PIN with students and
parents who can join the Meet by calling from their own phone.
1. Click the down arrow.
2. Share the Dial-in phone number and PIN with the parent or student. Click here for
student and parent instructions for how to use the Dial-in phone number and PIN
number for audio only.
Join a Google Meet Session
Joining a Google Meet is quick and easy and can be done from a computer or mobile device. teachers
and other educators can join a Google Meet from your Google Calendar event, directly from
meet.google.com, or dial-in by phone.
Join a Google Meet from Google Calendar
Google Calendar allows teachers and other educators to view upcoming meetings and join directly from
the event.
On the web
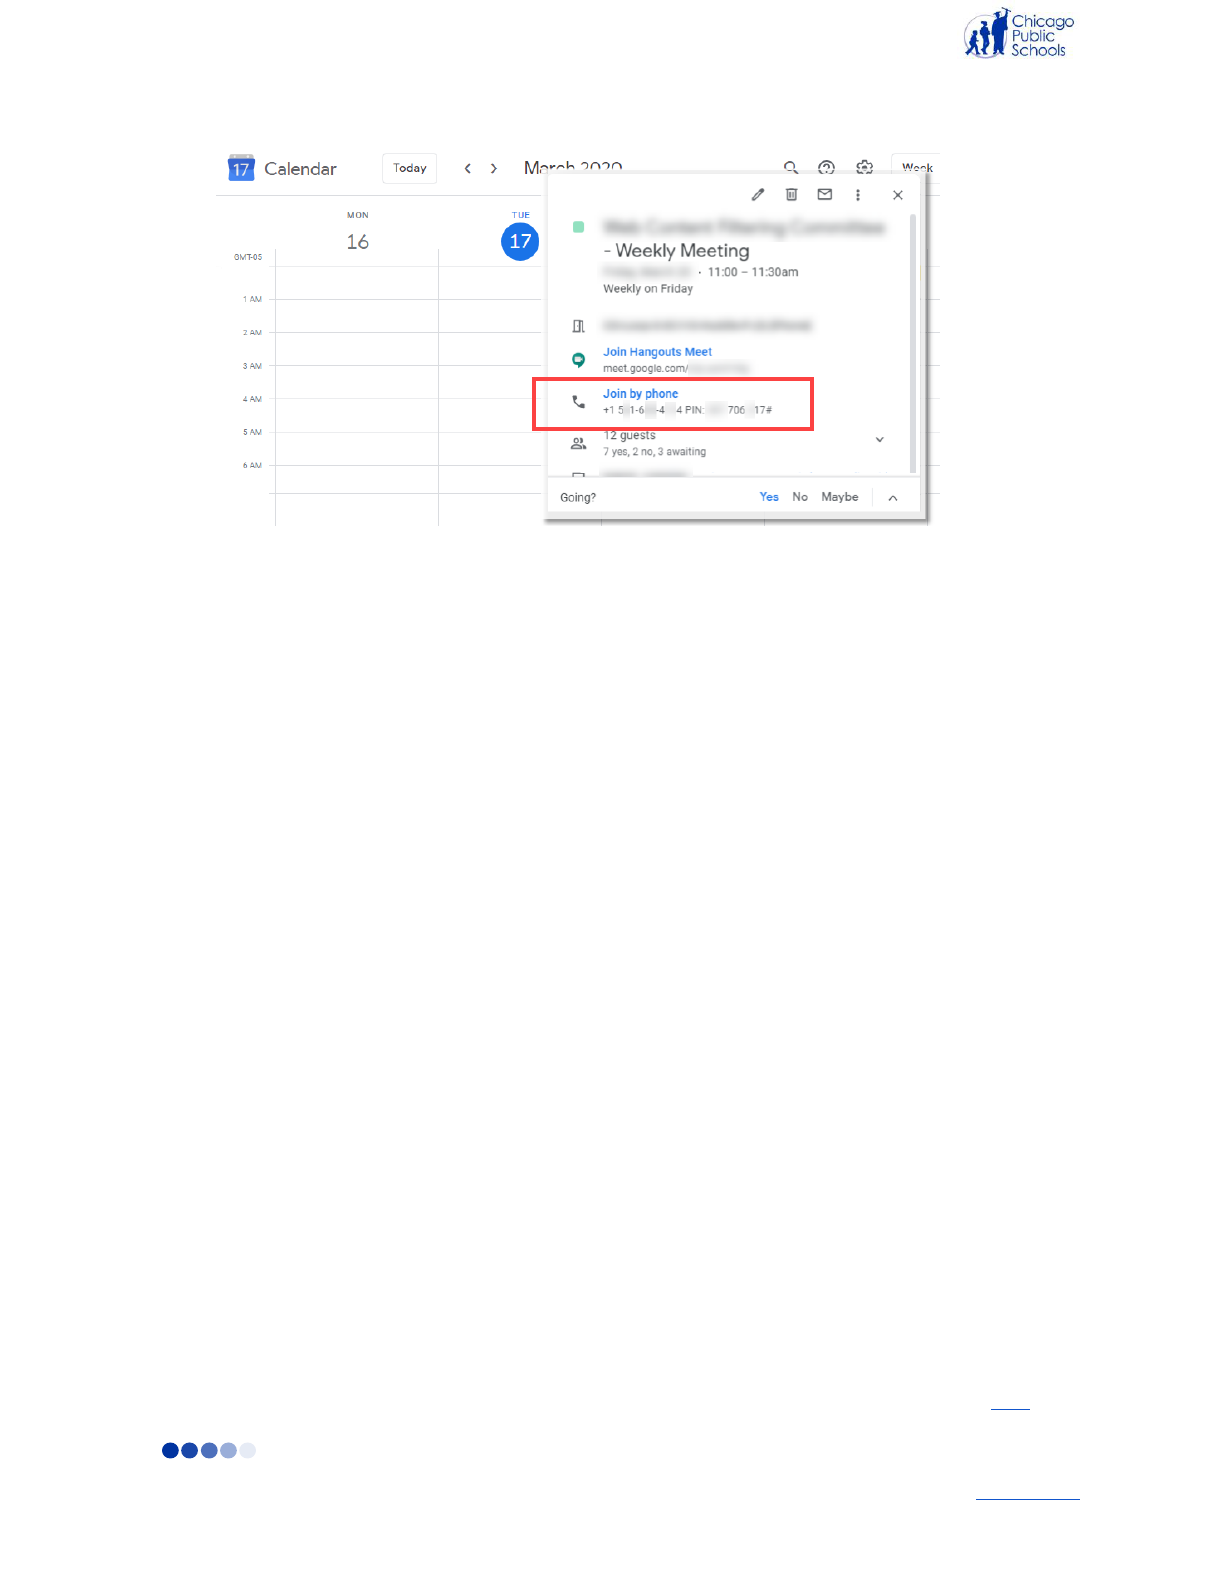
1. In Calendar, click the event you want to join.
2. Click Join Hangouts Meet.
3. Then click Join meeting.
On mobile devices
1. In Calendar, open the event you want to join.
11
Back to top
2. Tap the Join video call link.
Join from the Google Meet Website or App
On the web
1. In a web browser, go to meet.google.com.
2. Select the meeting from your list of scheduled events.
3. Click Join Meeting.
On mobile devices
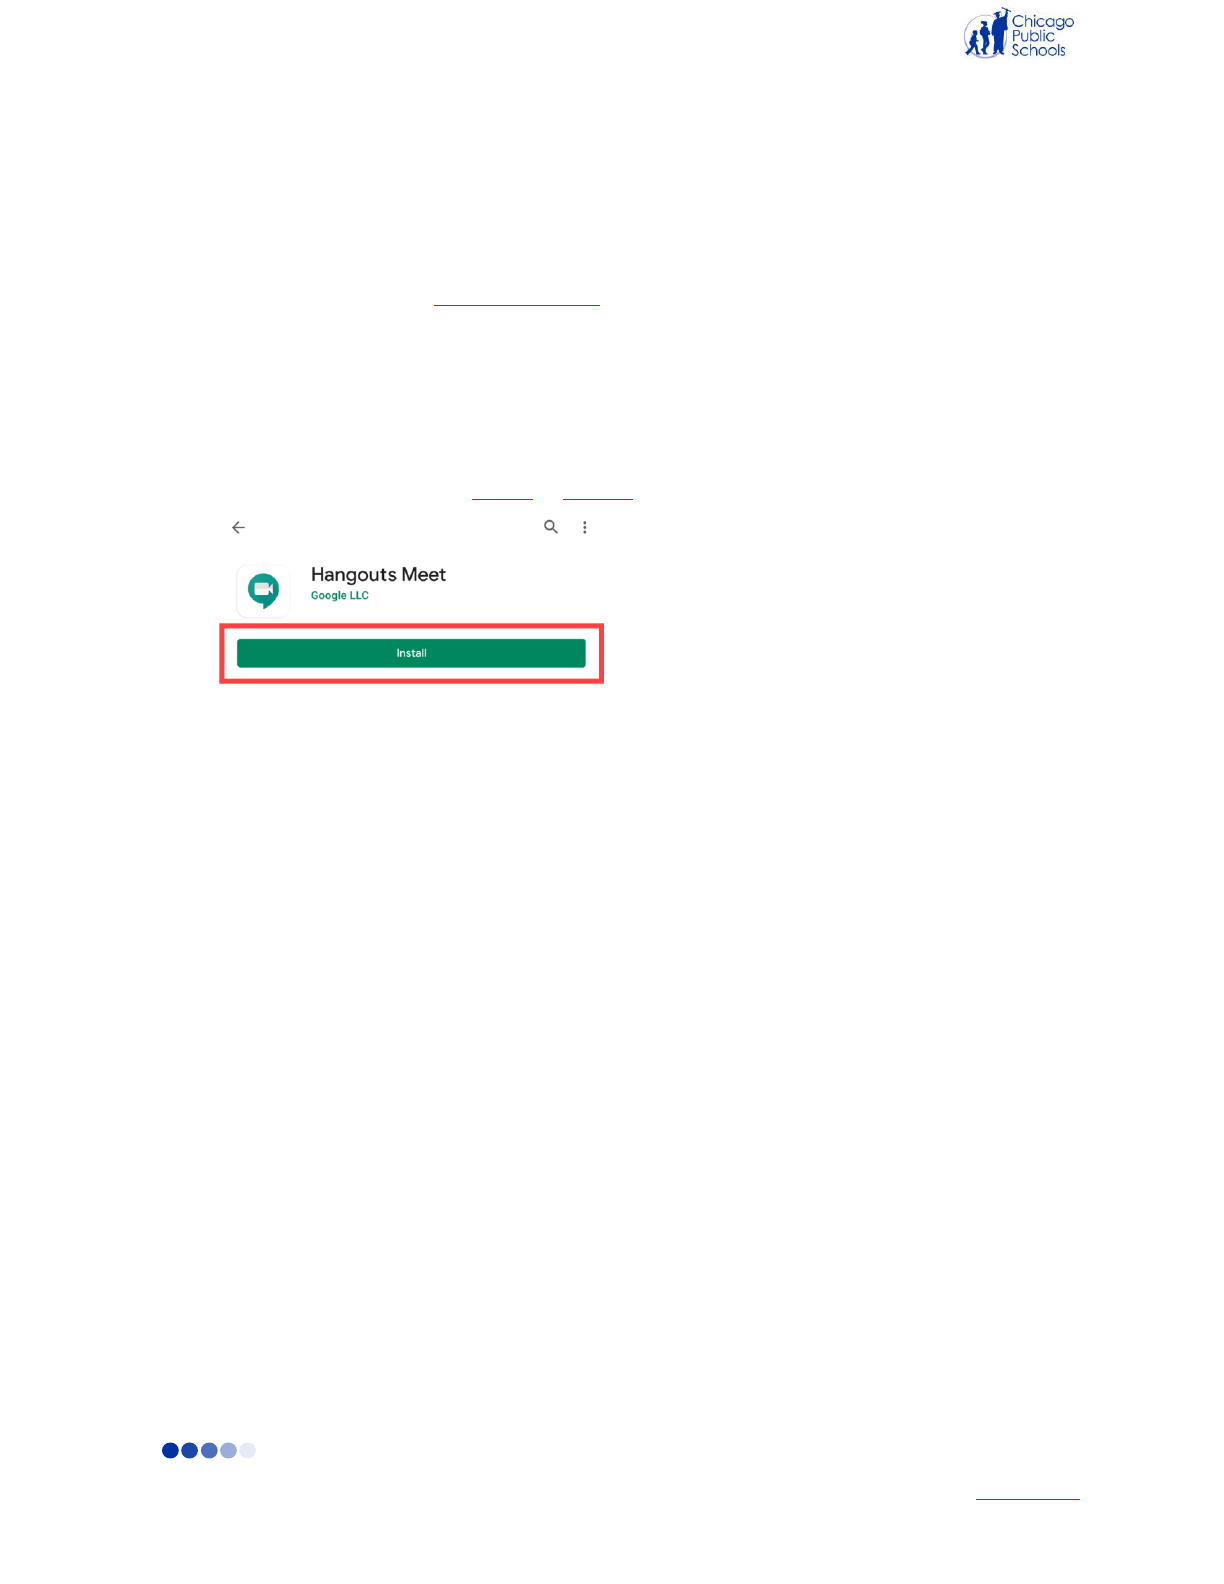
1. Install the Meet app on your iPhone or Android.
2. Open the Hangouts Meet app.
3. Swipe up from the bottom to view your scheduled meetings.
4. Select a meeting from the list and tap Join.
Join by Phone
Google Meet includes a dial-in option for audio-only access.
On the web
1. In Calendar, click the event you want to join.
2. Manually dial the phone number found under Join by phone.
12
Back to top
3. Enter the PIN to join the call.
On mobile devices
1. From your mobile device, in Calendar, click the event or meeting invite you want to join.
2. Tap Join by Phone found in the event.
NOTES: The PIN is automatically entered if you tap Join by phone from your mobile device.
Record a Google Meet Session
When using Google Meet, teachers and other educators should utilize the recording feature within the
tool to archive the lesson for future use. When recording a Google Live Stream lesson, teachers and
other educators must notify students that the lesson will be recorded and archived for future viewing. To
preserve student privacy, recorded Meet sessions may only be used for future instruction and may not
be shared with others (e.g., posted on a website, emailed to parents or guardians). It is important that
teachers and other educators remain in the video session until all students have left the Google Meet
before leaving the session themselves to ensure students do not continue to engage with one another
unsupervised. Recordings include the active speaker and anything being presented on the screen. Other
windows or notifications are not included.
Participants who dial in using a phone are notified when the recording starts or stops, but cannot control
the recording. Once the recording is stopped, a file of the recorded live stream will automatically be
generated in Drive and a link to the session is emailed to the session organizer. This ensures a record of
the session is archived and allows teachers and other educators to reference the session with their
students at a later date. For an exhaustive guide on recording your Google Meet session, click here.
13
Back to top
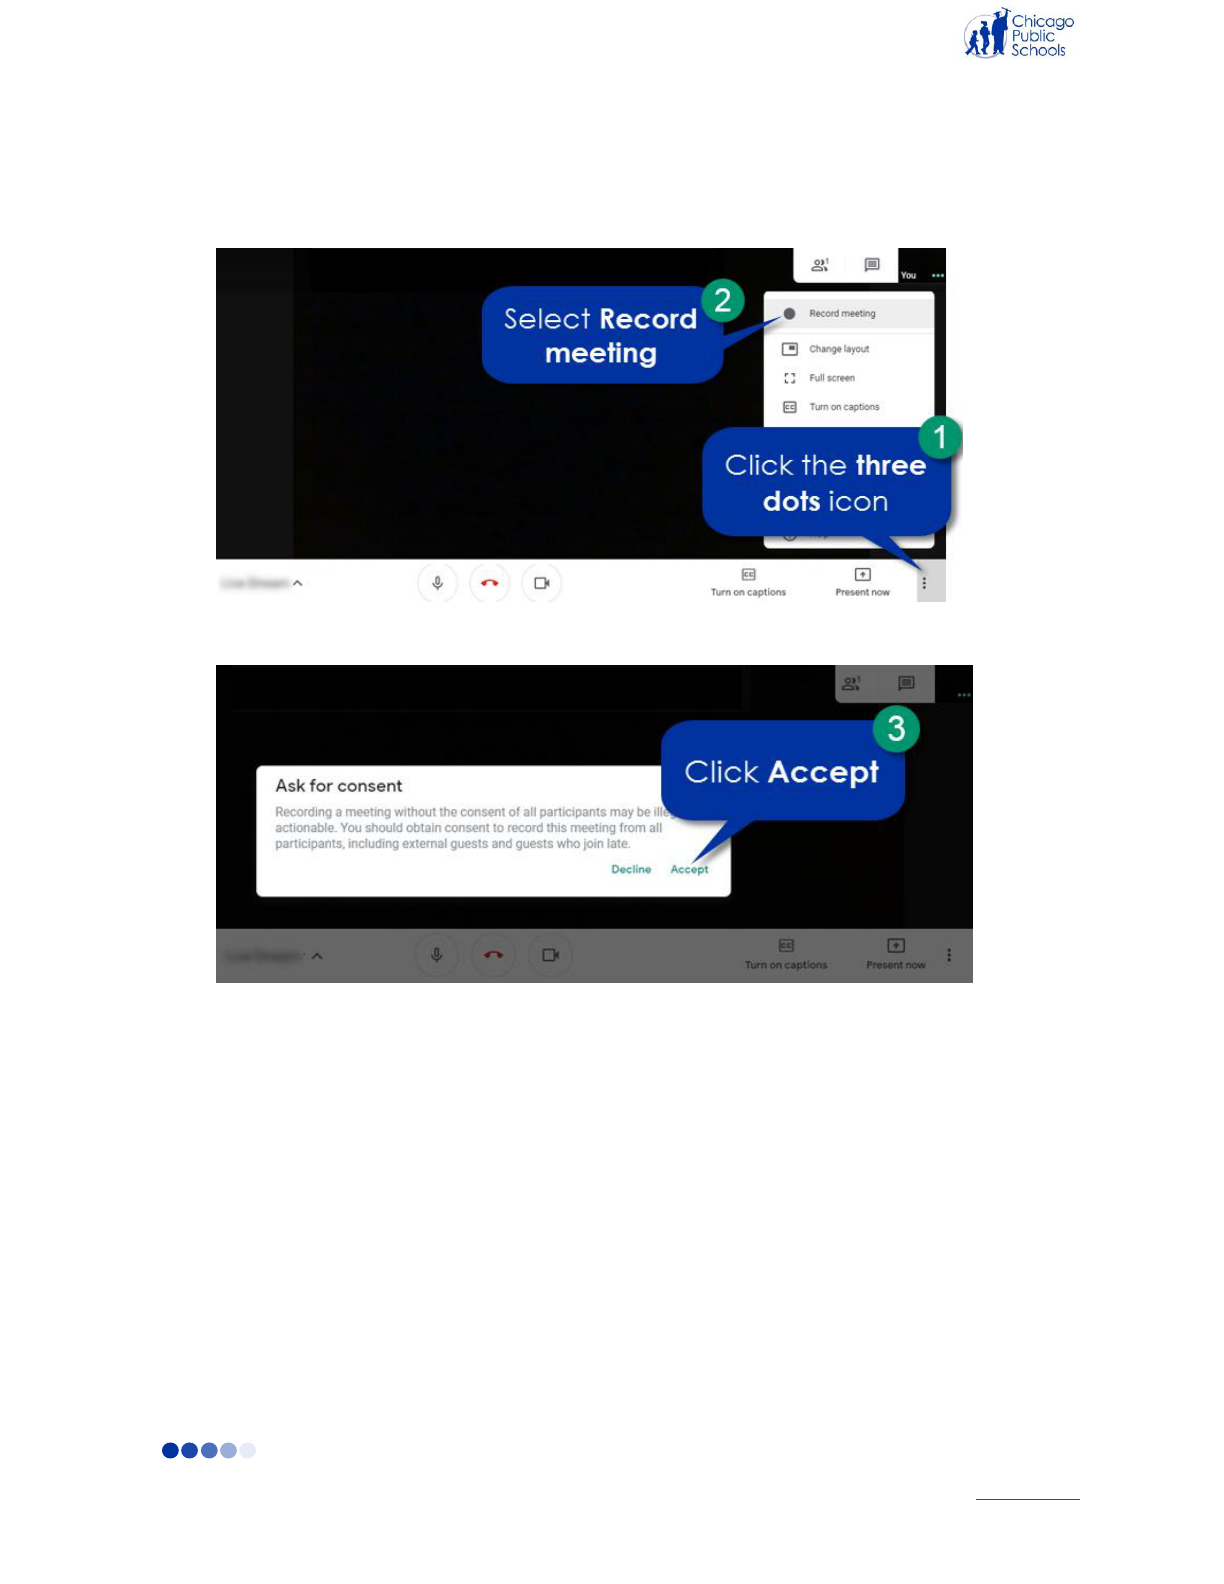
1. Once you have started a Google Meet session, click the three dots icon.
2. Select Record meeting.
3. Click Accept.
NOTE: When recording is on, you will see Rec in the top left corner.
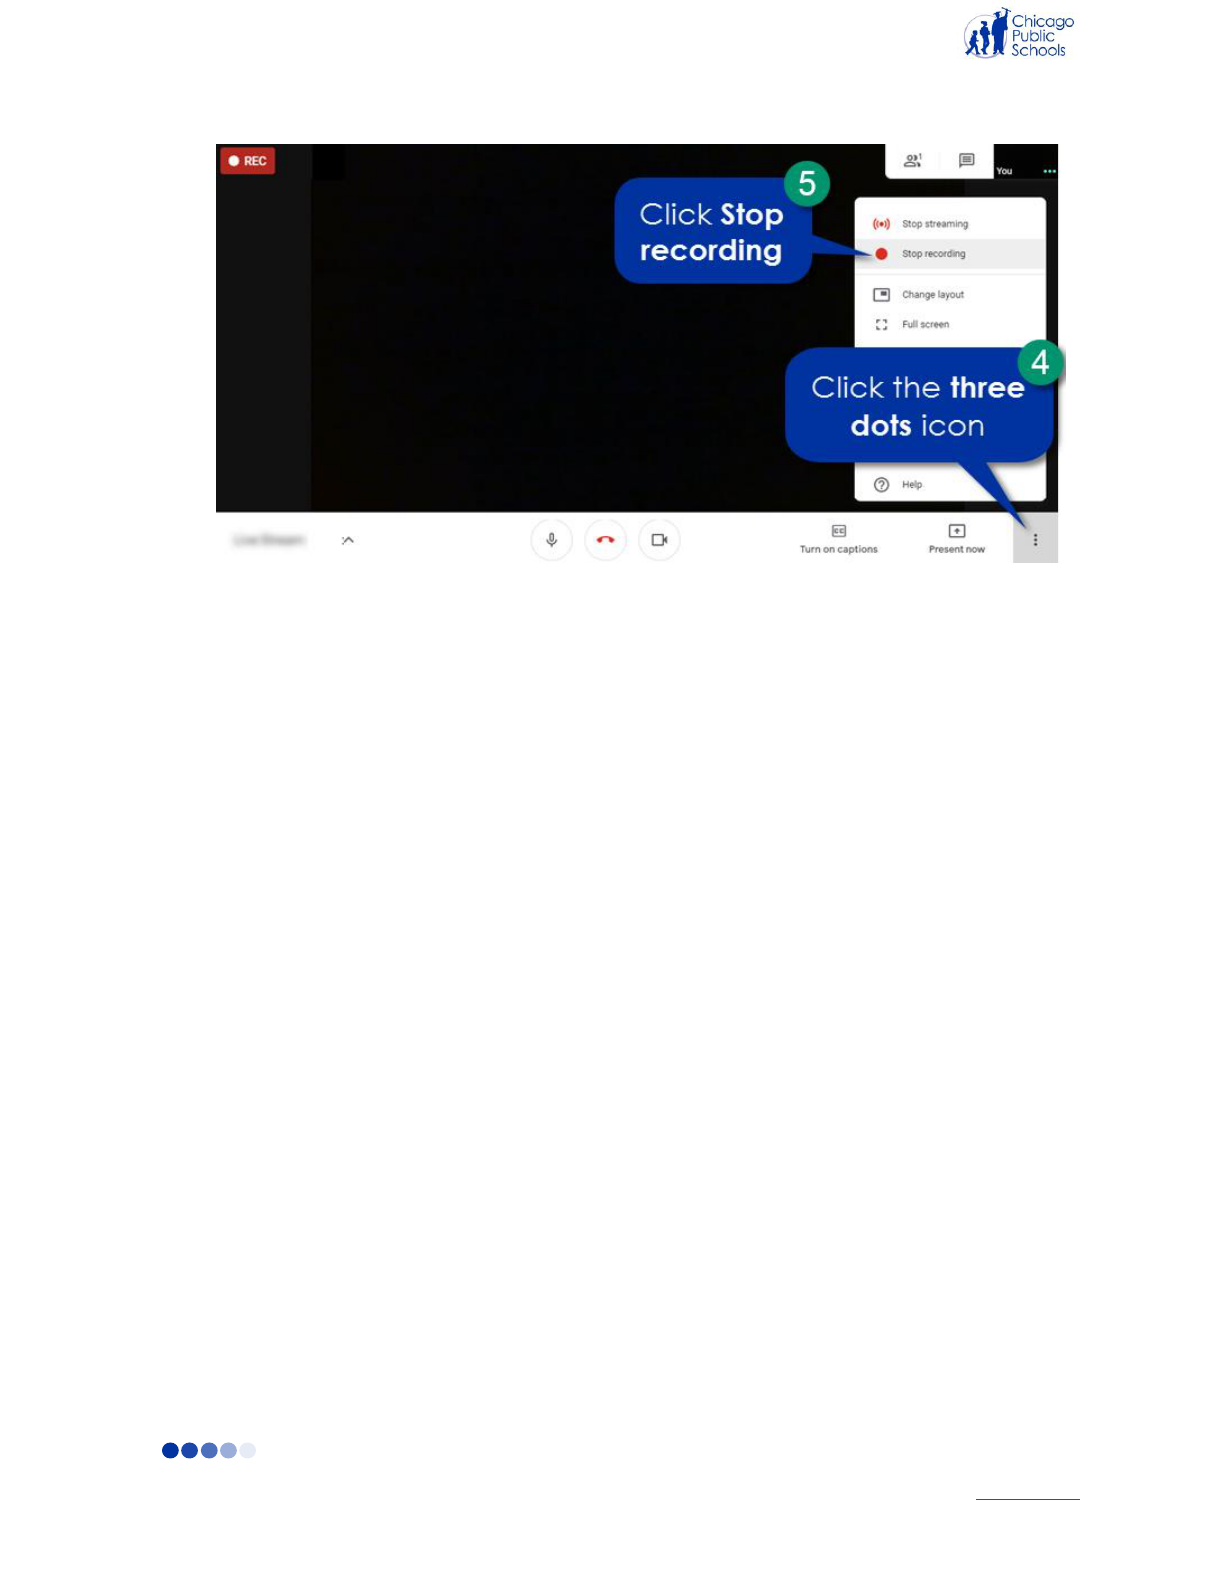
4. Once all students have left the Google Meet session, click the three dots icon.
5. Click Stop Recording.
14
Back to top
15
Back to top
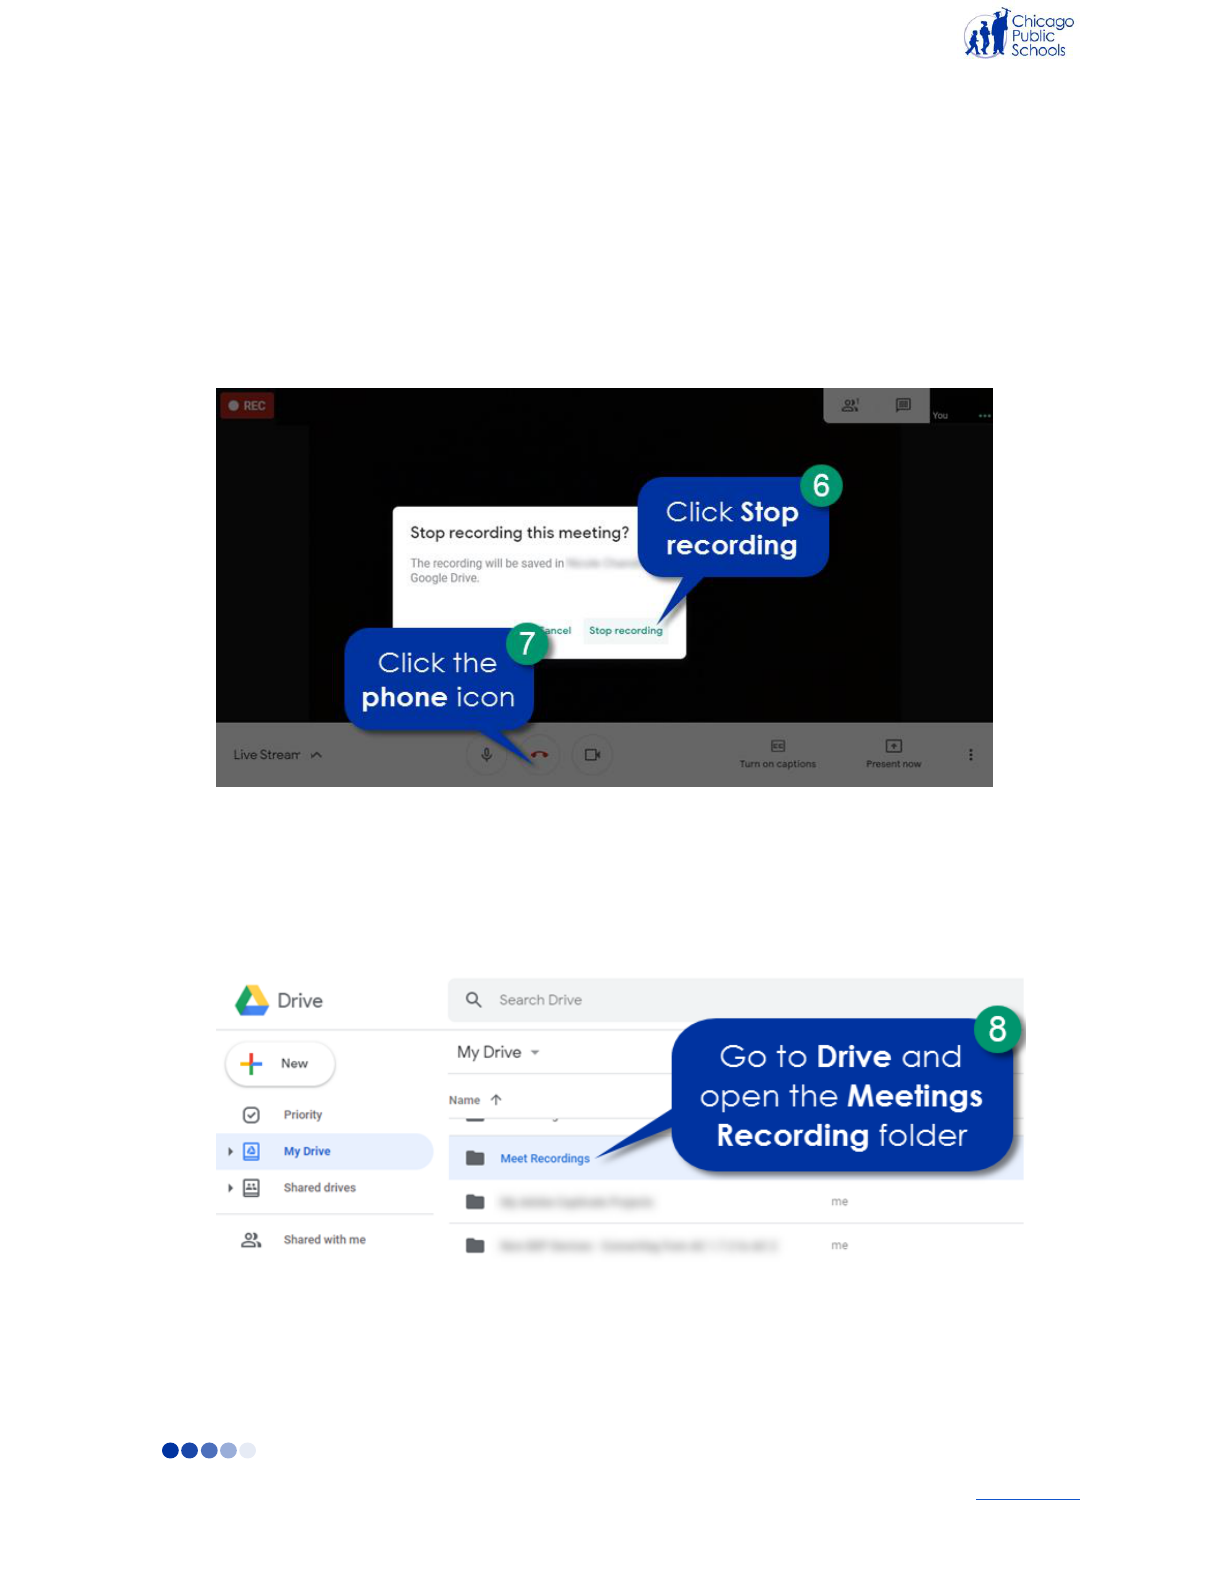
6. Click Stop recording in the popup window.
7. Click the phone icon to end the session.
NOTE: It is important that teachers and other educators remain in the video session until all
students have left the Google Meet before leaving the session themselves to ensure students do
not continue to engage with one another unsupervised. After the last participant leaves the
Meet, wait another two minutes before ending the session.
8. A file of the recorded live stream will automatically be generated in Drive. Go to Drive and open
the Meet Recordings folder to access your Live Stream recording.
NOTE: An email with the recording link is sent to the person who created the calendar event.
NOTE: If a participant turns on live captions during recording, the captions won't be recorded and
don't appear when you play the recording.
Managing Participants in Google Meet

16
Back to top
As the organizer of the meeting, teachers and other educators have the ability to manage participants by
muting, removing and viewing a list of students in the Google Meet session. For more information, click
here.
Mute a Participant
1. Click the people icon in the top right corner of the screen.
2. Click on the participant’s image.
3. Click the microphone icon to mute the participant.
NOTE: Only the participant has the ability to unmute themselves.
4. Click Mute.
17
Back to top
View a Participant List
While in a Google Meet, you can see a list of all participants in the meeting.
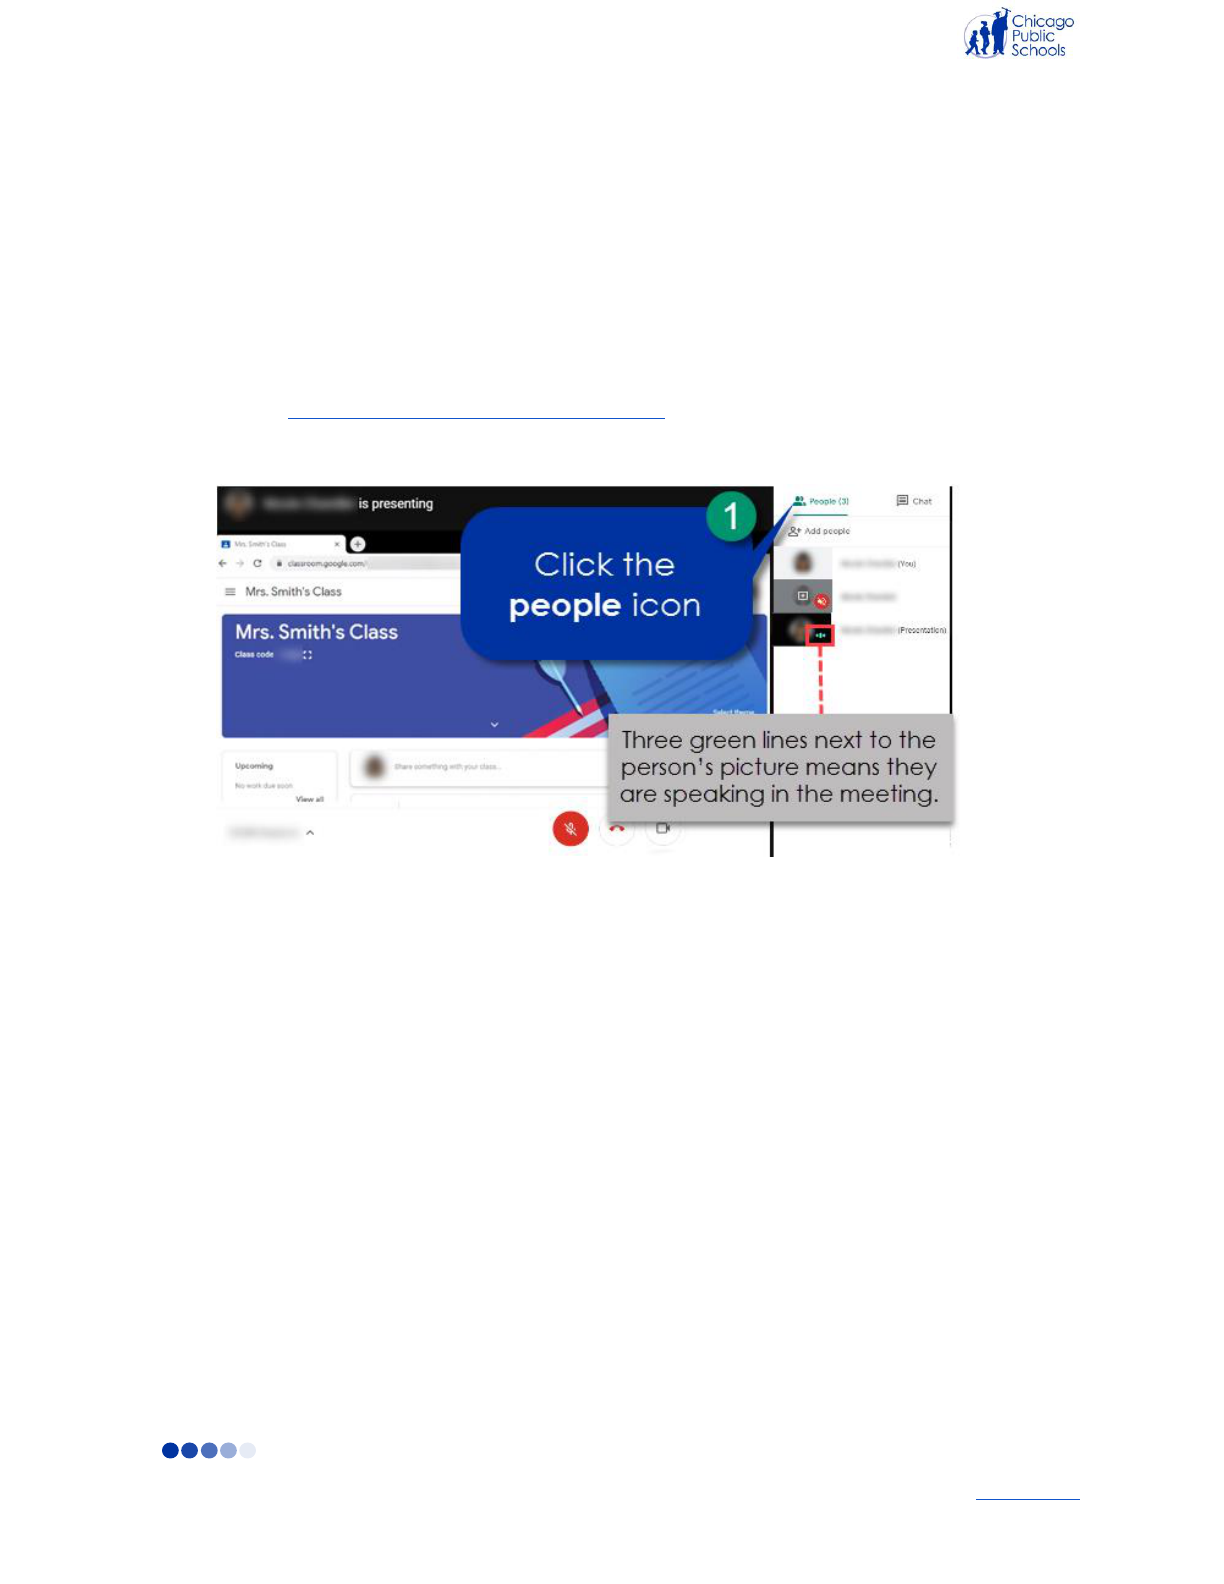
1. In the Google Meet video session, click on the people icon to see the full list of participants.
NOTE:
● In the list of participants on the video call, you will see three green lines next to the
person’s picture if they are speaking in the meeting.
● Obtaining a Student Contact List in Aspen - Step-by-step instructions for staff on how to
generate a student contact list via Aspen and how to export that list to Excel if needed.
Remove a Participant
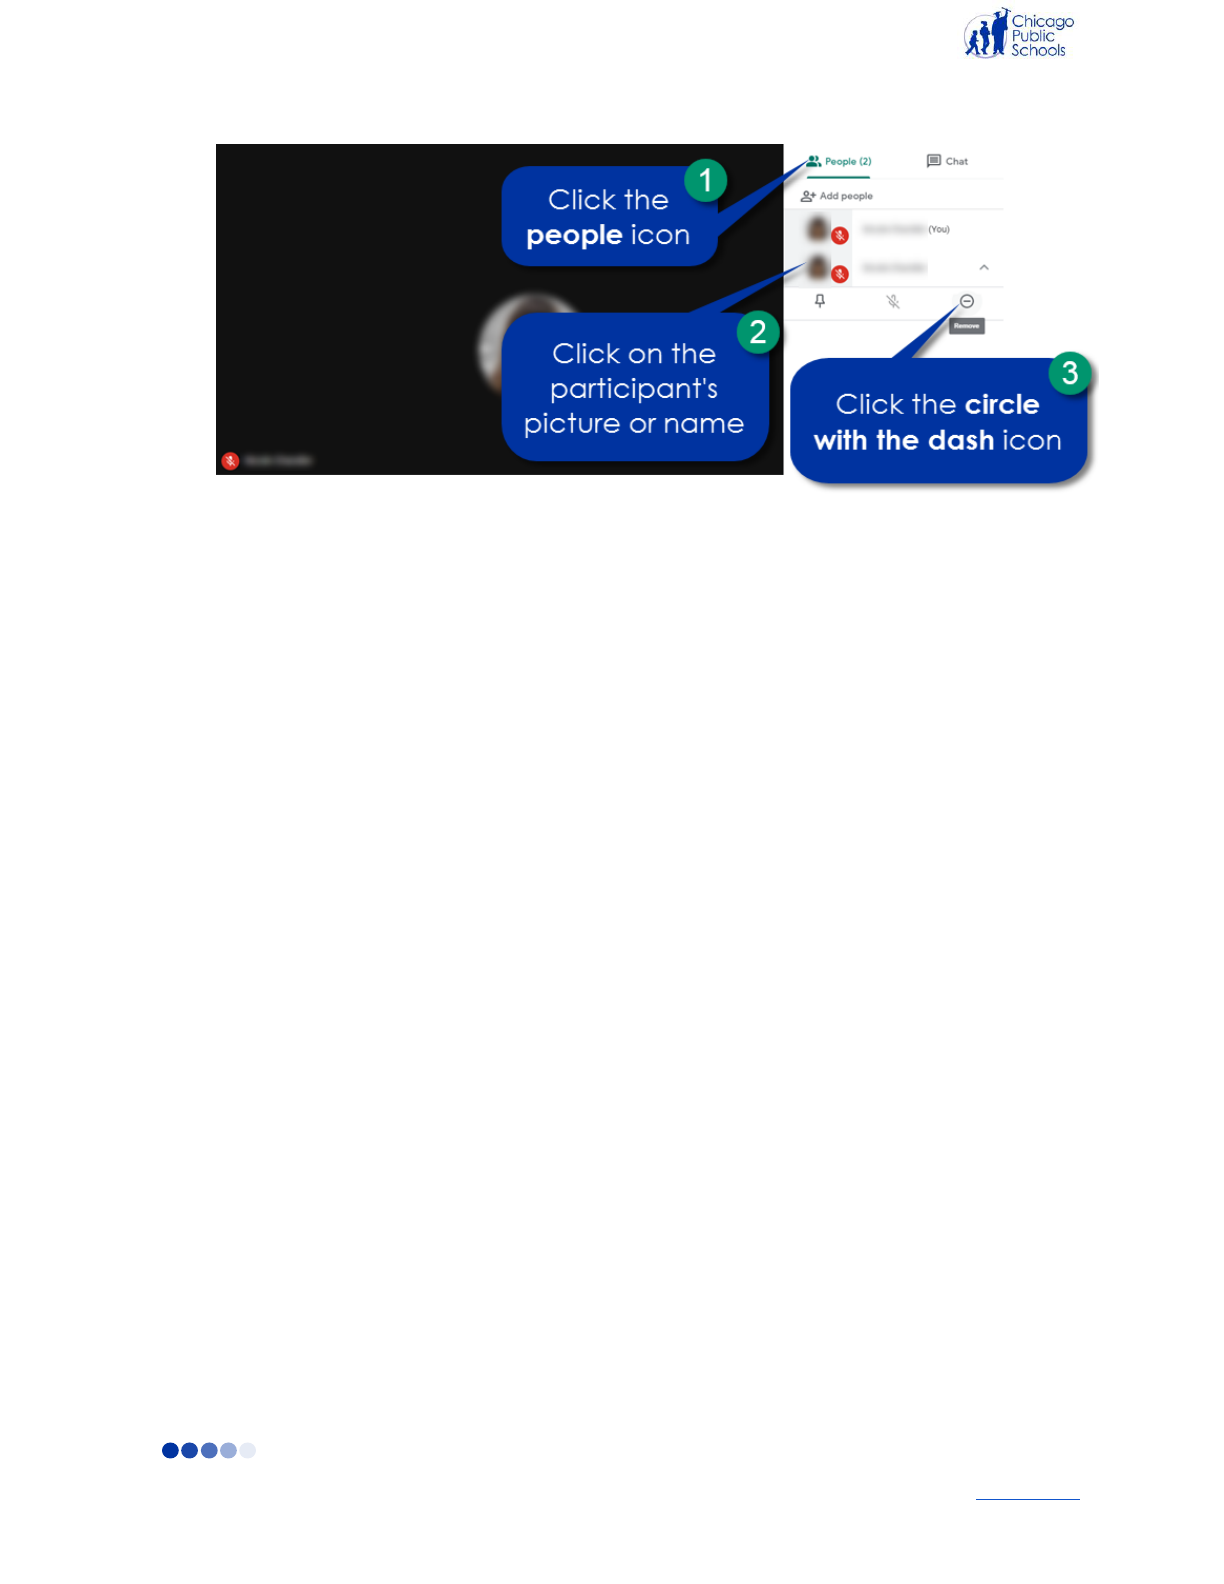
1. Click on the people icon in the top right corner of the screen.
2. Click on the participant’s image.
3. Click the circle with the dash icon in it to remove the participant.
18
Back to top
