QUICKBOOKS ONLINE ADVANCED CERTIFICATION COURSE
Copyright
Copyright 2017 Intuit, Inc. Intuit, Inc.
All rights reserved. 5601 Headquarters Drive
Plano, TX 75024
Trademarks
©2017 Intuit, Inc. All rights reserved. Intuit, the Intuit logo, Intuit ProLine, Lacerte,
ProAdvisor, ProSeries and QuickBooks, among others, are trademarks or registered
trademarks of Intuit, Inc. in the Unit
are the property of their respective owners.
Notice to Readers
The publications distributed by Intuit, Inc. are intended to assist accounting
professionals in their practices by providing current and accurate information.
However, no assurance is given that the information is comprehensive in its coverage
information provided should not be relied upon as a substitute for independent
research. Intuit, Inc. does not render any accounting, legal or other professional
advice, nor does it have any responsibility for updating or revising any information
presented herein. Intuit, Inc. cannot warrant that the material contained herein will
continue to be accurate nor that it is completely free of errors when published.
Readers should verify statements before relying on them.

Supplemental Guide Table of Contents
Module 3: Special Transactions 1
Table of Contents
About the Author ....................................................................................................................... 2
About the Team ......................................................................................................................... 3
Supplemental Guide Overview ................................................................................................. 6
Purpose of this Guide ...................................................................................................................................... 6
Google Chrome ............................................................................................................................................... 6
Learning Objectives ......................................................................................................................................... 6
Training at a Glance ......................................................................................................................................... 7
QuickBooks Online Accountant Test Drive ................................................................................................... 8
Topic 1: Special Transactions ..................................................................................................... 9
Sales Summaries .............................................................................................................................................. 9
Outside Payroll ............................................................................................................................................... 14
Zero Dollar Expense ...................................................................................................................................... 18
Write off Invoices ............................................................................................................................................ 19
Negative Deposit ........................................................................................................................................... 21
Topic 2: Complex Workflows .................................................................................................. 23
Bounced Checks ............................................................................................................................................ 23
Allocate Overhead ......................................................................................................................................... 26
Barter Transactions ........................................................................................................................................ 30
Client Retainers and Deposits ...................................................................................................................... 32
Track Commissions ........................................................................................................................................ 38
Track Prepaid Multiple Session Sales .......................................................................................................... 43
Guide Conclusion .................................................................................................................... 52

Supplemental Guide About the Author
Module 3: Special Transactions 2
About the Author
Heather has been helping users learn and use QuickBooks since the late 1990s. Her passion is
helping others improve their business accounting processes through the use of QuickBooks and
related apps, and spreading her knowledge and experience with others through blog articles, live
events and webinars.
As owner and founder of Satterley Training & Consulting, LLC, Heather works with accounting
professionals to create accounting systems and procedures using QuickBooks and related
applications that simplify and streamline their day to day workflows.
She is Advanced Certified in QuickBooks Desktop and Online as well as POS Desktop and
QuickBooks Enterprise. In addition to QuickBooks related services, Heather is also an Enrolled
Agent licensed to practice before the IRS and works with clients to resolve tax issues.
Heather was named a Top 100 ProAdvisor by Insightful Accountant in 2014, 2015 and 2016. She is a
member of Intuit Trainer/Writer Network.
Heather D. Satterley, EA
www.satterleyconsulting.com
Supplemental Guide About the Team
Module 3: Special Transactions 3
About the Team
It does take a village to complete a project of this magnitude. My heartfelt thanks goes out to the
following team members and fellow ProAdvisors as well as Intuit employees, Linsay Ransom and
Trudie Folsom for all their long hours and dedication.
She is an International Trainer for Intuit
and speaker at many conferences. She is co-host of QB Power Hour (free bi-weekly webinar).
Michelle is the owner of Long for Success, LLC specializing in QuickBooks training and
consulting. Plus, she consults with developers regarding feedback and input on app development,
understanding and reaching the market and more.
She is co-author of the Advanced Certifications for QuickBooks (both QuickBooks Online and
desktop) and author of numerous courses .
Michelle is the author of five Books: How to Start a Home-Based Bookkeeping Business, QuickBooks
Practice Set, QuickBooks Online Practice Set, QuickBooks 2014: on Demand, and Successful
QuickBooks Consulting all are available on Amazon.
Michelle's recognition includes: CPA Practice Advisor Most Powerful Women, Top 10 ProAdvisor for
Trainer/Writer and Social Media, Top 100 ProAdvisor, Small Business Influencer Champion, Stevie
Gold Winner for Women in Business and more.
Michelle L. Long, CPA, MBA
Long for Success, LLC
QB Power Hour
Supplemental Guide About the Team
Module 3: Special Transactions 4
MB (Mary Beth) Raimondi, CPA, CITP, MS Taxation is an Advanced QuickBooks Certified ProAdvisor
in both QuickBooks Desktop and QuickBooks Online as well as being certified in Enterprise and
Point of Sale.
She has been teaching QuickBooks nationally to both end users and accountants/consultants since
1999. She is a charter member of the Intuit Trainer/Writer Network.
The focus of her practice in CT is mainly QuickBooks consulting and training, specializing in
strategizing, researching and installing third-party add-ons and conversions to QuickBooks from
other accounting software.
MB was named the Top QuickBooks Online ProAdvisor, 2015 by Insightful Accountant and has been
in the Top 100 ProAdvisors for 2014-2016.
MB Raimondi, CPA.CITP
mb@mbraimondicpa.com
Visit MB on Facebook
Supplemental Guide About the Team
Module 3: Special Transactions 5
Laura Redmond is a financial controller and IT manager turned cloud accounting advocate and app
designer. She is a QuickBooks Online power user, Advanced Certified QuickBooks ProAdvisor,
member of the Intuit Trainer/Writer Network, and co-author of QuickBooks Online training and
certification courses. Laura has been awarded Top 100 ProAdvisor and Leading QuickBooks Online
Practice.
Laura runs Redmond Accounting Inc., a boutique cloud accounting and consulting firm selected by
Intuit as a Top 20 Firm of the Future. Their service delivery is centered solely on QuickBooks Online
and its eco-system of apps. Laura co-created the AERO Workflow app used by accounting firms to
manage their knowledge capital and service delivery. The Aero Library includes step-by-step
inst -
system.
Laura Redmond
Redmond Accounting Inc.
Aero Workflow

Supplemental Guide Overview
Module 3: Special Transactions 6
Supplemental Guide Overview
PURPOSE OF THIS GUIDE
The basic certification program outlined entering transactions in the normal course of business. In
this advanced module, we will cover special transactions that may be helpful for some clients. Each
of the workflows presented in this guide is intended to help you understand how to utilize special
transactions in QuickBooks Online.
Product Update Notification!
QuickBooks Online and QuickBooks Online Accountant are constantly being improved:
When you log in to qbo.intuit.com, it may look different from the screenshots originally taken for
this supplemental guide
Where to go to learn about the latest product updates:
https://www.firmofthefuture.com/product-industry-news/product-updates//
http://quickbooks.intuit.com/blog
GOOGLE CHROME
NOTE: Screenshots and instructions included in this guide use Google Chrome as the browser.
LEARNING OBJECTIVES
Determine when to utilize special transactions
Recognize the steps to create special transactions
Determine when to utilize complex workflows
Recognize the steps to create complex workflows

Supplemental Guide Overview
Module 3: Special Transactions 7
TRAINING AT A GLANCE
Use this as a guide to select specific workflows you want to cover.
TOPIC
STEP-BY-STEP WORKFLOWS
LEARNING OBJECTIVES
SPECIAL
TRANSACTIONS
Sales Summaries
Outside Payroll
Zero-dollar Checks
Writing off Invoices
Negative Deposit
Determine when to utilize special
transactions
Recognize the steps to create
special transactions
COMPLEX
WORKFLOWS
Bounced Checks
Barter Transactions
Allocating Overhead
Tracking Commissions
Tracking Retainers and
Prepayments
Tracking Prepaid Multiple
Session Sales Bar
Determine when to utilize complex
workflows
Recognize the steps to create
complex workflows

Supplemental Guide Overview
Module 3: Special Transactions 8
QUICKBOOKS ONLINE ACCOUNTANT TEST DRIVE
GUIDES
Exercises contained inside this guide can be completed using the QuickBooks Online Sample
Open the Sample Company by logging into your QBOA gear icon Your Company section
Sample Company
While you are working in the Sample Company, your work will be saved
Upon closing the sample company file, QuickBooks Online automatically restores its settings and
data. If you log out and log in again, the Sample Company will reset (your work is not saved).
By default, the Sample Company will sign out if inactive for one hour. You will lose any data and
settings, since this sample company resets each time you log in. Give yourself enough time to
complete the assignment.
To increase the maximum hours of inactivity allowed before timing out, in the Sample Company
gear icon Your Company section Account and Settings Advanced Settings Other
preferences Sign me out if inactive for and select two hours or three hours.
NOTE: The QuickBooks Online Accountant test drive company contains some features that are not
available in QuickBooks Online Simple Start, Essentials or Plus. (You may wish to share the
QuickBooks Online test drive file with your clients for them to practice without seeing Accountant-
only features: https://QuickBooks Online.intuit.com/redir/testdrive.) In addition, some features (such
as in-product Help) are not enabled in this test drive file. This is subject to change.
Supplemental Guide Topic 1: Special Transactions
Module 3: Special Transactions 9
Topic 1: Special Transactions
SALES SUMMARIES
Situation
QuickBooks is designed to record sales using an invoice or sales receipt for each customer.
However, there m individual sales
transactions for each customer.
You can use sales summary transactions for clients who need to record a summary of sales (daily,
weekly or monthly) from another source like a
offer integration into QuickBooks. This is useful for clients like restaurants, retailers, ecommerce
merchants, medical service providers and many other industries. Any time sales are recorded in a
third party program, you may want to use a sales summary.
The details for sales (and sometimes inventory) are already tracked using the third party system, so it
is usually not necessary to capture these details in QuickBooks too. By using a sales summary
transaction, you record only the information necessary to generate accurate financial reports and
manage sales tax. For example, many restaurant POS systems track different categories of sales and
provide detailed reports that give the client useful management information. It is not efficient to
have the client enter the same detail information into QuickBooks. Additionally, restaurants or other
food service companies do not usually track perpetual inventory and use a periodic inventory system
(i.e., no need to track inventory details).
Supplemental Guide Topic 1: Special Transactions
Module 3: Special Transactions 10
Setup
The daily sales summary is a zero sales receipt which records your income and funds collected on
one form like a register z-tape. The sales amounts are recorded as positive numbers using service
items mapped to income accounts and the funds collected are recorded using service items
recorded as negative entries and mapped to the Undeposited Funds or bank asset accounts. When
you record the sales receipt transactions, the appropriate revenue accounts are increased (credit)
and the Undeposited Funds or bank accounts are increased (debit). Other service items are often
used to record things like cash payouts, gift certificates sold or redeemed and other adjustments
such as cash over/short.
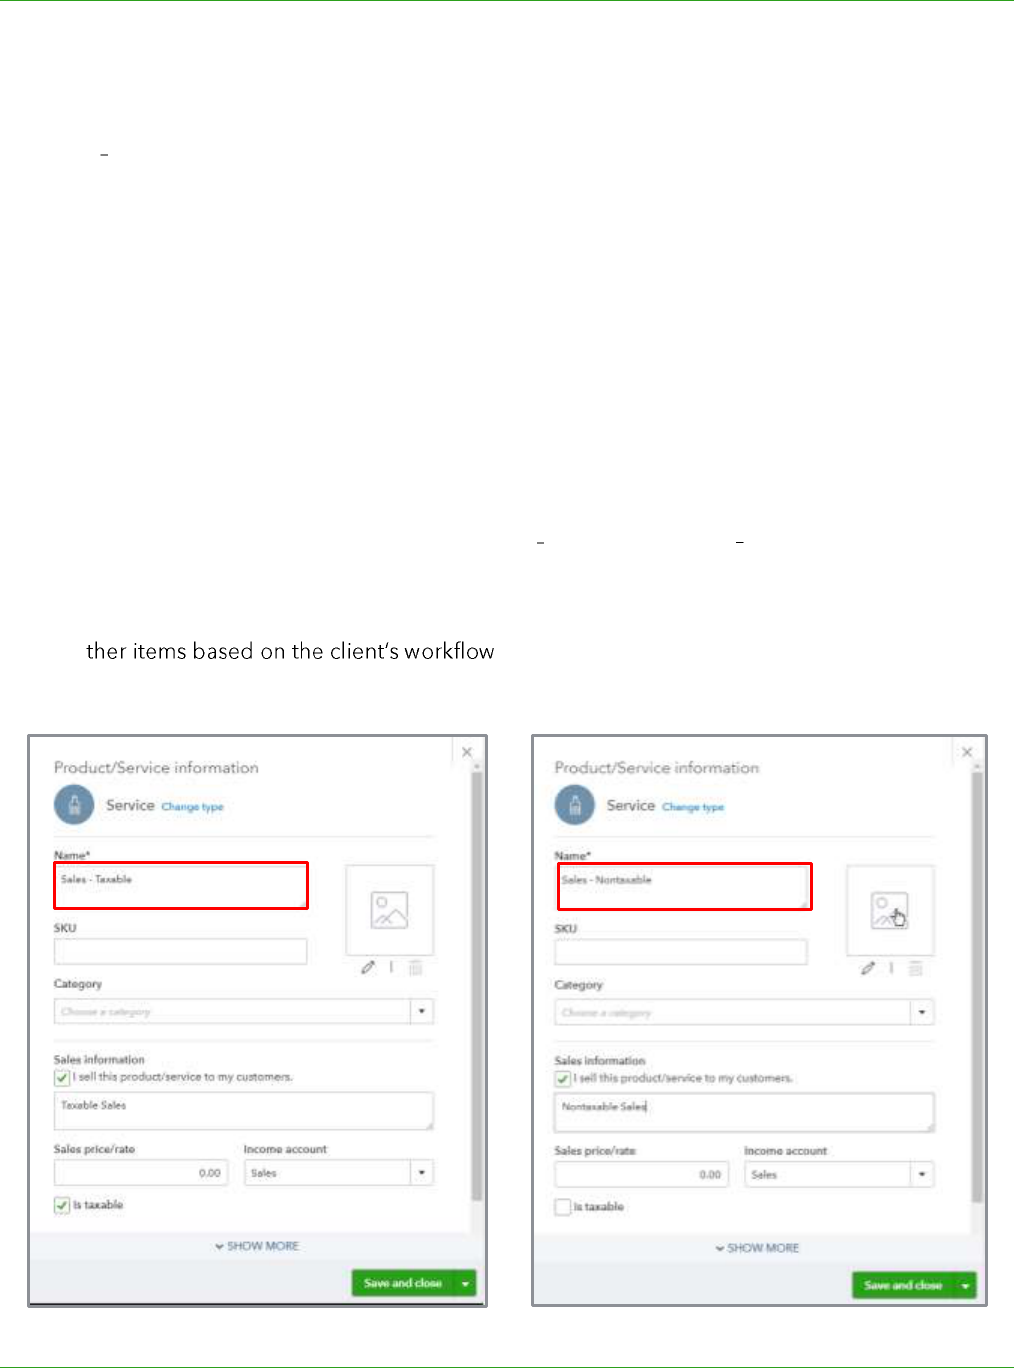
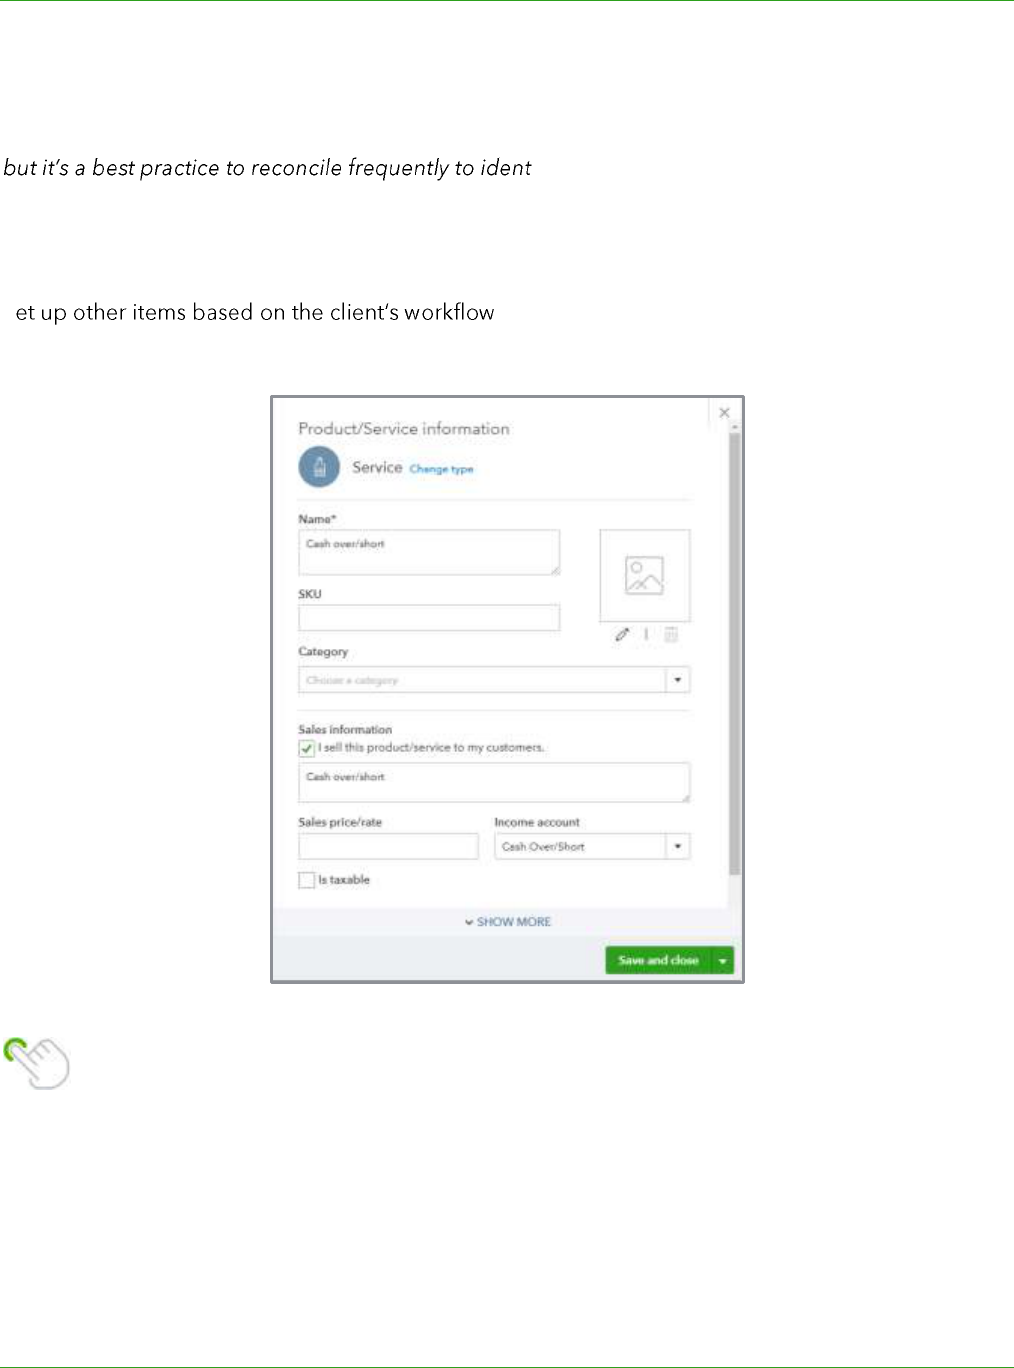
Items for Sales
The first step is to set up the service type items that will be used for the sales amounts on the sales
summary, then set up the accounts and service items that will be used to capture the sales totals. A
separate service item must be created for each account you want displayed on the Profit & Loss.
Many businesses create only two service items (Sales Taxable and Sales Non-Taxable). Since the
sales detail is maintained in the POS system, it is usually not necessary to capture every sales
category in QuickBooks.
Set up o , such as certificates or pre-payments (coded to a
liability account), cash/over short (coded to an expense account) or paid outs.
Supplemental Guide Topic 1: Special Transactions
Module 3: Special Transactions 11
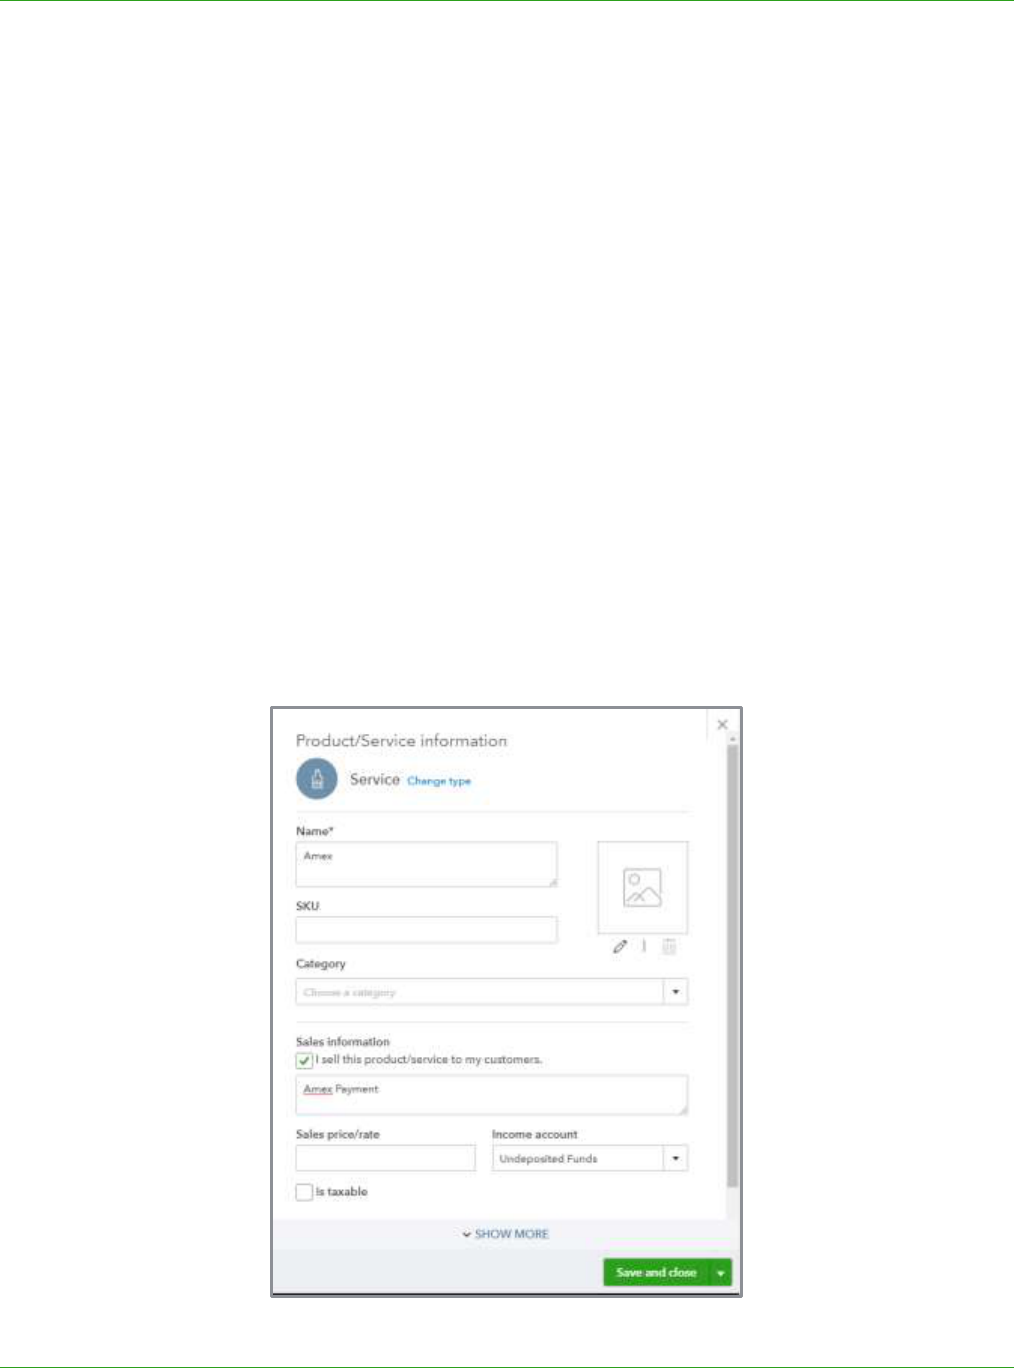
Items for Payment Methods
Find out the payment methods accepted by the client and how they are deposited to the bank (daily
deposits, every few days, etc.), to determine the service items to set up and the appropriate account
mapping. For example, if cash and checks from multiple days are deposited together, use
Undeposited Funds as the income account for the items. Undeposited Funds will be increased each
time the items are used on a sales summary transaction and will be decreased when they are
selected to be included on a deposit transaction.
Here are a few examples of the service items you need to set up:
Cash/checks
Visa
MasterCard
American Express
Gift cards (may require additional setup of gift card liability accounts)
Supplemental Guide Topic 1: Special Transactions
Module 3: Special Transactions 12
NOTE: Some ProAdvisors use a clearing account, such as Cash on Hand, as the income account for all
payment items. With this method, all deposits are coded to the Cash on Hand account either
manually or from the bank feed. The idea is that the debits and credits will zero the clearing account,
ify deposits that may have been received from
other sources (such as proceeds from a loan or capital contributions).
Other Items
S , such as gift certificates or pre-payments (coded to
a liability account), cash/over short (coded to an expense account) or paid outs.
TIP: Set up a bank type account called Sales Summary Register to use as the Deposit to
account on the sales receipt. This will create a bank register that lists all the sales summary
transactions in QuickBooks. This is also a good way to identify errors as the balance of the
account should always be zero.
Supplemental Guide Topic 1: Special Transactions
Module 3: Special Transactions 13
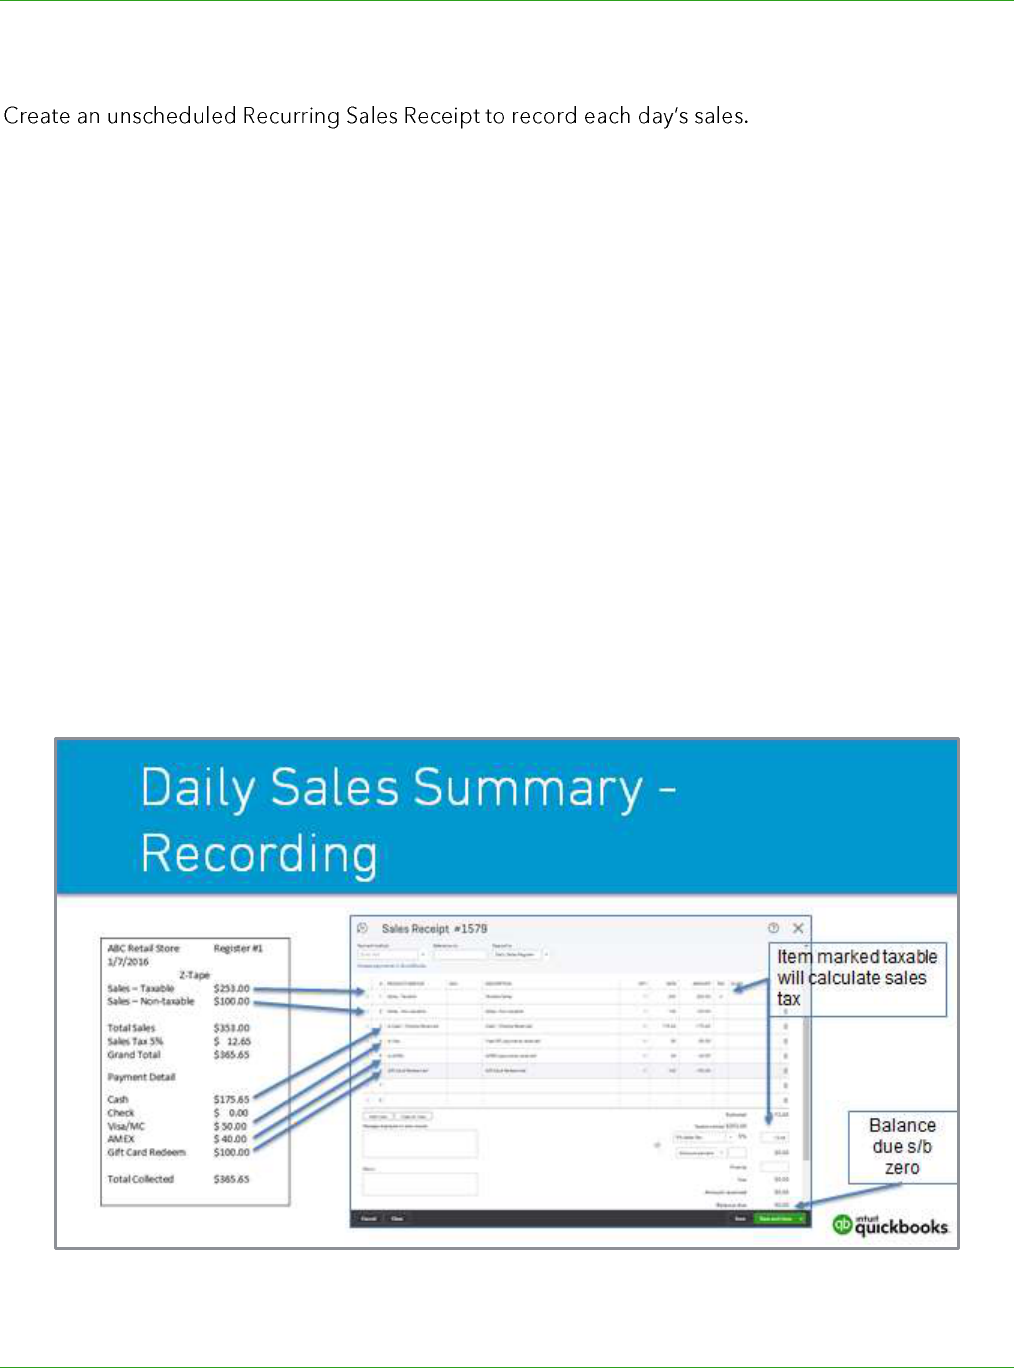
Enter the Sales Receipt
The customer name may
be Daily Sales, Monthly Sales or whatever makes sense for the client. You may even want to set up a
customer for each day the business is open (Monday, Tuesday, etc.). This would give you an extra
level of reporting that could be useful to your client.
Next you enter the sales items you are tracking/entering from your z-tape or other third party
reports. These sales values will be entered as positive values on the sales receipts.
Your payment method items will be listed next, but they will be recorded as negative values.
Because these payment items are mapped to bank or asset type accounts, entering them as a
negative on the sales receipt debits (increases) those accounts. You may need to add an item for
cash over/short if you use the sales receipt to balance the cash register.
The sales receipt should equal zero once completed, as the total amount of sales and tax collected
should equal the funds collected plus cash over/short.
Sales Tax
Use the Sales Tax Center to track sales tax owed, or you may want to consider setting up service
items to record sales tax if tax is collected for multiple agencies or is very complicated. If you use
service items to track sales tax, enter the amounts as a positive amount on the Sales Receipt.
You can watch the recording for this module to see a demonstration of the setup and recording of a
sales summary transaction.

Supplemental Guide Topic 1: Special Transactions
Module 3: Special Transactions 14
OUTSIDE PAYROLL
Situation
Some clients may not want to use the integrated QuickBooks payroll services available in
QuickBooks Online. They may be concerned that users will be able to view sensitive payroll
information
to manually record payroll into the books.
Create a journal entry for each payroll period to record the expenses, liabilities and deductions from
the bank account.
Setup
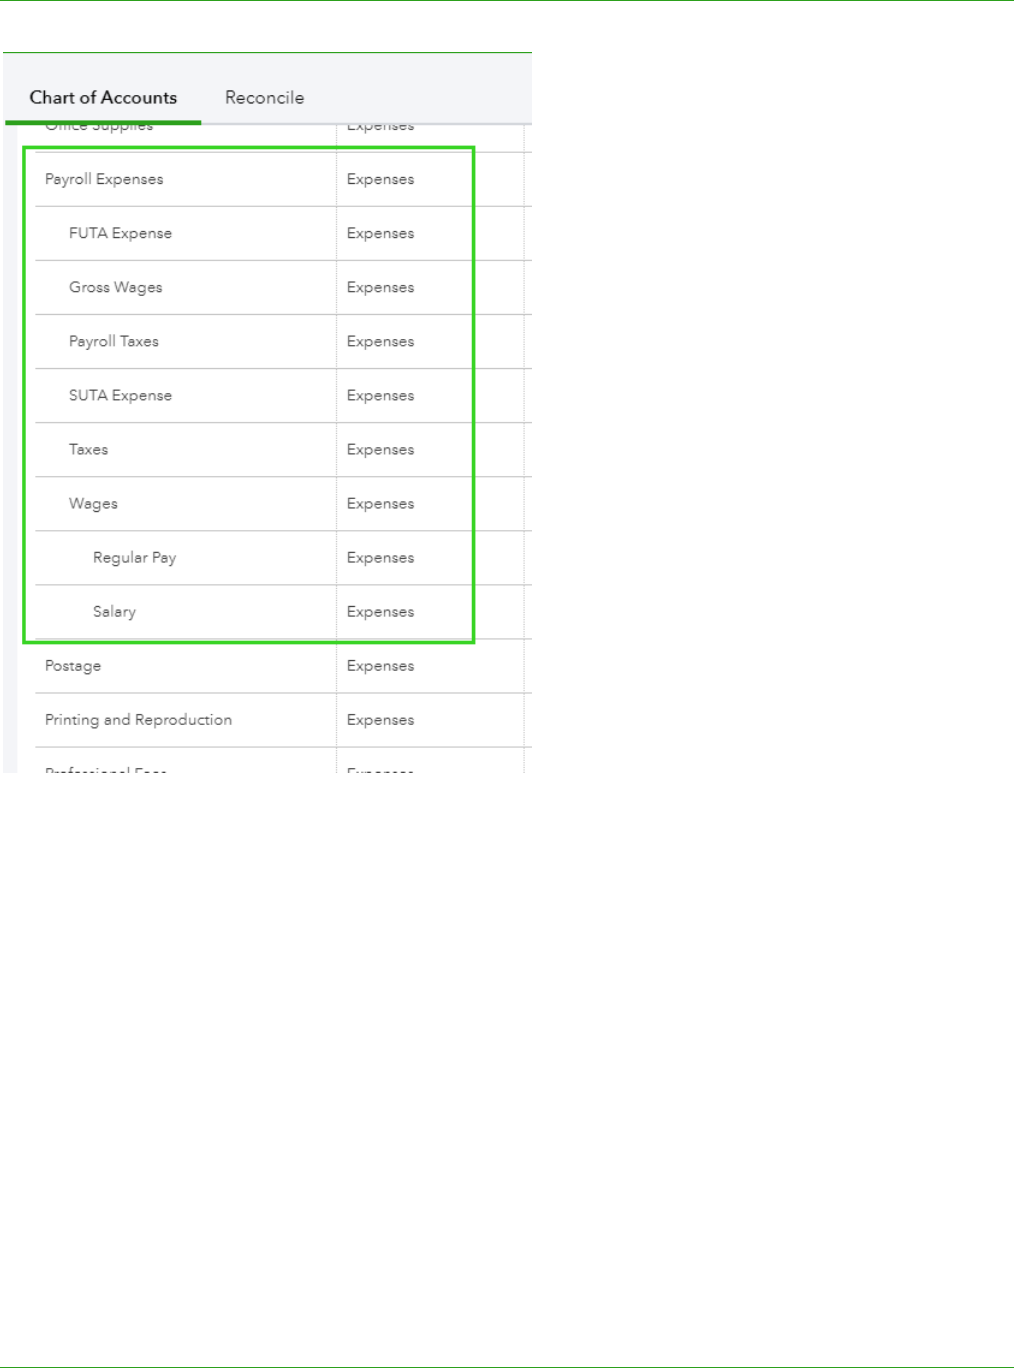
Payroll Expense Accounts
You must have the proper expense accounts set up for payroll processing fees, wages and
expenses. The breakdown of these accounts will depend on the detail your client would like to see
on their Profit & Loss reports. For example, you could have something as simple as a single Salaries
& Wages account used for all types of wages paid, or you can use multiple accounts to track
different kinds of labor, such as direct labor, marketing or administrative salaries.
Similarly, payroll tax expenses can be captured in a single account or multiple accounts. Many
companies use sub-accounts to break out payroll taxes by type, this can make it easy to reconcile
payroll tax returns to the account balances.
Other accounts may also be needed for contributions or deductions like health insurance, 401K
plans, child support and garnishments.
Supplemental Guide Topic 1: Special Transactions
Module 3: Special Transactions 15
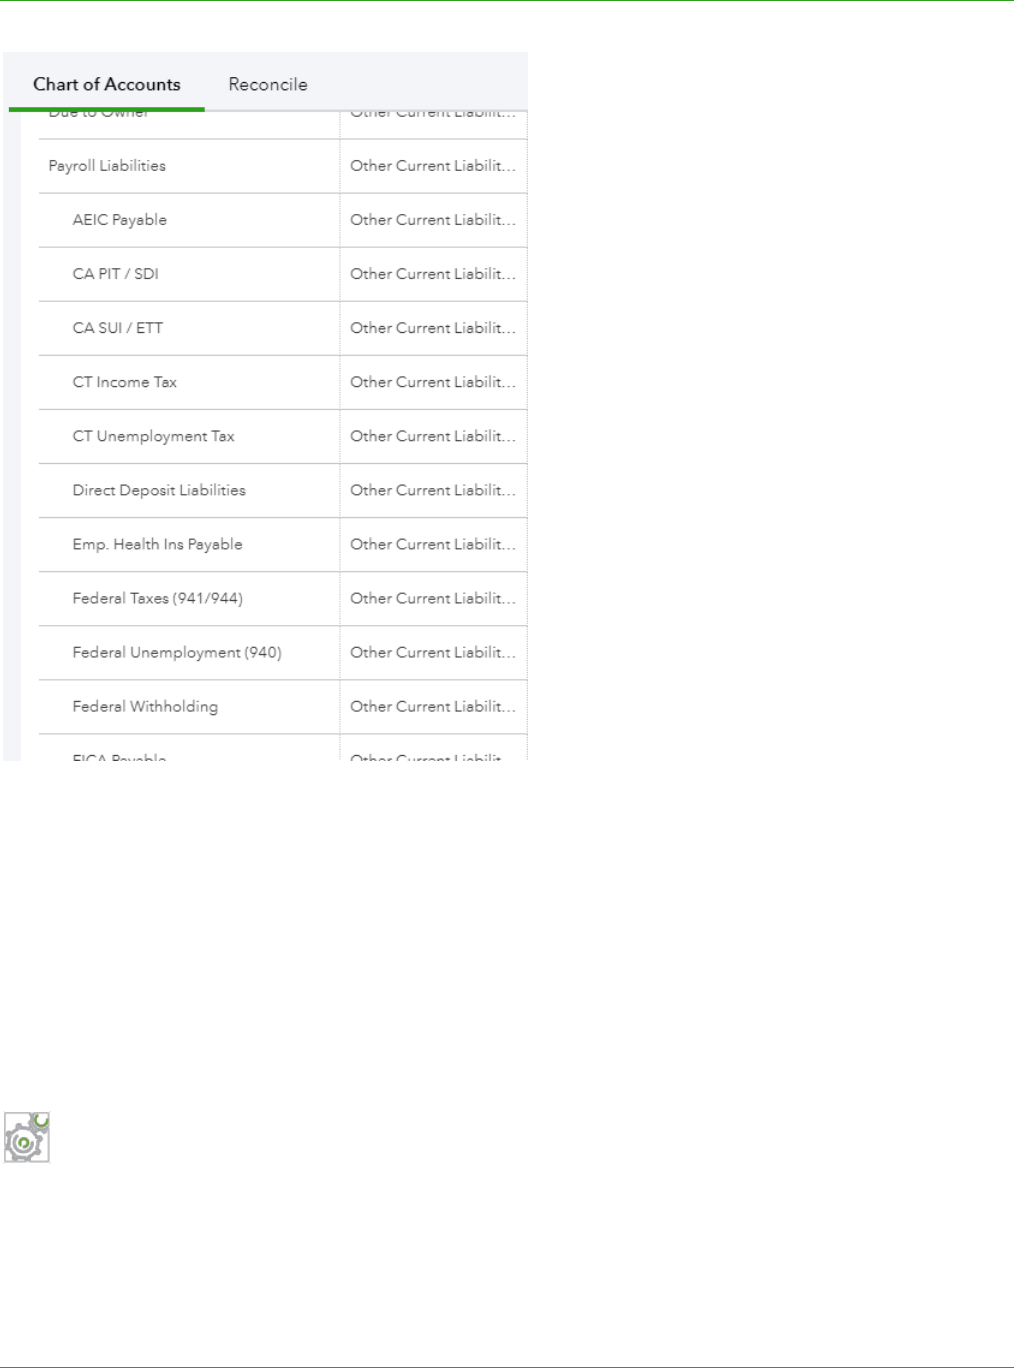
Payroll Liability Accounts
Usually there is no need for payroll liability accounts. Most payroll companies impound payroll taxes,
meaning the funds are included in the amount deducted from the bank account each pay period, so
there is no accruing liability on the books of the company.
However, if the client pays the payroll taxes directly to the agency, then you would need to set up
payroll tax liability accounts to correspond with the payroll taxes related to the company. In this
situation, your journal entry would include extra lines to post amounts to the liability accounts with
each payroll.
Supplemental Guide Topic 1: Special Transactions
Module 3: Special Transactions 16
Other Considerations
You should also consider if there is a need to allocate payroll by class, location or customer as this
will be a factor in training your client to record the journal going forward.
Recording
Once the proper accounts have been set up, design a journal entry and mark it as recurring for
simple entry.
Step-by-Step: Set up a Recurring Payroll Journal Entry
The client uses a third party payroll company to process their bi-weekly payroll. The wages and taxes
are impounded each pay period and remitted by the payroll company. The employees participate in
a 401K plan and have amounts deducted from their paychecks. These amounts are remitted to the
brokerage by the client.
Supplemental Guide Topic 1: Special Transactions
Module 3: Special Transactions 17
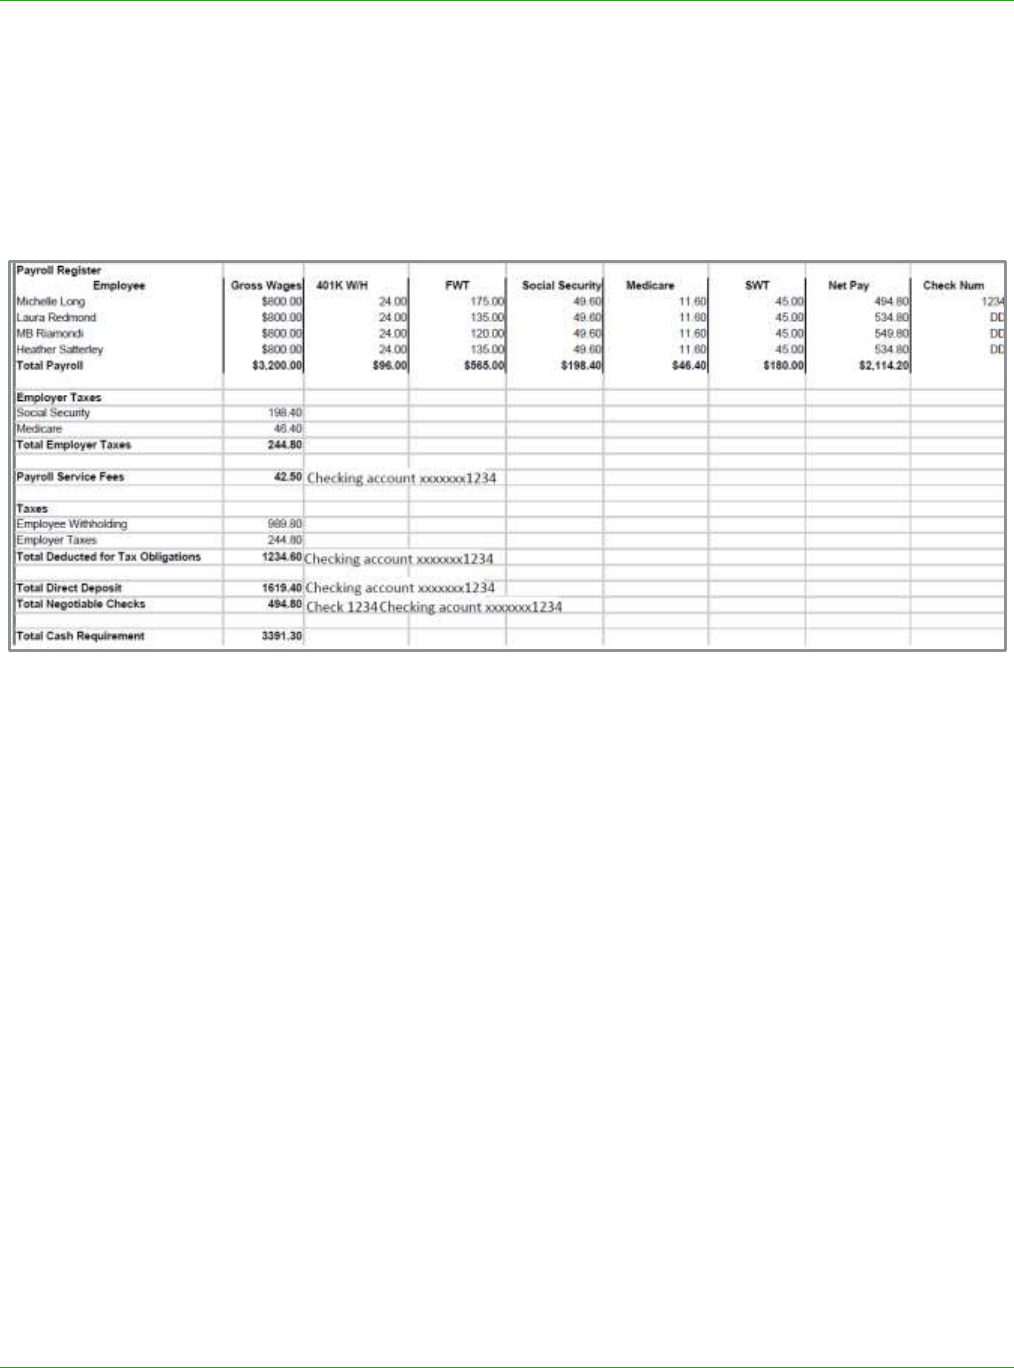
Below is a payroll report provided from the outside payroll service that will be used to enter the
information into the recurring template.
For this example, we will use one account for Salaries & Wages and one account for Payroll Tax
Expense. You will also need to set up a liability account for the 401K payable and a Payroll Service
Fee expense account.
1. Set up accounts as needed to record the payroll expenses and payments: gear Chart of
Account New Account.
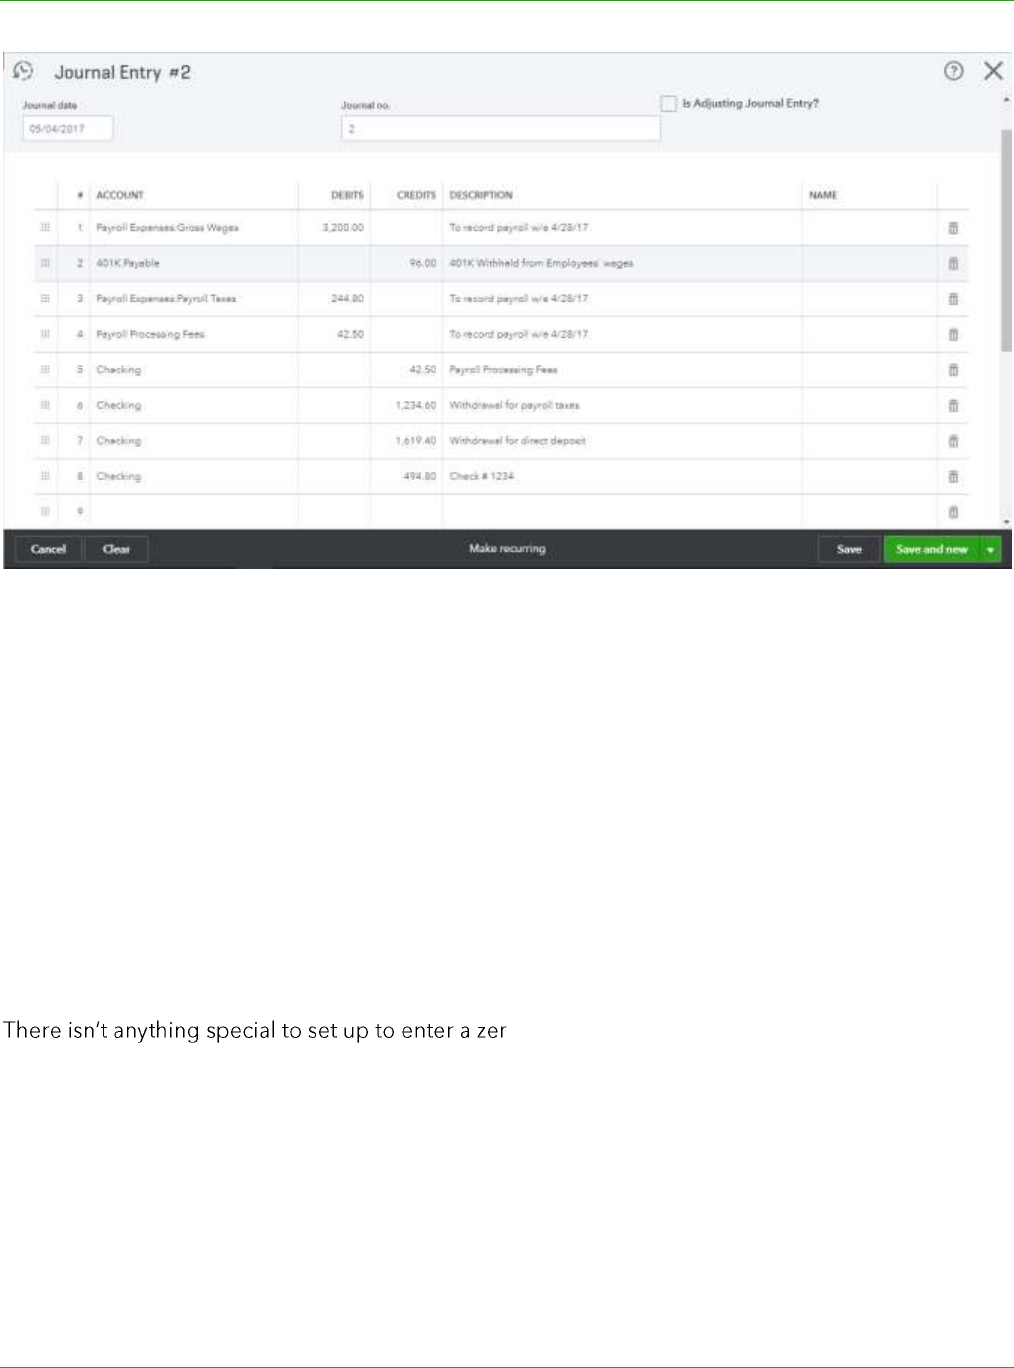
2. Quick Create Journal Entry. Adjust the journal entry as needed to match the bank account
activity. If individual checks come out of the bank account, then you need to enter the credit for
each net check instead of a total amount withdrawn from the bank account. There is no need to
enter all the paycheck details (the payroll service has the details) just enter the net check amount.
3. Click Save.
Supplemental Guide Topic 1: Special Transactions
Module 3: Special Transactions 18
You can watch the recording for this module to see a demonstration of the setup and recording of
this outside payroll journal entry.
NOTE: You can set this up as a recurring transaction and receive automated reminders, then train the
client to fill in the journal entry with the appropriate amounts from the payroll journals.
ZERO DOLLAR EXPENSE
There are some things you cannot adjust using a journal entry, such as items or billable expenses. In
these situations, use a zero-dollar expense transaction (the expense transaction amount is zero),
which allows you to make the adjustment because you can enter items on a check and make things
billable too.
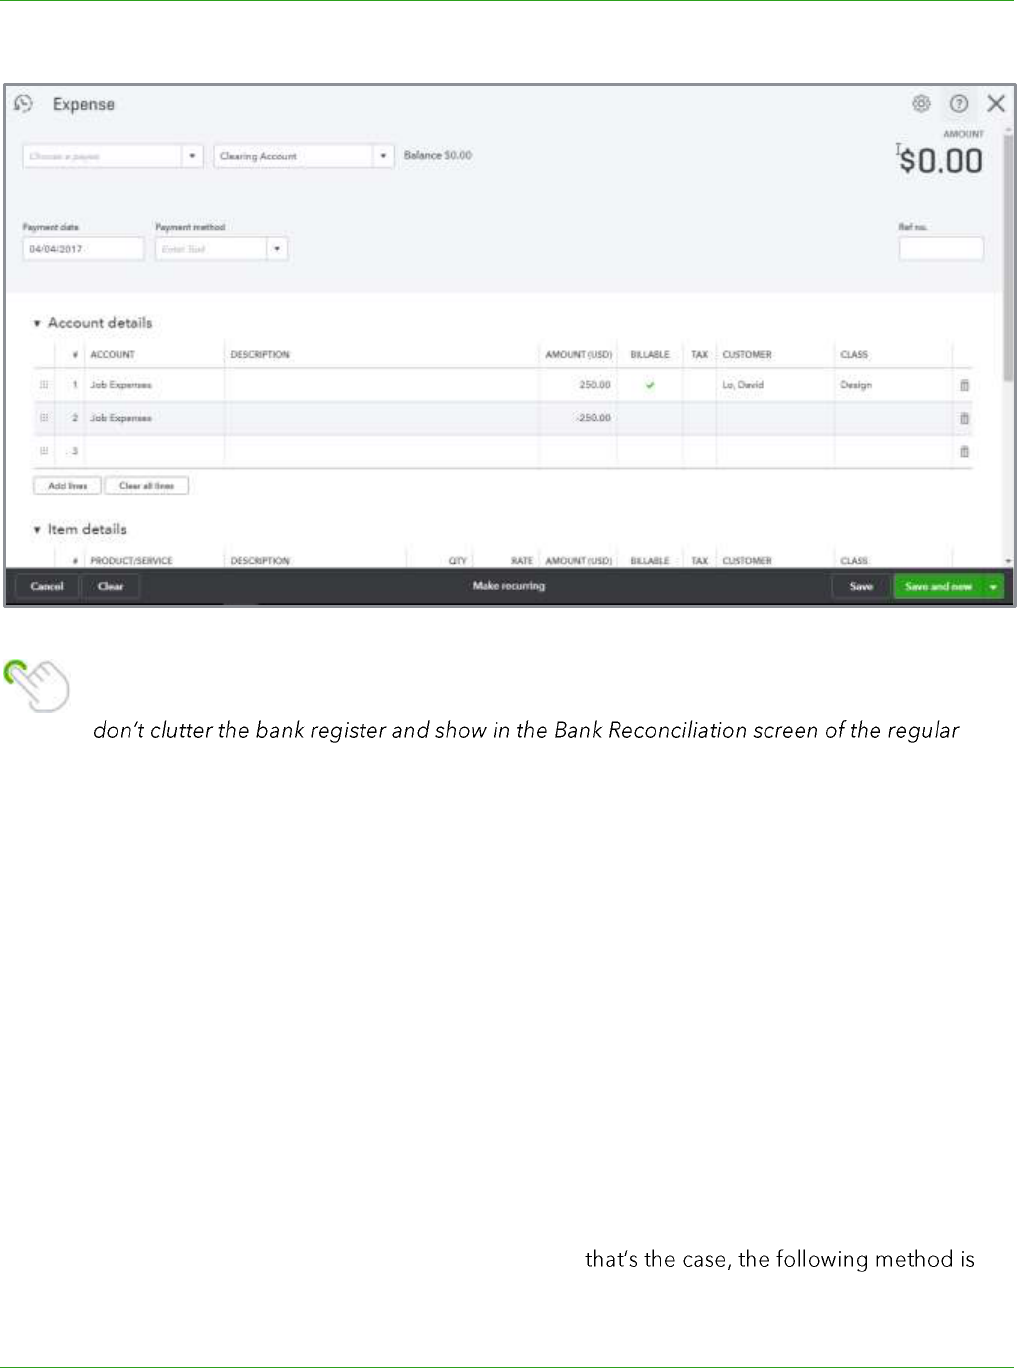
o-dollar expense. The debit part of the entry
should be entered on the check as usual for an account or item. The credit part of the entry (to offset
so the expense totals zero) should be entered as a negative amount to an account or item.
Supplemental Guide Topic 1: Special Transactions
Module 3: Special Transactions 19
Tip: You can set up a Clearing Account (bank type) for these types of transactions so they
bank accounts.
WRITE OFF INVOICES
Situation
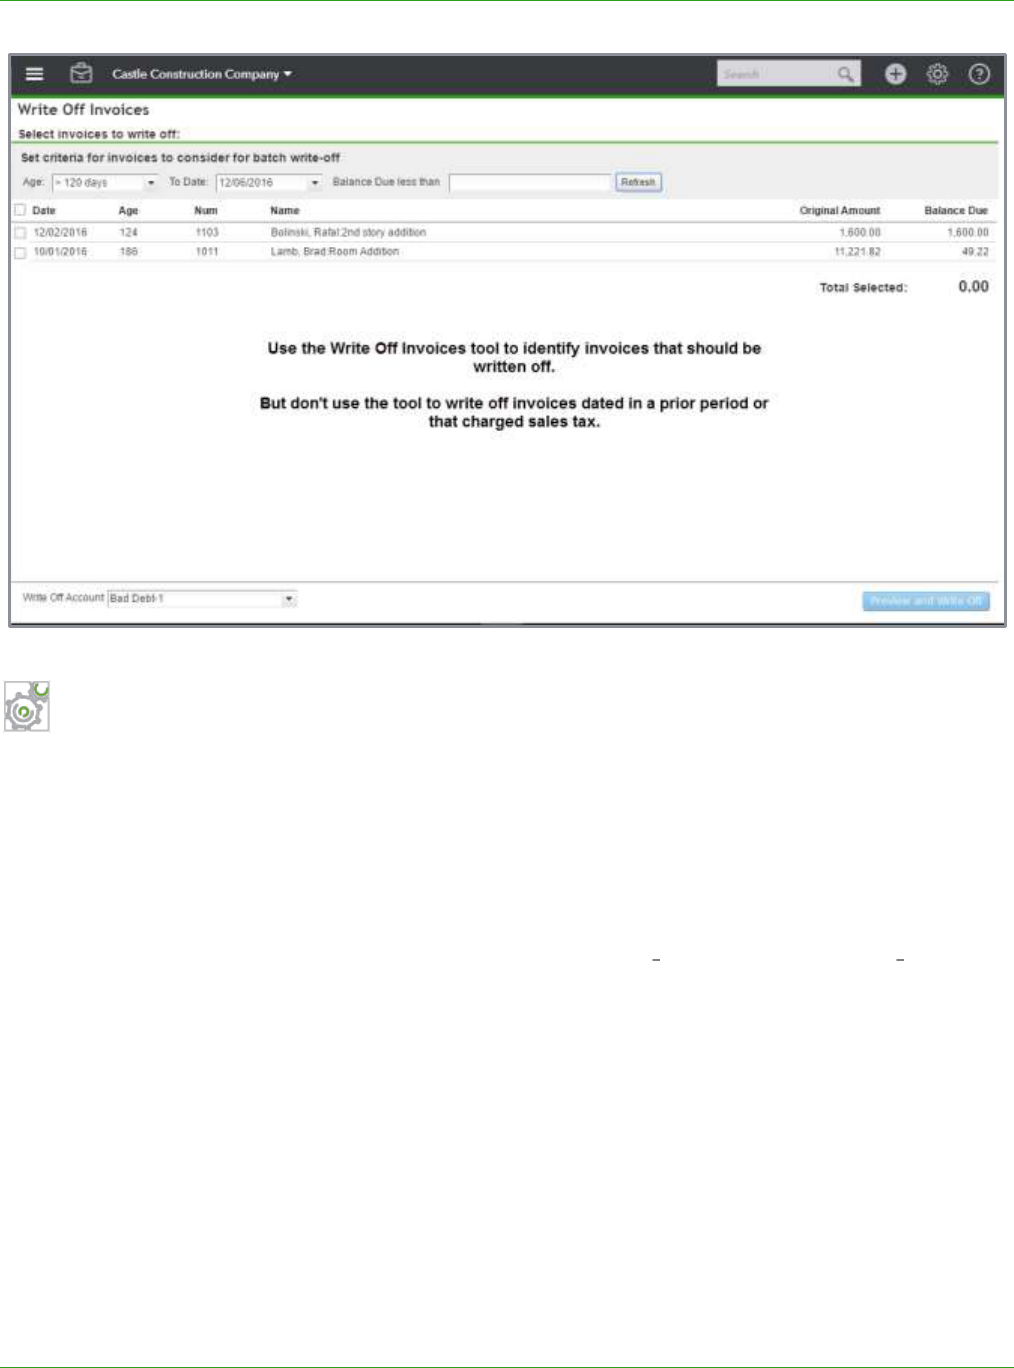
Periodically you will need to write off bad debts that are uncollectible and remove them from
accounts receivable. There is a Write Off Invoices tool in QuickBooks Online Accountant. However,
you must use caution when using this tool.
The write-off tool uses a discount item to write off the open invoice and applies the discount to the
invoice as of the original date of the invoice. This may cause prior period balances to change thus
changing prior period retained earnings. This tool should only be used to write off invoices in the
current period to avoid this situation.
While there are different methods to write off an invoice, if there is sales tax on the invoice, it is
important to adjust the sales tax liability account as well. If
recommended.
Supplemental Guide Topic 1: Special Transactions
Module 3: Special Transactions 20
Step-by-Step: Write Off Invoices Dated in a Prior Period or that Charged
Sales Tax
1. Identify invoices to be written off. The Write Off Invoices tool can help you prepare this list as it
allows you to filter invoices based on age and amount.
2. Set up a service item called Bad Debt posted to the Bad Debt expense account (or a contra
income account since it is not deductible on cash basis). If you have both taxable and non-
taxable items, you should set up two service items: Bad Debt Taxable and Bad Debt Non
Taxable.
3. In Company Settings Advanced Automation, turn off Automatically Apply Credits to
ensure the credit is applied to the invoice to be written off.
4. Enter a Credit Memo using the Bad Debt items and enter the amounts for taxable and non-
taxable as appropriate. This will adjust the sales tax liability account for the write off.
5. Open Receive Payments, select the customer and click to apply the credit memo entered to the
invoice to be written off.
Supplemental Guide Topic 1: Special Transactions
Module 3: Special Transactions 21
NEGATIVE DEPOSIT
Situation
If your client uses a third party merchant service provider instead of QuickBooks Payments, you may
have a situation where total refunds for the day exceed the total payments. This will result in a
withdrawal from the bank account instead of deposit. If you are using QuickBooks Payments, this
issue is resolved automatically for you by QuickBooks, but if you or your client is using another
In this case, you have payments in the Undeposited Funds account that need to be credited and you
you to create a
negative deposit!
Solution
There is no setup required to create this transaction. Create a new line in the Add new deposits
section of the Deposit screen coded to the same bank account you are depositing to. This will offset
the total negative payments and make the total of the deposit zero. This will also create a deduction
in the bank register for the proper amount and clear the balance in the Undeposited Funds account.
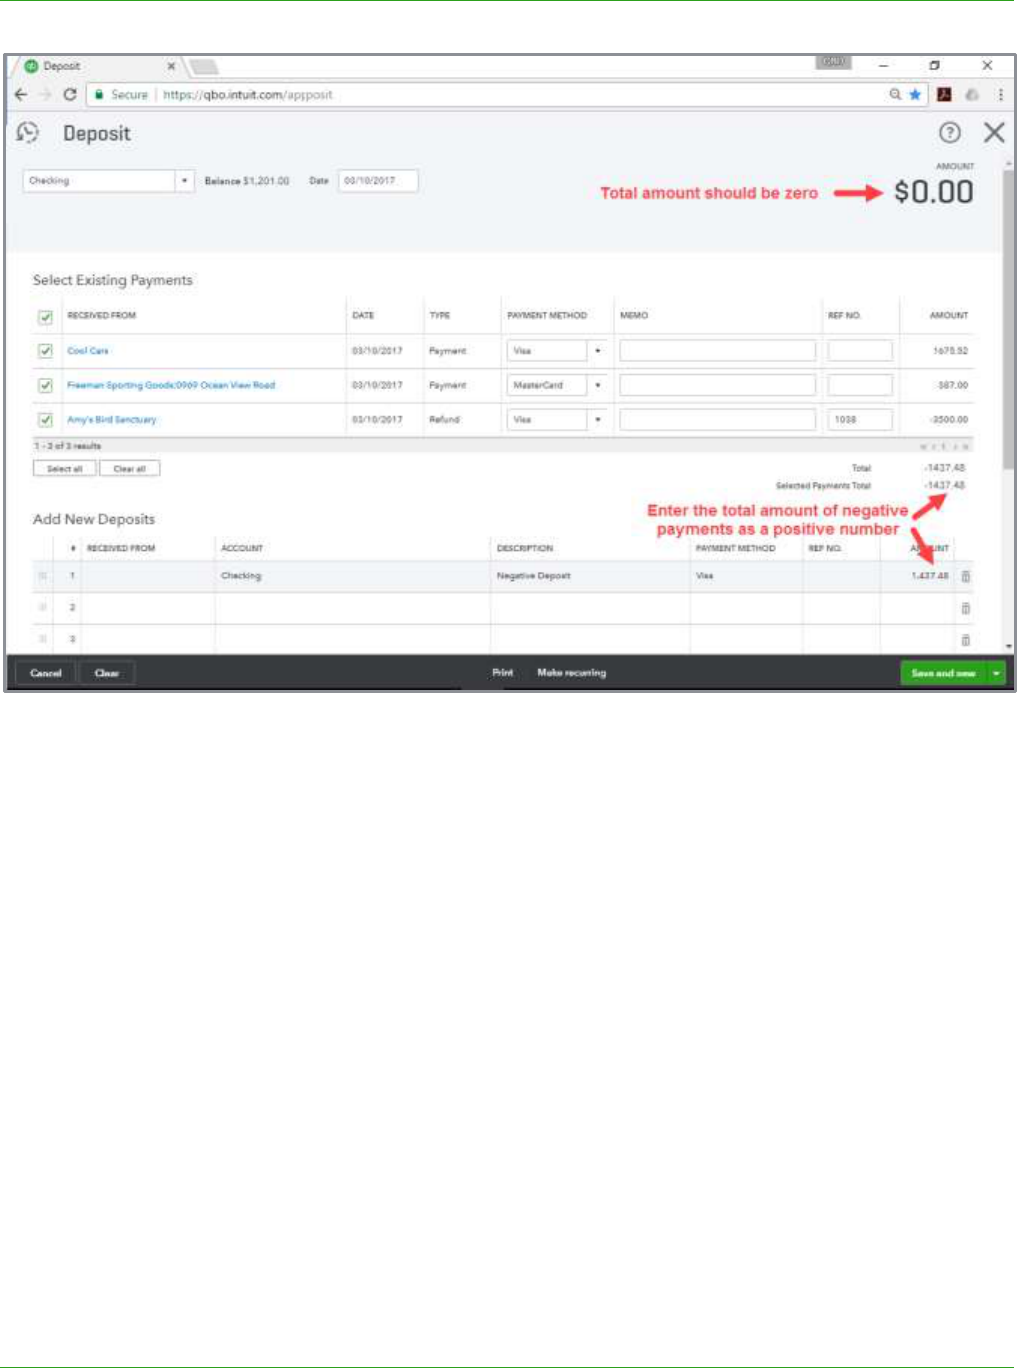
Step-by-Step: Record a Negative Deposit
1. Record a customer refund using the Refund Receipt screen, use Undeposited Funds as the
Deposit to account.
2. Open the Bank Deposits screen, select the payments and refund included in the bank draft. This
will cause a negative amount to be displayed.
3. Select the bank account from the Account field drop-down list, and enter the amount of the total
selected payments as a positive number in the Add New Deposit grid on the Deposit screen.
Make sure the total amount of the deposit is zero.
4. Click Save and close.
Supplemental Guide Topic 1: Special Transactions
Module 3: Special Transactions 22

Supplemental Guide Topic 2: Complex Workflows
Module 3: Special Transactions 23
Topic 2: Complex Workflows
BOUNCED CHECKS
Situation
Sometimes customers pay with a check that bounces. When this occurs, a few things need to
happen in QuickBooks to correctly reflect the failed transaction in the books:
The deduction for the returned check and bank fee must be recorded in the bank register
The accounts receivable balance must be increased
The customer must be invoiced for the bank charge assessed, plus any handling fee
The aging on the original invoice must be restored because the payment was returned

Supplemental Guide Topic 2: Complex Workflows
Module 3: Special Transactions 24
Setup
Create a Bounced Check service item mapped to the checking account involved. If you have
multiple checking accounts, you will need to set up a separate service item for each one. Create a
Bounced Check Fee service item mapped to an income account or to the Bank Fees expense
account (to offset the fees charged by your bank).
Supplemental Guide Topic 2: Complex Workflows
Module 3: Special Transactions 25
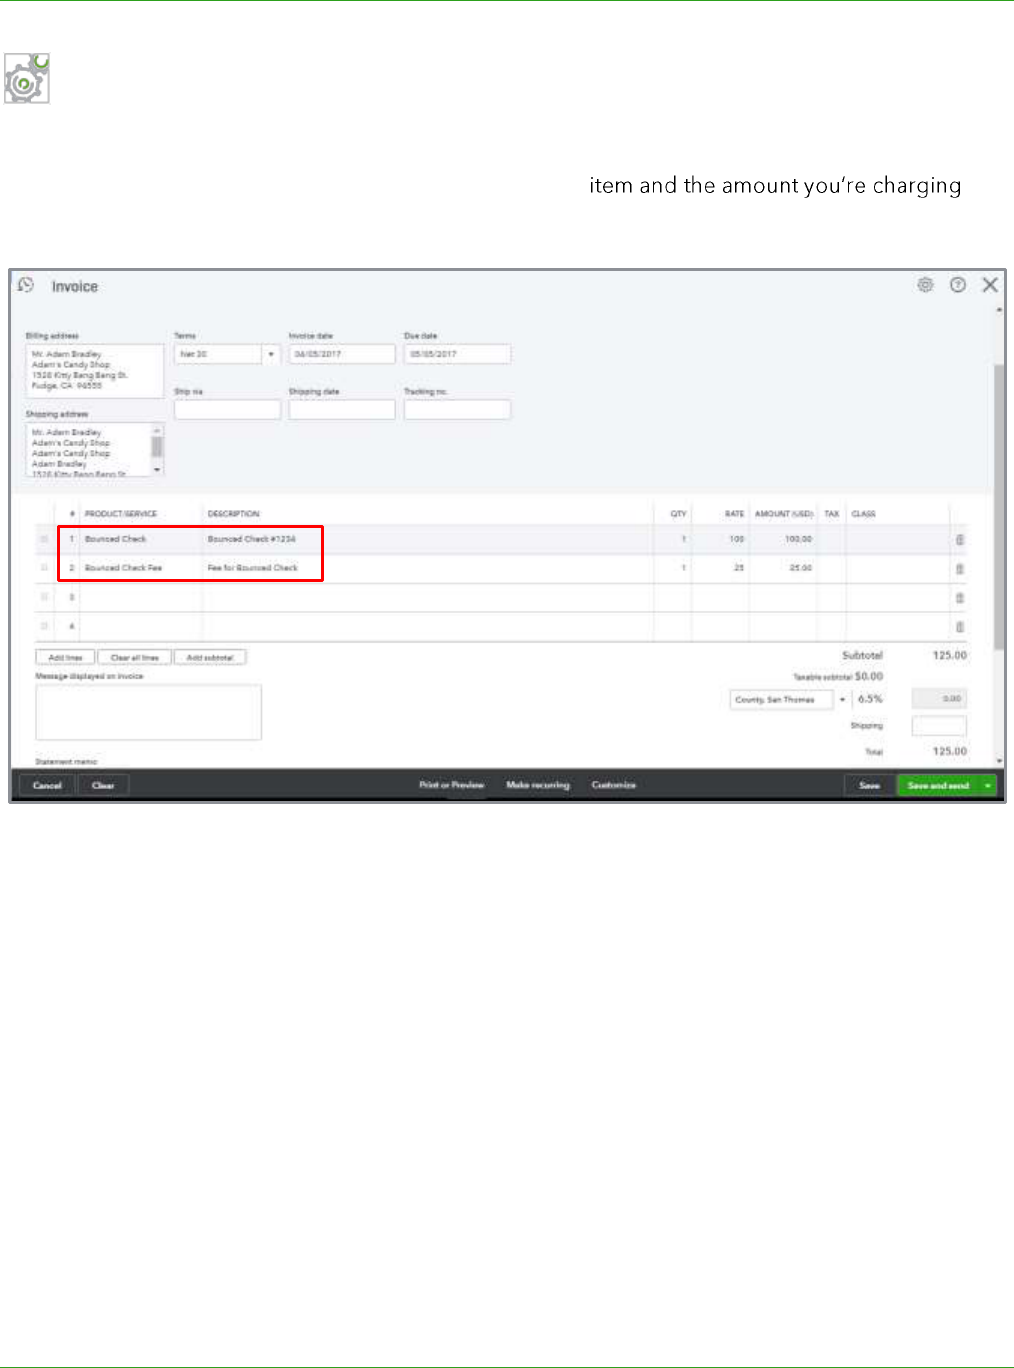
Step-by-Step: Record the Bounced Check
1. Create an invoice for the customer that includes the Bounced Check item and the amount of the
check that bounced as well as the Bounced Check Fee
them for the bounced check.
2. Enter the bank service charge as an expense or check, with the date the check bounced and the
NSF fee charged by the bank, posted to the Bank Fees expense account.
3. Open the original payment that was received from the customer (the one that bounced) and
unselect the invoice it paid then select the invoice you created in Step 1. This will restore the
aging of the original invoice.
4. When payment is received for the bounced check, use Receive Payment to post the payment
against the open invoice.
Supplemental Guide Topic 2: Complex Workflows
Module 3: Special Transactions 26
ALLOCATE OVERHEAD
Situation
Many businesses allocate overhead or payroll expenses to a class, location or customer to create
segmented financial reports that give better insight into the operations of a business. The allocation
is made by creating a journal entry that balances with a zero-dollar effect on the accounts involved.
There are two methods businesses commonly use to allocate expense and both methods work
essentially the same way, but vary in the use of accounts verses classes to capture the transactions
that need to be allocated.
In the first method, the expenses to be allocated are coded to an overhead expense account. The
second method uses the regular expense accounts (such as supplies, job expenses, etc.) but is
coded to an overhead class. Both methods will only work in QuickBooks Online Plus subscription
level companies.
nal entry to allocate the amounts to each class, location or
customer. For each account, debit the account by the amount to be allocated to each segment, then
credit the expense account for the total allocated.

Supplemental Guide Topic 2: Complex Workflows
Module 3: Special Transactions 27
Method 1 Overhead Allocation Account
This method requires you to capture all the transactions that need to be allocated in one account
then allocate them using the same account to each class.
Step-by-Step: Overhead Allocation Account
1. Set up an Overhead Allocation account as an Other Expense type.
2. Make a journal entry. Debit the Overhead Allocation expense account and indicate the name of
the class, location or customer. Add additional lines for each class, location or customer as
needed.
3. On the last line enter a credit for the total to the Overhead Allocation expense account with no
class, location or customer. However, if you have set up an Admin or Overhead class, location or
customer, then you would use it on the last line for the credit.
Supplemental Guide Topic 2: Complex Workflows
Module 3: Special Transactions 28
Method 2 Overhead Allocation Class
The clas
Instead, each transaction would be posted to the normal expense account (e.g., Utilities,
Advertising, etc.) and classed to the Overhead Allocation class when recorded. The allocation
journal entry would include lines for each expense account that includes transactions assigned to
this class.
Companies allocate overhead costs using different methods. Some common methods include
allocating by percentage of sales, gross profit, square footage or some other factor. To determine
the allocation percentage, divide the sales, GP, etc. of the segment by the total sales, GP, etc. for the
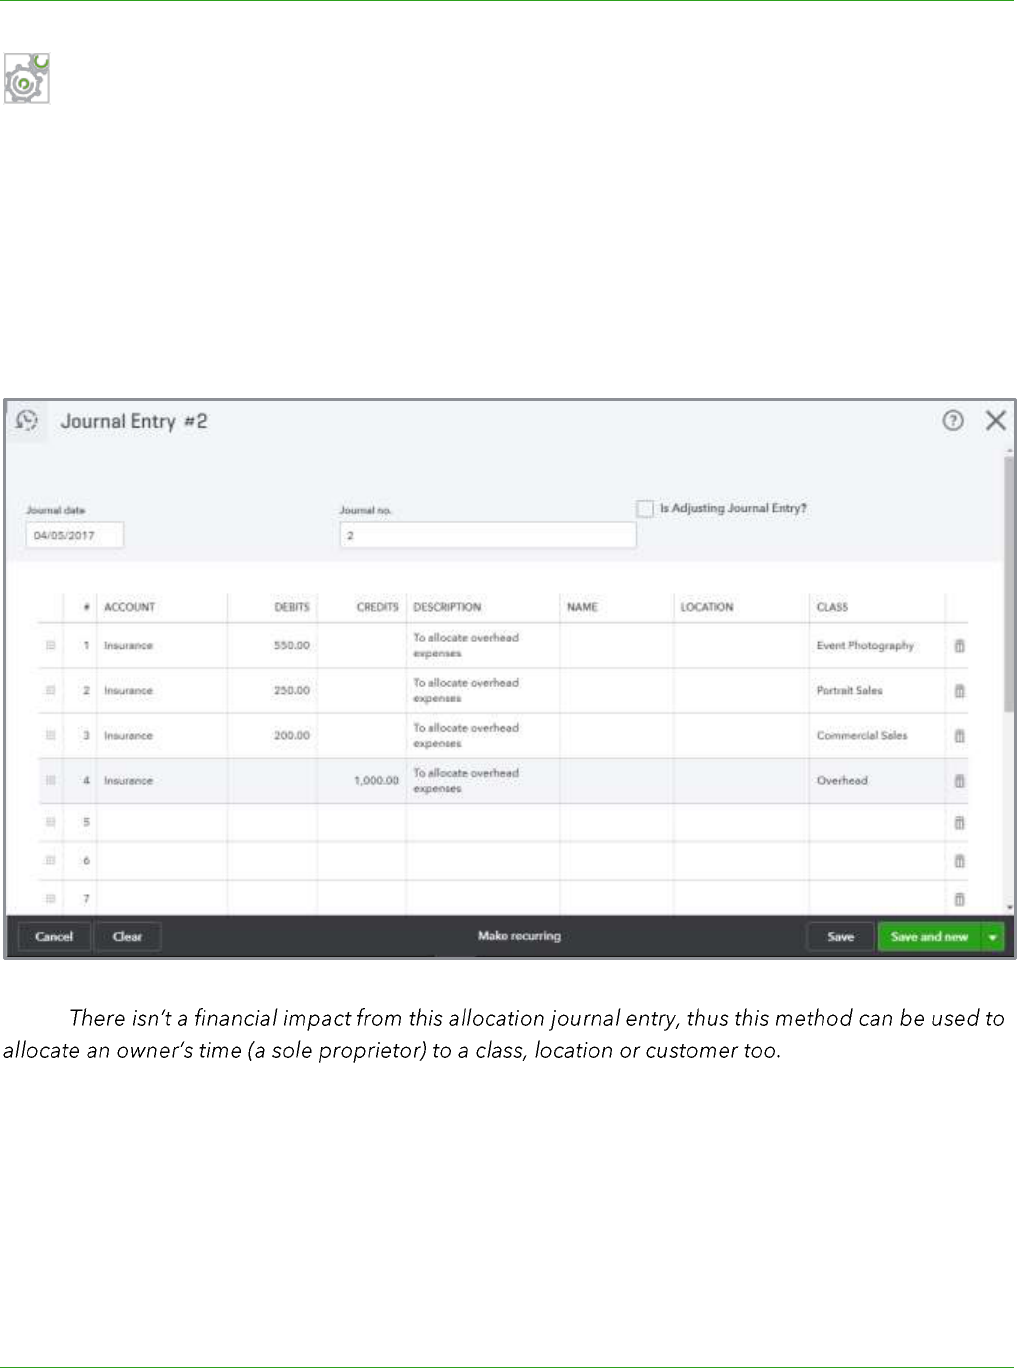
period. The example in the training video allocates overhead by percentage of sales for Event
Photography, Portrait Sales and Commercial Sales.
Below is the spreadsheet used in the example demonstrated in the video for this module. The
percentages are calculated by dividing the sales for each segment by the total sales for the period
($100,000). The total of each expense is multiplied by the allocation percentage for each segment to
determine how much should be allocated.
Satterley Studios Overhead Allocation
TOTAL
EVENT
PHOTOGRAPHY
PORTRAIT
SALES
COMMERCIAL
SALES
SALES
$100,000.00
$55,000.00
$25,000.00
$20,000.00
PERCENTAGE
OF SALES
100%
55%
25%
20%
EXPENSES
INSURANCE
$1,000.00
$550.00
$250.00
$200.00
RENT
$12,000.00
$6,600.00
$3,000.00
$2,400.00
SUPPLIES
$35,000.00
$19,250.00
$8,750.00
$7,000.00
UTILITIES
$1,500.00
$825.00
$375.00
$300.00
Supplemental Guide Topic 2: Complex Workflows
Module 3: Special Transactions 29
Step-by-Step: Overhead Allocation Class
1. Set up an Overhead Allocation class.
2. Make a journal entry. Debit the appropriate account (e.g., Utilities, Advertising, etc.) and indicate
the name of the class, location or customer. Add additional lines for each class, location or
customer as needed.
3. For each account line debited, enter a credit for the same account and use the Overhead
Allocation class and the same location or customer as the debit line.
NOTE:

Supplemental Guide Topic 2: Complex Workflows
Module 3: Special Transactions 30
BARTER TRANSACTIONS
Situation
Small businesses may enter into barter transactions where they trade goods or services with other
small businesses. It is important to make sure earned income is reported regardless of how payment
is received. Recording barter transactions ensures revenues and expenses are recognized in the
proper period; it is especially important when inventory is affected. Some examples of barter
transactions may be a web designer exchanging design services for mechanical work, or a
photographer trading services for landscaping.
Setup
To track bartering in QuickBooks, set up a Barter bank type account to track the exchange of goods
and services. Record the sales and expense transactions normally, but instead of depositing money
or paying bills out of the regular bank account, record these transactions using the Barter account.
Any amounts due to or from the trading partner that exceeds the bartered amount will be paid or
received normally using regular bank accounts.
Step-by-Step: Track Barter Transactions in QuickBooks
1. Create a new bank type account called Barter Clearing account.
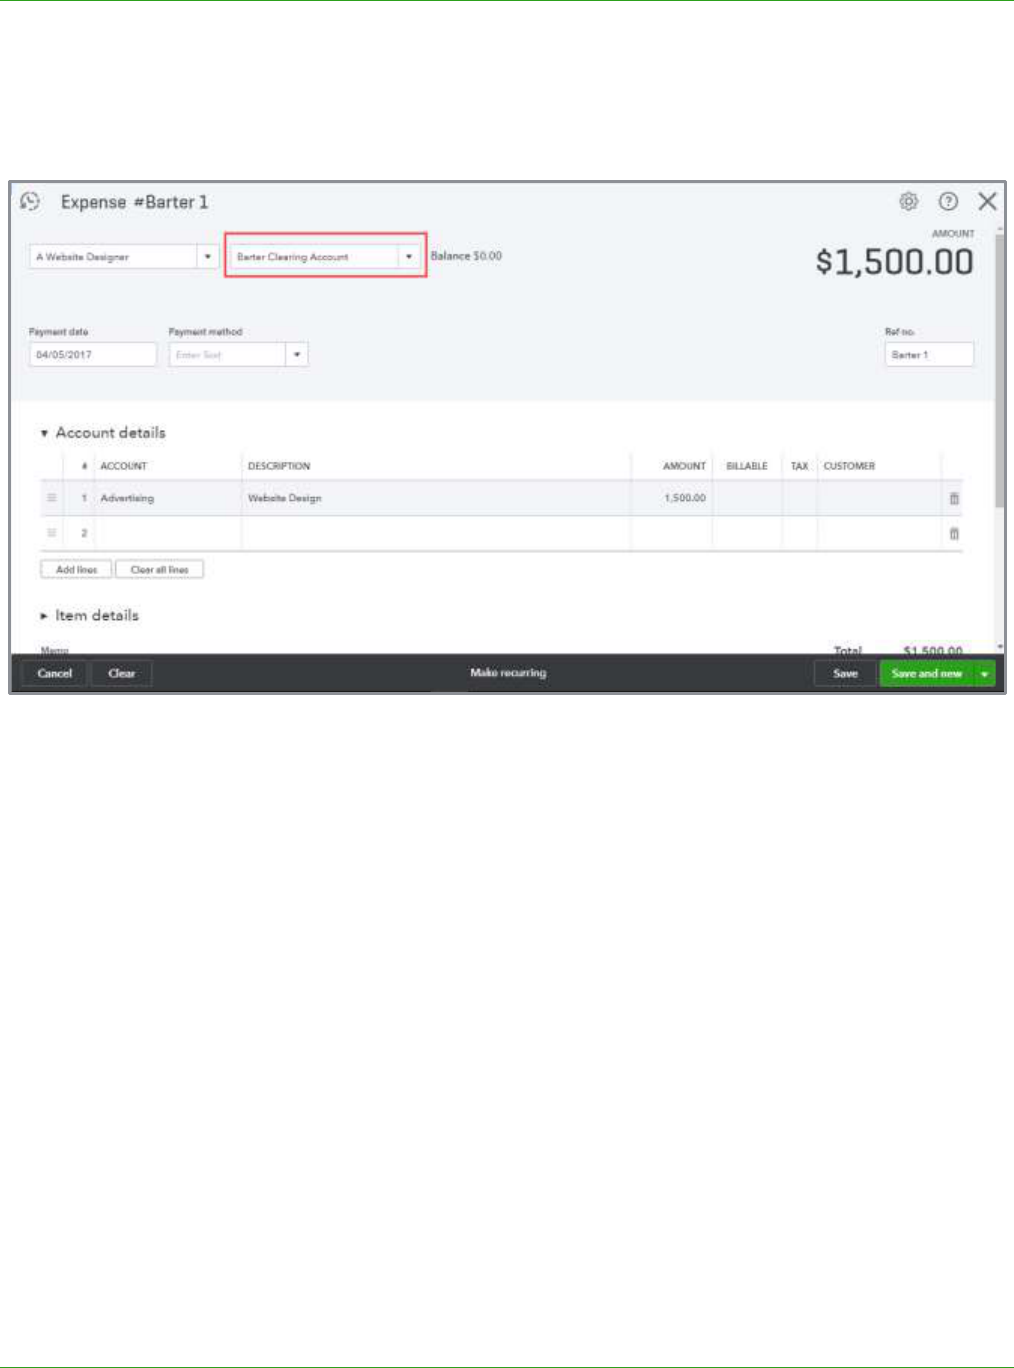
2. Enter the sale as normal via a sales receipt or invoice and receive payment. Post it to the Barter
Clearing account as the bank account.
Supplemental Guide Topic 2: Complex Workflows
Module 3: Special Transactions 31
3. Enter the purchase as a normal purchase via a check, expense or enter and pay a bill for the
services or items received. For the payment method use the Barter Clearing account as the bank
account.
This method allows the user to treat the barter transactions the same as cash transactions. All the
transactions can be found in one register and you can implement procedures to reconcile the Barter
Clearing account, which can help the client avoid errors in record keeping.
NOTE: You could use a journal entry to record the bartered portion of a transaction because you can
have multiple Accounts Receivable and Accounts Payable lines in a single journal entry in QuickBooks
Online. However, there are advantages to using the method described in this training, such as:
consistency of workflow because the transactions are recorded in the usual sales and expense
transaction screens, and the Barter Clearing account provides a register where you can view all barter
transactions.

Supplemental Guide Topic 2: Complex Workflows
Module 3: Special Transactions 32
CLIENT RETAINERS AND DEPOSITS
Situation
Many businesses collect deposits or retainers from their customers; accountants may collect a
retainer before beginning a big project, attorneys commonly require retainers from their clients, and
other business may require deposits on goods or services they sell. These payments may be called a
retainer, deposit, down payment or similar term, bu them as retainers during this
training. We are discussing money received as payment in advance of the services or work being
performed, in other words, unearned income. We are not discussing security deposits received from
tenants (that is always recorded as a liability when received).
Law firms might also use trust accounts to hold client funds. The difference is with trust accounts, you
must set up a separate bank account to hold your client's funds. Be sure to always follow the rules of
your state regarding the professional and ethical conduct for handling client funds. Failure to abide
by those rules and practices could result in administrative, civil or criminal sanctions.
This section discusses three options for handling client retainers:
Using the Deposit feature in QuickBooks
Credit balance in AR and reclassify
Unearned income method
Determining which one is right for a client will vary depending on a variety of factors such as:
Sales tax Does the client need to assess sales tax on the retainer? (Check the laws for your state
or locality.)
Financial reporting Are financial statements provided to outside parties?
Materiality How often does the client receive retainers and for how much?
Client capability Is the client capable of handling the workflow?
Supplemental Guide Topic 2: Complex Workflows
Module 3: Special Transactions 33
Option 1: Deposit Feature in QuickBooks Online
Setup
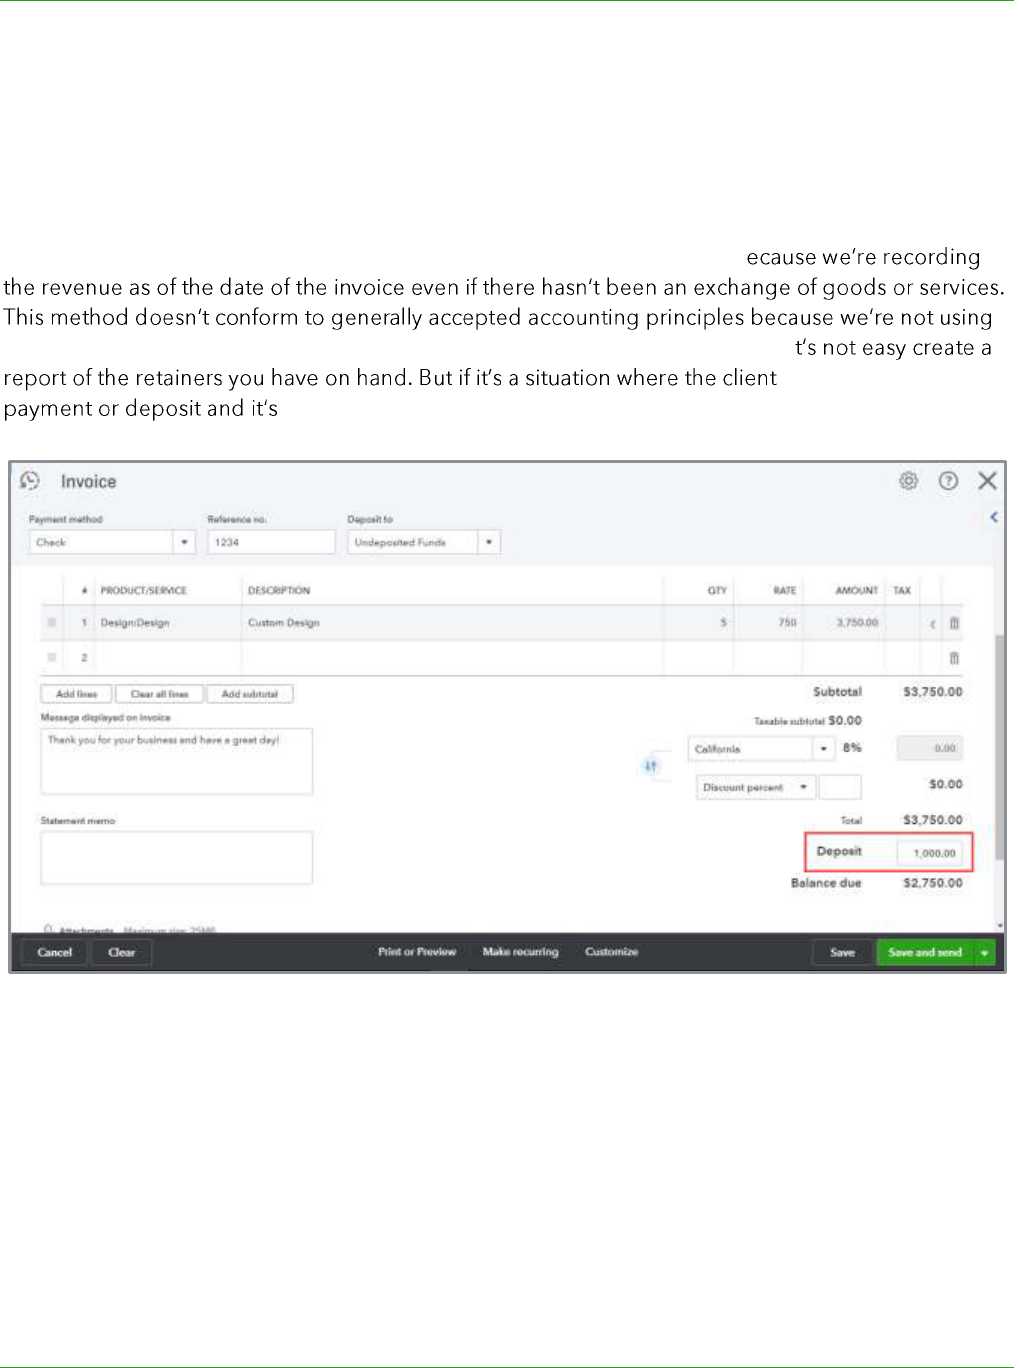
The Deposit feature in QuickBooks Online allows deposits to be recorded in the same form as the
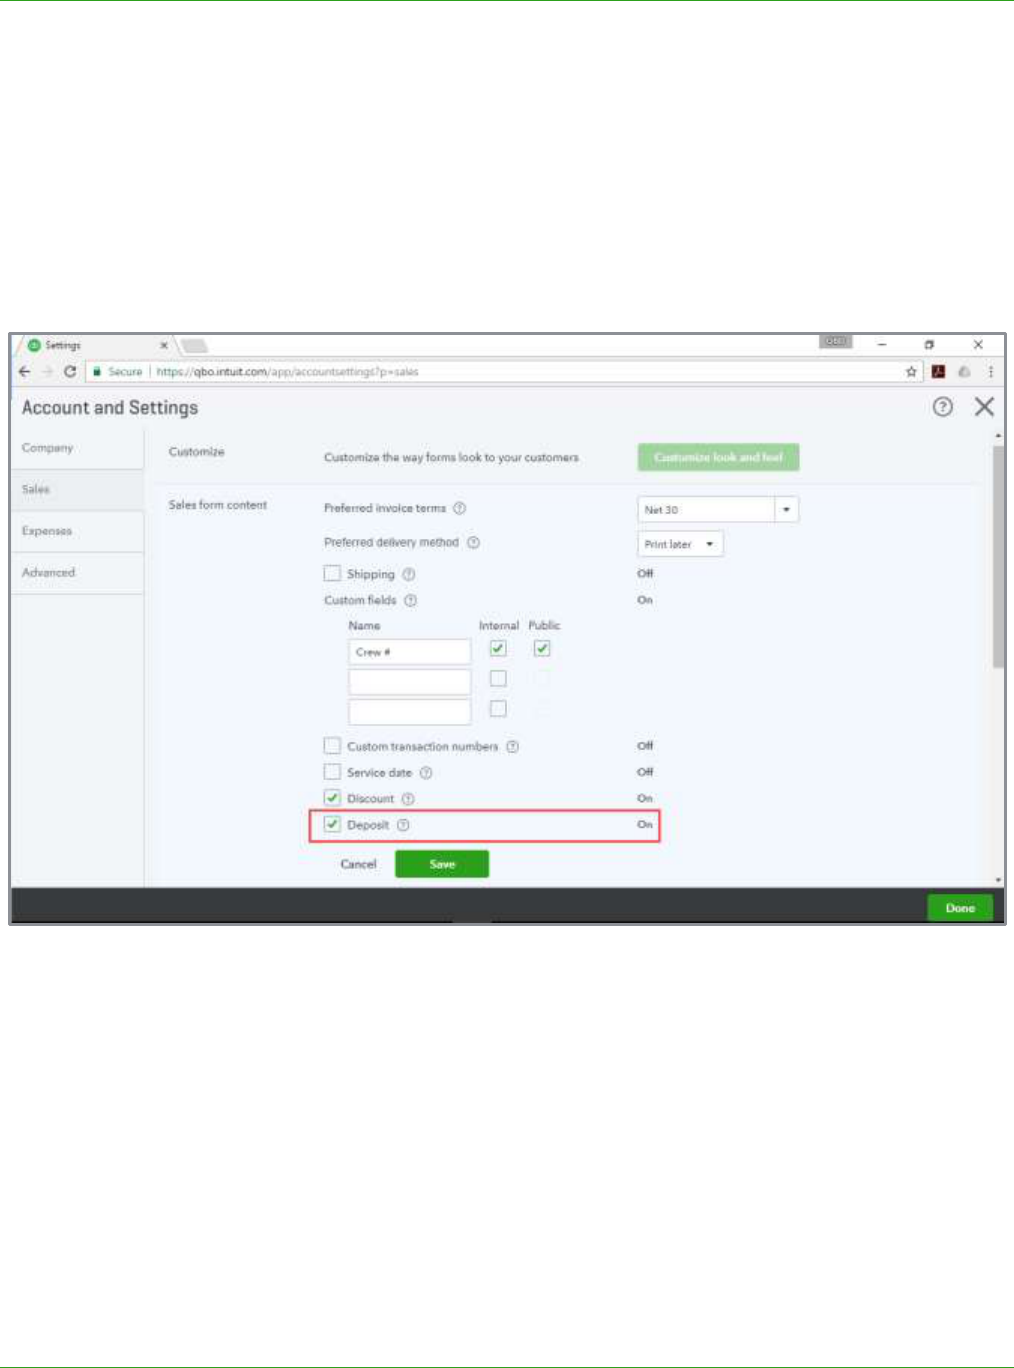
sales transaction. To turn on the Deposit feature, navigate to Company Settings Sales Sales
Form Content then check the box to turn on the Deposit feature. When creating the invoice, enter
the retainer amount in the Deposit field.
Supplemental Guide Topic 2: Complex Workflows
Module 3: Special Transactions 34
Recording
To record the deposit, create an invoice with the retainer amount in the Deposit field. When you use
this feature, the income is recorded based on the items billed on the invoice and the retainer is
posted to Undeposited Funds. The remaining balance due on the invoice is posted to accounts
receivable.
This method may be acceptable when a retainer is received occasionally b
an unearned income liability account. Another drawback of this method is that i
is receiving a down
nonrefundable, then this method could be acceptable.
Supplemental Guide Topic 2: Complex Workflows
Module 3: Special Transactions 35
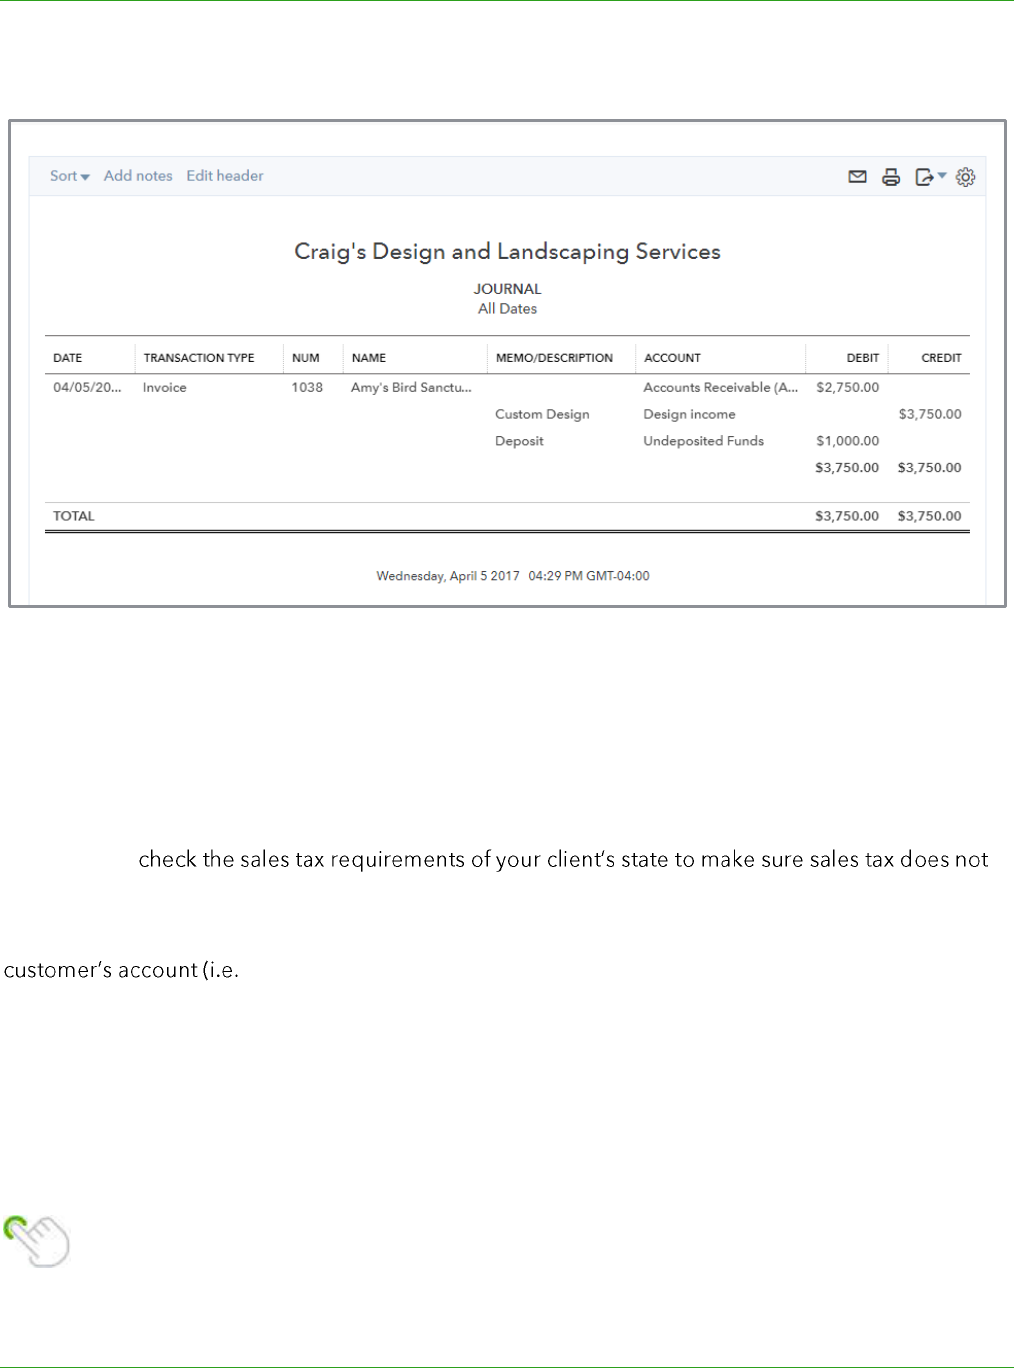
Here is what the general ledger entry looks like for this type of transaction:
Option 2: Credit Accounts Receivable and Reclassify at Year End
Option 2 requires no setup. This method follows the normal workflow, which may be easier for some
clients who enter the transactions as opposed to the accountant or bookkeeper doing it.
This option may be acceptable if the small business uses reports for management purposes only
(i.e., not provided to a third party) or when the total amount of retainers is not a material amount.
Make sure to
need to be collected on the retainer.
When using this option, the retainer is entered via Receive Payment creating a credit in the
, negative amount in accounts receivable). If you selected the automation
setting Automatically apply credits, the open retainer will automatically be applied to the invoice
once you create it. If not, when the retainer needs to be applied to the invoice, you can use the
Receive Payments button to apply the credit to the invoice on the date the income becomes earned
revenue. At year-end, the accountant should make a journal entry to reclassify the credit balance for
retainers from accounts receivable to an unearned income liability account. Then a reversing journal
entry should be entered on the first day of the new year.
TIP: Make sure to apply the deposit to the final invoice before sending it to the customer so
the correct amount due displays on the invoice.
Supplemental Guide Topic 2: Complex Workflows
Module 3: Special Transactions 36
Option 3: Unearned Income Method
You may decide the best option is to track retainers using an unearned income liability account. This
option follows GAAP and is recommended if financial statements are provided to outside parties or
if retainers are a normal course of business or a material amount.
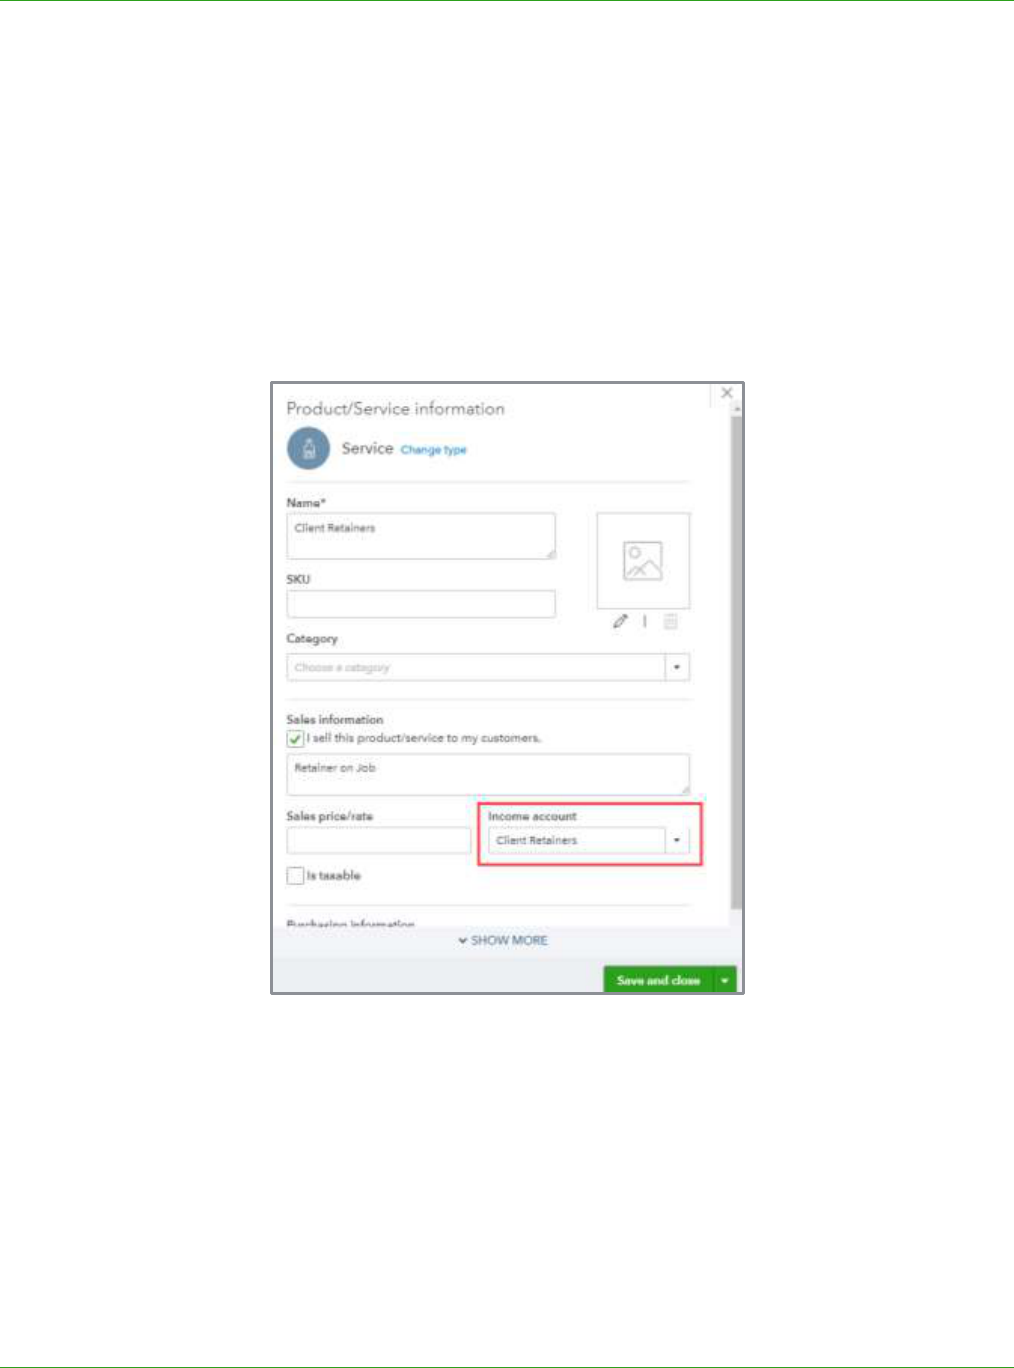
Setup
Create a liability account for Client Retainers. Then create a service item for Client Retainers with the
Income account field mapped to the liability account created.
Supplemental Guide Topic 2: Complex Workflows
Module 3: Special Transactions 37
Step-by-Step: Track Retainers Using the Unearned Income Method
1. Create a sales receipt (or invoice and payment) to record receipt of the retainer from the
customer, using the Client Retainers item you created, using QTY of 1 and Rate equal to the
amount of the retainer.
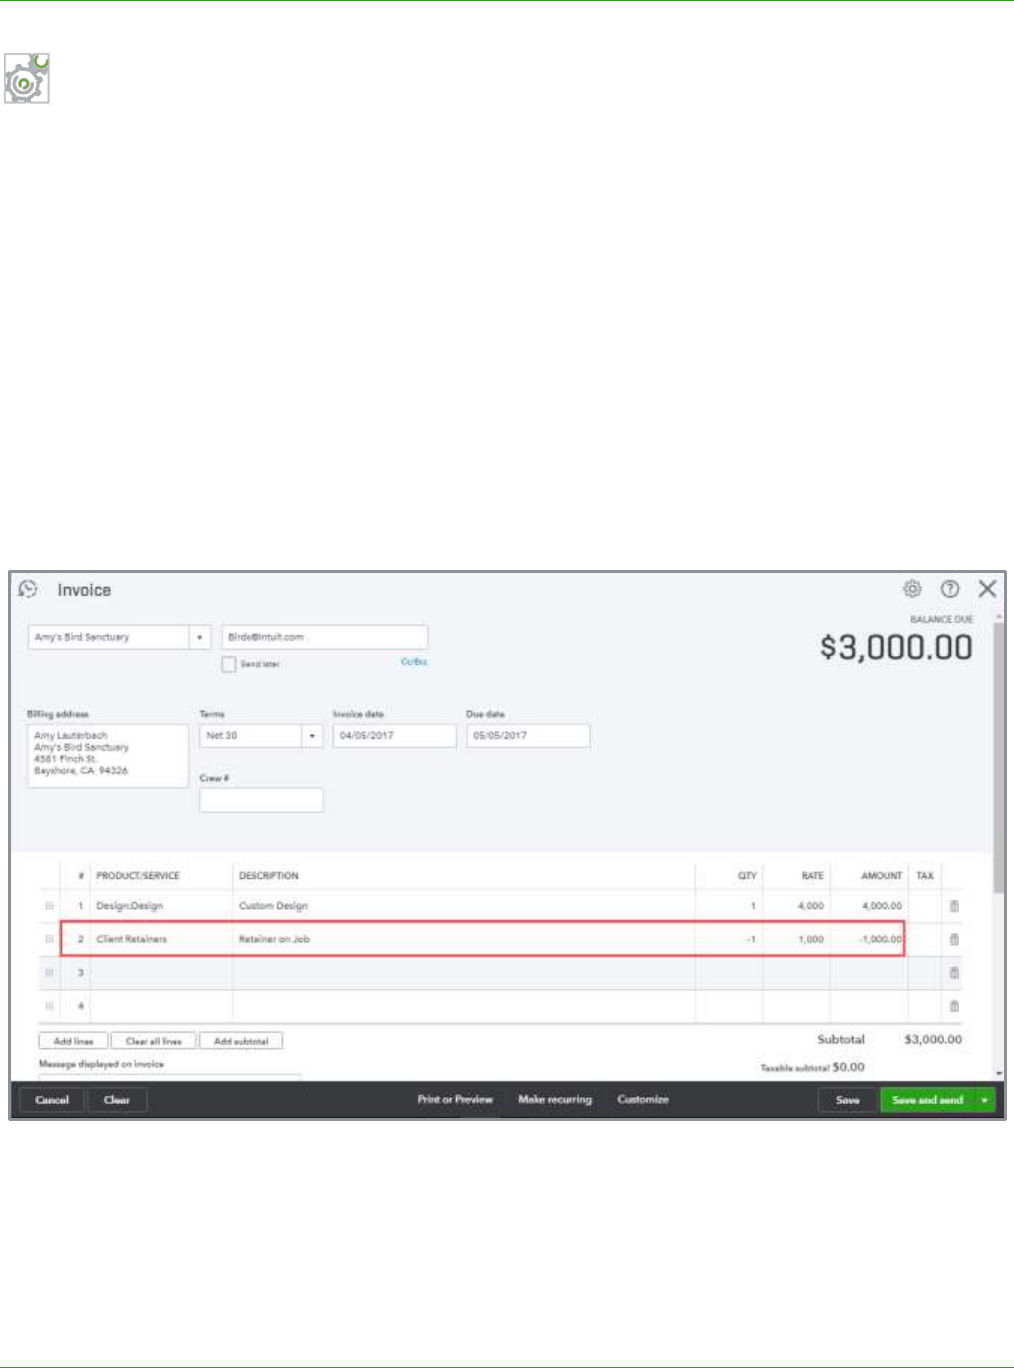
2. Once the work is performed, create another invoice or sales receipt for the appropriate items
based on the services rendered or products sold.
a. On the next line after all the products and services sold, enter the Client Retainers item using
a QTY of -1 and Rate equal to the original retainer amount (or the appropriate amount if it
was not for the full amount of the retainer) that you are applying).
b. The retainers can be broken down and applied to multiple invoices if desired. This removes
the amount from the liability account and recognizes the income earned. This also allows the
user to record sales tax correctly for each item.

Supplemental Guide Topic 2: Complex Workflows
Module 3: Special Transactions 38
TRACK COMMISSIONS
Situation
Lots of small business track and pay commissions to their sales reps or service contractors and need
a way to track the amounts owed on sales. The client needs to record the commission expense with
each sale as well as the liability owed to the sales rep. While there is no built-in calculator in
QuickBooks Online to track commissions, you can use Bundle type items to calculate and record the
accrual for commissions payable.
Step by Step: Set up QuickBooks to Track Commissions
1. Create a Sales Rep field to include on sales forms. Open Account and Settings Sales Sales
form content Custom fields and enter Sales Rep in one of the three Name boxes.

Supplemental Guide Topic 2: Complex Workflows
Module 3: Special Transactions 39
2. Create accounts for Commission Expense and Commission Owed (other current liability type).
3. Create two service items for Commission Expense and Commission Owed and map them to the
appropriate accounts.
Supplemental Guide Topic 2: Complex Workflows
Module 3: Special Transactions 40
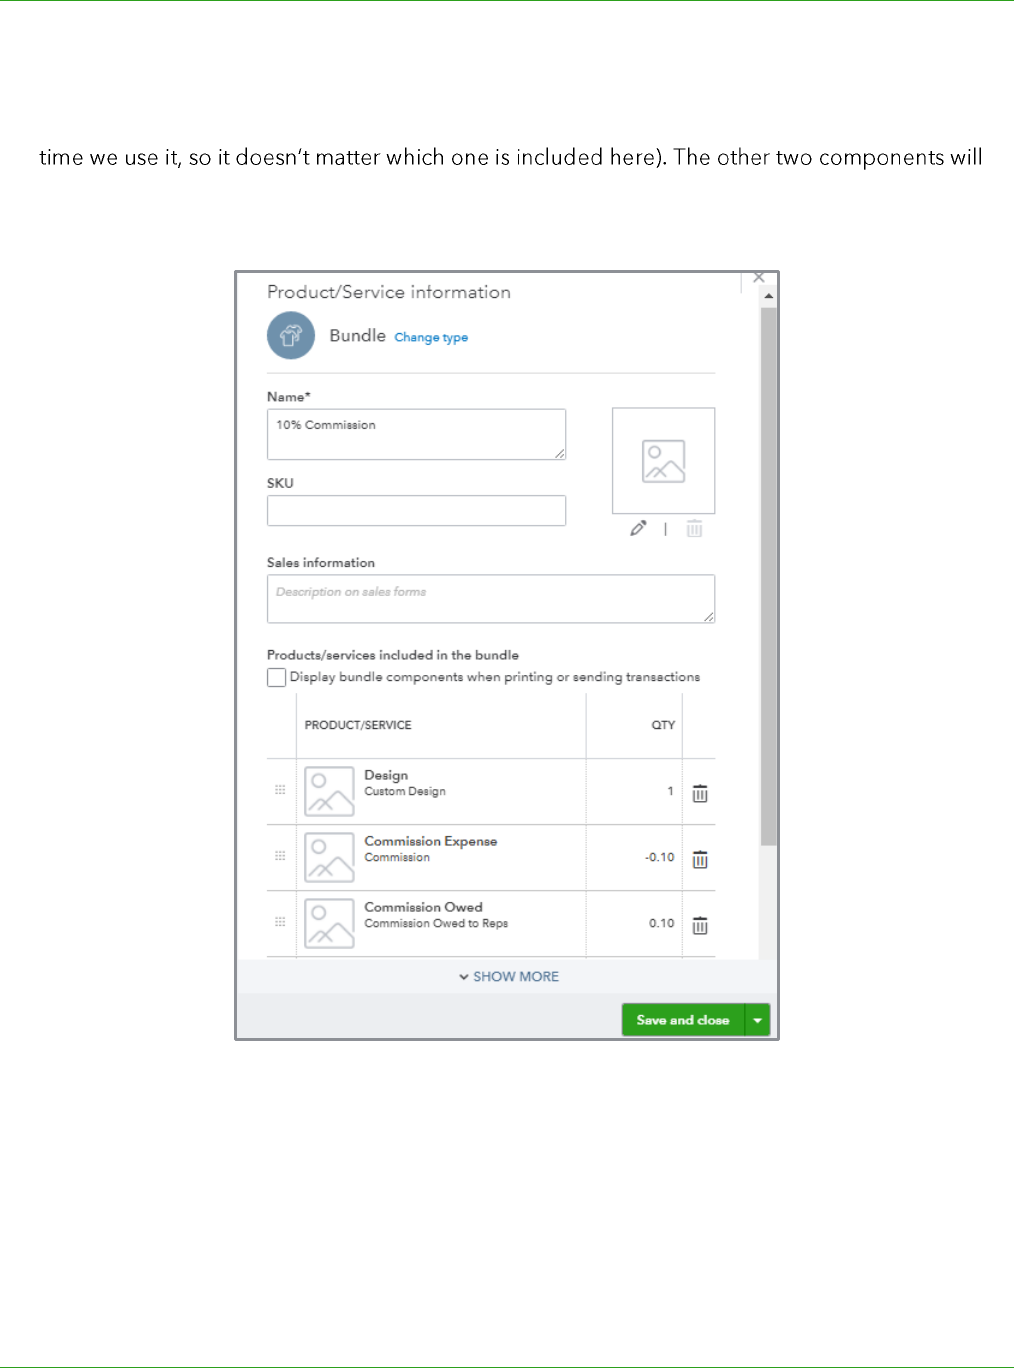
4. Create a Bundle item called 10% Commission. Leave the Sales information field blank and make
sure the box Display bundle components when printing or sending transactions is unchecked.
Select any Product/Service item as the first component part in the bundle (this will change each
be the Commission Expense and Commission Owed items. Enter a QTY of -.10 for the
Commission Expense and a QTY of .10 for Commission Owed.
Supplemental Guide Topic 2: Complex Workflows
Module 3: Special Transactions 41
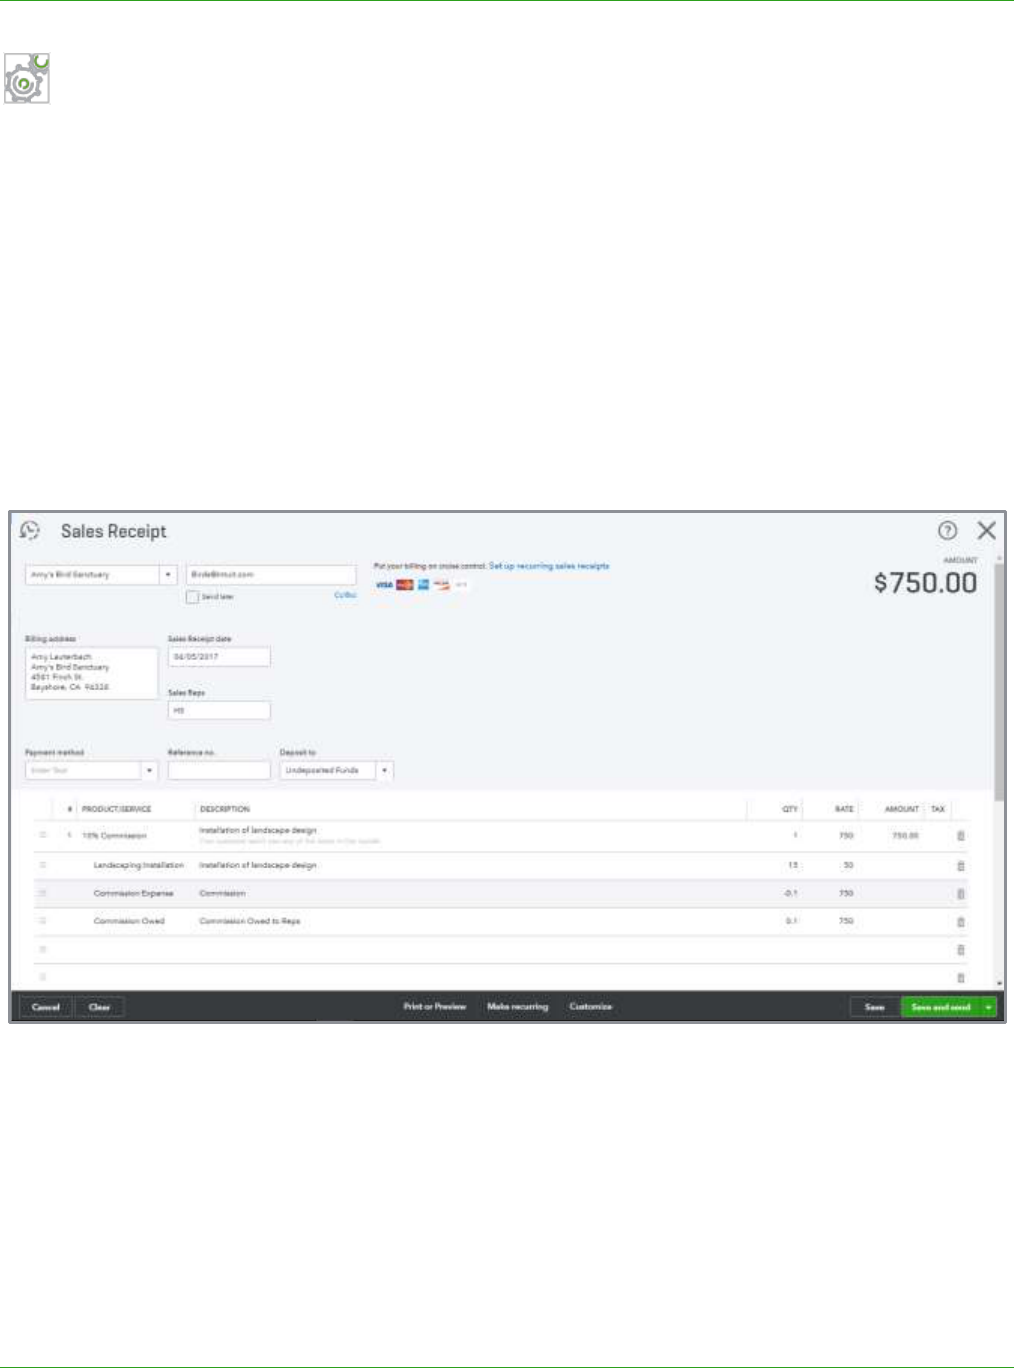
Step-by-Step: Track Commissions on Sales Forms
1. Create a sales transaction, such as an invoice or sales receipt and use the 10% Commission item
on the form.
2. Select the down arrow next to the first component item (the placeholder) and select the item
you are selling; edit the QTY and Rate as necessary.
3. Copy the description of the item and paste it onto the Description field of the Bundle item. (This
will be displayed on the printed sales form.)
4. Enter the Amount of the Bundle item into the Rate field for both the Commission Expense and
Commission Owed lines. The line amounts should zero out, leaving the Amount of the Bundle
item unchanged.
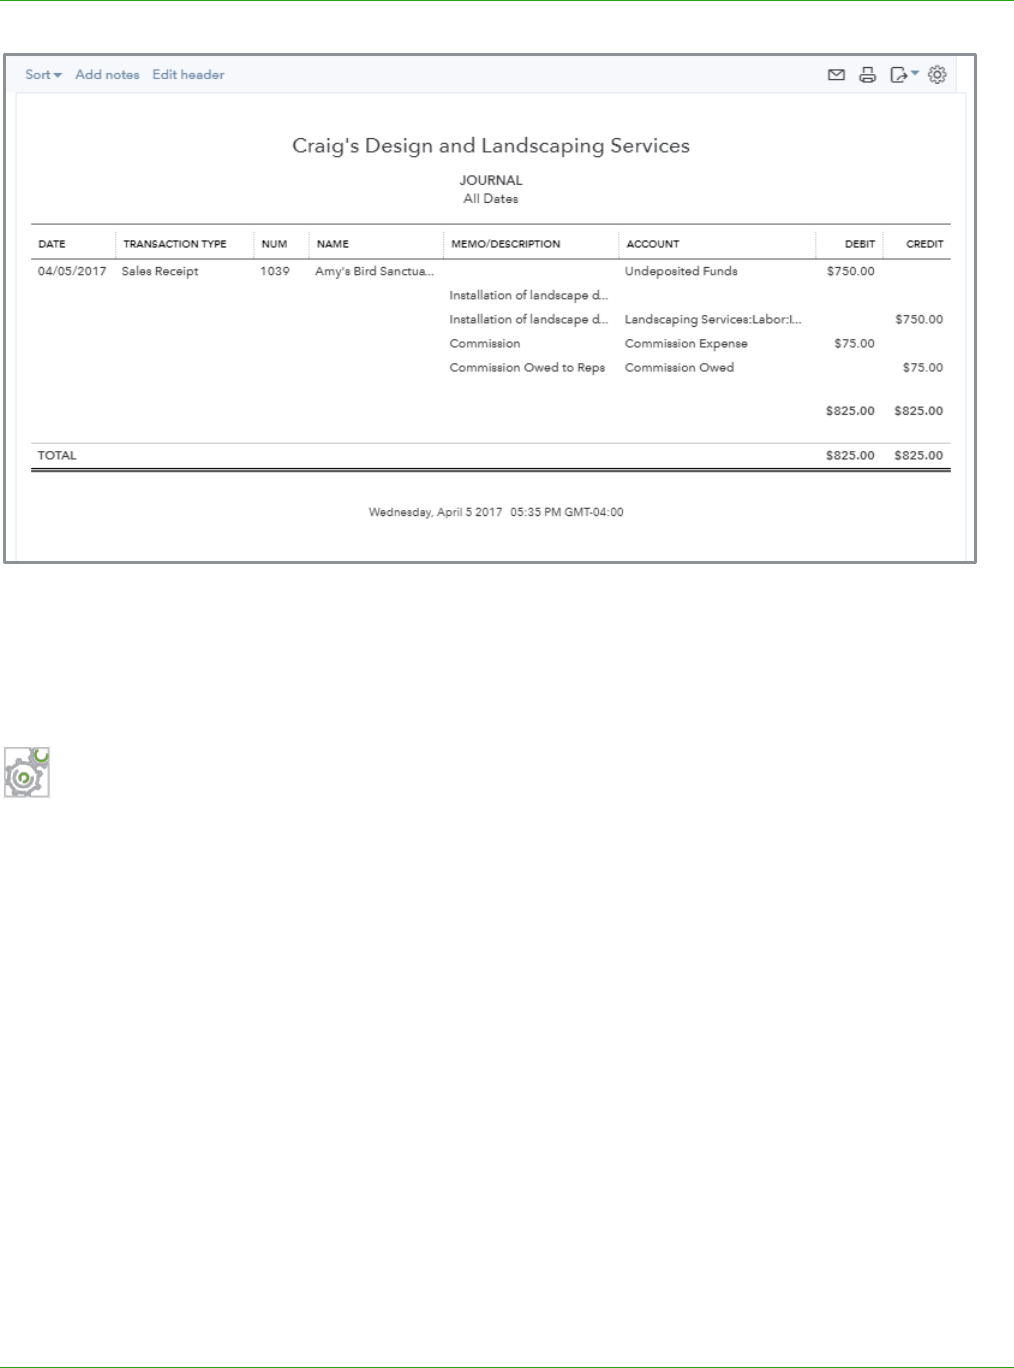
Use the Bundle item for each product/service being sold on the sales form, each time selecting the
product/service you are selling as the first component item. Below is the transaction journal behind
this sales receipt where you can see that the Commission Expense account was debited and
Commission Owed liability account was credited.
Supplemental Guide Topic 2: Complex Workflows
Module 3: Special Transactions 42
NOTE: Keep in mind that while this workflow will work for basic commission tracking, your client may
have more complex needs. In that case, they should look for a third party app on apps.com to handle
the commission tracking.
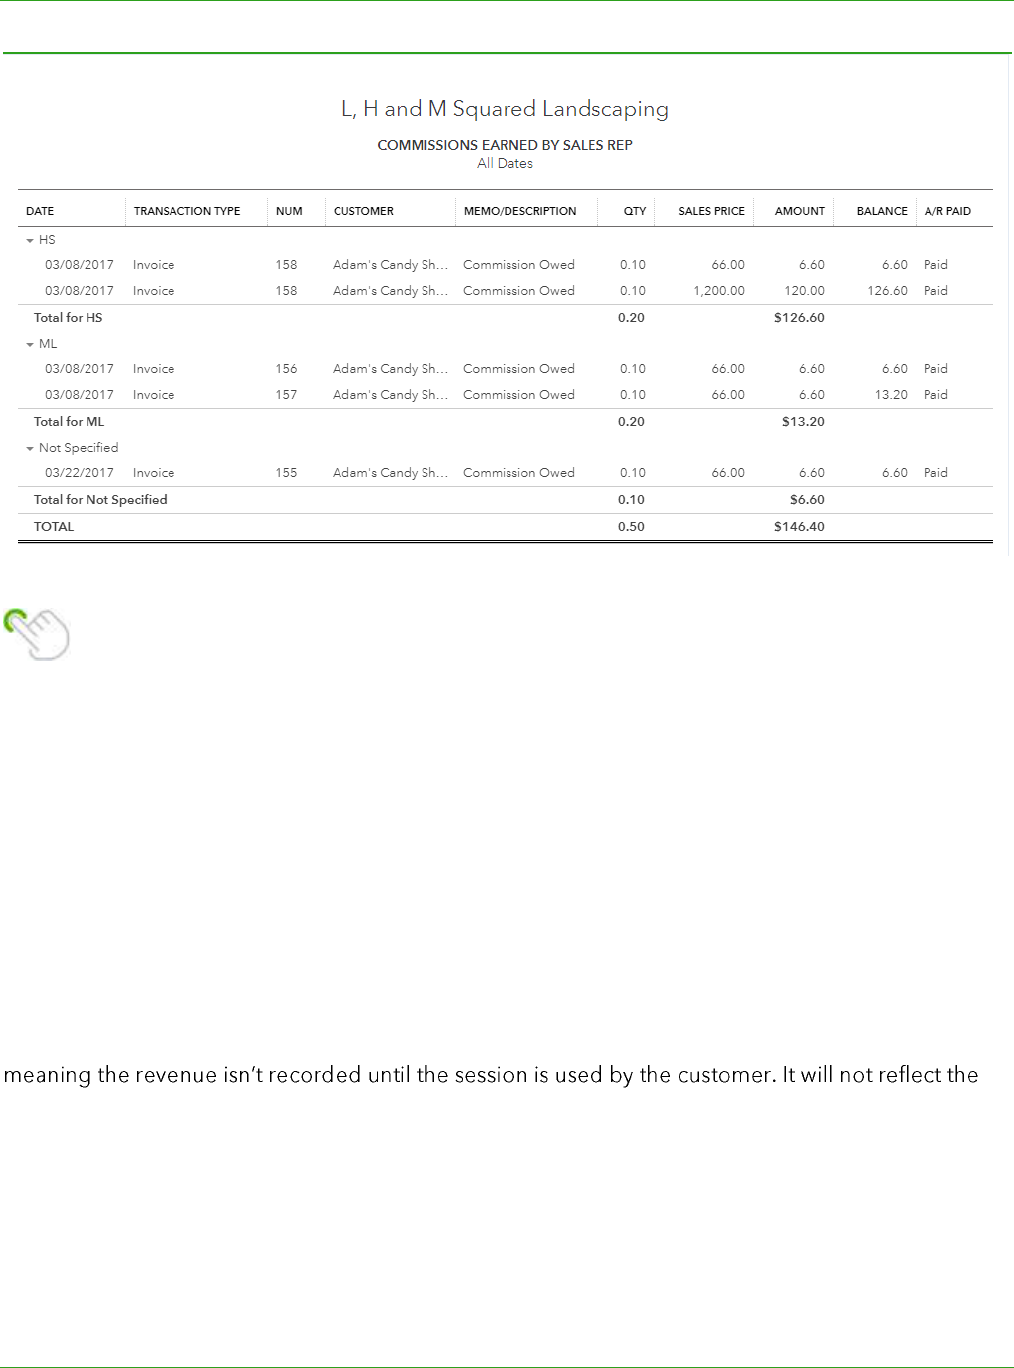
Step-by-Step: Create a Commission Earned by Sales Rep Report
You can create a report that shows how much commission was earned by each sales rep for a
period.
1. From the Report Center, run a Sales by Product/Service Detail report.
2. Edit header and change the name to Commission Earned by Sales Rep.
3. Click Customize. Under Rows/Columns, change the Group by to Sales Rep by clicking the down
arrow.
4. Click Change columns and select the Sales Rep and A/R Paid fields to display them on the
report.
5. Click Filter, select Product/Service and choose Commission Owed from the drop-down. Then
click Run Report.
Supplemental Guide Topic 2: Complex Workflows
Module 3: Special Transactions 43
TIP: If the client pays commission on paid invoices only, change the accounting method on
the report to cash and this will filter the report to only display paid invoices and sales
receipts. Click Save customization to save the report to the My Custom Reports tab so you
can run it on demand.
TRACK PREPAID MULTIPLE SESSION SALES
Many service-based businesses sell multi-session packages to their customers. Examples could be a
massage therapist, personal trainer, chiropractor or even a sports complex. In fact, a ProAdvisor
could use this workflow to track prepaid training packages. In these cases, the business owner needs
to know how many sessions have been used and how many are still available. You can set up and
track these types of transactions in QuickBooks Online and even automate future transactions so
your financial statements are accurate. This method works well for an accrual-basis business,
correct revenue on a cash basis.
Because this workflow involves multiple steps and attention to detail to maintain it correctly, you may
want to consider looking at a third party app if your client has lots of sales like this. We included this
workflow in your training, in part to illustrate how an Advanced Certified ProAdvisor employs
multiple features in QuickBooks to solve complex workflows for their clients.
Supplemental Guide Topic 2: Complex Workflows
Module 3: Special Transactions 44
Setup
To set up this workflow, create an unearned liability account and service item that is mapped to it,
just like we did in Option 3 in the client retainers workflow. To use this workflow, we also need to set
up a bundle item to track the sale of the multiple sessions. The component items of the bundle will
be the ones mapped to the liability account. Our cash- because initial
sale of the package credits the liability account, not revenue.
income. In this case, we set up a liability account called Unearned Revenue.
Supplemental Guide Topic 2: Complex Workflows
Module 3: Special Transactions 45
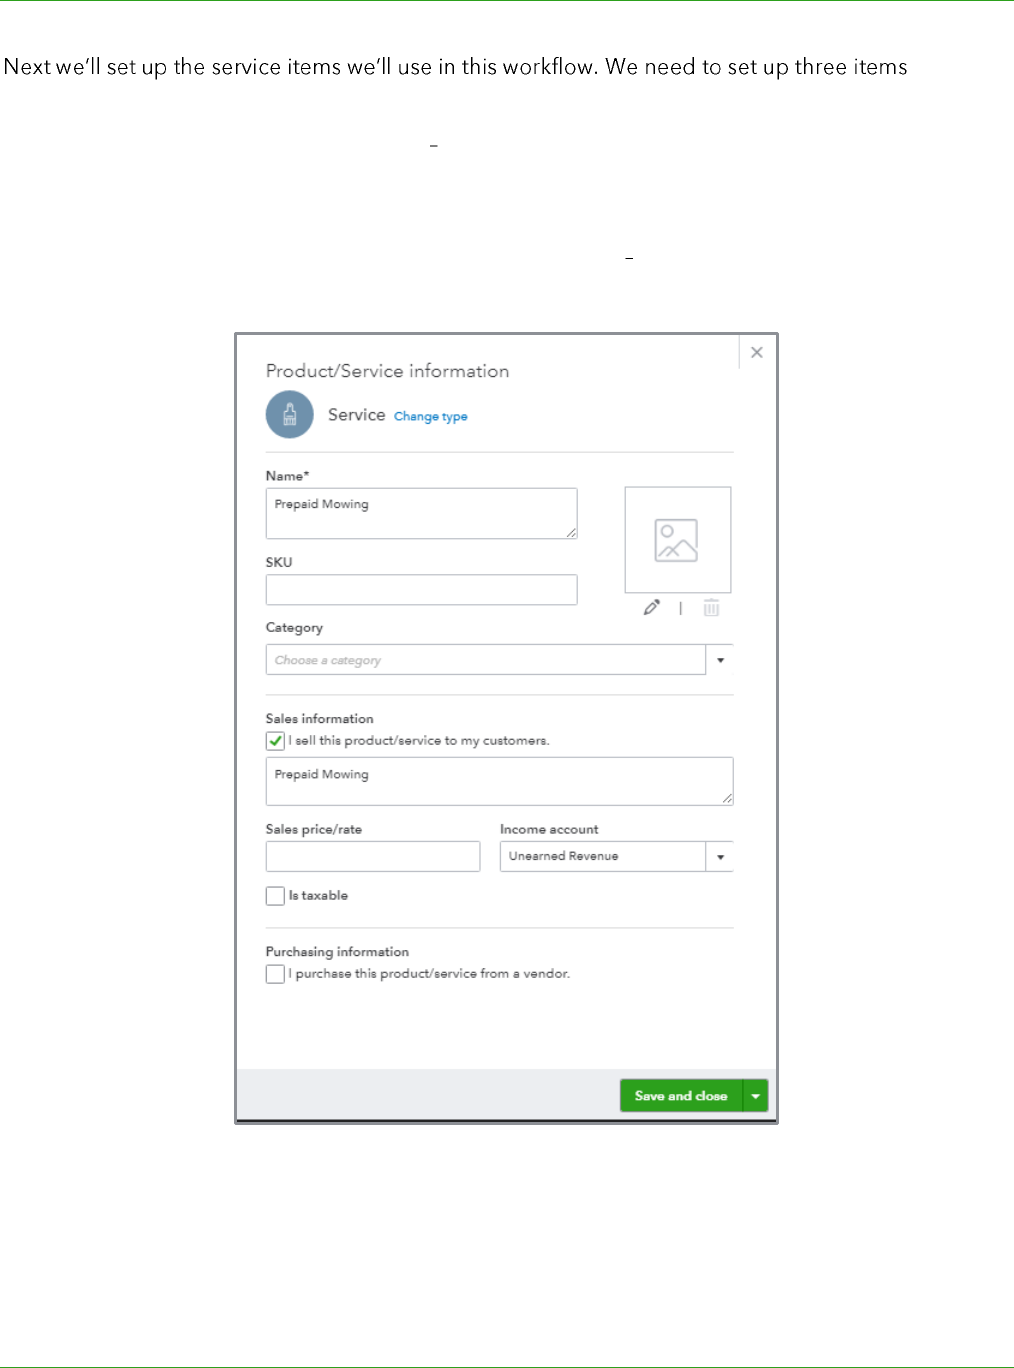
:
Service item used to record revenue This item should be mapped to the income account
(This item can also be used when the business sells an individual mowing service or includes it in
another package)
Service item used to track the unused prepaid services This item is mapped to the
Unearned Revenue liability account we created
Supplemental Guide Topic 2: Complex Workflows
Module 3: Special Transactions 46
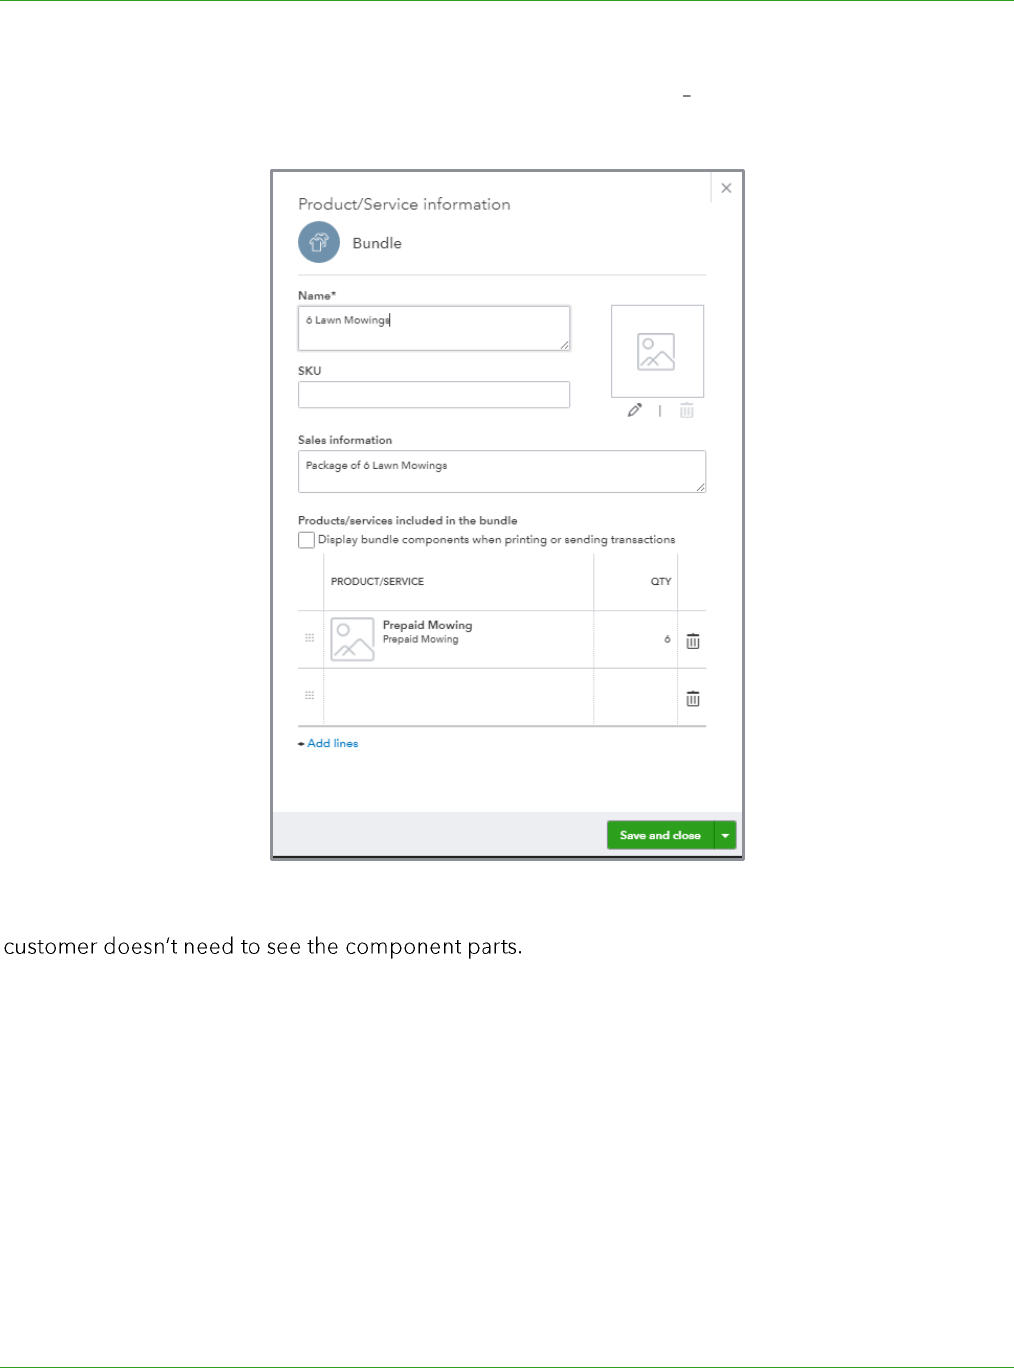
Bundle item used when selling the package to the customer The component item in this
bundle will be the prepaid mowing item we created that is mapped to the liability account
Do not check the box Display bundle components when printing or sending transactions; the

Supplemental Guide Topic 2: Complex Workflows
Module 3: Special Transactions 47
Step-by-Step: Record and Track Prepaid Multiple Session Sales
1. Create an invoice or sales receipt to sell the package to the customer. Use the Bundle item on
the invoice and record the other required details about the transaction. This will credit the
Unearned Revenue account. Save the transaction.
Supplemental Guide Topic 2: Complex Workflows
Module 3: Special Transactions 48
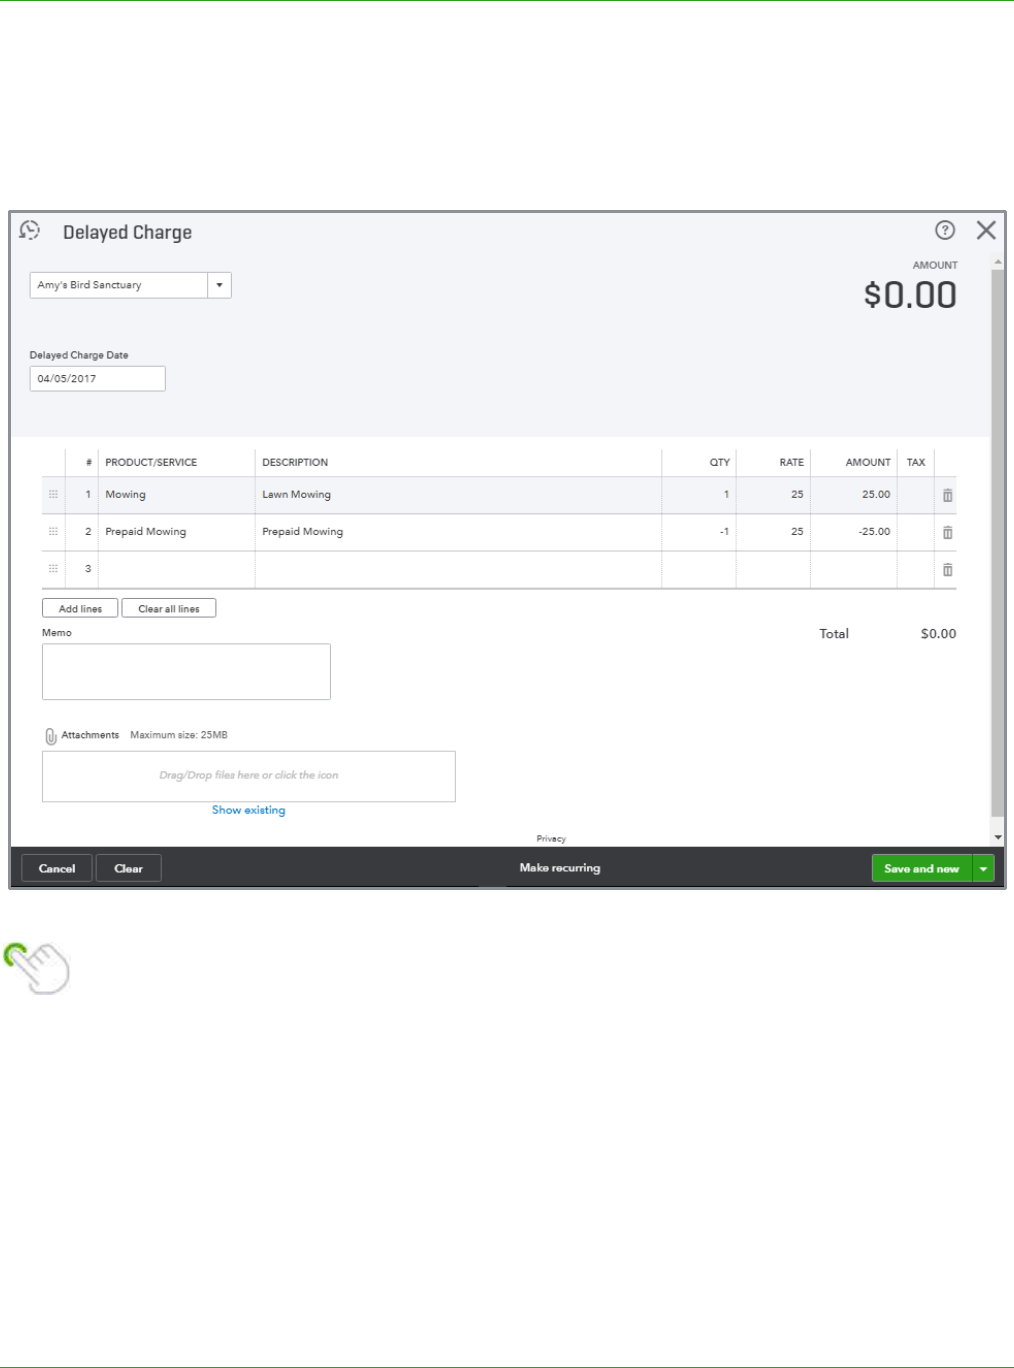
2. Create a Delayed Charge for each of the six sessions using both the liability service item and the
revenue service item. The next amount of the delayed charge will be zero. Keep in mind that
Delayed Charges are non-posting transactions and will not be reflected on the general ledger
until they are added to an invoice.
Tip: After you save the first delayed charge, click More
Copy on the bottom of the
Delayed Charge screen to create the remaining five transactions.
Supplemental Guide Topic 2: Complex Workflows
Module 3: Special Transactions 49
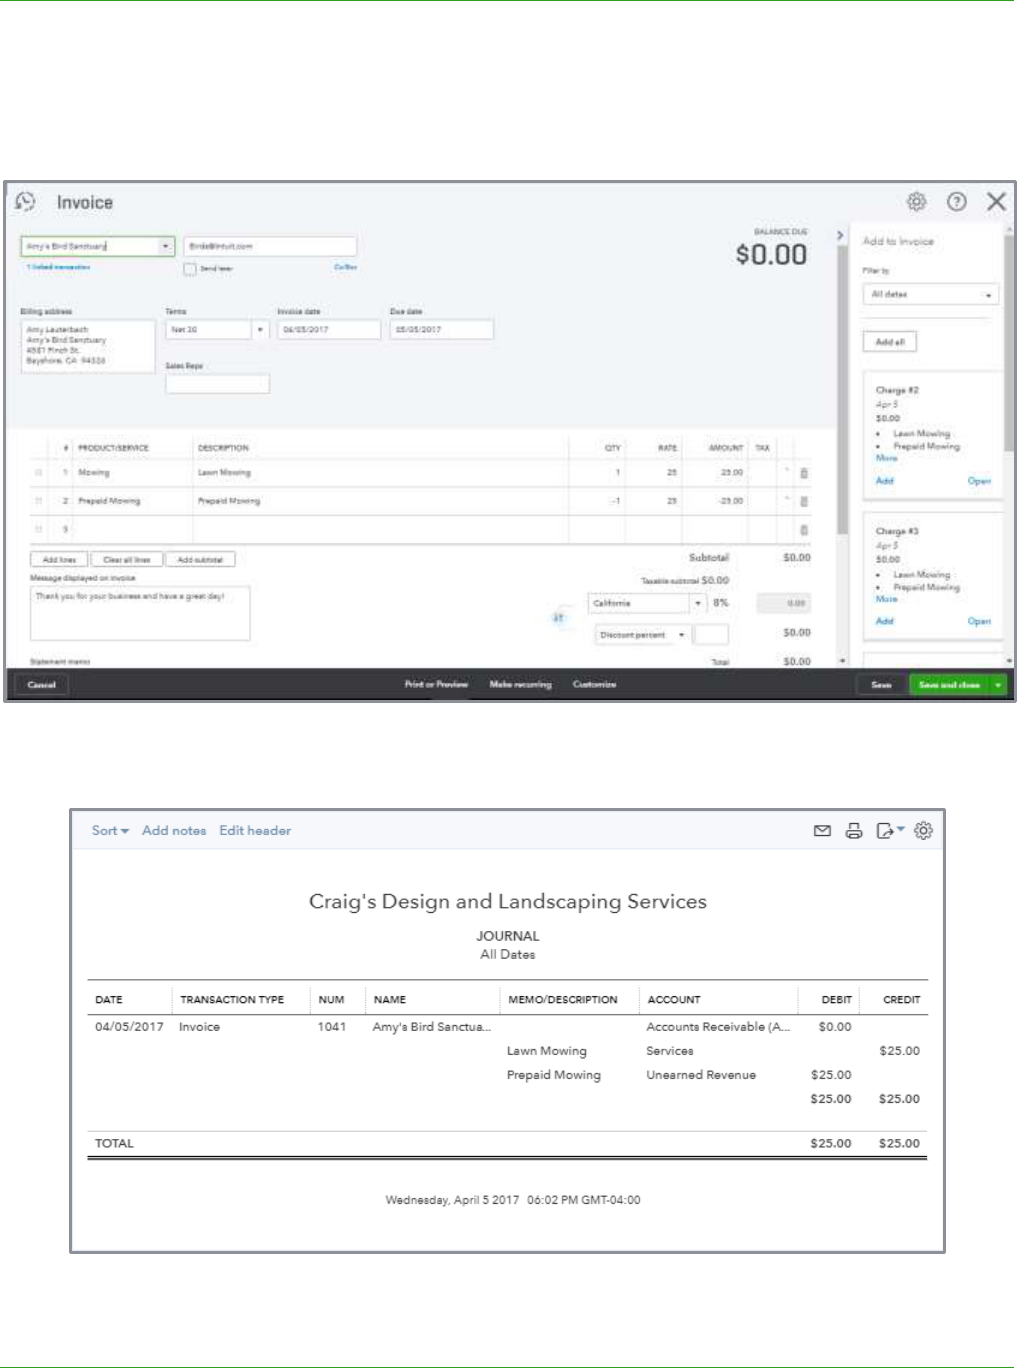
3. When the customer redeems a session, create an Invoice and add the delayed charge to the
invoice from the drawer. This will create a zero invoice and create the entry to debit the
Unearned Liability account and credit revenue.
4. Click More Transaction journal to view the entry behind the transaction.
Supplemental Guide Topic 2: Complex Workflows
Module 3: Special Transactions 50
Step-by-Step: Create a Report to Track Unused Prepaid Sessions
You can create a customized report to show all unused package sessions by customer. This report
should tie out to the balance in the Unearned Revenue account as of the report date.
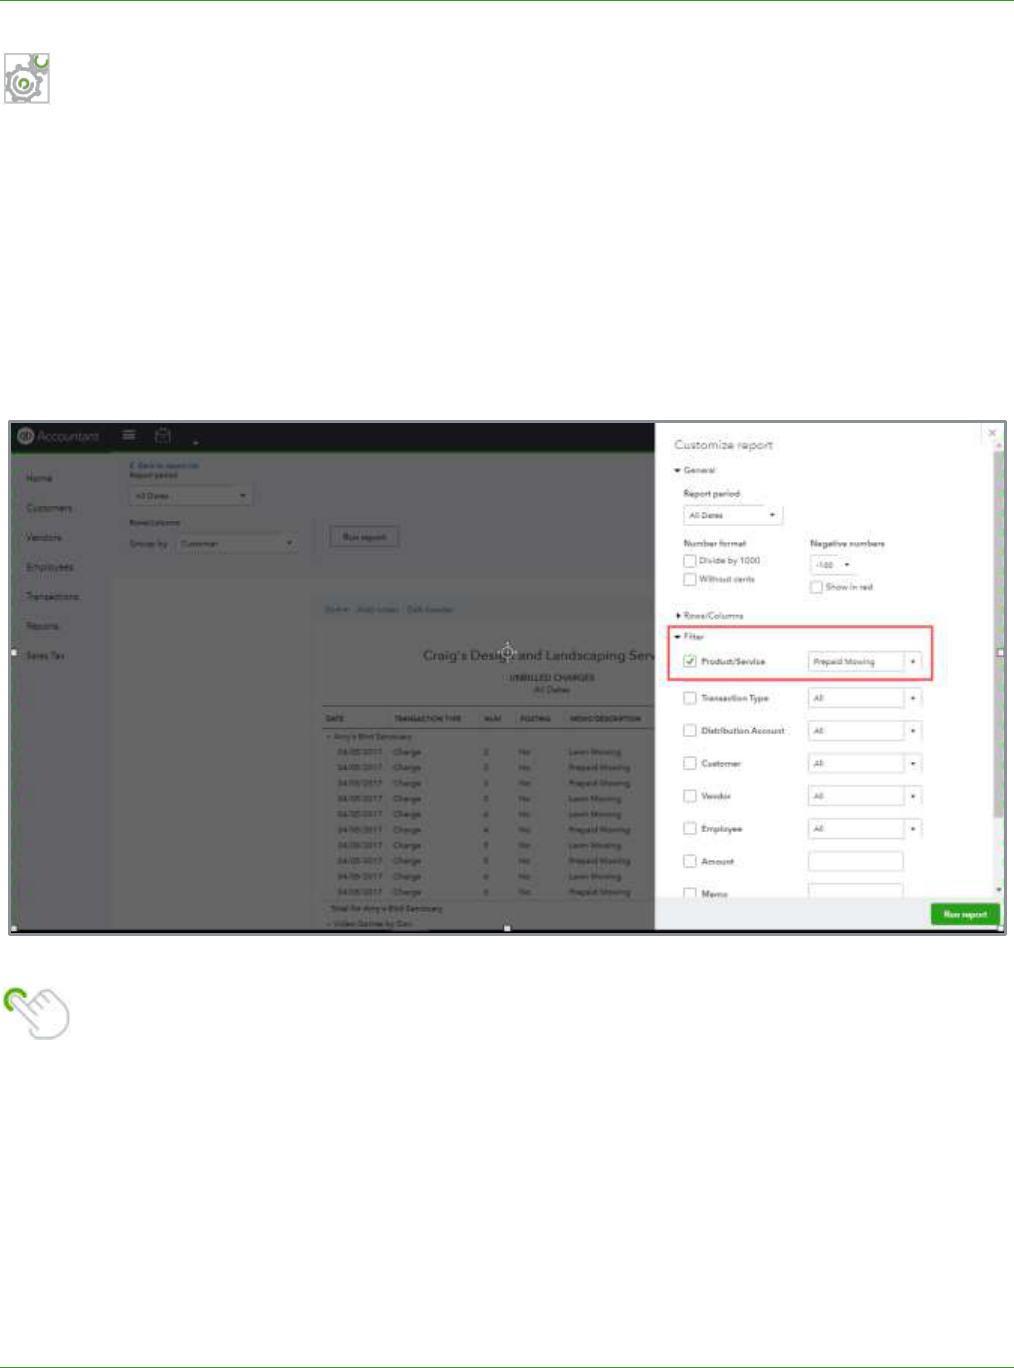
1. From the Report Center, click Reports All Reports Review Sales Unbilled Charges.
2. Click Customize.
3. Filter by Product/Service then choose the service item mapped to the Unearned Revenue
account, in this example Prepaid Mowing.
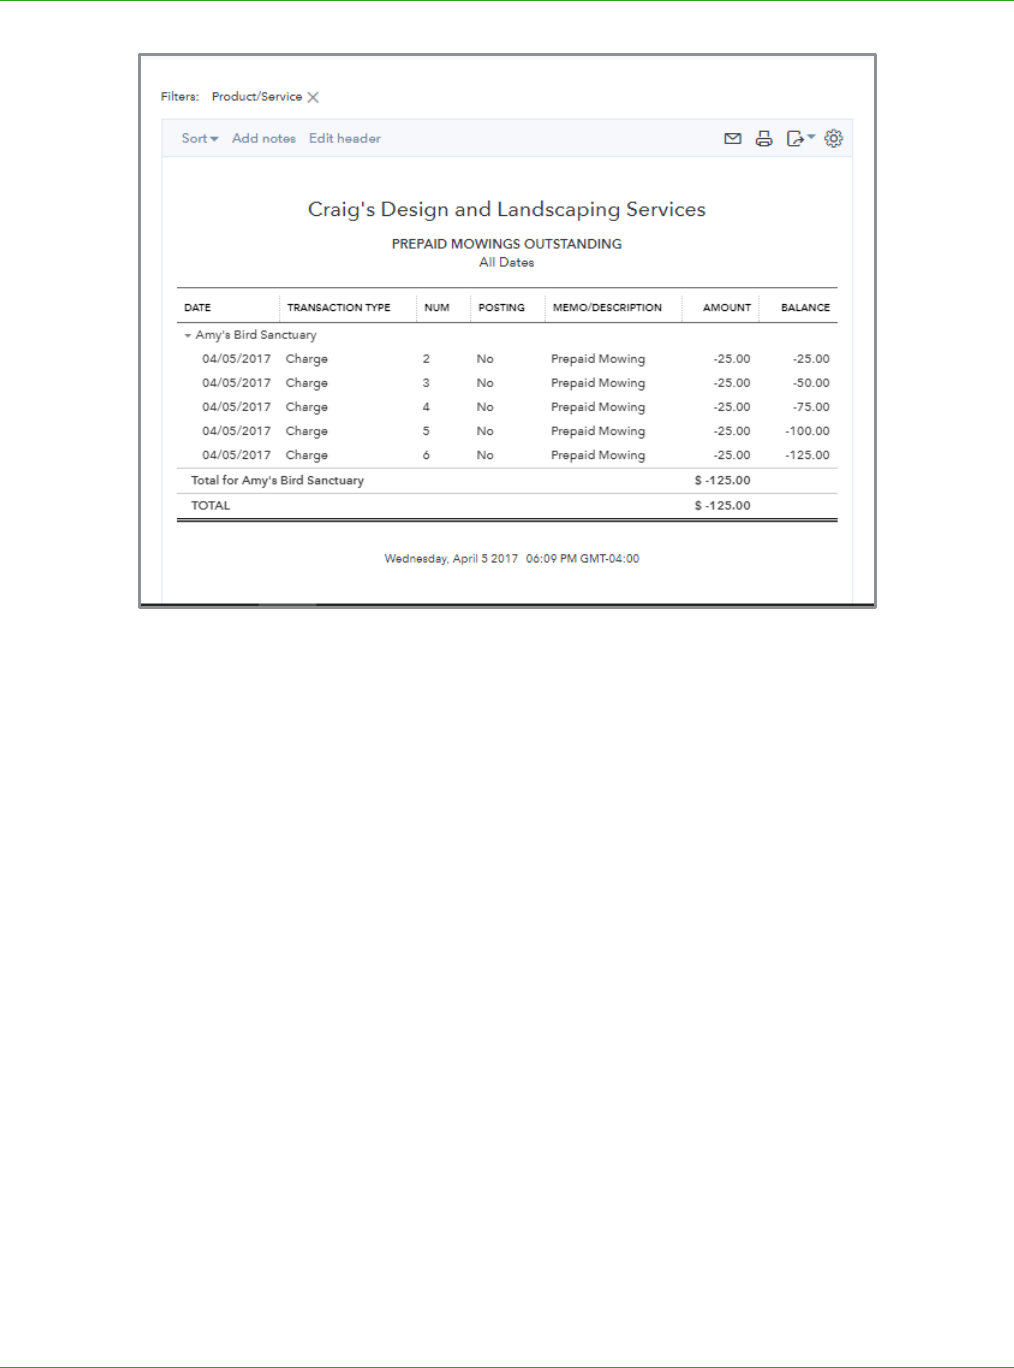
TIP: Rename the report to something meaningful to you and/or your client then click Save
customizations to add the report to My Custom Reports in the Report Center.
Supplemental Guide Topic 2: Complex Workflows
Module 3: Special Transactions 51
This new report should agree to the balance in the Unearned Revenue account on the Trial Balance.

Supplemental Guide Guide Conclusion
Module 3: Special Transactions 52
Guide Conclusion
You have just completed Module 3: Special Transactions. This Supplemental Guide, in tandem with
its recorded module, has been provided to help prepare you for the QuickBooks Online Advanced
Certification Exam. Continue on to the remaining modules and their related guides then proceed to
the certification exam.
By completing this module, you should be able to:
Determine when to utilize special transactions
Recognize the steps to create special transactions
Determine when to utilize complex workflows
Recognize the steps to create complex workflows
