Microsoft Word Basics
Opening a New File
Opening a new file in Word is easy to do. There are several ways to open a new file.
Follow any of the methods listed below:
1. Open up Word and go to File and choose New. Then double click on blank
document.
2. Click on the new document icon found on the standard toolbar.
3. Click on the start button and then click on New Office Document.
4. Double click on blank document.
Any of these methods will open up a new document for you to work on.
Opening Up an Existing File
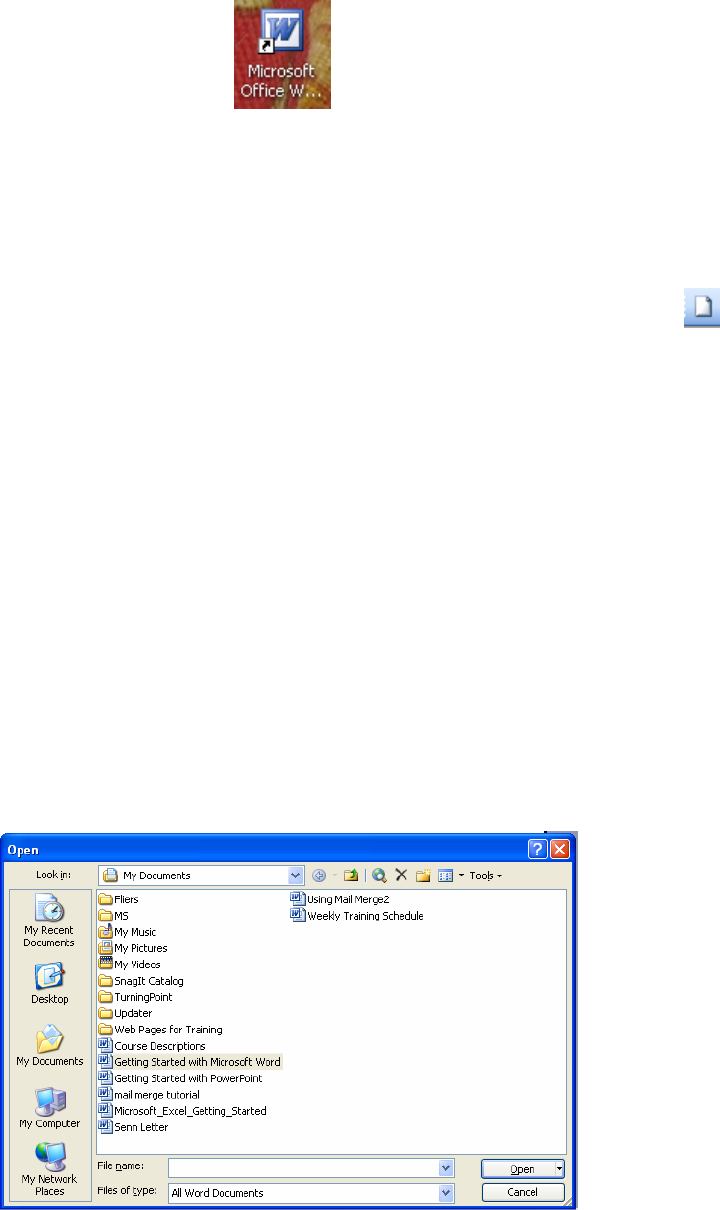
After you have begun creating Word documents you will need to open them to continue
working on them. To open up an existing file follow these steps:
1. Go to File on the menu bar and choose Open, click on the Open icon on the
standard toolbar, or click on Control +O.
2. The Open dialog box will display.
3. Click on the down arrow where it says look in and browse to the file you want to
open.
4. Double click on the file or click on it once and choose open.
5. Your existing file will open.
1
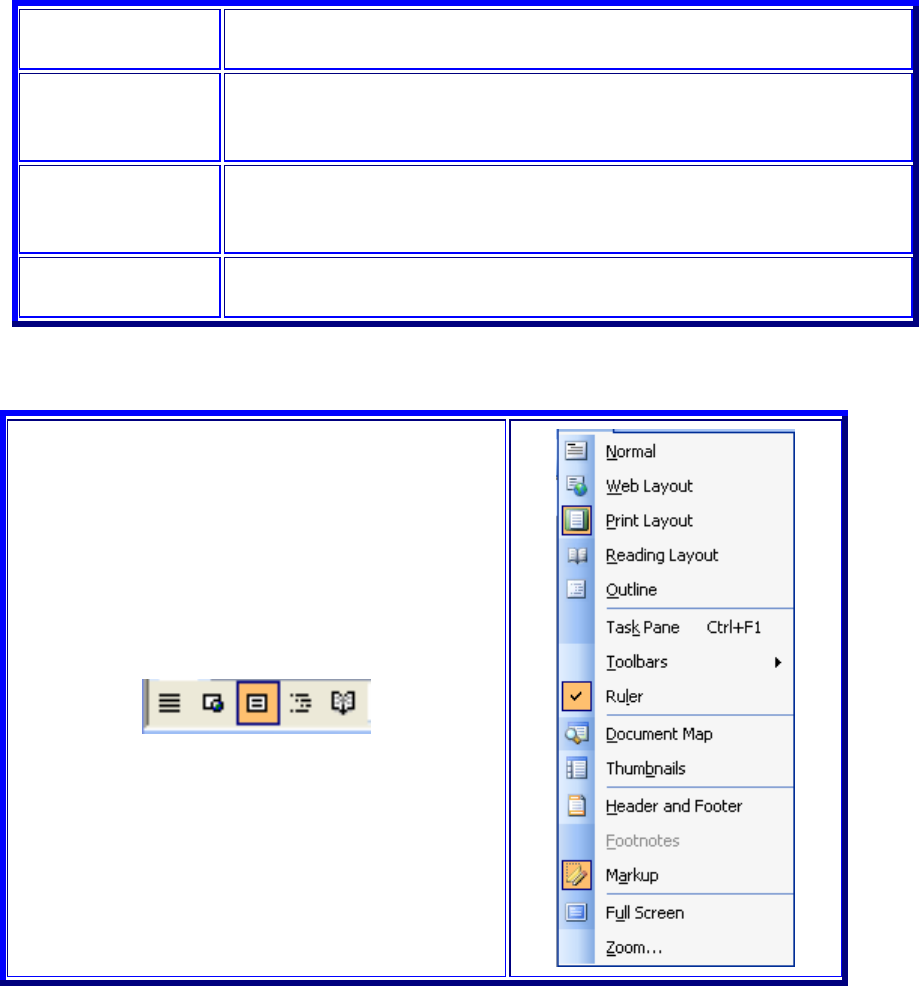
Viewing Files in Word
There are four different types of views that you can use in Word. Below is a table listing
each type of view and how they are best used.
Normal
Best used when working with text only. Graphic images do not show
in this view.
Web Layout
This view is best used when creating a page for the web. In this view
you can see the background, text is wrapped to fit the window, and
images appear as they would online.
Print Layout
This view is best used when your document will contain things like
images, headers, and footers, columns, etc. Each of these components
will be visible.
Outline
Outline view displays your document as an outline. This is useful if
you are moving sections of your document, or creating an outline.
To change your view, follow these steps:
1. Go to View on the menu bar and choose
the view you want to use by clicking on
it.
OR
2. Click on the view icons on the bottom left
hand side of the Word screen.
Formatting Text/Paragraphs Using Toolbars:
In Word, there are numerous options available for presenting your text.
2

The Standard Toolbar:
Word allows all toolbars to be customized, so you may not find all options listed here.
There are several buttons that may or may not appear immediately in your version of
Word. Use the following graphic as a guide to the Standard Toolbar.
1. New Blank Document:
To begin a new document, click on the New Blank Document icon, shaped like a
blank sheet of paper.
2. Open:
Clicking on this icon opens up a previously saved document on your computer.
3. Save:
Clicking on the Save icon saves the document you are currently working on. If
you are saving a document for the first time, you can click on this button.
However, if you want to save a new file from a preexisting document, then you
must go to the menu bar and select “File” >> “Save As” and give the file a new
name. When working on any document, you should be sure to save frequently, so
that you don't lose any work.
4. Permission:
Microsoft has enabled Information Rights Management (IRM) within the new
version of Word, which can help protect sensitive documents from being copied
or forwarded. Click this for more information and options.
5. Print:
Clicking on the Print icon automatically prints the document currently active in
Word. If you wish to explore more print options, then go to the menu bar and
select “File” >> “Print.”
6. Print Preview:
To get an idea of the appearance of your document in print before you actually
print it out, you can click on this icon to view your document from a zoom-out
distance.
7. Spelling and Grammar:
Clicking begins a review of your document in search of spelling and grammatical
errors that may need to be corrected.
8. Copy:
Copy the current selection to the clipboard, which can then be pasted elsewhere in
the document, or into a completely separate program/document.
9. Paste:
Clicking on the Paste button inserts the text that has been most recently added to
the Clipboard (the text would have been added there by Cutting or Copying).
With Paste, you can either insert the copied text into a document or replace
selected text.
10. Undo Typing:
The Undo Typing button goes back and removes the last addition or change made
to your document.
3
11. Insert Hyperlink:
You may find that you want to make links to a particular web site, web page, or
some other kind of online file in your Word document. Using the Insert Hyperlink
button, you can turn selected text into hyperlinks. When the icon is clicked, a
window will appear that will allow you to insert the URL (web address) of the
web page you want to link to. You can type in the URL yourself or insert a
preexisting bookmark. Once the link is inserted, the link in your Word document
can be clicked and the web page will open up in a web browser.
12. Insert Table:
When this icon is clicked, a small window will appear in the form of a grid of
squares. Use this window as a guide to indicate how many rows and columns you
would like your table to contain. Once selected, a table will automatically appear
in Word. Clicking the Tables and Borders button will allow you to modify the
table. To modify an aspect of the table, select, or place the cursor in, the area and
apply changes such as borders and colors.
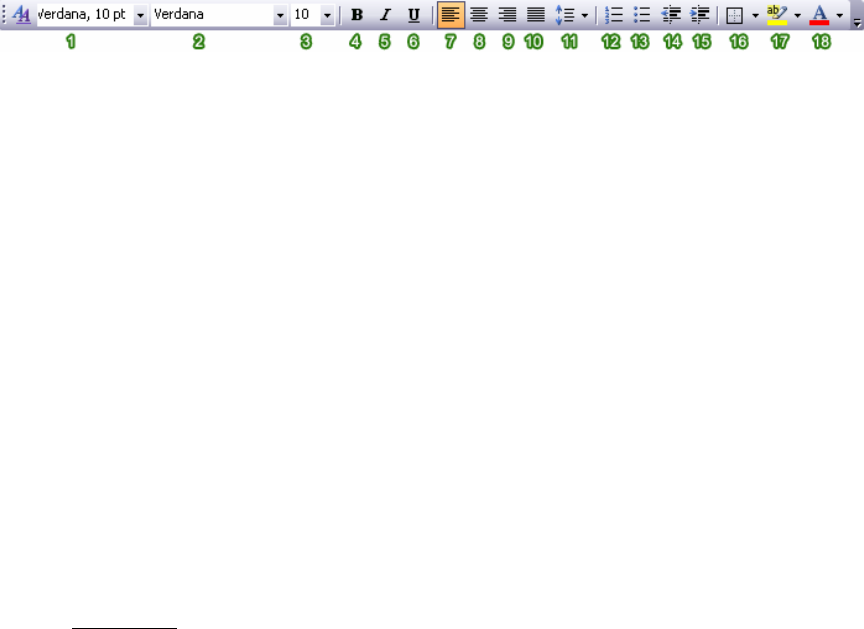
The Formatting Toolbar:
Word allows all toolbars to be customized, so you may not find all options listed here.
There are several buttons that may or may not appear immediately in your version of
Word. Use the following graphic as a guide to the Formatting Toolbar.
1. Style:
Styles in Word are used to quickly format portions of text. For example, you
could use the "Normal" or "Default Paragraph Font" for the body text in a
document. There are also three preset styles made for headings.
2. Font:
Font is a simple but important factor in Word documents. The choice of font (the
style of the text itself) can influence the way others view documents, either on the
screen or in print. For example, Arial font looks better on screen, while Times
New Roman is clearer in print. To apply a font to text, select desired text with
your cursor, and choose a font from the font drop down menu.
3. Font Size:
You may encounter times in which you need to display some text larger or
smaller than other text. Selecting desired text with the cursor and choosing a font
size from the drop down menu changes the size of text.
4. Bold:
Places the text in bold.
5. Italic:
Places the text in italics.
6. Underline:
Underlines the text.
7. Align Left:
Aligns the selection to the left of the screen/paper.
4
8. Center:
Aligns the selection to the center of the screen/paper.
9. Align Right:
Aligns the selection to the right of the screen/paper.
10. Justify:
Aligns the selection to both the left and right of the screen/paper.
11. Line Spacing:
Adjust the line spacing (single-spaced, double-spaced, etc.)
12. Numbering:
Create a numbered list.
13. Bullets:
Create an unordered, bulleted list.
14. Decrease Indent:
Decreases the indentation of the current selection (to the left).
15. Increase Indent:
Increases the indentation of the current selection (to the right).
16. Outside Border:
Places a border around the current selection; click the drop-down for a wide
selection of bordering options.
17. Highlight:
Highlight the current selection; default color is yellow.
18. Font Color:
Change the font color; the default/automatic color is black.
Entering Text
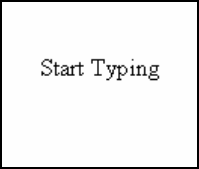
To enter text into a word document follow these steps:
1. Place the cursor inside the Microsoft Windows document.
2. Start typing your text.
Saving
It is a good idea to save your document right away and then continue saving every 5 or 10
minutes so if your computer crashes you will not have lost much. To save a document,
follow these steps:
• Go to File on the menu bar and choose Save As if it is the first time you are
saving a document or if you want to save your document to a new location.
5
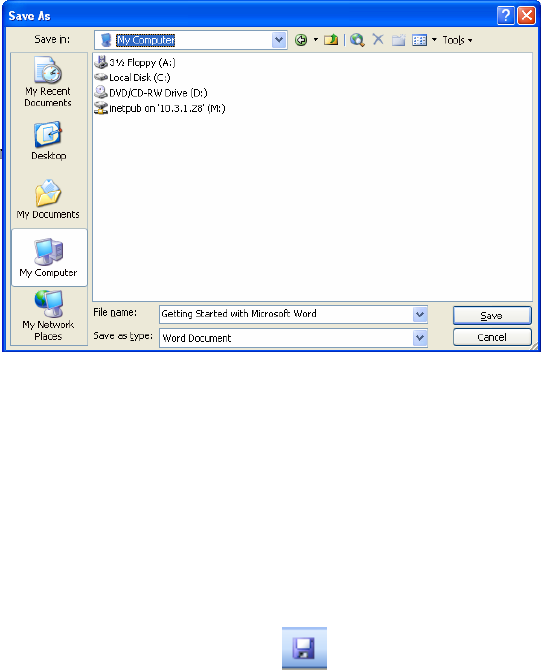
• The Save As dialog box will open.
• Click on the down arrow and choose the location you want to save your file in.
Click down in the file name box and type a name for your file. By default it will
put in the first line or two of what you typed.
• Under files of type you usually don' t have to change this but if you were saving
to use this file on another computer that didn't have the same version of Word you
can click on the down arrow and choose 95 format, Microsoft Word, Macintosh,
txt, etc.
• Click on the Save button.
• The next time you work on this document or the next time you save you can just
click on the Save button from the Standard toolbar.
Saving As a Web Page
You can also save your files as a web page. It will save your document in an html format.
If you have graphics in your document they will all end up left aligned unless they are in
a table. If you have a document already typed and you want to include it on your web site
save your file as a web page and you can quickly use it online. To save your document as
a web page, follow these steps:
• Go to File on the menu bar and choose Save as Web Page.
• Give your file a name. It is a good idea to give it a shorter name without any
spaces.
• Click on Change title.
• Type in the title you want for your web page title. Click on Save.
• Your file will be saved in html format.
6
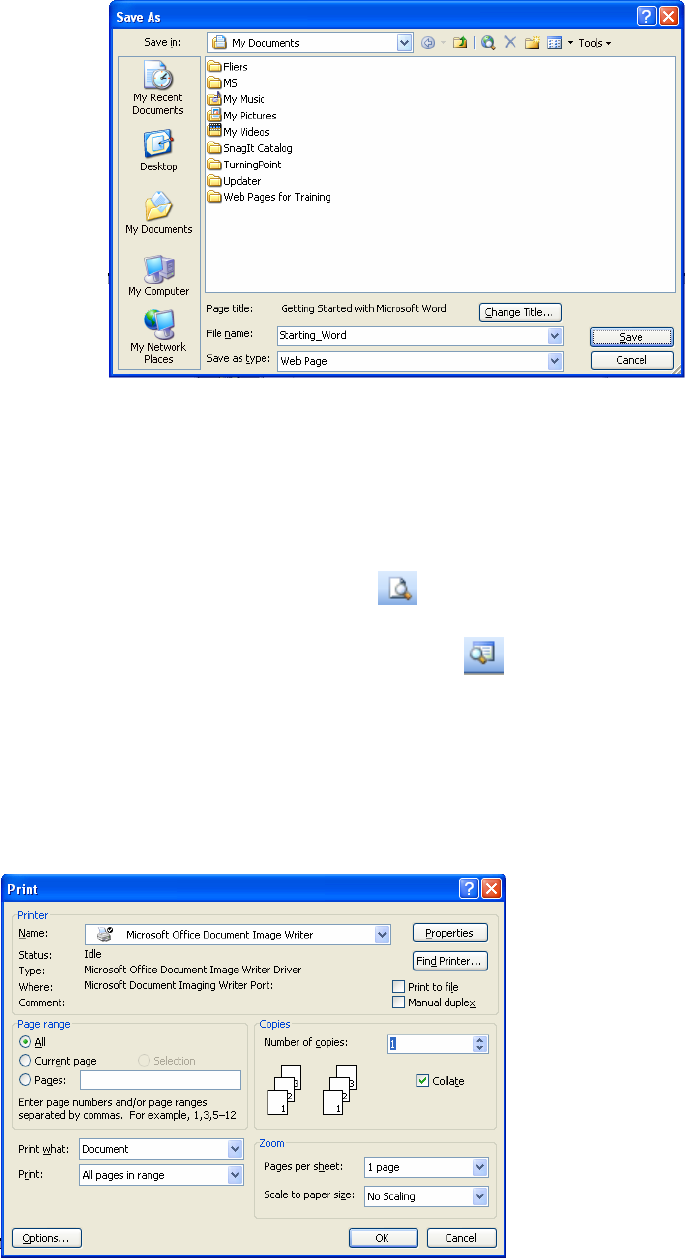
Printing & Print Previewing
Using the print preview button will show you what your printed document will look like.
It will show you if you have anything hanging out of the margin range. To do a print
preview, follow these steps:
• Click on the print preview button.
• If you want to make any adjustments click on the magnifier and you can then
click within the document to make changes.
• Click on the close button when you are done previewing.
To Print follow these steps:
• Go to File on the menu bar and then click on Print.
• The Print dialog box will open.
7

• Choose the printer you want to print to, the number of copies, the pages, etc and
click on OK.
• If you just hit the print button from the standard toolbar you will bypass the
print dialog box and your document will be sent to the default printer.
8

Microsoft Word Intermediate I
Inserting Images from ClipArt Gallery
Microsoft Office comes with its own clip gallery of images, sounds, and animations. To
use the clip gallery follow these steps:
1. Go to Insert on the menu bar and choose Picture then click on Clip Art.
2. The Insert ClipArt dialog box will open to the right side of your document.
9
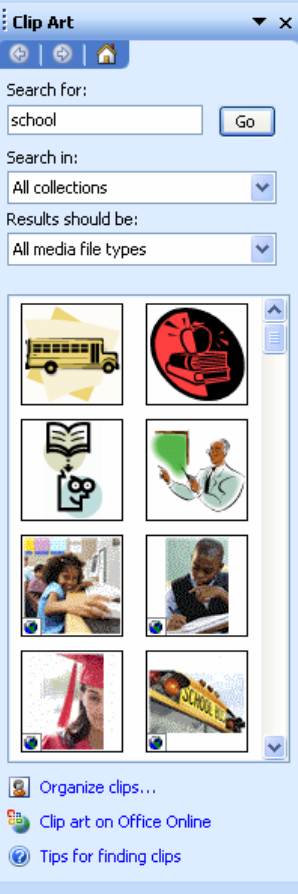
3. Type in a keyword in the text area under Search for that best describes what you
are looking for and click on the Go button.
10

4. When you find the image that you want to use click on it. The image is inserted
onto your page. You can insert multiple images.
5. When you are done click on the x in the top right hand corner to close the Insert
ClipArt dialog box.
Inserting Images from a File
Instead of using clip art, you may chose to use an image from a file. You can get these
images from images that you take yourself with a digital camera, images that are scanned,
or images that you obtain from the Internet. To insert images from a file follow these
steps:
1. Go to Insert on the menu bar and choose Picture, then click on From File.
2. The Insert Picture dialog box will open.
3. Click on the drop down arrow and choose to browse to your file's location.
4. Double click on your file or click on it and click on insert.
5. Your image will be inserted on your page.
11
Deleting Images
You can quickly delete images that you no longer want to use in your documents. To
delete images follow these steps:
1. Click on the image to select it. Handles will surround the image.
2. Hit either the backspace or the delete key and the image will delete.
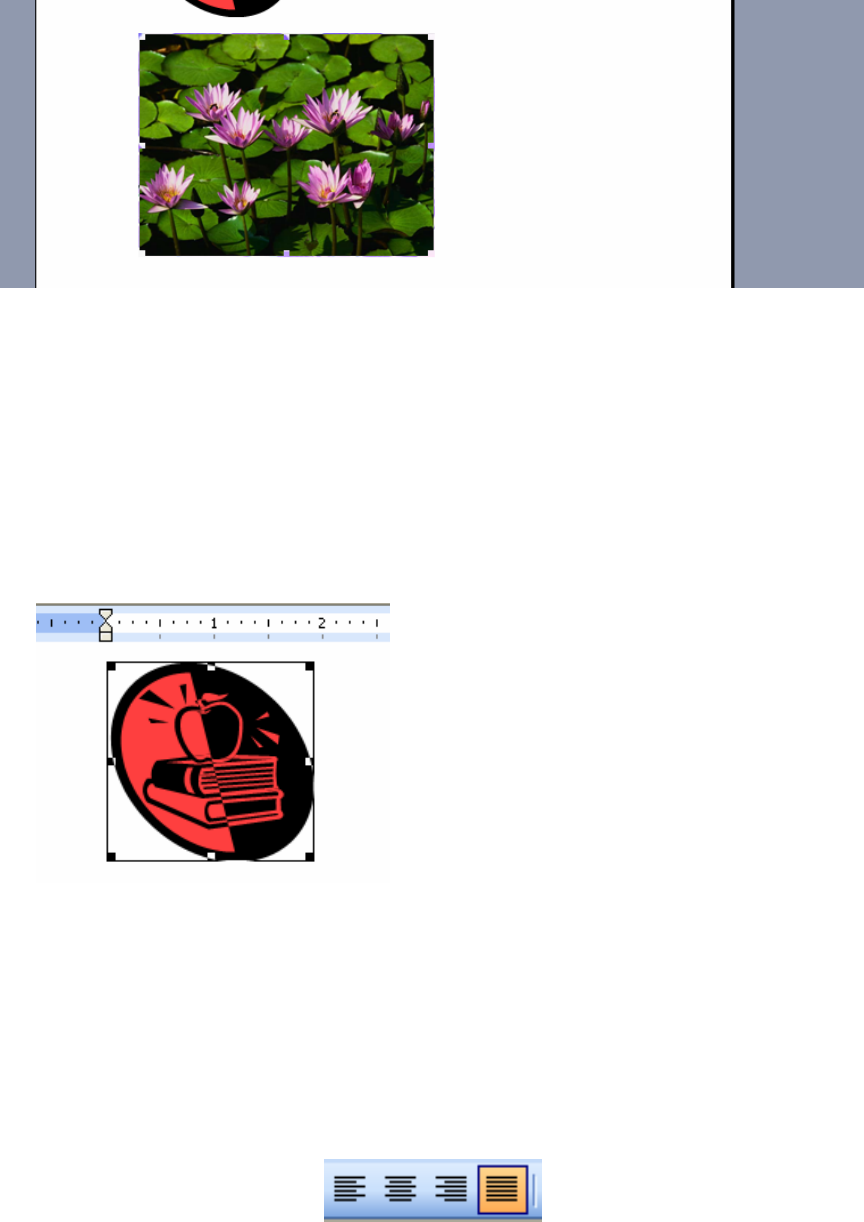
Alignment
You can align your graphics quickly with the alignment buttons. To align your graphics
follow these steps:
1. Select the graphic you want to align.
2. Click on the alignment button from the formatting toolbar. You can choose left
aligned, center, right aligned or justified.
12
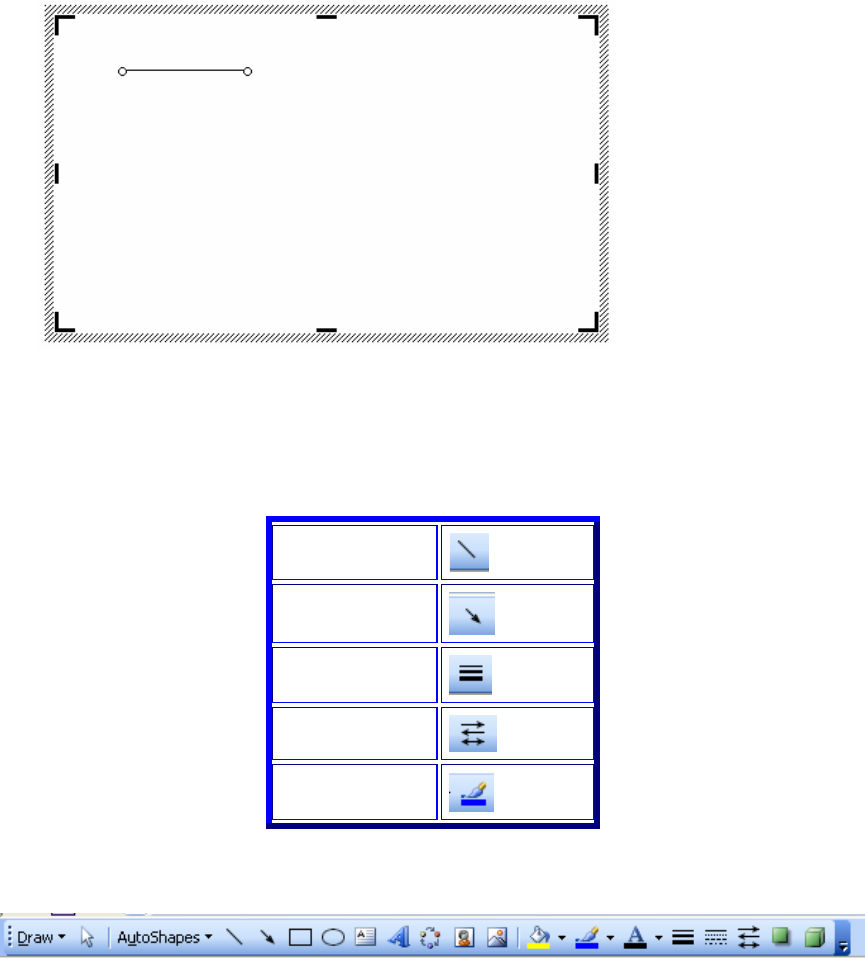
Lines & Arrows
You can use lines and arrows in your documents. The drawing toolbar provides you with
these tools. To draw lines and/or arrows follow these steps.
1. Click on the line or arrow tool from the Draw toolbar and move your mouse
onto your document. Your cursor will turn to a crosshair.
2. Click and drag your line/arrow to the desired length then release the mouse
button.
3. If you want to draw multiple lines or arrows double click the line or arrow icon
from the Draw toolbar and you can draw repeated times.
4. You can change the color and thickness of your lines/arrows by using the Line
Style, Arrow Style, and Line Color icons from the draw toolbar.
Line
Arrow
Line Style
Arrow Style
Line Color
(The drawing toolbar)
13
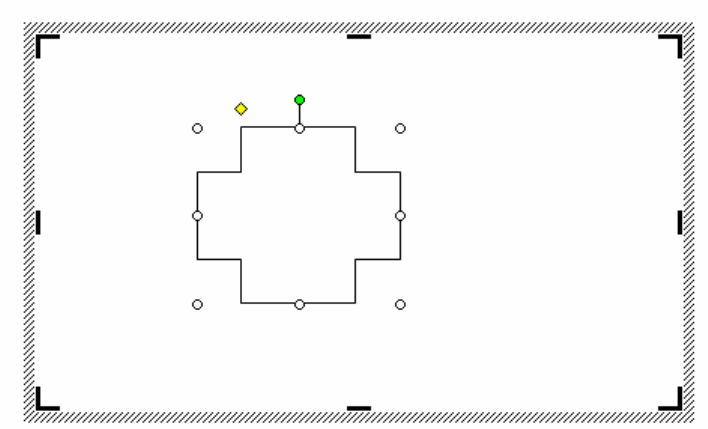
AutoShapes
The drawing toolbar has AutoShapes that you can use. They are used for drawing shapes
and lines and call outs to add to your documents. The AutoShapes are made up of the
following categories:
• Lines
• Connectors
• Basic Shapes
• Block Arrows
• Flowchart
• Stars and Banners
• Callouts
• More AutoShapes
To use AutoShapes follow these steps:
1. Click on the down arrow next to AutoShape on the Draw toolbar. Choose a
category then click on the type of AutoShape you want to use.
2. Move your mouse to the location on your document where you want to add the
shape and click and hold down the mouse button while you draw it to the size you
want.
3. Release the mouse button and you shape will be drawn.
4. You can then add line or fill colors.
14
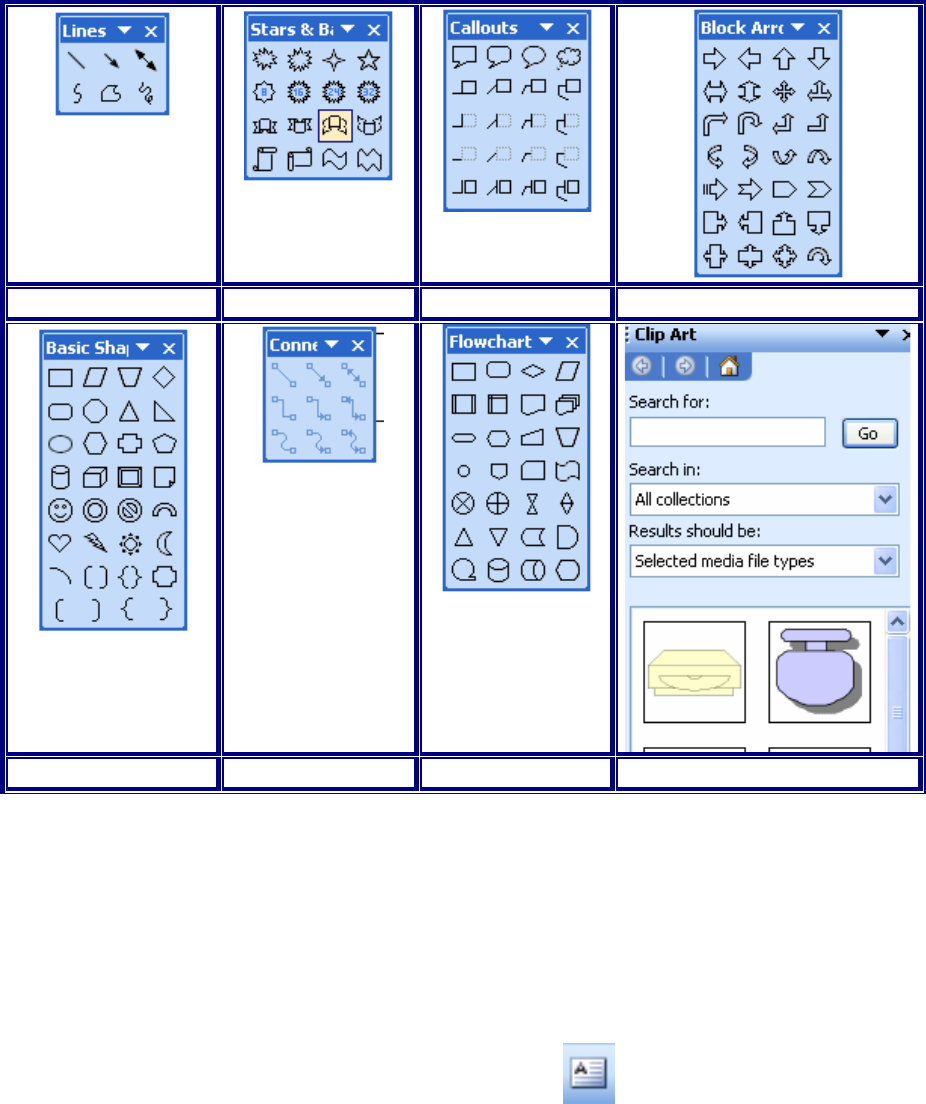
Shown below are the different shapes that can be found in AutoShapes.
Lines Stars & Banners Callouts Block Arrows
Basic Shapes Connectors Flowchart More AutoShapes
Text Boxes
In word you can add text boxes. Text can seem to float or you can show the fill and lines
for the box. You can also use text boxes to create text on an image. To create a text box
follow the steps below.
1. Click on the text box icon from the Draw toolbar.
2. Click on your document and hold down your mouse button while you draw your
text box.
3. Start typing your text for the box.
15
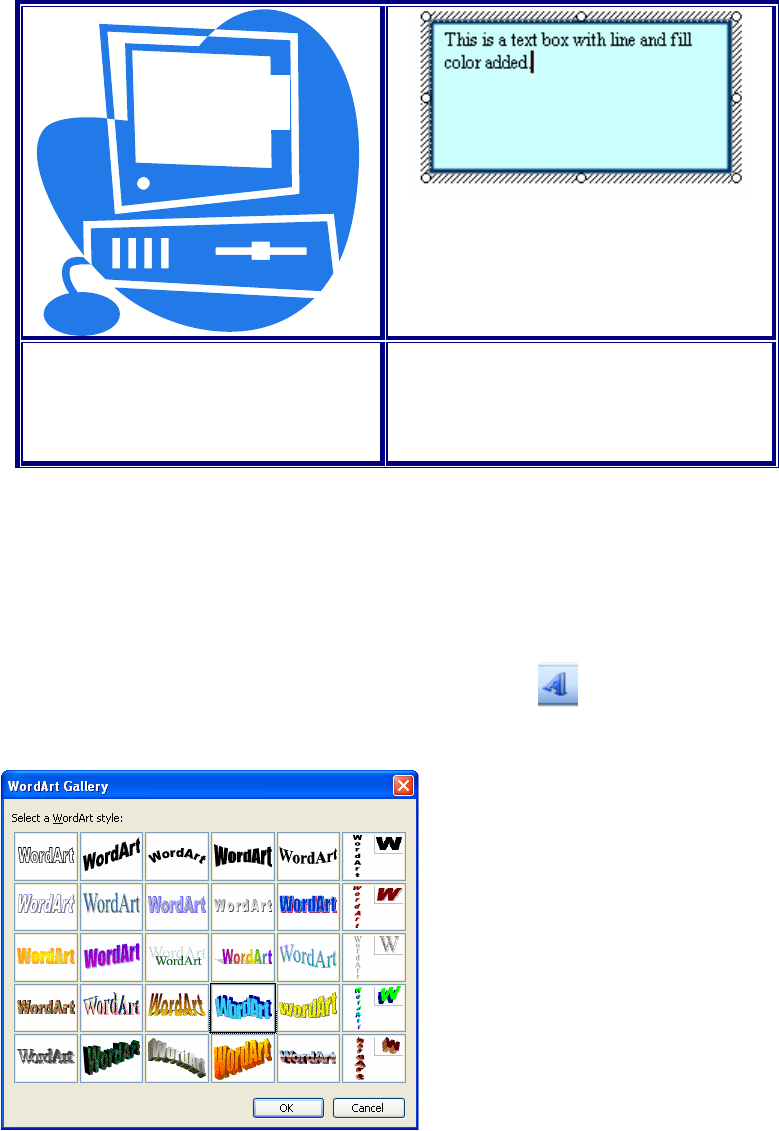
4. If you want to work with the fill and line colors then right click on the border of
the text box and choose format text box. You can then work with the colors and
lines tab to get your text box looking like you want.
Text box placed on graphic
Text box added with line and fill
color
Computer
WordArt
WordArt is a feature of Microsoft word that allows you to make creative looking text.
You can use WordArt to embellish any of your documents. You can use them for titles,
sidebars, and attention grabbers. To create WordArt follow these steps:
1. Click on the WordArt icon from the Draw toolbar.
2. The WordArt Gallery will open.
16
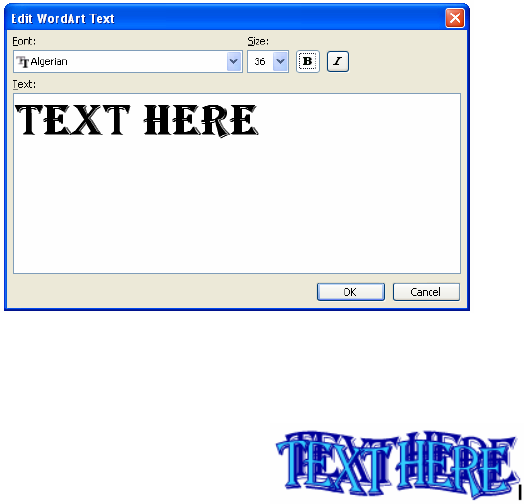
3. Double click on the WordArt design you want to use.
4. Type in the text for your WordArt design and you can also choose the size and
font as well.
5. Click on OK.
6. Your WordArt will be inserted onto your page.
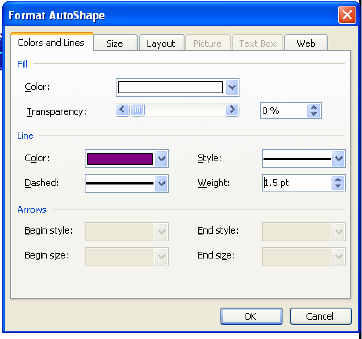
Line Color
You can quickly change the line color and thickness of your images. To add a border or
line color, follow these steps:
1. Right click on your image and choose Format (AutoShape, picture, etc.)
2. The format dialog box will open.
3. Click on the down arrow next to Line color and choose a color.
4. Click on the up or down arrow next to weight to change the thickness of the line.
5. Click on OK.
17
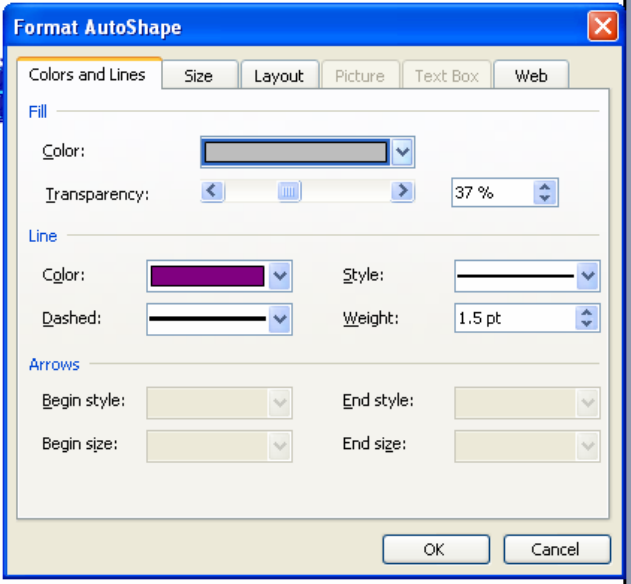
Fill Color
You can quickly change the fill color and images, both images from the Clip Gallery and
images that you draw with the drawing tools. To add a fill color, follow these steps:
1. Right click on your image and choose Format (AutoShape, picture, etc.)
2. The format dialog box will open.
3. Click on the down arrow next to Fill color and choose a color.
4. If you move the slider next to Transparency the image color will be lightened.
5. Click on OK.
18
Inserting Symbols
Inserting symbols into your word document is easy. To insert symbols follow these
steps:
1. Go to Insert on the menu bar and choose Symbol.
2. The Symbol dialog box will open.
19
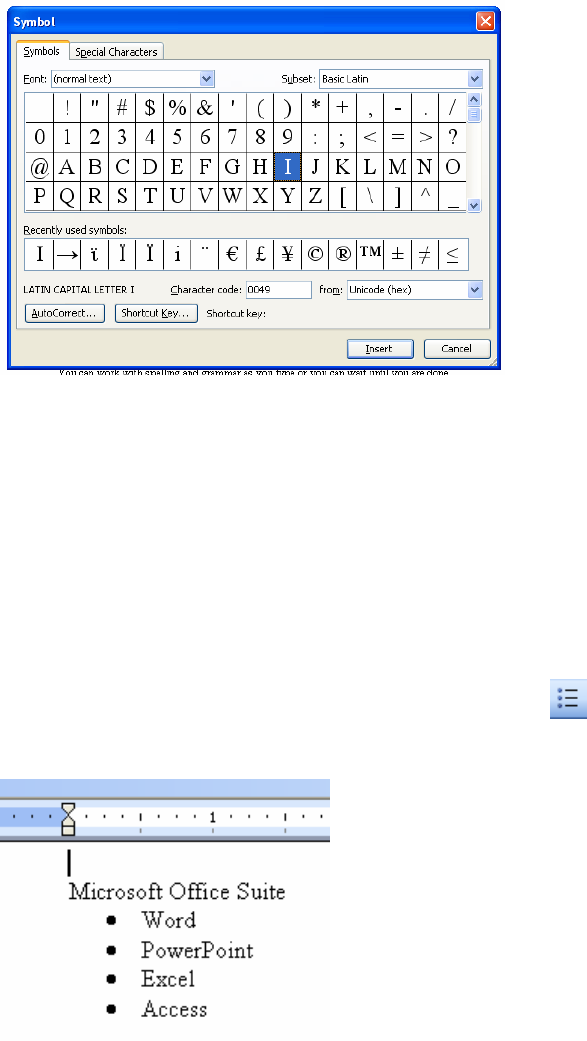
3. Click on the symbol you want to insert into your document.
4. Click the Insert button and then click the Close button.
5. Your symbol will be inserted on your page.
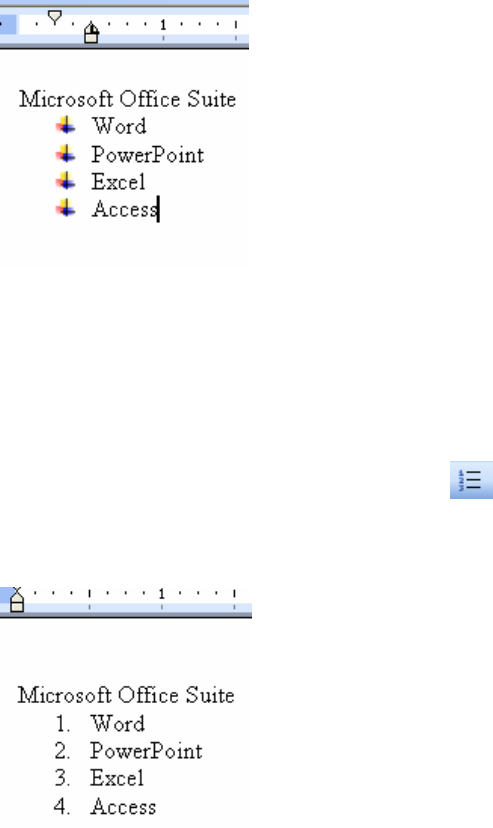
Bullets & Numbering
You can add bullets and numbering to your Word document. You can also choose the
type of bullets you want as well as the numbering style for outlining. To add bullets
follow these steps:
• Click on the bullets button on the Standard toolbar.
• Your bullets will appear. Each time you hit enter a new bullet will appear.
• When you are done using your bullets click on the bullet button again to turn it
off or hit enter twice and then backspace and start typing. You will no longer
have bullets.
Changing Bullets Design
20
To change your type of bullet, follow these steps:
• Select your bulleted.
• Go to Format on the menu bar and choose Bullets and Numbering.
• Choose the type of bullets from the list or click on Customize and then click on
Bullet. If you click on picture then you can choose some graphic images that can
be used as well.
• Choose a font like Wing Dings or Monotype sort and pick the image that you
want to use by clicking on it.
• Click OK and OK again. Your new bullet will be inserted in your document.
Numbering
To add numbering follow these steps:
1. You can either use the automated feature and type 1. Then a space and a word and
hit enter. It will automatically begin numbering or you can click on the
numbering button on the Standard toolbar.
2. When you are done using the numbering scheme you can either click on the
numbering button to turn it off or hit enter twice and then backspace.
Changing the Numbering For Outlining
21

1. Select the numbering list you want to change.
2. Go to Format on the menu bar and choose Bullets and Numbering.
3. You can choose from the Numbered tab or click on Outline Numbered.
4. Click on the format you want to use.
5. Click on OK.
6. When typing and you want to indent to the next level click on the increase indent
button from the Standard toolbar.
7. When you want to come back out a level click on the decrease indent button
from the Standard toolbar.
22
Microsoft Word Intermediate II
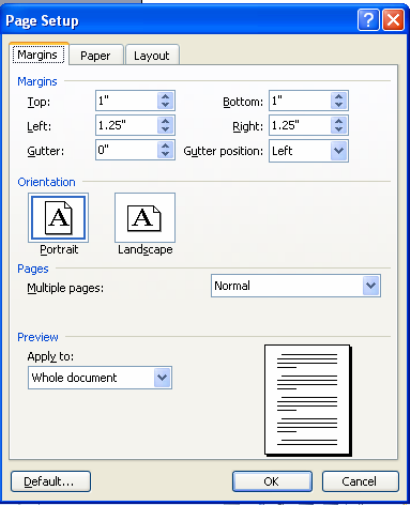
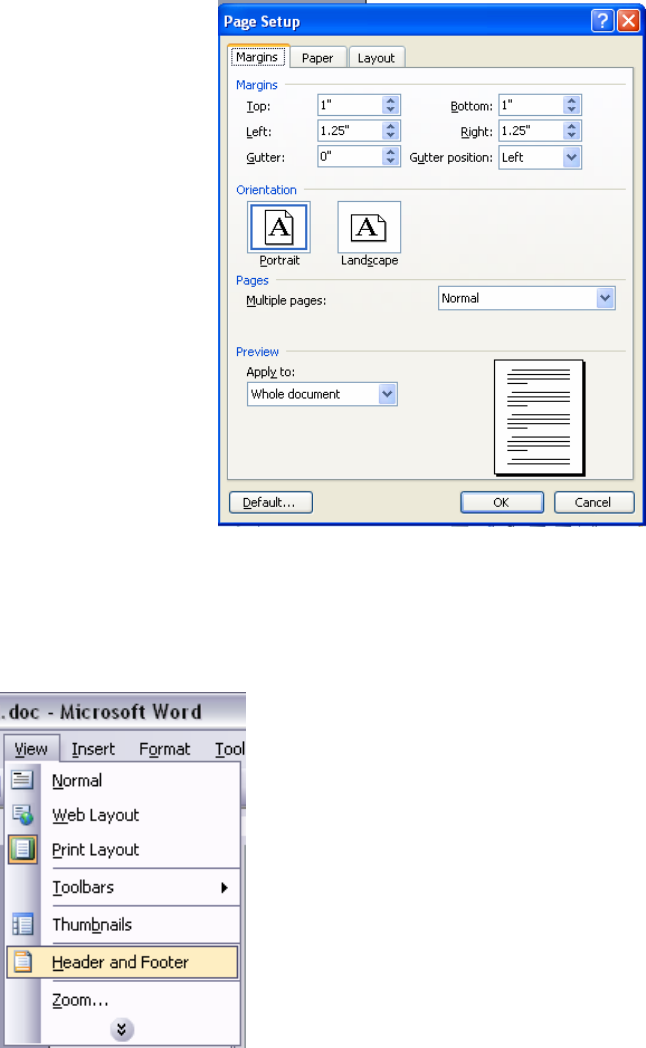
Page Setup
You can change your page orientation quickly in Word. Portrait is the default for new
documents. To change your layout, follow these steps:
1. With your new document open go to File on the menu bar and choose Page
Setup.
2. Click on the Margins tab and choose either landscape or portrait.
3. Click on OK.
Margins
By default your new documents are set with the margins you see below. You can change
this at any time.
Top: 1"
Bottom: 1"
Left: 1.25"
Right: 1.25"
23
To change your margins follow these steps:
1. With your document open go to File then Page Setup.
2. Click on the Margins tab.
3. Type in the numbers you want for your margins or use the up and down arrows.
4. Click on OK.
Inserting Headers/Footers:
Headers and footers are important aspects of a Word document if you wish to include
information such as page numbers and headings on every page. To access the header and
footer options, go to the menu bar and select “View” >> “Header and Footer.”
24
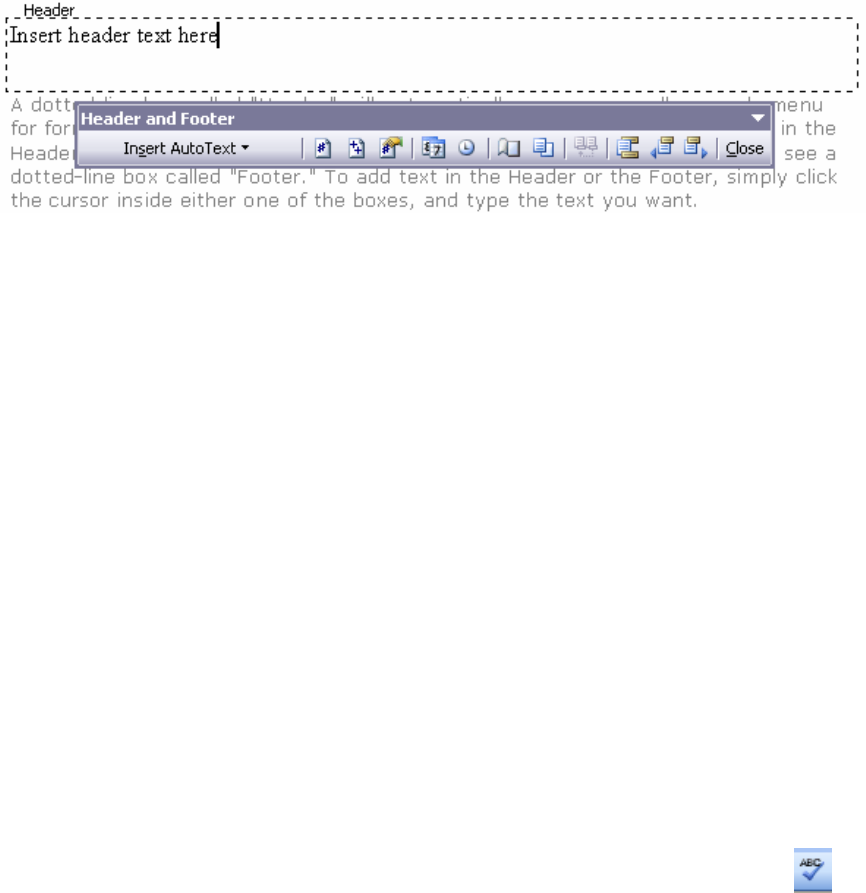
A dotted-line box called "Header" will automatically appear, as well as a sub-menu for
formatting header and footer properties. The cursor will already be placed in the Header
box. If you scroll down on your current page opened in Word, you will see a dotted-line
box called "Footer." To add text in the Header or the Footer, simply click the cursor
inside either one of the boxes, and type the text you want.
To add page numbers to your document, click your cursor inside of the footer box. Then,
click on the icon shaped like a sheet of paper with a "#" inside. The page number will
then be inserted and applied to all of the pages in your document.
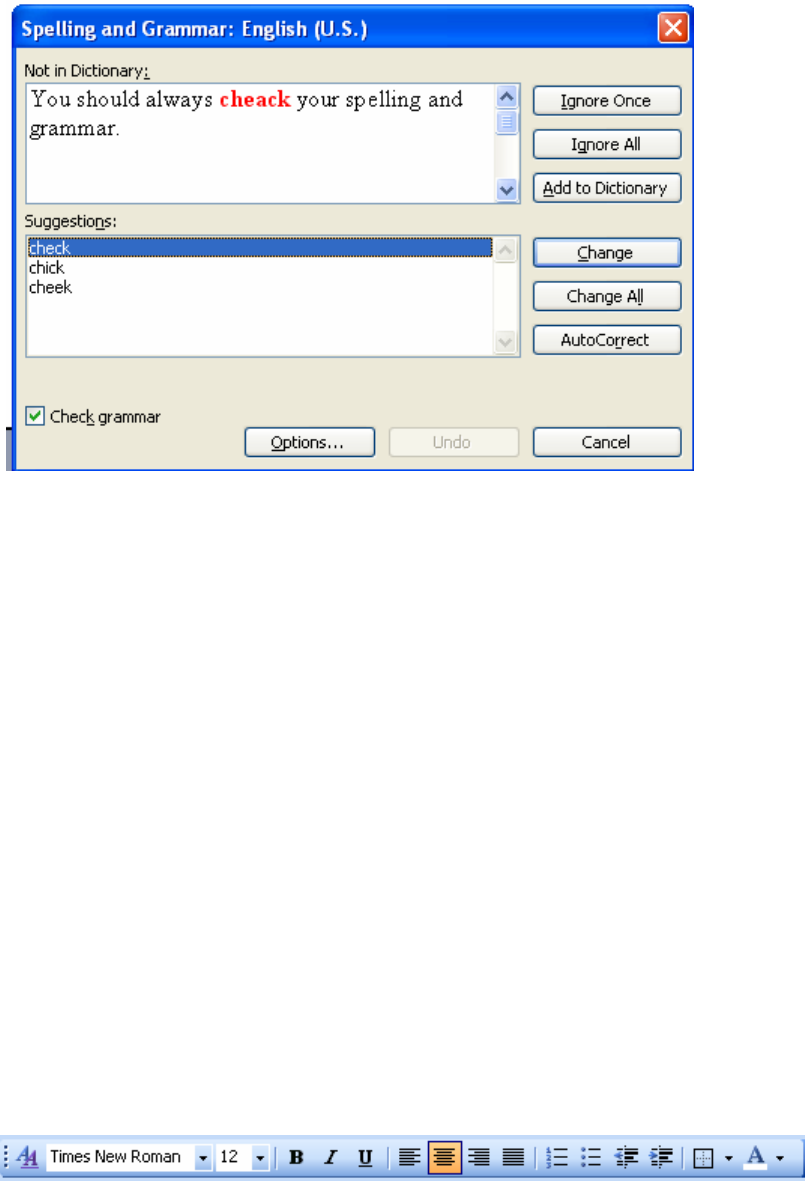
Spelling & Grammar
You can work with spelling and grammar as you type or you can wait until you are done
and then check the spelling and grammar for the whole document. As you type in
Word the default is set up to automatically check your spelling and grammar as you type.
Words that are spelled wrong are indicated by a red squiggly line and grammar mistakes
are indicated by a green squiggly line. To correct as you type you can right click on the
words and choose one of the words that pops up. If the word you spelled is correct you
can choose ignore. If you have other occurrences of that word choose ignore all. There
are some words that you may type wrong that are automatically corrected as you type
them. This is part of the autocorrect feature in Word. To correct spelling and grammar of
your whole document follow these steps:
1. Go to Tools on the menu bar and choose Spelling & Grammar.
OR
2. Click on the Spelling and Grammar button from the Formatting toolbar.
OR
3. Click on the F7 Key.
4. It will go through each of your spelling and grammar errors. Make your changes
and then your spelling and grammar check will be complete.
25
Moving Text
There are a few different ways to move your text in Word. To move text, follow any one
of these steps:
• Select the text, click in the selected area while holding the mouse button down
and drag the text to the desired location.
• Select the text, copy it and then paste it where you want it. It will remain in the
original place and be added to the new location.
• Select the text and cut the text and paste it. It will be removed from the original
place and moved to a new location.
Formatting Text
You can format you text quickly in Word. You can use either the format dialog box or
the formatting toolbar. Formatting text will allow you to format things like bold, font,
underline, italic, color to text, superscript, subscript, etc. To format your text, follow
these steps:
• Select your text and click on the appropriate button from the formatting toolbar.
26
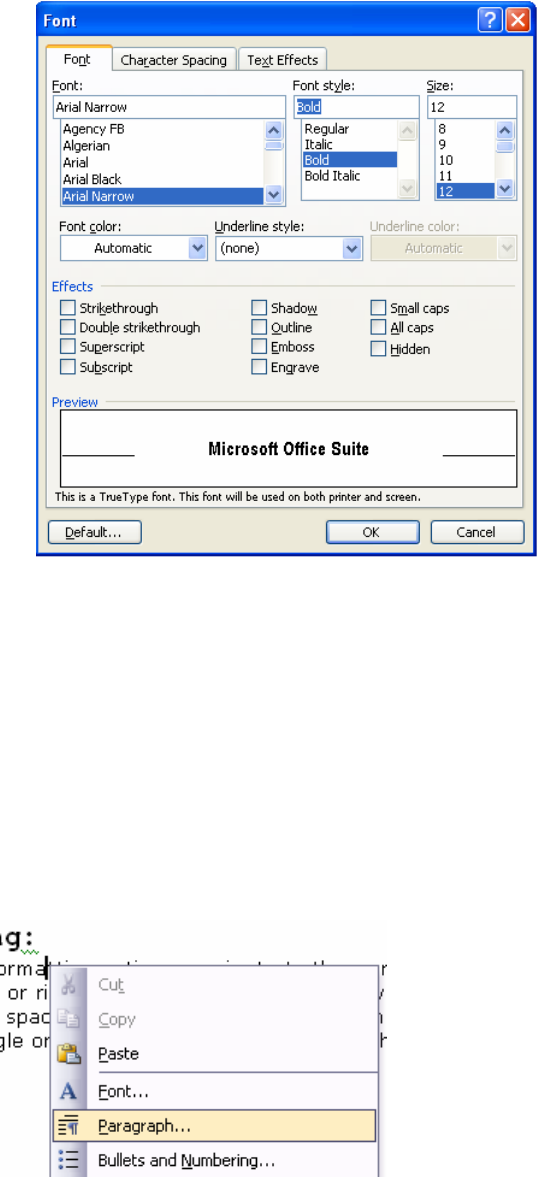
• Or you can go to Format font and the dialog box will open.
• Make your changes and click on OK.
Some commands you can do with the Control keys:
1. Bold- Control +B
2. Underline- Control +U
3. Italic- Control + I
Paragraph Spacing:
To access the Paragraph formatting options, navigate to the menu bar, and select
“Format” >> “Paragraph,” or right-click within a paragraph.
27
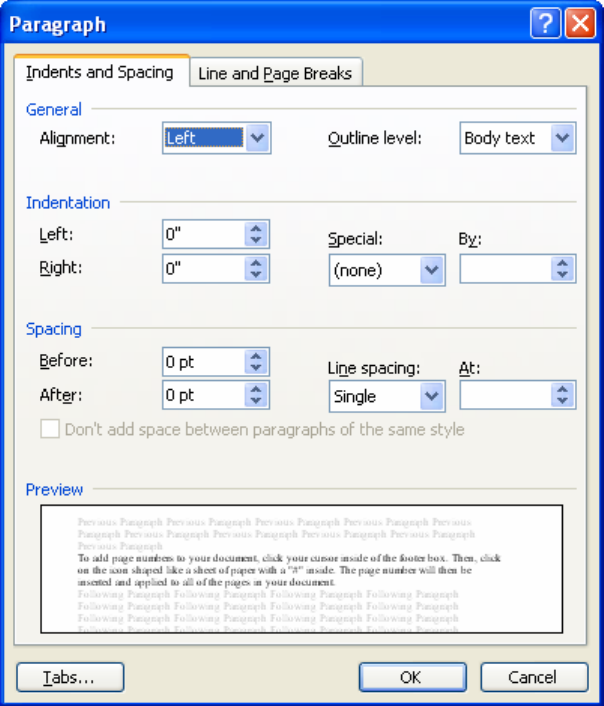
A window will appear with options for modifying spacing and indenting. Here, you can
choose to make the text in your document single or double spaced, as well as edit the
margins for the document.
28
Microsoft Word Advanced I
Inserting Tables
There are many uses for tables in a Word document. There are a couple different ways to
add your table to the document. To add a table, follow these steps:
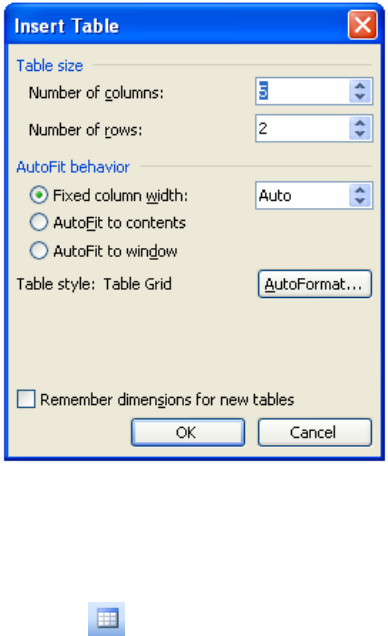
• Go to Table on the menu bar and choose Insert and click on Table.
• The Insert table dialog box opens up.
• Put in the number of columns and rows you want in your table.
• Click on OK.
• Your table will be added to your page.
OR
• Click on the table button on the standard toolbar and drag your mouse over,
down and over until you cover the number of rows and columns you want. If you
need more just click when you are dragging and it will give you more.
• Release the mouse button and your table will be added.
Deleting a Table
To delete a table follow these steps:
• Click anywhere within the table.
29
• Go to Table on the menu bar and choose Select and click on Table. This will
highlight the table in black.
• Go to Table on the menu bar and choose Delete Table.
Adding a Table Border
You can add style to your table by changing the thickness, style or color of your table
border. To make these changes to your table follow these steps:
• You can right click within your table and choose table properties or click within
your table and go to Table on the menu bar and choose Table Properties.
• The Table properties dialog box will open.
• Click on the Borders and Shading button.
• Chose the setting, style, color and width that you want.
• Click on OK.
30
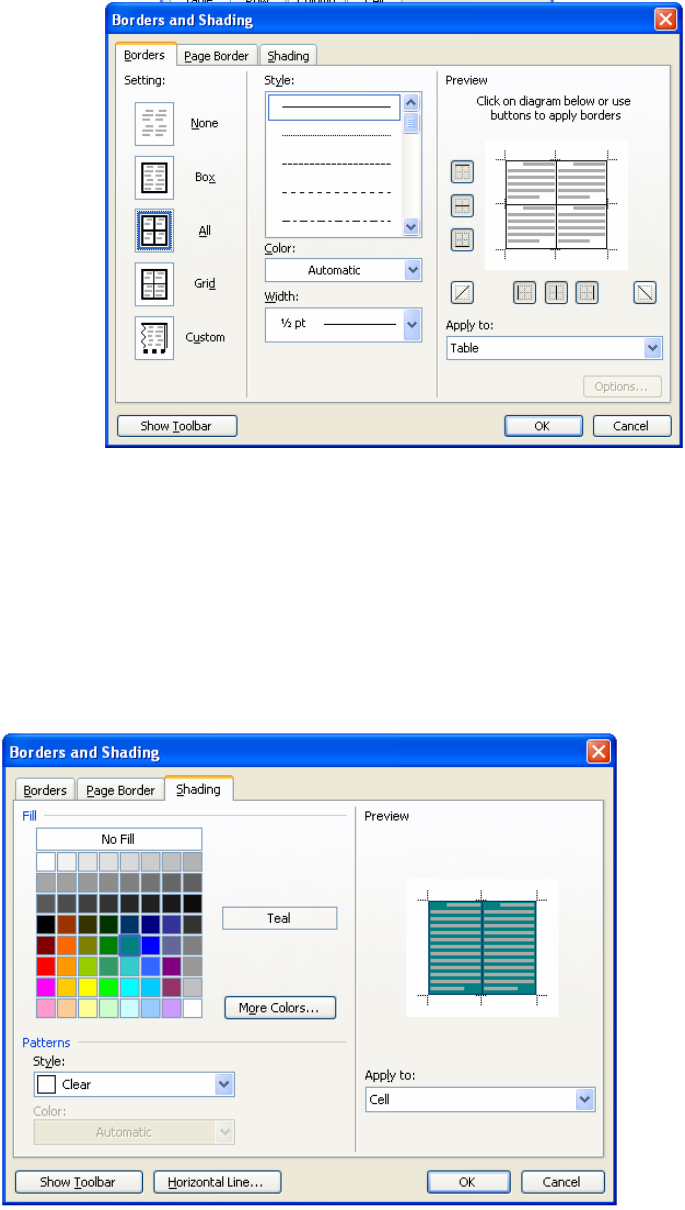
• Your new settings will be added to your table.
Adding Table Shading
You can shade in your table or shade in individual cells. To do this, follow these steps:
• Select the cell, rows, or columns you want to add shading to.
• Go to Format on the menu bar and choose Borders & Shading.
• Click on the color you want to use from the Fill choices. (Click on the more
colors button to find additional color choices).
31
• Click on OK.
• That color will be added to your selected cells.
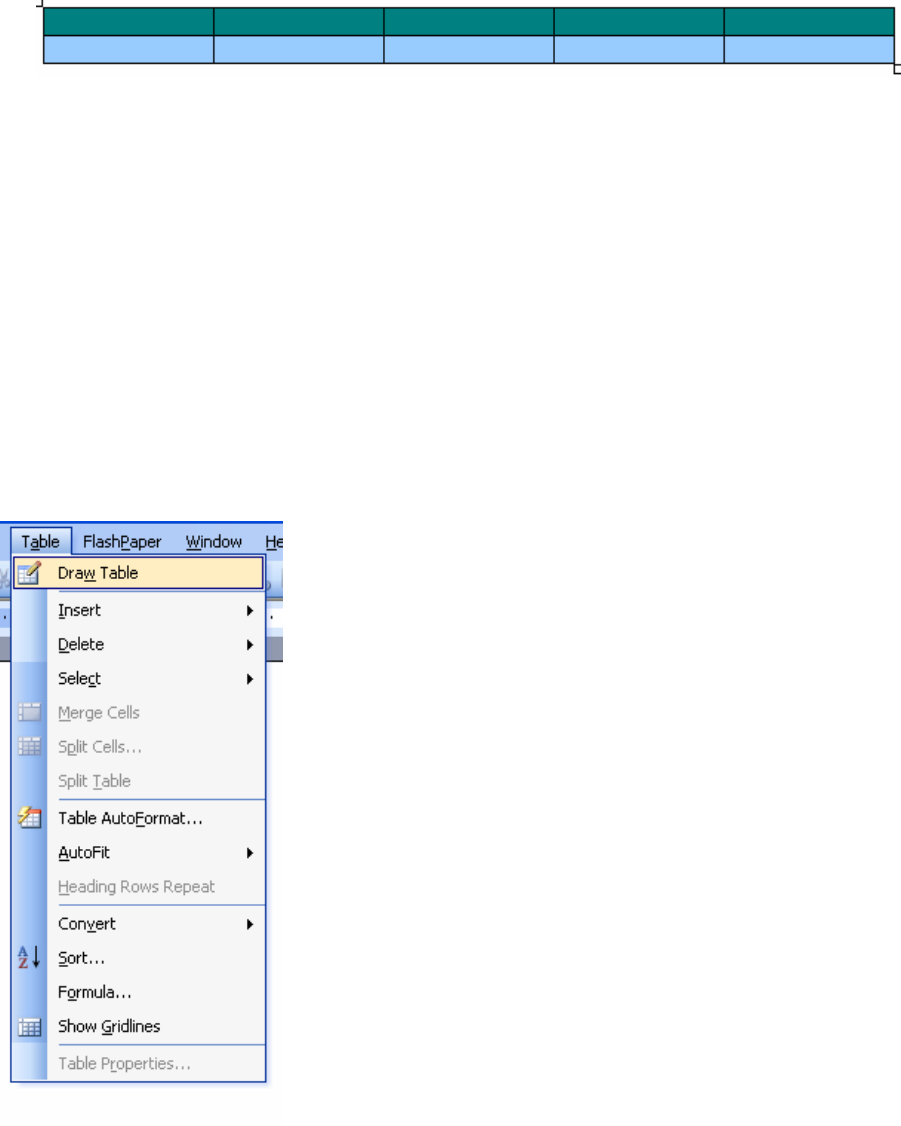
Ex. Table with a row of teal shading and a row of pale blue shading.
Input the necessary information needed to create your table. Decide on a number of rows
and columns. "AutoFit" refers to the space that the table takes up in your document. For
your initial table, you might want to set the "Fixed column width" to "Auto." This sets the
width to all of the columns in your table to an equal amount, and the table itself will take
up the entire width of the document. When you have decided on all of your table options,
click on the "OK" button. The table will then be automatically inserted into your
document.
Draw Table:
If you'd like to draw your own table from scratch, go to the menu bar and select “Table”
>> “Draw Table.”
32
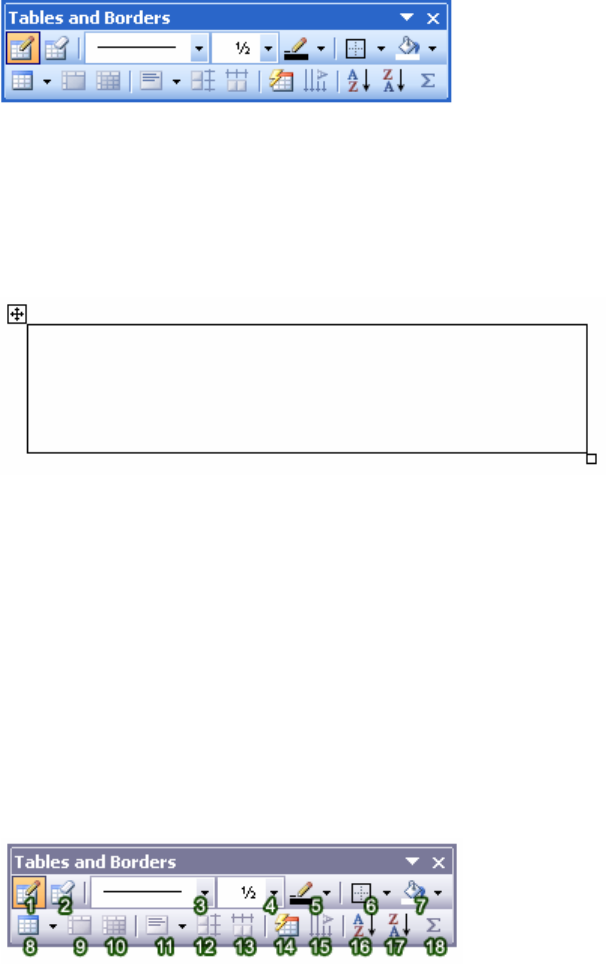
Once this option is selected, the "Tables and Borders" toolbar will pop up (we will cover
this toolbar more in-depth in a little bit).
Click on the first icon on this toolbar, the "Draw Table" tool (looks like a pencil drawing
a line), to begin drawing a table. Then, navigate to the location in your document where
you want to draw your table. Using the "Draw Table" tool, click and drag to form the
outside border of the table, determining its width. When you are finished, let go of the
mouse button so that the outside border of the table can be rendered.
You can draw rows and columns by using the "Draw Table" tool to draw vertical lines to
create columns, and horizontal lines to form rows. Continue to draw your table as you see
fit.
Now that you have the initial table inserted into your Word document (either by using the
"Insert Table" or "Draw Table" method), you can begin to modify your table as needed.
The Tables and Borders Toolbar:
You'll primarily be using the Tables and Borders toolbar for formatting and modifying
the appearance of your table. To open the toolbar, go to the “File” menu and select
“Toolbars” >> “Tables and Borders.”
1. Draw Table: Lets you create a table by drawing it freehand (see above section).
2. Eraser: You can remove parts of your table by using the eraser to click and drag
on lines, rows and columns.
3. Line Style: Click on the small triangle to show the drop down menu. From here,
you can choose a line style for your borders, such as solid, dotted, dashed, and
more.
33
4. Line Weight: Click on the small triangle to show the drop down menu. Using
this, you can choose a line thickness for your table line borders. The bigger the
line weight, the thicker the line.
5. Border Color: By clicking on this button, you can access the color template that
will allow you to apply a color to your line borders.
6. Borders: To apply a certain border style to the borders of specific cells, or to
remove the borders from specific cells completely, use your mouse to select the
desired cells. Then, use the Borders menu to apply or remove borders from those
selected cells. You can identify the cells that have borders by the border type
icons that are a light shade of gray in the Borders menu.
7. Shading Color: You can apply a background color to cells, rows, and columns by
accessing the color palette that appears when you click on the small triangle next
to the paint bucket.
8. Insert Table : Clicking on this icon brings up the "Insert Table" window
which allows you to input specific information about the look and design of your
table (see above section on "Insert Table").
9. Merge Cells : Merging cells is the act of selecting more than one separate cell
and merging them so that they become one. First, select the cells that you want to
merge with your mouse (by clicking and holding within one cell and dragging the
mouse across the cells you want to select), and then click on the "Merge Cells"
icon. Word will automatically merge the two cells together.
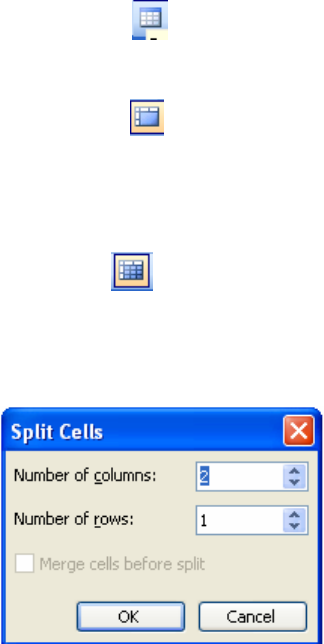
10. Split Cells : Splitting a cell is the act of selecting a specific cell, and dividing
it into one or more rows or columns. Select the cell that you want to split, and
then click on the "Split Cells" icon. Once you do this, the "Split Cells" window
will appear. From here, you can decide how many rows or columns you wish to
create from the one cell.
11. Align: Choosing an alignment from the drop-down menu allows you to format the
text or content within a cell. From here, you can make your text right, left, and
centered aligned. There are also other alignments to choose from, such as
different horizontal and vertical alignments.
12. Distribute Rows Evenly: Makes the heights between rows equally spaced. Select
the desired rows that you wish to format, and then click on the "Distribute Rows
Evenly" icon.
13. Distribute Columns Evenly: Makes the widths between columns equally spaced.
14. Table AutoFormat: Clicking on this icon brings up the Table AutoFormat
window. There are a number of pre-made design table templates you can use to
34
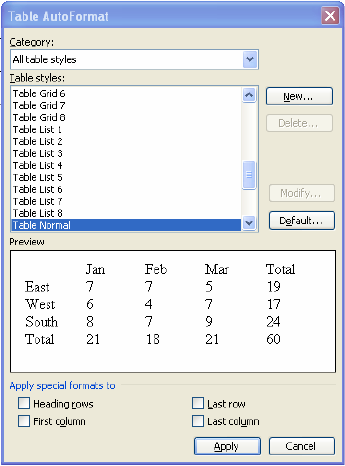
apply to your table. You can customize colors, fonts, borders, and other table
features.
15. Change Text Direction: This allows you to modify the orientation of text within
a cell. The default setting is horizontal, but by clicking on this icon, you can
change the orientation of the text to display vertically.
16. Sort Ascending: Sort a selection of text in cells in ascending order.
17. Sort Descending: Sort a selection of text in cells in descending order.
18. AutoSum: Automatically calculates formulas within cells.
Inserting Text and Content into a Table:
To begin adding text to a table, click your cursor in the cell where you want the text to be
placed. Begin typing (or paste text from another source) into the cell. To move from one
cell to another, hit the "Tab" button on your keyboard, and continue typing in the cell as
needed. You can format the text within the cell using the Formatting toolbar, just as you
would edit any other text in Word (see Word Introduction tutorial).
Inserting an Image into a Table:
Place your cursor into the cell where you wish to insert an image. Then, go to the menu
bar, and select Insert >> Picture, and then choose from "Clip Art" or "From File." Locate
a picture, and click on "Insert" to put the image into a cell.
Modifying a Table:
Not only can you edit your table using the Tables and Borders toolbar, but you can also
use your mouse to physically alter a table.
35
Moving a Table
To move a table, follow these steps:
Move your cursor over the table until you see the icon that appears in the upper left-hand
corner of the table, shaped like a square with crosshair arrows inside.
When you see this appear, click on it. You will see that it selects the entire table. With the
table selected, you can drag it to any new place in your document.
Change Row/Column Heights/Widths:
If you need to increase or decrease the height or width of a row or column, you can do so
by clicking and dragging the borders of rows or columns. Drag the borders until you
create the desired amount of space between rows or columns.
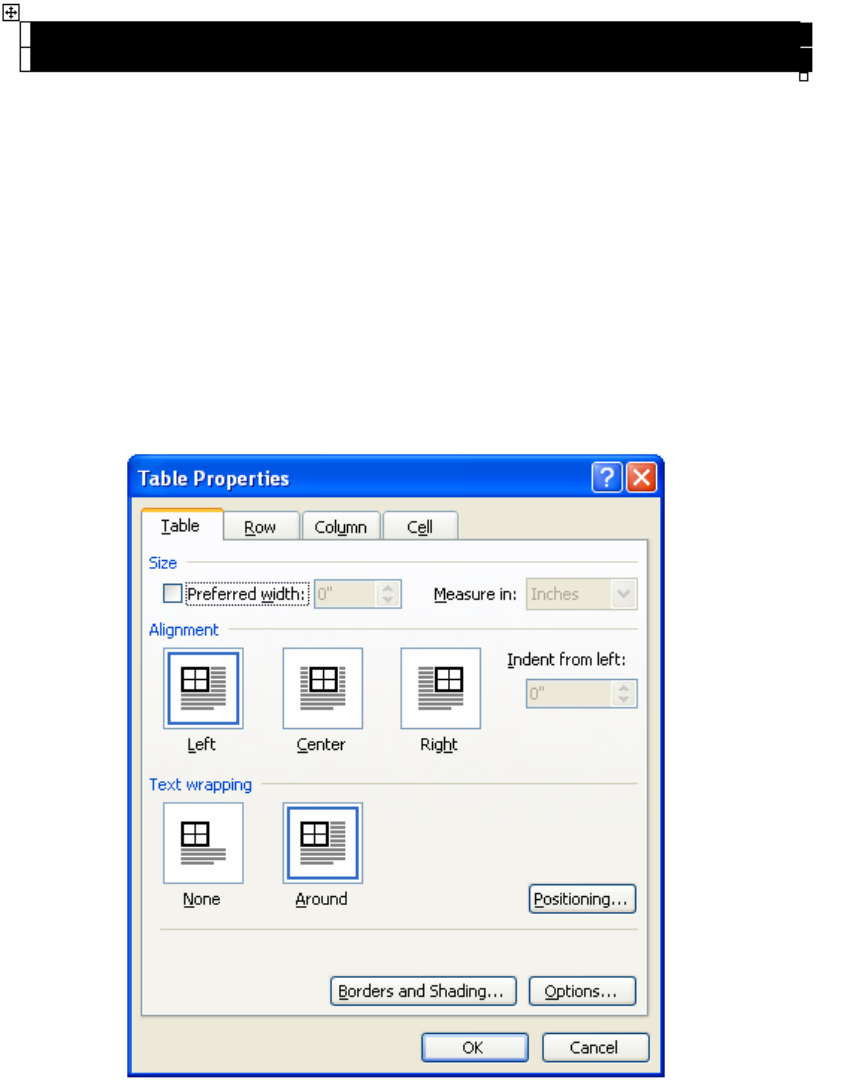
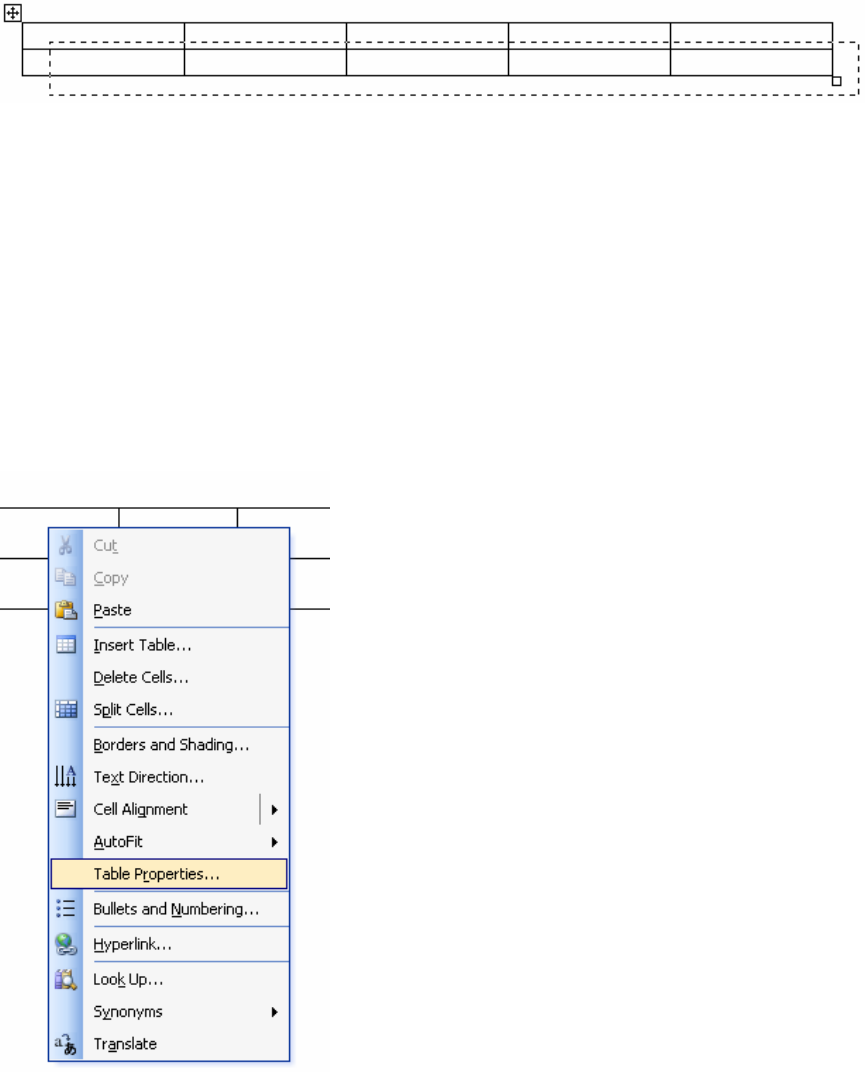
Table Properties:
At any time, you are free to change the properties of your table. Right-click inside of any
table and select “Table Properties.”
36
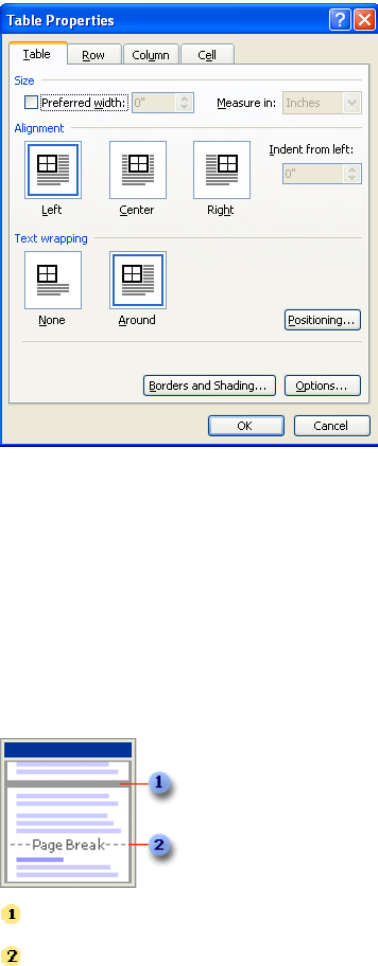
A new window with four tabs will appear. Within these tabs, you can adjust every minor
detail about the table including alignment, spacing, text wrapping, etc.
Inserting Page Breaks
When you fill a page with text or graphics, Microsoft Word inserts an automatic page
break (page break: The point at which one page ends and another begins. Microsoft Word
inserts an "automatic" (or soft) page break for you, or you can force a page break at a
specific location by inserting a "manual" (or hard) page break.) and starts a new page. To
force a page break at a specific location, you can insert a manual page break.
Automatic page break
Manual page break
For example, you can force a page break to ensure that a chapter title always starts on a
new page.
If you work on documents of more than several pages in length, and you insert manual
page breaks, you might have to frequently rebreak pages as you edit the document.
Instead, you might want to set pagination options to control where Word positions
automatic page breaks. For example, you can prevent a page break from occurring within
37
a paragraph or within a table row. Or ensure that a page break doesn’t fall between two
paragraphs, such as a heading and the following paragraph.
Insert a Manual Page Break
1. Click where you want to start a new page.
2. On the Insert menu, click Break.
3. Click Page Break.
Insert a Section Break
1. Click where you want to insert a section break. (section break: A mark you insert
to show the end of a section. A section break stores the section formatting
elements, such as the margins, page orientation, headers and footers, and
sequence of page numbers.).
2. On the Insert menu, click Break.
3. Under Section break types, click the option that describes where you want the
new section to begin. (Section: A portion of a document in which you set certain
page formatting options. You create a new section when you want to change such
properties as line numbering, number of columns, or headers and footers.)
38
