
GE Digital Proficy Historian and Operations Hub: Data Analysis in Context 1
iFIX 6.1
Using VisiconX

Proprietary Notice
The information contained in this publication is believed to be accurate and reliable. However, General Electric Company assumes no
responsibilities for any errors, omissions or inaccuracies. Information contained in the publication is subject to change without notice.
No part of this publication may be reproduced in any form, or stored in a database or retrieval system, or transmitted or distributed in any
form by any means, electronic, mechanical photocopying, recording or otherwise, without the prior written permission of General Electric
Company. Information contained herein is subject to change without notice.
© 2020, General Electric Company. All rights reserved.
Trademark Notices
GE, the GE Monogram, and Predix are either registered trademarks or trademarks of General Electric Company.
Microsoft® is a registered trademark of Microsoft Corporation, in the United States and/or other countries.
All other trademarks are the property of their respective owners.
We want to hear from you. If you have any comments, questions, or suggestions about our documentation, send them to the following email
address:

Table of Contents
Using VisiconX 1
iFIX Reference Documents 1
CIMPLICITY Reference Documents 1
Introduction 2
How VisiconX Works 2
Getting Started 3
Getting Information About Your OLE DB Data Provider 3
Before You Begin Working with VisiconX 4
Understanding VisiconX Controls 4
Data Control 5
Provider Tab 6
Database Tab 6
Record Source Tab 6
SQL Wizard 7
Grid Control 8
ListBox and ComboBox Controls 8
Connecting to an OLE DB Data Provider 8
Connecting to Multiple Databases 9
Accessing Secured OLE DB Data Providers 9
Testing the OLE DB Data Provider Connection 10
Overview Checklist 10
To retrieve data from an OLE DB data provider and display it in iFIX: 10
To retrieve data from an OLE DB data provider and display it in CIMPLICITY: 10
Implementing VisiconX 11
Planning Your Query 11
Planning Your Database Write 12
Designing Your Layout 12
Finalizing Your Design 13
Optimizing System Performance 13
© 2020 General Electric Company. All rights reserved. i

Selecting a Data Provider 13
Use Row Filters to Limit Data Retrieved 13
Troubleshooting 13
Avoiding Problems 14
Assessing Failed Test Connections 14
Assessing Failed Connections at Run Time 14
Row Filters using Date Fields Display No Data 14
Controls Animated by the Data Control Display No Data 15
Troubleshooting Problems Caused By Stored Procedures 15
Microsoft Access Databases 15
Oracle Servers 16
Creating SQL Statements in VisiconX 17
Creating a Query 17
Creating a Query Using the SQL Wizard 17
Entering or Pasting an SQL Statement 18
Joining Tables 18
Creating a Query Using a Table 20
Creating a Query Using a Stored Procedure 20
Writing to a Database 21
Creating an Insert or Update Statement 22
The SQL Wizard 22
Selecting Tables 23
Selecting Columns 24
Returning Unique Rows 24
Filtering Rows Returned 24
Sorting Data by Column Value 25
Creating a Row Filter: Overview 25
Row Filter Comparison Operators 26
Row Filter Values 26
Displaying Data 28
Configuring Display Properties 28
ii © 2020 General Electric Company. All rights reserved.

Using VisiconX: Examples 30
Example 1: Displaying Batch Processes by Batch ID 30
Example 2: Displaying Batch Processes by Recipe Version Dates 31
VisiconX Automation Reference 31
Quick Reference - VisiconX Automation 32
32
A-B 32
C 32
D 33
E 33
F-H 33
I-L 33
M-N 33
O 34
P 34
Q 34
R 34
S 34
T 34
U-Z 34
Property Summary 35
35
A-B 35
C 35
D 35
E 36
F-H 36
I-L 36
M-O 36
P 36
Q 36
© 2020 General Electric Company. All rights reserved. iii

R 36
S 36
T 37
U-Z 37
ADOConnection Property 37
Syntax 37
Parameters 37
Remarks 37
ADORecords Property 37
Syntax 37
Parameters 37
Remarks 37
AutoConnect Property 37
Syntax 38
Parameters 38
Settings 38
Remarks 38
AutoResize Property 38
Syntax 38
Parameters 38
Settings 38
Remarks 39
BackColor Property 39
Syntax 39
Parameters 39
Remarks 39
BackColorBackGround Property 39
Syntax 39
Parameters 39
Remarks 40
BackColorFixed Property 40
iv © 2020 General Electric Company. All rights reserved.

Syntax 40
Parameters 40
Remarks 40
BorderStyle Property 40
Syntax 40
Parameters 40
Settings 41
Col Property 41
Syntax 41
Parameters 41
Cols Property 41
Syntax 41
Parameters 41
Remarks 41
ColumnN Property 41
Syntax 41
Parameters 42
ColumnName Property 42
Syntax 42
Parameters 42
ColumnNames Property 42
Syntax 42
Parameters 42
ColumnNumber Property 42
Syntax 42
Parameters 43
Remarks 43
ColumnWidths Property 43
Syntax 43
Parameters 43
Remarks 43
© 2020 General Electric Company. All rights reserved. v

Connected Property 43
Syntax 43
Parameters 43
Settings 44
Remarks 44
CurrentRow Property 44
Syntax 44
Parameters 44
Remarks 44
Database Property 44
Syntax 44
Parameters 44
DisplayHeaders Property 44
Syntax 44
Parameters 45
Settings 45
Remarks 45
DisplayRowMarker Property 45
Syntax 45
Parameters 45
Settings 45
Remarks 45
DSN Property 45
Syntax 45
Parameters 46
ErrorDesc Property 46
Syntax 46
Parameters 46
ErrorNum Property 46
Syntax 46
Parameters 46
vi © 2020 General Electric Company. All rights reserved.

Font Property 46
Syntax 46
Parameters 46
ForeColor Property 47
Syntax 47
Parameters 47
Remarks 47
ForeColorFixed Property 47
Syntax 47
Parameters 47
Remarks 47
GridColor Property 48
Syntax 48
Parameters 48
Remarks 48
InvisibleInRunMode Property 48
Syntax 48
Parameters 48
Settings 48
Remarks 49
JetDB Property 49
Syntax 49
Parameters 49
JetSDB Property 49
Syntax 49
Parameters 49
Remarks 49
MergeCells Property 49
Syntax 49
Parameters 50
Settings 50
© 2020 General Electric Company. All rights reserved. vii

ODBCConnectionString Property 50
Syntax 50
Parameters 50
Remarks 50
OLEDBConnectionString Property 50
Syntax 51
Parameters 51
Remarks 51
OLEDBProvider Property 51
Syntax 51
Parameters 51
Remarks 52
Password Property 52
Syntax 52
Parameters 52
Remarks 52
PersistUserInfo Property 52
Syntax 52
Parameters 52
Settings 52
Remarks 53
ProcedureNames Property 53
Syntax 53
Parameters 53
QPn Property 53
Syntax 53
Parameters 53
Remarks 53
Row Property 53
Syntax 53
Parameters 53
viii © 2020 General Electric Company. All rights reserved.

Rows Property 54
Syntax 54
Parameters 54
Remarks 54
Server Property 54
Syntax 54
Parameters 54
ShowMilliseconds Property 54
Syntax 54
Parameters 54
Settings 55
SourceType Property 55
Syntax 55
Parameters 55
SQLCommand Property 55
Syntax 55
Parameters 55
Remarks 55
Table Property 56
Syntax 56
Parameters 56
TableNames Property 56
Syntax 56
Parameters 56
Text Property 56
Syntax 56
Parameters 56
UseNTSecurity Property 57
Syntax 57
Parameters 57
Settings 57
© 2020 General Electric Company. All rights reserved. ix

Remarks 57
UseCDBCConnectionString Property 57
Syntax 57
Parameters 57
Settings 57
User Property 58
Syntax 58
Parameters 58
Method Summary 58
AboutBox Method 58
Syntax 58
Parameters 58
CopyCells Method 59
Syntax 59
Parameters 59
DBConnect Method 59
Syntax 59
Parameters 59
DBDisConnect Method 59
Syntax 59
Parameters 60
MoveFirst Method 60
Syntax 60
Parameters 60
MoveLast Method 60
Syntax 60
Parameters 60
MoveNext Method 60
Syntax 60
Parameters 60
MovePrevious Method 60
x © 2020 General Electric Company. All rights reserved.

Syntax 61
Parameters 61
RefreshData Method 61
Syntax 61
Parameters 61
RunSQLWizard Method 61
Syntax 61
Parameters 61
Remarks 61
SetMyContainer Method 61
Method Examples 61
AboutBox Method Example 62
DBConnect Method Example 62
DBDisConnect Method Example 63
MoveFirst Method Example 63
MoveLast Method Example 63
MoveNext Method Example 63
MovePrevious Method Example 64
RefreshData Method Example 64
RunSQLWizard Method Example 64
Event Summary 65
Click Event 65
Syntax 65
Remarks 66
Click (Area as Integer) Event 66
Syntax 66
Parameters 66
DataChanged Event 66
Syntax 67
Parameters 67
DblClick Event 67
© 2020 General Electric Company. All rights reserved. xi

Syntax 67
Parameters 67
Remarks 67
DblClick (Area as Integer) Event 67
Syntax 68
Parameters 68
Remarks 68
ErrorOccurred Event 68
Syntax 68
Parameters 68
ExecuteComplete Event 69
Syntax 69
Parameters 69
Remarks 70
RowChanged Event 70
Syntax 70
Parameters 70
Object Summary 70
vxCombo Object 71
vxData Object 71
vxGrid Object 71
vxList Object 71
Glossary 71
A-C 71
D-M 72
N-R 72
S-Z 72
Animate 72
Animation 72
Automation 72
Collection 73
xii © 2020 General Electric Company. All rights reserved.

ComboBox Control 73
Data Control 73
Event 73
Grid Control 73
ListBox Control 73
Method 73
Numeric Expression 73
Object 73
Object Expression 73
Property 74
Query 74
Query Property (QPn) 74
Row Filter 74
Source Object 74
SQL Statement 74
SQL Wizard 74
Stored Procedure 75
String Expression 75
Target Object 75
VisiconX Dialog Boxes 75
VisiconX ComboBox OLE Properties Dialog Box 76
Font Tab 76
Color Tab 77
VisiconX Data Control OLE Properties Dialog Box 77
Provider Tab 77
Database Tab 77
Record Source Tab 79
VisiconX Grid OLE Properties Dialog Box 80
Font Tab 80
Color Tab 80
VisiconX ListBox OLE Properties Dialog Box 81
© 2020 General Electric Company. All rights reserved. xiii

Font Tab 81
Color Tab 81
Welcome to the VisiconX Wizard Dialog Box 82
Do Not Show Welcome Dialog Again Check Box 82
Next > 82
Select Operation Dialog Box 82
SQL SELECT 82
SQL INSERT 82
SQL UPDATE 82
SQL SELECT Dialog Boxes 82
Select Tables Dialog Box 83
Available Tables 83
Add/Remove/All Buttons 83
Selected Tables 83
Up/Down Arrow Buttons 83
Select Columns Dialog Box 83
Available Columns 83
Add/Remove/All Buttons 83
Selected Columns 84
Up/Down Arrow Buttons 84
Return Unique Rows 84
Create Row Filter Dialog Box 84
Available Columns 84
Add/Remove/All Buttons 84
Selected Columns 84
Up/Down Arrow Buttons 84
Operator 84
Comparison Operator 84
Value 85
Select Columns to Sort By Dialog Box 85
Available Columns 85
xiv © 2020 General Electric Company. All rights reserved.

Add/Remove/All Buttons 85
Selected Columns 85
Up/Down Arrow Buttons 85
Sort This Column 86
Finish Dialog Box 86
SQL Statement Edit Box 86
SQL INSERT Dialog Boxes 86
Select Table to Insert Into Dialog Box 86
Available Tables 86
Add/Remove/All Buttons 86
Selected Tables 86
Up/Down Arrow Buttons 87
Select Values to Insert Dialog Box 87
Insert Values 87
Finish Dialog Box 87
SQL Statement Edit Box 87
SQL UPDATE Dialog Boxes 87
Select Table to Update Dialog Box 87
Available Tables 87
Add/Remove/All Buttons 87
Selected Tables 88
Up/Down Arrow Buttons 88
Select Columns to Update Dialog Box 88
Update Columns 88
Create Row Filter Dialog Box 88
Available Columns 88
Add/Remove/All Buttons 88
Selected Columns 88
Up/Down Arrow Buttons 88
Operator 89
Comparison Operator 89
© 2020 General Electric Company. All rights reserved. xv

Value 89
Finish Dialog Box 89
SQL Statement Edit Box 89
How Do I... 89
Connecting to a Data Provider 90
Overview: Connecting to an OLE DB Data Provider 90
To connect to an OLE DB data provider: 90
Connecting to Microsoft OLE DB Provider for SQL Server 90
To connect to the Microsoft OLE DB Provider for SQL Server: 91
Connecting to a Microsoft OLE DB Simple Provider 91
To connect to the Microsoft OLE DB Simple data provider: 91
Connecting to an ODBC Driver 91
Connecting to an ODBC Driver Using a Data Source Name 91
To connect to the Microsoft OLE DB Provider for ODBC drivers using an existing data
source name: 91
Connecting to an ODBC Driver Using a Connection String 91
To connect to the Microsoft OLE DB Provider for ODBC drivers using a connection string: 92
Connecting to Microsoft Jet OLE DB Provider 92
To connect to the Microsoft Jet OLE DB provider: 92
Connecting to Microsoft OLE Provider for Oracle 92
To connect to the Microsoft OLE Provider for Oracle: 92
Connecting to Multiple OLE DB Data Providers or Databases 92
To connect multiple OLE DB data providers or databases: 93
Accessing Secured OLE DB Providers 93
Accessing a Secured OLE DB Data Provider with User ID and Password 93
To access a secured OLE DB data provider using a user ID and password: 93
Using Windows Security to Access a Microsoft SQL Server Database 93
To use Windows integrated security to access a Microsoft SQL Server database: 93
Testing the OLE DB Data Provider Connection 94
To test the OLE DB data provider connection: 94
Creating SQL Statements 94
Using the SQL Wizard 94
xvi © 2020 General Electric Company. All rights reserved.

Creating SQL Statements with the SQL Wizard 94
To create an SQL statement with the SQL Wizard: 95
Constructing an SQL SELECT Command 95
To construct an SQL SELECT command using the SQL Wizard: 95
Selecting Tables in an SQL SELECT Command 95
To select tables in an SQL SELECT command using the SQL Wizard: 95
Selecting Columns in an SQL SELECT Command 96
To select columns in an SQL SELECT command using the SQL Wizard: 96
Returning Unique Rows for Your Query 96
To create a query that returns unique rows using the SQL Wizard: 96
Creating a Row Filter 97
To create a row filter using the SQL Wizard: 97
Sorting Retrieved Data by Column Values 97
To sort data using the SQL Wizard: 98
Constructing an SQL INSERT Command 98
To construct an SQL INSERT command using the SQL Wizard: 98
Selecting Tables in an SQL INSERT Command 98
To select tables in an SQL INSERT command using the SQL Wizard: 98
Constructing an SQL UPDATE Command 99
To construct an SQL UPDATE command using the SQL Wizard: 99
Selecting Tables in an SQL UPDATE Command 99
To select tables in an SQL UPDATE command using the SQL Wizard: 99
Creating a Row Filter 100
To create a row filter using the SQL Wizard: 100
Creating a Statement Manually 100
To query a database by entering or pasting an SQL statement: 101
Creating a Query for an Entire Table 101
To query an entire table: 101
Creating a Query Using a Stored Procedure 101
To create a query based on a stored procedure: 101
Displaying Data at Run Time 101
© 2020 General Electric Company. All rights reserved. xvii

Overview: Displaying Data at Run Time 102
To display data in Grid, ListBox, or ComboBox controls in iFIX: 102
To display data in Grid, ListBox, or ComboBox controls in CIMPLICITY: 102
Hiding the Data Control at Run Time 102
To make the Data Control invisible in the run-time environment: 102
Configuring Run Time Display Properties 102
To configure the text and color properties of the Grid, ListBox, and ComboBox controls: 102
Accessing VisiconX Properties 103
Accessing VisiconX Object Properties 103
To access and edit VisiconX object properties in iFIX: 103
To access and edit VisiconX object properties in CIMPLICITY: 103
Accessing VisiconX OLE Control Properties 103
To access and edit VisiconX OLE Control properties in iFIX: 103
To access and edit VisiconX OLE Control properties in CIMPLICITY: 104
Using VisiconX in iFIX 104
Inserting VisiconX Controls in iFIX 104
Using Electronic Signatures with SQL Commands 105
Using VisiconX to View Historian Data 105
Using VisiconX Properties and Methods in iFIX 105
Using VisiconX Properties and Methods in a Visual Basic Script 106
Using Properties and Methods with a Data Control in iFIX 106
Setting VisiconX Properties in an iFIX Properties Window 108
Animating Objects with VisiconX Properties in iFIX 109
Animating Grid, ListBox, or ComboBox Controls in iFIX 110
Animating a Grid Control 111
Animating ListBox and ComboBox Controls 111
Animating Query Properties 111
Animating Query Properties with OLE Objects 112
Animating Query Properties with Data Links 112
Examples of Animating Query Properties 113
Example 1: Using a ListBox Control 113
xviii © 2020 General Electric Company. All rights reserved.

Example 2: Using a Microsoft Forms Check Box Control 114
Example 3: Using a Data Link Control 115
iFIX VisiconX Dialog Boxes 116
VisiconX Configuration to View Historian Data Dialog Box 116
Historian Configuration 116
Server 116
User Name 116
Password 116
Raw Data 117
Connect to ihrawData Table 117
Select a Tag Name 117
Time Stamp 117
From: 117
To: 117
Advanced 117
All Historian Tables 117
Form Your Own Query Check Box 117
Selected Query 117
How Do I... (iFIX) 117
Working with VisiconX in the Workspace 117
Inserting a VisiconX Control in iFIX 118
To insert a VisiconX data control: 118
To insert a VisiconX grid control: 118
To insert a VisiconX list box control: 118
To insert a VisiconX combo box control: 118
Adding the VisiconX Toolbar to the WorkSpace 118
To import the VisiconX toolbar or make it visible in the WorkSpace: 118
Setting Synchronous Execution for VisiconX 119
To change VisiconX to use synchronous execution: 119
Configuring VisiconX to View Historian Data 119
To configure VisiconX to view Historian data: 119
© 2020 General Electric Company. All rights reserved. xix

Using VisiconX Properties and Methods in iFIX: Procedures 120
Using VisiconX Properties and Methods in a Visual Basic Script 120
To use VisiconX properties and methods in a Visual Basic script: 120
Editing VisiconX Properties in the iFIX Properties Dialog Box 121
To edit VisiconX properties in the iFIX Properties dialog box: 121
Animating Controls: Procedures 121
Animating a Grid Control 121
To animate a Grid Control: 121
Animating a ListBox or ComboBox Control 122
To animate a ListBox or a ComboBox Control: 122
Animating Query Properties: Procedures 122
Overview: Animating Query Properties 122
To animate a query property: 122
Animating Query Properties with an OLE Object 123
To animate a query property with an OLE object: 123
Animating Query Properties with a Data Link 123
To animate a query property with a Data link: 123
Using VisiconX in CIMPLICITY 124
Inserting VisiconX Controls in CIMPLICITY 124
Using VisiconX to View Historian Data in CIMPLICITY 124
Software Requirements 125
To create the data control: 125
To add the VisiconX.ini file to the installation folder: 126
To add the data display (the Grid control): 127
Using VisiconX Properties and Methods in CIMPLICITY 127
Using VisiconX Properties and Methods in a CimEdit Basic Script 127
Using Properties and Methods with a Data Control in CIMPLICITY 128
Setting VisiconX Properties in a CimEdit Properties Dialog Box 130
Using Query Properties in CIMPLICITY 131
CIMPLICITY VisiconX Dialog Boxes 131
VisiconX ListBox Control Dialog Box 131
xx © 2020 General Electric Company. All rights reserved.

Current Data Source 131
Select a Data Source 132
VisiconX ComboBox Control Dialog Box 132
Current Data Source 132
Select a Data Source 132
VisiconX Grid Control Dialog Box 132
Current Data Source 132
Select a Data Source 132
VisiconX Data Control Dialog Box 132
Object Name 132
Configure Database Connection 132
How Do I... (CIMPLICITY) 132
Inserting a VisiconX Control in CIMPLICITY 133
To insert a VisiconX Data Control: 133
To insert a VisiconX Grid Control: 133
To insert a VisiconX ListBox Control: 133
To insert a VisiconX ComboBox Control: 133
Associating a VisiconX Control With a Data Source 133
To associate a VisiconX Grid Control with a data source: 133
To associate a VisiconX ListBox Control with a data source: 134
To associate a VisiconX ComboBox control with a data source: 134
Using VisiconX Properties and Methods in CIMPLICITY: Procedures 134
Using VisiconX Properties and Methods in a CimEdit Basic Script 134
To use VisiconX properties and methods in a CimEdit Basic script: 134
Editing VisiconX Properties in the CimEdit Properties Dialog Box 135
To edit VisiconX properties in the CimEdit Properties dialog box: 135
Index 137
© 2020 General Electric Company. All rights reserved. xxi

Using VisiconX
This e-book, Using VisiconX, is intended for users who need to access data from relational or non-rela-
tional databases. The information in this document describes how to use the VisiconX ActiveX controls.
These controls offer access to data in any database. Scripts or customized programs previously
required to access data are a thing of the past.
Previously, accessing data meant writing a Microsoft Visual Basic script, which can be tedious and
requires knowledge of Visual Basic. The VisiconX controls harness the newest Microsoft technology
known as ADO, which stands for ActiveX Data Objects. By using ADO, VisiconX lets you access data
easily and quickly.
This e-book assumes you are familiar with either iFIX or CIMPLICITY, both of which support the use of
VisiconX objects. It also assumes some familiarity with SQL queries and relational database concepts.
Finally, knowledge of the Windows environment and the advanced capabilities of Microsoft Windows is
assumed.
NOTE (CIMPLICITY USERS ONLY): CIMPLICITY WebView does not support the use of VisiconX objects.
iFIX Reference Documents
For related information on iFIX, refer to the following iFIX manuals:
l
Creating Pictures
l
Using SQL
l
Writing Scripts
CIMPLICITY Reference Documents
For related information on CIMPLICITY, refer to the following CIMPLICITY manuals:
NOTE: Reference documents for iFIX or CIMPLICITY will only be available for the product you have installed.
© 2020 General Electric Company. All rights reserved. 1

Introduction
VisiconX™ is a GE Plug and Solve® solution for the iFIX® and CIMPLICITY® products. It is an easy-to-
use, object-oriented development tool that makes accessing data in any type of database a snap! Its
simple point-and-click interface provides the means to configure access to any database and then cre-
ate an SQL query as simple or complex as necessary to retrieve the information you need. You can also
create simple insert and update statements to add or change the data in a database table.
VisiconX consists of a suite of controls that can be inserted into a iFIX WorkSpace™ picture or a
CIMPLICITY CimEdit screen. These controls access Microsoft's ActiveX™ Data Objects (ADO), elim-
inating the need to write Microsoft® Visual Basic® scripts or create a customized program to access
and manipulate data. A task that previously required hours of development time is reduced to seconds!
The VisiconX SQL Wizard makes it easy for you to retrieve the precise information you need, or to add
and change the data stored in a database table. The SQL Wizard helps you choose options for your
statement and then builds the SQL Select, Insert, or Update statement for you. If you want, you can
bypass the SQL Wizard and query the database using a stored procedure or by entering an SQL state-
ment yourself.
Besides making data access easier and quicker, VisiconX also enforces access to secured databases.
VisiconX can use either a user name and password or the features of Windows integrated security to per-
form a security check. The security check must succeed before VisiconX returns any data.
iFIX users can configure SQL commands to require either Perform Only or Perform and Verify electronic
signatures. Both iFIX and CIMPLICITY users can configure whether the SQL Wizard is available in run
mode.
How VisiconX Works
VisiconX is a suite of the following four ActiveX objects:
l Data Control
l Grid Control
l ListBox Control
l ComboBox Control
The Data Control connects to any database and retrieves data. The Grid, ListBox, and ComboBox Con-
trols display the data retrieved by connecting to the Data Control through object-to-object animation in
iFIX and through pre-built script logic in CIMPLICITY.
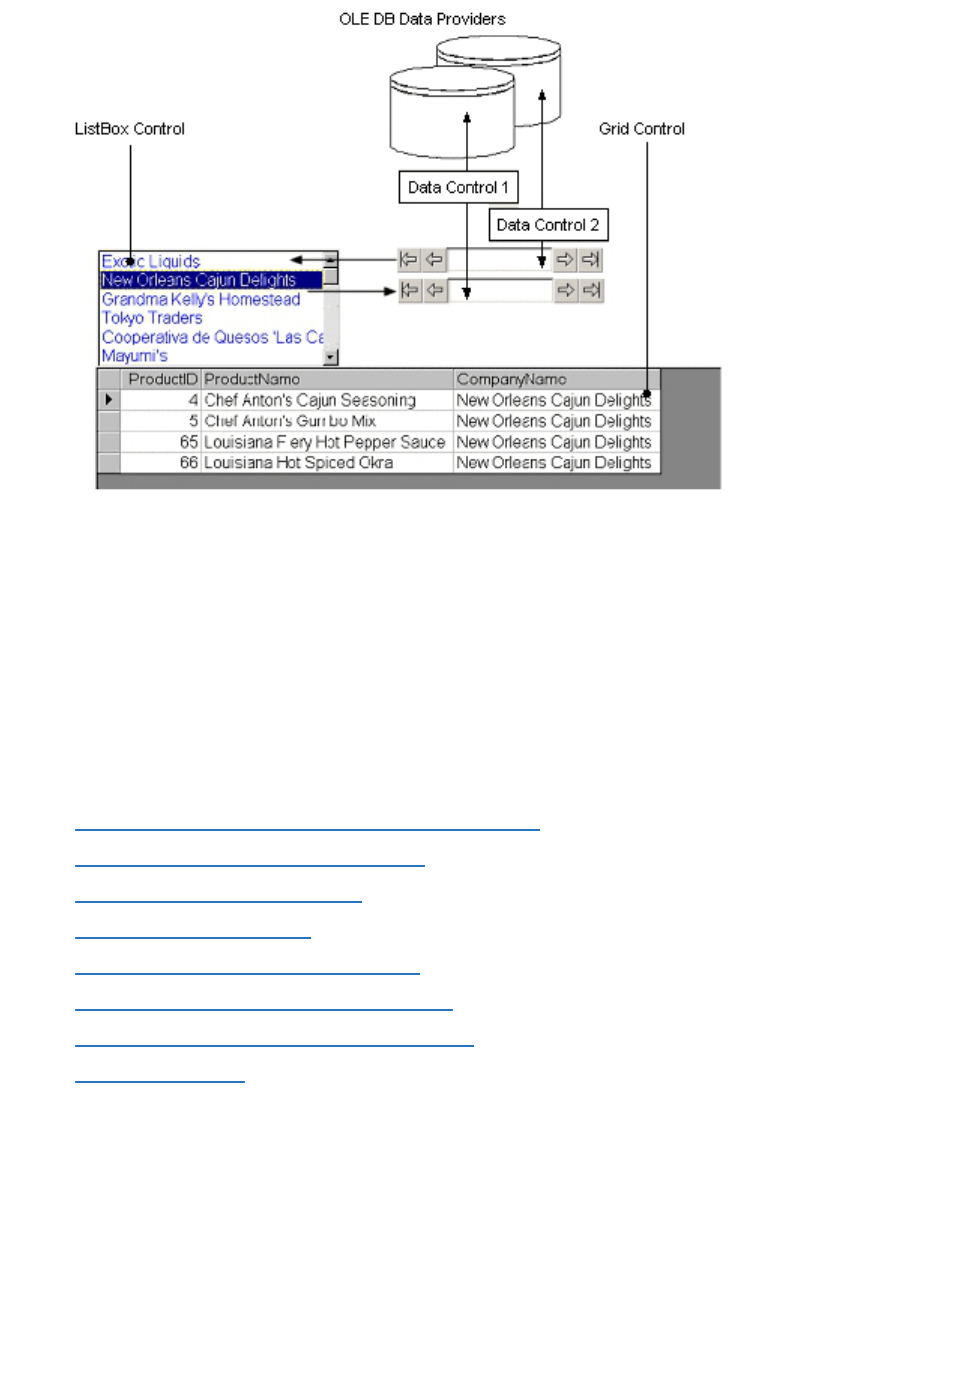
The following illustration depicts how VisiconX works. In this figure, each Data Control is configured to
access an OLE DB data provider.
l Data Control 1 animates the Grid Control, which displays the retrieved data in a spreadsheet-like
format.
l Data Control 2 animates the ListBox Control.
l The ListBox Control animates the query property defined in the SQL Select statement of Data
Control 1, which in turn filters the data displayed in the Grid Control.
2 © 2020 General Electric Company. All rights reserved.
Using VisiconX Controls
Getting Started
This chapter describes how to begin using VisiconX controls to connect to and retrieve data from OLE
DB data providers. It describes the controls themselves, how to insert them in a picture, and how to con-
figure the Data Control to connect to an OLE DB data provider, secure access, and test the connection.
It includes the following sections:
l Getting Information About Your OLE DB Data Provider
l Before You Begin Working with VisiconX
l Understanding VisiconX Controls
l Inserting VisiconX Controls
l Connecting to an OLE DB Data Provider
l Accessing Secured OLE DB Data Providers
l Testing the OLE DB Data Provider Connection
l Overview Checklist
Getting Information About Your OLE DB Data Provider
Before you begin using VisiconX, find out what you need to know to access an OLE DB data provider.
The first thing to determine is which data provider to access. VisiconX supports a number of data
© 2020 General Electric Company. All rights reserved. 3

providers, such as SQL Server and Oracle, as well as ODBC drivers that map to many different types of
relational databases.
The information you need differs depending on the data provider you access. Begin by asking your sys-
tem administrator. The following table defines the information to acquire for each type of OLE DB data
provider VisiconX supports.
OLE DB Data Provider Information Needed
Microsoft Jet 3.51 or 4.0 Provider Database path and name
System (security) database path and name
ODBC Drivers ODBC data source name or
ODBC connection string
SQL Server Server name
Database name
Oracle Server name
Simple Provider Connection string for the data source (server) and initial catalog
Required Connection Information for an OLE DB Data Provider
NOTE: ODBC data source names are defined through the ODBC Administrator tool. Access this tool by click-
ing the Start button and pointing to Programs, Administrative Tools, and then Data Sources (ODBC). You can
also access the Administrative Tools folder from the Control Panel.
You also need to determine if the OLE DB data provider is secured. If it is, you need a user ID and pass-
word to access the data provider. You also need to determine which access privileges you have. For
example, do you have access to all or specific databases on the server? Can you access all tables in
the database?
Before You Begin Working with VisiconX
Before you begin working with VisiconX Controls:
l iFIX users:
Start iFIX and the iFIX WorkSpace. When you start the WorkSpace, you are ready to begin insert-
ing and defining your controls. Start by creating a new picture or opening an existing one, as
described in the iFIX
Creating Pictures
ebook.
l CIMPLICITY users:
Start CimEdit and then create a new CimEdit screen or open an existing one, as described in the
ebook. VisiconX controls are inserted and defined in a CimEdit screen.
Understanding VisiconX Controls
VisiconX provides the following OLE ActiveX controls for you to include in your iFIX WorkSpace picture
or CIMPLICITY CimEdit screen:
4 © 2020 General Electric Company. All rights reserved.
l Data Control
l Grid Control
l ListBox and ComboBox Controls
These controls let you connect to an OLE DB data provider, specify a database query, and view the
returned data in a spreadsheet-like format, list box, or drop-down list box.
Data Control
The Data Control provides the interface between OLE DB data providers and the VisiconX object.
Through the Data Control, you can communicate with any OLE DB data provider installed on your local
machine, including, but not limited to SQL Server, MS Access, and Oracle. You can also access rela-
tional databases using OBDC drivers.
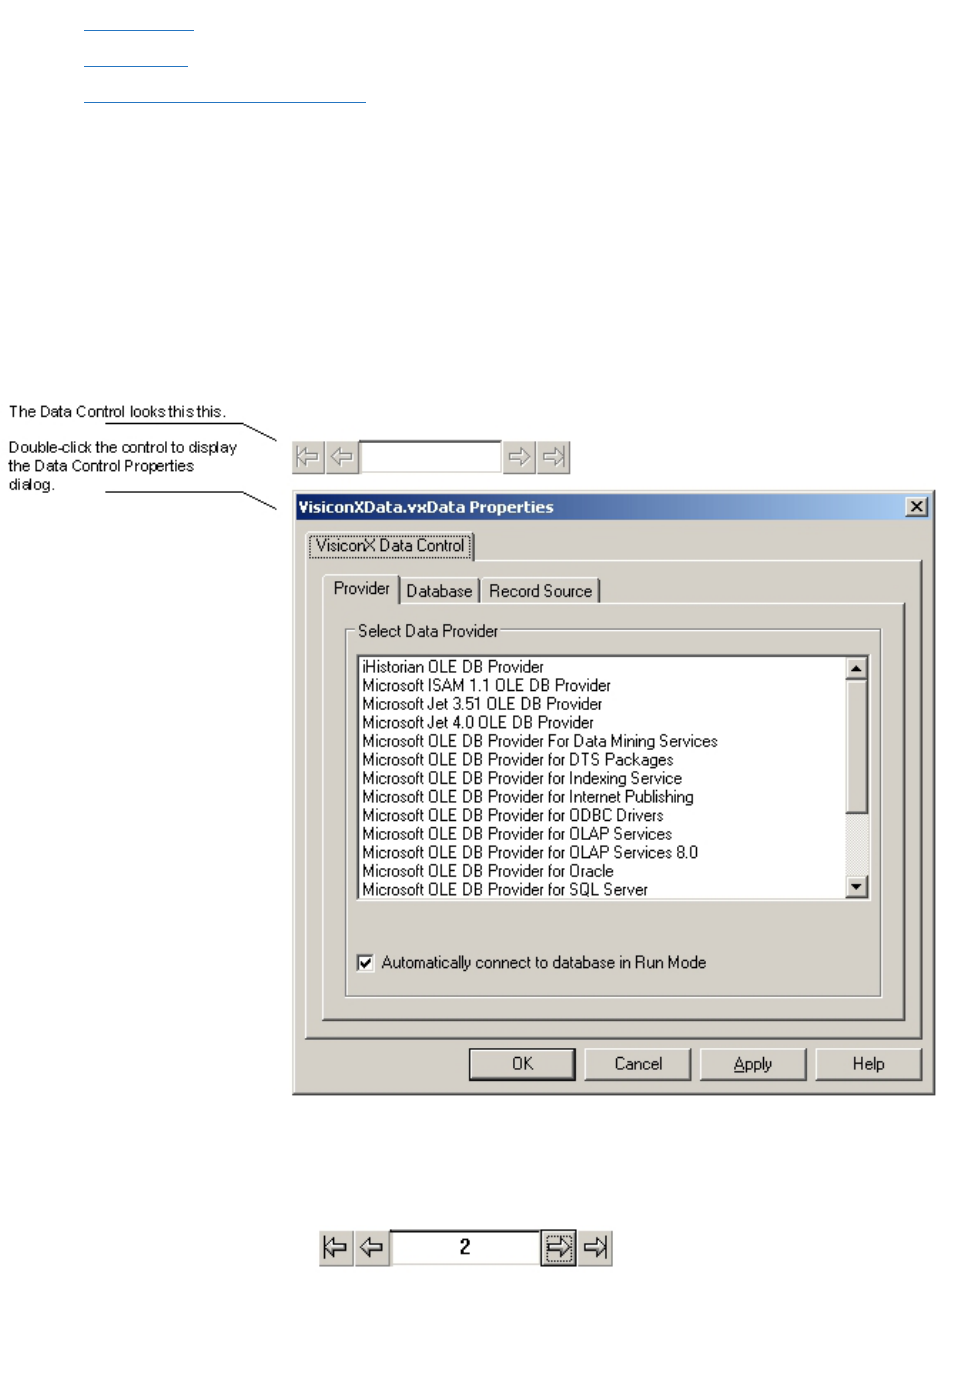
Data Control and Its Properties Dialog Box
In the run-time environment, the control itself displays the zero-based number of the current row and nav-
igation arrows, which you can use to move through the data displayed in the Grid Control.
© 2020 General Electric Company. All rights reserved. 5

Data Control Display in the run-time environment
If the data provider you want to access has security implemented, the Data Control requires an author-
ized user ID and password before it can access and retrieve data. Users accessing a secured SQL
Server have the option of using the security features of Windows.
NOTE: If the data control's InvisibleInRunMode property is set to True, security error messages will not
appear.
The Data Control is easy to configure with a point-and-click user interface. The Data Control dialog box
presents tabs from which you can quickly select a server and a database to access.
Provider Tab
The Provider tab provides a list of the available OLE DB data providers you can choose from. These
data providers map to many different types of relational databases. Once you have selected a provider,
you can proceed to the Database tab.
Database Tab
The fields on the Database tab differ depending on the data provider you select. Each type of data pro-
vider requires different information to connect to the associated databases. You must select a data pro-
vider and database before moving on to the Record Source tab.
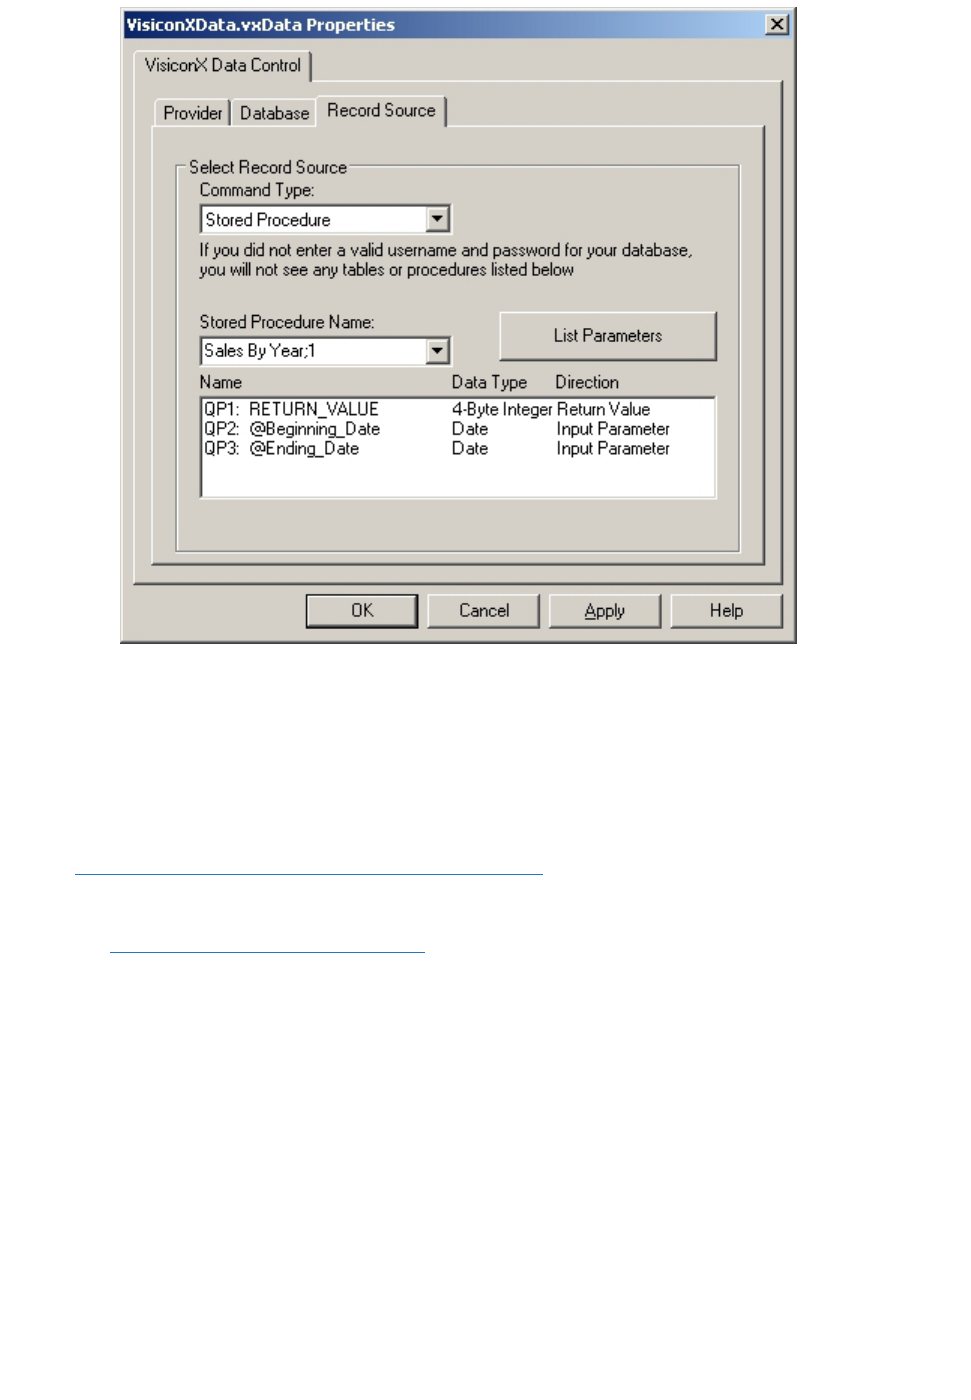
Record Source Tab
The Record Source tab in the Data Control OLE Properties dialog box is the location where you create
an SQL statement to retrieve, insert, or update data, or use a stored procedure to retrieve data. The
Record Source Tab is identical for iFIX and CIMPLICITY users, with the exception of the Secure SQL
Operation section for electronic signatures, which is only available to iFIX users as shown in the fol-
lowing figure:
6 © 2020 General Electric Company. All rights reserved.

Record Source Tab in the iFIX Data Control OLE Properties Dialog
In the Record Source tab, you can specify whether the SQL Wizard can be accessed during run mode.
iFIX users can also specify whether electronic signatures are required for SQL statements when they
are run in WorkSpace run mode.
IMPORTANT (iFIX USERS ONLY): Before you can write to a database you must have the VisiconX Writes
application feature added to your user and/or group account. Also, if the data controls you created in a pre-
vious version of iFIX were performing database writes, they will no longer work; you must add the VisiconX
Writes application feature to your user and/or group account. For more information, see
Application Features
in the
Configuring Security Features
e-book.
SQL Wizard
The Record Source tab is also the location where you activate the SQL Wizard, a tool that builds SQL
Select, Insert, and Update statements for you. Use the SQL Wizard to quickly create simple-to-complex
SQL Select statements or simple Insert or Update statements. You can create more complex Insert or
Update statements in the Record Source tab. Queries can support:
l Up to 64 column properties that can be animated.
l Up to 32 query properties that serve as variables in the query statement. These properties can be
set to any value or animated through the iFIX object animation dialog.
Be aware that on Record Source tab, if you choose to use a .csv file as table, then you should use a
table alias instead of using the .csv file name to modify the table columns in the SQL command. For
example, do not create a query like this:
© 2020 General Electric Company. All rights reserved. 7

SELECT data.csv.col1, data.csv.col2 FROM data.csv
Instead, create a query like this:
SELECT t.col1, t.col2 FROM data.csv t
where
t
is the alias of the data.csv table.
For more information about using the SQL Wizard, see Creating a Query Using the SQL Wizard and
Creating an Insert or Update Statement.
Grid Control
The Grid Control presents retrieved data in a spreadsheet-like format. To display data, you must animate
the Grid Control using a Data Control as its data source. Each time the Data Control is re-configured, the
data presented in the Grid Control is automatically updated. The Grid Control also lets you choose dis-
play properties for the displayed data, such as the font and font size.
ListBox and ComboBox Controls
The ListBox and ComboBox Controls display a specific column of data in a list box and drop-down list
box, respectively. Like the Grid Control, you can animate these controls with the Data Control as their
data source. Also like the Grid Control, you can select display properties for these controls, such as the
font, as well as a color for the text displayed in the list boxes.
Connecting to an OLE DB Data Provider
The first step in setting up VisiconX to access data is to configure a Data Control to connect to an OLE
DB data provider or ODBC driver.
By default, the Data Control automatically connects to the OLE DB data provider in the run-time envir-
onment. However, there may be times (when testing your configuration, for example) when you want to
manually connect and disconnect from the data provider. To connect manually, you can add a command
button to your picture and enter the following code for the command button Click event:
Private Sub CommandButton1_Click()
vxData1.DBConnect
End Sub
NOTES (CIMPLICITY USERS ONLY):
l The name of the subroutine shown here follows standard VBA naming convention, which does not
apply to CimEdit Basic script language.
l In CIMPLICITY, the following additional code must precede the first reference of vxData1 in its scope:
Dim vxData1 As Object
Set vxData1 = CimGetScreen.Object.Objects.Item("vxData1").OleObject
For more information about VisiconX properties, methods, and events, see the VisiconX Automation
Reference. For information how to use properties and events in your application, consult the appropriate
topic below:
8 © 2020 General Electric Company. All rights reserved.
l Using VisiconX Properties and Methods in iFIX
l Using VisiconX Properties and Methods in CIMPLICITY
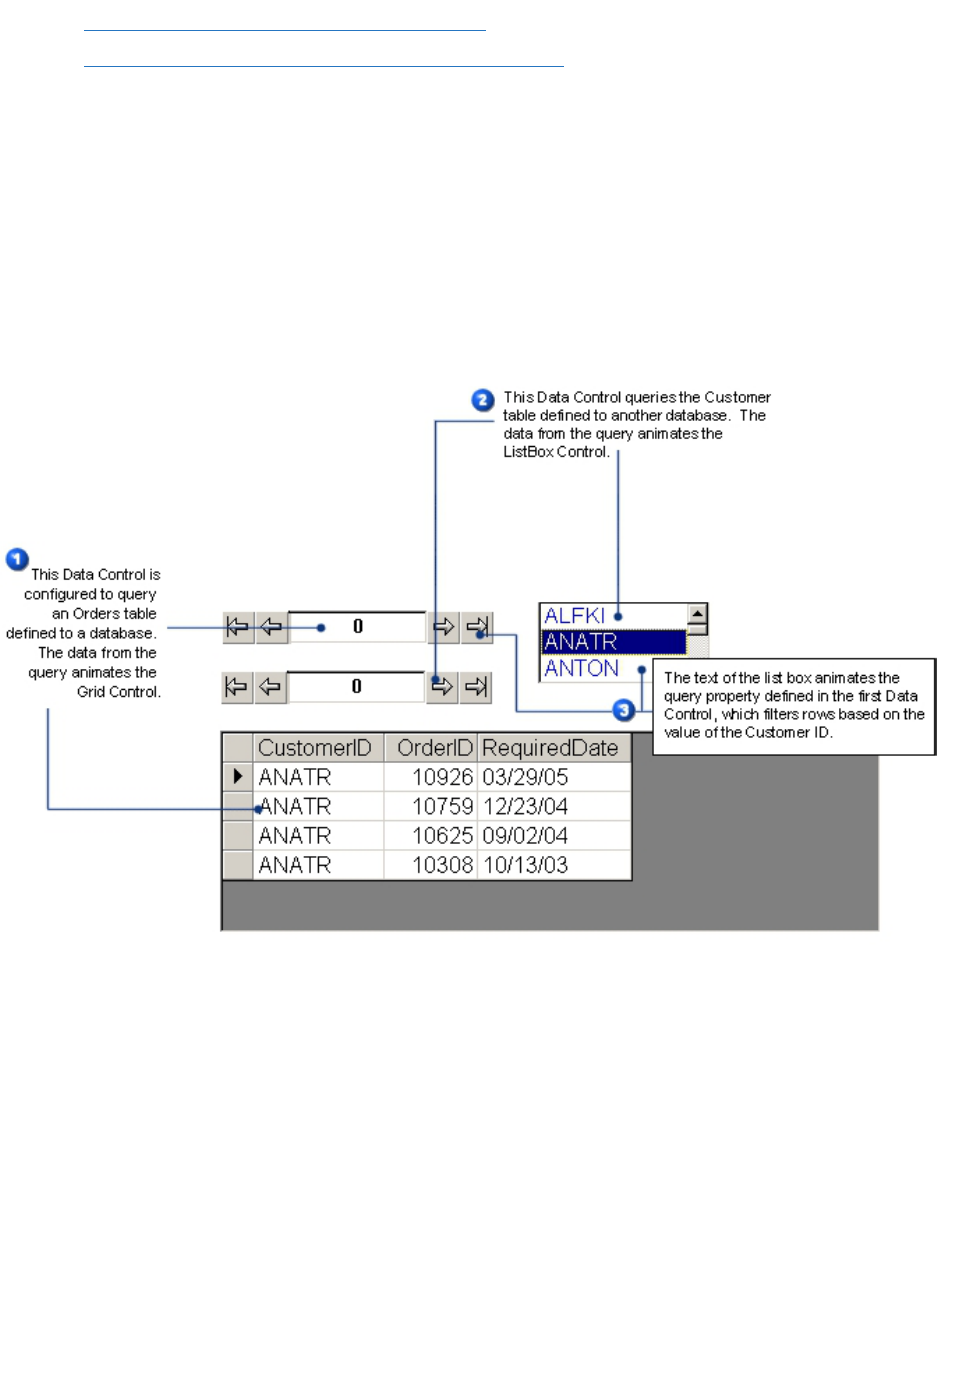
Connecting to Multiple Databases
The data your enterprise stores in one database may affect the view of data you want to see in another
database. For example, the delivery dates in your Order Entry database impact production dates in the
Production database.
With VisiconX, you acquire data from multiple databases by configuring a Data Control for each data-
base you want to access. Through object-to-object animation, you can query one database based on the
values returned by a different database, as illustrated in the following diagram.
Accessing Multiple Databases
Accessing Secured OLE DB Data Providers
VisiconX provides a simple user interface to enter the information necessary to access secured OLE DB
data providers. In addition, you can configure the Data Control to display a login dialog box each time
iFIX or CIMPLICITY is put into run mode.
Users accessing the Microsoft OLE DB for SQL Server data provider can opt to use the Windows integ-
rated security system, rather than entering a User Name and Password.
© 2020 General Electric Company. All rights reserved. 9

Testing the OLE DB Data Provider Connection
The final step in connecting to an OLE DB data provider is to test the OLE DB data provider connection.
Before you test the connection, you must select the OLE DB data provider in the OLE Properties dialog
box for the Data Control and select or enter the database that you want access to. If the OLE DB data
provider is secured, you must also enter or select the appropriate security information.
If the connection succeeds, a dialog box with the message Test Connection Succeeded appears. If the
connection does not succeed, a dialog box with the message Test Connection Failed appears along with
an error returned. Click OK. For more information about troubleshooting failed connections, see Assess-
ing Failed Test Connections.
Overview Checklist
The following steps outline the procedural checklist you should follow to retrieve data from an OLE DB
data provider and display it in either iFIX or CIMPLICITY:
To retrieve data from an OLE DB data provider and display it in iFIX:
1. Insert a Data Control into your iFIX WorkSpace picture.
2. In the Data Control OLE Properties dialog box, configure the Data Control to connect to an OLE
DB data provider and database; test the connection.
3. In the same dialog box, select the database table or tables to query and create your query using
any of the methods provided by VisiconX.
4. In your WorkSpace picture, insert a Grid, ListBox, and/or ComboBox Control in which to display
the retrieved data.
5. On the Behavior tab of the Animations dialog box, animate the Grid, ListBox, and ComboBox
Controls. For the animation data source, select the Data Control and choose Object in the Data
Conversion drop-down list box.
6. To view your picture in Run mode:
In Ribbon view, on the Home tab, in the Workspace group, click Switch to Run.
- Or -
In Classic view, on the Standard toolbar, click Switch to Run.
To retrieve data from an OLE DB data provider and display it in CIMPLICITY:
1. Insert a Data Control into your CIMPLICITY CimEdit screen.
2. In the Data Control OLE Properties dialog box, configure the Data Control to connect to an OLE
DB data provider and database; test the connection.
3. In the same dialog box, select the database table or tables to query and create your query using
any of the methods provided by VisiconX.
4. In your CimEdit screen, insert a Grid, ListBox, and/or ComboBox Control in which to display the
10 © 2020 General Electric Company. All rights reserved.

retrieved data. Select a Data Control source for the control(s) you insert.
5. Save your CimEdit screen and open it in CimView's run-time environment.
Implementing VisiconX
This chapter describes some things to consider when using VisiconX controls to connect to a database
and when planning how to query or write to that database. This includes planning the information to
obtain from a query, or the information you want to insert or update, designing a layout of the retrieved
information for the intended audience, finalizing your design, and optimizing system performance. This
chapter also describes some common pitfalls and how to correct them.
Refer to the following sections for more information:
l Planning Your Query
l Planning Your Database Write
l Designing Your Layout
l Finalizing Your Design
l Optimizing System Performance
l Troubleshooting
Planning Your Query
The first step in working with VisiconX is planning what information you want to obtain. For example,
sales may want a list of all customers whose orders were shipped after the required date so that they
can offer special incentive packages for future orders.
This means finding out what database to query and obtaining privileges to access data in the database.
It also means finding out how information is organized in the database so that you can determine what
tables to access.
Once you have determined where and how information is organized, you should determine how to con-
struct a query that returns the precise information you want. That means finding out:
l What table or tables to query. If you query more than one table, what column should they be
joined on and should the join by an inner join or an outer join?
l What columns to include in the query and the order in which they should appear. Do you want to
see duplicate rows or not?
l What comparison expressions to use in the row filter and whether to combine the expressions
using an And operator or an Or operator.
l How to sort the information returned.
You may need to create multiple queries, especially in a situation where the data residing in one data-
base determines the data retrieved from another database. In each case, use the considerations listed in
the preceding bullets to return the information you need.
© 2020 General Electric Company. All rights reserved. 11

Planning Your Database Write
In the course of your business operations you will find that, over time, the information stored in your data-
bases changes. For example, you acquire new customers, or information about existing customers
changes, such as the contact person name, or telephone number. VisiconX allows you to write this new
information to your databases using either an SQL Insert or Update statement.
IMPORTANT (iFIX USERS ONLY): Before you can write to a database you must have the VisiconX Writes
application feature added to your user and/or group account. Also, if the data controls you created in a pre-
vious version of iFIX were performing database writes, they will no longer work; you must add the VisiconX
Writes application feature to your user and/or group account. For more information, see
Application Features
in the iFIX
Configuring Security Features
e-book.
Adding to or changing information means finding out which database you want to update and how inform-
ation is organized in the database so that you can determine which tables and columns to access.
After you have determined where and how information is organized, you should find out:
l Which table or tables you want to add to or change.
l Which columns contain the information you want to add to or change.
l When performing an Update, which comparison expressions to use in the row filter and whether
to combine the expressions using an And operator or an Or operator.
You may need to perform multiple database writes, especially when the data residing in one database
affects the data in another database.
TIPS:
l SQL statements must follow standard SQL-92 conventions. Consistent with SQL standards, any state-
ments you enter are not case-sensitive.
l When executed through a stored procedure, the Datetime output parameter does not return mil-
liseconds because the ADOParameter returned to the VisiconX object from ADOCommand does not
contain the millisecond part.
Designing Your Layout
Once you have researched what information to obtain, you should think about how to present the inform-
ation and how it will be used in the runtime display. Some things to consider are:
l How to display specific types of information, such as in a spreadsheet-like grid or in a list box.
l Who the audience is for the runtime display. Someone monitoring production may want to see a
Grid Control with the returned rows, but not the Data Control that configures and queries the data-
base. A user who needs access to more than one database may want to use push buttons in run
mode to connect to and query different databases.
l How to use color in the picture.
l What objects should be visible or invisible in the run-time environment.
l Whether to use the information to animate another object, such as a query property or the fill prop-
erties of a rectangle.
12 © 2020 General Electric Company. All rights reserved.

Finalizing Your Design
After planning your query and designing your layout, you can refine your design by:
l Requiring users to log in to the data provider in the run-time environment.
l Animating objects, such as list boxes, query properties, and so on.
l Using properties and methods in scripts to create a more dynamic run-time environment. For
example, in iFIX you can add Microsoft Forms, such as command buttons and option buttons, to
run specific queries or activate the SQL Wizard.
l Modifying the design to optimize system performance.
Optimizing System Performance
Querying relational databases and retrieving data can impact the performance of your Windows system.
This section describes a few actions you can take to optimize system performance when querying data-
bases through VisiconX Data Controls. It includes the following topics:
l Selecting a Data Provider
l Use Row Filters to Limit Data Retrieved
Selecting a Data Provider
VisiconX performs best when it accesses data through native OLE DB data providers, rather than using
an ODBC database driver. If your site has access to both a native OLE DB data provider, for example
SQL Server, and an ODBC database driver for the same server, select the native OLE DB data provider
in the Data Control OLE Properties dialog box.
Use Row Filters to Limit Data Retrieved
Retrieving large data sets affects the time it takes to retrieve all the data, but it does not freeze the sys-
tem while the data retrieval occurs. However, if you need a limited subset of the data retrieved, use a
Row Filter in the SQL query to limit the data set to the records required.
Troubleshooting
VisiconX is a simple tool to implement and use. Certain situations, however, such as connecting to a
data provider or animating an object, can produce problems that seem difficult to understand.
This section provides descriptions of typical problems you may experience. It also lists actions that you
can take to resolve the issue. It includes the following topics:
l Avoiding Problems
l Assessing Failed Test Connections
© 2020 General Electric Company. All rights reserved. 13

l Assessing Failed Connections at Run Time
l Row Filters Using Date Fields Display No Data
l Controls Animated by the Data Control Display No Data
l Troubleshooting Problems Caused By Stored Procedures
Avoiding Problems
You can avoid problems by configuring your system properly before operation. When troubleshooting,
always try to simplify object animations and data query.
The following list is the minimum recommended configuration you should adhere to while troubleshoot-
ing problems:
l Use recommended computers.
l Use recommended network hardware and software.
For more information, see the
Getting Started with iFIX
guide if you are using iFIX, or the
Getting Started
guide if you are using CIMPLICITY.
Assessing Failed Test Connections
When you click the Test Connection button on the Database tab of the VisiconX Data Control OLE Prop-
erties dialog box, you get a message indicating that the connection failed.
l Try to determine the reason for the failure from the description that appears in the Failed Con-
nection dialog box.
l If the database is secured, make sure that you have authority to access the database and the
tables selected in the query.
l Make sure that the User ID and password for the database is correct.
l Make sure that the server on which the database resides is accessible and operating.
For continued problems, contact your System Administrator to determine if your settings are correct.
Assessing Failed Connections at Run Time
In the run-time environment, the Data Control displays Connection Error.
l Make sure the table in the query is accessible. Create a query using the Table command and run
the query again. If the message reappears, the table is not accessible.
l Check your user privileges. You may not have the necessary privileges to access the table.
l Review the data source and data conversion selected for all objects and animated query prop-
erties.
Row Filters using Date Fields Display No Data
14 © 2020 General Electric Company. All rights reserved.

The Row Filter contains a comparison expression that equates a Date field to a value or query property.
When you run the query, no data is displayed in the objects animated by the Data Control.
l Make sure that there is data that corresponds to the specifications of the row filter.
l The DATE field may really be a STRING field formatted to display dates. In the Row Filter, enter
a string formatted as a date and re-run the query. In addition, set the date format to a format that
matches the database date format. To set the date format, use the Regional and Language
Options in the Control Panel.
Controls Animated by the Data Control Display No Data
A Grid, ListBox, or ComboBox control displays no data in the run-time environment.
l Make sure there is data that corresponds to the specifications of your query.
l Make sure the object is animated by the Data Control in iFIX or is associated with it in
CIMPLICITY.
l If the query contains a query property, make sure the Data Control query property is animated in
iFIX or initialized in a CimEdit script.
If the query contains a query property, switch to the run-time environment. Select or enter a value in the
object that animates the query property. The new value should change the data displayed in the object
animated by the Data Control. For example, if a ListBox Control animates the query property, select
another item in the ListBox to change the display in objects animated by the Data Control.
Troubleshooting Problems Caused By Stored Procedures
Using a stored procedure to query a Microsoft Access database or an Oracle server requires special con-
sideration because of specific elements incorporated in the design of these databases.
Microsoft Access Databases
Microsoft Access databases do not truly support stored procedures. However, they do support queries,
which ADO treats in the same way as stored procedures. Currently, the MS Jet 3.51 and 4.0 OLE DB
Providers cannot retrieve parameter information from Access queries. Therefore, when Stored Pro-
cedure is selected as the command type in the Record Source tab of the Data Control OLE Properties
dialog, no parameters or mapped query properties appear for a selected Access query.
To get around this problem, you can try one of two solutions:
l Connect to the Microsoft Access database through an ODBC driver, rather than through the nat-
ive MS Jet OLE DB Provider
l If you know the parameters defined in the Access query, you can enter the query as an SQL
Select statement. In this example, ScrBatchSummary is the name of the Access query and
Batch_Serial_No is an input parameter to the query:
Select * From ScrBatchSummary where ScrBatchSummary.batch_serial_no = QP1
© 2020 General Electric Company. All rights reserved. 15

Oracle Servers
Oracle stored procedures that Update, Insert, or Delete database information work as expected in Vis-
iconX. However, stored procedures that retrieve, or Select, data from an Oracle server require special
consideration. In order for an Oracle stored procedure to return a Recordset, you must create a package.
The Oracle package defines an array that is populated with the Recordset data returned to ADO and Vis-
iconX. You cannot call this package using the "Stored Procedure" command type in VisiconX. You must
call it as an SQL command. In this example,
packperson
is the name of the package,
oneperson
is the
name of the stored procedure,
resultset 2
tells the package the maximum number of rows to return,
ssn
,
fname
, and
lname
specify the columns to return, and QP1 is the VisiconX variable that controls the
selection:
{call packperson.oneperson(QP1,{resultset 2, ssn, fname, lname})}
For details on how to create a package in Oracle that is able to return a Recordset to ADO and VisiconX,
look at Article Q176086 in the Microsoft Support KnowledgeBase.
16 © 2020 General Electric Company. All rights reserved.

Creating SQL Statements in VisiconX
This chapter describes how to create an SQL statement to retrieve data from an OLE DB data provider.
Beyond the basics, it tells you how to refine your statements to retrieve the specific information you
need, add data to a database, or update existing data, as well as how to use animated query properties.
Once you retrieve the data, you can display it in a Grid Control, ListBox Control, or ComboBox Control.
For more information, refer to the Displaying Data section.
This chapter includes the following sections:
l Creating a Query
l Writing to a Database
l The SQL Wizard
l Creating a Row Filter
Creating a Query
A query accesses tables in a database and returns the data you request. A simple query returns the
entire contents of a single table. A more complex query filters rows based on selection criteria, sorts
data, or combines data from more than one table. With VisiconX, it's easy to create queries as simple or
complex as you need.
Query creation begins in the Record Source tab of the Data Control OLE Properties dialog box. The
Command Type list box let you choose what type of query to create, as shown in the following table.
Command
Type
Description
SQL Command Uses the SQL Wizard to create an SQL command or lets you enter an SQL command
manually.
Table Returns data for an entire table.
Stored Pro-
cedure
Maps query properties to the parameters of a stored procedure.
Query Command Types
The Record Source tab also provides options for setting the type of database lock to use when reading
and updating data. For more information, see
Advanced Topics
in the
Setting Up the Environment
e-
book.
Creating a Query Using the SQL Wizard
VisiconX's SQL Wizard helps you create simple-to-complex SQL Select statements quickly. By using
the Wizard, you do not need to know SQL Select statement syntax; the Wizard builds the statement for
you.
Besides making your job quicker and easier, the SQL Wizard also lets you use query properties. By
animating the query properties, you can modify the data displayed based on the value currently assigned
© 2020 General Electric Company. All rights reserved. 17

to the query property. Animating Query Properties, in the Using VisiconX in iFIX chapter, describes
query animation in more detail.
NOTE: CIMPLICITY users need to use CimEdit Basic script to use query properties. For more information,
see Using Query Properties in CIMPLICITY.
With the SQL Wizard, you can:
l Select one or more tables to query.
l Select the table columns to display.
l Return rows with unique values, rather than rows with duplicate entries.
l Filter the rows returned based on selection criteria you assign.
l Sort data in ascending or descending order by the values of columns you select.
Entering or Pasting an SQL Statement
The Record Source tab of the Data Control OLE Properties dialog box includes the SQL Command Text
box. You can enter SQL statements directly into the text box or paste a statement from another applic-
ation. Queries built by the SQL Wizard also appear in this box, where you can refine them further.
Users comfortable with coding SQL statements and who know the table and column names of their data-
base may prefer to enter the statement manually. You may also want to create an SQL query in another
application, such as MS Query, and then paste it in.
Joining Tables
When you want to create a query that combines data from two or more tables, you are
joining
the tables.
The tables used in the query must share a common column. For example, a Customer table and an
Orders table both have a column of Customer IDs.
With the SQL Wizard, you can easily combine tables using the most common type of join operation,
which is an
inner join
. An inner join selects only the records from each table where the values of the com-
mon column match. For example, this Select statement joins the Customer and Orders tables by equat-
ing the CustomerID column in both tables. It returns information about customers and orders that have
the same customer ID value. It does not return information about customers with no associated orders
or information about orders with no associated customer.
SELECT
Customers.CustomerID,
Customers.ContactName,
Orders.OrderID,
Orders.ShipName
FROM Customers, Orders
WHERE (Customers.CustomerID = Orders.CustomerID)
ORDER BY Customers.CustomerID
The following figure shows a sampling of data retrieved by joining the Customers and Order table based
on the preceding Select statement.
18 © 2020 General Electric Company. All rights reserved.
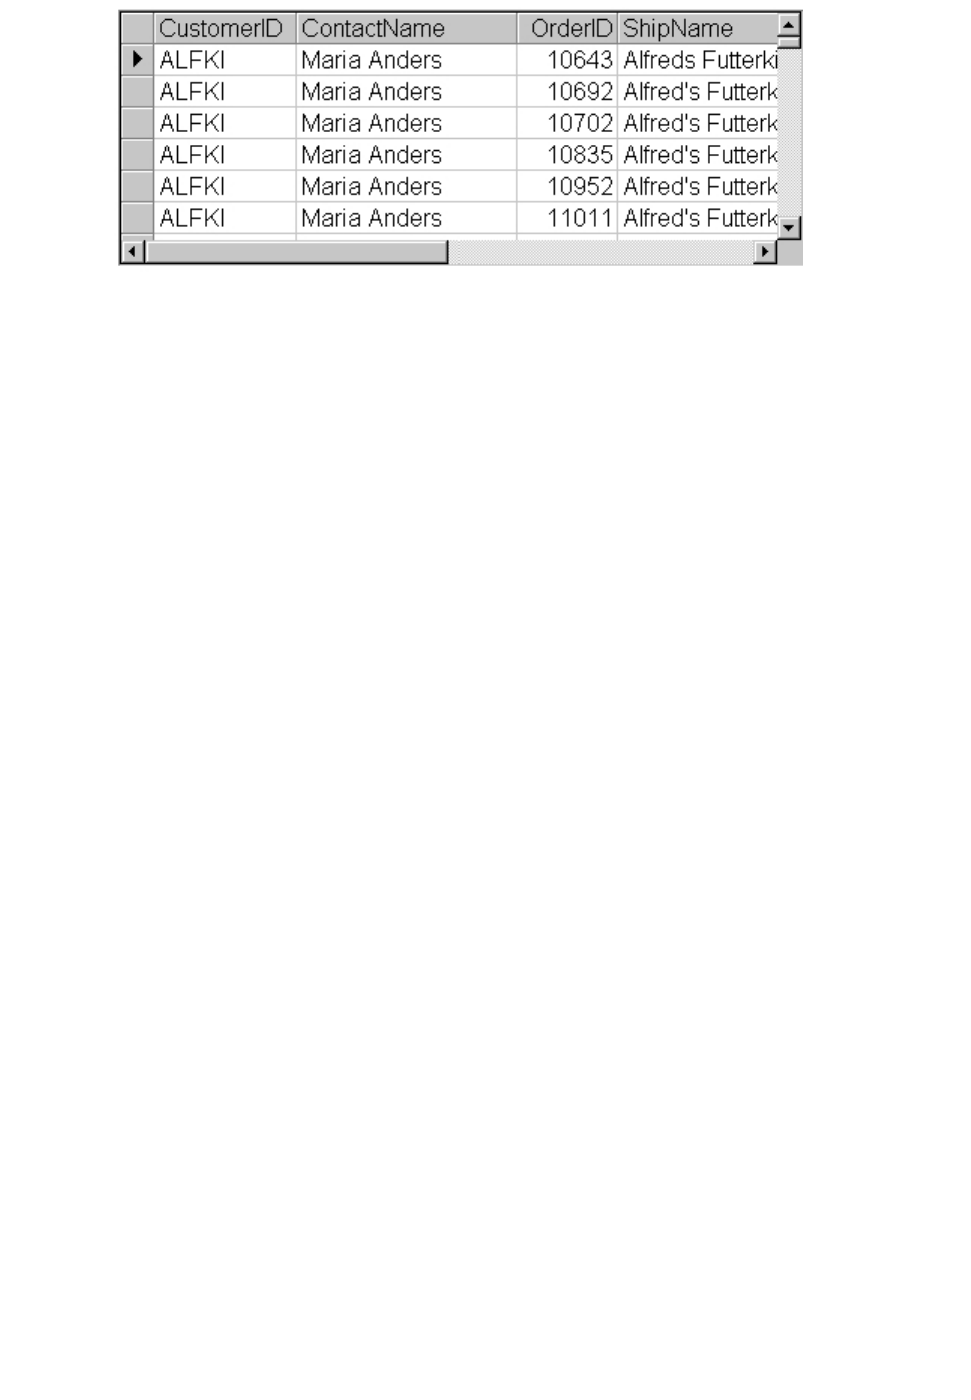
Results of an Inner Join
The other type of join is an
outer join
, which must be created by entering or pasting a Select statement.
An outer join returns all the records for one table, but only the records from the second table where the
values of the common column match. For example, this Select statement uses an outer join to return all
the records in the Orders table, but only the records in the Customer table where the Customer ID value
in both tables is the same. That is, it displays each Order record, with or without associated customer
information.
SELECT
Customers.CustomerID,
Customers.ContactName,
Orders.ShippedDate,
Orders.ShipName
FROM
(Orders LEFT OUTER JOIN Customers
ON Orders.CustomerID = Customers.CustomerID)
ORDER BY Customers.CustomerID
This Select statement does the reverse; notice the only difference is the sequence of tables in the From
clause. This statement returns all the records in the Customers table and only the records in the Orders
table where the Customer ID value in both tables is the same. That is, it displays each Customer record,
with or without associated order information.
SELECT
Customers.CustomerID,
Customers.ContactName,
Orders.OrderID,
Orders.ShipName
FROM
(Customers LEFT OUTER JOIN Orders
ON Customers.CustomerID = Orders.CustomerID)
ORDER BY Customers.CustomerID
The following figure shows a sampling of data retrieved by running the preceding Select statement.
Notice the PARIS customer ID record has no associated order information.
© 2020 General Electric Company. All rights reserved. 19
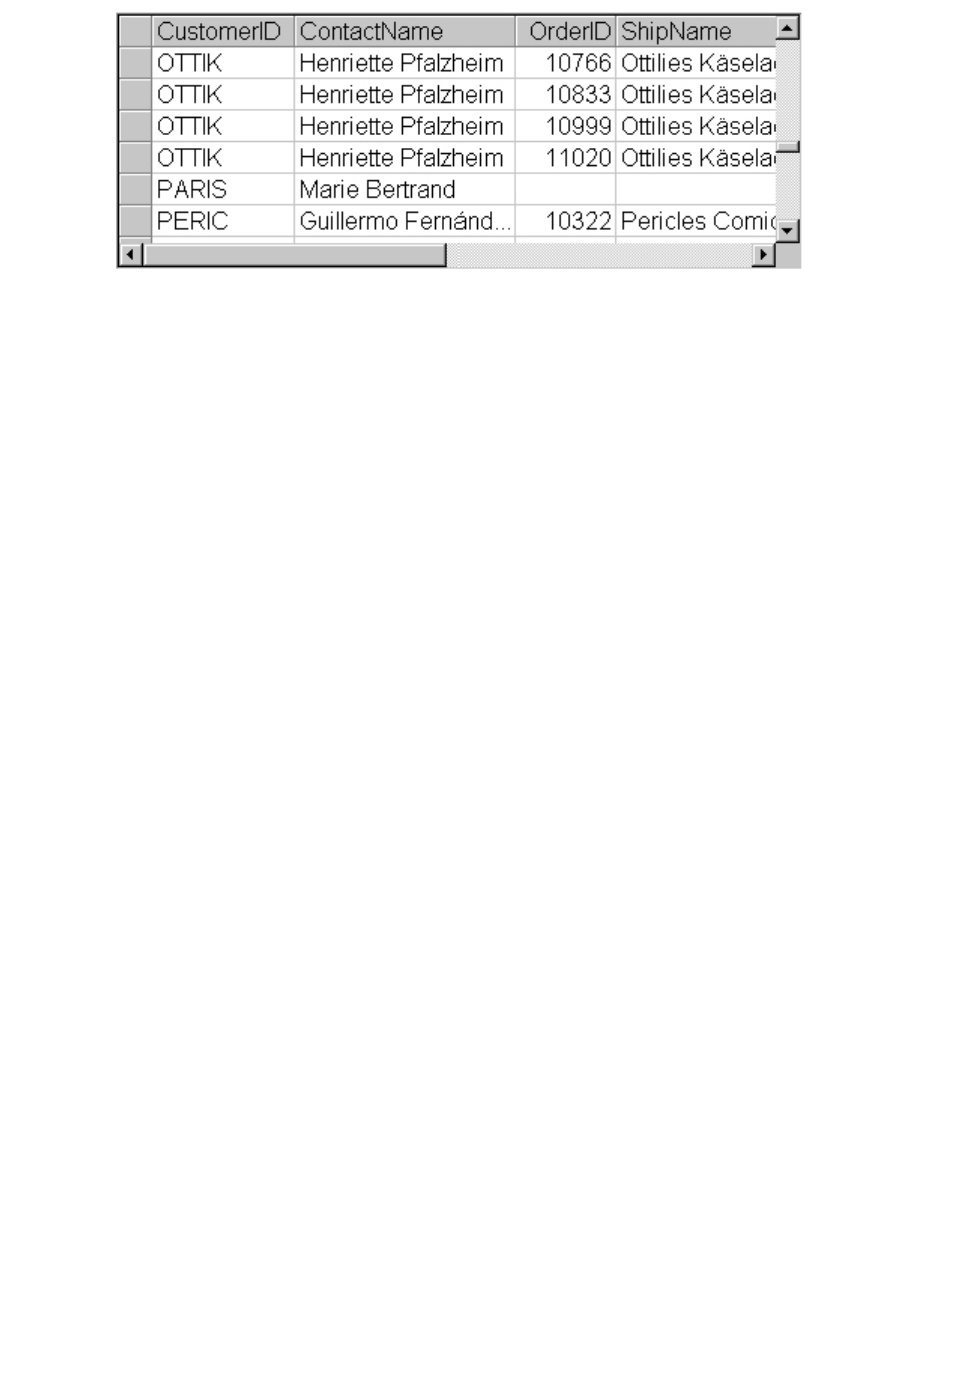
Results of an Outer Join
Creating a Query Using a Table
The easiest query you can create is one that returns all the data in a table; that is, all the columns and
rows in a table. For a small table, where the data is easy to digest, you may want to choose this option.
Creating a Query Using a Stored Procedure
Stored procedures are compiled blocks of code in the relational database. They are useful because they
can have conditional statements and flow statements. Stored procedures can perform INSERT,
UPDATE, DELETE, and SELECT commands. They can also take arguments and return results. The
arguments may be values to insert or values to use in Where clauses.
Procedures can be much faster than SQL commands for the following reasons:
l Executing a stored procedure requires only one call.
l A stored procedure is already compiled in the database.
l A stored procedure runs on the server, not on the client.
When VisiconX uses a stored procedure to access and retrieve data, it creates a list of query properties
that map to the parameters of the stored procedure. The query property list displays the query property /
parameter mapping, the parameter's data type, and the direction the parameter passes information, as
the following illustration shows.
20 © 2020 General Electric Company. All rights reserved.
Stored Procedure Parameter Mapping
VisiconX assigns query properties to the return value, input parameters, output parameters, and
input/output parameters defined to the stored procedure. In cases where VisiconX cannot determine the
purpose of a parameter, the direction in the Parameter List appears as Unknown.
NOTES:
l If you use a stored procedure to query a Microsoft Access database or Oracle database, please see
Troubleshooting Problems Caused By Stored Procedures for special considerations that apply to
these databases.
l CIMPLICITY users need to use CimEdit Basic script to use query properties. For more information,
see Using Query Properties in CIMPLICITY.
l The Datetime output parameter does not return milliseconds when executed through a stored pro-
cedure. (The ADOParameter returned to the VisiconX object does not contain the millisecond part
when a stored procedure returns a datatype of datetime.)
After viewing the Parameter List for the stored procedure, make a note of the query properties that map
to the input parameters for the stored procedure. These are the query properties that must be animated in
order to retrieve data using the stored procedure.
Writing to a Database
Writing to a database means that you can insert or update the column values of the selected database
table. You can use the SQL Wizard to create simple insert or update statements, or you can manually
© 2020 General Electric Company. All rights reserved. 21

enter more complex statements using the Record Source tab of the Data Control OLE Properties dialog
box.
By using the Wizard, you do not need to know SQL Insert or Update statement syntax; the Wizard
builds the statement for you.
TIP: SQL statements must follow standard SQL-92 conventions. Consistent with SQL standards, any state-
ments you enter are not case-sensitive.
Creating an Insert or Update Statement
VisiconX data controls can use SQL commands that allow you to add or update column values to selec-
ted database tables. You can use the SQL Wizard to create simple Insert or Update statements, or you
can manually enter more complex statements using the Record Source tab of the Data Control OLE
Properties dialog box. For more information about manually creating SQL statements, refer to Entering
or Pasting an SQL Statement.
VisiconX's SQL Wizard helps you create simple SQL Insert or Update statements quickly. By using the
Wizard, you do not need to know SQL statement syntax; the Wizard builds the statement for you.
With the SQL Wizard, you can:
l Select one or more tables to write to.
l Select the table columns you want to write to.
l Filter the rows you are updating, based on selection criteria you assign.
The SQL Wizard
The SQL Wizard is a powerful tool that makes it easy to create sophisticated SQL statements to obtain
the data you want to display or to add and update your databases. You do not need to know SQL state-
ment syntax; the Wizard builds the statement for you. With the SQL Wizard, you can quickly:
l Select tables
l Select columns
l Filter rows using a point-and-click interface to specify selection criteria.
l Sort data by column value.
l Return unique rows only.
Creating statements with the SQL Wizard begins in the Record Source tab of the Data Control OLE
Properties dialog box. The Run SQL Wizard button is available only when the selected Command Type
is SQL Command. The SQL Wizard gives you the choice to create Select, Insert, or Update statements.
22 © 2020 General Electric Company. All rights reserved.
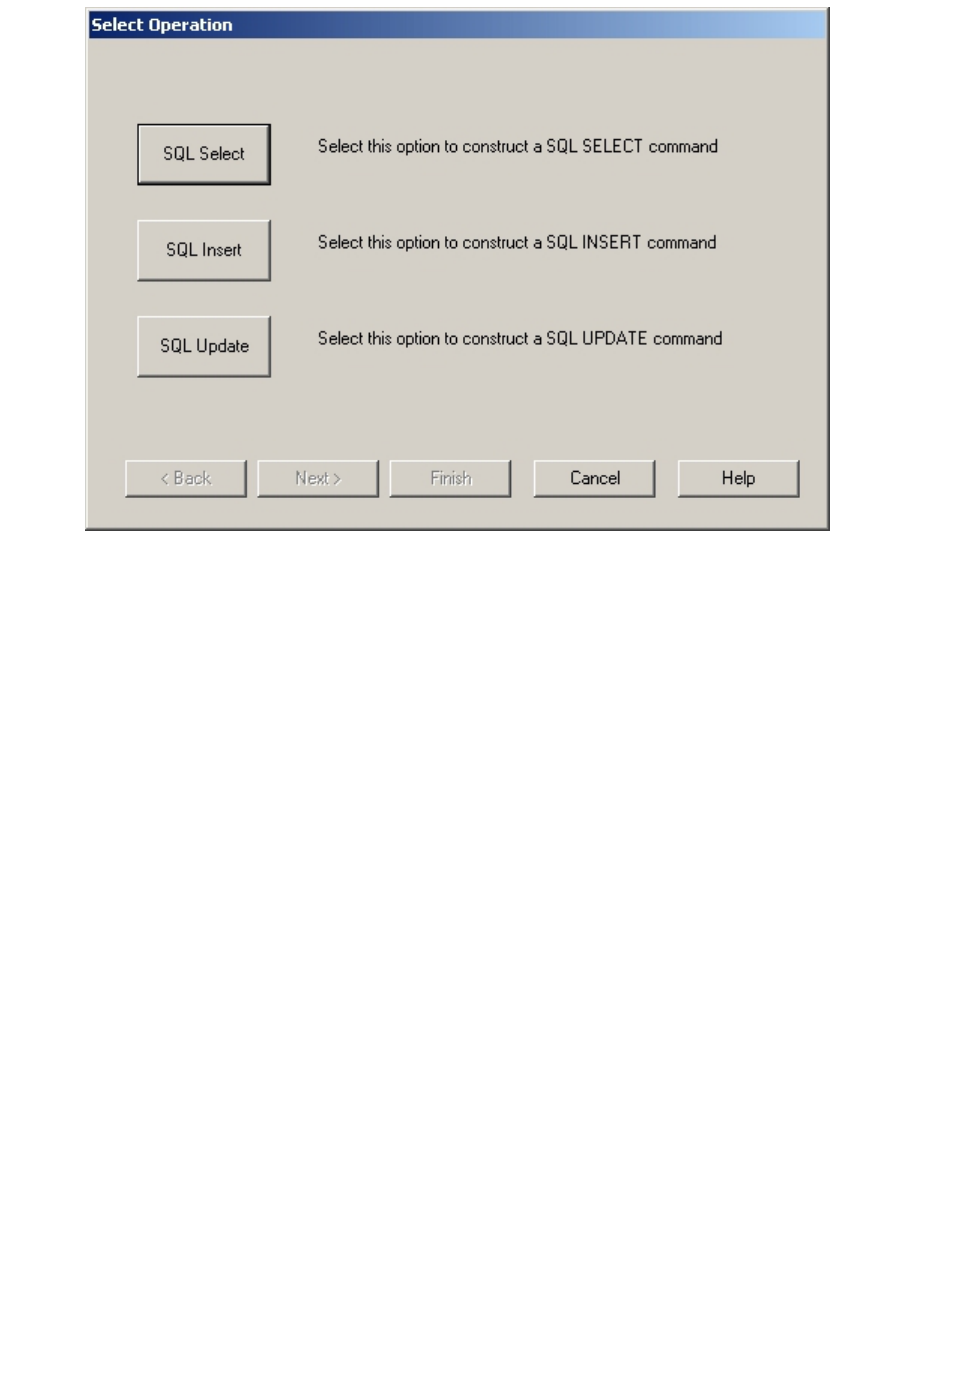
SQL Wizard Select Operation
The SQL Wizard walks you through the process of creating an SQL statement. When you click the Next
button in the Wizard, the Wizard uses the options you selected in the current dialog box to build the
information displayed in the next dialog box. If you want to backtrack and select different choices, click
the Back button. At any point in the Wizard, you can click Finish to complete your query.
The SQL Wizard asks you to select:
1. The tables to query, add to, or update.
2. The columns in those tables to query, add to, or update, and whether those columns should have
unique values.
3. The selection criteria to use to filter rows in a Select or Update statement.
4. Columns upon which the table data is sorted in a Select statement.
When you finish the statement, the SQL Wizard displays the SQL statement it has built, first in the Fin-
ish dialog box of the SQL Wizard, and in a text box on the Record Source tab of the Data Control OLE
Properties dialog box. You can edit the finished statement in either of these places. The following list
itemizes some common edits you may need to perform:
l To filter rows based on one or another comparison expression in the Where clause, change the
AND keyword to OR.
l In a Select statement that joins two or more tables, remove quotation marks surrounding the
column name in the Where clause.
Selecting Tables
© 2020 General Electric Company. All rights reserved. 23

The first step in creating an SQL statement is selecting the tables in the database you want to query,
add to, or update. Knowing how data in your database is organized will help you make informed
decisions.
A simple query accesses the data in one table. The SQL Wizard can build more complex queries based
on data in two or more tables using an inner join. To join tables using an outer join, you need to enter your
query manually. For more information about joining tables, see Entering or Pasting an SQL Select State-
ment.
Selecting Columns
Selecting the table columns you want to query, add to, or update is one way to filter information con-
tained in a table. For example, if you want to display or update the contact name and phone number for
each customer ID, it would make sense to select only those columns and omit the columns containing
information about the customer's mailing address.
In SQL, the column name is qualified by its table name like this:
tablename.columnname
The SQL Wizard displays the column names using this naming convention. When performing a query,
the display lists all the columns belonging to the first table before listing the columns belonging to the
second table and so on.
The SQL Wizard also displays an asterisk (*) in the list of available columns. In SQL, the asterisk is the
symbol to select all columns in the table(s) and appears like this in a Select statement:
SELECT * FROM tablename
Selecting the asterisk from the list of Available Columns is the same as clicking the All >> button in the
SQL Wizard.
Returning Unique Rows
The SQL Wizard gives you the option to retrieve rows that contain unique column values or rows that
contain duplicate column values. For example, suppose you want to query the names and addresses of
vendors used to ship orders, but that information is associated with each Order ID in the Orders table.
The query will return multiple occurrences of each shipping vendor.
By selecting the option to return Distinct, or unique, rows, the query will return only one occurrence of
each shipping vendor, making it much easier to make sense of the information returned.
NOTE: This option is available only when creating an SQL Select statement.
Filtering Rows Returned
The Create Row Filter dialog box in the SQL Wizard is where you can limit the rows retrieved to only
those that meet the selection criteria you specify. For those of you familiar with SQL, this is the Where
clause. For example, this string:
Milktype equal to 3
24 © 2020 General Electric Company. All rights reserved.

returns only the rows where the value in the MilkType column equals 3. This string:
Milktype equal to 3 and BatchID equal to 1
returns only the rows where the value of Milktype equals 3 and the value of the BatchID is 1.
In the previous examples, the row filter is static; that is, the values used in the clause are hard-coded. In
many cases, it is preferable to create a clause that is more flexible; one where you can change the value
at run time and retrieve the updated results.
To create a clause that can be updated at run time, use a query property as shown in the following
example:
Milktype equal to {ts `QP1'}
In this query, you can animate QP1 in the Data Control and assign a value to it at run time. The Data
Control queries the data provider and updates the display in your picture.
For more information about creating a clause to filter the rows of your query, see Creating a Row Filter.
If you are using iFIX, see Animating Query Properties for more information about animating query prop-
erties.
NOTE: CIMPLICITY users need to use CimEdit Basic script to use query properties. For more information,
see Using Query Properties in CIMPLICITY.
Sorting Data by Column Value
Sorting the data retrieved by a query can make it much easier to understand the data displayed. SQL
sorts data based on the values of selected columns. All the data in the table is sorted based on the val-
ues of the first sort column. Within that sort, the data is sorted based on the values of the second sort
column and so on.
You can sort the column values in both ascending and descending order. Ascending is the default.
Ascending means that numeric data is sorted from lowest-to-highest and character data is sorted from
A-to-Z. Descending means the numeric data is sorted from highest-to-lowest value and character data is
sorted from Z-to-A.
NOTE: This option is available only when creating an SQL Select statement.
Creating a Row Filter: Overview
The Create Row Filter dialog box of the SQL Wizard helps you create a Row Filter that customizes the
data returned by your query. The SQL Wizard builds a clause with the following syntax:
columnName1comparison-operatorvalue | QP1
AND
columnName2 comparison-operatorvalue | QP2
AND
columnNameN comparison-operatorvalue | QPn
where:
© 2020 General Electric Company. All rights reserved. 25

l
ColumnName1, ColumnName2,
and
ColumnNameN
are column names in the queried table.
l
Comparison-operator
compares the column value to another value or query property.
l
Value
is a string, date, or number value or expression that results in a value. It can also be a
column name for queries that join two or more tables together.
l QP
n
is a query property where
n
is an integer from 1 to 32.
l AND is a keyword that retrieves rows that satisfy both comparison expressions.
NOTES:
l This option is not available when you create an SQL Insert statement.
l The Row Filter dialog box does not support the OR keyword, which retrieves rows that satisfy one com-
parison expression or the other. To combine comparison expressions with an OR keyword, edit the
resulting SQL Select statement that appears when you click the Finish button.
l If you create a comparison expression that equates two column names, you may need to edit the res-
ulting Where clause by removing quotation marks surrounding the column names.
l Be aware that CIMPLICITY users need to use CimEdit Basic script to use query properties. For more
information, see the Using Query Properties in CIMPLICITY section.
Row Filter Comparison Operators
The Row Filter comparison expression supports a number of comparison operators, which are visible in
a list box in the Create Row Filter dialog box. The following table describes the meaning of each com-
parison operator.
Comparison Operator Description
Any value Is any value
Equal to Equals a specified value
Less than Is less than a specified value
Greater than Is greater than a specified value
Less or equal Is less than or equal to a specified value
Greater or equal Is greater than or equal to a specified value
Begin with Begins with the specified text string
End with Ends with the specified text string
Contain Contains the specified text string
Between Is between and including two specified values
Null Is Null
Row Filter Comparison Operators
You can customize the comparison expression to do the opposite of what the comparison expression
contains by selecting Is/Does Not from the list box to the left of the comparison expression list box. For
example, this comparison expression retrieves all rows where the MilkType is not equal to 3:
MilkType Is Not Equal To 3
Row Filter Values
26 © 2020 General Electric Company. All rights reserved.
NOTE: Filtering rows is not available when creating SQL Insert statements.
The SQL Wizard uses the column name selected for the comparison expression to determine if the
value you enter is a string value, date value, or numeric value. The value you enter can be an explicit
value or an expression that results in an explicit value.
The resulting SQL statement displays string and date values enclosed in special characters; for
example, string values are enclosed in quotes. If you enter an SQL statement manually, follow the
formats for Resulting Syntax described in the table.
Data
Type
Entering in the SQL Wizard Resulting Syntax
String Enter string values, even those with
spaces and apostrophes, as you would
normally; for example:
Sir Rodney's Scones
The SQL Wizard encloses string values in quotes;
when it encounters an apostrophe, it replaces it
with two single quotes, as follows:
`Sir Rodney's Scones'
Numeric Enter numeric values as you would nor-
mally. For percentages, use the decimal
representation; for example, 0.10 for
10%.
The SQL Wizard displays the number as you
entered it.
Date Enter date values using this syntax:
yyyy
-
mm
-
dd
hh
:
mm
:
ss
where:
yyyy
is the four-digit year
mm
is the two-digit month
dd
is the two-digit day
hh
is the two-digit hour
mm
is the two-digit minute
ss
is the two-digit second
The SQL Wizard encloses the value in quotes pre-
fixed by the string `ts'. Braces enclose the entire
expression:
{ts
`yyyy
-
mm
-
dd
hh
:
mm
:
ss
'}
Query
Property
Select a query property from the drop-
down list box.
The SQL Wizard treats the query property as a
string, numeric, or date value, depending on the
data type of the column used in the comparison
expression.
For example, `QP1' for strings, QP1 for numeric,
and {ts `QP1'} for dates. Note if a string is case-
sensitive, you may need to change QP to qp.
How the SQL Wizard Interprets Row Filter Values
© 2020 General Electric Company. All rights reserved. 27

Displaying Data
To display data in Grid, ListBox, or ComboBox controls in iFIX, you must first animate them to use the
ADORecords of the Data Control as a data source, as described in Animating Grid, ListBox, or Com-
boBox Controls. Then, to switch the WorkSpace to Run mode: in Ribbon view, on the Home tab, in the
WorkSpace group, click the Switch to Run button, or in Classic view, on the WorkSpace toolbar click
the Run button.
To display data in Grid, ListBox, or ComboBox controls in CIMPLICITY, you must make sure that each
of your controls is associated with a Data Control as a data source, if you have not already done so.
Then, open the screen in CimView.
Whether using iFIX or CIMPLICITY's run-time environment, you can use the navigation arrows on the
Data Control to move to the first, last, next, or previous records of data displayed in a Grid Control. The
zero-based number in the Data Control displays the number of the current record. You can also make the
Data Control invisible in the run-time environment by setting the InvisibleInRunMode property to True in
the Data Control's object Properties window.
The Grid, ListBox, and ComboBox Controls behave as you would expect them to. For example, data in a
ListBox Control appears in a list box, with a scroll bar if necessary to view the data. Data in a Com-
boBox Control, appears in a drop-down list box. Click the down-arrow to view listed items or enter a
value. In the Grid Control, data appears in a spreadsheet-like format. Use the scroll bars to view data. To
resize columns in the Grid Control, position the mouse cursor over the column headings. When the
cursor changes to a double-headed arrow, slide the mouse left or right to resize the columns.
Configuring Display Properties
With VisiconX, you can configure the display properties of the Grid, ListBox, and ComboBox Controls in
their respective OLE Properties dialog boxes. Specifically, you can select the display font and font size
of the controls, as well as colors for text, column headings, and backgrounds.
The following picture illustrates a Grid Control with colors set for each element of the control that can
have a color property:
28 © 2020 General Electric Company. All rights reserved.
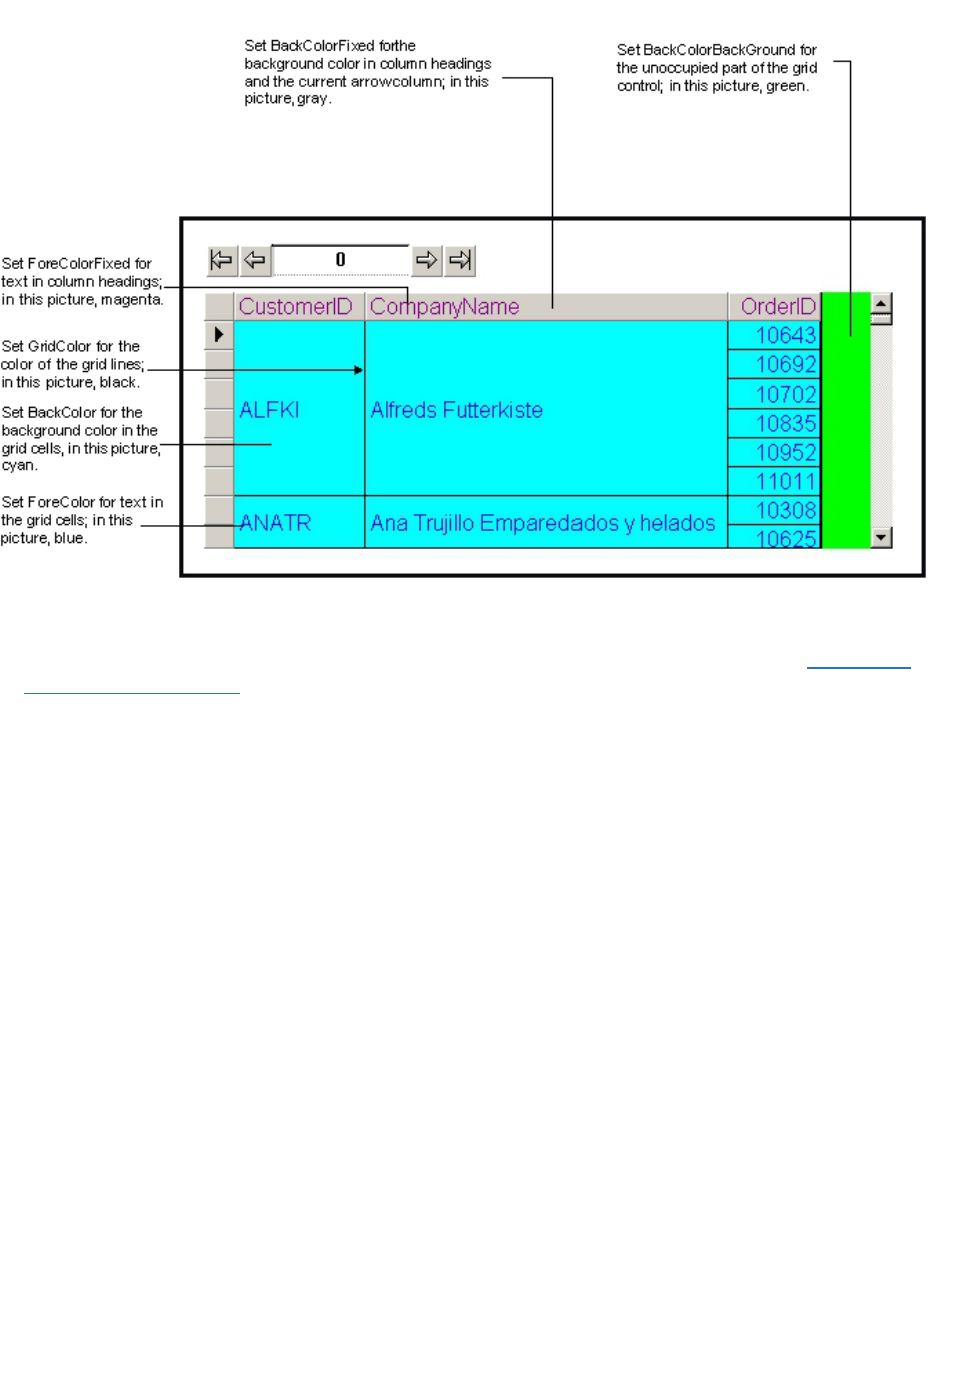
Grid Control Color Elements in the run-time environment
This illustration also shows the use of two Grid Control object properties that you can set by opening the
object Properties window for the Grid Control.
One property, MergeCells, when set to True, displays one occurrence of repeating column values. For
example, customer ID, ALFKI, has six associated orders. Instead of repeating the Customer ID and
name six times, once for each order, the values appear once.
The other property, BorderStyle, when set to vxBorderNode, hides the outside border of the grid control.
If you turn off the border and set the BackColorBackGround color of the grid to white, the Grid Control
appears to be floating in the picture. The following picture is the same as the previous example, except
that the BackColorBackGround color is set to white, instead of green; in both pictures, the outside bor-
der is hidden.
© 2020 General Electric Company. All rights reserved. 29
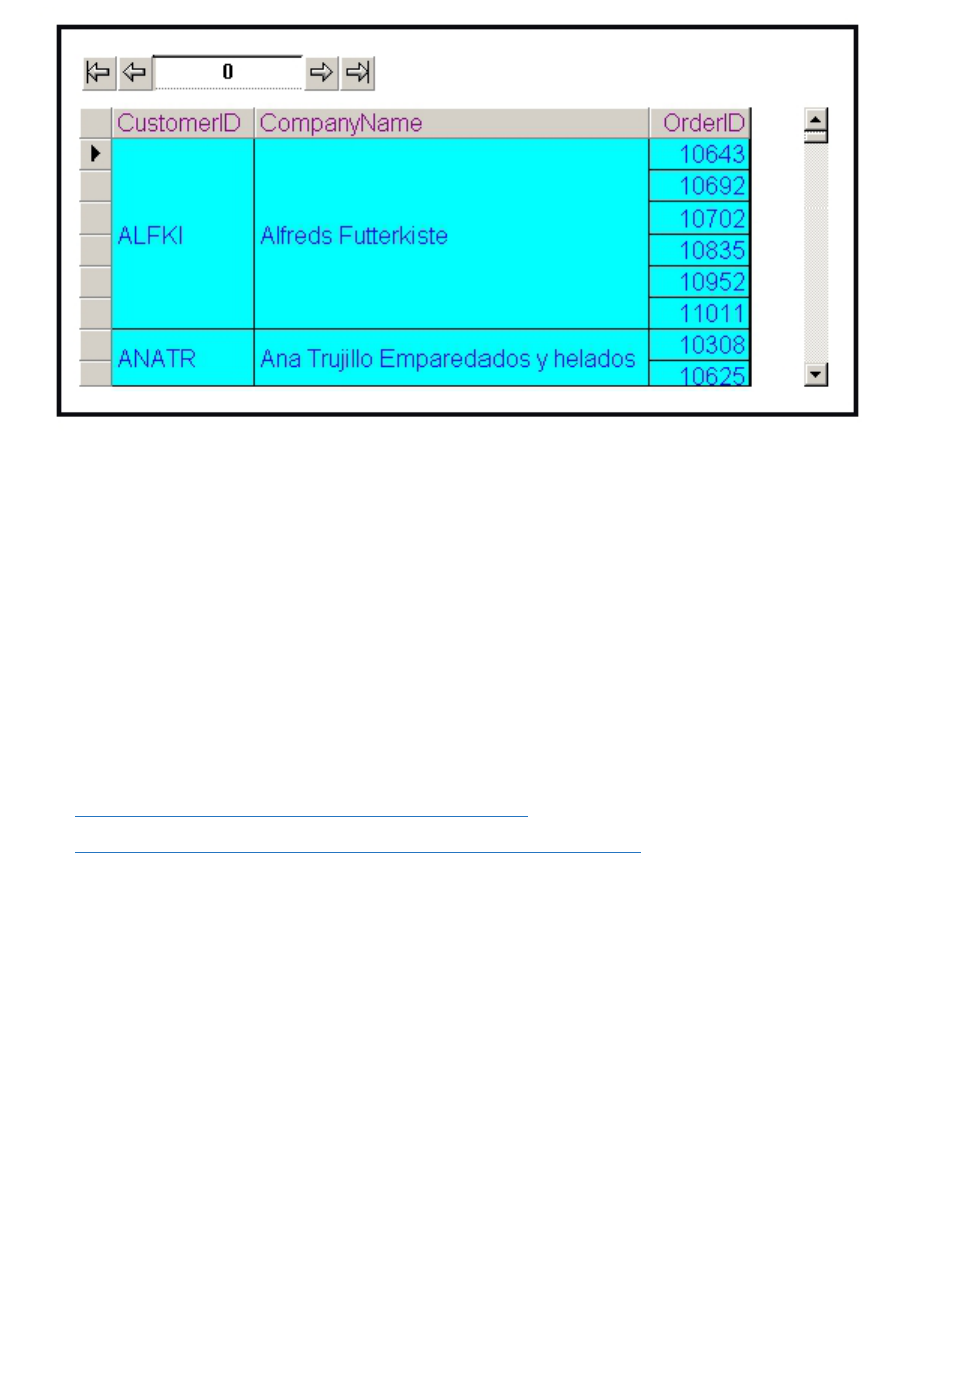
Grid Control with No Border and White Background Color
To hide the row with column headings and the column with the row marker, you can set the Dis-
playHeaders and DisplayRowMarker properties in the Properties window of the Grid Control to False.
You also have the option to set the column widths in the Grid Control by setting the AutoResize property
to False and then entering the column widths in the ColumnWidths property.
Using VisiconX: Examples
This section provides some concrete examples of using VisiconX. The examples are based on a sample
Microsoft Access database:
l Example 1: Displaying Batch Processes by Batch ID
l Example 2: Displaying Batch Processes by Recipe Version Dates
This is just a small and simple sampling of the types of queries and displays you can create. As you
become more familiar with VisiconX controls, the applications at your site become obvious.
Example 1: Displaying Batch Processes by Batch ID
In this example, the process control operators want to view the details of a batch process by batch ID.
To view the batch process details, this example uses:
l Two Data Controls to submit two different queries to the Batch table in the database.
l A Grid Control to display batch process information for a selected batch ID.
l A ListBox Control to select the batch ID.
The following screen shows the result in the run-time environment.
30 © 2020 General Electric Company. All rights reserved.
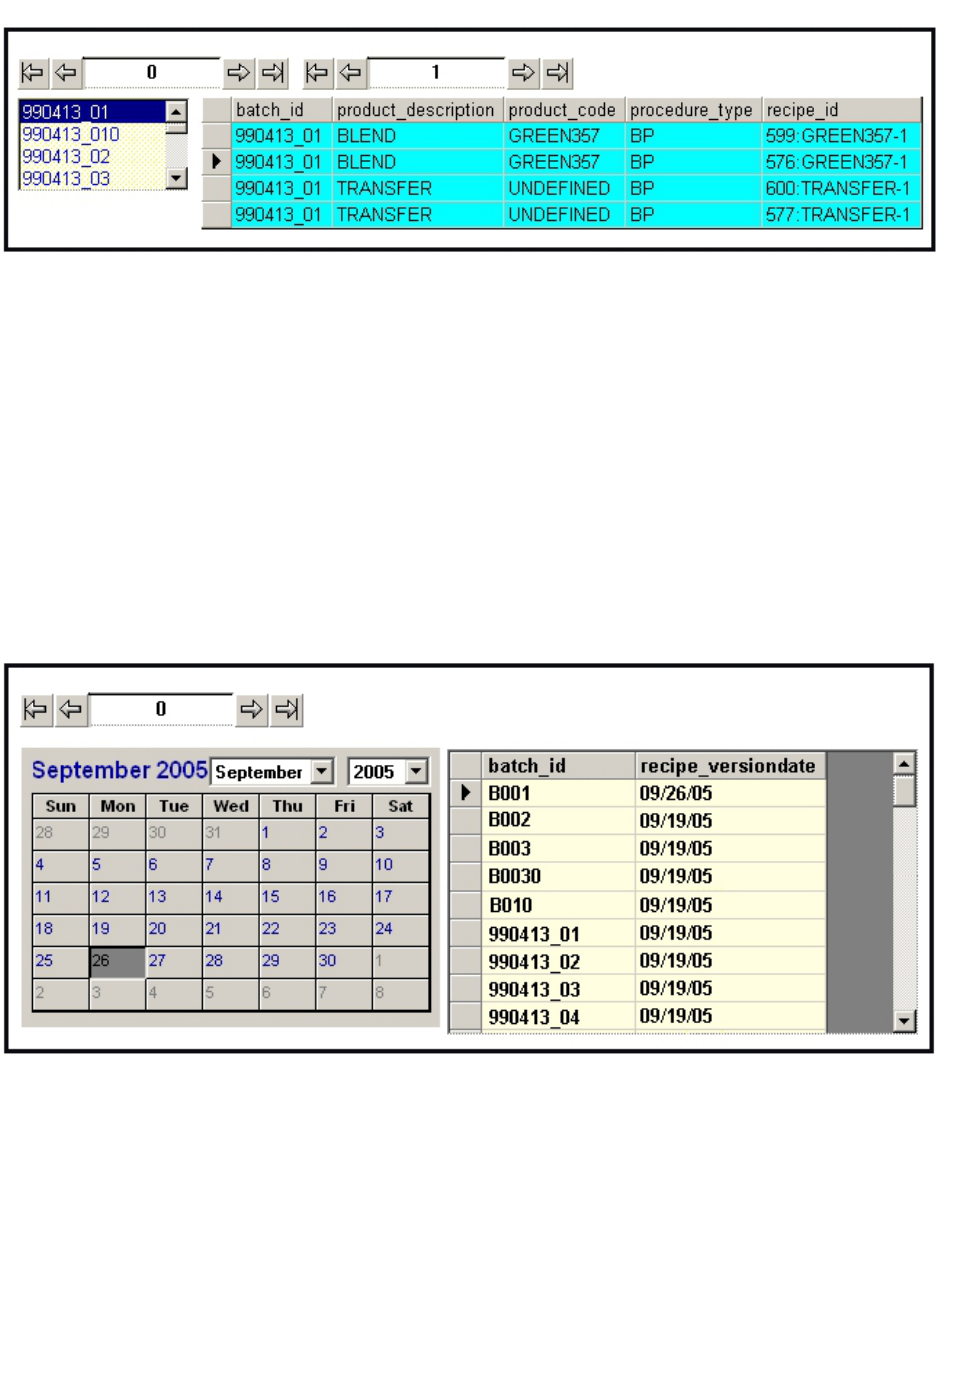
Displaying Batch Process Details by Batch ID
Here, the list pointer in the Grid Control points to the second record of the ADO record set retrieved by
the query, which is Record 1 in the Data Control. As you increment the Data Control, the list pointer
moves down the list.
Example 2: Displaying Batch Processes by Recipe Version Dates
This example of VisiconX shows how you can create an SQL query to display batch processing inform-
ation for recipe version dates on and beyond a specified date. The figure includes a Data Control and
Grid Control as well as an OLE Calendar Object control. The data in the Grid Control changes depending
on the date selected in the OLE Calendar Control.
Displaying Batch Data by Specific Recipe Dates
VisiconX Automation Reference
© 2020 General Electric Company. All rights reserved. 31

The VisiconX Automation Reference is intended for integrators and programmers who want to develop
applications that access and manipulate information in iFIX or CIMPLICITY through a set of automation
interfaces. This help file assumes the reader is proficient in the Microsoft® Visual Basic® programming
language.
The following sections provide more details on how to use the objects, properties, methods, and events
associated with VisiconX:
l Quick Reference
l Object Summary
l Property Summary
l Method Summary
l Event Summary
Quick Reference - VisiconX Automation
The following list contains all of the Plug & Solve Solutions objects, properties, methods, and events
that are available to the VisiconX Automation interface.
A-B
AboutBox Method
ADOConnection Property
ADORecords Property
AutoConnect Property
AutoResize Property
BackColor Property
BackColorFixed Property
BorderStyle Property
C
Click Event
Click (Area as Integer) Event
Col Property
Cols Property
Column
N
Property
32 © 2020 General Electric Company. All rights reserved.

ColumnName Property
ColumnNames Property
ColumnNumber Property
ColumnWidths Property
Connected Property
CurrentRow Property
D
Database Property
DataChanged Event
DBConnect Method
DBDisConnect Method
DblClick Event
DblClick (Area as Integer) Event
DisplayHeaders Property
DisplayRowMarker Property
DSN Property
E
ErrorDesc Property
ErrorNum Property
ErrorOccurred Event
ExecuteComplete Event
F-H
Font Property
ForeColor Property
I-L
InvisibleInRunMode Property
JetDB Property
JetSDB Property
M-N
MoveFirst Method
MoveLast Method
© 2020 General Electric Company. All rights reserved. 33

MoveNext Method
MovePrevious Method
O
ODBCConnectionString Property
OLEDBConnectionString Property
OLEDBProvider Property
P
Password Property
PersistUserInfo Property
ProcedureNames Property
Q
QPn Property
R
RefreshData Method
Row Property
RowChanged Event
Rows Property
RunSqlWizard
S
Server Property
ShowMilliseconds Property
SourceType Property
SQLCommand Property
T
Table Property
TableNames Property
Text Property
U-Z
UseNTSecurity Property
UseODBCConnectionString Property
34 © 2020 General Electric Company. All rights reserved.

User Property
Property Summary
The following list contains the Plug & Solve Solutions properties that are available to the VisiconX Auto-
mation Interface.
A-B
ADOConnection Property
ADORecords Property
AutoConnect Property
AutoResize Property
BackColor Property
BackColorBackGround Property
BackColorFixed Property
BorderStyle Property
C
Col Property
Cols Property
Column
N
Property
ColumnName Property
ColumnNames Property
ColumnNumber Property
ColumnWidths Property
Connected Property
CurrentRow Property
D
Database Property
DisplayHeaders Property
DisplayRowMarker Property
DSN Property
© 2020 General Electric Company. All rights reserved. 35

E
ErrorDesc Property
ErrorNum Property
F-H
Font Property
ForeColor Property
I-L
InvisibleInRunMode Property
JetDB Property
JetSDB Property
M-O
MergeCells Property
ODBCConnectionString Property
OLEDBConnectionString Property
OLEDBProvider Property
P
Password Property
PersistUserInfo Property
ProcedureNames Property
Q
QPn Property
R
Row Property
Rows Property
S
Server Property
ShowMilliseconds Property
SourceType Property
SQLCommand Property
36 © 2020 General Electric Company. All rights reserved.

T
Table Property
TableNames Property
Text Property
U-Z
UseNTSecurity Property
UseODBCConnectionString Property
User Property
ADOConnection Property
Exposes the read-only Data Control's connection object so that it can be used in Visual Basic scripts.
Syntax
object.
ADOConnection
Parameters
The
object
placeholder represents an object expression that evaluates to an object in the Applies To list.
Remarks
The data type of this property is ADODB.CONNECTION.
ADORecords Property
Specifies the read-only ADO Record set containing the query results.
Syntax
object.
ADORecords
Parameters
The ADO Record property syntax has this part:
Part Description
object
An object expression that evaluates to an object in the Applies To list.
Remarks
The data type of this property is ADODB.RECORDSET.
AutoConnect Property
© 2020 General Electric Company. All rights reserved. 37

Specifies whether to automatically connect to the selected OLE DB data provider when iFIX or
CIMPLICITY enters the run-time environment.
Syntax
object.
AutoConnect [=
Boolean
]
Parameters
The AutoConnect property syntax has these parts:
Part Description
object
An object expression that evaluates to an object in the Applies To list.
Boolean
Whether to automatically connect to the OLE DB data provider in the run-time environment.
Settings
The settings for
Boolean
are:
Value Description
True Automatically connects to the selected OLE DB data provider in the run-time environment.
(Default)
False Must manually connect to the selected OLE DB data provider using the DBConnect method.
Remarks
This property can only be set in Configure mode. It is read-only in Run mode.
AutoResize Property
Controls whether VisiconX automatically sizes the columns in a Grid Control to fit the data.
Syntax
object.
AutoResize [=
Boolean
]
Parameters
The AutoResize property syntax has these parts:
Part Description
object
An object expression that evaluates to an object in the Applies To list.
Boolean
Whether to automatically size the column widths in a Grid Control.
Settings
The settings for
Boolean
are:
Value Description
True Automatically sizes the column widths in a Grid Control to fit the data. (Default)
False Must manually size the column widths in a Grid Control using the ColumnWidths Property.
38 © 2020 General Electric Company. All rights reserved.

Remarks
Set this property to False and use the ColumnWidths property if you want to set the Grid column widths
manually. By setting the widths manually, the columns remain the same size each time you run the
query.
BackColor Property
Sets the background color of cells in the Grid Control and the background color of the text area in
ListBox and ComboBox Controls.
Syntax
object.
BackColor [=
OLE_COLOR
]
Parameters
The BackColor property syntax has these parts:
Part Description
object
An object expression that evaluates to an object in the Applies To list.
OLE
COLOR
The value of the color you select from the displayed color palette; for example:
&H0000FF00&
Remarks
In a Grid Control, this property sets the background color each cell in the grid. To set:
l The background color of the column headings and the column for the current row pointer, use the
BackColorFixed property.
l To set the background color of the portion of the control not occupied by the grid, use the Back-
ColorBackGround property.
l To set the color of the grid lines, use the GridColor property.
l To set the color of the cell text, use the ForeColor property.
l To set the color of the column headings, use the ForeColorFixed property.
BackColorBackGround Property
Specifies the background color of the Grid Control that is not occupied by the grid.
Syntax
object.
BackColorBackGround [=
OLE_COLOR
]
Parameters
The BackColorBackGround property syntax has these parts:
Part Description
object
An object expression that evaluates to an object in the Applies To list.
OLE
COLOR
The value of the color you select from the displayed color palette; for example:
&H0000FF00&
© 2020 General Electric Company. All rights reserved. 39

Remarks
To set:
l To set the background color for cells that display query data, use the BackColor property.
l The background color of the column headings and the column for the current row pointer, use the
BackColorFixed property.
l To set the color of the grid lines, use the GridColor property.
l To set the color of the cell text, use the ForeColor property.
l To set the color of the column headings, use the ForeColorFixed property.
BackColorFixed Property
Sets the background color of cells used for column headings and the current row pointer in the Grid Con-
trol.
Syntax
object.
BackColorFixed [=
OLE_COLOR
]
Parameters
The BackColorFixed property syntax has these parts:
Part Description
object
An object expression that evaluates to an object in the Applies To list.
OLE
COLOR
The value of the color you select from the displayed color palette; for example:
&H0000FF00&
Remarks
In a Grid Control, this property sets the background color each cell in the grid. To set:
l To set the background color for cells that display query data, use the BackColor property.
l To set the background color of the portion of the control not occupied by the grid, use the Back-
ColorBackGround property.
l To set the color of the grid lines, use the GridColor property.
l To set the color of the cell text, use the ForeColor property.
l To set the color of the column headings, use the ForeColorFixed property.
BorderStyle Property
Specifies the border style of the vxGrid object.
Syntax
object.
BorderStyle [=
enumBorderStyle
]
Parameters
The BorderStyle property syntax has these parts:
40 © 2020 General Electric Company. All rights reserved.

Part Description
object
An object expression that evaluates to an object in the Applies To list.
EnumBorderStyle
Determines whether the border style is fixed or none.
Settings
The settings for
enumBorderStyle
are:
Constant Value Description
vxBorderNone 0 Returns no border.
vxBorderFixed 1 Returns a fixed border.
Col Property
Specifies the column number of the currently selected cell in the Grid Control.
Syntax
object.
Col [=
Long
]
Parameters
The Col property syntax has these parts:
Part Description
object
An object expression that evaluates to an object in the Applies To list.
Long
The column number of the currently selected cell in the Grid Control.
Cols Property
Specifies the total number of columns in the Grid Control. This property is read-only.
Syntax
object.
Col [=
Long
]
Parameters
The Col property syntax has these parts:
Part Description
object
An object expression that evaluates to an object in the Applies To list.
Long
The column number of the currently selected cell in the Grid Control.
Remarks
Use this Property with the Rows Property to determine the total number of columns and rows in a grid.
Column
N
Property
Specifies the value of the current row of the specified column in the ADO Record set.
Syntax
object.
Column
N
[=
String | Long | Date | Double)
]
© 2020 General Electric Company. All rights reserved. 41

Parameters
The Column property syntax has these parts:
Part Description
object
An object expression that evaluates to an object in the Applies To list.
String
A string value in the current row.
Long
A numeric value in the current row.
Date
A date value in the current row.
Double
A double-precision floating-point value in the current row.
ColumnName Property
Returns the read-only column name selected for a ListBox or ComboBox Control display. To select the
column, use the ColumnNumber property.
Syntax
object.
ColumnName [=
String
]
Parameters
The ColumnName property syntax has these parts:
Part Description
object
An object expression that evaluates to an object in the Applies To list.
String
The name of a column whose value populates a ListBox or ComboBox Control.
String
is read-
only.
ColumnNames Property
Returns an ADO Recordset containing the name and data type of each column that the query is con-
figured to return.
Syntax
object.
ColumnNames
Parameters
The ColumnNames property syntax has this part:
Part Description
object
An object expression that evaluates to an object in the Applies To list.
ColumnNumber Property
Specifies the column number of the ADO record set to use to populate a ListBox or ComboBox Control.
Syntax
object.
ColumnNumber [=
Long
]
42 © 2020 General Electric Company. All rights reserved.

Parameters
The ColumnNumber property syntax has these parts:
Part Description
object
An object expression that evaluates to an object in the Applies To list.
Long
The column number of the retrieved ADO record set.
Remarks
The ColumnNumber property refers to the column number in the data table retrieved, not the column
number of the table queried.
ColumnWidths Property
Use this property to manually set the column widths in a Grid Control.
Syntax
object.
ColumnWidths [=
String
]
Parameters
The ColumnWidths property syntax has these parts:
Part Description
object
An object expression that evaluates to an object in the Applies To list.
String
The width of the columns in the grid, measured in twips, and separated by a pipe char-
acter, using the following format:
column1|column2|column3|column4|column
N
Remarks
To use this property, set AutoResize to false. The column widths you apply remain each time you query
the database. This property applies the sizes specified. If you do not specify a column width, the default
is 960 twips. To hide a column in the grid display, specify 0. If you specify more columns than the query
contains, VisiconX ignores the extra column specifications.
Connected Property
Returns the connection status of the Data Control.
Syntax
object.
Connected [=
Boolean
]
Parameters
The Connected property syntax has these parts:
Part Description
object
An object expression that evaluates to an object in the Applies To list.
Boolean
Whether the data control is currently connected.
© 2020 General Electric Company. All rights reserved. 43

Settings
The settings for
Boolean
are:
Value Description
True Currently connected
False Not connected.
Remarks
Use this property to test the connection to the selected OLE DB data provider and database.
CurrentRow Property
Identifies the number of the current row in the retrieved ADO record set.
Syntax
object.
CurrentRow [=
Long
]
Parameters
The CurrentRow property syntax has these parts:
Part Description
object
An object expression that evaluates to an object in the Applies To list.
Long
The zero-based number of the current record in the record array.
Remarks
The CurrentRow value is visible in the Data Control in Run mode. Use the MoveNext, MovePrevious,
MoveFirst, and MoveLast methods to change the current row number.
Database Property
Specifies the name of the current database if the provider is SQL Server.
Syntax
object.
Database [=
String
]
Parameters
The Database property syntax has these parts:
Part Description
object
An object expression that evaluates to an object in the Applies To list.
String
The name of the currently connected database; for example: Northwind.
DisplayHeaders Property
Displays or hides the fixed row at the top of a grid that displays the column headings.
Syntax
object.
DisplayHeaders [=
Boolean
]
44 © 2020 General Electric Company. All rights reserved.

Parameters
The DisplayHeaders property syntax has these parts:
Part Description
object
An object expression that evaluates to an object in the Applies To list.
Boolean
Whether to display or hide the column headers in a grid display.
Settings
The settings for
Boolean
are:
Value Description
True Displays the fixed row of column headers. (Default)
False Hides the fixed row of column headers.
Remarks
Set this property to False to display customized column headings using text objects.
DisplayRowMarker Property
Displays or hides the fixed column to the left of a grid that displays the arrow row marker.
Syntax
object.
DisplayRowMarker [=
Boolean
]
Parameters
The DisplayRowMarker property syntax has these parts:
Part Description
object
An object expression that evaluates to an object in the Applies To list.
Boolean
Whether to display or hide the fixed column in a grid that displays the arrow row
marker.
Settings
The settings for
Boolean
are:
Value Description
True Displays the fixed column in a grid with the arrow row marker.
False Hides the fixed column.
Remarks
Set this property to False to customize a grid display by hiding the arrow row marker.
DSN Property
Specifies the ODBC data source name if the provider is ODBC.
Syntax
object.
DSN [=
String
]
© 2020 General Electric Company. All rights reserved. 45

Parameters
The DSN property syntax has these parts:
Part Description
object
An object expression that evaluates to an object in the Applies To list.
String
The name of the ODBC data source, as defined through the ODBC Administrator tool;
for example: Northwind.
ErrorDesc Property
Specifies a description of the current error.
Syntax
object.
ErrorDesc [=
String
]
Parameters
The ErrorDesc property syntax has these parts:
Part Description
object
An object expression that evaluates to an object in the Applies To list.
String
The description of the current error.
String
is read-only.
ErrorNum Property
Specifies the read-only error code of the current error.
Syntax
object
ErrorNum [=
Long
]
Parameters
The ErrorNum property syntax has these parts:
Part Description
object
An object expression that evaluates to an object in the Applies To list.
Long
A read-only error code value.
Font Property
Returns or sets the Font object for the selected Grid Control, ListBox Control, and ComboBox Control.
Syntax
object.
Font [=
StdFont
]
Parameters
The Font property syntax has these parts:
Part Description
object
An object expression that evaluates to an object in the Applies To list.
StdFont
The name of the Font selected from the Windows Font dialog box.
46 © 2020 General Electric Company. All rights reserved.

ForeColor Property
Sets the color of text for cells in the Grid Control and in ListBox and ComboBox Controls.
Syntax
object.
ForeColor [=
OLE_COLOR
]
Parameters
The ForeColor property syntax has these parts:
Part Description
object
An object expression that evaluates to an object in the Applies To list.
OLE
COLOR
The value of the color you select from the displayed color palette; for example:
&H0000FF00&
Remarks
In a Grid Control, this property sets the text color for each cell in the grid. To set:
l The background color of the grid cells, use the BackColor property.
l The text color of the column headings, use the ForeColorFixed property.
l The background color of the column headings and the column for the current row pointer, use the
BackColorFixed property.
l The background color of the portion of the control not occupied by the grid, use the Back-
ColorBackGround property.
l The color of the grid lines, use the GridColor property.
ForeColorFixed Property
Sets the text color of column headings in the Grid Control.
Syntax
object.
ForeColorFixed [=
OLE_COLOR
]
Parameters
The ForeColorFixed property syntax has these parts:
Part Description
object
An object expression that evaluates to an object in the Applies To list.
OLE
COLOR
The value of the color you select from the displayed color palette; for example:
&H0000FF00&
Remarks
To set:
l To set the color of the cell text, use the ForeColor property.
l The background color of the column headings and the column for the current row pointer, use the
BackColorFixed property.
© 2020 General Electric Company. All rights reserved. 47

l To set the background color of the grid cells, use the BackColor property.
l To set the background color of the portion of the control not occupied by the grid, use the Back-
ColorBackGround property.
l To set the color of the grid lines, use the GridColor property.
GridColor Property
Specifies the color of the grid lines in the Grid Control
Syntax
object.
GridColor [=
OLE_COLOR
]
Parameters
The GridColor property syntax has these parts:
Part Description
object
An object expression that evaluates to an object in the Applies To list.
OLE
COLOR
The value of the color you select from the displayed color palette; for example:
&H0000FF00&
Remarks
To set:
l To set the background color for cells that display query data, use the BackColor property.
l The background color of the column headings and the column for the current row pointer, use the
BackColorFixed property.
l To set the background color of the portion of the control not occupied by the grid, use the Back-
ColorBackGround property.
l To set the color of the cell text, use the ForeColor property.
l To set the color of the column headings, use the ForeColorFixed property.
InvisibleInRunMode Property
Specifies whether the selected Data Control is visible in the run-time environment.
Syntax
object.
InvisibleInRunMode [=
Boolean
]
Parameters
The InvisibleInRunMode property syntax has these parts:
Part Description
object
An object expression that evaluates to an object in the Applies To list.
Boolean
Whether the Data Control is visible in the run-time environment.
Settings
The settings for
Boolean
are:
48 © 2020 General Electric Company. All rights reserved.

Value Description
True The Data Control is not visible in the run-time environment.
False The Data Control is visible in the run-time environment. (Default)
Remarks
Use this property to make the Data Control invisible in the run-time environment.
JetDB Property
Specifies the Microsoft Access Database Name for the Microsoft Jet data provider.
Syntax
object.
JetDB [=
String
]
Parameters
The JetDB property syntax has these parts:
Part Description
object
An object expression that evaluates to an object in the Applies To list.
String
The name of the Microsoft Access database; for example: C:\Program Files
(x86)\GE\iFIX\PDB\APPTEST.mdb
JetSDB Property
Specifies the Microsoft Access System (Security) Database Name for the Microsoft Jet data provider.
Syntax
object.
JetSDB [=
String
]
Parameters
The JetSDB property syntax has these parts:
Part Description
object
An object expression that evaluates to an object in the Applies To list.
String
The name of the Microsoft Access database; for example: C:\Program Files
(x86)\GE\iFIX\PDB\APPTEST.mdb
Remarks
Use this property if Microsoft Access is configured for user-based security.
MergeCells Property
In a Grid Control, turns on or off an option to display only one occurrence of a repeating cell value in a
column. For example, in a query that displays orders for each customer, the customer ID and name
appear once, centered vertically, next to the rows that contain the associated orders.
Syntax
object.
MergeCells [=
Boolean
]
© 2020 General Electric Company. All rights reserved. 49

Parameters
The MergeCells property syntax has these parts:
Part Description
object
An object expression that evaluates to an object in the Applies To list.
Boolean
Whether to display one occurrance of repeating cell values in a column or display all occur-
rences.
Settings
The settings for
Boolean
are:
Value Description
True Display one occurrance of repeating cell values in a column, centered vertically.
False Fills each grid cell with data. (Default)
ODBCConnectionString Property
Specifies an ODBC connection string to connect to an ODBC driver.
Syntax
object.
ODBCConnectionString[=
String
]
Parameters
The ODBCConnectionString property syntax has these parts:
Part Description
object
An object expression that evaluates to an object in the Applies To list.
String
An ODBC connection string that connects to an ODBC driver; for example:
Driver={SQL Server};Server=QALAB15;Database=Northwind;'
The connection string replaces the ODBC data source name.
Remarks
Use this property if the UseODBCConnectionString property is set to True. An example connection
string for the SQL Server appears above. Below are example connection strings for a Microsoft Access
Driver and the Oracle Server driver:
Microsoft Access Driver
Driver={Microsoft Access Driver (*.MDB)};DBQ=C:\Program Files (x86)\GE\iFIX\PDB\ac-
cessarchiver.mdb;
Oracle Driver
Driver={Microsoft ODBC For Oracle};Server=OTTO;
OLEDBConnectionString Property
50 © 2020 General Electric Company. All rights reserved.

Specifies a string used to connect to an OLE DB provider other than ODBC, Jet, SQL Server, and
Oracle.
Syntax
object.
OLEDBConnectionString[=
String
]
Parameters
The OLEDBConnectionString property syntax has these parts:
Part Description
object
An object expression that evaluates to an object in the Applies To list.
String
An OLE DB connection string; for example:
Data Source=QALAB15;Initial Catalog=Test
Remarks
When setting up the OLEDBConnectionString property on a vxData object, do not pass in a user and
password in the string. Set up the User and Password properties instead, because VisiconX will append
whatever is assigned to these properties when it tries to create the connection.
See the documentation for your OLE Provider for more information about using a connection string.
OLEDBProvider Property
Specifies the name of the OLE DB data provider currently selected.
Syntax
object.
OLEDBProvider[=
String
]
Parameters
The OLEDBProvider property syntax has these parts:
Part Description
object
An object expression that evaluates to an object in the Applies To list.
String An OLE DB data provider name, as described below.
The following table identifies values for
String
and identifies its corresponding data provider.
String
Description
SQLOLEDB SQL Server
MSDAORA Oracle Server
Microsoft.Jet.OLEDB.3.51 Microsoft Jet 3.51 data provider
Microsoft.Jet.OLEDB.4.0 Microsoft Jet 4.0 data provider
MSDAOSP Simple provider
MS Remote MS Remote
MS DataShape MS DataShape
© 2020 General Electric Company. All rights reserved. 51

Remarks
The table above shows the default set of data providers installed by ADO 2.1. See the documentation for
your OLE Provider if you are using another provider.
Password Property
Sets your password for access to secured databases. This property is designed so that the password
cannot be read for security purposes.
Syntax
object.
Password(pwCode As String)=
String
Parameters
The Password property syntax has these parts:
Part Description
object
An object expression that evaluates to an object in the Applies To list.
pwCode
An empty string.
String
Your password.
Remarks
This example shows how to set a password. The password can be set, but it cannot be read back:
VxData1.Password(“”)=my_password
PersistUserInfo Property
Specifies whether the user must login to secured OLE DB data providers every time iFIX or
CIMPLICITY enters the run-time environment.
Syntax
object.
PersistUserInfo [=
Boolean
]
Parameters
The PersistUserInfo property syntax has these parts:
Part Description
object
An object expression that evaluates to an object in the Applies To list.
Boolean
Whether the User must login each time the run-time environment is entered for a secured OLE
DB data provider.
Settings
The settings for
Boolean
are:
Value Description
True The user does not have to login each time the run-time environment is entered. (Default). The
User ID and Password are stored in the Data Control.
52 © 2020 General Electric Company. All rights reserved.

False The user does have to login each time the run-time environment is entered.
Remarks
Set this property to False to force users to log in to secured OLE DB data providers in order to view data.
ProcedureNames Property
Returns an ADO Recordset containing the name and description of each stored procedure defined to the
queried database.
Syntax
object.
ProcedureNames
Parameters
The ProcedureNames property syntax has this part:
Part Description
object
An object expression that evaluates to an object in the Applies To list.
QP
n
Property
Specifies a string that equates to the current value assigned to the query property.
Syntax
object.
QP
n
[=
String
]
Parameters
The QP
n
property syntax has these parts:
Part Description
object
An object expression that evaluates to an object in the Applies To list.
String
The current value assigned to the query property. For example, the value assigned to
QP1 could be Finance.
Remarks
These properties are designed to be variables for use in the SQL Select statement. When the query
runs, it replaces the QP
n
placeholder with the
string
value.
Row Property
Specifies the row number of the currently selected cell in the Grid Control.
Syntax
object.
Row [=
Long
]
Parameters
The Row property syntax has these parts:
© 2020 General Electric Company. All rights reserved. 53

Part Description
object
An object expression that evaluates to an object in the Applies To list.
Long
The number of the currently selected cell in the Grid Control.
Rows Property
Specifies the total number of rows in the Grid Control. This property is read-only.
Syntax
object.
Row [=
Long
]
Parameters
The Row property syntax has these parts:
Part Description
object
An object expression that evaluates to an object in the Applies To list.
Long
The total number of of rows in the Grid Control.
Remarks
Use this Property with the Cols Property to determine the total number of columns and rows in a grid.
Server Property
Specifies the name of the current data base server for SQL Server or Oracle providers.
Syntax
object.
Server[=
String
]
Parameters
The Server property syntax has these parts:
Part Description
object
An object expression that evaluates to an object in the Applies To list.
String
The name of the current database server; for example:
QALAB15
ShowMilliseconds Property
In a Grid Control, indicates whether milliseconds are displayed in time or date/time fields.
Syntax
object.ShowMilliseconds
[=
Boolean
]
Parameters
The ShowMilliseconds property syntax has these parts:
Part Description
object
An object expression that evaluates to an object in the Applies To list.
54 © 2020 General Electric Company. All rights reserved.

Boolean
Whether to display milliseconds in a Grid Control's time or date/time fields.
Settings
The settings for
Boolean
are:
Value Description
True Displays milliseconds in Grid Control time or date/time fields.
False Does not display milliseconds in Grid Control time or date/time fields. (Default)
SourceType Property
Identifies the type of command to use to query the database; for example, using an SQL Command, a
stored procedure, or a table.
Syntax
object.
SourceType[=
vxSourceType
]
Parameters
The SourceType property syntax has these parts:
Part Description
object
An object expression that evaluates to an object in the Applies To list.
vxSourceType
Enumerates the type of query command, as follows:
1 vxSourceSQL SQL Command
4 vxSourceTable Table Command
512 vxSourceStoredProc Stored Procedure Command
SQLCommand Property
Specifies an SQL command string.
Syntax
object.
SQLCommand[=
String
]
Parameters
The SQLCommand property syntax has these parts:
Part Description
object
An object expression that evaluates to an object in the Applies To list.
String
An SQL command string.
Remarks
The SQL command string value displayed in the Properties window is the string built by the SQL Wizard
or the string entered or pasted into the SQL Command edit box on the Record Source tab of the Data
Control OLE Properties dialog box.
© 2020 General Electric Company. All rights reserved. 55

Table Property
Specifies the name of a database table selected for the Table command type or Stored Procedure for the
Stored Procedure command type.
Syntax
object.
Table[=
String
]
Parameters
The Table property syntax has these parts:
Part Description
object
An object expression that evaluates to an object in the Applies To list.
String
The name of the database table that is currently selected to query for the Table com-
mand type or the name of the Stored Procedure for the Stored Procedure command
type.
TableNames Property
Returns an ADO Recordset containing the name, type (Table or View), and description of each table and
view defined to the queried database.
Syntax
object.
TableNames
Parameters
The TableNames property syntax has this part:
Part Description
object
An object expression that evaluates to an object in the Applies To list.
Text Property
Specifies the text in:
l The selected cell of a grid, based on the settings of the Row and Col properties.
l The selected row in a list box.
l The value in the text box of a drop-down (combo) box.
Syntax
object.
Text[=
String
]
Parameters
The Text property syntax has these parts:
Part Description
object
An object expression that evaluates to an object in the Applies To list.
String
The text in a selected cell of a grid, selected row of a list box, or text in a combo box.
String
is
56 © 2020 General Electric Company. All rights reserved.

read-only.
UseNTSecurity Property
Specifies whether to use Microsoft Windows integrated security to access a Microsoft SQL Server data-
base.
Syntax
object.
UseNTSecurity [=
Boolean
]
Parameters
The Active property syntax has these parts:
Part Description
object
An object expression that evaluates to an object in the Applies To list.
Boolean
Whether to use Windows integrated security.
Settings
The settings for
Boolean
are:
Value Description
True Uses Windows integrated security to secure access to the chosen MS SQL Server database.
False Uses the user ID and password to secure access to the chosen MS SQL Server database.
(Default)
Remarks
Use this property to use Windows integrated security to access MS SQL Server providers.
UseCDBCConnectionString Property
Uses an ODBC connection string to access an ODBC driver, rather than a data source (DSN) defined
through the ODCB Administrator tool located in the Windows Control Panel.
Syntax
object.
UseODBCConnectionString[=
Boolean
]
Parameters
The UseODBCConnectionString property syntax has these parts:
Part Description
object
An object expression that evaluates to an object in the Applies To list.
Boolean
Whether to use an ODBC connection string to configure access to an ODBC driver.
Settings
The settings for
Boolean
are:
Value Description
True Uses an ODBC connection string to configure access to an ODBC driver.
© 2020 General Electric Company. All rights reserved. 57

False Uses an ODBC data source name to access an ODBC driver. (Default)
User Property
Specifies a user name or ID required for access to a secured data provider.
Syntax
object.
User[=
String
]
Parameters
The User property syntax has these parts:
Part Description
object
An object expression that evaluates to an object in the Applies To list.
String
The current user name required for access to a secured data provider.
Method Summary
The following list contains the Plug & Solve Solutions object methods that are available to the VisiconX
Automation Interface:
l AboutBox Method
l DBConnect Method
l DBDisConnect Method
l MoveFirst Method
l MoveLast Method
l MoveNext Method
l MovePrevious Method
l RefreshData Method
l RunSqlWizard Method
For examples of these object methods, refer to the Method Examples section.
AboutBox Method
Shows the version and copyright information for the vxData Object, vxGrid Object, vxList Object or
vxCombo Object.
Syntax
object
.AboutBox
Parameters
The AboutBox method property syntax has this part:
58 © 2020 General Electric Company. All rights reserved.
Part Description
object
An object expression that evaluates to an object in the Applies To list.
CopyCells Method
Used to copy a specified cell or range of cells onto a system clipboard.
Syntax
object
.CopyCells
(IngRow, IngColoumn, [varEndRow], [varEndColumn], [bIncludeHeader])
Parameters
The CopyCells method property syntax has this part:
Part Description
object
An object expression that evaluates to an object in the Applies To list.
IngRow
Long. The row number of the cell to be copied, or the starting row number of the cell
range to be copied.
IngColumn
Long. The column number of the cell to be copied, or the starting column number of
the cell range to be copied.
varEndRow
Variant. Optional. If provided, specifies the last row in the range of cells to be copied.
varEndColumn
Variant. Optional. If provided, specifies the last column in the range of cells to be
copied.
bIncludeHeader
Boolean. Optional. Indicates whether the column headers are to be copied. TRUE
includes the column headers.
DBConnect Method
Used to manually instruct the Data Control to connect to the configured data source and run its query.
Syntax
object
.DBConnect
Parameters
The DBConnect method property syntax has this part:
Part Description
object
An object expression that evaluates to an object in the Applies To list.
DBDisConnect Method
Used to manually disconnect the Data Control from its configured data source and close the ADORe-
cords object.
Syntax
object
.DBDisconnect
© 2020 General Electric Company. All rights reserved. 59

Parameters
The DBDisConnect method property syntax has this part:
Part Description
object
An object expression that evaluates to an object in the Applies To list.
MoveFirst Method
Moves the database cursor to the first returned row of the ADO Record set.
Syntax
object
.MoveFirst
Parameters
The MoveFirst method property syntax has this part:
Part Description
object
An object expression that evaluates to an object in the Applies To list.
MoveLast Method
Moves the database cursor to the last returned row of the ADO Record set.
Syntax
object
.MoveLast
Parameters
The MoveLast method property syntax has this part:
Part Description
object
An object expression that evaluates to an object in the Applies To list.
MoveNext Method
Advances the database cursor to the next returned row in the ADO Record set.
Syntax
object
.MoveNext
Parameters
The MoveNext method property syntax has this part:
Part Description
object
An object expression that evaluates to an object in the Applies To list.
MovePrevious Method
60 © 2020 General Electric Company. All rights reserved.

Moves the database cursor to the previous returned row in the ADO Record set.
Syntax
object
.MovePrevious
Parameters
The MovePrevious method property syntax has this part:
Part Description
object
An object expression that evaluates to an object in the Applies To list.
RefreshData Method
Manually instructs the Data Control to run its query.
Syntax
object
.RefreshData
Parameters
The RefreshData method property syntax has this part:
Part Description
object
An object expression that evaluates to an object in the Applies To list.
RunSQLWizard Method
If the command type for the Data Control is SQLCommand, this method launches the SQL Wizard,
allowing you to create an SQL Select statement in the run-time environment and run the query.
Syntax
object
.RunSQLWizard
Parameters
The RunSQLWizard method property syntax has this part:
Part Description
object
An object expression that evaluates to an object in the Applies To list.
Remarks
This method assigns the SQL Select statement to the SQLCommand property.
SetMyContainer Method
This method is reserved for internal use and should not be called.
Method Examples
© 2020 General Electric Company. All rights reserved. 61

Click the appropriate link below for examples of VisiconX methods:
l AboutBox Method Example
l DBConnect Method Example
l DBDisConnect Method Example
l MoveFirst Method Example
l MoveLast Method Example
l MoveNext Method Example
l MovePrevious Method Example
l RefreshData Method Example
l RunSQLWizard Method Example
AboutBox Method Example
The following example opens the Help About Box for the Data Object
vxData1
.
vxData1.AboutBox
NOTE (CIMPLICITY USERS ONLY): In CIMPLICITY, the following additional code must precede the first ref-
erence of vxData1 in its scope:
Dim vxData1 As Object
Set vxData1 = CimGetScreen.Object.Objects.Item("vxData1").OleObject
DBConnect Method Example
The following example is a script associated with a command button. When you click the button in the
run-time environment, the script sets properties and methods for the Data Object
vxData1
. The script dis-
connects from the current data provider and configures vxData1 to connect to the Northwind database of
SQL Server QALAB15. Then it connects to the database and runs a query that returns the rows and
columns of the Employees table.
Private Sub CommandButton1_Click()
vxData1.DBDisconnect
vxData1.OLEDBProvider = "SQLOLEDB"
vxData1.Server = "QALAB15"
vxData1.Database = "NORTHWIND"
vxData1.SourceType = vxSourceTable
vxData1.Table = "Employees"
vxData1.User = "sa"
vxData1.DBConnect
End Sub
NOTES (CIMPLICITY USERS ONLY):
l The name of the subroutine shown here follows standard VBA naming convention, which does not
apply to CimEdit Basic script language.
l In CIMPLICITY, the following additional code must precede the first reference of vxData1 in its scope:
Dim vxData1 As Object
Set vxData1 = CimGetScreen.Object.Objects.Item("vxData1").OleObject
62 © 2020 General Electric Company. All rights reserved.

DBDisConnect Method Example
The following example is a script associated with a command button that, when clicked, disconnects
from the data provider selected in the Data Object
vxData1
.
Private Sub CommandButton1_Click()
vxData1.DBDisConnect
NOTES (CIMPLICITY USERS ONLY):
l The name of the subroutine shown here follows standard VBA naming convention, which does not
apply to CimEdit Basic script language.
l In CIMPLICITY, the following additional code must precede the first reference of vxData1 in its scope:
Dim vxData1 As Object
Set vxData1 = CimGetScreen.Object.Objects.Item("vxData1").OleObject
MoveFirst Method Example
The following example is a script associated with a command button, that, when clicked, makes the first
row of the record set retrieved by the Data Object
vxData1
the current row.
Private Sub CommandButton1_Click()
vxData1.MoveFirst
End Sub
NOTES (CIMPLICITY USERS ONLY):
l The name of the subroutine shown here follows standard VBA naming convention, which does not
apply to CimEdit Basic script language.
l In CIMPLICITY, the following additional code must precede the first reference of vxData1 in its scope:
Dim vxData1 As Object
Set vxData1 = CimGetScreen.Object.Objects.Item("vxData1").OleObject
MoveLast Method Example
The following example is a script associated with a command button, that, when clicked, makes the last
row of the record set retrieved by the Data Object
vxData1
the current row.
Private Sub CommandButton1_Click()
vxData1.MoveLast
End Sub
NOTES (CIMPLICITY USERS ONLY):
l The name of the subroutine shown here follows standard VBA naming convention, which does not
apply to CimEdit Basic script language.
l In CIMPLICITY, the following additional code must precede the first reference of vxData1 in its scope:
Dim vxData1 As Object
Set vxData1 = CimGetScreen.Object.Objects.Item("vxData1").OleObject
MoveNext Method Example
© 2020 General Electric Company. All rights reserved. 63

The following example is a script associated with a command button, that, when clicked, makes the
next row in the record set retrieved by the Data Object
vxData1
the current row.
Private Sub CommandButton1_Click()
vxData1.MoveNext
End Sub
NOTES (CIMPLICITY USERS ONLY):
l The name of the subroutine shown here follows standard VBA naming convention, which does not
apply to CimEdit Basic script language.
l In CIMPLICITY, the following additional code must precede the first reference of vxData1 in its scope:
Dim vxData1 As Object
Set vxData1 = CimGetScreen.Object.Objects.Item("vxData1").OleObject
MovePrevious Method Example
The following example is a script associated with a command button, that, when clicked, makes the pre-
vious row in the record set retrieved by the Data Object
vxData1
the current row.
Private Sub CommandButton1_Click()
vxData1.MovePrevious
End Sub
NOTES (CIMPLICITY USERS ONLY):
l The name of the subroutine shown here follows standard VBA naming convention, which does not
apply to CimEdit Basic script language.
l In CIMPLICITY, the following additional code must precede the first reference of vxData1 in its scope:
Dim vxData1 As Object
Set vxData1 = CimGetScreen.Object.Objects.Item("vxData1").OleObject
RefreshData Method Example
The following example is a script associated with a command button, that, when clicked, re-queries the
data provider selected for the Data Object
vxData1
and refreshes the data displayed.
Private Sub CommandButton1_Click()
vxData1.RefreshData
End Sub
NOTES (CIMPLICITY USERS ONLY):
l The name of the subroutine shown here follows standard VBA naming convention, which does not
apply to CimEdit Basic script language.
l In CIMPLICITY, the following additional code must precede the first reference of vxData1 in its scope:
Dim vxData1 As Object
Set vxData1 = CimGetScreen.Object.Objects.Item("vxData1").OleObject
RunSQLWizard Method Example
64 © 2020 General Electric Company. All rights reserved.

The following example initiates the SQL Wizard from a command button in the run-time environment.
The command button configures the Data Object
vxData1
to connect to the Microsoft Jet provider and an
Access database. After setting the command type as an SQL Command, the example initiates the SQL
Wizard. After you close the SQL Wizard, the example connects to the database and runs the query.
Private Sub CommandButton4_Click()
vxData1.DBDisconnect
vxData1.OLEDBProvider = "Microsoft.Jet.OLEDB.3.51"
vxData1.JetDB = "C:\Program Files (x86)\GE\iFIX\PDB\APPTest.MDB"
vxData1.SourceType = vxSourceSQL
vxData1.RunSQLWizard
vxData1.DBConnect
End Sub
NOTES (CIMPLICITY USERS ONLY):
l The name of the subroutine shown here follows standard VBA naming convention, which does not
apply to CimEdit Basic script language.
l In CIMPLICITY, the following additional code must precede the first reference of vxData1 in its scope:
Dim vxData1 As Object
Set vxData1 = CimGetScreen.Object.Objects.Item("vxData1").OleObject
Event Summary
The following list contains the Plug & Solve Solutions object events that are available to the VisiconX
Automation Interface.
l Click Event
l Click (Area as Integer) Event
l DataChanged Event
l DblClick Event
l DblClick (Area as Integer) Event
l ErrorOccurred Event
l ExecuteComplete Event
l RowChanged Event
Click Event
Occurs when the user releases the left mouse key in a list box object or grid object in the run-time envir-
onment.
Syntax
object_
Click( )
The Click event syntax has this part:
© 2020 General Electric Company. All rights reserved. 65

Part Description
object
An object expression that evaluates to an object in the Applies To list.
NOTE (CIMPLICITY USERS ONLY): The event handler above is named in accordance with the standard
VBA naming convention. In CIMPLICITY, this convention is not followed and the default name for this event
handler is OnClick(). You can use a name of your own choice for the event handler and use the Event tab to
associate it with the ActiveX event in question. For some events you may notice that there are already hand-
lers, in which case you should add your own processing to the existing handlers rather than replacing them.
Remarks
This event is the common event used to initiate an operator action. It is also the default event used by
the script authoring wizards.
The sequence of mouse-related events is:
Click
DblClick
Click (Area as Integer) Event
Occurs when the user releases the left mouse key in a drop-down list (combo) box object in the run-time
environment.
Syntax
object_
Click(1 | 2 | 3)
NOTE (CIMPLICITY USERS ONLY): The event handler above is named in accordance with the standard
VBA naming convention. In CIMPLICITY, this convention is not followed and the default name for this event
handler is OnClick. You can use a name of your own choice for the event handler and use the Event tab to
associate it with the ActiveX event in question. For some events you may notice that there are already hand-
lers, in which case you should add your own processing to the existing handlers rather than replacing them.
Parameters
The Click event syntax has these parts:
Part Description
object
An object expression that evaluates to an object in the Applies To list.
1 A click in the default display area of the drop-down list box.
2 A click on the arrow of the drop-down list box.
3 A click in the drop-down area of the list box.
The sequence of mouse-related events is:
Click
DblClick
DataChanged Event
Occurs to indicate that the ADORecords property has changed. This event fires:
66 © 2020 General Electric Company. All rights reserved.

l After each query
l At regular intervals during a large query to update the Fetch progress
Syntax
object_
DataChanged( )
NOTE (CIMPLICITY USERS ONLY): The event handler above is named in accordance with the standard
VBA naming convention. In CIMPLICITY, this convention is not followed and the default name for this event
handler is OnDataChanged(). You can use a name of your own choice for the event handler and use the
Event tab to associate it with the ActiveX event in question. For some events you may notice that there are
already handlers, in which case you should add your own processing to the existing handlers rather than
replacing them.
Parameters
The DataChanged event syntax has this part:
Part Description
object
An object expression that evaluates to an object in the Applies To list.
DblClick Event
Occurs when the user double clicks the mouse in a list box object or grid object in the run-time envir-
onment
Syntax
object_
DblClick( )
Parameters
The DblClick event syntax has this part:
Part Description
object
An object expression that evaluates to an object in the Applies To list.
NOTE (CIMPLICITY USERS ONLY): The event handler above is named in accordance with the standard
VBA naming convention. In CIMPLICITY, this convention is not followed and the default name for this event
handler is OnDblClick(). You can use a name of your own choice for the event handler and use the Event tab
to associate it with the ActiveX event in question. For some events you may notice that there are already hand-
lers, in which case you should add your own processing to the existing handlers rather than replacing them.
Remarks
The DblClick event occurs when multiple left mouse clicks are received in the object.
The sequence of mouse-related events is:
Click
DblClick
DblClick (Area as Integer) Event
© 2020 General Electric Company. All rights reserved. 67

Occurs when the user double clicks the mouse in a drop-down list (combo) box object in the run Time
environment.
Syntax
object_
DblClick( 1 | 2 | 3 )
Parameters
The DblClick event syntax has these parts:
Part Description
object
An object expression that evaluates to an object in the Applies To list.
1 A double-click in the default display area of the drop-down list box.
2 A double-click on the arrow of the drop-down list box.
3 A double-click in the drop-down area of the list box.
NOTE (CIMPLICITY USERS ONLY): The event handler above is named in accordance with the standard
VBA naming convention. In CIMPLICITY, this convention is not followed and the default name for this event
handler is OnDblClick. You can use a name of your own choice for the event handler and use the Event tab to
associate it with the ActiveX event in question. For some events you may notice that there are already hand-
lers, in which case you should add your own processing to the existing handlers rather than replacing them.
Remarks
The DblClick event occurs when multiple left mouse clicks are received in the object.
The sequence of mouse-related events is:
Click
DblClick
ErrorOccurred Event
Occurs when the Data Control encounters an error while connecting to the database or when running the
query. This event usually indicates:
l Configuration errors in the connection properties (for example, Provider, Server, Database, etc)
l Invalid login credentials (User name and Password)
l Syntax errors in the query, such as an invalid table name, query property value, and so on.
Syntax
object_
ErrorOccurred(
pError
as
ErrObject
)
NOTE (CIMPLICITY USERS ONLY): The event handler above is named in accordance with the standard
VBA naming convention. In CIMPLICITY, this convention is not followed and the default name for this event
handler is OnErrorOccurred. You can use a name of your own choice for the event handler and use the Event
tab to associate it with the ActiveX event in question. For some events you may notice that there are already
handlers, in which case you should add your own processing to the existing handlers rather than replacing
them.
Parameters
The ErrorOccurred event syntax has this part:
68 © 2020 General Electric Company. All rights reserved.

Part Description
object
An object expression that evaluates to an object in the Applies To list.
The event returns a VB Error Object (pError) that contains the specific error number, description, source,
and so on as defined in the following table:
Property Value
Number The Error code that specifies the error that occurred.
Source The Name of the component that generated the error.
Description A string corresponding to the return of the Error function for the specified Number, if this
string exists. If the string doesn't exist, Description contains "Application-defined or
object-defined error".
HelpFile The fully qualified drive, path, and file name of the Visual Basic Help file.
HelpContext The Visual Basic Help file context ID for the error corresponding to the Number property.
LastDLLError On 32-bit Microsoft Windows operating systems only, contains the system error code
for the last call to a dynamic-link library (DLL). The LastDLLError property is read-only.
ExecuteComplete Event
Occurs when a query submitted to a database is done executing. This event returns information that
indicates whether the query was successful. Error number 0 means that the query was successful.
Syntax
object_
ExecuteComplete(
pStatus
as
ErrObject
,
sQuery
as
String
)
NOTE (CIMPLICITY USERS ONLY): The event handler above is named in accordance with the standard
VBA naming convention. In CIMPLICITY, this convention is not followed and the default name for this event
handler is OnExecuteComplete. You can use a name of your own choice for the event handler and use the
Event tab to associate it with the ActiveX event in question. For some events you may notice that there are
already handlers, in which case you should add your own processing to the existing handlers rather than
replacing them.
Parameters
The ExecuteComplete event syntax has this part:
Part Description
object
An object expression that evaluates to an object in the Applies To list.
The event returns a VB Error Object (pStatus) that contains the specific error number, description,
source, and so on as defined in the following table:
Property Value
object
An object expression that evaluates to an object in the Applies To list.
Number The Error code that specifies the error that occurred.
Source The Name of the component that generated the error.
Description A string corresponding to the return of the Error function for the specified Number, if this
string exists. If the string doesn't exist, Description contains "Application-defined or
object-defined error".
© 2020 General Electric Company. All rights reserved. 69

HelpFile The fully qualified drive, path, and file name of the Visual Basic Help file.
HelpContext The Visual Basic Help file context ID for the error corresponding to the Number property.
LastDLLError On 32-bit Microsoft Windows operating systems only, contains the system error code
for the last call to a dynamic-link library (DLL). The LastDLLError property is read-only.
sQuery is a string that displays the parsed value of the last query submitted to the database. For
example, it displays the last Select statement submitted, including the values assigned to any query
properties defined to the query.
Remarks
Use the sQuery string, displayed in a Message box, to help you debug queries. For example, if the query
returns no data or if the query returns unexpected results, you can use this string to determine the exact
query submitted to the database.
RowChanged Event
Occurs when the CurrentRow property changes.
The CurrentRow property changes when you:
l Set its value
l Use the MoveFirst, MoveLast, MoveNext, or MovePrevious methods to move through the
ADORecord set
l Use the buttons in the Data Control's user interface to move through the ADORecord set.
Syntax
object_
RowChanged( )
NOTE (CIMPLICITY USERS ONLY): The event handler above is named in accordance with the standard
VBA naming convention. In CIMPLICITY, this convention is not followed and the default name for this event
handler is OnRowChanged(). You can use a name of your own choice for the event handler and use the
Event tab to associate it with the ActiveX event in question. For some events you may notice that there are
already handlers, in which case you should add your own processing to the existing handlers rather than
replacing them.
Parameters
The RowChanged event syntax has this part:
Part Description
object
An object expression that evaluates to an object in the Applies To list.
Object Summary
The following list contains the Plug & Solve Solutions objects that are available to the VisiconX Auto-
mation Interface. For information on non Plug & Solve Solutions objects, refer to the appropriate help
system.
70 © 2020 General Electric Company. All rights reserved.

l vxCombo Object
l vxData Object
l vxGrid Object
l vxList Object
vxCombo Object
The vxCombo object is a ComboBox Control that displays column data retrieved from an OLE DB data
provider in a drop-down list box.
vxData Object
The vxData object is a Data Control inserted into an iFIX WorkSpace picture or CIMPLICITY CimEdit
screen. It establishes a connection with an OLE DB data provider, secures access to secured data pro-
viders, and queries and retrieves data.
For more information on the vxData object, see the "Getting Started" chapter in the
Accessing Data
manual.
vxGrid Object
The vxGrid object is a Grid Control that displays data retrieved from an OLE DB data provider in a table.
vxList Object
The vxList object is a ListBox Control that displays column data retrieved from an OLE DB data provider
in a list box.
Glossary
Use the Glossary to further your understanding of the terms used in VisiconX VBA.
A-C
Animate
Animation
Automation
Collection
ComboBox Control
© 2020 General Electric Company. All rights reserved. 71

D-M
Data Control
Event
Grid Control
ListBox Control
Method
N-R
Numeric Expression
Object
Object Expression
Property
Query
Query Property (QPn)
Row Filter
S-Z
Source Object
SQL Statement
SQL Wizard
Stored Procedure
String Expression
Target Object
Animate
The act of animating the property of an object. Although the result you see in the run-time environment is
an object performing a visible, functional action, it is the object's properties that are animated, not the
object itself.
To animate an object in iFIX, select it, right-click, and choose Animations from the pop-up menu.
Animation
The connection between a data source and an object's property that dynamically changes the property.
Automation
72 © 2020 General Electric Company. All rights reserved.

The method through which objects are exposed that allows you to create and manipulate them.
Collection
An ordered set of items that can be referred to as a unit.
ComboBox Control
A VisiconX object that displays a specific column of retrieved data in a drop-down list box. To display
retrieved data, you must animate the ComboBox Control using a Data Control as its data source.
Data Control
A VisiconX object that establishes an interface with a OLE DB data provider installed on your local
machine. Through the Data Control, you select a database to query and submit the query.
Event
Action that the object recognizes, such as a mouse click on the object.
Grid Control
A VisiconX object that displays retrieved data in a spreadsheet-like format. To display retrieved data,
you must animate the Grid Control using a Data Control as its data source.
ListBox Control
A VisiconX object that displays retrieved data in a spreadsheet-like format. To display retrieved data,
you must animate the Grid Control using a Data Control as its data source.
Method
Subroutine that affects the object's behavior, such as scale or refresh.
Numeric Expression
Any expression that evaluates to a number.
Object
Any expression that evaluates to a number.
Object Expression
© 2020 General Electric Company. All rights reserved. 73

An expression that specifies a particular object. This expression can include any of the object's con-
tainers. For example, if your application has an Application object that contains a Document object that
contains a Text object, the following are valid object expressions:
Application.Document.Text
Application.Text
Document.Text
Text
Property
Any expression that evaluates to a number.
Query
A command submitted to a database that accesses tables in a database and returns the data you
request. A simple query returns the entire contents of a single table. A more complex query filters rows
based on selection criteria, sorts data, or combines data from more than one table.
Query Property (QP
n
)
A property of the Data Control, QP1 through QP32, which serve as variables in the query submitted to
the database. These properties can be set to any value or can be animated by any object. For example,
in this equation, milk_type = QP1, VisiconX assigns a value to QP1 at run time and submits the query to
the database.
Row Filter
A comparison expression or group of comparison expressions connected by And or Or keywords that fil-
ter the rows returned by a query. For example, milk_type = 3 returns only the rows where the value of
milk_type is 3. In SQL , commonly known as a Where clause.
Source Object
The object that provides data to a target object.
SQL Statement
A command submitted to a database that accesses tables in a database and returns the data you
request. SQL statements can be Select, Insert, or Update statements
SQL Wizard
74 © 2020 General Electric Company. All rights reserved.

A Wizard accessible from the Record Source tab of the Data Control OLE Properties dialog that builds
SQL Select statements based on input you submit to the Wizard.
Stored Procedure
Compiled blocks of code in the relational database. Stored procedures can perform INSERT, UPDATE,
DELETE, and SELECT commands. They can also take arguments and return results. The arguments
may be values to insert or values to use in Where clauses.
String Expression
Any expression that evaluates to sequence of contiguous characters.
Target Object
The object that receives data from a source object.
VisiconX Dialog Boxes
The VisiconX application includes the following dialog boxes:
l VisiconX ComboBox OLE Properties Dialog Box
l VisiconX Data Control OLE Properties Dialog Box
l VisiconX Grid OLE Properties Dialog Box
l VisiconX ListBox OLE Properties Dialog Box
l Welcome to the VisiconX Wizard Dialog Box
l Select Operation Dialog Box
l SQL SELECT Dialog Boxes:
l Select Tables Dialog Box
l Select Columns Dialog Box
l Create Row Filter Dialog Box
l Select Columns to Sort By Dialog Box
l Finish Dialog Box
l SQL INSERT Dialog Boxes:
l Select Table to Insert Into Dialog Box
l Select Values to Insert Dialog Box
l Finish Dialog Box
l SQL UPDATE Dialog Boxes:
© 2020 General Electric Company. All rights reserved. 75

l Select Table to Update Dialog Box
l Select Columns to Update Dialog Box
l Create Row Filter Dialog Box
l Finish Dialog Box
One additional dialog box is only available when using VisiconX in iFIX
l VisiconX Configuration to View Historian Data Dialog Box
Four additional dialog boxes are only available when using VisiconX in CIMPLICITY:
l VisiconX ListBox Control Dialog Box
l VisiconX ComboBox Control Dialog Box
l VisiconX Grid Control Dialog Box
l VisiconX Data Control Dialog Box
VisiconX ComboBox OLE Properties Dialog Box
The VisiconX ComboBox OLE Properties dialog box displays the following items:
Font Tab
Item Description
Properties Displays the properties you can modify for this control. In the Font tab,
this will always display "Font."
Font Lets you choose the font to use in the control.
Size Lets you choose the size of the font to use in the control.
Bold Select this check box to apply a bold effect to the control's font.
Italic Select this check box to apply an italic effect to the control's font.
Underline Select this check box to apply an underline effect to the control's font.
Strikeout Select this check box to apply a strikeout effect to the control's font.
Sample Text Displays a preview of what the control's font will look like based on your
selections in the Font tab.
76 © 2020 General Electric Company. All rights reserved.

Color Tab
Item Description
Properties Displays the control elements whose colors can be changed. Select the
control element you want to modify.
Color Set Lets you select a color palette from which you can choose a color for the
selected control element.
Color
Palette
Displays the colors that are available from the currently selected color set.
Select a color to apply to the selected control element.
NOTE: The Windows custom color selection dialog box also appears if
you double-click Custom in the Color Palette drop-down box.
Edit Custom
Colors
Opens the Windows custom color selection dialog box, where you can
choose a custom color or define your own.
VisiconX Data Control OLE Properties Dialog Box
The VisiconX Data Control OLE Properties dialog box displays the following items:
Provider Tab
Item Description
Select Data
Provider
Lists the OLE DB data providers that are installed on your computer.
Select the data provider that you want to query from the list of data pro-
viders.
NOTE: A data provider must be selected before other tabs in the Data
Control OLE Properties dialog box can be accessed.
Automatically
connect to
database in
Run Mode
Lets you automatically connect to the selected OLE DB data provider
when you activate the run-time environment. Clear this check box if you
want to manually control when to connect to and disconnect from the
data provider.
Database Tab
NOTE: The contents displayed in the upper part of the Database Tab depend on which type of data provider
was selected in the Provider Tab. Consult the following tables for information on the items that are displayed
for each type of data provider.
Microsoft Jet
Item Description
© 2020 General Electric Company. All rights reserved. 77
Database path
and file name
For a Microsoft Jet provider, lets you enter or browse for the database path and name
of a Microsoft Access database, which has *.MDB as a default file extension.
System (Secur-
ity) Database
path and file
name
For a Microsoft Jet provider, lets you enter or browse for the Microsoft Access system
security database path and name, which has *.MDA or *.MDW as a default file exten-
sion; enter a value in this field if the Microsoft Access database selected for the query
is secured.
ODBC
Item Description
DSN Name Lets you select an ODBC data source name defined through the ODBC Admin-
istrator tool in the Windows Control Panel. The list includes both system and
user-defined data source names.
Use ODBC Con-
nection String (No
DSN Required)
Lets you use an ODBC connection string, rather than an ODBC data source
name, to establish a connection to an ODBC driver.
ODBC Connection
String
Lets you enter an ODBC connection string to establish a connection to an
ODBC driver.
Oracle Server
Item Description
Server Name Lets you enter the name of the Oracle server.
Microsoft SQL Server
Item Description
Server Name Lets you select the name of a SQL Server data provider.
Database Name Lets you select a database defined to the selected SQL Server data provider.
Generic Server
Item Description
OLE DB Con-
nection String
Lets you enter a connection string to connect to an OLE DB Provider. Below is an
example connection string for a Simple Provider:
Data Source=QALAB15; Initial Catalog=Test;
NOTE: The Database Security Settings area in the lower part of the Database Tab is always displayed
regardless of which type of data provider was selected in the Provider Tab.
Database Security Settings Area
Item Description
User Name Lets you enter your user name as defined to the selected data provider; if access to
the data provider is not secured, then the user name is not required.
Password Lets you enter the password as defined to the selected data provider; if access to
the data provider is not secured, then the password is not required.
Prompt for user Displays a login box in Run mode, which prompts for a user name and password
78 © 2020 General Electric Company. All rights reserved.

name and pass-
word in Run
Mode
before accessing the selected data provider.
Use Windows
NT integrated
security
For SQL Server data providers, uses Windows integrated security to control access
to secured SQL Server data providers.
Test Connection Click this button to test the connection to the selected data provider. VisiconX
responds with a message that indicates a successful or failed connection. In the
case of failed connections, the message includes a reason for the failure.
Record Source Tab
Item Description
Command
Type
Lets you select the type of query to use for the selected database. The
options are:
l SQL Command – Uses an SQL statement to acquire, add, or
update data; you can create the statement with the SQL Wizard or
you can enter or paste one directly into the displayed scroll box.
l Stored Procedure – Uses a stored procedure to acquire data.
l Table – Uses an SQL Select statement to acquire all data in a
selected table.
Do not allow
SQLWizard
at runtime
Select this check box to prevent the SQL Wizard from being accessed
when the data control is opened in run mode.
Electronic
Signature
Select this check box to apply electronic signature requirements to the
data control in run mode.
NOTE: This item is only available in iFIX.
Perform
Only
Select this option to require a Perform Only electronic signature for the
data control in run mode.
NOTE: This item is only available in iFIX.
Perform and
Verify
Select this option to require Perform and Verify electronic signatures for
the data control in run mode.
NOTE: This item is only available in iFIX.
Run SQL
Wizard
Click this button to create an SQL statement using the SQL Wizard.
SQL Edit
Box
Lets you enter or paste an SQL statement. This box also displays state-
ments built by the SQL Wizard, which can be edited. Press Ctrl+Enter to
© 2020 General Electric Company. All rights reserved. 79

create line breaks in the SQL command.
VisiconX Grid OLE Properties Dialog Box
The VisiconX Grid OLE Properties dialog box displays the following items:
Font Tab
Item Description
Properties Displays the properties you can modify for this control. In the Font tab,
this will always display "Font."
Font Lets you choose the font to use in the control.
Size Lets you choose the size of the font to use in the control.
Bold Select this check box to apply a bold effect to the control's font.
Italic Select this check box to apply an italic effect to the control's font.
Underline Select this check box to apply an underline effect to the control's font.
Strikeout Select this check box to apply a strikeout effect to the control's font.
Sample Text Displays a preview of what the control's font will look like based on your
selections in the Font tab.
Color Tab
Item Description
Properties Displays the control elements whose colors can be changed. Select the
control element you want to modify.
Color Set Lets you select a color palette from which you can choose a color for the
selected control element.
Color
Palette
Displays the colors that are available from the currently selected color set.
Select a color to apply to the selected control element.
NOTE: The Windows custom color selection dialog box also appears if
you double-click Custom in the Color Palette drop-down box.
Edit Custom Opens the Windows custom color selection dialog box, where you can
80 © 2020 General Electric Company. All rights reserved.

Colors choose a custom color or define your own.
VisiconX ListBox OLE Properties Dialog Box
The VisiconX ListBox OLE Properties dialog box displays the following items:
Font Tab
Item Description
Properties Displays the properties you can modify for this control. In the Font tab,
this will always display "Font."
Font Lets you choose the font to use in the control.
Size Lets you choose the size of the font to use in the control.
Bold Select this check box to apply a bold effect to the control's font.
Italic Select this check box to apply an italic effect to the control's font.
Underline Select this check box to apply an underline effect to the control's font.
Strikeout Select this check box to apply a strikeout effect to the control's font.
Sample Text Displays a preview of what the control's font will look like based on your
selections in the Font tab.
Color Tab
Item Description
Properties Displays the control elements whose colors can be changed. Select the
control element you want to modify.
Color Set Lets you select a color palette from which you can choose a color for the
selected control element.
Color
Palette
Displays the colors that are available from the currently selected color set.
Select a color to apply to the selected control element.
NOTE: The Windows custom color selection dialog box also appears if
you double-click Custom in the Color Palette drop-down box.
Edit Custom Opens the Windows custom color selection dialog box, where you can
© 2020 General Electric Company. All rights reserved. 81

Colors choose a custom color or define your own.
Welcome to the VisiconX Wizard Dialog Box
The Welcome to the VisiconX Wizard dialog box displays the following item:
Do Not Show Welcome Dialog Again Check Box
Lets you bypass the SQL Wizard Welcome dialog when you activate the Wizard. Clear this check box if
you want to display the Welcome dialog box when you activate the SQL Wizard.
Next >
Click this button to move to the Next screen of the SQL Wizard.
Select Operation Dialog Box
The Select Operation dialog box contains the following buttons:
SQL SELECT
Select this option to construct a SQL SELECT command. For more information on the dialog boxes
associated with the SQL SELECT command construction, see SQL SELECT Dialog Boxes.
SQL INSERT
Select this option to construct a SQL INSERT command. For more information on the dialog boxes
associated with the SQL INSERT command construction, see SQL INSERT Dialog Boxes.
SQL UPDATE
Select this option to construct a SQL UPDATE command. For more information on the dialog boxes
associated with the SQL UPDATE command construction, see SQL UPDATE Dialog Boxes.
SQL SELECT Dialog Boxes
The SQL SELECT command construction involves the following dialog boxes (listed in order from start
to finish):
l Select Tables Dialog Box
l Select Columns Dialog Box
l Create Row Filter Dialog Box
82 © 2020 General Electric Company. All rights reserved.
l Select Columns to Sort By Dialog Box
l Finish Dialog Box
Select Tables Dialog Box
The Select Tables dialog box displays the following items:
Available Tables
Displays tables, defined to the selected database, that are available to query, add to, or update. Double-
click a listed table or select it and then click the Add button to add it to the list of selected tables.
Add/Remove/All Buttons
Button Description
Add -> Adds the item selected in the Available list to the Selected list.
All ->> Adds all the items in the Available list to the Selected list.
<- Remove Moves a selected item from the Selected list to the Available list.
<<- All Moves all items in the Selected list to the Available list.
Selected Tables
Displays tables selected to include in the SQL statement.
Up/Down Arrow Buttons
Button Description
Up Arrow Click this button to move the selected item higher in the Selected list.
Down Arrow Click this button to move the selected item lower in the Selected list.
Select Columns Dialog Box
The Select Columns dialog box displays the following items:
Available Columns
Displays columns, defined to the selected tables, that are available to query, add to, or update. Each
column name is qualified by its table name. Double-click a listed column or select it and then click the
Add button to add it to the list of selected columns.
Add/Remove/All Buttons
Button Description
Add -> Adds the item selected in the Available list to the Selected list.
All ->> Adds all the items in the Available list to the Selected list.
<- Remove Moves a selected item from the Selected list to the Available list.
<<- All Moves all items in the Selected list to the Available list.
© 2020 General Electric Company. All rights reserved. 83

Selected Columns
Displays columns selected to include in the SQL statement.
Up/Down Arrow Buttons
Button Description
Up Arrow Click this button to move the selected item higher in the Selected list.
Down Arrow Click this button to move the selected item lower in the Selected list.
Return Unique Rows
When selected, returns only one occurrence of rows with duplicate values; when clear, returns rows
with duplicate values.
Create Row Filter Dialog Box
The Create Row Filter dialog box displays the following items:
Available Columns
Displays columns, defined to the selected tables, that are available to query, add to, or update. Each
column name is qualified by its table name. Double-click a listed column or select it and then click the
Add button to add it to the list of selected columns.
Add/Remove/All Buttons
Button Description
Add -> Adds the item selected in the Available list to the Selected list.
All ->> Adds all the items in the Available list to the Selected list.
<- Remove Moves a selected item from the Selected list to the Available list.
<<- All Moves all items in the Selected list to the Available list.
Selected Columns
Displays columns selected to include in the SQL statement.
Up/Down Arrow Buttons
Button Description
Up Arrow Click this button to move the selected item higher in the Selected list.
Down Arrow Click this button to move the selected item lower in the Selected list.
Operator
Lets you select the action of the selected comparison operator. Is/Does has no effect on the selected
comparison operator; Is/Does Not negates the action of the comparison operator. For example, 'equal
to' becomes 'is not equal to'; 'less than' becomes 'is not less than'.
Comparison Operator
Lets you select a comparison operator for the column selected in the list of selected columns. The
options are:
84 © 2020 General Electric Company. All rights reserved.
Option Description
any value The column value equals any value. Any Value is the default.
equal to The column value equals a specified value or query property.
less than The column value is less than a specified value or query property.
greater than The column value is greater than a specified value or query property.
less or equal The column value is less than or equal to a specified value or query property.
greater or
equal
The column value is greater than or equal to a specified value or query prop-
erty.
begins with The column value begins with the specified string value or query property.
ends with The column value ends with the specified string value or query property.
contain The column value contains the specified string value or query property.
between The column value is between two specified values or query properties.
Null The column value is Null.
Value
Value Description
Comparison
Value
Lets you enter a comparison value for the comparison expression. Enter a
value or select a query property from the drop-down list box.
Second
Comparison
Value
Lets you enter a second comparison value for the comparison expression.
This box appears only if the Between operator is selected. Enter a value or
select a query property from the drop-down list box.
Select Columns to Sort By Dialog Box
The Select Columns to Sort By dialog box displays the following items:
Available Columns
Displays columns, defined to the selected tables, that can be sorted. Each column name is qualified by
its table name. Double-click a listed column or select it and then click the Add button to add it to the list
of selected columns.
Add/Remove/All Buttons
Button Description
Add -> Adds the item selected in the Available list to the Selected list.
All ->> Adds all the items in the Available list to the Selected list.
<- Remove Moves a selected item from the Selected list to the Available list.
<<- All Moves all items in the Selected list to the Available list.
Selected Columns
Displays columns selected to include in the SQL statement.
Up/Down Arrow Buttons
Button Description
© 2020 General Electric Company. All rights reserved. 85

Up Arrow Click this button to move the selected item higher in the Selected list.
Down Arrow Click this button to move the selected item lower in the Selected list.
Sort This Column
Lets you choose the sort order for the column selected in the list of selected columns. In Ascending
Order, the default, sorts from lowest-to-highest value; In Descending Order sorts from highest-to-lowest
value.
Finish Dialog Box
The Finish dialog box displays the following item:
SQL Statement Edit Box
Displays the SQL statement built by the SQL Wizard. You can refine the statement further by editing it.
For example, you can change an AND keyword in a Where clause to OR. Click OK to exit the SQL Wiz-
ard.
SQL INSERT Dialog Boxes
The SQL INSERT command construction involves the following dialog boxes (listed in order from start
to finish):
l Select Table to Insert Into Dialog Box
l Select Values to Insert Dialog Box
l Finish Dialog Box
Select Table to Insert Into Dialog Box
The Select Table to Insert Into dialog box displays the following items:
Available Tables
Displays tables, defined to the selected database, that are available to query, add to, or update. Double-
click a listed table or select it and then click the Add button to add it to the list of selected tables.
Add/Remove/All Buttons
Button Description
Add -> Adds the item selected in the Available list to the Selected list.
All ->> Adds all the items in the Available list to the Selected list.
<- Remove Moves a selected item from the Selected list to the Available list.
<<- All Moves all items in the Selected list to the Available list.
Selected Tables
Displays tables selected to include in the SQL statement.
86 © 2020 General Electric Company. All rights reserved.

Up/Down Arrow Buttons
Button Description
Up Arrow Click this button to move the selected item higher in the Selected list.
Down Arrow Click this button to move the selected item lower in the Selected list.
Select Values to Insert Dialog Box
The Select Values to Insert dialog box displays the following item:
Insert Values
Displays fields, defined to the selected tables, that are available to update. Any field whose Required
setting is True must be assigned a value. Insert values into the Value column for the desired fields, and
click Next.
Finish Dialog Box
The Finish dialog box displays the following item:
SQL Statement Edit Box
Displays the SQL statement built by the SQL Wizard. You can refine the statement further by editing it.
For example, you can change an AND keyword in a Where clause to OR. Click OK to exit the SQL Wiz-
ard.
SQL UPDATE Dialog Boxes
The SQL UPDATE command construction involves the following dialog boxes (listed in order from start
to finish):
l Select Table to Update Dialog Box
l Select Columns to Update Dialog Box
l Create Row Filter Dialog Box
l Finish Dialog Box
Select Table to Update Dialog Box
The Select Table to Update dialog box displays the following items:
Available Tables
Displays tables, defined to the selected database, that are available to query, add to, or update. Double-
click a listed table or select it and then click the Add button to add it to the list of selected tables.
Add/Remove/All Buttons
Button Description
© 2020 General Electric Company. All rights reserved. 87
Add -> Adds the item selected in the Available list to the Selected list.
All ->> Adds all the items in the Available list to the Selected list.
<- Remove Moves a selected item from the Selected list to the Available list.
<<- All Moves all items in the Selected list to the Available list.
Selected Tables
Displays tables selected to include in the SQL statement.
Up/Down Arrow Buttons
Button Description
Up Arrow Click this button to move the selected item higher in the Selected list.
Down Arrow Click this button to move the selected item lower in the Selected list.
Select Columns to Update Dialog Box
The Select Columns to Update dialog box displays the following item:
Update Columns
Displays columns, defined to the selected tables, that are available to update. Insert values into the
Value column for the desired columns, and click Next.
Create Row Filter Dialog Box
The Create Row Filter dialog box displays the following items:
Available Columns
Displays columns, defined to the selected tables, that are available to query, add to, or update. Each
column name is qualified by its table name. Double-click a listed column or select it and then click the
Add button to add it to the list of selected columns.
Add/Remove/All Buttons
Button Description
Add -> Adds the item selected in the Available list to the Selected list.
All ->> Adds all the items in the Available list to the Selected list.
<- Remove Moves a selected item from the Selected list to the Available list.
<<- All Moves all items in the Selected list to the Available list.
Selected Columns
Displays columns selected to include in the SQL statement.
Up/Down Arrow Buttons
Button Description
Up Arrow Click this button to move the selected item higher in the Selected list.
Down Arrow Click this button to move the selected item lower in the Selected list.
88 © 2020 General Electric Company. All rights reserved.
Operator
Lets you select the action of the selected comparison operator. Is/Does has no effect on the selected
comparison operator; Is/Does Not negates the action of the comparison operator. For example, 'equal
to' becomes 'is not equal to'; 'less than' becomes 'is not less than'.
Comparison Operator
Lets you select a comparison operator for the column selected in the list of selected columns. The
options are:
Option Description
any value The column value equals any value. Any Value is the default.
equal to The column value equals a specified value or query property.
less than The column value is less than a specified value or query property.
greater than The column value is greater than a specified value or query property.
less or equal The column value is less than or equal to a specified value or query property.
greater or
equal
The column value is greater than or equal to a specified value or query prop-
erty.
begins with The column value begins with the specified string value or query property.
ends with The column value ends with the specified string value or query property.
contain The column value contains the specified string value or query property.
between The column value is between two specified values or query properties.
Null The column value is Null.
Value
Value Description
Comparison
Value
Lets you enter a comparison value for the comparison expression. Enter a
value or select a query property from the drop-down list box.
Second
Comparison
Value
Lets you enter a second comparison value for the comparison expression.
This box appears only if the Between operator is selected. Enter a value or
select a query property from the drop-down list box.
Finish Dialog Box
The Finish dialog box displays the following item:
SQL Statement Edit Box
Displays the SQL statement built by the SQL Wizard. You can refine the statement further by editing it.
For example, you can change an AND keyword in a Where clause to OR. Click OK to exit the SQL Wiz-
ard.
How Do I...
Click the following links for more information about working with VisiconX:
© 2020 General Electric Company. All rights reserved. 89

l Accessing Secured OLE DB Providers
l Testing the OLE DB Data Provider Connection
l Creating SQL Statements
l Displaying Data at Run Time
l Accessing VisiconX Properties
Connecting to a Data Provider
For VisiconX, refer to the following sections for information on connecting to a data provider:
l Connecting to an OLE DB Data Provider Overview
l Connecting to Microsoft OLE DB Provider for SQL Server
l Connecting to Microsoft OLE DB Simple Provider
l Connecting to an ODBC Driver
l Connecting to Microsoft Jet OLE DB Provider
l Connecting to Microsoft OLE Provider for Oracle
l Connecting to Multiple OLE DB Data Providers or Databases
Overview: Connecting to an OLE DB Data Provider
To connect to an OLE DB data provider:
1. Open the VisiconX Data Control OLE Properties dialog box. For information on how to do this in
your product, refer to the Accessing VisiconX OLE Control Properties section.
2. From the Provider tab, select an OLE DB data provider.
3. Optionally, clear the Automatically Connect To Database In Run Mode check box if you do not
want to automatically connect to the data provider in Run Mode.
4. Click the Database tab.
5. Enter the connection information for the OLE DB data provider you selected.
6. If access to the OLE DB data provider is secured, enter the necessary security information.
7. Click Test Connection to test the OLE DB data provider connection.
Connecting to Microsoft OLE DB Provider for SQL Server
90 © 2020 General Electric Company. All rights reserved.

To connect to the Microsoft OLE DB Provider for SQL Server:
1. Open the VisiconX Data Control OLE Properties dialog box. For information on how to do this in
your product, refer to the Accessing VisiconX OLE Control Properties section.
2. From the Provider tab, select Microsoft OLE DB Provider for SQL Server.
3. Click the Database tab.
4. In the Server Name drop-down list box, enter a server name.
5. In the Database Name drop-down list box, enter a database name.
Connecting to a Microsoft OLE DB Simple Provider
To connect to the Microsoft OLE DB Simple data provider:
1. Open the VisiconX Data Control OLE Properties dialog box. For information on how to do this in
your product, refer to the Accessing VisiconX OLE Control Properties section.
2. From the Provider tab, select Microsoft OLE DB Simple Provider.
3. Click the Database tab.
4. Enter the OLE DB connection string to connect to a data source and catalog. For example:
Data Source=QALAB15; Initial Catalog=Test;
Connecting to an ODBC Driver
For VisiconX, refer to the following sections for information on connecting to an ODBC driver:
l Using a Data Source Name
l Using a Connection String
Connecting to an ODBC Driver Using a Data Source Name
To connect to the Microsoft OLE DB Provider for ODBC drivers using an existing data source name:
1. Open the VisiconX Data Control OLE Properties dialog box. For information on how to do this in
your product, refer to the Accessing VisiconX OLE Control Properties section.
2. From the Provider tab, select Microsoft OLE DB Provider for ODBC Drivers.
3. Click the Database tab.
4. In the DSN Name drop-down list box, enter a data source name.
Connecting to an ODBC Driver Using a Connection String
© 2020 General Electric Company. All rights reserved. 91

To connect to the Microsoft OLE DB Provider for ODBC drivers using a connection string:
1. Open the VisiconX Data Control OLE Properties dialog box. For information on how to do this in
your product, refer to the Accessing VisiconX OLE Control Properties section.
2. From the Provider tab, select Microsoft OLE DB Provider for ODBC Drivers.
3. Click the Database tab.
4. Select the Use ODBC Connection String check box.
5. Enter an ODBC connection string in the Connection String (No DSN Required) edit box; for
example:
Driver=SQL Server;Server=QALAB15;Database=Northwind;
Connecting to Microsoft Jet OLE DB Provider
To connect to the Microsoft Jet OLE DB provider:
1. Open the VisiconX Data Control OLE Properties dialog box. For information on how to do this in
your product, refer to the Accessing VisiconX OLE Control Properties section.
2. From the Provider tab, select Microsoft Jet 4.0 OLE DB Provider.
3. Click the Database tab.
4. Enter the path and name of a Microsoft Access database; the extension of these databases is
*.mdb.
5. If access to the database is secured through MS Access security, enter the path and name of a
Microsoft Access System (Security) database. The extensions of these databases are *.mda
and *.mdw.
Connecting to Microsoft OLE Provider for Oracle
To connect to the Microsoft OLE Provider for Oracle:
1. Open the VisiconX Data Control OLE Properties dialog box. For information on how to do this in
your product, refer to the Accessing VisiconX OLE Control Properties section.
2. From the Provider tab, select Microsoft OLE DB Provider for Oracle.
3. Click the Database tab.
4. Enter the name of the Oracle server.
Connecting to Multiple OLE DB Data Providers or Databases
92 © 2020 General Electric Company. All rights reserved.

To connect multiple OLE DB data providers or databases:
1. Open the VisiconX Data Control OLE Properties dialog box. For information on how to do this in
your product, refer to the Accessing VisiconX OLE Control Properties section.
2. For simplicity, configure the first VisiconX Data Control to access the database and table whose
data you want displayed; configure the second Data Control to access the database that supplies
the value for the row filter.
3. Create a query in the first VisiconX Data Control that equates a query property to a column com-
mon to both database tables.
4. Animate the query property, using the data supplied by the second data control as its data
source.
NOTE: CIMPLICITY users need to use CimEdit Basic script to use query properties. For more inform-
ation, see Using Query Properties in CIMPLICITY.
Accessing Secured OLE DB Providers
For VisiconX, you can access secure OLE DB data providers by using the following sections:
l Entering User ID and Password
l Using Windows Security
Accessing a Secured OLE DB Data Provider with User ID and Password
To access a secured OLE DB data provider using a user ID and password:
1. Open the VisiconX Data Control OLE Properties dialog box. For information on how to do this in
your product, refer to the Accessing VisiconX OLE Control Properties section.
2. Click the Database tab.
3. Enter the User ID and password required for access to the secured OLE DB data provider in the
Database Security Settings area.
4. If you want users to login to the secured OLE DB data provider in the run-time environment,
select the Prompt For Username And Password In Run Mode check box.
Using Windows Security to Access a Microsoft SQL Server Database
To use Windows integrated security to access a Microsoft SQL Server database:
1. Open the VisiconX Data Control OLE Properties dialog box. For information on how to do this in
your product, refer to the Accessing VisiconX OLE Control Properties section.
© 2020 General Electric Company. All rights reserved. 93

2. Click the Database tab.
3. In the Database Security Settings area, select the Use Windows Integrated Security check box.
Testing the OLE DB Data Provider Connection
To test the OLE DB data provider connection:
1. Open the VisiconX Data Control OLE Properties dialog box. For information on how to do this in
your product, refer to the Accessing VisiconX OLE Control Properties section.
2. In the Provider tab, select the OLE DB data provider.
3. Click the Database tab.
4. Select a database to access.
5. If necessary, enter the information required to access a secured OLE DB data provider.
6. Click Test Connection.
Creating SQL Statements
Refer to the following sections for information on creating SQL statements when using VisiconX con-
trols:
l Using the SQL Wizard
l Creating Statements Manually
l Creating a Query for an Entire Table
l Creating a Query Using a Stored Procedure
Using the SQL Wizard
The following sections provide information on how to use the SQL Wizard to create SQL statements
with VisiconX:
l Creating SQL Statements with the SQL Wizard
l Constructing an SQL SELECT command
l Constructing an SQL INSERT command
l Constructing an SQL UPDATE command
Creating SQL Statements with the SQL Wizard
94 © 2020 General Electric Company. All rights reserved.

To create an SQL statement with the SQL Wizard:
1. Open the VisiconX Data Control OLE Properties dialog box. For information on how to do this in
your product, refer to the Accessing VisiconX OLE Control Properties section.
2. Click the Record Source tab.
3. Select SQL Command from the Command Type list box.
4. Click the SQL Wizard button. The Welcome dialog box appears.
5. On the SQL Wizard Welcome page, optionally select the Do not show Welcome Dialog again
check box, then click Next. The Select Operation dialog box appears.
6. On the Select Operation dialog box, click the type of SQL statement you want to construct. You
can construct an SQL SELECT, SQL INSERT, or SQL UPDATE command.
7. Proceed through the appropriate SQL command construction wizard.
8. At the end of the wizard, click OK in the Finish dialog box to return to the Data Control OLE Prop-
erties dialog box.
Constructing an SQL SELECT Command
To construct an SQL SELECT command using the SQL Wizard:
1. From the Record Source tab of the Data Control OLE Properties dialog box, click Run SQL Wiz-
ard. The Select Operation dialog box appears.
2. In the Select Operation dialog box, click SQL Select. The Select Tables dialog box appears.
3. Select one or more tables for your statement, then click Next. The Select Columns dialog box
appears.
4. Select one or more table columns for your statement.
5. Optionally, select the Return Unique Rows check box, then click Next. The Create Row Filter
dialog box appears.
6. Optionally, create a row filter based on selection criteria you define. Click Next. The Select
Columns to Sort By dialog box appears.
7. Optionally, sort the data in ascending or descending order by column values. Click Next. The Fin-
ish dialog box appears.
8. Optionally, edit the statement. Click OK to return to the Data Control OLE Properties dialog box.
Selecting Tables in an SQL SELECT Command
To select tables in an SQL SELECT command using the SQL Wizard:
1. Run the SQL Wizard and on the Select Operation dialog box, click SQL Select.
2. Proceed in the SQL Wizard until you reach the Select Tables dialog box.
3. In the Select Tables dialog box's Available Tables list, select a table and click Add. Repeat this
action for each table required for the SQL statement or, to add all the tables, click All >>.
© 2020 General Electric Company. All rights reserved. 95

4. To re-order the sequence of selected tables, select a table in the Selected Tables list and click
the Up or Down arrow to move the table up or down in the list.
5. Click Next to continue creating the query.
- Or -
Click Back to return to the previous screen in the SQL Wizard.
- Or -
Click Finish if the query is done.
NOTE: To remove a table from the statement, select it from the Selected Tables list and click Remove
All to remove all the tables in the statement.
Selecting Columns in an SQL SELECT Command
To select columns in an SQL SELECT command using the SQL Wizard:
1. Run the SQL Wizard and on the Select Operation dialog box, click SQL Select.
2. Proceed in the SQL Wizard until you reach the Select Columns dialog box.
3. In the Select Columns dialog box's Available Columns list, select a column and click Add.
Repeat this action for each column required in the SQL Statement or, to add all the columns,
choose * (All Columns) or click All >>.
4. To re-order the sequence of selected columns, select a column in the Selected Columns list and
click the Up or Down arrow to move the column up or down in the list.
5. Click Next to continue creating the query.
- Or -
Click Back to return to the previous screen in the SQL Wizard.
- Or -
Click Finish if the query is done.
NOTE: To remove a column from the statement, select it from the Selected Columns list and click
Remove All to remove all the columns in the statement.
Returning Unique Rows for Your Query
To create a query that returns unique rows using the SQL Wizard:
1. Run the SQL Wizard and on the Select Operation dialog box, click SQL Select.
2. Proceed in the SQL Wizard until you reach the Select Columns dialog box.
NOTE: You can only return unique rows for your query in an SQL SELECT statement.
3. In the Select Columns dialog box, select columns to include in your query.
4. Select the Return Unique Rows check box.
5. Click Next to continue creating the query.
96 © 2020 General Electric Company. All rights reserved.

- Or -
Click Back to return to the previous screen in the SQL Wizard.
- Or -
Click Finish if the query is done.
Creating a Row Filter
To create a row filter using the SQL Wizard:
1. Run the SQL Wizard and on the Select Operation dialog box, click SQL Select or SQL Update.
2. Proceed in the SQL Wizard until you reach the Create Row Filter dialog box.
NOTE: You can only create a row filter when constructing an SQL SELECT or SQL UPDATE com-
mand.
3. In the Create Row Filter dialog box, select a column from the list of available columns and click
Add. Repeat this action for each column to use in the Row Filter or, to add all the columns, click
All >>.
4. Select a column from the list of selected columns.
5. Select a comparison operator from the Operator drop-down list box.
6. Enter a comparison value in the Value box or select a query property to compare the column
value to.
7. To negate the action of the comparison operator, select Is/Does Not from the Operator drop-down
list box.
8. Repeat Steps 3 through 6 until the row filter is complete.
9. Click Next to continue creating the query.
- Or -
Click Back to return to the previous screen in the SQL Wizard.
- Or -
Click Finish if the query is done.
NOTES:
l To remove a column from the row filter, select it from the Selected Columns list and click Remove; click
<< All to remove all the columns in the row filter.
l The resulting Select statement connects multiple comparison expressions with the AND keyword; that
is, the row is selected when both comparison expressions are true. To use the OR keyword, which
selects the row if one of the two comparison expressions is true, edit the finished Select statement.
Sorting Retrieved Data by Column Values
© 2020 General Electric Company. All rights reserved. 97

To sort data using the SQL Wizard:
1. Run the SQL Wizard and on the Select Operation dialog box, click SQL Select.
2. Proceed in the SQL Wizard until you reach the Select Columns To Sort By dialog box.
2. In the Select Columns To Sort By dialog box, select a column from the list of available columns
and click Add. Repeat this action for each column to be sorted or, to sort all the columns in the
list, click All >>.
3. To re-order the sequence of selected columns, select a column in the Selected Columns list and
click the Up or Down arrow to move the column up or down in the list. The first column in the list
is the primary sort column.
4. To sort a column in descending order, select it in the Selected Columns list and choose In Des-
cending Order from the drop-down list box.
5. Click Next to continue creating the query.
- Or -
Click Back to return to the previous screen in the SQL Wizard.
- Or -
Click Finish if the query is done.
NOTE: To remove a column from the query, select it from the Selected Columns list and click Remove
All to remove all the columns in the query.
Constructing an SQL INSERT Command
To construct an SQL INSERT command using the SQL Wizard:
1. From the Record Source tab of the Data Control OLE Properties dialog box, click Run SQL Wiz-
ard. The Select Operation dialog box appears.
2. In the Select Operation dialog box, click SQL Insert. The Select Table to Insert Into dialog box
appears.
3. Select one or more tables for your statement, then click Next. The Select Values to Insert dialog
box appears.
4. Insert values into one or more table columns for your statement, then click Next. The Finish dia-
log box appears.
5. Optionally, edit the statement. Click OK to return to the Data Control OLE Properties dialog box.
Selecting Tables in an SQL INSERT Command
To select tables in an SQL INSERT command using the SQL Wizard:
1. Run the SQL Wizard and on the Select Operation dialog box, click SQL Insert.
2. Proceed in the SQL Wizard until you reach the Select Tables To Insert To dialog box.
98 © 2020 General Electric Company. All rights reserved.

3. In the Select Tables To Insert To dialog box's Available Tables list, select a table and click Add.
Repeat this action for each table required for the SQL statement or, to add all the tables, click All
>>.
4. To re-order the sequence of selected tables, select a table in the Selected Tables list and click
the Up or Down arrow to move the table up or down in the list.
5. Click Next to continue creating the query.
- Or -
Click Back to return to the previous screen in the SQL Wizard.
- Or -
Click Finish if the query is done.
NOTE: To remove a table from the statement, select it from the Selected Tables list and click Remove
All to remove all the tables in the statement.
Constructing an SQL UPDATE Command
To construct an SQL UPDATE command using the SQL Wizard:
1. From the Record Source tab of the Data Control OLE Properties dialog box, click Run SQL Wiz-
ard. The Select Operation dialog box appears.
2. In the Select Operation dialog box, click SQL Update. The Select Table to Update dialog box
appears.
3. Select one or more tables for your statement, then click Next. The Select Columns to Update dia-
log box appears.
4. Insert values into one or more table columns for your statement.
5. Optionally, create a row filter based on selection criteria you define. Click Next. The Finish dialog
box appears.
6. Optionally, edit the statement. Click OK to return to the Data Control OLE Properties dialog box.
Selecting Tables in an SQL UPDATE Command
To select tables in an SQL UPDATE command using the SQL Wizard:
1. Run the SQL Wizard and on the Select Operation dialog box, click SQL Update.
2. Proceed in the SQL Wizard until you reach the Select Table To Update dialog box.
3. In the Select Table To Update dialog box's Available Tables list, select a table and click Add.
Repeat this action for each table required for the SQL statement or, to add all the tables, click All
>>.
4. To re-order the sequence of selected tables, select a table in the Selected Tables list and click
the Up or Down arrow to move the table up or down in the list.
5. Click Next to continue creating the query.
- Or -
© 2020 General Electric Company. All rights reserved. 99

Click Back to return to the previous screen in the SQL Wizard.
- Or -
Click Finish if the query is done.
NOTE: To remove a table from the statement, select it from the Selected Tables list and click Remove
All to remove all the tables in the statement.
Creating a Row Filter
To create a row filter using the SQL Wizard:
1. Run the SQL Wizard and on the Select Operation dialog box, click SQL Select or SQL Update.
2. Proceed in the SQL Wizard until you reach the Create Row Filter dialog box.
NOTE: You can only create a row filter when constructing an SQL SELECT or SQL UPDATE com-
mand.
3. In the Create Row Filter dialog box, select a column from the list of available columns and click
Add. Repeat this action for each column to use in the Row Filter or, to add all the columns, click
All >>.
4. Select a column from the list of selected columns.
5. Select a comparison operator from the Operator drop-down list box.
6. Enter a comparison value in the Value box or select a query property to compare the column
value to.
7. To negate the action of the comparison operator, select Is/Does Not from the Operator drop-down
list box.
8. Repeat Steps 3 through 6 until the row filter is complete.
9. Click Next to continue creating the query.
- Or -
Click Back to return to the previous screen in the SQL Wizard.
- Or -
Click Finish if the query is done.
NOTES:
l To remove a column from the row filter, select it from the Selected Columns list and click Remove; click
<< All to remove all the columns in the row filter.
l The resulting Select statement connects multiple comparison expressions with the AND keyword; that
is, the row is selected when both comparison expressions are true. To use the OR keyword, which
selects the row if one of the two comparison expressions is true, edit the finished Select statement.
Creating a Statement Manually
100 © 2020 General Electric Company. All rights reserved.

To query a database by entering or pasting an SQL statement:
1. Open the VisiconX Data Control OLE Properties dialog box. For information on how to do this in
your product, refer to the Accessing VisiconX OLE Control Properties section.
2. From the Record Source tab, in the Command Type drop-down list box, select SQL Command.
3. In the SQL Command Text box, enter or paste the SQL command.
4. To start a new line or to create line breaks in the SQL command, press CTRL+ENTER.
Creating a Query for an Entire Table
To query an entire table:
1. Open the VisiconX Data Control OLE Properties dialog box. For information on how to do this in
your product, refer to the Accessing VisiconX OLE Control Properties section.
2. From the Record Source tab, in the Command Type drop-down list box, select Table.
3. In the Table drop-down list box, enter a table name.
4. Click List Columns if you want to see the columns defined to the selected table and their data
types.
Creating a Query Using a Stored Procedure
To create a query based on a stored procedure:
1. Open the VisiconX Data Control OLE Properties dialog box. For information on how to do this in
your product, refer to the Accessing VisiconX OLE Control Properties section.
2. From the Record Source tab, in the Command Type drop-down list box, select Stored Procedure.
3. Enter a stored procedure name in the Stored Procedure drop-down list box.
4. Click List Parameters to display the query properties mapped to the stored procedure para-
meters.
5. Click OK.
6. Animate the query properties that map to the input parameters for the stored procedure.
NOTE: CIMPLICITY users need to use CimEdit Basic script to use query properties. For more inform-
ation, see Using Query Properties in CIMPLICITY.
Displaying Data at Run Time
© 2020 General Electric Company. All rights reserved. 101

Refer to the following sections for information on creating displaying data at runtime when using Vis-
iconX controls:
l Overview: Displaying Data at Run Time
l Hiding the Data Control at Run Time
l Configuring Run Time Display Properties
Overview: Displaying Data at Run Time
To display data in Grid, ListBox, or ComboBox controls in iFIX:
1. Animate the controls to use the ADORecords of the Data Control as a data source.
2. To switch to Run mode:
In Ribbon view, on the Home tab, in the WorkSpace group, click Switch to Run.
- Or -
In Classic view, on the WorkSpace toolbar click Run.
To display data in Grid, ListBox, or ComboBox controls in CIMPLICITY:
1. Associate the controls with a Data Control. You can change or verify the association by double-
clicking on the control and selecting or viewing the current data source.
2. Run CimView on the screen file.
Hiding the Data Control at Run Time
To make the Data Control invisible in the run-time environment:
1. Open the Properties dialog box. For information on how to do this in your product, refer to the
Accessing VisiconX Object Properties section.
2. In the Property window, set the InvisibleInRunMode property setting to True.
Configuring Run Time Display Properties
To configure the text and color properties of the Grid, ListBox, and ComboBox controls:
1. Open the VisiconX Data Control OLE Properties dialog box. For information on how to do this in
your product, refer to the Accessing VisiconX OLE Control Properties section.
2. Click the Font tab.
102 © 2020 General Electric Company. All rights reserved.

3. Select the font, font size, and any special font effects, such as bold or italic. The Sample Text
box shows a sample of your current selection.
4. Click the Color tab.
5. Select Standard Colors or Windows System Colors from the Color Set list box.
6. For each control element, such as Fore Color and Back Color, select a color from the Color
Palette scroll box or click Edit Custom Colors to further refine your color selection.
NOTE: To avoid repetitions of recurring column values, set MergeCells to True in the object Prop-
erties dialog box. To hide the outside border of the Grid Control, set BorderStyle to 0 (vxBorderNone).
Accessing VisiconX Properties
VisiconX control objects have two types of properties: object properties, which are part of any object in
iFIX or CIMPLICITY; and OLE control properties, which are specific to VisiconX.
Refer to the following links for information on how to access and edit either of these types of properties:
l VisiconX Object Properties
l VisiconX OLE Control Properties
Accessing VisiconX Object Properties
To access and edit VisiconX object properties in iFIX:
1. Right-click a VisiconX control in your iFIX WorkSpace picture and choose Property Window. The
iFIX Properties dialog box for the selected object appears.
2. Edit the properties you want to change.
3. Optionally, if you want to edit the object properties of another VisiconX control in the same pic-
ture, select it from the drop-down list in the Properties dialog box.
To access and edit VisiconX object properties in CIMPLICITY:
1. Right-click a VisiconX control in your CimEdit screen and choose Properties. The CIMPLICITY
Properties dialog box for the selected object appears.
2. Click the Control Properties tab.
3. Edit the properties you want to change.
Accessing VisiconX OLE Control Properties
To access and edit VisiconX OLE Control properties in iFIX:
1. Right-click a VisiconX control in your iFIX WorkSpace picture and choose Properties [control
name] Object. The OLE Properties dialog box for the selected object appears.
2. Edit the properties you want to change.
© 2020 General Electric Company. All rights reserved. 103
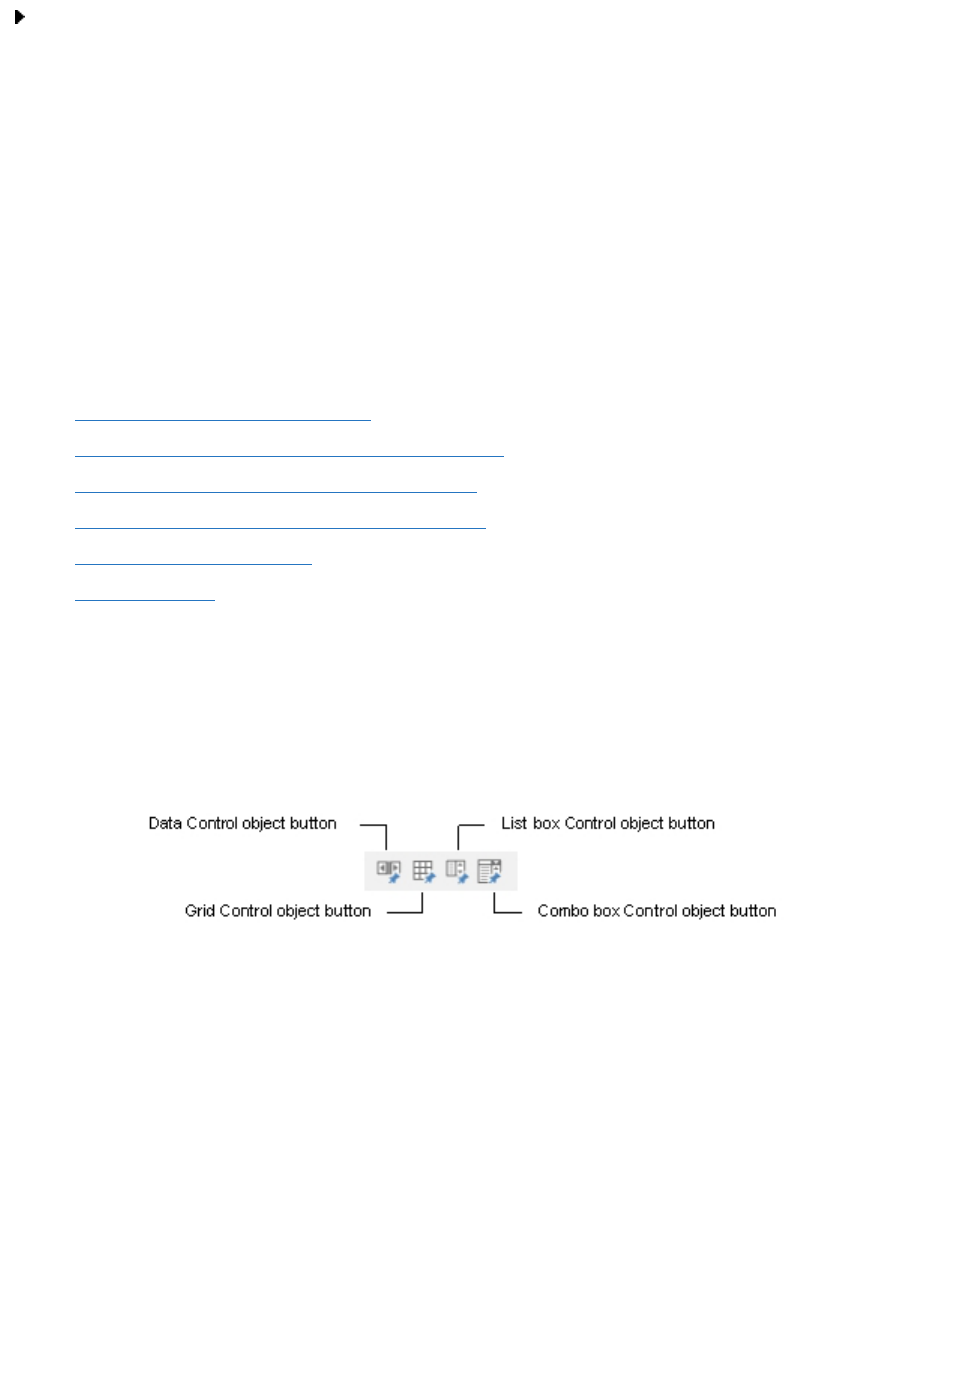
To access and edit VisiconX OLE Control properties in CIMPLICITY:
1. Right-click a VisiconX control in your CimEdit screen, point to the Object name, and then choose
Properties. The OLE Properties dialog box for the selected object appears.
2. Edit the properties you want to change.
TIP: CIMPLICITY users can also access the Data Control's OLE Properties dialog box by double-click-
ing the Data Control in the CimEdit screen, and then clicking on the Configure Database Connection
button in the dialog box that appears.
Using VisiconX in iFIX
Consult the following topics for iFIX-specific information and procedures regarding VisiconX:
l Inserting VisiconX Controls in iFIX
l Using Electronic Signatures with SQL Commands
l Using VisiconX Properties and Methods in iFIX
l Animating Grid, ListBox, or ComboBox Controls
l Animating Query Properties
l iFIX How Do I...
Inserting VisiconX Controls in iFIX
After installing VisiconX, the iFIX WorkSpace includes a new toolbar, VisiconX, with four buttons:
VisiconX Toolbar
In Classic view, use these toolbar buttons to insert VisiconX controls into your picture. In Ribbon view,
you may access the VisiconX controls from the Ribbon, on the Insert tab, in the VisiconX group.
The control appears in the picture, with handles that you can grab to move and size the control as you
would with any picture object.
For more information about moving and sizing picture objects, see the iFIX
Creating Pictures
e-book.
If the VisiconX toolbar is not visible in the WorkSpace, it either needs to be imported or it needs to be
selected from the list of available toolbars to display.
104 © 2020 General Electric Company. All rights reserved.

After inserting VisiconX controls into your picture, they appear as objects in the WorkSpace system
tree. The following table displays the naming conventions used for each object. In this naming con-
vention,
n
is an integer, starting with 1, which is automatically incremented for each new occurrence of
an object type.
Control Naming Convention
Data Control vxData
n
Grid Control vxGrid
n
ListBox Control vxList
n
ComboBox Control vxCombo
n
Naming Conventions for VisiconX Con-
trols
Using Electronic Signatures with SQL Commands
When you are creating SQL Select, Insert, or Update statements for your VisiconX data control in iFIX,
you have the option of requiring electronic signatures to be used for these commands when WorkSpace
is in run mode. You can apply Perform Only or Perform and Verify signatures to your statements.
When your data control is opened in run mode, you are prompted with the Electronic Signature login dia-
log box. When you sign in, a message is sent to the iFIX alarm system. If the signature is valid a suc-
cessful signature message displays. If the signature is invalid, an Invalid Esignature message displays.
For more detailed information about using electronic signatures, see
Using Electronic Signatures
.
These electronic signatures are provided for added security. For example, if you are changing data in a
database and require those changes to be audited. You can access the audit trail from the same esig-
nature audit trail that the other iFIX esignatures use. For more information, see
Creating an Electronic
Signature Audit Trail
.
Using VisiconX to View Historian Data
Beginning with iFIX 5.0, you can easily configure VisiconX data and grid objects to display Historian
data in pictures, using the VisiconX Configuration to View Historian Data tool; the tool is available from
the GE Historian toolbar (Classic and Ribbon views) or from the Insert tab, in the VisiconX group, in the
VisiconX Controls (Ribbon view).
Configuring VisiconX to view Historian data allows you to display data in Grid and Data Controls; the
data displayed is based on the parameters you set at configuration time. You can choose the time, date,
tag name and query during the configuration process.
Although the Data and Grid objects are standard VisiconX objects, because you have configured them
using the configuration tool to use Historian data, they are already animated. When you place them in
the picture, they require no further configuration, unlike directly placing VisiconX Data and Grid objects.
Using VisiconX Properties and Methods in iFIX
© 2020 General Electric Company. All rights reserved. 105

Like other iFIX objects, VisiconX objects have associated properties and methods that you can use in
VisualBasic scripts or to animate other objects. These properties and methods give you the flexibility to
use a variety of objects to access and display data.
For example, to let users access different databases in Run mode, you might want to insert individual,
labeled command buttons rather than several Data Control objects. In Run mode, the user can click a
button, which executes a Visual Basic script that uses the properties and methods of the Data Control to
connect to a database and execute a query. You can even invoke the SQL Wizard in Run mode using
the RunSQLWizard method.
You also use properties to animate other objects. For example, you typically animate grid objects with
the ADORecords property of a Data Control. Similarly, you can use properties to animate other objects,
like the caption of a Data link or the HorizontalFillPercentage of a rectangle.
The following sections describe how to use the properties and methods of the VisiconX objects:
l In Run mode within a VisualBasic script.
l In Configuration mode in an object Properties window.
l To animate other objects.
Using VisiconX Properties and Methods in a Visual Basic Script
VisiconX properties and methods are integrated with Microsoft's Visual Basic Editor, giving you the
means to configure and manipulate the object in Run mode using Visual Basic scripts.
For more information about writing Visual Basic scripts for iFIX objects, see the iFIX
Writing Scripts
e-
book. For detailed descriptions of VisiconX properties, methods, and events, see the VisiconX Auto-
mation Reference section.
The following section describes using properties and methods with Data Controls. Only one method,
AboutBox, can be used with Grid, ListBox, and ComboBox Controls.
Using Properties and Methods with a Data Control in iFIX
Using Data Control properties and methods within Visual Basic scripts that are associated with option
buttons, command buttons, and so on, gives you the option to create an intuitive, flexible, and attractive
Run mode environment. The methods associated with the Data Control object, vxData
n
, fall into the fol-
lowing descriptive categories.
Descriptive Category Methods
Connects or disconnects from the database provider and queries the database DBConnect
DBDisconnect
RefreshData
Builds an SQL Select statement. RunSQLWizard
Moves the position of the row pointer in the ADO Record set. MoveFirst
MoveNext
MovePrevious
Method Categories for Data Control Objects
106 © 2020 General Electric Company. All rights reserved.
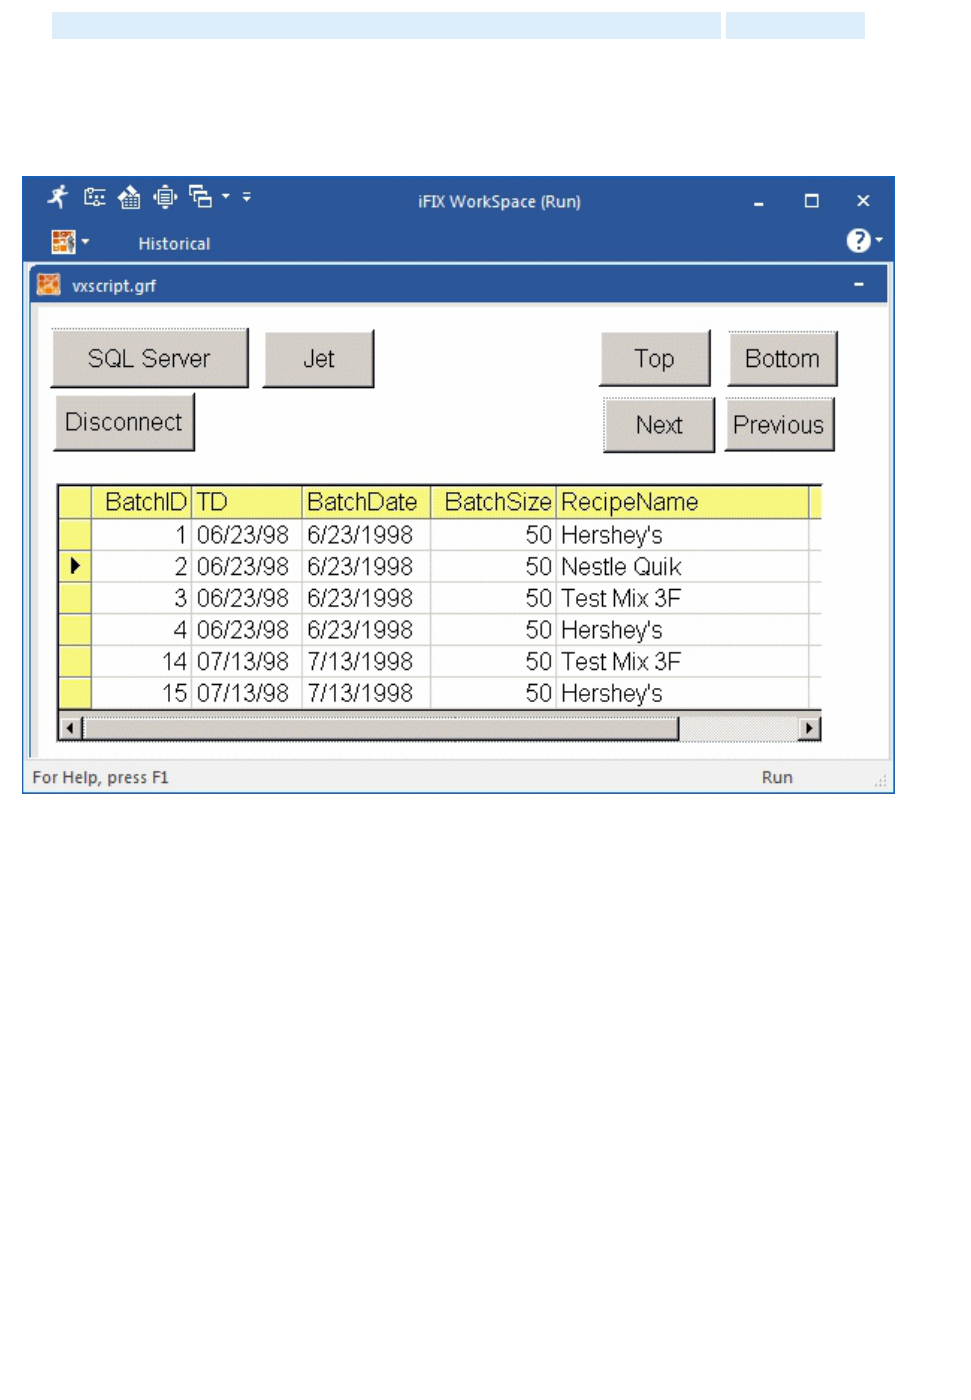
MoveLast
The following illustration shows a picture in Run mode that contains a number of command buttons and
a Grid Control. The SQL Server and Jet command buttons connect to and query an SQL Server data-
base and Microsoft Access database respectively. The Top, Bottom, Next, and Previous buttons move
the current pointer in the Grid Control.
Using VisiconX Properties and Methods in Run Mode
Below is the script associated with the SQL Server button in the preceding illustration.
Private Sub CommandButton1_Click()
vxData1.DBDisconnect
vxData1.OLEDBProvider = "SQLOLEDB"
vxData1.Server = "QALAB15"
vxData1.Database = "NORTHWIND"
vxData1.User = "sa"
vxData1.SourceType = vxSourceSQL
vxData1.RunSQLWizard
vxData1.DBConnect
End Sub
This script:
1. Uses the DBDisconnect method to disconnect from the current data provider.
2. Uses properties for Data Control, vxData1, to configure it to access an SQL Server provider and
database. The type of command it submits, determined by the SourceType property, is an SQL
Command.
© 2020 General Electric Company. All rights reserved. 107

3. Initiates the SQL Wizard in response to the RunSQLWizard method
4. Uses the DBConnect method to connect to the database and run its query.
The following example shows the script for the Top button in the preceding illustration; it sets the current
row pointer to the first row in the ADO Record set.
Private Sub CommandButton5_Click()
vxData1.MoveFirst
End Sub
The command buttons in the previous example make it unnecessary to display the Data Control in the
Run time environment, because the buttons duplicate the function of the navigation arrows in the Data
Control. To make the Data Control invisible in the Run mode environment, use the Properties window to
set its InvisibleInRunMode property to True.
Setting VisiconX Properties in an iFIX Properties Window
To set configuration properties of a VisiconX object, such as display attributes in the run-time envir-
onment, you can use the Properties window for the object. The Properties window provides a simple and
quick way to expose the properties of any object. It displays the properties both alphabetically and by
category.
For example, this figure shows the Properties window in iFIX for a Grid Control, vxGrid1. The Cat-
egorized tab displays properties organized by those that pertain to display properties for the grid, beha-
vior, and so on. In this example, the current background color for the grid cells is white. Clicking the
down-arrow displays the color palette, from which you can select another color for the cell background.
108 © 2020 General Electric Company. All rights reserved.
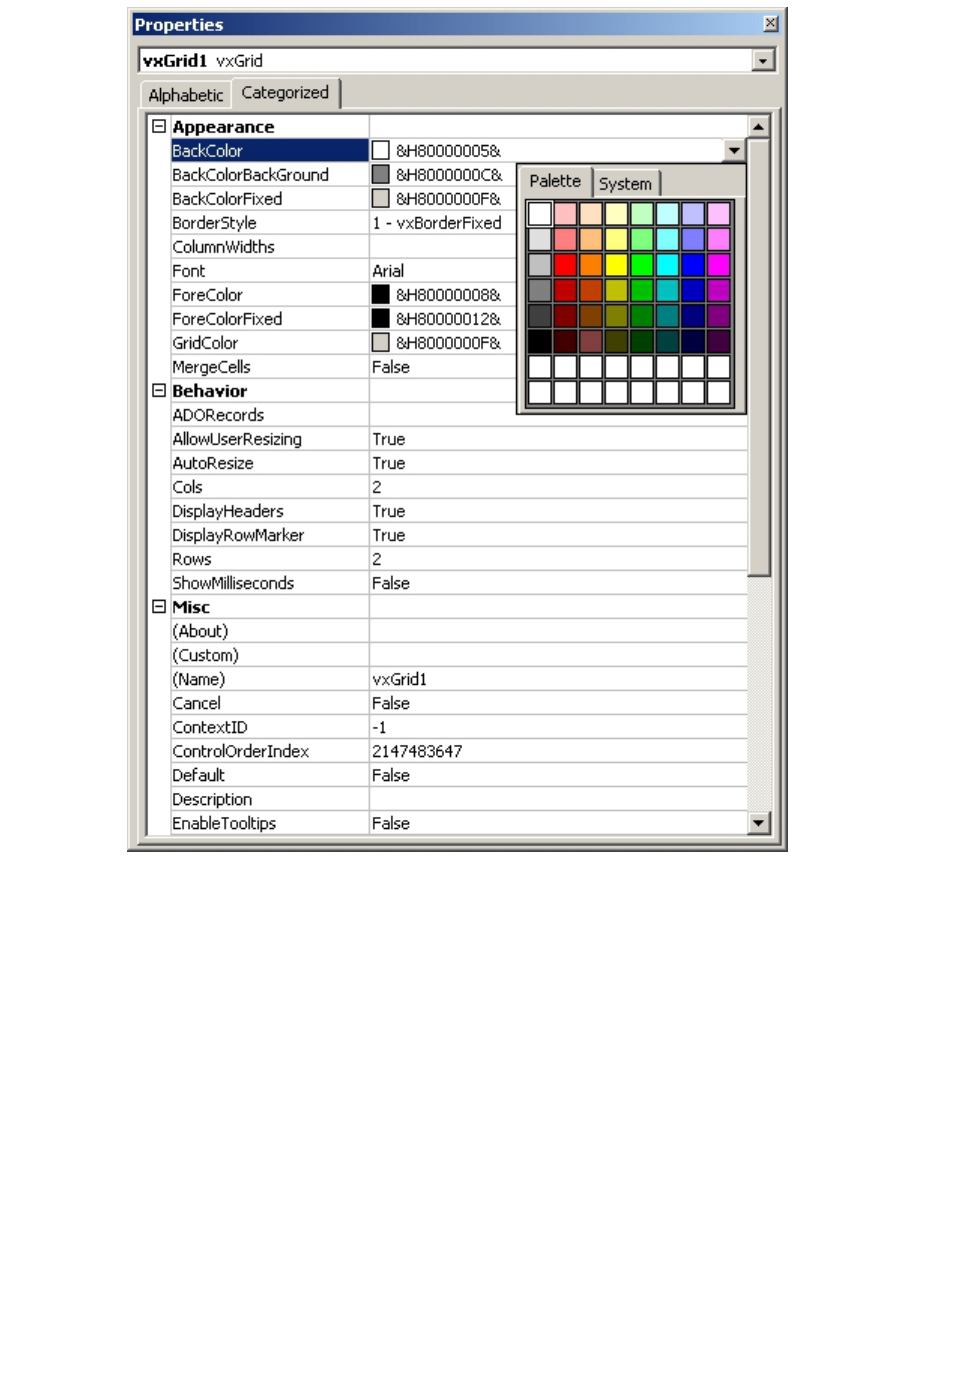
Properties Window in iFIX
Use the Properties window to expose some properties that are not visible in the user interface such as
MergeCells, BorderStyle, DisplayHeader, DisplayRowMarker, Autoresize, and ColumnWidths for Grid
Controls and InvisibleInRunMode for Data Controls. Using the Properties window also lets you quickly
set properties without activating object dialog boxes in the user interface, expediting development and
testing.
The properties associated with the Grid, ListBox, and ComboBox controls pertain primarily to display
properties for the controls, such as the display font and colors for the text and background of the objects.
The properties associated with the Data Control include 32 query properties, 64 column properties, and a
variety of configuration properties.
Animating Objects with VisiconX Properties in iFIX
© 2020 General Electric Company. All rights reserved. 109
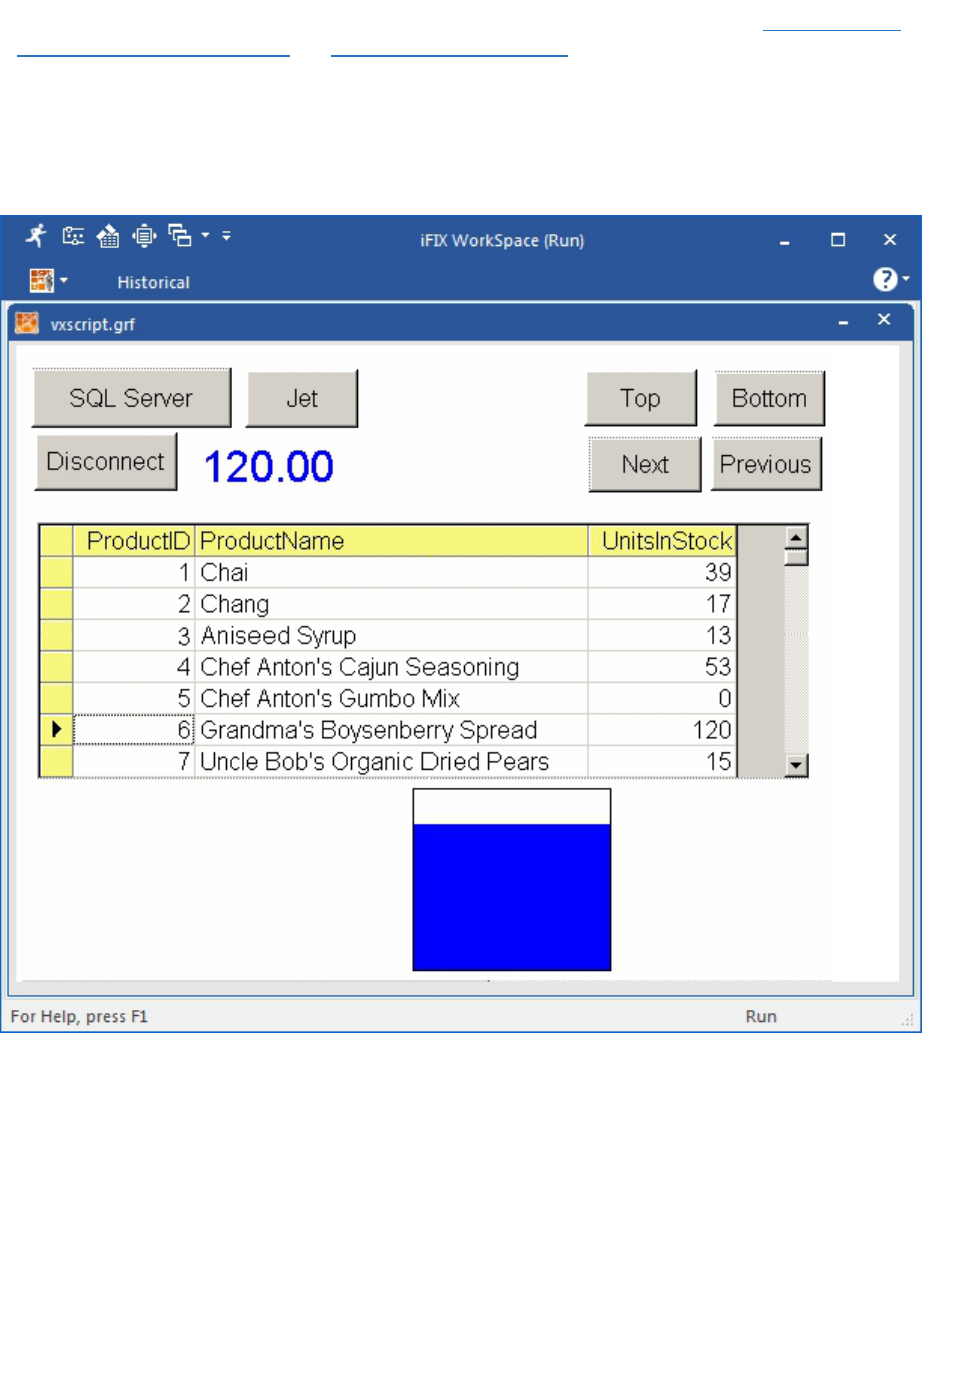
Animating objects with VisiconX properties has already been introduced in the sections Animating Grid,
ListBox, or ComboBox Controls and Animating Query Properties. What wasn't made obvious in those
sections was that you were actually using a VisiconX property, most often ADORecords, as the anim-
ation source.
The following illustration shows a Data link, displaying the value 120.00, and a rectangle. The caption of
the Data link and the VerticalFillPercentage of the Rectangle are animated by the Column3 property of
the Data Control.
Animating Objects with VisiconX Properties
In this case, Column3 contains the number of product units in stock. The Data link displays the number
of units in stock for the current row and the rectangle fills as a percentage of the number of units in stock.
Animating Grid, ListBox, or ComboBox Controls in iFIX
110 © 2020 General Electric Company. All rights reserved.

A Data Control defines the connection to the OLE DB data provider and determines what data to
retrieve. To display the retrieved data, use the Grid, ListBox, and ComboBox Controls.
The Grid Control displays data in a table-like format. The ListBox and ComboBox Controls display the
values of a single column of a queried table in a scrollable list box or a drop-down list box.
To display data in these controls in iFIX, you must animate them and select the Data Control as the
animation data source. The animated connection means that you can re-configure the Data Control, for
example, to query another database or table, and automatically update the display in the connected dis-
play controls.
Note that you can also animate the query properties of the Data Control with the values of the Grid,
ListBox, and ComboBox controls. For example, the item selected in a list box can animate a Data Con-
trol query property, which is used to filter the data returned by the data query.
For more information about animating objects, see the iFIX
Creating Pictures
e-book. For more inform-
ation about animating query properties, see Animating Query Properties.
Animating a Grid Control
Typically, the data source that animates the Grid Control is a Data Control. Most often, the data source
name is:
Picturename.vxDataN.ADORecords
where
Picturename
is the name of the WorkSpace picture and vxData
N
is the Data Control that is anim-
ating the Grid Control. The last part of the data source name, ADORecords, is selected from the Prop-
erties list; it contains the data retrieved from the OLE DB data provider.
NOTE: In place of ADORecords, you may want to select ColumnNames from the Properties list to display the
column names of the queried table or TableNames to display the table names of the queried database.
Animating ListBox and ComboBox Controls
ListBox and ComboBox Controls display the values of a column in the table of retrieved data. To des-
ignate which column values to display, you need to know the column sequence in the retrieved table.
Generally, this should match the sequence of columns in the SQL Select statement built by the SQL
Wizard.
Typically, the data source that animates the ListBox or ComboBox Control is a Data Control. Most
often, the data source name is:
Picturename.vxDataN.ADORecords
where
Picturename
is the name of the WorkSpace picture and vxData
N
is the Data Control that is anim-
ating the ListBox or ComboBox Control. The last part of the data source name, ADORecords, is selec-
ted from the Properties list; it contains the data retrieved from the OLE DB data provider.
NOTE: In place of ADORecords, you may want to select ColumnNames from the Properties list to display the
column names of the queried table or TableNames to display the table names of the queried database.
Animating Query Properties
© 2020 General Electric Company. All rights reserved. 111

Query Properties are properties of the Data Control. Query properties, QP1 through QP32, serve as vari-
ables in the query submitted to the database. These properties can be set to any value or can be anim-
ated by any object. To use query properties in a query, you can:
l Select them in the Create Row Filter dialog box of the SQL Wizard
l Enter them manually in an SQL Select or Update statement, using the following syntax:
{ts 'QPn'}
where
n
is an integer from 1 to 32.
If you use a stored procedure to query a database, VisiconX automatically assigns query properties to
the parameters of the stored procedure.
The query properties act as placeholders in the query statement. In this example:
OrderDate={ts 'QP1'} and Customer= 'QP2'
the query substitutes values for QP1 and QP2; the resulting query might look something like this:
OrderDate={ts '1999-02-18 00:00:00'} and Customer= 'FOLKO'
You animate query properties through the Data Control. The query gets the substitution values from
objects linked to the query property, such as an OLE object, a Data link, or another object control.
When you switch to run mode, the objects animated by the Data Control, such as the Grid Control, will
appear empty until you select or enter a value in the object that is animating the query property. For
example, suppose you animate the query property with the value selected in a ListBox Control. The list
box value animates a query property in the Data Control, which in turn, determines the data displayed in
the Grid Control.
For more information about animating objects, see the
iFIX
Creating Pictures
manual.
Animating Query Properties with OLE Objects
Using OLE objects with VisiconX Controls gives you a tremendous amount of flexibility for querying and
displaying data. For example, you can display data in a Grid Control based on the date selected in an
OLE Calendar control. You can use Microsoft Form objects, such as check boxes, option buttons, list
boxes, and so on, to filter the data displayed.
VisiconX Controls themselves are OLE objects that can be used to animate a query property. The
options are limitless, especially for those users who are familiar with coding Visual Basic logic for
Microsoft Forms objects.
Animating Query Properties with Data Links
Data links give you a flexible tool for displaying text and values from process databases. Data links
provide:
l Access to any data source.
l The ability to enter data.
112 © 2020 General Electric Company. All rights reserved.

l Flexible display formatting.
l Definable output error messages.
With VisiconX Controls, you might want to use Data links to quickly test out some design features for
your SQL queries and displays. For users who manually enter or paste in SQL commands, using a Data
link gives you the ability to edit the command in Run mode and see the results immediately.
For more information about Data links, see the iFIX
Creating Pictures
manual.
Examples of Animating Query Properties
The following examples are all based on a query submitted to a table in an Access database. The query
retrieves all rows from the table where the query property equals the value of the batch serial number.
The table name in this example is Unit_Operation_Proc:
Unit_Operation_Proc.Batch_Serial_No = QP1
The examples use different data sources to animate the query property, as follows:
l Example 1 uses a ListBox Control.
l Example 2 uses a Microsoft Forms check box control.
l Example 3 uses the caption of a Data link control.
Example 1: Using a ListBox Control
This example animates the query property used in the following Where clause
Unit_Operation_Proc.Batch_Serial_No = QP1
with the text of a ListBox Control. That is, the value selected in the list box filters the rows displayed in
the Grid Control, as shown in the following figure.
© 2020 General Electric Company. All rights reserved. 113
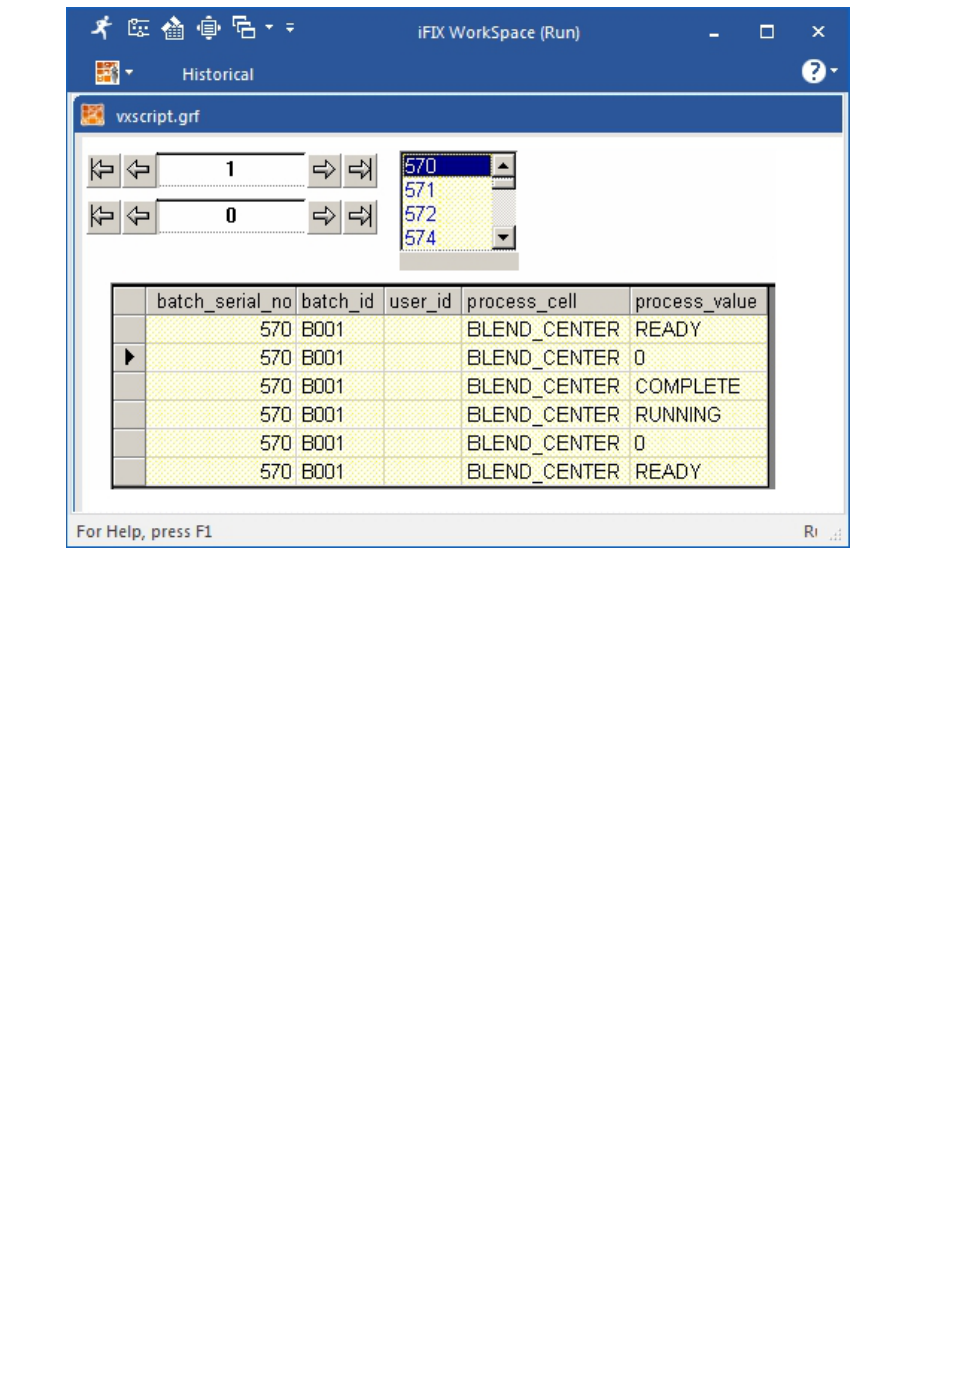
Animating Query Properties with a ListBox Control
Example 2: Using a Microsoft Forms Check Box Control
This example animates the query property used in the following Where clause
Unit_Operation_Proc.Batch_Serial_No = QP1
with the caption of a Microsoft Forms check box control. The check box object toggles the displayed
data, based on one of two batch serial numbers, as shown in the following figure.
114 © 2020 General Electric Company. All rights reserved.
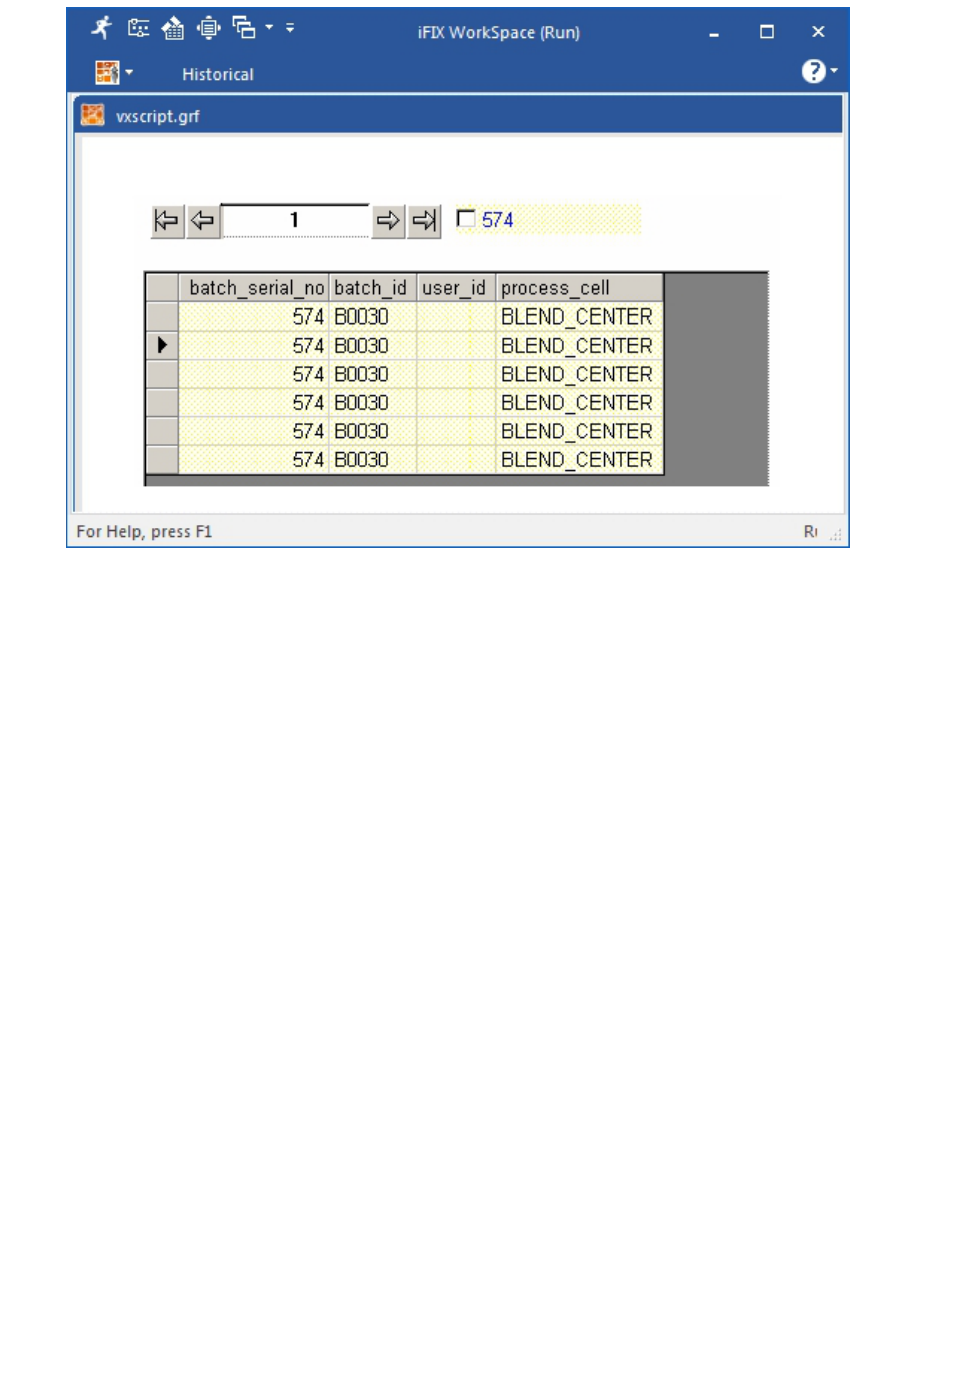
Animating Query Properties with a Check Box Object
The following script was entered for the Click action for the Microsoft Forms CheckBox control:
Private Sub CheckBox1_Click()
If CheckBox1.Value Then
CheckBox1.Caption = "570"
Else
CheckBox1.Caption = "574"
End If
End Sub
In Run mode, the check box displays `570' when the box is checked and the Grid Control displays all
operation processes for that batch serial number. When the check box is cleared, `574' appears in the
check box caption and the Grid Control displays all operation processes for batch serial number 574.
Example 3: Using a Data Link Control
This example animates the query property used in the following Where clause
Unit_Operation_Proc.Batch_Serial_No = QP1
with the value supplied by a Data link. Each time you change the value of the Data link in Run mode, the
display in the Grid Control changes. In this picture, the value of the Data link animates the query prop-
erty and all unit operation processes for batch serial number 570 are displayed in the Grid Control.
© 2020 General Electric Company. All rights reserved. 115
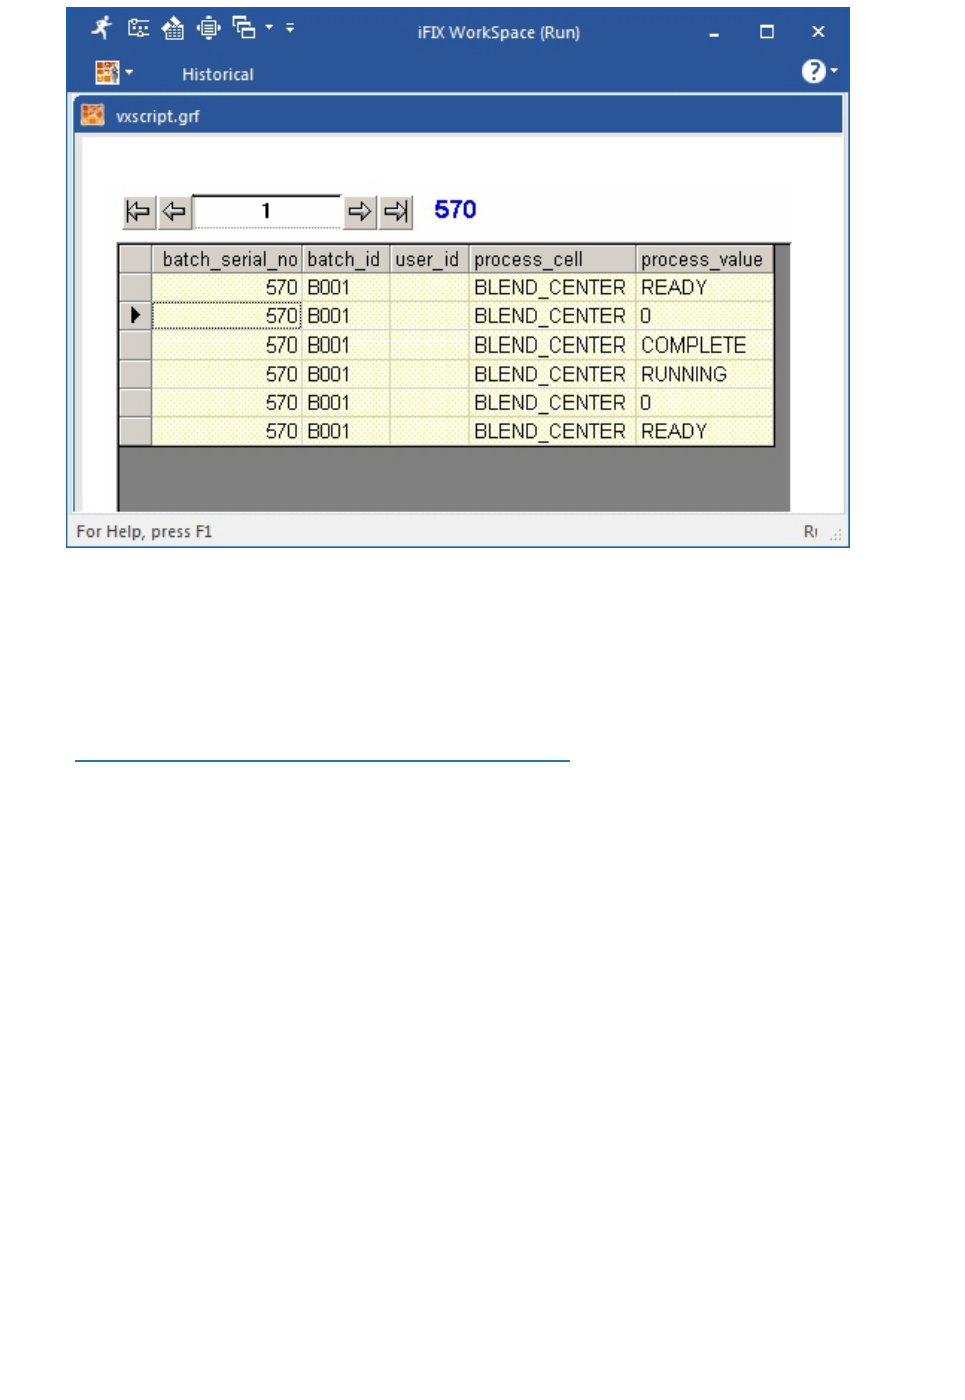
Animating Query Properties with a Data Link
iFIX VisiconX Dialog Boxes
The VisiconX application includes the following dialog box specific to iFIX:
l VisiconX Configuration to View Historian Data Dialog Box
VisiconX Configuration to View Historian Data Dialog Box
The VisiconX Configuration to View Historian Data dialog box displays the following items:
Historian Configuration
Server
Lets you enter the name of the Historian server to which you want to connect. If you do not specify a
server name, the default Historian server is used.
User Name
Allows you to enter the Historian server user name.
Password
Allows you to enter the password for the Historian server.
116 © 2020 General Electric Company. All rights reserved.

Raw Data
Connect to ihrawData Table
Click this button to use the data in Historian's ihrawData table.
Select a Tag Name
Select tags to use from the list box. You may select more than one Tag Name by using either the Shift or
Ctrl key and clicking additional files.
Time Stamp
From:
Enter the time you want the data query to begin, using the format for your region. The format is indicated
in the example.
To:
Enter the time you want the data query to stop, using the format for your region. The format is indicated
in the example.
Advanced
Click this button to display the All Historian Tables area.
All Historian Tables
Form Your Own Query Check Box
Click this button if you want to use the SQL Wizard to build your own query.
Selected Query
Displays the query created by the SQL Wizard. You may also enter a query in this field or modify the
query created by the SQL Wizard. This field can be edited only if Advanced is selected.
How Do I... (iFIX)
Click the following links for more information about working with VisiconX in iFIX:
l Working with VisiconX in the WorkSpace
l Using VisiconX Properties and Methods
l Animating Controls
l Animating Query Properties
Working with VisiconX in the Workspace
Click the following links for more steps on how to work with VisiconX in the iFIX WorkSpace:
© 2020 General Electric Company. All rights reserved. 117

l Inserting a VisiconX Control
l Adding the VisiconX Toolbar to the WorkSpace
l Setting Synchronous Execution with VisiconX
Inserting a VisiconX Control in iFIX
To insert a VisiconX data control:
In Ribbon view, on the Insert tab, in the VisiconX group, click VisiconX Controls, and then click
VisiconX Data Control.
- Or -
In Classic view, on the VisiconX toolbar, click the first button.
To insert a VisiconX grid control:
In Ribbon view, on the Insert tab, in the VisiconX group, click VisiconX Controls, and then click
VisiconX grid control.
- Or -
In Classic view, on the VisiconX toolbar, click the second button.
To insert a VisiconX list box control:
In Ribbon view, on the Insert tab, in the VisiconX group, click VisiconX Controls, and then click
VisiconX List Box Control.
- Or -
In Classic view, on the VisiconX toolbar, click the third button.
To insert a VisiconX combo box control:
In Ribbon view, on the Insert tab, in the VisiconX group, click VisiconX Controls, and then click
VisiconX Combo Box Control.
- Or -
In Classic view, on the VisiconX toolbar, click the fourth button.
TIP: If the VisiconX toolbar is not visible, you can make it appear by adding it to the WorkSpace. Refer to the
Adding the VisiconX Toolbar to the WorkSpace procedure for details.
Adding the VisiconX Toolbar to the WorkSpace
To import the VisiconX toolbar or make it visible in the WorkSpace:
NOTE: All of the functionality provided by the toolbar is available in Ribbon view on the Insert tab, in
the VisiconX group.
1. In the iFIX WorkSpace, in Ribbon view, on the Home tab, in the WorkSpace group, click Set-
tings, and then click Toolbars.
- Or -
118 © 2020 General Electric Company. All rights reserved.

In Classic view, on the WorkSpace menu, click Toolbars.
2. In the Owner list box, select Picture.
3. If VisiconX appears in the list of toolbars, select it to make it visible.
4. If VisiconX does not appear in the list of toolbars, click Customize to import it.
5. In the Toolbars tab, click Import.
6. Select VisiconXToolbar.
Setting Synchronous Execution for VisiconX
To change VisiconX to use synchronous execution:
1. In Notepad or other Windows text editor, open the FixUserPreferences.ini file. By default, the
FixUserPreferences.ini file is located in the C:\Program Files (x86)\GE\iFIX\LOCAL folder.
2. Change the setting for RunAsynch to FALSE:
[VisiconX]
RunAsynch=FALSE
NOTE: By default, VisiconX uses asynchronous execution logic to SELECT data from an OLE DB pro-
vider. You need to change this setting if your OLE DB provider does not support asynchronous exe-
cution. When you change this setting, it is applied globally in the WorkSpace (for all VisiconX data
controls and all OLE DB providers in all pictures). You do not need to re-build or re-save pictures. The
data control uses synchronous execution the next time you open a picture.
3. Save the file.
Configuring VisiconX to View Historian Data
To configure VisiconX to view Historian data:
1. In Ribbon view, on the Insert tab, in the VisiconX group, click VisiconX Controls, and then click
Configure VisiconX Historical Data.
- Or -
In Classic view, on the GE Historian toolbar, click Automatically Configure VisiconX Objects to
View Historical Data.
2. In the Historian Configuration area, enter the following information:
l Historian server name,
l Historian server user name, and
l Historian server password.
3. Choose to use either raw or historical data. To use raw data, go to Step 4. To use historical data,
go to Step 9.
4. Click Connect to ihrawData Table and click OK.
© 2020 General Electric Company. All rights reserved. 119

5. Select a tag name from the Select a Tag Name list. To select multiple tag names, use either Ctrl
or Shift and click the additional tag names.
NOTE: To prevent the WorkSpace from crashing, limit tag selection so that there are less than a total
of 4000 characters in the tag names.
6. In the From field, enter the time you want the query to start.
7. In the To field, enter the time you want the query to end .
8. Click OK.
End of procedure
.
9. To write your own query:
a. Click Advanced.
b. In the All Historian Tables area, click Form Your Own Query.
c. To use the SQL Wizard to assist you in writing a query, click SQL Select and proceed
through the SQL command construction wizard. At the end of the wizard, click OK.
NOTE: If the SQL Wizard does not appear, and you want to use it, double-click Form Your Own
Query.
d. Otherwise, click Cancel and enter your query in the Selected Query field.
e. Click OK.
Using VisiconX Properties and Methods in iFIX: Procedures
Click the following links for more information about procedures to use with VisiconX properties and meth-
ods in iFIX:
l Using Properties and Methods in a Visual Basic Script
l Exposing VisiconX Properties through a Property Window
Using VisiconX Properties and Methods in a Visual Basic Script
To use VisiconX properties and methods in a Visual Basic script:
1. Insert a VisiconX Data Control and Grid Control, ListBox Control, and/or ComboBox Control into
a picture in the iFIX WorkSpace.
2. Select an object in the picture.
3. Right-click and select Edit Script. The Visual Basic Editor appears.
4. In the Visual Basic Editor, select the event, from the drop-down list box, that activates the asso-
ciated script in Run mode.
5. In the script area, enter the name of the VisiconX object, for example vxData1, followed by a
period (.). The list of properties and methods available to the VisiconX object appear when you
type the period.
6. Select or enter the property or method.
120 © 2020 General Electric Company. All rights reserved.

7. If necessary, enter an equal sign (=) and the value assigned to the property. In some cases, the
Visual Basic editor displays selectable values.
Editing VisiconX Properties in the iFIX Properties Dialog Box
To edit VisiconX properties in the iFIX Properties dialog box:
1. In the iFIX WorkSpace, select the object.
2. Right-click and select Property Window. The Properties dialog box appears.
3. Optionally, click the Alphabetic tab to view the properties alphabetically or the Categorized tab to
view them by categories.
4. Select a property to modify.
5. If the property displays a down-arrow button or a button with ellipses, select it to choose an
option. Otherwise, enter the value to associate with the property.
Animating Controls: Procedures
For VisiconX, refer to the following sections for procedures used to animate controls:
l Animating a Grid Control
l Animating a ListBox or ComboBox Control
Animating a Grid Control
To animate a Grid Control:
1. In the iFIX WorkSpace, insert a VisiconX Grid Control into a picture.
2. Right-click the VisiconX Grid Control and select Animations from the pop-up menu. The Basic
Animation dialog box appears.
3. Click the Configure button. The VisiconX Advanced Animations dialog box appears.
4. Click the Behavior tab.
5. Click the Animate button for ADORecords in the Property Name scroll box.
6. In the Dynamic Setting area for the ADORecords property, enter the ADORecords data source.
Generally, this is ADORecords, as follows:
Picture-name.vxDataN.ADORecords
6. Select Object from the Data Conversion drop-down list box.
NOTE: In place of ADORecords, you may want to select ColumnNames from the Properties list to dis-
play the column names of the queried table or TableNames to display the table names of the queried
database.
© 2020 General Electric Company. All rights reserved. 121

Animating a ListBox or ComboBox Control
To animate a ListBox or a ComboBox Control:
1. In the iFIX WorkSpace, insert a VisiconX ListBox or ComboBox Control into the picture.
2. Right-click the VisiconX ListBox or ComboBox Control and select Animations from the pop-up
menu. The Basic Animation dialog box appears.
3. Click the Behavior tab. The VisiconX Advanced Animations dialog box appears.
4. Find ColumnNumber in the Property Name scroll box. The default number is 0, which displays
the first column of retrieved data. Enter another number to display values of a different column.
5. Click the Animate button for ADORecords in the Property Name scroll box.
6. In the Dynamic Setting area for the ADORecords property, enter the ADORecords data source.
Generally, this is ADORecords, as follows:
Picture-name.vxDataN.ADORecords
7. Select Object from the Data Conversion drop-down list box.
NOTE: In place of ADORecords, you may want to select ColumnNames from the Properties list to dis-
play the column names of the queried table or TableNames to display the table names of the queried
database.
Animating Query Properties: Procedures
For VisiconX, refer to the following sections for procedures used to animate query properties:
l Overview: Animating Query Properties
l Animating Query Properties with an OLE Object
l Animating Query Properties with a Data Link
Overview: Animating Query Properties
To animate a query property:
1. In the iFIX WorkSpace, insert an object in your picture that will supply the data for the query prop-
erty.
2. In the Create Row Filter dialog box of the SQL Wizard, create a comparison expression that uses
a query property.
3. Right-click the Data Control and select Animations from the pop-up menu. The Basic Animation
dialog box appears.
4. Click the Query tab.
5. Click the Animate button of the QP property used in the comparison expression.
6. In the Dynamic Settings area, enter the data source that animates the query property.
7. Select a Data Conversion option for the Query Property, which is usually Object.
122 © 2020 General Electric Company. All rights reserved.

Animating Query Properties with an OLE Object
To animate a query property with an OLE object:
1. In the iFIX WorkSpace, insert and configure a VisiconX Data Control.
2. Create a query for the VisiconX Data Control, using the SQL Wizard and a query property (QP) in
the Row Filter comparison expression.
3. Insert a Grid Control and animate it, selecting the Data Control as the animation data source.
4. Insert an OLE object. If necessary, edit the script for the change event.
5. Animate the query property in the Data Control.
6. Select the OLE object and its property as the animation data source for the query property. Select
Object for Data Conversion.
7. Switch to Run mode. Select a value in the OLE object. The Grid Control displays the data filtered
by the OLE object value.
Animating Query Properties with a Data Link
To animate a query property with a Data link:
1. In the iFIX WorkSpace, insert and configure a VisiconX Data Control.
2. In the Create Row Filter dialog box, create a query that uses a query property.
3. Insert a VisiconX Grid, ListBox, or ComboBox Control and animate it. Use the VisiconX Data
Control as the animation data source.
4. To insert a Data link object:
In Ribbon view, on the Insert tab, in the Objects/Links group, click Objects/Links and then
Datalink.
- Or -
In Classic view, on the WorkSpace Insert menu, select Datalink.
5. In the Datalink dialog box, select the source. This could be Caption for in-place entries. From the
Data Entry list, select In-Place and if necessary, increase the Chars/Line value.
6. Right-click the Data link to animate its caption. Select the Text tab.
7. Click the Animate button for the Caption property. Select the Data link's caption as its data
source and choose In-Place for Data Entry.
8. Right-click the Data Control and animate the query property used in the Filter Options dialog box.
Use the caption of the Data link as the animation data source.
9. In the iFIX WorkSpace, switch to Run mode.
10. Modify the caption in the Data link to change the rows displayed in the Grid Control.
© 2020 General Electric Company. All rights reserved. 123

Using VisiconX in CIMPLICITY
Consult the following topics for CIMPLICITY-specific information and procedures pertaining to Vis-
iconX:
l Inserting VisiconX Controls in CIMPLICITY
l Using VisiconX to View Historian Data in CIMPLICITY
l Using VisiconX Properties and Methods in CIMPLICITY
l CIMPLICITY VisiconX Dialog Boxes
l CIMPLICITY How Do I...
Inserting VisiconX Controls in CIMPLICITY
After installing VisiconX, the CimEdit Object Explorer will contain a new folder, VisiconX, displaying four
objects, one for each VisiconX control. Drag an object into your CimEdit screen to insert a VisiconX con-
trol.
When you drag a VisiconX Data Control into your CimEdit screen, a dialog box will prompt you to
choose a name for the Data Control. Once you have entered a name, you can either click OK to place
the control in the CimEdit screen, or you can click the Configure Database Connection button to begin
configuring the Data Control.
When you drag any of the other three VisiconX controls into your CimEdit screen, a dialog box will
prompt you to select a data source from a list of Data Controls that have previously been inserted.
NOTE: If you insert a ListBox Control, ComboBox Control, or Grid Control into the CimEdit screen and you
have not yet inserted a Data Control, a message window will inform you that you must select a data source
later. When you click OK, the control will be placed in the CimEdit screen.
Once inserted in the CimEdit screen, the VisiconX objects have handles that you can grab to move and
size them as you would with any picture object.
For more information about moving and sizing picture objects, see the CIMPLICITY manual.
Using VisiconX to View Historian Data in CIMPLICITY
The VisiconX control allows for the retrieval of data (via an OLE DB Provider) from a database such as
GE Historian or Microsoft SQL. This allows the data to be displayed on a grid or in a drop down list box.
The VisiconX Control for CIMPLICITY was released as part of Productivity Pack 4 and included in
CIMPLICITY 7.5. The VisiconX control is listed as a Developer Download from the GE support site
under the heading of “DD209 - VisiconX for Proficy HMI/SCADA – CIMPLICITY”.
124 © 2020 General Electric Company. All rights reserved.
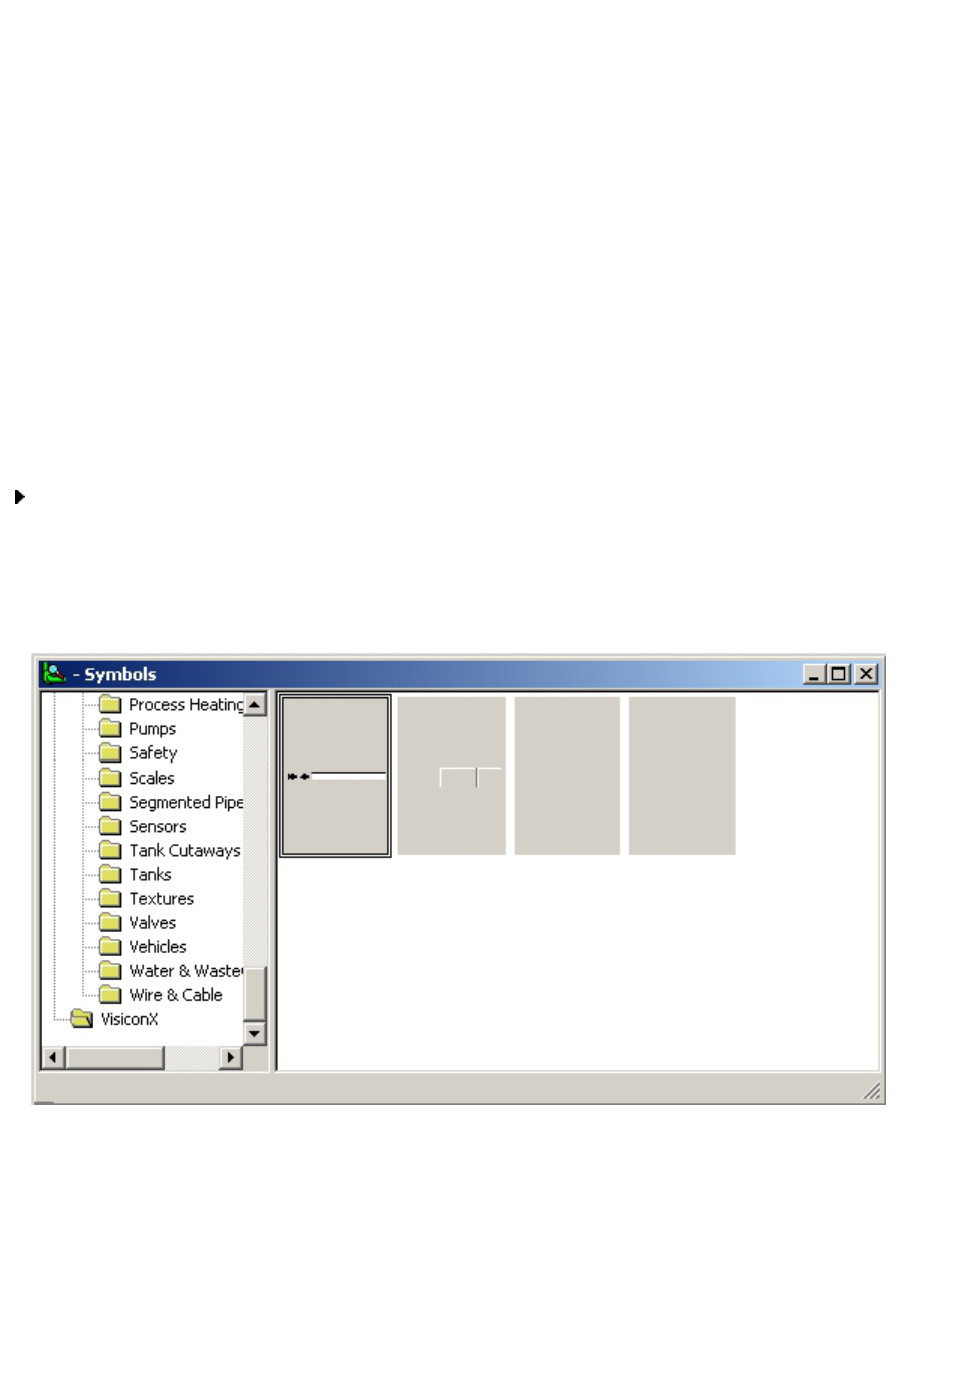
Software Requirements
lCIMPLICITY 7.5 Development Server (or higher).
lGE Historian 3.1 (with the OLE DB Driver installed).
lVisiconX Control for CIMPLICITY.
NOTE: A user name and password is required to log in to the GE Historian database. If you do not know your
Historian user name and password, please contact your IT Administrator. In addition, this topic assumes that
your Historian Server and your CIMPLICITY installation are on the same system.
The VisiconX control independently attempts to connect to the database that is being used and then
retrieves the data that is requested. It then displays this data on a set of specialized controls that are
available. These controls include a Grid, a Combo Box, and a List Box.
For example, there are 3 steps:
1. Create the Data Control.
2. Add the VisiconX.ini file to the installation folder.
3. Add the data display (for example: Grid Control).
To create the data control:
1. Create a new CimEdit screen.
2. Open the Smart Object Explorer by clicking the icon on the CimEdit toolbar or by selecting Tools-
>Show Object Explorer from the CimEdit Menu. The Object Explorer window appears and dis-
plays a tree control in the left pane, as shown in the following figure.
3. At the bottom of the left pane in the Object Explorer, click the VisiconX folder to display the asso-
ciated objects in the right pane.
© 2020 General Electric Company. All rights reserved. 125
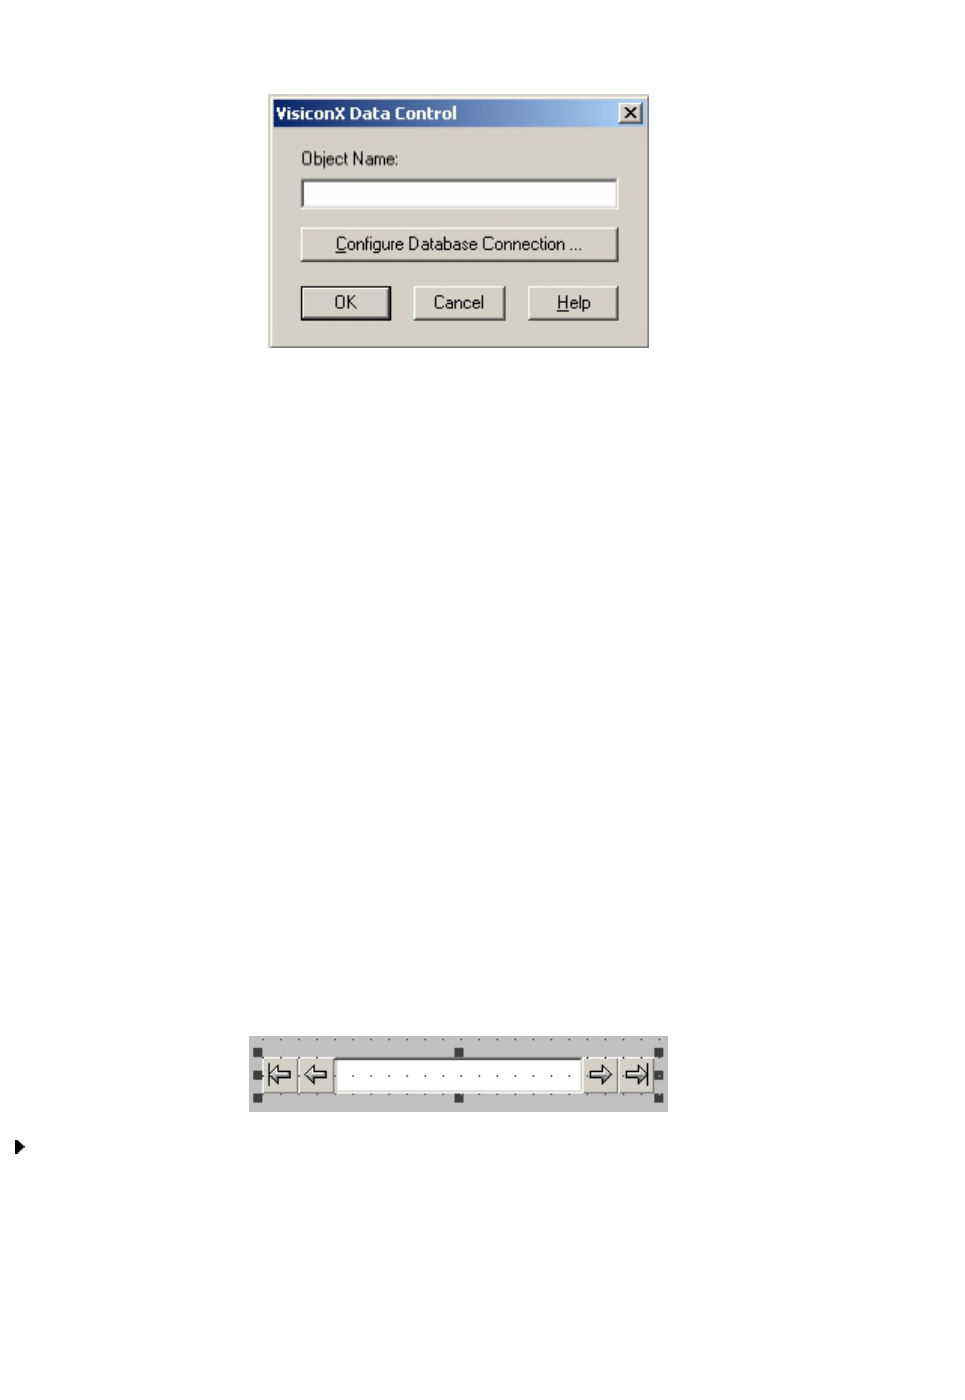
4. In the right pane, click the leftmost object (it has two black arrows on it) and drag the object onto
the CimEdit screen. A VisiconX Data Control dialog box appears, as shown in the following fig-
ure.
5. Click Configure Database Connection. The VisiconX Properties dialog box appears.
6. On the Provider tab, highlight the iHistorian OLE DB Provider.
NOTE: Communicating with a remote Historian database requires installation of the Historian OLE DB
Provider from the Historian installation CD onto the CIMPLICITY 7.5 node.
7. Click the Database tab on the dialog and enter the user name and password that will be used to
connect to the actual database (this is for a local Historian database).
NOTE: If you are communicating to a remote Historian Database then you must enter Data Source-
e=ComputerName as the OLE DB Connection String (where ComputerName is the name of the His-
torian Server).
8. Click Test Connection to validate the connection information.
9. Click the Record Source tab. This tab is used to specify the database results you would like
returned.
10. For the Command Type drop down, choose Table to return the results of an entire table. For the
Table Name drop down, choose “ihRawData”.
NOTE: You can use any Table Name that exists in the database instead of ihRawData. This table was
chosen because it contains all of the data in the database.
11. Click OK to close this dialog and return to the preceding dialog.
12. In the VisiconX Data Control dialog, in the Object Name field, enter VXDataControl.
NOTE: You can use any unique name for this control. The name is the object name that CIMPLICITY
uses to uniquely identify the object.
13. Click OK to close the dialog and display the control on the CimEdit screen. The following figure
shows an example of a VisiconX control on the CimEdit screen.
To add the VisiconX.ini file to the installation folder:
1. Open Notepad or another text editor, and add the following lines:
[visiconx]
RUNASYNC=FALSE
126 © 2020 General Electric Company. All rights reserved.
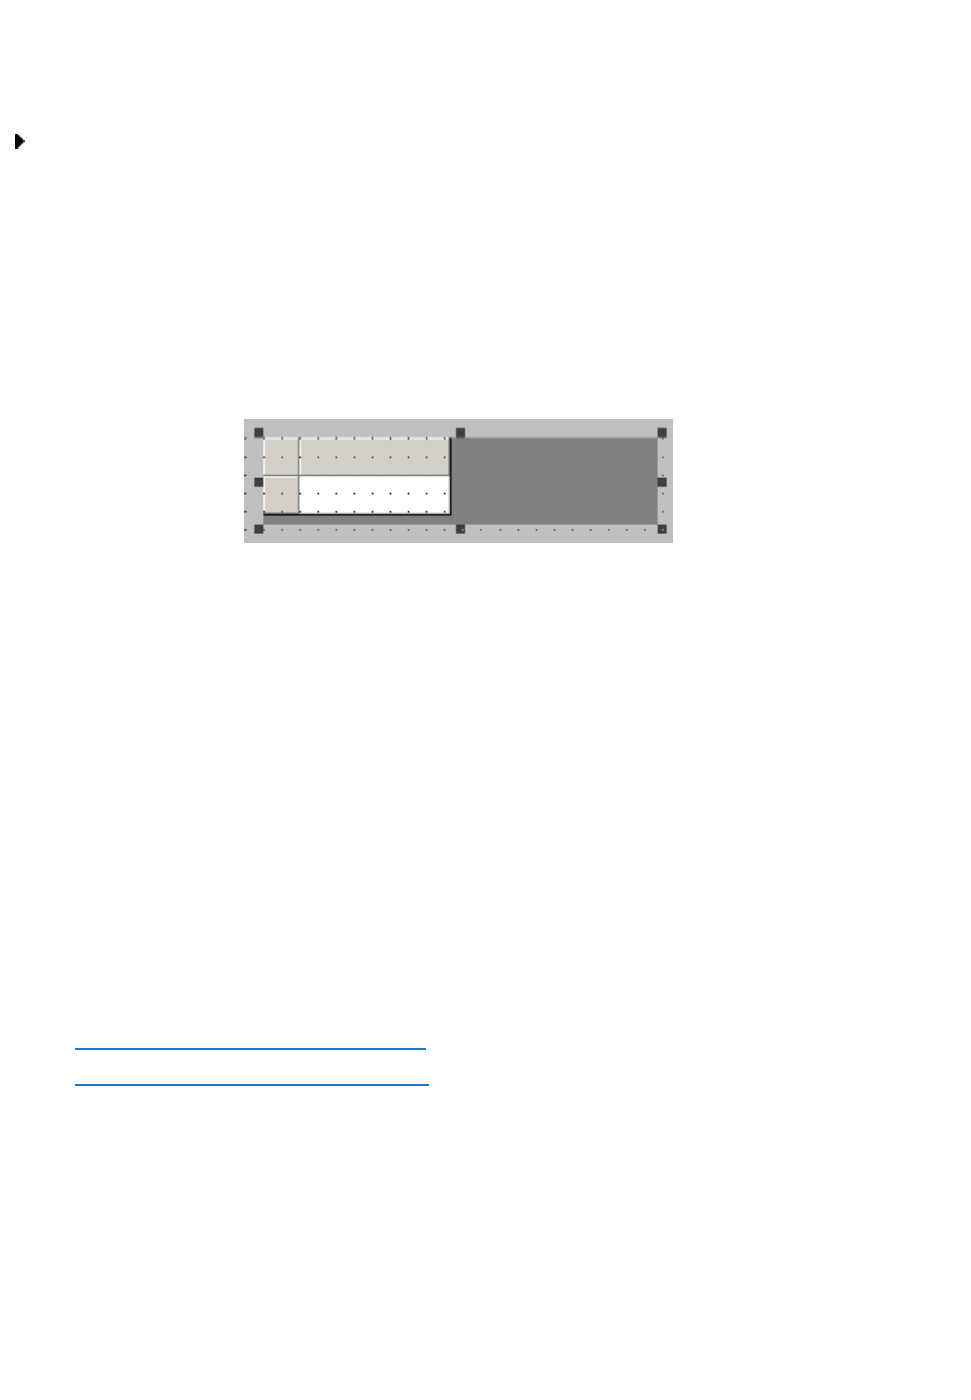
2. Save the file as VisiconX.ini in the CIMPLICITY installation folder. Typically, this folder is C:\Pro-
gram Files\Proficy\Proficy CIMPLICITY\exe.
NOTE: This file is required for the VisiconX control to operate. If it does not exist then the VisiconX con-
trol will fail to connect to the database when you attempt to use it in CimView.
To add the data display (the Grid control):
1. Open the Smart Object Explorer by clicking the icon on the CimEdit toolbar or by selecting Tools-
>Show Object Explorer from the CimEdit Menu. The Object Explorer window appears and dis-
plays a tree control in the left pane.
2. In the right pane, click the second object from the left (this is the VisiconX grid control) and drag
the object onto the CimEdit screen. A VisiconX Grid Control dialog box appears.
3. Select the same Data Source name configured when the Data Control was created (in this case,
VXDataControl).
4. Click OK to close the dialog and display the control on the CimEdit screen.
5. Save the CimEdit screen using File->Save.
6. Open the screen in CimView. It should now be active and have a grid populated with data.
Using VisiconX Properties and Methods in CIMPLICITY
Like other OLE objects, VisiconX objects have associated properties and methods that you can use in
CimEdit Basic scripts. These properties and methods give you the flexibility to use a variety of objects
to access and display data.
For example, to let users access different databases at run time, you might want to insert individual,
labeled command buttons rather than several Data Control objects. At run time, the user can click a but-
ton, which executes a script that uses the properties and methods of the Data Control to connect to a
database and execute a query. You can even invoke the SQL Wizard at run time using the Run-
SQLWizard method.
The following sections describe how to use the properties and methods of the VisiconX objects:
l At run time within a CimEdit Basic script.
l In a CimEdit object Properties dialog box.
Using VisiconX Properties and Methods in a CimEdit Basic Script
VisiconX properties and methods are accessible in the CimEdit's script editor just as other ActiveX con-
trols, giving you the means to configure and manipulate the object at run time using scripts.
© 2020 General Electric Company. All rights reserved. 127

For more information about writing CimEdit Basic scripts, see the Cimplicity CimEdit manual. For
detailed descriptions of VisiconX properties, methods, and events, refer to the VisiconX Automation
Reference section.
The Using Properties and Methods with a Data Control in CIMPLICITY section describes using prop-
erties and methods with Data Controls. Only one method, AboutBox, can be used with Grid, ListBox,
and ComboBox Controls.
Using Properties and Methods with a Data Control in CIMPLICITY
Using Data Control properties and methods within CimEdit Basic scripts gives you the option to create
an intuitive, flexible, and attractive run-time environment. The methods associated with the Data Control
object fall into the following descriptive categories.
Descriptive Category Methods
Connects or disconnects from the database provider and queries the database DBConnect
DBDisconnect
RefreshData
Builds an SQL Select statement. RunSQLWizard
Moves the position of the row pointer in the ADO Record set. MoveFirst
MoveNext
MovePrevious
MoveLast
Method Categories for Data Control Objects
The following illustration shows a screen in CimView that contains a number of buttons and a Grid Con-
trol. The SQL Server and Jet buttons connect to and query an SQL Server database and Microsoft
Access database respectively. The Top, Bottom, Next, and Previous buttons move the current pointer
in the Grid Control.
128 © 2020 General Electric Company. All rights reserved.
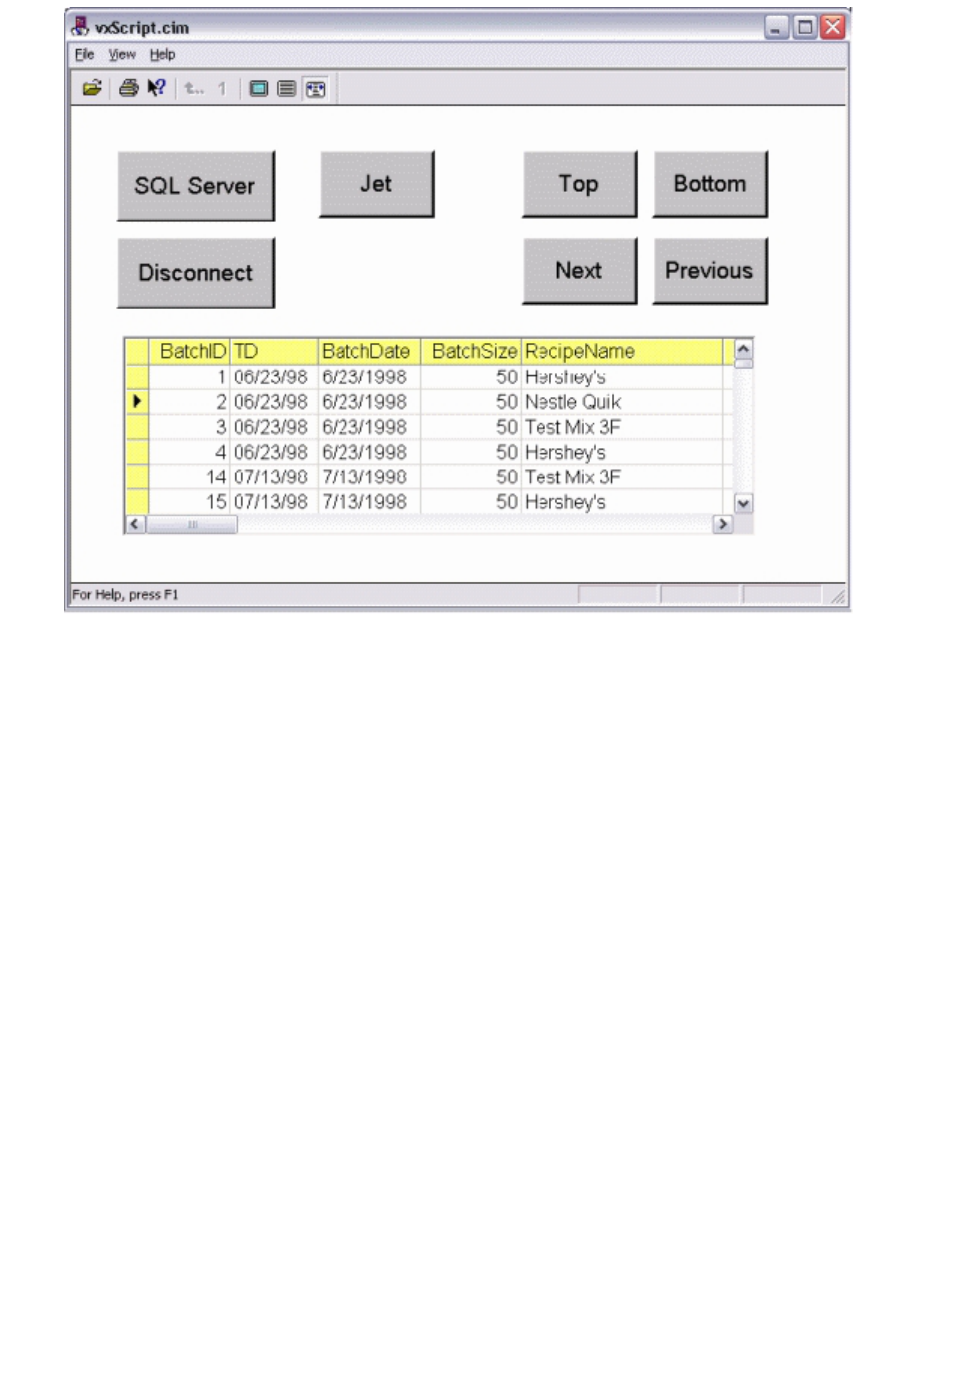
Using VisiconX Properties and Methods in the run-time environment
Below is the script associated with the SQL Server button in the preceding illustration.
Private Sub OnMouseDown()
Dim vxData1 As Object
Set vxData1 = CimGetScreen.Object.Objects.Item("vxData1").OleObject
vxData1.DBDisconnect
vxData1.OLEDBProvider = "SQLOLEDB"
vxData1.Server = "QALAB15"
vxData1.Database = "NORTHWIND"
vxData1.User = "sa"
vxData1.SourceType = vxSourceSQL
vxData1.RunSQLWizard
vxData1.DBConnect
End Sub
This script:
1. Uses the DBDisconnect method to disconnect from the current data provider.
2. Uses properties for Data Control, vxData1, to configure it to access an SQL Server provider and
database. The type of command it submits, determined by the SourceType property, is an SQL
Command.
3. Initiates the SQL Wizard in response to the RunSQLWizard method
4. Uses the DBConnect method to connect to the database and run its query.
The following example shows the script for the Top button in the preceding illustration; it sets the current
row pointer to the first row in the ADO Record set.
© 2020 General Electric Company. All rights reserved. 129
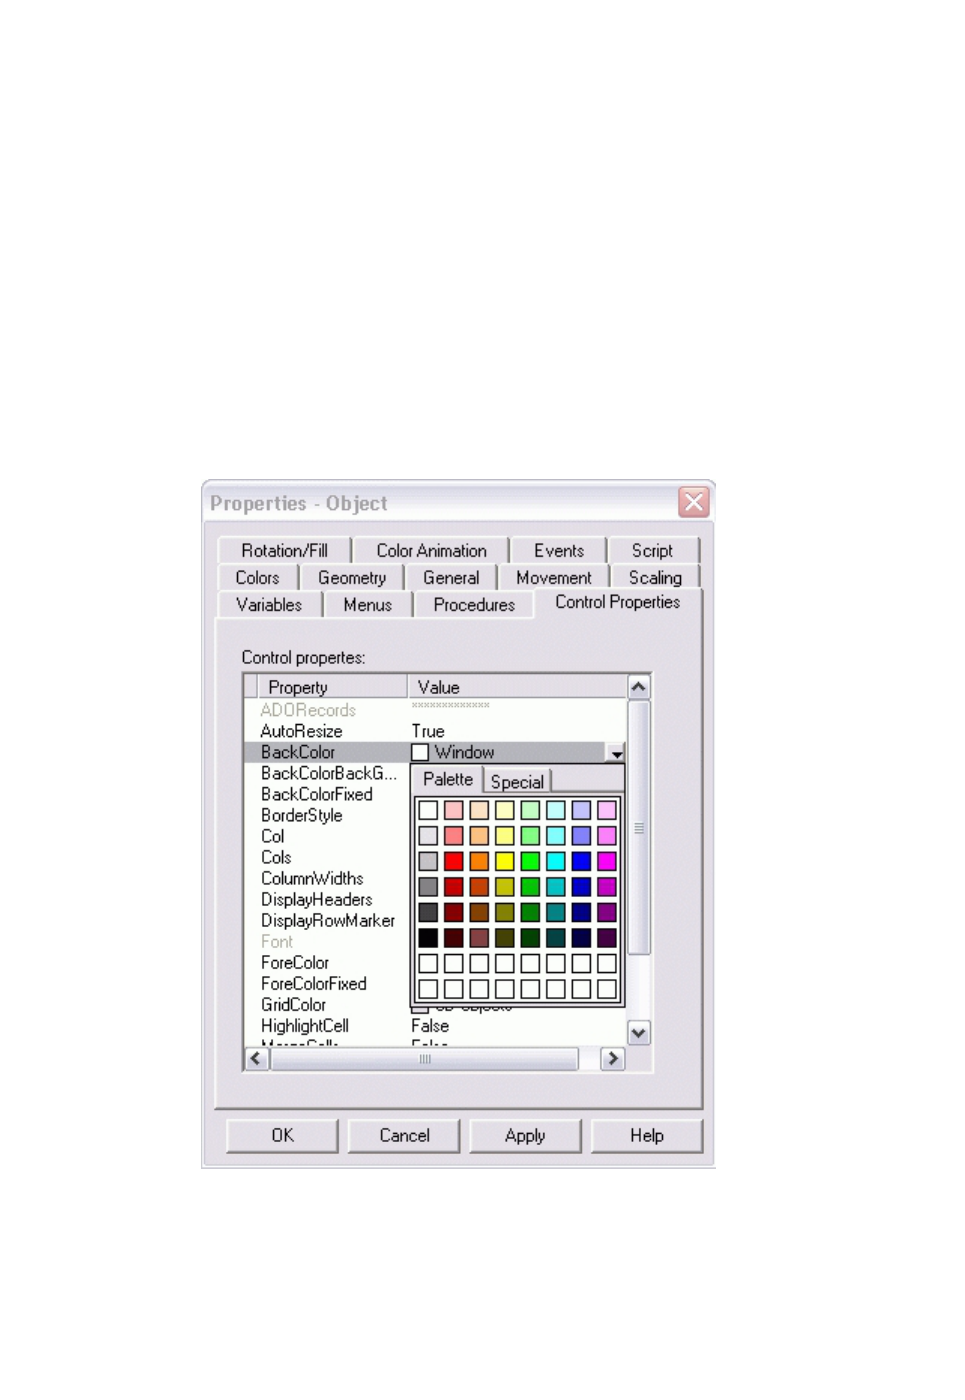
Private Sub OnMouseDown()
Dim vxData1 As Object
Set vxData1 = CimGetScreen.Object.Objects.Item("vxData1").OleObject
vxData1.MoveFirst
End Sub
The buttons in the previous example make it unnecessary to display the Data Control in the run-time
environment, because the buttons duplicate the function of the navigation arrows in the Data Control. To
make the Data Control invisible in the run-time environment, use the Properties dialog box to set its
InvisibleInRunMode property to True.
Setting VisiconX Properties in a CimEdit Properties Dialog Box
To set object configuration properties of a VisiconX object, such as display attributes in the run-time
environment, you can use the Control Properties tab in the Properties dialog for the object. The tab
provides a simple and quick way to expose the properties of any object. It displays the properties alpha-
betically.
For example, the following figure shows the Control Properties tab in CimEdit for a Grid Control.
Properties Window in CimEdit
130 © 2020 General Electric Company. All rights reserved.

In this example, the current background color for the grid cells is white. Clicking the down-arrow displays
the color palette, from which you can select another color for the cell background.
Use the Properties window to expose some properties that are not visible in the user interface such as
MergeCells, BorderStyle, DisplayHeader, DisplayRowMarker, Autoresize, and ColumnWidths for Grid
Controls and InvisibleInRunMode for Data Controls.
The properties associated with the Grid, ListBox, and ComboBox controls pertain primarily to display
properties for the controls, such as the display font and colors for the text and background of the objects.
The properties associated with the Data Control include 32 query properties, 64 column properties, and a
variety of configuration properties.
Using Query Properties in CIMPLICITY
CIMPLICITY requires the use of CimEdit Basic script in order to take advantage of VisiconX SQL query
properties. For example, if you want to query a ProductionEventRecords table to find all records whose
severity is greater than 4, you would need to create the following two elements in your CimEdit screen:
l A VisiconX Data Control containing the following SQL command:
SELECT * FROM ProductionEventRecords WHERE ProductionEventRecords.Severity > QP1
l A text button that defines an event action for the "Mouse Down" event with the following script:
Sub OnMouseDown(x As Long, y As Long, flags As Long)
CimGetScreen.Object.Objects.Item("MyDataControlName").OleObject.QP1 = 4
End Sub
At run time, when you click the button, the VisiconX Data control will query for only those records in the
ProductionEventRecords table whose severity is greater than 4.
CIMPLICITY VisiconX Dialog Boxes
VisiconX includes the following dialog boxes that are only available in CIMPLICITY:
l VisiconX ListBox Control Dialog Box
l VisiconX ComboBox Control Dialog Box
l VisiconX Grid Control Dialog Box
l VisiconX Data Control Dialog Box
VisiconX ListBox Control Dialog Box
The VisiconX ListBox Control dialog box (available only in CIMPLICITY) displays the following items:
Current Data Source
If a Data Control has already been associated with this control, it is displayed here. Otherwise, (None) is
displayed.
© 2020 General Electric Company. All rights reserved. 131

Select a Data Source
The Select a Data Source drop-down list lets you select a Data Control that has been previously inser-
ted into your CimEdit screen. The Data Control you select will animate the ListBox Control.
VisiconX ComboBox Control Dialog Box
The VisiconX ComboBox Control dialog box (available only CIMPLICITY) displays the following items:
Current Data Source
If a Data Control has already been associated with this control, it is displayed here. Otherwise, (None) is
displayed.
Select a Data Source
The Select a Data Source drop-down list lets you select a Data Control that has been previously inser-
ted into your CimEdit screen. The Data Control you select will animate the ComboBox Control.
VisiconX Grid Control Dialog Box
The VisiconX Grid Control dialog box (available only in CIMPLICITY) displays the following items:
Current Data Source
If a Data Control has already been associated with this control, it is displayed here. Otherwise, (None) is
displayed.
Select a Data Source
The Select a Data Source drop-down list lets you select a Data Control that has been previously inser-
ted into your CimEdit screen. The Data Control you select will animate the Grid Control.
VisiconX Data Control Dialog Box
The VisiconX Data Control dialog box (available only in CIMPLICITY) displays the following items:
Object Name
Enter a name for the Data Control object. If you are using more than one Data Control object in your
CimEdit screen, each object name must be unique.
Configure Database Connection
The Configure Database Connection button, when clicked, displays the VisiconX Data Control OLE
Properties dialog box, where you can configure the Data Control object's data provider, database set-
tings, and record source.
How Do I... (CIMPLICITY)
132 © 2020 General Electric Company. All rights reserved.

Click the following links for more information about working with VisiconX in CIMPLICITY:
l Inserting a VisiconX Control in CIMPLICITY
l Associating a VisiconX Control With a Data Source
l Using VisiconX Properties and Methods in CIMPLICITY
Inserting a VisiconX Control in CIMPLICITY
To insert a VisiconX Data Control:
1. In CimEdit, open the Object Explorer.
2. From the VisiconX folder in the Object Explorer, drag the Data Control object into the CimEdit
screen.
To insert a VisiconX Grid Control:
1. In CimEdit, open the Object Explorer.
2. From the VisiconX folder in the Object Explorer, drag the Grid Control object into the CimEdit
screen.
To insert a VisiconX ListBox Control:
1. In CimEdit, open the Object Explorer.
2. From the VisiconX folder in the Object Explorer, drag the ListBox Control object into the CimEdit
screen.
To insert a VisiconX ComboBox Control:
1. In CimEdit, open the Object Explorer.
2. From the VisiconX folder in the Object Explorer, drag the ComboBox Control object into the
CimEdit screen.
TIP: You can also insert a control by double-clicking on it in the Object Explorer. The control will be placed in
the center of the CimEdit screen.
Associating a VisiconX Control With a Data Source
To associate a VisiconX Grid Control with a data source:
1. Make sure at least one Data Control has been inserted into your CimEdit screen.
2. In CimEdit, double-click the Grid Control, or insert a Grid Control if you have not already done so.
The VisiconX Grid Control dialog box appears.
3. From the Select a Data Source drop-down list, select a Data Control and click OK.
© 2020 General Electric Company. All rights reserved. 133

To associate a VisiconX ListBox Control with a data source:
1. Make sure at least one Data Control has been inserted into your CimEdit screen.
2. In CimEdit, double-click the ListBox Control, or insert a ListBox Control if you have not already
done so. The VisiconX ListBox Control dialog box appears.
3. From the Select a Data Source drop-down list, select a Data Control and click OK.
To associate a VisiconX ComboBox control with a data source:
1. Make sure at least one Data Control has been inserted into your CimEdit screen.
2. In CimEdit, double-click the ComboBox Control, or insert a ComboBox Control if you have not
already done so. The VisiconX ComboBox Control dialog box appears.
3. From the Select a Data Source drop-down list, select a Data Control and click OK.
Using VisiconX Properties and Methods in CIMPLICITY: Procedures
Click the following links for more information about procedures to use with VisiconX properties and meth-
ods in CIMPLICITY:
l Using VisiconX Properties and Methods in a CimEdit Basic Script
l Editing VisiconX Properties in the CimEdit Properties Dialog Box
Using VisiconX Properties and Methods in a CimEdit Basic Script
To use VisiconX properties and methods in a CimEdit Basic script:
1. Insert a VisiconX Data Control into a CimEdit screen, then insert a Grid Control, ListBox Control,
and/or ComboBox Control into the CimEdit screen.
2. Select an object in the picture.
3. Right-click and select Properties.
4. In the Script tab, click the “Edit” button, or double-click the subroutine you want to edit. See the
CimEdit manual to learn how to use the Events tab to associate the event to an event handler
subroutine.
5. If the object you are editing script for is the ActiveX control whose properties or methods you
want to use, you can use the “ActiveX Methods” and “ActiveX Properties” menu items located
under the Tools menu item. Selecting a property or method will put a statement or expression at
your caret's location in the script. The icon in the toolbar that represents the ActiveX control
provides the same access.
6. If you are accessing properties and methods of an VisiconX control from another object's script,
you need to properly reference the control as:
CimGetScreen.Object.Objects.Item("NameOfTheVisiconXControl").OleObject.
Replace the name of the control and append the method or property to the expression.
7. If necessary, enter an equal sign (=) and the value assigned to the property.
134 © 2020 General Electric Company. All rights reserved.

Editing VisiconX Properties in the CimEdit Properties Dialog Box
To edit VisiconX properties in the CimEdit Properties dialog box:
1. In CimEdit, select the object.
2. Right-click and select Properties. The Properties dialog box appears.
3. Click the Control Properties tab.
4. Select a property to modify.
5. If the property displays a down-arrow button or a button with ellipses, click the button to choose
an option. Otherwise, enter the value to associate with the property.
© 2020 General Electric Company. All rights reserved. 135

136 © 2020 General Electric Company. All rights reserved.

Index
A
ADORecords 37
animating
ComboBox Control 122
Grid Control 121
ListBox Control 121
animating controls 15
about 111
Grid Control 111
ListBox and ComboBox Controls 111
animating objects with properties 109
animating query properties 112
about 112
examples of 113
purpose 24
with data links 112
with OLE objects 112
animation data sources 111
for Grid Controls 111
for ListBox and ComboBox Controls 111
Any Value comparison operator 26
asterisk (*), meaning in SQL 24
AutoConnect 37
AutoResize 38
AutoResize property 28
B
BackColor 39
BackColorBackGround 39
BackColorFixed 40
background color 102
selecting 102
background colors, selecting 28
Begin With comparison operator 26
Between comparison operator 26
border 103
hiding 102
border, hiding 28
BorderStyle 40
BorderStyle property 28
BorderStyle Property 102
C
cells, merging 28
click 66
color 102
selecting 102
color properties, selecting 28
Cols 41
column 96
selecting 96
sorting by value 97
column headings, sizing and displaying 28
ColumnN 41
ColumnName 42
ColumnNames 42
ColumnNumber 42
columns 25
naming convention 24
numbering convention 111
selecting in SQL Wizard 24
© 2020 General Electric Company. All rights reserved. 137

sorting in SQL Wizard 25
ColumnWidths 43
ComboBox Control 28, 122
configuring display properties 102
displaying data 102
inserting 118
naming convention for 104
selecting font and color properties 28
comparison operators 26
for row filters 26
negating 26
Connected 43
connecting 93
to an OLE DB data provider 90
to Microsoft Jet provider 92
to multiple providers: database 92
to ODBC driver 91
to Oracle provider 92
to password-protected provider 93
to Simple provider 91
to SQL Server provider 90
connecting to 9
an OLE DB data provider 8
databases using Data Control methods 106
multiple databases 9
Contain comparison operator 26
control 118
inserting 118
controls, about 4
creating
SQL query 101
SQL statement manually 100
creating a row filter 25
creating and animating SQL statements 16
creating Insert or Update statements 22
creating queries 17
about 17
for entire table 20
manually 18
using stored procedures 20
with SQL Wizard 17
CurrentRow 44
D
data changed 66
Data Control 5, 102
accessing secured providers 9
and animated query properties 111
configuring 90
connecting to multiple databases 9
display in Run mode 5
hiding 102
inserting 118
naming convention for 104
purpose 5
Data link 123
data links 112
example in query animation 115
using to animate query properties 112
data provider 3, 93
accessing password-protected 93
connecting to 91
testing connection 94
138 © 2020 General Electric Company. All rights reserved.

database 90
connecting to 90
connecting to multiple 92
Database 44
database writes 12
date fields 14
entering in comparison expression 26
DBConnect 59
DBConnect method 106
DBDisConnect 59
DBDisconnect method 106
disabling 90
automatic data provider connection 90
DisplayHeaders 44
DisplayHeaders property 28
displaying 118
selecting font and color properties 102
toolbar 118
displaying data
about 27
by animating controls 110
formatting 28
DisplayRowMarker 45
DisplayRowMarker property 28
distinct rows, returning 24
Distinct, meaning in SQL 24
doubleclick 67
DSN 45
E
electronic signatures 105
End With comparison operator 26
entering 101
entering values in comparison expressions 26
Equal To comparison operator 26
error occurred 68
error status 69
ErrorDesc 46
ErrorNum 46
events 65
examples 30
of animating query properties 113
of using VisiconX 30
F
filtering 24
rows 97, 100
font 102
selecting 102
font properties, selecting 28
ForeColor 47
ForeColorFixed 47
formatting display properties 28
G
getting started
information required 3
what to do first 4
glossary 71
Greater Or Equal comparison operator 26
Greater Than comparison operator 26
grid cells 102
merging 102
© 2020 General Electric Company. All rights reserved. 139

Grid Control 28, 121
border styles 102
column headings 28
configuring display properties 102
displaying data 102
hiding border 28
hiding headings and arrow marker 28
inserting 118
merging cells 28, 102
naming convention for 104
purpose 8
selecting font and color properties 28
GridColor 48
H
help 58
hiding 118
Data Control 102
grid borders 102
toolbar 118
I
iFIX WorkSpace 104
and VisiconX controls 2
inserting VisiconX controls 104
implementing Windows security 93
inner join 18
inserting 104, 118
controls 118
toolbar 118
VisiconX controls 104
VisiconX toolbar buttons 104
InvisibleInRunMode 48
InvisibleInRunMode property 102, 108
J
JetDB 49
JetSDB 49
L
Less Or Equal comparison operator 26
Less Than comparison operator 26
ListBox Control 28, 121
configuring display properties 102
displaying data 102
example in query animation 113
inserting 118
naming convention for 104
selecting font and color properties 28
M
mapping stored procedure parameters 20
MergeCell property 28
MergeCells 49
MergeCells property 102
merging cells 102
methods 58, 105
for Data Control 106
using in a script 120
using in a Visual Basic script 106
using in VisiconX 105
Microsoft Access database 9, 92
and stored procedures 15
connecting to 8, 92
140 © 2020 General Electric Company. All rights reserved.

testing connection to 9
Microsoft Forms Check Box Control 114
example in query animation 114
Microsoft Jet provider 92
connecting to 92
Microsoft Jet Provider 9
connecting to 8
required information 3
testing connection to 9
Microsoft Simple OLE DB provider 91
connecting to 91
MoveFirst 60
MoveLast 60
MSDataShape provider 9
connecting to 8
testing connection to 9
N
naming conventions 105
for columns 24
for VisiconX controls 104
Null comparison operator 26
numbering convention 27
for columns 111
for rows 27
O
objects 70
ODBC Administrator Tool 4
defining ODBC data source names 3
ODBC driver 9
connecting to 8, 91
data source names 3
required information 3
testing connection to 9
ODBCConnectionString 50
OLE DB data provider 10
accessing secured providers 9
connecting to 8
required information 3
selecting for performance 13
simple 4
supported 3
testing connection to 9
OLE object 123
OLE objects 112
example in query animation 114
using to animate query properties 112
OLEDBConnectionString 50
OLEDBProvider 51
OR keyword and SQL Wizard 25
Oracle provider 92
connecting to 92
Oracle server 9
and stored procedures 15
connecting to 8
required information 3
testing connection to 9
P
Password 52
password-protected provider 93
pasting 101
PersistUserInfo 52
© 2020 General Electric Company. All rights reserved. 141

picture layout, designing 12
planning 11
ProcedureNames 53
programming language 32
properties 35
for data controls 106
setting in the Properties window 108
using in a script 120
using in a Visual Basic script 106
using in VisiconX 105
using to animate objects 109
viewing in the Property Window 121
Properties window, activating 108
Property window 121
Q
QP 92
see Query property 92
QPn 53
query 7, 101
animating 25
creating manually 18
creating with SQL Wizard 17
for entire table 20
optimizing performance 13
planning 11
supported attributes 5
query properties 20
animating 111
animating with OLE objects 112
entering in comparison expression 26
examples of 113
mapped to stored procedure parameters 20
query property 122
R
refining queries 22
filtering rows 24
selecting columns 24
selecting tables 23
selecting unique rows 24
sorting column values 25
RefreshData method 106
Row 53
row filter
about 25
comparison operators 26
performance considerations 13
values for 26
rows 24, 96
filtering 24, 97, 100
numbering convention 27
selecting unique 96
unique 24
Rows 54
run mode 28
and animated query properties 111
and Visual Basic scripts 106
connecting to an OLE DB data provider 8
Data Control display 6
logging in to secured data providers 9
troubleshooting failed connection 14
viewing data 27
142 © 2020 General Electric Company. All rights reserved.

Run mode 93
disabling Automatic Connect 90
hiding Data Control 102
login dialog 93
RunSQLWizard 61
RunSQLWizard method 108
S
script 120
creating 120
scripts 106
writing 106
secured provider 93
security 9, 93
activating Windows security 9
configuring the Data Control for 9
for password-protected providers 93
selecting 102
fonts 102
sort columns 97
text and background colors 102
unique rows 96
Server 54
sorting column values 25
SourceType 55
sql 53
SQL Insert and Update statement 5
creating with SQL Wizard 22
using electronic signatures 105
SQL Server 9, 93
accessing password-protected server 93
activating Windows security 9
connecting to 8, 90
required information 3
testing connection to 9
SQL statements 7
column naming convention 24
creating with SQL Wizard 17
entering 18
meaning of * 24
meaning of Distinct 24
meaning of Where 24
querying entire table 20
SQL Command command type 17
supported attributes 5
using electronic signatures 105
using the SQL Wizard 22
SQL Wizard 22
activating 17
activating in run mode 106
attributes of 22
creating a statement with 94
creating an Insert or Update statement 22
creating row filter 97, 100
filtering rows 24
selecting columns 96
selecting columns in 24
selecting tables 95
selecting tables in 23
selecting unique rows 24, 96
sorting column values 25, 97
SQLCommand 55
© 2020 General Electric Company. All rights reserved. 143

statements
Insert 95
Select 95
Update 95
stored procedure 15, 101
command type 17
creating a query with 20
special considerations 15
using in query 101
string fields 26
comparison operators for 26
entering in comparison expression 26
summaries 65
synchronous execution with VisiconX 119
syntax for row filters 25
system performance 13
optimizing 13
T
table 101
creating query for 101
selecting 23
Table 56
table command type 17
table of contents 32
TableNames 56
tables 23
querying entire 20
selecting in SQL Wizard 23
writing to 22
testing connection 94
testing connections 14
procedure 9
text 28, 102
configuring 102
selecting font properties and colors 28
Text 56
toolbar 118
inserting and displaying 118
toolbar buttons 104
troubleshooting issues 13
U
unique rows, returning 24
UseNTSecurity 57
UseODBCConnectionString 57
User 58
user ID 93
entering 93
V
VisiconX
about 1
designing layout 12
examples of using 30
how it works 2
implementing 11
information required 3
optimizing system performance 13
synchronous execution 119
task checklist 10
toolbar buttons 104
troubleshooting 13
144 © 2020 General Electric Company. All rights reserved.

using electronic signatures 105
what to do first 4
writing to a database 21
VisiconX controls 106
about 4
animating 110
inserting 104
ListBox Control, purpose 8
naming conventions 105
properties and methods 105
troubleshooting problems 15
writing scripts 106
Visual Basic scripts 106
writing 106
vxCombo 71
vxData 71
vxGrid 71
vxList 71
W
where clause, meaning in SQL 24
writing scripts 106
writing to a database 21
© 2020 General Electric Company. All rights reserved. 145
