
USER
MANUAL
U61
This product is suitable for users over 14 years old.
Stay away from the rotating propeller
Read the<important statement and safety guidelines >carefully.
Suitable for indoor flight
ON OFF
Ready Before Take Off
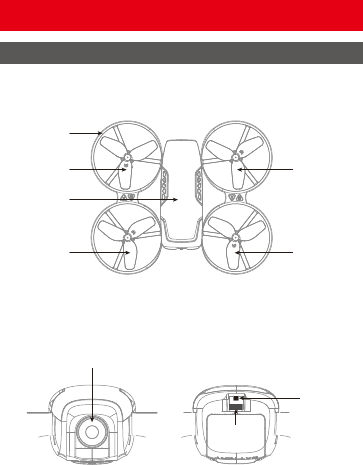
Drone preparation
Power
Switch
Drone LED
Camera
Main frame
Propeller A
Propeller A
Propeller B
Propeller B
Front (Prow)
Front (Prow)
Rear (Tail)
Rear (Tail)
Drone Cover
Housing
2
②①
Charging Instruction
Battery power is insufficient in the original plant. It must be charged
saturated before it can be used.
Connect the original charging cable with the drone, and then connect other USB
charging port. The drone red LED keeps bright when charging and the light turns
green when fully charged. The drone power button should be
turned off when charging.
Original Charging Cable
Drone battery
Only use the original charging cable; suggest select Adapters with output current of 5V 2A.
USB adapter
(Not included)
Battery buckle
Press the battery button and pull the battery back.
Battery Installation
Disassembly:
Put the battery into the battery
compartment and push it into
position.
Installation:
3
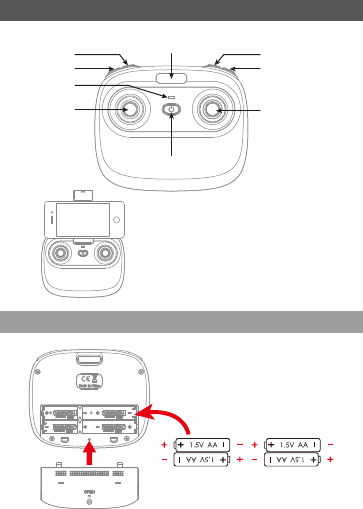
Transmitter Preparation
Power-LED
Phone Holder Jack
Left Stick
Right Stick
Heading Hold Mode
Take Off / Landing/
Emergency Stop
Power Switch
Photo
Video
Speed switching
(Press Down)
Trimmer
(Press Down)
Phone
(not include)
Notice: Taking photo and recording video
are available after connecting with
smart phone.
4×1.5V AA Battery
Battery cover
Back
Open the battery cover of the remote
controller and place the same type of
battery with saturated capacity,
according to the '+-' electrode indication
in the battery cell (Not include).
Battery installation
4
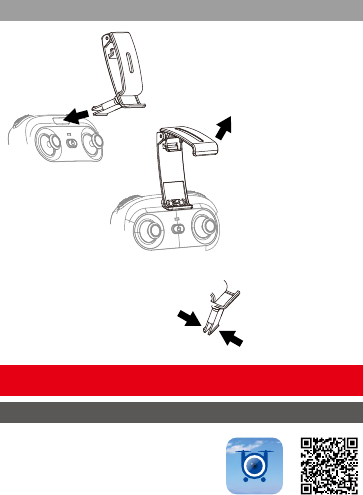
When take out the phone clip, you
need to press the clip buckle behind
the phone clip , so that the buckle
can be closed and removed easily.
Take out the phone holder
and insert into the transmitter.
Pull out upper lamp
of the holder and put the
phone into the holder,
then release the clamp,
and the phone will be fixed
on the holder. Please make
sure that the button on
phone is not clamped.
Flight Operations
Mobile phone connect with Drone
Download and install APP: Flyingsee
This software is suitable for mobile phones
in the IOS and Android system. For detailed
operation, please check the system “HELP”
of APP.
Mobile Phone Installation
5
Press down
Turn on the prower
on the transmitter, the
transmitter indicator
light will flash quickly.
Pull the left stick until bottom
and then release, the transmitter
power-LED will flash slowly, and
enter frequency pairing.
Turn on power switch of drone,
the indicator light becomes from
shiny to long bright which
indicating the drone is in the state
of successful opposite frequency.
It must be placed on the horizontal ground.
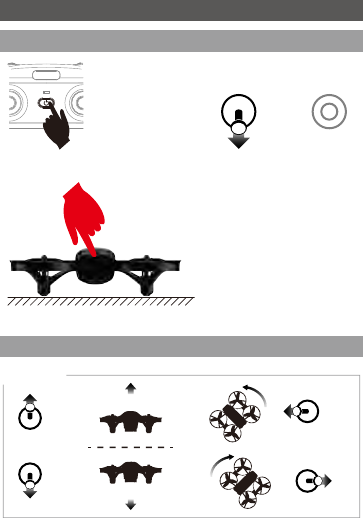
Left stick
Go up
Go down
Control stick operation
Clockwise turn
Counterclockwise
turn
Transmitter connect with Drone
Frequency Pairing
6
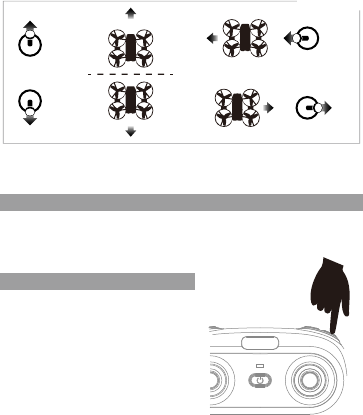
Right stick
Fly to the left
Fly to the right
Forward
Backward
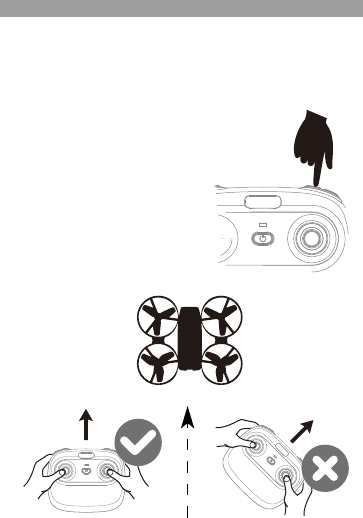
Take off
After the frequency pairing is successful, press the "take off/land" button, the
transmitter will sound "di", and the drone will automatically rises and flies at an
altitude of about 1.2 meters.
Tip: Do not use the emergency stop function unless in emergency situation.
Landing
During the flight, press the "take off/land"
button, the transmitter will sound "di",
and the drone will land slowly until landing.
Emergency Stop: During the flight, press
" take off/land" button for about 2 seconds,
the transmitter will sound "di.di..." and the
drone crashes directly.
Don’t operate the left stick during landing,
otherwise the current command will
automatically fail.
7
Heading Hold Mode
①
②
The default setting is NOT Heading Hold Mode.
Heading Hold Mode means that the user can operate the aircraft without having
to distinguish directions. This mode is suitable for beginners, or when it is
difficult to distinguish the forward and backward direction of the drone.
The Heading Hold Mode needs to ensure that the front of the drone is
consistent with the front of the controller, the controller does
not change the direction of the transmitter, and the drone is
always in front of the controller.
When the front of the drone is not
consistent with the pilot's front, the
drone will lose control or be lost.
Start: Press the "Heading Hold Mode" button,
the transmitter will sound "didi" to enter
the Heading Hold Mode.
Off: Press again, the transmitter will sound
"dididi" to exit the Heading Hold Mode.
Front
Rear
8
Medium speed default
Speed mode switch
Low speed: suitable for beginners to practice without wind.
Medium speed: suitable for skilled operatoroperating in light breeze.
High speed: suitable for professional operation in outdoor wind resistance.
Press down the right stick in the center button,
the transmitter will sound "di" to enter the Low
Speed Mode "L".
Press down again, the transmitter will sound
"di.di" to enter the Medium Speed Mode "M".
Press down again, the transmitter will sound
"di.di.di" to enter the High Speed Mode "H".
Press down
Short press the "Photo" button once
to take a picture.
When taking photo , the transmitter
will sound “di”.
Photos
Long press "video" about 1 seconds
toenter the recording state,to repeat
thisaction to stop recording and save
video.
When taking videothe transmitter
will sound“di”sound a long rang.
Video
Notes for Filming
The photos and videos are stored in the phone local gallery,you can display
in the phone directly.
App must be authorized to access the phone gallery, if not, then may be
unavailable to display the video and photos.
9

Left and right side flying trimmer
During the flight, if the drone tilts to left, then
press down the left stick in the center button
and push the right stick to right to adjust.
Otherwise push to left.
Forward / Backward Trimmer
During the flight, if the drone tilts forward,
press down the left stick in the center button,
and push the right stick backwards.
Otherwise push forwards.
Left and right turning trimmer
During the flight, if the drone head rotates to
left,then press down the left stick in the
center button and push the left stick to right.
Otherwise push to left.
Tips: When the drone is fiercely impacted or crashed, it may cause the gyro
can not recover and cause difficult control, if so, you can re-pairing &
re-calibrateand put the drone on the level surface.
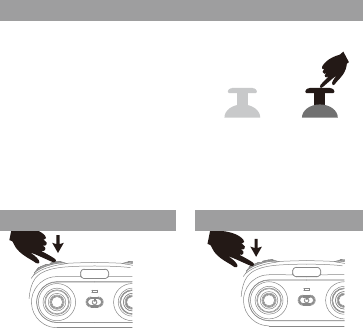
After successful frequency alignment,
the right stick is pushed to the lower
right corner by 45°, and the drone LED
turns to keep bright after quick flashing,
indicating that the gyroscope has been
calibrated. Release the right stick.
Flying Trimmer
Drone calibration (When abnormal flying)
Press down
Press down
Press down
10
Push the left and right stick inward to the
45 degree angle simultaneously.
In standby, unlocked the motor and working.
In Working, locked the motor and stop rotating.
Unlocking/locking the motor
Note: If the propeller is deformed or damaged, Altitude Hold Mode will fail.
If the atmospheric pressure is instability or Typhoon weather, Altitude Hold Mode
can not work well.
Intelligent flight control system calculates the hovering position, more stable
control feature, makes it easier for beginners to control. Release the stick, the
drone will keep hovering automatically to enable single hand operation.
Altitude Hold Mode
Low Battery Alarm
①
②
When the propellers get stuck, then activate stuck protection function and
the motors stop running.
Pull down the left stick to the lowest position and then go back to the
center, stuck protection will be released and the drone can fly again.
Stuck Protection
Out of range alarm
Transmitter: When the transmitter in low battery, the transmitter will continues
to sound "di...di...di......" to remind the user to return home and
replace the batteries of the transmitter as soon as possible.
Drone: When the drone in low battery, the transmitter will continues to sound
"di.di.di......" to remind the user to return home.
When the drone is out of the remote control distance, the transmitter will
continues to sound “didi...didi...didi” to alarm the user to return the drone
immediately.
11
B
B
B
A
A
A
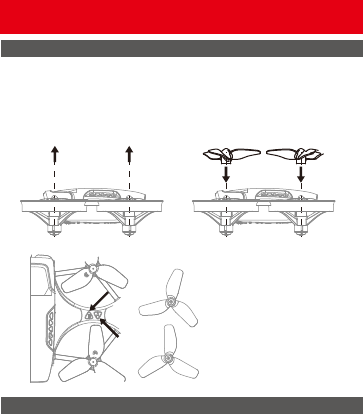
There is different A and B remarks on the propeller. Be sure that the propellers are installed
to the correct motors, which remarked the Letters to identify on the motor holder, if not,
then the drone can not work normally.
Disassembly:
hold the propeller vertically and then pull the propeller out.
Installation:
mount propeller aim the central shaft of the motor and press down.
Disassembly
Installation
Parts Replacement
Propeller Replacement
Please make sure the
propeller are installed
correctly, otherwise
the drone cannot fly.
Attention
① Switching sequence. At first, turn on the power of the transmitter, then turn
on the power of the drone. After the end, turn off the power of the drone
first, and then turn off the power of the transmitter.
Improper operation caused the crash. It is necessary to check and confirm
the connection of the motorpropeller or battery of the drone and the
damage degree, so that the drone can fly again. If there is damaged, please
replace the new accessories or prone to accident.
②
12
Li-Po Battery Disposal & Recycling
Wasted Lithium-Polymer batteries should not be placed
with household trash. Please contact local environmental
or waste agency or the supplier of your model or your
nearest Lithium-Polymer batteries recycling center.
Parameter
Tips: the above data are the test data of UDIRC toy lab, for reference only.
Drone
Model
Weitht
Maximum
flight time
WIFI Distance
Operating
Temperature Range
Operating frequency
Battery
Type of battery
Charging Time
Charging
temperature range
U61
63g (typical value)
7 minutes(calm)
30m (indoor and
unobstructed)
0°C to 40°C
2.4GHz / 2.4G WiFi
3.7V500mAh
LiPo
About 80 minutes
5°C to 40°C
Transmitter
Operating frequency
Maximum
transmission distance
Operating
temperature Battery
2.4GHz
50m
(unobstructed)
0°C to 40°C
4×1.5V AA
battery
Charger
Output
5V 2A
APP / Live View
App Name
Image transmission
system
Real time image
transmission
Operation System
Flyingsee
2.4GHz wifi
480 P@20 fps
This software is
suitable for mobile
phones in the
IOS 9.0 or later
and Android 4.4
or later system,
Camera
Image resolution
Static Photography
Mode
Video Resolution
Image mode
Frame Rate
File System
Image format
Video format
TF Card
Operation
Temperature
640×480P
Single shoot
640×480P
RGB
25
FAT 32
JPEG
MP4, H.264
Unable
0°C to 40°C
13

Troubleshooting Guide
The drone
could not
hover and
tilts to
one side.
4
The drone
indicator
light is off.
5
1. Low battery. 1. Recharge the drone battery.
2. The battery is expired or over
discharge protection.
2. Buy a new battery from local seller to
replace the battery or charge the battery
in accordance with the use manual.
Could not
see the
picture.
6
1. There is interfering signal nearby. 1. Cut off the wire and re-connect.
2. Damaged camera.
2. Buy a new camera box from local
seller to replace
Hard to
control by
cellphone.
7 1. Not experienced enough.
1. Practice and read the cellphone
controlling instruction carefully.
1. The propeller deformed seriously. 1. Replace propeller.
2. The motor holder deformed. 2. Replace the motor holder.
3. The gyro did not reset after violent
crash.
3. Put the drone on the flat ground for
about 10s or restart the the drone to
calibrate again.
4. The motor is damaged. 4. Replace motor.
Problem Problem Cause SolutionNo.
The
transmitter
indicator
light is off
1
1. Low battery. 1. Replace the transmitter battery.
2. The battery positive pole and
negative pole are in reverse order.
2. Install the battery in accordance with
the user manual.
3. Poor Contact.
3. Clean the dirt between the battery and
the battery slice.
Fail to pair
the drone
with
transmitter
2
1. Indicator light is off. 1. The same as above 1.2.3.
2. There is interfering signal nearby.
2. Restart the drone and power on the
transmitter.
3. Mis-operation.
3. Operate the drone step by step in
accordance with the user manual.
4. The electronic component is damaged
for frequent crash.
4. To buy spare parts from local seller
and replace damaged parts.
The drone
is under-
powered or
can not fly.
3
1. The propeller deformed seriously. 1. Replace the propeller.
2. Low battery. 2. Recharge the drone battery.
3. Incorrect installation of propeller.
3. Install the propeller in accordance
with the user manual .
14
FCC Note
This equipment has been tested and found to comply with the limits
for a Class B digital device, pursuant to Part 15 of the FCC Rules.
These limits are designed to provide reasonable protection against
harmful interference in a residential installation. This equipment
generates uses and can radiate radio frequency energy and, if not
installed and used in accordance with the instructions, may cause
harmful interference to radio communications. However, there is no
guarantee that interference will not occur in a particular installation.
If this equipment does cause harmful interference to radio or
television reception, which can be determined by turning the
equipment off and on, the user is encouraged to try to correct the
interference by one or more of the following measures:
Reorient or relocate the receiving a ntenna.
Increase the separation between the equipment and receiver.
Connect the equipment into an outlet on a circuit different from
that to which the receiver is connected.
WARNING: Changes or modifications not expressly approved by the party
responsible for compliance could void the user's authority to
operate the equipment.
15
MADE IN CHINA
This device complies with Part 15 of the FCC Rules. Operation is
subject to the following two conditions:
(1) This device may not cause harmful interference.
(2) This device must accept any interference received, including
interference that may cause undesired operation.
The equipment may generate or use radio frequency energy. Changes
or modifications to this equipment may cause harmful interference
unless the modifications are expressly approved in the instruction
manual. Modifications not authorized by the manufacturer may void
user’s authority to operate this device.
Important
Notice
Our company's products are improving all the time, design
and specifications are subject to change without notice.
All the information in this manual has been carefully checked
to ensure accuracy, if any printing errors, our company
reserve the final interpretation right.
16
