
Admin User Guide:
Keycode Management
June 2017


LiveText Keycode Management User Guide
Keycode Management Overview ............................................................................................. 2
Accessing Keycode Management .......................................................................................... 2
To access Keycode Management: ................................................................................................................. 2
The Keycodes screen ............................................................................................................... 3
Distributing Keycodes .............................................................................................................. 4
To distribute keycodes by term or course: .............................................................................................. 4
To distribute keycodes by individual student: ....................................................................................... 8
Sending Reminder Emails ...................................................................................................... 12
To send a reminder email to unregistered users by batch: ............................................................ 12
To send a reminder email to unregistered users by term or course: ......................................... 13
Unassigning keycodes ............................................................................................................ 16
To unassign a keycode: .................................................................................................................................. 16
Customizing the Registration Email .................................................................................... 19
2
Keycode Management Overview
LiveText Keycode Management is a tool that allows administrators to distribute and
manage keycodes for faculty and students. When Keycode Management is enabled, a
special administrator account is created. This account, called the
Keycode Manager
, has
unique permissions giving it access to the Keycode Management tool.
After courses and student rosters have been imported into LiveText, Keycode
Management can be used to select faculty and students to whom keycodes will be
assigned. Keycode Managers can select faculty or students by individuals within a
course, everyone in a specific course or multiple courses, or even all faculty and students
for an entire term. When new users have been selected, Keycode Management will
send those users an invitation email to their institutional email address, which contains
instructions and a link for registration. Once registered, users will have access to
LiveText, and will be automatically matched up with their courses.
Accessing Keycode Management
Keycode Management is a no-cost feature of LiveText.
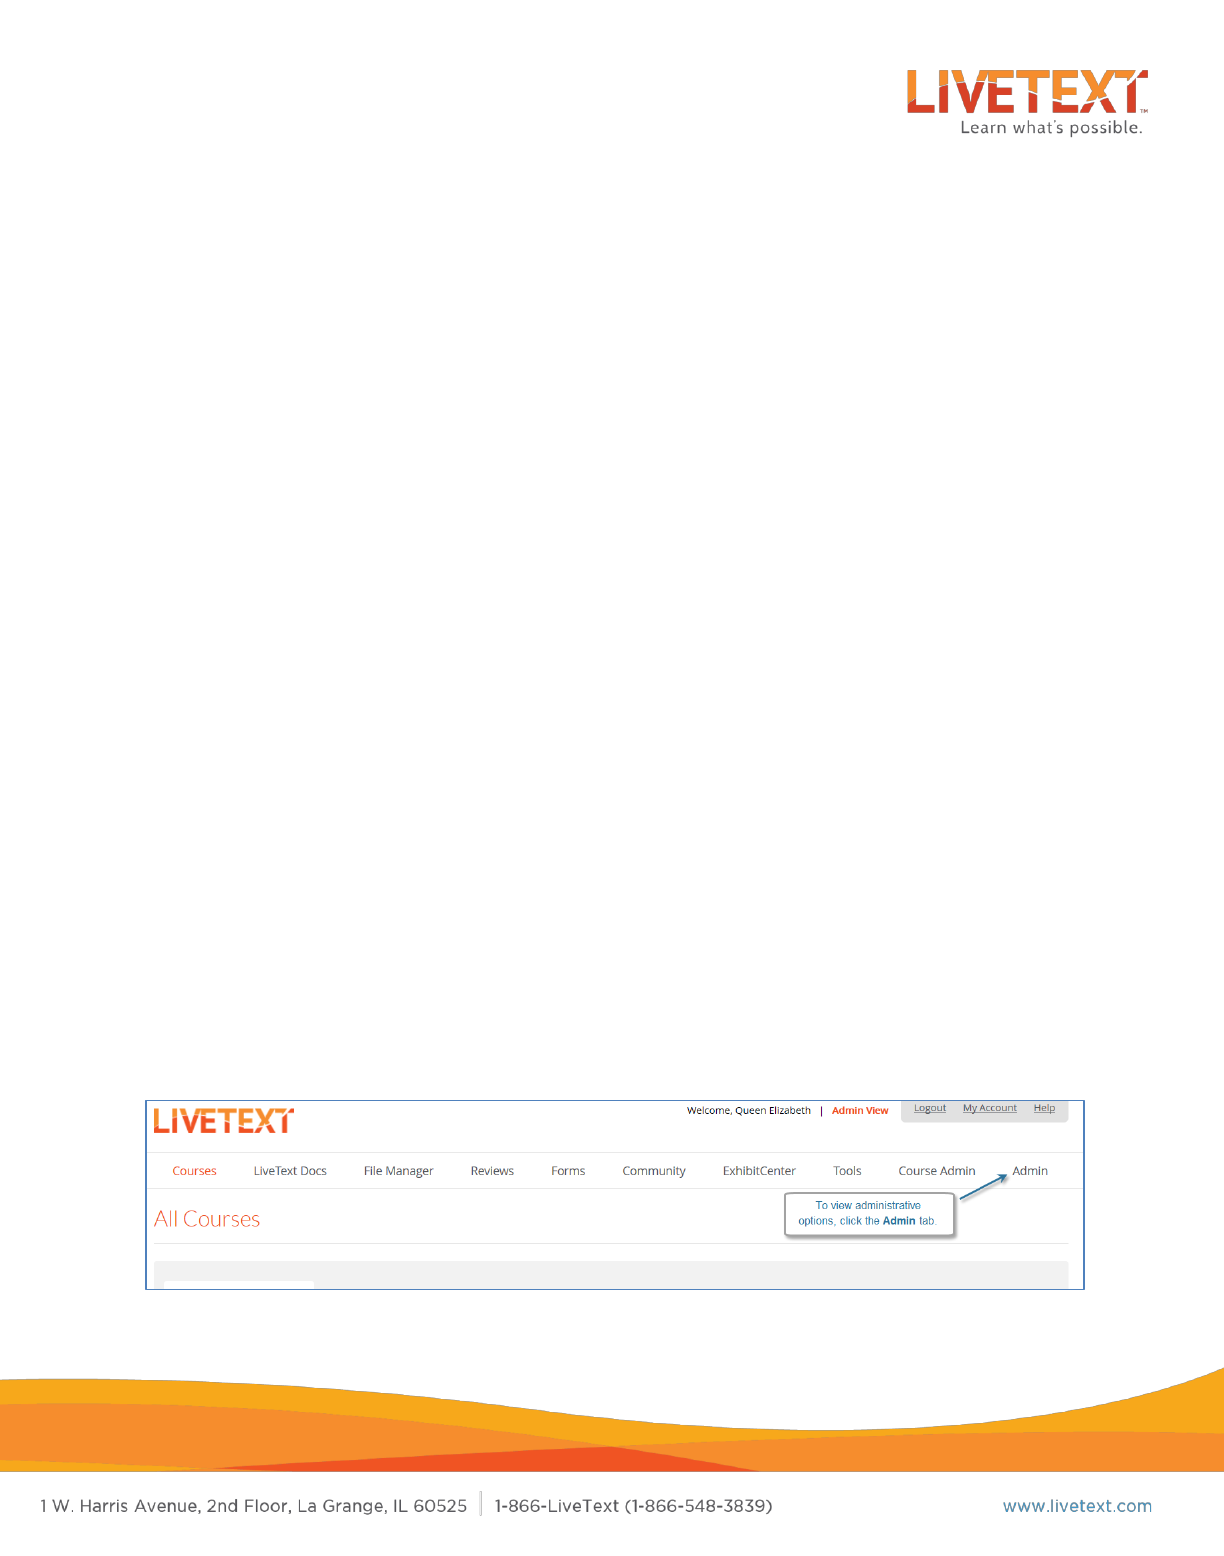
To access Keycode Management:
1. Log in to LiveText using the keycode manager account.
2. Click the Admin tab.
3
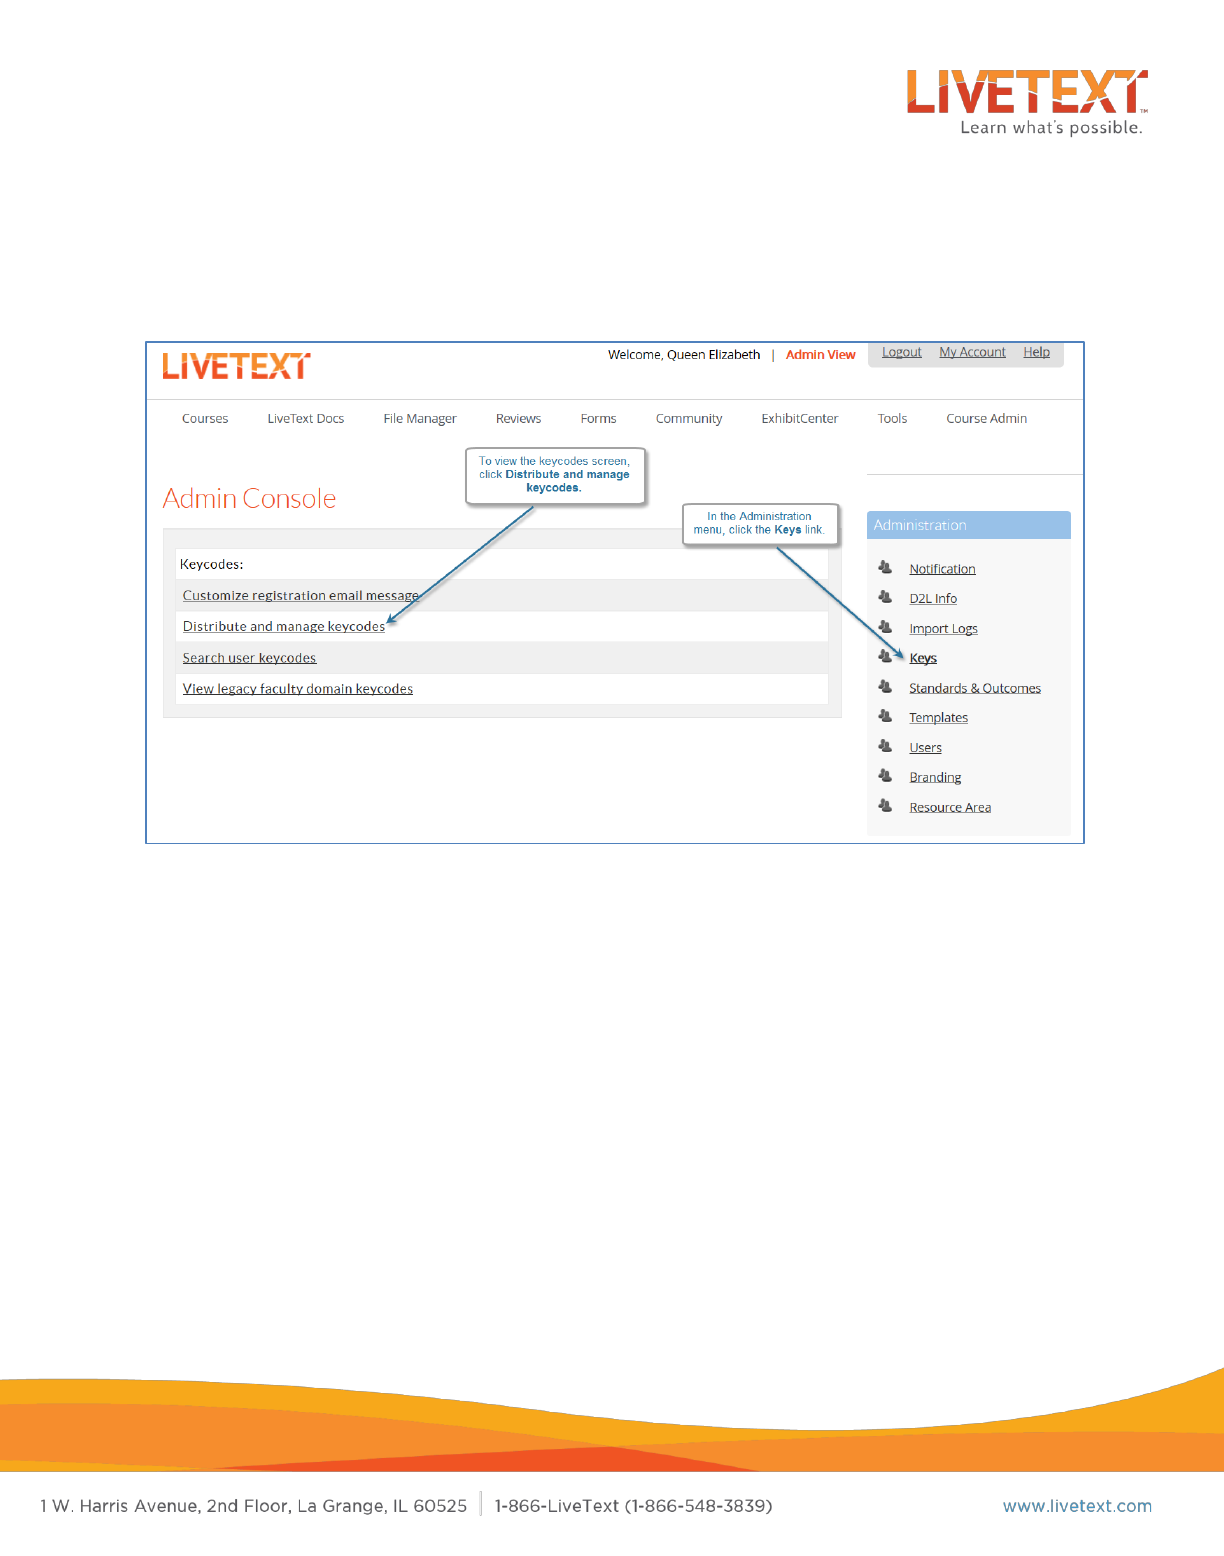
3. Under the Administration menu, click Keys.
4. Under the Keycodes menu, click Distribute and manage keycodes.
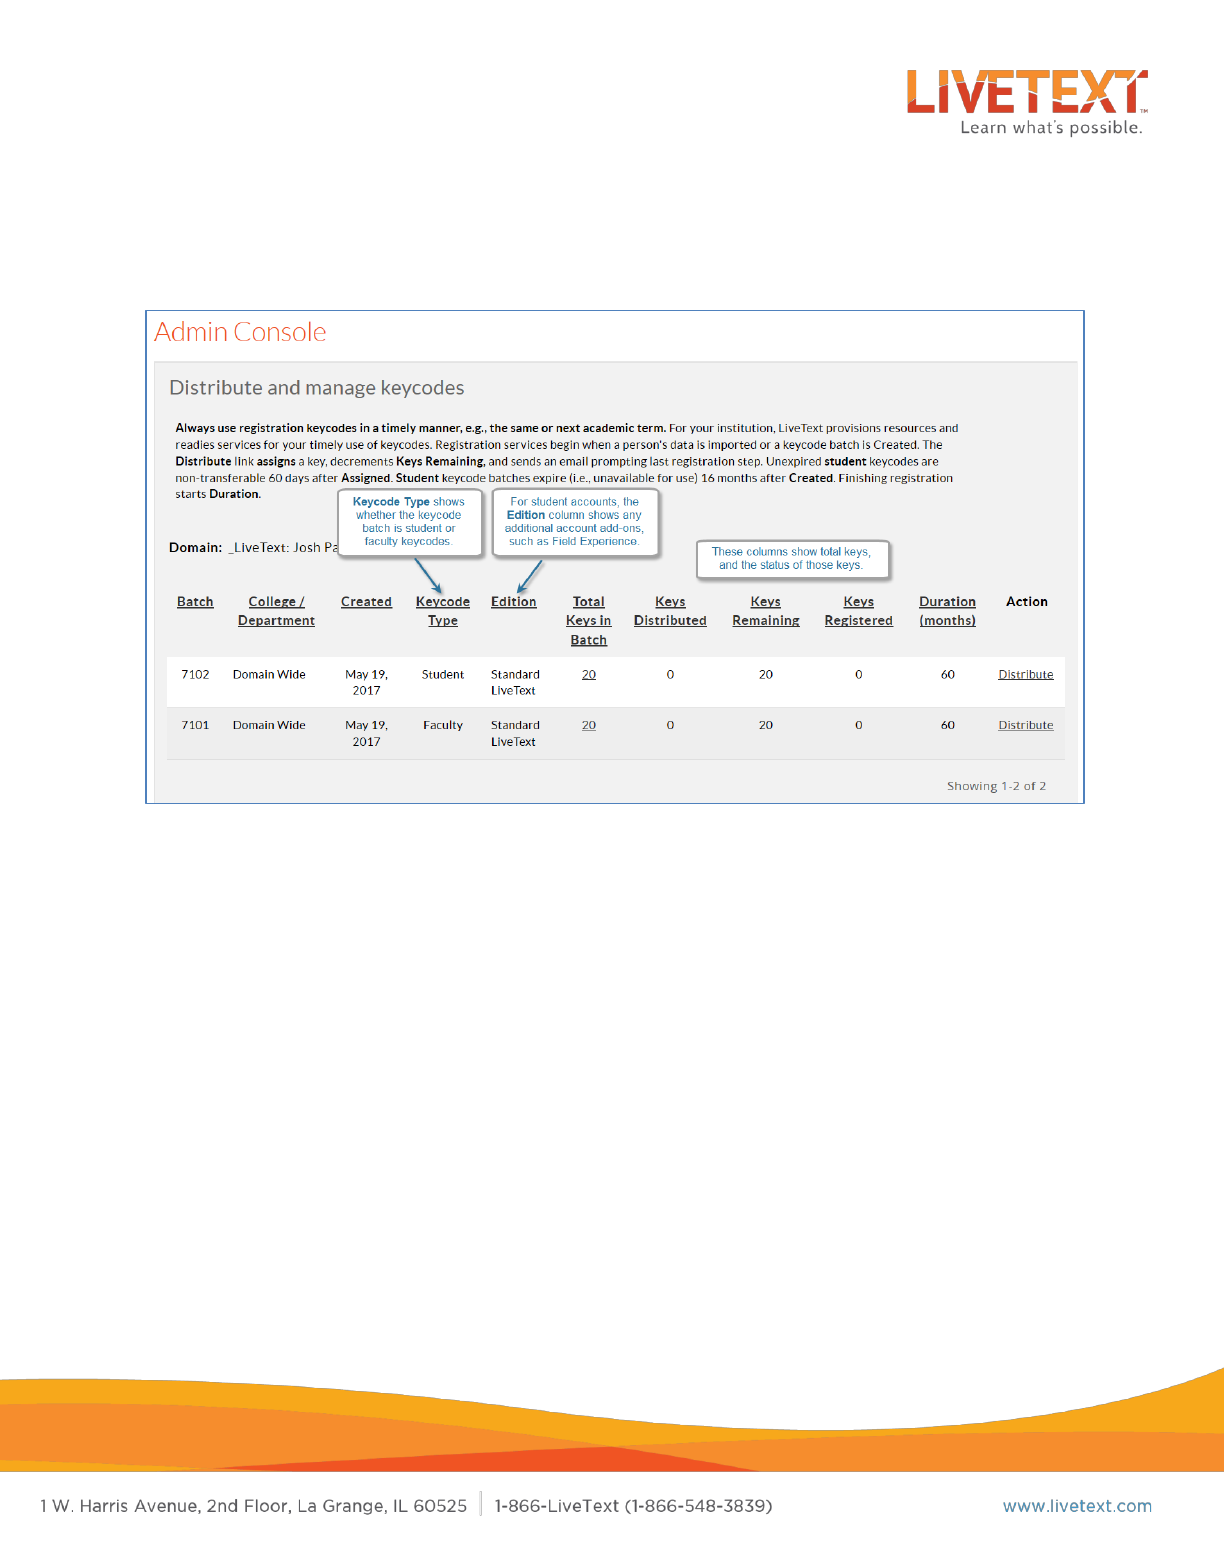
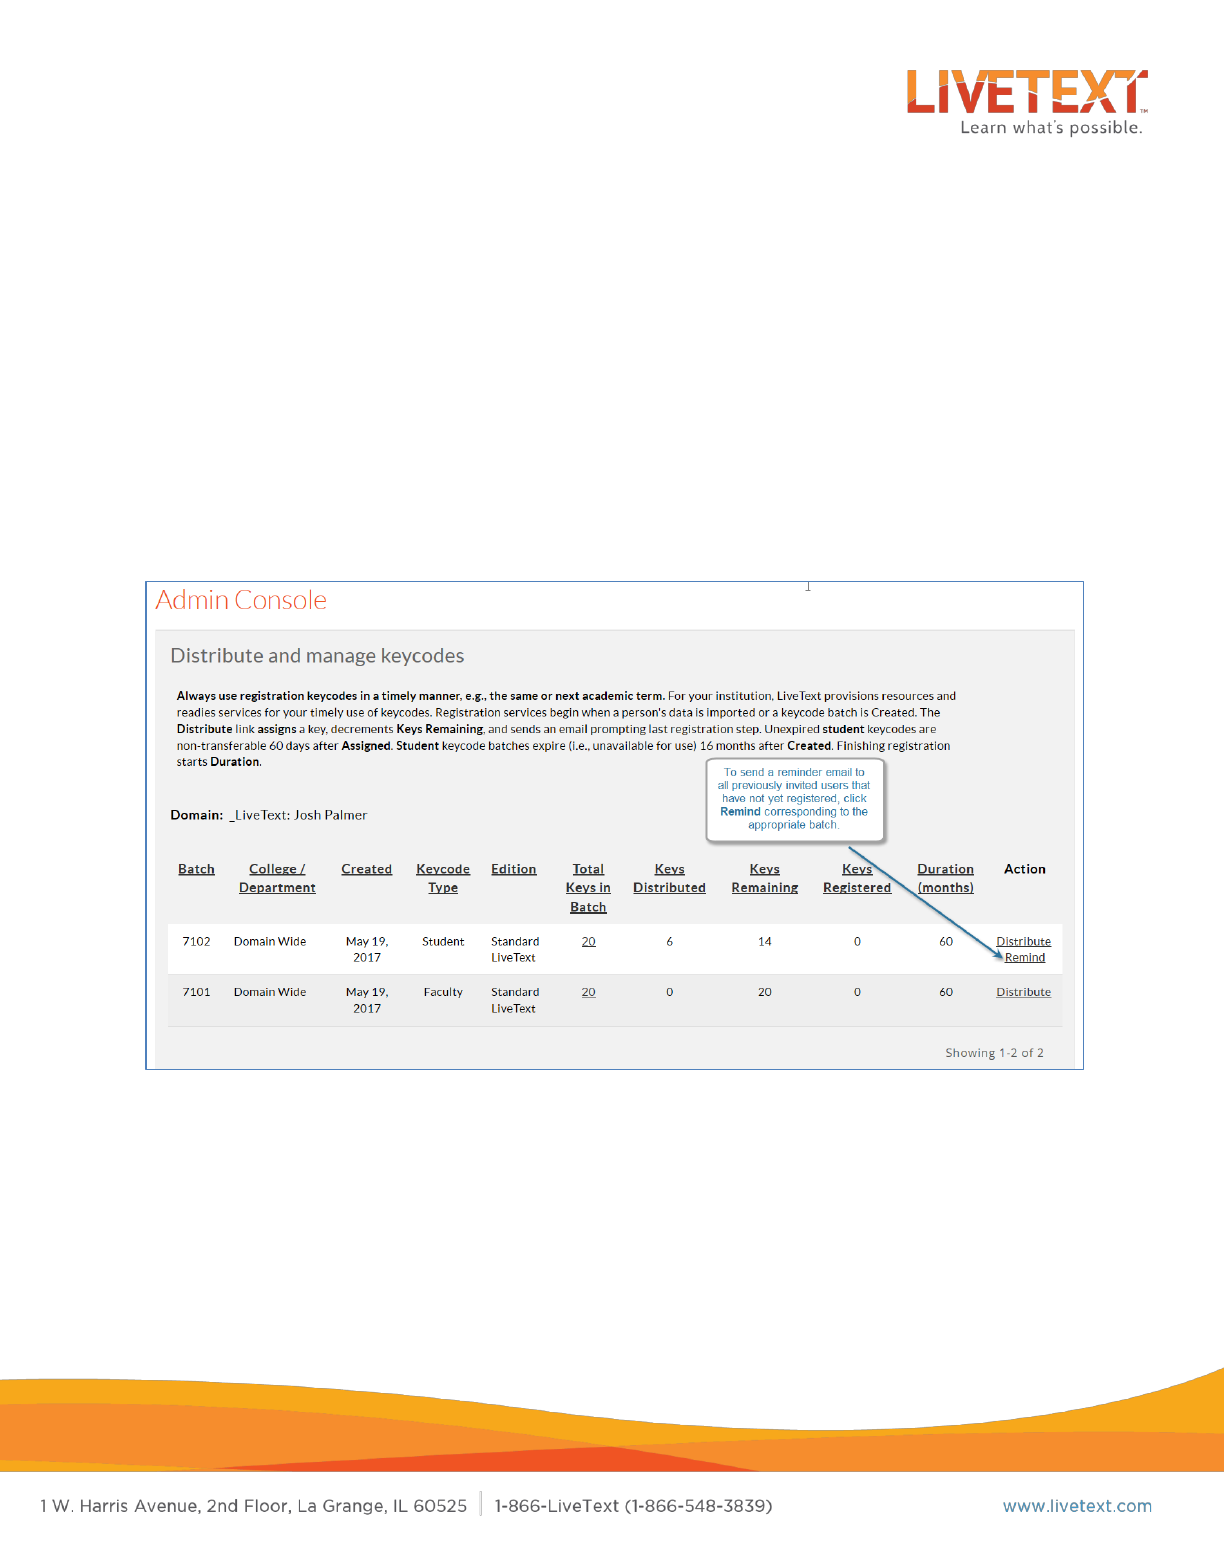
The Keycodes screen
When institutions purchase student keycodes (or request complimentary faculty
keycodes), LiveText adds keycodes to the keycodes screen in batches. The keycodes
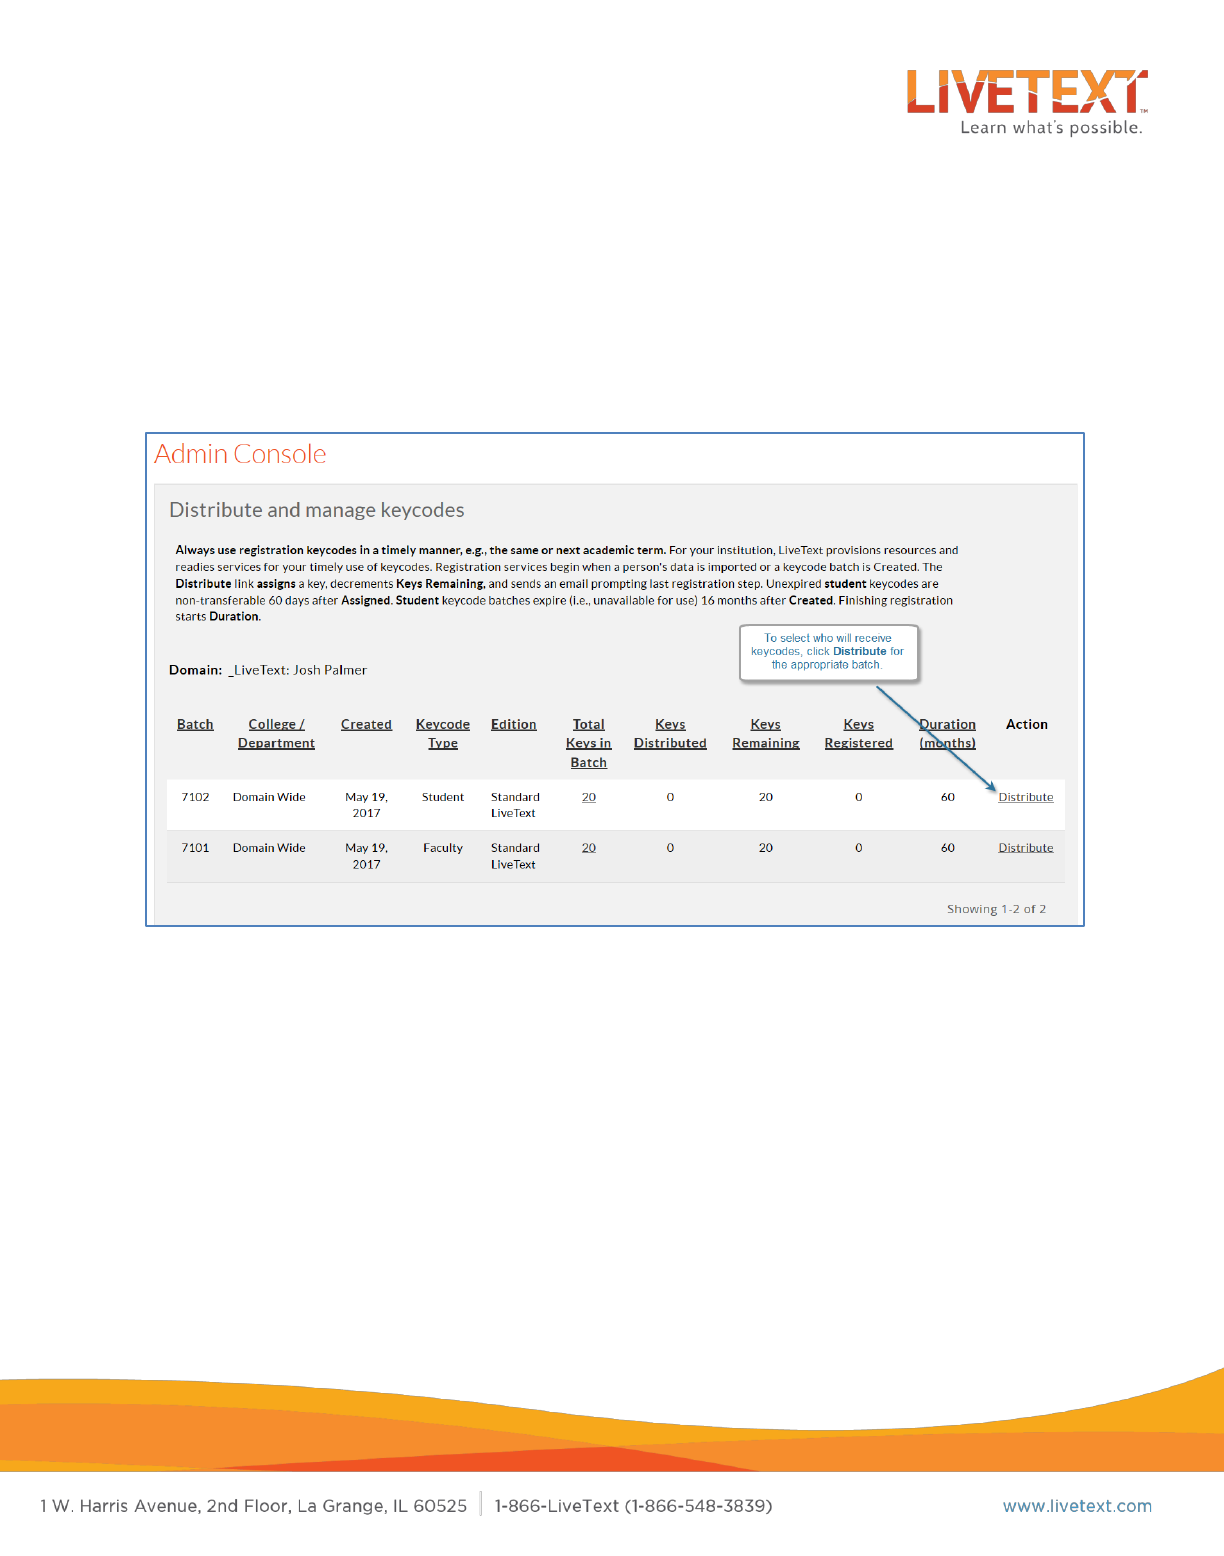
screen lists all batches, and provides details and distribution stats on the included
keycodes. The columns on the keycodes screen are:
1. Batch – A unique number used to indentify a batch of keycodes
2. College/Department – Defines if the keycode is usable across the entire institution or can only be
used within a specific college or department
3. Created – The date which the keycode batch was first created
4. Keycode Type – Displays whether the batch is student keycodes or faculty keycodes
5. Edition – For student keycodes, edition displays any feature add-ons, i.e. Field Experience
6. Total Keys in Batch – The total number of keycodes included in a batch
7. Keys Distributed – The number of keycodes in a batch that have been assigned
8. Keys Remaining – The number of keycodes in a batch that have not yet been assigned
9. Keys Registered – The number of distributed keycodes that have been registered by the user
4
10. Duration (months) – The number of months that the accounts registered will remain active
11. Action – Contains links that allow the distribution of keycodes, re-sending invitation emails, etc.
Distributing Keycodes
Unassigned or unregistered student keycodes are valid for 16 months from the date the
batch is created. After 16 months, student keycodes become invalid and are no longer
available for distribution or registration. Faculty keycode batches are valid indefinitely,
and may be assigned and registered at any time.
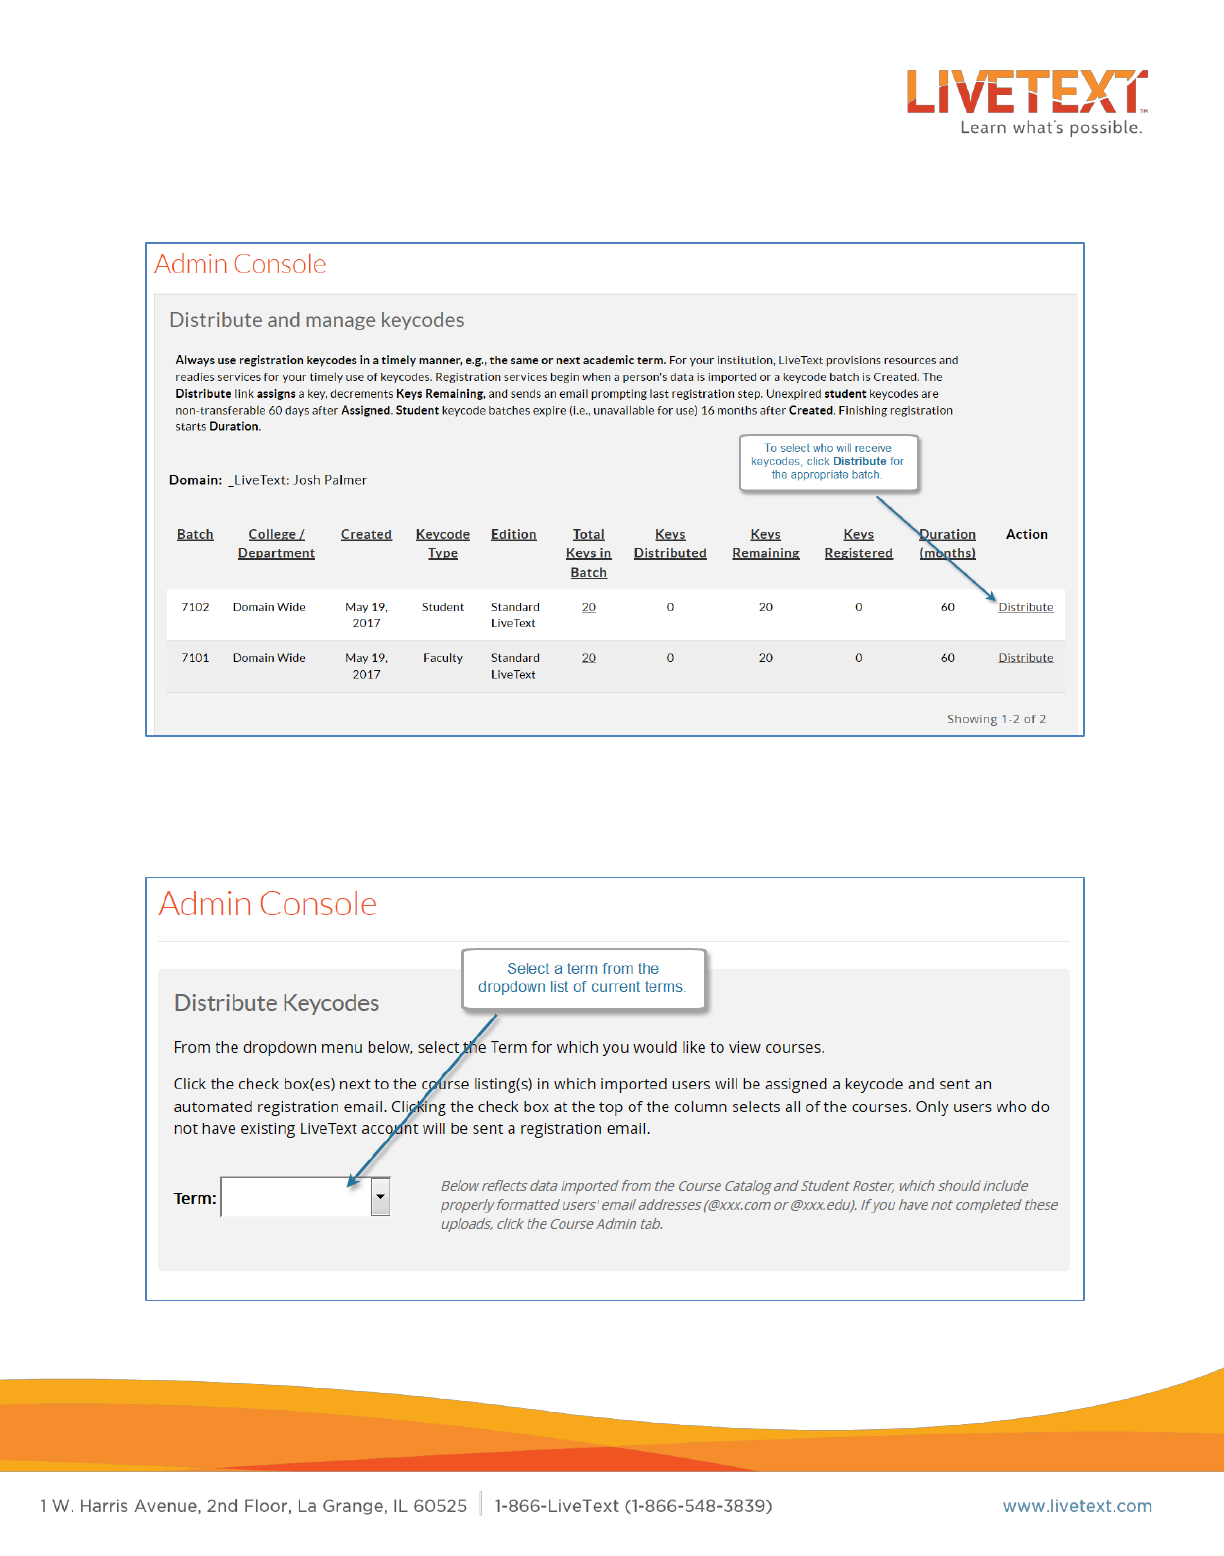
To distribute keycodes by term or course:
1. From the keycodes screen, locate the batch of keycodes to be distributed.
2. In the Action column, click the Distribute link corresponding to the
appropriate batch.
5
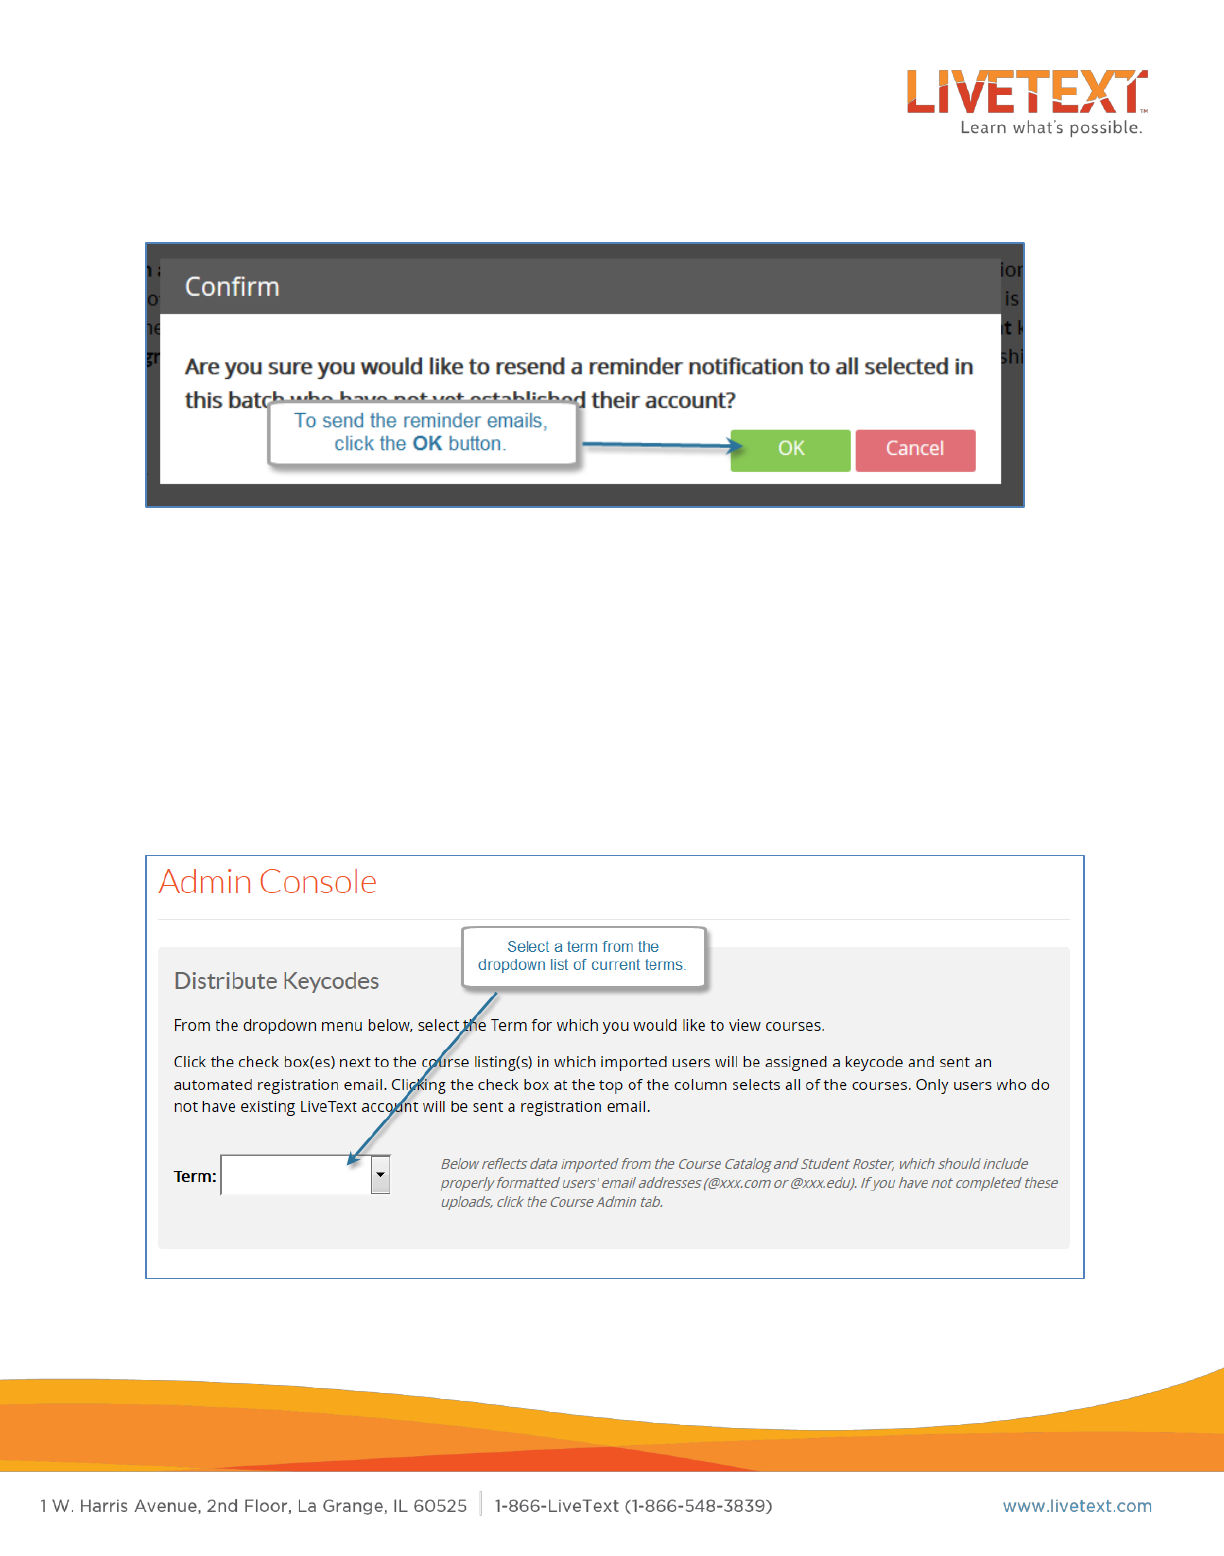
3. On the Distribute Keycodes screen, select a term from the dropdown menu.
All courses in the term will appear.
6
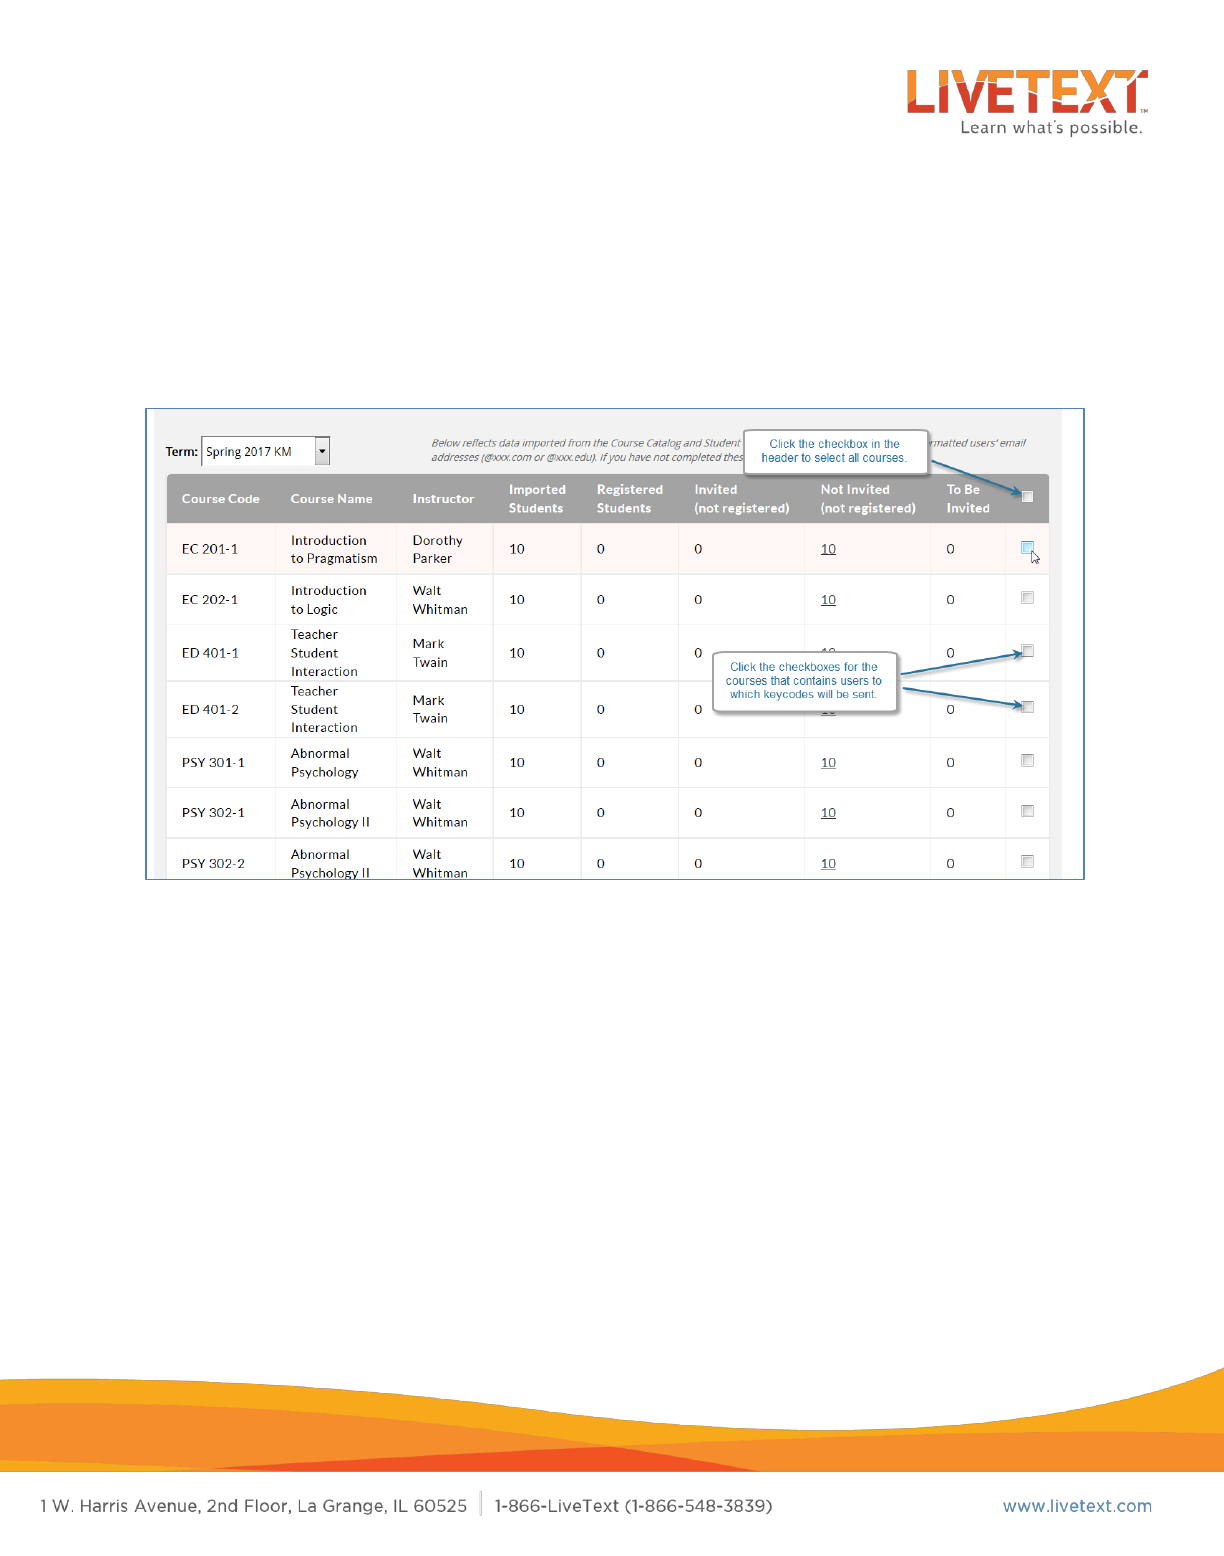
4. To select all students or faculty in the term, click the checkbox located in the
far right column of the table headers.
5. To select all students or faculty in a specific course or courses, click the
checkbox in the far right column corresponding to the course or courses.
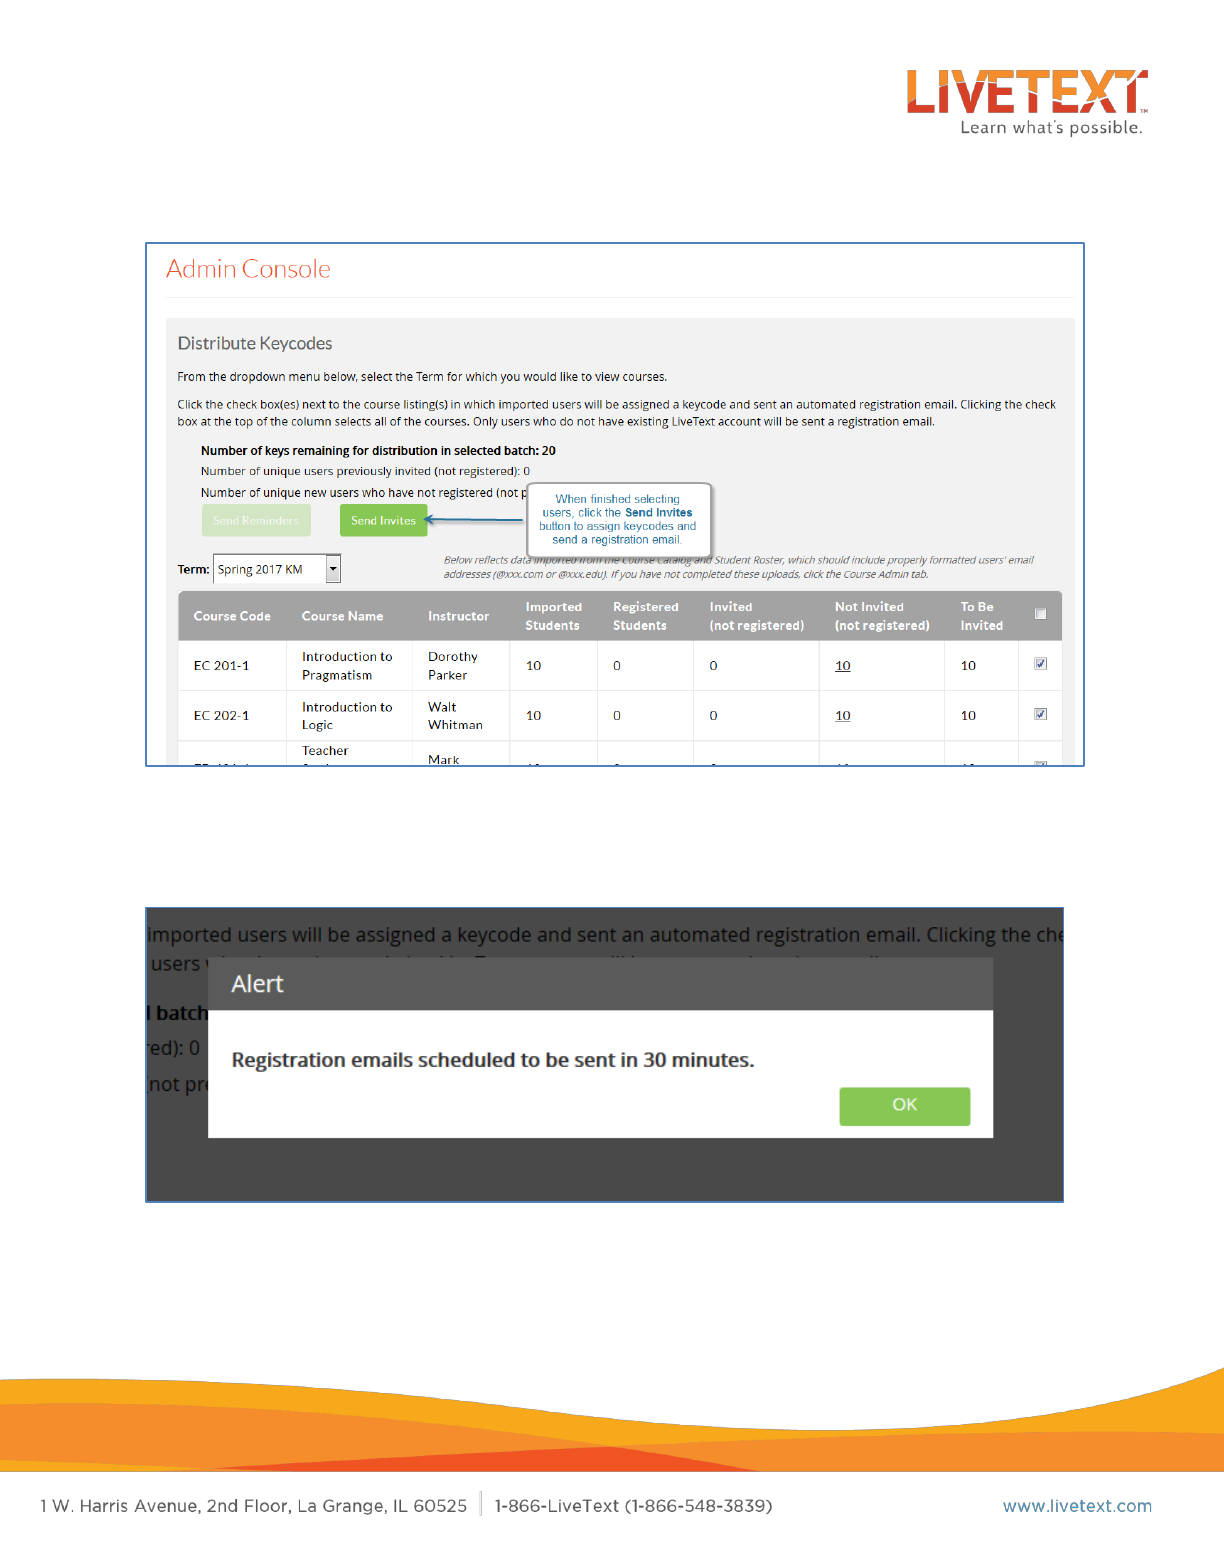
6. Once all selections have been made, click the Send Invites button to send
registration emails to all selected users.
7
7. A confirmation popup will appear, indicating sending the registration emails
successfully.
8
To distribute keycodes by individual student:
1. From the keycodes screen, locate the batch of keycodes to be distributed.
2. In the Action column, click the Distribute link corresponding to the
appropriate batch.
3. On the Distribute Keycodes screen, select a term from the dropdown menu.
All courses in the term will appear.

9
4. To select specific students within a course, click the underlined number in
the Not Invited (not registered) column that corresponds to the course in
which the student(s) are located.
10
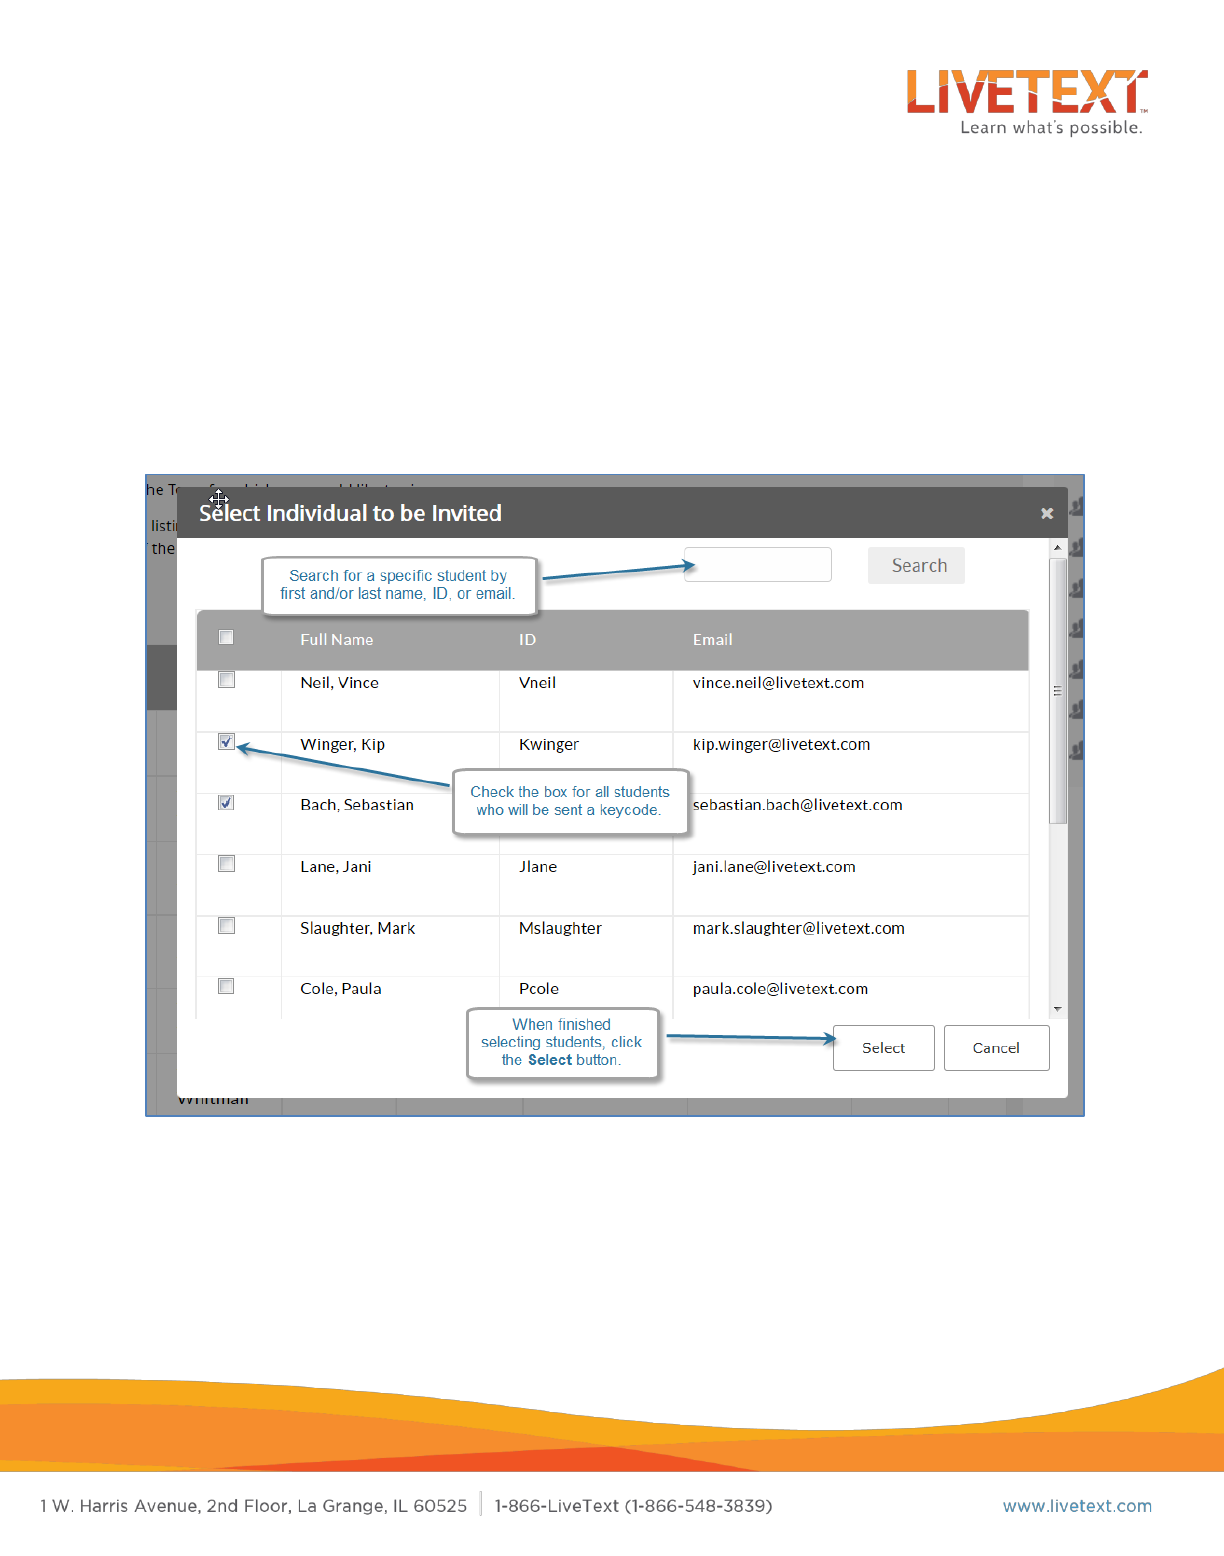
5. On the Select Individual to be Invited popup, click the checkbox next to the
name of the student(s) to select them.
or…
6. Use the search box to look for a student by name, ID, or email address.
7. Once all selections have been made, click the Send Invites button to send
registration emails to all selected users.

11
8. A confirmation popup will appear, indicating sending the registration emails
successfully.
12
Sending Reminder Emails
Once a registration email has been sent, keycode managers can send reminder emails to
users that have not yet registered their accounts.
To send a reminder email to unregistered users by batch:
1. From the keycodes screen, locate the keycodes batch containing the users to
whom reminder emails will be sent.
2. In the far right column, click Remind for the corresponding batch.
3. On the confirmation popup, click the OK button.
13
To send a reminder email to unregistered users by term or course:
1. From the keycodes screen, locate the keycodes batch containing the users to
whom reminder emails will be sent.
2. In the Action column, click the Distribute link corresponding to the
appropriate batch.
3. On the Distribute Keycodes screen, select a term from the dropdown menu.
All courses in the term will appear.

14
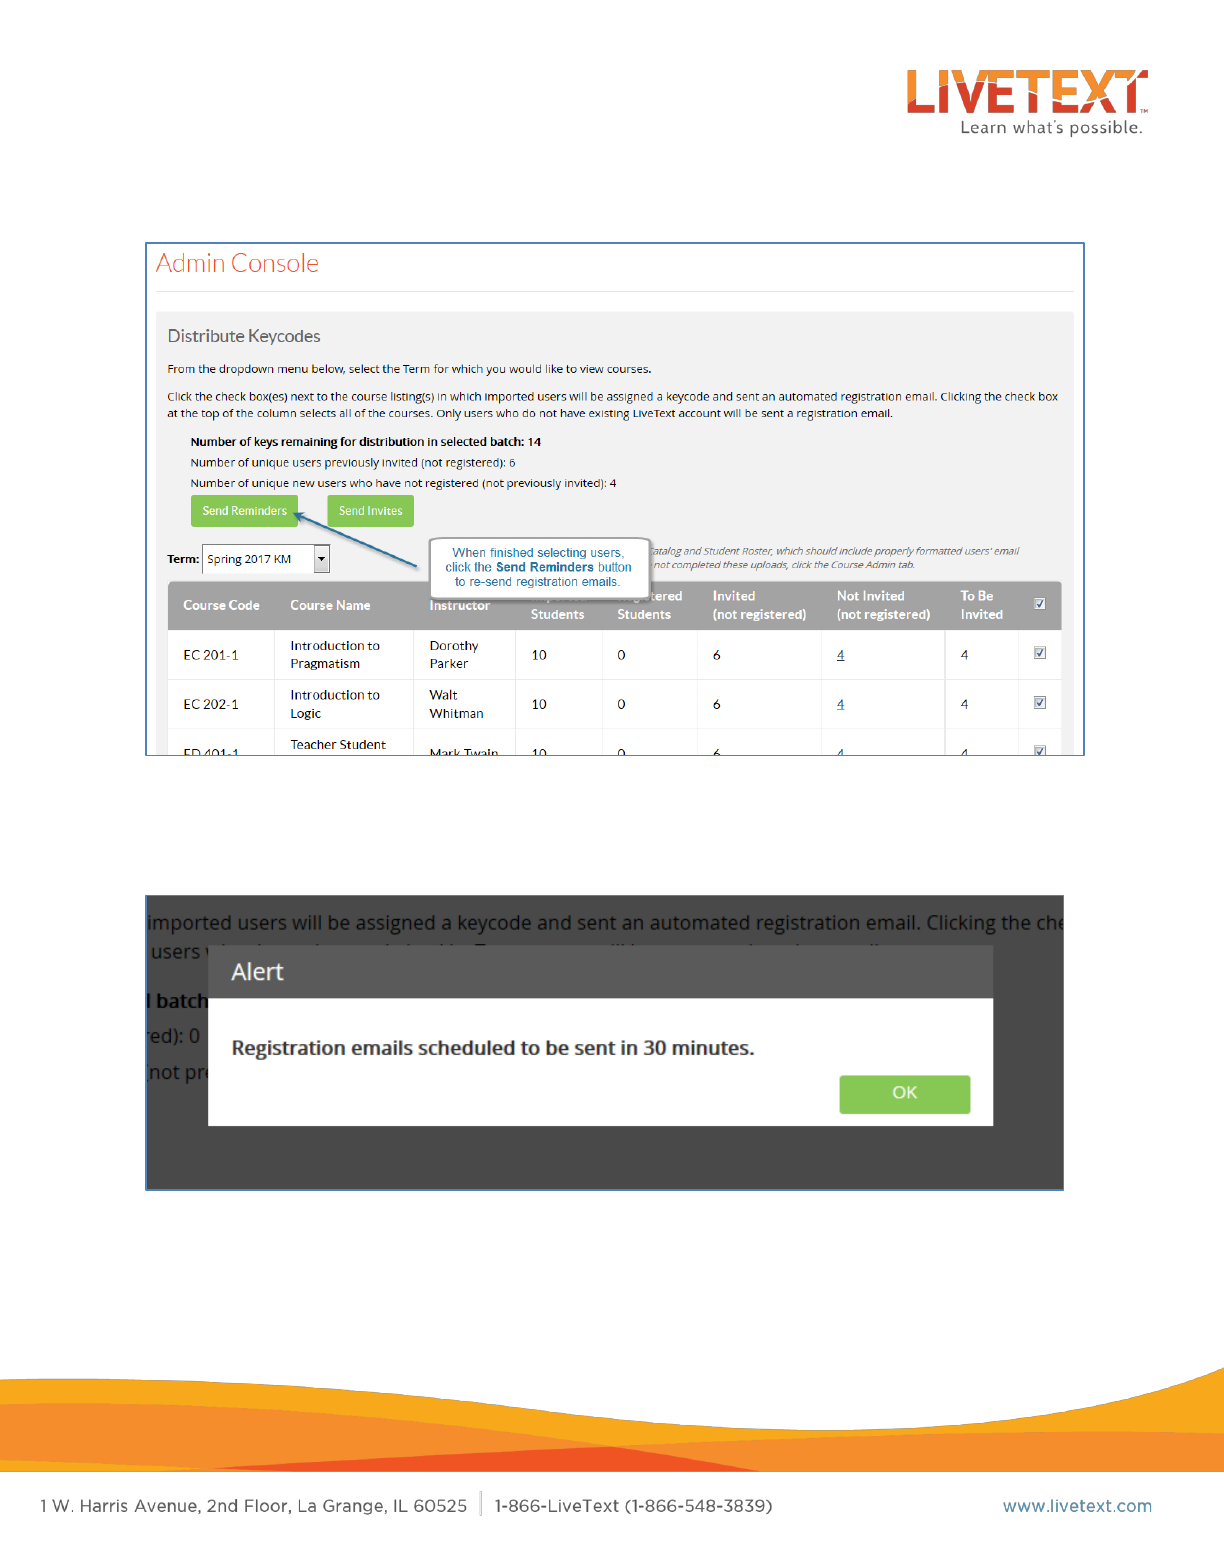
4. To select all students or faculty in the term, click the checkbox located in the
far right column of the table headers.
5. To select all students or faculty in a specific course or courses, click the
checkbox in the far right column corresponding to the course or courses.
6. Once all selections have been made, click the Send Reminders button to
send reminder emails to all selected users.
15
7. A confirmation popup will appear, indicating sending the registration emails
successfully.

16
Unassigning keycodes
Keycodes that have been assigned and distributed can be pulled back, or
Unassigned
.
This is useful if a keycode was assigned to the wrong user, or if it’s determined after
distribution that a user won’t need an account. A keycode can only be unassigned if it
has not yet been used to register an account.
Additionally, when student keycodes are assigned and registration emails have been
sent, students have 60 days to complete registration. If a student keycode remains
assigned and distributed, but NOT registered for more than 60 days, the student
keycode will become permanently assigned to that student, and can no longer be
unassigned.
Faculty keycodes that have been assigned and distributed remain valid and re-assignable
indefinitely.
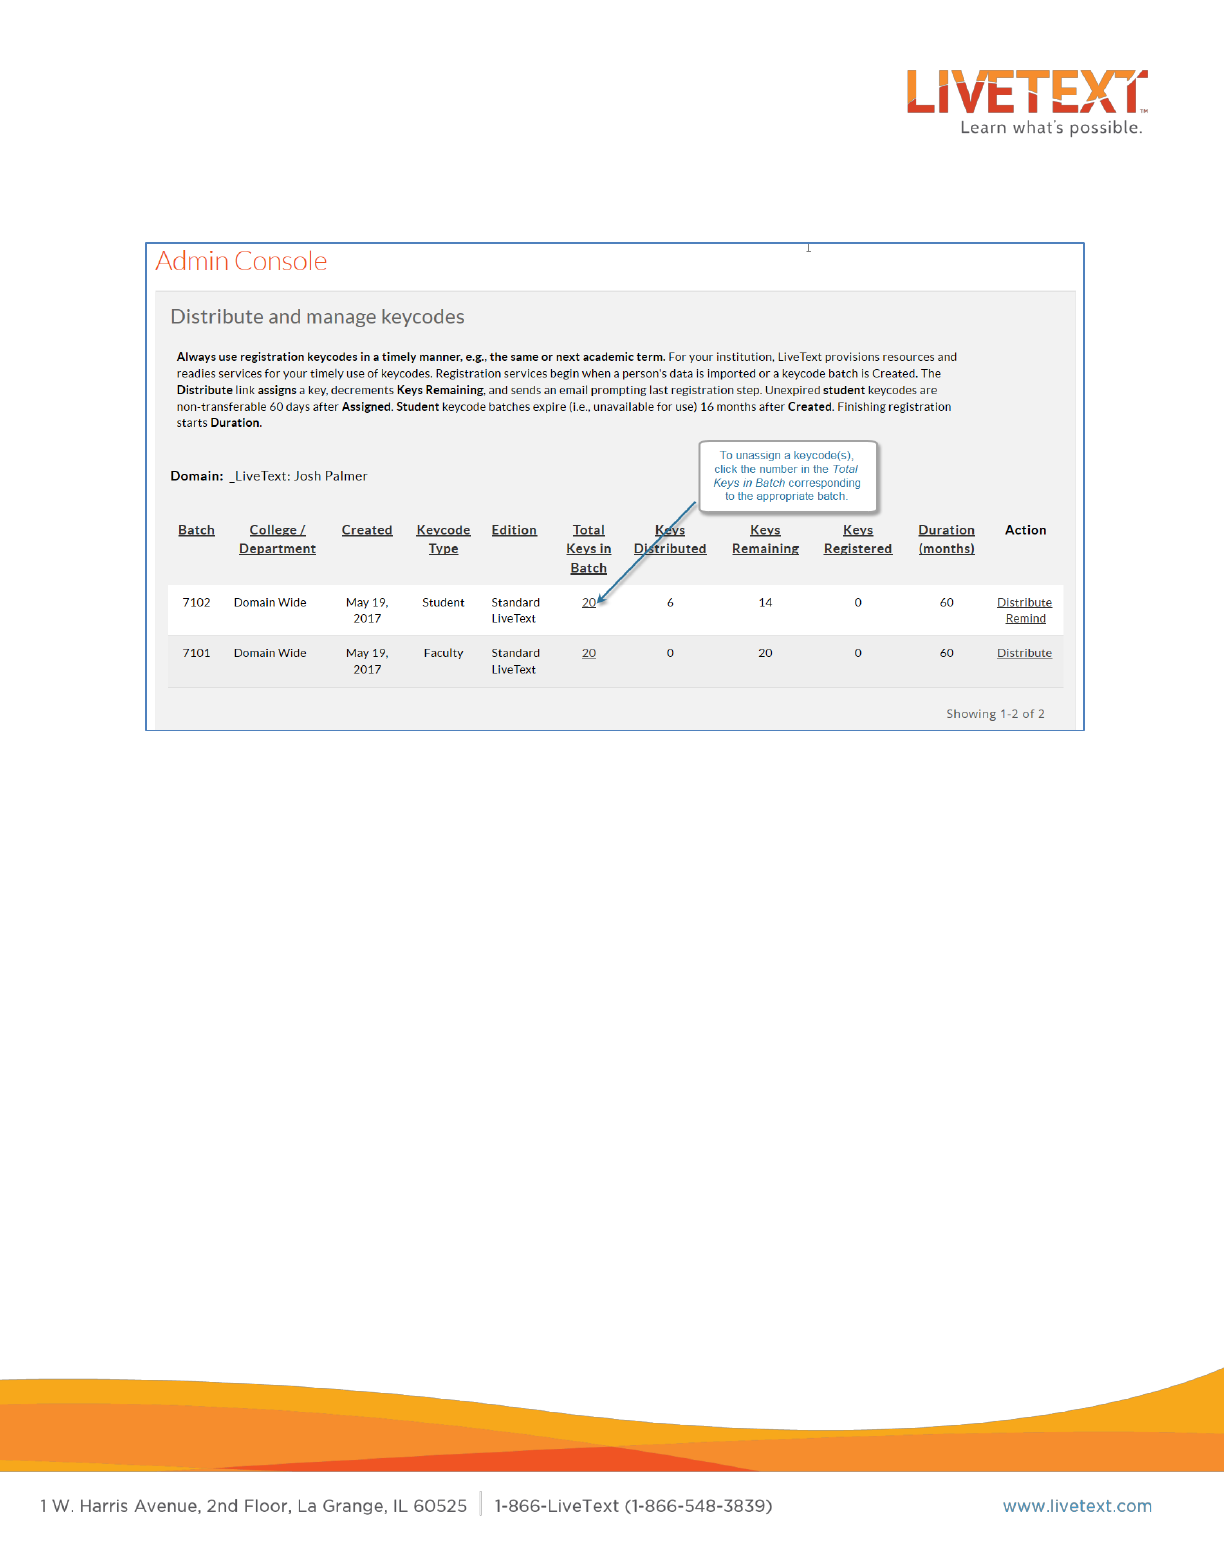
To unassign a keycode:
1. From the keycodes screen, locate the keycodes batch containing the
keycode(s) that will be unassigned.
2. Click the underlined number in the Total Keys in Batch cloumn corresponding
to the batch.
17
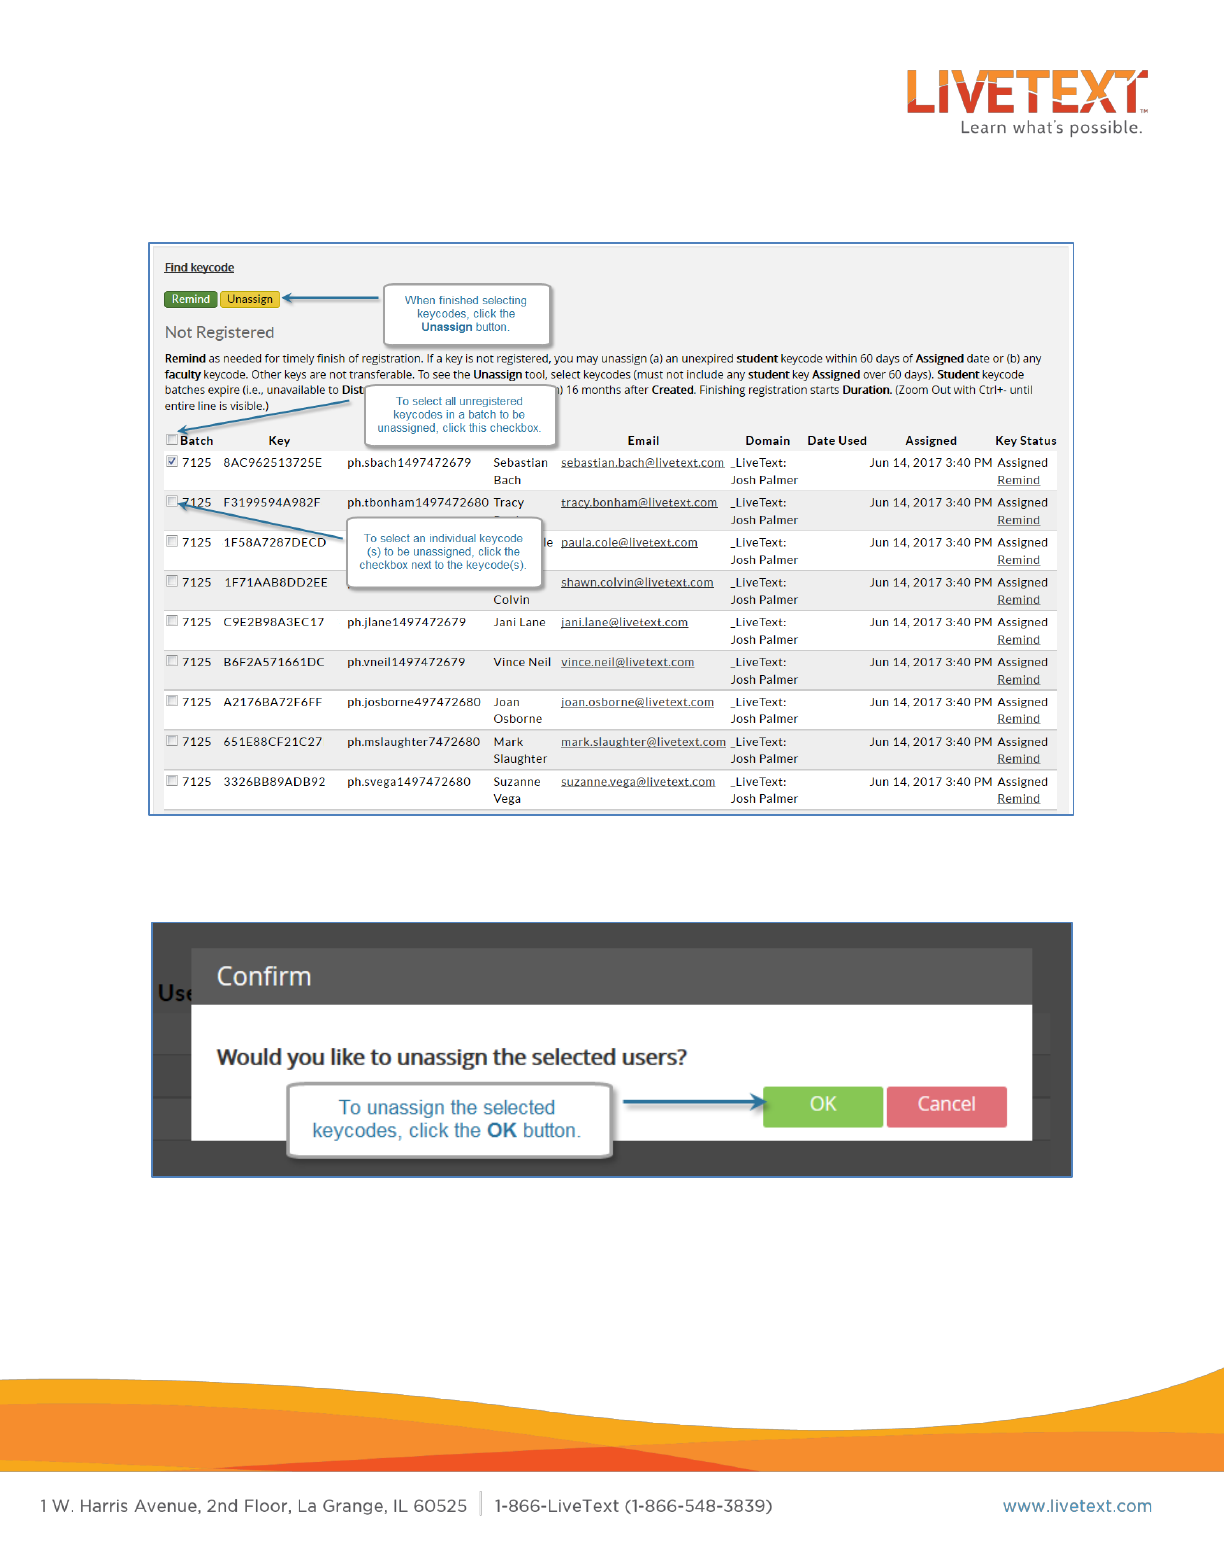
3. To select individual keycodes, click the checkbox next to the keycode(s) to
be unassigned.
4. To select all unregistered keycodes to a batch, click the checkbox next to
Batch in the table headers.
5. When finished selecting keycodes, click the Unassign button.
NOTE: The Unassign button is only visible if the selected keycodes are faculty keycodes or
student keycodes distributed within the last 60 days.
18
6. On the confirmation popup, click the OK button.
19
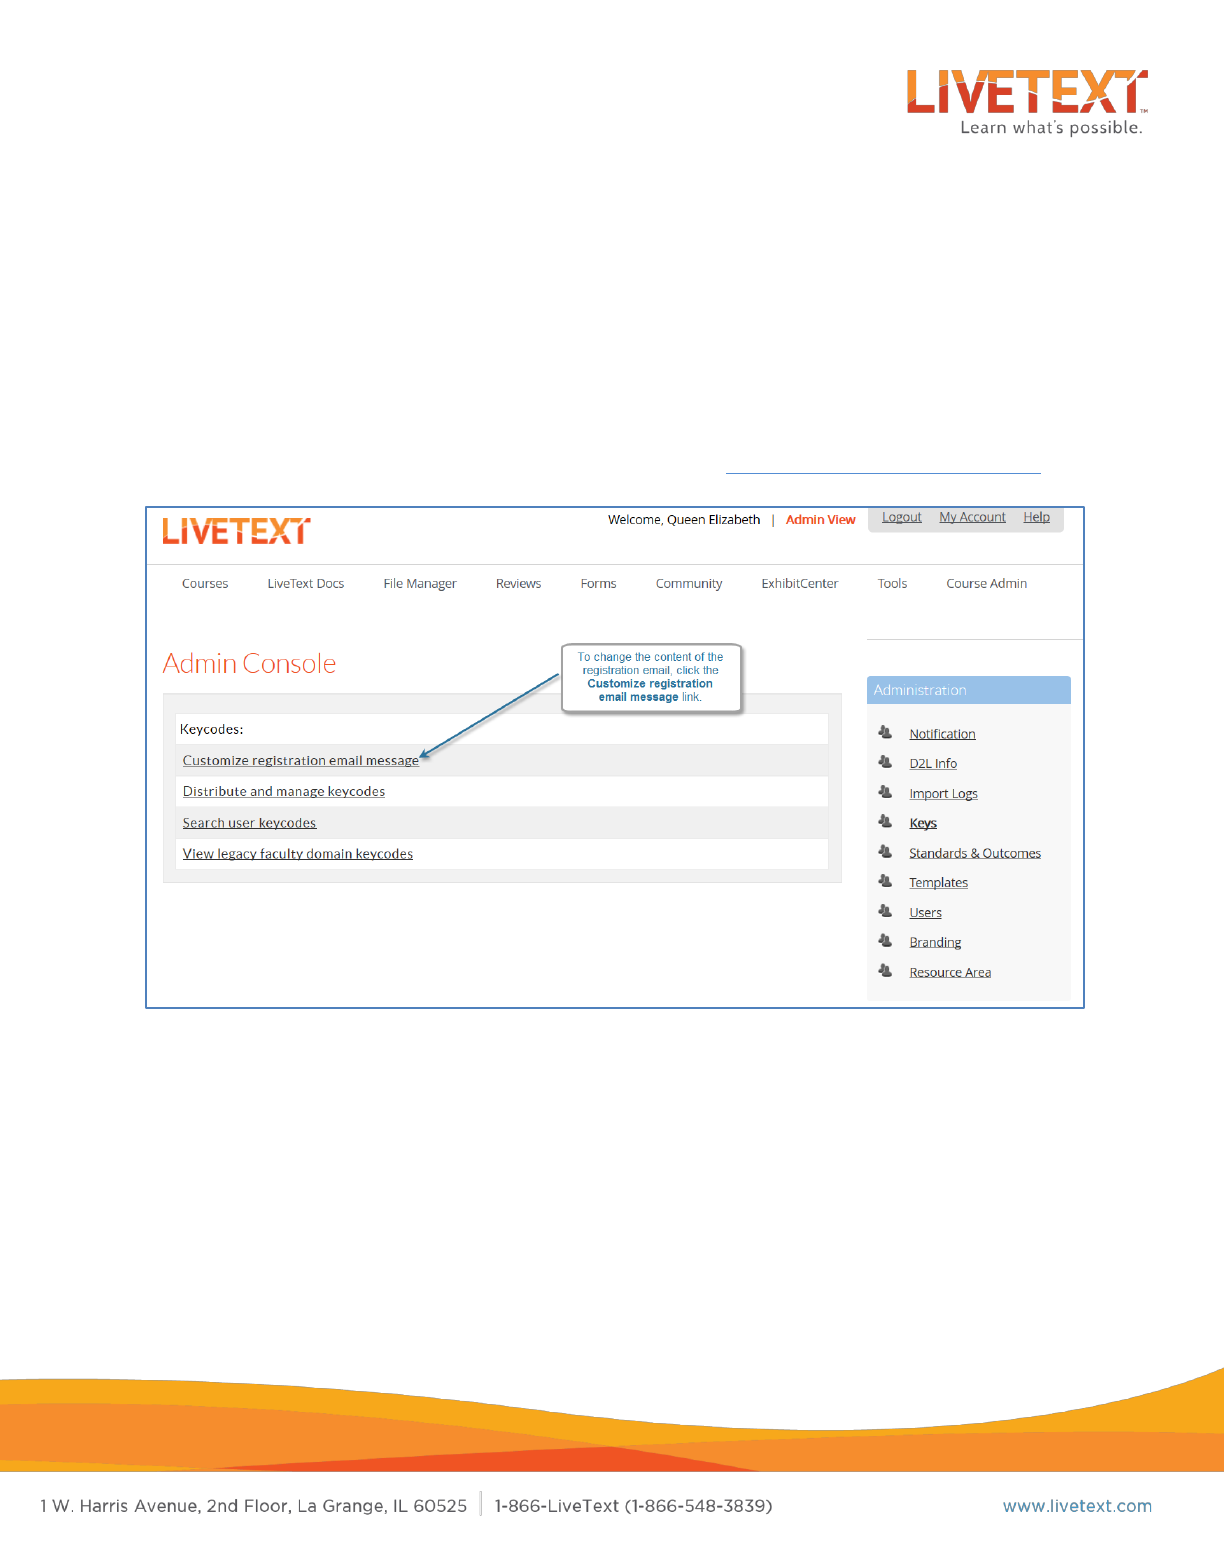
Customizing the Registration Email
The invitation email users receive can be customized using the Customize registration
email message link under the Keycodes menu.
Instructions are provided at the top of the window. Be sure to read them carefully, and
keep in mind that items in brackets are required. Please contact the LiveText
implementation team with questions on this process at implementation@livetext.com.
