National Aeronautics and
Space Administration
www.nasa.gov
When you have created and launched an AWS Linux EC2 instance, you need to be able to connect to it from your
computer using the SSH protocol. is will use the Mac Terminal window command line.
You must have an AWS account. If you have one, click HERE to sign into it.
You will need to create and launch a Linux EC2 instance to connect to. Instructions for this are found in the
tutorial titled “Create a Basic Elastic Cloud Compute (EC2) Instance.”
Connect to an EC2 instance using SSH
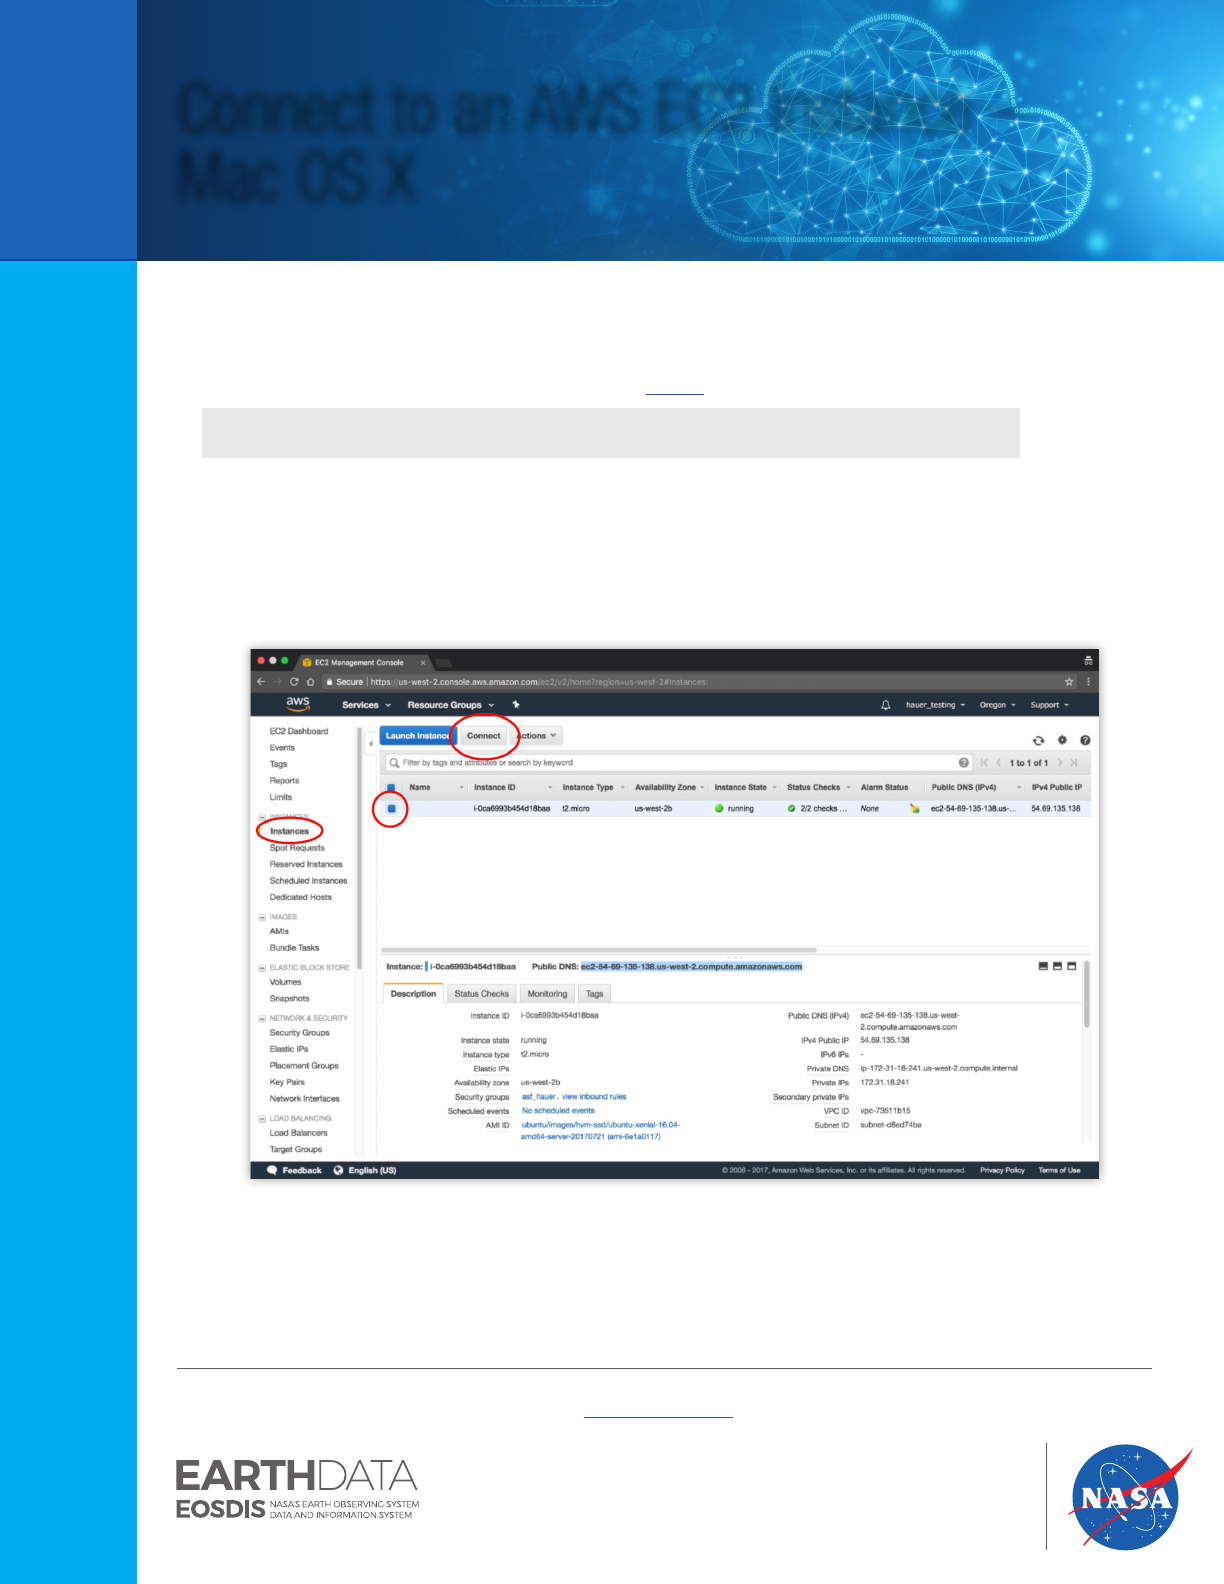
1. In the AWS EC2 Management Console (Figure 5.1), click on “Instances” in the left menu under EC2
Dashboard.
CLOUD PRIMER
Figure 5.1.
Connect to an AWS EC2 Instance –
Mac OS X
Includes moving les into and out of an EC2 Instance
C:\> pscp -i C:\<path>\yourkey.ppk C:\<path>\yourlename ubuntu@public_DNS:/home/ubuntu
Cloud technology is evolving so fast that it is likely that some details in the primer may no longer match reality when you are trying to use it. If you find
mismatches (e.g. broken third-party links), please send them to [email protected] so that we can feed them into the next release of the primer.
v1.0/August 2020
2
2. Select an instance by clicking on the box next to the name.
a. Click on the “Connect” button to open the “Connect To Your Instance” window (Figure 5.2).
You will copy and paste information from this window to your Mac Terminal window later.
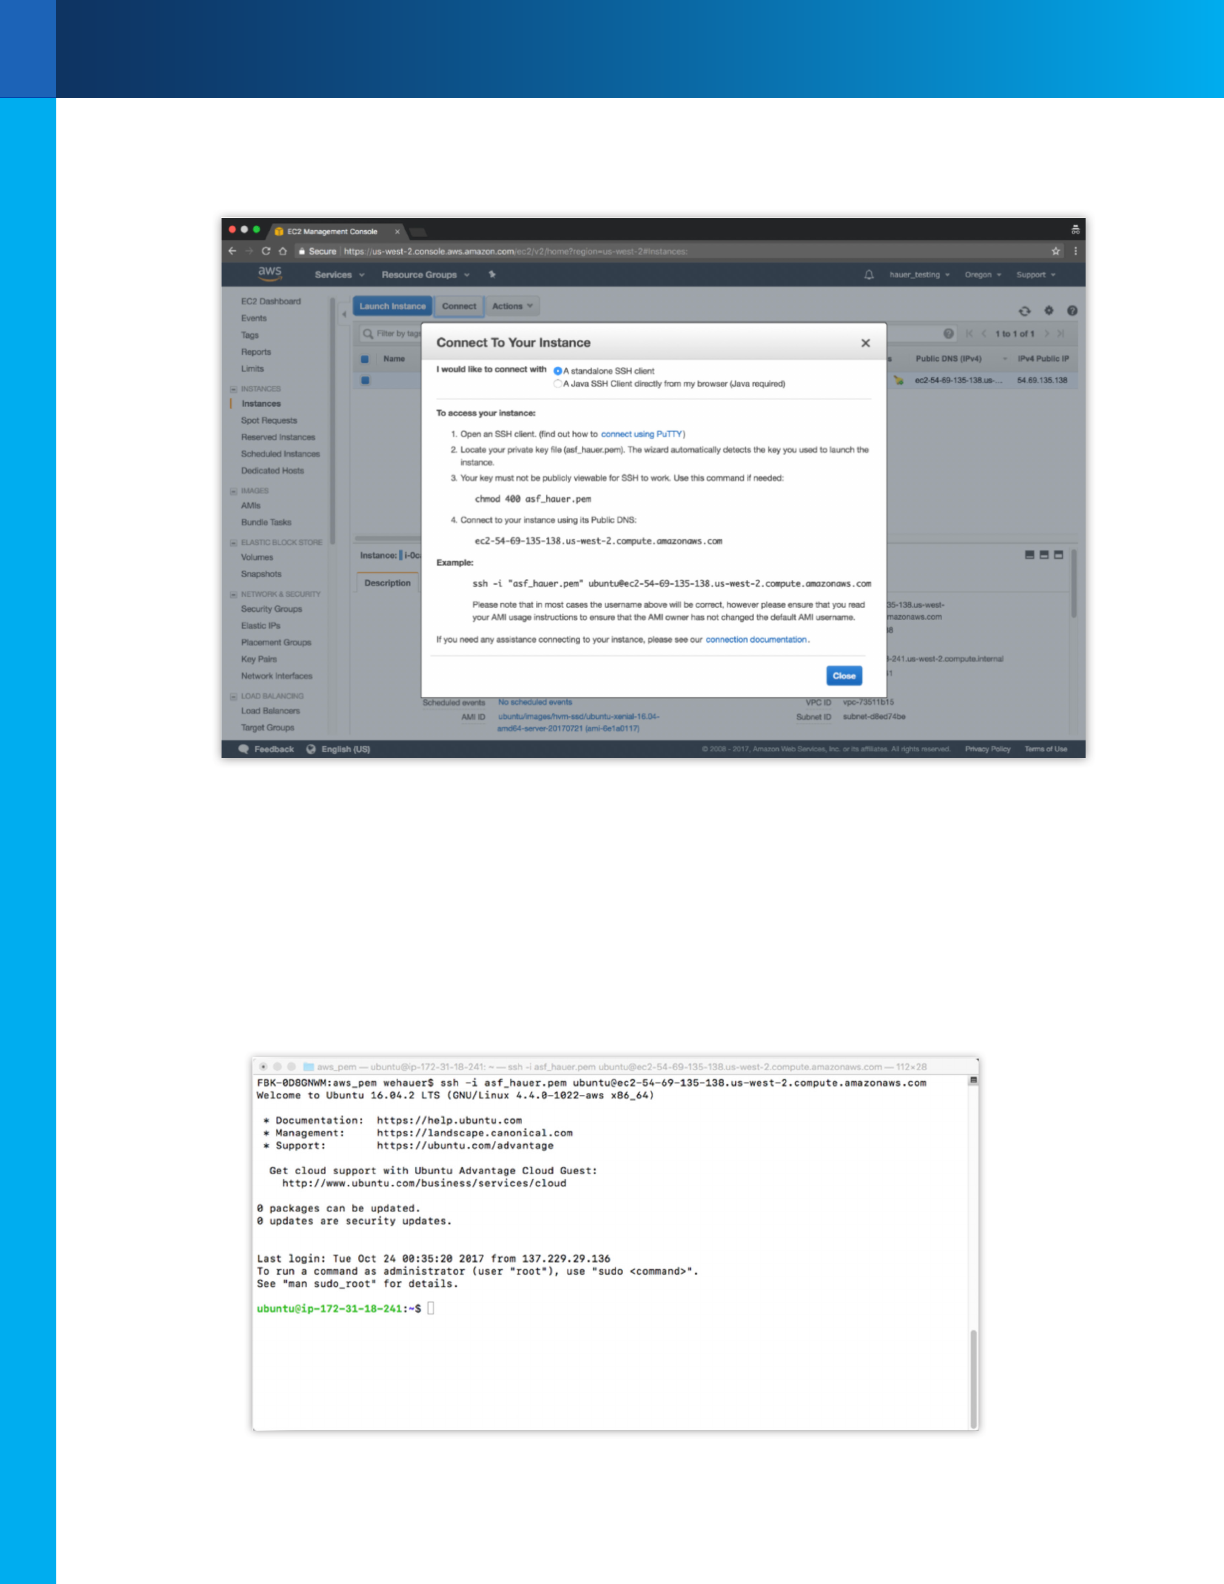
3. Open a terminal window on your Mac and navigate using the cd (change directory) command to the folder
containing the private key le (.pem) created during the EC2 conguration process. is is usually the Downloads
folder, unless you moved the le to another folder
Example: $ cd ~/Downloads
To view the contents of a directory:
4. Change access permissions for the private key le (.pem)
Figure 5.2.
$ cd ~/<path to pem_folder>
$ ls -ltr
$ chmod 400 <lename.pem>
3
Figure 4.4.
Or copy the command (rst circled item) from the “Connect To Your Instance” window (Figure 5.3) and paste at the
Terminal prompt.
5. Press <Enter>.
6. From the “Connect To Your Instance” window, copy the complete SSH command under Example: (second circled
item in Figure 5.3).
is string includes your lename.pem, the username ubuntu, and the Public DNS of your EC2 instance
7. Paste the string at the Terminal prompt
8. Delete the double-quotes enclosing lename.pem and press <Enter>.
9. Type yes when prompted “Are you sure you want to continue connecting?” and press <Enter>.
A terminal window appears for your EC2 instance (Figure 5.4).
You are now connected to your EC2 instance.
Figure 5.3.
Figure 5.4.
4
Move a le into an EC2 instance
To move a le (for example, a le to be processed) from your computer to your EC2 instance Home directory of user
ubuntu using Secure Copy Protocol (SCP), type the commands below in the terminal window of your Mac. Words
surrounded by <> indicate optional input.
Type:
1.
2.
3.
Move a le out of an EC2 instance
To move a le (for example a processing product) from your EC2 instance ubuntu directory to your computer using
SCP, type the commands below in your Mac terminal.
To move le S1A_EW_GRDM.zip from your computer to your EC2 instance, follow the steps below. Words
surrounded by <> indicate optional input.
1.
2.
3.
If you store your .pem le in a directory other than the directory you are working in, you must provide a path to that
directory in the SSH command.
Example
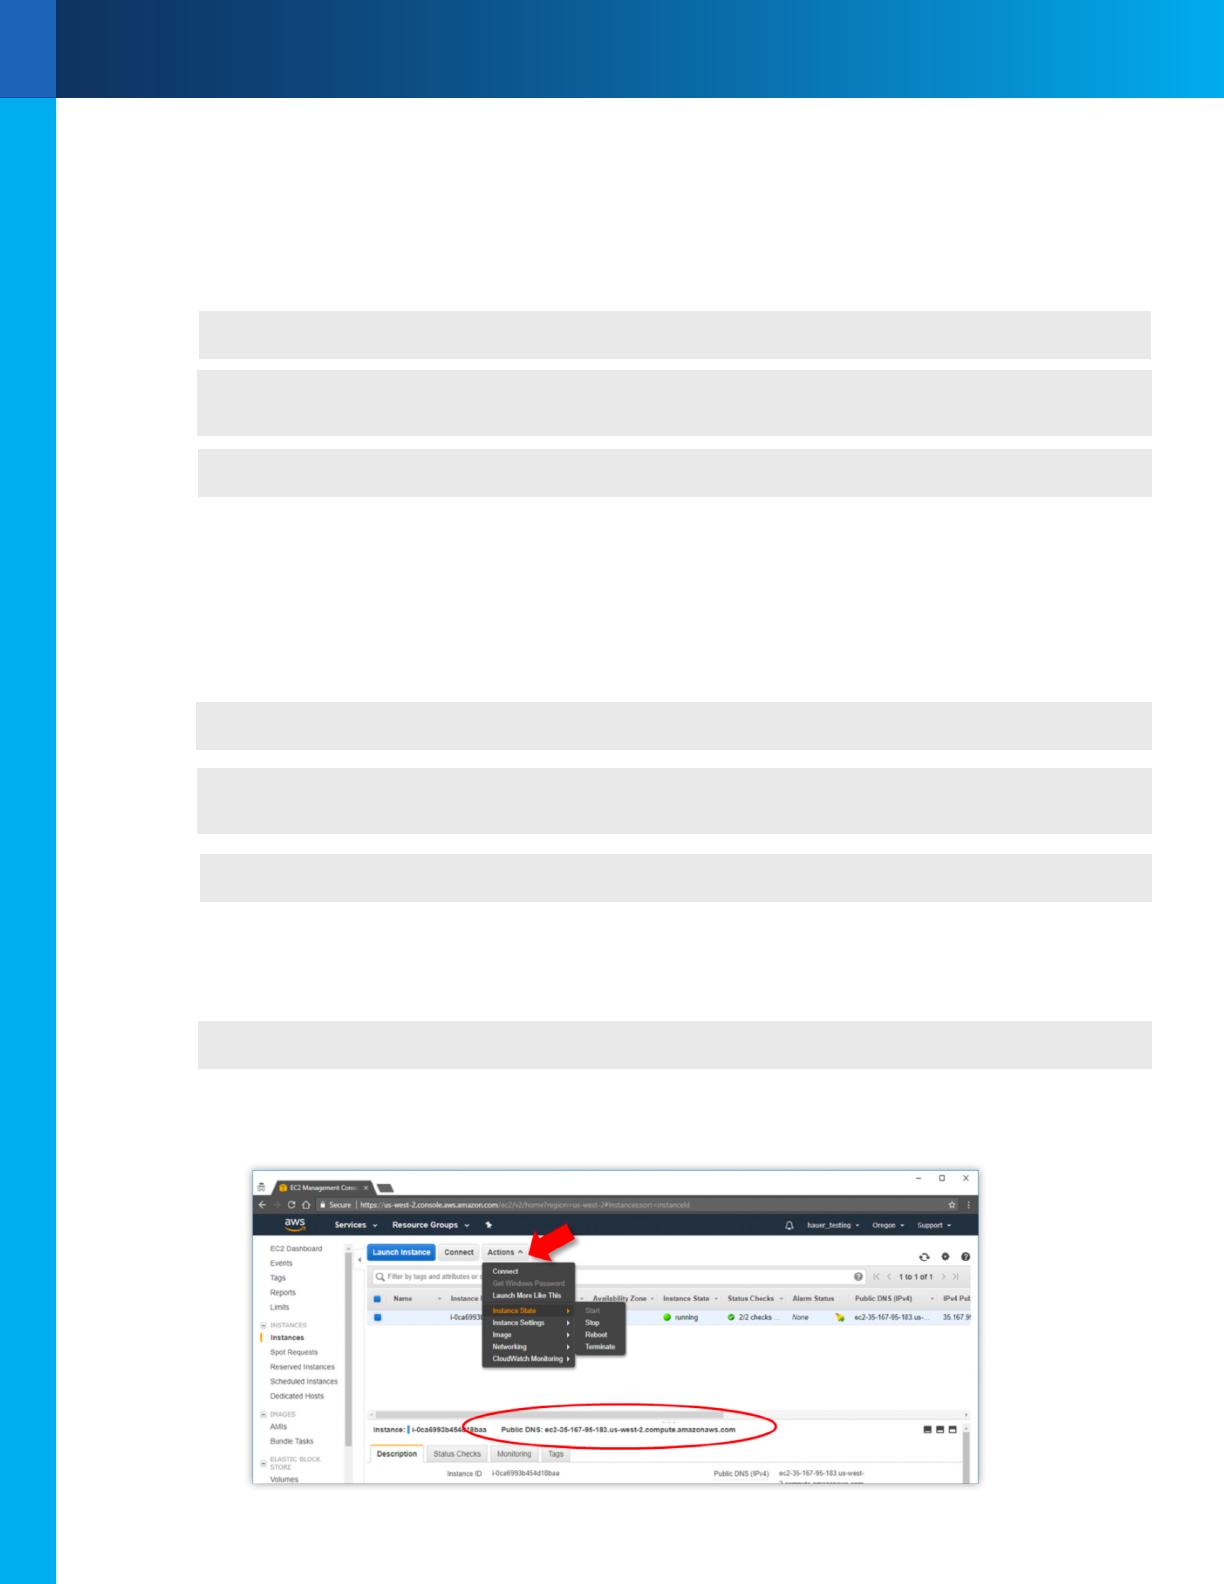
If you Stop your instance using the EC2 Management Console (Action > Instance State > Stop), when you restart it you
will be assigned a new Public DNS. Use this new DNS to reconnect
$ scp -i private.pem your_lename ubuntu@EC2instance_public_DNS:/home/ubuntu/
$ scp -i AWSrecipe.pem S1A_EW_GRDM.zip [email protected]
2.compute.amazonaws.com:/home/ubuntu/
$ scp -i pemle.pem your_lename ubuntu@Public_DNS:/<path>/
$ scp -i pemle.pem ubuntu@PublicDNS:/<path>/your_lename ~/<path>/local_directory
$ ssh –i ~/Documents/aws_pem/asf_hauer.pem [email protected]
$ scp -i private.pem ubuntu@Public_DNS:/home/ubuntu/lename ~/local_folder
$ scp -i asf_aws.pem [email protected]:/home/ubuntu/PRODUCT/
F2_unw_phase.tif ~/Downloads
