
Sept 2022 Instructional Technology & Design Services 1
Intermediate Microsoft Access 2019
Table of Contents
Using More Than One Table ..................................................................................................... 3
Understanding the Types of Relationships in an Access Database ........................................... 3
One-To-Many Relationship ....................................................................................................................................3
A Many-to-Many Relationship ................................................................................................................................3
A One-to-One Relationship ....................................................................................................................................3
Relationships Between Tables .................................................................................................. 3
To Create a Relationship Between Tables:............................................................................................................3
To Define the Relationships between the Tables in your Database: .....................................................................3
Referential Integrity ................................................................................................................... 4
Cascade Update Related Fields: ...........................................................................................................................5
Cascade Delete Related Records: .........................................................................................................................5
Creating Queries ....................................................................................................................... 5
Using AND Logic in a Query ..................................................................................................................................5
To Find all Employees Who Attended Access Training and Passed: ....................................................................5
To Add Tables to the Grid: .....................................................................................................................................5
CourseID field criteria: Access* ..............................................................................................................................6
Passed field criteria: Yes ........................................................................................................................................6
Saving a Query .......................................................................................................................... 7
To Save the Query: ................................................................................................................................................7
To Create a Query Using OR Logic: ......................................................................................................................8
Using a Calculated Field in a Query .......................................................................................... 9
To Create a Calculated Field: ................................................................................................................................9
To Format the Field to Currency: ...........................................................................................................................9
Creating a Summary Query ..................................................................................................... 10
To Summarize a Field in a Query: ...................................................................................................................... 10
Including Operators in a Query ................................................................................................ 11
To Locate Specific Records Within a Range of Dates: ....................................................................................... 11
Creating and Using a Parameter Query................................................................................... 12
To Create a Parameter Query: ............................................................................................................................ 12
Forms ...................................................................................................................................... 13
To Create a Form: ............................................................................................................................................... 13
There are 3 basic views in an Access form: ........................................................................................................ 13
Form View ........................................................................................................................................................... 14
There are 3 main sections of an Access form: .................................................................................................... 14

Sept 2022 Instructional Technology & Design Services 2
Understanding Controls on a Form .......................................................................................... 14
To Add a Label Control to a Form: ...................................................................................................................... 15
To Add a Text Control to a Form: ........................................................................................................................ 15
To Edit the Label to the Left of the Control you just Added: ............................................................................... 16
To Move a Control: .............................................................................................................................................. 16
To Change the Tab Order on a Form: ................................................................................................................. 16
To Add a Calculated Control to a Form: .............................................................................................................. 17
Reports .................................................................................................................................... 17
To Create a Report Based on a Query: .............................................................................................................. 17

Sept 2022 Instructional Technology & Design Services 3
Using More Than One Table
Often times a database will have more than one table. For example, in a Customer database,
one table might contain information about each individual customer and another table might
hold information about which items they ordered.
In order for the user to query information found in multiple tables, a relationship between the
tables must be defined.
Understanding the Types of Relationships in an Access Database
One-To-Many Relationship
One record in a table is related to many records in another table. An example would be that
one customer can place many orders.
A Many-to-Many Relationship
A good example of this would be between a Products table and an Orders table. A single order
can include more than one product. On the other hand, a single product can appear on many
orders.
A One-to-One Relationship
Each record in the first table can have only one matching record in the second table, and each
record in the second table can have only one matching record in the first table.
Relationships Between Tables
To Create a Relationship Between Tables:
1) Click the Database Tools tab
2) Click Relationships
To Define the Relationships between the Tables in your Database:
1) In Show Table, double-click on the tables to add them to the Relationships window
2) Close Show Table when done adding tables
3) Drag a field (typically the primary key) from one table to the common field (the foreign
key) in the other table
Sept 2022 Instructional Technology & Design Services 4
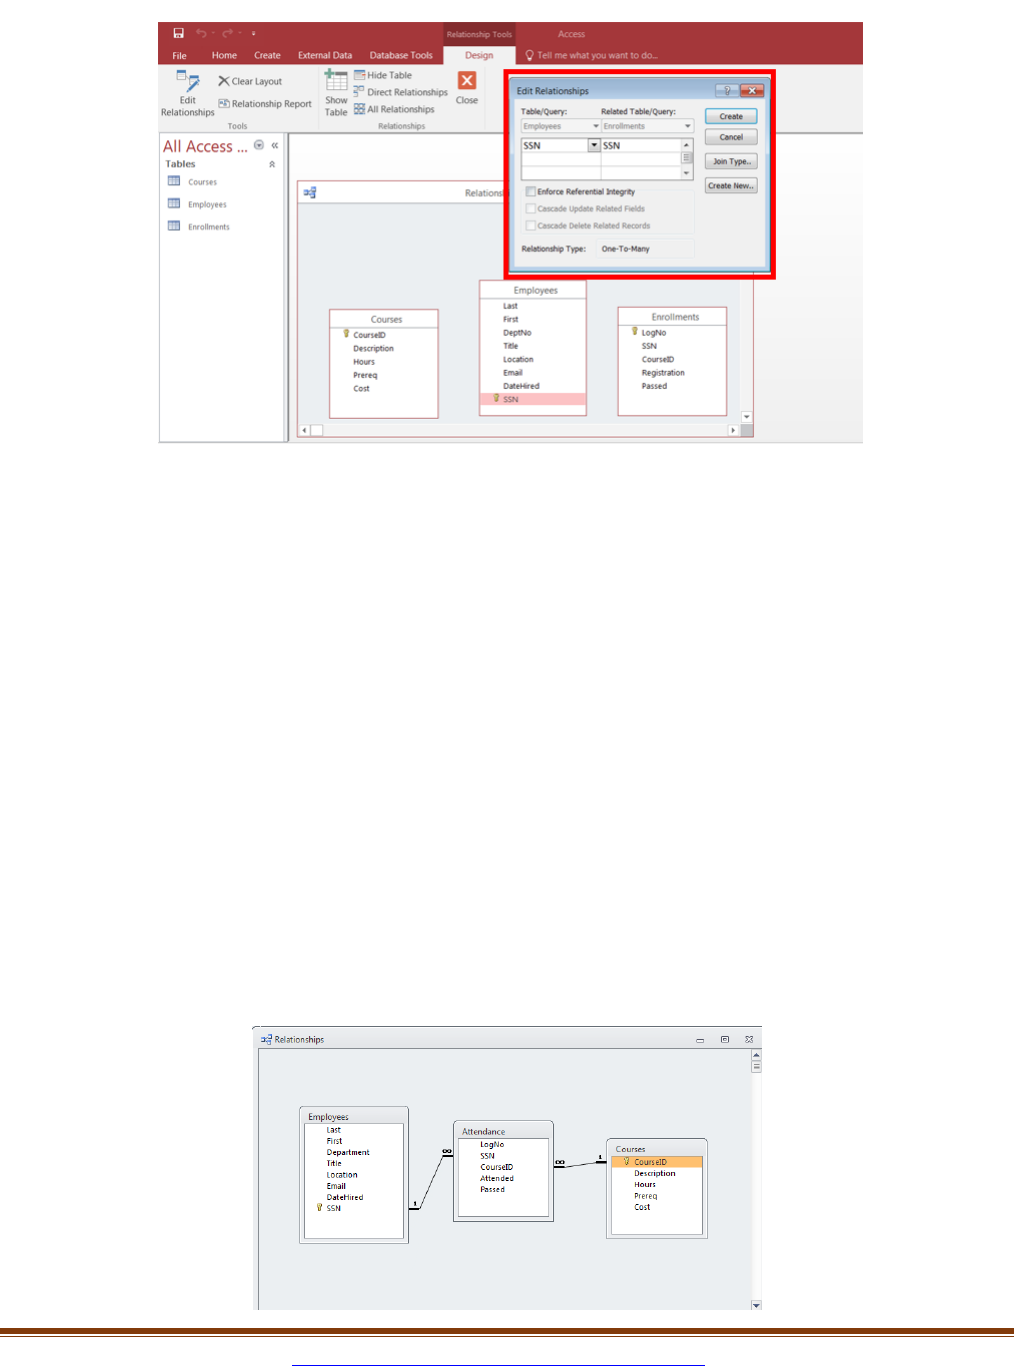
4) Verify that the field names shown in Edit Relationships are the fields for the
relationship. If a field name is incorrect, click on the field name and select the
appropriate field from the list.
5) To enforce referential integrity for this relationship, select Enforce Referential
Integrity. (This is explained below.)
6) Click Create
7) Click Close on the Design tab
8) Click Yes to save changes
Referential Integrity
Enforcing referential integrity ensures that the following three rules will not be broken:
• You are unable to enter a value in the foreign key field of a child table if that value
doesn’t exist in the primary key of the parent table.
• You are unable to delete a record from a parent table if matching records exist in a
related table.
• You are not able to change the value in the primary key field if that record has related
records in another table.
The relationships window will show a line between the related fields as shown below.
Sept 2022 Instructional Technology & Design Services 5
On one end of the line is a “1” indicating the “one” side of a one-to-many relationship.
The other end of the line will have an infinity symbol next to it to show that there are potentially
many entries on the “many” side of the one-to-many relationship.
Cascade Update Related Fields:
If this item is selected, the following rule applies:
Access will automatically update any foreign key values in the “child” table (the “many” table in
a one-to-many relationship) if you change a primary key value in a “parent” table (the “one”
table in a one-to-many relationship).
Cascade Delete Related Records:
If this item is selected, the following rule applies:
Record(s) in the “child” table will be deleted when a related record(s) in the “parent” table are
deleted.
Creating Queries
Using AND Logic in a Query
Using AND logic in a query will return records in which one condition is true AND another
condition is also true. For example:
To Find all Employees Who Attended Access Training and Passed:
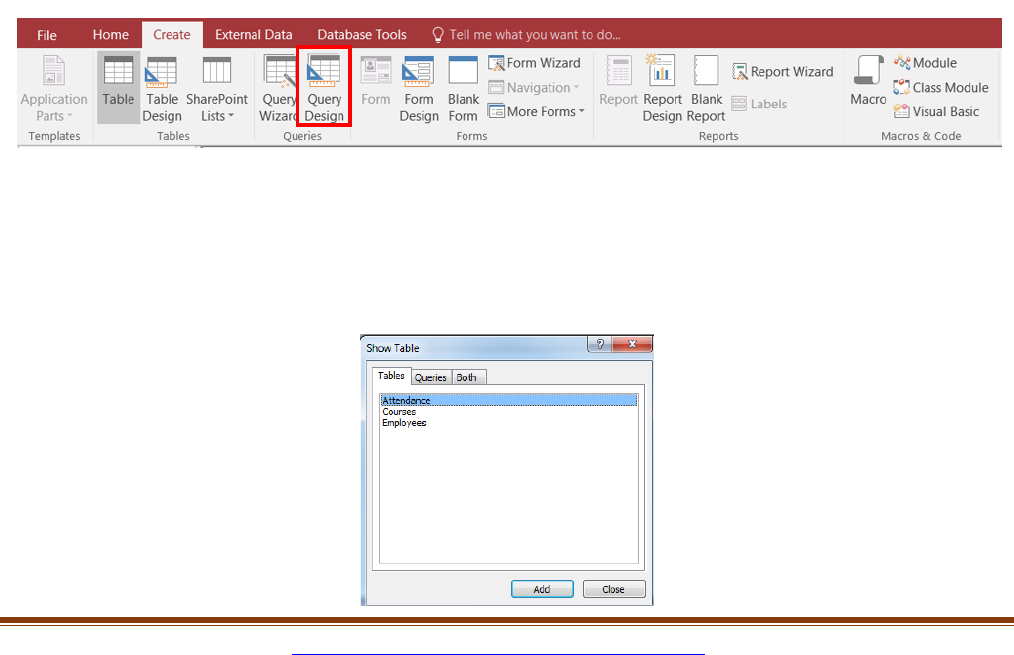
1) Click the Create tab
2) Click Query Design in the Queries group
In order to add fields to the Query Grid, you must first add the tables that the fields are in.
To Add Tables to the Grid:
1) Double-click on the tables needed for the query
2) Close the Show Table window when all the tables have been added
Sept 2022 Instructional Technology & Design Services 6
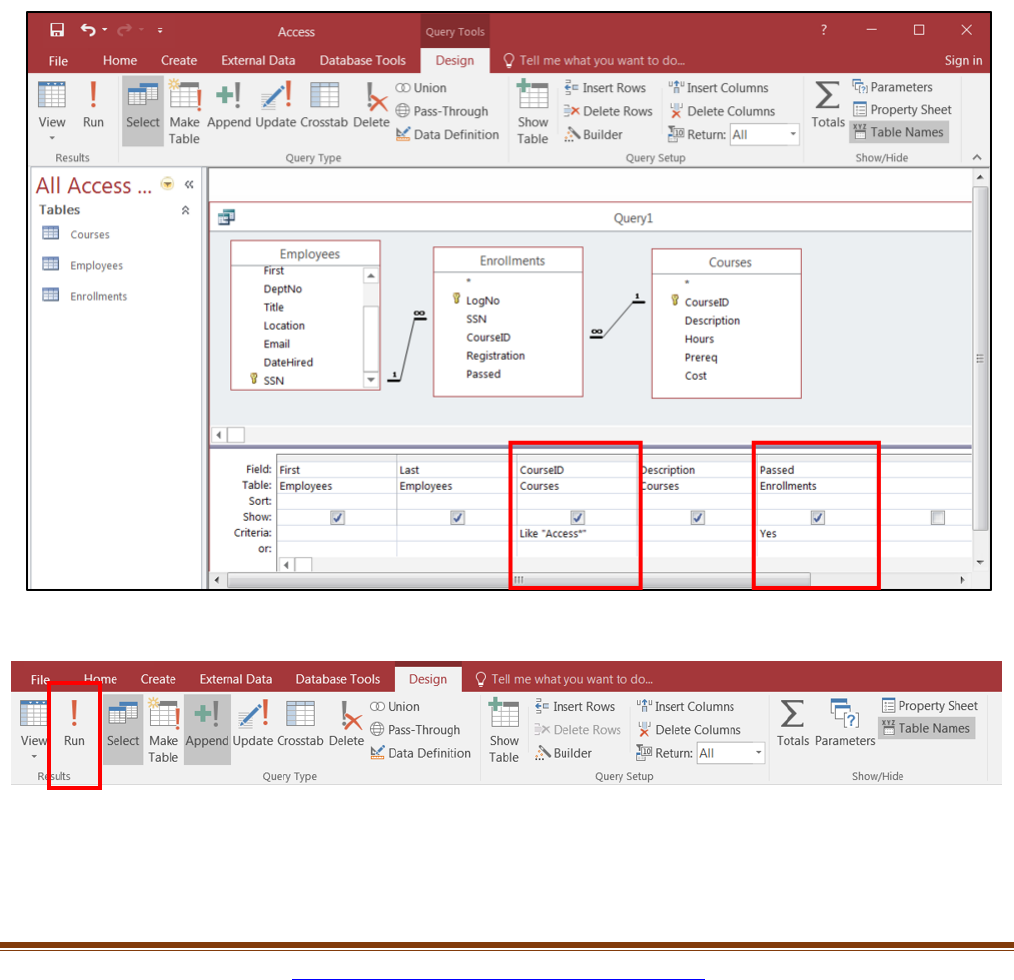
3) Double-click on the fields to add them to the Query Grid
4) In the Criteria Row, type in the criteria
The criteria entered for this example is as follows:
CourseID field criteria: Access*
This will locate any Course ID that begins with the word Access and ends in anything. The
asterisk * is used as a wildcard.
Passed field criteria: Yes
This will locate any records of individuals who have passed Access.
If both of these criteria exist on the same row of the query, it creates AND logic.
5) Click Run to execute the query
The results of this query are displayed on the next page:
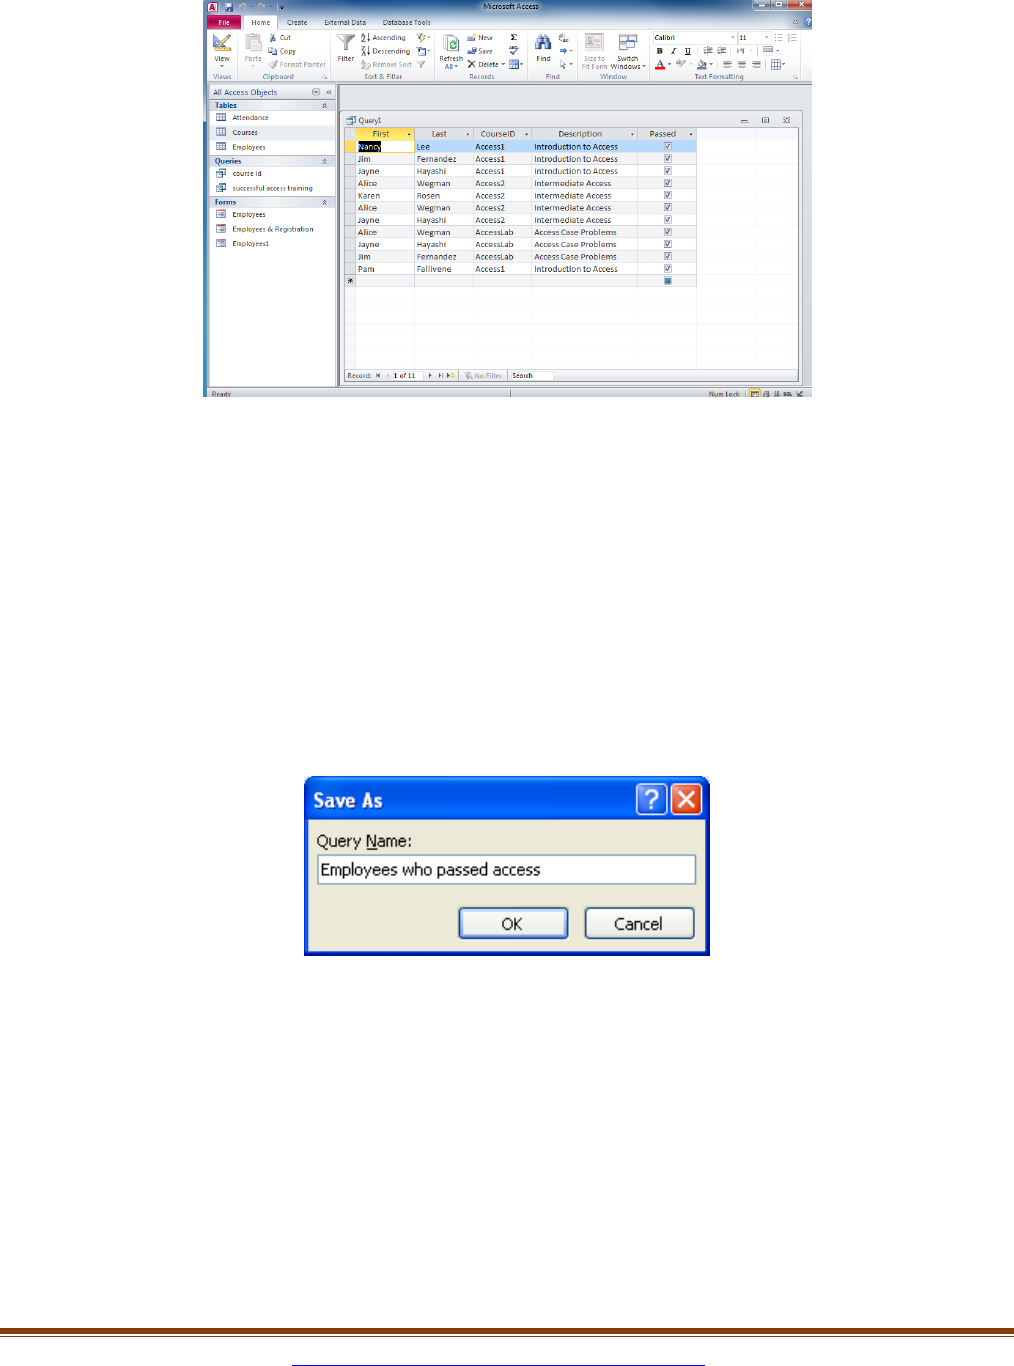
Sept 2022 Instructional Technology & Design Services 7
Saving a Query
When you save a query, what you are saving is really the question you are asking, not the
results that you see when you run a query. For example, in the above query we asked to
display any records where the Course ID contains the word “Access” and the Passed field is
“Yes”. If we run that query next week, we are likely to see more records as a result.
To Save the Query:
1) Close the query
2) Click Yes to save the query
3) Enter a name for the query
4) Click OK
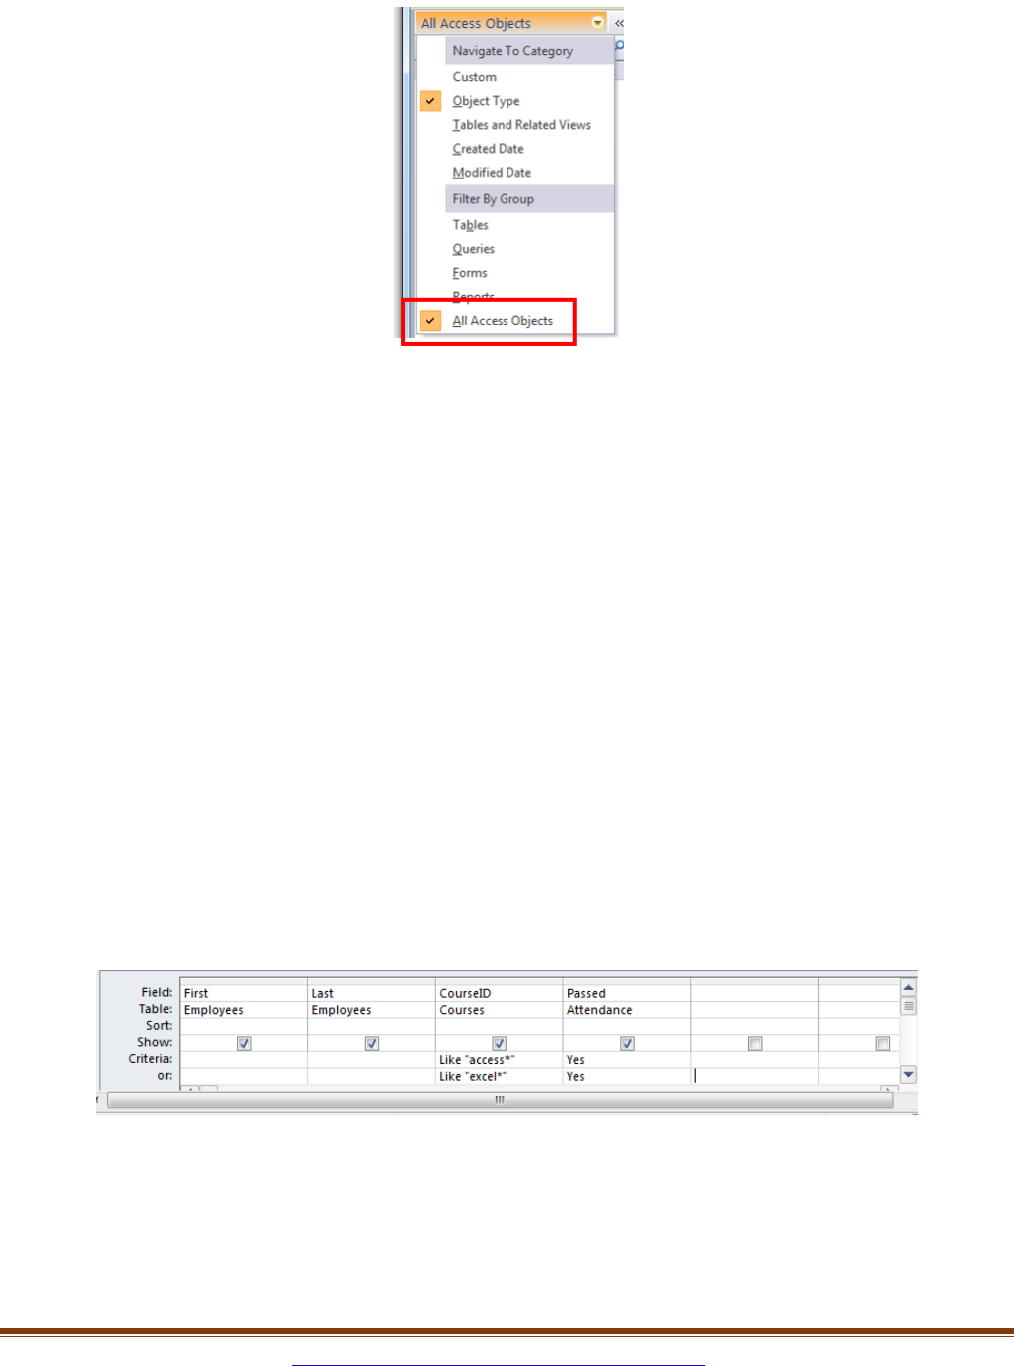
If you don’t see the query in the Navigation Bar you need to select All Access Objects in the
Navigation Bar:
1) Click on the Navigation bar drop-down arrow
2) Select All Access Objects
Sept 2022 Instructional Technology & Design Services 8
Creating OR Logic in a Query
OR logic is based on the fact that either condition(s) can be true in order for a record to be
included in the results of the query.
To Create a Query Using OR Logic:
1) Click the Create tab
2) Click Query Design in the Queries group
3) Double-click on the tables needed for the query
4) Close the Show Table window when all the tables have been added
5) Double-click on the fields to add them to the Query Grid
6) In the Criteria Row, enter the criteria for the query. By placing criteria on two separate
rows in the grid, OR logic is automatically created.
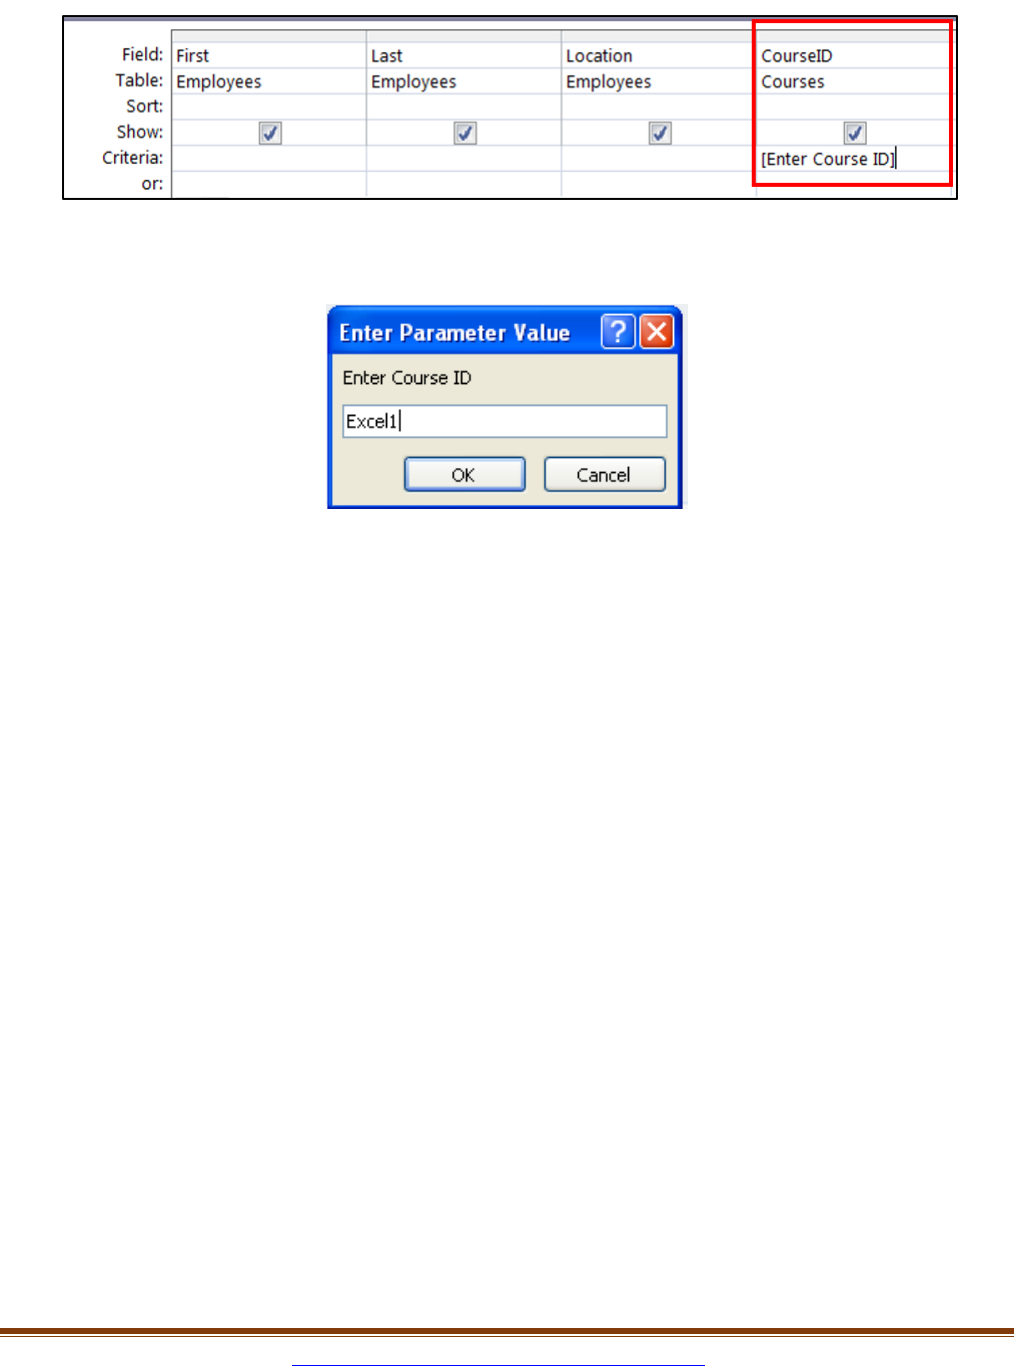
Below is an example of OR logic in a query:
• Course ID field criteria: Access*
• Course ID Field criteria: Excel*
• Passed field criteria: Yes
This will locate any records of individuals who have attended Access or Excel and Passed.
7) Run the query
Sept 2022 Instructional Technology & Design Services 9
Using a Calculated Field in a Query
A query can be used to perform calculations. In this example, we will create a new field in a
query “Hourly Rate” to calculate the hourly rate per course.
To Create a Calculated Field:
1) Click the Create tab
2) Click Query Design in the Queries group
3) Double-click on the tables needed for the query
4) Close the Show Table window when all the tables have been added
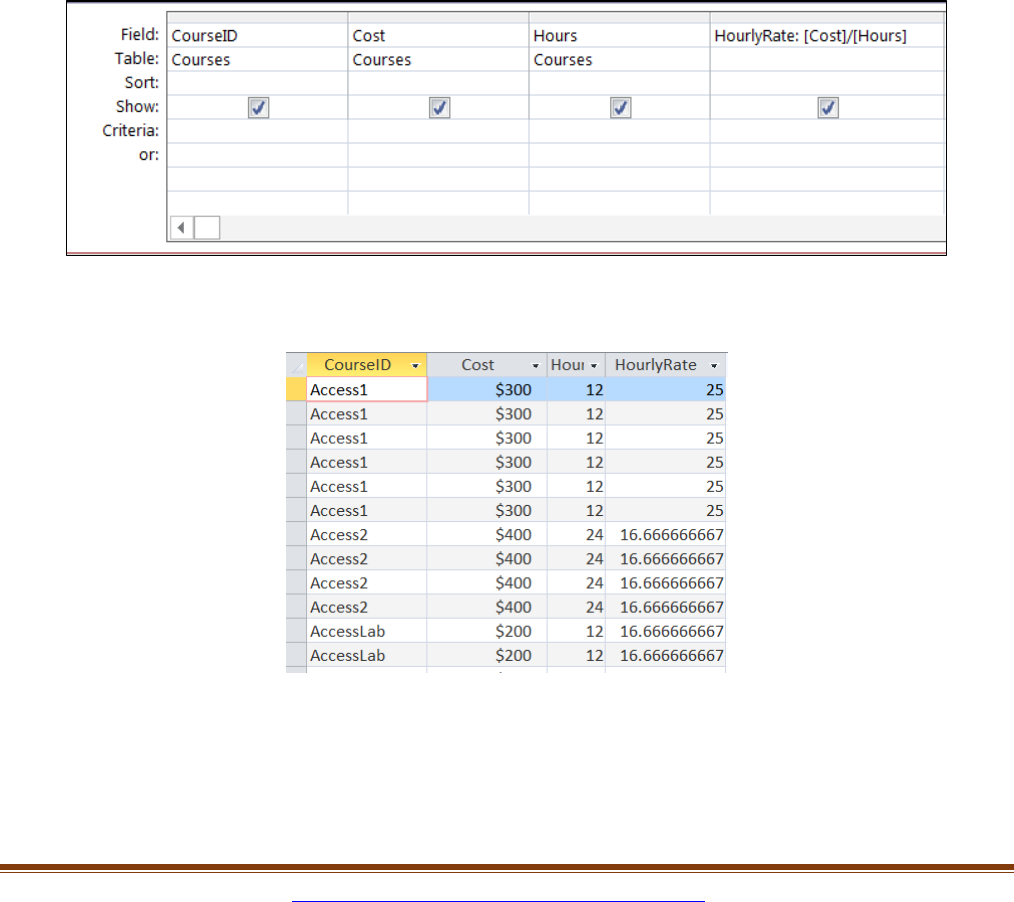
5) Double-click on the fields to add them to the Query Grid. In this example we are adding
the Course ID, Cost and Hours.
6) Click in an empty Field cell in the Query Grid
7) Type the name of the new field (in this example type HourlyRate) followed by a colon, a
space and then the formula: HourlyRate: [cost]/[hours]. Square brackets [ ] are
needed for the field names.
8) Run the query. This creates a new field in the query titled HourlyRate.
To Format the Field to Currency:
1) Switch to Design View
2) Right-click on the HourlyRate field in the Query Grid
3) Select Properties
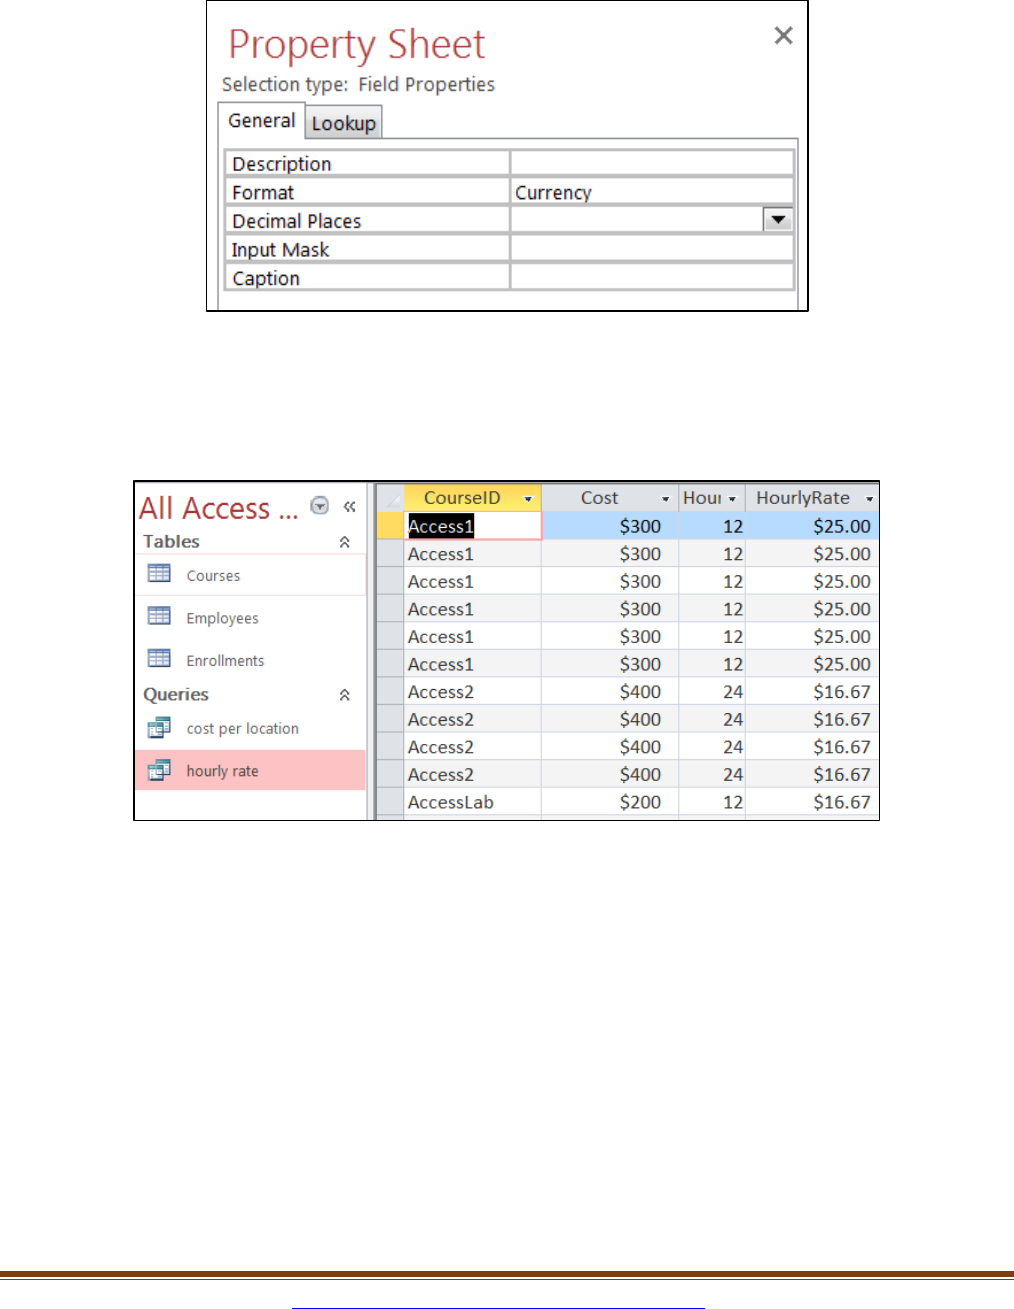
4) Click in the Format line in the Property Sheet and click on the drop-down arrow
Sept 2022 Instructional Technology & Design Services 10
5) Select Currency
6) Close the Property Sheet
7) Run the query
Below are the results:
Creating a Summary Query
To summarize records in a table, use the Group By and Sum function in a query.
To Summarize a Field in a Query:
In this example, we will create a query to see total cost per location.
1) Click the Create tab
2) Click Query Design in the Queries group
3) Double-click on the tables needed for the query
4) Close the Show Table window when all the tables have been added
5) Double-click on the fields to add them to the Query Grid. We are adding Location and
Cost in this example.
6) Click the Totals icon on the Ribbon

Sept 2022 Instructional Technology & Design Services 11
7) Notice the Total row has now been inserted into the Query Grid
8) Select Group by for the Location field to group the locations together
9) Select the SUM function for the Cost field to sum the cost per location
10) Run the query
Below are the results based on the criteria above:
Including Operators in a Query
You are able to create criteria based on the following operators:
< Less Than
> Greater Than
<= Less Than or Equal To
>= Greater Than or Equal To
= Equal To
<> Not Equal To
You are also able to define criteria based on a range.
To Locate Specific Records Within a Range of Dates:
In this example, we are creating a query to find the registration for the month of February.
1) Click the Create tab
2) Click Query Design in the Queries group
Sept 2022 Instructional Technology & Design Services 12
3) Double-click on the tables needed for the query
4) Close the Show Table window when all the tables have been added
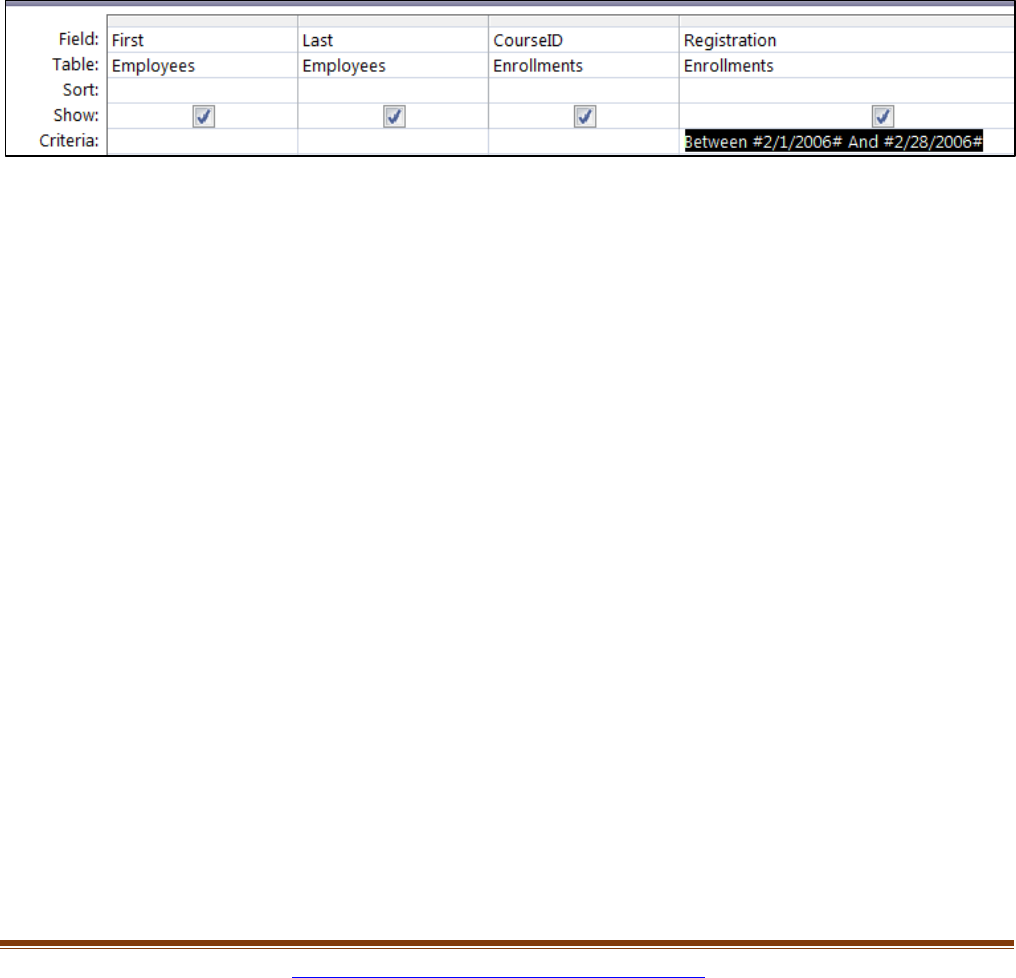
5) Add the necessary fields to the Query Grid. In this example we are adding First and
Last name, CourseID and Registration.
6) After adding the fields to the Query Grid, position your cursor in the criteria row for the
field you are defining. In this example we are using the Registration field.
7) Enter the criteria: Between 2/1/2006 and 2/28/2006. When you tab to the next column #
symbols will be added to the dates as below:
Between #2/1/2006# And #2/28/2006#
In the example below, the criteria is to identify records where the registration date is between
February 1, 2006 and February 28, 2006.
4) Run the query
Creating and Using a Parameter Query
In a Parameter Query the criterion written on the criteria line is actually a prompt to the user of
the query to type in a criterion. The prompt must be enclosed in square brackets [ ] on the
criteria line. When executed, the query will display a prompt, and the user will enter the
criterion he or she wishes to use. When the Parameter Query is run, the prompt written on the
criteria line will display as shown below.
To Create a Parameter Query:
1) Click the Create tab
2) Click Query Design in the Queries group
3) Double-click on the tables needed for the query
4) Close the Show Table window when all the tables have been added
5) Add fields to the Query Grid. In this example we are adding First and Last name,
Location and CourseID.
6) Position your cursor in the criteria row for the field that you would like to create the
parameter for. In this example, we want to be prompted to see registration via the
CourseID.
7) Type: [Enter Course ID]
Sept 2022 Instructional Technology & Design Services 13
8) Run the query
9) Type the Course ID you wish to see registration for and click OK
Forms
Forms are used to either view records that are in a table, or used as a way to enter records
into a table.
To Create a Form:
1) Select the table from the Navigation Pane that the form will be based on
2) Click the Create Tab
3) Click on Form
The form is created in Layout View.
There are 3 basic views in an Access form:
Layout View
The form is actually “live” in this view, so you can see your data as it will appear in Form view.
However, you can also make changes to the form design in this view. Because you can see
the data while you are modifying the form, this is a very useful view for setting the size of
controls or performing almost any other task that affects the appearance and usability of the
form.
Design View
This view gives you a more detailed view of the structure of your form. You can see the
header, detail, and footer sections for the form. The form is not actually running when it is
shown in Design view, so you cannot see the underlying data while you are making design
changes; however, there are certain tasks you can perform more easily in Design view than in
Layout view. In this view you can add controls to your form, edit control sources and resize
form sections.
Sept 2022 Instructional Technology & Design Services 14
Form View
This view is used to enter, edit or display data in your table.
There are 3 main sections of an Access form:
These are the Header, Detail and Footer. If data is in the Form Header, the data will
display/print at the top of the form only. Data in the Detail section is records from the table or
query that the form is based on. If there is data in the Footer section, the data will display/print
at the bottom of the form.
These 3 main sections are available in Design View.
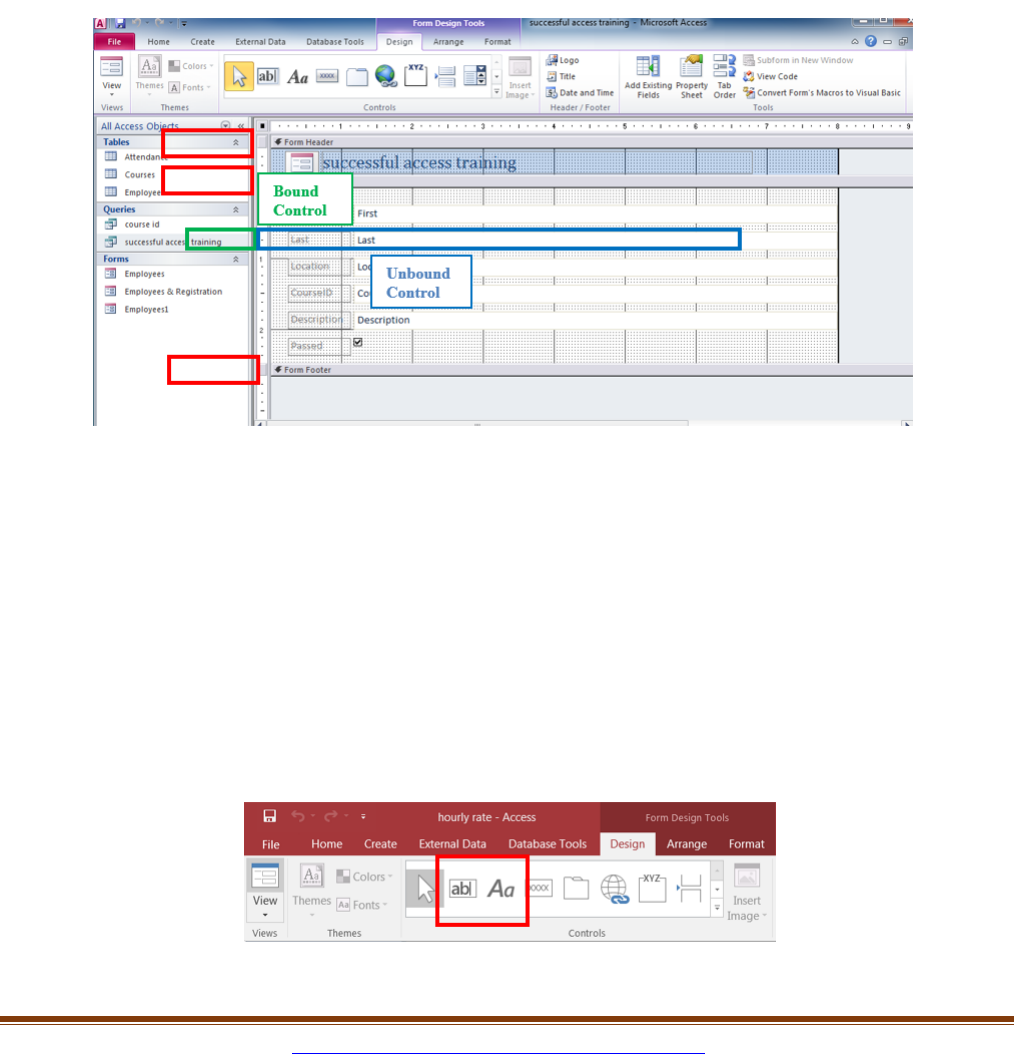
Understanding Controls on a Form
Forms are made up of 3 things: Bound Controls, Unbound Controls and Calculated
Controls. A Bound Control is a control whose source is connected to a field or query. An
Unbound Control is a control that is not connected to a source such as a field in a table or
query. An example of this type of control is a title on a form, a picture, line or other label. A
Calculated Control is a control whose source is a formula or expression.
On a form, there are two types of commonly added controls: a label control and text box
control. A label control will allow you to simply add text to a form. A text box control will
allow you to add a field from a table/query.
Sept 2022 Instructional Technology & Design Services 15
To Add a Label Control to a Form:
1) Switch to Design View
2) Click Design under Form Design Tools
3) Click the Label icon
4) Click your mouse where you would like to add the text
5) Type the text
To Add a Text Control to a Form:
1) Switch to Design View
2) Click Design under Form Design Tools
3) Click on the Text Box icon on the toolbar
4) Click on the form where would like the control to exist
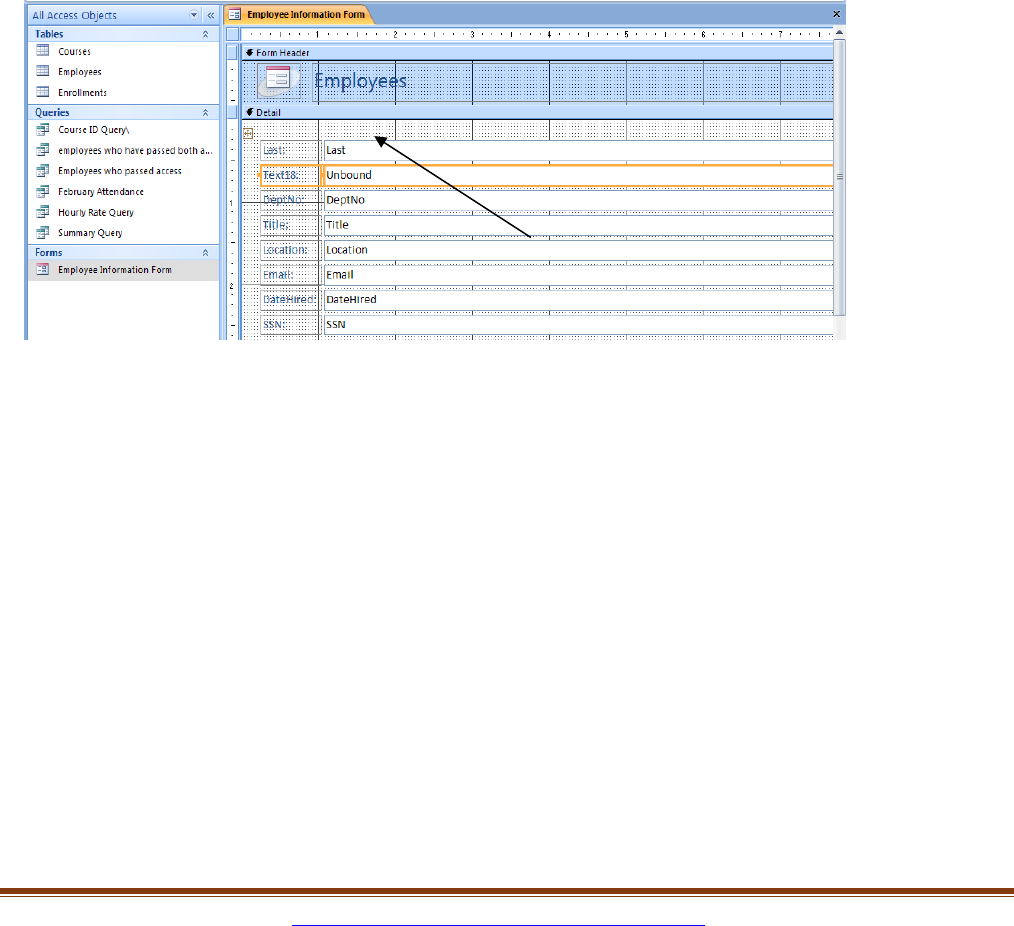
Below is a picture of a text box control that has been added to a form:
Text18 is the label for the control. Unbound means that there is no connection between a
field in a table/query and this control.
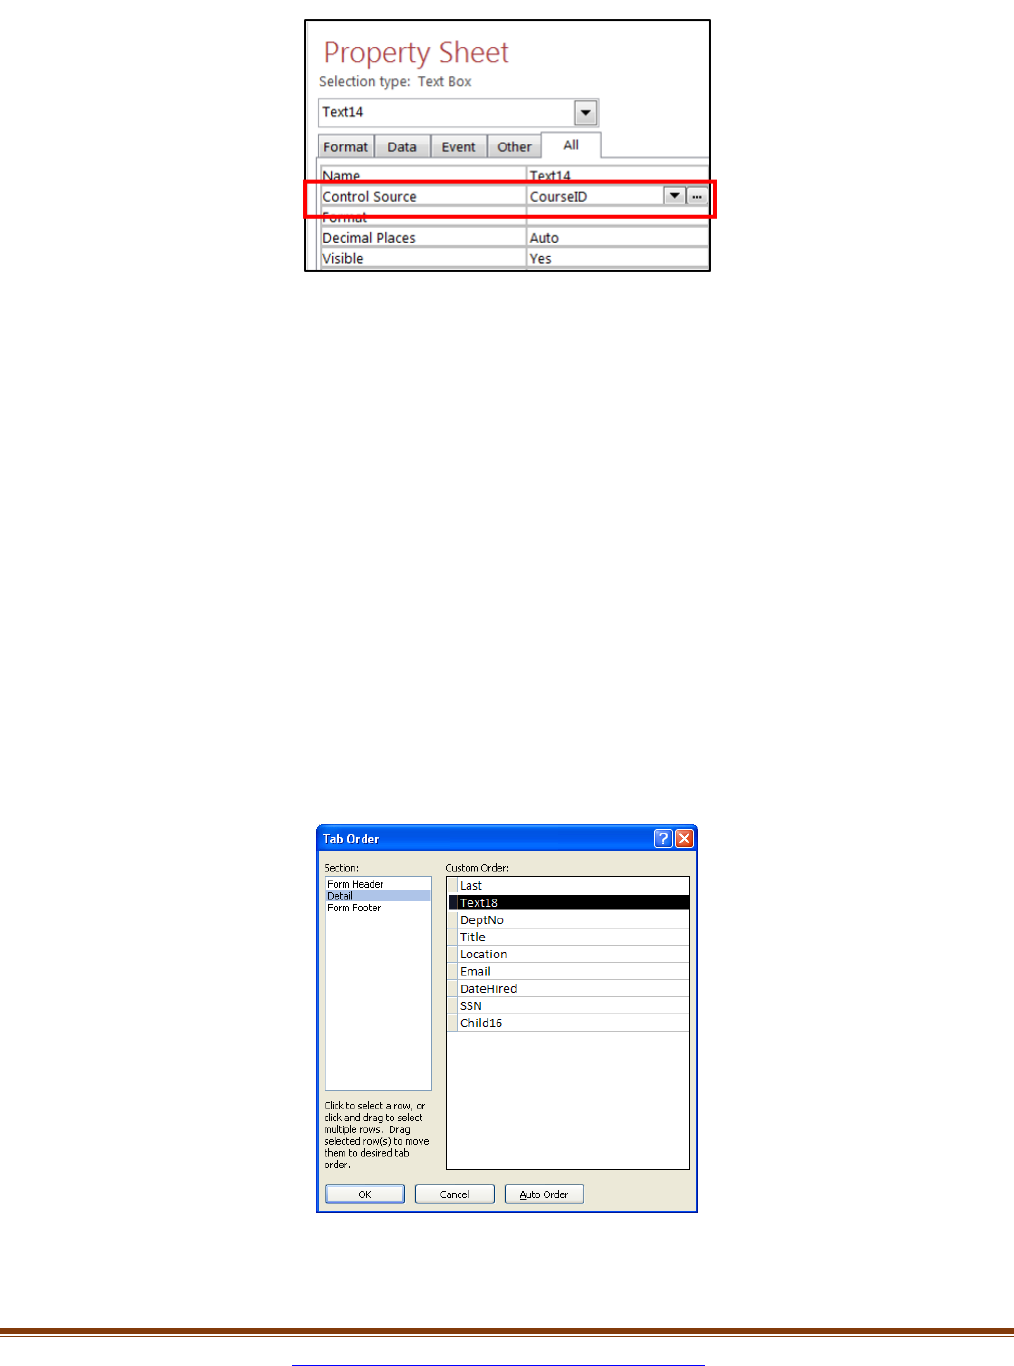
To associate this control with a field in a table/query:
1) Right-click where it says Unbound
2) Select Properties
3) In the Property Sheet, on the Control Source row, select the field that you would like
to associate the control with
4) Close the Property Sheet window
Sept 2022 Instructional Technology & Design Services 16
To Edit the Label to the Left of the Control you just Added:
1) Double-click on the Label Control
2) Type the name of the label
3) Hit Enter
To Move a Control:
1) Select the Arrange tab under Form Design Tools
2) Click Remove Layout from the Table group
3) Click on the control you wish to move
4) Click and drag the control to a new location on the form
To Change the Tab Order on a Form:
1) Right-click on the form
2) Choose Tab Order
3) Click to the left of the field
4) Click and drag the control to a new position in the Tab Order window
5) Click OK

Sept 2022 Instructional Technology & Design Services 17
To Add a Calculated Control to a Form:
1) Switch to Design View
2) Click on the Design tab under Form Design Tools
3) Click on the Text Box Control icon
4) Click on the location on the form where you want to add the new control
5) Right-click where it states Unbound
6) Choose Properties
7) On the Data tab, click to position your cursor in the Control Source field
8) Enter a formula. For example, =Sum([cost])
9) Close the Property Sheet window
Reports
In order to capture the data that you would like to report on, you must first create a query to
identify the records to be included in the report. After you have created the query, you need to
think about the design and layout of the report.
To Create a Report Based on a Query:
1) Open the query that the report will be based on
2) Click the Create tab on the Ribbon
3) Click Report
4) A report will be created for that query/table and opens in Layout View
Reports are similar to Forms in that they are made up of sections and controls. To change and
move controls or add additional controls, switch to Design View.
