
Microsoft Word 2010 - Level 3
© Watsonia Publishing Page 81 Fields
CHAPTER 10 FIELDS
Fields enable the automatic input of certain types of data into a
document. Fields are commonly used to display dynamic
information and information that is subject to change, such as the
last print date of a document, the document’s file name and path, or
a formula total, for example. Fields can be used to automate
common tasks, and to display up-to-date document information.
In this session you will:
gain an understanding of fields
gain an understanding of the Field dialog box
learn how to insert document information fields
learn how to set field properties
learn how to show and hide field codes
learn how to display field shading
learn how to insert formula fields
learn how to insert and format a date and time field
learn how to update fields automatically before printing
learn how to lock and unlock fields
learn how to apply a number format.
INFOCUS
WPL_W861

Microsoft Word 2010 - Level 3
© Watsonia Publishing Page 82 Fields
UNDERSTANDING FIELDS
Fields enable you to quickly insert and update
certain types of data in your document. This data
is generally information that is subject to change,
such as the author’s name or the last save date,
or a formula total. The field acts like a placeholder
for that data, and contains a code that tells Word
what type of data to insert. There are many
different types of fields available.
What Is A Field?
Fields are used to display up-to-date document information, such as the name of the last person
who worked on the document, or the last time a document was saved, and where it’s saved now.
Fields can be used to automate processes and tasks, such as automating page numbering, as well
as to automatically update the document with key information, such as your name.
You can insert fields anywhere in a document, and they are useful in organisational templates and
forms, particularly where multiple people use the same business documents.
To update field data and display the latest information, click in the field and press .
Field Codes
Each field acts as a placeholder for certain types of data, and contains a code that instructs Word
what type of data to insert. A field code is made up of the following syntax:
{ FIELDNAME “Properties” \*SWITCHES }
Where:
FIELDNAME is the Field name, such as Numwords or Date.
“Properties” and \*SWITCHES are the field properties that you can set for a field type. Each
field type will contain properties that are relevant to that field type.
Types Of Field Properties
Field properties include the following.
Formatting controls: allows you to specify the format of field data, such as the date or the
numbering format, as well as capitalisation. These formatting controls are referred to as
SWITCHES.
Prompts: used to insert the text that will prompt users for specific information when using
prompting fields (such as the Fill-In or Ask fields).
Text, such as Name, Value and Comment fields that enable you to type the required name or
value. This therefore becomes a manual field entry and overrides automatic updating.
You can view and hide the field codes by pressing + .
The Fields Dialog Box
The complete list of fields available in Word is located in the Fields dialog box. To open the Fields
dialog box, click on the Insert tab, then click on Quick Parts in the Text group and select Field.
Here you can insert and modify fields, as well as view and hide field codes. You can also set field
properties and the format (switches).
The Difference Between Fields And Content Controls
As well as fields there are also content controls. A content control displays field information for
certain types of document information fields but in a different format. When a user clicks on data
contained in a content control, the data is displayed in a data input field, with the field name
displayed in a label. Content controls can make it easier for users to work with fields, as they guide
the user as to what they need to type in a particular field. Content controls are useful for forms or
any business documents that contain document information fields.
You can insert content controls by clicking on the Insert tab, then clicking on Quick Parts and
selecting Document Property to view a list of available content controls.
Microsoft Word 2010 - Level 3
© Watsonia Publishing Page 83 Fields
THE FIELD DIALOG BOX
You can create and work with fields and field
properties in the Field dialog box. The Field
dialog box enables you to set properties and
options for all available field types (Field names).
The Properties and Options available for a field
depend on the field type. Formatting properties
may be available for one field type but may not be
applicable to another field type.
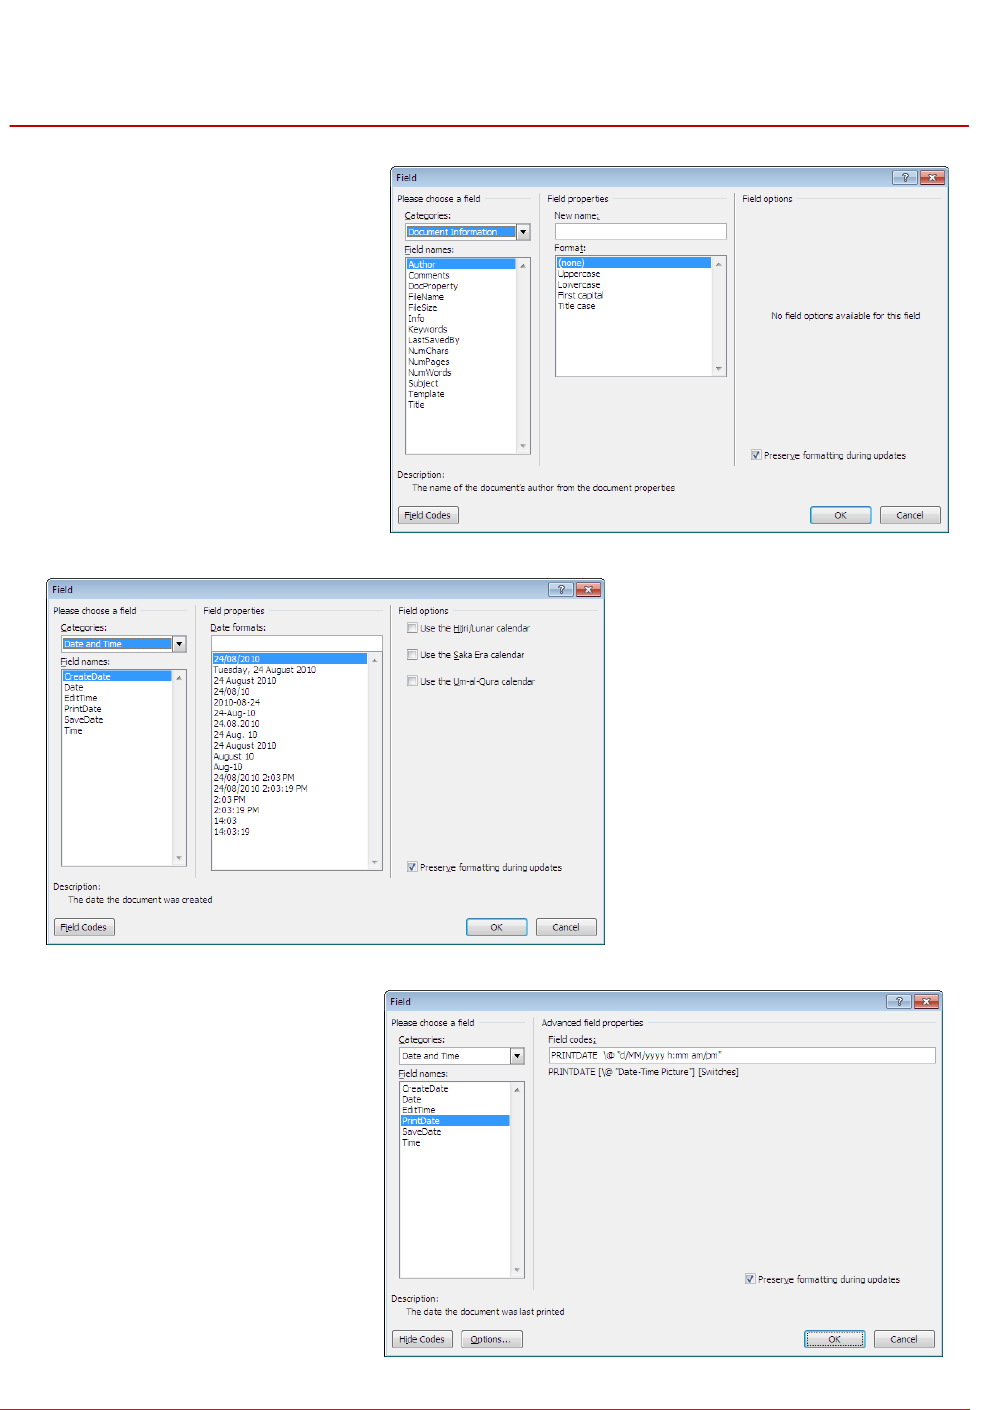
The Field Dialog Box
The left side of the Field dialog
box displays the available fields
(Field names) for each Category.
When you click on a field in Field
name, the right side of the dialog
box will display applicable
Properties and Options. A brief
description of the Field name will
also appear along the bottom of
the dialog box.
The picture to the right shows the
available Properties and Options
for the Author field, such as the
Format and New name.
Field Properties And Options
Each field type will have
properties and options that are
relevant to that field.
Not all field codes have
properties and options, but in
the picture to the left,
CreateDate, has both. You can
select from a range of standard
Date formats, or type your own,
and/or select a Field option.
Showing Field Codes
Click on [Field Codes] to display
the field codes for the selected
field. This is an alternative way to
view and edit field codes. For
example, you might prefer to
modify the code itself rather than
selecting a format. Or, you may
need to check the code if the field
doesn’t run as it should.
Click on [Hide Codes] to return to
the default Field properties view.
Microsoft Word 2010 - Level 3
© Watsonia Publishing Page 84 Fields
INSERTING A DOCUMENT INFORMATION FIELD
Try This Yourself:
Open
File
Before starting this exercise
you MUST open the file W861
Fields_1.docx...
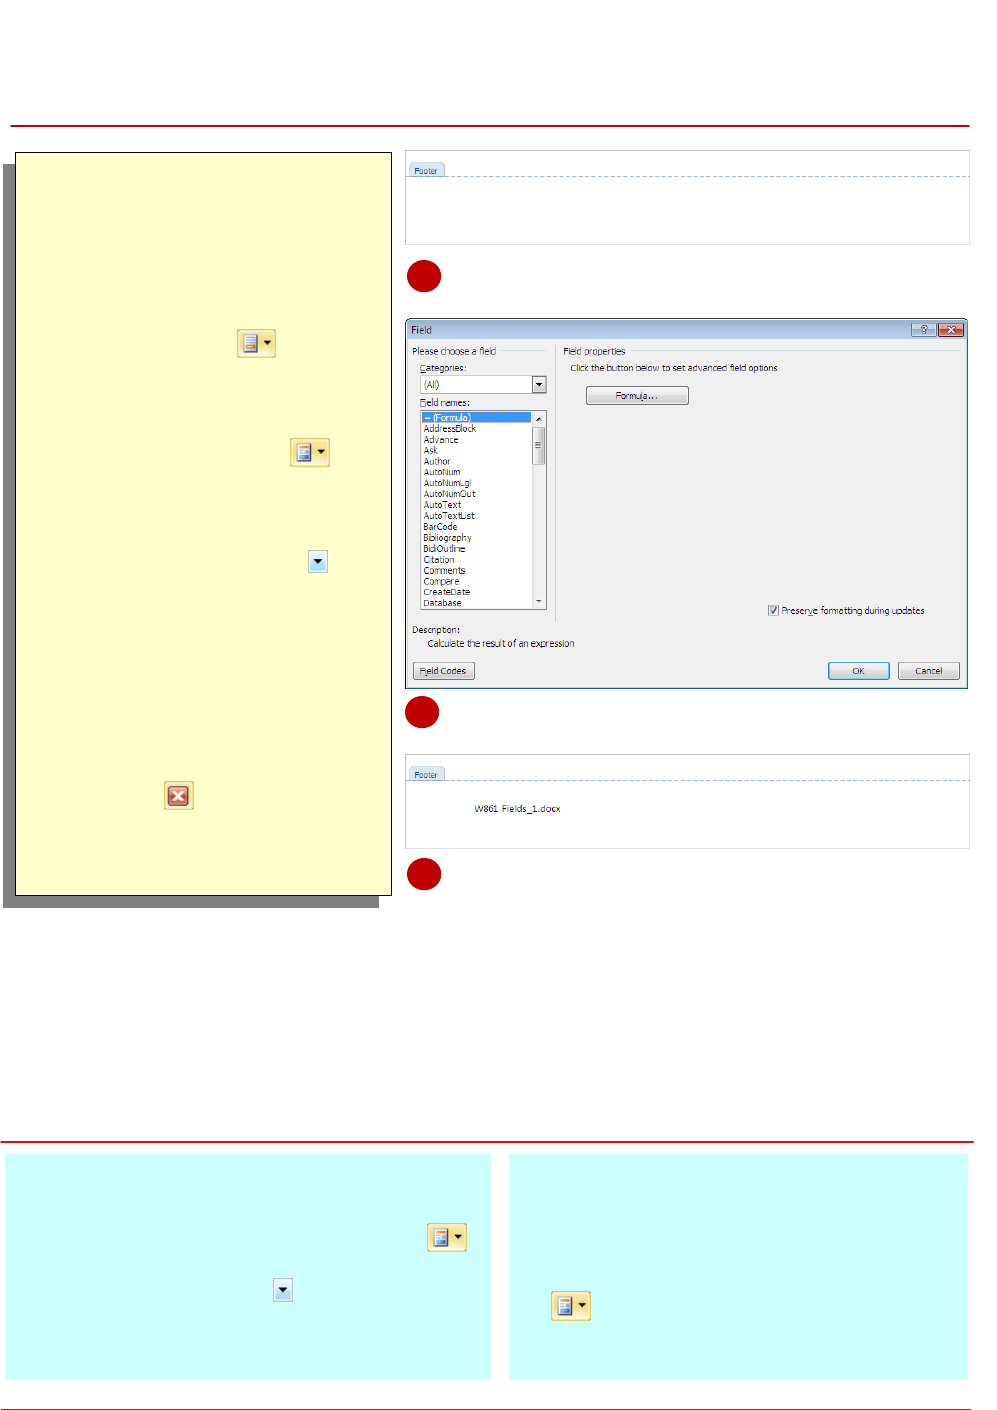
Click on the Insert tab, then
click on Footer in the
Header & Footer group and
select Edit Footer to make the
footer active
Click on Quick Parts in
the Insert group and select
Field to open the Field dialog
box
Click on the drop arrow for
Categories and select
Document Information, then
click on FileName for Field
names and click on [OK]
The field will be inserted into
the footer at the insertion point
and display the file name...
Click on Close Header and
Footer in the Close group
and then save the document
For Your Reference…
To insert a document information field:
1. Position the cursor, click on Quick Parts
on the Insert tab and select Field
2. Click on the drop arrow for Category and
select Document Information, then click on a
Field name to select it
3. Set the desired properties and click on [OK]
Handy to Know…
You can insert content controls for
document information fields instead of the
default fields. To do this, position the cursor,
click on the Insert tab, click on Quick Parts
in the Text group and select Fields,
then select Document Property and select a
document information field to insert.
1
2
Some of the most useful fields available can help
you keep up-to-date with information about the
document, such as the file name, creation date
and the like. Document information fields are
useful in standard business documents, where the
content remains the same, but information about
the document, such as its location, print status,
author and so on, changes depending on the user.
3
Microsoft Word 2010 - Level 3
© Watsonia Publishing Page 85 Fields
SETTING FIELD PROPERTIES
Try This Yourself:
Open
File
Before starting this exercise you
MUST open the file W861
Fields_2.docx...
Click on the Insert tab, then
click on Footer in the
Header & Footer group and
select Edit Footer, or double-
click on the footer area to make
the footer active
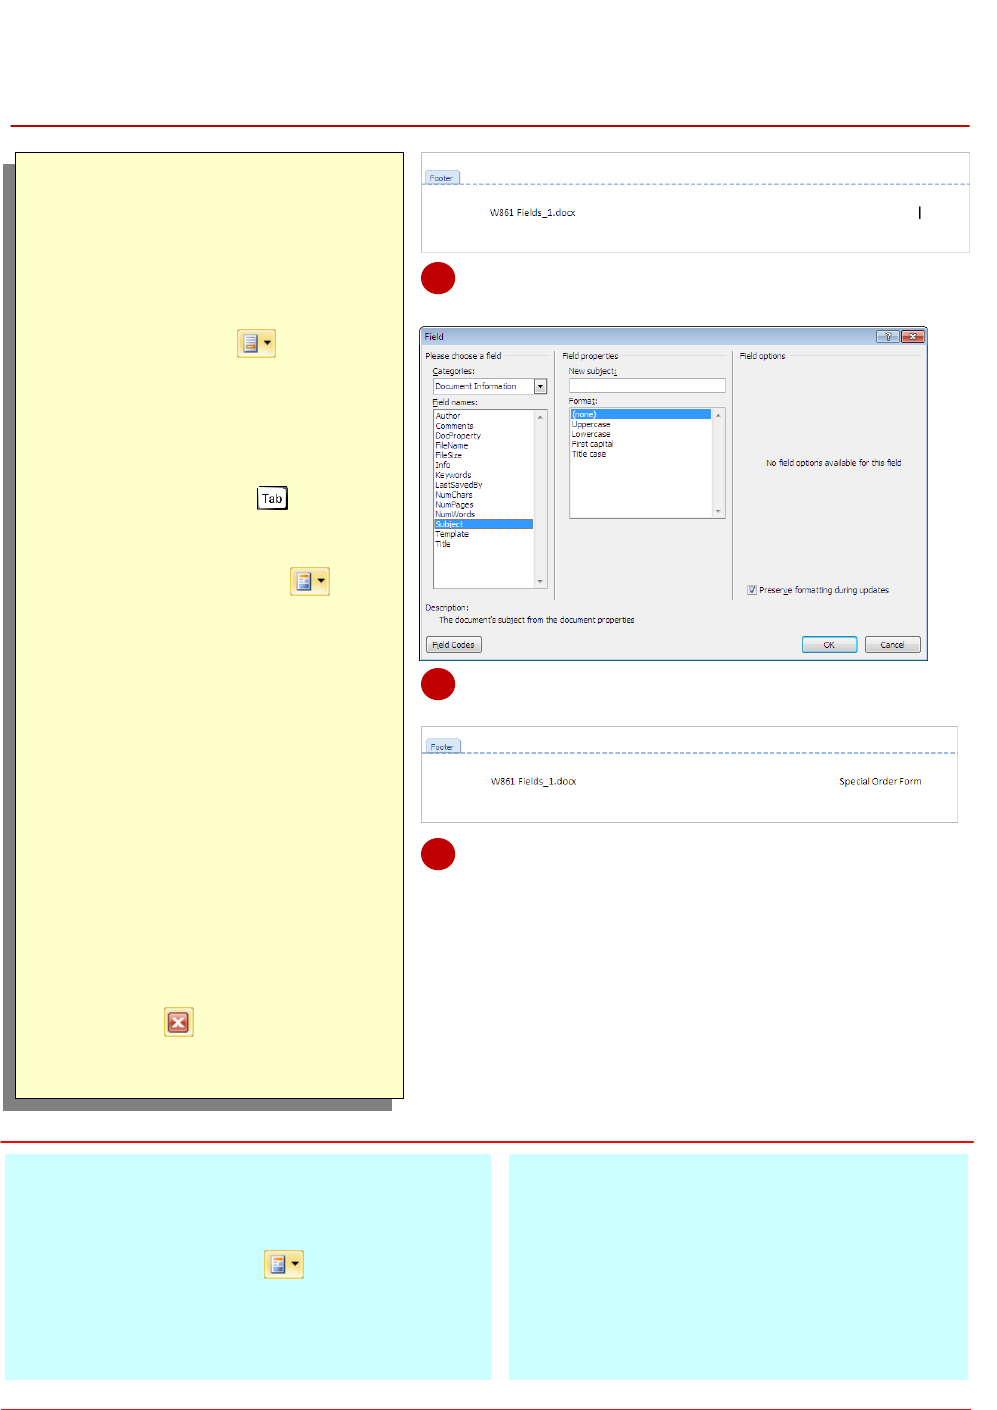
Click at the end of the file
name, then press twice to
position the cursor at the right
margin
Click on Quick Parts in
the Insert group and select
Field to open the Field dialog
box
Ensure that Document
Information is selected for
Categories, then click on
Subject for Field names
Type Special Order Form for
New subject, then click on
[OK]
The Subject text will be inserted
according to the field properties
you set, and the field data will
not update until you change the
field properties…
Click on Close Header and
Footer in the Close group
and then save the document
For Your Reference…
To set field properties:
1. Position the cursor, click on the Insert tab,
click on Quick Parts and select Field
2. Select the field Category and Name
3. Set the field properties as required, then
click on [OK]
Handy to Know…
To update or set field properties for an
existing field, right-click on the field and
select Edit Field. Set or modify the required
field properties in the Fields dialog box, then
click on [OK].
2
4
Each field type contains a range of field
properties that you can set to control the format
of the data, as well the data that appears in the
field. These field properties include switches, to
control formatting and capitalisation, as well text
fields for inserting specific data or values. For
example, you might want to ensure that only your
name only ever appears in the Author field.
5
Microsoft Word 2010 - Level 3
© Watsonia Publishing Page 86 Fields
SHOWING AND HIDING FIELD CODES
Try This Yourself:
Open
File
Before starting this exercise
you MUST open the file W861
Fields_3.docx...
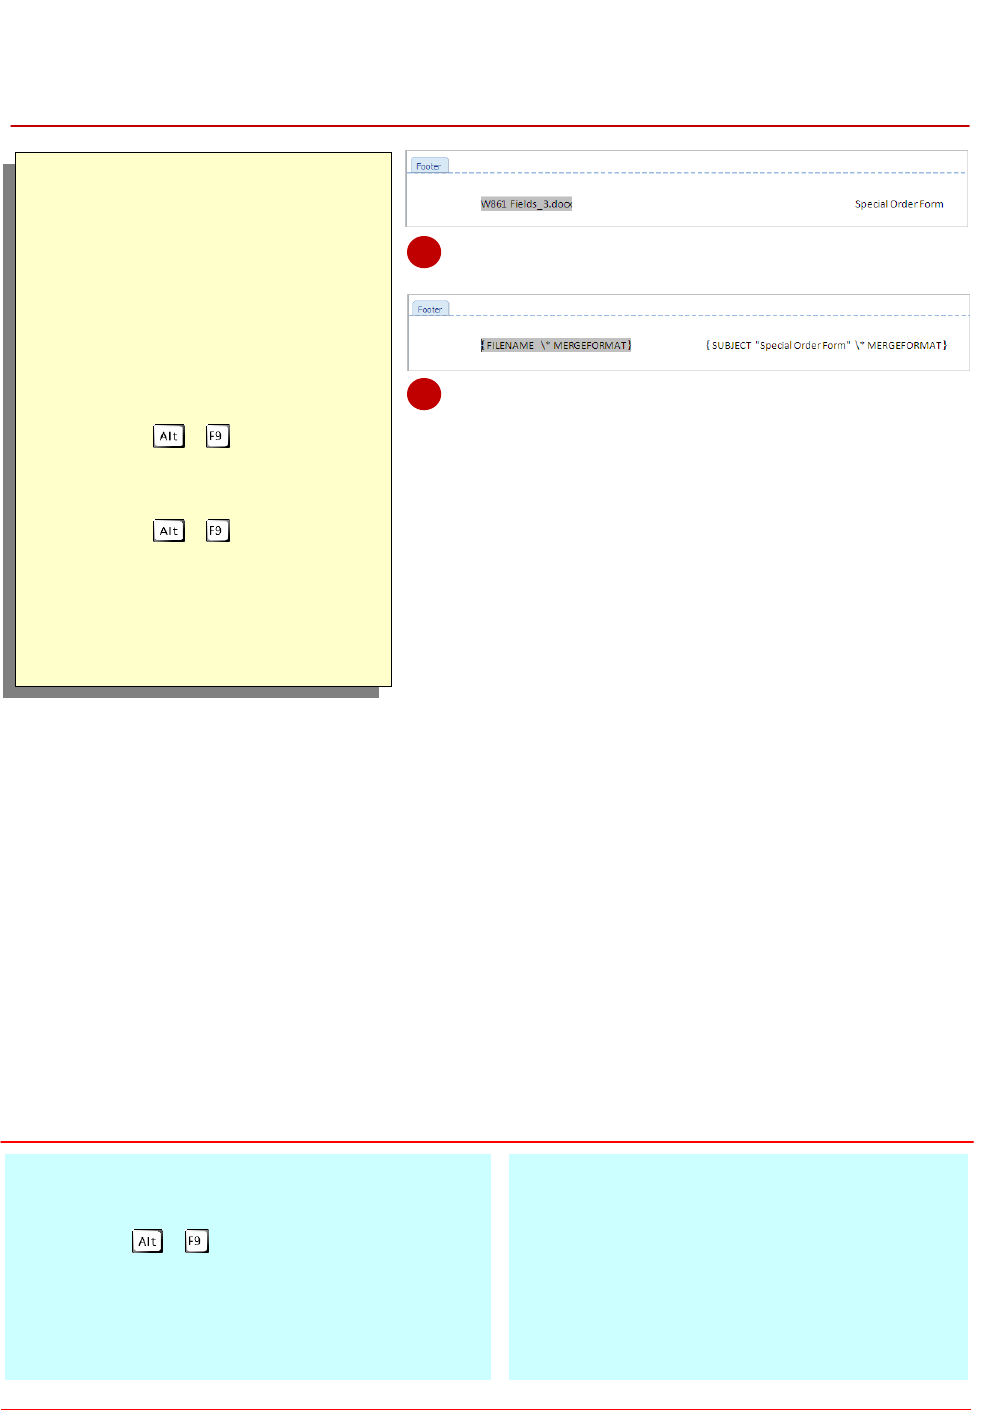
Make sure you can see the
footer information
By default the field data is
displayed...
Press
+
The field codes will be
displayed...
Press + again to hide
the codes and display the field
data
Save the document
For Your Reference…
To show/hide field codes:
1. Press +
Handy to Know…
\* MERGEFORMAT is a default property
setting that preserves the formatting during
updates. This means that any formatting that
has been manually changed or lost will be
restored when the field is updated.
1
2
When you insert a field into the document, the
resultant data is displayed in the field by default,
and the field code is hidden from view. You can
view the field code instead of the data, that is,
switch between viewing the data and viewing the
field code. You can do this if you need to, for
example, modify the field code or examine the
syntax.
Microsoft Word 2010 - Level 3
© Watsonia Publishing Page 87 Fields
SHOWING AND HIDING FIELD SHADING
Try This Yourself:
Open
File
Before starting this exercise
you MUST open the file W861
Fields_4.docx...
Make sure you can see the
footer information
By default, the field data is
displayed, but unless you
understand fields it may be
difficult to know whether this
has been typed in manually or
whether the data is contained
in a field…
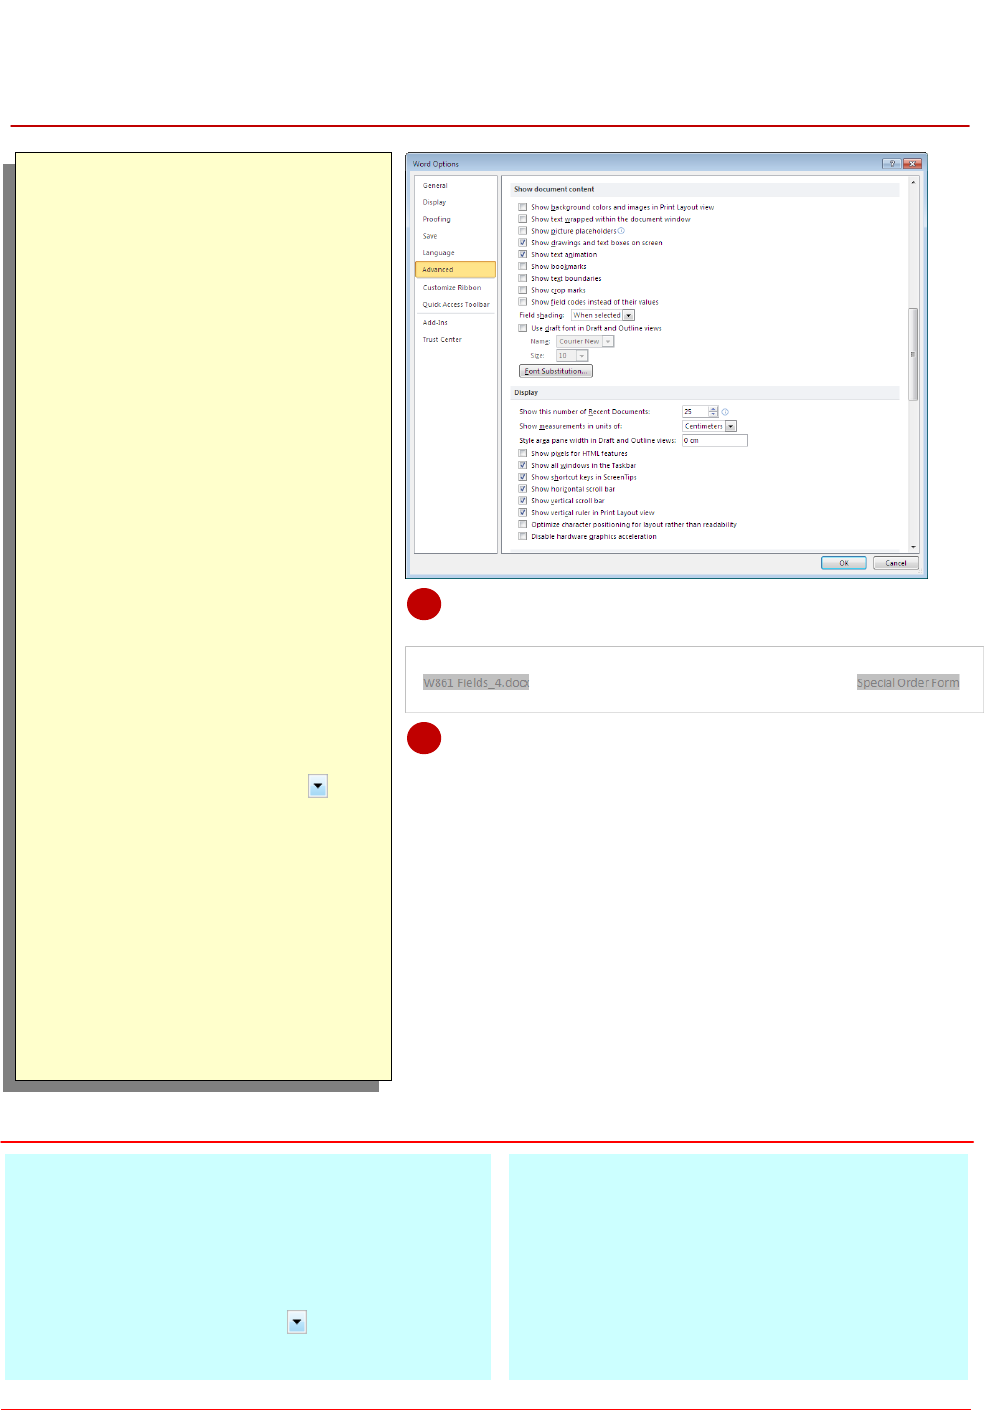
Click on the File tab, then click
on Options to open the Word
Options dialog box
Click on Advanced in the left
panel and navigate to the
Show document content
section
The default field shading
setting is When selected...
Click on the drop arrow for
Field shading and select
Always, then click on [OK]
The field data will now have
grey shading applied...
Repeat steps 2 to 4 to change
the Field shading setting to
When selected
Save the document
For Your Reference…
To display field shading:
1. Click on the File tab, then click on Options
2. Click on Advanced and navigate to the
Show document content section
3. Click on the drop arrow for Field shading
and click on Always, then click on [OK]
Handy to Know…
The default Field shading setting is When
selected. This displays the shading only
when you click in the field, but remains
otherwise hidden.
Field shading will remain on for all
documents until it is turned off in the Word
Options dialog box.
3
4
For users of your document who may not be
familiar with fields and how they work, it may be
difficult to know where fields are located in a
document. This is because the field data is
displayed by default. To make it easier for
document users to work with fields, you can display
the field shading in the document, so users know
exactly where the fields are located.
Microsoft Word 2010 - Level 3
© Watsonia Publishing Page 88 Fields
INSERTING FORMULA FIELDS
Try This Yourself:
Open
File
Before starting this exercise you
MUST open the file W861
Fields_5.docx...
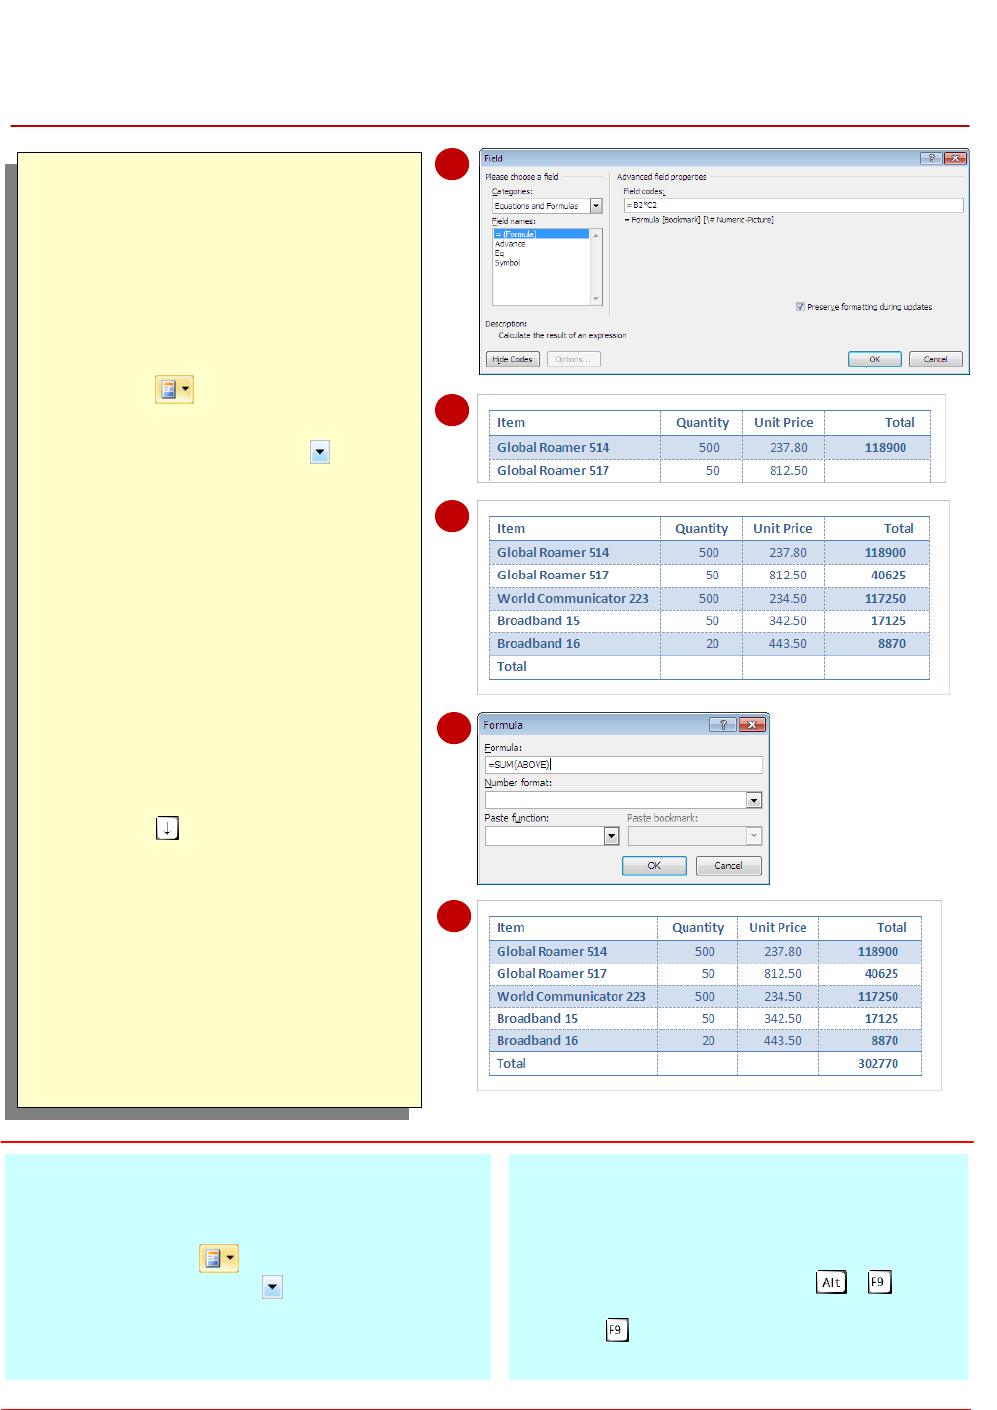
Click in the first empty cell (below
Total) in the table, click on the
Insert tab, then click on Quick
Parts and select Field to
open the Field dialog box
Click on the drop arrow for
Categories and select Equations
and Formulas
You will insert a formula that
multiples the Quantity in cell B2
by the Unit price in cell C2…
Ensure = (Formula) is selected in
Field names, click on [Field
Codes] to display the field codes,
then click after the equal sign in
Field codes and type B2*C2
Click on [OK] to insert the field
The formula result is displayed in
the field…
Press to move down one cell
and repeat steps 2 to 6 to insert
formula fields for the remaining
four items, as shown
Click in the last Total cell then
repeat steps 2 and 3, then click
on [Formula] to display the
function =SUM(ABOVE)
Click on [OK] to insert the formula
field
For Your Reference…
To insert formula fields:
1. Position the cursor, click on the Insert tab, click
on Quick Parts and select Field
2. Click on the drop arrow for Categories and
select Equations and Formulas
3. Click on = (Formula) and then click on [Field
Codes], type the formula then click on [OK]
Handy to Know…
When you want to insert the same formula
field in several cells, you can copy and paste
the formula field instead of opening the
Fields dialog box, then press + to edit
the fields with the new cell references. Then
press to recalculate the field with the
updated cell references.
1
4
Formula fields allow you to perform calculations
in a document. Formula fields are often used to
calculate a series of numbers in a table, such as
in invoices and the like. When using a formula
field, the formula must start with an equal sign (=)
and refer to the particular cells in the table that
contain the values to include in the formula.
5
7
6
Microsoft Word 2010 - Level 3
© Watsonia Publishing Page 89 Fields
INSERTING A DATE AND TIME FIELD
Try This Yourself:
Open
File
Before starting this exercise you
MUST open the file W861
Fields_6.docx...
Click on the Insert tab, then click
on Footer in the Header &
Footer group and select Edit
Footer, or double-click on the
footer area to make the footer
active
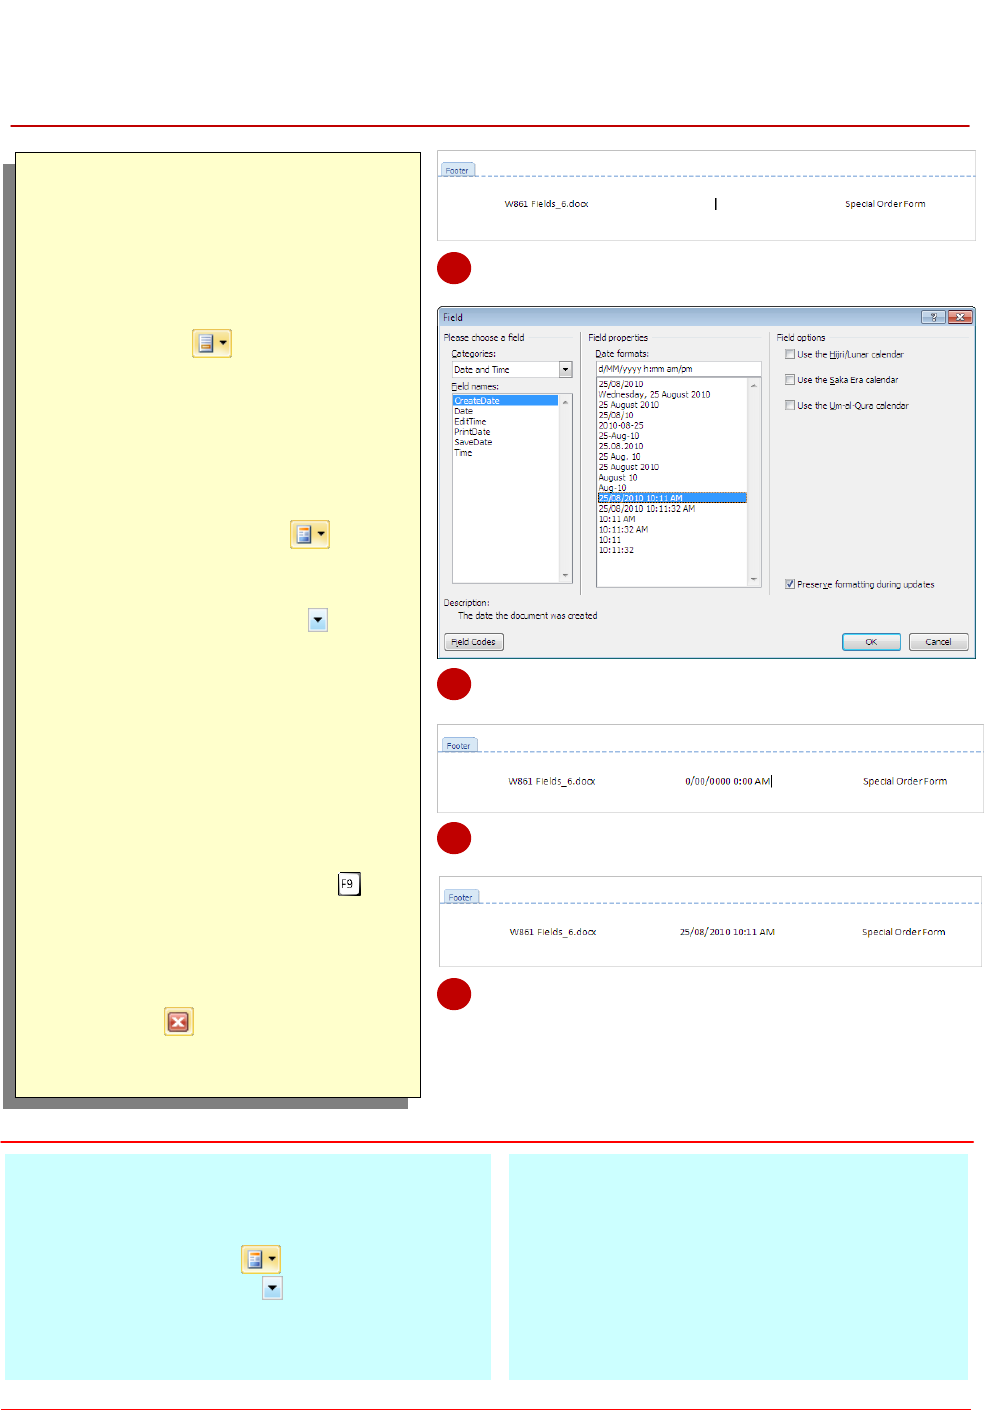
Click in the centre of the footer to
position the cursor, as shown
Click on Quick Parts in the
Insert group and select Field to
open the Field dialog box
Click on the drop arrow for
Categories and select Date and
Time, then click on PrintDate for
Field names, then click on the
Date format as shown to select it
Click on [OK]
If the document has not yet been
printed, the format will be
displayed but with zero values…
Print the document, then right-
click on the field and press to
update it
The print date should now appear
in the field…
Click on Close Header and
Footer in the Close group
and then save the document
For Your Reference…
To insert a date and time field:
1. Position the cursor, click on the Insert tab, then
click on Quick Parts and select Field
2. Click on the drop arrow for Category and
select Date and Time, then click on a Field
name to select it
3. Set desired properties and click on [OK]
Handy to Know…
As well as setting Field properties, you can
also set Field options for relevant field
types. Field options provide further or more
advanced settings for applicable field types.
Make sure you view the Field options when
working with fields in the Fields dialog box,
as they may prove useful.
2
4
The Date and Time field category contains
several field types that will insert the last date a
particular action was performed, such as the last
date and time a document was saved or printed.
Inserting the last print date can be helpful, as it
can help to establish the most recent version of a
document. You may also be required to use date
and time fields to meet document requirements.
5
6
Microsoft Word 2010 - Level 3
© Watsonia Publishing Page 90 Fields
UPDATING FIELDS AUTOMATICALLY WHEN PRINTING
Try This Yourself:
Same
File
Continue using the previous file
with this exercise, or open the file
W861 Fields_7.docx...
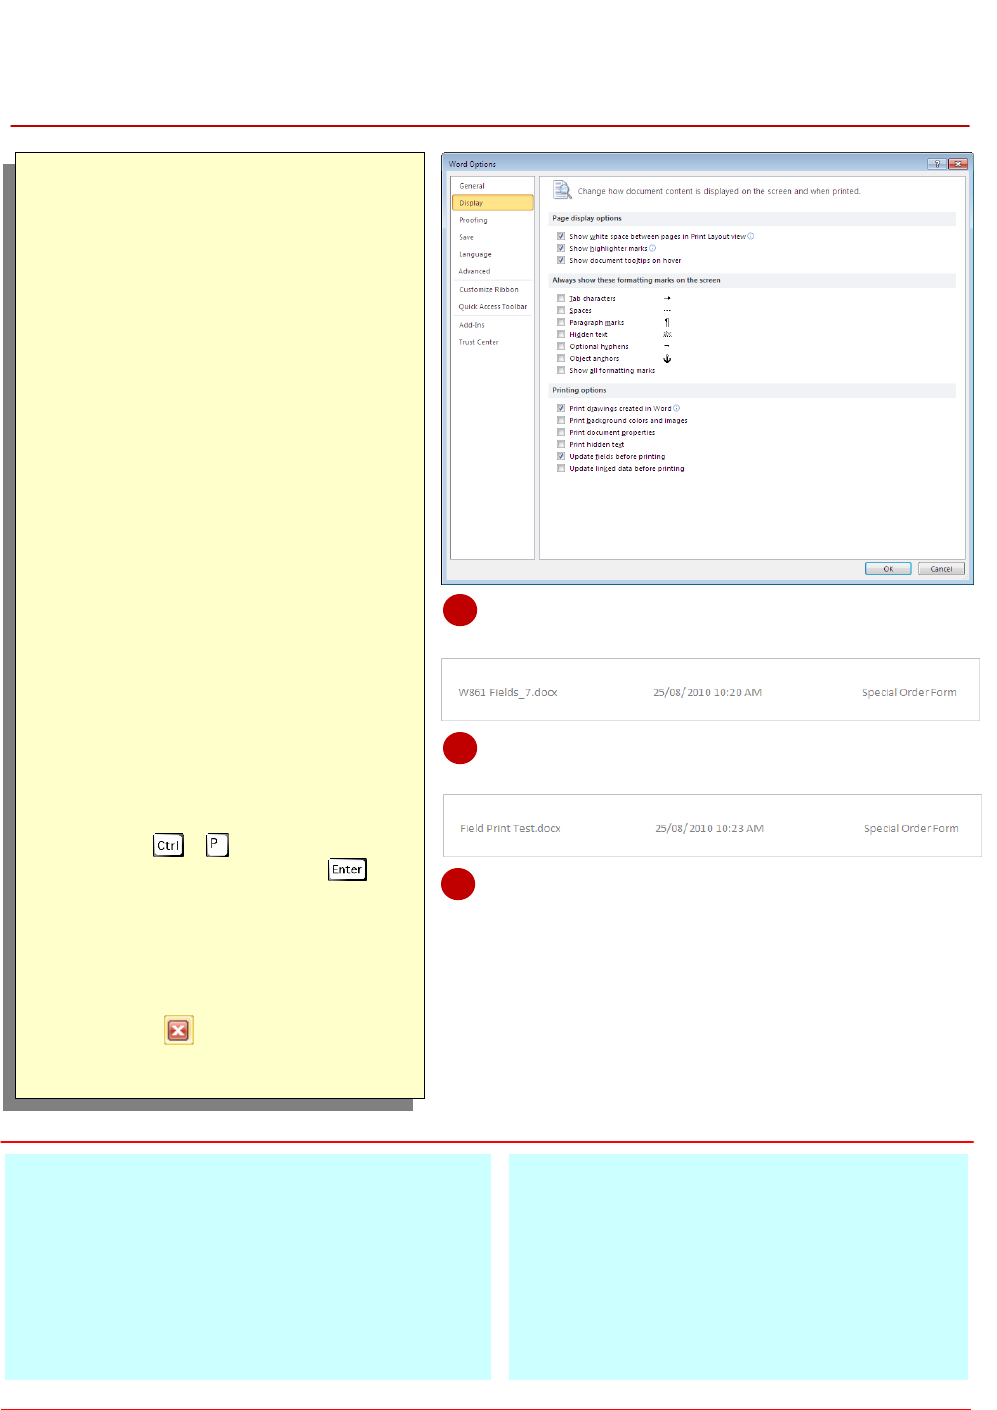
Click on the File tab, then click on
Options to open the Word
Options dialog box
The Printing options are located in
the Display options...
Click on Display in the left pane,
then click on Update fields
before printing in Printing
options so that it appears with a
tick
Click on [OK] to apply the settings
and then navigate to the footer
Save the document as Field Print
Test.docx in the course files
folder
The previous file name still
appears in the footer. You will now
test this option by updating
(changing) the information in the
FileName field…
Press + to print preview the
document and then press to
print the document
The FileName field (located on the
left of the footer) will now have the
new file name displayed…
Click on Close Header and
Footer in the Close group and
then save the document
For Your Reference…
To update fields automatically when printing:
1. Click on the File tab, then click on Options
and click on Display
2. Ensure that Update fields before printing
appears with a tick
3. Click on [OK]
Handy to Know…
Other printing options for fields include
being able to print the field codes instead
of the field data. To do this, open the Word
Options dialog box, click on Advanced and
then click on Print field codes instead of
their values. Click on [OK] to apply as a
global change. Repeat these steps to undo.
2
4
You can update fields in a document manually as
information changes, but it is probably most
important to have the most up-to-date information
on a printed copy of the document. Word
provides an option that enables fields to be
updated automatically just before the document is
printed. This option is turned off by default. In this
exercise you will turn the option on.
5
Microsoft Word 2010 - Level 3
© Watsonia Publishing Page 91 Fields
LOCKING AND UNLOCKING FIELDS
Try This Yourself:
Open
File
Before starting this exercise you
MUST open the file W861
Fields_7.docx...
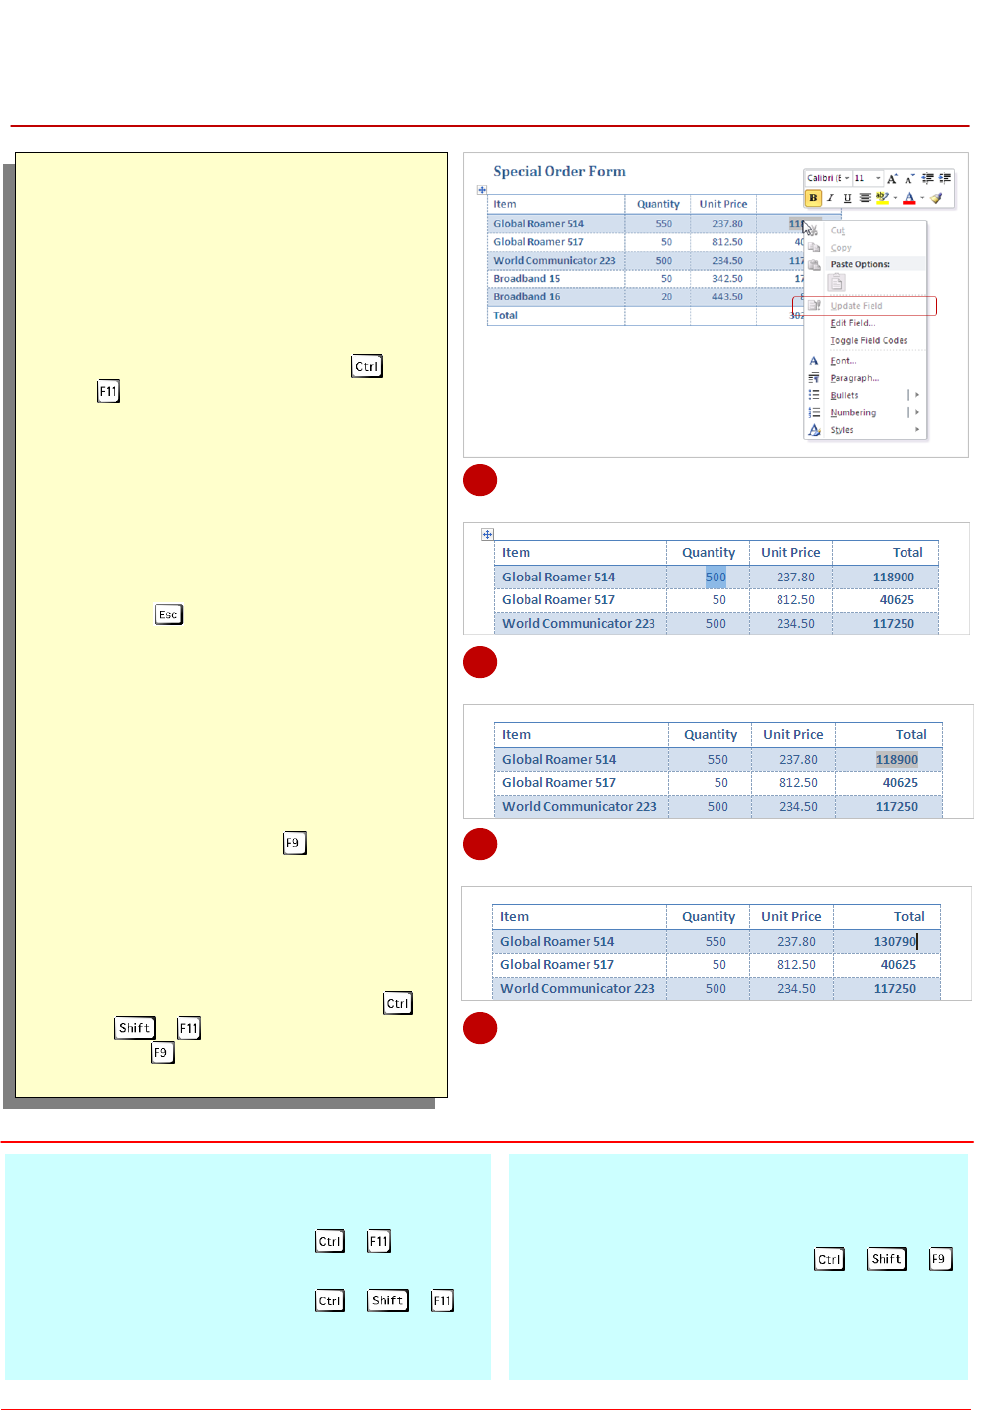
Click on the value in the Total cell
for the Global Roamer 514 to
activate the field, then press +
to lock the field
The field will now be locked. You will
check to make sure…
Right-click on the field to display a
shortcut menu
The Update Field option should be
unavailable, which means the field is
locked…
Press to hide the shortcut menu,
then double-click on 500 in the
Quantity cell for the Global Roamer
514 to select the text
The client is receiving 50 bonus
units, so you will adjust the quantity
but not the total…
Type 550 then click on the value in
the Total cell for the Global Roamer
514 again and press to update
the field
The field will not update as it is
locked. You will now unlock the field
to see how this feature works, then
update the field…
Click in the Total cell and press
+ +
to unlock the field, then
press to update the field data
For Your Reference…
To lock a field:
1. Click in the field and press +
To unlock a field:
1. Click in the field and press + +
Handy to Know…
Alternatively, you can convert the field data
into normal text so it can no longer be
updated automatically. Press + +
to do this.
2
3
A field contains a code that instructs Word to
insert specific types of data. As this data changes
it is updated regularly to reflect these changes.
However, you may want to lock the field so that
the data will remain static, and will not update until
you unlock the field. Locking fields might be useful
where you want specific values or data to remain
fixed, such as your name.
4
5
Microsoft Word 2010 - Level 3
© Watsonia Publishing Page 92 Fields
APPLYING A NUMBER FORMAT
Try This Yourself:
Open
File
Before starting this exercise
you MUST open the file W861
Fields_8.docx...
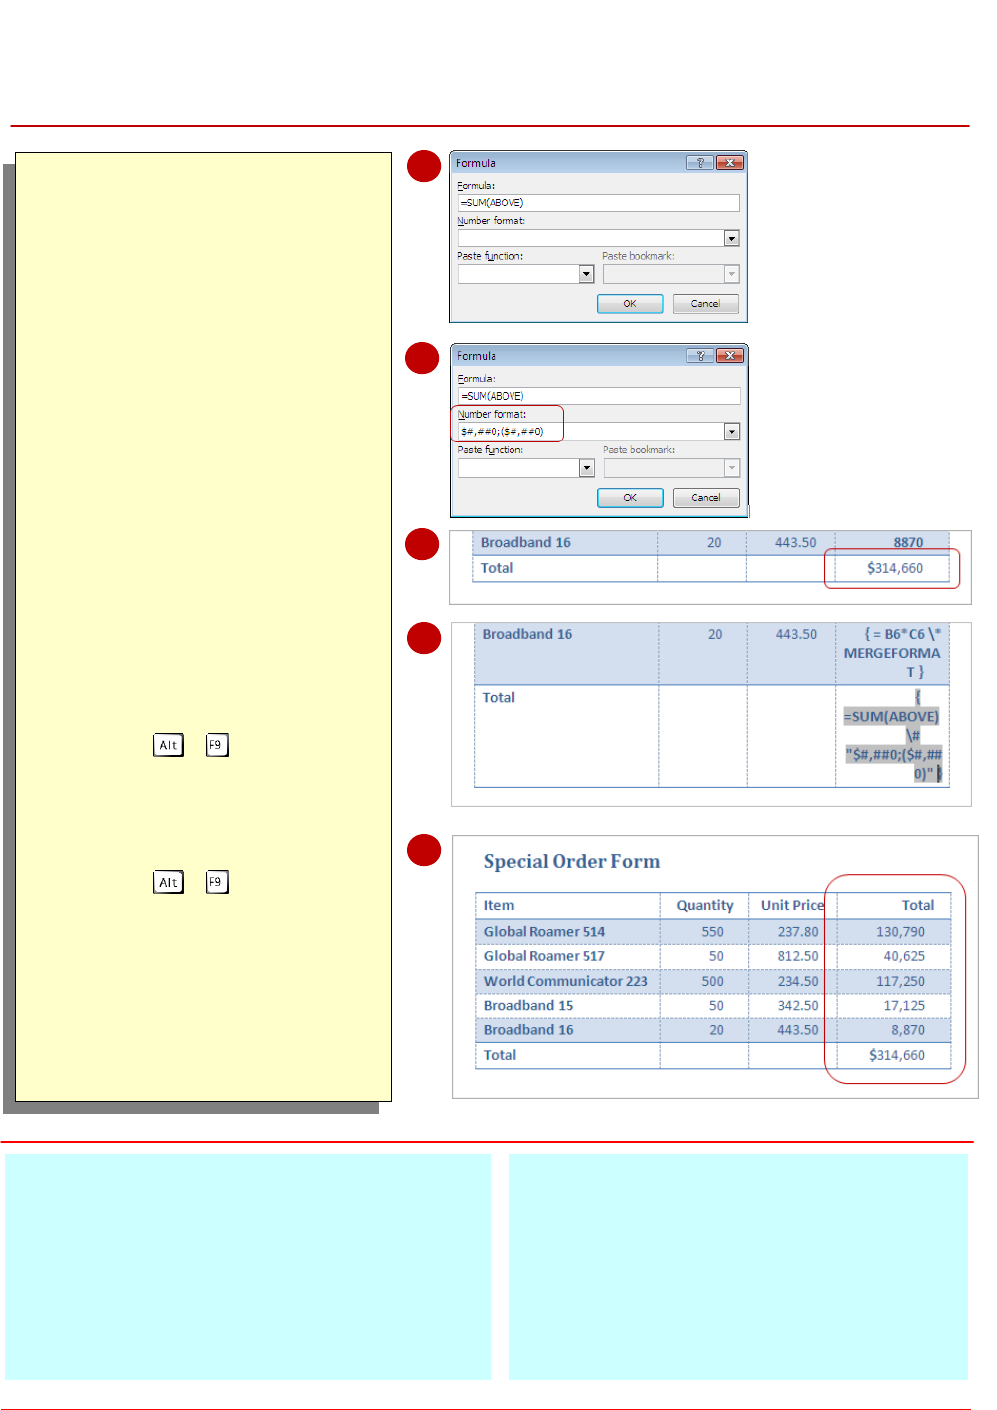
Right-click on the field that
displays the total 308830 and
select Edit Field to open the
Fields dialog box
You will edit the field
properties for the formula by
applying a number format…
Click on [Formula] to display
the Formula dialog box
Click on the drop arrow for
Number format and select
$#,##0.00;($#,##0.00), then
edit the format to appear as
$#,##0;($#,##0)
Click on [OK] to apply the
format to the field data
Press + to display the
field codes
The code is updated to include
the format switch for the
applied number formatting...
Press + to display the
field data
Repeat steps 2 to 4 to apply
the Number format #,##0 to
the Total of each item, as
shown
Save and close the document
For Your Reference…
To apply a number format:
1. Right-click on the field and select Edit Field
2. Select an applicable Format in Field
Properties
3. Edit if required, then click on [OK]
Handy to Know…
In this exercise you could have copied the
field and field code to other fields and then
update the cell references accordingly. To
do this, you could simply copy the field that
contains the correct code, then paste into the
new cell, reveal the codes and then update
the code with the correct cell references.
2
3
Many field types contain properties to control the
format and appearance of field data, such as the
date or number format, or the capitalisation rules
applied to text. These formatting properties
appear as switches in the field code. For most of
your formatting needs, you can set the required
properties in the Fields dialog box. Here you will
apply a number format to formula fields.
7
5
4
