Introduction to Computer Science with MakeCode for Minecraft
Lesson 6: Conditionals
Computer programs are made up of instructions that tell the computer how to process input
and deliver output. In Minecraft, the instructions you write are triggered by events or by
commands, and they control what actions take place in the Minecraft world. An important part
of programming is telling the computer WHEN to perform a certain task. For this, we use
something called ‘conditionals’, because a certain Condition or Rule has to be met before an
action is performed.
Students are already familiar with the concept of conditionals in their daily lives!
Have they ever had a parent say..?
● “If you clean your room, you can go out with your friends.”
● “If your homework is done, you can play video games.”
● “If you do your chores all week, you get your allowance, else you are grounded.”
These are all conditionals! Conditionals follow the format of IF this, THEN that.
IF (condition is met), THEN (action performed)
Have the students share a few conditionals from their own lives with the class or within small
groups.
NOTE: For older students, you can have them add the ELSE portion of a conditional.
IF (condition is met), THEN (action performed), ELSE (different action performed)
Examples:
IF it is snowing, THEN wear boots, ELSE wear shoes.
The ELSE portion makes sure that some action is performed in either case.
Example: For the ‘IF it is snowing, THEN wear boots, ELSE wear shoes’ conditional, notice that
without the ELSE action, your students might end up not wearing any footwear!

Unplugged activity: Simon Says If Then Else
A quick variation on Simon Says to practice conditionals (If, Then, Else statements).
How to play:
● Everyone stands up
● The Teacher will say a series of conditional statements – some may just be If… Then…,
but some may be If… Then… Else.
● Students will follow the instructions
Here’s a simple example: The teacher will say “If you have brown hair, Then raise your right
hand, Else sit down.” So, everyone who has brown hair should have their right hands raised, and
everyone else should be sitting down.
Teacher tips:
• Lead the activity to practice conditionals with simple instructions, yet visually different
physical poses
• Check that students have correctly executed the instructions based on the criteria
• Read out the Conditional statements slowly and clearly
• Make sure students understand and are following along with each set of statements
• Reset the students to normal standing positions between each conditional statement
• Ask the class for a few volunteers to create their own Conditional statements for the rest
of the class to follow along
Examples of some Conditional Statements:
• If your name starts with a ‘J’, Then give me a thumbs up
• If the month of your birthday ends with a ‘Y’ or an ‘R’, Then raise both your arms
• If you play soccer, Then kick your feet (be careful not to kick anyone)
• If your favorite ice cream flavor is Chocolate, Then stick out your tongue, Else make
rabbit ears behind your head
• If you play a musical instrument, Then snap your fingers, Else whistle
• If your favorite monster in Minecraft is a Zombie, Then make zombie noises and
movements, Else jump up and down
Other example conditions:
• Your hair is brown / blond / red
• Your eyes are brown / blue / green
• You are wearing a sweater / shorts / T-shirt / pants / skirt / sneakers / sandals
• It is raining / sunny / cloudy today
• You’ve played soccer / volleyball / football / frisbee in the past month
• You’ve eaten spaghetti / cereal / ham / toast in the past week
• You slept well last night / had a hard time waking up this morning
• Your favorite ice cream flavor is chocolate / vanilla / strawberry / mint / cookie dough
• You have a pet dog / cat / bird
• You have a sister / brother / no siblings
Types of Conditions in MakeCode
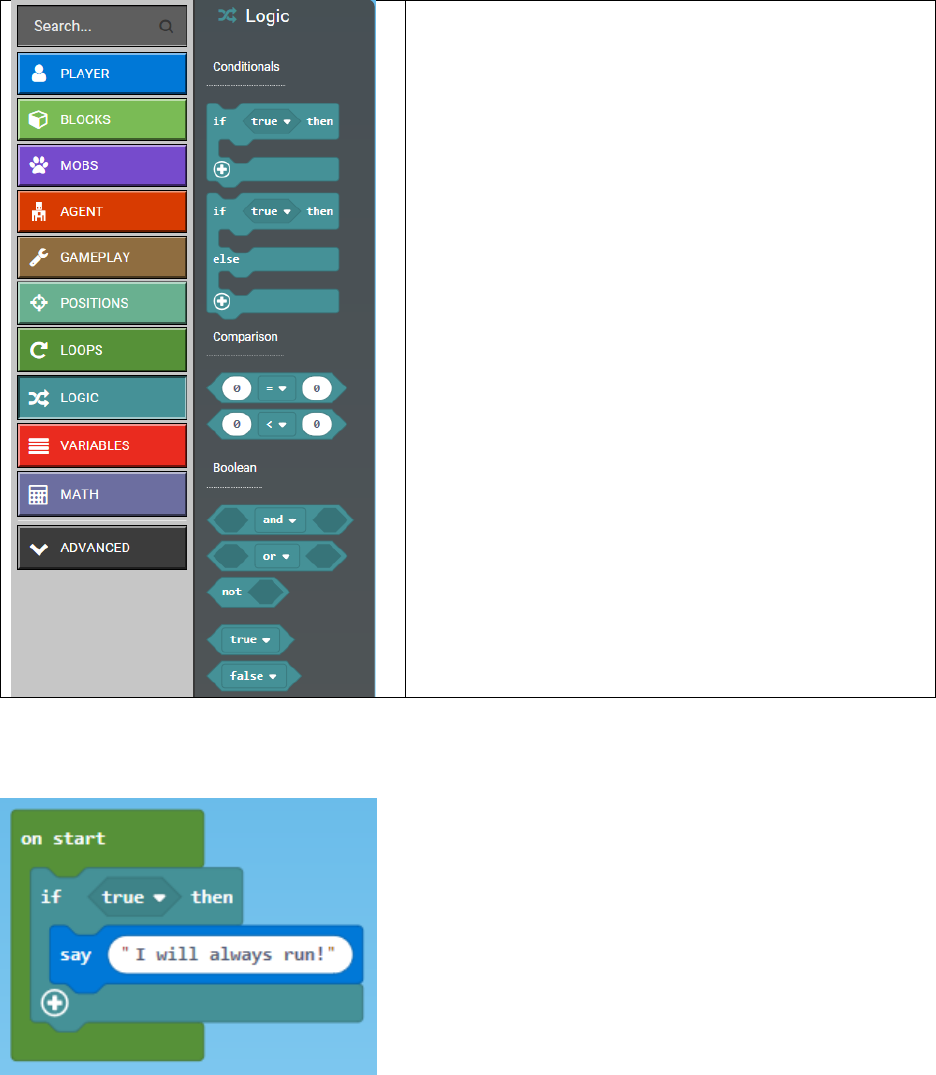
MakeCode for Minecraft features a special
conditional block called an IF… THEN… block.
There is also another related block called IF…
THEN… ELSE… block.
These blocks are in the Logic Toolbox drawer. These
blocks will check to see if a certain condition is true,
and if so, then they will perform their operations.
If you click the little plus sign at the bottom of these
blocks, you can add more conditions.
By default, there is a pointed-end spot for a block that says “true”. If you don’t change this, then
anything that the “If… Then block” encloses will run every time, because “true” is always true.
However, you can substitute another block, or a combination of blocks, next to the If, as long as
they ultimately are true or false, and fit in that pointed-end spot.
There is one other block in the Blocks Drawer that has pointed ends. Here it is:
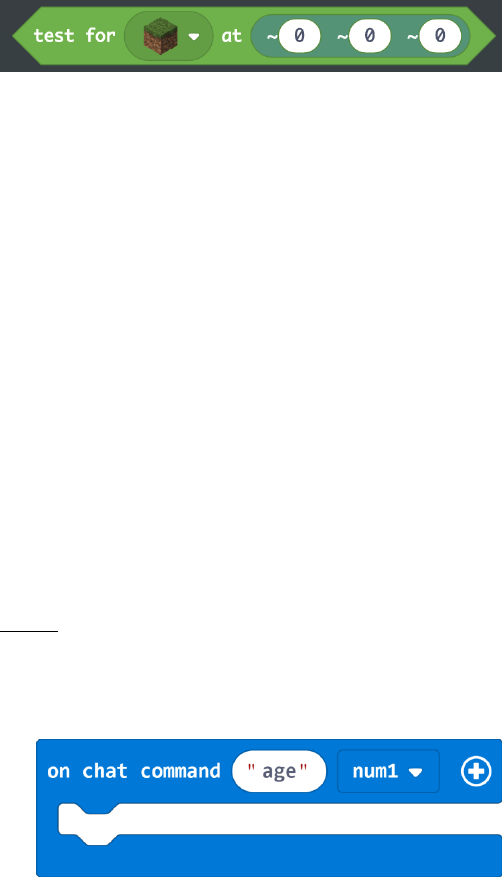
This block tests for a certain type of block at a specific set of coordinates. In this example, they
are the player’s exact location, which is always going to be false, because the player is occupying
that area. But you can specify ~0 -1 ~0 to check the block the player is currently walking on, or
even use a Position range to detect the presence of a certain block within a given area.
In this chapter, we’ll explore some of the possibilities that the different conditional blocks
provide, by automating some common Minecraft tasks like chopping down trees or mining.
Then we’ll challenge you to create your own independent project automating some other
Minecraft task of your choice. Let’s go!
Activity: How Old Are You?
In this programming activity, students will practice using the Conditional If Then Else block in
MakeCode. They will code a program that uses a condition to compare their friends’ age with
their own, and print different messages if they are younger, older or the same age.
Steps:
1. Create a New Project and call it “How Old”
2. Rename the existing On chat command to “age”
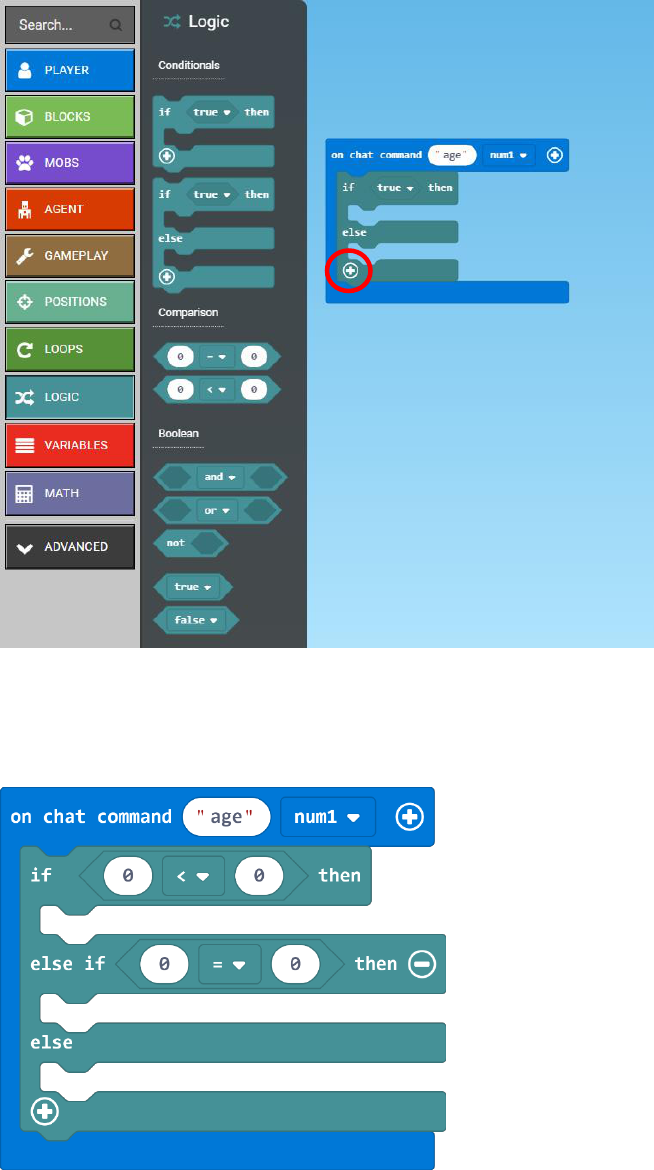
3. Click the Plus (+) sign on the On Chat command block to create a num1 variable parameter
4. From the Logic Toolbox drawer, drag an If then else block under the On chat command
block
5. Click the Plus (+) sign in the If then else block to create another “Else if” clause
6. From the Logic Toolbox drawer, drag a Less than (<) Comparison block into the If slot
replacing ‘true’
7. From the Logic Toolbox drawer, drag an Equals (=) Comparison block into the Else If slot
8. From the Variables Toolbox drawer, drag 2 of the num1 blocks into the first slot of each of
the Comparison blocks
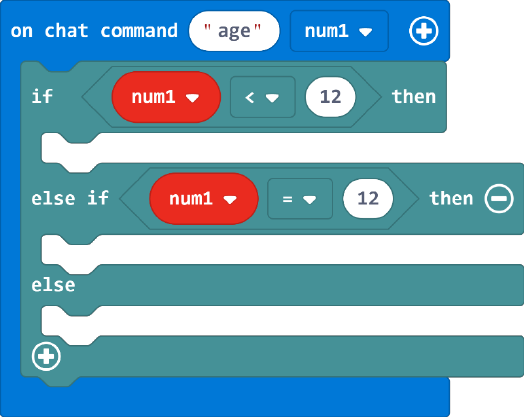
9. In the second slot of the Comparison blocks, type your age (for example 12)
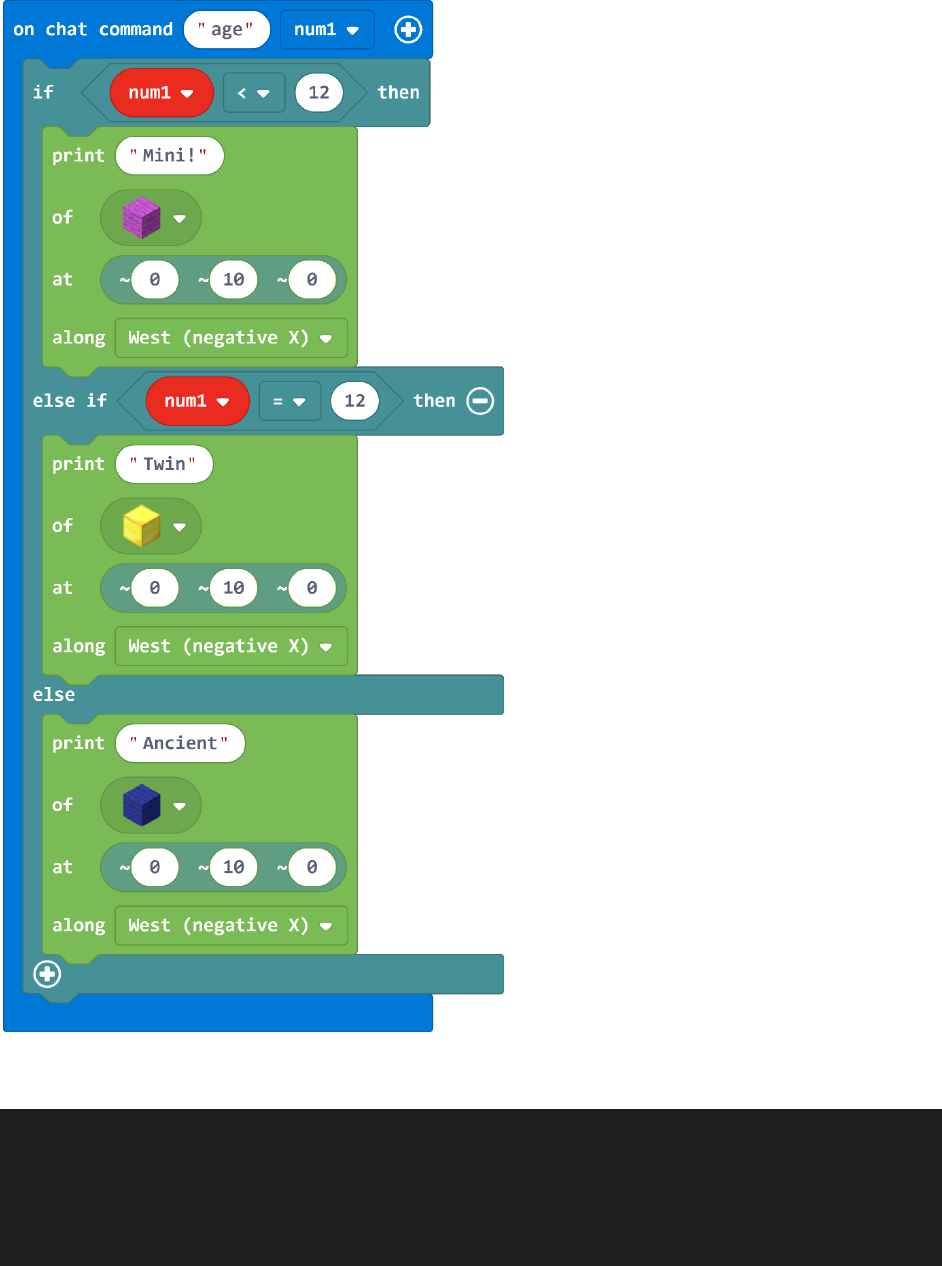
10. From the Blocks Toolbox drawer, drag 3 of the Print blocks onto your Workspace (or you can
right-click on one block and select Duplicate to make a copy)
11. Place one in each of your If, Else If, and Else clauses
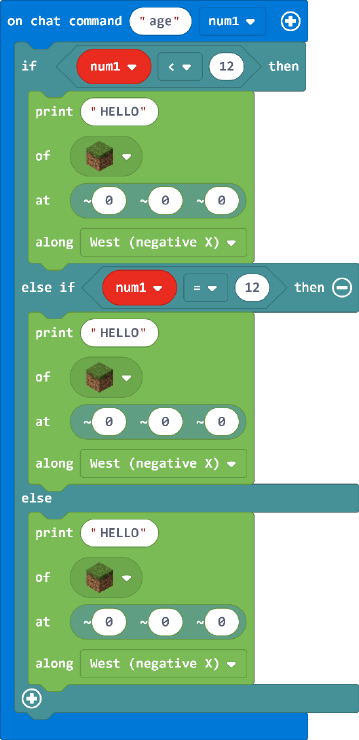
12. In each of your Print blocks, type a different message for people who are Younger than you,
your Same age, or Older than you. Keep this message short – just 1 or 2 words.
13. Use the drop-down menu in the Print blocks to select a different block to use for each
message
14. In all the Print blocks, set the Y coordinate to 10 (so these messages print in the sky)
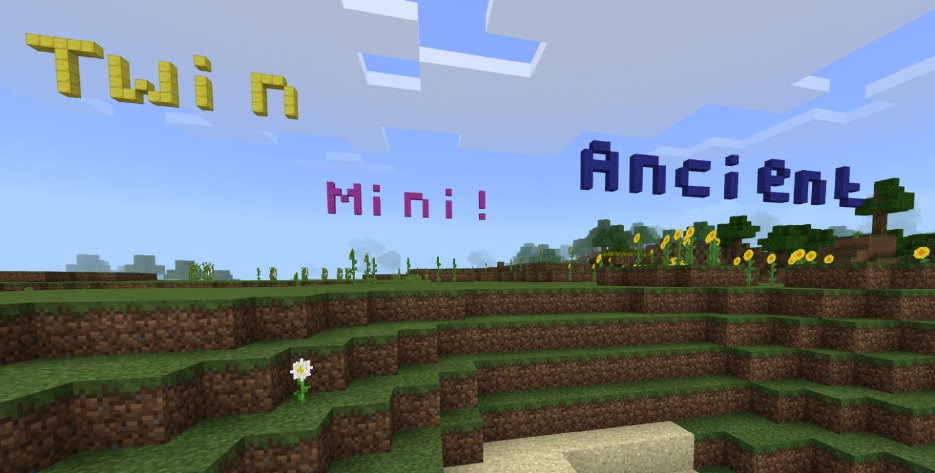
Have students pair up to run these programs:
• In the Minecraft Game, type ‘t’ to open the chat window
• Ask your neighbor their age, and type ‘age x’ – where x is your neighbor’s age
• Stay in the same position until your message is complete
• Then look in the sky above you at your message!
Complete Program:
JavaScript:
player.onChat("age", function (num1) {
if (num1 < 12) {
blocks.print(
"Mini!",

blocks.block(Block.MagentaWool),
positions.create(0, 10, 0),
CompassDirection.West
)
} else if (num1 == 12) {
blocks.print(
"Twin",
blocks.block(Block.GoldBlock),
positions.create(0, 10, 0),
CompassDirection.West
)
} else {
blocks.print(
"Ancient",
blocks.block(Block.BlueWool),
positions.create(0, 10, 0),
CompassDirection.West
)
}
})
Shared Program: https://makecode.com/_4R5VTf0bD4AM
Activity: Agent Tree Chopper
Chopping trees for wood is hard, but necessary in Minecraft if you want to craft objects and
tools in Survival mode. But we can automate this chore through code with the help of our
Agent! Let’s teach the Agent how to chop down a tree of any height and return back down to
the ground again.
When you start a new MakeCode project, it’s often a good idea to plan out what steps you want
to take before you start coding. Here’s what we’ll want to do:
1. Figure out how tall the tree is:
o As long as there’s a block in front of the Agent, keep moving up
o Keep track of how tall the tree is

2. Repeat the same number of times as the tree is tall:
o Destroy the block in front of you
o Move down
3. Collect everything
Steps:
1. Create a new MakeCode project called “Chopper”
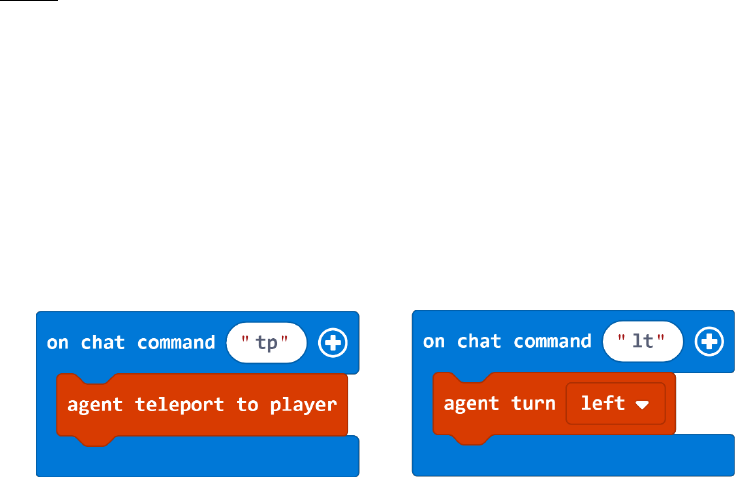
2. Rename the existing On chat command to “tp”
3. From the Agent Toolbox drawer, drag an Agent teleport to player block and drop it under
the On chat command
Now, let’s also create a directional command so we can turn our Agent around
4. From the Player Toolbox drawer, drag an On chat command block to the coding Workspace
5. Rename this On chat command to “lt”
6. From the Agent Toolbox drawer, drag an Agent turn block and drop it under the On chat
command “lt”
7. From the Player Toolbox drawer, drag an On chat command block into the coding
Workspace and rename it to “chop”.
We’ll use a variable to keep track of the height of the tree.
8. In the Variables Toolbox drawer, click the “Make a Variable” button
9. Name the variable “height”
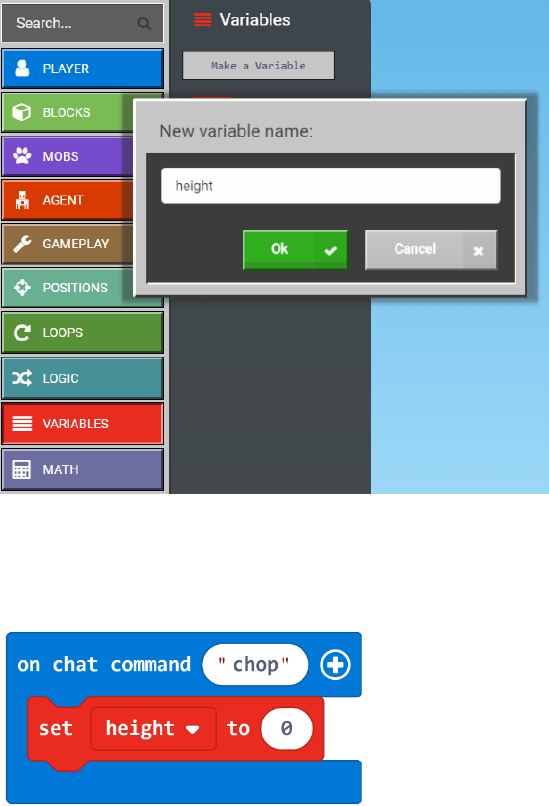
10. From the Variables Toolbox drawer, drag out a Set block and snap it under the On chat
command “chop” block.
11. In the Set block, use the drop-down menu to select “height” as the variable
We’ll assume the Agent is placed facing the base of the tree when the chop command is given.
Let’s use a While loop, which is like a repeat loop combined with a conditional statement to
check whether there is a block in front of the Agent, and if so to keep moving up the tree.
12. From the Loops Toolbox drawer, drag out a While loop block and drop it under the Set block
in our On chat command “chop”
13. From the Agent Toolbox drawer, drag out an Agent detect block and drop it into the While
loop replacing the True block
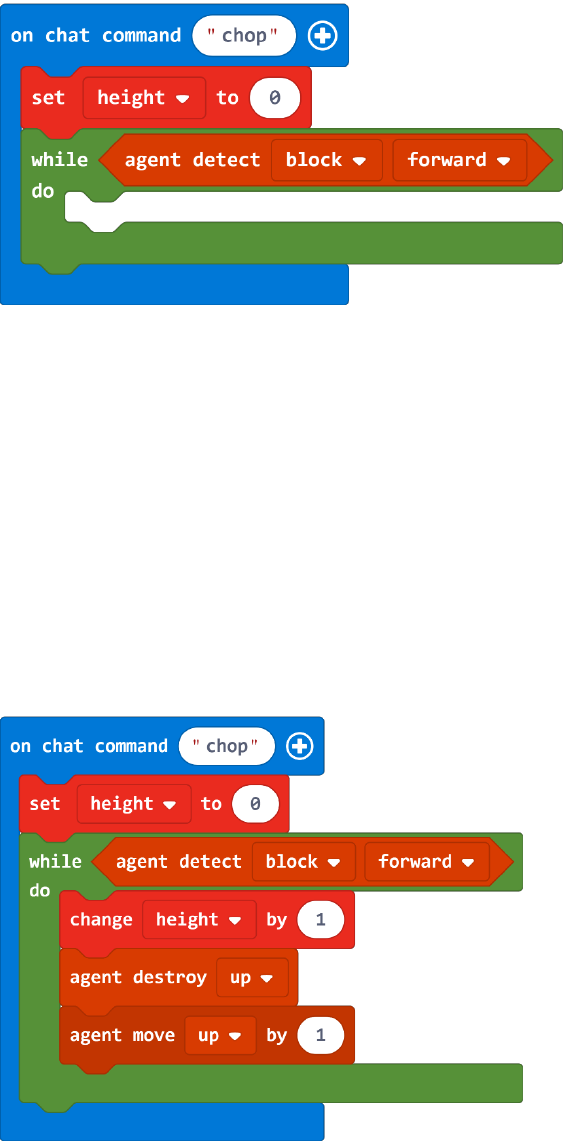
14. From the Variables Toolbox drawer, drag out a Change block and drop it under the While
loop.
15. In the Change block, use the drop-down menu to select the “height” variable
This will increment the height variable each time the Agent moves up so we can keep track of
the height of the tree.
16. From the Agent Toolbox drawer, drag out an Agent destroy block, and an Agent move block
and drop both blocks under the Change block in our While loop
17. In the Agent destroy block, use the drop-down menu to select “up” as the direction
18. In the Agent move block, use the drop-down menu to select “up” as the direction
In case there are leaves or branches above the Agent’s head, we will want to destroy them in
order to move the Agent up.
Once the Agent reaches the top of the tree (there is no longer a block in front of it) the height
of the tree will be stored in the variable height. Then we’ll want another loop that will destroy
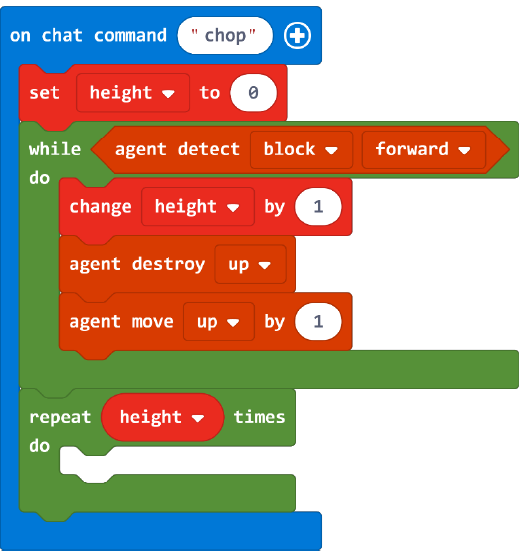
the block in front of the Agent (the tree trunk) and move the Agent down. This loop should run
height times (the height of the tree).
19. From the Loops Toolbox drawer, drag out a Repeat loop, and drop it after the While loop in
our On chat command “chop”
20. From the Variables Toolbox drawer, drag out the height variable block and drop it into the
Repeat loop replacing the number 4
21. From the Agent Toolbox drawer, drag out an Agent move block, and an Agent destroy block
and drop them (in that order) under our Repeat loop
22. In the Agent move block, use the drop-down menu to select “down” as the direction
Remember that we stopped when there was no longer a block in front of us, so in the loop we
need to move down first, then destroy forward. Finally, when the Agent gets to the bottom of
the tree, we want to make sure to collect all the wood that she’s chopped.
23. From the Agent Toolbox drawer, drag out an Agent collect all block and drop it after the
Repeat loop as the last block in our On chat command “chop”
Here is the complete program:

JavaScript:
let height = 0
player.onChat("tp", function () {
agent.teleportToPlayer()
})
player.onChat("lt", function () {
agent.turn(TurnDirection.Left)
})
player.onChat("chop", function () {
height = 0
while (agent.detect(AgentDetection.Block,
SixDirection.Forward)) {
height += 1
agent.destroy(SixDirection.Up)

agent.move(SixDirection.Up, 1)
}
for (let i = 0; i < height; i++) {
agent.move(SixDirection.Down, 1)
agent.destroy(SixDirection.Forward)
}
agent.collectAll()
})
Shared Program: https://makecode.com/_1hFLi6X1qPcJ
Optional Extension:
It is hard to predict which direction the Agent will be facing when you summon it. That’s why
directional commands are handy. But can you do without them?
You can omit the “tp” and “lt” commands and put everything in the “chop” program by doing
the following:
• Have Agent teleport to player be the first command when you call “chop” while standing
at the base of a tree.
• While the Agent is NOT facing a block, have it keep turning left. See if you can get the
Agent to stop once it is facing the tree trunk, then continue the program as normal.
The only potential drawback to this plan is that you need to stand directly at the base of the tree
in order for the Agent to end up there, if you don’t have a “fd” command. This means you may
have to trim some of the low-hanging leaves away. But you may be able to think of a way to
solve that too!
Activity: All Mine!
In addition to chopping trees for wood, you will probably also want to mine the earth for
precious minerals. One good strategy for finding the rarest of minerals, diamond, is to tunnel
deep beneath the earth to levels Y12 or Y13, then create a series of branching tunnels off a
central passageway. If you completed the previous Lesson 5 Iteration Independent Staircase
Project, you may have some code that gets the Agent to dig it for you. If not, get yourself down
to Y12 or Y13 and we’ll meet you there! Hint – find your world position in the game (press F1
key to see your world position on the screen), enter the command: /tp X 12 Z where X and Z are
your current world coordinates. This will teleport you to directly down to level 12 altitude in
your Minecraft world. Make sure you equip yourself with a pickaxe and torches to make some
room and see down there!
In this activity, we’ll create a basic mining Agent that automatically destroys blocks in front of it
and collects everything. We’ll use conditional statements to test for precious minerals. The
Agent is one block tall, so we’ll send it forward 64 blocks, then have it turn around, move up one
block, and come back. If the Agent finds anything of value, it will let us know and collect the ore.
Steps:
1. Create a new MakeCode project and name it “All Mine”
2. Rename the existing On chat command to “tp”
3. From the Agent Toolbox drawer, drag an Agent teleport to player block and drop it under
the On chat command
Now, let’s also create a directional command so we can turn our Agent around
4. From the Player Toolbox drawer, drag an On chat command block to the coding Workspace
5. Rename this On chat command to “lt”
6. From the Agent Toolbox drawer, drag an Agent turn block and drop it under the On chat
command “lt”
7. From the Player Toolbox drawer, drag an On chat command block into the coding
Workspace and rename it to “mine”
We can only mine diamonds in Survival mode, so the first thing we should do is make sure we
change the game mode to survival.
8. From the Gameplay Toolbox drawer, drag a Change game mode block and drop it in the On
Chat Command “mine” block
9. In the Change game mode block, click the player selector drop-down menu to select
“yourself @s”
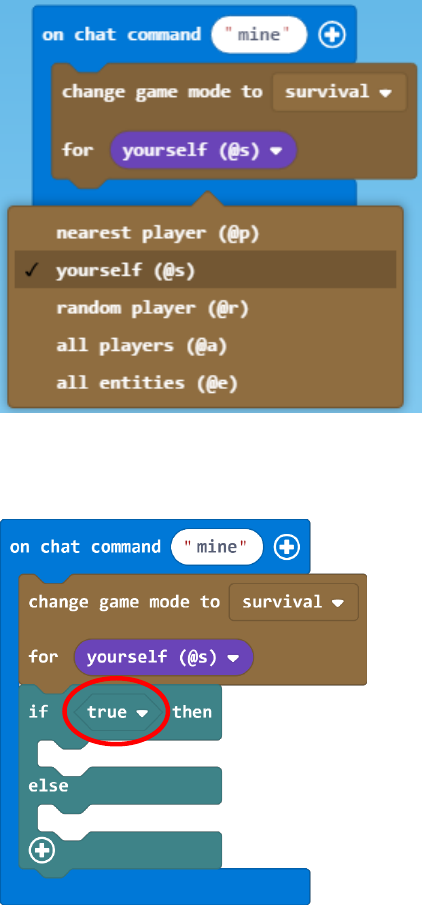
10. From the Logic Toolbox drawer, drag an If then else block out and drop it after the Change
game mode block
Notice that the true condition is a diamond-shaped block. As we mentioned earlier, you can
construct your own conditions that must be true in order for the blocks inside the If statement
to run. In our case, we want to give an alert if the Agent finds valuable blocks like gold or
diamond ore.
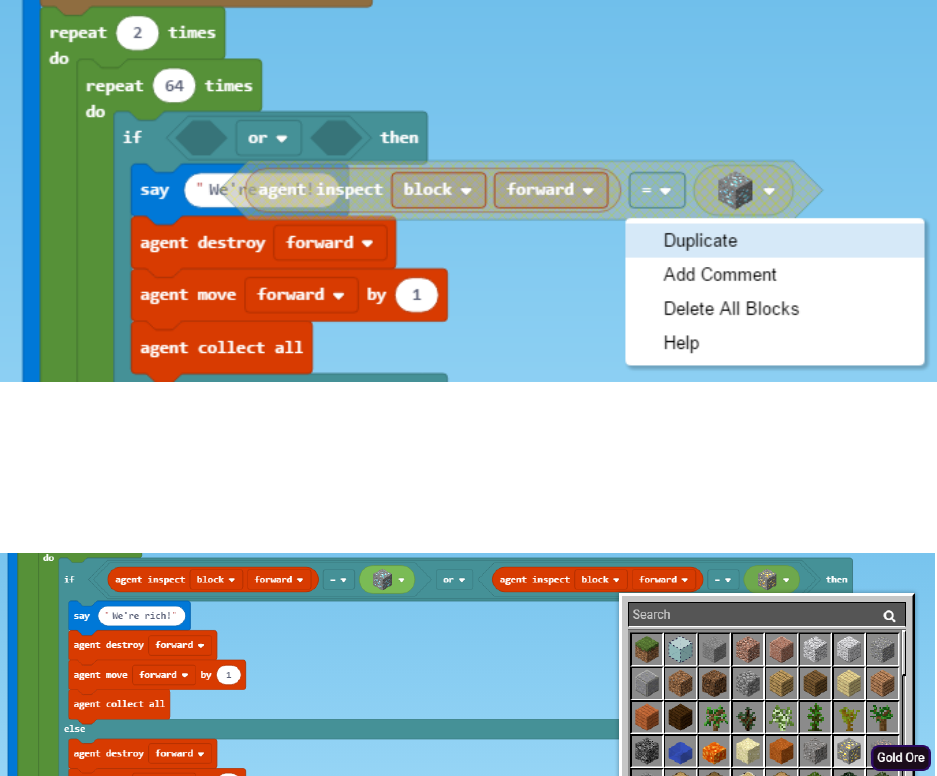
11. From the Logic Toolbox drawer, drag an Equals (=) comparison block out and drop into the
If then else block replacing “true”
12. From the Agent Toolbox drawer, drag the Agent inspect block into the first slot of the Equals
(=) comparison block replacing the number 0. The Agent inspect block will check the block
directly in front of the Agent.
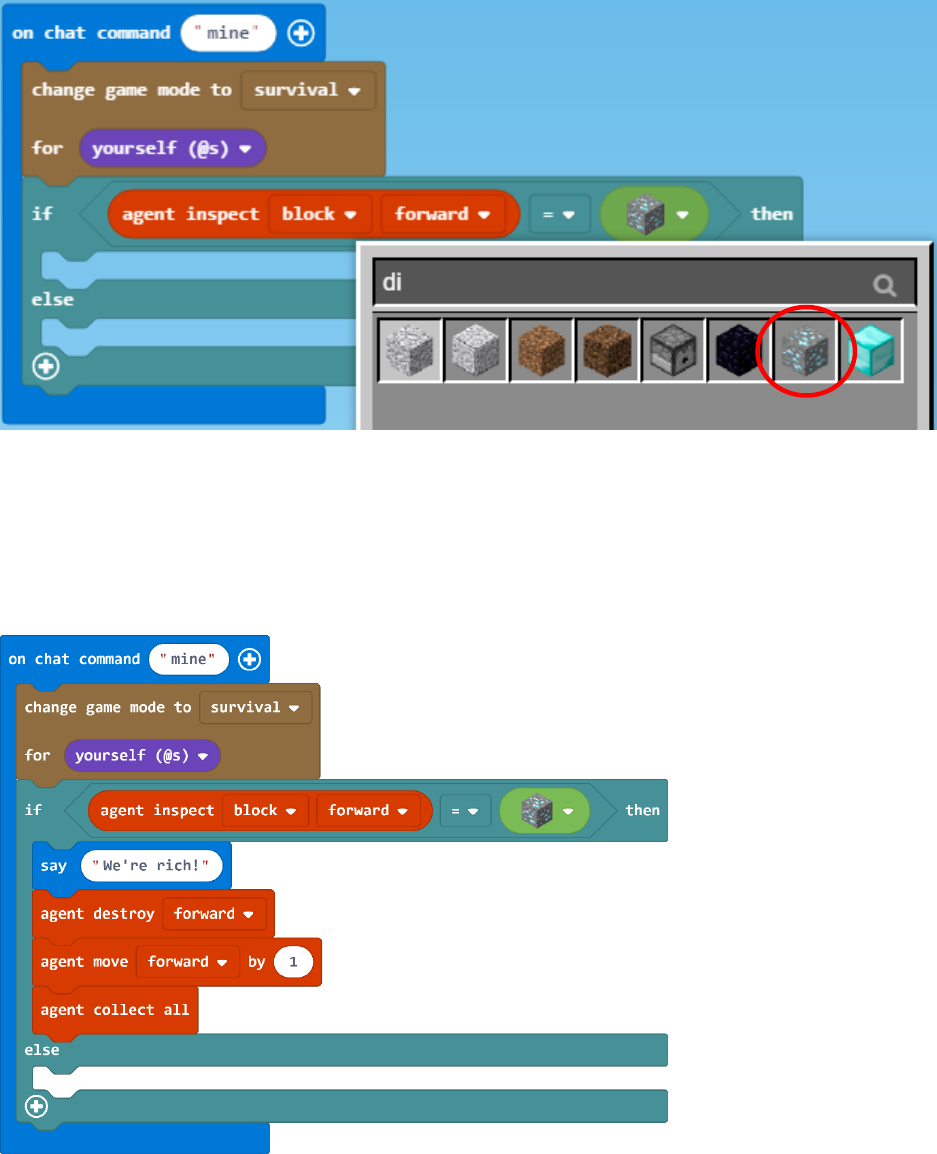
13. From the Blocks Toolbox drawer, drag a Block block out and drop into the second slot of the
Equals (=) comparison block replacing the number 0
14. In the Block block, use the drop-down menu to select “Diamond Ore” as the block we are
checking (you can also use the Search bar to find it)
If we do find Diamond Ore, then we want to print a message to the screen, and mine the ore.
15. From the Player Toolbox drawer, drag a Say block and drop under the If then block
16. In the Say block, type in a message like “We’re rich!”
17. From the Agent Toolbox drawer, drag the following 3 blocks and drop them in order under
the Say block: Agent destroy, Agent move, and Agent collect all
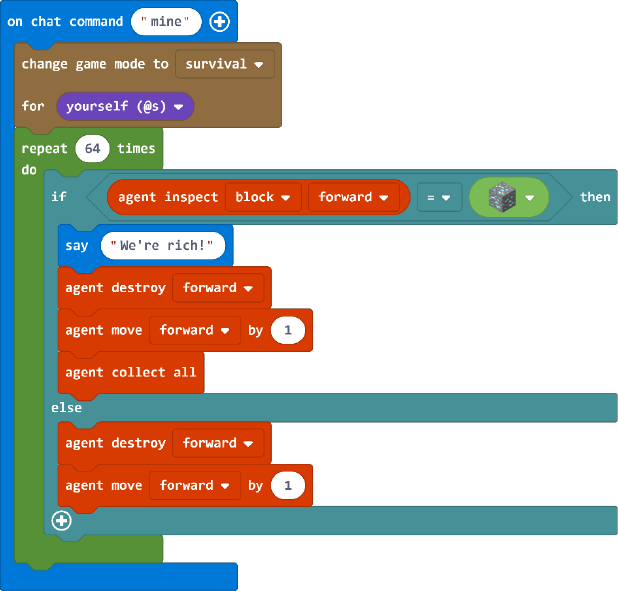
Otherwise, if the Agent doesn’t find Diamond Ore, he should simply destroy the non-valuable
block in front of it, and move forward without collecting anything.
18. From the Agent Toolbox drawer, drag the Agent destroy block and the Agent move block
and drop them into the Else clause of the If then else block
Now we want to repeat this process 64 times, so we’ll use a loop.
19. From the Loops Toolbox drawer, drag a Repeat loop out and drop it after the Change game
mode block, and surround our If then else block
20. In the Repeat loop, type in the number 64
This will send our Agent forward to mine 64 blocks. But we need to have her turn around and
come back. So, we’ll use another loop outside our Repeat loop – this is called a “Nested Loop”
since it’s a loop within a loop.
21. From the Loops Toolbox drawer, drag another Repeat loop out and drop it after the Change
game mode block, and surround our existing Repeat 64 loop
22. In the Repeat loop, type in the number 2, since we’ll just want our Agent to mine two rows
of blocks
At the end of the first row, we want our Agent to move up and turn around.
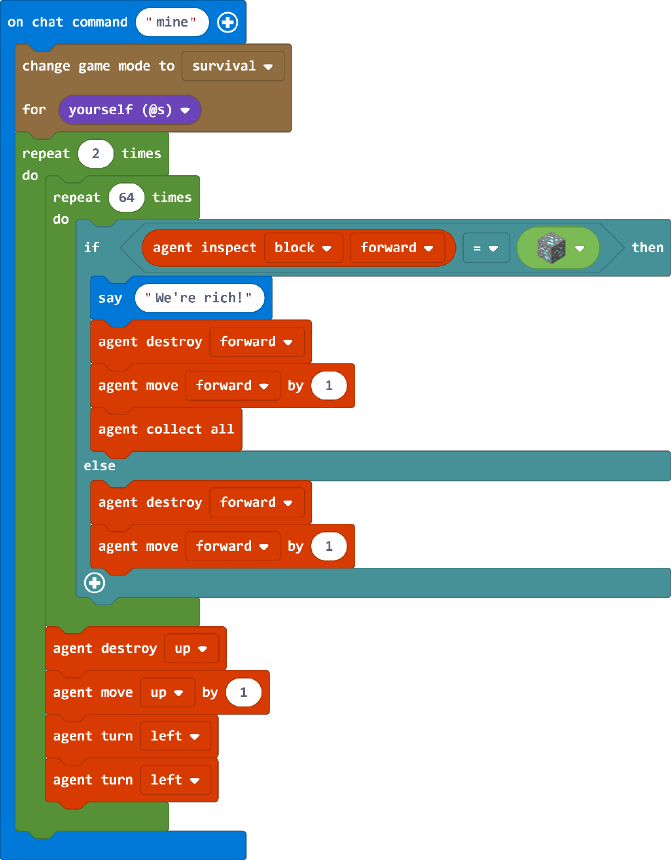
23. From the Agent Toolbox drawer, drag the following 4 blocks out and drop them in order
under the inner Repeat loop: Agent destroy, Agent move, and 2 Agent turn blocks
24. In the Agent destroy block, use the drop-down menu to select “up” as the direction
25. In the Agent move block, use the drop-down menu to select “up” as the direction
Optional Extension:
The other valuable mineral you will find at this level is gold ore. We can add a check for gold as
well as diamond ore to our program. To do this, we’ll use the Logical OR operator. MakeCode
for Minecraft supports boolean operations, which are more complex conditions that are true if
one or the other condition is true (“or”), or if both of the conditions are true (“and”).
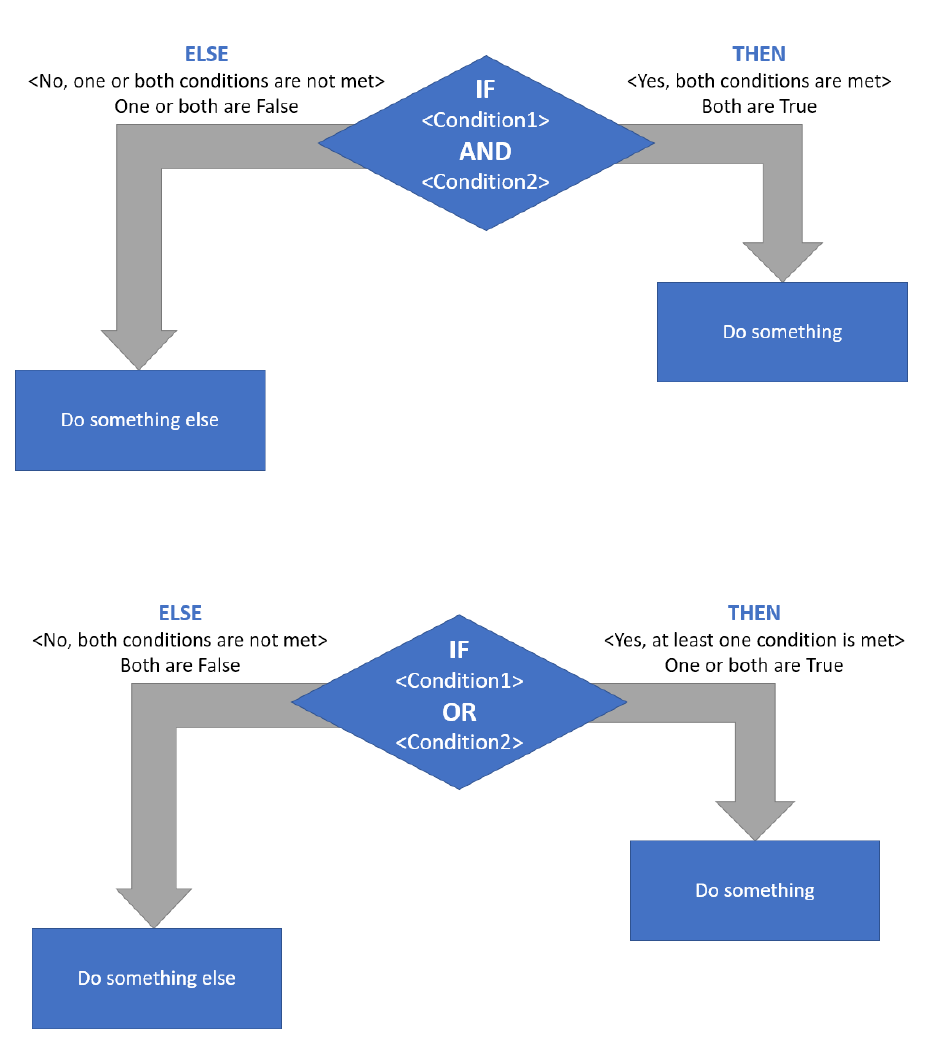
AND operator: both conditions must be True
OR operator: only one of the conditions must be True
26. Open the Logic Toolbox drawer and drag a Boolean Or block into the If then else block
replacing the Equals comparison block
27. The Equals comparison block will be floating disconnected and greyed out on your
Workspace. Right-click on this block and select Duplicate to create another copy.
28. Drag both of these Equals comparison blocks into the first and second slots of the Boolean
Or block
29. In the second Equals comparison block, use the drop-down menu on the Block block to
select ‘Gold ore’ as the mineral to check for
In this case, the If statement will run its code if the block is in front of the Agent is diamond ore,
OR if the block in front of the Agent is gold ore. If either of these is the case, we say “We’re rich!”
then destroy the block forward (which will drop the diamonds or gold ore) move forward, and
collect them. Otherwise, the Agent will simply destroy the non-valuable block in front of it, and
move forward without collecting anything.
Finished code:
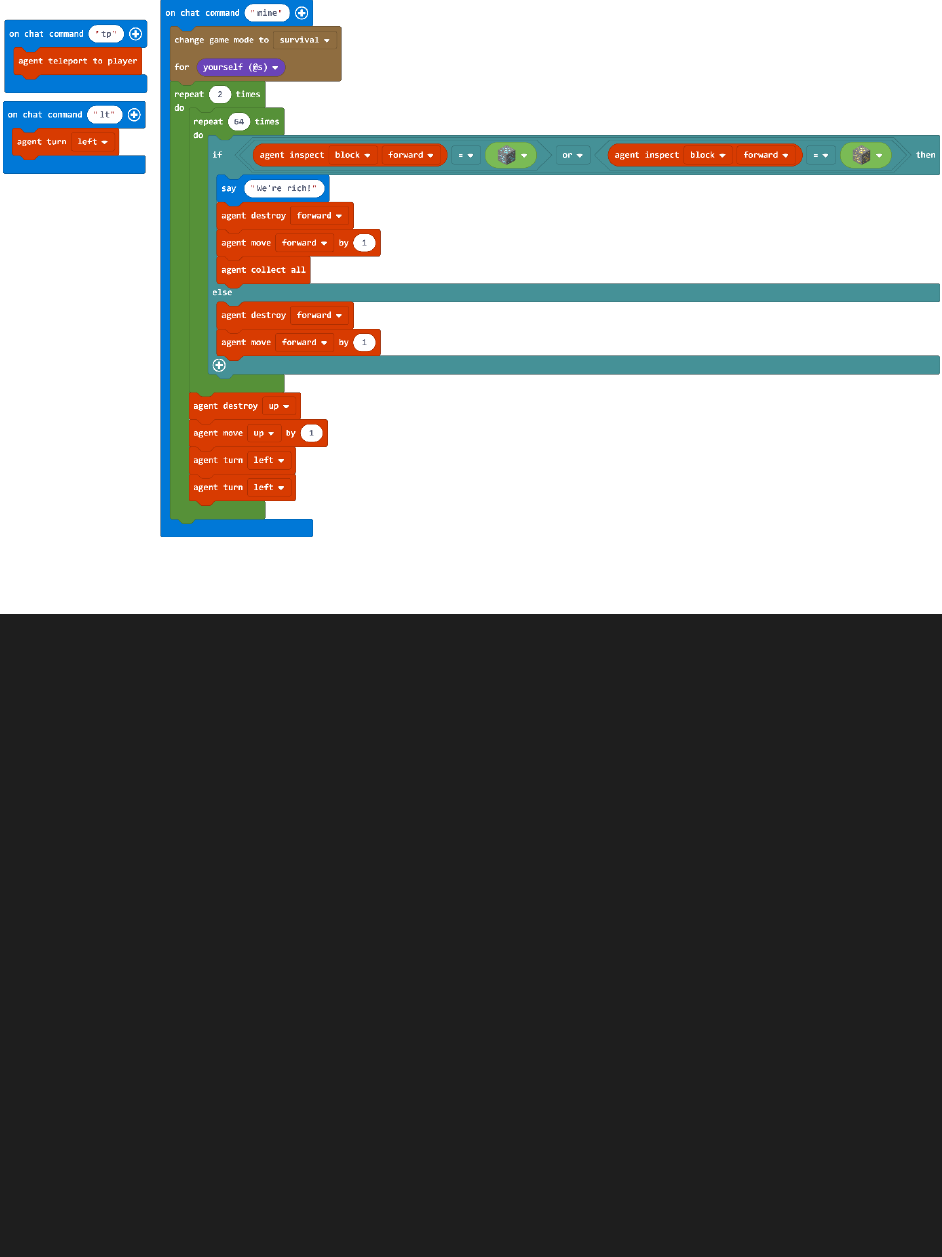
JavaScript:
player.onChat("mine", function () {
gameplay.setGameMode(
GameMode.Survival,
mobs.target(TargetSelectorKind.LocalPlayer)
)
for (let i = 0; i < 2; i++) {
for (let i = 0; i < 64; i++) {
if (agent.inspect(AgentInspection.Block,
SixDirection.Forward) == blocks.block(Block.DiamondOre)
|| agent.inspect(AgentInspection.Block,
SixDirection.Forward) == blocks.block(Block.GoldOre)) {
player.say("We're rich!")
agent.destroy(SixDirection.Forward)
agent.move(SixDirection.Forward, 1)
agent.collectAll()
} else {

agent.destroy(SixDirection.Forward)
agent.move(SixDirection.Forward, 1)
}
}
agent.destroy(SixDirection.Up)
agent.move(SixDirection.Up, 1)
agent.turn(TurnDirection.Left)
agent.turn(TurnDirection.Left)
}
})
player.onChat("tp", function () {
agent.teleportToPlayer()
})
player.onChat("lt", function () {
agent.turn(TurnDirection.Left)
})
Shared Program: https://makecode.com/_8Aif41bHEdFo
Paired Independent Project
In this chapter, we’ve looked at how some of the different conditional blocks work. We’ve seen
that a while loop is like a repeat block combined with a conditional statement (repeat while this
condition is true) and we’ve also seen how we can use a series of If statements separated by Else
statements to create blocks of code that run in all sorts of different cases. Finally, we’ve looked
at boolean operators, which define a relationship between conditions such that both conditions
must be true, or only one of the conditions needs to be true, in order for the whole expression
to be considered true.
For the independent project, work with another student to create a project together that uses
one or more blocks from the Logic Toolbox drawer. Think about problems you encounter in a
Minecraft world, and try to come up with solutions for them.
Paired Project Work Techniques
Collaborative Design

In any design project, it’s important to start by understanding the problem. You can begin this
activity by interviewing people around you who might have encountered the problem you are
trying to solve. For example, if you are designing a survival tool, what do most Minecraft
players do to survive the first night? Ask your friends how they find food, build a shelter, etc.
What resources do they tend to look for first? Do they have a system? What would be more
effective? What do they wish they had the ability to do?
If you are designing something else, think about how you might find out more information
about your problem through interviewing or observing people playing Minecraft, with your
focus being strictly on studying their behavior in-game. A good way to focus your
observations is to make a list of key questions ahead of time:
What do new players do first?
How quickly do they decide to go underground?
How long do they stay there?
Do they tend to stay in one place, or migrate?
Which characteristics make a good place to build a base?
Then start brainstorming with your partner. Talk about a variety of different ideas. Remember
that it’s okay if the ideas seem far-out or impractical. Some of the best programs come out of
seemingly crazy ideas that can ultimately be worked into a useful program.
Pair Programming
The concept of “pair programming” is a valuable way to have programmers collaborate when
creating programs together. Two programmers share one computer, with one person at the
keyboard acting as the driver, and the other person providing directions as the navigator. If
you are collaborating with someone else on a project, try using one computer and take turns
creating code and then seeing how it behaves in the Minecraft world. The main rule is, if you
are at the keyboard, you are doing what the other person is telling you to do. They are the
navigator! Remember to practice good communication with each other throughout the entire
programming process.
Debugging
Be sure to test out a number of different ideas in Minecraft. What is the easiest way to keep
track of data? You can test to see if certain conditions are actually being detected by adding a
Say block inside the If Then block. If you do something in the world that should trigger the
condition, but you don’t see the message printed to the screen, then you know that
something is wrong is wrong with your condition.
Similarly, If you are updating your variables based on certain conditions, you can use a Say
block to print out the value of the variable so you can make sure it is changing properly. If
you are using a number variable, remember to use a Join block to join it with a word (or
empty quotes) so it will print.

Here are some examples of challenges for your Independent Project:
Iron Finder
One of the most common tasks early in the game is finding enough iron to make iron tools and
perhaps a full set of iron armor for protection. Iron is found in streaks of iron in the stone
hillsides and caverns, but it is often hidden from view. Create a MakeCode Project that checks to
see if iron is near you, and then alerts you when you are very close to iron ore. Once you find
one block of iron ore, there is likely to be more close by, so all you need is to hit on one block to
strike an iron vein!
Improved Miner
Work with the Agent program we have defined, and see if you can make it better. Can you make
the Agent check multiple levels at a time? Can you check for other rare minerals as well, like
Emerald?
Minecraft Diary
Compose a diary entry addressing the following:
• What Minecraft problem did you decide to solve? What does your program do?
• How did you use conditional statements in your project?
• Discuss one (or more) ways that working with a partner was different from just doing the
project by yourself.
• Describe one point where you got stuck. Then discuss how you figured it out.
• Include at least one screenshot of your Agent in action.
• Share your project to the web and include the URL here.
NOTE: If you decided to improve one of this lesson’s activities, please talk about the new code
you wrote in addition to what was already provided in the lesson.
Assessment
1
2
3
4
Diary
Minecraft
Diary entry is
missing 4 or
more of the
required
prompts.
Minecraft
Diary entry is
missing 2 or
3 of the
required
prompts.
Minecraft
Diary entry
is missing 1
of the
required
prompts.
Minecraft
Diary
addresses all
prompts.
Logic
Doesn’t use
conditional
statements
at all or uses
loops in a
superficial
way and has
problems
with
conditional
statement
execution.
Uses
conditional
statements
effectively
but in a
superficial
way.
Uses
conditional
statements
in a way that
is integral to
the program
but some
problems
with
conditional
statement
execution.
Uses
conditional
statements
effectively in
a way that is
integral to
the program.
Project
Project lacks
all of the
required
elements.
Project lacks
2 of the
required
elements.
Project lacks
1 of the
required
elements.
Project
solves a
specific
problem,
efficiently
and
effectively.
CSTA K-12 Computer Science Standards
• CL.L2-05 Implement problem solutions using a programming language, including:
looping behavior, conditional statements logic, expressions, variables, and functions.
• CL.L2-03 Collaborate with peers, experts, and others using collaborative practices such as
pair programming, working in project teams, and participating in group active learning
activities.
• CL.L2-04 Exhibit dispositions necessary for collaboration: providing useful feedback,
integrating feedback, understanding and accepting multiple perspectives, socialization.
• CL.L3A-01 Work in a team to design and develop a software artifact.
• K-12 Computer Science Framework Core concept: Control Structures
