
Oxford American Handbook of
Clinical
Examination
and
Practical Skills
About the Oxford American Handbooks in Medicine
The Oxford American Handbooks are pocket clinical books, providing prac-
tical guidance in quick reference, note form. Titles cover major medical spe-
cialties or cross-specialty topics and are aimed at students, residents, internists,
family physicians, and practicing physicians within specifi c disciplines.
Their reputation is built on including the best clinical information, com-
plemented by hints, tips, and advice from the authors. Each one is carefully
reviewed by senior subject experts, residents, and students to ensure that
content refl ects the reality of day-to-day medical practice.
Key series features
• Written in short chunks, each topic is covered in a two-page spread
to enable readers to fi nd information quickly. They are also perfect
for test preparation and gaining a quick overview of a subject without
scanning through unnecessary pages.
• Content is evidence based and complemented by the expertise and
judgment of experienced authors.
• The Handbooks provide a humanistic approach to medicine—it’s
more than just treatment by numbers.
• A “friend in your pocket,”the Handbooks offer honest, reliable
guidance about the diffi
culties of practicing medicine and provide
coverage of both the practice and art of medicine.
• For quick reference, useful “everyday”information is included on the
inside covers.
Published and Forthcoming Oxford American Handbooks
Oxford American Handbook of Clinical Medicine
Oxford American Handbook of Anesthesiology
Oxford American Handbook of Cardiology
Oxford American Handbook of Clinical Dentistry
Oxford American Handbook of Clinical Diagnosis
Oxford American Handbook of Clinical Examination and Practical Skills
Oxford American Handbook of Clinical Pharmacy
Oxford American Handbook of Critical Care
Oxford American Handbook of Emergency Medicine
Oxford American Handbook of Gastroenterology and Hepatology
Oxford American Handbook of Geriatric Medicine
Oxford American Handbook of Nephrology and Hypertension
Oxford American Handbook of Neurology
Oxford American Handbook of Obstetrics and Gynecology
Oxford American Handbook of Oncology
Oxford American Handbook of Ophthalmology
Oxford American Handbook of Otolaryngology
Oxford American Handbook of Pediatrics
Oxford American Handbook of Physical Medicine and Rehabilitation
Oxford American Handbook of Psychiatry
Oxford American Handbook of Pulmonary Medicine
Oxford American Handbook of Rheumatology
Oxford American Handbook of Sports Medicine
Oxford American Handbook of Surgery
Oxford American Handbook of Urology
Oxford American
Handbook of
Clinical
Examination and
Practical Skills
E lizabeth A. B urns, MD, MA
Professor of Family Medicine
President and CEO
Michigan State University
Kalamazoo Center for Medical Studies
Kalamazoo, Michigan
K enneth K orn, PA-C, ARNP
Adjunct Faculty, Physician Assistant Program
University of North Dakota
Grand Forks, North Dakota
and
Family Nurse Practitioner
Leon County Health Department
Florida Department of Health
Tallahassee, Florida
J ames W hyte IV, ND, ARNP
Associate Professor
College of Nursing
Florida State University
Tallahassee, Florida
with
J ames T homas
T anya M onaghan
1
3
Oxford University Press, Inc. publishes works that further
Oxford University’s objective of excellence
in research, scholarship and education.
Oxford New York
Auckland Cape Town Dar es Salaam Hong Kong Karachi
Kuala Lumpur Madrid Melbourne Mexico City Nairobi
New Delhi Shanghai Taipei Toronto
With offi ces in
Argentina Austria Brazil Chile Czech Republic France Greece
Guatemala Hungary Italy Japan Poland Portugal
Singapore South Korea Switzerland Thailand Turkey Ukraine Vietnam
Copyright © 2011 by Oxford University Press, Inc.
Published by Oxford University Press Inc.
198 Madison Avenue, New York, New York 10016
www.oup.com
Oxford is a registered trademark of Oxford University Press.
First published 2011
UK version 2007
All rights reserved. No part of this publication may be reproduced,
stored in a retrieval system, or transmitted, in any form or by any means,
electronic, mechanical, photocopying, recording, or otherwise,
without the prior permission of Oxford University Press,
Library of Congress Cataloging-in-Publication Data
Oxford American handbook of clinical examination and practical skills / edited by
Elizabeth A. Burns, Kenneth Korn, James Whyte IV ; with James Thomas, Tanya
Monaghan.
p. ; cm.
Other title: Handbook of clinical examination and practical skills
Includes index.
ISBN 978-0-19-538972-2
1. Physical diagnosis—Handbooks, manuals, etc. I. Burns, Elizabeth A. (Elizabeth
Ann), 1950– II. Korn, Kenneth. III. Whyte, James, IV. IV. Title: Handbook of
clinical examination and practical skills.
[DNLM: 1. Clinical Medicine—methods—Handbooks. 2. Physical
Examination—Handbooks. WB 39]
RC76.O937 2011
616.07´54—dc22
2010027995
10 9 8 7 6 5 4 3 2 1
Printed in China
on acid-free paper
This material is not intended to be, and should not be considered, a
substitute for medical or other professional advice. Treatment for the
conditions described in this material is highly dependent on the individ-
ual circumstances. And, while this material is designed to offer accurate
information with respect to the subject matter covered and to be cur-
rent as of the time it was written, research and knowledge about medical
and health issues are constantly evolving and dose schedules for medica-
tions are being revised continually, with new side effects recognized and
accounted for regularly. Readers must therefore always check the product
information and clinical procedures with the most up-to-date published
product information and data sheets provided by the manufacturers and
the most recent codes of conduct and safety regulation. Oxford University
Press and the authors make no representations or warranties to readers,
express or implied, as to the accuracy or completeness of this material,
including without limitation that they make no representation or warran-
ties as to the accuracy or effi cacy of the drug dosages mentioned in the
material. The authors and the publishers do not accept, and expressly dis-
claim, any responsibility for any liability, loss, or risk that may be claimed
or incurred as a consequence of the use and/or application of any of the
contents of this material.
This page intentionally left blank

vii
Preface (U.S.)
Although we would like to claim the idea for this text as our own, this is
not the case; however, the belief in the text’s adaptability for U.S. medical
providers is. The fi rst edition of this text was developed for use in the
U.K., where a different model of health care exists.
In the United States, the primary care provider role was once the exclu-
sive responsibility of the traditional, medical school–educated MD or DO.
Primary care is no longer the realm of only one type of health-care pro-
vider. No longer is it the duty of only the physician to assess and care
for the patient. Now, collaborative and collegial relationships exist among
various disciplines. Cooperative-care models seek to provide optimal care.
It is from this type of model that the U.S. authors elected to remove the
term doctor from most areas of this text in preference to the term health-
care provider .
Representing the varied disciplines now likely to serve as primary care
providers, the U.S. team of authors illustrates the changing face of U.S.
health care. The authors represent educators and practitioners from
traditional allopathic medicine, nurse practitioner, and physician assistant
disciplines.
This text is not offered as the quintessential text on physical examin-
ation; it is presented, as the title states, as a handbook of physical examin-
ation and practical skills. We also believe that as U.S. health care evolves,
so will this text, with requisite changes and adaptations.
In this text, the important elements that will not change are those that
comprise an appropriate exam and quality care. No matter which discip-
line the provider represents, quality is critical.
Elizabeth Burns, MD
Kenneth Korn, PA-C, ARNP
James White, ARNP
2010
* Out of great respect for the work of James Thomas and Tanya
Monaghan, the U.S. authors chose to leave the following Preface and
Acknowledgments by the U.K. authors unchanged.

Preface
viii
Preface (U.K.)
There are very few people who, in the course of their daily work, can
approach a stranger, ask them to remove their clothes, and touch their
bodies without fear of admonition. This unique position of doctors, med-
ical students, and other health care professionals comes with many strings
attached. We are expected to act “professionally”and be competent and
confi dent in all our dealings. This is hard to teach and hard to learn and
many students are rightly daunted by the new position in which they fi nd
themselves.
We felt a little let down by many books during our time in medical
school, and often found ourselves having to dip into several texts to
appreciate a topic. This book, then, is the one text that we would have
wanted as students covering all the main medical and surgical subspecial-
ties. We anticipate it will be useful to students as they make the transition
to being a doctor and also to junior doctors. We hope that it will be car-
ried in coat pockets for quick glances as well as being suitable for study at
home or in the library.
The fi rst three chapters cover the basics of communication skills, history
taking, and general physical examination. Chapters 4–14 are divided by sys-
tems. In each of these there is a section on the common symptoms seen
in that system, with the appropriate questions to ask the patient, details
of how to examine parts of that system, and important patterns of disease
presentation. Each of these system chapters is fi nished off with an “elderly
patient”page provided by Dr. Richard Fuller. Following the systems, there
are chapters on paediatric and psychiatric patients—something not found
in many other books of this kind. The penultimate chapter—practical pro-
cedures—details all those tasks that junior doctors might be expected to
perform. Finally, there is an extensive data interpretation chapter which,
while not exhaustive, tries to cover those topics such as ECG, ABG, and
X-ray interpretation that may appear in a fi nal OSCE examination.
Although we have consulted experts on the contents of each chapter,
any mistakes or omissions remain ours alone. We welcome any comments
and suggestions for improvement from our reader—this book, after all,
is for you.
James Thomas
Tanya Monaghan
2007

ix
Acknowledgments (U.S.)
The U.S. authors acknowledge the great work of the U.K. team in the
development of a unique text. The combination of examination, pro-
cedures, and data interpretation into a single handbook-sized resource
represents a new type of resource. It is recognized that this text is a
resource with the potential for substantial enhancement. Your comments
are welcome.
We would also like to thank Oxford University Press (U.S.) for the
opportunity to be involved in this adaptation of this text, with special
thanks to Andrea Seils and Staci Hou for their patience and assistance
during this process.
Colleagues providing specialty review of the Americanization of the
U.K. data and procedures also deserve special thanks.
As always, such projects represent time away from other responsibil-
ities. We acknowledge and appreciate our co-workers and family for giving
us the time to complete this project.
Finally, one last thank-you goes to the fi ne U.K. authors for those
moments of humor while reviewing their text for “Britishisms.”

x
Acknowledgments (U.K.)
We would like to record our thanks to the very many people who have
given their advice and support through this project.
For contributing specialist portions of the book, we thank
Dr. Tom Fearnley (pages relating to ophthalmology), Dr. Caroline Boyes
(Chapter 16, The paediatric assessment) and Dr. Bruno Rushforth (ECG
interpretation and other parts of Chapter 18). We also thank Heidi
Ridsdale, senior physiotherapist at Leeds General Infi rmary, for her help
with the oxygen/airway pages and for providing all the equipment for
the photographs. Dr. Franco Guarasci and Jeremy Robson read the NIV
and inhaler pages, respectively, for which we are very grateful. We thank
Senior Sister Lyn Dean of Ward 26 at the Leeds General Infi rmary for
reading parts of Chapter 17 (Practical procedures). Our thanks also go to
Dr. Jonathan Bodansky, Mandy Garforth, and Mike Geall for providing the
retinal photographs.
An extra special word of thanks is reserved for our models Adam
Swallow, Geoffrey McConnell, and our female model who would like to
remain anonymous. Their bravery and good humour made a potentially
diffi cult few days very easy. They were a joy to work with. We thank the
staff at the St James’s University Hospital Medical Illustration Studio, in
particular Tim Vernon, for taking the photographs.
We would also like to thank the staff at Oxford University Press,
especially Catherine Barnes, for having faith in us to take this project on,
and Elizabeth Reeve, for her seemingly endless patience, support, and
guidance.
A special word of thanks is reserved for our offi cial “friend of the book,”
Dr. Richard Fuller, who provided all the “elderly patient”pages. Aside from
this, his steadfast and overtly biased support helped carry us through.
Finally, we would like to thank our good friend Dr. Paul Johns. He read
through much of the text and provided invaluable advice and support
from the very beginning. We wish Paul the very best with his own writing
projects and hope to work with him in the future.
Our panel of readers was responsible for confi rming the medical accur-
acy of the text. Most have performed far beyond our expectations, we are
eternally grateful to them all.

Contents
xi
Contents
How to use this book xii
Detailed contents xiii
Symbols and abbreviations xx
1 Communication skills
1
2 The history
29
3 General examination
47
4 Skin, hair, and nails
75
5 Endocrine system
95
6 Ear, nose, and throat
119
7 Cardiovascular system
145
8 Respiratory system
181
9 Abdomen
203
10 Nervous system
255
11 Musculoskeletal system 337
12 Male reproductive system 375
13 Female breast 391
14 Female reproductive system 407
15 Psychiatric assessment 449
16 Pediatric assessment 479
17 Examination under special circumstances 507
18 Practical procedures 511
19 Data interpretation 591
Index 673

xii
How to use this book
The systems chapters
In each chapter, there are suggestions of what questions to ask and how
to proceed depending on the nature of the presenting complaint. These
are not exhaustive and are intended as guidance.
The history parts of the systems chapters should be used in conjunction
with Chapter 2 in order to build a full and thorough history.
Practical procedures
This chapter (Chapter 18) describes those practical procedures that the
health-care provider, whether a physician, physician assistant, nurse prac-
titioner, or member of another health-care discipline, may be expected
to perform. Some procedures should only be performed once you have
been trained specifi cally in the correct technique by an experienced
professional.
Each procedure has a diffi culty icon as follows:
1 Requires no specifi
c training, and all primary-care provider graduates
should be competent to perform this procedure.
2 Requires some skill. Providers with moderate experience should be
able to perform this procedure with ease.
3 More complex procedures that you may only come across in spe-
cialty practices and will not be required to perform without advanced
training and experience.
Reality vs. theory
In describing the practical procedures, we have tried to be realistic. The
methods described are the most commonly ones used across the profes-
sion and are aimed at helping the reader perform the procedure correctly
and safely within a clinical environment.
There may be differences between the way a number of the procedures
are described here and the way in which they are taught in a clinical skills
laboratory. In addition, local hospitals and clinics may use different equip-
ment for some procedures. Good practitioners should be fl exible and
make changes to their routine accordingly.
Data interpretation
A minority of the reference ranges described for some of the biochemical
tests in the data interpretation chapter (Chapter 19) may differ slightly
from those used by your local laboratory—this depends on the equipment
and techniques used for measurement. Any differences are likely to be
very small. Always check with, and be guided by, your local resources.

xiii
Detailed contents
1 Communication skills 1
Introduction 2
Essential considerations 4
Essential rules 6
Getting started 7
General principles 9
Communicating with deaf patients 12
Cross-cultural communication 13
Interpreters 14
Imparting information 15
The importance of silence 15
Angry patients 15
Telephone and e-mail communication 16
Talking about sex 16
Breaking bad news 17
Body language: an introduction 21
Written communication 23
Law, ethics, and communication 26
2 The history 29
History-taking 30
Using this book 31
Patient profi le
(PP)
31
Chief complaint (CC) 32
History of present illness (HPI) 33
Past medical history (PMH) 35
Allergies 36
Drug history 36
Alcohol 37
Smoking 38
Family history (FH) 39
Social history (SH) 41
Review of systems (ROS) 42
The elderly patient 43
The pediatric patient 45
3 General examination 47
Approaching the physical examination 48
First impressions 50
Preparing for the examination 50
Color 51
Temperature 53

xiv
DETAILED CONTENTS
Hydration 54
Edema 55
Nutritional status 56
Lymph nodes 58
Hands 62
Recognizable syndromes 68
Vitamin and trace element defi ciencies 70
The elderly patient 72
4 Skin, hair, and nails 75
Applied anatomy and physiology 76
Dermatological history 78
Hair and nail symptoms 80
Examining the skin 82
Describing a lesion 84
Examining a lump 88
Examining an ulcer 90
The elderly patient 92
5 Endocrine system 95
Applied anatomy and physiology 96
Presenting symptoms in endocrinology 98
The rest of the history 100
General examination 102
Examining the thyroid 104
Eye signs in thyroid disease 106
Examining the patient with diabetes 108
The fundus in endocrine disease 110
Important presenting patterns 114
6 Ear, nose, and throat 119
Applied anatomy and physiology 120
Symptoms of ear disorders 122
Tinnitus 124
Symptoms of nasal disorders 127
Symptoms of throat disorders 129
Examining the ear 132
Examining the nose 135
Examining the nasal sinuses 137
Examining the mouth and throat 138
Important presentations 141
7 Cardiovascular system 145
Applied anatomy and physiology 146
Chest pain 148
Breathlessness and edema 150

xv
DETAILED CONTENTS
Palpitations 152
Syncope 152
Other cardiovascular symptoms 153
The rest of the history 154
General inspection and hands 155
Peripheral pulses 157
The face and neck 161
Examining the precordium 165
Auscultating the precordium 167
The rest of the body 173
Important presenting patterns 175
The elderly patient 179
8 Respiratory system 181
Applied anatomy and physiology 182
Dyspnea 184
Cough and expectoration 185
Other respiratory symptoms 187
The rest of the history 188
General appearance 190
Hands, face, and neck 191
Inspection of the chest 193
Palpation 194
Percussion 196
Auscultation 198
Important presenting patterns 200
The elderly patient 201
9 Abdomen
203
Applied anatomy 204
Esophageal symptoms 206
Nausea, vomiting, and vomitus 208
Abdominal pain 210
Bowel habit 212
Jaundice and pruritus 216
Abdominal swelling 217
Urinary and prostate symptoms 218
Appetite and weight 220
The rest of the history 221
Outline examination 223
Hand and upper limb 224
Face and chest 226
Inspection of the abdomen 229
Auscultation 231
Palpation 232
Palpating the abdominal organs 233
Percussion 239
Rectal examination 241

xvi
DETAILED CONTENTS
Hernial orifi ces 243
Important presenting patterns 246
The elderly patient 252
10 Nervous system 255
Presenting symptoms in neurology 256
The rest of the history 258
The outline examination 259
General inspection and mental state 259
Speech and language 260
Cognitive function 262
Cranial nerve I: olfactory 263
Cranial nerve II: optic 264
Cranial nerve II: ophthalmoscopy 268
Pupils 273
Cranial nerves III, IV, and VI 276
Palsies of cranial nerves III, IV, and VI 280
Cranial nerve V: trigeminal 283
Cranial nerve VII: facial 285
Cranial nerve VIII: vestibulocochlear 287
Cranial nerves IX and X 289
Cranial nerve XI: accessory 291
Cranial nerve XII: hypoglossal 293
Motor: applied anatomy 294
Motor: inspection and tone 296
Motor: upper limb power 298
Motor: lower limb power 300
Tendon refl exes 302
Other refl exes 305
Primitive refl exes 307
Sensory: applied anatomy 308
Sensory examination 312
Coordination 315
Some peripheral nerves 317
Gait 321
Important presenting patterns 323
The unconscious patient 331
The elderly patient 334
11 Musculoskeletal system 337
Applied anatomy and physiology 338
Important locomotor musculoskeletal symptoms 340
The rest of the history 344
Outline examination 346
GALS screen 347
Elbow 349
Shoulder 351
Spine 354

xvii
DETAILED CONTENTS
Hip 356
Knee 358
Ankle and foot 363
Important presenting patterns 365
The elderly patient 373
12 Male reproductive system 375
Applied anatomy and physiology 376
Sexual history 378
Symptoms 379
Examining the male genitalia 381
Important presenting patterns 386
The elderly patient 388
13 Female breast 391
Applied anatomy and physiology 392
Important symptoms 394
Inspection of the breast 397
Palpation of the breast 399
Examining beyond the breast 402
Important presentations 404
14 Female reproductive system 407
Applied anatomy 408
Applied physiology 411
History-taking in gynecology 413
Abnormal bleeding in gynecology 415
Other symptoms in gynecology 419
Outline gynecological examination 423
Pelvic examination 424
Taking a cervical smear 430
History-taking in obstetrics 433
Presenting symptoms in obstetrics 437
Outline obstetric examination 441
Abdominal examination 442
The elderly patient 447
15 Psychiatric assessment 449
Approach to psychiatric assessment 450
History 452
Mental status examination 458
Physical examination 466
Important presenting patterns 467
Medical conditions with psychiatric symptoms and signs 476

xviii
DETAILED CONTENTS
16 Pediatric assessment 479
History-taking 480
Examination: an approach 482
Respiratory system 484
Ear, nose, and throat 488
Cardiovascular system 490
Abdomen and gastrointestinal system 493
Palpation 495
Nervous system 497
Developmental assessment 500
The newborn 502
17 Examination under special circumstances 507
Overview 508
Disasters, terrorism, and public health emergencies 509
Sexual assault 510
Other thoughts 510
18 Practical procedures 511
Using this chapter 512
Infi
ltrating anesthetic agents
512
Sterility and preparation 513
Hand-washing 514
Injections 516
Venipuncture 518
Peripheral IV catheterization 522
Setting up an infusion 524
External jugular vein catheterization 526
Central venous catheterization 527
Blood pressure measurement 531
Recording a 12-lead ECG 533
Arterial blood gas sampling 535
Peak fl ow
measurement
537
Inhaler technique 538
Oxygen administration 544
Basic airway management 547
Tracheostomy management 555
Endotracheal (ET) intubation 557
Noninvasive ventilation (NIV) 559
Pleural fl
uid sampling (thoracentesis)
561
Chest tube insertion 563
Nasogastric (NG) tube insertion 567
Ascitic tap 569
Abdominal paracentesis (drainage) 571
Male urethral catheterization 573
Female urethral catheterization 575
Suprapubic catheterization 577

xix
DETAILED CONTENTS
Basic suturing 579
Lumbar puncture 581
Pericardial aspiration 583
Defi brillation 584
Knee joint aspiration 588
19 Data interpretation 591
ECG: introduction 592
Chest X-rays: introduction 616
Abdominal X-rays: introduction 641
Radiology: pelvis 646
Radiology: hips and femurs 648
Radiology: knees 650
Radiology: shoulder 652
Radiology: cervical spine 654
Radiology: thoracic and lumbar spine 656
Lung function tests 658
Arterial blood gas analysis 663
Cerebrospinal fl uid
(CSF)
667
Urinalysis 669
Pleural and ascitic fl uid 671
Index 673

xx
Symbols and
abbreviations
i increased
d decreased
n normal
7 approximately
b cross-reference
0 warning
2 important
ABC airway, breathing, circulation
ABG arterial blood gases
AC acromioclavicular
ACE angiotensin-converting enzyme
ACL anterior cruciate ligament
ACLS advanced cardiac life support
ACSM American College of Sports Medicine
ACTH adrenocorticotrophic hormone
AD Alzheimer’s disease
ADH antidiuretic hormone
ADL activities of daily living
ADP adenosine diphosphate
AED automated external defi brillator
AF atrial fi brillation
AHA American Heart Association
AITFL antero-inferior tibio-fi bular
ligament
AMTS Abbreviated Mental test Score
ANCOVA analysis of covariance
ANOVA analysis of variance
AP anteroposterior
APH antepartum hemorrhage
APL antiphospholipid
ASD atrial septal defect
ASL American Sign Language
ATFL anterior talofi bular
ligament
ATLS advanced trauma life support
ATP adenosine triphosphate

xxi
SYMBOLS AND ABBREVIATIONS
AV atrioventricular
AVN avascular necrosis
AVPU Alert, Voice, Pain, Unresponsive (scale)
AXR abdominal X-ray
BCC basal cell carcinoma
BCG bacillus Calmette-Guérin
bid twice daily
BiPAP bilevel positional vertigo
BMD bone mineral density
BMI body mass index
BMR basal metabolic rate
BP blood pressure
BPH benign prostatic hyperplasia
bpm beats per minute
BPV benign positional vertigo
C cervical
CABG coronary artery bypass graft
CBC complete blood count
CBRNE chemical, biological, radiological, nuclear, & explosive
CC chief complaint
CDC Centers for Disease Control and Prevention
CEA carcinoembryogenic antigen
CF cystic fi brosis
CFS chronic fatigue syndrome
CHD coronary heart disease
CHF congestive heart failure
CHO carbohydrate
CIN cervical intraepithelial neoplasm
CK creatine kinase
CN cranial nerve
CNS central nervous system
COPD chronic obstructive pulmonary disease
CP cerebral palsy
CPAP continuous positive airways pressure
CPK creatine phosphokinase
CPR cardiopulmonary resuscitation
CRF corticotropin-releasing factor
CRP C-reactive protein
CSF cerebrospinal fl uid
CT computerized tomography

xxii
SYMBOLS AND ABBREVIATIONS
CTD connective tissue disease
CVA cerebrovascular accident
CVP central venous pressure
CXR chest X-ray
DEXA dual-energy X-ray absorptiometry
DIP distal interphalangeal
DKA diabetic ketoacidosis
DM diabetes mellitus
DO detrussor overactivity
DOB date of birth
DUB dysfunctional uterine bleeding
DVT deep venous thrombosis
EBP epidural blood patch
ECG electrocardiogram
ECRB extensor carpi radialis brevis
ECRL extensor carpi radialis longus
ECU extensor carpi ulnaris
EDD estimated date of delivery
EIA exercise-induced asthma
EIB exercise-induced bronchospasm
EJV external jugular vein
EMG electromyography
EMR electronic medical record
ENMG electoneuromyography
EPAP expiration positive airways pressure
EPB extensor polaris brevis
EPO erythropoetin
ESR erythrocyte sedimentation rate
ET endotracheal
FCU fl
exor carpi ulnaris
FDS fl exor digitorum superfi cialis
FeCO
2
expired air carbon dioxide concentration
FeO
2
expired air oxygen concentration
FEV
1
forced expiratory volume in 1 second
FH family history
FHR fetal heart rate
FMLA Family Medical Leave Act
FPL fl exor policis longus
FRC functional residual capacity
FSH follicle-stimulating hormone

xxiii
SYMBOLS AND ABBREVIATIONS
FVC forced vital capacity
G gauge
GALS gait, arms, legs, spine
GBS Guillain–Barré syndrome
GCS Glasgow Coma Scale
GEJ gastroesophageal junction
GERD gastroesophageal refl ux disease
GFR glomerular fi ltration rate
GH growth hormone
GI gastrointestinal
GnRH gonadotrophin-releasing hormone
hCG human chorionic gonadotrophin
Hct hematocrit
Hgb hemoglobin
HDL high-density lipoprotein
HIPAA Health Insurance Portability & Accountability Act
HPI history of present illness
HPV human papillomavirus
HR heart rate
HRT hormone replacement therapy
HT hormone therapy
HZV herpes zoster virus
Hct hematocrit
IA intra-arterial
IBD infl
ammatory bowel disease
IBS irritable bowel syndrome
ICP intracranial pressure
ICU intensive care unit
ID intradermal
IGF-1 insulin-like growth factor 1
IHD ischemic heart disease
IHS Indian Health Service
IHSS idiopathic hypertrophic subaortic stenosis
IIH idiopathic intracranial hypertension
IJV internal jugular vein
ILI infl uenza-like illness
IM intramuscular
IMB intermenstrual bleeding
IOC International Olympic Committee
IPAP inspiration positive airways pressure

xxiv
SYMBOLS AND ABBREVIATIONS
IRMA intraretinal microvascular abnormalities
ITB ilio-tibial band
ITBS ilio-tibial band syndrome
IUD intrauterine device
IV intravenous
IVP intravenous pyelogram
JVP jugular venous pressure
L lumbar
LBBB left bundle branch block
LBC liquid-based cytology
LDH lactate dehydrogenase
LDL low-density lipoprotein
LEP Limited English Profi ciency
LFT liver function test
LH luetinizing hormone
LMA laryngeal mask airway
LMN lower motor neuron
LMP last menstrual period
LP lumbar puncture
LOC loss of consciousness
LSB left sternal border
LSE left sternal edge
LV left ventricle
LVH left ventricular hypertrophy
MALT mucosa-associated lymphoid tissue
MANOVA multivariate analysis of the variance
MCL medial collateral ligament
MCP metacarpophalangeal
MC&S microscopy, culture, and sensitivity
MDI metered-dose inhaler
MI myocardial infarction
MLF medial longitudinal fasciculus
MMSE Mini-Mental State Examination
MND motor neuron disease
MPHR maximum predicted heart rate
MRI magnetic resonance imaging
MRSA methicillin-resistant Staphylococcus aureus
MS multiple sclerosis
MSH melanocyte-stimulating hormone
MTP metatarsophalangeal

xxv
SYMBOLS AND ABBREVIATIONS
MVA motor vehicle accident
NG nasogstric
NIV noninvasive ventilation
NSAID nonsteroidal anti-infl ammatory drug
NYHA New York Heart Association
OA osteoarthritis
OCD obsessive-compulsive disorder
OCP oral contraceptive pill
OSHA Occupational Safety & Health Administration
ORIF open reduction and internal fi xation
OTC over the counter
PA posterior–anterior
PCL posterior cruciate ligament
PCOS polycystic ovarian syndrome
PCP primary care provider
PCR polymerase chain reaction
PCS post-concussion syndrome
PDA patent ductus arteriosis
PE pulmonary embolism
PFJ patello-femoral
PID pelvic infl ammatory
disease
PIP proximal interphalangeal
PMH past medical history
PMI point of maximum impulse
PND paroxysmal nocturnal dyspnea
PP patient profi le
PPH postpartum hemorrhage
PPRF parapontine reticular formation
PSIS posterior superior iliac crest
PSYM parasympathetic
PTFL posterior talofi bular ligament
PTH parathyroid hormone
Q cardiac output
q4h every 4 hours
qid 4 times a day (quarter in die)
RAPD relative afferent pupil defect
RBC red blood count or cell
RICE rest, ice, compression, elevation
ROM range of motion
ROS review of systems

xxvi
SYMBOLS AND ABBREVIATIONS
RR respiratory rate
RSE right sternal edge
RV residual volume; right ventricule
SA sinoatrial
SAAG serum/ascites albumin gradient
SANE sexual assault nurse examiner
SAH subarachnoid hemorrhage
SaO
2
oxygen saturation
SC subcutaneous
SCC squamous cell carcinoma
SH social history
SI stress incontinence
SIJ sacroiliac joint
SLAP superior labrum anterior to posterior
SLE systemic lupus erythematosus
SLR straight leg raise
SOB shortness of breath
SPECT single photon emission computer tomography
STD sexually transmitted disease
STI sexually transmitted infection
SQJ squamo-columnar junction
SV stroke volume
SVC superior vena cava
SVT sustained ventricular tachycardia
T thoracic
T
3
triiodothyronine
T
4
thyroxine
TB tuberculosis
TBG thyroid-binding globulin
TBI traumatic brain injury
TGA transposition of the great arteries
TIA transient ischemic attack
tid three times daily
TPN total parenteral nutrition
TSH thyroid-stimulating hormone
TURP transurethral resection of the prostate
UAP unlicensed assistive personnel
UMN upper motor neuron
UC ulcerative collitis
UCL ulnar collateral ligament

xxvii
SYMBOLS AND ABBREVIATIONS
URI upper respiratory infection
US ultrasound
UTI urinary tract infection
UV ultraviolet
VEGF vascular endothelial-derived growth factor
VF ventricular fi brillation
VIN vulval intraepithelial neoplasm
VIP vasoactive intestinal polypeptide
VO
2
oxygen uptake
VRSA vancomycin-resistant Staphylococcus aureus
VSD ventricular septal defect
VT ventricular tachycardia
WBC white blood count
WHO World Health Organization
WPW Wolff–Parkinson–White (syndrome)
Important Notes
0 Write legibly on orders, or print or enter orders via computer.
0 Date, time, and sign all patient care orders.
0 Remember, all facilities should have an approved abbreviations list—
follow it.
0 The offi
cial “Do Not Use”list of abbreviations is available at the Joint
Commission Web site at: http://www.jointcommission.org.
This page intentionally left blank

1
Communication Skills
Introduction 2
Essential considerations 4
Essential rules 6
Getting started 7
General principles 9
Communicating with deaf patients 12
Cross-cultural communication 13
Interpreters 14
Imparting information 15
The importance of silence 15
Angry patients 15
Telephone and e-mail communication 16
Talking about sex 16
Breaking bad news 17
Body language: an introduction 21
Written communication 23
Law, ethics, and communication 26
Chapter 1

CHAPTER 1 Communication skills2
Introduction
Communication skills are notoriously hard to teach and describe. There
are too many possible situations that you might encounter to be able to
draw rules or guidelines. In addition, your actions will depend greatly on
the personalities present—not least of which your own!
Using this chapter
Over the following pages, we present some general advice about com-
municating in different situations and to different people. We have
not provided rules to stick to but rather have tried to give the reader
an appreciation of the many ways in which the same situation may be
tackled.
Ultimately, skill at communication comes from practice, self-knowledge
and refl ection, and a large amount of common sense.
Quite a bit has been written about communication skills in medicine and
the health sciences. Most articles suggest a mix of accepted protocols and
traditional approaches—this chapter is no different.
Communication models
There are many models of the practitioner–patient encounter that have
been discussed over the years at great length. These models are for the
hardened student of communication. We mention them here so that the
reader is aware of their existence.
Patient-centered communication
In recent years, there has been a signifi cant change in the way health-
care workers interact with patients. The biomedical model has fallen out
of favor and instead, an appreciation has evolved that the patient has a
unique experience of the illness. This experience involves the social, psy-
chological, and behavioral effects of the disease. Some authors refer to this
approach as the biopsychosocial model, which focuses on the patient in a
more encompassing way.
The biomedical model
• The provider is in charge of the consultation and examination.
• Focus is on disease management.
The patient-centered model
• Power and decision-making are shared.
• Address and treat the whole patient.
The rule is: there are no rules.

INTRODUCTION
3
Box 1.1 Key points in the patient-centered model
• Explore the disease and the patient’s experience of it:
• Understand the patient’s ideas and feelings about the illness.
• Appreciate the illness’s impact on the patient’s quality of life and
psychosocial well-being.
• Understand the patient’s expectations of the encounter.
• Understand the whole person:
• Family
• Social and work environment
• Beliefs
• Find common ground on disease management.
• Establish the doctor–patient relationship.
• Be realistic:
• Priorities for treatment
• Resources
Box 1.2 Confi dentiality
As a doctor, health-care provider, or student, you are party to per-
sonal and confi dential information. While Health Insurance Portability
and Accountability Act (HIPAA) regulations must be followed, there are
also times when confi dentiality must or should be broken (b p. 26).
The essence of day-to-day practice is:
Never tell anyone about a patient unless it is directly related to his
or her care and you have permission.
This includes relatives, which can be very diffi cult at times, particularly if
a relative asks you directly about something confi dential.
You can reinforce the importance of confi dentiality to relatives and
visitors. If asked by a relative to speak about a patient, it is a good idea
to approach the patient fi rst and ask their permission, within full view of
the relative. You can also seek permission from the patient in anticipa-
tion of such queries.
This rule also applies to friends outside of medicine. As care provid-
ers, we come across many amazing, bizarre, amusing, or uplifting sto-
ries on a day-to-day basis, but like any other kind of information, these
should not be shared with anyone.
If you do intend to use an anecdote in public, at the very least you
should ensure that there is nothing in your story that could possibly
lead to the identifi cation of the person involved. If you are in a small
community, it is best to avoid sharing anything, lest you undermine your
reputation as a professional.

CHAPTER 1 Communication skills4
Essential considerations
Attitudes
Patients are entrusting their health and personal information to you—they
want someone who is confi dent, approachable, competent, and, above
all, trustworthy.
Personal appearance
First impressions count—and studies have consistently shown that your
appearance (clothes, hair, makeup) has a great impact on patients’ opinion
of you and their willingness to interact with you. Part of that intangible
professionalism comes from your image.
The white coat is still part of medical culture for students and most
providers. Fashions in clothing change rapidly, but some basic rules still
apply:
• Neutralize any extreme tastes in fashion that you may have.
• Men and women should wear appropriate professional attire.
• Women may wear skirts or slacks but the length of the skirts should
not raise any eyebrows.
• Necklines should not be revealing—no décolletage!
• The belly should be covered—no bare midriffs!
• The shoulders, likewise, should be covered.
• Shoes should be polished and clean.
• Clean surgical scrubs may be worn, if appropriate.
• Hair should be relatively conservatively styled and no hair should be
over the face. Wear long hair tied up.
• Your name badge should be clearly visible, even if you don’t like your
picture.
• Stethoscopes are best carried or held in a coat pocket—worn at the
neck is acceptable but a little pretentious, according to some views.
• Try not to tuck items in your belt—use pockets or belt-holders for
cell phones, keys, and wallets.
2 Psychiatry, pediatrics, and a handful of other specialties require a differ-
ent dress code, as they deal with patients who require differing techniques
for bonding with the health-care professional.
Timing
If in a hospital setting, make sure that your discussion with a patient is not
during an allocated quiet time or disturbing to the patient’s roommate.
You should also avoid mealtimes or when the patient’s long-lost relative
has just come to visit.
2 If you plan to move the patient from the bed to an exam room, ask
the supervising doctor (if not you) and the nursing staff, and let all con-
cerned know where you have gone in case the patient is needed.
Setting
Students, doctors, and other medical providers tend to see patients on
hospital fl oors fi lled with distractions that can break up the interaction.

ESSENTIAL CONSIDERATIONS
5
Often such meetings are necessary during the course of the day. However,
if you need to discuss an important matter that requires concentration
from both of you, consider the following conditions:
• The room should be quiet, private, and free from disturbances.
• There should be enough seating for everyone.
• Chairs should be comfortable enough for an extended conversation.
• Arrange the seats close to yours, with no intervening tables or other
furniture.
Box 1.3 Becoming a good communicator
Learning
As in all aspects of medicine, learning is a lifelong process. One part of
this process, particularly for acquiring communication skills and at the
beginning of your career, is watching others .
You should take every opportunity to observe provider–patient
interactions.
2 You should ask to be present during diffi cult
conversations.
Instead of glazing over during clinic visits or on rounds, you should
watch the interaction and consider if the behaviors you see are worth
emulating or avoiding. Consider how you might adjust your future
behavior.
Select the actions and words you like and use them as your own,
building up your own repertoire of communication techniques.
Spontaneity vs. learned behaviors
When you watch a good communicator, you will see them making friendly
conversation and spontaneous jokes, and using words and phrases that
put people at ease. The conversation seems natural, relaxed, and spon-
taneous. Watching that same person interact with someone else can
shatter the illusion as you see them using the same “spontaneous” jokes
and other gambits from their repertoire.
This is one of the keys to good communication—an ability to judge
the situation and pull the appropriate phrase, word, or action from your
internal catalogue. If done well, it leads to a smooth interaction with no
hesitations or misunderstandings. The additional advantage is that your
mental processes are free to consider the next move, mull over what
has been said, or assess fi ndings, while externally you are partially on
autopilot, following a familiar pattern of interaction.
During physical examination this ability is particularly relevant. You
should be able to coax the wanted actions from the patient and put
them at ease while considering fi ndings and your next step.
It must be stressed, however, that this is not the same as lacking con-
centration—quite the opposite.

CHAPTER 1 Communication skills6
Essential rules
Avoid medical jargon
Medical personnel are so immersed in jargon that it becomes part of their
daily speech. The patient may not understand the words or may have a
different idea of their meaning.
Technical words such as myocardial infarction are in obvious need of
avoidance or explanation. Consider also terms such as exacerbate , chronic ,
numb , and sputum —these may seem obvious in meaning to you but not
to the patient.
You may think that some terms such as angina and migraine are so well
known that they don’t need explanation, but these are very often misinter-
preted. Some examples of such words are given in Table 1.1.
Remember names
Forgetting someone’s name is what we all fear; it is relatively easy to
disguise by simple avoidance. However, using the patient’s name will
make you appear to be taking a greater interest in them. It is particularly
important that you remember the patient’s name when talking to fam-
ily members. Getting the name wrong is embarrassing and can seriously
undermine their confi dence in you.
Aside from actually remembering the name, it is a good idea to have it
written down and within sight—on a piece of paper in your hand, on the
chart, or on the desk. It is a best practice to confi rm the identity of the
patient, using two identifi ers (name, date of birth [DOB]), before you read
results from the chart or electronic medical record (EMR). To be seen
glancing at the name is forgivable; patients would rather have you double
check than bluff your way through an interview.
Table 1.1 Some examples of differing interpretations of medical terms
Word Your meaning Patient’s understanding
Acute Rapid onset Very bad, severe
Chronic Long duration Very bad, severe
Sick Nauseated, vomiting Unwell
Angina Chest pain associated with
ischemic heart disease
Heart attack, shortness of
breath, palpitations
Migraine Specifi c headache disorder Any severe headache
Numb Without sensation Weak

GETTING STARTED
7
Getting started
The start of an encounter is important but is fraught with potential diffi cul
-
ties. Like ever
y
thin
g
else in this cha
p
ter, there are no hard-and-
f
ast rules.
Issues
y
ou should take into consideration include the followin
g
:
•
Are you using a language the patient can understand
?
•
Can the
p
atient hear
y
ou?
Greetin
g
Beware o
f
sa
y
in
g
“
g
ood a
f
ternoon” or “
g
ood mornin
g
.” These
g
reetin
g
s
c
an be inappropriate if you are about to break some bad news or if there is
a
nother reason
f
or distress.
C
onsider instead usin
g
a sim
p
le “hello.”
Shaking hands
A traditional greeting, shaking hands will be readily accepted by most
p
atients, but it can also
p
resent challen
g
es
(
think of
p
atients with severe
a
rthritis of the hands
)
. While physical contact always seems friendly and
c
an warm a
p
erson to
y
ou, a handshake ma
y
be seen as overl
y
formal b
y
s
ome and inappropriate by others. Consider using some other form o
f
touch, such as a sli
g
ht
g
uidin
g
hand on the
p
atient
’
s arm as the
y
enter the
room or a brief touch to the forearm.
(
See also
b
p
. 21.
)
Introduct
i
ons
This is a minefi eld! You ma
y
wish to alter
y
our
g
reetin
g
de
p
endin
g
on the
circumstances—choose terms that suit
you
.
Title—patient
Older patients may prefer to be called “Mr.” or “Mrs.”; younger patients
would
fi
nd this odd. For
f
emale
p
atients whose marital status
y
ou don’t
k
now, you can try using “Ms.,” although some younger or married patients
m
a
y
fi
nd this term o
ff
ensive.
Calling the patient by their fi rst name may be considered too informal
by
some
p
atients. A chan
g
e to usin
g
the
f
amil
y
name mid-wa
y
throu
g
h the
e
ncounter ma
y
a
pp
ear unfriendl
y
or could indicate that somethin
g
has
gone wrong wit
h
t
h
e interaction.
Th
ere are no ru
l
es
h
ere; use common sense to
j
u
dg
e t
h
e situation at t
h
e
time. When unsure, the best option is always to ask.
Title—
y
ou
The title docto
r
has always been a status symbol and a badge of author-
r
ity—within the health-care professions at least. Young doctors may be
reluctant to
p
art with the title so soon a
f
ter ac
q
uirin
g
it, but these da
y
s,
when offi ce visits are becoming two-way conversations between equals,
p
atients may expect equity in t
h
e way t
h
ey are a
dd
resse
d
.
Man
y
p
atients will sim
p
l
y
call
y
ou “doctor
”
and the matter doesn
’
t arise.
We pre
f
er using
f
ormality initially, then using
fi
rst names i
f
circumstances
s
eem a
pp
ro
p
riate. Some elderl
y
p
atients
p
refer—and ex
p
ect—a certain
level of formality, so each situation has to be judged.
“Is it Mrs. or Miss
S
mith
?
” “How would
y
ou like to be addressed
?
”

CHAPTER 1 Communication skills8
Mid-level providers should follow the conventions of the health-care
setting they are in. Formality is appropriate in many settings; however,
most mid-level providers are more comfortable using fi rst names.
Standing
Although this might be considered old-fashioned by some younger people,
standing is a universal mark of respect. You should stand when a patient
enters a room and take your seat at the same time as them. You should
also stand as they leave, but if you have established a good rapport during
the visit, this isn’t absolutely necessary.
You may notice that patients stand when you enter the exam room. Put
them at ease and acknowledge this gesture as well.

GENERAL PRINCIPLES
9
General principles
Demeanor
Give the patient your full attention. Appear encouraging with a warm,
open manner. Use appropriate facial expressions—don’t look bored!
Defi ne your role
Along with the standard introductions, you should always make it clear
who you are and what your role is. You might also wish to introduce
your team members, if appropriate. In this era, when patients see so many
health-care providers during the course of a hospitalization, it is helpful to
write the team names down for them.
Style of questioning
Open questions vs. closed questions
Open questions are those for which any answer is possible:
“What’s the problem?”
“How does it feel?”
These enable patients to give you the true answer in their own words. Be
careful not to lead the patient or cut them off with closed questions.
Compare “How much does it hurt?” with “Does it hurt a lot?” The
fi rst question allows the patient to tell you how the pain feels on a wide
spectrum of severity; the second one leaves the patient only two options
and will not give a true refl ection of the severity.
Multiple-choice questions
Often, patients have diffi culty with an open question if they are not quite
sure what you mean. A question about the character of pain, for example,
is rather hard to formulate, and patients will often not know what you
mean (“What sort of pain is it”; “What does it feel like, exactly?”).
In these circumstances, you may wish to give them a few examples, but
leave the list open-ended for them to add their own words. You must be
very careful not to give the answer that you are expecting from them. For
example, a patient whom you suspect has angina (“crushing” pain) you
could ask the following:
“What sort of a pain is it—burning, stabbing, or aching, for example?”
Clarifying questions
Use clarifying questions to get the full details:
“When you say ‘dizzy’, what exactly do you mean?”
“What’s the problem
?
”
“How does it feel?”
“What sort o
f
a pain is it—burning, stabbing, or aching,
f
or example
?
”
“When you say ‘dizzy’, what exactly do you mean?”

CHAPTER 1 Communication skills10
Refl ective comments
Use refl ective comments to encourage patients to continue and reassure
them that you are following the story:
“Yes, I see that.”
Staying on topic
You should be directive but polite when keeping patients on the topic
you want or moving them on to a new topic. Don’t be afraid to interrupt
them—some patients will talk for hours if you let them!
“Before we move on to that, I would just like to get all the
details of this dizziness.”
“We’ll come to that in a moment.”
Diffi cult questions
Recognize potentially offensive or embarrassing questions. Explain why it
is necessary to ask these questions, to put the patient more at ease.
“This may be an uncomfortable question, but I need to know…”
Eye contact
2 Make eye contact and look at the patient when he or she is speaking.
Make a note of eye contact next time you are in conversation with a
friend or colleague.
In normal conversations, the speaker usually looks away while the lis-
tener looks directly at the speaker. The roles then change when the other
person starts talking, and so on.
In the medical situation, while the patient is speaking, you may be
tempted to make notes, read the referral letter, look at a test result, or
check the EMR—you should resist this urge and stick to the customary
rules of eye contact.
Adjusting your manner
You would clearly not talk to another provider as you would to some-
one with no medical knowledge. In much the same way, you should try
to adjust your manner and speech according to the patient’s educational
level. This is can be extremely diffi cult—you should not make assumptions
about intellect or understanding solely on the basis of educational history.
Even the most educated patient can have low health literacy.
A safe approach is to start in a relatively neutral way and then adjust
your manner and speech according to what you see and hear in the fi rst
minute or two of the interaction, but be alert to whether this is effective
and make changes accordingly. Understand that patients want to please
and seem agreeable and may say “yes” when they really don’t understand
“Yes
,
I see that.”
“Be
f
ore we move on to that, I would
j
ust like to
g
et all the
detai
l
s of this dizziness.”
“We’ll come to that in a moment.”
“This may be an uncom
f
ortable question, but I need to know…”

GENERAL PRINCIPLES
11
at all. Having patients explain what they heard back to you (teach back or
“show me” method) is a good way to check their understanding.
Interruptions
Apologize to the patient if you are interrupted in your meeting with
them.
Don’t take offence or get annoyed
As well as being directly aggressive or offensive, people may be thought-
less in their speech or manner and cause offence when they don’t really
mean to. As a professional, you should rise above this situation.

CHAPTER 1 Communication skills12
Communicating with deaf patients
People who are hard of hearing may cope with this problem by using
a hearing aid, lip-reading, or sign language. Whichever technique is used
(if any), some simple rules should always apply:
• Speak clearly but not too slowly.
• Don’t repeat a sentence if it is misunderstood—say the same thing in a
different way.
• Write things down, if necessary.
• Use plain English and be succinct.
• Be patient and take the time to communicate properly.
• Check understanding frequently.
• Consider fi
nding an amplifi er—many geriatric fl oors or clinics will have
one available.
Lip-readers
Patients who are able to lip-read do so by looking at the normal move-
ments of your lips and face during speech. Exaggerating movements or
speaking loudly will distort these movements and make it harder for them
to understand you. In addition to the points above, when talking to lip-
readers
• Maintain eye contact.
• Don’t shout.
• Speak clearly but not too slowly.
• Do not exaggerate your oral or facial movements.
American Sign Language (ASL)
• ASL is not a signed version of English; it is a distinct language with its
own grammar and syntax.
• For ASL users, English is a second language, so using a pen and paper
may not be effective or safe for discussing complex topics or gaining
consent.
• Seek an offi
cial interpreter, if possible, and follow the rules (b p. 14)
on working with interpreters.

13
CROSS-CULTURAL COMMUNICATION
Cross-cultural communication
Cultural background and tradition may have a large infl uence on dis-
ease management. Beliefs about the origin of disease and prejudices or
stigma surrounding the diagnosis can make dealing with the problem
challenging.
Be aware of all possible implications of a person’s cultural background.
For example, a Muslim may not take anything by mouth in the daylight
hours during Ramadan. This may have serious implications for medica-
tion management, particularly for chronic diseases such as diabetes or
hypertension.
Even something as benign (to you) as eye contact may have important
cross-cultural implications. For most individuals eye contact is desired,
but for many Native American and Asian cultures, it carries negative
connotations.
Above all, be aware of prejudice—yours and theirs. If you are not aware
of cultural implications when seeing a patient of a different culture, ask for
their input.

CHAPTER 1 Communication skills14
Interpreters
Federal and state laws require the use of interpreters for patients with
Limited English Profi ciency (LEP) and those with hearing disabilities.
Health-care facilities have protocols to follow to meet the LEP regula-
tions; they may have in-house or contract staff or use telephonic services.
Offi cial communicators are bound by a code of ethics, impartiality, and
confi dentiality; friends and relatives are not. It is often impossible to be
sure that a relative is passing on all that is said in the correct way.
Sometimes, especially in urgent situations, the patient’s children are
used to interpret. This is clearly not advisable for a number of reasons.
This places too much responsibility on the child, and the child may not
be able to explain diffi cult concepts. Conversations about sex, death, or
other diffi cult topics are unsuitable for children to take part in; if they do,
this will impede optimal communication.
Using an offi cial interpreter
Before you start
• Brief the interpreter on the situation, and clarify your role and the
work of the department, if necessary.
• Allow the interpreter to introduce themselves to the patient and
explain their role.
• Arrange seating so that the patient can see both the interpreter and
health-care provider easily.
• Allow enough time (at least twice as long as normal).
During the exchange
• Speak to the patient, not the interpreter. This may be hard to do at
fi
rst, but you should speak to and look at the patient at all times.
• Be patient—some concepts are hard to explain.
• Avoid complex terms and grammar.
• Avoid jargon.
• Avoid slang and colloquialisms that may be hard to interpret correctly.
• Check understanding frequently.
• The interpreter may also provide information on the patient’s culture
to assist in the communication.
Finishing off
• Check understanding.
• Allow time for questions.
• Take the time to debrief with the interpreter.
2 If the conversation has been distressing, offer the interpreter support
and let their employer know, if appropriate.
Written information
• If interpreting written information, read it out loud. The interpreter
may not necessarily be able to translate written language as easily.
• Many state and federal health departments and charities provide
written information in a variety of languages—some also provide
recordings. You should be aware of what your locality has to offer.

ANGRY PATIENTS
15
Imparting information
There are some guidelines for imparting any information—good or
bad—to a patient:
• Identify the topic for discussion.
• Identify the people present and ask if there is anyone else that they
would like to be there.
• Establish previous experience and knowledge.
• Keep sentences and explanations short and simple.
• Repeat important information.
• Allow time for feedback and questions, and check understanding.
• Schedule time for follow-up.
• Be honest!
The importance of silence
In conversations with friends or colleagues, your aim is often to avoid
silence, using fi ller noises such as “um” and “ah” while pausing.
In medical situations, by contrast, silences should be embraced and used
to extract more information from the patient. Use silence in order to
listen.
Practice is needed, as the inexperienced may fi nd this situation uncom-
fortable. It is often useful, however, to remain silent once the patient has
answered your question. You will usually fi nd that the patient will start
speaking again, and often provide useful and enlightening facts that you
would otherwise not have gleaned.
Angry patients
With angry patients, use body language to take charge of the situation
without appearing aggressive (b p. 21). Throughout the exchange, you
should remain polite, avoiding confrontation, and resist becoming angry
yourself.
• Look to your own safety fi rst.
• Calm the situation, then establish the facts of the case. Anger is often
secondary to some other emotion, such as loss, fear, or guilt.
• Acknowledge the patient’s emotions through statements such as the
following:
• “I can see that this has made you angry.”
• “It’s understandable that you should feel like this.”
• Steer the conversation away from the area of unhappiness and toward
the positive and plans, to move the situation forward.
• Don’t incriminate colleagues—the patient may remember your throw-
away comments, which could come back to haunt you. Avoid remarks
like “he shouldn’t have done that.”
• Emphasize any grounds for optimism or plans for resolving the
situation and putting things right.

CHAPTER 1 Communication skills16
Telephone and e-mail communication
The essential rule of confi dentiality is that you must not impart personal
information to anyone without the express permission of the patient con-
cerned—except in a few specifi c circumstances (b p. 26).
You must not give out any confi dential information over the telephone
unless you are sure of the identity of the caller. All communication is best
done face to face. This may cause diffi culty if a relative calls to ask about
the patient, but you should remain strict about this rule unless you have
the expressed permission of the patient.
When discussing follow-up communication for test results, obtain the
patient’s permission to leave a message on an answering machine or as
voice mail. Check to see if you have their correct phone number.
E-mail communications can be very problematic, especially if you do not
have a secure, encrypted system. Most health-care institutions have their
own policy regarding use of e-mail, so you should know what the rules are.
Patient’s e-mails should nonetheless be answered. Some providers will call
the patient back, documenting the communication in the EMR or chart.
Others will ask the patient to set up an appointment.
The use of social media (e.g., Facebook, Twitter) in medicine is still
evolving. It is best not to use these for any patient information.
If telephone communication is essential but you are in doubt as to the
caller’s identity, you may wish to take their number, check it with your
records, and then call them back.
Talking about sex
This can be a cause of considerable embarrassment for the patient and
for the inexperienced professional. Sexual questions are inappropriate to
ask in the presence of friends or relatives, so ask them to leave the room.
Your aim is to put the patient at ease and make responses more forthcom-
ing. Make no assumptions about a patient’s sexual orientation.
• The key is to ask direct, clear questions and show no embarrassment.
• You should maintain eye contact.
• You should also show no surprise whatsoever, even if the sexual
practices described differ from your own or from those that you
would consider acceptable.
• Try to become familiar with sexual slang and sexual practices that you
might not be familiar with.
• A failure to understand slang may lead to an immediate barrier in
the patient interview.
• In general, you should not use slang terms fi
rst. You may wish
to consider mirroring the patient’s speech as you continue the
conversation.
• See b p. 378 for details of taking the sexual history.

BREAKING BAD NEWS
17
Breaking bad news
Students fear breaking bad news, and no one likes doing it. However,
knowing that you have broken diffi cult news in a sensitive way and that
you have helped the patient through a terrible experience can be one of
the most uplifting aspects of working in health care.
Before you start
• Confi rm all the information for yourself and ensure that you have all
the information on hand, if necessary.
• Speak to the nursing staff to get background information on what the
patient knows, their fears, and details of their relationship with any
family or friends who may be present.
Choose the right place
• Pick a quiet, private room where you won’t be disturbed.
• Ensure that there is no intervening desk or other piece of furniture.
• Arrange the chairs so that everyone can be seen equally.
• Hand your pager and cell phone to a colleague or turn it off.
Ensure that the right people are present
• Invite a member of the nursing staff to join you, particularly if they
have already established a relationship with the patient.
• Remember, it is usually the nursing staff that will be dealing with the
patient and relatives after you leave, so they need to know exactly
what was said.
• Would the patient like anyone in particular to be present?
Remember the general principles
See b p. 6 and b p. 9. Avoid using jargon, and speak slowly and
clearly.
Establish previous knowledge
It is essential to understand what the patient already knows. The situa-
tion is very different for a patient who knows that you have been look-
ing for cancer than that of a patient who thinks their cough is due to a
cold.
“What do you know so far?”
“What have the other doctors told you?”
How much do they want to know?
This is key. Before you consider breaking bad news, you have to learn if
the patient actually wants to hear it. Ask an open question, such as:
“Have you thought about what might be causing these problems?”
“Do you know why we’ve been doing these tests?”
“What do you know so
f
ar
?
”
“What have the other doctors told
y
ou?”
“Have you thought about what might be causing these problems
?
”
“Do
y
ou know wh
y
we’ve been doin
g
these tests?”

CHAPTER 1 Communication skills18
You can also ask directly if they want to hear what you might have to
say:
“Are you the sort of person who likes to know all the available facts?”
Warning shots
If they do want to know, you should break the news in a step-wise fash-
ion, delivering multiple “warning shots.” This gives the patient a chance
to stop you if they’ve heard enough or to ask for more information.
Keep your sentences, short, clear, and simple. A conversation may go
like this:
You : I’m afraid the test results show that things are more
serious than fi rst thought.
Patient : What do you mean more serious?
You : Some of the cells look abnormal.
Patient : Do you mean that I have cancer?
You : Yes.
At any point, the patient may stop you, signaling that they don’t want to
hear more about it. Inexperienced practitioners sometimes feel that they
ought to tell the patient the full story, but they must understand that many
people would much rather not hear the words said aloud—this is their
coping strategy and must be respected. More than likely, this will not be
your only opportunity to speak with the patient.
You : I’m afraid the test results show that things are more
serious than fi rst thought.
Patient : Just tell me what we can do next.
You : OK.
Allow time for information to sink in
You should allow time for each piece of information to sink in, ensur-
ing that the patient understands all that has been said and repeating any
important information.
Remember also that patients will not be able to remember the exact
details of what you have said—you may need to reschedule at a later time
to talk about treatment options or prognosis.
Honesty, above all else
Above all, you should be honest at all times. Never guess, predict, or lie.
The patient may break your pre-prepared fl ow of information, requiring
you to think on your feet. Sometimes you simply can’t abide by the rules
above. If asked a direct question, you must be honest and straightforward.
For example:
“Are
y
ou the sort o
f
p
erson who likes to know all the available
f
acts
?
”
Y
o
u
: I’m a
f
raid the test results show that thin
g
s are more
serious than fi rst thought.
P
atien
t
: What do you mean more serious
?
You
: Some of the cells look abnormal.
P
atien
t
: Do you mean that I have cancer
?
Y
ou : Yes.
You
: I’m afraid the test results show that things are more
serious than
fi
rst thou
g
ht.
Pat
i
e
n
t
:
J
ust tell me what we can do next.
Y
o
u
:
O
K.

BREAKING BAD NEWS
19
You : I’m afraid the test results show …
Patient : Just tell me, have I got cancer?
You : Yes, I’m afraid you do.
Don’t rush to the positive
When told of bad news, the patient needs a few moments to let the
information sink in. After the “yes” in the previous examples, you should
preferably wait in silence for the patient to speak next.
The patient may break down in tears, in which case they should be
offered tissues and the support of relatives, if nearby.
If emotionally distressed, the patient will not be receptive to what
you say next—you may want to give them some time alone with a rela-
tive or nurse before you continue to talk about prognosis or treatment
options.
Above all, you should not give false hope . The moment after the bad
news has been broken can be uncomfortable, and you must fi ght the
instinctive move to positive,-sounding statements, such as “there are
things we can do”; “on the plus side . . . ”; “the good news is . . .”; or
something similar.
Ending
Summarize the information given, check the patient’s understanding,
repeat any information as necessary, allow time for questions, and make
arrangements for a follow-up appointment or a further opportunity to ask
questions again.
Obviously, you shouldn’t make promises that you can’t keep. Don’t
offer to come back that afternoon if you’re going to be in clinic!
“Do you understand everything that we’ve discussed?”
“Is there anything else that you would like to ask me?”
“I’ll plan to see you tomorrow morning. I’ll be happy to come back
in the meantime if you think of anything that you’d like to ask or
if you need to talk. Just ask one of the nursing staff to page me.”
Questions about time
“How long have I got?” is one of the most common questions asked, and
the hardest to answer.
• As always, don’t guess and don’t lie.
• It’s often impossible to estimate this. Giving a fi
gure will almost always
lead to you being wrong. If you don’t know, it is perfectly acceptable
to say so.
• Explain that it is impossible to judge, and ask if there is any date
in particular that they don’t want to miss—perhaps they want to
experience Christmas or a relative’s birthday.
• Don’t assume that they are asking out of fear; some people are surprisingly
practical and want to put their affairs in order before their death.
“Do you understand everything that we’ve discussed
?
”
“Is there an
y
thin
g
else that
y
ou would like to ask me
?
”
“I’ll plan to see you tomorrow morning. I’ll be happy to come back
in the meantime i
f
y
ou think o
f
an
y
thin
g
that
y
ou’d like to ask o
r
i
f you need to talk. Just ask one of the nursing staff to page me.”
You
: I’m afraid the test resu
l
ts show …
P
atien
t
: Just tell me, have I
g
ot cancer
?
Y
ou
: Yes, I’m afraid
y
ou do.

CHAPTER 1 Communication skills20
Box 1.4 Fear words
There are certain words that immediately generate fear, such as cancer
and leukemia . You should use these if you are sure that the patient
understands the full diagnosis and plan.
Beware, however, of avoiding these words and causing confusion by
not giving the whole story.
You should also be aware of certain words that people will instinctively
assume mean something more serious. For example, to most people a
“shadow” on the lung means cancer. Don’t then use the word when you
are talking about pulmonary consolidation due to pneumonia!

BODY LANGUAGE: AN INTRODUCTION
21
Body language: an introduction
Body language is rarely given the place it deserves in the teaching of com-
munication skills. There are over 600 muscles in the human body—90 in
the face, of which 30 act purely to express emotion. Changes in your posi-
tion or expression—some obvious, others subtle—can heavily infl uence
the message that you are communicating.
We’ve all met someone and thought, “I didn’t like him” or “she seemed
trustworthy.” Often these impressions of people are not built on what
is said but the manner in which people handle themselves. You subcon-
sciously pick up cues from the other person’s body. Being good at using
body language means having awareness of how the other person may be
viewing you and getting your subconscious actions and expressions under
conscious control.
If done well, you can infl uence the other person’s opinion of you, make
them more receptive to your message, or add particular emphasis to cer-
tain words and phrases.
Touching
Touching is one of the most powerful forms of nonverbal communication
and needs to be managed with care.
• Greeting: Touch is part of greeting rituals in most cultures. It
demonstrates that you are not holding a weapon and establishes
intimacy.
• Shaking hands: There are many variations. The length of the shake
and the strength of the grip impart a huge amount of information. For
added intimacy and warmth, a double-handed grip can be used. For
extra intimacy, one may touch the other’s forearm or elbow.
*
• Dominance: Touch is a powerful display of dominance. Touching
someone on the back or shoulder demonstrates that you are in
charge—this can be countered by mirroring the action back.
• Sympathy: The lightest of touches can be very comforting and is
appropriate in the medical situation where another type of touch may
be misread as dominance or intimacy (you shouldn’t hug a patient
you’ve just met!). Display sympathy by a brief touch to the arm or
hand.
Open body language
A cluster of movements are associated with seeming open . The most
signifi cant part of this is the act of opening—signaling a change in the
way you are feeling. Openness demonstrates that you have nothing
to hide and are receptive to the other person. Openness encourages
openness.
This can be used to calm an angry situation or when asking about per-
sonal information.
*
Watch the fi rst few minutes of the 1998 fi lm “Primary Colors,” which demonstrates the different
uses of touch during handshakes.

CHAPTER 1 Communication skills22
2 The key is to not have your arms or legs crossed in any way.
• Arms open: either at your side or held wide. Even better, hold your
hands open and face your palms toward the other person.
• Legs open: this does not mean legs wide, rather, legs not crossed. You
may hold them parallel. The feet often point toward something of
subconscious interest to you—point them at the patient!
Emphasis
You can amplify your spoken words with your body, usually without notic-
ing it. Actions include nodding your head, pointing, or other hand gestures.
A gesture may involve your entire body.
Watch TV news anchors—often only their heads are in view, so they
emphasize with nods and turns of their heads much more than one would
during normal conversation.
• Synchrony: This is key. Time your points of the fi
nger, taps of the hand
on the desk, or other actions with the words you wish to emphasize.
• Precision: Signal that the words currently being spoken are worth
paying attention to with delicate, precise movements. You could make
an ‘O’ with your thumb and index fi
nger or hold your hands such that
each fi
nger is touching its opposite counterpart—like a splayed prayer
position.
*
Eye level
This is a very powerful tool. In general, the person with a higher eye level
is in control of the situation.
You can use this tactic to your advantage. When asking someone per-
sonal questions or when you want them to open up, position yourself such
that your eyes are below theirs, meaning they have to look down at you
slightly. This makes them feel more in control and comfortable.
Likewise, anger often comes from a feeling of lack of control—put the
angry person in charge by lowering your eye level—even if that means
squatting next to them or sitting when they are standing.
Conversely, you may raise your eye level to take charge of a diffi cult
situation; looking down on someone is intimidating. Stand over a seated
person to demonstrate that you are in charge.
Watch and learn
There is much that could be said about body language. You should watch
others and yourself and consider what messages are being portrayed by
nonverbal communication.
Stay aware of your own movements, and consider intentionally chang-
ing what would normally be subconscious actions to add to, or alter, the
meaning of your speech.
*
Many successful politicians are excellent users of body language. Pay attention to their campaign
speeches and formal presentations as well as to their informal talks.

WRITTEN COMMUNICATION
23
Written communication
Medical notes serve a number of purposes. The most important ones are
as follows:
• They are a record of the patient’s illness, treatments, and medical
encounters, for use by other medical practitioners in the future.
• They are the only record of your actions—and the means by which
you may be judged in case of future disputes.
• They are a record of events for the purposes of clinical audit.
How to write in the notes
Your entries in the notes should be tidy and legible. All entries should
include the following:
• Date
• Time
• Medical information
• Signature (also print your name if your handwriting is illegible).
• Identity of the inscriber
• Contact number (pager and/or cell phone)
Use black ink only (blue often doesn’t photocopy easily and can fade).
What to write in the notes
• Everything that occurs should be recorded. If it isn’t written down, it
didn’t happen!
• Remember especially to record discussions with relatives and the
details of what the patient has been told of diagnoses.
• There are no specifi
c rules on how things should be written—there
are a number of conventions introduced throughout the book.
In general, entries should be easily understood by another staff
member.

CHAPTER 1 Communication skills24
Box 1.5 Standard examination drawings
The essential rule is that the record you make should be easily under-
stood by another person. If it is hard to describe where the cut on the
patient’s foot is, draw it! There are a number of diagrams that, though
not offi cial, are widely used and accepted as standard.
Chest
This is usually represented as a stylized version of the lungs seen from
the front. You can then add symbols (e.g., BS—breath sounds) indicating
your clinical fi nding.
Heart sounds
These are often represented as a version of a phonogram—see b p. 171
for examples.
Abdomen
This is usually drawn as a hexagon, although the anatomical stickler may
add the xiphoid process and the genitalia.
Peripheral pulses and tendon refl exes
These are often indicated on stick-men. Be sure to make clear which are
the left and right sides of the person.
Creps ® base BS dull to
percussion lower
1/2
lung
L
No masses felt
No organomegaly
soft BS
N
Indicate flanks
at the side like this
Palpable
Σ colon
Tender
Plantars
Tendon reflexes:
R R
L
L
=
=
++
++
++
++
++
++
++
++
−
−
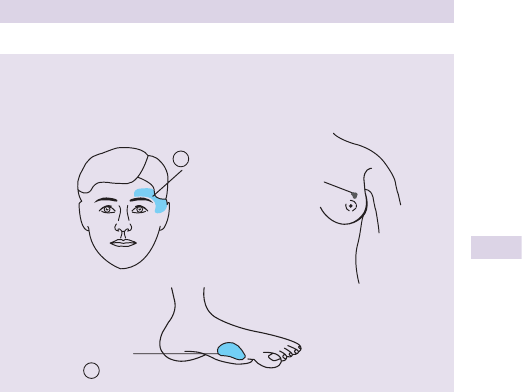
WRITTEN COMMUNICATION
25
Other body parts
You should feel free to make drawings to illustrate your fi ndings.
4 x 2 cm
ulcer medial
aspect foot
L
L
Palpable lump
in breast
Palpable lymph nodes
Bruising around
eye

CHAPTER 1 Communication skills26
Law, ethics, and communication
No discussion of communication skills would be complete without men-
tion of confi dentiality, capacity, and consent. It is also worth knowing the
four bioethical principles, about which much has been written elsewhere.
Four bioethical principles
• Autonomy: a respect for the individual and their ability to make
decisions regarding their own health
• Benefi cence: acting to the benefi
t of patients
• Nonmalifi cence: acting to prevent harm to the patient
• Justice: fairness to the patient and the wider community when
considering the consequences of an action
Confi dentiality
Confi dentiality is closely linked to the ethical principles described above.
Maintaining a secret record of personal information shows respect for the
individual’s autonomy and their right to control their own information.
There is also an element of benefi cence, whereas releasing the protected
information may cause harm.
Breaking confi dentiality
The rules surrounding the maintenance of confi dentiality have already
been mentioned (see b p. 3). There are a number of circumstances in
which confi dentiality can, or must, be broken. The exact advice varies
between different bodies; see Further Reading in this section. In general,
confi dentiality may be broken in the following situations:
• With the consent of the individual concerned
• If disclosure is in the patient’s interest but consent cannot be gained
• If required by law
• When there is a statutory duty, such as reporting of births, deaths, and
abortions, and in cases of certain communicable diseases
• If it is overwhelmingly in the public interest
• If it is necessary for national security or when prevention or detection
of a crime may be prejudiced or delayed
• In certain situations related to medical research
Consent and capacity
There are three main components to valid consent. To be competent (or
have capacity) to give consent, the patient
• Must understand the information that has been given
• Must believe that information
• Must be able to retain and evaluate the information to make a decision
In addition, for consent to be valid, the patient must be free from any
kind of duress.
2 It should be noted that an assessment of capacity is valid for the spe-
cifi
c decision at hand. It is not an all-or-nothing phenomenon—you cannot
either have capacity or not. The assessment regarding competence must
be made for each new decision faced.

LAW, ETHICS, AND COMMUNICATION
27
Young people and capacity
• All persons aged 18 and over are considered to be a competent adult
unless there is evidence to the contrary.
• People between 16 and 18 years of age may be treated as adults if they
are covered by statutes regarding emancipated minors. However, the
refusal of a treatment can be overridden by the courts.
• Children age 16 and younger are considered competent to give
consent if they meet the three conditions mentioned previously.
However, their decisions can be overridden by the courts or by
people with parental responsibility.
Further reading
There are many articles on communication in the medical setting. A
good summary of issues of communication, including cultural compe-
tency, Limited English Profi ciency, and health literacy, can be found at
the U.S. Department of Health and Human Services, Health Resources
and Services Administration Web site. The online training module is enti-
tled Unifi ed Heath Communication: Addressing Health Literacy, Cultural
Competency and Limited English Profi ciency, at: http://www.hrsa.gov/
healthliteracy/default.htm
HIPAA (Health Insurance Portability and Accountability Act)
Health records and personal communications have undergone a sig-
nifi cant change since enactment of the Health Insurance Portability and
Accountability Act (HIPAA) in 1996. This Act has dramatically affected
issues of medical records, privacy, and security and transfer of information
that are far beyond the scope of this text. Further information on this
topic can be obtained at: http://www.hhs.gov/ocr/privacy
This page intentionally left blank

29
The history
History-taking 30
Using this book 31
Patient profi le (PP) 31
Chief complaint (CC) 32
History of present illness (HPI) 33
Past medical history (PMH) 35
Allergies 36
Drug history 36
Alcohol 37
Smoking 38
Family history (FH) 39
Social history (SH) 41
Review of systems (ROS) 42
The elderly patient 43
The pediatric patient 45
Chapter 2

CHAPTER 2 The history30
History-taking
The history is a patient’s account of their illness together with other rele-
vant information you have gleaned from them. Like all things in medicine,
there is a tried and tested standard sequence that you should conform to
and is used by all providers.
It is good practice to make quick notes while talking to the patient that
you can use to write a thorough history afterward—don’t document every
word they say, as this breaks up your interaction!
By the end of the history-taking you should have a good idea of a diagnosis
or have several differential diagnoses in mind. The examination is your chance
to confi rm or refute these through the acquisition of more information.
History-taking is not a passive process. You need to keep your wits
about you and gently guide the patient in giving you relevant information
through use of all the communication skills described in Chapter 1.
The history should be broken down under the headings listed in Box 2.1
and recorded in the notes in this order—many people prefer to use the
standard abbreviations instead of writing out the heading in full.
The outline shown in Box 2.1 is the standard method, although slight
variations exist.
Many people list information on smoking and alcohol as part of the
social history. We feel that these factors have such a signifi cant impact on
health that they are more appropriately placed as part of the past medical
history, rather than as what the patient does in their spare time.
It is good practice in medicine to watch what other practitioners do and
adapt the parts that you feel are done well to your own style, making them
part of your own routine.
Box 2.1 The standard history framework
• Patient profi le (PP)
• Chief complaint (CC)
• History of the present illness (HPI)
• Past medical history (PMH)
•
Allergies
•
Drug history
•
Alcohol
•
Smoking
• Family history (FH)
• Social History (SH)
•
Occupational History
• Review of Systems (ROS)

PATIENT PROFILE (PP)
31
Using this book
This book is divided into chapters by organ system. Each chapter offers
suggestions of how to proceed (see Boxes 2.2 and 2.3 ), depending on the
nature of the presenting complaint, and notes on what you should espe-
cially ask about under each of the headings. These notes are not exhaus-
tive and are intended as a guide to supplement a thorough history.
Box 2.2 Recording the history
Documentation is a vital part of all medical interactions.
The history should be recorded in the patient’s notes according to the
standard framework in Box 2.1 , using the rules and procedures described
in the section Written Communication in Chapter 1 (b p. 23).
Always remember: if it isn’t written, it didn’t happen!
Box 2.3 Collateral histories
There are many situations in which the patient may be unable to give a
history (e.g., they are unconscious, delirious, demented, or dysphasic). In
these situations, you should make an effort to speak to all who can help
you fi ll in the gaps—regarding not only what happened to the patient
but also their usual medication, functional state, living arrangements, and
so on.
When taking a history from a source other than the patient, be sure
to document clearly that this is the case and the reason(s) for the patient
being unable to speak for themselves.
Useful sources of information include the following:
• Relatives, guardians, and cohabitants
• Close friends and roommates
• Primary care physician (PCP) or other members of the primary care
team
• Pharmacist
• Staff at the nursing home or residential or other facility
• Ambulance personnel
• Anyone who witnessed the event.
Patient profi le (PP)
• This is the essential identifying and biographic information required by
the facility.
• Typically included in the PP will be the patient’s name, address, and
DOB.
• Other information included in the PP may include age, religion,
nationality, marital status, and contact information as requested by the
individual facility.

CHAPTER 2 The history32
Chief complaint (CC)
• This is the patient’s chief symptom(s) in their own words. It should
generally be no more than a single sentence.
• If the patient has several symptoms, present them as a list that you can
expand on later in the history.
• Ask the patient an open question, such as, “What’s the problem?” or
“What made you come to the offi
ce?” Each provider will have their
own style. You should choose a phrase that suits you and your manner
(one of the authors favors saying “tell me the story” after a brief
introduction).
0 The question “What brought you here?” usually brings the response
“an ambulance,” “my feet,” or “the taxi”—each patient being under the
impression that they are the fi
rst to crack this joke. This question is thus
best avoided.
2 Remember, the CC is expressed in the patient’s words. “Hemoptysis”
is rarely a presenting complaint, but “coughing up blood” may well be!

HISTORY OF THE PRESENTING ILLNESS (HPI)
33
History of the presenting illness (HPI)
Here you are asking about and documenting details of the presenting com-
plaint. By the end of taking the HPI, you and readers of the record should
have a clear idea about the nature of the problem and of exactly how and
when it started, how it has progressed over time, and what impact it has
had on the patient in their general physical health, psychology, and social
and working lives. The HPI is best tackled in two phases.
First, ask an open question (as for the CC) and allow the patient to
talk through what has happened for about 2 minutes. Don’t interrupt!
Encourage the patient with nonverbal responses and take discreet notes.
This allows you to make an initial assessment of the patient in terms of
education level, personality, and anxiety. Using this information, you can
adjust your responses and interaction. It should also become clear to you
exactly what symptom the patient is most concerned about.
In the second phase, you should revisit the whole story, asking more
detailed questions. It may be useful to say, “I’d just like to go through the
story again, clarifying some details.” This is your chance to verify time-lines
and the relation of one symptom to another. You should also clarify pseu-
do-medical terms (e.g., exactly what does the patient mean by “vertigo,”
“fl u,” or “rheumatism”?). Remember, this should feel like a conversation,
not an interrogation!
2 The standard features that should be determined for any symp-
tom are shown in Box 2.4 , along with additional features regarding
pain (
Box 2.5 ). A mnemonic for remembering the important factors in
analyzing pain or a symptom is O3PQRST. This simple, alphabetically
ordered pneumonic includes the signifi cant factors: O nset, P revious
occurrences, P rovoking factors, P alliative factors (including prescribed
and home treatments attempted), Q uality (such as characteristics of
Box 2.4 For each symptom, determine
• The exact nature of the symptom
• The onset
•
Date it began
•
How it began (e.g., suddenly, gradually—over how long?)
•
If the symptom is long- standing, why is the patient seeking help
now?
• Previous occurrences and frequency
•
Is the symptom constant or intermittent?
•
How long does it last each time?
•
What is the exact manner in which it comes and goes?
• Change over time
•
Is it improving or deteriorating?
• Exacerbating factors
•
What makes the symptom worse?
• Relieving factors
•
What makes the symptom better?
• Associated symptoms.

CHAPTER 2 The history34
pain), R adiation (site of onset and any radiation), S everity, and T iming
(duration; see Box 2.6 ).
See the rest of this book for guidance on tackling other, organ-specifi c
presenting complaints.
At the end of the history of the presenting illness, you should have
established a problem list. You should run through these items with the
patient, summarizing what you have been told, and ask them if you have
the information correct and if there is anything further that they would like
to share with you.
Box 2.5 For pain, determine
• Site (where is the pain is worst—ask the patient to point to the site
with one fi nger)
• Radiation (does the pain move anywhere else?)
• Character (i.e., dull, aching, stabbing, burning)
• Severity (scored out of 10, with 10 being the worst pain imaginable)
• Mode and rate of onset (how did it come on—over how long?)
• Duration
• Frequency
• Exacerbating factors
• Relieving factors
• Associated symptoms (e.g., nausea, dyspepsia, shortness of breath)
Box 2.6 Long-standing problems
If the symptom is long-standing, ask why the patient is seeking help now.
Has anything changed? It is often useful to ask when the patient was last
well. This may help focus their mind on the start of the problem, which
may seem distant and less important to them.

PAST MEDICAL HISTORY (PMH)
35
Past medical history (PMH)
Some aspects of the patient’s past illnesses or diagnoses may have already
been covered. Here, you should obtain detailed information about past
illnesses and surgical procedures.
Ask the patient if they are receiving care for anything else or have ever
been to the hospital before. Ensure that you get dates and a location for
each event. Some conditions, listed in Box 2.7 , you should ask patients
about specifi cally. For each condition, ask the following:
• When was it diagnosed?
• How was it diagnosed?
• How has it been treated?
For operations, ask about any previous anesthesia problems.
0 Ask about immunizations. Have the patient provide as many specifi cs
about types and dates of immunizations. Also ask about employment and
insurance examinations. See Box 2.8 for gaining further clarifi cation
when
taking the PMH.
Box 2.7 Specifi c conditions to include in PMH
• Diabetes
• Rheumatic fever
• Jaundice
• Hypercholesterolemia
• Hypertension
• Angina
• Myocardial infarction (MI)
• Stroke or transient ischemic attack (TIA)
• Asthma
• Tuberculosis (TB)
• Epilepsy
• Anesthetic problems
• Blood transfusions
• Childhood illnesses and sequelae
Box 2.8 Don’t take anything for granted!
For each condition that the patient reports having, ask exactly how it
was diagnosed (where? by whom?) and how it has been treated since
then.
For example, if the patient reports “asthma,” ask who made the diag-
nosis, when the diagnosis was made, if they have ever had lung function
tests, if they have ever seen a pulmonologist, and if they are taking any
inhalers. Have they used any over-the-counter (OTC) treatments or
alternative medications? Occasionally, patients will give a long-standing
symptom a medical name, which can be very confusing. In this example,
the patient’s “asthma” could be how they refer to their wheeze that is
due to congestive cardiac failure.

CHAPTER 2 The history36
Allergies
Any allergies should be documented separately from the drug history
because of their importance.
Ask if the patient has any allergies or is allergic to anything if they are
unfamiliar with the term allergies . Be sure to probe carefully, as people
will often tell you about their hay fever and forget about the rash they had
when they took penicillin. Ask specifi cally if they have had any reactions to
drugs or medication; don’t forget to inquire about food or environmental
allergies.
2 If an allergy is reported, you should obtain the exact nature of the
event and decide if the patient is describing a true allergy, intolerance, or
simply an unpleasant side effect.
Drug history
Here you should list all the medications that the patient is taking, includ-
ing the dosage and frequency of each prescription. If the patient is unsure
about their medications, confi rm the drug history with the prescribing
provider or pharmacy. Take special note of any drugs that have been
started or stopped recently.
You should also ask about compliance—does the patient know what
dose they take? Do they ever miss doses? If they are not taking the medi-
cation, what’s the reason? Do they have any compliance aids such as a
pre-packaged weekly supply? It may also be valuable to ask if the patient is
having any diffi culty obtaining their medications.
The patient may consider some medications as not being drugs,
so specifi c questioning is required. Don’t forget to ask about the
following:
• Eye drops
• Inhalers
• Sleeping pills
• Oral contraception
• OTC drugs (bought at a store or pharmacy), vitamin supplements
• Herbal remedies
• Illicit or “recreational” drug use

ALCOHOL
37
Alcohol
You should attempt to quantify, as accurately as possible, the amount of
alcohol consumed per week, and establish if the consumption is spread
out evenly over the week or concentrated in a smaller period. The CAGE
questionnaire, long considered a standard in alcohol assessment, may be
supplemented or possibly replaced by use of a single question: “How
many times in the past year have you had X or more drinks in a day?,”
where X is 5 for men and 4 for women, and a response of 1 or more times
has been validated and may prove to be valuable with certain populations
(see Box 2.9 ).
In the United States and many European countries, alcohol is quantifi ed
as standard drinks. In the United States, a standard drink contains 0.54
ounces of alcohol (Box 2.10).
Healthy People 2010
Information on this initiative (Box 2.11) is available at: http://www.
healthypeople.gov
Box 2.9 Alcohol consumption
Healthy People 2010 reports that males may be at risk for alcohol-
related problems if they drink more than 14 drinks per week or more
than 4 drinks per occasion. Likewise, females may be at risk if they drink
more than seven drinks per week or three drinks per occasion.
Box 2.10 Alcohol amounts of common drinks
For typical strength alcoholic beverages the following contain approxi-
mately 0.54 ounces of ethanol.
• 12 ounces beer
• 5 ounces of wine
• 1.5 ounces of 80 proof distilled spirits
Box 2.11 Health People 2010
A target goal of Healthy People 2010 is to reduce the average annual
alcohol consumption to 2 gallons per year from a 1997 baseline, when
2.18 gallons of ethanol was consumed per person age 14 years and
older.

CHAPTER 2 The history38
Smoking
Attempt to quantify the habit (Box 2.12) in pack-years: 1 pack-year is 20
cigarettes (1 pack) per day for 1 year (e.g., 40/day for 1 year = 2 pack-
years; 10/day for 2 years = 1 pack-year).
Ask about previous smoking, as many patients will call themselves non-
smokers if they gave up yesterday or are even on their way to the hospital
or clinic!
Remember to ask about passive smoking. An inquiry such as, “Do you
smoke in your house, in your car, or around your children?” may help to
raise consciousness regarding health risks for children and the issue of
infl uencing the child’s future behavior.
0 Be aware of cultural issues—smoking is forbidden for Sikhs, for
example, and they may take offence at the suggestion of smoking!
0 Beware of appearing judgmental.
Box 2.12 Haggling and the art of quantifi cation
Smoking and alcohol histories are notoriously unreliable—alcohol espe-
cially so. The patient may be trying to please you or feel embarrassed
about openly admitting their true consumption. Gaining an accurate
account of consumption can sometimes feel like haggling. There are two
steps in this process.
First, appear nonjudgmental and resist acting surprised in any way ,
even in the face of liquor or tobacco consumption that you may con-
sider excessive and unwise.
Second, if the patient remains reticent (“I smoke a few”), suggest a
number, but start very high (“Shall we say 60 a day?”) and the patient
will usually give you a number nearer the true amount (“Oh no, more
like 20”). If you start low, the same patient may only admit to half that
amount.

FAMILY HISTORY (FH)
39
Box 2.13 Family trees
Conventionally, males are represented by a square (□) and females by a
circle (○). The patient you are talking to is called the propositus, proband,
or index and is indicated by a small arrow (↗).
Horizontal lines represent marriages or other relationships resulting in
a child. Vertical lines descend from these, connecting to a horizontal line
from which the children “hang.” You can add ages and causes of death.
Family members who have died are represented by a diagonal line
drawn through their circle or square (∅, ), and those with the condi-
tion of interest are represented by shaded shapes (●, ■).
Example 1 Our patient is an only child and has no children, his parents
are alive, but all his grandparents have died of different causes.
Family history (FH)
The FH details the following:
• Makeup of the family, including age and gender of parents, siblings,
children, and extended family, as relevant
• Health of the family
You should ask about any diagnosed conditions in other living fam-
ily members. Stating a “laundry list” of common conditions will help
the patient understand conditions that you are most concerned about.
You should also document the age and cause of death for all deceased
fi rst-degree relatives and for other family members if you feel it is
appropriate.
It may help to draw a family tree (genogram), as shown in Box 2.13 .
These diagrams are particularly useful in pediatric assessments, families
with multiple health problems that demonstrate familial propensities, and
families with hereditary conditions.
Ca lung
74
61
CVA
85
TB
65
MI
80
64
22

CHAPTER 2 The history40
Example 2 Our patient suffers from colon cancer and has no children.
She has a brother who is well. Her parents are both alive and her mother
has colon cancer. Of her grandparents, only her paternal grandfather is
alive. Her maternal grandfather died of colon cancer.
Example 3 Our patient has epilepsy, as does her father. She has 3 chil-
dren, 2 boys and a girl. One of the boys also has epilepsy.
1087
Box 2.13 (Contd.)

SOCIAL HISTORY (SH)
41
Social history (SH)
This is your chance to document the details of the patient’s personal life
that are relevant to the working diagnosis, the patient’s general well-being,
and recovery or convalescence. The SH will help in understanding the
impact of the illness on the patient’s functional status.
This is a vital part of the history but is often given only brief attention.
The disease and, indeed, the patient do not exist in a vacuum but are part
of a community that they interact with and contribute to. Without these
details, it is impossible to take a holistic approach to the patient’s well-
being. Establish the following:
• Marital status
• Sexual orientation
• Occupation (or previous occupations if retired)
•
You should establish the exact nature of the job if it is unclear—
does it involve sitting at a desk, carrying heavy loads, or traveling?
• Other people who live at the same address
• Type of accommodation (e.g., house, apartment—and on what fl oor)
• Does the patient own their accommodation or rent it?
• Are there any stairs? How many?
• Does the patient have any aids or adaptations in their house (e.g., rails
near the bath)?
• Does the patient use any walking aids (e.g., cane, walker, scooter)?
• Does the patient receive any help on a daily basis?
•
Who from (e.g., family, friends, social services)?
•
Who does the laundry, cleaning, cooking, and shopping?
• Does the patient have relatives living nearby?
• What hobbies does the patient have?
• Does the patient own any pets?
• Has the patient been abroad recently or spent any time abroad in the
past?
• Does the patient drive?

CHAPTER 2 The history42
Review of systems (ROS)
Prior to the exam, you should perform a screening of the other body sys-
tems relevant to the chief complaint. When conducting the comprehen-
sive exam, review of all systems is necessary and use of a cranial–caudal
approach to the review may be most appropriate.
The review of systems often proves to be more important than you
expect. You may fi nd symptoms that the patient had forgotten about or
identify secondary, unrelated problems that can be addressed as part of
the review. Not only is the fi nding of unexpected symptoms important,
the absence of particular symptoms may be of even greater signifi cance,
therefore, always document signifi cant negatives .
The questions asked will depend on any previous discussion(s). If you
have discussed chest pain in the history of presenting complaint, there is
no need to ask about it again.
Ask the patient if they have any of the following symptoms:
General symptoms
• Weight change (loss or gain), change in appetite (loss or gain), fever,
lethargy, malaise
Skin symptoms
• Lumps, bumps, sores, ulcers, rashes, itch
Sensory symptoms
• Vision problems hearing defi cits
Respiratory symptoms
• Cough, sputum, hemoptysis, shortness of breath, wheeze, chest pain
Cardiovascular symptoms
• Shortness of breath on exertion, paroxysmal nocturnal dyspnea, chest
pain, palpitations, ankle swelling, orthopnea, claudication
Gastrointestinal symptoms
• Dysphagia, indigestion, abdominal pain, nausea, vomiting, a change in
bowel habit, constipation, diarrhea, rectal blood loss
Genitourinary symptoms
• Urinary frequency, polyuria, dysuria, hematuria, nocturia, menstrual
problems, impotence
Neurological symptoms
• Headaches, dizziness, tingling, weakness, tremor, faint, seizures,
convulsions, epilepsy, blackouts or other loss of consciousness
Psychological symptoms
• Depression, anxiety, sleep disturbances
Endocrine symptoms
• Intolerance to heat or cold
Musculoskeletal symptoms
• Aches, pains, stiffness, swelling

THE ELDERLY PATIENT
43
The elderly patient
Obtaining a history from older people might be regarded as no greater
task than that for any other patient; however, cognitive decline, deafness,
and acute illness can make this diffi cult. Taking a good history from older
people is a skill that you will fi nd useful in all other situations.
While the history is key for making diagnoses, it is also an opportunity
for much more—your fi rst interaction with an older patient sets impor-
tant fi rst impressions. A skillful history not only reaps diagnostic rewards
but also marks you as a competent provider who can gain trust, reassure,
and communicate well with patients in any challenging situation.
Key points
Learn to listen
It can be tempting to ask lots of questions to obtain every fact in the his-
tory, particularly if you are rushed. Doing this will not only frustrate and
offend your patient (because you clearly don’t listen) but will also risk your
missing important facts.
Instead, learn to stay quiet—and listen in detail to the history of the pre-
senting complaint, which may only be 3–4 minutes, but gives your patient
a chance to be heard (see Box 2.14). Seemingly irrelevant detail is often
useful when patients have the chance to put it in context. It often saves
you time, as other key information may emerge, and you can better focus
the history.
Problem lists
Patients with chronic illness or multiple diagnoses may have more than
one strand to their acute presentation. Consider breaking the history
of the presenting complaint down into a problem list, e.g., 1) worsen-
ing heart failure; 2) continence problems; 3) diarrhea; 4) falls. This can
often reveal key interactions between diagnoses that you might not have
thought about.
Drug history
Remember to consider polypharmacy and that patients may not remem-
ber all the treatments they take. Be aware that more drugs mean more
side effects and less compliance, so ask which are taken and why—(older)
people are often quite honest about why they omit tablets.
Many elderly individuals use supplements or alternative remedies that
may interfere with your prescribed treatments, so ask about them! Eye
drops, sleeping pills, and laxatives are often regarded non-medicines by
patients, so be thorough and ask about each separately. Avoid precipitat-
ing delirium due to acute withdrawal of benzodiazepines.
Finally, remember the cost of medications and the impact they have on
an individual on a fi xed income.
Functional history
A comprehensive functional history is a cornerstone of your history-tak-
ing in older people—we make no apologies for reminding you about this
throughout this book. Diseases may not cured or modifi ed, but their key

CHAPTER 2 The history44
component—the effects on patients and their lives—might be easily trans-
formed through manipulation of activities of daily living.
Remember to ask about support systems for the patient at home—
have things resulted in a crisis for the patient because a caregiver is ill? Be
polite and ask tactfully about fi nances and available services. Are social
service benefi ts, such as home health and meals-on-wheels, available?
Many patients do not realize that they might be eligible, so precede your
questions with an explanation that, if desired, information about resources
or referral may be provided.
Social history
SH is exactly that and should complement the functional history.
Occupation (other than retired) can be of value when one is faced with
a new diagnosis of pulmonary fi brosis or bladder cancer and may give
your patient a chance to sketch out more about their lives. Inquire about
family—don’t assume that a relative may be able to provide help, as they
may live far away; the patient may still have a spouse, but be separated.
Chat with patients about their daily lives—interests and pursuits can
help distract an ill patient, give hope for the future, and act as an incentive
for recovery and meaningful rehabilitation.
Box 2.14 A note on narratives
• Akin to learning to listen is recognition that many patients might
not deliver their histories in a style that fi ts the traditional pattern
described in this chapter. Pushing (older) patients through histories
is not recommended. Older people will often discuss events and
preferences with a constituted story, and it is important to recognize
the value of this. Narrative analysis at its most simple—i.e., your
ability to listen and interpret—is a vital skill for all clinicians. Listening
to stories allows you to understand patients’ preferences, hopes, and
fears.
• Remember also that older patients often have different views about
what they want from their doctors. Their “agendas” may differ
hugely from what you think treatment plans should be, but they
may not make their views known, through fear of offending you. If
you are unsure, always ask—learning to involve your patients in key
decisions about their care will make you a better clinician.

THE PEDIATRIC PATIENT
45
The pediatric patient
Obtaining a history about or from children may present additional chal-
lenges, depending on who is available to provide the history and how
active the child is.
Key points
Learn to listen
Remember to listen to the child in addition to the caregiver. Again, it can
be tempting to ask lots of questions to obtain every fact in the history.
Doing this may result in missed opportunities to observe the patient–
caregiver interaction.
The child who is given appropriate attention during the history may
feel more engaged and be more cooperative during the exam. Instead of
having the child be quiet, remember to solicit the input of your youthful
patient. It gives them a chance to be heard. It can even save time, as key
information may emerge from the unexpected source—the child.
Drug history
Remember that parental practices may put children at risk. Ask about
the use of OTC medications and alternative treatments. This is often an
overlooked area when dealing with children.
Social history
Don’t assume that a relative bringing the child in for an exam may be able
to provide all the needed information. The child may be the subject of a
shared-custody agreement, or the noncustodial parent, who has minimal
information about the child, may be bringing the child in. Remember to
ask about formal and informal support for the patient and family during
illness.
Ask tactfully about the availability of parental benefi ts, including sick
time, as many parents do not realize that they might be eligible for such
benefi ts as leave time under the Family and Medical Leave Act (FMLA).
Chat with the child about their daily activities. Understanding the child’s
perceptions about their illness as well as their life in general may give
important clues to the best ways to provide care. Having the child discuss
interests and practices can help in providing treatment and supporting
parental relationships.
This page intentionally left blank

47
General examination
Approaching the physical examination 48
First impressions 50
Preparing for the examination 50
Color 51
Temperature 53
Hydration 54
Edema 55
Nutritional status 56
Lymph nodes 58
Hands 62
Recognizable syndromes 68
Vitamin and trace element defi ciencies
70
The elderly patient 72
Chapter 3

CHAPTER 3 General examination48
Approaching the physical examination
General conduct
Medical professionals are in a position of trust. It is generally assumed that,
as a medical professional, you will act with professionalism, integrity, and
honesty, as well as respect for the dignity and privacy of your patient.
In no part of the patient encounter is this more evident than during the
physical examination. People you may have only just met will take off their
clothes and allow you to look at and touch their bodies—something that
would be completely unacceptable to many people in any other situation.
They will, of course, be more comfortable with this if you have established
an appropriate rapport during the history-taking phase of the visit.
Communication does not stop at the end of taking the history, as addi-
tional historical information should be elicited during the physical exami-
nation. The manner in which you conduct yourself during the examination
can be the difference between an effective examination and a formal
complaint. It is essential that cultural and religious norms be taken into
consideration in the context of the physical examination.
This is not to say that you should shy away from examining the patient
for fear of acting inappropriately and causing offense. In particular, you
should not avoid examining members of the opposite sex, especially their
intimate body parts, as there should be no sexual undertones in the rela-
tionship whatsoever.
The examiner must project a self-confi dent and empathetic persona
throughout thee examination. Further, the use of consistent verbal and
nonverbal communication should ensure that no misunderstandings occur.
You should, of course, be sure that you have a chaperone present—
another student, doctor, nurse, or other health-care professional—when-
ever you perform any intimate examination. Ideally, the chaperone should
be of the same gender as the patient.
Format of the examination
Examination techniques may seem overstructured and unnaturally formulaic
at fi rst, but these routines ensure that no part of the examination is missed.
The right approach
One important rule is that you should always stand at the patient’s right-
hand side. This gives them a feeling of control over the situation (most
people are right-handed). All the standard examination techniques are
formulated with this orientation in mind.
Systems examinations
The physical examination can be accomplished through a body systems
approach, which is the format of this book.
Often you will need to examine several systems simultaneously by inte-
grating examination techniques in an integrated manner. For example, you
may wish to examine the patient’s thorax with a view to the cardiovascular
and respiratory systems, listening for heart and breath sounds during the

APPROACHING THE PHYSICAL EXAMINATION
49
auscultation phase of the exam, rather than completing the heart exam
and then returning to examine the chest and respiratory system.
Examination framework
Each system-based examination is divided into the following categories:
• Inspection (looking)
• Palpation (feeling)
• Percussion (tapping)
• Auscultation (listening)
In addition, there may be special tests and other added categories; you will
meet these as you go through this book.
Using this book
• Each chapter in this book is based around one body system and
describes the standard examination format for that system only.
• At the beginning of each encounter, you should consider the
topics covered in this chapter before moving to the more specifi c
examination.
• You should not consider these examination routines to be entirely
separate entities. If examining several systems at once, you should
combine these frameworks to create a single, fl uid
routine.

CHAPTER 3 General examination50
First impressions
Diagnosis at fi rst sight
From the fi rst moment you set eyes on the patient, you should be forming
impressions of their general state of health. It takes experience and practice
to pick up on all of the possible clues, but much can be gained by combining
common sense with medical knowledge. Ask yourself the following:
• Did the patient walk in unassisted?
• Does the patient appear comfortable or distressed?
• Does the patient appear well or ill?
• Is there a recognizable syndrome or facies?
• Does the patient appear well nourished and hydrated ?
You will note many of these features subconsciously, but you must work
to make yourself consciously aware of them.
Bedside clues
In a hospital setting, there may be additional clues as to the patient’s state of
health in the objects around them. In other circumstances, look at objects
they are carrying or that are visible in their pockets. Examples include
oxygen tubing, inhalers, insulin syringes, a glucose meter, or cigarettes.
Vital signs
It is also essential that vital signs be assessed at an early stage. These usu-
ally include the following:
• Temperature
• Blood pressure
• Pulse
• Oxygen saturation
• Respiratory rate
• Level of pain
Consciousness level
If necessary, a rapid and initial assessment of a patient’s level of consciousness
can be made using the Alert, Voice, Pain, Unresponsive (AVPU) scale (Box 10.9
b p. 332) or the Glasgow Coma Scale (GCS) (Box 10.10 b p. 332).
Preparing for the examination
Before commencing a formal examination, introduce yourself, explain
what you would like to do, and obtain verbal consent.
• Ensure that the patient has adequate privacy to undress.
• Make sure that you will not be disturbed.
• Check that the examination couch or bed is draped or covered by a
clean sheet or disposable drape.
• If the patient is accompanied, ask them if they would like their
companion to remain in the room during the exam.
• Check that any equipment you will require is available (light source,
cotton ball, refl
ex hammer, stethoscope, etc.).
• When ready, the patient should be positioned supine with the head
and shoulders raised to 45°.

COLOR
51
Color
The color of the patient, or parts of the patient, can give clues to their
general state of health and to particular diagnoses. Look especially for
evidence of pallor, central or peripheral cyanosis, jaundice, and abnormal
skin pigmentation.
Pallor (paleness)
Facial pallor is often a sign of severe anemia and is especially notice-
able on inspecting the palpebral conjunctiva, nail beds, and palmar skin
creases.
Ask the patient to look upward and gently draw down their lower eyelid
with your thumb—the conjunctiva should be red or pink.
However, pallor is an unreliable sign in patients suffering shock or in
those with vascular disease. Peripheral vasoconstriction or poor blood
fl ow causes pallor of the skin and conjunctiva, even in the absence of
blood loss.
Cyanosis
See also b p. 191. Cyanosis refers to a bluish discoloration of the skin
and mucous membranes and is due to the presence of at least 2.5 g/dL of
deoxygenated hemoglobin in the blood.
In central cyanosis , the tongue appears blue from an abnormal amount
of deoxygenated blood in the arteries. This may develop in any lung dis-
ease in which there is a ventilation/perfusion mismatch, such as chronic
obstructive pulmonary disease (COPD), cor pulmonale, and massive
pulmonary embolus (PE). It will also occur in right-to-left cardiac shunts.
Finally, polycythemia and hemoglobinopathies (such as methemoglob-
inemia) may give the appearance of cyanosis due to abnormal oxygen
carriage.
Peripheral cyanosis is bluish discoloration at the extremities (fi ngers,
toes) only. It is usually due to a decrease in blood supply or a slowing of
the peripheral circulation. The latter commonly arises with exposure to
cold, reduced cardiac output, or peripheral vascular disease.
Note that one cannot have central cyanosis without also demonstrating
peripheral cyanosis. Peripheral cyanosis, however, can occur alone.
Jaundice
Jaundice (icterus) refers to a yellow pigmentation of those tissues in the
body that contain elastin (skin, sclerae, and mucosa) and occurs from an
increase in plasma bilirubin (visible at >35 μmol/L).
It is best appreciated in fair-skinned individuals in natural daylight.
Jaundice should not be confused with carotonemia, which also causes a
yellow discoloration of the skin, but the sclerae remain white.
During the examination, expose the sclera by gently holding down
the lower lid and asking the patient to look upward. It is important
that the examiner consider the possibility that in patients with black or
brown skin, hyperpigmented areas on the sclera are often nonpatho-
logical and are associated with the presence of melanin in the tissue of
the sclera.

CHAPTER 3 General examination52
Other abnormalities of coloration
You will see other distinctive color patterns throughout this book; a list
here would be lengthy and probably unnecessary.
These include the classic slate-gray appearance of hemachromatosis,
silver-gray coloration in argyra (silver poisoning), hyperpigmented skin-
fold pigmentation seen in Addison’s disease, and nonpigmented patches
of vitiligo (b p. 83).

TEMPERATURE
53
Temperature
• Record the patient’s temperature using either a mercury or electronic
thermometer. The recording will depend on the site of measurement.
• Normal oral temperature is usually considered to be 98.6°F, with a
range of 97.5° to 99.5°F. Rectal temperature is 1.0°F higher and axillary
temperature is 1.0°F lower.
• There is also a diurnal variation in body temperature, with peak
temperatures occurring between 6 and 10 PM and the lowest
temperatures between 2 and 4 AM.
High temperature
The febrile pattern of most diseases also follows this diurnal variation.
Sequential recording of temperature may show a variety of patterns that
can be helpful in the diagnosis of disease.
For example, persistent pyrexia may be a sign of malignant hyperthermia,
a drug fever (e.g., halothane, succinylcholine), typhus, or typhoid fever.
Intermittent pyrexia can be suggestive of lymphomas and pyogenic infec-
tions, such as milliary TB.
A relapsing high temperature occasionally occurs in patient with
Hodgkin’s disease and is characterized by 4–5 days of persistent fever that
then returns to baseline before rising again.
Also note any rigors (uncontrollable shaking), which may accompany
high fever and are often characteristic of biliary sepsis or pyelonephritis.
Low temperature
Hypothermia is a core (rectal) temperature of <95.0°F and occurs usually
from exposure to cold (e.g., near-drowning) or secondary to an impaired
level of consciousness (e.g., following excess alcohol or drug overdose) or
in the elderly (e.g., myxedema).
Patients may be pale with cold, waxy skin and stiff muscles; conscious-
ness is often reduced. Patients typically lose consciousness at tempera-
tures <81°F.

CHAPTER 3 General examination54
Hydration
When assessing hydration status, you may already have obtained clues
from the history. For example, a patient may have been admitted with
poor fl uid intake and may be thirsty. Sepsis, bleeding, or bowel obstruc-
tion and vomiting can also cause a person to become dehydrated.
Examination
• Begin with looking around the patient for any obvious clues, including
fl uid restriction signs, urinary catheter bag, or nutritional supplements.
• Inspect face for sunken orbits (sign of moderate–severe dehydration).
Mucous membranes
• Inspect the tongue and mucous membranes for moisture.
• Dehydration will cause these surfaces to appear dry.
Skin turgor
• Assess by gently pinching a fold of skin on the forearm, holding for a
few moments, and letting go.
• With normal hydration, the skin will promptly return to its original
position, whereas in dehydration, skin turgor is reduced and the skin
takes longer to return to its original state.
• 0This sign is unreliable in elderly patients, whose skin may have lost
its normal elasticity.
Capillary refi ll
• Test by raising the patient?s thumb to the level of the heart, pressing
hard on the pulp for 5 seconds and then releasing. Measure the time
taken for the normal pink color to return.
• Normal capillary refi
ll time should be <2 seconds; a prolongation is
indicative of poor blood supply to the peripheries.
Pulse rate
• A compensatory tachycardia may occur in dehydration or in fl uid
overload.
Blood pressure
• Check lying and standing blood pressure (b p. 50) and look for low
blood pressure on standing, which may suggest dehydration (along
with many other diagnoses).
Jugular venous pressure (JVP)
• See b p. 146. Assess height of the JVP, which is one of the most
sensitive ways of judging intravascular volume.
• The JVP is low in dehydration but raised in fl
uid overload (e.g.,
pulmonary edema). The latter commonly causes fi ne
basal
inspiratory rales (b p. 198).
Edema
• Edema is another useful sign of fl
uid overload (consider right heart
failure, constrictive pericarditis, hypoalbuminemia). Remember to test
for both ankle and sacral edema (
b p. 55).

EDEMA
55
Edema
Edema refers to fl uid accumulation in the subcutaneous tissues and implies
an imbalance of the Starling forces (intravascular pressure or reduced
intravascular oncotic pressure), causing fl uid to seep into the interstitial
space.
Edema will occur in hypoproteinemic states (especially nephrotic syn-
drome, malnutrition, and malabsorption) and severe cardiac and renal
failure (see Box 3.1).
Examination
In ambulatory patients, palpate the distal shaft of the tibia for edema by
gently compressing the area for up to 10 seconds with the thumb. If the
edema is pitting, the skin will show an indention where pressure was
applied, which refi lls slowly.
2 If edema is present, note its upper level. Edema may also involve the
anterior abdominal wall and external genitalia.
When a person with edema lies down, fl uid moves to the new depend-
ent area, causing sacral edema. This can be checked for by asking the
patient to sit forward, exposing the lower back and sacral region, and again
applying gentle pressure with your fi ngertips.
Box 3.1 Some causes of leg swelling
Local causes
• Cellulitis (usually unilateral)
• Ruptured baker’s cyst (usually unilateral)
• Occlusion of a large vein—i.e., thrombophlebitis, deep venous
thrombosis (DVT), extrinsic venous compression
• Chronic venous insuffi ciency—pigmentation
induration,
infl ammation,
lipodermatosclerosis
• Lipomatosis
• Gastrocnemius rupture—swelling and bruising around the ankle joint
and foot
Systemic causes
• Congestive heart failure
• Hypoproteinemia (nephrotic syndrome, liver cirrhosis, protein-losing
enteropathy, kwashiorkor)
• Hypothyroidism
• Hyperthyroidism
• Drugs (e.g., corticosteroids, nonsteroidal anti-infl ammatory
drugs
[NSAIDs], vasodilators)
Lymphedema
This is non-pitting edema associated with thickened and indurated skin.
It can be idiopathic or secondary to proximal lymphatic obstruction,
such as post-surgery, in metastatic cancer, or with chronic infection.

CHAPTER 3 General examination56
Nutritional status
The nutritional status of the patient may be an important marker of dis-
ease and is often overlooked in physical examination. The following are
simple clinical measures that can be easily undertaken to assess a patients
overall nutritional status.
General physical appearance
• Note the patient’s overall body habitus: are they fat or thin ? Do
they appear to have recently lost or gained weight ? (See Boxes 3.2
and 3.3.)
• Weight loss can lead to muscle wasting, seen as skeletal prominence,
especially cheek bones and heads of humerus and major joints, rib
cage, and the bony landmarks of the pelvis.
Body weight and height
All patients should be weighed with accurate scales and have their height
recorded (ideally using a stadiometer).
Body mass index
The body mass index (BMI) is a useful estimate of body composition and
related health risk.
BMI =
weight (kg)
[height (m)
2
]
The World Health Organization (WHO) has classifi ed BMI as follows:
• 19–25 = normal
• 25–30 = overweight
• 30–40 = obese
• >40 = extreme or morbid obesity
Regional fat distribution
A central distribution of body fat (waist–hip circumference ratio >1.0 in
men, >0.9 in women) is associated with a higher risk of morbidity and
mortality.
Skin-fold thickness
Skin-fold thickness is another useful method of assessing body composi-
tion and is usually measured at the triceps halfway between the olecranon
and acromial processes. This is measured using specialist calipers.
The examiner should pinch a fold of skin and subcutaneous tissue
between the thumb and fi rst fi nger and then apply the calipers to the skin-
fold. Three measurements are normally taken and the average calculated
(normal values are 20 mm in men and 30 mm in women).
Mid-arm circumference
An additional method for estimating body fatness at the bedside is to
measure mid-arm muscle circumference.

NUTRITIONAL STATUS
57
As with skin fold thickness, use the midpoint between the tip of the
olecranon and acromial processes as the standard measurement point.
With the arm in fl exed right-angle position, take three tape measurements
at this point before calculating the average. Standard age and sex charts
are available.
Box 3.2 Some conditions associated with malnutrition
• Any very ill patient
• Malignancy
• Metabolic disease (e.g., renal failure)
• Gastrointestinal disease (especially small bowel)
• Sepsis
• Trauma
• Post-surgery
• Psychosocial problems (e.g., depression, anorexia nervosa, social
isolation)
• Dementia
Box 3.3 Some conditions associated with obesity
• Simple obesity (‘biopsychosocial’)
• Genetic, e.g., Prader–Willi, Lawrence–Moon–Biedl syndrome
• Endocrine (e.g., Cushing’s syndrome, hypothyroidism)
• Drug induced (e.g., corticosteroids)
• Hypothalamic damage due to a tumor or trauma

CHAPTER 3 General examination58
Lymph nodes
An examination of the lymph nodes forms a portion of the routine exam
for most body regions. As there is no need to percuss or auscultate, exam-
ination involves inspection followed by palpation. Normally, lymph nodes
should be nonpalpable. Lymphadenopathy occurs when various health
states result in enlargement of lymphoid tissues (see Box 3.4).
There are a great many lymph nodes that are not accessible to the
examining hand—for example, within the mediastinum or the intestinal
mesentery.
Several groups of lymph nodes are accessible for the purposes of physi-
cal examination. In the head and neck, these are located along the ante-
rior and posterior aspects of the neck and on the underside and angle
of the jaw (see Fig. 3.1). In the upper limb and trunk, lymph nodes are
located in the epitrochlear (Fig. 3.2) and axillary (Fig. 3.3) regions, and
in the lower limbs nodes can be examined in the inguinal (Fig. 3.4) and
popliteal regions.
2 Remember that the liver and spleen are often enlarged in the pres-
ence of generalized lymphadenopathy These should be examined as on
b p. 233 (Liver) and b p. 234 (Spleer), respectively.
Inspection
Large nodes are often clearly visible on inspection, particularly if the
enlargement is asymmetrical. If nodes are infected, the overlying skin may
be red and infl amed.
Palpation
Lymph nodes should be palpated using the most sensitive part of your
hands—the fi ngertips.
Head and neck
The nodes should be palpated with the patient in an upright position and
the examiner standing behind—similar to examination of the thyroid gland
(b p. 60).
Axillae
To examine the nodes at the right axilla:
• The patient should be sitting comfortably and you should stand at their
right-hand side.
• Support their right arm abducted to 90° with your right hand.
• Examine the axilla with your left hand.
To examine the nodes at the left axilla:
• Perform the same maneuver as for the right, but on the opposite side.
Inguinal
With the patient lying supine, palpate their inguinal region along the inguinal
ligament—the same position as when feeling for a hernia (
b p. 243) or the
femoral pulse (b p. 151).
• There are two chains of superfi
cial inguinal lymph nodes—a horizontal
chain that runs just below the inguinal ligament, and a vertical chain
that runs along the saphenous vein.

LYMPH NODES
59
Epitrochlear nodes
Place the palm of your right hand under the patient’s slightly fl exed right
elbow and feel with your fi ngers in the groove above and posterior to the
medial epicondyle of the humerus.
Popliteal
This is best examined by passively fl exing the knee and exploring the fossa
with the fi ngers of both hands—much like feeling for the popliteal pulse
(b p. 157).
Findings
Similar to the considerations when examining a lump (b p. 88), during
palpation of lymph nodes, the following features should be assessed:
• Site: Important diseases, such as both acute and chronic infections and
metastatic carcinoma, will cause localized lymphadenopathy, depending
on the site of primary pathology. It is often helpful to draw a diagram
detailing exactly where the enlarged node is.
• Number: How many nodes are enlarged ? Make a diagram and detail
the palpable nodes clearly and carefully.
• Size: Normal nodes are not palpable. Palpable nodes, therefore, are
enlarged. You should measure their length and width.
• Consistency: Malignant lymph nodes feel unusually fi
rm or hard and
irregular. Enlarged nodes secondary to infection may feel rubbery.
• Tenderness: Painful, tender nodes usually imply infection.
• Fixation: Nodes fi
xed to surrounding tissue are highly suspicious of
malignancy. Matted glands may occur in tuberculous lymphadenopathy.
• Overlying skin: Infl
amed nodes may cause redness and swelling in the
overlying skin. Spread of a metastatic carcinoma into the surrounding
tissue may cause edema and surface texture changes.
Box 3.4 Some causes of generalized lymphadenopathy
• Hematological malignancies (e.g., lymphoma, acute, and chronic
lymphatic leukemia)
• Infections
• Viral (e.g., HIV, infectious mononucleosis, cytomegalovirus [CMV])
• Bacterial (e.g., tuberculosis, syphilis, brucellosis)
• Infi
ltrative diseases (e.g., sarcoidosis, amyloidosis)
• Autoimmune diseases (e.g., systemic lupus erythematosus [SLE],
rheumatoid arthritis)
• Drugs (e.g., phenytoin causes a pseudolymphoma)
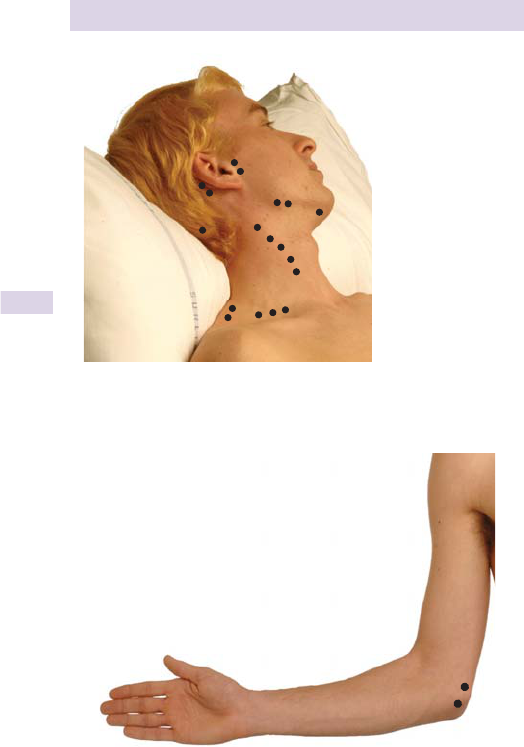
CHAPTER 3 General examination60
E
H
C
G
F
D
A
B
A = Supraclavicular
B = Posterior triangle
C = Jugular chain
D = Preauricular
E = Postauricular
F = Submandibular
G = Submental
H = Occipital
Fig. 3.1 Cervical and supraclavicular lymph nodes.
Fig. 3.2 Epitrochlear lymph nodes.

LYMPH NODES
61
B
E
D
C
A
A = Lateral
B = Pectoral
C = Central
D = Subscapular
E = Infraclavicula
r
Fig. 3.3 Axillary lymph nodes.
Horizontal
group
Vertical
group
Fig. 3.4 Inguinal lymph nodes.

CHAPTER 3 General examination62
Hands
Examination of the hands is an important part of all examination routines
and may provide a large number of diagnostic clues. The examination of
the hands, even if only through a handshake, is an almost universal part
of every exam.
You will note the various ‘hand signs’ relevant to the body systems
throughout the book.
Preparation
Begin by exposing the forearms up to the elbows and asking the patient to
place their hands on a pillow on their lap with you sitting opposite.
Bedside clues
Make a point of looking around the room or the patient for any functional
aids or adaptations.
Inspection
• Dorsum: ask the patient to hold their hands out fl at, palms down.
• Palm: next, ask the patient to turn their hands over.
• It is often possible to make a spot diagnosis with inspection of the
palmar and dorsal surfaces as many diseases cause characteristic hand
changes (e.g., rheumatoid arthritis, systemic sclerosis, psoriasis, ulnar
nerve palsy).
• Skin color: take note of the color (e.g., palmar erythema, vasculitis,
digital ischemia, purpura) and consistency of the skin.
• Note that pathological palmar erythema can also be found on the
thenar and hypothenar eminences and also continues along the digits.
• Discrete lesions: are there any discrete lesions present ? Examine as
described as in Chapter 4.
• Muscles: look at the small muscles of the hand and the larger muscles
of the forearm and make note of any wasting or fasciculation.
• Joints: make a point of looking at each joint in turn:
• Distal interphalangeal (DIP).
• Proximal interphalangeal (PIP).
• Metacarpophalangeal (MCP).
• Wrist.
• Bony deformities: look for evidence of swelling or deformities.
• Nails: the nails should be inspected carefully. See Box 3.7 for
important nail signs not to be missed.
Box 3.5 Dupuytren’s contracture
Dupuytren’s fasciitis causes progressive thickening and contracture of
fi brous bands on the palmar surface of the hand. This leads to a progres-
sive fi xed fl exion of the fi ngers—usually the fourth and fi fth digits.
Dupuytren’s is more common in men than in women. the cause is
unknown. it may be familial, sporadic, and has been associated with alco-
holism, use of anticonvulsant drugs, and diabetes.

HANDS
63
Palpation
• Palpate any abnormalities identifi ed on inspection.
• 0 Ask the patient if there is any tenderness and palpate those areas
last.
Box 3.6 Some fi nger joint deformities
• Swan neck: fi xed fl exion at the DIP and extension at the PIP joints—
associated with rheumatoid arthritis (b p. 365).
• Boutonniere: fi
xed extension at the DIP and fl
exion at the PIP
joints—associated with rheumatoid arthritis (b p. 365).
• Z-shaped thumb(Hitchhiker’s Thumb): fl
exion at the MCP joint
of the thumb with hyperextension at the interphalangeal joint—
associated with rheumatoid arthritis (
b p. 365).
• Ulnar deviation: a feature of rheumatoid arthritis and other
conditions, the fi
ngers are deviated medially (toward the ulnar
aspect of the forearm) at the MCP joints.
• Wrist subluxation: deviation (either ulnar or radial) at the wrist.
• Heberden’s nodes: swelling (due to osteophytes) at the DIP
joints—a feature of osteoarthritis (b p. 367).
• Bouchard’s nodes: similar to Heberden’s nodes but at the PIP
joints—a feature of osteoarthritis (b p. 367).
Box 3.7 Some important nail/fi nger-tip signs
• Important signs to look for are described elsewhere in this book:
• Leukonychia, koilonychia, Muehrcke’s lines, blue lanulae = b p. 81.
• Xanthomata, Osler’s nodes, Janeway lesions = b p. 156.
• Splinter hemorrhages, pitting, onycholysis, Beau’s lines, paronychia,
onychomycosis = b p. 81.
Clubbing
Also described on b p. 191. This is i curvature of the nails. Early club-
bing is seen as a softening of the nail bed but this is very diffi cult
to
detect. Progression leads to a loss of the angle at the base of the nail
(the Lovibond angle) and eventually to gross curvature and deformity.
Objectively check for clubbing by putting the patients nails back-to-
back as in Fig. 8.2. Clubbing leads to a loss of the diamond-shaped gap
(Schamroth’s sign).
Causes of clubbing
The full list of causes is huge. The diseases to be aware of are:
• Pulmonary: chronic interstitial lung diseases, chronic lung infections
(e.g., bronchiectasis), cystic fi
brosis, lung abscess, asbestosis, fi brosing
alveolitis, lung cancer.
• Cardiac: cyanotic congenital heart disease, infective endocarditis.
• Other: liver cirrhosis, infl
ammatory bowel disease.

CHAPTER 3 General examination64
• Pay attention to areas of temperature change.
• It is worth remembering to palpate the anatomical snuff box (Fig. 3.5).
• At the base of the anatomical snuff box are the scaphoid and
trapezium bones. Tenderness here may be the only sign of scaphoid
damage. Pathology here is easily missed.
Movement
Before assessing movement, always ask the patient if they have pain any-
where in the hands. If allowed to continue, test passive and then active
movements in all joints.
Passive movements
As in Chapter 11, move each joint and assess range of movement, any
crepitus and whether there is any pain.
Active movements
2 The examination here overlaps with that in Chapter 11.
• Ask the patient to open and close their hands quickly to test for signs
of myotonic dystrophy (hand will be slow to relax).
• Wrist extension: test with the ‘prayer sign’ maneuver them with fi ngers
extended as in Fig. 3.6. Ask the patient to place their hands, palm to
palm, in front of.
• Wrist fl exion: test with the ‘reverse prayer’ position. Ask the patient to
place their hands back to back in front of them with fi ngers
extended
(Fig. 3.7).
• Finger fl exion: ask the patient to make a fi st.
• Finger extension: as the patient straighten their fi
ngers out. Also tested
with the prayer and reverse prayer positions.
Fig. 3.5 The anatomical snuff box formed by the tendons of the extensor pollicis
brevis and abductor pollicis longus laterally and the tendon of the extensor pollicis
longus medially.
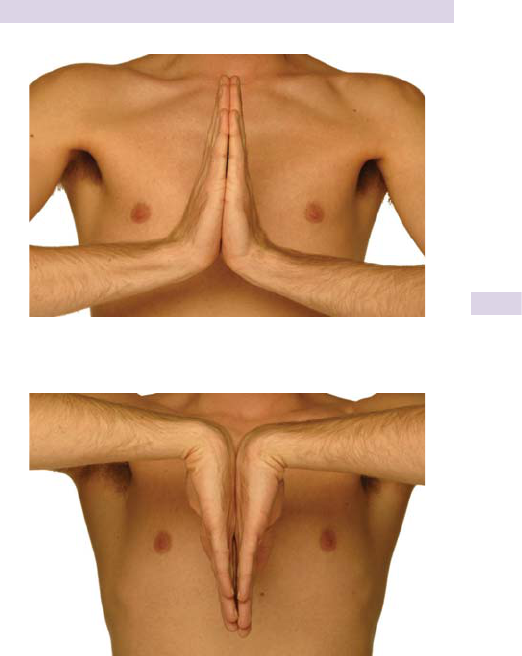
HANDS
65
• Dorsal interossei: (ulnar nerve). These can be assessed by asking
the patient to spread the fi ngers apart (abduction) and resist your
attempts to push them together.
• Palmar interossei: (ulnar nerve). These can be tested by asking the
patient to hold a piece of paper between their fi
ngers and resisting
your attempts to pull it free.
• Abductor pollicis brevis: (median nerve). Ask the patient to put their hand
out, palm upwards, and then point their thumb at the ceiling. You should
then try to push the thumb back towards the hand whilst they resist you.
Fig. 3.6 The prayer position.
Fig. 3.7 The reverse prayer position.

CHAPTER 3 General examination66
• Opponens pollicis: (median nerve). This can be assessed by asking
the patient to put thumb and little fi nger together in an ‘O’ and again
instructing the patient to try to stop you pulling them apart.
Sensation
Test modalities of light touch, pin prick (pain), vibration, and joint pos-
ition sense in both peripheral nerve (ulnar, median, radial) and der-
matomal distributions. Examining the hands neurologically is detailed
on b p. 312.
Pulses
Palpate both radial and ulnar pulses (b p. 157).
Elbows
• Always examine the elbows to elicit any clues as to the cause of joint
pathology.
• For example, there may be rheumatoid nodules, psoriatic plaques,
xanthomata or scars.
Function
Testing function is a vital part of any hand examination and should not be
overlooked. Ask the patient to:
• Write their name.
• Pour a glass of water.
• Fasten and unfasten a button.
• Pick a coin up from a fl at
surface.
Box 3.8 Allan’s test
This is a test of hand perfusion.
• Ask the patient to make a fi st.
• Next, occlude both radial and ulnar arteries by applying pressure
over them for 5 seconds.
• Ask the patient to open the palm—which should now be white.
• Release the pressure from the radial artery and look at the color
of the palm. If perfusion is adequate, it should change from pale to
pink.
• Repeat for the ulnar artery.

67
HANDS
Box 3.9 Some more eponymous signs at the hand
Tinel’s sign
A test for nerve compression. Commonly used at the wrist to test for
median nerve compression in carpal tunnel syndrome.
• Percuss the nerve over the site of possible compression (at the
wrist, gently tap centrally near the fl
exor palmaris tendon).
• If the nerve is compressed, the patient will experience tingling in the
distribution of the nerve on each tap.
Froment’s sign
A test of ulnar nerve function. Ask the patient to grasp a piece of paper
between their thumb and forefi
nger. Alternatively, ask them to make a
fi
st. If there is ulnar nerve damage, the thumb will be unable to adduct
so will fl ex instead (see Fig. 10.23, b p. 317).
Finkelstein’s test
Ask the patient to fl ex the thumb then fl ex and ulnar deviate the wrist.
Pain is indicative of De Quervain’s tenosynovitis (tendons of abductor
pollicis longus and extensor pollicis brevis).

CHAPTER 3 General examination68
Recognizable syndromes
Some physical (especially facial) characteristics are so typical of certain
congenital, endocrine, and other disorders that they immediately suggest
the diagnosis.
The following are the physical features of certain conditions that can be
appreciated on fi rst inspection—enabling a ‘spot diagnosis’. Most of these
conditions have many other features which are not detailed here.
Down’s syndrome (trisomy 21)
• Facies: oblique orbital fi ssures, epicanthic folds, hypertelorism (widely
spaced eyes), conjunctivitis, lenticular opacities, small low set ears, fl at
nasal bridge, mouth hanging open, protruding tongue (large, heavily
fi ssured).
• Hands: single palmar crease (not pathogneumonic), short broad hands,
curved little fi nger,
hyperfl
exible joints with generalized hypotonia.
• Other: mental defi
ciency, wide gap between fi
rst and second toes,
short stature, dementia of Alzheimer type, hypothyroidism.
Turner’s syndrome (45 XO)
• Facies: micrognathia (small chin), epicanthic folds, low set ears, fi sh-like
mouth, hypertelorism, ptosis, strabismus.
• Neck: short, webbed neck, redundant skin folds at back of neck, low
hairline.
• Chest: shield-like chest, widely spaced nipples.
• Upper limbs: short fourth metacarpal or metatarsal, hyperplastic nails,
lymphoedema, i carrying angle of the elbow.
Marfan’s syndrome
Autosomal dominant condition caused by defects in fi brillin gene
(ch15q).
• Facies: long, narrow face, high-arched palate, lens dislocation,
heterochromia of iris, blue sclera, myopia.
• Limbs: tall stature, armspan > height, hyperextensibility of joints,
recurrent dislocations.
• Hands: elongated fi
ngers and toes (arachnodactyly).
• Chest: funnel or pigeon chest, pectus excavatum, kyphoscoliosis, aortic
incompetence.
• Other: cystic disease of the lungs (spontaneous pneumothorax, bullae,
apical fi
brosis, aspergilloma and bronchiectasis), inguinal or femoral
hernias.
Tuberous sclerosis
Also known as Bourneville’s disease of the skin. Autosomal dominant con-
dition localized to chromosomes 16 and 9.
• Skin: adenoma sebaceum (angiofi bromata—papular,
salmon-colored
eruption on centre of the face, especially at the nasolabial folds),
Shagreen patches (fl
esh-colored, lumpy plaques found mostly on the
lower back), ungal fi bromata (fi rm, pink, periungal papules growing out

RECOGNIZABLE SYNDROMES
69
from nail beds of fi ngers and toes), hypopigmented ‘ash-leaf’ macules
(trunk and buttocks), café-au-lait macules and patches.
Neurofi bromatosis—type 1
Also known as von Recklinghausen’s disease—autosomal dominant.
• Skin: neurofi
bromata (single, lobulated or pedunculated, soft, fi rm,
mobile, lumps or nodules along the course of nerves), Cafe-au-lait
spots (especially in the axillae), axillary freckling.
• Other: kyphoscoliosis, nerve root involvement or compression, muscle
wasting, sensory loss (Charcot’s joints), plexiform neuroma, lung cysts.
Peutz–Jegher’s syndrome
• Skin: sparse or profuse small brownish-black pigmented macules on
lips, around mouth and on buccal mucosa, hands and fi ngers.
Oculocutaneous albinism
Marked hypomelaninosis (pale skin), white hair or faintly yellow blonde.
Nystagmus, photophobia, hypopigmented fundus, translucent iris (pink).
Myotonic dystrophy
• Facies: myopathic facies (drooping mouth and long, lean, sad, sleepy
expression), frontal balding in men, ptosis, wasting of facial muscles
(especially temporalis and masseter), cataracts.
• Other: wasting of sternomastoids, shoulder girdle and quadriceps,
arefl
exia, myotonia (percussion in tongue and thenar eminence, delay
before releasing grip), cardiomyopathy, slurred speech, testicular
atrophy, diabetes, intellect and personality deterioration in later stages.
Parkinson’s disease
• Facies: expressionless, unblinking face, drooling, titubation,
blepharoclonus (tremor of eyelids when eyes gently closed).
• Gait: shuffl
ing, festinant gait with reduced arm swing.
• Tremor: pill-rolling tremor, lead-pipe rigidity, cog-wheel rigidity,
glabellar tap positive (b p. 325) small, tremulous, untidy hand writing
(micrographia).
Osler–Weber–Rendu syndrome
Also known as hereditary hemorrhagic telangiectasia (HHT).
• Facies: telangiectasia (on face, around mouth, on lips, on tongue,
buccal mucosa, nasal mucosa), telangiectasia may also be found on
fi
ngers. Associated with epistaxis, GI haemorrhage, iron defi ciency
anemia, haemoptysis.
Systemic sclerosis/CREST syndrome
• Face/hands: telangiectasia and pigmentation, pinched nose, perioral
tethering, tight, shiny and adherent skin, vasculitis, atrophy of fi nger
pulps, calcinosis (fi
ngers), Raynaud’s phenomenon.

CHAPTER 3 General examination70
Vitamin and trace element defi ciencies
Fat soluble vitamins
Vitamin A (retinol)
• Found in dairy produce, eggs, fi sh oils, and liver.
• Defi ciency causes night blindness, xerophthalmia, keratomalacia
(corneal thickening) and follicular hyperkeratosis.
Vitamin D (cholecalciferol)
• Found in fi
sh liver oils, dairy produce, and undergoes metabolism at
the kidneys and the skin using UV light.
• Defi
ciency causes rickets (in children) and osteomalacia (in adults).
Proximal muscle weakness may be evident.
Vitamin E (alpha-tocopherol)
• Widely distributed, green vegetables, and vegetable oils.
• Defi
ciency causes hemolytic anemia (premature infants) and gross
ataxia.
Vitamin K (K
1
= phylloquinine K
2
= menaquinone)
• Widely distributed but particularly in green vegetables. Synthesized by
intestinal bacteria.
• Defi
ciency causes coagulation defects seen as easy bruising and
hemorrhage.
Water soluble vitamins
Vitamin B
1
(thiamine)
• Found in cereals, peas, beans, yeast, and whole-wheat fl our. It is
an essential factor in carbohydrate metabolism and transketolation
reactions.
• Defi
ciency causes dry beri-beri (sensory and motor peripheral
neuropathy), wet beri-beri (high output cardiac failure and edema),
Wernicke–Korsakoff syndrome.
Vitamin B
2
(ribofl avin)
• Found in whole-wheat fl our, meat, fi
sh, and dairy produce. It is a
coenzyme in reversible electron carriage in oxidation–reduction
reactions.
• Defi
ciency gives angular stomatitis (fi ssuring and infl ammation at the
corners of the mouth), infl
amed oral mucous membranes, seborrhoeic
dermatitis, and peripheral neuropathy.
Vitamin B
3
(niacin)
• Found in fi sh, liver, nuts, and whole-wheat fl our.
• Defi
ciency causes pellagra): dermatitis, diarrhea, dementia.
Vitamin B
6
(pyridoxine)
• Widespread distribution, also synthesized from tryptophan.
• Defi ciency causes peripheral neuropathy, convulsions, and sideroblastic
anemia. Defi
ciency may be provoked by a number of commonly used

VITAMIN AND TRACE ELEMENT DEFICIENCIES
71
drugs (e.g., isoniazid, hydralazine, penicillamine) and is also seen in
alcoholism and pregnancy.
Vitamin B
12
(cyanocobalamin)
• Causes of a defi ciency are numerous and include partial or total
gastrectomy, Crohn’s disease, ileal resection, jejunal diverticulae, blind
loop syndrome, and tapeworm.
• Defi
ciency causes megaloblastic anemia, peripheral neuropathy,
subacute combined degeneration of the spinal cord depression,
psychosis, and optic atrophy.
Vitamin B
9
(folic acid)
• Defi ciency can be caused by poor diet, malabsorption states, coeliac
disease, Crohn’s disease, gastrectomy, drugs (e.g., methotrexate,
phenytoin), excessive utilization (e.g., leukemia, malignancy,
infl ammatory
disease).
• Consequences of defi
ciency include megaloblastic anemia, and glossitis.
Vitamin C (ascorbic acid)
Defi ciency causes scurvy (perifoillicular haemorrhage, bleeding swollen
gums, spontaneous bruising, corkscrew hair, failure of wound healing),
anemia, and osteoporosis.
Trace elements
Copper
• Defi ciency results in hypochromic and microcytic anemia, Wilson’s
disease, impaired bone mineralization, Menks’ kinky hair syndrome
(growth failure, mental defi
ciency, bone lesions, brittle hair, anemia).
• Usually caused by copper malabsorption.
Zinc
Defi
ciency causes achondromatosis enterpathica (infants develop growth
retardation, hair loss, severe diarrhea, candida and bacterial infections),
impaired wound healing, skin ulcers, alopecia, night blindness, confusion,
apathy, and depression.
Magnesium
Severe defi ciency can cause cardiac arrhythmias, paraesthesia and tetany.
Iodine
Severe defi ciency can cause cretinism (children), hypothyroidism, and
goiter.

CHAPTER 3 General examination72
The elderly patient
Many individuals perceive a comprehensive physical examination to be an
intrusive event that is best avoided if possible. However, for older people,
in whom the ‘typical’ presentations of illness may be subtle or unusual, a
thorough physical examination is a cornerstone of assessment.
The value of a thorough physical examination can be underestimated
by healthcare professionals, but may be highly regarded as a therapeutic
benefi t by patients. This general overview complements the system-based
chapters that follow, but the key message is repeated throughout—to rein-
force the value of a comprehensive, holistic and unrushed examination.
General points
Use your eyes
A key question in your mind should be ‘is the patient unwell ?’. Learn not
to overlook key indices such as hypothermia (see below) and delirium
which point to an acutely unwell patient.
Seek additional diagnoses
Multiple illnesses are a typical feature of old age—seemingly incidental
fi ndings (to the presenting condition) are common, so look out for skin
lesions which are often malignant, new/isolated patches of ‘psoriasis’
(Bowen’s disease ?), asymptomatic peripheral arterial disease etc.
Talk to your patient
During the examination. As indicated, it is often of huge therapeutic ben-
efi t, of reassurance, engendering trust, and potentially gaining additional
history—especially if an incidental lesion is discovered.
Key points
Observations
It is essential that observations be recorded and acted upon. Detailed
documentation is essential so that all members of the healthcare team are
made aware of the fi ndings of the assessment, and actions taken on behalf
of the patient to address one’s fi ndings.
• Many patients may run low blood pressures, often as a consequence
of medications—a small drop from this point is easily overlooked, but
may be the only sign of a myocardial infarction.
• Recognize the limits of temperature/ or fever in the elderly—seriously
ill older people may actually be hypothermic.
Hydration
may be diffi
cult to assess—reduction in skin turgor through changes in
elasticity with age, dry mucous membranes (e.g., through mouth breath-
ing), or sunken eyes (muscle wasting, weight loss) are useful in younger
patients, but less reliable in elders.
A useful alternative is axillary palpation—are they sweating ?
Skin and nail health
asteatosis and varicose eczema are common, but easily overlooked.

THE ELDERLY PATIENT
73
• Look out for typical lesions in atypical places—squamous cell
carcinomas are notorious in this respect.
• Learn to look at footwear/toenails—is there onychomycosis ?
Nutrition
Signs of weight loss are often obvious—ill-fi tting clothes and dentures are
good examples.
Joints
Remember to look and examine—is the patient’s mobility worse, or the
reason for falling acute (pseudo) gout ?
Mini Mental Status Examination
Should be mandatory for the majority of patients.
Gait (where possible)
Akin to the mental status examination, should be undertaken whenever
possible. See the Chapter 10 (b p. 321) for a brief description of the ‘get
up and go’ test.
Box 3.10 Geriatric giants
So described by Bernard Isaacs, one of the key fi gures of contemporary
geriatric medicine. Isaacs described fi ve ‘giants’
• Immobility
• Instability
• Incontinence
• Intellectual impairment
• Iatrogenic illness
These are not ‘diagnoses’, so avoid reaching them—but extremely com-
mon presentations of illness in older people, for which an underlying
cause (or causes!) should be sought.
This page intentionally left blank


CHAPTER 4 Skin, hair, and nails76
Applied anatomy and physiology
The skin, nails, hairs, glands, and associated nerve endings make up the
integumentary system.
Skin
The skin acts as a physical, biochemical, and immunological barrier
between the outside world and the body. It also has a role in temperature
regulation, synthesis of vitamin D, prevention of water loss, antigen pres-
entation, and sensation.
It is important to remember that the skin also has an important psycho-
social function. When we look at another person, we are in fact looking at
their skin. As our skin represents our outward appearance to the world,
unsightly blemishes or lesions can have a signifi cant impact on a person’s
self-esteem, despite their small size.
The skin is made up of 3 layers—epidermis, dermis, and hypodermis.
Epidermis
This is the outermost layer and is formed of a modifi ed stratifi ed squa-
mous epithelium. Almost 90% of epithelial cells are keratinocytes. These
cells are produced in the basal layer and then rise to the surface as more
are produced below and the outer cells are shed. The time from forming
in the basal layer to shedding is usually about 3 months.
Melanocytes reside in the basal layer and secrete melanin into surround-
ing keratinocytes via long projections. This, along with the underlying
fat and blood, gives the skin its color. In this way, skin tone is deter-
mined by the size and number of melanin granules, not by the number of
melanocytes.
Dermis
Below the epidermis lies a layer of connective tissue consisting of collagen,
elastic fi bers, and ground substance. This is where the skin appendages,
muscles, nerves, and blood vessels lie.
Hypodermis
Also known as the subcutaneous layer or the superfi cial fascia, this con-
sists of adipose tissue and serves for lipid storage and provides insulation.
It also contributes to the body contours and shape.
Glands
After infancy, sebaceous glands become active again at puberty and
secrete sebum, a mixture of fatty acids and salts, directly onto the skin
or into the necks of hair follicles. This waterproofs and lubricates the skin
and hair. These glands are particularly numerous in the upper chest, back,
face, and scalp.
Sweat glands secrete a mixture of water, electrolytes, urea, urate,
ammonia, and mild acids. Eccrine sweat glands are found all over the body
surface, besides the mucosa. Apocrine sweat glands are found in the axil-
lae and pubic regions, secrete a more viscous sweat, and are under auto-
nomic control. They do not function until puberty.

APPLIED ANATOMY AND PHYSIOLOGY
77
Hair
Hairs are formed by follicles of specialized epidermal cells buried deep in
the dermis. Humans are covered with hair, apart from the palms, soles,
inner surface of the labia minora, prepuce, and glans penis. Most hair is
fi ne, unpigmented, vellous hair and not easily seen. Terminal hair is coarser,
pigmented, and seen on the scalp, beard, and pubic regions.
Growth is cyclical with each follicle shedding its hair and then regrow-
ing. A cycle lasts ~4 years for scalp hair. Pregnancy can have widely vari-
able effects on hair appearance, growth, loss, texture and strength.
Nails
These are sheets of keratin that are continuously produced by the matrix
at the proximal end of the nail plate. This can often be seen as the small,
lighter, crescent-shaped area just before the cuticle. Nails grow at 70.1
mm/day, toenails growing slower than fi ngernails.

CHAPTER 4 Skin, hair, and nails78
Dermatological history
Patients with a skin condition may describe a variety of complaints.
However, whether they talk of a rash, spots, growth, lump, ulcer, itch, or
pain, the following guide should be used.
The history should help you establish the time course and behavior
of the complaint as well as any possible precipitating or exacerbating
factors.
2 Don’t waste time listening to the patient describe what the rash looks
like—you’re about to examine it yourself!
History of presenting illness
• When was the problem fi rst noticed?
• How have things changed since? Has it been a continuous or
intermittent problem?
• Where did it start?
• Has it spread—is it still spreading?
• If spreading, is it spreading from the edge or appearing in crops?
• What is the distribution of the problem?
• Is there any discharge, bleeding, or scale?
• Is there pain, itch, or altered sensation?
• Has it started to resolve?
• Are there any obvious factors that either trigger or relieve the
problem? Ask especially about the following:
• UV light (sunlight)
• Foods
• Temperature
• Contact with any other substances
• What has it been treated with—was the treatment effective?
• Are there any systemic symptoms such as fever, headache, fatigue,
anorexia, weight loss, or sore throat?
PMH
• Are there previous skin problems?
• Does the patient have diabetes, connective tissue disease,
infl ammatory bowel disease, asthma?
• What does the patient use on their skin—e.g., soaps, creams,
cleansers, aloe or other plant products?
Allergies
Remember to ask about the nature of any allergic reaction.
Drug history
• Which drugs is the patient taking and for how long?
• Did the start of any therapy coincide with the start of the skin
complaint? (Remember, there can be a delay of months before a rash
becomes apparent.)
• Remember to ask about topical and over-the-counter drugs and
alternative treatments and herbal products.

DERMATOLOGICAL HISTORY
79
FH
Ask especially about atopy, eczema, psoriasis, and skin cancers.
SH
• Occupation?
• Hobbies? Include pets and any pets of close friends or relatives.
• Living conditions—how many share the house or living space?
• Recent travel? Were appropriate vaccinations received before leaving?
• Insect bites?
• Has the patient been exposed to venereal disease or HIV? Consider a
full sexual history—see Chapters 12 and 14.
2 Remember, venereology was considered a predecessor to dermatol-
ogy and is still combined with dermatology in some countries. Sir William
Osler’s famous quote “He who knows syphilis, knows medicine” is refl ec-
tive of the long-standing relationship of venereology and dermatology.
Psychosocial impact
Be aware of the psychological and social function of the skin. Ask what
effect the condition has had on the patient in this regard and consider
whether this aspect of the condition needs to be formally addressed.

CHAPTER 4 Skin, hair, and nails80
Hair and nail symptoms
Hair loss
Alopecia is the loss of hair (see Box 4.1 ) and should be treated in much the
same way as any other symptom, noting the following:
• Mode of onset (sudden/gradual)
• Associated symptoms
• Pain
• Rash
• Family history of hair loss
Note also:
• Regions of hair loss (scalp, body, face)
• A recognizable pattern of hair loss?
• Male-pattern baldness is at the frontal and temporal areas of the
scalp and at the crown.
• Hair loss at the very front of the scalp can be caused by pulling back
of hair when styling, particularly in women.
Abnormal hair growth
Facial hair growth is common in postpubertal women, but many fi nd this
distressing. If the patient reports abnormal hair growth, treat as any other
symptom but remember to ask about the following:
• FH of a similar problem
• Menstrual cycle—when was the last menstrual period? Are they
usually regular or erratic?
• Symptoms of virilization (if female)—e.g., voice change, clitoromegaly
• Prescription or OTC drug use or use of any supplements?
Box 4.1 Important hair disorders and signs
• Male-pattern baldness commonly occurs from the second decade.
Hair is lost fi rst from the temporal regions, frontal area, and the
crown.
• Alopecia areata is associated with autoimmune disorders and occurs
in the second or third decade. Sharply defi ned,
noninfl ammatory
bald patches appear on the scalp. There may be exclamation-mark
hairs thinner at the base. This also affects the eyebrows and beard.
Nails may be slow growing and show pitting.
• Alopecia totalis is loss of hair from all areas of the scalp.
• Alopecia universalis is loss of all body hair.
• Telogen effl uvium: Normally, hairs grow and shed at different times
and different rates. A severe illness, high fever, pregnancy, and, more
commonly, child-birth may synchronize all the hair follicles, causing
them to shed at the same time, about 3 months later. This gives a
brief total hair loss that grows back.
• Scarring alopecia: Infl
ammatory lesions causing hair loss include
lichen planus, burns, and infection.

HAIR AND NAIL SYMPTOMS
81
Nail symptoms
These should be treated as any other dermatological condition, but you
should remember to direct your questions toward fi nding other condi-
tions that involve nails (e.g., psoriasis, eczema, fungal infections) (see also
Box 4.2 ).
Box 4.2 Important nail disorders and signs
See also Chapter 3 (b p. 63).
• Splinter hemorrhages are tiny, longitudinal streak hemorrhages
under the nails caused by microemboli or trauma. They can be a
normal fi
nding in manual workers.
• Pitting involves tiny indentations in the surface of the nail. It is a
feature of psoriasis and less commonly eczema, lichen planus, and
alopecia areata.
• Onycholysis is is premature lifting of the nail.
• Leukonychia is white discoloration of the nail. It is a sign of low
albumin or chronic ill health.
• Beau’s lines are transverse depressions in the nail. They coincide
with arrested nail growth during a period of acute illness.
• Paronychia is infection of the skin adjacent to the nail, causing pain,
swelling, redness, and tenderness.
• Koilonychia is spooning (concave indentation) of the nail. It is
associated with severe iron defi ciency.
• Clubbing: See Chapter 8, Fig. 8.2 (b p. 192).
• Onychomycosis is fungal nail infection causing the nail to become
thickened, opaque, crumbly, and yellow. It often occurs with
onycholysis and may be indistinguishable from psoriatic nail changes.

CHAPTER 4 Skin, hair, and nails82
Examining the skin
Avoid focusing on the area identifi ed by the patient—the whole organ
needs to be examined.
After explaining the examination and asking permission, ask the patient
to undress to their underwear and lie back comfortably on the exam table
or bed, and cover them with a sheet. Ensure that the room is warm and
private and that you have adequate lighting, preferably in the form of an
adjustable light source. You should consider having an assistant to help
with and chaperone the exam.*
The examination in dermatology consists largely of a careful, thorough
inspection along with an accurate description using recognized dermato-
logical terms.
General inspection of the skin
Begin by scanning the whole surface of the skin for any abnormal lesions.
This can be done in any order, but it will help you to build a pattern that
you can consistently remember that does not miss any areas!
Remember to inspect those areas that are usually hidden:
• Inner thighs
• Undersurfaces of female breasts
• External genitalia
• Axilla
• Gluteal cleft (between the buttocks)
0 Remember also to inspect the mucosal surfaces of the mouth, nails,
hair, and scalp.
Skin color
Skin color varies widely between individuals but should always be even in
distribution, with normal variation for sun-exposed surfaces.
Inspecting a lesion
Inspect each lesion carefully and note the following:
• Grouped or solitary? Pattern if grouped (see Figs. 4.2 . and 4.3 . , b p. 86)
• Distribution and location
• Symmetrical or asymmetrical?
• Peripheral?
• In only light-exposed areas?
• Dermatomal?
• Color
• Shape
• Size
• Surface
• Edge
• Nature of the surrounding skin
* The presence of chaperones is controversial–attitudes vary between geographic areas and institu-
tions. It is considered prudent advice that providers have a chaperone present when performing a
sexually sensitive examination. In practice, male providers performing an examination on a female
and females performing an examination on a male should consider having a chaperone present; the
need for a chaperone in other situations can be judged at the time.

EXAMINING THE SKIN
83
For each of the previous points, describe it as accurately as you can using
dermatological terms. However, if a lesion is pear shaped, it is perfectly
acceptable to call it just that!
When noting the distribution, bear in mind the type of clothing (or lack
of) is usually at that site and what other objects or substances that part of
the body would come into contact with. (Consider especially belt buckles,
watches, gloves, and jewelry.)
Palpation
Each lesion should be felt (remember to ask for, and be granted, permis-
sion fi rst). It is rare to catch an infection from touching a rash or lesion,
and it’s even rarer to see a dermatologist wearing gloves. Each situation
should be judged at the time—obviously, gloves should be worn if there is
bleeding or exudate present or if you are examining the genitalia.
For each lesion, note the following:
• Tenderness (watch the patient’s face)
• Consistency
• Temperature
• Use the back of your hand (infl
amed lesions are usually hot)
• Depth and height
• Mobility
• What skin layer is the lesion in? Is it attached to any underlying or
nearby structures?
• Can it be moved in all directions or only in one or two?
• Does it move with movement of underlying muscle or tendons?
Beyond the lesion
The skin condition must be seen in the context of the whole patient, and
other organ systems should be examined as necessary. Remember to pal-
pate regional lymph nodes if appropriate (See Chapter 3, Lymph Nodes,
b p. 58).
Box 4.3 Koebner’s phenomenon
This is the tendency for certain rashes or lesions to form at the site of
skin trauma, including surgical scars.
Box 4.4 Some common skin color abnormalities
• Jaundice: a yellow tinge to the skin; best appreciated at sclera
• Carotenemia: a yellow–orange tinge to the skin that is similar to that
of jaundice but the sclera are spared
• Hemochromatosis: slate-gray skin coloration
• Addison’s disease: darkened scars and skin creases on the palms and
soles–also darkening of mucosa
• Albinism: a lack of pigmentation with white skin and pink irises
• Vitilgo: autoimmune phenomenon resulting in patchy loss of skin
color

CHAPTER 4 Skin, hair, and nails84
Describing a lesion
A careful description often clinches the diagnosis in dermatology. All
lesions should be documented in accepted dermatological terms ( Figs. 4.1 ,
4.2 , and 4.3 . and Box 4.5 )
Flat, nonpalpable changes in skin color
(a)
Macule
Flat, nonpalpable
change in skin color
<0.5 cm diameter.
Freckles are
pigmented macules
Elevation due to fluid in a cavity
Blister
Fluid below the
epidermis >0.5 cm
diameter
Elevation due to solid masses
Loss of skin
Papule
A raised area <0.5 cm
diameter
Nodule
A mass or lump >0.5 cm
diameter
Callus
Hyperplastic epidermis, often found on the
soles, palms or other areas of excessive
friction and use
Erosion
Partial epidermal loss
Heals without scarring
Fissure
A linear crack
Atrophy
Thinning of the
epidermis
Loss of tissue
(epidermis/dermis + /or
subcutis)
Ulcer
Full-thickness skin loss
(see p. 90)
Wheal
Dermal edema
Plaque
A raised area >2 cm
diameter
Pustule
Visible collection of pus
in the subcutis
Bulla
Large, fluid-filled lesion
below the epidermis
>10 cm diameter
Patch
Flat, nonpalpable
change in skin color
>0.5 cm diameter
Vesicle
Fluid below the
epidermis <0.5 cm
diameter
Fig. 4.1 (a) Primary lesions.

DESCRIBING A LESION
85
Scale
A small thin piece of
horny epithelium
resembling that of a fish
Excoriation
A scratch mark
Telangiectasia
Easily visible superificial
blood vessels
Purpura
A rash caused by blood
in the skin—often
multiple petechiae
Ecchymosis
A ‘bruise,’. Technically a
form of purpura
Erythema
A reddening of the skin
due to local
vasodilatation
Petechia
microhemorrahge
1–2 mm diameter
Spider nevus
A single telangiectatic
arteriole in the skin
Lichenification
Thickening of the
epidermis with
exaggerated skin
markings (bark-like)
usually due to repeated
scratching
Crust (scab)
Dried exudate
is a crust of
blood/plasma
(b)
(c)
Fig. 4.1 (b) Secondary lesions. (c) Vascular lesions.
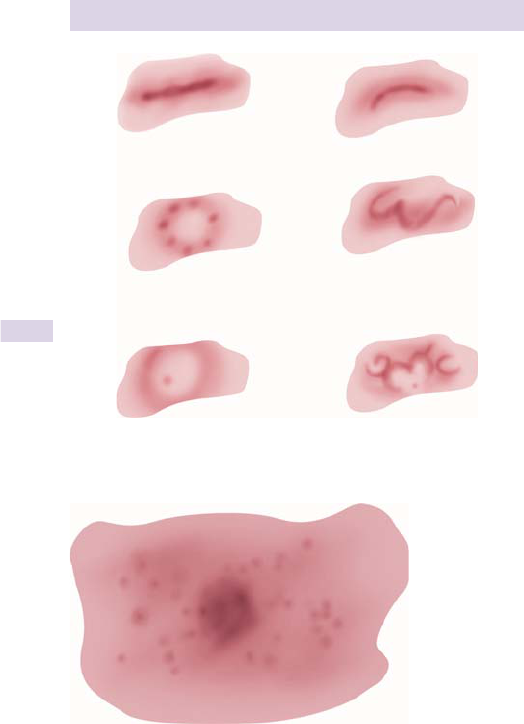
CHAPTER 4 Skin, hair, and nails86
Linear
Annular
Arciform
Serpiginous
Target Gyrate
Fig. 4.2 Descriptive terms for lesion shapes and patterns of grouped lesions.
Fig. 4.3 Confl uence of grouped lesions. Note how the smaller lesions coalesce to
form a larger lesion.

DESCRIBING A LESION
87
For more information from the American Cancer Society, go to http://
www.cancer.org
For more information from the American Academy of Dermatology, go
to http://www.aad.org
Box 4.5 Malignant melanoma
This is an invasive malignant tumor of melanocytes, occurring mostly in
white adults, and is more common in women. Malignant melanoma can
be present on any skin surface but is most frequently seen on the trunk
of men and women and the legs of women. It can also be found in the
eyes, ears, oral and genital mucosa, and internal sites.
You should be alert to the possibility of a malignant mole if the patient
describes a newly presenting pigmented lesion.
The system most commonly used to assist in diagnosis of malignant
melanoma is the ABCD of the American Cancer Society.
ABCD
• A: asymmetry
• B: irregular border
• C: irregular color
• D: diameter >6 mm
Inclusion of an E, for evolving , is used by the American Academy of
Dermatology. Recent additions to the traditional ABCD warning signs
for malignant melanoma include the “Ugly Duckling sign” or “funny-
looking mole.”

CHAPTER 4 Skin, hair, and nails88
Examining a lump
Any raised lesion or lump should be inspected and palpated as described
previously. Note position, distribution, color, shape, size, surface, edge,
nature of the surrounding skin, tenderness, consistency, temperature, and
mobility.
When examining a lump, there are some points to pay particular atten-
tion to.
Which layer is the lump in?
• Does it move with the skin? (epidermal or dermal)
• Does the skin move over the lump? (subcuticular)
• Does it move with muscular contraction? (muscle/tendon)
• Does it move only in one direction? (tendon or nerve)
• If the lesion belongs to a nerve, the patient may feel pins and
needles in the distribution of the nerve when the lump is pressed.
• Is it immobile? (bone)
Additional characteristics to consider
• Consistency: e.g., stony, rubbery, spongy, soft (Remember, the
consistency does not always correlate with the composition—a fl uid-
fi
lled lump will feel hard if it is tense.)
• Fluctuation: Press one side of the lump—the other sides may
protrude.
• If the lump is solid, it will bulge at the opposite side only.
• Fluid thrill: This can only be elicited if the fl uid-fi
lled lesion is very
large. Examine by tapping on one side and feeling the impulse on the
other, much as you would for ascites (see Chapter 9,
b p. 240).
• Translucency: Darken the room and press a lit penlight to one side of
the lump—it will glow, illuminating the whole lump in the presence of
water, serum, fat, or lymph. Solid lumps will not transilluminate.
• Resonance: This is only possible to test on large lumps. Percuss as you
would any other part of the body (see Chapter 8, b p. 196) and listen
(and feel) if the lump is hollow (gas-fi
lled) or solid.
• Pulsatility: Can you feel a pulse in the lump? Consider carefully if the
pulse is transmitted from an underlying structure or if the lump itself is
pulsating.
• Use two fi
ngers and place one on either side of the lump.
• If the lump is pulsating, it will be expansile and your fi ngers will
move up and outward, away from each other.
• If the pulse is transmitted from a structure below, your fi ngers
will
move upward but not outward (see Chapter 9,
b p. 238).
• Compressibility: Attempt to compress the lump until it disappears. If
this is possible, release the pressure and watch for the lump reforming.
Compressible lumps may be fl uid-fi
lled or vascular malformations.
Note that this is not reducibility.
• Reducibility: This is a feature of hernias. Attempt to reduce the lump
by maneuvering its contents into another space (e.g., back into the
abdominal cavity). Ask the patient to cough and watch for the lump
reforming.

EXAMINING A LUMP
89
Auscultation
You should always listen with a stethoscope over any lump; you could
gain important clues regarding its origin and contents. Listen especially
for the following:
• Vascular bruits
• Bowel sounds

CHAPTER 4 Skin, hair, and nails90
Examining an ulcer
Ulcers should be examined just like any other skin lesion, noting the posi-
tion, distribution, color, shape, size, surface, edge, nature of the surround-
ing skin, tenderness, consistency, and temperature.
If the shape of the ulcer or its position is unusual or diffi cult to describe,
make a drawing!
Some of the following characteristics particular to ulcers need to be
considered.
Base
If the base of the ulcer can be seen (i.e., not covered with mucus, blood, or
crust), it should be carefully examined and described. Ulcers usually have
either slough or granulation tissue at the base. Look especially for bone,
tendons, and blood vessels.
Edge
Look carefully at the edge—it may help to make a quick drawing of the
edge in cross-section. Some typical edges are described as follows (also
see Fig. 4.4):
• Sloping: These ulcers are usually shallow and a sloping edge implies
that it is healing (e.g., venous ulcers).
• Punched out: This is full-thickness skin loss and typical of neuropathic
ulceration and vasculitic lesions.
• Undermined: These extend below the visible edge, creating a lip. This
is typical of pyoderma gangrenosum and infected ulceration such as
TB.
• Rolled: Here the edge is mounded but neither everted or undermined
and implies proliferation of the tissues at the edge of the ulcer. Basal
cell carcinoma typically has a rolled edge that is often described as
pearly in color with thin overlying vessels.
• Everted: The tissues at the edge of the ulcer are proliferating too fast,
creating an everted lip. This is typical of neoplastic ulceration.
Depth
Determine what layer (of skin or underlying tissues) the ulcer extends to.
If possible, estimate the depth in mm.
Discharge
Any discharge (e.g., serous fl
uid, pus, blood) from the ulcer should be
examined and noted. If there is an overlying scab or crust (dried discharge
or scale), this should be carefully removed in order to examine the base
of the ulcer.

EXAMINING AN ULCER
91
Box 4.6 Leg ulcers
Leg ulcers are often a result of mixed venous and arterial disease.
However, one pathology may predominate, giving the fi ndings below.
Venous ulceration
Venous hypertension causes fi brin to be laid down at the pericapillary
cuff (lipodermatosclerosis), interfering with the delivery of nutrients to
the surrounding tissues. There may be brown discoloration (hemosi-
derin deposition), eczema, telangiectasia, and, eventually, ulcer forma-
tion with a base of granulation tissue and a serous exudate. Venous
ulcers occur at the medial or lateral malleoli especially. These ulcers will
often heal with time and care.
Arterial ulceration
Along with other symptoms and signs of leg ischemia (Chapter 7,
b p. 178), there may be loss of hair, and toenail dystrophy. Chronic
arterial insuffi ciency may lead to deep, sharply defi ned, and painful ulcers
that will not heal without intervention to restore blood supply. Arterial
ulcers appear especially on the foot or mid-shin.
(a)
(b)
(c)
(d)
(e)
Fig. 4.4 Representation of some ulcer edges. (a) sloping; (b) punched out; (c)
undermined; (d) rolled; (e) everted.

CHAPTER 4 Skin, hair, and nails92
The elderly patient
While the skin may be regarded as the largest organ of the body, it is sadly
the one most often overlooked in any assessment of a patient. Many of the
functional changes in aging skin make it increasingly susceptible to injury,
with delayed resolution of wounds and consequent i in infection risk.
Systemic illnesses often manifest in skin and nail changes, and astute
assessment can resolve challenging diagnoses—e.g., erythema ab igne as a
manifestation of hot water bottle use for abdominal pain and underlying
pancreatic cancer or late-onset icthyosis associated with lymphoma.
For acutely ill older people, being alert to the existence and develop-
ment of pressure ulcers can signifi cantly reduce pain and immobility as
well as delays in their recovery.
History
Symptoms
These should be taken seriously. While it is tempting to dismiss pruritus if
there is no visible skin lesion, doing so risks missing a range of important
diagnoses, including iron-defi ciency anemia and liver disease.
Attributing symptoms to age-related changes in the skin should be a
diagnosis of exclusion by generalists (and avoid the term senile pruritus —
older people fi nd it offensive). Always remember that many systemic dis-
eases may fi rst manifest through skin changes.
Pre-existing conditions
Carefully documenting the presence of (and treatment plan for) pres-
sure ulcers is the obligation of medical and nursing staff. Do not shirk
this responsibility—it is important to plan pressure care as critically as
any other intervention. You should be particularly thorough if there is
diabetes mellitus.
Medications
It is important to ask about new changes in drugs and to carefully docu-
ment what an allergy or intolerance consists of—contact the patient’s pri-
mary provider if needed. In the presence of infusion or injection sites, it is
always important to evaluate the integrity of the site.
Functional history
Are overgrown toenails really a sign of self-neglect, or are they more likely
due to poor vision, arthritis, poor handgrip, or neuropathy? Consider ask-
ing about diet, particularly in continuing-care and nursing home residents.
Examination
General
An assessment of pressure areas is critical—ask about and look for sore
heels (and prescribe heel pads if needed). Is the skin frail, intact, marked,
or broken? Asteatosis is extremely common, especially in states of dehy-
dration. Prescribing emollients will earn the thanks of your patients (who
may be uncomfortable and itching) and colleagues.

THE ELDERLY PATIENT
93
Edema
Avoiding hurting your patient—palpate gently. Is the edema gravitational;
are there signs of venous insuffi ciency or hypoalbuminemia? Avoid rushing
instantly to the diagnosis of heart failure.
Gravitational eczema
This is often linked with edematous change, as above. Look for pigment
change and ensure that emollients are prescribed. For patients who may
receive compression bandaging or hosiery, check peripheral pulses care-
fully. Carefully describe any ulceration present.
ECG electrodes
If you perform an electrocardiogram (ECG), remove the electrodes imme-
diately afterward. Frail skin is easily torn and ulcerated when attempts at
removal are made the next day, merely from the thoughtlessness of the
person recording the ECG.
Skin malignancies
Common presentations
We all spend signifi cant amounts of time examining and talking to our
patients. Don’t overlook the typical ulceration of a basal cell carcinoma
around the eye or nasal region and the ears.
If you suspect a skin cancer, explore the patient’s previous occupation
or lifestyle. Most importantly, if lesions are suspicious, biopsy them or
refer for further evaluation.
Atypical presentations
Atypical presentations of common problems in atypical sites are legion, so
be thoughtful and carefully examine areas where patients might not look
or be able to see (e.g., scalp, back, calves). Examine nails particularly care-
fully for signs of systemic disease or subungual melanoma.
Be careful about rushing to a diagnosis of psoriasis in a new, isolated
plaque. This is more likely to be Bowen’s disease, so seek expert review.
New onset of diffuse psoriasis-like type plaques in the mature patient with
no history of psoriasis may actually represent lesions of tertiary syphilis.
This page intentionally left blank

95
Endocrine system
Applied anatomy and physiology 96
Presenting symptoms in endocrinology 98
The rest of the history 100
General examination 102
Examining the thyroid 104
Eye signs in thyroid disease 106
Examining the patient with diabetes 108
The fundus in endocrine disease 110
Important presenting patterns 114
Chapter 5

CHAPTER 5 Endocrine system96
Applied anatomy and physiology
The endocrine system is a complex, delicately balanced arrangement of
hormonal feedback loops designed to coordinate organ functions. It main-
tains the internal environment (homeostasis), controls the storage and
utilization of energy substrates, regulates growth and reproduction, and
controls the organ responses to external stimuli.
The major glands that make up the human endocrine system are the
hypothalamus, pituitary, thyroid, parathyroids, adrenals, pineal, and repro-
ductive glands, which include the ovaries and testes ( Fig. 5.1 ). The pan-
creas and the digestive system have endocrine components secreting
insulin, glucagons, gastrin, and somatostatin.
The following is a very brief overview of those aspects of the endocrine
system that may have an impact on the history and examination. Readers
wanting more extensive information on endocrine physiology are advised
to consult a more traditional physiology text.
The hypothalamopituitary axis
The hypothalamus is a collection of specialized cells located in the lower
central part of the brain and, along with the pituitary gland sitting just
below the optic chiasm, forms the primary link between the endocrine and
nervous systems. Neurons in the hypothalamus control the pituitary gland
by producing chemical releasing factors that either increase or suppress
hormone secretion.
This part of the brain is also important in the regulation of satiety,
metabolism, and body temperature.
The releasing factors produced in the hypothalamus reach the pituitary
via a short portal system running down the pituitary stalk (infundibulum).
The pituitary gland is a pea-shaped structure lying in a bony walled cavity,
the sella turcica, in the sphenoid bone at the base of the skull. It has an
anterior lobe that develops from an outgrowth of ectoderm called the
hypophyseal (Rathke’s) pouch in the roof of the mouth and a posterior lobe
that is directly linked to the hypothalamus.
Anterior pituitary hormones
• Growth hormone (GH) stimulates general body growth and regulates
aspects of metabolism.
• Thyroid-stimulating hormone (TSH) controls the production of thyroid
hormones by the thyroid gland.
• Follicle stimulating hormone (FSH) and luteinizing hormone (LH) together
act on the secretion of estrogen and progesterone from the ovaries,
maturation of oocytes, and secretion of testosterone and production
of spermatozoa in the testes.
• Prolactin initiates milk production in mammary glands.
• Adrenocorticotrophic hormone (ACTH) stimulates the adrenal cortex to
produce glucocorticoids.
• Melanocyte stimulating hormone (MSH) enhances skin pigmentation.
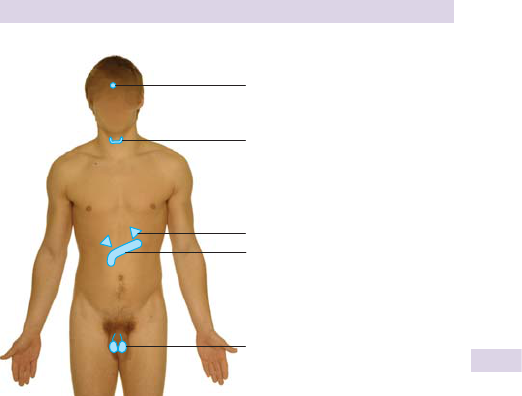
APPLIED ANATOMY AND PHYSIOLOGY
97
Posterior pituitary gland
Hormones released here are actually produced in the hypothalamus but
travel down axons in the pituitary stalk to be stored ready for release.
They include anitdiuretic hormone (ADH) and oxytocin.
• Oxytocin acts principally to stimulate contraction of smooth muscle
cells in the uterus during childbirth and around glandular cells of the
mammary glands to cause milk ejection.
• ADH (vasopressin) is secreted by neurosecretory cells in the
hypothalamus in response to increased blood osmotic pressure,
dehydration, and loss of blood volume. It acts to conserve body water.
Thyroid
The thyroid gland is made up of the isthmus and two lateral lobes. The
isthmus overlies the second and third rings of the trachea, while the lobes
extend from either side of the thyroid cartilage downward.
TSH stimulates the release of T
4
(thyroxine) and T
3
(triiodothyronine).
T
3
is considered the active hormone, as it is about 2–4 times more potent
than T
4
, which can be considered a prohormone. Around 80% of circulat-
ing T
3
is derived from the deiodination (removal of iodine) of T
4
. This takes
place in peripheral tissue—the remaining 20% is secreted directly by the
thyroid gland. Most circulating T
3
and T
4
is bound to proteins, including
albumin and thyroid-binding globulin (TBG).
The effects of thyroid hormones are multiple, including increased base-
line metabolism, O
2
utilization, energy turnover, and heat production.
Hypothalamus
and pituitary
Thyroid
Adrenal
Pancreas
Testicles
Fig. 5.1 The major endocrine glands of the body.

CHAPTER 5 Endocrine system98
Presenting symptoms in endocrinology
As hormones have an impact on every body system, it is necessary to
cover all areas of general health in history-taking.
This section outlines some of the more important presenting symptoms
in endocrine disease that should not be missed (if clinical suspicion of
endocrine dysfunction is high), but it is by no means exhaustive.
Appetite and weight changes
Many people do not routinely weigh themselves but may have noticed the
consequences of weight change—e.g., their clothes becoming looser or
tighter (see Box 5.1, b p. 100).
Lethargy
Lethargy or fatigue is a diffi cult symptom to pin down. Ask the patient
how the tiredness affects their daily life. What are they able to do before
needing to rest, and has this changed?
Fatigue may be a feature of undiagnosed diabetes mellitus, Cushing’s
syndrome, hypoadrenalism, hypothyroidism, or hypercalcemia.
Consider depression and chronic disease of any other kind (e.g., anemia,
chronic liver and renal problems, chronic infection, and malignancy).
Bowel habit
See b p. 312. Constipation is a common feature of hypercalcemia and
hypothyroidism. Hyperthyroidism and Addison’s disease may produce
diarrhea.
Urinary frequency and polyuria
See b p. 108. Common endocrine causes are diabetes mellitus and diabetes
insipidus. Hyperglycemia caused by Cushing’s syndrome can also result in
polyuria. Polyuria may also be seen in the presence of hypercalcemia.
Thirst and polydipsia
Consider diabetes mellitus, diabetes insipidus, and hypercalcemia.
Sweating
i Perspiration may be seen during episodes of hypoglycemia as well as in
hyperthyroidism and acromegaly and is associated with the other adrener-
gic symptoms of a pheochromocytoma.
Pigmentation
Localized loss of pigmentation may be due to vitiligo —an inherited autoim-
mune disorder associated with other endocrine immune diseases such as
hypo- or hyperthyroidism, Addison’s disease, and Hashimoto’s thyroiditis.
• i pigmentation: Addison’s disease, Cushing’s syndrome
• d pigmentation: generalized loss of pigmentation in hypopituitarism
Hair distribution
Hirsutism , or excessive hair growth, in a female may be due to endocrine
dysfunction. Consider polycystic ovarian syndrome, Cushing’s syndrome,
congenital adrenal hyperplasia, acromegaly, and virilizing tumors.

PRESENTING SYMPTOMS IN ENDOCRINOLOGY
99
Hypogonadism , or adrenal insuffi ciency, leads to decreased adrenal
androgen production and loss of axillary and pubic hair in both sexes.
Skin and soft tissue changes
Endocrine disorders cause many soft tissue changes:
• Hypothyroidism: dry, coarse, pale skin with xanthelasma formation,
and, classically, loss of outer 1/3 of the eyebrows
• Hyperthyroidism: thyroid achropachy is seen only in hyperthyroidism
due to Grave’s disease. It is fi
nger clubbing and new bone formation
at the fi
ngers. There is also pretibial myxedema —reddened edematous
lesions on the shins (often the lateral aspects).
• Hypoparathyroidism: generally dry, scaly skin
• Diabetes mellitus: xanthelasma, ulceration, repeated skin infections,
necrobiosis lipoidica diabeticorum —shiny, yellowed lesions on the shins
• Acromegaly: soft tissue overgrowth with skin tags at the axillae and
anus, doughy-looking hands and fi ngers,
acanthosis nigricans
—velvety
black skin changes at the axilla. (Acanthosis nigricans can also be
seen in Cushing’s syndrome, polycystic ovarian syndrome and insulin
resistance.)
Headache and visual disturbance
Visual fi eld defects, cranial nerve palsies, and headache may be caused by
space-occupying lesions within the skull. Pituitary tumors classically cause
a bitemporal hemianopia by impinging on the optic chiasm (b p. 266).
Blurred vision is rather nonspecifi c, but consider osmotic changes in the
lens due to hyperglycemia.
Alteration in growth
Hypopituitarism, hypothyroidism, growth hormone defi ciency, and steroid
excess may present with short stature. Tall stature may be caused by
growth hormone excess or gonadotrophin defi ciency.
Growth hormone excess in adults (acromegaly) causes soft tissue over-
growth. Patients may notice an increase in shoe size, glove size, or facial
appearance (do they have any old photographs for comparison?).
Changes in sexual function
Altered menstrual pattern in a female may be an early symptom suggestive
of pituitary dysfunction. See b Chapter 14 for more detail.
In men, hypogonadism may result in loss of libido and an inability to
attain or sustain an erection (see b Chapter 12). Remember to look for
nonendocrine causes of sexual dysfunction, such as alcoholism, spinal cord
disease, or psychological illness (see b Chapters 11 and 15).
Flushing
Flushing may be a symptom of carcinoid tumor or menopause.
Ask about the nature of the fl ushing, any aggravating or relieving fac-
tors, and, importantly, any other symptoms at the time, such as palpita-
tions, diarrhea, or dizziness. Remember to take a full menstrual history
(see b Chapter 14).

CHAPTER 5 Endocrine system100
The rest of the history
A full history should be taken (b Chapter 2). In a patient with endocrine
symptoms, you should pay special attention to the following (see also
Box 5.1).
Drug history
As ever, a detailed medication history should be sought. Remember to ask
especially about the following:
• Over-the-counter medicines
• Hormonal treatments—including oral contraceptive pill, and local and
systemic steroids
• Amiodarone
• Lithium
• Herbal or other alternative remedies
Past medical history
• Any previous thyroid or parathyroid surgery
• Any previous Iodine
131
(radioiodine) treatment or other antithyroid
drugs
• Gestational diabetes
• Hypertension
• Any previous pituitary or adrenal surgery
Family history
Ask especially about the following:
• Type 2 diabetes (Box 5.2).
• Related autoimmune disorders (pernicious anemia, celiac disease,
vitiligo, Addison’s disease, thyroid disease, type 1 diabetes)
•
Many patients will only have heard of these disorders if they have a
family member who suffers from them.
• Congential adrenal hyperplasia (CAH)
• Tumors of the MEN syndromes (Box 5.3)
Box 5.1 Weight, appetite, and endocrine disorders
• i Appetite , d weight: thyrotoxicosis, uncontrolled diabetes mellitus
• i Appetite , i weight: Cushing’s syndrome, hypoglycemia,
hypothalamic disease
• d Appetite , d weight: gastrointestinal disease, malignancy, anorexia,
Addison’s disease, diabetes mellitus
• d Appetite , i weight: hypothyroidism

THE REST OF THE HISTORY
101
Box 5.2 Diabetic history
As with other diseases, you should establish when the diagnosis was
made (and how) and the course and treatment of the disease. Additional
questions relating to disease monitoring and diabetic complications that
you should ask patients with diabetes are as follows:
• When was it fi rst
diagnosed?
• How was it fi rst diagnosed?
• How was it fi rst managed?
• How is it managed now?
• If on insulin, when was that fi rst
started?
• Are they compliant with a diabetic diet?
• Are they compliant with their diabetic medication?
• How often do they check their blood sugar?
• What readings do they normally get (if possible, ask to see their
monitoring booklet)?
• What is their latest Hb
A
1
C
(many will know this)?
• Have they ever been admitted to hospital with diabetic ketoacidosis
(DKA)?
• Do they go to a podiatrist?
• Have they experienced any problems with their feet? Do they use
any moisturizers or cream on their feet?
• Do they participate in a retinal screening program?
• Have they needed a referral to an ophthalmologist?
• In the newly diagnosed diabetic, ask about a history of weight loss
(will differentiate type 1 and type 2 diabetes).
Box 5.3 MEN syndromes
These are multiple endocrine neoplasias (MEN) that display autosomal
dominant inheritance.
• MEN 1: the “3 Ps: p arathyroid hyperplasia (100%), p ancreatic
endocrine tumors (40–70%), p ituitary adenomas (30–50%)
• MEN 2: medullary cell thyroid carcinoma (100%),
pheochromocytoma (50%), and the following:
• MEN 2a: parathyroid hyperplasia (80%)
• MEN 2b: mucosal and bowel neuromas, marfanoid habitus

CHAPTER 5 Endocrine system102
General examination
It is not possible to perform an examination of the endocrine system in the
same way that you examine other organ systems. Usually, an endocrine
examination is focused—looking for signs to confi rm or refute differential
diagnoses that you have developed during history-taking or examining the
function of one or more specifi c glands (e.g., thyroid).
You may, however, perform a quick screening general examination of a
patient’s endocrine status. Combine this with the examination described
in b Chapter 3.
Hands and arms
Check size, subcutaneous tissue, length of the metacarpals, nails, palmar
erythema, and sweating, tremor. Note also skin thickness (thin skin in
Cushing’s, thick skin in acromegaly) and look for signs of easy bruising.
Assess pulse and blood pressure—lying and standing. Test for proximal
muscle weakness (b p. 343).
Axillae
Note any skin tags, loss of hair, abnormal pigmentation, or acanthosis
nigricans.
Face and mouth
Look for hirsutism, acne, plethora, or skin greasiness. Look at the soft tis-
sues of the face for prominent glabellas (above the eyes) and enlargement
of the chin (macrognathism). In the mouth, look at spacing of the teeth and
if any have fallen out. Note any buccal pigmentation and tongue enlarge-
ment (macroglossia). Normally, the upper teeth close in front of the lower
set; reversal of this is termed prognathism .
Eyes and fundi
See b p. 110–113.
Neck
Note any swellings or lymphadenopathy (b p. 60). Examine the thyroid.
Palpate the supraclavicular regions and note any excessive soft tissue.
Chest
Inspect for any hair excess or loss, breast size in females, and gynecomastia
in males. Note the nipple color, pigmentation, or galactorrhea.
Abdomen
Inspect for central adiposity and obesity, purple striae, and hirsutism.
Palpate for organomegaly. Look at the external genitalia to exclude any
testicular atrophy in males or virilization (e.g., clitoromegaly) in women.
Legs
Test for proximal muscle weakness (b p. 343) and make note of any
diabetes-related changes (b p. 108 and p. 109 respoctively).

GENERAL EXAMINATION
103
Height and weight
Calculate the patient’s BMI (b p. 56).
Box 5.4 Signs of tetany
Trousseau’s sign
Infl ate a blood pressure cuff just above the systolic pressure for 3 min-
utes. When hypocalcemia has caused muscular irritability, the hand will
develop fl exor spasm.
Chvostek’s sign
Gently tap over the facial nerve (in front of the tragus of the ear). The
sign is positive if there is contraction of the lip and facial muscles on the
same side of the face.

CHAPTER 5 Endocrine system104
Examining the thyroid
The patient should be sitting upright on a chair or the edge of a bed.
Inspection
Look at the thyroid region. If the gland is quite enlarged (goiter), you may
notice it protruding as a swelling just below the thyroid cartilage. The
normal thyroid gland is usually neither visible nor palpable.
Thyroid gland
The gland lies 72–3 cm below the thyroid cartilage and has two equal-sized
lobes connected by a narrow isthmus.
If a localized or generalized swelling is visible, ask the patient to take a
mouthful of water and then swallow—watch the neck swelling. Also ask
the patient to protrude their tongue and watch the neck swelling.
• The thyroid is attached to the thyroid cartilage of the larynx and will
move up with swallowing.
• Other neck masses, such as an enlarged lymph node, will hardly move.
• Thyroglossal cysts will not move with swallowing but will move
upward with protrusion of the tongue.
The rest of the neck
• Carefully inspect the neck for any obvious scars (thyroidectomy scars
are often hidden below a necklace and are easily missed).
• Look for the JVP and make note of dilated veins, which may indicate
retrosternal extension of a goiter (see Box 5.5).
• Redness or erythema may indicate suppurative thyroiditis (Box 5.6).
Palpation
Thyroid gland
Always begin palpation from behind the patient. Place a hand on either
side of their neck, which should be slightly fl exed to relax the sternomas-
toids. 0 Explain what you are doing.
• Ask if there is any tenderness.
• Place the middle three fi
ngers of either hand along the midline of the
neck, just below the chin.
• Gently walk your fi
ngers down until you reach the thyroid gland.
• The central isthmus is almost never palpable.
• If the gland is enlarged, determine if it is symmetrical.
• Are there any discrete nodules?
• Assess the size, shape, and mobility of any swelling.
• Repeat the examination while the patient swallows.
• Ask them to hold a small amount of water in their mouth, then ask
them to swallow once your hands are in position.
• Consider the consistency of any palpable thyroid tissue.
• Soft: normal
• Firm: simple goiter
• Rubbery hard: Hashimoto’s thyroiditis
• Stony hard: cancer, cystic calcifi cation,
fi
brosis, Riedel’s thyroiditis
• Feel for a palpable thrill, which may be present in metabolically active
thyrotoxicosis.

EXAMINING THE THYROID
105
The rest of the neck
Palpate cervical lymph nodes, carotid arteries (to check for patency—can
be compressed by a large thyroid), and the trachea for deviation.
Percussion
• Percuss downward from the sternal notch.
• In retrosternal enlargement, the percussion note over the manubrium
of the sternum is dull, in contrast to the normal resonance.
Auscultation
Apply the diaphragm of the stethoscope over each lobe of the thyroid
gland and auscultate for a bruit.
• A soft bruit is indicative of increased blood fl
ow characteristic of the
hyperthyroid goiter seen in Grave’s disease.
• You may need to occlude venous return within the internal jugular
vein (IJV) to rule out a venous hum.
• Listen over the aortic area to ensure that the thyroid bruit is not an
outfl ow obstruction murmur conducted to the root of the neck.
Box 5.5 Pemberton’s sign
This signifi es thoracic inlet obstruction (e.g., retrosternal goiter).
• Ask the patient to raise both arms above the head.
• Patients with inlet obstruction may develop signs of venous
compression (facial plethora, cyanosis, dizziness, syncope).
• Look at neck veins for congestion and listen for stridor.
Box 5.6 Assessing thyroid status: examination
• Observe the patient’s composure (relaxed, agitated, fi dgety?).
• Measure heart rate and note if patient is in atrial fi brillation.
• Inspect hands for erythema, warmth, and thyroid acropachy
(phalangeal bone overgrowth similar to pulmonary osteopathy).
• Feel the palms—are they sweaty or dry?
• Look for peripheral tremor—ask patient to stretch out arms with
fi
ngers out straight and palms down. Resting a piece of paper on
back of the hand can make a tremor more obvious.
• Inspect the face.
• Exophthalmos, proptosis ( b p. 106)
• Hypothyroid features ( b p. 114)
• Examine the eyes ( b p. 106).
• Examine thyroid and neck ( b p. 104).
• Test tendon refl
exes at the biceps and ankle ( b
p. 302).
• Test for proximal myopathy by asking the patient to stand from a
sitting position.
• Look for pretibial myxedema.

CHAPTER 5 Endocrine system106
Eye signs in thyroid disease
Examination
Inspection
• Look at the patient’s eyes from the front, side, and above.
• Note whether the sclera is visible above or below the iris and whether
the eyeball appears to sit forward (proptosis—best seen from above).
• Note health of the conjunctiva and sclera, looking especially for any
ulceration or conjunctivitis.
• Ensure that both eyes can close (failure is a medical emergency).
Visual fi elds
It is wise to perform a quick screening test of the visual fi elds
(
b p. 264
and 265).
Eye movements
Test eye movements in all directions (b p. 276).
Lid lag (von Graefe’s sign)
• Hold your fi
nger high and ask the patient to look at it and follow it
with their eyes as it moves (keeping their head still).
• Quickly move your hand downward—in this way the patient is made
to look upward and then quickly downward.
• Watch the eyes and eyelids—do they move smoothly and together?
• If lid lag is present, the upper eyelid seems to lag behind movement
of the eye, allowing white sclera to be seen above the iris as the eye
moves downward.
Findings
Proptosis
This is protrusion of the globes as a result of an increase in retro-
orbital fat, edema, and cellular infi ltration (see Box 5.7). It can be formally
assessed using Hertel’s exophthalmometer.
Exophthalmos
This is more severe form of proptosis. Sclera becomes visible below the
lower edge of the iris (the inferior limbus). In very severe cases, the patient
may not be able to close their eyelids and can develop the following:
• Corneal ulceration
• Chemosis (edema of the conjunctiva and sclera caused by obstruction
of the normal venous and lymphatic drainage)
• Conjunctivitis
Lid retraction
The upper eyelid is retracted such that you are able to see white sclera
above the iris when the patient looks forward.
This condition is caused by increase tone and spasm of levator palpe-
brae superioris as a result of thyroid hormone excess (Dalrymple’s sign).
Lid lag
This is caused by sympathetic overstimulation of the muscles supplying the
upper eyelid, seen in thyroid hormone excess.

EYE SIGNS IN THYROID DISEASE
107
Box 5.7 Eye signs of thyrotoxicosis and Graves disease
A common misconception is that proptosis and exophthalmos are
caused by thyrotoxicosis, but this is not the case. Proptosis and exoph-
thalmos may be seen in 50% of patients with Graves disease, and thyro-
toxicosis may occur in Graves disease. However, proptosis may persist
once thyroid hormone levels have normalized.
Eye signs of thyrotoxicosis
• Lid retraction
• Lid lag
Eye signs of Graves disease (Graves ophthalmopathy)
• Periorbital edema and chemosis
• Proptosis/exophthalmos
• Ophthalmoplegias (particularly of upward gaze)
• Lid retraction and lid lag only when thyrotoxicosis is present
Visual blurring may indicate optic neuropathy, therefore, fundoscopy
(b p. 268) should be performed.

CHAPTER 5 Endocrine system108
Examining the patient with diabetes
As diabetes has an impact on every body system, you can make the exami-
nation of a diabetic patient complex or simple depending on the circum-
stances (Box 5.8).
In diabetes clinics, a quick screening examination is performed looking
for major complications, particularly those involving the feet.
In general, you should be alert to cardiovascular disease, renal disease,
retinal disease, peripheral neuropathy, especially sensory, health of insulin
injection sites, the diabetic foot, secondary causes of diabetes (e.g., acrome-
galy, Cushing’s syndrome, hemochromatosis), and associated hyperlipidemia.
The diabetic foot
The combination of peripheral vascular disease and peripheral neuropathy
can lead to repeated minor trauma to the feet, resulting in ulceration and
infection, which are very slow to heal. Chronic infection and other foot
complications are a major cause of morbidity and mortality in the diabetic
patient (see Box 5.8 for examination).
Box 5.8 Important points for a thorough diabetic
examination
Inspection
• Hydration, weight, facies associated with a known endocrine disease,
pigmentation (hyperpigmentation or patchy loss)
• Legs
• Muscle wasting, hair loss, skin atrophy, skin pigmentation, leg
ulceration (especially around pressure points and toes), skin infections
Injection sites
• Inspect and palpate for fat atrophy, fat hypertrophy, or local infection
Associated skin lesions
• Necrobiosis lipoidica diabeticorum—look on the shins, arms, and
back for sharply demarcated oval plaques with a shiny surface, yellow
waxy atrophic centers, and brownish-red margins with surrounding
telangiectasia. Also look for granuloma annulare.
Hyperlipidemia
• Eruptive xanthoma, tendon xanthoma, xanthelasma
Neurological examination
• Visual acuity, fundoscopy, peripheral sensory neuropathy—evidence
of injury, ulceration, and Charcot joint formation. Test muscle
strength and examine feet.
Cardiovascular examination
• Ideally, a conduct a full cardiovascular examination, including lying
and standing blood pressure measurements.

EXAMINING THE PATIENT WITH DIABETES
109
Using a 10 gram monofi lament
Small, thin plastic fi laments are used for testing peripheral sensation in the
diabetic foot. They are designed such that it bends under approximately
10 grams of pressure.
• Apply fi
lament to the patient’s skin at spots shown in Fig. 5.2a .
• Press fi rmly so that the fi lament bends ( Fig. 5.2b ).
• Hold the fi
lament against the skin for 71.5 seconds and ask the patient
if they can feel it.
• The fi
lament should not slide, or stroke or scratch the skin.
• 0 Do not press on ulcers, calluses, scars, or necrotic tissue.
• The patient’s feet are at risk if they cannot feel the monofi lament
at
any of the sites.
Box 5.9 Framework for diabetic foot examination
Inspection
• Color
• Ulceration
• Dryness
• Callous formation
• Infection
• Evidence of injury—are shoes rubbing?
• Charcot’s joints (grossly abnormal and dysfunctional joints due to
repeated minor trauma and poor healing from a loss of pain sensation)
Neurology
• 10 g monofi
lament test (see below)
• Light touch sensation, pain sensation, vibration sense, and joint
position sense (proprioception)
Circulation
• Peripheral pulses (dorsalis pedis and posterior tibial)
• Temperature
• Capillary fi lling
time.
(a) (b)
Fig. 5.2 (a) Sites to test with a 10 g monofi lament in the diabetic patient.
(b) Apply the monofi lament to the skin with enough force to make it bend.

CHAPTER 5 Endocrine system110
The fundus in endocrine disease
Diabetes mellitus
Diabetes mellitus (DM) is the most common cause of blindness in
people between ages 25 and 74 worldwide. Early diagnosis and treat-
ment of diabetic retinopathy can eliminate >95% of diabetic blindness.
For this reason, it is essential for all diabetics to undergo an annual eye
examination.
Mechanisms of damage
The precise metabolic mechanisms underlying the retinal changes seen in
diabetes are still unclear. There may be a role for aldose reductase, the
enzyme responsible for the conversion of glucose to sorbitol. High levels
of sorbitol are found in the lens, pericytes, and Schwann cells of diabetic
patients and are thought to lead to cell damage. A great deal of the dam-
age may be caused by the release of vascular endothelial-derived growth
factor (VEGF) in response to retinal ischemia.
The changes seen in the fundus of diabetic patients arise from common
microvascular lesions. These include the following:
• Microaneurysms
• Hemorrhages—dot and blot
• Hard exudates—lipid precipitated out of the plasma
• Cotton wool spots—represent ischemia and occur from interruption
of axoplasmic fl
ow in the nerve fi ber
layer
• Intraretinal microvascular abnormalities (IRMA)
• Venous beading
• Neovascularization
Classifi
cation of diabetic retinopathy
A simple classifi cation system exists and is detailed below.
Background diabetic retinopathy
Microaneurysms, hard exudates, and hemorrhages are present ( Fig. 5.3 ). It
may be extensive and widespread in severe disease.
Pre-proliferative retinopathy
Ischemia is demonstrated by cotton wool spots; venous beading may also
be present.
Proliferative
New retinal vessel formation occurs ( Fig. 5.4 ). This may progress to vitre-
ous bleeding, traction, retinal detachment, and blindness.
Maculopathy
Pathology affecting the macula causes catastrophic visual loss:
• Exudates and hemorrhages in the macular area ( Fig. 5.5 )
• 2The patient may have reduced visual acuity with no abnormality seen
on fundoscopy.
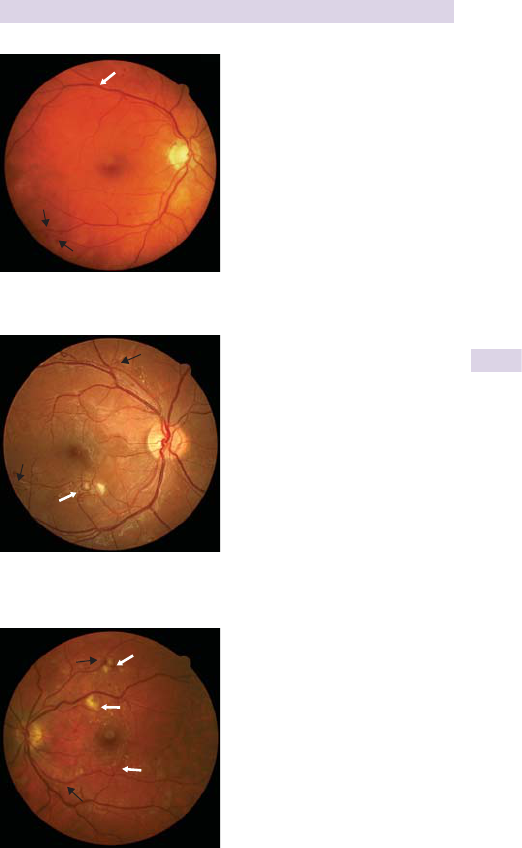
THE FUNDUS IN ENDOCRINE DISEASE
111
Fig. 5.5 Retinal photograph showing diabetic maculopathy. Thin white arrows
show hard exudates; black arrows show hemorrhages—both within the macula.
New vessels are growing into the macula (thick white arrow).
Fig. 5.3 Retinal photograph showing background diabetic retinopathy. White
arrow shows a microaneurysm, black arrows show hemorrhages.
Fig. 5.4 Retinal photograph showing proliferative diabetic retinopathy. White
arrow shows new vessels growing into an ischemic area (cotton wool spot). Dot
hemorrhages (black arrows) are also apparent.

CHAPTER 5 Endocrine system112
Further ocular manifestations of diabetes
While a great deal of focus is placed on retinal changes seen in diabetes, it
is also worth noting that diabetic patients are predisposed to a number of
other sight-threatening conditions (see Box 5.10 for prevention).
Glaucoma
• Open angle
• Neovascular secondary to rubeosis iridis—new vessel formation on
the iris and interruption of the drainage angle ( Fig. 5.6 )
Cataract
Cataract treatment can be very diffi cult
( Fig. 5.7
). Generally, diabetic retin-
opathy should be treated fi rst before contemplating cataract surgery.
Optic neuropathy
• Acute ischemic optic neuritis
• Diabetic optic neuropathy
Cranial nerve palsy
See cranial nerve examination in b Chapter 10 for the common palsies
associated with diabetes.
Hypertensive retinopathy
This is classifi ed into mild, moderate, and severe forms to better correlate
with the duration of systemic hypertension and associated risk of coronary
artery and cerebrovascular disease (see
Fig. 5.8 for treatment).
Appearance—mild
• Generalized or focal arteriolar narrowing of the retinal arterioles
• Opacity of the retinal artery walls—so-called silver/copper wiring
• Arteriovenous (AV) nicking—the retinal arteries cross the veins at a
more perpendicular angle and impinge on the surface of the vein.
Appearance—moderate
• Retinal hemorrhage.
• Cotton wool spots—small areas of ischemia with resulting disruption
of axoplasmic fl
ow in the nerve fi
ber layer of the retina
• Hard exudateslipid exudates
• Microaneurysms
Appearance—severe
• All the above plus optic disc swelling
Box 5.10 Avoiding visual loss in diabetes
Management of the diabetic eye requires a multidisciplinary approach
involving the primary care provider, diabetes physician, diabetes center
staff, optician, ophthalmologist, and, not least of all, the patient.
Ocular examination at the time of diagnosis and yearly screening
thereafter coupled with tight control of weight, blood pressure, chol-
esterol, and blood glucose can help the patient to avoid the devastating
consequences of diabetic eye disease.
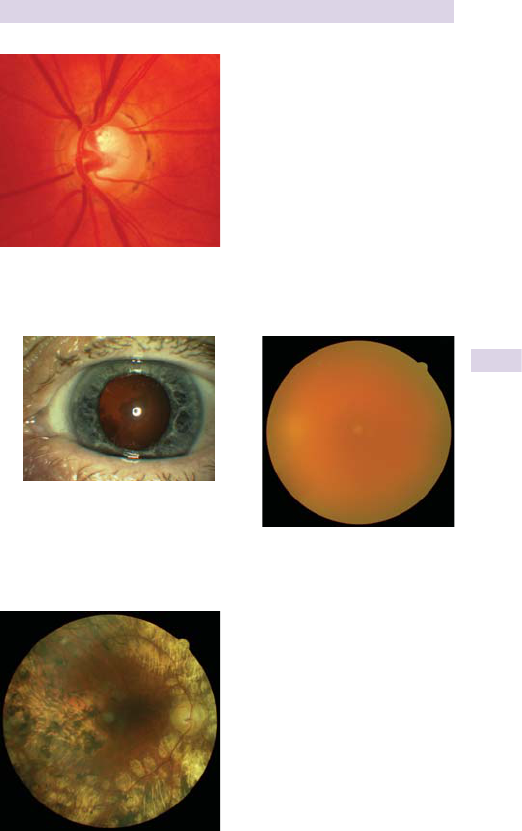
THE FUNDUS IN ENDOCRINE DISEASE
113
Fig. 5.6 Retinal photograph showing close-up of the optic disc in glaucoma. Note
how the disc is sunken—the vessels appear to disappear into it (left side of picture).
(a) (b)
Fig. 5.7 Cataract. (a) External appearance. (b) Fundoscopy becomes very diffi cult
or impossible.
Fig. 5.8 Retinal photograph showing proliferative diabetic retinopathy treated
with laser therapy. Note the multiple rounded scars on the retina.

CHAPTER 5 Endocrine system114
Important presenting patterns
Hypothyroidism
Causes
These include dietary iodine defi ciency, autoimmune thyroiditis (Hashimoto
thyroiditis), lymphocytic thyroiditis (10% of postpartum women), drugs
(amiodarone, interferon alpha, thalidomide, dopamine, lithium), radio-
active iodine treatment, surgical thyroid injury, external irradiation (e.g.,
for head and neck neoplasms or breast cancer), and pituitary adenoma.
Symptoms
Symptoms include tiredness, weight gain, anorexia, cold intolerance, poor
memory, depression, d libido, goiter, puffy eyes, brittle hair, dry skin,
arthralgia, myalgia, muscle weakness, constipation, and menorrhagia.
Signs
A croaking voice, mental and physical sluggishness, and pseudodementia
“myxedema madness” can be present.
Inspection
• Coarse, cool dry skin (look for yellowish tint of carotenemia “peaches
and cream” complexion), palmar crease pallor, peripheral cyanosis,
puffy lower eyelids, loss of outer 1/3 of eyebrows, thinning of scalp
hair, tongue swelling, xanthalasma
Cardiovascular and chest
• Mild hypertension, pericarditis, pleural effusion, low cardiac output,
cardiac failure, bradycardia, small-volume pulse
Neurological
• Carpal tunnel syndrome, peripheral neuropathy, cerebellar syndrome,
proximal muscle weakness, myotonia, muscular hypertrophy,
delayed ankle jerks, bilateral neural deafness (seen in congenital
hypothyroidism)
Hyperthyroidism
Causes
These include Graves disease, chronic thyroiditis (Hashimoto thyroiditis),
sub acute thyroiditis (de Quervain thyroiditis), postpartum thyroiditis,
drugs (iodine-induced, amiodarone), bacterial thyroiditis, postviral thy-
roiditis, idiopathic, toxic multinodular goitre, malignancy (toxic adenoma,
TSH-producing pituitary tumours).
Symptoms
Symptoms include weight loss, i appetite, irritability, restlessness, muscle
weakness, tremor, breathlessness, palpitations, sweating, heat intolerance,
itching, thirst, vomiting, diarrhea, eye complaints (Graves ophthalmopa-
thy), oligomenorrhea, loss of libido, and gynecomastia.
Signs
Irritability and weight loss can occur.

IMPORTANT PRESENTING PATTERNS
115
Inspection
• Onycholysis, palmar erythema, tremor, sweaty palms, thyroid
acropachy, hyperkinesis, gynecomastia, pretibial myxedema, Graves
ophthalmopathy
Cardiovascular and chest
• Resting tachycardia, high cardiac output, systolic fl ow
murmurs
Neurological
• Proximal myopathy, muscle wasting, hyperrefl exia in legs
Polycystic ovarian syndrome (PCOS)
PCOS is caused by abnormal metabolism of androgens and estrogen with
abnormal control of androgen production.
Symptoms
These include oligomenorrhea with an ovulation and erratic periods, and
infertility. Some patients present with hirsutism.
Signs
Obesity (50%), male-pattern hair growth, male-pattern baldness, increased
muscle mass, deep voice, clitoromegaly, and acanthosis nigricans are
among the signs of PCOS.
Glucocorticoid excess (Cushing’s syndrome)
Causes
Causes include high ACTH production from a pituitary adenoma and
ectopic ACTH (e.g., small cell lung cancer). Primary hypercortisolemia
caused by adrenal hyperplasia, adrenal tumor (adenoma or carcinoma), use
of exogenous steroids, ectopic (CRF) production (very rare), depression,
and alcohol use can also contribute to excessive glucocorticoid levels.
Symptoms
These include weight gain (central or upper body), change in appearance,
menstrual disturbance, thin skin with easy bruising, acne, excessive hair
growth, muscle weakness, d libido, depression, and insomnia.
Signs
There are supraclavicular fat pads, moon face, thoracocervical fat pads
(“buffalo hump”), centripetal obesity, hirsutism, thinning of skin, easy
bruising, purple striae, poor wound healing, skin infections, proximal mus-
cle weakness (shoulders and hips), ankle edema, hypertension, fractures
due to osteoporosis, hyperpigmentation (if raised ACTH), and glycosuria.
Hypoadrenalism (Addison’s disease)
Causes
These include autoimmune adrenalitis (up to 80% of U.S. cases), tubercu-
losis, metastatic malignancy, amyloidosis, hemorrhage, infarction, bilateral
adrenalectomy, and HIV.

CHAPTER 5 Endocrine system116
Symptoms
Anorexia, weight loss, tiredness, nausea, vomiting, diarrhea, constipation,
abdominal pain, confusion, erectile dysfunction, amenorrhea, dizziness,
syncope, myalgia, and arthralgia can occur.
Signs
These include skin pigmentation (especially on sun-exposed areas, mucosal
surfaces, axillae, palmar creases, and in recent scars), cachexia, loss of
body hair, postural hypotension, low-grade fever, and dehydration.
Growth hormone excess (acromegaly)
Causes
Pituitary tumor (>95%), hyperplasia due to GHRH excess (very rare), and
tumors in the hypothalamus, adrenal, or pancreas are possible causes.
Symptoms
These include headache, diplopia, change in appearance, enlarged extremi-
ties, deepening of the voice, sweating, tiredness, weight gain, erectile
dysfunction, dysmennorrhea, galactorrhea, snoring, arthralgia, weakness,
numbness, paresthesia, polyuria, and polydipsia.
Signs
These include prominent supraorbital ridges, a large nose and lips, protru-
sion of the lower jaw (prognathism), interdental separation, macroglos-
sia, spade-like hands, doughy soft tissue, thick oily skin, carpal tunnel
syndrome, hirsutism, bitemporal hemianopia (if pituitary tumor impinges
on optic chiasm), cranial nerve palsies (particularly III, IV, and VI), and
hypertension.
Prolactinoma
This is a pituitary tumor (the most common hormone-secreting tumor).
Symptoms
Symptoms depend on the patient’s age, sex, and degree of prolactine-
mia. In females there is oligomenorrhea, vaginal dryness, dyspareunia, and
galactorrhea. In males there is d libido, erectile dysfunction, infertility, and
galactorrhea. If prolactinoma occurs before puberty in males, they may
have a female body habitus and small testicles.
Signs
Visual fi eld defects (bitemporal hemianopia), cranial nerve palsies (III, IV,
and VI), and galactorrhea can occur. Males may have small testicles and a
female pattern of hair growth.
Hypercalcemia
Causes
Common causes include hyperparathyroidism and malignancy (PTHrp
production or metastases in bone). Less common causes are vitamin D
intoxication, granulomatous disease, familial hypocalciuric hypercalemia.
Rarely, hypercalcemia results from certain drugs (e.g., bendrofl uazide),
hyperthyroidism, or Addison’s disease.

IMPORTANT PRESENTING PATTERNS
117
Symptoms
These depend largely on the underlying cause. Mild hypercalcemia is
asymptomatic. Higher levels may cause nausea, vomiting, drowsiness, con-
fusion, abdominal pain, constipation, depression, muscle weakness, myal-
gia, polyuria, headache, and coma.
Signs
Often there are signs of the underlying cause. There are no specifi c signs
of hypercalcemia.
Hypocalcemia
Causes
These include hypoalbuminemia, hypomagnesemia, hyperphosphatemia,
surgery to the thyroid or parathyroid glands, parathyroid hormone (PTH)
defi ciency or resistance, and vitamin D defi ciency.
Symptoms
Depression, paresthesia around the mouth, and muscle spasms occur.
Signs
Carpopedal spasm (fl exion at the wrist and the fi ngers) occurs when
blood supply to the hand is reduced by infl ating a sphygmomanometer cuff
on the arm (Trousseau’s sign). There is also nervous excitability—tapping
a nerve causes the supplied muscles to twitch (Chvostek’s sign—tapping
the facial nerve at the parotid gland about 2 cm anterior to the tragus of
the ear causes the facial muscles to contract).
This page intentionally left blank

119
Ear, nose, and throat
Applied anatomy and physiology 120
Symptoms of ear disorders 122
Tinnitus 124
Symptoms of nasal disorders 127
Symptoms of throat disorders 129
Examining the ear 132
Examining the nose 135
Examining the nasal sinuses 137
Examining the mouth and throat 138
Important presentations 141
Chapter 6

CHAPTER 6 Ear, nose, and throat120
Applied anatomy and physiology
Following is a brief review of anatomy relevant to clinical examination.
Ear
The ear is involved in both balance and hearing and is divided into the
external, middle, and inner ear.
The external ear is composed of the pinna (auricle), external auditory
meatus, and the lateral wall of the tympanic membrane.
The auricle is divided into the antihelix, helix, lobe, tragus, and concha
(see Fig. 6.2 , b p. 133) and is composed of fi brocartilage. The ear lobe
is adipose only.
The tympanic membrane is a thin, gray, oval, semitransparent mem-
brane at the medial end of the external acoustic meatus 71 cm in diameter.
It detects air vibrations (sound waves). These tiny movements are then
transmitted to the auditory ossicles.
The middle ear lies in the petrous part of the temporal bone and is
connected to the nasopharynx via the Eustachian tube. It connects with
the mastoid air cells.
The tympanic cavity contains three tiny bones (ossicles: the malleus,
incus, and stapes) that transmit vibrations to the cochlea and two small
muscles (stapedius and tensor tympani). The chorda tympani branch of the
facial nerve passes through here before it exits the skull.
The inner ear (vestibulocochlear organ) is involved in the reception of
sound and maintenance of balance. It consists of a series of interconnect-
ing bony-walled, fl uid-fi lled chambers (vestibule, semicircular canals, and
cochlea). Within the bony labyrinth is a further series of interconnecting
membranous chambers (membranous labyrinth: saccule, utricle, cochlear
duct, and semicircular ducts).
The vestibule and semicircular canals contain the peripheral balance
organs. These have connections to the cerebellum and are important in
the maintenance of posture and fi xed gaze. The sensory impulses are con-
ducted by the cochlear and vestibular divisions of cranial nerve VIII.
Nose and paranasal sinuses
The main functions of the nose and nasal cavities are olfaction, respiration,
and air fi ltration.
The upper 1/3 of the external nose is bony; the rest is cartilaginous. The
inferior surface holds the anterior nares (nostrils), which are separated
from each other by the bony and cartilaginous nasal septum. The lateral
wall of each cavity supports a series of three ridges called turbinates (supe-
rior, middle, and inferior).
The paranasal sinuses are air-fi lled extensions of the nasal cavity. They
are named according to the bones in which they are located: frontal, eth-
moid, sphenoid, and maxilla (see Fig. 6.1 ). Their purpose is thought to
include protection of intracranial structures and the eyes from trauma, an
aid to vocal resonance, and reduction of skull weight.
Mouth and throat
The oral cavity comprises the lips, the anterior 2/3 of the tongue, hard
palate, teeth, and alveoli of the mandible and maxilla.

APPLIED ANATOMY AND PHYSIOLOGY
121
The tongue is involved with mastication, taste, swallowing (deglutina-
tion) and articulation.
Two sets of teeth develop within a lifetime. The fi rst set is deciduous
(milk teeth). The incisors are the fi rst to erupt at 76 months of age; the
rest follow within 3 years. In the permanent set, the fi rst molar or central
incisor erupts fi rst (76 years), the second molar erupts at 711 years of age;
the third molar emerges at 718 years (wisdom teeth).
The pharynx is divided into three parts: nasopharynx, oropharynx, and
hypopharynx. The nasopharynx lies posterior to the nose and superior to
the soft palate. The oropharynx lies posterior to the oral cavity, extend-
ing from the soft palate to the epiglottis, and contains the tonsils. The
hypopharynx lies posterior to the larynx, extending from the epiglottis
to the inferior border of cricoid cartilage, where it is continuous with the
esophagus.
The larynx lies at the level of the bodies of C3–C6 vertebrae. It con-
nects the inferior part of the pharynx with the trachea. It functions to pre-
vent food and saliva from entering the respiratory tract and as a phonating
mechanism for voice production. It is supported by a framework of hyaline
cartilage connected by ligaments.
The thyroid cartilage is the largest of the laryngeal cartilages and can be
seen as the Adam’s apple. The nervous supply of the larynx is from cranial
nerve X (sensory and motor).
The epiglottis is attached to the thyroid cartilage and occludes the laryn-
geal inlet during swallowing.
Salivary glands
The main salivary glands are the parotid, submandibular, and sublingual.
The sublingual glands are the smallest; their ducts open onto the fl oor
of the mouth, as do the ducts of the submandibular glands. The parotid
glands are the largest ones. The parotid ducts cross the masseter muscles
and open into the oral cavity opposite the upper second molar teeth.
Frontal
Ethmoid
Maxillary
Fig. 6.1 Surface anatomy of the facial sinuses.

CHAPTER 6 Ear, nose, and throat122
Symptoms of ear disorders
Otalgia
Earache (otalgia) is common in both children and adults and may be oto-
logical (local) or nonotological (referred) in cause ( Box 6.1 ).
Take a standard pain history, as on b p. 34.
Ask about associated discharge, hearing loss, previous ear operations,
use of Q-tips, trauma, swimming, and air travel.
2 Remember that the ear has a sensory supply from cranial nerves V,
IX, and X and from the second and third cervical nerves, so otalgia may be
referred from several other areas.
Otorrhea
This is discharge from the external auditory meatus. Ask about other ear
symptoms, when the discharge began, and any precipitating or exacerbat-
ing factors. Ask especially about the nature of the discharge:
• Watery: eczema, cerebrospinal fl uid
(CSF)
• Purulent: acute otitis externa
• Mucoid: chronic suppurative otitis media with perforation
• Mucopurulent or blood-stained: trauma, acute otitis media, cancer
• Foul-smelling: chronic suppurative otitis media ± cholesteatoma
Hearing loss
Deafness or total hearing loss is unusual. Hearing loss is usually described
as being mild, moderate, or profound. Hearing loss may be conductive,
sensorineural, mixed, or nonorganic.
Conductive hearing loss may be due to pathology of the ear canal, ear-
drum, or middle ear ( Box 6.2 ). Sensorineural hearing loss is caused by
disease in the cochlea or the neural pathway to the brain.
Box 6.1 Some causes of otalgia
Otological
• Acute otitis externa
• Acute otitis media
• Perichondritis
• Furunculosis
• Trauma
• Neoplasm
• Herpes zoster
Nonotological causes (referred)
• Cervical spine disease
• Tonsillitis
• Dental disease
• Temporomandibular joint disease
• Neoplasms of the pharynx or larynx

SYMPTOMS OF EAR DISORDERS
123
Take a full history as in b Chapter 2. In particular, note the following:
• CC : As well as the usual questions, establish the following:
• Time and speed of onset
•
Is it partial or complete?
•
Are both ears affected or just one?
•
Is there associated pain, discharge, or vertigo?
• PMH : especially tuberculosis and septicemia
• FH : Hearing loss may be inherited (e.g., otosclerosis).
• Drug history : Certain drugs, particularly those toxic to the renal
system, affect the ear (e.g., aminoglycosides, some diuretics, cytotoxic
agents). Salicylates and quinine show reversible toxicity.
• SH : occupation and leisure activities should not be overlooked.
Prolonged exposure to loud noise (e.g., heavy industrial machinery)
can lead to sensorineural hearing loss. The Occupational Safety and
Health Administration (OSHA) requires ear protection or limited
exposure at levels of 90 dB or greater.
0 OSHA mandated limits are available at http://www.osha.gov.
Nonorganic hearing loss
0 Diagnose only after fully excluding an organic cause. In such cases, there
may be a discrepancy between the history and clinical and audiometric
fi ndings.
Box 6.2 Some causes of hearing loss
Conductive
• Cerumen
• Otitis externa, if ear is full of debris
• Middle ear effusion
• Trauma to ossicles
• Otosclerosis
• Chronic middle ear infection (current or previous)
• Tumors of the middle ear
Sensorineural
• Presbycusis
• Vascular ischemia
• Noise exposure
• Infl
ammatory or infectious diseases (e.g., measles, mumps meningitis,
syphilis)
• Ototoxicity
• Acoustic tumors (progressive unilateral hearing loss, but may be
bilateral)

CHAPTER 6 Ear, nose, and throat124
Tinnitus
This is the perception of abnormal noise in the ear or head and may be
caused by almost any pathology in the auditory apparatus ( Box 6.3 ).
As well as taking the full standard history, ask the patient about the
character of the tinnitus, associated hearing loss, how the tinnitus bothers
them (i.e., whether sleep or daily living is affected), and any previous his-
tory of ear disease.
Rushing, hissing, or buzzing tinnitus is most common and is usually
associated with a hearing loss. It is caused by pathology in the inner ear,
brainstem, or auditory cortex (although it can sometimes appear with
conductive hearing loss).
Pulsatile tinnitus is caused by noise transmitted from blood vessels close
to the ear. These include the internal carotid artery and internal jugular
vein (the latter can be diagnosed by abolition of the noise by pressure on
the neck). Occasionally, pulsatile tinnitus can be heard by an observer, by
using a stethoscope over the ear or neck.
Cracking and popping noises can be associated with dysfunction of the
Eustachian tube or rhythmic myoclonus of the muscles in the middle ear
or attached to the Eustachian tube.
2 Remember to distinguish tinnitus from complex noises (e.g., voices,
music) that may constitute auditory hallucinations and point to a psychi-
atric diagnosis.
Injury to the ear
• Trauma may be self-infl icted, especially in children; foreign bodies
inserted in the ear can damage the meatal skin or the eardrum.
• Head injuries can cause temporal bone fractures, with bleeding from the
ear. Fracture may be associated with dislocation of the ossicles or may
pass through the labyrinth, causing severe vertigo and complete deafness.
• Temporary or permanent facial nerve palsy may also occur.
Deformity of the ear
• This may be either congenital or acquired (usually traumatic).
• There may be complete or partial absence of the pinna (anotia or
microtia), accessory auricles (anterior to the tragus) or a preauricular
Box 6.3 Some causes of tinnitus
• Presbycusis
• Noise-induced hearing loss
• Menière’s disease
• Ototoxic drugs, trauma
• Any cause of conductive hearing loss
• Acoustic neuromas
Pulsatile tinnitus
• Arterial aneurysms
• Arteriovenous malformations
• Glomus tumors of the middle ear

TINNITUS
125
sinus. Protruding ears may cause social embarrassment and can be
surgically corrected.
• Small auricles are seen in Down syndrome, often with a rudimentary
or absent lobule.
Dizziness
The term dizziness can mean different things to different people and must
be distinguished from light-headedness, presyncope, and simple unsteadi-
ness. Two features of dizziness suggest that it arises from the vestibular
system:
• Vertigo (a hallucination of movement, most commonly rotational)
• Dizziness related to movement or position change
Both of these symptoms can occur together, separately in time, or alone in
different people. Disequilibrium (unsteadiness or veering) may accompany
vestibular dizziness.
Important points from the history
Obtain a precise history, aiming to establish whether or not the dizziness
is due to vestibular disease ( Boxes 6.4 and 6.5 ). Ask about the following:
• Nature and severity of the dizziness
• Whether it is persistent or in intermittent attacks
• Duration of attacks (seconds, hours, or days)
• Pattern of events since the onset
• Relation to movement or position, especially lying down
• Associated symptoms (e.g., nausea, vomiting, hearing change, tinnitus,
headaches)
• History, including alcohol or drug use
• Other ear problems or previous ear surgery
Peripheral vestibular lesions
Vertigo caused by vestibular problems is most commonly rotational but
may be swaying or tilting. Whether it is movement of the person or sur-
roundings is irrelevant.
Any rapid head movement may provoke the dizziness, but dizziness
provoked by lying down, rolling over, or sitting up is generally specifi c
to
benign paroxysmal positional vertigo.
Box 6.4 Some otological causes of dizziness
• Benign paroxysmal positional vertigo
• Menière’s disease
• Vestibular neuronitis
• Trauma (surgery or temporal bone fracture)
• Perilymph fi stula
• Middle ear infection
• Otosclerosis
• Syphilis
• Ototoxic drugs
• Acoustic neuromas

CHAPTER 6 Ear, nose, and throat126
Central vestibular lesions
These are not always easy to distinguish on the history, with vertigo being
less evident. Gait disturbances, along with other neurological signs and
symptoms, might suggest the presence of a central vestibular lesion.
Box 6.5 Some nonotological causes of dizziness and
disequilibrium
• These are often more disequilibrium than dizziness.
• Aging (poor eyesight and proprioception)
• Cerebrovascular disease
• Parkinson’s disease
• Migraine
• Epilepsy
• Demyelinating disorders
• Hyperventilation
• Drugs (e.g., cardiovascular, neuroleptic drugs, alcohol)

SYMPTOMS OF NASAL DISORDERS
127
Symptoms of nasal disorders
Nasal obstruction
As well as the full history (b Chapter 2), establish the following:
• Is the nose blocked constantly or intermittently?
• Constant: long-standing structural deformity such as deviated
septum, nasal polyps, or enlarged turbinates
• Intermittent: allergic rhinitis or common cold
• Unilateral or bilateral obstruction?
• Associated nasal discharge
• Relieving or exacerbating factors
• Use of nose drops or any other nasal substance (e.g., “huffi ng,”
glue-
sniffi
ng, or drug-snorting)
2 Don’t miss a previous history of nasal surgery.
Nasal discharge
Ask about the specifi c character of the discharge, which is often very help-
ful in deciding etiology. See Box 6.6 .
The terms catarrh and postnasal drip should be reserved only for com-
plaints of nasal discharge fl owing backward into the nasopharynx.
Epistaxis
This is a nasal hemorrhage, or nosebleed. The anterior septum, known
as Kiesselbach’s plexus or Little’s area, is the point of convergence of the
anterior ethmoidal artery, the septal branches of the sphenopalatine and
superior labial arteries, and the greater palatine artery. This is a common
site of bleeding.
Epistaxis is most commonly due to spontaneous rupture of a blood ves-
sel in the nasal mucous membrane.
Explore the possible causes ( Box 6.7 ) during history-taking.
Box 6.7 Some causes of epistaxis
• Trauma from nose-picking, surgery, or infection
• Prolonged bleeding may be caused by hypertension, alcohol,
anticoagulants, coagulation defects, and hereditary telangiectasia.
• Neoplasia and angiomas of the postnasal space and nose may
present with epistaxis.
Box 6.6 Some causes of nasal discharge
• Watery or mucoid: allergic or infective (viral) or vasomotor rhinitis
•
A unilateral copious watery discharge may be due to CSF rhinorrhea.
• Purulent: infective rhinosinusitis or foreign body (especially if
unilateral)
• Blood stained: (with unilateral symptoms) tumors, a bleeding
diathesis, or trauma

CHAPTER 6 Ear, nose, and throat128
Sneezing
Sneezing is a very frequent accompaniment to viral upper respiratory tract
infection and allergic rhinitis. It is commonly associated with rhinorrhea
and itching of the nose and eyes.
Ask about exacerbating factors and explore the timeline carefully, look-
ing for precipitants.
Disorders of smell
Patients may complain of a decreased sense of smell (hyposmia) or, more
rarely, a total loss of smell (anosmia) . Ask about the exact timing of the
hyposmia and any other associated nasal symptoms.
Anosmia is most commonly caused by nasal polyps but may be caused
by head injury disrupting the olfactory fi bers emerging through the cribi-
form plate. It may also complicate a viral upper respiratory tract infection
(viral neuropathy).
Cacosmia is the hallucination of an unpleasant smell and may be caused
by infection interfering with the olfactory structures.
Nasal deformity
Nasal deformity may occur as a result of a trauma causing pain ± swelling
± epistaxis ± displacement of nasal bones and septum.
Disruption of the bones and nasal septum may produce a “saddle”
deformity. Other causes of a saddle nose include Wegener’s granuloma-
tosis, congenital syphilis, and long-term snorting of cocaine.
Rosacea (acne rosacea) can cause an enlarged, red, and bulbous rhino-
phyma. Widening of the nose is an early feature of acromegaly.
Nasal and facial pain
Facial pain is not normally due to local nasal causes. More frequently, it is
related to infection within the sinuses, trigeminal neuralgia, dental infec-
tion, migraine, or mid-facial segment pain.

SYMPTOMS OF THROAT DISORDERS
129
Symptoms of throat disorders
Oral pain
• The most common cause of pain in the oral cavity is dental caries and
periodontal infection. Periodontal disease can cause pain with tooth-
brushing and is associated with halitosis.
• Gum disease is a common cause of oral pain.
• In elderly patients, dentures may cause pain if improperly sized or if
they produce an abnormal bite.
• Take a full pain history (b p. 34) and ask about other mouth and
throat symptoms.
Throat pain
• A sore throat is an extremely common symptom. Clarify the full
nature of the pain as discussed on b p. 34. It is important to establish
exactly where the pain is felt.
• Most acute sore throats are viral in origin and are associated with
rhinorrhea and a productive cough. Consider infectious mononucleosis
in teenagers.
• Acute tonsillitis is associated with systemic symptoms such as malaise,
fever, and anorexia.
• Consider malignancy in adults with a chronically sore throat (see also
Box 6.8 ).
• Ask about symptoms associated with cancer, such as dysphagia,
dysphonia, weight loss, and a history of smoking or excessive
alcohol.
2 It is important to remember that oral and throat problems may be
indicative of sexually transmitted infections. Tactfully ask about sexual
encounters, if indicated. Such questioning is often diffi cult for new provid-
ers, but one can preface the question with a brief comment as to why such
questions need to be asked.
2 Throat pain often radiates to the ear because the pharynx and external
auditory meatus are innervated by the vagus (X) nerve.
Lumps in the mouth
• Lips are a common site for localized malignancy, e.g., basal cell
carcinoma (BCC), squamous cell carcinoma (SCC).
• Tongue : lumps here are nearly always neoplastic.
• Oral cavity : blockage of a minor salivary gland might give rise to a cystic
lesion called a ranula and is usually sited in the fl oor of the mouth.
Box 6.8 Questions regarding chronic pharyngitis
• Ask about irritants such as tobacco smoke and alcohol.
• Consider chronic tonsillitis, postnasal drip from chronic sinusitis, acid
refl ux, and chronic noninfective laryngitis.

CHAPTER 6 Ear, nose, and throat130
Most malignant lesions on the fl oor of the mouth present late: pain,
dysphagia, and odynophagia (pain on swallowing) are common symptoms.
The buccal lining is also another very common site for cancer.
Globus hystericus (globus pharyngeus)
This is the sensation of a lump in the throat (globus hystericus or globus
syndrome). It is important to ask about symptoms of gastroesophageal
refl ux (GER) (b p. 206) or postnasal drip.
It is occasionally associated with a malignancy. Ask about dysphagia,
odynophagia, hoarseness, and weight loss.
Lumps in the neck
Neck lumps are usually secondary to infection but a minority are due
to malignant disease. The most common cause of neck swelling is lymph
node enlargement. A comprehensive history and examination of the head
and neck is important.
2 In the adult, remember that metastatic neck disease may represent
spread from structures below the clavicle, including lung, breast, stomach,
pancreas, kidney, prostate, and uterus. If malignancy is suspected, the his-
tory and examination should include a search for symptoms and signs in
other systems.
As well as the full standard history, ask especially about the following:
• Duration of the swelling
• Progression in size
• Associated pain or other symptoms in the upper aerodigestive tract
• Odynophagia
• Dysphagia
• Dysphonia
• Systemic symptoms (weight loss, night sweats, malaise)
• Smoking and alcohol habits
Dysphonia
This is an alteration in the quality of the voice. The history should be
aimed at identifying any of the several possible causes:
• Infl ammatory : acute laryngitis, chronic laryngitis (chronic vocal abuse,
alcohol, smoke inhalation)
• Neurological
• Central : pseudobulbar palsy, cerebral palsy, multiple sclerosis, stroke,
Guillain–Barré syndrome, head injury
• Peripheral : lesions affecting cranial nerve X and recurrent laryngeal
nerves (e.g., lung cancer, post-thyroidectomy, cardiothoracic and
esophageal surgery), myasthenia gravis, motor neuron disease
• Neoplastic : laryngeal cancer, for example
• Systemic : rheumatoid arthritis, angiogenic edema, hypothyroidism
• Psychogenic : These are dysphonias in the absence of laryngeal disease
and are mainly due to an underlying anxiety or depression (i.e.,
musculoskeletal tension disorders, conversion voice disorders). Like all
other nonorganic disorders, you must rule out organic pathology.

SYMPTOMS OF THROAT DISORDERS
131
Halitosis
This is offensive-smelling breath. It is commonly caused by poor den-
tal hygiene or diet. Tonsillar infection, gingivitis, pharyngeal pouch, and
chronic sinusitis with purulent postnasal drip can also cause bad breath.
Stridor
This is a noise from the upper airway (see also b p. 187) and is caused by
narrowing of the trachea or larynx. The main causes of stridor in adults are
laryngeal cancer, laryngeal trauma, epiglottitis, and cancer of the trachea
or main bronchus.

CHAPTER 6 Ear, nose, and throat132
Examining the ear
Inspection and palpation
• Briefl y inspect the external structures of the ear ( Fig. 6.2 ), paying
particular attention to the pinna, noting its shape, size, and any deformity.
• Carefully inspect for any skin changes suggestive of cancer.
• Don’t forget to look behind the ears for any scars or a hearing aid.
• Gently pull on the pinna and push on the tragus and ask the patient if
it is painful.
• Pain indicates infection of the external auditory meatus
• Palpate the area in front of the tragus and ask if there is any pain.
• Pain indicates temporomandibular joint disease.
• Look for any discharge.
Otoscopy
The otoscope allows you to examine the external auditory canal, the ear-
drum, and a few middle ear structures.
Otoscope
The otoscope consists of a light source, removable funnel-shaped specu-
lum, and viewing window that often slightly magnifi es the image. On many
otoscopes, the viewing window can be slid aside for insertion of instru-
ments (e.g., curettes and swabs) down the auditory canal ( Fig. 6.3 ).
Technique
The following is the method for examining the patient’s right ear.
Examination of the left ear should be a mirror image of this.
• Explain the procedure to the patient and obtain verbal consent.
• Turn the light source on.
• Place a clean speculum on the end of the scope.
• Gently pull the pinna upward and backward with your left hand.
• This straightens out the cartilaginous part of the canal, allowing
easier passage of the scope.
• Holding the otoscope in your right hand, place the tip of the speculum
in the opening of the external canal. Do this under direct vision before
looking through the viewing window.
• Slowly advance the otoscope while looking through it.
• It is often helpful to stabilize the otoscope by extending the little
fi
nger of the right hand and placing it on the patient’s head.
• Inspect the skin of the auditory canal for signs of infection, wax, and
foreign bodies.
• If wax is causing obstruction, it may be necessary to perform ear
lavage before continuing.
• Examine the tympanic membrane ( Fig. 6.4 ).
• A healthy eardrum should appear grayish and translucent.
• Look for the light refl
ex. This is the refl
ection off the surface of the
drum visible just below the malleus.
• Notice any white patches (tympanosclerosis) or perforation.
• A reddened, bulging drum is a sign of acute otitis media.
• A dull gray, yellow drum may indicate middle ear fl uid.

EXAMINING THE EAR
133
Triangula
r
fossa
External
auditory
meatus
Tragus
Lobule
Helix
Concha
Antihelix
Antitragus
Fig. 6.2 The surface anatomy of the normal ear.
Insufflator port for
pneumatic otoscopy
Removable specula—
choice of sizes
Built-in bulb here
On/off switch.
These often slide side-to-side
for variable illumination
Batteries housed here
Magnified viewing
lens—can slide open
to insert the instruments
Fig. 6.3 A standard otoscope.
Posterior fold
Short process
of malleus
Umbo
Pars flaccida
Anterior fold
Handle of malleus
Cone of high reflex
Fig. 6.4 The appearance of the normal eardrum on otoscopy.

CHAPTER 6 Ear, nose, and throat134
A note on pneumatic otoscopy: Remember that this simple evaluation,
when used by a reasonably skilled provider, may help avoid the necessity
of sending the patient for a costly procedure. Simple procedures can be
accurate and cost-effective.
Box 6.9 Testing auditory and vestibular function
See b Chapter 10, Cranial Nerve VIII (b p. 287).

EXAMINING THE NOSE
135
Examining the nose
External inspection
• Inspect the external surface and appearance of the nose, noting any
disease or deformity.
• Stand behind the patient and look down over their head to detect any
deviation.
Palpation
• Gently palpate the nasal bones and ask patient to alert you to any pain.
• If a visible deformity is present, palpate to determine if it is bony (hard
and immobile) or cartilaginous (fi rm but compressible).
• Feel for facial swelling and tenderness.
• Tenderness suggests underlying infl ammation.
Nostril patency
Assess whether air moves through both nostrils effectively.
• Push on one nostril until it is occluded.
• Ask the patient to inhale through their nose.
• Then repeat on the opposite side.
Air should move equally well through each nostril; however, remember
that nasal cycling may occur in a substantial portion of the population.
Internal examination
The postnasal space (nasopharynx) can be examined using fi ne-bore
endoscopy. This is done by trained professionals; the student or nonspe-
cialist should examine the anterior portion of the nose only.
• Ask the patient to tilt their head back.
• Push up slightly on the tip of the nose with the thumb (see Fig. 6.5 ).
• You should now be able to see just inside the anterior vestibule.
• In adults, you can use a nasal speculum (see Fig. 6.6 ) to widen the
nares to enable easier inspection.
• Pinch or release the speculum to the closed position, place the prongs
just inside the nostril, and squeeze or release your grip gently, allowing
the prongs to spread apart.
• Look at the following:
• Color of the mucosa
• Presence and color of any discharge
• Septum (which should be in the midline)
• Any obvious bleeding points, clots, crusting, or perforation
• Middle and inferior turbinates along the lateral wall for evidence of
polypoid growth, foreign bodies, and other soft tissue swelling
Testing olfaction
This is described in b Chapter 10, Cranial Nerve I (b p. 263).
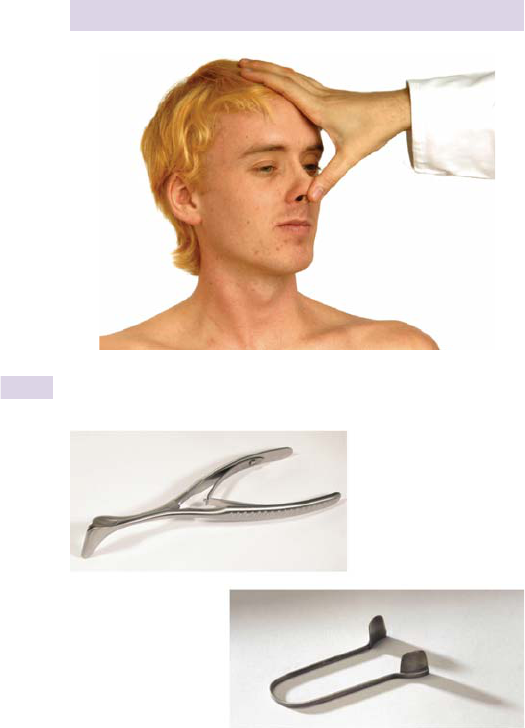
CHAPTER 6 Ear, nose, and throat136
Fig. 6.6 A standard nasal speculum and Thudicum speculum.
Fig. 6.5 Examination of the anterior vestibule: press nose upward with your thumb.

EXAMINING THE NASAL SINUSES
137
Examining the nasal sinuses
The reader should revisit the anatomy of the sinuses and Fig. 6.1 on
b p. 121. The frontal and maxillary sinuses are the only two that can be
examined, albeit indirectly.
Palpation
• Palpate and percuss the skin overlying the frontal and maxillary sinuses.
• Tap on the upper teeth (which sit in the fl oor of the maxillary sinus).
• In both of the above, pain suggests infl ammation (sinusitis).

CHAPTER 6 Ear, nose, and throat138
Examining the mouth and throat
Ensure that the room is well lit. You should have an adjustable light-source.
An otoscope or penlight should be adequate for nonspecialists.
Inspection
Face
Look at the patient’s face for obvious skin disease, scars, lumps, signs of
trauma, deformity, or facial asymmetry (including parotid enlargement).
Lips, teeth, gums
Inspect the lips at rest fi rst.
• Ask the patient to open their mouth and take a look at the buccal
mucosa, teeth, and gums.
• Note signs of dental decay or gingivitis.
• Ask the patient to evert the lips and look for any infl ammation,
discoloration, ulceration, nodules, or telangiectasia.
Tongue and fl
oor of the mouth
Inspect the tongue inside and outside the mouth. Look for any obvious
growths or abnormalities.
• Included in this should be an assessment of cranial nerve XII (b p. 293).
• Ask the patient to touch the roof of the mouth with their tongue.
• This allows you to look at the underside of the tongue and fl oor of
the mouth.
Oropharynx
In order to look at the posterior oropharynx ( Fig. 6.7 ), ask the patient to
say “aaah” (which elevates the soft palate).
Hard palate
Soft palate
Uvula
Posterior arch
(pilla)
Tonsillar fossa
Anterior arch
(pilla)
Oropharynx
Fig. 6.7 The normal appearance of the oral cavity.

EXAMINING THE MOUTH AND THROAT
139
• Use of a tongue depressor may provide a better view or it may just
serve to gag the patient.
Uvula
The uvula should hang down from the roof of the mouth, in the mid-
line. With an “aaah” the uvula rises up. Deviation to one side may be
caused by cranial nerve IX palsy (see b p. 289 for more detail), tumor,
or infection.
Soft palate
Look for any cleft, structural abnormality, or asymmetry of movement and
note any telangiectasia.
Tonsils
Inspect the tonsils, noting their size, color, and any discharge.
• The tonsils lie in an alcove between the posterior and anterior pillars
(arches) on either side of the mouth.
Palpation
This is reserved for any abnormal or painful areas detected on initial
inspection.
• Put on gloves and palpate the area of interest with both hands (one hand
outside on patient’s cheek or jaw and the other inside the mouth).
• Note the characteristics of any lump (b p. 88).
The rest of the neck
Palpate the cervical and supraclavicular lymph nodes (b p. 58) and
thyroid (b p. 104) and look for any additional masses (describe each
as on b p. 98).
Findings
• Mucosal infl ammation: bacterial, fungal (candidiasis), and viral (e.g.,
herpes simplex) infections, or after radiotherapy treatment
• Oral candidiasis: radiotherapy, use of inhaled steroids, and
immunodefi
ciency states (e.g., leukemia, lymphoma, HIV)
• Gingivitis: infl
ammation of the gums may occur in minor trauma (teeth
brushing), vitamin and mineral defi
ciency, or lichen planus (see also
Box 6.10 ).
• Tonsillitis: mucopus on the pharyngeal wall implies bacterial infection.
Posterior pharyngeal wall vesicles may imply a viral origin. In teenagers
think of infectious mononucleosis, particularly if the tonsils are covered
with a white pseudomembranous exudate.
Box 6.10 Gum changes in systemic conditions
• Chronic lead poisoning: punctuate blue lesions
• Phenytoin treatment: fi rm and hypertrophied
• Scurvy: soft and hemorrhagic
• Cyanotic congenital heart disease: spongy and hemorrhagic

CHAPTER 6 Ear, nose, and throat140
• Acute tonsillitis is often associated with systemic features of
malaise, fever, anorexia, cervical lymphadenopathy, and candidiasis.
Remember to consider HIV or other immune disorders in the
presence of candidiasis!
• See Box 6.11 for causes of neck masses.
Box 6.11 Some causes of neck masses
Midline
• Lesions of the thyroid gland, thyroglossal cysts (lump moves when
patient sticks out tongue), midline dermoids, submental lymph
nodes, parathyroid gland enlargement (very rare)
Lateral
• Neoplasia (primary cancer, lymphoma, schwannoma, metastatic
cancer), infection (mumps, glandular fever, TB, HIV), autoimmune
(e.g., Sjogren’s syndrome), normal variants (transverse process of C2,
cervical rib, elongated styloid process), sarcoidosis, branchial cyst

IMPORTANT PRESENTATIONS
141
Important presentations
Otitis externa
This is infl ammation of the outer ear and is commonly caused by bacterial
infection of the ear canal (e.g., Streptococci, Staphylococci, Pseudomonas )
and fungi. Heat, humidity, swimming, and any irritants causing pruritis can
all predispose a patient to otitis externa.
Otitis externa often occurs in patients with eczema, seborrheic derma-
titis, or psoriasis due to scratching. Symptoms can vary from irritation to
severe pain ± discharge.
Pressure on the tragus or movement of the auricle may cause pain.
Malignant otitis externa is a very aggressive form caused by a spreading
osteomyelitis of the temporal bone (usually Pseudomonas pyocaneus ). The
infection may spread to involve the middle ear and lower cranial nerves. It
is seen in immunocompromised patients and diabetics.
Furunculosis
This is an infection of hair follicles in the auditory canal. It presents with
severe throbbing pain, exacerbated by jaw movement, with pyrexia and
often precedes rupture of an abscess.
Otitis media and glue ear
This infl ammation of the middle ear usually follows an upper respiratory
tract infection.
In the early stages, the eardrum becomes retracted as the Eustachian
tube is blocked, resulting in an infl ammatory middle ear exudate. If there
is infection, pus builds up, causing the middle ear pressure to rise. This is
seen on otoscopy as bulging of the eardrum. The eardrum may eventually
rupture if untreated.
Complications
These include infl ammation in the mastoid air cells (mastoiditis), labyrin-
thitis, facial nerve palsy, extradural abscess, meningitis, lateral sinus throm-
bosis, and cerebellar and temporal lobe abscess.
Chronic suppurative otitis media
This is associated with a central persistent perforation of the pars tensa.
The resulting otorrhea is usually mucoid and profuse in active infection.
Glue ear
Glue ear, or otitis media with effusion, is the most common cause of
acquired conductive hearing loss in children (peaks at 3–6 years). There is
a higher incidence in patients with cleft palate and Down syndrome. The
etiology is usually Eustachian tube dysfunction with thinning of the drum.
Cholesteatoma
This is a destructive disease consisting of overgrowth of stratifi ed squa-
mous epithelial tissue in the middle ear and mastoid causing erosion of
local structures and the introduction of infection.

CHAPTER 6 Ear, nose, and throat142
When infected, there may be a foul-smelling aural discharge. Bone
destruction and marked hearing loss can occur. Cholesteatoma may be
complicated by meningitis, cerebral abscesses, and facial nerve palsy.
Menière’s disease
This is also known as endolymphatic hydrops. There is distension of the
membranous labyrinthine spaces; the exact cause is not known.
Symptoms include attacks of vertigo with prostration, nausea, vomiting,
a fl uctuating sensorineural hearing loss at the low frequencies, tinnitus, and
aural fullness or pressure in the ear.
Attacks tend to occur in clusters with quiescent periods between. Each
attack lasts only a few hours, and the patient usually has normal balance in
between. Over years, hearing gradually deteriorates in the affected ear.
Vestibular neuronitis
This is typically associated with sudden vertigo, vomiting, and prostration.
The symptoms are exacerbated by head movement. It often follows a viral
illness in the young or a vascular lesion in the elderly. There is no deafness
or tinnitus. The vertigo lasts for several days, but complete recovery of
balance can take months or may never be achieved.
Otosclerosis
This is a localized disease of bone that affects the capsule of the inner ear.
Vascular, spongy bone replaces normal bone around the oval window and
may fi x the footplate of the stapes.
Otoscopic examination is usually normal. There may be progressive
conductive deafness manifesting after the second decade, possibly with
tinnitus and, rarely, vertigo. Pregnancy and lactation aggravate the condi-
tion. There is often a strong family history. Both ears are affected in >50%
of patients.
Benign positional vertigo
These are attacks of sudden-onset rotational vertigo provoked by lying
down fl at or turning over in bed. The condition is caused by crystalline
debris in the posterior semicircular canal. It can follow an upper respira-
tory tract infection or head injury, but often there is no preceding illness.
The Dix-Hallpike maneuver (also referred to as Nylen-Barany maneu-
ver) is diagnostic (see b p. 288). If diagnosed, the person should undergo
an Epley maneuver, which is often curative. This repositions the debris in
the posterior semicircular canal into the utricle.
Labyrinthitis
This is a localized infection of the labyrinth apparatus and is diffi cult to
distinguish clinically from vestibular neuronitis, unless there is hearing loss
due to cochlear involvement.
Acoustic neuromas
These are benign, slowly growing tumors of the vestibular element of
cranial nerve VIII. They usually present in middle age and occur more
frequently in females. Bilateral neuromas occur in 5% of patients.

IMPORTANT PRESENTATIONS
143
The early symptoms are unilateral or markedly asymmetric, progressive
sensorineural hearing loss and tinnitus. Vertigo is rare, but patients with
large tumors may have ataxia.
Presbycusis (senile deafness)
Presbycusis is a progressive loss of hair cells in the cochlea with age,
resulting in a loss of acuity for high-frequency sounds. It becomes clinically
noticeable from the age of 60–65 years, although the degree of loss and
age of onset is variable.
Hearing is most affected in the presence of background noise.
Glomus jugulare tumor
This is a highly vascular tumor arising from glomus jugulare tissue lying in
the bulb of the internal jugular vein or the mucosa of the middle ear.
It usually presents with a hearing loss or pulsatile tinnitus. Examination
of the ear may show a deep red mass behind the ear drum. Occasionally,
they are associated with other tumors, such as pheochromocytomas or
carotid body tumors.
Allergic rhinitis
In allergic rhinitis, inhaled allergens are responsible for an antigen–anti-
body type I hypersensitivity reaction.
Common allergens in seasonal allergic rhinitis (hayfever) are pollen
(including from grass) and fl owering trees. In perennial allergic rhinitis, the
principal allergens are animal dander, * dust mites, ** and feathers. Rarely,
digested allergens, such as wheat, eggs, milk, and nuts, are also involved.
The main symptoms include bouts of sneezing, a profuse rhinorrhea due
to activity of glandular elements, postnasal drip, nasal itching, and nasal
obstruction due to nasal vasodilatation and edema.
Nonallergic (vasomotor) rhinitis
This has all the clinical features of allergic rhinitis but the nose does not
respond to an antigen–antibody type 1 reaction. The reactions tend to be
to inhaled chemicals, such as deodorants, perfumes, or smoke, although
alcohol and sunlight can provoke symptoms.
Allergies can coexist, and some people seem to have instability of the
parasympathetic system in the nose, with excessive secretion of watery
mucus and congestion (vasomotor rhinitis).
Nasal polyps
Nasal polyps are pale, grayish, pedunculated, edematous mucosal tissue
that project into the nasal cavity. They most frequently arise from the
ethmoid region and prolapse into the nose via the middle meatus and are
nearly always bilateral.
In most cases, they are associated with nonallergic rhinitis and late-onset
asthma. Other causes to consider include chronic paranasal infection, neo-
plasia (usually unilateral ± bleeding), cystic fi brosis, and bronchiectasis.
*
The fi eld of allergy research is rather interesting. Cat allergy, for example, is actually an allergy to
one of the proteins in feline saliva—their fur is covered in it through licking.
**
Actually an allergy to dust mite feces.

CHAPTER 6 Ear, nose, and throat144
The main symptoms are watery anterior rhinorrhea, purulent postnasal
drip, progressive nasal obstruction, anosmia, change in voice quality, and
taste disturbance.
Septal perforation
Septal perforation may be idiopathic or caused by trauma (especially post-
operative nasal surgery), infection (e.g., tuberculosis, syphilis), neoplasia
(SCC, BCC, malignant granuloma), or inhaling cocaine and toxic gases.
The main clinical complaints include crusting, recurrent epistaxis, and a
whistling respiration.
Tonsillitis
Acute tonsillitis is uncommon in adults in comparison to its frequency in
children. The diagnosis is made from the appearance of the tonsils, which
are enlarged with surface exudates. The patient is usually systemically ill
with pyrexia, cervical lymphadenopathy, dysphagia, halitosis, and, in chil-
dren, abdominal pain.
Complications include peritonsillar abscess (quinsy) and retropharyn-
geal abscess.
Laryngitis
This is frequently associated with an upper respiratory tract infection and
is self-limiting. There may be associated secondary infection with Staph.
and Strep. species. The patient typically complains of hoarseness, malaise,
and fever. There may also be odynophagia, dysphagia, and throat pain.
Epiglottitis
0 This is a medical emergency. It is caused by group B Haemophilus infl u-
enzae. Epiglottitis is characterized by gross swelling of the epiglottis and is
seen primarily in 3- to 7-year-olds, although adults may also be affected.
Clinical features include pyrexia, stridor, sore throat, and dysphagia.
Remember the classic radiological feature, the “thumb sign.”
Croup (laryngotracheobronchitis)
Most cases are viral (parainfl uenza or respiratory syncytial virus). Croup
occurs mainly between the ages of 6 months and 3 years.
Branchial cyst
These are an embryological remnant of the branchial complex during
development of the neck. They are located in the anterior triangle just in
front of the sternomastoid.
Presentation is typically at the age of 15–25 years.

145
Cardiovascular system
Applied anatomy and physiology 146
Chest pain 148
Breathlessness and edema 150
Palpitations 152
Syncope 152
Other cardiovascular symptoms 153
The rest of the history 154
General inspection and hands 155
Peripheral pulses 157
The face and neck 161
Examining the precordium 165
Auscultating the precordium 167
The rest of the body 173
Important presenting patterns 175
The elderly patient 179
Chapter 7

CHAPTER 7 Cardiovascular system146
Applied anatomy and physiology
Cardiologists consider this system to be the most important one in the
body. This system is fundamentally straightforward, and a good deal of
information about its functioning can be gleaned from physical examination.
The basic anatomy of the cardiovascular system should be familiar to read-
ers. Following is a summary of some points that have particular implications
for the clinical assessment.
The heart
The heart rotates counterclockwise during embryonic development, fi nally
settling in such a way that the left ventricle lies almost entirely posteriorly
and the right anteriorly—the whole seeming to hang in the chest, held by
the aorta ( aorta comes from the Greek “aorte,” meaning “to suspend”).
The myocardium is arranged in a complex spiral such that a contraction
causes the heart to elongate and rotate slightly, hitting the anterior chest
wall as it does—this can be felt as the apex beat.
All of this movement is lubricated by a double-lined cavity fi lled with a
very small amount of fl uid that the heart sits in—the pericardial sac.
Heart sounds
As the ventricles contract, the tricuspid and mitral valves close, heard
as the fi rst heart sound. As the ventricles relax, intraventricular pressure
drops, and blood expelled into the great vessels begins to fall back, the
aortic and pulmonary valves slam closed—this is heard as the second
heart sound. The sounds are often described as sounding like lub dub .
As each heart sound is, in fact, two valves closing, any mistiming will
cause a double, or “split,” heart sound as one valve closes shortly after the
other. A split second heart sound is normal in young adults and children.
During inspiration, intrathoracic pressure drops, drawing blood into the
chest, i delivery to the right side of the heart, and d delivery to the left as
it pools in the pulmonary veins.
Consequently, the stroke volume will be greater on the right than on
the left and the right ventricular contraction will take slightly longer. Thus,
the pulmonary valve will close very slightly later than the aortic valve,
producing the split second sound ( lub da-dub ). This is called “physiological
splitting.” Split heart sounds are considered on b p. 168.
Jugular venous pulse (JVP)
There is no valve between the right heart and the large vessels supplying it.
Thus, fi lling and contraction of the right atrium will cause a pressure wave
to travel back through the vena cava. This can actually be seen in the neck
at the internal jugular vein (IJV). See b p. 161.
Arteries
As the ventricle expels blood into the arteries, it sends a pulse wave to
the periphery that can be felt. This is not the actual fl ow of blood from the
ventricle at that contraction but a pressure wave. The shape and feel of
the wave can be altered by the force of expulsion, any obstacles (such as
the aortic valve), and the state of the peripheral vasculature.

APPLIED ANATOMY AND PHYSIOLOGY
147
The arteries have their own intrinsic elasticity, allowing a baseline, or
diastolic, pressure to be maintained between each pulse wave.
Veins
Blood fl ows at a much lower pressure in the veins.
Above the level of the heart, gravity does most of the work in returning
the blood. Below, blood return is facilitated by contraction of muscles sur-
rounding the deep veins, helped by numerous one-way valves to prevent
backfl ow. Blood moves initially from the surface to the deep veins before
moving upward, again mediated by one-way valves (if these valves become
damaged, blood fl ows outward to the surface veins, causing them to swell
and look tortuous—varicose veins).
Blood return is also aided by a negative pressure created by blood being
pumped out of the right ventricle, and therefore drawn in through the
right atrium at each beat.

CHAPTER 7 Cardiovascular system148
Chest pain
This is the most common—and most important—cardiovascular symp-
tom. Patients who mention it may be surprised to fi nd themselves whisked
away for an ECG before they can say anything more. It is, however, usu-
ally possible to determine the probable cause of the pain with a detailed
history.
As for any other type of pain, the history must include the following:
• Nature (crushing, burning, aching, stabbing, etc.)
• Exact location
• Any radiation
• Severity (scored out of 10)
• Mode and rate of onset. What was the patient doing at the time?
• Change in the pain over time (and current score out of 10)
• Duration (if now resolved)
• Exacerbating factors (particularly, is it affected by respiration or
movement?)
• Relieving factors (including the use of nitroglycerin)
• Associated symptoms (nausea, vomiting, sweating, belching, etc.)
Patients with a history of cardiac pain can also tell you whether the pain
experienced is the same as or different from their usual angina.
Angina
Angina pectoris , or angina , is the pain caused by myocardial ischemia and
the buildup of toxic products of respiration in the muscle. This is usually
due to coronary artery disease but can also be caused by other cardiac
diseases, such as aortic stenosis or hypertrophic cardiomyopathy.
Angina comes from the Latin for “choking,” and this is often what the
patient describes. As the brain cannot interpret pain from the heart per
se, it is felt over the central part of the anterior chest and can radiate up
to the jaw or shoulder, or down the arms or even to the umbilicus. This
pattern is due to the common embryological origins of the heart and these
parts of the body. Indeed, some patients may experience angina pain only
in the arm, for example.
The “pain” of angina is usually an unfamiliar sensation; consequently,
patients may be more comfortable with the term discomfort .
In true angina, you can expect the following features:
• Retrosternal
• Descriptions such as “crushing,” “heaviness,” or “like a tight band”
• Worse with physical or emotional exertion, with cold weather, and
after eating
• Relieved by rest and nitrate spray, pill, or paste (within a couple of
minutes)
• Not affected by respiration or movement
• Sometimes associated with breathlessness
In addition, patients classically clench their right fi
st and hold it to their
chest when describing the pain.
In patients with known angina, a change in the nature of the symptom
is important. Ask them how much exercise they can do before feeling the
discomfort and whether this has changed.

CHEST PAIN
149
Myocardial infarction (MI)
Patients will know this as a “heart attack.” The pain is similar to that
of angina but much more severe, persistent (despite nitroglycerin), and
associated with nausea, sweating, and vomiting. Patients may also describe
a feeling of impending doom or death—angor animi.
Pericarditis
The most common causes are viral or bacterial infection, MI, or uremia.
• Constant retrosternal soreness
• Worse on inspiration (pleuritic pain)
• Relieved slightly by sitting forward
• Not related to movement or exertion
Esophageal spasm
This is often mistaken for MI or angina.
• A severe, retrosternal burning pain
• Onset often after eating or drinking
• May be associated with dysphagia
• May have a history of dyspepsia
• May be relieved by nitroglycerin, as this is a smooth muscle relaxant (hence
the confusion with angina). But nitroglycerin will take up to 20 minutes to
relieve this pain, whereas angina is relieved within a few minutes.
Gastroesophageal refl ux disease (“heartburn”)
• Retrosternal, burning pain
• Relieved by antacids, onset after eating
Dissecting aortic aneurysm
This must be differentiated from MI as thrombolysis here may prove fatal.
• Severe, “tearing” pain
• Felt posteriorly—classically between the shoulder blades
• Persistent, most severe at onset
• Patient is usually hypertensive and marfanoid (see b p. 68)
Pleuritic (respiratory) pain
This is covered in more detail in b Chapter 8. It may be caused by a wide
range of respiratory conditions, particularly pulmonary embolus (PE) and
pneumothorax.
• Sharp pain, worse on inspiration and coughing
• Not central—may be localized to one side of the chest
• No radiation
• No relief with nitroglycerin
• Associated with breathlessness, cyanosis, etc.
Musculoskeletal pain
This pain may be caused by injury, fracture, or chondritis, among other
etiologies. It is localized to a particular spot on the chest and worsens with
movement and respiration. The area may be tender to palpation.
Tietze’s syndrome is costochondritis (infl ammation of the costal carti-
lages) at ribs 2, 3, and 4. It is associated with tender swelling over the
costosternal joints.

CHAPTER 7 Cardiovascular system150
Breathlessness and edema
Breathlessness and edema are presented together here, as usually they are
linked pathophysiologically in the cardiovascular patient.
Excess tissue fl uid caused by a failing heart will settle wherever gravity
pulls it. In someone who is on their feet, it will settle in their ankles, caus-
ing swelling. If the patient is sitting in bed, the swelling will occur about
their sacrum, and if the patient is lying down, fl uid will collect in their lungs
(pulmonary edema), causing breathlessness.
Dyspnea (breathlessness)
Dyspnea is an abnormal awareness of one’s breathing and is described in
detail in Chapter 8. Certain aspects of breathlessness should be asked of
the cardiovascular patient in particular.
As with everything in clinical medicine, you must quantify the symptom,
if you are able, in order to gauge its severity and as a baseline so that the
effects of treatment or disease progression can be monitored. The New
York Heart Association (NYHA) has devised a classifi cation of breath-
lessness, shown in Box 7.1 . In practice, it makes sense to measure the
functional abilities of the patient. For example:
• How far can the patient walk on a level surface before they have to
stop (“march tolerance”)?
• What about stairs and hills—can they make it up a fl ight?
• Are they sure that they stop because of breathlessness or is it some
other reason (arthritic knees, for example)?
• Has the patient had to curtail their normal activities in any way?
Orthopnea
This is shortness of breath when lying fl
at. Patients will not usually volun-
teer this as a symptom, so ask them about the following:
• How many pillows does the patient sleep with and has this changed?
•
Some patients may describe having to sleep sitting upright in a chair.
• If the patient sleeps with a number of pillows, ask why. Are they
breathless when they lie down or is it for some other reason?
Paroxysmal nocturnal dyspnea (PND)
As the name suggests, PND constitutes episodes of breathlessness occur-
ring at night—usually thought to be due to pulmonary edema. Again,
patients won’t usually volunteer this information and will often react with
Box 7.1 Framework for the cardiovascular examination
• I-none at rest, some on vigorous exercise
• II-none at rest, breathless on moderate exertion
• III-mild breathlessness at rest, worse on mild exertion
• IV-signifi
cant breathlessness at rest and worse on even slight
exertion (the patient is often bed-bound)
Source: The Criteria Committee of the New York Heart Association (1994). Nomenclature and
Criteria for Diagnosis of Diseases of the Heart and Great Vessels . 9th ed. Boston: Little, Brown &
Co., pp. 253-256.

BREATHLESSNESS AND EDEMA
151
surprised pleasure when you ask them about it. Sufferers will experience
waking in the night spluttering and coughing—they fi nd they have to sit up
or stand and many go to the window for “fresh air” in an attempt to regain
their normal breathing.
• Do they wake up in the night coughing and trying to catch their
breath?
• If so, describe in as much detail as you can, including how often and
how badly the symptom is disturbing the patient’s sleep cycle.
Cough
Pulmonary edema may cause a cough productive of frothy white sputum.
This may be fl ecked with blood (pink) due to ruptured bronchial vessels.
Ankle edema
As already mentioned, in ambulatory patients, fl uid will collect at the
ankles and cause swelling. It is often surprising just how severe the swell-
ing can get before people seek medical attention. Ask the following:
• How long has this been going on for?
• Is it worse at any particular time of day? (Typically, cardiac edema is
worse toward evening and resolved somewhat overnight as the fl uid
redistributes itself.)
• Exactly how extensive is the swelling? Is it confi
ned to the feet and
ankles, or does it extend to the shin, knee, thigh, or even the buttocks,
genitalia, and anterior abdominal wall?
• Is there any evidence of abdominal swelling and ascites? (b p. 239)

CHAPTER 7 Cardiovascular system152
Palpitations
To have palpitations is to have an awareness of one’s own heartbeat. This
is one of the many situations in which the patient may have a very differ-
ent idea of the word’s meaning than yours. You should spend some time
understanding exactly what they mean. Patients may be unfamiliar with the
term altogether and instead describe the heart as “jumping,” “skipping,” or
“missing a beat.” Attempt to determine the following:
• When did the sensation start and stop?
• How long did it last?
• Did it come on suddenly or gradually?
• Did the patient lose consciousness? If so, for how long?
• Was the heartbeat felt as fast, slow, or some other pattern?
• Was it regular or irregular?
•
it is useful at this stage to ask the patient to tap out on their knee or
a nearby table what they felt.
• What was the patient doing when the palpitations started?
• Is there any relationship to eating or drinking (particularly tea, coffee,
wine, chocolate)?
• Could it have been precipitated or terminated by any medication?
• Has this ever happened before? If so, what were the circumstances?
• Are there any associated symptoms? (chest pain, shortness of breath,
syncope, nausea, dizziness)
• Did the patient have to stop their activities or lie down?
• Was the patient able to stop the palpitations somehow? (Often,
people discover they can terminate their palpitations with a vagal
maneuver, such as a Valsalva maneuver, a cough, or swallow.)
Syncope
This is a faint or a blackout. You must determine whether there truly was a
loss of consciousness and not simply the feeling that the patient was about
to faint (presyncope). In particular, can the patient remember hitting the
fl oor? If there really was a loss of consciousness, attempt to gain a collateral
history from witnesses. Ask about the following:
• Was the onset gradual or sudden?
• How long was the loss of consciousness?
• What was the patient doing at the time? (standing, urinating, coughing)
• Were there any preceding or associated symptoms such as chest pain,
palpitations, nausea, or sweating? (see Chest Pains, b p. 148, and
Palpitations, b p. 152, this chapter)
• Was there any relationship to the use of medication?
(Antihypertensives and use of nitroglycerin spray are common
culprits.)
• When the patient came to, were there any other symptoms remaining?
• Was there any tongue-biting or urinary or fecal incontinence?
• Was there any motor activity during the unconscious episode?
• How long did it take for the patient to feel “back to normal”?

OTHER CARDIOVASCULAR SYMPTOMS
153
Other cardiovascular symptoms
Claudication
This comes from the Latin “claudicatio” meaning “to limp.” These days,
however, it is used to describe muscle pain that occurs during exercise as
a sign of peripheral ischemia.
In true claudication, the patient describes the pain thus:
• Feels like a tight cramp in the muscle
• Usually occurs in the calf, thigh, buttock, and foot
• Appears only with exercise
• Disappears at rest
• May also be associated with numbness or pins-and-needles sensation
on the skin of the foot (blood is diverted from the skin to the ischemic
muscle).
As always, you should attempt to quantify wherever possible. In this case,
determine the “claudication distance”—that is, how far the patient is able
to walk before the pain starts. This will be useful in judging the severity
of the disability and in monitoring the condition.
Rest pain
This pain, similar to claudication, comes on at rest and is usually continu-
ous, a sign of severe ischemia. The patient may describe the following:
• Continuous, severe pain in the calf, thigh, buttock, or foot
• Aching in nature
• Lasts through the day and night
• Exacerbations of the pain may wake the patient from sleep.
• The patient may fi
nd slight relief by hanging the affected leg off the
side of the bed.
Fatigue
Fatigue is a diffi cult symptom to determine, as you will fi nd that most peo-
ple claim to be more tired than normal if asked. However, this pathological
fatigue is caused by d cardiac output and d blood supply to muscles and
needs to be taken seriously. Again, quantify and determine the following:
• Is the patient able to do less than they were previously?
• Is any d in activity due to fatigue or some other symptom
(e.g., breathlessness)?
• What activities has the patient had to give up because of fatigue?
• What are they able to do before they become too tired?

CHAPTER 7 Cardiovascular system154
The rest of the history
Cardiac risk factors
These are important aspects of the history that have an impact on the risk
of cardiovascular disease. When documenting a history of a cardiovascular
case, it is worth pulling these factors out of the usual order and document-
ing them, with details where appropriate, at the end of the presenting
complaint (as below). They should not then be repeated again later in the
write-up.
• Age: i risk with age
• Gender: risk in males > females
• Obesity: How heavy is the patient? (Calculate their BMI—see b p. 56.)
• Smoking: See b p. 38 for further advice. Quantify in pack-years. Don’t
be fooled by the “ex-smoker” that gave up yesterday!
• Hypertension: Find out when it was diagnosed. How was it treated? Is
it being monitored?
• Hypercholesterolemia: Increasingly, patients will know about this;
some will even know their latest blood test results. When was it
diagnosed? How is it being treated and monitored?
• Diabetes: what type? When was it diagnosed? How is it being treated
and monitored? What are the usual glucose readings?
• FH: particularly fi
rst-degree relatives who have had cardiovascular
events or diagnoses before the age of 60
Past medical history
Ask especially about the following:
• Angina—if the patient has nitroglycerin, ask how often they need to
use it and whether this use has changed signifi cantly
recently.
• MI—when? How was it treated?
• Ischemic heart disease—how was the diagnosis made? Any
angiograms? Any stent placements? What other investigations has the
patient had?
• Cardiac surgery—bypass? How many arteries?
• Atrial fi
brillation (AF) or other rhythm disturbance—what treatment?
On warfarin?
• Rheumatic fever
• Endocarditis
• Thyroid disease
Drug history
Take particular note of cardiac medications and attempt to assess com-
pliance and the patient’s understanding of what the medication does.
Remember, some recreational drug use can be a major cardiac stressor.
Social history
As in any other case, take note of the patient’s employment—both how
the disease has affected their ability to work and how any cardiac diagnosis
may affect the patient’s employability.
Also record the home arrangements—whether there are any caregivers
present, aids or adaptations, stairs, and so on.

GENERAL INSPECTION AND HANDS
155
General inspection and hands
The full examination framework is shown in Box 7.2 . While the order need
not be strictly adhered to, the authors feel that this is the easiest routine,
working from the hands and face to more intimate areas of the body.
Positioning
The patient should be seated, leaning back to 45*, supported by pillows,
with their chest, arms, and ankles (if appropriate) exposed. Their head
should be well supported, allowing relaxation of the muscles in the neck.
Ensure that the room is warm and that there is enough privacy. In an
exam condition, the patient should be undressed to their underwear with
appropriate drapes and gown.
If you intend to measure that patient’s blood pressure seated and stand-
ing (remember to have the patient stand for 3 minutes before measuring),
it may be wise to do this at the beginning of the examination.
General inspection
As always, take a step back and take an objective look at the patient.
• Do they look ill? If so, in which way?
• Are they short of breath at rest?
Box 7.2 Framework for the cardiovascular examination
Following is an example framework for a thorough examination of the
cardiovascular system—the information in this chapter is presented in a
slightly different order for the purpose of clarity.
This is the authors’ recommendation. Other methods exist and none
are right or wrong, so long as nothing is missed.
• General inspection
• Hands
• Radial pulse
• Brachial pulse
• Blood pressure
• Face
• Eyes
• Tongue
• Carotid pulse
• Jugular venous pressure and pulse waveform
• Inspection of the precordium
• Palpation of the precordium
• Auscultation of the precordium
• Auscultation of the neck
• Dynamic maneuvers (if appropriate)
• Lung bases
• Abdomen
• Peripheral pulses (lower limbs)
• Edema assessment
• Peripheral veins

CHAPTER 7 Cardiovascular system156
• Is there any cyanosis (see b p. 191)?
• What is their nutritional state?
•
Are they overweight?
•
Are they cachectic (underweight with muscle wasting)?
• Do they have features of any genetic syndrome such as Turner, Down,
or Marfan?
Hands
Take the patient’s right hand in yours as if to greet them, look at it care-
fully, and compare with the other side. Look especially for the following:
• Temperature (may be cold in congestive cardiac failure)
• Sweat
• State of the nails
•
Blue discoloration if peripheral blood fl ow is poor
•
Splinter hemorrhages (small, streak-like bleeding in the nail bed)
seen especially in bacterial endocarditis, but may also be a sign of
rheumatoid arthritis, vasculitis, trauma, or sepsis from any source
• Finger clubbing (see b p. 191). Cardiac causes include infective
endocarditis and cyanotic congenital heart disease.
• Xanthomata—raised yellow lesions caused by a buildup of lipids
beneath the skin. This is often seen on tendons at the wrist.
• Osler’s nodes—rare manifestation of infective endocarditis (a late sign,
and the disease is usually treated before this develops). There are red,
tender nodules on the fi
nger pulps or thenar eminence.
• Janeway lesions—nontender macular–papular erythematous lesions
seen on palm or fi
nger pulps as a rare feature of bacterial endocarditis

PERIPHERAL PULSES
157
Peripheral pulses
All of the major pulses are described below but should be examined in the
order described on the previous page. For each, you should attempt to
detect the rate and rhythm of the pulsation. For the brachial and carotid
pulsations in particular, you should also determine the volume and charac-
ter (waveform) of the pulse.
Technique
Examination technique is described below and illustrated in Fig. 7.1 .
It is good practice not to use your thumb to feel pulses, as you may mis-
take your own pulse (which can be felt weakly in the thumb) for the weak
pulse of the patient, especially in the peripheral arteries.
Radial artery
Feeling for the waveform is not useful here as it is too far from the heart.
Use the fi rst and second fi ngers to feel just lateral to the tendon of the
fl exor carpi radialis and medial to the radial styloid process at the wrist.
Brachial artery
Feel at the medial side of the antecubital fossa, just medial to the tende-
nous insertion of the biceps.
Carotid artery
This is the best place to assess the pulse volume and waveform.
Find the larynx, move a couple of centimeters laterally, and press back-
ward medial to the sternomastoid muscle.
0 Be sure not to compress both carotids at once, for fear of diminishing
blood fl
ow to the brain, particularly in the frail and elderly.
Femoral artery
This is another useful place for assessing the waveform unless there is
disease or abnormality in the abdominal aorta.
The patient is usually stripped to their underwear by this point in the
examination and should be lying on a bed or exam table with their legs
outstretched. Ask them to lower their clothes a little more, exposing the
groin area. The femoral pulsation can be felt midway between the pubic
tubercle and the anterior superior iliac spine.
Popliteal artery
This lies deep in the popliteal fossa and is surrounded by strong tendons. It
can be diffi cult to feel and usually requires more pressure than you expect.
There are several techniques but we recommend the following:
With the patient lying fl at and knees slightly fl exed, press into the center
of the popliteal fossa with tips of the fi ngers of the left hand and use the
fi ngers of the right hand to add extra pressure to these.
Posterior tibial artery
Palpate at the ankle just posterior and inferior to the medial malleolus.
Dorsalis pedis
This runs lateral to the exterior hallucis longus tendon on the superior sur-
face of the foot between the bases of the fi rst and second metatarsals.

CHAPTER 7 Cardiovascular system158
Pulse rate
This should be expressed in beats per minute (bpm). A rate <60 bpm is
called bradycardia whereas tachycardia is a pulse >100 bpm. A normal
healthy adult pulse rate should be 760–100 bpm.
(a) (b)
(c) (d)
(e)
(g)
(f)
Fig. 7.1 Palpation of the peripheral pulses. a) The radial pulse. b) The brachial
pulse. c) The carotid pulse. d) The femoral pulse. e) The popliteal pulse. f) The
posterior tibial pulse. g) The dorsalis pedis pulse.

PERIPHERAL PULSES
159
The most accurate method is to count the pulse for a full minute. In prac-
tice, count for a portion of this time and calculate the rate by multiplication.
Commonly, people count for 15 seconds and multiply the number by 4.
Rhythm
You should feel the pulse for as long as it takes to be sure of the rhythm. In
general, the pulse can be either regular or irregular but variations exist.
• Regular: a self-explanatory defi nition. Remember that the pulse rate
may
d with inspiration and i with expiration in the normal state.
• Irregularly irregular: a completely random pattern of pulsation
synonymous with AF. The atria twitch and contract in an irregular
fashion, sending electrical impulses to the ventricles (and, therefore,
causing contraction and arterial pulsation) at random intervals.
• Regularly irregular: not quite the contradiction that it seems—a
nonregular pulse can occur in some other regular pattern. For
example, pulsus bigeminus will cause regular ectopic beats, resulting in
alternating brief gaps and long gaps between pulses. In Wenckebach’s
phenomenon, you may feel increasing time between each pulse until
one is “missed,” and then the cycle repeats.
• Regular with ectopics: a very diffi
cult thing to feel and be sure of
without an ECG. A normal regular heart rate may be intermittently
interrupted by a beat that is out of step, making the pulse feel almost
irregularly irregular.
Character/waveform and volume
This is best assessed at the carotid artery. Feel for the speed at which the
artery expands and collapses and for the force with which it does so. This
takes some practice to master, and it may be useful to imagine a graph
such as those shown in Fig. 7.2 . Some examples follow:
• Aortic stenosis: a “slow rising” pulse, perhaps with a palpable shudder.
This is sometimes called anacrotic or a plateau phase.
• Aortic regurgitation: a “collapsing” pulse that feels as though it
suddenly hits your fi
ngers and falls away just as quickly. Try feeling at
the brachial artery and raising the arm above the patient’s heart. This is
sometimes referred to as a waterhammer
pulse.
• Pulsus bisferiens: a waveform with two peaks, found where aortic
stenosis and regurgitation coexist
• Hypertrophic cardiomyopathy: this pulse may feel normal at fi rst
but
recedes quickly. It is often described as “jerky.”
• Pulsus alternans: an alternating strong and weak pulsation,
synonymous with a severely impaired left ventricle in a failing heart
• Pulsus paradoxus: pulse is weaker during inspiration (causes include
cardiac tamponade, status asthmaticus, and constrictive pericarditis)
Other tests of arterial pulsation
These are not routinely performed unless the history and the rest of the
examination have made the examiner suspicious of the specifi c patholo-
gies that they represent.

CHAPTER 7 Cardiovascular system160
Radioradial delay
Feel both radial pulses simultaneously. In the normal state, the pulses will
occur together. Any delay in the pulsation reaching the radial artery on
one side may point to pathology, such as an aneurysm at the aortic arch
or subclavian artery stenosis.
Radiofemoral delay
Palpate the radial and femoral pulses on the same side simultaneously.
They should occur together. Any delay in the pulsation reaching the femo-
ral artery may point to aortic pathology, such as coarctation.
Normal
Slow rising e.g., aortic stenosis
e.g., aortic stenosis
mixed with
aortic regurgitation
e.g., aortic regurgitation
e.g., occluded artery, death
Bisferiens
Collapsing
None
Fig. 7.2 Graphical representation of different arterial pulse waveforms and their
causes.

THE FACE AND NECK
161
The face and neck
Face
Examine the patient’s face at rest. It’s a good idea to develop your own
pattern for this. The authors recommend starting with an overview, mov-
ing to the eyes, mouth, then neck. The order is not important as long as
all aspects are examined. Be sure to ask the patient to:
• Look up while you gently pull down one lower eyelid, exposing the
conjunctiva.
• Open wide. Look inside their mouth.
• Stick out their tongue.
In the cardiovascular examination, look especially for the following:
• Jaundice: seen as a yellow discoloration of the sclera
• Anemia: seen as an unusually pale conjunctiva (experience is needed here)
• Xanthelasma: yellow, raised lesions found particularly around the
eyes, indicative of high serum cholesterol
• Corneal arcus: a yellow ring seen overlying the iris. This is signifi cant
in
patients <40 years but not in older persons.
• Mitral facies: rosy cheeks suggestive of mitral stenosis
• Cyanosis: seen as a bluish discoloration of the lips and tongue
• High arched palate: suggestive of diseases such as Marfan syndrome
• Dental hygiene: periodontal disease is a common source of organisms
causing endocarditis.
Carotid pulse
At this point, the carotid pulse should be examined (b p. 157).
Jugular venous pressure
Theory
The jugular veins connect to the superior vena cava (SVC) and the right
atrium without any intervening valves. Therefore, changes in pressure in
the right atrium will transmit a pressure wave up these veins that can be
seen in the neck. By measuring the height of the impulse, the pressure in
the right side of the circulation can be expressed in centimeters.
Examination
It is often said that the JVP must only be measured in the internal jugular
vein (IJV). This is not strictly the case. The external jugular vein (EJV) is
easily seen as it makes a winding course down the neck (see Fig. 7.3 ). Its
tortuous course means that impulses are not transmitted as readily or as
reliably. It is for this reason that the IJV is used.
The center of the right atrium lies 75 cm below the sternal angle, which
is used as the reference point.
The normal JVP is 78 cm of blood (therefore 3 cm above the sternal
angle). With the patient tilted back to 45*, the upper border of the pulse is
just hidden at the base of the neck. This, therefore, is used as the standard
position for JVP measurement.
2 Remember, it is the vertical distance from the sternal angle to the
upper border of the pulsation that must be measured.
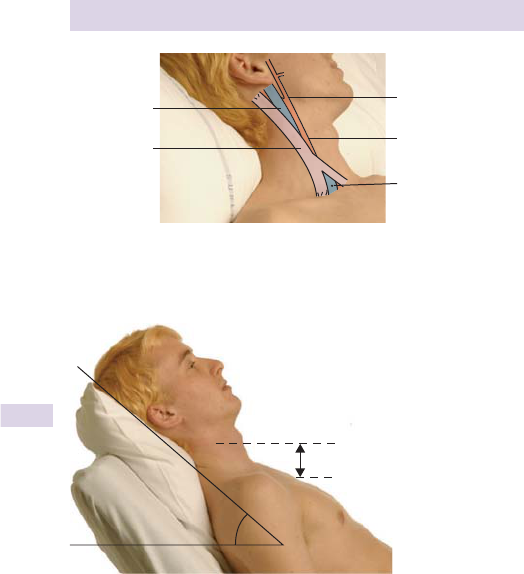
CHAPTER 7 Cardiovascular system162
2 You must add 5 cm to the fi gure to give the true JVP (see Fig. 7.4 ).
• With the patient lying back at 45*, expose the neck.
• Ask the patient to turn their head away from you (their left) and
ensure that the neck muscles are relaxed.
• Look for the JVP and measure the vertical distance from the top of the
pulsation to the sternal angle.
0 The result is often expressed along the lines of “3 cm above the
sternal angle.” Remember that that is a total JVP of 8 cm after adding the
extra 5 cm that are not measured.
• Try to look upward, along the line of the sternomastoid. Don’t get too
close, and use oblique lighting to make the pulsation more obvious.
2 It can sometimes be diffi
cult to distinguish the JVP from the carotid
pulse—see next section and
Table 7.1 for some advice.
External carotid
artery
Common carotid
artery
Point of access to
the IVJ between the
heads of the
sternomastoid
Internal
jugular vein
Sternomastoid
Fig. 7.3 The surface anatomy of the vasculature in the neck. Note that the IJV is
partly hidden by the sternocleidomastoid at the base of the neck.
45º
Max venous pulse
JVP
Sternal angle
Fig. 7.4 Measuring the JVP. Measure the vertical distance from the top of the
pulsation to the sternal angle and then add 5 cm to get the JVP.

THE FACE AND NECK
163
Differentiating jugular and carotid pulsations
The rules for differentiating the jugular and carotid pulsations ( Table 7.1 )
are guides only and not always true. For example, in severe tricuspid
regurgitation, the jugular pulse is palpable and is not easily abolished by
compression. If proving diffi cult, test the hepatojugular refl ex.
Hepatojugular refl ux
• Watch the neck pulsation.
• Exert pressure over the liver with the fl
at of your right hand.
The JVP should rise by approximately 2 cm; the carotid pulse will not.
Character of jugular venous pulsation
This is rather diffi cult to detect without experience (see Box 7.3 ). The
jugular pulsation has two main peaks (see Fig. 7.5 ). Establish the timing of
the peaks in the cardiac cycle by palpating the carotid pulse at the same
time. The key features are as follows:
• a wave: caused by atrial contraction; seen just before the carotid pulse
• c point: slight AV-ring bulge during ventricular contraction
• x descent: atrial relaxation
• v wave: tricuspid closure and atrial fi lling
• y descent: ventricular fi
lling as tricuspid valve opens
Table 7.1 Characteristics of normal jugular and carotid pulsations
Jugular pulsation Carotid pulsation
2 peaks (in sinus rhythm) 1 peak
Impalpable Palpable
Obliterated by pressure Hard to obliterate
Moves with respiration Little movement with respiration
Box 7.3 A word about honesty in learning
Students often fi nd the JVP hard to see while they are learning the vari-
ous examination techniques. This reminds the authors of an important
point.
In medicine, there is an almost overwhelming pressure to say “yes”
when asked, “Can you see that?” by the teacher. One may be moti-
vated by a fear of appearing stupid, taking too much of the teacher’s
time, or delaying the ward rounds further. If the real answer is “no,”
however, succumbing to this fear is useful to no one. The student fails
to learn the correct technique or the correct identifi cation of the sign,
and the teacher fails to discover that their demonstration is inadequate.
Misconceptions are born and passed on from person to person.
The authors thus urge students of medicine of all ages and at all stages
to say “no, please show me again” when this is needed, and we will all
be better for it.

CHAPTER 7 Cardiovascular system164
Findings
• Raised JVP: right ventricular failure, tricuspid stenosis, tricuspid
regurgitation, SVC obstruction, pulmonary embolus, fl uid overload
• Large a waves: caused usually by a hypertrophied right atrium
(pulmonary hypertension, pulmonary stenosis, tricuspid stenosis)
• Absent a wave: atrial fi brillation
• “Cannon” a waves: large, irregular waves caused by contraction of the
atrium against a closed tricuspid valve; seen in complete heart block
• Large v waves: regurgitation of blood though an incompetent tricuspid
valve
• Sharp y descent: characteristic of constrictive pericarditis
• Sharp x descent: characteristic of cardiac tamponade
Kussmaul’s sign
The JVP will d during inspiration in the normal state. The JVP will rise dur-
ing inspiration (Kussmaul’s sign) in the presence of pericardial constriction,
right ventricular infarction, or, rarely, cardiac tamponade.
aa
v
c
x
y
Fig. 7.5 Representation of the normal jugular venous pulsation.

EXAMINING THE PRECORDIUM
165
Examining the precordium
The precordium refers to that part of the chest overlying the heart.
Inspection and palpation are discussed below. Auscultation is discussed in
the next section (b p. 193).
Inspection
The patient should be lying at 45* with the chest exposed. Look for the
following:
• Scars—sternal split is used to access the median structures and to
perform coronary artery bypass graft (CABG) surgery. A left lateral
thoracotomy may be evidence of previous closed mitral valvotomy,
resection of coarctation, or ligation of a patent ductus arteriosus.
• Any abnormal chest shape or movements (b p. 167)
• Pacemaker or implantable defi
brillator—usually implanted over the left
pectoral region
• Any visible pulsations
Palpation
0 Before starting the exam, explain what you are going to do and how you
will do it, particularly to female patients. If possible, warm your hands.
General palpation
Place the fl
at of your right hand on the chest wall—to the left, then to the
right of the sternum. Can you feel any pulsations?
• Heave —this is a sustained, thrusting pulsation usually felt at the left
sternal edge indicating right ventricular enlargement.
• Thrill —this is a palpable murmur felt as a shudder beneath your hand.
It is caused by severe valvular disease (if systolic: aortic stenosis,
ventricular septal defect, or mitral regurgitation; diastolic: mitral
stenosis)
Palpating the apex beat
This is the lowermost lateral point at which a defi nite pulsation can be felt.
It is usually at the fi
fth intercostal space in the mid-clavicular line (Fig. 7.6).
Findings
• Abnormal position of the apex beat: usually more lateral than expected.
This is caused by an enlarged heart or disease of the chest wall. With
chronic lung disease, the apex may be more midline.
• No apex beat felt: usually caused by heavy padding with fat or internal
padding with an overinfl
ated emphysematous lung. It can sometimes
be felt by asking the patient to lean forward or laterally.
Character of the apex beat
This can only be learned with experience, after having felt many normal
impulses. Some common abnormalities are as follows:
• Stronger, more forceful: hyperdynamic circulation (e.g., sepsis, anemia)
• Sustained: impulse longer than expected (left ventricular hypertrophy,
aortic stenosis, hypertrophic cardiomyopathy or hyperkinesia)
• Double impulse: (palpable atrial systole) characteristic of hyptertrophic
cardiomyopathy
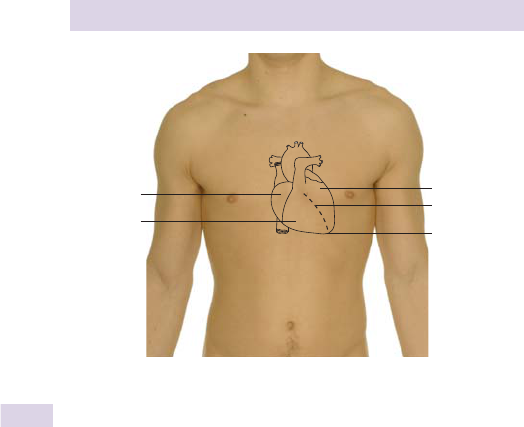
CHAPTER 7 Cardiovascular system166
• Tapping: the description given to a palpable fi rst heart sound in severe
mitral stenosis
• Diffuse: a poorly localized beat caused by left ventricular aneurysm
• Unpalpable: emphysema, obesity, pericardial effusion, or death
0 Beware of dextrocardia. If no beat is felt, check the right side.
Percussion
This is not useful and usually not included in the cardiovascular exam.
Right ventricle
Right atrium
Left ventricle
Ventricular
septum
Apex
Fig. 7.6 Surface anatomy of the heart and most common location of the apex
beat.

AUSCULTATING THE PRECORDIUM
167
Auscultating the precordium
Technique
The bell of the stethoscope is used to detect lower-pitched sounds; the
diaphragm, for higher-pitched sounds.
Auscultate at each of the four standard areas (Box 7.4; see Fig. 7.7).
0 These areas do not relate exactly to the anatomical position of the
valves but are areas at which the sound of each valve can be best heard.
Different methods exist for this examination. A sensible approach
would be to listen with the diaphragm at each area and then repeat, using
the bell. You can then go back and concentrate on any abnormalities. You
can then examine other areas looking for the features of certain murmurs
and extra sounds as described on the following pages.
Practice is needed here; many hearts should be listened to in order
to be familiar with the normal sounds. The physiology behind the heart
sounds and physiological splitting were described on b p. 146 and may be
worth revisiting at this point.
If you are unsure which is the fi
rst and second heart sound—or where a
murmur is occurring—you can palpate one carotid pulse while listening to the
heart, enabling you to “feel” systole. The carotid pulsation occurs with S
1
.
Box 7.4 The four areas for auscultation
• Mitral : fi fth intercostal space in the mid-axillary line (the apex)
• Tricuspid : fi
fth intercostal space at the left sternal edge
• Pulmonary : second intercostal space at the left sternal edge
• Aortic : second intercostal space at the right sternal edge
A = Aortic
P = Pulmonary
T = Tricuspid
M = Mitral
P
A
T
M
Fig. 7.7 The four standard areas for auscultation of the precordium and the valves
that are best heard at each area.

CHAPTER 7 Cardiovascular system168
0 Remember to palpate only one carotid pulse at a time.
Findings—the heart sounds
First heart sound (S
1
)
Mitral valve closure is the main component of S
1
, and the volume depends
on the force with which it closes.
• Loud: forceful closing (mitral stenosis, tricuspid stenosis, tachycardia)
• Soft: prolonged ventricular fi
lling or delayed systole (left bundle branch
block [LBBB], aortic stenosis, aortic regurgitation)
• Variable: variable ventricular fi
lling (AF, complete heart block)
Second heart sound (S
2
)
• Soft: d mobility of aortic valve (aortic stenosis) or if leafl ets fail to
close properly (aortic regurgitation)
• Loud: aortic component loud in hypertension or congenital aortic
stenosis (here the valve is narrowed but mobile). Pulmonary
component loud in pulmonary hypertension
Splitting of S
2
See also Applied anatomy and Physiology, this chapter (b p. 146).
• Exaggerated normal splitting: caused by a delay in right ventricular
emptying (right bundle branch block [RBBB], pulmonary stenosis,
ventricular septal defect, or mitral regurgitation)
• Fixed splitting: no difference in the extent of splitting between
inspiration and expiration. Usually due to atrial septal defect
• Reversed splitting: i.e., the pulmonary component of S
2
comes before
the aortic component. Caused by a delay in left ventricular emptying
(LBBB, aortic stenosis, aortic coarctation)
Third heart sound
This is a low-frequency (can just be heard with the bell) sound occurring
just after S
2
. It is described as a “triple” or “gallop” rhythm: da-da-dum or
ken-tuck-y . It occurs at the end of rapid ventricular fi lling, early in diastole,
and is caused by a shortening of the papillary muscles or by ventricular
distension.
• Physiological: soft sound heard only at the apex, normal in children and
fi
t adults up to age 30
• Pathological: indicates some impairment of left ventricular function or
rapid ventricular fi
lling (dilated cardiomyopathy, aortic regurgitation,
mitral regurgitation, or constrictive pericarditis). May be associated
with a high-pitched pericardial knock
Fourth heart sound
This is a late diastolic sound (just before S
1
) caused by d compliance
or i stiffness of the ventricular myocardium. It sounds like da-lub dub or
Ten-nes-see . It coincides with abnormally forceful atrial contraction and
raised end diastolic pressure in the left ventricle.
• Never physiological
• Causes are hypertrophic cardiomyopathy and systemic hypertension.

AUSCULTATING THE PRECORDIUM
169
Findings—murmurs
These are “musical” humming sounds produced by the turbulent fl ow of
blood. For each murmur heard, you should determine the following:
• Timing
• Site and radiation (where is it heard the loudest?)
• Loudness and pitch (see Box 7.5)
• Relationship to posture and respiration
The timing of the murmur is particularly essential in establishing the
sound’s origin. You must decide whether the noise occurs in systole or
diastole (feel the patient’s pulse at the carotid artery to be sure) and
then when, within that period, it occurs.
Systolic murmurs
Pansystolic
This is a murmur that lasts for the whole of systole and tends to be due
to backfl ow of blood from a ventricle to an atrium (tricuspid regurgita-
tion, mitral regurgitation). A ventricular septal defect will also cause a
pansystolic murmur.
Ejection systolic
These murmurs start quietly at the beginning of systole, quickly rise to
a crescendo, and then decrescendo, creating a whoosh sound. They are
caused by turbulent fl ow of blood out of a ventricle (pulmonary stenosis,
aortic stenosis, hypertrophic cardiomyopathy). They are also found if fl ow
is particularly fast (with fever, in healthy young adults).
Late systolic
There is an audible gap between S
1
and the start of the murmur, which
then continues until S
2
. Typically this is due to tricuspid or mitral regurgita-
tion through a prolapsing valve.
Diastolic murmurs
• Early: usually due to backfl ow through incompetent aortic or
pulmonary valves. It starts loudly at S
2
and decrescendos during
Box 7.5 Grading volume of a murmur
The experienced examiner should be able to give the murmur a grade
according to its loudness:
• 1—very quiet (students may only hear it if they have already been
told that it is there)
• 2—quiet but can be heard with a stethoscope wielded by an
examiner with some experience
• 3—moderate; easily heard
• 4—loud, obvious murmur
• 5—very loud; heard over the whole of the precordium and may be
accompanied by a palpable thrill
• 6—heard without the aid of a stethoscope

CHAPTER 7 Cardiovascular system170
diastole. (You can produce a similar sound by whispering the letter R
out loud).
• Mid-diastolic: begin later in diastole and may be brief or continue up to
S
1
. They are usually due to fl ow through a narrowed mitral or tricuspid
valve. They are lower pitched than early diastolic murmurs.
• Austin–Flint murmur: audible vibration of the mitral valve during
diastole as it is hit by fl
ow of blood due to severe aortic regurgitation
• Graham–Steele murmur: pulmonary regurgitation secondary to
pulmonary artery dilatation caused by i pulmonary artery pressure in
mitral stenosis
Continuous murmurs
These are murmurs heard throughout both systole and diastole. Common
causes include a patent ductus arteriosus or an arteriovenous fi stula.
Radiation
The murmur can sometimes be heard in areas where heart sounds are not
normally auscultated—the murmur will tend to radiate in the direction of
the blood fl ow that is causing the sound (see b p. 171 for summary).
For example, murmur of aortic stenosis will radiate up to the carotids,
whereas a mitral regurgitation murmur may be heard in the left axilla.
Position
Some murmurs will become louder if you position the patient in such a
way that gravity aids the fl ow of blood creating the sound.
• Aortic regurgitation is heard louder if you ask the patient to sit up and
lean forward; listen at the left sternal border.
• Mitral stenosis is louder if you ask the patient to lie on their left-hand
side (listen with the bell at the apex).
Dynamic maneuvers
The following may help in identifying the origin of a murmur.
• Respiration: Right-sided murmurs (e.g., pulmonary stenosis) tend to be
louder during inspiration and quieter during expiration (because of i
venous return—see b p. 169). Ask the patient to breathe deeply while
you listen. Left-sided murmurs are louder during expiration.
• Valsalva maneuver: This is forceful expiration against a closed glottis
(consider straining over the toilet bowl). Replicate by asking the
patient to blow into the end of a syringe, attempting to expel the
plunger. This will d cardiac output and cause most murmurs to
soften. Murmurs of hypertrophic obstructive cardiomyopathy, mitral
regurgitation, and mitral prolapse will get louder on release of Valsalva.
Findings—extra sounds
These are added sounds that are often associated with a specifi c mur-
mur—see Table 7.2 (b p. 171).

AUSCULTATING THE PRECORDIUM
171
Table 7.2 Selection of cardiac abnormalities and expected clinical fi ndings (see also b p. 175)
Abnormality Primary site of
murmur
Radiation Timing Added sounds* Graphical Representation
of the sounds
Aortic stenosis Aortic area and
apex
To carotid arteris Ejection systolytic Ejection click
(esp.bicuspid valve)
S
1
S
2
S
1
Aortic
regurgitation
Left sternal edge Toward apex Early diastolic (Austin-Flint murmur
b p. 170)
S
1
S
2
S
1
Mitral stenosis Apex Nil Mid-diastolic Opening snap
S
1
S
2
S
1
Mitral
regurgitation
Apex Toward left axilla
or base of left lung
Pansystolytic Mid-systolytic click
(if prolapsing)
S
1
S
2
S
1
Tricuspid
regurgitation
Lower left
sternal edge
Lower right sternal
edge, lung
Pansystolytic
S
1
S
2
S
1
Pulmonary
stenosis
Upper left
sternal edge
Left clavicular
region
Ejection systolytic
S
1
S
2
S
1
Ventricular
septal defect
Left sternal edge whole of the
precordium
Pansystolytic
S
1
S
2
S
1
*Note that added sounds, such as clicks and snaps, may only be present in certain patients and should not be expected when examining someone with a certain abnormality.

CHAPTER 7 Cardiovascular system172
Opening snap
The mitral valve normally opens immediately after S
2
. In mitral stenosis,
sudden opening of the stiffened valve can cause an audible high-pitched
snap. This may be followed by the murmur of mitral stenosis. If there is no
opening snap, the valve may be rigid.
This is best heard over the left sternal border with the diaphragm of
the stethoscope.
Ejection click
Similar to the opening snap of mitral stenosis, this is a high-pitched click
heard early in systole, caused by the opening of a stiffened semilunar valve
(aortic stenosis). It is associated with bicuspid aortic valves.
Ejection click is heard at the aortic or pulmonary areas and down the
left sternal border.
Mid-systolic click
Usually caused by mitral valve prolapse, this is the sound of the valve
leafl et fl icking backward (prolapsing) midway through ventricular systole.
It will be followed by the murmur of mitral regurgitation.
It is best heard at the mitral area.
Tumor plop
This is a very rare fi nding due to atrial myxoma. If there is a pedunculated
tumor in the atrium, it may move and block the atrial outfl ow during atrial
systole, causing an audible sound.
Pericardial rub
This is a scratching sound comparable to creaking leather that is heard
with each heartbeat and caused by infl amed pericardial membranes rub-
bing against each other in pericarditis. It is louder as the patient is sitting
up, leaning forward, and heard best in expiration.
Metallic valves
Patients who have had metallic valve replacement surgery will have an
obviously audible mechanical “click” corresponding to the closing of that
valve. These can often be heard without the aid of a stethoscope. Some
valves have both opening and closing clicks.
If a patient’s valve click is unusually soft, this may indicate dysfunction, e.g.,
thrombus or pannus.
All patients with prosthetic valves will have a fl ow murmur when the
valve is open.

THE REST OF THE BODY
173
The rest of the body
The lung bases
Examination of the lungs should form part of a thorough cardiovascular
examination (b Chapter 8). Look especially for crackles or sign of effusion.
The abdomen
See also b Chapter 9. Look especially for the following:
• Hepatomegaly. Is the liver pulsatile (severe tricuspid regurgitation)?
• Splenomegaly
• Ascites
• Abdominal aortic aneurysm
• Renal bruits (renal artery stenosis)
• Enlarged kidneys
Peripheral edema
This is an abnormal i in tissue fl uid resulting in swelling—its causes are
multiple but often due to heart failure. Edema is under gravitational con-
trol so will gather at the ankles if the patient is standing or walking, at the
sacrum if sitting, and in the lungs if lying (orthopnea, b p. 150).
• Make a note of any peripheral swelling, examining both the ankles and
the sacrum.
• Note if the edema is “pitting” (are you able to make an impression in it
with your fi
nger?—best tested over the anterior of the tibia).
• Note how high the edema extends (ankles, leg, thighs, etc.).
• If the edema extends beyond the thighs, it is important to examine the
external genitalia, particularly in men, where the swelling may cause
outfl ow
obstruction.
Varicose veins
Inspection
Varicosities appear as visible, dilated, tortuous, subcutaneous veins caused
by the backfl ow of blood from the deep veins (usually a branch of the long
saphenous vein).
• The patient should be examined in a standing position with the legs
fully exposed.
• Note any stasis changes, such as surrounding edema, eczema, brown
pigmentation, or ulcers.
Palpation
• Gently feel the varicose veins—hard veins may contain thrombus.
• Ask the patient to cough. If there is a palpable pulsation in the
varicosity, there may be valvular incompetence at the long saphenous
vein in the groin.
Percussion
• Apply the fi
ngers of one hand to the upper part of the varicose vein.
• Gently fl ick the lower part of the vein with the other hand.
•
If there is a palpable wave sent up the vein, there are incompetent
valves between those two points.

CHAPTER 7 Cardiovascular system174
Trendelenburg test
• Ask the patient to lie down and raise their leg so as to drain the veins.
• Apply a tourniquet over the saphenous vein (upper half of thigh).
• Ask the patient to stand.
•
You can then determine the site of the incompetent perforating
vein. Do the varicose veins fi ll above or below the tourniquet?
• Repeat the procedure until you are able to pinpoint the exact location
of the incompetence and, by applying localized pressure, prevent the
varicose veins from fi
lling at all.

IMPORTANT PRESENTING PATTERNS
175
Important presenting patterns
Valvular disease (see also b p. 171)
Mitral stenosis
• Symptoms: dyspnea, cough productive of frothy (pink?) sputum,
palpitations (often associated with AF and resultant emboli)
• Signs: palmar erythema, malar fl
ush, “tapping” apex beat, left
parasternal heave, loud S
1
, mid-diastolic murmur 9 opening snap
Mitral regurgitation
• Symptoms: acute dyspnea and pulmonary congestion
• Signs: collapsing pulse, sustained apex beat displaced to the left, left
parasternal heave, soft S
1
, loud S
2
(pulmonary component), pansystolic
murmur heard at the apex radiating to left axilla ± mid-systolic click,
third heart sound
Aortic stenosis
• Symptoms: angina, syncope, dyspnea, sudden death
• Signs: Slow rising pulse, low blood pressure, narrow pulse pressure,
sustained and powerful apex beat, ejection systolic murmur radiating
to carotids, soft S
2
, 9 ejection click
Aortic regurgitation
• Symptoms: similar to aortic stenosis
• Signs: collapsing pulse, wide pulse pressure, sustained and displaced
apex beat, soft S
2
, early diastolic murmur at the left sternal edge (often
described as “blowing” or decrescendo), 9 ejection systolic murmur
(i volume). You may also hear a “pistol shot” sound over the femoral
artery with severe aortic regurgitation. See also Box 7.6 .
Tricuspid stenosis
This usually occurs along with mitral or aortic valvular disease (e.g., in
rheumatic fever) and is often the less serious of the patient’s problems.
• Signs: auscultation similar to that of mitral stenosis, hepatomegaly,
pulsatile liver, and venous congestion
Box 7.6 Some eponymous signs of aortic regurgitation
• Prominent carotid pulsation (Corrigan’s sign)
• Head-nodding in time with the heartbeat (De Musset’s sign)*
• Pulsation of the uvula in time with the heartbeat (Mueller’s sign)
• Higher blood pressure in the legs than in the arms (Hill’s sign)
• Nailbed capillary pulsation (Quincke’s sign)
*
Abraham Lincoln probably had Marfan syndrome, given his tall stature and long arms. In addi-
tion, a study of old photographs shows that he had De Musset’s sign. During his lifetime cam-
eras had longer shutter speeds, and President Lincoln’s head-nodding caused his face to appear
blurred in photographs, compared with the people sitting around him.

CHAPTER 7 Cardiovascular system176
Tricuspid regurgitation
Signs include dilated neck veins, prominent v-wave in JVP that may, rarely,
cause the earlobe to oscillate, pansystolic murmur louder on inspiration
with a loud pulmonary component of S
2
, left parasternal heave, pulsatile
liver, peripheral and sacral edema, and ascites. You may also hear a third
heart sound and evidence of AF.
Pulmonary stenosis
Signs include normal pulse with an ejection systolic murmur radiating to
lung fi elds often with a palpable thrill over the pulmonary area. Other
signs of right heart strain or failure can also occur.
Pulmonary regurgitation
This is usually a coincidental fi nding.
• Signs: loud S
2
that may be palpable, early diastolic murmur heard at the
pulmonary area and high at the left sternal edge
Congenital heart disease
Ventricular septal defect (VSD)
• Symptoms: Children with VSD are often asymptomatic. If there is a
large defect, the patient may suffer congestive cardiac failure with
dyspnea and fatigue.
• Signs: There may be cyanosis and clubbing of fi
ngers. Heart sounds
usually appear normal, but if pulmonary hypertension develops, you may
hear a loud pulmonary component of S
2
with a right-ventricular heave.
A pansystolic murmur may also be heard at the left sternal edge, often
accompanied by a palpable thrill. The signs may settle with time; the
right heart pressure increases, causing less shunting and a softer murmur.
Atrial septal defect (ASD)
ASD is the most common congenital lesion and is often an asymptomatic
fi nding discovered on investigating a murmur.
• Symptoms of secondum defect: asymptomatic if small. Symptoms include
fatigue, dyspnea, palpitations (atrial arrythmias), recurrent pulmonary
infections, and other symptoms of right heart failure. This defect is also
associated with migraine and paradoxical emboli.
• Symptoms of primum defect: These include symptoms of heart
failure in childhood with failure to thrive, chest infections, and poor
development. In adults, there may be syncope (heart block) and
symptoms suggestive of endocarditis.
• Signs: fi
xed splitting of S
2
, i fl ow over the normal pulmonary valve may
give an ejection systolic murmur. There is also left parasternal heave
with a normal or diffuse apical impulse. Particularly in ostium primum
defects (endocardial cushion defects), you may hear the pansystolic
murmur of mitral regurgitation or coexisting VSD (or both). Look also
for signs of pulmonary hypertension.
Patent ductus arteriosus (PDA)
PDA is a persistent embryonic connection between the pulmonary artery
and the aorta. Blood fl ows from the aorta into the pulmonary artery.

IMPORTANT PRESENTING PATTERNS
177
• Symptoms: often asymptomatic. Severe cases show dyspnea on
exertion.
• Signs: collapsing pulse, heaving apex beat, “machinery” (continuous)
murmur heard all over the precordium, S
2
not heard, systolic or
diastolic thrill in the second intercostal space on the left
Coarctation of the aorta
This is a congenital narrowing of the aorta at or beyond the arch.
• Symptoms: usually asymptomatic. Symptoms may include headache,
epistaxis, dizziness, and palpitations. Claudication, leg fatigue are
also features. The coarctation may cause the heart to strain and give
symptoms of congestive cardiac failure.
• Signs: i blood pressure in the upper limbs, radiofemoral delay, ejection
systolic murmur at the left sternal edge, sometimes palpable collateral
arteries over the scapulae with interscapular bruits. Patients may also
have underdeveloped lower limbs.
• Coarctation is often associated with aortic stenosis, aortic aneurysms,
and bicuspid aortic valves. It is also seen in Turner syndrome.
Tetralogy of Fallot
This consists of pulmonary stenosis, VSD (infundibular), right ventricular
hypertrophy, and an overriding aorta. (If associated with an ASD as well,
this is Fallot’s pentalogy.)
• Symptoms: syncope, squatting relieves breathlessness, growth
retardation
• Signs: fi
nger clubbing and central cyanosis with superadded paroxysms
(“spells”). Murmurs of pulmonary stenosis or the VSD may be heard
along with a systolic thrill and left parasternal heave.
Pericarditis
Causes include collagen diseases, infections such as TB, postinfarction, and
idiopathic causes.
• Symptoms of acute pericarditis: constant retrosternal soreness, worse
on inspiration (pleuritic), relieved slightly by sitting forward, not
related to movement or exertion
• If chronic, constrictive, may cause Kussmaul’s sign, impalpable apex beat,
S
3
, hepatomegaly, splenomegaly, ascities (pseudo-cirrhosis)
Pericardial effusion
• Pulsus paradoxus, i JVP, impalpable apex beat, soft heart sounds,
hepatomegaly, ascites, peripheral edema
Ischemic heart disease
See bw p. 148.
Congestive heart failure (CHF)
In simple terms, this refers to the inability of the heart to maintain an
adequate cardiac output for perfusion of vital organs with variable severity.
It is usually described in terms of “left” and “right” heart failure, but there
is usually an element of both (biventricular).

CHAPTER 7 Cardiovascular system178
Left ventricular failure
• Symptoms may include shortness of breath on exertion, orthopnea,
paroxysmal nocturnal dyspnea, cough with pink frothy sputum, fatigue,
weight loss, muscle wasting, and anorexia.
• Signs: The patient may appear tired, pale, sweaty, and clammy, and have
tachycardic, thready pulse, low blood pressure, narrow pulse pressure,
displaced apex beat (murmur of an underlying valvular abnormality?), third
and fourth heart sounds, tachypnea, and crepitations at the lung bases.
Right ventricular failure
• Symptoms: as for LV failure, with peripheral edema and facial swelling
• Signs: many of those of LV failure. Also i JVP, hepatomegaly, ascites,
peripheral (sacral?) edema, pulsatile liver (if tricuspid regurgitation)
Hypertrophic cardiomyopathy
There may be a family history, although the vast majority of cases are
sporadic, caused by new mutations.
• Symptoms: often none. If they are present, the patient may suffer from
shortness of breath, angina, and syncope.
• Signs: sharp, rising (jerky) pulse, prominent JVP a-wave, double apex
beat, late systolic murmur at left sternal border that i with Valsalva
maneuver
Peripheral vascular disease
• Symptoms: claudication, as on b p. 153.
• Signs: (see also Box 7.7 ) shiny, pale, cold limb, hair loss, absent peripheral
pulse(s). If severe, ischemic ulceration and gangrene can occur.
Deep vein thrombosis (DVT)
DVT is often confused with cellulitis and a ruptured popliteal cyst.
• Symptoms: calf pain, swelling, and loss of use
• Signs: warm, tense, swollen limb, erythema, dilated superfi cial
veins,
cyanosis. There may be palpable thrombus in the deep veins. Often
there is pain on palpating the calf.
Box 7.7 The acutely ischemic limb
Use the rule of Ps. The acutely ischemic limb will be
• P ainful (at fi
rst, then becoming)
• P ainless (numb)
• P ale
• P aralyzed
• P ulseless

THE ELDERLY PATIENT
179
The elderly patient
Geriatricians are equally interested in cardiovascular disease—with an
aging population, the prevalence of cardiac, peripheral vascular, and stroke
disease will rise. While age is one of many risk factors for vascular disease,
older people are one of the biggest groups to benefi t from primary and
secondary risk factor reduction, so be comprehensive in all assessments.
A careful history is of far more use than an inaccurate one and a list of
physical fi ndings.
History
Angina
Angina presents in a multitude of ways. Avoid labeling the symptoms as
pain (which can irritate many patients); instead, listen to their complaints:
“discomfort,” “twinges,” and “aches” are equally common presentations.
Many older people have few symptoms and may present with sweating or
breathlessness. Be astute and ask if these relate to exertion.
Orthopnea
Ask why patients sleep on extra pillows. Often this is due to other symp-
toms, such as arthritis. Do they sleep upright in a chair?
Breathlessness
This relates to a low-output state and not necessarily to pulmonary edema.
Fatigue is a common presenting symptom and should not be overlooked.
Drug history
There is always a diffi cult balance of compliance, managing symptoms,
achieving target doses, and avoiding side effects. Avoid rushing to optimize
doses and upsetting a careful regimen. Ask about B-blocker eye drops, as
they can be absorbed systemically and exert signifi cant effects.
Lifestyle
Ask about smoking and seek opportunities to explore smoking cessa-
tion—it’s never too late! Ask about alcohol use, as this may have a bearing
on decisions around anticoagulation. Advice about healthy eating is often
welcome; healthy eating is more palatable than more tablets.
Functional history
As ever, this is a key part of all histories. Targeted interventions, such
as help with bathing to avoid overexertion (and symptoms), can have a
signifi cant impact.
Examination
General
Look for clues—e.g., the breathless patient returning from the bathroom,
the nitroglycerin spray close at hand.
Ausculate and think
Think especially about valve lesions. It is important to assess how much
a valvular problem could be contributing to a patient’s symptoms and
arrange for investigations to confi rm this. Aortic valve replacement and
CABG are often hugely successful in older people.

CHAPTER 7 Cardiovascular system180
Edema
Be careful when palpating—contrary to popular teaching, pitting and non-
pitting edema are painful! Could it be gravitational?
Peripheral pulses
These are often overlooked but are a vital part of the examination.
Document them carefully, and look for skin changes and ulceration that
might be causing signifi cant problems but are not necessarily raised in the
history.
Additional points
Alternative diagnoses
Respiratory illnesses often overlap and may mimic, e.g., pulmonary fi brosis
and left ventricular failure. If things don’t add up or there is little response
to treatment, revisit your diagnosis.

181
Respiratory system
Applied anatomy and physiology 182
Dyspnea 184
Cough and expectoration 185
Other respiratory symptoms 187
The rest of the history 188
General appearance 190
Hands, face, and neck 191
Inspection of the chest 193
Palpation 194
Percussion 196
Auscultation 198
Important presenting patterns 200
The elderly patient 201
Chapter 8

CHAPTER 8 Respiratory system182
Applied anatomy and physiology
Anatomy
The respiratory tract extends from the nostrils to the alveoli and includes
the pulmonary blood supply. Clinically, it is divided into the upper respi-
ratory tract, which is the nose and pharynx, and the lower respiratory
tract, which consists of the larynx and all distal structures.
Trachea, bronchi, and bronchioles
The trachea lies in the midline deep to the sternal notch and divides into
the left and right main bronchi at the carina , level with the sternal angle.
There are about 25 further divisions before reaching the alveoli. The last
16 orders are termed bronchioles and differ from the bronchi by having no
cartilage, fewer goblet cells, and progressively less muscular walls.
Lungs
The right lung has three lobes (upper, middle, and lower) whereas the left
lung has two (upper and lower); see Fig. 8.1. Note the angle of the oblique
fi ssure, dividing the upper and lower lobes such that examination of the
anterior chest is mostly that of the upper (and middle) lobes; examination
of the back is of the lower lobe.
The right middle lobe sits anterior, separated from the upper lobe by
the horizontal fi ssure. The chest wall corresponding to this is between the
right fourth and sixth ribs anterior and is easily missed. The same area on
the left is the lingula , part of the left upper lobe, which reaches around the
anterior side of the heart.
The slant of the diaphragm is such that the inferior border of the lungs is
at the sixth rib anterior but extends down to the twelfth posterior.
Physiology
Lung function
Ventilation is under the infl uence of the respiratory center in the brain.
This, in turn, can be infl uenced by higher voluntary centers and by chem-
oreceptors that respond to changes in blood gas partial pressures. In
health, the most important ones are the brainstem chemoreceptors,
stimulating breathing in response to rising blood CO
2
.
The main muscle of breathing is the diaphragm, innervated by the
phrenic nerve. Contraction causes a fl attening of the central part and
a slight elevation of the peripheral parts. This causes expansion of the
chest cavity, and as the intrathoracic pressure drops, air is sucked into the
lungs. The intercostal and scalene muscles maintain the chest wall stability.
When a larger inspiration is needed, these “accessory” muscles, including
the sternocleidomastoids, act to further expand the chest.
Expiration is largely passive, the air being expelled as the lungs recoil
under their innate elasticity.
Aside from inadequate ventilation, ineffective lung functioning can
result from inadequate perfusion of the ventilated areas. Also, impaired
gas transfer across the alveoli may be a factor—either by a thickening of
the wall (e.g., fi brosis), a loss of surface area (as in COPD), or fl uid in the
alveoli, such as edema, pus, or blood.
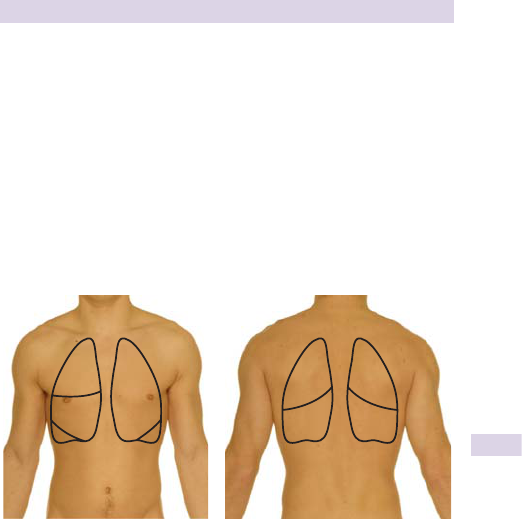
APPLIED ANATOMY AND PHYSIOLOGY
183
Defense
Mechanical defense against infection includes the narrow passages of the
nose as well as the larynx, which separates the respiratory and gastrointes-
tinal (GI) tracts. Cough receptors in the pharynx and lower airways initiate
mechanisms resulting in a deep inspiration, followed by expiration against
a closed glottis and a sudden glottal opening. This causes a rapid, forceful
expulsion of air, which we know as a cough.
Most of the respiratory tract is lined with mucous secreted from goblet
cells that catch small particles and microbes. This is continuously swept
upward toward the larynx by beating cilia on the epithelium.
In the smaller airways and alveoli, macrophages and a variety of secreted
defensive proteins act against microbes at a microscopic level.
UL UL
LL LL
UL
ML
UL
Fig. 8.1 Surface anatomy of the lungs. UL, upper lobe; ML, middle lobe;
LL, lower lobe.

CHAPTER 8 Respiratory system184
Dyspnea
Defi ning dyspnea
Shortness of breath (SOB), or dyspnea , is the sensation one has when using
an abnormal amount of effort to breathe. Patients may describe “breath-
lessness,” an inability to “get their breath,” or being “short-winded.”
“Tightness” is often described and may actually be the sensation of air-
way narrowing, as in asthma, or may be chest pain, as in cardiac disease.
Tease out exactly what the patient means by this.
0 Pleuritic chest pain is worse at the height of deep inspiration; patients
may say they are “not able to get their breath.” While their complaint is of
breathlessness, their actual problem is pain on inspiration. Ask if they feel
the need to breathe faster than normal or are unable to breathe deeply. If
the latter, ask if that is due to pain or to some other sensation. If in doubt,
ask the patient to take a deep breath and watch the results.
Onset and duration
How quickly did SOB come on? Pulmonary embolus, pneumothorax, and
asthmatic attacks can come on suddenly. Pneumonia, heart failure, and
anemia cause SOB that worsens over days or weeks. Smoking-related lung
disease, by contrast, causes i breathlessness over many years.
Slower onsets are poorly reported. The patient often reports the onset
of a worsening of breathlessness. Ask when they were last able to run up
the stairs, and the real duration of breathlessness becomes apparent.
Severity
Several classifi cations exist, but it is often more useful to quantify severity
in terms of functional impairment. Ask, “How far can you walk before you
have to stop? How many fl ights of stairs can you manage?” Restriction of
hobbies such as gardening and dancing are also useful guides.
0 Be sure that activities are restricted by SOB and not by arthritic hips
or knees, chest pain, or some other ailment.
Exacerbating and relieving factors
What makes the breathlessness worse? Can it be reliably triggered by a
particular activity or situation? Divide symptoms into SOB at rest and SOB
on exertion and quantify as above. Remember to ask about position, e.g.,
orthopnea (b Chapter 7, p. 150).
Has the patient used inhalers? How frequently are they used? Did they
help?
Associated symptoms
See the following pages for a full breakdown. Be aware of hyperventilation,
in which the d of blood CO
2
will cause paresthesia in the lips and fi ngers
along with light-headedness and, in severe cases, tetany.

COUGH AND EXPECTORATION
185
Cough and expectoration
Cough
Cough is a common but often overlooked symptom in respiratory dis-
ease usually caused by upper respiratory infection (URI) and/or smoking.
Duration of cough is important, as well as character, exacerbating factors,
and whether any sputum is produced.
Note that cough may be the only symptom of childhood asthma.
Chronic cough is that lasting >3 weeks and may be caused by asthma,
carcinoma, interstitial disease and bronchiectasis, gastroesophageal refl ux
disease, and postnasal drip.
0 Smokers will have a chronic cough, particularly in the mornings, so a
history of a change in pattern is important.
The character of the cough often reveals the cause (Table 8.1).
Associated pain is common and the patient will be able to localize it
to the upper respiratory tract (e.g., laryngitis; tracheitis is particularly
painful) or the chest wall (i.e., pleurisy secondary to lobar pneumonia or
collapse).
Remember nonpulmonary causes: postnasal drip (dry, tickly), gastro-
esophageal refl
ux (dry), pharyngeal pouch or tracheoesophageal fi stula
(worse after eating or lying down), and angiotensin-converting enzyme
(ACE) inhibitors (dry).
Sputum
Sputum is excess respiratory secretions that are coughed up. Patients will
usually understand the term phlegm or mucous better. Features to inquire
about include the following: How often? How much? How diffi cult is it to
cough up? Color? Consistency? Smell?
Table 8.1 Some characteristic coughs
Cause Character
Laryngitis Cough with a hoarse voice
Tracheitis Dry and very painful
Pleurisy Sharp pain (chest wall)
Postnasal drip Tickly
Asthma Chronic, paroxysmal, worse after
exercise and at night
Esophageal refl ux Dry and nauseating. Often fi rst
thing in the morning.
Tracheo-esophageal fi stula (rare) Nauseating and worse after eating
Epiglottitis Barking
Laryngeal nerve palsy “Bovine” hollow, brassy
Left heart failure Productive and worse on lying fl at

CHAPTER 8 Respiratory system186
Attempt to quantify sputum production in terms of well-known objects,
such as teaspoons, etc. Mucoid sputum is white or clear in color but can
be turned gray in cigarette smokers. Yellow or green sputum is termed
purulent and usually indicates infection, although eosinophils in the sputum
of asthmatics can also produce a green color. See Table 8.2.
Harder “plugs” of sputum from the airways are seen in asthmatic spu-
tum. Miniature tree-like bronchial casts are produced in bronchopulmo-
nary aspergillosis.
Hemoptysis
The coughing up of blood can vary from streaks or a pink hue (e.g., CHF)
to massive, life-threatening bleeds. Establish the amount, color, frequency,
and nature of any associated sputum. (Massive hemoptysis = >500 mL
in 24 hours.) Hemoptysis is easily confused with blood originating in the
nose, mouth, and GI tract (hematemesis). Ask about, and check for, bleeds
in these areas.
Causes of hemoptysis include bronchitis, carcinoma, pulmonary embo-
lus, and infarction, TB, cystic fi brosis, and lung abscesses. Infective causes
will usually produce blood-stained sputum, not pure hemoptysis.
Be alert to other potential sites of bleeding (skin, GI tract, mouth) that
could point to a coagulation disorder.
Table 8.2 Some characteristics of sputum
Nature of sputum Causes
White/gray Asthma
Smoking
Green/yellow Bronchitis
Bronchiectasis
Green and offensive Bronchiectasis
Abscesses
Sticky, rusty Lobar pneumonia
Frothy, pink Congestive cardiac failure
Separates to 3 layers
(mucoid, watery, rusty)
Severe bronchiectasis
Very sticky, often green Asthma
Sticky, with “plugs” Allergic aspergillosis
(complication of asthma)

OTHER RESPIRATORY SYMPTOMS
187
Other respiratory symptoms
Wheeze
This is a high-pitched, whistling, “musical” sound produced by narrowing
of airways, large or small. It occurs with inspiration and expiration, but is
usually louder and more prominent in the latter. If it is due to small-airway
narrowing, as in asthma, it will be accompanied by a prolonged expiratory
phase.
Causes include asthma, smoking-related lung disease, mucosal edema,
airway obstruction, airway collapse, and pulmonary edema (cardiac
asthma).
Stridor
Stridor has a harsh “crowing” inspiratory and expiratory sound with a
constant pitch. It signals large-airway narrowing, usually at the larynx or
trachea. It can precede complete airway obstruction so is treated as a
medical emergency.
Hoarseness and dysphonia
This is described in b Chapter 6 on p. 130.
Pain
Chest pain is explored fully in Chapter 7 (b p. 148). Pain arising from
respiratory disease is usually pleuritic in nature and arises from the chest
wall, parietal pleura, or mediastinum, as the lungs have no pain fi bers. It
is felt as a severe, sharp pain at the height of inspiration or on coughing.
It is usually localized to a small area of chest wall. Note that patients will
avoid deep breathing and may complain of breathlessness (see Dyspnea,
this b chapter, p. 185).
Pain resulting from lung parenchymal lesions may be dull and constant
and is usually an ominous sign of spread into the chest wall.
The pain of tracheitis is a poorly localized, central soreness. Dia-
phragmatic pain may be felt at the ipsilateral shoulder tip, while pain from
the costal parts of the diaphragm may be referred to the abdomen.
In general, muscular and costal lesions will be tender to touch over
the corresponding chest wall and exacerbated by certain twisting move-
ments, whereas pleurisy is not, although this is not always the case.
Costochondritis is a common cause of pleuritic pain, of which Tietze’s
syndrome is a specifi c cause associated with pain and swelling of the supe-
rior costal cartilages.
Pain in a nerve-root distribution may be due to spinal lesions or herpes
zoster virus (HZV).

CHAPTER 8 Respiratory system188
The rest of the history
Other symptoms
Fever
Fever, particularly at night, may be a sign of infection such as TB, malig-
nancy, or a connective tissue disorder.
Weight loss
This can be a symptom of carcinoma, chronic lung disease, or chronic
infection. Attempt to quantify any loss (how much in how long?).
Peripheral edema
Edema manifesting as ankle swelling at the end of the day may be a sign
of right heart failure secondary to chronic lung disease (cor pulmonale).
If severe enough, patients may exhibit signs and symptoms of left heart
failure (see b Chapter 7, p. 177).
Obstructive sleep apnea
This is caused by upper-airway obstruction by the fl accid palatal muscles
during REM sleep. This causes snoring and progressive hypoxia, which
briefl y wakes the patient from sleep, often accompanied by thrashing
around, disturbing those sharing the bed. The bedtime partner will
graphically tell this tale. The patient will describe early-morning head-
aches caused by CO
2
retention and daytime somnolence from sleep
deprivation.
Past medical history
• Vaccination for respiratory illnesses, particularly bacillus Calmette-
Guérin (BCG)
• Previous respiratory infections, especially TB before 1950, when
operations could result in lifelong deformity
• X-ray abnormalities previously mentioned to the patient
• Childhood (a frequently coughing child may have had undiagnosed
asthma)
• Previous intensive care unit (ICU) admissions or respirator
dependency
Drug history
• What inhalers are used and how often? Check inhaler technique.
• Previous successful use of bronchodilators and steroids
• Oral steroid therapy predisposes to infection and TB especially.
• B-blockers may exacerbate obstructive lung diseases.
• ACE inhibitors cause a dry cough.
• If O
2
therapy—cylinders or concentrator? How many hours a day?
• Illicit drug use (Cocaine is associated with respiratory disease.)
Family history
• Asthma, eczema, and allergies
• Inherited conditions (e.g., cystic fi brosis [CF], A1-antitrypsin defi ciency)
• Family contacts with TB

THE REST OF THE HISTORY
189
Smoking
Attempt to quantify the habit in pack-years: 1 pack-year is 20 cigarettes
per day for 1 year (e.g., 40/day for 1 year = 2 pack-years; 10/day for 2
years = 1 pack-year).
0 Beware of appearing judgmental.
Ask about previous smoking, as many patients will call themselves non-
smokers if they gave up yesterday or even on the way to the hospital!
Remember to ask about passive smoking.
Alcohol
Alcohol abusers are at greater risk of chest infections, and bingeing may
result in aspiration pneumonia.
Social history
Pets
Dogs and cats are a common source of allergens. Also ask about birds and
caged animals. Ask about exposure beyond the home, at homes of close
friends and relatives, and hobbies involving animal exposure.
Travel
Ask about travel (recent or previous) to areas where respiratory infec-
tions are endemic. Think particularly about TB. Remember that Legionella
can be caught from water systems and air-conditioning even in developed
countries.
Occupation
This factor is more important in chest medicine than in any other fi eld. Be
alert to exposure to asbestos, coal, cotton, nitrogen dioxide, metals such
as tin, silver, iron oxide, and titanium, and hay, air conditioner systems,
and so on.
Trace the patient’s occupational history back, as there may be a lag of
20 or 30 years between exposure and resultant disease. Remember that
exposure may not be obvious and that the patient may have been unaware
of it at the time. Plumbers, builders, and electrical engineers may have
been exposed to asbestos in the past.
Ask also about close personal contacts—partners may be signifi cantly
exposed by handling and washing clothing, for example (although this is
relatively rare).

CHAPTER 8 Respiratory system190
General appearance
Respiratory patients may be short of breath, and it may be easiest to
examine them sitting at the edge of the bed instead of in the classic posi-
tion of sitting back at 45 * . Choose a position comfortable to you both. The
patient should be undressed to the waist.
As ever, a surprising amount of information can be obtained by observ-
ing the patient before touching the patient.
Bedside clues
Look for evidence of the disease and its severity around the patient:
• Inhalers? Which ones?
• Any additional inhaler devices?
• Nebulizer?
• Is the patient receiving O
2
therapy? If so, how much and by what
method (i.e., face mask, nasal cannula, etc.)?
• Sputum container? Sputum-laden tissues?
• Remember to inspect the sputum carefully and to record the fi ndings.
• Any mobility aids nearby?
• Look for cigarettes, lighter, or matches at the bedside or in a pocket.
Respiration
Watch the patient from the foot of the bed. Or watch them approach
your clinic room.
• Do they appear out of breath at rest?
• If so, do they appear in distress?
• Are they breathing through the mouth or the nose?
• Are they breathing through pursed lips? (i the expiratory
pressure—an indication of smoking-related lung disease)
• If mobile, did they have to stop on the way to the room? How quickly
did they recover?
• Count the respiratory rate. At rest, this should be <12/minute.
• Are the breaths of normal volume?
• Are they using the accessory respiratory muscles (e.g.,
sternomastoids)?
• Are they using their arms to splint their chest? (The classic position is
sitting forward, hands on knees.)
Speech
• Is their speech limited by their breathlessness? If so, can they complete
a full sentence? (an important indicator of severity in many conditions)
• Listen for hoarseness as well as the gurgling of excess secretions.
• A nasal voice may indicate neuromuscular weakness.
Cough and abnormal sounds
Watch and listen for coughing (see previous pages) as well as stridor and
wheeze.

HANDS, FACE, AND NECK
191
Hands, face, and neck
Temperature
• Cold fi ngers indicate peripheral vasoconstriction or heart failure.
• Warm hands with dilated veins are seen in CO
2
retention.
Staining
Fingers stained with tar appear yellow/brown where the cigarette is held
(nicotine is colorless and does not stain). This indicates smoking but is not
an accurate indicator of the number of cigarettes smoked.
Cyanosis
This is a bluish tinge to the skin, mucous membranes, and nails (see b
Chapter 3, p. 51), evident when >2.5g/dL of reduced hemoglobin is present
(O
2
Saturation about 85%). It is easier to see in good, natural light.
Central cyanosis is seen in the tongue and oral membranes (severe
lung disease, e.g., pneumonia, PE, COPD). Peripheral cyanosis is seen only
in the fi ngers and toes and is caused by peripheral vascular disease and
vasoconstriction.
Finger clubbing
There is i curvature of the nails. Early clubbing is seen as a softening of
the nail bed (nail can be rocked from side to side), but this is very diffi cult
to detect. Progressive clubbing leads to a loss of the nail angle at the base
and eventually to a gross longitudinal curvature and deformity.
Objectively check for clubbing by putting the patient’s nails back to back
as in Fig. 8.2. Clubbing leads to a loss of the diamond-shaped gap.
Important respiratory causes are carcinoma, asbestosis, fi brosing alve-
olitis, and chronic sepsis (bronchiectasis, abscess, empyema, CF).
Pulse
Check rate, rhythm, and character. A tachycardic bounding pulse = CO
2
retention.
Tremor
• Fine tremor: caused by use of B-agonist drugs (e.g., albuterol)
• Flapping tremor (asterixis): fl apping when holding hands dorsifl exed
with fi
ngers abducted (Fig 8.3). This is identical to the fl ap of hepatic
failure (see b Chapter 9, p. 244) and is a late sign of CO
2
retention.
Blood pressure
Pulsus paradoxus (see b Chapter 7, p. 159) is caused by pericardial effu-
sion and severe asthma.
JVP
See b Chapter 7, p. 161. JVP is raised in pulmonary vasoconstriction or
pulmonary hypertension and right heart failure. It is markedly raised, with-
out a pulsation, in SVC obstruction, with distended upper chest wall veins
and facial and conjunctival edema (chemosis).

CHAPTER 8 Respiratory system192
Nose
Examine inside and out, looking for polyps (asthma), deviated septum, and
lupus pernio (red/purple nasal swelling of sarcoid granuloma).
Eyes
• Conjunctiva: evidence of anemia?
• Horner’s syndrome: (b Chapter 9, p. 274) caused by compression of
the sympathetic chain in the chest cavity (tumor, sarcoidosis, fi brosis)
• Iritis: TB, sarcoidosis
• Conjunctivitis: TB, sarcoidosis
• Retina: Papilledema in CO
2
retention or cerebral metastases. Retinal
tubercles in TB. Choroiditis in TB or syphilis
Lymph nodes
See b Chapter 3, p. 58, for a full description of examination technique.
Feel especially the anterior and posterior triangles, the supraclavicular
areas. Don’t forget that the axillae receive lymph drainage from the chest
wall and breasts.
Fig. 8.3 Looking for a fl apping tremor. Wrists are dorsifl exed and fi ngers abducted.
Fig. 8.2 Examining for clubbing. In the normal state, a diamond window will be
seen between opposed nail beds, which is lost in fi nger clubbing.

INSPECTION OF THE CHEST
193
Inspection of the chest
Look at the shape and movement of the chest up close.
Surface markings
Check the whole chest for scars and lesions.
• Scars may indicate previous surgery. Look especially in the mid-axillary
lines for evidence of past chest drains.
• Radiotherapy will often cause lasting local skin thickening and
erythema.
• Veins: Look for unusually prominent surface vasculature.
Shape
• Deformity: Is there any asymmetry of shape? Remember to check the
spine for scoliosis or kyphosis.
• Surgery : TB patients from the 1940s and 1950s may have had
operations resulting in lasting and gross deformity (thoracoplasty).
• Barrel chest: a rounded thorax with i anteroposterior (AP) diameter.
Hyperinfl
ation is a marker of smoking-related lung disease.
• Pectus carinatum : also called “pigeon chest.” Sternum and costal carti-
lages are prominent and protrude from the chest. It is caused by i
respiratory effort when the bones are still malleable in childhood, from
asthma or rickets.
• Pectus excavatum: also called “funnel chest.” Sternum and costal
cartilages appear depressed into the chest. This is a developmental
defect, usually a normal variant with no signifi
cance to pathology.
• Surgical (subcutaneous) emphysema: Air in the soft tissues will appear
as a diffuse swelling. It occurs especially in the neck; it may feel crackly
to the touch.
Breathing pattern
Again, examine rate and depth of breathing.
• Fast, deep breaths are seen in anxiety states.
• Deep, sighing breaths are Kussmaul’s respiration = systemic acidosis.
• Cheyne–Stokes breathing has an alternating pattern of deep, regular
breathing with very slow, shallow breaths. It is due to failure of the
normal respiratory regulation in response to blood CO
2
levels.
• Prolonged expiratory phase = marker of outfl
ow limitation, a sign of
smoking-related lung disease if coupled with pursed-lip breathing.
Movement
Observe chest wall movement during breathing at rest. Also, ask the
patient to take a couple of deep breaths in and out, and watch closely.
• Look for asymmetry. d Movement indicates lung disease on that side.
• d Movement globally is seen in COPD, along with a “pump handle”
movement of the ribs (hinged posteriorly only), compared with the
normal “bucket handle” (hinged at the front and back).
• Harrison’s sulcus is a depression of the lower ribs just above the costal
margins and indicates severe childhood asthma.

CHAPTER 8 Respiratory system194
Palpation
Mediastinal position
Trachea
The trachea should lie in the midline just beneath the sternal notch. The
trachea will shift as the mediastinum is pulled or pushed laterally. This is a
late sign and not easy to assess, unless the shift is marked.
There are several methods for checking the position, all of which are
somewhat uncomfortable for the patient. The two most popular methods
are as follows:
• Use a single fi
nger to feel for the trachea; the distance between it and
the sternomastoids on each side should be the same.
• Use two fi
ngers and palpate the sulci on either side of the trachea at
the same time. They should feel identical in size.
Apex beat or PMI (point of maximum impulse)
This is normally at the fi fth intercostal space in the mid-clavicular line. It
will shift with the mediastinum. However, it is very diffi cult to palpate in
the presence of hyperexpanded lungs and may be shifted to the left if the
heart is enlarged.
Chest expansion
This is an objective measure of chest movement, using your hands as a guide.
• Put both hands on the patient’s posterior thorax, at a level just below
the nipples, anchoring your fi
ngers laterally at the sides.
• Extend your thumbs so that they touch at the spinous processes; don’t
press them against the chest.
• Ask the patient to take a deep breath. As they do this, watch your
thumbs; they should move apart equally. Any d in movement on one
side should be visible.
• It is easy to move your thumbs yourself in the expected direction. Be
aware of this and allow them to follow the movement of the chest.
0 This maneuver may also be done on the anterior chest, as illustrated
in Fig. 8.4, but as one can see, personal comfort, breast size, and mod-
esty may preclude a quality exam of a female. If chest expansion must be
assessed on the anterior chest wall, it is important to explain what you are
doing, as suddenly reaching for a female chest may be misconstrued!
Tactile vocal fremitus
This is the vibration felt on the chest as the patient speaks. Each part of the
chest is tested, as for percussion.
• Place the medial edge of your hand horizontally against the chest.
• Ask the patient to say “99” or “1, 1, 1.”
• You should feel the vibration against your hand.
This test is rather crude and often neglected by clinicians. The changes are
identical to those for vocal resonance.
• i Vibration in consolidation
• d In pneumothorax, collapse, COPD and pleural effusion
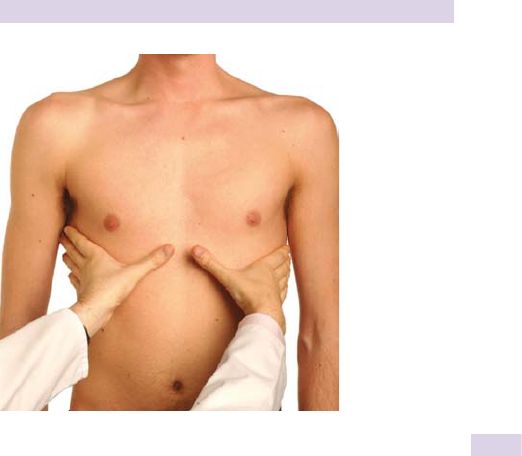
PALPATION
195
Fig. 8.4 Placement of the hands for testing chest expansion. Anchor with the
fi ngers and leave the thumbs free-fl oating.

CHAPTER 8 Respiratory system196
Percussion
Technique
This takes some practice to master fully, thus it can serve as an excellent
indicator of how much time a student has spent performing the maneuver.
The aim is to tap the chest by the standard method and listen to and feel
for the resultant sound (see Figs. 8.5 and 8.6). For a right-handed provider:
• Place the left hand on the chest wall, fi
ngers separated and lying
between the ribs.
• Press the middle fi nger
fi
rmly against the chest.
• Using the middle fi
nger of the right hand, strike the middle phalanx of
the middle fi
nger of the left hand (Fig. 8.5).
• The striking fi
nger should be moved away again quickly, as keeping it
pressed on the left hand may muffl
e the noise.
• The right middle fi
nger should be kept in the fl
exed position, the
striking movement coming from the wrist (much like playing the
piano).
0 Students quickly learn to keep the middle fi
ngernail of their right hand
well trimmed!
• Students should practice on themselves and each other. Learn the
different sounds produced percussing over the lung and the more
dense liver just below.
• In clinical practice, one should percuss each area of the lung, each time
comparing right then left, as shown in Fig. 8.6.
• Don’t forget the apices, which can be assessed by percussing directly
onto the patient’s clavicle (no left hand needed).
• If an area of dullness is heard (or felt), this should be percussed in
more detail so as to map out the borders of the abnormality.
Findings
• Normal lung sounds resonant.
• Dullness = heard over areas of i density (consolidation, collapse,
alveolar fl uid, pleural thickening, peripheral abscess, neoplasm)
• Stony dullness = the unique extreme dullness heard over a pleural
effusion
• Hyperresonant = areas of d density (emphysematous bullae or
pneumothorax). COPD will create a globally hyperresonant chest.
2 There should be an area of dullness over the heart that may be dimin-
ished in hyperexpansion states (e.g., COPD or severe asthma).
2The liver is manifested by an area of dullness below the level of the
sixth rib anteriorly on the right. This may also be lost with hyperinfl
ated
lungs.
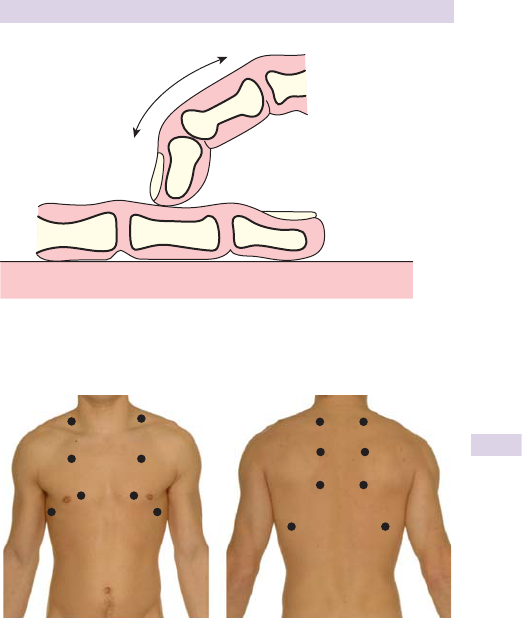
PERCUSSION
197
Fig. 8.5 Strike the middle phalanx of the middle fi nger of the left hand with the
middle fi nger of the right hand.
Fig. 8.6 Areas of the chest to percuss. Test right vs. left for each area, front and
back.

CHAPTER 8 Respiratory system198
Auscultation
Technique
The diaphragm should be used, except where better surface contact is
needed in very thin or hairy patients.
• Ask the patient to take deep breaths in and out through the mouth.
• Listen to both inspiration and expiration.
• Listen over the same areas percussed, comparing left to right.
• If an abnormality is found, examine more carefully and defi ne
borders.
• Listen for the breath sounds and any added sounds, and note at which
point in the respiratory cycle they occur.
0 Many patients have diffi
culty performing correctly here. They may take
one deep breath and hold it, may breath through the nose, or may take
only one breath. Simple prompts (“keep going, in and out”) will help. A
brief demonstration will usually solve things if all else fails.
Findings
Breath sounds
• Normal: vesicular. Produced by airfl ow in the large airways and larynx
and altered by passage through the small airways before reaching the
stethoscope. Often described as rustling. This is heard especially well
in inspiration and early expiration.
• Reduced sound: if local = effusion, tumor, pneumothorax, pneumonia,
or lung collapse. If global = COPD or asthma (The “silent chest” is a
sign of a life-threatening asthma attack.)
• Bronchial breathing: caused by i density of matter in the peripheral
lung, allowing sound from the larynx to the stethoscope unchanged,
has a hollow, blowing quality, heard equally in inspiration and
expiration, often with a brief pause between. (Think of a certain
black-helmeted villain in a popular space movie series.) A similar
sound can be heard by listening over the trachea in the neck.
Bronchial breathing is heard over consolidation, lung abscess at
the chest wall, and with dense fi
brosis. It is also heard at the upper
border of a pleural effusion.
Added sounds
• Wheeze (rhonchi): musical whistling sounds caused by narrowed
airways. It is heard easier in expiration.
• Different-caliber airways = different-pitch note; thus asthma and
COPD can cause a chorus of notes termed polyphonic wheeze .
•
Monophonic wheeze indicates that a single airway is narrowed,
usually by a foreign body or carcinoma.
0 This is not a good marker of disease severity!
• Crackles (crepitations, rales): caused by air entering collapsed airways
and alveoli producing an opening snap. They are heard in inspiration.
•
Coarse crackles are made by larger airways opening and sound like
the snap and pop of a certain breakfast cereal. Causes include fl uid
or infection.

AUSCULTATION
199
•
Fine crackles occur later in inspiration. These sound like the tear of
Velcro
®
and can also be reproduced by rolling hair at the temples
between the thumb and forefi nger. Causes include fl uid, infection,
or fi brosis (particularly at lung bases).
0 Crackles are often a normal fi
nding at the lung bases, If so, they will
clear after asking the patient to cough.
• Rub: creaking sound likened to the bending of new leather or the creak
of a footstep in fresh snow. This is heard at the height of inspiration
and is caused by infl
amed pleural surfaces rubbing against each other.
•
Causes include pneumonia and pulmonary embolism with infarction.
0 Movement of the stethoscope on the chest wall sounds similar.
Vocal resonance
• Auscultatory equivalent of vocal fremitus
• Low-pitched sounds transmit well and create a vocal booming quality.
• Ask the patient to say “99” or 1, 1, 1” and listen over the same areas
as before.
• The changes are the same as those for vocal fremitus.
• A marked i resonance, such that a whisper can be clearly heard, is
termed whispered pectoriloquy .

CHAPTER 8 Respiratory system200
Important presenting patterns
Consolidation
• d Air entry locally, secondary to infection
• d Chest wall movement locally
• Dullness to percussion
• Bronchial breathing or i breath sounds
• Coarse or fi
ne crackles, localized
• i Vocal resonance
Collapse
• Blockage of a major airway and collapse of the distal lung segment
• Mediastinal shift towards the abnormality
• d Chest wall movement locally
• Dullness to percussion restricted to affected lobe
• d Breath sounds
• d Vocal resonance
Pleural effusion
• Collection of fl uid between the two pleural layers, creating a sound
barrier between the examiner and the patient’s lung
• Mediastinal shift away from the lesion (with a large effusion)
• d Chest wall movement locally
• Stony dull to percussion
• d Breath sounds with bronchial breathing at the upper border
• d Vocal resonance
• Sometimes a pleural rub just above
Pneumothorax
• Air in the pleural space
• Mediastinal shift away from the lesion (with a tension pneumothorax)
• d Chest wall movement locally
• Hyperresonant to percussion
• d Breath sounds
• d Vocal resonance
Interstitial fi brosis
• No mediastinal shift. The trachea may move toward the fi brosis in
upper-lobe disease.
• n or d chest wall movement
• n percussion note
• n breath sounds
• n vocal resonance
• Fine crackles present

THE ELDERLY PATIENT
201
The elderly patient
Up to 60% of older people may suffer respiratory symptoms but less read-
ily see their doctors about them. Lung function declines with age and
exertional breathlessness rises, often with concurrent (nonrespiratory)
illnesses. Careful, thoughtful assessment is therefore vital.
History
Clarify diagnosis
Not all disease in elders is COPD and many older people are lifelong non-
smokers. Asthma and pulmonary fi brosis are often underdiagnosed.
Fatigue
Fatigue is often associated with chronic respiratory illnesses, and this may
be more disabling to individuals than respiratory symptoms themselves.
Drug history
This should be comprehensive and dovetail with other medical problems.
Anticholinergic drugs (e.g., atrovent) may precipitate glaucoma or worsen
bladder and bowel symptoms, so be thorough. Ask about vaccinations—
many people miss their annual fl u vaccine because of hospitalization.
Consider vaccination as appropriate.
Nutrition and mood
Undernutrition is common with chronic diseases and those in long-term
care, affecting illnesses with higher resting metabolic rates (e.g., COPD).
Depressed mood is similarly common and should be asked about.
Social history
Functional history is paramount and may reveal key interventions. A thor-
ough occupational history is vital; many people do not know that they
have worked or lived with someone exposed to, e.g., asbestos.
Examination
General
Poorly fi tting clothes or dentures may point to weight loss (undernutri-
tion, chronic disease, malignancy).
Hands
Arthritis and other deformities may make inhaler use diffi cult and point
to related diagnoses (e.g., rheumatoid lung disease). Clubbing may not be
present in later-onset pulmonary fi brosis.
Chest
Beware of basal crepitations, which are common in older age. Pick out
discriminating signs—tachypnea, position of crackles, added sounds, etc.
Inhaler technique
This is a key examination. It may reveal why prior treatments were
unsuccessful.

CHAPTER 8 Respiratory system202
Diagnoses not to be missed
• Asthma: seen in up to 8% of individuals over 60 but underrecognized
and undertreated. Spirometry is a key investigation.
• Tuberculosis: i in the elderly, through reactivation, chronic illness, and
undernutrition. TB presents nonspecifi
cally, with cough, lethargy, and
weight loss.

203
Abdomen
Applied anatomy 204
Esophageal symptoms 206
Nausea, vomiting, and vomitus 208
Abdominal pain 210
Bowel habit 212
Jaundice and pruritus 216
Abdominal swelling 217
Urinary and prostate symptoms 218
Appetite and weight 220
The rest of the history 221
Outline examination 223
Hand and upper limb 224
Face and chest 226
Inspection of abdomen 229
Auscultation 231
Palpation 232
Palpating the abdominal organs 233
Percussion 239
Rectal examination 241
Hernial orifi ces 243
Important presenting patterns 246
The elderly patient 252
Chapter 9

CHAPTER 9 Abdomen 204
Applied anatomy
The abdomen includes the perineum, external and internal genitalia, and
inguinal regions. These components are discussed in Chapters 12 and 14.
Boundaries
The abdomen is defi ned as the region lying between the thorax above and
the pelvic cavity below. The anterior abdominal wall is bounded by the
seventh to twelfth costal cartilages and the xiphoid process of the sternum
superiorly and the inguinal ligaments and pelvic bones inferiorly.
The abdominal cavity is separated from the thoracic cavity by the dia-
phragm. There is no such delineation, however, between the abdomen
and the pelvis; consequently, defi nitions vary.
Abdominal contents
The abdomen contains structures that form part of just about every body
system.
The digestive organs of the esophagus, stomach, small intestine, large
intestine, and the associated organs (liver, gallbladder, and biliary system,
exocrine pancreas) all lie within the abdomen.
The endocrine portion of the pancreas, the adrenal glands, and gonads
represent the endocrine system.
The cardiovascular system includes the abdominal aorta with its impor-
tant branches to the liver, spleen, intestine, kidneys, and lower limbs.
The immunological system is represented by the spleen, the multi-
ple lymph nodes surrounding the aorta and intestines, and the mucosa-
associated lymphoid tissue (MALT) within the intestine itself.
The whole of the urinary system is present (kidneys, ureters, bladder,
and urethra).
Much like the thorax, the abdomen is lined by a thin layer of membra-
nous tissue: the peritoneum . This is a double lining—the parietal peritoneum
covers the internal surface of the abdominal walls while the visceral peri-
toneum covers the organs. Between the two layers (the peritoneal cavity)
is a small amount of fl uid that acts as a lubricant enabling the abdominal
contents to move against each other as the body changes position or, for
example, as the gut contorts with peristalsis.
A select few organs lie behind the peritoneum on the posterior abdomi-
nal wall. They are the pancreas, a portion of the duodenum, the ascending
and descending colon, and the kidneys.
Abdominal regions
The anterior abdominal wall is artifi cially divided into nine portions for
descriptive purposes. Four imaginary lines can be drawn (see Fig. 9.1 ):
• 1horizontal line between the anterior superior iliac spines
• 1horizontal line between the lower border of the ribs
• 2vertical lines at the mid-clavicular point
To make life easier, the abdomen can also be divided into four quadrants
by imagining one horizontal and one vertical line crossing at the umbilicus
(see Fig. 9.2 ). Familiarize yourself with these along with the organs lying
in each area.
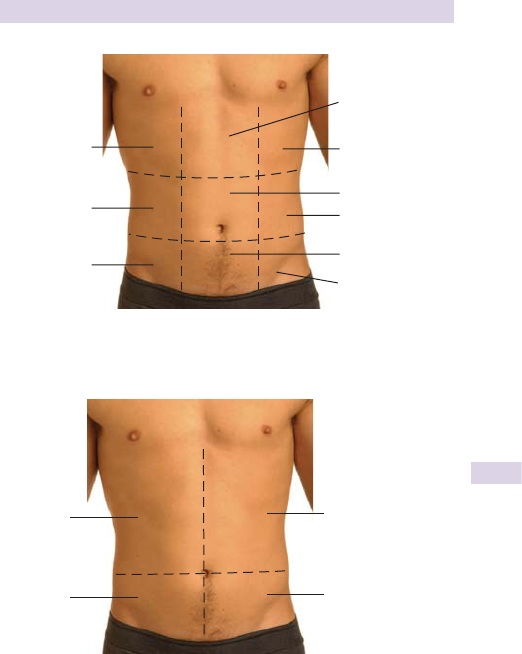
205
APPLIED ANATOMY
Right upper
quadrant
Right lower
quadrant
Left upper
quadrant
Left lower
quadrant
Fig. 9.2 The four quadrants of the anterior abdominal wall.
Right
hypochondrium
Right
lumbar
Right
inguinal
Epigastrium
Left hypochondrium
Umbilical
Left lumbar
Suprapubic
Left inguinal
Fig. 9.1 The nine segments of the anterior abdominal wall.

CHAPTER 9 Abdomen 206
Esophageal symptoms
Dysphagia
This is diffi culty swallowing and is the principal symptom of esophageal
disease (see Box 9.1 for important causes). When a patient complains of
dysphagia, you should attempt to establish the following:
• Level of obstruction: Where does the patient feel the food or liquid
sticking? Patients can often point to a level on the chest, although the
sensation usually correlates poorly with the actual level of obstruction.
• Onset: How quickly did the symptoms emerge? Obstruction caused by
cancer, for example, may progress rapidly over a few months, whereas
those with a benign peptic stricture may describe a very long history of
GERD and progressive dysphagia.
• Course: Is it intermittent? Present for only the fi
rst few swallows
(lower esophageal ring, spasm)? Progressive (cancer, stricture,
achalasia)?
• Solids/liquids: Both solids and liquids being affected equally suggests a
motor cause (achalasia, spasm). However, if solids are affected more
than liquids, some physical obstruction is more likely (e.g., cancer).
• Associated symptoms: heartburn (leads to esophageal strictures),
weight loss, wasting, fatigue (perhaps suggestive of cancer). Coughing
and choking suggest pharyngeal dysphagia due to motor dysfunction
(e.g., motor neuron disease causing bulbar or pseudobulbar palsy).
Odynophagia
This is pain on swallowing. It is usually an unpleasant substernal sensation
during the swallow and suggestive of esophageal infl ammation (infective
esophagitis—candidida, herpes, cytomegalovirus; peptic ulceration; caustic
damage; esophageal perforation).
0 Remember to ask about potential causes during the drug history.
Heartburn and acid refl ux
Also known as gastroesophageal refl ux disease (GERD),this is caused by
regurgitation of stomach contents into the esophagus due to an incompe-
tent antirefl ux mechanism at the gastroesophageal junction (GEJ).
Typical features
• Site: midline, retrosternal
• Radiation: to the throat and occasionally the infrascapular regions
• Nature: burning
• Aggravating factors: worse after meals and when performing postures
that raise the intra-abdominal pressure (bending, stooping, lying
supine). Also worse during pregnancy
• Associated symptoms: often accompanied by acid or bitter taste (acid
regurgitation) or sudden fi
lling of the mouth with saliva* (waterbrash)
* The salivary glands can produce 10 mL of saliva/minute—the esophag eo-salivary response.

207
ESOPHAGEAL SYMPTOMS
Acid refl ux may be worsened by certain foods (alcohol, caffeine, choc-
olate, fatty meals) and some drugs (calcium channel blockers, anticholiner-
gics) that act to d the GEJ sphincter pressure.
0 Hiatal hernia is another important cause of refl
ux symptoms—be sure
to inquire about this in the history.
Dyspepsia
This is commonly known as indigestion. It is very common and presents
as a variety of symptoms:
• Upper abdominal discomfort
• Bloating
• Belching
Be on the alert for features suggestive of a serious pathology (anemia,
weight loss, dysphagia, rectal blood loss, melena, and abdominal masses).
Box 9.1 Some causes of dysphagia
• Oral: painful mouth ulceration, oral, or throat infections
• Neurological: cerebrovascular event, bulbar and pseudobulbar
palsies, myasthenia gravis
• Dysmotility: achalasia, systemic sclerosis, presbyesophagus
• Mechanical: pharyngeal pouch, esophageal cancer, peptic stricture,
other benign strictures, extrinsic compression of the esophagus
(e.g., large lung or thyroid tumor)

CHAPTER 9 Abdomen 208
Nausea, vomiting, and vomitus
Nausea and vomiting
Nausea* is a feeling of sickness—the inclination to vomit. It usually occurs
in waves and may be associated with retching or heaving. It can last from
seconds to days depending on the cause.
Vomiting (emesis) usually follows nausea and autonomic symptoms, such
as salivation. It is the forceful expulsion of the gastric contents by refl ex
contractions of thoracic and abdominal muscles. See Box 9.2 for causes.
The vomiting center is in the medulla and is composed of many efferent
nuclei in serial communication with each other. When the entire circuit is
activated by afferent stimuli, the complete set of actions required to cause
vomiting is triggered.
Timing
You should be clear on exactly when the vomiting tends to occur, particu-
larly its relation to meals—e.g., vomiting delayed for >1 hour after meals
suggests gastroesophageal obstruction or gastroparesis. Early-morning
vomiting is typical of pregnancy or raised intracranial pressure.
Nature of the vomitus
Although unpleasant, you should inquire about the exact nature of any
vomited material and attempt to see a sample, if possible.
Blood (hematemesis)
Presence of blood indicates bleeding in the upper gastrointestinal tract
(esophagus, stomach, duodenum). A history of bleeding must be explored
in the context of other abdominal symptoms ( Box 9.3 ). Ask especially
about the following:
• Amount of blood and exact nature of it (see Box 9.4 )
• Previous bleeding episodes, treatment and outcome (e.g., previous
surgery?)
• Cigarette smoking
• Use of drugs such as aspirin, NSAIDs, and warfarin
0 Remember to ask about weight loss, dysphagia, abdominal pain, and
melena (consider the possibility of neoplastic disease).
Bile
Assess the presence or absence of bile. Remember that bile comes largely
in two colors—the green pigment (biliverdin) often seen to color the
vomitus in the absence of undigested food. The yellow pigment (bilirubin)
appears as orange, often occurring in small lumps.**
Undigested food without bile suggests a lack of connection between the
stomach and the small intestine (e.g., pyloric obstruction).
** This is the answer to the age-old question, why are there always carrots in vomit?. The orange
globules are, in fact, dyed with bilirubin. We suggest saving that fact for your next dinner party.
* Nausea comes from the Latin, meaning “sea-sickness,” through the Greek naus, meaning “ship.”

NAUSEA, VOMITING, AND VOMITUS
209
Box 9.2 Important causes of vomiting
• Acute: GI tract infections (viral gastroenteritis, e.g., food poisoning,
Norwalk, viral hepatitis), systemic bacterial infection, mechanical
bowel obstruction, alcohol intoxication, acute upper GI bleed,
urinary tract infection
• Chronic: pregnancy, uremia, drugs (narcotics, digitalis, aminophylline,
cancer chemotherapy), gastroparesis (diabetes mellitus, scleroderma,
drugs)
• Other: peptic ulcer disease, motor disorders (post-surgery or
autonomic dysfunction), hepatobiliary disease, alcoholism, cancer
2 Don’t forget about central nervous system and vestibular problems.
Box 9.3 Causes of upper GI bleeding
• Peptic ulceration
• Erosive or ulcerative esophagitis
• Gastritis
• Varices (esophageal/gastric)
• Gastric and esophageal tumors
• Mallory–Weiss tear
• Dieulafoy’s lesion
• Vascular anomalies (e.g., angiodysplasia, AV malformation)
• Hereditary hemorrhagic telangiectasia
• Connective tissue disorders
• Vasculitis
• Bleeding disorders
Box 9.4 Nature of hematemesis
• Large volume of fresh, red blood suggests active bleeding (coincident
liver disease and/or heavy alcohol intake may suggest bleeding
esophageal varices; abdominal pain and heartburn suggest a gastric
or esophageal source such as a peptic ulceration or GERD).
• Small streaks at the end of prolonged retching may indicate minor
esophageal trauma at the GEJ (Mallory–Weiss tear).
• Coffee-grounds: This term is used for blood that has been altered by
exposure to stomach acid as the result of a bleeding site superior to
the ligament of Trietz. It appears brown and in small lumps.

CHAPTER 9 Abdomen 210
Abdominal pain
Like pain in any other region, abdominal pain may present in very different
ways and has many different causes. You should establish the site, radia-
tion, severity, character, frequency, duration, any exacerbating or relieving
factors, and associated symptoms.
Site
Like most organs, those in the abdomen cannot be felt directly—the pain
is referred to areas of the abdominal wall according to the organ’s embry-
ological origin (see Box 9.5 and Fig. 9.3 ).
• Ask the patient to point to the area affected. They often fi nd
this
challenging and may indicate a wide area. In this case, ask them to
use one fi
nger and point to the area of maximum intensity: “Use one
fi nger and point to where the pain is worst.”
A very localized pain may originate from the parietal peritoneum. For
example, appendicitis may begin as an umbilical pain (referred from the
appendix) then move to the right iliac fossa as the infl ammation spreads
to the peritoneum overlying the appendix.
Radiation
Ask the patient if the pain is felt elsewhere or if they have any other pains
(they may not associate the radiated pain with the abdominal pain).
Some examples include the following:
• Right scapula: gallbladder
• Shouldertip: diaphragmatic irritation
• Mid-back: pancreas
Character
Ask the patient what sort of pain it is. Give some examples if they have
trouble, but be careful not to lead the patient. A couple of examples
include the following:
• Colicky: This is pain that comes and goes in waves and indicates
obstruction of a hollow, muscular-walled organ (intestine, gallbladder,
bile duct, ureter).
• Burning: This usually indicates an acid cause and is related to the
stomach, duodenum, or lower end of the esophagus.
Aggravating and relieving factors
Ask the patient what appears to make the pain better or worse—or what
they do to get rid of the pain if they suffer from it often.
Box 9.5 Sites of abdominal pain and embryological origins
• Epigastric: foregut (stomach, duodenum, liver, pancreas, gallbladder)
• Periumbilical: midgut (small and large intestines including appendix)
• Suprapubic: hindgut (rectum and urogenital organs)
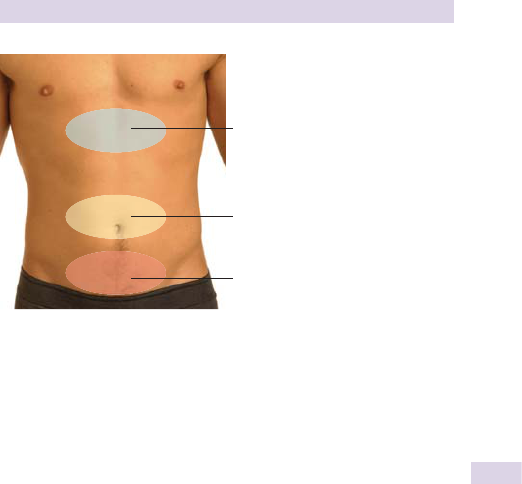
ABDOMINAL PAIN
211
Findings
Some characteristic pains:
• Renal colic: colicky pain at the renal angles ± loins, which are tender
to touch, radiating to the groin, testicles, or labia. Typically, the patient
writhes about, unable to fi
nd a position that relieves the pain.
• Bladder pain: a diffuse severe pain in the suprapubic region
• Prostatic pain: a dull ache that may be felt in the lower abdomen,
rectum, perineum, or anterior thighs.
• Urethral pain: variable in presentation, ranging from a tickling
discomfort to a severe sharp pain felt at the end of the urethra (tip of
the penis in males) and exacerbated by micturition. It can be so severe
that patients attempt to hold urine, causing yet more problems.
• Small bowel obstruction : colicky central pain associated with vomiting,
abdominal distension ± constipation
• Colonic pain: as with small bowel obstruction but sometimes
temporarily relieved by defecation or passing fl atus
• Bowel ischemia: dull, severe, constant, right upper quadrant or central
abdominal pain exacerbated by eating
• Biliary pain: severe, constant, right upper quadrant or epigastric pain
that can last hours and is often worse after eating fatty foods.
• Pancreatic pain: epigastric, radiating to the back and partly relieved by
sitting up and leaning forward
• Peptic ulcer pain: dull, burning pain in the epigastrium. Typically
episodic at night, waking the patient from sleep. It is exacerbated by
eating and sometimes relieved by consuming milk or antacids.
Foregut
Midgut
Hindgut
Fig. 9.3 Typical sites of pain according to origin.

CHAPTER 9 Abdomen 212
Bowel habit
Ask patients how often they move their bowels and if this has changed
recently. Ask also about the other symptoms on these pages.
Constipation
This disorder can mean different things to different people. Normal bowel
habit ranges from 3 times/day to once every 3 days.
Constipation is the passage of stool <3 times/week, or stools that are
hard or diffi cult to pass. See Box 9.6 for causes.
A thorough history should include the following:
• Duration of constipation
• Stool size and consistency
• Straining, particularly at the end of evacuation
• Associated symptoms (nausea, vomiting, weight loss)
• Pain on defecation
• Rectal bleeding
• Intercurrent diarrhea
• Fluid and fi ber
intake
• Depression, lack of exercise
• Drug history (prescription and overthecounter). Particularly ask about
use of codeine, antidepressants, aluminum, and calcium antacids.
• Metabolic or endocrine diseases (thyroid disorders, hypercalcemia,
diabetes, pheochromocytoma, Hirshsprung’s disease)
• Neurological problems (autonomic neuropathy, spinal cord injury,
multiple sclerosis)
Diarrhea
This is defi ned as an increase in stool volume (>200mL daily) and
frequency(3/day). There is also a change in consistency to semiformed or
liquid stool. See Box 9.7 for causes.
Establish the time course, since acute diarrhea is suggestive of infection.
Ask especially about the following:
• Color, consistency, offensive smell, ease of fl ushing
• Duration
• Does the diarrhea disturb the patient’s sleep?
• Is there any blood, mucus, or pus?
• Is there associated pain or colic?
• Is there urgency?
• Nausea, vomiting, weight loss?
• Any difference if the patient fasts?
•
No change in secretory diarrhea—e.g., E. coli, Staph. aureus
•
Disappears on fasting: osmotic diarrhea
• Foreign travel
• Recent antibiotics

BOWEL HABIT
213
Rectal bleeding and melena
There are many causes of rectal blood loss ( Box 9.9 ) but, as always, a
detailed history will help. Determine the following:
• Amount
0 Small amounts can appear dramatic, coloring toilet water red.
• Nature of the blood (red, brown, black)
• Is it mixed within the stool or is it on the stool?
• Is it spattered over the bowl or with the stool, or only seen on the
paper?
• Any associated features (Mucus may indicate infl ammatory
bowel
disease or colonic cancer.)
Box 9.6 Some causes of constipation
• Low-fi ber diet
• Physical immobility
• Functional bowel disease
• Drugs (e.g.,opiates, antidepressants, aluminumantacids).
• Metabolic and endocrine diseases (e.g.,hypothyroidism, hypercalcemia,
hypokalemia, diabetes mellitus, porphyria, pheochromocytoma)
• Neurological disorders (e.g., autonomic neuropathy, spinal cord
injury, multiple sclerosis)
• Colonic stricture
• Anorectal disease (e.g., anal fi
ssure—causes pain to the extent that
the patient may avoid defecating altogether)
• Habitual neglect
• Depression
• Dementia
Box 9.7 Some causes of diarrhea
• Malabsorption: may cause steatorrhea, a fatty, pale stool that is
extremely odorous and diffi cult to fl ush. See Box 9.8 on b p. 214.
• iIntestinal motility: hyperthyroidism, irritable bowel syndrome (see
below).
• Exudative: infl
ammation of the bowel causes small volume, frequent
stools, often with blood or mucus (e.g., colonic carcinoma, Crohn’s
disease, ulcerative colitis)
• Osmotic: large volume of stool that disappears with fasting. Causes
include lactose intolerance, gastric surgery.
• Secretory: high volume of stool that persists with fasting. No pus,
blood or excessive fat. Causes include gastrointestinal infections,
carcinoid syndrome, villous adenoma of the colon, Zollinger–Ellison
syndrome, vasoactive intestinal polypeptide (VIP)-secreting tumor.

CHAPTER 9 Abdomen 214
Melena
This is jet-black, tar-like, and pungent-smelling stool representing blood
from the upper GI tract (or right side of the large bowel) that has been
altered by passage through the gut.
The presence of melena is often asked about in hospitalized patients,
but those who have smelled true melena rarely forget the experience!
Ask about iron supplementation or bismuth-containing compounds. These
cause blackened stools but without the melena smell or consistency.
Mucus
This is a clear, viscoid secretion of the mucus membranes.* It contains
mucus, epithelial cells, leukocytes, and various salts suspended in water.
The presence of mucus in or on stools may indicate the following:
• Infl
ammatory bowel disease
• Solitary rectal ulcer
• Small or large bowel fi stula
• Colonic villous adenoma
• Irritable bowel syndrome
Flatus
Small amounts of gas frequently escape from the bowel via the mouth
(eructation) and anus. A notable excess of this is a common feature of
both functional and organic disorders of the gastrointestinal tract.
It is often associated with abdominal bloating and caused by the fermen-
tation of certain foods by colonic fl ora.
Excessive fl atus is a particular feature of the following
• Hiatal hernia
• Peptic ulceration
• Chronic gallbladder disease
• Air-swallowing (aerophagy)
• High-fi ber
diet
Box 9.8 Fat malabsorption (steatorrhea)
This is a common feature of pancreatic insuffi ciency (e.g., due to chronic
pancreatitis, cystic fi brosis). It is also caused by diseases such as celiac
disease, infl ammatory bowel disease, blind bowel loops, and short
bowel syndrome.
You should be aware of these features and explore them all fully if
one is mentioned by the patient:
• Pale stool
• Offensive smelling
• Poorly formed
• Diffi
cult to fl ush
(fl oats)
* Think “slime” or even “snot.” Patients may fi nd this easier to understand: “Have you noticed any
slime-like mucus in your stools?”

BOWEL HABIT
215
Box 9.9 Causes of lower GI bleeding
• Hemorrhoids
• Anal fi ssure
• Diverticular disease
• Colonic carcinoma
• Colonic polyp
• Angiodysplasia
• Infl
ammatory bowel disease
• Ischemic colitis
• Meckel’sdiverticulum
• Small bowel disease (e.g., tumor, diverticulae, intussusception,
Crohn’s)
• Solitary rectal ulcer
• Hemobilia (bleeding into the biliary tree)

CHAPTER 9 Abdomen 216
Jaundice and pruritus
Jaundice
Jaundice (icterus) is a yellow pigmentation of skin, sclera, and mucosa
caused by excess bilirubin in the body fl uids. It is usually considered a sign,
as it is seen on examination. See also b p. 51 and Box 9.10 .
Ask about the following:
• Color of the urine (dark in cholestatic jaundice)
• Color and consistency of the stools (pale in cholestatic jaundice)
• Abdominal pain (e.g., caused by gallstones)
While the following factors should be included in any thorough history,
you should make a special point of asking about them:
• Previous blood transfusions
• Past history of jaundice
• Drugs (e.g., antibiotics, NSAIDs, oral contraceptives, phenothiazines)
• IV drug use
• Tattoos and body piercing
• Foreign travel
• Sexual history
• Family history of liver disease
• Alcohol consumption
• Any personal contacts who also have jaundice
Pruritus
This is itching of the skin and may be either localized or generalized.
It has many causes—it is particularly associated with cholestatic liver
disease (e.g., primary biliary cirrhosis, sclerosing cholangitis).
Box 9.10 Causes of jaundice
Prehepatic
• Hemolysis
• Gilbert’s disease
• Dubin–Johnson syndrome
• Rotor syndrome
Hemodialysis
• Hepatocellular
• Cirrhosis
• Acute hepatitis (viral, alcoholic, autoimmune, drug induced)
• Liver tumors
• Cholestasis from drugs (e.g., chlorpromazine)
Posthepatic
Obstruction of biliary outfl
ow due to the following:
•
Luminal obstruction: gallstones
• Wall pathology: congenital bile duct abnormalities, primary biliary
cirrhosis, trauma, tumor
• External compression: pancreatitis, lymphadenopathy, pancreatic
tumor, ampulla of Vater tumor

ABDOMINAL SWELLING
217
Abdominal swelling
The fi ve classic causes of abdominal swelling (the 5 F’s) are shown in
Box 9.11 . To these you should also add tumor .
In decompensated cirrhosis, a combination of portal (sinusoidal) hyper-
tension and Na and H
2
O retention favors the transudation of fl uid into
the peritoneal cavity (ascites). The resultant swelling may be unsightly. It
can also cause shortness of breath by putting pressure on the diaphragm
from below, particularly when supine, and may be associated with pleural
effusions.
See b p. 672 for the causes and classifi cation of ascites.
Box 9.11 Five causes of abdominal swelling—the 5 F’s
• Fat
• Fluid
• Flatus
• Feces
• Fetus

CHAPTER 9 Abdomen 218
Urinary and prostate symptoms
Urinary frequency
This is the passing of urine more often than is normal for the patient.
Quantify this—how many times in a day—and also ask about the volume
of urine passed each time (you are attempting to decide whether the
patient is producing more urine than normal or simply feeling the urge to
urinate more than normal).
Urgency
This is the sudden need to urinate, a feeling that the patient may not be
able to make it to the toilet in time. Ask about the volume expelled.
Nocturia
This is urination during the night. Does the patient wake from sleep to
urinate? How many times a night? How much urine is expelled each
time?
Urinary incontinence
This is the loss of voluntary control of bladder emptying. Patients may be
hesitant to talk about this, so try to avoid the phrase “wetting yourself.”
“You could ask about it immediately after asking about urgency” “Do you
ever feel the desperate need to empty your bladder? Have you ever not
made it in time?” Or ask about a “loss of control.”
There are fi ve main types of urinary incontinence:
• True: total lack of control of urinary excretion. This suggests a fi stula
between the urinary tract and the exterior or a neurological condition.
• Giggle: incontinence during bouts of laughter. This is common in young
girls.
• Stress: leakage associated with a sudden i in intra-abdominal pressure
of any cause (e.g., coughing, laughing, sneezing)
• Urge: intense urge to urinate such that the patient is unable to get to
the toilet in time. Causes include overactivity of the detrusor muscle,
urinary infection, bladder stones and bladder cancer.
• Dribbling or overfl ow: continual loss of urine from a chronically
distended bladder. Typically this occurs in elderly males with prostate
disease.
Terminal dribbling
This is a male complaint and usually indicative of prostate disease. It is a
dripping of urine from the urethra at the end of micturition, requiring an
abnormally protracted shake of the penis and may cause embarrassing
staining of clothing.
Hesitancy
This is diffi culty in starting to micturate. The male patient describes stand-
ing and waiting for the urine to start fl owing. Hesitancy is usually due to
bladder outfl ow obstruction from prostatic disease or strictures.

URINARY AND PROSTATE SYMPTOMS
219
Dysuria
Pain on micturition is usually described by the patient as “burning” or
“stinging” and is felt at the urethral meatus. Ask whether it is throughout
the passage of urine or only at the end (terminal dysuria).
Hematuria
This is the passage of blood in the urine. It is always an abnormal fi nding.
0 Remember that microscopic hematuria will be undetectable to the
patient, only showing on dip-testing.
Incomplete emptying
This is the sensation that there is more urine left to expel at the end of
micturition. It suggests detrusor dysfunction or prostatic disease.
Intermittency
This is the disruption of urine fl ow in a stop–start manner. Causes include
prostatic hypertrophy, bladder stones, and ureteroceles.
Oliguria and anuria
Oliguria is scanty or low-volume urination and is defi ned as the excretion
of <300mL urine in 24 hours. Causes can be physiological (dehydration) or
pathological (intrinsic renal disease, shock, or obstruction).
Anuria is the absence of urine formation. You should attempt to rule
out urinary tract obstruction as a matter or urgency. Other causes include
severe intrinsic renal dysfunction and shock.
Polyuria
This is excessive excretion of large volumes of urine and must be care-
fully differentiated from urinary frequency (the frequent passage of small
amounts of urine).
Causes vary widely but include the ingestion of large volumes of water
(including hysterical polydipsia), diabetes mellitus (the osmotic effect of
glucose in the tubules results in more urine produced), failure of the action
of antidiuretic hormone (ADH) at the renal tubule (as in diabetes insip-
idus) and defective renal concentrating ability (e.g., chronic renal failure).
0 Remember also to ask the patient about the use of diuretic medication.

CHAPTER 9 Abdomen 220
Appetite and weight
Loss of appetite and changes in weight are rather non-specifi c symptoms
but should raise suspicion of a serious disease if either is severe, pro-
longed, or unexpected.
2 Remember that weight loss has many causes outside of the abdomen
and a thorough systems inquiry should be conducted.
Weight loss may not be noticed by patients if they don’t regularly weigh
themselves—ask about clothes becoming loose.
0 Remember that the patient may have been intentionally losing weight,
throwing you off track. Ask if the loss is expected.
2 Ascites weighs 1kg/L and some patients with liver failure may have
10–20L of ascites, masking any dry-weight loss.
Ask the patient about their eating habit and average daily diet.
Try to determine the following:
• When the symptom was fi rst
noticed
• Quantify the problem. In the case of weight loss, determine exactly
how and over what time period.
• Cause of the anorexia—does eating make the patient feel sick?
• Does eating cause pain (e.g., gastric ulcer, mesenteric angina,
pancreatitis)?
• Any accompanying symptoms (abdominal pain, nausea, vomiting, fever)
Ask also about the following:
• Color and consistency of stools (e.g., steatorrhea?)
• Urinary symptoms (see b p. 218)
• Recent change in temperature tolerance
In every case, you should calculate the patient’s BMI as on b p. 56.
The combination of weight loss with i appetite may suggest malabsorp-
tion or a hypermetabolic state (e.g., thyrotoxicosis).

THE REST OF THE HISTORY
221
The rest of the history
Past medical history
Ask especially about the following:
• Previous surgical procedures, including peri- and postoperative
complications and anesthetic complications
• Chronic bowel diseases (e.g., infl
ammatory bowel disease [IBD],
including recent fl
areups and treatment to date)
• Possible associated conditions (e.g., diabetes with hemachromatosis)
Drug history
Think about drugs that can precipitate abdominal diseases and remember
to ask about over-the-counter drugs. For example:
• Hepatitis: halothane, phenytoin, chlorothiazides, pyrazinamide,
isoniazid, methyl dopa, HMG CoA reductase inhibitors (statins),
sodium valproate, amiodarone, antibiotics, NSAIDs
• Cholestasis: chlorpromazine, sulfonamides, sulfonylureas, rifam-picin,
nitrofurantoin, anabolic steroids, oral contraceptive pill
• Fatty liver: tetracycline, sodium valproate, amiodar-one
• Acute liver necrosis: acetaminophen
0 Ask also about previous blood transfusions.
Smoking
Smokers are at i risk of peptic ulceration, esophageal cancer, and colo-
rectal cancer. Smoking may also have a detrimental outcome on the natu-
ral history of Crohn’s disease. There is some evidence that smoking may
protect against ulcerative colitis.
Alcohol
As always, a detailed history is required—see b p. 37. If dependence is
suspected, run through the CAGE questionnaire—see Box 9.12 .
Box 9.12 CAGE questionnaire
A positive response to any of the four questions may indicate someone
at risk of alcohol abuse. A positive answer to two or more questions
makes the presence of alcohol dependence likely.
C Have you ever felt that you should C ut down your drinking?
A Have you ever got A ngry when someone suggested that you should
cut down?
G Do you ever feel G uilty about your drinking?
E Do you ever need an E ye-opener in the morning to steady your
nerves or get rid of a hangover?

CHAPTER 9 Abdomen 222
Family history
Ask especially about a history of infl ammatory bowel disease, celiac
disease, peptic ulcer disease, hereditary liver diseases (e.g., Wilson’s,
hemochromatosis) bowel cancer, jaundice, anemia, splenectomy, and
cholecystectomy.
Social history
• Risks of exposure to hepatotoxins and hepatitis through occupation
• Tattoos
• Illicit drug use (especially sharing needles)
• Social contacts with a similar disease (particularly relevant to jaundice)
• Recent foreign travel
Dietary history
• Amount of fruit, vegetables and fi ber in the diet
• Evidence of lactose intolerance
• Change in symptoms related to eating certain food groups
• Sensitivities to wheat, fat, caffeine, gluten

OUTLINE EXAMINATION
223
Outline examination
As always, ensure adequate privacy. Ideally, the patient should be lying fl at
with the head propped on a single pillow, arms lying at the sides.
The abdomen should be exposed at least from the bottom of the ster-
num to the symphysis pubis—preferably the whole upper torso is uncov-
ered. Do not expose the genitalia until needed.
The examination should follow an orderly routine. The authors’ sugges-
tion is shown in Box 9.13 . It is standard practice to start with the hands and
work proximally—this establishes a physical rapport before you examine
more sensitive areas.
General inspection
Looking at the patient from the end of the bed, assess their general health
and look for any obvious abnormalities described in b Chapter 3 before
moving closer. Look especially for the following:
• High or low body mass
• The state of hydration
• Fever
• Distress
• Pain
• Muscle wasting
• Peripheral edema
• Jaundice
• Anemia
Box 9.13 Framework for abdominal examination
• General inspection
• Hands
• Arms
• Axillae
• Face
• Chest
• Inspection of abdomen
• Auscultation
• Palpation of abdomen
• Light
• Deep
• Specifi c
organs
• Examination of hernial orifi ces
• External genitalia
• Percussion (± examination for ascites)
• Digital examination of the anus, rectum ± prostate

CHAPTER 9 Abdomen 224
Hand and upper limb
Take the patient’s right hand in yours and examine carefully for the fol-
lowing signs.
Nails
See also Chapter 4.
• Leukonychia: whitening of the nail bed due to hypoalbuminemia
(e.g., malnutrition, malabsorption, hepatic disease, nephrotic syndrome)
• Koilonychia: spooning of the nails, making a concave shape instead
of the normal convexity. Causes include congenital and chronic iron
defi ciency.
• Muehrcke’s lines: transverse white lines. They are seen in
hypoalbuminemic states, including severe liver cirrhosis.
• Clubbing: described on b p. 191. abdominal causes are cirrhosis,
infl
ammatory bowel disease, and celiac disease.
• Blue lunulae: a bluish discoloration of the normal lanulae seen in
Wilson’s disease
Palms
• Palmar erythema: “liver palms.” This is a blotchy reddening of the
palms of the hands, especially affecting the thenar and hypothenar
eminences. It can also affect soles of the feet. It is associated with
chronic liver disease, pregnancy, thyrotoxicosis, rheumatoid arthritis,
polycythemia, and (rarely) chronic leukemia. It can also be a normal
fi nding.
• Dupuytren’s contracture: thickening and fi
brous contraction of the
palmar fascia. In early stages, palpable irregular thickening of the fascia
is seen, especially that overlying the fourth and fi
fth metacarpals. This
can progress to a fi xed fl exion deformity of the fi ngers starting at the
fi fth fi nger and working across to the third or second. Often bilateral,
it may also affect the feet. It is seen especially with alcoholic liver
disease but may also be seen in manual workers (or may be familial).
• Anemia: Pallor in the palmar creases suggests signifi cant
anemia.
• Rash: Remember syphilis in the differential.
Hepatic fl ap (asterixis)
This is identical to the fl ap seen in hypercapnic states (see b p. 191).
Ask the patient to stretch out their hands in front of them with the
hands dorsifl exed at the wrists and fi ngers out-stretched and separated
(see Fig.9.4 ).
The patient should hold that position for at least 15 seconds. If fl ap is
present, the patient’s hands will move in jerky, irregular fl exion and exten-
sion at the wrist and MCP joints. The fl ap is nearly always bilateral. It may
be subtle and intermittent.
This is characteristic of encephalopathy due to liver failure.
If a sign of hepatic encephalopathy in a patient with previously com-
pensated liver disease, it may have been precipitated by infection, diuretic
medication, electrolyte imbalance, diarrhea or constipation, vomiting, cen-
trally acting drugs, upper GI bleeding, abdominal paracentesis, or surgery.

HAND AND UPPER LIMB
225
Upper limb
Examine the arms for any signs of the following:
• Bruising: This may be a sign of the following:
•
Hepatocellular damage and the resulting coagulation disorder
•
Thrombocytopenia due to hypersplenism
•
Marrow suppression with alcohol
• Petechiae: pin-prick bleeds that do not blanch with pressure. Possibly a
sign of thrombocytopenia
• Muscle wasting: seen as a decrease in muscle mass, possibly with
overlying skin hanging loosely. A late manifestation of malnutrition and
often seen in patients with chronic alcoholic liver disease
• Scratch marks (excoriations): suggests itch (pruritus) is present and
may be the only visible feature of early cholestasis
0 Be careful not to miss AV fi
stulae or hemodialysis catheters!
Axillae
Examine carefully for the following:
• Lymphadenopathy
• Acanthosis nigricans (a thickened, blackening of the skin. Velvety in
appearance. May be associated with intra-abdominal malignancy)
Fig. 9.4 Testing for hepatic fl ap. The patient should hold their arms outstretched
with wrists dorsifl exed and fi ngers extended and abducted for at least 15 seconds.

CHAPTER 9 Abdomen 226
Face and chest
Eyes
Ask the patient to look straight ahead while you look closely at their eyes,
orbits, and surrounding skin. Then ask the patient to look up while you
gently retract the lower lid with a fi nger, looking at the underlying sclera
and conjunctiva. Look especially for the following:
• Jaundice: a yellow discoloration of the sclera. This is usually the fi rst
place that jaundice can be seen. This sign is particularly useful in
patients with dark skin tones in whom jaundice would not otherwise
be obvious.
• Anemia: pallor of the conjunctivae. You will need experience to spot
this easily.
• Kayser–Fleisher rings: best seen with a slit lamp in an ophthalmology
clinic. A greenish-yellow pigmented ring is just inside the cornea-scleral
margin. It is due to copper deposition and seen in Wilson’s disease.
• Xanthelasma: raised yellow lesions caused by a buildup of lipids
beneath the skin. They are often seen encircling the eyes, especially at
the nasal side of the orbit.
Mouth
Ask the patient to show you their teeth then open wide. Look carefully at
the state of the teeth, the tongue, and the inner surface of the cheeks. You
should also subtly attempt to smell the patient’s breath.
Angular stomatitis
This is a reddening and infl ammation at the corners of the mouth. It is a
sign of thiamine, vitamin B
12
, and iron defi ciencies.
Circumoral pigmentation
Hyperpigmented areas surround the mouth. This is seen in Peutz–Jegher’s
syndrome.
Dentition
Note dentures or if there is evidence of tooth decay.
Telangiectasia
This is dilatation of the small vessels on the gums and buccal mucosa, seen
in Osler–Weber–Rendu syndrome.
Gums
Look especially for ulcers (causes include celiac disease, infl ammatory
bowel disease, Behçet’s disease and Reiter’s syndrome) and hypertro-
phy (caused by pregnancy, phenytoin use, leukemia, scurvy [vitamin C
defi ciency],or infl ammation [gingivitis]).
Breath
Smell especially for the following:
• Fetor hepaticus: a sweet-smelling breath
• Ketosis: sickly sweet pear-drop smelling breath
• Uremia: fi shy
smell

227
FACE AND CHEST
Tongue
Look especially for the following:
• Glossitis: smooth, erythematous swelling of the tongue. Causes include
defi ciencies of iron, vitamin B
12
, and folate.
• Macroglossia: enlarged tongue. Causes include amyloidosis,
hypothroidism, acromegaly, Down syndrome, and neoplasia.
• Leukoplakia: a white-colored thickening of the tongue and oral mucus
membranes. This is a premalignant condition caused by smoking, poor
dental hygiene, alcohol, sepsis, and syphilis.
• Geographical tongue: painless red rings and lines on the surface of the
tongue looking like a map. It can be caused by vitamin B
2
(ribofl avin)
defi ciency or may be a normal variant.
Candidiasis
Also known as thrush , this is a fungal infection of the oral membranes seen
as creamy, white curd-like patches that can be scraped off, revealing ery-
thematous mucosa below. Causes include immunosuppression, antibiotic
use, poor oral hygiene, iron defi ciency, and diabetes.
Neck
Examine the cervical and supraclavicular lymph nodes as on b p. 58.
Look especially for a supraclavicular node on the left-hand side, which,
when enlarged, is called Virchow’s node (Troisier’s sign—suggestive of
gastric malignancy).
Chest
Look at the anterior chest and look especially for the signs listed below.
Spider nevi
These are telangiectatic capillary lesions.
• A central red area with engorged capillaries spreading out from it in a
spidery manner
• Caused by engorgement of capillaries from a central feeder vessel
• If the lesion is truly a spider nevus, it will be completely eliminated by
pressure at the center from a penpoint or similar instrument and will
fi
ll outward when the pressure is released.
• Can range in size from those that are only just visible to up to 5 or
6mm in diameter
• Found in the distribution of the superior vena cava (see Fig. 9.5 )
• A normal adult is allowed up to 5 spider nevi.
• Causes include chronic liver disease and estrogen excess.
Gynecomastia
This is the excessive development of male mammary glands due to ductal
proliferation such that they resemble postpubertal female breasts.
• This is often embarrassing for the patient, so be sensitive in your
approach.
• It is caused by alcoholic liver disease, congenital adrenal hyperplasia,
and several commonly used drugs, including spironolactone, digoxin,
and cimetidine.
• It can also be seen during puberty in the normal male.

CHAPTER 9 Abdomen 228
Fig. 9.5 Distribution of drainage to the superior vena cava and the area where
one should look for spider nevi. The normal adult may have up to 5 such lesions.

INSPECTION OF ABDOMEN
229
Inspection of abdomen
With the abdomen exposed, you should make a careful and methodical
inspection. Squat by the side of the bed or exam table so that the patient’s
abdomen is at your eye level when looking for waves or pulsations.
Note especially the features discussed on these pages.
Scars
These may be the result of trauma or previous surgery ( Fig. 9.6 ). Recent
scars will be pink and vascular. Old scars are white and may be indurated.
Laproscopic surgery scars may be hidden in skin folds or the umbilicus.
Abdominal distension
Does the abdomen look swollen? Consider the 5 F’s ( Box 9.11 b p. 217)
and note the state of the umbilicus (everted? deep?).
Focal swellings
Treat an abdominal swelling as you would do any other lump (b p. 88) and
bear in mind the underlying anatomy and possible organ involvement.
Divarication of the recti
Particularly in the elderly and in patients who have had abdominal surgery,
the twin rectus abdominis muscles may separate laterally on contraction,
causing the underlying organs to bulge through the resultant midline gap.
Ask the patient to lift their head off the bed or to sit up slightly. Watch
for the appearance of a longitudinal midline bulge.
Prominent vasculature
If veins are seen coursing over the abdomen, note their exact location.
Attempt to map the direction of blood fl ow within them:
• Place two fi
ngers at one end of the vein and apply occlusive pressure.
• Move one fi
nger along the vein, emptying that section of blood in a
milking action.
• Release the pressure from one fi nger and watch for the fl
ow of blood
back into the vein.
‘Mercedes-Benz’
scar of liver
transplantation
Upper midline
Paramedian
Lower midline
Appendix
Right
subcostal
Renal
Left inguinal
Suprapubic
Fig. 9.6 Some common abdominal surgical scars.

CHAPTER 9 Abdomen 230
• Repeat, emptying blood in the other direction.
• Given the venous valves, you should be able to determine the
direction of blood fl
ow in that vein.
Inferior fl ow of blood suggests superior vena cava (SVC) obstruction.
Superior fl ow of blood suggests inferior vena cava (IVC) obstruction.
Flow radiating out from the umbilicus (caput medusae) indicates portal
vein hypertension (porto-systemic shunting occurs through the umbilical
veins which become engorged).
Obvious pulsations
Look across the abdomen for any pulsations. A pulsatile, expanding mass
in the epigastrium may be an abdominal aortic aneurysm.
Peristaltic waves
These are usually only seen in thin, fi t, young individuals. A very obvious
bowel peristalsis is seen as rippling movements beneath the skin and may
indicate intestinal obstruction.
Striae
Stretch marks are pink or white streaky lines caused by changes in the ten-
sion of the abdominal wall. These may be normal in rapidly growing pubes-
cent teens. They are also seen in obesity, pregnancy (striae gravidarum),
and ascites and following rapid weight loss or abdominal paracentesis.
Bear in mind that these will turn pink or purple in Cushing’s syndrome,
as will other scars (see b p. 115).
Skin discoloration
There are two classical patterns of bruising or discoloration indicating the
presence of retroperitoneal blood (seen especially in pancreatitis):
Cullen’s sign: discoloration at the umbilicus and surrounding skin
Grey-Turner’s sign: discoloration at the fl anks
Stomas
Look for surgical stomas or fi stulae, noting their exact location, nature of
the stoma, and appearance of the exposed mucosa (if any). Remember
that a stoma may be from the large bowel, small bowel, or renal tract.
Look also at the contents of the stoma bag, noting any abnormalities such
as diarrhea, pus, mucus, or blood.
• Colostomy: usually seen in the left iliac fossa and will be fl
ush to the
skin (bag may contain semisolid to formed stool)
• Ileostomy: usually in the right iliac fossa and formed as a spout of
bowel mucosa extending from the abdominal wall to prevent the
luminal contents from harming the abdominal wall (bag will contain
semi-formed and liquid stool)
• Urostomy: often formed as an ileal conduit with ureters connected to
a portion of small bowel and then to the abdominal wall. Usually in the
right iliac fossa (bag will contain urine)
• Nephrostomy: drainage of urine from the kidney pelvis to the exterior.
Usually a temporary measure following operative procedures to the
renal tract or to decompress an obstructed system. Usually at the
fl
ank (bag will contain urine)

AUSCULTATION
231
Auscultation
This is an important part of the abdominal examination that is easily
missed. Listen before palpation or percussion of the abdomen.
Bowel sounds
These are low-pitched gurgling sounds produced by normal gut peristalsis.
They are intermittent but will vary in timing depending on when the last
meal was eaten. Practice listening to as many abdomens as possible to
understand the normal range of sounds.
Listen with the diaphragm of the stethoscope just below the umbilicus.
• Normal: low-pitched gurgling, intermittent
• High-pitched: often called tinkling. These sounds are suggestive of
partial or total bowel obstruction.
• Borborygmus: a loud, low-pitched gurgling that can even be heard
without a stethoscope. (The sounds are called borborygmi .) These re
typical of diarrheal states or abnormal peristalsis.
• Absent sounds: If no sounds are heard for 2 minutes, there may be a
complete lack of peristalsis—i.e., a paralytic ileus or peritonitis.
Bruits
These are sounds produced by the turbulent fl ow of blood through a
vessel—similar in sound to heart murmurs. Listen with the diaphragm of
the stethoscope.
Bruits may occur in normal adults but raise the suspicion of pathological
stenosis (narrowing) when heard throughout both systole and diastole.
There are several areas you should listen at on the abdomen:
• Just above the umbilicus over the aorta (abdominal aortic aneurysm)
• Either side of midline just above the umbilicus (renal artery stenosis)
• At the epigastrium (mesenteric stenosis)
• Over the liver (AV malformations, acute alcoholic hepatitis,
hepatocellular carcinoma)
Friction rubs
These are creaking sounds like that of a pleural rub (b p. 199) heard when
infl amed peritoneal surfaces move against each other with respiration.
Listen over the liver and spleen in the right and left upper quadrants,
respectively.
Causes include hepatocellular carcinoma, liver abscesses, recent per-
cutaneous liver biopsy, liver or splenic infarction, and STI-associated peri-
hepatitis (Fitz–Hugh–Curtis syndrome).
Venous hums
Rarely, it is possible to hear the hum of venous blood fl ow in the upper
abdomen over a caput medusa (b p. 230) secondary to portosystemic
shunting of blood.

CHAPTER 9 Abdomen 232
Palpation
General approach
The patient should be positioned lying supine with the head supported by
a single pillow and arms at their sides.
Each of the four quadrants (see b p. 204) should be examined in turn
with light and then by deep palpation before focusing on specifi c organs
(b p. 233). The order in which they are examined doesn’t matter—fi nd
a routine that suits you. Ask the patient if there is any area of tenderness,
and remember to examine this part last.
Before you begin, ask the patient to let you know if you cause any dis-
comfort. You should be able to examine the abdomen without looking at
it closely. Instead, you should watch the patient’s face for signs of pain.
Light palpation
For this use the fi ngertips and palmar aspects of the fi ngers.
• Lay your right hand on the patient’s abdomen and gently press in by
fl
exing at the metacarpophalangeal joints.
If there is pain on light palpation, attempt to determine whether the pain
is worse when you press down or when you release the pressure ( rebound
tenderness ).
If the abdominal muscles seem tense, determine whether it is localized
or generalized. Ensure that the patient is relaxed—it may be helpful for
the patient to bend their knees slightly, relaxing the abdominal muscles.
An involuntary tension in the abdominal muscles, apparently protecting
the underlying organs, is called guarding .
Deep palpation
• Once all four quadrants are lightly palpated, re-examine using more
pressure. This should enable you to feel for any masses or structural
abnormalities.
If a mass is felt, treat it as you would any other lump, describing its exact
location, size, shape, surface, consistency, mobility, movement with respi-
ration, and tenderness and whether or not it is palatial.
It is often possible to detect the putty-like consistency of stool in the
sigmoid colon. You should treat this as you would any other lump, to be
sure of its nature.
Box 9.14 Signs of peritonitis
• Pain on light palpation
• Rebound tenderness
• Involuntary guarding
• Pain recurring with slight movement of the examining hand
• Absent bowel sounds (b p.231)

PALPATING THE ABDOMINAL ORGANS
233
Palpating the abdominal organs
Liver
The normal liver extends from the fi fth intercostal space on the right
of the midline to the costal margin, hiding under the ribs so is often not
normally palpable—don’t worry if you can’t feel one.
• Using the fl
at of the right hand, start palpation from the right iliac fossa.
• You should angle your hand such that the index fi nger is aligned with
the costal margin (see
Fig. 9.7 ).
• Exert gentle pressure and ask the patient to take a deep breath.
• With each inward breath, your fi
ngers should drift slightly superiorly
as the liver moves inferiorly with the diaphragm. Relax the pressure on
your hand slightly at the height of inspiration.
• If the liver is just above the position of your hand, the lateral surface
of your index fi
nger will strike the liver edge and glide over it with a
palpable step.
• If the liver is not felt, move your hand 1–2cm superiorly and feel again.
• Repeat the process, moving toward the ribs until the liver is felt.
If a liver edge is felt, you should note the following:
• How far below the costal margin it extends in fi nger-breadths
or
(preferably) centimeters and record the number carefully
• Nature of the liver edge (is the surface smooth or irregular?)
• Presence of tenderness
• Whether the liver is pulsatile
Fig. 9.7 Palpation of the liver—align the lateral surface of the index fi nger with the
costal margin and palpate from the right iliac fossa to the ribs in a step-wise fashion.

CHAPTER 9 Abdomen 234
Findings
• It is often possible to palpate the liver just below the costal margin at
the height of inspiration in normal, healthy, thin people.
• An enlarged liver has many causes.
• A normal liver may be palpable in patients with COPD or
asthma in whom the chest is hyperexpanded or in patients with a
subdiaphragmatic collection.
• The liver may also be palpable in the presence of Riedel’s lobe —a
normal variant in which a projection of the liver arises from the
inferior surface of the right lobe. It is more common in females and is
commonly mistaken for a right kidney or enlarged gallbladder.
Gallbladder
The gallbladder lies at the right costal margin at the tip of the ninth rib,
at the lateral border of the rectus abdominis. Normally it is only palpable
when enlarged from biliary obstruction or acute cholecystitis ( Box 9.15 ).
• Felt as a bulbous, focal, rounded mass that moves with inspiration
• Position the right hand perpendicular to the costal margin and palpate
in a medial to lateral direction (see Fig. 9.8 ).
Spleen
The spleen is the largest lymphatic organ, which varies in size and shape
between individuals—roughly the size of a clenched fi st (12 × 7cm).
Normally, it is hidden beneath the left costal cartilages and is not palpable.
Enlargement of the spleen occurs in a downward direction, extending
into the left upper quadrant (and even the left lower quadrant) across
toward the right iliac fossa.
• It is palpated using a similar technique to that used to examine the
liver (b p. 233).
• Your left hand should be used to support the left of the ribcage
posterolaterally. Your right hand should be aligned with the fi ngertips
parallel to the left costal margin (see Fig. 9.9 ).
• Start palpation just below the umbilicus in the midline and work
toward the left costal margin, asking the patient to take a deep breath
in and feeling for movement of the spleen under your fi ngers,
much
like palpating the liver.
Box 9.15 Important gallbladder signs
Murphy’s sign
A sign of cholecystitis—pain on palpation over the gallbladder during
deep inspiration. It is positive only if there is NO pain on the left at the
same position.
Courvoisier’s law
In the presence of jaundice, a palpable gallbladder is probably NOT
caused by gallstones.
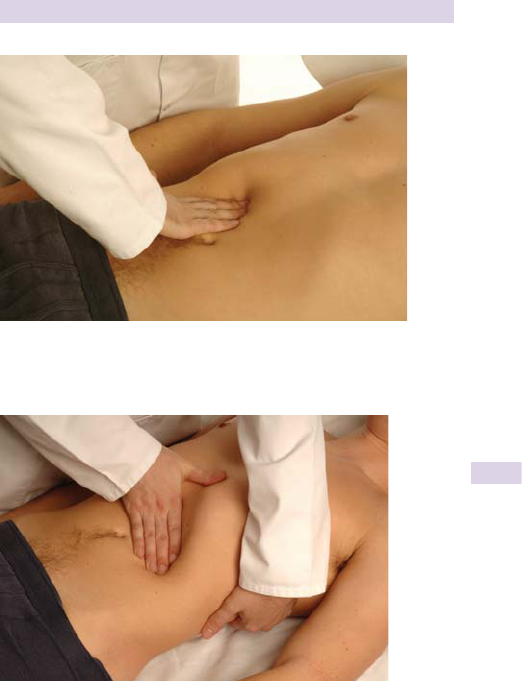
PALPATING THE ABDOMINAL ORGANS
235
• The inferior edge of the spleen may have a palpable notch centrally,
which will help you differentiate it from any other abdominal mass.
• If a spleen is felt, measure the distance to the costal border in fi nger-
breadths or (preferably) centimeters.
2 A nonpalpable spleen may sometimes become palpable by reposition-
ing the patient. Ask them to roll onto their right-hand side and repeat the
examination as above.
Fig. 9.8 Palpation of the gallbladder—the examining hand should be
perpendicular to the costal margin at the tip of the ninth rib (where the lateral
border of the rectus muscle meets the costal cartilages).
Fig. 9.9 Palpation of the spleen—align the fi ngertips of your right hand with the
left costal border and start palpating just below the umbilicus, working toward the
left upper quadrant.

CHAPTER 9 Abdomen 236
Kidneys
The kidneys are retroperitoneal, lying on the posterior abdominal wall
either side of the vertebral column between T12 and L3 vertebrae. They
move slightly inferiorly with inspiration. The right kidney lies a little lower
than the left (displaced by the liver).
Palpation is bimanual (both hands). You may be able to feel the lower
pole of the right kidney in normal, thin people.
• Place your left hand behind the patient at the right loin.
• Place your right hand below the right costal margin at the lateral
border of the rectus abdominis.
• Keeping the fi
ngers of your right hand together, fl
ex them at the
metcarpophalangeal joints, pushing deep into the abdomen.
• Ask the patient to take a deep breath—you may be able to feel the
rounded lower pole of the kidney between your hands, slipping away
when the patient exhales.
• This technique of using one hand to move the kidney toward the other
is called renal ballottement .
• Repeat the procedure for the left kidney, leaning over and placing your
left hand behind the patient’s left side (see Table 9.1 for comparison
with enlarged spleen).
Findings
• Unilateral palpable kidney: hydronephrosis, polycystic kidney disease,
renal cell carcinoma, acute renal vein thrombosis, renal abscess, acute
pyelonephritis
• Bilateral palpable kidneys: bilateral hydronephrosis, bilateral renal cell
carcinoma, polycystic kidney disease, nephrotic syndrome, amyloidosis,
lymphoma, acromegaly
Table 9.1 Differentiating an enlarged spleen and an enlarged left kidney
Enlarged spleen Enlarged kidney
Impossible to feel above Can feel above the organ
Has a central notch on the leading
edge
No notch, but you may feel the
central hilar notch medially
Moves early on inspiration Moves late on inspiration
Moves inferiomedially on inspiration Moves inferiorly on inspiration
Not ballottable Ballottable
Dullness to percussion Resonant percussion note due to
overlying bowel gas
May enlarge toward the umbilicus Enlarges inferiorly lateral to the
midline
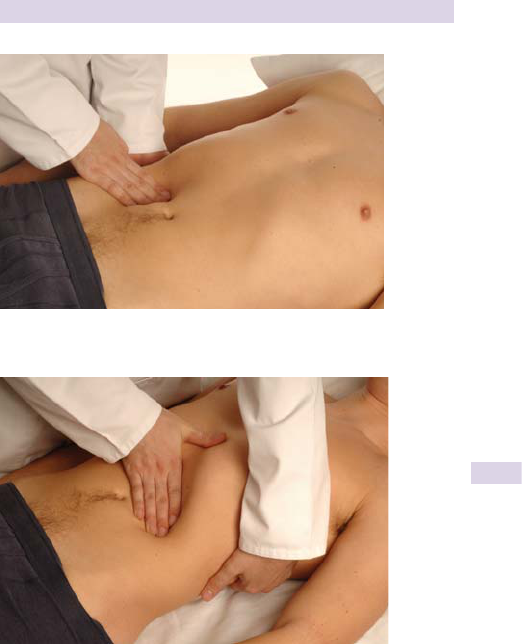
PALPATING THE ABDOMINAL ORGANS
237
Bladder
The urinary bladder is pyramid shaped and lies within the pelvic cavity. It
is not palpable when empty.
As it fi lls, it expands superiorly and may even reach as high as the umbili-
cus or just beyond if very full.
It may be diffi cult to differentiate it from an enlarged uterus or ovarian
cyst. The full bladder will be as follows:
• A palpable, rounded mass arising from behind the pubic symphysis
• Dull to percussion
• You will be unable to feel below it.
• Pressure on the full bladder will make the patient feel the need to
urinate.
Fig. 9.11 Palpation of the left kidney.
Fig. 9.10 Palpation of the right kidney.

CHAPTER 9 Abdomen 238
Aorta
The abdominal aorta may be palpated in the midline above the umbilicus,
felt as a longitudinal pulsatile mass. It is particularly palpable in thin people.
If it is felt:
• Position the fi
ngers of each hand on either side of the outermost
palpable margins.
• Measure the distance between your fi
ngers. Normal diameter
82–3cm.
• Decide whether the mass you feel is pulsatile/expansile in itself (in
which case your fi
ngers will move outward) or whether the pulsation
is transmitted through other tissue (in which case your fi ngers
will
move upward). See Fig. 9.12 .
Inguinal lymph nodes
The inguinal chain of lymph nodes lies along the inguinal ligament between the
pubic tubercle and the anterior superior iliac spine and should not be missed.
• Feel along this line for any lumps, treating each as you would any other
lump (b p. 88).
Small, fi
rm, mobile lymph nodes are common in healthy people and are
often the result of minor sepsis or abrasions of the lower limbs.
2 By this stage of the examination, you should have examined the nodes
in the axillae, neck, supraclavicular areas, and inguinal regions.
Hernial orifi ces
Described on b p. 243.
External genitalia
No thorough abdominal examination is complete without examining the
genitalia, although in clinical practice, many leave this out, considering it
inappropriate if you are not suspicious of any genitourinary pathology.
See b Chapters 12 and 14.
(a)
(b)
Fig. 9.12 Palpating a pulsatile mass. If the mass itself is expansile (a), your fi ngers
will move outward. If the pulsatility is being transmitted through overlying tissues
(b), your fi ngers will move upward.

PERCUSSION
239
Percussion
In the examination of the abdomen, percussion is useful for
• Determining the size and nature of enlarged organs or masses
• Detecting shifting dullness (below)
• Eliciting rebound tenderness (b p. 232)
Organs or masses will appear as dullness, whereas a bowel full of gas
will seem abnormally resonant. Good technique comes with experience.
Practice percussing your own liver. Percussion technique is described on
b p. 196.
Examining for ascites
If fl uid is present in the peritoneal cavity (ascites), gravity will cause it to
collect in the fl anks when the patient is lying fl at—this will give dullness to
percussion laterally with central resonance as the bowel fl oats.
Ascites will produce a distended abdomen, often with an everted
umbilicus. If you suspect the presence of ascites:
• Percuss centrally to laterally with the fi
ngers spread and positioned
longitudinally (see
Fig. 9.13 ).
• Listen (and feel) for a defi
nite change to a dull note.
There are then two specifi c tests to perform.
Fig. 9.13 Testing for a fl uid thrill. Ask an assistant to place their hand centrally
on the abdomen—this prevents transmission of the impulse through the abdominal
wall.

CHAPTER 9 Abdomen 240
Shifting dullness*
• Percuss centrally l laterally until dullness is detected. This marks the
air-fl uid level in the abdomen.
• Keep your fi
nger pressed there as you do the following:
• Ask the patient to roll onto the opposite side (i.e., if dullness is
detected on the right, roll the patient to their left-hand side).
• Ask the patient to hold the new position for about half a minute.
• Repeat percussion, moving laterally to central over your mark.
• If the dullness truly was an air-fl
uid level, the fl
uid will now be moved
by gravity away from the marked spot and the previously dull area will
be resonant.
Fluid thrill
In this test, you are attempting to detect a wave transmitted across the
peritoneal fl uid. This is only really possible with massive ascites.
0 You need an assistant for this test (you can ask the patient to help).
• Ask your assistant to place the ulnar edge of one of their hands in the
midline of the abdomen (see Fig. 9.13 ).
• Place your left hand on one side of the abdomen, about level with the
mid-clavicular line.
• With your right hand, fl
ick the opposite side of the patient’s abdomen.
• If a fl uid thrill can be detected, you will feel the ripple from the fl ick
transmitted as a tap to your left hand.
The assistant’s hand is important—it prevents transmission of the impulse
across the surface of the abdominal wall.
Liver
Percuss to map the upper and lower borders of the liver—note the length,
in centimeters, at the mid-clavicular line.
Spleen
Percussion from the left costal margin toward the midaxillary line and the
lower left ribs may reveal dullness suggestive of splenic enlargement that
could not normally be palpated.
Kidneys
Percussion is useful in differentiating an enlarged kidney from an enlarged
spleen or liver. The kidneys lie deep in the abdomen and are surrounded by
perinephric fat, which makes them resonant to percussion. Splenomegaly
or hepatomegaly will be dull.
Bladder
Dullness to percussion in the suprapubic region may be helpful in deter-
mining whether an ill-defi ned mass is an enlarged bladder (dull) or dis-
tended bowel (resonant).
* This is also the punchline to the medical student joke: “What’s the defi nition of ward rounds?”

RECTAL EXAMINATION
241
Rectal examination
This is an important part of the examination and should not be avoided
simply because it is considered unpleasant. It is particularly important in
patients with symptoms of rectal bleeding, tenesmus, change in bowel
habit, and pruritus ani.
2 Remember: If you don’t put your fi
nger in it, you may put your foot
in it.
Before you begin
Explain to the patient what is involved and obtain verbal consent. Choose
your words carefully, adjusting your wording to suit the patient. Favorite
phrases include “hindend,” “backside,” and “bottom.” Tell the patient that
you need to examine their bottom with a fi nger. Warn that it ‘probably
won’t hurt’ but may feel cold and a little unusual.
Ask for another staff member to chaperone, to protect yourself against
future claims of inappropriate treatment and to reassure the patient.*
As you proceed, explain each stage to the patient.
Equipment
• Chaperone
• Nonsterile gloves
• Tissues
• Lubricating jelly
Technique
• With informed verbal consent obtained, ensure adequate privacy.
• Uncover the patient from the waist to the knees.
• Ask the patient to lie in the left lateral position with their legs bent
such that their knees are drawn up to their chest and their buttocks
facing toward you—preferably projecting slightly over the edge of the
bed or exam table.
• Ensure that there is a good light source, preferably a mobile lamp.
• Put on a pair of gloves.
• Separate the buttocks carefully by lifting the right buttock with your
left hand.
• Inspect the perianal area and anus.
•
Look for rashes, excoriations, skin tags, ulcers, anal warts, fi stulous
openings, fi ssures, external hemorrhoids, abscesses, fecal soiling,
blood, and mucus.
• Ask the patient to strain or bear down and watch for the projection of
pink mucosa of a rectal prolapse.
• Lubricate the tip of your right index fi
nger with the jelly.
* Accepted practice is that all providers have a chaperone when performing an intimate examina-
tion. In practice, male providers performing an examination on a female always have a chaperone
present, while the need for a chaperone in other situations is judged individually at the time.

CHAPTER 9 Abdomen 242
• Begin by placing the pulp of your right index fi nger against the anus in
the midline and press in fi rmly but slowly.
•
Most anal sphincters will refl exively tighten when touched but will
quickly relax with continued pressure.
• When the sphincter relaxes, gently advance the fi
nger into the anal
canal.
• Assess anal sphincter tone by asking the patient to tighten around your
fi nger.
• Rotate the fi
nger backward and forward, covering the full 360
*, feeling
for any thickening or irregularities.
• Push the fi
nger further into the rectum.
• Examine all 360˚ by moving the fi nger in sweeping motions. Note:
•
Presence of thickening or irregularities of the rectal wall
•
Presence of palpable feces, and its consistency
•
Any points of tenderness
• Next, in the male, identify the prostate gland, which can be felt
through the anterior rectal wall.
•
The normal prostate is smooth-surfaced, fi rm with a slightly rubbery
texture, measuring 2–3cm diameter. It has two lobes with a palpable
central sulcus.
• Gently withdraw your fi
nger and inspect the glove for feces, blood, or
mucus and note the color of the stool, if present. Test the stool for
occult blood if a testing card is available.
• Tell the patient that the examination is over and wipe any feces or jelly
from the gluteal cleft with the tissues. Some patients may prefer to do
this themselves.
• Thank the patient and ask them to get dressed. You may need to help.
Findings
If any mass or abnormality is identifi ed on the exterior or interior of the
areas examined, its exact location should be noted. It is conventional to
record as the position on a clock face, with 12 o’clock indicating the anter-
ior side of the rectum at the perineum. Other features of the mass should
be recorded as described on b p. 88.
• Benign prostatic hyperplasai (BPH): The prostate is enlarged but the
central sulcus is preserved, often exaggerated.
• Prostate cancer: The gland loses its rubbery consistency and may
become hard. The lateral lobes may be irregular and nodular. There is
often distortion or loss of the central sulcus. If the tumor is large and
has spread locally, there may be thickening of the rectal mucosa either
side of the gland, creating winging of the prostate.
• Prostatitis: The gland will be enlarged, boggy, and very tender.
2 Hints
• If the patient experiences severe pain, with gentle pressure on the
anal opening, consider anal fi ssure, ischiorectal abscess, anal ulcer,
thrombosed hemorrhoid, or prostatitis.
• In this situation, you may have to apply local anesthetic gel to the
anal margin before proceeding. If in doubt, ask a senior resident or
attending physician.

HERNIAL ORIFICES
243
Hernial orifi ces
A hernia is an abnormal protrusion of a structure, organ, or part of
an organ out of the cavity in which it belongs. A hernia can usually be
reduced—i.e., its contents returned to the original cavity either spontane-
ously or by manipulation.
Abdominal hernias are usually caused by portions of bowel protrud-
ing through weakened areas of the abdominal wall. In the abdomen, her-
nias usually occur at natural openings of the abdominal wall (e.g., inguinal
canals, femoral canals, umbilicus, esophageal hiatus) or acquired weak
spots such as surgical scars.
Most abdominal hernias have an expansile cough impulse—asking the
patient to cough will increase the intra-abdominal pressure, causing a vis-
ible or palpable impulse.
Strangulation
Hernias that cannot be reduced (irreducible) may become fi xed and swol-
len as their blood supply is occluded, causing ischemia and necrosis of
the herniated organ. The hernias are painfully swollen with overlying ery-
thema and may cause disruption of normal gut function (e.g., intestinal
obstruction).
An approach to hernias
• Determine the characteristics as you would for any lump (b p. 88),
including position, temperature, tenderness, shape, size, tension, and
composition.
• Make note of the characteristics of the overlying skin.
• Palpate the hernia and feel for a cough impulse.
• Attempt reduction of the hernia.
• Percuss and auscultate the hernia (listening for bowel sounds or bruits).
• Always remember to examine the same site on the opposite side.
Inguinal hernias
Anatomy
The inguinal canal extends from the pubic tubercle to the anterior supe-
rior iliac spine. In the male, it carries the spermatic cord (vas deferens,
blood vessels and nerves). In the female, it is much smaller and carries the
round ligament of the uterus.
After testicular descent, the canal closes but the site is weakened.
The internal ring is an opening in the transversalis fascia lying at the mid-
inguinal point, halfway between the anterior superior iliac spine and the
pubic symphysis (about 1.5cm above the femoral pulse).
The external ring is an opening of the external oblique aponeurosis and
is immediately above and medial to the pubic tubercle (see Fig. 9.14 ).
• Direct inguinal hernia: This is herniation at the site of the external ring.
• Indirect inguinal hernia: This is the most common site (85% of
all hernias). Herniation is through the internal ring with bowel or
omentum traveling down the inguinal canal and may protrude through
the external ring into the scrotum. It is more likely to strangulate than
direct inguinal hernias.
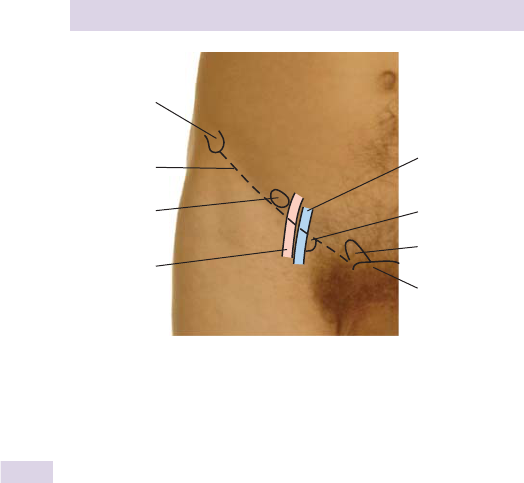
CHAPTER 9 Abdomen 244
Examination
• The patient should be examined standing up and undressed from the
waist down (some hernias may spontaneously reduce when supine).
• Palpate especially for tenderness and consistency of the lump.
•
Herniated omentum will appear rubbery, nonfl uctuant, and dull to
percussion.
•
Herniated gut will be fl uctuant and resonant. You may be able to
hear bowel sounds within the hernia.
• With two fi
ngers on the mass, ask the patient to cough, and feel for an
expansile cough impulse.
• Attempt to reduce the hernia by massaging it back toward its
suspected site of origin.
•
For indirect hernias, you should use the fl at of your hand, directing
the hernia from below and guide it through the external ring, up the
inguinal canal laterally toward the internal ring.
• Once reduced, the hernia should not reappear until you release the
pressure.
• With the hernia reduced, try pressing over the site of the internal ring
and asking the patient to cough. An indirect hernia will remain reduced,
whereas a direct hernia will protrude once more (see Table 9.2 ).
Femoral hernias
Anatomy
The femoral canal is the small component of the femoral sheath medial
to the femoral vessels and contains loose connective tissue, lymphatic
vessels, and lymph nodes. It is bordered anteriorly by the inguinal liga-
ment, the pectineal ligament posteriorly, the femoral vein laterally, and the
lacunar ligament medially.
Femoral vein
Anterior
superior
iliac spine
Inguinal
ligament
Femoral canal
External
inguinal ring
Internal
inguinal ring
Femoral artery
Symphysis pubis
Fig. 9.14 Sites of the internal and external inguinal rings.

HERNIAL ORIFICES
245
Femoral hernias are protrusions of bowel or omentum through this
space (see Box 9.16 for differential). They are more common in middle-
aged and elderly women and can easily strangulate given the small, rigid
opening they pass through.
Examination
• Examine with patient standing up and undressed from the waist down.
• Examine as you would any other hernia and attempt reduction.
• If present, a femoral hernia will appear as a lump just lateral and
inferior to the pubic tubercle, about 2cm medial to the femoral pulse.
Other abdominal wall hernias
• Umbilical/paraumbilical: herniation through a defect near the
umbilicus (considered congenital if identifi ed in children)
• Epigastric: herniation through the linea alba above the umbilicus
• Spigalean: herniation through the linea semilunaris (lateral to the
rectus sheath), usually below and lateral to the umbilicus; rare
• Obturator: herniation through the obturator canal, associated with
increasing age and multiparity
• Perineal: herniation through the pelvic fl
oor diaphragm; rare
• Incisional: herniation through the site of previous surgery. The bulge
is usually seen underlying a surface surgical scar. There is increasing
incidence with advanced age, but it can be caused by wound infection
and associated fasciitis or muscle necrosis.
Table 9.2 Differentiation of inguinal hernias
Indirect inguinal hernia Direct inguinal hernia
Can descend into the scrotum Very rarely descends to the
scrotum
Reduces upward, laterally, backward Reduces upward and backward
Remains reduced with pressure at
the internal ring
Not controlled by pressure over
the internal ring
The causative defect is not palpable Defect in the abdominal wall is
palpable
Reappears at the internal ring and
fl ows medially
Reappears in the same position as
before reduction
Box 9.16 Differential diagnosis of femoral hernia
• Inguinal hernia
• Very large lymph node
• Ectopic testicle
• Psoas bursa or abscess
• Lipoma

CHAPTER 9 Abdomen 246
Important presenting patterns
Chronic liver disease
Any of the following features may be seen. With severe disease and
decompensation, more will become apparent:
Portal hypertension
Raised pressure in the hepatic portal vein is often secondary to liver dis-
ease or noncirrhotic causes such as portal vein thrombosis. Causes are
portosystemic shunting and esophageal varices. Signs include
• Fetor hepaticus
• Splenomegaly
• Risk of gastrointestinal blood loss from varices (anemia, hematemesis,
melena)
• Ascites
• Caput medusae
Alcoholic liver disease
This may cause all the features of chronic liver disease as described
above. In addition, alcohol dependency or addiction is associated with
the following:
• Tolerance
• Withdrawal symptoms
• Alcohol taken in larger amounts and for longer than intended
• Persistent desire to cut down
Men Women
• Gynecomastia • Breast atrophy
• Testicular atrophy • Irregular menses
• Impotence
•
Amenorrhea
• Jaundice • Purpura
• Palmar erythema • Easy bruising
• Leuconychia • Epistaxis
• Clubbing • Menorrhagia
• Spider nevi • Loss of libido
• Telangiectasia • Hair loss
• Hepatomegaly • Bilateral parotid swelling
• Ascites • Encephalopathy
• Variceal bleeding—manifesting as hematemesis and/or melena.

IMPORTANT PRESENTING PATTERNS
247
• Excessive time spent in activities related to alcohol intake
• Abandoning social, occupational or recreational activities
• Continued use despite an awareness of the adverse physiological and
psychological effects of continued use
Fatty liver
Hepatic steatosis has many other causes, including drugs, pregnancy, and
diabetes mellitus. Deposition of fat occurs as a result of preferential alco-
hol oxidation. It is reversible with abstinence but may proceed to cirrhosis
with continued use. There are no specifi
c clinical features.
Alcoholic hepatitis
This is hepatocellular infl ammation with lymphocyte infi ltration, steatosis,
cholestasis, fi brosis, and necrosis. Clinical features include the following:
• Fever
• Jaundice
• Tender hepatomegaly
• May hear a bruit over the liver
Cirrhosis
This is severe hepatic fi
brosis with micronodules. There is loss of hepato-
cytes, impaired synthetic function, and portal hypertension. Other causes
of cirrhosis include chronic viral hepatitis (B or C), sclerosingcholangitis,
Wilson’s disease, hemachromotosis, A
1
-antitrypsin defi ciency, primary
biliary cirrhosis, Budd–Chiari syndrome, and several drugs (e.g., amiodar-
one, methyldopa, and methotrexate). Clinical features can be any of those
listed under Chronic Liver Disease, above.
Extrahepatic manifestations of alcoholic liver disease or alcoholism
• Obesity or malnutrition • Osteoporosis
• Diarrhea • Falls
• Gastric erosions • Seizures
• Peptic ulcer disease • Cognitive impairment (b p. 262)
• Pancreatitis • Metabolic encephalopathy
• Varices • Peripheral neuropathy
• Ascites • Ataxic gait (b p. 321)
• Splenomegaly • Wernicke’s encephalopathy
• Hypertension • Korsakoff’s syndrome
• Loss of secondary sexual
characteristics
• Cardiomyopathy
• Osteomalacia • Arrhythmias (especially atrial
fi brillation)

CHAPTER 9 Abdomen 248
Hepatic encephalopathy
Shunting of blood away from the portal circulation, seen in chronic liver
disease, allows potentially neurotoxic substances absorbed in the gut to
bypass the liver where they would normally be removed.
Hepatic encephalopathy is graded as follows:
Grade 0 Normal mental state
Grade I Altered mood or behavior (d attention span, diffi culty with
numbers, and lack or awareness)
Grade II i Drowsiness, slurred speech, mild to moderate confusion
Grade III Stupor but responsive to stimuli, signifi cant confusion,
restlessness
Grade IV Coma
Malabsorption
Numerous disorders can cause malabsorption states. They can be grouped
as pancreatic insuffi ciency, bile salt malabsorption, small bowel mucosa
defects (celiac disease, tropical sprue, giardiasis, disaccharidase defi ciency,
Whipple’s disease, short bowel syndrome), bacterial overgrowth, and spe-
cifi c delivery defects.
General symptoms and signs of malabsorption include the following:
• Muscle wasting
• Weight loss
• Pallor
• Diarrhea (watery)
• Steatorrhea: pale, fatty stools; offensive smelling and diffi
cult to fl ush
• Glossitis
• Angular stomatitis (vitamin B
2
, B
12
, and folic acid defi ciencies)
• Intraoral purpura and easy bruising (vitamin K defi ciency)
• Follicular keratitis: hyperkeratotic white patches (vitamin A defi ciency)
Acute pancreatitis
Symptoms
• Pain—central abdominal or epigastric, radiating through to the back.
Sometimes relieved slightly by sitting forward.
• Vomiting
Signs
• Tachycardia
• Fever
• Jaundice (rarely)
• Peritonitis (bowel ileus, very tender abdomen, guarding)
• Retroperitoneal bleed: Cullen’s or Grey–Turner’s signs (b p. 230)
Chronic pancreatitis
In developed countries, the most common cause is chronic heavy alcohol
intake. A small group of patients can inherit chronic pancreatitis through
an autosomal dominant gene with incomplete penetrance.
Clinical features are usually due to pancreatic enzyme defi ciencies and
malabsorption and chronic pain. There may be acute exacerbations, pre-
senting as acute pancreatitis. Loss of pancreatic endocrine function may
cause diabetes.

IMPORTANT PRESENTING PATTERNS
249
Cholangitis
This is biliary sepsis. It is suggested by Charcot’s triad:
• Right upper quadrant pain
• Fever
• Jaundice
You may also be able to elicit Murphy’s sign (b p. 234).
Celiac disease
This a common cause of malabsorption. It affects 1 in 133 (2 million) peo-
ple in the United States. Incidence is much higher (up to 1/22) if a fi rst-
degree relative has the disease.
1
T-cell-mediated autoimmune disease of
the small bowel mucosa is characterized by villous atrophy and i intraepi-
thelial lymphocytosis in response to ingestion of gluten.
Gluten is a high-molecular weight compound containing gliadins and
peptides. It is found in a huge number of foods containing wheat, barley,
and rye. Controversy exists over eating oats.
Clinical features are listed below.
Symptoms
• Tiredness
• Malaise
• Diarrhea or steatorrhea
• Abdominal discomfort and bloating
• Weight loss
• Anxiety
• Depression
• Peripheral paresthesia
Signs
• Muscle wasting
• Mouth ulceration
• Angular stomatitis
• Ankle edema (low serum albumin)
• Polyneuropathy
• Muscle weakness
• Tetany
Associated with
• Autoimmune thyroid disorders, chronic liver disease, fi brosing
alveolitis, ulcerative colitis, insulin-dependent diabetes mellitus
Possible complications to be aware of
• Small bowel lymphoma (rare)
• Small bowel adenocarcinoma (rarer)
• Ulcerative jejunitis
• Splenic atrophy
• Anemia
• Osteomalacia
• Osteoporosis
• Secondary lactose intolerance
1
http://digestive.niddk.nih.gov/ddiseases/pubs/celiac.

CHAPTER 9 Abdomen 250
Infl ammatory bowel disease: ulcerative colitis (UC)
This is a chronic relapsing disease of unknown etiology involving superfi cial
infl ammation of the colonic mucosa, starting from the rectum and work-
ing proximally without any breaks. The terminal ileum may be affected by
backwash ileitis. Periods of remission may give no symptoms at all.
Symptoms
• Diarrhea (often with blood or mucus)
• Weight loss
• Fever
• Abdominal pain
• Proctitis may cause rectal bleeding, mucus, tenesmus, and constipation.
Complications to be aware of
• Toxic megacolon
• Iron defi ciency
anemia
• Increased risk of colorectal carcinoma
• Fistula formation (rare)
Infl ammatory bowel disease: Crohn’s disease
Like ulcerative colitis, this is a chronic infl ammatory disease of the gas-
trointestinal tract but differs from UC in that lesions occur anywhere from
the mouth to anus but especially at the terminal ileum and anorectum.
Pathology involves deep ulceration, cobblestoning of the mucosa, fi ssuring
and abscess formation with skip lesions, and non-caseating granulomas.
Symptoms
If disease is limited to the colon, symptoms may be identical to UC.
• Loose stools or diarrhea (usually not bloody)
• Anorexia
• Malaise
• Weight loss
• Abdominal pain (insidious, often in the right lower quadrant)
• Perianal pain
• Joint pains
Note on examination (these can occur in UC also)
• Aphthous mouth ulcers
• Uveitis
• Anemia
• Arthropathy
Active Crohn’s disease
• Colicky pain often in the right iliac fossa
• May have diarrhea with blood and mucus
• Weight loss
• Borborygmus (b p. 231)
• May be a palpable infl
ammatory mass in the right iliac fossa
• Abdominal distension
• ± Bowel obstruction

IMPORTANT PRESENTING PATTERNS
251
Active Crohn’s colitis
• Similar presentation to ulcerative colitis
• Perianal disease more likely to produce fi ssuring and fi stula
formation
Complications to be aware of
• Fistula formation (from the bowel to any other abdominal organ or
the exterior)
• Small increased risk of colorectal carcinoma (especially in long-standing
disease limited to the colon)
• Vitamin B
12
defi ciency
• Iron defi ciency
• Abscess formation
• Stricture formation
• Systemic infection
Extraintestinal features of infl ammatory bowel disease
• Seronegative arthropathy of large or small joints (peripheral, non-
deforming, particularly at the knees, ankles, and wrists)
• Sacroiliitis
• Anterior uvetitis
• Erythema nodosum
• Pyoderma gangrenosum
• Ureteric calculi
• Gallstones
• Sclerosing cholangitis
• Cholangiocarcinoma
• Nutritional defi
ciencies (Osteoporosis? Osteomalacia?)
• Bile salt malabsorption
• Osteoporosis secondary to longterm steroid use or malabsorption
• Systemic amyloidosis
Irritable bowel syndrome (IBS)—Rome III
diagnostic criteria
Symptoms of abdominal discomfort or pain need to meet a frequency
criterion (3 or more days a month for at least 3 months) in the preceding
6 months and has two out of three features:
• Relief or improvement with defecation
• Onset associated with a change in frequency of stool
• Onset associated with a change in form/appearance of stool
Other symptoms that support the diagnosis of IBS:
• Abnormal stool frequency (>3/day or <3/week)
• Abnormal stool form (lumpy/hard, loose/watery)
• Abnormal stool passage (straining, urgency, feeling of incomplete
evacuation)
• Passage of mucus
• Bloating or feeling of abdominal distension

CHAPTER 9 Abdomen 252
The elderly patient
Gastrointestinal disease presents as a huge spectrum in older patients,
encompassing nutrition, oral care, and continence in addition to the range
of presentations described in this chapter. While many older people suf-
fer gastrointestinal symptoms, often due to underlying illnesses or the
effect of medication, they may be embarrassed about discussing them.
Thoughtful and holistic assessment is paramount, and simple interventions
can pay dividends.
History
Oral care
This is an often overlooked but key part of any assessment. Dentures
may be ill-fi tting or lost, and dietary intake can suffer as a consequence.
Hospitalized patients are particularly prone to losing their dentures.
Clarify symptoms and diagnoses
Does the patient really have an irritable bowel? (See below.) Many patients
may describe themselves as having such diagnoses, but take the time to
clarify what this means. Recent changes of bowel habit must always be
viewed with a degree of alarm and causes considered.
Constipation
This can often lead to serious decline in patients. It is often easily
remediable.
Weight and nutrition
Ask yourself why has the patient lost weight. The range of diagnoses
is broad, but contemplate mood, dietary habits, and functional abilities
in your assessments—it may be a matter of dislike of delivered frozen
meals.
Drug history
Always consider the side effects of medication—analgesics and constipa-
tion, recent antibiotics, and diarrhea. Ask about over-the-counter drugs
including NSAIDs (and topical drugs) and laxatives.
Continence
This is another key part of the assessment; try to discuss it sensitively
and determine if there factors additional to any GI disturbance, includ-
ing mobility, cognition and visual problems. This dovetails with the ever-
important functional history.
Examination
General
Look out for signs of weight loss—wasting, poorly fi tting clothes, etc. For
inpatients, a completed weight chart and careful consideration may allevi-
ate some of the problems of poor nutrition and acute illness.
Look in the mouth
A range of diagnoses is often apparent. Denture care should be assessed
(poor cleaning associated with recurrent stomatitis), and other problems
such as oral candida are obvious.

THE ELDERLY PATIENT
253
Observe
Look for other signs of systemic disease that might point to the cause of
the gastrointestinal symptoms (e.g., multiple telangiectasia, valvular heart
disease in GI bleeding).
Examine
Examine thoroughly for lymphadenopathy. Remember to examine her-
nial orifi ces—the cause of abdominal pain may be instantly obvious and
correctable.
Rectal examination
This is vital—changes in bowel habit, continence, iron defi ciency anemia,
and bladder symptomatology all indicate that this should be performed.
Diagnoses not to be missed
Functional bowel disorders
These tend to be less common in older people, so always consider under-
lying organic problems. Endoscopic examinations are often well tolerated
and have a good diagnostic yield.
Biliary sepsis
This is the third most common source of infection in older people (after
chest and urine sepsis) and may lack many of the salient presenting fea-
tures described previously in this chapter. Be alert to this possibility when
considering differential diagnoses and choosing antibiotics.
This page intentionally left blank

255
Nervous system
Presenting symptoms in neurology 256
The rest of the history 258
The outline examination 259
General inspection and mental state 259
Speech and language 260
Cognitive function 262
Cranial nerve I: olfactory 263
Cranial nerve II: optic 264
Cranial nerve II: ophthalmoscopy 268
Pupils 273
Cranial nerves III, IV, and VI 276
Palsies of cranial nerves III, IV, and VI 280
Cranial nerve V: trigeminal 283
Cranial nerve VII: facial 285
Cranial nerve VIII: vestibulocochlear 287
Cranial nerves IX and X 289
Cranial nerve XI: accessory 291
Cranial nerve XII: hypoglossal 293
Motor: applied anatomy 294
Motor: inspection and tone 296
Motor: upper limb power 298
Motor: lower limb power 300
Tendon refl exes
302
Other refl exes 305
Primitive refl exes
307
Sensory: applied anatomy 308
Sensory examination 312
Coordination 315
Some peripheral nerves 317
Gait 321
Important presenting patterns 323
The unconscious patient 331
The elderly patient 334
Chapter 10

CHAPTER 10 Nervous system256
Presenting symptoms in neurology
The history is key in the examination of many neurological cases. If the
patient cannot give a complete story (e.g., when describing a loss of con-
sciousness or seizure), collateral histories should be gained from any wit-
nesses to the event(s)—relatives, friends, the primary care provider, or
even passers-by.
Approach to neurological symptoms
Symptoms can vary widely in neurology; the intricacies of a few are
discussed below. For all symptoms, you should try to understand the
following:
• Exact nature of the symptom
• Onset (Sudden? Slow—hours? Days? Weeks? Months?)
• Change over time (Progressive? Intermittent? Episodes of recovery?)
• Precipitating factors
• Exacerbating and relieving factors
• Previous episodes of the same symptom
• Previous investigations and treatment
• Associated symptoms
• Any other neurological symptoms
Dizziness
Narrow the exact meaning down without appearing aggressive or disbe-
lieving. Dizziness is used by different people to describe rather different
things:
• A sense of rotation = vertigo
• Swimminess or light-headedness —a nonspecifi
c symptom that can be
related to pathology in many different systems
• Presyncope —the unique feeling one gets just prior to fainting
• Incoordination —many will say they are dizzy when, in fact, they can’t
walk straight because of either ataxia or weakness.
Headache
This should be treated as any other type of pain. Establish character,
severity, site, duration, time course, frequency, radiation, aggravating and
relieving factors, and associated symptoms.
• Ask about facial and visual symptoms. (Some different types of
headaches are described on b p. 329.)
Numbness and weakness
These two words are often confused by patients, describing a leg as
“numb” when it is weak with normal sensation. Also, patients may report
numbness when, in fact, they are experiencing pins and needles (paresthe-
sia)or pain.
Tremor
Here you should establish if the tremor occurs only at rest, only when
attempting an action, or both. Is it worse at any particular time of the day?
The severity can be established in terms of its functional consequence (can
the patient hold a cup or bring food to their mouth?).

PRESENTING SYMPTOMS IN NEUROLOGY
257
Again, establish exactly what is being described. A tremor is a shaking,
regular or jerky involuntary movement.
Syncope
This is discussed in b Chapter 7.
Falls and loss of consciousness (LOC)
An eyewitness account is vital. Establish also whether the patient actually
lost consciousness. People often describe “blacking out” when in fact they
simply fell to the ground (drop attacks have no LOC). An important ques-
tion here is, “Can you remember hitting the ground?”.
Ask about preceding symptoms and warning signs—they may point
toward a different organ system (sweating or weakness could be a marker
of hypoglycemia; palpitations may indicate a cardiac dysrhythmia).
Seizures
These are very diffi cult to assess, even for experienced history-takers!
Establish early on if there was any impairment of consciousness, and seek
collateral histories. Laypersons usually consider seizure = “fi t” = tonic–
clonic seizure. Doctors’ understanding of seizure may be quite different. A
surprising number of people also suffer pseudoseizures , which are nonor-
ganic and have a psychological cause.
A few points to consider are as follows:
• Syncopal attacks can often cause a few tonic–clonic or myoclonic jerks,
which may be mistaken for epilepsy.
• True tonic–clinic seizures may cause tongue-biting, urinary and fecal
incontinence, or all of the above.
• People presenting with pseudoseizure can have true epilepsy as well,
and vice versa.
Visual symptoms
Commonly, there is visual loss, double vision, or photophobia (pain when
looking at bright lights). Here, establish exactly what is being experi-
enced—“double vision” (diplopia) is often complained of when, in fact,
the vision is blurred or sight is generally poor (amblyopia) or clouded.

CHAPTER 10 Nervous system258
The rest of the history
Ask if the patient is right- or left-handed (consider disability from loss of
function; this may also be useful when thinking about cerebral lesions).
Direct questioning
In every patient, inquire about neurological symptoms other than the pre-
senting complaint (headaches, fi ts, faints, blackouts, visual symptoms, pins
and needles, tingling, numbness, weakness, incontinence, constipation, or
urinary retention).
Past medical history
A birth history is important here, particularly in patients with epilepsy.
Additional forms of neurological injury are often present at birth, for
instance, in the case of brachial plexus injury during dystotic deliveries.
Brain injury at birth has neurological consequences.
While a thorough history is required, inquire especially about the
following:
• Hypertension—if so, what treatment?
• Diabetes mellitus—what type? What treatment?
• Thyroid disease
• Mental illness (e.g., depression)
• Meningitis or encephalitis
• Head or spinal injuries
• Epilepsy, convulsions, or seizures
• Cancer
• HIV/AIDS
Drug history
Ask especially about the following:
• Anticonvulsant therapy (current or previous)
• Oral contraceptive or other estrogen-based contraceptive preparation
• Corticosteroids
• Anticoagulants or antiplatelet agents
Family history
A thorough history, as always, is important. Ask about neurological diag-
noses and evidence of missed diagnoses (seizures, blackouts, etc.).
Tobacco and alcohol
These are as important to ask about here as for any other system.
Social history
• Occupation: Neurological disease can have a signifi
cant impact on
occupation, so ask about this at an early stage—some suggest right at
the beginning of the history. Also ask about exposure to heavy metals
or other neurotoxins.
• Is patient driving? Many neurological conditions have implications here.
• Ask about the home environment in detail (this will be very useful
when considering handicaps and consequences of the diagnosis).
• Ask about support systems—family, friends, home help, day visits.

GENERAL INSPECTION AND MENTAL STATE
259
The outline examination
It is easy to get bogged down in some of the complexities of the neurologi-
cal examination, but it is not something to be afraid of. Students should
embrace it; practice often, as a competent neurological examination is a
sure sign of someone who has spent plenty of time on honing their clinical
skills. The following is a brief outline of how it should be approached:
• Inspection, mood, conscious level
• Speech and higher mental functions
• Cranial nerves (CN) II–XII
• Motor system
• Sensation
• Coordination
• Gait
• Any extra tests
• Other relevant examinations
•
Skull, spine, neck stiffness, eardrums, blood pressure, anterior chest,
carotid arteries, breasts, abdomen, lymph nodes
General inspection and mental state
The neurological exam should start with any clues that can be gleaned
from simply looking at and engaging with the patient.
• Is the patient accompanied by caregivers, and how does the patient
interact with those people?
• Does the patient use any walking aids or other forms of support?
• Are there any abnormal movements? (b p. 315)
• Observe the gait as they approach the clinic room, if able (b p. 321).
• Is there any speech disturbance? (b p. 260)
• What is their mood like?
•
A detailed mood assessment (b p. 458) is not necessary here.
•
Ask the patient how they feel.
•
What is the state or their clothing, hair, skin, and nails?
•
Is there any restlessness, inappropriately high spirits, or
pressure of speech?
•
Are they obviously depressed with disinterest?
•
Are they denying any disability?

CHAPTER 10 Nervous system260
Speech and language
Speech and language diffi culties, especially expressive dysphasia, may be
extremely distressing for the patient and their family. This topic must be
approached with care, reassurance, and a calm seriousness in the face of
possible bizarre and amusing answers to questions.
Examination
Speech and language problems may be evident from the start of the his-
tory and require no formal testing. You should briefl y test the patient’s
language function by asking them to read or obey a simple written com-
mand (e.g., “close your eyes”) and write a short sentence.
If apparently problematic, speech can be tested formally by asking the
patient to respond to progressively harder questions, with answers rang-
ing from yes/no, simple statements, to more complicated sentences, and
fi nally by asking them to repeat complex phrases or tongue-twisters (see
Dysarthria section).
Before jumping to conclusions, ensure that the patient is not deaf or
that their hearing aid is working, and that they can understand English.
Dysarthria
This is a defect of articulation with language function intact (writing will
be unaffected). There may be a cerebellar lesion, a lower motor neuron
(LMN) lesion of the cranial nerves, an extrapyramidal lesion, or a problem
with muscles in the mouth and jaws or their nerve supply.
• Listen for slurring and the rhythm of speech.
• Test function of different structures by asking the patient to repeat
•
“Yellow lion” or words with D , L , and T (tests tongue function).
•
“Peter Piper picked a pickle,” or words with P and B (tests lip function).
• Cerebellar lesions: slow, slurred, low volume with equal emphasis on all
syllables (scanning)
• Facial weakness: speech is slurred.
• Extrapyramidal lesions: monotonous, low volume, lacks normal rhythm
Dysphonia
This constitutes defective volume—huskiness. Dysphonia is usually from
laryngeal disease, laryngeal nerve palsy, or, rarely, muscular disease, such
as myasthenia gravis. It may also be “functional” (psychological).
Dysphasia
This is a defect of language, not just speech, so reading and writing may
also be affected (some patients attempt to overcome speaking diffi culties
with a notepad and pen, only to be bitterly disappointed).
In very simple terms, the main language areas of the brain are illustrated
in Fig. 10.1 . Defi cits can be understood in terms of lesions in one or more
of these areas. There are four main types of dysphasia.
Global dysphasia
Both Broca’s and Wernicke’s areas are affected. The patient is unable to
speak or understand speech at all.
Expressive dysphasia
This is also called anterior , motor , or Broca’s dysphasia.
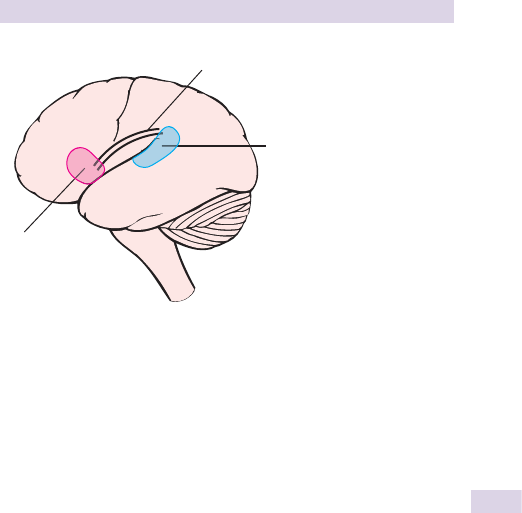
SPEECH AND LANGUAGE
261
• Lesion in Broca’s area (frontal lobe), involved in language production
• Understanding remains intact
• Unable to answer questions appropriately
• Speech is nonfl
uent, broken with abnormal word ordering
• Unable to repeat sentences
• Can be very distressing for patients. Ask, “Do you know what you
want to say, but can’t get it out?” and you’ll be met with a grateful
smile, nod, and handshake.
Receptive dysphasia
Also called posterior , sensory , or Wernicke’s dysphasia.
• Lesion in Wernicke’s area creates problems with understanding
spoken or written language (dyslexia) and problems with word-fi nding
• Unable to understand commands or questions
• Speech is fl
uent with lots of meaningless grammatical elements.
• May contain meaningless words
• Unable to repeat sentences
• Patients are often unaware of their speech diffi
culty and will speak in a
nonsensical way, often becoming frustrated with other people’s lack of
understanding.
• Jargon dysphasia describes a severe form of receptive dysphasia
containing only meaningless words (neologisms) and sounds.
• Paraphasia is the supplementation of one word with another.
Conductive dysphasia
There is a lesion in the arcuate fasciculus and/or other connections
between the two primary language areas.
• Patient can comprehend and respond appropriately
• Unable to repeat a sentence
Nominal dysphasia
• All language function is intact except for naming of objects.
• Caused by lesion in angular gyrus
• Patient may function with circumlocution (e.g., says “that thing that I
write with” if unable to say “pen”)
Broca’s
area
Arcuate
fasciculus
Wernicke’s
area
Fig. 10.1 Simple representation of the main language areas of the brain.

CHAPTER 10 Nervous system262
Cognitive function
Neurological diseases may affect function such that patients’ appearance or
communication skills are at odds with their social standing or educational
level. Formal assessment of a person’s mental state is thus important. This
also allows for any future change to be noted and monitored.
Abbreviated mental test score (10 points)
This serves as a brief screening tool with a maximum score of 10 points. A
more detailed, 30-point, score is shown in Box 15.11 (b p. 464).
Approach this gently—patients often dislike being tested without warning.
Always explain the purpose of the questions, and ask permission to proceed.
Hints
When testing 5-minute recall:
• If thinking of an address for the patient to remember, be careful not to
give out your own!
• Beware of repeating the test too often. Patients may well remember
“42 West Street” from the last time it was asked.
Table 10.1 Abbreviated mental test score
1. Date of birth “What is your date of birth?”
2. Age “How old are you?”
3. Time “What time is it?”
•
Correct to the nearest hour
4. Year “What year is it now?”
•
Note that hospital patients often lose track of the day
or month, not the year.
5. Place “Where are we?” or “What is this place?”
•
Name of the hospital, clinic, or surgery ward
6. Head of
state
“Who is the current president?”
•
A name is required. Such descriptions as “that man in all
the trouble” won’t do—even if it is potentially correct!
7. Current
event
In recognition of the patient’s age, culture, and education, it
may be appropriate to ask the year of a noteworthy event,
such as, “When was President Kennedy shot?” “When
were aircraft crashed into the World Trade Center?”
8. 5-minute
recall
Tell the patient an address (often “42 West Street” is
used) and ask them to repeat it back to you to ensure
they’ve heard it correctly. Ask them to remember it. Five
minutes later, ask them to recall the address.
•
They must remember the address in full to score the point.
9. 20–1 “Count backward from 20 down to 1”
•
Patients sometimes need a prompt here: “Like this: 20,
19, 18, and so on.”
10. Recognition “What job do I do?” (doctor) and “What job does this
man or woman do?” (nurse)
•
Both must be correct to score a point.

CRANIAL NERVE I: OLFACTORY
263
Cranial nerve I: olfactory
Applied anatomy
• Sensory: smell
• Motor: none
Fibers arise in the mucous membrane of the nose. Axons pass across the
cribiform plate to the olfactory bulb. The olfactory tract runs backward
below the frontal lobe and projects mainly in the uncus of the ipsilateral
temporal lobe.
Note: Olfactory epithelium also contains free nerve endings of the fi rst
division of cranial nerve V.
Examination
This nerve is not routinely tested unless the patient complains of loss of
sense of smell (anosmia) and exhibits other signs suggestive of a frontal or
temporal lobe cause (e.g., tumor).
• Casual: Take a nearby odorous object (e.g., coffee or chocolate) and
ask the patient if it smells normal.
• Formal: A series of identical bottles containing recognizable smells are
used. The patient is asked to identify them. Commonly used agents
include coffee, vanilla, camphor, and vinegar.
Test each nostril separately and determine if any loss of smell is uni- or
bilateral.
Findings
• Bilateral anosmia: usually nasal, not neurological
Causes include upper respiratory tract infection, trauma, smoking, old age,
and Parkinson’s disease. Less commonly, there are tumors of the ethmoid
bones or congenital ciliary dysmotility syndromes.
• Unilateral anosmia: mucous-blocked nostril, head trauma, subfrontal
meningioma
Hints
Peppermint, ammonia, and menthol stimulate the free trigeminal endings
so are not a good test of cranial nerve I.

CHAPTER 10 Nervous system264
Cranial nerve II: optic
Applied anatomy
With an understanding of anatomy of the optic nerves, defects in the visual
fi eld enable localization of a lesion within the brain.
The optic nerve begins at the retina (and is the only part of the central
nervous system [CNS] that can be directly visualized). The nerve passes
through the optic foramen and joins its fellow nerve from the other eye
at the optic chiasm just above the pituitary fossa. Here, the fi bers from the
nasal half of the retina cross over. They continue in the optic tract to the
lateral geniculate body. From there, they splay out such that those from
the upper retina pass through the parietal lobe and the others through
the temporal lobe.
0 Students easily get confused here and should focus on gaining full
understanding of these processes at an early stage. Because of the refrac-
tion at the lens, images are represented on the retina upside down and
back to front. Therefore, the nasal half of the retinal receives input from
the temporal part of the visual fi eld in each eye, while the temporal half of
the retinal receives input from the nasal half of the eye.
Further back in the optic system, fi bers from the nasal halves of the ret-
inas cross, so, for example, the left side of the brain receives input from
the right side of vision (the left temporal retina and the right nasal retina)
and vice versa (see Fig. 10.2 , b p. 267).
Visual acuity
Sharpness or clarity of vision is formally tested using a Snellen’s chart.
• In good light, the patient should stand 20 feet away from the chart.
• Each eye is tested in turn, and the patient is asked to read the chart.
• The number above each line indicates the distance at which a person
with normal sight should be able to read it.
• Record the line reached—allow a maximum of two errors per line.
•
Indicate results as distance from chart/distance it should be read,
e.g., 20/20.
If the patient can’t see any of the letters, record whether they can
• Count fi
ngers held in front of their face (CF)
• See hand movements (wave your hand)
• Perceive light
•
Record as CF, HM, PL, or NPL (not perceive light).
Color vision
• Not tested routinely and not considered in this book
• Tested using Ishihara plates
Visual fi elds
The area that each eye can see without moving can be mapped out. They
are not circular—eyebrows and the nose obstruct superiorly and nasally,
whereas there is no obstruction laterally.
Sitting opposite the patient, the examiner’s left visual fi eld (for example)
should be an exact mirror image of the patient’s right visual fi eld. In this
way, the patient’s fi elds can be tested against the examiner’s.

CRANIAL NERVE II: OPTIC
265
Gross defects and visual neglect (inattention)
Sit opposite the patient, 71 m apart, at eye level Test fi rst for gross defects
and visual neglect, with both eyes open.
• Raise your arms up and out to the sides so that one hand is in the
upper right quadrant of your vision and one in the upper left.
• Ask the patient to look directly at you (“look at my nose”).
• Move one index fi
nger and ask the patient, while looking straight at
you, to point to the hand that is moving.
• Test with the right, left, and then both hands.
• Test the lower quadrants in the same way.
• If visual neglect is present, the patient will be able to see each hand
moving individually but report seeing only one hand when both are
moving (compare with sensory inattention, b p. 312).
Testing each eye
In the same position as above, ask the patient to cover their right eye while
you cover your left, and look directly at one another.
• If you were now to trace the outer borders of your vision in the air
half-way between yourself and the patient, it should be almost identical
to the area seen by the patient.
Test each quadrant individually:
• Stretch your arm out and up so that your hand is just outside your
fi
eld of vision, an equal distance between you and the patient.
• Slowly bring your hand into the center (perhaps wiggling one fi nger)
and ask the patient to say “yes” as soon as they can see it.
• You should both be able to see your hand at the same time.
• Test upper right and left, lower right and left individually, bringing your
hand in from each corner of vision at a time.
• Ensure that the patient remains looking directly at you (many will
attempt to turn and look at the hand if not prompted correctly).
• Map out any areas of visual loss in detail, fi
nding borders. Test if any
visual loss extends across the midline horizontally or vertically.
• Test each eye in turn (you both may require a short break between
eyes, as this requires considerable concentration).
Repeat the above procedure with a red-headed pin or similar small red
object to map out areas of visual loss in more detail.
• Ask the patient to say “yes” when they see the pin as red .
• Start by mapping out the blind spot, which should be 715° lateral
from the center at the midline (this tests both your technique and the
patient’s reliability as a witness before proceeding).
Decide if any defect is of a quadrant, half the visual fi
eld or another shape
and in which eye, or both. Record by drawing the defect in two circles
representing the patient’s visual fi elds, as shown in Fig. 10.2 b p. 267.
If the patient is unable to cooperate
Like much of the neurological examination, gross defects can be seen with-
out the patient’s cooperation (confused or drowsy). Test for response to
“menace” by bringing your hand in sharply from the side, stopping just
short of hitting the patient in the eye. If your hand can be seen, the patient
will blink. Test vision on the left and the right.

CHAPTER 10 Nervous system266
Some common visual fi eld defects
Compare the defects below with the corresponding number on Fig. 10.2
showing the position of the lesion and a representation of the fi elds, as it
should be recorded in the patient’s notes.
• Tunnel vision: a confusing term. A constricted visual fi eld,
giving
the impression of looking down a pipe or tunnel, may be caused
by glaucoma, retinal damage or papilledema. Tubular vision is often
functional.
• Enlarged blind spot: caused by papilledema
• Unilateral fi eld
loss:
(1) blindness in one eye caused by devastating
damage to the eye, its blood supply, or optic nerve.
• Central scotoma: a hole in the visual fi
eld (macular degeneration,
vascular lesion or, if bilateral, toxins). If bilateral, this may indicate a
very small defect in the corresponding area of the occipital cortex
(multiple sclerosis).
• Bitemporal hemianopia: (2) the nasal half of both retinas and,
therefore, the temporal half of each visual fi
eld is lost (damage
to the center of the optic chiasm, such as a pituitary tumor,
craniopharyngioma, suprasellar meningioma).
• Binasal hemianopia: the nasal half of each visual fi
eld is lost (very rare)
• Homonymous hemianopia: (3) may be left or right. Commonly seen in
stroke patients. The right or left side of vision in both eyes is lost (e.g.,
the nasal fi
eld in the right eye and the temporal fi
eld in the left eye).
If the central part of vision (corresponding to the macula) is spared,
the lesion is likely in the optic radiation; without macula sparring, the
lesion is in the optic tract.
• Homonymous quadrantanopia: corresponding quarters of the vision
are lost in each eye (e.g., the upper temporal fi
eld in the right and the
upper nasal fi
eld in the left)
•
Upper quadrantanopias (4) suggest a lesion in the temporal lobe.
•
Lower quadrantanopias (5) suggest a lesion in the parietal lobe.
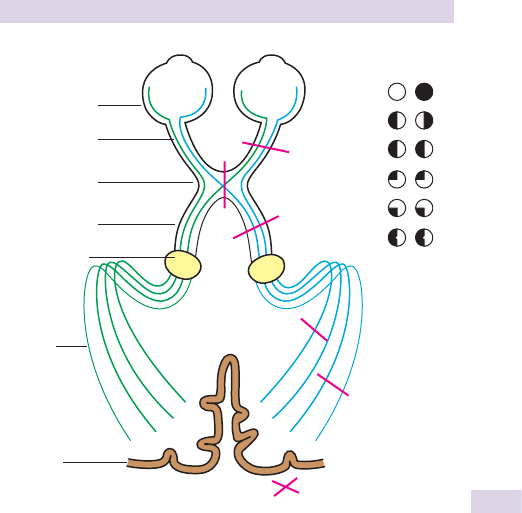
CRANIAL NERVE II: OPTIC
267
1
1.
2.
3.
4.
5.
6.
Retina
Optic nerve
3
4
5
6
2
Optic chiasm
Optic tract
Lateral
geniculate body
Optic
radiation
Occipital
cortex
Fig. 10.2 Representation of the visual tracts from the retina to the occipital
cortex showing main structures and expected visual fi eld loss according to the
site of the lesion.

CHAPTER 10 Nervous system268
Cranial nerve II: ophthalmoscopy
Direct ophthalmoscopic examination of the fundus is a vital part of any
neurological examination but is often avoided, as it is considered diffi cult.
It can provide the observer with vital information about the condition
of the optic nerve head. The exam takes practice, but the experienced
observer can gain views of the fundus, macular region, and retinal vascular
arcades. It is worth practicing at every opportunity. The direct ophthalmo-
scope gives a greatly magnifi ed view of the fundus; gaining a view of the
peripheral retina beyond the equator requires examination with a slit lamp
or indirect ophthalmoscope, not covered in this book.
For a complete ophthalmoscopic examination, it is often worth dilating
the pupil by instilling a few drops of a mydriatic medication (1% cyclopen-
tolate) into the inferior conjunctival sac. With a little practice, one often
fi nds that this is not necessary for a routine examination.
0 If you plan to dilate the pupil, ask the patient if they have any history
of angle-closure glaucoma or episodes of seeing haloes around lights at
nighttime. If you suspect this, or the anterior chamber of the eye appears
shallow, it is best to err on the side of caution—dilating the pupil could
occlude the drainage angle and precipitate an acute attack.
Examination
• Performed in a dimly lit room with the patient sitting or lying down
• Ask the patient to focus on a distant object and keep their eyes still
(this relaxes accommodation as much as possible).
• Look through the ophthalmoscope 30 cm away from the patient and
bring light in nasally from the temporal fi
eld to land on the pupil.
•
The pupil will appear red, and opacities in the visual axis will appear
as black dots or lines.
•
By cycling through the different lenses of the ophthalmoscope, you
should be able to gain an impression of where these opacities lie.
Possible locations are the cornea, aqueous, lens (and its anterior and
posterior capsules), and vitreous.
• Dial up a hypermetropic (plus) lens on the ophthalmoscope to focus
on the corneal surface and move in as close as possible to the patient’s
eye—by gradually d the power of the lens, you can examine the
cornea, iris, and lens. (Formal examination of these structures is best
done with the slit lamp, although a great deal of information can be
gained with the direct ophthalmoscope.)
• Continue to d the power of the lens until you can sharply focus on the
retinal vessels. It is often best to pick up one of the vascular arcades
in the periphery and track them in toward the optic disc. This allows
the peripheral quadrants to be examined before viewing the optic
disc. Take time to look at the vessels carefully, particularly where the
arteries cross the veins.
• Ask the patient to look directly into the light of the ophthalmoscope
so you can gain a view of the macular region.

CRANIAL NERVE II: OPHTHALMOSCOPY
269
The normal fundus
Optic disc
• The healthy disc is a pale pink/yellow color and round or slightly oval
( Fig. 10.3 ).
• The margins between the disc and the surrounding retina should be
crisp and well defi
ned. Occasionally, a surrounding ring is present,
which may be slightly lighter or darker in color.
• At the center of the disc is the physiological cup. It appears paler in
color than the rest of the disc.
Macular region
• Located temporally from the optic disc
• This is the region with the maximum concentration of cones.
• At the center of the macula is the fovea —a tiny pit devoid of blood
vessels and responsible for fi ne
resolution.
• Disease involving the macula and fovea can cause devastating
visual loss.
Retinal vessels
• The central retinal artery and vein enter and leave the globe in the
center of the optic disc.
• Veins appear larger and darker in color than the arteries.
• Spontaneous venous pulsations are seen in many normal eyes.
• Arterial pulsations should not be visible in normal eyes.
Hint
View the macula by directing light on the most sensitive part of the eye.
This can often be unpleasant for the patient and will lead to more marked
miosis and a restricted view.
Optic cup
Optic disc
Vein
Artery
Macula
Fig. 10.3 The normal appearance of the fundus of the right eye.

CHAPTER 10 Nervous system270
Abnormal fi ndings on fundoscopy
Optic disc swelling
Appearance
• The optic disc is raised, swollen, and enlarged.
• The disc often appears darker in color.
• The margins of the disc are blurred and become indistinct from the
adjacent retina.
• Retinal vessels can be seen arching down from the raised disc toward
the peripheral retina.
• In severe cases, retinal hemorrhage may be seen around the disc.
The term papilledema is often incorrectly used to describe optic disc
swelling. Papilledema is swelling of the optic disc due to raised intracranial
pressure (ICP) ( Fig. 10.4 ).
Causes
• Space-occupying lesions, including intracranial malignancy, subdural
hematoma, and cerebral abscess
• Subarachnoid hemorrhage (often associated with vitreous
hemorrhage)
• Chronic meningitis
• Idiopathic intracranial hypertension (IIH)
• Malignant hypertension
• Ischemic optic neuropathy
Optic disc cupping
Appearance
• The physiological cup is indented with respect to the rest of the disc.
• Retinal vessels kink sharply as they emerge over the rim of the cup
( Fig. 10.5 ).
• Hemorrhages may be present.
Causes
• Most commonly one of the various types of glaucoma
Optic atrophy
Appearance
• Pale optic disc due to loss of nerve fi
bers in the optic nerve head
(
Fig. 10.6 )
Causes
• Ischemic optic neuropathy
• Optic neuritis
• Trauma
• Optic nerve compression
Retinal hemorrhages
Appearance
The appearance of a hemorrhage depends on its location within the vari-
ous layers of the retina. Deep hemorrhages appear as dots from the close
packing of cells in this region. More superfi
cial hemorrhages in the nerve
fi
ber layer appear as more widespread blotches.
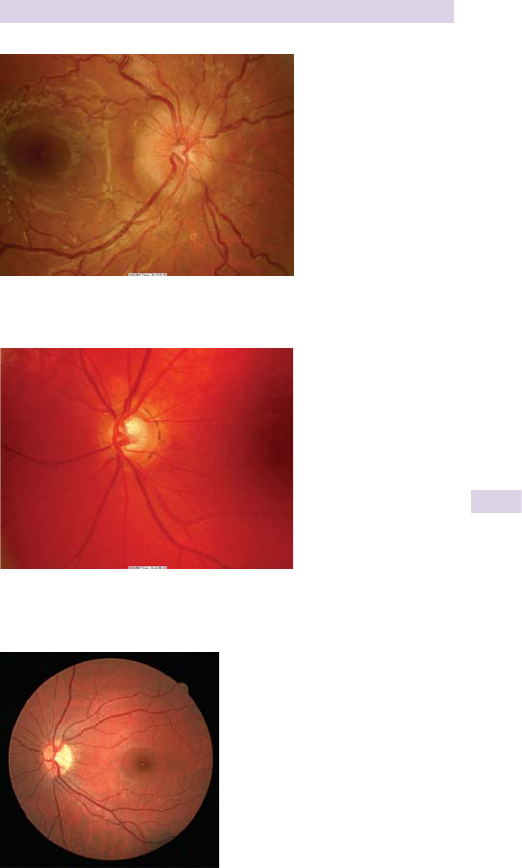
CRANIAL NERVE II: OPHTHALMOSCOPY
271
Fig. 10.4 Severe papilledema. Note how the disc margins are blurred and that
there is a lack of normal cupping at the disc.
Fig. 10.5 Optic disc cupping, in this case secondary to glaucoma. Note how the
vessels seem to disappear over the edge of the disc as if falling down a hole.
Fig. 10.6 Optic atrophy. The optic disc is pale and well demarcated.

CHAPTER 10 Nervous system272
Causes
Many pathological processes:
• Diabetes mellitus
• Hypertension
• Subarachnoid hemorrhage
• Blood dyscrasias
• Systemic vasculitis
• Valsalva related
• Trauma
• Bacterial endocarditis (known specifi
cally as Roth spots)
Central or branch retinal artery occlusion
Appearance
• Large areas of ischemic white retina associated with sudden
catastrophic visual loss
• Calcifi
c, cholesterol, or fi brin-platelet emboli can often be seen
occluding the retinal artery or branch.
Causes
• Either embolic or thrombotic (remember giant cell arteritis)
Central or branch retinal vein occlusion
Appearance
• Large, widespread fl ame-shaped hemorrhages classically giving the
fundus a stormy-sunset appearance. It is associated with gradual-onset
painless, blurred vision and visual loss.
• Optic disc swelling may be present.
Causes
• Blood dyscrasias
• Diabetes mellitus
• Glaucoma
Foster–Kennedy syndrome
Appearance
• Unilateral optic atrophy
• Contralateral papilledema
• Central scotoma
• Anosmia (variable)
• Systemic symptoms such as headache, dizziness, vertigo, and vomiting
Causes
• Meningioma of optic nerve, olfactory groove or sphenoid wing
• Frontal lobe tumor

PUPILS
273
Pupils
Applied anatomy
The pupil is the aperture at the center of the iris. Variation in pupil size is
brought about by two muscles in the iris under the control of the auto-
nomic nervous system:
• Sphincter pupillae muscle: found in the iris at margin of the pupil and
innervated by parasympathetic fi
bers. It constricts the pupil (miosis).
• Dilator pupillae muscle: radially arranged smooth muscle. Innervated by
sympathetic nervous system. It dilates the pupil (mydriasis).
The pupillary light response
The pupillary light response has afferent and efferent limbs that can be
affected separately in a number of pathologies. The afferent fi bers
leave
the eye in the optic nerve and separate in the midbrain to synapse with
the third nerve nuclei. Efferent pathway fi
bers then travel to synapse in the
ciliary ganglion before innervating the sphincter pupillae.
Examination
Inspect both pupils in good light—is there a discrepancy in size (anisoco-
ria) or shape? (This is present in 25% of the normal population and does
not necessarily indicate pathology. It may be secondary to previous ocular
infl ammatory disease, trauma, or surgery.) If anisocoria is present, one
must determine which of the pupils is the correct size.
• A pathologically constricted pupil is more obvious in dim light as the
normal pupil dilates.
• A pathologically large pupil will be more apparent in bright illumination
when the normal pupil will constrict.
Test pupil responses to direct and consensual light. This is best done in a
dimly lit room. Ask the patient to look into the distance to ensure the eye
is relaxed and dis-accommodated. Shine a light upward from just inferior
to the lower lid to avoid dazzling the patient.
• Constriction of the pupils should be seen almost instantaneously
in response to illumination in both the illuminated eye (direct) and
nonilluminated eye (consensual). Repeat for both eyes.
The afferent limb of the pupillary light pathway is assessed using the
Marcus–Gunn swinging light test, to look for a relative afferent pupil defect
(RAPD). If present, do the following:
• Shine light in the normal eye and both pupils constrict. (The
consensual response in the affected eye is intact.)
• Swing light to the affected eye and both pupils dilate. (Afferent drive
to cause constriction of the pupils from the affected eye is reduced
compared to that of the unaffected eye.)
• Swing light back to the normal eye and both pupils constrict.
• Finally, check the near refl
ex (the efferent limb of the pupil refl ex).
Ask the patient to focus on a distant object and then look immediately
to your index fi nger
held 730 cm in front of their face.
The normal response will be for the pupils to constrict in response to
convergence and accommodation.

CHAPTER 10 Nervous system274
Findings: some pupil abnormalities
Argyll–Robertson pupil
Midbrain lesions caused by neurosyphilis target the more dorsally located
fi bers that subserve the light response. The ventrally located fi bers
responsible for accommodation are spared.
• Appearance: a small, irregular pupil that accommodates but does not
react to light
• Causes: neurosyphilis and diabetes mellitus
Holmes–Adie pupil
There is denervation of the iris and ciliary body due to ciliary ganglionitis
(although some would dispute this). Associated loss of tendon refl exes
is
seen in some patients and is termed Holmes–Adie syndrome
.
Appearance
• Unilateral dilated pupil—accommodates (and relaxes) very slowly and
shows absent or depressed light refl
ex. It is supersensitive to 0.1%
pilocarpine (muscarinic agonist causing constriction).
Causes
• Usually idiopathic and predominates in young adult females
(5:4 8 2:1). It may also follow iridoplegia or ocular trauma.
Horner’s syndrome
This involves interruption of the sympathetic nerve supply to the iris.
Appearance
• Unilateral miotic pupil with partial ptosis (due to paralysis of Muller’s
muscle—a small smooth muscle in the upper lid). Movement of the
upper lid should be intact as the levator muscle is supplied by the
oculomotor nerve. There is also a variable interruption of sudomotor
innervation to the ipsilateral side of the face.
• Sweating is absent if the lesion occurs proximal to the carotid plexus,
after which the sudomotor fi bers
separate.
Causes
The protracted course of the sympathetic pathway makes it vulnerable to
disruption at many different points.
• Congenital—often associated with an alteration in iris pigment
(heterochromia); injury or surgery to the neck (avulsion of C8 and
T1 nerve roots results in Klumpke’s paralysis); multiple sclerosis;
caver nous sinus disease; neoplasia involving the mediastinum, cervical
cord or apex of the lung; infarction—secondary to occlusion of the
basilar or posterior inferior cerebellar artery; thoracic aortic aneurysm;
syringomyelia or syringobulbia

PUPILS
275
Box 10.1 More on the RAPD
At rest, the patient’s pupils are equal and of normal size. RAPD
is relative because the response seen when light is shone on the
affected pupil is less than that seen when light is shone in the normal
pupil, and afferent because it demonstrates a problem in the afferent
limb of the light response in the affected eye. The response indicates
unilateral or asymmetrical optic nerve disease or extensive retinal
pathology. An RAPD will not be seen in patients with corneal or
lens opacities.

CHAPTER 10 Nervous system276
Cranial nerves III, IV, and VI
The third (oculomotor), fourth (trochlear), and sixth (abducens) nerves are
considered together, as their primary function is to provide motor innerva-
tion to the extrinsic muscles of the eye. Connections exist with the horizon-
tal gaze center in the pons and the vertical gaze center in the midbrain.
Applied anatomy: CN III
• Motor: levator palpebrae superioris, superior rectus, medial rectus,
inferior rectus, inferior oblique (all the extrinsic muscles of the eye
except the lateral rectus and superior oblique)
• Autonomic: parasympathetic supply to the constrictor (sphincter)
pupillae of the iris and ciliary muscles
The main oculomotor nucleus lies anterior to the aqueduct of the
midbrain. The Edinger–Westphal nucleus (accessory parasympathetic
nucleus) lies posterior to the oculomotor nucleus. Fibers pass anteriorly,
through the cavernous sinus and enter the orbit through the superior
orbital fi
ssure.
Applied anatomy: CN IV
• Motor: superior oblique
The nucleus lies just inferior to that of the oculomotor nerve and has
connections with the cerebral hemispheres, visual cortex, and nerves III,
VI, and VIII. Its fi
bers pass posteriorly and immediately cross one another.
They then travel through the cavernous sinus, entering the orbit through
the superior orbital fi ssure.
Applied anatomy: CN VI
• Motor: lateral rectus
The nucleus lies beneath the fourth ventricle. It connects with the nuclei
of the III and IV cranial nerves through the medial longitudinal fasciculus
(MLF). It emerges from the pons and travels through the cavernous sinus
to enter the orbit through the superior orbital fi ssure.
Examination
The patient should be sitting facing you with their eyes straight ahead.
Ensure that visual acuity has already been assessed and recorded.
• Inspect the position of the lids.
•
Is there ptosis (drooping of the lid)?
•
Are the epicanthic folds prominent? (This may cause pseudosquint.)
• Look at the position of the eyes in neutral gaze.
•
An asymmetrical position suggests strabismus (squint); this should be
assessed with the cover test (see Box 10.2 , b p. 277).
• Ask the patient to follow your index fi
nger in vertical, horizontal, and
oblique planes, avoiding extremes of gaze. Draw a large imaginary H
directly in front of the patient.
•
Is nystagmus present (rapid to-and-fro movements of the eyes)?
•
Ask the patient if they see double at any stage (diplopia).
• The patient’s eyes should be able to follow the moving target
smoothly. This is termed pursuit . (It is often slowed or interrupted with
saccades in Huntington’s chorea and Parkinson’s disease.)

CRANIAL NERVES III, IV, AND VI
277
• Now hold up your index fi nger on one side of their head and your
thumb on the other—in their temporal visual fi elds. Ask the patient
to look quickly between the fi nger and thumb. This tests saccadic eye
movements—they should be accurate, smooth, and rapid.
• Ask the patient to look from a distant object to a near object—the
eyes should converge smoothly and equally in association with
accommodation and pupil constriction. This is called convergence .
Hints
Patients will often attempt to turn their head to look at your moving
fi nger. This can be overcome in two ways:
• Fully explain the examination before beginning. Often, an instruction,
such as, “Please follow the tip of my fi
nger with your eyes but keep
your head still,” works wonders.
• If the patient continues to turn their head, you can stabilize it by gently
placing your free hand on their forehead.
Abnormal fi ndings
Ptosis (drooping of the lid)
Causes include the following:
• Weakness of the levator muscle in myasthenia gravis
• Third-nerve palsy
• Disruption of insertion of the levator muscle into the tarsal plate of
the lid, through either surgery or trauma
Strabismus or squint
This is an abnormality of coordinated eye movements. In divergent squint,
one eye is directed toward the target, the other is turned laterally. In
convergent squint, the other eye is turned medially.
Squint is broadly categorized into two forms:
• Nonparalytic: seen in childhood. Both eyes have full range of movement
but only one eye is directed toward the target of fi xation.
• Paralytic: Movement of one or more of the extraocular muscles
is decreased because of disease of the muscle, a nerve palsy, or a
physical obstruction to movement in a particular direction (e.g.,
tethering, trauma, or neoplasm).
Box 10.2 Cover–uncover test
This test is used for further analysis of nonparalytic squint.
• The patient should be sitting in front of you.
• Present a fi
xation target in front of them (the top of your pen, for
example).
• Ask them to cover their right eye.
• Closely observe the uncovered left eye—one of three responses is
possible:
•
The eye doesn’t move—normal
•
The eye moves nasally to fi xate—divergent squint present
•
The eye moves temporally to fi xate—convergent squint present
• Now repeat the test, covering the left eye.

CHAPTER 10 Nervous system278
Pick up a subtle squint by holding a pen light about 10 inches away from
the center of the patient’s face. The refl ection of light should be from the
same position on the cornea in both eyes. If this is not the case, the fi xating
eye will have the central refl ection.
0 A more sophisticated assessment of squint is made in eye clinics, using
a syntophore.
Further assessment of a squint should always involve a detailed exami-
nation of the cornea, lens, vitreous, and retina, to exclude opacities and
abnormalities.
Nystagmus
For oscillating movements of the eyes, there are several subclassifi
cations
based on clinical appearance and lesion location. Watch the movements
carefully. Are the to-and-fro phases of the movements the same speed in
both directions, or is one more rapid than the other?
Vestibular
This is a type of jerk nystagmus (to-and-fro movements are of different
velocities). It is caused by disease in the labyrinth or its central connec-
tions. The fast phase is away from the side of the lesion. There are often
horizontal and rotary components. It is usually only present in the acute
phase of labyrinthine disease.
Pendular nystagmus
The velocity of the movements is the same in both directions. This is often
a congenital condition associated with d visual acuity. It is also seen in
cerebrovascular disease and multiple sclerosis.
Patients with acquired nystagmus will often complain of continual move-
ment of their visual environment (oscillopsia), which is not the case with
congenital nystagmus.
Optokinetic nystagmus
This is a normal response of the eye when trying to follow a moving object
(e.g., when looking from the window of a train). It is formally assessed
using a rotating drum painted with vertical black and white lines.
Movements are controlled by the cerebral hemisphere, toward which
the drum is rotating, causing pursuit movement in the direction of rotation
followed by saccadic movement back in the opposite direction. Defective
optokinetic nystagmus is seen in lesions of the deep parietal lobe, when
drum rotation is toward the affected cerebral hemisphere.
Upbeat nystagmus
The fast phase is upward. Causes include brainstem disease, intoxication
with alcohol, and a number of other drugs, including phenytoin.
Downbeat nystagmus
The fast phase is downward. This is seen in toxic states and demyelinating
disease. There is also herniation of cerebellar tissue through the foramen
magnum, as seen in Chiari malformation.

CRANIAL NERVES III, IV, AND VI
279
Gaze-evoked nystagmus
The fast phase is toward the direction of action of the affected muscle.
This is usually seen in dysfunction of extraocular muscles secondary to
intrinsic weakness or nerve palsy.
Hint
When assessing nystagmus, try to avoid the extremes of lateral gaze (i.e.,
not >30*). This will elicit end-point nystagmus —a physiological response
not to be confused with a pathological process.

CHAPTER 10 Nervous system280
Palsies of cranial nerves III, IV, and VI
CN III: oculomotor
Appearance
The pupil is dilated and responds to neither light nor accommodation.
All of the extraocular muscles are paralyzed except for the lateral rectus
and the superior oblique. The unopposed action of these causes the eye
to look down and out. Paralysis of the levator muscle causes complete
ptosis.
Causes
These include diabetes mellitus (pupil sparing), lesions involving the supe-
rior orbital fi ssure, cavernous sinus disease, aneurysm of the posterior
communicating artery, and Weber’s syndrome (associated contralateral
hemiplegia).
CN IV: trochlear
Appearance
Paralysis of the superior oblique causes the eye to elevate when adducting.
The patient will complain of diplopia and have diffi culty looking down-
ward and inward on the affected side. The patient may try to compen-
sate for this by tilting their head away from the side of the lesion (ocular
torticollis).
Causes
Trauma, surgery, diabetes mellitus, atherosclerosis, or neoplasia may be
involved.
CN VI: abducens
Appearance
Paralysis of the lateral rectus muscle means the eye cannot be abducted
from the midline and the unopposed action of the medial rectus leaves
the eye deviated nasally at rest. The patient will complain of diplopia in
horizontal gaze. Lesions in the sixth nerve nucleus also involve the lateral
gaze center and lead to a gaze paresis.
Causes
These include diabetes mellitus, atherosclerosis, multiple sclerosis, neo-
plastic lesions, raised ICP leading to compression of the nerve on the
edge of the petrous temporal bone (a false localizing sign), trauma, and
surgery.
Combined nerve palsies
Given the close proximity of nerves III, IV, and VI at points along their
courses, lesions at specifi c anatomical locations can lead to combined
nerve palsies.
Cavernous sinus
All three nerves involved in oculomotor control, along with sympathetic
fi bers to the iris and the ophthalmic and maxillary divisions of the trigemi-
nal nerve, pass through here.

PALSIES OF CRANIAL NERVES III, IV, AND VI
281
Common lesions include caroticocavernous fi stula; expanding pituitary
tumor; cavernous sinus thrombosis, associated with proptosis and injec-
tion of conjunctival vessels (chemosis); and an aneurysm.
Orbit
A complex range of ophthalmoplegias can result from any compres-
sive lesion located within the orbit. Proptosis may be present with vari-
able optic nerve involvement. Many lesions may directly impinge on the
extraocular muscles as well as the innervating nerves.
Superior orbital fi ssure
The superior orbital fi ssure transmits all the nerves supplying the extraoc-
ular muscles along with the ophthalmic division of the trigeminal nerve.
Infl ammation or a lesion at the superior orbital fi ssure leads to Tolosa–
Hunt syndrome , a complex unilateral ophthalmoplegia associated with
anesthesia over the forehead and ocular pain.
Some other eye movement disorders
Internuclear ophthalmoplegia
This is interruption of the MLF, connecting the nuclei of cranial nerves III
and VI on opposite sides.
Voluntary gaze toward one side is initiated by the opposite cerebral
hemisphere. Descending fi bers then decussate to the horizontal gaze
center in the pons and parapontine reticular formation where further
impulses are transmitted directly to the sixth nerve nucleus, causing
abduction of the ipsilateral eye.
Conjugate adduction of the contralateral eye is brought about by
impulses transmitted via the medial longitudinal fasciculus to the third
nerve nucleus, thus maintaining binocular single vision.
Appearance
• Impaired adduction in the ipsilateral eye in unilateral lesions.
Nystagmus is often seen in the abducting eye.
• Bilateral lesions often cause vertical nystagmus and impaired vertical
pursuit.
• Convergence remains intact.
• The patient will complain of horizontal diplopia due to impaired
adduction on the affected side, not to nystagmus in the abducting eye.
Common causes
• Cerebrovascular disease, multiple sclerosis
Lesions of the parapontine reticular formation (PPRF)
The PPRF is responsible for conjugate eye movements in horizontal gaze.
Appearance
• Failure of horizontal eye movements toward the side of the lesion—a
horizontal gaze paresis
• An ipsilateral internuclear ophthalmoplegia if the lesion extends to
involve the MLF
• Preservation of vertical gaze
• Contralateral deviation of the eyes in the acute phase

CHAPTER 10 Nervous system282
Causes
• Vascular disease, demyelinating disease, neoplasia
Parinaud’s syndrome
Lesions occurring in the dorsal midbrain involve the vertical gaze center,
hence this syndrome is also known as dorsal midbrain syndrome.
Appearance
• Impaired upward gaze in both eyes, resulting in convergence,
retraction of the globe into the orbit, and nystagmus
• Light-near dissociation of the pupils—the near refl
ex is intact but
response to light is poor.
Causes
• Demyelinating disease, vascular disease affecting the dorsal midbrain,
enlarged third ventricle

CRANIAL NERVE V: TRIGEMINAL
283
Cranial nerve V: trigeminal
Applied anatomy
Sensory
• Facial sensation in three branches—ophthalmic (V1), maxillary (V2),
and mandibular (V3). Distribution is shown in Fig. 10.7 .
Motor
• Muscles of mastication
Nerve originates in the pons, travels to trigeminal ganglion at the petrous
temporal bone, and splits. V
1
passes through the cavernous sinus with
CN III and exits via the superior orbital fi ssure; V
2
leaves via the infraor-
bital foramen (also supplies the palate and nasopharynx); V
3
exits via the
foramen ovale with the motor portion.
Examination
Inspection
Inspect the patient’s face—wasting of the temporalis will show as hollow-
ing above the zygomatic arch.
Testing motor function
• Ask the patient to clench their teeth. Feel both sides for the bulge of
the masseter and temporalis.
• Ask the patient to open their mouth wide—the jaw will deviate
toward the side of a V lesion.
• Again ask them to open their mouth, but provide resistance by holding
their jaw closed with one of your hands.
V
1
V
2
V
3
Fig. 10.7 Distribution of the sensory branches of the trigeminal nerve.
V
1
= ophthalmic, V
2
= maxillary, V
3
= mandibular. Note that V
1
extends to the
vertex and includes the cornea and V
3
does not include the angle of the jaw.

CHAPTER 10 Nervous system284
Testing sensory function
• Assess light touch for each branch and ask patient to say “yes” if felt.
•
Choose three spots to test on each side to make the examination
easy to remember—forehead, cheek, and mid-way along jaw.
• For each branch, compare left to right. Ignore minor differences (it’s
diffi
cult to press with exactly the same force each time).
• Test pin-prick sensation at the same spots, using a sterile pin.
• Temperature sensation is not routinely tested—consider this only if
abnormalities in light touch or pin-prick are found. Use specimen tubes
or other small containers full of hot or cold water.
Findings
• Wasting of muscles: long-term V palsy, motor neuron disease (MND),
myotonic dystrophy
• Loss of all sensory modalities: V ganglion lesion (e.g., herpes zoster)
• Loss of light touch only—with loss of sensation on ipsilateral side of
the body: contralateral parietal lobe (sensory cortex) lesion.
• Loss of light touch in V only: lesion at sensory root pons
• Loss of pin-prick only—along with contralateral side of body: ipsilateral
brainstem lesion
• Loss of sensation in muzzle distribution (nose, lips, anterior cheeks):
damage to the lower part of the spinal sensory nucleus (syringomyelia,
demyelination)
Refl exes
Jaw jerk
0Explain to the patient what you will do; this could appear threatening!
• Ask the patient to let their mouth hang loosely open.
• Place your fi
nger horizontally across their chin and tap your fi nger
with
a patella hammer.
• Feel and watch jaw movement.
•
There should be a slight closure of the jaw, but this varies widely in
normal people. A brisk and defi nite closure may indicate an upper
motor neuron (UMN) lesion above the level of the pons (e.g.,
pseudobulbar palsy).
Corneal refl ex
Afferent = V
1
, efferent = VII.
• Ask the patient to look up and away from you.
• Gently touch the cornea with a wisp of cotton wool. Bring this in from
the side so it cannot be seen approaching.
• Watch both eyes. A blink is a normal response.
•
No response = ipsilateral V
1
palsy
•
Lack of blink on one side only = VII palsy
• Watch out for contact lenses, as they will give a reduced sensation.
Ask the patient to remove them fi rst.
Hints
• Note the sensory distribution. The angle of the jaw is not supplied by
V
3
but by the great auricular nerve (C2, C3).
• When testing the corneal refl ex, touch the cornea (overlies the iris),
not the conjunctiva (overlies the sclera).

CRANIAL NERVE VII: FACIAL
285
Cranial nerve VII: facial
Applied anatomy
• Sensory: external auditory meatus, tympanic membrane, small portion
of skin behind the ear. Special sensation: taste anterior 2/3 of tongue
• Motor: muscles of facial expression, stapedius
• Autonomic: parasympathetic supply to lacrimal glands
The nucleus lies in the pons, the nerve leaves at the cerebellopontine
angle with CN VIII. The nerve gives off a branch to the stapedius at the
geniculate ganglion, while most of the nerve leaves the skull via the stylo-
mastoid foramen and travels through the parotid gland.
Examination
Muscles of facial expression
Test both the left and right sides at the same time. Some patients have
diffi cultly understanding the instructions—the authors recommend a quick
demonstration following each command, allowing the patient to mirror
you (e.g., “puff out your cheeks like this”). This exam can be quite embar-
rassing; the examiner making equally strange faces can lighten the mood
and aid in the patient’s cooperation and enthusiasm.
• Look at the patient’s face at rest. Look for asymmetry in the nasolabial
folds, angles of the mouth, and forehead wrinkles.
• Ask the patient to raise their eyebrows (“look up!”). Watch the
forehead wrinkle.
• Attempt to press their eyebrows down and note any weakness.
• Ask patient to close their eyes tightly. Watch, then test against
resistance with your fi
nger and thumb, saying, “Don’t let me pull
them apart.”
• Ask the patient to blow out their cheeks. Watch for air escaping on
one side.
• Ask the patient to bare their teeth (e.g., “show me your teeth!”). Look
for asymmetry.
• Ask the patient to purse their lips and to whistle for you. Look for
asymmetry. The patient will always smile after whistling (see below).
Whistle-smile sign
Failure to smile when asked to whistle (whistle-smile negative) is usually
due to emotional paresis of the facial muscles and is synonymous with
Parkinsonism.
External auditory meatus
This should be examined briefl
y if only CN VII is examined—it can be
done as part of CN VIII if examining all the cranial nerves.
Taste
This is rarely tested outside specialist clinics.
• Each side is tested separately, using cotton buds dipped in the solution
of choice applied to each side of the tongue. Be sure to swill the
mouth with distilled water between each taste sensation.
• Test sweet, salty, bitter (quinine), and sour (vinegar).
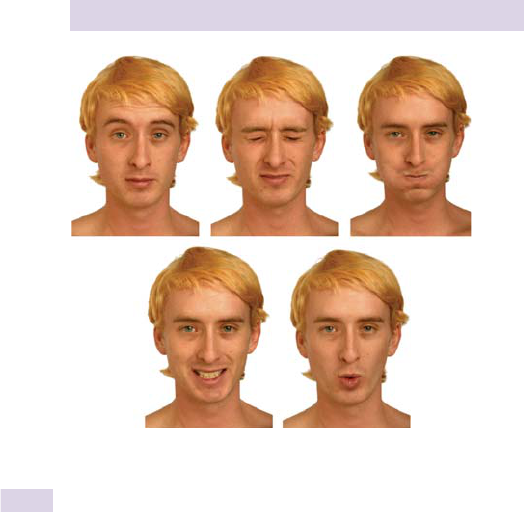
CHAPTER 10 Nervous system286
Findings
• Upper motor nerve lesion will cause loss of facial movement on the
ipsilateral side but with preservation of forehead wrinkling—both
sides of the forehead receive bilateral nervous supply (unilateral =
cerebrovascular accident [CVA], etc.; bilateral = pseudobulbar palsy,
motor neuron disease).
• Lower motor nerve lesion will cause loss of all movement on the
ipsilateral side of the face (unilateral = demyelination, tumors, Bell’s
palsy, pontine lesions, cerebellopontine angle lesions; bilateral =
sarcoid, Guillain–Barré syndrome [GBS], myesthenia gravis).
• Bell’s palsy: idiopathic unilateral LMN VII paresis
• Ramsay–Hunt syndrome: unilateral paresis caused by herpes at the
geniculate ganglion (look for herpes rash on the external ear)
Hints
• Bell’s phenomenon is the upward movement of the eyeballs when the
eye closes. This occurs in the normal state but can be clearly seen if
the eyelids fail to close because of VII palsy.
• VII palsy does not cause eyelid ptosis.
• Long-standing VII palsy can cause fi
brous contraction of the muscles
on the affected side, resulting in a more pronounced nasolabial fold
(the reverse of the expected fi ndings).
• Bilateral VII palsy will cause a sagging, expressionless face and is often
missed.
(a)
(d) (e)
(b) (c)
Fig. 10.8 Testing the muscles of facial expression as described on b p. 285.
(a) Eyebrows; (b) eyelids; (c) puffi ng out the cheeks; (d) baring teeth; (e) whistle.

CRANIAL NERVE VIII: VESTIBULOCOCHLEAR
287
Cranial nerve VIII: vestibulocochlear
Applied anatomy
• Sensory: hearing (cochlear), balance and equilibrium (vestibular)
• Motor: none
The eighth nerve comprises two parts.
The cochlear branch originates in the organ of Corti in the ear and passes
through the internal auditory meatus to its nucleus in the pons. Fibers pass
to the superior gyrus of the temporal lobes.
The vestibular branch arises in the utricle and semicircular canals, joins
the auditory fi
bers in the facial canal, enters the brainstem at the cerebel-
lopontine angle, and ends in the pons and cerebellum.
Examination
Inquire fi rst about symptoms—hearing loss or changes, or balance prob-
lems. Peripheral vestibular lesions cause ataxia during paroxysms of ver-
tigo but not at other times.
Begin by inspecting each ear as described in b Chapter 6 (p. 132).
Hearing
Test each ear separately. Cover one by pressing on the tragus or cre-
ate white noise by rubbing your fi ngers together at the external auditory
meatus.
Simple test of hearing
• Whisper a number into one ear and ask the patient to repeat it.
• Repeat with the other ear.
• Be careful to whisper at the same volume in each ear (the end of
expiration is best) and at the same distance (about 24 inches).
Rinne’s test
• Tap a 512 Hz* tuning fork and hold adjacent to the ear (air
conduction, Fig. 10.9a ).
• Then apply the base of the tuning fork to the mastoid process (bone
conduction)—see Fig. 10.9b .
• Ask the patient which position sounds louder.
•
Normal = air conduction > bone conduction = “Rinne’s positive”
•
In neural (or perceptive) deafness, Rinne’s test will remain positive.
•
In conductive deafness, the fi ndings are reversed (bone > air).
Weber’s test
• Tap a 512 Hz tuning fork and hold the base against the vertex or
forehead at the midline (see Fig. 10.9c ).
• Ask the patient if it sounds louder on one side.
•
In neural deafness, the tone is heard better in the intact ear.
•
In conductive deafness, the tone is heard better in the
affected ear.
* This is the C above middle C for those musically inclined.

CHAPTER 10 Nervous system288
Vestibular function
Turning test
• Ask the patient to stand facing you, with arms outstretched.
• Ask them to march on the spot, then close their eyes (continue
marching).
• Watch!
•
The patient will gradually turn toward the side of the lesion;
sometimes they will turn right round 180*.
Hallpike’s maneuver
This is a test for benign positional vertigo (BPV). Do not test those with
known neck problems or possible posterior circulation impairment.
• Explain to the patient what will happen.
• Sit the patient facing away from the edge of the bed such that when
they lie back, their head will not be supported (over the edge).
• Turn their head to one side and ask them to look in that direction.
• Lay them back quickly, supporting their head so that it lies about 30*
below the horizontal.
• Watch for nystagmus (the affected ear will be lowermost).
• Repeat with the head turned in the other direction.
•
No nystagmus = normal
•
Nystagmus, with a slight delay (10 seconds) and fatigable (can’t be
repeated successfully for 10–15 minutes) = BPV
•
Nystagmus, no delay and no fatiguing = central vestibular syndrome
(a)
(b)
(c)
Fig. 10.9 (a) Testing air conduction. (b) Testing bone conduction. (c) Position
of the tuning fork for Weber’s test.

CRANIAL NERVES IX AND X
289
Cranial nerves IX and X
The ninth (glossopharyngeal) and tenth (vagus) nerves are considered
together as they have similar functions and work together to control the
pharynx, larynx, and swallowing.
Applied anatomy: IX
• Sensory: pharynx, middle ear. Special sensation: taste on posterior 1/3
of tongue
• Motor: stylopharyngeous
• Autonomic: parotid gland
This nerve originates in the medulla, passes through the jugular foramen.
Applied anatomy: X
• Sensory: tympanic membrane, external auditory canal, and external
ear. Also proprioception from thorax and abdomen
• Motor: palate, pharynx, and larynx
• Autonomic: carotid baroreceptors
This nerve originates in the medulla and pons, leaves the skull via the
jugular foramen.
Examination
Pharynx
• Ask the patient to open their mouth. Inspect the uvula (use a tongue
depressor if necessary). Is it central or deviated to one side? If to one
side, which side?
• Ask the patient to say “aah.” Watch the uvula. It should move upward
centrally. Does it deviate to one side?
Gag refl ex
This is unpleasant for the patient and should only be tested if a IX or X
nerve lesion is suspected (afferent signal = IX, efferent = X).
• With the patient’s mouth open wide, gently touch the posterior
pharyngeal wall on one side with a tongue depressor or other sterile
stick.
• Watch the uvula (it should lift up).
• Repeat on the opposite side.
• Ask the patient if they felt the two touches and if there was any
difference in sensation.
Larynx
• Ask the patient to cough. Normal character? Gradual onset or sudden?
• Listen to the patient’s speech. Note volume and quality and whether it
appears to fatigue (gets quieter as time goes on).
Test swallow
• At each stage, watch the swallow action. Are there two phases or
one smooth movement? Delay between fl
uid leaving the mouth (oral
phase) and pharynx and larynx reacting (pharyngeal phase)? Is there
any coughing or choking? Any “wet” voice?
• Terminate the test at the fi
rst sign of the patient aspirating.

CHAPTER 10 Nervous system290
• Offer the patient a teaspoon of water to swallow. Repeat x 3.
• Offer the patient a sip of water. Repeat x 3.
• Offer the patient the glass for a mouthful of water. Repeat x 3.
Findings
Uvula
• Moves to one side = X lesion on the opposite side
• No movement = muscle paresis
• Moves with “aah” but not gag and d pharyngeal sensation = IX palsy
Cough
• Gradual onset of a deliberate cough = vocal cord palsy
• “Wet,” bubbly voice and cough (before the swallow test) = pharyngeal
and vocal cord palsy (X palsy)
• Poor swallow and aspiration = combined IX and X or lone X lesion

CRANIAL NERVE XI: ACCESSORY
291
Cranial nerve XI: accessory
Applied anatomy
• Sensory: none
• Motor: sternocleidomastoids and upper part of trapezii
The accessory nerve is composed of cranial and spinal parts. The cra-
nial accessory nerve arises from the nucleus ambiguous in the medulla.
The spinal accessory nerve extends from the lateral part of the spinal
cord down to C5 as a series of rootlets. These join together and ascend
adjacent to the spinal cord, passing through the foramen magnum to join
with the cranial portion of the accessory nerve. It leaves the skull via the
jugular foramen.
The cranial portion joins with the vagus nerve (X). The spinal portion
innervates the sternocleidomastoids and the upper fi
bers of the trapezii.
2 Note that each cerebral hemisphere controls the ipsilateral sternoclei-
domastoid and the contralateral trapezius.
Examination
The cranial portion of the accessory nerve cannot be tested separately.
• Inspect the sternocleidomastoids. Look for wasting, fasciculation,
hypertrophy, and any abnormal head position.
• Ask the patient to shrug their shoulders, and observe.
• Ask the patient to shrug again, using your hands on their shoulders to
provide resistance.
• Ask the patient to turn their head to each side, fi
rst without and then
with resistance (use your hand on their cheek).
Findings
Isolated accessory nerve lesions are very rare. CN XI lesions usually
present as part of a wider weakness or neurological syndrome.
• Bilateral weakness: with wasting caused by muscular problems or
motor neuron disease
• Unilateral weakness (trapezius and sternomastoid same side) suggests a
peripheral neurological lesion.
• Unilateral weakness (trapezius and sternomastoid of opposite sides),
usually with hemiplegia, suggests a UMN lesion ipsilateral to the weak
sternomastoid.
Hints
• Remember that the action of the sternocleidomastoid is to turn the
head to the opposite side (e.g., poor head turning to the left indicates a
weak right sternocleidomastoid).
• When providing resistance to head turning, be sure to press against
the patient’s cheek (see Fig. 10.10 ). Lateral pressure to the jaw can
cause pain and injury, particularly in older and frail patients.

CHAPTER 10 Nervous system292
(a)
(b)
Fig. 10.10 (a) Using resistance against lateral head-turning. Be careful not to apply
pressure to the patient’s jaw. (b) Testing the trapezius against resistance.

CRANIAL NERVE XII: HYPOGLOSSAL
293
Cranial nerve XII: hypoglossal
Applied anatomy
• Sensory: none
• Motor: muscles of the tongue
The nucleus lies on the fl oor of CN IV ventricle. Fibers pass ventrally,
leaving the brainstem lateral to the pyramidal tracts. The nerve leaves the
skull via the hypoglossal foramen.
Examination
• Ask the patient to open wide and inspect the tongue on the fl oor
of the mouth. Look for size and evidence of fasciculation.
• Ask the patient to protrude the tongue. Look for deviation or
abnormal movements.
• Ask the patient to move the tongue in and out repeatedly, then from
side to side.
• To test for subtle weakness, place your fi
nger on the patient’s cheek
and ask them to push against it from the inside, using their tongue.
Findings
• A LMN neuron lesion will cause fasciculation on the affected side and
a deviation toward the affected side on protrusion. There will also be
a weakness on pressing the tongue away from the affected side.
• A unilateral UMN lesion will rarely cause any clinically obvious signs.
• A bilateral UMN lesion will give a small, globally weak tongue with
reduced movements.
• A bilateral LMN lesion (e.g., motor neuron disease) will also produce a
small, weak tongue.
• Rapid in-and-out movement on protrusion (trombone tremor) can be
caused by cerebellar disease, extrapyramidal syndromes, and essential
tremor.
Hint
Rippling movements may be seen if the tongue is held protruded for long
periods. This is normal and should not be mistaken for fasciculations.

CHAPTER 10 Nervous system294
Motor: applied anatomy
The motor system is complex. A detailed description is beyond the scope
of this book; what follows is a brief overview.
Cortex
The primary motor area is the precentral gyrus of the cerebrum. It is here,
along with adjacent cerebral areas, that initiation of voluntary movement
occurs. Muscle groups are represented by areas of the cortex from medial
to lateral, as shown in Fig. 10.11 . The size of the area dedicated to muscle
corresponds to the precision of movement (= the number of motor units
that are involved).
Pyramidal (direct) pathways
These are concerned with precise, voluntary movements of the face, vocal
cords, hands, and feet. The simplest pathways consist of two neurons. The
upper motor neuron (UMN) originates in the cerebral cortex then passes
down through the internal capsule, brainstem, and spinal cord where it
synapses with a lower motor neuron (LMN). This, in turn, leaves the cord
to synapse with the skeletal muscle fi bers.
There are three pyramidal tracts:
• Lateral corticospinal: control of precise movement in the hands and feet
and represents 90% of the UMN axons. These cross over (decussate)
in the medulla oblongata before continuing to descend so that nerves
from the right side of the brain control muscles on the left of the body
and vice versa.
Swallowing
Tongue
Jaw
Lips
Face
Eye
Brow
Neck
Thumb
Index
Middle
Little
Hand
Wrist
Elbow
Shoulde
r
Trunk
Hip
Knee
Ankle
Toes
Ring
Fig. 10.11 Coronal section through the motor cortex showing the representation
of different muscle groups. Note the larger areas given to those muscles performing
precise movements—hands, face, and lips.

MOTOR: APPLIED ANATOMY
295
• Anterior corticospinal: control of the neck and trunk and holds 10% of
the UMN axons. These do not cross in the medulla but descend in the
anterior white columns of the spinal cord. They decussate at several
spinal levels and exit at the cervical and upper thoracic segments.
• Corticobulbar: voluntary muscles of the eyes, face, tongue, neck, and
speech. They terminate at nuclei in the pons and medulla, some
crossed, others not. They control cranial nerves III, IV, V, VI, VII, IX, X,
XI, and XII.
Extrapyramidal (indirect) pathways
These constitue all of the other descending pathways. They are complex
circuits involving the cortex, limbic system, basal ganglia, cerebellum, and
cranial nerve nuclei. There are fi ve major tracts controlling precise move-
ments of the hands and feet, movement of the head and eyes in response
to visual stimuli, muscle tone, and truncal stability and balance.
Basal ganglia and nuclei are complex circuits concerned with the pro-
duction of automatic movement and planning movement sequences. They
also appear to inhibit intrinsically excitable circuits.
Cerebellum
This is involved in learning and performing skilled, automatic movements
(e.g., running, playing the piano) and in posture and balance. It monitors
intention, receives signals for actual movements, compares the difference,
and makes corrective adjustments.
Box 10.3 A word about functional weakness
Large parts of the neurological examination rely on cooperation of the
patient. Occasionally, patients can give the appearance of neurological
disability that does not exist, for any number of psychiatric or psychoso-
cial reasons. The examination here is very diffi
cult even for very expe-
rienced practitioners. Consider a functional component to the problem
if you see the following:
• Abnormal distribution of weakness
• Normal refl
exes and tone despite weakness
• Movements are variable and power erratic.
• Variation is seen on repeat testing.
Be careful! Don’t jump to conclusions. Do not assume symptoms are
functional if they are unusual. All patients should be given the benefi t
of
the doubt. Functional weakness is a diagnosis largely of exclusion.

CHAPTER 10 Nervous system296
Motor: inspection and tone
Inspection
As for any other system, the examination begins when you fi rst set eyes
on the patient and continues through the history-taking.
• Any walking aids or abnormal gait (see b p. 321)?
• Shake hands—abnormalities of movement? Strength? Relaxation?
• Any abnormal movements when sitting?
• Any obvious weaknesses (e.g., hemiplegia)?
• Does the patient have good sitting balance?
Inspection can be formalized at the examination stage of the encounter.
The patient should be seated or lying comfortably with as much of their
body exposed as possible. Look at all muscle groups for the following:
• Abnormal positioning, due to weakness or contractures
• Wasting
• Fasciculation (irregular contractions of small areas of muscle)
Make a point of inspecting the shoulder girdle, small muscles of the hand,
quadriceps, anterior compartment of the lower leg, and ankle. Look at the
foot for contractures or abnormalities of shape.
Tone
The aim is to test resting tone in the limbs. This takes practice; the feel of
normal, d or i tone can be taught only through experience.
0The assessment can be diffi
cult, as it relies on the patient being relaxed;
telling the patient to relax usually has the opposite effect! They can be
distracted by a counting task or told to relax the limb “as if you’re asleep.”
Distracting the patient with light conversation is a generally successful
ploy. You should also repeat the following maneuvers at different speeds
and intervals to catch the patient at an unguarded moment.
Arms
• Take the patient’s hand in yours (as if shaking it) and hold their elbow
with your other hand (see Fig. 10.12a ). From this position, you can
•
Pronate and supinate the patient’s forearm.
•
Roll the patient’s wrist through 360*.
•
Flex and extend the patient’s elbow.
Legs
• Hip: With the patient lying fl at, legs straight, hold onto the patient’s
knee and roll it from side to side (see
Fig. 10.12b ).
• Knee: With the patient in the same position, put your hand behind
the patient’s knee and raise it quickly ( Fig. 10.12c ). Watch the heel—it
should lift from the bed or exam table slightly if tone is normal.
• Ankle: Holding the foot and the lower leg, fl
ex and dorsifl
ex the ankle
( Fig. 10.12d ).
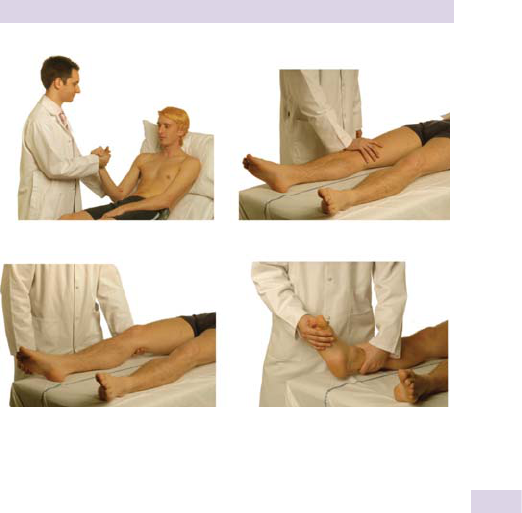
MOTOR: INSPECTION AND TONE
297
Findings
Normal tone
• Slight resistance in movement (feel through experience)
d Tone
• Flaccid due to LMN or cerebellar lesions or myopathies
i Tone
• Spasticity (clasp-knife rigidity): The limb appears stiff. With increased
pressure, there is a sudden give and the limb moves. This is seen in
UMN lesions.
• Rigidity (lead pipe): The limb is equally stiff through all movements.
• Rigidity (cogwheel): an extrapyramidal sign, caused by tremor super-
imposed on a rigid limb. The limb moves in a stop–go halting fashion.
• Gegenhalten: (paratonia) seen in bilateral frontal lobe damage and
catatonic states. Tone i with i pressure from the examiner—the
patient appears to be resisting movement.
• Myotonia: a slow relaxation after action. When asked to make a fi st,
the patient is unable the release it quickly and will be slow to let go of
a handshake (e.g., myotonic dystrophy).
• Dystonia: The limb or head has an abnormal posture that looks
uncomfortable.
(a) (b)
(c) (d)
Fig. 10.12 Testing tone. (a) Testing the upper limb. (b) Testing tone at the hip.
(c) Testing tone at the knee. (d) Testing tone at the ankle.

CHAPTER 10 Nervous system298
Motor: upper limb power
As for the muscles of the face, the examiner should demonstrate each
movement, mirroring the patient (see Fig. 10.13 ).
This also allows each action that the patient makes to be opposed by
the same (or similar) muscle groups in the examiner—test their fi ngers
against your fi ngers, and so on. Each muscle group should be graded from
0 to 5 according to the system shown in Box 10.4 .
Examination of the upper limbs also allows both sides to be tested at
once, providing direct comparison between left and right (see Fig.10.13 ).
0Be careful not to hurt frail, elderly patients or those with osteoarthritis
(OA), rheumatoid arthritis (RA), or other rheumatological disease.
Shoulder
• Abduction (C5): Ask the patient to abduct their arms with elbows
bent. Ask them to hold still as you attempt to push their arms down.
• Adduction (C6, C7): The patient should hold their arms tightly to their
sides with elbows bent. You attempt to push their arms out.
Elbow
• Flexion (C5, C6): The patient holds their elbows bent and supinated in
front of them. Hold the patient at the elbow and wrist and attempt to
extend their arm: “Don’t let me straighten your arm!”
• Extension (C7): Patient holds position above as you resist extension at
the elbow by pushing on their distal forearm or wrist: “Push me away!”
Wrist
• Flexion (C6, C7): With arms supinated, the patient should fl ex their
wrist and hold as you try to extend it by pulling from your own wrists.
• Extension (C6, C7): The opposite of fl
exion. The patient holds their
hand out straight and resists your attempts to bend it.
Fingers
• Flexion (C8): Ask the patient to squeeze your fi ngers or
(better) ask
the patient to grip your fi ngers palm to palm (see Fig. 10.13c ) and
resist your attempts to pull their hand open.
• Extension (C7, C8): Ask the patient to hold their fi
ngers out straight.
You support their wrist with one hand and try to push their fi ngers
down with the side of your hand over their fi
rst interphalangeal joints.
• Abduction (T1): Ask the patient to splay their fi
ngers out and resist
your attempts to push them together.
• Adduction (T1): Holding the patient’s middle, ring, and little fi nger
with one hand and their index fi
nger with the other, ask the patient
to pull their fi
ngers together or place a piece of paper between their
outstretched fi ngers and ask them to resist your attempts to pull it
away.
Pronator drift
This is a useful test of subtle weakness. The patient is asked to hold their
arms outstretched in front, palms upward and eyes closed. If one side is
weak, the arm will pronate and slowly drift downward.
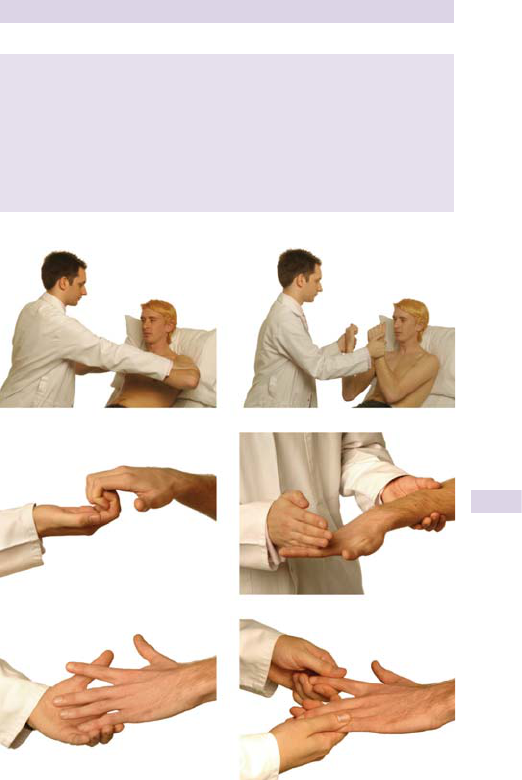
MOTOR: UPPER LIMB POWER
299
Box 10.4 Muscle strength testing classifi cations
• 5 = Normal power
• 4 = Movement against resistance but not normal
• 3 = Movement against gravity, but not against resistance
• 2 = Movement with gravity eliminated (e.g., can move leg from side
to side on bed but not lift it)
• 1 = Contractions but no movement seen
• 0 = No movement
(a) (b)
(c) (d)
(e) (f)
Fig. 10.13 Testing power in the upper limbs. (a) Shoulder movements. (b) Elbow
movements. (c) Finger fl exion. (d) Finger extension. (e) Finger abduction. (f) Finger
adduction.
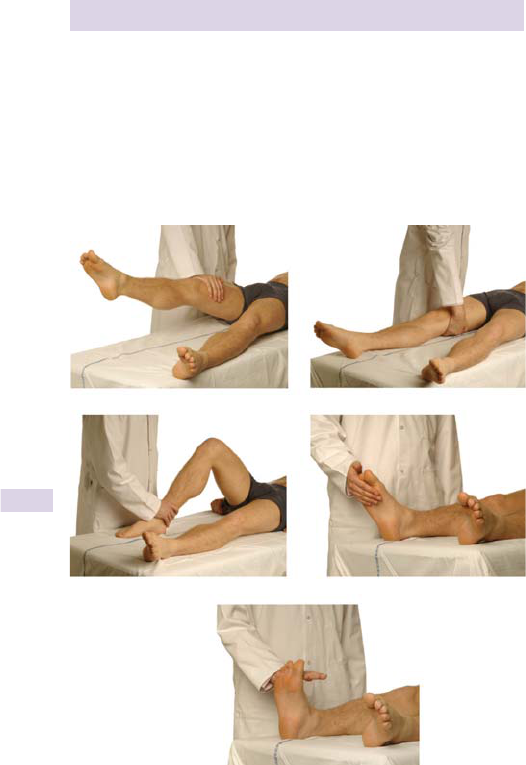
CHAPTER 10 Nervous system300
Motor: lower limb power
The patient should be seated on an exam table or bed with legs out-
stretched in front of them. The limbs should be exposed as much as pos-
sible so that contractions of the muscles can be seen .
Again, power is tested for each muscle group on one side and then the
other ( Fig. 10.14 ). Comparing left with right and score results according to
the scale in Box 10.4 (b p. 299).
(a) (b)
(c) (d)
(e)
Fig. 10.14 Testing power in the lower limb against resistance. (a) Flexing the hip.
(b) Extending the hip. (c) Flexing and extending the knee. (d) Plantar fl exion at the
ankle. (e) Dorsifl exion at the ankle.

MOTOR: LOWER LIMB POWER
301
Hip
• Flexion (L1, L2, L3): With the lower limbs lying on the bed or couch,
the patient raises each leg, keeping the knee straight. Oppose the
movement by pushing down on the thigh just above the knee: “Stop
me from pushing down!”
• Extension (L5, S1): Ask the patient to keep their leg pressed against
the bed as you attempt to lift it, either with a hand beneath the calf or
the ankle: “Stop me from lifting your leg up!”
• Abduction (L4, L5, S1): Ask the patient to move their leg out to the
side as you oppose the movement with a hand on the lateral thigh:
“Stop me pushing your legs together!”
• Adduction (L2, L3, L4): With the legs central, put your hand on
the medial thigh and attempt to pull the leg out to the side against
resistance: “Don’t let me pull your legs apart!”
Knee
• Flexion (L5, S1): Take hold of the patient’s knee with one hand and
their ankle with the other and fl ex the leg to about 60
*. (The patient
may think you want them to resist this, so often a quick instruction
of “bend at the knee” is required.) Ask the patient to bend their
leg further (“stop me straightening your leg out”) and oppose the
movement at their ankle.
• Extension (L3, L4): With the patient’s leg in the fl
exion position, have
the patient extend their leg (“push me away,” “straighten your leg
out”) as you oppose it. Alternatively, attempt to bend the patient’s leg
from a straightened starting position.
Ankle
• Plantar fl exion (S1, S2): With the patient’s leg out straight and ankle
relaxed, put your hand on the ball of the foot and ask the patient to
push you away: “Push down and stop me pushing back!”
• Dorsifl exion (L4, L5): From the starting position for plantar fl exion,
hold the patient’s foot just above the toes and ask them to pull their
foot backward. Patients often attempt to move their entire leg here, so
tell them, “Pull your foot back and stop me pushing your foot down,”
along with an accompanying hand gesture.

CHAPTER 10 Nervous system302
Tendon refl exes
Theory
The sudden stretch of a muscle is detected by the muscle spindle, which
initiates a simple two-neuron refl ex arc, causing that muscle to contract.
Tendons are struck with a refl ex hammer (causing a sudden stretch of
the muscle) and the resultant contraction is observed. In LMN lesions or
myopathies, the refl ex is diminished or absent, but is hyperactive or brisk
in UMN lesions.
Technique
The tendons are tapped with a refl ex hammer ( Fig. 10.15 ). For each refl ex,
test the right, then left, and compare. The hammer should be held at the
far end of the handle and swung in a loose movement from the wrist. The
patient should be relaxed (see b p. 303).
Record deep tendon results according to the scale in Box 10.5 .
Examination
Biceps(C5, C6)
With the patient seated, lay their arms across their abdomen. Place your
thumb across the biceps tendon and strike it with the refl ex hammer as
above. Watch the biceps for contraction.
Supinator (C5, C6)
The muscle tested is actually the brachioradialis. With the patient’s arms
lying loosely across their abdomen, put your fi ngers on the radial tuberos-
ity and tap with the hammer. The arm will fl ex at the elbow. If brisk, the
fi ngers may also fl ex.
Triceps (C7)
Taking hold of the patient’s wrist, fl ex their arm to 790*. Tap the triceps
tendon about 5 cm superior to the olecranon process of the ulna. Watch
the triceps.
Fingers (C8)
This is only present if tone is pathologically i. With your palm up and the
patient’s arm pronated, lay their fi ngers on yours. Strike the back of your
fi ngers. The patient’s fi ngers will fl ex.
Knee (L3, L4)
With the patient’s leg extended, use one hand behind their knee to lift
their leg to 760*. Tap the patella tendon and watch the quadriceps. If brisk,
proceed to testing for clonus here.
Knee clonus
With the patient’s leg extended, place your thumb and index fi nger over
the superior edge of the patella. Create a sudden downward (toward the
feet) movement and hold . Watch the quadriceps. Any beat of clonus here
is abnormal.
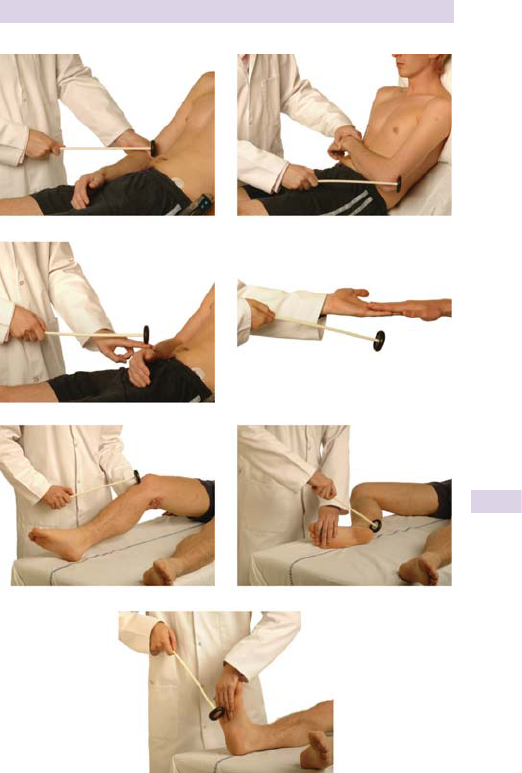
TENDON REFLEXES
303
(a) (b)
(c) (d)
(e) (f)
(g)
Fig. 10.15 Testing tendon refl exes. (a) Biceps. (b) Triceps. (c) Supinator.
(d) Fingers. (e) Knee. (f) Ankle. (g) Alternative method for ankle.

CHAPTER 10 Nervous system304
Ankle (S1, S2)
With the hip fl exed and externally rotated and the knee fl exed to 790*,
hold the foot and tap the Achilles tendon. Watch the calf muscles for
contraction and ankle fl exion.
Alternatively, with the leg extended and relaxed, place your hand on the
ball of the foot and strike your hand with the hammer.
Augmentation
If the refl ex is absent, it can sometimes be elicited by asking the patient to
perform an augmenting action, which acts to increase the activity of neu-
rons in the spinal cord. This effect is short-lived, however, so you should
aim to test the refl ex in the fi rst 10 seconds of the augmentation.
• For upper limb refl
exes, ask the patient to clench their teeth.
• For lower limb refl
exes, ask the patient to lock their fi ngers
together,
pulling in opposite directions.
Box 10.5 Recording deep tendon refl exes
These are usually recorded as a list, or often by applying the numbers
below to the appropriate area of a stick-man sketch.
• 0 = absent
• ± = present only with reinforcement
• 1+ = less than normal
• 2+ = normal
• 3+ = hyperactive without clonus.
• 4+ = hyperactive with clonus.

OTHER REFLEXES
305
Other refl exes
In normal practice, the plantar response is the only one of the following
routinely tested.
Abdominal refl ex
This test relies on observing the abdominal muscles. It is therefore not
easy in those with a covering of fat. It is also less obvious in children,
the elderly, multiparous patients, or those who have had abdominal
surgery.
• The patient should lie on their back, relaxed, with abdomen exposed.
• Using a tongue depressor or something similar, stroke each of the
4 segments of the abdomen in a brief movement toward the umbilicus.
• As each segment is stroked, the abdominal muscles will refl exively
contract.
• Summarize the fi
ndings diagrammatically using a simple 2 x 2 grid and
indicating the presence or absence of a response by marking “+” and
“–”, respectively (“9” for an intermediate response).
The upper segments are supplied by T8–T9; the lower, by T10–T11.
Cremasteric refl ex (L1, L2)
Given its nature, this refl ex is very rarely tested and requires a full expla-
nation and consent from the patient fi rst.
• With the male patient standing and naked from the waist down, lightly
stroke the upper aspect of their inner thigh.
• The ipsilateral cremaster muscle contracts and the testicle will briefl y rise.
Plantar response (L5, S1, S2)
This is sometimes, inappropriately, called the Babinski refl ex .
• The patient should be lying comfortably, legs outstretched.
• Warn the patient that you are about to touch the sole of their foot
(this may prevent a startled withdrawal response).
• Stroke the patient’s sole with a tongue depressor or similar
disposable item (many people use their fi
ngernail, but this has obvious
implications for sterility).
• Stroke from the heel, up the lateral aspect of the sole to the base of
the fi
fth toe (
Fig. 10.16 ). If there is no response, the stroke can be
continued along the ball of the foot to the base of the big toe.
• Watch the big toe for its initial movement.
•
Normal response is plantar fl exion of the big toe.
•
UMN lesions will cause the big toe to dorsifl ex. This is the Babinski
response.
• Document your fi
ndings using arrows:
•
d for plantar fl exion
•
i for dorsifl exion
•
– for an absent response
• If the leg is withdrawn and the heel moves in a ticklish reaction, this is
called a withdrawal response and the test should be repeated.
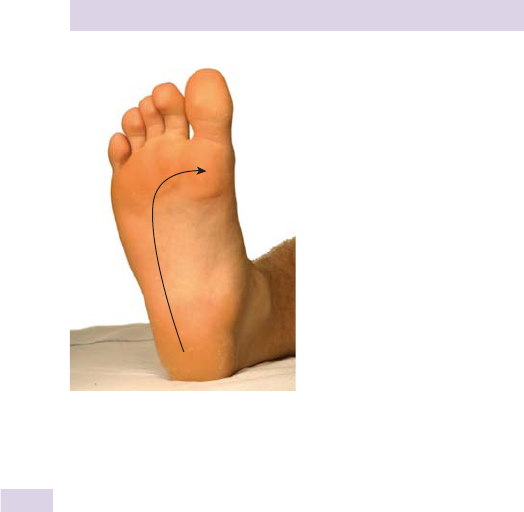
CHAPTER 10 Nervous system306
Ankle clonus
A rhythmical contraction of a muscle when suddenly stretched is a sign
of hyperrefl exia due to a UMN lesion. With the patient lying on the
bed, knee straight, and thigh slightly externally rotated, suddenly dorsifl ex
the foot. More than three beats of clonus—as long as the foot is held
dorsifl exed—is abnormal.
Fig. 10.16 Testing the plantar response. The arrow shows the direction that the
stroke should take.

PRIMITIVE REFLEXES
307
Primitive refl exes
These are refl exes seen in the newborn, but they may still be present in
a few normal adults. They return somewhat in the elderly but are seen
mainly in frontal lobe disease and encephalopathy.
The primitive refl exes are not routinely tested unless the examiner is
looking specifi cally for frontal lobe signs or Parkinson’s disease.
Glabellar tap
• Using your index fi nger, repeatedly tap (gently) the patient’s forehead
between the eyebrows.
• If normal, the patient will blink only with the fi
rst three or four taps.
Palmomental refl ex
• Stroke the patient’s palm, using sharp, fi rm pressure from the radial
side to the ulnar side.
• Watch the patient’s chin.
• If the refl
ex is present, there will be a contraction of the ipsilateral
mentalis seen in the neck and chin.
Grasp refl ex
• Gently stroke your fi ngers over the patient’s palm in a radial–ulnar
direction, telling the patient not
to grip your hand.
• If present, the patient will involuntarily grasp your hand and seemingly
refuse to let go.
Snout (or pout) refl ex
• With the patient’s eyes closed, gently tap their lips with your fi ngers or
(very cautiously) with a patellar hammer.
• An involuntary puckering of the lips is a positive refl ex.
Suckling refl ex
With the patient’s eyes closed, gentle stimulation at the corner of their
mouth will result in a suckling action at the mouth. The patient’s head may
also turn toward the stimulus.

CHAPTER 10 Nervous system308
Sensory: applied anatomy
The sensory system, like the rest of the nervous system, is vastly complex.
The following is a simplifi ed explanation that should provide enough back-
ground to make sense of the examination technique and fi ndings.
Spinal roots and dermatomes
At each spinal level, a spinal nerve arises that contains sensory and motor
neurons serving a specifi c segment of the body. The area of skin supplied
by the sensory neurons corresponding to each spinal level can be mapped
out—each segment is called a dermatome . See Figs. 10.18 and 10.19 on
b p. 310, 311.
There is considerable overlap such that loss of sensation in just one der-
matome is usually not testable (and textbooks show a marked variation in
dermatome maps). Health sciences students should become familiar with
the dermatomal distribution at an early stage.
Somatic sensory pathways
There are two main spinal pathways for sensory impulses. The clinical
importance of these can be seen in spinal cord damage and is summarized
on b p. 326.
Posterior columns
These convey light touch, proprioception, and vibration sense, as well as
stereognosis (the ability to recognize an object by touch), weight discrimi-
nation, and kinesthesia (the perception of movement).
Nerves from receptors extend up the ipsilateral side of the spinal cord
to the medulla, their axons forming the posterior columns (fasciculus gra-
cilis and fasciculus cuneatus). The second-order neurons decussate (cross
over) at the medulla and travel in the medial lemniscus to the thalamus.
From there, the impulse is conveyed to the sensory cortex.
Spinothalamic tract
This carries pain and temperature sensation. From a clinical point of view,
the important difference here is that the fi rst-order neurons synapse in the
posterior gray horn on joining the spinal cord. The second-order neurons
then cross over and ascend the contralateral side of the cord in the spi-
nothalamic tract to the thalamus.
Sensory cortex
This is located at the postcentral gyrus, just posterior to the motor cortex.
Much like the motor strip, the areas receiving stimuli from various parts of
the body can be mapped out (see Fig. 10.17 ). A lesion affecting one area
will cause sensory loss in the corresponding body area on the contralat-
eral side (see Somatic Sensory Pathways, above).

SENSORY: APPLIED ANATOMY
309
Pharynx
Tongue
Gums, jaw
Lower lip
Lips
Upper lip
Face
Nose
Eye
Thumb
Index
Middle
Ring
Little
Hand
Wrist
Forearm
Elbow
Arm
Shoulder
Head
Neck
Trunk
Hip
Leg
Genitals
Toes
Foot
Fig. 10.17 Sensory cortex map showing areas corresponding to the different
parts of the body. Note the large areas given over to the fi ngers and lips.
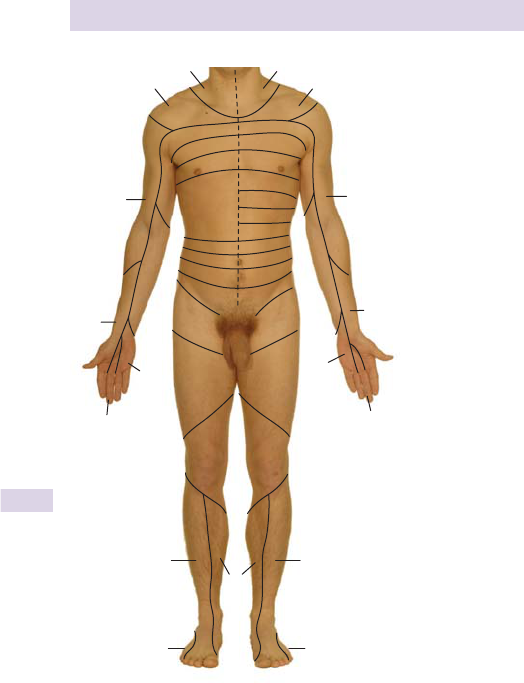
CHAPTER 10 Nervous system310
C4 C4
C5
C8
C6
C7
C3 C3
C7
C8
C6
C5
T1
L1 L1
L2 L2
L3 L3
T1
L4
L5
S1 S1
L5
T2
T3
T4
T5
T6
T7
T8
T9
T10
T11
Fig. 10.18 The dermatomes (anterior view). Students should be familiar with
these diagrams, particularly the limbs. Note important landmarks to aid recall
(C7 covers the middle fi nger, T4 lies at the level of the nipples, T10 is over the
umbilicus).
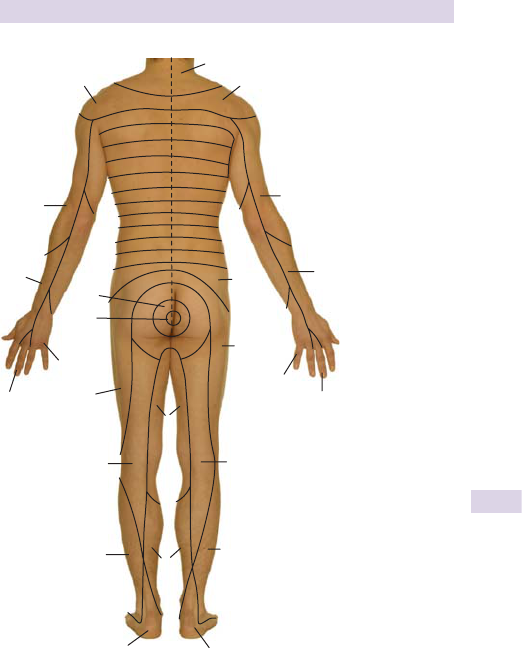
SENSORY: APPLIED ANATOMY
311
C4
C3
C4
C5
C6
C8
S2
S2
L5
L4
L5
S1
S1
L3
L2
C8
C6
C5
S4
S3
T1
S5
C7
C7
T1
L1
L2
T2
T3
T4
T5
T6
T7
T8
T9
T10
T11
T12
Fig. 10.19 The dermatomes (posterior view).

CHAPTER 10 Nervous system312
Sensory examination
This examination can be diffi cult, as it requires concentration and co-
operation on the part of both the patient and the examiner. The results
depend on the patient’s response and are thus partly subjective. Many
patients prove unreliable witnesses from a lack of understanding or
attempts to please the examiner. Education, explanation, and reassur-
ance are important at all times.
Often, sensory loss (particularly vibration and temperature) is not
noticed by the patient, and revealing them during the course of an exami-
nation may be upsetting. Keep this in mind as you proceed.
Technique
The examination should be infl uenced by the history. In practice, only light
touch is tested as a quick screening exam if no defi cit is expected.
If you are testing vibration sense and proprioception, it may be best to
test these fi rst, as they require the least concentration and can be used
to assess the patients’ reliability as a witness, before testing the other
sensory modalities.
For each modality, begin at any area of supposed defi cit and work out-
ward, mapping the affected area, then move to a systematic examination
from head to toe. Always test one side, then the other for each limb and
body area. Aim to test one spot in each dermatome.
Light touch
With the patient’s eyes closed, touch their skin with a wisp of cotton wool
and ask them to say “yes” when it is felt. The interval between each touch
should be irregular and unpredictable.
• In practice, a gentle touch with a fi
nger is often used. However, this
risks testing pressure, not light-touch sensation—it is also harder to
ensure that equal force is applied in all areas.
0Do not make tiny stroking movements on the skin—this stimulates hair
fi
bers and is not a test of light touch.
0Be aware of areas where decreased sensation is expected (foot cal-
luses, etc.).
• After testing each limb and body area, double check with the patient:
“Did that feel the same all over?” Explore any areas of abnormal
sensation more thoroughly before moving on.
Sensory inattention
• This is a subtle but often clinically important sign of parietal lobe
dysfunction. The patient feels a stimulus on the affected part, but not
when there is competition from a stimulus on the opposite side.
• Ask the patient to close their eyes and tell you if they feel a touch on
their left or right—use any body part—commonly hands and feet as a
quick screen.
• Touch the right hand, then the left hand, then both.
• The touches should be repeated randomly to confi
rm the result.

SENSORY EXAMINATION
313
•
For example, with a right-sided parietal lesion, the patient will feel
both left and right stimuli, but when both sides are touched, they
will not be able to feel the stimulus on the left.
Vibration sense
A 128 Hz tuning fork (compare with CN VIII) is used.
• Ask the patient to close their eyes, tap the tuning fork, and place the
base on a bony prominence. Ask if the patient can feel the vibration .
• If yes, then confi
rm by taking hold of the tuning fork with your other
hand to stop the vibration after asking the patient to tell you when the
vibration ceases.
• As always, compare left to right and work in a systematic fashion,
testing bony prominences:
•
Fingertip, wrist, elbow, shoulder, anterior superior iliac spine, tibial
tuberosity, matatarsophalangeal joint, and toes
Proprioception
Testing of proprioception in the manner described below provides a
rough gauge, thus results must be interpreted with the rest of the history
and examination.
Loss of position sense is usually distal. Start by testing the patient’s big
toe as follows. This technique can be used at any joint.
• With the patient’s eyes closed and leg relaxed, grasp the distal
phalanyx of the big toe from the sides.
• While stabilizing the rest of the foot, move toe up and down at joint.
• Ask the patient if they can feel any movement and in which direction.
• Flex and extend the joint, stopping at intervals to ask the patient
whether the toe is up or down.
• If proprioception is absent, test other joints, working proximally.
• The toe is gripped from the sides —if held incorrectly, pressure on the
nail may suggest that the toe is pressed down.
• Normal proprioception should allow the patient to identify very subtle
movements that are barely visible.
Box 10.6 Romberg’s sign
This is a further test of joint position sense. When proprioception is lost
in the limbs, patients can often stand and move normally as long as they
can see the limb in question.
0Perform with care, only if you are able to safely catch the patient in
the event of a fall!
• Ask the patient to stand, and you stand facing them.
• Ask the patient to close their eyes.
• If there is loss of proprioception, the patient will lose their balance
and fall. If so, catch them with care, asking them to open their eyes
again immediately if they haven’t already done so.

CHAPTER 10 Nervous system314
Pin-prick
Use a disposable pin or safety pin—not a hypodermic needle, as these
break the skin (a line of tiny wounds up a patient’s arm or weeping edema
up a shin is an infection risk and very embarrassing).
• Test as you would for light touch, gently pressing the pin on the skin.
• Test each dermatome in a systematic way, mapping out abnormalities.
• On each touch, ask the patient to say whether it feels sharp or dull .
• Occasionally, test the patient’s reliability as a witness with a negative
control by using the opposite (blunt) end of the pin.
Temperature
• This is not routinely tested outside of specialist clinics. Loss of
temperature sensation may be evident from the history (accidental
burns?).
• When tested, test tubes or similar vessels containing hot and ice-cold
water are used, and each dermatome is tested as with pin-prick.
• Remember to ensure the exterior of the tube is dry.

COORDINATION
315
Coordination
Coordination should be tested in conjunction with gait (b p. 321).
Cerebellar lesions cause incoordination on the ipsilateral side (b p. 327).
For each of the following, compare performance on the left and right.
Upper limbs
Finger–nose test
• Ask the patient to touch the end of their nose with their index fi nger.
• Hold your own fi
nger out in front of them—at arm’s reach from
the patient—and ask them to then touch the tip of your fi nger with
theirs.
• Ask them to move between their nose and your fi nger
(
Fig. 10.20 ).
• Look for intention tremor (worse as it approaches the target) and
past-pointing (missing the target entirely).
• The test can be made more diffi
cult by moving the position of your
fi
nger each time the patient touches their nose.
Rapid alternating movements
• This is hard to describe and should be demonstrated to the patient.
Ask the patient to repeatedly supinate and pronate their forearm,
keeping the other arm still such that they clap their hands palm to
palm, then back to palm, and so on (see Fig. 10.21 ).
• Alternatively, ask them to mimic screwing in a lightbulb.
•
Slow and clumsy = dysdiadokokinesis
•
0 Dysdiadokokinesis is the inability to perform rapidly alternating
movements (diadoke = Greek for “succession”). It is not, as many
students think, the actual test.
Fig. 10.20 Finger–nose testing.

CHAPTER 10 Nervous system316
Rebound
• From a resting (arms at their side) position, ask the patient to quickly
abduct their arms and stop suddenly at the horizontal level.
•
In cerebellar disease, there will be a delay in stopping and the arm
will oscillate about the intended fi nal position.
• Alternatively, pull on the patient’s fl
exed arms (as if testing elbow
fl
exion power) and suddenly let go. If lacking coordination, the patient
will hit his- or herself in the face. This test does little for provider–
patient trust and is rarely performed for obvious reasons.
Lower limbs
Heel–shin test
• With the patient sitting, legs outstretched, ask them to slide the heel
of one foot up and down the shin of the other leg at a moderate pace.
•
A lack of coordination will manifest as the heel moving side to side
about the intended path.
•
In sensory, in contrast to cerebellar, ataxia (lack of proprioception),
patients will perform worse with their eyes closed.
Foot tapping
• The patient taps your hand with their foot as fast as possible.
•
The nondominant side performs poorly in normal individuals.
Fig. 10.21 Testing rapidly alternating movements. This can be hard to describe to
a patient—a brief demonstration is usually required.

SOME PERIPHERAL NERVES
317
Some peripheral nerves
Peripheral nerve lesions may occur in isolation (e.g., trauma, compression,
neoplasia) or as part of a wider pathology (e.g., mononeuritis multiplex).
The following pages describe the signs associated with lesions of a selec-
tion of peripheral nerves.
Upper limb
Median nerve (C6–T1)
• Motor: muscles of the anterior forearm, except fl exor carpi ulnaris, and
LOAF (lateral 2 lumbricals, opponens pollicis, abductor pollicis brevis
and fl
exor pollicis brevis)
• Sensory: thumb, anterior index and middle fi
ngers, as well as some of
the radial side of the palm (see
Fig. 10.22 )
Examining a lesion
• Weakness and wasting of the thenar eminence
• With the hand lying fl
at, palm up, hold your pen above the thumb
and ask the patient to move their thumb vertically to touch it (pen-
touching test)—they will not be able to.
• Often power is good here despite symptoms and obvious carpel
tunnel syndrome.
• For lesions of the nerve at the cubital fossa, perform Ochsner’s
clasping test for weakness of fl
exor digitorum superfi
cialis. Ask the
patient to clasp their hands together. If a lesion is present, the index
fi nger will fail to fl ex.
Ulnar nerve (C8–T1)
• Motor: all of the small muscles of the hand except LOAF and fl exor
carpi ulnaris
• Sensory: ulnar side of the hand, little fi
nger, and half of ring fi nger
(see
Fig. 10.22 ).
Examining a lesion
• This is hard to test. There may be visible wasting of the small
muscles of the hand, with clawing of the fi
ngers (extension at the
phalangeometacarpal joints and fl
exion at the interphalangeal joints).
• Froment’s sign: ask the patient to grasp a piece of paper between
their thumb and forefi
nger. Alternatively, ask them to make a fi st.
The
thumb is unable to adduct and so will fl ex instead (see Fig. 10.23 ).
Radial nerve (C5–C8)
• Motor: triceps, brachioradialis, and extensors of the hand
• Sensory: a small area over the anatomical snuffbox—hard to test
Examining a lesion
• Look for wrist drop. If not obvious, ask the patient to fl
ex at the
elbow, pronate the forearm, and extend the wrist (you may need to
demonstrate). Wrist weakness will become clear. See also
Box 10.7
for testing nerve compression.
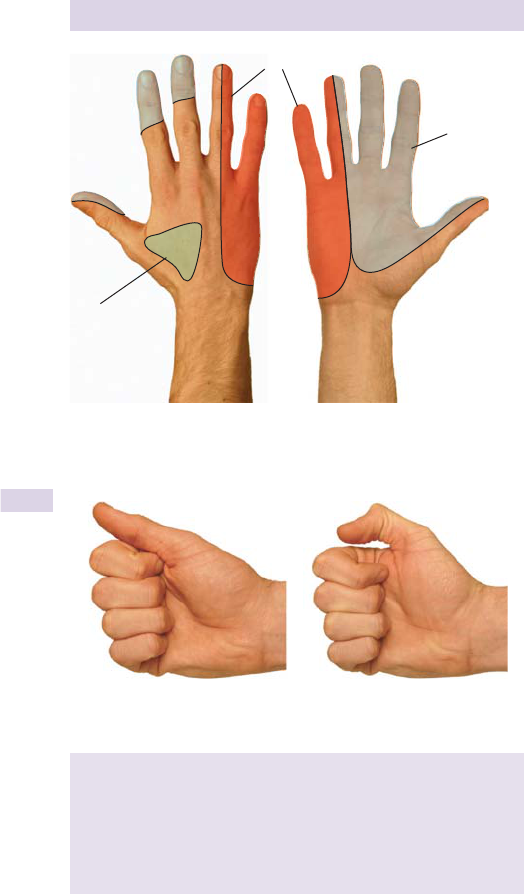
CHAPTER 10 Nervous system318
Radial
Ulnar
Median
Fig. 10.22 Sensory distribution of the major peripheral nerves in the hand. There
is considerable overlap and the small area supplied by the radial nerve may not be
detectable clinically.
(a) (b)
Fig. 10.23 Froment’s sign. (a) Normal. (b) Froment’s positive.
Box 10.7 Tinel’s sign
This is a test for nerve compression. It is commonly used at the wrist to
test for median nerve compression in carpal tunnel syndrome.
• Percuss the nerve over the site of possible compression (at the
wrist, gently tap centrally near the fl
exor palmaris tendon).
• If the nerve is compressed, the patient will experience tingling in the
distribution of the nerve on each tap.

SOME PERIPHERAL NERVES
319
Lower limb
Lateral cutaneous nerve of the thigh (L2–L3)
• Motor: none
• Sensory: lateral aspect of the thigh (see Fig. 10.24a )
Examining a lesion
There may be some sensory loss as indicated, but in practice this is very
hard to test. Although sensory loss to this nerve is rare, conditions such as
meralgia paresthetica can result in a complete or partial loss of sensation
in this nerve distribution.
Common peroneal nerve (L4–S2)
• Motor: anterior and lateral compartments of the leg
• Sensory: dorsum of the foot and anterior aspect of the leg
Examining a lesion
• Foot drop with corresponding gait (b p. 321). Weakness of foot
dorsifl exion
(
b p. 297) and eversion. Preserved inversion ( Fig. 10.24b )
• In an L5 lesion there will be a similar defi
cit but will also display a
weakness of inversion, hip abduction, and knee fl exion.
Femoral nerve (L2–L4)
• Motor: quadriceps
• Sensory: medial aspect of the thigh and leg (see Fig. 10.24d )
Examining a lesion
• Weakness of knee extension is only slightly affected—hip adduction is
preserved (b p. 356).
• Stretch: With the patient lying prone, abduct the hip, fl
ex the knee and
plantar-fl
ex the foot. The stretch test is positive if pain is felt in the
thigh/inguinal region.
Sciatic nerve (L4–S3)
• Motor: all the muscles below the knee and some hamstrings.
• Sensory: posterior thigh, ankle and foot (see Fig. 10.24c ).
Examining a lesion
• Foot drop and weak knee fl exion
(
b p. 321).
• Knee jerk refl ex
(
b p. 302) is preserved but ankle jerk and plantar
response (b p. 302) are absent.
• Stretch test: with the patient lying supine, hold the ankle and lift the
leg, straight, to 90*. Once there, dorsifl
ex the foot. If positive, pain will
be felt at the back of the thigh.
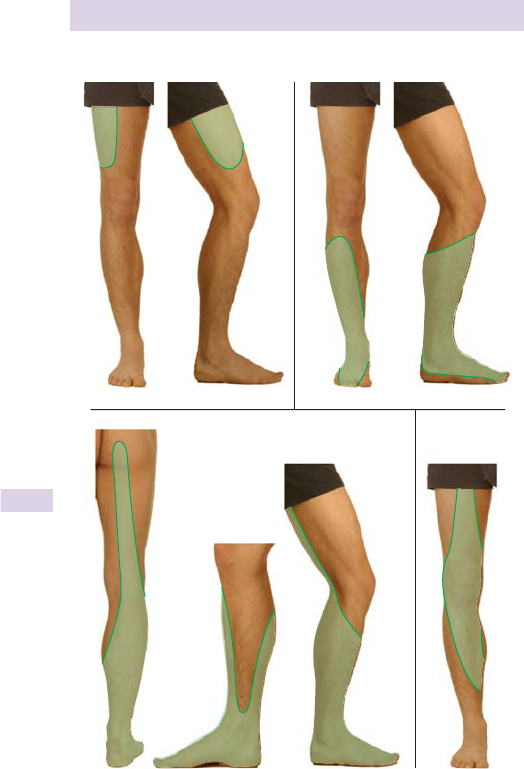
CHAPTER 10 Nervous system320
(a) (b)
(c) (d)
Fig. 10.24 Distribution of the sensory component of some lower limb nerves.
(a) Lateral cutaneous nerve of the thigh. (b) Common peroneal nerve. (c) Sciatic
nerve. (d) Femoral nerve.

GAIT
321
Gait
This is easily missed from the neurological examination. Gait is often dif-
fi cult to test in a crowded ward or cramped exam room. However, you
should try to incorporate it into your assessment.
Gait can be observed informally as the patient makes their way to the
clinic room or returns to their chair on the ward. Watch the patient stand,
and use the same opportunity for Romberg’s test ( Box 10.6 , b p. 313).
The patient may be simply lacking in confi dence, and this will be evident
later. Do not test if you suspect a severe problem with balance.
Examination
• Ask the patient to walk a few yards, turn, and walk back to you.
• Note especially the following:
•
Use of walking aids
•
Symmetry
•
Length of paces
•
Lateral distance between the feet
•
How high the feet and knees are lifted
•
Bony deformities
•
Disturbance of normal gait by abnormal movements
• You may want to consider asking the patient to
•
Walk on tiptoes (inability = S1 or gastrocnemius lesion)
•
Walk on their heels (inability = L4/L5 lesion—foot drop)
Findings
• Hemiplegia: One side will be obviously weaker than the other with
the patient tilting the pelvis to lift the weak leg, which may swing out
to the side. Gait may be unsafe without the use of walking aid.
• Scissoring: If both legs are spastic (cerebral palsy, MS), toes drag on
fl
oor, trunk sways from side to side, and legs cross over on each step.
• Parkinsonism: fl
exed posture with small, shuffl
ing steps. No or little
arm swing. Diffi culty starting, stopping, and turning. Gait seems hurried
(festinant) as legs attempt to prevent the body from falling forward.
• Cerebellar ataxia: broad-based (legs wide) gait with lumbering body
movements and variable distance between steps. The patient has
diffi
culty turning (be there to catch them).
• Sensory ataxia (loss of proprioception): The patient requires more
sensory input to be sure of leg position so lifts legs high (high-stepping)
and stamps the feet down with a wide-based gait. They may also watch
their legs as they walk. Romberg’s is positive (see Box 10.6 , b p. 313).
• Waddling (weakness of proximal lower limb muscles): The patient fails
to tilt the pelvis as normal and then rotates to compensate, also at the
shoulders. You may also see i lumbar lordosis.
• Foot drop (L4/L5 lesion, sciatic, or common peroneal nerves): Failure
to dorsifl
ex the foot leads to a high-stepping gait with i
fl exion at the
hip and knee. If bilateral, this may indicate peripheral neuropathy.
• Apraxic (usually frontal lobe pathology such as normal pressure
hydrocephalus or cerebrovascular disease): Problems with gait occur
even if all other movements are normal. The patient may appear

CHAPTER 10 Nervous system322
frozen to the spot and be unable to initiate waking. Movements are
disjointed once walking.
• Marche à petits pas (diffuse cortical dysfunction): There is upright
posture and small steps with a normal arm swing.
• Painful gait: The cause will normally be obvious from the history. The
patient limps with an asymmetrical gait due to painful movement.
• Functional (also known as hysterical): Gait problems will be variable
and inconsistent, often with bizarre and elaborate consequences.
The patient may fall without causing injury. Gait is often worse when
watched.

IMPORTANT PRESENTING PATTERNS
323
Important presenting patterns
Neck stiffness
This is caused by a number of conditions provoking painful extensor mus-
cle spasm, including bacterial and viral meningitis, subarachnoid hemor-
rhage, parkinsonism, raised intracranial pressure, cervical spondylosis,
cervical lymphadenopathy, and pharyngitis.
None of the following tests should be conducted if there is suspicion of
cervical injury or instability.
Testing stiffness
• Lay the patient fl at.
• Taking their head in your hands, gently rotate it to the sides in a “no”
movement, feeling for stiffness.
• Lift the head off the bed and watch the hips and knees—the chin
should easily touch the chest.
Brudzinski’s sign
When the head is fl exed by the examiner, the patient briefl y fl exes at the
hips and knees. This is a test for meningeal infl ammation.
Kernig’s sign
• A further test of meningeal infl ammation
• With the patient lying fl at,
fl
ex their hip and knee, holding the weight
of the leg yourself ( Fig. 10.25 ).
• With the hip fl
exed to 90
*, extend the knee joint so as to point the leg
at the ceiling.
• If positive, there will be resistance to leg-straightening (caused by
hamstring spasm as a result of infl
ammation around the lumbar spinal
roots) and pain felt at the back of the neck.
Lhermitte’s phenomenon
• A test for intrinsic lesion in the cervical cord (not meningeal irritation)
• When the neck is fl
exed as for testing stiffness, the patient feels an
electric shock–like sensation down the center of their back.
Upper motor and lower motor nerve lesions
Upper motor neuron (UMN) lesions
These are defi ned as damage above the level of the anterior horn cell—
anywhere from the spinal cord to the primary motor cortex.
• No muscle wasting (although patients will have disuse atrophy in long-
term weakness)
• iTone. Spasticity (clasp-knife) due to stretch refl ex
hypersensitivity
• The typical pattern of weakness ( Box 10.8 ) is termed pyramidal:
•
Upper limbs: weak abductors and extensors
•
Lower limbs: weak adductors and fl exors
• iTendon refl
exes and clonus. Up-going plantar response
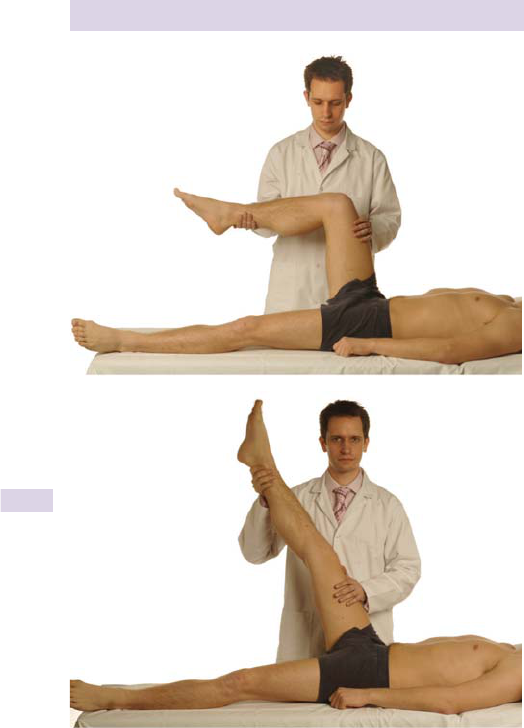
CHAPTER 10 Nervous system324
(a)
(b)
Fig. 10.25 Testing for Kernig’s sign. The patient’s leg is fl exed at the hip and
knee, then extended at the knee as above. If positive, there is resistance to knee
extension in this position and pain is felt at the back of the neck.

IMPORTANT PRESENTING PATTERNS
325
Lower motor neuron (LMN) lesions
• Muscle wasting. Fasciculation
• Diminished tone
• Flaccid weakness
• Diminished deep tendon refl
exes. Plantar response may be down-going
or absent.
Motor neuron disease (MND)
There is damage to anterior horn cells, medulla, and spinal tracts.
• UMN and LMN pattern of weakness
• Fasciculations almost always present
• Refl
exes normal or i until later in the disease
• Plantar response is up-going
• External ocular muscles almost never involved
• No sensory disturbance (distinguishing presentation from a
polyneuropathy)
Parkinsonism
This is a pattern of symptoms comprising an akinetic-rigid syndrome.
Parkinsonism has a number of causes, including drug-induced and other
intracranial pathologies. Diagnosis of Parkinson’s disease (loss of dopaminer-
gic neurons in the subtantia nigra) is often inaccurate; there is no single test.
• Triad of resting tremor, bradykinesia, and rigidity
• Face: mask-like and expressionless facies, little blinking, positive
glabellar tap refl ex
(
b p. 307)
• Gait: fl
exed posture with d arm swing. Gait is festinant
, meaning
hurried, often in small, shuffl ing steps, with feet barely lifted off the
ground. The patient is slow to start and has diffi culty stopping.
• Tone: i tone with cogwheel or lead-pipe rigidity (b p. 297).
• Tremor: pill-rolling fl
exion at the thumb and forefi
nger at 4–8 Hz
• Speech: extrapyramidal dysarthria; soft, quiet, and hesitant speech. You
may have to wait some time for the answer to a question.
• Writing: writing is small and neat—micrographia.
Abnormal movements defi ned
• Akathisia: motor restlessness with a feeling of muscle quivering and an
inability to remain in a sitting position
• Athetosis: slow, writhing involuntary movements, often with fl exion,
extension, pronation, and supination of the fi
ngers and wrists
• Blepharospasm: intermittent spasm of muscles around the eyes
• Chorea: nonrhythmical, dance-like, spasmodic movements of the limbs
or face. Movements appear pseudopurposeful (the patient often hides
Box 10.8 Some defi nitions of weakness
• Monoplegia: one limb affected
• Hemiplegia: one side of the body (left or right).
• Paraplegia: both lower limbs affected.
• Quadriplegia: all 4 limbs

CHAPTER 10 Nervous system326
the condition by turning a spasm into a voluntary movement—e.g.,
the arm suddenly lifts up and the patient pretends they were adjusting
their hair).
• Dyskinesia: repetitive, automatic movements that stop only during
sleep
• Tardive dyskinesia: dyskinetic movements, often of the face (lip-
smacking, twisting of the mouth). This is often a permanent side effect
of neuroleptic therapy.
• Dystonia: markedly i tone, often with spasms causing uncomfortable-
looking postures
• Hemiballismus: violent involuntary fl
inging movements of the limbs on
one side, like severe chorea
• Myoclonus: brief, shock-like movement of a muscle or muscle group
• Pseudoathetosis: writhing limb movements (often fi
nger or arm) much
like athetosis but caused by a loss of proprioception. The arm returns
to the normal position when the patient notices it straying.
• Myokymia: continuous quivering and rippling movements of muscles at
rest, like a bag of worms. Facial myokymia occurs especially near the
eyes.
• Tic: repetitive, active, habitual, purposeful contractions causing
stereotyped actions. It can be suppressed for brief periods, with effort.
• Titubation: rhythmical contraction of the head. There may be either
yes–yes or no–no movements.
• Tremor: repetitive, alternating movements, usually involuntary
Spinal cord lesions
As neurons in some spinal cord tracts relate to the contralateral side of
the body, others the ipsilateral side, certain types of spinal cord damage
will give predictable patterns of motor and sensory loss.
Complete section of the cord
There is loss of all modalities below the level of the lesion.
Hemisection of the cord
This is also known as Brown-Sequard syndrome.*
• Motor: below the level of the lesion, UMN pattern of weakness on
ipsilateral side
• Sensory: below the level of the lesion:
•
Contralateral loss of pain and temperature sensation
•
Ipsilateral loss of light touch, vibration sense, and proprioception
•
Light touch may remain intact, as some fi bers travel in the
spinothalamic tract.
Posterior column loss
There is loss of vibration sense and proprioception on both sides below
the level of the lesion.
* Charles Edward Brown-Sequard discovered this while studying victims of failed murder attempts
among traditional cane cutters in Mauritius.

IMPORTANT PRESENTING PATTERNS
327
Subacute combined degeneration of the cord
Posterolateral column syndrome is often due to vitamin B
12
defi ciency.
• Loss of vibration sense and proprioception on both sides below the
level of the lesion
• UMN weakness in lower limbs, absent ankle refl exes
• Also peripheral sensory neuropathy, optic atrophy, and dementia
Anterior spinal artery occlusion
• Loss of pin-prick and temperature sensation below the lesion
• Intact light-touch, vibration sense, and proprioception
Central lesions
These include syringomyelia—longitudinal cavities in the central part of
the spinal cord and brainstem.
• Loss of pain and temperature sensation over the neck, shoulders, and
arms in a ‘cape’ distribution.
• Intact vibration sense, proprioception, and light touch.
• Atrophy and arefl
exia in the arms.
• UMN weakness in the lower limbs.
• Look also for scoliosis due to weakness of paravertebral muscles.
Cerebellar lesions
Signs are ipsilateral to the lesion and may include the following:
• Nystagmus (b p. 276)
• Speech is staccato, scanning (b p. 260).
• Diminished tone, drift and tremor in limbs (upper especially, p. 256)
• Finger–nose testing (b p. 315) may reveal intention tremor and past-
pointing.
• Dysdiadokokinesis (b p. 315)
• Rebound (b p. 316)
• Pendular jerks—best seen in knee. Test tendon refl
ex at knee
as normal. If pendular, the extensor response will continue to
several beats.
• Poor sitting balance
• Ataxic gait
Disturbance of higher functions
This includes a selection of testable consequences of cortical lesions.
Parietal lobe
• Sensory and visual inattention (b p. 312 and b p. 265).
• Visual fi eld defects (b p. 264).
• Gerstmann’s syndrome: right–left dissociation, fi
nger agnosia, dysgraphia
(writing defect), dyscalculia (test with serial 7s; instruct the patient to count
backwards from 100 in increments of seven. For instance 100, 93, 86 ect.).
Agnosias (lack of sensory perceptual abilities)
• Hemi-neglect —patient ignores one side of their body
• Asomatagnosia —patient fails to recognize own body part
• Anosagnosia —patient is unaware of neurological defi cits
• Finger agnosia —patient is unable to show you different fi ngers
when
requested (e.g., “show me your index fi nger”)

CHAPTER 10 Nervous system328
• Astereognosis —inability to recognize an object by touch alone
• Agraphaesthesia —inability to recognize letters or numbers when
traced on the back of the hand
• Prosopagnosia —inability to recognize faces (test with faces of family
members or famous faces from a nearby magazine)
Apraxias (inability to perform movements or use objects correctly)
• Ideational apraxia —unable to perform task but understands what is
required
• Ideomotor apraxia —performs task but makes mistakes (e.g., puts tea
into kettle and pours milk into cup)
• Dressing apraxia —inability to dress correctly (test with a dressing
gown). This is one of a number of apraxias named after the action
tested.
Temporal lobe
• Memory loss—confabulation (invented stories and details)
Frontal lobe
• Primitive refl exes
• Concrete thinking (unable to explain proverbs—e.g., ask to explain
what “a bird in the hand is worth two in the bush” means)
• Loss of smell sensation
• Gait apraxia (b p. 321)
Myopathies
Muscle disease causes a weakness similar to that of LMN lesions with
no sensory loss. Tendon refl exes are reduced or absent. The causes and
types are numerous.
Myotonias
These are characterized by continued, involuntary muscle contraction
after voluntary effort has ceased.
Myotonic dystrophy
This is a defect of skeletal muscle Cl
–
channels caused by a trinucleotide
repeat, usually. It becomes evident at age 20–50.
• Distal limb weakness
• Weak sternomastoids (evident by weakness of neck fl exion
with
normal power on neck extension)
• Weak facial muscles (expressionless face)
• Test by shaking the patient’s hand—they may be unable to let go.
• It is also associated with frontal baldness, cataracts (look for thick
glasses), mild intellectual impairment, cardiomyopathy, hypogonadism,
and glucose intolerance.
Percussion myotonia
• Tap the patient’s thenar eminence. This will cause contraction and very
slow relaxation of abductor pollicis brevis.
Myaesthenia gravis
This is an autoimmune disease with antibodies against acetylcholine
receptors.

IMPORTANT PRESENTING PATTERNS
329
• Complex palsies, including extraocular muscles. Weakness is proximal
and often includes the eyelids (ptosis) and muscles of mastication.
• Weakness increases with use. Patients report i severity of symptoms
at the end of the day.
• In the early stages, patients will feel tired as they expend extra energy
in performing routine tasks. Friends may notice ptosis (see Fig. 10.25 ).
Test for fatiguability:
• Ask the patient to look to the ceiling and hold the position. Watch for
ptosis.
• Ask the patient to hold their arms above their head, or out to the
sides—watch for i weakness.
Some characteristic headaches summarized
Tension headache
• Bilateral—frontal, temporal
• Sensation of tightness radiating to neck and shoulders
• Can last for days
• No associated symptoms
Subarachnoid hemorrhage
• Sudden, dramatic onset like being hit with a brick
• Occipital initially—may become generalized
• Associated with neck stiffness and sometimes photophobia
Sinusitis
• Frontal, felt behind the eyes or over the cheeks
• Ethmoid sinusitis is felt deep behind the nose.
• Overlying skin may be tender.
• Worse on bending forward
• Lasts 1–2 weeks. Associated with coryza
Temporal (giant cell) arteritis
• Diffuse, spreading from the temple—unilateral
• Tender overlying temporal artery (painful brushing hair)
• Jaw claudication while eating
• Blurred vision—can lead to loss of vision if severe and untreated
Meningitis
• Generalized
• Associated with neck stiffness and signs of meningism (b p. 323)
• Nausea, vomiting, photophobia
• Purpuric rash is caused by septicemia, not meningitis per se.
Cluster headache
• Rapid onset, usually felt over one eye
• Associated with a bloodshot, watering eye and facial fl ushing
• May also have rhinorrhea (runny nose)
• Last for a few weeks at a time
Raised intracranial pressure
• Generalized headache, worse when lying down, straining, coughing, on
exertion or in the morning

CHAPTER 10 Nervous system330
* Hence the name. Migraine is a shortened version of hemicranium (say the second and third
syllables out loud), meaning “half the head.”
• Headache may wake the patient in the early hours.
• It may be associated with drowsiness, vomiting, and focal neurology.
Migraine
• Unilateral—rarely crosses the midline*
• Throbbing and pounding headache
• Associated with photophobia, nausea, vomiting, and neck stiffness
• May have preceding aura

THE UNCONSCIOUS PATIENT
331
The unconscious patient
History
• Is there an eyewitness account? State of clothing—loss of continence?
• Look for alert necklace or bracelet. Look in patient’s wallet or purse.
Examination
ABC (Airway, Breathing, Circulation)
• Is the airway patent? Should the patient be in the recovery position?
• Measure the respiratory rate, note pattern of breathing. Is O
2
needed?
• Is there cyanosis? Feel the pulse. Listen to the chest. Measure heart
rate and blood pressure (BP).
Skin
• Look for injury, petechial hemorrhage, and evidence of intravenous
(IV) drug use.
Movements and posture
• Watch! Is the patient still or moving? Are all four limbs moving equally?
• Are there any abnormal movements—fi
tting, myoclonic jerks?
• Test tone and compare both sides.
• Squeeze the nail bed to test the response to pain (all four limbs).
• Test tendon refl
exes and plantar response.
• Decorticate posture (lesion above the brainstem): fl
exion and internal
rotation of the arms, extension of the lower limbs
• Decerebrate posture (lesion in the midbrain): extension at the elbow,
pronation of the forearm, and extension at the wrist. Lower limbs are
extended.
Consciousness
• Attempt to wake the patient by sound. Ask them their name. If
responsive, are they able to articulate appropriately? Note the best
response. Be aware of possible dysphasia or aphasia that may cause an
inappropriate response in an otherwise alert individual.
•
Score level of consciousness according to GCS ( Box 10.9 ).
Neck
• Do not examine the neck if there may have been trauma. Test for
meningeal irritation (b p. 323)—these signs d as coma deepens.
Head
• Inspect for signs of trauma and facial weakness. Test pain sense.
•
Battle’s sign: bruising behind the ear = a base of skull fracture.
Ears and nose
• Look for CSF leakage or bleeding. Test any clear fl uid for glucose
(positive result = CSF). Inspect eardrums.
Tongue and mouth
• Look for cuts on the tongue (seizures) and corrosive material around
the mouth. Smell breath for alcohol or ketosis. Test the gag refl
ex; it is
absent in brainstem disease or deep coma.

CHAPTER 10 Nervous system332
Eyes
• Pupils: measure size in mm. Are they equal (b p. 273)? Test direct
and consensual light responses. Pupils
i with atropine, tricyclic
antidepressants, and amphetamine; d with morphine and metabolic coma.
• Test corneal refl ex.
• Fundi: look especially for papilledema and retinopathy.
• Doll’s head maneuver: take the patient’s head in your hands and turn
it from side to side. The eyes should move to stay fi
xed on an object;
this indicates an intact brainstem.
Box 10.9 Glasgow Coma Scale (GCS)
This is an objective score of consciousness. Repeated testing is useful for
judging whether coma is deepening or lifting. There are three categories.
Note that the lowest score in each category is 1, meaning that the low-
est possible GCS = 3 (even if the patient is dead).
Eye opening (max 4 points)
Spontaneously open 4
Open to (any) verbal stimulus 3
Open in response to painful stimulus 2
No eye opening at all 1
Best verbal response (max 5 points)
Conversing and orientated (normal) 5
Conversing but disorientated and confused 4
Inappropriate words (random words, no conversation) 3
Incomprehensible sounds (moaning, etc.) 2
No speech at all 1
Best motor response (max 6 points)
Obeying commands (e.g., “raise your hand”) 6
Localizing to pain (moves hand toward site of stimulus) 5
Withdraws to pain (pulls hand away from stimulus) 4
Abnormal fl exion to pain (decorticate posturing) 3
Abnormal extension to pain (decerebrate posturing) 2
No response at all 1
Box 10.10 AVPU
This is a more simplifi ed score used in rapid assessment of conscious-
ness and by nonspecialist nurses in monitoring consciousness level.
A = Alert
V = responds to Voice
P = responds to Pain
U = Unresponsive

THE UNCONSCIOUS PATIENT
333
Rest of the body
• Brief but thorough exam. Look especially for trauma, fractures, signs of
liver disease (b p. 246), and added heart sounds.
Other bedside tests
• Test urine, capillary glucose, and temperature.

CHAPTER 10 Nervous system334
The elderly patient
Diagnosing and managing neurological illness can be complex; the combi-
nation of cognitive failure and the effects of an aging neurological system
can present additional signifi cant challenges for clinicians.
Presentations of neurological disease are varied, and the range of diag-
noses diverse. Epilepsy, Parkinsonism, and dementia are all common prob-
lems in older age, so resist the temptation to restrict your diagnoses to
stroke or TIA.
History
Witness histories
These are vital. Many patients may attend with vague symptoms that may
be underplayed. Partial complex seizures may be very diffi cult to diagnose,
so pursue witness histories from families, neighbors, and home care staff,
etc. Inquire not just about the present incident but also prior function and
any decline.
Drug history
Falls are a common presentation and often multifactorial. Always remem-
ber to ask about any drugs that may lower blood pressure, even if the
primary cause of the fall is due to neurological disease.
Intercurrent illness
This may precipitate further seizures or make pre-existing neurological
signs seem worse. Don’t rush to diagnose a worsening of the original
problem—careful assessment pays dividends.
Cognition and mood disorders
These often complicate presentations. Look for clues in the history, and
ask witnesses.
Functional history
This is a key part of the neurological history. The disease itself may be
incurable—functional problems often are not.
Examination
Observe
Nonverbal clues may point to mood or cognitive disorders. Handshakes
and facial expressions are an important part of the examination
Think
Think about patterns of illness and attempt to identify if there are single
or multiple lesions. There may often be more than one diagnosis—e.g.,
cerebrovascular disease and peripheral neuropathy due to diabetes.
Assess cognition
Use a scale that you are comfortable with, such as the Abbreviated Mental
Test Score (AMTS, b p. 262; Mini-Mental State Examination [MMSE], but
remember, no half marks!

THE ELDERLY PATIENT
335
Gait
Even simple observation of a patient’s walking can reap rewards. Always
include it in your examination where practicable and note why, if unable.
Therapy colleagues
Sharing observations is a useful practice. Therapists are a huge source of
knowledge and experience, so seek them out to learn from them.
Additional points
Communicating diagnoses
Many diagnoses—e.g., dementia and motor neuron disease—can be dev-
astating, so be thoughtful in your approach. Clarify what the patient knows
and what has already been said. Learn fi rst from your senior colleagues
how to explain the diagnosis and, more importantly, talk about its impact.
It is also vital to reassure patients—many with benign essential tremors
are terrifi ed that they may have Parkinson’s disease
Managing uncertainty
Many diagnoses are not clear, especially in the early stages of diseases. Try
to resist labeling your patients when a diagnosis is unclear; be open about
uncertainty—patients often cope with it better than their doctors.
This page intentionally left blank

337
Musculoskeletal system
Applied anatomy and physiology 338
Important locomotor musculoskeletal symptoms 340
The rest of the history 344
The outline examination 346
GALS screen 347
Elbow 349
Shoulder 351
Spine 354
Hip 356
Knee 358
Ankle and foot 363
Important presenting patterns 365
The elderly patient 373
Chapter 11
The hand examination is described in Chapter 3, b p. 62

CHAPTER 11 Musculoskeletal system338
Applied anatomy and physiology
The joint
A joint (articulation) is a connection or point of contact between bones or
between bone and cartilage.
Joints are classifi ed according to the type of material uniting the articu-
lating bones as well as the degree of movement they allow. There are
three types:
• Fibrous joints: held together by fi
brous (collagenous) connective
tissue and are fi
xed or immoveable. They do not have a joint cavity.
Examples include the connections of the skull bones.
• Cartilagenous joints: held together by cartilage, are slightly moveable
and have no cavity. An example is the vertebral joints.
• Synovial joints: covered by cartilage with a synovial membrane
enclosing a joint cavity. These joints are freely moveable and the most
common type of joint functionally, being typical of nearly all joints of
the limbs.
Synovial joints
Articular cartilage covers the surface of the bones and d friction at the
joint and facilitates shock absorption. A sleeve-like bag (fi brous capsule
lined with a synovial membrane) surrounds the synovial joint ( Fig. 11.1 ).
The inner synovial membrane secretes synovial fl uid, which has a
number of functions, including lubrication and supply of nutrients to the
cartilage. The fl uid contains phagocytic cells that remove microbes and
debris within the joint cavity.
Synovial joints are usually supported by accessory ligaments and muscle.
There are different types of synovial joints. Some of the more important
types are as follows:
Bone
Capsule
Synovium
Joint space
(synovial fluid)
Bone
Hyaline
articular
cartilage
Fig. 11.1 Diagram of cross-section through a typical synovial joint.

APPLIED ANATOMY AND PHYSIOLOGY
339
• Hinge: movement occurs primarily in a single plane (e.g., elbow, knee,
and interphalangeal joints) (see Box 11.1 ).
• Ball and socket: allows movement around three axes (fl exion/extension,
abduction/adduction, and rotation). Examples are the shoulder and hip.
• Pivot: a ring of bone and ligament surrounds the surface of the other
bone, allowing rotation only (e.g., atlantoaxial joint at C1 and C2
vertebrae and the connection between the radius and ulna).
• Gliding: fl
at bone surfaces allow side-to-side and backward and
forward movements (e.g., between carpals, tarsals, sternum and
clavicle and the scapula and clavicle).
• Saddle: similar to a hinge joint but with a degree of movement in a
second plane (e.g., base of thumb).
Box 11.1 Some movements at synovial joints
Angular movements
• Flexion: a decrease in angle between the articulating bones
(e.g., bending the elbow = elbow fl exion)
• Extension: an increase in angle between the articulating bones
(e.g., straightening the elbow = elbow extension)
• Abduction: movement of a bone away from the midline (e.g., moving
the arm out to the side = shoulder abduction)
• Adduction: movement of a bone toward the midline (e.g., bringing the
arm in to the side of the body = shoulder adduction)
Rotation
This involves movement of a bone about its longitudinal axis.
• Internal or medial rotation: rotating a bone toward the
midline (e.g., turning the lower limb such that the toes point
inward = internal rotation at the hip)
• External or lateral rotation: rotating a bone away from the
midline (e.g., turning the lower limb such that the toes point
outward = external rotation at the hip)
Special movements
These occur at specifi
c joints only.
• Pronation: moving the forearm as if turning a doorknob
counterclockwise (internal rotation of the forearm in anatomical
position)
• Supination: moving the forearm as if turning a doorknob clockwise
(external rotation of the forearm in anatomical position)
• Dorsifl
exion: moving the ankle to bring the dorsum of the foot
toward the tibia
• Plantar fl
exion: moving the ankle to bring the plantar surface in line
with the tibia (e.g., pointing toes or depressing a pedal)
• Inversion: tilting soles of the feet inward to face each other
• Eversion: tilting soles of the feet outward away from each other
• Protraction: moving the mandible forward
• Retraction: moving the mandible backward.

CHAPTER 11 Musculoskeletal system340
Important locomotor musculoskeletal
symptoms
As with any system, but especially the musculoskeletal system, a carefully
and accurately compiled history can be very informative and may point to
a diagnosis even before examination or laboratory tests.
Pain
Pain is the most common symptom with problems of the musculoskeletal
system and should be approached in the same way as any other type of
pain (b p. 33). Determine its character, nature of onset, site, radiation,
severity, periodicity, exacerbating and relieving factors (particularly how it
is infl uenced by rest and activity), and diurnal variation.
• Pain in a joint is called arthralgia .
• Pain in a muscle is called myalgia .
Character
• Bone pain is typically experienced as boring and penetrating and
is often worse at night. Causes include tumor, chronic infection,
avascular necrosis, and osteoid osteoma.
• Pain associated with a fracture is usually sharp and stabbing and is
often exacerbated by movement.
• Shooting pain is suggestive of nerve entrapment (e.g., disc protrusion).
Onset
• Acute onset of pain is often a manifestation of infection, such as septic
arthritis or crystal arthropathies (e.g., gout).
• Osteoarthritis and rheumatoid arthritis (RA) can cause chronic pain.
Site
Determine the exact site of maximal pain, if possible, and any associated
lesser pains. Remember that the site of pain is not necessarily the site of
pathology; often pain is referred. Referred pain is due to the inability of the
cerebral cortex to distinguish between sensory messages from embryo-
logically related sites. See Boxes 11.2 and 11.3.
Box 11.2 Some causes of knee arthralgia
Chondromalacia patellae
This is from softening of the patellar articular cartilage and is felt as a
patellar ache after prolonged sitting. It is usually seen in young people.
Osteochondritis dissecans
This is usually associated with trauma resulting in osteochondral fracture
that forms a loose body in the joint, with underlying necrosis.
Osgood–Schlatter’s disease
This arises as a result of a traction injury of the tibial epiphysis, which is
classically associated with a lump over the tibia.

IMPORTANT LOCOMOTOR MUSCULOSKELETAL SYMPTOMS
341
Box 11.3 Some causes of arthralgia in adults
Knee
• Osteoarthritis
• Referred from the hip
• Chondromalacia patellae
• Trauma
• Osteochondritis dissecans
• Bursitis
• Tendonitis
• Osgood–Schlatter’s disease
• Rheumatoid arthritis
• Infection
• Malignancy
Hip
• Osteoarthritis
• Referred pain—e.g., from a lumber spine abnormality
• Trauma
• Rheumatoid arthritis
• Infection
• Hernia
• Tendonitis
• Bursitis
Shoulder
• Rotator cuff disorders (e.g., tendonitis, rupture,
adhesivecapsulitis or frozen shoulder)
• Referred pain—e.g., cervical, mediastinal, cardiac
• Arthritis—glenohumeral, acromioclavicular
Elbow
• Lateral epicondylitis (tennis elbow)
• Medial epicondylitis (golfer’s elbow)
• Olecranon bursitis
• Referred pain from neck or shoulder (e.g., cervical spondylosis)
• Osteoarthritis
• Rheumatoid arthritis
Mechanical or degenerative back pain
• Arthritis
• Trauma
• Disc prolapse
• Osteoporosis
• Infection
• Ankylosing spondylitis
• Spondylolisthesis
• Lumbar spinal or lateral recess stenosis
• Spinal tumors—especially metastases from the lung,
breast, prostate, thyroid, and kidney
• Metabolic bone disease

CHAPTER 11 Musculoskeletal system342
Stiffness
This is a subjective symptom that must be explored in detail to establish
exactly what the patient means.
Stiffness is the inability to move the joints after a period of rest. It may
be due to mechanical dysfunction, local infl ammation of a joint, or a com-
bination of both.
2 If stiffness predominates over pain, consider spasticity or tetany. Look
for hypertonia and other upper motor neuron signs (b p. 297).
Ask the patient the following:
• When is the stiffness worst?
•
Early-morning stiffness is seen in infl ammatory conditions (e.g.,
rheumatoid arthritis), whereas mechanical joint disease will become
worse as the day progresses.
• Which joints are involved? Or is the stiffness generalized?
•
A generalized stiffness may be seen in rheumatoid arthritis and
ankylosing spondylitis.
• How long does it take the patient to get going in the morning?
• How is the stiffness related to rest and activity?
•
Mechanical joint diseases will be exacerbated by prolonged activity.
Locking
This is the sudden inability to complete a certain movement and suggests
a mechanical block or obstruction, usually caused by a loose body or torn
cartilage within the joint (often secondary to trauma).
Swelling
Joint swelling can be due to a variety of factors, including infl ammation of
the synovial lining, an increase in volume of synovial fl uid, hypertrophy of
bone, or swelling of structures surrounding the joint.
This symptom is particularly signifi cant in the presence of joint pain and
stiffness. Establish the following:
• Which joints are affected (small or large)?
• Is the distribution symmetrical or not?
• What was the nature of onset of the swelling?
•
Rapid onset: hematoma or hemarthrosis (exacerbated by
anticoagulants or any underlying bleeding disorder)
•
Slow onset is suggestive of a joint effusion.
• Are the joints always swollen or does it come and go (and when)?
• Is there any associated pain?
• Do the joints feel hot to touch?
• Is there erythema? (This is common in infective, traumatic, and crystal
arthropathies.)
• Have the joints in question sustained any injuries?
Deformity
Establish the following:
• Time frame over which the deformity has developed
• Any associated symptoms, such as pain and swelling
• Any resultant loss of function? (What is the patient now unable to do
with the joint in question?)

IMPORTANT LOCOMOTOR MUSCULOSKELETAL SYMPTOMS
343
Acute deformity may arise with a fracture or dislocation. Chronic deformi ty
is more typical of bone malalignment and may be partial/ subluxed or
complete/dislocated. Some common deformities are discussed later in
this chapter (see also Box 11.4 ).
Weakness
Always inquire about the presence of localized or generalized weakness,
which suggests a peripheral nerve lesion or systemic cause, respectively.
Consider that the weakness may be neurogenic or myopathic in origin.
Sensory disturbance
Ask about the exact distribution of any numbness or paraesthesia and
document any exacerbating and relieving factors.
Loss of function
Loss of function is the inability to perform an action (disability) and is distin-
guished from the term handicap , which is the social and functional result
or impact that disability has on the individual’s life.
Loss of function can be caused by a combination of muscle weakness,
pain, mechanical factors, and damage to the nerve supply.
The questions you ask will depend partly on the patient’s occupation. It
is also essential to gain some insight into the patient’s mobility: Can they
use stairs? How do they cope with personal care such as feeding, washing
and dressing? Can they manage shopping and cooking?
Extra-articular features
Several musculoskeletal disorders (e.g., rheumatoid arthritis) cause extra-
articular or multisystem features, some of which are outlined below:
• Systemic symptoms: fever, weight loss, fatigue, lethargy
• Skin rash
• Raynaud’s phenomenon
• Gastrointestinal (e.g., diarrhea and resultant reactive arthritis or
enteropathic arthritis secondary to infl
ammatory bowel disease)
• Urethritis (Reiter’s syndrome)
• Eye symptoms
• Cardiorespiratory: breathlessness (pulmonary fi
brosis?), pericardial and
pleuritic chest pain, aortic regurgitation, and spondyloarthropathies.
• Neurological: nerve entrapment, migraine, depression, stroke
Box 11.4 Some terminology of joint deformity
Valgus
The bone or part of limb distal to the joint is deviated laterally. For
example, a valgus deformity at the knees would give “knock knees” that
tend to meet in the middle, despite the feet being apart.
Varus
Here, the bone or part of limb distal to the joint is deviated medially.
For example, a varus deformity at the knees would give “bow legs” with
a gap between the knees, even if the feet are together.

CHAPTER 11 Musculoskeletal system344
The rest of the history
Past medical history
Ask about all previous medical and surgical disorders and inquire specifi -
cally about any previous history of trauma or musculoskeletal disease.
Family history
It is important to note any FH of illness, especially those musculoskeletal
conditions with a heritable element:
• Osteoarthritis
• Rheumatoid arthritis
• Osteoporosis
Note that the seronegative spondyloarthropathies (e.g., ankylosing spond-
ylosis) are more prevalent in patients with the HLA B27 haplotype.
Drug history
Take a full drug history, including all prescribed and over-the-counter
medications. Assess the effi cacy of each treatment, past and present.
Ask about side effects of any drugs taken for musculoskeletal disease:
• Gastric upset associated with nonsteroidal anti-infl ammatory
drugs
(NSAIDs)
• Long-term side effects of steroid therapy, such as osteoporosis,
myopathy, infections, and avascular necrosis
Ask also about medication with known adverse musculoskeletal effects:
• Statins: myalgia, myosistis, and myopathy
• ACE inhibitors: myalgia
• Anticonvulsants: osteomalacia
• Quinolone: tendinopathy
• Diuretics, aspirin, alcohol: gout
• Procainamide, hydralazine, isoniazid: systemic lupus erythematosus
(SLE)
2 Bear in mind that illicit drugs may increase the risk of developing infec-
tious diseases, such as TB, HIV, and hepatitis, all of which can cause mus-
culoskeletal complaints.
Smoking and alcohol
As always, full smoking and alcohol histories should be taken (b p. 37
and 38).
Social history
This should form a natural extension of the functional inquiry and include a
record of the patient’s occupation if not already noted and ethnicity.
• Certain occupations predispose to specifi c
musculoskeletal
problems—e.g., repetitive strain injury, hand-vibration syndrome, and
fatigue fractures seen sometimes in dancers and athletes.
• Ethnicity is relevant, as there is an overrepresentation of lupus and TB
in Asian populations. Both of these disorders are linked to a variety of
musculoskeletal complaints.

THE REST OF THE HISTORY
345
• If the patient is an older person, make a note about the activities of
daily living (ADL), how mobile the patient is, and if there are any home
adaptations, such as a chair lift or railings.
• Remember to ask about home care or other supports.
• Where appropriate, take a sexual history. This is important because
reactive arthritis or Reiter’s syndrome may be caused by sexually
transmitted diseases, such as chlamydia and gonorrhea.

CHAPTER 11 Musculoskeletal system346
The outline examination
A full examination of the entire musculoskeletal system can be long and
complicated (but see Box 11.5 for framework). In this chapter, we have
broken down the examination into the following joints and regions: elbow,
shoulder, spine, hip, knee, ankle, and foot.
2 The hand examination is discussed in Chapter 3, b p. 62.
Box 11.5 Examination framework
Examination of each joint should follow the standard format:
• Look
• Feel
• Move*
•
Passive
•
Active
• Measure
• Special tests
• Function
2 In a thorough locomotor examination, examine the joints above and
below the symptomatic one. For example, for an elbow complaint, also
examine the shoulder and wrist.
* Limitation of active movement refl ects underlying pathology of the tendons and muscle sur-
rounding the joint, but limitation of both active and passive movement suggests an intrinsic
joint problem.

GALS SCREEN
347
GALS screen
The overall integrity of the musculoskeletal system can be screened very
quickly by using the GALS method of assessment.
You may use this method to make a quick, screening examination of the
whole musculoskeletal system in order to identify the joints or regions
that need to be examined in more detail (see also Box 11.6 ).
The GALS screen consists of four components:
• G = gait
• A = arms
• L = legs
• S = spine
Box 11.6 Modifi ed GALS screen
The GALS screen was originally devised as a quick screen for abnormal-
ity without symptoms. Our slightly modifi ed version follows:
Gait
• Watch the patient walk.
•
There should be symmetry and smoothness of movement and arm
swing with no pelvic tilt and with normal stride length. The patient
should be able to start, stop, and turn quickly.
Arms (sitting on couch)
• Inspection: Look for muscle wasting and joint deformity at the
shoulders, elbows, wrists, and fi
ngers. Squeeze across the second to
fi
fth metacarpals—there should be no tenderness.
• Shoulder abduction: Ask the patient to raise their arms out sideways,
above their head. Normal range is 170–180°.
• Shoulder external rotation: Ask the patient to touch their back
between their shoulder blades.
• Shoulder internal rotation: Ask the patient to touch the small of their
back. They should touch above T10.
• Elbow extension: Ask patient to straighten out arms. Normal is 0*.
• Wrist and fi
nger extension: the prayer sign (b p. 65).
• Wrist fl exion and fi nger extension: reverse prayer sign (b p. 65).
• Power grip: Ask patient to make a tight fi
st, hiding fi ngernails.
• Precision grip: Ask patient to put their fi ngertips on their thumb.
Legs (lying on couch)
• Inspection: Look for swelling or deformity at the knee, ankle, and
foot, as well as quadriceps muscle wasting. Squeeze across the
metatarsals—there should be no tenderness.
• Hip and knee fl
exion: Test passively and actively. Normal hipfl exion is
120*, normal knee fl exion is 135*.
• Hip internal rotation: Normal is 90* at 45* fl exion.
See b
p. 356.
• Knee: bulge test (b p. 358) and patellar tap (b p. 358)
• Ankle: Test dorsifl
exion (normal 15
*) and planarfl exion (normal 55*).

CHAPTER 11 Musculoskeletal system348
Spine (standing)
• Inspection from behind: Look for scoliosis, muscle bulk at the
paraspinals, shoulders, and gluteals, and level iliac crests.
• Inspection from the side: Look for normal thoracic kyphosis and
lumbar and cervical lordosis.
• Tenderness: Feel over the mid-supraspinatus—there should be no
tenderness.
• Lumbar fl
exion: Ask patient to touch their toes. Normal is fi nger-
fl
oor distance <15 cm. Lumbar expansion (Schober’s test b p. 355)
• Cervical lateral fl
exion: Ask the patient to put their ear on their
shoulder.
Republished with permission from Doherty et al. (1992). Ann Rheum Dis 51:1165–1169.
Box 11.6 (Contd.)

ELBOW
349
Elbow
Look
Look around the bed for any mobility aids or other clues. Ask the patient
to stand. Make sure both upper limbs are exposed and look at the patient
from top to toe.
Inspect the elbow joint from the front, side, and behind, noting:
• Malalignment of the bones
• Scars
• Skin change (e.g., psoriatic plaques)
• Skin or subcutaneous nodules
• Deformities
•
Varus (cubitus varus) can be caused by a supracondylar fracture.
•
Valgus (cubitus valgus) can be caused by nonunion of a lateral
condylar fracture.
• Muscle wasting
• Swelling
Feel
2 Always ask about pain before getting started.
Palpate the joint posteriorly and feel for the following:
• Temperature
• Subcutaneous nodules
• Swelling
•
Soft swelling may be due to olecranon bursitis.
•
Hard swelling suggests a bony deformity.
•
Boggy swelling suggests synovial thickening (e.g., secondary to RA).
• If fl uid is present, attempt to displace it on either side of the
olecranon.
• Carefully palpate the joint margin for tenderness and note if it is
localized to the medial epicondyle (golfer’s elbow) or the lateral
epicondyle (tennis elbow).
Move
0 Check that there is good shoulder function before attempting to assess
elbow movements.
2 Remember to test passive movements (you do the moving) and active
movements (the patient does the moving) at each stage.
• Ask the patient to place their arms on the back of their head.
• Next assess elbow fl
exion and extension with the upper arm fi xed.
•
Remember to compare with the opposite side.
• With the elbows tucked into the sides and fl exed to a right angle, test
the radioulnar joints for pronation (palms toward fl
oor) and supination
(palms toward the sky) ( Fig. 11.2 ).
Measure
Measure elbow fl exion and extension in degrees from the neutral position
(i.e., consider a straight elbow joint to be 0*).
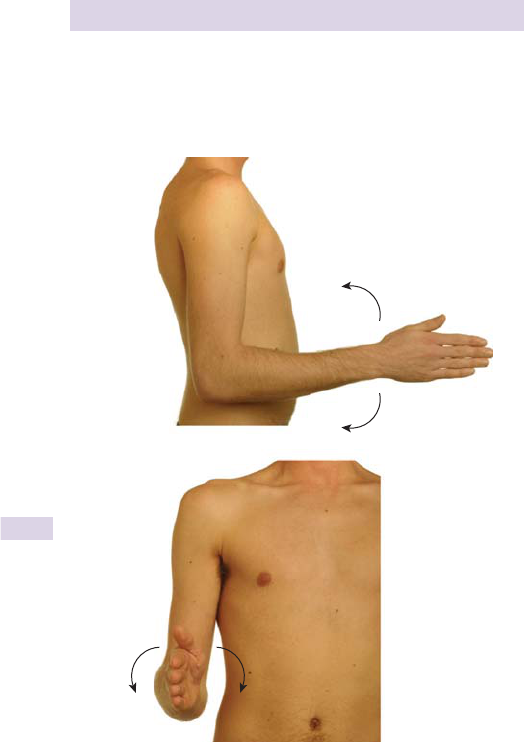
CHAPTER 11 Musculoskeletal system350
Function
Observe the patient pouring a glass of water and then putting on a
jacket.
Flexion
Extension
Supination Pronation
Fig. 11.2 Movements at the elbow joint. (a) Flexion and extension. (b) Pronation
and supination (remember that pronation and supination require movement at the
elbow as well as at the wrist).

SHOULDER
351
Shoulder
Look
Look for any aids or adaptations. Ask the patient to remove any covering
clothing and have them expose the upper limbs, neck, and chest. Scan the
patient from top to toe. Inspect from the front, side, and behind.
Look especially for the following:
• Contours
•
Make note of any obvious asymmetry or deformity, such as winging
of the scapula, prominence of the acromioclavicular joint, and
wasting of the deltoid or short rotators that overlie the upper and
lower segments of the scapula.
• Joint swelling
•
This is more obvious from the front and may be a clue to acute
bleeds, rheumatoid effusions, pseudogout, or sepsis.
• Scars
• Bruising or other skin or subcutaneous tissue changes
• Position of both shoulders, looking for evidence of dislocation
•
Posterior dislocation can be seen when the arm is held in
aninternally rotated position.
•
Anterior dislocation can be seen easily when the arm is displaced in
a forward and downward position.
2 Remember to inspect the axillary regions.
Feel
2 Always ask about pain before getting started.
Make note of any temperature changes, tenderness, or crepitus. Standing
in front of the patient:
• Palpate the soft tissues and bony points in the following
order:sternoclavicular joint, clavicle, acromioclavicular joint, acromial
process, head of humerus, coracoid process, spine of scapula, greater
tuberosity of humerus.
• Check the interscapular area for pain.
• Palpate the supraclavicular area for lymphadenopathy.
Move
2 Remember to test passive movements (you do the moving) and active
movements (the patient does the moving) at each stage. Quantify any
movement in degrees (measure) .
0 To test true glenohumeral movement, anchor the scapula by pressing
fi rmly down on the top of the shoulder. After about 70* of abduction, the
scapula rotates on the thorax—movement is scapulothoracic.
• Flexion: Ask the patient to raise their arms forward above their head.
• Extension: Straighten the arms backward as far as possible.
• Abduction: Move the arm away from the side of the body until the
fi
ngertips are pointing to the ceiling.
• Adduction: Ask the patient to move the arm inward toward the
opposite side, across the trunk.

CHAPTER 11 Musculoskeletal system352
• External rotation: With the elbows held close to the body and fl exed
to 90*, ask the patient to move the forearms apart in an arc-like
motion, to separate the hands as widely as possible.
• Internal rotation: Ask the patient to bring the hands together again
across the body. (Loss of rotation suggests a capsulitis.)
• Compound movements: These types of movements may be employed
as screening tests to assess shoulder dysfunction, taking the place of a
fuller examination if no abnormalities are detected. See Fig. 11.3.
•
Ask the patient to put both hands behind their head
(externalrotation in abduction).
•
Ask the patient to reach up their back with the fi ngers to touch a
spot between their shoulder blades (internal rotation in adduction).
Special tests
Testing for a rotator cuff lesion or tendonitis: the painful arc
Ask the patient to abduct the shoulder against light resistance.
Pain in early abduction suggests a rotator cuff lesion and usually occurs
between 40* and 120*. This is due to a damaged and infl amed supraspina-
tus tendon being compressed against the acromial arch.
Testing for acromioclavicular arthritis
If there is pain during a high arc of movement (starting around 90*) and the
patient is unable to raise their arm straight up above their head to 180*,
even passively, this suggests acromioclavicular arthritis.
Function
Ask the patient to scratch the center of their back or to put on a jacket.
(a) (b)
Fig. 11.3 Compound movements. (a) External rotation and abduction.
(b) Internal rotation and adduction

SHOULDER
353
Box 11.7 A word about winging of the scapula
This is due to weakness of the serratus anterior, from damage to the
long thoracic nerve, injury to the brachial plexus, injury or viral infec-
tions of C5–7 nerve roots, and muscular dystrophy.
Winging only becomes obvious when the serratus anterior contracts
against resistance, such as pushing outstretched hands against a wall.

CHAPTER 11 Musculoskeletal system354
Spine
Look
Scan around the room for any clues, such as a wheelchair or walking aids.
Watch how the patient walks into the room or moves around the bed
area. Study their posture, paying particular attention to the neck.
Ask the patient to strip down to their underwear. Inspect from in front,
the side, and behind, in both the standing and sitting positions.
Look especially for the following:
• Scars
• Pigmentation
• Abnormal hair growth
• Unusual skin creases
• Asymmetry, including abnormal spinal curvature
•
Kyphosis: convex curvature—normal in the thoracic (T) spine
•
Lordosis: concave curvature—normal in the lumbar (L) and cervical
(C) spines
•
Scoliosis: side-to-side curvature away from the midline
2 A question-mark spine with exaggerated thoracic kyphosis and a loss of
lumbar lordosis is a classic sign of ankylosing spondylitis.
Feel
Palpate each spinous process, noting any prominence or step, and feel the
paraspinal muscles for tenderness.
You should also make a point of palpating the sacroiliac joints.
Move
C-spine
Assess active movements of the C-spine fi rst. These include fl exion,
extension, lateral fl exion, and rotation. It is often helpful to demonstrate
these movements yourself.
• Flexion: Ask the patient to put their chin on their chest.
• Extension: Ask the patient to look up to the ceiling.
• Lateral fl
exion: Ask the patient to lean their head sideways, placing an
ear on their shoulder.
• Rotation: Ask the patient to look over each shoulder.
T- and L-spine
Movements at the thoracic and lumbar spine include fl exion,
extension,
lateral fl
exion, and rotation.
• Flexion: Ask the patient to touch their toes.
• Extension: Ask the patient to lean backward.
• Lateral fl
exion: Ask the patient to bend sideways, sliding each hand
down their leg as far as possible.
• Rotation: Anchor the pelvis (put a hand on either side) and ask the
patient to twist at the waist to each side in turn.
Measure
Schober’s test
This is a useful measurement of lumbar fl exion.

SPINE
355
• Ask the patient to stand erect with normal posture. Identify the level
of the posterior superior iliac spines on the vertebral column.
• These are located at 7 L5.
• Make a small pen mark at the midline 5 cm below and 10 cm above
this point.
• Now instruct the patient to bend at the waist to full forward fl exion.
• Measure the distance between the two marks, using a tape measure.
• The distance should have increased to >20 cm (an increase of >5 cm).
If not, there is a limitation in lumbar fl
exion (e.g., found in ankylosing
spondylitis).
Special tests
Sciatic nerve stretch test
• This test is used to look for evidence of nerve root irritation (see also
Box 11.8 ).
• With the patient lying supine, hold the ankle and lift the leg, straight,
to 90*. Once there, dorsifl
ex the foot (Bragard test). If positive, pain is
felt at the back of the thigh. The pain may be relieved by knee fl exion.
• A positive stretch test suggests tension of the nerve roots supplying the
sciatic nerve (L5–S2), commonly over a prolapsed disc (L4/5 or L5/S1).
0 This test is partially age dependent. Most elderly people will struggle to
fl
ex their hip beyond 70
*.
Femoral nerve stretch test
With the patient lying prone, abduct and extend the hip, fl ex the knee, and
plantarfl ex the foot. The stretch test is positive if pain is felt in the thigh or
inguinal region. See b p. 319.
Box 11.8 Neurological examination
Don’t forget the neurological aspects of the examination. The femoral
and sciatic stretch tests may uncover root irritation, but you should
also examine for the neurological and functional consequences as in
b Chapter 10.

CHAPTER 11 Musculoskeletal system356
Hip
Look
Expose the whole lower limb. Look around the room for any aids or
devices such as orthopedic shoes or walking aids. If they have not done so
already, ask the patient to walk, and note the gait. Note if there is evidence
of a limp or obvious pain.
With the patient in standing position, inspect from the front, side, and
behind. Look for the following:
• Scars
• Sinuses
• Asymmetry of skin creases
• Swelling
• Muscle wasting
• Deformities
Pay attention to the position of limbs (e.g., external rotation, pelvic tilting,
standing with one knee bent or foot held plantarfl
exed or in equinus).
Feel
Feel for bony prominences, such as the anterior superior iliac spines and
greater trochanters. Check that they are in the expected position.
Palpate the soft tissue contours and feel for any tenderness in and
around the joint.
Move
Ask the patient if they have any pain before you examine them.
2 Fix the pelvis by using your left hand to stabilize the contralateral
anterior superior iliac spine, since any limitation of hip movement can eas-
ily be hidden by movement of the pelvis.With the patient supine :
• Flexion: Ask the patient to fl
ex the hip until the knee meets the
abdomen. Normal is around
7120*.
• Abduction: With the patient’s leg held straight, ask them to move it
away from the midline. Normal is 30–40*.
• Adduction: With the patient’s leg held straight, ask them to move it
across the midline. Normal is 730*.
With the patient prone:
• Extension: Ask the patient to raise each leg off the bed. Normal is only
a few degrees.
• Internal rotation: Ask the patient to keep the knees tight together and
spread the ankles as far as possible.
• External rotation: Ask the patient to cross the legs over.
Passive movements
Most of these movements should be assessed by the examiner as for
active movements while the patient is in a relaxed state.
• Passive external and internal rotation: With the patient supine, fl ex
the
knee, stabilizing it with one hand while the other hand moves the heel
laterally or medially so that the heel either moves away or toward the
midline (internal and external rotation respectively).

HIP
357
Measure (limb length)
0 True shortening, in which there is loss of bone length, must not becon-
fused with apparent shortening due to a deformity at the hip, in which
there is no loss of bone length.
Technique
• With the patient supine, place the pelvis square and the lower limbs in
comparable positions in relation to the pelvis.
• Measure the distance from the anterior superior iliac spine to the
medial malleolus on each side (true length) .
•
Apparent length is measured from a midline structure, such as the
xiphisternum or umbilicus, to the medial malleolus.
Special tests
Trendelenberg test
This is useful as an overall assessment of the function of the hip and will
expose dislocations or subluxations, weakness of the abductors, shorten-
ing of the femoral neck, or any painful disorder of the hip.
• Ask the patient to stand up straight without any support.
• Ask them to raise their left leg by bending the knee.
• Watch the pelvis (normally it should rise on the side of the lifted leg).
• Repeat the test with the patient standing on the left leg.
• A positive test is when the pelvis falls on the side of the lifted leg,
indicating hip instability on the supporting side (i.e., the pelvis falls to
the left = right hip weakness).
Thomas test
A fi xed
fl
exion deformity of the hip (often seen in osteoarthritis) can be
hidden when the patient lies supine by tilting the pelvis and arching the
back. The Thomas test will expose any fl exion deformity.
• With the patient lying supine, feel for lumbar lordosis (palm upward).
• With the other hand, fl
ex the opposite hip and knee fully to ensure
that the lumbar spine becomes fl attened.
• If a fi xed-fl
exion deformity is present, the opposite leg fl exes
too
(measure the angle relative to the bed).
• Remember to repeat the test on the other hip.
Function
Assess gait. See Chapter 10, b p. 321.

CHAPTER 11 Musculoskeletal system358
Knee
Look
Scan the room for any walking aids or other clues and inspect the patient
standing. The lower limbs should be completely exposed except for
underwear so that comparisons can be made.
Compare one side to the other and look for the following:
• Deformity (valgus, varus, or fl exion)
• Scars or wounds to suggest infection past or present
• Muscle wasting (quadriceps)
• Swelling (including posteriorly)
• Erythema
• Look for loss of the medial and lateral dimples around the knees,
which suggests the presence of an effusion.
Feel
2 Always ask about pain before getting started. Always compare sides.
With the patient lying supine:
• Palpate for temperature using the back of the hand.
• Ask if the knee is tender on palpation.
• Feel around the joint line while asking the patient to bend the
knee slightly.
• Palpate the collateral ligaments (either side of the joint).
• Feel the patellofemoral joint (by tilting the patella).
Examining for a small effusion—the bulge sign
• Holding the patella still, empty the medial joint recess using a wiping
motion of your index fi nger
(
Fig. 11.4a ).
•
This will milk any fl uid into the lateral joint recess.
• Now apply a similar wiping motion to the lateral recess and
• Watch the medial recess ( Fig. 11.4b ).
•
If there is fl uid present, a distinct bulge should appear on the
fl attened, medial surface and it is milked out of the lateral side.
Examining for a large effusion—the patellar tap
If the effusion is large, the bulge sign is absent, as you will be unable to
empty either recess of fl uid—use the patellar tap instead.
• Move any fl
uid from the medial and lateral compartments into the
retropatellar space.
•
Apply fi rm pressure over the suprapatellar pouch with the fl at of
the hand and use your thumb and index fi nger placed on either side
of the patella to push any fl uid centrally (see Fig. 11.5a ).
• With the fi
rst one or two fi ngers of the other hand, push the patella
down fi
rmly (see Fig. 11.5b ).
• If fl
uid is present, the patella will bounce off the lateral femoral
condyle behind. You will feel it being pushed down and then “tap”
against the femur.
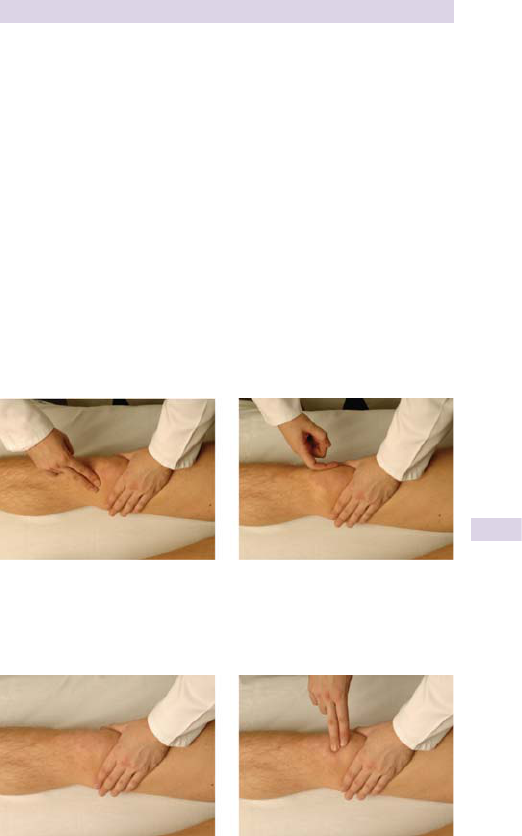
KNEE
359
Move
2 Remember to test passive movements (you do the moving) and active
movements (the patient does the moving) at each stage. Quantify any
movement in degrees (measure) .
• Begin by moving the joint passively and feel over the knee with one
hand for any crepitus.
• Flexion: Ask the patient to maximally fl
ex the knee. Normal
8135*.
• Extension: Ask the patient to straighten the leg at the knee.
• Hyperextension: Assess by watching the patient lift the leg off the bed
and then holding the feet stable in both hands above the bed or couch,
and ask the patient to relax. Ensure that you are not causing the
patient any discomfort.
Measure
The visual impression of wasting of the quadriceps can be confi rmed by
measuring the circumference of the thighs at the same level using a fi xed
bony point of reference e.g., 2.5 cm above the tibial tubercle.
(a) (b)
Fig. 11.4 Examining for the bulge sign. (a) Wipe any fl uid from the medial joint
recess. (b) Wipe the fl uid back out of the lateral joint recess and watch themedial
side.
(a) (b)
Fig. 11.5 Testing for patellar tap. (a) Use the palmar surface, thumb, and index
fi nger of one hand to move any fl uid into the retropatellar space. (b) Attempt to
tap the patella on the femur using the other hand.

CHAPTER 11 Musculoskeletal system360
Special tests
Testing for medial and lateral collateral ligament instability
• Take the patient’s foot with your right hand.
• Hold the patient’s extended knee fi rmly with your left hand (
Fig. 11.6 ).
• Attempt to bend the distal leg medially (varus)
•
This tests the lateral collateral ligament.
• Attempt to bend the distal leg laterally (valgus).
•
This tests the medial collateral ligament.
• Repeat the above with the knee at 30* of fl exion.
•
Normally, the joint should move no more than a few degrees.
Excessive movement suggests torn or stretched collateral ligament.
Anterior and posterior drawer tests
These test the anterior and posterior cruciate ligaments, which prevent
the distal part of the knee from moving anteriorly and posteriorly.
• Ensure that the patient is lying in a relaxed supine position.
• Ask the patient to fl
ex the knee to 90
*.
• You may wish to position yourself perched on the patient’s foot to
stabilize the leg. Warn the patient about this fi rst!
• Wrap your fi
ngers around the back of the knee, using both hands,
positioning the thumbs over the patella pointing toward the ceiling
(
Fig. 11.7 ).
• Push up with your index fi
ngers to ensure the hamstrings are relaxed.
• The upper end of the tibia is then pulled forward and pushed
backward in a rocking motion.
•
Normally, there should be very little or no movement seen.
•
Excessive anterior movement refl ects anterior cruciate laxity.
•
Excessive posterior movement denotes posterior cruciate laxity.
McMurray test
This is a test for detecting meniscal tears ( Fig. 11.8a ).
• With the patient lying supine, bend the hip and knee to 90*.
• Grip the heel with your right hand and press on the medial and lateral
cartilage with your left hand.
• Internally rotate the tibia on the femur and slowly extend the knee.
• Repeat, but externally rotate the distal leg while extending the knee.
• Repeat with varying degrees of knee fl exion.
•
If there is a torn meniscus, a tag of cartilage may become trapped
between the articular surfaces, causing pain and an audible click. You
may also be able to feel the click with your left hand.
Apley test
This is another test for meniscal tears ( Fig. 11.8b ).
• Position the patient prone with the knee fl
exed to 90
*.
• Stabilize the thigh with your left hand.
• With your right hand, grip the patient’s foot.
• Rotate or twist the foot and press downward in a grinding motion.
•
This test should produce symptoms if a meniscus is torn.
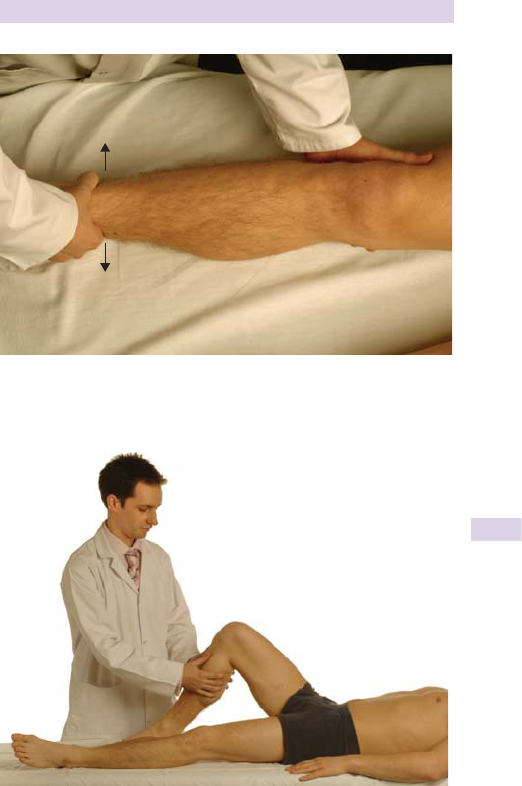
KNEE
361
Fig. 11.6 Testing collateral ligament stability.
Fig. 11.7 Performing the anterior drawer test.
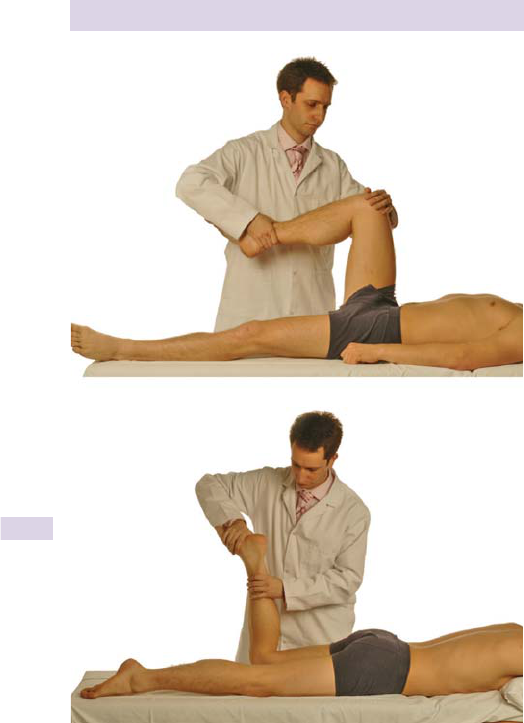
CHAPTER 11 Musculoskeletal system362
(a)
(b)
Fig. 11.8 Testing for meniscal tears. (a) McMurray test. (b) Apley grinding test.

ANKLE AND FOOT
363
Ankle and foot
Look
Expose the lower limbs and make note of any walking or other aids
present. Take a moment to also examine the shoes carefully for any
abnormal wear or stretching.
Examine feet and ankles when the patient is standing and, more care-
fully, with the patient lying on a couch or bed. Look for the following:
• Skin or soft tissue lesions, including calluses, swellings, ulcers, and scars
• Muscle wasting at the calf and lower leg
• Deformities, especially those involving the arch
•
Pes planus (fl at foot)
•
Pes cavus (high-arched foot)
• Look for a bunion (bony deformity) at the fi rst
metatarsophalangeal
(MTP) joint.
• Look for a bunionette at the fi
fth MTP joint.
• Examine nails carefully for any abnormalities, such as fungal infections
or in-growing toenails.
2 Don’t forget to look between the toes. You may also wish to inspect
for evidence of other abnormalities, such as hammertoes, claw toes, or
clubbing of the feet (talipes equinovarus).
Feel
2 Always ask about pain before getting started.
• Assess the skin temperature and compare over both the feet.
• Look for areas of tenderness, particularly over bony prominences
(lateral and medial malleoli, MTP joints, interphalangeal joints, and
heel) as well as the metatarsal heads.
• Squeeze across the MTP joints and assess pain and movement.
• Remember to palpate any swelling, edema, or lumps.
Move
The ankle and foot constitute a series of joints that function as a unit.
2 Remember to test passive movements (you do the moving) and active
movements (the patient does the moving) at each stage.
Active movements should be performed with the patient’s legs hanging
over the edge of the bed.
• Ankle dorsifl exion: Ask the patient to point their toes at their head.
• Ankle plantarfl exion: Ask the patient to push their toes down toward
the fl
oor, like pushing on a pedal.
• Inversion: (subtalar joint between the talus and calcaneus): Grasp the
ankle with one hand and, with the other, grasp the heel, thereby fi xing
the calcaneus, and turn the sole inward toward the midline ( Box 11.9 ).
• Eversion: as inversion but turn sole outward, away from the midline.
• Midtarsal joints: Grasp the heel with one hand and attempt to move
the tarsus up and down and from side to side with the other.
• Toe fl exion: Ask the patient to curl their toes.
• Toe extension: Ask the patient to straighten their toes.
• Toe abduction: Ask the patient to fan out their toes as far as possible.
• Toe adduction: Ask patient to hold a piece of paper between the toes.

CHAPTER 11 Musculoskeletal system364
Measure
Calf circumference can be measured bilaterally to check for any discrepan-
cies that may highlight muscle wasting or hypertrophy (e.g., 10 cm below
the tibial tuberosities).
Special tests
Thompson or Simmond test
This test is used to assess for a ruptured Achilles tendon.
• Ask the patient to kneel on a chair with their feet hanging over the
edge. Squeezes both calves
• Normally the feet should plantarfl
ex. If the Achilles tendon is ruptured,
there will be no movement on the affected side.
Function
It is also helpful to observe the patient’s gait with and without shoes. Be
sure to ask the patient if they are able to do this.
Box 11.9 A word on inversion and eversion
Orthopedic purists will say that the ankle cannot invert or evert as it
is mainly a simple hinge—the eversion and inversion tests are, there-
fore, “failure only” tests. You should note that some eversion and inver-
sion is possible in the normal state at the tarsal joints, as tested by
neurologists.
Orthopedic practitioners test pathological inversion and eversion by
watching the heels from behind as the patient stands on tiptoes.

IMPORTANT PRESENTING PATTERNS
365
Important presenting patterns
Rheumatoid arthritis (RA)
RA is a chronic infl ammatory, multisystem, autoimmune disease medi-
ated by proinfl ammatory cytokines, such as tumor necrosis factor alpha
(TNF-A), and in some cases is characterized by the presence of rheuma-
toid factor (RF).
There is a strong association with HLA-DR4, and patients with DR4
tend to have more severe disease. It affects around 1–3% of the population
in all racial groups, with peak age of onset in the fourth and fi fth decades
and a female–male ratio of 3:1.
The usual pattern of disease is insidious but can also be episodic with
complete resolution between attacks (palindromic) or acute. The clinical
features of RA can be divided into articular and extra-articular features
and are summarized below.
Articular features
RA usually presents as a symmetrical polyarthritis affecting the wrists and
small joints of the hands and feet. Occasionally, a patient presents with a
monoarthritis of a larger joint, such as the knee or shoulder. Common
presenting symptoms are joint pain, stiffness, and swelling that are typically
worse in the mornings and improve as the day progresses. The disease
eventually leads to varying degrees of functional loss.
Signs of RA in the hands and wrist
There is synovitis involving the wrists and metacarpophalangeal (MCP)
and proximal interphalangeal (PIP) joints, with sparing of the distal inter-
phalangeal (DIP) joints.
• Ulnar deviation of fi
ngers (subluxation or dislocation at MCP joints)
• Swan neck deformity: hyperextension of PIP joints with fl
exion of MCP
and DIP joints.
• Boutonniere’s deformity: fl
exion deformity of PIP joints with extension
of DIP and MCP joints
• Z-deformity of thumb: fl
exed MCP joint with extended interphalangeal
joint of thumb
• Triggering of fi nger
• Generalized wasting of small muscles of hand
• Cutaneous vasculitis
Signs of RA in the feet
• Forefoot synovitis with proximal phalangeal subluxation dorsally
• Metatarsal head erosion and displacement toward the fl oor.
The
patient experiences this as like walking on marbles.
• Valgus deformities
• Collapse of longitudinal arch
Signs of RA in the spine
• Atlantoaxial subluxation 9 spinal cord compression

CHAPTER 11 Musculoskeletal system366
Extra-articular features of RA
• Rheumatoid nodules: common at sites of pressure (elbows and wrists).
They are associated with more severe disease and always RF positive.
• Tenosynovitis and bursitis
• Carpal tunnel syndrome
• Amyloidosis (proteinuria, hepatosplenomegaly)
• Systemic features (fever, malaise, weight loss, and lymphadenopathy)
Anemia
Causes include the following:
• Anemia of chronic disease
• GI bleeding associated with NSAID use
• Bone marrow suppression secondary to disease-modifying
antirheumatic drugs, such as gold and penicillamine
• Megaloblastic anemia from folic acid defi
ciency (also secondary to
methotrexate) or pernicious anemia
• Felty’s syndrome (RA, splenomegaly, and leucopenia)
Lung features
• Pleuritic pain
• Pleural effusions
• Pulmonary fi brosis
• Pulmonary nodules
• Obliterative bronchiolitis
• Caplan syndrome (massive lung fi
brosis in patients with pneumoniosis)
Neurological features
• Peripheral nerve entrapment
• Mononeuritis multiplex
• Peripheral neuropathy
• Cervical myelopathy due to atlantoaxial subluxation
Cardiac features
• Pericarditis
• Pericardial effusions
Eye features
• Painless episcleritis
• Painful scleritis
• Scleromalacia perforans
• Keratoconjunctivitis sicca
• Sjögren’s syndrome
• Cataracts (chloroquine, steroids)
Vasculitis
• Nail fold infarcts
• Cutaneous ulceration
• Digital gangrene
• Cerebral and mesenteric infarction
• Coronary and renal vasculitis (rare)
Skin lesions
• Palmar erythema
• Pyoderma gangrenosum

IMPORTANT PRESENTING PATTERNS
367
Osteoarthritis
Osteoarthritis is a chronic disorder of synovial joints that is characterized
by focal cartilage loss and an accompanying reparative bone response.
It represents the single-most important cause of musculoskeletal
disability with a prevalence that increases with age and has a female
preponderance.
The joints commonly affected include the hips, knees, spine, and fi rst
carpometacarpal, fi rst
metatarsal, and DIP joints.
Secondary causes include trauma, RA, infection, neuropathic (Charcot’s)
joints, and metabolic disorders (e.g., Paget’s disease, acromegaly,
hemachromatosis, avascular necrosis, and hypoparathyroidism).
Clinical features
Common symptoms include swelling, deformity, stiffness, weakness, and
pain that is normally worse after activity and relieved by rest.
Common signs include the following:
• Hard, bony swellings of the DIP joints (Heberden’s nodes)
• Bony nodules at the PIP joints (Bouchard’s nodes)
•
These are bony outgrowths at the joint margins (osteophytes).
• “Square hand” deformity due to subluxation of the base of the thumb
• Valgus and varus deformities
• Crepitus
• Wasting and weakness (especially of the quadriceps and glutei)
• Tilting of the pelvis
Crystal arthropathies
Gout
Gout is a disorder of purine metabolism. It is characterized by hyper-
uricemia due to either overproduction or underexcretion of uric acid
( Box 11.10 ). Prolonged hyperuricemia leads to the formation of urate
crystals in the synovium, other connective tissues, and the kidney.
Clinical features of acute gout
• Severe pain and swelling classically in the great toe MTP joint, worse at
night and associated with redness ( Box 11.11 )
• Occasionally multiple joints are involved.
• 9 Systemic symptoms
Clinical features of chronic (tophaceous) gout
• Tophus formation (soft tissue deposits of urate found especially in
digits, helix of the ear, bursae, and tendon sheaths)
•
9 Overlying necrotic skin with chalky exudate of urate crystals
Pseudogout
This is caused by deposition of calcium pyrophosphate crystals in the syn-
ovium, joint capsule, and tendons. It is the most common cause of an acute
monoarthritis in older adults and may present as either an acute synovitis
or a chronic arthritis.
It is linked to chondrocalcinosis (calcifi cation of articular cartilage).
On examination, you may fi nd a swollen, erythematous, and tender joint
(often knees, wrist, elbow, ankle, or shoulder, and MCP joints, especially
the index and middle) associated with systemic upset.

CHAPTER 11 Musculoskeletal system368
Spondyloarthropathies
These include ankylosing spondylitis, psoriatic arthritis, reactive arthritis,
and enteropathic arthritis. This is a group of related and overlapping forms
of infl ammatory arthritis that characteristically lack rheumatoid factor
and are associated with HLA-B27. They present at any age, though young
males are primarily affected.
They also share a number of key features:
• Enthesitis (An enthesis is the insertion of a tendon, ligament, or capsule
into a bone.)
• Synovitis
• Sacroiliitis
• Dactylitis
• Peripheral arthritis affecting predominantly the large joints
Ankylosing spondylitis
Ankylosing spondylitis usually develops in early adulthood with a peak age
of onset in the mid-20s and is three times more common in males.
Common symptoms
• Lower back pain and stiffness that is typically worse in the morning and
after long periods of rest
• Chest pain as a result of T-spine involvement as well as enthesitis at
the costochondral joints
• Tender sacroiliac joints
Box 11.10 Causes of hyperuricemia
• Drugs: diuretics, ethanol, low-dose salicylates, pyrazinamide,
ethambutol, nicotinic acid, and cyclosporine
• Chronic renal failure
• Myeloproliferative and lymphoproliferative disorders (i purine
metabolism)
• Obesity
• Hypertension
• Hypothyroidism
• Hyperthyroidism
• Familial
• Excessive dietary purines
2 It is more common in the summer months because of reduced fl uid
intake and increased fl uid
loss.
Box 11.11 Conditions associated with gout
• Obesity
• Type IV hyperlipidemia
• Hypertension
• Impaired glucose tolerance or diabetes
• Ischemic heart disease

IMPORTANT PRESENTING PATTERNS
369
• Pain in peripheral joints, such as the shoulders and knees
Musculoskeletal features and signs
• Question-mark posture (loss of lumbar lordosis, fi xed kyphoscoliosis
of the T-spine, compensatory extension of the C-spine)
• Protuberant abdomen
• Schober’s test is positive (see b p. 354)
• Achilles tendonitis
• Plantar fasciitis
Some extraskeletal features
• Anterior uveitis
• Aortic regurgitation
• Apical lung fi brosis
• AV block
• Amyloidosis (secondary)
• Atlantoaxial dislocation
• Traumatic fracture of a rigid spine
• Hypoxia
• Fever
• Weight loss
Psoriatic arthritis
Psoriatic arthropathy affects up to 10% of patients with psoriasis and may
precede or follow the skin disease.
2 The arthropathy does not correlate with the severity of skin lesions.
There are fi
ve main subtypes of psoriatic arthropathy:
• Asymmetrical distal interphalangeal joint arthropathy
• Asymmetrical large joint mono- or oligoarthropathy
• Spondyloarthropathy and sacroiliitis
• Rheumatoid-like hands (clinically identical to RA but seronegative)
• Arthritis mutilans (a severely destructive form with telescoping of the
fi ngers)
Associated clinical features
• Psoriatic plaques (classically found on the extensor surfaces and scalp,
behind the ears, and in the navel and natal cleft)
• Nail involvement (pitting, onycholysis, discoloration, and thickening)
• Dactylitis (sausage-shaped swelling of the digits due to tenosynovitis)
Reactive arthritis
• An aseptic arthritis, strongly linked to a recognized episode of
infection. Common causes are gut and genitourinary pathogens.
• It mainly affects young adults and usually presents with asymmetric
and oligoarticular arthritis with symptoms starting a few days to a few
weeks after the infection.
• Enthesitis and dactylitis are other common features. Patients may
experience pain in the articular joints.
Associated extraskeletal features
• Urethritis
• Conjunctivitis
• Skin and mucosal lesions

CHAPTER 11 Musculoskeletal system370
Reiter’s syndrome
This is a form of reactive arthritis associated with the classic triad of
• Arthritis
• Urethritis
• Conjunctivitis
It often follows dysenteric infections such as Shigella , Salmonella ,
Campylobacteria , and Yersinia or infections of the genital tract. Other fi nd-
ings that may be encountered are mouth ulceration, circinate balanitis,
keratoderma blennorrhagica (pustular-like lesions found on the palms or
soles), and persistent plantar fasciitis.
Enteropathic arthritis
Enteropathic arthritis is a peripheral or axial arthritis occurring in associa-
tion with infl
ammatory bowel disease (IBD) and does not typically corre-
late with the severity of bowel disease. However, the peripheral arthritis
has been shown to improve if the affected bowel is resected.
Osteoporosis
Osteoporosis is a systemic skeletal disorder involving d bone mass (osteo-
penia) and microarchitectural deterioration, resulting in an i risk of frac-
ture. Classifi cation (and treatment) is based on measurement of bone
mineral density (BMD), with comparison to that of a young healthy adult.
The underlying pathology is related to an imbalance between osteoblast
cells producing bone and osteoclast cells removing bone, which ultimately
produces a net loss of bone. See Box 11.12 for risk factors.
• Type I: accelerated (mainly trabecular) bone loss secondary to estrogen
defi
ciency and leads to fracture of vertebral bodies as well as the distal
forearm in women in their late 60s and 70s
• Type II: age-related cortical and trabecular bone loss occurring in both
sexes and leads to fractures of the proximal femur in the elderly
Clinical features
The process leading to established osteoporosis is asymptomatic and the
condition usually presents only after bone fractures.
Features differ according to the fracture site. The most common clinical
features include the following:
• Marked kyphosis
• Loss of height
• Protuberant abdomen
• Spinal tenderness
Paget’s disease
This disorder of bone remodeling is characterized by i osteoclastic and
osteoblastic cell activity, leading to accelerated but disorganized bone
resorption and formation.
Paget’s disease is the second most common disease of bone after oste-
oporosis, is more common in males, and affects around 3% of the popula-
tion >40 years of age. It occurs more commonly in Britain than anywhere
else in the world; there are thought to be up to one million sufferers in
the UK.

IMPORTANT PRESENTING PATTERNS
371
While the exact etiology remains unknown, a number of factors have
been implicated, including a slow viral infection. Some 30% of Paget’s
patients have an affected fi rst-degree relative.
Important clinical features and complications
• Enlargement of the skull
• Hearing loss (ossicles are involved and VIII nerve compression)
• Optic atrophy and angioid streaks
• Cardiac failure
• Kyphosis, anterior bowing of the tibia, lateral bowing of the femur
• i Bone warmth
• d Mobility
• Fractures
• Sarcomatous change (rare)
• Cord compression
• Cerebellar signs
• Hypercalcemia
Box 11.12 Risk factors for osteoporosis
• Smoking
• High alcohol consumption
• BMI <19
• Family history
• Premature menopause
• Prolonged immobilization
• Prolonged secondary amenorrhea
• Primary hypogonadism
• Low dietary calcium and vitamins
• Older age
• Female gender
• Sedentary lifestyle
• Caucasian or Asian origin
Chronic disorders, such as the following:
• Anorexia nervosa
• Malabsorption syndromes
• Primary hyperthyroidism
• Post-transplantation
• Cushing’s syndrome
• Chronic renal failure

CHAPTER 11 Musculoskeletal system372
Box 11.13 Some important causes of a swollen knee
• RA
• Ruptured Baker’s cyst
• Pseudogout
• Gout
• Edematous states (e.g., CHF,
nephrotic syndrome)
• Trauma
• Charcot’s knee
• Septic arthritis
• Hemarthrosis

THE ELDERLY PATIENT
373
The elderly patient
Rheumatological diseases represent a huge spectrum of illness in older
people, often complicating and concurrent with other diseases—e.g., the
impact of severe arthritis on COPD or heart failure or the effect of hip or
knee arthritis on recovery after acute stroke.
Arthritis and osteoporosis are two major factors in the geriatric giants
of immobility and instability—pertinent reminders of the widespread
effect of musculoskeletal illness with advancing age.
History
Method of presentation
This can vary, ranging from the fall that leads to a femoral neck fracture
or a referral “off legs” or with declining mobility. Older people will often
have an existing diagnosis of some form of arthritis—the diffi culty is not in
the diagnosis but in understanding the impact on everyday life.
Musculoskeletal illnesses are a key part of such presentations, and atten-
tion to these illnesses is vital. However, it is important to remember that
presentations such as falls are multifactorial—try to work out how muscu-
loskeletal illness contributes to mobility or risk of falls.
Intercurrent illness
This may often precipitate gout or particularly pseudogout. Equally impor-
tant are those illnesses that disturb carefully balanced homeostasis, leading
to a fall and fracture. Your task is to not just treat the consequence of the
fall but look at why it happened in the fi rst place
Septic joints
They can be notoriously diffi cult to diagnose at times. Unilateral large joint
swelling and acute arthritis should ring alarm bells, especially if the patient
is unwell. A myriad of causes contribute to back pain, but never forget
deep-seated infection, such as discitis or osteomyelitis, which may be a
consequence of something as innocuous as a urinary infection.
Drug history
This is a keystone of any assessment. Consider the side-effect profi le of
NSAIDs or whether gout has been precipitated by the effects of diuretics
or low-dose aspirin. If the patient has sustained a fragility fracture due to
osteoporosis, are they on appropriate treatment?
Never forget the i number of older people whose arthritis is success-
fully treated with disease-modifying drugs, and understand the effects
of such drugs (and the need to prescribe concurrent folic acid with
methotrexate).
Activities, occupation, and interests
These overlap with the functional history. Multidisciplinary assessment
is vital for tailoring rehabilitation, physical aids, and future care, where
appropriate. Ask about hobbies and interests—improving balance, mini-
mizing pain, and maximizing function may allow patients to carry on with
activities that are a key part of their lives (and might represent an oppor-
tunity for continued exercise or rehabilitation).

CHAPTER 11 Musculoskeletal system374
Examination
General
The signs are often very clear but despite this, easily overlooked. The need
here is for a careful and thoughtful assessment of function as well as dis-
ease activity. Always ask about your patient’s comfort, and examine care-
fully, explaining what you wish to do, to avoid misunderstanding and pain.
Pattern of disease
Look for typical patterns of disease and single-joint pathology. Look at
the ankles, feet, and back. It takes only a little more time to undertake
a good examination, but is depressingly common to see patients with
poor balance and a history of falls whose fi les detail no musculoskeletal
assessment.
Disease activity
Be careful when palpating, but look to see if an acute exacerbation of joint
disease may well have contributed to the current presentation.
Gait and balance
These are often overlooked but are a vital part of the examination. Learn
(e.g., from the ward physiotherapist) how to undertake the get up and go
test, a well-validated test of gait and balance (see Box 11.14 ). This assess-
ment should overlap with neurological assessment when appropriate.
Box 11.14 Get up and go
This is an easy test to do and one that gives a wealth of information. In
essence, ask the patient to rise to standing from a chair, walk 10 feet,
then turn and return to the chair. The clinician’s role is not that of a pure
observer—you must make an assessment of safety and be on hand to
support the patient, if needed.


CHAPTER 12 Male reproductive system376
Applied anatomy and physiology
Anatomy
The male reproductive system consists of a pair of testes, a network of
excretory ducts (epididymis, ductus deferens, and ejaculatory tracts), sem-
inal vesicles, prostate, bulbourethral glands, and the penis.
Penis
The penis consists of erectile tissue contained within two dorsally placed
corpora cavernosa and the corpus spongiosum, which lies on their ventral
surface. The corpora are attached proximally to the inferior pubic rami.
The corpus spongiosum expands distally to form the glans penis and sur-
rounds the urethra.
The three corpora are contained within a fi brous tubular sheath of fas-
cia and covered by freely mobile (and elastic) skin. A loose fold of skin, the
prepuce or foreskin, extends distally to cover the glans penis.
Scrotum
This is a muscular out-pouching of the lower part of the anterior abdomi-
nal wall. It contains the testes, epididymis, and lower ends of the sper-
matic cords. The scrotum acts as a climate-control system for the testes.
Muscles in the wall of the scrotum, in conjunction with muscle fi bers in the
spermatic cord, allow it to contract and relax, moving the testicles closer
or further away from the body.
Testes
These are paired, ovoid organs measuring 74 x 3 x 2 cm, found within the
scrotal sac. The testes are made up of masses of seminiferous tubules that
are responsible for producing spermatozoa. Interstitial or Leydig cells lying
between these tubules produce the male sex hormones.
In the fetus, the testes develop close to the kidneys in the abdomen,
then descend caudally through the inguinal canal to reach the scrotum at
738 weeks gestation.
Each testis is covered by an outer fi brous capsule (tunica albuginea).
Laterally and medially lies the visceral layer of the tunica vaginalis (a
closed serous sac—an embryonic derivative of the processus vaginalis,
which normally closes before birth). The posterior surface of the testis
is devoid of tunica vaginalis and is pierced by numerous small veins
that form the pampiniform plexus. The seminiferous tubules converge
here to form the efferent tubules, which eventually give rise to the
epididymis.
Spermatic cord
This suspends the testis in the scrotum and contains structures running
between the testis and the deep inguinal ring (the ductus deferens, arter-
ies, veins, testicular nerves, and epididymis).
The cord is surrounded by the layers of the spermatic fascia (internal
spermatic fascia) formed from the transversalis fascia, the cremasteric
fascia formed from fascia covering the internal oblique, and the external
spermatic fascia formed from the external oblique aponeurosis.

APPLIED ANATOMY AND PHYSIOLOGY
377
The cremasteric fascia is partly muscular. Contraction of the cremaster
muscle draws the testis superiorly. The raising and lowering of the testis
acts to keep it at a near-constant temperature.
Epididymis
This is a convoluted duct 76 cm in length lying on the posterior surface of
the testis. It is a specialized part of the collecting apparatus where sperma-
tozoa are matured before traveling up the vas deferens to join the ducts
draining the seminal vesicles, known as the ejaculatory ducts.
The seminal vesicles are paired organs that lie on the posterior surface
of the bladder and contribute most of the fl uid that makes up semen,
along with fructose, ascorbic acid, amino acids, and prostaglandins.
Prostate gland
This is a fi rm, walnut-sized structure that lies inferior to the bladder, encir-
cling the urethra. Many short ducts produce fl uid that is emptied into the
urethra and makes up a proportion of semen.
Bulbourethral glands
These are small, pea-sized glands located near the base of the penis.
In response to sexual stimulation, the bulbourethral glands secrete an
alkaline mucus-like fl uid that neutralizes the acidity of the urine in the
urethra and provides a small amount of lubrication for the tip of the penis
during intercourse.
Sex hormones
Three hormones are the regulators of the male reproductive system:
• Follicle-stimulating hormone (FSH) is produced in the anterior pituitary
gland and stimulates spermatogenesis by its action on Sertoli cells.
• Luteinizing hormone (LH) is produced in the anterior pituitary gland
and stimulates the production of testosterone from Leydig cells.
• Testosterone is produced in the testis and adrenal gland and
aids in development of male secondary sexual characteristics and
spermatogenesis.
Male sexual response
There are four stages of the sexual response:
• Excitement or arousal is under control of the parasympathetic nervous
system. During this stage, the penis becomes engorged with blood and
stands out from the body. Other changes include an i in heart rate,
blood pressure, respiratory rate, and skeletal muscle tone.
• Plateau: Continued sexual stimulation maintains the changes made in
the arousal phase. This can last from a few seconds to many minutes.
• Orgasm: In males, this is the briefest stage and mediated by the
sympathetic nervous system. Rhythmic contractions of the perineal
muscles and accessory glands and peristaltic contraction of the seminal
ducts result in ejaculation. This is usually followed by a refractory period
during which another erection cannot be achieved. This varies between
individuals, from minutes to hours, and lengthens with advancing age.
• Resolution: Blood pressure, heart rate, respiratory rate, and muscle
tone return to the unaroused state. This is accompanied by a sense of
relaxation.

CHAPTER 12 Male reproductive system378
Sexual history
This can be awkward for both the patient and the history-taker. It should
be undertaken in a sensitive, confi dent, and confi dential manner. Before
the discussion takes place, the patient should be reassured about the lev-
els of privacy and confi dentiality and that they are free to openly discuss
their sexual life and habits.
Make no assumptions, remain professional, and try to use the patient’s
own words and language. Be aware of cultural and religious differences
surrounding sex and talking about it. See b p. 48 for further guidance.
You should approach a sexual history in a structured way, as below.
Sexual activity
This should include an assessment of the risk of acquiring a sexually trans-
mitted infection (STI).
Determine the number and gender of the patient’s sexual partners, their
risk of having an STI, and the precautions (if any) that were taken. Try ask-
ing the following questions:
• Do you have sex with men, women, or both?
• In the past 2 months, how many people have you had sex with?
• When did you last have sexual intercourse?
• Was it with a man or a woman?
• Were they a casual or regular partner?
• Where were they from?
• Do they use injected drugs?
• Do they have any history of sexually transmitted infections?
• How many other partners do you think they’ve had recently?
• In what country did you have sex?
• What kind of sex did you take part in? (e.g., vaginal, anal, oral)
• For each type of sex, did you use a condom?
• Does your partner have any symptoms?
• Have you had any other partners in the last 6 weeks?
•
If so, repeat the questions above for each partner.
Previous history
You also need to establish the history of STIs for the patient:
• Have you had any other STIs?
• Have you ever had a sexual check-up?
• Have you ever been tested for HIV, hepatitis, or syphilis?
• Have you ever been vaccinated against hepatitis A or B?
Psychological factors
Concerns over loss of libido and sexual function may point to a complex
psychological cause for symptoms. Explore this delicately and ask about
• History of sexual abuse
• Problems with the relationship
• Sexual partners outside the relationship
• Any other cause for anxiety
• History of depression or anxiety

SYMPTOMS
379
Symptoms
Urethral discharge
If the patient complains of discharge or “mucus” from the end of their
penis, establish the following:
• Amount
• Color
• Presence of blood?
• Relation between the discharge and urination or ejaculation
• Is there any pain?
• Are there any other symptoms, such as conjunctivitis or arthralgia?
• Has the patient recently had symptoms of gastroenteritis?
You should also determine when this symptom was fi
rst noticed and
how that relates to any sexual contacts that the patient has had and the
possibility of exposure to STIs (see previous pages).
Rashes, warts, ulcers
Treat a genital skin lesion as you would any other rash (b p. 80). Also
ask about the following:
• Similar lesions elsewhere (mouth, anus)
• Foreign travel
Determine the risk of recent exposure to STIs as previously.
Testicular pain
This is often felt as deep, burning pain and accompanied by nausea. Treat
as pain in any other location, as on b p. 33. Also ask about associated
genital symptoms, such as testicular swelling, dysuria, or hematuria (see
Box 12.1 ).
Common causes include testicular torsion, mumps, orchitis, andepidi-
dymitis. Remember the possibility of cancer.
Erectile dysfunction
The term impotence should be avoided by health-care providers because
of its negative social implications. Patients may use the term impotence
Box 12.1 The rest of the history
A full history needs to be taken in all cases, as described in Chapter 2.
The following may have particular relevance here.
PMH
Ask especially about the following:
• Sexually transmitted infections (as previously)
• Orchitis or a history of mumps
• Inguinal, scrotal, and testicular injury or surgery
• Urethral injury
Smoking and alcohol
Detailed histories should be taken as described in b Chapter 2 (p. 41).

CHAPTER 12 Male reproductive system380
for a number of different sexual problems. Ask specifi cally if the patient
means the following:
• Diffi
culty in achieving or maintaining an erection (erectile dysfunction)
• Diffi
culty with premature ejaculation (ejaculatory dysfunction)
• Diffi culty in reaching orgasm (orgasmic dysfunction)
Remember that an erection is not necessary for men to reach orgasm
or to ejaculate . Erectile dysfunction
is the inability to gain and maintain an
erection for satisfactory completion of sexual activities.
If a patient complains of impotence, this needs to be explored in more
detail. Establish particularly if the lack of function is related to a particular
partner or situation or is constant. Ask the following questions:
• Are you able to get an erection at all?
• Do you wake with an erection in the morning?
• Are you able to get an erection to masturbate?
If the cause is psychological, the patient will often still wake with an erec-
tion (the so-called morning glory) but not be able to perform in a sexual
situation. This can be tested with a sleep study, if necessary. Psychological
factors should be explored with sensitivity.
Organic causes for erectile dysfunction include atherosclerosis, diabe-
tes mellitus, multiple sclerosis, pelvic fractures, urethral injury, or other
endocrine dysfunction.
Drug history is important. Drugs associated with erectile dysfunction
include barbiturates, benzodiazepines, phenothiazines, lithium, antihyper-
tensives (e.g., B-blockers), alcohol, estrogens, methadone, and heroin.
Loss of sexual desire (libido)
This can be an early sign of a pituitary tumor, but the cause is more often
deeply rooted in the patient’s psychology. Ask the following questions:
• How often do you shave your face?
• Has this changed recently?
• Do you have any muscle wasting or pain?
• Explore any issues about the sexual partner and the patient’s
relationship with them.
Infertility
Around 10% of couples have diffi culty with conception. Male infertility
accounts for 1/3 of childless relationships. This is a complex topic and not
within the scope of this book.
Relevant information to ascertain includes the following:
• Age of both partners
• Length of time they have been trying to conceive
• Presence of existing children belonging to both partners, and children
of each partner from prior relationships
• Frequency and timing of intercourse
• Any erectile, ejaculatory, or orgasmic dysfunction
• Drug history of both partners
• Factors suggestive of endocrine malfunction, as under Loss of Sexual
Desire
• Smoking and alcohol consumption
• Menstrual history from partner

EXAMINING MALE GENITALIA
381
Examining male genitalia
Explain to the patient that you would like to examine the penis and testes
and reassure them that the procedure will be quick and gentle.
You should have a chaperone present, particularly if you are female. A
chaperone, however, is often desirable even in circumstances where the
examiner is male.
Ensure that the examination room is warm and that you are unlikely to
be disturbed. With the patient on a bed or couch, raised to a comfortable
height, ask them to pull their clothing down. You should be able to see the
genitalia and lower part of the patient’s abdomen at the very least.
Penis
Inspection
Make a careful inspection of the organ, noting the following:
• Size
• Shape
• Presence or absence of a foreskin
• Color of the skin
• The position and caliber of the urethral meatus (see Box 12.2 )
• Any discharge
• Any abnormal curvature
• Any lesion, scaling, scabbing or other superfi
cial abnormality such as
erythema or ulceration, particularly at the distal end (glans)
Palpation
Palpate the whole length of the penis to the perineum and note the state
of the dorsal vein, which is usually easily seen stretching the length of the
penis at the dorsal midline. Note also any abnormalities of the underlying
tissues (e.g., fi rm areas) that may not be visible—this may represent the
plaques of Peyrone’s disease.
Retract the foreskin to expose the glans penis and urethral meatus.
The foreskin should be supple, allowing smooth and painless retraction.
Look especially for any secretion or discharge and collect a specimen, if
possible. The patient may be able to milk the shaft of the penis to express
the secretion.
Box 12.2 Hypospadias
Hypospadias is the abnormal, ventral, positioning of the urethralmeatus.
It is seen in 1 in 250 males. In the vast majority, the hypospadias is
slight.
Patients may have a hooded foreskin with the meatus at the very edge
of the glans or a very slightly ventral meatus that iscompletely covered
by a normal foreskin.
Slight hypospadias has no effect on sexual function but may be a cause
of anxiety and embarrassment resulting in psychosexual problems once
the patient is aware that his penis is “different.”

CHAPTER 12 Male reproductive system382
There is often a trace of smegma underlying the foreskin. This is a nor-
mal fi nding.
0 Remember to replace the foreskin at the end of the examination.
Note that in the presence of phimosis, the foreskin will be nonretractile
and attempts may cause considerable pain.
Scrotum and contents
Reminder
Before touching the genitalia, consider assessing the patient for the pres-
ence of the cremasteric refl ex when evaluating complaints of testicular
pain. Please note, however, that the assessment of the cremasteric refl ex
can be unreliable in a patient who is tense or anxious.
Examining the scrotum and scrotal contents is best done with the
patient standing up.
Inspection
Make a careful examination of the scrotal skin. It is usually wrinkled and slightly
more pigmented than the rest of the patient’s body and should be freely
mobile of the testis. One testis usually hangs lower than the other. Remember
to lift the scrotum, inspecting the inferior and posterior aspects.
Look especially for the following:
• Edema
• Sebaceous cysts
• Ulcers
• Scabies
• Scars
Palpation
The scrotal contents should be gently supported with your left hand and
palpated with the fi ngers and thumb of your right hand. It may help to ask
the patient to hold their penis to one side (see Fig. 12.1 ).
• Check that the scrotum contains two testes.
•
Absence of one or both testes may be due to previous excision,
failure of the testis to descend, or a retractile testis.
•
If there appears to be a single testis, carefully examine theinguinal
canal for evidence of a discrete swelling that could be an
undescended testis.
• Make careful note of any discrete lumps or swellings in the body of the
testis.
•
Any swelling in the body of the testis must be considered to be
suggestive of a malignancy.
• Compare the left and right testes, noting the size and consistency.
•
The testes are normally equal in size, and smooth, with a fi rm,
rubbery consistency. If there is a signifi cant discrepancy, ask the
patient if he has ever noticed this.
• Feel for the epididymis, which lies at the posterolateral aspect of each
testis.
• The vas can be distinguished from the rest of the cord structures, lying
along the posterior aspect of the bundle, and feels fi
rm and wire-like.
It runs from the epididymis to the external inguinal ring.
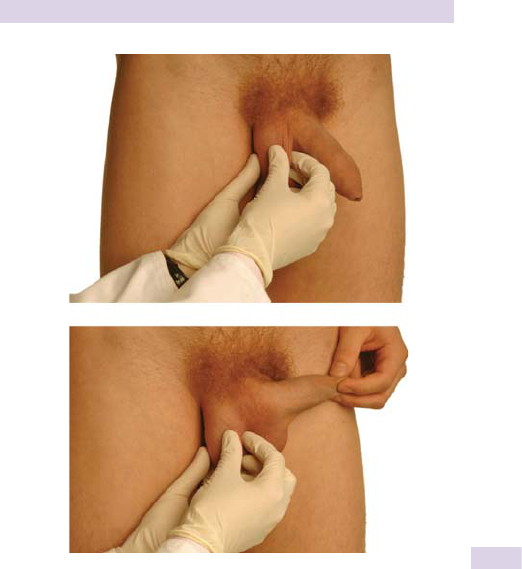
383
EXAMINING MALE GENITALIA
Scrotal swellings
If a lump is palpated:
• Decide if the lump is confi ned to the scrotum. Are you able to feel
above it? Does it have a cough impulse? Is it fl
uctuant? (You will be
unable to get above swellings that descend from the inguinal canal.)
• Defi
ne the lump as any other mass, as described on b p. 88.
• Transillumination is often important here. Darken the room and shine
a small torch through the posterior part of the swelling (see Fig. 12.2 ).
•
A solid mass remains dark, whereas a cystic mass or fl uid will
transilluminate.
(a)
(b)
Fig. 12.1 (a) Examine the scrotum with the patient standing and use both hands.
It is sometimes preferable to ask the patient to hold their penis aside (b).
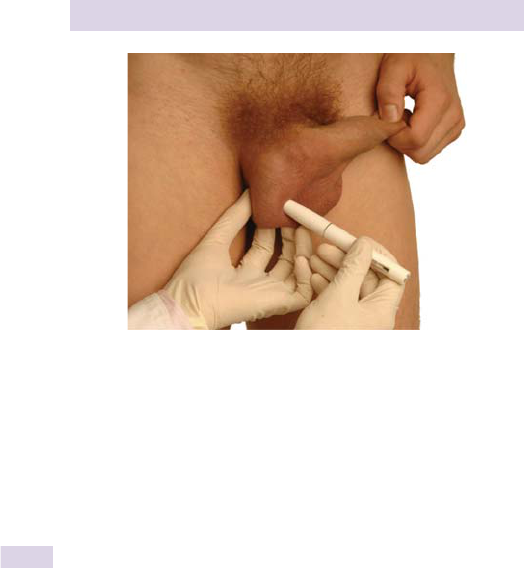
CHAPTER 12 Male reproductive system384
Perineum and rectum
Don’t overlook the perineum, anal canal, and rectum. In particular, a digital
rectal examination should be performed as described on b p. 241, with
particular attention to feeling the prostate and seminal vesicles.
Local lymphatics
• Lymph from the skin of the penis and scrotum drains to the inguinal
lymph nodes.
• Lymph from the covering of the testes and spermatic cord drains
initially to the internal, then common, iliac nodes.
• Lymph from the body of the testes drains to the para-aortic lymph
nodes—these are impalpable.
• Your examination is not complete without a careful palpation of the
inguinal lymph nodes ( Fig. 12.3 ). This is best done with the patient lying
comfortably on a bed or couch.
• If any swelling is found, it should be described in the same way as any
lump (b p. 88).
Fig. 12.2 Attempt to transilluminate any swelling by shining a small penlight
through it. Unlike the fi gure above, the room should be darkened.
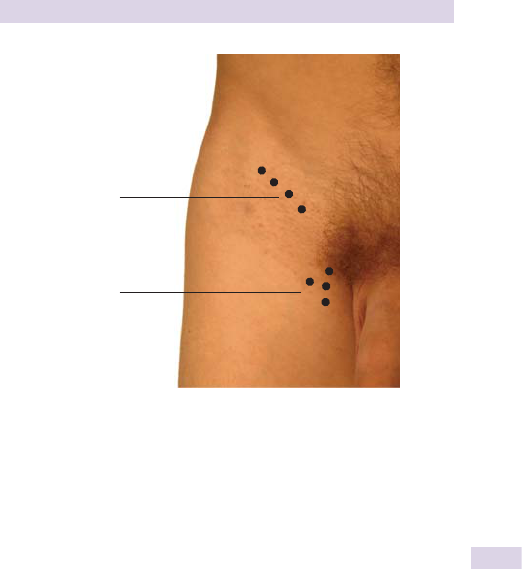
385
EXAMINING MALE GENITALIA
Horizontal
group
Vertical
group
Fig. 12.3 Diagrammatic representation of the inguinal lymph nodes.

CHAPTER 12 Male reproductive system386
Important presenting patterns
Phimosis
This is a narrowing of the end of the foreskin that prevents its retrac-
tion over the glans penis. It can cause diffi culty with micturition and lead
to recurrent balanitis. It may cause interference with erections and sexual
intercourse.
• Causes : congenital, infection, trauma, infl ammation
(balanitis)
Paraphimosis
In this case, the foreskin can be retracted but then cannot be replaced
over the glans. This results in edema, which limits its movement still fur-
ther. If left in this condition, it can become necrotic or gangrenous.
This condition commonly occurs in men 15–30 years old. It is a frequent
complication of urinary catheterization if the practitioner fails to replace
the foreskin after the procedure is performed.
Hypospadias
See also Box 12.2 , b p. 384. Hypospadias is a congenital abnormality
in which the urethra opens on the ventral surface of the penis. Minor
degrees result in a hooded or dorsal foreskin and spraying of the urine
during micturition.
Openings on the ventral surface of the shaft of the penis (secondary
hypospadias) or openings at the scrotum or perineum (tertiary hypospa-
dias) may cause serious diffi culties with micturition and sexual function.
Balanitis and balanoposthitis
Balanitis is infl ammation of the glans penis. Balanoposthitis is infl amma-
tion of the glans and the foreskin. Such infl ammation presents as redness,
swelling, and pain of the affected parts, often with diffi culty retracting the
foreskin.
• Causes: Candida albicans (especially in patients with diabetes), herpes
infection, carcinoma, drug eruptions, poor hygiene
Priapism
This is a painful, persistent erection and a serious feature of sickle crisis.
Other causes include leukemia, drugs (e.g., erectile dysfunction treat-
ments or psychotropics), and neurogenic (e.g., diseases of spinal cord).
Penile ulcers
Conditions causing ulceration of genitalia include herpes simplex (vesicles
followed by ulceration), syphilis (nontender ulceration), malignancy (e.g.,
squamous cell carcinoma—nontender), and Behçet’s syndrome.
Hydrocele
This is fl uid entrapment in the tunica vaginalis, causing usually painless
swelling of the scrotum, the size of which can be considerable. Hydroceles
will surround the testis, making it impalpable. It will transilluminate.
As well as congenital abnormalities in the inguinal canal, hydrocele can
be caused by trauma, infection, and neoplastic disease.

IMPORTANT PRESENTING PATTERNS
387
Epididymal cysts
These are harmless, painless swellings arising behind and separate from
the testis itself. The examiner may be unable to feel the rest of the epidi-
dymis. The testicle (anteriorly) should be normal. Epididymal cysts will
transilluminate.
Varicocele
This involves abnormal dilatation of the veins in the spermatic cord caused
by incompetent valves in the testicular vein. They only become apparent
when the patient is standing and almost disappear when the patient is
supine. These are much more common on the left.
Varicoceles are usually painless (although they can cause a deep ache in
some men) and, in themselves, harmless. Varicocele is, however, associ-
ated with a reduction in fertility (it makes the testis abnormally warm).
They are classically described as feeling like a bag of worms on palpation.
Orchitis
This is infl ammation of the testis. The affected organ will hang higher in
the scrotum and may be swollen and warm with redness of the overlying
skin. It will be very tender to palpation. The patient may be systemically
unwell with fever.
Testicular torsion
This presents in a very similar way to orchitis and is often diffi cult to distin-
guish, although the onset is much more sudden in torsion. Twisting of the
testis on the spermatic cord (torsion) will cause ischemia and severe pain.
Frequently, this pain is referred to the abdomen, often mimicking acute
abdominal conditions such as appendicitis.
It usually occurs in young adults and teenagers, with a peak age of 14.
Torsion is usually inward, toward the midline.
This is a urological emergency, and its presence must initially be con-
fi rmed through vascular ultrasonography to confi rm the presence of
diminished blood fl ow. If the testicle is left in this condition without being
untwisted (with appropriate analgesia), surgical removal of the testis may
be necessary. Immediate surgical referral is advised if this is suspected.
Testicular carcinoma
This should be at the top of your list of differential diagnoses in the case of
an intrascrotal mass. Teratomas commonly occur between the ages of 20
and 30 years, whereas seminomas are more common at age 30–40 years.
There may be associated pain and tenderness or a dull aching, dragging
sensation in the scrotum and groin. Look for constitutional symptoms sug-
gestive of neoplastic disease, such as malaise, wasting, and anorexia, as
well as leg swelling (venous or lymphatic obstruction), lymphadenopathy,
or an associated abdominal mass.

CHAPTER 12 Male reproductive system388
The elderly patient
Much of the information on this page overlaps with that on the female
reproductive system in Chapter 14. We would encourage the reader to
regard both sections as a whole.
It is important to recognize that bladder carcinoma and diseases of the
prostate are some of the most common urogenital problems faced by
older men; remember to screen for such problems in any assessment. For
prostate diseases, it is also important to know that patient awareness is
high, so you should expect questions and a wish to be involved in treat-
ment decisions. Equally so, many of these problems are faced by patients
with cognitive impairment, in whom history may be limited and thorough
assessment is vital.
Retain a holistic outlook on male urogenital problems, and you will be
less likely to miss delirium because of acute epididymo-orchitis—a not
uncommon presentation!
Studies report that half of U.S. adults ages 65–74 and more than 25% of
those age 75 or older maintain active sexual lives. Avoiding sexual issues
in this population can cause major problems to be overlooked. Many men
over the age of 70 experience erectile dysfunction, so try not to make
assumptions when seeing older people with sexual health problems.
History
Explore
Explore the history. Even for patients with prostate disease, how will the
effects of treatment (e.g., TURP or conventional surgical prostate resec-
tion) affect relationships or sexual activity? Keep your thought processes
open when assessing continence problems—there may symptoms of both
obstruction and incontinence in many men. See also Box 12.3.
Box 12.3 A note on (recurrent) urinary tract infections
Most readers will have already seen many older patients with this com-
mon (and often over diagnosed) problem.
While many diagnoses are made on clinical suspicion, it is vital to
undertake urinalysis and obtain urine for microscopy and culture to
confi rm the presence of urinary tract infections (UTIs). The reasoning
is twofold: avoiding rushing to a label of UTI as the cause of delirium or
mobility decline will reduce the chance of missing the correct diagnosis.
Similarly, a proven culture diagnosis of UTI aids in prescribing and helps
identify recurrent infections. Recognizing the latter may reveal underly-
ing diagnoses and reduce discomfort or even hospitalization for some
patients.
So, when faced with recurrent infections, be assiduous and request
urine cytology (to look for bladder cancers) and ultrasound (for struc-
tural abnormalities), and discuss the value of cystoscopy and rotating or
long-term antibiotics with urology colleagues.

THE ELDERLY PATIENT
389
PMH
Vascular diseases, metabolic, and neurological illnesses may all be under-
pinning diagnoses when faced with impotence. Could the new presenta-
tion of balanitis indicate diabetes?
Drug history
Aside from obvious culprits (e.g., diuretics), consider the effects of anti-
depressants, digoxin, and antihypertensives on both bladder and sexual
function.
SH and sexual history
Always take an appropriate functional history, particularly if there are con-
tinence problems. Consider alcohol and tobacco in relation to impotence,
and undertake a detailed occupational history if the patient presents with
hematuria (bladder cancer?).
Have the confi dence to take a sexual history if there are problems with
erectile or ejaculatory dysfunction. As indicated earlier, many older people
have active sex lives and you’re more likely to be embarrassed about tak-
ing the history than they are recounting it.
Examination
General
In addition to the detailed examination considered earlier in this chapter,
keep in mind the need for a general examination, focusing on mood and
neurological assessment in particular.
Cognition
This is a key part of this assessment, particularly for continence and erec-
tile dysfunction problems.
Urogenital
Think subtly: in older men, orchitis may present with declining mobility,
delirium, or falls, so don’t forget to undertake a thorough examination in
older adults, even when there is apparently little to indicate a urogenital
problem. For patients with urinary catheters, whether short or long term,
examination is a mandatory part of assessment.


392 CHAPTER 13 Female breast
Applied anatomy and physiology
Anatomy of the breast
The two mammary glands are highly developed apocrine sweat glands.
They develop embryologically along two lines extending from the axillae
to the groin—the milk lines (see Fig. 13.1 ). In humans, only one gland
develops on each side of the thorax, although extra nipples with breast
tissue may sometimes occur.
The breasts extend from the second to the sixth ribs and transversely
from the lateral border of the sternum to the mid-axillary line.
For the purposes of examination, each breast may be divided into four
quadrants by horizontal and vertical lines intersecting at the nipple. An
additional lateral extension of breast tissue (the axillary tail) stretches
from the upper outer quadrant toward the axilla (see Fig. 13.2 ).
Each mammary gland consists of 15–20 lobes separated by loose adi-
pose tissue and subdivided by collagenous septa. Strands of connective
tissue called the suspensory ligaments of the breast (Cooper’s ligaments)
run between the skin and deep fascia to support the breast. Each lobe is
further divided into a variable number of lobules composed of grape-like
clusters of milk-secreting glands termed alveoli and is drained by a lactif-
erous duct that opens onto the nipple. Myoepithelial cells surround the
alveoli, which contract and help propel the milk toward the nipples.
The nipple is surrounded by a circular pigmented area called the areola
and is abundantly supplied with sensory nerve endings. The surface of this
area also contains the glands of Montgomery, which act to lubricate the
nipple during lactation.
Lymphatic drainage
Lymphatic drainage from the medial portion of the breast is to the internal
mammary nodes. The central and lateral portions drain to the axillary
lymph nodes, which are arranged into fi ve groups (see Fig. 13.7 , p. 403).
Physiology—normal breast changes in women
• Puberty: During adolescence, estrogen promotes the development of
the mammary ducts and distribution of fatty tissue, while progesterone
induces alveolar growth.
• The menstrual cycle: Toward the second half of the menstrual cycle,
after ovulation, the breasts can become tender and swollen. They
return to their resting state after menstruation.
• Pregnancy: High levels of placental estrogen, progesterone, and
prolactin promote mammary growth in preparation for milk
production.
• Postnatal: The sharply declining levels of estrogen and progesterone
permit prolactin to stimulate the alveoli and produce milk. Suckling
stimuli increases the secretion of prolactin as well as releases oxytocin,
which stimulates myoepithelial cells to contract.
• Menopause: The breasts become softer and more homogenous
and undergo involutional changes, including d size, atrophy of the
secretory portions, and some atrophy of the ducts.
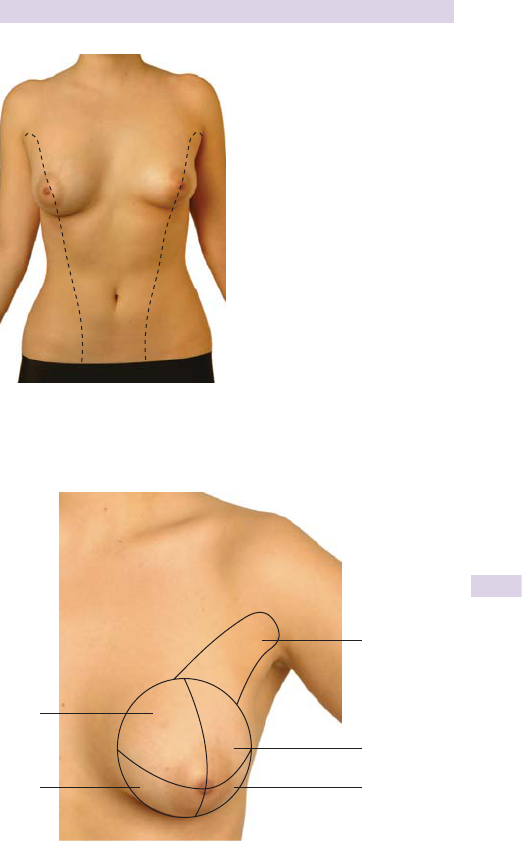
APPLIED ANATOMY AND PHYSIOLOGY
393
Fig. 13.1 Illustration of the two milk lines along which the nipples form—
occasionally extra nipples can be found.
Upper
inner
Upper
outer
Lower
inner
Lower
outer
Tail of
Spence
Fig. 13.2 Illustrations showing the four quadrants of the breast with the axillary
tail.

CHAPTER 13 Female breast394
Important symptoms
First steps
Begin by establishing a menstrual history (see Box 13.1 and b Chapter 14).
You should also determine the date of the last period of menstruation.
Pre-existing disease in the breast is likely to become more noticeable dur-
ing the second half of the menstrual cycle—lumps often get bigger or
become more easily palpable.
2 Bear in mind that seeking medical attention for a breast lump or tender-
ness can produce extreme anxiety and embarrassment in patients. Men
with gynecomastia are also likely to feel anxious about their breast devel-
opment ( Box 13.2 ). Be sure that you adopt an appropriately sensitive,
sympathetic, and professional approach.
Breast pain (mastalgia)
As for pain at any other site, you should establish the site, radiation, char-
acter, duration, severity, exacerbating factors, relieving factors, and associ-
ated symptoms. Also ask the following:
• Is the pain unilateral or bilateral?
• Is there any heat or redness at the site?
• Are there any other visible skin changes?
• Is the pain cyclical or constant—and is it related to menstruation?
• Is there a history of any previous similar episodes?
• Is the patient breastfeeding?
• Is the patient on any hormonal therapy (especially perimenopausal)?
The most common cause of mastalgia in premenopausal women is
hormone-dependent change. Other benign causes include mastitis and
abscesses. One in 100 breast cancers presents with mastalgia as the sole
symptom.
Box 13.1 Menstrual history
It is important to take a clear and accurate menstrual history, as outlined
in b Chapter 14. Establish the following:
• Age of fi rst
menses
• Usual time between menstruation
• Usual duration of menstruation
• Usual quantity of menstruation
• Age of menopause (if applicable)
• Number of pregnancies
• Previous history of breast-feeding
• The date of the beginning of the last menstrual period.

IMPORTANT SYMPTOMS
395
Nipple discharge
Important causes of nipple discharge include ductal pathology, such as
ductal ectasia, papilloma, and carcinoma.
Ask about the following:
• Is the discharge true milk or some other substance?
• What color is the discharge (e.g., clear, white, yellow, blood-stained)?
• Is it spontaneous or nonspontaneous?
• Is the discharge unilateral or bilateral?
• Are there any changes in the appearance of the nipple or areola?
• Mastalgia?
• Are there any breast lumps?
• Periareolar abscesses or fi
stulae indicating periductal mastitis?
•
This is closely linked to smoking in young women. Periductal mastitis
is also associated with hidradenitis suppuritiva. Ask about abscess
elsewhere, e.g., axilla and groin. The symptoms are often recurrent.
0 Remember that after childbearing, some women continue to discharge
a small secretion of milk (galactorrhea). However, in rare instances this
can be the fi
rst presenting symptom of a prolactin-secreting pituitary
adenoma. In the case of true bilateral galactorrhea, you should also ask
about
• Headaches
• Visual disturbances, especially visual fi eld
defi
cits
Box 13.2 Male breast
Gynecomastia
This is enlargement of male breast tissue, which should not normally
be palpable. There is an i in ductal and connective tissue.
Gynecomastia is a common occurrence in adolescents and the eld-
erly. It is seen in obese men due to increased adipose tissue.
In many patients, gynecomastia is drug related and the full causative
list is long. Important drug causes include estrogen receptor binders,
such as estrogen, digoxin, and marijuana, as well as anti-androgens, such
as spironolactone and cimetidine.
2 In the history, ask about drug and hormone treatment (e.g., for
prostate cancer).
2 You should also make a full examination of the patient, looking for
signs of hypopituitarism, chronic liver disease, and thyrotoxicosis.
Remember to carefully examine the genitalia.
Breast cancer in males
The female–male ratio for breast cancer is 100:1.
The appearance and pathology of breast cancer in males is similar to
that in females.
The most common presentation in males is a hard, painless lump fi xed
to the skin or chest wall, followed by nipple discharge.

CHAPTER 13 Female breast396
Box 13.4 Risk factors for breast cancer in females
• Advancing age
• Breast cancer in a fi rst-degree relative
• BRCA genes
• Previous cancer in the other breast
• Early menarche (<12 years)
• Late menopause (>55 years)
• Nulliparity (no pregnancies)
• No previous breast-feeding
• Previous radiotherapy—e.g., mantle radiotherapy for Hodgkin’s disease
• Oral contraceptive pill or hormone therapy
Box 13.3 Some causes of breast lumps
• Cyst
• Fibroadenoma
• Carcinoma
• Fat necrosis
• Hamartoma
• Lipoma
• Epidermoid cyst
• Cystosarcoma
Breast lumps
These are a very important presenting complaint with a number of causes
( Box 13.3 ), the most important one being cancer (see Box 13.4 for risk
factors). Establish the following:
• When the lump was fi rst
noticed
• Whether the lump has remained the same size or enlarged
• Whether the size of the lump changes according to menstrual cycle
• Is there any pain?
• Are there any local skin changes?
• Is there a history of breast lumps (ask about previous biopsies,
diagnoses, and operations)?
• A full systems inquiry should include any other symptoms that might
suggest a neoplastic disease (weight loss, loss of appetite, fatigue, etc.)
and metastatic spread to other organ systems (shortness of breath,
bony pain, etc.).
Age
A good clue as to the likely diagnosis of a lump is the age of the patient:
• Fibroadenomas are common between 20 and 30 years.
• Cysts are common between 30 and 50 years.
• Cancer is very rare <30 years of age but more likely in the >50 age-
group.

INSPECTION OF THE BREAST
397
Inspection of the breast
Before you start
• When examining the female breast, you should have a chaperone
present. Ideally, the chaperone should be female.*
• The patient should be fully undressed to the waist and sitting on the
edge of the exam table with her arms by her side.
• You should be able to see the neck, breasts, chest wall, and arms.
General inspection
Stand in front of the patient and observe both breasts, noting:
• Size
• Tanner stage
• Symmetry
• Contour
• Color
• Scars
• Venous pattern on the skin
• Any dimpling or tethering of the skin
• Ulceration (describe fully as on b p. 90)
• Skin texture, e.g., any visible nodularity
•
An unusual fi nding but one that should not be missed is the orange-
peel appearance of peau d’orange caused by local edema. This is
seen in breast carcinoma and following breast radiotherapy.
Nipples
Note whether the nipples are
• Symmetrical
• Everted, fl
at, or inverted
• Scaling (may indicate eczema or Paget’s disease of the breast)
• Associated with any discharge
•
Single-duct discharge can indicate a papilloma or cancer.
•
Multiple-duct discharge at the nipple suggests ductal ectasia.
If abnormalities are present, ask if these are a recent or long-standing
appearance. Make note of any additional nipples, which can occur any-
where along the mammary line.
Axillae
Ask the patient to place her hands on her head, and repeat the inspection
process. Pay particular attention to any asymmetry or dimpling that is now
evident. Examine the axillae for masses or color change.
Maneuvers
Finally, dimpling or fi xation can be further accentuated by having the
patient perform the following maneuvers (see Fig. 13.3 ):
• Lean forward while sitting
• Rest her hands on her hips
• Press her hands against her hips (pectoral contraction maneuver)
* Prudent advice is that all providers should have a chaperone present when performing an inti-
mate examination and the chaperone should be the same sex as the patient.
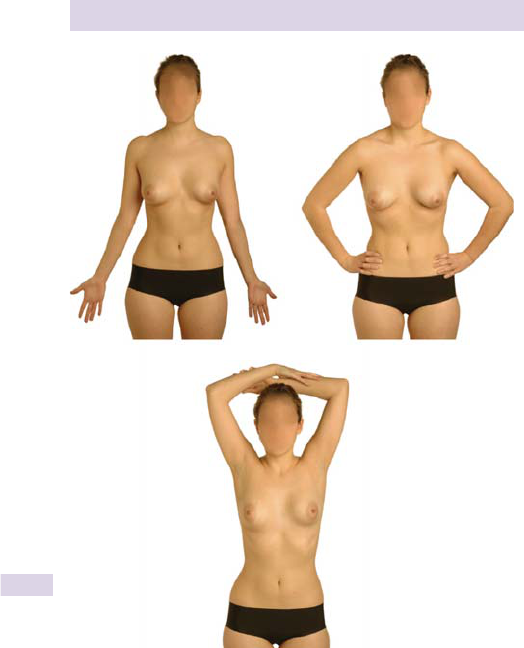
CHAPTER 13 Female breast398
(a) (b)
(c)
Fig. 13.3 Maneuvers for breast inspection. (a) Anatomical position. (b) Hands on
hips. (c) Arms crossed above the head.

PALPATION OF THE BREAST
399
Palpation of the breast
Before you start
Palpation of the breast should be performed with the patient lying supine
on the exam table. Examination of the breast is best performed with the
hand on the side to be examined placed behind her head ( Fig. 13.4 ). A
maneuver for fl attening a large breast is to have the patient roll onto her
contralateral hip, keeping the shoulders fl at against the table.
1
Inform the patient that an adequate breast exam will take approximately
3 minutes per breast; taking this time will help in detecting breast masses.
Palpation
Ask the patient if there is any pain or tenderness, and examine that area
last. Also ask her to tell you if you cause any pain during the examination.
Begin the examination on the asymptomatic side; this allows you to
determine the texture of the normal breast fi rst.
Ask the patient to point out any areas of tenderness; come to these last.
Breast
Palpation is performed by keeping the hand fl at, using the fi nger pads and
applying three levels of pressure as the breast tissue is palpated in a circu-
lar pattern against the underlying chest wall.
0 Most breasts will feel lumpy if pinched.
You should proceed in a systematic way to ensure that the whole breast
is examined. There are two regularly used methods (see Fig. 13.5 ); the
authors favor the vertical strip method:
• Start below the areola and work outward in a circumferential pattern,
ensuring that all quadrants have been examined.
• Examine breast systematically from the mid-axillary line, palpating up
and down between the clavicle and the bra line toward the sternum.
2 Do not forget to examine the axillary tail of Spence stretching from the
upper-outer quadrant to the axilla.
Lumps
• If you feel a lump, describe it according to the method on b p. 88,
noting especially the position, color, shape, size, surface, nature of the
surrounding skin, tenderness, consistency, temperature, and mobility.
• Next ascertain its relation to the overlying skin and underlying muscle.
• You must decide whether you are feeling a lump or a lumpy area.
Skin tethering
A lump may be described as tethered to the skin if it can be moved
independently of the skin for a limited distance but pulls on the skin if
moved further.
Tethering implies that an underlying lesion has infi
ltrated Cooper’s liga-
ments, which pass from the skin through the subcutaneous fat.
Tethering may involve the skin itself with cancers or abscesses .
1
Barton MB, Russell H, Fletcher SW (1999). Does this patient have breast cancer? The screening
clinical breast examination: should it be done? How?, JAMA 282(13):1270–1280.

CHAPTER 13 Female breast400
On inspection at rest, there may be puckering of the skin surface (as if
being pulled from within) or there may be no visible abnormality.
To demonstrate tethering:
• Move the lump from side to side and look for skin dimpling at the
extremes of movement.
• Ask the patient to lean forward while sitting.
• Ask the patient to raise her arms above her head as in Fig. 13.3 .
Skin fi
xation
This is caused by direct, continuous infi ltration of the skin by the under-
lying disease. The lump and the skin overlying it cannot be moved inde-
pendently. It is on a continuum with skin tethering. This may be associated
with some changes of skin texture.
Relation of a lump to muscle
The lump may be tethered or fi xed to the underlying muscle (e.g., pec-
toralis major).
2 Lumps attached to the underlying muscle can be moved to some degree
if the muscle is relaxed but are less mobile if the muscle is tensed.
• Ask the patient to rest her hand on her hip with the arm relaxed.
• Hold the lump between your thumb and forefi
ngers and estimate its
mobility by moving it in two planes at right angles to each other (e.g.,
up/down and left/right).
• Ask the patient to press her hand against her hip, causing contraction
of pectoralis major. Repeat the mobility exercise.
Immobile lumps
If a lump is immobile in all situations, it may have spread to involve the
bony chest wall (e.g., in the upper half of the breast or axilla).
Nipple
If the patient complains of nipple discharge, ask her to gently squeeze and
express any discharge. Note the color, presence of blood, and odor.
Milky, serous or green-brown discharges are almost always benign. A
bloody discharge may indicate neoplasia (e.g., papilloma or cancer).
Although the time typically spent palpating the breast is considered an
excellent time to instruct the patient in self-examination, recent recom-
mendations have not supported the usefulness of teaching it. In any case,
women should be counseled on breast awareness. Providers should con-
tinue to look for further information on this.
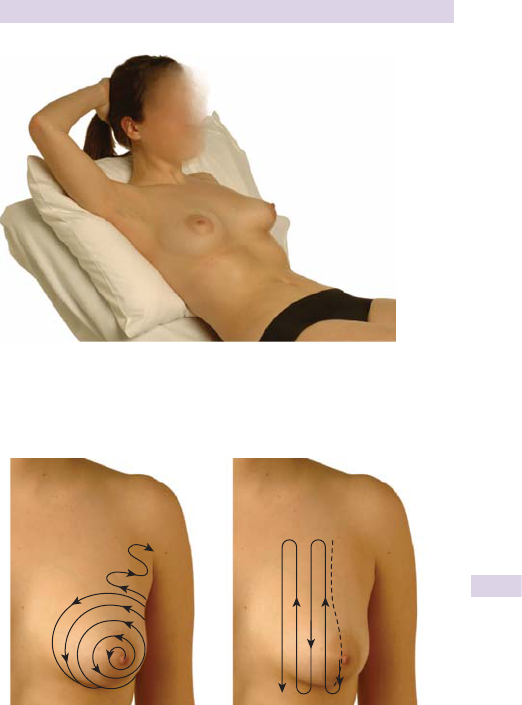
PALPATION OF THE BREAST
401
Fig. 13.4 Correct position of the patient for examination of the breast.
(a) (b)
Fig. 13.5 Two methods for systematic palpation of the breast. (a) Work
circumferentially from the areola. (b) Examine each half at a time, working from
bottom to top.

CHAPTER 13 Female breast402
Examining beyond the breast
Lymph nodes
The technique is described in detail on b p. 58.
Support the patient’s arm. For example, when examining the right axilla,
abduct the patient’s right arm gently and support it at the wrist with your
right hand while examining the axilla with your left hand.
Examine the main sets of axillary nodes ( Fig. 13.6 ):
• Central
• Lateral
• Medial (pectoral)
• Infraclavicular
• Supraclavicular ( Fig. 13.7 )
• Apical
If you feel any lymph nodes, consider site, size, number, consistency,
tenderness, fi
xation, and overlying skin changes.
Remember to also palpate for lymph nodes in the lower deep cervical
lymph chain at the same time as the supraclavicular nodes.
The rest of the body
If cancer is suspected, perform a full general examination, keeping in mind
the common sites of metastasis of breast cancer. Examine especially the
lungs, liver, skin, skeleton, and central nervous system.
B
E
D
C
A
A = Lateral
B = Pectoral
C = Central
D = Subscapular
E = Infraclavicula
r
Fig. 13.6 Axillary lymph nodes.
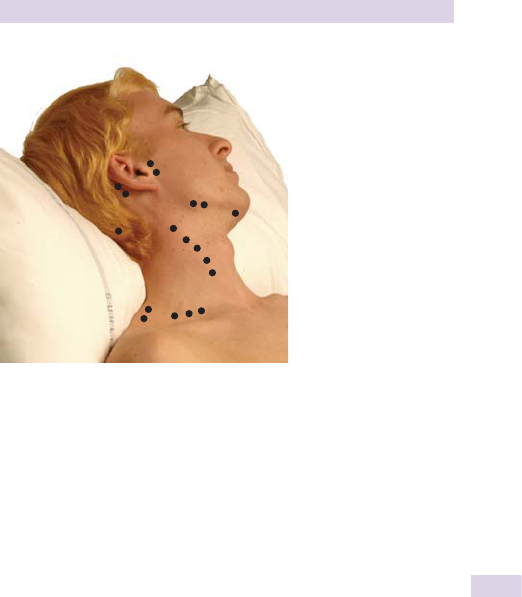
EXAMINING BEYOND THE BREAST
403
E
H
C
G
F
D
A
B
A = Supraclavicular
B = Posterior triangle
C = Jugular chain
D = Preauricular
E = Postauricular
F = Submandibular
G = Submental
H = Occipital
Fig. 13.7 Cervical and supraclavicular lymph nodes.

CHAPTER 13 Female breast404
Important presentations
Fibroadenoma
This is a benign neoplasm of the breast that is composed of both fi brous
and glandular tissue. It is usually found in young women <30 years old.
It presents as a painless, solid, mobile, well-circumscribed, rounded
breast mass with a smooth surface and rubbery consistency.
They may be multiple and bilateral with no axillary lymphadenopathy.
Large fi broadenomas may be found in teenagers.
Fibrocystic disease
This is another common benign breast condition consisting of fi brous
(rubbery) and cystic changes in the breast.
It usually presents with pain or tenderness that varies with the menstrual
cycle. Cysts and fi brous nodular fullness can be found on examination. A
solitary cyst is usually smooth, spherical, and tense. It is rarely possible to
elicit fl uctuation or to transilluminate. The axillary lymph nodes should
not be palpable.
Fat necrosis
This can occur after trauma. The physical signs can mimic cancer (e.g., a
fi rm, hard lump with skin tethering).
Abscesses
These occur mainly during childbearing years and are often associated
with trauma to the nipple during breast-feeding.
They present with a painful, spherical lump with surrounding edema.
Breast often shows additional signs of infl ammation (hot, red). The patient
may have constitutional symptoms, including malaise, night sweats, hot
fl ushes, and rigors.
Most recurrent or chronic breast abscesses occur in association with
duct ectasia or periductal mastitis. The associated periductal fi brosis can
often lead to nipple retraction.
Abnormal nipple and areola
Diseases of the nipple are important because they must be differentiated
from malignancy and they cause concern to patients.
Unilateral retraction or distortion of a nipple is a common sign of breast
carcinoma, as is blood-stained nipple discharge. The latter suggests an
intraductal carcinoma or benign papilloma.
A unilateral red, crusted, and scaling areola suggests an underlying carci-
noma (Paget’s disease of the breast) or, more commonly, eczema. Ask the
patient if she has eczema at other sites and examine appropriately.
Breast cancer
After non-melanoma skin cancers, breast cancer is the most common
form of cancer affecting women in the United States. It is second to lung

IMPORTANT PRESENTATIONS
405
cancer as a cause of cancer mortality.* It is rare under the age of 35, with
the incidence steadily increasing per decade.
There are a number of risk factors (see b Box 13.4 , p. 396). Several
on-line risk calculators are available for use by patients and clinicians to
estimate breast cancer risk (www.nci.nih.gov; Gail model).
There are two main types, which may be invasive or in situ:
• Ductal
• Lobular
In situ cancer is usually not palpable and diagnosed on mammography or
biopsy. Clinicians should remember that mammography does not detect
all breast cancers. It is estimated that 4–10% of cancers will be detected
on clinician exam alone.
There are a number of prognostic factors in breast cancer, mostly
related to the histological presentation of the tumor.
Presenting symptoms
The presenting symptoms may be related to the primary lesion. For
example:
• Palpable mass
• Pain (1/100 cancers present with mastalgia only)
• Nipple discharge, retraction, or rash
• Dimpling of the breast tissue
• Local edema
The presenting symptom may be related to the effects of secondary
spread. For example:
• Arm swelling (lymphatic or venous obstruction)
• Backache (skeletal infi ltration)
• Malaise
• Loss of weight
• Dyspnea
• Cough
• Nodules in skin
• Jaundice
• Mental changes
• Seizures
• Symptoms of hypercalcemia (e.g., thirst)
*
http://www.cdc.gov/cancer/breast/statistics/
This page intentionally left blank

407
Female reproductive
system
Applied anatomy 408
Applied physiology 411
History-taking in gynecology 413
Abnormal bleeding in gynecology 415
Other symptoms in gynecology 419
Outline gynecological examination 423
Pelvic examination 424
Taking a cervical smear 430
History-taking in obstetrics 433
Presenting symptoms in obstetrics 437
Outline obstetric examination 441
Abdominal examination 442
The elderly patient 447
Chapter 14

CHAPTER 14 Female reproductive system408
Applied anatomy
Pelvis
The bony pelvis is composed of the two pelvic bones with the sacrum and
coccyx posteriorly. The pelvic brim divides the “false pelvis” above (part
of the abdominal cavity) and the “true pelvis” below.
• Pelvic inlet: also known as the pelvic brim. It is formed by the sacral
promontory posteriorly, the iliopectineal lines laterally, and the
symphysis pubis anteriorly.
• Pelvic outlet: formed by the coccyx posteriorly, ischial tuberosities
laterally, and pubic arch anteriorly. The pelvic outlet has three wide
notches. The sciatic notches are divided into the greater and lesser
sciatic foramina by the sacrotuberous and sacrospinous ligaments,
which can be considered part of the perimeter of the outlet clinically.
• The pelvic cavity: lies between the inlet and the outlet. It has a deep
posterior wall and a shallow anterior wall giving a curved shape.
The contents of the pelvic cavity
The pelvic cavity contains the rectum, sigmoid colon, coils of the ileum,
ureters, bladder, female reproductive organs, fascia, and peritoneum.
Female internal genital organs
Vagina
The vagina is a thin-walled distensible, fi bromuscular tube that extends up
and backward from the vestibule of the vulva to the cervix. It is ~8 cm long
and lies posterior to the bladder and anterior to the rectum.
The vagina serves as an eliminatory passage for menstrual fl ow, forms
part of the birth canal, and receives the penis during sexual intercourse.
Fornix
This is the vaginal recess around the cervix and is divided into anterior,
posterior, and lateral regions, which, clinically, provide access points for
examining the pelvic organs.
Uterus
The uterus is a thick-walled, hollow, pear-shaped muscular organ consist-
ing of the cervix, body, and fundus. In the nulliparous female, it is 7–8 cm
long, ~5 cm wide, and ~2.5 cm deep. The uterus is covered with perito-
neum that forms an anterior uterovesical fold, a fold between the uterus
and rectum termed the pouch of Douglas , and broad ligaments laterally.
The uterus receives, retains, and nourishes the fertilized ovum.
Uterine orientation
In most females, the uterus lies in an anteverted and antefl exed position.
• Anteversion: the long axis of the uterus is angled forward.
• Retroversion: The fundus and body are angled backward and therefore
lie in the pouch of Douglas. This occurs in about 15% of the female
population. A full bladder may result in retroversion clinically.

APPLIED ANATOMY
409
• Antefl exion: The long axis of the body of the uterus is angled forward
on the long axis of the cervix.
• Retrofl
exion:
The body of the uterus is angled backward on the cervix.
Fallopian tubes
The fallopian, or uterine, tubes are paired tubular structures 710 cm long.
The fallopian tubes extend laterally from the cornua of the uterine body,
in the upper border of the broad ligament, and open into the peritoneal
cavity near the ovaries. The fallopian tube is divided into four parts:
• Infundibulum: distal, funnel-shaped portion with fi nger-like
fi
mbriae
• Ampulla: widest and longest part of tube outside the uterus
• Isthmus: thick-walled with a narrow lumen and, therefore, least
distensible part. The isthmus enters the horns of the uterine body.
• Intramural: that part which pierces the uterine wall
The main functions of the uterine tube are to receive the ovum from
the ovary, provide a site where fertilization can take place (usually in the
ampulla), and transport the ovum from the ampulla to the uterus. The
tube also provides nourishment for the fertilized ovum.
Ovaries
The ovaries are whitish-gray, almond-shaped organs measuring 74 cm x 2 cm
that are responsible for production of the female germ cells, ova, and female
sex hormones, estrogen and progesterone.
They are suspended on the posterior layer of the broad ligament by
a peritoneal extension (mesovarium) and supported by the suspensory
ligament of the ovary (a lateral extension of the broad ligament and meso-
varium) and the round ligament, which stretches from the lateral wall of
the uterus to the medial aspect of the ovary.
Perineum
The perineum lies inferior to the pelvic inlet and is separated from the
pelvic cavity by the pelvic diaphragm.
Seen from below with the thighs abducted, it is a diamond-shaped area
bounded anteriorly by the pubic symphysis, posteriorly by the tip of the
coccyx, and laterally by the ischial tuberosities.
The perineum is artifi cially divided into the anterior urogenital triangle,
containing the external genitalia in females, and an anal triangle, containing
the anus and ischiorectal fossae.
Female external genital organs
These are collectively known as the vulva . It consists of the following:
• Labia majora: a pair of fat-fi lled folds of skin extending on either side
of the vaginal vestibule from the mons towards the anus.
• Labia minora: a pair of fl
at folds containing a core of spongy
connective tissue with a rich vascular supply. Lie medial to the labia
majora.
• Vestibule of the vagina: between the labia minora, contains the
urethral meatus and vaginal orifi
ce. Outlet for mucous secretions from
the greater and lesser vestibular glands.

CHAPTER 14 Female reproductive system410
• Clitoris: short, erectile organ; the female homologue of the male penis.
Like the penis, a crus arises from each ischiopubic ramus and join in
the midline forming the ‘body’ capped by the sensitive ‘glans’.
• Bulbs of vestibule: 2 masses of elongated erectile tissue, ~3 cm long,
lying along the sides of the vaginal orifi ce.
• Bulbs of vestibule: Greater and lesser vestibular glands.

APPLIED PHYSIOLOGY
411
Applied physiology
Menstrual cycle
Menstruation is the shedding of the functional superfi cial 2/3 of the
endometrium after sex hormone withdrawal. This process, consisting
of three phases, is typically repeated ~300–400 times during a woman’s
life. Coordination of the menstrual cycle depends on a complex inter-
play between the hypothalamus, pituitary gland, ovaries, and uterine
endometrium.
Cyclical changes in the endometrium prepare it for implantation in the
event of fertilization and menstruation in the absence of fertilization. It
should be noted that several other tissues are sensitive to these hormones
and undergo cyclical change (e.g., the breasts and the lower part of the
urinary tract).
The endometrial cycle can de divided into three phases.
Phases of the menstrual cycle
The fi rst day of the menses is considered day 1 of the menstrual cycle.
Proliferative or follicular phase
This begins at the end of the menstrual phase (usually day 4) and ends at
ovulation (days 13–14). During this phase, the endometrium thickens and
ovarian follicles mature.
The hypothalamus is the initiator of the follicular phase. Gonadotrophin-
releasing hormone (GnRH) is released from the hypothalamus in a pulsa-
tile fashion to the pituitary portal system surrounding the anterior pituitary
gland. GnRH causes release of follicle-stimulating hormone (FSH). FSH is
secreted into the general circulation and interacts with the granulosa cells
surrounding the dividing oocytes.
FSH enhances the development of 15–20 follicles each month and
interacts with granulosa cells to enhance aromatization of androgens into
estrogen and estradiol.
Only one follicle with the largest reservoir of estrogen can withstand
the declining FSH environment, while the remaining follicles undergo
atresia at the end of this phase.
Follicular estrogen synthesis is essential for uterine priming but is also
part of the positive feedback that induces a dramatic preovulatory lutein-
izing hormone (LH) surge and subsequent ovulation.
Luteal or secretory phase
The luteal phase starts at ovulation and lasts through day 28 of the men-
strual cycle.
The major effects of the LH surge are the conversion of granulosa
cells from predominantly androgen-converting cells to predominantly
progesterone-synthesizing cells. High progesterone levels exert negative
feedback on GnRH, which in turn d FSH/LH secretion.
At the beginning of the luteal phase, progesterone induces the endome-
trial glands to secrete glycogens, mucus, and other substances. These
glands become tortuous and have large lumina due to i secretory activity.
Spiral arterioles extend into the superfi cial layer of the endometrium.

CHAPTER 14 Female reproductive system412
In the absence of fertilization by day 23 of the menstrual cycle, the
superfi cial endometrium begins to degenerate, and consequently ovar-
ian hormone levels d. As estrogen and progesterone levels fall, the
endometrium undergoes involution.
If the corpus luteum is not sustained by human chorionic gonado-
trophin (hCG) hormone from the developing placenta, menstruation
occurs 14 days after ovulation. If conception occurs, placental hCG main-
tains luteal function until placental production of progesterone is well
established.
Menstrual phase
In this phase, there is a gradual withdrawal of ovarian sex steroids, which
causes slight shrinking of the endometrium, thus the blood fl ow of spi-
ral vessels is reduced. This, together with spiral arteriolar spasms, leads
to distal endometrial ischemia and stasis. Extravasation of blood and
endometrial tissue breakdown lead to the onset of menstruation.
The menstrual phase begins as the spiral arteries rupture, releasing
blood into the uterus and the apoptosing endometrium is sloughed off.
During this period, the functionalis layer of the endometrium is
complete ly shed. Arteriolar and venous blood, remnants of endometrial
stroma and glands, leukocytes, and red blood cells are all present in the
menstrual fl ow. Shedding usually lasts ~4–7 days.

HISTORY-TAKING IN GYNECOLOGY
413
History-taking in gynecology
It is important to remember that many females can be embarrassed by
having to discuss their gynecological problems, so it is vital to appear con-
fi dent, remaining open to questions or concerns, and be nonjudgmental.
Although there are parts particular to this history, most of it is the same
as the basic outline described in b Chapter 2. We suggest that readers
review that chapter before going on.
Patient profi le
This includes the patient’s name, age, date of birth, and occupation.
Chief complaint
Ask the patient to tell you in her own words what she perceives as being
the main symptoms. Document each in order of severity.
History of presenting illness
More detailed questioning will depend on the presenting complaint (see
following pages). As described on b p. 33, ascertain the following:
• Exact nature of the symptom
• Onset
•
When and how it began (e.g., suddenly, gradually—over how long?)
•
If long-standing, why is the patient seeking help now?
• Periodicity and frequency
•
Is the symptom constant or intermittent?
•
If intermittent, how long does it last each time?
•
What is the exact manner in which it comes and goes?
•
2 How does it relate to the menstrual cycle?
• Change over time
• Exacerbating and relieving factors
• Associated symptoms
• Degree of functional disability caused
Menstrual history
• Age of menarche (fi rst menstrual period)
•
Normally at about 12 years, but can be as early as 9 or as late as 16
• Date of last menstrual period (LMP)
• Duration and regularity of periods (cycle)
•
Normal menstruation lasts 4–7 days.
•
The average length of the menstrual cycle is 28 days (i.e., the time
between fi rst day of one period and the fi rst day of the following
period), but it can vary between 21 and 42 days in normal women.
• Menstrual fl
ow: whether light, normal, or heavy (see
b p. 415)
• Menstrual pain: whether it occurs prior to or at the start of bleeding
• Irregular bleeding
•
E.g., intermenstrual blood loss, postcoital bleeding
• Associated symptoms
•
Bowel or bladder dysfunction, pain
• Hormonal contraception or hormone therapy (HT)
• Age at menopause (if this has occurred)

CHAPTER 14 Female reproductive system414
Past gynecological history
Record all details of the following:
• Previous cervical smears, including date of last Pap smear, any
abnormal smear results, and treatments received
• Previous history and results of human papillomavirus (HPV) testing
• Previous history of HPV vaccination
• Previous gynecological problems and treatments, including surgery and
pelvic infl
ammatory disease (PID)
Contraception
It is essential to ask women of reproductive age who are sexually active
with men about contraception, including the methods used, duration of
use and acceptance, current method, and future plans.
Past obstetric history
• Gravidity and parity: see b p. 434 for a full explanation.
Document the specifi cs of each pregnancy:
• Current age of the child and age of the mother when pregnant
• Birth weight
• Complications of pregnancy, labor, and puerperium
• Miscarriages and terminations. Note gestation time and complications.
Ask if Rhogam was given if Rh negative.
Past medical history
This is as described in b Chapter 2. Pay particular attention to any history
of chronic lung or heart disease, and note all previous surgical procedures.
Drug history
This is as described in b Chapter 2. Ask about all medication and drugs
taken (prescribed, over the counter, herbs, vitamins, and illicit drugs).
Record dosage and frequency, as well as any known drug allergies.
2 Make particular note to ask about use of the oral contraceptive pill
(OCP), patch, implant, vaginal ring, or hormone-releasing intrauterine
device (IUD) and of HT if not done so already.
Family history
Note especially any history of genital tract cancer, breast cancer, or
diabetes.
Smoking and alcohol
As always, document this fully, as described on b p. 37.
Social history
Take a standard SH, including living conditions and marital status.
This is also an extra chance to explore the impact of the presenting
problem on the patient’s life, in terms of her social life, employment, home
life, and sexual activity (see Sexual History, b p. 378). This discussion may
lead to issues far beyond the presenting complaint.
It is important to obtain a history regarding sexual abuse (rape, incest,
childhood molestation). Women who have a history of sexual abuse may
have fl ashbacks during an exam or may be unable to tolerate a full exam.

ABNORMAL BLEEDING IN GYNECOLOGY
415
Abnormal bleeding in gynecology
Menorrhagia
This is defi ned as >80 mL of menstrual blood loss per period (nor-
mal = 20–60 mL) and may be caused by a variety of local, systemic, or
iatrogenic factors. Menorrhagia is hard to measure, but periods are consid-
ered heavy if they lead to frequent changes (every 1–2 hours) of sanitary
products and there are clots >1 inch in diameter. Causes are listed in
Box 14.1
In the absence of structural uterine disease or other pathology, menor-
rhagia can also be described as dysfunctional uterine bleeding (DUB). This is
often found in adolescence or in the perimenopausal period.
In addition to the standard questions for any symptom, ask about the
following:
• Number of sanitary pads or tampons used per day and the strength
(absorbency) of those products
• Bleeding through to clothes or onto the bedding at night (fl ooding)
• The need to use two pads at once
• The need to wear double protection (i.e., pad and tampon together)
• Any clots in the menstrual fl
ow (compare to the size of coins)
• Interference with normal activities
2 Remember to ask about symptoms of iron-defi ciency anemia, such as
lethargy, breathlessness, and dizziness.
Dysmenorrhea
This is pain associated with menstruation and is thought to be caused
by i levels of endometrial prostaglandins during the luteal and menstrual
phases of the cycle, resulting in uterine contractions ( Box 14.2 ). The pain
is typically cramping, localized to the lower abdomen and pelvic regions
and radiating to the thighs and back.
Dysmenorrhea may be primary or secondary:
• Primary: occurring from menarche
Box 14.1 Some causes of menorrhagia
• Hypothyroidism
• IUD
• Fibroids
• Endometriosis
• Polyps—cervix, uterus
• Uterine cancer
• Infection (STIs)
• Previous sterilization
• Warfarin therapy
• Aspirin
• NSAIDs
• Clotting disorders (e.g., von-Willebrand’s disease)

CHAPTER 14 Female reproductive system416
• Secondary: occurring in females who previously had normal periods
(often caused by pelvic pathology)
When taking a history of dysmenorrhea, take a full pain history as on
b p. 33 and detailed menstrual history (b p. 413), and ask about the rela-
tionship of the pain to the menstrual cycle. Remember to ask about the
functional consequences of the pain—how does it interfere with normal
activities?
Intermenstrual bleeding (IMB)
Intermenstrual bleeding is uterine bleeding that occurs between the men-
strual periods. Causes are listed in Box 14.3
As for all of these symptoms, a full standard battery of questions should
be asked (b p. 413), as full menstrual history (b p. 413), past medical
and gynecological histories (b p. 414), and sexual history (b p. 414).
Ask also about association of the bleeding with hormonal therapy, con-
traceptive use, and previous cervical smears.
Postcoital bleeding
This is vaginal bleeding precipitated by sexual intercourse. It can be caused
by similar conditions to those for intermenstrual bleeding ( Box 14.4 ). Take
a full and detailed history, as for IMB.
Amenorrhea
This is the absence of periods and may be primary or secondary.
• Primary: failure to menstruate by 16 years of age in the presence of
normal secondary sexual development or failure to menstruate by
14 years in the absence of secondary sexual characteristics.
Box 14.2 Some causes of secondary dysmenorrhea
• Pelvic infl ammatory disease
• Endometriosis
• Uterine adenomyosis
• Fibroids
• Endometrial polyps
• Premenstrual syndrome
• Cessation of OCP
Box 14.3 Some causes of intermenstrual bleeding
• Obstetric: pregnancy, ectopic pregnancy, gestational trophoblastic
disease
• Gynecological: vaginal malignancy, vaginitis, cervical cancer,
adenomyosis, fi
broids, ovarian cancer
• Iatrogenic: anticoagulants, corticosteroids, antipsychotics,tamoxifen,
selective serotinin reuptake inhibitors (SSRIs), rifampicin, antiepileptic
drugs (AEDs)

ABNORMAL BLEEDING IN GYNECOLOGY
417
• Secondary: normal menarche, then cessation of menstruation with no
periods for at least 6 months.
2 Amenorrhea is a normal feature in prepubertal girls, pregnancy, during
lactation, postmenopausal females, and in some women using hormonal
contraception (see Box 14.5 ).
History-taking
A full and detailed history should be taken as described on b p. 33 and in
b Chapter 2. Ask especially about the following:
• Childhood growth and development
• If secondary amenorrhea:
•
Age of menarche
•
Cycle days
•
Day and date of LMP
•
Presence or absence of breast soreness
•
Mood change immediately before menses
• Chronic illnesses
• Previous surgery (including cervical surgery, which can cause stenosis,
and, more obviously, oophorectomy and hysterectomy)
• Prescribed medications known to cause amenorrhea, such
as phenothiazines and metoclopramide (they produce either
hyperprolactinemia or ovarian failure)
• Illicit or recreational drugs
• Sexual history
• Social history, including any emotional stress at school, work, or home,
and exercise and diet—include here any weight gain or weight loss.
Box 14.4 Some causes of postcoital bleeding
These are similar to those for intermenstrual bleeding, as well as vaginal
infection with Chlamydia , gonorrhea, trichomoniasis, or yeast. Cervicitis
can also result in bleeding.
Box 14.5 Some causes of amenorrhea
• Hypothalamic: idiopathic, weight loss, intense exercise
• Hypogonadism from hypothalamic or pituitary damage: tumors,
craniopharyngiomas, cranial irradiation, head injuries
• Pituitary: hyperprolactinemia, hypopituitarism
• Delayed puberty: constitutional delay
• Systemic: chronic illness, weight loss, endocrine disorders (e.g.,
Cushing’s syndrome, thyroid disorders)
• Uterine: mullerian agenesis
• Ovarian: PCOS, premature ovarian failure (e.g., Turner’s syndrome,
autoimmune disease, surgery, chemotherapy, pelvic irradiation,
infection)
• Psychological: emotional stress at school, home, or work

CHAPTER 14 Female reproductive system418
• Systems review: include vasomotor symptoms, hot fl ashes, virilizing
changes (e.g., i body hair, greasy skin), galactorrhea, headaches, visual
fi eld disturbance, palpitations, nervousness, hearing loss
Postmenopausal bleeding
This is vaginal bleeding occurring >6 months after menopause. It requires
reassurance and prompt investigation, as it could indicate the presence of
malignancy (see Box 14.6 ). In addition to the points outlined for amenor-
rhea, ask about the following:
• Local symptoms of estrogen defi
ciency, such as vaginal dryness,
soreness, and superfi
cial dyspareunia (b p. 419)
• Itching (pruritus vulvae—more likely in non-neoplastic disorders)
• Presence of lumps or swellings at the vulva
Cervical or endometrial malignancy
This is often present with profuse or continuous vaginal bleeding or with
a bloodstained, malodorous discharge.
Box 14.6 Some causes of postmenopausal bleeding
• Cervical carcinoma
• Uterine sarcoma
• Vaginal carcinoma
• Endometrial hyperplasia, carcinoma, or polyps
• Cervical polyps
• Trauma
• Hormone therapy (HT)
• Bleeding disorder
• Vaginal atrophy
• Sexually transmitted infections

OTHER SYMPTOMS IN GYNECOLOGY
419
Other symptoms in gynecology
Pelvic pain and dyspareunia
As with any type of pain, pelvic pain may be acute or chronic (see also
Box 14.7 ). Chronic pelvic pain is often associated with dyspareunia.
Dyspareunia
This is painful sexual intercourse and may be experienced superfi cially at
the area of the vulva and introitus on penetration or deep within the pelvis
(see Box 14.8 for causes). Dyspareunia can lead to failure to reach orgasm,
avoidance of sexual activity, and relationship problems.
When taking a history of pelvic pain or dyspareunia, you should obtain a
detailed history as for any type of pain (b p. 34) including site, radiation,
character, severity, mode and rate of onset, duration, frequency, exacer-
bating factors, relieving factors, and associated symptoms.
You also need to establish the relationship of the pain to the menstrual
cycle. Ask about the following:
• Date of LMP
• Cervical (Pap) smears
• Intermenstrual or postcoital bleeding
• Previous gynecological procedures (e.g., IUD, hysteroscopy)
• Previous PID or genitourinary infections
• Previous gynecological surgery (adhesion formation?)
• Vulvovaginal discharge
Box 14.7 Gynecological vs. gastrointestinal pain
Distinguishing between pain of gynecological and gastrointestinal origin
is often diffi cult. This is because the uterus, cervix, and adnexae share
the same visceral innervation as the lower ileum, sigmoid colon, and
rectum. Be careful in your history to rule out a gastrointestinal problem,
and keep an open mind.
Box 14.8 Some causes of dyspareunia
• Scars from episiotomy
• Vaginal atrophy
• Vulvitis
• Vulvar vestibulitis
• PID
• Ovarian cysts
• Endometriosis
• Varicose veins in pelvis
• Ectopic pregnancy
• Infections (STIs)
• Bladder or urinary tract disorder
• Cancer in the reproductive organs or pelvic region

CHAPTER 14 Female reproductive system420
• Bowel habit, nausea, and vomiting (b p. 208)
• A detailed sexual history (b p. 378) should include contraceptive use
and the degree of impact the symptoms have on the patient’s normal
life and psychological health.
Vaginal discharge
Vaginal discharge is a common complaint during the childbearing years. In
addition to the standard questions (b p. 413), ask about the following:
• Color, volume, odor, and presence of blood
• Irritation
• Hygiene habits including douching
• Which OTC remedies have been tried
2 Don’t forget to ask about diabetes and obtain a full drug history,
including recent antibiotic use; both may precipitate candidal infection.
• Obtain a full sexual history (b p. 378). A full gynecological history
should include history of cervical (Pap) smear testing, use of ring
pessaries, and recent history of surgery (i risk of vesicovaginal
fi stulae).
2 Lower abdominal pain, backache, and dyspareunia suggest PID.
2 Weight loss and anorexia may indicate underlying malignancy.
Physiological vaginal discharge
Physiological discharge is usually scanty, mucoid, and odorless. It occurs
with the changing estrogen and progesterone levels during the menstrual
cycle (clear discharge i in quantity mid-cycle, with subsequent thickening
as a physiological sign of ovulation) and pregnancy.
It may arise from vestibular gland secretions, vaginal transudate, cervical
mucus, and residual menstrual fl uid.
Pathological vaginal discharge
This usually represents infection (trichomonal or candidal vaginitis) and
may be associated with pruritus or burning of the vulval area.
• Candida albicans: discharge is typically thick and causes itching
• Bacterial vaginitis: discharge is gray and watery with a fi
shy smell. It is
seen especially after intercourse.
• Trichomonas vaginalis: discharge is typically profuse, opaque, cream-
colored, and frothy. It also has a characteristic fi
shy smell. This may also
be accompanied by urinary symptoms, such as dysuria and frequency.
Vulval symptoms
The main symptom to be aware of is itching or irritation of the vulva (pruri-
tis vulvae). It can be debilitating and socially embarrassing. Embarrassment
often delays the seeking of advice.
Causes include infection, vulval dystrophy, neoplasia, and other derma-
tological conditions. Ask especially about the following:
• Nature of onset, exacerbating and relieving factors
• Abnormal vaginal discharge
• History of cervical intraepithelial neoplasia ([CIN] thought to share a
common etiology with vulval intraepithelial neoplasia [VIN])
• Sexual history

OTHER SYMPTOMS IN GYNECOLOGY
421
• Dermatological conditions such as psoriasis and eczema
• Symptoms suggestive of renal or liver problems (b p. 210)
• Diabetes
• Use of douching and feminine hygiene products
Urinary incontinence
This is an objectively demonstrable involuntary loss of urine that can be
both a social and hygienic problem.
The two most common causes of urinary incontinence in females are
stress incontinence (SI) and detrusor overactivity (DO). Other less commonly
encountered causes include mixed SI and DO, sensory urgency, chronic
voiding problems, and fi stulae.
When taking a history of urinary incontinence, ascertain under what cir-
cumstances the patient experiences symptom. See also b p. 435. Remember
to ask about the functional consequences on the patient’s daily life.
Stress incontinence
Patients notice small amounts of urinary leakage with a cough, sneeze, or
exercise. One-third may also admit to symptoms of DO.
Ask about the following:
• Number of children (i risk with i parity)
• Genital prolapse
• Previous pelvic fl oor
surgery
Detruser overactivity
With DO there is urge incontinence, urgency, frequency, and nocturia
(see b p. 447). Ask about the following:
• History of nocturnal enuresis
• Previous neurological problems
• Previous incontinence surgery
• Incontinence during sexual intercourse
• Drug history (see note under The Elderly Patient, b p. 447)
Overfl ow
incontinence
Voiding disorders can result in chronic retention, leading to overfl ow
incontinence and i predisposition to infection. The patient may complain
of hesitancy, straining, poor fl ow, and incomplete emptying in addition to
urgency and frequency.
Fistulae
Suspect these if incontinence is continuous during the day and night.
Genital prolapse
Genital prolapse is descent of the pelvic organs through the pelvic fl oor
into the vaginal canal (possible causes are listed in Box 14.9 ). In the female
genital tract, the type of prolapse is named according to the pelvic organ
involved. Some examples include the following:
• Uterine: uterus
• Cystocele: bladder
• Vaginal vault prolapse: apex of vagina after hysterectomy
• Enterocele: small bowel
• Rectocele: rectum

CHAPTER 14 Female reproductive system422
Mild degrees of genital prolapse are often asymptomatic. More exten-
sive prolapse may cause vaginal pressure or pain, introital bulging, a feeling
of something coming down, and impaired sexual function.
Uterine descent often gives symptoms of backache, especially in older
patients.
There might be associated symptoms of incomplete bowel emptying
(rectocele) or urinary symptoms such as frequency or incomplete empty-
ing (cystocele or cystourethrocele).
Box 14.9 Some causes of genital prolapse
• Estrogen-defi ciency states: advancing age and menopause (atrophy
and weakness of the pelvic support structures)
• Childbirth: prolonged labor, instrumental delivery, fetal macrosomia,
i parity
• Genetic or congenital factors: e.g., spina bifi da
• Chronic raised intra-abdominal pressure: e.g., chronic cough,
constipation
Box 14.10 Some other common vulval conditions
• Dermatitis: atopic, seborrheic, irritant, allergic, steroid induced (itch,
burning, erythema, scale, fi ssures, lichenifi cation)
• Vulvovaginal candidiasis: itch, burning, erythema, vaginal discharge
• Lichen sclerosus: itch, burning, dyspareunia, white plaques, atrophic
wrinkled surface
• Psoriasis: remember to look for other areas of psoriasis; scalp, natal
cleft, nails
• Vulval intraepithelial neoplasia: itch, burning, multifocal plaques
• Erosive vulvovaginitis: erosive lichen planus, pemphigoid, pemphigus
vulgaris, fi
xed drug eruption (chronic painful erosion and ulcers with
superfi cial
bleeding)
• Atrophic vaginitis: secondary to estrogen defi
ciency (thin, pale, dry
vaginal epithelium; superfi
cial dyspareunia, minor vaginal bleeding,
pain)

OUTLINE GYNECOLOGICAL EXAMINATION
423
Outline gynecological examination
The gynecological examination should include a full abdominal examina-
tion before proceeding to pelvic, speculum, and bimanual examinations.
Explain to the patient that you would like to examine their genitalia and
reproductive organs, and reassure them that the procedure will be quick and
gentle. You should have a chaperone present, particularly if you are male.*
As always, ensure that the room is warm and well lit, preferably with a
moveable light source, and that you will not be disturbed.
The examination should follow an orderly routine. The authors’ sug-
gestion is shown in Box 14.11. It is standard practice to start with the
cardiovascular and respiratory systems—this not only gives a measure of
the general health of the patient but also establishes a physical rapport
before you examine more sensitive areas.
General inspection and other systems
Always begin with a general examination of the patient (as described in b
Chapter 3), including temperature, hydration, coloration, nutritional sta-
tus, lymph nodes, and blood pressure. Note especially the following:
• Distribution of facial and body hair, as hirsutism may be a presenting
symptom of various endocrine disorders
• Height and weight
• Examine the cardiovascular and respiratory systems in turn(see b
Chapters 7 and 8).
• Examine breasts in a systematic approach. Although the value of
teaching and performing breast self-exam is debated, patient education
on breast awareness during the exam is a good use of time and should
be done (see b Chapter 13).
Abdominal examination
A full abdominal examination should be performed (see b Chapter 9).
Look especially in the periumbilical region for scars from previous lapar-
oscopies and in the suprapubic region, where transverse incisions from
caesarean sections and most gynecological operations are found.
Box 14.11 Framework for gynecological examination
• General inspection
• Cardiorespiratory examination
• Breast examination
• Abdominal examination
• Pelvic examination
•
External genitalia—inspection
•
External genitalia—palpation
•
Speculum examination
•
Bimanual examination
* Attitudes regarding chaperones vary. Offi cial advice is that all providers should have a chaper-
one when performing an intimate examination and the chaperone should be the same sex as the
patient. In practice, male providers performing an examination on a female and females performing
an examination on a male should always have a chaperone present; the need for a chaperone in
other situations is judged at the time.

CHAPTER 14 Female reproductive system424
Pelvic examination
The patient should be allowed to undress in privacy and, if necessary, to
empty her bladder fi rst.
Setup and positioning
Before starting the examination, explain to the patient what will be
involved. Keep the abdomen covered. Ensure good lighting, and always
wear disposable, latex-free gloves.
Ask the patient to lie on her back on an examination table with both
knees bent up; the head of the table can be raised for comfort. The but-
tocks should be at the edge of the main table surface, with the heels
placed in stirrups or the feet on the table extension. Her knees should fall
to the side when the exam starts. In many clinical settings, it is standard
to use stirrups to support the heels; however, keeping the feet on the
table extension during the exam has been found to increase comfort and
decrease the patient’s sense of vulnerability during the exam.
1
Examination of the external genitalia
• Uncover the mons to expose the external genitalia, making note of the
pattern of hair distribution.
• Separate the labia from above with the forefi
nger and thumb of your
gloved left hand.
• Inspect the clitoris, urethral meatus, and vaginal opening.
• Look especially for any of the following:
•
Discharge
•
Redness
•
Ulceration
•
Atrophy
•
Old scars
• Ask the patient to cough or strain down and look at the vaginal walls
for any prolapse.
Palpation
• Palpate length of the labia majora between the index fi
nger and thumb.
•
The tissue should feel pliant and fl eshy.
• Palpate for Bartholin’s gland with the index fi
nger of the right hand just
inside the introitus and thumb on the outer aspect of labium majora.
•
Bartholin’s glands are only palpable if the duct becomes obstructed,
resulting in a painless cystic mass or an acute Bartholin’s abscess.
The latter is seen as a hot, red, tender swelling in the posterolateral
labia majora.
Speculum examination
Speculum examination is carried out to see further inside the vagina and
to visualize the cervix. It also allows the examiner to take a cervical smear
or swabs.
1
Seehusen DA, Johnson DR, Earwood JS, et al. (2006). Improving women’s experience during
speculum examinations at routine gynaecological visits: randomized clinical trial. BMJ 333:171.

PELVIC EXAMINATION
425
There are different types of vaginal specula (see Fig. 14.1 ), but the most
common is the bivalve speculum (Peders on or Graves). Plastic, dispos-
able speculum are in use in many clinics. It is important that you familiarize
yourself with the operation of the speculum before examining a patient so
that you can concentrate on the fi ndings (see Box 14.12 ).
Inserting the speculum
• Explain to the patient that you are about to insert the speculum into
the vagina, and provide reassurance that this should not be painful.
• Warm the speculum under running water.
• Test the temperature of the speculum on the inner thigh (warning the
patient before this is done).
• Using the left hand, open the lips of the labia minora to obtain a good
view of the introitus.
• Hold the speculum in the right hand with the main body of the
speculum in the palm (see Fig. 14.2 ) and the closed blades projecting
between index and middle fi ngers.
• Gently insert the speculum into the vagina, held with your wrist turned
such that the blades are in line with the opening between the labia.
• The speculum should be angled down and backward due to the angle
of the vagina.
• Maintain a posterior angulation and rotate the speculum through 90*
to position handles downward.
Handle
Thumb screw
Upper blade
Lower blade
(a) (b)
Fig. 14.1 (a) Sim’s speculum—used mainly in examination of women with vaginal
prolapse. (b) Cusco’s speculum.
Box 14.12 A word about specula
Many departments and clinical areas now used plastic or disposable
specula. These do not have a thumb-screw but have a ratchet to open
and close the blades.
Take care to familiarize yourself with the operation of the speculum -
before starting the examination. The clicking noise can startle a patient,
so it is best to comment on this prior to insertion.
Plastic specula with a light source are very convenient and much easier
to use than struggling to properly position a large lamp.
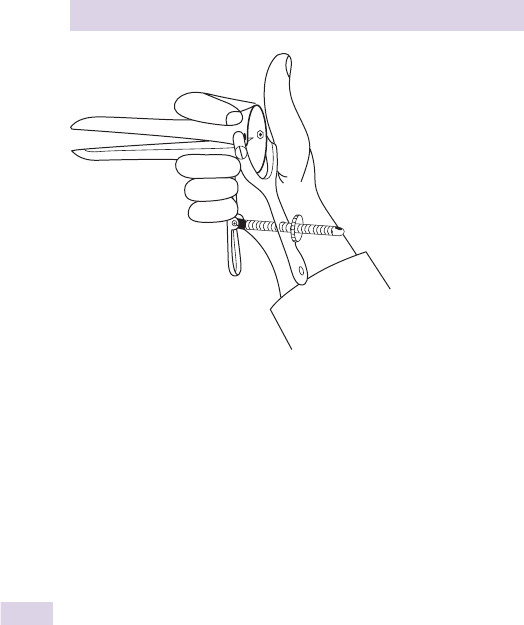
CHAPTER 14 Female reproductive system426
• When it cannot be advanced further, maintain a downward pressure
and press on the thumb piece to hinge the blades open, exposing the
cervix and vaginal walls.
• Once the optimum position is achieved, tighten the thumbscrew or
engage the locking mechanism (plastic speculum).
Findings
Inspect the cervix, which is usually pink, smooth, and regular.
• Look for the external os (central opening), which is round in
nulliparous women and slit-shaped after childbirth.
• Look for cervical ectopy (eversions), which appear as strawberry-
red areas spreading circumferentially around the os and represent
extension of the endocervical epithelium onto the surface of the
cervix.
• Note the presence of an IUD string if you obtained that history.
• Identify any ulceration or growths that may suggest cancer.
• Cervicitis may give a mucopurulent discharge associated with a red,
infl
amed cervix that bleeds on contact. Take swabs for culture.
Removing the speculum
2 This should be conducted with as much care as insertion. You should
still be examining the vaginal walls as the speculum is withdrawn.
• Undo the thumbscrew or lock and withdraw the speculum.
0 The blades should be held open until their ends are visible distal to
the cervix to avoid causing pain.
• Rotate the open blades in a counterclockwise direction to ensure that
the anterior and posterior walls of the vagina can be inspected.
Fig. 14.2 Hold speculum in the right hand such that the handles lie in the palm
and the blades project between the index and middle fi ngers.

PELVIC EXAMINATION
427
• Near the introitus, allow the blades to close, taking care not to pinch
the labia or pubic hairs.
Bimanual examination
Digital examination helps identify the pelvic organs. Ideally, the bladder
should be emptied, if not already done so by this stage. In some cases,
and with patients over age 50, a rectal exam is done as the last step of the
bimanual exam.
Getting started
• Explain to the patient that you are about to perform an internal
examination of the vagina, uterus, tubes, and ovaries, and obtain verbal
consent.
• The patient should be positioned as described on b p. 424.
• Expose the introitus by separating the labia with the thumb and
forefi
nger of the gloved left hand.
• Gently introduce the lubricated index and middle fi
ngers of the gloved
right hand into the vagina.
•
Insert your fi ngers with the palm facing laterally and then rotate 90*
so that the palm faces up.
•
The thumb should be abducted and the ring and little fi nger fl exed
into the palm (see Fig. 14.3 ).
Vagina, cervix, and fornices
• Feel walls of the vagina, which are slightly rugated, supple, and moist.
• Locate the cervix—usually pointing down in the upper vagina.
•
The normal cervix has a similar consistency to that of cartilage in the
tip of the nose.
• Assess the mobility of the cervix by moving it from side to side and
note any tenderness suggesting infection.
• Gently palpate the fornices on either side of the cervix.
Uterus
• Place your left hand on the lower anterior abdominal wall about 4 cm
above the symphysis pubis.
Fig. 14.3 Correct position of fi ngers of the right hand for vaginal examination.
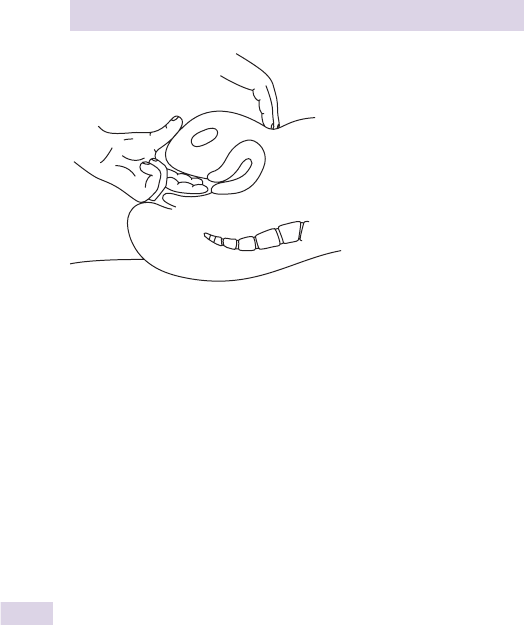
CHAPTER 14 Female reproductive system428
• Move the fi ngers of your right internal hand to push the cervix upward
and simultaneously press the fi ngertips of your left external hand
toward the internal fi ngers ( Fig. 14.4 ).
•
You should be able to capture the uterus between your two hands.
Note the following features of the uterine body:
• Size: A uniformly enlarged uterus may represent a pregnancy, fi broid,
or endometrial tumor.
• Shape: Multiple fi
broids tend to give the uterus a lobulated feel.
• Position
• Surface characteristics
• Any tenderness
2 Remember that an anteverted uterus is easily palpable bimanually, but
a retroverted uterus may not be.
• Assess a retroverted uterus with the internal fi
ngers positioned in the
posterior fornix or during the rectovaginal exam.
Ovaries and fallopian tubes
• Position the internal fi
ngers in each lateral fornix (fi
nger pulps facing
the anterior abdominal wall) and place your external fi ngers over each
iliac fossa in turn.
• Press the external hand inward and down, and the internal fi ngers
upward and laterally.
• Feel the adnexal structures (ovaries and fallopian tubes), assessing size,
shape, mobility, and tenderness.
•
Ovaries are fi rm, ovoid and often palpable. If there is unilateral or
bilateral ovarian enlargement, consider benign cysts (smooth and
compressible) and malignant ovarian tumors.
•
Normal fallopian tubes are not palpable.
•
There may be marked tenderness of the lateral fornices and cervix
in acute infection of the fallopian tubes (salpingitis).
Rectal
• If a rectal exam is done and you want to test any fecal material for
blood, change gloves prior to the exam.
Fig. 14.4 Bimanual examination of the uterus.

PELVIC EXAMINATION
429
• The third fi nger of the examining hand is inserted into the rectum,
with the second fi nger in the vagina (rectovaginal).
• Palpate the uterus and adnexal structures as described under Uterus,
and Ovaries and Fallopian Tubes. Palpate the rectal wall for any masses
or abnormalities.
Masses
It is often not possible to differentiate between adnexal and uterine
masses. However, there are some general rules:
• Uterine masses may be felt to move with the cervix when the uterus is
shifted upward, whereas adnexal masses will not.
• If you suspect an adnexal mass, there should be a line of separation
between the uterus and the mass, and the mass should be felt
distinctly from the uterus.
• While the consistency of the mass may help distinguish its origin in
certain cases, an ultrasound is necessary to further evaluate the mass.
Finishing the examination
• Withdraw your fi
ngers from the vagina.
•
Inspect the glove for blood or discharge.
• Redrape the genital area and allow the patient to get dressed in
privacy—offer them tissues to wipe and assistance, if needed.

CHAPTER 14 Female reproductive system430
Taking a cervical smear
Theory
The purpose of the cervical smear is to detect premalignant conditions
of the cervix. The U.S. Preventive Services Task Force recommends
screening sexually active women with a cervix starting 3 years after ini-
tial sexual activity or at age 21. Cervical samples should be taken regu-
larly (at least every 3 years). See Box 14.13 for taking samples during
pregnancy.
Routine sampling after age 65 is not recommended for women with
adequate, recent negative screening and who are not at high risk for cer-
vical cancer. There is no indication for routine screeing in women who
have had a hysterectomy for benign disease. Current recommendations
indicate that there is insuffi cient evidence to recommend routine screen-
ing for human papillomavirus (HPV) as a primary cancer screen. (http://
www.ahrq.gov/clinic/USpstf/uspscerv.htm).
A sample of cells from the squamocolumnar junction are obtained
and a cytological examination performed to look for evidence of cervical
intraepithelial neoplasia (CIN). Early stages of cervical cellular abnormality
are easily and successfully treated.
Most clinical settings now use liquid-based cytology (LBC), to minimize
the number of inadequate samples.
Equipment
• Specula of different sizes
• Disposable latex-free gloves
• Request form
• Sampling device—plastic broom, spatula or cytobrush ( Fig. 14.5)
• LBC vial—preservative for sample
Before you start
• Ensure that the woman understands the purpose of the examination.
• Discuss how and when she will receive the results.
• Document the date of the last menstrual period.
• Document the use of hormonal treatment (e.g., contraception, HT).
• Record the details of the last smear and previous abnormal results.
• Ask about irregular bleeding (e.g., postcoital or postmenopausal).
• Ask about unusual discharge.
• Where appropriate, offer screening for Chlamydia infection (under age
25 years, symptomatic).
Box 14.13 Cervical smears in pregnancy
Cervical smears may be performed during pregnancy. However, the
broom or brush type sampling devices may cause excessive (and con-
cerning) bleeding, so the more traditional wooden or plastic spatula is
often used instead.
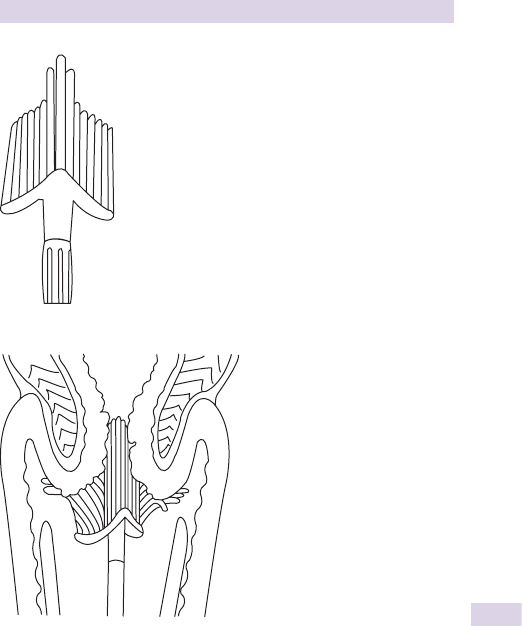
TAKING A CERVICAL SMEAR
431
Procedure
• Prepare the woman as for a vaginal examination, remembering to
make her comfortable and allow privacy—see b p. 424.
• Write the patient’s identifi
cation details on the LBC vial.
• Insert the speculum to identify and visualize cervix as on b p. 425.
Record any abnormal features of the cervix.
• Insert the plastic broom so that the central bristles of the brush are
in the endocervical canal and the outer bristles in contact with the
ectocervix (see Fig. 14.6 ).
• Using pencil pressure, rotate the brush 5 times in a clockwise
direction.
•
The bristles are beveled to scrape cells only on clockwise rotation.
Fig. 14.5 The end of a typical Cervex-Brush
®
.
Fig. 14.6 Representation of how to use a Cervex-Brush
®
. Note that the longer,
central bristles are within the cervical canal, while the outer bristles are in contact
with the ectocervix.

CHAPTER 14 Female reproductive system432
• Rinse the brush thoroughly in the preservative (ThinPrep
®
) or break
off brush into the preservative (SurePath
®
).
• If using a cytobrush, spatula, and slide, obtain adequate endocervical
(cytobrush) and ectocervical (spatula) samples and apply the specimen
to the slide (roll the brush across the slide; apply a thin smear of
material from the spatula to the slide) and apply fi xative.
• Place the slide in transport packaging with a completed request form.
• Remove the speculum as on b p. 426.
• Perform the bimanual exam.
• Allow the patient to get dressed in privacy.
Current practice recommendations and consensus guidelines are
available from the American Society of Colposcopy and Cervical
Pathology Web site at: http://www.asccp.org/

HISTORY-TAKING IN OBSTETRICS
433
History-taking in obstetrics
Although some parts are particular to this history, most of this process is
the same as the basic outline described in b Chapter 2. We suggest that
readers review that chapter before going on.
Demographic details
• Name, age, and date of birth
• Gravidity and parity—see Box 14.15
Estimated date of delivery (EDD)
The EDD can be calculated from the last menstrual period (LMP) by
Naegele’s rule,* which assumes a 28-day menstrual cycle ( Box 14.4 ).
It is important to consider at this point any details that may infl uence the
validity of the EDD as calculated from the LMP, such as the following:
• Was the last period normal?
• What is the usual cycle length?
• Are the patient’s periods usually regular or irregular?
• Was the patient using the oral contraceptive pill in the 3 months prior
to conception? If so, calculations based on her LMP are unreliable.
Current pregnancy
Ask about the patient’s general health and that of her fetus. If there is a pre-
senting complaint, the details should be documented in full as on b p. 33.
Also ask about the following:
• Fetal movements
•
These are not usually noticed until 20 weeks’ gestation in the fi rst
pregnancy and 18 weeks’ in the second or subsequent pregnancies.
• Any important laboratory tests or ultrasound scans
•
This include dates and details of all the scans, especially the fi rst scan
(dating or nuchal translucency scan).
Box 14.14 Calculating the EDD
• Subtract 3 months from the fi rst day of the LMP.
• Add on 7 days and 1 year.
If the normal menstrual cycle is <28 days or >28 days, then an appropri-
ate number of days should be subtracted from or added to the EDD,
respectively. For example, if the normal cycle is 35 days, 7 days should
be added to the EDD.
* Named after the German obstetrician Franz Naegele, following the rule’s description in his
Lehrbuch der Geburtshuelfe, published for midwives in 1830. The formula was actually developed by
Harmanni Boerhaave. See Boerhaave H. (1744) Praelectiones Academicae in Propias Institutiones Rei
Medicae . Von Haller A (ed). Göttingen: Vandehoeck. Vol. 5 (part 2), p. 437.
The parts of the history detailed below are only those that differ from
those described in b Chapter 2 and earlier in this chapter (b p. 413).

CHAPTER 14 Female reproductive system434
Past obstetric history
Ask about all of her previous pregnancies, including miscarriages, termina-
tions, and ectopic pregnancies.
For each pregnancy, note the following:
• Age of the mother when pregnant
• Antenatal complications
• Duration of pregnancy
• Details of induction of labor
• Duration of labor
• Presentation and method of delivery
• Birth weight and sex of infant
2 Also ask about any complications of the puerperal period, which is
the period from the end of the third stage of labor until involution of the
uterus is complete (about 6 weeks).
Possible complications include the following:
• Postpartum hemorrhage
• Infections of the genital and urinary tracts
• Deep vein thrombosis (DVT)
Box 14.15 Gravidity and parity
These terms can be confusing. Although it is worth knowing the defi ni-
tions and how to use them, they should be supplemented with a detailed
history and not relied on alone, as you may miss subtleties that alter
your outlook on the case.
Gravidity (G)
• The number of pregnancies (including the present one) to any stage
Parity (P)
• The outcomes of the pregnancies. The notations after the P refer to
full-term (F), premature (P), abortions (spontaneous or terminations)
(A), and living children (L).
Examples
• A woman who is currently 20 weeks pregnant and has had two
normal deliveries:
•
G 3 P 2002
• A woman who is not pregnant and has had a single live birth and one
miscarriage at 17 weeks:
•
G 2 P 1011
• A woman who is currently 25 weeks pregnant, has had three normal
deliveries, one miscarriage at 9 weeks, and a termination at 7 weeks:
•
G 6 P 3023
Twins
• A woman who is not pregnant and had a delivery of twins at 34
weeks:
•
G 1 P 0202

HISTORY-TAKING IN OBSTETRICS
435
• Perineal complications, such as breakdown of the episiotomy site or
perineal wounds
• Psychological complications (e.g., postpartum depression)
Past gynecological history
• Record all previous gynecological problems with full details of how the
diagnosis was made, treatments received, and the success or otherwise
of that treatment.
• Record date of the last cervical smear and any previous abnormal
results.
• Take a full contraceptive history.
Past medical history
Take a full PMH as on b p. 35. Note especially those conditions that may
have an impact on the pregnancy:
• Diabetes
• Thyroid disorders
• Addison’s disease
• Asthma
• Epilepsy
• Hypertension
• Heart disease
• Renal disease
• Infectious diseases, such as TB, HIV, syphilis, and hepatitis
•
Identifi cation of such conditions allows early referral to a specialist
for shared care as needed.
• All previous operative procedures
• Blood transfusions and receipt of other blood products
• Psychiatric history
Drug history
• Take a full drug history (b p. 36), which should include all prescribed
medications, OTC medicines, herbal treatments, vitamins, and illicit drugs.
• Record any drug allergies and their nature.
• If currently the patient is pregnant, ensure that she is taking 400 mcg
of folic acid daily until 12 weeks’ gestation to reduce the incidence of
spina bifi da.
Smoking and alcohol
A full history should be taken (b p. 37).
Family history
Family history is an important aspect of the obstetric history and should
not be overlooked.
• Ask about any pregnancy-related conditions, such as congenital
abnormalities, problems following delivery ( Box 14.16 ), etc.
• Ask also about a FH of diabetes.
2 Ask especially if there are any known hereditary illnesses.
Appropriate counseling and investigations such as chorionic villus
sampling or amniocentesis may need to be offered.

CHAPTER 14 Female reproductive system436
Social history
A full standard SH (b p. 41) should be taken. Ask about the following:
• Her partner—age, occupation, health
• How stable the relationship is
• If she is not in a relationship, who will give her support during and
after the pregnancy?
• Ask if the pregnancy was planned or not.
• If she works, ask about her job and if she has any plans to return to
work.
0 You may also use this opportunity to give advice on regular exercises
and avoidance of certain foods, e.g., seafood (high mercury content), soft
cheeses (risk of Listeria ), and calf liver (high vitamin A content).
Box 14.16 A word about deliveries
The verb to deliver is often misused by students of obstetrics, as it is
often misused by the public at large.
Babies are not delivered; the mothers are delivered of the child, as in
being relieved of a burden.
Check your nearest dictionary!

437
PRESENTING SYMPTOMS IN OBSTETRICS
Presenting symptoms in obstetrics
Bleeding—during pregnancy
Treat as any symptom. In addition, you should build a clear picture of how
much blood is being lost, and when and how it is affecting the current
pregnancy (see also Box 14.17 ).
After establishing an exact timeline and other details about the symp-
tom, ask about the following:
• Exact nature of the bleeding (fresh or old)
• Amount of blood lost
• Number of sanitary pads or tampons used daily
• Presence of clots (and, if present, size of those clots)
• Presence of pieces of tissue in the blood
• Presence of mucoid discharge
• Fetal movement
Box 14.17 Some causes of vaginal bleeding in early
pregnancy
Ectopic pregnancy
• Symptoms: light bleeding, abdominal pain, fainting if pain and blood
loss is severe
• Signs: closed cervix, uterus slightly larger and softer than normal,
tender adnexal mass, cervical motion tenderness
Threatened miscarriage
• Symptoms: light bleeding; sometimes cramping, lower abdominal pain
• Signs: closed cervix, uterus corresponds to dates; sometimes uterus
is softer than normal
Complete miscarriage
• Symptoms: light bleeding; sometimes light cramping, lower abdominal
pain and history of expulsion of products of conception
• Signs: uterus smaller than dates and softer than normal; closed
cervix
Incomplete miscarriage
• Symptoms: heavy bleeding; sometimes cramping lower abdominal
pain, partial expulsion of products of conception
• Signs: uterus smaller than dates and cervix dilated
Molar pregnancy
• Symptoms: heavy bleeding, partial expulsion of products of
conception that resemble grapes; sometimes nausea and vomiting,
cramping lower abdominal pain, history of ovarian cysts
• Signs: dilated cervix, uterus larger than dates and softer than normal
Information adapted from World Health Organization, Department of
Reproductive Health Research (2007). Vaginal bleeding in early preg-
nancy. In Managing Complications in Pregnancy and Childbirth: A Guide for
Midwives and Doctor s . Geneva: WHO.

CHAPTER 14 Female reproductive system438
• Associated symptoms, such as abdominal pain (associated with
placental abruption; placenta previa is painless).
• Possible trigger factors—recent intercourse, injuries (see Box 14.18 )
• Any history of cervical abnormalities and the result of the last smear
Abdominal pain
A full pain history should be taken as on b p. 33, including site, radiation,
character, severity, mode and rate of onset, duration, frequency, exacer-
bating factors, relieving factors, and associated symptoms.
Take a full obstetric history and systems review. Ask especially about
a past history of preeclampsia, preterm labor, peptic ulcer disease, gall-
stones, appendectomy, and cholecystectomy.
0 Remember that the pain may be unrelated to pregnancy, so keep an
open mind! Causes of abdominal pain in pregnancy include the following:
• Obstetric: preterm or term labor, placental abruption, ligament pain,
symphysis pubis dysfunction, preeclampsia or HELLP (Hemolysis,
Elevated Liver enzyme levels, Low Platelet count) syndrome, acute
fatty liver of pregnancy
• Gynecological: ovarian cyst rupture, torsion, hemorrhage, uterine
fi broid
degeneration
• Gastrointestinal: constipation, appendicitis, gallstones, cholecystitis,
pancreatitis, peptic ulceration
• Genitourinary: cystitis, pyelonephritis, renal stones, renal colic
Labor pain
This is usually intermittent and regular in frequency and associated with
tightening of the abdominal wall.
Bleeding—after pregnancy
This is called postpartum hemorrhage , or PPH.
• Primary PPH: >500 mL blood loss within 24 hours following delivery
• Secondary PPH: any excess bleeding between 24 hours and 6 weeks
post-delivery (No amount of blood is specifi
ed in the defi nition.)
2 Take a full history as for bleeding during pregnancy, on b p. 437. Ask
Box 14.18 Some causes of bleeding in second and third
trimesters (>24 weeks)
This is known as antepartum hemorrhage (APH).
Placenta previa
The placenta is positioned over the lower pole of the uterus, obscuring
the cervix. Bleeding is usually after 28 weeks and often precipitated by
intercourse. Findings may include a relaxed uterus, fetal presentation
not in the pelvis, and normal fetal condition.
Placental abruption
This is detachment of a normally located placenta from the uterus before
the fetus is delivered. Bleeding can occur at any stage of the pregnancy.
Possible fi ndings include a tense, tender uterus, d or absent fetal move-
ments, fetal distress, or absent fetal heart sounds.

439
PRESENTING SYMPTOMS IN OBSTETRICS
also about symptoms of infection, an important cause of secondary PPH
(see Boxes 14.18 and 14.19 ).
Hypertension
Hypertension is a common and important problem in pregnancy. You
should be alert to the possible symptoms that can result from it, such
as headache, blurred vision, vomiting, and epigastric pain after 24 weeks,
convulsions, or loss of consciousness.
Pregnancy-induced hypertension
• Two readings of diastolic blood pressure 90–110, systolic BP >140,
4 hours apart after 20 weeks gestation; no proteinuria
Mild proteinuric pregnancy-induced hypertension/preeclampsia
• Two readings of diastolic blood pressure 90–110, systolic BP >140,
4 hours apart after 20 weeks gestation, and proteinuria 1–2+
Severe proteinuric pregnancy-induced hypertension/preeclampsia
• Diastolic blood pressure 110 or greater after 20 weeks’ gestation and
proteinuria 3+.
• Other symptoms may include hyperrefl
exia, headache, clouding of
vision, oligura, abdominal pain, pulmonary edema. There may be
evidence of HELLP syndrome.
Eclampsia
• Convulsions associated with raised blood pressure and/or proteinuria
beyond 20 weeks gestation. The patient may be unconscious.
Box 14.19 Some causes of postpartum hemorrhage
Primary
• Uterine atony (most frequent cause)
• Genital tract trauma
• Coagulation disorders
• Retained placenta
• Uterine inversion
• Uterine rupture
Secondary
• Retained products of conception
• Endometritis
• Infection

CHAPTER 14 Female reproductive system440
Box 14.21 Minor symptoms of pregnancy
These so-called minor symptoms of pregnancy are often experienced by
many women as normal, physiological changes occur. This is not to say
that they should be ignored, as they may point to pathology.
• Nausea and vomiting: severity varies greatly and is more common in
multiple pregnancies and molar pregnancies. Persistence of vomiting
may suggest pathology such as infections, gastritis, biliary tract
disease, or hepatitis.
• Frequent urination: An expected fi
nding in pregnancy, it does not
exclude the possibility of urinary tract infection.
• Heartburn/gastroesophageal refl ux: Heartburn is a frequent
complaint during pregnancy due partially to compression of the
stomach by the gravid uterus. See b p. 206.
• Constipation: often secondary to i progesterone. It improves with
gestation (b p. 212).
• Shortness of breath: due to dilatation of the bronchial tree
secondary to i progesterone. Peaks at 20–24 weeks. The growing
uterus also has an impact. Other possible causes (such as PE) need
to be considered. See b p. 184.
• Fatigue: very common in early pregnancy, peaking at the end of the
fi
rst trimester. Fatigue in late pregnancy may be due to anemia.
• Insomnia: due to anxiety, hormonal changes, and physical discomfort
• Pruritus: Generalized itching in the third trimester may resolve after
delivery. Biliary problems should be excluded (b p. 216).
• Hemorrhoids: may resolve after delivery
• Varicose veins: especially at the feet and ankles
• Vaginal discharge: Exclude infection and spontaneous rupture of the
membranes.
• Pelvic pain: Stretching of pelvic structures can cause ligament pain
that resolves in the second half of the pregnancy. Symphysis-pubis
dysfunction causes pain on abduction and rotation at the hips and on
mobilization.
• Backache: often fi
rst develops during the fi
fth to seventh months of
pregnancy
• Peripheral paresthesias : Fluid retention can lead to compression of
peripheral nerves, such as carpal tunnel syndrome. Other nerves can
be affected, e.g., lateral cutaneous nerve of the thigh.
Box 14.20 Risk factors for postpartum hemorrhage
These include placental abnormalities, polyhydramnios, prolonged labor,
very rapid labor, multiple gestation, previous PPH or APH, preeclampsia,
coagulation abnormalities, genital tract lacerations, and small maternal
stature.

OUTLINE OBSTETRIC EXAMINATION
441
Outline obstetric examination
Explain to the patient that you would like to examine her uterus and baby,
and reassure her that the procedure will be quick and gentle. You should
have a chaperone present, particularly if you are male.
As always, ensure that the room is warm and well lit, preferably with a
moveable light source, and that you will not be disturbed.
As with the gynecological examination, you should follow an orderly
routine. The authors’ suggestion is shown in Box 14.22. It is standard prac-
tice to start with the cardiovascular and respiratory systems—this not
only gives a measure of the general health of the patient but also estab-
lishes a physical rapport before you examine more sensitive areas.
General inspection
Always begin with a general examination of the patient (as in Chapter 3),
including temperature, hydration, coloration, nutritional status, lymph
nodes, and blood pressure. Note especially the following:
• Any brownish pigmentation over the forehead and cheeks, known
as chloasma
• Distribution of facial and body hair, as hirsutism may be a presenting
symptom of various endocrine disorders
• Height and weight, and calculate BMI (b p. 56)
2 Blood pressure should be measured in the left lateral position at 45*
to avoid compression of the IVC by the gravid uterus.
0 Anemia is a common complication of pregnancy, so examine the
mucosal surfaces and conjunctivae carefully (b p. 51).
• Examine the cardiovascular and respiratory systems in turn(see
Chapters 7 and 8).
•
Flow murmurs are common in pregnancy and, although usually of no
clinical signifi cance, must be recorded in detail.
• A routine breast examination is usually performed. Take note of
inverted nipples, which may interfere with breast-feeding.
Box 14.22 Framework for obstetric examination
• General inspection
• Cardiorespiratory examination
• Breast examination
• Abdominal inspection
• Abdominal palpation
•
Uterine size
•
Fetal lie
•
Fetal presentation
•
Engagement
•
Amniotic fl uid estimation
• Auscultation of the fetal heart
• Vaginal examination
2 Perform urinalysis (particularly urine dipstick)

CHAPTER 14 Female reproductive system442
Abdominal examination
Inspection
Look for abdominal distension caused by the gravid uterus rising from the
pelvis. Look also for the following:
• Asymmetry
• Fetal movements
• Surgical scars
•
Pubic hairline (transverse suprapubic Pfannenstiel incision)
•
Paraumbilical region (laparoscopic scars)
• Cutaneous signs of pregnancy
•
Linea nigra (black line), which stretches from the pubic symphysis
upward in the midline
•
Red stretch marks of current pregnancy (striae gravidarum)
•
White stretch marks (striae albicans) from a previous pregnancy
•
Other areas that can undergo pigmentation in pregnancy include the
nipples, vulva, umbilicus, and recent abdominal scars.
• Umbilical changes
•
Flattening as pregnancy advances
•
Eversion secondary to i intra-abdominal pressure (e.g., caused by
multiple pregnancies or polyhydraminios)
Palpation
Before palpating the abdomen, always ask about any areas of tenderness
and examine those areas last. Palpation should start as for any standard
abdominal examination (Chapter 9) before proceeding to more specifi c
maneuvers in an obstetric examination.
Uterine size
This provides an estimation of gestational age in weeks ( Fig. 14.7 ) and
is objectively measured and expressed in centimeters as the symphysial–
fundal height (distance from the symphysis pubis to the upper edge of the
uterus) ( Boxes 14.23 and 14.24 ).
0 You need a tape measure for this—don’t start without it!
• Use the ulnar border of the left hand to press fi
rmly into the abdomen
just below the sternum.
• Move your hand down the abdomen in small steps until you can feel
the fundus of the uterus.
• Locate the upper border of the bony pubic symphysis by palpating
downward in the midline, starting from a few centimeters above the
pubic hair margin.
• Measure the distance between the two points that you have found in
centimeters, using a fl
exible tape measure.
Fetal lie
This describes the relationship between the long axis of the fetus and the
long axis of the uterus ( Fig. 14.8 ). In general, it can be the following:
• Longitudinal: The long axis of the fetus matches the long axis of the
uterus. Either the head or breech will be palpable over the pelvic inlet.
• Transverse: The fetus lies at right angles to the uterus and the fetal
poles are palpable in the fl anks.
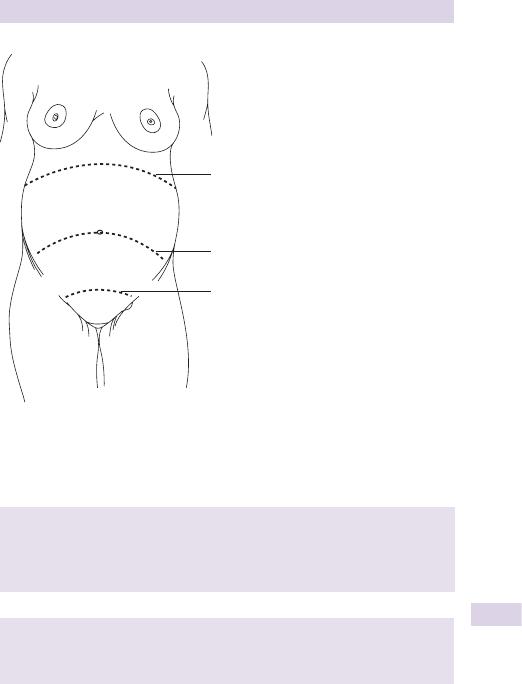
443
ABDOMINAL EXAMINATION
• Oblique: The long axis of the fetus lies at an angle of 45* to the long axis
of the uterus; the presenting part will be palpable in one of the iliac fossae.
Examination technique
The best position is to stand at the mother’s right side, facing her feet.
• Put your left hand along the left side of the uterus.
• Put your right hand on the right side of the uterus.
• Palpate systematically toward the midline with one hand and then the
other hand—use dipping movements with fl
exion of the MCP joints to
feel the fetus within the amniotic fl uid.
• You should feel the fetal back as fi
rm resistance or the irregular shape
of the limbs.
36 weeks
20 weeks
12 weeks
Fig. 14.7 The distance between the fundus (upper border of the uterus) and the
pubic symphysis can be used as a guide to the number of weeks’ gestation. You can
also, therefore, judge whether the uterus is smaller or larger than expected, which
may point to problems with the pregnancy.
Box 14.23 Symphysial–fundal height (cm) 8 weeks
gestation
At 16–36 weeks, there is a margin of error of 92 cm, 93 cm at 36–40
weeks, and 94 cm at 40 weeks on.
Box 14.24 Uterine size—milestones
• The uterus fi rst becomes palpable at 12 weeks’ gestation.
• 20 weeks’ gestation = at the level of the umbilicus
• 36 weeks’ gestation = at the level of the xiphisternum
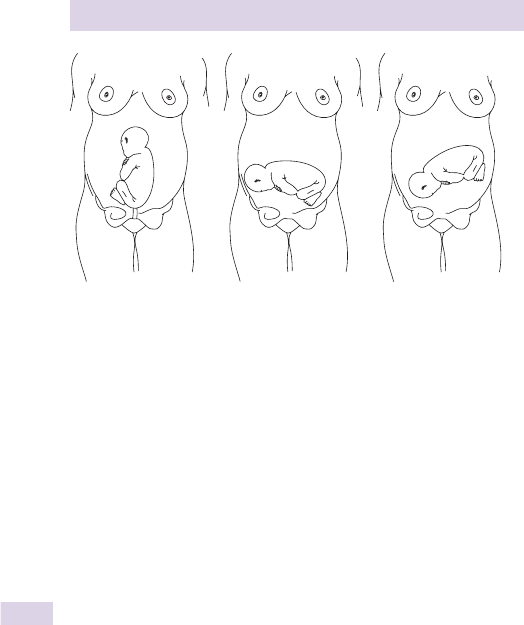
CHAPTER 14 Female reproductive system444
• Now palpate more widely, using the two-handed technique above to
stabilize the uterus, and attempt to locate the head and the breech.
•
The head can be felt as a smooth, round object that is ballotable—
that is, it can be bounced (gently) between your hands.
•
The breech is softer, less discrete, and not ballotable.
Fetal presentation
This is the part of the fetus that presents to the mother’s pelvis. Possible
presenting parts include the following:
• Head: cepahalic presentation. One option in a longitudinal lie
• Breech: podalic presentation. The other option in a longitudinal lie
• Shoulder: seen in a transverse lie
Examination technique
• Stand at the mother’s right side, facing her feet.
• Place both hands on either side of the lower part of the uterus.
• Bring the hands together fi
rmly but gently.
•
You should be able to feel either the head, breech, or other part as
described under Fetal Lie.
It is also possible to use a one-handed technique (Paulik’s grip) to feel for
the presenting part—this is best left to obstetricians. In this technique,
you use a cupped right hand to hold the lower pole of the uterus. This is
possible in 795% of pregnancies at about 40 weeks.
Engagement
When the widest part of the fetal skull is within the pelvic inlet, the fetal
head is said to be engaged .
In a cephalic presentation, palpation of the head is assessed and expressed
as the number of fi fths of the skull palpable above the pelvic brim. A fi fth of
a fetal skull is roughly equal to a fi nger breath on an adult hand.
Longitudinal Transverse Oblique
Fig. 14.8 Some examples of fetal lie.

445
ABDOMINAL EXAMINATION
• The head is engaged when three or more fi fths are within the pelvic
inlet—that is when two or fewer fi fths are palpable.
• When three or more fi
fths are palpable, the head is not engaged.
Number of fetuses
The number of fetuses present can be calculated by assessing the number
of fetal poles (head or breech) present.
• If there is one fetus present, two poles should be palpable (unless the
presenting part is deeply engaged).
• In a multiple pregnancy, you should be able to feel all the poles except
one, as one is usually tucked away out of reach.
Amniotic fl uid volume estimation
The ease with which fetal parts are palpable can give an indication of the
possibility of d or i amniotic fl uid volume.
• i Volume will give a large-for-dates uterus that is smooth and
rounded. The fetal parts may be almost impossible to palpate.
• d Volume may give a small-for-dates uterus. The fetus will be easily
palpable, giving an irregular, fi
rm outline to the uterus.
Percussion
This is usually unhelpful in an obstetric examination, unless you suspect
polyhydramnios (increased amniotic fl uid volume). In this case, you may
wish to attempt to elicit a fl uid thrill (b p. 239).
Auscultation
Auscultation is used to listen to the fetal heart rate (FHR). This is usually
performed using an electronic hand-held Doppler fetal heart rate monitor
and can be used as early as 14 weeks.
Using Pinard’s fetal stethoscope
With the prevalance and low cost of the modern fetal Doppler, a Pinard’s
fetal stethoscope is no longer likely to be seen or used. Fetascopes are not
generally useful until 28 weeks’ gestation. It is a simple-looking device that
looks like an old-fashioned ear-trumpet ( Fig. 14.9 ).
• Place the bell of the instrument over the anterior fetal shoulder,
where the fetal heart sounds are best heard.
• Press your left ear against the stethoscope to hold it between your
head and the mother’s abdomen in a hands-free position, or hold the
instrument lightly with one hand.
• Press against the opposite side of the mother’s abdomen with your
other hand to stabilize the uterus.
• It should sound like a distant ticking noise. The rate varies between
110 and 150/minute at term and should be regular.
2 Record the rate and rhythm of the fetal heart.
Vaginal examination
Vaginal examination enables you to assess cervical status before induction
of labor. You should attempt this only under adequate supervision if you
are unsure of the procedure.

CHAPTER 14 Female reproductive system446
This examination allows you to assess the degree of cervical dilatation
(in centimeters) using the examining fi ngers.
0 Examination of the vagina and cervix should be performed under
aseptic conditions in the presence of ruptured membranes or in patients
with abnormal vaginal discharge.
Technique
The examination should be performed as described on b p. 427. It takes
experience to reliably determine the fi ndings.
Findings
Assess the following:
• Degree of dilation
•
Full dilation of the cervix is equivalent to 10 cm.
•
Most obstetric departments will have plastic models of cervices in
various stages of dilatation with which you can practice.
• Length of the cervix
•
Normal length is 73 cm but shortens as the cervix effaces secondary
to uterine contraction.
• Consistency of the cervix, which can be described as follows:
•
Firm
•
Mid-consistency
•
Soft (this consistency facilitates effacement and dilatation)
• Position
•
As the cervix undergoes effacement and dilatation it tends to be
pulled from a posterior to an anterior position.
• Station of the presenting part
•
The level of the head above or below the ischial spines may be
estimated in centimeters.
Fig. 14.9 A Pinard’s stethoscope.

THE ELDERLY PATIENT
447
The elderly patient
It is easy to be seduced into thinking that the principal focus should be on
very medical diagnoses, such as urinary tract infections, which contribute
to signifi cant morbidity (and mortality) in older people.
Continence issues are frequently overlooked in most clinical assess-
ments. Large-scale surveys of prevalence have shown up to 20% of women
over 40 reporting diffi culties with continence. So while this is more com-
mon in older people, you should always be mindful of problems in younger
adults as well.
Although continence issues are one of the geriatric giants of disease
presentation, it is important to recall the physiology of postmenopausal
changes, such as vaginal atrophy and loss of secretions, which can com-
plicate urinary tract infections, continence, and uterovaginal prolapse in
older patients.
Assessment
Tact and understanding
Although problems are common, patients may be reluctant to discuss them
or have them discussed in front of others. Engaging in a discussion about
bladder and/or sexual function can seem daunting, but if done empathet-
ically, remembering not to appear judgmental or be embarrassed, you may
reveal problems that have seriously affected your patient’s quality of life.
Treating problems such as these, even with very simple interventions,
can be of immeasurable value to the patient. Remember to consider STIs
in your differential. “Elderly” does not mean sexual inactivity.
Holistic assessment of urinary problems
Learn to think when asking about bladder function, and work out a pattern
of dysfunction—e.g., bladder instability or stress incontinence. Remember
that bladder function may be disrupted by drugs, pain, or lack of privacy.
Continence issues may refl ect poor mobility or visual and cognitive
decline.
Genital symptoms
Don’t forget to consider vaginal or uterine pathology—view postmeno-
pausal bleeding with suspicion. Discharges may represent active infection
(if Candida , consider diabetes) or atrophic vaginitis (see Box 14.25 ).
Past medical history
Pregnancies and previous surgery in particular may help point to a diag-
nosis of stress incontinence. Are urinary tract infections recurrent—has
bladder pathology been excluded?
Drugs
Many are obvious—diuretics and anticholinergics; some are more sub-
tle—sedatives may provoke nocturnal loss of continence. Does your
patient drink tea or coffee?
Tailored functional history
This is the cornerstone of these pages and of any assessment you perform.
It largely relates to bladder function—is the bathroom located upstairs or

CHAPTER 14 Female reproductive system448
down? How are the stairs? Does your patient already have continence aids,
such as bottles, commodes, or pads, and do they manage well with them?
Box 14.25 A word on atrophic vaginitis
Up to 40% of postmenopausal women will have symptoms and signs of
atrophic vaginitis. The vast majority will be elderly and may be reluctant
to discuss this with their doctors. A result of estrogen decline, the sub-
sequent i vaginal pH and thinned endometrium lead to both genital and
urinary symptoms and signs.
An decrease in vaginal lubrication presents with dryness, pruritus, and
discharges, accompanied by an i rate of prolapse. Urinary complications
can result in frequency, stress incontinence, and infections.
Careful physical examination often makes the diagnosis clear with
labial dryness, loss of skin turgidity, and smooth, shiny vaginal epithe-
lium. A range of treatment options, including topical estrogens, simple
lubricants, and continued sexual activity when appropriate, are all key
interventions to manage this common condition.


CHAPTER 15 Psychiatric assessment450
Approach to psychiatric assessment
In taking a psychiatric history and assessing mental state, it is crucial to
communicate to the patient with empathy, respect, competence, and
interest, in a nonjudgmental fashion. This approach will create an atmo-
sphere of trust that encourages the patient to talk honestly about their
thoughts and feelings.
Central to the psychiatric interview process is the art of active listen-
ing to what is said and an awareness of any nonverbal communication
between patient and assessor.
Be prepared to spend anywhere from 30 minutes to an hour, depending
on the circumstances, conducting an interview. This might seem a daunt-
ing task in the early stages, particularly as patients rarely fi nd a narrative.
However, staying on track is often made easier by remembering to write
out the headings for parts of the assessment in advance.
Preparation and preliminary considerations
The room
Before proceeding to questioning, adequate preparations should be made
regarding the place where the assessment is to be carried out. An inter-
view room should be a safe environment, especially when seeing a patient
who is potentially violent. Your facility will normally have rooms specifi -
cally confi gured for the performance of psychiatric examinations.
• Inform your colleagues and departmental staff of your location.
• You should know where to locate, and how to use, the panic button.
• You should be accompanied by a colleague if you are seeing a patient
with a history of violent behavior.
• Remove any objects that might pose a danger (i.e., those that can be
used as a weapon).
• Know your nearest exit point and ensure that it is open or unblocked.
• Never allow the patient to come between you and the door.
• Ensure adequate privacy and lighting.
• Ideally, the patient should be sitting off-center, so that all of their body
may be seen but without the situation appearing too threatening.
• The height of your seats should be equal or similar.
Conduct of interview
Begin by introducing yourself, explaining who you are and the purpose of
your assessment. Use a handshake—a widespread sign of introduction and
welcome. Establish whether or not the patient wishes a friend or relative
to be present (and whether you feel it is appropriate).
The interview should generally start in an informal way to establish a
friendly and concerned rapport. This might involve a short period of neu-
tral conversation.
Try to avoid leading or direct questions. Use relatively broad, open, gen-
eral questions and leave specifi
c closed questions for further clarifi cation
later. Allow breaks and digressions within reason, especially with sensitive
individuals. At appropriate intervals, clarify what the patient has said by
repeating sentences and asking them to confi rm
this.

APPROACH TO PSYCHIATRIC ASSESSMENT
451
Examination
In psychiatry, you should be examining the patient’s mental state; this is
described later. However, don’t overlook physical examination, as this is
often an important part of the assessment. Conduct the physical examina-
tion is described in Chapters 2 and 3. A useful framework for psychiatric
assessment is given in Box 15.1
Box 15.1 Framework for psychiatric assessment
History
• Name, age, marital status, occupation, ethnic origin, and religion
• Source, mode, and reason for referral
• Chief complaint
• History of present illness
• Risk assessment
• Past psychiatric history
• Past medical history
• Drug history
• Family history
• Personal history
•
Birth and early development
•
School
•
Occupational history
•
Psychosexual history
•
Marital history
•
Children
•
Forensic history
• Premorbid personality
• Social history
Mental state examination
• Appearance and behavior
• Speech
• Mood
• Thought content
• Perception
• Cognitive functioning
• Insight
Physical examination
• As appropriate

CHAPTER 15 Psychiatric assessment452
History
The psychiatric history is very similar in structure to the standard medical
history described in Chapter 2. Symptoms and issues should be dealt with
in the same way (see Box 15.2 ).
Patient profi le
Start by making a note of the patient’s name, age, marital status, occupa-
tion, ethnic origin, and religion.
Source, mode, and reason for referral
Record here all the information you have about the patient from other
sources—relatives, caregivers, social workers, counselors, primary care
team, and police, if relevant.
• Who has asked for the individual to be seen and why?
• What was the mode of referral—voluntary, or involuntary as a referral
from other clinicians or law enforcement (as under the Baker Act)?
Chief complaint
Obtain a brief description of the principal complaint(s) and the time frame
of the problem in the individual’s own words.
This can be diffi cult if the patient is in a psychotic state and does not
believe a problem exists. In these cases, try to comment on the presenting
complaint as described by an informant.
Box 15.2 Factors asked about for a physical or mental
symptom
The following is repeated from Chapter 2. Treat psychiatric symptoms in
a similar way, but remember that the patient may not regard their issue
as a symptom, so tailor your language carefully.
• Exact nature of the symptom
• Onset
•
Date it began
•
How it began (e.g., suddenly, gradually–over how long?)
•
If long-standing, why is the patient seeking help now?
• Periodicity and frequency
•
Is the symptom constant or intermittent?
•
How long does it last each time?
•
What is the exact manner in which it comes and goes?
• Change over time
•
Is it improving or deteriorating?
• Exacerbating factors
•
What makes the symptom worse?
• Relieving factors
•
What makes the symptom better?
• Associated symptoms

HISTORY
453
History of present illness
This is a detailed account of the presenting problems in chronological
order (as for any other kind of symptom as in Chapter 2):
• Onset of illness (when was the patient last well?)
• How did the condition develop?
• Severity of the patient’s symptoms
• Precipitating factors (including any signifi
cant life events preceding
onset of the symptoms)
• Exacerbating factors (what makes the symptoms worse?)
• Relieving factors (what makes the symptoms better?)
• How has it affected the patient’s daily life, pattern, or routine (effect
on interpersonal relationships, working capacity, etc.)?
• Treatment history. Include treatment tried during the course of the
present illness, previous drug treatments, electroconvulsive therapy,
and psychosocial interventions.
• Associated symptoms
• Systematic inquiry. Similar to the standard medical history, run
through other psychiatric symptoms and ask the patient if they have
experienced them (see Box 15.3 ). Explore related symptoms; if
the patient admits to a few depressive symptoms, ask about other
symptoms of depression.
Risk assessment
This includes an assessment of not only self-harm but also the possibility
of harm to others. This should be broached in a serious and sensitive way.
Some useful questions in assessing suicide risk ( Box 15.4 ) are as follows:
• How do you feel about the future?
• Does life seem worth living?
• Do you have thoughts of hurting or harming yourself?
• Have you had thoughts of harming others?
• Have you ever thought of ending it all?
If suicidal thoughts are present, ask how often they occur and if the patient
has made a specifi
c plan and what the plan is.
• Ask about the means, e.g., prescribed and over-the-counter drugs,
guns, or knives.
• Explore for feelings of excessive guilt and loss of self-esteem.
Box 15.3 Tailoring the history
In the taking of a history in any specialty, you should formulate your
questions according to what is said. Also, information may not be pro-
vided by the patient in the order you would like.
This is particularly true of psychiatry—if the patient is talking freely,
you may fi nd them providing information that comes under a number of
different subheadings in your history. Be fl exible, note the information in
the appropriate places, and then fi ll in the gaps with direct questions.

CHAPTER 15 Psychiatric assessment454
If thoughts involving harming others are present, ask about the specifi c
persons and circumstances surrounding these thoughts.
• Ask about the means, e.g., presence of weapons such as guns or
knives.
Previous history of self-harm
Ask about previous attempts—when, where, how, and why. Ask in detail
about the most recent attempt:
• What events led up to the attempt (see Box 15.5 )?
• Were there any specifi
c precipitating factors?
• Was there concurrent use of drugs and alcohol?
• What were the methods used?
• Was it planned?
• Was there a suicide note?
• Were there any active attempts made to avoid being discovered?
Box 15.4 Risk factors for suicide
Biological
• Age >40 years
• Male gender
Medical and psychiatric history
• Previous suicide attempts
• Previous deliberate self-harm
• Psychiatric disorder (depression, substance misuse, schizophrenia,
personality disorder, obsessive-compulsive disorder, panic disorder)
• Chronic physical illness
• History of trauma or abuse
• Substance misuse (including alcohol)
Personality
• Impulsivity, poor problem-solving skills, aggression, perfectionism,
low self-esteem
Family history
• Family history of mental health, substance abuse, family violence, or
suicide attempts among family members
Social
• Lack of social support, isolation
•
Unemployment or retired
•
Single, unmarried, divorced, or widowed
• Presence of fi rearms in the home
•
History of previous incarceration
• Previous exposure to suicidal behaviors in others to whom they have
had close exposure
Access to means
• Weapons in the home or through occupational or social activities

HISTORY
455
• What is the meaning of the action (wanted to die, share distress)?
• Also ask about the circumstances surrounding discovery and how they
were brought to medical attention (if at all).
• Was this what the patient expected?
Protective factors for suicide
These are factors that would stop a person from attempting suicide ( Box
15.6 ). Record what social supports are available to the person (friends,
church, doctor, counselor).
Assessing homicidal intent
If faced with a patient expressing homicidal intent, you should inform a
senior colleague and law enforcement authorities immediately. Legal
instruments such as the Baker Act should be used to prevent the patient’s
release in order to protect those individuals against whom they state this
intent.
Some questions to assess a homicidal or violent patient are as follows:
• Are you upset with anyone?
• Do you have thoughts of hurting anyone?
• Have you made plans to harm someone?
• How would you harm them? (It is important to establish whether the
patient has actually made plans for carrying out the action.)
Past psychiatric history
Explore in detail previous contact with psychiatry and other services for
mental health problems. Include as far as possible:
• Dates of illness, symptoms, diagnoses, treatments, hospitalizations,
previous outpatient treatment, and compulsory treatment under the
Baker Act.
Box 15.5 Factors that may precipitate suicide
The overriding theme here is loss—loss of occupation, independence,
family member, friend, social supports, or freedom.
• Death, separation, or divorce
• Imprisonment, or threat thereof
• Humiliating event
• Job loss
• Reminder of a past loss
• Unwanted pregnancy
Box 15.6 Protective factors for suicide
• Strong family and social connections
• Hopefulness, good skills in problem solving
• Cultural or religious beliefs discouraging suicide
• Responsibility for children

CHAPTER 15 Psychiatric assessment456
Past medical history
This should be evaluated in the same way as in the general medical history,
but remember to ask in particular about obstetric complications, epilepsy,
head injuries, and thyroid disorders.
Drug and alcohol history
• Ask about all current drug intake, including prescribed and over-the-
counter medicines.
• Take a detailed history of substance abuse, if relevant, recording the
type, quality, source, route of administration, and cost.
• Ask about alcohol, tobacco, and any allergic reactions. If necessary, use
the CAGE questionnaire (b p. 221).
Family history
Explore family relationships in detail (parents, siblings, spouse, children).
It is useful to draw a family tree and record age, health, occupation, per-
sonality, quality of relationship, family history of mental illness, including
alcoholism, suicide, and deliberate self-harm, as well as any other serious
family illnesses.
Also record the details and times of certain important family events,
such as death, separation, or divorce, and their impact on the patient.
Personal history
The personal history is a chronological account of the individual’s life from
birth up to the present. This section, which is often lengthy, should be
tackled under the following subheadings.
Birth and early development
• Begin with recording the place and date of birth, gestation at delivery,
and any obstetric complications or birth injuries.
• Inquire about developmental milestones.
• Ask about neurotic traits in childhood (night terrors, sleep walking,
bedwetting, temper tantrums, stammer, feeding diffi culties).
• Ask about relationships with peers, siblings, parents, and relatives,
particularly in adolescence.
• Record any adverse experiences (physical or emotional abuse).
• Note any signifi
cant life events, such as separations and bereavement.
School
• Explore how they did at school socially, academically, and athletically.
• Record the start and end of their education and qualifi cations.
• Ask about the type of school, relationships with peers, teachers, and
extracurricular interests and whether there was a history of academic
diffi
culty or truancy.
Occupational history
• Inquire about all previous jobs held, dates, and reason for change, level
of satisfaction with employment, and ambitions.
• Include present job and economic circumstances.

HISTORY
457
Psychosexual history
This can be a diffi cult section of the history to elicit and is often dependent
on how willing the patient is to volunteer such intimate details. However,
try not to avoid it. It may have to be excluded if judged inappropriate or
likely to cause distress.
• Record the onset of puberty (and menarche, if female).
• Sexual orientation (heterosexual, bisexual, gay, or lesbian)
• Gender identity (transsexual)
• First sexual encounter
• Current sexual practices (practice of safer sex?)
• Any of sexual abuse
• Record any history of sexual dysfunction.
Marital history
This includes a detailed account of number of marriages, duration, qual-
ity of relationships and personality, age and occupations of spouses, and
reasons for breakup of relationship(s).
Children
• Ask about the sex, age, and mental and physical health of all children.
Forensic history
This may or may not be volunteered by the patient. Begin by asking non-
threatening questions: “Have you ever been in trouble with the law?”
• Ask about criminal record and any previous episodes of violence or
other acts of aggression.
Premorbid personality
This is the patient’s personality before the onset of mental illness. An inde-
pendent account is especially important for this part of the history.
• It may help to ask the patient how they would describe themselves
and how they think others would describe them.
• Ask about social relationships and supports.
• Include interests and recreational activities.
• Inquire specifi
cally about temperament—what’s their mood like on
most occasions?
• Ask the patient to describe the nature of their emotional reactions,
coping mechanisms, and character (e.g., shy, suspicious, irritable,
impulsive, lacking in confi
dence, history of obsession).
• What are their moral and religious beliefs?
Social history
Ask especially about fi nances, legal problems, occupation, dependants,
and housing. If elderly, ask about social support, such as home care or
attendance at a day center, and how they cope with activities of daily living
(hygiene, mobility, domestic activity).

CHAPTER 15 Psychiatric assessment458
Mental status examination
The mental status examination is a vital part of the psychiatric assessment.
It is your assessment of the patient’s mental state based on your observa-
tions and interaction. It begins as soon as you see the patient. Mental state
features prior to the interview, whether described by the patient or by
other informants, are considered part of the history.
Appearance and behavior
This involves a brief descriptive note of your observations, both at fi rst
contact and through the interview process. It should include a description
of the following:
• Dress and grooming
•
Patients with depression, dementia, and drug abuse may show
evidence of self-neglect.
•
Flamboyant clothes with clashing colors may be worn by a manic
patient.
•
Loose-fi tting clothes may indicate an underlying anorexia or other
eating disorder.*
• Facial appearance
• Eye contact
• Degree of cooperation
• Posture
• Mannerisms
• Motor activity
•
Excessive movement indicating agitation?
•
Very little movement (retardation) suggesting depression?
• Abnormal movements
•
E.g., tics, chorea, tremor, stereotypy—repetitive movements, such as
rocking or rubbing hands
• Gait
• Any other physical characteristics worth noting
Speech
Describe in terms of the following:
• Rate
• Quantity (i = pressure of speech and is often associated with fl ight
of
ideas,
d = known as poverty of speech)
• Fluency
• Articulation (including stammering, stuttering, and dysarthria)
• Form: this is the way in which a person speaks, rather than actual
content (see Box 15.7 ).
Mood and affect
Mood is a pervasive and sustained emotion that can color the patient’s per-
ception of the world over long periods. Affect is the patient’s immediate
emotional state, including the external expression of feeling.
* Loose-fi tting clothing is usually not a sign of weight loss, contrary to popular belief. In fact,
patients with anorexia tend to deliberately wear baggy clothes to hide their underlying skeletal
appearance.

MENTAL STATUS EXAMINATION
459
Examining mood and affect involves consideration of the patient’s sub-
jective emotional state and your objective evaluation.
Abnormalities of mood include depression, elation, euphoria, anxiety,
and anger. You should note whether mood is consistent with thought and
action or is incongruous.
Abnormalities of affect include the following:
• Blunting: the coarsening of emotions and insensitivity to social context.
This is commonly used synonymously with affective “fl attening.”
• Flattening of affect: a reduction in range and depth of outward emotion
• Lability: superfi cially
fl
uctuating and poorly controlled emotions.
This may be found in delirium, dementias, frontal lobe damage, and
intoxication.
Thought content
Preoccupations
These include phenomena such as obsessive thoughts , or ruminations
characterized by an intrusive preoccupation with a topic. The patient
cannot stop thinking about it even though they may realize that it is
irrational.
Box 15.7 Some examples of abnormal speech or thought
form
The following are examples of abnormal speech; however, the speech is
a manifestation of the underlying thought processes. One could argue,
therefore, that the following are abnormalities of thought form.
• Flight of ideas: associated with mania. Ideas fl
ow rapidly but remain
connected although sometimes by unusual associations. The
patient’s train of thought tends to veer off on wild tangents.
•
Derailment: loosening of association seen in formal thought
disorders (e.g., schizophrenia) in which train of thought slips of the
track. Things may be said in juxtaposition that lack a meaningful
association or the patient may shift from one frame of reference to
another.
• Perseveration: mainly seen in dementia and frontal lobe damage.
The patient fi
nds moving to the next topic diffi
cult, resulting in an
inappropriate repetition of a response.
• Incoherence: pattern of speech that is essentially incomprehensible
at times
• Echolalia: feature of dementia. This is a repetitive pattern of speech
in which a patient echoes words or phrases said by the interviewer.
• Neologisms: found mainly in schizophrenia and structural brain
disease (see b p. 261). New words are invented that have no
meaning.
• Circumstantiality: a long-winded pattern of speech loaded down
with unnecessary detail and digression before fi
nally getting to
the point. The patient is, however, able to maintain their train of
thought.

CHAPTER 15 Psychiatric assessment460
Phobias represent a fear or anxiety that is out of proportion to the
situation, cannot be reasoned or explained away, and leads to avoidance
behavior.
Other types of ruminations particularly important to establish here
include suicidal or homicidal thoughts, in addition to morbid ideation (e.g.,
ideas of guilt, unworthiness, burden, and blame).
Abnormal beliefs
Overvalued ideas
These are isolated beliefs that are not obsessive in nature and preoccupy
an individual to the extent of dominating their life. That is, the patient is
able to stop thinking about them, but they choose not to.
The core belief of anorexia nervosa—the belief that one is fat—is an
example of an overvalued idea. Other examples include unusual sect or
cult beliefs, forms of morbid jealousy, and hypochondriasis.
Delusions
These are fi xed false beliefs based on an incorrect inference about reality,
not consistent with a patient’s intelligence and cultural background (see
Box 15.8 ). Importantly, these cannot be corrected by reasoning. They can
sometimes be diffi cult to differentiate from overvalued ideas. The differ-
ence is that the patient fi rmly believes the delusion to be true.
Box 15.8 Some examples of delusions and associated
terminology
• Mood-congruent delusion: a delusion with content that has an
association to mood. For example, a depressed person may believe
that the world is ending.
• Mood-incongruent delusion: a delusion with content that has no
association to mood. This is seen in schizophrenia.
• Nihilistic delusion: a false feeling that self, others, or the world is
nonexistent or coming to an end
• Paranoid delusion: any delusion that is self-referential. In psychiatry,
paranoid does not carry the lay meaning of fearful or suspicious.
• Delusions of reference: a false belief that others are talking about
you or that events are somehow connected with you. For example,
the patient may believe that people on TV or the radio are actually
talking directly to them. The feelings and delusional messages
received are usually negative in some way, but the fact that the
patient alone is being spoken to has a grandiose quality.
• Delusion of grandeur: an exaggerated perception of one’s importance,
power, or identity. Usually, patients believe they have made an
important achievement that has not been suitably recognized.
• Delusions of control: a false belief that a person’s will, thoughts,
or feeling are being controlled by external forces. These include
disorders of the possession of thought.

MENTAL STATUS EXAMINATION
461
Delusions may be primary with no discernable connection with any pre-
vious experience or mood (characteristic of schizophrenia) or secondary
to an abnormal mood state or perception. In this way, the content of the
delusions can give a clue to the nature of the mental illness.
Perception
Alteration in normal perception consists of changes to our normal, famil-
iar awareness or ordinary experiences. These include sensory distortions
(heightened or dulled perception), sensory deceptions (illusions and halluci-
nations), and disorder of self-awareness (depersonalization, derealization).
Disorders of self-awareness
• Depersonalization is the feeling that the body is strange and unreal.
• Derealization is the perception of objects in the external world as
being strange end unreal.
Both of these phenomena commonly occur in stressful situations, with
drug intoxication, anxiety, depressive disorders, and in schizophrenia.
Many psychologically normal people can experience an element of dereal-
ization or depersonalization if sleep deprived.
Box 15.8 (Con’d.)
•
Thought broadcasting: the false belief that the patient’s thoughts
can be heard by others
•
Thought insertion: the belief that an outside force, person, or
persons are putting thoughts in the patient’s mind. Thought
withdrawal is the belief that thoughts are being removed.
•
Thought echo: thoughts being heard spoken aloud
•
Thought blocking: the experience of having one’s train of thought
halted
• Passivity feelings: examples of delusions of control. They may include
made acts and impulses, where the individual feels they are being
made to do something by another, made movements, where patients
believe their limbs are controlled by someone else, made emotions,
where they are experiencing someone else’s emotions.
• Erotomania: a belief that another person is in love with the patient.
Patients often believe that innocent glances from another person
have a deeper, sexual meaning.
• Capgras delusion
1
: belief that those around you (often loved ones)
have been removed and replaced with exact replicas. Patients exist
in a world of impersonators. The delusion may extend to animals
and objects. Patients may believe that they are their own double.
• Religious delusions: any delusions with a religious or spiritual content.
0 Be careful here! Beliefs considered normal for a person’s religious
or cultural background (e.g., a Christian believing that God has cured
their illness) are not classed as delusions.
1
Capgras JMJ, Reboul-Lachaux J (1923). L’illusion des ‘sosies’ dans un délire systématisé
chronique. Bulletin de la Société clinique de médecine mentale 11:6–16.

CHAPTER 15 Psychiatric assessment462
Illusions
An illusion is a misperception or misinterpretation of real sensory stimuli. It
may affect any sensory modality. Inquire as to when they occur and what
signifi cance they have.
Illusions frequently arise from a sensory impairment, such as partial
sightedness or deafness, and represent an understandable attempt at fi lling
in the gap. Most people have experienced some form of visual illusions—
for example, mistaking a distant object for a person, particularly in poor
lighting (e.g., at night).
Hallucinations
Hallucination is a false perception that is not based on a real external
stimulus. It is experienced as true and coming from the outside world.
They may occur in any sensory modality, although visual and auditory
hallucinations are most common ( Box 15.9 ).
Importantly, not all hallucinations point to psychiatric disease. For
example, some hallucinations occur in normal people when falling asleep
(hypnagogic) or on waking (hypnopompic), and although the nature of
dreams is heavily debated, it could be said that they are hallucinations.
Note also the Charles Bonnet syndrome ( Box 15.10 ).
Sensory distortions
This includes heightened perception with especially vivid sensations (e.g.,
hyperacusis), dulled perception, and changed perception. For example,
patients may experience objects as having a changed shape, size, or color.
Box 15.9 Some examples of hallucinations
• Auditory hallucinations: false perception of sounds, usually voices,
but also other noises such as music. The hallucination of voices
may be classed as second person, where the voice is speaking to the
patient (“you should do this”) or third person, where the voice or
voices are talking about the patient (“he should do this”).
• Visual hallucinations: false perceptions involving both formed (e.g.,
faces, people) and unformed (e.g., lights, shadows) images
• Scenic or panoramic hallucinations: a form of visual hallucination
involving whole scenes, such as battles
• Olfactory hallucinations: the false perception of odors
• Gustatory hallucinations: the false perception of taste
• Tactile hallucinations: the false perception of touch or surface
sensation (e.g., phantom limb; crawling sensation in or under skin in
delirium tremens—formication)
• Somatic hallucination: the false sensation of things occurring in or to
the body, most often visceral in origin. Somatic hallucinations include
haptic (touch, tickling, pricking), thermic (heat/cold), and kinathetic
(movement and joint position).
• Pseudohallucinations: These are recognized as not being real by the
patient, acquiring an as-if quality, and have some degree of voluntary
control.

MENTAL STATUS EXAMINATION
463
Cognitive function
Cognition can be described as the mental processes of appraisal, judgment,
memory, and reasoning. Evaluation of cognitive functioning is important
for detecting impairment, following the course of an illness, and monitor-
ing improvement or response to treatment.
The Mini-Mental State Examination (MMSE)
The MMSE provides a brief quantitative measure of cognitive func-
tioning and can be used in both a psychiatric or general medical set-
ting. It tests attention, orientation, immediate and short-term recall,
language, and the ability to follow verbal and written commands (see
Box 15.11 ).
Notes on conducting the MMSE
It is important to remember that there are no half marks in this test—be
strict and rigorous. The maximum total score is 30.
• Orientation: Rather than asking for each part of the date in turn, ask
the patient for today’s date and then ask specifi
cally for those parts
omitted. Do the same for place (“where are we now?”).
• Registration: Say the name of the objects clearly and slowly, allowing
about 1 second to say each. The fi
rst repetition determines the
patient’s score, but keep repeating the names of the object until the
patient has got all three, to enable testing of recall later.
• Attention and calculation: If the patient can’t perform this
mathematical task, ask them to spell the word WORLD
backward.
The score is the number of letters in the correct order
(e.g., dlrow = 5, dlorw = 3).
Box 15.10 Charles Bonnet syndrome
This is a good example of hallucinations in a psychiatrically normal
patient. In this syndrome, patients with some kind of visual impair-
ment (usually older people) see visual hallucinations within the area of
impaired vision. The hallucinations are often cartoon-like characters or
faces. For example, the authors once came across a patient with a visual
scotoma due to retinal injury. The voice of our Irish consultant would
trigger the hallucination of a leprechaun dancing and cavorting within
their blind spot.
The syndrome is also an example of pseudohallucination, as often the
patient realizes that the visions are not real.
It was fi rst described by the Swiss philosopher Charles Bonnet in
1760, whose 87-year-old grandfather admitted seeing visions of buildings
and people after developing severe cataracts in both eyes.
Charles Bonnet syndrome is likely much more common than most
medical people realize. Older sufferers are often afraid to admit to it,
for fear of being diagnosed with a psychiatric disorder or being labeled
“Insane.”

CHAPTER 15 Psychiatric assessment464
• Repetition: Allow one trial. Score 1 only if the repetition is completely
correct. Make sure you say it slowly and clearly so that the patient can
hear!
• Three-stage command: Say all three stages of the command before
giving the piece of paper to the patient. Do not prompt the patient as
you go. Score 1 point for each part conducted correctly.
• Reading: Say “read this sentence and do what it says.” Score 1 point if
the patient closes their eyes, no points if they simply read the sentence
out loud.
• Writing: Be sure not to dictate a sentence or give any examples. The
sentence must make sense and contain a subject and a verb. Correct
grammar, punctuation, and spelling are not necessary.
• Copying: All 10 angles must be present, and 2 must intersect. Ignore
mistakes from tremor and ignore rotation of the diagram.
Interpreting the fi nal
score
The MMSE score will vary within the normal population by age and number
of years in education (decreasing with advancing age and increasing with
advanced schooling). The median score is 29 for people with 9 years of
education, 26 for 5–8 years of education, and 22 for 0–4 years.
1
Box 15.11 Mini-Mental State Examination (MMSE) Sample
Items
Orientation to time
“What is the date?”
Registration
“Listen carefully. I am going to say three words. You say them back after
I stop. Ready? Here they are…
APPLE (pause), PENNY (pause), TABLE (pause). Now repeat those
words back to me.” [Repeat up to 5 times, but score only the fi rst
trial.]
Naming
“What is this?” [Point to a pencil or pen.]
Reading
“Please read this and do what it says.” [Show examinee the words on
the stimulus form.]
CLOSE YOUR EYES
Reproduced by special permission of the Publisher, Psychological Assessment Resources, Inc.,
16204 North Florida Avenue, Lutz, FL 33549, from the Mini Mental State Examination, by Marshal
Folstein and Susan Folstein, Copyright 1975, 1998, 2001 by Mini Mental LLC, Inc. Published 2001
by Psychological Assessment Resources, Inc. Further reproduction is prohibited without permis-
sion of PAR, Inc. The MMSE can be purchased from PAR, Inc. by calling (813) 968-3003.

MENTAL STATUS EXAMINATION
465
As a rule of thumb, scores of <23 are taken to indicate mild, <17 mod-
erate, and <10 severe cognitive impairment. This is a nonlinear scale, how-
ever. For more information, see Crum et al. (1993).
1
Insight
This is how well the patient is able to understand or explain their condi-
tion. When assessing insight, ask the following questions:
• Do they recognize and accept that they are suffering from a mental or
physical illness?
• Are they willing to accept treatment and agree to a management plan?
Note also whether an individual’s attitudes are constructive or uncon-
structive, realistic or unrealistic.
If not accepting of a psychiatric diagnosis, to what does the patient
attribute their diffi
culties or abnormal experiences?
Summary
At the end of the assessment, a summary should be made of history and
mental state examination, which should encompass a statement of diagno-
sis or differential diagnosis, etiolgical factors, and a plan for further inves-
tigations and management.
1
Crum RM, Anthony JC, Bassett SS, Folstein MF (1993). Population-based norms for the Mini-
Mental State Examination by age and educational level, JAMA 18:2386–2391.

CHAPTER 15 Psychiatric assessment466
Physical examination
A full physical examination, particularly that of the neurological system
should be seen as an integral part of the assessment of a psychiatric
patient.
You may want to tailor an examination to look for, or exclude, physical
conditions that give rise to the psychiatric symptoms and signs that you
have discovered. See the end of this chapter for details.

IMPORTANT PRESENTING PATTERNS
467
Important presenting patterns
Schizophrenia
The term schizophrenia * is often described as a single disease, but the
diagnostic category includes a group of disorders, probably with hetero-
geneous causes, but with somewhat similar behavioral symptoms and
signs ( Box 15.12 ). It is a psychosis, characterized by splitting of normal
links between perception, mood, thinking, behavior, and contact with
reality.
The prevalence of schizophrenia is 70.5% worldwide, with equal
incidence in both sexes. The onset is usually in adolescence or early
adulthood. Symptoms tend to remit, although a return to baseline is
unusual.
Clinical features
Schizophrenia is characterized by delusions and hallucinations with no
insight. These symptoms are often followed by a decline in social func-
tioning. Historically, several different diagnostic classifi cations have been
developed. For the latest diagnostic criteria, see the ICD-10 or DSM-IV or
DSM-V (due in 2012).
Bleuler’s four A’s
In 1910, Bleuler coined the term schizophrenia . He went on to characterize
the key features, summarized as the four A’s.
• Associative loosening (disconnected, incoherent thought process)
• Ambivalence (the ability to experience two opposing emotions at the
same time—e.g., loving and hating a person)
• Affective incongruity (affect disassociated with thought)
• Autism (self-absorption and withdrawal into a fantasy world)
Box 15.12 Subtypes of schizophrenia
• Simple: Negative symptoms tend to predominate.
• Paranoid: Delusions and hallucinations are prominent and tend to
include religious, grandiose, and persecutory ideas.
• Hebephrenic: Affective incongruity predominates, with shallow range
of mood. Delusions and hallucinations tend to lack an organized
theme.
• Catatonic: Anhedonia, avolition, alogia, and poverty of movement
are the key features. This may lead to a “waxy fl
exibility,” where the
patient’s limbs can be moved into, and stay in, certain positions.
* Schizophrenia comes through Latin from the Greek skhizein, “to split” and phren, “mind.” The
term phrenic refers also to the diaphragm. This is because in ancient Greece, the mind was thought
to lie in the diaphragm.

CHAPTER 15 Psychiatric assessment468
Crow’s positive and negative symptoms
In 1980, Crow
1
suggested that the symptoms of schizophrenia could be
divided into two distinct groups—those that are positive and those that
are negative. This remains a useful way to think of the symptoms.
Crow went on to suggest that schizophrenia could be split into two syn-
dromes, comprising mostly positive or negative symptoms, respectively.
Positive symptoms
• Delusions (including ideas of reference)
• Hallucinations
• Thought disorder
Negative symptoms
• Blunted affect
• Anhedonia (lack of enjoyment)
• Avolition (lack of motivation)
• Alogia (poverty of speech)
• Social withdrawal
• Self-neglect
Schneider’s fi rst-rank
symptoms
Kurt Schneider listed his fi rst-rank symptoms of schizophrenia in 1959
2
.
One of these, Schneider said, is diagnostic of schizophrenia in the absence
of organic brain disease or drug intoxication.
• Third-person auditory hallucinations (running commentary, arguments,
or discussions about the patient)
• Thought echo, or “echo de la pensée”
• Disorders of thought control (withdrawal, insertion, broadcast)
• Passivity phenomena
• Delusional perception
• Somatic passivity
Schneider’s criteria have been criticized for being too narrow, providing a
snapshot of a patient at only one time, and for not taking into account the
long-term negative symptoms.
For information on etiology, treatment, and prognosis, see appropriate
other Handbooks in this series.
Delirium
Delirium , or acute confusional state, is a transient global disorder of cog-
nition that is characterized by an acute onset and a fl uctuating course.
It represents one of the most important and misdiagnosed problems in
medicine and surgery (see Box 15.13 for assessment).
Delirium may occur in as many as 10–20% of hospital inpatients, with
elderly patients being the most vulnerable. Approximately 60% of patients
suffer delirium following hip fracture.
1
Crow TJ (1980). Molecular pathology of schizophrenia: more than one disease process? BMJ
280:66–68.
2
Schneider K (1959). Clinical Psychopathology. New York: Grune and Stratton.

IMPORTANT PRESENTING PATTERNS
469
Following is a brief summary of the main features and causes. You should
bear all the possible causes in mind and tailor your physical examination
and investigations accordingly (see Chapter 10).
Predisposing factors (risk factors)
• Increasing age
• Pre-existing cognitive defect
• Psychiatric illness
• Severe physical comorbidity
• Previous episode of delirium
• Defi
cits in hearing or vision
• Anticholinergic drug use
• New environment or stress
Causes (precipitants)
Delirium is usually multifactorial, with a single cause being diffi cult
or
impossible to identify. Some factors include the following:
Intracranial factors
• Trauma
• Vascular disease (e.g., stroke)
• Epilepsy and postictal states
• Tumor
• Infection (meningitis, encephalitis, tuberculosis, neurosyphilis)
Extracranial factors
• Drugs—both prescribed and recreational, intoxication, and withdrawal
• Electrolyte imbalances
• Infection (e.g., urinary tract, chest, septicemia)
• Endocrine (e.g., thyroid dysfunction, hypo- and hyperglycemia)
• Organ failure (heart, lung, liver, kidney)
• Hypoxia
• Acid–base disturbance
Box 15.13 Confusion assessment method (CAM)
This is method is commonly used to assess delirium in the clinical set-
ting.
1
The patient must display both features 1 and 2 plus either 3 or 4.
• 1 Acute onset and fl uctuating course:
often best obtained from a
relative or member of the ward staff. Onset is hours to days, lucid
periods are often in the morning.
• 2 Inattention: easily distracted, attention wanders in conversation
• 3 Disorganized thinking: rambling or irrelevant conversation, illogical
fl
ow of ideas, unable to maintain a coherent stream of thought
•
4 Altered level of consciousness: drowsy or over active, may
fl uctuate. May experience nightmares and hallucinations.
1
Inouye S, van Dyck C, Alessi C, et al. (1990). Clarifying confusion: the confusion assessment
method. Ann Intern Med 113(12):941–948

CHAPTER 15 Psychiatric assessment470
• Nutritional defi ciencies
• Postoperative or postanesthetic states
• Miscellaneous
•
Sensory deprivation
•
Sleep deprivation
•
Fecal impaction
•
Change of environment
Symptoms
• Fluctuating level of consciousness
• Diffi culty maintaining, or frequently shifting, attention
• Disorientation (often worse at night)
• Illusions
• Hallucinations (often simple, visual)
• Apathy
• Emotional lability
• Depression
• Disturbance of the normal sleep–wake cycle
Differential diagnosis
• Dementia (often coexists with delirium and i risk of delirium 2- to
3-fold), depression, psychosis, AIDS-related complex
Anxiety disorders*
Generalized anxiety disorder (GAD)
The main feature is excessive anxiety and worry about events or activities
that the patient fi nds diffi cult to control, such as work or school perfor-
mance. The symptoms must be present for more than 6 months and
include three or more of the following:
• Restlessness or feeling on edge
• Easily fatigued
• Diffi
culty concentrating or mind goes blank
• Irritability
• Muscle tension
• Sleep disturbance (insomnia and fatigue on waking)
Panic disorder
This involves spontaneous occurrence of severe panic attacks (periods of
fear that peak within
10 minutes).
These should be accompanied by four or more of the following: tachy-
cardia, sweating, trembling or shaking, shortness of breath, a feeling of
choking, chest pain, dizziness, lightheadedness or presyncope, paresthesia,
depersonalization or derealization, nausea, abdominal pain, fear of dying,
fear of losing control, and hot fl ushes.
Phobic disorders
A phobia is an irrational fear that produces an avoidance of the subject of
the fear (an object, person, activity, or situation). A phobia is perceived by
the patient as excessive (i.e., they have insight).
* Based on DSM-IV criteria.

IMPORTANT PRESENTING PATTERNS
471
Agoraphobia
Agoraphobia
†
is not fear of wide open spaces per se, as is commonly
thought, but is anxiety caused by being in places or situations from which
escape may be diffi cult or in which help might not be available in the event
of a panic attack. These situations may include being outside, being home
alone, being in a crowded place, or traveling on a bus or train.
Social phobia
This is a fear of social situations in which the person is exposed to unfa-
miliar people or to possible scrutiny by others. The fear is of the resulting
humiliation caused by a poor performance.
Avoidance behavior, anticipation, or distress at the time of the social
encounter leads to impairment in functioning at work or in school and can
have a signifi cant impact on the patient’s life.
Other specifi c phobias
These are marked and persistent fears cued by the presence or anticipa-
tion of specifi c objects or situations. The list is manifold. Our favorites,
from which no medic can suffer, include bromidrosiphobia (the fear of
body odor), spermophobia (the fear of germs), belonephobia (the fear
of needles), phronemophobia (the fear of thinking), iatrophobia (the fear
of doctors), and, of course, pinaciphobia (the fear of lists).
Obsessive-compulsive disorder (OCD)
This is characterized by time-consuming obsessions or compulsions that
cause social impairment or mental distress.
Obsessions are intrusive thoughts, feelings, ideas, or sensations. They are
recognized by the patient as their own (compare with thought insertion)—
the patient usually tries to ignore or suppress them.
Compulsions are conscious, purposeful behaviors through which the
person attempts to neutralize or prevent a discomfort or dreaded event.
Examples include repeated hand-washing, checking, and counting.
The key here is that the obsessions and compulsions are recognized as
coming from within the patient, and the patient feels powerless to stop
and is distressed by their presence. Severe obsessions and compulsions
can occur in depression, schizophrenia, generalized anxiety disorder, panic
disorder, and other disorders.
Dementia
Dementia is usually a disease of older people and refers to a global dete-
rioration of higher mental functioning, without impairment in conscious-
ness, that is progressive and usually irreversible.
Dementia usually presents with a history of chronic, steady decline in
short- and long-term memory and is associated with diffi culties in social
relationships, work, and activities of daily living. Important manifestations
include disruption of language and intelligence as well as changes in per-
sonality and behavior. Apathy, depression, and anxiety are frequently
found, and psychotic phenomena may be seen in a third of patients.
†
Agoraphobia comes from the Greek agora, meaning “the marketplace.”

CHAPTER 15 Psychiatric assessment472
A diagnosis of dementia is based on MMSE results and information from
other sources, such as the patient’s family, friends, and employers.
Dementia may be primary or secondary to diseases:
• Chronic CNS infection: HIV, syphilis, meningitis, encephalitis
• CNS trauma: anoxia, diffuse axonal injury, dementia pugilistica
(repeated head injury—seen in boxers), chronic subdural hematoma
• i Intracranial pressure: neoplasia, hydrocephalus
• Toxins: heavy metals, organic chemicals, chronic substance abuse
• Vitamin defi
ciencies: B
12
, folate
• Autoimmune disease: SLE, temporal arteritis, sarcoidosis
Other possible causes include endocrinopathies, Wilson’s disease, and
lipid storage diseases.
Alzheimer’s disease
The key pathological changes in Alzheimer’s disease (AD) are decreased
brain mass and increased size of the ventricles. There is neuronal loss and
occurrence of amyloid plaques and neurofi
brillary tangles. AD makes up
7
50% of all cases of dementia and 790% of all primary dementias. The main
features are memory impairment and at least one of the following:
• Aphasia (b p. 260)
• Apraxia (b p. 328)
• Agnosia (b p. 327)
• Abnormal executive functioning (planning, organizing, abstracting,
sequencing)
Vascular dementia/multi-infarct dementia
This makes up about 20–30% of all cases of dementia. Onset may be abrupt
and/or with a stepwise decline. Vascular dementia is associated with more
patchy cognitive impairment then AD, often with focal neurological signs
and symptoms such as hyperrefl
exia, extensor plantar responses, pseu-
dobulbar, bulbar, or other cranial nerve palsies, gait abnormalities, and
focal weakness.
The primary pathology is multiple small areas of infarction (cortex and
underlying white matter). It is important to note vascular risk factors such
as previous stroke, hypertension, heart disease, diabetes, and smoking.
Lewy body dementia
Lewy body dementia accounts for up to 20% of all cases. Patients with this
disorder show features similar to AD but also often have recurrent visual
hallucinations, fl uctuating cognitive impairment, parkinsonian features, and
extrapyramidal signs.
Frontotemporal dementia
This accounts for 5% of all dementia. Pick’s disease is a form of frontotem-
poral dementia characterized by the presence of neuronal Pick’s bodies
(masses of cytoskeletal elements).
The predominance of frontal lobe involvement is evidenced by pro-
found personality changes, social impairment, and stereotyped behavior.
However, visuospacial skills are usually preserved. The patient may also
show primitive refl exes (b p. 307).

IMPORTANT PRESENTING PATTERNS
473
Huntington’s disease
Huntington’s is an autosomal dominant disease presenting as early as the
third decade and is associated with a subcortical type of dementia. Apart
from the movement disorder showing involuntary choreiform movements
of the face, shoulders, upper limbs, and gait, the symptoms of the demen-
tia include psychomotor slowing and personality alteration with apathy
or depression.
Parkinson’s disease
Patients with Parkinson’s disease have cognitive slowing along with the
signs described earlier (b p. 325). Dementia is seen in later stages of
disease.
Creutzfeldt–Jakob disease (CJD)
Contrary to common perception, this is not a new disease or one that
affects young people. The most frequently seen of this family of diseases
is sporadic CJD, which has no known cause. Onset is usually between the
forth and sixth decades of life and is associated with a very rapid progres-
sion of dementia, in addition to signs such as myoclonus, seizures, and
ataxia—the time to death is typically a few months.
Variant CJD (vCJD) is a disease mainly confi ned to the UK, fi rst reported
in 1996, and is thought to have resulted from transmission of infection
from cattle suffering from bovine spongeiform encephalopathy (BSE). The
average age of onset is 27 years, presenting initially with behavioral symp-
toms. The duration is of a year or more.
Affective disorders
Bipolar disorder
Bipolar disorder, previously known as manic-depression, is usually charac-
terized by periods of deep, prolonged depression with periods of exces-
sively elevated and irritable mood, known as mania .
It is important to note that patients presenting only with mania, and
no evident depression, are said to have bipolar disorder. There are three
main patterns of disease:
• Bipolar I disorder : one or more episodes of major depression with
episodes of mania
• Bipolar II disorder: milder bipolar disorder consisting of recurrent
periods of depression and hypomania but no manic episodes
• Cyclothymic disorder: characterized by frequently occurring hypomanic
and depressive symptoms that do not meet the diagnostic criteria of
manic episodes or major depression
Mania
Manic episodes are characterized by profound mood disturbance, consist-
ing of an elevated, expansive, or irritable mood that causes impairment at
work or danger to others ( Box 15.14 ). These patients may suffer delusions
and hallucinations, the former usually involving power, prestige, position,
self-worth, and glory. The key feature is disinhibition.

CHAPTER 15 Psychiatric assessment474
There may be several of the following:
• Infl
ated self-esteem or grandiosity
• Reduced need for sleep
• Racing thought, fl
ight of ideas, and distractibility
• Excessive talking or pressured speech
• i Level of goal-focused activity at home, at work, or sexually
• Psychomotor agitation
• Excessive involvement in pleasurable activities, often with unfortunate
consequences (especially sexual indiscretions, unrestrained spending)
Box 15.14 Typical mental state examination in affective
disorders
Mania
• Appearance: bright, colorful, or garish clothing, hyperactivity,
hypervigilance, restlessness
• Speech: fast, pressured, fl ight of ideas
•
Mood and affect: joy, elation, jubilance, euphoria, annoyance,
irritability
• Thought content: expansive and optimistic thinking, excessively self-
confi
dent or grandiose, distractible, rapid production of ideas and
thoughts
•
Perception: mood-congruent and mood-incongruent delusions.
Fleeting auditory or, more rarely, visual hallucinations. Delusions of
wealth, power, infl
uence, or religious signifi cance
•
Cognitive functioning: usually unaffected
• Insight: seriously impaired judgment and no insight
Depression
• Appearance: reduced eye contact, poor grooming and hygiene,
change in weight, psychomotor agitation, or retardation
• Speech: slow, monotonous, or lacking in spontaneity
• Mood and affect: sadness, numbness, irritability, anhedonia, reduced
concentration, loss of energy, and motivation
• Thought content: preoccupied with negative ideas and nihilistic
concerns, overwhelmed or inadequate, helpless, worthless, hopeless,
suicidal
• Perception: delusions and hallucinations (usually mood congruent),
especially second-person auditory hallucinations. For example,
auditory hallucinations of voices call the patient worthless.
• Cognitive functioning: poor memory and concentration but level of
consciousness is normal. Depressed patients may score falsely low
on an MMSE if they are not willing to answer the questions (“I don’t
know”)—pseudodementia.
• Insight: diminished judgment and insight

IMPORTANT PRESENTING PATTERNS
475
Depression
Depressive disorders can be classifi ed as bipolar or unipolar and as mild,
moderate, or severe. They may include somatic symptoms and psychotic
symptoms (delusions and hallucinations that are usually mood-congruent)
in the case of severe depression.
The diagnostic criteria, treatment, and prognosis can be found in the
Oxford Handbook of Psychiatry . Depression can cause signifi cant social
impairment and distress.
In general terms, features of major depression include the following:
• Depressed mood with feelings of worthlessness
• Diminished interest or pleasure (anhedonia)
• Signifi
cant weight loss or gain
• Insomnia or hypersomnia
• Psychomotor agitation or retardation
• Fatigue or loss of energy
• Diminished ability to think or concentrate; indecisiveness
• Recurrent thoughts of death, suicide, suicide attempts, or specifi c
plans
for suicide
Hypomania
Hypomanic episodes are characterized by a persistently elevated, expan-
sive, or irritable mood with features similar to mania. However, the
episode is not severe enough to cause marked impairment in social or
occupational functioning, and delusions and hallucinations do not occur.

CHAPTER 15 Psychiatric assessment476
Medical conditions with psychiatric
symptoms and signs
There are many medical conditions that can produce psychiatric clinical
features. This can sometimes lead to failure of the underlying medical
condition to be recognized and treated appropriately. It is important in
psychiatry to consider possible organic causes for the symptoms and signs
before starting psychiatric treatment. Further, many medical disorders are
associated with psychiatric diagnoses.
The following is a sample of such situations, aimed at illustrating the
above points, rather than providing an exhaustive list.
Neurological disorders
Seizure disorder
• Ictal events, including status epilepticus, may mimic psychosis.
• Automatisms are seen in some temporal lobe seizures.
• The preictal prodrome can involve changes in mood, particularly
irritability, and auras (including auditory and olfactory hallucinations)
can be seen in temporal lobe epilepsy. These may also include
epigastric sensations, déja vu or jamais vu .
• The postictal state often involves confusion and disorientation.
Parkinson’s disease
• Patients may suffer from major depression, anxiety syndromes,
hallucinations, and delusions.
Brain tumors and cerebrovascular events (depend on location)
• Frontal: personality change, cognitive impairment, motor and language
disturbance
• Dominant temporal lobe: memory and speech impairment, Korsakoff
psychosis in bilateral lesions
• Occipital lesions: visual agnosis, visual hallucinations
• Limbic and hypothalamic: affective symptoms, rage, mania
Multiple sclerosis (MS)
• Cognitive defi
cits, dementia, bipolar disorder, major depression
Infectious diseases
• Neurosyphilis: primarily affects the frontal lobe (irritability, poor self-
care, mania, progressive dementia)
• Meningitis: especially with indwelling shunts, can cause acute
confusion, memory impairment
• Herpes simplex encephalitis: bizarre and inconsistent behavior,
seizures, anosmia, hallucinations (olfactory and gustatory), psychosis
• HIV encephalitis: progressive subcortical dementia, major depression,
suicidal behavior, anxiety disorders, abnormal psychological reactions
Endocrine disorders
• Hyperparathyroidism: delirium, sudden stupor and coma. Visual
hallucinations with associated hypomagnesaemia

477
MEDICAL CONDITIONS WITH PSYCHIATRIC SYMPTOMS: SIGNS
• Hypoparathyroidism: psychosis, depression, anxiety
• Hyperthyroidism: depression, anxiety, hypomania, psychosis
• Hypothyroidism: depression, apathy, psychomotor retardation, poor
memory, delirium and psychosis myxoedema madness
Rheumatological disorders
• Systemic lupus erythematosus (SLE): delirium, psychosis, severe
depression
Metabolic disorders
• Hyponatraemia: confusion, depression, delusions, hallucinations,
seizures, stupor, coma
• Hypernatremia: acute changes of mental state
• Encephalopathy
• Uremia encephalopathy: memory impairment, depression, apathy,
social withdrawal
Vitamin defi ciencies
• B
1
(thiamine): asthenia, fatigue, weakness, depression
• B
12
(cyanocobalamin): impaired cognitive function
This page intentionally left blank


CHAPTER 16 Pediatric assessment480
History-taking
Children and providers
The specialty of pediatrics is very different from adult medicine. Children
grow, change, and mature. Your style and approach to history-taking and
examination will depend greatly on the child’s age, independence, and
understanding, so fl exibility is essential. The most important thing to
remember during your time as a provider is that pediatrics should be
pleasurable.
An approach to the child patient
The child needs to be put at ease and made to feel welcome.
• Make a complimentary remark, or show them an interesting toy. The
fascination of how to turn on a tuning fork can amaze many children.
• Tell the child your name, and ask theirs.
• Make friends with them by asking what their favorite class is at school
or what they had for breakfast.
• Shake hands with children—even toddlers may enjoy this formality.
History
A structured approach to history-taking is important to keep from for-
getting things, but avoid excessive rigidity, as it is sometimes necessary
to pursue a different line of questioning to gain essential information.
Box 16.1 is a list of useful headings in pediatric history-taking that should
be memorized to avoid missing essential information.
Talking to the child
Ask the child to give their account of events with parental corrobora-
tion. Children under 5 years old may lack the vocabulary to describe their
symptoms but will be able to point to parts that hurt. Sometimes it is
important to quiet the eager parent to hear from the patient!
Talking to parents
Most of the history is likely to be gained from the parents or guardians.
First confi rm the relationship of the history provider.
• Ask if they have an infant medical record book—this contains
information about height and weight percentiles, immunizations,
development, and illnesses in the fi
rst few years of life.
• Ask if they have any views on what the cause of the child’s trouble is.
Listen carefully to the parents; they are the observer of their child.
• Ensure that all terms used are appropriately defi ned—you
should
be gleaning information from the parents’ observations and not
their
interpretation of the symptoms.
For example, the word wheeze is often used incorrectly; sometimes a
demonstration can be helpful. Further, the parent may interpret a baby’s
cries as pain, when, in fact, it is your task to establish the circumstances of
the cries and thus the cause.
As children get older, parents may have a hazy memory for early events.
Establishing symptoms in relation to easily remembered events (e.g. fi rst
walked) may clarify the timeline.

HISTORY-TAKING
481
“You can do anything with children if you only play with them.”
—Otto von Bismarck, 19th century
Box 16.1 Outline of pediatric history
• Presenting complaint and history of presenting complaint
• Birth history
•
Place of birth
•
Gestation and pregnancy
•
Birth weight
•
Delivery
•
Perinatal events and subsequent hospital course
• Feeding methods and weaning
•
If the child is bottle fed, note how the formula is mixed (how
many scoops or number of ounces).
• PMH, including hospital admissions, infections, injuries
• Developmental history
• School progress
• Immunizations
• Drugs
• Allergies
• Family tree with sibling’s ages, including deaths, miscarriages, and
stillbirths
• Parental age and occupation
• Family illnesses and allergies
• Housing
•
Include a discussion about the child’s bedroom, with furnishings, as
they may spend 12 hours of each day there.
• Travel
• Systems review
“You can do anything with children if you only play with them.”
—O
tto von Bismarck, 19th century

CHAPTER 16 Pediatric assessment482
Examination: an approach
Examination of children varies depending on the age and cooperation
of the child (see also Box 16.2 ). School-age children and babies may be
examined on an exam table with a parent nearby, whereas toddlers may
be best examined on the parent’s lap ( Box 16.3 ). If the child is asleep on
the parent’s lap, much of the examination should be completed before
waking them.
Undressing
Let the parent undress the child, and only expose the part of the body
you will be examining.
Positioning
Some children may prefer to be examined standing up. Only lay the child
down when you have to, as this can be very threatening.
Putting the child at ease
Slowly introduce yourself to the child’s space during the examination by
exchanging toys, for example.
Explain what you are going to do and be repeatedly reassuring, children
can be embarrassed by silence after a provider’s question but will be com-
forted by endless rambling. And remember—don’t ask permission, as this
will often be refused!
Examination
First, use a hands-off approach. Allow the child to look at you, and let
them play in your presence. Watch the child. How do they interact with
their parents? Do they look well or ill? Do they look clean, well nourished,
and well cared for?
Kneel on the fl oor so that you are at the child’s level. Use a style and
language appropriate to the age of the child—a toddler will understand
the word tummy better than the word abdomen .
Box 16.2 Some distraction techniques to help examination
• Playing peek-a-boo
• Letting toddlers play with your refl ex hammer or tuning fork
• Giving infants something to hold
• Asking mom or dad to wave a bright toy in front of the child
Box 16.3 The mother’s lap
1. Be cautious about taking any baby or young child to an exam table.
It is often better to leave them on their mother’s knee for most of
the examination.
2. Avoid taking a baby off their mother’s knee if they are beyond 7–8
months of age—this will invariably result in screaming.

EXAMINATION: AN APPROACH
483
Be opportunistic
Do not adhere to a rigid examination protocol—e.g., you may have to
listen to the heart fi rst while the child is quiet, then look at the hands later.
Never examine the presenting part only. Be thorough and train yourself to
be a generalist ( Box 16.4 ).
Sometimes, demonstrating with a cooperative older sibling, parent, or a
stuffed toy may put a child more at ease about what is to be done.
Leave unpleasant procedures, such as examination of the ears and
throat, for last.
Presenting your fi ndings
When presenting your fi ndings, translate what you see into appropriate
terminology. Informing a colleague that a child “looks funny” is not very
helpful, but the saying that the child is dysmorphic, followed by a detailed
description is acceptable. Describe in simple terms the relevant features
that make the child look unusual, e.g., low-set ears, wide-set eyes.
2 There is no substitute for examining lots of normal children.
“Pediatrics is a specialty bound by age and not by system.”
—Apley
“Pediatrics is a s
p
ecialt
y
bound b
y
a
g
e and not b
y
s
y
stem.
”
—
Apley
Box 16.4 Using this chapter
The examination routines in this chapter describe the techniques
to employ and the signs to look for in each body system. For more
detailed information about how to perform certain aspects, the reader
should refer to the relevant organ system chapter elsewhere in this
book (e.g., how to perform accurate percussion, where to listen to
heart sounds, and so on).

CHAPTER 16 Pediatric assessment484
Respiratory system
Key points from the history
• Is the child short of breath or wheezy (remember to defi ne terms)?
• Is there stridor or croup?
• Is there a cough? Does it disturb sleep?
• Does anything trigger the symptoms—sports, cold weather, pets?
• Has the child expectorated or vomited any sputum?
• Is the infant short of breath during breast or bottle feeding?
• Is there a possibility the child could have inhaled a foreign body?
• Is there a FH of respiratory problems, such as asthma or cystic fi brosis?
• Does the child have a fever—suggestive of infection?
• Has anyone else been ill? Any contacts with tuberculosis?
• What’s happening at the child-care facility?
• Has the child traveled abroad recently?
• How does the respiratory problem limit the child’s life—how much
school is missed, can they participate in sports, how far can they run, is
sleep disturbed?
Examination
Inspection
Look around for any clues—is the patient on oxygen? Are there inhalers
or nebulizers at the bedside? Remember if mom or dad’s clothing smells
of tobacco, the child is breathing smoke too.
General inspection
• Is the child comfortable or in respiratory distress ( Box 16.5 )? Look for
the following:
•
Nasal fl aring
•
Use of accessory muscles of respiration
•
Intercostal retractions (sucking in of the muscles between the ribs)
and subcostal retractions (drawing in of the abdomen)
•
Grunting (a noise at the end of expiration, which is the infant’s
attempt to maintain a positive end expiratory pressure)
• Is the child running around or just sitting on the parent’s knee?
• Are they restless or drowsy?
• Count the respiratory rate (see Table 16.1 ).
• Listen for wheeze or stridor (a harsh inspiratory sound caused by
upper airways obstruction).
• What type of cough does the child have ( Box 16.6 )?
Box 16.5 Pain
Children may complain of pain when they wish to indicate distress or
discomfort that their vocabulary will not allow. Remember also that
diseases may present differently in children than in adults. For example,
children may describe chest pain with chest tightness and asthma.
Pneumonia often produces abdominal pain in children.

RESPIRATORY SYSTEM
485
• Has the child coughed up any sputum? (Children under 5 years will
swallow sputum, which is often vomited after a bout of coughing.)
Hands
• Clubbing (cystic fi brosis, bronchiectasis)
• Measure the radial pulse—pulsus paradoxus (Chapter 7, b p. 159) is
an important feature of acute, severe asthma in children.
Face
• Check the conjunctiva for anemia.
• Look for central cyanosis in the tongue.
• Look for petechiae (nonblanching spots from small burst blood
vessels) around the eyes from a prolonged bout of coughing.
Chest
• Look for chest movement. Is it symmetrical? Is the child splinting
(failing to move) one side of the chest?
•
Children who splint their chest as a consequence of pneumonia
often also have a slight spinal scoliosis.
• Look at the chest shape. Is there any chest wall deformity?
•
Harrison’s sulcus: permanent groove in the chest wall at the insertion
of the diaphragm in long-standing asthma
•
Barrel chest: air trapping in asthma
•
Pectus carinatum: “pigeon chest” seen in long-standing asthma Pectus
excavatum: normal variant
Table 16.1 Normal respiratory and heart rates, by age
Age (years) Heart rate (bpm) Respiratory rate
<1 120–160 30–60
1–3 90–140 24–40
3–5 75–110 18–30
5–12 75–100 18–30
12–16 60–90 12–16
Box 16.6 Some childhood coughs
The following factors may give important clues to origin of the cough:
• Productive: cystic fi brosis, bronchiectasis, pneumonia
• Nocturnal: asthma, cystic fi brosis
• Worse on wakening: cystic fi brosis
• Brassy: tracheitis
• Barking: croup (laryngotracheobronchitis)
• Paroxysmal: pertussis, foreign body
• Worse during exercise: asthma
• Disappears when sleeping: habitual cough
• During or after feeding: aspiration

CHAPTER 16 Pediatric assessment486
Palpation
• Feel the neck for enlarged cervical lymph nodes.
• Palpate the trachea to ensure that it is midline.
• Then move onto the chest.
•
Feel for the apex beat. This may be displaced in effusion, collapse, or
tension pneumothorax.
•
Assess expansion (see b Chapter 8, p. 194), commenting on extent
and symmetry.
•
In young children, you may be able to feel crackles.
Percussion
Percussion is rarely useful in infants and toddlers. Remember to also per-
cuss for the normal cardiac dullness as well as the upper and lower bor-
ders of the liver.
• Dull = consolidation
• Hyperresonant = air-trapping or pneumothorax
• Stony dull = pleural effusion
Auscultation
0 Before using a stethoscope on the child, pretend to auscultate the
parent’s or an older sibling’s chest or a less vulnerable part of the child’s
body (e.g., their leg).
2 Remember to listen under the axillae as well as the anterior and
posterior chest wall.
2 Especially in young children, upper airway noises may be transmitted to
the chest, so if they are old enough, ask them to cough to clear them.
Listen for the following:
• Breath sounds
•
Are they vesicular (normal), absent, or bronchial?
• Added sounds (e.g., wheeze or crackles—see b Chapter 8, p. 198, for
more details) (see Table 16.2 for some associated conditions)
• Absent breath sounds in one area suggests a pleural effusion,
pneumothorax, or dense consolidation.
2 i Respiratory rate and work of breathing are the most important signs
of a lower respiratory tract infection in infancy, as sometimes palpation,
percussion, and auscultation will be normal.

RESPIRATORY SYSTEM
487
Table 16.2 Some common respiratory conditions and signs
Condition Age Inspection Auscultation
Bronchiolitis <1 year Pale, coryza,
cough, retractions,
tachypnea
Wheezes and
crackles throughout
chest
Croup (laryngo-
tracheobronchitis)
1–2 years Stridor, hoarse voice,
barking cough
Clear
Asthma >1 year Tachypnea,
retractions ± audible
wheeze and use of
accessory muscles
Wheeze, variable
air entry throughout
chest. Crackles in
young children
Pneumonia Infant Tachypnea,
retractions, fl ushing
due to fever, grunting
May be clear,
reduced breath
sounds over affected
area, crackles
Pneumonia Child Tachypnea,
retractions, fl ushed,
generally ill
Abdominal pain
(may be the only
symptom), crackles
and bronchial
breathing over
affected area

CHAPTER 16 Pediatric assessment488
Ear, nose, and throat
Ear, nose, and throat (ENT) conditions are a common reason for children
to present to the provider.
0 Examination of this system should be left until last, as many children
fi
nd it unpleasant.
Key points from the history
• Does the child pull at their ears (suggests infection)?
• Does the child complain of an earache or a sore throat?
• Is there coryza (runny nose)?
• Does the child have a fever?
• Does the infant drool more than normal (suggests sore throat)?
Examination
Ears
• Sit the child on the parent’s lap, facing to the side.
• Ask the parent to hold the child’s head against their chest with one
hand, and to fi
rmly hold the child’s arms and upper body with the
other hand (see
Box 16.7 ).
• With an infant, gently pull the pinna back before inserting the
otoscope. When examining an older child, pull the pinna up.
• Use the otoscope as in adults—see Chapter 6, b p. 132.
See Table 16.3 for common conditions of the eardrum.
Table 16.3 Some common fi ndings when examining the eardrum
Appearance of drum Condition
Translucent, clear light refl ex Normal
Red, bulging, loss of light refl ex Acute otitis media
Retracted, loss of light refl ex, dull Glue ear (chronic otitis media with effusion)
Box 16.7 More on ear examination
While asking the parent to hold the child’s head during the ear examina-
tion is the usually taught method, this often leads to a struggle.
It is equally appropriate to allow the child free movement of the head,
providing you splint the hand holding the otoscope against the child’s
face so that your hand (and otoscope) will move as the child’s head
moves. This can lead to a less distressing examination.
0 In infancy, the pinna should be pulled forward (not back) to straighten
the auditory canal.

EAR, NOSE, AND THROAT
489
Nose
• Examine the nose externally for discharge.
• The nose may be examined very gently, using an otoscope.
•
Polyps are a common fi nding in asthma and cystic fi brosis.
•
Pale, boggy nasal mucosa suggests allergic rhinitis.
Throat
• Sit the child upright on the parents lap facing toward you.
• Ask the parent to hold the child’s forehead with one hand, with the
back of the child’s head against their chest.
•
The parent should fi rmly hold the child’s arms with the other hand.
• The diffi culty now is encouraging the child to open their mouth!
•
Ask the child to open their mouth “as wide as a lion’s.”
•
Tempt an infant to open their mouth with the pacifi er.
•
Sometimes children will be more inclined to open their mouth if you
promise not to use a tongue depressor.
• When the child’s mouth is open, gently depress the tongue with the
tongue depressor if it is obstructing view of the tonsils.
• Decide whether the tonsils are
•
Normal: pink and small
•
Acutely infl amed: red, enlarged, with purulent areas
•
Chronically hypertrophied: enlarged and pitted, but not infl amed
Lymph nodes
• Always feel for cervical and supraclavicular lymphadenopathy.

CHAPTER 16 Pediatric assessment490
Cardiovascular system
Key points from the history
• Does the child ever have blue spells (cyanosis)?
• Does the child become tired, pale, or sweaty (indicating heart failure)?
• If the patient is an infant, ask how long the child takes to feed from a
bottle. Breathlessness may inhibit feeding.
• Is the child growing normally? Plot on a percentile chart.
• Does the child suffer from recurrent chest infections?
• Does the child suffer from abdominal pain (caused by organomegaly)?
• Is there a history of fainting or collapse?
• Has the child ever complained of their heart racing (would imply an
arrhythmia such as supraventricular tachycardia)?
• Is there a FH of congenital heart disease?
Examination
Inspection
Search for evidence of heart failure: pallor, cyanosis, sweating, respiratory
distress, and tachypnea.
Hands
• Clubbing is seen in cyanotic congenital heart disease.
• Search for signs of endocarditis, including splinter hemorrhages,
Janeway lesions, and Osler’s nodes.
Face
• Anemia in the conjunctiva
• Central cyanosis (“stick your tongue out!”)
Neck
The jugular venous pulse and pressure are diffi
cult to appreciate in young
children, given the relative shortness of the neck.
Peripheral pulses
Palpate the radial, brachial, and femoral pulses.
0 The femoral pulse, although sometimes awkward to feel, must always
be sought to ensure coarctation of the aorta is not missed. Assess:
• Volume: Is it full or thready? (You need to practice feeling many pulses
to appreciate the difference.) A thready, weak, or small volume pulse
indicates hypovolemia. Look for pulsus paradoxus (b Chapter 7,
p. 159).
• Rate: Heart rate varies with age, activity, distress, excitement, and fever
(pulse rate will i by 10 bpm with every temperature rise of 1ºC).
• Rhythm
•
Sinus arrhythmia: an i in pulse rate on inspiration, with slowing on
expiration. This is very common in children.
•
Occasional ventricular ectopic beats are normal in children.
• Character
•
Collapsing pulse in children is most commonly due to a patent
ductus arteriosus.
•
Slow rising pulse suggests ventricular outfl ow obstruction.

CARDIOVASCULAR SYSTEM
491
Blood pressure
Blood pressure readings in children are not easy, but they are important,
so remember to perform this test. The use of the correct cuff size is vital
to prevent inaccurate readings.
Anxiety and poor technique are the most common causes for raised
blood pressure in children, so it should be measured several times.
Chest
Note the presence of the following:
• Precordial bulge: causes the sternum and ribs to bow forward
• Visible ventricular impulse: right ventricular (RV) impulse may be
visible under xiphoid process. The left ventricular (LV) impulse (PMI) is
often visible in thin children and in children with true LV hypertrophy.
• Scars: indicative of previous heart surgery
Palpation
• Feel the PMI to determine its location and character. It is usually
situated in the fourth intercostal space in the mid-clavicular line in
infants or toddlers (often diffi
cult to localize if they are plump), and in
the fourth or fi
fth intercostal space in older children.
•
LV hypertrophy results in a diffuse, forceful, and displaced apex beat,
felt as a heave.
•
If the apex is impalpable, consider dextrocardia (inverted heart with
apex pointing to the right) or pericardial effusion. Levocardia is the
normal orientation of the heart to the left.
• Right ventricular heave: Place your fi
ngertips along the left sternal
border (LSB). If the child has RV hypertrophy, you will feel your fi ngers
lift up with each impulse.
• Palpate in the four valve areas (aortic, pulmonary, tricuspid, and mitral)
for thrills.
• Palpate the abdomen for hepatomegaly, which suggests heart failure
(percuss the upper border of the liver—a normal-sized liver may be
displaced downward by lung disease such as bronchiolitis.) Raised JVP,
pulmonary, and peripheral edema are rarely seen in children.
Auscultation
Listen to the heart sounds in the four valve areas with the diaphragm and
bell of the stethoscope (preferably pediatric size).
First heart sound (S1) is best heard at the apex with the bell.
• Loud S
1
is heard with high cardiac output states (e.g., anxiety, exercise,
fever).
• Soft S
1
is heard with emphysema and impaired LV function.
Second heart sound (aortic = A2 and pulmonary = P2) is best heard at the
base with the diaphragm. It is normally split in children.
• Soft P
2
is heard with stenotic pulmonary valve (e.g., tetralogy of Fallot).
• Loud P
2
is heard with pulmonary hypertension.
• Wide fi
xed splitting is caused by atrial septal defect.

CHAPTER 16 Pediatric assessment492
Third heart sound is due to rapid ventricular fi lling.
• Causes include i LV stroke volume (aortic or mitral regurgitation)
and restricted ventricular fi lling (constrictive pericarditis, restrictive
cardiomyopathy). It may be normal in children.
Fourth heart sound is due to forceful atrial contraction.
• Causes include hypertrophic cardiomyopathy and severe hypertension.
Murmurs
Auscultate for murmurs ( Table 16.4 ) over the four valve areas and at the
back. About 30% of children have innocent murmurs.
Innocent murmurs
The patient is asymptomatic. These are systolic (except venous hum), with
no radiation or thrill. Change occurs with altering patient posture.
• Venous hum: due to turbulent fl
ow in the head and neck veins. A
continuous murmur in diastole and systole is heard below the clavicles,
which disappears when the child lies fl at.
• Ejection murmur: due to turbulent fl
ow in the outfl
ow tracts of the
heart. It is heard in the second to fourth left intercostals spaces.
Pathological murmurs
These are systolic or diastolic and may radiate. The patient may have a
thrill and may be symptomatic.
• Atrial septal defect: soft ejection systolic murmur at the upper LSE due
to i RV outfl
ow. Fixed wide splitting of the second heart sound may
fi
rst be detected at school entry.
• Ventricular septal defect: parasternal thrill . Loud pansystolic murmur
occurs at the lower left sternal border (LSB) . It radiates throughout
the precordium . Signs of heart failure may be present.
• Coarctation of the aorta: ejection systolic murmur is heard between the
shoulder blades. Femoral pulses are weak or absent.
• Patent ductus arteriosus: collapsing pulse. A continuous “machinery
murmur” is heard below the left clavicle.
• Also see b Chapter 7, p. 171.
Table 16.4 Quick guide to common pediatric murmurs
Symptom Cause
Cyanosis + murmur Usually tetralogy of Fallot
Cyanosis + murmur + operation Possibly tetralogy of Fallot or
transposition of the great arteries
Pink + loud systolic murmur Probable ventricular septal defect
(most common form of CHD)
Pink + murmur + impalpable femorals Coarctation of the aorta
Continuous low-pitched murmur Probable patent ductus arteriosus

ABDOMEN AND GASTROINTESTINAL SYSTEM
493
Abdomen and gastrointestinal system
Key points from the history
Determine whether the child takes in suffi cient calories for growth and
has a well-balanced diet. Ask about height and weight gain.
2 This may be an appropriate time for dietary teaching.
When taking a history, start at the head and work down to avoid miss-
ing things.
• Does the child have a good appetite?
• Does the child vomit?
•
How much?
•
Are they hungry afterward?
•
Is it forceful (projectile) or effortless (regurgitation)?
•
Is it related to eating?
•
What does it contain? Ask about coffee grounds or other
appearances of the vomit. (Bile-stained vomiting in an infant always
indicates obstruction and must be considered pathological.)
• Does the child suffer from abdominal pain?
• Does the child ever have a bloated abdomen?
• Are there any urinary symptoms?
• Ask about bowel habit—is the child constipated?
• Have there been any frequent or loose stools? Are the stools
particularly offensive (suggests malabsorption)?
• Is there a relevant FH (e.g., celiac or infl
ammatory bowel disease)?
Examination
Inspection
Start with a general inspection of the patient, looking especially for the
following:
• Visible liver edge or spleen
• Peristalsis (important in diagnosing pyloric stenosis during a test feed)
• Jaundice
• Observe for signs of liver disease (see b Chapter 9, p. 246), including
spider nevi, xanthomata, and purpura.
• Edema over the tibia and sacrum
• Whether the child is under- or overweight
• Wasted buttocks (suggesting weight loss—typical of celiac disease)
Hands
• Clubbing, palmar erythema
Face
• Check the conjunctiva for anemia.
• Periorbital edema (e.g., in nephrotic syndrome)
Abdomen
• Abdominal distension (see Boxes 16.8 and 16.9 )
• Gross ascites may be evident—the abdomen will be distended and the
umbilicus everted.
• Caput medusae (cutaneous collateral veins with blood fl owing away from
the umbilicus due to
i portal venous pressure; see Chapter 9, b p. 229).

CHAPTER 16 Pediatric assessment494
Box 16.9 Detecting peritoneal infl ammation
A further useful technique is to ask the patient to make their belly “as fat
as possible” and “as thin as possible.” Also ask them to cough. If perito-
nitis is present, any of these maneuvers may result in pain.
Box 16.8 Causes of abdominal distension in a child
• Fat
• Fluid
• Flatus
• Feces
• Organomegaly
• Muscle hypotonia
• Exaggerated lordosis (normal in young children)

PALPATION
495
Palpation
0 Young children may resist abdominal examination. First try distraction
techniques. If these fail, use the child’s hand to guide yours around the
abdomen. If there is doubt as to the signifi
cance of tenderness in a child’s
abdomen, listen with your stethoscope and gently apply more pressure.
Often, quite fi rm pressure can be tolerated in this way where there was
previously tenderness.
The aims of palpation are to
• Determine the presence of normal abdominal organs.
• Detect enlargement of the abdominal organs.
• Detect the presence of abnormal masses or fl uid.
Procedure
• Ensure the child is relaxed and that your hands are warm.
• Inquire about pain before you begin.
• Palpate for tenderness (light palpation fi
rst, then deep palpation).
•
Feel for guarding (tensing of the abdominal muscles, which may
indicate underlying tenderness).
• Palpate the spleen. This is normally felt 1–2 cm below the costal
margin in infancy. It is soft and can be tipped on inspiration. Begin
palpation in the right iliac fossa and move toward the left upper
quadrant, to avoid missing a very large spleen. It may help to turn the
child onto their right side.
• To palpate the liver, start in the right iliac fossa and move upward in
time with the child’s respiratory movements until the liver edge meets
your fi
ngers. A liver edge 1–2 cm below the costal margin is normal up
to the age of 2 or 3 years. See
Box 16.10 regarding hepatomegaly.
• Kidneys are not easy to palpate in children (they are easier to palpate
in newborns), so if you can feel them, they are probably enlarged.
They are best palpated bimanually. The kidneys move with respiration
and have a smooth outline, and one can get above them (unlike the
liver and spleen).
• Palpate for other masses and check for constipation (usually felt as a
hard, indentable, nontender mass in the left iliac fossa).
Box 16.10 Confi rming hepatomegaly
If in doubt, confi rmation of liver enlargement can be made by
• Placing the stethoscope over the xiphoid process.
• Gently rubbing the abdomen, progressing up from the right iliac
fossa.
•
When the rubbing hand is over the liver, the sound will be heard
through the stethoscope.

CHAPTER 16 Pediatric assessment496
Percussion
• Ascites. Test for shifting dullness (described in b Chapter 9, p. 240)
as a sign of ascites.
• Gaseous distension
• Percuss to determine the size of the liver and spleen
Auscultation
• Bowel sounds
Rectal examination
This is rarely indicated in children. However, it is often useful to inspect
the perianal region for fi ssures, tags, soiling, and pinworms.
Male genitalia
Penis
• Note the state of hygiene.
• True micropenis is rare. If the penis looks small, it is probably because
it is buried in suprapubic fat.
• Check the urethral orifi
ce is at the tip of the glans. If not, is there
epispadius (dorsal opening, very rare) or hypospadias (ventral
opening)?
Scrotum
The child should be standing up.
• Inspect for normal rugosity of the scrotum.
• Palpate for the testes.
•
If they are not present in the scrotum, feel at the inguinal canal and,
if found, try to milk the testis down.
•
Many undescended testes are subsequently found on re-examination
as retractile testes, so be gentle in your approach to avoid provoking
a cremasteric refl ex!
Female genitalia
Inspect the female external genitalia if there are urinary symptoms.

NERVOUS SYSTEM
497
Nervous system
Key points from the history
• Detailed birth and perinatal history, including maternal drugs or illness
• Careful history of developmental milestones
• Hearing or visual concerns. Did the child pass the newborn hearing
screen?
• Any change in school performance, personality or behavior
(e.g., aggression)?
• Ask about symptoms of raised intracranial pressure (e.g., headache,
vomiting).
• Any change in gait or frank ataxia?
• Does the child have limited function—what can they do? What do
they need help with?
• Obtain relevant FH of learning diffi
culties or genetic conditions.
Examination
Examination of the nervous system in school-age children should be
performed as in adults. Young children cannot cooperate with a formal
neurological examination, so assessment is opportunistic—observation
becomes important. The assessment of a young child is described below.
Young children—where to start
Palpate the anterior fontanel when the child is quiet to
• Determine the presence of raised intracranial pressure (felt as fullness
or bulging).
• Determine the degree of dehydration (felt as a sunken fontanel).
2 It is impossible to assess fontanel tension in crying babies.
2 Pulsation of the fontanel is normal.
• Measure the maximum occipitofrontal head circumference and plot
this on a percentile chart.
Cranial nerves
It is not possible to systematically examine cranial nerves in infants or
young children; below is a rough guide (see b Chapter 10).
• I (olfactory): very diffi cult
• II (optic): Ask the parents—can the child see?
• III, IV, VI (eye movements): Gain the infant’s visual attention with an
object and move it back and forth. Watch for the range of ocular
movements as the child tracks the object. Pendular nystagmus may
indicate a visual defect. See Box 16.11 for assessment of strabismus.
• V (trigeminal): rooting refl ex
• VII (facial): Facial palsy will become apparent when the child cries.
Asymmetry will be more obvious. Does the child close both eyes?
• VIII (vestibulocochlear): Formal hearing tests are performed at birth.
• IX, X: swallowing
• XI (accessory): neck and shoulder movements
• XII (hypoglossal): tongue movement

CHAPTER 16 Pediatric assessment498
• Pupils: Check for size, shape, and reaction to light.
• Fundi should be examined but should be left to the end of the
examination, as it is unpleasant (and sometimes impossible).
Tone
• Observe the child’s response to gravity.
•
Hypotonic infant: slips through in ventral suspension (holding them
up with a hand in each axilla), droops over your hand during ventral
suspension, head lags when pulled to sit, frog legs posture.
•
Hypertonic infant: scissoring of lower limbs when the baby is picked
up. Resistance to movement of limbs. The baby will seem to move
in one piece.
Move limbs through their range of movements. Important areas to exam-
ine include the following:
• Arm fl
exors and extensors
• Arm supinators and pronators (most sensitive for i tone)
• Hip adductors
• Leg extensors
• Leg fl exors
• Ankle extension
Power
Observe for the following:
• Symmetry
• Spontaneous movements (Reduced movement is indicative of muscle
weakness.)
Sensation
This is diffi
cult to assess. Only response to pain can be confi dently
elicited
in young children, but please don’t try this!
Box 16.11 Assessment of strabismus
Any strabismus persisting beyond the age of 6 weeks needs specialist
assessment, as strabismus may lead to amblyopia (cortical blindness).
• Ask when the strabismus is most apparent—latent strabismus may
only be present when the child is tired.
Examination
• Corneal light refl
ection test: shine a penlight at a spot directly
between the patient’s eyes to produce a refl ection in the cornea.
The refl ected light that you see should be at the same spot on each
eye. If the refl ection from the corneas is asymmetrical, strabismus is
probably present.
• Eye movements: to detect a paralytic strabismus (rare)
• Cover test: encourage the child to fi
x on a toy, and cover the normal
eye with a card or occluder. If the fi
xing eye is covered, the affected
eye moves to take up fi xation.
•
Manifest (constant) strabismus: on removal of the cover, the eyes
move again as the fi xing eye takes up fi xation.

NERVOUS SYSTEM
499
Refl exes
• Tendon refl exes can be elicited by tapping the tendon with a fi nger
for
babies, and using a refl ex hammer for children.
•
The examiner should know the nerve roots responsible for the
refl exes (see b Chapter 10, p. 330).
2 Remember that the plantar response is upward until age 8 months.
• Primitive refl
exes: The presence of primitive refl exes beyond 6 months
of age is abnormal and will inhibit normal development.
•
Persistence is indicative of a UMN lesion (e.g., cerebral palsy). See
Table 16.5 .
Coordination (assess in older children)
Ask the child to do the following:
• Stand on one leg and then hop.
• Walk on tiptoes.
• Walk on heels. This is a good test for coordination and overall
neurological integrity. Patients with any kind of spasticity, for example,
will be unable to do this.
• Do the fi
nger-to-nose test and heel-to-shin test if child is old enough.
Gait (assess in older children)
• Spastic gait: Spasticity of extensor muscles causes a stiff gait on a
narrow base. Toes catch the ground fi rst (e.g., cerebral palsy).
• Hemiplegic gait: If the spasticity is unilateral, the affected leg drags
stiffl
y and is circumducted as it is brought forward.
• Ataxic gait: broad based, unsteady, with frequent falls
• Lower limb weakness (distal): The affected leg is lifted over obstacles,
then the foot returns to the ground with a slap.
• Lower limb weakness (proximal): There is a waddling gait as the
pelvis is thrown side to side, being poorly supported by lower limbs
(e.g., muscular dystrophy)
• Limp has several causes, but always rule out dislocation of the hip.
Table 16.5 Some primitive refl exes and age of extinction
Refl ex Age of extinction
Stepping refl ex 2 months
Palmar grasp 3–4 months
Moro refl ex 4–5 months
Asymmetric tonic neck refl ex 6 months

CHAPTER 16 Pediatric assessment500
Developmental assessment
Development is a continuous process, the rate of which varies consider-
ably among normal children.
Development is divided into four areas:
• Gross motor
• Fine motor and vision
• Speech and hearing
• Social
Delay in all four areas is usually abnormal, but delay in one area may not
be ( Table 16.6 ). For example, some children become expert at bottom
shuffl
ing or scooting. Thus having learned an effective means of traveling,
the need to walk becomes less important.
Performing a developmental assessment
• Observation is key. Young children will often not cooperate. Take
a history from the parents about milestones the child has achieved
( Table 16.7 ) .
• Be systematic and evaluate each of the four developmental areas.
• Learn a few essential milestones, as it is diffi
cult to remember them all.
2 If an infant was born prematurely, allow for this by calculating their
corrected age from their expected due date.
• Limit distractions and present one task at a time.
Equipment for developmental assessment
• Wooden blocks: for assessing palmar grasp and building towers
• Coins or Cheerios: for testing pincer grip
• Pencil and paper: for assessing fi
ne motor skills
• Different-colored cards or colorful book
Table 16.6 Developmental warning signs
Age Warning sign
Any Regression in previously acquired skills or a halt in
developmental progress
8 weeks No smiling
6 months Persistent primitive refl exes. Hand preference (this should not
appear until 18 months)
12 months No sitting. No pincer grip. No double babble
18 months Not walking. No words
4 years No words

DEVELOPMENTAL ASSESSMENT
501
Table 16.7 Developmental milestones
Age Gross motor Fine motor Language Social
3 months Head control, pushes up
with arms
Opens hand Laughs Smiles (6 weeks)
6 months Sits Palmar grasp, reaches, transfers Babbles
(monosyllabic: ba, ka, da)
Eats solid food
9 months Crawls, pulls to stand Pincer grip begins to develop Double babble
(dada, mama, baba)
Stranger awareness,
waves bye-bye
12 months Walks Developed pincer grip Mommy, daddy, specifi cally Peek-a-boo
18 months Walks upstairs, jumps Scribbles, 3-block tower 2-word phrases Mimics
2 years Kicks, runs Draws straight line,
6–8 block tower
Begins to use clauses
(including verbs)
Uses spoon skillfully,
undresses, symbolic play
3 years Hops, walks upstairs
adult-style
Draws a circle, builds a bridge
with blocks
Says name, knows colors Dresses, has a friend,
dry diapers by day
4 years Stands on one leg, hops Draws a cross, makes 3 steps
with blocks
Sentences of 5+ words Does up buttons
5 years Can ride a bicycle Draws a triangle Ties shoelaces, dry all night

CHAPTER 16 Pediatric assessment502
The newborn
The vast majority of newborns have a normal intrauterine life and normal
birth and are physically normal. However, because there is wide variation
in the spectrum of normal, it is important to stress the value of examining
a large number of neonates to appreciate the normal spectrum.
In the delivery room
All newborns should have a brief examination at birth to determine
whether resuscitation is needed and to rule out any major abnormalities.
The APGAR score is used to gauge the need for resuscitation
( Table 16.8 ) .
In the nursery
A more thorough examination is carried out prior to discharge. At this
stage, the baby is unrecognizable from the one you met in the delivery
room—they will be pink, vigorous, and feeding well.
Ask briefl y about whether the baby has passed urine and meconium
(the fi rst, black sticky stool), and inquire about the progress of feeding as
well as a FH of congenital anomalies. Of particular importance is a FH of
dislocated hips, renal abnormalities, and deafness.
• Examination should start at the top and work down, to ensure nothing
is missed.
• Undress the baby yourself as the examination proceeds, to get a feel
for how the baby handles.
General observation
First observe the baby without disturbing him or her.
• Color: pink, pale, cyanosed, or jaundiced? Acrocyanosis (cyanosis of the
hands and feet) is normal, provided the lips and tongue are pink.
• Rash: a blotchy erythematous rash occurs in about half of all neonates;
this is usually harmless and is called erythema toxicum .
• Peeling of skin is common, especially in post-dates babies.
Table 16.8 APGAR score
Sign 0 1 2
Appearance White/blue Blue extremities,
pink trunk
Pink
Pulse Absent <100bpm >100 bpm
Grimace on
stimulation of foot
None Frown/grimace Cry
Activity, tone Floppy Some limb fl exion Active movement
Respiratory effort Absent Irregular, slow Loud cry

THE NEWBORN
503
Hand and face
• Shape of the head can vary widely in the fi rst week.
• Fontanels should be soft and fl
at. The size of the anterior fontanel also
varies widely, from 1 to 4 cm in diameter. The posterior fontanel may
accept a little fi ngertip.
• Cranial sutures: Are they fused?
• Look for trauma from the birth, such as caput succedaneum (edema
caused by pressure over the presenting part) and molding (head
changing shape as it passes through the birth canal), forceps marks, and
subconjunctival hemorrhages. In general, these conditions will resolve
within the fi rst
week.
•
A cephalhematoma is a localized, fl uctuant swelling, usually over the
parietal bone, caused by subperiosteal bleeding. This will resolve
over a few months.
• Ears can be of different shape and size. Look for preauricular sinuses
and ear tags, and observe their position.
Mouth
• Palate: Look at it when the infant cries, then palpate it for a cleft with a
clean fi nger.
•
Epstein’s pearls are small, white cysts in the midline of the hard
palate. They are normal and resolve spontaneously.
• Jaw: A small jaw (micrognathia) may be part of the Pierre Robin
sequence (midline cleft, small jaw, posterior displacement of the
tongue, which can cause upper airway obstruction).
• Tongue: Note the size. If it is large and protruding, this may indicate a
number of syndromes (e.g., Down syndrome).
Eyes
• Note the position and size.
• Look for the red refl
ex with an ophthalmoscope to exclude a cataract,
which would be seen as a white refl ection.
•
To encourage the baby to open their eyes, wrap them in a blanket
(a crying baby will not open their eyes) and sit them upright.
•
If this fails, give the baby something to suck on, or startle with the
Moro refl ex.
• Sticky eyes can be the result of ophthalmia neonatorum (purulent
conjunctivitis in the fi
rst 3 weeks of life), usually due to accumulation
of lacrimal fl
uid due to incomplete drainage of the nasolacrimal duct.
Respiratory system and chest
• Observe: This is best done with a quiet baby (either sleeping or with
the aid of a pacifi er).
• Chest: Comment on size, symmetry, and shape.
• Respiratory rate should be <60/minute. Note the work of breathing. Are
there any subcostal or intercostal retractions? Is the baby grunting?
•
Normal newborn respiration should be quiet, effortless, and
predominantly diaphragmatic (abdomen moves more than the chest).
• Auscultate the lung fi
elds to ensure symmetrical air entry. Crepitations
may be normal in the fi
rst few hours of life.
• Breasts: Engorgement is common in male and female infants.

CHAPTER 16 Pediatric assessment504
Cardiovascular system
• Observe: Note color, respiratory effort, and precordial heave.
• Apex beat: Palpate and feel for any thrills (common in neonates).
• Femoral pulse: This is extremely important; its absence may imply
coarctation of the aorta. This requires a relaxed, still baby and lots of
patience.
0 Remember that too much pressure may obliterate it. A collapsing pulse
(water hammer) suggests patent ductus arteriosus.
• Heart rate should be between 100 and 160 bpm.
• Auscultate for the heart sounds and murmurs. Systolic murmurs are
common and usually best heard along the left sternal edge.
Abdomen
• Observe: Distension could be bowel obstruction or abdominal mass.
• Umbilical stump: Count the three vessels. Note any signs of infection,
such as an unpleasant smell, discharge, or periumbilical erythema.
•
The cord will spontaneously separate around the fourth or fi fth day.
• Palpate: Gently feel the abdomen for intra-abdominal organs and
exclude organomegaly. Use warm hands and a pacifi er, if necessary.
0 The liver edge is soft and easily missed.
• Kidneys: Determine presence and size by balloting.
•
It is possible to palpate the lower poles of the kidneys in normal
neonates.
• Bladder: Palpate suprapubically. If felt, this suggests outlet obstruction.
• Anus: Infants with an imperforate anus may still pass meconium via a
fi
stula, so check that the anus is patent and in the correct position.
Male genitalia
• Urethra: Identify the urethral orifi
ce and exclude hypospadias.
• Testes: Palpate gently. If they cannot be found in the scrotum,
commence in the inguinal area and palpate downward.
•
If a testis appears larger than normal, transilluminate the scrotum
(b Chapter 12, p. 384) to check for the common condition
hydrocele.
• Inguinal hernia: These are more common in preterm infants.
0 Put the diaper back on quickly, for obvious reasons. In the event of
failure to quickly cover the genitalia, note the urinary stream, as a weak
stream may indicate posterior urethral valves.
Female genitalia
• Labia minora may not be fully covered, especially in preterm infants.
• Vaginal tags are common and resolve spontaneously in the fi rst
week.
• Vaginal discharge and occasionally bleeding can occur, and is normal.
• Note i pigmentation and clitoromegaly.
Limbs
• Ensure that all joints have full range of movement, to exclude any
congenital contractures.
• Examine fi
ngers and toes for syndactyly (fused digits) or polydactyly
(extra digits).

THE NEWBORN
505
Examination of the hips
This is to detect congenital dislocation and instability of the hips, and
should be left until last, as it will make the baby cry.
• Observe for unequal leg length and asymmetry of skin creases.
Hip examination is in two parts:
• Lay the infant supine on a fl
at surface with hips and knees at 90*.
• Stabilize pelvis with one hand and with the other, grasp the knee
between thumb and palm, with the fi
ngertips over the greater
trochanter.
•
Barlow test assesses whether the hip can be dislocated. Pull the hip
up and then push down and laterally.
•
Ortolani test assesses whether the hip is dislocated. Pull the hip
up into the acetabulum (producing a “clunk”); then the hip can be
abducted (Ortolani = out).
Feet
• Talipes equino varus: primary clubfoot. This is usually a fi xed
structural
deformity requiring early manipulation and fi xation.
• Calcaneo valgus: common. Dorsum of the foot is in a position close to
the shin. It resolves after about 2 months with i calf muscle tone.
• Positional talipes is extremely common and involves no bony deformity.
It is easily corrected by movement and treated with physiotherapy.
Spine
Lay the infant prone in one hand and with the other, palpate the spine,
checking for spina bifi
da occulta or a dermal sinus.
Neurological examination
Because infants with little or no cerebral cortex can show normal refl exes
and tone, you should observe the baby’s state of consciousness through-
out the examination. This should vary from quiet sleep to semi-wakeful-
ness to an alert state.
A normal infant will be consolable when they cry, whereas it is very
diffi cult to settle a neurologically abnormal infant.
Inspection of the spine
Any midline lesion over the spine needs immediate investigation. A single
hair might indicate communication with the spinal column (spina bifi da).
Posture
Posture is generally fl exor, although abnormal intrauterine positions can
distort this, such as extended breech position.
Movements
Watch spontaneous limb movements, noting the presence of jitteriness.
Tone
Assess and compare the fl exor recoil of the limbs.
Evaluate tone in response to gravity:
• Pull-to-sit test. Let the baby grasp your fi
ngers and pull the baby up to
sit. The head should fl
ex and follow the traction to an upright position
and hold momentarily. Also observe the tone in the baby’s arms.

CHAPTER 16 Pediatric assessment506
• Ventral suspension is assessed by grasping the infant under each axilla.
A normal infant will support themselves in this position by extending
their back and hips, lifting their head, and fl
exing their arms and legs.
Primitive refl exes (see Box 16.12 )
These are used to assess asymmetry of function, gestational age, and neu-
rological function.
Vision
Assessment of vision should be carried out with the infant in an alert state.
The baby will fi x on an interesting object 8 inches away and will follow
the target.
Hearing
This can be assessed by sounding a loud rattle outside of the infant’s vision.
The baby should look toward the noise.
Head circumference and weight
Finally, measurement and plotting of head circumference and birthweight
on a growth chart is of utmost importance.
Box 16.12 Primitive refl exes
• Palmar grasp: Fingers close to hold an object placed in the palm.
• Rooting: When pressure is applied to the cheek, the head turns
toward the pressure and the mouth opens.
• Sucking: When a fi
nger is placed in the mouth, the infant will suck
vigorously.
• Stepping: Hold the infant with both hands and lower the feet onto a
surface. The legs will move in a stepping fashion.
• Moro refl ex: Lay the infant supine on your hand and forearm. When
the head is dropped a couple inches, the upper limbs abduct, extend,
and fl
ex in a symmetrical fl
owing movement. A unilateral response
indicates damage (usually transient) to the fi fth and sixth cervical
roots, producing Erb’s palsy.


CHAPTER 17 Examination under special circumstances 508
Overview
This chapter provides an overview and Web URLs for some special con-
siderations that medical personnel should address within the topics of
natural disasters, terrorism events, public health emergencies, and sexual
assault. Detailed information is beyond the scope of this text.
In many communities, there are specifi c laws that address and defi ne the
working relationship among health and law enforcement offi cials. Health-
care providers should be aware of these laws and incorporate a working
knowledge of all appropriate regulations (or at least where to locate the
information) before it is needed.
Often in these situations, support personnel, such as social workers,
may have left for the day, and providing timely and appropriate care can
be challenging without basic knowledge and skills.

DISASTERS, TERRORISM, AND PUBLIC HEALTH EMERGENCIES
509
Disasters, terrorism, and public
health emergencies
The need for increased opportunities for health-profession students and
providers to learn about emergency preparedness is a direct outcome
of horrifi c natural disasters (Hurricane Katrina, the Haiti earthquake),
terrorism events (Oklahoma City, New York City), and concerns about
pandemic infl uenza.
The U.S. Centers for Disease Control and Prevention (CDC) has exten-
sive training opportunities and information on its Web site ( www.bt.cdc.
gov ). A readiness assessment survey for health-care facilities can be found
at http://www.ahrq.gov/prep/cbrne . Personal readiness information can be
found at http://www.fema.gov/areyouready
Skills such as good communication and teamwork are essential in deal-
ing with emergencies. An understanding of the role of primary providers
in the Public Health Surveillance systems is critical, as they may be the fi rst
to see the effects of widespread biological or radiation exposures. Early
identifi cation will lead to appropriate treatment and has the potential of
saving lives.
Beyond participating in surveillance activities and having a high index of
suspicion, providers should acquire competencies in patient care that pre-
pares them to assist in disasters, terrorism events, or public health emer-
gencies. They should be knowledgeable about reporting sentinel events to
the appropriate public health authorities.
Providers should be able to determine the absence or presence of
symptoms characteristic of exposure to chemical, biological, radiological,
nuclear, or explosive agents (CBRNE). They should also know to assess
for evidence of psychological trauma. This could be a result of the event or
triggered by experiences of previous events. Providers should watch for
delayed stress reactions in responders or community members.
Physical assessment and evaluation need to be appropriate to the expo-
sure or trauma. It is essential to know how to access information in the
event of a local emergency. The Internet may not always be accessible in
an emergency, so a reliable backup plan should be in place.
Care will be both acute (trauma, antibiotics, vaccines, antidotes) and
chronic (burn and wound long-term care, physical therapy) and should
address physical and emotional aspects of healing. There may be a need to
collect and preserve evidence for forensic purposes; this should be done
once life-threatening injuries are attended to.
Appropriate precautions must be taken to avoid exposures spreading to
other patients, care providers, and the wider population. As such, provid-
ers should be familiar with and have access to personal protective equip-
ment, isolation levels, isolation rooms, and decontamination areas.
1
1
Markenson D, DiMaggio C, Redlener I (2005). Preparing health professions students for terror-
ism, disaster, and public health emergencies: core competencies, Acad Med 80(6):517–526.

CHAPTER 17 Examination under special circumstances 510
Sexual assault
Sexual assault victims have suffered an extreme trauma and need to be
treated with respect and understanding. Many localities will have a victim
advocacy program, through which advocates can come to the clinic or
emergency room to support the victim and help arrange for aftercare
counseling.
Providers should be aware of state laws and the proper procedure for
collecting forensic evidence (often there are evidence collection kits with
all the materials needed for collecting evidence and maintaining the integ-
rity of the evidence chain).
In addition to the physical trauma, providers should also address the
psychological effects of the assault. It is essential that the necessary exam
and specimen/culture collection not retraumatize the patient. Allowing
patients to control the pace of the exam and ensuring that they know
what is going to happen to them each step of the way is paramount.
If the victim was assaulted by an intimate partner, the provider may have
to notify law enforcement authorities, regardless of whether the victim
wants to do this. If the victim is a minor, child protective services may
need to be called in.
Appropriate cultures and monitoring for STIs and pregnancy should be
initiated. Patients will need long-term follow-up, which should be arranged
at the initial visit. Providers should remember that victims can be of either
gender; providers need to make an extra effort to remain nonjudgmental
in their approach.
Since the 1970s, programs to educate sexual assault nurse examiners
(SANE) have been developed. A comprehensive development and opera-
tion guide is available online from the U.S. Department of Justice, Offi ce of
Justice Programs, Offi ce for Victims of Crime, at: www.ojp.usdoj.gov/ovc/
publications/infores/sane/saneguide.pdf .
These programs have allowed specialized services for assault victims to
become available nationwide.
Other thoughts
Hints
Consider keeping an inexpensive disposable or digital camera in the
patient care area for photodocumentation.

511
Practical procedures
Using this chapter 512
Infi ltrating anesthetic agents 512
Sterility and preparation 513
Hand-washing 514
Injections 516
Venipuncture 518
Peripheral IV catheterization 522
Setting up an infusion 524
External jugular vein catheterization 526
Central venous catheterization 527
Blood pressure measurement 531
Recording a 12-lead ECG 533
A rterial blood gas sampling 535
Peak fl
ow measurement
537
Inhaler technique 538
Oxygen administration 544
Basic airway management 547
Tracheostomy management 555
Endotracheal (ET) intubation 557
Noninvasive ventilation (NIV) 559
Pleural fl
uid sampling (thoracentesis)
561
Chest tube insertion 563
Nasogastric (NG) tube insertion 567
Ascitic tap 569
Abdominal paracentesis (drainage) 571
Male urethral catheterization 573
Female urethral catheterization 575
Suprapubic catheterization 577
Basic suturing 579
Lumbar puncture 581
Pericardial aspiration 583
Defi brillation
584
Knee joint aspiration 588
Chapter 18

CHAPTER 18 Practical procedures512
Using this chapter
This chapter describes those practical procedures that the primary care
provider may be expected to perform.
Obviously, some of these are more complicated than others, and some
should only be performed once you have been trained specifi cally in the
correct technique.
Each procedure has a diffi culty icon as follows:
1 Requires no specifi
c further training and primary care
providers should be competent to perform.
2
Requires some skill. Experienced providers should be able to
perform with ease.
22 More complex procedures that you may only come across
in specialty jobs and will not be required to perform without
specifi
c guidance from specialists or highly experienced
clinicians.
Rules are made to be broken
Many procedures and practical skills do not have a “correct” method but
have an accepted method. These methods should, therefore, be abided
by, although deviation from the routine by a competent practitioner, when
circumstances demand, is acceptable.
Many procedures have local variations—if in doubt, check the standard
method used in your hospital or facility.
Infi ltrating anesthetic agents
A large number of procedures involve the infi ltration of local anesthetic
agents. The importance of this procedure cannot be overlooked. Injection
of a large amount of anesthetic into a vein could lead to potentially fatal
cardiac arrhythmias. It is also important, of course, to ensure that you do
not damage any vessels.
Advance and withdraw
Whenever you inject anything, you should advance the needle and attempt
to withdraw the plunger at each step. If you do not aspirate blood, you
may then go ahead and infi ltrate the anesthetic.
Making a surface bleb
• Take the syringe of anesthetic (e.g., 1% lidocaine) and a small needle.
• Pinch a portion of skin, insert the needle horizontally into the surface.
• Withdraw the plunger to ensure no blood is aspirated then inject a
small amount of the anesthetic—you should see a wheal of fl uid
rise.
• The area of skin will now be suffi
ciently anesthetized to allow you to
infi ltrate
deeper.
• Remember —no epinephrine-containing anesthetic agents for
infi
ltration into the digits!

STERILITY AND PREPARATION
513
Sterility and preparation
Most equipment will come in prepacked sterile wrapping. When perform-
ing a procedure in which sterility is important, all packaging should be
opened using a no-touch technique.
Large packs of equipment
Some equipment is available in pre-prepared sterile packs. For example,
a catheterization pack may contain gauze, cotton balls, a cleansing agent,
lubricant, and a sterile vessel. These come wrapped in plastic and then
internally wrapped with material for the placement of a sterile fi eld while
opening the pack.
Any such packs should be placed on a stand that has fi rst been appro-
priately cleaned. You should then carefully open the pack, touching the
corners only, and using sterile gloved hands.
The opened pack can then be used as a sterile surface on which to place
additional sterile equipment.
Smaller pieces of equipment
Most equipment (e.g., needles, syringes) comes sterilized and wrapped in
paper or plastic. These should also be opened using a no-touch technique
if absolute sterility is needed.
For example, unwrap a needle by peeling back the packaging as if peel-
ing a banana and allow the needle to drop onto the pre-prepared sterile
fi eld.

CHAPTER 18 Practical procedures514
1 Hand-washing
Theory
Hand-washing is the single-most important procedure for preventing the
spread of infections. It is underperformed in frequency and quality.
Hands should be washed before every episode of care that involves
direct contact with a patient’s skin, their food, invasive devices, or dress-
ings, and after any activity or contact that could result in hands becoming
contaminated, such as using community computers to enter data.
Alcohol sanitizers can also be regularly used when entering or leaving a
patient care area and before and after examining patients.
Equipment
• Soap and alcohol gel
• Disposable paper towels
• Moisturizer (if required)
Procedure
If hands are not visibly soiled, hand-sanitizing with alcohol-cleansing agents
may be as if not more effective than hand-washing.
When required to wash our hands, we should use soap and warm water.
Those parts often missed are the tips of fi ngers, thumbs, and between the
fi ngers.
The following routine is advised ( Fig. 18.1 ):
• First, rub hands palm to palm ( Fig. 18.1 a).
• Rub right palm over the left dorsum.
• Rub left palm over the right dorsum.
• Wash palm to palm with the fi
ngers interlaced (
Fig. 18.1 b).
• Wash the backs of the fi ngers with opposing palms, with fi ngers
interlocked (
Fig. 18.1 c).
• Perform rotational rubbing of the right thumb clasped with the left fi st
( Fig. 18.1 d).
• Perform rotational rubbing of the left thumb clasped with the right fi st.
• Wash the right palm with rotational rubbing using fi
ngers of left hand.
• Wash the left palm with rotational rubbing using the fi
nger of the right
hand (
Fig. 18.1 e).
• Wash the space between the thumbs and fi rst
fi
ngers by interlocking
them and rubbing together ( Fig. 18.1 f).
• Rinse away all soap and pat dry using disposable paper towels.
• Apply moisturizer to protect the skin from the drying effects of regular
washing.
2 Hints
• Keep nails short, clean, and polish free.
• Avoid wearing wristwatches and jewelry, especially rings with ridges or
stones.
• Any cuts or abrasions should be covered with waterproof dressing.

515
HAND-WASHING
(a) (b)
(c) (d)
(e) (f)
Fig. 18.1 The correct stages of hand-washing as described on previous page.

CHAPTER 18 Practical procedures516
1 Injections
Theory
This is an important and routine procedure that is often carried out by
nursing staff, although providers may be asked to administer medication at
times. Good injection technique can make the experience for the patient
relatively painless. Three commonly used routes of administration are sub-
cutaneous (SC), intramuscular (IM), and intradermal (ID).
2 Before gloving for any procedure, confi
rm the absence of latex allergy.
2 Before attempting an injection, familiarize yourself with the operation of
any syringe cover or guard device.
Equipment
• Syringe (size depends on injection)
• Needles: 25-gauge (G) for SC route; 21–23G for IM route
• Extra 21G needle for drawing up dose
• Alcohol swab
• Gloves
• Cotton
• Sharps container
• Medication for injecting
• Band-aid for covering injection site
Procedures
Subcutaneous injections
The SC route is used for a slow absorption of medication and is ideal for
drugs such as insulin.
• Introduce yourself, confi
rm the identity of the patient, explain the
procedure, and obtain verbal consent.
• Wash your hands and put on a pair of gloves.
2 Always check that you have the correct drug and correct dose and
that it is within the expiration date before injecting it.
• Draw up the medication using a 21G needle and double check the
medication, dose, and expiration date.
• Expel any air in the syringe and replace with a 25G needle or other
needle appropriate for the medication being injected.
• Clean the injection site with the alcohol swab.
• Pinch a fold of skin so as to lift the adipose tissue away from the
underlying muscle.
• Insert the needle horizontally into the fold and draw back to ensure
you are not in a vein.
• Inject the medication.
• Withdraw needle and apply cotton to the site to absorb any bleeding.
Suitable SC sites include the forearm, triceps area, and abdomen.
Intramuscular injections
IM injections are administered through the epidermis, dermis, and SC tis-
sue into the muscle. They provide rapid systemic action and allow rela-
tively large doses to be absorbed.

517
INJECTIONS
Suitable IM sites typically include the deltoid muscle, dorsogluteal site,
ventrogluteal site, and lateral thigh or vastus lateralis muscle, depending
on available muscle mass. A related method of IM injection, the Z-track
method, is used for “sealing” the injection site to prevent staining from
medications such is iron.
0 Remember to avoid sites of infl
ammation, swelling, infection, or skin
lesions.
• Introduce yourself, confi
rm the identity of the patient, explain the
procedure, and obtain verbal consent.
• Wash your hands and put on a pair of gloves.
2 Always check that you have the correct drug and correct dose and
that it is within the expiration date before injecting it.
• Draw up the medication using a 21G needle and have a colleague
double check the medication, dose, and expiration date.
• Expel any air in the syringe and replace with a 25G needle or other
needle appropriate for the medication being injected.
• Inspect the proposed site for adequate muscle mass.
• Clean the injection site with the alcohol swab.
• IM injections should be given at a 90
0
angle to ensure the needle
reaches the muscle and to reduce pain.
• A good way to ensure accuracy and avoid a needle-stick injury is to
rest the heel of the palm on the thumb of the nondominant hand.
• Pull the skin down or to one side at the intended site.
• Hold the syringe between the thumb and forefi
nger and insert the
needle at full depth.
• Draw back on the syringe to ensure the needle is not in a vein.
• Slowly inject the medication.
• After needle insertion and injection, allow 10 seconds before removing
the needle, to facilitate diffusion of the medication into the muscle.
• Withdraw the needle and wipe the area clean with cotton.
Intradermal injections
The ID route provides a local, rather than systemic, effect and is used
primarily for diagnostic purposes, such as allergy or tuberculin testing.
This involves the same preliminary procedures as for IM injection
except a 25G needle is inserted at a 10–15
0
angle, bevel up, just under
the epidermis.
Up to 0.5 mL is injected until a wheal appears on the skin surface—just
as when creating a bleb of local anesthetic.

CHAPTER 18 Practical procedures518
*
There is no solid evidence for benefi t in using alcohol wipes unless there is visible dirt at the veni-
puncture site. However, their use is policy in most facilities and should be used accordingly.
1 Venipuncture
Two methods exist: the common method of collecting blood directly into
the tubes by Vacutainer
®
, and the traditional needle-and-syringe method.
Equipment
• Gloves • Sticky tape
• Alcohol swabs • Gauze or cotton ball
• Tourniquet
• Needle (try 21G fi rst), a syringe, and blood collection bottle or:
• Vacutainer
®
tube, holder, and blood collection needle
• Don’t forget a band-aid!
Procedure
Using a needle and syringe
• Introduce yourself, confi rm the patient’s identity, explain the
procedure, and obtain verbal consent.
• The patient should be lying or sitting comfortably with the arm from
which blood is to be taken resting on a pillow.
• Select a vein site—usually the antecubital fossa (see Fig. 18.2 ).
• Apply tourniquet proximal to the puncture site and recheck vein.
• Put on gloves and ask the patient to clench their fi
st a few times.
• Cleanse the area with an alcohol swab in spirals, inside to out.*
• Attach the needle to a syringe and unsheathe it.
• Use the thumb of your nondominant hand to gently anchor the skin
just below the puncture site.
0Warn patient to expect a sharp scratch and to not move their arm.
• Insert the needle fi
rmly through the skin, bevel up, at an angle of
20–40
0
over the vein.
• With experience, you will feel a slight give as the vein is entered.
Blood will visibly enter the hub (plastic portion) of the needle
(fl ashback).
• Carefully holding the needle in position, pull back on the plunger.
•
There are several ways of doing this. The authors favor holding the
needle and syringe in the nondominant hand, once in place, and
pulling back with the dominant hand.
• When enough blood is taken, release the tourniquet before removing
the needle from the vein.
• Apply a clean cotton ball or folded gauze to the puncture site as the
needle is withdrawn. Pressure should be applied for >1 minute. (Ask
the patient to do this for you, if they are able.)
• Apply a band-aid to the site, and thank the patient.
• Vacuum blood tubes are fi
lled by puncturing the rubber top with the
needle and allowing the blood to enter the tube.
• Remember to label the tubes correctly, ideally at the patient’s bedside,
and dispose of sharps in a sharps bin.
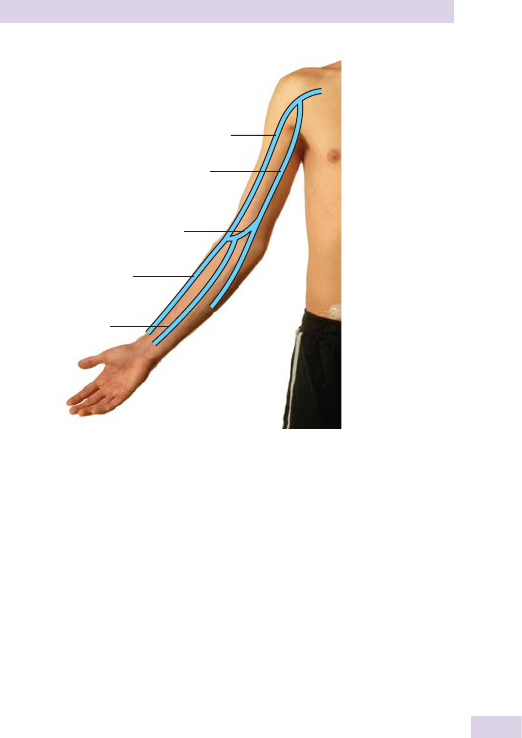
519
VENIPUNCTURE
Cephalic vein
Cephalic vein
Anterior median
vein of the forearm
Basilic vein
Median cubital vein
Fig. 18.2 Representation of peripheral veins of the upper limb.
Using a Vacutainer
®
system
Much of the procedure is the same as for using a needle and syringe.
• Vacutainer
®
needles are double-ended, one standard needle and one
needle covered by a rubber sleeve.
• Attach a Vacutainer
®
holder over the covered needle (see Fig. 18.3 ).
• The needle is inserted into the vein as with a syringe, but no fl ashback
will be visible.
• Once in place, the Vacutainer
®
tubes are attached to the needle directly
by pushing them onto the covered needle using the tube holder.
• Allow enough blood to enter the tube (some tubes must be fi lled—
check local laboratory guidance).
• Multiple tubes may be fi
lled by removing and replacing tubes while
carefully holding the needle in position.
Inappropriate sites for venipuncture
• Edematous areas
• Cellulitic areas
• Hematomas
• Phlebitis or thrombophlebitis
• Scarred areas
• Arm in which there is a transfusion or infusion
• Arm on the side of previous mastectomy
• Arms with AV fi
stulae or vascular grafts
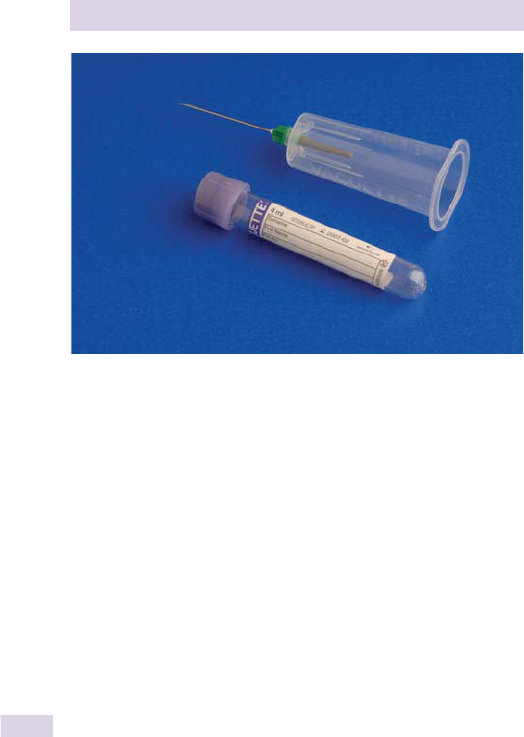
CHAPTER 18 Practical procedures520
Fig. 18.3 Vacutainer
®
blood collection system, ready for use.
Hints
• If extraction of blood with the Vacutainer
®
proves diffi cult, it may be
easier to switch to the needle-and-syringe technique, as this gives you
more control over the fl ow of blood.
• Venipuncture can be performed at any peripheral vein. Inpatients from
whom it is diffi
cult to draw blood often have the blood taken from the
back of their hands, feet, or legs.
• In diffi
cult to reach places, it is often easier to use a butterfl y
needle.
This is a smaller needle attached to a length of tubing that can be
used with either technique. It allows for greater control of the
needle.

521
VENIPUNCTURE
Box 18.1 Taking blood from a central venous catheter
Theory
Central lines should only be used for taking blood if it is not possible to
obtain a sample via the peripheral route. Do not risk catheter sepsis or
a clotted line unless there are no alternatives!
Practicality
Central lines are frequently used for taking blood for assorted reasons.
Avoidance of additional needle-sticks for patient comfort is a primary
concern.
Blood culture requirements may preclude use of the central line for
obtaining a sample. However, blood may need to be obtained from the
central line and a peripheral site simultaneously to assist in differentia-
tion of a source of sepsis.
In any case, caution must be observed to appropriately obtain a
specimen from a port that may have been salinized or heparinized, and
proper care of the port must be exercised after use of the port. Proper
caution will decrease risk of catheter sepsis or a clotted line.
Facility policy will dictate what is done.
Equipment
• 3 x 10 mL syringes
• 0.9% isotonic or heparinized saline
• Chlorhexidine, povidone-iodine, or other recommended agent
• Gauze
• Sterile gloves
• Drape
Procedure
• Introduce yourself, confi
rm the identity of the patient, explain the
procedure, and obtain verbal consent.
• Stop any infusions for at least 1 minute before sampling.
• Place the patient in a supine position.
• Ask the patient to turn their head away from the line site during the
procedure.
• Drape the site in case of splash, and put on a pair of sterile gloves.
• Spray or paint the line with the chosen sanitizing agent.
• Clamp the line before removing the cap.
• Connect a 10 mL syringe to the line before unclamping.
• Withdraw 5–10 mL of blood, clamp the line, and remove syringe.
• Discard the blood.
• Connect a new 10 mL syringe to the line, unclamp it, and withdraw
another 10 mL of blood.
• Clamp the line and remove the syringe (keep this sample).
• Fill a further syringe with saline and attach to the line.
• Unclamp the line, instill the saline, and clamp the line again.
• Remove the syringe and replace the cap.

CHAPTER 18 Practical procedures522
1 Peripheral IV catheterization
Theory
Peripheral IV catheterization is a generic skill that most students should
have learned early in their education. A thin tube line is inserted into a
vein, allowing easy venous access that is used in many situations, including
the administration of fl uids and IV medication.
Equipment
• Gloves • Sticky tape
• Alcohol swabs • Gauze or cotton ball
• Tourniquet • Catheter of appropriate size (see Box 18.2, Fig. 18.4)
• Saline for injection • 5 mL syringe
Procedure
• Introduce yourself, confi rm the patient’s identity, explain the
procedure, and obtain verbal consent.
• The patient should be lying or sitting comfortably with the arm in
which the catheter is to be inserted resting on a pillow.
• Apply the tourniquet to the arm and identify a suitable vein.
0 Often those veins that can be felt are more reliable than those that are seen .
The vein should be superfi cial and have a straight course for a few centimeters.
• Put on gloves and clean the overlying skin with the alcohol swab.
• Remove the catheter from its packaging.
• Ensure that the catheter is functioning properly by slightly withdrawing
the needle and replacing it. Fold down the wings and open and close
the port on the top.
0 Warn patient to expect a sharp scratch and to not move their arm.
• Insert the catheter fi
rmly through the skin, bevel up, at an angle of
20–40
0
over the vein.
• With experience, you will feel a slight give as the vein is entered. Blood
will visibly enter the hub (plastic portion) of the catheter (fl ashback).
• Once the fl
ashback is seen, hold the needle in place with one hand and
slide the catheter off the needle—into the vein—with the other. Once
the catheter is fully inserted, the needle should be sitting just within it,
preventing blood from spilling.
• Release the tourniquet.
• Press over the vein at the tip of the catheter, remove the needle, and
dispose of it safely in a sharps bin.
• Put the cap on the catheter and fi
x it in place with tape and the
appropriate dressing.
• Draw up saline into the syringe and fl
ush it through the catheter using
the port on the top. Watch the vein—if the catheter is misplaced, the
saline will enter the subcutaneous tissues, causing swelling.
2 Don’t forget to do this—it confi
rms that the catheter is working and
clears it of blood that would form a clot.
Hints
• Try to avoid the antecubital fossa. Although this is often the easiest
place to see and feel a vein, catheters at that site can become
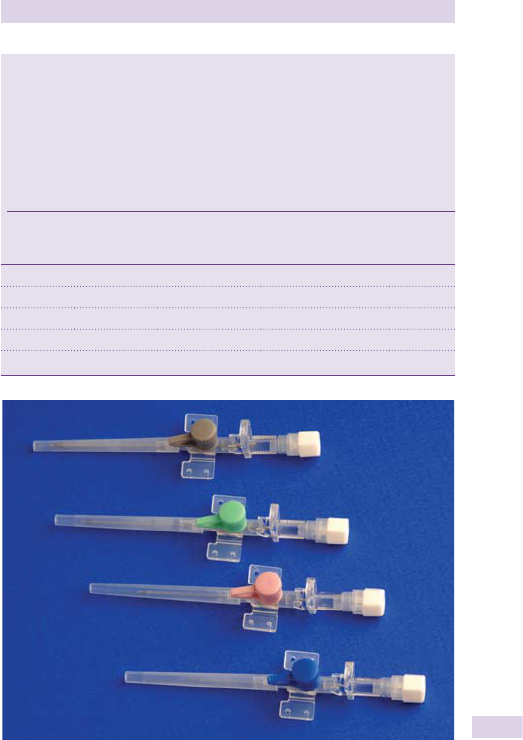
523
PERIPHERAL IV CATHETERIZATION
kinked and blocked as well as cause pain for the patient on bending
the arm.
• Avoid an arm with a fi
stula or AV shunt.
• Bring a selection of different-sized catheters to the bedside, allowing
you to choose a smaller gauge if you experience problems.
• Don’t be afraid to ask for assistance from nursing or auxiliary staff if
the patient is likely to move their arm during the procedure.
Fig. 18.4 A selection of standard IV catheters.
Box 18.2 Sizing catheters
Like needles, catheters are color-coded according to size. Each is given
a gauge (G), which has an inverse correlation to the external diameter.
Color-coding is standardized across manufacturers.
The standard-size catheter is green, or 18G, but for most hospital
patients, a pink, or 20G, cannula will suffi ce. Even blue catheters are ade-
quate in most circumstances unless fast fl ows of fl uid are required.
Gauge
External
diameter
(mm)
Length (mm)
Approximate
maximum fl ow
rate (mL/min)
Color
14G 2.1 45 290 Orange
16G 1.7 45 172 Gray
18G 1.3 45 76 Green
20G 1.0 33 54 Pink
22G 0.8 25 25 Blue

CHAPTER 18 Practical procedures524
Port with cap
for attaching tubing set
Rubber port for
injection ingredients
Fig. 18.5 Diagrammatic representation of the base of a fl uid bag and the port in
which the tubing set should be inserted.
1 Setting up an infusion
Theory
Fluid therapy is one of the core skills for nurses. While it is usually the
nursing staff that sets up an IV infusion, providers should nevertheless be
competent at this technique.
Equipment
• Gloves
• An appropriate fl uid
bag
• Tubing (infusion) set
• IV (standard) pole
• Infusion pump, if required
Procedure
0 IV infusions require IV access—see b p. 522. Check the fl uid in the bag
and fl uid prescription chart.
• Ask a colleague to double-check the prescription and the fl
uid and sign
their name on the chart.
• Open the fl
uid bag and tubing set, which come in sterile packaging.
• Unwind the tubing set and close the adjustable valve.
• Remove the sterile cover from the bag outlet and from the sharp end
of the tubing set (see Fig. 18.5 ).
• Using a lot of force, push the tubing set end into the bag outlet.
• Invert the bag and hang it on a stand.
• Squeeze the drip chamber to half fi
ll it with fl uid.
• Partially open the valve to allow the drip to run, and watch fl uid run
through to the end (it might be best to hold the free end over a sink in
case of spills).
• If bubbles appear, try tapping or fl
icking the tube.
• Once the tubing is fi lled with liquid, connect it to the catheter.
• Adjust the valve and watch the drips in the chamber.
• Adjust the drip rate according to the prescription (see Box 18.3 ).

525
SETTING UP AN INFUSION
Box 18.3 Drip rate
Most infusions tend to be given with electronic devices that pump the
fl uid in at the prescribed rate. However, it is still important that health-
care professionals be able to set up a drip at the correct fl ow rate
manually.
Using a standard tubing set, clear fl uids will form drips of about 0.05
mL—that is, there will be approximately 20 drips/mL. You can then cal-
culate the number of drips per minute for a given infusion rate.
Infusion and drip rates
Prescription
number of hours
per liter of fl uid
Infusion
rate (mL/hr)
Infusion
rate (mL/min)
Drip rate
(drips/min)
1 1000 16 320
2 500 8 160
4 250 4 80
6 166 3 60
8 125 2 40
10 100 1.6 32
12 83 1.4 28
24 42 0.7 14

CHAPTER 18 Practical procedures526
2 External jugular vein catheterization
Theory
The external jugular vein lies superfi cially in the neck, running down from
the angle of the jaw and across the sternocleidomastoid muscle before
passing deep to drain into the subclavian vein. It is sometimes used to
provide essential venous access in cardiac arrest and other emergency
situations in which no peripheral access is obtainable.
See Fig. 18.6 for the surface anatomy of the external jugular vein.
Equipment
• Antiseptic solution or antiseptic wipe
• 2 x 5 mL syringes
• 1 25G orange needle
• 1 21G green needle
• 1% lidocaine
• 14G or 16G catheter
• 0.9% saline fl ush
• Dressing
• Gloves
• Sharps bin
Procedure
• Introduce yourself, confi rm the identity of the patient, explain the
procedure, and obtain verbal consent, if possible.
• Wash your hands and put on a pair of gloves.
• Tilt the patient to 10–15
0
head-down to facilitate venous fi lling.
• Once the external jugular vein is visible, clean the area with antiseptic
solution.
• Reconfi
rm the patient’s identity, the procedure, and the site.
• Attach a 25G (orange) needle to a 5 mL syringe and make a SC bleb of
1–2 mL of 1% lidocaine and infi ltrate around the insertion site.
0 Be careful not to insert any anesthetic into the vein.
• Position yourself at the head of the bed.
• Remove the cap from the catheter and attach a clean 5 mL syringe.
• Turn the patient’s head away from the side of insertion.
• Catheterize using the same technique as for peripheral venous access.
2 Remember to aspirate as you advance the catheter. Correct placement
will be confi
rmed once you are able to aspirate venous blood.
• Fix the catheter in place, using a suitable dressing.
• Flush the catheter with 5 mL of 0.9% saline solution.
• Dispose of all sharps in a sharps bin, wash your hands, and help the
patient to a comfortable position.
• Document details of the procedure in patient record.
Hints
In an emergency situation, you may forgo the anesthetic, as venous access
may be needed swiftly.

527
CENTRAL VENOUS CATHETERIZATION
3 Central venous catheterization
Theory
Central venous access is the placement of a catheter in a vein that leads
directly to the heart. There are a number of central veins, including the
internal jugular, external jugular, subclavian, femoral, and antecubital.
For each of these, the basic equipment and preparation are the same.
Central venous catheterization is performed for vascular access, total
parenteral nutrition (TPN), infusion of irritant, vasoactive, and inotropic
drugs, measurement of central venous pressure (CVP), cardiac catheteri-
zation, pulmonary artery catheterization, transvenous cardiac pacing, and
hemodialysis or plasmaphoresis.
Single- and multi-lumen catheters are available; the type to be used
should be decided on prior to insertion according to the anticipated use
(e.g., concurrent CVP monitoring and multiple-drug infusion). Frequently,
quad-lumen catheters are used because of their versatility. Decisions on
catheter selection are also contingent on length of the catheter needed
relative to the size of the patient.
For the inexperienced, a CVP kit it can be overwhelming, given the
variety of materials included for performing the procedure.
Equipment
• Appropriate instrument stand
• Sterile pack including sterile drapes
• Sterile gown and gloves
• Suture material e.g., 2/0 silk on a curved needle
• Antiseptic solution
• Local anesthetic—approximately 5 mL of 1% lidocaine
• Central venous line kit
• 21G green and 25G orange needles
• Saline or heparinized saline to prime and fl
ush the line prior to and
after insertion
• Sterile dressing
• Ultrasound machine
Procedure—internal jugular vein
• Introduce yourself, confi rm the identity of the patient, explain the
procedure, and obtain verbal consent.
• Remember, this can be a potentially frightening procedure. Explanations
and reassurance must be given before and during the procedure.
• Put on a sterile gown and gloves.
• Unwrap all equipment.
• Check that the wire passes through the needle freely. Attach 3-way
taps to all catheter ports. Flush all lumens with heparinized saline.
• Place the patient in a supine position, at least 15
0
head-down.
•
This is usually quite easy on a tilting bed and is performed to distend
the neck veins and reduce the risk of air embolism.
• Turn the head away from the venipuncture site.
• Cleanse the skin with antiseptic solution and drape the area.
• Stand at the head of the bed.

CHAPTER 18 Practical procedures528
• Locate the cricoid cartilage and palpate the carotid artery lateral to it.
• The site for insertion is approximately 1/3 of the way up the
sternocleidomastoid, just between its two heads.
• Reconfi
rm the patient’s identity, the procedure, and the site.
• Use local anesthetic to numb the venipuncture site once located.
• Infi
ltrate the skin and deeper tissues with a smaller orange needle and
then replace with a green needle.
• Introduce the large-caliber introducer needle, attached to an empty
syringe, into the center of a triangle formed by the two lower heads of
the sternocleidomastoid muscle and clavicle.
• Keep your fi
nger on the carotid artery and ensure that the needle
enters the skin lateral
to the artery.
• Direct the needle caudally at an angle of 30–40
0
to the skin, toward
the ipsilateral nipple. The vein is usually within 2–3 cm of the skin.
• Aspirate as the needle is advanced. Once you see blood, catheterize
the vein using the Seldinger technique.
• Remove the syringe and occlude the needle lumen with a thumb.
• Straighten the J tip of the spring guide wire and advance into the vessel
through the needle.
• Holding the spring-wire in place, remove the needle while maintaining
a fi
rm grip on the wire at all times.
• Enlarge the cutaneous puncture site with the cutting edge of the
scalpel positioned away from the spring-wire guide.
• Use the dilator provided to enlarge the site and thread the tip of the
catheter into the vessel using the spring-wire guide.
• Grasp the catheter near the skin and, using a slight twisting motion,
advance into the vein.
• Make sure before you push the catheter forward that the wire is
visible at the proximal end. Hold the wire at all times to prevent it from
getting lost inside the patient.
• Hold the catheter and remove the spring-wire guide.
• Check lumen placement by aspirating through the pigtails and fl ush
with saline.
• Lock off the 3-way taps. The patient can now be leveled.
• Secure the catheter in place with a suture and cover with an adhesive
sterile dressing. (Do not forget to anesthetize suture sites as well.)
• Request a chest X-ray to verify correct catheter position and to
exclude a pneumothorax.
• Catheters have a radio-opaque strip for this purpose.
• The catheter tip should lie in the SVC at the level of the carina.
• Dispose of your sharps and clear the instrument stand.
• Document the details of the procedure in the patient record.
Complications of internal jugular vein catheterization
• Pneumothorax • Infection
• Hemothorax • Thrombosis of vessel
• Chylothorax • Neural injury
• Air embolism • Cardiac tamponade
• Arrhythmais • AV fi stula
• Carotid artery puncture • Patient discomfort

529
CENTRAL VENOUS CATHETERIZATION
Procedure: femoral vein
The femoral vein lies medial to the femoral artery immediately beneath
the inguinal ligament. It is commonly used in an ICU setting for place-
ment of a double-lumen hemofi ltration line and when central access is not
feasible by other routes. This is impractical for mobile patients and raises
concerns regarding the sterility of the groin area.
• Introduce yourself, confi
rm the identity of the patient, explain the
procedure, and obtain consent.
• Extend the patient’s leg and abduct slightly at the hip.
• Use full aseptic technique.
• Before initiating the procedure, reconfi
rm the patient’s identity, the
procedure, and the site.
• Locate the femoral artery, keep a fi
nger on the artery, and introduce
a needle attached to a 10 mL syringe at 45
0
, 1.5 cm medial to the
femoral artery pulsation, 2 cm below the inguinal ligament.
• Slowly advance the needle cephalad and posteriorly while gently
withdrawing the plunger.
• When a free fl
ow of blood appears, follow the Seldinger approach as
detailed for the internal jugular vein.
• Ultrasound can be used to identify the vessels and ensure that the vein
is punctured near the inguinal ligament where the artery and vein lie
side by side.
*
Procedure: subclavian vein
The subclavian vein is preferred for central venous access if the patient has
a cervical spine injury and is best for long-term parenteral nutrition, pacing
wires, or Hickman lines. It is, however, associated with a higher incidence
of incorrect line placement than internal jugular catheterization. Given the
local anatomy, pressure cannot be exerted on the subclavian artery if it is
accidentally punctured.
The subclavian vein is a continuation of the axillary vein and runs from
the apex of the axilla, behind the posterior border of the clavicle and
across the fi rst rib to join the internal jugular vein, forming the brachio-
cephalic vein behind the sternoclavicular joint ( Fig. 18.6 ).
• Introduce yourself, confi
rm the identity of the patient, explain the
procedure, and obtain verbal consent.
• Place the patient in a supine position, head-down.
• Turn the head to the contralateral side.
• Reconfi
rm the patient’s identity, procedure, and site prior to starting.
• Using full sterile technique, introduce a needle attached to a 10 mL syringe,
1 cm below the junction of the medial 1/3 and outer 2/3 of the clavicle.
*
U.K. Guidelines produced by the National Institute for Clinical Excellence (NICE) in September
2002 encourage the routine use of 2-D (B-mode) ultrasound guidance for CVC insertion into the
internal jugular vein in adults and children in elective and emergency situations. There is, however,
limited evidence supporting ultrasound use for subclavian and femoral vein catheterization based
on anatomy. Ultrasonography enables direct visualization of the anatomy before and during cath-
eterization. Portable ultrasound machines can be used at the bedside. An additional review of this
issue can be viewed in McGee DC, Gould MK (2003). Preventing complications of central venous
catheterization. N Engl J Med 348;1123–1133.
Assorted U.S. procedural guidelines can be seen at http://www.guidelines.gov
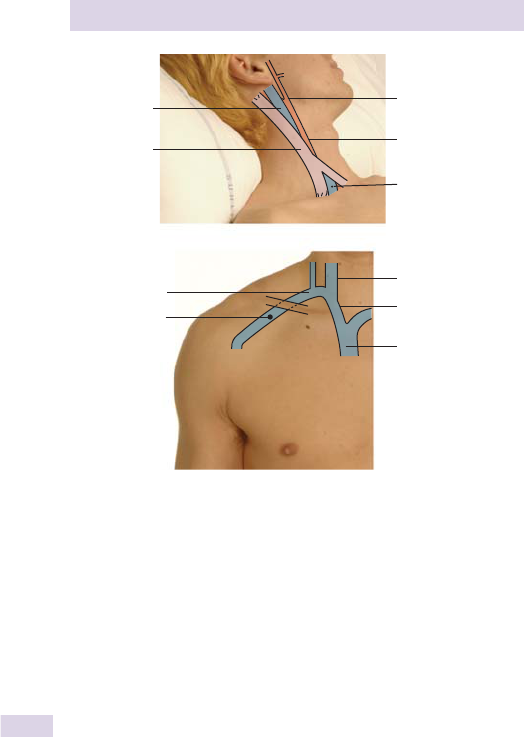
CHAPTER 18 Practical procedures530
• Direct the needle medially, slightly cephalad, and posteriorly behind
the clavicle toward the suprasternal notch.
• Slowly advance the needle while gently withdrawing the plunger.
• When a free fl
ow of blood appears, follow the Seldinger approach as
detailed for internal jugular vein catheterization.
• The catheter tip should lie in the SVC above the pericardial refl ection.
• Perform a chest X-ray to confi
rm position and exclude pneumothorax.
• As before, ultrasound can be used to guide puncture of the vein, using
a more lateral approach.
Removing internal jugular venous catheters
• Remove any dressing and suture material.
• Ensure that all drugs and infusions have been stopped.
• Lay the patient down to reduce the risk of air embolism.
• Ask the patient to take a deep breath and fully exhale.
• Remove the line smoothly with a steady pull, while the patient is
breath-holding, and apply fi
rm pressure to the puncture site for at
least 5 minutes to stop bleeding.
• Sit the patient up.
• If infection is suspected, send the tip of the line in a sterile dry
specimen container for culture.
External carotid
artery
Common carotid
artery
Right internal
subclavian vein
Right branchiocephalic
vein
Superior vena cava
Point of access to
the IVJ between the
heads of the
sternomastoid
Internal
jugular vein
Sternomastoid
Right subclavian
Point of
insertion for
central access
(a)
(b)
vein
Fig. 18.6 Surface anatomy of the internal jugular vein (a) and subclavian vein (b).

531
BLOOD PRESSURE MEASUREMENT
1 Blood pressure measurement
Theory
BP is measured with a sphygmomanometer, usually at the brachial artery.
Machines, operated by nurses or health-care assistants usually measure
BP, but these are not fool-proof and a good working knowledge of the
“old-fashioned,” manual method of BP measuring is still essential.
A cuff is applied to the upper arm and infl ated to cut off the arterial
supply. The pressure is released slowly and a stethoscope used to listen
for the blood fl ow.
When the pressure in the cuff equals the systolic blood pressure, blood
will audibly pulse through the artery. When the cuff pressure falls below
the diastolic blood pressure, the blood will fl ow continuously and the
sound of intermittent blood fl ow will disappear.
Equipment
• A (functioning) sphygmomanometer with:
• An appropriately sized cuff (see Table 18.1 )
• Stethoscope
Procedure
• Introduce yourself, explain the procedure, and obtain verbal consent.
2 Check that the sphygmomanometer is working and is within the calibra-
tion box or that the dial reads “0.”
• The patient should be sitting, relaxed for 5 minutes beforehand.
• Apply the cuff to the upper arm with the air bladder anteriorly
(indicator over the brachial artery).
• Using your left arm, support the patient’s arm so that it is held
horizontally at the level of mid-sternum (avoid hyperextension of
elbow).
• Close the valve (may be a screw or lever), monitor the patient’s radial
artery, and infl
ate the cuff until the radial pulse is no longer palpable.
• Listen over the brachial artery at the antecubital fossa, using the
diaphragm or the bell of the stethoscope, while defl
ating the cuff at a
rate of 2–3 mmHg/second.
• Note the point at which the pulsation is audible (Korotkoff* phase
I—the systolic BP)
Table 18.1 National Guideline Clearinghouse guidelines for choice of BP
cuff *
Arm circumference (cm) Cuff size Bladder dimensions (cm)
22–26 Small adult/child 12 × 22
27–34 Adult 16 × 30
35–44 Large adult 16 × 36
45–52 Adult thigh cuff 16 × 42
* Available at: www.guideline.gov

CHAPTER 18 Practical procedures532
• And the point at which the sounds disappear (Korotkoff phase V—the
diastolic BP).
• Record the BP as “systolic/diastolic” to the nearest 2 mmHg.
2 Hints
• In some people with normal blood pressure, the sounds may not
disappear completely. In this case, a distinct muffl ing of the noise
(Korotkoff phase IV) should be used to indicate the diastolic BP.
• BP recording may be particularly diffi
cult in a noisy environment or
at the time of an emergency (which is when providers are most often
asked to record the BP) or when the BP is very low. In this case, a
rough estimation of the systolic BP may be made by feeling for the
return of the radial pulse as the cuff is defl ated.

533
RECORDING A 12-LEAD ECG
1 Recording a 12-lead ECG
Theory
The ECG is a recording of the electrical activity of the heart. Electrodes are
placed on the limbs and chest for a 12-lead recording. The term 12-lead
relates to the number of directions that the electrical activity is recorded
from and is not the number of electrical wires attached to the patient!
Equipment
• ECG machine capable of recording 12 leads
• 10 ECG leads (4 limb leads, 6 chest leads)—should be attached to
machine
• Conducting sticky pads (ECG electrodes)
Procedure
• Introduce yourself, confi rm the identity of the patient, explain the
procedure, and obtain verbal consent.
• Position the patient so that they are sitting or lying comfortably with
their upper body, wrists, and ankles exposed.
• Each electrode is attached by clipping it to the sticky pads and sticking
them to the patient’s skin.
• The leads are usually labeled. The limb leads are often color-coded:
•
Right arm—red
•
Left arm—yellow
•
Right leg—green
•
Left leg—black
• The arm leads are of medium length and should be attached to a
hairless part of the patient’s wrists.
• The leg leads are the longest and should be attached to the patient’s
ankles (the hairless part just superior to the lateral malleolus is ideal).
• Position the chest leads as follows (see Fig. 18.7 ):
•
V1—fourth intercostal space at the right sternal border
•
V2—fourth intercostal space at the left sternal border
•
V3—midway between V2 and V4
•
V4—fi fth intercostal space in the mid-clavicular line on the left
•
V5—left anterior axillary line, level with V4
•
V6—left mid-axillary line, level with V4
• Turn on the ECG machine. These are usually self-explanatory and
require just one button to be pressed—marked analyze or record .
• Check the calibration and paper speed:
•
1 mV should cause a vertical defl ection of 10mm.
•
Paper speed should be 25 mm/sec (5 large squares per second).
• Ensure that the patient’s name, DOB, as well as date and time of the
recording are clearly recorded on the trace.
• Remove the leads and discard the sticky electrode pads.
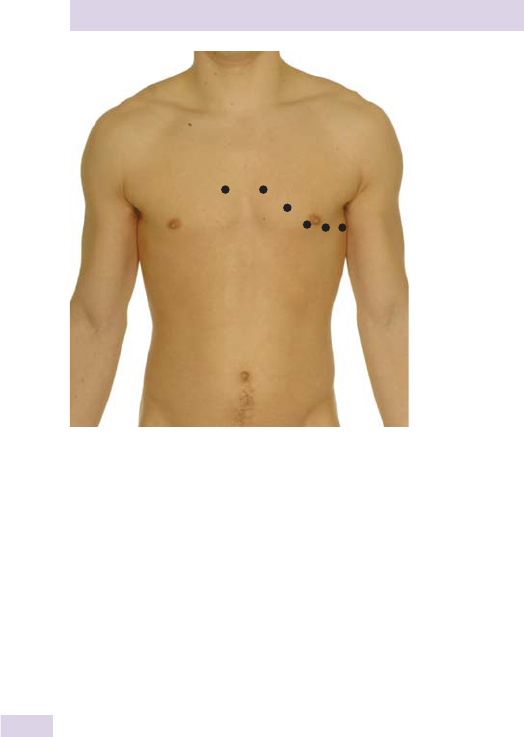
CHAPTER 18 Practical procedures534
2 Hints
• Encourage patient to relax, as muscle contraction causes interference.
• Ensure that you cleanse the area gently with an alcohol swab before
attaching an electrode, to ensure a good connection.
• AC electrical lines and fl
uorescent lights may cause 60-cycle
interference. If this is the case, try turning off the fl uorescent
lights.
V
1
V
2
V
3
V
4
V
5
V
6
Fig. 18.7 Correct positioning of electrodes for a standard 12-lead ECG.

535
ARTERIAL BLOOD GAS SAMPLING
1 Arterial blood gas sampling
Theory
An arterial sample is obtained to assess pH, PO
2
, PCO
2
, HCO
3
–
, and
base excess or defi cit. It is also sometimes used for rapid assessment of
electrolytes.
Equipment
• ABG kit (usually contains heparin-fi lled syringe, needle and vented cap)
• Gauze or cotton ball
• Tape
• Sterile gloves
Procedure
• Wash your hands and put on gloves.
• Verify patient identity, explain the procedure, and obtain verbal
consent. Be sure to warn the patient of potential pain, and ask them to
keep as still as possible.
• Note the patient’s temperature and oxygen support.
• Chose a site for arterial puncture.
Radial
Because there are no adjacent nerves or vessels, this is the most com-
monly used site.
• Assess for adequate ulnar arterial circulation by performing the Allen’s
Test.
• Obstruct the radial artery with fi ngertip
pressure.
• Ask the patient to make a tight fi st to expel blood from the hand and
maintain pressure on the radial artery.
• Ask them to open their hand and watch for fl
ushing of the palm; this
indicates adequate perfusion.
• Take the blood gas syringe, ensuring that the heparin has coated the
inside by withdrawing and advancing plunger.
• Attach the needle and expel the excess heparin.
• Position the wrist in extension.
• Palpate the radial arterial pulse along its length using your middle and
index fi ngers.
• Clean the skin.
• Having chosen a suitable spot, insert the needle with the bevel facing
toward the direction of blood fl
ow, using an appropriate angle.
• Advance the needle until arterial pressure fi
lls the syringe.
• Obtain a sample of 1–3 mL and withdraw the needle.
• Apply pressure to the puncture site with gauze or a cotton ball until
bleeding has stopped (minimum 2 minutes).
• Remove and discard the needle with care and place a vented cap on
the syringe. Holding vertically, expel any air through the vent.
• Mix sample gently and take it to a blood gas analyzer.

CHAPTER 18 Practical procedures536
Femoral
• Position patient with the hip extended and slightly internally rotated.
• Note that the femoral nerve is just lateral to the artery, so maintain a
medial approach.
• Use the same procedure as above but use a 21G needle, aiming at the
pulsation positioned between your index and middle fi nger.
Brachial
• Position the elbow in extension.
• Watch for adjacent nerves (see Fig. 18.8 ).
Appropriate angles for needle insertion
• Radial artery—45
0
• Brachial artery—60
0
• Femoral artery—90
0
Hints
• The key to success is carefully lining up the needle over a palpable
pulsation—take your time!
• If there is no fl
ashback, withdraw the needle slightly, change the angle,
and advance. Note that most pain is from puncturing the skin, so do
not remove the needle fully when repositioning.
• If there will be some delay in analyzing the sample, store the blood-
fi
lled syringe on ice.
• Sources of blood gas result errors are as follows:
•
Air in the sample
•
Delay in analyzing sample or delay in icing
•
Excess heparin in the syringe
•
Accidentally obtaining a venous or mixed AV sample
•
Alterations in temperature
Cephalic vein
Cephalic vein
Median cubital vein
Radial artery
Brachial artery
Basilic vein
Ulnar artery
Fig. 18.8 Position of the brachial artery and surrounding structures at the
antecubital fossa. The right arm is pictured.

537
PEAK FLOW MEASUREMENT
1 Peak fl ow measurement
Theory
Peak expiratory fl ow rate (PEFR) is a measure of the maximum speed of
expiration. Expressed in liters/minute, this simple and easy-to-administer test
is a useful indicator of airway caliber and may be performed before and after
administration of a bronchodilator to assess reversible airway obstruction.
Normal values are based on gender, age, and height.
Equipment
• Peak fl ow meter (see Fig. 18.9 )
• Clean disposable mouthpiece
Procedure
• Introduce yourself, explain the procedure, and obtain verbal consent.
• The patient should be standing or sitting upright.
• Ensure that the meter is set to 0.
• Ask the patient to take a deep breath in, hold the mouthpiece in their
mouth, and seal their lips tightly around it.
• The patient should blow out as hard and as fast as possible.
2The PEFR needs a hard and short maximal blow-out. The patient does
not have to blow out completely.
• Make note of the reading achieved.
• The procedure should be repeated and the best of 3 efforts recorded.
• The result should be compared to the normal value on the Nunn-
Greggs nomogram.
• If the patient is to keep a record, be sure to explain how to record
the readings appropriately. (Sometimes a 2-week diary is kept by the
patient to assess for diurnal variation.)
2 Hints
• If the patient is having diffi culty performing the test correctly, a brief
demonstration often proves useful.
• If a patient has very variable fl
ow measurements, repeat your
demonstration and go on asking for fl
ows until three consistent
readings have been recorded.
Fig. 18.9 Electronic and mechanical peak fl ow meters.

CHAPTER 18 Practical procedures538
1 Inhaler technique
A person new to respiratory medicine may be surprised by the sheer
number of different inhaler devices on the market. Each has its advantages
and disadvantages and a different set of drugs that it can deliver.
Here we outline the inhaler devices currently available and the instruc-
tions for use, written as you would explain them to a patient. We suggest
that providers become familiar with the different devices by asking your
pharmacist if you can see placebo versions.
Instructions for use of devices are typically available from the manufac-
turer’s Web site. Full video demonstrations illustrating appropriate use
of devices are often available at manufacturer’s Web sites, so these sites
should not be overlooked.
Devices are constantly changing. Many devices are currently used, some
of which have gone out of production. Some common devices include
Clickhaler, Spinhaler, Aerohaler, Diskhaler, Rotahaler, Foradil inhaler, and
Pulvinal. Included here is Handihaler, which is in current use.
Metered-dose inhaler (MDI)
This is the fi rst device developed and the one people think of as a typical
inhaler ( Fig. 18.10 ). It is small and cheap and has many different drugs and
doses. However, there is no dose counter and it requires much coordin-
ation to use correctly, making it unsuitable for the very young or elderly
or those with arthritis or other ailments affecting the hands.
Instructions for use
• Take one dose at a time.
• Remove the cap and shake the inhaler several times.
• Sit upright, hold the head up, and breathe out.
• Place the inhaler in the mouth and seal lips around the mouthpiece.
Fig. 18.10 A metered-dose inhaler (MDI).

539
INHALER TECHNIQUE
• Breathe in, press the canister down to release drug, and continue to
take a deep breath in. (The canister should be pressed just after the
start of inhalation, not before.)
• Remove inhaler and hold breath for as long as possible, up to 10 sec.
• Recover before taking the next dose, and replace the cap.
Autohaler
This is one of the breath-actuated inhalers, releasing a dose of the drug
when a breath is taken ( Fig. 18.11 ). This eliminates the need for hand
coordination and can reassure patients that a dose has been successfully
administered.
Some people, however, may still fi nd the priming lever hard to use or
may have diffi cultly remembering to prime the device for each dose. Also,
the puff and click during inhalation can be distracting.
Instructions for use
• Remove the cap and shake the inhaler several times.
• Prime the device—push the lever right up, keeping the inhaler upright.
• Sit upright, hold the head up and breathe out.
• Seal lips around the mouthpiece.
• Inhale slowly and deeply —don’t stop when the inhaler clicks, and
continue taking a really deep breath.
• Remove the inhaler and hold breath for as long as possible, up to
10 seconds.
• Push lever down and replace the cap.
• Recover before taking the next dose.
• Advise the patient that they won’t feel the spray hitting the back of the
throat, although there may be a slight taste disturbance.
Fig. 18.11 Autohaler. Note the lever on the top. The inhaler must be primed for
each dose.

CHAPTER 18 Practical procedures540
2 Hints
• Patients unable to push the lever up by hand can sometimes use the
edge of a table to push it against.
• Patients should breathe in steadily, not as fast as possible.
Diskus
This is one of the dry-powder devices ( Fig. 18.12 ) and has superseded
the Diskhaler. Like most of the other inhalers, it is preloaded and has an
integral cap. It also has a dose counter. However, it is more expensive than
some of the other devices and has a several-step priming mechanism that
some patients may not be able to cope with.
Instructions for use
• Hold the outer casing and push the thumb grip away from you,
exposing the mouthpiece, until you hear a click.
• Holding the mouthpiece toward you, slide the lever back until it clicks
(the device is now primed and the dose counter moves on 1).
• Sit upright, hold the head up, and breathe out.
• Holding the Diskus lever, seal lips around the mouthpiece.
• Inhale deeply and steadily.
• Remove the inhaler and hold breath for as long as possible, up to 10
seconds.
• To close, slide the thumbgrip toward you, so that the cover moves
over the mouthpiece, until you hear a “click.”
• Recover before taking the next dose.
• Advise the patient that they won’t feel the spray hitting the back of the
throat, although there may be a slight taste disturbance.
Turbohaler
This is another dry-powder device with preloaded drug ( Fig. 18.13 ). There
is no dose counter, but a window that turns red after 20 doses—the
device is empty when there is red at the bottom of the window. Some
Fig. 18.12 Accuhaler (Diskus) closed and open. Note the thumbgrip, lever, and
mouthpiece.
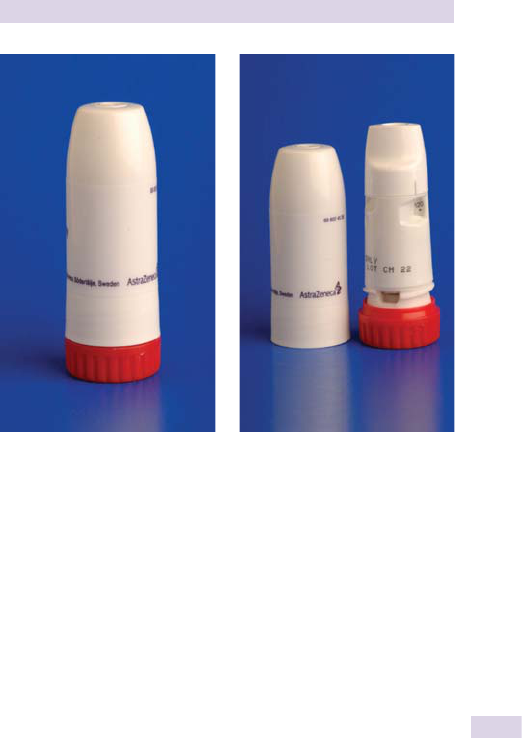
541
INHALER TECHNIQUE
people fi nd the lack of taste disadvantageous (they like to be sure the dose
has been given). Again, those with hand problems or deformities may fi nd
it diffi cult to use.
Instructions for use
• Unscrew and remove the white cover.
• Hold the inhaler upright.
• Twist the grip clockwise then counterclockwise as far as it will go until
a “click” is heard.
• Sit upright, hold the head up, and breathe out.
• Seal lips around the mouthpiece.
• Inhale slowly and as deeply as possible.
• Remove the inhaler and hold breath for 10 seconds.
• Replace cover.
• Recover before taking the next dose.
• Advise the patient that they won’t feel the spray hitting the back of the
throat, although there may be a slight taste disturbance.
There are devices available that can calculate whether a person has a suf-
fi
cient inspiratory fl
ow rate to deliver the drug into the airways.
Handihaler
At the time of this writing, this is relatively new to the market and only
available for tiotropium. It is a dry-powder device with an integrated cap
and requires a lower inspiratory fl ow rate than other devices ( Fig. 18.14 ).
Fig. 18.13 Turbohaler. Note the tiny dose-indicating window.
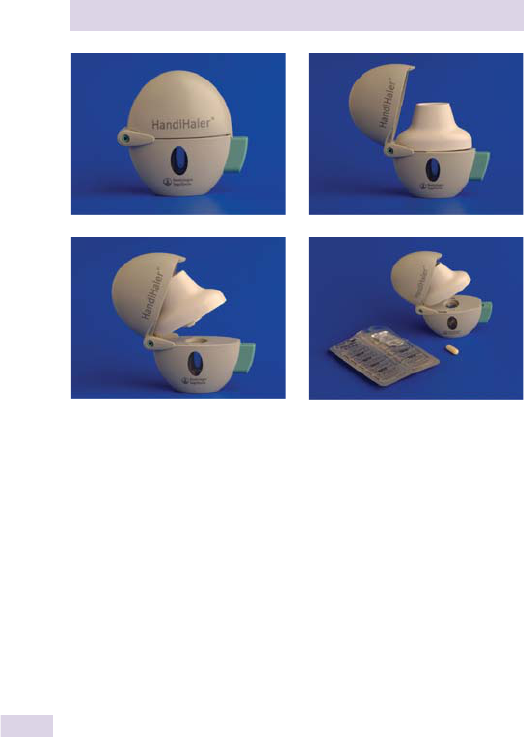
CHAPTER 18 Practical procedures542
However, it is not preloaded, thus a dose needs to be inserted via cap-
sule at each use. This task requires some dexterity. Some people also fi nd
the cap hard to open, as a moderate amount of strength is needed to get
it right.
Instructions for use
• Open cap by pulling upward, exposing the mouthpiece.
• Open the mouthpiece by pulling upwards exposing the chamber.
• Take a capsule from the blister-pack and insert it into the chamber.
• Replace the mouthpiece (make sure it clicks) and leave the cap open.
• Press the side button in a few times to pierce the capsule (you can
watch through the small window).
• Sit upright, hold the head up, and breathe out.
• Seal lips around the mouthpiece.
• Breathe in deeply to a full breath (you should hear the capsule
vibrate).
• Remove inhaler and hold breath for as long as is comfortable.
• Breathe out slowly.
• Remove the use capsule and replace the cap.
Spacer devices
These are used with a standard MDI and allow the drug to be puffed
into a chamber before it is inhaled. This reduces deposition of the drug
in the upper airways (and the local side effects) and increases peripheral
lung deposition. This also means that no coordination is required and the
Fig. 18.14 Handihaler. Note the button at the side for piercing the capsule and
the small window at the front.
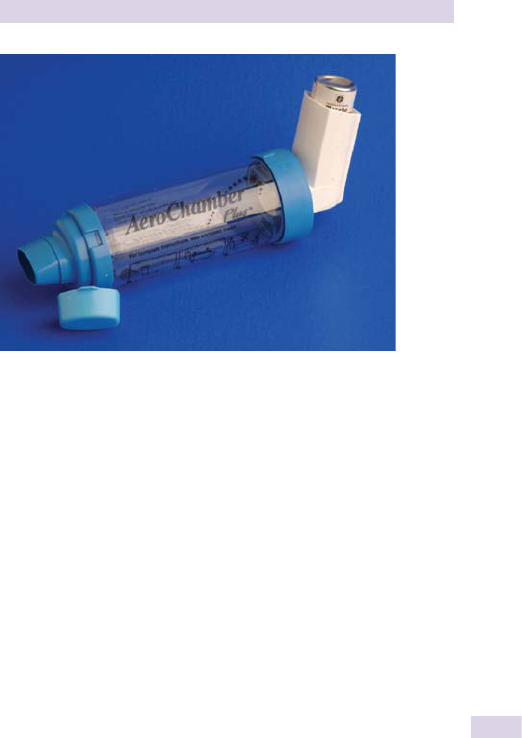
543
INHALER TECHNIQUE
patient has more time to inhale the drug. These are particularly useful for
the very young or elderly, or those with severe breathlessness.
These devices are, however, bulky, which patients may fi nd embarrass-
ing. They also require a certain amount of dexterity to put together.
There are a number of spacer devices available, but only the
Aerochamber ( Fig. 18.15 )is discussed here.
Instructions for use (Aerochamber)
• Remove cap of the MDI, shake the inhaler, and insert into the back of
the Aerochamber.
• Breathe out.
• Seal lips around the mouthpiece.
• Press down the canister once to release the drug.
• Breathe in slowly and deeply—the Aerochamber will whistle if you
breathe too quickly.
• Hold breath for 10 seconds.
• Breathe out through mouthpiece and breathe in again (do not press
the canister a second time). This may be repeated up to 4 or 5
breaths.
• If a second dose is required, relax for a minute and repeat steps 3–5.
• Remover the inhaler and replace the cap.
Cleaning the Aerochamber
• The device must be rinsed daily in soapy water.
• Allow to air-dry on a drainer—do not rub (creates static electricity).
• Aerochambers should be replaced by a new model every 6 months.
Fig. 18.15 Aerochamber with MDI inserted in the end.

CHAPTER 18 Practical procedures544
1 Oxygen administration
Theory
This is the administration of supplementary oxygen when tissue oxygena-
tion is impaired.
The aim is to achieve adequate tissue oxygenation (without causing a
signifi cant d in ventilation and consequent hypercapnia or oxygen toxicity)
while minimizing cardiopulmonary workload.
2 Oxygen is a drug with a correct dosage and side effects, which, when
administered correctly, may be life saving.
The primary responsibility for oxygen prescription lies with the hospital
medical staff. It is good practice to record the following:
• Whether delivery is continuous or intermittent
• Flow rate/percentage used
• What SaO
2
should be
When to treat
• Tissue hypoxia is diffi cult to recognize, as clinical features are
nonspecifi c. They include altered mental state, dyspnea, cyanosis,
tachypnea, arrhythmias, and coma.
• Treatment of tissue hypoxia should correct any arterial hypoxemia
(cardiopulmonary defect or shunt, e.g., PE, pneumonia, asthma), any
transport defi cit (anemia, low cardiac output), and the underlying causes.
2 Remember, SaO
2
/PaO
2
can be normal when tissue hypoxia is caused by
low cardiac-output states.
Equipment
See b p. 546.
Procedure
• Explain what is happening to the patient and ask their permission.
• Choose an appropriate oxygen delivery device (see next page).
• Choose an initial dose:
•
Cardiac or respiratory arrest: 100%
•
Hypoxemia with PaCO
2
<40 mmHg: 40–60%
•
Hypoxemia with PaCO
2
>40 mmHg: 24% initially
• Decide on the acceptable level of SaO
2
or PaO
2
and titrate oxygen
accordingly.
• If possible, try to measure a PaO
2
in room air prior to giving
supplementary oxygen. (This is not absolutely necessary, especially if
the patient is in severe respiratory distress or is hypoxic.)
• Work with nursing staff, respiratory therapist, or outreach services for
support in setting up equipment.
• Apply the oxygen and monitor via oximetry (SaO
2
) and/or repeat
ABGs (PaO
2
) in 30 minutes.
• If hypoxemia continues, the patient may require respiratory support
either invasively or noninvasively—consult with a respiratory specialist.
• Stop supplementary oxygen when tissue hypoxia or arterial hypoxemia
has resolved.

545
OXYGEN ADMINISTRATION
Hints
• Only 10% of patients with COPD are susceptible to CO
2
retention
with oxygen therapy. Use Venturi-style masks and monitor closely.
• Think about what is normal for the individual.
Oxygen administration equipment
The method of delivery will depend on the type and severity of respi-
ratory failure, breathing pattern, respiratory rate, risk of CO
2
retention,
need for humidifi cation, and patient compliance.
Each oxygen delivery device ( Fig. 18.16 ) comprises an oxygen supply, fl ow
rate, tubing, interface 9 humidifi cation. (Humidifi cation should be used for
patient comfort, presence of thick tenacious secretions, or fl ows >4 L/min.)
Nasal cannulas
These direct oxygen via two short prongs up the nasal passage They
• Can be used for long periods of time.
• Prevent rebreathing.
• Can be used during eating and talking.
Local irritation, dermatitis, and nose bleeding may occur, and rates of
above 4 L/min should not be used routinely.
Low-fl
ow oxygen masks
These deliver oxygen concentrations that vary depending on the patient’s
minute volume. At these low fl ow rates there may be some rebreathing of
exhaled gases (they are not suffi ciently expelled from the mask).
Fixed performance masks
These achieve a constant concentration of oxygen independent of the
patient’s minute volume.
The masks contain Venturi barrels where relatively low rates of oxygen
are forced through a narrow orifi ce, producing a greater fl ow rate that
draws in a constant proportion of room air through several gaps.
Partial and non-rebreather masks
Masks such as these have a reservoir bag that is fi lled with pure oxygen
and depend on a system of one-way valves that prevent mixing of exhaled
gases with the incoming oxygen.
The concentration of oxygen delivered is set by the oxygen fl ow rate.
High-fl ow oxygen masks
Masks or nasal prongs generate fl ows of 50–120 L/min using a high-fl ow
regulator to mix air and oxygen at specifi c concentrations.
These masks are highly accurate, as delivered fl ow rates will match a
high respiratory rate in patients with respiratory distress. It should always
be used with humidifi cation.
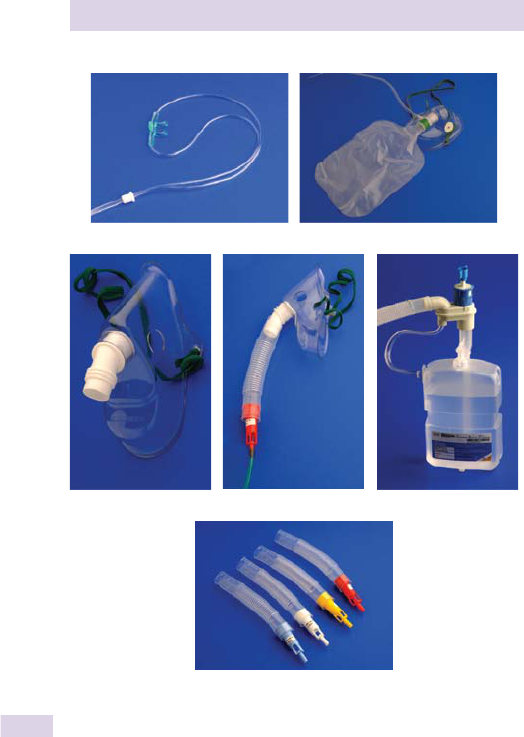
CHAPTER 18 Practical procedures546
(a)
(b)
(e)
(d) (f)
(c)
Fig. 18.16 (a) Nasal cannula. (b) Low-fl ow/variable-concentration mask. (c) Non-
rebreather mask. (d) Mask with Venturi valve attached. (e) Selection of Venturi
valves. (f ) Humidifi cation circuit.

547
BASIC AIRWAY MANAGEMENT
2 Basic airway management
Theory
An inadequate airway ( Box 18.4 ) leads rapidly to hypoxemia and, if uncor-
rected, brain damage and death. Endotracheal intubation remains the gold
standard for securing an airway and protecting the patient from aspiration
( Box 18.5 ).
Airway management without intubation is an important skill to master
and consists of the use of one or more of the following: triple maneuver,
face masks, oropharyngeal and nasopharyngeal airways, laryngeal masks,
and other supraglottic devices, e.g., Combitube. It may be carried out
when intubation equipment or skills are unavailable, if intubation is diffi -
cult, or on a patient with a partially obstructed airway.
Urgency is an important factor in planning and securing an airway in the
most appropriate manner. This will depend on risk of vocal cord injury,
degree of patient cooperation, anatomy of airway, equipment at hand, and
your own experience.
Before you start
2 Think about simple positioning and the recovery position of the patient,
especially for airway protection alone.
Assess for airway obstruction:
• LOOK (into mouth and for chest or abdominal movement)
• LISTEN (snoring, gurgling, wheezing)
• FEEL (expired air)
2 Complete airway obstruction is silent.
Make sure that you have the following:
• Oxygen tubing
• Suction equipment
• Ambu-bag
• Rebreather bag
Hints
• A fully conscious, talking patient is able to maintain his or her own
airway and needs no further assessment.
0 Do not use a head tilt or chin lift in suspected cervical spine injury,
except as a last resort.
Airway maneuvers
The following techniques are performed with the patient lying supine, and
all aim to open the airway with simple physical maneuvers. These are
Box 18.4 Common causes of airway obstruction
• Tongue (due to unconciousness)
• Soft tissue swelling (trauma, tumor)
• Foreign material (blood, vomit)
• Direct injury
•
Secretions
•
Bronchospasm

CHAPTER 18 Practical procedures548
Box 18.5 Secure airways
A secure airway may be necessary in patients with the following:
• Apnea
• Glasgow Coma Scale <9/15
• High aspiration risk
• Respiratory failure
• Unstable mid-face trauma
• Airway injuries
Fig. 18.17 Performing a head tilt.
useful as a fi rst step in managing a patient with a compromised airway and
are used in conjunction with an oxygen mask. They are also useful in situ-
ations where no airway devices are available.
If unsuccessful, you should go on to use additional equipment.
Head tilt
Place your hands around the patient’s forehead and tilt backward to
achieve upper cervical extension ( Fig. 18.17 ).
Chin lift
• This is usually used with the head tilt.
• Place the tips of the index and middle fi
ngers of your right hand under
the front of the patient’s mandible.
• Lift up, pulling the mandible anteriorly ( Fig. 18.18 ).
Jaw thrust
• Use this maneuver if there is suspicion of an injury to the cervical
spine. This is a two-handed technique.
• Holding the patient from behind, place the fi
ngers of both hands
behind the angle of the mandible.
• Lift the mandible with these fi
ngers while using your thumbs to
displace the chin downward, opening the mouth (
Fig. 18.19 ).
2 Hint
0 Do not use a head tilt or chin lift in a patient with (or suspected to
have) cervical spine injuries.
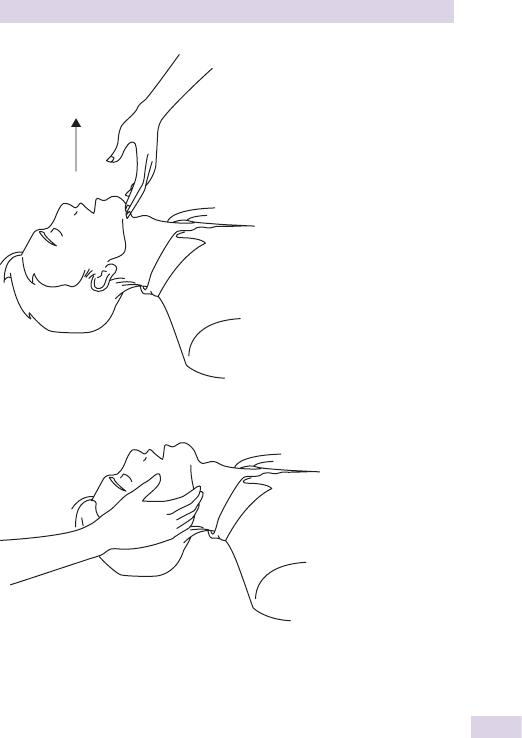
549
BASIC AIRWAY MANAGEMENT
Fig. 18.18 Performing a chin lift.
Fig. 18.19 Performing a jaw thrust.
Airway devices
Face masks
2 Use the smallest-fi tting mask to fi t over the mouth and nose.
This is a simple mask that is fi tted over the nose and mouth. You may
use an airway to aid ventilation or to clear any obstruction.
One-hand technique
• Place your thumb and index fi
nger on the mask in a C
shape (see
Fig. 18.20 ).
• Grasp the jaw with the remaining fi
ngers, pulling face into the mask.
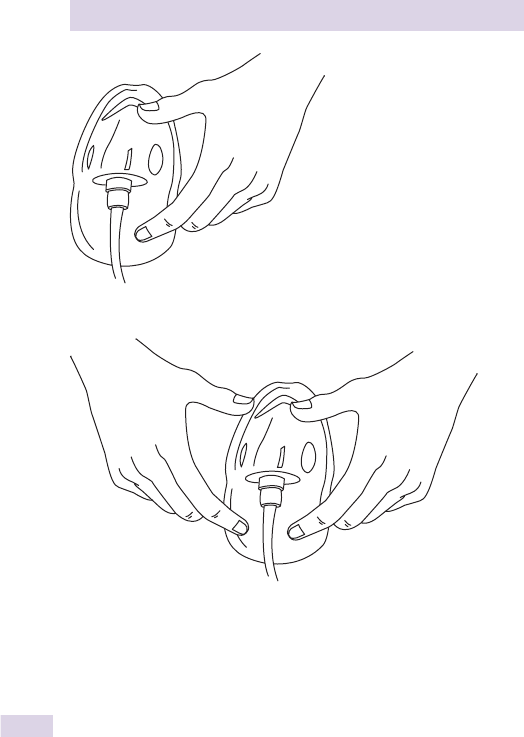
CHAPTER 18 Practical procedures550
Fig. 18.20 Use of a face mask, one-handed technique.
Fig. 18.21 Use of a face mask, two-handed technique.
Two-hand technique
• Place your thumbs on either side of the nasal portion of the mask.
• Use your index fi ngers to support the body of the mask.
• Use your other fi ngers to lift the jaw and extend the neck (
Fig. 18.21 ).
Oropharyngeal airway
2 Use this when the patient is semiconscious.
This device consists of a fl ange (limits depth of insertion), bite portion
(teeth of patient rest against this), and curved body (follows curvature of
the tongue), which has a lumen allowing passage of air and suction.
Different sizes are available and are color coded. The correct size is
determined by measuring the airway against the distance between the cor-
ner of the mouth and the angle of the jaw (Figs. 18.22 and 18.23).
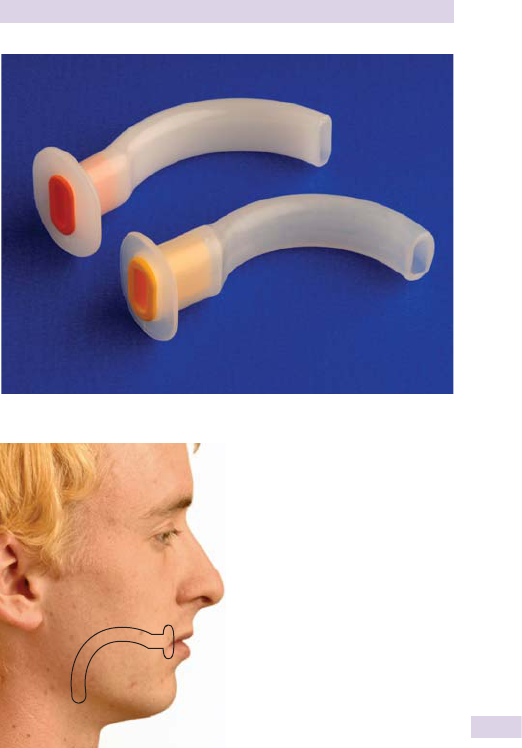
551
BASIC AIRWAY MANAGEMENT
Technique
• Lubricate and insert the airway upside down.
• Once it is well into the mouth rotate 180˚ and advance to full position.
•
Alternatively, hold the tongue down and forward with a tongue
depressor until the airway is in place.
Fig. 18.22 Oropharyngeal airways.
Fig. 18.23 Chose size of the oropharyngeal airway by measuring from the
patient’s teeth to the angle of the mandible.
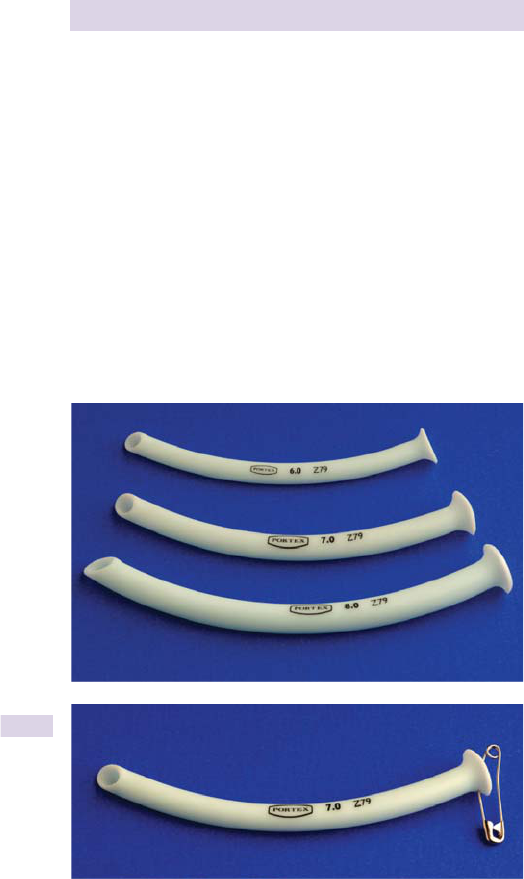
CHAPTER 18 Practical procedures552
•
Check for no gagging, snoring, or vomiting and that air is moving in
and out.
• Use a size 10/12/14 catheter for suction, if required.
Nasopharyngeal airway
2 This is tolerated better than the oropharyngeal airway in alert patients.
This device consists of a fl
ange (limits depth of insertion). The pharyn-
geal end has a bevel to facilitate nontraumatic insertion and a curved body
with lumen allowing passage of air and suction. Some airways come with-
out an adequate fl
ange, so a safety pin is used at the nasal end to prevent
the airway from falling back into the nose (see Fig. 18.24 ).
Different sizes are available. Determine the correct size by comparing
with the distance between the nostril and the tragus (see Fig. 18.25 ).
Technique
• The wider nostril is traditionally chosen, but most airways are beveled
for introduction into the left nostril.
• Lubricate airway and pass directly into the nasal passage, passing along
the fl
oor of the nose or aiming for the back of the opposite eyeball.
• Use a size 10/12 catheter for suction, if required.
Fig. 18.24 Nasopharyngeal airways.

553
BASIC AIRWAY MANAGEMENT
Laryngeal mask airway (LMA)
This consists of a tube with an infl atable cuff designed to seal around the
laryngeal opening ( Fig. 18.26 ). The patient must be deeply unconscious.
Technique
• Maintain oxygenation by bag and mask.
• Defl
ate the cuff of the LMA using a 20 mL syringe.
• Lubricate the outer cuff with aqueous gel. This part will not be in
contact with the larynx.
• The patient should be in a supine position with head and neck in
alignment.
• Stand behind the patient or, if this is not possible, from the front.
• Hold the tube like a pen and pass it into the mouth with the distal
aperture facing the feet of the patient.
• Push back over the tongue while applying the tip to the surface of the
palate until it reaches the posterior pharyngeal wall.
• The mask is then pressed backward and down until it reaches the back
of the hypopharynx and resistance is felt.
• The black line on the tube should be aligned with the nasal septum.
• Infl
ate the cuff with usually 20–30 mL of air.
• The tube should lift out of the mouth slightly; the larynx is pushed
forward if it is in the correct position.
• Attach breathing circuit and gently ventilate patient with 100% oxygen.
• Confi
rm correct placement by auscultating the chest in the axillary
regions and observe for bilateral chest movement.
• Insert a bite block or oropharyngeal airway alongside the tube and
secure the airway with the tape or tie provided.
Fig. 18.25 Chose size of the nasopharyngeal airway by measuring from the
patient’s nostril to the tragus.
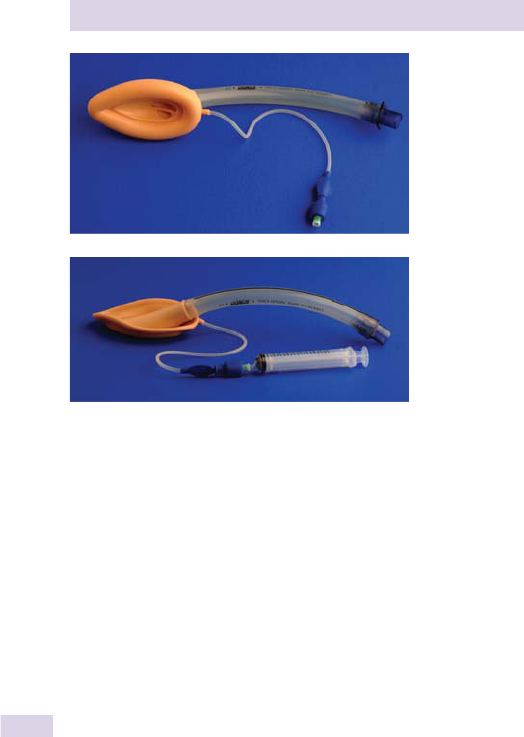
CHAPTER 18 Practical procedures554
Fig. 18.26 A laryngeal mask airway.

555
TRACHEOSTOMY MANAGEMENT
3 Tracheostomy management
Theory
A tracheostomy is an opening in the anterior wall of the trachea below the
larynx that can facilitate ventilation and respiration.
A mini-tracheostomy is a narrow-diameter, cuffl ess tube inserted into the
trachea, through which a catheter can be passed to stimulate a cough and/
or suction. This is not a method for protecting the airway or delivering any
kind of ventilatory support except emergency oxygen therapy.
Tracheostomy may be performed if the need for an endotracheal tube
is prolonged, to facilitate weaning, to identify an inability to maintain or
protect an airway, and to secure and clear an airway.
Patients may have a permanent tracheostomy in place or even a stoma.
These often do not need humidifi cation or suction unless the patient is
acutely ill.
Equipment
Tracheostomy tube
The tracheostomy tube may be stitched in or secured around the neck and
is either single or double lumen (has an inner tube that can be removed
for cleaning). The tubes are either fenestrated or nonfenestrated.
Fenestrated tubes allow the passage of air and secretions into the
mouth. These are good for weaning.
Humidifi cation
Heated humidifi cation is used for the short term and is the gold standard.
A heat moisture exchanger is used for patients with minimal secretions or
who are mobile.
Procedures
Open suction
The aim is to remove secretions and prevent blockages in the tracheos-
tomy tube, bronchial obstruction, and alveolar collapse.
• Use a catheter with diameter no more than one 1/2 the internal
tracheotomy diameter. [(Size of outer diameter) – 2 x 2 = x; e.g., 8.0
mm – 2 x2 = 12].
• Negative pressure should be 100–150 mmHg.
• Wear gown, gloves, and protective eyewear.
• Attach a sterile catheter to suction equipment, ensuring a good seal,
and leave most of the packaging in place.
• Place under the nondominant arm.
• Put a clean, disposable glove on the dominant hand and do not
touch anything other than the catheter tip.
• Pull the packaging away with the nondominant hand.
• Open the suction port.
• Introduce the tip of the catheter into the tracheostomy tube with
the dominant hand gently but quickly.
• Depth of insertion should be 0.5–1.0 cm beyond the end of the
tracheostomy tube (about 1/3 the length of catheter).

CHAPTER 18 Practical procedures556
• Insert until the patient coughs.
• Withdraw the tip 0.5 cm and apply suction.
• Continue to withdraw slowly and continuously.
• Close the suction port and discard the glove and catheter.
2 Suction should last no more than 10 seconds.
2 Allow suffi
cient time between passes for recovery.
• Repeat until secretions are cleared.
• After suction, ensure that the patient is reconnected to respiratory
support and oxygen and that oxygen levels are returned to normal.
Tube occlusion
• Call for help.
• Reassure the patient.
• Ask the patient to cough, or attempt to clear secretions via suction.
• Remove the inner cannula and replace it with a new one.
• If there is no inner cannula, defl
ate the cuff and administer oxygen
facially, instill 2–5 mL 0.9% saline, and suction to try to clear blockage.
• If you are unable to clear the blockage, a total tube change may be
required (try using a smaller size, if necessary).
• If tube insertion fails, then consider mask-to-stoma ventilation
(consider suction via stoma).
2 If respiration stops all together, initiate the proper code, call for anes-
thesia service, infl
ate the cuff, and manually ventilate using a catheter
mount and rebreather or Ambu-bag.
Swallowing assessment
This should be performed by the appropriate practitioner (e.g., radiologist
or speech and language therapist).
• Sit the patient up.
• Suction via tracheotomy prior to cuff defl ation.
• Defl
ate cuff fully, if possible, or to maximum degree that the patient
can tolerate.
• Ensure that there is an appropriate inner cannula in place.
• Give the patient sips of water from a teaspoon and follow the
procedure explained on b p. 289.
• Intermittently check for voice quality (ask the patient to say “ah” or
count out loud).
• Stop if the patient deteriorates, fatigues, shows signs of persistent
coughing or aspiration on suction, or has a persistently “wet” voice.
Hints
• Practice techniques before needing them in an emergency.
• Stridor is a good indication that an airway is partially blocked.
• Always remember to humidify oxygen in tracheostomy patients.

557
ENDOTRACHEAL (ET) INTUBATION
3 Endotracheal (ET) intubation
Theory
There are three main indications for tracheal intubation: relieving airway
obstruction, protecting the airway from aspiration, and facilitating artifi cial
ventilation of the lungs.
2 Remember, if you are inexperienced in this technique, never perform
tracheal intubation unsupervized.
2 In an emergency situation, it is safer to bag and mask the patient or use
a laryngeal mask airway if one is available and await assistance.
Equipment
• Laryngoscope (check bulb)—usually size 3 is adequate
• Selection of ET tubes (size 7 in most women and size 8 in most men)
• Sterile lubricant
• 20 mL syringe for cuff infl ation
• Tape to tie tube in place
• Rigid stilette or gum-elastic bougie
• Self-infl
ating bag and oxygen supply
• Stethoscope for confi
rming correct position of tube
• Suction apparatus with a wide-bore, rigid suction end (Yankauer)
Procedure
• In the awake patient, introduce yourself, confi rm the patient’s identity,
explain the procedure, and obtain verbal consent.
• Wash your hands and put on a pair of gloves.
• Pre-oxygenate the patient with a high concentration of oxygen for a
minimum of 15 seconds.
2 Remember, intubation must take no longer than 30 seconds.
• Position the neck such that it is distally extended and proximally
slightly fl
exed, with a small pillow underneath the head—an
exaggeration of the normal cervical lordosis.
2 If a cervical injury is suspected, the head and neck should be maintained
in neutral alignment.
• Stand at the head of the bed and open the mouth.
• Inspect for loose dentures or foreign material—remove any if present.
• Hold the laryngoscope in the left hand and look down its length as you
insert.
• Slide the scope into the right side of the mouth until the tonsillar fossa
comes into view.
• Now move the blade to the left so that the tongue is pushed into a
midline position.
• Advance blade, following the posterior edge of the soft palate until the
uvula comes into view.
• Advance blade over the base of the tongue, and the epiglottis should
pop into sight.
• With blade positioned between the epiglottis and base of the tongue
(vallecula), apply traction in the line of the handle of the laryngoscope.

CHAPTER 18 Practical procedures558
•
This movement should lift the epiglottis and expose the V-shaped
glottis behind.
• Once the triangular-shaped laryngeal inlet is in view, position the ET
tube between the vocal cords so that the tube is just distal to them.
•
Use mark on the tube above the cuff to indicate correct position.
•
This is around 21 cm in a female and 22 cm in a male.
• If diffi culty is experienced passing ET tube into the larynx, pass a gum-
elastic bougie fi
rst and then try passing a lubricated ET tube over this.
• Once the ET tube is in position, infl
ate the cuff while ventilating
through the ET tube with a self-infl
ating bag ( Fig. 18.27 ).
• Verify correct positioning of the tube by observing chest movement
and auscultate at the sides of the chest in the mid-axillary line (both
sides of the chest should move equally, and you should hear breath
sounds at both lung bases).
• Secure the ET tube with a tie.
• Obtain a chest X-ray to confi
rm the tube position. The ET tube has a
radio-opaque line within it.
• Document the details of the procedure in the patient notes.
Important note
2 The insertion of the ET tube should take no more than 30 seconds from
start to fi nish. If 30 seconds pass and the tube is not in the correct pos-
ition, remove all the equipment and bag/mask ventilate the patient until
you are ready to try again.
Some complications of ET intubation
• Trauma to teeth, airway, larynx, or trachea
• Aspiration
• Airway obstruction
• Tube misplacement
• Hypoxia from prolonged attempts
• Tracheal stenosis (late complication)
Fig. 18.27 ET tube with attached syringe. The cuff has been infl ated to
demonstrate.

559
NONINVASIVE VENTILATION (NIV)
3 Noninvasive ventilation (NIV)
Theory
NIV is the application of positive pressure ventilatory support via a facial
or nasal interface and not via an airway (ET tube, tracheostomy) (see Box
18.6 for setup). NIV should be operated only by trained staff in an appro-
priate area. It may be used in acute conditions in the hospital or in chronic
conditions at home.
Patients need to be spontaneously breathing, maintaining their airway
(i.e., conscious), and compliant. It is not a substitute for mechanical venti-
lation unless this has been decided as the ceiling of treatment.
Pressures are usually documented in cmH
2
O (rather than mmHg), and
it is good practice that the decision of maximal pressure to be used is
documented in the medical notes so that if a patient continues to deterio-
rate, the intensivist, pulmonologist, or anesthesiologist has an appropriate
management strategy in place.
Contraindications
These include undrained pneumothorax and pulmonary hemorrhage. It
is good practice to review a recent chest X-ray to rule these out before
beginning.
Cautions
These comprise bullae, unstable cardiovascular system, abscess, facial
trauma, basal skull fracture, recent bronchial or esophageal surgery, per-
sistent vomiting, and high bronchial tumor.
CPAP
Continuous Positive Airways Pressure (CPAP) maintains a single pres-
sure continuously throughout both inspiratory and expiratory phases.
It is used in the treatment of type I respiratory failure (obstructive
sleep apnea and cardiopulmonary edema, and occasionally in pulmonary
embolus, pneumonia, and weaning from ventilation).
BiPAP
Bilevel Positive Airways Pressure (BiPAP) ventilation uses different
pressures on expiration (EPAP) and on inspiration (IPAP). Higher EPAP
increases functional residual capacity (FRC), while higher IPAP augments
tidal volume. The system is normally pressure driven but can be volume
driven.
It is used in the treatment of type II respiratory failure (i.e., hypoventila-
tion, chronic neuromuscular conditions, and exacerbations of COPD).

CHAPTER 18 Practical procedures560
Box 18.6 Setting up NIV
This is not something that the inexperienced provider will be expected
to do. The following is a brief guide that should allow you to understand
what is involved.
CPAP
Equipment
• Mask, head strap, positive end-expiratory pressure (PEEP) valves
(5–7.5–10 cmH
2
O)
• Circuit, safety pop-off/blow-off valve
• High-fl
ow generator for oxygen and air
• Heated humidifi cation
Procedure
• Explain the procedure to the patient and obtain verbal consent.
• Use measuring templates to assess appropriate-size interface and
minimize air leaks.
• Set oxygen and fl
ow rate and ensure that the PEEP valve opens a
small distance only and never fully closes.
• Start with a low pressure and slowly increase for patient comfort
and to gain compliance.
• Aim to reduce the work of breathing.
• Continuously monitor ABG/SaO
2
, heart rate, and BP. Watch for
abdominal distension.
BiPAP
Equipment
• Mask (facial/nasal), prongs, full face mask, head strap
• Circuit, exhalation port
• Entrained oxygen, if required
• Heated humidifi cation
• Ventilator (NIPPV1/2/3, Breas, BiPAP vision)
Procedure
• Explain the procedure to the patient and obtain verbal consent.
• Use measuring templates to assess appropriate-size interface and
minimize air leaks.
• Start with low pressures and slowly increase for patient comfort and to
gain compliance. (Trial data in COPD is based on pressures of 20/5.)
• Setting inspiratory and expiratory times will need to be continuously
reassessed, as respiratory rate will change over time.
• Initially aim to match the patient’s own ventilatory pattern, but
eventually aim to d respiratory rate and i tidal volume/fl ow
using
the minimal pressures possible.
• Monitor ABG/SaO
2
, heart rate, and BP at 1 and 4 hours. Watch for
abdominal distension.

561
PLEURAL FLUID SAMPLING (THORACENTESIS)
2 Pleural fl uid sampling
(thoracentesis)
Theory
After identifying a pleural effusion, a small volume of fl uid may be aspirated
and sent for biochemical, cytological, and microbiological analysis.
A neurovascular bundle runs on the inferior/inner aspect of each rib; to
avoid this, needles for aspiration are inserted immediately above a rib.
Equipment
• Instrument stand
• Sterile/wound care pack
• Sterile gloves
• Antiseptic solution
• 5 mL syringe
• 20 mL syringe
• 1 vial of local anesthetic (usually
1% lidocaine)
• Selection of needles
(2 green, 1 orange/blue)
• 2 sterile sample containers
• 1 pair of culture bottles
• Biochemistry tube for glucose
sample
Procedure
• Introduce yourself, check the patient’s identity, explain the procedure,
obtain verbal consent, and unwrap the equipment.
• Position the patient to sit upright on the edge of the bed, leaning
forward with arms raised—use a pillow on a raised bedside. table for
the patient to lean on (see Fig. 18.29 ).
• Percuss upper border of the effusion posteriorly, and choose a site
one or two intercostal spaces below that.
• Mark the chosen spot at the upper edge of a rib with a pen.
• Wash your hands and put on sterile gloves.
• Clean the marked area with the antiseptic solution on a cotton ball.
Work outward in a spiraling fashion.
• Pause to reconfi
rm patient identity, the procedure, and site.
• Draw up 5 mL of the lidocaine with the green needle.
• Swap the needle for an orange one and infi
ltrate the skin, creating a
surface bleb.
• Swap for a green (18G) needle and infi
ltrate anesthetic deeper.
Advance needle in a step-wise manner, drawing back the syringe each
time it is advanced to ensure vasculature is avoided (
Fig. 18.30 ) and
infi ltrating anesthetic before advancing again.
• Once you reach the pleural cavity, a fl
ashback of pleural fl
uid may be
obtained.
• Take the 20 mL syringe, attach a green (18G) needle and aspirate
20 mL of pleural fl
uid, being careful to use the anesthetized tract.
• Withdraw the needle and cover the wound with a suitable dressing
(dry gauze and medical sticky tape will suffi ce).
• Put 4 mL of fl
uid in each bottle and send to the laboratories for
•
Biochemistry (pH, protein, LDH, amylase, glucose)
•
Cytology
•
Microbiology (MC&S plus TB stain and culture, if indicated)
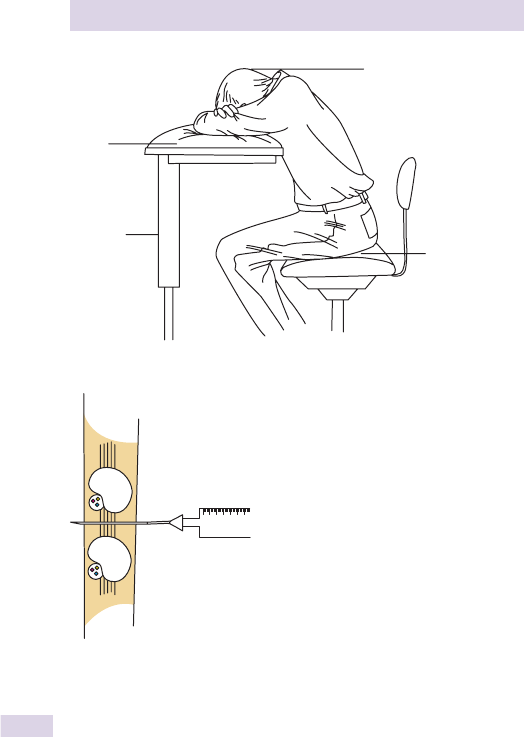
CHAPTER 18 Practical procedures562
• Request a chest X-ray post-procedure to check for pneumothorax
only if the procedure was diffi cult or high risk.
Hints
2 If pH needs to be measured, the sample must be sent to the laboratory
immediately.
0 Some laboratories will not measure pH—check before you begin. An
alternative is to save a small amount of fl uid, draw it up in a primed blood
gas syringe, and run it through a blood gas analyzer to gain an instant pH
measurement.
• In larger individuals, the pleural cavity may be at some depth from the
skin. If this is the case, use a longer needle—needles of IV catheters
are often signifi
cantly longer despite being the same gauge.
Pillow
Bedside
table
Bed or chai
r
Arms crossed,
head on arms
Fig. 18.28 Position patient comfortably leaning forward—use a bedside table and
pillow for them to lean on with their arms crossed.
Fig. 18.29 Insert needle just above a rib, at the lower border of the intercostal
space, to avoid the neurovascular bundle.

563
CHEST TUBE INSERTION
Equipment
• Instrument stand
• 10 mL 1% lidocaine
• 10 mL syringe
• 1 orange (14 gauge) needle
• 1 green (18 gauge) needle
• Sterile gloves
• Sterile pack (containing cotton
balls, container, drape)
• Barrier pad (Blue pad/Chux)
• Suitable dressing
• Seldinger chest tube kit
(containing chest tube,
in-troducer, chest drain needle,
syringe, scalpel, 3-way tap, guide
wire)
• Suture (no. 15)
• Povidone-iodine solution
• Chest drain tubing
• Chest drainage bottle
• 500 mL sterile water
Procedure
• Introduce yourself, confi rm the identity of the patient, explain the
procedure, and obtain verbal consent.
• Double-check the history and chest X-ray to be sure of which side
needs the drain.
• Position the patient sitting on a chair or the edge of their bed, arms
raised. Instead of asking the patient to hold their arm over their head,
it is often easier to ask them to cross their arms and lean on a bedside
table with a pillow, raised level with their shoulders (see Fig. 18.28 ).
• Triple-check the side by briefl
y examining the patient (tap out dullness
of an effusion or listen for the
d breath sounds of a pneumothorax).
• The usual site for insertion is in the mid-axillary line, within a triangle
formed by the diaphragm, the latissimus dorsi, and the pectoralis major
( Fig. 18.30 ). For apical pneumothoraces, you may wish to choose the
second intercostal space in the mid-clavicular line.
• Place the barrier pad on the bed to absorb any spillage.
• Mark your chosen spot (just above a rib to avoid hitting the
neurovascular bundle; see Fig. 18.29 ) with a pen.
22Chest tube insertion
Theory
Tubes are inserted to drain either fl uid (pleural effusion/empyema) or air
(pneumothorax) from the pleural cavity. In both cases, the insertion of the
tube is almost entirely identical.
The tube is connected to a container with a small amount of water (cre-
ating an airtight seal), so there is no direct connection between the pleural
cavity and air. On inspiration, the negative intrathoracic pressure draws
water up the tube (about 4 cm); on expiration, the water level falls and
(if draining a pneumothorax) air bubbles through the water. This one-way
valve allows air or fl uid to drain from the chest but not re-enter.
The method described below is the Seldinger technique . While other
techniques exist for wide-bore tubes, these are now only used in the set-
ting of blunt trauma and cardiothoracic surgery, or for other problems
such as extensive surgical emphysema overlying a pneumothorax.

CHAPTER 18 Practical procedures564
• Sterilize the area with antiseptic solution or povidone-iodine on cotton
balls, working in a spiral pattern outward from the insertion point.
• Pause to reconfi
rm the patient identity, procedure, and site.
• Using the syringe and the orange needle, anesthetize the skin (see b
p. 512), forming a subcutaneous bleb.
• Swap the orange needle for the green (18G) one and anesthetize
deeper, remembering to aspirate before injecting, to ensure that you
have not hit a vessel. Anesthetize right down to the pleural cavity and
only stop when you aspirate air or pleural fl uid.
• Use the scalpel to make a small cut in the skin.
• Now use the drain-kit needle with the curved tip and syringe (in some
kits, this has a central stylet that needs to be removed fi
rst). With the
curved tip facing down (up for a pneumothorax), advance through the
anesthetized route until you are aspirating either air or fl uid
again.
• Remove the syringe and hold the needle steady.
• Thread the guide wire through the needle into the pleural cavity (this
usually comes precoiled but often needs to be retracted slightly fi rst
to straighten the curve on the tip). See Fig. 18.31 .
• Once the wire is half-way in the chest, discard the covering.
• Now withdraw the needle from the chest but be sure to not
remove the guide wire—KEEP HOLD OF IT AT ALL TIMES.
• Thread the needle right off the end of the guide wire. You should now
have the wire in the chest, but nothing else.
• Thread the introducer over the guide wire and into the chest, twisting
back and forth as you go to open up a tract for the drain’s passage.
You can then slide the introducer back off the wire—but be careful
not to pull the wire out of the chest.
• The chest drain has a central stiffener in place; leave this in situ. Now
thread the drain over the wire and into the chest, curving downward.
Always HOLD ON TO THE WIRE with one hand—you may need to
pull the wire out of the chest slightly so that it protrudes from the end
of the drain before you push the drain into the chest. You don’t want
to push it right into the chest and lose it!
• Once the drain is in place, withdraw the wire and the central stiffener.
• Quickly attach the 3-way tap and make sure all the ports are closed.
• You can now stitch the drain in place ( Fig. 18.32 ). This needn’t be
complicated—a simple stitch just above the drain will suffi
ce with the
ends then wrapped tightly around the drain, knotted several times.
• Fix the drain in place with a suitable dressing.
• Attach the drain to the tubing and the tubing to the drain collection
bottle, which you have prefi
lled with 500 mL of sterile water.
• Open the 3-way tap. You should either see the fl
uid start to fl ow
or
air start to bubble in the collection bottle. Ask the patient to take a
few deep breaths and watch the water level in the tubing to ensure it
is rising and falling.
• Warn the patient not to knock the bottle over and to keep it below
the level of their umbilicus.
• Request a post-insertion chest X-ray.

565
CHEST TUBE INSERTION
Fig. 18.30 Correct positioning of the patient for chest drain insertion and ideal
site of drain insertion.
Fig. 18.31 Prepare the guide wire before starting the procedure by retracting
slightly so as to straighten the curved tip.

CHAPTER 18 Practical procedures566
Fig. 18.32 Diagrammatic representation of a suitable stitch to hold the drain in
place.

567
NASOGASTRIC (NG) TUBE INSERTION
1 Nasogastric (NG) tube insertion
Theory
In this procedure, a plastic tube is inserted through the nose, down the
back of the throat and esophagus, and into the stomach.
The bore of the tube (large = 16, medium = 12, small = 10) is dictated
by the tube’s intended purpose. For short- or medium-term nutritional
support in patients with a defective swallow, a fi ne-bore tube is used.
Larger bores are used to drain the stomach contents and decompress
intestinal obstruction.
• Contraindications: severe facial trauma and basal skull fractures
• Complications: aspiration, tissue trauma, electrolyte loss, tracheal or
duodenal intubation, perforation of esophagus or stomach
Equipment
• Disposable gloves • 50 mL syringe
• Protective gown • Drainage bag (if necessary)
• Drape • Adhesive tape or steristrips
• Lubricant gel • Emesis basin
• NG tube • Paper towel
• Cup of water and straw
• Suction pump (if indicated)
Procedure
• Introduce yourself, confi rm the patient’s identity, explain the
procedure, and obtain verbal consent.
• Wash your hands thoroughly, and put on gloves and gown.
• Ideally, the patient should be seated upright (often, the head tilted
slightly forward can aid insertion).
• Examine the patient’s nose for deformity or obstructions and decide
which nostril to use.
• Use the tube to measure the distance xiphoid process l earlobe l tip
of nose and note the distance.
• Lubricate the fi
rst 4–8 cm of tube. You may also wish to use local
anesthetic spray on the patient’s throat, if available.
• Pass the tube into the nostril and then posteriorly, a short distance at
a time. You will feel it turn the corner at the nasopharynx and another
slight obstruction as it passes into the esophagus.
• If the patient is able, ask them to swallow as the tube passes the
pharynx—a brief sip of water may help here.
• Advance the tube as far as the premeasured distance.
• To check for correct placement, you may wish to aspirate some stomach
contents with the syringe and test the fl uid’s pH (it should be <6).
• Secure the tube to the patient’s nose with some tape. You may also
wish to curl it back over their ear and secure it to their cheek.
• Request a chest X-ray and confi
rm the tube’s position ( below
the
diaphragm in the region of the gastric bubble) before using for feeding.
• Record the procedure in the patient’s notes.

CHAPTER 18 Practical procedures568
2 Hints
• If resistance is felt, try rotating the tube while advancing it. Never force
it.
• Partially cooling the tube can stiffen the tube, making it easier to pass.
2 No longer considered appropriate, an alternate test for correct place-
ment was to insert a small bolus of air (20–30 mL) via the tube with
the syringe while listening to the epigastrium with the stethoscope. One
would thus hear the air entering the stomach.

569
ASCITIC TAP
22 Ascitic tap
Theory
In this procedure, a needle is inserted through the abdominal wall, allow-
ing withdrawal of a small amount of fl uid for diagnostic purposes.
Equipment
• 1 green (18 gauge) needle
• 1 orange (14 gauge) needle
• 10 mL syringe
• 20 mL syringe
• 5–10 mL 1% lidocaine solution
• Povidone-iodine or antiseptic
solution
• Microbiology culture bottles
(anaerobic and aerobic)
• Sterile pack (including gloves,
cotton balls, and container)
• 2 sterile collection bottles
• Biochemistry tube (glucose)
• Hematology tube
Procedure
• Introduce yourself, confi rm the identity of the patient, explain the
procedure, and obtain verbal consent.
• Ensure that the patient has emptied their bladder.
• Position the patient lying supine or in the lateral decubitus position,
leaving the right side available. Undress this side, exposing abdomen.
• Percuss the extent of the ascitic dullness (b p. 239).
• Mark your chosen spot in the region of the right iliac fossa (preferably)
within the area of dullness ( Fig. 18.33 ).
• Clean the area thoroughly with antiseptic, and put on sterile gloves.
• Pause to reconfi
rm patient identity and the procedure and site.
• Infi ltrate the skin and subcutaneous tissues with lidocaine via the orange
needle and 10 mL syringe and wait a minute for it to take effect.
• Attach the green needle to the 20 mL syringe and insert it into the
abdomen, perpendicular to the skin. Advance the needle as you
aspirate until fl
uid is withdrawn.
• Aspirate as much fl
uid as possible (up to the 20 mL).
• Remove the needle and apply a suitable sterile dressing.
• Put >4 mL of fl
uid in each bottle and send to the lab for the following:
•
Biochemistry—standard collection bottle (albumin, LDH, amylase)
•
Biochemistry—accurate glucose collection tube (glucose)
•
Cytology
•
Hematology (total and differential white cell count)
•
Microbiology (C&S)

CHAPTER 18 Practical procedures570
Site in IF (iliac fossa) for aspiration
L
Fig. 18.33 Performing a diagnostic ascitic tap.

571
ABDOMINAL PARACENTESIS (DRAINAGE)
22 Abdominal paracentesis (drainage)
Theory
In this procedure, a drain is inserted into the abdominal cavity, allowing
drainage of large amounts of ascitic fl uid for therapeutic purposes.
The procedure below relates to a Bonanno drainage kit—the essence is
the same as for other catheter kits ( Fig. 18.34 ), although minor details may
differ. Refer to the manufacturer’s instructions.
Equipment
• 1 orange (14 gauge) needle
• 1 green (18 gauge) needle
• 2 x 10 mL syringes
• 5–10 mL 1% lidocaine solution
• Povidone-iodine or antiseptic
solution
• Sterile pack (including gloves,
cotton balls, and container)
• Bonanno abdominal catheter
pack (catheter, sleeve, puncture
needle, and adaptor clamp)
• Catheter bag
• Catheter bag stand
• Scalpel
Procedure
• Introduce yourself, confi rm the identity of the patient, explain the
procedure, and obtain verbal consent.
• Ensure that the patient has emptied their bladder.
• Position the patient lying supine or in the lateral decubitus position,
leaving the right side available. Undress this side, exposing abdomen.
• Percuss the extent of the ascitic dullness (b p. 239).
• Mark your chosen spot in the region of the right iliac fossa (preferably)
within the area of dullness.
• Clean the area thoroughly with antiseptic and put on sterile gloves.
• Pause to reconfi
rm patient identity and the procedure and site.
• Infi ltrate the skin and subcutaneous tissues with lidocaine via the orange
needle and 10 mL syringe and wait a minute for it to take effect.
• Attach the green needle to the other 10 mL syringe and insert into
the abdomen, perpendicular to the skin. Advance the needle as you
aspirate until fl
uid is withdrawn.
• Prepare the catheter kit—straighten the catheter (which is curled in
the pack) using the plastic covering sheath provided.
• Take the needle provided in the pack and pass through the sheath such
that the needle bevel is directed along inside the curve of the catheter
( Fig. 18.35 ). Continue until the needle protrudes from the catheter tip.
• Close off the rubber at the end of the catheter.
• Make a small incision in the skin with the scalpel.
• Grasp catheter needle 710 cm above the distal end and, with a fi rm
thrust, push needle through the abdominal wall to 73 cm deep.
• Disengage needle from the catheter hub and advance catheter until
the suture disc is fl
at against the skin.
• Withdraw needle.
• Connect adaptor-clamp to the catheter hub and securely attach the
rubber portion of the clamp into a standard drainage catheter bag.
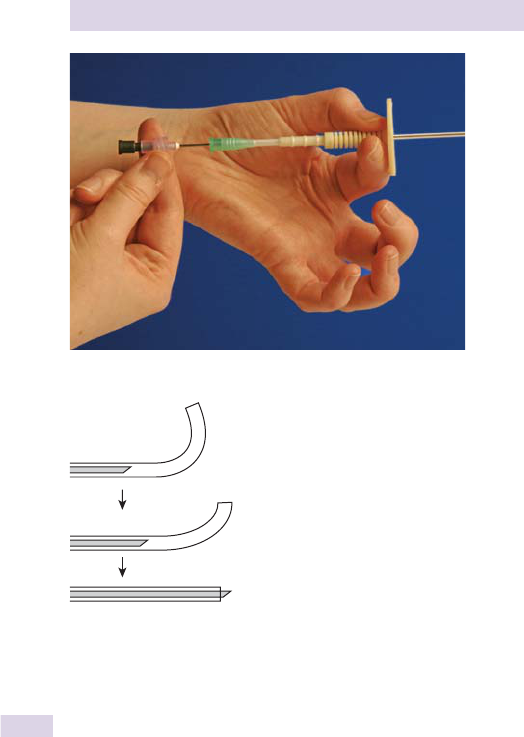
CHAPTER 18 Practical procedures572
Fig. 18.34 The assembled catheter components.
Fig. 18.35 Inserting the needle into the curved catheter.
• Carefully suture the catheter into the abdominal wall—you may also
need to apply further tape to ensure the catheter won’t fall out.
• Ensure that the clamp is open to allow fl
uid to drain.
Hints
• In cirrhotic patients, protein loss should be replaced (and
hemodynamic stability maintained) by infusing human albumin solution
(HAS) IV at a rate of 100 mL of 20% HAS for every 3 L of ascitic fl uid
drained—check local protocols with the gastroenterology department.
• Usually catheters are not left in place for >24 hours.
• During drainage, the fl
ow may stop, which suggests that the drain is
blocked. This may be positional, and simply moving the patient may
solve the problem.

573
MALE URETHRAL CATHETERIZATION
1 Male urethral catheterization
Theory
A urinary catheter has a balloon near the tip that is infl ated via a side-arm
near the other end. Once inside the bladder, the infl ated balloon prevents
it from falling, or being pulled, out.
Equipment
• Catheter pack (containing a basin, a small bowl with cotton balls, a
sterile towel, sterile gauze, and sterile gloves)
• Antiseptic solution or vial of saline
• Appropriate urological anesthetic gel
• 10 mL water-fi lled
syringe
• Catheter bag (leg bag if situation is not acute)
• Male catheter (12F or 14F)
Procedure
• Wash your hands thoroughly. Confi rm the patient’s identity, explain
the procedure, and obtain verbal consent.
• Unwrap all the equipment onto an instrument stand in an aseptic
fashion and pour saline solution over the cotton balls.
• Position the patient supine with genitalia exposed. Raise the bed to a
comfortable height.
• Wash your hands again and put on gloves. Create a hole in the center
of the towel, or use a fenestrated drape, and drape over the patient so
the penis can be reached through the hole.
• From here on, use your nondominant hand to hold the penis with
some gauze.
• Clean the penis with the wet cotton balls, working away from the
meatus. Remember to retract the foreskin and clean beneath.
• Lift penis to a vertical position, carefully position the nozzle of the
lubricant gel inside the meatus, and instill the full 10 mL slowly. (If
proving problematic, this can be aided by gentle milking action.)
• Position kidney bowl between patient’s thighs to catch spillages later.
• The catheter will be in a plastic wrapper with a tear-away portion near
the tip. Remove this portion, being careful not to touch the catheter.
• Insert the tip of the catheter into the urethral meatus and advance
slowly but fi
rmly by feeding it out of the remaining wrapper.
• On passing through the prostate, some resistance may be felt, which,
if excessive, may be countered by adjusting the angle of the penis by
pulling it to a horizontal position between the patient’s legs.
• On entering the bladder, urine should start to drain. Advance the
catheter far enough to ensure the balloon is beyond the urethra.
• Infl
ate the balloon with the 10 mL of water via the secondary catheter
lumen.
0 Warn the patient to alert you to any pain, and watch his face.
• Remove the syringe and withdraw the catheter until resistance is felt.
• Attach draining tube and catheter bag.
• Replace the foreskin, and clean and re-dress the patient as necessary.

CHAPTER 18 Practical procedures574
Hints
• You may wish to verify the presence of a full bladder with a bladder
ultrasound before starting.
• Lack of urine drainage may be caused by blockage by anesthetic gel, an
empty bladder, or catheter misplacement.
• Attempt to aspirate urine with a catheter-tipped syringe. Feel for a full
bladder. If there is any doubt about position of the catheter, remove it
immediately (defl
ating balloon fi
rst) and seek appropriate consultation.
• Always record the residual volume—this is essential in cases of urinary
retention.
• Consider the use of prophylactic antibiotics before the procedure.
• Complications include pain, infection, misplacement, and trauma.
• Patients with prostate disease can often experience some mild
hematuria following catheterization. Don’t worry about this, but watch
carefully and be sure the bleeding doesn’t continue or form into clots.
2 Be aware of latex allergy!

575
FEMALE URETHRAL CATHETERIZATION
1 Female urethral catheterization
Theory
A urinary catheter has a balloon near the tip that is infl ated via a side-arm
near the other end. Once inside the bladder, the infl ated balloon prevents
it from falling, or being pulled, out.
Female staff will usually catheterize females.
0 Consider antibiotic prophylaxis.
Equipment
• Catheter pack (containing a basin, a small vessel with cotton balls, a
sterile towel, and sterile gauze)
• Sterile gloves
• Saline solution
• 5 mL 1% lidocaine/lubricant gel in prefi lled
syringe
• 10 mL water-fi lled
syringe
• Catheter bag
• Female catheter (12F or 14F)
Procedure
• Wash your hands thoroughly. Confi rm the patient’s identity, explain
the procedure, and obtain verbal consent.
• Unwrap all the equipment onto a cleaned (antiseptic) instrument stand
in an aseptic fashion and pour saline over the cotton balls.
• Position the patient supine with knees fl
exed and hips abducted with
the heels together. Raise the bed to a comfortable height.
• Wash your hands again and put on gloves. Lay the towel and drape it
over the patient so the genitalia are exposed.
• From here on, use your nondominant hand to hold the labia apart,
approaching the patient from the right-hand side, leaning over her
ankles in order to reach the genitalia from below.
• Clean genitalia with the wet cotton balls (using each once only),
working in a pubis–anus direction (see Fig. 18.36 ).
• Carefully position the nozzle of the lubricant gel inside the meatus and
instill most of the 5 mL.
• Position the bowl between the patient’s thighs to catch spillages.
• The catheter will be in a plastic wrapper with a tear-away portion near
the tip. Remove this portion, being careful not to touch the catheter,
and apply a little lidocaine gel to the catheter tip.
• Insert the tip of the catheter into the urethral meatus and advance
slowly but fi
rmly by feeding it out of the remaining wrapper.
• On entering the bladder, urine should start to drain. Advance the
catheter fully to ensure the balloon is beyond the urethra.
• Infl
ate the balloon with 10 mL of water via the catheter side-arm.
0 Warn the patient to alert you to any pain and watch her face.
• Remove the syringe and withdraw the catheter until resistance is felt.
• Attach draining tube and catheter bag.
• Clean and re-dress the patient as necessary.
• Record the residual urinary volume.
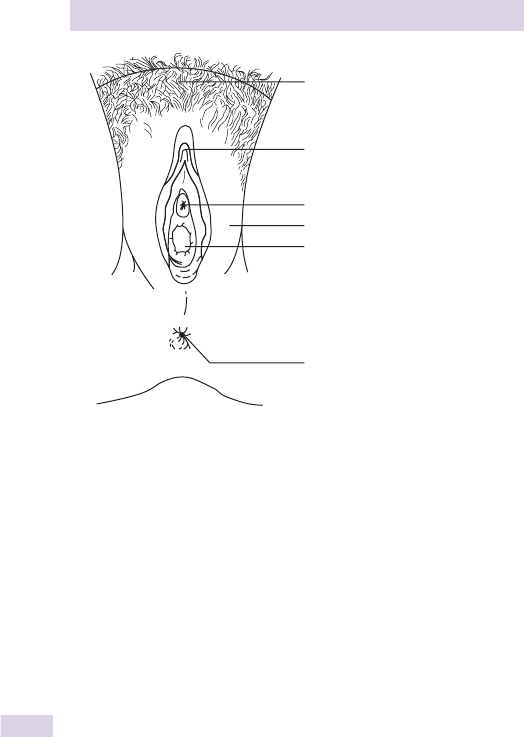
CHAPTER 18 Practical procedures576
Hints
• Some female patients are easier to catheterize in a different position—
lying on their side with knees raised.
• Lack of urine drainage may be caused by blockage by lubricant gel, an
empty bladder, or catheter misplacement.
• Attempt to aspirate urine with a catheter-tipped syringe. Feel for a
full bladder. If there is any doubt about the position of the catheter,
remove it immediately (defl
ating balloon fi
rst) and seek advice.
• Complications
•
Pain
•
Infection
•
Misplacement and trauma
2 Be aware of latex allergy!
Mons pubis
Glans clitoris
Urethral meatus
Labium majus
Vaginal orifice
Anus
Fig. 18.36 Diagrammatic representation of the female external genitalia showing
position of the urethral meatus.

577
SUPRAPUBLIC CATHETERIZATION
22 Suprapubic catheterization
Theory
Suprapubic catheterization is sometimes seen as a safer and more effi cient
means of controlling bladder drainage than urethral catheterization, par-
ticularly if the patient has had treatment or surgery involving the vagina,
urethra, ureter, or prostate. Patients may in fact fi nd this more accept-
able than urethral catheterization. Also, it allows assessment of when the
patient is able to void spontaneously, without having to remove (and pos-
sibly replace) a urethral catheter.
The catheter is inserted directly into the bladder, through the abdom-
inal wall just superior to the pubic symphysis. Safe placement under local
anesthesia requires a very full bladder.
The procedure below relates to the Bonanno Suprapubic tray. The
essentials of the technique remain the same for other catheterization sys-
tems, although small details may differ—refer to the pack instructions.
Many urologists currently favor the Bard Addacath system.
• Instrument (Mayo) stand
• 1 Bonanno Suprapubic catheter
tray (contains puncture needle,
catheter with sleeve, and
adaptor clamp)
• 1 drainage bag
• Povidone-iodine or antiseptic
solution
• 2 x 10 mL syringes
• 5–10 mL 1% lidocaine
• 1 green needle
• 1 orange needle
• Sterile pack (containing
gloves, swab, and container)
• Fine, nonabsorbable suture
Equipment
Procedure
• Introduce yourself, confi rm identity of the patient, explain the
procedure, and obtain verbal consent.
• Position the patient supine with genitalia exposed. Raise the bed to a
comfortable height.
• Unwrap all the equipment onto an instrument stand in an aseptic
fashion and pour antiseptic solution over the cotton balls.
• Before commencing, make sure that the patient has a palpable bladder.
If not, distend the bladder with 500–700 mL of saline solution instilled
via a urethral catheter (if urethral route is available and feasible).
2 If the bladder is not full, proceed no further.
• Put on sterile gloves, and prep the suprapubic area with antiseptic
solution.
• Pause to reconfi
rm patient identity and the procedure and site.
• The point of insertion is in the midline, two fi
nger-breadths above the
pubic symphysis and well below the upper edge of palpable bladder.
• Assemble the Bonanno catheter components (see Fig. 18.34 ).
• Advance the catheter sleeve along the course of the radio-opaque
catheter from a proximal position adjacent to the suture disc to the
distal end of the catheter to allow straightening of the coiled catheter.
• Infi
ltrate the insertion area with the lidocaine.

CHAPTER 18 Practical procedures578
• Carefully insert the 18-gauge puncture needle into the catheter so that
the heel of the needle bevel is directed along inside the curve of the
catheter and move in a clockwise direction, until the bevel extends
beyond the catheter tip ( Fig. 18.35 ).
• Slide the straightener sleeve off the distal end of the catheter.
• Grasp the catheter needle ~9 cm above the distal end and, with a
fi
rm thrust, push the needle through the abdominal wall, heading in a
slightly caudal direction, until you feel resistance disappear.
• Check position of the catheter in the bladder by removing the black
vent plug, and aspirate urine with a 10 mL syringe.
• Disengage needle from the catheter hub and advance catheter until
the suture disc is fl
at against the skin.
• Withdraw needle.
• Connect adaptor-clamp to the catheter hub and securely attach the
rubber portion of the clamp into a standard drainage catheter bag.
• Carefully suture the catheter into the abdominal wall—you may also
need to apply further tape to ensure the catheter won’t fall out.
• Ensure that the clamp is open to allow urine to drain.
Hints
• It may be easier to use a scalpel to make a small stab incision before
inserting the needle.

579
BASIC SUTURING
1 Basic suturing
Theory
Basic suturing, or stitching, has many practical applications outside the fi eld
of surgery.
Whether you are called upon to suture a central line in place or are stitch-
ing up a laceration, it’s a skill you should practice before you need to use it.
There are many useful texts and articles that describe in more detail the fi ne
art of suturing, and we refer you to these. Undoubtedly, the best way to learn
is by watching a surgeon and then doing it yourself. In most clinical skills labs
you should fi nd the necessary equipment to practice these skills.
Equipment
• Instrument (Mayo) stand • Tape
• Dressing pack • Sterile gloves
• 21-gauge green needle • Sharps bin
• 25-gauge orange needle • Toothed forceps
• 10 mL and 20 mL syringes • Needle holder
• Gauze • Scissors
• Antiseptic solution • Scalpel
• Sutures
(selection depending on site and nature of wound)
Procedure
• Introduce yourself, confi rm identity of the patient, explain the
procedure, and obtain verbal consent.
• First assess the wound and decide on the size of the suture material.
•
Remember that there are alternative ways to achieve wound closure,
such as glue, staples, and steri-strips. Always consider the most
appropriate means of closing a wound.
• Before suturing, irrigate the wound and remove any foreign bodies and
any nonviable or infected tissue.
• Use a needle holder such as toothed forceps, where possible, to
minimize the risk of needle-stick injury.
• Hold the needle 2/3 of the way from the needle tip.
• Lift the skin edge farthest away without pinching or damaging it.
• Pierce the skin with the needle at 90˚.
• Rotate your wrist to pass the needle into the middle of the wound.
• Release the forceps and clasp the needle again as it protrudes into the
wound, rotating it out of the wound.
• Next press the near side with the closed forceps to evert the skin
edge, and pass the needle through, taking a smooth semicircular
course to exit at 90˚ to the wound edge. See Fig. 18.37 .
• This method ensures a square bite and good eversion of the wound.
• Now perform a surgeon’s knot.
•
Wrap the long end of the thread around the forceps, which is used
to transfer the coil around the short end (grab the short tail and pull
in toward you, pulling the long end away).
•
Repeat the cycle.
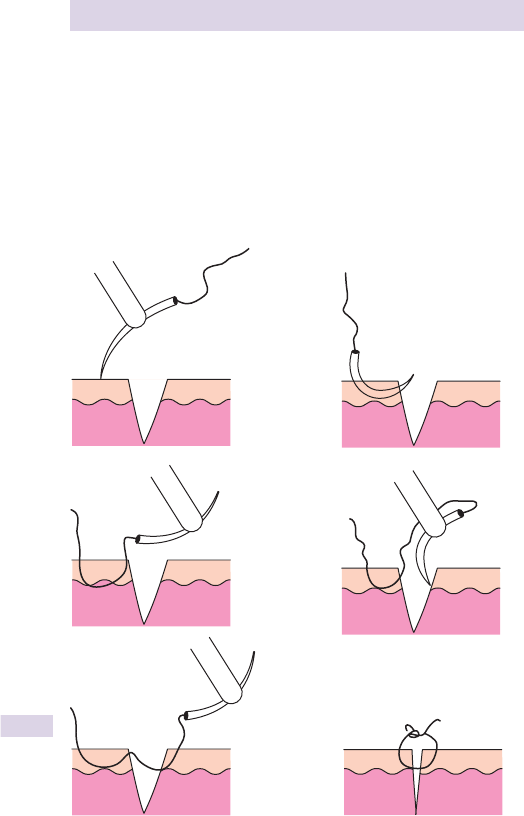
CHAPTER 18 Practical procedures580
• Remember to cut the ends of the thread off, leaving a few mm so that
they can be easily removed later.
2 When removing sutures, clean the wound with antiseptic solution, use
forceps or a blade, and pull the suture out across rather than away from
the wound.
The time taken to remove nonabsorbable sutures depends on location:
• Face: 5–7 days or less
• Scalp: 7–10 days
• Limbs and trunk: 12–14 days
Fig. 18.37 Diagrammatic representation of the stages involved in a basic suture.

581
LUMBAR PUNCTURE
2 Lumbar puncture
Theory
A needle is introduced between the lumbar vertebrae at a level below
termination of the spinal cord. It then passes through the dura into the
subarachnoid space and a sample of cerebrospinal fl uid (CSF) is obtained.
Lumbar puncture (LP) is used for diagnostic and therapeutic purposes,
which are too numerous to list.
Equipment
Level of iliac
crests
Fig. 18.38 Correct position of the patient for a lumbar puncture.
• Sterile gloves
• Sterile pack (containing drape,
cotton balls, and container)
• Antiseptic solution
• Sterile gauze dressing
• 5–10 mL 1% lidocaine
• 2 x10 mL syringe
• Biochemistry tube for glucose
• Orange needle (14 gauge)
• Green needle (18 gauge)
• LP needle
• LP manometer
• 3-way tap (may be included in
LP kit)
• Sterile collection tubes
Procedure
• Introduce yourself, confi rm identity of the patient, explain the
procedure, and obtain verbal consent.
• Position patient lying on their left-hand side with the neck, knees, and
hips fl
exed as much as possible (ask the patient to clasp their hands
around their knees, if they are able). Put a pillow between the patient’s
knees to prevent the pelvis from tilting (see
Fig. 18.38 ).
• Ensure that the patient can hold this position comfortably.
• Identify the iliac crest—the disc space vertically below this (as you are
looking) will be 7L3–L4.
• Mark the space between the vertebral spines with a pen.
• Wash your hands and put on sterile gloves.

CHAPTER 18 Practical procedures582
• Unwrap all equipment and ensure that it fi ts together correctly.
• Apply the drapes around the area and sterilize with the antiseptic
solution and cotton balls in outward-spiral motions.
• Pause to reconfi
rm patient identity and the procedure and site.
• Inject the lidocaine (using a 10 mL syringe and the orange needle) at
the marked site to raise a small wheal.
• Swap out the orange needle for the green one and infi ltrate
the
lidocaine deeper. Take care to aspirate before injecting to ensure that
blood vessels are avoided.
• Wait for 71 minute for the anesthetic to take effect.
• Introduce the spinal needle (22G usually) through the marked site at
about 90˚ to the skin, heading slightly toward the umbilicus. Keep the
bevel facing up the patient’s spine.
• Gently advance the needle through the ligaments (to 75 cm depth).
• At this point, a further push of the needle should produce a give as the
needle enters the subarachnoid space (this takes a little practice to feel
with confi dence).
• If at any point the needle strikes bone and cannot be advanced,
withdraw slightly, re-aim it, and advance in a stepwise fashion until the
gap is found.
• Withdraw the stylet from the needle. CSF should begin to drip out.
• Measure the CSF pressure—connect the manometer to the end of the
needle via the 3-way tap (the CSF will rise up the manometer, allowing
you to read off the number).
• Open the tap and allow the CSF to drip into the three collection
tubes, about 5 or 6 drips per tube. The tubes should be labeled “1,”
“2,” and “3,” in order of collection. Collect a few more drips into the
biochemistry tube for glucose measurement.
• Replace the stylet and remove the needle. Apply a sterile dressing.
• Send the fl
uid for analysis.
•
Cell count (bottles 1 and 3)
•
Microscopy, culture, and sensitivities (M,C&S) (bottles 1 and 3)
•
Biochemistry: glucose, protein (bottle 2)
• Advise the patient to lie fl
at for 1 hour, and ask nursing staff to check
CNS observations regularly during that time.
Hints
• Always use the smallest-gauge spinal needle available.
• Treatment of mild post–lumbar puncture headache (PLPH) is
supportive with NSAIDs and fl uids.
• If the patient suffers a severe or prolonged headache after the
procedure, it may be possible to inject 720 mL of venous blood
into the LP site to produce an epidural blood patch (EBP), a “blood
patch”—ask for anesthesiology advice!

583
PERICARDIAL ASPIRATION
22 Pericardial aspiration
Theory
Emergency pericardial aspiration (drainage of fl uid from the pericardial
cavity) may be performed in cardiac tamponade or large pericardial effu-
sions where there is hemodynamic compromise. This procedure can also
be used to obtain diagnostic pericardial fl uid.
Equipment
• Sterile gown and gloves
• Antiseptic solution
• Sterile towels
• 10 mL syringe
• 50 mL syringe
• Three-way tap
• ECG monitoring, defi
brillator and resuscitation equipment
• Local anesthetic
• Needles
• 18-gauge catheter
Procedure
• If the patient is conscious, introduce yourself, confi rm the identity of
the patient, explain the procedure, and obtain verbal consent.
• Establish IV access and connect the ECG monitor with full
resuscitation equipment at hand.
• Provide adequate sedation, if necessary.
• Put on sterile gloves and gown.
• Pause to reconfi
rm patient identity and the procedure and site.
• If time permits, use local anesthesia to infi ltrate the insertion site.
• Attach the 18-gauge catheter to the 50 mL syringe.
• Introduce needle at 45
0
to the skin immediately below and to the left
of the xiphoid process to a depth of 6–8 cm, in a direction aiming for
the tip of the scapula.
• Aspirate continuously and watch the ECG.
•
If the needle touches the ventricle, an injury pattern (depressed ST
segment) or arrhythmia may be seen—withdraw the needle slightly.
• Aspirate pericardial fl
uid through the syringe and 3-way tap.
• Aspiration should produce immediate hemodynamic improvement.
• You can check if the fl
uid you are aspirating is pure blood if it clots
quickly. Heavily bloodstained pericardial fl
uid does not clot.
• Perform a chest X-ray and echocardiogram after the procedure.
• You may wish to insert a pericardial drain (seek consultation).
• Document the details of the procedure in the notes.
Possible complications
• Pneumothorax
• Arrhythmia
• Myocardial puncture
• Damage to the coronary arteries

CHAPTER 18 Practical procedures584
1 Defi brillation
Theory
Electrical defi brillation is the only effective therapy for cardiac arrest
caused by ventricular fi brillation (VF) or pulseless ventricular tachycardia
(VT). The American Heart Association (AHA) has long supported early
attempted defi brillation, because the chances of successful defi brillation
decline at a rate of 7–10% with each minute of delay.
In the hospital setting, two types of defi brillator may be encountered:
the traditional manual defi brillator and the newer automated external
defi brillators (AED).
There are two types of AED: most are semiautomatic and advise the
need for a shock, but this has to be delivered by the operator, when
prompted. Some also have the facility to enable the operator to override
the device and deliver a shock manually, without any prompts. A few fully
automatic AEDs are also available.
In recognition of changing guidelines, the reader is directed to the AHA
Web site: www.americanheart.org for the most current resuscitation
guidelines.
Equipment
• Defi brillator
• Gel pads
Procedure for manual defi brillation
• Switch on the defi brillator and ensure that the skin is dry and free of
excess hair.
• Attach the ECG electrodes accordingly:
•
Red under right clavicle
•
Yellow under left clavicle
•
Green at the umbilicus
• Ascertain that the ECG rhythm is shockable (VF/pulseless VT).
• Place the defi
brillation gel pads on the patient’s chest (
Fig. 18.39 ):
•
One just to the right of the sternum, below the clavicle
•
The other just lateral to the cardiac apex
• Shave chest hair only if it is excessive and will interfere with electrical
contact.
• Select 360J on the defi brillator.
• Place the paddles fi
rmly on the gel pads.
• Press the charge button on the paddles to charge the defi brillator and
shout, “
stand clear—charging.”
• Check that all staff have stepped back (including yourself) and that no
one is touching the patient or their bed.
2 Ensure that high-fl
ow oxygen has also been removed.
2 Check the monitor again to ensure a shockable rhythm.
• Shout “stand clear—shocking” and press both discharge buttons
simultaneously to discharge the shock.
• Follow protocol overleaf ( Fig. 18.40 ). Return paddles to defi brillator
before continuing with cardiopulmonary resuscitation (CPR).
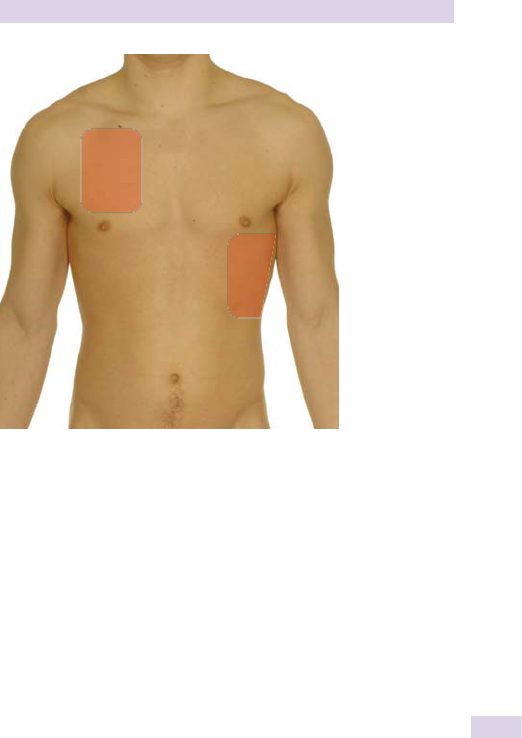
585
DEFIBRILLATION
Fig. 18.39 Correct position of gel pads or AED electrodes on patient. Ensure
that they are not touching or overlying any wires, oxygen tubing, or any other
conducting material. Ensure that the patient’s chest is dry and shaved if particularly
hairy.
Procedure for AEDs ( Fig. 18.41 )
• Switch on the defi brillator, ensure the skin is dry and free of excess
hair, and attach the electrode pads (same position as the gel pads in
manual defi brillation; see Fig. 18.39 ).
• Continue CPR while this is done if more than one assistant is present.
• Make sure no one is touching the patient during ECG analysis by AED.
• Follow the voice prompts.
•
These are usually programmable, and the American Heart
Association recommends that they be set as follows:
• A single shock only when a shockable rhythm is detected
• No rhythm, breathing, or pulse check after the shock
• A voice prompt for immediate resumption of CPR after the
shock.
• Two minutes allowed for CPR using a ratio of 30 compressions
to 2 rescue breaths before a voice prompt to assess the rhythm,
breathing, or a pulse is given.
2 If a shock is indicated, shout “stand clear” and perform visual checks
to ensure no personnel are in contact with the patient or their bed and
that any oxygen has been removed.
• Push the shock button and continue as directed.

CHAPTER 18 Practical procedures586
Hypoxia
Hypovolaemia
Hypo/hyperkalaemia/metabolic
Hypothermia
Tension pneumothorax
Tamponade, cardiac
Toxins
Thrombosis (coronary or pulmonary)
* Reversible causes
Unresponsive?
Open airway
Look for signs of life
Call
Resuscitation Team
CPR 30:2
Until defibrillator/monitor
attached
Assess
rhythm
Immediately resume
CPR 30:2
for 2 min
Immediately resume
CPR 30:2
for 2 min
1 Shock
150–360J biphasic
or 360J monophasic
Shockable
(VF/pulseless VT)
Non-shockable
(PEA/asystole)
During CPR:
- Correct reversible causes*
- Check electrode position
and contact
- Attempt/verify:
IV access airway and oxygen
- Give uninterrupted
compressions when
airway secure
- Give adrenaline
every 3–5 min
- Consider: amiodarone,
atropine, magnesium
Fig. 18.40 Algorithm for advanced life support using a manual defi brillator.
Reproduced with permission from the Resuscitation Council (UK) guidelines. It is
recommended to consult the latest AHA guidelines when available.
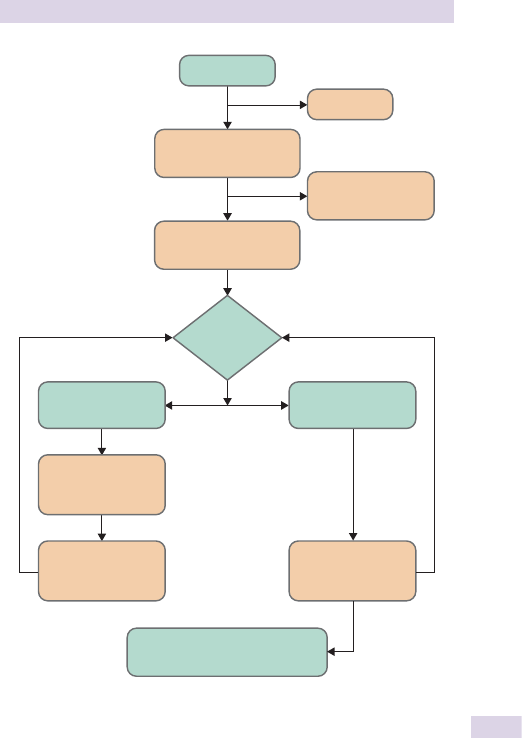
587
DEFIBRILLATION
Unresponsive
Call for help
Open airway
Not breathing normally
CPR 30:2
Until AED is attached
Send or go for AED
Call 999
AED
assesses
rhythm
Immediately resume
CPR 30:2
for 2min
Continue until the victim starts to
breathe normally
1 Shock
150–360 J biphasic
or 360J monophasic
Shock
advised
No shock
advised
Immediately resume
CPR 30:2
for 2min
Fig. 18.41 AED algorithm. Reproduced with permission from the Resuscitation
Council (UK) guidelines..

CHAPTER 18 Practical procedures588
22 Knee joint aspiration
Theory
In the context of a swollen joint, a joint aspiration is performed for both
diagnostic (to identify infectious and crystal arthropathies) and therapeutic
(to relieve tense effusions and hemarthroses) purposes.
A sample of fl uid may be removed and sent for microscopy, culture and
sensitivity and to be examined for crystals under polarized light.
This same procedural approach may be used for joint injections (e.g.,
steroids and local anesthetic to suppress infl ammation).
Equipment
Procedure
• Introduce yourself, confi rm the identity of the patient, explain the
procedure, and obtain verbal consent.
• Ensure that the patient is relaxed and lying comfortably on the couch
or bed with the knee exposed and slightly fl exed.
• Palpate the outline of the patella and the medial joint line (aspiration is
easier on the medial side).
• Wash your hands and put on a pair of sterile gloves.
• Clean the site with the cotton balls and antiseptic solution.
• Pause to reconfi
rm patient identity and the procedure and site.
• Infi
ltrate the insertion site with local anesthetic. Use 1–2 mL of
1% lidocaine using the 25-gauge orange needle and a 5 mL syringe.
Remember to aspirate before injecting.
• Take a 20 mL syringe and attach a 21-gauge green needle.
• Insert the needle at an angle of about 45
0
in the gap between the
lower border of the patella and the medial joint line ( Fig. 18.42 ).
• If the needle is in the joint space (about 2 cm in), you should be able
to freely aspirate synovial fl
uid. Aspiration can be aided by pressing on
the opposite side of the joint with your free hand.
• Once the syringe is full, remove it from the joint and transfer the fl uid
into sterile specimen bottles.
• Send to microbiology for microscopy, culture, and sensitivity and a
further sample to the biochemistry department to look for crystals.
• Following aspiration, ask the patient to rest the knee for 24–48 hours.
• Record in the notes the procedural details, including the color of the
synovial fl
uid and the investigations requested.
• 5–10 mL 1% lidocaine
• 1 x 20 mL syringe
• 1 x 5 mL syringe
• 1 x 21-gauge (green) needle
• 1 x 25-gauge (orange) needle
• Sterile gloves
• Antiseptic solution
• Sterile bottles
• Dressing pack with cotton balls

589
KNEE JOINT ASPIRATION
Fig. 18.42 Aspiration of the knee joint—insert the needle at about 45
0
heading
distally below the patella.
This page intentionally left blank

591
Data interpretation
ECG: introduction 592
Chest X-rays: introduction 616
Abdominal X-rays: introduction 641
Radiology: pelvis 646
Radiology: hips and femurs 648
Radiology: knees 650
Radiology: shoulder 652
Radiology: cervical spine 654
Radiology: thoracic and lumbar spine 656
Lung function tests 658
Arterial blood gas analysis 663
Cerebrospinal fl
uid (CSF)
667
Urinalysis 669
Pleural and ascitic fl uid
671
Chapter 19

CHAPTER 19 Data interpretation592
ECG: an introduction
The fi rst step in making sense of an electrocardiogram (ECG) printout is
to understand the electrical conduction process in the normal heart.
Electrophysiology of the heart
Cardiac myocytes
In their resting state, the surface of cardiac myocytes (muscle cells) is
polarized with a potential difference of 790 mV across the cell membrane
(negatively charged intracellularly and positively charged extracellularly).
Depolarization (reversal of this charge) results in movement of calcium
ions across the cell membranes and subsequent cardiac muscle contrac-
tion. It is this change in potential difference that can be detected by the
ECG electrodes and represented as defl ections on a tracing.
Basics of the tracing
It is easiest to imagine an electrode ‘looking’ at the heart from where it is
attached to the body.
Depolarization of the myoctes that spreads toward the electrode is
seen as an upward defl ection, electrical activity moving away from the
electrode is seen as downward defl ection, and activity moving to one
side but neither toward nor away from the electrode is not seen at all
( Fig. 19.1 ).
Electrical conduction pathway
In the normal heart, pacemaker cells in the sinoatrial (SA) node initiate
depolarization. The depolarization fi rst spreads through the atria, and this
is seen as a small upward defl ection (the P wave) on the ECG.
The atria and the ventricles are electrically isolated from each other.
The only way in which the impulse can progress from the atria to the
ventricles normally is through the atrioventricular (AV) node. Passage
Direction of
depolarization
Deflection on
ECG trace
Toward electrode
Away from electrode
Downward deflection
Upward deflection
Neither toward nor
away from electrode
No deflection
or
Fig. 19.1 Diagrammatic representation of how the electrodes monitor waves of
depolarization.

ECG: AN INTRODUCTION
593
through the AV node slows its progress slightly. This can be seen on an
ECG as the isoelectric interval between the P wave and QRS complex,
the PR interval.
Depolarization then continues rapidly down the rapidly conducting
Purkinje fi bers—bundle of His, then down left and right bundle
branches—to depolarize both ventricles ( Fig. 19.2 ). The left bundle has
two divisions (fascicles). The narrow QRS complex on ECG shows this
rapid ventricular depolarization.
Repolarization of the ventricles is seen as the T wave. Atrial repolari-
zation causes only a very slight defl ection, which is hidden in the QRS
complex and not seen.
2 The P wave and QRS complex show the electrical depolarization of
atrial and ventricular myocardium, respectively, but the resultant mechani-
cal muscle contraction, which usually follows, cannot be inferred from the
ECG trace (e.g., in pulseless electrical activity [PEA]).
12-lead ECG
Leads
Electrodes are placed on the limbs and chest for a 12-lead recording.
The term 12-lead refers to the number of directions that the electrical
activity is recorded from, not number of electrical wires attached to
the patient.
The six chest leads (V
1–6
) and six limb leads (I, II, III, aVR, aVL, aVF) com-
prise the 12-lead ECG. These refl ect the electrical activity of the heart
from various directions. The chest leads correspond directly to the six
electrodes placed at various points on the anterior and lateral chest wall
(see Fig. 19.3 ). The six limb leads represent the electrical activity through a
combination of the four electrodes placed on the patient’s limbs, e.g., lead
I is generated from the right and left arm electrodes.
2 Remember there are 12 ECG leads—12 different views of the
electrical activity of the heart—but only 10 actual electrodes placed on
the patient’s body.
1. Impulse begins at SA node
2. Spreads through atria
3. Conducted through
the AV node
4. Down the bundle
of His
5. Spreads through
the ventricles
from the apex
Fig. 19.2 Electrical conduction pathway in the normal heart.
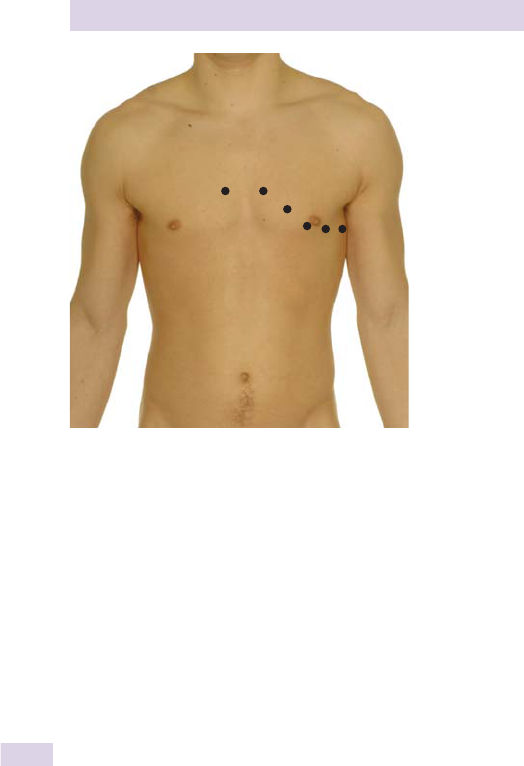
CHAPTER 19 Data interpretation594
0 Additional leads can be used (e.g., V7–9 extending laterally around the
chest wall) to look at the heart from further angles, such as in suspected
posterior myocardial infarction (MI).
ECG orientation
When a wave of myocardial depolarization fl
ows toward a particular lead,
the ECG tracing shows an upward defl ection. A downward defl ection
represents depolarization moving away from that lead. The key to inter-
preting the 12-lead ECG is thus to remember the directions at which the
different leads view the heart.
The six limb leads look at the heart in the coronal plane (see Fig. 19.4 ).
• aVR views the right atrium.*
• aVF, II, and III view the inferior or diaphragmatic surface of the heart.
• I and aVL examine the left lateral aspect.
The six chest leads examine the heart in a transverse plane.
• V
1
and V
2
look at the right ventricle.
• V
3
and V
4
look at the septum and anterior aspect of the left ventricle.
• V
5
and V
6
look at the anterior and lateral aspects of the left ventricle.
Although each of the 12 leads gives a different view of electrical activity
of the heart, for simplicity’s sake when considering the standard ECG
trace we can describe the basic shape common to all leads ( Fig. 19.5 ).
V
1
V
2
V
3
V
4
V
5
V
6
Fig. 19.3 V
1–6
electrode placement on the chest wall.
* All the vectors in lead aVR will be negative in the normal ECG.
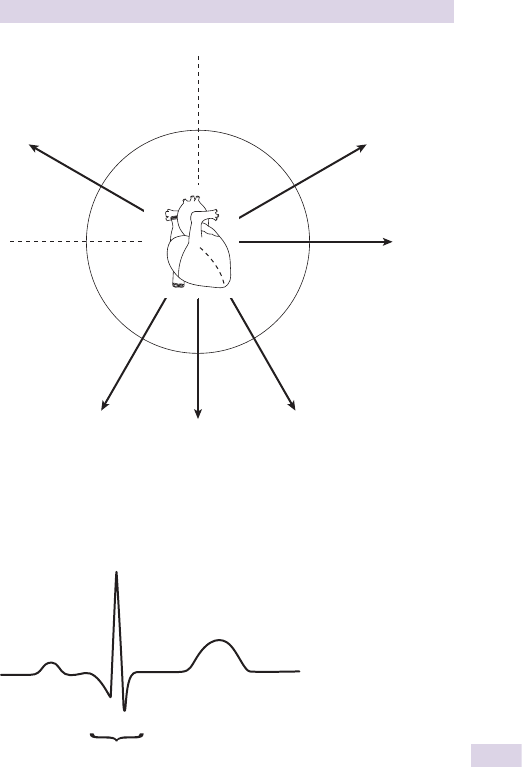
ECG: AN INTRODUCTION
595
60º 60º
60º 60º
30º30º
30º 30º
aVR
aVF
aVL
II
I
III
Fig. 19.4 The respective views of the heart of the six limb leads. Note the
angles between the directions of the limb leads—these become important when
calculating the cardiac axis.
P
R
T
Q
S
ST segment
QRS
Com
p
lex
Fig. 19.5 Basic shape of the ECG tracing.

CHAPTER 19 Data interpretation596
ECG tracing
Waves
• P wave represents atrial depolarization and is a positive (upward)
defl ection, except in aVR.
• QRS complex represents ventricular depolarization and comprises
•
Q wave —so called if the fi rst QRS defl ection is negative (downward).
Pathological Q waves are seen in infarction (b p. 612).
•
R wave —the fi rst positive (upward) defl ection. It may or may not
follow a Q wave.
•
S wave —a negative (downward) defl ection following the R wave
• T wave represents ventricular repolarization and is normally a positive
(upward) defl ection, concordant with the QRS complex.
0 Remember, Q waves appear following an MI, so they should be
absent from the normal ECG trace.
Rate
The heart rate can be calculated by dividing 300 by the number of large
squares between each R wave (with machine trace running at the standard
speed of 25 mm/sec and defl
ection of 1 cm/10 mV).
• 3 large squares between R waves = rate 100
• 5 large squares = rate 60
Normal rate is 60–100 beats per minute (bpm).
• Rate <60 = bradycardia
• Rate >100 = tachycardia
Intervals and timing
• PR interval: from start of the P wave to start of the QRS complex. This
represents the built-in delay in electrical conduction at the AV node.
Normally <0.20 seconds (5 small squares at standard recording speed)
• QRS complex: width of the QRS complex. Normally <0.12 seconds (3
small squares at standard rate)
• R–R interval: from the peak of one R wave to the next. This is used in
calculation of the heart rate (see above).
• QT interval: from start of the QRS complex to end of the T wave. It
varies with heart rate. Corrected QT = QT/square root of the R–R
interval. Corrected QT interval should be 0.38–0.42 seconds.
Rhythm
• Is rhythm (and time between successive R waves) regular or irregular?
•
If irregular but in a clear pattern, then it is ‘regularly irregular’ (e.g., types
of heart block—see b p. 599).
•
If irregular but with no pattern, then it is ‘irregularly irregular’ (e.g., atrial
fi brillation).
ECG axis
Cardiac axis
The cardiac axis, or QRS axis , refers to the overall direction of depolarization
through the ventricular myocardium in the coronal plane.
0
Remember, Q waves appear following an MI, so they should be
a
bsent
f
rom the normal E
CG
trace.

ECG: AN INTRODUCTION
597
Zero degrees is taken as the horizontal line to the left of the heart
(the right of your diagram).
The normal cardiac axis lies between –30° and +90° ( Fig. 19.6 ). An axis
outside of this range may suggest pathology, either congenital or acquired.
Cardiac axis deviation may be seen in healthy individuals with distinctive
body shapes—right-axis deviation if tall and thin, left-axis deviation if
short and stocky.
Calculating the axis
Look at Fig. 19.4. Leads I, II, and III all lie in the coronal plane (along with
aVR, aVL, and aVF). By calculating the relative depolarization in each of these
directions, one can calculate the cardiac axis. To accurately determine the
cardiac axis, use leads I, II, and III, as described below.
• Draw a diagram like the one in Fig. 19.7 showing the three leads—be
careful to use the correct angles.
• Look at ECG lead I. Count the number of millimeters (mm) above the
baseline that the QRS complex reaches.
• Subtract from this the number of mm below the baseline that the QRS
complex reaches.
• Now measure this number of centimeters along line I on your diagram
and make a mark (measure backward for negative numbers).
• Repeat this for leads II and III.
• Extend lines from your marks, perpendicular to the leads ( Fig. 19.6 ).
• The direction from the center of the diagram to the point at which all
these lines meet is the cardiac axis.
Calculating the axis—short cuts
There are many shorter ways of roughly calculating the cardiac axis. These
are less accurate, however.
C
ardiac axis deviation ma
y
be seen in health
y
individuals with distinctive
body shapes—right-axis deviation if tall and thin, left-axis deviation i
f
s
h
ort an
d
stoc
k
y.
–30º
+90º
0º
Range of
normal ECG
axis
Fig. 19.6 The normal ECG axis.

CHAPTER 19 Data interpretation598
An easy method is to look at only leads I and aVF. These are perpendicular
to each other and make a simpler diagram than the one described above.
(AV) conduction abnormalities
In the normal ECG, each P wave is followed by a QRS complex. The
isoelectric gap between is the PR interval and represents slowing of the
impulse at the AV junction. Disturbance of the normal conduction here,
leads to heart block.
Causes of heart block include ischemic heart disease, idiopathic fi brosis
of conduction system, cardiomyopathies, inferior and anterior MI, drugs,
such as digoxin, B-blockers, and verapamil, and physiological factors (fi rst
degree) in athletes.
III
Axis
II
60°
30°30°
I
30
°
Fig. 19.7 Calculating the ECG axis using leads I, II, and III. See text on previous page.
Box 19.1 Causes of axis deviation
Left axis deviation (<–30°)
• Left ventricular hypertrophy
• Left bundle branch block (LBBB)
• Left anterior hemiblock (anterior fascicle of the left bundle)
• Inferior MI
• Cardiomyopathies
• Tricuspid atresia
Right axis deviation (>+90°)
• Right ventricular hypertrophy
• Right bundle branch block (RBBB)
• Anterolateral MI
• Right ventricular strain (e.g., pulmonary embolism)
• Cor pulmonale
• Fallot’s tetralogy (pulmonary stenosis)
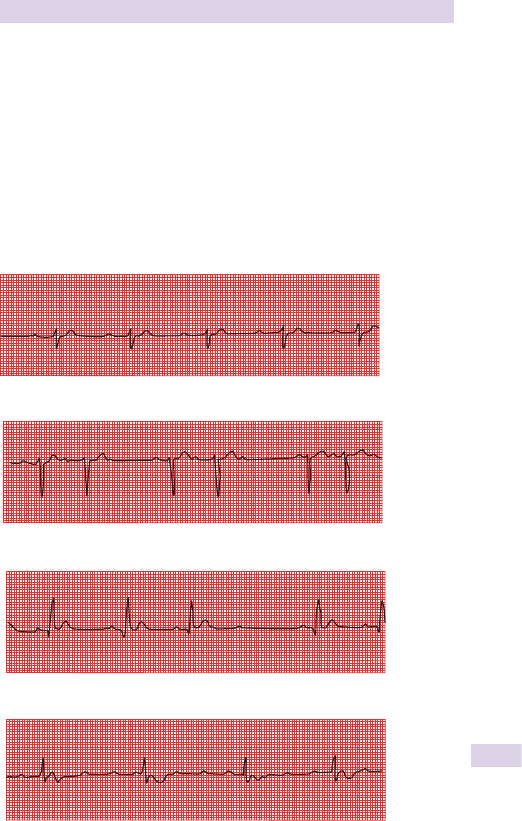
ECG: AN INTRODUCTION
599
First-degree heart block
The PR interval is fi xed but prolonged at >0.20 seconds (5 small squares
at standard rate). See rhythm strip 1 ( Fig. 19.8 ).
Second-degree heart block
Not every P wave is followed by a QRS complex.
• Möbitz type I: PR interval becomes progressively longer after each P
wave until an impulse fails to be conducted at all. The interval then
returns to the normal length and the cycle is repeated (rhythm strip 2;
Fig. 19.8 ). This is also known as the Wenckebach phenomenon .
• Möbitz type II: PR interval is fi
xed but not every P wave is followed by
a QRS complex. The relationship between P waves and QRS complex
Rhythm strip 1—first-degree heart block.
Rhythm strip 2—second-degree heart block Möbitz type I.
Rhythm strip 3—second-degree heart block Möbitz type II.
Rh
y
thm stri
p
4—third-de
g
ree
(
com
p
lete
)
heart block.
Fig. 19.8 Rhythm strips showing AV conduction abnormalities.

CHAPTER 19 Data interpretation600
may be 2:1 (two P waves for every QRS), 3:1 (three P waves per
QRS), or random. See rhythm strip 3 ( Fig. 19.8 ).
Third-degree heart block
This is also called complete heart block ; see rhythm strip 4 ( Fig. 19.8 ). There
is no conduction of impulse through the AV junction. Atrial and ventricular
depolarization occur independent of one another. Each has a separate
pacemaker triggering electrical activity at different rates (rhythm strip 4).
The QRS complex is an abnormal shape, as the electrical impulse does
not travel through ventricles via normal routes (see Ventricular Escape
Rhythm, b p. 609).
0 In third-degree heart block, P waves may be seen merging with QRS
complexes if they coincide.
0 If in doubt about the pattern of P waves and QRS complexes, mark out
the P-wave intervals and the R–R intervals separately, then compare.
2 P waves are best seen in leads II and V
1
.
Ventricular conduction abnormalities
Depolarization of both ventricles usually occurs rapidly through left and
right bundle branches of the His–Purkinje system (see Fig. 19.9 ). If this
process is disrupted as a result of damage to the conducting system,
depolarization will occur more slowly through nonspecialized ventricular
myocardium. The QRS complex, usually <0.12 seconds’ duration, will
become prolonged and is described as a broad .
Right bundle branch block (RBBB)
Conduction through the AV node, bundle of His, and left bundle branch
will be normal but depolarization of the right ventricle occurs by the slow
spread of electrical current through myocardial cells ( Fig. 19.10 ). The
result is delayed right ventricular depolarization, giving a second R wave
known as R’ (R prime).
RBBB suggests pathology in the right side of the heart but can be a
normal variant.
ECG changes
• RSR pattern seen in V
1
• Cardiac axis usually remains normal unless left anterior fascicle is also
blocked (bifascicular block), which results in left axis deviation.
• T wave d in anterior chest leads (V
1
–V
3
)
SA node
AV node
Right bundle
branch
Posterior facicle
Anterior facicle
Bundle of His
Left bundle branch
Fig. 19.9 Diagrammatic representation of the conducting system of the heart.
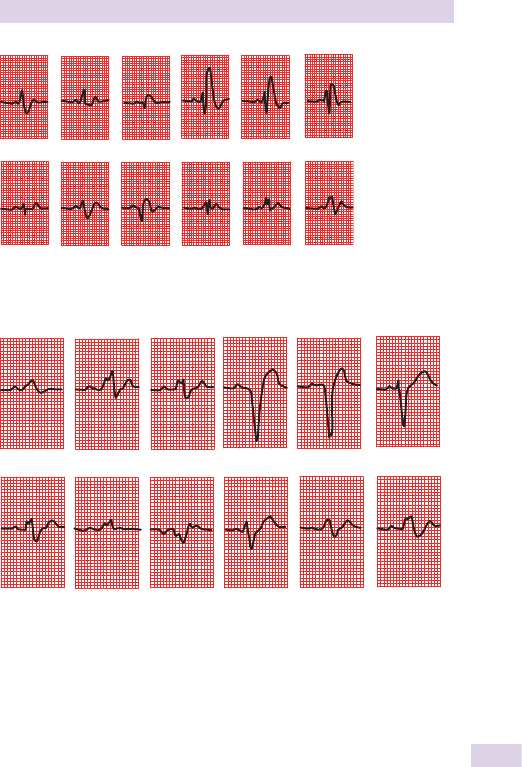
ECG: AN INTRODUCTION
601
Some causes of RBBB
• Hyperkalemia
• Congenital heart disease (e.g., Fallot’s tetralogy)
• Pulmonary embolus
• Cor pulmonale
• Fibrosis of conduction system
Left bundle branch block (LBBB)
Conduction through the AV node, bundle of His, and right bundle branch
will be normal but depolarization of the left ventricle occurs by the slow
spread of electrical current through myocardial cells ( Fig. 19.11 ). The
result is delayed left ventricular depolarization.
LBBB should always be considered pathological.
I II III V
1
V
2
V
3
aVF aVL aVR V
4
V
5
V
6
Fig. 19.10 Typical 12-lead ECG showing RBBB.
I II III V
1
V
2
V
3
aVF aVL aVR V
4
V
5
V
6
Fig. 19.11 Typical 12-lead ECG showing LBBB.

CHAPTER 19 Data interpretation602
ECG changes
• M pattern seen in V
6
• T wave d in lateral chest leads (V
5
–V
6
)
Some causes of LBBB
• Hypertension
• Ischemic heart disease
• Acute MI
• Aortic stenosis
• Cardiomyopathies
• Fibrosis of conduction system
0 LBBB on the ECG causes abnormalities of the ST segment and T wave.
You should not comment any further on these parts of the tracing.
Box 19.2 Bundle branch block mnemonic
• In LBBB, the QRS complex in V
1
looks like a W and like an M in V
6
.
This can be remembered as WiLLiaM . There is a W at the start, an
M at the end, and an L in the middle, for ‘left.’
• Conversely, in RBBB, the QRS complex in V
1
looks like an M and in
V
6
, like a W . Combined with an R , for ‘right,’ you have MaRRoW .
Sinus rhythms
Supraventricular rhythms arise in the atria. They may be physiological in
some causes of sinus brady and tachycardia or be caused by pathology
within the SA node, the atria, or the fi rst parts of the conducting system.
Normal conduction through the bundle of His into the ventricles will
usually give narrow QRS complexes.
Sinus bradycardia
This is a bradycardia (rate <60 bpm) at the level of the SA node. The
heart beats slowly, but conduction of the impulse is normal (rhythm strip
1, Fig. 19.12 ).
Some causes of sinus bradycardia
• Drugs (B-blockers, verapamil, amiodarone, digoxin)
• Sick sinus syndrome
• Hypothyroidism
• Inferior MI
• Hypothermia
• i Intracranial pressure (ICP)
• Physiological (athletes)
Sinus tachycardia
This is a tachycardia at the level of the SA node—the heart is beating too
quickly but conduction of impulse is normal (rhythm strip 2, Fig 19.12).

ECG: AN INTRODUCTION
603
ECG features
• Ventricular rate >100 (usually 100–150 bpm)
• Normal P wave before each QRS
Some causes of sinus tachycardia
• Drugs (epinephrine/adrenaline, caffeine, nicotine)
• Pain
• Exertion
• Anxiety
• Anemia
• Thyrotoxicosis
• Pulmonary embolus
• Hepatic failure
• Cardiac failure
• Hypercapnia
• Pregnancy
• Constrictive pericarditis
Supraventricular tachycardias
These are tachycardias (rate >100 bpm) arising in the atria or the AV
node. As conduction through the bundle of His and ventricles will be
normal (unless there is other pathology in the heart), the QRS complexes
appear normal.
There are four main causes of a supraventricular tachycardia that you
should be aware of: atrial fi brillation, atrial fl utter, junctional tachycardia,
and re-entry tachycardia.
Atrial fi brillation (AF)
This is disorganized contraction of the atria in the form of rapid, irregular
twitching. There will thus be no P waves on the ECG.
Electrical impulses from the twitches of the atria arrive at the AV node
randomly. They are then conducted via the normal pathways to cause
Rhythm strip 1—sinus bradycardia.
Rhythm strip 2—sinus tachycardia.
Fig. 19.12 Rhythm strips from lead II showing a sinus bradycardia (rhythm strip 1)
and sinus tachycardia (rhythm strip 2).
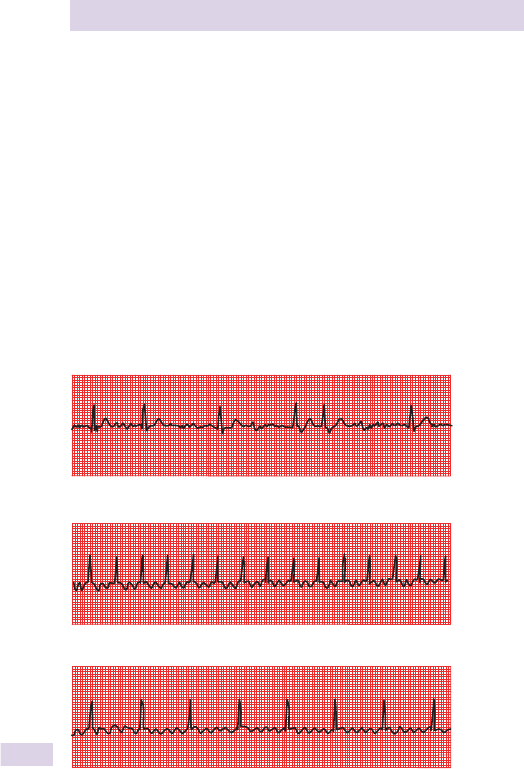
CHAPTER 19 Data interpretation604
ventricular contraction. The result is a characteristic ventricular rhythm
that is irregularly irregular with no discernable pattern ( Fig. 19.13 , rhythm
strip 1).
ECG features
• No P waves. Rhythm is described as irregularly irregular.
• Irregular QRS complexes
• Normal appearance of QRS
• Ventricular rate may be i (fast AF)—typically 120–160 per minute.
Some causes of atrial fi
brillation
• Idiopathic
• Ischemic heart disease
• Thyroid disease
• Hypertension
• MI
• Pulmonary embolus
• Rheumatic mitral or tricuspid valve disease
Rhythm strip 1—atrial fibrillation.
Rhythm strip 2—atrial flutter with 2:1 block.
Rhythm strip 3—atrial flutter with 4:1 block.
Fig. 19.13 Rhythm strips from lead II showing some supraventricular tachycardias.

ECG: AN INTRODUCTION
605
Atrial fl utter
This is abnormally rapid contraction of the atria. The contractions are
not disorganized or random, as in AF, but are fast and inadequate for the
normal movement of blood. Instead of P waves, the baseline will have a
typical saw-tooth appearance (sometimes known as F waves ).
The AV node is unable to conduct impulses faster than 7200/min. Atrial
contraction faster than that leads to impulses failing to be conducted. For
example, an atrial rate of 7300/min will lead to every other impulse being
conducted, giving a ventricular rate (and pulse) of 7150/min. In this case,
it is called 2:1 block ( Fig. 19.13 , rhythm strip 2). Other ratios of atrial to
ventricular contractions may occur.
A variable block at the AV node may lead to an irregularly irregular
pulse indistinguishable from that of AF on clinical examination.
ECG features
• Saw-tooth appearance of baseline
• Normal appearance of QRS complexes
Causes of atrial fl
utter
Similar to those of AF (see previous page)
Junctional (nodal) tachycardia
Here the area in or around the AV node depolarizes spontaneously;
the impulse will be immediately conducted to the ventricles. The QRS
complex will be of a normal shape but no P waves will be seen.
ECG features
• No P waves
• QRS complexes are regular and normal shape
• Rate may be fast or may be of a normal rate
Some causes of junctional tachycardia
• Sick sinus syndrome (including drug-induced)
• Digoxin toxicity
• Ischemia of the AV node, especially with acute inferior MI
• Acutely after cardiac surgery
• Acute infl
ammatory processes (e.g., acute rheumatic fever) that may
involve the conduction system
• Diphtheria
• Other drugs (e.g., most antiarrhythmic agents)
Wolff–Parkinson–White syndrome
In Wolff–Parkinson–White (WPW) syndrome, there is an extra conduct-
ing pathway between the atria and the ventricles (the bundle of Kent)—a
break in the normal electrical insulation. This accessory pathway is not spe-
cialized for conducting electrical impulses so does not delay the impulse
as the AV node does. However, it is not linked to the normal conduction
pathways of the bundle of His.
Depolarization of the ventricles will occur partly via the AV node and
partly by the bundle of Kent. During normal atrial contraction, electrical
activity reaches the AV node and the accessory pathway at roughly the
same time. While it is held up temporarily at the AV node, the impulse
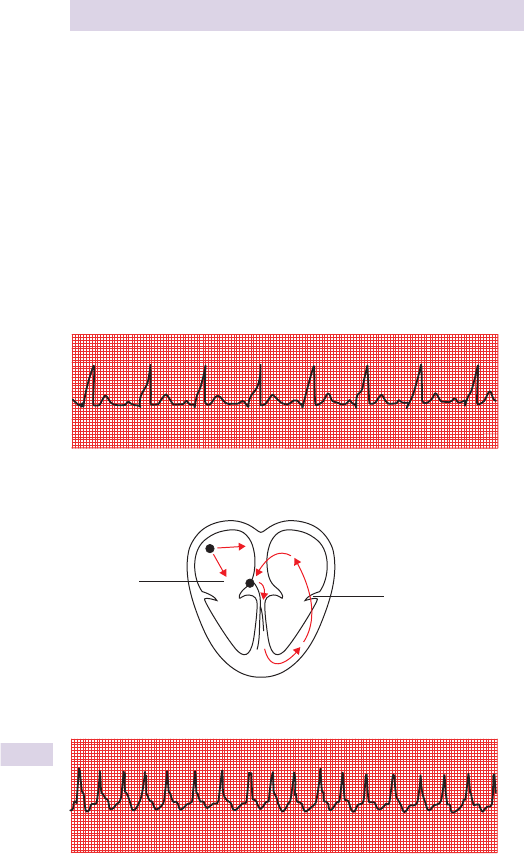
CHAPTER 19 Data interpretation606
passes through the accessory pathway and starts to depolarize the ventri-
cles via nonspecialized cells (pre-excitation), distorting the fi rst part of the
R wave and giving a short PR interval. Normal conduction via the bundle of
His then supervenes. The result is a slurred upstroke of the QRS complex
called a delta wave (see Fig. 19.14 ).
This is an example of a fusion beat , in which normal and abnormal ventricular
depolarization combine to give a distortion of the QRS complex.
2 Re-entry tachycardia
The accessory pathway may allow electrical activity to be conducted from
the ventricles back up to the atria.
For example, in a re-entry tachycardia, electrical activity may be
conducted down the bundle of His, across the ventricles, and up the
accessory pathway into the atria ( Fig. 19.15 ), causing them to contract
again, and the cycle is repeated ( Fig. 19.16 ). This is called a re-entry circuit .
Fig. 19.14 Rhythm strip showing WPW syndrome.
Conduction
at the AV
node
Accessory
conduction
pathway
Fig. 19.15 Diagrammatic representation of re-entry tachycardia.
Fig. 19.16 Rhythm strip showing a re-entry tachycardia.

ECG: AN INTRODUCTION
607
Ventricular rhythms
Most ventricular rhythms originate outside the usual conduction path-
ways, meaning that excitation spreads by an abnormal path through the
ventricular muscle to give broad or unusually shaped QRS complexes.
Ventricular tachycardia (VT)
There is a focus of ventricular tissue depolarizing rapidly within the
ventricular myocardium. VT is defi ned as three or more successive
ventricular extrasystoles at a rate of >120/min. Sustained VTs last >30
seconds.
VT may be stable , showing a repetitive QRS shape (monomorphic;
Fig.19.17, rhythm strip 1) or unstable , with varying patterns of the QRS
complex (polymorphic).
It may be impossible to distinguish VT from an SVT with bundle branch
block on a 12-lead ECG.
ECG features
• Wide QRS complexes that are irregular in rhythm and shape
• AV dissociation—independent atrial and ventricular contraction
• May see fusion and capture beats on ECG as signs of atrial activity
independent of ventricular activity. This is said to be pathognomonic.
•
Fusion beats: depolarization from AV node meets depolarization
from ventricular focus, causing hybrid QRS complex
•
Capture beats: atrial beat conducted to ventricles causing a normal
QRS complex in among the VT tracing
• Rate can be up to 130–300/min.
• QRS concordance: all QRS complexes in chest leads are either mainly
positive or mainly negative—suggests ventricular origin of tachycardia.
• Extreme axis deviation (far negative or far positive)
Some causes of ventricular tachycardia
• Ischemia (acute including MI or chronic)
• Electrolyte abnormalities (d K, d Mg)
• Aggressive adrenergic stimulation (e.g., cocaine use)
• Drugs, especially antiarrhythmics
Box 19.3 Classifi cation of Wolff–Parkinson–White
syndrome
The bundle of Kent may connect the atria with either the right or the left
ventricle. Thus, WPW is classically divided into two groups according to
the resulting appearance of the QRS complex in the anterior chest leads.
In practice, this classifi cation is simplistic, as 11% of patients may have
more than one accessory pathway.
• Type A: upright delta wave and QRS in V
1
•
May be mistaken for RBBB or posterior MI
• Type B: downward delta wave and QRS in V
1
, positive elsewhere
•
May be mistaken for LBBB or anterior MI

CHAPTER 19 Data interpretation608
Ventricular fi brillation (VF)
This is disorganized, uncoordinated depolarization from multiple foci in
the ventricular myocardium ( Fig. 19.17 , rhythm strip 2).
ECG features
• No discernible QRS complexes
• A completely disorganized ECG
Some causes of ventricular fi
brillation
• Coronary heart disease
• Cardiac infl ammatory diseases
• Abnormal metabolic states
• Proarrhythmic toxic exposures
• Electrocution
• Tension pneumothorax, trauma, and drowning
• Large pulmonary embolism
• Hypoxia or acidosis
Box 19.4 Fine VF
This is VF with a small-amplitude waveform ( Fig. 19.17 , rhythm strip 3). It
may resemble asystole on the ECG monitor (see Fig. 19.18 , rhythm strip
5, b p. 609), particularly in an emergency situation.
In a clinical situation, you should remember to increase the gain on the
monitor to ensure that what you think is asystole is not really fi ne VF, as
the management for each is very different.
Rhythm strip 1—monomorphic ventricular tachycardia (VT).
Rhythm strip 2—ventricular fibrillation (VF).
Rhythm strip 3—“fine” ventricular fibrillation.
Fig. 19.17 Rhythm strips showing ventricular rhythms.
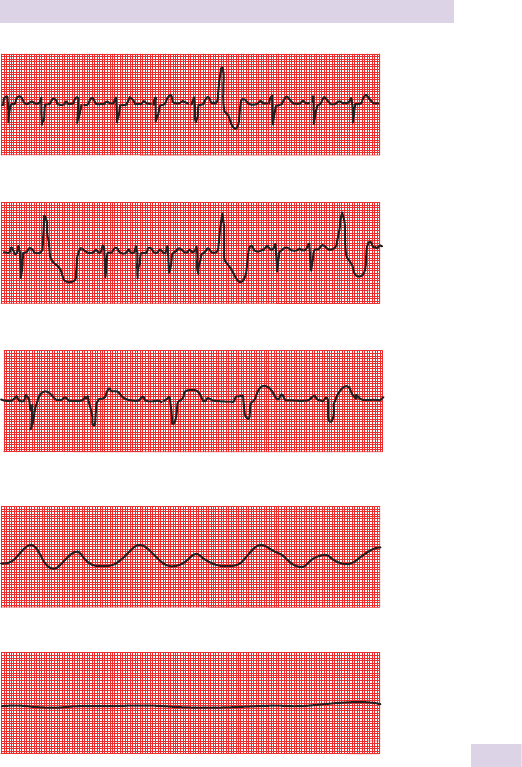
ECG: AN INTRODUCTION
609
Rhythm strip 1—a single ventricular extrasystole.
Rhythm strip 2—multiple, unifocal, ventricular extrasystole.
Rhythm strip 3—ventricular escape in the case of complete heart block.
Rhythm strip 4—agonal rhythm.
Rhythm strip 5—asystole.
Fig. 19.18 Rhythm strips showing some ventricular rhythms.

CHAPTER 19 Data interpretation610
Box 19.5 Torsades de pointes
Torsades de pointes , literally meaning ‘twisting of points,’ is a form of
polymorphic VT characterized by a gradual change in the amplitude and
twisting of the QRS axis ( Fig. 19.19 ). In the United States, it is known as
cardiac ballet .
Torsades usually terminates spontaneously but frequently recurs and
may degenerate into sustained VT and VF.
Torsades results from a prolonged QT interval. Causes include con-
genital long-QT syndromes and drugs (e.g., antiarrhythmics). Patients
may also have d K and d Mg.
Fig. 19.19 Torsades de pointes. The axis of the QRS complex rotates—seen
from a fi xed position, there is a repeated change of amplitude.
Other ventricular rhythms
Ventricular extrasystoles (ectopics)
These are ventricular contractions originating from a focus of depolariza-
tion within the ventricle. As conduction is via abnormal pathways, the QRS
complex will be unusually shaped ( Fig. 19.18 , rhythm strips 1 and 2).
Ventricular extrasystoles are common and harmless if there is no
structural heart disease. If they occur at the same time as a T wave, the
R-on-T phenomenon , they can lead to VF.
Ventricular escape rhythm
This occurs as a backup when conduction between the atria and the
ventricles is interrupted (as in complete heart block).
The intrinsic pacemaker in ventricular myocardium depolarizes at a slow
rate (30–40/min) (see Fig. 19.18 , rhythm strip 3).
The ventricular beats will be abnormal and wide with abnormal T waves
following them. This rhythm can be stable but may suddenly fail.
Asystole
This is a complete absence of electrical activity and is not compatible with
life (see Fig. 19.18 , rhythm strip 5).
There may be a slight wavering of the baseline, which can be easily
confused with fi ne VF in emergency situations (see Box 19.5 ).
Agonal rhythm
This is a slow, irregular rhythm with wide ventricular complexes that vary
in shape ( Fig. 19.18 , rhythm strip 4). This is often seen in later stages of
unsuccessful resuscitation attempts as the heart dies. Complexes become
progressively broader before all recognizable activity is lost (asystole).

ECG: AN INTRODUCTION
611
P- and T- wave abnormalities
P wave
This represents depolarization of the small muscle mass of the atria. The
P wave is thus much smaller in amplitude than the QRS complex.
Normal
• In sinus rhythm, each P wave is closely associated with a QRS complex.
• P waves are usually upright in most leads, except aVR.
• P waves are <3 small squares wide and <3 small squares high.
Abnormal
• Right atrial hypertrophy will cause tall, peaked P waves ( Fig. 19.20 ,
rhythm strip 1). Causes include pulmonary hypertension (in which case
the wave is known as P pulmonale and tricuspid valve stenosis ).
• Left atrial hypertrophy will cause the P wave to become wider and
twin-peaked, or bifi
d
( Fig. 19.20 , rhythm strip 2). This is usually caused
by mitral valve disease, in which case the wave is known as P mitrale .
T wave
This represents repolarization of the ventricles. The T wave is most
commonly affected by ischemic changes. The most common abnormality
is inversion, which has a number of causes.
Normal
• Commonly inverted in V
1
and aVR
• May be inverted in V
1
–V
3
as normal variant
Abnormal
• Myocardial ischemia or MI (e.g., non-Q-wave MI) can cause T-wave
inversion ( Fig. 19.20 , rhythm strip 3). Changes need to be interpreted
in light of clinical picture.
• Ventricular hypertrophy causes T inversion in those leads focused on
the ventricle in question. For example, left ventricular hypertrophy will
give T changes in leads V
5
, V
6
, II, and aVL.
• Bundle branch block causes abnormal QRS complexes due to
abnormal pathways of ventricular depolarization. The corresponding
abnormal repolarization gives unusually shaped T waves, which have
no signifi
cance in themselves.
• Digoxin causes a characteristic T-wave inversion with a down-sloping
of the ST segment known as the reverse tick sign. This occurs at
therapeutic doses and is not a sign of digoxin toxicity (see Fig. 19.20 ,
rhythm strip 4).
• Electrolyte imbalances cause a number of T-wave changes.
•
i K can cause tall tented T waves.
•
d K can cause small T waves and U waves (broad, fl at waves
occurring after the T waves; Fig. 19.20 , rhythm strip 5).
•
i Ca can cause small T waves with a prolongation of the QT
interval (d Ca has the reverse effect).
•
Other causes of T-wave inversion include subarachnoid hemorrhage
and lithium use.
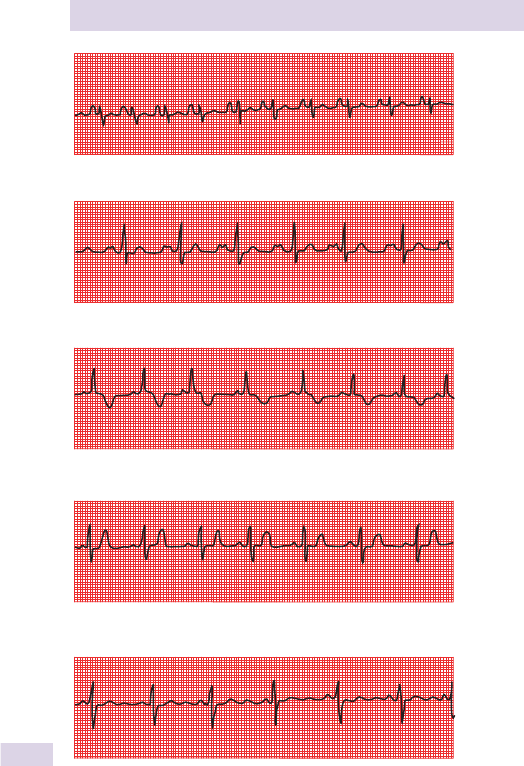
CHAPTER 19 Data interpretation612
Rhythm strip 1—peaked P waves.
Rhythm strip 2—bifid P waves.
Rhythm strip 3—T wave inversion after myocardial infarction.
Rhythm strip 4—Hyperkalemia with peaked T waves.
Rhythm strip 5—Hyperkalemia with small T waves and U waves.
Fig. 19.20 Rhythm strips showing some P-and T-wave abnormalities.
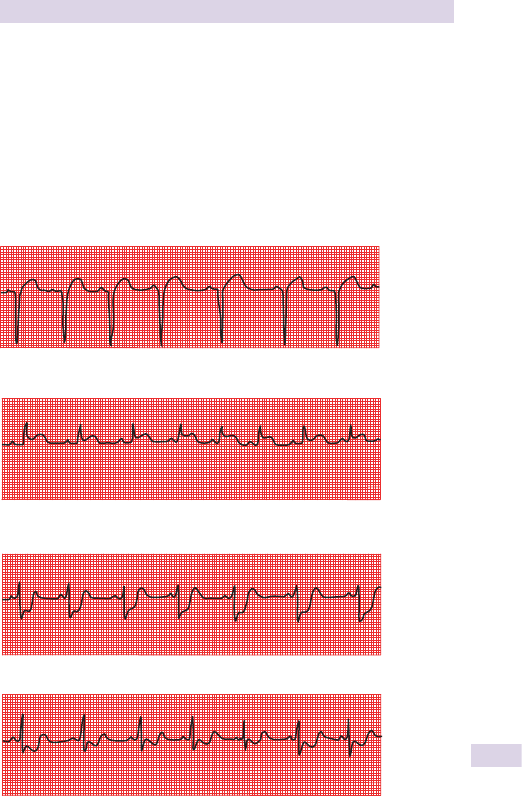
ECG: AN INTRODUCTION
613
ST segment
This is the portion of the ECG from the end of the QRS complex to the
start of the T wave and is an isoelectric line in the normal ECG (see Fig. 19.5 ,
b p. 595.). Changes in the ST segment can represent myocardial ischemia
and, most importantly, acute MI ( Fig. 19.21 , rhythm strip 1).
ST elevation
The degree and extent of ST elevation is of crucial importance in ECG
interpretation, as it determines whether reperfusion therapy ( thrombolysis
or primary PCI) is considered in an acute MI.
Rhythm strip—Lead V
2
showing acute myocardial infarction.
Rhythm strip—Pericarditis. The ST elevation is usually described as
‘saddle-shaped’.
Rhythm strip—Ischemia.
Rhythm strip—Digoxin use showing the ‘reverse-tick’.
Fig. 19.21 Rhythm strips showing some ST segment abnormalities.

CHAPTER 19 Data interpretation614
Causes of ST elevation
• Acute MI—convex ST elevation in affected leads (the tombstone
appearance), often with reciprocal ST depression in opposite leads
• Pericarditis—widespread concave ST elevation (saddle-shaped; Fig. 19.21 ,
rhythm strip 2)
• Left ventricular aneurysm—ST elevation may persist over time.
ST depression
ST depression can be horizontal, upward sloping, or downward sloping.
Causes of ST depression
• Myocardial ischemia—horizontal ST depression and an upright T
wave ( Fig. 19.21 , rhythm strip 3). May be the result of coronary artery
disease or other causes (e.g., anemia, aortic stenosis)
• Digoxin toxicity—downward sloping (reverse tick; Fig. 19.21 , rhythm
strip 4)
• Nonspecifi
c changes—ST segment depression that is often upward
sloping may be a normal variant and is not thought to be associated
with any underlying signifi cant
pathology.
2 In exercise ECG testing, which looks to induce ischemic changes, the
extent, timing, and nature of ST changes can help quantify the probability
of ischemic heart disease.
Myocardial infarction
In the fi rst hour following an MI, the ECG can remain normal. However,
when changes occur, they usually develop in the following order:
• ST segment becomes elevated and T waves become peaked.
• Pathological Q waves develop.
• ST segment returns to baseline and T waves invert.
The leads in which these changes take place can help you identify which
part of the heart has been affected and, therefore, which coronary artery
is likely to be occluded.
• Anterior: V
2
–V
5
• Anterolateral: I, aVL, V
5
, V
6
• Inferior: III, aVF (sometimes II also)
• Posterior: The usual depolarization of the posterior of the left ventricle
is lost, giving a dominant R wave in V
1
. Imagine it as a mirror image of
the Q wave you would expect with an anterior infarction.
• Right ventricular: often no changes on the 12-lead ECG. If suspected
clinically, leads are placed on the right of the chest, mirroring the
normal pattern and are labeled V
1
R, V
2
R, V
3
R, and so on.
Hypertrophy
If the heart is faced with having to overcome pressure overload (e.g., left
ventricular hypertrophy in hypertension or aortic stenosis) or higher systemic
pressures (e.g., essential hypertension), it will i its muscle mass in response.
This muscle mass can result in changes in the ECG.
Atrial hypertrophy
This can lead to changes in the P wave.

ECG: AN INTRODUCTION
615
Ventricular hypertrophy
This can lead to changes in the cardiac axis, QRS complex height and
depth, and the T wave.
Left ventricular hypertrophy (LVH)
• Tall R wave in V
6
and deep S wave in V
1
• May also see left axis deviation
• T-wave inversion in V
5
, V
6
, I, aVL
• Voltage criteria for LVH includes the following:
•
R wave >25 mm (5 large squares) in V
6
•
R wave in V
6
+ S wave in V
1
>35 mm (7 large squares)
Right ventricular hypertrophy
• Dominant R wave in V
1
(i.e., R wave bigger than S wave)
• Deep S wave in V
6
• May also see right axis deviation
• T-wave inversion in V
1
–V
3
Paced rhythms
Temporary or permanent cardiac pacing may be indicated for a number
of conditions, such as complete heart block or symptomatic bradycardia.
These devices deliver a tiny electrical pulse to an area of the heart, initiating
contraction. This can be seen on the ECG as a sharp spike.
Many different types of pacemakers exist, and can be categorized
according to the following:
• The chamber paced (atria or ventricles or both)
• The chamber used to detect the heart’s electrical activity (atria or
ventricles or both)
• How the pacemaker responds—most are inhibited by the normal
electrical activity of the heart
On the ECG, look for the pacing spikes (see Fig. 19.22 ), which may
appear before P waves if the atria are paced, before the QRS complexes
if the ventricles are paced, or both.
0 Be careful not to mistake the vertical lines that separate the different
leads on some ECG printouts as pacing spikes!
2 Paced complexes do not show the expected changes described else-
where in this section. Thus you are unable to diagnose ischemia in the
presence of pacing.
Fig. 19.22 Rhythm strip showing dual-chamber pacing.

CHAPTER 19 Data interpretation616
Chest X-rays: introduction
Experienced clinicians and radiologists who look at a chest fi lm and
immediately give a diagnosis are able to do so through years of practice
and the development of pattern recognition. For the nonspecialist, careful
review of chest radiographs requires systematic examination of the fi lm,
including all systems and body parts in it.
While there is no ‘correct’ method, you should ensure that all is examined.
You can do this by region; we do it by organ system. See Box 19.6 for a
framework for reporting chest X-ray (CXR) results.
Technical considerations
2 It should be remembered that the CXR is not a slice of the chest. It
is a two-dimensional representation of all the internal structures, created
by X-rays passing through them. Features can overlie each other, hiding
abnormalities or creating unusual features with compound images. As
such, the image can be infl
uenced by a whole host of external factors.
Projection
This refers to the direction at which the X-ray beam passes.
• PA (posterior–anterior): The cassette is placed in front of the patient
and X-rays pass from the back. This is a standard CXR.
• AP (anterior–posterior): The cassette is placed at the back of the patient
and X-rays are fi
red from in front. An AP fi
lm may be taken in the ill
or injured patient who is unable to stand in front of the X-ray machine.
• Lateral: These views are from either the left or the right of the patient.
The direction of the beam has consequences for the appearance of the
intrathoracic structures. As the X-rays leave the machine, they diverge.
Thus objects near the cassette will appear their true size, but objects
further from the cassette (i.e., nearer the source of radiation) will appear
enlarged (see Fig. 19.23 ).
Box 19.6 Framework for reporting a chest fi lm
• Name
• DOB
• Exam date
• Technical considerations
•
Stationary vs. portable
•
Type of fi lm
•
Position of patient
•
Projection
•
Orientation
•
Rotation
•
Exposure
•
Inspiration
•
Inclusion
• Clinical review

CHEST X-RAYS: INTRODUCTION
617
This is particularly important for viewing the heart—it is not possible to
accurately judge heart size on an AP fi lm, as the heart lies much further
from the cassette.
Position
Standard X-rays are taken with the patient standing. Any deviation from
this will usually be marked on the fi lm, allowing you to learn more about
the patient and adjust your assessment of the image.
• Sitting: suggests a severe illness as the patient is unable to stand
•
The diaphragm will be artifi cially raised, infl ation of the lungs will be
reduced, soft tissues at the front of the patient may be folded.
• Supine or prone: suggests a very severe illness (patient is unable to sit).
•
Structures will be displaced within the chest, with abnormal
distribution of blood supply to the lungs; fl uid levels will not be seen.
Orientation
• Films should have position markers. Often only one side is labeled
(e.g., R , for the right of the patient).
• The image should be presented as if you are looking at the patient—that
is, the patient’s right on your left, and vice versa.
• Ensure that the marker is on the correct side—watch for the relatively
rare cases of dextrocardia.
Rotation
Films should be taken with the patient facing directly away from the source
(for PA fi lms).
You should ensure that this is the case, as rotation can cause abnormal
appearances of the mediastinum and other structures.
• Look at the spinous processes of the thoracic vertebrae—these should
appear at the center of each bone.
• Look also at the distance between the medial ends of the clavicles and
the spinous process of the nearest vertebra—these should be equal.
Exposure
The appropriate exposure depends largely on patient size. Too little will
cause the lungs to appear too white, too much will make structures appear
too dark ( Fig. 19.24 ) and subtle signs may be lost.
• As a rule of thumb, you should just be able to make out the thoracic
vertebral bodies through the image of the heart.
PA AP
Fig. 19.23 An exaggeration of X-ray beam divergence. Note that when the heart
is closer to the origin of the beam, it appears larger on the resultant image.

CHAPTER 19 Data interpretation618
Infl ation
A chest X-ray should be taken with fully infl ated lungs. A poor inspiration
can make the lungs appear denser, draw the trachea to the right, and make
the heart appear abnormally large.
• There should be t 9 ribs visible posteriorly.
•
Count from the top down, but be careful, as it is often easy to
confuse the fi rst couple of ribs and the clavicles.
•
To be sure, fi nd the anterior end of the fi rst rib and trace it
posteriorly; the second rib often appears quite close below.
2 See Fig. 19.25 for a comparison of adequate and inadequate lung
inspiration.
Inclusion
Does the fi
lm show all the structures that you wish it to? You should be
able to see the apices of both lungs and both costophrenic angles.
Fig. 19.24 Radiograph showing an inadequate image quality. The lung fi elds
appear too black and the apices of the lungs are not included in the image.
Box 19.7 Densities
2 Be aware that there are fi ve basic densities on X-rays:
• Black: gas
• Dark gray: fat
• Light gray: soft tissues and fl uid
• White: bone and calcifi cation
• Intense white: metal
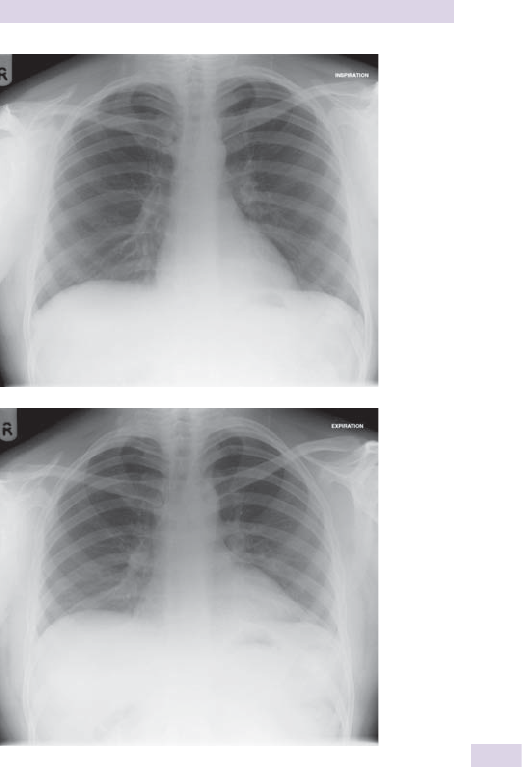
CHEST X-RAYS: INTRODUCTION
619
Fig. 19.25 Radiographs of the same patient showing the effect of inspiration. The
upper image has a good inspiration, the lower is inadequate. Note how the lungs
appear denser in the lower image and the heart is enlarged.

CHAPTER 19 Data interpretation620
Right
brachiocephalic
vessels
Left
brachiocephalic
vessels
Aortic arch
Pulmonary
trunk
Left atrial
appendage
Left
ventricle
SVC
IVC
Right
atrium
Fig. 19.26 Diagram illustrating the normal outline of the mediastinum and the
structures giving rise to the shape.
Clinical interpretation
Heart and mediastinum
The key to understanding the mediastinum is knowledge of the normal
anatomy. All the structures, apart from the trachea, appear as fl uid or soft-
tissue density and are hard to distinguish separately. Much can be learned
by looking at the shape of the mediastinum ( Fig. 19.26 ).
Examine the following:
• Mediastinal border, looking for abnormality
• Trachea and bronchi
• Heart, looking for visible valves (metal heart valves will appear opaque
on the CXR—see Fig. 19.52 , b p. 638)
• Cardiac size: should be <1/2 of the thoracic width on a PA fi lm.
Measure carefully (with a ruler).
• Look for masses, calcifi
cation, or free air (pneumomediastinum).
Abnormalities
• Venous engorgement: look at the lung fi elds.
• Hiatal hernia: may be seen as a rounded object sitting behind the heart
or causing distortion of the normal mediastinal outline. There may be a
visible fl
uid level within it (
Fig. 19.27 ).
• Enlarged heart: enlargement of one or more chamber may be seen
on the mediastinal outline or simply by enlargement of the heart size
(Fig.19.28).
• Pericardial effusion: massive enlargement of the heart with a classical
boot shape ( Fig. 19.29 )
• LV aneurysm: seen as an enlarged left side of the heart—look for
calcifi
cation, which will appear white.
• Pericardial calcifi
cation: seen as a patchy white outline of the heart
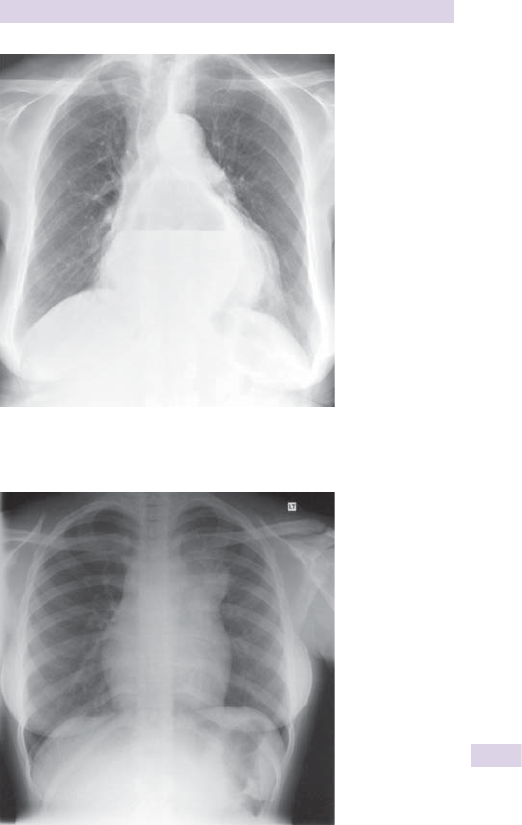
CHEST X-RAYS: INTRODUCTION
621
Fig. 19.27 Radiograph showing a large hiatal hernia. A fl uid level can be seen
within the herniated stomach behind the heart.
Fig. 19.28 Radiograph showing a mass in the upper portion of the mediastinum
on the left.
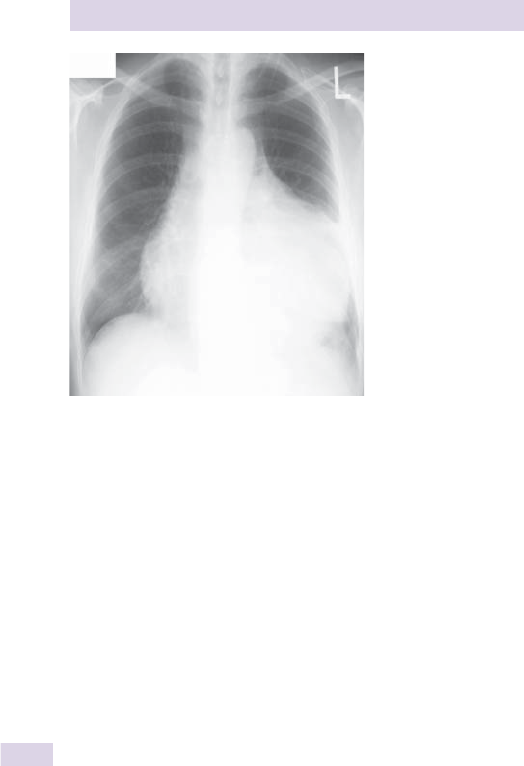
CHAPTER 19 Data interpretation622
Hila
The hila are the regions at which the lungs connect to the central
circulation. They appear as opaque regions on the right and the left side of
the mediastinum. Most of the image is created by the pulmonary arteries
and veins coming to and from the heart.
The hila should be rounded and symmetrical. As the left pulmonary
artery is slightly superior to the right, the left hilum appears 71 cm higher
than the right. On each side, the bronchi appear as lucent structures.
Look for the following:
• Difference in density
• Asymmetry
• Loss of the normal concavity
• 2 Check for rotation of the fi lm.
Causes of hilar enlargement
• Vascular: smoothly enlarged and irregularly shaped. Arterial
enlargement is due to congestion or aneurysm or pulmonary
hypertension (usually bilateral).
0 Pulmonary hypertension will also cause d peripheral vasculature in the
lung fi eld
( Fig.
19.30 ).
• Lymph nodes: smoothly enlarged, regular masses within the hila. Causes
include neoplastic (bronchial carcinoma, lymphoma, metastatic),
infective (especially TB—look also for peripheral abscesses or miliary
shadowing), and infi
ltrative (sarcoid—look also for pulmonary nodules)
(
Fig. 19.31 ).
• Other masses: irregular masses, sometimes with poorly defi ned
edges
Fig. 19.29 Radiograph showing a large pericardial effusion. The heart appears
grossly enlarged with a typical boot shape.
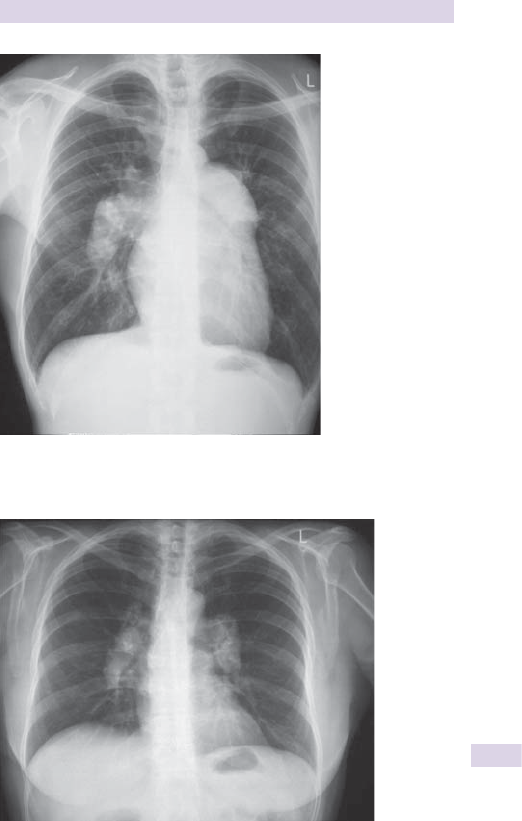
CHEST X-RAYS: INTRODUCTION
623
Fig. 19.30 Radiograph showing pulmonary hypertension. The engorged
pulmonary arteries are clearly visible at both hila.
Fig. 19.31 Radiograph showing bilateral hilar lymphadenopathy, in this case, due
to sarcoidosis.

CHAPTER 19 Data interpretation624
Look at each bone in detail, including the shoulder girdles, ribs, clavicles,
and thoracic vertebrae. Look at the density and trabecular pattern. Look
for the following:
• Lytic lesions
• Sclerosis
• Erosions
• Fractures
• Dislocation
Vertebrae
Ensure that the size and density are uniform and the spaces equal.
Remember to look for paraspinous soft tissue masses.
Ribs
• Trace each from the back to the front, note width of space between.
• New fractures appear as sharp lines—look for associated
complications, such as surgical emphysema and pneumothorax.
• Old fractures appear as widened areas of rib, often with a slight
distortion of the line of the bone.
Lytic lesions
Bone looks as if it is smudged. This may be the only sign of metastatic
disease.
Soft tissues
Remember that chest cavities are surrounded on all sides by soft tissue,
including the front and the back. Look at all the regions visible. Look for
calcifi
cation and free air.
Surgical emphysema
Air pockets exist in the soft tissues ( Fig. 19.32 ). Anterior or posteriorly,
this can be diffi cult to see, and may only be seen indirectly by distortion of
the image of the other structures. Laterally, side-on views of the pockets
of air can be seen as radiolucent, lozenge-shaped or tapering structures.
Breasts
Female and male breast tissue overlying the inferior part of the lung may
give the appearance of an increase in lung density. Look for missing breasts
as a clue to underlying disease ( Fig. 19.33 ).
Nipples
Nipples often appear as rounded opacities that could be mistaken for
lesions within the lung.
Abdomen
One should be able to see air in the stomach as a bubble below the left
hemidiaphragm. Often, there is an air-fl uid level within it creating a shape
with a rounded top and a horizontal lower edge.
A gastric bubble on the right may indicate either situs inversus or mis-
labeling of the fi lm.
Look below the diaphragm for free air (pneumoperitoneum), often seen
as a wisp of radiolucency between the liver and the right hemidiaphragm
or above the gastric bubble ( Fig. 19.34 ).
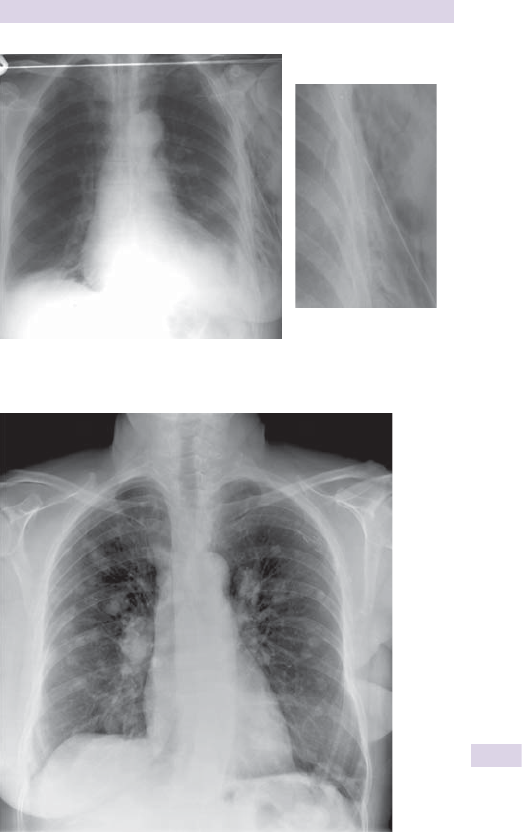
CHEST X-RAYS: INTRODUCTION
625
Fig. 19.32 Radiograph showing extensive surgical emphysema on the left of the
chest. Insert shows a close-up. Also visible is the chest tube causing the problem.
Fig. 19.33 Radiograph showing a patient with disseminated breast cancer. Aside
from the multiple pulmonary lesions, there is a lack of breast shadow on the left,
indicating that this patient has had a left mastectomy.

CHAPTER 19 Data interpretation626
Lungs
Readers should review normal lung anatomy. The points pertinent to the
physical examination are also relevant to the radiographic examination.
Normal
Seen head on, the oblique fi ssures are not visible. As the upper lobes lie
anterior to the lower lobes, the lung fi eld on the CXR is both the upper
and lower lobes (on the left). Normal features include the following:
• Lung fi
elds are of equal density.
• The right hemidiaphragm is slightly higher than the left.
• Sharp costophrenic angles and cardiophrenic angles
• The horizontal fi
ssure in the right lung passes horizontally from the
midpoint of the right hilum to about the sixth rib in the axillary line.
• The pleura should be thin and symmetrical.
Examining the fi lm
Scan the entire lung, looking for areas that are too black, too white, or
abnormally placed. Look for abnormal calcifi cation.
2 Look especially at the fi
rst ribs, behind the heart, and behind the
diaphragms, where lesions can often be missed.
2 Ensure that the lung markings extend to the periphery.
Collapse
On fi
lm, loss of air in a lobe or lung region appears dense. Look for the
following:
• Changes to the normal anatomy and asymmetrical density
• Mediastinal and tracheal shift (The volume loss in the affected lung will
pull the mediastinum toward the lesion.)
• Loss of clarity of the borders of the heart and the diaphragms
(Collapse nearby will cause a blurred outline.)
Right upper lobe
Collapses are upward and to the midline ( Fig. 19.35 ). The horizontal
fi
ssure may be elevated and mediastinum shifted to the right. There is a
white mass to the right of the upper part of the mediastinum.
Fig. 19.34 Close-up showing free air below the left hemidiaphragm.
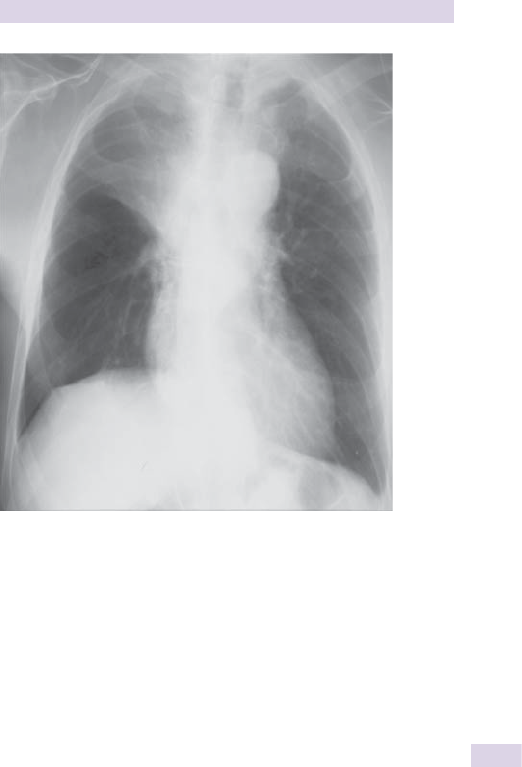
CHEST X-RAYS: INTRODUCTION
627
Fig. 19.35 Radiograph showing right upper lobe collapse.
Right middle lobe
This is diffi cult to see on PA fi lm. It may be seen as a slight blurring of the
right heart border and elevation of the right hemidiaphragm ( Fig. 19.36 ).
On lateral fi lm, collapse here is seen as a triangle of white with its apex
at the hilum and base anteriorly.
Right lower lobe
A triangular area of white is between the right heart border and diaphragm,
causing both to be indistinct.
Left upper lobe
Collapse is hard to see; the left hemithorax is hazy with loss of clarity at
the left heart border ( Fig. 19.37 ). Collapse is easier to see on lateral fi lm.
Left lower lobe
There is a sail-like shape of white ( Fig. 19.38 ), but hidden behind the heart
border so it is diffi cult to spot. Look for a double edge to the heart.
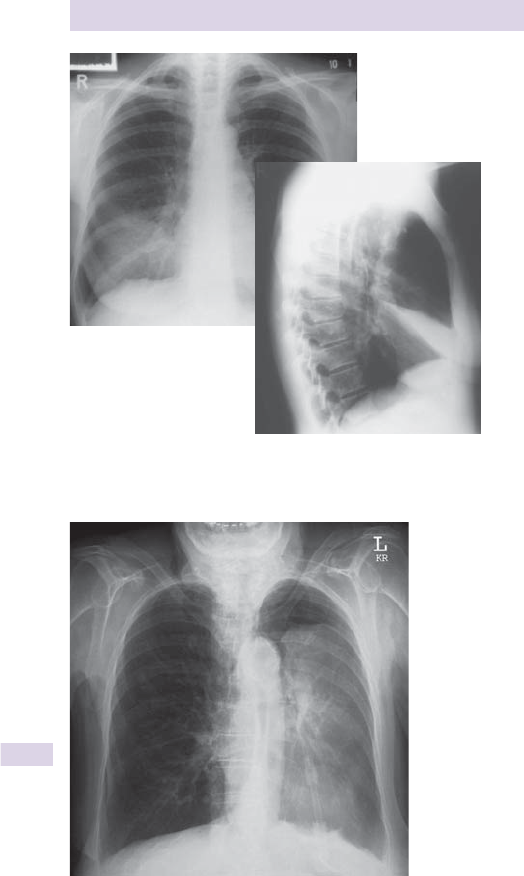
CHAPTER 19 Data interpretation628
Fig. 19.36 Radiographs showing right middle lobe collapse. This is seen only as
a slight increase in density to the right of the heart on the PA fi lm. The collapse is
much easier to see here than on the lateral fi lm.
Fig. 19.37 PA radiograph showing left upper lobe collapse.

CHEST X-RAYS: INTRODUCTION
629
Fig. 19.38 Radiograph showing left lower lobe collapse—note the sail-like shape
of white behind the heart.
Consolidation
Consolidation is usually a sign of infection—fl uid within the alveolar
spaces, making an area of the lung appear denser ( Fig. 19.39 ). Look for
the following:
• Focal area of i density with indistinct margins
• Heterogeneous alveolar shadowing
• Not present on previous X-rays (Focal fi
brosis may appear similar but
is usually long-standing with a chronic course.)
• There may be a sharp demarcation at lobar margins (right upper
lobe consolidation may be seen with a sharp horizontal lower border
where it meets the right middle lobe) (see Box 19.8 ).
• Air bronchograms: as the airways remain patent, an air-fi lled
bronchus
passing through an area of consolidation may be seen as a radiolucent
(black) tube.
Fibrosis
Increased density of the lung tissue in fi brosis causes a reticulonodular
(net-like with nodules) pattern of opacity. As it progresses, it may cause
a honeycomb appearance of the lung. Be careful to differentiate fi brosis
from edema or consolidation.
Features of fi brosis ( Figs. 19.40 and 19.41 ) are as follows:
• Often bilateral, although not necessarily symmetrical
• Causes d lung volumes

CHAPTER 19 Data interpretation630
• If focal, draws the mediastinum toward the affected side
• Causes blurring of the heart and diaphragm borders
• Has a distinctive reticulonodular pattern
Pulmonary edema
This causes an alveolar pattern of shadowing. If due to congestive cardiac
failure, there will also be changes in the appearance of the heart.
Features of pulmonary edema secondary to heart failure ( Fig. 19.42 ):
• Enlarged heart
• Bilateral, although not necessarily symmetrical, lung shadowing
• Classically, in middle and upper zones, causing a bat’s wing appearance
Box 19.8 Differentiating right lower zone consolidation
Consolidation at the base of the right lung may either be in the right
middle lobe and/or right lower lobe. Look for blurring of the structures
nearby.
• The right middle lobe does not touch the diaphragm—consolidation
here will cause blurring of the right heart border, whereas the
diaphragm remains distinct.
• The right lower lobe lies against the diaphragm but very little of it
touches the heart—consolidation here will cause blurring of the right
hemidiaphragm but leave the right heart border relativelydistinct.
Fig. 19.39 Radiograph showing right lower lobe consolidation.
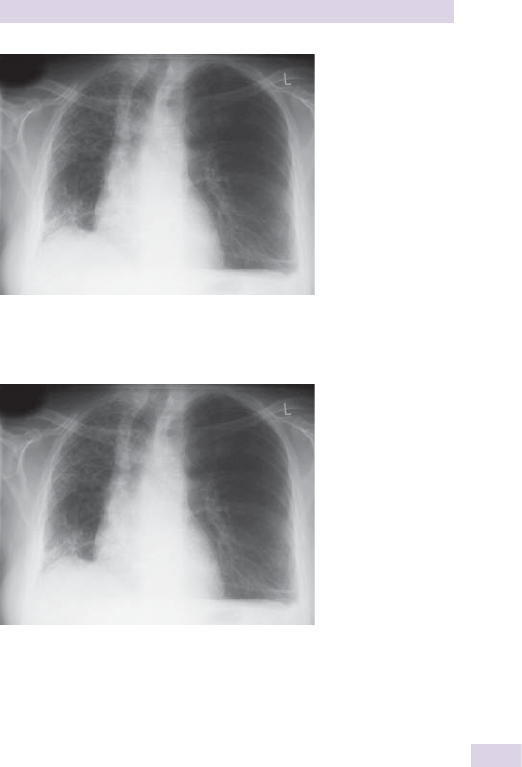
CHEST X-RAYS: INTRODUCTION
631
Fig. 19.40 Radiograph showing a patient post–lung transplant. The right lung is
the patient’s native lung and is severely fi brosed—note the reticular shadowing and
the d volume. The left lung is the healthy donated lung.
Fig. 19.41 Close-up of a radiograph showing pulmonary fi brosis.
• Pulmonary venous engorgement
•
The vessels appear to extend further than normal into the lung fi eld.
•
Vessels in the upper zone appear larger than normal (often >5 mm
diameter)—upper lobe blood diversion.
• Kerley’s B lines: short, horizontal white lines close to the lung
periphery, usually extending horizontally into the lung fi
eld. They are
found particularly at the bases and caused by edema of the interlobular
septa.
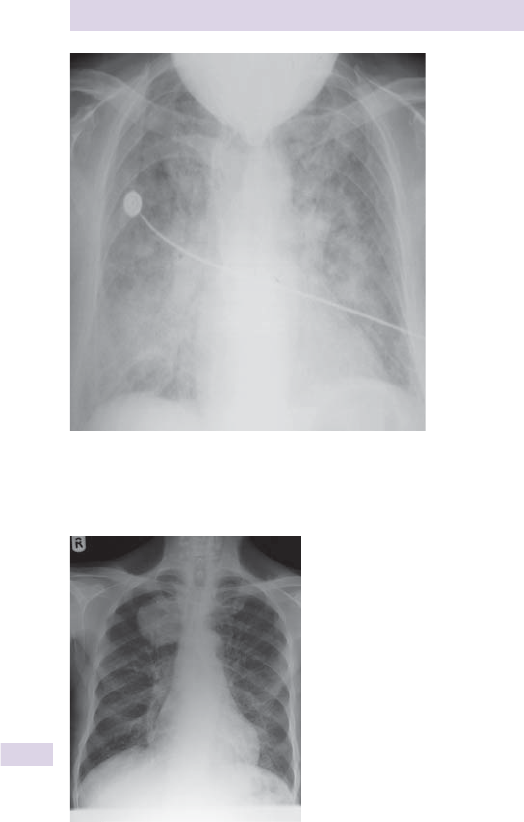
CHAPTER 19 Data interpretation632
Fig. 19.42 Radiograph showing severe pulmonary edema. There is extensive
alveolar shadowing in both lung fi elds, and the heart is enlarged. Note also the ECG
lead attached to the patient’s chest—a sign of the clinical severity.
Fig. 19.43 Radiograph showing a right upper zone mass.

CHEST X-RAYS: INTRODUCTION
633
Coin lesions
The lung masses often have well-demarcated borders. They could also
represent a focal area of consolidation or a pleural lesion ( Fig. 19.43 ). Look
for the following:
• Calcifi
cation within the lesion (rare if malignant)
• Air bronchogram within lesion (indicating consolidation, not a mass)
• Cavitation
• Changes in the bones and soft tissues nearby
• Lymph node enlargement in the hila
• Other lesions
Cavitating lesions
These lung lesions have a central cavity, creating a circular radiographic
appearance. If there is fl
uid within the lesion, an air-fl
uid level may be seen
( Fig. 19.44 ). Look at the rest of the fi lm for clues to the nature of the lesion
(i.e., lymphadenopathy, other lesions, signs of infection). Possible causes
include lung abscess, neoplasm, or focal area of infarction.
Bronchiectasis
This can be diffi cult to diagnose on a plain X-ray. The combination of
airway enlargement, airway wall thickening, and alveolar shadowing can,
however, give a distinct appearance.
• Ring shadows: affected bronchi are seen head on. They appear as small
rings—several together give a bunch-of-grapes appearance.
• Tramline shadows: affected bronchi are seen side on. They appear as
short parallel lines.
Pneumonectomy
This is rare. The side from which the lung was removed will appear densely
white (a whiteout) ( Fig. 19.45 ). As such, it should be carefully differenti-
ated from a large pleural effusion or dense consolidation. There may also
be the following:
• Mediastinal shift toward the affected side (An effusion would push the
mediastinum the other way.)
• Total absence of lung markings on the affected side
Fig. 19.44 Radiograph showing an abscess in the left lung—note the distinct air-
fl uid level within the rounded lesion (insert).
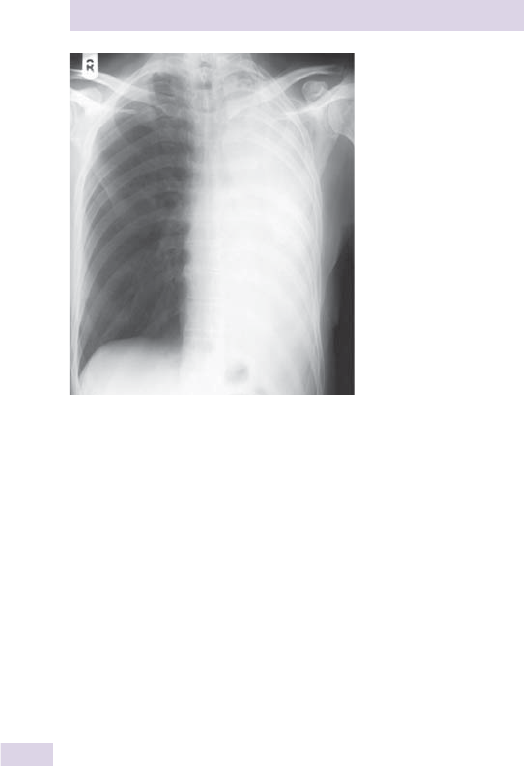
CHAPTER 19 Data interpretation634
• d Density of the remaining lung as it expands to fi ll the space available
• Signs of previous surgery (e.g., rib resections, sutures)
Pleural lesions
Lesions in the pleura may be seen to overlie the lung fi eld, or may be seen
laterally at the lung edge. Pleural plaques caused by asbestos exposure are
often seen as a heterogeneous lesion with irregular and spiculated edges
(holly-leaf appearance) (
Fig. 19.46 ).
Remember that the pleura also covers the diaphragm—look for the
linear appearance of plaques seen side-on. Be careful not to mistake
pleural lesions for lung lesions.
Pleural effusion
An effusion will appear as a white area at the base of the lung (if the patient
is standing or sitting up). It often has a well-demarcated upper border with
a meniscal edge as the fl uid tracks up lateral to the lung ( Fig. 19.47 ). As the
overlying lung is unable to infl ate fully, there may be the appearance of
increased lung density with a blurred upper border of the effusion. Look for
mediastinal shift (it will move away from the effusion, if large) ( Fig. 19.48 ).
0 Small effusions may only be seen as a blunting of the costophrenic angle
on the affected side. Remember that 7500 mL of fl
uid can hide behind the
hemidiaphragm before it becomes visible on a PA chest fi lm.
Fig. 19.45 Radiograph showing a previous left pneumonectomy. The mediastinum
has shifted so far to the left that it is almost impossible to distinguish amid the
density of the left side of the chest.
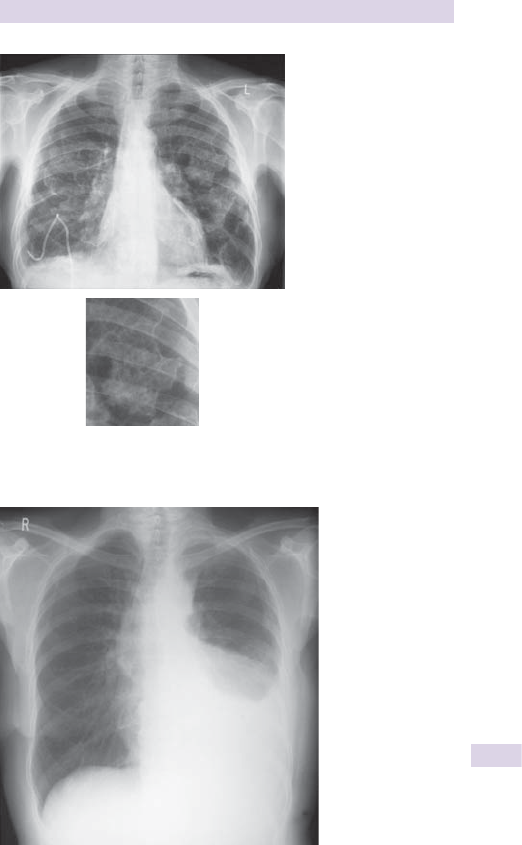
CHEST X-RAYS: INTRODUCTION
635
Fig. 19.46 Radiograph showing extensive pleural plaque disease. Close-up shows
one of the lesions—note the characteristic holly-leaf appearance.
Fig. 19.47 Radiograph showing large pleural effusion on the left. Note the
meniscus as the fl uid tracks laterally beside the lung.
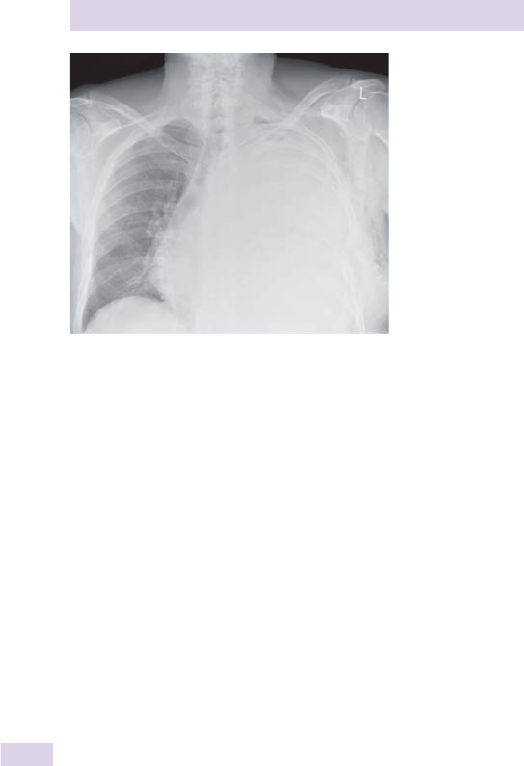
CHAPTER 19 Data interpretation636
Air outside the lung will appear as a black area, often as a sliver between
the lung and the thoracic wall. Look for the following:
• A darker area peripherally, often superior in an erect fi lm
• The lung markings do not reach the edge of the lung fi eld—look
carefully, do not mistake a bulla for a pneumothorax. Examine the rest
of the lung for similar areas.
• A visible, albeit thin, demarcation between the lung and the free air
( Fig. 19.49 )
Small pneumothoraces can be hard to spot, try
• Turning the fi
lm on its side (one can often see horizontal lines easier
than vertical ones).
• Asking for an expiratory fi
lm (the lungs will appear more dense and
the pneumothorax will take up relatively more of the lung fi eld).
Tension pneumothorax
0 This is a medical emergency, as i pressure in the chest reduces venous
return to the heart.
• The lung may appear small and shriveled within the lung fi eld.
• The mediastinum is shifted away from the affected side ( Fig. 19.50 ).
• A lowered hemidiaphragm is on the affected side.
COPD
This is diffi
cult to spot on a chest X-ray. The lung fi
elds may appear
less dense than normal with reduced lung markings. The chest may be
hyperinfl ated, often with an elongated appearance to the mediastinum.
Look for bullae and be careful to differentiate from a pneumothorax.
2 The key sign is fl
attening of the diaphragms (
Fig. 19.51 ).
Fig. 19.48 Radiograph showing a massive pleural effusion causing almost a
complete whiteout of the left lung fi eld. Note how the mediastinum is shifted away
from the affected side.
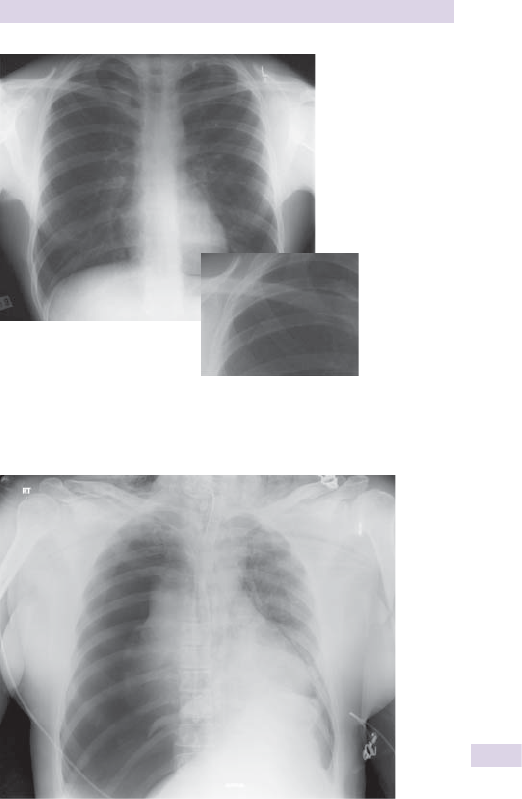
CHEST X-RAYS: INTRODUCTION
637
Fig. 19.49 Radiograph showing a right-sided pneumothorax. It is diffi cult to spot.
Close-up shows the pleural edge as a tiny but distinct demarcation between the
lung tissue and the free air.
Fig. 19.50 Radiograph showing a right-sided tension pneumothorax. There are no
lung markings on the right of the chest. The mediastinum is shifted to the left and
the right hemithorax is overinfl ated.
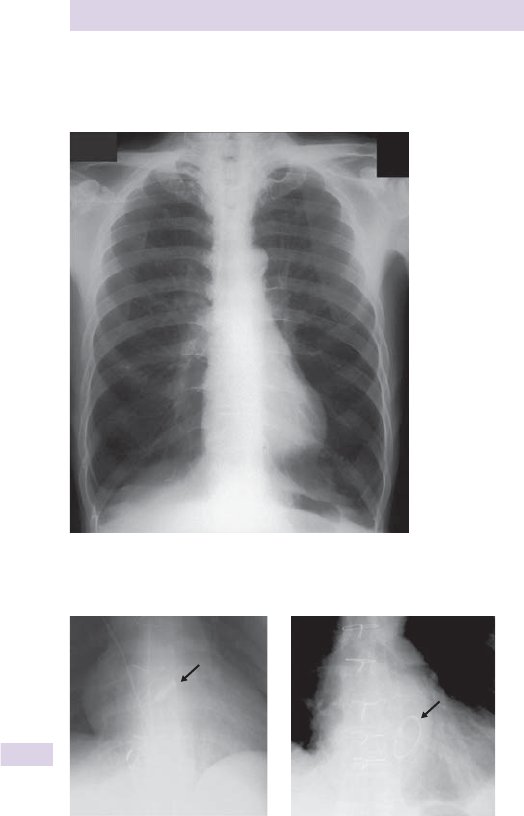
CHAPTER 19 Data interpretation638
Fig. 19.51 Radiograph showing COPD. Note the d density of the lung fi elds.
(a) (b)
Fig. 19.52 Close-ups of radiographs showing (a) aortic valve replacement and (b)
mitral valve replacement.
Iatrogenic features and foreign bodies
Clothes, buttons, zippers, or even a cigarette packet in a shirt pocket can
give misleading and often amusing appearances on the chest fi lm.
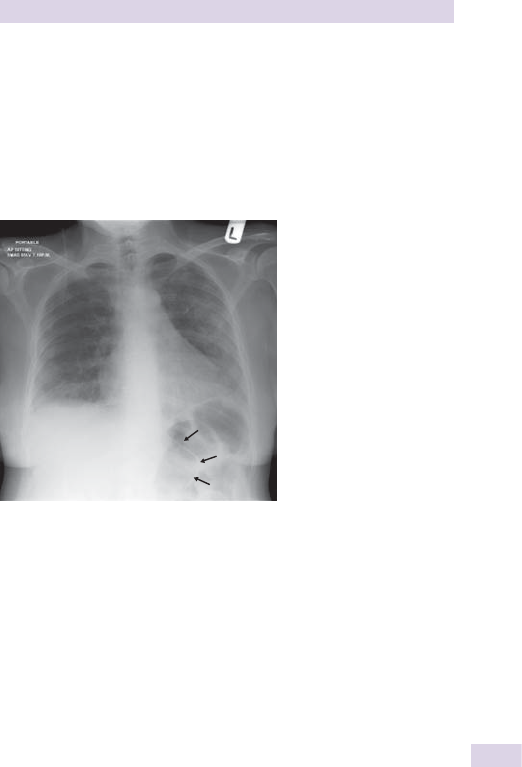
CHEST X-RAYS: INTRODUCTION
639
NG tubes
A correctly placed NG tube ( Fig. 19.53 ) will appear as a thin radio-opaque
line descending through the mediastinum, below the diaphragm, and ending
somewhere in the region of the gastric bubble. If the tube does not reach
the stomach but is seen to pass inferior to the carina, it is almost certainly in
the esophagus and will need to be inserted further rather than reinserted.
Tubes seen entering either major bronchus ( Figs. 19.54 and 19.55 ) should
be removed immediately.
Fig. 19.53 Radiograph showing a correctly placed NG tube.
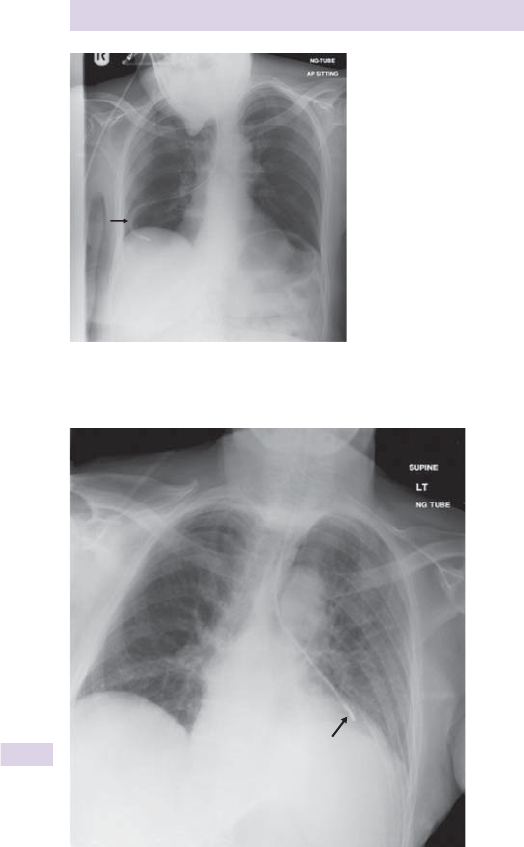
CHAPTER 19 Data interpretation640
Fig. 19.54 Radiograph showing an NG tube in the right bronchus.
Fig. 19.55 Radiograph showing an NG tube in the left bronchus.

ABDOMINAL X-RAYS: INTRODUCTION
641
Abdominal X-rays: introduction
A systematic viewing strategy will aid you in the interpretation of abdom-
inal fi lms. Certain key points to inspect on every abdominal X-ray include
technical quality, gas pattern, calcifi cation, bones, and soft tissue.
Technical assessment
Always begin your inspection by checking the following:
• Name of patient
• DOB
• Age of patient
• Sex of patient
• Date when fi
lm was taken
• Left and right markers
• Note the projection of the fi lm.
•
Almost all abdominal X-rays are AP; other views include upright,
supine, or decubitus—these are usually marked on the fi lm.
Views
• Standard abdominal X-ray: also known as an AXR , ‘fl
at plate,’ or KUB
(kidneys, ureters, bladder); it is a supine view (
Fig. 19.56 ).
• Upright fi
lm is useful in identifying the presence of free intraperitoneal
air and intestinal air-fl uid
levels.
• The left/right lateral decubitus* is especially useful in severely ill patients
who are suspected of having free intraperitoneal air and are unable to
stand or sit.
•
Decubitus fi lms can be identifi ed by fl uid levels lying parallel to
the long axis of the body, instead of at right angles to it as on
conventional erect fi lms.
Penetration
• A fi
lm that is too light (underpenetrated) or too dark (overpenetrated)
is of little diagnostic value (see
Box 19.9 ).
• As a general rule, if you can see the bones in the spine, the technical
quality should suffi ce.
• With overexposed or overpenetrated fi
lms, it is recommended that
you inspect these areas with a bright light behind them (present on
most viewing boxes).
Gas pattern
The large bowel lies around the periphery of the abdomen and normally
shows haustral indentations. It should contain feces and gas.
• In the large bowel, loops are considered dilated if diameter is >5 cm.
The small bowel is more central, shows mucosal folds across its width
(valvulae conniventes), and contains fl
uid and gas.
• The diameter of the normal small bowel should not exceed 2.5–3 cm.
2 Become familiar with the normal gas pattern on an abdominal X-ray.
Abnormal positioning of bowel loops may indicate the presence of an
abdominal mass.
* From the Latin decumbere: ‘to lie down’ on the left or right side.
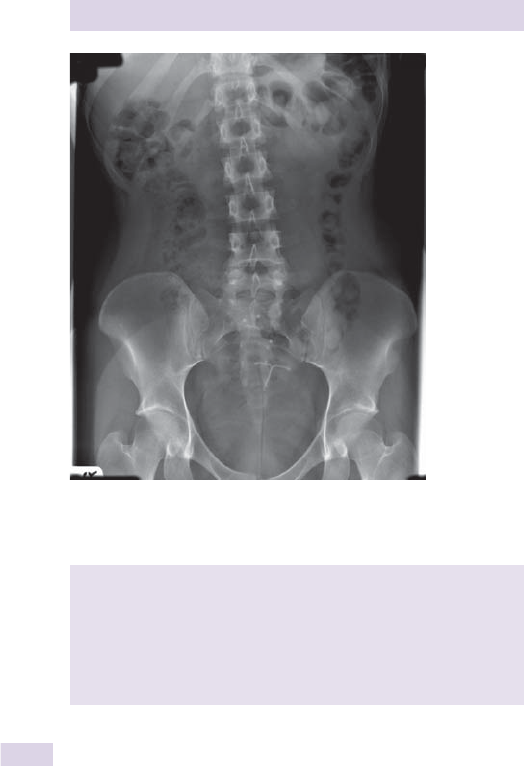
CHAPTER 19 Data interpretation642
Box 19.9 Densities
2 Be aware that there are fi ve basic densities on X-rays:
• Black: gas
• Dark gray: fat
• Light gray: soft tissues and fl uid
• White: bone and calcifi cation
• Intense white: metal
Fig. 19.56 A standard abdominal X-ray showing a normal abdomen. Incidentally,
this patient has a T-shaped copper contraceptive device in her uterus, which is
visible on the fi lm.
Fluid levels
Air-fl uid levels are seen as a clear horizontal demarcation between an area
of light gray fl uid and darker gray or black gas. Small fl uid levels in the small
and large bowel are a normal fi nding.
However, distended loops of bowel with air-fl uid levels in a diffuse pat-
tern are highly suggestive of a mechanical obstruction. The bowel loops
frequently have a hairpin (180° turn) appearance.

ABDOMINAL X-RAYS: INTRODUCTION
643
0 To demonstrate fl uid levels, you need an erect or decubitus fi lm.
Extraluminal gas
Carefully inspect for signs of extraluminal gas (outside the bowel lumen).
This may be either free (pneumoperitoneum) or contained within an
abscess cavity, the retroperitoneum, the bowel wall, or the biliary or por-
tal venous systems of the liver.
Free intraperitoneal air suggests a ruptured viscus in the absence of
immediate previous surgery.
A subtle sign to look for free gas is the double wall sign. Here, both sides
of the wall of loops of bowel become visible because of air on the inside
and outside of the bowel.
Pneumoperitoneum
Request an erect chest fi lm in suspected cases of pneumoperitoneum and
look for bilateral dark crescents of free gas under the hemidiaphragms
( Fig. 19.57 ).
Calcifi cation
There are several structures that may become calcifi ed, particularly with i
age of the patient. These may sometimes cause confusion if mistaken for
intestinal structures:
• Costal cartilages
• Aorta
• Iliac and splenic arteries
Fig. 19.57 An AXR showing a severe pneumoperitoneum. Note how the bowel
wall can be clearly seen; it has air both on the outside and the inside.

CHAPTER 19 Data interpretation644
• Pelvic phleboliths (small round opacities sometimes containing lucent
centers in the pelvic venous plexus)
• Mesenteric lymph nodes
2 Make careful note of abnormal calcifi cations
( Fig.
19.58 ), such as biliary
and urinary calculi, calcifi ed aneurysms, tumors, pancreatic calcifi cation in
chronic pancreatitis, and calcifi ed kidneys in nephrocalcinosis.
Bones
Examine the bones, looking for secondary malignant disease (possibly
seen as rounded lucent lesions), degenerative changes, and osteoporosis
( cortical thinning).
Remember to look at all the bones and joints within the fi eld:
• Pelvis
• Vertebrae
• Lowermost ribs
• Sacroiliac joints
• Femoral heads
Soft tissues
Scan the fi lm and identify the following:
• Lower borders of the liver and spleen
• Renal outlines
• Psoas muscles
Masses
Abdominal masses are frequently revealed by displacements or distortions
of normal viscera.
Distended bladder is the most common mass encountered in the pelvis;
alternatively, a mass here may be ovarian or uterine pathology.
Fig. 19.58 An AXR showing calcifi cation in the gall bladder.

ABDOMINAL X-RAYS: INTRODUCTION
645
Gross liver enlargement may be indicated by a large mass in the right side
of the abdomen, which may extend to the iliac crest. Look for an absence
of gut shadows and increased density here.
Gross splenic enlargement is seen as a mass extending inferomedially
from the left upper quadrant. There may be elevation of the left hemidi-
aphragm and downward displacement of the left kidney and stomach.
There may also be associated liver and lymph node enlargement.
Normal renal length is 73–3.5 lumbar vertebrae plus their discs. The left
kidney is usually higher and slightly larger than the right one. A discrep-
ancy of more than 1.5 cm between the two sides should be viewed with
suspicion.
2 The loss of the psoas margin or renal outline generally indicates an
infl
ammatory condition in the retroperitoneum.
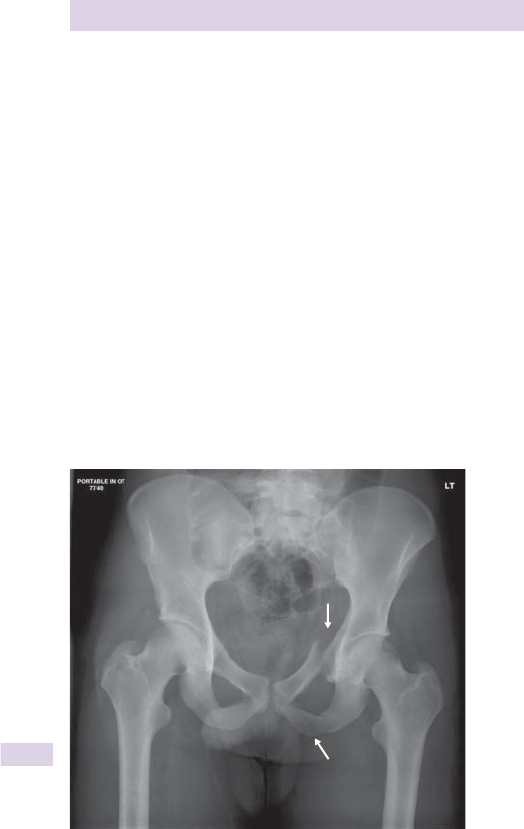
CHAPTER 19 Data interpretation646
Radiology: pelvis
Normal
The symphysis pubis joint space should be no wider than 5 mm and there
should be alignment of the pubic rami. Look closely at the main pelvic
ring and the two obturator rings to exclude any abnormality in the bony
cortex. Examine the sacroiliac joints to ensure consistent width on either
side. The sacral foramina should appear symmetrical and undisrupted.
Pelvic fractures
Stable
• Avulsion fractures—e.g., ischial tuberosity (hamstring avulsion)
• Iliac wing fracture: Duverney’s
• Sacral fractures: Denis classifi cation
• Ischiopubic rami fractures
• Acetabular fractures
• Coccygeal fractures: X-rays are not indicated here, as they will not
change management.
0 Avulsion fractures are often due to forceful muscle contraction.
Unstable
The pelvic ring is disrupted in two or more places ( Fig. 19.59 ).
Fig. 19.59 Radiograph showing fractured pubic rami on the left. Note that both
the superior and inferior pubic rami are broken—it is not usually possible to break
only one.

RADIOLOGY: PELVIS
647
• Straddle fracture: both obturator rings
• Bucket-handle fracture: sacroiliac and contralateral ischiopubic rami
(not to be confused with the bucket-handle fracture indicative of child
abuse)
• Malgaigne fracture: sacroiliac and ipsilateral ischiopubic rami
• Open-book fracture: both sacroiliacs and both ischiopubic rami
Hints
2 If you detect a fracture of the main pelvic ring, look hard to exclude a
second disruption to the ring—either a fracture or joint widening at the
symphysis pubis/sacroiliacs.
2 Pelvic fractures can result in severe damage to internal organs.
Pediatrics
• Normal development: be careful not to misinterpret the normal
cartilaginous junction (synchondrosis) between pubic and ischial bones
as a fracture.

CHAPTER 19 Data interpretation648
Radiology: hips and femurs
Normal
The joint space between the femoral head and acetabulum should not
appear narrowed at any point. Examine the femoral neck for a normal
trabecular (bony mesh) pattern and absence of sclerotic areas. Look for a
smooth, undamaged cortex as you trace the outline of the proximal femur
and femoral shaft.
Fractures
Fractures of the proximal femur are common in the elderly and carry
signifi cant mortality risk. Avascular necrosis is a potential complication if
the fracture involves the femoral neck and results from disruption of the
blood supply to the femoral head (retinacular vessels).
Fractures about the hip are typically characterized by location as femoral
neck, intertrochanteric (between the greater and lesser trochanters), and
subtrochanteric ( Fig. 19.60 ).
Femoral neck fractures can be further graded on their radiological
appearance using the Garden classifi cation , presented in Box 19.10.
Hints
2 Ask for lateral as well as AP views when requesting hip X-rays.
0 Hip fracture is used loosely, but incorrectly, to describe all proximal
femoral fractures. Strictly speaking it only relates to intracapsular fractures
(those within the joint capsule).
0 Fractures described as subcapital (just below the femoral head) and
transcervical (across the femoral neck) are both intracapsular fractures.
Degenerative changes
Classical X-ray changes in osteoarthritic degenerative disease at the hip
( Fig. 19.61 ), as with other joints, include the following:
(a) (b)
Fig. 19.60 Close-up of radiographs showing (a) an intertrochanteric fracture on
the left and (b) fractured neck of the femur.

RADIOLOGY: HIPS AND FEMURS
649
Box 19.10 Garden classifi cation*
• I—fracture line across the neck stops short of inferior cortex. No
displacement. Trabecular angulation across fracture
• II—fracture extends right across the neck. No displacement. No
trabecular angulation (no deviation of bony mesh lines)
• III—fracture extends right across the neck. Some displacement and/
or rotation of femoral head
• IV—femoral head severely (often completely) displaced
* The value of this classifi cation is disputed.
Fig. 19.61 Radiograph showing severe degenerative changes at both hips.
• d Joint space
• Osteophyte formation (bony spurs)
• Bone cysts
• Subarticular sclerosis
Dislocation of hip joint
Of all such cases, 90% are posterior dislocations, with the femoral head
seen superior and lateral to the acetabulum. Check for sciatic nerve injury
(10%).
0 Posterior dislocation strongly suggests that major force was applied;
consider trauma elsewhere.
Pediatrics
• Slipped femoral epiphysis: Look for misalignment on lateral X-ray of
the shaft and neck of the femur with the epiphysis (teenagers).
• Legg-Calve-Perthes disease (aseptic necrosis of femoral epiphysis):
Look for sclerosis and fl
attening of the epiphysis and cysts in
metaphysic (preteens).
• Developmental dysplasia of the hip (congenital dislocation): The
femoral head fails to lie within the acetabulum. If missed, osteoarthritis
and gait defects ensue. This is diagnosed neonatally with ultrasound.

CHAPTER 19 Data interpretation650
Radiology: knees
Normal
AP and lateral views are provided as standard. The joint space should be
maintained across the joint. On AP fi lm, the lateral tibial condyle margin
should be no more than 5 mm outside the femoral condyle margin. On
lateral fi lm the distance from the tibial tuberosity to the inferior aspect of
the patella should be similar to the length of the patella.
Abnormal
Distal femur fractures
All of the following fractures are readily identifi able on plain X-ray:
• Supracondylar
• Condylar (medial or lateral)
• Intercondylar
Proximal tibial fractures
These are often a result of being hit by car. Lateral (80%) tibial plateau
fractures are more common (think impact site).
On X-rays, look for an impacted sclerotic area and lateral displacement
of tibial condyle, in addition to fracture itself. A lateral view of the knee
can show a fat-fl
uid (marrow-blood) level in the suprapatellar bursa, which
may be the only sign of intra-articular fracture.
• Depressed plateau fracture—lateral or medial
• Split fracture—proximal fi
bula and lateral tibial condyle both affected
• Combined split depressed fracture—combination of depressed plateau
and split fracture
• Medial condyle fracture—less common
• Comminuted fracture of lateral and medial tibial condyles
• Segond fracture—avulsion fracture superolateral aspect proximal tibia.
Associated with ligamentous and meniscal injury
• Intercondylar eminence fracture (tibial spine)—associated with
anterior cruciate ligament injury
Patella
Transverse, vertical, comminuted, or avulsion fractures can occur. Oblique
or skyline views may be required to identify some vertical fractures. Patella
dislocation is usually lateral. Rupture of patellar ligament leads to superior
displacement of the patella.
Neck of fi bula
fractures
Think about accompanying ligamentous (collateral and cruciate) injury.
Proximal third of fi bula fractures
Look for associated ankle fracture.
Degenerative changes
Knee joint changes are similar to those at the hip.
Knee dislocation
In knee dislocation, 75% of cases are posterior. There is potential for
signifi cant injury to the popliteal and peroneal blood vessels.

RADIOLOGY: KNEES
651
Hints
0 Most meniscal or ligamentous injuries have no X-ray changes.
2 Examine the hip when patients complain of a painful knee—it could be
referred pain.
Pediatrics
• Bipartite patella: normal variant. Secondary ossifi cation center, usually
in superiolateral region. May stay unfused throughout adulthood. Do
not confuse this with fracture.
• Osgood–Schlatter disease: recurrent minor trauma leads to swelling
and pain at quadriceps tendon insertion. Avulsion of tibial tubercle may
be seen on X-ray. Boys are affected more than girls.
• Osteochondritis dissecans: chronic trauma causes articular cartilage
and subchondral bone disruption. Most commonly seen at lateral side
of medial femoral epicondyle. Remember the mnemonic LAME: Lateral
Aspect Medial Epicondyle.

CHAPTER 19 Data interpretation652
Radiology: shoulder
AP and either axial (armpit view), lateral scapular (Y view), or apical
oblique views are usually provided.
Abnormal
Glenohumeral dislocation
• Anterior dislocations: (95%) humeral head lies anterior and inferior to
glenoid
• Posterior dislocation: often missed. Look for a rounded symmetrical
humeral head (due to internal rotation).
• Inferior dislocation (luxatio erecta): rare (neurovascular damage more
likely)
Fractures
• Clavicle fracture: readily identifi
ed on AP fi
lm. 80% lateral 1/3
• Fracture-dislocations: humeral greater tuberosity often involved
• Humeral head or neck fracture: oblique or impacted fractures seen on
X-ray ( Fig. 19.62 )
• Humeral shaft fracture: transverse, spiral, or comminuted
• Scapula fracture: uncommon. May require trans-scapular view.
• Supraspinatus rupture: may see bony avulsion on X-ray
Acromioclavicular (AC) injury
On the AP view, the inferior cortex of the clavicle and that of the acromion
process should be aligned. Normal AC distance should be d8 mm. Look
for widening of the AC joint and any associated fractures.
Fig. 19.62 Radiograph showing fractured neck of humerus on the right.
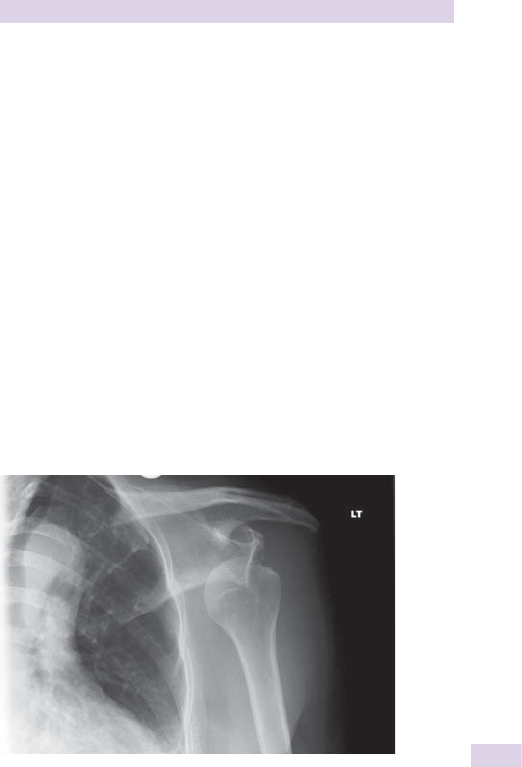
RADIOLOGY: SHOULDER
653
AC injury is graded according to degree of separation:
• Grade I: ligamentous involvement only. Slight separation
• Grade II: subluxation but with some bony overlap
• Grade III: AC joint fully dislocated. Coracoclavicular ligament ruptured
Adhesive capsulitis (frozen shoulder)
On X-ray, joint space narrowing and osteoporotic changes due to disuse
are apparent.
Sternoclavicular dislocation
Anterior dislocations are more common ( Fig. 19.63 ). There is risk of injury
to large vessels and the trachea with posterior dislocation.
Calcifi c
tendonitis
This is exquisitely painful; rapid relief is with local steroidal injections. Look
for abnormal calcium in soft tissues around the joint on X-ray.
Hints
2 AP views of posterior dislocation may appear normal. The axillary view
may be helpful.
• Fracture of the glenoid can be a complication of anterior dislocation.
0 Look for any fracture fragments with anterior dislocation.
Stress views (giving the patient weight to hold on the affected side) can
make AC injury more obvious on X-ray.
Fig. 19.63 Radiograph showing anterior dislocation of the humerus on the left.
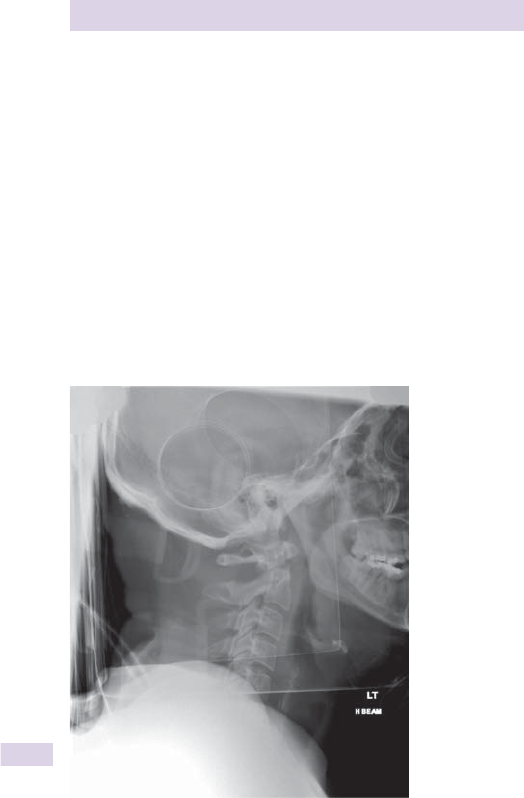
CHAPTER 19 Data interpretation654
Radiology: cervical spine
Examining C-spine fi lms
Three views are advisable—lateral, AP, and open mouth (the latter to
get a clear view of the odontoid peg). Remember, the peg is the upward
extension of the body of C2—the axis.
Lateral view
• Can you see all seven cervical vertebrae, including the top of T1?
• Trace three superimposed parallel curved lines running down the neck
to look for steps or misalignments (see Fig. 19.64 ).
• Check the gap between the anterior aspect of the peg and anterior
arch of C1—it should be d3 mm in adults, d5 mm in children.
• Look for prevertebral soft-tissue swelling. This may be only sign
of a C-spine fracture (lack of soft tissue swelling does not exclude
fracture).
• Inspect for narrowing of disc spaces.
Fig. 19.64 Radiograph showing a fractured odontoid peg. Note that the fi rst
cervical vertebra is displaced posteriorly. Several additional lines appear on the fi lm,
caused by the head and neck brace that the patient is wearing.

RADIOLOGY: CERVICAL SPINE
655
AP view
• Ensure that the spinous processes are aligned (some may be bifi d).
• Measure the gaps between spinous processes. These should be
approximately equal (but are allowed to be up to 50% wider than the
gaps directly above or below).
Open-mouth (odontoid peg) view
• Check that the peg is intact.
• Are the lateral aspects of C1 and C2 aligned?
• Look for equal gaps on both sides of the peg.
C-spine injuries
Stable
• Unilateral facet dislocation: spinous processes misaligned on AP
• Posterior arch of C1 fracture
• Wedge fracture: d height of anterior vertebral body. Delayed instability
is possible.
• Extension teardrop fracture: avulsion fracture, anteroinferior aspect C2
• Burst fracture: compression fracture between C3 and C7
• Anterior subluxation: fanning (widening) seen between adjacent spinous
processes on lateral view. Delayed instability is possible.
• Clay-shoveler’s fracture: oblique avulsion fracture of lower spinous
process
Unstable
• Bilateral facet dislocation
• Odontoid fracture ( Fig. 19.64 )
• Hangman’s fracture: fracture of C2 pedicles
• Jefferson’s fracture: fracture to anterior and posterior arches of C1
• Flexion teardrop fracture: fracture-dislocation of the vertebral body
• Hyperextension fracture-dislocation: anterior displacement of vertebra is
common
• Atlanto-occipital disassociation (remember, atlanto refers to C1)
Pediatrics
• Normal variant: Particularly in children, the base of C2 spinous process
may lie 2 mm posterior to the curved line linking the other bases.
• Pseudosubluxation: Normal ligamentous laxity causes anterior
displacement of C2 or C3.
Hints
0 If you see one fracture, look for another—20% of cases are multiple.
0 Most C-spine fractures occur near the top (C1–C2) and bottom
(C5–C7) of the neck.
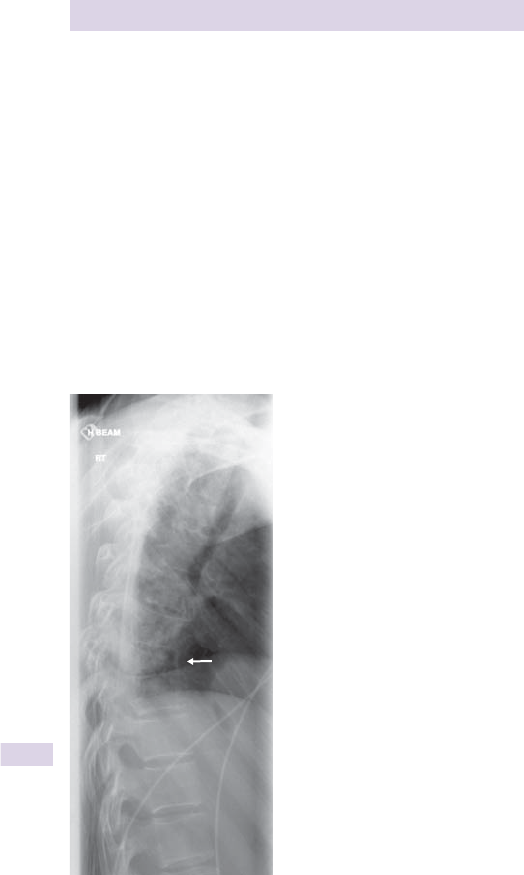
CHAPTER 19 Data interpretation656
Radiology: thoracic and lumbar spine
Examining spinal fi lms
Lateral and AP views are provided as standard.
• Examine the height of each vertebra—they should be approximately
equal and the same front and back.
• Look for the normal concave shape of the back of each vertebral body.
The gaps between vertebrae (the disc spaces) should be equal.
• Trace the lines of the anterior and posterior vertebral bodies. Look for
any steps, ridges, or misalignments.
• On the AP view, the lumbar pedicles should become slightly further
apart going down the spine.
Abnormalities
Thoracic (T) and lumbar (L) spine fractures
• Wedge (compression) fracture ( Fig. 19.65 )
•
d Height of vertebral body with wedge shape
•
Loss of concave shape to posterior vertebral body
Fig. 19.65 Radiograph showing a wedge fracture of a thoracic vertebra.

RADIOLOGY: THORACIC AND LUMBAR SPINE
657
• Burst fracture: vertebral body crushed into >2 pieces (comminuted)
• Fracture-dislocations: high suspicion of spinal cord injury
• Chance fracture: horizontal splitting of vertebra
• Transverse process fracture
• Spinous process fracture
Spondylolysis
• Degeneration of intervertebral discs leads to narrowing of disc space
and osteophyte formation.
Spondylolisthesis
• Anterior subluxation of vertebral body (congenital or after injury)
Hint
• 90% fractures are at T11–L4.

CHAPTER 19 Data interpretation658
Lung function tests
Simple lung function tests can help with the diagnosis and monitoring of
common respiratory diseases, such as asthma and chronic obstructive pul-
monary disease (COPD). Recognizing patterns of abnormality of these
tests is an essential skill in data interpretation.
Peak expiratory fl ow rate
Peak expiratory fl ow rate (PEFR) is the maximum fl ow rate recorded
during a forced expiration. Predicted readings vary according to age, sex,
height, and ethnicity (see Fig. 19.66 ).
Interpreting PEFR
PEFR readings less than the patient’s predicted, or usual best reading, dem-
onstrate airfl ow obstruction in the large airways.
PEFR readings are useful in determining the severity and thus most
appropriate treatment algorithm for asthma exacerbations:
• PEFR 80–100% best or predicted—mild asthma attack
• PEFR 50–80% best or predicted—moderate asthma attack
• PEFR <50% best or predicted—severe asthma attack
• PEFR <33% best or predicted—life-threatening asthma attack
0 PEFR readings are subject to considerable personal variation.
0 Note the diurnal variations in PEFR with asthma.
2 Don’t confuse PEFR with forced expiratory volume in 1 second (FEV
1
).
700
650
600
550
500
450
400
350
300
11
10
9
8
7
6
5
1.8 m1.7 m1.6 m1.5 m
71"67"63"59"
1.4 m 1.9 m
Age (yrs):20–25
30
40
50
60
20–25
40
60
Height (m) = metres, " = inches
SD 60 L/min
SD 67 L/min
SD 1 L/s
SD 1.1 L/s
Top 5 lines are for men (black)
Bottom 5 lines are for women (blue)
Peak expiratory flow (L/min)
Peak expiratory flow (L/s)
Fig. 19.66 Predicted values of peak expiratory fl ow rate according to age, sex,
and height. Reproduced with permission from Longmore M, et al. (2004). Oxford
Handbook of Clinical Medicine , 6th ed. Oxford: Oxford University Press.

LUNG FUNCTION TESTS
659
Reversibility testing
Improvement in PEFR or FEV
1
“ 15% following bronchodilator therapy
(e.g., salbutamol) shows reversibility of airfl ow obstruction and can help
to distinguish asthma from poorly reversible conditions, such as COPD.
Spirometry
Spirometry is the measurement of airfl ow and functional lung volumes.
Fig. 19.67 shows the pattern of lung volumes in a healthy individual during
normal breathing, and maximum inspiration and expiration with a single
breath.
Patients are asked to blow, as fast as possible, into a mouthpiece
attached to a spirometer. This records the rate and volume of airfl ow.
Unlike measuring PEFR, patients must continue blowing out for as long as
possible. The test is repeated until two similar readings are achieved.
Two key values are
• FEV
1
: forced expiratory volume in the fi rst second.
• FVC: forced vital capacity—the total lung volume from maximum
inspiration to maximum expiration, in forced exhalation.
Modern machines will often calculate the patient’s predicted values for
FEV
1
and FVC, which, like PEFR, are dependent on age, sex, height, and
ethnicity. Usually 70–85% of the FVC is expired in the fi rst second, giving
the volume–time graph shown in Fig. 19.68.
Volume
Time
RV
FRC
TV FVC
TLC
IC = Inspiratory capacity
TLC = Total lung capacity
RV = Residual volume
FRC = Functional residual capacity
TV = Tidal volume
FVC = Forced vital capacity
IC
Fig. 19.67 Normal pattern of lung volumes.
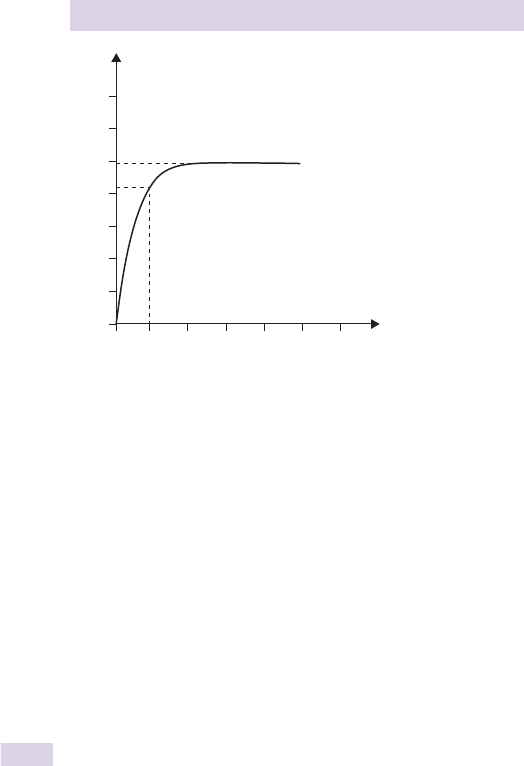
CHAPTER 19 Data interpretation660
Flow volume loops can also be generated from spirometry data and show
the fl ow at different lung volumes. These are useful in distinguishing intra-
and extrathoracic causes of obstruction as well as in assessing for small
airways obstruction.
2 Spirometry is valuable in assessing anesthetic risk prior to elective sur-
gery and vital for the diagnosis of COPD.
0 Don’t confuse PEFR with FEV
1
. While these may correlate well in
asthma, a normal PEFR does not exclude a reduced FEV
1
in COPD.
Gas transfer
Measuring the capacity of a gas to diffuse across the alveolar–capillary
membrane can provide important information. DLCO (carbon monoxide
diffusion capacity) measures the uptake from a single breath of 0.3% CO.
It is reduced in interstitial lung disease and emphysema.
Other tests
Pulmonology practices calculate static lung volumes with a body plethys-
mograph or through helium rebreath and dilutional techniques:
• TLC—total lung capacity
• RV— residual volume
Both of these can help in identifying patterns of lung disease and assessing
patients prior to lung surgery.
Common patterns of abnormality
Abnormal patterns of lung function fall broadly into two types, obstructive
and restrictive (see Table 19.1 ).
7
6
5
4
3
2
1
0
0123456
FVC
FEV
1
Time (seconds)
Volume (litres)
Fig. 19.68 Spirogram showing normal volume–time graph.

LUNG FUNCTION TESTS
661
Table 19.1 Obstructive v. restrictive spirometry results
Pattern FEV 1 FVC FEV
1
/FVC ratio TLC RV
Obstructive d n/d <75% i (or n) i
Restrictive d d >75% d d
See Fig. 19.69 for spirograms showing obstructive and restrictive volume–
time graphs.
Obstructive
When airfl ow is obstructed, although FVC may be reduced, FEV
1
is much
more reduced, hence the FEV
1
/FVC ratio falls. It can also take much longer
to fully exhale.
2 FVC can be normal in mild to moderate obstructive conditions.
Conditions causing an obstructive defect include the following:
• COPD
• Asthma
• Bronchiectasis
• Cystic fi brosis
• Foreign bodies, tumors, and stenosis following tracheotomy (all
localized airfl ow
obstruction)
Restrictive
The airway patency is not affected in restrictive lung conditions, so the
PEFR can be normal. But the FEV
1
and FVC are reduced because of the
restrictive picture.
Conditions causing a restrictive defect include the following:
• Fibrosing alveolitis of any cause
• Skeletal abnormalities (e.g., kyphoscoliosis)
• Neuromuscular diseases (e.g., motor neuron disease)
• Connective tissue diseases
• Late-stage sarcoidosis
• Pleural effusion
• Pleural thickening
2 Mixed obstructive and restrictive defects can also be found.
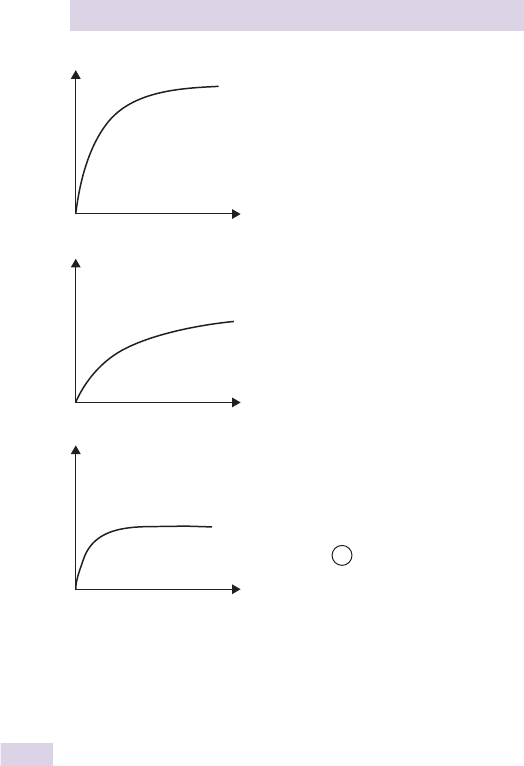
CHAPTER 19 Data interpretation662
Normal
V
FEV
1
–
FVC –
FEV
1
/FVC – 70–80%
FEV
1
– dd
FVC – d
FEV
1
/FVC d
T
Obstructive
V
T
V
Restrictive
T
FEV
1
– d
FVC – d
FEV
1
/FVC
N
Fig. 19.69 Spirograms showing obstructive and restrictive volume–time graphs.

ARTERIAL BLOOD GAS ANALYSIS
663
Arterial blood gas analysis
While clinical examination skills will enable you to detect many important
conditions, at times we all need help from the analysis of blood and other
fl uids. Even the most experienced provider can’t determine the PaCO
2
just by the laying on of hands (although they might tell you otherwise).
A systematic approach
The printout from the ABG machine can have a bewildering number of
results. Initially, just focus on the pH, PaCO
2
, and HCO
3
–
, in that order
(see Box 19.11 ).
pH
Is it low (acidosis) or high (alkalosis)?
PaCO
2
Remember, CO
2
is acidic.
• If PaCO
2
is raised and there is acidosis (pH <7.35), you can deduce a
respiratory acidosis.
• If PaCO
2
is low and there is alkalosis (pH >7.45), then the lack of acid
gas has led to a respiratory alkalosis.
• Conversely, if PaCO
2
is low and there is acidosis, the respiratory
system is not to blame and there must instead be a metabolic acidosis.
•
Confi rm this by looking at the HCO
3
–
; it should be low—remember
it is alkaline and acts as a buffer.
• If PaCO
2
is high or normal and there is alkalosis, then again the
respiratory system will not be to blame and there must instead be a
metabolic alkalosis.
•
Confi rm this by looking at the HCO
3
–
; it should be raised.
PaO
2
0 Note what FiO
2
(fraction of inspired oxygen) the patient was breathing
when the sample was taken.
Hypoxia is PaO
2
of <60 mmHg (8.0 kPa) and can result from
ventilation–perfusion (V/Q) mismatch—e.g., pulmonary embolism—or
from alveolar hypoventilation—e.g., COPD, pneumonia.
• Type I respiratory failure: hypoxia and PaCO
2
d45 mmHg
• Type II respiratory failure: hypoxia and PaCO
2
t50 mmHg
2 If the PaO
2
is very low, consider venous blood contamination.
Box 19.11 Reference ranges
• pH : 7.35–7.45
• PaCO
2
: 35–45 mm Hg
• PaO
2
: 80–100 mm Hg
• HCO
3
–
: 21–28 mEq/L
• Base excess: ±2 mEq/L

CHAPTER 19 Data interpretation664
Compensatory mechanisms
Mechanisms controlling pH are activated when acid–base imbalances
threaten. Thus, renal control of H
+
and HCO
3
–
ion excretion can result
in compensatory metabolic changes. Similarly, blowing off or retaining
CO
2
via control of respiratory rate can lead to compensatory respiratory
changes. This can complicate interpretation of ABG results.
2 A normal pH does not exclude acid–base disturbance ( Table 19.2 )—
there may be adequate compensation or a mixed picture.
2 A compensated picture suggests chronic disease.
Base excess and (standard) HCO
3
–
effectively measure the same thing.
Small variations of above-normal values exist between facilities.
Table 19.2 Some acid–base disturbances
Disturbance pH PaCO
2
HCO
3
–
Respiratory
acidosis
d i n
(i if compensated)
Metabolic acidosis d n
(d if compensated)
d
Respiratory
alkalosis
i d n
(d if compensated)
Metabolic alkalosis i n
(i if compensated)
i
Box 19.12 Example of respiratory acidosis (on room air)
pH 7.29, PaCO
2
56, PaO
2
70, HCO
3
−
25
The cause in this case is acute exacerbation of COPD.
Acidosis
A relative excess of cations (e.g., H
+
), unless adequately compensated, will
result in acidosis (more correctly, acidemia).
Respiratory acidosis
In this condition, pH is d, PaCO
2
i is (HCO
3
–
may i be if compensated)
( Box 19.12 ). Conditions that can lead to respiratory acidosis are as
follows:
• COPD, asthma, pneumonia, pneumothorax, pulmonary fi brosis
• Obstructive sleep apnea
• Opiate overdose (causing respiratory depression)
• Neuromuscular disorders (e.g., Guillain–Barré, motor neuron disease)
• Skeletal abnormalities (e.g., kyphoscoliosis)
• Congestive cardiac failure
0 In COPD, fi
nd patient’s normal PaCO
2
—it may be abnormally high.

ARTERIAL BLOOD GAS ANALYSIS
665
Metabolic acidosis
This involves pH, d HCO
3
–
d (PaCO
2
may be d if compensated) (see
Box 19.13 ).
Anion gap (Na
+
+ K
+
) – (HCO
3
–
+ Cl
–
): Normal range is 8–16 mEq/L
(Note: Reference values vary and an alternative formula is available.)
It is useful to calculate the anion gap to help distinguish causes of metabolic
acidosis. An i anion gap points to i production of unmeasurable anions.
Conditions that can lead to metabolic acidosis involve either an increased
or normal anion.
i Anion gap
• Diabetic ketoacidosis
• Renal failure (urate)
• Lactic acidosis (tissue hypoxia or excessive exercise)
• Salicylates, ethylene glycol, biguanides
Normal anion gap
• Chronic diarrhea, ileostomy (loss of HCO
3
–
)
• Addison’s disease
• Pancreatic fi stula
• Renal tubular acidosis
• Acetazolamide treatment (loss of HCO
3
–
)
A
nion
g
ap
(
Na
+
+
K
+
)
–
(
HCO
3
–
+ Cl
–
)
: Normal ran
g
e is 8–16 mE
q
/L
(
Note: Reference values vary and an alternative formula is available.
)
Box 19.13 Example of metabolic acidosis (on room air)
pH 7.25, PaCO
2
40, PaO
2
96, HCO
3
–
12
The cause in this case is diabetic ketoacidosis
Box 19.14 Example of respiratory alkalosis (on room air)
pH 7.53, PaCO
2
28, PaO
2
85, HCO
3
–
22
The cause in this example is anxiety.
Alkalosis
A relative excess of anions (e.g., HCO
3
–
), unless adequately compensated,
will result in alkalosis (more correctly, alkalemia)
Respiratory alkalosis
This involves i pH, d PaCO
2
(HCO
3
–
may be d if compensated) ( Box 19.14 ).
Conditions that can lead to respiratory alkalosis are as follows:
• Hyperventilation, secondary to
•
Panic attack (anxiety)
•
Pain
• Meningitis
• Stroke, subarachnoid hemorrhage
• High altitude

CHAPTER 19 Data interpretation666
2 Sensory changes (tingling in hands, face, lips) with hyperventilation are
due to d ionized calcium.
Metabolic alkalosis
This involves i pH, i HCO
3
–
(PaCO
2
may be i if compensated) ( Box 19.15 ).
Conditions that can lead to metabolic alkalosis are as follows:
• Diuretic drugs (via loss of K
+
)
• Prolonged vomiting (via acid replacement and release of HCO
3
–
)
• Burns
• Base ingestion
Mixed metabolic and respiratory disturbance
In clinical practice, patients can develop a mixed picture in which
acid–base imbalance is the result of both respiratory and metabolic fac-
tors ( Box 19.16 ). For example, in critically ill patients, hypoventilation
leads to d PaO
2
, and O
2
-depleted cells then produce lactic acid.
Box 19.15 Example of metabolic alkalosis (on room air)
pH 7.50, PaCO
2
36, PaO
2
92, HCO
3
–
27
The cause in this example is vomiting
Box 19.16 Example of mixed respiratory and metabolic
acidosis (on room air)
pH 7.0, PaCO
2
59, PaO
2
86, HCO
3
–
14
The cause in this example is septic shock.

CEREBROSPINAL FLUID (CSF)
667
Cerebrospinal fl uid (CSF)
CSF is produced by the choroid plexus lining the cerebral ventricles and
helps cushion and support the brain. Samples are usually obtained by
means of lumbar puncture.
Normal adult CSF
Normal values will vary by laboratory.
• Opening pressure
50–200 mm H
2
O
• Red cells 0
• WBC
0–5
• Lymphocytes
40–80%
• Neutrophils 0–6%
• Protein 15–45 mg/dL
• Glucose
60–80% of blood glucose)
• IgG
0–4.5 mg/dL
2 CSF glucose is abnormal if it is < 50% of blood glucose level
0 Premature babies, newborns, children, and adolescents have different
normal ranges
Interpreting CSF
Table 19.3 is only a general guide. Be guided by CSF results (see Box 19.17 )
together with the clinical picture.
Table 19.3 Characteristics of CSF according to underlying pathology
Pathology Appearance Protein
Glucose
CSF–blood
ratio)
Cells
Bacterial
meningitis
Turbid i d Neutrophils
Viral meningitis Clear n /i i/n Lymphocytes
Viral
encephalitis
Clear n /i d Lymphocytes
TB meningitis Fibrin webs i d d Lymphocytes
Neutrophils
Fungal
meningitis
Clear/turbid i d Lymphocytes
Subarachnoid
hemorrhage
Xanthochromia n /i i Red cells
Multiple
sclerosis
Clear n /i n /i Lymphocytes
Guillain–Barré
syndrome
Clear i n /i
Cord
compression
Clear i n
Malignancy Clear i d Malignant

CHAPTER 19 Data interpretation668
Box 19.17 Further CSF tests
• Culture
• Gram stain
• Ziehl–Neelsen stain (TB)
• India ink (cryptococcus)
• Electrophoresis (oligoclonal bands in multiple sclerosis)
• Cytology (malignant cells)
• Serological tests (syphilis)
• Viral polymerase chain reaction (PCR)

URINALYSIS
669
Urinalysis
Dipstick urinalysis offers speedy and noninvasive testing that can help with
the diagnosis of common conditions such as urinary tract infections (UTIs)
and diabetes mellitus (DM). Samples can be sent to the laboratory for
further analysis, including microscopic analysis and culture/sensitivity.
Box 19.18 Methods of collecting urine for analysis
• Random sample (contamination likely)
• Mid-stream sample (less contamination)
• First-void urine (for intracellular organisms—e.g., Chlamydia )
• Early-morning sample (to look for acid-alcohol fast bacilli—TB)
• Suprapubic aspiration
• Via catheter bag
• Via urine bag (pediatrics)
• 24-hour collection
Dipstick
Dipstick testing gives semiquantitative analysis of the following:
• Protein (normally negative)
• Glucose (normally negative)
• Ketones (normally negative)
• Nitrites (normally negative)
• Blood (normally negative)
• Leucocytes (normally negative)
• Bilirubin (normally negative)
• pH (normally acidic with range 4.5–8.0)
• Specifi
c gravity (normal range 1.000–1.030)
2 Test the urine within 15 minutes of obtaining the sample.
0 Color vision must be intact to interpret the dipstick chart.
2 Urine pregnancy-testing is equally convenient and is indicated in females
of childbearing age who present with abdominal symptoms.
2 Various foods (e.g., beets, asparagus, blackberries) and drugs
(e.g., rifampicin, tetracyclines, levodopa, phenytoin, chloroquine, vitamins,
iron supplements) can change the color of urine.
Microscopy, culture, and sensitivity (M,C&S)
Microscopy enables identifi cation of bacteria and other microorganisms,
urinary casts (formed in the tubules or collecting ducts from proteins or
cells), crystals, and cells (including renal tubular and transitional epithelial
cells, leukocytes, and red blood cells). Organism growth and antibiotic
sensitivities and can also be determined.
2 Microscopy and culture/sensitivity may not be indicated for patients
with uncomplicated UTI diagnosed on clinical history and dipstick and
started on antibiotics.
2 Asymptomatic bacteriuria is more common in pregnancy (up to 7%) and
can lead to pyelonephritis and potential fetal complications.

CHAPTER 19 Data interpretation670
Characteristic urinalysis fi ndings
• UTIs: nitrites, leukocytes
• Diabetes mellitus: glucose
• Diabetic ketoacidosis: ketones
• Cholestasis (obstructive jaundice): bilirubin
• Prehepatic jaundice: urobilinogen
• Glomerulonephritis: protein, blood
• Renal stones: blood
• Renal carcinoma: blood
• Nephrotic syndrome: protein ++
• Renal TB: leukocytes, no organisms grown (sterile pyuria)
• Sexually transmitted infections (chlamydia, gonorrhea): sterile pyuria
2 Suspected UTIs in children must be investigated with the consideration
that they may be indicators of anatomical abnormalities or possible sexual
abuse.

PLEURAL AND ASCITIC FLUID
671
Pleural and ascitic fl uid
Pleural effusion
Fluid in the pleural space can be classifi ed as exudate (protein content
>30 g/L) or transudate (protein content <30 g/L). At borderline levels,
if the pleural protein is >50% serum protein, then the effusion is an
exudate. Blood, pus, and chyle (lymph with fat) can also form an effusion.
See b p. 561 for pleural tap guidance.
Box 19.19 Tests for pleural fl uids
• Microscopy, culture (conventional ± TB culture), and sensitivity
(Gram stain, Ziehl–Neelsen stain)
• Cytology (malignant cells)
• Biochemistry
•
Protein
•
Glucose (d if rheumatoid or pneumonia related)
•
Amylase (i in pancreatitis)
•
LDH (i in empyema, malignancy, rheumatoid)
2 A large effusion needs a chest drain.
2 If you suspect malignant pleural disease, consider pleural biopsy.
0 Unilateral effusion suggests localized disease (malignancy, pneumonia).
0 Pleural fl
uid may be purulent (e.g., empyema) and therefore diffi cult
to aspirate.
Transudate causes
These involve i venous or d oncotic pressure.
• Heart failure
• Hypoproteinemia (liver failure, malabsorption, nephroticsyndrome)
• Hypothyroidism
• Constrictive pericarditis
• Meig’s syndrome (ovarian fi
broma + pleural effusion)
Exudate causes
These involve i capillary permeability.
• Pneumonia
• Empyema
• Malignancy (lung, pleura, lymph)
• Pulmonary infarction
• TB
• Systemic lupus erythematosus (SLE)
• Rheumatoid arthritis
• Dressler’s syndrome (post-MI)

CHAPTER 19 Data interpretation672
Ascites
Fluid in the peritoneal cavity can result in abdominal distension and short-
ness of breath. As with pleural fl uid, analysis of an aspirated sample can aid
diagnosis. See b p. 569 for ascitic tap guidance.
Box 19.20 Tests for ascites
• MCS (bacterial peritonitis, TB)
• Cytology (malignant cells, macrophages in infl ammatory
diseases)
• Biochemistry (amylase, protein)
2 Spontaneous bacterial peritonitis = neutrophils >250/mm
3
2 Further tests you may consider for a patient with ascites include liver
function tests (LFTs), hepatitis serology, antimitochondrial antibodies (pri-
mary biliary cirrhosis), ultrasound of liver or pelvis, and esophagogastrodu-
odenoscopy (EGD) (varices).
0 It is useful to check platelets and clotting profi
le before inserting drain.
0 Chylous ascites can result from obstruction of lymph drainage.
Causes
• Decompensated liver disease
• Infection (bacterial peritonitis, TB)
• Malignancy (liver, ovary)
• Right-sided heart failure
• Pancreatitis
• Portal vein occlusion
• Nephrotic syndrome
Serum/ascites albumin gradient (SAAG)
• Used to classify ascites as exudate or transudate
• SAAG = serum albumin concentration/ascitic fl uid
albumin
concentration
SAAG >1.1 g/dL (transudate)
• Cirrhosis with portal hypertension
• Cardiac failure
• Nephrotic syndrome
SAAG <1.1 g/dL (exudate)
• Malignancy
• Pancreatitis
• TB

673
Index
A
Abdomen, 203
appetite and weight,
220
applied anatomy,
204–5
auscultation, 231
boundaries, 204
bowel habit, 212–14
contents, 204
dietary history, 222
distension, 229
drug history, 221
in elderly patient, 252
esophageal symptoms,
206–7
and face and chest,
226–7
family history, 222
focal swellings, 229
and gastrointestinal
system, 493
and hand and upper
limb, 224–5
hernial orifi ces, 243–5
inspection of, 229–30
jaundice, 216
nausea, vomiting, and
vomitus, 208
obvious pulsations, 230
outline examination,
223
pain, 210–1
palpating the
abdominal organs,
233–8
palpation, 232
past medical history,
221
percussion, 239–40
peristaltic waves, 230
presenting patterns,
246–51
prominent vasculature,
229–30
pruritus, 216
rectal examination,
241–2
recti, divarication
of, 229
regions, 204–5
scars, 229
skin discoloration, 230
smoking, 221
social history, 222
stomas, 230
striae, 230
swelling in, 217
urinary and prostate
symptoms, 218–19
Abdominal examination
framework for, 223
during pregnancy, 442
Abdominal pain, 210–1
aggravating and
relieving factors,
210
character, 210
fi ndings, 211
in pregnancy, 438
radiation, 210
site, 210
Abdominal refl ex, 305
Abdominal wall, anterior
quadrants of, 205
segments of, 205
Abdominal X-rays,
641–5
bones, 644
calcifi cation, 643–4
gas pattern, 641–3
soft tissues, 644–5
technical assessment,
641
Abducens, 280
Abductor pollicis brevis,
64–6
Accessory nerve, 291
applied anatomy, 291
examination, 291
fi ndings, 291
Acid–base disturbances,
664
Acidosis, 664–5
Acoustic neuromas,
142–3
Acromegaly, 99 , 116
Addison’s disease, 83 ,
115–16
Aerochamber, 543
Affect, 458–9
Affective disorders,
473–5
bipolar disorder, 473
depression, 475
hypomania, 475
mania, 473–4
mental state
examination in, 474
Agonal rhythm, 610
Air conduction, testing,
288
Airway management,
547–53
Akathisia, 325–6
Albinism, 83
Alcohol, 37
in common drinks, 37
consumption, 37
Health People
2010, 37
Alcohol and respiratory
system, 189
Alcoholic hepatitis, 247
Alcoholic liver disease,
246–7
extrahepatic
manifestations
of, 247
Alkalosis, 665–6
Allan’s test, 66
Allergic rhinitis, 143
Allergies, 36
Alopecia areata, 80
Alopecia totalis, 80
Alopecia universalis, 80
Alzheimer’s disease
(AD), 472
Amenorrhea, 416 , 417
American Sign Language
(ASL), 12
Amniotic fl uid
volume
estimation,
445
Angina, 148
Angina pectoris. See
Angina

674
INDEX
Angry patients, 15
Angular stomatitis, 226
Ankle, 301
Ankle and foot, 363–4
feel, 363
function, 364
inversion and
eversion, 364
look, 363
measure, 364
move, 363
Thompson or
Simmond test, 364
Ankle clonus, 306
Ankle edema, 151
Ankle examination, 304
Ankylosing spondylitis,
368–9
Anosmia, 128
Antepartum hemorrhage
(APH), 438
Anuria, 219
Anxiety disorders, 470–1
generalized anxiety
disorder (GAD),
470
panic disorder, 470
phobic disorders,
470–1
Aorta, 238
coarctation of, 177
Aortic aneurysm,
dissecting, 149
Aortic regurgitation,
159 , 175
eponymous signs
of, 175
Aortic stenosis, 159 ,
175
Apex beat/PMI, 194
APGAR score, 502
Apley grinding test,
360 , 362
Apocrine sweat glands,
76
Appetite and weight, 220
Apraxic, 321–2
Argyll–Robertson pupil,
274
Arterial blood gas
analysis, 663–6
Arterial blood gas
sampling, 535–6
Arterial ulceration, 91
Arteries
applied anatomy and
physiology of,
146–7
Arthralgia in adults,
causes of, 341
Ascites, 672
examining for, 239–40
Ascitic tap, 569
Asystole, 610
Athetosis, 325–6
Atrial fi brillation
(AF),
603–4
Atrial fl utter, 605
Atrial septal defect
(ASD), 176
Atrioventricular (AV)
conduction
abnormalities,
598–600
Atrophic vaginitis, 448
Attitudes, 4
Auditory hallucinations,
462
Auditory meatus,
external, 285
Augmentation, 304
Auscultation, 198–9 , 231 ,
445 , 486 , 491–2
added sounds, 198–9
bowel sounds, 231
bruits, 231
fi ndings, 198
friction rubs, 231
technique, 198
venous hums, 231
vocal resonance, 199
Autohaler, 539
Automated external
defi brillators
(AED),
584 , 585 , 587
Autonomy, 26
Axillae, 225
Axillary lymph node, 61
B
Background diabetic
retinopathy, 110–1
Bad news, breaking,
17–20
Balanitis, 386
Balanoposthitis, 386
Beau’s lines, 81
Bell’s palsy, 286
Bendrofl uazide, 116
Benefi cence, 26
Benign positional
vertigo, 142
Benign prostatic
hyperplasai (BPH),
242
Biceps examination, 302
Bile, 208
Bilevel Positive Airways
Pressure (BiPAP),
559 , 560
Binasal hemianopia, 266
Bioethical principles, 26
Biomedical model, 2
Biopsychosocial model,
2–3
Bipartite patella, 651
Bipolar disorder, 473
Bitemporal hemianopia,
266
Bladder, 237 , 240
Bleeding
abnormal, 415
amenorrhea,
416–17
dysmenorrhea, 415
intermenstrual
bleeding (IMB),
416
menorrhagia, 415
postcoital bleeding,
416
postmenopausal
bleeding, 418
after pregnancy, 438
during pregnancy, 437
in second and third
trimesters, 438
Blepharospasm, 325–6
Blood (hematemesis),
208
Blood pressure (BP), 54
measurement, 531–2
Blue lunulae,
224
Body language, 21–2
emphasis, 22
eye level, 22
open body language,
21–2
touching, 21
watching and
learning, 22
Body mass index (BMI),
56
Body weight and height,
56
Bone conduction,
testing, 288

INDEX
675
Bouchard’s nodes, 63
Boutonniere, 63
Bowel habit, 212–14
constipation, 212
diarrhea, 212
fl atus, 214
mucus, 214
rectal bleeding and
melena, 213–14
Bowel sounds, 231
Brachial artery, 157
Bradycardia, 158–9
Brain, main language
areas of, 261
Brain tumors and
cerebrovascular
events, 476
Branchial cyst, 144
Breast (female), 391
abnormal nipple and
areola, 404
abscesses, 404
anatomy, 392 , 393
cancer,
404
examination, 402 , 403
fat necrosis, 404
fi broadenoma, 404
fi brocystic disease, 404
inspection, 397 , 398
lumps, 396
lymphatic drainage, 392
menstrual history, 394
nipple discharge, 395
normal breast changes
in, 392
pain, 394
palpation, 399–400
symptoms, 394–6
Breast (male), 395
Breast cancer
examination, 404
in females, 396
in males, 395
Breath, 226
Breathlessness and
edema, 150–1
ankle edema, 151
cough, 151
dyspnea, 150–1
Bronchi, anatomy of, 182
Bronchioles, anatomy
of, 182
Brudzinski’s sign, 323
Bruising, 225
Bruits, 231
Bulbourethral glands, 377
C
Cacosmia, 128
CAGE questionnaire, 37
Candidiasis, 227
Capillary refi ll, 54
Cardiac myocytes, 592
Cardiovascular
examination,
framework for, 150 ,
155
Cardiovascular system,
145 , 490–2
abdomen, 173
applied anatomy and
physiology, 146–7
breathlessness and
edema, 150–1
cardiac risk factors,
154
chest pain, 148–9
claudication, 153
congenital heart
disease, 176–7
congestive heart
failure (CHF), 177–8
deep vein thrombosis
(DVT), 178
drug history, 154
in elderly patient,
179
alternative diagnoses,
180
examination, 179–80
history, 179
face and neck, 161–4
fatigue, 153
general inspection,
155–6
hands, 156
hypertrophic
cardiomyopathy,
178
lung bases, 173
palpitations, 152
past medical history,
154
pediatric assessment
of, 490–2
examination, 490–2
murmurs, 492
pericardial effusion, 177
pericarditis, 177
peripheral edema, 173
peripheral pulses,
157–60
peripheral vascular
disease, 178
positioning, 155
precordium,
auscultating,
167–72
precordium,
examining, 165–6
rest pain, 153
social history, 154
syncope, 152
valvular disease,
175–6
varicose veins,
173–4
Carotenemia, 83
Carotid artery, 157
Carotid pulse, 161
Carpopedal spasm, 117
Cartilaginous joints, 338
Cataract treatment,
112–13
Catheters, sizing, 523
Cavernous sinus, 280–1
Celiac disease, 249
Central/branch retinal
artery occlusion, 272
Central/branch retinal
vein occlusion, 272
Central cyanosis, 51
Central scotoma, 266
Central venous
catheterization,
527–30
Central venous pressure
(CVP) kit, 527
Central vestibular
lesions, 126
Cerebellar ataxia, 321–2
Cerebellar lesions, 327
Cerebellum, 295
Cerebrospinal fl uid
(CSF), 667
urinalysis, 669–70
Cervical and
supraclavicular lymph
node, 60
Cervical smears, in
pregnancy, 430
Cervical spine, radiology
of, 654–5
Charles Bonnet
syndrome, 463
Chest, 227
expansion, 194 , 195
inspection of, 193
breathing pattern, 193

INDEX
676
Chest (Cont.)
movement, 193
shape, 193
surface markings, 193
Chest pain, 148–9
angina, 148
aortic aneurysm,
dissecting, 149
esophageal spasm, 149
gastroesophageal
refl ux disease,
149
myocardial infarction
(MI), 149
pericarditis, 149
pleuritic (respiratory)
pain, 149
Chest X-rays, 616–39
clinical interpretation,
620–4
densities on, 618
lungs, 626–39
reporting, framework
for, 616
technical
considerations,
616–18
Childhood coughs,
485
Chin lift, 548 , 549
Cholangitis, 249
Cholesteatoma, 141–2
Chondromalacia
patellae, 340
Chorea, 325–6
Chronic cough, 185
Chronic liver disease,
246
Chvostek’s sign, 103 , 117
Circumoral
pigmentation, 226
Cirrhosis, 247
Clarifying questions, 9
Claudication, 153
Clothing, 4
Clubbing, 63 , 224
causes of, 63
Cluster headache, 329
Cognitive function, 262
Collapse, 200
Color
cyanosis, 51
jaundice, 51
pallor (paleness), 51
Colostomy, 230
Common peroneal
nerve, 319
Communication skills, 1
angry patients, 15
bad news, breaking,
17–20
body language, 21–2
communication
models, 2
confi dentiality, 3
cross-cultural
communication, 13
deaf patients,
communicating
with, 12
essential
considerations, 4–5
essential rules, 6
follow-up
communication, 2
general principles, 9
getting started, 7–8
imparting
information, 15
interpreters, 14
law, ethics, and
communication, 15
patient-centered
communication,
2–3
sex, talking about, 16
silence, importance
of, 15
telephone and e-mail
communication, 16
written
communication, 23
Complete heart block,
600
Conductive dysphasia, 261
Confi dentiality, 3 , 26
breaking, 26
Confusion assessment
method (CAM), 469
Congenital heart disease
(CHF), 176–7 , 177–8
aorta, coarctation
of, 177
atrial septal defect
(ASD), 176
Fallot, tetralogy of,
177
left ventricular failure,
178
patent ductus
arteriosus (PDA),
176–7
right ventricular
failure, 178
ventricular septal
defect (VSD), 176
Congenital heart disease,
176–7
Consent and capacity,
26–7
Consolidation, 200
Constipation, 212
causes of, 213
Continuous murmurs,
170
Continuous Positive
Airways Pressure
(CPAP), 559 , 560
Coordination, 315–16
lower limbs, 316
rebound, 316
upper limbs, 315
Copper, 71
Corneal refl ex, 284
Cortex, 294
Costochondritis, 187
Cough, 151
and abnormal sounds,
190
and expectoration,
185–6
hemoptysis, 186
sputum, 185–6
Courvoisier’s law, 234
Cover–uncover test, 277
Cracking and popping
noises, 124–6
Cranial nerve I. See
Olfactory nerve
Cranial nerve II. See
Ophthalmoscopy;
Optic nerve
Cranial nerves III, IV, and
VI, 276–9
palsies of, 280–2
Cranial nerve V. See
Trigeminal nerve
Cranial nerve VII. See
Facial nerve
Cranial nerve VIII. See
Vestibulocochlear
nerve
Cranial nerves IX and X,
289–90
Cranial nerve XI. See
Accessory nerve
Cranial nerve XII. See
Hypoglossal nerve
Cremasteric refl ex, 305
CREST syndrome, 69

INDEX
677
Creutzfeldt–Jakob
disease (CJD), 473
Crohn’s disease, 250–1
Cross-cultural
communication, 13
Croup (laryngotracheo-
bronchitis), 144
Crystal arthropathies,
367
C-spine fi lms, examining,
654–5
C-spine injuries, 655
C-spine movements, 354
Cullen’s sign, 230
Cultural background and
tradition, 13
Cushing’s syndrome, 115
Cyanosis, 51 , 191
D
Dalrymple’s sign, 106
Data interpretation, 591
abdominal X-rays,
641–5
arterial blood gas
analysis, 663–6
cerebrospinal fl uid
(CSF), 667
cervical spine,
radiology of, 654–5
chest X-rays, 616–39
ECG, 592–615
hips and femurs,
radiology of, 648–9
knees, radiology of,
650–1
lung function tests,
658–61
pelvis, radiology of,
646–7
pleural and ascitic
fl uid, 671
shoulder, radiology of,
652–3
thoracic and lumbar
spine, 656–7
urinalysis, 669–70
Deaf patients,
communicating
with, 12
American Sign
Language (ASL),
12
lip-readers, 12
Deep palpation, 232
Deep vein thrombosis
(DVT), 178
Defi brillation, 584–5
Deformity, in
musculoskeletal
systems, 342–3
Delirium, 467 , 468–70
Delusions, 460–1
Demeanor, 9
Dementia, 471–3
Alzheimer’s disease,
472
Creutzfeldt–Jakob
disease (CJD), 473
frontotemporal, 472
Huntington’s disease,
473
Lewy body, 472
Parkinson’s disease,
473
vascular/multi-infarct,
472
Dentition, 226
Depolarization, 592–3
Depression, 474 , 475
Dermatological history,
78–9
allergies, 78
drug history, 78
FH, 79
PMH, 78
presenting illness,
history of, 78
psychosocial impact,
79
SH, 79
Dermatomes, 308 , 310 ,
311
Dermis, 76
Developmental
assessment, 500
Diabetes, 99
avoiding visual loss
in, 112
examining patient
with, 108–9
diabetic foot, 108–9
ocular manifestations
of, 112
cataract, 112–13
cranial nerve palsy, 112
glaucoma, 112–13
hypertensive retin-
opathy, 112–13
optic neuropathy, 112
Diabetic examination,
108
Diabetic foot
examination,
framework for, 109
Diabetic retinopathy,
110–11
background, 110
classifi cation of, 110
maculopathy, 110
mechanisms of
damage, 110
pre-proliferative
retinopathy,
110
proliferative, 110
Diarrhea, 212
causes of, 213
Diastolic murmurs,
169–70
Dipstick testing, 669
Discussion, setting
during, 4–5
Diskhaler, 540
Diskus, 540
Disaster planning, 509
Disseminated breast
cancer, radiograph
of, 625
Disturbance of higher
functions, 327–8
Dix-Hallpike maneuver,
142
Dizziness, 125–6 , 256
nonotological causes
of, 126
otological causes
of, 125
Dominance, 21
Dorsal interossei, 64–6
Dorsalis pedis, 157
Downbeat nystagmus,
278
Down’s syndrome, 68
Drug history, 36 , 45
Dupuytren’s
contracture, 62 , 224
Dysarthria,
260
Dysfunctional uterine
bleeding (DUB),
415
Dyskinesia, 325–6
Dysmenorrhea, 415
Dyspepsia, 207
Dysphagia, 206 , 260–1
causes of, 207
conductive, 261
expressive, 260–1

INDEX
678
Dysphagia (Cont.)
global, 260
nominal, 261
receptive, 261
Dysphonia, 130 , 260
Dyspnea
(breathlessness),
150–1 , 184
associated symptoms,
184
defi ning, 184
exacerbating and
relieving factors,
184
onset and duration,
184
severity, 184
Dystonia, 325–6
Dysuria, 219
E
Ear
applied anatomy and
physiology of, 120
deformity of, 124–5
examining, 132–4
inspection and
palpation, 132
otoscopy, 132
technique, 132–4
injury to, 124
surface anatomy of,
133
Ear, nose, and throat
(ENT), assessment
of, 488–9
Earache (otalgia), 122
Ear disorders, symptoms
of, 122–3
hearing loss, 122–3
otalgia, 122
otorrhea, 122
Eccrine sweat glands, 76
Edema, 54 , 55
Ejection click, 172
Ejection systolic
murmur, 169
Elbow, 298 , 349–50
examining, 66
feel, 349
function, 350
look, 349
measure, 349
move, 349 , 350
Electrocardiogram
(ECG), 592–615
(AV) conduction
abnormalities,
598–600
axis, calculating, 597–8
axis deviation, 598
cardiac axis, 596–7
heart, electrophysiology
of,
592–3
myocardial infarction,
614–15
paced rhythms, 615
P- and T-wave
abnormalities, 611
sinus rhythms, 602–3
ST segment, 613–14
supraventricular
tachycardias, 603–6
tracing, 596
12 -lead ECG, 593–4
ventricular conduction
abnormalities,
600–2
ventricular rhythms,
607–8 , 610
Wolff–Parkinson–
White syndrome,
607
E-mail
communication, 16
Emergency
preparedness, 509
Emphasis, 22
Endocrine disease,
fundus in, 110–2
diabetes mellitus
(DM), 110
ocular manifestations
of diabetes, 112
Endocrine disorders,
476–7
Endocrine system, 95
abdomen, examination
of, 102
applied anatomy and
physiology, 96–7
axillae, examination
of,
102
chest, examination
of, 102
diabetes, examining
patient with, 108–9
drug history, 100
face and mouth,
examination of, 102
family history, 100
fundus in endocrine
disease, 110–2
general examination,
102–3
hands and arms,
examination of,
102
hypothalamopituitary
axis, 96–7
legs, examination
of, 102
neck, examination
of, 102
past medical history,
100
presenting patterns,
114
symptoms in
endocrinology, 98–9
tetany, signs of, 103
thyroid, 97
examining, 104–5
thyroid disease, eye
signs in, 106
Endocrinology,
presenting symptoms
in, 98–9
appetite and weight
changes, 98
bowel habit, 98
fl ushing, 99
growth, alteration
in, 99
hair distribution, 98–9
headache and visual
disturbance, 99
lethargy/fatigue, 98
pigmentation, 98
sexual function,
changes in, 99
skin and soft tissue
changes, 99
sweating, 98
thirst and
polydipsia, 98
urinary frequency and
polyuria,, 98
Endotracheal (ET)
intubation, 557–8
Enlarged blind spot, 266
Enlarged spleen and
enlarged left kidney,
236
Enteropathic arthritis,
370
Epidermis, 76

INDEX
679
Epididymal cysts, 387
Epididymis, 377
Epiglottis, 120–1
Epiglottitis, 144
Epistaxis, 127
causes of, 127
Epitrochlear lymph
node, 60
Erectile dysfunction,
379–80
Esophageal spasm, 149
Esophageal symptoms,
206–7
dyspepsia, 207
dysphagia, 206
heartburn and acid
refl ux, 206–7
odynophagia, 206
Estimated date of
delivery (EDD), 433
Eversion, 363 , 364
Examination, format of,
48–9
examination
framework, 49
right approach, 48
systems examinations,
48–9
Examination, general, 47
color, 51–2
edema, 55
in elderly patient, 72
fi rst
impressions,
50
hands, 62–6
hydration, 54
lymph nodes, 58–9
nutritional status, 56–7
physical examination,
approaching, 48–9
preparing for, 50
recognizable
syndromes, 68–9
temperature, 53
vitamin and trace
element
defi ciencies, 70–1
Examination drawings,
standard, 24–5
Examination under
special
circumstances, 507
disasters, terrorism,
and public health
emergencies, 509
overview, 508
sexual assault, 510
Expressive dysphasia,
260–1
External ear, 120
External genitalia, 238
examination of, 424
External jugular vein
(EJV), 161–2
External jugular vein
catheterization, 526
Extraluminal gas, 643
Extrapyramidal (indirect)
pathways, 295
Exudates, 671
Eye contact, 10
Eye level, 22
Eyes, 226
F
Face
and chest, 226–7
inspecting, 138
and neck, 161–4
Face masks, 549–50
Facial expression,
muscles of, 285
Facial nerve, 285–6
applied anatomy, 285
examination, 285
fi ndings, 286
Facial sinuses, surface
anatomy of, 121
Fallopian tubes, anatomy
of, 409
Fallot, tetralogy of, 177
Falls and loss of
consciousness
(LOC), 257
Family history (FH), 39
Family tree (genogram),
39–40
Fatigue, 153
Fat malabsorption, 214
Fat necrosis, 404
Fat soluble vitamins,
70
vitamin A (retinol), 70
vitamin D
(cholecalciferol),
70
vitamin E
(alpha-tocopherol),
70
vitamin K, 70
Fatty liver, 247
Fear words, 20
Female breast. See
Breast (female)
Female reproductive
system, 407
abdominal
examination, 442
abnormal bleeding, in
gynecology, 415
cervical (pap) smear,
taking, 430
in elderly patient, 447
external genital
organs, 409
gynecological
examination,
outline of, 423
history-taking, in
gynecology, 413
history-taking, in
obstetrics, 433
internal genital organs,
408
menstrual cycle, 411
obstetric examination,
outline of, 441
obstetrics, presenting
symptoms in, 437
pelvic examination,
424
pelvis, anatomy of, 408
perineum, 409
symptoms, in
gynecology, 419
Female urethral
catheterization,
575–6
Femoral artery, 157
Femoral hernia, 244–5
differential diagnosis
of, 245
Femoral nerve, 319
Femoral nerve stretch
test, 354
Femoral vein, 529
Fetal lie, 442 , 444
Fibroadenoma, 404
Fibrocystic disease, 404
Fibrous joints, 338
Finger, stain in, 191
Finger clubbing, 191 , 192
Finger extension, 64–6
Finger fl exion, 64–6
Finger joint
deformities, 63
Finger–nose test, 315
Fingers, 298
Fingers examination, 302

INDEX
680
Finkelstein’s test, 67
First impressions, 50
bedside clues, 50
consciousness level, 50
fi rst sight, diagnosis
at, 50
vital signs, 50
Flatus, 214
Fluid thrill, testing for,
239
Follicle-stimulating
hormone (FSH), 411
Follow-up
communication, 16
Foot and ankle. See
Ankle and foot
Foot drop, 321–2
Foot tapping, 316
Fornix, anatomy of, 408
Foster–Kennedy
syndrome, 272
Friction rubs, 231
Froment’s sign, 67 , 318
Frontotemporal
dementia, 472
Fundoscopy, abnormal
fi ndings
on,
270–2
central/branch retinal
artery occlusion,
272
central/branch retinal
vein occlusion, 272
Foster–Kennedy
syndrome, 272
optic atrophy, 270 ,
271
optic disc cupping,
270–1
optic disc swelling,
270
retinal hemorrhages,
270–2
Fundus, 269
Furunculosis, 141
G
Gait, 321–2
examination, 321
fi ndings, 321–2
Gallbladder, 234
palpation of, 235
Gallbladder signs, 234
GALS screen, 347
modifi ed, 347–8
Gastroesophageal refl ux
disease (GERD), 149 ,
206–7
Gaze-evoked nystagmus,
279
Generalized anxiety
disorder (GAD), 470
Genital prolapse, 421
Geriatric giants, 73
GI bleeding, lower
causes of, 215
GI bleeding, upper
causes of, 209
Glabellar tap, 307
Glands, applied anatomy
and physiology of, 76
Glasgow Coma Scale
(GCS), 332
Glaucoma, 112–13
Global dysphasia, 260
Globus hystericus
(globus pharyngeus),
130
Glomus jugulare tumor,
143
Glucocorticoid excess
(Cushing’s
syndrome), 115
Glue ear, 141
Gluten, 249
Gonadotrophin-releasing
hormone (GnRH),
411
Gout, 367 , 368
Grasp refl ex, 307
Graves disease, eye signs
of, 107
Gravidity, 434
Greeting, 7 , 21
Grey-Turner’s sign, 230
Growth hormone excess
(acromegaly), 116
Gums, 226
inspecting, 138
Gustatory hallucinations,
462
Gynecological vs.
gastrointestinal pain,
419
Gynecomastia, 227 , 395
H
Haggling and the art of
quantifi cation, 38
Hair
applied anatomy and
physiology of, 77
in elderly patient, 92
Hair disorders and
signs, 80
Hair growth, abnormal,
80
Hair loss, 80
Hair style, 4
Halitosis, 131
Hallpike’s maneuver, 288
Hallucinations, 462
Hand and upper limb,
224–5
axillae, 225
hepatic fl ap (asterixis),
224
nails, 224
palms, 224
upper limb, 225
Handihaler, 541–2
Hands, 62–6
Allan’s test, 66
bedside clues, 62
Dupuytren’s
contracture, 62
elbows, 66
function, 66
inspection, 62
movement, 64–6
palpation, 63–4
preparation, 62
pulses, 66
sensation, 66
shaking, 7
Hand-washing
procedures, 514 , 515
Headaches, 256 , 329–30
cluster headache, 329
meningitis, 329
migraine, 330
raised intracranial
pressure, 329–30
sinusitis, 329
subarachnoid
hemorrhage, 329
temporal (giant cell)
arteritis, 329
tension headache, 329
Head tilt, 548
Health Insurance
Portability and
Accountability Act
(HIPAA), 27
Hearing, simple test
of, 287
Hearing loss, 122–3

INDEX
681
causes of, 123
nonorganic, 123
Heart
applied anatomy and
physiology, 146
electrophysiology of,
592–3
Heart block
fi rst-degree heart
block, 599
second-degree heart
block, 599–600
third-degree heart
block, 600
Heartburn and acid
refl ux, 206–7
Heart sounds, 168
applied anatomy and
physiology, 146
Heberden’s nodes, 63
Heel–shin test, 316
Hematemesis, nature
of, 209
Hematuria, 219
Hemiballismus, 325–6
Hemiplegia, 321–2
Hemochromatosis, 83
Hemoptysis, 186
Hepatic encephalopathy,
248
Hepatic fl ap
(asterixis),
224
testing for, 225
Hepatojugular refl ux,
163
Hepatomegaly,
assessment of,
495–6
Hernial orifi ces, 243–5
femoral hernias, 244–5
hernias, 243
inguinal hernias, 243–4
strangulation, 243
Hernias, 243
Hertel’s
exophthalmometer,
106
High temperature, 53
Hila, radiograph of,
622–4
Hip, 356–7 , 301
examination, 505
feel,
356
function, 357
look, 356
measure, 357
move, 356
Thomas test, 357
Trendelenberg test,
357
Hips and femurs,
radiology of, 648–9
Hirsutism, 98–9
History, 29
alcohol, 37
allergies, 36
chief complaint (CC),
32
drug history, 36
elderly patient, 43–4
family history (FH), 39
history of present
illness (HPI), 33–4
history-taking, 30
past medical history
(PMH), 35
patient profi le
(PP),
31
pediatric patient, 45
review of systems
(ROS), 42
smoking, 38
social history (SH), 41
History-taking, 30 , 480–1
standard history
framework, 30
Hitchhiker’s Thumb, 63
Holmes–Adie pupil, 274
Homonymous
hemianopia, 266
Homonymous
quadrantanopia, 266
Horner’s syndrome, 274
Human chorionic
gonadotrophin
(hCG) hormone, 411
Human papillomavirus
(HPV), 430
Huntington’s disease,
473
Hydration, 54
Hydrocele, 386
Hypercalcemia, 116–17
Hypertension, in
pregnancy,
440
Hypertensive
retinopathy, 112–3
Hyperthyroidism,
114–15 , 99
Hypertrophic
cardiomyopathy,
159 , 178
Hyperuricemia, causes
of, 368
Hypoadrenalism
(Addison’s disease),
115–16
Hypocalcemia, 117
Hypodermis, 76
Hypoglossal nerve, 293
Hypogonadism, 98–9
Hypomania, 475
Hypoparathyroidism, 99
Hypopharynx, 120–1
Hypospadias, 381 , 386
Hypothalamopituitary
axis, of endocrine
system, 96–7
anterior pituitary
hormones, 96
posterior pituitary
gland, 97
Hypothermia,
53
Hypothyroidism, 99 , 114
I
Ileostomy, 230
Illusions, 462
Imparting
information, 15
Infectious diseases, 476
Infertility, 380
Infl ammatory bowel
disease, 250–1
extraintestinal features
of, 251
Information,
imparting, 15
Inguinal hernias, 243–4
differentiation of, 245
Inguinal lymph nodes, 61 ,
238 , 385
Inguinal rings, 244
Inhaler technique,
538–43
autohaler, 539
Diskus, 540
Handihaler, 541–2
metered-dose inhaler
(MDI), 538–9
spacer devices, 542–3
turbohaler, 540–1
Injection techniques,
516–17
Inner ear, 120
Intermenstrual bleeding
(IMB), 416
Intermittent pyrexia, 53

INDEX
682
Internal jugular vein
(IJV), 161–2 , 527–8
Internuclear
ophthalmoplegia, 281
Interpreters, 14
offi cial interpreter,
using, 14
Interruptions, 11
Interstitial fi brosis, 200
Interview, in psychiatric
assessment, 450
Intradermal (ID)
injections,
procedures for, 517
Intramuscular (IM)
injections,
procedures for,
516–17
Introduction, 7–8
of doctor, 7–8
of patient, 7
Inversion, 363 , 364
Iodine, 71
Irritable bowel
syndrome (IBS), 251
J
Jaundice, 51 , 83 , 216
causes of, 216
Jaw jerk, 284
Jaw thrust, 548 , 549
Joint, 338
Joint deformity, 343
Joint swelling, 342
Jugular venous pressure
(JVP), 54 , 161–4
applied anatomy and
physiology, 146
character of jugular
venous pulsation, 163
differentiating jugular
and carotid
pulsations, 163
examination, 161–2
fi ndings, 164
hepatojugular refl ux, 163
Kussmaul’s sign, 164
theory, 161
Justice, 26
JVP, 191
K
Kernig’s sign, 323
testing for, 324
Kidneys, 236 , 240
Knee, 301 , 358–60
anterior and posterior
drawer tests, 360 ,
361
Apley grinding test,
360 , 362
feel, 358
look, 358
McMurray test, 360 ,
362
measure, 359
medial and lateral
collateral ligament
instability, testing
for, 360 , 361
move, 359
Knee arthralgia, causes
of, 340
Knee clonus, 302
Knee examination, 302
Knees, radiology of,
650–1
abnormal, 650
normal, 650
pediatrics, 651
Koebner’s
phenomenon, 83
Koilonychia, 81 , 224
Kussmaul’s sign, 164
L
Labor pain, 438
Labyrinthitis, 142
Laryngeal mask airway
(LMA), 553
Laryngitis, 144
Late systolic murmur, 169
Law, ethics, and
communication, 26
Learning, 5
Left bundle branch block
(LBBB), 601–2
Left kidney, palpation
of, 237
Legg-Calve-Perthes
disease, 649
Leg swelling, causes
of, 55
Leg ulcers, 91
Lesion, 84–7
confl uence of grouped
lesions, 85
malignant melanoma,
87
primary lesions, 85
secondary lesions, 85
shapes and patterns of
grouped lesions, 86
vascular lesions, 85
Leukonychia, 81 , 224
Lewy body dementia,
472
Lhermitte’s
phenomenon, 323
Libido, 380
Lid lag (von Graefe’s
sign), 106
Light palpation, 232
Limited English
Profi ciency
(LEP)
regulations,
14
Lip-readers, communi-
cating with, 12
Lips, inspecting, 138
Liver, 233–4 , 240
palpation of, 233
Locomotor
musculoskeletal
symptoms, 340–3
deformity, 342–3
extra-articular
features, 343
locking, 342
loss of function, 343
pain,
340
sensory disturbance,
343
stiffness, 342
swelling, 342
weakness, 343
Long-standing problems,
34
Loss of consciousness
(LOC), 257
Loss of function, 343
Lower limb, 319
common peroneal
nerve, 319
femoral nerve, 319
lateral cutaneous
nerve of thigh, 319
sciatic nerve, 319
testing power in, 300
Lower motor neuron
(LMN) lesions, 286 ,
294–5 , 325
Low temperature, 53
Lumbar puncture (LP),
581–2
Lump

INDEX
683
examining, 88–9
auscultation, 88
compressibility, 88
consistency, 88
fl uctuation, 88
fl uid thrill, 88
pulsatility, 88
reducibility, 88
resonance, 88
translucency, 88
in mouth, 129–30
in neck, 130
Lung function tests,
658–61
Lungs
anatomy of, 182
physiology, 182
radiographic examina-
tion of, 626–39
cavitating lesions, 633
coin lesions, 633
collapse, 626–7
consolidation, 629–30
COPD, 636 , 638
fi brosis, 629–30
iatrogenic features
and foreign
bodies, 638
NG tubes, 639–40
normal, 626
pleural effusion,
634–6
pleural lesions, 634
pneumonectomy,
633–4
pulmonary edema,
630–1
tension
pneumothorax,
636–7
fi lm,
examining,
626
surface anatomy of,
183
Luteinizing hormone
(LH), 411–12
Lymphadenopathy,
causes of, 59
Lymph nodes, 58–9
axillary, 61
cervical and
supraclavicular, 60
epitrochlear, 60
fi ndings, 59
inguinal, 61
inspection, 58
palpation, 58–9
M
Macular region, 269
Maculopathy diabetic
retinopathy,
110–11
Magnesium, 71
Malabsorption, 248
Male breast, 395
Male genitalia, pediatric
assessment of, 496
Male-pattern baldness,
80
Male reproductive
system, 375
applied anatomy and
physiology, 376–7
balanitis and
balanoposthitis,
386
in elderly patient, 388
epididymal cysts, 387
examination, 381–4
hydrocele, 386
hypospadias, 386
orchitis, 387
paraphimosis, 386
penile ulcers, 386
phimosis,
386
priapism, 386
sexual history, 378
symptoms, 379–80
testicular carcinoma,
387
testicular torsion, 387
varicocele, 387
Male urethral
catheterization, 573–4
Malignant melanoma, 87
Malignant otitis externa,
141
Malnutrition, conditions
associated with, 57
Mania, 473–4
Manner, adjusting, 10–1
Manual defi brillation,
procedure for, 584
Marche àetits pas, 321–2
Marcus–Gunn swinging
light test, 273
Marfan’s syndrome, 68
Mastalgia, 394
McMurray test, for
meniscal tears
detection, 360 , 362
Median nerve, 317
Mediastinal position, 194
Medical jargon,
avoiding, 6
Medical notes, 23
Melanocytes, 76
Melena, 214
Meni
’s disease,
142
Meningitis, 329
Meniscal tears, testing
for,, 362
Menopause, 392
Menorrhagia, 415
Menstrual cycle, 411–12
luteal/secretory phase,
411–12
menstrual phase, 412
proliferative/follicular
phase, 411
Mental status examina-
tion, 458–65 , 474
appearance and
behavior, 458
cognitive function,
463–5
insight, 465
mood and affect,
458–9
perception, 461–2
speech, 458
thought content,
459–61
Metabolic acidosis, 665
Metabolic alkalosis,
666
Metallic valves, 172
Metered-dose inhaler
(MDI), 538–9
Microscopy, culture, and
sensitivity (M,C&S),
669
Mid-arm circumference,
56–7
Middle ear, 120
Mid-systolic click, 172
Migraine, 330
Mini-Mental State
Examination (MMSE),
463 , 464
Mitral regurgitation,
175
Mitral stenosis, 175
Mixed metabolic and
respiratory
disturbance,
666
Mood, 458–9
Motor neuron disease
(MND), 325

INDEX
684
Motor system, 294–5
cerebellum, 295
cortex, 294
extrapyramidal
(indirect)
pathways, 295
inspection, 296
lower limb power,
300–1
pyramidal (direct)
pathways, 294–5
tone, 296 , 297
upper limb power, 298
Mouth, 226–7
fl oor of
inspecting, 138
lumps in, 129–30
Mouth and throat
applied anatomy and
physiology of,
120–1
examining, 138–40
fi ndings, 139–40
inspection, 138–9
palpation, 139
Movements, abnormal,
325–6
Mucous membranes, 54
Mucus, 214
Muehrcke’s lines, 224
Multiple-choice
questions, 9
Multiple endocrine
neoplasias (MEN)
syndrome, 101
Multiple sclerosis (MS),
476
Murmurs, 492
Murphy’s sign, 234
Muscle wasting, 225
Musculoskeletal system,
337
ankle and foot, 363–4
applied anatomy and
physiology, 338–9
crystal arthropathies,
367
elbow, 349–50
in elderly patient, 334
examination
framework, 346
GALS screen, 347
hip, 356–7
knee, 358–60
locomotor
musculoskeletal
symptoms, 340–3
osteoarthritis, 367
osteoporosis, 370 , 371
Paget’s disease, 370–1
rest of the history,
344–5
rheumatoid arthritis
(RA), 365–6
shoulder, 351–2
spine, 354–5
spondyloarthropathies,
368–70
swollen knee, causes
of, 372
Myaesthenia gravis,
328–9
headaches, 329–30
Myocardial infarction
(MI), 149
Myoclonus, 325–6
Myokymia, 325–6
Myopathies, 328
Myotonias, 328
Myotonic dystrophy,
69 , 328
N
Nail disorders and
signs, 81
Nail/fi nger-tip signs, 63
Nails, 224
applied anatomy and
physiology of, 77
in elderly patient, 92
Nail symptoms, 81
Name badge, 4
Names, remembering, 6
Nasal discharge, 127
causes of, 127
symptoms of, 127–8
epistaxis, 127
nasal and facial pain,
128
nasal deformity, 128
nasal discharge, 127
nasal obstruction, 127
smell, disorders of,
128
sneezing, 128
Nasal polyps, 143–4
Nasal sinuses, examining,
137
Nasopharyngeal airway,
552
Nasopharynx, 120–1
Nausea and vomiting,
208
Neck, 227
lumps in, 130
Neck masses, causes
of, 140
Neck stiffness, 323
Nephrostomy, 230
Nerve palsies, combined,
280–1
Nervous system, 497–9
abdominal refl ex, 305
abnormal movements,
325–6
accessory nerve, 291
ankle clonus, 306
cerebellar lesions, 327
cognitive function, 262
coordination, 315–16
cranial nerves III, IV,
and VI, 276–9
palsies of, 280–2
cranial nerves IX and
X, 289–90
cremasteric refl ex,
305
direct questioning, 258
disturbance of higher
functions, 327–8
drug history, 258
in elderly patient, 334
facial nerve, 285–6
family history, 258
gait, 321–2
general inspection and
mental state, 259
headaches, 329–30
hypoglossal nerve, 293
motor
applied anatomy,
294–5
inspection and tone,
296–7
lower limb power,
300–1
upper limb power,
298
myaesthenia gravis,
328–9
myopathies, 328
neck stiffness, 323
olfactory nerve, 263
ophthalmoscopy,
268–72
optic nerve, 264–6
outline examination, 259

INDEX
685
parkinsonism, 325
past medical history,
258
peripheral nerves,
317–19
plantar response,
305 , 306
primitive refl exes, 307
pupils, 273–4
sensory: applied
anatomy, 308
sensory examination,
312–14
social history, 258
speech and language,
260–1
spinal cord lesions,
326–7
symptoms in
neurology, 256–7
tendon refl exes,
302–4
tobacco and alcohol,
258
trigeminal nerve,
283–4
unconscious patient,
331–3
upper motor and
lower motor nerve
lesions,
323–5
vestibulocochlear
nerve, 287–8
Nervous system,
pediatric assessment
of, 497–9
Neurofi bromatosis, 69
Neurological disorders,
476
brain tumors and
cerebrovascular
events, 476
multiple sclerosis
(MS), 476
Parkinson’s disease,
476
seizure disorder, 476
Newborn, 502
examination of, 502
Nocturia, 218
Nominal dysphasia, 261
Nonallergic (vasomotor)
rhinitis, 143
Noninvasive ventilation
(NIV), 559 , 560
Nonmalifi cence, 26
Nose, examining, 135–6
external inspection,
135
internal examination,
135
olfaction, testing, 135
palpation, 135
Nose and paranasal
sinuses, applied
anatomy and
physiology of, 120
Nostril patency, 135
Numbness and
weakness, 256
Nutritional status, 56–7
body weight and
height, 56
general physical
appearance, 56
mid-arm circumference,
56–7
skin-fold thickness, 56
Nystagmus, 278–9
downbeat, 278
gaze-evoked, 279
optokinetic, 278
pendular, 278
upbeat, 278
vestibular, 278
O
O3PQRST, 33–4
Obesity, conditions
associated with, 57
Obsessive-compulsive
disorder (OCD), 471
Occupational Safety and
Health Administration
(OSHA), 122–3
Oculocutaneous
albinism, 69
Oculomotor nerve, 280
Odynophagia, 206
Offi cial interpreter,
using, 14
Olfactory hallucinations,
462
Olfactory nerve, 263
applied anatomy, 263
examination, 263
fi ndings, 263
Oliguria and anuria,
219
Onycholysis, 81
Onychomycosis, 81
Open body language,
21–2
Opening snap, 172
Open questions vs.
closed questions, 9
Ophthalmoscopy,
268–72
examination, 268
fundoscopy, abnormal
fi ndings
on,
270–2
normal fundus, 269
Opponens pollicis,
64–6
Optic atrophy, 270 ,
271
Optic disc, 269
Optic disc cupping,
270–1
Optic disc swelling, 270
Optic nerve, 264–6
applied anatomy, 264
color vision, 264
visual acuity, 264
visual fi eld defects,
266 , 267
visual fi elds, 264–5
Optic neuropathy, 112
Optokinetic nystagmus,
278
Oral cavity, 120–1
normal appearance
of, 138
Oral pain, 129
Orbit, 281
Orbital fi ssure,
superior,
281
Orchitis, 387
Oropharyngeal airway,
550–2
Oropharynx, 120–1
inspecting, 138–9
Osgood–Schlatter
disease, 340 , 651
Osler–Weber–Rendu
syndrome, 69
Osteoarthritis, 367
Osteochondritis
dissecans, 340 , 651
Osteoporosis, 370 , 371
Otalgia, 122
causes of, 122
Otitis externa,
141
Otitis media and glue
ear, 141
Otorrhea, 122
Otosclerosis, 142

INDEX
686
Otoscope, 132–3
normal eardrum on,
133
Otoscopy, 132
Ovaries, anatomy of, 409
Ovaries and fallopian
tubes, bimanual
examination of, 428
Oxygen administration,
544–5
P
PaCO2, analysis of, 663
Paget’s disease, 370–1
Painful gait, 321–2
Pallor (paleness), 51
Palmar erythema, 224
Palmar interossei, 64–6
Palmomental refl ex, 307
Palms, 224
Palpating abdominal
organs, 233–8
aorta, 238
bladder, 237
deep palpation, 232
external genitalia, 238
gallbladder, 234
general approach, 232
inguinal lymph nodes,
238
kidneys,, 236
light palpation, 232
liver, 233–4
spleen, 234–5
Palpation of breast,
399–400
Palpation of lymph
nodes, 58–9
axillae, 58
epitrochlear nodes,
59
head and neck, 58
inguinal, 58
popliteal, 59
Palpation of pediatric
assessment, 194 ,
495–6
auscultation, 496
female genitalia, 496
male genitalia, 496
percussion, 496
rectal examination,
496
Palpation of respiratory
system, 194
chest expansion, 194 ,
195
mediastinal position,
194
tactile vocal fremitus,
194
Palpitations, 152
Pancreatitis, acute, 248
Pancreatitis, chronic, 248
Panic disorder, 470
Pansystolic murmur, 169
PaO2, analysis of, 663
Papilledema, 270 , 271
Paraphimosis, 386
Parapontine reticular
formation (PPRF),
lesions of, 281–2
Parinaud’s syndrome,
282
Parity, 434
Parkinsonism, 325
Parkinson’s disease, 69 ,
473 , 476
Paronychia, 81
Past medical history
(PMH), 35
Patent ductus arteriosus
(PDA), 176–7
Patient-centered
communication, 2–3
Patient-centered model,
2–3
key points in, 3
Peak expiratory fl ow
rate (PEFR), 537 ,
658–9
Peak fl ow
measurement,
537
Pediatric assessment,
479
Pediatric history, 481
Pediatric patient, 45
drug history, 45
learning to listen, 45
social history, 45
Pelvis
anatomy, 408
dyspareunia, 419–20
examination, 424–9
pain, 419–20
radiology of, 646–7
Pemberton’s sign, 105
Pendular nystagmus, 278
Penis
anatomy and
physiology,
376
examination, 381–2
ulcers, 386
Percussion, in abdominal
examination, 239–40
ascites, examining for,
239–40
bladder, 240
kidneys, 240
liver, 240
spleen, 240
Percussion, in respiratory
system, 196
fi ndings, 196
technique, 196 , 197
Percussion myotonia,
328
Pericardial effusion, 177
Pericardial rub, 172
Pericarditis, 177 , 149
Perineum, 409
Peripheral cyanosis, 51
Peripheral IV
catheterization,
522–3
Peripheral nerves,
317–19
lower limb, 319
upper limb, 317
Peripheral pulses,
157–60
character/waveform
and volume, 159
irregularly irregular,
159
palpation of, 158
pulse rate, 158–9
radiofemoral delay,
160
radioradial delay, 160
regular, 159
regularly irregular, 159
regular with ectopics,
159
rhythm, 159
technique, 157
Peripheral vascular
disease, 178
Peripheral vestibular
lesions, 125
Peritonitis, signs of, 232
Persistent pyrexia, 53
Personal appearance, 4
Petechiae, 225
Peutz–Jegher’s
syndrome, 69
Pharyngitis, chronic, 129

INDEX
687
Phimosis, 386
Phobic disorders, 470–1
Physical appearance,
general, 56
Physical examination,
approaching
format of examination,
48–9
general conduct, 48
Pinard’s fetal
stethoscope, 445–6
Pitting, 81
Pituitary gland,
posterior, 97
Pituitary hormones,
anterior, 96
Plantar response, 305 ,
306
Pleural effusion, 200 , 671
Pleural fl uids, tests
for, 671
Pleural fl uid sampling,
561–2
Pleuritic (respiratory)
pain, 149
Pleuritic chest pain, 184
Pneumoperitoneum, 643
AXR of,
643
Pneumothorax, 200
Polycystic ovarian
syndrome (PCOS),
115
Polyuria, 219
Popliteal artery, 157
Portal hypertension, 246
Postcoital bleeding, 416
Posterior tibial artery,
157
Postmenopausal
bleeding, 418
Postpartum hemorrhage,
439 , 440
Practical procedures,
511
abdominal
paracentesis, 571–2
anesthetic agents,
infi ltration
of,
512
arterial blood gas
sampling, 535–6
ascitic tap, 569
basic airway
management,
547–53
basic suturing, 579–80
blood pressure
measurement,
531–2
central venous
catheterization,
527–30
chest tube insertion,
563–4
defi brillation, 584–5
endotracheal (ET)
intubation, 557–8
external jugular vein
catheterization,
526
female urethral
catheterization,
575–6
hand-washing, 514
infusion, setting up,
524
inhaler technique,
538–43
injections, 516–17
knee joint aspiration,
588
lumbar puncture (LP),
581–2
male urethral
catheterization,
573–4
nasogastric (NG) tube
insertion, 567–8
noninvasive ventilation
(NIV), 559
oxygen administration,
544–5
peak fl ow
measurement, 537
pericardial aspiration,
583
peripheral IV
catheterization,
522–3
pleural fl uid
sampling,
561–2
rules, 512
sterility and
preparation, 513
suprapubic
catheterization,
577–8
tracheostomy
management,
555–6
12 -lead ECG,
recording, 533–4
venipuncture, 518–20
Prayer position, 65
Precordium, auscultating,
167–72
continuous murmurs,
170
diastolic murmurs,
169–70
dynamic maneuvers,
170
fi ndings extra sounds,
170–2
heart sounds, 168
murmurs, 169
position, 170
radiation, 170
systolic murmurs, 169
technique, 167–8
Precordium, examining,
165–6
inspection, 165–6
percussion, 166
Pregnancy, minor
symptoms of, 440
Pre-proliferative
retinopathy, 110
Presbycusis (senile
deafness), 143
Priapism, 386
Primitive refl exes, 307 ,
499 , 506
Prolactinoma, 116
Proliferative diabetic
retinopathy, 110–11
Pronator drift, 298
Prostate cancer, 242
Prostate gland, 377
Prostatitis, 242
Pruritus, 216
Pseudoathetosis, 325–6
Pseudogout, 367
Pseudohallucinations,
462
Psoriatic arthritis, 369
Psychiatric assessment,
449
affective disorders,
473–5
anxiety disorders,
470–1
confusion assessment
method (CAM),
469
delirium, 468–70
dementia, 471–3
examination, 451
framework for, 451

INDEX
688
Psychiatric assessment
(Cont.)
history, 452–7
medical conditions
with psychiatric
symptoms and
signs, 476
mental status
examination,
458–65
obsessive-compulsive
disorder (OCD),
471
physical examination,
466
preparation and
preliminary
considerations, 450
schizophrenia, 467–8
Ptosis, 277
Public health
emergencies, 509
Pulmonary hypertension,
radiograph of, 623
Pulmonary
regurgitation, 176
Pulmonary stenosis, 176
Pulsatile tinnitus,
124–6
Pulse rate, 54 , 158–9
Pulsus alternans, 159
Pulsus bisferiens, 159
Pulsus paradoxus,
159 ,
191
Pupillary light response,
273
Pupils, 273–4
applied anatomy, 273
Argyll–Robertson
pupil, 274
examination, 273
Holmes–Adie pupil, 274
Horner’s syndrome,
274
Pyramidal (direct)
pathways, 294–5
Q
Questioning, style of, 9
clarifying questions, 9
multiple-choice
questions, 9
open questions vs.
closed questions, 9
Questions, diffi cult, 10
R
Radial artery, 157
Radial nerve, 317
Radiofemoral delay, 160
Radioradial delay, 160
Raised intracranial
pressure, 329–30
Ramsay–Hunt syndrome,
286
Rapid alternating
movements, 315 , 316
Reactive arthritis,
369–70
Receptive dysphasia, 261
Recognizable syndromes,
68–9
Down’s syndrome, 68
Marfan’s syndrome, 68
myotonic dystrophy,
69
neurofi bromatosis, 69
oculocutaneous
albinism, 69
Osler–Weber–Rendu
syndrome, 69
Parkinson’s disease, 69
Peutz–Jegher’s
syndrome, 69
systemic sclerosis/
CREST syndrome,
69
tuberous sclerosis,
68–9
Turner’s syndrome, 68
Rectal bleeding and
melena, 213–14
Rectal examination,
241–2
Re-entry tachycardia,
606
Refl ective
comments,
10
Refl exes, 499
Reiter’s syndrome, 370
Relative afferent pupil
defect (RAPD), 273 ,
275
Reproductive system.
See Female
reproductive system;
Male reproductive
system
Respiratory acidosis, 664
Respiratory
alkalosis, 665–6 ,
665 ,Respiratory
system, 181 , 484–6
and alcohol, 189
anatomy, 182
auscultation, 198–9
bedside clues, 190
chest, inspection
of, 193
collapse, 200
common
respiratory condi-
tions and signs, 487
consolidation, 200
cough and abnormal
sounds, 190
cough and
expectoration,
185–6
drug history, 188
dyspnea, 184
ear, nose, and throat
(ENT), 488–9
in elderly patient, 201
family history, 188
hands, face, and neck,
191–2
interstitial fi brosis, 200
pain, 187
palpation, 194
past medical history,
188
pediatric assessment
of,
484–6
percussion, 196
physiology, 182–3
pleural effusion, 200
pneumothorax, 200
respiration, 190
and smoking, 189
social history, 189
speech, 190
stridor, 187
symptoms, 188
wheeze, 187
Rest pain, 153
Retinal hemorrhages,
270–2
Retinal vessels, 269
Reverse prayer
position, 65
Review of systems
(ROS), 42
Rheumatoid arthritis
(RA), 365–6
Right bundle branch
block (RBBB), 600–1
Rinne’s test,
287
Role, defi ning, 9

INDEX
689
Romberg’s sign, 313
Rome III diagnostic
criteria, 251
S
Salivary glands, applied
anatomy and
physiology of, 121
Scarring alopecia, 80
Scenic/panoramic
hallucinations, 462
Schizophrenia, 467–8
Schober’s test, 354–5
Sciatic nerve, 319
Sciatic nerve stretch
test, 354–5
Scissoring, 321–2
Scratch marks, 225
Scrotum
anatomy and
physiology of, 376
examination, 382–3
Seizure disorder, 476
Seizures, 257
Seldinger technique, 563
Self-awareness,
disorders of, 461
Sensory ataxia, 321–2
Sensory examination,
312–14
light touch, 312
pin-prick,
314
proprioception, 313
sensory inattention,
312–13
temperature, 314
vibration sense, 313
Sensory system, 308
sensory cortex, 308 ,
309
somatic sensory
pathways, 308
spinal roots and
dermatomes, 308
Septal perforation, 144
Serum/ascites albumin
gradient (SAAG), 672
Sex hormones, 377
Sexual assault, 510
Sexual assault nurse
examiners (SANE),
510
Sexually transmitted
infection (STI), 378
Sexual questions,
asking, 16
Shaking hands, 21 , 7
Shortness of breath
(SOB). See Dyspnea
Shoulder, 298 , 351–2
feel, 351
function, 352
look, 351
move, 351–2
radiology of, 652–3
special tests, 352
winging of scapula, 353
Silence, importance
of, 15
Sinuses, examining, 137
Sinusitis, 329
Sinus rhythms, 602–3
Skin, applied anatomy
and physiology of, 76
color, 82
dermis, 76
in elderly patient, 92
epidermis, 76
hypodermis, 76
Skin, examining, 82–3
beyond the lesion,
83
general inspection, 82
inspecting a lesion,
82–3
palpation, 83
Skin color
abnormalities, 83
Skin-fold thickness, 56
Skin malignancies, in
elderly patient, 93
Skin turgor, 54
Slipped femoral
epiphysis, 649
Smell, disorders of, 128
Smoking, 38
Smoking and respiratory
system, 189
Sneezing, 128
Snout (or pout) refl ex,
307
Social history (SH), 41
Soft palate, 139
Somatic hallucination,
462
Somatic sensory
pathways, 308
Sore throat, 129
Spacer devices, 542–3
Speech and language,
260–1
dysarthria, 260
dysphasia, 260–1
dysphonia, 260
examination, 260
Speech/thought form,
abnormal, 459
Spermatic cord, 376–7
Spider nevi, 227
Spinal cord lesions,
326–7
Spinal roots and
dermatomes, 308
Spine, 354–5
C-spine movement,
354
feel, 354
femoral nerve stretch
test, 355
look, 354
neurological
examination, 355
Schober’s test, 354–5
sciatic nerve stretch
test, 354–5
T- and L-spine
movement, 354
Spirometry, 659–60
Spleen, 234–5 , 240
palpation of, 235
Splinter hemorrhages, 81
Spondyloarthropathies,
368–70
Spontaneity vs. learned
behaviors, 5
Sputum, 185–6
characteristics of, 186
Squint, 277–8
Standing, 8
Staying on topic, 10
Sterility and preparation
procedures, 513
Stethoscopes, 4
Stiffness, 342
Strabismus, assessment
of, 498
Strabismus/squint, 277–8
Strangulation, 243
Stretch marks, 230
Stridor, 131 , 187
Subarachnoid
hemorrhage, 329
Subclavian vein, 529–30
Subcutaneous (SC)
injections,
procedures for, 516
Subcutaneous layer, 76
Suckling refl ex, 307

INDEX
690
Suicide risk
assessment, 453–5
protective factors
for, 455
risk factors for, 454
Superfi cial fascia, 76
Supinator examination,
302
Supraventricular
tachycardias, 603–6
Swan neck, 63
Sweat glands, 76
Swelling, 342
Swollen knee, causes
of, 372
Sympathy, displaying, 21
Symphysial–fundal
height, 422–3
Syncope, 152
Synovial joints, 338–9
Systemic lupus
erythematosus (SLE),
477
Systemic sclerosis, 69
Systolic murmurs, 169
T
Tachycardia, 158–9
Tactile hallucinations,
462
Tactile vocal fremitus,
194
T- and L-spine
movements, 354
Tardive dyskinesia,
325–6
Taste sensation, 285
Technical words,
avoiding, 6
Teeth, inspecting, 138
Telangiectasia, 226
Telephone
communication, 16
Telogen effl uvium, 80
Temperature, 53
Temporal (giant cell)
arteritis, 329
Tendon refl exes, 302–4 ,
499
augmentation, 304
examination, 302–4
technique, 302
theory, 302
Tension headache, 329
Terminal dribbling, 218
Terrorism, 509
Testes
anatomy and
physiology of, 376
carcinoma, 387
testicular pain, 379
Testicular torsion, 387
Tetany, signs of, 103
Thigh, lateral cutaneous
nerve of, 319
Thompson or Simmond
test, 364
Thoracentesis, 561–2
Thoracic and lumbar
spine, radiology of,
656–7
Throat
applied anatomy and
physiology of,
120–1
examining, 138–40
fi ndings, 139–40
inspection, 138–9
palpation, 139
Throat disorders,
symptoms of, 129–31
dysphonia, 130
halitosis, 131
mouth, lumps in,
129–30
neck, lumps in, 130
oral pain, 129
stridor, 131
throat pain, 129
Throat pain, 129
Thudicum speculum, 136
Thyroid, examining, 97 ,
104–5
auscultation, 105
inspection
rest of the neck, 104
thyroid gland, 104
palpation, 104–5
rest of the neck, 105
thyroid gland, 104
Pemberton’s sign, 105
percussion, 105
thyroid status,
assessing, 105
Thyroid disease, eye
signs in, 106
exophthalmos, 106
eye movements, 106
inspection, 106
lid lag, 106
lid retraction, 106
proptosis, 106
thyrotoxicosis and
graves disease, eye
signs of, 107
visual fi elds, 106
Thyroid status, assessing,
105
Thyrotoxicosis, eye signs
of, 107
Thyrotoxicosis and
graves disease, eye
signs of, 107
Tic, 325–6
Tietze’s syndrome,
149 , 187
“Tightness,” 184
Timing, 4
Tinel’s sign, 67 , 318
Tinnitus, 124–6
causes of, 124
deformity of the ear,
124–5
dizziness, 125–6
injury to the ear, 124
Titubation, 325–6
Tongue, 227
Tongue, inspecting, 138
Tonsillitis, 144
Tonsils, 139
Torsades de pointes, 610
Touching, 21
Trace elements, 71
copper, 71
iodine, 71
magnesium, 71
zinc, 71
Trachea, 194
anatomy of, 182
Tracheitis, pain of, 187
Tracheostomy manage-
ment, 555–6
Transudate, 671
Tremor, 191 , 192 , 256–7 ,
325–6
Triceps examination, 302
Tricuspid regurgitation,
176
Tricuspid stenosis, 175
Trigeminal nerve, 283–4
applied anatomy, 283
examination, 283–4
fi ndings, 284
refl exes, 284
Trochlear nerve, 280
Trousseau’s sign, 103 ,
117

INDEX
691
Tuberous sclerosis, 68–9
Tumor plop, 172
Tunnel vision, 266
Turbinates, 120
Turbohaler, 540–1
Turner’s syndrome, 68
12-lead ECG, 593–4
leads, 593–4
orientation, 594
Tympanic cavity, 120
Tympanic membrane,
120
U
Ulcer, examining, 90
base, 90
depth, 90
discharge, 90
edge, 90
leg ulcers, 91
representation of
some ulcer edges,
91
Ulcerative colitis (UC),
250
Ulnar deviation, 63
Ulnar nerve, 317
Ulsatile mass, Palpating,
238
Unconscious patient,
331–3
Unilateral fi eld loss, 266
Upbeat nystagmus, 278
Upper limb, 225 , 317
median nerve, 317
radial nerve, 317
testing power in, 299
ulnar nerve,
317
Upper motor and lower
motor nerve lesions,
323–5
Upper motor nerve
lesion, 286
Upper motor neuron
(UMN), 294–5 , 323
Urinary and prostate
symptoms, 218–19
dysuria, 219
hematuria, 219
hesitancy, 218
incomplete emptying,
219
intermittency, 219
nocturia, 218
oliguria and anuria, 219
polyuria, 219
terminal dribbling, 218
urgency, 218
urinary frequency, 218
urinary incontinence,
218
Urinary bladder, 237
Urinary incontinence,
421
Urinary tract infections
(UTIs), 388
Urostomy, 230
Uterus
anatomy of, 408–9
bimanual examination
of, 427–8
U.S. Centers for Disease
Control and
Prevention (CDC),
509
Uvula, 139
V
Vacutainer®, 518–20
Vagina, anatomy of, 408
Vaginal bleeding, in early
pregnancy, 437
Vaginal discharge, 420
Vaginal examination, 445
Valgus deformity, 343
Valvular disease, 175–6
aortic regurgitation,
175
aortic stenosis, 175
mitral regurgitation, 175
mitral stenosis, 175
pulmonary
regurgitation, 176
pulmonary stenosis,
176
tricuspid
regurgitation, 176
tricuspid stenosis, 175
Variant CJD (vCJD), 473
Varicocele, 387
Varus deformity, 343
Vascular dementia/
multi-infarct
dementia, 472
Vascular
endothelial-derived
growth factor
(VEGF), 110
Veins, applied anatomy
and physiology, 147
Venipuncture, 518–20
Venous hums, 231
Venous hypertension, 91
Ventricular conduction
abnormalities, 600–2
Ventricular escape
rhythm, 610
Ventricular
extrasystoles, 610
Ventricular fi brillation
(VF), 608
Ventricular rhythms,
607–8 , 610
Ventricular septal defect
(VSD), 176
Ventricular tachycardia
(VT), 607
Vestibular neuronitis, 142
Vestibular nystagmus,
278
Vestibulocochlear nerve,
287–8
applied anatomy, 287
examination, 287
hearing, 287
vestibular function,
288
Vestibulocochlear organ,
120
Visual hallucinations, 462
Visual loss avoidance in
diabetes, 112
Visual symptoms, 257
Vitamin A (retinol), 70
Vitamin and trace
element defi ciencies,
70–1
fat soluble vitamins, 70
trace elements, 71
water soluble vitamins,
70–1
Vitamin B1 (thiamine),
70
Vitamin B2
(ribofl avin), 70
Vitamin B3 (niacin), 70
Vitamin B6 (pyridoxine),
70–1
Vitamin B9 (folic acid), 71
Vitamin B12
(cyanocobalamin), 71
Vitamin C (ascorbic
acid),
71
Vitamin D
(cholecalciferol), 70
Vitamin defi ciencies, 447

INDEX
692
Vitamin E (alpha-
tocopherol), 70
Vitamin K, 70
Vitilgo, 83
Vomiting, causes of, 209
Vomitus, nature of,
208
bile, 208
blood (hematemesis),
208
Vulva, 409–10
Vulval symptoms, 420
W
Waddling, 321–2
Watching and
learning, 22
Water soluble vitamins,
70–1
vitamin B1 (thiamine),
70
vitamin B2 (ribofl avin),
70
vitamin B3 (niacin), 70
vitamin B6
(pyridoxine), 70–1
vitamin B9 (folic
acid), 71
vitamin B12
(cyanocobalamin),
71
vitamin C (ascorbic
acid), 71
Weber’s test, 287
position of tuning fork
for, 288
Wheeze, 187
Whistle-smile sign,
285
White coat, 4
Wolff–Parkinson–White
(WPW) syndrome,
605–6 , 607
Wrist, 298
Wrist extension,
64–6
Wrist fl exion, 64–6
Wrist subluxation,
63
Written
communication, 23
Z
Zinc, 71
Z-shaped thumb
(Hitchhiker’s
Thumb), 63
