
QLIK.COM
Single Node Installation and
Setup Guide
Qlik Catalog
May 2023

Qlik Catalog May 2023 Single Node Installation Guide 1
TABLE OF CONTENTS
1.1 Hardware Configuration Requirements 2
1.2 Software Configuration Requirements & Support Matrix 2
2.0 New Deployments 4
3.0 Installation Prerequisites 5
3.1 Java JDK Installation 7
3.2 Create Catalog Linux User and Qlik Catalog Directory 8
3.3 Tomcat Installation 9
3.4 PostgreSQL Installation 11
3.5 Container Platform & Node.js Installation 13
4.0 Qlik Catalog Software Installation 18
4.1 First-time Installation Using the Installer 18
4.2 Upgrade of Qlik Catalog 22
4.3 Non-Interactive (“Silent”) Installation 23
5.0 Qlik Catalog Software Installation Reference 24
5.1 Enabling SAML 24
5.2 Tomcat SSL Configuration 29
5.3 Port Redirection 31
5.4 Testing Licenses Connectivity to QlikCloud 32
5.5 Configuration Recommendations for Qlik Catalog Installations 32
5.6 Enabling NextGen XML 32
5.7 Logging 35
5.8 Hive JDBC Driver 35
5.9 Migrating to or Upgrading Tomcat 9 37
5.10 Disabling Tomcat Redirect / SSL 38
5.11 Upgrading PostgreSQL 39
5.12 Attaching a New Data Volume 42
5.13 SAML and PODIUM Authentication Using Single Tomcat Instance 43
5.14 RHEL 9, SELinux and podman 44

Qlik Catalog May 2023 Single Node Installation Guide 2
1.0 Qlik Catalog Overview and System Requirements
This document describes how to install the "single-node" deployment option for Qlik Catalog. Once
the installation is complete, upon first login to the Qlik Catalog application, you will be prompted for
a license. A license for "Qlik Catalog" must be entered.
1.1 Hardware Configuration Requirements
Single Node Recommendations
➢ Recommended Minimum Production Configuration
o 12 Cores
o 128GB RAM
o System Drive 250GB
o Data Drive 3x expected data
o Ubuntu or RHEL deployments: 2gb /home directory OR set custom container
storage directory according to Podman documentation
o Ethernet 10GB
o Virtual Machine or bare metal
➢ Minimum POC/Dev Configuration
o 8 Cores
o 32GB RAM
o System partition 250GB
o Data partition 3x expected data
o Ubuntu or RHEL deployments: 2gb /home directory
o Ethernet 10GB
o Virtual Machine or bare metal
➢ Minimum Supported Screen Resolution: 1366x768px
1.2 Software Configuration Requirements & Support Matrix
Qlik Catalog and Qlik Enterprise Manager supported versions
• Qlik Enterprise Manager May 2021 and above
• Qlik Catalog November 2020 Service Release 1 and above (4.8.1+)
Qlik Catalog and Qlik Sense supported versions
• QSEoW/QSD May 2021 and above
• Qlik Catalog February 2021 Service Release 2 and above (4.9.2+)
• QSEoW/QSD February 2021 (latest patch) and November 2020 (latest patch)
• Qlik Catalog February 2021 Service Release 1 (4.9.1)
• QSEoW/QSD November 2020 patch 3
• Qlik Catalog February 2021 (4.9)

Qlik Catalog May 2023 Single Node Installation Guide 3
System Requirements
Version
PostgreSQL Metadata Database
Custom Qlik Catalog PostgreSQL 14. Version 14.6 required for first-time
installations.
Oracle Metadata Database
Not supported
Apache Tomcat
Tomcat 9. Version 9.0.73+ encouraged for first-time installations.
Java
OpenJDK 8 or JDK 11, minimum version 1.8.0_222
Podman (RHEL 8.x & 9.1 or Ubuntu
deployments)
3.4.2+
Browsers
Google Chrome
80.0 or higher
MS Internet Explorer
Not supported
Other browsers not actively tested.
Issues must be reproducible using Chrome to be eligible for a fix.
Operating Systems
CentOS 7.x
Red Hat Enterprise Linux 7.x
Red Hat Enterprise Linux 8.x
Red Hat Enterprise Linux 9.1
Ubuntu 20.04 LTS
Ubuntu 22.04 LTS
CentOS Linux release 7.0 certified on en_US locale
All Red Hat Enterprise Linux installations require a valid Red Hat entitlement
subscription.
RHEL 7 installations require access to the following repositories:
• rhel-7-server-rpm
• rhel-7-server-extras-rpms
• rhel-7-server-optional-rpms
Additional Requirements
➢ All JDBC drivers needed for database connectivity
➢ Ensure port 8080 or 8443 (http or https) is open from user desktops to the Qlik Catalog node

Qlik Catalog May 2023 Single Node Installation Guide 4
2.0 New Deployments
The Qlik Catalog installation package includes a script named CatalogFirstTime.sh which
combines prerequisite, application, and post-installation scripts for a start-to-finish installation. It is
intended only for new deployments of Qlik Catalog.
Use of CatalogFirstTime.sh is recommended for new deployments to simplify the process, but it is
not required. You may follow the next two sections of this guide and run the installation scripts
individually.
The CatalogFirstTime.sh script works in conjunction with the CatalogInstaller.properties file.
Additional documentation is present in that file. Most of the properties have been pre-populated and
the defaults should work for most installations; however, they may be changed for customized
installations. PODIUM_RELEASE_FILE is set to the current podium zip file name. The properties
SUPERUSER_NAME and SUPERUSER_PASSWORD are for the Qlik Catalog PostgreSQL
instance.
There are two empty properties which MUST be populated prior to running CatalogFirstTime.sh:
• QDC_SERVICE_ACCOUNT_PW (password for the Linux user that will be created)
• SUPERUSER_PASSWORD (password for PostgreSQL superuser that will be created)
In the event any of these properties are left empty, the CatalogFirstTime.sh script will prompt for
input.
CatalogFirstTime.sh may be run in interactive mode or non-interactive “silent” mode:
Interactive installation allows users to confirm installer actions in a step-by-step manner.
Example: $ sudo ./CatalogFirstTime.sh
Non-Interactive or “silent” installation allows users to deploy Catalog in a scripted manner
which does not require any user interaction. The following arguments must be added to the
CatalogFirstTime.sh command to run in non-interactive mode:
• -s (silent)
• -a (Accept Qlik Customer Agreement)
Example: $ sudo ./CatalogFirstTime.sh -sa
NOTE: Invoking the “-a” option indicating acceptance of the Qlik Customer Agreement
(QCA) is required to run the CatalogFirstTime.sh in silent mode. By selecting this
installation option, the user agrees to the following:
BY DOWNLOADING, INSTALLING, OR OTHERWISE USING QLIK PRODUCTS, THE
CUSTOMER ACKNOWLEDGES AND AGREES THAT THE USE OF ALL QLIK
PRODUCTS IS SUBJECT TO THE TERMS AND CONDITIONS OF THE QLIK
CUSTOMER AGREEMENT (QCA) FOUND ON https://qlik.com. ANY SUCH USE WILL
CONSTITUTE CUSTOMER'S ACCEPTANCE AND RESULT IN A BINDING AND
LEGALLY ENFORCEABLE AGREEMENT BETWEEN THE CUSTOMER AND THE QLIK
ENTITY IDENTIFIED IN TABLE 1 OF THE AGREEMENT ("QLIK"). IF YOU ACCEPT
THESE TERMS ON BEHALF OF ANY CORPORATION, PARTNERSHIP, OR OTHER
ENTITY, YOU REPRESENT AND WARRANT THAT YOU ARE AUTHORIZED TO
LEGALLY BIND SUCH ENTITY TO THIS AGREEMENT AND SUCH ENTITY IS DEEMED
THE CUSTOMER HEREUNDER.

Qlik Catalog May 2023 Single Node Installation Guide 5
To use CatalogFirstTime.sh:
1. Install unzip (if not present)
All Red Hat Enterprise Linux & CentOS 7 Deployments
(sudo) # sudo yum install -y unzip
Ubuntu Deployments
(sudo) # sudo apt install -y unzip
2. Copy the CatalogInstaller.zip file into an installer “working” directory (example: /tmp)
Example: (sudo) # cp CatalogInstaller.zip /tmp
3. Unzip CatalogInstaller.zip
(sudo) # cd /tmp
(sudo) # unzip CatalogInstaller.zip
4. Copy the podium zip file into the CatalogInstaller directory created in Step 3
Example: (sudo) # cp podium-4.18-xxxxx.zip /tmp/CatalogInstaller/
5. Edit the CatalogInstaller.properties file located within the CatalogInstaller directory. Set the
properties described above. (If properties are not set the script will prompt for user input).
Example: (sudo) # vi /tmp/CatalogInstaller/CatalogInstaller.properties
6. Run CatalogFirstTime.sh
(sudo) # cd /tmp/CatalogInstaller
(sudo) # ./CatalogFirstTime.sh
Once CatalogFirstTime.sh completes successfully you may skip to this section of the guide.
3.0 Installation Prerequisites
The prerequisite software need only be installed before a first-time Catalog installation, not an
upgrade. There is also no requirement to upgrade prerequisites (e.g., Tomcat or PostgreSQL)
when upgrading Catalog.
NOTE: In all commands below, the user that the command should be “executed as” is in parentheses
at the beginning of the line:
● “(sudo)” means the command should be run as a user with sudo permission
● “(qdc)” means the command should be run as the Qlik Catalog Linux account user -- “sudo su
- qdc” may be used to become this user
● “(postgres)” means the command should be run as the PostgreSQL superuser -- “sudo su -
postgres” may be used to become this user

Qlik Catalog May 2023 Single Node Installation Guide 6
Note: Outside ports 80 (HTTP) and 443 (HTTPS) must be opened to allow outbound
communication to the Internet to allow software to be downloaded.
Prerequisite Installation Script (strongly encouraged)
There is a prerequisite installation script which may be used to install the prerequisite packages
described in this section. Its use is strongly encouraged. It will automatically download and
configure all required prequisite software, including Java, Tomcat and PostgreSQL. Further, it will
automatically configure Tomcat for HTTPS.
It is located within the CatalogInstaller.zip package and is named CatalogPrereqs.sh:
• ‘sudo’ permission is required to run CatalogPrereqs.sh
• CatalogPrereqs.sh works in conjunction with the CatalogInstaller.properties file. There are
two empty properties which MUST be populated prior to running CatalogPrereqs.sh:
• QDC_SERVICE_ACCOUNT_PW (password for Linux user that will be created)
• SUPERUSER_PASSWORD (password for PostgreSQL superuser that will be
created)
• All Red Hat Enterprise Linux installations require a valid Red Hat entitlement
subscription. This prerequisite script will not run without a subscription.
To run CatalogPrereqs.sh:
1. Install unzip (if not present)
All Red Hat Enterprise Linux & CentOS 7 Deployments
(sudo) # sudo yum install -y unzip
Ubuntu Deployments
(sudo) # sudo apt install -y unzip
2. Copy the CatalogInstaller.zip file into an installer “working” directory (example: /tmp)
Example: (sudo) # cp CatalogInstaller.zip /tmp
3. Unzip CatalogInstaller.zip
(sudo) # cd /tmp
(sudo) # unzip CatalogInstaller.zip
4. Copy the podium zip file into the CatalogInstaller directory created in Step 3
Example: (sudo) # cp podium-4.18-xxxxx.zip /tmp/CatalogInstaller/
5. Edit the CatalogInstaller.properties file located within the CatalogInstaller directory. Set the
properties described above. (If properties are not set the script will prompt for user input).
Example: (sudo) # vi /tmp/CatalogInstaller
6. Run CatalogPrereqs.sh

Qlik Catalog May 2023 Single Node Installation Guide 7
(sudo) # cd /tmp/CatalogInstaller
(sudo) # ./CatalogPrereqs.sh
7. After CatalogPrereqs.sh has been run successfully you may skip to Section 4.1 First Time
Installation Using the Installer
Manual Prerequisite Installation
Important: During the prerequisite setup process, several items are needed from the Qlik Catalog
software distribution, podium-4.18-xxxxx.zip. The instructions below assume the Qlik Catalog
software distribution has been unzipped to /tmp:
1. Install unzip (if not present)
All Red Hat Enterprise Linux & CentOS 7 Deployments
(sudo) # sudo yum install -y unzip
Ubuntu Deployments
(sudo) # sudo apt install -y unzip
2. Expand the Qlik Catalog software distribution to /tmp
(sudo) # unzip <replace-path>/podium-4.18-xxxxx.zip -d /tmp/
3.1 Java JDK Installation
Qlik Catalog is supported on the following JDK platforms:
•
OpenJDK 8
•
OpenJDK 11
•
Oracle JDK 8 (license required)
1. Check if JDK exists. If a supported version (or later) exists, skip this step.
(sudo) # java -version
JDK 8 results:
Openjdk version "1.8.0_222"
OpenJDK Runtime Environment (build 1.8.0_222-b10)
OpenJDK 64-Bit Server VM (build 25.222-b10, mixed mode)
JDK 11 results:
openjdk version "11.0.6" 2020-01-14 LTS
OpenJDK Runtime Environment 18.9 (build 11.0.6+10-LTS)
OpenJDK 64-Bit Server VM 18.9 (build 11.0.6+10-LTS, mixed mode, sharing)
2. JDK Installation:
è OpenJDK: Use package manager for installation:

Qlik Catalog May 2023 Single Node Installation Guide 8
OpenJDK 8 installation:
All Red Hat Enterprise Linux & CentOS 7 Deployments
(sudo) # sudo yum install -y java-1.8.0-openjdk-devel
Ubuntu Deployments
(sudo) # sudo apt install -y openjdk-8-jdk
OpenJDK 11 installation:
All Red Hat Enterprise Linux & CentOS 7 Deployments
(sudo) # sudo yum install -y java-11-openjdk-devel
Ubuntu Deployments
(sudo) # sudo apt install -y openjdk-11-jdk
Oracle JDK 8 (license required): Download the package directly from Oracle and install.
3.2 Create Catalog Linux User and Qlik Catalog Directory
Create a new Linux user "service account" to run Qlik Catalog. Tomcat will be started as this user.
Typically, this user is named “qdc” or “qdcsvc”. Throughout the remainder of this document “qdc” will
be used -- please replace “qdc” with a different user if so desired. In a similar fashion, “qdc” is also
used as a group name.
1. Create a Linux user to run Qlik Catalog (the user which launches Tomcat)
(sudo) # sudo groupadd qdc
(sudo) # sudo useradd -s /bin/bash -g qdc qdc
Additional step for Ubuntu deployments:
(sudo) mkdir /home/qdc && chown qdc:qdc /home/qdc
2. Optionally, set a password for the new Linux user - this is not needed if “sudo” is used to
become this user (e.g., “sudo su - qdc”)
(sudo) # sudo passwd qdc
3. Create a directory for all Qlik Catalog artifacts, including Tomcat
(sudo) # sudo mkdir /usr/local/qdc
4. Change ownership of /usr/local/qdc to the Linux user and group being used
(sudo) # sudo chown -Rf qdc:qdc /usr/local/qdc

Qlik Catalog May 2023 Single Node Installation Guide 9
3.3 Tomcat Installation
Qlik Catalog is only supported on Tomcat version 9. Version 9.0.73+ is encouraged for first-time
installs. There is no requirement to upgrade Tomcat when upgrading Catalog. If needed, Tomcat
upgrade instructions are included elsewhere in this guide.
Qlik strongly encourages the use of SSL with Tomcat for securing Qlik Catalog sessions.
Instructions for configuring Tomcat to support SSL connections are provided later in this document.
1. Install wget (if not present) while a sudo capable user
All Red Hat Enterprise Linux & CentOS 7 Deployments
(sudo) # sudo yum install -y wget
Ubuntu Deployments
(sudo) # sudo apt install -y wget
2. Become the Catalog Linux user
(sudo) # sudo su - qdc
3. Download Apache Tomcat 9.0.73+
(qdc) $ cd /usr/local/qdc
(qdc) $ wget https://archive.apache.org/dist/tomcat/tomcat-
9/v9.0.73/bin/apache-tomcat-9.0.73.tar.gz
4. Extract the Tomcat file
(qdc) $ tar -xvf apache-tomcat-9.0.73.tar.gz
5. The resulting directory, for example “/usr/local/qdc/apache-tomcat-9.0.73”, is known as
the Tomcat home directory. When configuring the CatalogInstaller.properties file in the
next section, please set TOMCAT_HOME to this value.
6. Overwrite <tomcat home>/conf/server.xml with the version expanded from the Qlik
Catalog zip file or edit the existing server.xml manually.
Overwrite Instructions (recommended)
(qdc) $ cp /tmp/podium/config/tomcat9-server.xml /usr/local/qdc/apache-
tomcat-9.0.73/conf/server.xml
OR
Manual Edit Instructions:
In the HTTP Connector element, add the bold attributes to turn compression on
<Connector port="8080" protocol="HTTP/1.1"
connectionTimeout="20000"
useSendfile="false" maxHttpHeaderSize="65536"
compression="on"
compressionMinSize="150"

Qlik Catalog May 2023 Single Node Installation Guide 10
noCompressionUserAgents="gozilla, traviata"
compressibleMimeType="text/html,text/xml,text/plain,text/css,text/javas
cript,application/javascript,application/json,application/xml"
redirectPort="8443" />
In the AccessLogValve element, change the bold attributes prefix, suffix and pattern
<Valve className="org.apache.catalina.valves.AccessLogValve" directory="logs"
prefix="localhost_access" suffix=".log"
pattern="%h %l %u %t "%r" %s %b %{podiumUser}s %{podiumSession}s [%I]" />
7. Port 8080 needs to be opened on the Qlik Catalog node firewall for HTTP connections.
Port 8443 needs to be opened on the Qlik Catalog node firewall for secure HTTPS
connections.
è It is recommended that Tomcat be configured to redirect insecure HTTP connections
directly to a secure HTTPS session. Instructions for configuring HTTPS redirect are
provided later in this document.
All Red Hat Enterprise Linux & CentOS 7 Deployments
(sudo) # sudo firewall-cmd --zone=public --permanent --add-
port=8080/tcp
(sudo) # sudo firewall-cmd --zone=public --permanent --add-
port=8443/tcp
(sudo) # sudo systemctl restart firewalld.service
Ubuntu Deployments (if UFW firewall is enabled)
(sudo) # sudo ufw allow 8080,8443/tcp
8. Setup Apache Tomcat as a service to automatically start when Linux restarts
Possible edit: if the Tomcat home directory is not /usr/local/qdc/apache-tomcat-9.0.73
or the service user/group is not “qdc,” the file /etc/systemd/system/tomcat.service must
be edited after the copy (cp) step below.
The copy (cp) command below assumes the Qlik Catalog software (a.k.a., podium zip)
has been expanded to /tmp -- see Section 2.0. You will not be able to start the service
until Qlik Catalog PostgreSQL is later installed, as a dependency exists.
(sudo) # sudo cp /tmp/podium/config/tomcat.service
/etc/systemd/system/
(sudo) # sudo systemctl daemon-reload
(sudo) # sudo systemctl enable tomcat.service
9. Optional: Configure Tomcat to support HTTPS.
Configuring Tomcat to support HTTPS may be done now or later.
10. Start Tomcat manually
(qdc) $ cd <tomcat home>
(qdc) $ ./bin/startup.sh

Qlik Catalog May 2023 Single Node Installation Guide 11
11. Browse to the following URL to verify that Tomcat is running
http://<Qlik-Catalog-Node-IP-Address-OR-Hostname>:8080
12. Tomcat can be manually stopped at any time
(qdc) # cd <tomcat home>
(qdc) # ./bin/shutdown.sh
13. The Tomcat log can be monitored
(qdc) # tail -F <tomcat home>/logs/catalina.out
3.4 PostgreSQL Installation
Qlik Catalog is certified on Qlik Catalog PostgreSQL 14, a customized version of PostgreSQL that
supports long schema and table names. First-time Catalog installations must install Qlik Catalog
PostgreSQL 14.6. There is no requirement to upgrade PostgreSQL when upgrading Catalog. If
needed, PostgreSQL upgrade instructions are included elsewhere in this guide.
To ensure this version is used, the Qlik Catalog PostgreSQL installer has been included in the Qlik
Catalog zip file. The directions below describe how to extract and install this custom version of
PostgreSQL, and then configure it.
Do NOT install PostgreSQL using rpm, yum or otherwise download it from the Internet.
NOTE: If you already have a different version of PostgreSQL installed, please first uninstall it.
NOTE: The below instructions assume that the Qlik Catalog zip file has already been extracted to
/tmp -- see Section 2.0.
1. Create a “postgres” user and group
(sudo) # sudo groupadd postgres
(sudo) # sudo useradd -s /bin/bash -g postgres postgres
Additional step for Ubuntu deployments:
(sudo) # sudo mkdir /home/postgres && chown postgres:postgres
/home/postgres
2. Add the “postgres” user to the “qdc” group
(sudo) # sudo usermod -aG qdc postgres
3. Create directories for executables and data, and change their ownership
(sudo) # sudo mkdir -p /usr/pgsql/qdc14-6
(sudo) # sudo chown -R postgres:postgres /usr/pgsql
(sudo) # sudo mkdir -p /var/lib/pgsql/14-6/qdc_data
(sudo) # sudo chown -R postgres:postgres /var/lib/pgsql
4. Run the custom Qlik Catalog PostgreSQL installer appropriate for your operating system
as the postgres user:

Qlik Catalog May 2023 Single Node Installation Guide 12
(sudo) # sudo su - postgres
Installer for RHEL 7/CentOS 7 deployments:
(postgres) $ /tmp/podium/thirdParty/qdc_pg14-6_RHEL7-and-
CentOS7.bsx
Installer for RHEL 8 deployments:
(postgres) $ /tmp/podium/thirdParty/qdc_pg14-6_RHEL8-and-
CentOS8.bsx
Installer for RHEL 9.1+ deployments:
(postgres) $ /tmp/podium/thirdParty/qdc_pg14-6_RHEL9.bsx
Installer for Ubuntu 20.04 deployments:
(postgres) $ /tmp/podium/thirdParty/qdc_pg14-6_Ubuntu20.bsx
Installer for Ubuntu 22.04 deployments:
(postgres) $ /tmp/podium/thirdParty/qdc_pg14-6_Ubuntu22.bsx
5. Create symlinks to executables
(sudo) # sudo ln -s /usr/pgsql/qdc14-6/bin/psql /usr/bin/psql
(sudo) # sudo ln -s /usr/pgsql/qdc14-6/bin/pg_dump /usr/bin/pg_dump
(sudo) # sudo ln -s /usr/pgsql/qdc14-6/bin/pg_restore
/usr/bin/pg_restore
6. IMPORTANT! Port 5432 needs to be opened on the Qlik Catalog node firewall to allow
connections to PostgresSQL. The Qlik Licenses container is dependent upon
communication with the PostgreSQL database.
All Red Hat Enterprise Linux &
CentOS 7 Deployments
(sudo) # sudo firewall-cmd --zone=public --permanent --add-port=5432/tcp
(sudo) # sudo systemctl restart firewalld.service
Ubuntu Deployments
(sudo) # sudo ufw allow 5432/tcp
7. Set PostgreSQL to start automatically, then start it.
Possible edit: if the directories in step 3 were altered, or the user/group is not “postgres”,
the file /etc/systemd/system/qdc_pg.service must be edited after the copy (cp) step
below.
The copy (cp) command below assumes the Qlik Catalog software (a.k.a., podium zip)
has been expanded to /tmp -- see Section 2.0.

Qlik Catalog May 2023 Single Node Installation Guide 13
(sudo) # sudo cp /tmp/podium/config/qdc_pg.service
/etc/systemd/system/
(sudo) # sudo systemctl daemon-reload
(sudo) # sudo systemctl enable qdc_pg.service
(sudo) # sudo systemctl start qdc_pg.service
3.5 Container Platform & Node.js Installation
Qlik Catalog requires a container platform to run containers. Platform is determined by the
operating system upon which Catalog is deployed:
RHEL 7 & CentOS 7: Docker
RHEL 8, RHEL 9.1, Ubuntu 20.04, and Ubuntu 22.04: Podman
Node.js is required for integration with Qlik Sense.
1. Install Node.js (which includes npm)
Red Hat Enterprise Linux Deployments
(sudo) # curl -sL https://rpm.nodesource.com/setup_18.x | sudo bash -
(sudo) # sudo yum install -y nodejs
CentOS 7 Deployments
(sudo) # curl -sL https://rpm.nodesource.com/setup_16.x | sudo bash -
(sudo) # sudo yum install -y nodejs
Ubuntu Deployments
(sudo) # curl -sL https://deb.nodesource.com/setup_18.x | sudo -E bash -
(sudo) # sudo apt install -y nodejs
2. Install Container Platform
CentOS 7 Deployments: Docker Community Edition (CE)
Docker CE installation instructions for CentOS 7
1. Install Docker, set it to start automatically, and start it:
(sudo) # sudo yum install -y yum-utils device-mapper-persistent-data lvm2
(sudo) # sudo yum-config-manager --add-repo
https://download.docker.com/linux/centos/docker-ce.repo
(sudo) # sudo yum install -y docker-ce
(sudo) # sudo systemctl enable docker.service
(sudo) # sudo systemctl start docker.service
2. Add the service user to the “docker” group
(sudo) # sudo usermod -aG docker qdc
3. Install Docker Compose

Qlik Catalog May 2023 Single Node Installation Guide 14
(sudo) sudo curl -L
"https://github.com/docker/compose/releases/download/1.29.0/docker-
compose-$(uname -s)-$(uname -m)" -o /usr/local/bin/docker-compose
% Total % Received % Xferd Average Speed Time Time Time Current
Dload Upload Total Spent Left Speed
100 617 100 617 0 0 2114 0 --:--:-- --:--:-- --:--:-- 2127
100 11.2M 100 11.2M 0 0 13.9M 0 --:--:-- --:--:-- --:--:-- 32.9M
(sudo) # sudo chmod +x /usr/local/bin/docker-compose
4. Test Docker and Docker Compose -- this should be done as the Catalog Linux
user
(sudo) # sudo su - qdc
(qdc) $ docker ps
CONTAINER ID IMAGE COMMAND CREATED STATUS PORTS NAMES
(qdc) $ docker-compose version
docker-compose version 1.23.2, build 1110ad01
docker-py version: 3.6.0
CPython version: 3.6.7
OpenSSL version: OpenSSL 1.1.0f 25 May 2017

Qlik Catalog May 2023 Single Node Installation Guide 15
RHEL 7 Deployments: Docker Enterprise
• Docker Enterprise is the officially supported Docker platform for RHEL 7.
• A Red Hat entitlement subscription is required to access the RHEL repository
containing the Docker Enterprise engine package.
• Official RHEL 7 Docker Enterprise installation instructions may be found here:
https://access.redhat.com/documentation/en-
us/red_hat_enterprise_linux_atomic_host/7/html-
single/getting_started_with_containers/index#using_the_docker_command_and_serv
ice
Docker Enterprise installation instructions for RHEL 7
1. Install Docker, set it to start automatically, and start it:
(sudo) # subscription-manager repos --enable=rhel-7-server-rpms
(sudo) # subscription-manager repos --enable=rhel-7-server-extras-rpms
(sudo) # subscription-manager repos --enable=rhel-7-server-optional-rpms
(sudo) # yum install docker device-mapper-libs device-mapper-event-libs
(sudo) # systemctl enable docker.service
(sudo) # systemctl start docker.service
(sudo) # groupadd docker
(sudo) # chown -R root:docker /run/docker /etc/sysconfig/docker /etc/docker
/var/lib/docker /usr/bin/docker /usr/share/bash-completion/completions/docker
/usr/libexec/docker
(sudo) # chmod -R 770 /var/lib/docker
(sudo) # systemctl restart docker.service
2. Add the service user to the “docker” group
(sudo) # sudo usermod -aG docker qdc
3. Install Docker Compose
(sudo) sudo curl -L
"https://github.com/docker/compose/releases/download/1.29.0/docker-
compose-$(uname -s)-$(uname -m)" -o /usr/local/bin/docker-compose
% Total % Received % Xferd Average Speed Time Time Time Current
Dload Upload Total Spent Left Speed
100 617 100 617 0 0 2114 0 --:--:-- --:--:-- --:--:-- 2127
100 11.2M 100 11.2M 0 0 13.9M 0 --:--:-- --:--:-- --:--:-- 32.9M
(sudo) # sudo chmod +x /usr/local/bin/docker-compose
4. Test Docker and Docker Compose -- this should be done as the Catalog Linux
user
(sudo) # sudo su - qdc
(qdc) $ docker ps
CONTAINER ID IMAGE COMMAND CREATED STATUS PORTS NAMES
(qdc) $ docker-compose version
docker-compose version 1.23.2, build 1110ad01

Qlik Catalog May 2023 Single Node Installation Guide 16
docker-py version: 3.6.0
CPython version: 3.6.7
OpenSSL version: OpenSSL 1.1.0f 25 May 2017
RHEL 8 Deployments: Podman
• Podman is the officially supported container platform for RHEL 8.
• Podman is a "daemonless" container platform
RHEL 8 Podman installation instructions
(sudo) # yum module install -y container-tools
(sudo) # loginctl enable-linger qdc (where "qdc" is the Catalog Linux user)
Test Podman command as Catalog Linux user
(sudo) # sudo su - qdc
(qdc) $ podman info
Verify Linger is enabled for the Catalog Linux user account
(qdc) $ loginctl user-status qdc | grep inger
Result:
State: lingering
Linger: yes
RHEL 9.1 Deployments: Podman
• Podman is the officially supported container platform for RHEL 9.x.
• Podman is a "daemonless" container platform
RHEL 9.1 Podman installation instructions
(sudo) # yum install -y podman
(sudo) # loginctl enable-linger qdc (where "qdc" is the Catalog Linux user)
Test Podman command as the Catalog Linux user
(sudo) # sudo su - qdc
(qdc) $ podman info
Verify Linger is enabled for the Catalog Linux user account
(qdc) $ loginctl user-status qdc | grep inger
Result:
State: lingering
Linger: yes
Ubuntu 20.04 & Ubuntu 22.04 Deployments: Podman
• Podman is the supported container platform for Ubuntu 20.04 & Ubuntu 22.04 deployments.
• Podman is a "daemonless" container platform
Ubuntu 20.04 Podman installation instructions

Qlik Catalog May 2023 Single Node Installation Guide 17
(sudo) # apt install curl gnupg2 -y
(sudo) # echo 'deb
http://download.opensuse.org/repositories/devel:/kubic:/libcontainers:/stable/xUbuntu_20.04/
/' > /etc/apt/sources.list.d/devel:kubic:libcontainers:stable.list
(sudo) # wget -nv
https://download.opensuse.org/repositories/devel:kubic:libcontainers:stable/xUbuntu_20.04/R
elease.key -O- | apt-key add -
(sudo) # apt-get update -qq -y
(sudo) # apt-get -qq --yes install podman
(sudo) # loginctl enable-linger qdc (where "qdc" is the Catalog Linux user)
Test Podman command as the Catalog Linux user
(sudo) # sudo su - qdc
(qdc) $ podman info
Verify Linger is enabled for the Catalog Linux user account
(qdc) $ loginctl user-status qdc | grep inger
Result:
State: lingering
Linger: yes
Ubuntu 22.04 Podman installation instructions
(sudo) # apt-get -y install podman
(sudo) # loginctl enable-linger qdc (where "qdc" is the Catalog Linux user)
Test Podman command as the Catalog Linux user
(sudo) # sudo su - qdc
(qdc) $ podman info
Verify Linger is enabled for the Catalog Linux user account
(qdc) $ loginctl user-status qdc | grep inger
Result:
State: lingering
Linger: yes

Qlik Catalog May 2023 Single Node Installation Guide 18
4.0 Qlik Catalog Software Installation
The Qlik Catalog installer is a shell script, CatalogInstaller.sh, that is guided by a properties file
containing configuration, CatalogInstaller.properties. The same properties file can be used both
for the initial install as well as later upgrades.
The shell script and properties files are included in a zip file, CatalogInstaller.properties.zip.
Required installation parameters are first configured in the properties file. Then, the shell script is
run and begins by confirming the installation parameters.
Password Encryption
Passwords may be encrypted at any time using a utility. It will use stdin to prompt for the password
and output the encrypted password to stdout.
$ unzip -j podium-4.18-xxxxx.zip podium/lib/podium-encrypt-util.jar -d .
$ java -cp podium-encrypt-util.jar com.nvs.core.utils.PodiumEncrUtil
NOTE: In all commands below, the user that the command should be “executed as” is in
parentheses at the beginning of the line:
● “(sudo)” means the command should be run as a user with sudo permission
● “(qdc)” means the command should be run as the Qlik Catalog Linux user -- “sudo su -
qdc” may be used to become this user
● “(postgres)” means the command should be run as the PostgreSQL superuser -- “sudo
su - postgres” may be used to become this user
4.1 First-time Installation Using the Installer
Execute the following steps to perform a first-time install:
1. The installer must be run as the Qlik Catalog Linux user:
(sudo) # sudo su - qdc
2. Unzip CatalogInstaller.zip into a working directory
3. Copy the Qlik Catalog software zip file (e.g., podium-4.18-xxxxx.zip) into the working
directory
4. Change directory to the working directory. It should contain the following:
podium-4.18-xxxxx.zip CatalogFirstTime.sh CatalogInstaller.properties
CatalogInstaller.sh CatalogPostInstall.sh CatalogPrereqs.sh QCA.txt QSValidation.sh
upgrade-scripts (directory)

Qlik Catalog May 2023 Single Node Installation Guide 19
5. Edit the installation parameters in CatalogInstaller.properties -- additional
documentation is present in that file. There are two empty properties which MUST be
populated prior to running CatalogInstaller.sh:
• QDC_SERVICE_ACCOUNT_PW (password for Linux user account created
previously)
• SUPERUSER_PASSWORD (password for PostgreSQL superuser set previously)
6. Interactive & Non-Interactive installation modes:
The Qlik Catalog installer shell script may be run in interactive mode or non-interactive
“silent” mode.
Interactive installation allows users to confirm installer actions in a step-by-step manner.
To run the installer in interactive mode simply run: ./CatalogInstaller.sh
Non-Interactive or “silent” installation allows users to deploy Catalog in a scripted
manner which does not require any user interaction. Details for running the installer in
non-interactive mode are noted later in this document.
7. Run the shell script. You may abort the script at any time by entering control-C. The
installer will begin by asking you to confirm the data you entered in
CatalogInstaller.properties -- it will also validate the parameters. It will expand the Qlik
Catalog software zip and create all necessary configuration files. It will then setup the
database.
(qdc) $ ./CatalogInstaller.sh
8. When complete, Tomcat is automatically started. It may be started and shutdown using
the following:
(qdc) $ <tomcat home>/bin/startup.sh
(qdc) $ <tomcat home>/bin/shutdown.sh
The log can be viewed as follows:
(qdc) $ tail -F <tomcat home>/logs/catalina.out
9. Open a browser and go to the following URL to validate that you can display the
homepage. If a WEBAPP_NAME other than “qdc” was specified in
CatalogInstaller.properties, please replace “qdc” with the alternative webapp name.
https://<Catalog node hostname or IP address>:8443/qdc
10. Attempt to login for the first time (user: podium, password: nvs2014!) and a prompt will
appear to enter a license key. Enter the provided key and click register.

Qlik Catalog May 2023 Single Node Installation Guide 20
4.1.1 Post-Installation Tasks
The installer deployed four containers which are used by Qlik Catalog:
• Licenses
• Engine
• DCaaS
• Data Rest Connector
These containers should be configured to auto-start during system boot. (In fact, the
Licenses container MUST be running to login to Qlik Catalog).
A post-installation script which simplifies the process of configuring the containers to run
as services is included, and its use is strongly encouraged. It is located within the
CatalogInstaller.zip package and is named CatalogPostInstall.sh:
NOTE: ‘sudo’ permission is required to run CatalogPostInstall.sh
To run CatalogPostInstall.sh:
1. Switch to a user account with ‘sudo’ privileges
2. Navigate to the CatalogInstaller working directory (used above to run the Catalog
installer)
Example: $ cd /tmp/CatalogInstaller
3. Run CatalogPostInstall.sh using an account with ‘sudo’
(sudo) $ sudo ./CatalogPostInstall.sh
Manual Container Service Configuration
If you did not run CatalogPostInstall.sh, then do the following.
a) If the Qlik Catalog Qlik Sense integration directory is not /usr/local/qdc/qlikcore or the
service user/group is not “qdc,” the file
/etc/systemd/system/qlikContainers.service
must be edited after the copy
(cp) step below
b) If deploying to RHEL 8, RHEL 9.1, Ubuntu 20.04, or Ubuntu 22.04 which use
Podman to manage containers you must edit
/etc/systemd/system/qlikContainers.service
after the copy (cp) step below:
a. REMOVE line 13 completely:
Requires=docker.service
b. EDIT line 14 and remove the following text: docker.service
The copy (cp) command below assumes the Qlik Catalog software (a.k.a., podium zip)
has been expanded to /tmp in the prerequisites section.
(sudo) $ sudo cp /tmp/podium/config/qlikContainers.service
/etc/systemd/system/

Qlik Catalog May 2023 Single Node Installation Guide 21
(sudo) $ sudo systemctl daemon-reload
(sudo) $ sudo systemctl enable qlikContainers.service
Congratulations! Qlik Catalog software installation is now complete.
The installer created two databases: the Qlik Catalog metadata database (podium_md) and the
distribution database (podium_dist). The default users (roles) for these databases are podium_md
and podium_dist, both with a default password of “nvs2014!”.
Important Notes
• Any JDBC drivers for your licensed RDBMS should be placed in the directory called out by the
following core_env property. This directory is preferred over placing drivers in
$TOMCAT_HOME/webapps/qdc/WEB-INF/lib, where they will be overwritten on upgrade and
where they may interfere with other libraries.
# An alternate directory to WEB-INF/lib for JDBC driver jars.
# May also be set directly, for a given driver, on table
# podium_core.pd_jdbc_source_info, column alt_classpath.
# Restart required. Default: not set
jdbc.alternate.classpath.dir=/usr/local/qdc/jdbcDrivers
• If a JDBC driver is particularly complicated and consists of multiple jars (e.g., the Simba Google
Big Query driver has dozens of jars), it can be further isolated into its own sub-directory. If you
do this, you must run a SQL statement as follows (default password is “nvs2014!”; update path
and name):
psql podium_md -U podium_md -c "update podium_core.pd_jdbc_source_info
set alt_classpath = '/usr/local/qdc/jdbcDrivers/simbaBigQuery'
where sname = 'BIGQUERY';"
REMINDER: Reboot Procedure
When the Qlik Catalog server is restarted, several required processes must be started.
The following are autostarted services. To manually restart these services:
● PostgreSQL: (sudo) # sudo systemctl restart qdc_pg.service
○ test: (sudo) # psql
● RHEL 7/CentOS 7 Deployments using Docker
○ Docker: (sudo) # sudo systemctl restart docker.service
○ test: (sudo) # sudo docker ps
The following should be autostarted services, if configured correctly above. To manually restart
these services:
● Qlik Licenses & Engine Containers:
(sudo) # sudo systemctl restart qlikContainers.service
Check for Running Containers:
o Docker:

Qlik Catalog May 2023 Single Node Installation Guide 22
(sudo) # sudo docker inspect -f '{{.State.Running}}' qlikcore_qix-
engine_1
(sudo) # sudo docker inspect -f '{{.State.Running}}' licenses
o Podman:
(qdc) $ podman inspect -f '{{.State.Running}}' catalog-pod-engine
(qdc) $ podman inspect -f '{{.State.Running}}' catalog-pod-licenses
● Tomcat: (sudo) # sudo systemctl restart tomcat.service
If the following were not configured to be autostarted services, they must be manually restarted after
reboot. First, become the service user: (sudo) # sudo su - qdc
● Qlik Licenses & Engine Containers: (qdc) $ cd /usr/local/qdc/qlikcore &&
./launch_qlikContainers.sh
○ Test using Docker:
(qdc) $ docker inspect -f '{{.State.Running}}' qlikcore_qix-engine_1
(qdc) $ docker inspect -f '{{.State.Running}}' licenses
○ Test using Podman:
(qdc) $ podman inspect -f '{{.State.Running}}' catalog-pod-engine
(qdc) $ podman inspect -f '{{.State.Running}}' catalog-pod-licenses
● Tomcat: (qdc) $ /usr/local/qdc/apache-tomcat-9.0.73/bin/startup.sh
4.2 Upgrade of Qlik Catalog
NOTE: Beginning with Qlik Catalog May 2021, Apache Tomcat 9 is mandatory. Prior installations
using Tomcat 7 must be migrated. The installer will disallow use of any version of Tomcat other than
version 9. Please see the section "Migrating to or Upgrading Tomcat 9". Notably, at the end, the
installer should be run WITHOUT the upgrade option “-u”. Please review the release notes and the
below guidance before proceeding.
You should re-use the CatalogInstaller.properties file from the initial install, updating the value for
PODIUM_RELEASE_FILE.
The installer script has an upgrade mode, which also performs a backup of the WEB-INF/classes
directory. Execute the following steps to perform an upgrade of Qlik Catalog June 2019 and later:
1. The installer must be run using the Qlik Catalog Linux user account:
(sudo) # sudo su - qdc
2. Stop Tomcat. Ensure it is no longer running.
(qdc) $ cd <tomcat home>
(qdc) $ ./bin/shutdown.sh
(qdc) $ ps -ef | grep Boot
3. Backup the PostgreSQL databases, in case the upgrade must be reverted.
(sudo) # pg_dump -U postgres --format=c --file=<backupFileName1>
podium_md

Qlik Catalog May 2023 Single Node Installation Guide 23
(sudo) # pg_dump -U postgres --format=c --file=<backupFileName2>
podium_dist
4. Unzip CatalogInstaller.zip into a working directory
5. Copy the Qlik Catalog software ZIP file (e.g., podium-4.18-xxxxx.zip) into the working
directory
6. Change directory to the working directory. It should contain the following:
podium-4.18-xxxxx.zip CatalogFirstTime.sh CatalogInstaller.properties
CatalogInstaller.sh CatalogPostInstall.sh CatalogPrereqs.sh QCA.txt QSValidation.sh
upgrade-scripts (directory)
7. Edit the installation parameters in CatalogInstaller.properties -- additional documentation
is present in that file
● Only the following are used for upgrade: QDC_HOME, TOMCAT_HOME,
PODIUM_RELEASE_FILE, WEBAPP_NAME, POSTGRES_HOSTNAME,
POSTGRES_IPADDRESS, CATALOG_IPADDRESS, and database
SUPERUSER_NAME and SUPERUSER_PASSWORD.
8. Run the shell script with the “-u” argument. You may abort the script at any time by
entering control-C. The installer will begin by asking you to confirm the data you entered
in CatalogInstaller.properties -- it will also validate the parameters. It will expand the Qlik
Catalog software ZIP and update the webapp. A backup of WEB-INF/classes is
automatically made in <tomcat home>/backups. The file WEB-INF/classes/log4j.xml (or
log4j2.xml) is automatically restored during upgrade.
(qdc) # ./CatalogInstaller.sh -u
9. The Qlik Licenses container must be setup as a service to automatically start when Linux
restarts.
Possible edit: If the Qlik Catalog Qlik Sense integration directory is not
/usr/local/qdc/qlikcore or the service user/group is not qdc, the file
/etc/systemd/system/qlikContainers.service must be edited after the copy (cp)
step below.
The copy (cp) command below assumes the Qlik Catalog software (a.k.a., podium zip)
has been expanded to /tmp -- the prerequisites section.
(sudo) # sudo cp /tmp/podium/config/qlikContainers.service
/etc/systemd/system/
(sudo) # sudo systemctl daemon-reload
(sudo) # sudo systemctl enable qlikContainers.service
10. If previously using the QVD Import feature then remove the existing qlikcore.service
file. The Qlik Engine container required for the QVD Import feature has been included in
the unified qlikContainers.service file configured in step 11.
(sudo) # sudo rm /etc/systemd/system/qlikcore.service
4.3 Non-Interactive (“Silent”) Installation

Qlik Catalog May 2023 Single Node Installation Guide 24
Note: If upgrading from a Catalog version prior to 4.7 non-interactive mode is not allowed by the
installer due to mandatory upgrade scripts which must be run manually.
To run the installer in non-interactive mode:
1. Edit the installation parameters in CatalogInstaller.properties -- additional documentation
is present in that file. There are two empty properties which MUST be populated prior to
running CatalogInstaller.sh:
• QDC_SERVICE_ACCOUNT_PW (password for the Catalog Linux user user created
previously)
• SUPERUSER_PASSWORD (password for PostgreSQL superuser set previously)
1. The following options must be specified following the CatalogInstaller.sh command:
• -s (silent)
• -a (Accept Qlik Customer Agreement)
Example: ./CatalogInstaller.sh -s -a
NOTE: Invoking the “-a” option indicating acceptance of the Qlik Customer Agreement (QCA) is
required to run the installer in silent mode. By selecting this installation option, the user agrees
to the following:
BY DOWNLOADING, INSTALLING, OR OTHERWISE USING QLIK PRODUCTS, THE
CUSTOMER ACKNOWLEDGES AND AGREES THAT THE USE OF ALL QLIK PRODUCTS IS
SUBJECT TO THE TERMS AND CONDITIONS OF THE QLIK CUSTOMER AGREEMENT (QCA)
FOUND ON https://qlik.com. ANY SUCH USE WILL CONSTITUTE CUSTOMER'S
ACCEPTANCE AND RESULT IN A BINDING AND LEGALLY ENFORCEABLE AGREEMENT
BETWEEN THE CUSTOMER AND THE QLIK ENTITY IDENTIFIED IN TABLE 1 OF THE
AGREEMENT ("QLIK"). IF YOU ACCEPT THESE TERMS ON BEHALF OF ANY CORPORATION,
PARTNERSHIP, OR OTHER ENTITY, YOU REPRESENT AND WARRANT THAT YOU ARE
AUTHORIZED TO LEGALLY BIND SUCH ENTITY TO THIS AGREEMENT AND SUCH ENTITY IS
DEEMED THE CUSTOMER HEREUNDER.
5.0 Qlik Catalog Software Installation Reference
All following sections are not part of the base installation runbook and as such are treated in
isolation.
The core_env.properties file contains all the primary and secondary configuration parameters
necessary for desired operation. The file is found at <tomcat home>/conf/core_env.properties. It is
self-describing in that the explanation for all parameters is included in the file itself. Please see the
file and modify the parameters as needed. Once Qlik Catalog is launched, you can edit the file and
then use the button in the admin section to refresh core_env.properties if any changes are made,
which prevents having to restart Tomcat for these changes.
5.1 Enabling SAML
Qlik Catalog May 2023 Single Node Installation Guide 25
This section covers configuring Catalog to use one of three SAML providers: Microsoft Azure Active
Directory, Okta, and PingFederate. If using a different SAML provider, please review this section
and apply the same approach to your provider.
Note for Other SAML Providers
Some organizations prohibit the HTTP-based exchange of metadata between their Identity Provider
(typically on-premise) and Service Provider (Catalog). If so, Catalog can be configured to consume
a local, exported copy of the Identity Provider (IdP) metadata by setting a core_env property to
reference a local file:
saml.metadata.provider=file:///usr/local/qdc/idp.xml
Further, Catalog's Service Provider metadata can be exported to an XML file for hand delivery to the
Identity Provider:
curl -k
https://<REPLACE_WITH_FULL_CATALOG_HOSTNAME>:8443/qdc/saml2/service-
provider-metadata/catalog > spExport.xml
The hostname in the above URL should be that used by end-users to access Catalog.
5.1.1 Enabling SAML using Microsoft Azure Active Directory (MS AAD)
(1) Qlik Catalog Tomcat must first be configured for HTTPS (see section below) -- new installs since
May 2022 are automatically configured with HTTPS.
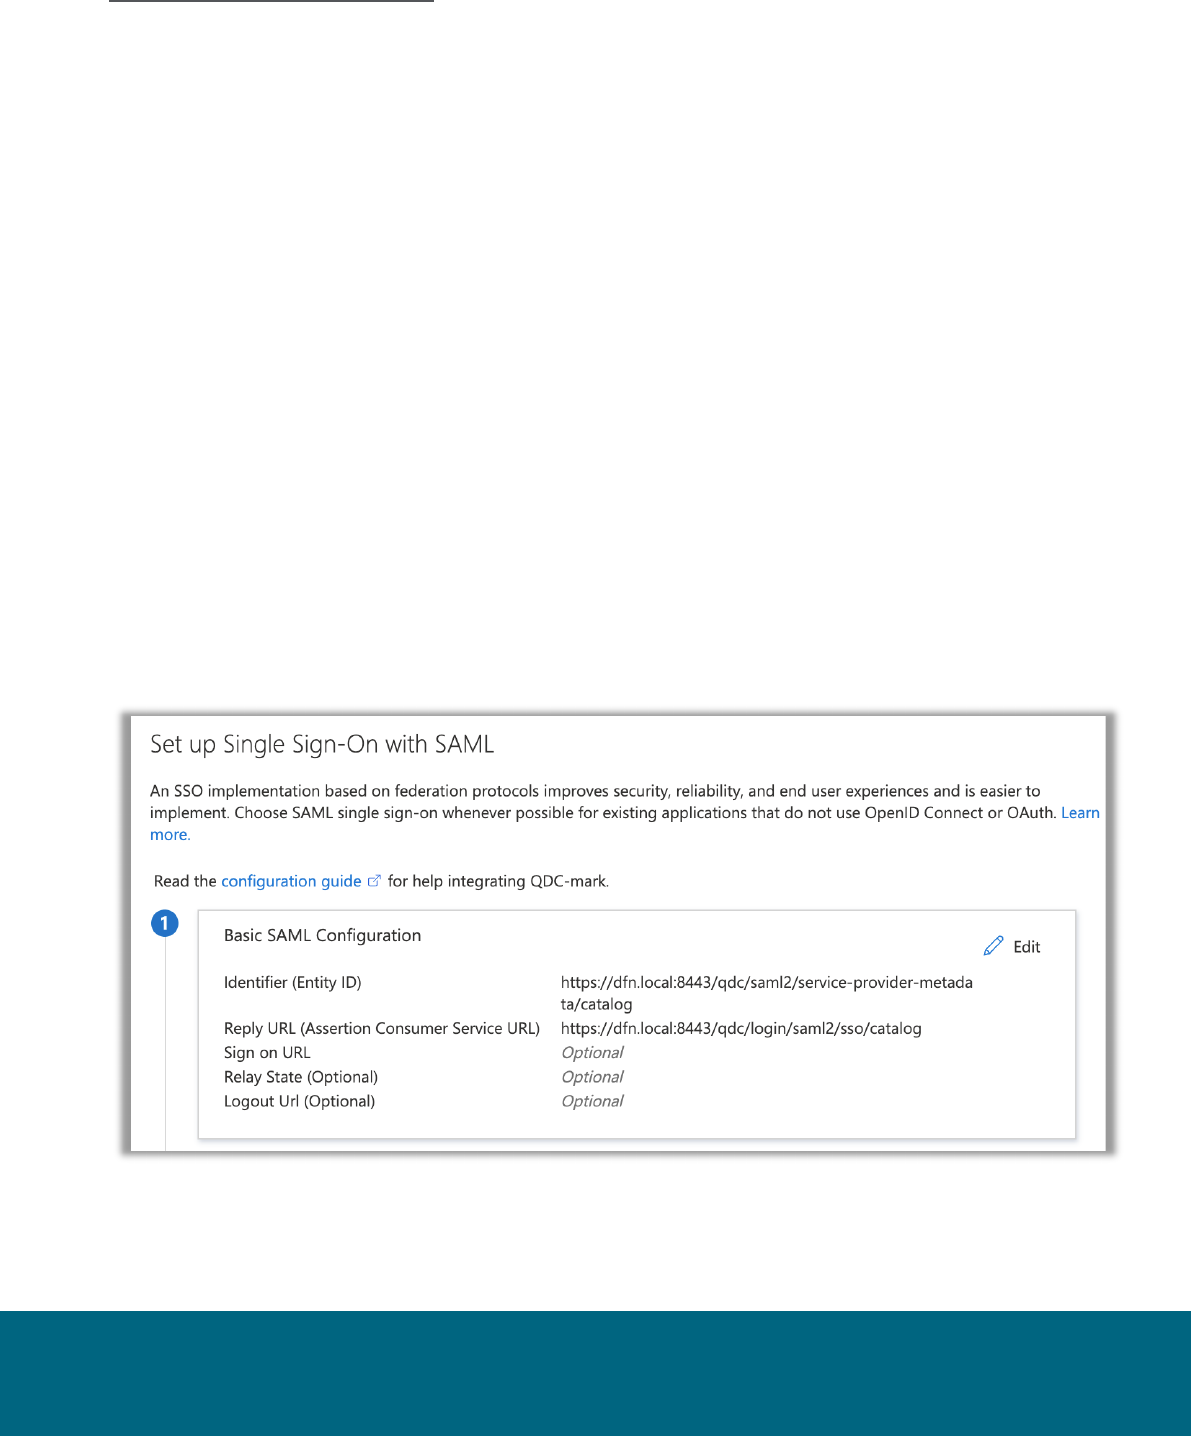
(2) Two properties must be set in the MS AAD “Single Sign-On with SAML” “Basic SAML
Configuration” dialog – replace <HOSTNAME> with the Qlik Catalog hostname:
• Identifier (Entity ID) – https://<HOSTNAME>:8443/qdc/saml2/service-provider-
metadata/catalog
• Reply URL (Assertion Consumer Service URL) –
https://<HOSTNAME>:8443/qdc/login/saml2/sso/catalog
(3) The following three core_env properties must be set (see notes immediately following):
authentication.mode=SAML

Qlik Catalog May 2023 Single Node Installation Guide 26
# this will log out of Qlik Catalog and MS AAD
# replace <tenant-id> and <HOSTNAME> (and possibly 8443 and qdc)
logout.url=https://login.windows.net/<tenant-
id>/oauth2/logout?post_logout_redirect_uri=https%3A%2F%2F<HOSTNAME>%3A8443%2Fqdc%
2Flogged-out
# replace <tenant-id> and <app-id>
saml.metadata.provider=https://login.microsoftonline.com/<tenant-
id>/federationmetadata/2007-06/federationmetadata.xml?appid=<app-id>
Notes on core_env properties:
• property "saml.metadata.provider" is taken from MS AAD setup, "App Federation Metadata
Url"
• property "logout.url" was formerly "saml.logout.url" – it applies to both manually initiated
logout via the menu, as well as session timeout
• property "logout.url", when configured for login.windows.net, now supports
"post_logout_redirect_uri" to allow redirection from MS back to the Catalog logged-out page
• property "saml.entity.baseurl" is no longer set (May 2021 change)
• property "saml.keystore.path" is no longer set, and there is no longer a need to download the
Base64 Certificate and add it to samlKeystore.jks – in fact, samlKeystore.jks is no longer
present (May 2021 change)
• do NOT copy "Logout URL" from MS AAD into the core_env property "logout.url"
• there are only two valid choices for “logout.url”: /logged-out (log out of only Qlik Catalog) or
https://login.windows.net/<tenant-id>/oauth2/logout (log out of MS AAD and Qlik Catalog)
• IMPORTANT: when logging in to the UI, use URL "https://<HOSTNAME>:8443/qdc" and not
"https://<HOSTNAME>:8443/qdc/login"
5.1.2 Enabling SAML using Okta
Instructions below are a reference with examples. Modifications will be required for client-specific
SAML authentication and client environment. In this example setup, Okta is used as the Identity
Provider (IdP) while Catalog is the Service Provider (SP).
1. Log in to your Okta organization as a user with administrative privileges. You can create a free
Okta Developer Edition organization with your own email
here: https://www.okta.com/developer/signup/.
2. Click on the blue Admin button on the top right corner.
3. Click on the Add Applications shortcut in the right panel.
4. Click on the green Create New App button.
5. In the dialog that opens, select the SAML 2.0 option, then click the green Create button
6. In Step 1 General Settings, enter the application name (e.g., HostName SAML Application) in App
name field, then click the green Next button.
7. In Step 2 Configure SAML, paste the URL below into the “Single Sign On URL" field – replace
<HOSTNAME> with the Qlik Catalog hostname:
https://<HOSTNAME>:8443/qdc
Then, paste the URL below into the “Audience URI (SP Entity ID)” [old] or “Audience Restriction”
[new] field:
https://<HOSTNAME>:8443/qdc/saml2/service-provider-metadata/catalog

Qlik Catalog May 2023 Single Node Installation Guide 27
Then, check the box “Allow this app to request other SSO URLs” and paste the URL below into
the “Requestable SSO URLs” field:
https://<HOSTNAME>:8443/qdc/login/saml2/sso/catalog
8. In Step 3 Feedback click the checkbox next to the text This is an internal application that we
created then click the green Finish button.
9. You will now see the Sign On section of your newly created Spring Security SAML application
10. Copy the Identity Provider metadata link and paste it in the core_env.properties
saml.metadata.provider. Example:
saml.metadata.provider=https://dev-
248822.okta.com/app/exk2z8xylfcOt2tRg4x7/sso/saml/metadata
11. You can also add additional users in the People section. All these users will need to be added to
podium application as well with the same username.
12. Open the core_env.properties and add this line to it.
authentication.mode=SAML
13. Restart the Qlik Catalog application (Tomcat).
There are now two ways to log into Qlik Catalog using Okta SAML Provider:
1. Log in to https://<HOSTNAME>:8443/qdc as usual. It will redirect you to Okta IDP from where you
will have to authenticate using username/password. After successful authentication it will redirect
to qdc.
Important! A user with the same username must previously exist in Qlik Catalog.
2. Log in to your Okta account and on the home page, click on the application icon you just created.
This will login to the Qlik Catalog application using the account you signed in with. If in the admin
console, use the “My end user dashboard” from the top-right corner.
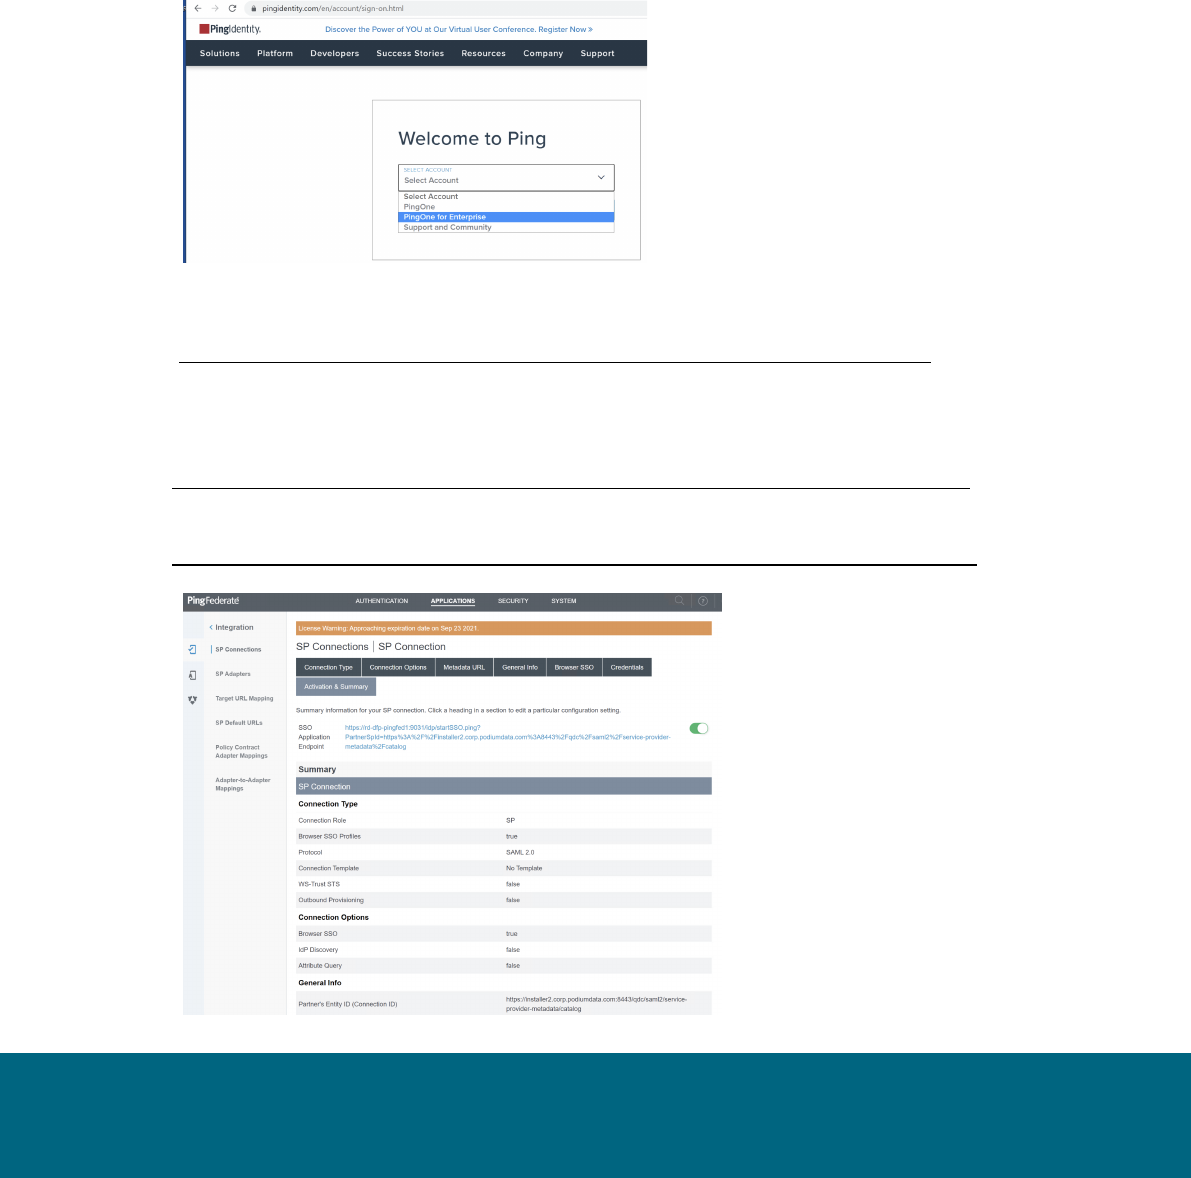
5.1.3 Enabling SAML using PingIdentity's PingOne & PingFederate
Instructions below are a reference with examples. Modifications will be required for client-specific
SAML authentication and client environment. In this example setup, PingFederate is used in
conjunction with PingOne as the Identity Provider (IdP) while Catalog is the Service Provider (SP).
PingIdentity's PingOne SAML connection has been demonstrated to work with Catalog using the
following steps:
1. From within PingOne admin console, add a SAML app by clicking on the Connections icon
2. Click the “+” icon & choose WEB APP
3. Select connection type “SAML”
4. Name new application. (Optionally, provide description and icon)
5. Configure SAML Connection:
Choose Manually Enter and accept all defaults except for the fields below:
• ACS URLS: https://<CATALOG-HOSTNAME>:8443/qdc/login/saml2/sso/catalog
• ENTITY ID: https://<CATALOG-HOSTNAME>:8443/qdc/saml2/service-provider-
metadata/catalog
• ASSERTION VALIDITY DURATION: 60
Qlik Catalog May 2023 Single Node Installation Guide 28
6. Attribute Mapping:
• Change default “User ID” attribute to “Username” and set SAML_SUBJECT to
"Username". One customer (where Ping was backed by Active Directory) used
"sAMAccountName" rather than "Username".
7. Limit Access (Optional):
As indicated within the console, all users have access to the application when no groups are
defined. The Access tab serves to limit access to the Qlik Catalog application if desired.
To limit access: create a group, add members, and add the group within the Access tab of
the Qlik Catalog application.
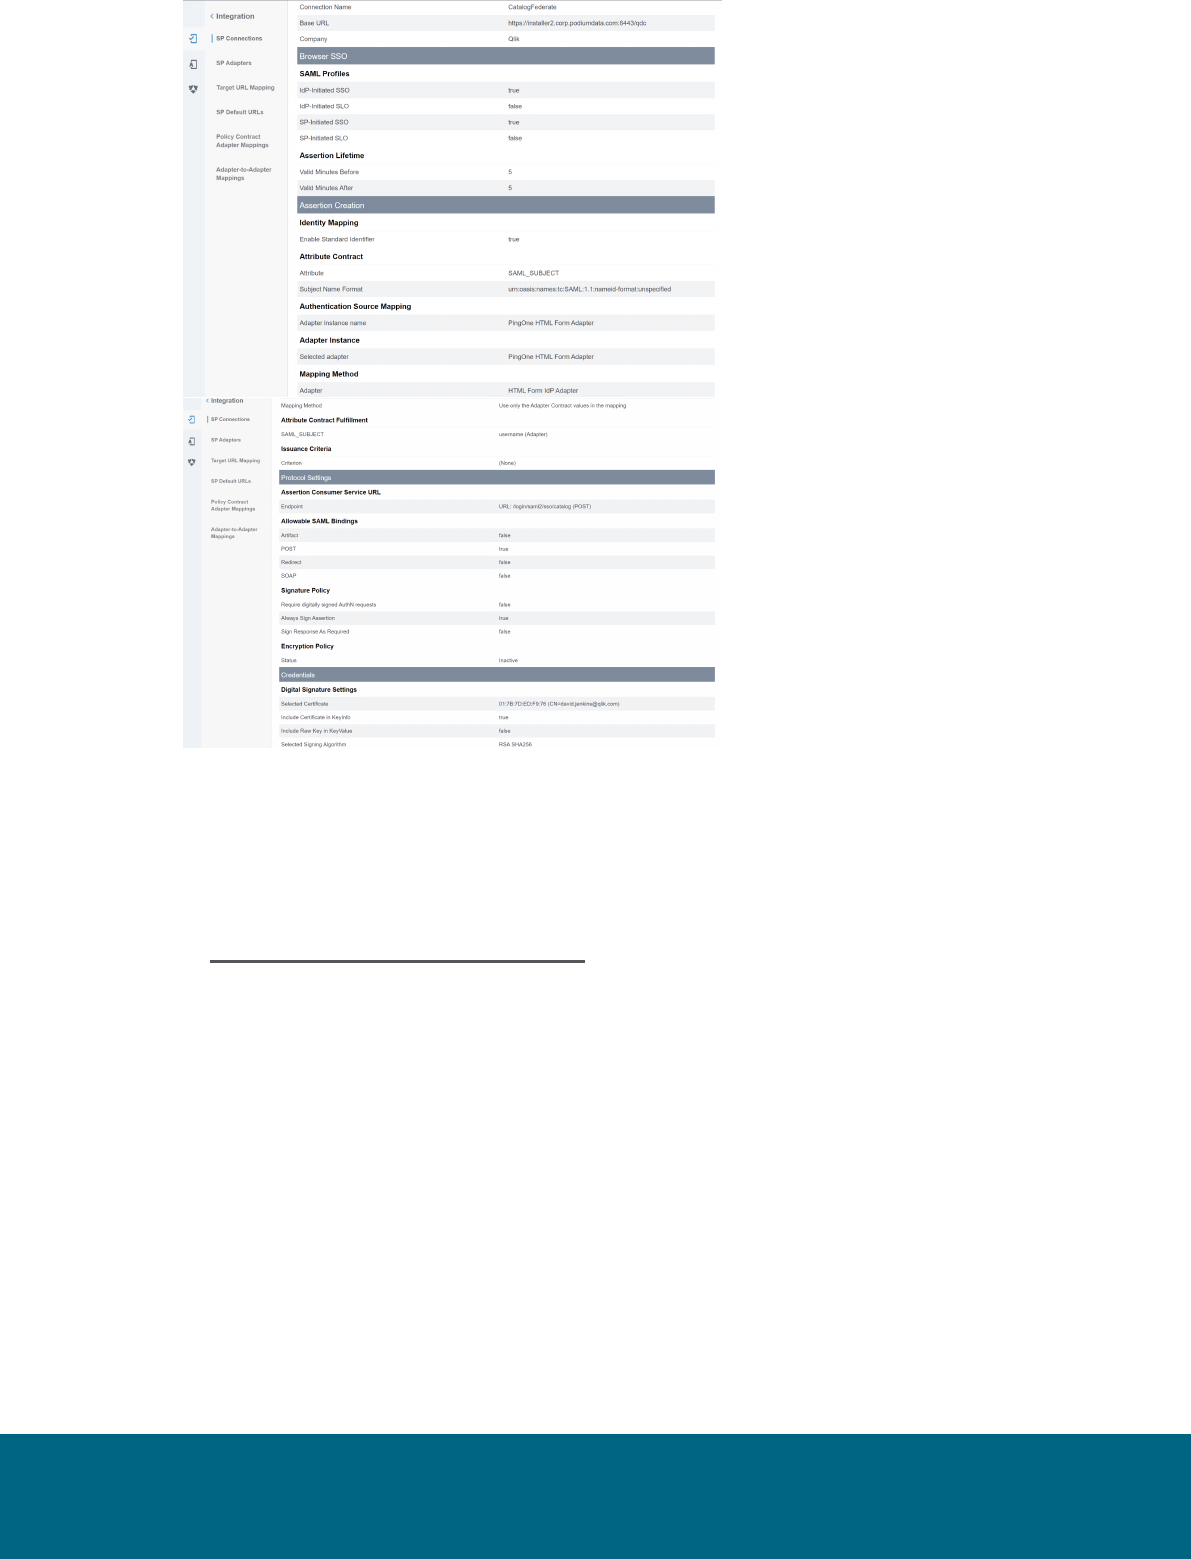
Some customers may use Ping Federate in conjunction with the PingOne for Enterprise cloud-
based product:
You must import the Ping Federate certificate into the Java Key
Store (https://stackoverflow.com/questions/2138940/import-pem-into-java-key-store) or you will
receive the following error during Tomcat startup after configuring SSO:
"PKIX path building failed" and "unable to find valid certification path to requested target"
Instructions for exporting the certificate from Ping Federate may be found
here: https://docs.pingidentity.com/bundle/pingfederate-93/page/yij1564002984865.html
Detailed instructions for setting up an SP Connection for use by Catalog are available
here: https://docs.pingidentity.com/bundle/solution-guides/page/ozz1597769517562.html
Qlik Catalog May 2023 Single Node Installation Guide 29
5.2 Tomcat SSL Configuration
Configure Tomcat to Support SSL (HTTPS)
NOTE: As of the May 2022 release, if the optional prerequisites script CatalogPrereqs.sh is used,
Tomcat is automatically configured for HTTPS (including the generation of a self-signed
certificate), and requests on port 8080 are automatically redirected to 8443.
The following steps are for customers that did not use the May 2022 (or more recent)
CatalogPrereqs.sh script.
1. Generate Keystore - Use 'keytool' command to create a self-signed certificate.
Optionally change the password from "changeit".
Example:
(qdc) # keytool -genkey -noprompt -validity 3650 -alias qdc -keyalg RSA -dname
'CN=Qlik Catalog,O=Qlik Technologies Inc.' -ext SAN=DNS:$(hostname) -ext
EKU:c=serverAuth -keystore /usr/local/qdc/qdc.jks -storepass changeit -keypass
changeit
The above created a certificate (with alias 'qdc') located at '/usr/local/qdc/qdc.jks' (the
filename that was provided in the keytool command).
Certification Details
Use same 'keytool' command to list the certificate’s details:

Qlik Catalog May 2023 Single Node Installation Guide 30
Example:
(qdc) # keytool -list -v -keystore /usr/local/qdc/qdc.jks -storepass changeit
2. Add Connector in server.xml - Locate your Tomcat’s server configuration file at
$TOMCAT_HOME\conf\server.xml; modify it by adding a connector element to support https
connections as follows:
Under the existing Connector, which begins "<Connector port="8080"", add the following:
<Connector port="8443" protocol="HTTP/1.1" SSLEnabled="true"
maxHttpHeaderSize="65536"
server="Unknown Application Server"
maxThreads="150" scheme="https" secure="true"
clientAuth="false" sslProtocol="TLS"
keystoreFile="${qdc.home}/qdc.jks"
keystoreType="JKS"
keystorePass="changeit"
keyPass="changeit" />
Note: The passwords (for both 'keystorePass' and 'keyPass') must be the same
passwords given when the certificate was generated.
Make sure that redirect port is available for the connector with the default (http) port you
are using. For example, default server.xml may show:
<Connector connectionTimeout="20000" port="8080" protocol="HTTP/1.1"
redirectPort="8443"/>
HTTPS Redirect Configuration: 8080 is the http port and 8443 is the https port:
1. Start the server
2. Browse http://catalog-node-hostname:8080/qdc
3. If the application doesn’t redirect to https, create file
$TOMCAT_HOME/webapps/qdc/WEB-INF/web.xml by either:
(qdc) $ cp /tmp/podium/config/tomcat9-web.xml /usr/local/qdc/apache-tomcat-
9.0.73/webapps/qdc/WEB-INF/web.xml
or manually adding the following content:
<?xml version="1.0" encoding="UTF-8"?>
<web-app xmlns="http://java.sun.com/xml/ns/j2ee"
xmlns:xsi="http://www.w3.org/2001/XMLSchema-instance"
xsi:schemaLocation="http://java.sun.com/xml/ns/j2ee
http://java.sun.com/xml/ns/j2ee/web-app_2_4.xsd"
version="2.4" id="WebApp_ID">
<session-config>
<session-timeout>60</session-timeout>
</session-config>
<listener>
<listener-
class>org.springframework.web.context.request.RequestContextListener<
/listener-class>
</listener>
<security-constraint>
<web-resource-collection>
<web-resource-name>Entire Application</web-resource-name>

Qlik Catalog May 2023 Single Node Installation Guide 31
<url-pattern>/*</url-pattern>
</web-resource-collection>
<user-data-constraint>
<transport-guarantee>CONFIDENTIAL</transport-guarantee>
</user-data-constraint>
</security-constraint>
</web-app>
4. Restart Tomcat
5.3 Port Redirection
Port redirection may be configured at the OS-level to redirect standard HTTPS traffic on port 443
to port 8443. Doing this will remove the need to specify the Tomcat port in the Catalog URL. For
instance, instead of entering https://catalog-server.mydomain.com:8443/qdc a user may simply
enter https://catalog-server.mydomain.com/qdc.
An OS-level redirect is strongly preferred to directly configuring Tomcat to use port 443, as ports
below 1024 are privileged and would require granting root access to the Catalog Linux user.
FirewallD Configuration (CentOS 7 & RHEL 7/8/9.1)
FirewallD is the default local firewall package used by CentOS & RHEL 7, 8, and 9.1. Enter
the following firewalld command to redirect requests from 443 to 8443:
$ sudo firewall-cmd --permanent --direct --add-rule ipv4 nat PREROUTING 1 -p tcp --
dport 443 -j REDIRECT --to-ports 8443
For CentOS 7 deployments using Docker additional configuration is required to allow the
LICENSES container to bypass the new redirect so that it can properly route to
https://license.qlikcloud.com:
1. Run the following command to create a rule for the LICENSES container to bypass the
443 redirect:
$ sudo firewall-cmd --permanent --direct --add-rule ipv4 nat PREROUTING 0 -s
172.20.0.0/16 -j ACCEPT
2. Run the following command to implement the new rules:
$ sudo firewall-cmd --reload
UFW Configuration (Ubuntu 20 & Ubuntu 22)
UFW (“uncomplicated firewall”) may be installed via APT package manager: $ sudo apt install
ufw
There are no ufw commands for setting up the port forwards. It must be done via configuraton file.
1. Add the lines below to
/etc/ufw/before.rules
just prior to the “filter” section (near
the top of the file:
*nat
:PREROUTING ACCEPT [0:0]
-A PREROUTING -p tcp --dport 443 -j REDIRECT --to-port 8443
COMMIT
2. Restart and enable ufw to start on boot:

Qlik Catalog May 2023 Single Node Installation Guide 32
$ sudo ufw enable
5.4 Testing Licenses Connectivity to QlikCloud
The licenses container must be able to contact https://license.qlikcloud.com periodically to verify the
validity of the license being used for Catalog. You can login to the licenses container and manually
verify connectivity to QlikCloud. This is particularly important after configuring port redirection.
1. Login to the licenses container according to the container manager in use (do this as the
Catalog Linux user):
$ docker exec -it -u=root licenses /bin/sh
$ podman exec -it -u=root catalog-pod-licenses /bin/sh
2. Test connectivity by issuing the following command from within the container:
/ # wget https://license.qlikcloud.com/v1/definitions
3. A successful connection will return a “401 unauthorized” error:
Connecting to license.qlikcloud.com (107.20.116.99:443)
wget: server returned error: HTTP/1.1 401 Unauthorized
4. If the connection attempt hangs it is an indication that the licenses container is not able to
make the connection to QlikCloud. Running a traceroute to QlikCloud from within the
container may reveal a problem with the network path being used.
In the example below, the licenses container (10.0.2.100) exits the pod network at
10.0.2.2, hops to the LAN gateway at 10.118.0.1 and eventually gets out to the Internet.
/ # traceroute license.qlikcloud.com
traceroute to license.qlikcloud.com (52.73.12.217), 30 hops max, 46 byte packets
1 10.0.2.2 (10.0.2.2) 0.113 ms 0.102 ms 0.098 ms
2 10.118.0.1 (10.118.0.1) 1.088 ms 0.954 ms 0.803 ms
3 10.118.17.6 (10.118.17.6) 0.229 ms 0.210 ms 0.207 ms
4 144.121.57.97.lightower.net (144.121.57.97) 6.823 ms 1.438 ms 1.289 ms
5.5 Configuration Recommendations for Qlik Catalog Installations
Single Node Settings
Hardware
Memory
128G
CPU
32
core-env.properties file
External.job.runner.spawn
true
external.job.runner.spawn.count
8
external.job.runner.enable
true
external.job.runner.process.rotation.period.hours
24
max.pool.size
96
hadoop.job.poolsize
32
use.single.receiving.mapper
true
5.6 Enabling NextGen XML

Qlik Catalog May 2023 Single Node Installation Guide 33
As of the May 2022 release, NextGen XML (along with Tomcat HTTPS) is automatically enabled for
first-time installs that use CatalogPrereqs.sh.
NextGen XML Containers
§ To use the 'next-generation' XML support in Qlik Catalog, the Catalog installer
(CatalogInstaller.sh) installs two Qlik Sense containers: DCaaS (a connector lookup service)
and a REST Connector (that parses XML files and converts them to flattened data).
§ The NextGen XML Docker containers must be setup as a service to automatically start when
Linux restarts.
The copy (cp) command below assumes the Qlik Catalog software (a.k.a., podium zip) has
been expanded to /tmp -- the prerequisites section.
IMPORTANT:
a) If the Qlik Catalog NextGen XML directory is not /usr/local/qdc/dcaasIntegration or
the service user/group is not “qdc,” the file
/etc/systemd/system/nextgen-
xml.service
must be edited after the copy (cp) step below
b) If deploying to RHEL 8, RHEL 9.1, Ubuntu 20.04, or 22.04 which use Podman to
manage containers you must edit
/etc/systemd/system/nextgen-xml.service
after the copy (cp) step below:
a. REMOVE line 13 completely:
Requires=docker.service
b. EDIT line 14 and remove the following text: docker.service
(sudo) # sudo cp /tmp/podium/config/nextgen-xml.service
/etc/systemd/system/
(sudo) # sudo systemctl daemon-reload
(sudo) # sudo systemctl enable nextgen-xml.service
Qlik Catalog Configuration
Qlik Catalog must be configured to support NextGen XML.
§ core_env.properties
The core_env.properties file is located here: $TOMCAT_HOME/conf/core_env.properties.
Locate the following property and replace $CATALOG_IPADDRESS with the IP address of the
Qlik Catalog server:
o base.xml.callback.url= http://$CATALOG_IPADDRESS:8082/qdc-xmlstore
Note: the following two NextGen XML properties are also present in the core_env.properties file
and are set automatically by the Qlik Catalog Installer:
o enable.new.xml.ingestion=true
o dcaas.connector.staging.dir=<QDC_HOME>/dcaasIntegration/dcaas-
connector-staging

Qlik Catalog May 2023 Single Node Installation Guide 34
Modify Tomcat Web Server Configuration
NOTE: As of the May 2022 release, if the optional prerequisites script CatalogPrereqs.sh is used, the
NextGen XML feature and Tomcat are automically configured to work together and this section can be
ignored.
Manual configuration changes to the Tomcat web server are also required. Follow the instructions
below to modify the Tomcat server.xml file to support NextGen XML:
1) Using a text editor, open $TOMCAT_HOME/conf/server.xml:
(qdc) $ vi /usr/local/qdc/apache-tomcat-9.0.73/conf/server.xml
2) Add a dedicated Service and Connector
A dedicated service and connector are setup to listen on port 8082. The connector is configured to
only allow localhost / local subnet connections (e.g., 127.0.0.1, 192.168.*.*, 172.16.*.*), thereby
prohibiting outside access.
This new Service should come after the existing Service and is likely near the end of the document,
near the closing </Server> tag. Here is the XML:
<!-- The qdc-xmlstore directory is a temporary location for serving XML files to the DCaaS REST connector.
By default, it is configured
to allow localhost and private IP access only. To allow access from an external host, add the host's IP
address with a pipe '|' separator
to the end of the 'allow' value. For instance,
allow="127\.\d+\.\d+\.\d+|::1|0:0:0:0:0:0:0:1|...|11.111.3.241" -->
<Service name="qdc-xmlstore">
<Connector port="8082" protocol="org.apache.coyote.http11.Http11NioProtocol"
connectionTimeout="20000" />
<Engine name="Catalina" defaultHost="localhost">
<Host name="localhost" appBase="qdc-xmlstore" unpackWARs="true" autoDeploy="true">
<Context docBase="${qdc.home}/dcaasIntegration/qdc-xmlstore" path="/qdc-xmlstore">
<Valve className="org.apache.catalina.valves.RemoteAddrValve"
allow="127\.\d+\.\d+\.\d+|::1|0:0:0:0:0:0:0:1|10\.\d+\.\d+\.\d+|172\.1[6-9]\.\d+\.\d+|172\.2[0-
9]\.\d+\.\d+|172\.3[0-1]\.\d+\.\d+|192\.168\.\d+\.\d+" />
</Context>
</Host>
</Engine>
</Service>
Port 8082 can be changed -- if changed, make sure to update core_env property
base.xml.callback.url. The above Context is standard for NextGen XML and prohibits outside
access.
4) Save the changes to server.xml and restart Tomcat
5) Restart NextGen XML docker containers:
(sudo) # sudo systemctl restart nextgen-xml.service

Qlik Catalog May 2023 Single Node Installation Guide 35
6) To verify that Docker and its containers are running:
§ Enter this on a command line: docker ps (or podman ps)
§ Expected result: you should see the dcaas and data-connector-rest containers in the list of
active containers.
Note: If SELinux is enabled (or other security framework), you may need to open port 50060 to
allow routing between the two containers:
(sudo) # sudo firewall-cmd --zone=public --permanent --add-
port=50060/tcp
(sudo) # sudo systemctl restart firewalld.service
5.7 Logging
As of May 2021, logging configuration changes, for single-node installations, are now made in file WEB-
INF/classes/log4j2.xml rather than log4j.xml. Formerly, a logger entry looked like:
<logger name="com.nvs.ui.interceptor.LoggingInterceptor">
<level value="info" />
</logger>
Now, in log4j2.xml, it looks like:
<Logger name="com.nvs.ui.interceptor.LoggingInterceptor" level="info"
additivity="false">
<AppenderRef ref="Console" />
</Logger>
5.8 Hive JDBC Driver
As of May 2021, the Hive JDBC driver is no longer included by default for single-node installations.
If you want to load from a Hive JDBC source, or publish to Hadoop+Hive, you will need to get the appropriate
Hive JDBC driver for your cluster. The example below allows a single-node installation to interact with Hive
running on a CDH 5.16.2 cluster.
Copy the JDBC driver jar(s) to a dedicated directory (also add the three log4j2 jars from WEB-INF/lib):
$ pwd
/usr/local/qdc/jdbcDrivers/hive-jdbc-cdh5.16.2
$ ls -la
total 51360
drwxr-xr-x 6 qdc staff 204B Jan 29 17:25 .
drwxr-xr-x 7 qdc staff 238B Jan 29 16:31 ..
-rw-r--r-- 1 qdc staff 23M Jan 29 16:30 hive-jdbc-1.1.0-cdh5.16.2-standalone.jar
-rw-r--r-- 1 qdc staff 285K Jan 29 17:21 log4j-api-2.13.2.jar

Qlik Catalog May 2023 Single Node Installation Guide 36
-rw-r--r-- 1 qdc staff 1.6M Jan 29 17:25 log4j-core-2.13.2.jar
-rw-r--r-- 1 qdc staff 23K Jan 29 17:18 log4j-slf4j-impl-2.13.2.jar
There is already a "HIVE" JDBC driver defined in the Admin “Database Drivers” section of the UI. It must be
updated to point to the above directory:
update podium_core.pd_jdbc_source_info
set alt_classpath='/usr/local/qdc/jdbcDrivers/hive-jdbc-cdh5.16.2' where sname='HIVE';
A Tomcat restart is required.

Qlik Catalog May 2023 Single Node Installation Guide 37
5.9 Migrating to or Upgrading Tomcat 9
Beginning with the May 2021 release, only Apache Tomcat 9 is supported. The installer will prohibit other
versions. If using Tomcat 7, please first initiate a migration to Tomcat 9 before installing this release. Then,
when installing, the upgrade option (-u) is NOT used.
These instructions may also be used to upgrade from an older version of Tomcat 9 to a newer version.
Step
Sample Commands
Shutdown and rename old
Tomcat 7 or 9
cd /usr/local/qdc (or cd /usr/local/podium)
./apache-tomcat-<OLD_VERSION>/bin/shutdown.sh
mv apache-tomcat-<OLD_VERSION> old-apache-tomcat
Download and expand
Tomcat 9 - NOTE: adjust
version 9.0.73 to use
latest 9.0.x series
wget https://archive.apache.org/dist/tomcat/tomcat-
9/v9.0.73/bin/apache-tomcat-9.0.73.tar.gz
tar -xf apache-tomcat-9.0.73.tar.gz
rm apache-tomcat-9.0.73.tar.gz
Copy core_env.properties
from old Tomcat 7 to new
Tomcat 9
cp old-apache-tomcat/conf/core_env.properties apache-tomcat-
9.0.73/conf/
If migrating from
Tomcat 7: Extract
server.xml from
podium.zip and copy to
new Tomcat
unzip -j podium-4.18-xxxxx.zip podium/config/tomcat9-server.xml -d .
mv ./tomcat9-server.xml apache-tomcat-9.0.73/conf/server.xml
If upgrading Tomcat 9:
Copy server.xml from old
Tomcat 9 to new Tomcat
9
cp old-apache-tomcat/conf/server.xml apache-tomcat-9.0.73/conf/
If the old Tomcat 9 was configured for HTTPS, and the keystore (jks
file) was stored in the old Tomcat directory, migrate it to the new
Tomcat directory, and update conf/server.xml to reference it.

Qlik Catalog May 2023 Single Node Installation Guide 38
Step
Sample Commands
Consider placing the keystore file in a non-Tomcat directory such as
/usr/local/qdc/keystore.
Configure
CatalogInstaller.properties
for Tomcat 9
Whether using an existing CatalogInstaller.properties file from a
previous install, or configuring one for the first time, ensure that it is
updated to point to Tomcat 9:
TOMCAT_HOME=/usr/local/podium/apache-tomcat-9.0.73
Finally, when the installer
is run, do NOT specify
upgrade mode (-u), as
some files should be
created as if it were a
first-time install.
./CatalogInstaller.sh
After installation, restore
webapp web.xml, then
restart Tomcat
cp old-apache-tomcat/webapps/qdc/WEB-INF/web.xml apache-
tomcat-9.0.73/webapps/qdc/WEB-INF/
At this point, Tomcat 9, if newly installed, will support only HTTP on port 8080.
Verify successful Qlik Catalog startup and basic functionality.
Additional configuration will be required to configure HTTPS on port 8443, apply security headers, etc. If
Tomcat 7 used HTTPS, the keystore (jks file) containing the public-private keypair should be copied to Tomcat
9 and conf/server.xml updated. For more information, see Configure Tomcat to Support SSL
In addition, Tomcat 7 may have been configured as a service. It should be disabled. Tomcat 9 may be
configured as a service to automatically start. For more information, see setting up Tomcat as a service
5.10 Disabling Tomcat Redirect / SSL
As of the May 2022 release, when using the optional prerequisites script CatalogPrereqs.sh,
Tomcat is automatically configured for HTTPS (including the generation of a self-signed certificate),
and requests on port 8080 are automatically redirected to 8443.
In certain situations, these may need to be disabled (e.g., when the SSL connection is terminated at
a load balancer). Perform either or both of the following and then restart Tomcat.

Qlik Catalog May 2023 Single Node Installation Guide 39
Disable Redirect from 8080 to 8443
Edit <tomcat home>/webapps/qdc/WEB-INF/web.xml
Remove the entire "<security-constraint>" element.
Disable HTTPS Port 8443
First, disable the redirect (see above).
Edit <tomcat home>/conf/server.xml
Remove the entire "<Connector>" element which begins "<Connector port="8443""
5.11 Upgrading PostgreSQL
These instructions may be used to upgrade to the latest version of Qlik Catalog custom PostgreSQL.
Reminder: there is no requirement to upgrade PostgreSQL when upgrading Catalog. If a PostgreSQL upgrade
is planned, please do so before upgrading Catalog.
Step
Sample Commands
Shutdown Tomcat
./bin/shutdown.sh
Backup databases. Default
password for podium_md
and podium_dist is
"nvs2014!" For licenses is
"licenses". For postgres is
"postgres". If "ERROR: out
of shared memory", see
note below table.
pg_dump -U podium_md --format=c --file=podium_md.sqlc podium_md
pg_dump -U podium_dist --format=c --file=podium_dist.sqlc podium_dist
pg_dump -U licenses --format=c --file=licenses.sqlc licenses
Find the Linux PostgreSQL
service file name. Will be
something like
"qdc_pg.service" or
"qdc_pg-11.2.service" --
USE THIS NAME FOR
NEXT TWO STEPS
ls -la /etc/systemd/system/
Stop the service and verify
PostgreSQL is not running
sudo systemctl stop qdc_pg-11.2.service
ps -ef | grep "postgres:"

Qlik Catalog May 2023 Single Node Installation Guide 40
Remove the service
sudo systemctl disable qdc_pg-11.2.service
sudo rm /etc/systemd/system/qdc_pg-11.2.service
Prepare for new
PostgreSQL -- adjust
version as needed
sudo mkdir -p /usr/pgsql/qdc14-6
sudo chown -R postgres:postgres /usr/pgsql
sudo mkdir -p /var/lib/pgsql/14-6/qdc_data
sudo chown -R postgres:postgres /var/lib/pgsql
Install new PostgreSQL --
adjust versions as
needed
cp podium-4.18-xxxxx_Linux_X64.zip /tmp/
cd /tmp
unzip podium-4.18-xxxxx_Linux_X64.zip
sudo su - postgres
/tmp/podium/thirdParty/qdc_pg14-6_RHEL7-and-CentOS7.bsx
OR
/tmp/podium/thirdParty/qdc_pg14-6_RHEL8-and-CentOS8.bsx
OR
/tmp/podium/thirdParty/qdc_pg14-6_Ubuntu.bsx
exit
Recreate symlinks
sudo rm /usr/bin/psql
sudo ln -s /usr/pgsql/qdc14-6/bin/psql /usr/bin/psql
psql --version
sudo rm /usr/bin/pg_dump
sudo ln -s /usr/pgsql/qdc14-6/bin/pg_dump /usr/bin/pg_dump
pg_dump --version
sudo rm /usr/bin/pg_restore
sudo ln -s /usr/pgsql/qdc14-6/bin/pg_restore /usr/bin/pg_restore
pg_restore --version
Recreate Linux service
sudo cp /tmp/podium/config/qdc_pg.service /etc/systemd/system/
sudo systemctl daemon-reload
sudo systemctl enable qdc_pg.service

Qlik Catalog May 2023 Single Node Installation Guide 41
Ensure Tomcat service
depends on new
PostgreSQL service -- two
references should be to
"qdc_pg.service"
sudo vi /etc/systemd/system/tomcat.service
Start the service and verify
PostgreSQL is running
sudo systemctl start qdc_pg.service
ps -ef | grep "postgres:"
Restore podium_md.
Default password for
podium_md is "nvs2014!"
For postgres is "postgres".
INTERNAL_DB_PASSWORD=nvs2014!
psql template1 -U postgres -c "create role podium_md with encrypted password
'$INTERNAL_DB_PASSWORD' createdb login;"
psql template1 -U podium_md -c "create database podium_md;"
pg_restore -U podium_md --dbname=podium_md podium_md.sqlc
Restore podium_dist.
Default password for
podium_dist is "nvs2014!"
For postgres is "postgres".
The last step may produce
an error/warning that can
be ignored.
INTERNAL_DB_PASSWORD=nvs2014!
psql template1 -U postgres -c "create role podium_dist with encrypted password
'$INTERNAL_DB_PASSWORD' superuser createdb login;"
psql template1 -U podium_dist -c "create database podium_dist;"
psql podium_dist -U podium_dist -f /tmp/podium/config/podium_dist_su_ddl.txt
pg_restore -U podium_dist --dbname=podium_dist podium_dist.sqlc
psql podium_dist -U podium_dist -f /tmp/podium/config/podium_dist_ddl.txt
psql podium_dist -U postgres -c "ALTER USER podium_readonly WITH
ENCRYPTED PASSWORD '$INTERNAL_DB_PASSWORD' LOGIN
NOSUPERUSER;"
Restore licenses. Default
password for licenses is
"licenses" For postgres is
"postgres".
psql template1 -U postgres -c "create user licenses with password 'licenses'"
psql template1 -U postgres -c "create database licenses owner licenses"
pg_restore -U licenses --dbname=licenses licenses.sqlc
Proceed to upgrade
Catalog
When performing a pg_dump or pg_restore of podium_dist, if you see the following:
pg_dump: [archiver (db)] query failed: ERROR: out of shared memory
HINT: You might need to increase max_locks_per_transaction.
pg_dump: [archiver (db)] query was: LOCK TABLE
podium_demo_muabbas.pd_role_str_parent IN ACCESS SHARE MODE

Qlik Catalog May 2023 Single Node Installation Guide 42
then PostgreSQL must be configured with additional resources:
Step
Sample Commands
Stop PostgreSQL -- adjust
version as needed
sudo systemctl stop qdc_pg-11.13.service
Become postgres user and
edit configuration file --
adjust version as needed
sudo su - postgres
vi /var/lib/pgsql/11-13/qdc_data/postgresql.conf
Increase these two settings,
then quit vi
shared_buffers = 2GB
max_locks_per_transaction = 4096
Exit postgres user
exit
Start PostgreSQL -- adjust
version as needed
sudo systemctl start qdc_pg-11.13.service
5.12 Attaching a New Data Volume
The following documents how to use a symbolic link (aka symlink) to transparently migrate data to a new,
larger data volume.
1. Stop Tomcat
2. Create a new data directory on the mounted volume (here assumed to be /mountedvol). Do this as root (or
use sudo):
# cd /mountedvol
# mkdir data
# chown qdc:qdc data
# chmod 775 data
3. Copy and backup the original data (backup can later be deleted). Do this as the Catalog Linux user (e.g.,
qdc):
$ cd /usr/local/qdc/data
$ cp -R * /mountedvol/data/
$ cd /usr/local/qdc
$ mv data data-BACKUP

Qlik Catalog May 2023 Single Node Installation Guide 43
4. Create the symlink. Do this as root (or use sudo):
# ln -s /mountedvol/data /usr/local/qdc/data
The core_env property should be left as "podium.base=/usr/local/qdc/data" and NOT changed to
"podium.base=/mountedvol/data".
5. Restart Tomcat
5.13 SAML and PODIUM Authentication Using Single Tomcat Instance
This solution should apply to any version of Catalog from May 2021 onwards.
These instructions assume the original "qdc" webapp has been configured for SAML authentication. A second
"qdcadmin" webapp will use PODIUM (username + password) authentication – it may be used for
administration, API access, QEM API access, etc.
(1) Shutdown Tomcat.
(2) Make complete copies of the qdc.war file and qdc directory – here is the result:
$ pwd
/usr/local/qdc/apache-tomcat-9.0.73
$ ls -la webapps/
total 880464
drwxr-x--- 7 qdc qdc 224 Sep 28 16:33 .
drwxr-xr-x 17 qdc qdc 544 Apr 20 15:16 ..
drwxr-xr-x 5 qdc qdc 160 Sep 28 16:33 qdc
-rw-r--r-- 1 qdc qdc 225386798 Sep 28 16:33 qdc.war
drwxr-xr-x 5 qdc qdc 160 Sep 28 16:33 qdcadmin
-rw-r--r-- 1 qdc qdc 225386798 Sep 28 16:33 qdcadmin.war
(3) Create file webapps/qdcadmin/WEB-INF/classes/core_env.local.properties – it should contain:
authentication.mode=PODIUM
logout.url=/logged-out
external.job.runner.enable=false
external.job.runner.spawn=false
NOTE: if you plan on running load, prepare or publish jobs in the qdcadmin webapp, do not include the two
"external.job.runner" properties.
NOTE: until the first release after August 2022 SR1 (likely November 2022), Job Runner will run in the
qdcadmin webapp despite its disablement above (this is ok) – a code fix is required to address this.
(4) Restart Tomcat.
(5) The two webapps are accessed using:
• SAML – https://<HOSTNAME>:8443/qdc
• PODIUM – https://<HOSTNAME>:8443/qdcadmin

Qlik Catalog May 2023 Single Node Installation Guide 44
Tomcat's log file, logs/catalina.out, is shared by the two webapps.
Upgrades
The following must be repeated each time Catalog is upgraded.
Before upgrade:
• Shutdown Tomcat
• Make a backup of webapps/qdcadmin/WEB-INF/classes/core_env.local.properties
• Execute: rm -fr webapps/qdcadmin*
After upgrade, repeat the initial process.
5.14 RHEL 9, SELinux and podman
If Catalog is installed on Red Hat Enterprise Linux (RHEL) 9.1+ (and some versions of 8) and SELinux is
enabled (the default on RHEL 9), configuration changes must be made to successfully use the podman
containers included by Catalog to import (load) and export (publish) QVDs, and to load XML data. NOTE: the
alternative to the below procedure is to disable SELinux.
For QVD import and export, please do the following, which will create a dedicated "temp" directory and
configure SELinux and Catalog to use it. This temporary directory is where the engine container writes its
output files. It must be in the root directory as many of the other standard locations (e.g., /tmp and /usr/local)
have been blacklisted.
As root:
# mkdir /tmp-catalog
# chown qdc:qdc /tmp-catalog
# semanage fcontext -a -s system_u -t container_file_t /tmp-catalog
# restorecon -F -v /tmp-catalog
As the Catalog service account user (e.g., qdc), edit core_env.properties and find and set the following
property:
qvd.conversion.temp.directory=/tmp-catalog
Also, as the Catalog service account, edit /usr/local/qdc/qlikcore/pod_qlikContainers.yml and uncomment the
following two blocks:
# Uncomment the following volumeMount.
- mountPath: /tmp-catalog
name: tmp-catalog
and:
# Uncomment the following volume.
- hostPath:
path: /tmp-catalog
type: Directory
name: tmp-catalog
To ensure the podman containers are started on host reboot, the container start must be made dependent on
the user service for the service account user (e.g., qdc).
As root, edit /etc/systemd/system/qlikContainers.service and follow the comment:

Qlik Catalog May 2023 Single Node Installation Guide 45
#After=syslog.target network.target qdc_pg.service
# A dependency on the service account user service is required for RHEL 9 with SELinux.
# Please see the November 2022 SR1 release notes or the February 2023 installation guide.
# Uncomment the below Requires and After; comment off the above Requires and After.
[email protected] qdc_pg.service
[email protected] qdc_pg.service
You can ensure user "qdc" has the correct ID by running "id -u qdc". If the correct numeric value is not used in
the service file, update the values above.
Then, uncomment similar lines in file /etc/systemd/system/nextgen-xml.service.
When all changes have been made, run "systemctl reboot" to restart the system.
QLIK.COM
© 2023 QlikTech International AB. All rights reserved. Qlik®, Qlik Sense®, QlikView®, QlikTech®, Qlik Cloud®, Qlik DataMarket®, Qlik Analytics Platform®, Qlik NPrinting®, Qlik
Connectors®, Qlik GeoAnalytics®, Qlik Core®, Associative Difference®, Lead with Data™, Qlik Catalog®, Qlik Associative Big Data Index™, Qlik Insight Bot™, Qlik World™ and the
QlikTech logos® are trademarks of QlikTech International AB that, where indicated by an “®”, have been registered in one or more countries. Attunity® and the Attunity logo™ are
trademarks of Qlik Analytics (ISR) Ltd. Other marks and logos mentioned herein are trademarks or registered trademarks of their respective owners.
About Qlik
Qlik is on a mission to create a data-literate world, where everyone can use data to solve their most
challenging problems. Only Qlik’s end-to-end data management and analytics platform brings together
all of an organization’s data from any source, enabling people at any skill level to use their curiosity to
uncover new insights. Companies use Qlik products to see more deeply into customer behavior,
reinvent business processes, discover new revenue streams, and balance risk and reward. Qlik does
business in more than 100 countries and serves over 48,000 customers around the world.
qlik.com
