
GYPSY BI LLC
FinJinni Professional
Administrator’s Guide
and Installation Manual
© 2018-2024 Gypsy BI LLC For assistance contact: support@gypsybi.com

Table of Contents
Introduction ...............................................................................1
Before You Begin ......................................................................2
Installation.................................................................................2
Trial Version ..............................................................................3
FinJinni First Time Setup ..........................................................5
First Time Setup Online .......................................................... 10
Using FinJinni Professional ..................................................... 12
Running Queries and Creating Reports .................................. 15
Licensing FinJinni ................................................................... 16
QuickBooks Company Setup .................................................. 18
Cash-Reporting Settings ......................................................... 22
Advanced Inventory Settings .................................................. 23
Using Custom Fiscal Years ..................................................... 25
Budget Reporting for QuickBooks Desktop ............................. 27
Reporting on QuickBooks Reimbursed Expenses ................... 28
Advanced Loading Options ..................................................... 29
Consolidating Multiple Companies .......................................... 32
Using Multiple Currencies ....................................................... 36
Automating an Extract ............................................................. 41
Sending eMail Event Notifications ........................................... 43
Advanced Data Loading Features:
Extending the QuickBooks Data Model with Custom Fields ... 45
Customizing the Chart of Accounts .............................................. 45
Adding Custom Fields to Classes ................................................ 46
Adding Additional Custom Fields to Items and Entities ................ 47
Using the Upload Function In Excel ............................................. 47
Consolidated/Combined Format for Uploading Custom Fields..... 48
Loading Budget Data from Outside QuickBooks ..................... 50
Loading Journal Entries from Outside QuickBooks ................. 52
Loading Other Transactions into QuickBooks ......................... 55
Adding Customers and Vendors to QuickBooks ...................... 58
Loading Data into User-Defined Tables .................................. 60
Automatically Loading Custom Data Files ............................... 61
(continued)

Table of Contents
SQL Server Topics For Advanced Users:
Installing and Configuring SQL Server Express ................................... 64
Setting Up Shared Access for SQL Server Express; Multi-User Access ....... 67
Using Custom SQL Logins ................................................................... 72
Using FinJinni to Manage Your Databases .......................................... 74
Using Azure SQL Databases ............................................................... 75
Setting Up Azure in FinJinni .......................................................................... 75
QuickBooks Load Performance with an Azure Database .............................. 76

F I N J I N N I P R O F E S S I O N A L
1
Introduction
FinJinni® Professional, called FinJinni Pro for short, is a data warehouse and reporting application for
Intuit QuickBooks companies. FinJinni Pro extracts the information stored in one or more companies
and makes it available for reporting in Excel and other tools*.
Both Desktop and Online are supported and FinJinni Pro allows for the consolidation of multiple
companies.
Using Microsoft SQL Server as its storage mechanism enables a wide range of data capacities. FinJinni
comes with an Excel add-in so that reports can be run directly from Excel. Other visualization tools such
as Microsoft Power BI and SAP Crystal Reports can access the FinJinni database.
This document describes the setup and administration of FinJinni. A separate document, “FinJinni Pro
Queries Manual” describes how to build queries and reports in Microsoft Excel. To view that document,
use the Help icon on the FinJinni Ribbon bar in Excel. You can also download it from the Gypsy BI LLC
web site, www.gypsybi.com.
* Intuit and QuickBooks are trademarks and service marks of Intuit Inc., registered in the United States and other counties. FinJinni
is a registered trademark of Gypsy BI LLC. SQL Server and Power BI are trademarks of Microsoft Corporation. Crystal Reports
is a trademark of SAP SE.
NOTICE
While this information is presented in good faith and believed to be accurate, Gypsy BI LLC disclaims the implied
warranties of merchantability and fitness for a particular purpose and makes no express warranties except as may
be stated in its written agreement with and for its customers. In no event is Gypsy BI LLC liable to anyone for any
indirect, special, or consequential damages. The information and specifications in this document are subject to
change without notice.

F I N J I N N I P R O F E S S I O N A L
2
Before You Begin
You should install Microsoft SQL Server. A free version, SQL Server Express, for a single user is
available from Microsoft and is included when you download FinJinni.
If FinJinni detects that SQL Server is not installed, it will automatically install SQL Server Express
version 2019, which requires Windows 10 or above (or Windows Server 2016 or above). This
installation uses default settings and requires no user interaction on your part. Under most
conditions, FinJinni’s automatic install will suffice.
If you will be working with many companies, additional Excel users, or tools other than Excel, it is
recommended that you also install SQL Server Management Studio, which is a tool for managing
databases and user access to databases.
Microsoft Azure SQL Database is also supported by FinJinni if you do not want to install SQL
Server locally. Microsoft will charge a monthly fee for the use of a “cloud hosted” Azure database.
Refer to the section “Using Azure SQL Databases” at the end of this document for more
information on Azure.
Refer to the section “Installing and Configuring SQL Server Express” at the end of this document
for more information on setting up SQL Server. The section “Automatic Install of SQL Server
Express” describes how FinJinni will give you the option to install SQL Server for you.
Installation
Downloading FinJinni
Start FinJinni installation by downloading the installation module, FJProSetup.exe, from the location
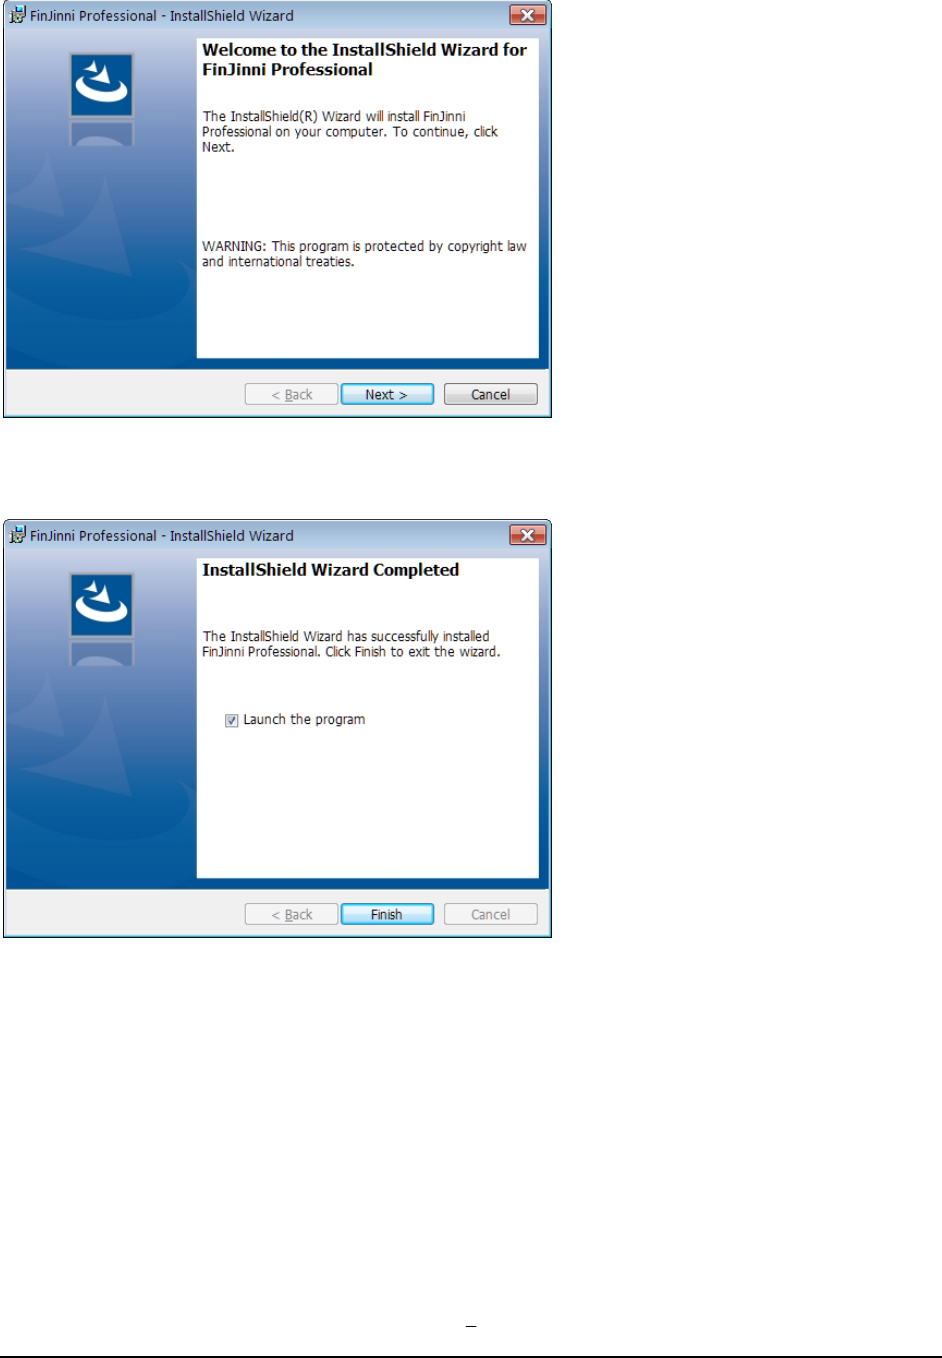
that Gypsy BI will give you. Run FJProSetup.exe. After an initial status panel, you'll see this panel:
3
Click Next on this screen and the following screens to start the installation. When the installation completes,
you will see this screen:
Leave the “Launch” box checked. Click Finish to start the FinJinni program.
Trial Version
FinJinni is distributed with a 15 day fully-functional trial version with a limit of two company files.
When the product is first launched, you will see this screen:

4
The above screen will be presented each time FinJinni is launched during the trial. To purchase
FinJinni and obtain a permanent license key, see the section ”Licensing” in this document. Until
then, just press Continue.
5
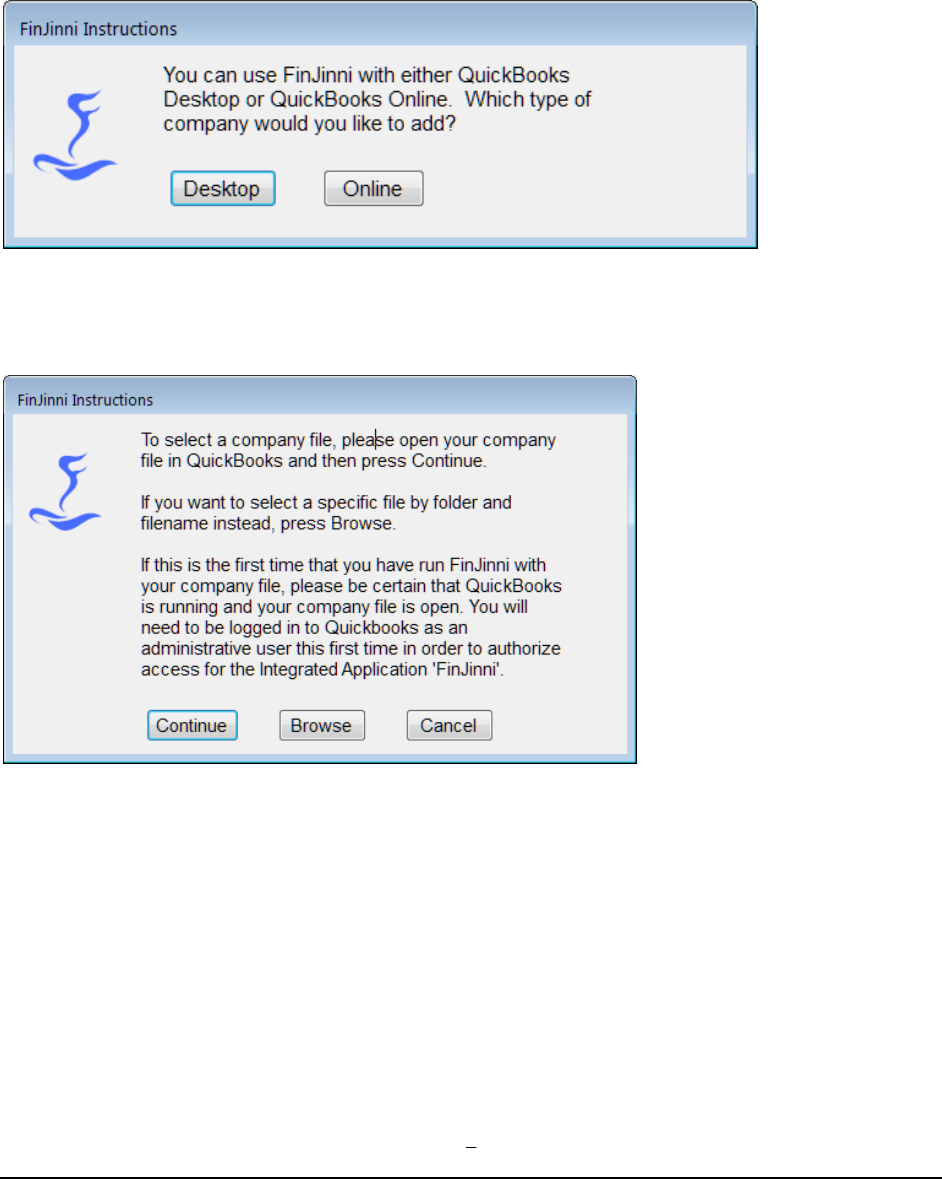
FinJinni First Time Setup
The first time that you run FinJinni, you will be prompted for your QuickBooks file information. Select
your QuickBooks company on the screens provided and choose a database name for your data repository.
The screens displayed in sequence are:
If you choose Online skip to the next section.
If you choose Desktop, you will see this screen next:
If you press Continue, QuickBooks will display its authorization screen so that you can authorize FinJinni
to access the company file.
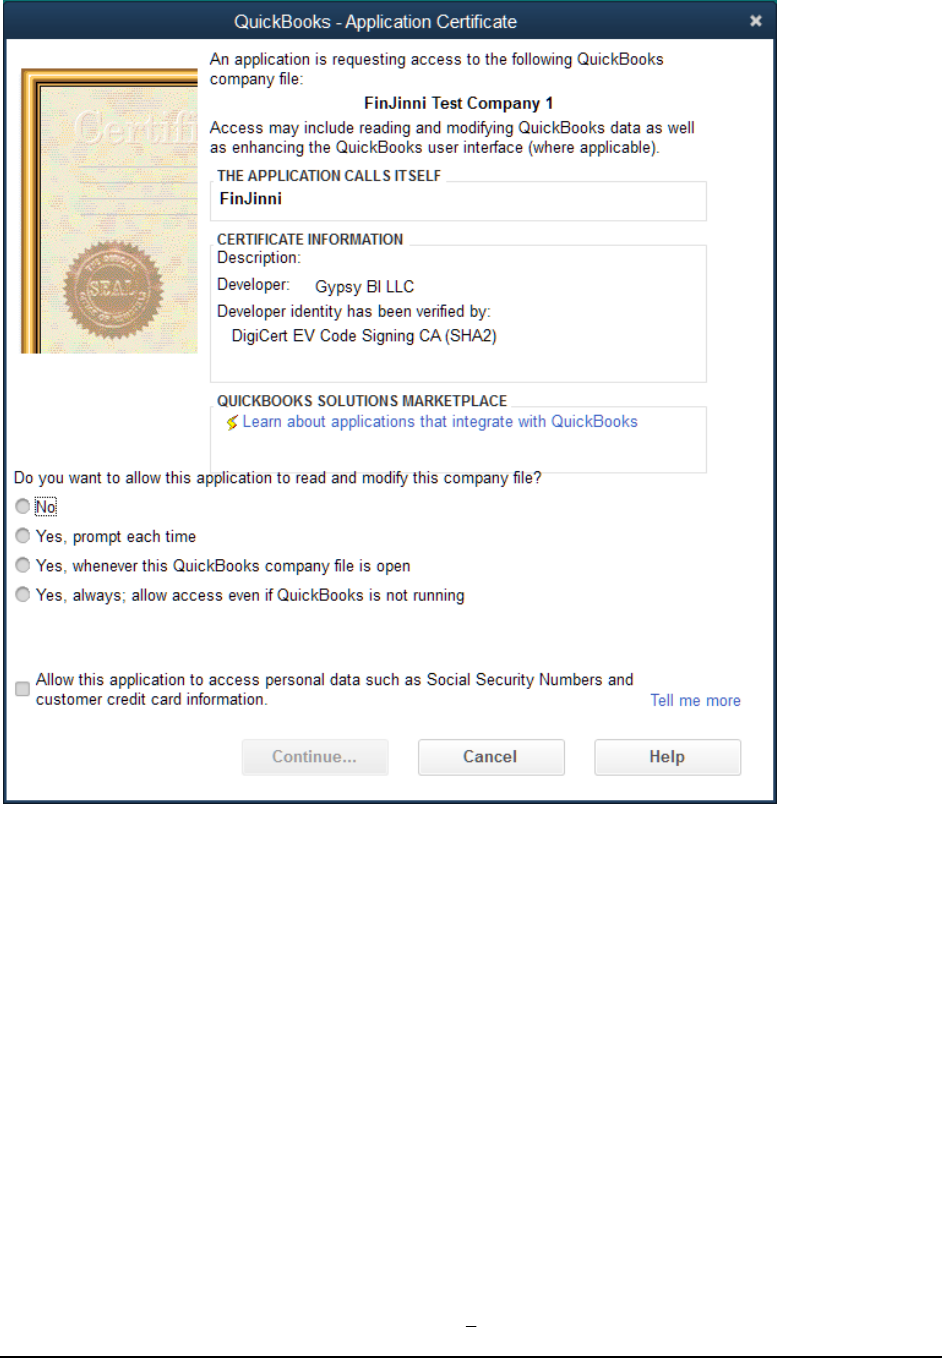
6
You do not need to give FinJinni access to personal data. Please press Continue and then Yes and
Done on the confirmation screens.
Next you will be asked for a short “nick-name” to be used to identify the company. This is used in drop-
down lists to select the company and is also available in reports as an identifier when you are using multiple
companies.
This is the screen:
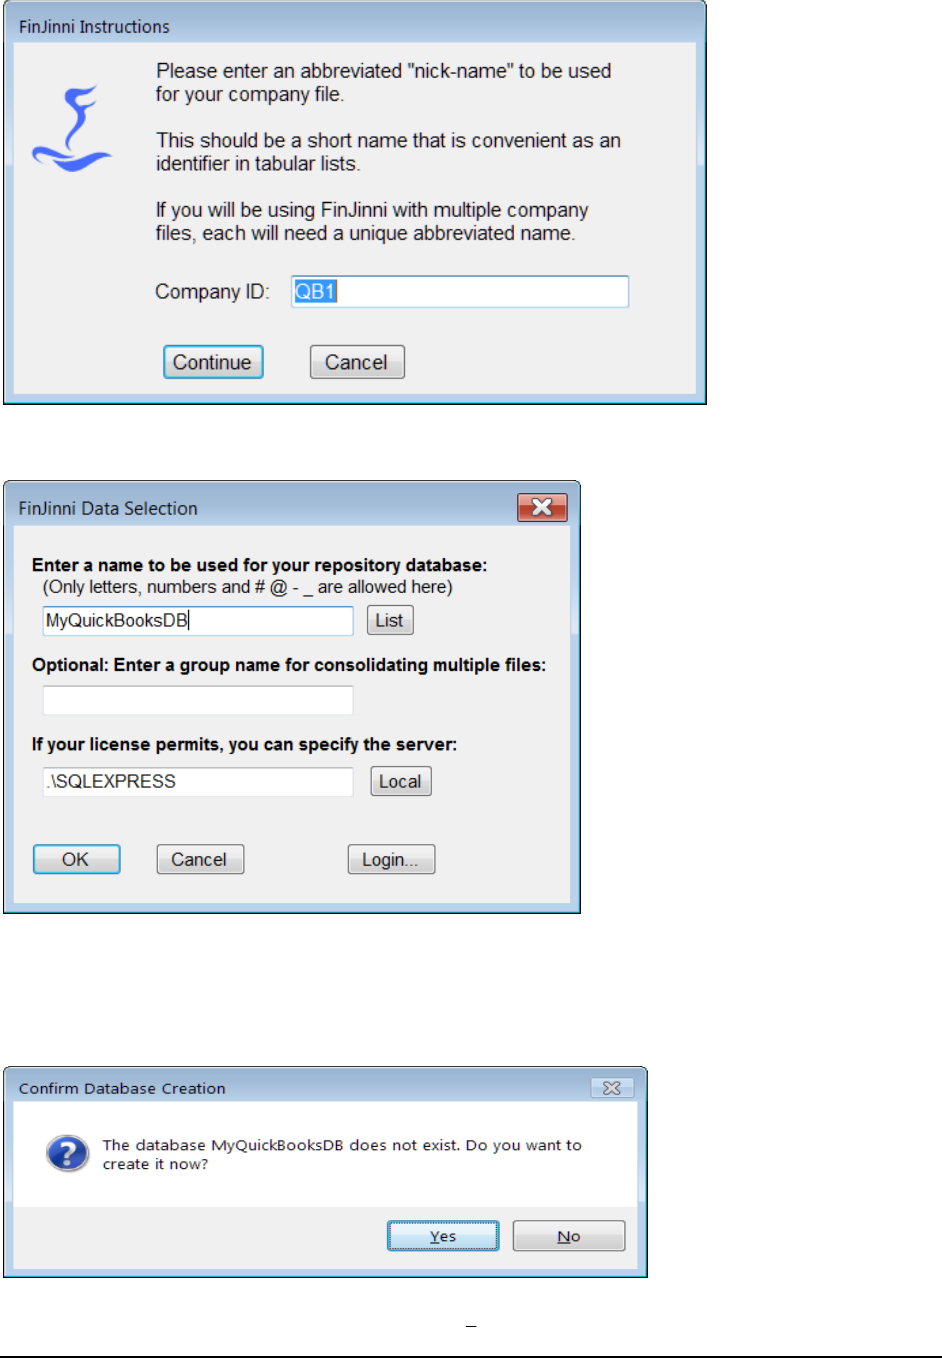
7
You will then be asked for a database in which the extracted company data will be stored.
We recommend using a more meaningful name than this default. Please note that the name can only
contain letters, numbers, and the characters # @ - _. Blanks are not allowed in this name.
If the database does not exist, you will be given the option to create it:
8
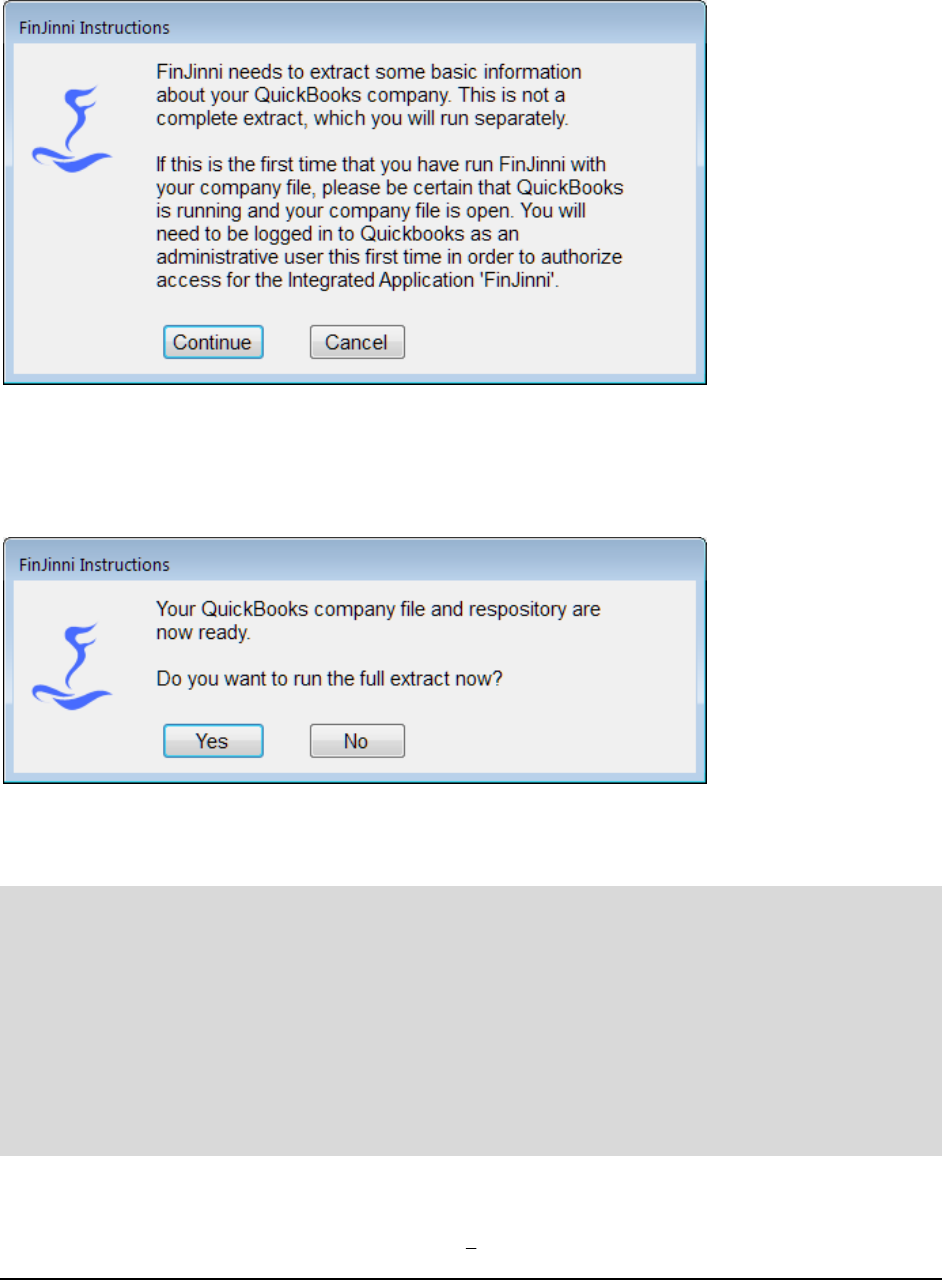
FinJinni will then attempt to connect to your company file and extract some basic information. This is not
a full extract, which you will run after setup is complete.
When you press Continue, FinJinni will connect to your company file and retrieve some basic company
and account information.
Your company file is now ready to have its data extracted. The next screen displayed will be:
Choose Yes to extract or No to return to the main screen where you can perform additional setup if
needed.
A few important tips for this first extract:
1. The full extract is only needed the first time that you run FinJinni for your company file. After
that, refreshes are done incrementally so that only new or changed data is loaded. The first load
can take a considerable amount of time if your company file is very large. One way to speed this
up is to open your company file in single-user mode for this initial load.
2. If you are using cash-basis reporting, or want to use job-time reporting, be sure to check those
Options in Setup before running the full extract. See “QuickBooks Company Setup” below for
this and other options.

9
3. If you want to produce reports mapping Bill Payments to their original Bill items, or Received
Payments to their original Invoice items, you must turn on cash-basis reporting even if you are
an accrual-only company. This will not affect any accrual-basis reports, it makes payment reports
available.
10
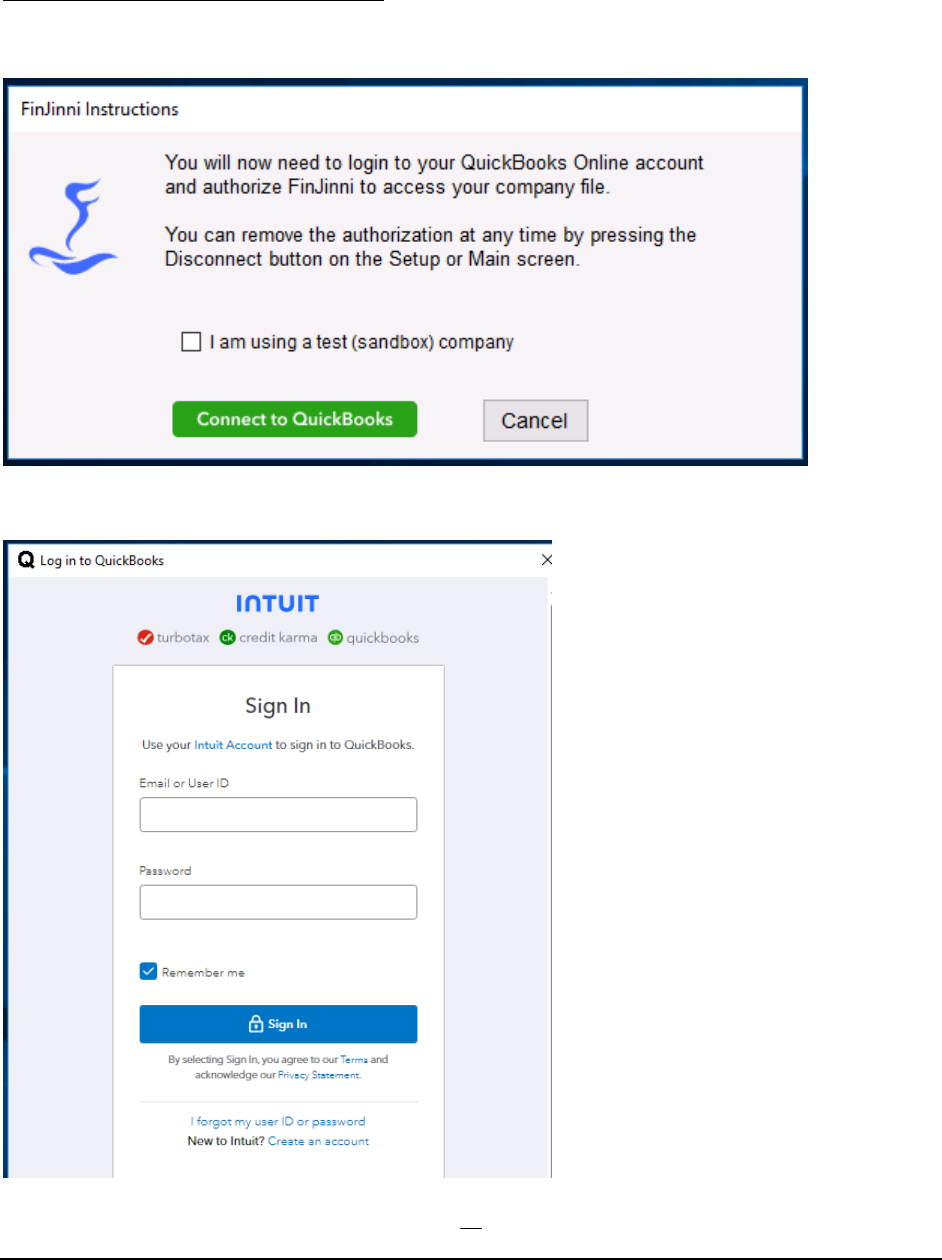
First Time Setup Online
If you chose to add an Online company
In this case, you will see the screen:
Press Connect to QuickBooks and you will be given the Intuit logon:
11
You will now need to login and authorize the access to your company.
Notice: FinJinni uses a Microsoft Edge component to login to your Intuit account. This is included
on most current Windows installations for Windows 10 or 11. Certain older system do not have this
component. On these systems, FinJinni will prompt you to install it and start the installation
automatically. If you have any difficulties, please contact GypsyBI support for assistance.
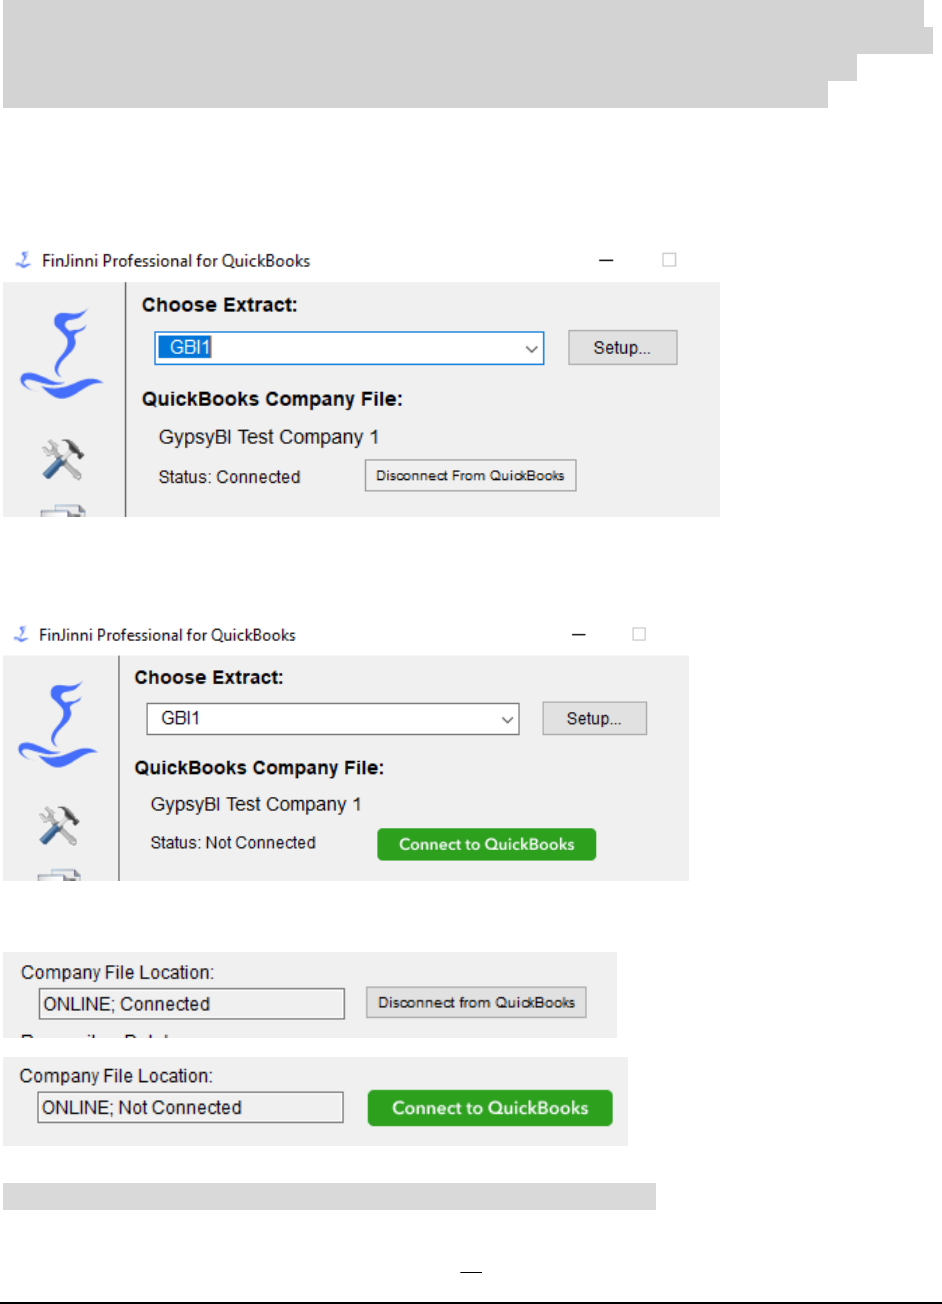
For future extracts, you will not need to log in again until your authorization expires; QuickBooks
Online will keep your authorization active for up to 100 days. You will see this status on the main
screen to indicate FinJinni is still connected to QuickBooks Online:
If FinJinni detects that you are no longer authorized, you will see this status and you will need to press the
Connect button to log into QuickBooks Online again:
On the setup screen, here is what you will see instead of the above screens:
Important: FinJinni must be Connected before you can run an extract.
12
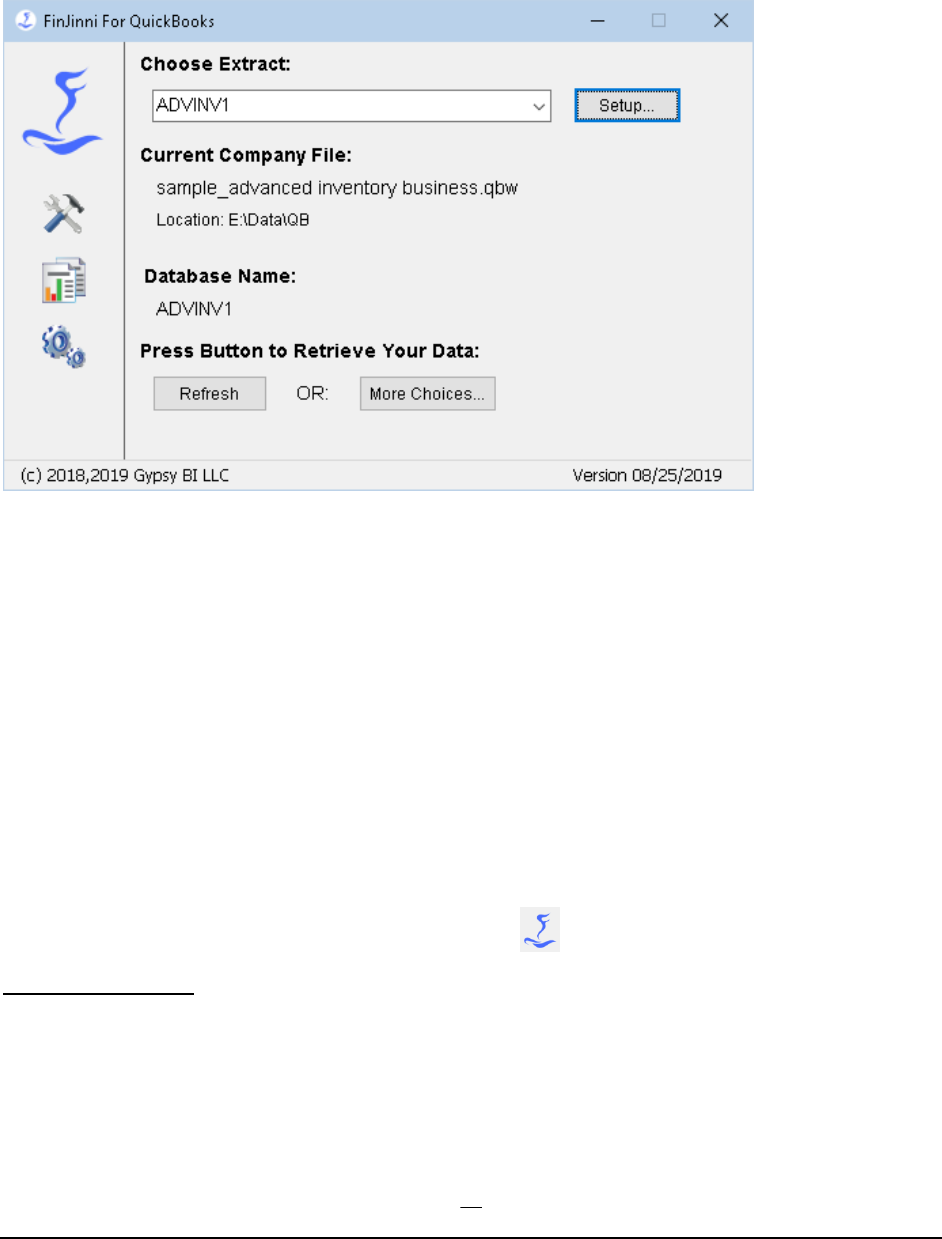
Using FinJinni Professional
This is the FinJinni main screen:
To use an existing extract, simply choose the name of your file from the drop down menu and press the
Refresh button. To edit an extract or create a new extract press Setup.
The Refresh button will run an incremental load of all information that has changed since the last load.
Normally, this is the proper and fastest way to extract data.
Additional load choices are available by pressing More Choices. If you want to reload all data (e.g. if you
restored an older backup file), use this and choose “Reload ALL Data”. If you want a complete reset of
your database (e.g. if you are switching to a completely different file), choose “Rebuild the Database”. These
and other choices are listed in more detail below.
Note: If you have extracted an older file and are given a new version of the same company, the incremental
load will work properly as long as only the new company file has been modified (it is a direct “descendent”
of the old file). Otherwise, use a Full Reload.
For help, updates and license information, click on the
More Load Choices
When you press “More Choices…”, you will see this menu:

13
The choices are:
Reload ALL data from the selected company
This will perform a complete reload of all data from the selected company file, or the group of
company files if a group is selected. All existing data is deleted and reload. If a single company is
selected and other companies are loaded into the same database, those companies will be
unaffected.
Rebuild the Database
This will reload all data and will also completely rebuild the database, clearing all data from all
companies that have been loaded.
Reload but Preserve Hierarchies
This is used in special instances where custom reporting hierarchies have been created. Those
hierarchies will be preserved on reload when this choice is used.
Continue Failed or Cancelled Reload
If a reload fails in the middle (e.g. the QuickBooks data server or the Internet connection to
QuickBooks Online fails) or you cancel the reload for some other reason, you can pick it up
where it left off by using this option.
Please use this option with care: Any entities or transaction types that have already been loaded
will not be checked for new changes when the load is restarted. Use this if you know that no
QuickBooks changes have been made since the previous load was stopped. You can also run
another incremental refresh after the continued load finishes to be certain any changes are picked
up.
Reauthorize QuickBooks Access
This will connect FinJinni to QuickBooks and re-authorize the access within QuickBooks. You
can use this to re-authorize FinJinni without reloading any data.
Load Custom-Field Definition Files
This allows you to immediately load custom field definition files without starting a QuickBooks
refresh (these files are otherwise automatically loaded on each refresh). You will be given a choice
of which type of entity file to load. For more information, refer to the section “Advanced Data
Loading Features” later in this document.
Load Added-Transaction Definition Files

14
This allows you to immediately load added-transactions, budget, and other custom data files
without starting a QuickBooks refresh (these files are otherwise automatically loaded on each
refresh). You will be given a choice of which type of data file to load. For more information, refer
to the section “Advanced Data Loading Features” later in this document.

15
Running Queries and Creating Reports
We recommend that you use Microsoft Excel to analyze the data extracted from FinJinni. In Excel,
there will be a FinJinni menu choice and a Help button on the FinJinni ribbon bar. From there, you
can bring up the documentation for Queries, or you can manually open the file FinJinni Pro Queries
Manual.pdf in the Program Files folder.
If you want to build queries from FinJinni Pro outside of Excel, click on this icon on the left side of
the main screen:
Refer to the Queries manual for information on how to proceed.

16
Licensing FinJinni
FinJinni is distributed with a fully-functional trial version, within a limit of 15 days and two companies. You
can purchase a permanent license for FinJinni from the GypsyBI online store. Once you purchase, you will
be given the licensing information in the order confirmation email. Press Activate on the Trial screen and
you will be given the Licensing screen where you can enter this information:
Note: If you have purchased add-on licenses for more than 3 companies, you will receive an updated
product code and license key from GypsyBI in a separate email.
Offline Licensing
On the license screen, if you select Send Email, you will be given these instructions:
When you click OK, you will be presented with a “Save As” dialog to save the file “FJLicenseRequest.txt”.
Please save this in a convenient location, such as your “Documents “folder.
Once you receive your license key, use the Import Key button to import the license file
“FJLicenseResponse.txt”.

17
You can also do either of the above steps from the main product screen by clicking on the FinJiini icon.
18
QuickBooks Company Setup
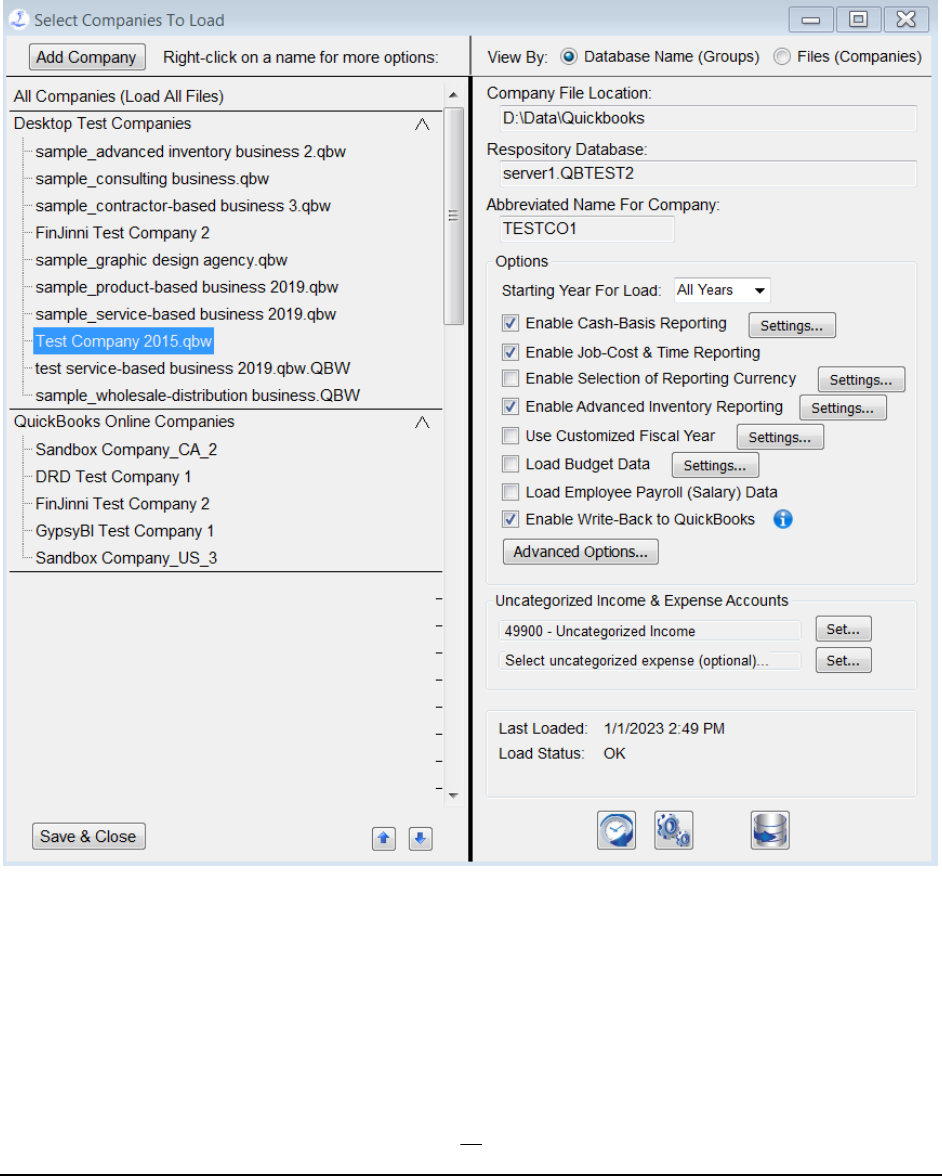
When you press the Setup button on the main screen, you will be presented with the Setup screen. This
displays all the QuickBooks companies that have been identified to FinJinni, for example:
All extracts that you have added will be listed on the left side. The settings for the selected extract are
displayed on the right.
If you're using FinJinni’s consolidated reporting, you can define groups of companies as shown above. Any
one company can be in multiple groups.
To add a new company file, press the Add Company button. The screens displayed will be the same as
described in “FinJinni First Time Setup”.

19
If you are only reporting on separate companies, you can use the display as shown or select the View By
Files radio button on the upper right of the screen to get a list view:
Important Options
There are two settings that are important for reliable reporting:
1. Enable Cash-Basis Reporting: You must select this before extracting if you will be using cash-
basis reporting. Accrual-basis reporting is always supported; checking this option will load both
and allow the basis to be chosen at the time of each report.
For a QuickBooks Online company, there will be a Settings button:
See the section “Cash Reporting Settings” below for a description. For QuickBooks desktop, no
additional settings are required.

20
2. Uncategorized Income Account: Certain income is not categorized when received. Normally,
FinJinni will select the account QuickBooks uses for uncategorized income. You can change that
here for special cases.
Other Options:
Other options are used for specialized reporting:
3. Starting Year for Load: Normally, FinJinni will load all historical data available in the QuickBooks
file on the first load. After that, only incremental changes are loaded when a refresh is performed.
However, the first load can take a considerable amount of time (from ½ hour up to several hours)
if you have a large amount of data in QuickBooks. You can use the starting-year option to restrict
the load of information starting with the year specified. FinJinni will obtain a starting balance for
balance-sheet accounts at the beginning of that year and only load transaction data starting at that
date.
Note: If you are using a non-calendar fiscal year, this selection is the fiscal year number.
4. Enable Job-Cost and Time Reporting: You must select this if you want FinJinni to extract payroll
costs and employee time by job from QuickBooks.
5. Enable Advanced Inventory Reporting: You must select this if you want FinJinni to extract
Advanced Inventory data from QuickBooks. There are several additional options you should
review and set as necessary. See the following section for more information.
6. Enable Selection of Reporting Currency: For multi-currency companies, allows the reporting
currency to be selected at the time a report is created. See the section “Using Multiple Currencies”
for more information.
7. Use Customized Fiscal Year: Use this to have FinJinni recalculate the financial data based on a fiscal
year other than what is set in QuickBooks. See the following section for more information.
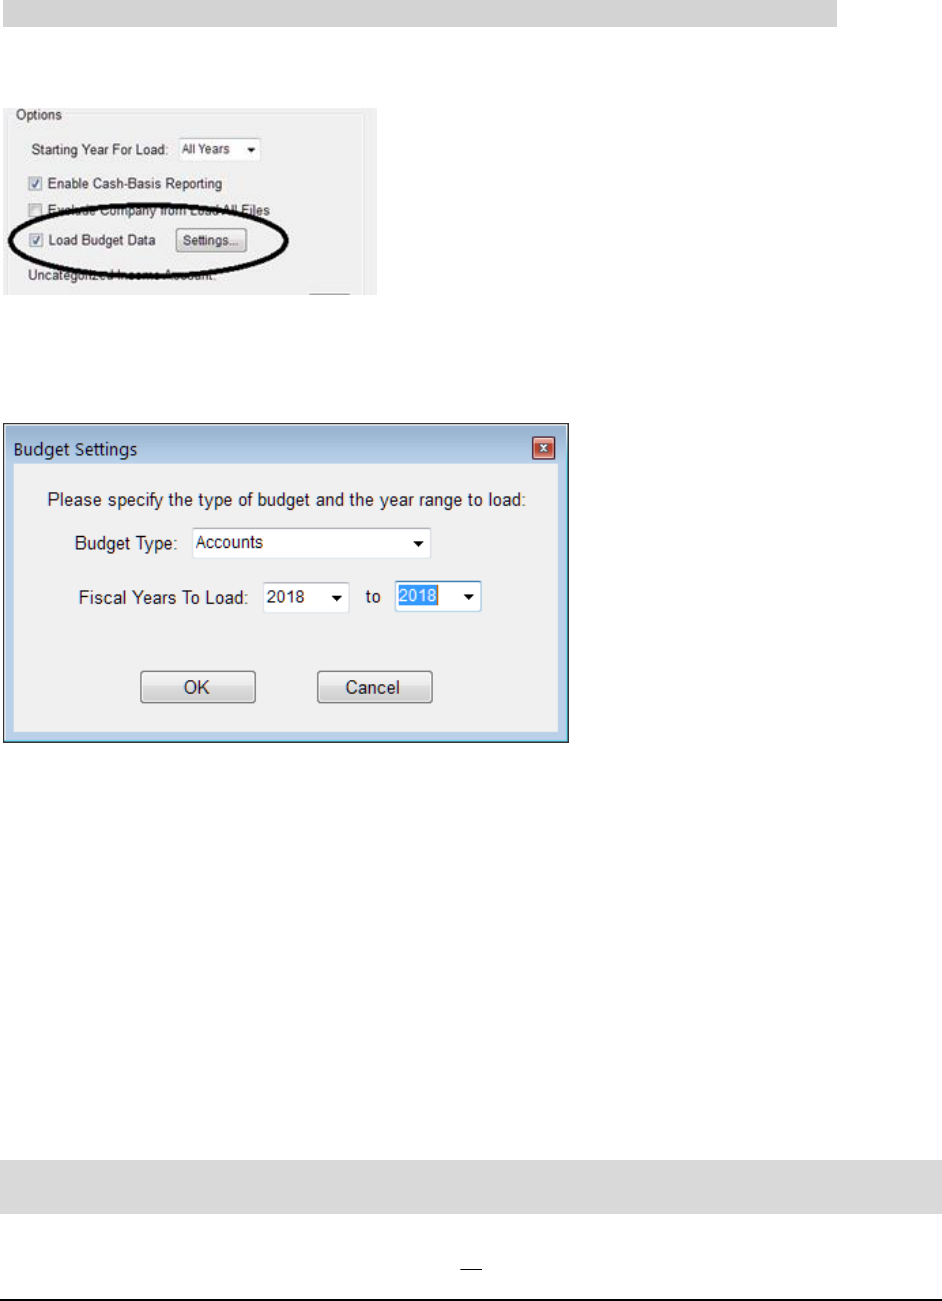
8. Load Budget Data: You must select this if you want FinJinni to extract budget data from
QuickBooks. The setup for this option is described below.
9. Load Employee Payroll (Salary) Data. QuickBooks considers salary data to be sensitive information.
You must check this option so that FinJinni knows to request this information from QuickBooks.
(This option applies to QuickBooks Desktop only).
10. Enable Write-Back to QuickBooks: Select this option if you will be using FinJinni to update
QuickBooks by posting List Items or Transactions, as described later in this document. If you leave
this option unchecked, FinJinni will only read from to your QuickBooks company and never write
transactions back, even if you set up data files to upload.
11. Advanced Options: Additional options that are less frequently used. See the section below on these
options for information.

21

22
Cash-Reporting Settings
Selecting Settings for Cash Reporting will display a pop-up with a single setting:
Selecting this option will tell FinJinni to run an allocation process whereby bill payments and received
payments are mapped back to their original transactions (Bills, Invoices, etc.) and allocated to the
individual transaction lines. This is used for payment break-down reports. Selecting this option will
increase the load time for large files and should only be used if payment break-down reporting is
desired.
Note: For QuickBooks Desktop, this mapping is always performed and no option is needed.
23
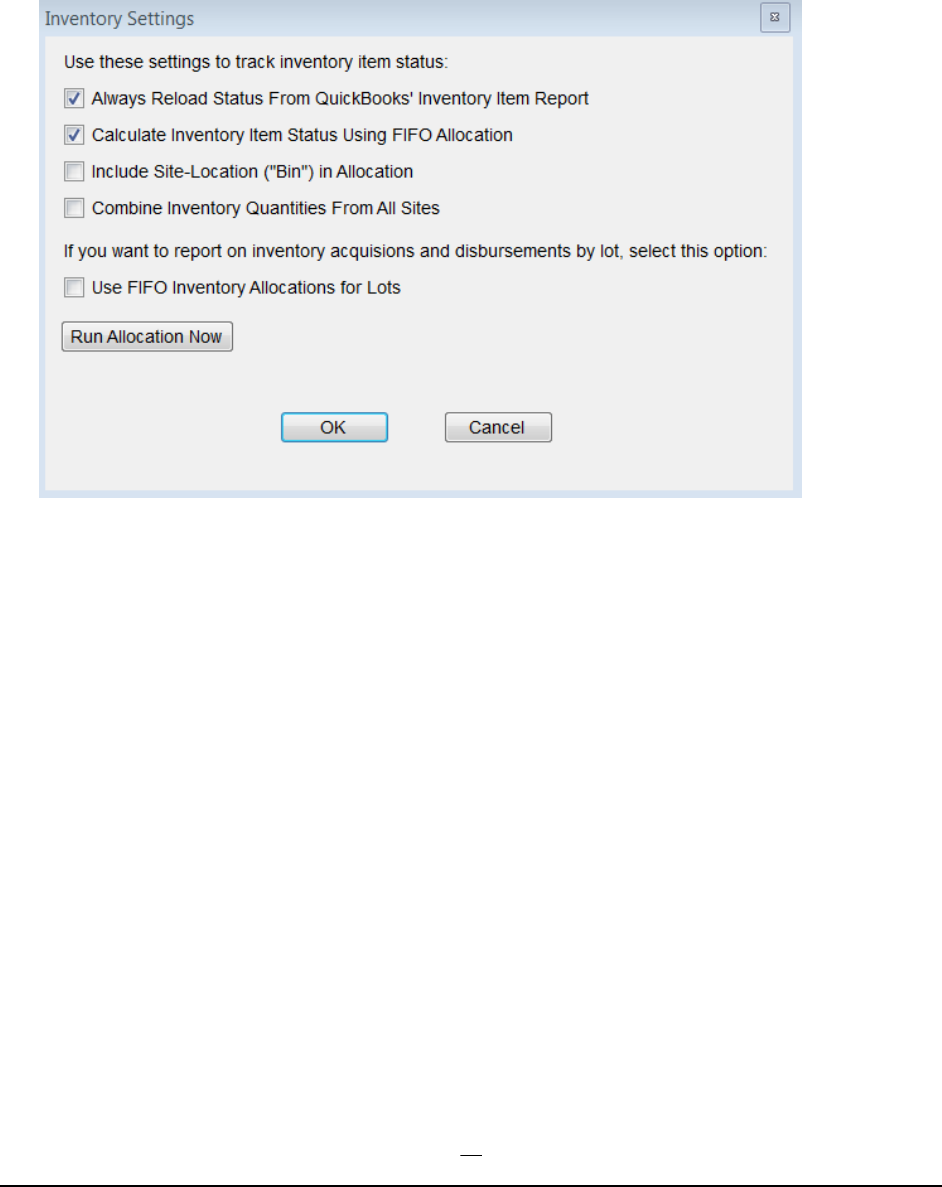
Advanced Inventory Settings
If you are using QuickBooks Enterprise with Advanced Inventory, FinJinni can provide additional
analysis reports based on the inventory data in QuickBooks. There are several settings you can choose
on the Settings screen for Advanced Inventory:
Always Reload Status From QuickBooks' Inventory Item Report
This option loads item on-hand quantities from the Inventory Item Status report as of the
current date instead of using the quantities from the item list, which can include future pending
transactions.
Calculate Inventory Item Status Using FIFO Allocation
This option will run an inventory-allocation process to match up acquisitions (purchases) and
distributions (sales) of inventory. It is the equivalent to how QuickBooks uses the “FIFO” option
in advanced inventory for reporting.
Note: This allocation process does not take item lots into account. If you want to use FIFO
allocation to report on lots, use the next option:
Include Site-Location (\"Bin\") in Allocation
If this option is selected, the FIFO allocation will include the intra-site location, usually called
“bin”. Purchase and sales transactions will not cross bins unless inventory transfers are properly
entered.
Combine Inventory Quantities From All Sites

24
If this option is selected, the FIFO allocation will ignore the inventory site and calculate total
quantities from all sites.
Use FIFO Inventory Allocations for Lots
This option will run a similar FIFO allocation process for Item Lots when those are used. It can
be chosen either with or independently from the general item options above.
25
Using Custom Fiscal Years
FinJinni provides several options for customizing your fiscal year reporting:
1. Annual: You can use a starting month other than January. The fiscal year will start on the first
date of that month. If you specify a starting month in QuickBooks, FinJinni will use that by
default. For specialized reporting needs, you can change the month in FinJinni without modifying
your QuickBooks company.
2. 13 by 4-Week Periods: The year consists of 52 weeks divided into 13 “months” of 4 weeks
each. A 53th week is added when needed. This setting only affects reporting in FinJinni. Your
QuickBooks company is unchanged.
3. 4-4-5-Week Periods: The year consists of 52 weeks divided into 4 quarters of 13 weeks each. A
53th week is added when needed. This setting only affects reporting in FinJinni. Your
QuickBooks company is unchanged.
For options #2 and #3, you should specify a starting day of week for the fiscal year to use a consistent day
of the week instead of the first of the month.
You can also define the fiscal year by the day on which it ends. For example, choose the last Sunday in
May. The fiscal year will then start on the Monday following, which can either be the last Monday in May
or June 1.
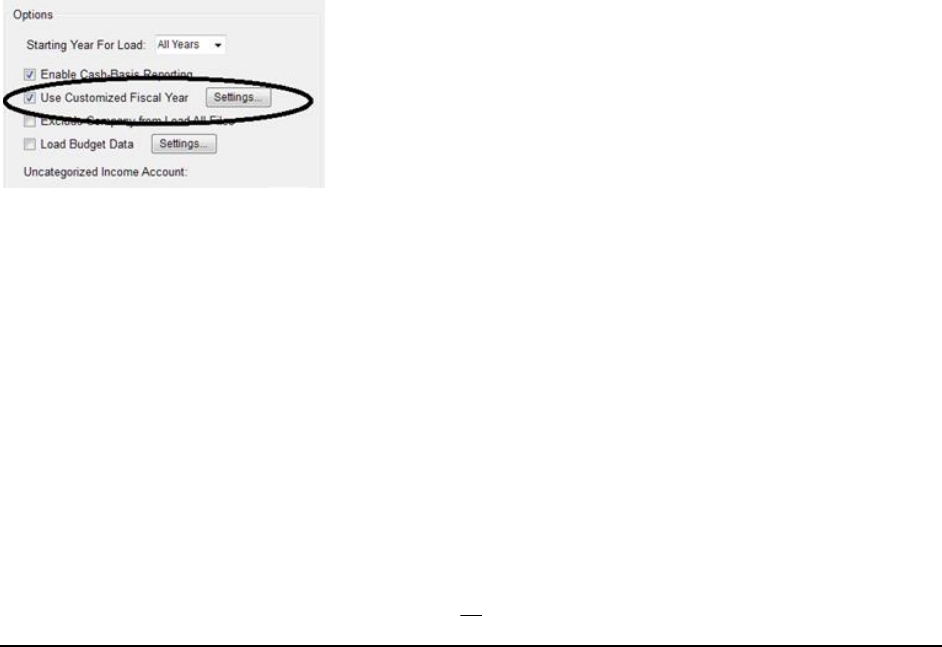
To select a custom fiscal year, press the Settings button as shown here:
You will be presented with this selection screen:
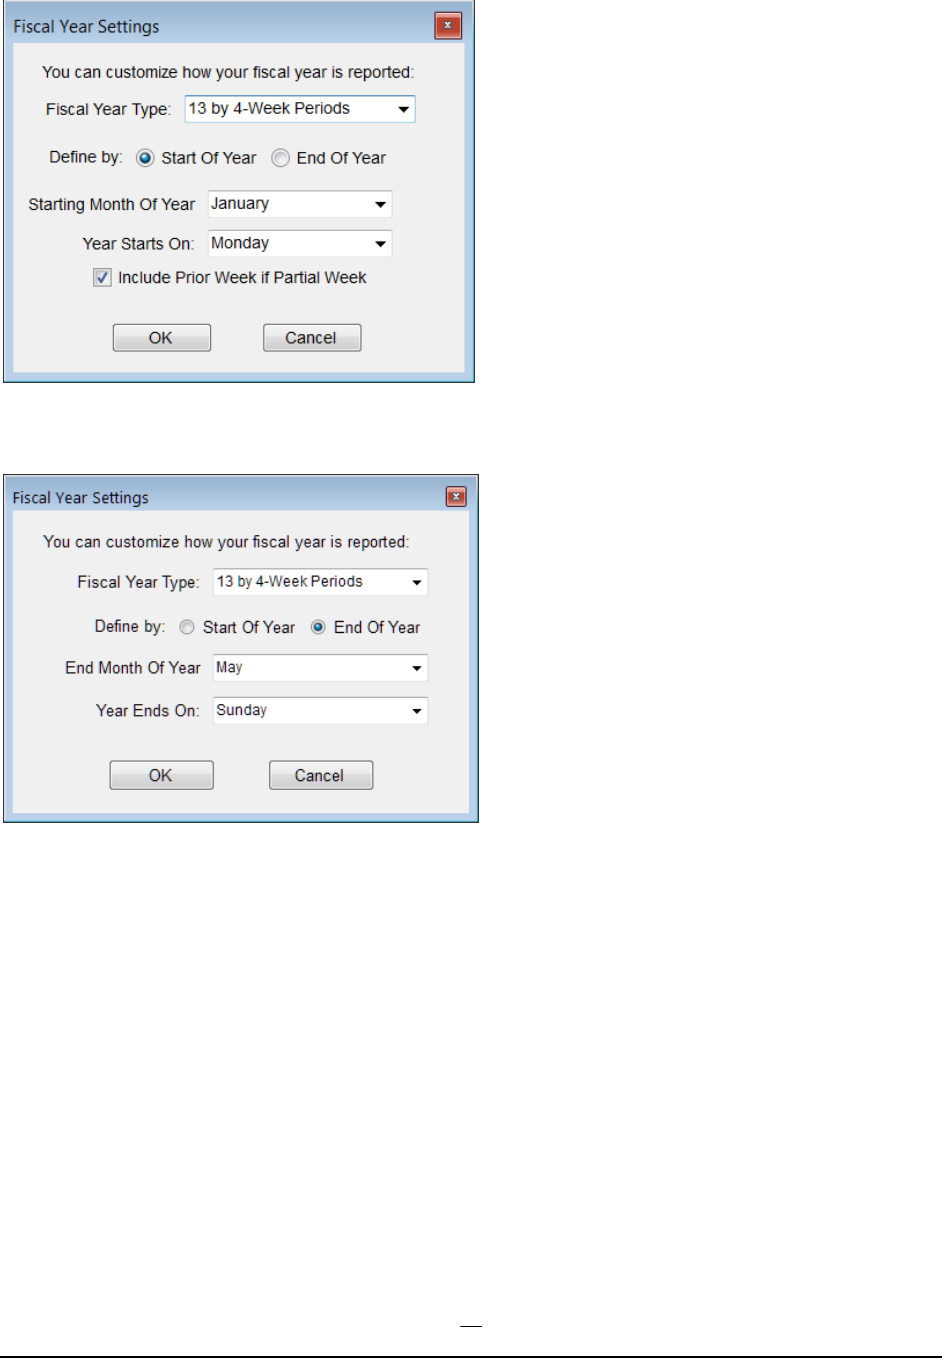
26
Or, if defining the end of the year:
Notes:
1. When you change these reporting settings, you must perform a full reload of your company
data for them to take effect.
2. When you are consolidating multiple companies, all companies in the same database must
have the same fiscal year settings.
3. The settings you choose do not need to be the same as what you have defined in
QuickBooks. Fiscal periods are recalculated as FinJinni loads data from QuickBooks.
4. You can verify the date calculations by using a query Transaction Date to Fiscal Period
Mapping" under “System Maintenance Queries". Refer to the Queries Manual for
instructions on how to run queries.
27
Budget Reporting for QuickBooks Desktop
For QuickBooks Online, budgets are always loaded if present. No special setup is needed.
If you want to load budget data from QuickBooks Desktop for reporting in FinJinni, you must specify the
budget type and years. There is a setting on the company setup screen for this:
When you check Load Budget Data the first time, or use the Settings button after that, you will see this
screen:
The choices for Budget Type are the same as in QuickBooks, namely:
Accounts
Accounts And Classes
Accounts And Customers
Please note the following:
1. Budget data from QuickBooks is available in a summary form by account and month, and class or
customer if selected. It is important that you select the correct budget type since QuickBooks can
have multiple budgets for the same year.
2. After making these changes, refresh your company data on the FinJinni main screen. Budgets are
reloaded whenever a refresh is requested.
FinJinni can also load budget data created outside QuickBooks. See the section “Loading Budget Data from
Outside QuickBooks” later in this document form more information.

28
Reporting on QuickBooks Reimbursed Expenses
This option applies to QuickBooks Desktop only. No additional setting is needed for QuickBooks
Online.
If you use the reimbursed expense feature in QuickBooks, Invoices can be created without the Item field
filled in on the line items. FinJinni normally requires this field to identify the associated account. QuickBooks
does not provide the account to third-party applications if the item field is not filled in.
To show the proper account balances for reimbursed expenses, FinJinni normally uses the daily trial balance
to identify the total of reimbursed expenses for each account and day.
If you want a finer level of detail, FinJinni can use an expense report from QuickBooks to fill in the
additional information and report the account and class on each reimbursed expense line. The load option
“Track Individual Reimbursed Expenses on Invoices” must be checked for this to be done.
When using QuickBooks reports to obtain additional information, it is important to use distinct account
names. If you have multiple accounts with the same name, they appear the same on QuickBooks reports,
even if they have different parent accounts. For example, if you have accounts “Homeowners:Insurance”
and “Auto:Insurance”, they both appear only as “Insurance”. FinJinni cannot tell which account is being
used on an individual expense line in this case.
Another way to handle these duplicate account names is to use an account description and set the
QuickBooks preference “Name and Description” under “Reports & Graphs”, “Show Accounts By”. The
account name and description will both appear on reports, e.g. “Insurance (Auto)” if the account description
is set to “Auto”.
29
Advanced Loading Options
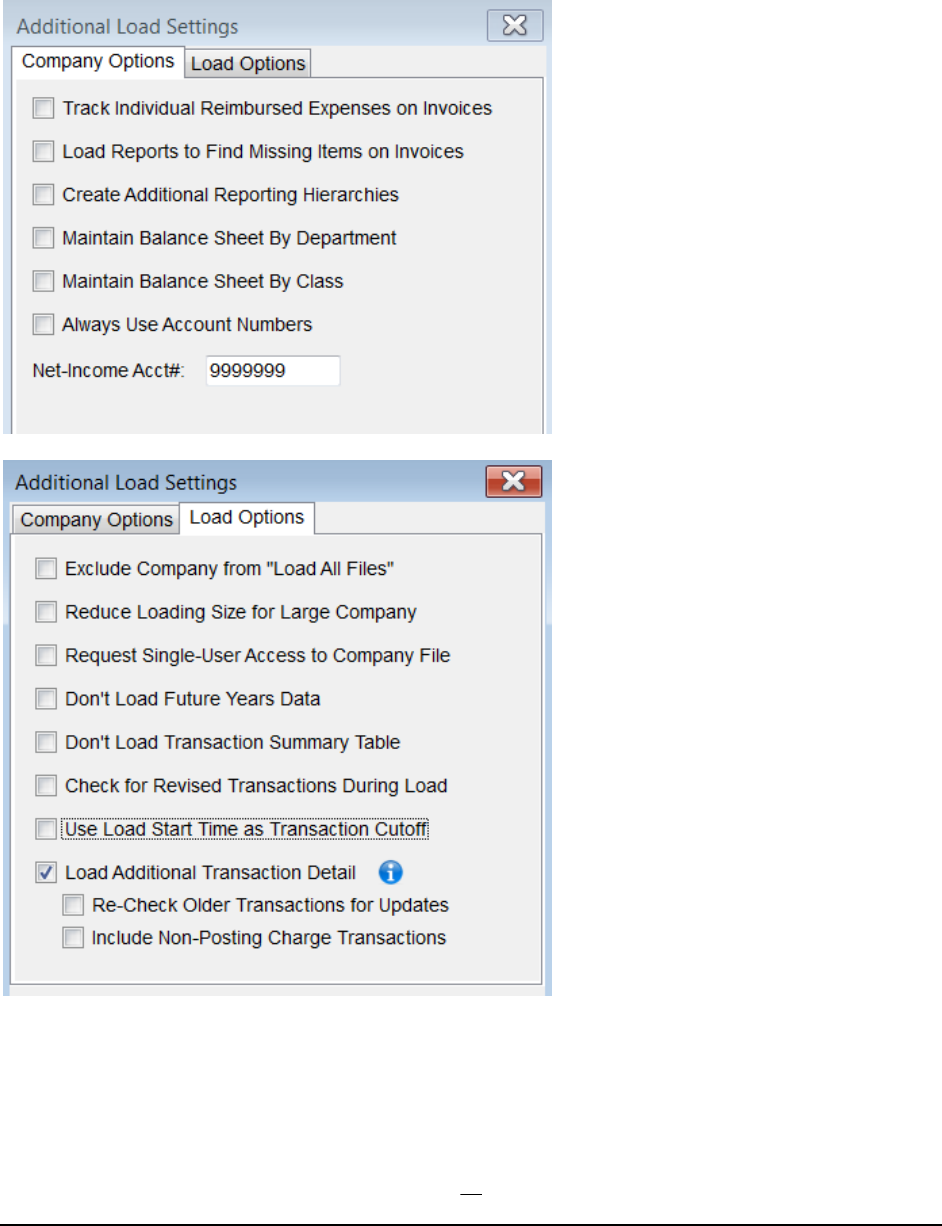
These additional options are set in special circumstances. Note that the Advanced Options window
has two tabs, one labelled Company Options and one labelled Load Options:
These options are:
• Track Individual Reimbursed Expenses on Invoices: If you use the reimbursed expense feature in
QuickBooks, Invoices can be created without the Item field filled in on the line items. FinJinni
requires this field to identify the associated account and reports daily totals for reimbursed expenses

30
by account. If you set this option, FinJinni will use an expense report from QuickBooks to fill in
the additional information.
(This option applies to QuickBooks Desktop only).
• Load Reports to Find Missing Items on Invoices: In QuickBooks, when you create an
Invoice, you specify the product or service that is sold. You do not specify the
income/expense account. QuickBooks determines that from the item setup. But Intuit
provides a back-door for external applications that allows them to specify the account on the
invoice without an item. When this is done, it does not allow other applications, like
FinJinni, to read back the account. If you set this option, FinJinni will use an invoice detail
report from QuickBooks to fill in the account information for both income and liability
accounts.
(This option applies to QuickBooks Desktop only).
• Create Additional Reporting Hierarchies: FinJinni always creates hierarchies of the various
QuickBooks entities so that they can be selected when reporting, e.g. selected customers,
vendors, etc. These are called “All Customers”, “All Vendors” and so on. If you select the
option to create additional hierarchies, FinJinni will also create hierarchies such as
“Customer by Bill State”, so that you can select an entire state. Additional hierarchies are
available for custom reporting.
• Maintain Balance Sheet by Department: Normally, the balance sheet is only maintained by
account. Selecting this option allows filtering of the balance sheet by department, also called
location.
• Maintain Balance Sheet by Class: Normally, the balance sheet is only maintained by account.
Selecting this option allows filtering of the balance sheet by class.
• Always Use Account Numbers: By default, FinJinni will only use account numbers if that
preference is set for the company in QuickBooks. This option overrides that setting and will
use account numbers whenever they are present.
• Net Income Acct #: When Net Income is displayed on the balance sheet, this is the account
number used for that row. Please note that this is a common setting shared by all company
files in a single database.
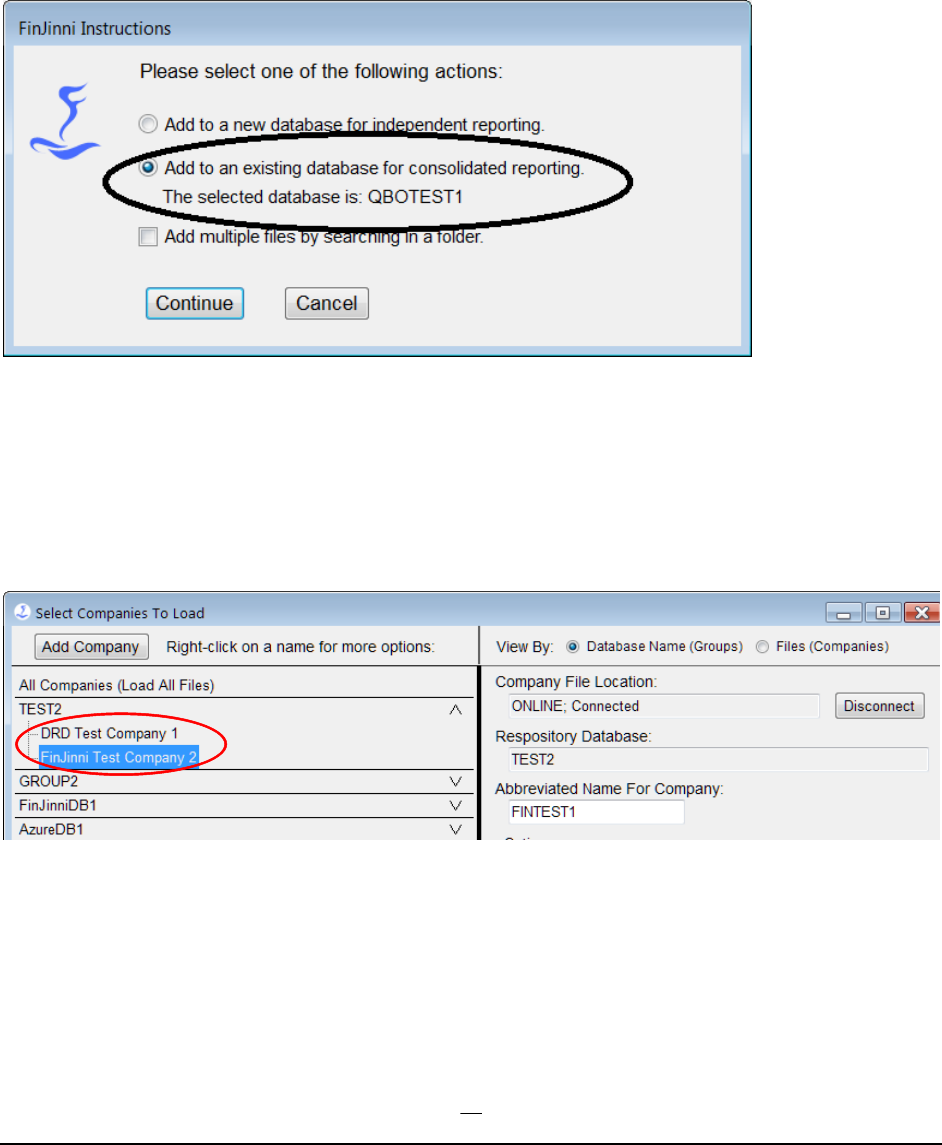
• Exclude Company from “Load All Files”: If checked, this company will not be loaded when
a group of companies or All Companies is selected to load in a batch.
• Reduce Loading Size for Large Company: QuickBooks has limits on the amount of data and
size of reports that can be retrieved. FinJinni usually determines these limits dynamically but
that can add time to the load for very large companies or QuickBooks can still return an
error. If you have a great deal of data in one or more years, setting this option will cause
FinJinni to request the data in smaller batches.

31
• Request Single-User Access to Company File: For QuickBooks desktop: Normally, FinJinni
will use either Single- or Multi- User access to QuickBooks, whichever QuickBooks is set to
use. This option will force use of Single-User access, which can speed up the load but
requires administrative privileges to use.
• Don’t Load Future Years Data: QuickBooks will allow postings in the future and this can
add to the load time. Check this box to exclude all postings past the end of the current year.
Any transactions up to the end of the current year are always included.
• Don’t Load Transaction Summary Table: This option skips loading of the QuickBooks
“Transaction” table, which is a summary of all transactions. This is a very large table in some
circumstances and can take a great deal of time to load for large companies. Since FinJinni
compiles its data from all of the individual tables, this summary table is not always needed.
Note: This option is still undergoing testing and should only be used with the guidance of
Gypsy BI support staff.
• Check for Revised Transactions During Load. If set, during an incremental load, FinJinni
will alter the loading process by checking each modified transaction to see if it is an updated
transaction or a new one before performing the update. This can reduce the overall amount
of additional data FinJinni needs to update at the expense of extra lookups. It primarily helps
to reduce updates with Azure, particularly when you have many future postings.
• Use Load Start Time as Transaction Cutoff. Normally, FinJinni will perform an incremental
load looking for any changed transactions changed. If other people are updating
QuickBooks during the load, it is possible for incomplete transactions or groups of
transactions to be loaded. This option causes any transaction changed since the start of the
load to ignored. This can provide more consistent reporting.
• Load Additional Transaction Detail: QuickBooks does not supply the Class used for the
parent transaction on Bills and Vendor Credits with the transaction data (i.e. on the balance
sheet side of the transaction). It also does not supply the “cleared” status on checks. FinJinni
will take the extra step of retrieving this data from separate QuickBooks reports. This option
defaults to being on and should normally be left on. In can be turned off in specific
circumstances to speed up the load at the expense of reporting these fields.
• Re-Check Older Transactions for Updates: This causes FinJinni to load additional data for
transactions that QuickBooks does not report as changed. At present, this is used to insure
that changes to the Billable status of items on bills are properly reflected.
• Include Non-Posting Charge Transactions: This will load additional non-posting transactions
that can be used in custom reports. At present, this applies to QuickBooks Online only.
32
Consolidating Multiple Companies
These instructions will show you how to setup FinJinni Professional for consolidated or
comparative reporting of multiple companies:
After adding the first company, when you press the Add Company button on Setup, you will first
choose Desktop or Online. After that, this screen will appear:
Select “Add to an existing database…” to enable consolidated reporting.
(If you don’t see the text “The selected database is …” it means that you didn’t have the original
database selected when you pressed the Add Company button. Please Cancel and try again.)
After adding the new company, you should see the display similar to this:
If you leave a single company selected, that will be displayed and loaded on the main screen. If you
want to load multiple companies automatically, select the database name:
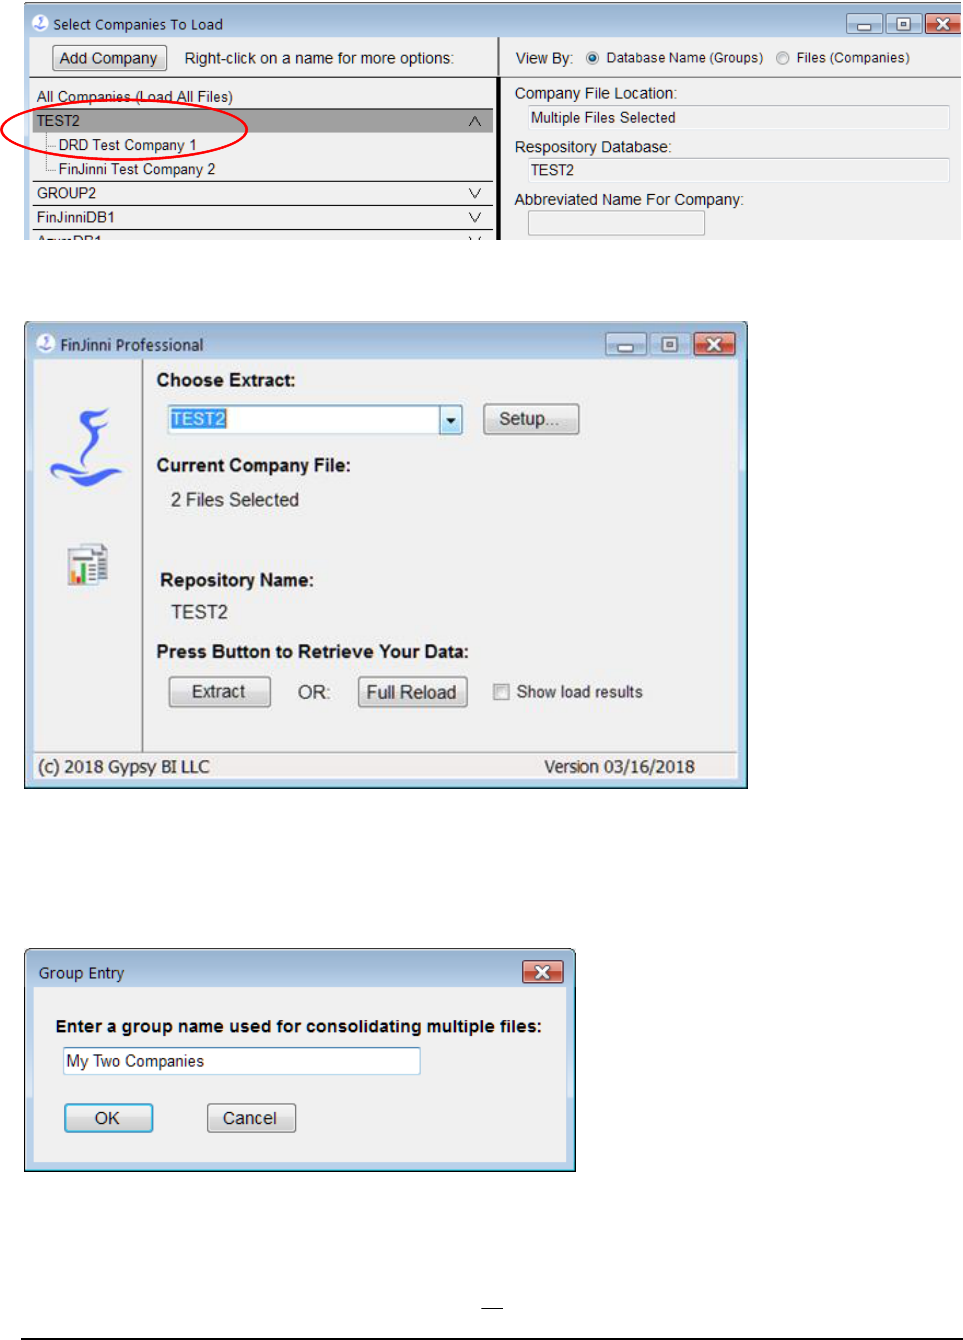
33
When you press Save and Close, the main screen will then appear as:
You can also assign a more meaningful name to the multi-company extract. On the Setup screen,
right click on the database name (TEST2 in this example) and you will see a choice “Rename
Group” in the drop-down. This gives you the screen:
Which then will show as:

34
And on the main screen:
35
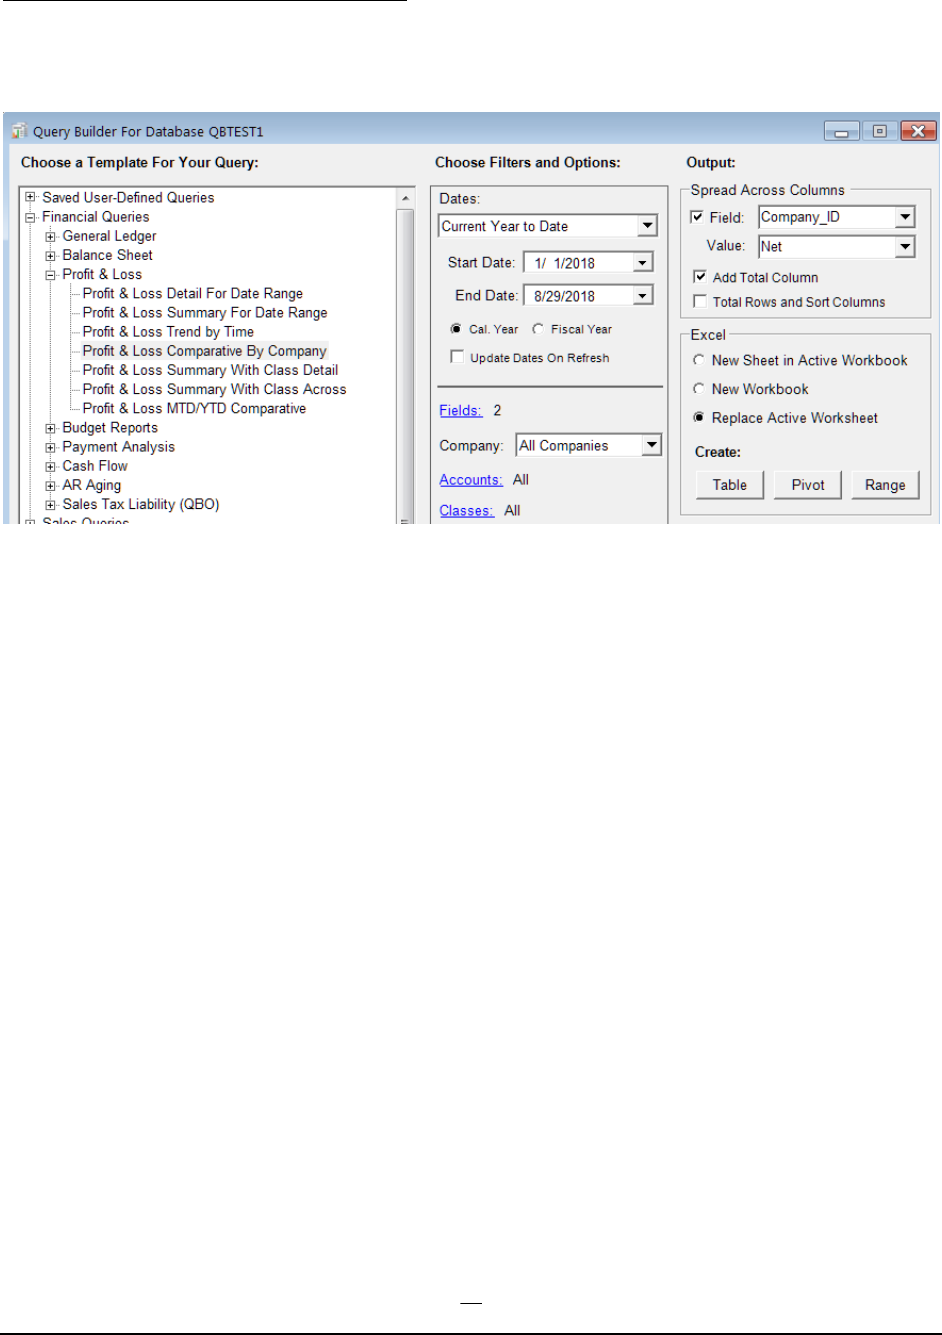
Building Consolidated Queries in Excel
It is common to want a report that shows the companies in columns across the spreadsheet for
comparative purposes. Here is what the Query build screen should look like to create this:
You can choose options such as adding a total column, or sorting the columns in order of total
value. See the FinJinni Pro Queries Manual for more information.
36
Using Multiple Currencies
FinJinni can be used to create reports when QuickBooks is using multiple currencies. FinJinni can even create
reports using currencies that are not defined in QuickBooks. For example, if you have a US and a Canadian
company, you can report on both together in US dollars, Canadian dollars, or even a different currency such
as Euros.
The currency conversions that FinJinni does are supported for both QuickBooks Desktop and Online.
The Multi-Currency feature must first be turned on in QuickBooks before it can be used for FinJinni.
How Currency Conversion Works
QuickBooks records a currency code and exchange rate for each transaction. FinJinni uses this
information to record its General Ledger in the home currency for the company file. All reports
start by using this home currency value.
You can then define reporting-currencies and exchange rates, which FinJinni will use to convert
values to a currency which is selectable at the time of reporting.
If you are consolidating results from multiple companies, all currency values reported will be
converted to the currency that you select for the report, even if each company uses a different home
currency.
Different reports can be created using different selected currencies.
Turning on Multi-Currency Reporting and Exchange Rates
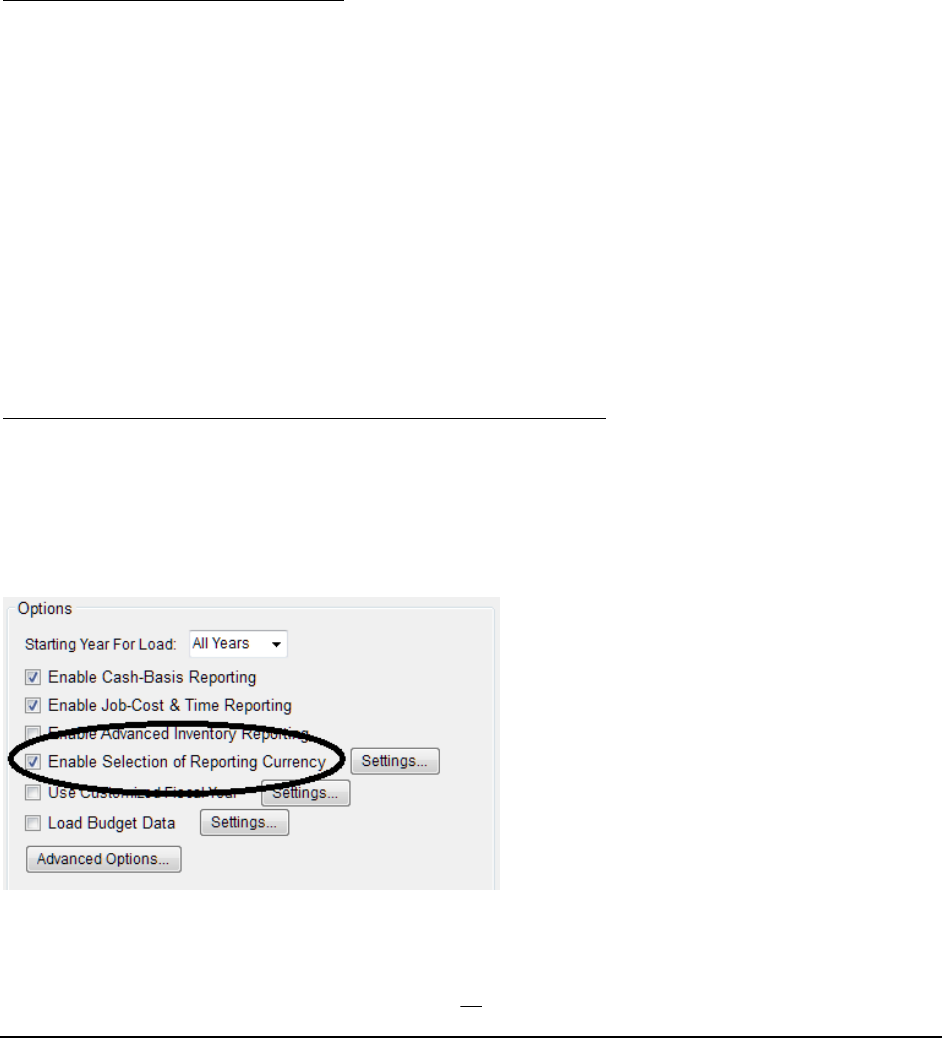
You must enable multi-currency reporting in FinJinni before you load data from your company files.
Once you turn this on, only an incremental refresh is required.
Here is the option on the setup screen that must be checked:
37
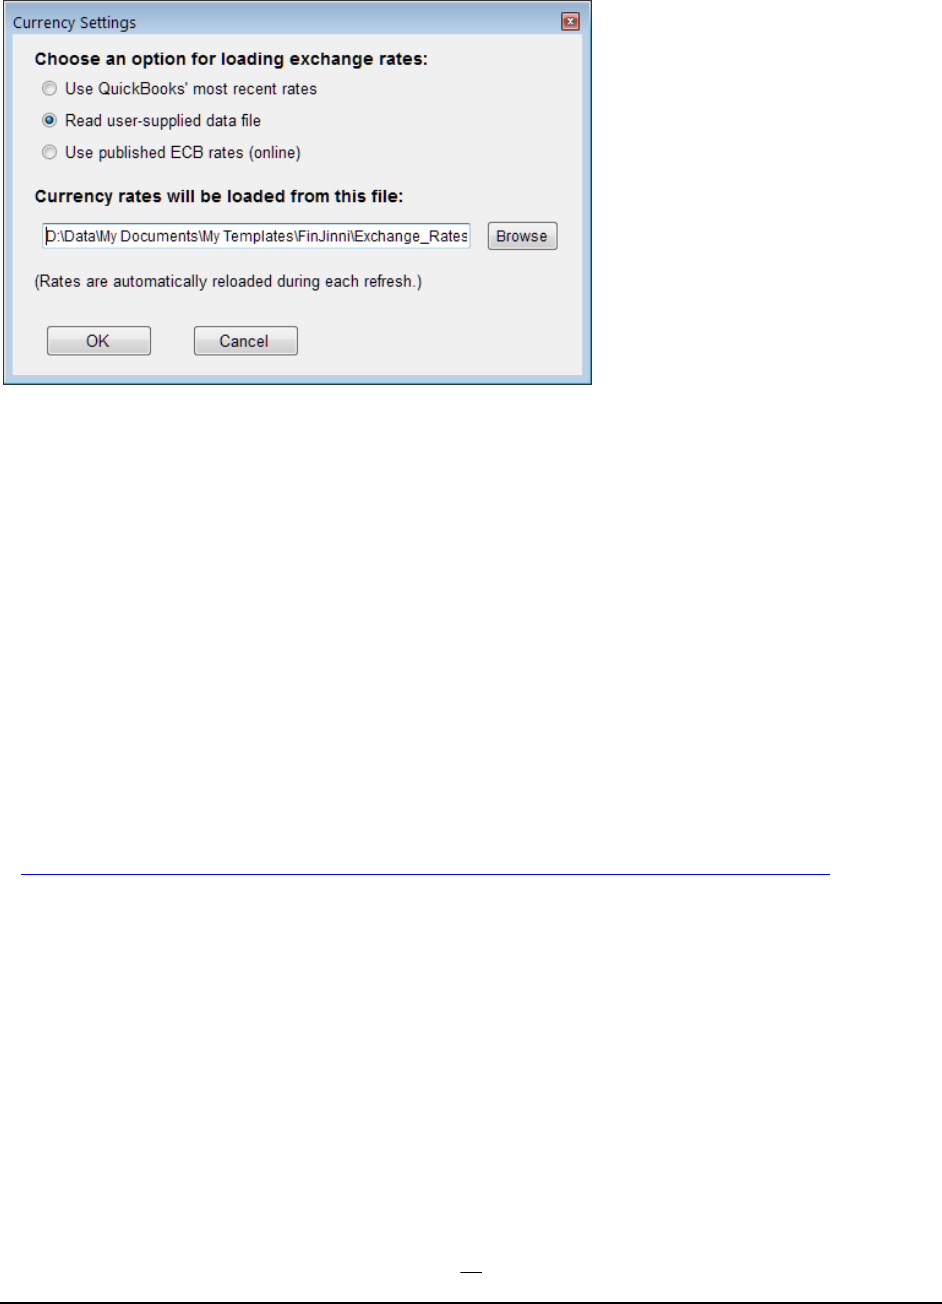
Then use the Settings button to specify how exchange rates will be loaded:
Selections available are:
Use QuickBooks' most recent rates
Will use the rates defined in the QuickBooks company file for the latest “as of date” up to and
including the date when the load is performed.
Read user-supplied data file
Allows you to create your own data file containing rates for reporting. This also allows different
rates to be specified for P&L reports and Balance Sheet reports. See the section below for
instructions in setting up this file.
Use published ECB rates (online)
Downloads the published European Central Bank exchange rates. For more information, see:
https://www.ecb.europa.eu/stats/policy_and_exchange_rates/euro_reference_exchange_rates/html/index.en.html
Notes:
1. The rates are loaded once when the OK button is pressed. They are then automatically
reloaded whenever a FinJinni refresh is performed.
2. Even though the ECB rates only show conversions in Euro’s, rates between other currencies
will be calculated using these values (e.g. CAD to USD = (CAD to EURO) * (EURO to
USD))
3. These settings are common to all companies in a single database. So if you have loaded
multiple companies for consolidated reporting, you only need to specify the currency
38
settings once. If you are using multiple databases, you must setup currency reporting for
each one.
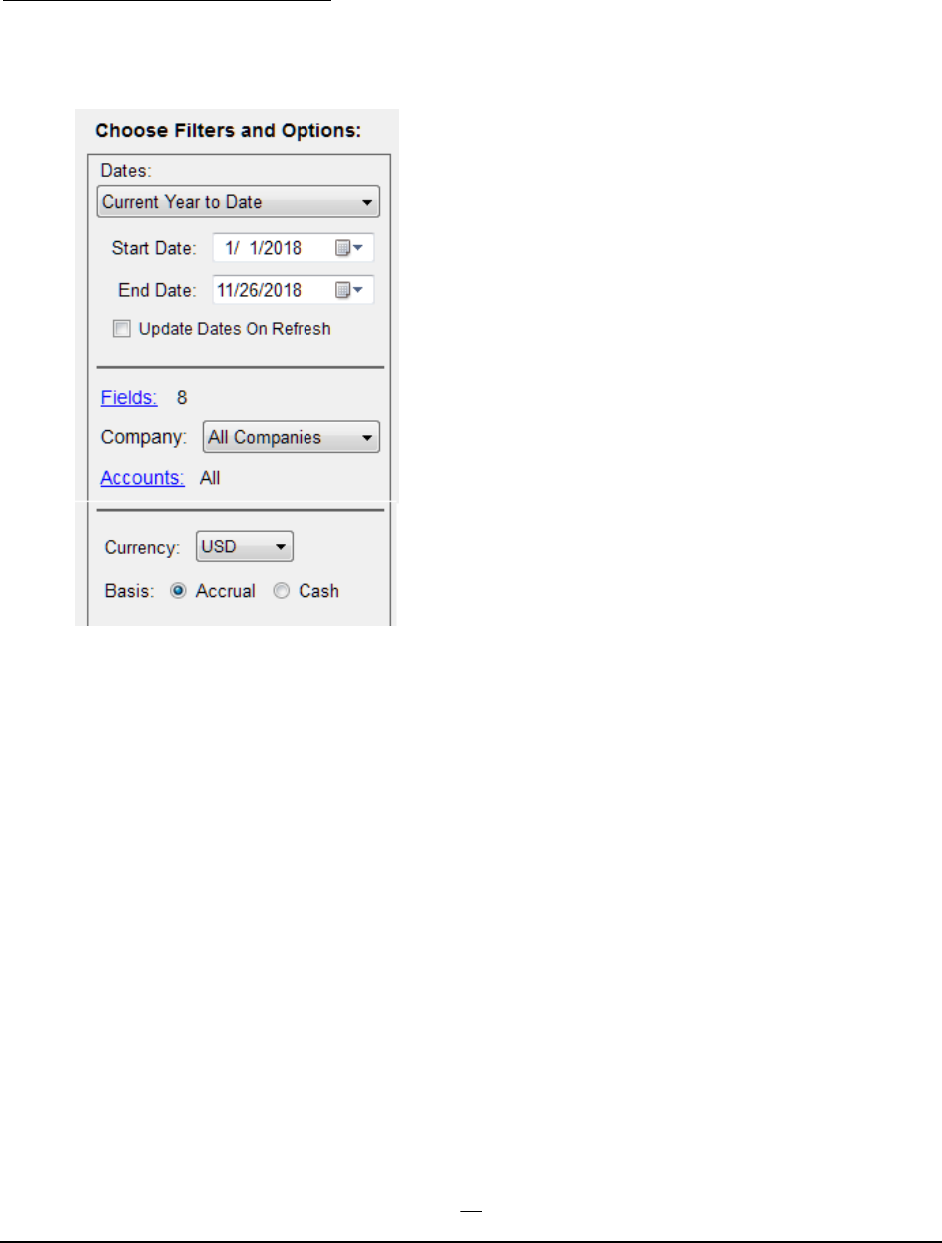
Choosing the Reporting Currency
When you enable multi-currency reporting in FinJinni, the Query Builder screen will have a drop-down
to select the currency for the report:

39
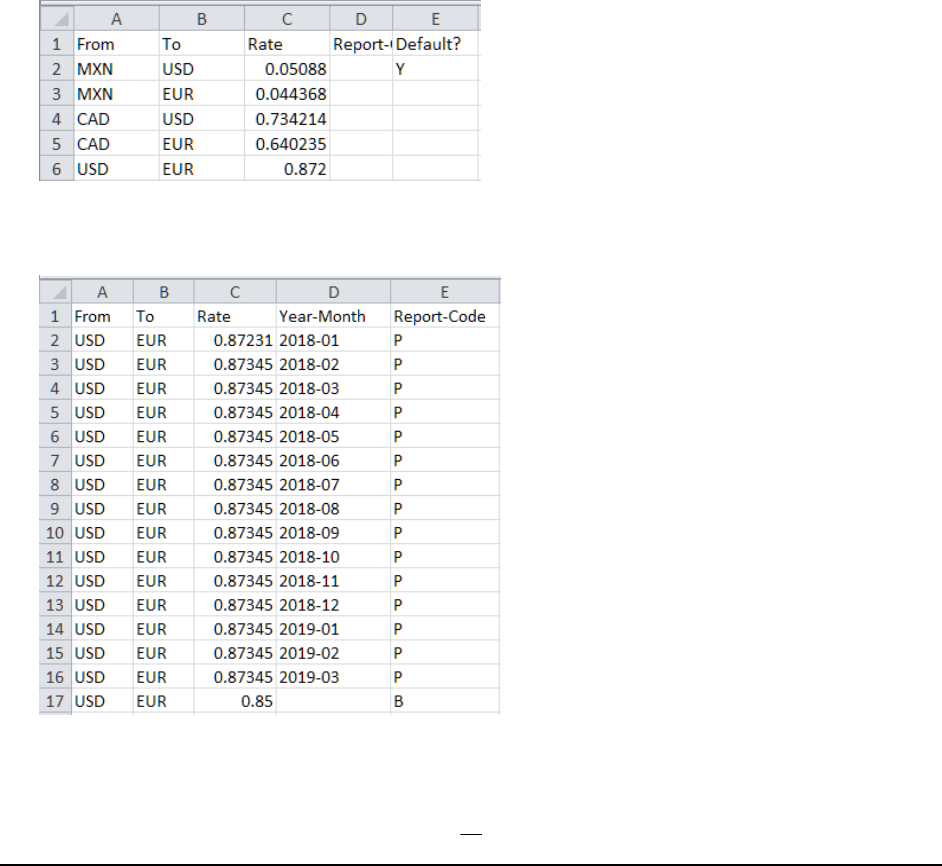
Supplying a User-Defined Exchange Rate File
To specify your own exchange rates for reporting, create a Comma-Separated-Value (CSV) file,
usually in Excel. This file has three or more columns and requires a header with the column name in
the first row:
1. From
The “from” currency code
2. To
The “to” currency code
3. Rate
The exchange rate, i.e. the multiplier used to convert 1 unit of “from” currency.
4. Report-Code
A single-character report code for FinJinni to match to report categories: “P” is used for Profit &
Loss reporting, “B” is used for Balance Sheet reporting, and “O” is used for other reports that
don’t fall into either category. Omit this column or leave it blank to supply a single exchange
rate for all reports.
Use an “F” to supply a fixed rate applied to a specific account. The company ID and account
description must be supplied in additional columns
Three additional codes are available for custom conversion rates that you apply to one or more
accounts: “Y”, “R”, and “C”. Usually, “Y” is used for a year-to-date average by month, “R” is used
for an annual retained earnings value, and “C” for an additional custom rate. However, you can
use these rates for any purpose. You map them to specific accounts by creating a custom field
on the account called Currency_Code (to which FinJinni will add the _Acct_ prefix).
5. Year-Month
The year and month for this exchange rate, as exactly 7 characters “yyyy-mm” (e.g. “2018-12”).
For P&L reporting, the individual transaction dates will be matched to this date. For Balance
Sheet reporting, the specified end date for the report will be matched to this date. Omit this
column or leave it blank to use the same reporting value regardless of the date.
6. Default?
A “Y” to indicate that the “to” currency on this line is the default currency for FinJinni reports.
This will be chosen in the drop-down on the Query Builder screen.
7. Company_ID
40
When using a fixed rate for a specific account, this is the company ID (FinJinni’s Extract Name)
that you provided when you set up the company.
8. Account
When using a fixed rate for a specific account, this is the account number or description (in the
“number – name” format used in FinJinni reports).
Notes:
1. All of the “to” currencies will be displayed in FinJinni’s drop-down to select a reporting currency.
2. You can leave off an inverse exchange rate and FinJinni will add it automatically. That means
that you can enter the rates in either direction, e.g. USD to EUR or EUR to USD.
Here is a sample of a simple exchange-rate file for CAD, MXN, and USD that allows any of these to be
chosen when a report is created:
This sample includes a date:
41
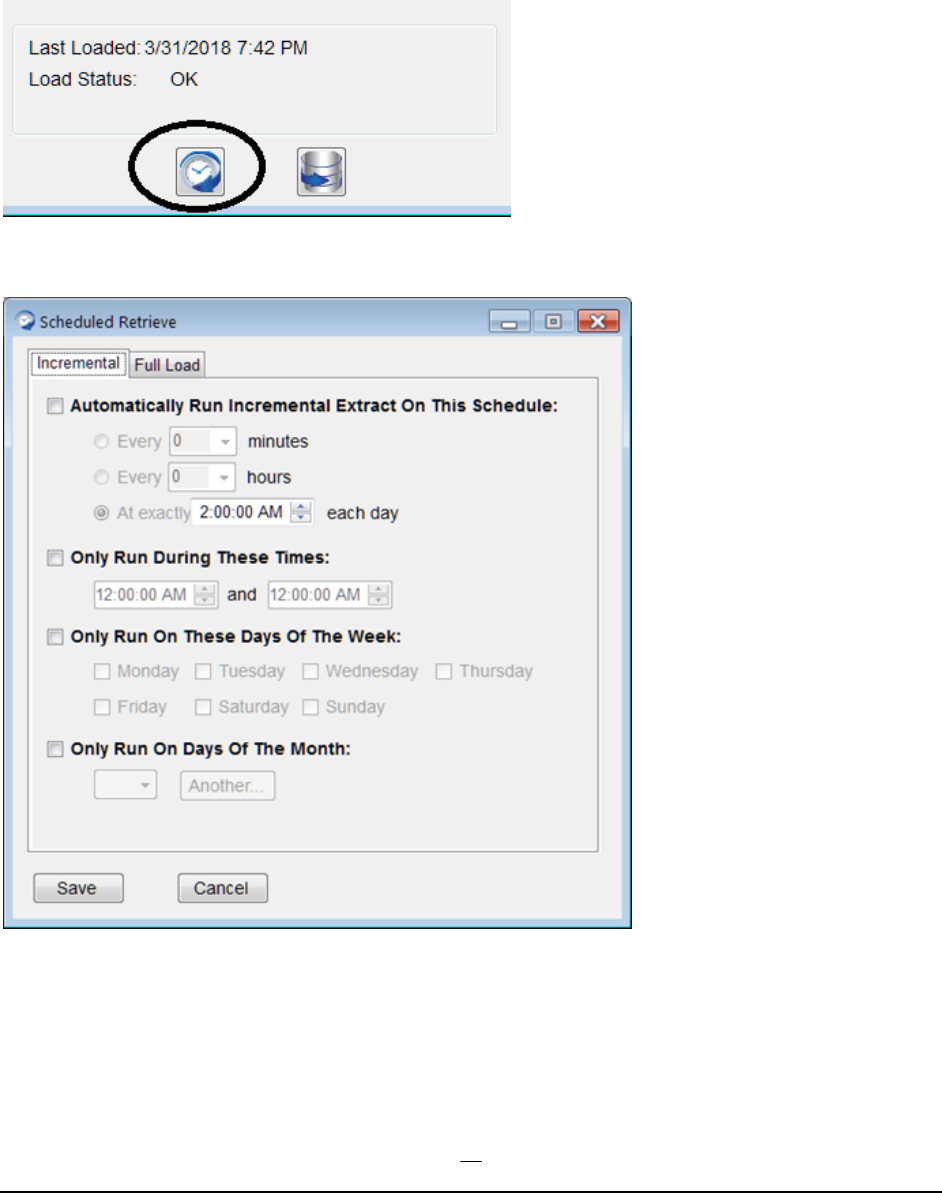
Automating an Extract
A FinJinni extract can be set to run automatically by using the Schedule button on the company
setup screen:
You will then see this screen:
The scheduled-retrieve setup screen has two tabs, one for an incremental load and one for a full
load. Normally, you would just use the incremental load. You can set a full load on an independent
schedule if you have a reason to reload a complete company file (e.g. you are given a new file from
an outside source).

42
If you have advanced scheduling requirements, you can use the Windows Task Scheduler to update
the load information. Look for the “FinJinni Refresh” task folder in Task Scheduler.
After you choose the schedule information, you will be asked to either enter your Windows
username and password so that Windows can automatically log you on at the scheduled time, or you
can choose to only run when you are already logged on, which of course requires you to leave your
user logged on.
Note: Intuit does not support QuickBooks Desktop running with automatic login. They
require your Windows user to be already logged in. Contact Gypsy BI support if you want
more information on this topic.
While FinJinni can run multiple copies simultaneously in order to load multiple companies, there are
several restrictions when using simultaneous or overlapped loads:
1. Only one copy of QuickBooks Desktop can be run at any one time. This is a QuickBooks
limitation.
2. Running multiple loads into the same database at the same time can cause performance
issues. Please avoid this case.
How FinJinni automation works
FinJinni accepts command arguments to initiate various automatic actions. A FinJinni extract can be set to
run automatically by creating a shortcut to the file
"C:\Program Files (x86)\GypsyBI\FinJinni Professional\Bin\FinJinniPro.exe"
On the Target option of the shortcut, add these arguments:
/ex “extract-name”
When the shortcut is invoked, the named extract will be run and then FinJinni will exit.
To execute a full reload instead of an incremental refresh, supply these arguments:
/reload “extract-name”
43
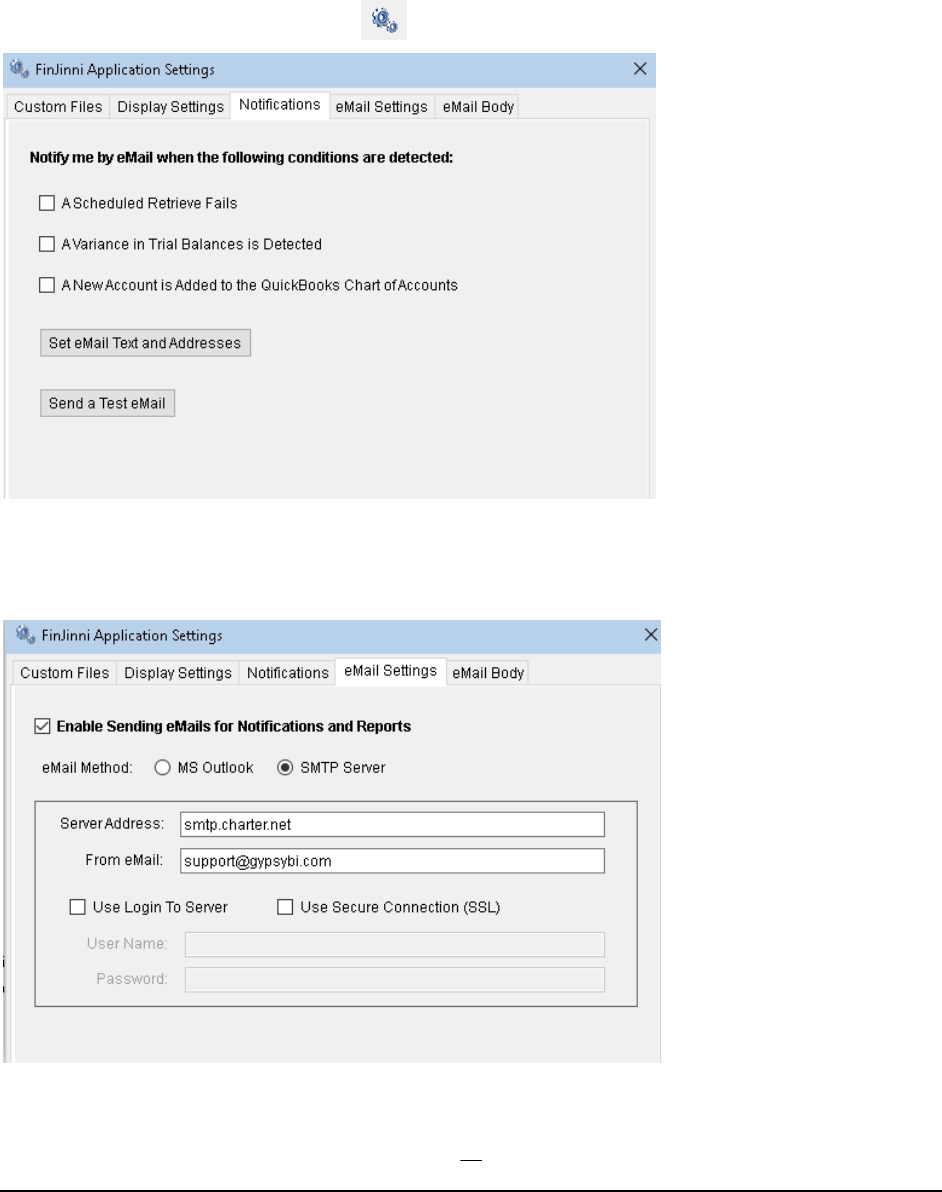
Sending eMail Event Notifications
FinJinni can automatically send eMail “alerts” when certain conditions are encountered during the
data load. These notifications are most useful when you are running a scheduled extract.
Select these notifications on the FinJinni Application Settings screen, which you bring up by
selecting this icon on the main screen:
Use the eMail Settings tab and the email Body tab to define how the email is sent and what the body
of the message consists of. In the settings you can choose either to use MS Outlook for sending mail
messages or a direct connection to your ISP’s email server:
44
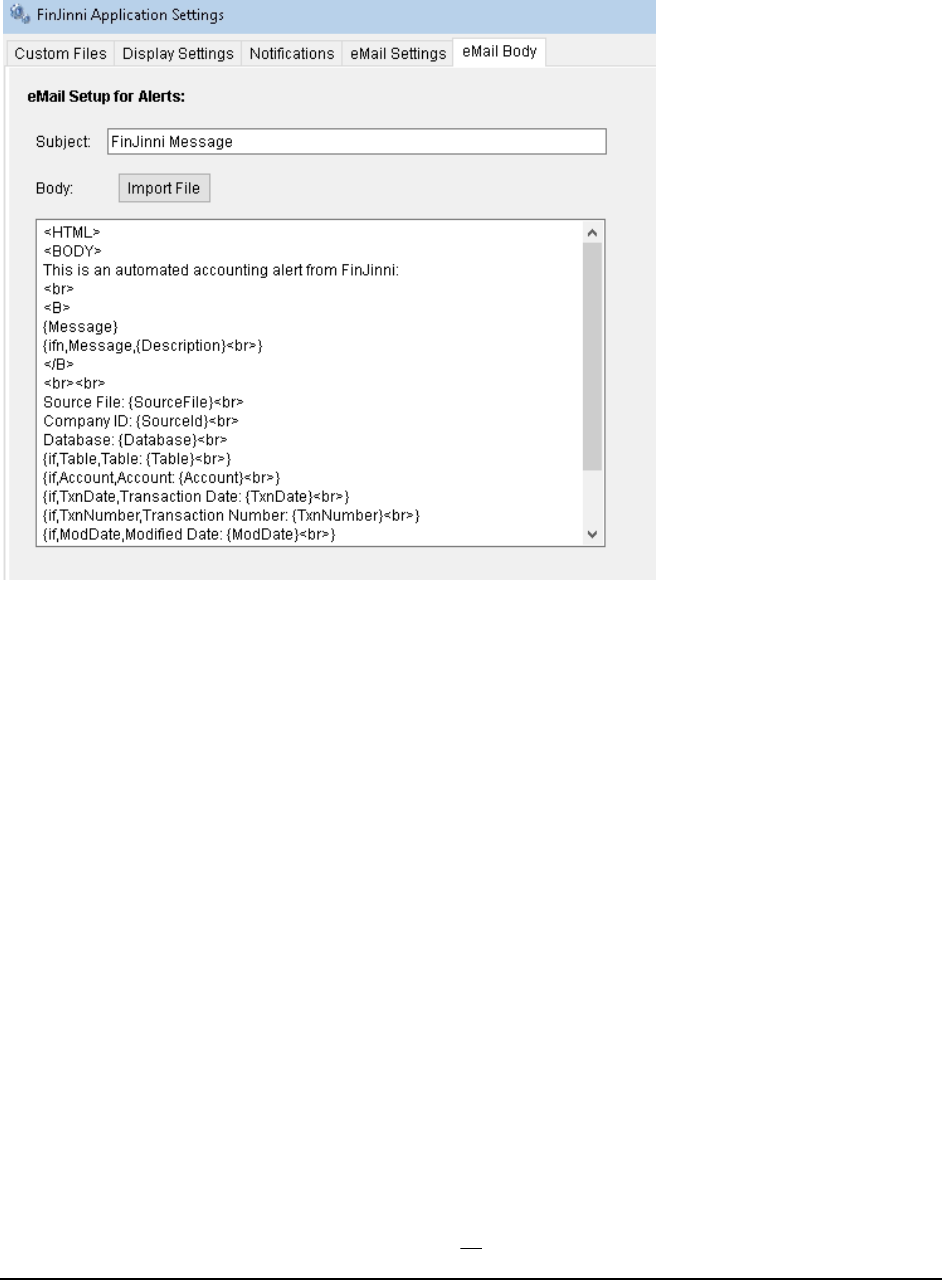
The body is in HTML format and can be edited directly or imported from a file. You also specify the email
subject here.
The text in braces is substituted by FinJinni when the email is created.

45
Extending the QuickBooks Data Model with Custom Fields
You can define your own custom fields outside of QuickBooks using data files that FinJinni will load and
automatically combine with the QuickBooks data describing various QuickBooks entities. Various use cases
are described next.
These custom fields can be used for either QuickBooks Desktop or QuickBooks Online (which does not
otherwise support custom fields).
FinJinni’s custom fields are stored in CSV-format files than you can create with Excel. There is a
separate file for each QuickBooks company. All files should be saved in the folder
“documents”\My Templates\FinJinni, where “documents” is your normal documents folder.
FinJinni will read these files when it loads the company data from QuickBooks. If you change the
file, you will need to reload your company data (only an incremental refresh is needed, any changes
to these files will be picked up at that time).
The FinJinni Excel Add-In can assist in saving these CSV-format data files from Excel worksheets.
Once you create a worksheet with the columns described below, use the Upload button on the
FinJinni ribbon bar in Excel to save the worksheet as a CSV file. You can also save it using the
normal Excel menu - the FinJinni Upload button is a convenient shortcut. See “Using the Upload
Function” below.
Customizing the Chart of Accounts
For specific reporting requirements, and particularly when consolidating multiple companies,
FinJinni will allow you to report on accounts and groups of accounts using names and grouping
different from what is used in QuickBooks.
To do this, you will assign custom fields to accounts. QuickBooks does not let you use custom fields
with accounts, but FinJinni does. For example, you can assign “_Acct_Alias” and “_Acct_Group”
to each account with an alias name and grouping for reporting. You can then use those fields in
place of the usual Account_Description or Account_Type. Whatever fields you use in a summary
query (e.g. P&L Summary) is what FinJinni will total by.
These files are named “companyid_Accounts.csv”, where “companyid” is the company identifier
(aka nick-name) that you assigned when you added the company to FinJinni.
This file has three columns and requires a header with the column name in the first row:
1. Account_Description
The account-number and name assigned by FinJinni from the QuickBooks accounts. This
has the format “number - name” where “number” is the account number from QuickBooks
and “name” is the account name from QuickBooks. If you are not using account numbers,
only use the name.
2. Field_Name
The custom field name that you want to assign to the account. For example, “Alias” or
“Group”. FinJinni will add a prefix “_Acct_” to these names but you should not.

46
3. Field_Value
The field value. This would be the account alias or group in this example.
For an example, look at the supplied file “samplecompany_Accounts.csv”. Then replace
“samplecompany” with the name you have used for your company in FinJinni.
Any names you put in the “Field_Name” column will appear in FinJinni’s Field list in the Custom
Fields section with a prefix “_Acct_”. Refer to the FinJinni Pro Queries Manual for instructions on
how to use customized queries.
Tip: You can obtain a list of all the accounts in your company using the query under “System
Information Queries, Account Information” for all accounts or “System Information Queries,
Posting Accounts Only” to choose only accounts that have GL postings.
Defining an Alias field
FinJinni recognizes the custom field “Alias” in a special manner. You can use it normally as
“_acct_Alias”, but FinJinni will also create a field named “Account_Alias” as a convenience for
reporting. It will also fill in a field called “Account_Hierarchy_Alias” which contains the complete
account hierarchy using the Alias field so that reports showing parent-child accounts can show the
alias value.
Adding Custom Fields to Classes
QuickBooks also does not allow you to create your own custom fields for classes. FinJinni can
create custom fields for Classes in the same way used for accounts described in the previous section.
The class file is named “companyid_Classes.csv”, where “companyid” is the company identifier (aka
nick-name) that you assigned when you added the company to FinJinni.
This file has three columns and requires a header with the column name in the first row:
1. Class_Name
The class name from QuickBooks. This must be the full name in the form “parent:child”
when parent classes are used.
2. Field_Name
The custom field name that you want to assign to the account. For example, “Alias” or
“Group”. FinJinni will add a prefix “_Class_” to these names but you should not.
3. Field_Value
The field value. This would be the class alias or group in this example.
Any names you put in the “Field_Name” column will appear in FinJinni’s Field list in the Custom
Fields section with the “_Class_” prefix. Refer to the FinJinni Pro Queries Manual for instructions
on how to use customized queries.

47
FinJinni recognizes the custom field “Alias” in a special manner. You can use it normally as “_class_Alias”,
but FinJinni will also create a field named “Class_Alias” as a convenience for reporting.
Adding Additional Custom Fields to Items and Entities
Even though QuickBooks has custom fields for items and other entities, you can still create your
own custom fields using FinJinni. FinJinni can create new custom fields for Items and Entities
(Customers, Employees, and Vendors) in the same way used for accounts and classes described
above.
The item file is named “companyid_Items.csv”, where “companyid” is the company identifier (aka nick-
name) that you assigned when you added the company to FinJinni. Similarly, the Customer, Employee, and
Vendor files are named “companyid_Customers”, “companyid_Employees”, and
“companyid_Vendors”. Jobs are included in the customer file. For QuickBooks Online, sub-customers
and projects are treated the same way as jobs.
This file has three columns and requires a header with the column name in the first row:
1. Item_Name -or- Entity_Name
The item or entity name from QuickBooks. This must be the full name in the form
“parent:child” when parent and child items or entities are used.
2. Field_Name
The custom field name that you want to assign to the account. For example, “Alias” or
“Group”. FinJinni will add a prefix to these names but you should not. The prefix FinJinni
adds is one of: “_Item_”, “_Cust_”, “_Job_”, “_Empl_”, and “_Vend_”.
3. Field_Value
The field value.
Any names you put in the “Field_Name” column will appear in FinJinni’s Field list in the Custom
Fields section with an item or entity-type prefix. Refer to the FinJinni Pro Queries Manual for
instructions on how to use customized queries.
For an example, look at the supplied file “samplecompany_Customers.csv”. Then replace
“samplecompany” with the name you have used for your company in FinJinni.
FinJinni recognizes the custom field “Alias” in a special manner. You can use it normally as “_[entity]_Alias”
where “[entity]” is Item, Customer, etc, but FinJinni will also create a field named “[Entity]_Alias” as a
convenience for reporting.
Using the Upload Function In Excel
The FinJinni Excel Add-In provides a simple means of saving the data files for the FinJinni
application to upload. You can create an Excel workbook with one or more worksheets and then
use this upload function to save individual worksheets as CSV data files.
48
Please note that this is only a shortcut to saving the worksheets manually. It does not create or
change the data uploaded.
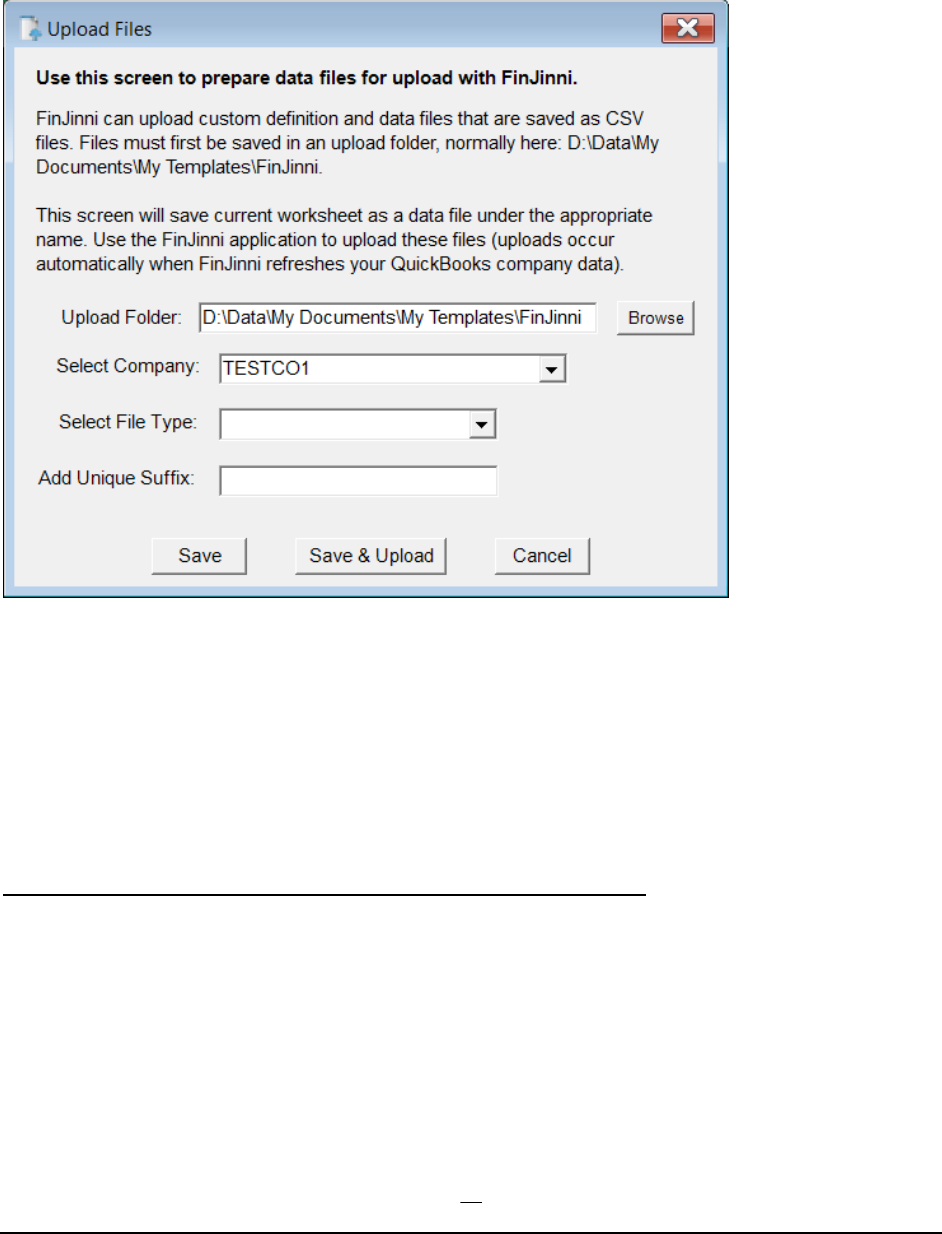
When you press the Upload button on the FinJinni ribbon bar in Excel, you will see this screen:
Select the company and type of data file to load. If necessary, add a unique file suffix. The file will be
saved under the name “company_filetype_suffix.csv”.
If you are the administrator and have the FinJinni application installed on your PC, you will have the
choice to either “Save” the file or to “Save & Upload”, which will launch the FinJinni application
immediately to read and process the file. Users who do not have the FinJinni application can only
create and save files that the administrator will need to process.
Consolidated/Combined Format for Uploading Custom Fields
As a convenience for defining custom fields with multiple companies and/or multiple custom fields,
the FinJinni Excel-Add in provides an improved means of creating the data files described above.
The selected file type must be one of the custom field file types: Accounts, Classes, Customers,
Employees, Items, or Vendors.
The Excel worksheet must have a single row for each entity and the following columns with
appropriate headers:
49
A. The company identifier (extract name in FinJinni). Include this column if you want to load
data for multiple companies from a single worksheet. FinJinni will separate them into the
appropriate company files for loading. The data must be sorted on this column so that all
rows for a company are grouped together.
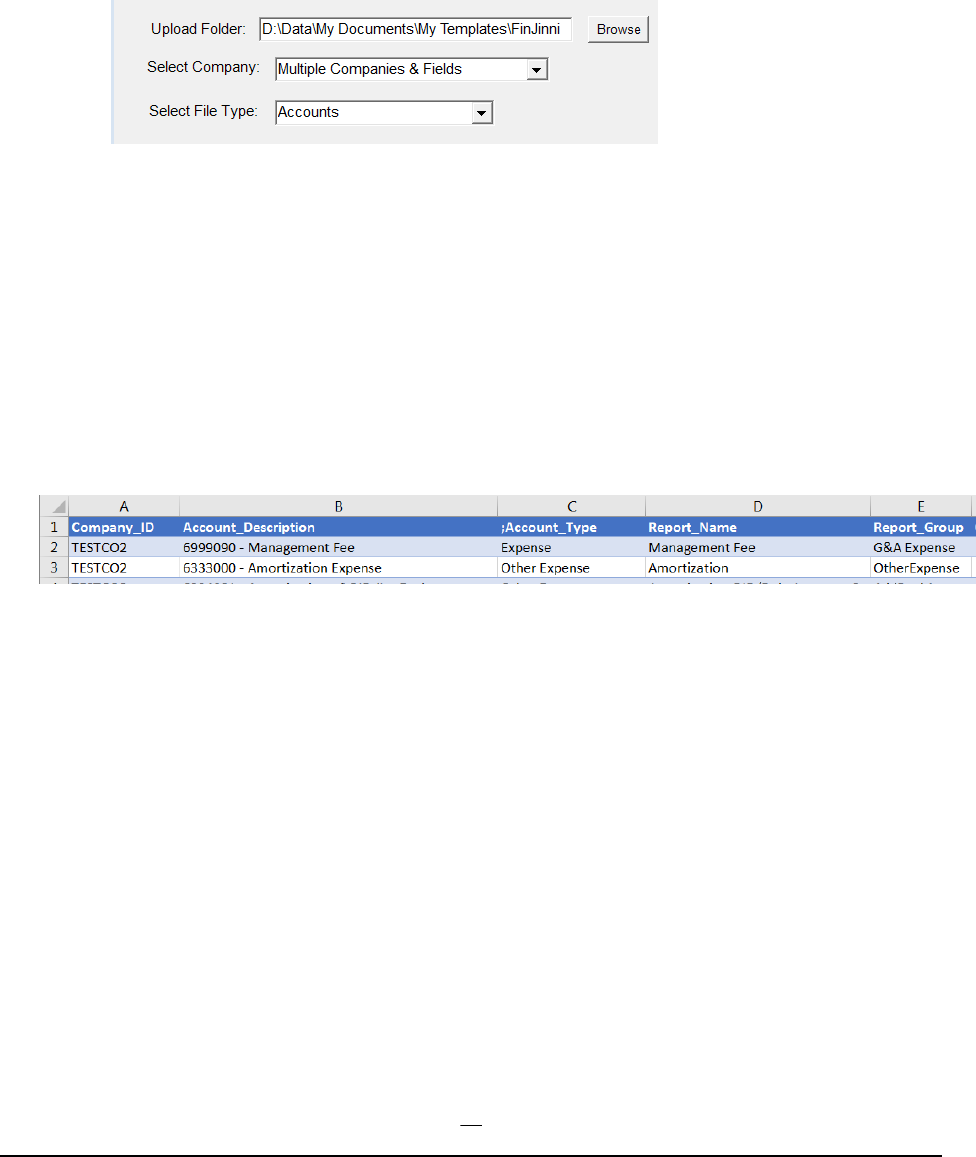
To use this feature, select “Multiple Companies & Fields” from the company drop-down on
the upload screen:
B. The account description or entity name, with the header name appropriate for that custom
field type (see the sections above for defining custom fields). You must use the specific
name, such as Item_Name, not the generic Entity_Name.
C. Zero or more descriptive fields. These are ignored by FinJinni but can be used to maintain
the worksheet. The header for ignored columns must begin with a “;”.
D. One or more custom field values. The field name is defined in the header.
For example, here is an account custom field definition that defines two custom fields,
Report_Name and Report_Group. Account_Type is ignored.

50
Loading Budget Data from Outside QuickBooks
If you want to report on budgets but don’t use QuickBooks for your budgeting, FinJinni can
incorporate a data file that you supply with budget data. This also allows you to create a more-
detailed budget, using accounts, classes, customers, and other entities (such as sales reps or
departments).
This feature is only available if you have purchased the license for the FinJinni Importer advanced
data loading feature. It is enabled in the trial versions so that you can preview it.
FinJinni’s will load budget data from CSV-format files that you can create with Excel. There is a
separate file for each QuickBooks company and you can either create a separate file for each budget
or combine multiple budgets in one file. All files should be saved in the folder “documents”\My
Templates\FinJinni, where “documents” is your normal documents folder.
These files can be created directly from Excel spreadsheets using simple Excel programming
macros. For examples of how to enter and create these budgets, please contact GypsyBI LLC sales
or support.
The budget data files that FinJinni will load are named “companyid_budget_[suffix].csv”, where
“companyid” is the company identifier (aka nick-name) that you assigned when you added the
company to FinJinni and “suffix” is a value to uniquely identify the file if needed - you can pick
anything you want for this, such as a year.
The FinJinni Excel Add-In can also assist in saving these CSV-format data files from Excel
worksheets. Once you create a worksheet with the columns described below, use the Upload button
on the FinJinni ribbon bar in Excel to save the worksheet as a CSV file. You can also save it using
the normal Excel menu - the FinJinni Upload button is a convenient shortcut.
These files have the following columns and require a header with the column name in the first row:
1. BudgetName
A name for the budget. You can use any name you like. Only the first data row of a budget
needs to have this value, you can leave it blank on subsequent rows.
2. Date
The date for the budget line. This is generally day 1 of a month, but it can be a different date
in special circumstances – Most of FinJinni’s reports will use a date range and as long as the
budget date lies within the range, it will be picked up.
3. Account
The account name or description (in the format “number - name”). This can also be the
full name for an account (in the format “parent:child” used by QuickBooks). Any of these
formats that uniquely identifies the account is sufficient.
4. Amount
The budget amount.
51
5. Class
A class name. If you have parent & child classes, this must be the full name in the format
“parent:child”. This is an optional column, omit or leave blank if not used.
6. Customer
A customer, or full sub-customer name in the format “parent:child”. Projects or jobs are
sub-customers and need their parent customer identified. This is an optional column, omit
or leave blank if not used.
7. OtherEntity
An employee or vendor name. This is an optional column, omit or leave blank if not used.
8. Sub_Budget
Enter a budget sub-name to divide a budget into multiple sub-budgets, each of which is
loaded from a separate file. All sub-budgets with the same budget name are combined for
reporting. This is an optional column, omit or leave blank if not used.
For an example, look at the supplied file “samplecompany_Budget_2018.csv”. Then replace
“samplecompany” with the name you have used for your company in FinJinni and “2018” with a
value of your choice.
Usage Notes:
1. If you are using this feature with a QuickBooks Desktop file, do not check the “Load
Budget Data” option on the setup screen. That option is only used to load budgets from
QuickBooks.
2. Budget files are automatically loaded whenever a refresh is performed. FinJinni will detect
whenever the budget file is changed (or a new file is added) and load the file.
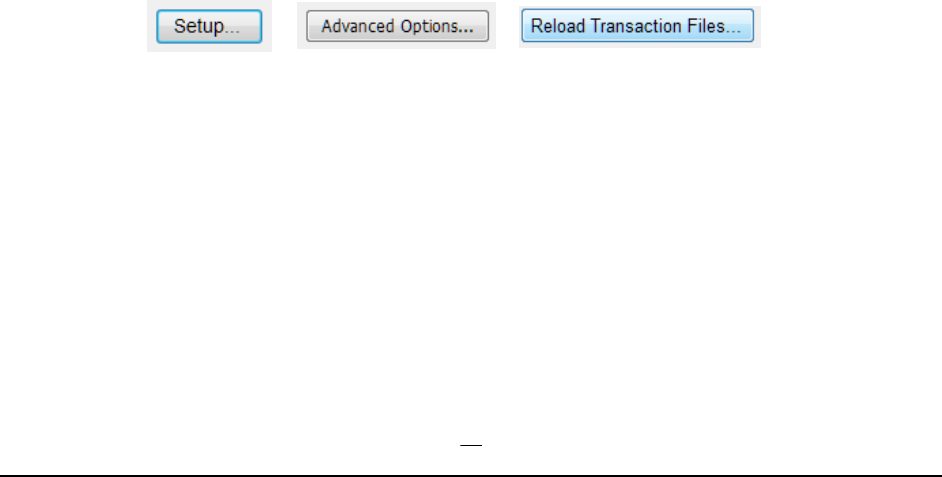
3. You can perform an initial load manually, using the Advanced Options button on the Setup
screen, that options screen has a “Reload Transaction Files” button - i.e., press these buttons
in sequence, then choose the option Reload Custom Budget Data.
4. If you need to delete or rename a budget, keep in mind that FinJinni loads budgets
incrementally and that budgets are identified by name, not date. There are two ways that a
budget will be deleted if you have removed it from the data files:
A. When a full load of the company is performed. All old budget data is cleared before
loading budget data from your files.
B. If a line containing only the budget name (no accounts or values) is placed in a budget
data file. All data for that particular budget name is deleted when the file is loaded.

52
Loading Journal Entries from Outside QuickBooks
You can use FinJinni to add General Journal Entries to the data retrieved from QuickBooks. These
journal entries can be created using an Excel spreadsheet or other program to create a data file that
FinJinni will load. You have the option to either:
1. Have FinJinni write these Journal Entries back to QuickBooks.
2. Keep the Journal Entries in FinJinni’s reporting database without updating QuickBooks. They
will appear in all of FinJinni’s reports but your QuickBooks company will not be modified.
This feature is only available if you have purchased the license for the FinJinni Importer advanced
data loading feature. It is enabled in the trial versions so that you can preview it.
FinJinni’s will load journal entries from CSV-format files that you can create with Excel. There are
separate files for each QuickBooks company and you may have multiple files for one company. All
files should be saved in the folder “documents”\My Templates\FinJinni, where “documents” is
your normal documents folder.
The data files that FinJinni will load are named “companyid_journal_[suffix].csv”, where
“companyid” is the company identifier (aka nick-name) that you assigned when you added the
company to FinJinni and “suffix” is a value to uniquely identify the file if needed - you can pick
anything you want for this, such as a year.
The FinJinni Excel Add-In can assist in saving these CSV-format data files from Excel worksheets.
Once you create a worksheet with the columns described below, use the Upload button on the
FinJinni ribbon bar in Excel to save the worksheet as a CSV file. You can also save it using the
normal Excel menu - the FinJinni Upload button is a convenient shortcut.
These files have the following columns and require a header with the column name in the first row:
1. TxnDate
The date for the transaction.
2. RefNumber
The Journal Entry number. This must be unique to a single Journal entry.
Multiple line items for the Journal Entry must have the same transaction date and
reference number. Each line item occupies a separate line in the data file and all line items
must be in sequence.
3. Account
The account name or description (in the format “number - name”). This can also be the
full name for an account (in the format “parent:child” used by QuickBooks). Any of these
formats that uniquely identifies the account is sufficient.
4. Amount
The amount.

53
5. DebitOrCredit
“D” or “Debit” for a debit, “C” or “Credit” for a credit.
6. Description
The description (memo) for the line item. This value is optional.
7. Memo
The memo field value for the transaction. This value is used for QuickBooks online only
and is optional.
8. PostBack
“1” to write back this journal entry to QuickBooks. “0” or blank to leave it in FinJinni’s
reporting database without modifying QuickBooks.
9. IsAdjustment
“1” if this should be marked as an adjustment entry in QuickBooks, “0” or blank
otherwise.
10. Revised
“Y” to revise an existing QuickBooks journal entry. “N” or blank otherwise.
Note: You can change the values on FinJinni’s journal entry at any time. However,
changed values will not be normally written back to QuickBooks after the journal entry is
initially added. If you set this field to “Y”, FinJinni will update the journal entry in
QuickBooks on the next refresh regardless.
Revised journal entries cannot have new line items. If you need to add new line items, void
the journal entry and create a new one.
11. Voided
“V” to void an existing QuickBooks journal entry (note: “V” not “Y” here). “D” to delete
an existing journal entry. Otherwise leave blank.
12. Class
A class name. If you have parent & child classes, this must be the full name in the format
“parent:child”. This is an optional column, omit or leave blank if not used.
13. Customer
A customer, or full sub-customer name in the format “parent:child”. Projects or jobs are
sub-customers and need their parent customer identified. This is an optional column, omit
or leave blank if not used.
14. Vendor
A vendor name. This is an optional column, omit or leave blank if not used.
Usage Notes:

54
1. Journal entry files are automatically loaded whenever a refresh is performed. FinJinni will
detect whenever the file is changed (or a new file is added) and load the file.
2. If you want FinJinni to write back Journal Entries to QuickBooks, you must select the option
“Enable Write-Back to QuickBooks” on the company setup screen.
3. You can perform an initial load manually, using the Advanced Options button on the Setup
screen, that options screen has a “Reload Custom Budget File” button - i.e., press these
buttons in sequence, then choose the option Reload Custom Journal Entry Data:
Note: This manual load does not immediately write back journal entries to QuickBooks if that
option is chosen. The journal entries are recorded in FinJinni and written back to
QuickBooks the next time that a refresh is performed.
4. FinJinni does not check for Journal Entries in balance. For Journal Entries written back to
QuickBooks, this check is performed by QuickBooks.
If QuickBooks cannot record the Journal Entry due to an error (such as the entry not in
balance), FinJinni will not display an error. Instead, a log file is created in the My Templates
folder with the error message contained in that file. The file is named
“companyid_JournalEntries.Log”.
You can also check the status of all user-defined journal entries from Excel using the
FinJinni Query “User-Defined Journal Entries” under the section “System Information
Queries”.
Creating Multiple Company Data Files in Excel
You can use the FinJinni Upload function in Excel to create multiple data files from a single Excel
worksheet. To use this feature in this way, add a Company_ID column as the first column of your
worksheet and choose select “Multiple Companies & Fields” from the company drop-down on the
upload screen. FinJinni will separate the rows into their appropriate company files.

55
Loading Other Transactions into QuickBooks
You can use FinJinni to add general transactions to QuickBooks. These transactions can be created
using an Excel spreadsheet or other program to create a data file that FinJinni will load. FinJinni will
then write these transactions to QuickBooks.
This feature is only available if you have purchased the license for the FinJinni Importer advanced
data loading feature. It is enabled in the trial versions so that you can preview it.
The following transaction types are supported at this time:
For QuickBooks Desktop
For QuickBooks Online
Bill
Bill
Check
Purchase
CreditCardCharge
CreditCardCredit
CreditMemo
CreditMemo
Deposit
Deposit
Estimate
Invoice
Invoice
PurchaseOrder
PurchaseOrder
RefundReceipt
SalesOrder
SalesReceipt
SalesReceipt
VendorCredit
VendorCredit
Accounts, Classes, and Entities that are referenced by these transactions must already exist in
QuickBooks. You can add Customers, Vendors, and Jobs/Projects to QuickBooks using a separate
data file, described below, but these must be added prior to loading the transaction file.
FinJinni’s will load these transactions from CSV-format files that you can create with Excel. There
are separate files for each QuickBooks company and you may have multiple files for one company.
All files should be saved in the folder “documents”\My Templates\FinJinni, where
“documents” is your normal documents folder.
The data files that FinJinni will load are named “companyid_Transaction_[suffix].csv”, where
“companyid” is the company identifier (aka nick-name) that you assigned when you added the
company to FinJinni and “suffix” is a value to uniquely identify the file if needed - you can pick
anything you want for this, such as a date.
The FinJinni Excel Add-In can assist in saving these CSV-format data files from Excel worksheets.
Once you create a worksheet with the columns described below, use the Upload button on the
FinJinni ribbon bar in Excel to save the worksheet as a CSV file. You can also save it using the
normal Excel menu - the FinJinni Upload button is a convenient shortcut.
There are a large number of supported data fields for transactions. Generally, the QuickBooks name
assigned to a field is used. For a complete list of all the fields, refer to one of these sample
transaction spreadsheets supplied with FinJinni:
Sample_ ImportData _QBD.xlsx -or- Sample_ ImportData _QBO.xlsx

56
Each transaction must have a “parent” row in the file and one or more detail rows. All line items for
the transaction must have the same transaction date and reference number. Each line item occupies
a separate row in the data file and all line items must be in sequence following the parent.
These files have at minimum the following columns and require a header with the column name in
the first row:
1. TxnType
The type of the transaction, from the list above.
2. TxnDate
The date for the transaction.
3. RefNumber
The transaction reference number. This must be unique for each transaction. For
QuickBooks transactions that do not support a reference number (e.g. Deposits), this value
is still required and is used to uniquely identify the transaction within FinJinni.
4. Account
The account name or description (in the format “number - name”). This can also be the
full name for an account (in the format “parent:child” used by QuickBooks). Any of these
formats that uniquely identifies the account is sufficient.
5. Amount
The amount for line items. For the parent transaction, QuickBooks will automatically
calculate the total amount from these individual line amounts.
A few other commonly used fields are these. Some may be required for certain transactions.
6. Description
The description (memo) for a line item.
7. Memo
The memo field value for the transaction.
8. Revised
Y to revise an existing QuickBooks transaction. N or blank otherwise.
Change values will not be automatically written back to QuickBooks after a transaction is
initially added. If you set this field to “Y”, FinJinni will update the transaction in
QuickBooks on the next refresh regardless.
Revised transaction cannot have new line items. If you need to add new line items, void or
delete the transaction and create a new one.
9. Voided
V to void an existing QuickBooks transaction (note: “V” not “Y” here). Otherwise leave
blank. D to delete an existing transaction.

57
10. Class
A class name. If you have parent & child classes, this must be the full name in the format
“parent:child”.
11. Customer
A customer, or full sub-customer name in the format “parent:child”. Projects or jobs are
sub-customers and need their parent customer identified.
12. Vendor
A vendor name.
Usage Notes:
1. Transaction files are automatically loaded whenever a refresh is performed. FinJinni will
detect whenever the file is changed (or a new file is added) and load the file.
2. You must select the option “Enable Write-Back to QuickBooks” on the company setup
screen in order to allow FinJinni to write data to your QuickBooks company.
3. You can also check the status of all user-defined transactions from Excel using the FinJinni
Query “User-Defined Transaction Postings” under the section “System Information
Queries”.
Creating Multiple Company Data Files in Excel
You can use the FinJinni Upload function in Excel to create multiple data files from a single Excel
worksheet. To use this feature in this way, add a Company_ID column as the first column of your
worksheet and choose select “Multiple Companies & Fields” from the company drop-down on the
upload screen. FinJinni will separate the rows into their appropriate company files.

58
Adding Customers and Vendors to QuickBooks
You can use FinJinni to add Customers and Vendors to QuickBooks. Sub-Customers can also be
added as Jobs for QuickBooks Desktop or Projects for QuickBooks Online. These entity definitions
can be created using an Excel spreadsheet or other program to create a data file that FinJinni will
load. FinJinni will then add these entities to QuickBooks.
This feature is only available if you have purchased the license for the FinJinni Importer advanced
data loading feature. It is enabled in the trial versions so that you can preview it.
FinJinni’s will load these entities from CSV-format files that you can create with Excel. There are
separate files for each QuickBooks company and you may have multiple files for one company. All
files should be saved in the folder “documents”\My Templates\FinJinni, where “documents” is
your normal documents folder.
The data files that FinJinni will load are named “companyid_Entity_[suffix].csv”, where
“companyid” is the company identifier (aka nick-name) that you assigned when you added the
company to FinJinni and “suffix” is a value to uniquely identify the file if needed - you can pick
anything you want for this, such as a date.
The FinJinni Excel Add-In can assist in saving these CSV-format data files from Excel worksheets.
Once you create a worksheet with the columns described below, use the Upload button on the
FinJinni ribbon bar in Excel to save the worksheet as a CSV file. You can also save it using the
normal Excel menu - the FinJinni Upload button is a convenient shortcut.
There are a large number of supported data fields for entities. Generally, the QuickBooks name
assigned to a field is used. For a complete list of all the fields, refer to one of these sample
transaction spreadsheets supplied with FinJinni:
Sample_ImportData_QBD.xlsx -or- Sample_ ImportData _QBO.xlsx
These files have at minimum the following columns and require a header with the column name in
the first row:
1. EntityType
The type of the entity: Customer or Vendor.
2. EntityName
The entity name. For sub-customers, this must be the full name in the format “parent:child”
as used by QuickBooks. This is the full entity name, also called the Display Name in
QuickBooks.
A few other commonly used fields are these:
1. Memo
The Notes value for the entity.
2. JobDesc
The Description for a Job.

59
3. Revised
Y to revise an existing QuickBooks entity. N or blank otherwise.
Change values will not be automatically written back to QuickBooks after an entity is initially
added. If you set this field to Y, FinJinni will update the entity in QuickBooks on the next
refresh regardless.
4. Voided
D to delete an existing entity.

60
Loading Data into User-Defined Tables
FinJinni can also load user-data files into database tables that are independent of FinJinni’s managed
database structure. This is provided as a convenience for loading additional data into the reporting
database.
FinJinni’s will load this data from CSV-format files that you can create with Excel. There are
separate files for each QuickBooks company and data table. You may have multiple files (multiple
tables) for one company. All files should be saved in the folder “documents”\My
Templates\FinJinni, where “documents” is your normal documents folder.
The data files that FinJinni will load are named “companyid_TableData_tablename.csv”, where
“companyid” is the company identifier (aka nick-name) that you assigned when you added the
company to FinJinni and “tablename” is the name of the database table. You must create this table
yourself using standard database tools or commands.
These files require a header with the column name in the first row. The column names must match
the column names in your data table.
Usage Notes:
1. Data files are automatically loaded whenever a refresh is performed. FinJinni will detect
whenever the file is changed (or a new file is added) and load the file.
2. If the table contains a “Company_ID” column, loading a data file will first clear all existing
rows for that company. This column does not need to be in the data file, it will be added
from the companyid value in the filename (if it is present, it will be over-ridden with that
value).
3. You can perform an initial load manually, by right-clicking on the Refresh button on the
FinJinni application screen. Choose “Load Added-Transaction Definition Files…” then
“Reload User-Defined Data Tables”. If you choose a group of companies from the Extract
drop-down, files for all companies in the group will be loaded.
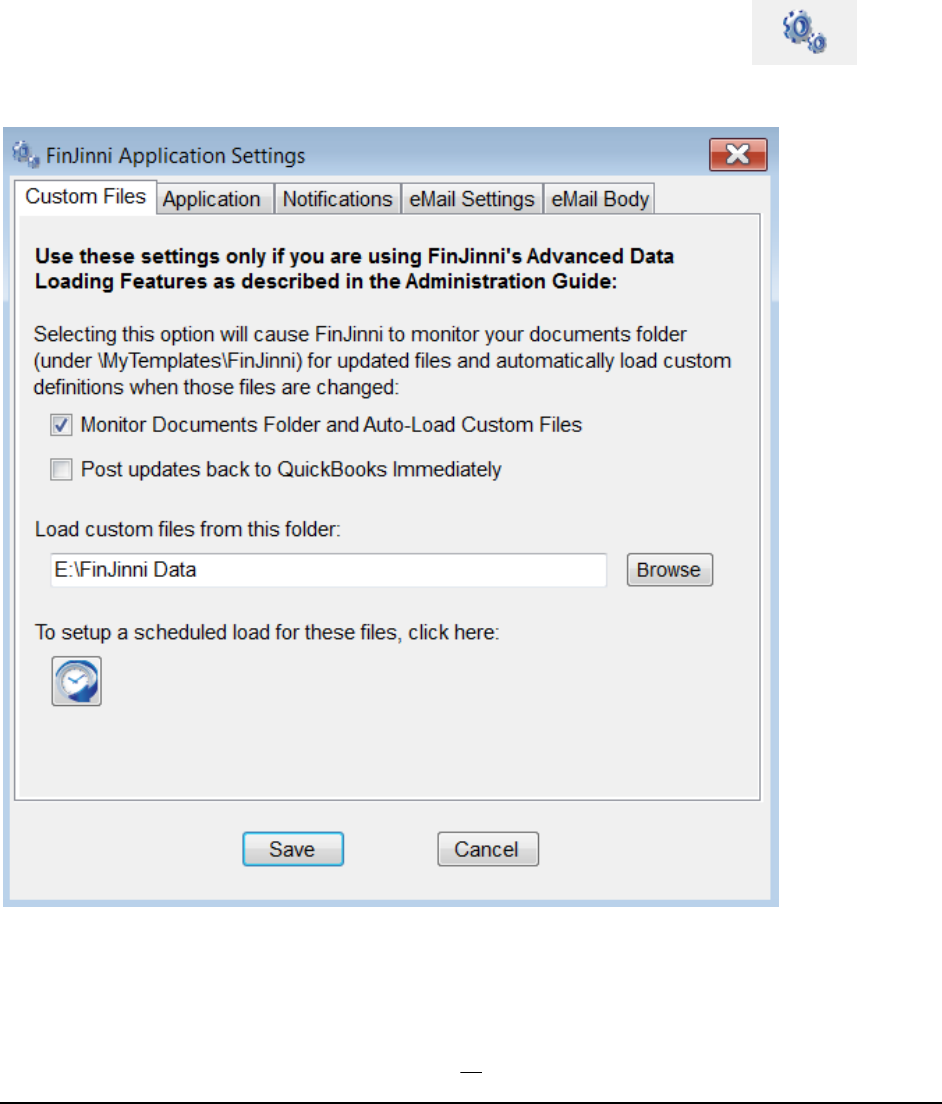
61
Automatically Loading Custom Data Files
Normally, any custom field or budget definitions described above reside in the folder
“documents”\My Templates\FinJinni, where “documents” is your normal documents folder.
For special circumstances, you can move these files to another folder, such as a shared folder on a
network.
You can also direct FinJinni to monitor this folder for updated or new files and automatically load
them without waiting for a new refresh of your company data.
To specify these settings, use the Application Settings Icon on the Main screen:
This will display the settings screen:
If you check the “Monitor Documents Folder” button, FinJinni will monitor that folder for any
changed or new “*.csv” files and automatically load them, based on the company name and entity
type contained in the file name. FinJinni will also check for these files when it starts, so that files
changed while FinJinni was not running will be picked up automatically.
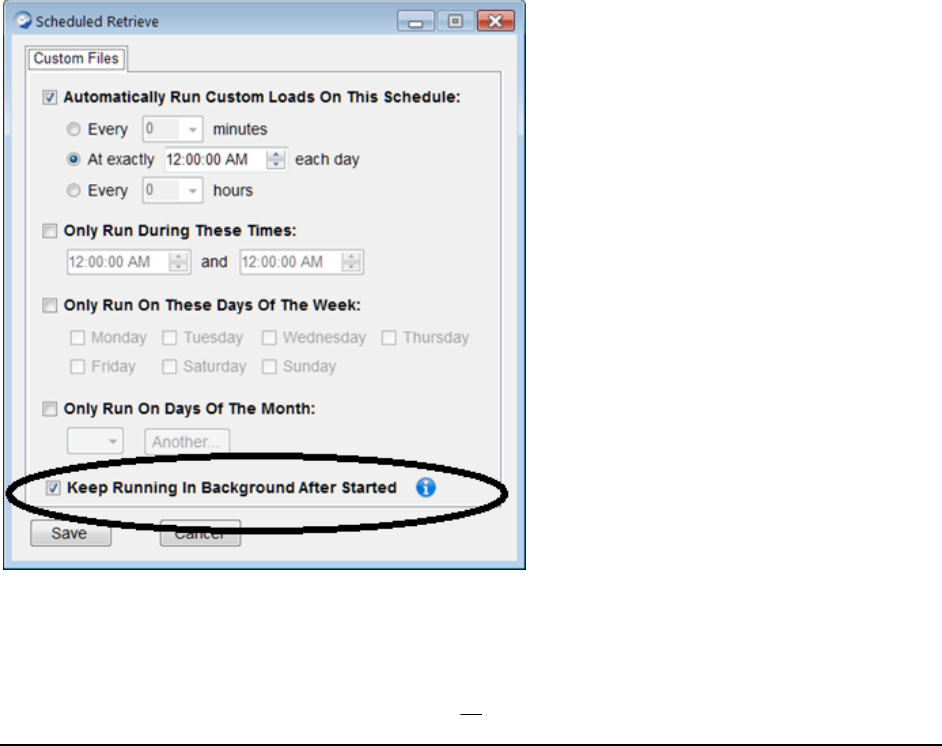
62
You can also change to a different folder location. FinJinni will use that folder whenever loading
custom definitions.
When a file is loaded, data is not normally written back to QuickBooks (when this feature is used)
until the next company-data refresh. However, you can request that FinJinni write updates to
QuickBooks immediately. In this case, any updated entities or transactions will be written to
QuickBooks immediately without refreshing the FinJinni database. You must run a separate refresh
of the company data in order for FinJinni to match QuickBooks.
FinJinni must be running in order for it to monitor the documents folder. An alternative to leaving
FinJinni running is to have it run on a schedule. If you have scheduled retrieves of company data,
FinJinni will check for new files after each retrieve. If you have not, or want to use a different
scheduled time for this file load, press the clock icon and enter the schedule information that you
want to use. The schedule setup works the same as the automated extract described under
“Automating an Extract”.
Note: When using this scheduled check, FinJinni compares the last-update time of the file to the last
time FinJinni was run. If you copy an older file to the documents folder, please be sure to update the
file time (i.e. by resaving the file).
FinJinni also has an option to keep running as a background task in order to load these data files:
When this option is checked, the Windows’ task that runs FinJinni will be set up to start at the same
time each day. FinJinni will keep running for the entire day and will monitor the data folder for

63
changes continuously. Loading will occur as soon as a changed file is detected, within 1 minute of
the change.
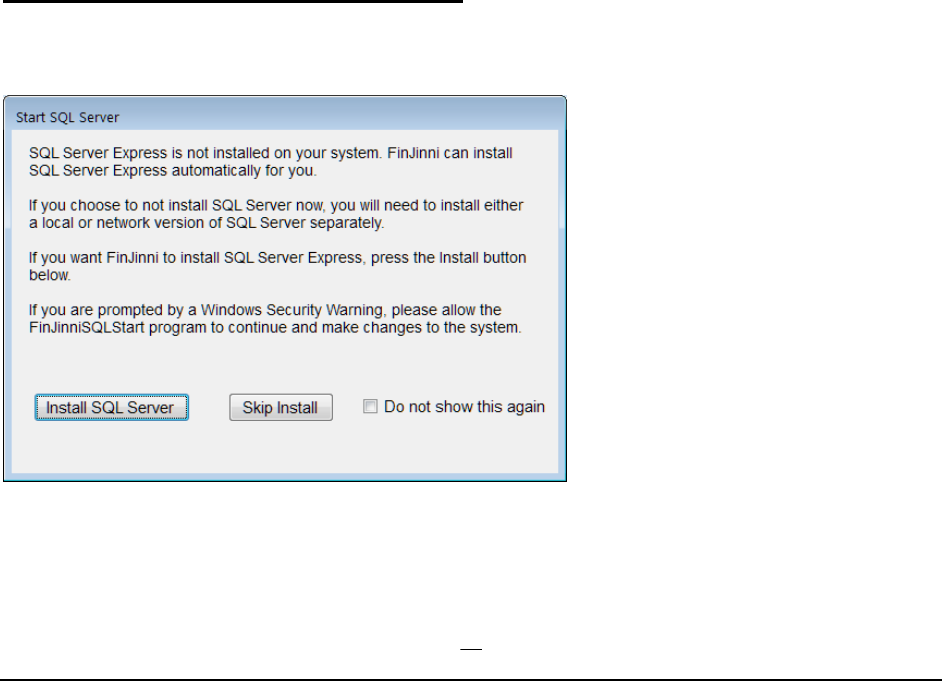
64
Installing and Configuring SQL Server Express
FinJinni will work with any version of SQL Server from 2012 onward. If needed, FinJinni will
automatically install SQL Server Express 2019, as described below.
Please note that SQL Server Express has a storage limitation of 10 gigabytes per database. When you
are using FinJinni to consolidate multiple companies, each database stores the data for a group of
companies. Unless you have a large number of companies to consolidate or very large companies in
QuickBooks, this limitation should not affect you. If you exceed this limit, you can either purchase a
license for the non-Express version of SQL Server or you can use an Azure database.
If you will be working with a large number of companies, additional Excel users, or tools other than
Excel, it is recommended that you install SQL Server Management Studio (SSMS), which you can
download from Microsoft:
SQL Server Management Studio is not installed if you let FinJinni install SQL Server automatically.
You must download and install this separately if you want it (do this after SQL Server is installed).
If you need the older SQL Server 2012 or 2016, you can download it from Microsoft directly.
Automatic Install of SQL Server Express
When FinJinni first starts, it will check to see if SQL Server is installed. If not, it will give you the
option of installing SQL Server automatically:
FinJinni can also prepare SQL Server Express for sharing over a network. If you will be using
multiple users with FinJinni, select that option on the next screen:
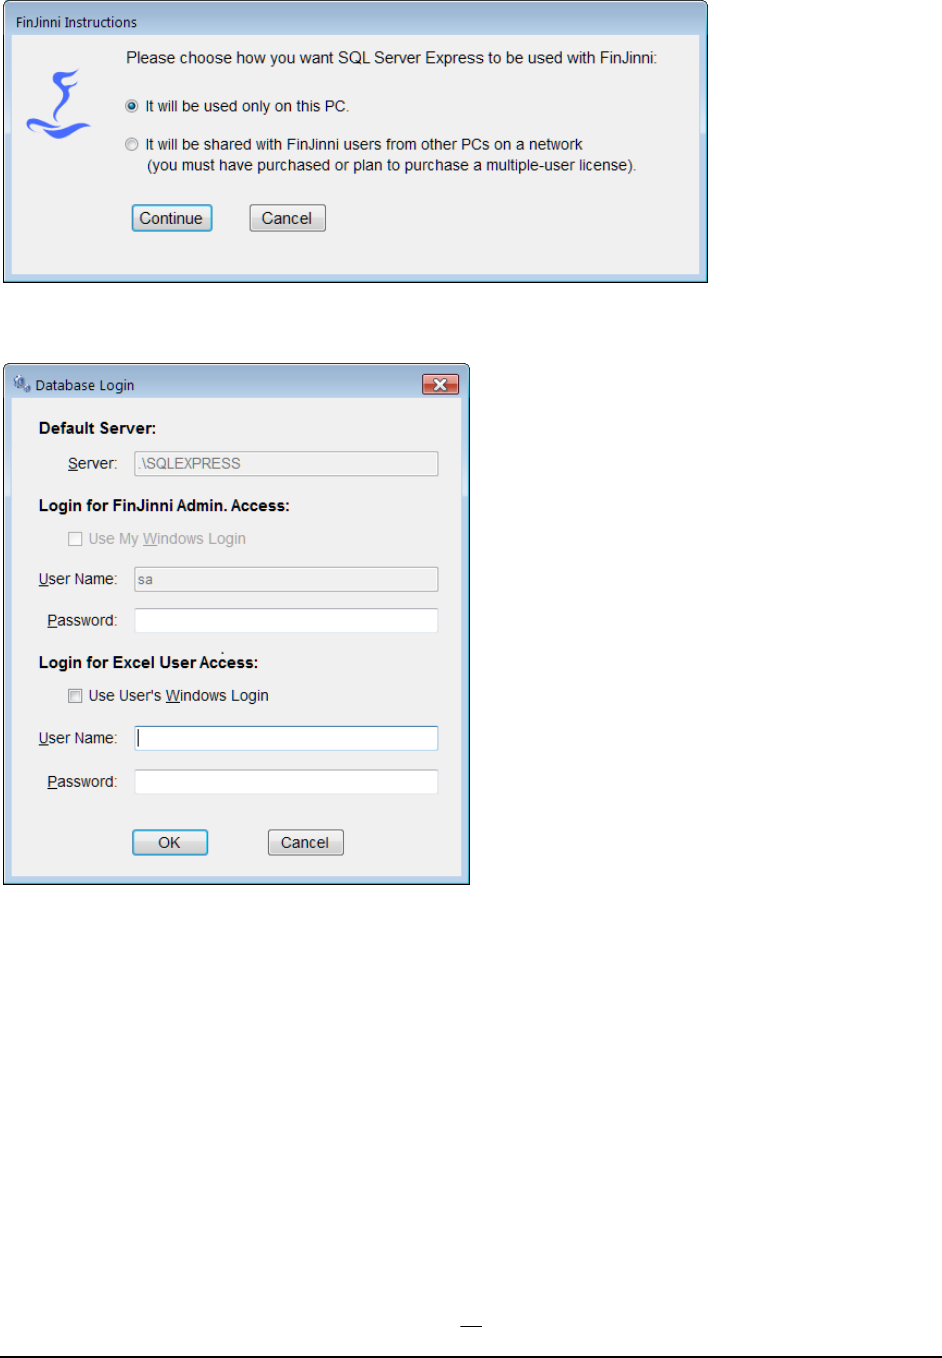
65
If you are using shared access, you will need to choose an administrator password for SQL Server
and a user name and password to be given to other FinJinni users. Enter these on the next screen:
Note: The administration user name “sa” is a fixed standard used for SQL Server.
Next, the SQL Installation will start. Normally, the SQL Server installation file is included when
FinJinni Pro is installed. If this file is not in the installation folder, you will see this message and be
given a chance to locate it:
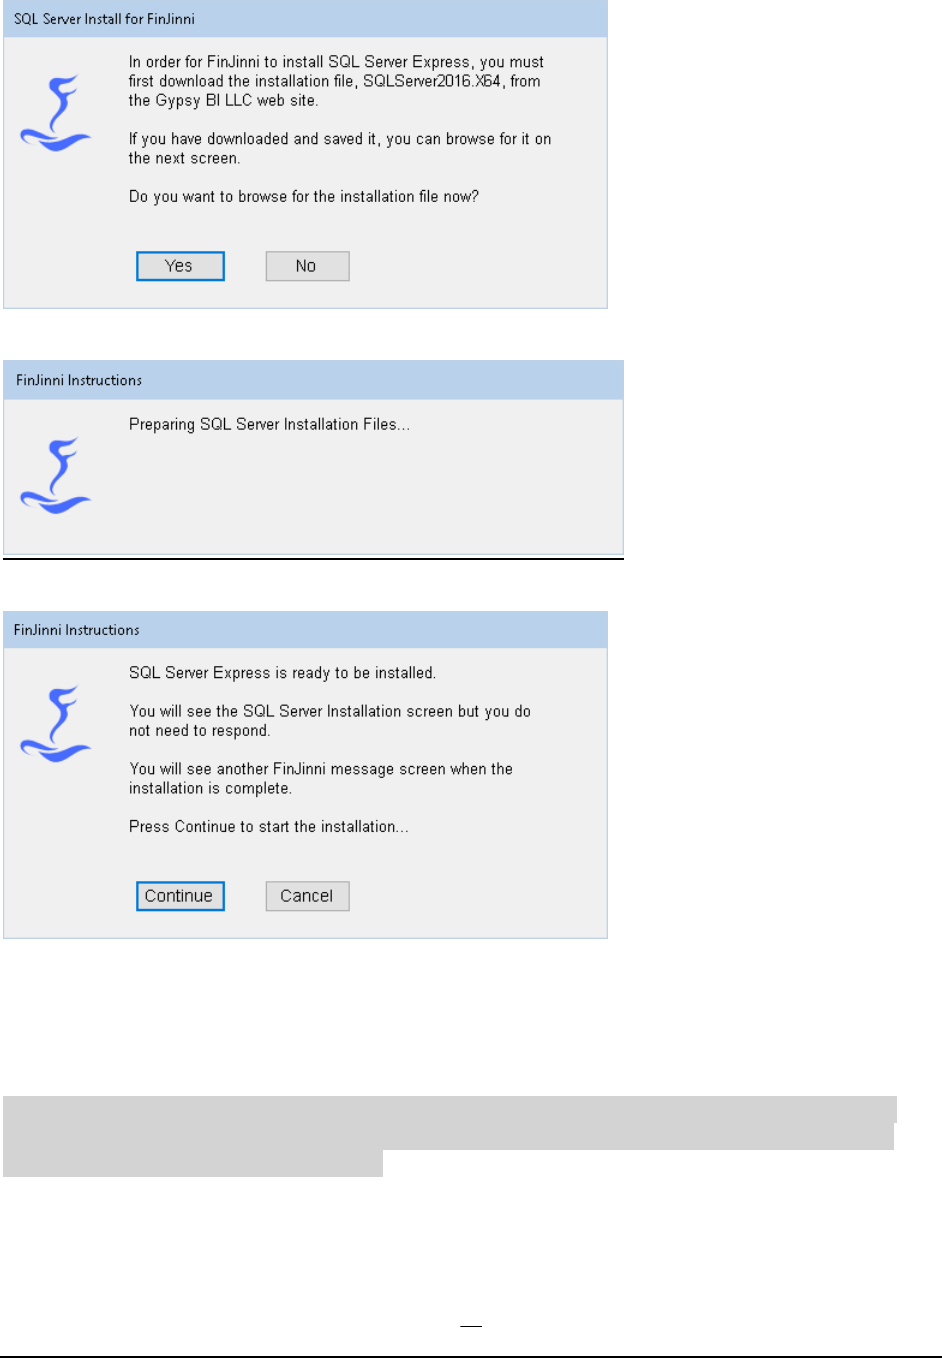
66
The install will start with this screen (the installation setup files are being unpacked):
Then this screen:
Normally, there is no further interaction required. However, if the SQL Server installation fails, you
will be given the choice to try again with an interactive install so that you can try and correct the
cause of the failure.
Note: A typical reason for failure is if you have a pending Windows update and have not yet rebooted
your PC to complete the update. It is a good idea to make certain you have current Windows updates
before you install FinJinni and SQL Server.

67
Setting Up Shared Access for SQL Server Express; Multi-User Access
This section is for advanced setup only.
Normally, you will install FinJinni and SQL Server Express on the same workstation that you are using it
from.
For multi-user versions of FinJinni, users need to access the database over your network. For large
installations, you can purchase a licensed version of SQL Server from Microsoft. For installation on
shared workstations and smaller servers, SQL Server Express can still be used.
By default, SQL Server Express only allows access from the machine on which it is installed. You can run
SQL Server Express in a network configuration by updating a few settings.
FinJinni will do this setup automatically for you if it installs SQL Server as described in the previous
section.
In all cases, you will also need to insure that your Windows Firewall is set to allow access from other PC’s
on the network. That is described in a following section “Open the Firewall”.
Automatic Setup for SQL Server Network Access sharing
Skip this section if you used FinJinni to install SQL Server using shared access.
If you did not select sharing when you installed FinJinni, or if you installed SQL Server independently, you
can still use FinJinni’s automatic network configuration: Look for the shortcut “Setup SQL Server
Express Sharing” in the GypsyBI folder on the Start menu. Use “Run as Administrator” to let FinJinni
perform the setup.
You will then need to ensure that the SQL Server security authentication mode is set to “mixed mode”,
which allows a SQL username and password to be used by other FinJinni users. Normally, you would select
this during SQL installation. You can do this at a later time by following these steps:
1. Open SQL Server Management Studio.
2. In the Object Explorer (the left pane), right-click the server, and then click Properties.
3. On the Security page, under Server authentication, select “SQL Server and Windows
Authentication mode”, and then click OK.
4. Click OK to acknowledge the requirement to restart SQL Server.
5. If you need to enable the “sa” administrative login by using Management Studio:
A. In the Object Explorer, expand Security, expand Logins, right-click “sa”, and then click
Properties.
B. On the General page, create and confirm a new password for the sa login.
C. On the Status page, in the Login section, click Enabled, and then click OK.
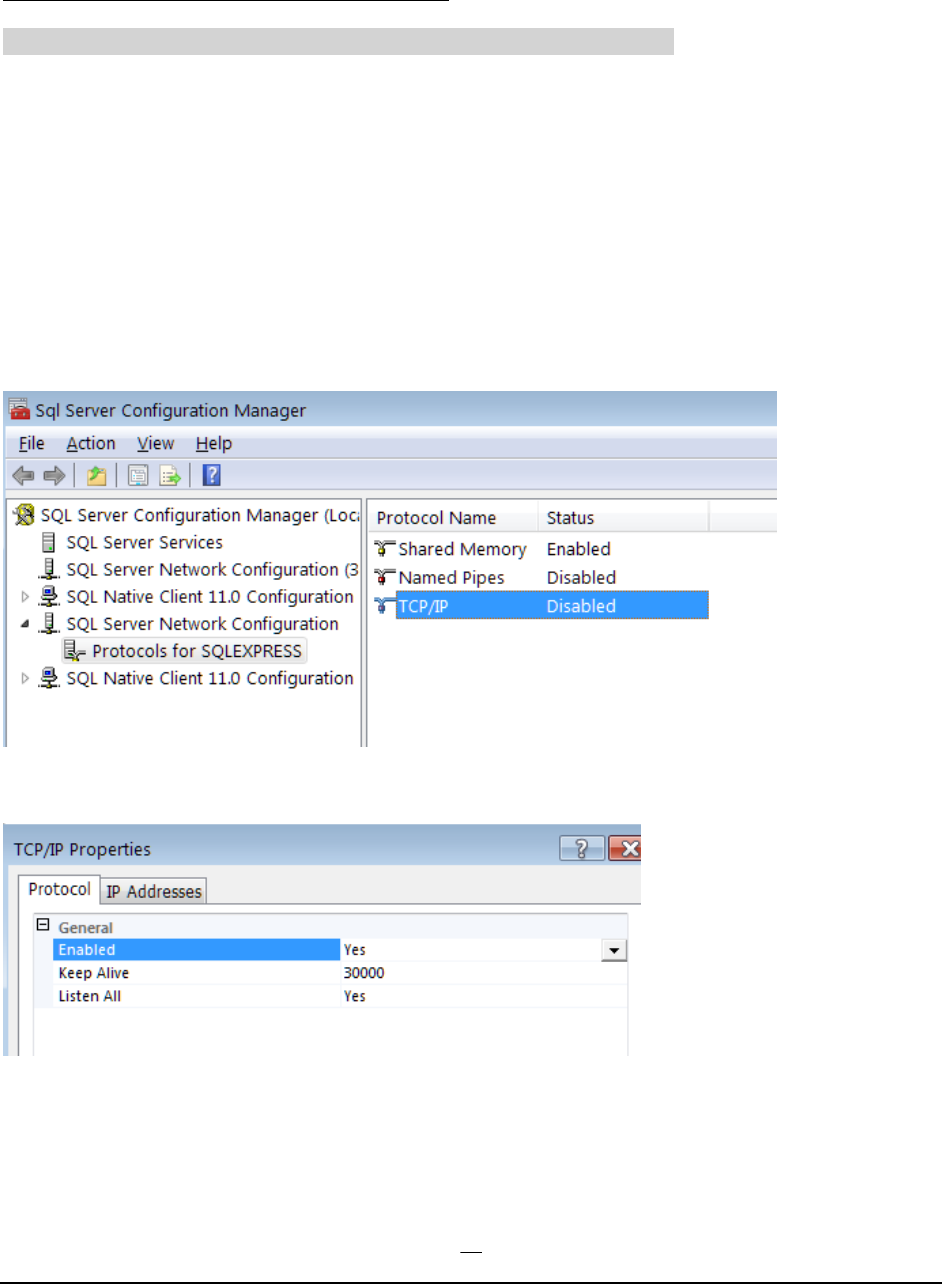
68
Manual Setup for SQL Server Network Access
Skip this section if you used FinJinni to configure SQL Server shared access.
You will need to run the SQL Server Configuration Manager tool, which is installed with SQL Server
Express. There is usually a start menu shortcut for this tool. If you do not have a shortcut to it on your
start menu, run this command to start it:
C:\windows\SysWOW64\SQLServerManager13.msc
The “13” indicates SQL Server 2016 and will be a different number for other SQL Server versions. Use
whichever version is installed.
Here is the main screen you will see. You will need to expand “SQL Server Network Configuration” by
clicking on the arrow to the left of that line.
Double-click on TCP/IP to bring up the properties. Then set it to enabled:
Next, use the IP Addresses tab to set up the port SQL Server will use. Scroll down to the IP address for
your local network, IP2 in this example. Change Enabled to Yes, TCP Dynamic Ports to blank, and TCP
Port to blank.
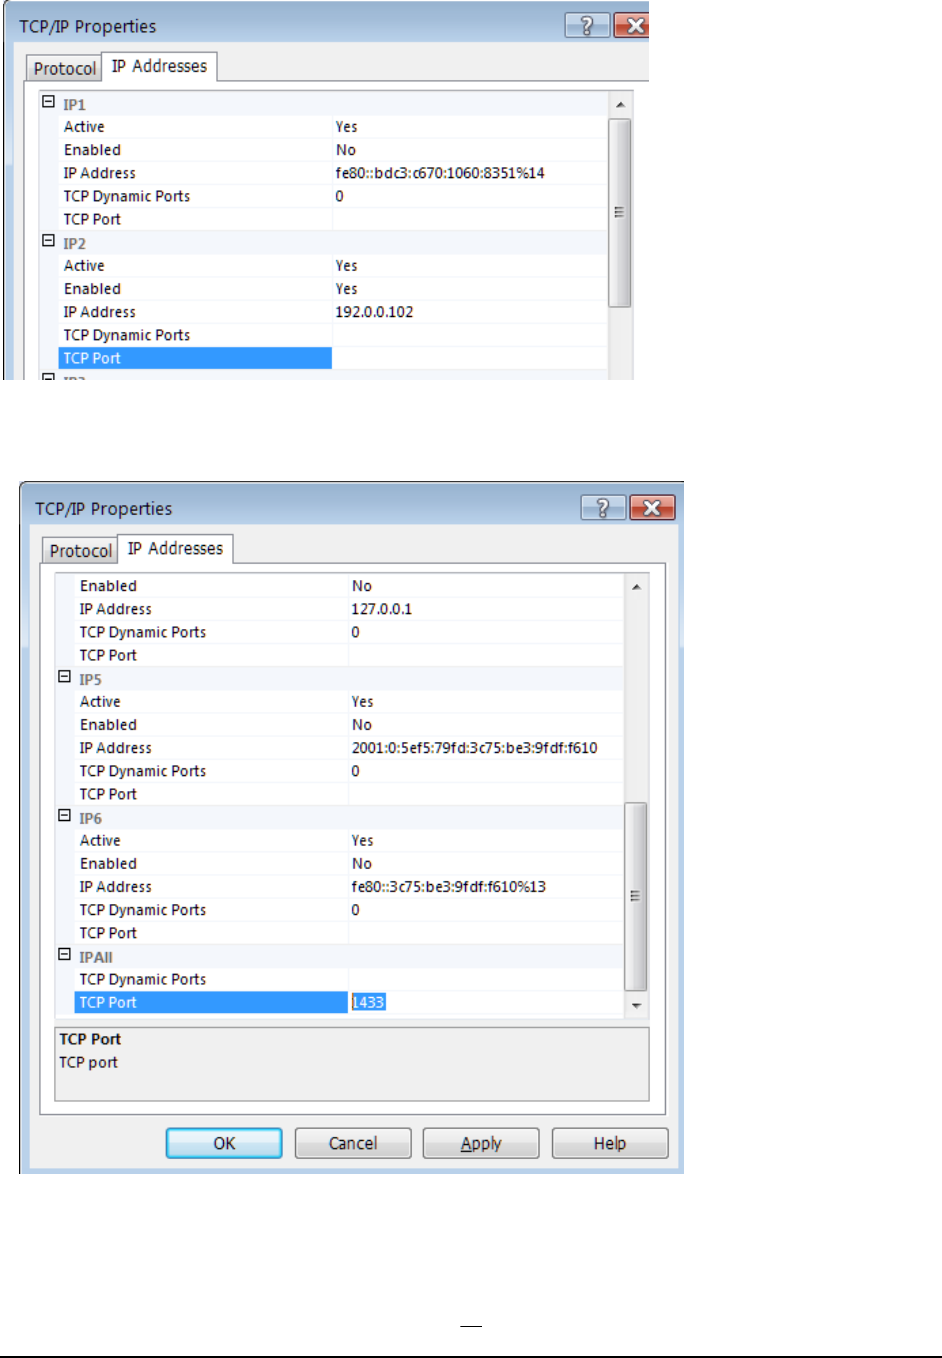
69
Now scroll down to the end of the list where it shows IPAll. Change TCP Dynamic Ports to blank and
TCP Port to “1433”. Then click OK.
Now you will need to restart SQL Server. Select SQL Server Services on the left, right click on SQL
Server (SQLEXPRESS) and choose Restart.

70
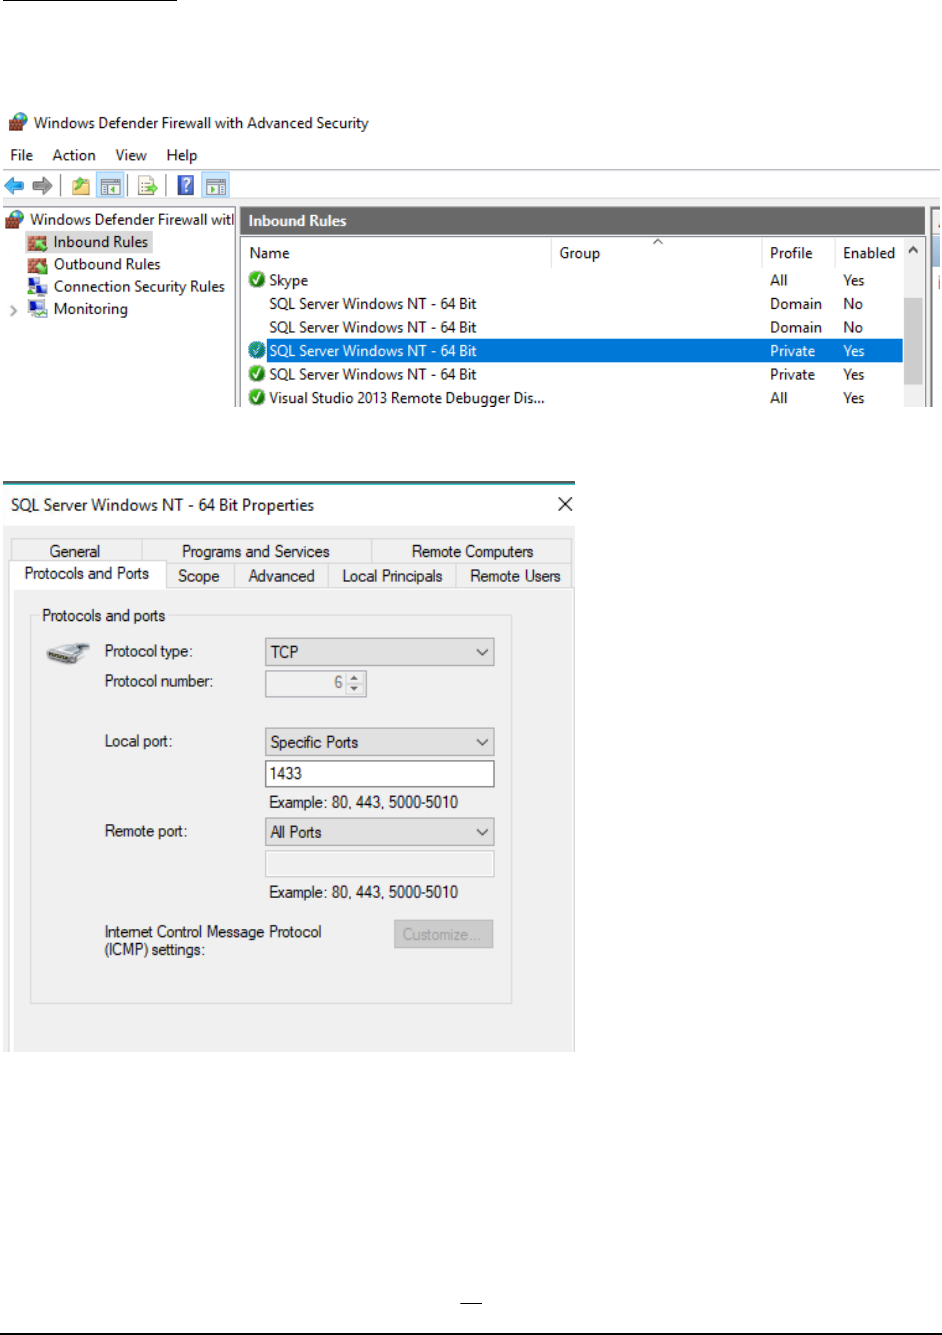
71
Open the Firewall
If you are using a firewall such as Windows Defender, you will also need to allow connections on port
1433. Here are the Advanced Settings for Windows Defender:
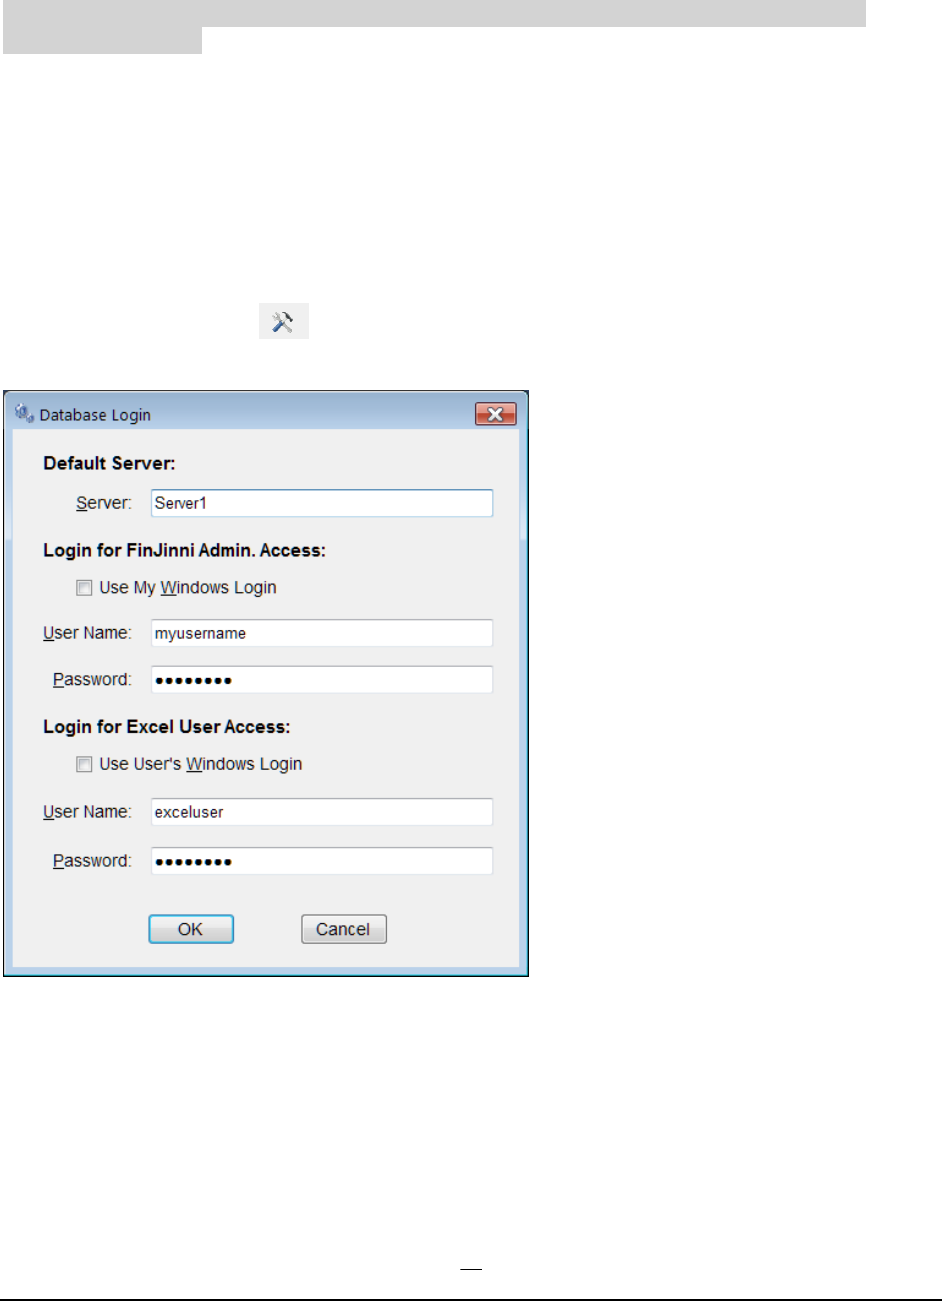
72
Using Custom SQL Logins
If you used FinJinni to install or configure SQL Server shared access, you have already entered the
following information.
Normally, SQL Server Express uses the “Windows” method of authentication, which allows full access
from the user that installed it.
If you are using multiple users or a network server other than your PC, FinJinni will prompt for
authentication when it is needed.
For convenience, you can setup defaults for SQL access from both FinJinni and Excel. Excel users only
need read access to the database so you can secure the database in a multi-user environment.
To setup defaults, use the button to display the database maintenance selections and choose
“Setup Database Login Defaults”. This screen will display:
The default server is “.\SQLEXPRESS” for a standard single-user installation. You can enter a network
server name instead. In this example, “Server1” is a separate network server.
Note: The user names must be created as SQL Server logins. “myusername” needs to have db_creator role-
privileges, plus permission to view logins (see below). “exceluser” needs only to have the “public” role.
FinJinni will automatically add “exceluser” as a “db_datareader” user-login to each database.

73
If you have setup “myusername” with SQL Server admin. privileges, you do not need this last step.
Otherwise, to add the permission to view logins, run this SQL command from a user with sysadmin
privileges:
USE master
GRANT VIEW ANY DEFINITION TO myusername

74
Using FinJinni to Manage Your Databases
Automating a database backup
If you are using SQL Server Express, which doesn’t have support for automatic backups, you can use
FinJinni to run a SQL database backup on a schedule. Setup a scheduled task with these parameters:
/ex “extract-name” /dbackup “output file name”
“extract-name” identifies the database and the output file name specifies the path and name of the backup
file. Using the “/dbackup” option will perform the database backup instead of an extract.
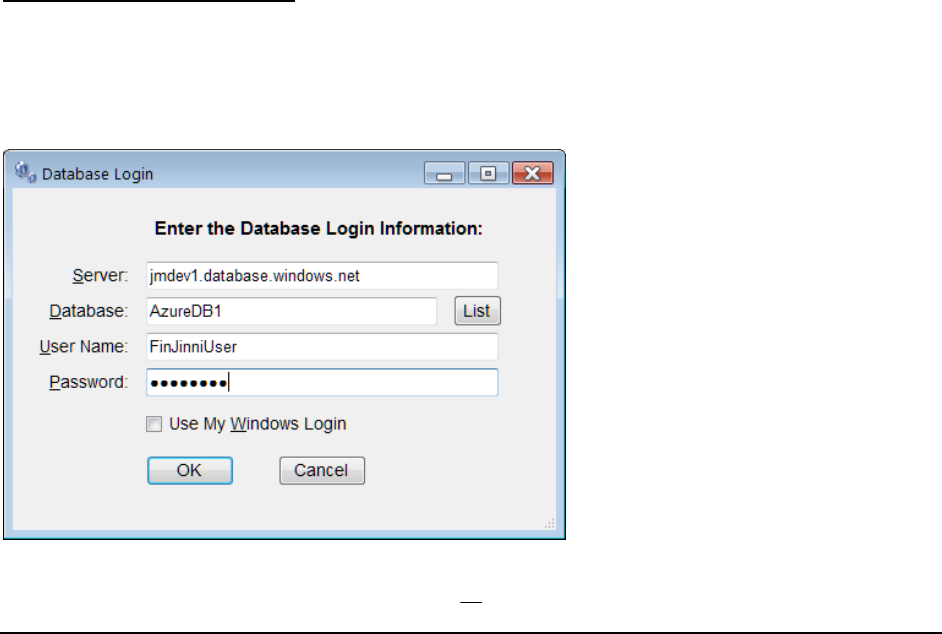
75
Using Azure SQL Databases
FinJinni can use Microsoft’s Azure database service instead of a local SQL database. Your QuickBooks data
is reliably and securely stored in Microsoft’s Azure network and only accessible to you or others that you
grant access to.
A major advantage of using Azure is that you can access your data from anywhere. The FinJinni Excel add-
in will connect to your Azure database over the internet. You can also use other tools which support Azure,
such as Microsoft PowerBI.
At the time of this writing, Microsoft provides 12 months of free database storage and access to new Azure
customers. Contact Microsoft for more information.
Microsoft Azure SQL Database has “service tiers”: basic, standard and premium and provides varying
performance levels within each service tier. The Standard level is recommended for use with FinJinni. The
required performance level will depend on the amount of QuickBooks data you are storing. A performance
level of “S1” is adequate for most needs and the less expensive “S0” can also be used. These levels affect
mainly the time it takes to load the QuickBooks data and so you can experiment with the level that provides
the best price-performance for your needs.
The performance levels can be changed at any time without affecting your data, so it is possible to start at a
high performance level while you load your data from QuickBooks and then lower the level once the data
is loaded; Queries from Excel and other tools require less resources than loading. The cost of the higher
performance level when only used for a few hours is minimal. Testing at Gypsy BI has found that a “S2”
performance level provides the best overall benefit while loading.
Setting Up Azure in FinJinni
When you set up your Azure account and create an Azure SQL database, you will choose both a
server name and a database name. The server name always ends with “.database.windows.net”. On
the FinJinni screen where you enter the database name, enter the server and database names you
chose for Azure. No other configuration is needed. For example:

76
You will also assign a user name and password in Azure for access to your database. If you set up a
SQL login, this is different from your Azure account login. You must enter the database access name
and password on the FinJinni screen.
You can also use Azure Active Directory authentication. Place the string “ad:” in front of your
username to use an Active Directory user.
QuickBooks Load Performance with an Azure Database
Due to the fact that all of the data which FinJinni extracts must be uploaded to the Azure servers and also
due to throttled performance of the service levels on those servers, the time to extract your data from
QuickBooks can be much higher in an Azure environment than if a local SQL database was used. Please
be patient and remember that a higher performance level will reduce the load time.
Also, once the initial data load is performed, incremental extracts will complete in much less time.
