
Appendix 14 Using Spreadsheet Data to Create CARS XML Invoices 212
Appendix 14 Using Spreadsheet Data to Create CARS XML Invoices
This appendix describes processes that are useful for extracting data from spreadsheet files, converting the data to XML-usable content, and using the built-in Excel®
XML functions to automatically generate tagged data for repeating blocks of invoice details such as direct labor or costs. The tagged data can then be copied and
carefully pasted into an XML invoice that can be imported into CARS. Use this process for repeating blocks of details such as direct labor and direct costs in actual cost
(cost plus) or specific rate invoices. You can enter non-repeating data for the invoice directly in the XML document. Invoices for lump sum and cost per unit contracts as
a whole are simple enough that you can either edit the sample XML invoice directly or enter them manually in CARS.
This appendix is intended as guidance. It does not provide all-inclusive solutions. Every consultant firm uses its own unique system for gathering and storing invoice
data, and there may be peculiarities with your data that are not covered in this appendix. For shorter invoices, you may also find that it is just as fast to manually key
invoice data directly into CARS, at least until you become comfortable with using Excel functions.
Because most data systems can export data to a spreadsheet and Excel is a common and robust spreadsheet program, the examples in this appendix use Excel 2007
(version 12). The steps needed for the Excel conversions may vary slightly if you use a different version of Excel. There may be slight differences in the text manipulation
functions, and there are differences in the XML function capabilities in different versions.
The goal is to take information in a spreadsheet and format it so that it can be used to automatically generate blocks of tagged invoice data. The tagged data must
exactly conform to the CARS schema for content and format. Each cost line, such as an actual cost line item, has several non-repeating lines which can be easily entered
into the XML document, including the payment type key, DBE key, and others. However, the repeating blocks of detail lines that include name, date, hours, cost, and
other data can be tedious and time-consuming to enter manually. For example, an invoice might have 50 lines of direct labor details. For each detail line, you must
include 11 individual data items. If you properly format an Excel spreadsheet and apply the CARS schema, you can automatically generate the 550 lines of tagged code
and paste these lines into a CARS XML invoice document. This appendix is intended to show you how to accomplish the steps needed to generate XML code using Excel
and manually paste it into the correct location in the CARS XML invoice.
Using a spreadsheet to partially automate the process of creating an XML invoice as described in this appendix is only one of many possibilities. XML invoices can be
created by typing plain text, but manual editing could be tedious and error-prone for longer invoices. Invoice data could be entered directly into a spreadsheet and
exported as XML. Spreadsheets are not the only program type useful for data manipulation; database applications may also be used. It is possible to fully automate the
process. Again, each consultant firm has the option to use XML for invoicing in CARS, but each system used to generate the invoices will be unique.
Appendix 14 Using Spreadsheet Data to Create CARS XML Invoices 213
General Process Steps
The general process steps for converting spreadsheet data into XML include the following:
1. Evaluate data exported from the financial system to a spreadsheet, either as a formatted report or as unformatted data. Ordinarily, you need to be most
concerned with repetitive data such as direct labor and direct costs.
2. Convert data into the required parts as needed for the XML based on the cost basis for the invoice. Refer to the CARS schema to determine the necessary data.
3. Copy the prepared data to a worksheet using one column per data element. If you have more than one block of data to export, you need a separate worksheet
for each data block. For example if you have both direct labor and direct costs for an invoice, you will have at least 3 worksheets:
a. The data exported from your financial software system
b. A worksheet for direct labor
c. A worksheet for direct costs
Note: Steps 2 and 3 can be incorporated into an Excel macro to speed up the invoicing process.
4. Associate the CARS XML format with the spreadsheet.
5. Apply the CARS XML format to the data.
6. Export tagged XML to a document.
7. Edit a sample invoice for the appropriate cost basis with your contract data. This edited document will become your XML invoice. You will edit the header,
invoice information, and the line item blocks, and then paste in the tagged direct labor and direct cost data exported from Excel.
8. Copy the tagged data into the appropriate block in the XML document.
You will need the following items for this process. Items 2 and 3 are available on the
CARS Page (http://www.dot.wisconsin.gov/business/engrserv/cars.htm).
1. An Excel spreadsheet with your financial data. This data may be entered as unformatted data, or it could be formatted as a printable report from which the
formatting will be removed.
2. CARS Invoice XML for Excel Export as an XML file (also called the “CARS XML file” in this appendix).
3. A sample invoice for the appropriate cost basis that you will use as a starting point to enter your data.
4. Optional but strongly recommended: an XML editor that offers features that help you easily read the text. Notepad++ is a free code editor that offers color-
differentiated content, line numbers and code block tools. It is available for download from
http://notepad-plus-plus.org/.
5. Basic understanding of XML. Suggested resources include W3 (
http://www.w3schools.com/xml/default.asp), sitepoint (http://www.sitepoint.com/really-good-
introduction-xml/), Wikipedia (http://en.wikipedia.org/wiki/XML), and appendix 13 of the CARS manual (for CARS-specific details).
Appendix 14 Using Spreadsheet Data to Create CARS XML Invoices 214
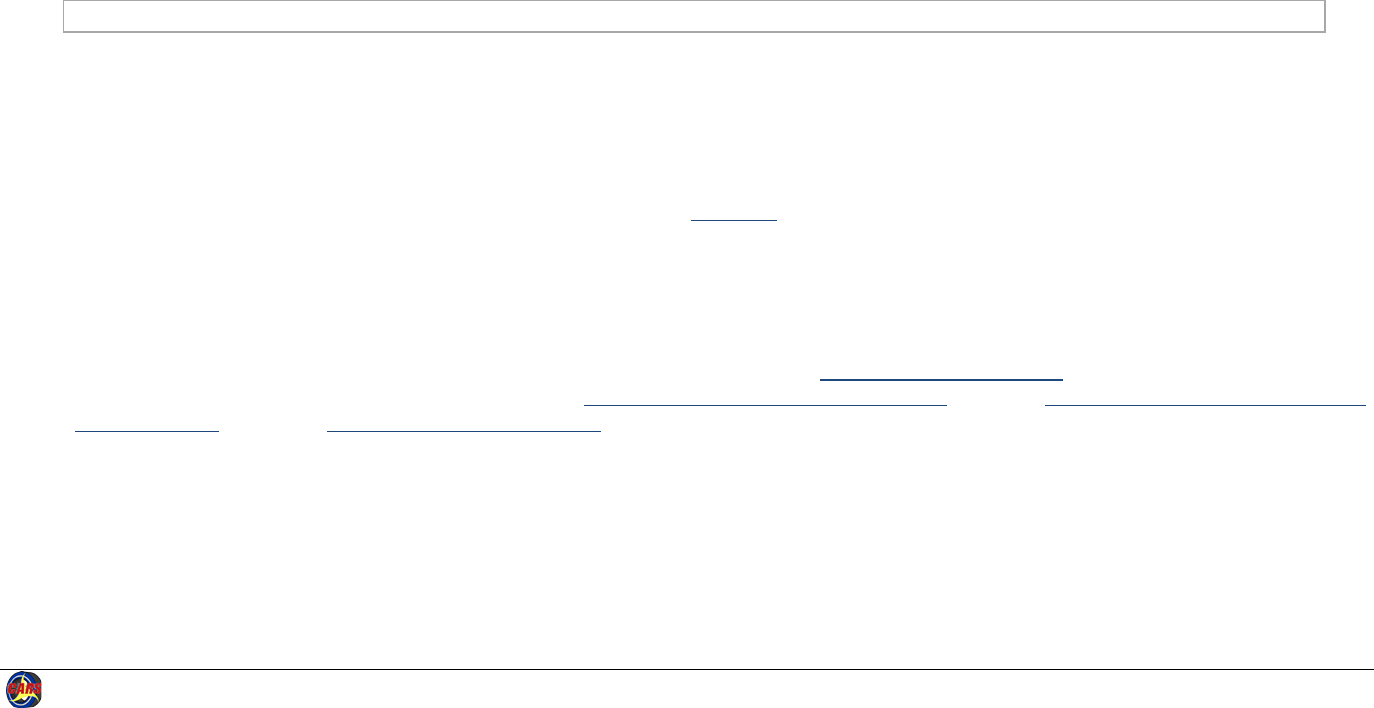
Consultants: Evaluate Data
Commonly, data exported from financial
systems to a spreadsheet are as a formatted
report or invoice, or as raw data in an
unformatted spreadsheet. Note that report
or invoice formatting can add to the data
cleanup processes. The exported data you
can get will vary with the financial software
system you use
Formatted Spreadsheets
Red arrows: Look for collapsed or merged
rows and columns. These areas may contain
hidden data or formulas.
Green arrows: Look for related data in
separate rows or columns. Separating
related information makes it more difficult
to make sure the invoice cost lines are
accurate.
Blue arrows: Look for data items combined
in one cell, possibly with unneeded data. The
data items will need to be separated into
items according to CARS schema
specifications. See Convert Data on page 217
for details on how to use Excel formulas to
quickly separate data elements.
Purple arrows: Look for unneeded data. This
data will need to be removed before
applying the CARS XML file CARS Invoice XML
for Excel Export.
Appendix 14 Using Spreadsheet Data to Create CARS XML Invoices 215
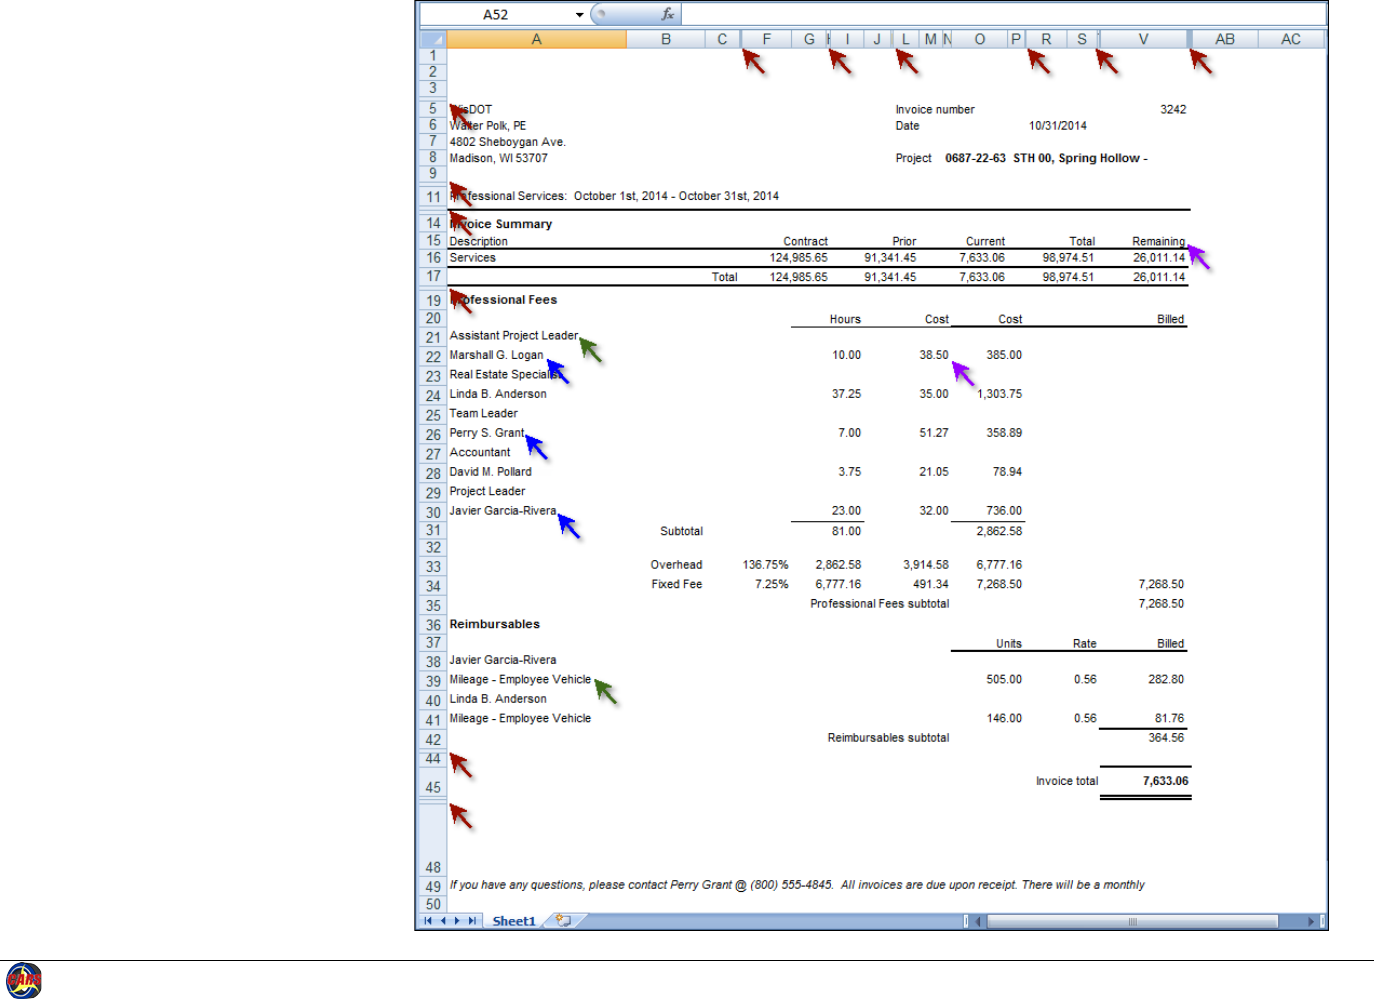
Consultants: Evaluate the
Spreadsheet Data - continued
Formatted Spreadsheets - continued
Orange Arrows: Look for indications of code
changes. The heading indicated by the
orange arrow on this image marks a change
in hours type.
Green arrows: Look for related data in
separate rows or columns. Separating
related information makes it more difficult
to make sure the invoice cost lines are
accurate.
Blue arrows: Look for data items combined
in one cell, possibly with unneeded data. The
data items will need to be separated into
items according to CARS schema
specifications. See Convert Data on page 217
for details on how to use Excel formulas to
quickly separate data elements.
Purple arrows: Look for unneeded data. This
data will need to be removed before
applying the CARS XML file CARS Invoice XML
for Excel Export.
Appendix 14 Using Spreadsheet Data to Create CARS XML Invoices 216
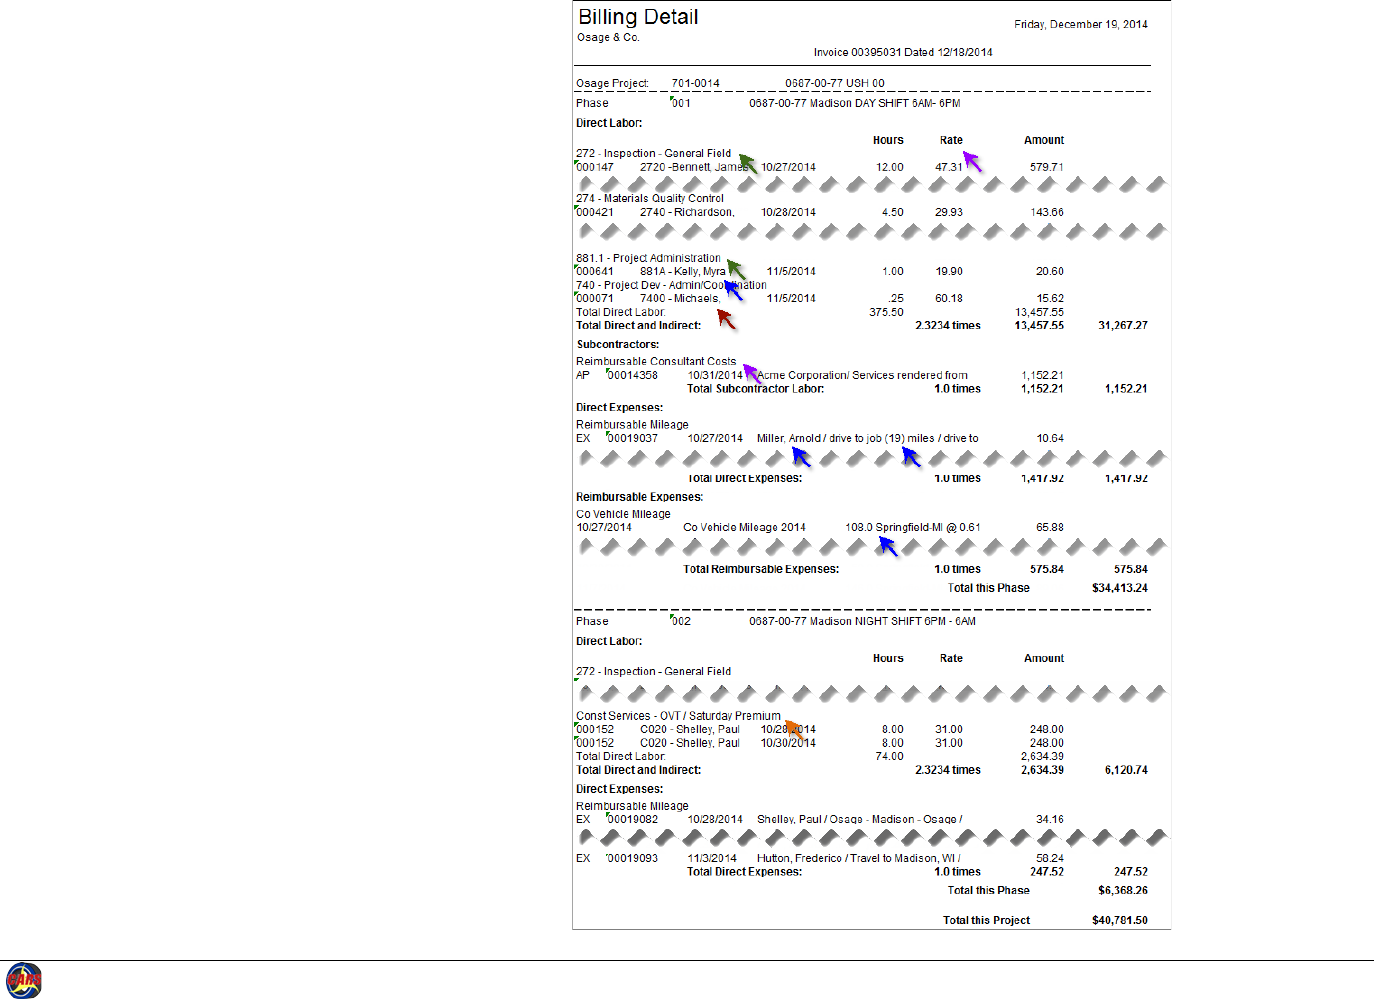
Consultants: Evaluate the
Spreadsheet Data - continued
Raw Data in Unformatted Spreadsheets
Blue arrows: Look for data items combined
in one cell, possibly with unneeded data. The
data items will need to be separated into
items according to CARS schema
specifications. See Convert Data on page 217
for details on how to use Excel formulas to
quickly separate data elements.
Purple arrows: Look for unneeded data. This
data will need to be removed before
applying the CARS XML file CARS Invoice XML
for Excel Export.
Appendix 14 Using Spreadsheet Data to Create CARS XML Invoices 217
Consultants: Convert Data
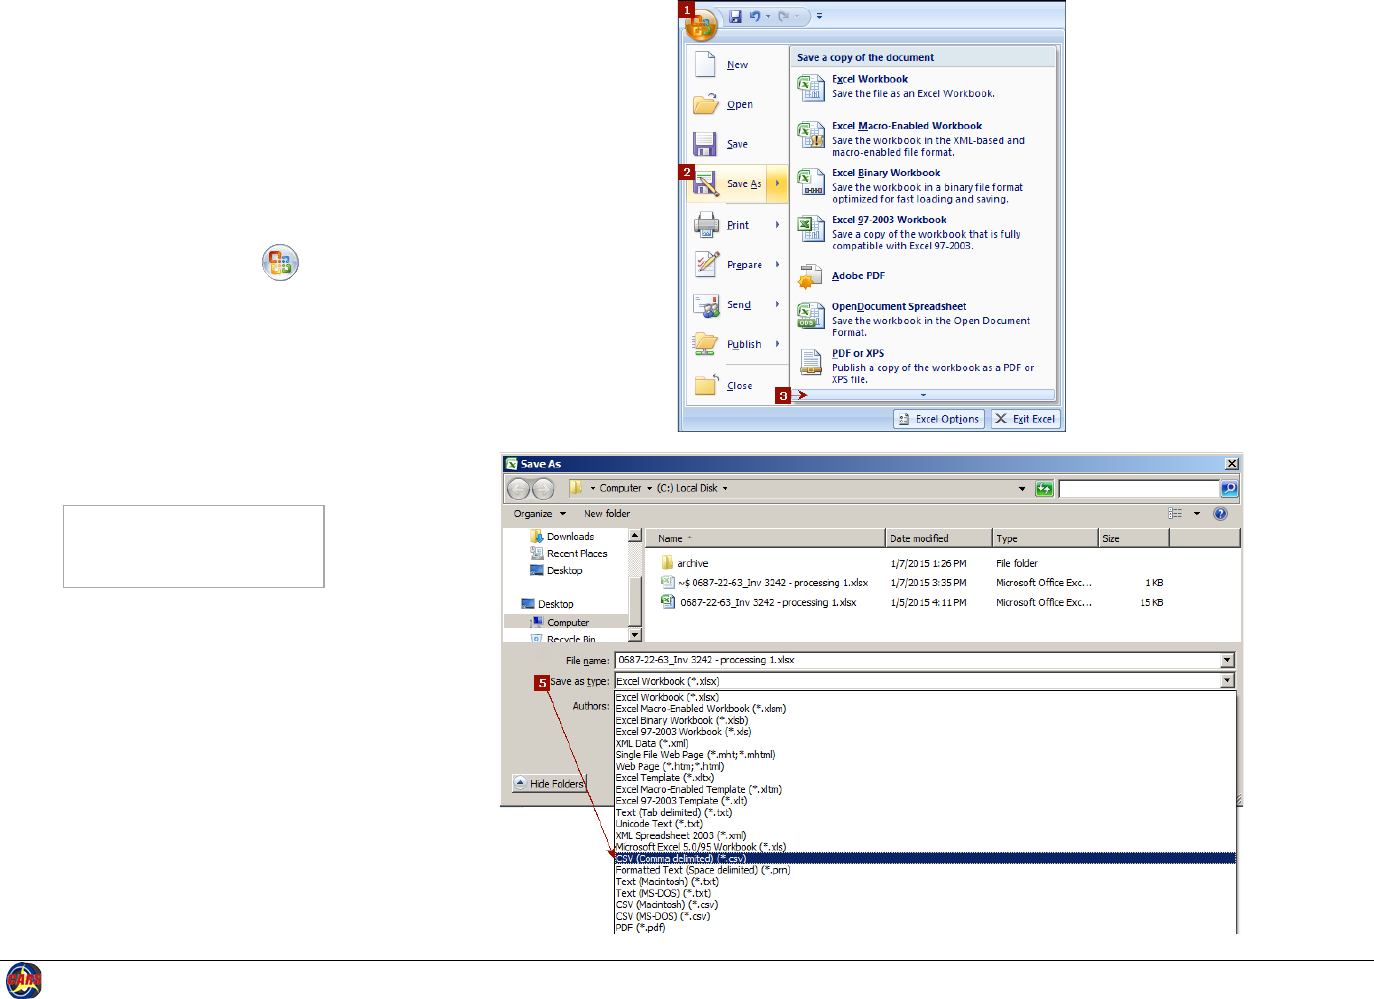
Remove Formatting
The simplest method for removing
formatting from an Excel spreadsheet is to
save it as a comma-separated value (CSV)
document.
The steps used to access the Save As
command may vary by Excel version.
1. Click the Office button .
2. Point to Save As.
3. Hover over the down arrow on the
bottom of the Save a copy of the
document list to show more
options.
4. Click Other Formats at the bottom
of the list. Excel opens the Save As
dialog box.
Note: The keyboard shortcut
to the Save As dialog
box is ALT + F, then A.
5. In the Save as type field, select
CSV (Comma delimited) (*.csv). Do
not use the CSV formats for
Macintosh or MS-DOS.
Appendix 14 Using Spreadsheet Data to Create CARS XML Invoices 218
Consultants: Convert
Data - continued
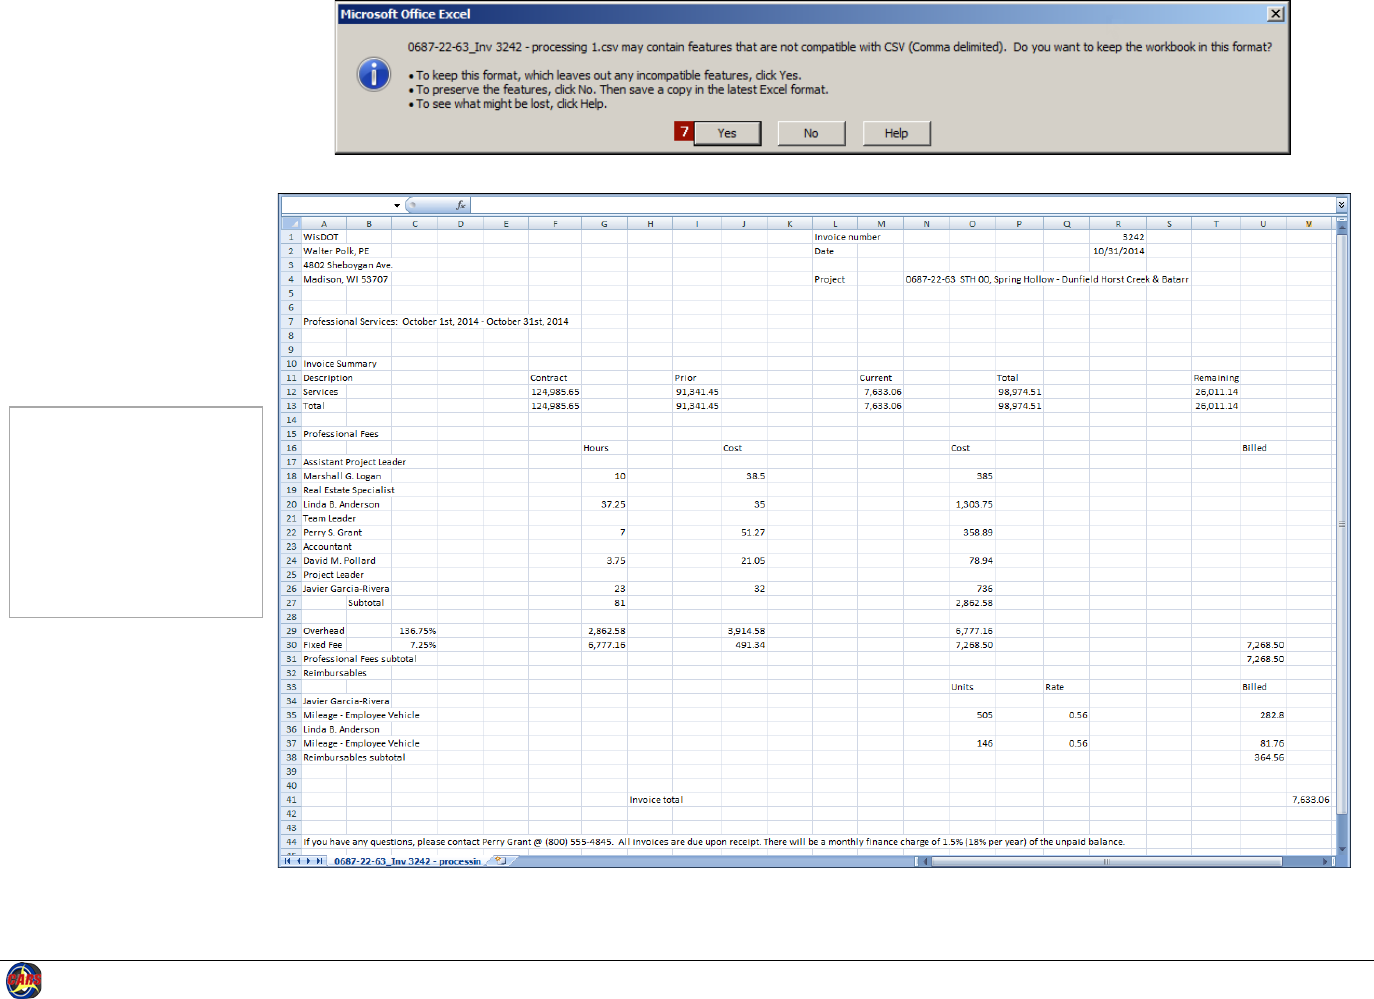
6. Click Save. Excel
displays a message
warning that
incompatible formats
will be lost.
7. Click Yes.
Excel then saves the
spreadsheet as a CSV
file. The file shown is
the unformatted
version of the invoice
shown on page 214.
Note: You may have better
results using Excel
functions (especially
date functions) if you
save the CSV file
without formatting
as Excel again at this
point.
Appendix 14 Using Spreadsheet Data to Create CARS XML Invoices 219
Consultants: Convert Data - continued
Split Data into Required Parts
This process uses added columns to manipulate the data. You may also be able to use the Excel
Convert Text to Columns wizard (https://support.office.com/en-
au/article/Split-names-by-using-the-Convert-Text-to-Columns-Wizard-39f7b055-6b39-4cb5-9512-13cc19b3a807).
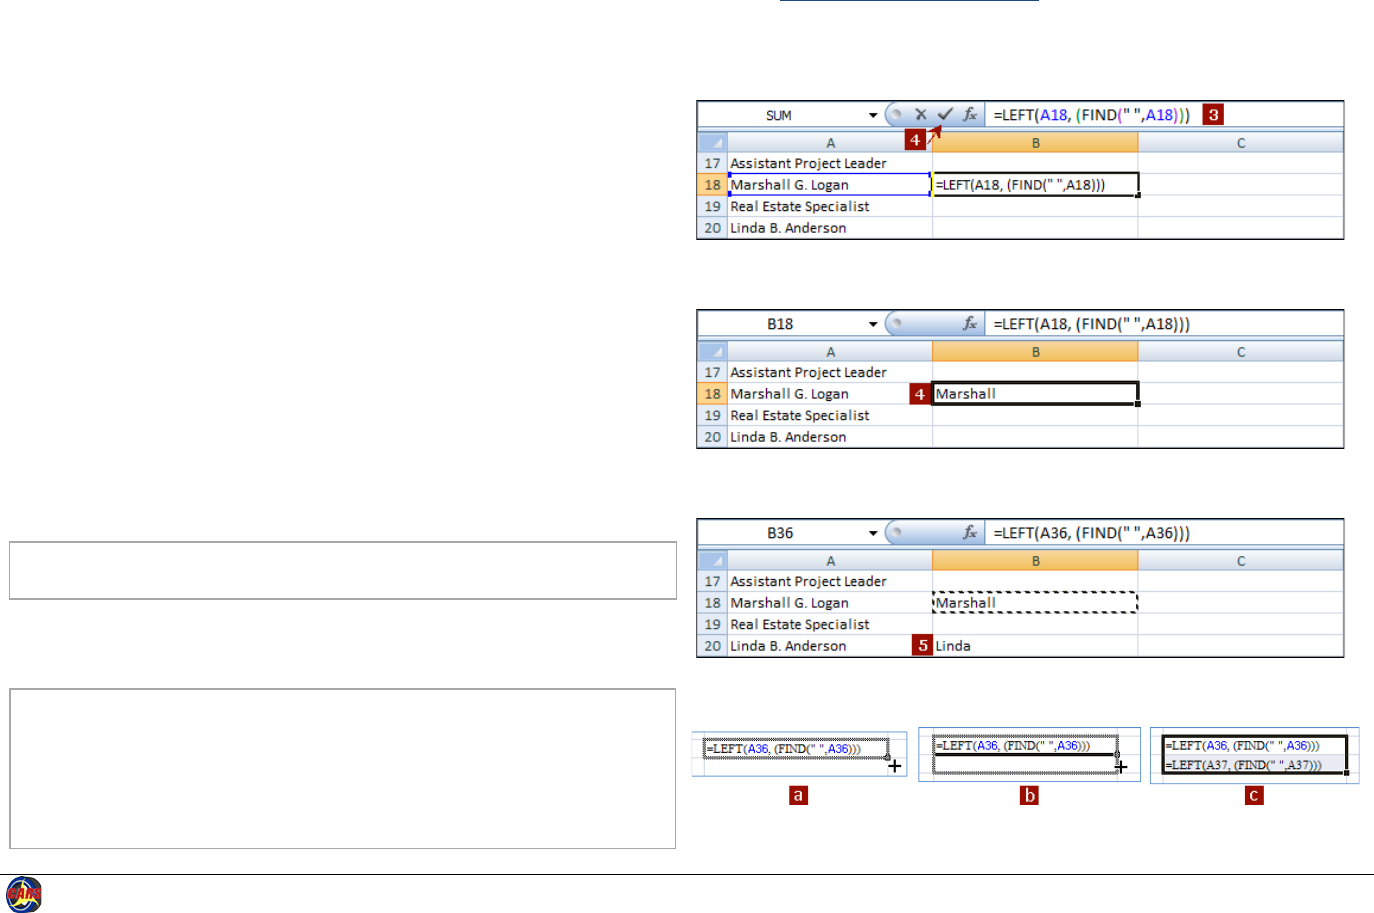
Extract Employee First Name
1. Adjust the width of the column that contains the employee names so
that you can clearly see the names.
2. If needed, insert four new empty columns after the column containing
the full name. Two columns will contain the Excel formulas, and the
other two will contain the extracted name data. In the examples shown,
there was enough room in the spreadsheet without inserting new
columns. You may also use rows if that helps keep the data organized
better.
3. In the first new column beside the first name (B18 in the example), enter
“=LEFT(A18, (FIND(" ",A18)-1))”
where “A18” is the cell reference for the original column, and there is a
space between the quotation marks in the FIND function to find the first
space in the data. See Excel Formulas on page 223 for more formulas
you can use to extract data in cells. The formula is editable in the
formula bar.
4. Click the check mark on the formula bar to approve the formula. Excel
displays the result of the formula that is now in this cell. In this case, the
result is “Marshall”.
Note: The CARS schema requires a value for employee first name, but you can
simply use the first initial.
5. Paste the formula from B18 in the other cells that contain employee
names. Excel automatically updates the cell references. Be aware that
you are copying the formula, not the resulting name data.
Note: You can use Excel’s fill-down function to quickly copy data in a column,
including formulas.
a. Select the cell and hover over the lower right corner until the cursor
changes to a black “+”.
b. Click and drag down.
c. Release the mouse button to fill in the data or formulas.
Appendix 14 Using Spreadsheet Data to Create CARS XML Invoices 220
Consultants: Convert Data - continued
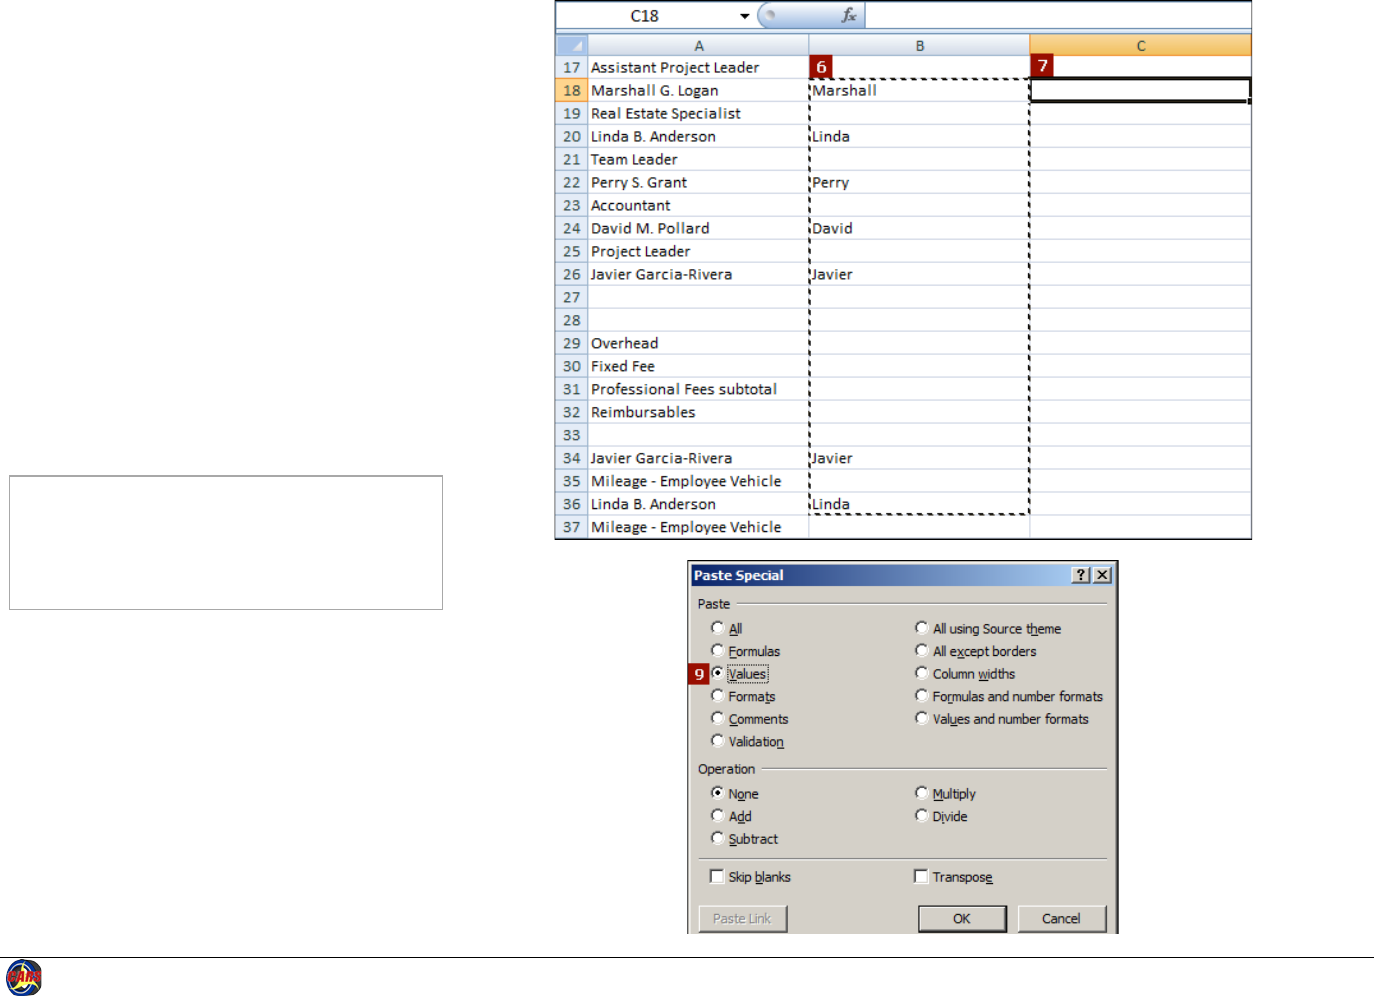
6. Copy all of the cells that contain the Excel
formulas as a block.
7. Click the cell next to the first cell containing
a formula.
8. Right-click and select Paste Special.... Excel
opens the Paste Special dialog box.
9. Click Values.
10. Click OK. Excel pastes the first name values
in the column.
11. Review the copied values for accuracy and
make any needed corrections directly in the
copied value cells.
You can now delete the formula column or delete
the existing formulas and replace them with new
formulas to extract other data, such as last names.
Repeat the steps for copying formulas and pasting
the resulting values into new columns.
Note: You can show and hide all of the formulas
(Formula View) in the worksheet at once
using the key combination CRTL + ` (grave
accent, which is the key left of numeric 1
above TAB).
Dates require specific date functions in Excel
because they are not stored as month, day and year
values, but as the number of days since January 1,
1900. The resulting number is referred to as a serial
number. For example, the serial number for October
31, 2014 is 41943. Handling dates in this manner
enables accurate date calculations. Cells containing
dates must be formatted as dates, as opposed to
text or general data. The cell format is shown on the
ribbon in the Number group of the Home tab.
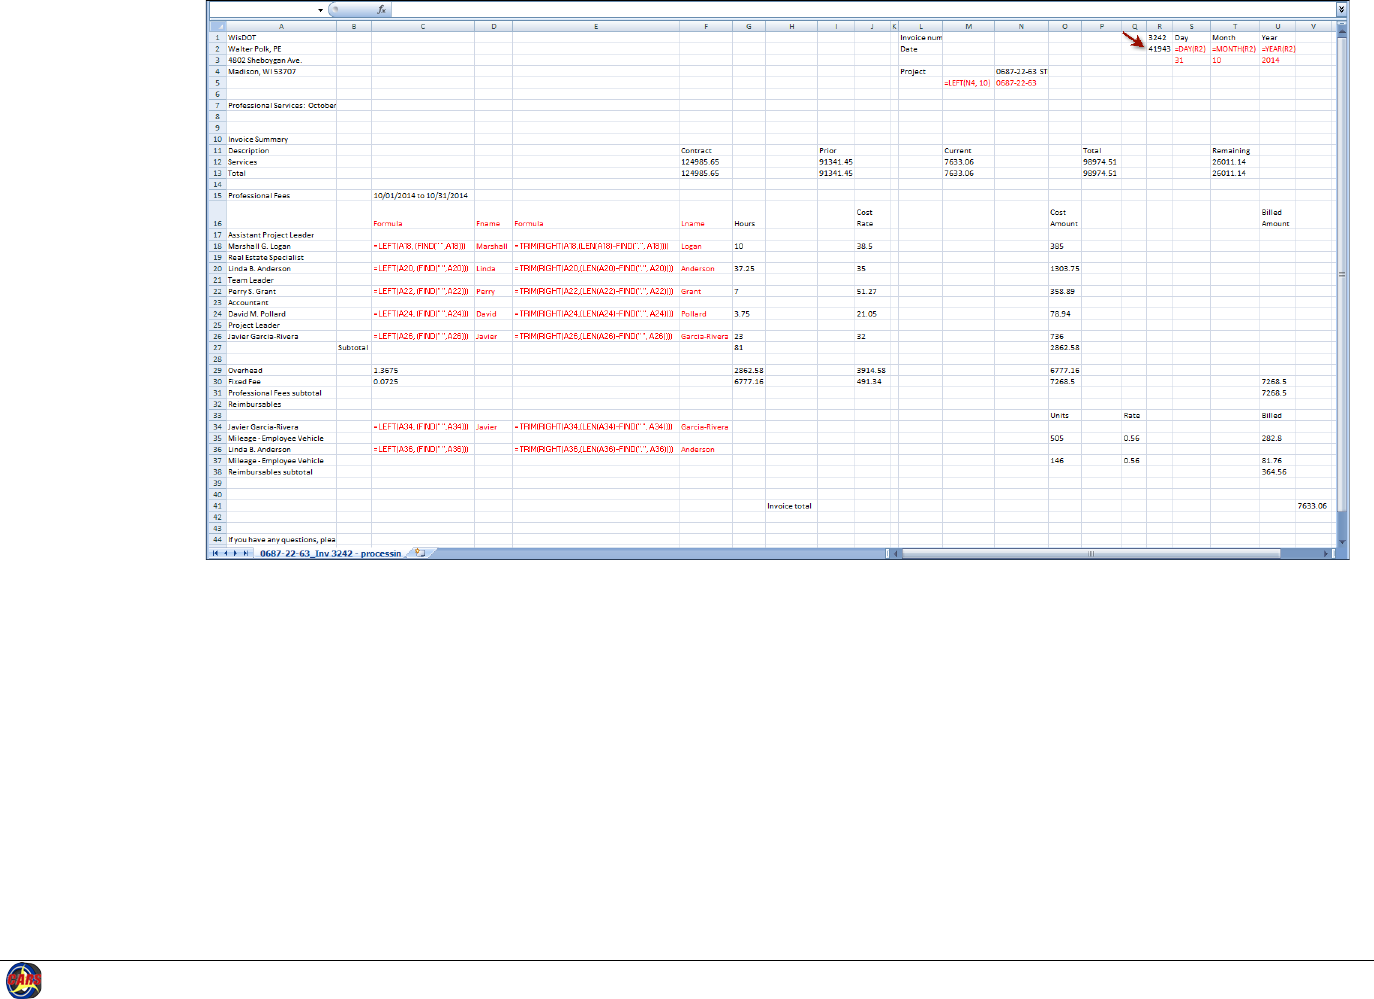
Appendix 14 Using Spreadsheet Data to Create CARS XML Invoices 221
Consultants:
Convert Data -
continued
The sample invoice is
shown with Formula
View activated
(CRTL + `) to show
formulas and data.
Red text in the
spreadsheet shows
where formulas and
extracted data were
added to the original
invoice. Some
original data does not
display with Formula
View activated.
Notice that the date
in cell R2 is shown as
the serial number.

Appendix 14 Using Spreadsheet Data to Create CARS XML Invoices 222
Consultants:
Convert Data -
continued
The sample invoice is
shown in normal
view. Cells containing
formulas show the
calculated results of
the formulas, as do
the cells into which
you copied the
values.
Appendix 14 Using Spreadsheet Data to Create CARS XML Invoices 223
Excel Formulas
Replace A1 with the appropriate cell reference in each formula. These formulas may be adjusted based on the text patterns in the cells.
You can use these formulas for both formatted and unformatted spreadsheets.
For explanations of Excel text functions, visit
http://office.microsoft.com/en-001/excel-help/text-and-data-functions-HP005203209.aspx.
Extract Text Sample Formula Data Example Result Example
First character in a cell =LEFT(A1, 1) Linda B. Anderson L
First text in a cell
=LEFT(A1, (FIND(" ",A1)-1))
This formula finds the characters before the first space
Marshall G. Logan Marshall
First text in a cell
=LEFT(A1, (FIND(",",A1)-1))
This formula finds the characters after the first comma.
Bennett, James Bennett
Last text in a cell
=TRIM(RIGHT(A1,(LEN(A1)-FIND(".", A1))))
This formula finds the characters after the first period.
Marshall G. Logan Logan
Last text in a cell
=TRIM(RIGHT(A1,(LEN(A1)-FIND(" ", A1))))
This formula finds the characters after the first space.
Javier Garcia-Rivera Garcia-Rivera
Last text in a cell
=RIGHT(A1,(LEN(A1)-FIND(" ", A1)))
Bennett, James James
Text in the middle of a cell
=MID(A1,(FIND(" ", A1)+2),(LEN(A1)-(FIND(" ", A1)+2)-
(LEN(A1)-(FIND(",",A1)))))
2720 -Bennett, James
Bennett
Day of date
=Day(A1)
This formula finds the day value when the cell is formatted as
“DATE”.
10/31/2014
31
Month of date
=Month(A1)
10/31/2014
10
Year of date
=Year(A1)
10/31/2014
2014
Appendix 14 Using Spreadsheet Data to Create CARS XML Invoices 224
Consultants: Copy Prepared Data
For this process, you need to know what data is needed for the cost basis specified for your contract. Refer to the sample invoice or the CARS XML Detailed Element
Descriptions spreadsheet to determine what elements are included in the block and which data is required in each block.
Note: All elements are required in the XML invoice, even if they do not contain data. However, only one line item block is required - actual cost, lump sum, cost per
unit, or specific rate. Use the sample invoices as examples.
For this example, the direct labor block for a specific rate basis invoice is used. The XML tags for this block are described on rows 126 to 135 on the CARS XML
Detailed Element Descriptions spreadsheet. The tags for this block are listed below. Data is required for every tag except employeeNumber.
1. employeeFirstName
2. employeeLastName
3. employeeNumber (data not required)
4. employeeClassification
5. hoursType
6. hours
7. activity
8. laborCalendarMonth
9. laborCalendarYear
10. laborCostAmount
Begin the copying process by creating a
new worksheet in the existing
workbook.
1. Click Insert Worksheet
to insert a new
worksheet in the workbook.
2. Rename the new worksheet as
needed. Right-click the
“Sheet1” tab and click Rename.
Then type the new worksheet
name.
3. Enter tag names for each
column in the first row(or copy
and paste from the CARS XML
file). Be sure to enter each tag
as shown and in the order
given in the XML invoice
sample or the CARS XML
Detailed Element Descriptions
spreadsheet. Capitalization and
spelling must match the CARS
schema exactly.
Appendix 14 Using Spreadsheet Data to Create CARS XML Invoices 225
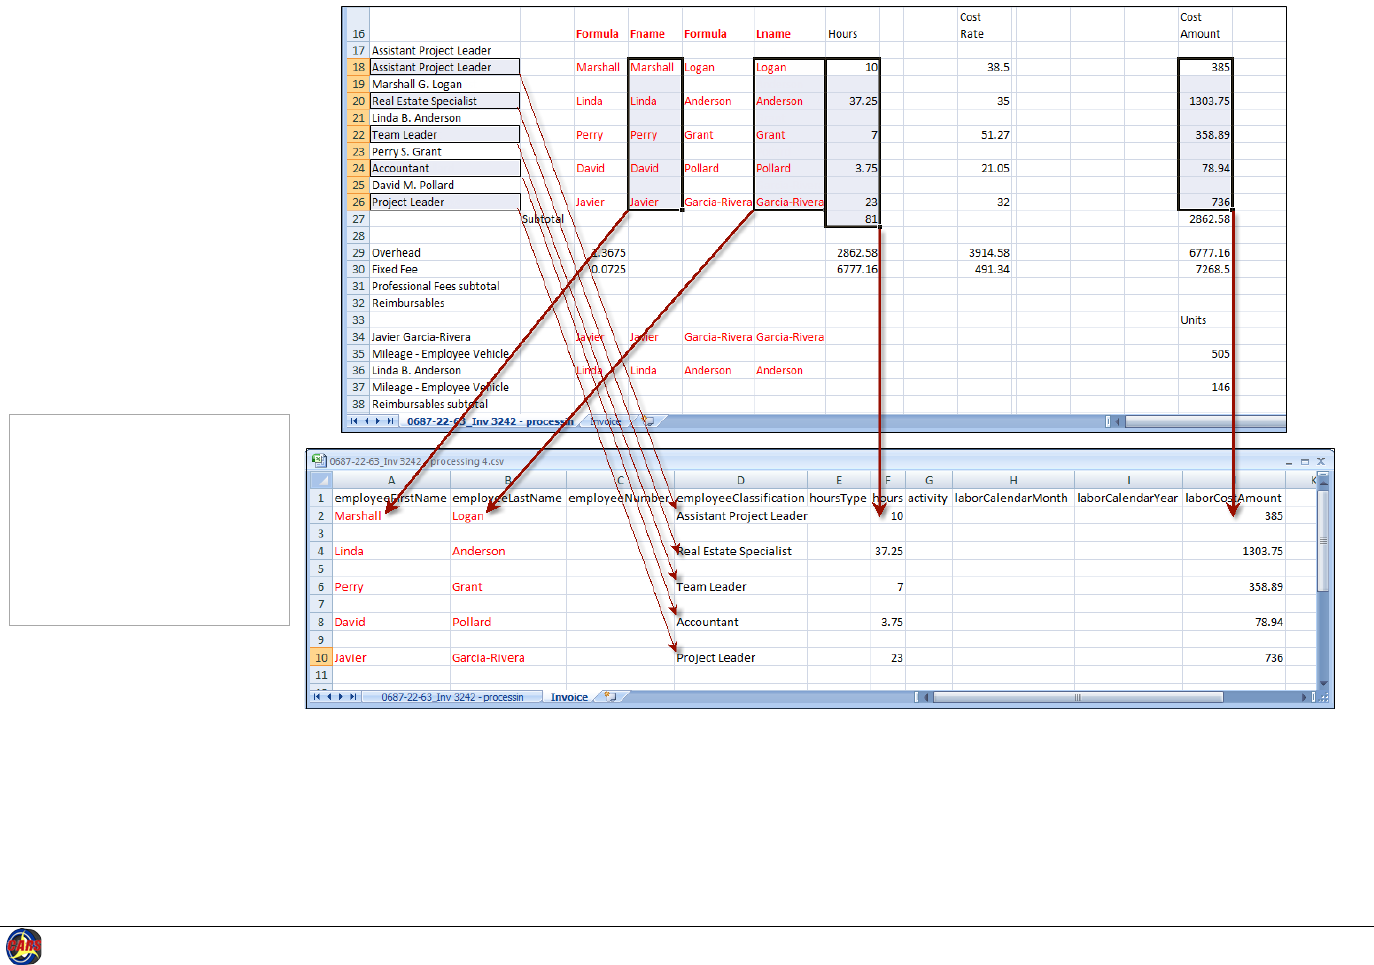
Consultants: Copy
Prepared Data - continued
4. On the spreadsheet
containing the data,
copy the information
from the data columns
and paste it into the
appropriate column on
the “Invoice” worksheet.
The data you need may
be in raw form or it may
be converted. The values
that were converted are
shown in red.
5. Delete any blank rows. In
this example, rows 3, 5,
7 and 9 will be removed.
Note: Be sure to copy only
direct labor costs onto
this invoice worksheet.
The direct costs and
overhead shown in rows
29 and following do not
belong in the direct
labor block.
6. Save the workbook as an
Excel workbook (.xlsx)
file to keep both
worksheets. If you save
as a CSV, only one
worksheet is saved.
Appendix 14 Using Spreadsheet Data to Create CARS XML Invoices 226
Copy Prepared Data - continued
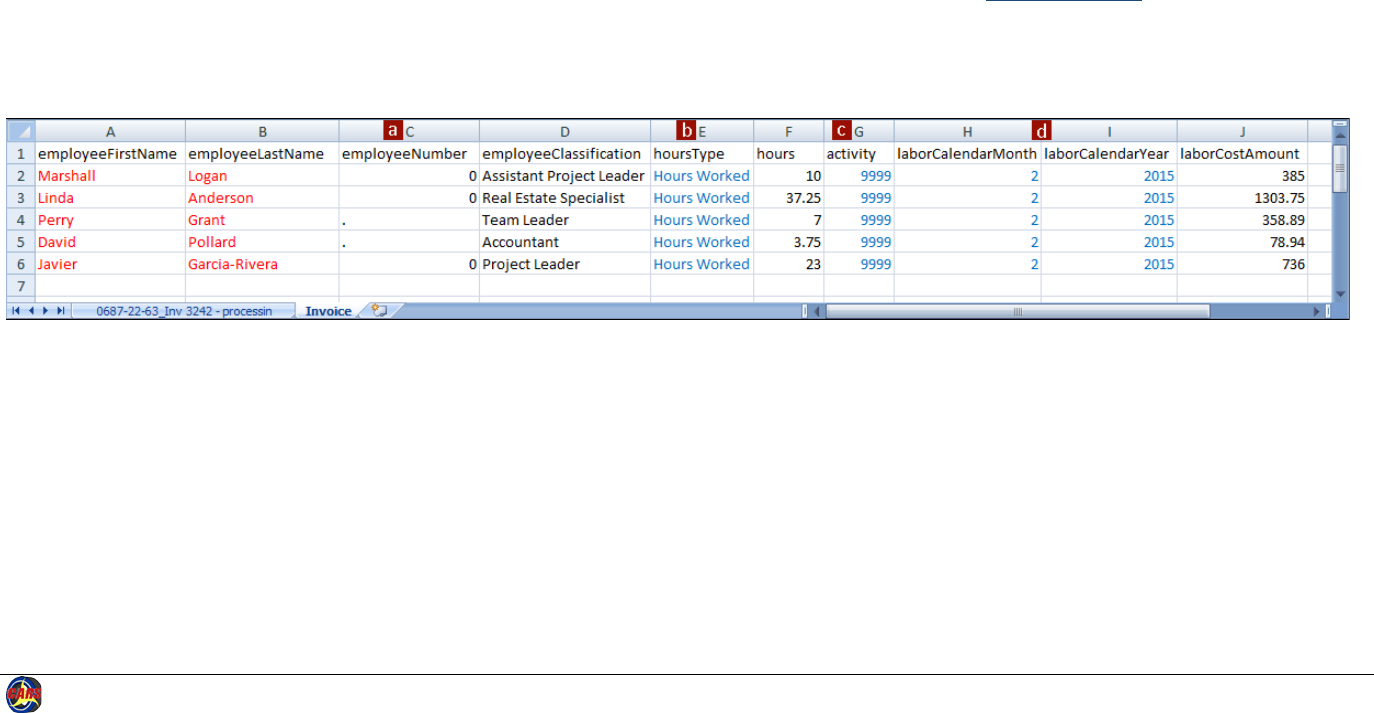
7. Enter all other required data. For repeating values, you can use the Excel fill-down function, which is described on page 219. You may also copy and paste
values. For this example the following values are entered and shown in blue:
a. employeeNumber is supposed to be blank in all cases for this example. This value is not required in CARS or in the XML invoice. However, when no data
is entered in the spreadsheet, Excel will not include the element in the exported XML. Remember that all elements in a block are required, even if they
are empty. A zero or a period is added for each employee number for this example to make sure the element is exported by Excel. This character can be
deleted from the XML generated by Excel by global find and replace if you use a text editor with that capability.
b. hoursType is set to ”Hours Worked”. This value is validated by lookup in CARS and must match the values stored in CARS exactly, including
capitalization. Possible values are “Hours Worked” or “Premium”. Premium pay is used only rarely.
c. activity is set to “9999” in each case. Activity codes are not currently required, but will be in a future release. When you enter other values for activities,
enter only the 1 to 4 digit activity code. A list of current activity codes and descriptions can be found on the
WisDOT CARS Page
(http://www.dot.wisconsin.gov/business/engrserv/cars.htm).
d. calendarMonth and calendarYear are set to “02” and “2015” respectively. Be sure to use the actual month and year the work was performed. Format
the cells in the “calendarMonth” column as text to ensure that the required leading zero for a 2 digit date is retained.
Appendix 14 Using Spreadsheet Data to Create CARS XML Invoices 227
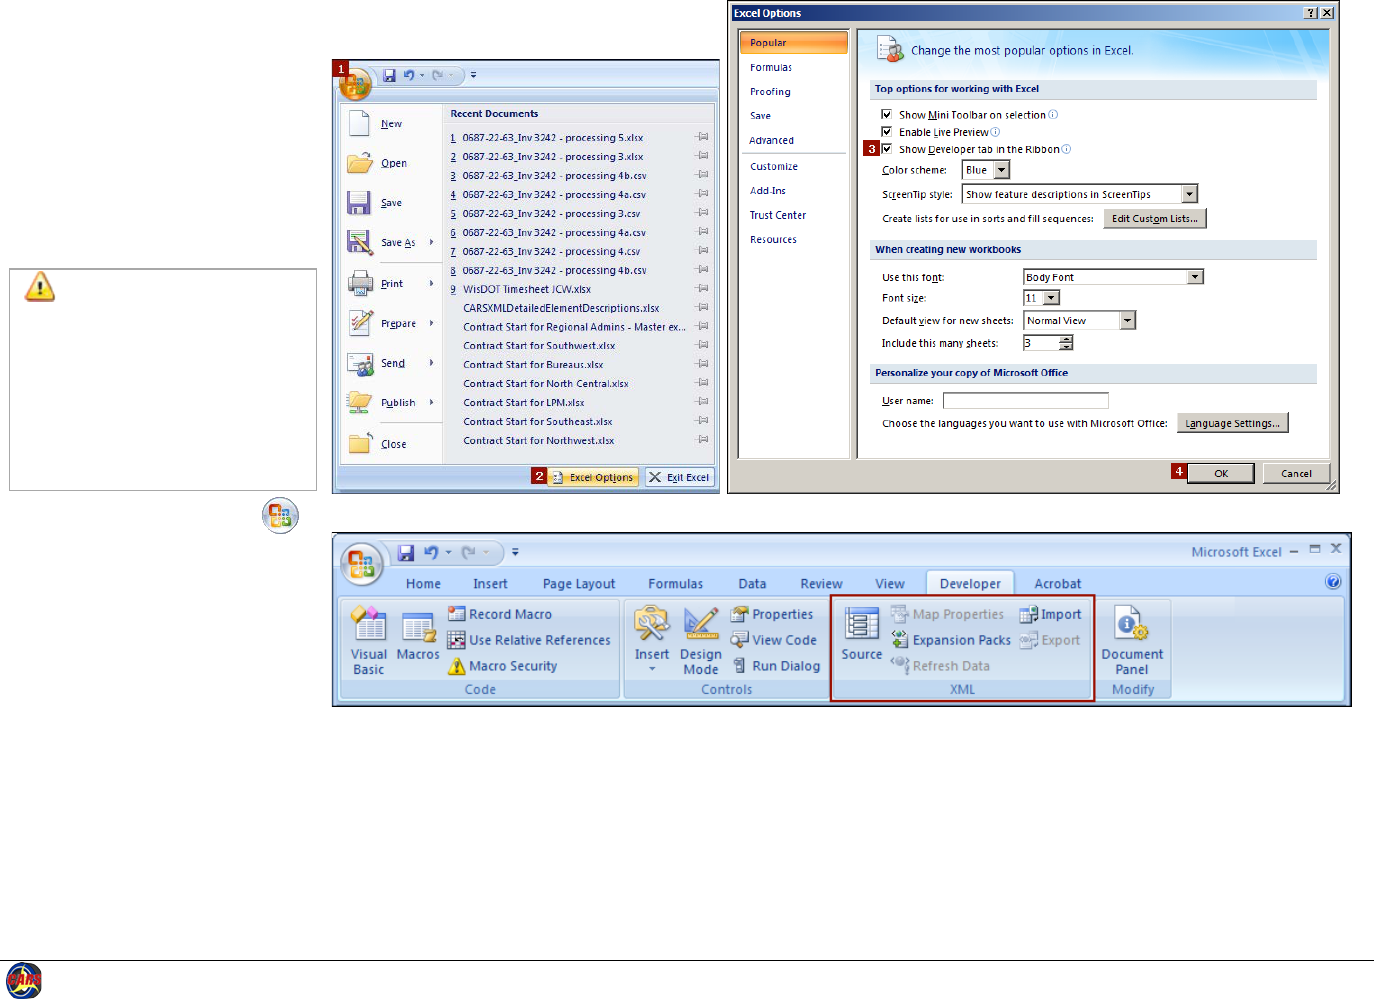
Consultants: Associate
CARS XML Format
Show the Developer Tab
The next step is to associate the
CARS XML file CARS Invoice XML for
Excel Export with the Excel
workbook. Begin this process by
showing the Developer tab in Excel,
which is where the XML tools reside.
Important: Do not associate
the CARS schema (XSD)
with the spreadsheet. Excel
cannot export repeating
lists when you associate the
spreadsheet with the XSD
file, but it can if you
associate the XML file.
1. Click the Office button .
2. Click Excel Options. Excel
opens the Excel Options
dialog box.
3. Select the Show Developer
tab in the Ribbon check
box.
4. Click OK. Excel shows the
Developer tab, which
contains the XML group.
Appendix 14 Using Spreadsheet Data to Create CARS XML Invoices 228
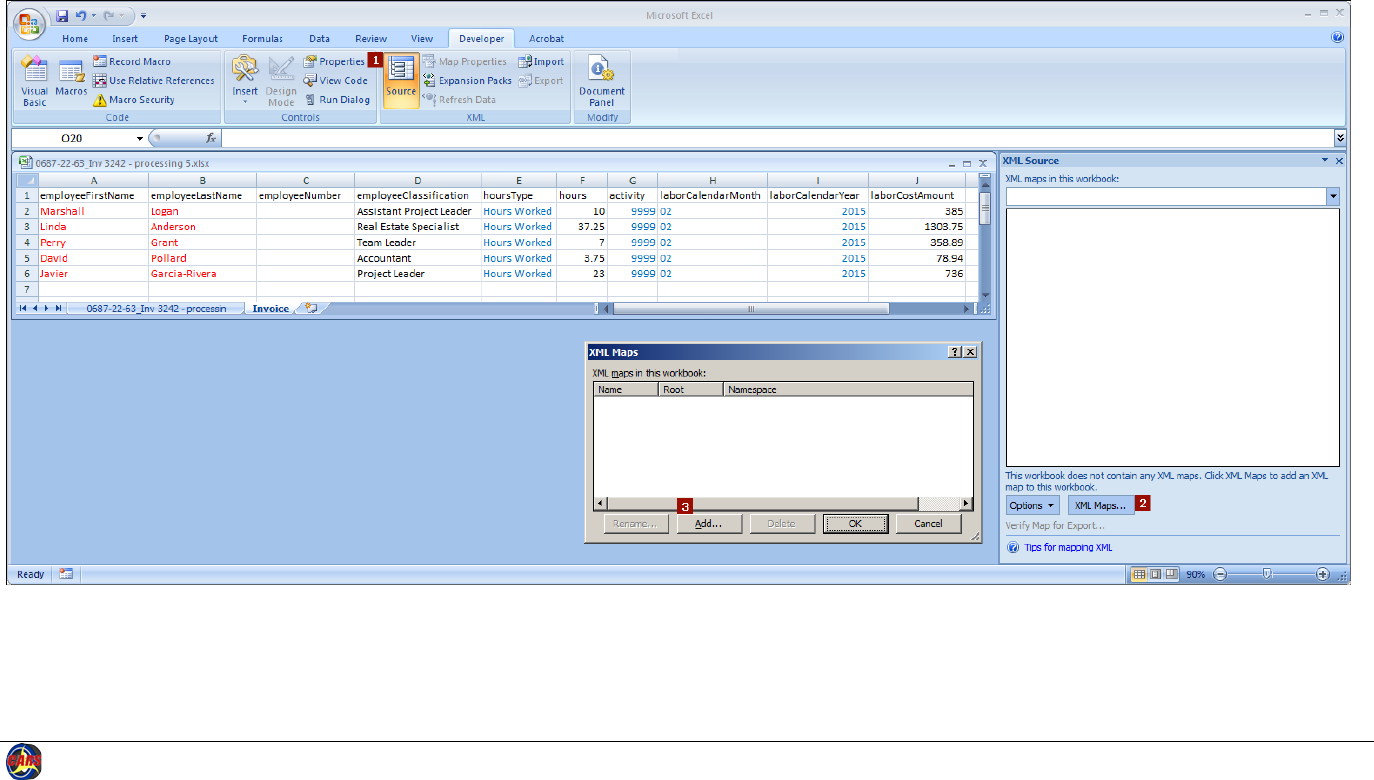
Consultants: Associate CARS XML Format - continued
The next step is to associate the CARS XML file CARS Invoice XML for Excel Export with the workbook.
1. On the Developer tab in the XML group, click Source. Excel opens the XML Source pane.
2. Click XML Maps.... Excel opens the XML Maps dialog box.
3. Click Add. Excel opens the Select XML Source dialog box.
Appendix 14 Using Spreadsheet Data to Create CARS XML Invoices 229
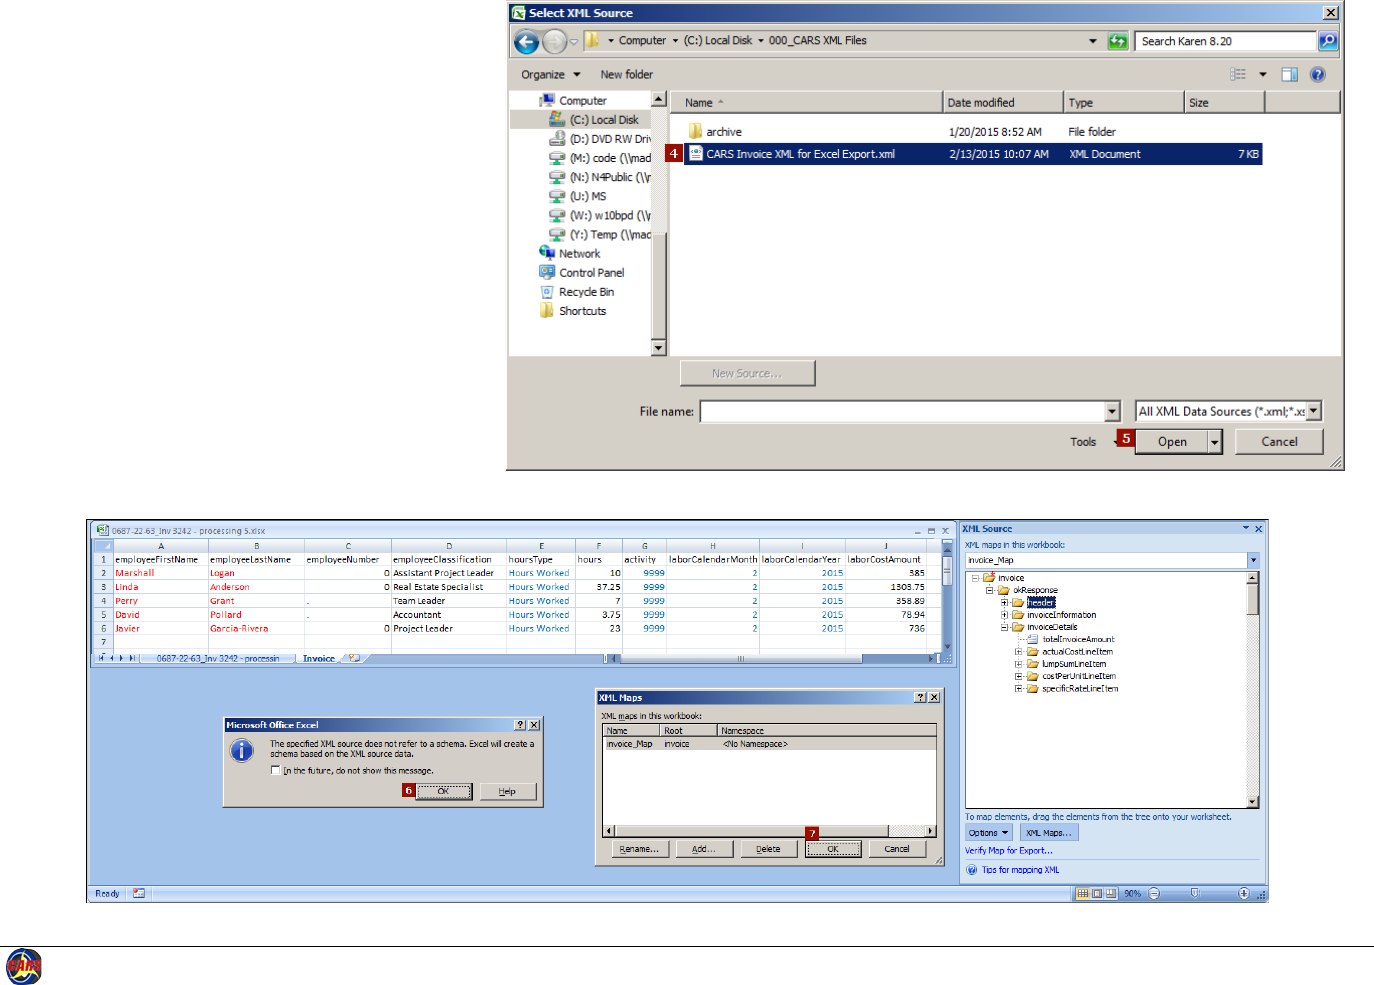
Consultants: Associate CARS XML Format -
continued
4. Navigate to location of the CARS XML file CARS
Invoice XML for Excel Export on your computer
and select this file.
5. Click Open. Excel displays the Microsoft Office
Excel message.
6. Click OK. Excel lists the CARS XML file as an XML
source.
7. Click OK in the XML Maps dialog box. Excel
displays the CARS XML file details in the XML
Source pane.
The CARS XML file contains definitions for all 4 cost basis
types. You can expand and collapse sections. The default
view shows all blocks fully expanded.
Every invoice will include the header and invoice
information blocks plus one of the invoice details blocks
based on the cost basis for your project. When you are
preparing the XML invoice, be certain that you are using
the appropriate cost basis section.
Appendix 14 Using Spreadsheet Data to Create CARS XML Invoices 230
Consultants: Apply CARS
XML Format
1. Expand the appropriate
cost basis line item
section in the XML Source
pane. For this example,
the specificRateLineItem
section is needed.
2. Select the repeating
parent element that
contains the same XML
elements as the
worksheet. Excel selects
the entire block.
3. Drag and drop the
repeating parent element
to cell A1, which contains
the tag name for the first
data element in the block.
In this example, the tag
name for the first
element is
“employeeFirstName”.
Excel maps the entire
block to the tag names
and data. Mapped
elements are shown in
bold in the XML source
pane.
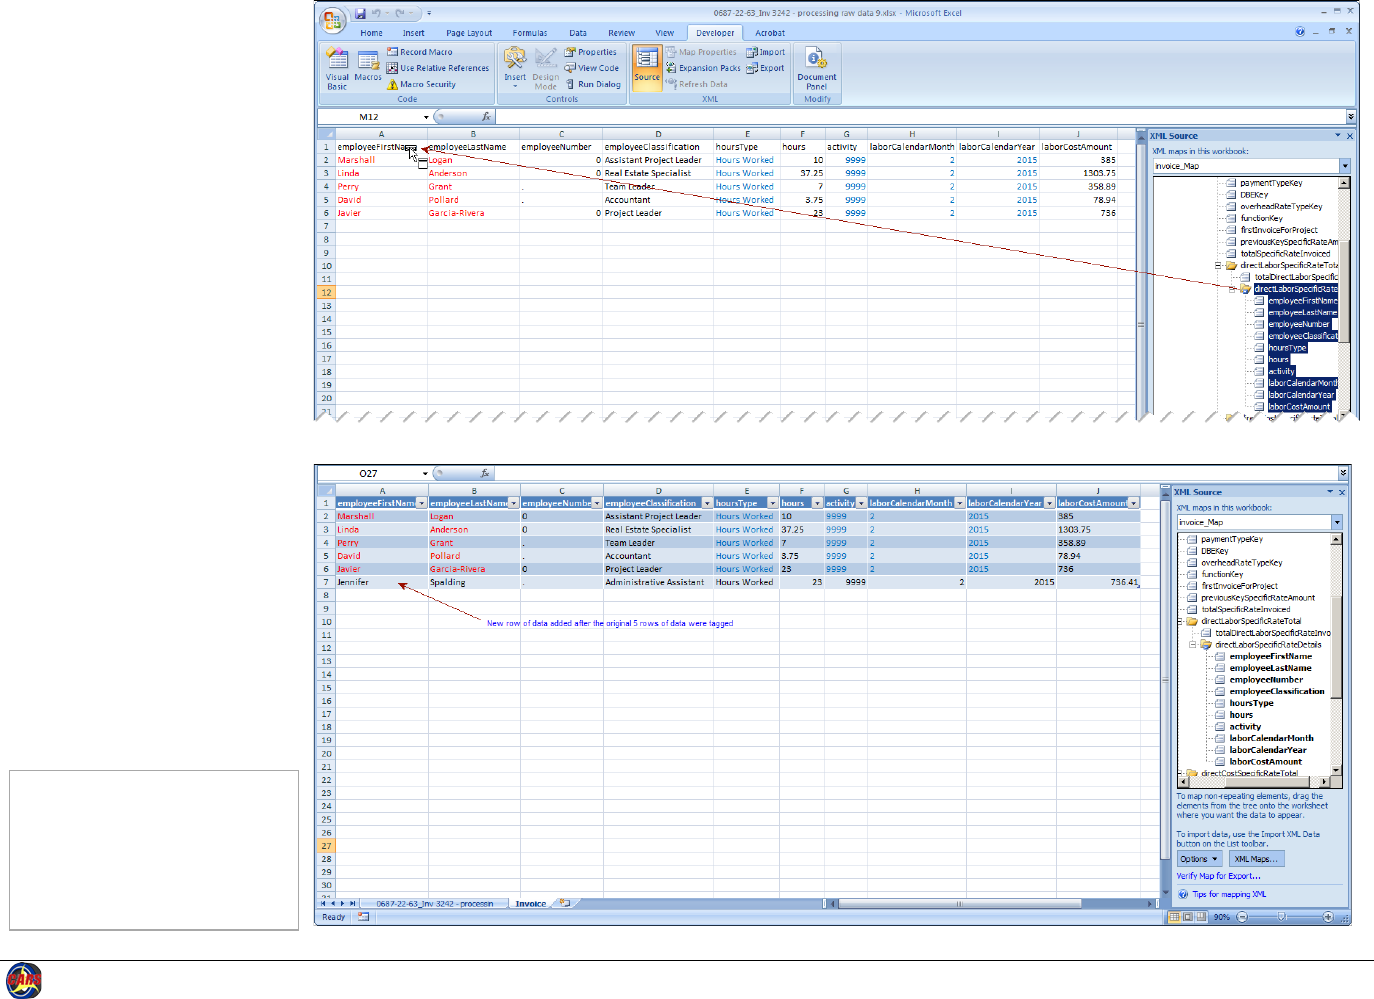
Note: If you add data to the
spreadsheet after you
complete this mapping
step, the new data will be
tagged and exported with
the original data.
Appendix 14 Using Spreadsheet Data to Create CARS XML Invoices 231
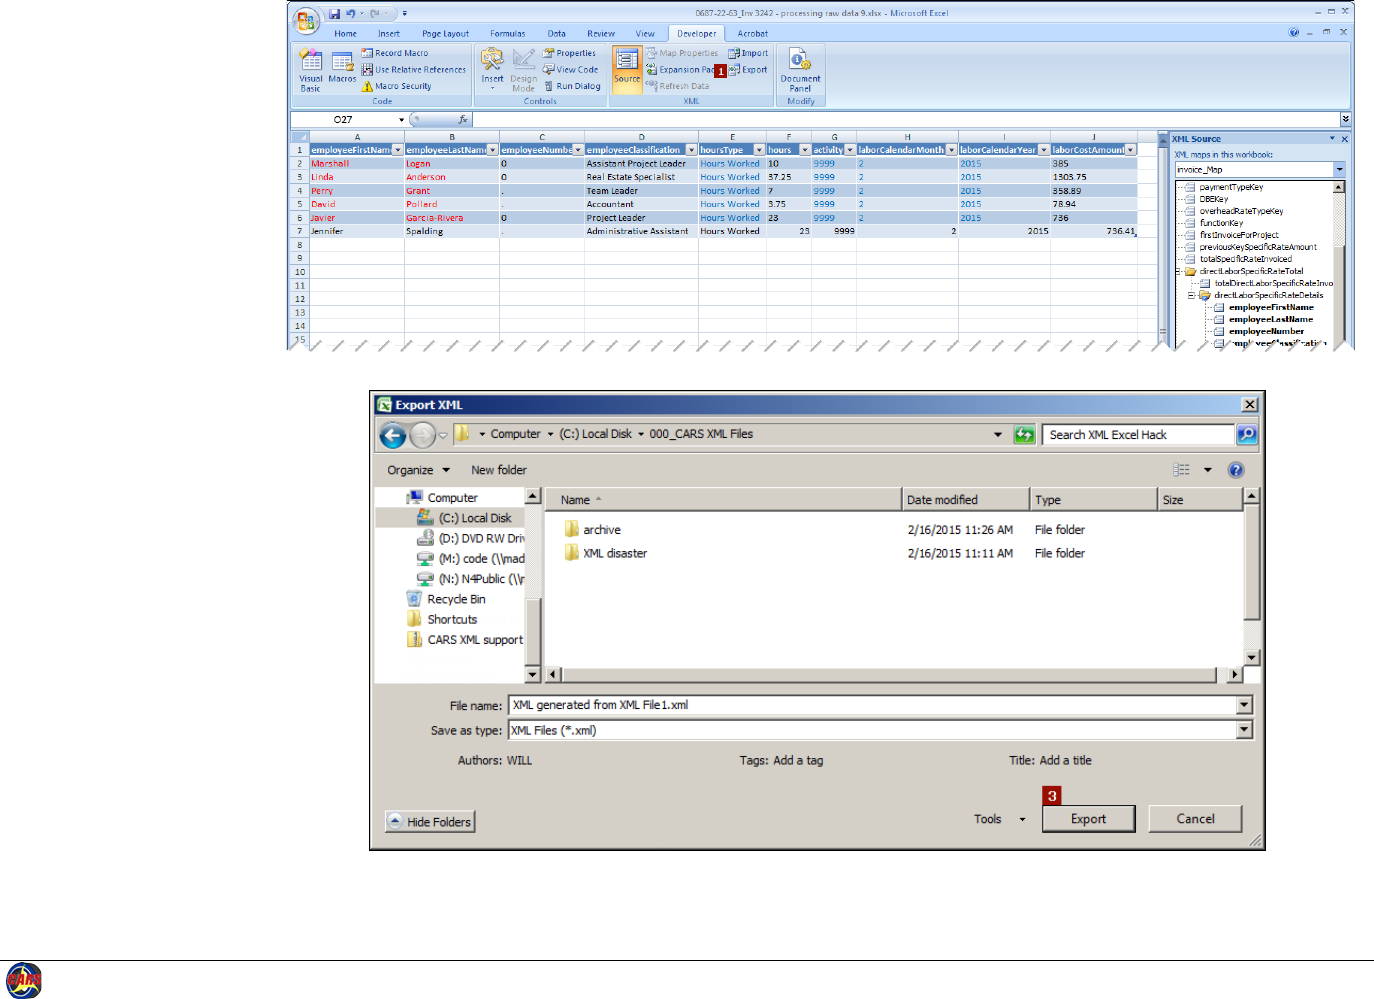
Consultants: Export
Tagged Data
1. On the ribbon in the
XML group, click
Export.
2. In the Export XML
dialog box, specify the
location where the
new XML file should
be stored.
3. Click Export. Excel
generates tagged XML
data from the data in
the worksheet.
Appendix 14 Using Spreadsheet Data to Create CARS XML Invoices 232
Consultants: Export Tagged Data -
continued
4. Navigate to the exported XML, open
the file, and proofread or spot
check the data.
5. If your XML editor application has
find and replace capabilities, be
sure to search and replace using at
least part of the tag for the element
to ensure that data you don’t
intend to change is not altered. For
example to correct month values,
search for
“<laborCalendarMonth>2” and
replace with
“<laborCalendarMonth>02”.
Places to find common errors:
• Missing elements: Make sure each
detail block has the correct number
of elements. For this example, each
specific rate direct labor detail item
has 10 elements.
• Dates: Month values should have 2
digits. The detail items still import,
but CARS will notify you that lines
having the incorrect month values
are in error.
• Data added to export tags, such as
employee numbers
Exported Data as XML Before Editing
Exported Data as XML After Editing
Appendix 14 Using Spreadsheet Data to Create CARS XML Invoices 233
Consultants: Edit Sample Invoice
Exporting invoice data from Excel data as XML is the first part of creating the CARS XML invoice. The next part is to create the full XML invoice that is valid for CARS.
One simple method for creating an XML invoice with data details that were exported from Excel begins with an “IMPORT” invoice for the appropriate cost basis.
Using an existing invoice is easier than starting with an empty page because all the tags are already in the invoice. The “IMPORT” invoices provided on the
CARS Page
(http://www.dot.wisconsin.gov/business/engrserv/cars.htm) also show the data needed to import an invoice. The data in these “IMPORT” invoices is meant to serve
as either an examples or an explanation of the requirements. “BLANK” or an explanation within an element tag indicates that data is either required or conditionally
required. If information is not required at all for an element, the element is left empty. The intent is that you edit a copy of one of these invoices with your data, and
then import the XML invoice into CARS as described in the CARs manual.
Note: Editing the XML invoice is easier when you use an XML editor that offers enhancements to help you read it, such as using different colors of
text for tags and data, line numbers, and the ability to collapse (hide) blocks. Notepad++ is a free code editor available for download from
http://notepad-plus-plus.org/.
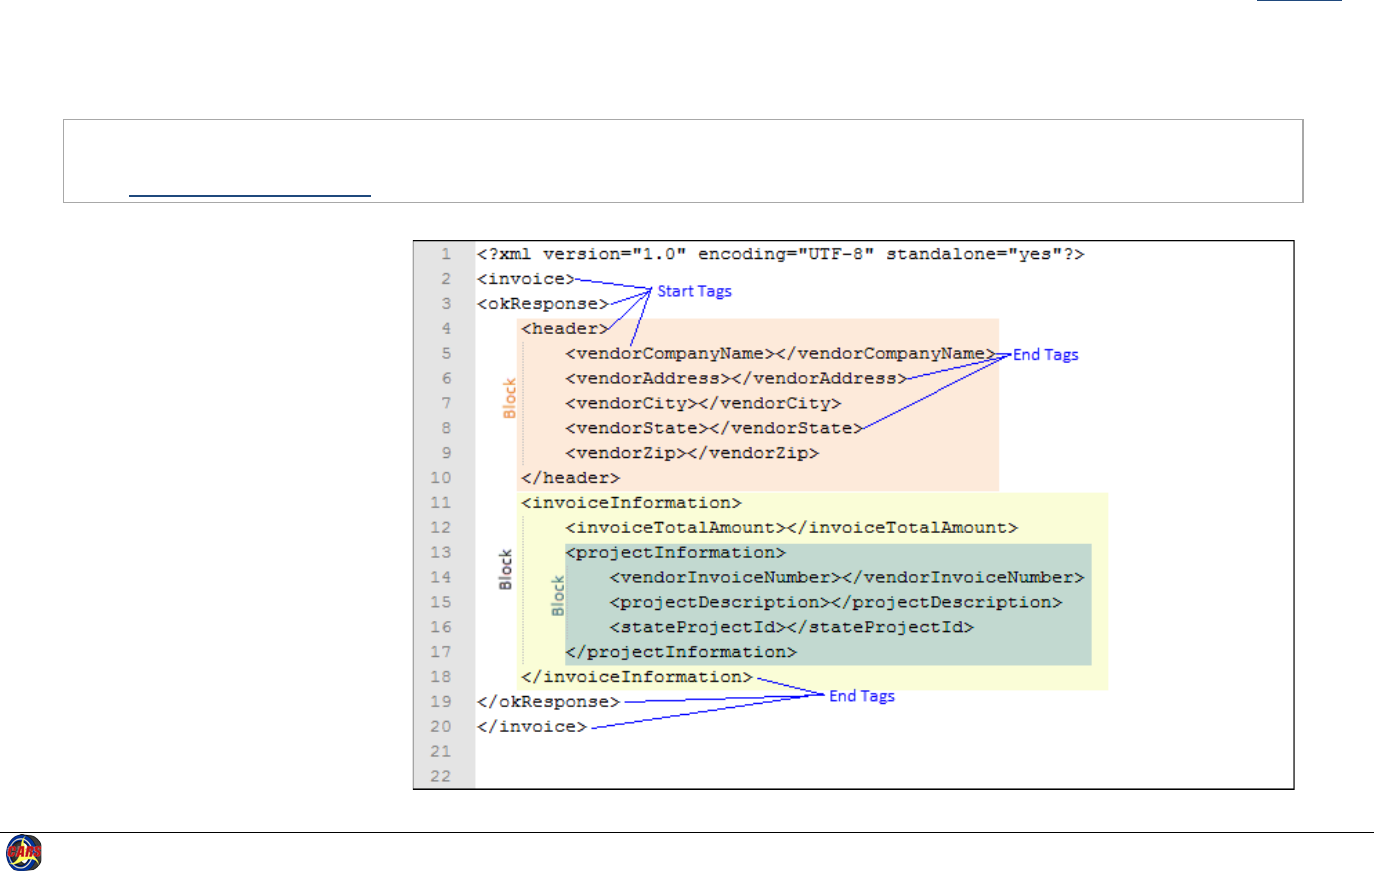
Consultants: Tags
When editing an XML invoice, pay close
attention to the element tags. Be careful
not to change or delete any of the tags.
The spelling of the tags must match the
CARS schema exactly, including case. Be
aware that tags have two parts: a start
and end. End tags have a slash after the
first bracket, and start tags do not. Tags
can be used to contain data elements,
or they can contain blocks of other
grouped data elements, or both. XML
blocks can be nested, but they can never
overlap.
To edit an element, enter data between
the start and end tags.
Appendix 14 Using Spreadsheet Data to Create CARS XML Invoices 234
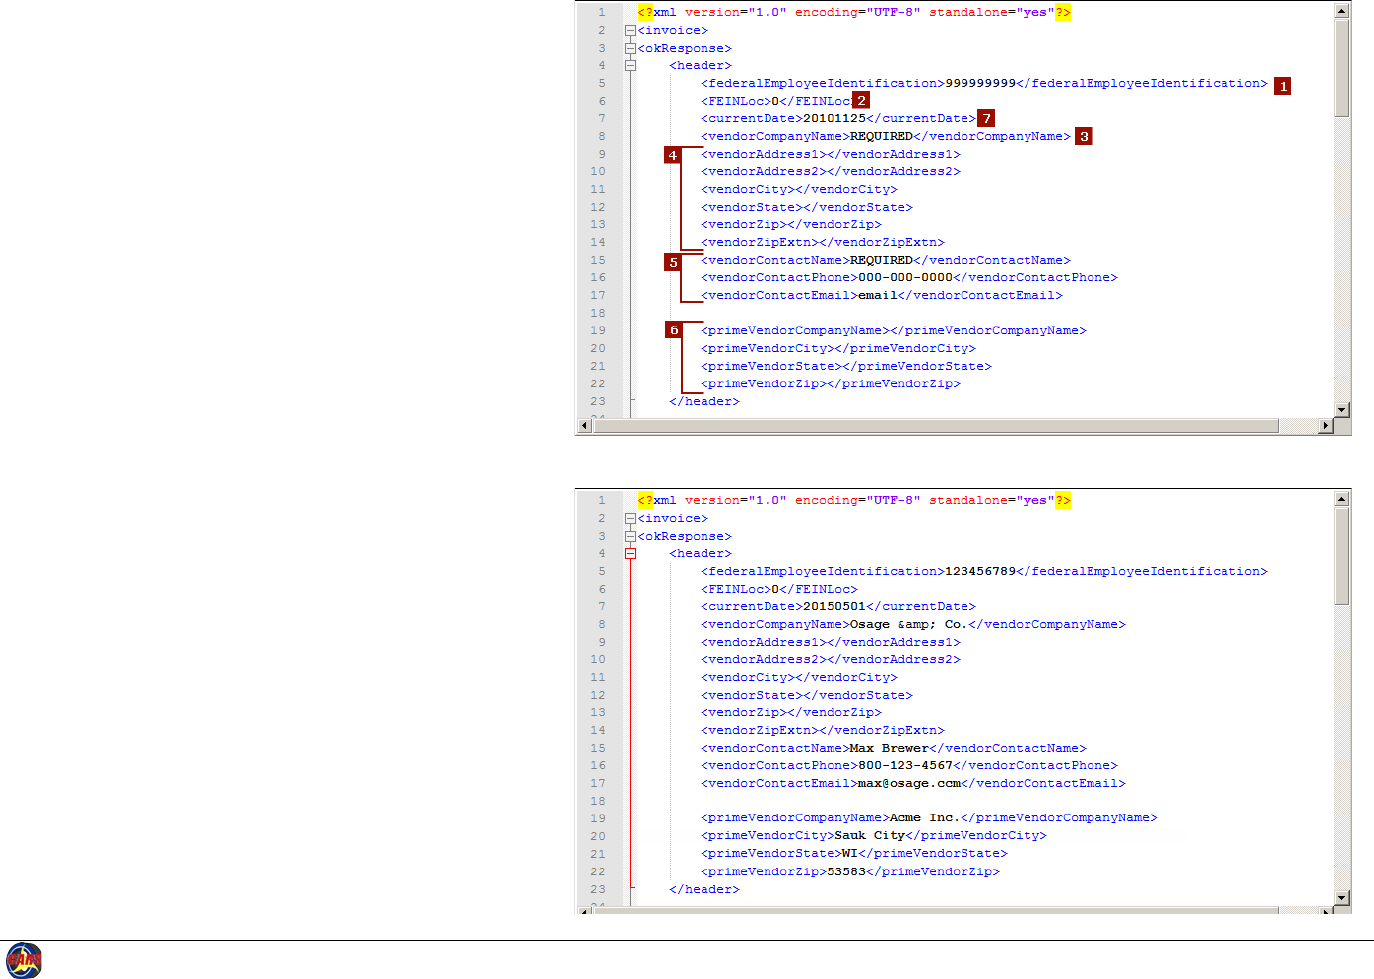
Consultants: Complete Header
The invoice header block in the XML invoice contains some
information that is consistent for every invoice you import. Your
federalEmployeeIdentification (FEIN), location, company name,
and address information will probably never change. The contact
person and information may change. The current date needs to be
updated with each invoice.
1. Enter your company’s 9-digit FEIN between the
federalEmployeeIdentification tags. This value is required.
2. Enter your company location in between the FEINLoc tags.
This single-digit value is usually “0”, but it may be another
number if your company has multiple locations for the
same FEIN registered in CARS. This value is required.
3. Enter your company’s name, preferably as shown in CARS.
Remember to substitute any special characters with XML
predefined entities as described in Appendix 13 of this
manual. This value is required.
4. Optionally, enter your company’s address information in
the 6 address elements. None of these elements are
required.
5. Enter the name, phone number and email address of the
person WisDOT should contact with questions about this
invoice between the vendorContactName,
vendorContactPhone, and vendorContactEmail tags.
Phone numbers must contain 10 digits with dashes
separating the area code, exchange and number. All of
these values are required.
6. Subconsultants may want to enter prime vendor
information for reference. None of these elements are
required.
7. Enter the current date between the currentDate tags. This
value is required. Dates are formatted as YYYYMMDD in
CARS XML invoices. The date in the “Before” image is
November 25, 2010.
“IMPORT” XML Invoice Header Before Editing
Appendix 14 Using Spreadsheet Data to Create CARS XML Invoices 235
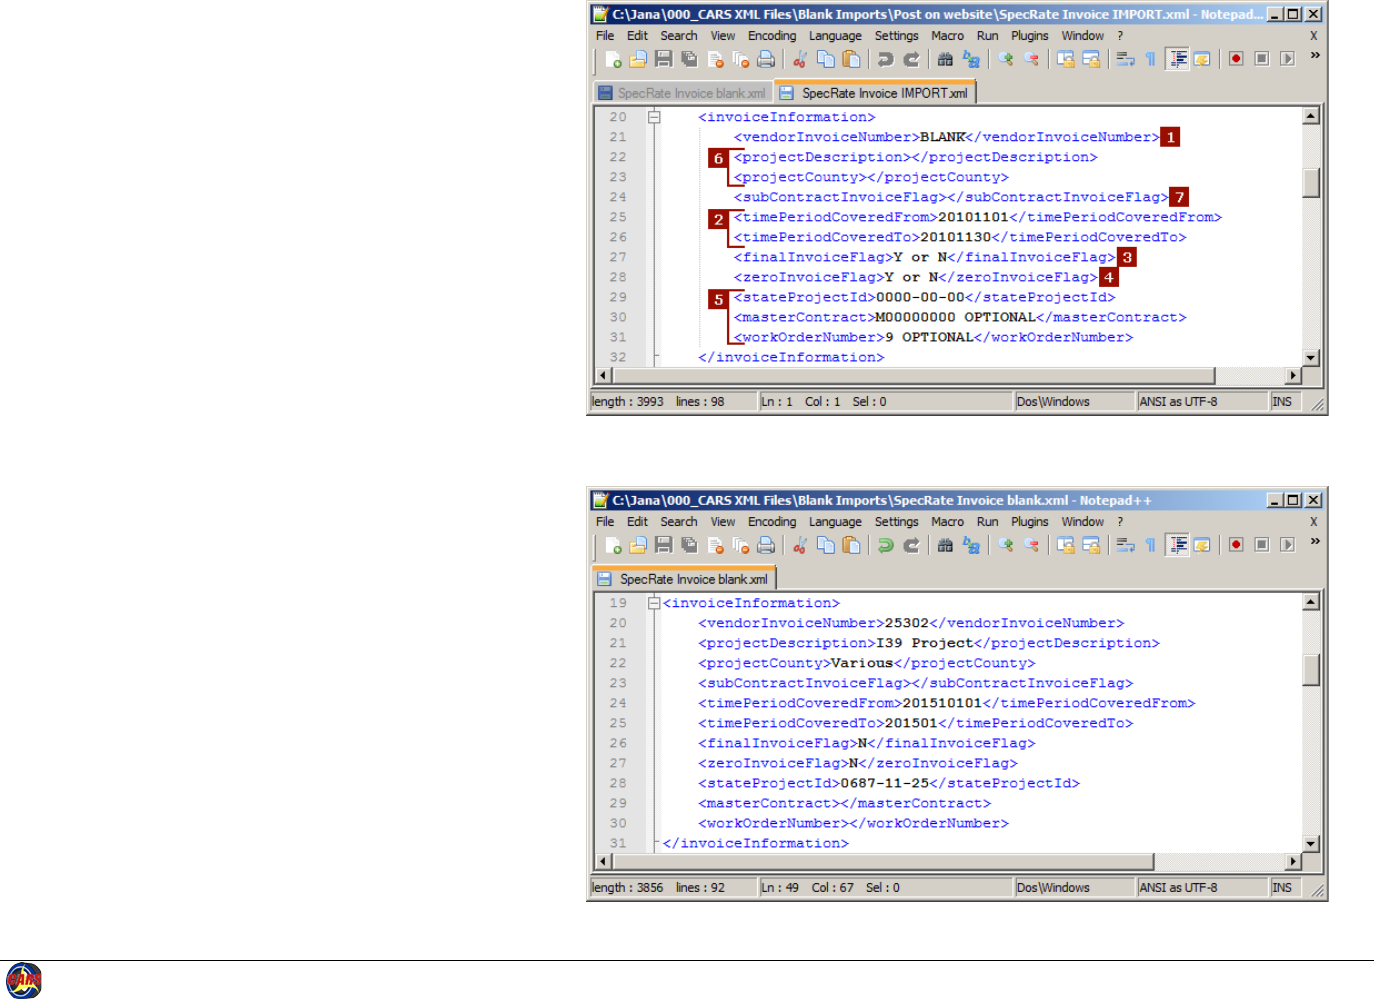
Consultants: Complete Invoice Information
The invoice information block in the XML invoice contains
contract-specific information. The required elements are:
• vendorInvoiceNumber
• timePeriodCoveredFrom
• timePeriodCoveredTo
• finalInvoiceFlag
• zeroInvoiceFlag
• stateProjectId -OR-
masterContract plus workOrderNumber
1. Enter your firm’s invoice reference number between the
vendorInvoiceNumber tags. This number must be unique
for invoices for a given project.
2. Enter the beginning and ending dates of the period
which the invoice covers between the
timePeriodCoveredFrom and timePeriodCoveredTo tags.
Dates are formatted as YYYYMMDD in CARS XML
invoices.
3. If this invoice is the final invoice for the project, enter “Y”
between the finalInvoiceFlag tags. Otherwise, enter “N”.
4. If this invoice has no costs, enter “Y” between the
zeroInvoiceFlag tags. Otherwise, enter “N”.
5. Enter the project ID with hyphens between the
stateProjectId tags when you are billing for a regular
contract.
-OR-
Enter the master contract ID without hyphens between
the masterContract tags and the work order number
between the workOrderNumber tags when you are
billing for a work order.
6. Optional: You may enter values between the
projectDescription or the projectCounty tags for your
reference. These values are not required.
7. The subContractInvoiceFlag is also not required, and this
tag is currently not in use.
“IMPORT” XML Invoice Information Before Editing
“IMPORT” XML Invoice Information After Editing
Appendix 14 Using Spreadsheet Data to Create CARS XML Invoices 236
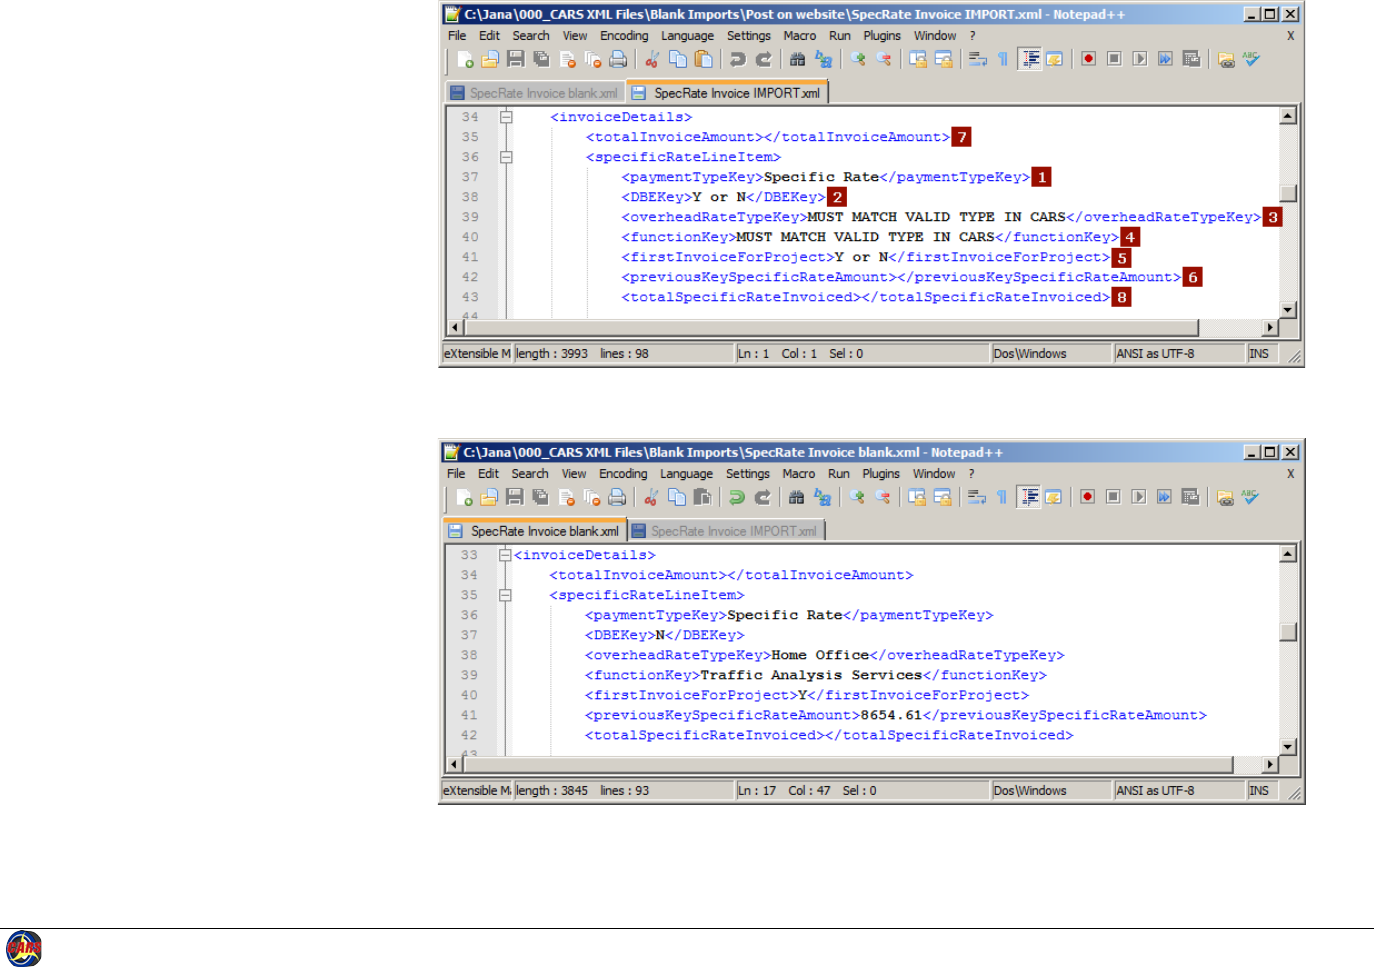
Consultants: Complete Invoice Details
The Invoice details block contains 2 main
parts:
• An element that may contain the
total amount for the entire invoice
• A Line Item block that contains the
other tags and blocks, which
includes:
Line item data consisting of 7
tags
One or more Total blocks,
which vary depending on the
cost basis for the invoice.
For this example of a specific rate invoice,
only the Line Item data is of concern for this
part of the process. Refer to Appendix 13:
Import XML Invoice for details about the
four-part line item key.
1. Make sure the value shown
between the paymentTypeKey tags
is correct. For this example, the
correct value is “Specific Rate”.
2. Change the value between the
DBEKey tags to “Y” or “N”.
3. Enter the overhead rate type from
the contract in CARS between the
overheadRateTypeKey tags. This
value must match the value in CARS
exactly, including capitalization and
spaces.
“IMPORT” XML Invoice Details Before Editing
“IMPORT” XML Invoice Details After Editing
Appendix 14 Using Spreadsheet Data to Create CARS XML Invoices 237
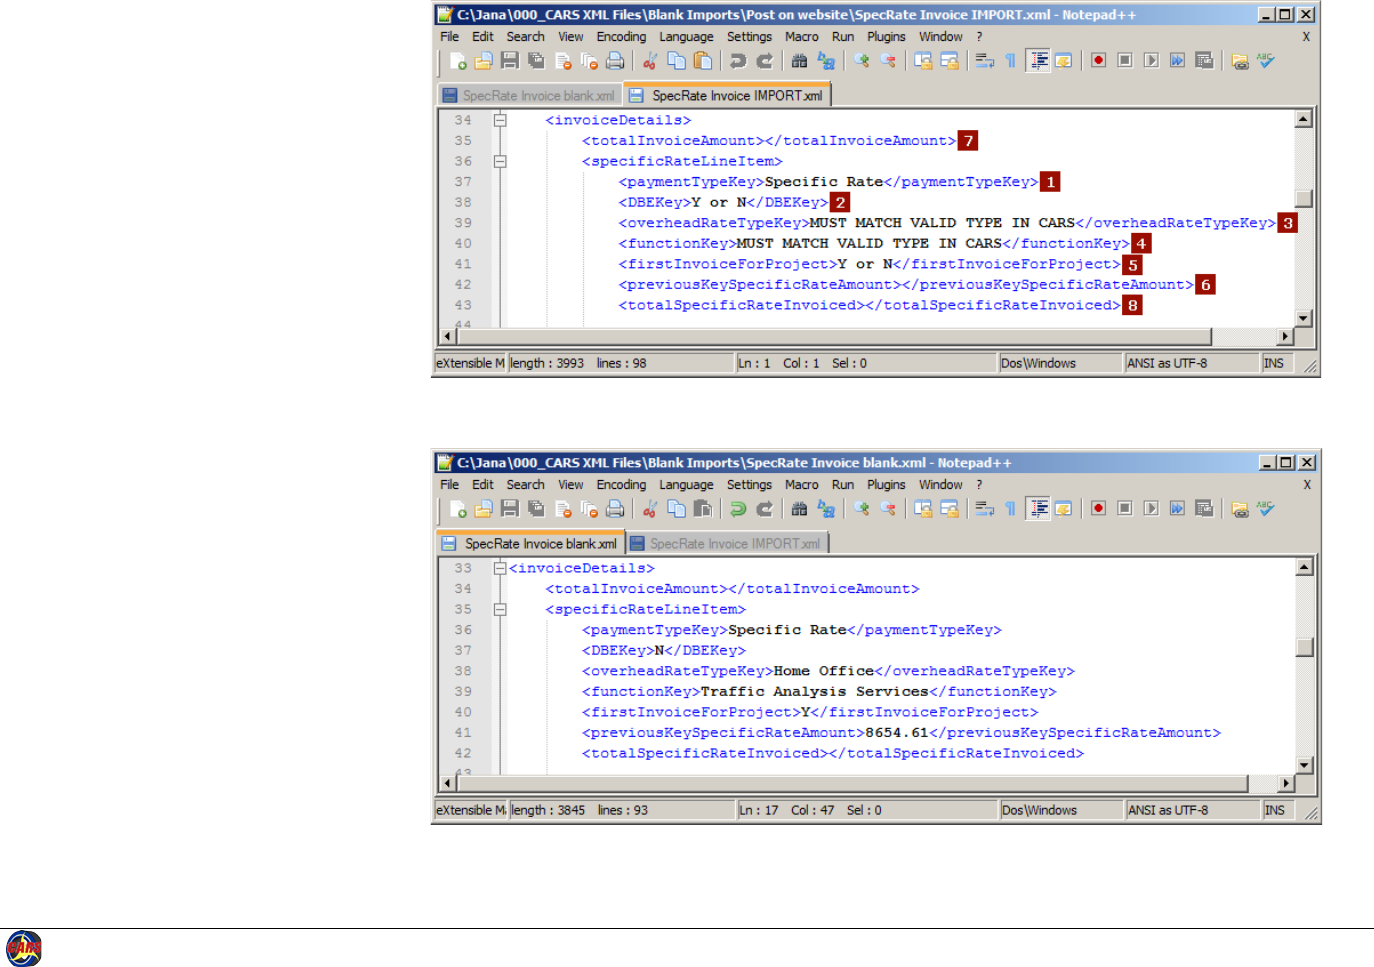
Consultants: Complete Invoice Details -
continued
4. Enter the contract function from the
contract in CARS between the
functionKey tags. This value must
match the value in CARS exactly,
including capitalization and spaces.
5. Change the value between the
firsInvoiceForProject tags to “Y” or
“N”.
6. If this is the first invoice in CARS and
there are existing invoices outside
CARS, enter the amount previously
invoiced outside CARS between the
previousKeySpecificRateAmount
tags.
This value will affect the total
amount you get paid for the
contract. Be sure it is correct.
7. Optional: Enter a dollar value for the
total invoice amount between the
totalInvoiceAmount tags for your
reference. This value is not required.
8. Optional: Enter a dollar value for the
total specific rate amount between
the totalSpecificRateInvoiced tags for
your reference. This value is not
required.
“IMPORT” XML Invoice Details Before Editing
“IMPORT” XML Invoice Details After Editing

Appendix 14 Using Spreadsheet Data to Create CARS XML Invoices 238
Consultants: Copy Tagged Data
The next step is to copy the tagged data
generated from the Excel data into the XML
invoice. For this example, the data from Excel
is direct labor costs for a specific rate project.
There is only one block for direct labor
specific rate details in the IMPORT copy of the
invoice. However, the CARS schema does not
limit the number of direct labor specific rate
details blocks. The same is true of direct cost
specific rate blocks. Refer to the CARS XML
Detailed Element Descriptions document for
other blocks that may repeat in the invoice.
1. Locate the
directLaborSpecificRateTotal block in
the XML invoice you have been
editing.
2. Optional: enter a value for the total
direct labor cost for this invoice
between the
totalDirectLaborSpecificRateInvoiced
tags for your reference. This value is
not required.
Appendix 14 Using Spreadsheet Data to Create CARS XML Invoices 239
Consultants: Copy Tagged Data -
continued
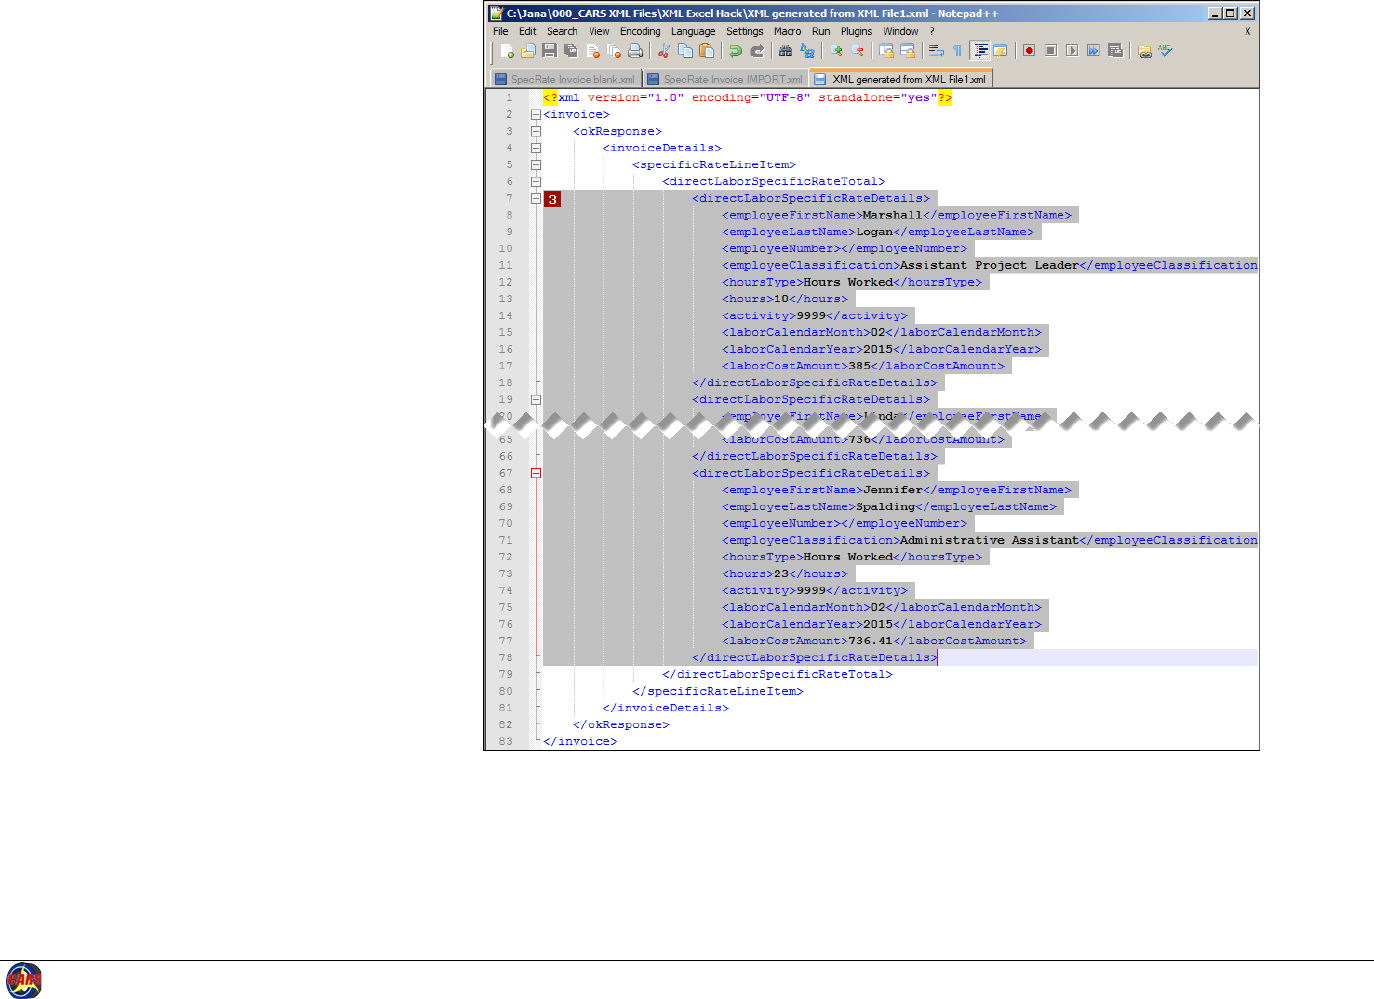
3. Locate and select the
directLaborSpecificRateDetails
blocks in the XML generated from
Excel. Be sure to select the start and
end tags. Do not select any other
tags or information.
4. Copy the selected data.

Appendix 14 Using Spreadsheet Data to Create CARS XML Invoices 240
Consultants: Copy Tagged Data -
continued
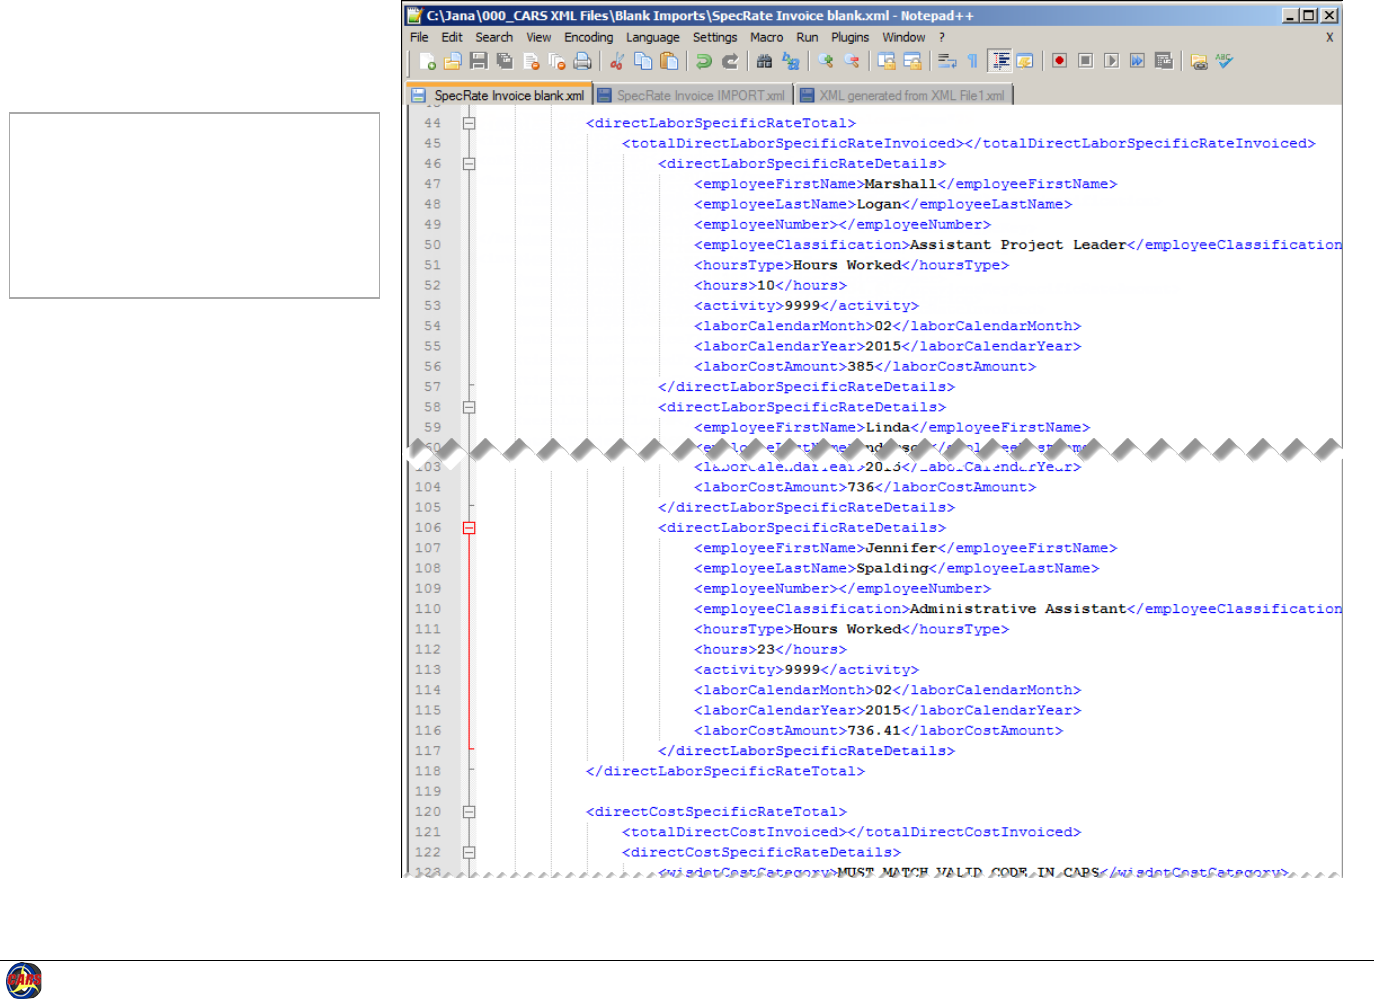
5. Locate and select the
directLaborSpecificRateDetails
block in the XML invoice you have
been editing. Be sure to select the
start and end tags. Do not select
any other tags or information.
Appendix 14 Using Spreadsheet Data to Create CARS XML Invoices 241
Consultants: Copy Tagged Data -
continued
6. Paste the data from the XML
generated from Excel.
Note: Spacing between lines and block
alignment is not critical for XML
invoices. The line spacing and
alignment is ignored when the data
is imported. However, formatting is
very helpful when you read and
edit the XML document.
7. Continue to edit the invoice. Edit
other sections and paste in other
details sections that were exported
from Excel as needed.
8. Import the XML invoice into CARS.
Review the invoice in CARS for
accuracy, and edit it manually as
necessary. Remember to upload
supporting documents, and submit
the invoice as described in the CARS
training manual.
1
