

Building REST APIs with Flask: Create Python Web Services with MySQL
ISBN-13 (pbk): 978-1-4842-5021-1 ISBN-13 (electronic): 978-1-4842-5022-8
https://doi.org/10.1007/978-1-4842-5022-8
Copyright © 2019 by Kunal Relan
This work is subject to copyright. All rights are reserved by the Publisher, whether the whole or
part of the material is concerned, specifically the rights of translation, reprinting, reuse of
illustrations, recitation, broadcasting, reproduction on microfilms or in any other physical way,
and transmission or information storage and retrieval, electronic adaptation, computer software,
or by similar or dissimilar methodology now known or hereafter developed.
Trademarked names, logos, and images may appear in this book. Rather than use a trademark
symbol with every occurrence of a trademarked name, logo, or image we use the names, logos,
and images only in an editorial fashion and to the benefit of the trademark owner, with no
intention of infringement of the trademark.
The use in this publication of trade names, trademarks, service marks, and similar terms, even if
they are not identified as such, is not to be taken as an expression of opinion as to whether or not
they are subject to proprietary rights.
While the advice and information in this book are believed to be true and accurate at the date of
publication, neither the authors nor the editors nor the publisher can accept any legal
responsibility for any errors or omissions that may be made. The publisher makes no warranty,
express or implied, with respect to the material contained herein.
Managing Director, Apress Media LLC: Welmoed Spahr
Acquisitions Editor: Nikhil Karkal
Development Editor: Laura Berendson
Coordinating Editor: Divya Modi
Cover designed by eStudioCalamar
Cover image designed by Freepik (www.freepik.com)
Distributed to the book trade worldwide by Springer Science+Business Media NewYork,
233 Spring Street, 6th Floor, NewYork, NY 10013. Phone 1-800-SPRINGER, fax (201) 348-4505,
e-mail orders-ny@springer-sbm.com, or visit www.springeronline.com. Apress Media, LLC is a
California LLC and the sole member (owner) is Springer Science + Business Media Finance Inc
(SSBM Finance Inc). SSBM Finance Inc is a Delaware corporation.
For information on translations, please e-mail rights@apress.com, or visit http://www.apress.
com/rights-permissions.
Apress titles may be purchased in bulk for academic, corporate, or promotional use. eBook
versions and licenses are also available for most titles. For more information, reference our Print
and eBook Bulk Sales web page at http://www.apress.com/bulk-sales.
Any source code or other supplementary material referenced by the author in this book is available
to readers on GitHub via the book’s product page, located at www.apress.com/9781484250211.
For more detailed information, please visit http://www.apress.com/source-code.
Printed on acid-free paper
KunalRelan
New Delhi, Delhi, India
www.allitebooks.com
v
Chapter 1: Beginning with Flask ����������������������������������������������������������1
Introduction to Flask ���������������������������������������������������������������������������������������������1
Starting Flask ��������������������������������������������������������������������������������������������������2
Flask Components Covered in This Book ���������������������������������������������������������3
Introduction to RESTful Services ��������������������������������������������������������������������������4
Uniform Interface ���������������������������������������������������������������������������������������������7
Representations ����������������������������������������������������������������������������������������������8
Messages ��������������������������������������������������������������������������������������������������������9
Links Between Resources �����������������������������������������������������������������������������12
Caching ����������������������������������������������������������������������������������������������������������13
Stateless ��������������������������������������������������������������������������������������������������������13
Planning REST API �����������������������������������������������������������������������������������������14
API Design �����������������������������������������������������������������������������������������������������15
Setting Up Development Environment ����������������������������������������������������������������16
Working with PIP �������������������������������������������������������������������������������������������17
Choosing the IDE �������������������������������������������������������������������������������������������18
Understanding Python Virtual Environments �������������������������������������������������19
Table of Contents
About the Author ���������������������������������������������������������������������������������ix
About the Technical Reviewer �������������������������������������������������������������xi
Acknowledgments �����������������������������������������������������������������������������xiii
Introduction ����������������������������������������������������������������������������������������xv
www.allitebooks.com
vi
Setting Up Flask �������������������������������������������������������������������������������������������������� 24
Installing Flask ����������������������������������������������������������������������������������������������25
Conclusion ����������������������������������������������������������������������������������������������������������26
Chapter 2: Database Modeling in Flask ����������������������������������������������27
Introduction ���������������������������������������������������������������������������������������������������������27
SQL Databases ����������������������������������������������������������������������������������������������28
NoSQL Databases ������������������������������������������������������������������������������������������28
Key Differences: MySQL vs� MongoDB ����������������������������������������������������������29
Creating a Flask Application with SQLAlchemy ��������������������������������������������������30
Creating an Author Database �������������������������������������������������������������������������33
Sample Flask MongoEngine Application �������������������������������������������������������������46
Conclusion ����������������������������������������������������������������������������������������������������������58
Chapter 3: CRUD Application with Flask (Part 1) ��������������������������������59
User Authentication ���������������������������������������������������������������������������������������������88
Conclusion ����������������������������������������������������������������������������������������������������������96
Chapter 4: CRUD Application with Flask (Part 2) ��������������������������������97
Introduction ���������������������������������������������������������������������������������������������������������97
Email Verification ������������������������������������������������������������������������������������������������98
File Upload ��������������������������������������������������������������������������������������������������������109
API Documentation ��������������������������������������������������������������������������������������������114
Building Blocks of API Documentation ��������������������������������������������������������115
OpenAPI Specification ���������������������������������������������������������������������������������116
Conclusion ��������������������������������������������������������������������������������������������������������134
Table of ConTenTsTable of ConTenTs
vii
Chapter 5: Testing in Flask ���������������������������������������������������������������135
Introduction �������������������������������������������������������������������������������������������������������135
Setting Up Unit Tests �����������������������������������������������������������������������������������136
Unit Testing User Endpoints ������������������������������������������������������������������������� 139
Test Coverage����������������������������������������������������������������������������������������������������155
Conclusion ��������������������������������������������������������������������������������������������������������157
Chapter 6: Deploying Flask Applications ������������������������������������������159
Deploying Flask with uWSGI and Nginx on Alibaba Cloud ECS �������������������������160
Deploying Flask on Gunicorn with Apache on Alibaba Cloud ECS ���������������������167
Deploying Flask on AWS Elastic Beanstalk �������������������������������������������������������172
Deploying Flask App on Heroku ������������������������������������������������������������������������176
Adding a Procfile �����������������������������������������������������������������������������������������177
Deploying Flask App on Google App Engine ������������������������������������������������������ 180
Conclusion ��������������������������������������������������������������������������������������������������������182
Chapter 7: Monitoring Flask Applications ����������������������������������������183
Application Monitoring �������������������������������������������������������������������������������������� 183
Sentry ���������������������������������������������������������������������������������������������������������� 185
Flask Monitoring Dashboard ������������������������������������������������������������������������187
New Relic ����������������������������������������������������������������������������������������������������189
Bonus Services ��������������������������������������������������������������������������������������������192
Conclusion ��������������������������������������������������������������������������������������������������������194
Index �������������������������������������������������������������������������������������������������195
Table of ConTenTsTable of ConTenTs

ix
About the Author
KunalRelanis an iOS security researcher
and a full stack developer with more than
four years of experience in various fields
of technology, including network security,
DevOps, cloud infrastructure, and application
development, working as a consultant with
start-ups around the globe. He is an Alibaba
Cloud MVP and author of iOS Penetration
Testing (Apress) and a variety of white papers.
Kunal is a technology enthusiast and an active
speaker. He regularly contributes to open source communities and writes
articles for Digital Ocean and Alibaba Techshare.

xi
About the Technical Reviewer
SaurabhBadhwaris a software engineer
with a passion to build scalable distributed
systems. He is mostly working to solve
challenges related to performance of software
at a large scale and has been involved in
building solutions that help other developers
quickly analyze and compare performance
of their systems when running at scale.
He is also passionate about working with
open source communities and has been
actively participating as a contributor in various domains, which involve
development, testing, and communityengagement. Saurabh has also been
an active speaker at various conferences where he has been talking about
performance of large-scale systems.
xiii
Acknowledgments
I would like to thank Apress for providing me this platform, without which
this would have been a lot harder. I would also like to thank Mr. Nikhil
Karkal for his help and Miss Divya Modi for her perseverance, without
whom this would have been a farsighted project.
I’d like to mention about the strong Python community which helped
me understand the core concepts in my early years of programming, which
inspired me to contribute back to the community with this book.
Last but certainly not the least, I would like to acknowledge all the
people who constantly reminded me about the deadlines and helped me
write this book, especially my family and Aparna Abhijit for helping me out
with editing.
xv
Introduction
Flask is a lightweight microframework for web applications built on top
of Python, which provides an efficient framework for building web-based
applications using the flexibility of Python and strong community support
with the capability of scaling to serve millions of users.
Flask has excellent community support, documentation, and
supporting libraries; it was developed to provide a barebone framework for
developers, giving them the freedom to build their applications using their
preferred set of libraries and tools.
This book takes you through different stages of a REST API–based
application development process using flask which explains the basics of
the Flask framework assuming the readers understand Python. We’ll cover
database integration, understanding REST services, REST APIs performing
CRUD operations, user authentication, third-party library integrations,
testing, deployment, and application monitoring.
At the end of this book, you’ll have a fair understanding of Flask
framework, REST, testing, deploying, and managing Flask applications,
which will open doors to understanding REST API development.
1
© Kunal Relan 2019
K. Relan, Building REST APIs with Flask, https://doi.org/10.1007/978-1-4842-5022-8_1
CHAPTER 1
Beginning withFlask
Flask is a BSD licensed, Python microframework based on Werkzeug and
Jinja2. Being a microframework doesn’t make it any less functional; Flask
is a very simple yet highly extensible framework. This gives developers
the power to choose the configuration they want, thereby making writing
applications or plugins easy. Flask was originally created by Pocoo, a
team of open source developers in 2010, and it is now developed and
maintained by The Pallets Project who power all the components behind
Flask. Flask is supported by an active and helpful developer community
including an active IRC channel and a mailing list.
Introduction toFlask
Flask has two major components, Werkzeug and Jinja2. While Werkzeug
is responsible for providing routing, debugging, and Web Server Gateway
Interface (WSGI), Flask leverages Jinja2 as template engine. Natively,
Flask doesn’t support database access, user authentication, or any other
high-level utility, but it does provide support for extensions integration to
add all such functionalities, making Flask a micro- yet production-ready
framework for developing web applications and services. A simple Flask
application can fit into a single Python file or it can be modularized to
create a production-ready application. The idea behind Flask is to build a
good foundation for all applications leaving everything else on extensions.
2
Flask community is quite big and active with hundreds of open source
extensions. The Flask core team continuously reviews extensions and
ensures approved extensions are compatible with the future releases. Flask
being a microframework provides flexibility to the developers to choose
the design decisions appropriate to their project. It maintains a registry of
extensions which is regularly updated and continuously maintained.
Starting Flask
Flask, just like all other Python libraries, is installable from the Python
Package Index (PPI) and is really easy to setup and start developing with,
and it only takes a few minutes to getting started with Flask. To be able to
follow this book, you should be familiar with Python, command line (or at
least PIP), and MySQL.
As promised, Flask is really easy to start with, and just five lines of code
lets you get started with a minimal Flask application.
Listing 1-1. Basic Flask Application
from flask import Flask
app = Flask(__name__)
@app.route('/')
def hello_world():
return 'Hello, From Flask!'
if __name__== '__main__':
app.run()
The preceding code imports the Flask library, initiates the application
by creating an instance of the Flask class, declares the route, and then
defines the function to execute when the route is called. This code is
enough to start your first Flask application.
CHAPTER 1 BEGINNING WITHFLASK
3
The following code launches a very simple built-in server, which
is good enough for testing but probably not when you want to go in
production, but we will cover that in the later chapters.
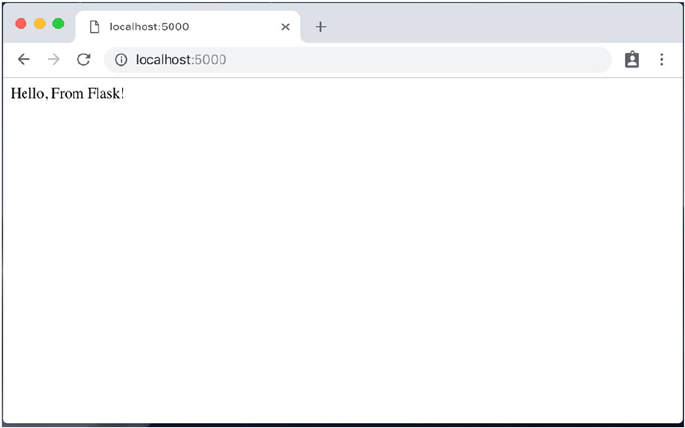
When this application starts, the index route upon request shall return
“Hello From Flask!” as shown in Figure1-1.
Flask Components Covered inThis Book
Now that you have been introduced to Flask, we will discuss the
components that we’ll cover in Flask REST API development in this book.
This book will serve as a practical guide to REST API development
using Flask, and we’ll be using MySQL as the backend database. As already
discussed, Flask doesn’t come with native database access support, and
to bridge that gap, we’ll use a Flask extension called Flask-SQLAlchemy
which adds support for SQLAlchemy in Flask. SQLAlchemy is essentially
Figure 1-1. Flask minimal application
CHAPTER 1 BEGINNING WITHFLASK
4
a Python SQL toolkit and Object Relational Mapper which provides the
developers the full power and flexibility of SQL.
SQLAlchemy provides full support for enterprise-level design patterns
and is designed for high-performing database access while maintaining
efficiency and ease of use. We’ll build a user authentication module, CRUD
(Create, Read, Update, and Delete) REST APIs for object creation, retrieval,
manipulation, and deletion. We’ll also integrate a documentation utility
called Swagger for creating API documentation, write unit and integration
tests, learn application debugging, and, finally, check out different
methods of deploying and monitoring our REST APIs on cloud platforms
for production use.
For unit tests, we’ll use pytest which is a full-featured Python testing
tool—pytest is easy to write tests with and yet is scalable to support
complex use cases. We’ll also use Postman which is a complete REST API
Platform—Postman provides integration tools for every stage of the API
lifecycle, making API development easier and more reliable.
API deployment and monitoring are critical parts of REST API
development; development paradigm changes drastically when it comes
to scaling the APIs for production use cases, and for the sake of this book,
we’ll deploy our REST APIs using uWSGI and Nginx on a cloud Ubuntu
server. We’ll also deploy our REST APIs on Heroku which is a cloud
platform that facilitates Flask app deployment and scaling out of the box.
Last but not least, we’ll discuss debugging common Flask errors and
warnings and debugging Nginx requests and check out Flask application
monitoring ensuring least amount on the downtime for production use.
Introduction toRESTful Services
Representational State Transfer (REST) is a software architectural style
for web services that provides a standard for data communication
between different kinds of systems. Web services are open standard
CHAPTER 1 BEGINNING WITHFLASK
5
web applications that interact with other applications with a motive of
exchanging data making it an essential part of client server architecture in
modern web and mobile applications. In simple terms, REST is a standard
for exchanging data over the Web for the sake of interoperability between
computer systems. Web services which conform to the REST architectural
style are called RESTful web services which allow requesting systems to
access and manipulate the data using a uniform and predefined set of
stateless operations.
Since its inception in 2000 by Roy Feilding, RESTful architecture has
grown a lot and has been implemented in millions of systems since then.
REST has now become one of the most important technologies for web-
based applications and is likely to grow even more with its integration
in mobile and IoT-based applications as well. Every major development
language has frameworks for building REST web services. REST principles
are what makes it popular and heavily used. REST is stateless, making it
straightforward for any kind of system to use and also making it possible
for each request to be served by a different system.
REST enables us to distinguish between the client and the server,
letting us implement the client and the server independently. The most
important feature of REST is its statelessness, which simply means that
neither the client nor the server has to know the state of each other to
be able to communicate. In this way, both the client and the server can
understand any message received without seeing the previous message.
Since we are talking about RESTful web services, let’s take a dive into web
services and compare other web service standards.
Web services in a simple definition is a service offered by one
electronic device to another, enabling the communication via the World
Wide Web. In practice, web services provide resource-oriented, web-
based interface to a database server and so on utilized by another web
client. Web services provide a platform for different kinds of systems to
communicate to each other, using a solution for programs to be able to
communicate with each other in a language they understand (Figure1-2).
CHAPTER 1 BEGINNING WITHFLASK

6
SOAP (Simple Object Access Protocol) is another web service
communication protocol which has been overtaken by REST in the
recent years. REST services now dominate the industry representing
more than 70% of public APIs according to Stormpath. They operate by
exposing consistent interface to access named resources. SOAP, however,
exposes components of application logic as services rather than data.
SOAP is now a legacy protocol originally created by Microsoft and has a
lot of other constraints when compared to REST.SOAP only exchanges
data over XML, and REST provides the ability to exchange data over a
variety of data formats. RESTful services are comparatively faster and less
resource intensive. However, SOAP still has its own use cases in which it’s a
preferred protocol over REST.
SOAP is preferred when robust security is essential as it provides
support for Web Services Security (WS-Security), which is a specification
defining how security measures are implemented in web services to
protect them from external attacks. Another advantage of SOAP over REST
is its built-in retry logic to compensate for failed requests unlike REST in
which the client has to handle failed requests by retrying. SOAP is highly
extensible with other technologies and protocols like WS-Security,
WS- addressing, WS-coordination, and so on which provides it an edge
over other web service protocols.
Figure 1-2. REST architecture diagram
CHAPTER 1 BEGINNING WITHFLASK
7
Now, when we have briefly discussed web services—REST and SOAP—
let’s discuss features of REST protocol. In general, REST services are
defined and implemented using the following features:
1. Uniform interface
2. Representations
3. Messages
4. Links between resources
5. Caching
6. Stateless
Uniform Interface
RESTful services should have a uniform interface to access resources, and
as the name suggests, APIs’ interface for the system should be uniform
across the system. A logical URI system with uniform ways to fetch and
manipulate data is what makes REST easy to work with. HTTP/1.1 provides
a set of methods to work on noun-based resources; the methods are
generally called verbs for this purpose.
In REST architecture, there is a concept of safe and idempotent
methods. Safe methods are the ones that do not modify resources like a GET
or a HEAD method. An idempotent method is a method which produces
the same result no matter how many times it is executed. Table1- 1 provides
a list of commonly used HTTP verbs in RESTful services.
CHAPTER 1 BEGINNING WITHFLASK

8
Representations
RESTful services focus on resources and providing access to the resources.
A resource can be easily thought of as an object in OOP.The first thing to
do while designing RESTful services is identifying different resources and
determining the relation between them. A representation is a machine-
readable explanation defining the current state of a resource.
Once the resources are identified, representations are the next course
of action. REST provides us the ability to use any format for representing
the resources in the system. Unlike SOAP which restricts us to use XML to
represent the data, we can either use JSON or XML.Usually, JSON is the
preferred method for representing the resources to be called by mobile or
web clients, but XML can be used to represent more complex resources.
Here is a small example of representing resources in both formats.
Table 1-1. Commonly used HTTP verbs useful in RESTful services
Verb CRUD Operation Safe Idempotent
GET Read Fetch a single or multiple resource Yes Yes
POST Created Insert a new resource No No
PUT Update/
Create
Insert a new resource or update
existing
No Yes
DELETE Delete Delete a single or multiple resource No Yes
OPTIONS READ List allowed operations on a resource Yes Yes
HEAD READ Return only response headers and no
body
Yes Yes
PATCH Update/
Modify
Only update the provided changes to
the resource
No No
CHAPTER 1 BEGINNING WITHFLASK
9
Listing 1-2. XML Representation of a Book Resource
<?xml version="1.0" encoding="UTF-8"?>
<Book>
<ID> 1 </ID>
<Name> Building REST APIs with Flask </Name>
<Author> Kunal Relan </Author>
<Publisher > Apress </ Publisher >
</Book>
Listing 1-3. JSON Representation of a Book resource
{
"ID": "1",
"Name": "Building REST APIs wiith Flask",
"Author": "Kunal Relan",
"Publisher": "Apress"
}
In REST Systems, you can use either of the methods or both the
methods depending on the requesting client to represent the data.
Messages
In REST architecture, which essentially established client–server style
way of data communication, messages are an important key. The client
and the server talk to each other via messages in which the client sends
a message to the server which is often called as a request and the server
sends a response. Apart from the actual data exchanged between the
client and the server in the form of request and response body, there is
some metadata exchanged by the client and the server both in the form
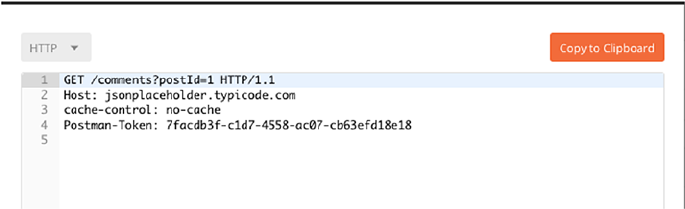
of request and response headers. HTTP 1.1 defines request and response
headers formats in the following way in order to achieve a uniform way of
data communication across different kinds of systems (Figure1-3).
CHAPTER 1 BEGINNING WITHFLASK
10
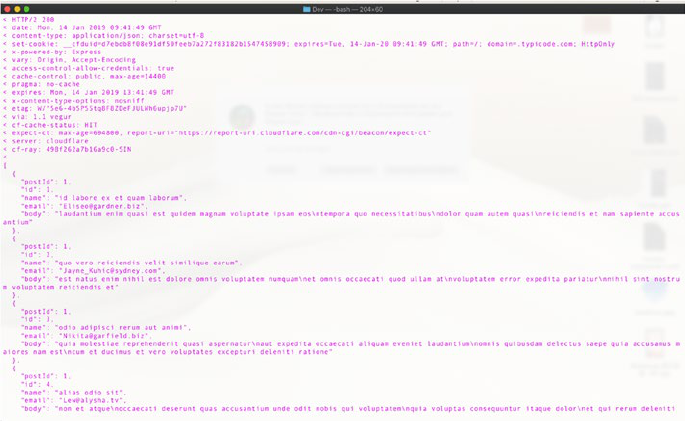
In Figure1-4, GET is the request method, “/comments” is the path in
the server, “postId=1” is a request parameter, “HTTP/1.1” is the protocol
version that the client is requesting, “jsonplaceholder.typicode.com” is the
server host, and content type is a part of the request headers. All of these
combined is what makes a HTTP request that the server understands.
In return, the HTTP server sends the response for the requested
resources.
[
{
"postId": 1,
"id": 1,
"name": "id labore ex et quam laborum",
"email": "[email protected]",
"body": "laudantium enim quasi est quidem magnam voluptate
ipsam eos\ntempora quo necessitatibus\ndolor quam
autem quasi\nreiciendis et nam sapiente accusantium"
},
{
"postId": 1,
"id": 2,
"name": "quo vero reiciendis velit similique earum",
"email": "[email protected]",
Figure 1-3. HTTP sample request
CHAPTER 1 BEGINNING WITHFLASK
11
"body": "est natus enim nihil est dolore omnis voluptatem
numquam\net omnis occaecati quod ullam at\nvoluptatem
error expedita pariatur\nnihil sint nostrum voluptatem
reiciendis et"
},
{
"postId": 1,
"id": 3,
"name": "odio adipisci rerum aut animi",
"email": "[email protected]",
"body": "quia molestiae reprehenderit quasi aspernatur\naut
expedita occaecati aliquam eveniet laudantium\nomnis
quibusdam delectus saepe quia accusamus maiores nam
est\ncum et ducimus et vero voluptates excepturi
deleniti ratione"
},
{
"postId": 1,
"id": 4,
"name": "alias odio sit",
"email": "[email protected]",
"body": "non et atque\noccaecati deserunt quas accusantium
unde odit nobis qui voluptatem\nquia voluptas
consequuntur itaque dolor\net qui rerum deleniti ut
occaecati"
},
{
"postId": 1,
"id": 5,
"name": "vero eaque aliquid doloribus et culpa",
"email": "[email protected]",
CHAPTER 1 BEGINNING WITHFLASK
12
"body": "harum non quasi et ratione\ntempore iure ex
voluptates in ratione\nharum architecto fugit
inventore cupiditate\nvoluptates magni quo et"
}]
In the preceding figure, “HTTP/2” is the response HTTP version and
“200” is the response code. The part below that till “cf-ray” is the response
headers, and the array of post comments below “cf-ray” is the response
body of the request.
Links Between Resources
A resource is the fundamental concept in the world of REST architecture.
A resource is an object with a type, associated data, and relationships to
other resources alongside a set of methods that can be executed on it.
The resource in a REST API can contain link to other resources which
should drive the process flow. Such as in the case of a HTML web page in
Figure 1-4. HTTP sample response
CHAPTER 1 BEGINNING WITHFLASK
13
which the links in the homepage drive the user flow, resources in REST API
should be able to drive the flow without the user knowing the process map.
Listing 1-4. A Book with Link to Buy
{
"ID": "1",
"Name": "Building REST APIs wiith Flask",
"Author": "Kunal Relan",
"Publisher": "Apress",
"URI" : "https://apress.com/us/book/123456789"
}
Caching
Caching is a technique that stores a copy of a given resource and serves it
back when requested, saving extra DB calls and processing time. It can be
done at different levels like the client, the server, or a middleware proxy
server. Caching is an important tool for increasing the API performance
and scaling the application; however, if not managed properly, it results
in the client being served old results. Caching in REST APIs is controlled
using HTTP headers. Cache headers have been an essential part of HTTP
header specifications and have been an important part of scaling web
services with efficiency. In REST specification, when a safe method is used
on a resource URL, usually the reverse proxy caches the results to use the
cached data when the same resource is requested the next time.
Stateless
Each request from client to server must contain all of the
information necessary to understand the request, and can-
not take advantage of any stored context on the server.
Session state is therefore kept entirely on the client
—Roy Fielding
CHAPTER 1 BEGINNING WITHFLASK
14
Statelessness here means that every HTTP response is a complete entity
in itself and enough to serve the purpose of providing information to
be executed without any need of another HTTP request. The point of
statelessness is to defeat the purpose of accord with the server allowing
intended flexibility in the infrastructure. To facilitate the same, REST
servers provide enough information in the HTTP response that the client
may need. Statelessness is an essential part of being able to scale the
infrastructure enabling us to deploy multiple servers to serve millions
of concurrent users given the fact that there is no server session state
dependency. It also enables the caching feature of REST infrastructure as
it lets the caching server to decide whether to cache the request or not, just
by looking at the particular request irrespective of any previous requests.
Planning REST API
Here is a list of things we need to check while planning to create REST APIs:
1. Understanding the use case. It is really important
to know why you are building the API and what
services will the API provide.
2. Listing down API features to understand what all
actions your APIs are going to do. This also includes
listing down actions and grouping them together to
tackle redundant endpoints.
3. Identify different platforms that’ll use the API and
provide support accordingly.
4. Plan long term on supporting growth and scaling
the infrastructure.
5. Plan API versioning strategy ensuring continuous
support is maintained over different versions of the APIs.
CHAPTER 1 BEGINNING WITHFLASK
15
6. Plan API access strategy, that is, authentication,
ACL, and throttling.
7. Plan API documentation and testing.
8. Understand how to use hypermedia with your APIs.
So, these are the eight important things to ensure while planning your
API and are really crucial for developing a stable, production-focused API
system.
API Design
Now let’s look into API design. Here we’ll cover the standards of designing
REST APIs keeping in mind the list of things we just talked about.
Long-Term Implementation
Long-term implementation helps you analyze the flaws in design before
actual implementation. This helps the developers to choose the right kind
of platforms and tools to build upon making sure the same system can be
scaled for more users later.
Spec-Driven Development
Spec-driven development enforces API design using definition and not just
the code, which ensures that the changes are made to the codebase while
the API design is intact. It is good practice to use a tool like API Designer
to understand the API design before development which also lets you
foresee the flaws. Tools like swagger or RAML let you keep the API design
standardized and enable you to port the API to different platforms if needed.
CHAPTER 1 BEGINNING WITHFLASK
16
Prototyping
Once the API specs are put in place, prototyping helps you visualize the
API before actual development by letting the developers create MOCK API
to help them understand every potential aspect of the API.
Authentication andAuthorization
Authentication involves the verification process to know who the person
is, but it just doesn’t involve giving access to all the resources yet, and
that’s where authorization comes in, which involves authorizing an
authenticated person to keep a check on resources allowed to access using
an Access Control List (ACL).
We have different ways of authenticating and authorizing users
like basic authentication, HMAC, and OAuth. OAuth 2.0 is however
a preferred method for the same and is a standard protocol used
by enterprises as well as small companies for authentication and
authorization in their REST APIs.
So, these are the key features of the REST infrastructure, and we’ll
discuss more about how REST works and enables better communication in
later chapters.
Now, we’ll start with setting up our development environment and
understand some key factors of developing applications with Python.
Setting UpDevelopment Environment
In this part, we’ll discuss setting up Python development environment
for a Flask application. We’ll use virtual environments for a separate
isolated environment for our dependencies. We’ll use PIP for installing and
managing our dependencies and a couple of other helpful utilities in the
process of setting up our development environment. For the sake of this
book, we’ll be doing everything on macOS Mojave and Python 2.7, but you
CHAPTER 1 BEGINNING WITHFLASK
17
can feel free to use any operating system as per your convenience. So if you
don’t have the right version of Python installed in your operating system,
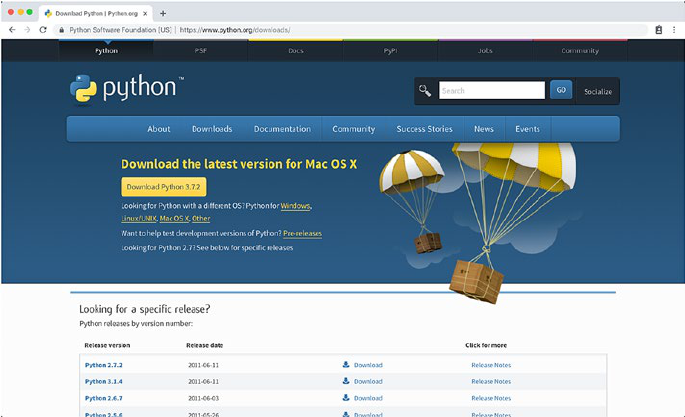
you can go ahead with installing Python on your choice of operating
system using this link: www.python.org/downloads/ (Figure1-5).
Working withPIP
PIP is a PyPi recommended tool for project dependency management. PIP
comes preinstalled with Python if you are using Python downloaded from
www.python.org.
However, if you don’t have PIP installed in your system, follow the
guide here to install PIP.
In order to install PIP, download get-pip.py by using the following
command in your terminal (or command line in Windows).
$ curl https://bootstrap.pypa.io/get-pip.py -o get-pip.py
Figure 1-5. Python download
CHAPTER 1 BEGINNING WITHFLASK

18
Once you have the get-pip.py file, install and run the next command:
$ python get-pip.py
The previous command will install PIP, setuptools (required for
installing source distributions), and wheel.
If you already have PIP, you can upgrade to the latest version of pip
using the following command:
$ pip install -U pip
To test your installation, you should run the following command
(Figure1-6) in your terminal (or command line in Windows):
$ python -V
$ pip -V
Choosing theIDE
Before we start writing the code, we’ll need something to write with.
Throughout this book, we’ll use Visual Studio Code which is an open
source and free IDE available on all major operating systems. Visual Studio
Code is available to download from www.code.visualstudio.com, and it
provides good support for developing Python applications with plenty of
handy plugins to facilitate development. You can choose to use your own
preferred text editor or IDE to follow this book (Figure1-7).
Figure 1-6. Checking Python and PIP installation
CHAPTER 1 BEGINNING WITHFLASK
19
Once we have the IDE setup, we can move to installing and setting up
the virtual environment.
Understanding Python Virtual Environments
Python, just like other modern programming languages, provides a huge
amount of third-party libraries and SDKs. Different applications might need
various specific versions of third-party modules, and it won’t be possible for
one Python installation to meet such requirements of every application. So,
in the world of Python, the solution for this problem is virtual environment,
which creates a separate self-contained directory tree containing a Python
installation of the required version alongside the required packages.
At its core, the main purpose of a virtual environment is to create an
isolated environment to contain an installation of Python and required
packages for the application. There is no limit to the number of virtual
environments you can create, and it’s super easy to create them.
Figure 1-7. Visual Studio Code
CHAPTER 1 BEGINNING WITHFLASK

20
Using Virtual Environments
In Python 2.7 we need a module called virtualenv which is installed using
PIP to get started with Python virtual environments.
Note In Python 3 the venv module comes preshipped as a part of
the standard library.
To install virtualenv, type the following command in your terminal
(or command line in case of Windows).
$ pip install virtualenv
Once we have the virtualenv module installed in our system, next we’ll
create a new directory and create a virtual environment in it.
Now, type the following command to create a new directory and open
it in your terminal.
$ mkdir pyenv && cd pyenv
The preceding command will create a directory and open it in your
terminal, and then we’ll use the virtualenv module to create a new virtual
environment inside the directory.
$ virtualenv venv
The previous command will use the virtualenv module and create a
virtual environment called venv. You can name your virtual environment
anything, but for this book, we’ll just use venv for the sake of uniformity.
Once this command stops executing, you’ll see a directory called venv.
This directory will now hold your virtual environment.
The directory structure of the venv folder should be similar to the one
in Figure1-8.
CHAPTER 1 BEGINNING WITHFLASK
21
Here is what each folder in the structure contains:
1. bin: Files to interact with the virtual environment.
2. include: C headers to compile the Python packages.
3. lib: This folder contains a copy of the Python version
and all the other third-party modules.
Next, there are copies of, or symlinks to, different Python tools to
ensure all the Python code and commands are executed within the current
environment. The important part here is the activation scripts in bin
folder, which sets the shell to use the virtual environment’s Python and site
packages. In order to do so, you need to activate the virtual environment by
typing the following command in your terminal.
$ source venv/bin/activate
Once this command is executed, your shell prompt will be prefixed
with the name of the virtual environment, just as in Figure1-9.
Figure 1-8. Virtual environment directory structure
CHAPTER 1 BEGINNING WITHFLASK

22
Now, let’s install Flask in our virtual environment using the following
command:
$ pip install flask
The preceding command should install Flask in our virtual
environment. We’ll use the same code we did in our sample Flask
application.
$ nano app.py
And type the following code in the nano text editor:
from flask import Flask
app = Flask(__name__)
@app.route('/')
def hello_world():
return 'Hello, From Flask!'
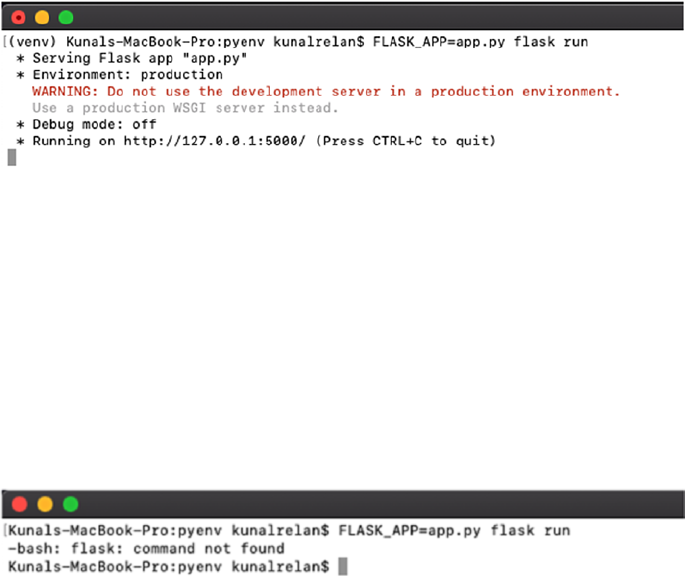
Now, try running your app.py using python app.py command.
$ FLASK_APP=app.py flask run
With the preceding command, you should be able to run the simple
Flask application, and you should see similar output in your terminal
(Figure1-10).
Figure 1-9. Activating virtual environment
CHAPTER 1 BEGINNING WITHFLASK
23
Now, to deactivate the virtual environment, you need to execute the
following command:
$ deactivate
After this command executes, (venv) prefix from the shell will go
away, and if you try running the application again, it will throw an error
(Figure1-11).
So now you understand the concept of virtual environments, we can
dig a little deeper and understand what’s happening inside the virtual
environment.
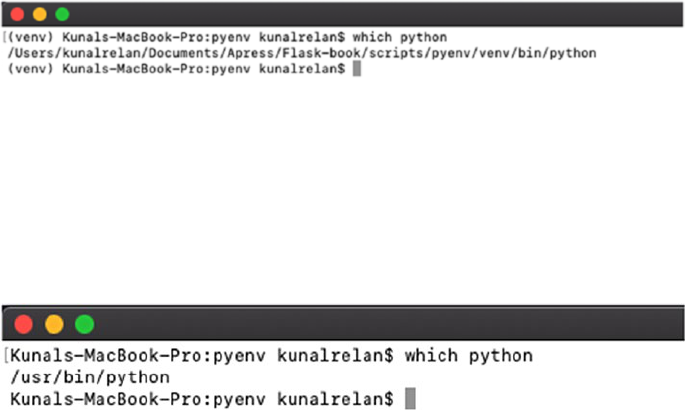
Understanding how virtual environments work can really help you
debug the application and understand the execution environment. To
start with, let’s check out the Python executable with virtual environment
activated and deactivated, in order to understand the basic difference.
Let’s execute the following command with virtual environment
activated (Figure1-12):
$ which python
Figure 1-10. Running Flask application in virtual environment
Figure 1-11. Running Flask application without virtual
environment
CHAPTER 1 BEGINNING WITHFLASK
24
As you see in the following figure, the shell is using virtual
environment’s Python executable, and if you deactivate the environment
and re-run the Python command, you’ll notice the shell is now using the
system’s Python (Figure1-13).
So once you activate the virtual environment, the $path environment
variable is modified to point at our virtual environment, and thus the
Python in our virtual environment is used rather than the system one.
However, an important thing to notice here is that it is basically a copy of,
or a symlink to, the system’s Python executable.
Setting UpFlask
We have already installed Flask in the earlier module, but let’s start over
and setup the Flask microframework.
Figure 1-12. Checking Python executable with virtual environment
Figure 1-13. Checking Python executable without virtual
environment
CHAPTER 1 BEGINNING WITHFLASK
25
Installing Flask
With virtual environment activated, execute the following command to
install the latest version of Flask.
$pip install flask
The preceding command will install Flask in your virtual environment.
However, if you wish to work with the latest Flask before release,
install/update the Flask module using the master branch of its repository
by executing the following command:
$pip install -U https://github.com/pallets/flask/archive/
master.tar.gz
When you install Flask, the following distributions are installed with
the main framework:
1. Werkzeug (http://werkzeug.pocoo.org/):
Werkzeug implements WSGI, the standard Python
interface between the application and the server.
2. Jinja (http://jinja.pocoo.org/): Jinja is the
templating engine in Flask which renders the pages
for the application.
3. MarkupSafe (https://pypi.org/project/
MarkupSafe/): Markupsafe comes preshipped with
Jinja, which helps escape an untrusted user input to
escalate injection attacks.
4. ItsDangerous(https://pythonhosted.org/
itsdangerous/): ItsDangerous is responsible for
securely signing data to ensure data integrity and is
used to protect Flask session cookies.
CHAPTER 1 BEGINNING WITHFLASK
26
5. Click (http://click.pocoo.org/): Click is a
framework to write CLI applications. It provides the
“Flask” CLI command.
Conclusion
Once you have Flask installed in your virtual environment, you are ready
to go to the next step of the development phase. Before we do that, we’ll
discuss about MySQL and Flask-SQLAlchemy which is the ORM that
we’ll use in our Flask application. Database is an essential part of a REST
application, and in the next chapter, we’ll discuss the MySQL database
and Flask-SQLAchemy ORM and also learn how to connect our Flask
application with Flask-SQLAlchemy.
CHAPTER 1 BEGINNING WITHFLASK
27
© Kunal Relan 2019
K. Relan, Building REST APIs with Flask, https://doi.org/10.1007/978-1-4842-5022-8_2
CHAPTER 2
Database Modeling
inFlask
This chapter covers one of the most important aspects of REST application
development, that is, connecting and interacting with database systems.
In this chapter, we’ll discuss about NoSQL and SQL databases, connecting
and interacting with them.
In this chapter we’ll cover the following topics:
1. NoSQL vs. SQL databases
2. Connecting with Flask-SQLAlchemy
3. Interacting with MySQL DB using Flask-
SQLAlchemy
4. Connecting with Flask-MongoEngine
5. Interacting with MongoDB using Flask-
MongoEngine
Introduction
Flask being a microframework provides flexibility of the data source for
applications and also provides library support for interacting with different
kinds of data sources. There are libraries to connect to SQL- and NoSQL-
28
based databases in Flask. It also provides the flexibility to interact with
databases using raw DB libraries or using ORM (Object Relational Mapper)
/ODM (Object Document Mapper). In this chapter, we’ll briefly discuss
NoSQL- and SQL-based databases and learn using ORM layer for our Flask
application using Flask-SQLAlchemy, after which we’ll use ODM layer
using Flask-MongoEngine.
Most applications do need databases at some point, and MySQL and
MongoDB are just two of the many tools for doing it. Choosing the right
one for your application will entirely depend on the data you are going to
store. If your datasets in tables are related to each other, SQL databases is
the way to go or NoSQL databases can serve the purpose too.
Now, let’s have a brief look over SQL vs. NoSQL databases.
SQL Databases
SQL databases use Structured Query Language (SQL) for data
manipulation and definition. SQL is a versatile, widely used and accepted
option which makes it a great choice for data storing. SQL systems
work great when the data in use needs to be relational and the schema
is predefined. However, a predefined schema also serves as a con, as it
requires the whole dataset to follow the same structure which might turn
out to be tough in some situations. SQL databases store data in forms of
tables made up of rows and columns and are vertically scalable.
NoSQL Databases
NoSQL databases have a dynamic schema for unstructured data and store
data in different ways ranging from column-based (Apache Cassandra),
document-based (MongoDB), and graph-based (Neo4J) or as a key-
value store (Redis). This provides the flexibility to store data without a
predefined structure and versatility to add fields to the data structure
on the go. Being schemaless is the key distinction of NoSQL databases,
CHAPTER 2 DATABASE MODELING INFLASK
29
and it also makes them better suited for distributed systems. Unlike SQL
databases, NoSQL databases are horizontally scalable.
Now that we have briefly explained SQL and NoSQL databases, we’ll
jump to functional differences between MySQL and MongoDB since these
are the two database engines we’ll be looking at in this chapter.
Key Differences: MySQL vs. MongoDB
So as discussed earlier, MySQL is a SQL-based database which stores
data in tables with columns and rows and only works on structured
data. MongoDB, on the other hand, can handle unstructured data and
stores JSON-like documents rather than tables and uses MongoDB query
language to communicate with the DB. MySQL is an extremely established
database with a huge community and great stability, and MongoDB is
a fairly new technology with growing community and is developed by
MongoDB Inc. MySQL is vertically scalable in which the load on the single
server can be increased by upgrading the RAM, SSD, or CPU, while in
the case of MongoDB, which is horizontally scalable, it needs to share
and add more servers in order to increase server load. MongoDB is the
preferred choice for high write loads and big datasets, and MySQL is a
perfect fit for applications that depends highly on multi-row transactions
like accounting systems. MongoDB is a great choice for applications with
dynamic structure and high data load such as that of a real-time analytics
application or a content management system.
Flask provides support for interacting with both MySQL and
MongoDB.There are various native drivers as well as ORM/ODM for
communication with the database. Flask-MySQL is a Flask extension that
allows native connection to MySQL; Flask-PyMongo is a native extension
for working with MongoDB in Flask and is recommended by MongoDB as
well. Flask-MongoEngine is a Flask extension, ODM for Flask to work with
MongoDB.Flask-SQLAlchemy is an ORM layer for Flask applications to
connect with MySQL.
CHAPTER 2 DATABASE MODELING INFLASK
30
Next, we’ll discuss about Flask-SQLAlchemy and Flask- MongoEngine
and create Flask CRUD applications using them.
Creating aFlask Application
withSQLAlchemy
Flask-SQLAlchemy is an extension for flask which adds support for
SQLAlchemy to the application. SQLAlchemy is a Python toolkit and
Object Relational Mapper that provides access to the SQL database using
Python. SQLAlchemy comes with enterprise-level persistence patterns
and efficient and high performing database access. Flask-SQLAlchemy
provides support for the following SQL-based database engines given the
appropriate DBAPI driver is installed:
• PostgreSQL
• MySQL
• Oracle
• SQLite
• Microsoft SQL Server
• Firebird SyBase
We’ll be using MySQL as the database engine in our application, so let’s
get started with installing SQLAlchemy and start setting up our application.
Let’s create a new directory called flask-MySQL, create a virtual
environment, and then install flask-sqlalchemy.
$ mkdir flask-mysql && cd flask-mysql
Now, create a virtual environment inside the directory using the
following command:
$ virtualenv venv
CHAPTER 2 DATABASE MODELING INFLASK
31
As discussed earlier, we can activate the virtual environment using the
following command:
$ source venv/bin/activate
Once the virtual environment is activated, let’s install flask-sqlalchemy.
Flask and Flask-SQLAlchemy can be installed using PIP with the
following command.
(venv)$ pip install flask flask-sqlalchemy
Other than SQLite, all other database engines need separate libraries
to be installed alongside Flask-SQLAlchemy for it to work. SQLAlchemy
uses MySQL-Python as the default DBAPI for connecting with MySQL.
Now, let’s install PyMySQL to enable MySQL connection with Flask-
SQLAlchemy.
(venv) $ pip install pymysql
Now, we should have everything we need to create our sample flask-
MySQL application with.
Let’s start by creating app.py which will contain the code for our
application. After creating the file, we’ll initiate the Flask application.
from flask import Flask
from flask_sqlalchemy import SQLAlchemy
app = Flask(__name__)
app.config['SQLALCHEMY_DATABASE_URI'] =
'mysql+pymysql://<mysql_username>:<mysql_password>@<mysql_
host>:<mysql_port>/<mysql_db>'
db = SQLAlchemy(app)
if __name__ == "__main__":
app.run(debug=True)
CHAPTER 2 DATABASE MODELING INFLASK

32
Here, we import the Flask framework and Flask-SQLAlchemy and
then initiate an instance of Flask. After that, we configure the SQLAlchemy
database URI to use our MySQL DB URI, and then we create an object of
SQLAlchemy named as db, which will handle our ORM-related activities.
Now, if you are using MySQL, make sure you supply connection strings
of a running MySQL server and that the database name supplied does exist.
Note Use environment variables for supplying database connection
strings in your applications.
Make sure that you have a running MySQL server to follow this
application. However, you can also use SQLite in its place by supplying the
SQLite config details in the SQLAlchemy database URI which should look
like this:
app.config['SQLALCHEMY_DATABASE_URI'] = 'sqlite:////tmp/
<db_name>.db'
In order to run the application, you need to execute the following code
in your terminal:
(venv) $ python app.py
And if there are no errors, you should see a similar output in your
terminal:
(venv) $ python app.py
*
Serving Flask app "app" (lazy loading)
*
Environment: production
WARNING: Do not use the development server in a production
environment.
Use a production WSGI server instead.
*
Debug mode: on
*
Running on http://127.0.0.1:5000/ (Press CTRL+C to quit)
CHAPTER 2 DATABASE MODELING INFLASK
33
*
Restarting with stat
*
Debugger is active!
*
Debugger PIN: 779-301-240
Creating anAuthor Database
We’ll now create an author database application which will provide
RESTful CRUD APIs. All the authors will be stored in a table titled “authors”.
After the declared db object, add the following lines of code to declare
a class as Authors which will hold the schema for the author table:
class Author (db.Model):
id = db.Column(db.Integer, primary_key=True)
name = db.Column(db.String(20))
specialisation = db.Column(db.String(50))
def __init__(self, name, specialisation):
self.name = name
self.specialisation = specialisation
def __repr__(self):
return '<Product %d>' % self.id
db.create_all()
With this code, we have created a model titled “Authors” which has three
fields—ID, name, and specialisation. Name and specialisation are strings,
but ID is a self-generated and auto-incremented integer which will serve
as a primary key. Notice the last line “db.create_all()” which instructs the
application to create all the tables and database specified in the application.
In order to serve JSON response from our API using the data returned by
SQLAlchemy, we need another library called marshmallow which is an add-
on to SQLAlchemy to serialize SQLAlchemy-returned data objects to JSON.
(venv)$ pip install flask-marshmallow
CHAPTER 2 DATABASE MODELING INFLASK
34
The following command will install the Flask version of marshmallow
in our application, and we’ll define our output schema from the Authors
model using marshmallow.
Add the following lines on the top, below the other imports in your
application file to import marshmallow.
from marshmallow_sqlalchemy import ModelSchema
from marshmallow import fields
After the db.create_all(), define your output schema using the
following code:
class AuthorSchema(ModelSchema):
class Meta(ModelSchema.Meta):
model = Authors
sqla_session = db.session
id = fields.Number(dump_only=True)
name = fields.String(required=True)
specialisation = fields.String(required=True)
The preceding code maps the variable attribute to field objects, and in
Meta, we define the model to relate to our schema. So this should help us
return JSON from SQLAlchemy.
After setting up our model and return schema, we can jump to creating
our endpoints. Let’s create our first GET /authors endpoint to return all
the registered authors. This endpoint will query for all the objects in the
Authors model and return them in JSON to the user. But before we write
the endpoint, edit the first import line to the following to import jsonify,
make_response, and request from Flask.
from flask import Flask, request, jsonify, make_response
And after the AuthorSchema, write your first endpoint /authors with
the following code:
CHAPTER 2 DATABASE MODELING INFLASK
35
@app.route('/authors', methods = ['GET'])
def index():
get_authors = Authors.query.all()
author_schema = AuthorSchema(many=True)
authors, error = author_schema.dump(get_authors)
return make_response(jsonify({"authors": authors}))
In this method, we are fetching all the authors in the DB, dumping it in
the AuthorSchema, and returning the result in JSON.
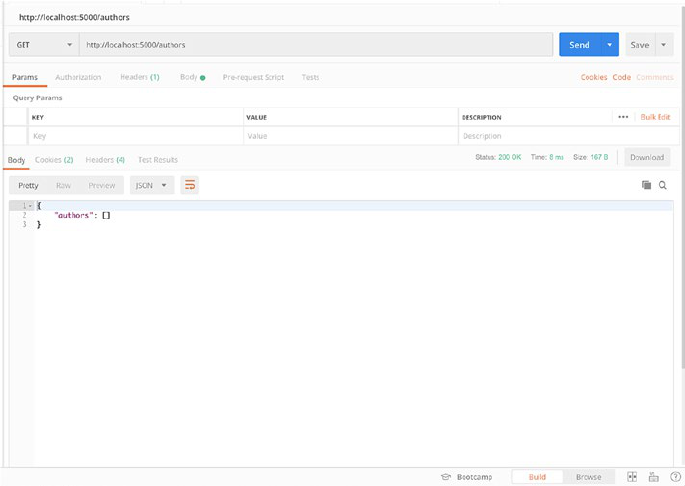
If you start the application and hit the endpoint now, it will return an
empty array since we haven’t added anything in the DB yet, but let’s go
ahead and try the endpoint.
Run the application using Python app.py, and then query the endpoint
using your preferred REST client. I’ll be using Postman to request the endpoint.
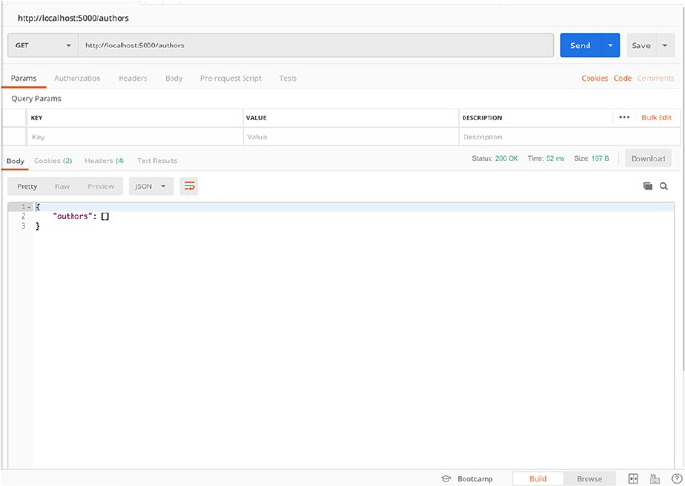
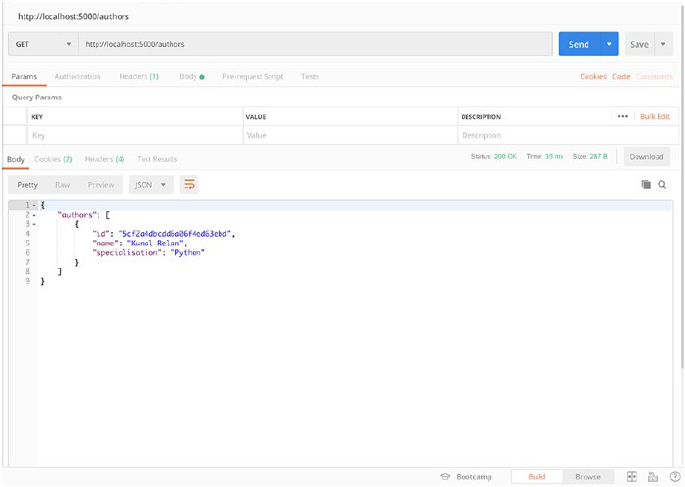
So just open your Postman and GET http://localhost:5000/authors
to query the endpoint (Figure2-1).
CHAPTER 2 DATABASE MODELING INFLASK
36
You should see a similar result in your Postman client. Now let’s create
the POST endpoint to add authors to our database.
We can add an object to the table by either directly creating an Authors
class in our method or by creating a classMethod to create a new object in
Authors class and then calling the method in our endpoint. Let’s add the
class Method in Authors class to create a new object.
Add the following code in Authors class after fields definition:
def create(self):
db.session.add(self)
db.session.commit()
return self
Figure 2-1. GET /authors response
CHAPTER 2 DATABASE MODELING INFLASK
37
The preceding method creates a new object with the data and then
returns the created object. Now your Authors class should look like this:
class Authors(db.Model):
id = db.Column(db.Integer, primary_key=True)
name = db.Column(db.String(20))
specialisation = db.Column(db.String(50))
def create(self):
db.session.add(self)
db.session.commit()
return self
def __init__(self, name, specialisation):
self.name = name
self.specialisation = specialisation
def __repr__(self):
return '<Author %d>' % self.id
Now we’ll create our POST authors endpoint and write the following
code after the GET endpoint:
@app.route('/authors', methods = ['POST'])
def create_author():
data = request.get_json()
author_schema = AuthorsSchema()
author, error = author_schema.load(data)
result = author_schema.dump(author.create()).data
return make_response(jsonify({"author": authors}),201)
The previous method will take the JSON request data, load the data in
the marshmallow schema, and then call the create method we created in
the Authors class which will return the created object with 201 status code.
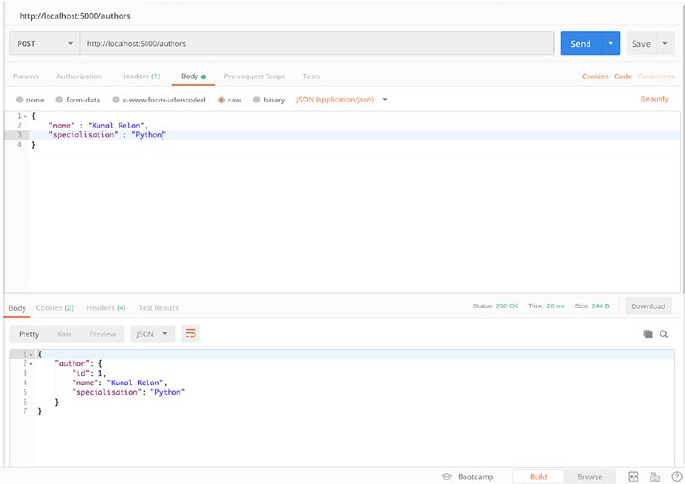
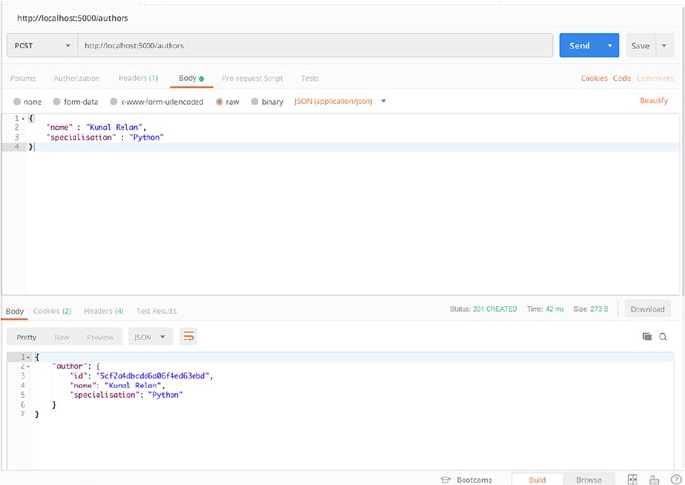
So let’s request the POST endpoint with sample data and check the
response. Let’s open Postman and POST /authors with JSON request body.
CHAPTER 2 DATABASE MODELING INFLASK
38
We need to add name and specialisation fields in our body to create the
object. Our sample request body should look like the following:
{
"name" : "Kunal Relan",
"specialisation" : "Python"
}
Once we request the endpoint, we shall get Author object in response
with our newly created Author. Notice that in this case, the return status
code is 201 which is the status code for a new object (Figure2-2).
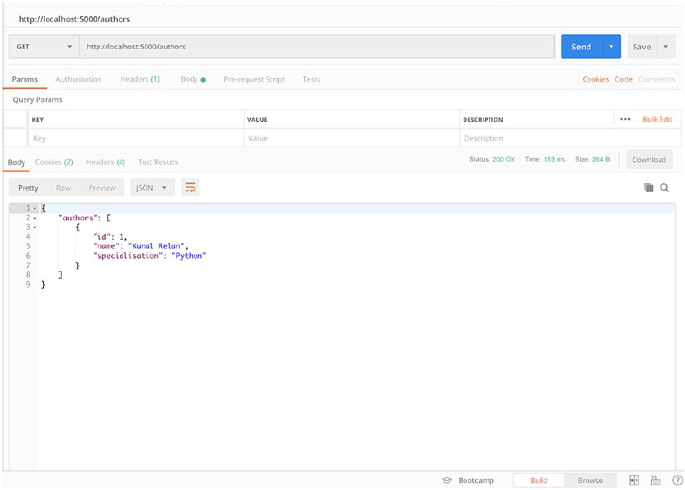
So now, if we request our GET /authors endpoint, we shall get our
newly created author in the response.
Figure 2-2. POST /authors endpoint
CHAPTER 2 DATABASE MODELING INFLASK
39
Revisit the GET /authors tab in Postman and hit the request again; this
time you should get an array of authors with our newly created Author
(Figure2-3).
So far, we have created endpoints to register new authors and to fetch
a list of authors. Next we’ll create an endpoint to return author using the
author ID and then update endpoint to update author details using author
ID and the last endpoint to delete an author using author ID.
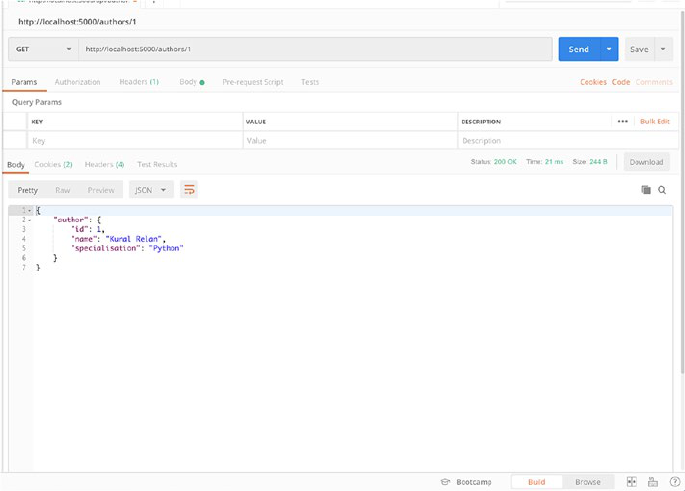
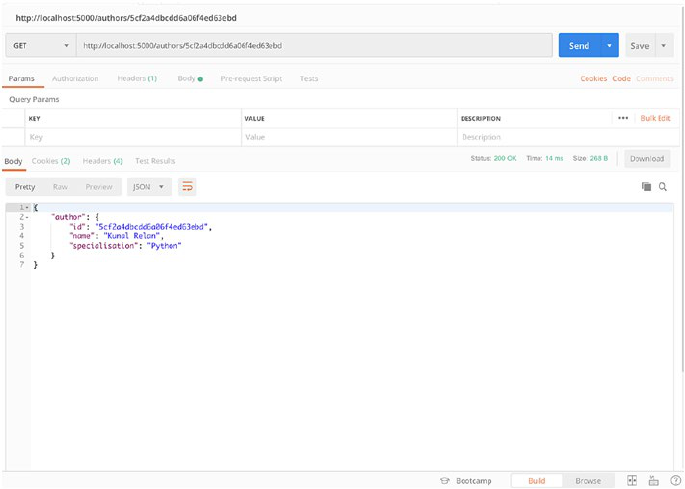
For GET author by ID, we’ll have a route like /authors/<id> which will
take author ID from the request parameter and find the matching author.
Add the following code for the GET author by ID endpoint below your
GET all authors route.
@app.route('/authors/<id>', methods = ['GET'])
def get_author_by_id(id):
Figure 2-3. GET all authors with new object
CHAPTER 2 DATABASE MODELING INFLASK
40
get_author = Authors.query.get(id)
author_schema = AuthorsSchema()
author, error = author_schema.dump(get_author)
return make_response(jsonify({"author": author}))
Next we need to test this endpoint, and we’ll request for author with
ID 1 as we see in the preceding GET all authors API response, so let’s open
Postman again and request /authors/1 on our application server to check
the response.
As you see in the preceding screenshot, we are returning an object
with a key author containing the author object with ID 1. You can now
add more authors using the POST endpoint and fetch them using the
returned ID.
Figure 2-4. GET author by ID endpoint
CHAPTER 2 DATABASE MODELING INFLASK
41
Next, we need to create an endpoint to update the author name or
specialisation, and for updating any object, we’ll use PUT HTTP verb as we
discussed in the “Introduction to RESTful Services” section. This endpoint
will be similar to the GET authors by ID endpoint but will use PUT verb
rather than the GET one.
Here is the code for the PUT endpoint to update an author object
@app.route('/authors/<id>', methods = ['PUT'])
def update_author_by_id(id):
data = request.get_json()
get_author = Authors.query.get(id)
if data.get('specialisation'):
get_author.specialisation = data['specialisation']
if data.get('name'):
get_author.name = data['name']
db.session.add(get_author)
db.session.commit()
author_schema = AuthorsSchema(only=['id', 'name',
'specialisation'])
author, error = author_schema.dump(get_author)
return make_response(jsonify({"author": author}))
So let’s test our PUT endpoint and change the specialisation of
author ID 1.
We’ll PUT the following JSON body to update the author specialisation.
{
"specialisation" : "Python Applications"
}
CHAPTER 2 DATABASE MODELING INFLASK
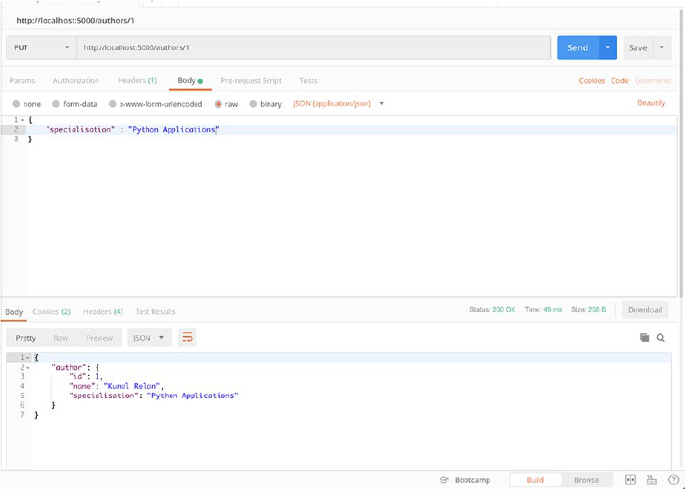
42
As you can see in Figure2-5, we updated the author with ID 1, and now
the specialisation has been updated to “Python Applications”.
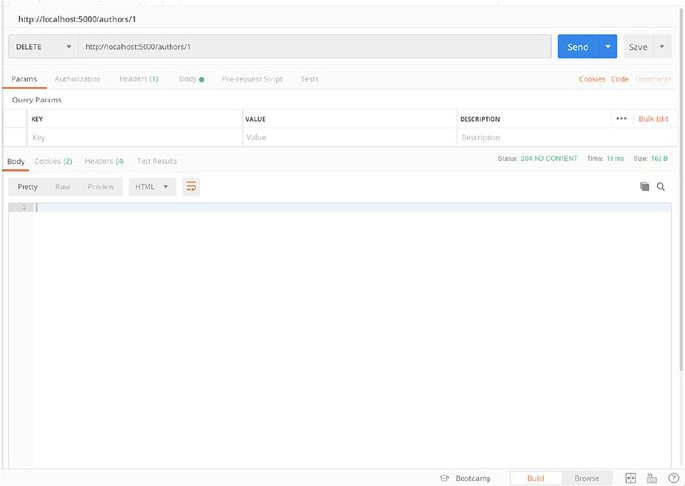
Now, the last endpoint to remove an author from the database. Add the
following code to add a delete endpoint which will look like get author by
ID endpoint but will use DELETE verb and return 204 status code with no
content.
@app.route('/authors/<id>', methods = ['DELETE'])
def delete_author_by_id(id):
get_author = Authors.query.get(id)
db.session.delete(get_author)
db.session.commit()
return make_response("",204)
Figure 2-5. UPDATE author by ID endpoint
CHAPTER 2 DATABASE MODELING INFLASK
43
And now we’ll request the delete endpoint to remove our author with
ID 1 (Figure2-6).
And now if you request GET all authors endpoint, it shall return an
empty array.
Now your app.py should have the following code:
from flask import Flask, request, jsonify, make_response
from flask_sqlalchemy import SQLAlchemy
from marshmallow_sqlalchemy import ModelSchema
from marshmallow import fields
app = Flask(__name__)
app.config["SQLALCHEMY_DATABASE_URI"] = 'mysql+pymysql://<mysql_
username>:<mysql_password>@<mysql_host>:<mysql_port>/<mysql_db>'
Figure 2-6. DELETE author by ID
CHAPTER 2 DATABASE MODELING INFLASK
44
db = SQLAlchemy(app)
class Authors(db.Model):
id = db.Column(db.Integer, primary_key=True)
name = db.Column(db.String(20))
specialisation = db.Column(db.String(50))
def create(self):
db.session.add(self)
db.session.commit()
return self
def __init__(self, name, specialisation):
self.name = name
self.specialisation = specialisation
def __repr__(self):
return '<Author %d>' % self.id
db.create_all()
class AuthorsSchema(ModelSchema):
class Meta(ModelSchema.Meta):
model = Authors
sqla_session = db.session
id = fields.Number(dump_only=True)
name = fields.String(required=True)
specialisation = fields.String(required=True)
@app.route('/authors', methods = ['GET'])
def index():
get_authors = Authors.query.all()
author_schema = AuthorsSchema(many=True)
authors, error = author_schema.dump(get_authors)
return make_response(jsonify({"authors": authors}))
CHAPTER 2 DATABASE MODELING INFLASK
45
@app.route('/authors/<id>', methods = ['GET'])
def get_author_by_id(id):
get_author = Authors.query.get(id)
author_schema = AuthorsSchema()
author, error = author_schema.dump(get_author)
return make_response(jsonify({"author": author}))
@app.route('/authors/<id>', methods = ['PUT'])
def update_author_by_id(id):
data = request.get_json()
get_author = Authors.query.get(id)
if data.get('specialisation'):
get_author.specialisation = data['specialisation']
if data.get('name'):
get_author.name = data['name']
db.session.add(get_author)
db.session.commit()
author_schema = AuthorsSchema(only=['id', 'name',
'specialisation'])
author, error = author_schema.dump(get_author)
return make_response(jsonify({"author": author}))
@app.route('/authors/<id>', methods = ['DELETE'])
def delete_author_by_id(id):
get_author = Authors.query.get(id)
db.session.delete(get_author)
db.session.commit()
return make_response("",204)
@app.route('/authors', methods = ['POST'])
def create_author():
data = request.get_json()
author_schema = AuthorsSchema()
CHAPTER 2 DATABASE MODELING INFLASK
46
author, error = author_schema.load(data)
result = author_schema.dump(author.create()).data
return make_response(jsonify({"author": result}),200)
if __name__ == "__main__":
app.run(debug=True)
So, we have now created and tested our sample Flask-MySQL CRUD
application. We’ll go over complex object relationships using Flask-
SQLAlchemy in the later chapters, and next we’ll create a similar Flask
CRUD application using MongoEngine.
Sample Flask MongoEngine Application
MongoDB, as we discussed, is a powerful document-based NoSQL
database. It uses a JSON-like document schema structure and is highly
scalable. In this example, we’ll create an Authors database CRUD
application again, but this time we’ll use MongoEngine rather than
SQLAlchemy. MongoEngine adds MongoDB support for Flask and is quite
similar to SQLAlchemy, but it lacks a couple of features due to the fact that
MongoDB is still not widely used with Flask.
Let’s get started with setting up our project for the flask-mongodb
application. Just like the last time, create a new directory flask-mongodb
and initiate a new virtual environment in there.
$ mkdir flask-mongodb && cd flask-mongodb
After creating the directory, let’s spawn our virtual environment and
activate it.
$ virtualenv venv
$ source venv/bin/activate
CHAPTER 2 DATABASE MODELING INFLASK

47
Now let’s install our project dependencies using PIP.
(venv) $ pip install flask
We’ll need Flask-MongoEngine and Flask-marshmallow, so let’s install
them as well.
(venv) $ pip install flask-mongoengine
(venv) $ pip install flask-marshmallow
After we are done installing the dependencies, we can create our app.
py file and start writing the code.
So, the following code is the skeleton of the app where are import
flask, create an app instance, and then import MongoEngine to create a db
instance.
from flask import Flask, request, jsonify, make_response
from flask_mongoengine import MongoEngine
from marshmallow import Schema, fields, post_load
from bson import ObjectId
app = Flask(__name__)
app.config['MONGODB_DB'] = 'authors'
db = MongoEngine(app)
Schema.TYPE_MAPPING[ObjectId] = fields.String
if __name__ == "__main__":
app.run(debug=True)
Here TYPE_MAAPPING helps marshmallow understand the ObjectId
type while serializing and de-serializing the data.
Note We don’t need db.create_all() here since MongoDB will create
it on the fly, during the first time you save the value in your collection.
CHAPTER 2 DATABASE MODELING INFLASK
48
If you now run the application, your server should start, but it’ll
have nothing to process but just create the db instance and make the
connection. Next, let’s create an author model using MongoEngine.
The code for creating the author model is fairly simple in this case and
looks like this:
class Authors(db.Document):
name = db.StringField()
specialisation = db.StringField()
Let’s now create the marshmallow schema which we’ll need to dump
our db objects into serialized JSON.
class AuthorsSchema(Schema):
name = fields.String(required=True)
specialisation = fields.String(required=True)
The preceding code lets us create the schema which we’ll use to
map our db object to marshmallow. Notice that here we are not using
marshmallow-sqlalchemy which has an extra layer of support for
SQLAlchemy and the code looks slightly changed due to that here.
Now we can write our GET endpoint to fetch all the authors from our DB.
@app.route('/authors', methods = ['GET'])
def index():
get_authors = Authors.objects.all()
author_schema =AuthorsSchema(many=True,only=['id','name',
'specialisation'])
authors, error = author_schema.dump(get_authors)
return make_response(jsonify({"authors": authors}))
CHAPTER 2 DATABASE MODELING INFLASK

49
Note MongoEngine returns the unique ObjectId in “id” field which is
autogenerated and hence not specified in the schema.
Now, let’s start the application again using the following command.
(venv) $ python app.py
If there were no errors, you should see the following output, and your
application should be up and running.
(venv) $ python app.py
*
Serving Flask app "app" (lazy loading)
*
Environment: production
WARNING: Do not use the development server in a production
environment.
Use a production WSGI server instead.
*
Debug mode: on
*
Running on http://127.0.0.1:5000/ (Press CTRL+C to quit)
*
Restarting with stat
*
Debugger is active!
*
Debugger PIN: 779-301-240
CHAPTER 2 DATABASE MODELING INFLASK
50
Now that our GET endpoint is working (Figure2-7), let’s create a POST
/authors endpoint to register authors in the database.
@app.route('/authors', methods = ['POST'])
def create_author():
data = request.get_json()
author = Authors(name=data['name'],specialisation=data
['specialisation'])
author.save()
author_schema = AuthorsSchema(only=['name',
'specialisation'])
authors, error = author_schema.dump(author)
return make_response(jsonify({"author": authors}),201)
Figure 2-7. Requesting GET /authors
CHAPTER 2 DATABASE MODELING INFLASK
51
The preceding code puts the request JSON data in data variable,
creates an object of class Authors, and invokes the save() method on it.
Next it creates a schema using the AuthorsSchema and dumps the new
object to return it back to the user confirming the user was created with a
201 status code.
Now re-run the application and request the POST endpoint with
sample author details to register.
We’ll use the same JSON data to post to this application like we did in
the other application.
{
"name" : "Kunal Relan",
"specialisation" : "Python"
}
Figure 2-8. Requesting POST /authors
CHAPTER 2 DATABASE MODELING INFLASK
52
Upon requesting you should get a similar output to what you see in
Figure2-8, and now just to confirm that our GET endpoint works fine, we’ll
request it again to see if it returns the data.
As you see in Figure2-9, we get our recently registered author in the
GET /authors endpoint.
Next we’ll create an endpoint to return authors using the author ID and
then update endpoint to update author details using author ID and the last
endpoint to delete an author using author ID.
For GET author by ID, we’ll have a route like /authors/<id> which will
take author ID from the request parameter and find the matching author.
Add the following code for the GET author by ID endpoint below your
GET all authors route.
Figure 2-9. Requesting GET /authors
CHAPTER 2 DATABASE MODELING INFLASK
53
@app.route('/authors/<id>', methods = ['GET'])
def get_author_by_id(id):
get_author = Authors.objects.get_or_404(id=ObjectId(id))
author_schema = AuthorsSchema(only=['id', 'name',
'specialisation'])
author, error = author_schema.dump(get_author)
return make_response(jsonify({"author": author}))
And now when you request the endpoint /authors/<id>, it shall return
the user with the matching ObjectId (Figure2-10).
Figure 2-10. GET author by ID
CHAPTER 2 DATABASE MODELING INFLASK
54
So next we’ll create PUT endpoint to update author info using author
ID.Add the following code for the PUT author endpoint.
@app.route('/authors/<id>', methods = ['PUT'])
def update_author_by_id(id):
data = request.get_json()
get_author = Authors.objects.get(id=ObjectId(id))
if data.get('specialisation'):
get_author.specialisation = data['specialisation']
if data.get('name'):
get_author.name = data['name']
get_author.save()
get_author.reload()
author_schema = AuthorsSchema(only=['id', 'name',
'specialisation'])
author, error = author_schema.dump(get_author)
return make_response(jsonify({"author": author}))
Open Postman and hit the same route as we did in the other module
to update author info, but here use the ObjectID returned in the GET
endpoint instead.
CHAPTER 2 DATABASE MODELING INFLASK
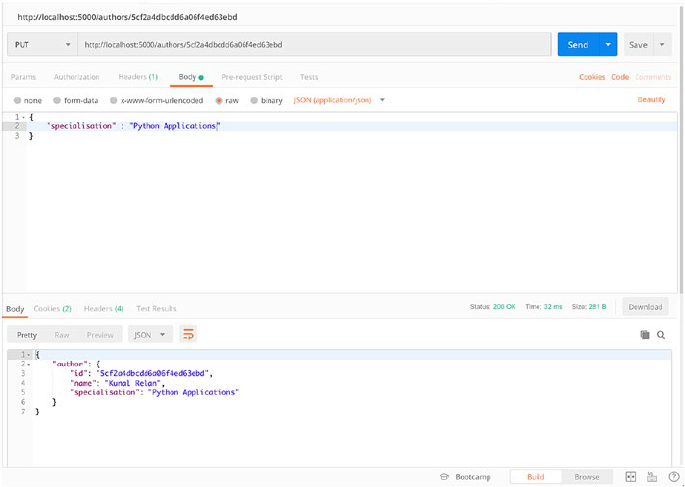
55
As you can see in Figure2-11, we were able to update the author
specialisation using the PUT endpoint. Next we’ll create the DELETE endpoint
to delete an author using the author ID to complete our CRUD application.
Add the following code to create the DELETE endpoint to our application.
@app.route('/authors/<id>', methods = ['DELETE'])
def delete_author_by_id(id):
Authors.objects(id=ObjectId(id)).delete()
return make_response("",204)
Now let’s delete our newly created author using the author ID, and
similar to the last application, this endpoint will not return any data but a
204 status code.
Request the delete endpoint using the author ID you did previously,
and it shall return a similar response as in Figure2-12.
Figure 2-11. PUT author endpoint
CHAPTER 2 DATABASE MODELING INFLASK
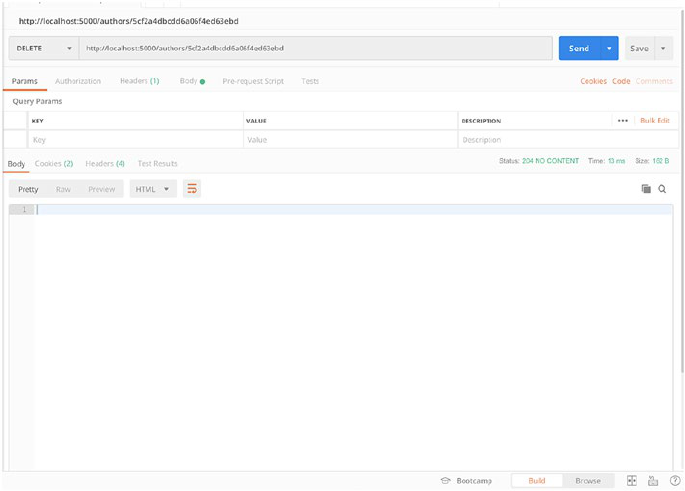
56
So this wraps up our flask-mongo CRUD application, and the final
code in your app.py should look like this.
from flask import Flask, request, jsonify, make_response
from flask_mongoengine import MongoEngine
from marshmallow import Schema, fields, post_load
from bson import ObjectId
app = Flask(__name__)
app.config['MONGODB_DB'] = 'DB_NAME'
db = MongoEngine(app)
Schema.TYPE_MAPPING[ObjectId] = fields.String
class Authors(db.Document):
name = db.StringField()
Figure 2-12. DELETE author endpoint
CHAPTER 2 DATABASE MODELING INFLASK
57
specialisation = db.StringField()
class AuthorsSchema(Schema):
name = fields.String(required=True)
specialisation = fields.String(required=True)
@app.route('/authors', methods = ['GET'])
def index():
get_authors = Authors.objects.all()
author_schema = AuthorsSchema(many=True, only=['id',
'name', 'specialisation'])
authors, error = author_schema.dump(get_authors)
return make_response(jsonify({"authors": authors}))
@app.route('/authors/<id>', methods = ['GET'])
def get_author_by_id(id):
get_author = Authors.objects.get_or_404(id=ObjectId(id))
author_schema = AuthorsSchema(only=['id', 'name',
'specialisation'])
author, error = author_schema.dump(get_author)
return make_response(jsonify({"author": author}))
@app.route('/authors/<id>', methods = ['PUT'])
def update_author_by_id(id):
data = request.get_json()
get_author = Authors.objects.get(id=ObjectId(id))
if data.get('specialisation'):
get_author.specialisation = data['specialisation']
if data.get('name'):
get_author.name = data['name']
get_author.save()
get_author.reload()
CHAPTER 2 DATABASE MODELING INFLASK
58
author_schema = AuthorsSchema(only=['id', 'name',
'specialisation'])
author, error = author_schema.dump(get_author)
return make_response(jsonify({"author": author}))
@app.route('/authors/<id>', methods = ['DELETE'])
def delete_author_by_id(id):
Authors.objects(id=ObjectId(id)).delete()
return make_response("",204)
@app.route('/authors', methods = ['POST'])
def create_author():
data = request.get_json()
author = Authors(name=data['name'],specialisation=data
['specialisation'])
author.save()
author_schema = AuthorsSchema(only=['id','name',
'specialisation'])
authors, error = author_schema.dump(author)
return make_response(jsonify({"author": authors}),201)
if __name__ == "__main__":
app.run(debug=True)
Conclusion
So now we have covered the introduction to SQLAlchemy and
MongoEngine and have created sample CRUD applications using them. In
the next chapter, we’ll discuss architecting REST APIs in detail and set up
the base for our Flask REST API application.
CHAPTER 2 DATABASE MODELING INFLASK
59
© Kunal Relan 2019
K. Relan, Building REST APIs with Flask, https://doi.org/10.1007/978-1-4842-5022-8_3
CHAPTER 3
CRUD Application
withFlask (Part 1)
In the last chapter, we discussed about databases and implemented
NoSQL- and SQL-based examples. In this chapter we’ll be creating a
RESTful Flask application from scratch. Here we’ll maintain a database of
Author objects alongside the books they have written. This application will
have a user authentication mechanism to only allow logged-in users to
execute certain functions. We’ll now create the following API endpoints for
our REST applications:
1. GET /authors: This gets list of authors alongside
their books.
2. GET /authors/<id>: This gets author with the
specified ID alongside their books.
3. POST /authors: This creates a new Author object.
4. PUT /authors/<id>: This will edit author object with
the given ID.
5. DELETE /authors/<id>: This will delete the author
with the given ID.
6. GET /books: This will return all the books.
7. GET /books/<id>: This gets the book with the
specified ID.
60
8. POST /books: This creates a new book object.
9. PUT / books/<id>: This will edit book object with
the given ID.
10. DELETE /book/<id>: This will delete the book with
the given ID.
Let’s jump right into it, and we’ll start by creating a new project and
name it author-manager. So create a new directory and start by creating a
new virtual environment.
$ mkdir author-manager && cd author-manager
$ virtualenv venv
And now we shall have our virtual environment setup; next we need to
activate the environment and install the dependencies just like we did in
the previous chapter.
We’ll start by installing the following dependencies to start with and
add on more as we need them.
(venv) $ pip install flask flask-sqlalchemy marshmallow-
sqlalchemy
We’ll also use blueprints in this application. Flask uses the concept
of blueprints to make application components and support common
patterns across the application. Blueprints help create smaller modules for
the application making it easy to manage. Blueprint is highly valuable for
larger applications and simplifies how large applications work.
We’ll structure the application into small modules and keep all our
application code in the /src folder inside our app folder. So, go ahead and
create a src folder inside your current working directory and then create
run.py file inside it.
(venv) $ mkdir src && cd src
CHAPTER 3 CRUD APPLICATION WITHFLASK (PART 1)
61
In src folder we’ll have our run.py file and another directory called api
which will export our modules, so go ahead and create an api folder inside
src. We’ll initialize our Flask app in main.py file inside src and then create
another file run.py which will import main.py, config file, and run the
application.
Let’s start with main.py.
Add the following code to import the needed libraries and then
initialize the app object. Here we’ll define a function which will accept app
config and then initialize our application.
import os
from flask import Flask
from flask import jsonify
app = Flask(__name__)
if os.environ.get('WORK_ENV') == 'PROD':
app_config = ProductionConfig
elif os.environ.get('WORK_ENV') == 'TEST':
app_config = TestingConfig
else:
app_config = DevelopmentConfig
app.config.from_object(app_config)
if __name__ == "__main__":
app.run(port=5000, host="0.0.0.0", use_reloader=False)
So that is our skeleton of main.py; next we’ll create run.py to call app
and run the application. Later we’ll add routes, initialize our db object, and
configure logging in main.py.
Add the following code to run.py to import create_app and run the
application.
CHAPTER 3 CRUD APPLICATION WITHFLASK (PART 1)

62
from main import app as application
if __name__ == "__main__":
application.run()
Here we have defined the config, imported create_app, and initialized
the application. Next we’ll move the config to a separate directory and
specify environment-specific configuration. We’ll create another directory
/api inside src and export config, models, and routes from api directory,
so now create a directory inside src called api and then create another
directory called config inside api.
Note Create an empty file called __init__.py inside every directory
for Python to know it contains modules.
Now create config.py inside config directory and also __init__.py. Next
add the following code in config.py
class Config(object):
DEBUG = False
TESTING = False
SQLALCHEMY_TRACK_MODIFICATIONS = False
class ProductionConfig(Config):
SQLALCHEMY_DATABASE_URI = <Production DB URL>
class DevelopmentConfig(Config):
DEBUG = True
SQLALCHEMY_DATABASE_URI = <Development DB URL>
SQLALCHEMY_ECHO = False
class TestingConfig(Config):
TESTING = True
SQLALCHEMY_DATABASE_URI = <Testing DB URL>
SQLALCHEMY_ECHO = False
CHAPTER 3 CRUD APPLICATION WITHFLASK (PART 1)
63
The preceding code defines the basic config that we did in main.py and
then adds environment-specific configuration on the top.
So alongside main, we import development, testing, and production
config from config module and import OS module to read environment
modules. After that we check if WORK_ENV environment variable is
supplied to start the application accordingly; otherwise we start the
application using development config by default.
So we have supplied the DB config already but haven’t initialized DB in
our application; next, let’s do that now.
Now create another directory inside api called utils which will hold our
utility modules; for now we’ll initiate our db object there.
Create database.py inside utility and add the following code in it.
from flask_sqlalchemy import SQLAlchemy
db = SQLAlchemy()
And this shall initiate to create our db object; next we’ll import the db
object in main.py and initialize it.
Add the following code where we import libraries to import the db
object.
from api.utils.database import db
def create_app(config):
app = Flask(__name__)
app.config.from_object(config)
db.init_app(app)
with app.app_context():
db.create_all()
return app
And update create_app to initialize the db object.
CHAPTER 3 CRUD APPLICATION WITHFLASK (PART 1)
64
So now we have the base of our REST application, and your app
structure should look like this.
venv/
src
├── api/
│ ├── __init__.py
│ ├── utils
│ │ └── __init__.py
│ │ └── database.py
│ └── config
│ └── __init__.py
│ └── database.py
├── run.py
├── main.py
└── requirements.txt
Next let’s define our db schema. Here we’ll deal with two resources,
namely, author and book. So let’s create book schema first. We’ll put all the
schema inside a directory called models in api directory, so go ahead and
initiate the models module and then create books.py
Add the following code to books.py to create the books model.
from api.utils.database import db
from marshmallow_sqlalchemy import ModelSchema
from marshmallow import fields
class Book(db.Model):
__tablename__ = 'books'
id = db.Column(db.Integer, primary_key=True,
autoincrement=True)
title = db.Column(db.String(50))
year = db.Column(db.Integer)
CHAPTER 3 CRUD APPLICATION WITHFLASK (PART 1)
65
author_id = db.Column(db.Integer, db.ForeignKey('authors.id'))
def __init__(self, title, year, author_id=None):
self.title = title
self.year = year
self.author_id = author_id
def create(self):
db.session.add(self)
db.session.commit()
return self
class BookSchema(ModelSchema):
class Meta(ModelSchema.Meta):
model = Book
sqla_session = db.session
id = fields.Number(dump_only=True)
title = fields.String(required=True)
year = fields.Integer(required=True)
author_id = fields.Integer()
Here we are importing db module, marshmallow, like we did earlier to
map the fields and help us return JSON objects.
Notice that we have a field here author_id which is a foreign key to ID
field in authors model. Next we’ll create the authors.py and create authors
model.
from api.utils.database import db
from marshmallow_sqlalchemy import ModelSchema
from marshmallow import fields
from api.models.books import BookSchema
class Author(db.Model):
__tablename__ = 'authors'
CHAPTER 3 CRUD APPLICATION WITHFLASK (PART 1)
66
id = db.Column(db.Integer, primary_key=True,
autoincrement=True)
first_name = db.Column(db.String(20))
last_name = db.Column(db.String(20))
created = db.Column(db.DateTime, server_default=db.func.now())
books = db.relationship('Book', backref='Author',
cascade="all, delete-orphan")
def __init__(self, first_name, last_name, books=[]):
self.first_name = first_name
self.last_name = last_name
self.books = books
def create(self):
db.session.add(self)
db.session.commit()
return self
class AuthorSchema(ModelSchema):
class Meta(ModelSchema.Meta):
model = Author
sqla_session = db.session
id = fields.Number(dump_only=True)
first_name = fields.String(required=True)
last_name = fields.String(required=True)
created = fields.String(dump_only=True)
books = fields.Nested(BookSchema, many=True,
only=['title','year','id']
The preceding code will create our authors model. Notice we also
import the books model here and create the relationship between the
author and their books so that when we retrieve the author object, we can
also get the books associated with their ID, and thus we have set up a one-
to- many relationship between author and books in this model.
CHAPTER 3 CRUD APPLICATION WITHFLASK (PART 1)
67
Now once we have our DB schema in place, next we need is to start
creating our routes, but before we jump onto writing the routes, there is
one more thing we should do as part of modularizing our application and
create another module responses.py to create a standard class of HTTP
responses.
After that we’ll create global HTTP configurations in main.py
Create responses.py inside api/utils, and here we’ll use jsonify and
make_response from Flask library to create standard responses for our APIs.
So write the following code in responses.py to initiate the module.
from flask import make_response, jsonify
def response_with(response, value=None, message=None,
error=None, headers={}, pagination=None):
result = {}
if value is not None:
result.update(value)
if response.get('message', None) is not None:
result.update({'message': response['message']})
result.update({'code': response['code']})
if error is not None:
result.update({'errors': error})
if pagination is not None:
result.update({'pagination': pagination})
headers.update({'Access-Control-Allow-Origin': '
*
'})
headers.update({'server': 'Flask REST API'})
return make_response(jsonify(result), response['http_
code'], headers)
CHAPTER 3 CRUD APPLICATION WITHFLASK (PART 1)

68
The preceding code exposes a function response_with for our API
endpoints to use and respond back; alongside this we’ll also create
standard response codes and messages.
So here is a list of responses that our application will support.
Table 3-1 provides the HTTP responses we’ll use in our application. Add
the following code above response_with to define them in responses.py.
INVALID_FIELD_NAME_SENT_422 = {
"http_code": 422,
"code": "invalidField",
"message": "Invalid fields found"
}
INVALID_INPUT_422 = {
"http_code": 422,
Table 3-1. HTTP responses
200 200 Ok Standard response to HTTP requests
201 201 Created Implies the request was fulfilled and a new
resource has been created
204 204 No Content Successful request and no data has been returned
400 400 Bad Request Implies that the server can’t process the request
due to a client error
403 403 Not Authorized Valid request but the requesting client is not
authorized to obtain the resource
404 404 Not Found The requested resource doesn’t exist on the server
422 422 Unprocessable Entity Request can’t be processed due to semantic error
500 500 Internal Server Error Generic error to imply an unexpected condition in
server
CHAPTER 3 CRUD APPLICATION WITHFLASK (PART 1)
69
"code": "invalidInput",
"message": "Invalid input"
}
MISSING_PARAMETERS_422 = {
"http_code": 422,
"code": "missingParameter",
"message": "Missing parameters."
}
BAD_REQUEST_400 = {
"http_code": 400,
"code": "badRequest",
"message": "Bad request"
}
SERVER_ERROR_500 = {
"http_code": 500,
"code": "serverError",
"message": "Server error"
}
SERVER_ERROR_404 = {
"http_code": 404,
"code": "notFound",
"message": "Resource not found"
}
UNAUTHORIZED_403 = {
"http_code": 403,
"code": "notAuthorized",
"message": "You are not authorised to execute this."
}
CHAPTER 3 CRUD APPLICATION WITHFLASK (PART 1)
70
SUCCESS_200 = {
'http_code': 200,
'code': 'success'
}
SUCCESS_201 = {
'http_code': 201,
'code': 'success'
}
SUCCESS_204 = {
'http_code': 204,
'code': 'success'
}
And now we shall have our working responses.py module; next we’ll
add global HTTP configurations for handling errors.
Next import the status and response_with function in main.py. Add the
following lines in the top section of main.py import.
from api.utils.responses import response_with
import api.utils.responses as resp
And then just above db.init_app function, add the following code to
configure global HTTP configs.
@app.after_request
def add_header(response):
return response
@app.errorhandler(400)
def bad_request(e):
logging.error(e)
return response_with(resp.BAD_REQUEST_400)
CHAPTER 3 CRUD APPLICATION WITHFLASK (PART 1)
71
@app.errorhandler(500)
def server_error(e):
logging.error(e)
return response_with(resp.SERVER_ERROR_500)
@app.errorhandler(404)
def not_found(e):
logging.error(e)
return response_with(resp. SERVER_ERROR_404)
The following code adds global responses in error situations. Now your
main.py should look like this.
from flask import Flask
from flask import jsonify
from api.utils.database import db
from api.utils.responses import response_with
import api.utils.responses as resp
app = Flask(__name__)
if os.environ.get('WORK_ENV') == 'PROD':
app_config = ProductionConfig
elif os.environ.get('WORK_ENV') == 'TEST':
app_config = TestingConfig
else:
app_config = DevelopmentConfig
app.config.from_object(app_config)
db.init_app(app)
with app.app_context():
db.create_all()
# START GLOBAL HTTP CONFIGURATIONS
@app.after_request
CHAPTER 3 CRUD APPLICATION WITHFLASK (PART 1)
72
def add_header(response):
return response
@app.errorhandler(400)
def bad_request(e):
logging.error(e)
return response_with(resp.BAD_REQUEST_400)
@app.errorhandler(500)
def server_error(e):
logging.error(e)
return response_with(resp.SERVER_ERROR_500)
@app.errorhandler(404)
def not_found(e):
logging.error(e)
return response_with(resp.SERVER_ERROR_404)
db.init_app(app)
with app.app_context():
db.create_all()
if __name__ == "__main__":
app.run(port=5000, host="0.0.0.0", use_reloader=False)
Next we need to create our API endpoints and include them in our
main.py using Blueprints.
We’ll put our routes inside a directory named routes in api, so go ahead
and create the folder; next add authors.py to create the books route.
Next import the required modules using the following code.
from flask import Blueprint
from flask import request
from api.utils.responses import response_with
from api.utils import responses as resp
CHAPTER 3 CRUD APPLICATION WITHFLASK (PART 1)
73
from api.models.authors import Author, AuthorSchema
from api.utils.database import db
Here we import Blueprint and request modules from Flask, response_
with and resp method from responses util, Author schema, and the db object.
Next we’ll configure the Blueprint.
author_routes = Blueprint("author_routes", __name__)
Once done, we can start with our POST author route, and add the
following code below book_routes.
@author_routes.route('/', methods=['POST'])
def create_author():
try:
data = request.get_json()
author_schema = AuthorSchema()
author, error = author_schema.load(data)
result = author_schema.dump(author.create()).data
return response_with(resp.SUCCESS_201, value={"author":
result})
except Exception as e:
print e
return response_with(resp.INVALID_INPUT_422)
So the preceding code will take JSON data from the request and
execute create method on the Author schema and then return the
response using response_with method, supplying the response type which
is 201 for this endpoint and the data value which is a JSON object with the
newly created author.
Now before we set up all other routes, let’s register author routes
Blueprint in the app and run the application to test if everything is alright.
CHAPTER 3 CRUD APPLICATION WITHFLASK (PART 1)
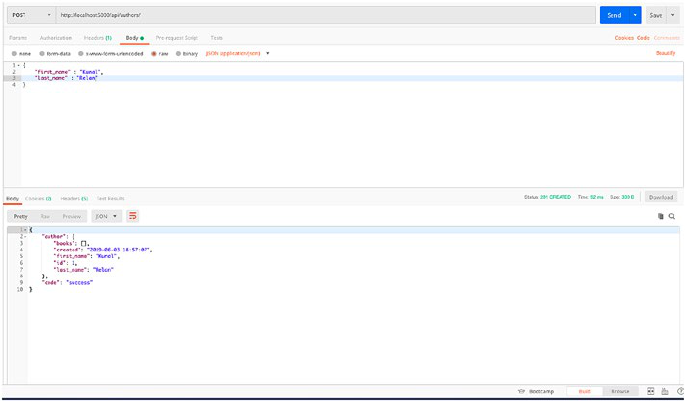
74
So in your main.py, import the author routes and then register the
blueprint.
from api.routes.authors import author_routes
And then add the following line right above @app.after_request.
app.register_blueprint(author_routes, url_prefix='/api/
authors')
Now run the application using Python run.py command, and our Flask
server should be up and running.
Let’s try out POST authors endpoint, so open up postmand request at
http://localhost:5000/api/authors/ with the following JSON data.
{
"first_name" : "kunal",
"last_name" : "Relan"
}
Figure 3-1. POST authors endpoint
CHAPTER 3 CRUD APPLICATION WITHFLASK (PART 1)
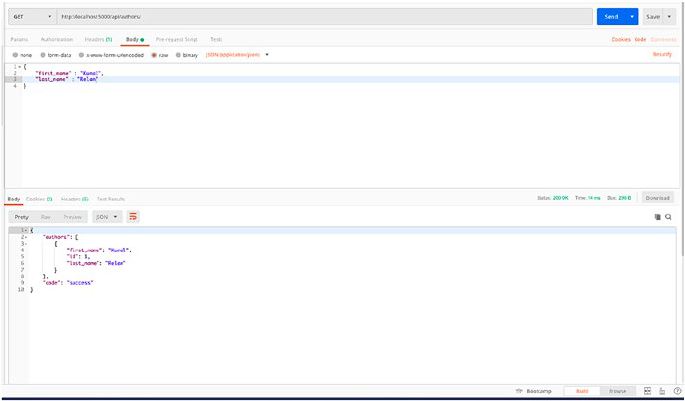
75
As you can see, books is an empty array since we haven’t created any
book yet; next let’s add GET authors endpoint (Figure 3-1).
@author_routes.route('/', methods=['GET'])
def get_author_list():
fetched = Author.query.all()
author_schema = AuthorSchema(many=True, only=['first_name',
'last_name','id'])
authors, error = author_schema.dump(fetched)
return response_with(resp.SUCCESS_200, value={"authors":
authors})
The preceding code will add GET all authors route, and here we’ll
respond with an array of authors only containing their ID, First Name, and
Last Name. So let’s go ahead and test it.
As you can see in Figure3-2, the endpoint responded with an array of
authors.
Figure 3-2. GET authors route
CHAPTER 3 CRUD APPLICATION WITHFLASK (PART 1)
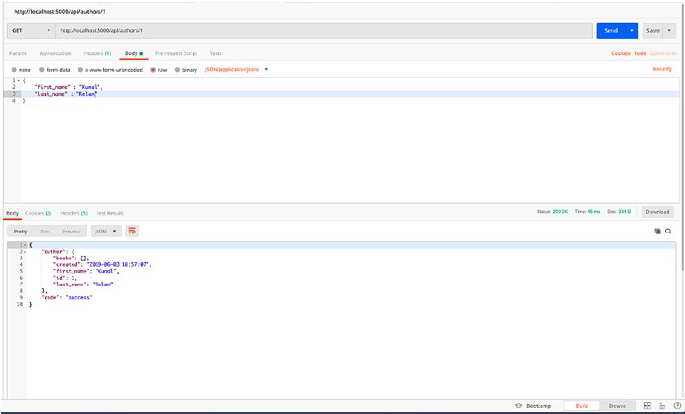
76
Next let’s add another GET route to fetch a specific author using their
ID and add the following code to add the route.
@author_routes.route('/<int:author_id>', methods=['GET'])
def get_author_detail(author_id):
fetched = Author.query.get_or_404(author_id)
author_schema = AuthorSchema()
author, error = author_schema.dump(fetched)
return response_with(resp.SUCCESS_200, value={"author":
author})
The preceding code takes an integer from the route parameters and
finds the author with the respective ID and return the author object.
So let’s try fetching author with ID 1 (Figure3-3).
If the author with the ID exists, we shall get the response back with
200 status code and the author object, otherwise 404 like in the following
screenshot. As you can see, there is no author with ID 2, and the get_or_404
Figure 3-3. Fetching author with ID 1
CHAPTER 3 CRUD APPLICATION WITHFLASK (PART 1)
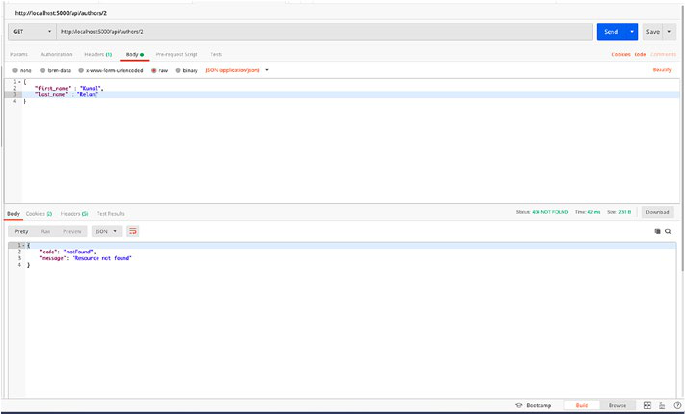
77
method throws 404 error on the endpoint which is then handled by app.
errorhandler(404) as per what we mentioned in our main.py (Figure 3- 4).
Before we move on to creating PUT and DELETE endpoints for author
object, let’s initiate book routes. Create books.py in the same routes folder
and add the following code to initiate the route.
from flask import Blueprint, request
from api.utils.responses import response_with
from api.utils import responses as resp
from api.models.books import Book, BookSchema
from api.utils.database import db
book_routes = Blueprint("book_routes", __name__)
And then register the book routes in main.py like we did for author routes.
Add the following code right below where you imported author routes.
from api.routes.books import book_routes
Figure 3-4. No author is found with ID 2
CHAPTER 3 CRUD APPLICATION WITHFLASK (PART 1)
78
Then right below where you added the author route blueprint
registration, add the following code.
app.register_blueprint(book_routes, url_prefix='/api/books')
Now your main.py should have the following code.
import logging
import sys
import api.utils.responses as resp
from flask import Flask, jsonify
from api.utils.database import db
from api.utils.responses import response_with
from api.routes.authors import author_routes
from api.routes.books import book_routes
def create_app(config):
app = Flask(__name__)
app.config.from_object(config)
db.init_app(app)
with app.app_context():
db.create_all()
app.register_blueprint(author_routes, url_prefix='/api/
authors')
app.register_blueprint(book_routes, url_prefix='/api/books')
@app.after_request
def add_header(response):
return response
@app.errorhandler(400)
def bad_request(e):
logging.error(e)
return response_with(resp.BAD_REQUEST_400)
CHAPTER 3 CRUD APPLICATION WITHFLASK (PART 1)
79
@app.errorhandler(500)
def server_error(e):
logging.error(e)
return response_with(resp.SERVER_ERROR_500)
@app.errorhandler(404)
def not_found(e):
logging.error(e)
return response_with(resp.SERVER_ERROR_404)
db.init_app(app)
with app.app_context():
db.create_all()
logging.basicConfig(stream=sys.stdout,
format='%(asctime)s|%(levelname)
s|%(filename)s:%(lineno)s|%(message)s',
level=logging.DEBUG)
return app
Next let’s start by creating POST book endpoint; open books.py inside
routes folder and add the following code below book_routes.
@book_routes.route('/', methods=['POST'])
def create_book():
try:
data = request.get_json()
book_schema = BookSchema()
book, error = book_schema.load(data)
result = book_schema.dump(book.create()).data
return response_with(resp.SUCCESS_201, value={"book":
result})
except Exception as e:
print e
return response_with(resp.INVALID_INPUT_422)
CHAPTER 3 CRUD APPLICATION WITHFLASK (PART 1)
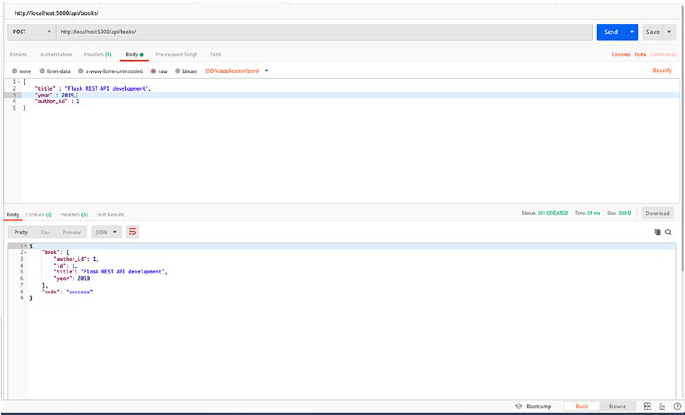
80
The preceding code will take user data and then execute the create()
method on book schema just like what we did in author object; let’s save
the file and test the endpoint.
{
"title" : "iOS Penetration Testing",
"year" : 2016,
"author_id": 1
}
We’ll use the preceding JSON data to POST to the endpoint, and we
should get a response with 200 status code and the newly created book
object. Also as we discussed earlier, we have set up a relationship between
authors and books, and in the preceding example, we have specified
author with ID 1 for the new book, so once this API succeeds, we shall be
able to fetch author with ID 1, and the books array in response shall have
this book as an object (Figure3-5).
Figure 3-5. Fetch author with ID 1
CHAPTER 3 CRUD APPLICATION WITHFLASK (PART 1)
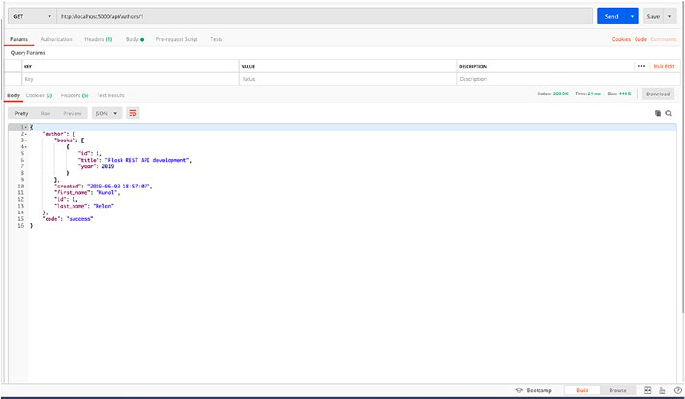
81
And as you can see in Figure3-6, when we request /authors/1 endpoint,
alongside author details, we also get the books array with the list of books
the author is linked to.
So our model relationship is working fine; now we can move on to
creating the rest of the endpoints for author routes. Go ahead and add the
following code to get the PUT endpoint for the author route to update the
author object.
@author_routes.route('/<int:id>', methods=['PUT'])
def update_author_detail(id):
data = request.get_json()
get_author = Author.query.get_or_404(id)
get_author.first_name = data['first_name']
get_author.last_name = data['last_name']
db.session.add(get_author)
db.session.commit()
author_schema = AuthorSchema()
Figure 3-6. GET author endpoint
CHAPTER 3 CRUD APPLICATION WITHFLASK (PART 1)
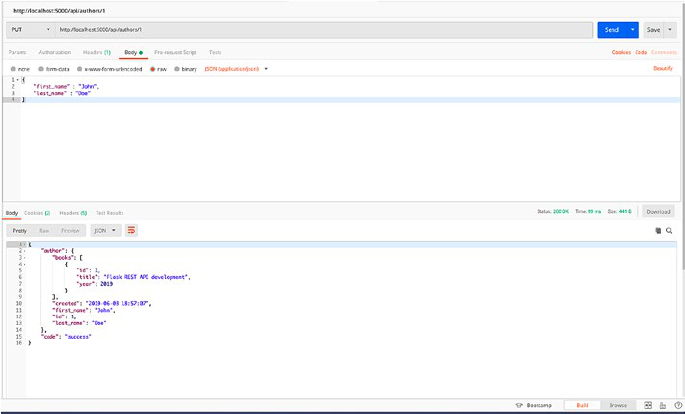
82
author, error = author_schema.dump(get_author)
return response_with(resp.SUCCESS_200, value={"author":
author})
The preceding code will create our PUT endpoint to update author
object. In the previous code, we take a request JSON in the data variable
and then fetch the author with the provided ID in request parameter. If the
author with that ID is not found, the request ends with 404 status code, or
else get_author contains the author object, and then we update the first_
name and last_name with the data supplied in request JSON and then we
save the session.
So let’s go ahead and update the first and the last name of the author
we created a while ago (Figure3-7).
Figure 3-7. PUT author endpoint
CHAPTER 3 CRUD APPLICATION WITHFLASK (PART 1)
83
So here we updated the first name and the last name of the author.
However in PUT we need to send the whole request body of the object as
we discussed in the second chapter, so next we’ll create a PATCH endpoint
to update only a part of the author object. Add the following code for the
PATCH endpoint.
@author_routes.route('/<int:id>', methods=['PATCH'])
def modify_author_detail(id):
data = request.get_json()
get_author = Author.query.get(id)
if data.get('first_name'):
get_author.first_name = data['first_name']
if data.get('last_name'):
get_author.last_name = data['last_name']
db.session.add(get_author)
db.session.commit()
author_schema = AuthorSchema()
author, error = author_schema.dump(get_author)
return response_with(resp.SUCCESS_200, value={"author":
author})
The preceding code gets the request JSON like the other endpoint but
doesn’t expect the whole request body but only the field that needs to be
updated in the request body, and similarly it updates the author object and
saves the session. Let’s try this out and this time we’ll only change the first
name of the author object.
CHAPTER 3 CRUD APPLICATION WITHFLASK (PART 1)
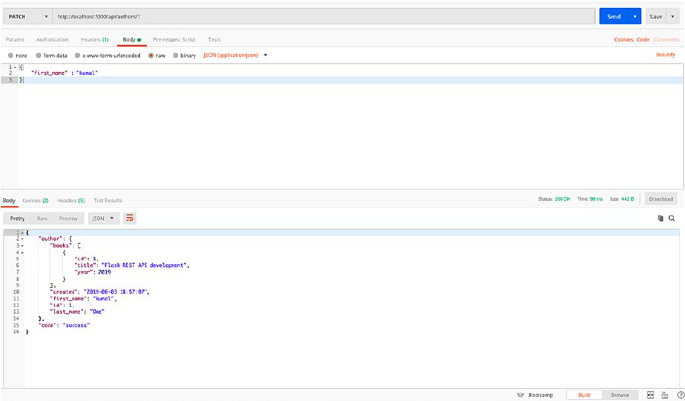
84
As you see in Figure3-8, we only supply the first name in the request
body and it got updated. So next we’ll finally create our DELETE author
endpoint which will take the author ID from the request parameter and
delete the author object. Notice that in this one, we’ll respond with 204
status code and no content.
@author_routes.route('/<int:id>', methods=['DELETE'])
def delete_author(id):
get_author = Author.query.get_or_404(id)
db.session.delete(get_author)
db.session.commit()
return response_with(resp.SUCCESS_204)
Add the previous code and now this shall create our DELETE endpoint.
Let’s go ahead and try deleting our author with ID 1 (Figure3-9).
Figure 3-8. Change the first name of the author object
CHAPTER 3 CRUD APPLICATION WITHFLASK (PART 1)
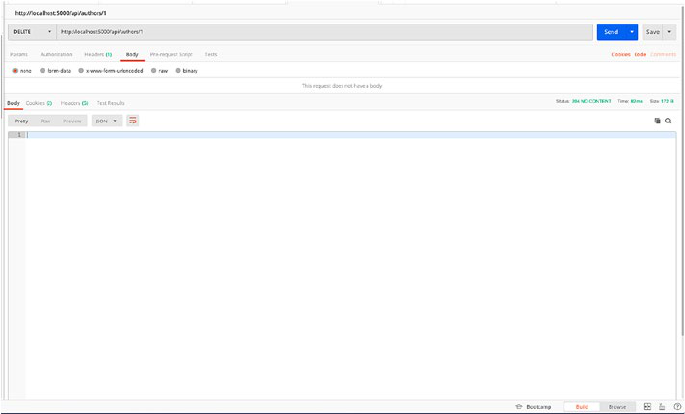
85
With this endpoint, our author object should be deleted from the
database, and while creating the author schema, we configured all cascade
in the book relationship. Thus all the books related to author ID 1 shall also
be deleted ensuring we don’t have any books without an author ID.
So this is it for our author routes and next we’ll work on the rest of our
book endpoints. Next add the following code in books.py to create GET
books endpoint.
@book_routes.route('/', methods=['GET'])
def get_book_list():
fetched = Book.query.all()
book_schema = BookSchema(many=True, only=['author_id',
'title', 'year'])
books, error = book_schema.dump(fetched)
return response_with(resp.SUCCESS_200, value={"books": books})
Save the file and try the endpoint; for now you shall get an empty array
since the book with author ID 1 was deleted when we deleted the author.
Figure 3-9. DELETE author endpoint
CHAPTER 3 CRUD APPLICATION WITHFLASK (PART 1)
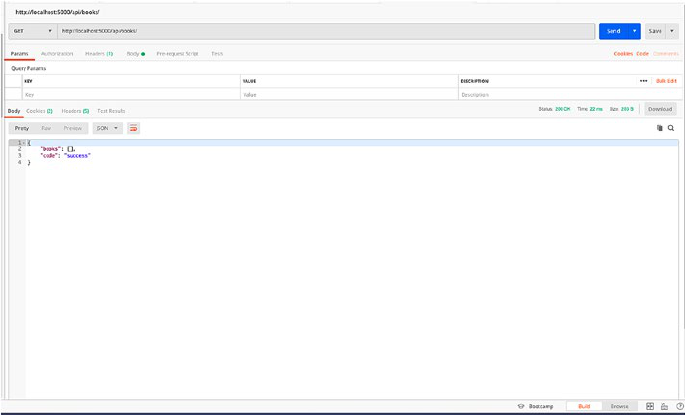
86
As you see in Figure3-10, there are no books in the table as of now, so
go ahead and create an author, and then add a couple of books with that
author ID, since we can’t add a book without an author, or else it’ll end in
422 unprocessable entity error.
Next we’ll create GET Book by ID endpoint.
@book_routes.route('/<int:id>', methods=['GET'])
def get_book_detail(id):
fetched = Book.query.get_or_404(id)
book_schema = BookSchema()
books, error = book_schema.dump(fetched)
return response_with(resp.SUCCESS_200, value={"books": books})
The following code will create GET Book by ID endpoint; next we’ll
create PUT, PATCH, and DELETE endpoints, and add the following code
for the same.
Figure 3-10. GET books endpoint
CHAPTER 3 CRUD APPLICATION WITHFLASK (PART 1)
87
book_routes.route('/<int:id>', methods=['PUT'])
def update_book_detail(id):
data = request.get_json()
get_book = Book.query.get_or_404(id)
get_book.title = data['title']
get_book.year = data['year']
db.session.add(get_book)
db.session.commit()
book_schema = BookSchema()
book, error = book_schema.dump(get_book)
return response_with(resp.SUCCESS_200, value={"book": book})
@book_routes.route('/<int:id>', methods=['PATCH'])
def modify_book_detail(id):
data = request.get_json()
get_book = Book.query.get_or_404(id)
if data.get('title'):
get_book.title = data['title']
if data.get('year'):
get_book.year = data['year']
db.session.add(get_book)
db.session.commit()
book_schema = BookSchema()
book, error = book_schema.dump(get_book)
return response_with(resp.SUCCESS_200, value={"book": book})
@book_routes.route('/<int:id>', methods=['DELETE'])
def delete_book(id):
get_book = Book.query.get_or_404(id)
db.session.delete(get_book)
db.session.commit()
return response_with(resp.SUCCESS_204)
CHAPTER 3 CRUD APPLICATION WITHFLASK (PART 1)
88
So this shall wrap up our book and author routes, and now we have a
working REST application. Now you can try executing CRUD on the author
and book routes.
User Authentication
Once we have all our routes in place, we need to add in user authentication
to make sure only logged-in users can access certain routes, so now we’ll
add in user login and signup routes, but before that we need to add user
schema.
Create users.py inside models. In the schema we’ll add two static
methods to encrypt the password and verify password, and for the same
we’ll need a Python library called passlib, so before we create the schema,
let’s install passlib using PIP.
(venv)$ pip install passlib
Once done add the following code to add user schema and the methods.
from api.utils.database import db
from passlib.hash import pbkdf2_sha256 as sha256
from marshmallow_sqlalchemy import ModelSchema
from marshmallow import fields
class User(db.Model):
__tablename__ = 'users'
id = db.Column(db.Integer, primary_key = True)
username = db.Column(db.String(120), unique = True,
nullable = False)
password = db.Column(db.String(120), nullable = False)
def create(self):
db.session.add(self)
CHAPTER 3 CRUD APPLICATION WITHFLASK (PART 1)
89
db.session.commit()
return self
@classmethod
def find_by_username(cls, username):
return cls.query.filter_by(username = username).first()
@staticmethod
def generate_hash(password):
return sha256.hash(password)
@staticmethod
def verify_hash(password, hash):
return sha256.verify(password, hash)
class UserSchema(ModelSchema):
class Meta(ModelSchema.Meta):
model = User
sqla_session = db.session
id = fields.Number(dump_only=True)
username = fields.String(required=True)
So here we have added a class method to find a user by username, and
create a user and then two static methods to generate the hash and verify
it. We’ll use these methods when we create the user routes.
Next create users.py in routes directory, and this is where we’ll add our
user login and signup routes.
For user authentication across the application, we’ll use JWT (JSON
Web Tokens) authentication. JWT is an open standard which defines a
compact and self-contained way of securely transmitting information as a
JSON object. JWT is a popular way of user authorization in the REST world.
In Flask there is an open source extension called Flask-JWT-Extended
which provides JWT support and other helpful methods.
CHAPTER 3 CRUD APPLICATION WITHFLASK (PART 1)
90
Let’s go ahead and install Flask-JWT-Extended.
(venv)$ pip install flask-jwt-extended
Next we’ll initialize JWT module in the app in main.py so import the
library in main.py.
from flask_jwt_extended import JWTManager
Next initialize JWTManager with the following code right above
db.init_app().
jwt = JWTManager(app)
Once installed and initialized, let’s import the needed modules for our
user routes file.
from flask import Blueprint, request
from api.utils.responses import response_with
from api.utils import responses as resp
from api.models.users import User, UserSchema
from api.utils.database import db
from flask_jwt_extended import create_access_token
These are the modules we’ll need for the user routes; next we’ll
configure the route using Blueprint with the following code.
user_routes = Blueprint("user_routes", __name__)
Next, we’ll import and register the /users routes in our main.py file, so
add the following code in main.py to import the user routes.
from api.routes.users import user_routes
And now right below where we have declared the other routes, add the
following line of code.
app.register_blueprint(user_routes, url_prefix='/api/users')
CHAPTER 3 CRUD APPLICATION WITHFLASK (PART 1)
91
Next, we’ll create our POST user route to create a new user and add the
following code in users.py inside routes.
@user_routes.route('/', methods=['POST'])
def create_user():
try:
data = request.get_json()
data['password'] = User.generate_hash(data['password'])
user_schmea = UserSchema()
user, error = user_schmea.load(data)
result = user_schmea.dump(user.create()).data
return response_with(resp.SUCCESS_201)
except Exception as e:
print e
return response_with(resp.INVALID_INPUT_422)
Here we are taking the user request data in a variable and then
executing the generate_hash() function on the password and creating the
user. Once done we’ll return a 201 response.
Next we’ll create a login route for the signed up users to login. Add the
following code for the same.
@user_routes.route('/login', methods=['POST'])
def authenticate_user():
try:
data = request.get_json()
current_user = User.find_by_username(data['username'])
if not current_user:
return response_with(resp.SERVER_ERROR_404)
if User.verify_hash(data['password'], current_user.
password):
access_token = create_access_token(identity =
data['username'])
CHAPTER 3 CRUD APPLICATION WITHFLASK (PART 1)
92
return response_with(resp.SUCCESS_201,
value={'message': 'Logged in as {}'.format(current_
user.username), "access_token": access_token})
else:
return response_with(resp.UNAUTHORIZED_401)
except Exception as e:
print e
return response_with(resp.INVALID_INPUT_422)
The following code will take the username and password from request
data and check if the user with the provided username exists using the
find_by_username() method we created in the schema. Next if the user
doesn’t exist, we’ll respond with 404, or else verify the password using
verify_hash() function in the schema. If the user exists, we’ll generate a
JWT Token and respond with 200; otherwise respond with 401. So now we
have our user login in place. Next we need to add jwt required decorator
to the routes we want to protect. So navigate to authors.py in routes and
import the decorator using the following code.
from flask_jwt_extended import jwt_required
And then before the endpoint definition, add the decorator using the
following code.
@jwt_required
We’ll add the decorator to the DELETE, PUT, POST, and PATCH
endpoints of authors.py and books.py, and the functions should now look
like this.
@author_routes.route('/', methods=['POST'])
@jwt_required
def create_author():
....Function code
CHAPTER 3 CRUD APPLICATION WITHFLASK (PART 1)

93
Let’s go ahead and test our user endpoints. Open Postman and request
the POST users endpoint with a username and password. We’ll use the
following sample data.
{
"username" : "admin",
"password" : "flask2019"
}
So our new user has been created (Figure3-11); next we’ll try logging
in with the same credentials and get the JWT.
Figure 3-11. User signup endpoint
CHAPTER 3 CRUD APPLICATION WITHFLASK (PART 1)

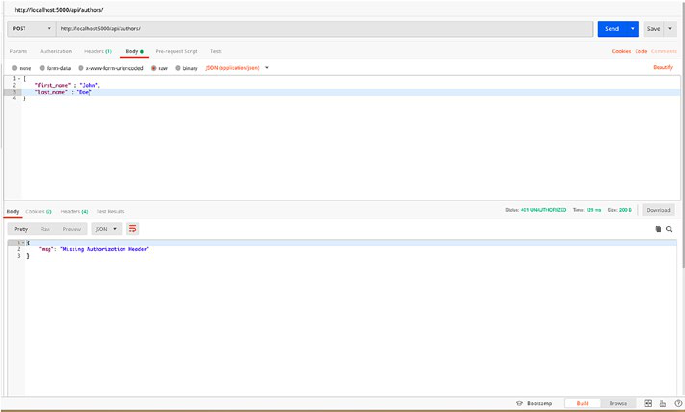
95
As you see in Figure3-14, we are not able to access the POST author
route anymore, and the jwt_required decorator responded back with
401 error. Now let’s try accessing the same route by supplying the JWT in
header. In the header section of the request in Postman, add the token
with a key called Authorization, and then in the value add Bearer <token>
to supply the JWT Token like in Figure3-14.
Figure 3-13. POST author route without JWT Token
CHAPTER 3 CRUD APPLICATION WITHFLASK (PART 1)
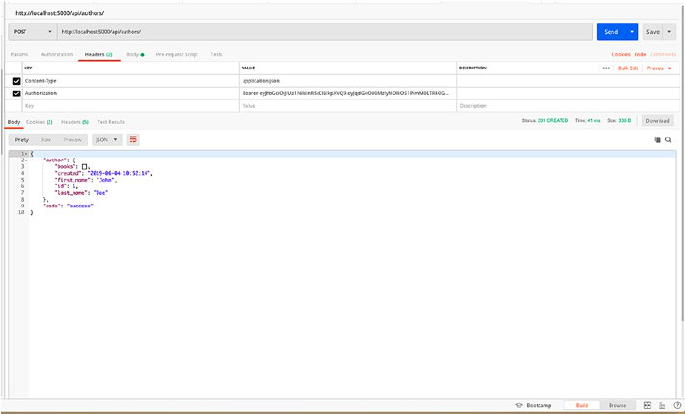
96
As you can see, after adding the JWT Token, we are able to access the
endpoint again, and this is how we can protect our REST endpoints.
So in the following scenario, we enabled anyone to login to the
platform and then access the routes. However, in real-world application,
we can also have email verification and restricted user signup alongside
that we can also enable user-based access control in which different types
of users can access certain APIs.
Conclusion
So this concludes this chapter, and we have successfully created a REST
application with user authentication. In the next chapter, we’ll work
on documenting REST APIs, integrating unit tests, and deploying our
application.
Figure 3-14. POST author route with JWT
CHAPTER 3 CRUD APPLICATION WITHFLASK (PART 1)
97
© Kunal Relan 2019
K. Relan, Building REST APIs with Flask, https://doi.org/10.1007/978-1-4842-5022-8_4
CHAPTER 4
CRUD Application
withFlask (Part 2)
In the last chapter, we created REST APIs using Flask, and now we have a
working CRUD application. In this chapter, we’ll discuss and implement
features to support and extend our REST APIs. While we have everything
ready to deploy, however, here are a few more things we’ll discuss before
deploying the application.
1. Email verification
2. File upload
3. Discuss API documentation
4. Integrate Swagger
Introduction
In the last chapter, we created a REST application using Flask and
MySQL.In this chapter we’ll discuss about extending the application for
additional features. We’ll start by adding email verification to our users
model. Next we’ll also add file upload endpoint to users object, and we’ll
also discuss about the need of API documentation, best practices for
documenting APIs, and using Swagger as an API documentation tool.
98
Email Verification
In the last chapter, we created user signup and login using a unique
username and password. In this chapter we’ll extend the user
authentication by adding email signup to the user model and also add
email verification. To do the same, we’ll add email field to the model,
and once a new user object is created using signup API, we’ll create a
verification token and send an email to the user with the link to verify the
account. We’ll also disable user login till the email is verified. First let’s add
the required fields in the user model.
Browse to users.py in models and add the following lines below
password in User class.
isVerified = db.Column(db.Boolean, nullable=False,
default=False)
email = db.Column(db.String(120), unique = True, nullable =
False)
And add the following line below username in UserSchema class.
email = db.Column(db.String(120), unique = True, nullable =
False)
Also since now we have user emails, we’ll update find_by_username
class method to find by email. So update find_by_username method to the
following.
@classmethod
def find_by_email(cls, email):
return cls.query.filter_by(email = email).first()
Now your User class should have the following code.
class User(db.Model):
__tablename__ = 'users'
Chapter 4 CrUD appliCation withFlask (part 2)
99
id = db.Column(db.Integer, primary_key = True)
username = db.Column(db.String(120), unique = True,
nullable = False)
password = db.Column(db.String(120), nullable = False)
isVerified = db.Column(db.Boolean, nullable=False,
default=False)
email = db.Column(db.String(120), unique = True, nullable =
False)
def create(self):
db.session.add(self)
db.session.commit()
return self
@classmethod
def find_by_email(cls, email):
return cls.query.filter_by(email = email).first()
@classmethod
def find_by_username(cls, email):
return cls.query.filter_by(username = username).first()
@staticmethod
def generate_hash(password):
return sha256.hash(password)
@staticmethod
def verify_hash(password, hash):
return sha256.verify(password, hash)
And UserSchema should have the following code.
class UserSchema(ModelSchema):
class Meta(ModelSchema.Meta):
model = User
sqla_session = db.session
Chapter 4 CrUD appliCation withFlask (part 2)
100
id = fields.Number(dump_only=True)
username = fields.String(required=True)
email = fields.String(required=True)
Notice here, isVerified field is set to False by default, and once the user
verifies the email, we’ll set it to True enabling the user to log in.
Next we’ll add a util called token.py which will contain methods
to generate verification token and confirm the verification token.
The verification link in the mail will contain a unique URL with the
verification token which should look like htttp://host/api/users/
confirm/<verification_token> and the token here should always be
unique. We’ll use itsdangerous package to encode the user email along
with a timestamp, so let’s go ahead and create token.py in api/utils.
Before we write the code to generate token, we need to add a few
more variables to app config since itsdangerous needs a secret key and
password salt for it to work which we’ll supply from our config.py. Add the
following lines in config/config.py under Development, Testing, as well as
Production configs ensuring all the keys and salts are different.
SECRET_KEY= 'your_secured_key_here'
SECURITY_PASSWORD_SALT= 'your_security_password_here'
Next, in token.py add the following code to import the requirements.
from itsdangerous import URLSafeTimedSerializer
from flask import current_app
And then add the following code to generate the token.
def generate_verification_token(email):
serializer = URLSafeTimedSerializer(current_app.
config['SECRET_KEY'])
return serializer.dumps(email,salt=current_app.
config['SECURITY_PASSWORD_SALT'])
Chapter 4 CrUD appliCation withFlask (part 2)
101
In the previous method, we use URLSafeTimedSerializer to generate
a token using email address, and the email is encoded in the token. Next
we’ll create another method to validate the token and expiration, and as
long as the token is valid and not expired, we’ll return the email and verify
the user email.
def confirm_verification_token(token, expiration=3600):
serializer = URLSafeTimedSerializer(current_app.
config['SECRET_KEY'])
try:
email = serializer.loads(
token,
salt=current_app.config['SECURITY_PASSWORD_SALT'],
max_age=expiration
)
except Exception as e :
return e
return email
Once we have our token utility in place, we can now modify user
routes. Let’s start by disabling user login before email verification. Update
the login route to have the following code; here we have changed find_by_
username to find_by_email, and now we will expect the user to send the
email address in login endpoint JSON data, and if the user isn’t verified,
we’ll return the request with a 400 bad code without the token.
Now your login method should contain the following code.
@user_routes.route('/login', methods=['POST'])
def authenticate_user():
try:
data = request.get_json()
if data.get('email') :
current_user = User.find_by_email(data['email'])
Chapter 4 CrUD appliCation withFlask (part 2)
102
elif data.get('username') :
current_user = User.find_by_username(data['username'])
if not current_user:
return response_with(resp.SERVER_ERROR_404)
if current_user and not current_user.isVerified:
return response_with(resp.BAD_REQUEST_400)
if User.verify_hash(data['password'], current_user.
password):
access_token = create_access_token(identity =
current_user.username)
return response_with(resp.SUCCESS_201,
value={'message': 'Logged in as {}'.format(current_
user.username), "access_token": access_token})
else:
return response_with(resp.UNAUTHORIZED_401)
except Exception as e:
return response_with(resp.INVALID_INPUT_422)
Now let’s create an endpoint to verify the email token.
We’ll start by importing the recently created methods in user.py
from api.utils.token import generate_verification_token,
confirm_verification_token
Next, add the following GET endpoint to handle email validation right
below the user signup method.
@user_routes.route('/confirm/<token>', methods=['GET'])
def verify_email(token):
try:
email = confirm_verification_token(token)
except:
return response_with(resp.SERVER_ERROR_401)
Chapter 4 CrUD appliCation withFlask (part 2)
103
user = User.query.filter_by(email=email).first_or_404()
if user.isVerified:
return response_with(resp. INVALID_INPUT_422)
else:
user.isVerified = True
db.session.add(user)
db.session.commit()
return response_with(resp.SUCCESS_200, value={'message':
'E-mail verified, you can proceed to login now.'})
The next step is to update the user signup method to generate the
token and send the email to the specified address for verification, so here
we’ll start with creating an email utility in our utils to send out emails.
In order to do so, we’ll need a flask-mail library; let’s start by installing
the same. Making sure you are still in the virtual environment, use the
following line to install flask-mail in your terminal.
(venv) $ pip install Flask-Mail
Once installed, let’s initiate and configure flask-mail. Add the following
variables in config.py to configure mail.
MAIL_DEFAULT_SENDER= 'your_email_address'
MAIL_SERVER= 'email_providers_smtp_address'
MAIL_PORT= <mail_server_port>
MAIL_USERNAME= 'your_email_address'
MAIL_PASSWORD= 'your_email_password'
MAIL_USE_TLS= False
MAIL_USE_SSL= True
Next create email.py in utils and add the following code.
from flask_mail import Message,Mail
from flask import current_app
mail = Mail()
Chapter 4 CrUD appliCation withFlask (part 2)
104
Next let’s import mail in our main.py and initiate it with app config.
from api.utils.email import mail
Add this among other imports in main.py, and then right below where
we initiated our JWTManager inside create_app, add the following code.
mail.init_app(app)
And now our mail object should be initiated with the app config; next
in email.py, let’s write a method to send out emails.
Add the following code in email.py to create a method send_email
which will take the sender’s address, subject, and mail template to send.
def send_email(to, subject, template):
msg = Message(
subject,
recipients=[to],
html=template,
sender=current_app.config['MAIL_DEFAULT_SENDER']
)
mail.send(msg)
So this is all we need to do in order to send out the verification email;
let’s go back to users.py and update the user signup method to incorporate
the changes.
Let’s start by importing the send_email, url_for, and render_template_
string method in users.py using the following line.
from api.utils.email import send_email
from flask import url_for, render_template_string
Update the following code for create_user() method in users.py, right
before the return function.
Chapter 4 CrUD appliCation withFlask (part 2)
105
try:
data = request.get_json()
if(User.find_by_email(data['email']) is not None or
User.find_by_username(data['username']) is not None):
return response_with(resp.INVALID_INPUT_422)
data['password'] = User.generate_hash(data['password'])
user_schmea = UserSchema()
user, error = user_schmea.load(data)
token = generate_verification_token(data['email'])
verification_email = url_for('user_routes.verify_
email', token=token, _external=True)
html = render_template_string("<p>Welcome! Thanks for
signing up. Please follow this link to activate your
account:</p> <p><a href='{{ verification_email }}'>{{
verification_email }}</a></p> <br> <p>Thanks!</p>",
verification_email=verification_email)
subject = "Please Verify your email"
send_email(user.email, subject, html)
result = user_schmea.dump(user.create()).data
return response_with(resp.SUCCESS_201)
except Exception as e:
print e
return response_with(resp.INVALID_INPUT_422)
Here we are supplying the email to generate_verification_token and
getting the token in return. Next we use Flask’s url_for to generate the
verification URL using the verification route we just created and the token.
After that we render HTML template using render_template_string of
Jinja2 where we supply the HTML string and the verification variable and
then we supply all the user-provided email, subject, and HTML to send_
email method to send out the verification email.
Chapter 4 CrUD appliCation withFlask (part 2)
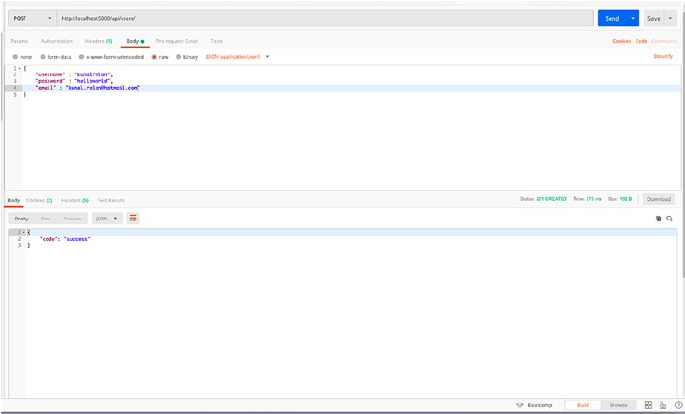
106
So this is all we need to setup email verification. Let’s start testing out
the signup, login, and verification routes to check if everything is working.
Let’s start by signup endpoint; open your Postman and request the
POST /users API; however, in the JSON body, add a valid email address.
{
"username" : "kunalrelan",
"password" : "helloworld",
"email" : "[email protected]"
}
We’ll use the following JSON in the request data and access the
endpoint; the response should be similar to earlier; however, you should
get a verification email from your configured mail address on the email
you specify in the JSON data with the token (Figure4-1).
Next, let’s check the email inbox to check if the email arrived and verify
the user.
Figure 4-1. User signup API
Chapter 4 CrUD appliCation withFlask (part 2)
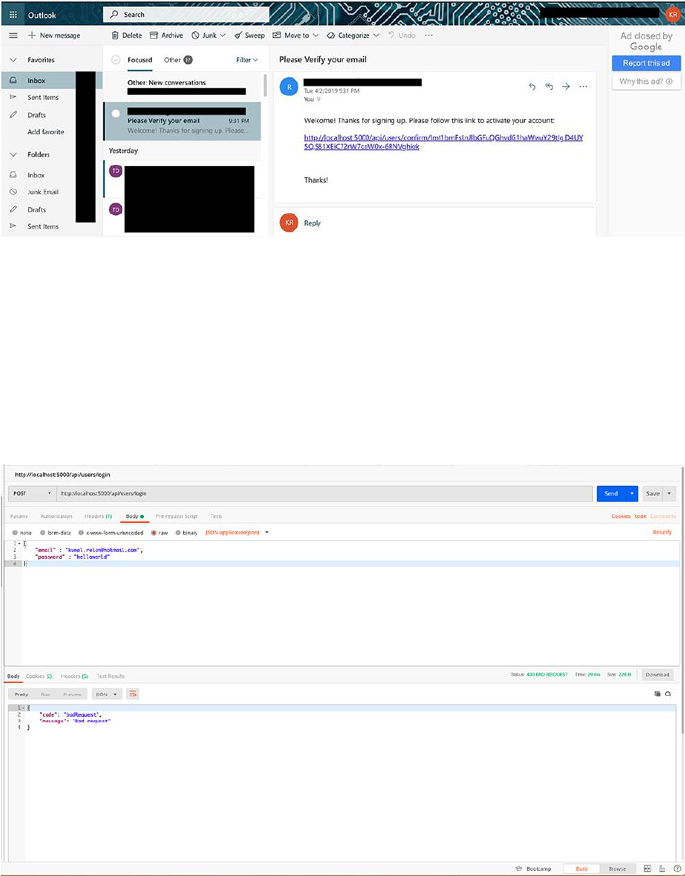
107
As you can see in Figure4-2, the verification email arrived with the link
to validate the user account. Before we activate the user account, let’s try
logging in with the user credentials to check if email validation works fine
(Figure4-3).
Figure 4-2.
Figure 4-3. User login without verification
Chapter 4 CrUD appliCation withFlask (part 2)

108
As you can see in Figure4-4, the user is not verified and thus can’t
login. Now let’s open the link provided in the email to verify the user which
shall then allow the user to login and obtain the JWT token.
Once the user is verified, let’s try logging in again, and nowwe should
be able to login and obtain the JWT token.
Figure 4-4. User email verification
Figure 4-5. User login after verification
Chapter 4 CrUD appliCation withFlask (part 2)
109
As you can see in Figure4-5, we are now again able to login to the
account after verifying the email address.
So this is it for this section. We have successfully implemented user
email verifications, and what we did here was just once use case of email
verification; there are a lot of ways email verification can be used. In a
lot of applications, users are able to login even before email verification;
however, there are certain functions which are disabled for the unverified
users which can be replicated similarly with the change we did in the login
endpoint. In the next section we’ll implement file upload and handling.
File Upload
File uploads is another common use case in REST APIs. In this section
we’ll implement avatar upload for author model and an endpoint to access
avatar. The idea is pretty straightforward here; we’ll update the author
model to store avatar URL, create another endpoint for a logged in user to
upload avatar for an author using author ID, save the file in the file system,
and create another endpoint to handle static image files.
Before we start developing the feature, let’s talk a bit more about
handling file uploads in Flask. Here we’ll use multipart/form-data content
type which indicates the media type of the request resource to the client
and use request.files. We’ll also define a set of allowed file extensions since
we don’t need any other file types except images to be uploaded which
otherwise can lead to big security vulnerability. We’ll then escape the
uploaded file’s name with werkzeug.secure_filename() which revolves
around the principle “never trust user input,” and hence the filename may
contain malicious code which can lead to security vulnerability exploitation.
Hence the method will escape special characters from the filename.
To start with let’s update the author model to add avatar field. So open
authors.py in models, and in the model declaration, add the following line
in Author class
avatar = db.Column(db.String(20), nullable=True)
Chapter 4 CrUD appliCation withFlask (part 2)
110
and the following line in AuthorSchema class
avatar = fields.String(dump_only=True)
After that, create a new folder in /src and name it images, and add
upload folder config in the app config which we’ll later use to save and
fetch the uploaded avatars.
So open config.py in config and add the following parameter.
UPLOAD_FOLDER= 'images'
Now we’ll import werkzeug.secure_filename() and url_for from
Flask which we’ll need in the endpoint we are going to create, so add the
following lines of code below the other imports in authors.py in routes.
from werkzeug.utils import secure_filename
Next where we imported Blueprint and request from Flask, add url_for
like the following.
from flask import Blueprint, request, url_for, current_app
Right after the import, declare allowed_extensions which will contain a
set of allowed file extensions.
allowed_extensions = set(['image/jpeg', 'image/png', 'jpeg'])
Once we have the set, let’s create a method to check if the uploaded
file’s extension is that of an image.
Add the following code right below allowed_extensions.
def allowed_file(filename):
return filetype in allowed_extensions
The above function will take the filename from the file and
check if the extension is valid and return.
Chapter 4 CrUD appliCation withFlask (part 2)
111
Now add the following endpoint to add avatar upload endpoint.
@author_routes.route('/avatar/<int:author_id>',
methods=['POST'])
@jwt_required
def upsert_author_avatar(author_id):
try:
file = request.files['avatar']
get_author = Author.query.get_or_404(author_id)
if file and allowed_file(file.content_type):
filename = secure_filename(file.filename)
file.save(os.path.join(current_app.config['UPLOAD_
FOLDER'], filename))
get_author.avatar = url_for('uploaded_file',
filename=filename, _external=True)
db.session.add(get_author)
db.session.commit()
author_schema = AuthorSchema()
author, error = author_schema.dump(get_author)
return response_with(resp.SUCCESS_200, value={"author":
author})
except Exception as e:
print e
return response_with(resp.INVALID_INPUT_422)
In the following code, we look for avatar field in request.files and
then look for the user with the provided user ID.Once we have that,
we’ll then check if a file was uploaded and then escape the filename
using the secure_filename function we just imported. Then we’ll use file.
save method and save the file in images folder by supplying the path by
concatenating UPLOAD_FOLDER from config and filename. Now once
the file is saved, we’ll use url_for method to create a URL for accessing the
uploaded file, for that we’ll create a route with a method uploaded_file that
accepts a filename and serves it from the configured upload folder which
Chapter 4 CrUD appliCation withFlask (part 2)
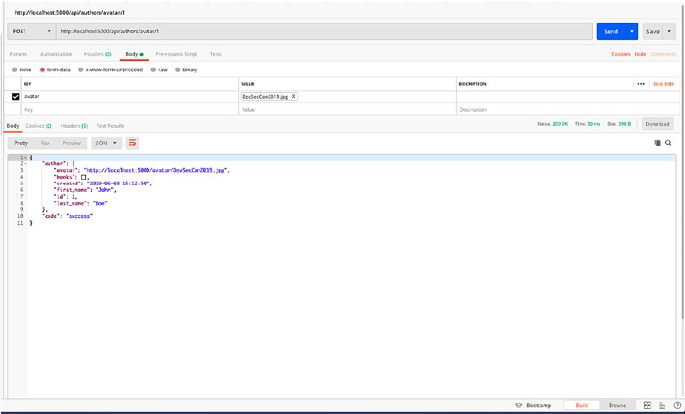
112
we’ll create next. Once done, we’ll update the author model and update
the avatar field with the URL for the uploaded avatar.
Next move to main.py and add the following route right after Blueprint
declarations for the routes in create_app function.
@app.route('/avatar/<filename>')
def uploaded_file(filename):
return send_from_directory(app.config['UPLOAD_
FOLDER'],filename)
So this function will accept the filename and return the file from the
configured UPLOAD_FOLDER in the response.
So this is it for file upload, and now we should be able to upload an
avatar for an author and fetch it back. Let’s go back to Postman and try it out.
So now request the update avatar endpoint with form-data, andspecify
the key avatar, select the image you want to upload, and send it. We shall
get 200 success response with user object in response; now notice the
avatar field with the link to the file (Figure4-6).
Figure 4-6. Author avatar upload endpoint
Chapter 4 CrUD appliCation withFlask (part 2)
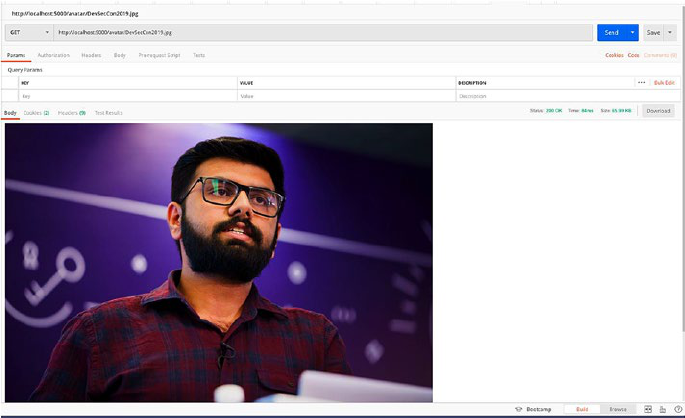
113
Next click the avatar link to fetch the image you just created to check if
it exists.
As you can see in Figure4-7, we are able to fetch the image using the
route we created. Next let’s try uploading an HTML file to check if the
allowed extension check works well. For this just create an HTML file with
any text in it or use any HTML file you have and try uploading it.
Now, as you see in Figure4-8, we got an error trying to upload an
HTML file which is not allowed on this endpoint, ensuring the extension
check is working fine for us.
Figure 4-7. Fetch avatar endpoint
Chapter 4 CrUD appliCation withFlask (part 2)
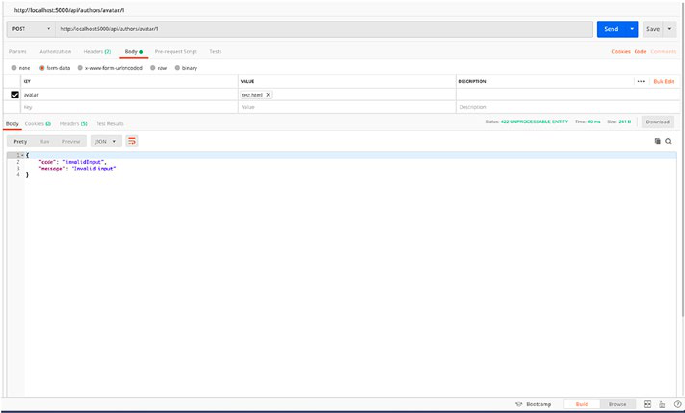
114
API Documentation
The process of API development does not end just after programming
them. Since REST APIs are used by a variety of clients and hence are used
by other developers who either access them directly using a REST client
or integrate with some kind of REST client, API documentation provides
an easy way to understand the functioning of REST endpoints which
makes API documentation an essential part of developing a REST-based
application.
In this section we’ll discuss about the basics of API documentation,
OpenAPI spec, and Swagger, generating API docs using OpenAPI spec,
publishing API docs, and testing APIs using Swagger UI.
Figure 4-8. Upload avatar endpoint with invalid file type
Chapter 4 CrUD appliCation withFlask (part 2)
115
Building Blocks ofAPI Documentation
In REST API reference documentation, there are five sections on which the
documentation is based, namely:
1. Resource Description: As discussed earlier, resources
refer to the information returned from the API; in
context of this book, author, books, and users are
resources. Resource description is generally brief
ranging from one to two sentences. Every resource has
certain verbs which can be accessed.
2. Endpoints and Methods: Endpoints define how the
provided resources can be accessed, and methods
indicate the allowed interactions or verbs on the resource,
for example, GET, POST, PUT, DELETE, and so on. Any
resource will have related endpoints with different paths
and methods but will revolve around the same resource.
3. Parameters: Parameters are the variable parts of the
endpoint which specifies the data you are working on.
4. Request Example: Request example includes a sample
request containing the required fields, optional fields,
and their sample value. Request example should usually
be as rich as possible and contains all acceptable fields.
5. Response Example and Schema: As the name
suggests, response example contains an elaborate
example of the API response in accordance to the
request. Schema on the other hand defines how the
response is formatted and labeled. The description
of the response is usually called as response schema
which is a complex document describing all the
possible parameters and response types.
Chapter 4 CrUD appliCation withFlask (part 2)
116
OpenAPI Specification
The OpenAPI Specification (OAS) defines a standard, language- agnostic
interface for REST API allowing both humans and computers to understand
the capabilities of the application without looking into source code or doing
network inspection enabling the API consumers to understand the working
of the application without knowing the implementation logic.
OpenAPI definitions can have multiple use cases including
documentation generation to display APIs, testing tools, and so on.
For the context of this book, we’ll use OpenAPI specification with
Swagger UI to generate and display the API reference documentation.
OpenAPI defines a standard set which is then used to describe
each part of the API; by doing this, publishing tools like Swagger UI can
programmatically parse information and display it with customized styling
and interactivity feature. An OpenAPI specification document can either be
expressed in YAML (YAML Ain’t Markup Language) or JSON, but ultimately
the spec file will be a JSON document. Since YAML is more readable and a
more common format, we’ll use YAML for creating OpenAPI specification
document here which then will be published using Swagger UI.
So before we jump into writing OpenAPI specs for our endpoints,
let’s understand the basics of OpenAPI specs. An OpenAPI specification
document has three required components, namely, openapi which
defines the semantic version number of the OpenAPI specification which
is essential for users to understand how the document is formatted and
for the parsing tools to parse the document accordingly; Info which
contains the metadata of the API which essentially has title and API
version as required fields alongside additional fields like description, legal
information, and contact; and Paths which contains information about the
endpoints and their available operations.
The Paths object is the heart of the OpenAPI specification document
which contains the details to the available endpoints which is basically the
five components we discussed in the previous section.
Chapter 4 CrUD appliCation withFlask (part 2)
117
OpenAPI specification 3.0 is the newest version; the older version of it
is Swagger specification 2.0 which was updated and made into OpenAPI
spec later on. For this book we’ll use Swagger 2.0 specification and define
the API documentation; to do so you can use Inspector from Swagger or
generate them using the build time Swagger generation tool. Let’s check out
both the approaches. We’ll start with checking out Swagger Inspector and
move on to build time generator which we’ll integrate in our application.
To start with, open https://inspector.swagger.io in your browser
window (Chrome browser) and login/signup with your preferred modem
(Figure4-9).
Once you have logged in, you’ll be able to use all the features of
Swagger Inspector; next we’ll need to access our API resources using their
REST client, and once we do so, it’ll appear in the history and we’ll be able
to convert it into an OpenAPI specification file, but before we can access
our application running on our local server, we’ll need to add Swagger
Inspector Chrome Extension, and to do so, add the extension using
Figure 4-9. Swagger Inspector
Chapter 4 CrUD appliCation withFlask (part 2)

118
https://chrome.google.com/webstore/detail/swagger-inspector-
extensi/biemppheiopfggogojnfpkngdkchelik. Once you have the
extension installed, Swagger Inspector will be able to run with requests on
your local server as well.
Once done, let’s start with accessing our Create user endpoint. So go
ahead and similar to what we did in Postman, add the URL and choose
POST method, and in body add the JSON body data and click send
(Figure4-10).
And similar to Postman, you should be able to check the API response
in the response window as you see in the previous figure. Next you can
verify the email and then access the login endpoint (Figure4-11).
Figure 4-10. Create user endpoint Swagger Inspector
Chapter 4 CrUD appliCation withFlask (part 2)
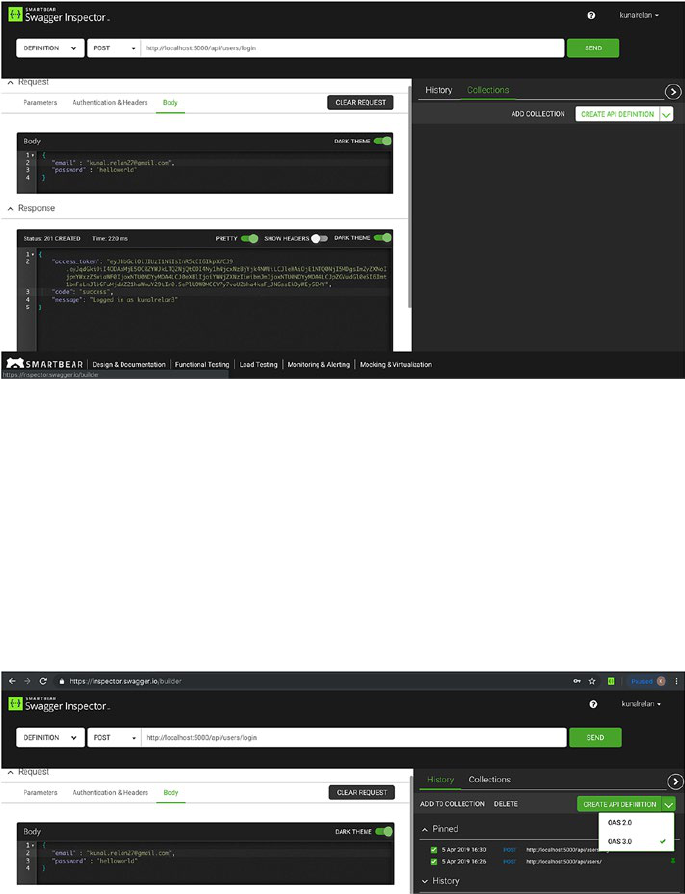
119
Once you have requested all the endpoints you want the API
documentation to generate, simply click the History tab and choose the
endpoints you want the specification document to generate and pin
them. Once you have them pinned, click the little arrow on the side of the
Create API Definition button and select OAS 2.0 to use version 2.0 of the
specification (Figure4-12).
Figure 4-11. Login endpoint
Figure 4-12. Pinned requests
Chapter 4 CrUD appliCation withFlask (part 2)
120
Now click Create Definition which once completed shall open up a
popup with link to open SwaggerHub where you can import the OpenAPI
spec and view the API docs (Figure4-13).
Now follow the link and SwaggerHub shall open which will ask you to
enter the title and version of your APIs. Here we’ll add Author DB and let
the version be default to 0.1, make visibility to private, and click Import API
like in Figure4-14.
Figure 4-13. OpenAPI spec generation
Chapter 4 CrUD appliCation withFlask (part 2)
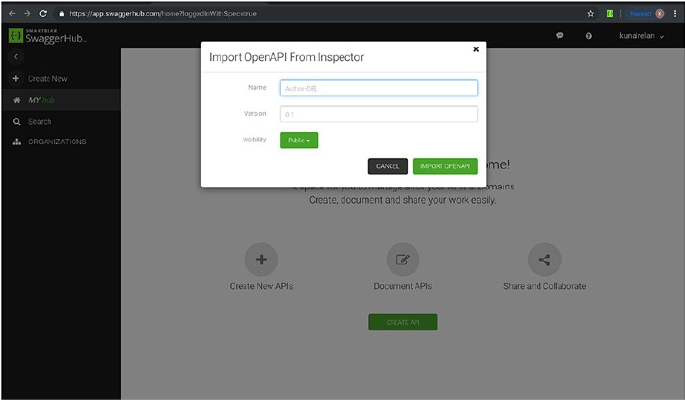
121
Once done, you shall be able to check out the documentation for your
APIs like in the following figure. Here for this tutorial, I have only selected
two endpoints, but you can have all your endpoints documented here.
In Figure4-15 you can see the selected server is the address of our local
server, and then we have our selected endpoints.
Figure 4-14. Importing OpenAPI from Inspector
Chapter 4 CrUD appliCation withFlask (part 2)

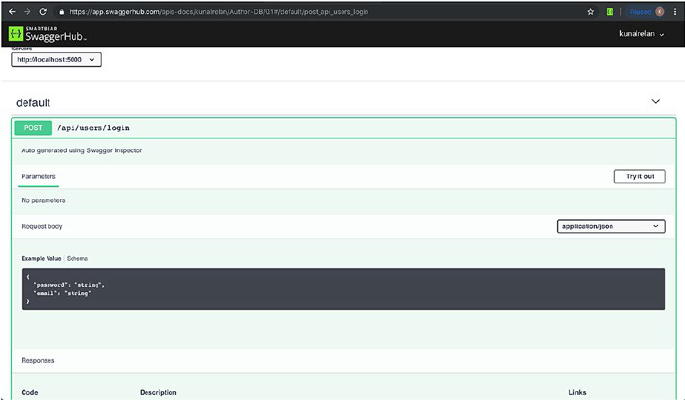
123
Once the page loads, you are now in an interactive mode of your API
documentation where you can see the endpoints, parameters, sample
request, and sample response. Next click Try It Out, and the Request body
window shall become editable where you can fill the request body data like
in Figure4-18. Below that you can also see the responses and their formats.
Figure 4-17. View documentation page
Chapter 4 CrUD appliCation withFlask (part 2)
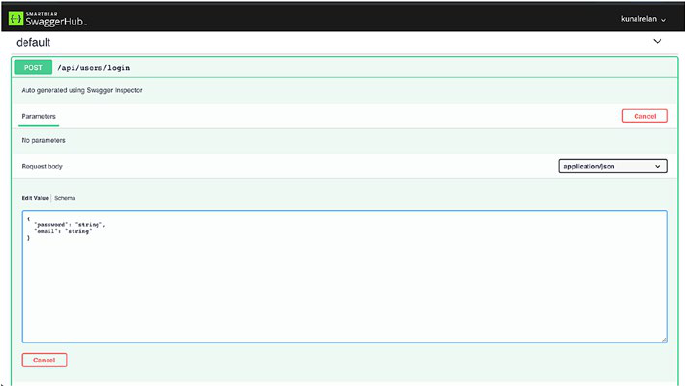
124
So go ahead and edit the email and password and click execute to
request to access the API.
Next you can also export the YAML/JSON version of the specification
document to use it with your version of Swagger UI.
Moving on, we’ll now integrate API documentation using our own
installation of Swagger UI and build time specification.
For the same we’ll use flask_swagger and flask_swagger_ui extension;
let’s go ahead and install both of them using PIP.
(venv)$ pip install flask_swagger flask_swagger_ui
Once installed let’s integrate it in our application; to do so open main.
py and import both the libraries using the following lines.
from flask_swagger import swagger
from flask_swagger_ui import get_swaggerui_blueprint
We’ll serve Swagger UI on /api/docs endpoint.
Figure 4-18. API request mode
Chapter 4 CrUD appliCation withFlask (part 2)

125
Now we’ll create an endpoint to serve our defined API specs using
Swagger 2.0
So add the following code below errorhandler functions where we’ll
define /api/spec route and initiate our Swagger definition and return the
generated JSON file.
@app.route("/api/spec")
def spec():
swag = swagger(app, prefix='/api')
swag['info']['base'] = "http://localhost:5000"
swag['info']['version'] = "1.0"
swag['info']['title'] = "Flask Author DB"
return jsonify(swag)
Now we’ll initiate flask_swagger_ui to fetch this JSON file and render
Swagger UI using it. Add the following code below the new route to initiate
get_swagger_blueprint method we just imported from flask_swagger_ui,
and here we’ll supply the docs route, JSON file router, and app_name in
config variable and then register the Blueprint.
swaggerui_blueprint = get_swaggerui_blueprint('/api/docs',
'/api/spec', config={'app_name': "Flask Author DB"})
app.register_blueprint(swaggerui_blueprint, url_
prefix=SWAGGER_URL)
And now when you try to access htttp://localhost:5000/api/docs,
you should be able to see Swagger UI (Figure4-19).
Figure 4-19. Swagger UI
Chapter 4 CrUD appliCation withFlask (part 2)
126
In the preceding URL bar, you can also provide the URL to the JSON file
exported from SwaggerHub to explore your APIs.
Build Time Documentation
Next, we’ll document the APIs using build time documentation and
generate the JSON documentation file; however, we’ll use YAML while
describing the endpoints.
Flask Swagger will automatically pick up YAML documentation from
method definitions using ‘ ‘ “ ” ’ under method followed by the description.
We’ll learn it using a sample definition in our Create user endpoint. So add
the following lines after def create_user() in users.py routes.
"""
Create user endpoint
---
parameters:
- in: body
name: body
schema:
id: UserSignup
required:
- username
- password
- email
properties:
username:
type: string
description: Unique username of the user
default: "Johndoe"
password:
type: string
description: Password of the user
Chapter 4 CrUD appliCation withFlask (part 2)
127
default: "somethingstrong"
email:
type: string
description: email of the user
default: "[email protected]"
responses:
201:
description: User successfully created
schema:
id: UserSignUpSchema
properties:
code:
type: string
422:
description: Invalid input arguments
schema:
id: invalidInput
properties:
code:
type: string
message:
type: string
"""
Here we are using YAML to define parameters and responses as you
can see in the previous example; we define the kind of parameter it is,
and in our case, it’s a body parameter, and then we define the schema of
the required parameters with sample data and field names. In responses
we define the different types of expected responses and their schema
(Figure4-20).
Chapter 4 CrUD appliCation withFlask (part 2)
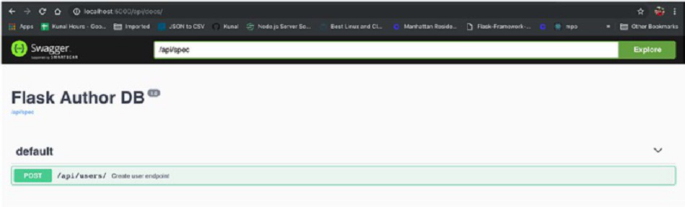
128
Now if you reload your application and visit Swagger UI, you should be
able to see your Create user endpoint and access it using Swagger UI.
Here notice how the description and parameters and responses were
interpreted and placed in Swagger UI.
Next add this to login method to generate docs for login endpoint.
"""
User Login
---
parameters:
- in: body
name: body
schema:
id: UserLogin
required:
- password
- email
properties:
email:
type: string
description: email of the user
default: "[email protected]"
password:
type: string
Figure 4-20. Build time document generation
Chapter 4 CrUD appliCation withFlask (part 2)
129
description: Password of the user
default: "somethingstrong"
responses:
200:
description: User successfully logged In
schema:
id: UserLoggedIn
properties:
code:
type: string
message:
type: string
value:
schema:
id: UserToken
properties:
access_token:
type: string
code:
type: string
message:
type: string
401:
description: Invalid input arguments
schema:
id: invalidInput
properties:
code:
type: string
message:
type: string
"""
Chapter 4 CrUD appliCation withFlask (part 2)
130
Next we’ll move on to authors.py route file and create doc for Create
author, and if you remember, this route needs the user to be logged in and
here we’ll add an extra header parameter which will accept authorization
header.
"""
Create author endpoint
---
parameters:
- in: body
name: body
schema:
id: Author
required:
- first_name
- last_name
- books
properties:
first_name:
type: string
description: First name of the author
default: "John"
last_name:
type: string
description: Last name of the author
default: "Doe"
- in: header
name: authorization
type: string
required: true
security:
- Bearer: []
responses:
Chapter 4 CrUD appliCation withFlask (part 2)
131
200:
description: Author successfully created
schema:
id: AuthorCreated
properties:
code:
type: string
message:
type: string
value:
schema:
id: AuthorFull
properties:
first_name:
type: string
last_name:
type: string
books:
type: array
items:
schema:
id: BookSchema
422:
description: Invalid input arguments
schema:
id: invalidInput
properties:
code:
type: string
message:
type: string
"""
Chapter 4 CrUD appliCation withFlask (part 2)
132
Next add the following lines for Upsert author avatar endpoint; notice
in this case we’ll add a parameter for author ID to be a variable in path.
"""
Upsert author avatar
---
parameters:
- in: body
name: body
schema:
id: Author
required:
- avatar
properties:
avatar:
type: file
description: Image file
- name: author_id
in: path
description: ID of the author
required: true
schema:
type: integer
responses:
200:
description: Author avatar successfully upserted
schema:
id: AuthorCreated
properties:
code:
type: string
message:
Chapter 4 CrUD appliCation withFlask (part 2)
133
type: string
value:
schema:
id: AuthorFull
properties:
first_name:
type: string
last_name:
type: string
books:
type: array
items:
schema:
id: BookSchema
422:
description: Invalid input arguments
schema:
id: invalidInput
properties:
code:
type: string
message:
type: string
"""
And now you can reload your Swagger UI, and you should be able to
see all the endpoints (Figure4-21) documented.
Chapter 4 CrUD appliCation withFlask (part 2)
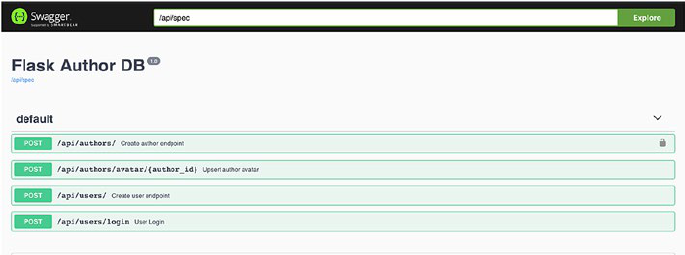
134
Conclusion
For this chapter, we’ll only create documentation for the given endpoints,
and you can build up on the top of it using the same methodologies, which
will help you create full-fledged documentation for your REST endpoints.
In the next chapter, we’ll discuss testing our REST endpoints and cover
topics including unit tests, mocks, code coverage, and so on.
Figure 4-21. Reload Swagger UI to see endpoints
Chapter 4 CrUD appliCation withFlask (part 2)
135
© Kunal Relan 2019
K. Relan, Building REST APIs with Flask, https://doi.org/10.1007/978-1-4842-5022-8_5
CHAPTER 5
Testing inFlask
Something that is untested is broken.
This quote comes from an unknown source; however, it’s not entirely
true but most of it is right. Untested applications are always an unsafe
bet to make. While the developers are confident about their work, in real
world things work out differently; hence it’s always a good idea to test
the application throughout. Untested applications also make it hard to
improve the existing code. However with automated tests, it’s always easy
to make changes and instantly know when something breaks. So testing
not just only ensures if the application is behaving the way it is expected to,
it also facilitates continuous development.
This chapter covers automated unit testing of REST APIs, and before
we get into the actual implementation, we’ll look into what unit testing is
and the principles behind.
Introduction
Most software developers out there are usually already familiar with the
term “unit testing,” but for those who are not, unit testing revolves around
the concept of breaking a large set of code into individual units to be tested
in isolation. So typically in such a case, a larger set of code is software, and
individual components are the units to be tested in isolation. Thus in our
case, a single API request is a unit to be tested. Unit testing is the first level
of software development and is usually done by software developers.
136
Let’s look into some benefits of unit testing:
1. Unit tests are simple tests for a very narrow block
of code, serving as a building block of the bigger
spectrum of the application testing.
2. Being narrowly scoped, unit tests are the easiest to
write and implement.
3. Unit tests increase confidence in modifying the code
and are also the first point of failure if implemented
correctly prompting the developer about parts of
logic breaking the application.
4. Writing unit tests makes the development process
faster, since it makes developers to do less of fuzzy
testing and helps them catch the bugs sooner.
5. Catching and fixing bugs in development using unit
tests is easier and less expensive than doing it after
the code is deployed in production.
6. Unit tests are also a more reliable way of testing in
contrast to manual fuzz tests.
Setting UpUnit Tests
So, in this section, we’ll jump right into the action and start on
implementing the tests; for the same we’ll use a library called unittest2
which is an extension to the original unit testing framework of Python
called unittest.
Let’s go ahead and install the library first.
(venv)$ pip install unittest2
Chapter 5 testing inFlask
137
This shall install unittest2 for us; next we’ll set up a base test class that
we’ll import in all our test files. This base class will set up the base for the
tests and initiate the test client as the name suggests. So go ahead and
create a file called test_base.py in utils folder.
Now let’s configure our testing environment, so open up your config.py
and add the following code to add testing config.
class TestingConfig(Config):
TESTING = True
SQLALCHEMY_ECHO = False
JWT_SECRET_KEY = 'JWT-SECRET'
SECRET_KEY= 'SECRET-KEY'
SECURITY_PASSWORD_SALT= 'PASSWORD-SALT'
MAIL_DEFAULT_SENDER= '
MAIL_SERVER= 'smtp.gmail.com'
MAIL_PORT= 465
MAIL_USERNAME= "
MAIL_PASSWORD= "
MAIL_USE_TLS= False
MAIL_USE_SSL= True
UPLOAD_FOLDER= 'images'
Notice that we won’t configure the SQLAlchemy URI here, which we’ll
do in test_base.py
Next, add the following lines to import the required dependencies in
test_base.py
import unittest2 as unittest
from main import create_app
from api.utils.database import db
from api.config.config import TestingConfig
import tempfile
Chapter 5 testing inFlask
138
Next add the BaseTestCase class with the following code.
class BaseTestCase(unittest.TestCase):
"""A base test case"""
def setUp(self):
app = create_app(TestingConfig)
self.test_db_file = tempfile.mkstemp()[1]
app.config['SQLALCHEMY_DATABASE_URI'] = 'sqlite:///' +
self.test_db_file
with app.app_context():
db.create_all()
app.app_context().push()
self.app = app.test_client()
def tearDown(self):
db.session.close_all()
db.drop_all()
Here we are creating the SQLAlchemy sqlite database on the fly
using tempfile.
What we just created previously is called a stub, which is a module that
acts as a temporary replacement for a called module providing the same
output as the actual product.
So the preceding method will run before every test is run and it
spawns a new test client. We’ll import this method in all the tests we create.
A test is recognized by all the methods in the class which starts with test_
prefix. Here we’ll have a unique database URL every time since we have
configured tempfile, and we’ll postfix it with a timestamp and then we
have configured TESTING= True in app config which will disable error
catching to enable better testing, and then finally we run db.create_all() to
create the DB tables for the application.
Next we have defined another method tearDown which will remove
the current database file and use a fresh database file for every test.
Chapter 5 testing inFlask
139
Unit Testing User Endpoints
So now we’ll start writing the tests, and the first step to it is by creating a
folder called tests in api directory where we’ll create all our test files. So go
ahead and create tests folder and create our first test file called test_users.py.
Now add the following imports in test_users.py
import json
from api.utils.test_base import BaseTestCase
from api.models.users import User
from datetime import datetime
import unittest2 as unittest
from api.utils.token import generate_verification_token,
confirm_verification_token
Once done, we’ll define another method to create users using the
SQLAlchemy model to facilitate testing.
Add this to the file next.
def create_users():
user1 = User(email="[email protected]",
username='kunalrelan12',
password=User.generate_hash('helloworld'),
isVerified=True).create()
user2 = User(email="[email protected]",
username='kunalrelan125',
password=User.generate_hash('helloworld')).create()
Now we have our imports and the method to create users; next we’ll
define TestUsers class to hold all our tests.
class TestUsers(BaseTestCase):
def setUp(self):
super(TestUsers, self).setUp()
Chapter 5 testing inFlask
140
create_users()
if __name__ == '__main__':
unittest.main()
Add this code to the file which will import our base test class and set
up the test client and call create_users() method to create the users. Notice
that in create_users() method, we have created one verified and one
unverified user so that we can cover up all the test cases. Now we can start
writing our unit tests. Add the following code inside TestUsers() class.
We’ll start by testing the login endpoint, and since we just created a
verified user, we should be allowed to log in with a valid set of credentials.
def test_login_user(self):
user = {
"email" : "[email protected]",
"password" : "helloworld"
}
response = self.app.post(
'/api/users/login',
data=json.dumps(user),
content_type='application/json'
)
data = json.loads(response.data)
self.assertEqual(200, response.status_code)
self.assertTrue('access_token' in data)
Add the following code inside the TestUsers class, and we should have
our first unit test in which we create a user object and post the user to
login endpoint. Once we receive the response, we’ll use assertion to check
if we got the expected status code and access_token in the response. An
assertion is a boolean expression which will be true unless there is a bug
or the conditional statement doesn’t match. Unit test provides a list of
assertion methods we can use to validate our tests.
Chapter 5 testing inFlask
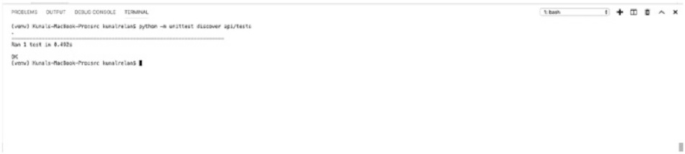
141
But assertEqual(), assertNotEqual(), assertTrue(), and assertNotTrue()
cover most of it.
Here assertEqual() and assertNotEqual() match for values, and
assertTrue() and assertNotTrue() check if the value of passed variable
being a boolean.
Now let’s run our first test, so just open your terminal and activate your
virtual environment.
In your terminal run the following command to run the tests.
(venv)$ python -m unittest discover api/tests
The preceding command will run all the test files inside the tests
directory; since we have only one test for now, we can see the result of our
tests in the following figure.
Figure 5-1. Running unit tests
So this was one way of running our unit tests, and before we process
further with writing more tests, I’d like to introduce you to another
extension to unittest library called nose which makes testing easier, so let’s
go ahead and install nose.
Use the following code to install nose.
(venv)$ pip install nose
And now once we have nose, let’s see how we can use nose to run our
tests since moving on we’ll use nose to run all our tests.
Chapter 5 testing inFlask

142
By default nose will find all the test files using a (?:\b|_)[Tt]est regular
expression; however, you can also specify the filename to test. Let’s run the
same test again by using nose.
(venv)$ nosetests
As you can see in the preceding figure, we can run our tests using a
simple nosetest command. Next let’s write unit tests for user model again.
So our goal here is to cover all the scenarios and check the application
behavior in each of the scenarios; next we’ll test login API when the user is
not verified and when wrong credentials are submitted.
Add the following code for the respective tests.
def test_login_user_wrong_credentials(self):
user = {
"email" : "[email protected]",
"password" : "helloworld12"
}
response = self.app.post(
'/api/users/login',
data=json.dumps(user),
content_type='application/json'
)
data = json.loads(response.data)
self.assertEqual(401, response.status_code)
Figure 5-2. Running unit tests with nose
Chapter 5 testing inFlask
143
def test_login_unverified_user(self):
user = {
"email" : "[email protected]",
"password" : "helloworld"
}
response = self.app.post(
'/api/users/login',
data=json.dumps(user),
content_type='application/json'
)
data = json.loads(response.data)
self.assertEqual(400, response.status_code)
In the preceding code, in test_login_user_wrong_credentials method,
we check for 401 status code in the response as we are supplying wrong
credentials, and in test_login_unverified_user() method, we are trying to
login with an unverified user which shall throw 400 error.
Next let’s test the create_user endpoint and start by creating a test to
create a user with correct fields to create a new user.
def test_create_user(self):
user = {
"username" : "kunalrelan2",
"password" : "helloworld",
"email" : "[email protected]"
}
response = self.app.post(
'/api/users/',
data=json.dumps(user),
content_type='application/json'
)
Chapter 5 testing inFlask
144
data = json.loads(response.data)
self.assertEqual(201, response.status_code)
self.assertTrue('success' in data['code'])
The preceding code will request the Create user endpoint with a new
user object and shall be able to do so and respond with a 201 status code.
Next we’ll add another test when username is not supplied to the
Create user endpoint, and in this case, we shall get a 422 response. Here is
the code for that.
def test_create_user_without_username(self):
user = {
"password" : "helloworld",
"email" : "[email protected]"
}
response = self.app.post(
'/api/users/',
data=json.dumps(user),
content_type='application/json'
)
data = json.loads(response.data)
self.assertEqual(422, response.status_code)
Now we can move on to testing our confirm email endpoint, and
here we’ll first create a unit test with valid email, so you noticed we had
an unverified user created in create_users() method, and here first we’ll
generate a validation token since we are not reading the email using the
unit tests and then send the token to confirm email endpoint.
def test_confirm_email(self):
token = generate_verification_token('kunal.relan123@
gmail.com')
Chapter 5 testing inFlask
145
response = self.app.get(
'/api/users/confirm/'+token
)
data = json.loads(response.data)
self.assertEqual(200, response.status_code)
self.assertTrue('success' in data['code'])
Next, we’ll write another test with email of an already verified user to
test if we get 422in response status code.
def test_confirm_email_for_verified_user(self):
token = generate_verification_token('kunal.relan12@
gmail.com')
response = self.app.get(
'/api/users/confirm/'+token
)
data = json.loads(response.data)
self.assertEqual(422, response.status_code)
And the last one for this endpoint is we’ll supply an incorrect email
and should get a 404 response status code.
def test_confirm_email_with_incorrect_email(self):
token = generate_verification_token('kunal.relan43@
gmail.com')
response = self.app.get(
'/api/users/confirm/'+token
)
data = json.loads(response.data)
self.assertEqual(404, response.status_code)
Once we have our tests in place, it’s time to test them all, so go ahead
and use nosetests and run the tests.
Chapter 5 testing inFlask
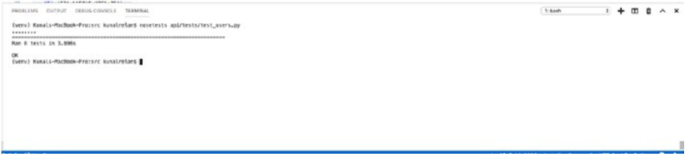
146
So these are all the tests we want to cover with user model; next we can
move on to authors and books.
Next let’s create test_authors.py and we’ll add the dependencies
with a few changes, so add the following lines to import the required
dependencies.
import json
from api.utils.test_base import BaseTestCase
from api.models.authors import Author
from api.models.books import Book
from datetime import datetime
from flask_jwt_extended import create_access_token
import unittest2 as unittest
import io
Next we’ll define two helper methods, namely, create_authors and
login, and add the following code for the same.
def create_authors():
author1 = Author(first_name="John", last_name="Doe").create()
author2 = Author(first_name="Jane", last_name="Doe").create()
We’ll create two authors for the test using the method defined
previously, and login method will generate a login token and return for
authorized only routes.
Figure 5-3. Nosetests on test_users.py
Chapter 5 testing inFlask
147
def login():
access_token = create_access_token(identity = 'kunal.relan@
hotmail.com')
return access_token
Next let’s define our test class like we did earlier and initiate it.
class TestAuthors(BaseTestCase):
def setUp(self):
super(TestAuthors, self).setUp()
create_authors()
if __name__ == '__main__':
unittest.main()
Now we have the base of our author unit tests, and we can add the
following test cases which should be self-explanatory.
Here we’ll create a new author using POST author endpoint with the
JWT token we generate using login method and expect author object with
201 status code in response.
def test_create_author(self):
token = login()
author = {
'first_name': 'Johny',
'last_name': 'Doee'
}
response = self.app.post(
'/api/authors/',
data=json.dumps(author),
content_type='application/json',
headers= { 'Authorization': 'Bearer '+token }
)
Chapter 5 testing inFlask
148
data = json.loads(response.data)
self.assertEqual(201, response.status_code)
self.assertTrue('author' in data)
Here we’ll try creating an author with authorization header, and it
should return 401in the response status code.
def test_create_author_no_authorization(self):
author = {
'first_name': 'Johny',
'last_name': 'Doee'
}
response = self.app.post(
'/api/authors/',
data=json.dumps(author),
content_type='application/json',
)
data = json.loads(response.data)
self.assertEqual(401, response.status_code)
In this test case, we’ll try creating an author without last_name field,
and it should respond back with 422 status code.
def test_create_author_no_name(self):
token = login()
author = {
'first_name': 'Johny'
}
response = self.app.post(
'/api/authors/',
data=json.dumps(author),
content_type='application/json',
Chapter 5 testing inFlask
149
headers= { 'Authorization': 'Bearer '+token }
)
data = json.loads(response.data)
self.assertEqual(422, response.status_code)
In this one we’ll test upload avatar endpoint and use io to create a
temp image file and send it as multipart/form-data to upload the image.
def test_upload_avatar(self):
token = login()
response = self.app.post(
'/api/authors/avatar/2',
data=dict(avatar=(io.BytesIO(b'test'),
'test_file.jpg')),
content_type='multipart/form-data',
headers= { 'Authorization': 'Bearer '+ token }
)
self.assertEqual(200, response.status_code)
Here, we’ll test the upload avatar by supplying a CSV file instead, and
as expected it should not respond with 200 status code.
def test_upload_avatar_with_csv_file(self):
token = login()
response = self.app.post(
'/api/authors/avatar/2',
data=dict(file=(io.BytesIO(b'test'), 'test_file.csv)),
content_type='multipart/form-data',
headers= { 'Authorization': 'Bearer '+ token }
)
self.assertEqual(422, response.status_code)
Chapter 5 testing inFlask
150
In this test, we’ll get all the authors using GET all authors endpoint.
def test_get_authors(self):
response = self.app.get(
'/api/authors/',
content_type='application/json'
)
data = json.loads(response.data)
self.assertEqual(200, response.status_code)
self.assertTrue('authors' in data)
Here we have a unit test for GET author by ID endpoint, and it’ll return
200 response status code and author object.
def test_get_author_detail(self):
response = self.app.get(
'/api/authors/2',
content_type='application/json'
)
data = json.loads(response.data)
self.assertEqual(200, response.status_code)
self.assertTrue('author' in data)
In this test we’ll update the author object on the recently created
author, and it shall also return 200 status code in the response.
def test_update_author(self):
token = login()
author = {
'first_name': 'Joseph'
}
response = self.app.put(
'/api/authors/2',
data=json.dumps(author),
Chapter 5 testing inFlask
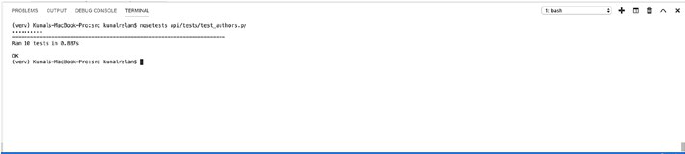
151
content_type='application/json',
headers= { 'Authorization': 'Bearer '+token }
)
self.assertEqual(200, response.status_code)
In this test we’ll delete author object and expect 204 response status code.
def test_delete_author(self):
token = login()
response = self.app.delete(
'/api/authors/2',
headers= { 'Authorization': 'Bearer '+token }
)
self.assertEqual(204, response.status_code)
So now you can run authors test like in the previous figure, and it
should all pass like in that figure; next we’ll move to books model test.
For books model tests, we can modify the author tests and set up unit
tests for books in the same module, so let’s update create_authors method
to create some books as well; just go ahead and update the method with
following code.
def create_authors():
author1 = Author(first_name="John", last_name="Doe").
create()
Figure 5-4. Authors test
Chapter 5 testing inFlask
152
Book(title="Test Book 1", year=datetime(1976, 1, 1),
author_id=author1.id).create()
Book(title="Test Book 2", year=datetime(1992, 12, 1),
author_id=author1.id).create()
author2 = Author(first_name="Jane", last_name="Doe").
create()
Book(title="Test Book 3", year=datetime(1986, 1, 3),
author_id=author2.id).create()
Book(title="Test Book 4", year=datetime(1992, 12, 1),
author_id=author2.id).create()
And then here are the unit tests for book routes.
def test_create_book(self):
token = login()
author = {
'title': 'Alice in wonderland',
'year': 1982,
'author_id': 2
}
response = self.app.post(
'/api/books/',
data=json.dumps(author),
content_type='application/json',
headers= { 'Authorization': 'Bearer '+token }
)
data = json.loads(response.data)
self.assertEqual(201, response.status_code)
self.assertTrue('book' in data)
def test_create_book_no_author(self):
token = login()
Chapter 5 testing inFlask
153
author = {
'title': 'Alice in wonderland',
'year': 1982
}
response = self.app.post(
'/api/books/',
data=json.dumps(author),
content_type='application/json',
headers= { 'Authorization': 'Bearer '+token }
)
data = json.loads(response.data)
self.assertEqual(422, response.status_code)
def test_create_book_no_authorization(self):
author = {
'title': 'Alice in wonderland',
'year': 1982,
'author_id': 2
}
response = self.app.post(
'/api/books/',
data=json.dumps(author),
content_type='application/json'
)
data = json.loads(response.data)
self.assertEqual(401, response.status_code)
def test_get_books(self):
response = self.app.get(
'/api/books/',
content_type='application/json'
)
Chapter 5 testing inFlask
154
data = json.loads(response.data)
self.assertEqual(200, response.status_code)
self.assertTrue('books' in data)
def test_get_book_details(self):
response = self.app.get(
'/api/books/2',
content_type='application/json'
)
data = json.loads(response.data)
self.assertEqual(200, response.status_code)
self.assertTrue('books' in data)
def test_update_book(self):
token = login()
author = {
'year': 1992,
'title': 'Alice'
}
response = self.app.put(
'/api/books/2',
data=json.dumps(author),
content_type='application/json',
headers= { 'Authorization': 'Bearer '+token }
)
self.assertEqual(200, response.status_code)
def test_delete_book(self):
token = login()
response = self.app.delete(
'/api/books/2',
Chapter 5 testing inFlask

155
headers= { 'Authorization': 'Bearer '+token }
)
self.assertEqual(204, response.status_code)
Test Coverage
So now we have learned to write test cases for our application, and the goal
of the unit tests is to test as much code as possible, so we have to make
sure every function with all its branches are covered, and the closer you
get to 100%, the more comfortable you will be before making changes.
Test coverage is an important tool to use in development; however, 100%
coverage doesn’t guarantee no bugs.
You can install coverage.py using PIP with the following command.
(venv)$ pip install coverage
Nose library has a built-in plugin that works with coverage module, so
to run test coverage, you need to add two more parameters to the terminal
while running nosetests.
Use the following command to run nosetests with the test coverage enabled.
(venv)$ nosetests --with-coverage --cover-package=api.routes
So here we are enabling coverage using --with-coverage flag and
specifying to only cover routes module, or else by default, it will also cover
the installed modules.
Figure 5-5. Test coverage
Chapter 5 testing inFlask
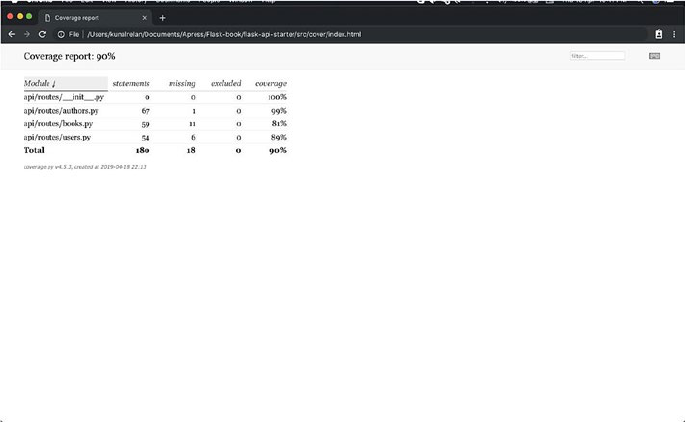
156
As you can see, we have got a significant amount of code test coverage,
and you can cover all other edge cases to achieve 100% test coverage.
Next you can also enable --cover-html flag to output information in
HTML format which is more readable and presetable.
(venv)$ nosetests --with-coverage --cover-package=api.routes
--cover-html
The preceding command will generate the HTML format result of test
coverage, and now you should see a folder called cover in your working
directory; open the folder, and open index.html using your browser to see
the test coverage report in HTML.
As you can see in the previous figure, we have got the HTML version of
our test coverage report.
Figure 5-6. Test coverage report in HTML
Chapter 5 testing inFlask
157
Conclusion
So this is it for this chapter; we have learned the basics of unit testing,
implemented test cases for our application, and covered unit tests for all
our routes and integrated test coverage using nose testing library. This
covers our development journey of this application. In the next chapter,
we’ll discuss about deployment and deploy our application on various
cloud service providers.
Chapter 5 testing inFlask
159
© Kunal Relan 2019
K. Relan, Building REST APIs with Flask, https://doi.org/10.1007/978-1-4842-5022-8_6
CHAPTER 6
Deploying Flask
Applications
So until now in this book, we focused entirely on developing the
application, and in this chapter, we’ll discuss about the next step which is
deploying our application and managing the application post deployment
which is a very crucial part of application development. In this chapter
we’ll primarily discuss various ways to deploy a Flask application
securely. There can be various ways of deploying a Flask application,
and each way has its pros and cons, so we’ll weigh them out and discuss
their cost effectiveness as well as security and perform ways to deploy
our application. As I mentioned earlier, Flask’s server is not suitable
for production deployment and is only intended for development and
debugging, so we’ll be looking into various options out there.
In this chapter we’ll cover the following topics:
1. Deploying Flask with uWSGI and Nginx on Alibaba
Cloud ECS
2. Deploying Flask with Gunicorn on Alibaba Cloud ECS
3. Deploying Flask on Heroku
4. Deploying Flask on AWS Elastic Beanstalk
5. Deploying Flask on Google App Engine
160
So in this chapter, we’ll entirely focus on deploying our application on
all these platforms and discuss the pros and cons of each of them. While
they all are great options, it’s entirely the business use case and resources
which define where we deploy the application.
Deploying Flask withuWSGI andNginx
onAlibaba Cloud ECS
Deploying applications this way is often called traditional hosting where
the dependencies are installed manually or through a scripted installer,
which involves manually installing the application and its dependencies
and securing it. In this section we’ll install and run our application in
production using uWSGI and Nginx on a Linux OS hosted on Alibaba
Cloud Elastic Compute Service.
uWSGI is a full-fledged HTTP server and a protocol capable of running
production applications. uWSGI is a popular uwsgi (protocol) server, while
Nginx is a free, open source, high-performing HTTP server and a reverse
proxy. In our case we’ll use Nginx to reverse proxy our HTTP calls to and
from the uwsgi server which we’ll deploy on Ubuntu OS.
So let’s get straight into the business and deploy our application, but
before we do that, we have to freeze our libraries in requirements.txt using
pip freeze. Run the following commands to make sure the file has the list of
all the required dependencies.
(venv)$ pip freeze > requirements.txt
So here pip freeze will output all the required installed packages in
requirements format. Next we need to push our codebase to a version
management system like GitHub which we’ll pull later on our Linux
instance. For this we’ll create an Ubuntu instance on Alibaba Cloud for
which you can signup at www.alibabacloud.com or you can use your
Ubuntu instance on any other cloud provider or even use a virtual one.
CHAPTER 6 DEPLOYING FLASK APPLICATIONS
161
So before we start deploying, we also need to have a MySQL server, and
since this is about deploying the Flask app, we won’t be covering deploying
MySQL server. However, you can deploy one on the same instance or use a
managed MySQL server service and edit the DB config details in config.py.
Once you have your cloud account setup, create an Ubuntu instance
preferably version 16.04 or greater. Here we have Alibaba Cloud ECS
(Elastic Compute Service), and once we have our instance, we’ll SSH into
using keypair or a password.
Figure 6-1. Alibaba Cloud ECS Console
Once you have your Ubuntu instance up and running, SSH into it and
pull the codebase from your preferred version management system.
CHAPTER 6 DEPLOYING FLASK APPLICATIONS
162
As you can see by default, we have logged in as a root, so before moving
on, we’ll create another sudo user called Flask which is a good security
measure. It is a good idea to run each app under its own user account, in
order to limit the damage that security vulnerabilities in the app can do.
$ adduser flask
Next it’ll prompt you to set a password for the new user and enter a few
details; you can just enter the password and leave other fields empty if you
wish to and then run the following command to add the user to sudoers list.
$ usermod -aG sudo flask
Now once we have our new user, let’s login with that user in the shell
using the following command.
$ su - flask
Next we’ll pull our app from our GitHub repo, so make sure you have
git client installed, and if you don’t, use the following command to do so.
$ sudo apt-get install git
Figure 6-2. SSH into Ubuntu instance
CHAPTER 6 DEPLOYING FLASK APPLICATIONS
163
Use the following command to clone the app repository.
$ sudo git clone <repo_name>
Next change your current directory to the app source code and install
virtualenv and uwsgi since we won’t have those in our reqiurements.txt.
$ sudo pip install virtualenv uwsgi
Create a virtual env like we did in the previous chapter, and install the
dependencies after activating the virtual environment with the following
command.
$ pip install -r requirements.txt
We’ll install all the dependencies needed to set up the application from
Ubuntu repositories, and we’ll start with installing python-pip which is a
package manager for Python and python-dev which contains the header
files needed to compile Python extensions.
$ sudo apt-get install python-pip python-dev
Once we have our dependencies installed, we’ll create a uWSGI
configuration file which will be called flask-app.ini, so go ahead and create
a file called flask-app.ini in your current directory and add the following
lines to it.
[uwsgi]
module = run:application
master = true
processes = 5
socket = flask-app.sock
chmod-socket = 660
vacuum = true
die-on-term = true
CHAPTER 6 DEPLOYING FLASK APPLICATIONS
164
This file starts with [uwsgi] header so that WSGI knows to apply the
settings. We also specify the module and the callable which is run.py in our
case minus the extension and the callable which is application.
Then we instruct uwsgi to start the process as a master and spawn five
worker processes to handle the requests.
Next we’ll supply the Unix socket file for Nginx to follow the uWSGI
requests for our application. Let’s also change the permissions on the
socket. We’ll be giving the Nginx group ownership of the uWSGI process
later on, so we need to make sure the group owner of the socket can read
information from it and write to it. We will also clean up the socket when
the process stops by adding the vacuum option.
The last thing we’ll do is set the die-on-term option. This can help
ensure that the init system and uWSGI have the same assumptions about
what each process signal means.
Next, we’ll create a systemd service unit file which will allow Ubuntu’s
init system to start our application automatically whenever the server
boots.
This file will be called flask-app.service and will be placed
in /etc/systemd/system
Directory.
$ sudo nano /etc/systemd/system/flask-app.service
And paste the following lines in the file.
#Metadata and dependencies section
[Unit]
Description=Flask App service
After=network.target
#Define users and app working directory
[Service]
User=flask
Group=www-data
CHAPTER 6 DEPLOYING FLASK APPLICATIONS
165
WorkingDirectory=/home/flask/flask-api-app/src
Environment="WORK_ENV=PROD"
ExecStart=/home/flask/flask-api-app/src/venv/bin/uwsgi --ini
flask-app.ini
#Link the service to start on multi-user system up
[Install]
WantedBy=multi-user.target
After this run the following command to enable and start our new
service.
$ sudo systemctl start flask-app
$ sudo systemctl enable flask-app
Our uWSGI server should now be up and running waiting for requests
in the socket file we made earlier. We’ll now install and configure Nginx to
pass and process the requests using the uwsgi protocol.
$ sudo apt-get install nginx
Now we should have an Nginx server up and running, and we’ll begin
by creating a new server block config file in /etc/nginx/sites-available , and
we’ll call it flask-app.
$ sudo nano /etc/nginx/sites-available/flask-app
We’ll open a server block and instruct it to listen on port 80 and define
the server name which should be the domain name of your service. Going
ahead we’ll define a location block inside the server block to define the
base location and import uwsgi_params headers inside that specifies some
general uWSGI parameters that need to be set. We’ll then pass the requests
to the socket we defined using the uwsgi_pass directive.
server {
listen 80;
CHAPTER 6 DEPLOYING FLASK APPLICATIONS
166
server_name flaskapp;
location / {
include uwsgi_params;
uwsgi_pass unix:/home/flask/flask-api-app/src/flask-
app.sock;
}
}
The preceding lines should configure our server block to listen to
server requests on the socket. Once we have that all ready, next we’ll create
a symlink to sites-enabled directory.
$ sudo ln -s /etc/nginx/sites-available/flask-app /etc/nginx/
sites-enabled
With that in place, we can now test our changes for syntax errors using
the following command.
$ sudo nginx -t
If there were no syntax errors, you should see this printed in
your terminal.
$ nginx: the configuration file /etc/nginx/nginx.conf syntax is
ok
$ nginx: configuration file /etc/nginx/nginx.conf test is
successful
And now when you access your domain, it should be working. In case
you don’t have a domain and want to access the application, you should
either edit the default server block in sites-enabled rather than creating a
new one, or delete the default app and you can just access the application
with the IP address.
CHAPTER 6 DEPLOYING FLASK APPLICATIONS
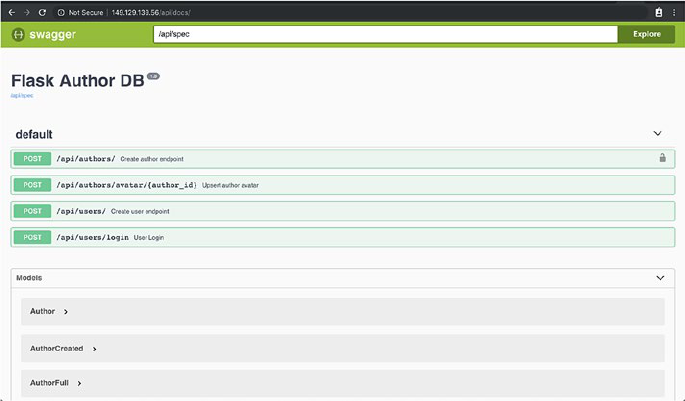
167
Also make sure if you are running the Ubuntu server on a cloud
service, port 80 is allowed on the firewall, and in our case, it’s set using the
security group.
Deploying Flask onGunicorn withApache
onAlibaba Cloud ECS
Now we’ll install our Flask application using Gunicorn which is a Python
WSGI HTTP server for Unix which will run our application, and then we’ll
reverse proxy the requests using Apache server.
To follow this section, you’ll need the following:
1. Ubuntu server with a non-root user with sudo privileges
2. Apache server installed
3. A copy of our Flask app in home directory
Figure 6-3. Deployed application
CHAPTER 6 DEPLOYING FLASK APPLICATIONS
168
As I mentioned, we’ll use Gunicorn to run our application, so let’s
install Gunicorn using PIP.
$ pip install gunicorn
Next we’ll create a system service just like we did in the earlier section,
so go ahead and create our new service with the following command.
$ sudo nano /etc/systemd/system/flask-app.service
Next add the following lines in your nano editor.
[Unit]
Description= Flask App service
After=network.target
[Service]
User=flask
Group=www-data
Restart=on-failure
Environment="WORK_ENV=PROD"
WorkingDirectory=/home/flask/flask-api-app/src
ExecStart=/home/flask/flask-api-app/src/venv/bin/gunicorn -c
/home/flask/flask-api-app/src/gunicorn.conf -b 0.0.0.0:5000
wsgi:application
[Install]
WantedBy=multi-user.target
Now save the file and exit, and we should have our system service. Next
we’ll enable and start our service using the following command.
$ sudo systemctl start flask-app
$ sudo systemctl enable flask-app
So now our app should be running on Port 5000; next we need to
configure Apache to reverse proxy our application.
CHAPTER 6 DEPLOYING FLASK APPLICATIONS
169
By default reverse proxy module is disabled in Apache, and to enable it
enter the following command.
$ a2enmod
And it will prompt for modules to activate; enter the following modules
to be activated:
$ proxy proxy_ajp proxy_http rewrite deflate headers proxy_
balancer proxy_connect proxy_html
Now add our application to Apache web server config file. Add
the following lines (inside VirtualHost block) to /etc/apache2/sites-
available/000-default.conf
<Proxy *>
Order deny,allow
Allow from all
</Proxy>
ProxyPreserveHost On
<Location "/">
ProxyPass "http://127.0.0.1:5000/"
ProxyPassReverse "http://127.0.0.1:5000/"
</Location>
Now it should be proxying our app on root route, and your final server
block should look like this.
<VirtualHost *:80>
# The ServerName directive sets the request scheme,
hostname and port that
# the server uses to identify itself. This is used when
creating
# redirection URLs. In the context of virtual hosts, the
ServerName
CHAPTER 6 DEPLOYING FLASK APPLICATIONS
170
# specifies what hostname must appear in the request's
Host: header to
# match this virtual host. For the default virtual host
(this file) this
# value is not decisive as it is used as a last resort host
regardless.
# However, you must set it for any further virtual host
explicitly.
#ServerName www.example.com
ServerAdmin webmaster@localhost
DocumentRoot /var/www/html
# Available loglevels: trace8, ..., trace1, debug, info,
notice, warn,
# error, crit, alert, emerg.
# It is also possible to configure the loglevel for particular
# modules, e.g.
#LogLevel info ssl:warn
ErrorLog ${APACHE_LOG_DIR}/error.log
CustomLog ${APACHE_LOG_DIR}/access.log combined
<Proxy *>
Order deny,allow
Allow from all
</Proxy>
ProxyPreserveHost On
<Location "/">
ProxyPass "http://127.0.0.1:5000/"
ProxyPassReverse "http://127.0.0.1:5000/"
</Location>
# For most configuration files from conf-available/, which are
# enabled or disabled at a global level, it is possible to
CHAPTER 6 DEPLOYING FLASK APPLICATIONS
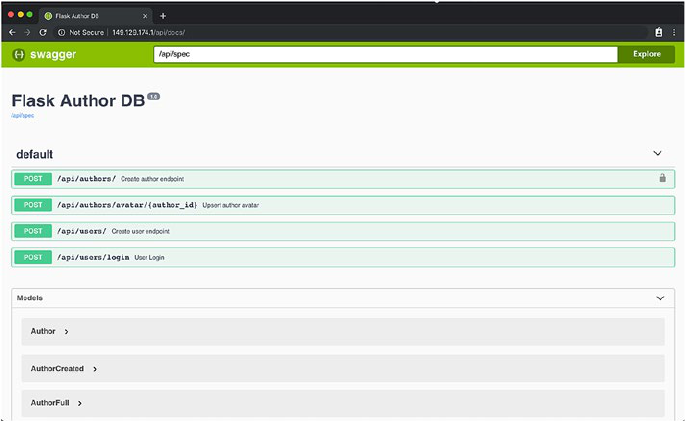
171
# include a line for only one particular virtual host. For
example the
# following line enables the CGI configuration for this
host only
# after it has been globally disabled with "a2disconf".
#Include conf-available/serve-cgi-bin.conf
</VirtualHost>
# vim: syntax=apache ts=4 sw=4 sts=4 sr noet
Save the file and exit, and we have covered it all. Just restart the server
with the following command.
$ sudo service apache2 restart
Now visit the application in your browser using the IP address.
Figure 6-4. Deployed Flask app on Gunicorn
CHAPTER 6 DEPLOYING FLASK APPLICATIONS

172
Deploying Flask onAWS Elastic Beanstalk
In this section we’ll deploy our Flask application using AWS Elastic
Beanstalk. AWS Elastic Beanstalk is an easy-to-use service for deploying
and scaling web applications and services.
We’ll assume that you already have an active AWS account and
AWS CLI setup in your development machine or else you can use AWS
docs on that.
To create the application environment and deploy the application,
initialize your EB CLI repository with the eb init command.
$ eb init -p python-2.7 flask-app --region <your_region>
Note For the list of regions, refer to this guide: https://docs.
aws.amazon.com/general/latest/gr/rande.html
You should see the following response in your terminal.
$ Application flask-app has been created.
The preceding command creates a new application named flask-app
and configures your local repository to create environments with the latest
Python 2.7.
Next run eb init again to configure a keypair for SSH login.
Next we’ll create an environment and deploy your application to it with
eb create.
$ eb create
Next enter the environment name, DNS prefix, and load balancer type
which will eliminate the need to expose the web server to the world.
CHAPTER 6 DEPLOYING FLASK APPLICATIONS
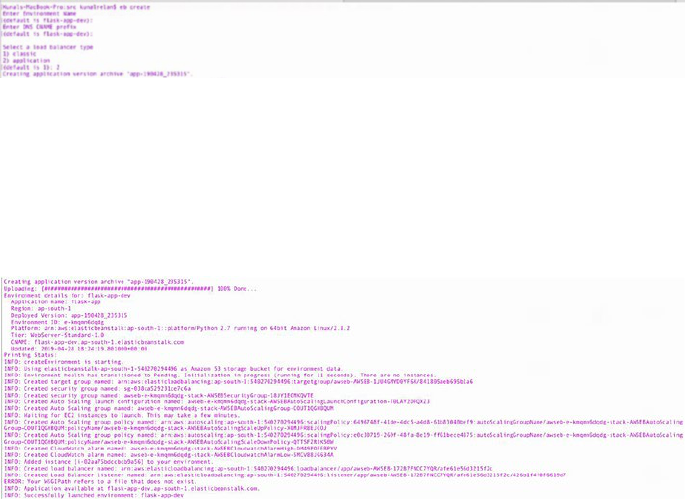
173
Now it shall take around 5 minutes to be deployed. Once it is deployed,
we just need to configure a few more details, which we’ll directly do in the
AWS web console.
Once the application finishes deploying, you should see a similar
output like in the preceding figure. Next log on to the AWS web console,
and open Elastic Beanstalk Configuration tab.
Figure 6-6. eb create success
Figure 6-5. eb create
CHAPTER 6 DEPLOYING FLASK APPLICATIONS
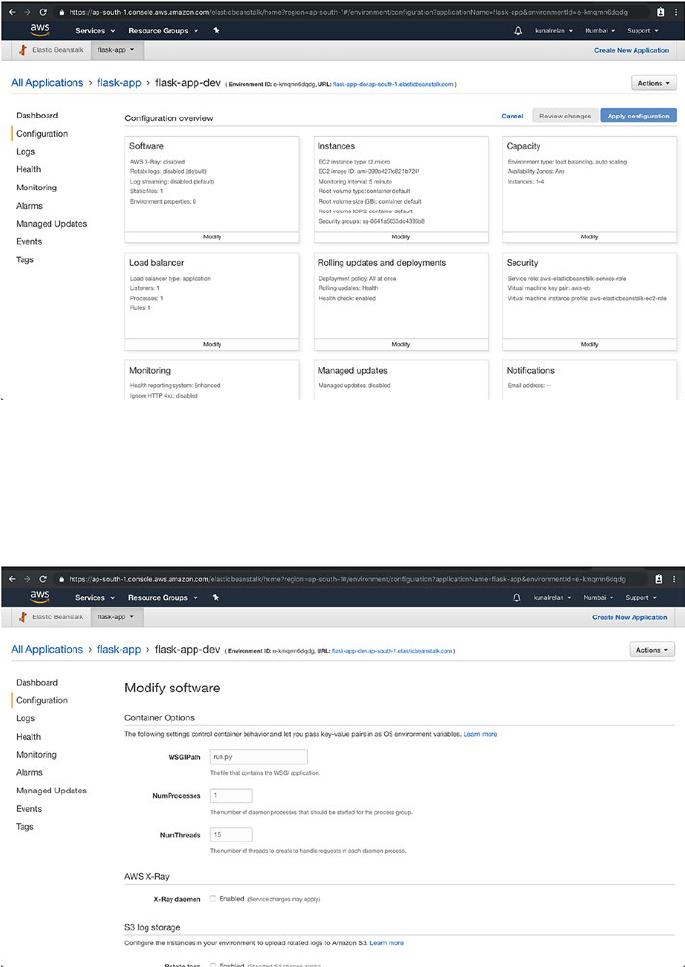
174
Next click on modify; on the software tab and inside container options,
update the WSGIPath to run.py.
Figure 6-8. WSGIpath set
Figure 6-7. Elastic Beanstalk Application Configuration
CHAPTER 6 DEPLOYING FLASK APPLICATIONS
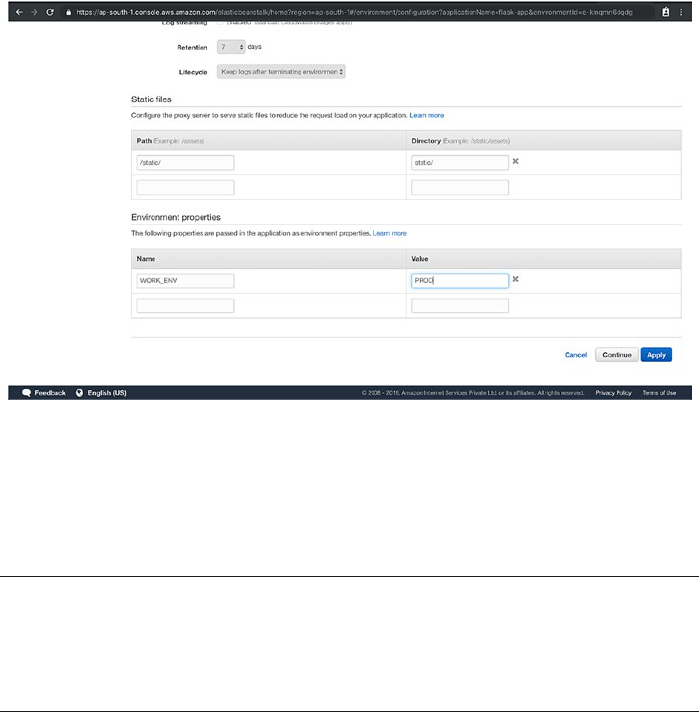
175
Now scroll down, and in environment variable, supply WORK_ENV
and set it to Prod so that our application runs in production mode. Next
click on apply and the application should reload and start working.
Now you can go back to dashboard to find the URL of the application,
and it should be up and running.
Note In Elastic Beanstalk you can also configure and start a MySQL
RDS server attached to the environment to run with the application,
but it is out of the scope of this book.
Figure 6-9. Elastic Beanstalk Environment variables
CHAPTER 6 DEPLOYING FLASK APPLICATIONS

176
Deploying Flask App onHeroku
Heroku is a Platform as a Service (PaaS) which supports a variety of
modern applications providing a container-based environment for
deploying and managing apps at scale in the cloud. Deploying applications
on Heroku is quite straightforward and instant. You can either use Heroku
git, connect with your current GitHub account, or use container registry.
Here we’ll deploy our application using Heroku CLI; hence make sure you
have a working Heroku account at https://signup.heroku.com/ which
lets you deploy up to five applications for free.
You’ll also need Heroku CLI which is available to download at
https://devcenter.heroku.com/articles/heroku-command-line. Once
you have the CLI, login to Heroku CLI using the following command which
will then prompt you to provide your login credentials.
$ heroku login
Figure 6-10. Deployed Flask app on Elastic Beanstalk
CHAPTER 6 DEPLOYING FLASK APPLICATIONS

177
Adding aProcfile
In order for us to successfully deploy our application on Heroku, we’ll
have to add Procfile to that application which defines the command to be
executed for the application to run.
With Heroku we’ll use a web server called Gunicorn, so before we
create Procfile, install Gunicorn using the following command.
(venv)$ pip install gunicorn
Now update your requirements.txt file using pip freeze command.
(venv)$ pip freeze > requirements.txt
Now let’s first test if Gunicorn is working fine with our application; run
the following command to locally start a Gunicorn server.
(venv)$ gunicorn run:application
Upon running, you should get the following output on your terminal
which implies that the server is working fine.
[2019-04-29 22:54:41 +0530] [37191] [INFO] Starting gunicorn
19.9.0
[2019-04-29 22:54:41 +0530] [37191] [INFO] Listening at:
http://127.0.0.1:8000 (37191)
[2019-04-29 22:54:41 +0530] [37191] [INFO] Using worker: sync
[2019-04-29 22:54:41 +0530] [37194] [INFO] Booting worker with
pid: 37194
Note By default Gunicorn starts on Port 8000.
CHAPTER 6 DEPLOYING FLASK APPLICATIONS
178
So next, create a file called Procfile inside src directory and add the
following line in it.
web: gunicorn run:application
Here Web is specified for Heroku to start a web server for the
application. Now there is just one more thing needed before we create and
deploy our application on Heroku. Since Heroku by default uses Python
3.6 runtime, we’ll have to create another file called runtime.txt and add
the following line so that Heroku uses the right Python version for our
application.
python-2.7.16
Now we are ready to deploy our application; in src directory of your
application, run the following command to create a new Heroku app.
$ heroku create <app_name>
It should take a few seconds and you shall see a similar output in your
terminal.
Creating flask-app-2019... done
https://flask-app-2019.herokuapp.com/ | https://git.heroku.com/
flask-app-2019.git
Next initialize a new Heroku git repo with the following command.
$ git init
$ heroku git:remote -a flask-app-2019
Now add all the files and commit the code with the following command.
$ git add .
$ git commiti -m "init"
CHAPTER 6 DEPLOYING FLASK APPLICATIONS
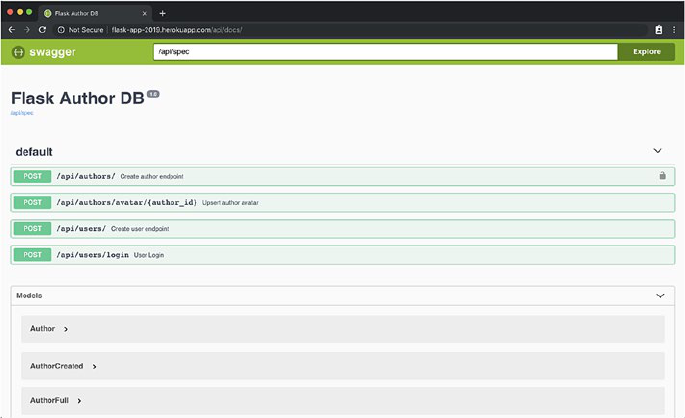
179
Before pushing and deploying the code, one last thing we need to do is
set the WORK_ENV environment variable, so use the following command
to do so.
$ heroku config:set WORK_ENV=PROD
Next we need to push the code to Heroku git and it’ll be automatically
deployed.
$ git push heroku master
In a few minutes, your application should be deployed and running.
The URL of your application is htttps://<app_name>.herokuapp.com
Figure 6-11. Flask App on Heroku
So this was it for deploying our application on Heroku; you can learn
more about Heroku on https://devcenter.heroku.com
CHAPTER 6 DEPLOYING FLASK APPLICATIONS
180
Deploying Flask App onGoogle App Engine
In this section, we’ll deploy our application on Google Cloud App Engine,
which is a fully managed serverless platform for deploying and scaling
applications on the cloud. App Engine supports a variety of platforms
including Python and provides a fully managed service for deploying
backend services. So before we start, make sure you have an active Google
Cloud Account or you can signup at https://cloud.google.com/products/
search/apply/. Google Cloud provides $300 credits for a year as well.
Next install Google Cloud CLI using the following guide:
https://cloud.google.com/sdk/docs/quickstarts. Once it’s setup run
the following command to login to your Google Cloud Account.
$ gcloud auth login
Once successful, we can start creating our Google App Engine
application, but before we do that, we need to create a couple of config files.
First create app.yaml in src directory with the following code to
configure the app basics for Google App Engine.
runtime: python27
api_version: 1
threadsafe: true
handlers:
- url: /avatar
static_dir: images
- url: /.*
script: wsgi.application
libraries:
- name: ssl
version: latest
env_variables:
WORK_ENV: PROD
CHAPTER 6 DEPLOYING FLASK APPLICATIONS
181
Next create appengine_config.py which will get the installed modules
from our virtual environment for the app engine to know where the third-
party modules are installed.
from google.appengine.ext import vendor
vendor.add('venv/lib/python2.7/site-packages/')
Now we are ready to initialize our app; run the following command for
the same:
$ gcloud init
which will prompt you to create the application, name, and project and
select the region, so enter appropriately.
Once done, run the following command to deploy your application on
Google Cloud App Engine.
Within a couple of minutes, it should be deployed and running.
Now you can run the following command in your terminal to open the
application in your default browser.
$ gcloud app browse
CHAPTER 6 DEPLOYING FLASK APPLICATIONS
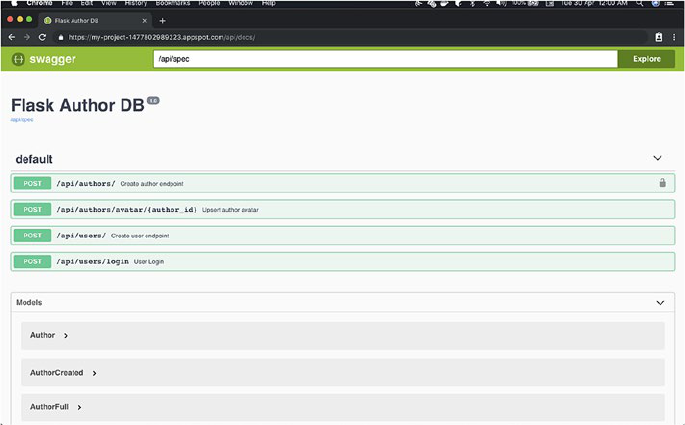
182
Conclusion
So in this chapter, we deployed our application on various cloud platforms
using different methodologies, which should have given you a primer,
or various deployment and scaling options for deploying your Flask
applications. In the next chapter, we’ll discuss about post-deployment
steps for managing and debugging your deployed application.
Figure 6-12. Flask App on Google Cloud App Engine
CHAPTER 6 DEPLOYING FLASK APPLICATIONS
183
© Kunal Relan 2019
K. Relan, Building REST APIs with Flask, https://doi.org/10.1007/978-1-4842-5022-8_7
CHAPTER 7
Monitoring Flask
Applications
Up until now, we have covered developing, testing, and deploying our flask
application. In this chapter, we’ll discuss about some add-ons to manage
and support your Flask application and steps forward from here.
Application Monitoring
Even after performing various kinds of tests on our application, in real
world there are always some exceptional scenarios and bottlenecks which
we are unaware of while development, and they shoot up as bugs and
errors in production, as people start using the application. That’s when
we need application monitoring which monitors the behavior of your
application in production including downtime check, endpoint errors,
crashes, exceptions, and performance-related issues. Monitoring is crucial
for applications, since raw log files are hard to interpret, and they get bulky
overtime for developers to make sense of. Log files can detect functional
errors most of the time, but it doesn’t tell much about the performance-
related issues which is also crucial to your application since the business
is dependent upon the application being able to serve its customers in a
timely fashion. Thus proactive application monitoring is critical to deal
with stability, performance, and errors in your application.
184
All major Cloud service providers support features for monitoring
virtual machines. We deploy our application on, for CPU utilization,
memory utilization and network on the operating system level. However,
application monitoring usually encompasses the following things:
1. Application errors and warnings
2. Application performance of every transaction
3. Database and third-party integration querying
performance
4. Basic server monitoring and metrics
5. Application log data
There are a lot of great application monitoring tools in the market, and
here in this chapter, we’ll cover integrating a few of them as they all come
with different sets of features, payment options, and so on.
Here is a list of few open-source monitoring projects:
1. Sentry
2. Sensu
3. Service canary
4. Flask monitoring dashboard
There are a couple of monitoring services available in the market as
well like New Relic, Sentry.io, Scout, and so on which takes the burden
of deploying the monitoring software away but comes at a price. We’ll
examine the types of application monitoring tools.
Chapter 7 Monitoring Flask appliCations
185
Sentry
Sentry is an open source application monitoring system developed in
Python but is available for all major platforms. Sentry also has a Cloud-
hosted service which has different subscription models ranging from a free
version for developers to business versions which costs around $80 per
month. In this we’ll be checking out the free version and integrate it with
ours which is pretty straightforward.
To begin with, signup for sentry on https://sentry.io/signup/, and
once you have successfully signed up, login to your dashboard. Once done,
click add project button and select Flask as the framework, input the name,
and submit on create project.
Once done, it will take us to the next page which has integration
details, so just install the sentry SDK using PIP with the given command
and copy paste the integration code in your main.py.
(venv)$pip install sentry-sdk[flask]
Next add the following code before app = Flask(__name__).
sentry_sdk.init(
dsn="<your_dsn_here>"
integrations=[FlaskIntegration()]
)
Figure 7-1. Create new project
Chapter 7 Monitoring Flask appliCations

186
Once done, you can deploy the application and sentry will take care of
the rest. Let’s test it out by hitting a 404 endpoint making an event in sentry
dashboard.
In your browser, request any endpoint which doesn’t exist, and
sentry SDK will fire off an event from the application like in the following
screenshot.
Clicking on the issue will give you insights into the issue and details to
help you resolve the issue like in the following screenshot.
Figure 7-3. Sentry issue details
Figure 7-2. Sentry issues listing
Chapter 7 Monitoring Flask appliCations
187
Sentry has a lot more features for you to explore and helo your
application stable and error free.
Flask Monitoring Dashboard
Flask Monitoring Dashboard is an extension for Flask applications. It
outrightly monitors the application performance and utilization, profiles
the requests, and can also be configured to run specific jobs to manage
your application. It is open source and free, so let’s get started on it.
Install Flask Monitoring Dashboard using PIP with the following code.
(venv)$pip install flask_monitoringdashboard
Next in your main.py file, import the extension using the following
code, where we have other library imports.
import flask_monitoringdashboard as dashboard
Now right below where we have initiated our app object, add the
following code.
dashboard.bind(app)
And that’s pretty much it; now restart your application and visit
http://<host>:<port>/dashboard, and it will open the login page. The
default credentials are admin and admin which you should change right
after.
Chapter 7 Monitoring Flask appliCations
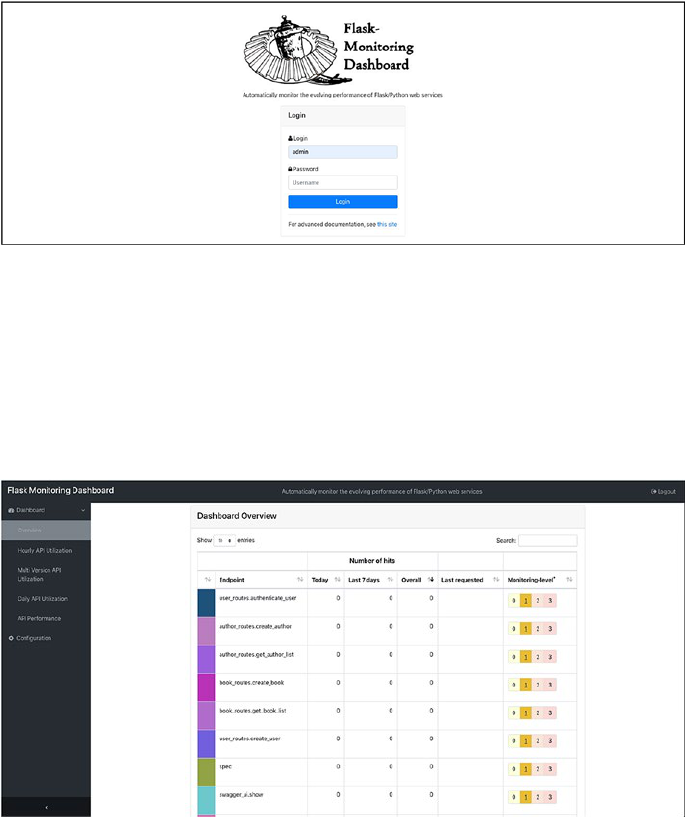
188
Once you login, you’ll be redirected to the dashboard which will have
an overview of your endpoints, and you can click each of them to get a
deeper insight and can also set the monitoring level for each one of them
as per your preferences.
Figure 7-5. Flask Monitoring Dashboard overview
Figure 7-4. Flask Monitoring Dashboard
Clicking upon endpoints will redirect you to the insights page for each
endpoint where you can churn out graph data for each requests and get
more in-depth information about the endpoint usage.
Chapter 7 Monitoring Flask appliCations
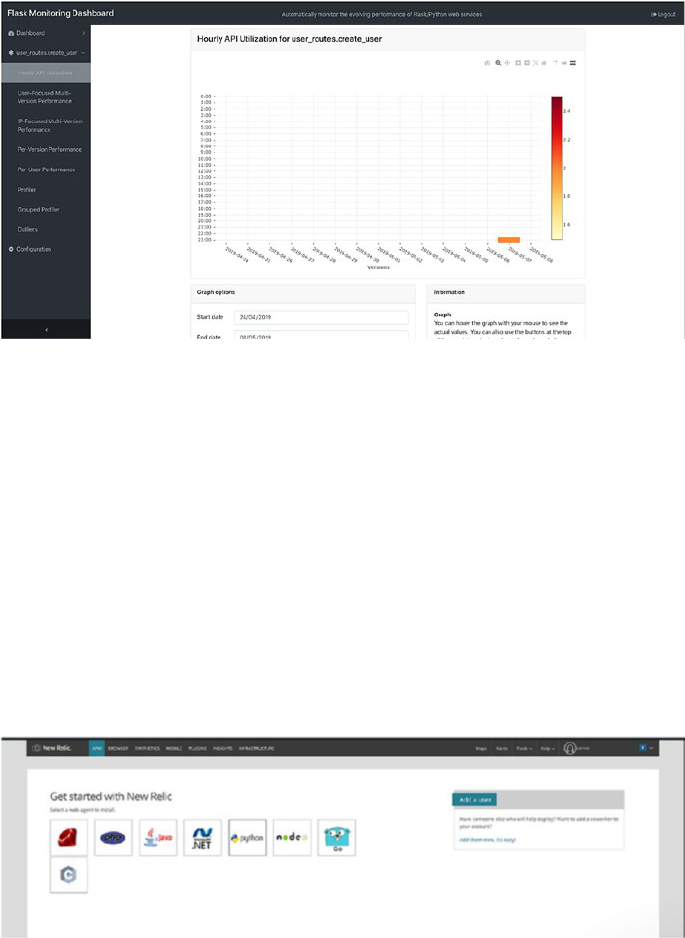
189
New Relic
New Relic is one of the most reliable and competitive application
monitoring tools in the market; they provide a comprehensive database
with real-time monitoring services. New Relic is a paid subscription-based
service, but they have a 14-day trial which we’ll use to check it out. So go
ahead and sign up for the same on https://newrelic.com/signup
Once you sign up, you’ll be asked to choose the platform; go ahead and
select Python as the platform.
Figure 7-6. API utilization insights
Figure 7-7. New Relic setup
Chapter 7 Monitoring Flask appliCations
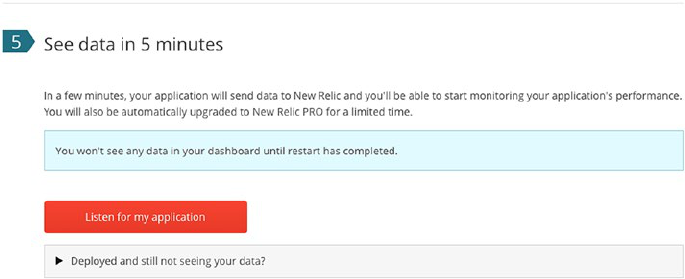
190
In your application directory, go ahead and install the New Relic agent
using the following command.
(venv)$ pip install newrelic
Next we need to generate the configuration using our New Relic key,
so click Reveal license key button on the screen which will display your
private key.
Now execute the following command with your key.
(venv)$ newrelic-admin generate-config <your-key-goes-here>
newrelic.ini
So now our application should be configured; next use the following
command to run your application and test the configuration.
(venv)$ NEW_RELIC_CONFIG_FILE=newrelic.ini newrelic-admin run-
program python run.py
Once you do, click Listen for my application button like in the
following screenshot, which will start listening to requests from your
application to configure your dashboard, and once it successfully receives
the data, you’ll see a button to redirect to your New Relic dashboard.
Figure 7-8. New Relic Listen for application
Chapter 7 Monitoring Flask appliCations
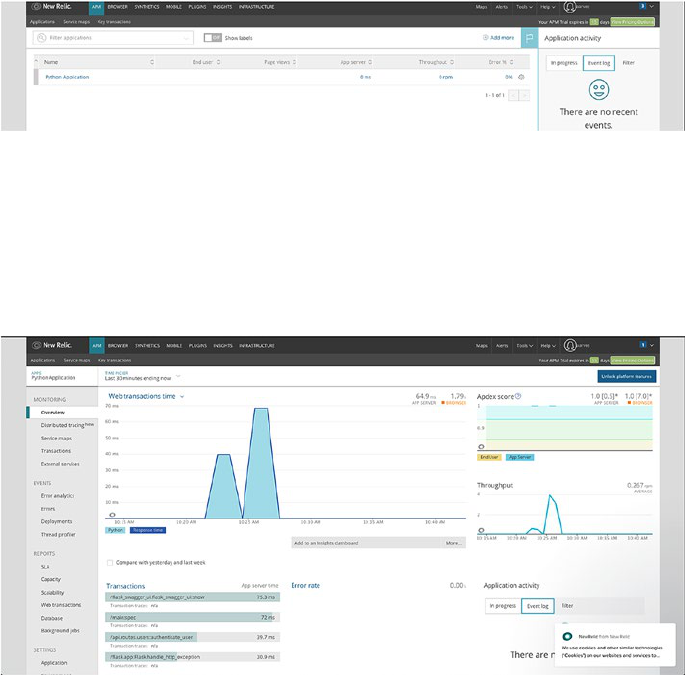
191
Now you’ll see the application dashboard which lists your applications;
click Python Application since we only have one application here.
After clicking, you’ll be redirected to your application dashboard
which looks quite comprehensive but provides a lot of insights about the
application state. Refer to the following screenshot as an example.
As you can see, we can check out the latest transactions and check out
the transaction time graph, and then we have throughput graph and apdex
score which scores the application on the basis of a set value of 0.5 seconds
response time. Under events, you can check out error analytics and errors
which provide an in-depth details of errors raised in the system.
Figure 7-9. New Relic Application dashboard
Figure 7-10. Python Application dashboard
Chapter 7 Monitoring Flask appliCations
192
You can learn more about New Relic in their official documentation at
https://docs.newrelic.com/docs/apm/new-relic-apm/guides.
Bonus Services
So we have covered all the topics to get you started with developing REST
applications using Flask. However, this is just a beginner’s guide, and
there are a lot more things to cover for real business use cases including
integrating third-party services like search, caching, pub-sub, real-time
communication, and so on. This book covers the basics of Flask REST API
development which can be used as a base to build your REST applications.
In this module we’ll cover the basics of some additional libraries and tools
that could add value to your application.
Full Text Search withFlask
Flask is compatible with a couple of libraries that provide integration with
full text search applications like Elasticsearch.
Pyelasticsearch
Pyelasticsearch is a clean library to integrate Elasticsearch which is a very
popular and powerful search engine in your flask application. However,
Elasticsearch provides REST endpoints to connect with the search engine,
but pyelasticsearch makes it easier to communicate with the endpoints.
You can learn more about pyelasticsearch at https://pyelasticsearch.
readthedocs.io and check this link out to understand more about
elasticsearch www.elastic.co/guide/en/elasticsearch/reference/
current/getting-started.html
Chapter 7 Monitoring Flask appliCations
193
Flask-WhooshAlchemy
Whoosh is a fast, search engine library built in Python and is highly
flexible and supports complex data searching based on free-form or
structured text. Flask-WhooshAlchemy is a Flask extension to integrate
the Whoosh search engine library with SQLAlchemy in Flask. It’s pretty
straightforward to integrate and get your full text search up without any
third-party application unlike pyelasticsearch. You can learn more about it
at https://pythonhosted.org/Flask-WhooshAlchemy/
Email
We used Flask mail for verifying user emails. Here is a list of other libraries
you can use for efficient email integration in your application.
Flask-SendGrid
Flask-SendGrid is a Flask extension to simplify sending email using
sendgrid which is a renowned email service; you can sign up for SendGrid
at https://sendgrid.com/; they provide a free subscription which
includes 40,000 emails for first 30 days and 100/day forever. You can check
out Flask-SendGrid at https://github.com/frankv/flask-sendgrid
which makes sending email a piece of cake.
AWS SNS Using Boto3
Boto3 is an AWS SDK for Python, and you can use AWS’ SNS (Simple
Notification Service) to send email and text message using Boto. Here
is a guide to sending email using Python with Boto https://docs.aws.
amazon.com/ses/latest/DeveloperGuide/send-using-sdk-python.
html. You’ll need an active AWS account for this and Boto installed
from https://boto3.readthedocs.io/en/latest/guide/quickstart.
html#installation.
Chapter 7 Monitoring Flask appliCations
194
File Storage
File storage is an important aspect of an application; we stored user avatars in
an application server file system which is not a good approach for production
applications, and in such cases you’d like to store and access your files using
a file storage service. Here are a handful of suggestions for the same.
AWS S3 Using Boto3
You can leverage Boto3 to manage your files on Amazon AWS S3, which
is a powerful file management system. This guide will provide you with
everything you need to manage your files using Flask https://boto3.
amazonaws.com/v1/documentation/api/latest/reference/services/
s3.html
Alibaba Cloud OSS
Alibaba Cloud provides a sophisticated file storage platform called Object
Storage Service; you can use their Python SDK from https://github.
com/aliyun/aliyun-oss-python-sdk and easily setup file management
using their OSS guide which is available at https://help.aliyun.com/
document_detail/32026.html
Conclusion
This marks the end of this chapter and the book. There is a lot more to
explore in optimizing and upgrading your application, but this will serve
as the right base to grow from; if you have issues in integrating any of the
mentioned services, check out their official docs, reach out to support,
or reach out on Stack Overflow to solve them. You can also use this link
to ask or read queries regarding Flask https://stackoverflow.com/
search?q=flask.
Chapter 7 Monitoring Flask appliCations
195
© Kunal Relan 2019
K. Relan, Building REST APIs with Flask, https://doi.org/10.1007/978-1-4842-5022-8
Index
A, B
Alibaba Cloud ECS Console, 161
Amazon AWS S3, 194
Assertion methods, 140
C
Caching, 13
Create, Read, Update, and Delete
(CRUD), 4
CRUD application
adds global responses, 71, 72
API documentation
building blocks, 115
OAS see (OpenAPI
Specification (OAS))
application structure, 64
author route blueprint
registration, 78
blueprints, 60
create authors model, 65, 66
create books model, 64
create __init__.py, 62
create responses.py inside
api/utils, 67
creating POST book
endpoint, 79
db.init_app function, 70
DELETE endpoints, 77, 84, 85
email verification
create_user() method,
104, 105
flask-mail library
installation, 103
GET endpoint, 102
login method, 101
token.py, 100
URLSafeTimedSerializer, 101
User class code, 98, 99
User email verification, 108
User login after
verification, 108
User login without
verification, 107
user signup API, 106, 107
users.py in models, 98
fetch author ID, 76, 80
file upload
add avatar field, 109, 111
avatar endpoint with invalid
file type, 114
avatar field endpoint, 112
fetch avatar endpoint, 113
GET author endpoint, 81, 82
GET authors route, 75
GET books endpoint, 86
196
HTTP responses, 68
import create_app, 61
PATCH endpoint, 83
POST author route, 73
POST authors endpoint, 74
PUT author endpoint, 82
user authentication
create POST user route, 91
create schema, 88, 89
Flask-JWT-Extended, 89
login endpoint, 94
POST author route, 95, 96
POST users endpoint, 93
user signup endpoint, 93
D
Database modelling
creating author database, 34
db.create_all(), 34
DELETE author by ID, 43–45
GET all authors, 39
GET author by ID
endpoint, 40
GET/authors response,
36, 37
POST/authors endpoint, 38
PUT endpoint, 41, 42
RESTful CRUD APIs, 33
Flask-SQLAlchemy, 30–32
MongoEngine application
create db instance, 47, 48
create PUT endpoint, 54, 55
CRUD application, 56–58
delete endpoint, 55
GET endpoint, 48, 50
installation, 47
JSON data, 51
requesting POST /authors,
51, 52
MySQL vs MongoDB, 29
NoSQL databases, 28
SQLAlchemy, creating author
database, 34
SQL databases, 28
db.init_app function, 70
Deploying applications
Alibaba Cloud ECS
GitHub repo, 162
Gunicorn, 167–169, 171
Nginx, 160, 162, 164–167
syntax errors, 166
Ubuntu instance, 160, 162
uWSGI, 160, 162, 164–167
AWS Elastic Beanstalk, 172
Google Cloud App Engine,
180–182
Heroku
Gunicorn, 177–179
PaaS, 176
Procfile, 177–179
E
Elastic Beanstalk application
AWS, 172
configuration, 174
CRUD application (cont.)
INDEX
197
deployed flask app, 176
eb create, 173
environment variables, 175
WSGIpath set, 174
F
find_by_username() method, 92
Flask
application, 2, 3
components, 1–4
installation, 25
python development
environment
IDE setup, 18, 19
PIP installation, 16–18
running virtual application,
23, 24
virtual directory structure,
21, 22
virtualenv, 20
SQLAlchemy, 4
Flask Monitoring Dashboard, 187
Flask-SQLAlchemy, 30
Flask-WhooshAlchemy, 193
G, H
Google Cloud App Engine, 180–182
I
__init__.py, 62
J, K, L
JSON Web Tokens (JWT), 89
M
Monitoring flask applications
bonus services
emails, 193, 194
Flask-WhooshAlchemy, 193
Pyelasticsearch, 192
flask monitoring dashboard,
187, 188
New Relic, 189–191
Sentry, 185–187
N
New Relic, 189
O
Object Document Mapper
(ODM), 28
Object Relational Mapper
(ORM), 28
Object Storage Service (OSS), 194
OpenAPI Specification (OAS), 116
API request mode, 124
build time documentation
author avatar endpoint,
132–134
create author endpoint,
130, 131
Index
198
create user endpoint,
126, 127
Swagger UI, 128
using YAML, 127
definition, 116
importing OpenAPI from
Inspector, 121
login endpoint, 119
pinned requests, 119
spec generation, 120
SwaggerHub, 122
Swagger Inspector, 117, 118
Swagger UI, 125
view documentation, 122, 123
P, Q
Platform as a Service (PaaS), 176
Pyelasticsearch, 192
Python Package Index (PPI), 2
R
render_template_string
method, 104
Representational State Transfer
(REST)
API design, 15, 16
architecture, 6
definition, 4
services
caching technique, 13
messages, 9–12
planning, 14, 15
representation, 8
resources, 12
statelessness, 14
uniform interface, 7
used HTTP verbs, 8
SOAP, 6
response_with function, 70
S
Sentry, 185
Simple Object Access Protocol
(SOAP), 6
Structured Query Language
(SQL), 28
T
test_login_unverified_user()
method, 143
test_login_user_wrong_credentials
method, 143
U
Unit testing
benefits, 136
setting up, 136–138
test coverage, 155
user endpoints
OpenAPI Specification
(OAS) (cont.)
INDEX
199
assertion methods, 140
authors test, 151, 153, 155
create temp image file, 149
create test_authors.py, 146
create_user endpoint,
143, 144
create_users() method, 144
creating author without
last_name field, 148
CSV file, 149
delete author object, 151
generate login token, 146
GET author ID, 150
POST author endpoint, 147
running with nose, 142
SQLAlchemy model, 139
test login API, 142
TestUsers() class, 140
test_users.py, 139
update author object, 150
V
Virtualenv, 20
W, X, Y, Z
Web Server Gateway Interface
(WSGI), 1
Index
