
IBM QRadar
7.4.0
Application Framework Guide
IBM

Note
Before you use this information and the product that it supports, read the information in “Notices” on
page 139.
Product information
©
Copyright International Business Machines Corporation 2016, 2020.
US Government Users Restricted Rights – Use, duplication or disclosure restricted by GSA ADP Schedule Contract with
IBM Corp.

Contents
Chapter1.QRadar
®
app framework version 1......................................................... 1
What's new for the application framework in QRadar V.7.4.0....................................................................1
QRadar apps ................................................................................................................................................1
QRadar app development overview ............................................................................................................2
GUI application framework fundamentals..................................................................................................3
App le structure..........................................................................................................................................7
Application manifest structure...............................................................................................................7
Source dependencies...........................................................................................................................10
Installing Node.js as a source dependency.........................................................................................11
Manifest object types.................................................................................................................................11
Areas type.............................................................................................................................................11
REST method type................................................................................................................................12
Dashboard items type.......................................................................................................................... 13
Conguration pages type..................................................................................................................... 14
GUI Action type.................................................................................................................................... 15
Page scripts type.................................................................................................................................. 17
Metadata providers type...................................................................................................................... 17
Resource bundles type.........................................................................................................................18
Developer options type........................................................................................................................ 19
Resources type..................................................................................................................................... 20
Fragments type.....................................................................................................................................20
Custom columns type...........................................................................................................................21
Services type........................................................................................................................................ 22
Environment variables type................................................................................................................. 27
The Hello World sample app..................................................................................................................... 28
New tab example..................................................................................................................................30
QRadar App Editor .................................................................................................................................... 32
What's new in the QRadar App Editor..................................................................................................32
Known issues........................................................................................................................................33
Installing the QRadar App Editor......................................................................................................... 34
Starting the QRadar App Editor............................................................................................................34
Editing apps in the editor..................................................................................................................... 37
Software development kit overview..........................................................................................................38
Optimize app memory usage............................................................................................................... 39
Installing the SDK...................................................................................................................................... 40
Use Python 2.7 in your app .......................................................................................................................40
Creating your development environment................................................................................................. 41
Developing apps in Eclipse.................................................................................................................. 42
Installing Python 2.7.9 on OSX............................................................................................................ 43
Packaging and deploying your app...................................................................................................... 44
Running your application locally..........................................................................................................45
OAuth app authorization with QRadar ......................................................................................................45
Enhancing security in app authorization by using the App Authorization Manager........................... 46
OAuth bearer token.............................................................................................................................. 46
Encryption and secure data storage in app development ....................................................................... 48
Multitenancy support for apps.................................................................................................................. 49
Creating an extension from your app........................................................................................................ 50
Adding multiple apps in an extension..................................................................................................51
QRadar content extensions..................................................................................................................52
Extensions management......................................................................................................................54
Sample apps.............................................................................................................................................. 54
iii
Dashboard item example..................................................................................................................... 55
Page script / toolbar button example.................................................................................................. 58
Passing context-specic information to a page script........................................................................ 63
Context-specic metadata provider example..................................................................................... 65
Add right-click functionality.................................................................................................................67
Custom fragments example................................................................................................................. 69
Custom column example..................................................................................................................... 71
Named service sample app..................................................................................................................73
Named services......................................................................................................................................... 75
Services type........................................................................................................................................ 77
Named service sample app..................................................................................................................81
Support functions...................................................................................................................................... 83
QRadar Python helper library functions....................................................................................................85
Jinja2 templates........................................................................................................................................ 86
Integrate JavaScript libraries into your template............................................................................... 87
App Framework JavaScript library............................................................................................................ 87
Communicating with QRadar hosts from Python......................................................................................89
GUI Application Framework REST API endpoints.................................................................................... 91
App logs......................................................................................................................................................92
Adding logging to your app...................................................................................................................92
Viewing your app logs.......................................................................................................................... 93
Stopping, restarting, and uninstalling an app........................................................................................... 93
App upgrades.............................................................................................................................................94
Available user role capabilities..................................................................................................................94
App names, GUI action groups, and page IDs.......................................................................................... 95
Application globalization........................................................................................................................... 99
Globalization of QRadar elements....................................................................................................... 99
Globalization of application-specic content....................................................................................103
Custom fragments injection points......................................................................................................... 108
Custom column injection points..............................................................................................................114
Custom actions for CRE responses......................................................................................................... 115
Dening custom actions.....................................................................................................................117
Testing your custom action................................................................................................................118
Adding a custom action script to an event rule.................................................................................118
Custom action REST API endpoints...................................................................................................119
Custom action and QRadar rules....................................................................................................... 120
Custom AQL functions............................................................................................................................. 121
Custom AQL function elds............................................................................................................... 123
Custom AQL function utilities............................................................................................................ 127
Resources................................................................................................................................................ 138
Notices..............................................................................................................139
Trademarks.............................................................................................................................................. 140
Terms and conditions for product documentation................................................................................. 140
IBM Online Privacy Statement................................................................................................................ 141
iv
Chapter 1. Developing with the QRadar app
framework
The QRadar app framework v1 documentation is now on GitHub.
You can now access the documentation at https://ibmsecuritydocs.github.io/qradar_appfw_v1/.
Note: Use this documentation for maintaining apps that are built by using CentOS, Python 2, and the
QRadar App Framework version 1. For newer apps that are built using Red Hat Universal Base Image
(UBI) 8 and Python 3, see the App Framework version 2 documentation. IBM
®
X-Force
®
Exchange no
longer accepts new apps that use App Framework version 1.
What's new for the application framework in QRadar V.7.4.0
IBM QRadar V.7.4.0 introduces new features and enhancements.
Run apps in a multi-tenant environment
QRadar V.7.4.0 includes support for multi-tenanted apps. A number of out of the box apps, such as Pulse,
Assistant, and Log source manager, can now be used in a multi-tenant environment.
App developers will now be able to mark that their app has been tested and works in a multi-tenanted
environment. There are two forms of multi-tenancy support in apps:
1. The app is tested and works with multi-tenancy, but it is not multi-tenancy aware. When a user installs
the app, they are presented with the option to create a default instance. Users can select this option
if they only want a single instance of the app, or the app does not need to support multi-tenancy. If
a user does not select the Default Instance option, they must create a separate instance for each
customer and associate each instance with a security prole to keep all client data separate.
2. The app is tested and is multi-tenancy aware. In this case, only one instance of the app is necessary.
This type of app is also benecial if the app is designed to be used only by administrators.
QRadar apps
Use IBM QRadar apps to extend and enhance your current QRadar deployment with new data and
ready-to-use use cases.
A QRadar app is a means to augment and enrich your current QRadar system with new data and
functionality. You can download and install other shared apps that are created by IBM, its Business
Partners, and other QRadar customers.
You create your own apps from QRadar by using the QRadar GUI Application Framework Software
Development Kit (SDK). You can then package the app and reuse it in other QRadar deployments. You
can share your app on the IBM X-Force Exchange portal (https://exchange.xforce.ibmcloud.com/).
Apps provide new tabs, API methods, dashboard items, pop-up menus, toolbar buttons, conguration
pages, and more within the QRadar user interface. The functionality is entirely dened by Python Flask
framework apps that serves the app endpoints from a secure container.
Important: The QRadar app framework does not support systems that are congured using the Security
Technical Implementation Guide (STIG). Customers that use STIG hardened systems can not install apps
in QRadar.
Download public apps
All apps and security product enhancements are hosted on the IBM X-Force Exchange portal (https://
exchange.xforce.ibmcloud.com/).
©
Copyright IBM Corp. 2016, 2020 1
You can see a list of available apps on the IBM Security App Exchange (https://
exchange.xforce.ibmcloud.com/hub). Filter apps by selecting the Application check box.
Every download from the X-Force App Exchange is known as an extension. An extension can consist of an
app or security product enhancement (content extension) that is packaged as an archive (.zip) le, which
you can deploy on QRadar by using the Extensions Management tool on the Admin tab.
QRadar app development overview
Use the IBM QRadar GUI Application Framework to develop new application modules that integrate with
QRadar and provide new capabilities.
Applications or apps are small plug-in modules to the GUI Application Framework. Apps serve endpoints
from within a secure container to inject the content directly into the QRadar web interface.
Each app has its own dedicated memory allocation and a dened amount of CPU resources that are
allocated to it.
The main web language that is used to author an application is Python, and the Flask framework is
integrated and available for use by the application.
Note: If an app is running in an IPV6 environment and the app sends log messages to the QRadar host's
Syslog (e.g. via the qpylib.log function), then the app container must be congured to use Python 2.7 in
order for the Python SysLogHandler to successfully send the messages. For more information, see “Use
Python 2.7 in your app ” on page 40.
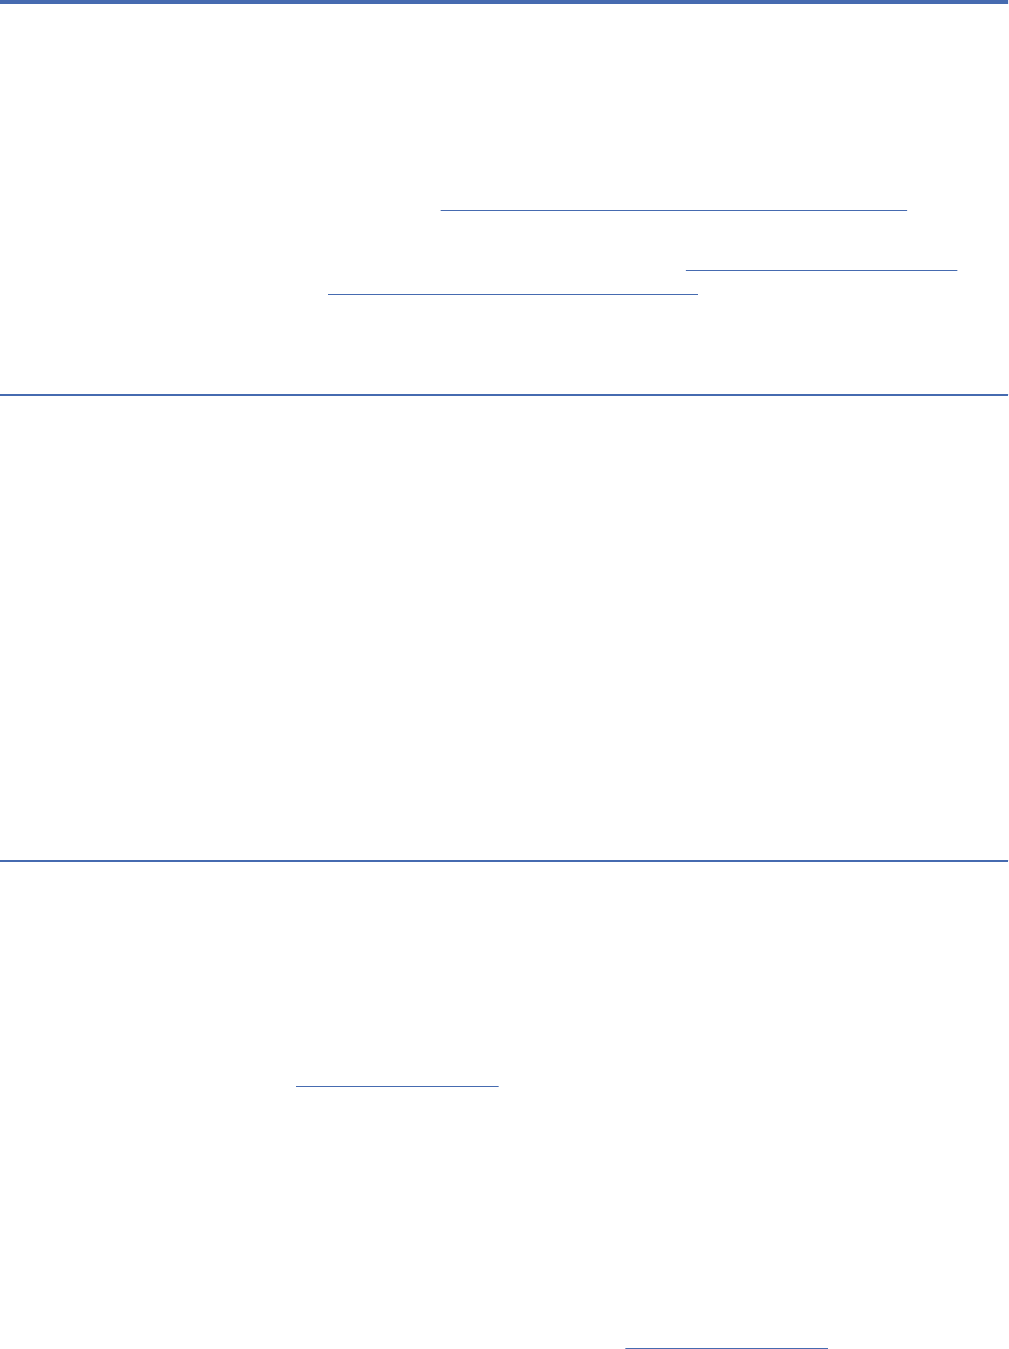
How an application runs and interacts with QRadar
QRadar applications run inside an isolated Python Flask environment that is independent of the QRadar
user interface.
The application can also use static images, scripts, and HTML pages.
All interaction with the application is proxied through the QRadar user interface. No direct access to
network ports or web services is usually permitted.
Figure 1. Application Framework
Note: The combined memory requirements of all the apps that are installed on a QRadar Console cannot
exceed 10 per cent of the total available memory. If you install an app that causes the 10 per cent
memory limit to be exceeded, the app does not work.
2
IBM QRadar : QRadar Application Framework Guide
If your app requires a minimum memory allocation, you must provide information about it in your app's
documentation.
Apps that require internet access
If the app that you develop requires internet access, you must implement proxy support in your app. Apps
can't use the proxy support that is built into QRadar.
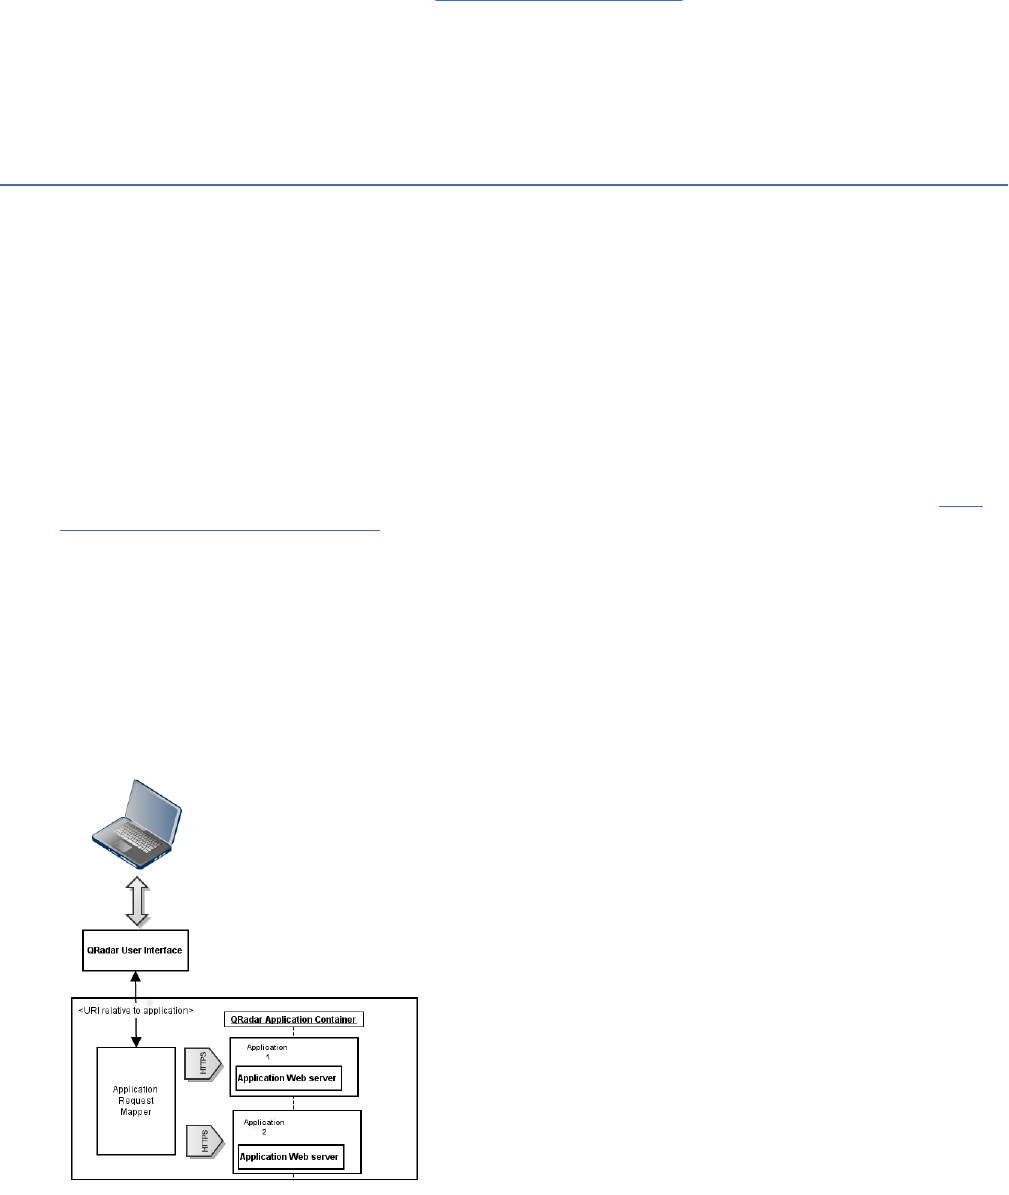
Types of app
The QRadar GUI Application Framework supports the following app types that are described in the
following table.
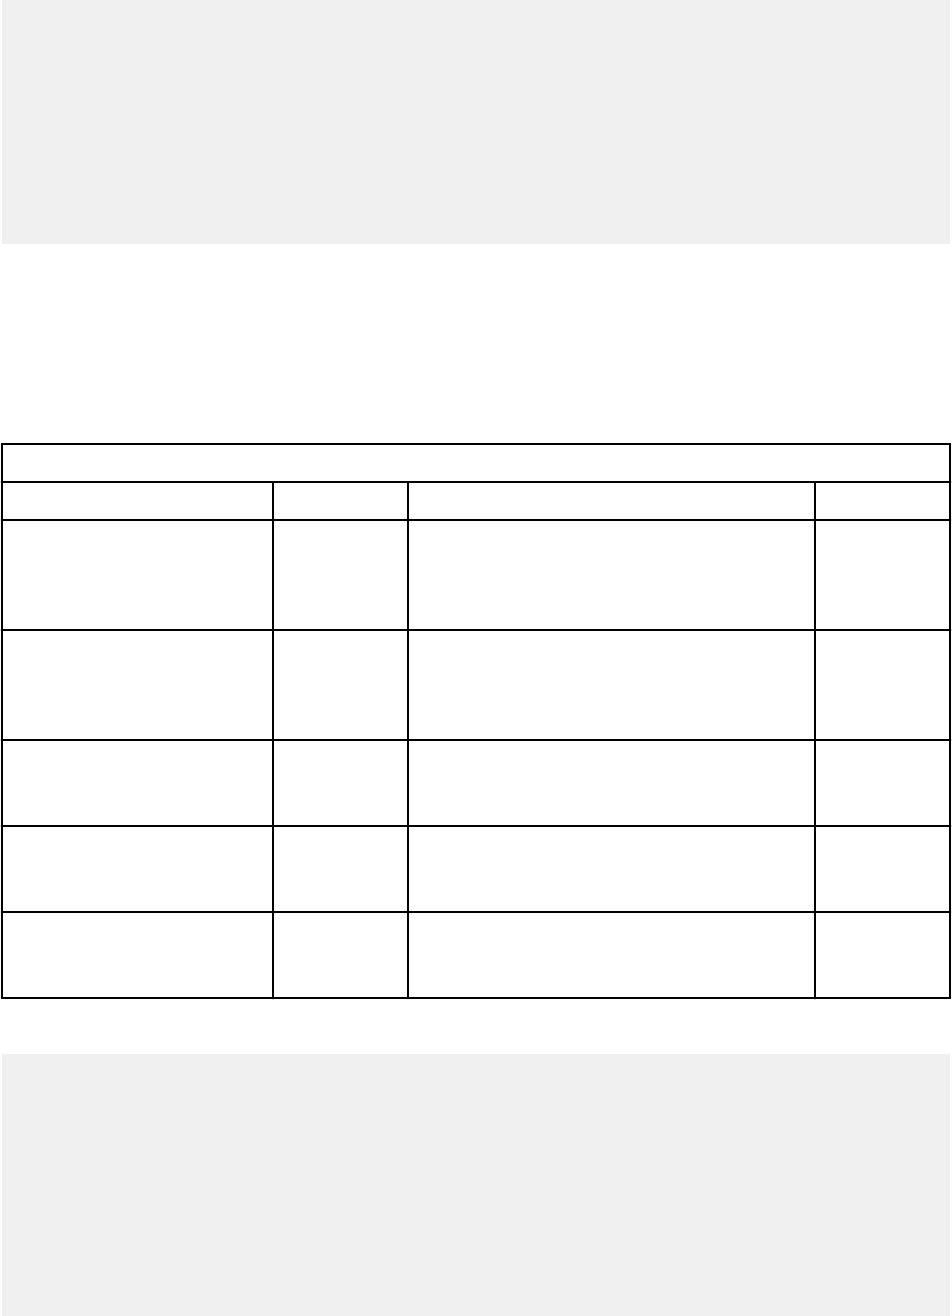
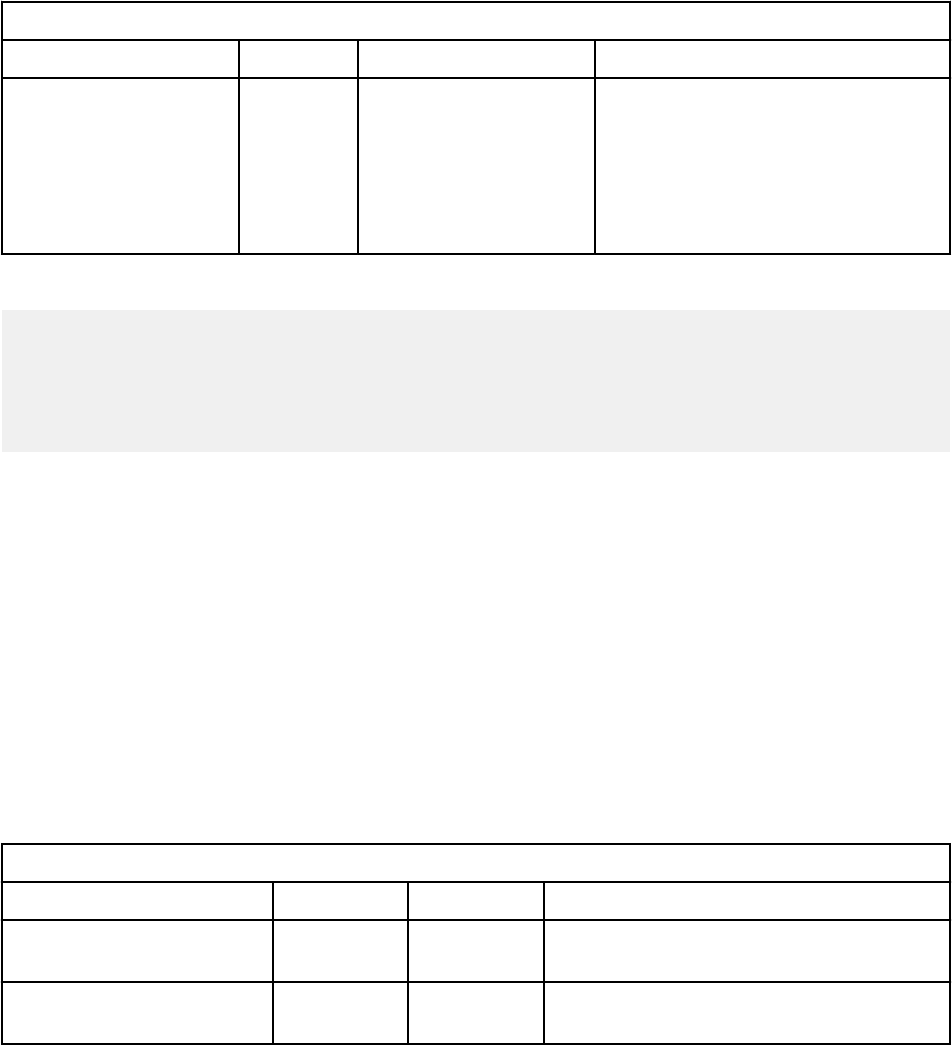
Table 1. Types of app
App Type Description
Areas (or visualizations) New screen that is presented in a new tab.
Right-click menus New right click menu options available with the QRadar GUI.
Toolbar buttons New toolbar buttons, with the enabling code that runs from the connes of
the app.
Dashboard/Dashboard
widgets
New dashboard widgets, with the HTML served from a particular app.
Administrative screens New Admin tab, conguration, and setup screens.
Hover Over metadata Injection of hover over metadata into existing hover over areas.
JavaScript page scripts Injected browser JavaScript functionality specic to an existing QRadar GUI
screen area.
Resource Bundles Partial support of Java style key value pair properties les to provide some
level of globalization support.
Custom fragments Inject custom HTML fragments into the QRadar UI.
Custom columns Add columns with custom content to tables in the QRadar
The app type content is dynamically injected back into the GUI display.
Apps are packaged as compressed archives (.zip), within the extension archive. You can install and
uninstall apps by using RESTful endpoints. More RESTful endpoints exist to control the lifecycle of an app
within QRadar.
Note: As a best practice, store your app conguration and data in /store because data in this directory is
protected during app upgrades.
For more information about QRadar application framework REST API endpoints, see “GUI Application
Framework REST API endpoints” on page 91.
GUI application framework fundamentals
QRadar GUI application framework apps are stand-alone web applications that run on the Flask micro-
framework, and are served from the Flask web server.
Installation overview
Every app runs in its own unique Flask server. Each Flask server, in turn, runs within a secure Linux
®
container. Docker is the implementation stack for the secure containment of the Flask app codebase.
Each app is installed by using the RESTful API endpoints. The installation endpoint handles these tasks:
Chapter 1. Developing with the QRadar app framework
3

• Validates the manifest of the app.
• Automatically creates a Docker image (asynchronous) with the app code that is bundled within it.
• Registers the app (asynchronous) with QRadar to enable web trafc proxy and the HTTP request/
response lifecycle from QRadar to the app.
• Automatically runs a Docker container from the Docker image (asynchronous), which is bound to a
data-only secondary container that is used for persistent storage.
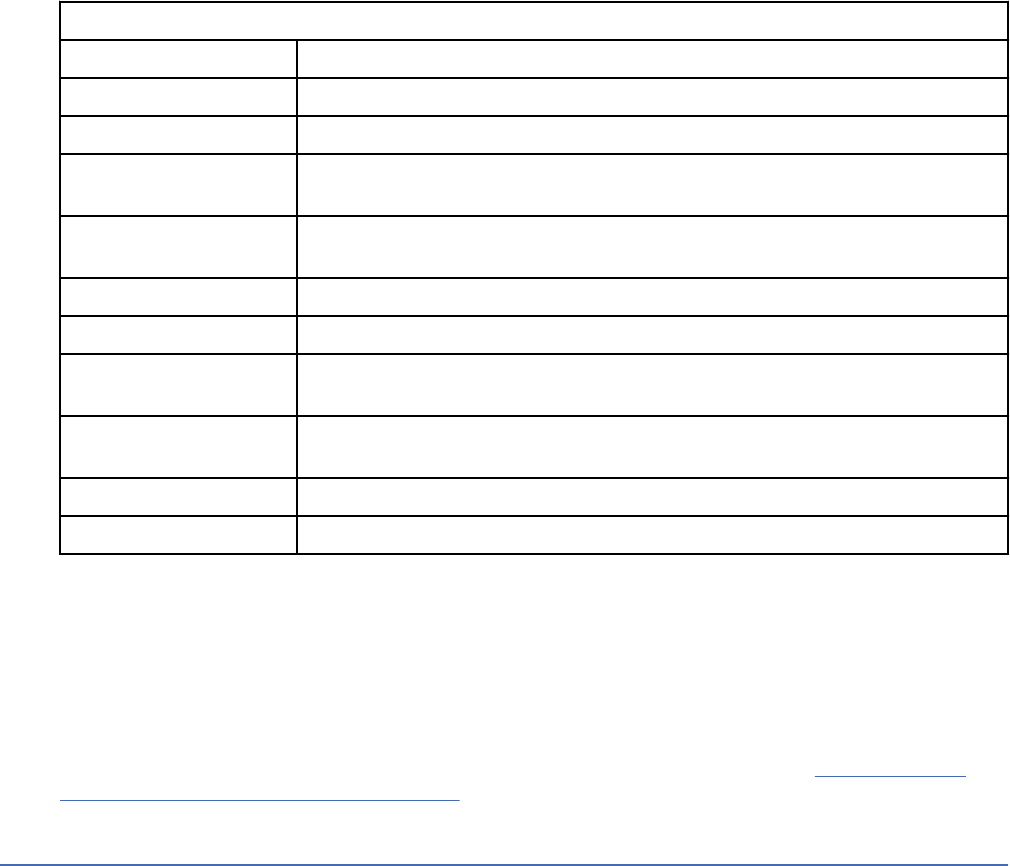
QRadar RESTful API endpoints
The key interface between lifecycle management of an app, during both its creation and running phases,
is the QRadar GUI App Framework REST API endpoints.
The following table describes the QRadar RESTful API endpoints.
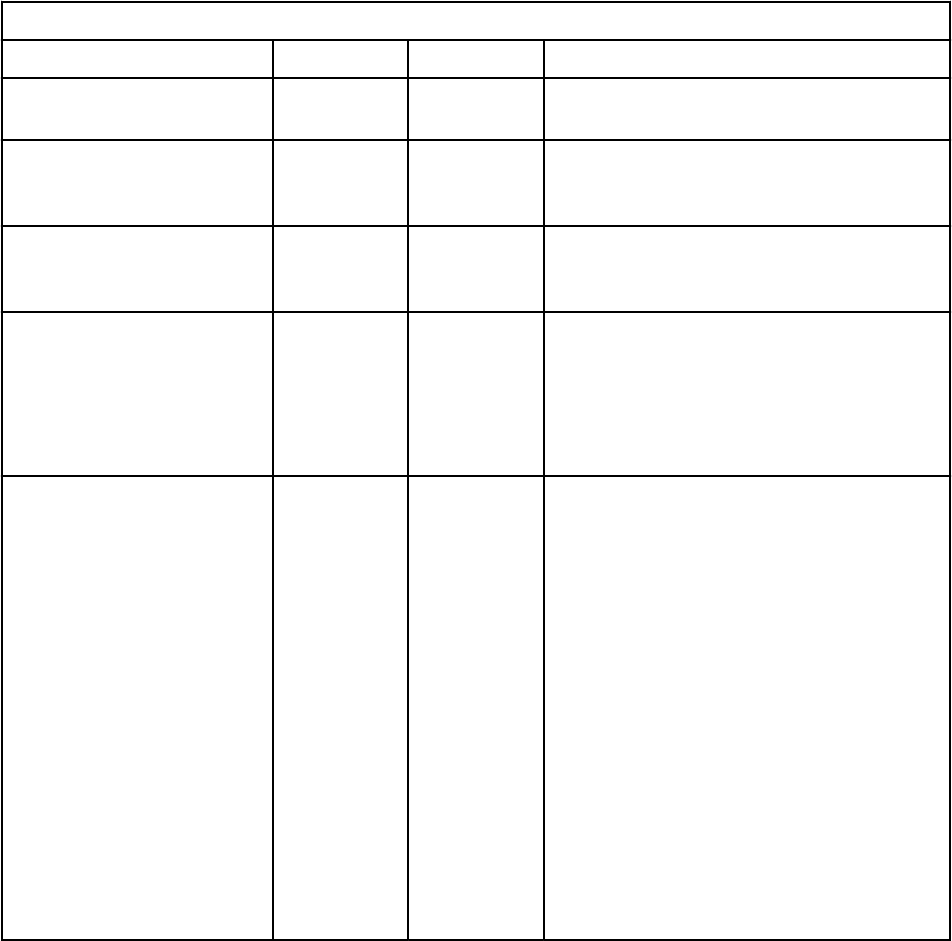
Table 2. GUI Application Framework REST API endpoints
Endpoint Parameters Description
GET /gui_app_framework/
application_creation_task
Application ID Retrieves a list of status details
for all asynchronous requests to
create apps.
GET /gui_app_framework/
application_creation_task
/{application_id}
Application ID Retrieves a list of status details
of an asynchronous request to
create apps.
POST /gui_app_framework/
application_creation_task
Application (.zip) bundle le Creates an app within
the application framework,
and registers it with
QRadar. The app is created
asynchronously. A reference
to the application_id is
returned and must be used
in subsequent API calls to
determine the status of the app
installation.
POST /gui_app_framework/
application_creation_task
/{application_id}
Application ID, cancel status Updates a new app installation
within the application framework
The application_id and a
status parameters are required.
GET /gui_app_framework/
applications
Retrieves a list of apps that
are installed on the QRadar
console, and their manifest JSON
structures and status.
GET /gui_app_framework/
applications/
{application_id}
Application ID Retrieves a specic app that
is installed on the console and
its manifest JSON structure and
status.
POST /gui_app_framework/
applications/
{application_id}
Application ID, start/stop status Updates an app. Starts or
stops an app by setting status
to RUNNING or STOPPED
respectively.
PUT /gui_app_framework/
applications/
{application_id}
Application ID Upgrade an application.
4 IBM QRadar : QRadar Application Framework Guide
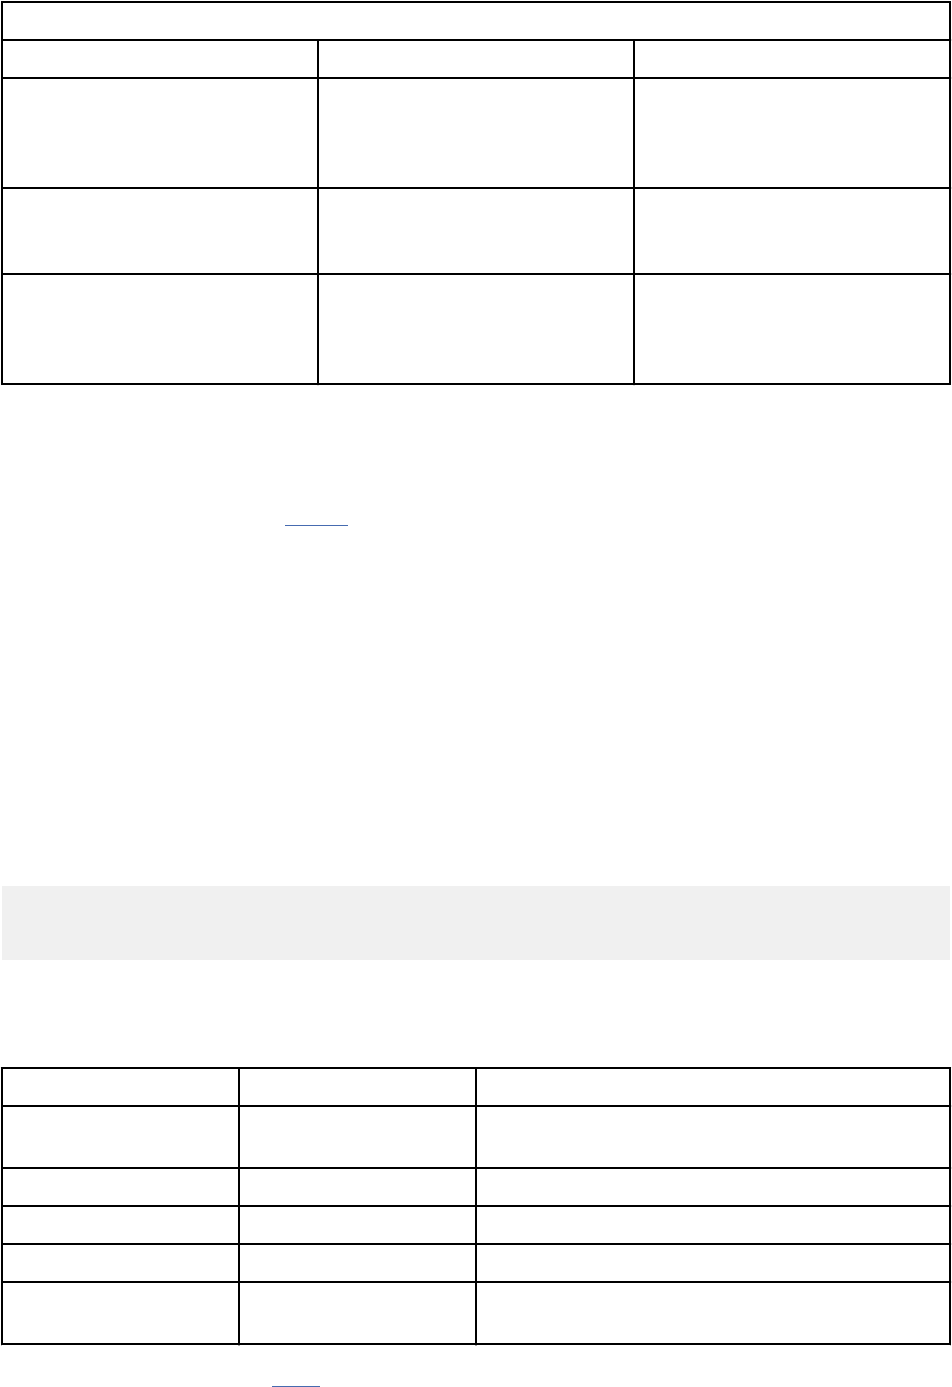
Table 2. GUI Application Framework REST API endpoints (continued)
Endpoint Parameters Description
DELETE /
gui_app_framework/
applications/
{application_id}
Application ID Deletes an application.
GET /gui_app_framework/
named_services
Retrieves a list of all named
services registered with the
Application Framework.
GET /gui_app_framework/
named_services/{uuid}
uuid Retrieves a named service
registered with the Application
Framework by using the supplied
uuid.
Python
The main web language that is used to author an app is Python, and the Flask framework is integrated and
available for use by the app.
For more information, go to the Python website (https://www.python.org/doc/).
Flask
Flask is a micro web application framework that is written in Python.
Flask is the web server from which the app-coded endpoints are served. You use Python functions to
deliver use cases. You can use route annotations for each Python method in the Flask application. After
the Flask web server starts, HTTP/HTTPS-bound requests are serviced by Flask for that route, and the
Python functions are run.
Each Flask server that is run from within the Docker container uses port 5000. Outwardly from the
container, Docker maps that internal port 5000 to the next free port from the 32768-60999 ephemeral
range. During the registration phase, this outward mapped port is stored by QRadar so that web requests
for an app, through QRadar are proxied to the correct container.
The following code is a sample Python route:
@app.route('/')
def hello_world():
return 'Hello World!'
In a standalone Flask web server, a web request through a browser to http://localhost:5000
returns: Hello World!
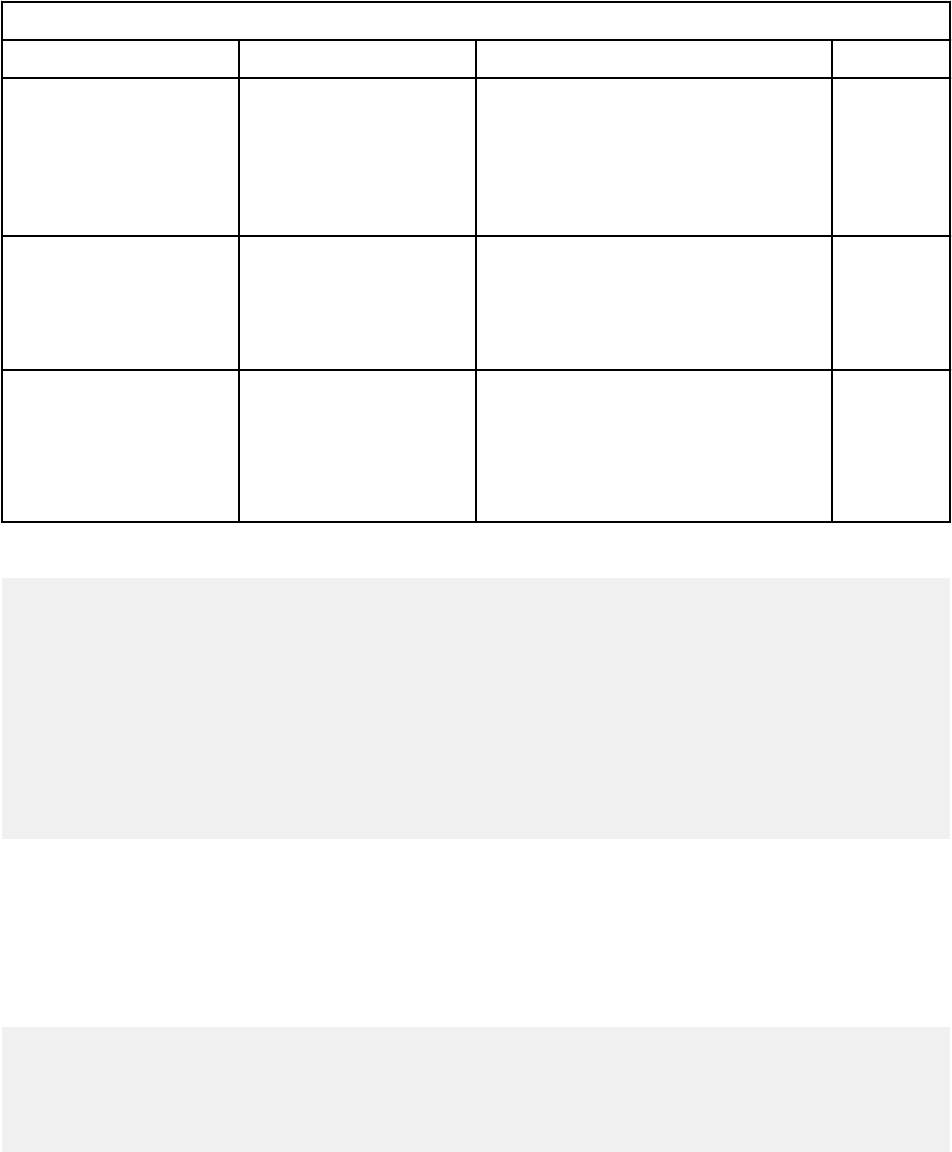
The following table outlines the specic version of Flask, and its dependencies:
Packages
Version Description
Flask 0.10.1 Microframework, or micro web application
framework
itsdangerous 0.24 Utility package for signing and encrypting data
jinja2 2.7.3 Template engine for python
markupsafe 0.23 Unicode escape library used alongside Jinja2
Werkzeug 0.96 WSGI (Web Server Gateway Interface) utility
library for Python
For more information, see the Flask website (http://flask.pocoo.org/).
Chapter 1. Developing with the QRadar app framework
5
Jinja2
Jinja2 is a Python library that enables you to create templates for various output formats from a core
template text le. HTML is the format that is used for QRadar apps. Jinja2 has a rich API, and large
array of syntactic directives (statements, expressions, variables, tags) that you use to dynamically inject
content into the template le.
Flask's in-built render_template() method is the easiest way to inject data from a Python method,
served by the route, into a Jinja2 HTML template, as shown in the following example.
@app.route('/')
def hello_world():
return render_template('hello.html', title='QRadar')
The template hello.html contains the following code:
<!doctype html>
<title>Hello from Flask</title>
<h1>Hello {{ title }}!</h1>
The following HTML output is produced:
<!doctype html>
<title>Hello from Flask</title>
<h1>Hello QRadar!</h1>
For more information, see the Jinja2 website (http://jinja.pocoo.org/docs/dev/).
HTTP request response lifecycle
When an app is successfully installed, requests to the app are proxied only by using an established
connection to QRadar. The app cannot be directly accessed by using direct URL requests or any other
method.
Apps can establish a secure authenticated and authorized session to QRadar. Any authorization tokens
that are created to verify that the integrity of session can be reused. The app obtains all the capabilities,
security, and authenticity facets of QRadar. The app can use the user session state to get access to all of
QRadar RESTful API endpoints to pull or push data to or from the QRadar system.
Containerized apps and the network
With the GUI Application Framework, trafc flows from container to container, from container to host on
its public IP address (not localhost), and from containers to the outside world.
When each app is passed as an archive (.zip le) of source code to the QRadar endpoints, QRadar
builds the initial image specic to your app codebase. Each image runs as an individual container. As the
container is run or started, QRadar maps the internal flask server port (5000) to an external ephemeral
port. This external ephemeral port is registered to QRadar so that proxied requests to your app code are
routed to the correct container.
/debug endpoints
All apps must include a /debug endpoint or route that runs locally on port 5000. If you use the default
flask framework, this endpoint is automatically included in your root _init_.py le. This endpoint is
used to ensure live apps are active and reachable.
If you disable the default flask to allow the app to use its own web server, you must include a /debug
endpoint on port 5000. If you do not include the endpoint, your app will restart once per minute, as a
result of QRadar being unable to receive a response from the app.
6
IBM QRadar : QRadar Application Framework Guide

App le structure
An IBM QRadar app that you create is distributed within a compressed le.
The Hello World sample app that is created when you set up your development environment is a basic
template that you can use for your application. However, the application le structure can be more
complex.
The following list outlines the layout of les and sub directories that you can add to the root directory of
your app. It also outlines the required nomenclature for app les and sub directories:
<App Root Folder>
This is main directory for application les
app/views.py
The main entry point into the web app.
app/templates
An optional subdirectory that contains any Python Flask of Jinja templates that are required by the
app.
app/static
An optional subdirectory that contains CSS, JavaScript, globalization, and other resource les.
• css
• js
• resources
The application_<LANG>.properties le is a Globalization resource bundle for the specied
language code. Text strings for globalization are stored as key/value pairs in Java format properties
les. If you congured text strings for globalization, they appear in QRadar when the user sets their
preferences for the relevant locale.
manifest.json
The application manifest description le.
src_deps
An optional directory that contains source dependencies.
• pip
Optional subdirectory that contains any extra Python libraries that the app requires.
• rpms
Optional subdirectory that contains any RPM dependencies that the app requires. RPMs must be
CentOS 6.7 x86_64 compatible.
• init
Optional subdirectory that contains any dependencies that the app requires that are not RPMs or
Python libraries.
Application manifest structure
The manifest is a JSON le that describes to IBM QRadar the capabilities that the app provides.
The following table describes the elds that you can include in the manifest.json le.
Chapter 1. Developing with the QRadar app framework
7

Table 3. Application manifest elds
Field Required Type Description
name Yes String The user-readable name of the app.
If the app is globalized This eld can
optionally point at a resource bundle
key.
description Yes String The user-readable description of the
app. If the application is globalized, this
eld can optionally point at a resource
bundle.
version Yes String A version string for the app. You can use
any format that you want here.
uuid Yes String An RFC 4122-compliant universally
unique identier for the application.
The create command uses the Python
UUID package to generate a random
128-bit number for the uuid value.
If you do not use the SDK to create the
app manifest le, you must manually
enter a unique value in the uuid eld.
authentication Yes String Authorization for the app to access
QRadar. The only mandatory entry
is "requested_capabilities":
["<capability>"].
For example, admin is a commonly used
user capability.
Enter at least one supported QRadar
user capability. The installation fails if
any of the requested_capabilities
are not dened in QRadar.
load_flask No Boolean Set to false when you don't want to
make Python Flask framework available
to your app. Typically, you might disable
Flask when you want your app to use a
different web application framework.
If not specied, this eld defaults to
true.
Supported by QRadar Console V7.3.0
and V7.3.1
node_only No Boolean If you want your app to be installed on
an app node only and not on the QRadar
Console Console, set to true.
Useful when your app is resource-
intensive. When you use this eld,
inform your users that your app
runs only on an app node appliance
(unmanaged host).
If not specied, this eld defaults to
false.
Supported by QRadar Console V7.3.0
and later.
debugging No Boolean Set to true to turn on logging for your
app. If not specied, this eld defaults
to false.
areas No Array of Area Type One or more Area objects describe new
complete pages of the application. In
QRadar, Area objects are represented
as tabs.
8 IBM QRadar : QRadar Application Framework Guide

Table 3. Application manifest elds (continued)
Field Required Type Description
rest_methods No Array of REST Method
Type
One or more REST Method objects
describe REST methods that the app
exposes. REST Method objects are
required parameters for Dashboard
Items and Metadata Providers, and are
optional for Actions.
dashboard_items No Array of Dashboard Item
Type
One or more Dashboard Item objects
describe the contents of new items
that you want to expose to the QRadar
dashboard.
configuration_pages No Array of Conguration
Page Type
One or more Conguration Page objects
describe new complete pages of the
app that represent conguration. In
QRadar, conguration pages are opened
from the Admin tab.
gui_actions No Array of GUI Action Type One or more GUI Action objects
describe new actions that can be
performed on items in the user
interface by page toolbars or by right-
click menus.
page_scripts No Array of Page Script type One or more Page Script objects
describe new JavaScript les that you
want included within an existing page in
QRadar. By default, these scripts run in
their own namespace.
metadata_providers No Array of Metadata
Provider type
One or more Metadata Provider objects
describe REST methods that can
be called to fetch new metadata
information for certain data types in
QRadar. Metadata is shown in tooltips
when a mouse is hovered-over an item.
resource_bundles No Array of Resource Bundle
type
One or more Resource Bundle objects.
You use these objects for language
locales and locale properties le
locations.
dev_opts No Array of Developer
Options type
One or more Developer Option objects.
You use these objects to specify values
that are used when you develop locally.
resources No Integer One or more Resource objects. You
use these objects to congure the
amount of memory in megabytes that is
available for the app to use.
Supported by QRadar V7.2.7 and later.
fragments No Array of Fragments type Use these objects to determine the
injection point in the QRadar UI where
content is added and the rest endpoint
that is used to retrieve the content.
Supported by QRadar V7.2.8 and later.
custom_columns No Array of Custom Columns
type
One or more Custom column objects.
You use these objects to identify the
context (the page and table in the
QRadar UI) where a custom column is
added, a label for the column header,
the type of data to be added, and the
rest endpoint that is used to add the
column content.
Supported by QRadar V7.2.8 and later.
Chapter 1. Developing with the QRadar app framework9

Source dependencies
If your app requires dependencies, such as RPMs or Python libraries, you can add them in the src_deps
sub directory of the app folder.
The src_deps directory can contain these optional sub directories:
pip
Use the pip folder to install extra Python libraries. For example, if your application requires the
observable-0.01.00 Python library, add the observable-0.01.00.tar.gz le to the pip folder.
Don't use .tar les for Python libraries that include extra C-based extensions. Instead, add libraries as
Python wheel les (.whl), which have C-based extensions pre-compiled.
You must install Python wheel les on the same system architecture they were compiled upon. To work
with IBM QRadar application framework, wheel les must be compiled on Centos 6.7 x86_64. If it uses
compatible architecture, you can use the Python bdist_wheel command to create wheel les from a
library's source code on your own system. The command python setup.py sdist bdist_wheel
creates the wheel le when you run it from within the root directory of the Python library's source folder.
A useful alternative to manually downloading Python packages for your app is the pip2pi Python
package. It requires pip and you can install it on your development computer by using the pip install
pip2pi command. After you install this package, you run the following command:
pip2tgz <target-directory> <Python package>
For example, the following command downloads the package's wheel, along with its dependencies, into
the specied folder.
pip2tgz python_packages/pytest/ pytest==2.8.2
The pytest parameter is optional and you can use it to download specic versions of a package.
For Python libraries that have dependencies, you can include an optional ordering.txt le in the pip
folder to specify the order in which Python libraries are installed. This text le must include the names of
les that are in the /pip folder. File names must be separated with a new line (UNIX line endings) in the
order that you want them installed.
rpms
Use the rpms folder to install extra Red Hat Enterprise Linus (RHEL) RPMs. The RPMs must be CentOs 6.7
x86_64 compatible.
For RPMs that have dependencies, you can include an optional ordering.txt le in the rpms folder to
specify the order in which RPMs are installed. This text le must include the names of les that are in the
rpms folder. File names must be separated with a new line (UNIX line endings) in the order you want them
installed.
init
Add dependencies les that do not t into the pip or rpms folders to the init folder. You must also
include an ordering.txt le in the init folder. The lines in this text le (UNIX line endings) are run as
shell commands during the installation of the app.
For example, you might want to install a collection of RPMs that has a complex dependency chain that is
not explicitly known. In this use case, you add a .tar le that is called dependant_rpms.tar.gz to
the init folder. You add the following commands to the ordering.txt le:
mkdir /src_deps/init/dependant_rpms
cd /src_deps/init
10
IBM QRadar : QRadar Application Framework Guide
tar -xzvf dependant_rpms.tar.gz
yum -y localinstall --disablerepo=* dependant_rpms/*rpm
rm -rf dependant_rpms
Note: The --disablerepo=* switch in this example is used to prevent the yum from attempting to
contact remote repositories on QRadar consoles that have no internet access.
This example uses yum's RPM auto-dependency resolution that installs a set of specied RPMs in the
required order. If the RPMs are included in the rpms folder, you must specify the installation order.
Installing Node.js as a source dependency
You can install Node.js as a web application framework to replace the Flask framework that is included
with the QRadar GUI Application Framework SDK.
Procedure
1. Download the Node.js archive (.tar) that you want to use, and copy it to app/src_deps/init
directory.
2. Create an installation script that is similar to the following example in the same folder that references
the archive node-v6.3.0-linux-x64.tar.gz that you want to use (in this case):
#!/bin/bash
##
## install node and npm from source tarball, and make available on the path
##
cd /usr/local
tar --strip-components 1 -xzf /src_deps/init/node-v6.3.0-linux-x64.tar.gz
3. Create a le ordering.txt in the same folder as the following content:
/src_deps/init/install_nodejs_npm.sh
The ordering.txt noties QRadar to run the Node.js installation script.
Manifest object types
You can dene several objects types in the IBM QRadar Application Framework manifest.
Areas type
Use the Areas type to add a tab to the IBM QRadar.
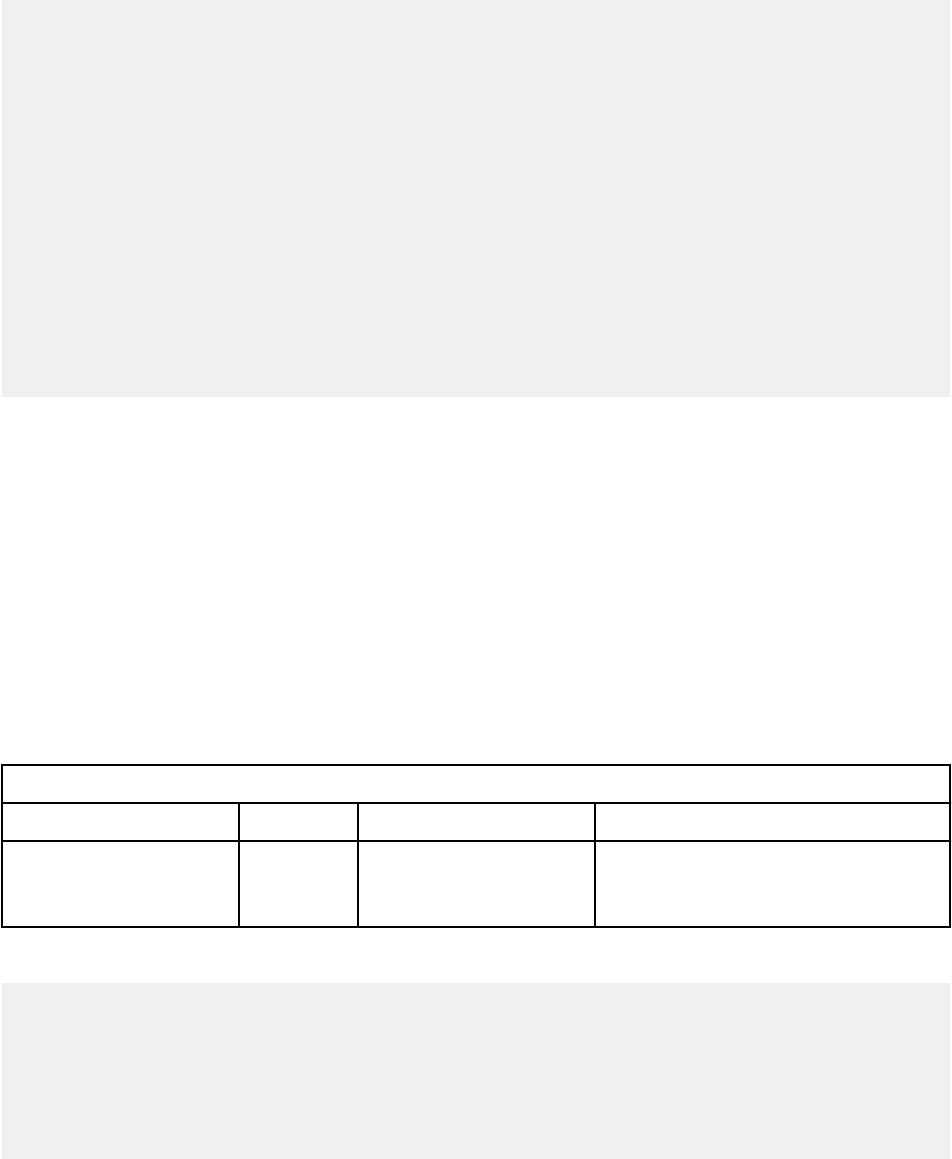
The following table describes the areas block elds in the manifest.json le.
Table 4.
Areas block elds
Field Required Type Description
id Yes String A unique ID.
text Yes String Concise text to display that describes the
area. This eld can optionally point at a
resource bundle key if the application is
globalized.
description No String Detailed text to display that describes the
area. This eld can optionally point at a
resource bundle key if the application is
globalized.
Chapter 1. Developing with the QRadar app framework11
Table 4. Areas block elds (continued)
Field Required Type Description
url Yes String A URL to load, relative to the application
root. Only URLs that live within the QRadar
application can be referenced.
required_capabilities No Array of
String
A set of capabilities that a user must
afliate with their user role to access this
area.
The following code is a sample areas block from manifest.json:
...
areas: [
{
"id":"QHelloWorld",
"text":"Hello World",
"description":"A Hello World app",
"url":"index",
"required_capabilities":["ADMIN"]
}
],
...
REST method type
The REST method that the app provides. REST methods can be used by other objects in this manifest,
including dashboard items, GUI actions, and metadata providers.
IBM QRadar expects the response of a REST method to be RFC 4627
-compliant JSON (https://
www.ietf.org/rfc/rfc4627.txt). Arguments are passed to the method either as a query string argument
or URI encoded parameters in the PUT or POST body.
REST methods are typically implemented in Python by using the Flask framework.
The following implementation of a REST method retrieves a type of metadata:
@app.route('/getMetaData', methods=['GET'])
def getMetaData():
ip = request.args.get("ip")
#Do something with this IP and populate a variable called 'value'
return json.dumps({'key':'myMetaData','label':'Item Label','value':value})
This method is then exposed in the manifest in the following way:
...
rest_methods: [
{
"name":"getMetaData",
"url":"/getMetaData",
"method":"GET",
"argument_names":["context"]
}
],
...
The following table describes the Rest_methods block elds in the manifest.json le.
12
IBM QRadar : QRadar Application Framework Guide
Table 5. Rest_methods block elds
Field Required Type Description
name Yes String A unique name for this REST method within
the app.
method Yes String An HTTP method on named endpoint (GET/
POST/DELETE/PUT).
url Yes String The URL to access the REST method,
relative to the app root. Only URLs within
the app are supported.
argument_names No String The names of arguments that this method
expects. Arguments that are passed to the
method are URL-encoded, as either query
string parameters or in the PUT or POST
body.
required_capabilities No Array of
String
A set of capabilities that a user must
afliate with their user role to access this
method.
Dashboard items type
A new item on the IBM QRadar dashboard. These items are available to users, who must manually add
the items to their dashboard.
The contents of the item come from the response of the REST method execution. The expected format of
the response is outlined in the following way:
{
id:"Unique ID of item"
title:"Title text to display in the item",
HTML:"Contents of dashboard item, including
any HTML and JavaScript you want to use."
}
Each time the dashboard item is refreshed, the REST method runs, so methods have a short response
time. The current default refresh rate for dashboard items in QRadar is 60 seconds.
The following table describes the dashboard_items block elds in the manifest.json le.
Table 6.
Dashboard_items block elds
Field Required Type Description
text Yes String A unique ID for this area.
description Yes String Concise text to display that describes the
area. Can optionally point at a resource
bundle key if the application is globalized.
rest_method Yes String Name of the REST method to load this item.
Must be declared in the rest_methods
section of the manifest.
required_capabilities No Array of
String
A set of capabilities that a user must
afliate with their user role to have access
to this item.
Chapter 1. Developing with the QRadar app framework13
The following code is a sample dashboard_items block from the manifest.json le:
...
"dashboard_items": [
{
"text":"Sample Item",
"description":"Sample dashboard item that is a copy of most recent offenses",
"rest_method":"sampleDashboardItem",
"rest_arguments":null,
"required_capabilities":["ADMIN"]
}
],
...
Conguration pages type
A new conguration page to be added to IBM QRadar. An app can dene any user interaction that is
required.
In QRadar, configuration_pages are represented as icons in the Admin tab.
The following table describes the configuration_pages block elds in the manifest.json le.
Table 7. Configuration_pages block elds
Field Type Description Required
text String Concise text to display that describes the
conguration page. This eld can optionally
point at a resource bundle key if the
application is globalized.
Yes
description String Detailed text to display that describes the
area. This eld can optionally point at a
resource bundle key if the application is
globalized.
Yes
icon String Path to the icon for your app on the Admin
tab, relative to the application root. Icons
must be 32x32 pixels.
Yes
url String A URL to load, relative to the application
root. Only URLs that exist within the QRadar
application can be referenced.
Yes
required_capabilities Array of
String
A set of capabilities that a user must
afliate with their user role to access this
conguration page.
No
The following code is a sample configuration_pages block from the manifest.json le:
...
"configuration_pages": [
{
"text":"Open mycompany.com",
"description":"Loading mycompany.com in a new window",
"icon":null,
"url":"my_config_page",
"named_service":"nodejsservice"
"required_capabilities":["ADMIN"]
}
],
...
14
IBM QRadar : QRadar Application Framework Guide
GUI Action type
An action that the user can do in IBM QRadar.
In QRadar, GUI Actions are represented as either buttons in page toolbars, or as right-click menu options.
On touchscreen devices, GUI Actions are for items that are pressed for a long time.
When run, GUI Actions run a block of JavaScript, or invoke a REST method, or a combination of both. If
you use both the rest_method and javascript attributes, the GUI Action invokes the server-side REST
method within your app. It then runs the client-side JavaScript.
The following table describes the gui_actions block elds in the manifest.json le.
Table 8. GUI_Actions block elds
Field Required Type Description
id Yes String A unique ID for this area within the
application.
text Yes String Concise text to display that describes the
area. Can optionally point at a resource
bundle key if the application is globalized.
description No String Detailed text to display that describes the
area. Can optionally point at a resource
bundle key if the application is globalized.
icon Yes String Path to the toolbar or right-click menu icon
to load, relative to the application root.
Icons must be 16x16 pixels.
If you do not want to add an icon, set the
value of this parameter to null.
rest_method No String A REST method to call when this action is
performed. The context parameter must
be specied as an argument. The REST
method is populated with whatever the
context of the GUI Action group is. The
GUI Action group context varies, depending
on what GUI Action group the action is
invoked from. As an example, on the right-
click menu of an IP address, the context
parameter contains the IP address.
Either this argument or the JavaScript
argument is required. If both are specied,
then the REST method is run rst, the
results of which can be passed back
into the JavaScript code block by using
the result variable. This method must be
declared in the rest_methods block of
the manifest.
Chapter 1. Developing with the QRadar app framework15

Table 8. GUI_Actions block elds (continued)
Field Required Type Description
javascript No String A JavaScript code block to run when this
action is performed. Either this argument or
the REST method argument is required. If
both are specied, then the REST method
is executed rst, the results of which are
passed into the JavaScript code block that
uses the result variable.
If only the JavaScript argument is specied,
a context variable that contains the context
of the GUI action, is passed into the
JavaScript code block.
groups Yes Array of
String
A list of one or more GUI Action groups to
install the action into (in other words, the
identier of the toolbar or right-click menu).
You must provide at least 1 group.
You can also use a group name in
this format ariel:<FIELD_NAME>, where
<FIELD_NAME> is the name of a eld in
the QRadar Event or Flow viewer. If this
eld is specied, the action is installed into
the menu of that eld, and the context
parameter is the contents of the eld.
required_capabilities No Array of
String
A set of capabilities that a user must
afliate with their user role to access this
area.
The following code is a sample gui_actions block from the manifest.json le:
...
"gui_actions": [
{
"id":"addToReferenceSet",
"text":"Add To Reference Set",
"description":"Adds to a reference set",
"icon":"static/images/Btn1.png",
"rest_method":"addToReferenceSet",
"javascript":"alert(result)",
"groups":[ "ipPopup" ],
"required_capabilities":[ "ADMIN" ]
},
{
"id":"sampleToolbarButton",
"text":"Sample Toolbar Button",
"description":"Sample toolbar button
that calls a REST method,
passing an offense ID along",
"icon":"static/images/Btn2.png",
"rest_method":"sampleToolbarMethod",
"javascript":"alert(result)",
"groups":[ "OffenseListToolbar" ],
"required_capabilities":[ "ADMIN" ]
}
],
..
16
IBM QRadar : QRadar Application Framework Guide
Page scripts type
Describes a new JavaScript le that the app includes inside an existing IBM QRadar page.
Script les that are included by the QRadar GUI Application Framework are run from the root QRadar
namespace context. Scripts can interact with each other within the same app and have access to top-level
functions that are dened in QRadar.
The following table describes the page_scripts block elds in the manifest.json le.
Table 9. Page_scripts block elds
Field Type Description Required
app_name String The name of the QRadar app that you
want to include the scripts in. The
asterisk wildcard "*" is also supported
if it is used with the page_id eld.
Use the wildcard to include a le on
every QRadar page.
Yes
page_id String The page ID that includes the scripts.
The asterisk wildcard character "*"
is also supported if used with the
app_name eld. Use the wildcard to
include a le on every QRadar page.
Yes
scripts Array of String The relative path to scripts that you
want to include on the page.
You can add more than one script to
each page. Paths to each script must
be separated by a comma.
Yes
The following code is a sample page_scripts block from manifest.json:
...
"page_scripts": [
{
"app_name":"SEM",
"page_id":"OffenseList",
"scripts":["/static/js/sampleScript1.js",
"/static/js/sampleScript2.js"]
}
],
...
Metadata providers type
Describes metadata providers that are used to show context-sensitive information in IBM QRadar.
Metadata is shown when the user's mouse pointer hovers over an item in QRadar. The contents of the
metadata comes from the response of the REST method. The following code example shows the expected
format of the response:
{
key:"Unique key for this metadata item",
label:"Description of what this metadata is",
value:"Plain-text context-sensitive data to be provided",
html:"HTML context-sensitive data to be provided"
}
The following table describes the metadata_providers block elds in the manifest.json le.
Chapter 1. Developing with the QRadar app framework
17

Table 10. Metadata_providers block elds
Field Required Type Description
rest_method Yes String Name of the REST method that is
used to fetch the metadata. Must be
declared in the rest_methods block
of the manifest. Requires a context
argument that species the item to
fetch metadata for.
metadata_type Yes String Type of metadata that can be fetched
for. The following list provides the
valid values for this eld:
• ip
• userName -
• ariel:<FIELD_NAME>, where
<FIELD_NAME> is the name of a
eld in the QRadar Event or Flow
viewer
The following code is a sample metadata_providers block from the manifest.json le:
...
"metadata_providers": [
{
"rest_method":"sampleIPInformation",
"metadata_type":"ip"
},
{
"rest_method":"sampleUserInformation",
"metadata_type":"userName"
},
{
"rest_method":"sampleURLInformation",
"metadata_type":"ariel:URL"
}
],
...
Resource bundles type
Describes the language locales and locations of the locale properties le locations that you use when you
globalize your app.
The following table describes the Resource_bundles block elds in the manifest.json le.
Table 11.
Resource_bundles block elds
Field Required Type Description
locale Yes String Language locale code
bundles Yes String Path to the globalization resource
bundle properties les. Files are stored
in the /app/static/resources/
folder. Properties les must use
the following naming convention:
application_<LANG>.properties.
18 IBM QRadar : QRadar Application Framework Guide
The following code is a sample resource_bundles block from the manifest.json le:
...
"resource_bundles": [
{
"locale": "en_US",
"bundle": "resources/hello_en_US.properties"
},
{
"locale": "es",
"bundle": "resources/hello_es.properties"
},
{
"locale": "fr",
"bundle": "resources/hello_fr.properties"
},
{
"locale": "en",
"bundle": "resources/hello_en.properties"
}
],
...
Text strings for globalization are stored as key/value pairs in Java format properties les. If you congured
text strings for globalization, they appear in IBM QRadar when the user sets their preferences for the
relevant locale.
Developer options type
Describes values that you use to develop and test your app locally.
The dev_opts object type is used only for local testing. Parameters in dev_opts blocks are not passed
to the IBM QRadar Console when you deploy your app.
You use the dev_opts block in the manifest.json le to specify the IP address of a remote QRadar
Console. If your application uses QRadar API endpoints, you can use the dev_opts object to contact the
QRadar API and test the application locally before you upload to your QRadar production instance.
The following table describes the parameters of the Dev_opts block:
Table 12.
Dev_opts block elds
Field Required Type Description
console_ip Yes String The IP address of the remote
QRadar Console that contacts the API
endpoints that your app uses.
The following code is a sample dev_opts block from the manifest.json le:
...
"dev_opts": [
{
"console_ip":"10.11.12.13",
}
],
...
When you run your app, you are prompted for your QRadar user name and password.
You can also store those credentials for your local development. Credentials are stored in
clear text in the <USER_HOME>/.qradar_appfw.auth le on Unix and Linux, and in the
C:\Users\<USER_HOME>\.qradar_appfw.auth le on Windows.
Chapter 1. Developing with the QRadar app framework
19
Resources type
Denes the memory resources to allocate to your app.
The Resources object is not an IBM QRadar app type. You use it to congure the amount of memory, in
megabytes, that your app can use.
The following table describes the Resources block elds in the manifest.json le.
Table 13. Resources block elds
Field Required Type Description
memory No Integer The amount of memory in megabytes
that is available for the app to use.
If the resources block is
omitted from manifest.json, 200
megabytes of memory is allocated to
your app by default.
The following code is a sample resources block from the manifest.json le:
...
"resources": {
"memory": 500
},
...
Note: The combined memory requirements of all the apps that are installed on a QRadar Console cannot
exceed 10 per cent of the total available memory. If you install an app that causes the 10 per cent
memory limit to be exceeded, the app does not work.
If your app requires a minimum memory allocation, you must provide information about it in your app's
documentation.
Fragments type
Use to inject custom content fragments into IBM QRadar.
The fragments block contains elds that dene the tab, page, and page area where you want to
inject custom content. It also denes the REST endpoint that QRadar uses to generate custom content.
Different apps can inject content into the same page location. However, each app can insert only one set
of HTML content for each location.
The following table describes the fragments block elds in the manifest.json le.
Table 14.
Fragments block elds
Field Required Type Description
app_name Yes String The QRadar app into which the content is to
be injected.
page_id Yes String The identier of the page in QRadar UI into
which the content is injected.
20 IBM QRadar : QRadar Application Framework Guide

Table 14. Fragments block elds (continued)
Field Required Type Description
location No String The location on the QRadar page where the
custom content is injected.
To inject content at the top of a page, if
permitted, the value for this parameter is
header. To inject content at the bottom
of a page, if permitted, the value for this
parameter is footer. If the page has only
one injection point, don't include this eld.
rest_endpoint Yes String Identies the REST API endpoint that
QRadar invokes to retrieve the custom
content. Can be any REST endpoint, not
necessarily one that is provided by this app.
An app's custom fragment REST endpoint
must return a JSON response body.
The following example species content that is retrieved from the /myoffensesheadercontent
endpoint to be injected into the header area of the Offense List page.
{
...
"fragments": [
{
"app_name": "SEM",
"page_id": "MyOffenseList",
"location": "header",
"rest_endpoint": "/myoffensesheadercontent"
}
],
...
}
For more information about adding custom content fragments to the QRadar user interface, see “Custom
fragments example” on page 69.
Custom columns type
Adds custom columns to tables in IBM QRadar.
You can add columns in various locations in QRadar. Different apps can add a column to the same table.
However, each app can add one column only for each table.
The following table describes the custom_columns block elds in the manifest.json le.
Table 15.
Custom_columns block elds
Field Required Type Description
label Yes String The name of the column. This string
can also be a resource bundle key for
globalization purposes.
rest_endpoint Yes String Identies the REST API endpoint that
QRadar invokes to retrieve the custom
content for the column. An app's custom
fragment REST endpoint must return a
JSON response body.
Chapter 1. Developing with the QRadar app framework21
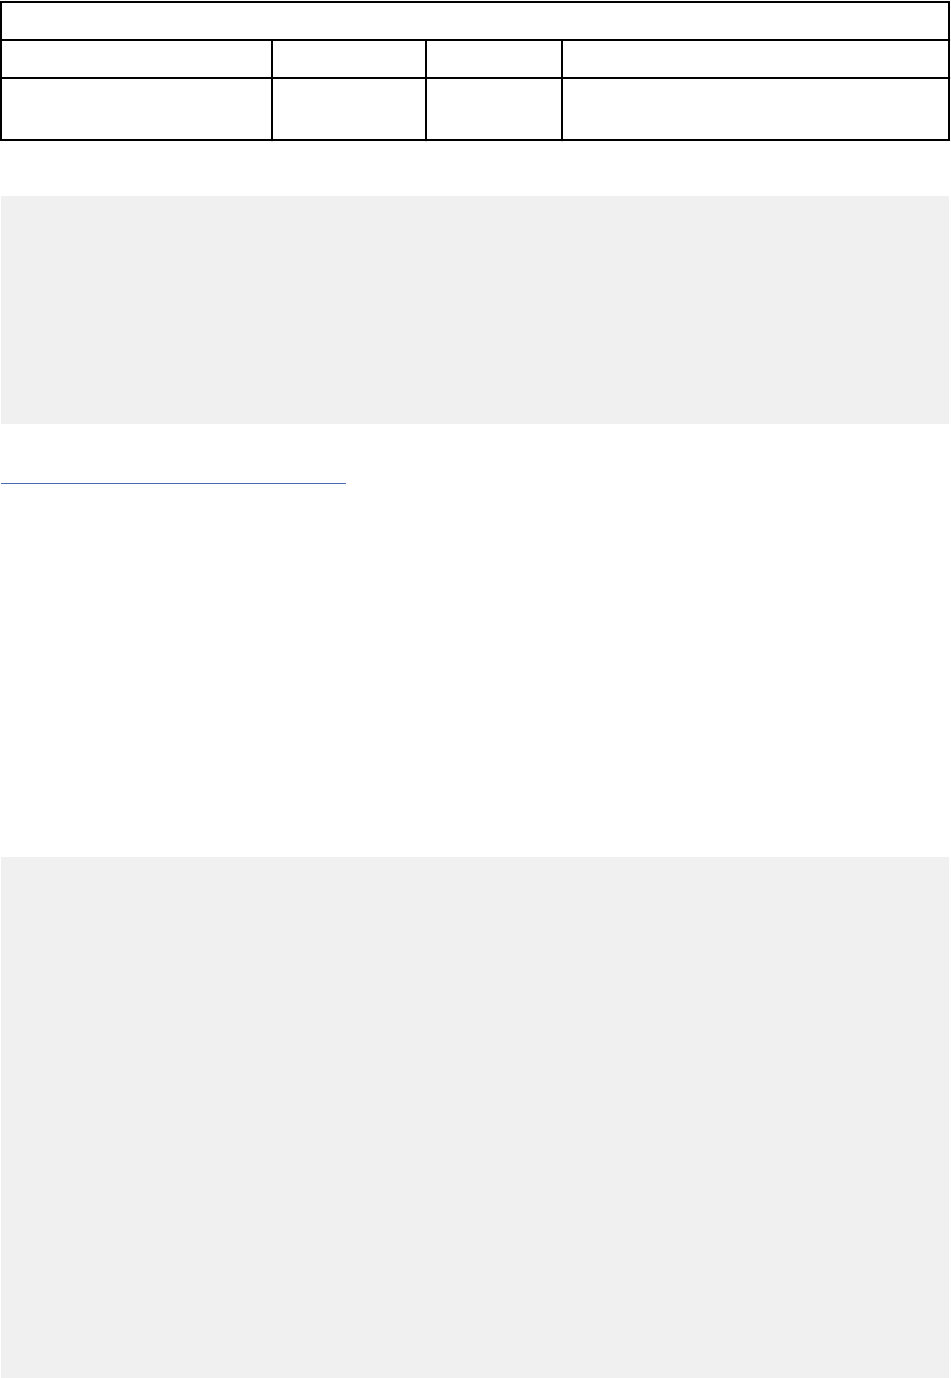
Table 15. Custom_columns block elds (continued)
Field Required Type Description
page_id Yes String The ID of the page that contains the table
where the column is to be added.
The following code sample shows how to congure the custom_columns block in the manifest le.
{
...
"custom_columns": [
{
"label": "labelfrommanifest",
"rest_endpoint": "test_method",
"page_id": "AssetList"
}
],
...
}
Related concepts
“Custom column example” on page 71
You can add columns that contain custom content to tables in QRadar.
Services type
Denes named services, service endpoints, and supervisord conguration parameters.
The parameters in your services block in your app's manifest le can be divided into these types:
Service denition parameters
The service name, version, and any endpoints that are dened for the service.
Endpoints eld parameters
A breakdown of the endpoints subparameters.
Supervisord conguration parameters
A list of parameters that can be passed to supervisord to control the service process.
The following code sample lists the services block elds:
{
...
"services": [
{
"name":"some_service",
"version":"1.0",
"endpoints": [
{ "name":"something",
"path":"get_something/{id}",
"http_method": "GET",
"parameters": [
{
"location": "PATH",
"name": "id"
"definition": "String"
}
]
}
],
"command":"/usr/bin/python loop.py",
"process_name":"%(program_name)s",
"numprocs":1,
"directory":"/src_deps/services/",
"umask":"022",
"priority":999,
"autostart":"true",
"autorestart":"true",
"startsecs":1,
"startretries":3,
"exitcodes":"0,2",
22
IBM QRadar : QRadar Application Framework Guide
"stopsignal":"TERM",
"stopwaitsecs":8,
"user":"root",
"redirect_stderr":"true",
"stdout_logfile":"/store/log/pro.log",
"stdout_logfile_maxbytes":"1MB",
"stdout_logfile_backups":7,
"stdout_capture_maxbytes":"0",
"stdout_events_enabled":"false",
"stderr_logfile":"/store/log/proerr.log",
"stderr_logfile_maxbytes":"1MB",
"stderr_logfile_backups":6,
"stderr_capture_maxbytes":"0",
"stderr_events_enabled":"false",
"environment":"PY_HOME=/usr/bin/python",
"serverurl":"AUTO"
}
],
...
}
The following tables provide details about the manifest elds for the services block.
Table 16. Service denition endpoints
Field Required Type Description
name Yes String The name of the service instance.
version Yes String
Version of this named service that is
supported by this instance.
Only one version per named service
denition is allowed.
endpoints No Array of
Endpoints
type
The endpoints that are dened for this
service instance.
You can dene a number of parameters
for each endpoint. For more information
about endpoint parameters, see Table 17
on page 23
Endpoints eld parameters
The endpoints eld parameters are explained in more detail in the following table:
Table 17. Endpoints eld parameters
Parameter Required Type Description
name Yes String The name of the endpoint.
http_method Yes String The HTTP method to use for the request: GET, POST, PUT, or
DELETE.
path Yes String The URL that is used to access endpoint.
request_mime_type No String The mime type of request body. Provide this value when
your request has a body (POST, PUT). Typical values include
these strings: "application/json", "application/json+ld",
"application/x-www-form-urlencoded".
request_body_type No Object Provides a JSON object that denes the structure of your request
body. If you use this parameter, do not set the location parameter to
BODY.
Chapter 1. Developing with the QRadar app framework23

Table 17. Endpoints eld parameters (continued)
Parameter Required Type Description
parameters No Array
location (required)
String. Can be one of these types:
• PATH
• QUERY
• BODY
Set the location parameter to BODY if the endpoint's
request_mime_type eld is set to application/x-www-
form-urlencoded.
The location parameter is required.
name (required)
String
definition (optional)
The type of the parameter.
response
No Object Denition of the expected response. If your endpoint does not return
a response body, then omit this eld.
mime_type (required)
String. The response mime type.
body_type (required)
Object. Provides a JSON object that denes the structure of
your response body.
error_mime_type No String The mime type of error message body. Defaults to text/plain.
Supervisord conguration parameter elds
The QRadar Application Framework uses supervisord to monitor and control named services. You can
specify supervisord conguration parameters as elds within the services block in your app's manifest
le.
You can use the following supervisord parameters as elds in the services block. For more
information about supervisord conguration parameters, see http://supervisord.org/conguration.html
(http://supervisord.org/conguration.html).
Table 18. Supervisord
conguration parameters
Field Required Type Description
port No Integer A TCP host:port value, for example,
127.0.0.1:9001 on which supervisor
listens for HTTP and XML-RPC requests.
If no port is specied the service
is treated as a headless background
process that runs continuously.
command No String The command that runs when this
program is started. The command
can be either absolute, for example, /
path/to/program or relative, for
example, program. If it is relative,
the supervisord’s environment $PATH is
searched for the executable.
directory No The path to the directory that
supervisord changes to before it
executes the child process.
24 IBM QRadar : QRadar Application Framework Guide

Table 18. Supervisord conguration parameters (continued)
Field Required Type Description
autorestart No Enum
Species whether supervisord
automatically restarts a process when it
exits in the RUNNING state.
Value is one of the following states:
TRUE, FALSE, UNEXPECTED.
process_name No String A Python string that is used for the
supervisor process name.
numprocs No String The number of instances of the program
the supervisor starts.
umask No String The octal number that represents the
umask of the process.
autostart No Enum Value is TRUE or FALSE.
If TRUE, this program starts
automatically when supervisord is
started.
startsecs No Integer The number of seconds that the
program needs to stay running after
startup to consider the start successful.
startretries No Integer The number of serial failure attempts
that supervisord allows when it
attempts to start the program.
exitcodes No String The list of expected exit codes for
this program that are used with
autorestart.
stopsignal No String The signal that is used to kill the
program when a stop is requested.
Use any of the following:
• TERM
• HUP
• INT
• QUIT
• KILL
• USR1
• USR2
stopwaitsecs No Integer The number of seconds to wait for the
operating system to return a SIGCHLD to
supervisord after the program is sent a
stopsignal.
user No String The UNIX user account that runs the
program.
Chapter 1. Developing with the QRadar app framework25

Table 18. Supervisord conguration parameters (continued)
Field Required Type Description
redirect_stderr No Enum Value is either TRUE or FALSE.
If TRUE, causes the StdErr output to be
sent back to supervisord on its StdOut
le descriptor.
stdout_logfile No String StdOut output is stored in this le.
If redirect_stderr is TRUE, StdErr
output is also stored in this le).
stdout_logfile_maxbytes No String The maximum number of bytes that
can be consumed by stdout_logfile
before it is rotated and a new log le is
started.
stdout_logfile_backups No Integer The number of stdout_logfile
backups to retain from the StdOut log
le rotation.
stdout_capture_maxbytes No String The maximum number of bytes that are
written to capture FIFO (rst in, rst out)
when the process is in StdOut capture
mode.
stdout_events_enabled No Enum Value is one of TRUE, FALSE.
If TRUE, PROCESS_LOG_STDOUT events
are emitted when the process writes to
its StdOut le descriptor.
StdErr_logfile No String Put process StdErr output in this le
unless redirect_stderr is TRUE.
stderr_logfile_maxbytes No String The maximum number of bytes before
log le rotation for stderr_logfile.
stderr_logfile_backups No Integer The number of stderr_logfile
backups to retain from the StdErr log le
rotation.
stderr_capture_maxbytes No String The maximum number of bytes that are
written to capture FIFO (rst in, rst out)
when the process is in StdErr capture
mode.
stderr_events_enabled No Enum Value is either TRUE or FALSE.
If TRUE, PROCESS_LOG_STDERR events
are generated when the process writes
to its StdErr le descriptor.
environment No String A list of key/value pairs, in the
form KEY="val",KEY2="val2", that
are placed in the child process’
environment.
serverurl No String The URL that is used to access
the supervisord server, for example,
http://localhost:9001
26 IBM QRadar : QRadar Application Framework Guide

Environment variables type
Use the environment variables object type to dene environment variables for your apps in your app's
manifest le.
The environment variables object is not an IBM QRadar application type. The following four environment
variables are set automatically by QRadar and are available to use in your app.
QRADAR_CONSOLE_HOST_NAME
The host name of the console where the app is installed.
QRADAR_CONSOLE_IP
The IP address of where the app is installed.
QRADAR_APPLICATION_BASE_URL
The web URL for the app.
LANG
The language code and character encoding that is used by the QRadar Console UI when the app is
installed.
HTTP_PROXY / HTTPS_PROXY
If a proxy is congured, this environment variable is the IP address/hostname of the proxy server that
QRadar uses.
PROXY_USERNAME
If a proxy is congured, this environment variable is the username of the HTTPS proxy server that
QRadar uses.
PROXY_PASSWORD_DECRYPTED
If a proxy is congured, this environment variable is the decrypted password of the HTTPS proxy
server that QRadar uses.
PROXY_URL
If a proxy is congured, this environment variable is the IP address/hostname of the proxy server that
QRadar uses.
PROXY_PORT
If a proxy is congured, this environment variable is the port number of the proxy server that QRadar
uses.
Environment variables that you dene in an app's manifest le are specic to that app and haven no effect
outside the app container.
The following code sample shows how to congure the environment_variables block in the manifest
le.
{
...
"environment_variables":[
{
"name":"ENV_VAR1",
"value":"1"
},
{
"name":"ENV_VAR2",
"value":"2"
},
{
"name":"ENV_VAR3",
"value":"3"
}
],
...
}
The following table explains the manifest elds for the environment_variables block.
Chapter 1. Developing with the QRadar app framework
27
Field Type Description Required
name String The name of the environment variable.
Environment variable names cannot
begin with a number, or contain an equals
(=) sign.
Yes
value String The value of the environment variable. Yes
The Hello World sample app
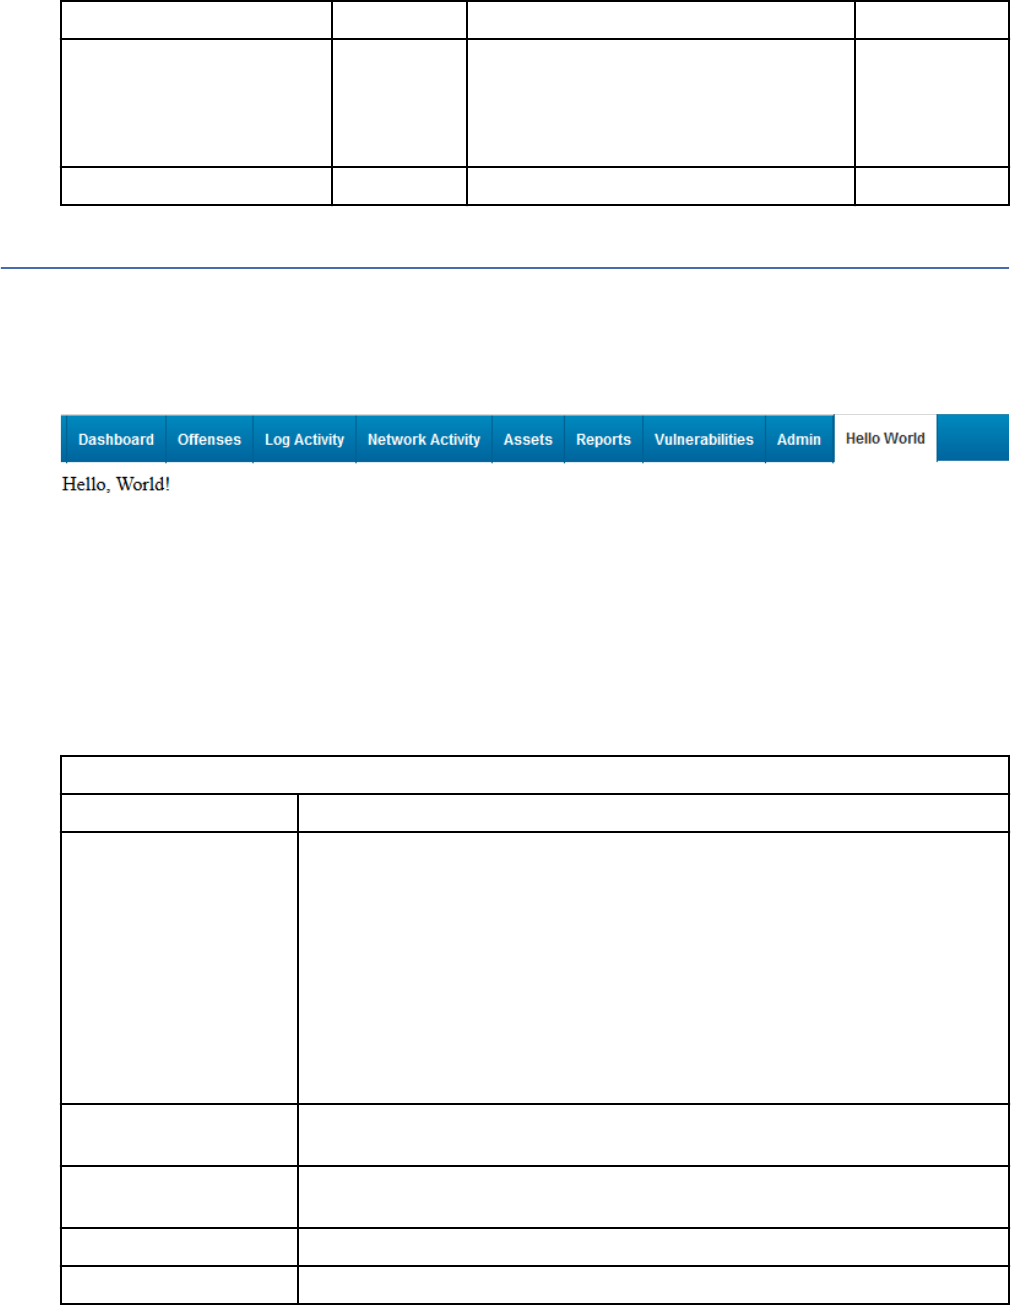
When you add an app in the Application Development Manager window, a simple "Hello World" sample
app is also created.
The Hello World sample app adds a Hello World tab to QRadar.
The following image shows an example of the Hello World tab that is added to QRadar.
You can use this sample app as a simple template from which to build your own apps that require tabs.
When you run the development environment script, the les that are described in the following table are
added to your application development folder:
Table 19. Application development
les
Files/Folders Description
app The root directory contains the following les:
qpylib contains the Python library les that your app uses to connect to the
QRadar API endpoints.
__init__.py a sample initialization le that creates a Flask instance,
imports views from the views.py script and functions from the qpylib
library.
views.py the main entry point into the web application. This le and
the manifest.json le are the only les that are required in every app.
Contains sample code for the Hello World app.
qradar_appfw_venv Contains the Python virtual environment where the dependencies are
installed.
__init__.py Creates an instance of the Flask micro-framework that is used to serve
content to QRadar.
manifest.json Describes to QRadar what the sample Hello World app does.
run.py Contains instructions to run the code that is stored in the app sub directory.
28 IBM QRadar : QRadar Application Framework Guide

manifest.json
The manifest.json le contains the following code:
{
"name":"Hello World",
"description":"Application to display hello world",
"version":"1.0",
"uuid":"558d7935-f00b-42da-a278-c82abdb12b34",
"areas": [
{
"id":"QHelloWorld",
"text":"Hello World",
"description":"A Hello World app",
"url":"index",
"required_capabilities":["ADMIN"]
}
],
"dev_opts": [
{
"console_ip":""
}
]
}
The rst four objects, name, description, version, and uuid provide basic app information.
The areas object describes the capabilities of the Hello World app. The QRadar GUI Application
Framework uses areas objects to describe new complete pages of the app. Areas objects are
represented as tabs in the user interface.
The areas block contains the elds that are described in the following table:
Table 20. Areas block
Name Description Value
id The ID of the new tab QHelloWorld
text The name of the tab that is displayed in the user
interface.
Hello World
description A description of the tab that is displayed. A Hello World
app
url Describes the route that is dened in the views.py
script that QRadar uses so it can display the "Hello,
World!" text in the body of the new tab.
index
required_capabilitie
s
Instructs QRadar to display the Hello World tab only to
users with Administrator privileges.
["ADMIN"]
The dev_opts block is used to provide the IP address of networked instance of QRadar Console for
testing purposes. This block is not required for this sample app.
views.py
The views.py le contains the following code:
__author__ = 'IBM'
from app import app
@app.route('/')
@app.route('/index')
def index():
return "Hello, World!"
Chapter 1. Developing with the QRadar app framework
29
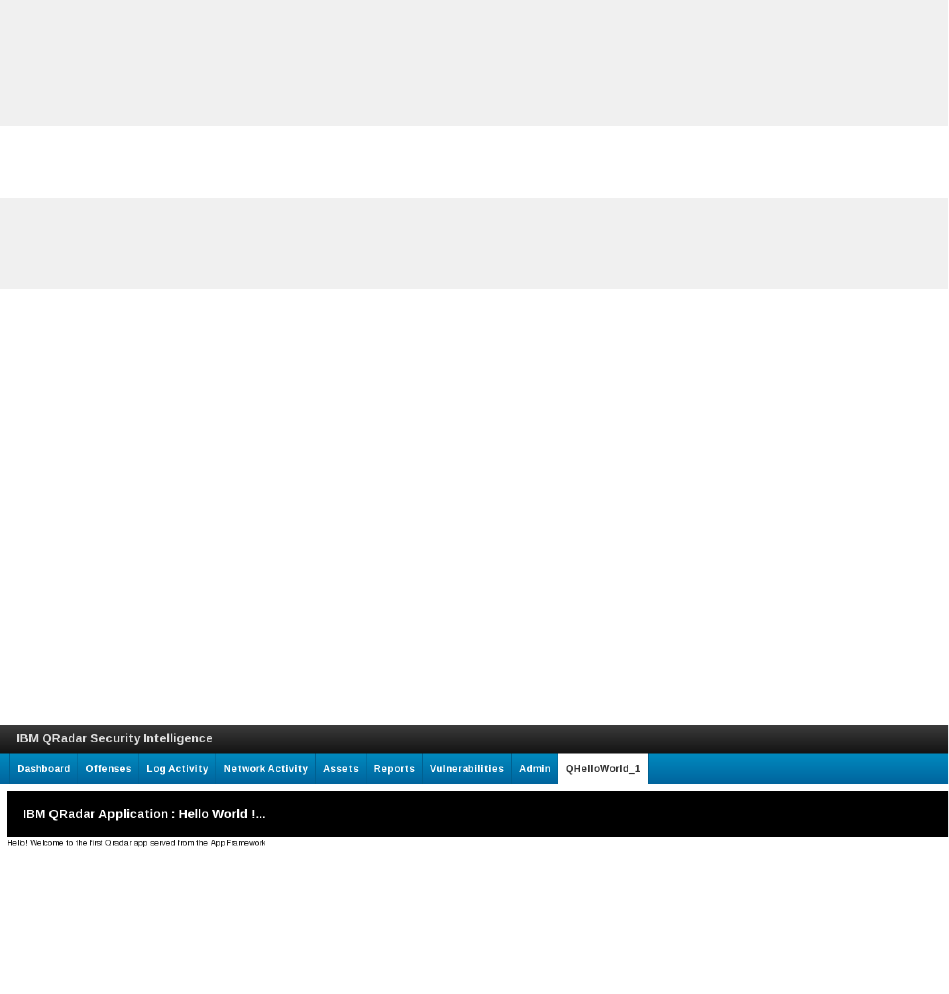
The code creates the default '/' and '/index' routes, both of which return a simple string. The index
route is declared in the url eld of the manifest.json le.
Note: You do not have to include the __author__ tag, but it is considered good practice to use it.
App startup
When QRadar starts your app, it calls the run.py and _init_.py scripts. The _init_.py le creates an
instance of the Flask microframework environment that imports your views module. Your views modules
dene all the necessary endpoints and routes that serve content back to QRadar.
__author__ = 'IBM'
from flask import Flask
app = Flask(__name__)
from app import views
The run.py le creates a new Flask application (by starting the Flask web server), from the app
directory.
__author__ = 'IBM'
from app import app
app.run(debug = True, host='0.0.0.0')
What can you do with the Hello World sample app?
You can use the Hello World sample app to test the QRadar SDK in these ways:
• Run the Hello World app locally.
• If you have a test instance of QRadar Console, you use the SDK to package and upload the Hello World
app to it.
However, most importantly you can use the Hello World sample app les as a template to start developing
your own QRadar apps.
New tab example
You can build on the Hello World sample app that the IBM QRadar SDK installs in your app workspace to
add a tab to QRadar.
You can build an app that uses a Jinja2 template to serve HTML content to a new tab as shown in the
following image.
The les and folders that are described in the following table are required for the tab example:
30
IBM QRadar : QRadar Application Framework Guide
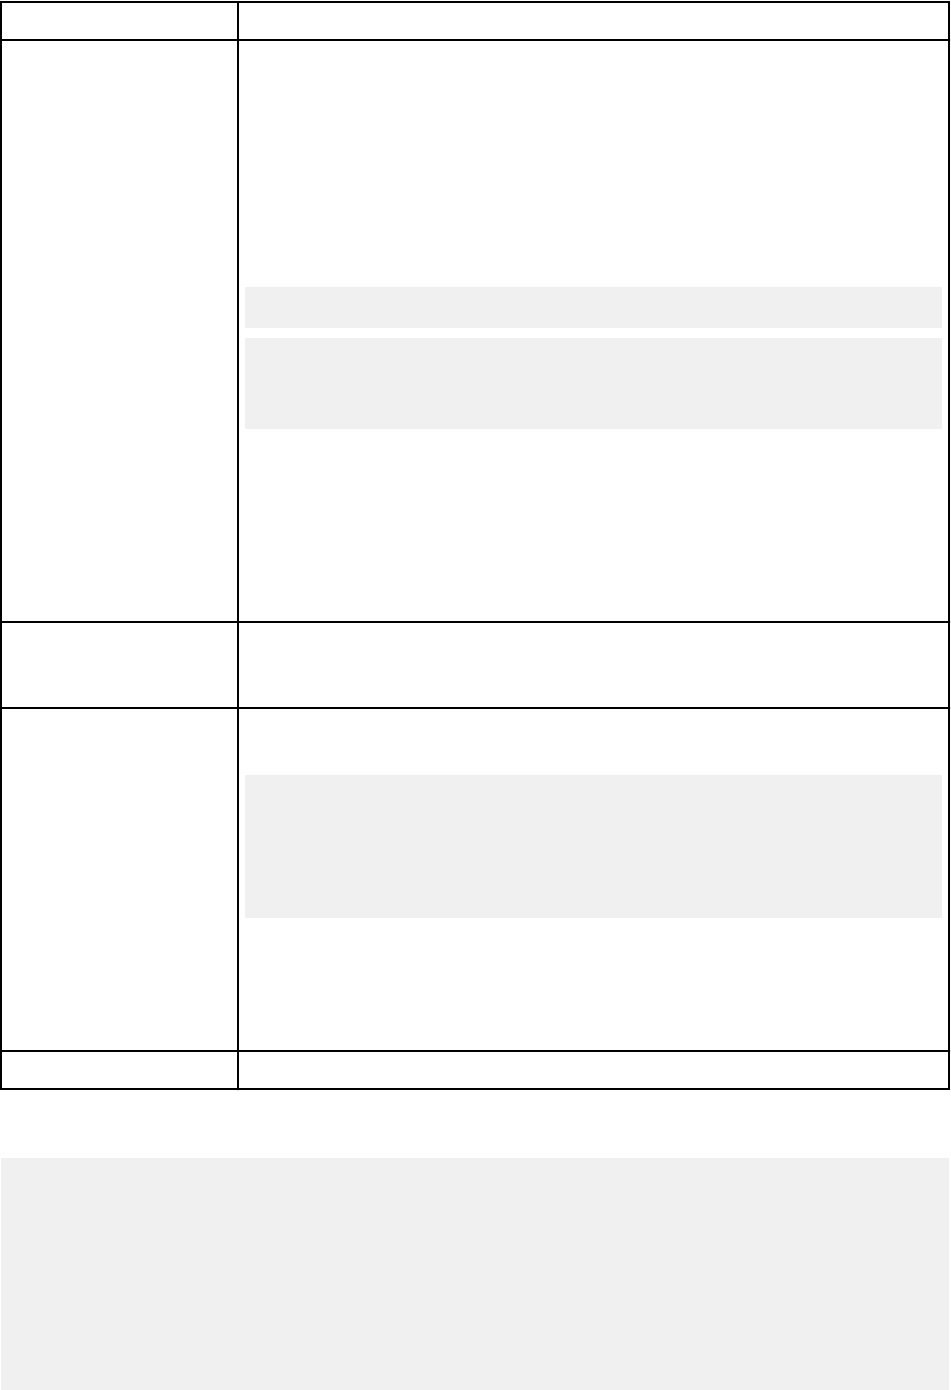
Files/Folders Description
app The main directory for application les. The app folder contains the following
les:
qpylib remains unchanged from the Hello World sample app example.
__init__.py remains unchanged from the Hello World sample app
example.
views.py updated to include code to render the Jinja2 template. Here's
snippets of the additional code that is added to views.py that is used to
return the render_template:
from flask import render_template
def index():
return render_template("index.html",
title = "QApp1 : Hello World !")
The Flask app route uses a Flask-Jinja2 templated HTML page to build the
content for the Hello World tab.
/templates/index.html - The Jinja2 template to render when requests
are routed to app.route annotated endpoints.
/static/css/style.css Renders the content that is served by the Jinja2
template, index.html.
__init__.py
This le creates an instance of the Flask micro-framework that is used to
serve content to QRadar. This le remains unchanged from the original Hello
World example.
manifest.json Describes to QRadar that your app creates a new tab. Here's a snippet of the
code, which is changed sightly from the Hello World sample app example.
"areas": [
{
"id":"QHelloWorld",
"text":"Hello World",
"description":"A Hello World app",
"url":"index",
"required_capabilities":["ADMIN"]
The dev_opts is removed and is needed only for testing the app on a
networked QRadar Console.
Functionally, this manifest le is identical to the manifest.json that is
provided in the basic Hello World sample app example.
run.py Remains unchanged from the Hello World sample app example.
manifest.json
{
"name":"QHelloWorld_1",
"description":"Application to display QHelloWorld",
"version":"1.0",
"areas": [
{
"id":"QHelloWorld_1",
"text":"QHelloWorld_1",
"description":"An Hello World app with some styling",
"url":"index",
"required_capabilities":["ADMIN"]
}
Chapter 1. Developing with the QRadar app framework
31

]
}
Functionally, this manifest le is identical to the manifest.json that is provided in the basic "Hello
World" sample. The elds that describe the app are updated and the dev_opts block is removed because
it is not needed.
views.py
The views.py le contains the following code:
__author__ = 'IBM'
from flask import render_template
from app import app
@app.route('/')
@app.route('/index')
def index():
return render_template("index.html", title = "QApp1 : Hello World !")
The views.py le imports the render_template method from Flask to render the index.html
template.
Like the views.py le in the "Hello World" sample, the code creates default routes '/' and '/index',
both of which return a simple string. The index route is declared in the url eld of manifest.json.
templates/index.html
This Jinja2 template contains the HTML content that is displayed on the new tab. It includes a variable
that uses the value of the title parameter that is dened in views.py for the browser window title text.
<!doctype html>
<html lang="en">
<head>
<meta charset="utf-8">
<title>{{title}} - Main</title>
<link rel="stylesheet" href="static/css/style.css">
</head>
<body>
<div id="pageheader" class="pagebanner">
IBM QRadar Application : Hello World !...
</div>
<div id="contentpane">
Hello! Welcome to the first Qradar app served from the AppFramework
</div>
</body>
</html>
QRadar App Editor
The QRadar App Editor documentation is now on GitHub.
You can now access the documentation at https://ibmsecuritydocs.github.io/qradar_app_editor/.
What's new in the QRadar App Editor
Learn about new features in each version of the IBM QRadar App Editor.
Version 3.0
• Added a New image eld for UBI Apps to the New App pane. The app uses the new image to install the
UBI image.
• Changed the le structure in the App Development tab.
32
IBM QRadar : QRadar Application Framework Guide

Important: Apps in QRadar App Editor 3.0 support QRadar App Framework V2 apps only. The QRadar
App Editor does not provide any automatic migration tools. Instead, users can follow the instructions to
migrate an app from QRadar App Framework V1 to V2. For more information, see Migrating from App
Framework v1 to v2.
Version 2.2
• Fixed an issue that can cause CSRF errors when saving python les.
• Retain console host names during a redeployment.
• Fixed certicate issues on certain QRadar environments.
• Fixed an issue where dependencies are not correctly packaged during an export or redeployment.
• Improved support for long le names.
• Improved error handling for redeployments.
• Numerous other bug xes and improvements.
Version 2.1
• Congure proxy settings to connect to a GIT repository.
• Download external app templates from Github
(https://github.com/ibm-security-intelligence/sample-
apps). You can submit Github pull requests for your sample apps that you think are helpful to the
development community.
• Search for les in the app folder navigation.
• Copy or move les in the app folder navigation.
• View gif, jpeg, bmp, and png images in the editor workspace.
Version 2.0
• Clone apps from a GIT repository.
• View app installation status.
• Upload les to your app.
• Delete apps.
• Help pages added.
Known issues
Learn about the known issues in each IBM QRadar App Editor release.
Version 3.0
The following problems and limitations are known to impact the QRadar App Editor 3.0.
• An error occurs if you move a le into the /opt/app-root root directory in the editor.
Tip: An error does not occur when you create, delete, and edit les in the directory.
• The App Editor does not fully support app dependencies. Errors might occur if you install an app with
dependencies.
• The App Editor supports Flask apps only.
• The App Editor supports HTTP proxies in the bootstrapper only.
• Apps in version 3.0 must follow the Flask application factory method, their app's __init__.py le
must include the function create_app() that returns a Flask instance. For more information, see
https://pythonise.com/series/learning-flask/application-factory-pattern-%7C-learning-flask-ep.-30
.
• Apps in version 3.0 support QRadar App Framework V2 apps only.
Chapter 1. Developing with the QRadar app framework
33

Tip: The QRadar App Editor does not provide any automatic migration tools. Instead, users can follow
the instructions to migrate an app from QRadar App Framework V1 to V2. For more information, see
Migrating from App Framework v1 to v2.
Installing the QRadar App Editor
Download and install the IBM QRadar App Editor from the IBM App Exchange.
Before you begin
You must have an IBM ID to access the App Exchange
(https://exchange.xforce.ibmcloud.com/) and
download the app. You can register for an IBM ID at IBM id registration (https://www.ibm.com/account/
prole/). You must have internet access for the app to access other QRadar resources such as videos and
information when it is installed.
Note:
To install the QRadar App Editor your installed version of QRadar must have Python V2.7, which is
available with the following releases:
• IBM
®
Security QRadar
®
7.2.8 software update 7 (7.2.8.20170530170730)
• IBM
®
Security QRadar
®
7.3.0 software update 2 (7.3.0.20170620100024)
• IBM
®
Security QRadar
®
7.3.1 GA (7.3.1.20171206222136)
Procedure
1. Download the QRadar App Editor extension from the App Exchange (https://
exchange.xforce.ibmcloud.com/).
2. Open the Admin settings:
• In IBM QRadar V7.3.0 or earlier, click the Admin tab.
•
In IBM QRadar V7.3.1 and later, click the navigation menu (
), and then click Admin to open the
admin tab.
3. Click Extensions Management and follow these steps:
a) Click Add.
b) In the Add a New Extension window, click Browse to nd the app extension that you downloaded.
c) Select Install immediately, and then click Add.
d) Click Install.
The extension appears in the Extensions Management window after it is installed.
4. Refresh your browser to see the Develop Applications icon on the Admin tab.
Starting the QRadar App Editor
Start the IBM QRadar App Editor and edit an existing app, create a new app, or access helpful resources.
Procedure
1. Open the Admin settings:
a) In IBM QRadar V7.3.0 or earlier, click the Admin tab.
b) In IBM QRadar V7.3.1 and later, click the navigation menu ( ), and then click Admin to open the
admin tab.
2. On the navigation menu, click Apps, and then click the Develop Applications icon.
The following table shows the tiles that you can select on the IBM Application Development Manager
window.
34
IBM QRadar : QRadar Application Framework Guide
Table 21. QRadar App Editor tiles
Tile Description
New App Develop a new app by using the Hello World built-in template or by
selecting one of the other templates that you clone from a Git repository.
Existing App Edit or develop an existing app that you import into the QRadar App
Editor, or clone from a Git repository.
Resources Development resources
Getting Started Video Learn to use the QRadar App Editor.
3. To develop a new app that uses the one of the available templates, click the New App tile.
a) Select a template.
b) Type a name, description, and version for your new app.
c) Click Install to add the new app development tab that includes the editor to your QRadar Console.
d) Refresh your browser to see the tab for the app in development mode in QRadar.
The Hello World app is an app that features a custom tab, so you can see a second tab that shows
the app in live mode without the editor. You might have to wait for a short time before the tabs
appear in the user interface. Any app that you install shows the development tab with the editor
and whatever functionality the app brings with it, for example the app might show a custom column
or a custom tab.
If you install the Hello World template, you can see the Hello World app in normal install mode
without the editor on the rst tab, and in development mode on the second tab. Use the App Editor
to develop your app from the development tab.
Some app templates might not be QRadar tabs so you only get the development mode tab, for
example, you only see one tab when you select the dashboard_items template.
The following screen capture shows an example of the Hello World app in the App Editor tab.
Chapter 1. Developing with the QRadar app framework
35

1
2
3
2
Figure 2. Hello World app in the editor
4. To edit and develop existing apps by importing the les into the QRadar App Editor, click the Existing
App tile.
• To select an existing app (.zip le), click Browse to nd the local app, or drag and drop an app into
the app drop box.
36
IBM QRadar : QRadar Application Framework Guide
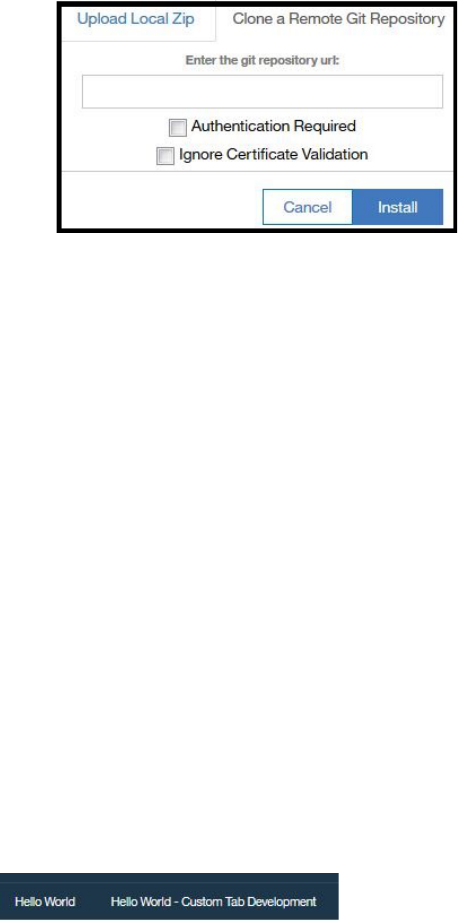
Note: You can't import an app that is packaged as an extension that you download from the
App Exchange. Apps that are packaged as extensions are only installed through the Extensions
Management tool in the QRadar Console and are not editable in the App Editor. You can import and
edit the app only in the app package (.zip) format.
• To clone an app from a Git repository, type the Git repository URL in the Enter the git repository url
eld that is shown in the following image:
Figure 3. Clone a remote Git repository
– Select the Authentication Required check box if you are required to provide credentials to clone
the app.
– Select the Ignore Certicate Validation check box to turn off certicate validation when you
download the app from the Git repository. This feature is useful when you're using a local
repository that you trust and you know the certicates are not current but you want to turn off
the warnings.
5. To congure a proxy to connect the App Editor to the GIT repository for sample apps or to clone apps,
click Proxy Settings. Then, type a http address and a port number to connect to your proxy.
6. Click Install to add the app development tab for the existing app to your QRadar user interface, and
then refresh your browser to see the tab.
You might have to wait for a short time before the tab for the app appears in QRadar.
Editing apps in the editor
Edit and create les and folders in the app editor tab, which is created on the QRadar Console.
About this task
When you install a new app, the Hello World development tab that includes the editor is added to the
Console, and a second tab shows the Hello World app in normal installed mode without the editor.
The following diagram shows the rst Hello World app tab without the editor, and the Hello World -
Custom Tab Development tab that includes the editor on QRadar.
Figure 4. Hello World tabs
Procedure
1. To edit les in the app folder,
double-click a le, or right-click to view the File Edit menu.
2. To create les and folders, save les, and close les, click File, and then select an option from the
menu.
3. To search for les in the app folder navigation, type the le name in the search box, and then click the
search icon to search for your le.
4. Copy or move les from one folder to folder in the app folder navigation.
Chapter 1. Developing with the QRadar app framework
37

a) To copy a le from one folder to another folder, select the le and press the CTRL key, and then use
your mouse to drag the le to the destination folder.
b) To move a le from one folder to another folder, select the le by using your mouse, and drag the
le to the destination folder.
5. To upload les to the app folder, use any of the following three ways to open the Upload File screen:
• Click > File > Upload, and then drag a le in the box, or browse to a le.
• In the app folder navigation, select a folder, and then right-click to open the Upload File screen.
• In the app folder navigation, select a folder, and then drag a le over the folder to open the Upload
File screen.
6. To deploy an app or export an app, click the Actions menu and choose one of the following options:
• Click Actions > Deploy App > in Development Mode to deploy and upgrade the current app in
development mode.
When you make changes, such as editing the manifest or other les, you deploy and upgrade the
app in development mode to apply your changes. The app version in the manifest le increments
when you deploy an app.
When you deploy your app in development mode, you have the option to save a copy of the current
app in .zip format.
• Click Actions > Deploy App > in Live Mode to view the app in QRadar.
Before, you deploy the app in Live Mode, it's good practice to save your app locally, otherwise you
can't access your changes after the app is deployed because the editor tab is removed.
The development mode tab that includes the App Editor is removed from the Console when you
deploy the app in Live Mode. If you want to edit the app again, you must export it as a .zip le so
that you can import it to QRadar and edit it at a later time.
• Click Actions > Export App > as Zip to save your app in a local folder.
The app is saved as an archive (.zip) le, which you can import as an existing app later.
The .zip le that you export is not an app extension that can be installed by using the Extensions
Management tool on the Admin tab.
When you export the app, the app version in the manifest displays in the export dialog box. When
you change the version that appears in the export dialog box, the app version in the manifest le
version is changed to the same version.
• Click Actions > Delete App to delete the app that you're editing. The app is removed from the
QRadar Console.
Note: If you make changes to the app, ensure that you export the app so that your changes are
saved in the exported zip le and you can install the app again later. The File > Save function saves
the session only in QRadar, and does not write to the compressed le, so these changes are lost
because the app les are removed when you delete the app.
Software development kit overview
The IBM QRadar application framework comes with its own software development kit (SDK).
Use the QRadar Application Framework software development kit (SDK) to do the following application
development tasks:
You Download the SDK (https://developer.ibm.com/qradar/) and extract the QRadar Application
Framework SDK archive (.zip le) from DeveloperWorks.
Create a development workspace
The QRadar Application Framework SDK installs a development workspace that has a sample
application that you use as a template to build your own extension.
38
IBM QRadar : QRadar Application Framework Guide
Run your app locally for test purposes
You don't need to upload your extension code to a live QRadar Console instance to test your app. The
QRadar application framework SDK includes a virtual development environment that you can use to
run your application locally.
If your app uses QRadar API endpoints, you can congure the virtual environment to connect to the
API on the QRadar Console instance and test locally. You do not need to upload to QRadar Console.
Package your app
The QRadar Application Framework SDK includes a packaging utility that you use to create an archive
(.zip le) that contains your extension les.
Deploy your app to QRadar Console
The QRadar Application Framework SDK includes a deployment utility that you can use to upload your
packaged app directly to a live QRadar Console instance.
Optimize app memory usage
Tune the IBM QRadar Application Framework to optimize app memory usage.
Use any of the following methods to help prevent your app from using an excessive amount of memory.
• Avoid allocating large amounts of memory by chunking (or staggering) the work into small memory
footprints.
• Change the memory model that is used by the Application Framework.
• Call for garbage collection when you're nished with code that uses large amounts of memory.
Changing the Application Framework memory model
By default, the Application Framework congures the Werkzeug WSGI web application server that
Flask uses to run as a single process. Threads are used to handle each request. You can congure
the application server to create a separate process to handle each new request. When the request is
completed, the process is removed, and all of the memory that is allocated by the Python interpreter to
process this request is released.
To override this behavior, edit the run.py le and add threaded=False and process=N where N is
greater than 1. In the following example, a value of process=3 allocates approximately 25 MB per
interpreter and leaves some room for growth.
__author__ = 'IBM'
from app import app
from app.qpylib import qpylib
qpylib.create_log()
app.run(debug = True, host='0.0.0.0',
threaded=False,
process=3)
Include the source to the run.py in the template folder within your app archive le (.zip). The run.py
le that is created during the installation is then overwritten with your settings.
Note: When you package an app with the SDK, the run.py is skipped and you must manually add it to
your app archive le (.zip).
For more information about parameters that can be passed to the Werkzeug WSGI web application server,
see http://werkzeug.pocoo.org/docs/0.11/serving/.
Chapter 1. Developing with the QRadar app framework
39
Calling for garbage collection
The Python interpreter might not know when to free the memory. You can speed up garbage collection by
placing the following code right after sections where large amounts of memory are no longer needed:
import gc
gc.collect()
Note: Python does not ensure that any memory that your code uses gets returned to the OS. Garbage
collection ensures that the memory used by an object is free to be used by another object at some future
time. Changing the Application Framework memory model option is important for apps that run for a long
time. Killing the process ensures the memory is freed for use by other components.
Tools
Some tools that can help you identify memory problems:
Memory Proler
A Python module for monitoring memory consumption of a process. For more information, see https://
pypi.python.org/pypi/memory_proler.
Linux utilities
The command-line utility top can be used to monitor all Python processes running on the machine:
top -p $(pgrep -d',' python)
You can also use the following command to get the total MB used by all Python interpreters on your
system:
ps -e -o pid,comm,rss |
awk '/python/{sum+=$3} END {print sum}'
Resource Module
You can log the amount of memory your process uses by adding the following code to your module:
import resource
print 'Memory usage: %s (kb)' % resource.getrusage
(resource.RUSAGE_SELF).ru_maxrss
Related concepts
“Resources type” on page 20
Denes the memory resources to allocate to your app.
Installing the SDK
The IBM QRadar Application Framework comes with its own software development kit (SDK).
You can download the SDK from IBM X-Force Exchange and extract the QRadar Application Framework
SDK archive (.zip le).
Please view the README.html from the extracted SDK archive for instructions on installing the SDK and
creating applications.
Use Python 2.7 in your app
Use environmental variables to make your app use Python 2.7 instead of Python 2.6.
This feature was introduced in IBM QRadar 7.3.0 Patch 2 (7.3.0.20170620100024) SFS.
Add the following environmental variables to the manifest le to instruct the app to use Python 2.7:
"environment_variables":[
{
"name":"PATHSTART",
40
IBM QRadar : QRadar Application Framework Guide
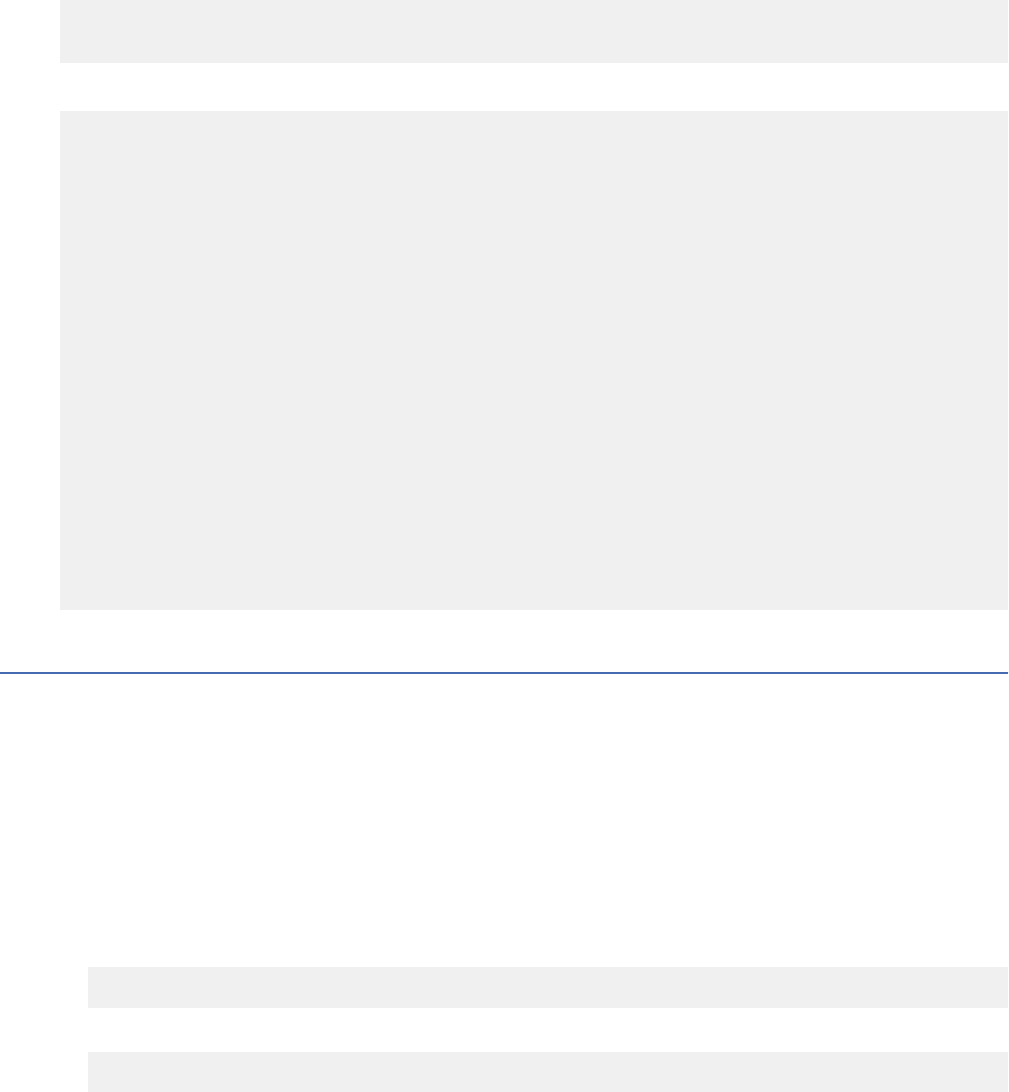
"value":"\/usr\/local\/bin"
}
],
The following manifest le example includes the environment variables that make the app use Python 2.7.
{
"environment_variables":[
{
"name":"PATHSTART",
"value":"\/usr\/local\/bin"
}
],
"console_ip":"10.11.12.13",
"configuration_pages":[
{
"required_capabilities":[
"ADMIN"
],
"description":"Application Development",
"text":"Develop Applications",
"url":"bootstrapper"
}
],
"name":"Application Development",
"log_level":"debug",
"description":"Application for installing other applications in Development-mode.",
"resources":{
"memory":200
},
"version":"1.0.2",
"uuid":"ae1c83d0-be94-11e5-a837-0800200c9a66",
"app_id":1006
}
Creating your development environment
Use the QRadar GUI Application Framework SDK (Software Development Kit) to create a basic
development environment for your app.
About this task
The SDK provides a sample template app that you use as a template to create your own app. Use Python
2.7.9 to develop your QRadar apps.
Procedure
1. Create a folder on your computer for the QRadar sample app. Name the directory according to the
following format.
<Author Namespace>.<App_Name>.<App_Version>
For example, the following directory name is an example of a good naming convention:
com.me.myApp.1.0.0
2. Depending on your operating system, type the following command: qradar_app_creator create
-w <path_to_app_folder>/com.me.myApp.1.0.0
• On UNIX and Linux operating systems, type the following command:
qradar_app_creator create -w <path_to_app_folder>/com.me.myApp.1.0.0
Important: On Linux operating systems, keep the absolute path to your workspace short. File paths
might be truncated because of the BINPRM_BUF_SIZE kernel constant (79 or 127 characters,
depending on kernel version), leading to failure of this command.
• On Windows operating systems, type the following command:
qradar_app_creator create -w <path_to_app_folder>\com.me.myApp.1.0.0
Chapter 1. Developing with the QRadar app framework
41
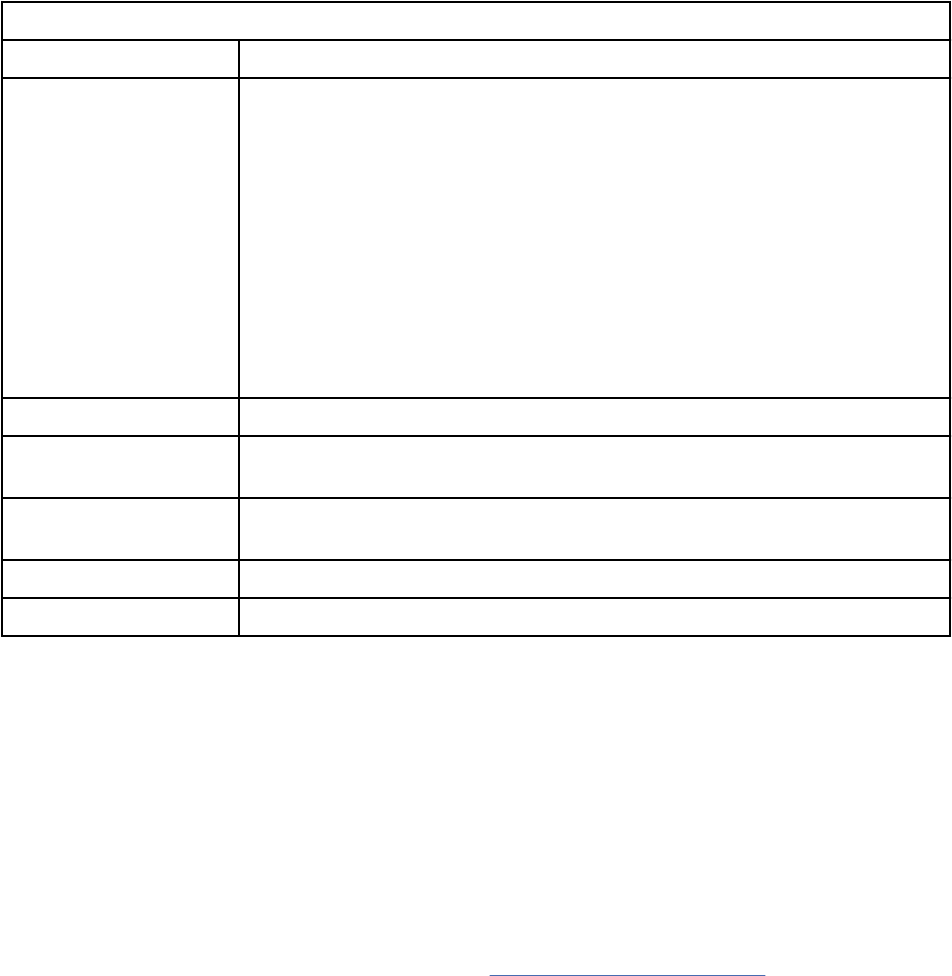
Important: Folder and le names in paths must not contain spaces.
Results
When you run the development environment script, the following folders and les that are described in
the table are added to your app development folder.
Table 22. QRadar App les and folders in the development folder
Files/Folders Description
app The root directory for application les. This directory contains the following
les:
The qpylib folder contains the Python library les that your app uses to run
QRadar tasks. For example; you can use the qpylib library to connect to API
endpoints, and get the storage path.
The __init__.py sample initialization le for your app. Creates a Flask
instance, imports views from views.py and functions from the qpylib
library.
The views.py le is the main entry point into the web app. This le and the
manifest.json le are the only les that are required for every app. This
le contains sample code for the "Hello World" application.
store The directory where the app data is stored. It is not packaged into your app.
qradar_appfw_venv Contains the Python virtual environment where the dependencies are
installed.
__init__.py Creates an instance of the Flask micro-framework that is used to serve
content to QRadar.
manifest.json Describes what the sample "Hello World" app does.
run.py Contains instructions to run the code that is in the app subdirectory.
What to do next
You are now ready to begin coding your app. Familiarize yourself with the requirements for the app and
manifest le structures.
Developing apps in Eclipse
After you set up your development environment, you import it into Eclipse to use that Eclipse integrated
development environment (IDE) features to develop your app.
About this task
For Python development, install PyDev, the Eclipse IDE that is used in Python development. The latest
version of Eclipse can be found on the Eclipse website https://eclipse.org/downloads/
(https://eclipse.org/
downloads/).
Procedure
1. Install PyDev into Eclipse.
• To install from the Eclipse Marketplace, click Help > Eclipse Marketplace on the main Eclipse Help
panel.
• To install the PyDev repository from (http://pydev.org/updates), click Help > Install New Software
on the main Eclipse Help panel.
2. After you install PyDev, switch the perspective to PyDev.
42
IBM QRadar : QRadar Application Framework Guide
3. In the PyDev perspective, click File > New > PyDev project and do the following tasks in the PyDev
Project dialog box.
a) Enter a project name.
b) Select 2.6 from the Grammar Version list.
c) Select Create links to existing sources
d) To congure the interpreter to use the virtual environment in the SDK, click Click here to congure
an interpreter not listed.
e) Click New in the Python Interpreters dialog and enter a name and path to the Python executable
le on your system.
f) Click OK.
Ensure that the site-packages folder path (.../<app_name>/qradar_appfw_venw/lib/
python2.7/site-packages) check box is selected when you select the folders to be added
to the system python path.
g) Click Apply, and OK to return to the PyDev Project dialog.
h) Click Create links to existing sources, and then click Next.
i) Click Add external source folder and go to the root directory of your development environment,
click OK, and then click Finish.
The new Eclipse PyDev project that contains your development environment appears in your
Package Explorer.
Installing Python 2.7.9 on OSX
You must install Python 2.7.9 to run IBM QRadar Application Framework SDK on the OSX operating
system.
About this task
OSX usually comes with Python 2.7.x. The QRadar app framework SDK requires Python 2.7.9.
Procedure
1. To install the HomeBrew package manager, type this command:
ruby -e "$(curl -fsSL https://raw.githubusercontent.com/Homebrew/install/
master/install)"
2. To install the Python version manager, pyenv, type this command:
brew install pyenv
3. To use pyenv to install Python 2.7.9, type this command:
pyenv install 2.7.9
4. To check that Python 2.7.9 was installed correctly, type this command:
pyenv versions
5. To use Python 2.7.9 locally, type this command:
pyenv global 2.7.9
6. To check your Python version, type this command:
python --version
If this command returns 2.7.9, the installation was successful.
Chapter 1. Developing with the QRadar app framework
43

If this command returns 2.7.x, it might indicate an issue with pyenv. To solve this problem, open or
create the ~/.bash_profile le in a text editor and add the following lines:
export PATH=/usr/local/bin:$PATH
export PYENV_ROOT="$HOME/.pyenv"
export PATH="$PYENV_ROOT/shims:$PATH"
Type the python --version command to check that Python 2.7.9 was installed.
Packaging and deploying your app
Use the QRadar GUI Application Framework to package your app as an archive (.zip le) and deploy it to
your IBM QRadar test environment.
Procedure
1. Open a shell prompt and use the cd command to go to the bin sub folder of your SDK installation
folder.
2. Package your app by using the following command syntax:
qradar_app_creator package -w <path_to_app_folder>/<app_name_folder> -p
<app_name.zip>
• To package an app on UNIX or Linux computers, type the following command:
qradar_app_creator package -w <path_to_app_folder>/<app_name_folder> -p
<app_name.zip>
• To package an app on a Windows computer, type the following command:
qradar_app_creator package -w <path_to_app_folder>\<app_name_folder> -p
<app_name.zip>
3. Upload your app (extension) to your QRadar Console by using the following command, and then press
Enter.
qradar_app_creator deploy -q <QRadar_console_IP> -u admin -p <app_name.zip>.
Here is an example of the command:
qradar_app_creator deploy -q 10.11.12.13 -u admin -p com.me.myapp.zip
Note: Make sure that you record the application ID for your app from Application Creation Task
state output that is returned when you issue the qradar_app_creator deploy command. You
need it when you export you app as a QRadar extension.
In the following example, the application ID is 1023.
Application Creation Task state: {u'status': u'COMPLETED',
u'application_id': u1023', u'error_messages': u'[]'}
If you're viewing your QRadar Console user interface in a browser, refresh your browser to see your
app running.
What to do next
After you successfully test your app, you can use the QRadar Content Management Tool to export the app
as an extension. You then use the QRadar Extensions Management tool on the Admin settings page to
install your extension on your QRadar Console.
44
IBM QRadar : QRadar Application Framework Guide
Running your application locally
Rather than packaging and uploading your app every time you change something, you can test it by
running it locally in a browser window.
About this task
The IBM QRadar GUI Application Framework includes a virtual environment that you can use to run your
application locally for testing purposes.
If your app uses QRadar API endpoints, you must connect to a QRadar Console instance. You congure
the IP address of the QRadar Console test instance in the console_ip eld of the dev_opts object
block in your app's manifest.json le.
Procedure
1. Run your app locally.
• To run on Unix or Linux, type the following command:
qradar_app_creator run -w <path_to_app_folder>/<app_folder_name>
• To run on Windows, type the following command:
qradar_app_creator run -w <path_to_app_folder>\<app_folder_name>
2. Open a browser and type http://0.0.0.0:5000 in the address bar. If your browser does not
support the http://0.0.0.0 URL, type http://127.0.0.1:5000.
Your app is displayed in the browser window, and the application output is sent to the command line or
to your terminal.
OAuth app authorization with QRadar
Apps use the OAuth authorization protocol to authorize the app to access QRadar resources.
Congure OAuth parameters in the authentication section of the manifest le. The only mandatory
entry is for the "requested_capabilities". When users install the app by using the Extensions
Management tool in QRadar, they select a user that has the user capability that is dened in
"requested_capabilities". When this authorization is congured, the app can access QRadar
resources.
The following example shows the authentication section in the manifest le.
"authentication":
{ "oauth2": {
"authorisation_flow": "CLIENT_CREDENTIALS",
"requested_capabilities": ["ADMIN"] } }
The "authorisation_flow" entry is optional. The only accepted value is "CLIENT_CREDENTIALS".
If the authorization is not congured as CLIENT_CREDENTIALS, the installation fails and returns the
following message:
"OAuth flow type X is not currently supported".
The "requested_capabilities" must contain at least one entry. It provides the capability
or permissions that the app needs to function in QRadar. The app installation fails if the
requested_capabilities capability that is congured is not listed in QRadar.
Chapter 1. Developing with the QRadar app framework
45
Enhancing security in app authorization by using the App Authorization
Manager
The App Authorization Manager helps to enhance the security of your app authorization by providing the
capability to edit or delete existing authorization tokens.
About this task
When you install an app that requests an OAuth authorization token to access QRadar resources, an
OAuth authorization token is created and a record that represents the token is added to the App
Authorization Manager. The record is identied by the App Name and App ID and includes the assigned
user access level that is assigned to the app to access QRadar resources.
Procedure
1. Click Main Menu > Admin tab.
2. Click the App Authorization Manager app icon to open the app.
3. To change assigned users for the OAuth authorization token, click Edit, and then select any users that
are available in the list. For example, if you don't want to use the Admin user and another user is
available in the list, you can change to a user with the requested capabilities that are dened in the
app manifest le.
Any users that appear in the list have the capability that the app requires to run.
4. To delete an OAuth authorization token, click Delete to remove a record. You might want to delete a
token that is no longer in use or you might want to remove the app authorization.
OAuth bearer token
The OAuth bearer token is an access token that allows an app to access specic QRadar resources.
A QRadar OAuth app can make QRadar REST API calls by using an OAuth bearer token.
The following diagram shows the folder and le structure for the OAuth app that is used in the example.
Figure 5. OAuth bearer token app
The following example shows how an app that is a background service gets and uses the bearer token for
authorization to make QRadar REST API calls:
1. The manifest.json le includes an authentication entry to identify and congure the app as an
OAuth app, and instructs the Flask web server not to load.
{
"name": "OAuth background process",
"version": "1.0",
"description": "Simple background process app that calls QRadar REST API using OAuth",
"uuid": "a7e67388-95e1-436e-bdbd-df9c53230728",
"load_flask": "false", "authentication": {
"oauth2": {
"authorisation_flow": "CLIENT_CREDENTIALS",
"requested_capabilities": ["ADMIN"]
}
46
IBM QRadar : QRadar Application Framework Guide
}
}
2. The src_deps/init/launch_background_process.sh script is run.
#!/bin/bash
nohup python /app/background_process.py >/store/log/background_process.log 2>&1 &
3. The src_deps/init/launch_background_process.sh script calls the app/
background_process.py Python module.
#!/usr/bin/python
from qpylib import qpylib
from qpylib import oauth_qpylib
import requests
import json
import time
qpylib.create_log()
rest_url = 'https://' + qpylib.get_console_address() + '/api/ariel/databases'
request_headers = {}
oauth_qpylib.add_oauth_header(request_headers)
while True:
time.sleep(30)
try:
response = requests.get(rest_url, headers=request_headers, verify=False)
qpylib.log('response=' + json.dumps(response.json()))
except Exception as e:
qpylib.log('Error: ' + str(e))
The background_process.py module runs a continuous loop where it calls a QRadar REST API
endpoint, and then logs the result.
How the OAuth bearer token is retrieved
The add_oauth_header function takes a Python requests-ready headers object and adds an
Authorization header that contains the application’s OAuth bearer token.
To retrieve the token, add_oauth_header sends a GET token request to the QRadar OAuth service,
which runs on a specic port at https://qoauth.service.consul.
The GET token request looks for the following details:
• The QRadar OAuth service port
The service port is identied by a call to the Python module service_port_locator.py, which is
in the root directory of the Docker container.
Here's an example of the call to the Python module:
def get_qoauth_port():
p = subprocess.Popen(['/service_port_locator.py',
'qoauth.service.consul'], stdout=subprocess.PIPE)
return str(p.communicate()[0]).strip()
• The application's OAuth client ID and client secret.
The client ID and secret are available to the Python code as the CLIENT_ID and CLIENT_SECRET
environment variables.
The following URL is an example of the GET token request to the OAuth service:
http://qoauth.service.consul:<Port_number>/token?
grant_type=client_credentials&client_id=<Client_ID>&client_secret=<Client_secret>
The JSON response holds the bearer token in its access_token eld, which is similar to the
following example:
{"access_token": "example_token_34j3fdde", "token_type": "Bearer", "scope": "ADMIN"}
When the token is retrieved, it can be used to make multiple QRadar REST API calls. The token is sent
in a request header and the following format:
Chapter 1. Developing with the QRadar app framework
47
"Authorization" : "Bearer example_token_34j3fdde"
Encryption and secure data storage in app development
Use the QRadar Python endec module to encrypt data in apps that you develop and prevent the
transmission of secure data and passwords in clear text. The endec module is built into the Application
Framework Software Development Kit (SDK) to enable encryption and secure data storage in the apps
that you develop.
How it works
In the following code snippet, the endec module is used to encrypt and store a password and a key token.
Then, the module is used to retrieve and decrypt those encrypted data items.
from qpylib.encdec import Encryption
app_password_handler = Encryption({
'name': 'appPassword',
'user': 238
})
app_password_handler.encrypt('clearTextPasswordSuppliedByUser')
key_token_handler = Encryption({
'name': 'keyToken',
'user': 238
})
key_token_handler.encrypt('773d3efcb4dd211c213ebf4c45cd81ae')
...
retrieved_password = app_password_handler.decrypt()
key_token = key_token_handler.decrypt()
How to use the code
Create a dedicated instance of the encryption object for each data item that you want to manage with
the encdec module. For example, in the code snippet example, the app_password_handler object
manages the password and the key_token_handler object manages the key token for the user who is
identied as 238.
The following table describes the elements that you use to create an encryption object.
Encryption object elements
Description
name Unique string that identies the data item to
manage.
user Unique identier for the user who owns the data
item to manage.
For each user, the encdec module stores the user’s secure data in the /store/<user_ID>_e.db le in
the Docker container. For example, secure data for user 238 in the example code snippet is stored in the
container’s /store/238_e.db le.
When you create the encryption object, the decrypt() function is invoked to retrieve and decrypt
a user-data item. You can use the same encryption object instance that was used for encryption. If
that object is no longer in scope, you can instantiate a new encryption object by supplying the same
initialization parameters that you used originally.
Add the PyCrypto module to your app
The encdec module depends on the PyCrypto module, which you can download from the Python
website
(https://pypi.python.org/pypi/pycrypto). Add the PyCrypto 2.6.1 package and its dependencies to your
app's src_deps/pip directory.
48
IBM QRadar : QRadar Application Framework Guide
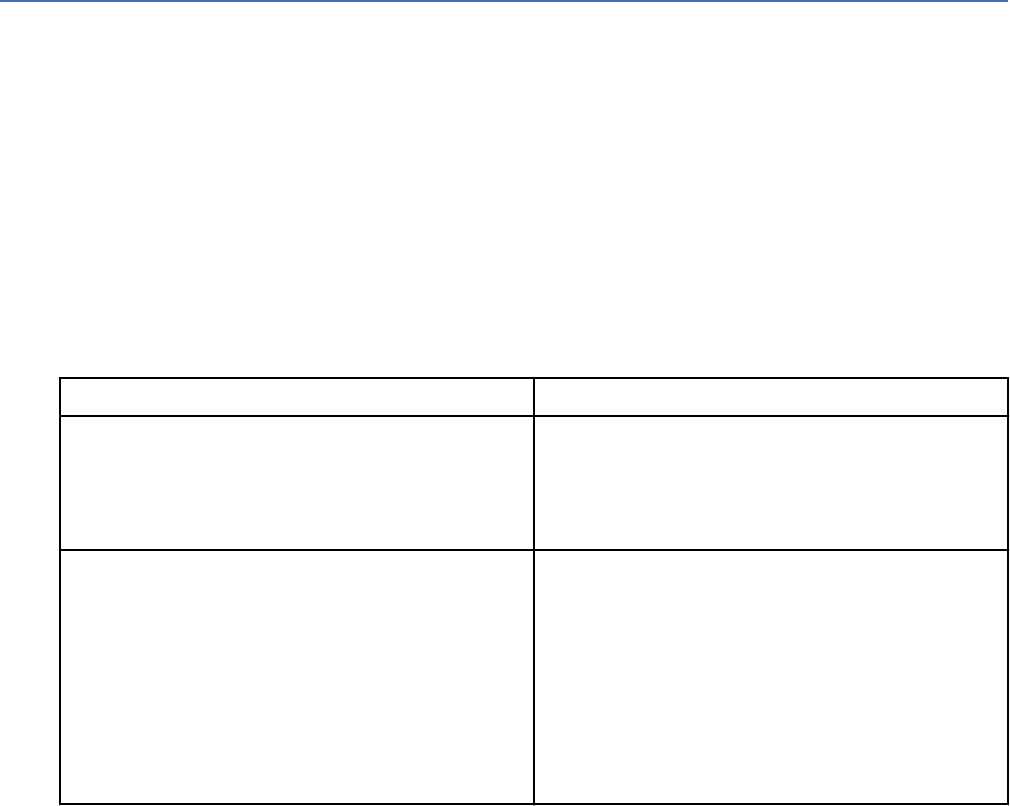
Note: The PyCrypto libraries in your app are subject to US export classication laws. If the app that you
develop is used outside of the US, you must ensure that you have an Export Control Classication Number
(ECCN) to comply with United States Department of Commerce regulations.
Multitenancy support for apps
QRadar V7.4.0 and later includes support for multi-tenanted apps. A number of out of the box apps, such
as Pulse, Assistant, and Log source manager, can now be used in a multitenant environment.
App developers are able to mark that their app is tested and works in a multi-tenanted environment. You
can support multitenancy in your app in two ways:
1. The app is tested and works with multitenancy, but it is not multitenancy aware. When a user installs
the app, they are presented with the option to create a default instance. Users can select this option if
they only want a single instance of the app, or the app does not need to support multitenancy. If a user
does not select the Default Instance option, they must create a separate instance for each customer
and associate each instance with a security prole to keep all client data separate.
2. The app is tested and is multitenancy aware. In this case, only one instance of the app is necessary.
This type of app is also benecial if the app is used only by administrators.
Use the following new manifest flags indicate support for multitenancy in an app. By default, these flags
are set to false.
Manifest key Description
multitenancy_safe If set to true, this key indicates that your
application can work in a multitenant environment.
If not set to true, it indicates that only one instance
of your app can be created, and any user who is a
member of a tenant is not able to see it.
single_instance_only
If this key is set to true, only one instance of this
app can be created. Typically, this indicates that
this application can either provide multitenancy
support itself, or that use of this application is
meant only for administrators.
If the multitenacy_safe key is not also set to
true, then users who are a member of a tenant
cannot see this app. If multitenacy_safe is also
set to true, then all users can see the app.
If the multitenancy_safe key is not set to true, then QRadar assumes that it cannot trust the app to
run in a multitenant environment. This key indicates that only one instance of the app runs, and that a
limited set of users can access it. This setting ensures that users who are in a tenant can't access other
tenants' data.
The single_instance_only denes how your app can operate in a multitenant environment.
If the key is not set to true, users can create multiple instances of the app. Set this key to true if the app
stores data locally, or if the app uses an API or other means of accessing QRadar that allows access to
more than one tenant's data, and the app cannot segregate the data itself. In this case, QRadar allows
administrators to create a new instance of this application that is tied to a specic security.
Example: A customer who installs your app has a small number of users that use two different security
proles: Electricity Company and Water Works. When an administrator creates a new instance of your app,
they must assign this instance to a security prole, such as Electricity Company. Then, only users with the
Electricity Company security prole are able to access this instance of your app.
Associating instances with security proles instead of tenants gives users more control over which users
can access tenant data. A tenant is expected to have one or more security proles associated with it to
dene what data different users can see.
Chapter 1. Developing with the QRadar app framework
49
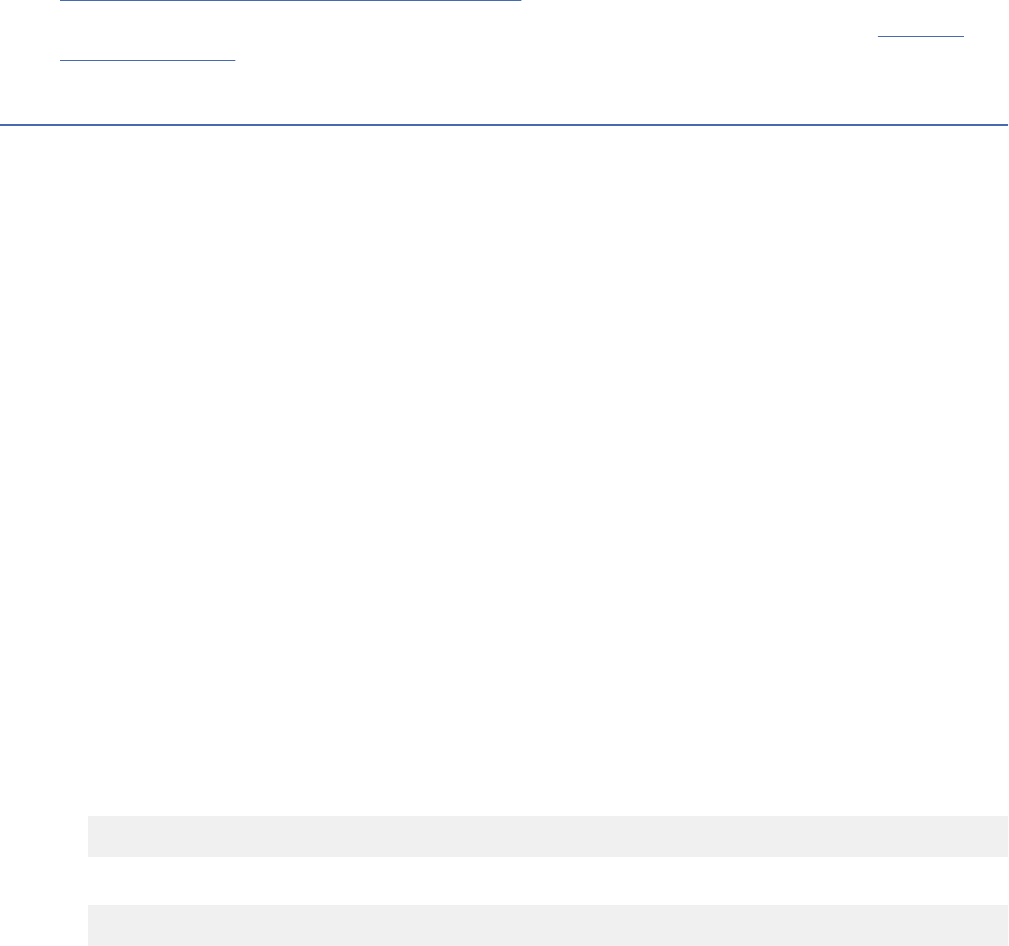
Tip: If your app uses an API key to autonomously access QRadar APIs, set up your application to request
authentication through its manifest. You can then dene the exact access capabilities that are required,
and that key is delivered to your app securely as needed. For more information on app authentication, see
“OAuth app authorization with QRadar ” on page 45.
For more information about managing multitenant apps with the QRadar Assistant app, see Managing
multitenanted apps.
Creating an extension from your app
After you deploy and test your app, you must export it as an extension to deploy it in a production
environment.
About this task
The IBM QRadar GUI Application Framework SDK deploy command is intended for use only in test
environments. To create an extension that you can use in a production environment, you must use the
QRadar Content Management Tool to export your application as an extension.
Procedure
1. Use the QRadar GUI Application Framework SDK to package and deploy your application to
your QRadar Console test environment. Make sure that you obtain the application ID for your
app from Application Creation Task state output that is returned when you issue the
qradar_app_creator deploy command.
2. Use SSH to log in to QRadar Console where your app is running as root user.
3. Type the following command at the command line:
/opt/qradar/bin/contentManagement.pl --action export --content-type 100 --id
<application_ID>
This example shows an app that has an ID of 1023.
/opt/qradar/bin/contentManagement.pl --action export --content-type 100 --id
1023
The extension is created as a .zip le in the /opt/qradar/bin folder. The le name has the
following format:
installed_application-ContentExport-YYYYMMDDhhmmss.zip
Here is an example:
installed_application-ContentExport-20160911141607.zip
What to do next
Download the .zip le from the /opt/qradar/bin folder on your QRadar Console. You can then use
QRadar Extensions Management on the Admin tab to install your extension on your QRadar Console.
For more information about exporting apps and content in extensions, and Extensions Management, see
the QRadar SIEM Administration Guide.
50
IBM QRadar : QRadar Application Framework Guide

Adding multiple apps in an extension
Package and export multiple apps and other content in an extension so users can download related apps
or content in one le.
About this task
You can include multiple apps or content types in an extension, which you export as a compressed (.zip)
le.
Procedure
1. Use SSH to log in to QRadar as the root user.
2. To get a list of the content types and search parameters, type the following command:
/opt/qradar/bin/contentManagement.pl -h export
In the following example, you search for apps that are represented by the content type ID of 100, and
the regex .*, which matches everything.
/opt/qradar/bin/contentManagement.pl --action search -c 100 -r .*
You must specify the content type (-c) and a search regex (-r).
In the following example, you search for the custom content type "dashboard" that is represented by
the content type ID of 4, and the regex .*, which matches everything for dashboards content.
/opt/qradar/bin/contentManagement.pl --action search -c 4 -r .*
Use regex to narrow your search, for example, you use the following search to nd dashboards content
that includes 'Threat' in the name.
/opt/qradar/bin/contentManagement.pl --action search -c 4 -r Threat
3. Add the content type IDs or string and the IDs of the apps or content in a text le. The content type can
be represented by the string or ID. Use the following format:
<content_type_ID_or_string>,<Content_or_app_ID>
<content_type_ID_or_string>,<Content_or_app_ID>
Use the following rules to create the package text le:
• Use a separate line for each content type.
• Make sure that the rst value that you enter on a line is the content type.
• Make sure that the value that follows the content type is the ID of the app or the content.
• Use commas to separate values.
Here's an example of packaging an app that has a content type of 100 and a dashboard that has a
content type of 4.
4,22
100,1051
Here's the same example where the string is used instead of the content type ID to represent the
content type.
dashboard,22
installed_application,1051
In the following example, strings are used for the content type, which are followed by the content IDs.
Chapter 1. Developing with the QRadar app framework
51
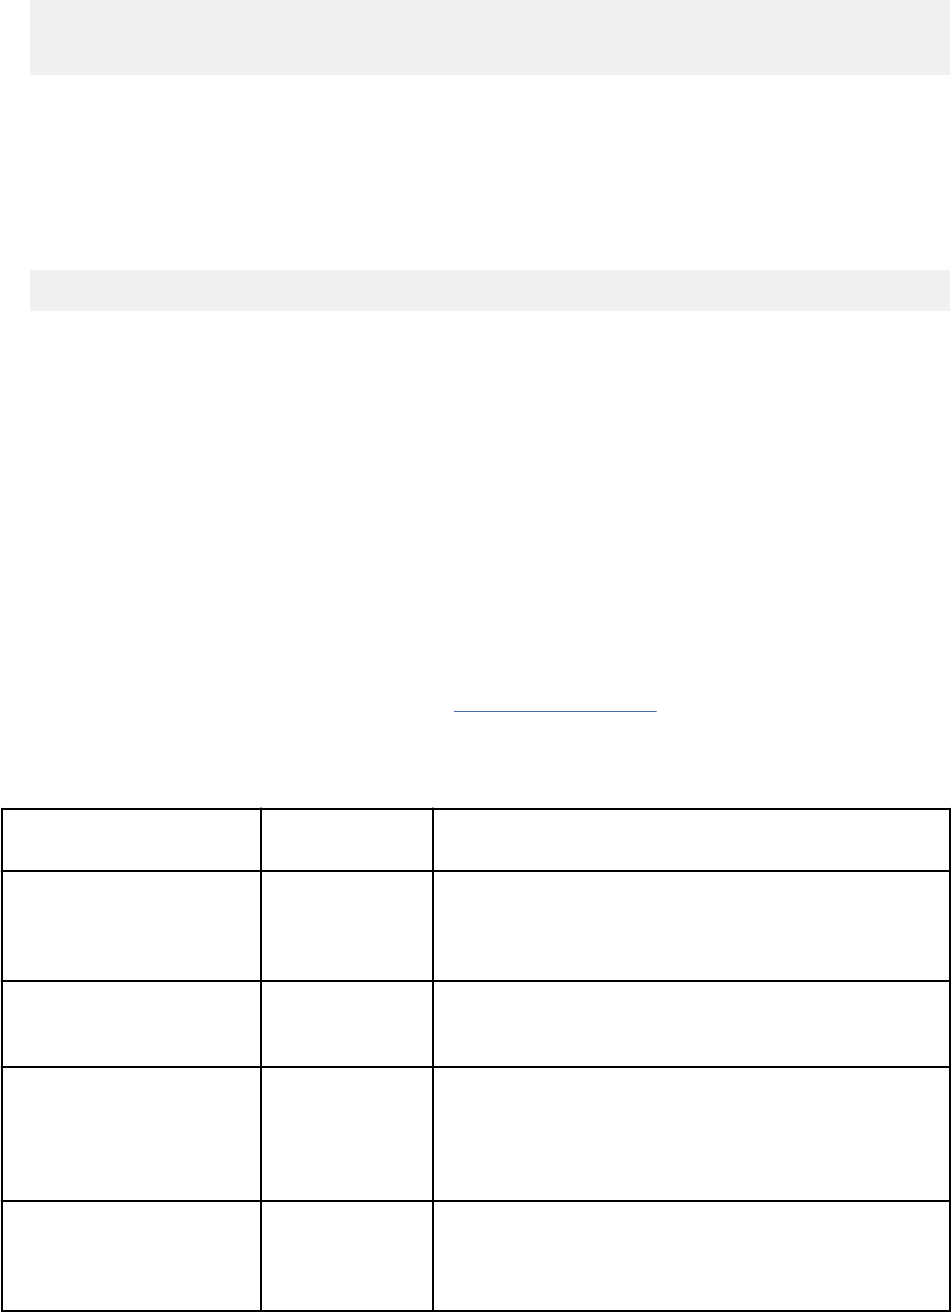
installed_application,1001
customrule,1274,1275
dashboard,10
4. Save the text le as <my_package>.txt
5. Type the following command to assemble and export your content in an extension le:
/opt/qradar/bin/contentManagement.pl -a export -c package -f <mypackage>.txt.
The extension is created as a .zip le in the /opt/qradar/bin folder. The le name has the
following format:
<file_name>-ContentExport-YYYYMMDDhhmmss.zip
What to do next
Download the compressed (.zip) le from the /opt/qradar/bin folder on your QRadar Console. You
can then use QRadar Extensions Management on the Admin tab to install your extension on your QRadar
Console.
For more information about using the contentManagement.pl script to export content, and about
Extensions Management, see the QRadar SIEM Administration Guide.
QRadar content extensions
Use content extensions to update IBM QRadar security template information or add new content such as
rules, reports, searches, logos, reference sets, custom properties.
Types of QRadar content extensions
All apps and content extensions are hosted on the IBM X-Force Exchange portal (https://
exchange.xforce.ibmcloud.com/), where you can lter by content type such as custom AQL function or
custom property. You can use content extensions can be used in conjunction with apps.
The following table describes the types of content extension that you can deploy in QRadar.
Content extension type
Enhancement
type
Description
Dashboard Data An associated set of dashboard items, which you view
on the Dashboard tab in QRadar. Dashboard items
are widgets are visual representations of saved search
results.
Reports Data/
Functionality
Templates for reports that are built upon saved event
or flow searches. Generate on-demand reports or
schedule them to run at repeating intervals.
Saved searches Data A set of search criteria (lters, time window, columns
to display or group data by). By saving the criteria of
commonly run searches, you don't need to dene them
repeatedly. Saved searches are required for reports and
dashboards.
FGroup Data A group of similar items by type, such as a group of
log sources, a group of rules, a group of searches,
or a group of report templates. FGroups are used as
organizational units.
52 IBM QRadar : QRadar Application Framework Guide

Content extension type Enhancement
type
Description
Custom rules Data A set of tests that are run against events or flows that
enter the system. The rule is triggered when the tests
match the input. Rules can have responses which are
actions that are triggered when the rule is triggered.
Responses can include actions such as generating an
offense, generating a new event, sending an email,
annotating the event, or adding data to a reference data
collection.
Custom properties Data Denes a property that is extracted or derived from
an inbound event or flow. Can be based on a regular
expression that extracts a subset of a particular event
or flow payload as a textual property. They can be based
on calculations, and perform an arithmetic operation on
existing numeric properties of the event or flow.
Log source Data A representation of a source of events such as a server,
mainframe, workstation, rewall, router, application, or
database. Any events that enter QRadar and originate
from that source are attributed to the log source. Log
sources contain the conguration information that is
needed to receive inbound events, or to pull event data
from the event source. Log sources contain information
that is specic to your environment such as IP
address or host name and other possible conguration
parameters.
Log source extensions Data A parsing logic denition that is used to synthesize a
custom DSM for an event source for which there is no
existing DSM. Use log source extensions to enhance or
override the parsing behavior of an existing DSM.
Custom QID map entries Data A combination of Event name, Event description,
Severity, and Low-level category values that are used
to represent a particular type of event that a log source
might receive. Custom Qid map entries are created to
supplement the default QID map that QRadar provides
for events that are not ofcially supported by QRadar.
Reference Data Collection Data A container denition that is represented as either a
set, a map, a map of sets, a map of maps, or a table
for holding reference data. Searches and rules can
reference Reference data collections.
Historical Correlation
Prole
Data A combination of a saved search and a set of one or
more rules. Use historical correlation proles to test
rules by rerunning a set of historical events through
an offline version of the custom rule engine that has a
subset of rules enabled.
Custom Functions Functionality A SQL-like function (dened in JavaScript) that you can
use in an Advanced search to enhance or manipulate
data
Custom Actions Functionality A custom response for a rule to run, when the rule is
triggered. Custom actions are dened by a Python, Perl,
or Bash script that can accept arguments from the event
or flow data that triggered the rule.
Chapter 1. Developing with the QRadar app framework53

For more information about content management, see the IBM QRadar Administration Guide
Extensions management
Use the Extensions Management tool on the IBM QRadar Console Admin tab to manage your extensions
in your deployment.
Use the QRadar Content Management Tool to export your application as an extension. Then, use the
Extensions Management tool on the Admin tab to upload, install, uninstall, and delete it. For more
information about content management and extensions, see the IBM QRadar Administration Guide.
About extensions
Before you install an extension, the content items are compared to content items that are already in the
deployment. If the content items exist, you can choose to overwrite them or to keep the existing data.
When you uninstall an extension, apps that are included in the extension are automatically uninstalled.
Content items that are included in the extension must be removed manually.
After the extension is added, a yellow caution icon in the Status column indicates potential issues
with the digital signature. Hover the mouse over the triangle for more information. Extensions that are
unsigned or are signed by the developer, but not validated by your vendor, might cause compatibility
issues in your deployment.
Sample apps
Build apps in Python that integrate with, and add extra functions to, QRadar.
The mini-tutorials for the sample apps help to explain the basics of what you need to know to build and
integrate your own apps into QRadar.
The following list describes some of the sample apps that are available:
• com.ibm.AppMan.1.0.0.zip creates an icon on the QRadar Admin tab, and opens an HTML page
when you click it that shows all of the apps that are currently installed.
• com.ibm.BugzillaOffenses.0.1.0.zip polls QRadar for offenses and pushing those offenses as
tickets to the Bugzilla REST API.
• com.ibm.configpage-with-image.1.0.0.zip creates an icon on the QRadar Admin tab and
opens an HTML page when you click it.
• com.ibm.HelloWorld.1.0.0.zip creates a new tab in the QRadar UI with the text "Hello World!".
This simple app is also created when you use the SDK to create a development environment.
• com.ibm.si.HelloWorldG11n.1.0.0.zip a globalized version of the simple Hello World app.
• com.ibm.googlemaps.belfast.zip creates a new tab and displays a map.
• com.ibm.IPMetadataProvider.1.0.0.zip demonstrates how to add IP metadata to QRadar
tooltips.
• com.ibm.IPMetadataProviderWithImage.1.0.0.zip - an app that demonstrates how to add IP
address metadata and images to QRadar tooltips.
• com.ibm.memory.resources.zip demonstrates how to use the manifest to request memory
resource for an app.
• com.ibm.MyFirstRESTApp.1.0.0.zip calls a REST API and adds the data to a dashboard item.
This app is included in the QRadar Software Development Kit.
• com.ibm.oauthExample.zip minimal example of how to set-up an app manifest to request to use
oAuth authentication.
• com.ibm.OffenseVisualizer.1.0.0.zip displays offenses on the QRadar Offenses tab.
• com.ibm.ReferenceDataManagerLite.zip creates a conguration page for handling reference
data.
54
IBM QRadar : QRadar Application Framework Guide
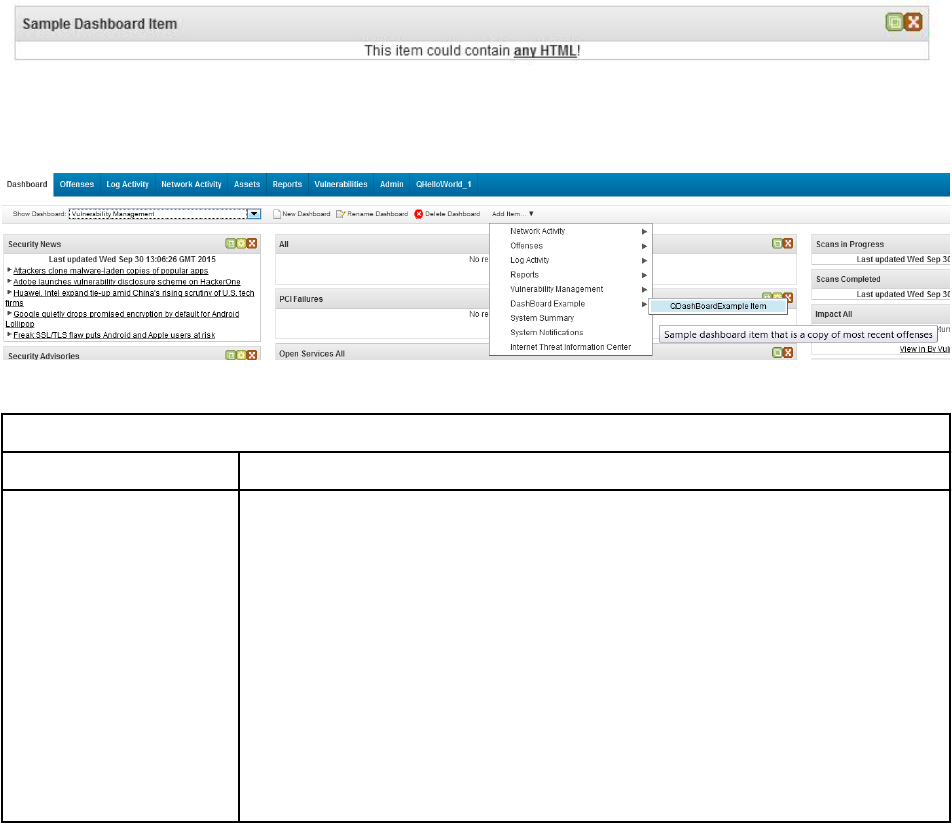
• com.ibm.si.dashboard-example.1.0.0.zip adds a dashboard item to the QRadar Dashboard
tab.
• com.ibm.si.dashboard-with-images.1.0.0.zip adds a dashboard item with images to the
QRadar Dashboard tab.
• com.ibm.si.multi-components-example.1.0.0.zip adds a tab, a new toolbar button in
QRadar, and an icon on the Admin tab.
• com.ibm.si.offense-toolbar-button.1.0.1.zip adds a button to the QRadar Offenses tab
toolbar that opens a JavaScript alert dialog that contains offense data.
• com.ibm.store.1.0.0.zip creates a new tab in QRadar that saves the data that is entered in a
database within the docker container.
Dashboard item example
You can use IBM QRadar GUI Application Framework to add a dashboard item to your QRadar dashboard.
You might use dashboards to display data that you want to view or use often, for example, you might want
to monitor disk usage on your QRadar appliances.
The sample dashboard item app adds a basic dashboard item to the QRadar Dashboard tab.
The following image is a dashboard example that is created by an app in QRadar.
On the Dashboard tab, the sample dashboard item is accessed by using the Add Item menu.
The following image shows the sample dashboard in the Add Item menu.
The dashboard sample app contains the les that are described in the following table:
Table 23. Dashboard sample app
les
Files/Folders Description
app The root directory for application les. The app folder contains the following
les:
qpylib contains the Python library les that your application uses to connect
to the QRadar API endpoints.
__init__.py - a sample initialization that creates a Flask instance, imports
views from views.py script and functions from the qpylib library.
views.py the main entry point into the web application. This le and
the manifest.json le are the only les that are required in every app.
Contains sample code for the Dashboard example app.
The /static/sampleDashboardItemResponse.json le contains the
JSON object that contains the dashboard ID, title, and HTML string.
Chapter 1. Developing with the QRadar app framework55
Table 23. Dashboard sample app les (continued)
Files/Folders Description
qradar_appfw_venv Contains the Python virtual environment where the dependencies are
installed.
__init__.py Creates an instance of the Flask micro-framework that is used to serve
content to QRadar.
manifest.json Describes details about the sample Dashboard Example, which QRadar uses.
run.py Contains instructions to run the code that is in the /app sub directory.
manifest.json
The manifest.json le contains the following code:
{
"name":"DashBoard Example",
"description":"Application to display a new dashboard item",
"version":"1.0",
"uuid":"558d7935-f00b-42da-a278-c82abdb12d21",
"dashboard_items":[
{
"text":"QDashBoardExample Item",
"description":"Sample dashboard item that is a copy of most recent offenses",
"rest_method":"sampleDashboardItem",
"required_capabilities":["ADMIN"]
}
],
"rest_methods": [
{
"name":"sampleDashboardItem",
"url":"/static/sampleDashboardItemResponse.json",
"method":"GET",
"argument_names":[]
"required_capabilities":["ADMIN"]
}
]
}
The rst four objects, name, description, version, and uuid, provide basic application information.
The dashboard_items object describes a new item on the QRadar Dashboard tab. These items are
available to users, who can manually add the items to their dashboard.
The dashboard_items block contains the elds that are described in the following table:
Table 24. Dashboard items block
Name Description Value
text The name of the dashboard item that is
displayed.
QDashBoardExample Item
description A description of the dashboard item that is
displayed when your mouse hovers over the
dashboard item.
Sample dashboard item that
is a copy of most recent
offenses
rest_method The name of the REST method to load this
item. This method must be declared in the
rest_methods section of the manifest.
sampleDashboardItem
required_capabiliti
es
Instructs QRadar to display the Dashboard
Example dashboard item only to users who
have administrator privileges.
["ADMIN"]
56 IBM QRadar : QRadar Application Framework Guide
The rest_methods block contains the elds that are described in the following table:
Table 25. REST methods block
Name Description Value
name A unique name for this REST
method within the app.
sampleDashboardItem
url The URL to access the
REST method, relative to the
application root. Only URLs
within their own application are
supported.
/static/
sampleDashboardItemResponse.js
on
method Concise text to display that
describes the area. Can
optionally point at a resource
bundle key, if the application is
globalized.
GET
argument_names The names of arguments that
this method supports. Arguments
are passed to the method URL
encoded, as either query string
parameters or in the PUT/POST
body.
[]
required_capabiliti
es
This eld instructs QRadar to
display the Dashboard Example
dashboard item only to users
with Administrator privileges.
["ADMIN"]
views.py
For this sample app, creates the default routes '/' and '/index', both of which return a simple string.
The index route is declared in the url eld of manifest.json.
__author__ = 'IBM'
from app import app
@app.route('/')
@app.route('/index')
def index():
return ""
/app/static/sampleDashboardItemResponse.json
The /app/static/sampleDashboardItemResponse.json le contains the following code:
{"id":"sampleDashboardItem","title":"Sample Dashboard Item",
"HTML":"<div>This item could contain <b><u>any HTML</u></b>!</div>"}
The JSON object that is returned needs the following data:
• An ID for the dashboard item you are creating
• A title for the dashboard item
• HTML to render the dashboard item
Chapter 1. Developing with the QRadar app framework
57
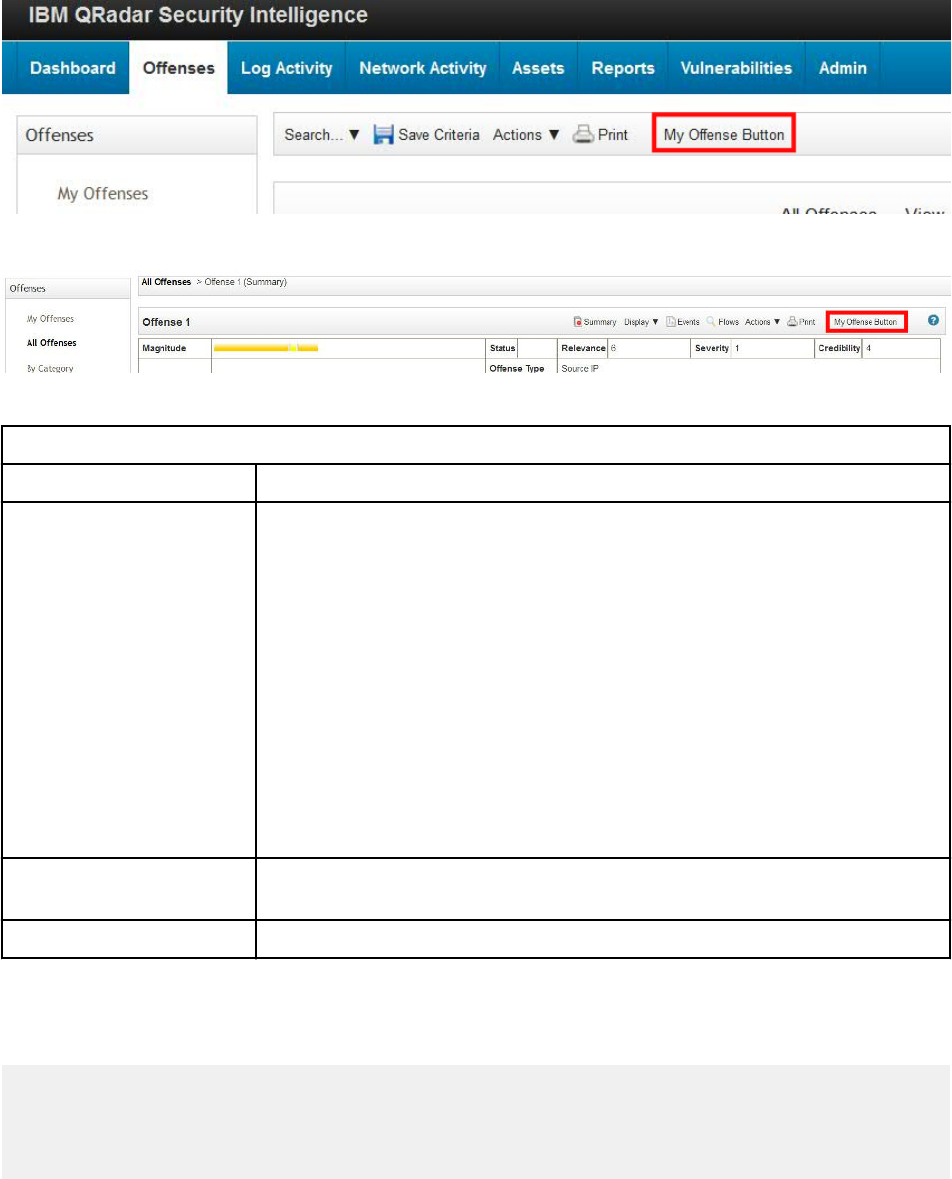
Page script / toolbar button example
The page script / toolbar button example adds a button to the toolbar on the Offenses or Offense
Summary tabs in IBM QRadar. The new button calls a page script when you click it.
When you select an offense in the Offenses or Offense Summary tab, and click the button, information
about the selected offense is displayed in an alert.
The following image shows the My Offense Button.
The following image shows the output from using the My Offense Button.
The following table shows the les that are used for this sample app:
Table 26. Sample app
les
Files/Folders Description
app The root directory for application les. The app folder contains the following
les:
qpylib folder that contains the Python library les that your application
can use to connect with QRadar API endpoints.
__init__.py - a sample initialization le your app. It creates a Flask
instance, imports views from views.py and functions from the qpylib
library.
views.py - The main entry point into the web application. This le and
the manifest.json le are the only les that are required in every
application. This le contains sample code for the sample application.
The /static/js/custom_script.js script that is run when the button
is clicked.
__init__.py Creates an instance of the Flask micro-framework that is used to serve
content to QRadar.
manifest.json This le tells QRadar what the sample app does.
manifest.json
The manifest.json le contains the following code:
{
"name":"Page script test App",
"description":"An example of to test page scripts",
"version":"1.0.1",
"uuid":"4a5d50cc-b9f1-4526-b356-5cb2d60e9467",
58
IBM QRadar : QRadar Application Framework Guide
"rest_methods": [
{
"name":"offenseListFunction",
"url":"/offenseListFunction",
"method":"GET",
"argument_names":["appContext"]
}
],
"gui_actions": [
{
"id":"OffenseListToolbarButton",
"text":"My Offense Button",
"description":"My Offense Button",
"icon":"",
"rest_method":"offenseListFunction",
"javascript":"my_offense_toolbar_button_action(result)",
"groups":["OffenseListToolbar"]
},
{
"id":"OffenseSummaryToolbarButton",
"text":"My Offense Button",
"description":"My Offense Button",
"icon":"",
"rest_method":"offenseListFunction",
"javascript":"my_offense_toolbar_button_action(result)",
"groups":["OffenseSummaryToolbar"]
}
],
"page_scripts": [
{
"app_name":"SEM",
"page_id":"OffenseList",
"scripts":["static/js/custom_script.js"]
},
{
"app_name":"SEM",
"page_id":"OffenseSummary",
"scripts":["static/js/custom_script.js"]
}
],
}
The rst three objects, name, description, and version, provide basic app information.
The gui_actions object describes a new GUI Action that the user can perform in the QRadar user
interface. It is abstracted from the underlying representation.
GUI Actions are represented as buttons on page toolbars, or as right-click menu options.
GUI Actions can run a block of JavaScript, invoke a REST method, or both.
The gui_actions block contains sections for both the Offenses page toolbar and the Offense Summary
page toolbar.
The Offenses page toolbar section contains the elds that are described in the following table:
Table 27. Offenses page toolbar
elds
Field Description Value
id A unique ID for this area within the application OffenseListToolbarButton
text The name of the GUI Action that is displayed in the
user interface.
My Offense Button
descriptio
n
A description of the GUI Action that is displayed
when your mouse hovers over the item.
My Offense Button
icon A URL to load, relative to the application root. Only
URLs that exist within the app can be referenced.
""
Chapter 1. Developing with the QRadar app framework59
Table 27. Offenses page toolbar elds (continued)
Field Description Value
rest_metho
d
The name of the REST method to load this
item. This method must be declared in the
rest_methods block of the manifest.
offenseListFunction
javascript A JavaScript code block to run when this action
is performed. Either this argument or the REST
method argument is required. If both are specied,
then the REST method is run rst, the results are
then passed into the JavaScript code block by using
the variable result.
If only the JavaScript argument is specied, a
context variable that contains the context of the GUI
Action, is passed into the JavaScript code block.
my_offense_toolbar_button
_action(result)
groups A list of one or more GUI Action groups to install the
action into. This string is the identier of the toolbar
or right-click menu in QRadar. At least one group
must be provided.
You can also use a group name in this format
ariel:<FIELD_NAME>, where <FIELD_NAME> is
the name of a eld in the QRadar Event or Flow
viewer. If this eld is specied, the action is
installed into the menu of that eld, and the
context parameter is the contents of the eld.
["OffenseListToolbar"]
The Offenses Summary page toolbar section contains the elds that are described in the following table:
Table 28. Offenses summary page toolbar
elds
Field Description Value
id A unique ID for this area within the application OffenseSummaryToolbarButton
text The name of the GUI Action that is displayed in
the user interface.
My Offense Button
description A description of the GUI Action that is displayed
when your mouse hovers over the item.
My Offense Button
icon A URL to load, relative to the application root.
Only URLs that exist within the QRadar app can
be referenced.
""
javascript A JavaScript code block to run when this
action is performed. Either this argument or the
REST method argument is required. If both are
specied, then the REST method is run rst, the
results are then passed into the JavaScript code
block by using the variable result.
If only the JavaScript argument is specied, a
context variable that contains the context of the
GUI Action, is passed into the JavaScript code
block.
my_offense_toolbar_button_
action(context)
60 IBM QRadar : QRadar Application Framework Guide
Table 28. Offenses summary page toolbar elds (continued)
Field Description Value
groups A list of one or more GUI Action groups to install
the action into. This string is the identier of the
toolbar or right-click menu in QRadar. At least 1
group must be provided.
You can also use a group name in this format
ariel:<FIELD_NAME>, where <FIELD_NAME>
is the name of a eld in the QRadar Event or
Flow viewer. If this eld is specied, the action
is installed into the menu of that eld, and the
context parameter is the contents of the eld.
["OffenseSummaryToolbar"]
The rest_methods block contains the elds that are described in the following table:
Table 29. rest_methods block elds
Field Description Value
name A unique name for this REST method within the
application.
offenseListFunction
url The URL to access the REST method, relative
to the application root. Only URLs within the
app are supported.
/offenseListFunction
method The HTTP method on the named endpoint
(GET/POST/DELETE).
GET
argument_name
s
The names of arguments that this method
expects. Arguments that are passed to the
method URL are encoded, as either query
string parameters or in the PUT/POST body.
["context"]
The page_scripts block contains the elds that are described in the following table:
Table 30. Page scripts block
elds
Name Description Value
app_name The name of the QRadar application you want to
include the script into. The wildcard "*" is also
supported if it is used with the page_id eld, to
have a le included in every QRadar page.
SEM
page_id The ID of the QRadar page where the script
is included. The wildcard "*" is also supported
when it is used with the app_nameeld. When
the wildcard character is used, a le is included
on every QRadar page.
OffenseList
scripts The scripts that you want to include, relative to
the application root.
["static/js/
custom_script.js"]
Chapter 1. Developing with the QRadar app framework61

views.py
The views.py for this example establishes the Flask routes that are used by the application. The script
injects context information from the REST API endpoint into the offense variable. This content is used by
the page script.
__author__ = 'IBM'
from flask import request
from app import app
from qpylib import qpylib
import json
@app.route('/offenseListFunction', methods=['GET'])
def offenseListFunction():
qpylib.log("offenseListFunction", "info")
offense = request.args.get("appContext")
qpylib.log("appContext=" + offense, "info")
#You can process the data and return any value here,
#that will be passed into javascript
return json.dumps({'context_passed_to_python_route':offense})
static/js/custom_script.js
Contains the function that turns the content of the offense variable into a string and displays it within a
JavaScript alert dialog.
function my_offense_toolbar_button_action(offense)
{
alert(JSON.stringify(offense));
}
Script les must be fragments and not fully formed HTML because they are injected in to a fully rendered
page.
Note: Be careful how you name functions because apps can share scripts from QRadar. It is good practice
to add a prex to the JavaScript function such as the app name.
Page script samples
You can use page scripts to link between apps, select rows in a QRadar table, and get the IP address of an
asset.
How to link between apps
You use the setActiveTab(tabId,url) function from the qradar.js library to link between two
apps that are installed on the same QRadar Console.
For example, you want to link from MyApp1 to MyApp2. MyApp1 uses the following HTML template with a
div tag that calls a JavaScript function:
<!doctype html>
<html lang="en">
<head>
<meta charset="utf-8">
<title>myApp1</title>
<script type="text/javascript" src="static/js/myApp2.js"></script>
</head>
<body>
<div onclick="somejs();">
Link to myApp2</div>
</body>
</html>
62
IBM QRadar : QRadar Application Framework Guide
The somejs() function in the static/js/myApp2.js le uses the setActiveTab(tabId,url)
function from the qradar.js library:
function somejs() {
alert('set active tab');
top.setActiveTab("myApp2_1057","plugins/1057/app_proxy/index");
}
The tabId parameter uses the following format: areasID_applicationID. The areas ID is the value of
the id eld in the areas block of the myApp2 manifest.json le.
The url parameter uses the following format:
plugins/<applicationID>/app_proxy/<areasURL>
.
The applicationID is assigned when you install your app. You can use the POST /gui_app_framework/
application_creation_task endpoint to retrieve the applicationID.
The areasURL is the value of the url eld in the areas block of the following myApp2 manifest.json
le.
"areas": [
{
"id":"myApp2",
"text":"myApp2",
"description":"The app I am linking to",
"url":"index",
"required_capabilities":["ADMIN"] }
],
How to get the selected rows in a table
To get all the selected rows in a table on a QRadar page, use the following code in your page script:
var selectedIds = getSelectedRowIds();
var grid = getGrid();
var store = grid.store;
var row = grid.row(selectedIds[0], true );
How to get the IP address of the selected asset from the Asset page
To get the IP address of the selected asset from the QRadar Asset tab use the following code in your page
script:
var assetId = selectedRows[0].id;
Passing context-specic information to a page script
You use a GUI Action to pass information about offenses, assets, vulnerabilities from a QRadar table to a
page script.
For example, you can extract selected information from QRadar and pass it to a script for further
processing. You can create a simple app that allows users to select offenses that are listed as rows
in the table on the Offenses tab and pass that information to a page script. By clicking a button on the
Offenses tab toolbar, a JavaScript alert that contains the extracted information is displayed.
You can also pass information about vulnerabilities, network activity, assets, and information from any
table in most QRadar pages.
The following manifest.json le example shows details of entries that you make in this le:
Chapter 1. Developing with the QRadar app framework
63
manifest.json
In the app's manifest.json le, the REST method that is used by the views.py script is dened. The
REST method also species that application name, page ID, and application context must be dened.
appName
The application name is dened in the page_scripts block and indicates to QRadar which tab
contains the data to be passed to the script.
pageId
The page ID is dened in the page_scripts block and indicates to QRadar which page within the
tab contains the data to be passed to the script.
appContext
The application context refers to the row or rows that are manually selected by the user on the tab
and page that is dened by the application name and page ID. In this case, it is the table on the
Offense List page on the Offenses tab. Each row contains data on a particular offense and it is this
data that is passed to the custom script.
{
"name":"offense log pass ids",
"description":"An example of passing ids",
"version":"1.0",
"uuid":"a4095969-1c88-4e35-aecb-4eea7b061cd3",
"rest_methods": [
1
{
"name":"listFunction",
"url":"/listFunction",
"method":"GET",
"argument_names":["appName","pageId","appContext"]2
}
],
"gui_actions": [
3
{
"id":"OffenseListToolbarButton",
"text":"Offense pass Ids !",
"description":"Pass Ids for offenses !",
"icon":"static/images/bookmarks_small.png",
"rest_method":"listFunction",4
"javascript":"my_toolbar_button_action(result)",5
"groups":["OffenseListToolbar"]6
}
],
"page_scripts": [7
{
"app_name":"SEM",
"page_id":"OffenseList",
"scripts":["static/js/custom_script.js"]
}
]
}
The following list describes the contents in the code snippet from the manifest.json le.
1. Use the rest_methods block to dene the API name, app.route URL, and API method that you add
to views.py.
2. Use the argument names to precisely locate the data that is passed to the script. The app name and
page ID values are dened in the QRadar tab and page. In this case, the Offenses tab and main
Offense List page.
The appContext argument is a placeholder that holds the actual offense data that is selected when
the user clicks a row or rows in the Offense List table. This data is passed to JavaScript for processing.
3. Use the gui_action block to dene the button that passes data to the screen when the user clicks it.
4. Use the rest_methods block to dene the REST methods that are used in the views.py script to list
the data from each selected row.
5. Use the JavaScript function to create an alert dialog that displays the JSON string that is passed by the
appContext argument from the listFunction method.
64
IBM QRadar : QRadar Application Framework Guide
6. Use the GUI Action group location to dene where the button appears. In this case, the button appears
on the main Offense List page toolbar.
7. Use the page_scripts block for the app_name and page_id arguments that are passed to the REST
API method, and for the location of the JavaScript le that processes the data.
app/views.py
The app's app/views.py denes the application route and function that retrieves the appContext data
and passes it as JSON to the custom script.
__author__ = 'IBM'
from flask import render_template, request
from app import app
from qpylib import qpylib
import json
@app.route('/')
@app.route('/index')
def index():
return render_template("index.html", title = "Offense Context App!")
@app.route('/listFunction', methods=['GET'])
1
def listFunction():
qpylib.log("listFunction", "info")
rows = request.args.get("appContext")2
qpylib.log("selectedRows=" + rows, "info")
#You can process the data and return any value here,
#It is passed into JavaScript.
return json.dumps({'context_passed_to_python_route':rows})3
The following list describes the contents in the code snippet from the views.py script.
1. The function URL and REST method that is dened in the rest_methods block of the app manifest
le.
2. The row variable that gets the content of the selected rows by using the appContext argument.
3. The Flask json.dumps method formats the data that is contained in the rows variable as JSON. This
data is passed to the custom_script.js le that displays it in a simple alert.
app/static/js/custom_script.js
The following short JavaScript creates an alert and formats the JSON content into strings for each row.
function my_toolbar_button_action(offense)
{
alert(JSON.stringify(offense));
}
Context-specic metadata provider example
Metadata providers are used to show extra context-sensitive information in IBM QRadar.
Metadata is displayed when the user's mouse pointer hovers over an item in the user interface. For
example, you might want to know the user name that is associated with an IP address, which you can
view by hovering your mouse pointer over the IP address.
The following image shows an example of context-sensitive information that is displayed when you hover
your mouse pointer over an IP address in the table.
Chapter 1. Developing with the QRadar app framework
65
You can create custom metadata providers for three types of metadata:
• ip displayed for an IP address throughout QRadar.
• userName displayed for a user name throughout QRadar.
• ariel:<FIELD_NAME>, where <FIELD_NAME> is the name of a eld in the QRadar Event or Flow
viewer - displayed for a eld in the event or flow viewer.
The following example demonstrates how to write a simple app that provides extra metadata when you
hover your mouse pointer over IP addresses in QRadar.
manifest.json
The manifest.json le contains the following code:
{
"name":"IP Metadata Provider Example",
"description":"Sample IP metadata provider functionality.",
"version":"1.0",
rest_methods: [
{
name:"getIPMetadata",
url:"/ip_metadata_provider",
method:"GET",
argument_names:["context"]
}
],
"metadata_providers" : [
{
"rest_method":"getIPMetadata",
"metadata_type":"ip"
}
]
}
The following table describes the block elds that are included in the Manifest.json le.
Table 31.
Manifest.json le block elds
Field Description
rest_methods Describes the rest method that is used to return the additional metadata.
metadata_providers Describes the metadata type and the rest method that returns the additional
metadata.
The manifest le shows that the app provides metadata for QRadar IP addresses that use the REST
method getIPMetadata. This REST method is exposed by the /ip_metadata_provider endpoint
66
IBM QRadar : QRadar Application Framework Guide
within the app. This endpoint represents a GET request and expects an argument context. The context
argument is appended to the GET request as a query string that contains the context-specic IP address
(/ip_metadata_provider?context=127.0.0.1).
views.py
The views.py script contains the following code:
import json
from app import app
from flask import render_template
from flask import request
from qpylib import qpylib
@app.route( '/ip_metadata_provider', methods=[ 'GET'])
def getIPMetadata():
context = request.args.get('context')
metadata_dict = {
'key' : 'exampleIPMetadataProvider',
'label' : ' Extra Metadata:',
'value' : 'Metadata value',
'html' : render_template( 'metadata_ip.html', ip_address=context)
}
return json.dumps(metadata_dict)
The views.py le shows a simple implementation for the getIPMetadata REST method that was
dened previously in the manifest.json. As noted, the context is passed to the endpoint by a query
string. Use the Flask request module to parse out the value of the context query. The value of the context
query is parsed by using the script: context = request.args.get('context'). This variable
contains the context-specic IP address.
Metadata providers are required to return JSON with the elds that are shown in the following table:
Table 32. Metadata providers
elds
Field Description
key Unique key for the metadata provider
label Description of the metadata, which is displayed in a pop-up layer in QRadar.
value Plain text context-sensitive data to be provided
html HTML context-sensitive data to be provided.
In this example, a Python dictionary object is created to contain these elds. For the html eld, a
template le, metadata_ip.html , is created in the /app/templates directory. The context that is
retrieved from the query string as the variable ip_address is passed to it.
metadata_ip.html
In this example, you render the context-specic IP address. The metadata_ip.html le contains a Jinja
template string that is replaced with the value that is passed in from the render_template call in
views.py.
{{ ip_address }}
Add right-click functionality
Add right-click functionality to a tab your app created in IBM QRadar.
Note: If you include the right-click GUI action in the manifest without adding an implementation of the
action, the right-click menu fails to load.
Chapter 1. Developing with the QRadar app framework
67
This example shows how to use the right-click GUI Action to capture an IP address and pass the
information to custom JavaScript. Use the right-click menu on the QRadar Log Activity tab to capture
an IP address of an event. Pass the IP address to a custom tab. Use a button on the custom tab to initiate
a search for events that contain the captured IP address.
manifest.json
...
"areas": [1
{
"url": "index",
"text": "RtClick",
"required_capabilities": ["ADMIN"],
"id": "QRtClick",
"description": "An app to POC Right Click"
}
],
"gui_actions" : [2
{
"id" : "rtClickEventIP",
"text" : "Get row info from right click",
"description" : "Right click on a row, get all the info",
"icon": null,
"rest_method": "rtgetcontext",
3
"javascript" : "clickme(result)",
"groups" : ["ipPopup"],
4
"required_capabilities" : ["ADMIN"]
}
],
"rest_methods" : [5
{
"name":"rtgetcontext",
"url":"/getcontext",
"method":"GET",
"argument_names":["context"]
}
],
"page_scripts" : [
6
{
"app_name":"EventViewer",
"page_id":"EventList",
"scripts" : ["static/clickme.js"]
}
]
...
app/views.py
__author__ = 'IBM'
from app import app
from flask import jsonify, request, render_template
import json
from qpylib import qpylib
@app.route('/')
@app.route('/index')
def index():
other_data = request.args.get("otherdata");
context = request.args.get("context");
if context is None:
context = ""
if other_data is None:
other_data = ""
qpylib.log("Displaying context" + str(context));
68
IBM QRadar : QRadar Application Framework Guide
return render_template("index.html", context=context, other=other_data)
@app.route('/getcontext', methods=['GET'])
def get_context():
context = request.args.get("context")
qpylib.log("Setting the results to: " + context)
return json.dumps({"app_id":qpylib.get_app_id(),"context":context})
app/static/clickme.js
function clickme(result) {
var app_id = ""
var context = ""
if (result) {
app_id = encodeURI(result.app_id)
context = encodeURI(result.context)
}
var d = new Date();
var n = d.getTime();
var otherData = "Something passed from Javascript"
console.log("Hey, you right clicked on me");
console.log(result)
app/templates/index.html
<html>
<body>
<script>
var gotoTab = function() {
var url = "/console/do/ariel/arielSearch?appName=
EventViewer&pageId=EventList&dispatch=performSearch&value(searchMode)=
AQL&searchOrigin=SEARCH_RESULTS_AQL&value(timeRangeType)=
aqlTime&value(interval)=300000&value(searchName)
=&value(searchId)=null&value(aql)
=select%20*%20from%20events%20where%20destinationip%20%3D%20%27" +
"{{context}}" + "%27%20LAST%2012%20HOURS&value(aqlLines)
=%5B%22select%20*%20from%20events%20where%20destinationip%20%3D%20%27" +
"{{context}}" + "%27%20LAST%2012%20HOURS%22%5D&value(recordsLimit)="
top.setActiveTab("EventViewer", url )
}
</script>
<div>
<ul>
<li>Received context data from QRadar: {{context}}</li>
<li>Received other data from Javascript: {{other}}</li>
<li><button onclick="gotoTab()">Search for events with
sourceip of {{context}}</button>
</ul>
</div>
</body>
</html>
Custom fragments example
The custom fragments feature allows an app to inject its own content into QRadar tabs and pages.
The application determines what the content is and how it is rendered. The injection points are xed,
predetermined locations within the QRadar page set.
The sample app that is presented here injects an HTML table that contains data for an offense on the
Offense Summary page. This example uses app/qpylib/offense_qpylib.py library functions to
retrieve offense details in JSON format.
Chapter 1. Developing with the QRadar app framework
69

The following image shows custom content at the top of the Offense Summary page:
Figure 6. Custom content injection
The following sections describe the manifest.json and app/views.py code that is used to inject
offense data into the Offense Summary page header.
manifest.json
Use the fragments block in the application manifest le to dene the location where you want to inject
the content. You also dene the REST endpoint that is used to retrieve the content in the fragments.
{
"name":"Offense Fragment New",
"description":"Render offense using custom python",
"version":"1.0",
"uuid":"a4095969-1c88-4e35-aecb-4eea7b061ab4",
"fragments": [
{
"app_name": "SEM",1
"page_id": "OffenseSummary",
"rest_endpoint": "fragoffense"
2
}
]
}
The following list describes the contents in the code snippet from the fragments block.
70
IBM QRadar : QRadar Application Framework Guide
1. The app_name and page_id elds dene the tab and page where the content is injected. As content
can be injected into the header of the Offense Summary page only, no location eld is required.
2. The fragoffense rest endpoint is dened in the app/views.py le.
app/views.py
__author__ = 'IBM'
from flask import Response
from app import app
from qpylib.qpylib import log
from qpylib.offense_qpylib import get_offense_json_html
1
@app.route('/fragoffense/<offense_id>', methods=['GET'])2
def get_offense(offense_id):
try:
offense_json = get_offense_json_html(offense_id, custom_html_generator)
return Response(response=offense_json, status=200, mimetype='application/json')
except Exception as e:
log('Error ' + str(e))
raise
def custom_html_generator(offense_json):
3
return ('<table><tbody>' +
'<tr><td><strong>Offense ID</strong></td>
<td>' + str(offense_json['id']) + '</td></tr>' +
'<tr><td><strong>Source IP</strong></td>
<td>' + offense_json['offense_source'] + '</td></tr>' +
'<tr><td><strong>Severity</strong></td>
<td>' + str(offense_json['severity']) + '</td></tr>' +
'</tbody></table>')
The following list describes the contents in the code snippet from the views.py scipt.
1. The get_offense_json_html function that is imported from the app/qpylib/
offense_qpylib.py library retrieves the details of the offense ID in JSON format.
2. The get_offense function has an @app.route annotation that denes the endpoint's route. Its
value is composed of the manifest's rest_endpoint eld value /fragoffense, and the context
information. In this case, the context information is the offense ID for the current offense on the
Offense Summary page.
3. The custom_html_generator function formats the offense JSON that was retrieved into an HTML
table.
Custom column example
You can add columns that contain custom content to tables in QRadar.
The following example describes how to add a column to the Offenses tab and to inject content into it.
The content is in JSON LD format and is formatted by a custom JavaScript.
The following image shows an example of a custom column that is added to the Offenses tab.
Chapter 1. Developing with the QRadar app framework
71
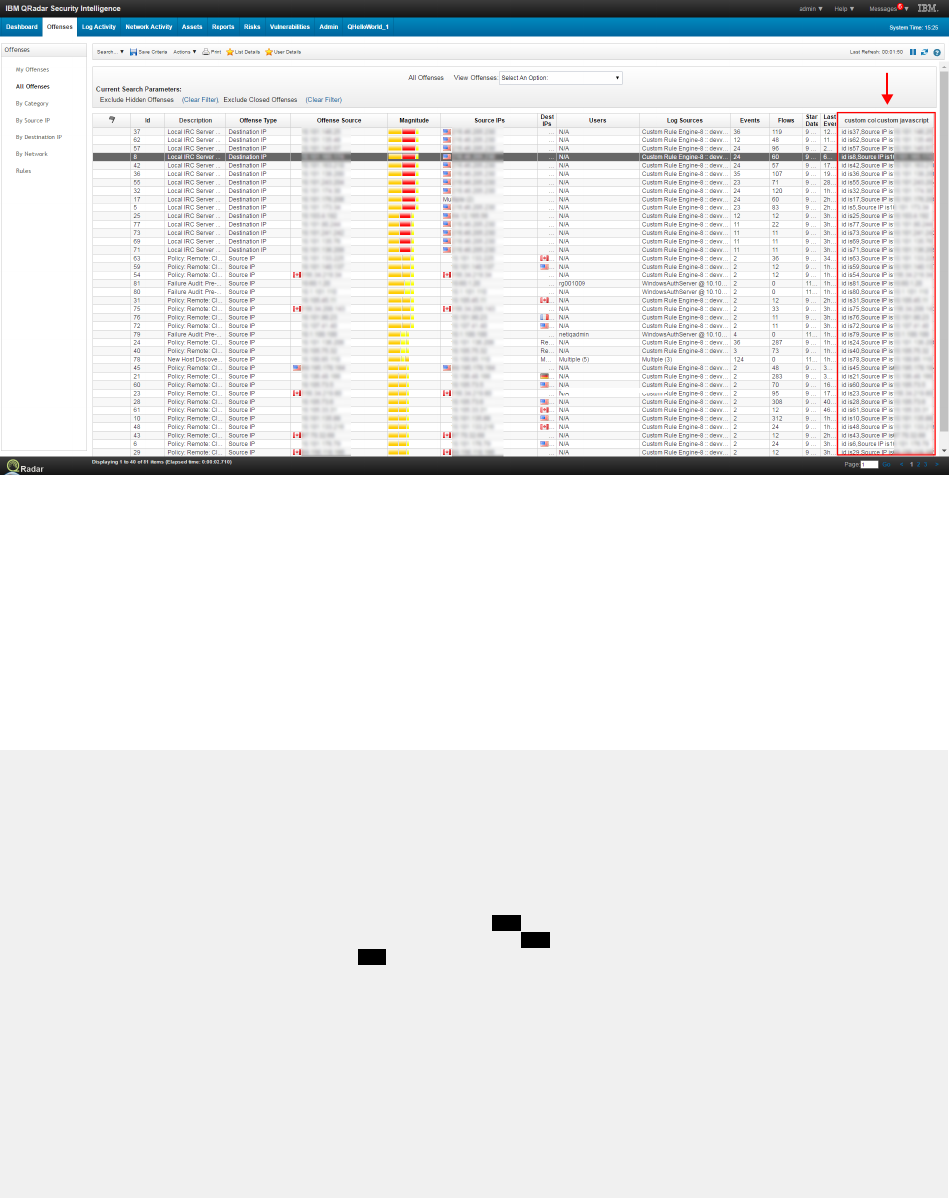
Figure 7. Custom column on the Offenses tab.
The following manifest.json le example shows details of a custom_columns block.
manifest.json
Use the custom_columns block in the app's manifest.json le to dene the injection point, column
header, and rest endpoint that are used to retrieve content in JSON format for the new column.
In this example, the JSON content that is injected is formatted by using a custom JavaScript. The location
of the script, and the tab and page on which it is run are dened in a page_scripts block.
{
"name": "Custom column offenses list table",
"description": "Render custom column offense using custom javascript",
"uuid": "7191b673-3225-4d5d-97ba-a41d72cc65f0",
"version": "1.0"
"custom_columns": [
{
"label": "Custom col custom javascript",1
"rest_endpoint": "custom_column_method", 2
"page_id": "OffenseList"3
}
],
"page_scripts": [
{
"app_name": "SEM",
"page_id": "OffenseList",
"scripts": [
"static/qjslib/custom_offense.js"
]
}
]
}
The following list describes the contents in the code snippet from the custom_columns block.
1. The label eld contains the column header content.
2. The custom_column_method REST endpoint is dened in the app/views.py script. This
custom_column_method REST endpoint is used to retrieve the information that is injected into the
custom column.
72
IBM QRadar : QRadar Application Framework Guide
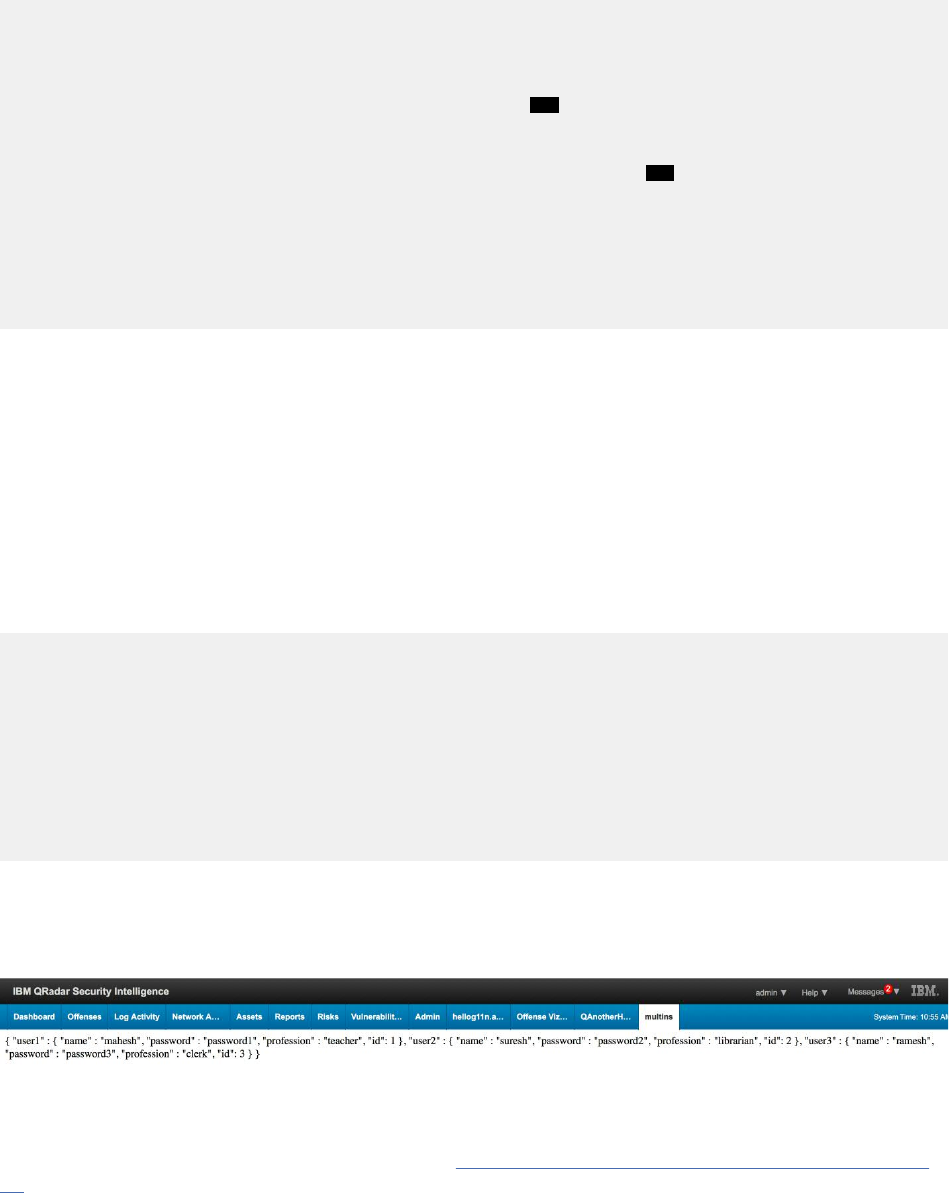
3. The page_id eld denes the page in which the new table column is added. In this case, it is the All
Offenses page.
app/views.py
__author__ = 'IBM'
from flask import Response
from app import app
from qpylib.qpylib import log
from qpylib.offense_qpylib import get_offense_json_ld
1
import json
@app.route('/custom_column_method/<offense_id>', methods=['GET']) 2
def get_offense(offense_id):
try:
log("get offense")
offense_json = get_offense_json_ld(offense_id)
return Response(response=offense_json, status=200, mimetype='application/json')
except Exception as e:
log('Error ' + str(e))
raise
The following list describes the contents in the code snippet from the views.py script.
1. The get_offense_json_ld function that is imported from the app/qpylib/offense_qpylib.py
library retrieves the details for the offense ID in JSON LD format.
2. The get_offense function includes an @app.route annotation that denes the endpoint's route.
The @app.route includes the manifest's rest_endpoint eld value /custom_column_method,
and the context information. In this case, the context information is the offense ID.
static/qjslib/custom_offense.js
The static/qjslib/custom_offense.js script renders the JSON content for the Offense ID and its
source IP address.
function renderJsonContent(jsonTagId, targetDivTagId)
{
var jsonTagContent = $("#" + jsonTagId).html();
var json = JSON.parse(jsonTagContent);
$("#" + targetDivTagId).html(renderOffense(json));
}
function renderOffense(json)
{
return 'id is' + json.data.id + ',' +
'Source IP is' + json.data.offense_source;
}
Named service sample app
This example shows how to run a Node.js server as a named service with a single endpoint. The app takes
data that is served from the service's endpoint and displays it on a new tab in the QRadar UI.
Because this example uses Node.js rather than Flask as the web application framework, the Node.js
runtime environment is installed as a source dependency in the app's /src_deps/init folder. For more
information about using source dependencies, see “Installing Node.js as a source dependency” on page
11.
Chapter 1. Developing with the QRadar app framework
73
manifest.json
The sample app's manifest le tells QRadar to run the web server script. It denes the port that the web
server monitors from, and a service with an endpoint that retrieves the data resource.
For more information about the services object type, see “Services type” on page 22
{
"name":"Named service example",
"description":"Named service example",
"version":"1.0",
"load_flask": "false",
1
"uuid":"ed9f7033-159b-4697-8c2a-0744010dcf49",
"services": 2
[
{
"command": "node /node_app/app/server.js",3
"directory": "/node_app",4
"endpoints":
5
[
{
"name": "listusers",
"path":"/list_users",
"http_method": "GET"
}
],
"name": "nodejsservice", 6
"path":"/list_users", 7
"port": 5000, 8
"version": "1"
}
],
"areas":
[
9
{
"id":"multins",
"text":"multins",
"description":"named service example",
"url":"list_users",
"named_service":"nodejsservice",
"required_capabilities":["ADMIN"]
}
]
}
1. Flask is not loaded because the app uses Node.js to serve content.
2. The services block denes the service name, version, and any endpoints it uses. In addition,
supervisord conguration parameters can also be added here. For a full list of available parameters,
see Table 18 on page 24.
3. This command is used by the Node.js runtime environment to run the web server script.
4. The path to the directory that supervisord changes to before it executes the child process.
5. The endpoint to be implemented by the service. The GET listusers endpoint retrieves a list of users
that is stored in a JSON source le, users.json.
For more information about the endpoints eld conguration parameters, see Table 17 on page 23.
6. The name of the service that must be referenced in the name_service elds of objects that want to
use the service.
7. The URL that is used to access the endpoint.
8. The port number that the web server listens on. Because Flask is not being used here, the port must be
set.
9. The area block adds a tab to the QRadar UI that displays the list of users and their associated data
that is retrieved by the service's listusers endpoint.
74
IBM QRadar : QRadar Application Framework Guide
/node_app/server/server.js
As Flask is not being used in this example, no views.py is required for the app. The following section
contains the web server code that serves the JSON content.
var express = require('express');
var app = express();
var fs = require("fs");
app.use(express.static('public')); 1
app.get('/list_users', function (req, res) { 2
fs.readFile( __dirname + "/" + "users.json", 'utf8', function (err, data) {
console.log( data );
res.send( data );
});
})
var server = app.listen(5000, function () {
3
var host = server.address().address
var port = server.address().port
console.log("Example app listening at http://%s:%s", host, port)
})
1. This function noties the Node.js server to serve the content from the node_app/public folder.
2. This function retrieves the content from the /node_app/server/users.json le.
3. The app.listen function sets the port that the server listens on. The port must be the same as you
congured in the app's manifest.
/node_app/server/users.json
In this example, the /node_app/server/users.json le is used as the data source.
{
"user1" : {
"name" : "mahesh",
"password" : "password1",
"profession" : "teacher",
"id": 1
},
"user2" : {
"name" : "suresh",
"password" : "password2",
"profession" : "librarian",
"id": 2
},
"user3" : {
"name" : "ramesh",
"password" : "password3",
"profession" : "clerk",
"id": 3
}
}
Named services
Use the named services feature to dene background processes for an app that other apps and IBM
QRadar can communicate with in an asynchronous manner.
You can write apps that dene services and REST API endpoints that other apps can interact with. QRadar
data that is manipulated by one app can be accessed, and represented, or reworked by another app.
Information that is generated by one app can be reused by other apps to add value to the original data.
Your apps are no longer restricted to working with the data that is provided by the QRadar REST API
alone.
The named services feature also provides developers with greater flexibility when they want to use web
services frameworks. Named service processes do not need to run as part of the Flask web service that
Chapter 1. Developing with the QRadar app framework
75

is built into the QRadar application framework. You can choose to install and use a different method
(for example, Node.js) to run the named service process from within the application container. The Flask
process can be disabled by setting the load_flask eld in your app's manifest le.
If your named service denes a process, it can also dene a port through which QRadar can communicate
with the service. If no port is dened, then the service is treated as a headless background process that
runs continuously.
Note: Named-service-endpoint URIs are not constructed by using the console IP address. The named-
service-endpoint URIs display a relative path with respect to the console, for example, /console/
plugins/1001/app_proxy:resourceservice/resource/{resource_id}.
How named services are dened
The services object in an app's manifest.json le is used to dene a named service. Fields within
the services block are used to dene:
• The service's name and version. These elds are mandatory.
• Optional REST API endpoints for the service.
• An optional port number to which your background processes binds internally. For example, port 80 if
you are running an HTTP server.
• A command that starts the background process.
• Supervisord conguration options. The QRadar application framework uses supervisord to monitor and
control service background processes.
For more information about named service denition in the app manifest, see “Services type” on page 22
.
For an example of how the services block is used to dene a named service, see “Named service
sample app” on page 73.
How apps communicate with a named service
When you install an app that is congured with a named service, the service is registered with QRadar.
Other apps and QRadar can now make calls to the background processes.
You can add a named_service eld in any of the following app object conguration blocks in your app's
manifest le to use the service:
• Area type
• Rest method type
• Conguration page type
• GUI action type
• Page script type
• Custom column type
• Fragments type
For an example of how the named_service eld is used, see “Named service sample app” on page 73
.
If you use a JavaScript client, the rst step in this process uses a JavaScript library (app/static/
qjslib/qappfw.js) that is supplied in the SDK. The library queries QRadar for apps that implement the
named service.
For information on the QRadar App Framework JavaScript library, see “App Framework JavaScript library”
on page 87.
After all the apps that match the named service and version are returned, the caller can decide which
ones to call. Calls proxy through QRadar and call the named service either directly, or via a port.
QRadar uses the value in the named_service elds to locate and register the named service that an app
object wants to interact with.
76
IBM QRadar : QRadar Application Framework Guide
Services type
Denes named services, service endpoints, and supervisord conguration parameters.
The parameters in your services block in your app's manifest le can be divided into these types:
Service denition parameters
The service name, version, and any endpoints that are dened for the service.
Endpoints eld parameters
A breakdown of the endpoints subparameters.
Supervisord conguration parameters
A list of parameters that can be passed to supervisord to control the service process.
The following code sample lists the services block elds:
{
...
"services": [
{
"name":"some_service",
"version":"1.0",
"endpoints": [
{ "name":"something",
"path":"get_something/{id}",
"http_method": "GET",
"parameters": [
{
"location": "PATH",
"name": "id"
"definition": "String"
}
]
}
],
"command":"/usr/bin/python loop.py",
"process_name":"%(program_name)s",
"numprocs":1,
"directory":"/src_deps/services/",
"umask":"022",
"priority":999,
"autostart":"true",
"autorestart":"true",
"startsecs":1,
"startretries":3,
"exitcodes":"0,2",
"stopsignal":"TERM",
"stopwaitsecs":8,
"user":"root",
"redirect_stderr":"true",
"stdout_logfile":"/store/log/pro.log",
"stdout_logfile_maxbytes":"1MB",
"stdout_logfile_backups":7,
"stdout_capture_maxbytes":"0",
"stdout_events_enabled":"false",
"stderr_logfile":"/store/log/proerr.log",
"stderr_logfile_maxbytes":"1MB",
"stderr_logfile_backups":6,
"stderr_capture_maxbytes":"0",
"stderr_events_enabled":"false",
"environment":"PY_HOME=/usr/bin/python",
"serverurl":"AUTO"
}
],
...
}
The following tables provide details about the manifest elds for the services block.
Table 33. Service
denition endpoints
Field Required Type Description
name Yes String The name of the service instance.
Chapter 1. Developing with the QRadar app framework77

Table 33. Service denition endpoints (continued)
Field Required Type Description
version Yes String
Version of this named service that is
supported by this instance.
Only one version per named service
denition is allowed.
endpoints No Array of
Endpoints
type
The endpoints that are dened for this
service instance.
You can dene a number of parameters
for each endpoint. For more information
about endpoint parameters, see Table 34
on page 78
Endpoints eld parameters
The endpoints eld parameters are explained in more detail in the following table:
Table 34. Endpoints eld parameters
Parameter Required Type Description
name Yes String The name of the endpoint.
http_method Yes String The HTTP method to use for the request: GET, POST, PUT, or
DELETE.
path Yes String The URL that is used to access endpoint.
request_mime_type No String The mime type of request body. Provide this value when
your request has a body (POST, PUT). Typical values include
these strings: "application/json", "application/json+ld",
"application/x-www-form-urlencoded".
request_body_type No Object Provides a JSON object that denes the structure of your request
body. If you use this parameter, do not set the location parameter to
BODY.
parameters No Array
location (required)
String. Can be one of these types:
• PATH
• QUERY
• BODY
Set the location parameter to BODY if the endpoint's
request_mime_type eld is set to application/x-www-
form-urlencoded.
The location parameter is required.
name (required)
String
definition (optional)
The type of the parameter.
response
No Object Denition of the expected response. If your endpoint does not return
a response body, then omit this eld.
mime_type (required)
String. The response mime type.
body_type (required)
Object. Provides a JSON object that denes the structure of
your response body.
error_mime_type No String The mime type of error message body. Defaults to text/plain.
78 IBM QRadar : QRadar Application Framework Guide

Supervisord conguration parameter elds
The QRadar Application Framework uses supervisord to monitor and control named services. You can
specify supervisord conguration parameters as elds within the services block in your app's manifest
le.
You can use the following supervisord parameters as elds in the services block. For more
information about supervisord conguration parameters, see http://supervisord.org/conguration.html
(http://supervisord.org/conguration.html).
Table 35. Supervisord conguration parameters
Field Required Type Description
port No Integer A TCP host:port value, for example,
127.0.0.1:9001 on which supervisor
listens for HTTP and XML-RPC requests.
If no port is specied the service
is treated as a headless background
process that runs continuously.
command No String The command that runs when this
program is started. The command
can be either absolute, for example, /
path/to/program or relative, for
example, program. If it is relative,
the supervisord’s environment $PATH is
searched for the executable.
directory No The path to the directory that
supervisord changes to before it
executes the child process.
autorestart No Enum
Species whether supervisord
automatically restarts a process when it
exits in the RUNNING state.
Value is one of the following states:
TRUE, FALSE, UNEXPECTED.
process_name No String A Python string that is used for the
supervisor process name.
numprocs No String The number of instances of the program
the supervisor starts.
umask No String The octal number that represents the
umask of the process.
autostart No Enum Value is TRUE or FALSE.
If TRUE, this program starts
automatically when supervisord is
started.
startsecs No Integer The number of seconds that the
program needs to stay running after
startup to consider the start successful.
startretries No Integer The number of serial failure attempts
that supervisord allows when it
attempts to start the program.
Chapter 1. Developing with the QRadar app framework79

Table 35. Supervisord conguration parameters (continued)
Field Required Type Description
exitcodes No String The list of expected exit codes for
this program that are used with
autorestart.
stopsignal No String The signal that is used to kill the
program when a stop is requested.
Use any of the following:
• TERM
• HUP
• INT
• QUIT
• KILL
• USR1
• USR2
stopwaitsecs No Integer The number of seconds to wait for the
operating system to return a SIGCHLD to
supervisord after the program is sent a
stopsignal.
user No String The UNIX user account that runs the
program.
redirect_stderr No Enum Value is either TRUE or FALSE.
If TRUE, causes the StdErr output to be
sent back to supervisord on its StdOut
le descriptor.
stdout_logfile No String StdOut output is stored in this le.
If redirect_stderr is TRUE, StdErr
output is also stored in this le).
stdout_logfile_maxbytes No String The maximum number of bytes that
can be consumed by stdout_logfile
before it is rotated and a new log le is
started.
stdout_logfile_backups No Integer The number of stdout_logfile
backups to retain from the StdOut log
le rotation.
stdout_capture_maxbytes No String The maximum number of bytes that are
written to capture FIFO (rst in, rst out)
when the process is in StdOut capture
mode.
stdout_events_enabled No Enum Value is one of TRUE, FALSE.
If TRUE, PROCESS_LOG_STDOUT events
are emitted when the process writes to
its StdOut le descriptor.
StdErr_logfile No String Put process StdErr output in this le
unless redirect_stderr is TRUE.
80 IBM QRadar : QRadar Application Framework Guide
Table 35. Supervisord conguration parameters (continued)
Field Required Type Description
stderr_logfile_maxbytes No String The maximum number of bytes before
log le rotation for stderr_logfile.
stderr_logfile_backups No Integer The number of stderr_logfile
backups to retain from the StdErr log le
rotation.
stderr_capture_maxbytes No String The maximum number of bytes that are
written to capture FIFO (rst in, rst out)
when the process is in StdErr capture
mode.
stderr_events_enabled No Enum Value is either TRUE or FALSE.
If TRUE, PROCESS_LOG_STDERR events
are generated when the process writes
to its StdErr le descriptor.
environment No String A list of key/value pairs, in the
form KEY="val",KEY2="val2", that
are placed in the child process’
environment.
serverurl No String The URL that is used to access
the supervisord server, for example,
http://localhost:9001
Named service sample app
This example shows how to run a Node.js server as a named service with a single endpoint. The app takes
data that is served from the service's endpoint and displays it on a new tab in the QRadar UI.
Because this example uses Node.js rather than Flask as the web application framework, the Node.js
runtime environment is installed as a source dependency in the app's /src_deps/init folder. For more
information about using source dependencies, see “Installing Node.js as a source dependency” on page
11.
manifest.json
The sample app's manifest le tells QRadar to run the web server script. It denes the port that the web
server monitors from, and a service with an endpoint that retrieves the data resource.
For more information about the services object type, see “Services type” on page 22
{
"name":"Named service example",
"description":"Named service example",
"version":"1.0",
"load_flask": "false", 1
"uuid":"ed9f7033-159b-4697-8c2a-0744010dcf49",
"services": 2
[
{
"command": "node /node_app/app/server.js",3
"directory": "/node_app",4
"endpoints": 5
Chapter 1. Developing with the QRadar app framework
81
[
{
"name": "listusers",
"path":"/list_users",
"http_method": "GET"
}
],
"name": "nodejsservice",
6
"path":"/list_users", 7
"port": 5000,
8
"version": "1"
}
],
"areas":
[
9
{
"id":"multins",
"text":"multins",
"description":"named service example",
"url":"list_users",
"named_service":"nodejsservice",
"required_capabilities":["ADMIN"]
}
]
}
1. Flask is not loaded because the app uses Node.js to serve content.
2. The services block denes the service name, version, and any endpoints it uses. In addition,
supervisord conguration parameters can also be added here. For a full list of available parameters,
see Table 18 on page 24
.
3. This command is used by the Node.js runtime environment to run the web server script.
4. The path to the directory that supervisord changes to before it executes the child process.
5. The endpoint to be implemented by the service. The GET listusers endpoint retrieves a list of users
that is stored in a JSON source le, users.json.
For more information about the endpoints eld conguration parameters, see Table 17 on page 23.
6. The name of the service that must be referenced in the name_service elds of objects that want to
use the service.
7. The URL that is used to access the endpoint.
8. The port number that the web server listens on. Because Flask is not being used here, the port must be
set.
9. The area block adds a tab to the QRadar UI that displays the list of users and their associated data
that is retrieved by the service's listusers endpoint.
/node_app/server/server.js
As Flask is not being used in this example, no views.py is required for the app. The following section
contains the web server code that serves the JSON content.
var express = require('express');
var app = express();
var fs = require("fs");
app.use(express.static('public')); 1
app.get('/list_users', function (req, res) { 2
fs.readFile( __dirname + "/" + "users.json", 'utf8', function (err, data) {
console.log( data );
res.send( data );
});
})
var server = app.listen(5000, function () { 3
var host = server.address().address
var port = server.address().port
console.log("Example app listening at http://%s:%s", host, port)
82
IBM QRadar : QRadar Application Framework Guide
})
1. This function noties the Node.js server to serve the content from the node_app/public folder.
2. This function retrieves the content from the /node_app/server/users.json le.
3. The app.listen function sets the port that the server listens on. The port must be the same as you
congured in the app's manifest.
/node_app/server/users.json
In this example, the /node_app/server/users.json le is used as the data source.
{
"user1" : {
"name" : "mahesh",
"password" : "password1",
"profession" : "teacher",
"id": 1
},
"user2" : {
"name" : "suresh",
"password" : "password2",
"profession" : "librarian",
"id": 2
},
"user3" : {
"name" : "ramesh",
"password" : "password3",
"profession" : "clerk",
"id": 3
}
}
Support functions
The IBM QRadar GUI Application Framework comes with several built-in routes, custom Jinja2 Flask
functions, and other helper utilities that support app development.
Overview
All HTTP requests from client-side browsers that go to an app use the following format:
https://<console_ip>/console/plugins/{application_id}/app_proxy/{my_route}
The application_id is the integer value that is assigned during the process of using the installation RESTful
endpoints for GUI app creation. The application_id value is recorded in the Application Creation
Task state output that is returned when you run the qradar_app_creator deploy command.
In the following example, the application ID is 1023.
Application Creation Task state:
{'status': 'COMPLETED', 'application_id': '1023', 'error_messages': '[]'}
Routes
You can create your own targeted web requests to the app for the routes in the following table:
Table 36. Request routes
Route Format Description
GET /debug
GET https://<console_ip>/console/plugins/
{application_id}/app_proxy/debug
Download your /store/log/app.log le from inside the container
for inspection.
Chapter 1. Developing with the QRadar app framework83
Table 36. Request routes (continued)
Route Format Description
GET /debug_view
GET https://<console_ip>/console/plugins/
{application_id}/app_proxy/debug_view
Display the contents of the /store/log/app.log le inside your
browser window.
POST /log_level
POST https://<console_ip>/console/plugins/
{application_id}/app_proxy/log_level
form body: level = 'INFO'
'DEBUG'
'ERROR'
'WARNING'
'CRITICAL'
Dynamically dene the level of logging that you want your app to
capture. Post a form, with an attribute level that is set to one of the
log level values to this endpoint. QRadar dynamically reset the log
collection levels in your /store/log/app.log le.
Accessing your Flask endpoints in views.py
You must use relative paths for your endpoints. Do not use the utility methods q_url_for and
get_console_ip to create URLs to access your Flask endpoints. If a console uses a web URL instead of
an IP address, all the Flask requests are denied because the request is cross-domain. In that case, your
app might not work. If you want to access an endpoint from the main app template level, for an AJAX call,
for example, to return some JSON data, use the following URL format:
url_cpu_data = 'cpu_data'
This format routes the method in views.py:
@app.route('/cpu_data', methods=['GET'])
If you are working from a folder at a deeper level, for example, use ../cpu_data to go back a level to
reach this endpoint.
Do not use the following format to create a URL to access your endpoint:
url_cpu_data = "{{ q_url_for('cpu_data') }}"
As before, if you go from a web URL to an IP address, this request might be denied because the request is
cross-domain and so your app might not work.
If you begin the URL with a slash, it starts the URL from this root: https://consoleIPaddress/
Here's an example to open a page with the offense ID:
console/qradar/jsp/QRadar.jsp?appName=Sem&pageId=OffenseSummary&summaryId="
+ encodeURIComponent(offense_id)
Here's an example to open a page by running the AQL search query:
/console/do/ariel/arielSearch?appName=EventViewer&pageId=EventList&dispatch=performSearch&value(searchMode)
=AQL&value(timeRangeType)=aqlTime" + "&value(aql)=" + encodeURIComponent(aql_query
Custom Flask methods
The following table describes the Flask custom methods that you can use:
84
IBM QRadar : QRadar Application Framework Guide
Table 37. Custom Flask methods
Method Format Description
q_url_for()
def q_url_for(endpoint, **values):
Use this Python method inside your routes in your app's views.py or your Jinja2
templates. It hides and abstracts the QRadar proxy addresses that are needed to
link together endpoints (routes) or resources (static les and images, for example).
The method is essentially a wrapper around the Flask url_for(..) method. It
applies a prex that pertains to the correct application-specic proxy path URL
portion to get to your app's endpoint.
The following snippet shows how to use the method in a Jinja2 template to hide
the QRadar proxy address of an image resource.
<img src="{{ q_url_for('static',
filename = 'images/come_image.png') }}"
width="256" height="256" alt="previous"
title="Previous" border="0">
For more information about the Flask url_for(..) method, go to the Flask
website.
getAppBaseURL()
def getAppBaseUrl():
Function to get the full URL through QRadar, that will proxy any request to the
appropriate application plug-in servlet. This routine returns a URL string that can
be appended to create a URL to reference resources in the application. Typically,
the q_url_for() function is used for this purpose but getAppBaseURL() is also
supplied for convenience.
QRadar CSRF token
The QRadar CSRF (cross-site request forgery) token is generated by QRadar to prevent cross-site scripting
attempts. For applications that are developed by using QRadar support libraries such as qpylib the use
of the CSRF token is seamless.
If you create an app that does not use QRadar qpylib support, you must harvest the token from any
application endpoints, or routes, and place it in your own HTTP headers before a REST or exported
method call is made in QRadar.
Related information
QRadar Python helper library functions
The QRadar Python helper library (qpylib) contains several useful functions that you can use to add
logging, make REST API calls, and convert JSON objects to Python dictionaries.
All functions that you import into your app's views.py le can be called globally.
The following table describes functions that you can import into your app's views.py le.
Table 38. Functions that you can import into your app
Function Format Description
log()
def log(message, level='info'):
Here's an example:
from qpylib import qpylib
..
#in precedence order from lowest level to highest
log('debug message' ,'debug')
log('info message' ,'info')
log('warning message' ,'warning')
log('error message' ,'error')
log('critical message' ,'critical')
Import the qpylib helper library into your app's
views.py to use the log() function. This function
writes messages at your chosen log level to the /
store/log/app.log le.
By default, logging is turned on and set to INFO level.
Lower level logging messages are ignored. Use the
POST /log_level endpoint to change
set_log_level( log_l
evel )
def set_log_level(log_level='info'):
Set the current log level. Used by the POST /
log_level endpoint but can also be called
programmatically.
Chapter 1. Developing with the QRadar app framework85
Table 38. Functions that you can import into your app (continued)
Function Format Description
REST()
def REST( RESTtype, requestURL, headers={},
data=None, params=None, json=None, version=None ):
For example:
try:
headers = {'content-type' : 'text/plain'}
arielOptions = qpylib.REST( 'get',
'/api/ariel/databases', headers = headers )
except Exception as e:
qpylib.log( "Error " + str(e) )
raise
Import the qpylib library to use this function to
make calls to the QRadar REST API endpoints. The
endpoint takes care of authentication and authorization
by reusing the security tokens that are passed on the
request from QRadar.
to_json_dict( JSON )
def to_json_dict(python_obj):
Converts a JSON object in to a Python dictionary.
Jinja2 templates
Jinja2 is a Python library that you can use to construct templates for various output formats from a core
template text le. It can be used to create HTML templates for IBM QRadar applications.
Jinja2 has a rich API, and large array of syntactic directives (statements, expressions, variables, tags) that
allow the dynamic injection of content into the templated le.
Use the Flask render_template() method in the app's views.py le to inject data from your Python
method, served by the route, into a Jinja2 templated HTML le. For example:
__author__ = 'IBM'
from flask import render_template
from app import app
@app.route('/')
def hello_world():
return render_template("hello.html", title = "QRadar")
The hello.html template must be stored in the /app/templates folder. The hello.html le is
described in the following section:
<!doctype html>
<title>Hello from Flask</title>
<h1>Hello {{ title }}!</h1>
The template produces the following output:
<!doctype html>
<title>Hello from Flask</title>
<h1>Hello QRadar!</h1>
Note: Do not use the Flask-Jinja2-mandated url_for functionality within your app Jinja2 template. The
QRadar GUI Application Framework uses relative addressing for request paths. If you use url_for, it
creates an absolute request path from the container itself.
For more information about Jinja2 templates, see the Jinja2 documentation.
Edit Jinja2 templates in Eclipse
You can use the Django template editor plug-in in Eclipse to develop Jinja2 templates.
PyDev Eclipse does not come with a Jinja2 template editor by default. The Django template editor plug-in
offers useful features that you can employ to develop Jinja2 templates for your app.
Install the Django repository (http://pydev.org/updates
) by clicking Help > Install New Software on the
main Eclipse Help panel.
86
IBM QRadar : QRadar Application Framework Guide
This plug-in offers useful syntax-highlighting and auto-completion features for Jinja2 template
development.
Integrate JavaScript libraries into your template
Add CSS and JavaScript libraries to your HTML templates to style and enhance your apps user interface.
You can use the Dojo and JQuery JavaScript libraries that are integrated into IBM QRadar to add CSS
styling, widgets, and other UI features to your app.
Dojo
To integrate the Dojo JavaScript toolkit into your app's HTML template, add the following tags to your
template's HEAD element:
<!doctype html>
<html lang="en">
<head>
<meta charset="utf-8">
<title>My app!</title>
<link type="text/css" rel="stylesheet"
href="/console/idt/dojo/resources/dojo.css"></link>
<link type="text/css" rel="stylesheet"
href="/console/idt/dijit/themes/dijit.css"></link>
<link type="text/css" rel="stylesheet"
href="/console/idt/dijit/themes/claro/claro.css"></link>
<link type="text/css" rel="stylesheet"
href="/console/idt/idx/themes/oneui/oneui.css"></link>
<script type="text/javascript"
src="/console/idt/dojo/dojo.js"
data-dojo-config="async:true, parseOnLoad: true"></script>
</head>
<body></body>
</html>
QRadar uses Dojo 1.9.3.
JQuery
To integrate the JQuery JavaScript library into your app's HTML template, add the following tag to your
template's HEAD element:
<!doctype html>
<html lang="en">
<head>
<meta charset="utf-8">
<title>My app!</title>
<script type="text/javascript"
src="/console/core/js/jquery/jquery.min.js"></script>
</head>
<body></body>
</html>
App Framework JavaScript library
The App Framework JavaScript library provides helper functions for common QRadar calls that you can
integrate into your own scripts.
The helper functions that are included in the App Framework JavaScript library (app/static/qjslib/
qappfw.js) can be used to do the following tasks:
• Get information on the current application, user, item, or selected table rows.
• Open the Details page for an asset.
• Search for an event or flow by using a specied AQL query.
Chapter 1. Developing with the QRadar app framework
87

• Open the Details page for an offense.
• Call a REST method by using an XMLHttpRequest.
• Retrieve named services and named service endpoints.
You can view the HTML documentation for the JS library in the jsdoc directory after you unzip the SDK
(.zip) le.
The helper functions in the App Framework JavaScript Library are described in the following table:
Table 39. App Framework JavaScript Library helper functions
Function Description
getApplicationBaseUrl(id) Returns the base URL of an application.
getApplicationId() Returns the ID of the current application.
Note:
The functions getApplicationId() and
getApplicationBaseUrl (id) depend on a variable
called CURRENT_SCOPE, which is injected into the
JavaScript context by the app framework when it imports
a JavaScript le that is dened in the page_scripts
section of an app manifest le. The functions can only be
used if you are using the page_scripts mechanism to
pull in your custom JavaScript. For example, if you use a
script tag in a Jinja template the functions won't work.
getCurrentUser() Returns the current user.
getItemId() Returns the ID of the item that is viewed (for example, an
asset or offense).
getSelectedRows() Returns the IDs of selected rows on a list page, such as
the offense or asset list.
openAsset(assetId, openWindow) Opens the Details page of an asset, either in a new
window or in the Assets tab.
openAssetForIpAddress(ipAddress,
openWindow)
Opens the Details page of an asset for an IP address,
either in a new window or in the Assets tab.
openEventSearch(aql, openWindow) Runs an event search with the specied AQL string, either
in a new window or the Event Viewer tab.
openFlowSearch(aql, openWindow) Runs a flow search with the specied AQL string, either in
a new window or the Flow Viewer tab.
openOffense(offenseId,
openWindow)
Opens the Details page of an offense, either in a new
window or in the Offenses tab.
rest(args) Calls a REST method by using an XMLHttpRequest.
buildNamedServiceEndpointRestArgs
(restArgs, endpoint,
parameterValues, bodyValue)
Populates an arguments object to be used in a
QRadar.rest call to a named service endpoint.
callNamedServiceEndpoint
(serviceName, serviceVersion,
endpointName, restArgs,
parameterValues, bodyValue)
A wrapper function that calls the /
gui_app_framework/named_services REST API,
selects the specied service endpoint, and invokes it by
using the supplied parameters and values.
getNamedService (services,
serviceName, serviceVersion)
Selects and returns a service from a list that is retrieved
by a /gui_app_framework/named_services
88 IBM QRadar : QRadar Application Framework Guide
Table 39. App Framework JavaScript Library helper functions (continued)
Function Description
getNamedServiceEndpoint (service,
endpointName)
Selects and returns a service endpoint.
Communicating with QRadar hosts from Python
You can communicate with IBM QRadar Hosts from Python by using the REST endpoints that QRadar
exposes.
As part of any communication from QRadar to an app, QRadar provides the following headers:
QRADAR-USER
This header contains theQRadar user name.
QRADAR-USER-ROLE
This header contains the user role assigned to the user.
QRADAR-SECURITY-PROFILE
This header contains the security prole that denes which networks, log sources, and domains that
the user can access
qpylib library
The qpylib library provides functions that encapsulate much of the logic that is required to initiate this
communication.
For REST API calls, use the qpylib.REST(RESTtype, request_url, headers, data, json,
params, version) function. This function prepends the IP address of the host console to the request
URL.
This REST function acts as a wrapper for the Python requests library. It returns a requests.Response
object.
The following table describes the elds that you can access from this object:
Table 40. Response
elds
Field Name Description
status_code Status code for the response. Useful for determining the success of a request.
For example, if you are checking for a 200 response.
url URL of the request.
headers Dictionary object that contains the response headers.
text Raw text output of the response. Useful for debugging purposes.
The function parameters are explained in the following table:
Table 41. Function parameters
Parameter Name Explanation
RESTtype String REST request type. Accepts 'GET', 'PUT', 'POST' and 'DELETE'.
request_url URL of the REST endpoint. The qpylib library prepends the appropriate
console IP address to the URL so that only the URL from /api/ is needed. For
example: /api/gui_app_framework/applications.
Chapter 1. Developing with the QRadar app framework89
Table 41. Function parameters (continued)
Parameter Name Explanation
headers (optional) Optional headers to be added to the request. Headers must be
contained within a Python dictionary object, for example, {'Accept':
'application/json'}.
data (optional) Optional data that can be contained within a request's body. Data must
be in the format that is appropriate to the REST endpoint. For example,
data must be converted to a JSON string by using the JSON Python library
(json.dumps()) when a REST endpoint accepts application/json.
json (optional) Optional parameter that accepts Python dictionary objects that are converted
to a JSON String that is included in the request's body.
params (optional) Optional parameter that accepts Python dictionary objects that are converted
to URL query parameters.
version (optional) Optional parameter that species which version of the QRadar RESTful API
to use. The value must be a string that matches a supported version of the
QRadar RESTful API (for example, 5.0). If no version is specied, no version
header is sent and the most recent version is used by default.
The Response object also contains functions that simplify access to the data contained in the response
body. You can use the json() function to retrieve a dictionary object that contains the response body, or
a list of dictionary objects if the endpoint returns a collection.
Example: Get QRadar Offenses
import qpylib
offenses_endpoint = '/api/siem/offenses'
headers = {'content-type' : 'application/json'}
response = qpylib.REST('GET', offenses_endpoint, headers=headers)
offenses_json_list = response.json()
# List containing dictionary objects for each QRadar offense
# Iterate over each offense JSON in the list and print its id.
format_string = 'Found offense id [{0}].'
for offense_json in offenses_json_list:
offense_id = str(offense_json['id']) # Access fields
print(format_string.format(offense_id))
Example: Get QRadar Offenses With Queries
import qpylib
offenses_endpoint = '/api/siem/offenses'
headers = {'content-type' : 'application/json'}
params= { 'filter' : 'inactive=false' }
response = qpylib.REST('GET', offenses_endpoint, headers=headers, params=params)
offenses_json_list = response.json()
Example: Post QRadar Offense Closing Reason
import qpylib
offense_closing_reasons_endpoint = '/api/siem/offense_closing_reasons'
headers = {'content-type' : 'application/json'}
json_dict = { 'reason' : 'Demonstrating posting data to QRadar'}
response = qpylib.REST('POST', offense_closing_reasons_endpoint,
headers=headers, json=json_dict)
90
IBM QRadar : QRadar Application Framework Guide

GUI Application Framework REST API endpoints
GUI Application Framework endpoints are available in the latest version of the IBM QRadar API that you
can use to develop apps.
Apps are packaged as compressed archives (.zip), within the extension archive. Extensions can be
installed or uninstalled by using RESTful endpoints. Apps within an extension (.zip) le use extra RESTful
endpoints to control the lifecycle of an App with QRadar (install, delete, start, stop).
The following table lists the GUI Application Framework REST API endpoints:
Table 42. GUI Application Framework REST API endpoints
Endpoint Parameters Description
GET /gui_app_framework/
application_creation_task
Application ID Retrieves a list of status details
for all asynchronous requests to
create apps.
GET /gui_app_framework/
application_creation_task
/{application_id}
Application ID Retrieves a list of status details
of an asynchronous request to
create apps.
POST /gui_app_framework/
application_creation_task
Application (.zip) bundle le Creates an app within
the application framework,
and registers it with
QRadar. The app is created
asynchronously. A reference
to the application_id is
returned and must be used
in subsequent API calls to
determine the status of the app
installation.
POST /gui_app_framework/
application_creation_task
/{application_id}
Application ID, cancel status Updates a new app installation
within the application framework
The application_id and a
status parameters are required.
GET /gui_app_framework/
applications
Retrieves a list of apps that
are installed on the QRadar
console, and their manifest JSON
structures and status.
GET /gui_app_framework/
applications/
{application_id}
Application ID Retrieves a specic app that
is installed on the console and
its manifest JSON structure and
status.
POST /gui_app_framework/
applications/
{application_id}
Application ID, start/stop status Updates an app. Starts or
stops an app by setting status
to RUNNING or STOPPED
respectively.
PUT /gui_app_framework/
applications/
{application_id}
Application ID Upgrade an application.
DELETE /
gui_app_framework/
applications/
{application_id}
Application ID Deletes an application.
Chapter 1. Developing with the QRadar app framework91
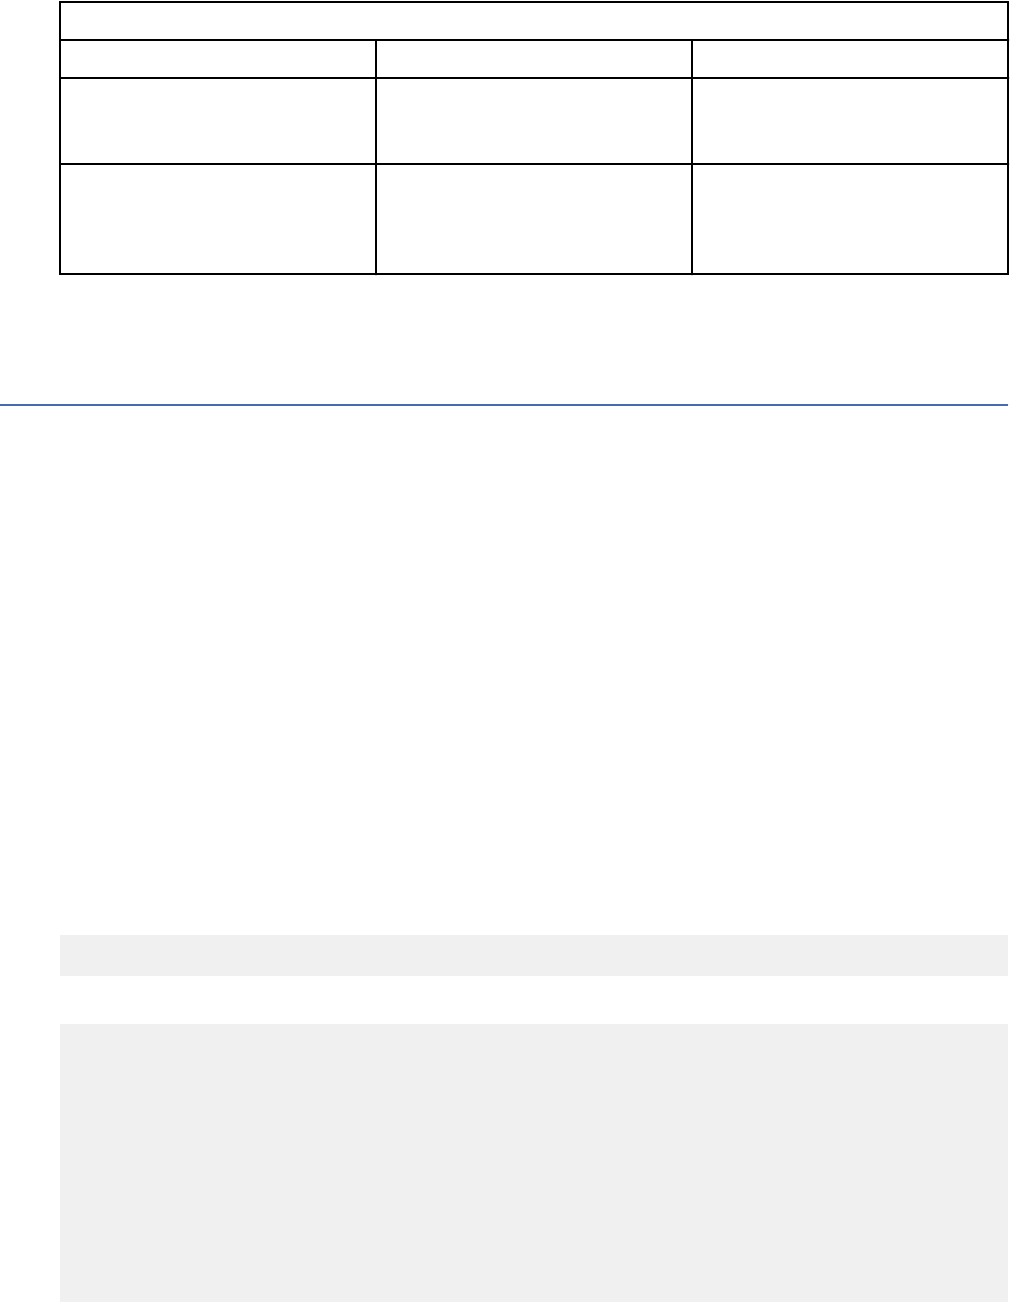
Table 42. GUI Application Framework REST API endpoints (continued)
Endpoint Parameters Description
GET /gui_app_framework/
named_services
Retrieves a list of all named
services registered with the
Application Framework.
GET /gui_app_framework/
named_services/{uuid}
uuid Retrieves a named service
registered with the Application
Framework by using the supplied
uuid.
For more information, see the API documentation page on your QRadar Console: https://
<Console_IP>/api_doc. Alternatively, see the IBM QRadar API Guide.
App logs
App logs are stored in the /store/log directory of your application's Docker container.
The /store/log directory contains 2 log les:
• startup.log is the initial start-up log for the application. This log is useful for checking the installation
of dependencies added to your app's app/src_deps/ folder.
• app.log is the log le that is created by the qpylib library. Logging calls to the qpylib.log()
method are written in the app.log le.
Adding logging to your app
The IBM QRadar Python helper library (qpylib) contains two useful functions that you can use to add
logging to your app.
The log() function
Import the qpylib helper library into your app's views.py to use the log() function. This function
writes messages at your chosen log level to the /store/log/app.log le.
By default, logging is turned on and set to INFO level. Lower level logging messages are ignored. Use the
POST /log_level endpoint to change log level.
The log() function uses the following format:
def log(message, level='info'):
For example:
from qpylib import qpylib
..
#in precedence order from lowest level to highest
qpylib.log('debug message' ,'debug')
qpylib.log('info message' ,'info')
qpylib.log('warning message' ,'warning')
qpylib.log('error message' ,'error')
qpylib.log('critical message' ,'critical')
Note:
92
IBM QRadar : QRadar Application Framework Guide
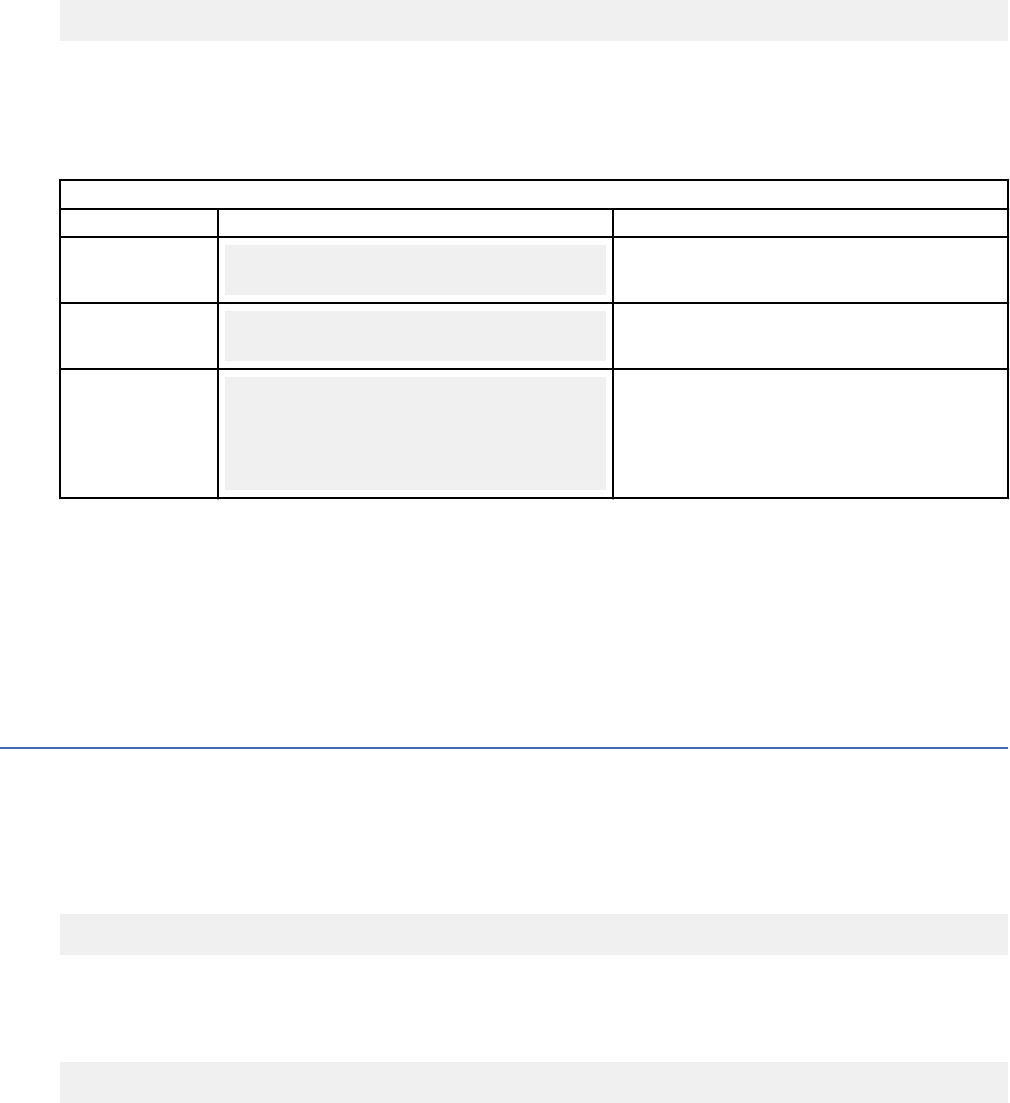
All qpylib functions that you import into your app's views.py le can be called globally. For that
reason, it is a good idea to add a namespace to the qpylib functions you import to prevent clashes with
other functions.
The set_log_level() function
You can use this function to set the current log level. This function is used by the POST /log_level
endpoint but can also be called programmatically.
def set_log_level(log_level='info'):
Viewing your app logs
Use built-in routes to create HTTP requests download, view, and set log collection levels.
You can create your own targeted web requests to the app for the following routes:
Table 43. Request routes
Route Format Description
GET /debug
GET https://<console_ip>/console/plugins/
{application_id}/app_proxy/debug
Download your /store/log/app.log le from inside the container
for inspection.
GET /debug_view
GET https://<console_ip>/console/plugins/
{application_id}/app_proxy/debug_view
Display the contents of the /store/log/app.log le inside your
browser window.
POST /log_level
POST https://<console_ip>/console/plugins/
{application_id}/app_proxy/log_level
form body: level = 'INFO'
'DEBUG'
'ERROR'
'WARNING'
'CRITICAL'
Dynamically dene the level of logging that you want your app to
capture. Post a form, with an attribute level that is set to one of the
log level values to this endpoint. QRadar dynamically reset the log
collection levels in your /store/log/app.log le.
The application_id is the integer value that is assigned when you use the installation RESTful endpoints
for GUI app creation. The application_id value is recorded in the Application Creation Task
state output that is returned when you run the qradar_app_creator deploy command.
Viewing logs within the host directory
All logs are located in the /store/log directory of the container.
Stopping, restarting, and uninstalling an app
You can stop, restart, or uninstall your app by using the IBM QRadar GUI Application Framework REST API
endpoints.
Stopping your app
You can disable your application that is running by sending the following empty POST request:
POST /api/gui_app_framework/applications/{app_id}?status="STOPPED"
Restarting your app
You can restart your app by sending the following POST request:
POST /api/gui_app_framework/applications/{app_id}?status="RUNNING"
Chapter 1. Developing with the QRadar app framework
93
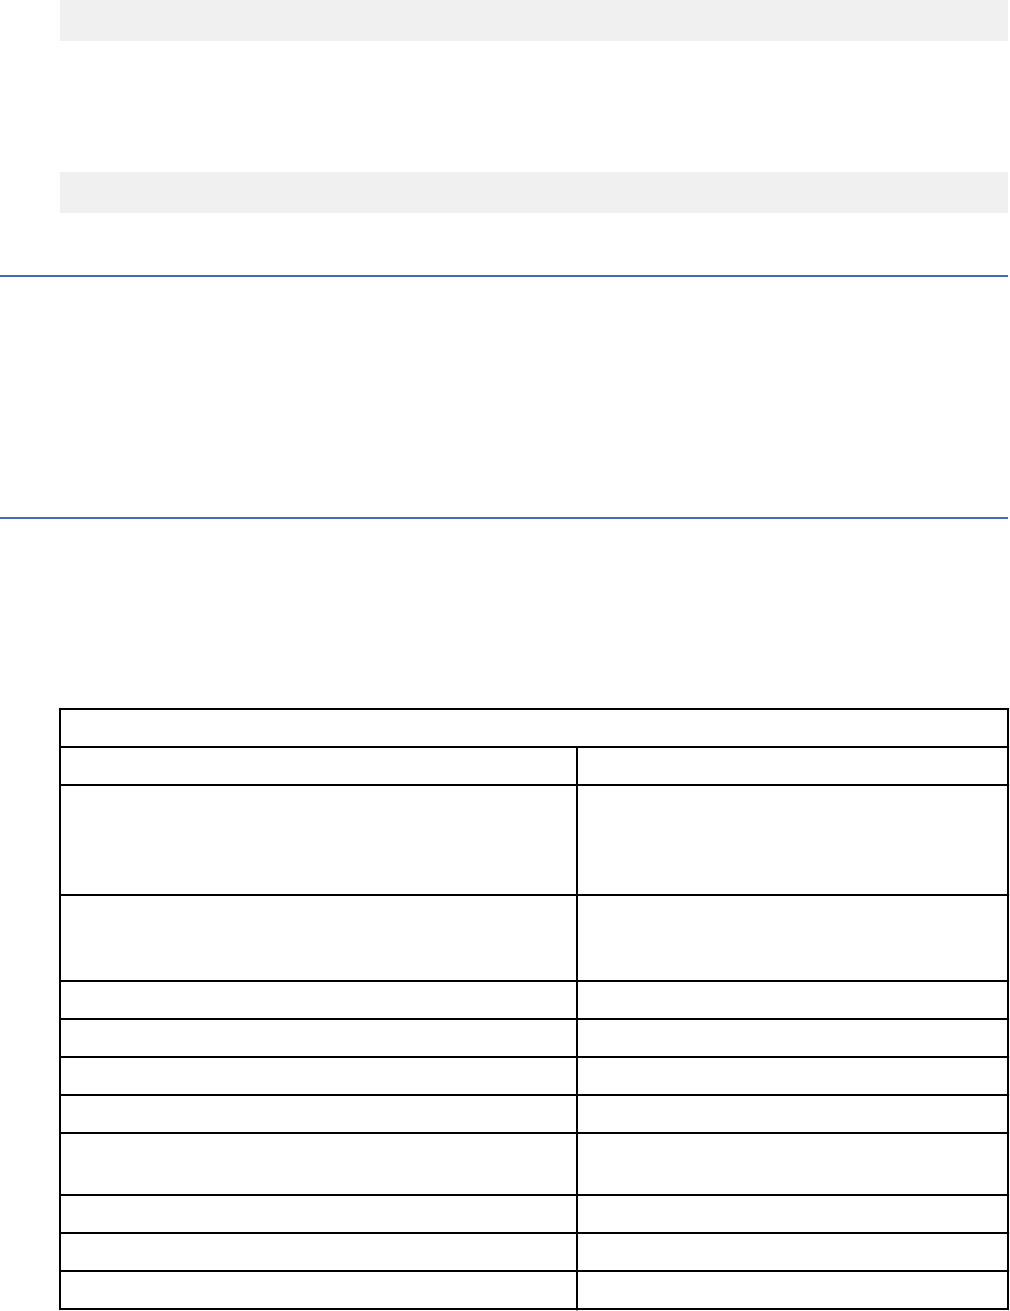
Uninstalling your app
Use the following DELETE request to uninstall and remove an app:
DELETE /api/gui_app_framework/applications/{app_id}
Checking the status of your app
After starting or stopping your app, you can check the status of the app by sending the following GET
request:
GET /api/gui_app_framework/application_definitions/{app_id}
App upgrades
Upgrade your app by using the IBM QRadar Extensions Management.
Note: As a best practice, store your app conguration and data in /store because data in this directory is
protected during app upgrades.
Important: If you want to upgrade an installed app that uses a lot of memory, you might need to stop
the app before you do the upgrade to avoid memory resource issues, and then restart the app after you
complete the upgrade.
Available user role capabilities
Capabilities are sets of permissions that are tied to user roles that are dened in the IBM QRadar Admin
tab.
The following table lists the capabilities that are supported by the QRadar GUI Application Framework.
Use the values in the Capability column to dene the user privileges for your app in the
required_capabilities eld of the object type block in your application’s manifest.json le.
The following table describes supported user role capabilities.
Table 44. Supported user role capabilities
Capability Description
ADMIN System administrator. Grants permission to
access all areas of the user interface. Users
who have this access cannot edit other
administrator accounts.
VIEWADMIN Remote networks and services conguration.
Grants permission to congure remote
networks and services on the Admin tab.
SEM Offense management
SEM.VIEWRULES View custom rules
SEM.RULECREATION Maintain custom rules
SEM.ASSIGNOFFENSE Assign offenses to users
SEM.MANAGECLOSINGREASONS Close offenses, manage offense closing
reasons
EventViewer Event viewer
EventViewer.VIEWRULES View custom rules
EventViewer.RULECREATION Maintain custom rules
94 IBM QRadar : QRadar Application Framework Guide

Table 44. Supported user role capabilities (continued)
Capability Description
EventViewer.CUSTOMARIELPROPERTY User-dened event properties
EventViewer.MANAGETIMESERIES Manage time series
ASSETS Asset management
ASSETS.VADATA View VA data
ASSETS.VASCAN Perform VA scans
ASSETS.SERVERDISCOVERY Server discovery
ASSETS.REMOVEVULNS Remove vulnerabilities
SURVEILLANCE Network Surveillance
SURVEILLANCE.VIEWRULES View custom rules
SURVEILLANCE.DATAMINECONTENT View flow content
SURVEILLANCE.CUSTOMFLOWPROPERTY User-dened flow properties
SURVEILLANCE.MANAGETIMESERIES Manage time series
SURVEILLANCE.RULECREATION Maintain custom rules
REPORTING Reporting
REPORTING.MAINTAINTEMPLATES Maintain templates
REPORTING.DISTRIBUTE Distribute reports via email
FORENSICS Incident Forensics
FORENSICS.CASECREATION Create cases in Incident Forensics
QRM QRM permission
QVM QVM permissions
QVM.ASSIGNASSETOWNER Assign asset owner
QVM.VULNERABILITY Assign vulnerability permissions
QVM.EXCEPTION Exception vulnerability permissions
For more information about capabilities and user roles in QRadar, see the IBM QRadar Administration
Guide.
App names, GUI action groups, and page IDs
App names, GUI action groups, and page IDs are identiers that IBM QRadar uses for QRadar products,
GUI actions, and UI pages.
The following manifest blocks use these identiers.
The groups eld of the gui_actions block uses GUI action group identiers to specify the toolbar or
right-click menu where the GUI action is added:
...
"gui_actions": [
{
"id":"sampleToolbarButton",
"text":"Sample Toolbar Button",
"description":"Sample toolbar button that
Chapter 1. Developing with the QRadar app framework
95

calls a REST method, passing an offense ID along",
"icon":null,
"rest_method":"sampleToolbarMethod",
"javascript":"alert(result)",
"groups":[ "OffenseListToolbar" ],
"required_capabilities":[ "ADMIN" ]
}
],
..
The app_name and page_id elds of the page_scripts block use the app name and page ID identiers
to specify the QRadar application tab and sub page into which the page script is added.
...
"page_scripts": [
{
"app_name":"SEM",
" page_id":"OffenseList",
"scripts":["/static/sampleScriptInclude.js"]
}
],
...
Supported app names
The following table shows a list of supported app names with descriptions.
Table 45. Supported app names
App Name Description
assetprole Asset Prole (for example, Vulnerabilities: Manage Vulnerabilities,
search)
Assets Assets Manager
EventViewer Event Viewer (for example, syslogdestination)
Forensics Incident Forensics
QRadar QRadar (for example, Reference Data)
QVM QRadar Vulnerability Manager
Reports Reports
Sem Offense Management
SRM QRadar Risk Manager
Surveillance Network Surveillance (Flows)
Supported GUI Actions and corresponding page IDs
The following table describes the supported GUI Actions and corresponding page IDs.
Table 46. Supported GUI Actions and Page IDs
GUI Action group App name Page ID Location
AssetDetailsToolbar Assets AssetDetailsVulnList Assets - click on IP Address/ Vulnerabilities
- Manage Vulnerabilities - By Asset - click on
IP Address
AssetListToolbar Assets AssetList Asset tab list
AssetOwnerToolbar assetprole AssetOwner Vulnerabilities tab - left panel - Vulnerability
Assignment
AttackerList SEM OffenseSummary Offense Tab - All Offenses - double-click
offense row - right-click row in Top 5 Source
IPs section
96 IBM QRadar : QRadar Application Framework Guide

Table 46. Supported GUI Actions and Page IDs (continued)
GUI Action group App name Page ID Location
AttackerListSmallToolbar SEM OffenseAttackerList Offenses tab - All Offenses - double-click
offense row - click Sources button on Top 5
Source IPs toolbar
NetworkAttackerList Offenses tab - By Network - select row -
click Sources button on toolbar to view List
of Sources
TargetAttackerList Offenses tab - By Destination IP - select row,
click Sources button on toolbar to view List of
Sources
AttackerListToolbar SEM AttackerList Offenses tab - By Source IP
ByAssetListFormToolbar assetprole ByAssetListForm Vulnerabilities tab - Manage vulnerabilities -
by Asset
ByNetworkListToolbar assetprole ByNetworkList Vulnerabilities tab - Manage vulnerabilities -
by Network
ByOpenServiceListToolbar assetprole ByOpenServiceList Vulnerabilities tab - Manage vulnerabilities -
by Open Service
ByVulnerabilityInstanceListToolbar assetprole ByVulnerabilityInstanceList Vulnerabilities tab - Manage vulnerabilities -
By vulnerability instance - main screen
ByVulnerabilityListToolbar assetprole ByVulnerabilityList Vulnerabilities tab - Manage vulnerabilities -
By vulnerability
CategoryList SEM OffenseSummary Offenses tab - All Offenses, - double-click
row -Top 5 Categories table - right-click a row
CategoryListToolbar SEM OffenseCategoryList Offenses Tab - All offenses - double-click row
- click Display > Categories in toolbar - List of
Event Categories table toolbar
DomainListToolbar QRadar DomainList Admin tab - Domain Management
EventDetailsToolbar Event Viewer EventDetails Log Activity tab - pause - click row - Events
detail toolbar
ExceptionRulesListToolbar assetprole ExceptionRulesList Vulnerabilities tab - Vulnerability exception
FlowDetailsToolbar Surveillance FlowDetails Network Activity - double-click on a flow.
FlowsourceListToolbar Surveillance FlowsourceList Admin tab - Flow Sources
MyAssignedVulnerabilitiesListToolbar assetprole MyAssignedVulnerabilitiesList Vulnerability tab - My assigned vulnerabilities
NetworkHierarchyListToolbar QRadar NetworkHierarchyList Admin tab - Network Hierarchy
NetworkListSmallToolbar SEM OffenseNetworkList Offenses tab - All Offenses - double-click
row - click Display in toolbar, Networks,
Destination Networks table, toolbar, and right
click
NetworkListToolbar SEM NetworkList Offenses -By Network
NetworkSummaryToolbar SEM NetworkOffenseList Offenses Tab - By Network - double-click an
offense.
ObfuscationProleContextMenu QRadar ObfuscationProles Admin - Data Obfuscation Management
ObfuscationRightClick QRadar Deprecated
OffenseListSmallToolbar SEM AttackerOffenseList Offenses - double-click a row in Offenses -
double-click row in Top 5 SourceIPs - select
a row and right click
SEM
TargetOffenseList Offenses - double-click a row in Offenses
- double-click row in Top 5 SourceIPs -
double-click a row - select a row and right
click
OffenseListToolbar SEM OffenseList Offenses tab main page
OffenseSummaryToolbar SEM OffenseSummary Offenses tab, double-click Offense - toolbar
OffenseDeviceList Click Display > Log Sources
OffenseUserList Click Display > Users
OffenseRuleList Click Display > Rules
OffenseSummaryToolbar OffenseAttackerList
Added in QRadar V.7.3.0
Offenses tab, double-click Offense - on
toolbar, Click Display > Sources
OffenseCategoryList
Added in QRadar V.7.3.0
Offenses tab, double-click Offense - on
toolbar, Click Display > Categories
Chapter 1. Developing with the QRadar app framework97

Table 46. Supported GUI Actions and Page IDs (continued)
GUI Action group App name Page ID Location
OffenseNetworkList
Added in QRadar V.7.3.0
Offenses tab, double-click Offense - on
toolbar, Click Display > Networks
OffenseSummaryToolbar SEM OffenseAnnotationList
Added in QRadar V.7.3.2
Click Display > Annotations
OffenseSummaryToolbar SEM OffenseTargetList
Added in QRadar V.7.3.2
Click Display > Destinations
OffenseSummaryToolbar SEM NotesList
Added in QRadar V.7.3.2
Click Display > Notes
ReferenceSetElemsContextMenu QRadar ReferenceSetElems Admin tab- Reference Set Management -
View a reference set - Content tab, right-click
row
ReferenceSetElemsToolbar QRadar ReferenceSetElems Admin tab- Reference Set Management -
View a reference set - Content tab
ReferenceSetRulesContextMenu QRadar ReferenceSetRules Admin tab - Reference Set Management -
View a reference set - References tab, right-
click row
ReferenceSetRulesToolbar QRadar ReferenceSetRules Admin tab - Reference Set Management -
View a reference set - References tab, click
row, click toolbar button
ReferenceSetsContextMenu QRadar ReferenceSets Admin tab - Reference Set Management -
right-click a reference set.
ReferenceSetsToolbar QRadar ReferenceSets Admin tab -Reference Set Management
ReportTemplateListToolbar Reports ReportTemplateListAll Reports tab toolbar
SensorDeviceListToolbar EventViewer SensorDeviceList Admin tab - Log Sources
TargetList SEM OffenseSummary Offenses tab - double-click offense, Top 5
Destination IPs table, right-click row.
TargetListToolbar SEM TargetList Offenses tab - By Destination IP.
TargetSummaryToolbar
SEM
TargetOffenseList
Offenses tab - By Destination IP - double-
click offense
TargetNotesList Offenses tab - By Destination IP - double
click offense - click Notes on toolbar
TargetAttackerList Offenses tab - By Destination IP - double
click offense - click Sources on toolbar
TenantListToolbar QRadar TenantList Admin tab - Tenant Management
VaScannerSchedulesListToolbar Assets VaScannerSchedulesList Admin tab - Schedule VA Scanners
VaScannersListToolbar Assets VaScannersList Admin tab - VA Scanners
ViewNotesToolbar SEM OffenseSummary Offenses tab - double-click Offense, Last 5
Notes table toolbar
ViewOffenseDevicesToolbar SEM OffenseSummary Offenses tab - double-click Offense - Top 5
Log Sources table toolbar
ViewoffenseusersToolbar SEM OffenseSummary Offenses tab - double-click Offense, Top 5
Users table toolbar
VulnerabilityManagementListPopup assetprole ByAssetListForm, ByNetworkList,
ByOpenServiceList, ByVulnerabilityList,
MyAssignedVulnerabilitiesList,
ByVulnerabilityInstanceList
Vulnerabilities tab - Manage Vulnerabilities
- By Network
- By Asset
- By Vulnerability
- By Open Service
- My Assigned Vulnerabilities
arielListToolbar Surveillance FlowList Network Activity tab
customEventListToolbar EventViewer EventList Log Activity tab
ipPopup
Assets
assetprole
assetprole
assetprole
assetprole
AssetList
MyAssignedVulnerabilitiesList
ByVulnerabilityInstanceList
ByAssetListForm
ExceptionRulesList
Right-click IP address on Assets tab,
Vulnerability tab - Manage Vulnerabilities -
Vulnerability Exception
98 IBM QRadar : QRadar Application Framework Guide
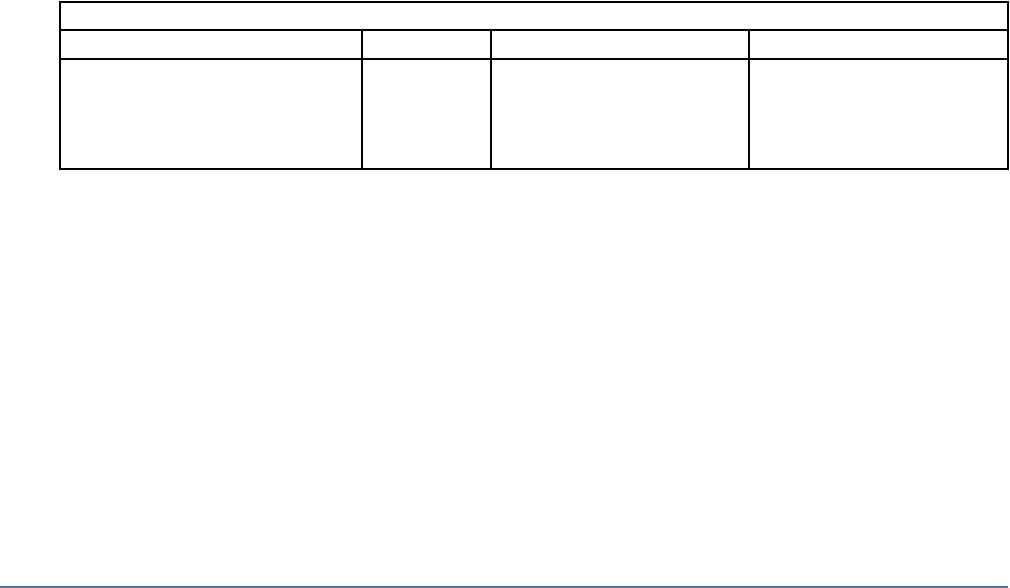
Table 46. Supported GUI Actions and Page IDs (continued)
GUI Action group App name Page ID Location
userNamePopup Assets AssetDetailsVulnList
For example, Assets Tab, click IP Address
to View Asset Details, select a row in
Vulnerabilities table, right-click Technical
User, see right-click View Assets /View
Events
Also used in Offenses, Log Activity.
Deprecated GUI actions
In QRadar V7.3.0 and later, the following GUI actions are deprecated:
• OffenseList
• NetworkList
• HistoricalCorrelationToolbar
• OffenseRuleList
• OffenseDeviceList
• OffenseUserList
• NotesList
• ByAssetListForm
Application globalization
Globalization refers to implementing multi-language support for your app that is built into the application
without the need for further engineering efforts.
Consider two aspects when you globalize your app:
• Globalization of IBM QRadar specic elements such as tab labels, toolbar button text, and tooltip
content.
• Globalization of application-specic content
Globalization of QRadar specic elements
QRadar elements are object types that can be dened in the application manifest.json le.
Globalization of QRadar elements includes the use of translated keys that are injected into your app's
manifest.json, and ingested into the QRadar globalization store.
Globalization of application-specic content
The GUI Application Framework does not support any single pre-dened globalization approach nor does
it provide an implementation stack for app developers to use for globalization. You can use common Flask
and python packages and approaches to globalize your application-specic content.
Globalization of QRadar elements
Add language-specic text strings to your app to globalize IBM QRadar elements such as tab labels,
toolbar button text, and tooltip content.
To globalize you app, you must create locale-specic properties les for the locales you want to use.
In the manifest.json le, you must congure the resource_bundles block to dene the locales and
the location of properties les that contains locale-specic text strings your app uses.
Globalization resource bundle properties les for the specied language code are stored in the app's
app/static/resources folder. The string elements are displayed in the current IBM QRadar user's
preferred locale, as dened within the QRadar GUI itself.
Chapter 1. Developing with the QRadar app framework
99

In the following example, the "Hello World" app includes locale-specic text.
manifest.json
{
"name":"com.ibm.hellog11n.name",
"description":"Application to display QHelloWorld",
"version":"1.0.2",
"areas": [
{
"id":"com.ibm.hellog11n.name",
"text":"com.ibm.hellog11n.name",
"description":"com.ibm.hellog11n.desc",
"url":"index",
"required_capabilities":["ADMIN"]
}
],
"resource_bundles": [
{
"locale": "en_US",
"bundle": "resources/hello_en_US.properties"
},
{
"locale": "es",
"bundle": "resources/hello_es.properties"
},
{
"locale": "fr",
"bundle": "resources/hello_fr.properties"
},
{
"locale": "en",
"bundle": "resources/hello_en.properties"
},
{
"locale": "ja",
"bundle": "resources/hello_ja.properties"
}
]
}
Three globalization keys are referenced by the app manifest metadata denition le:
• com.ibm.hellog11n.id
• com.ibm.hellog11n.name
• com.ibm.hellog11n.desc
The resource_bundles block denes locales for standard English, American English, French, and
Spanish. The bundle eld points to the properties le for each language locale.
Globalization key naming conventions
Use a consistent naming format for any globalization keys that are made available by resources les
within your app code. One useful approach is to employ a fully qualied company-app prex to all your
keys. This strategy prevents the replication of existing QRadar globalization store keys or keys made
available by other apps.
Here's an example:
• com.ibm.myapp.key1=value1
• com.ibm.myapp.key2=value2
Properties les
The resource_bundles block denes locales for standard English, American English, French, Spanish
and Japanese. The bundle eld points to the properties le for each language locale.
100
IBM QRadar : QRadar Application Framework Guide
The properties les are stored in the app/static/resources folder.
The id, text, and description elds in the areas block use the key that is dened in the properties
les. The key contains the value that is used for the app's user interface tab name in each language.
Text strings for globalization are stored as key/value pairs in Java format properties les.
Language locale properties le must use the following naming convention:
application_<LANG>.properties. For the purposes of this example, four properties les were
created.
These properties les are consumed by the main QRadar SIEM codebase, within a Java virtual machine
(JVM). It must adhere to Java processing support for properties les. Currently, Latin-1 font characters,
and Unicode characters are supported. Language sets that contain non-Latin-1 font characters must be
represented by their Unicode equivalents. Install the Java 7 Java Development Kit (JDK) and use the Java
Native-To-ASCII converter (native2ascii) to convert your content.
static/resources/hello_en.properties:
com.ibm.hellog11n.name=Hello World
com.ibm.hellog11n..id=Hello_World_G11n
com.ibm.hellog11n.desc=A fully globalized Hello World App
static/resources/hello_en_US.properties:
com.ibm.hellog11n.name=Hello World
com.ibm.hellog11n.id=Hello_World_G11n
com.ibm.hellog11n.desc=A fully globalized Hello World App
static/resources/hello_es.properties:
com.ibm.hellog11n.name=Hola Mundo
com.ibm.hellog11n.id=Hello_World_G11n
com.ibm.hellog11n.desc=Un totalmente globalizado Hello World App
static/resources/hello_fr.properties:
com.ibm.hellog11n.name=Bonjour Le Monde
com.ibm.hellog11n.id=Hello_World_G11n
com.ibm.hellog11n.desc=Un App World Bonjour totalement globalisé
static/resources/hello_ja.properties:
com.ibm.hellog11n.name=\u3053\u3093\u306b\u3061\u306f\u4e16\u754c
com.ibm.hellog11n.id=Hello_World_G11n
com.ibm.hellog11n.desc=\u5b8c\u5168\u306b\u30b0\u30ed\u30fc\u30d0\u30eb\u306aHello
World\u30a2\u30d7\u30ea\u30b1\u30fc\u30b7\u30e7\u30f3
Your Flask endpoint/services code: views.py
The views.py le denes a flask route, or service endpoint, that uses a Jinja2 template HTML page to
build an HTML string that is to be returned from the service endpoint.
__author__ = 'IBM'
from flask import render_template, send_from_directory
from app import app
from qpylib import qpylib
@app.route('/')
@app.route('/index')
def index():
return render_template("index.html", title = "QApp1 : Hello World !")
Chapter 1. Developing with the QRadar app framework
101
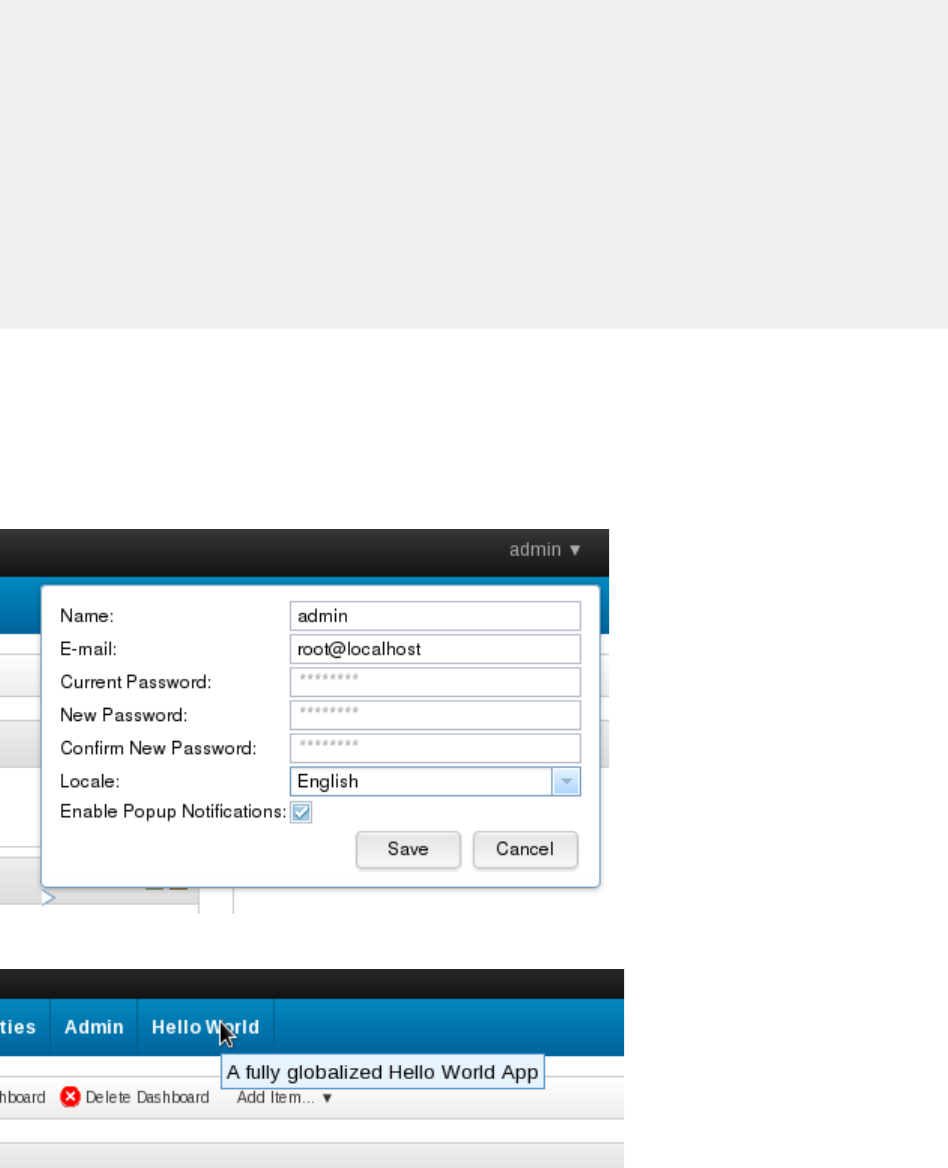
The rendered views: app/templates/index.html
The following Jinja2 template is a simple web page, a static HTML string that is returned by the endpoint.
No globalization occurs within your view with the following example.
<!doctype html>
<html lang="en">
<head>
<meta charset="utf-8">
<title>{{title}} - Main</title>
<link rel="stylesheet" href="static/css/style.css">
</head>
<body>
<div id="pageheader" class="pagebanner">
IBM QRadar Application : Hello World !...
</div>
<div id="contentpane">
Hello! Welcome to the first Qradar app served from the AppFramework
</div>
</body>
</html>
QRadar user locale preferences
To view the locale-specic content in QRadar, you must set your locale preferences.
Click Admin > User Preferences on the upper left of the QRadar user interface, and then select your
locale from the Locale menu.
The following image shows the user locale preferences dialog.
For the current example, if you choose any of the English language locales, you see:
For the current example, if you choose any of the Spanish language locales, you see:
You see the following image, if you choose any of the English language locales.
102
IBM QRadar : QRadar Application Framework Guide
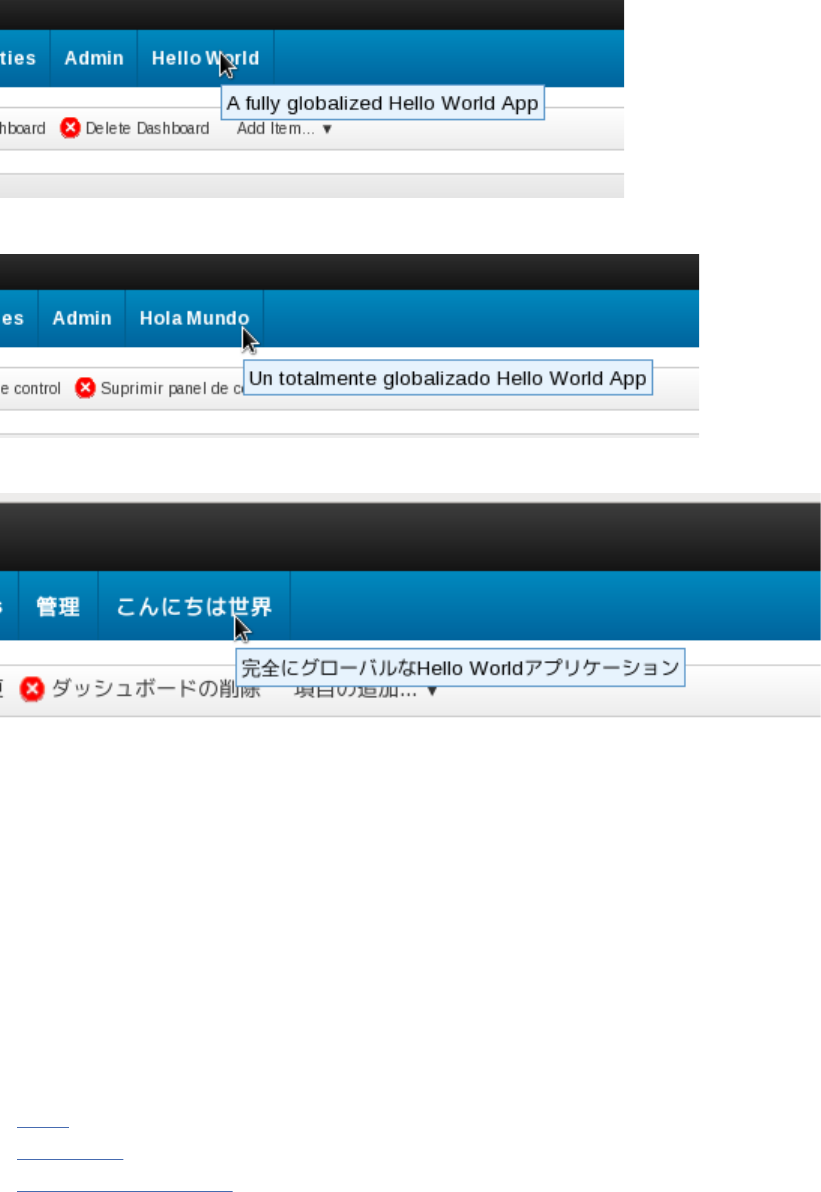
You see the following image, if you choose any of the Spanish language locales.
You see the following image, if you choose any of the Japanese language locales.
You can determine the following information from these globalized examples:
• The new tab uses the value in the manifest.json name eld as the text value for the tab.
• The tab tooltip the value in the manifest.json description eld as the text value for its content.
• Globalization resource les that are bundled with the app are ingested by the QRadar globalization
store.
• QRadar user session preferences for each locale use key look-ups to reflect the language-specic text
you want to display.
Globalization of application-specic content
Globalize application-specic content by using Python Babel, Flask Babel, and Jinja2 templates to .
Use the links to the following technologies to help you globalize your application-specic content:
• Babel (http://babel.pocoo.org/) is the standard globalization package for Python.
• Flask-Babel (https://pythonhosted.org/Flask-Babel/) is an extension to Flask.
• Jinja2/Babel integration (http://jinja.pocoo.org/docs/dev/integration/) provides instructions on how to
use Babel with Jinja2 templates.
Key concepts
For this example, you install the Flask-Babel pip package and its dependents into your app's
src_deps/pip/ directory. The Flask-Babel package, provides the pybabel tool, which you can use to
create translation les for your Flask-based app.
Chapter 1. Developing with the QRadar app framework
103
QRadar passes the user's preferred locale in the Accept-Languages header attribute through in the
request header to your app.
To use the Flask-Babel package to create globalization text values that your app employs, use the
following workflow:
1. Use the pybabel tool to extract out locale keys, typically to a .pot le.
2. Use the pybabel tool to build templated .po les for each language set you want to support.
3. Edit and complete the .po le. In other words, translate all the keys to the language-specic variant of
the text value.
4. Use the pybabel tool to compile the completed .po les into a binary set of .mo les that can be
employed by your Flask python code, or your Jinja2 templates.
Pre-requisites
To work through this example, you must install the following Python packages into your app's
src_deps/pip/ directory.
• pytz-2015.6-py2.py3-none-any.whl
• Babel-2.1.1-py2.py3-none-any.whl
• speaklater-1.3.tar.gz
• Flask-Babel-0.9.tar.gz
You must also create an ordering.txt le in the src_deps/pip/ directory that contains the following
content:
pytz-2015.6-py2.py3-none-any.whl
Babel-2.1.1-py2.py3-none-any.whl
speaklater-1.3.tar.gz
Flask-Babel-0.9.tar.gz
Note: Use the pip install -d src_deps/pip flask-babel command from within the virtual
environment that the SDK provides to download the dependencies for Flask-Babel.
Bundle python wheel (whl) les instead of .tar le (tar.gz) source les wherever possible. Some raw
python source package .tar les need to use the gcc compiler or other tools that the base docker
container that hosts your app code might not have.
Build python wheel les from package source tarballs on your local system. Here's an example:
tar -xvzf some_package.tar.gz
python setup.py sdist bdist_wheel
Jinja2 template: app/templates/index.html
This example builds on the HelloWorld sample app. The original HTML template was built with hardcoded
English language-specic text values. The following example wraps the English locale strings values with
Jinja2 directives that use the gettext functions from Flask-Babel. Here's an example:
<!doctype html>
<html lang="en">
<head>
<meta charset="utf-8">
<title>{{title}} - Main</title>
<link rel="stylesheet" href="static/css/style.css">
</head>
<body>
<div id="pageheader" class="pagebanner">
<p>{{ _( 'IBM QRadar Application : Hello World' ) }}</p>
</div>
<div id="contentpane">
<p>{{ _( 'Hello! and Welcome to the first Qradar app
served from the AppFramework/Docker instance on your console' ) }}</p>
104
IBM QRadar : QRadar Application Framework Guide

</div>
<div class="news-wrapper">
<p class="quote">{{ _( 'Hello World' ) }}</p>
</div>
</body>
</html>
This example uses the shorthand alias for gettext function. You can also use the full form. For example:
{{ gettext( '...') }}
This method provides a useful mechanism to quickly build and prototype your app. You can return later to
make it locale aware. By using the actual initial text as keys, you keep the template readable.
Note: Eliminate white space around the directive. For example, consider the use of an HTML <span>,
<div> or other element. The pybabel tool has some difculties to extract all key values.
Congure pybabel
You must congure the pybabel tool so that it is aware of what source les to examine.
[python: **.py]
[jinja2: **/templates/**.html]
extensions=jinja2.ext.autoescape,jinja2.ext.with_
In this example, pybabel is congured to examine all Python source les in the app/ folder, and all HTML
les in any sub directory of the app/templates/ folder.
The pybabel tool uses the babel.pyle to know which directories or les to examine within your app for
potential translatable entries. It looks for gettext(..) and _(..) entries in your *.py les and your
Jinja2 templates to build into a local .pot le.
Create the .pot le
To create a .pot le, open a command line and type the following command from within the app/ folder:
pybabel extract -F babel.cfg -o messages.pot
A message.pot le is created in the app/ folder. Its content is similar to the following le:
# Translations template for PROJECT.
# Copyright (C) 2015 ORGANIZATION
# This file is distributed under the same license as the PROJECT project.
# FIRST AUTHOR <EMAIL@ADDRESS>, 2015.
#
#
msgid ""
msgstr ""
"Project-Id-Version: PROJECT VERSION\n"
"Report-Msgid-Bugs-To: EMAIL@ADDRESS\n"
"POT-Creation-Date: 2015-10-07 21:27+0100\n"
"PO-Revision-Date: YEAR-MO-DA HO:MI+ZONE\n"
"Last-Translator: FULL NAME <EMAIL@ADDRESS>\n"
"Language-Team: LANGUAGE <[email protected]>\n"
"MIME-Version: 1.0\n"
"Content-Type: text/plain; charset=utf-8\n"
"Content-Transfer-Encoding: 8bit\n"
"Generated-By: Babel 1.3\n"
#: templates/index.html:11
msgid "IBM QRadar Application : Hello World"
msgstr ""
#: templates/index.html:15
msgid ""
"Hello! and Welcome to the first Qradar app served from the "
"AppFramework/Docker instance on your console"
msgstr ""
#: templates/index.html:19
Chapter 1. Developing with the QRadar app framework
105
msgid "Hello World"
msgstr ""
You can use the msgid entries as your keys.
Create the .po les
You create individual language-specic .po les for Spanish, French, and English. From a command line,
type the following commands from within the app/ folder:
pybabel init -i messages.pot -d translations -l es
pybabel init -i messages.pot -d translations -l fr
pybabel init -i messages.pot -d translations -l en
pybabel init -i messages.pot -d translations -l ja
These commands are used to create the translation les in the following locations:
• app/translations/es/LC_Messages/messages.po
• app/translations/fr/LC_Messages/messages.po
• app/translations/en/LC_Messages/messages.po
• app/translations/ja/LC_Messages/messages.po
The following example is the app/translations/es/LC_Messages/messages.po le that is
generated:
# Spanish translations for PROJECT.
# Copyright (C) 2015 ORGANIZATION
# This file is distributed under the same license as the PROJECT project.
# FIRST AUTHOR <EMAIL@ADDRESS>, 2015.
#
#
msgid ""
msgstr ""
"Project-Id-Version: PROJECT VERSION\n"
"Report-Msgid-Bugs-To: EMAIL@ADDRESS\n"
"POT-Creation-Date: 2015-10-07 16:02+0100\n"
"PO-Revision-Date: 2015-10-07 16:04+0100\n"
"Last-Translator: FULL NAME <EMAIL@ADDRESS>\n"
"Language-Team: es <[email protected]>\n"
"Plural-Forms: nplurals=2; plural=(n != 1)\n"
"MIME-Version: 1.0\n"
"Content-Type: text/plain; charset=utf-8\n"
"Content-Transfer-Encoding: 8bit\n"
"Generated-By: Babel 1.3\n"
#: templates/index.html:11
msgid "IBM QRadar Application : Hello World"
msgstr ""
#: templates/index.html:15
msgid "Hello! and Welcome to the first Qradar app served from the "
"AppFramework/Docker instance on your console"
msgstr ""
#: templates/index.html:19
msgid "Hello World"
msgstr ""
Edit the .po les
You edit the .po les to add the language-specic text strings that QRadar uses to translate your app's
content. For each msgid in the .po le, you must enter a corresponding msgstr value in the target
language.
106
IBM QRadar : QRadar Application Framework Guide
The following example is a code snippet from the app/translations/es/LC_Messages/
messages.po le:
#: templates/index.html:19
msgid "Hello World"
msgstr "Hola Mundo"
Create the .mo les
To create the .mo les, open a command line and type the following command from within the app/
folder:
pybabel compile -d translation
This command compiles all your .po les into .mo les in the following locations:
• app/translations/es/LC_Messages/messages.mo
• app/translations/fr/LC_Messages/messages.mo
• app/translations/en/LC_Messages/messages.mo
• app/translations/ja/LC_Messages/messages.mo
The QRadar GUI app framework provides a default Flask environment that looks for locale-specic les in
the sub directories of the app/translations/ folder.
To specify the UTF-8 encoded locales that your app supports, you can add a config.py le to the app/
folder. The le contains content similar to the following example:
# -*- coding: utf-8 -*-
# ...
# available languages
LANGUAGES = {
'en': 'English',
'es': 'Español',
'fr': 'Français',
'ja': '日本語'
}
This globalization support le helps QRadar to nd the .mo le for each locale you specify.
After you create the .mo les, you can remove the .po, .pot, and babel.py les if you do not want
these resources to be packaged with your app.
views.py
__author__ = 'IBM'
from flask import render_template, send_from_directory, request
from app import app
from flask.ext.babel import gettext
1
from config import LANGUAGES
from qpylib import qpylib
from flask.ext.babel import Babel
babel = Babel(app) 2
@babel.localeselector 3
def get_locale():
return request.accept_languages.best_match(LANGUAGES.keys())
@app.route('/')
@app.route('/index')
def index():
qpylib.log(request.headers.get('Accept-Language', ''))
return render_template("index.html", title = "QApp1 : Hello World !")
The following list describes content from the views.py code snippet:
Chapter 1. Developing with the QRadar app framework
107
1. The gettext method is imported from the Babel package. This line is optional but it is useful if you
want to use locale text away from the python tier. In the Jinja2 template for this example, the
gettext methods were used to extract key values.
2. The Flask app is injected into a Babel context so that your app can render locale-specic text.
3. This code applies the Babel localeselector decorator pattern across all your routes (in other
words, any request that comes in from QRadar). The decorator uses the locales that are dened in the
app/config.py le to connect the best-t language-specic keys le to the incoming request.
Custom fragments injection points
Use custom fragment injection points to display custom information in QRadar.
You add the injection point information to the app_name, page_id, and location elds in the
fragments block in the manifest le. The following table lists the injection point locations that you
use in the fragments block for each tab and page.
For some QRadar pages, HTML fragments can be injected at the top (header) or bottom (footer) of the
page. If injection points are not specied in the injection point name, the content is injected at the top of
the page (header). On the Admin tab, you can inject content at each section header.
The following table shows examples of custom fragments.
Table 47. Custom fragments injection point examples
Tab and page Sample manifest entry
Offenses > My Offenses
header
"fragments": [
{
"app_name": "SEM",
"page_id": "MyOffenseList",
"location": "header"
"rest_endpoint": "/somerestendpoint"
}
Offenses > My Offenses
footer
"fragments": [
{
"app_name": "SEM",
"page_id": "MyOffenseList",
"location": "footer"
"rest_endpoint": "/somerestendpoint"
}
Offenses > All Offenses >
header
"fragments": [
{
"app_name": "SEM",
"page_id": "OffenseList",
"location": "header"
"rest_endpoint": "/somerestendpoint"
}
Offenses > All Offenses
footer
"fragments": [
{
"app_name": "SEM",
"page_id": "OffenseList",
"location": "footer"
"rest_endpoint": "/somerestendpoint"
}
108 IBM QRadar : QRadar Application Framework Guide
Table 47. Custom fragments injection point examples (continued)
Tab and page Sample manifest entry
Offenses > By Category
header
"fragments": [
{
"app_name": "SEM",
"page_id": "CategoryTypeSummaryList",
"rest_endpoint": "/somerestendpoint"
}
Offenses > By Source IP
header
"fragments": [
{
"app_name": "SEM",
"page_id": "AttackerList",
"location": "header"
"rest_endpoint": "/somerestendpoint"
}
Offenses > By Source IP
footer
"fragments": [
{
"app_name": "SEM",
"page_id": "AttackerList",
"location": "footer"
"rest_endpoint": "/somerestendpoint"
}
Offenses > By Destination IP
header
"fragments": [
{
"app_name": "SEM",
"page_id": "TargetList",
"location": "header"
"rest_endpoint": "/somerestendpoint"
}
Offenses > By Destination IP
footer
"fragments": [
{
"app_name": "SEM",
"page_id": "TargetList",
"location": "footer"
"rest_endpoint": "/somerestendpoint"
}
Offenses > By Network
header
"fragments": [
{
"app_name": "SEM",
"page_id": "NetworkList",
"location": "header"
"rest_endpoint": "/somerestendpoint"
}
Offenses > By Network footer
"fragments": [
{
"app_name": "SEM",
"page_id": "NetworkList",
"location": "footer"
"rest_endpoint": "/somerestendpoint"
}
Chapter 1. Developing with the QRadar app framework109

Table 47. Custom fragments injection point examples (continued)
Tab and page Sample manifest entry
Offenses > Rules header
"fragments": [
{
"app_name": "QRadar",
"page_id": "RulesWizardExistingRules",
"rest_endpoint": "/somerestendpoint"
}
Offenses > Offense Summary
header
"fragments": [
{
"app_name": "SEM",
"page_id": "OffenseSummary",
"rest_endpoint": "/somerestendpoint"
}
Assets > Asset Proles
header
"fragments": [
{
"app_name": "Assets",
"page_id": "AssetList",
"location": "header"
"rest_endpoint": "/somerestendpoint"
}
Assets > Asset Proles footer
"fragments": [
{
"app_name": "Assets",
"page_id": "AssetList",
"location": "footer"
"rest_endpoint": "/somerestendpoint"
}
Assets > Server Discovery
header
"fragments": [
{
"app_name": "Assets",
"page_id": "ServerDiscovery",
"rest_endpoint": "/somerestendpoint"
}
Assets > VA Scan header
"fragments": [
{
"app_name": "Assets",
"page_id": "VaScannerSchedulesList",
"location": "header"
"rest_endpoint": "/somerestendpoint"
}
Assets > VA Scan footer
"fragments": [
{
"app_name": "Assets",
"page_id": "VaScannerSchedulesList",
"location": "footer"
"rest_endpoint": "/somerestendpoint"
}
110 IBM QRadar : QRadar Application Framework Guide

Table 47. Custom fragments injection point examples (continued)
Tab and page Sample manifest entry
Assets > Asset Proles > Id >
Asset Details dialog header
"fragments": [
{
"app_name": "Assets",
"page_id": "AssetDetailsVulnList",
"location": "header"
"rest_endpoint": "/somerestendpoint"
}
Assets > Asset Proles > Id >
Asset Details dialog footer
"fragments": [
{
"app_name": "Assets",
"page_id": "AssetDetailsVulnList",
"location": "footer"
"rest_endpoint": "/somerestendpoint"
},
Admin > System
Conguration header
"fragments": [
{
"app_name": "QRadar",
"page_id": "systemConfiguration",
"rest_endpoint": "/somerestendpoint"
}
Admin > Data Sources header
"fragments": [
{
"app_name": "QRadar",
"page_id": "dataSources",
"rest_endpoint": "/somerestendpoint"
}
Admin > Remote Networks
& Services Conguration
header
"fragments": [
{
"app_name": "QRadar",
"page_id": "viewConfiguration",
"rest_endpoint": "/somerestendpoint"
}
Admin > Try it out header
"fragments": [
{
"app_name": "QRadar",
"page_id": "trialLicense",
"rest_endpoint": "/somerestendpoint"
}
Admin > Plug-ins header
"fragments": [
{
"app_name": "QRadar",
"page_id": "plugins",
"rest_endpoint": "/somerestendpoint"
}
The following table describes custom fragments injection points that are not included in the Custom
fragments injection points examples table.
Chapter 1. Developing with the QRadar app framework
111
Table 48. Custom fragments injection points
Tab and page Injection point
Admin QRadar.allTabs
Asset Details dialog
Assets.AssetDetailsVulnList.header
Assets.AssetDetailsVulnList.footer
Assets > Server Discovery
Assets.ServerDiscovery
Dashboard
QRadar.Dashboard
Log Activity
EventViewer.EventList.header
EventViewer.EventList.footer
Network Activity
Surveillance.FlowList.footer
Reports > All
Reports.ReportTemplateListAll.header
Reports.ReportTemplateListAll.footer
Reports > Daily
Reports.ReportTemplateListDaily.header
Reports.ReportTemplateListDaily.footer
Reports > Hourly
Reports.ReportTemplateListHourly.header
Reports.ReportTemplateListHourly.footer
Reports > Manual
Reports.ReportTemplateListManual.header
Reports.ReportTemplateListManual.footer
Reports > Monthly
Reports.ReportTemplateListMonthly.header
Reports.ReportTemplateListMonthly.footer
Reports > Weekly
Reports.ReportTemplateListWeekly.header
Reports.ReportTemplateListWeekly.footer
Risks > Conguration Monitor
SRM.ConfigDeviceList
112 IBM QRadar : QRadar Application Framework Guide
Table 48. Custom fragments injection points (continued)
Tab and page Injection point
Risks > Connections
QRadar.ArcList.header
QRadar.ArcList.footer
Risks > Policy Management >
By Asset
SRM.ByAssetList
Risks > Policy > By Policy
SRM.ByPolicyList
Risks > Policy Management >
By Policy Check
SRM.ByPolicyCheckList
Risks > Policy Monitor
SRM.MaintainQuestions
Risks > Simulation >
Simulations
SRM.SimulationList.header
SRM.SimulationList.footer
Risks > Simulation > Topology
Models
SRM.ModelList.header
SRM.ModelList.footer
Risks > Topology
SRM.NetworkTopology
Vulnerabilities > Manage
assetprofile.ByVulnerabilityInstanceList.header
assetprofile.ByVulnerabilityInstanceList.footer
Vulnerabilities > Manage > By
Asset
assetprofile.ByAssetListForm.header
assetprofile.ByAssetListForm.footer
Vulnerabilities > Manage > By
Network
assetprofile.ByNetworkList.header
assetprofile.ByNetworkList.footer
Vulnerabilities > Manage > By
Open Service
assetprofile.ByOpenServiceList.header
assetprofile.ByOpenServiceList.footer
Vulnerabilities > Manage > By
Vulnerability
assetprofile.ByVulnerabilityList.header
assetprofile.ByVulnerabilityList.footer
Chapter 1. Developing with the QRadar app framework113
Table 48. Custom fragments injection points (continued)
Tab and page Injection point
Vulnerabilities > My Assigned
assetprofile
.MyAssignedVulnerabilitiesList.header
assetprofile
.MyAssignedVulnerabilitiesList.footer
Vulnerabilities > Research >
Vulnerabilities
assetprofile.ResearchVulnerabilityList.header
assetprofile.ResearchVulnerabilityList.footer
Vulnerabilities > Vulnerability
Assignment
assetprofile.AssetOwner.header
assetprofile.AssetOwner.footer
Vulnerabilities > Vulnerability
Exception
assetprofile.ExceptionRulesList.header
assetprofile.ExceptionRulesList.footer
Custom column injection points
Use custom column injection points to add custom columns in QRadar.
The following table lists the custom column injection points that you can use in your app. The page IDs
are used in the page_id eld in the custom_columns block in the app's manifest le.
Table 49. Custom column injection point examples
Page ID Table Location
AssetDetailsVulnList
Assets > IP Address column to open Asset Details page and Vulnerabilities
table
AssetList Asset tab list
AttackerList Offenses > By Source IP
ByAssetListForm Vulnerabilities > Manage vulnerabilities > by Asset
ByNetworkList Vulnerabilities > Manage vulnerabilities > by Network
ByOpenServiceList Vulnerabilities > Manage vulnerabilities > by Open Service
ByVulnerabilityInstanceList Vulnerabilities > Manage vulnerabilities
ByVulnerabilityList Vulnerabilities > Manage vulnerabilities > by Vulnerability
ExceptionRulesList Vulnerabilities > Vulnerability Exception
FlowsourceList Admin > Flow Sources
MyAssignedVulnerabilitiesList Vulnerabilities > My Assigned Vulnerabilities
NetworkList Offenses > By Network
NetworkOffenseList Offenses > By Network Double-click an offense.
OffenseList Offenses tab main page
ReferenceSetElems Admin > Reference Set Management. Double-click row to open content
window > Content tab.
114 IBM QRadar : QRadar Application Framework Guide
Table 49. Custom column injection point examples (continued)
Page ID Table Location
ReferenceSetRules Admin > Reference Set Management. Double-click row to open content
window > References tab.
ReferenceSets Admin > Reference Set Management
SensorDeviceList Admin > Log Sources
TargetList Offenses > By Destination IP
VaScannerSchedulesList Admin > Schedule VA Scanners
VaScannersList Admin > VA Scanners
Custom actions for CRE responses
You can add your own script that runs as a part of a custom action when a custom rules engine (CRE) rule
is triggered.
The following scripting languages are supported:
• Bash version 4.1.2
• Perl version 5.10.1
• Python version 2.7.9
You can use base libraries in these languages to do custom operations that use data that is passed
directly from the event that triggered the rule.
Create custom actions by using the Dene Actions window on the Admin tab. You can also create custom
actions by using the /api/analytics/custom_actions REST endpoints. The following sample is an
example of a custom action JSON le that the GET /api/analytics/custom_actions/actions
endpoint returns.
{
"id": 1004,
"interpreter": 1,
"description": "Custom action containing two parameters",
"name": "custom_action_1",
"script": 43,
"parameters": [
{
"encrypted": false,
"name": "fixedParam",
"value": "Hello World!",
"parameter_type": "fixed"
},
{
"encrypted": false,
"name": "dynamicParam",
"value": "sourceip",
"parameter_type": "dynamic"
}
]
}
The two JSON objects that are contained within the parameters eld represent parameters, which are
passed to your script when it is run. Two types of parameters are supported:
• Fixed parameters represent xed values that are passed to your script as is. For example, if the
fixedParam parameter has a value of "Hello World!" when accessed from your script, this parameter
returns the value "Hello World!".
• Dynamic parameters and their corresponding value elds represent properties that are extracted
from the event that triggered the CRE rule. For example, if the dynamicParam parameter has a value
of "sourceip" when passed to your script, this value is replaced with the corresponding source IP
address that is contained within the rule that triggers the event.
Chapter 1. Developing with the QRadar app framework
115

Parameters are passed to scripts in the order that they are dened within the custom action. These
parameters can then be accessed by using the supported methods for each language:
Bash
param1=$1 # First parameter
param2=$2 # Second parameter
Perl
$param1 = $ARGV [ 0 ]
$param2 = $ARGV [ 1 ]
Python
import sys
param1 = sys.argv[1]
param2 = sys.argv[2]
Example: Making a REST call to an external server
To write a script that makes a REST call to an external server when a rule is triggered, create a script that
passes the IP address to the external server. The following JSON le is an example custom action:
{"id": 1004,
"interpreter": 1,
"description": "Custom action containing two parameters",
"name": "custom_action_1",
"script": 43,
"parameters": [
{
"encrypted": false,
"name": "serverIP",
"value": "10.100.78.11",
"parameter_type": "fixed"
},
{
"encrypted": false,
"name": "username",
"value": "admin",
"parameter_type": "dynamic"
},
{"encrypted": true,
"name": "password",
"value": "ASDB231434DKSD#@SDA23SDD1",
"parameter_type": "dynamic"
},
{
"encrypted": false,
"name": "offendingIP",
"value": "sourceip",
"parameter_type": "dynamic"
}
]
}
The following Bash script uses these parameters to pass the IP address to an external server.
#!/bin/bash
# Assign parameters to variables.
serverAddress=$1
username=$2
password=$3
offendingIP=$4
# Call to an external server REST endpoint using the supplied parameters.
curl -u $username: $password -i -H "Accept: application/json" -X POST
-d "ip= $offendingIP" "https://" $serverAddress/some_service
116
IBM QRadar : QRadar Application Framework Guide
Dening custom actions
You can attach scripts to custom rules that do custom actions in response to network events. Use the
Custom Action window to manage custom action scripts.
Use custom actions to select or dene the value that is passed to the script and to dene the resulting
action.
For example, you can write a script to create a rewall rule that blocks a source IP addressfrom your
network in response to a rule that is triggered by a dened number of failed login attempts.
The following examples are custom actions that are the outcomes of passing values to a script:
• Block users and domains.
• Initiate work flows and updates in external systems.
• Update TAXI servers with a STIX representation of a threat.
Custom actions work best with a low volume of events and with custom rules that have a low response
limiter value.
Take the following steps to dene your custom actions:
1. From the Admin tab, click the Dene Actions icon.
2. Click Add on the Custom Action window toolbar to open the Dene Custom Action dialog where you
can upload scripts that dene custom actions.
3. Select a programming language version that the product supports from the Interpreter list.
4. Select and name a parameter from the following table to pass to the script that you upload.
Table 50. Custom action parameters
Parameter Description
Fixed property Values that are passed to the custom action script.
Not based on the events or flows, but are based on other dened
values that you can use the script to act on.
For example, the xed properties username and password for a
third-party system are passed to a script that results in sending an
SMS alert, or other dened action.
You can encrypt xed properties, such as passwords, by selecting
the Encrypt value check box.
Network event property Dynamic Ariel properties that are generated by events. Select from
the Property list.
For example, the network event property sourceip provides a
parameter that matches the source IP address of the triggered
event.
In order to ensure the security of your deployment, the product does not support the full range of
scripting functionality that is provided by the Python, Perl or Bash languages.
Parameters are passed into your script in the order in which you added them in the Dene Custom Action
dialog box.
Testing your custom action
You can test whether your script runs successfully before you associate it with a rule. Select a custom
action and click Test Execution > Execute to test your script. The Test custom action execution dialog
returns the result of the test and any output that is produced by the script.
Chapter 1. Developing with the QRadar app framework
117
Custom action scripts are executed inside a sand-boxed environment on your managed hosts. If you
need to write to disk from a custom action script, you must use the following directory: /home/
customactionuser. Custom action scripts execute on the managed host that runs the event processor
that triggered the rule.
After you congure and test your custom action, use the Rule Wizard to create a new event rule and
associate the custom action with it.
Testing your custom action
Test whether your script runs successfully before you associate it with a rule.
Procedure
1. From the Admin tab, click the Dene Actions icon.
2. Select a custom action.
3. Click Test Execution > Execute to test your script.
Custom action scripts are run inside a sandbox environment on your managed hosts. If you write to
disk from a custom action script, you must use the /home/customactionuser directory. Custom
action scripts run on the managed host that runs the event processor that triggered the rule.
What to do next
After you congure and test your custom action, use the Rule Wizard to create a new event rule and
associate the custom action with it.
Adding a custom action script to an event rule
You use the Rule Wizard to add a custom action script that runs in response to a custom rule event.
About this task
To create a new rule, you must have the Offenses > Maintain Custom Rules permission.
You can test rules locally or globally. A local test means that rule is tested on the local Event processor
and not shared with the system. A global test means that the rule is shared and tested by any Event
processor on the system. Global rules send events to the central Event processor, which might decrease
performance on the central Event processor.
Procedure
1. Click the Offenses tab.
2. On the navigation menu, click Rules.
3. From the Actions list, select New Event Rule.
4. In the Rule Test Stack Editor page, type a unique name for this rule in the enter rule name here eld
in the Rule pane.
5. From the list box, select Local or Global.
6. Add one or more tests to a rule:
a) To lter the options in the Test Group list box, type the text that you want to lter for in the Type to
lter eld.
b) From the Test Group list box, select the type of test you want to add to this rule.
c) For each test you want to add to the rule, select the plus (+) sign beside the test.
d) To exclude a test, click and at the beginning of the test in the Rule pane.
The and is displayed as and not.
e) Click the underlined congurable parameters to customize the variables of the test.
118
IBM QRadar : QRadar Application Framework Guide
f) From the dialog box, select values for the variable, and then click Submit.
7. To export the congured rule as a building block to use with other rules:
a) Click Export as Building Block.
b) Type a unique name for this building block.
c) Click Save.
8. On the Groups pane, select the check boxes of the groups to which you want to assign this rule.
9. In the Notes eld, type a note that you want to include for this rule. Click Next.
10. On the Rule Responses page, click the Execute Custom Action check box and select your script from
the Custom Action to execute drop-down list.
11. Click Next.
12. Review the Rule Summary, and then click Finish.
Custom action REST API endpoints
Custom action endpoints are available in the IBM QRadar API that you can use to aid application
development.
Endpoint Parameters Description
GET /analytics/
custom_actions/actions
elds, range, lter Retrieves a list of available
custom actions.
POST /analytics/
custom_actions/actions
elds, custom_action Creates a new custom action with
the supplied elds.
GET /analytics/
custom_actions/actions/
{action_id}
action_id, elds Retrieves a custom action based
on the supplied action_id.
POST /analytics/
custom_actions/actions/
{action_id}
action_id, elds, custom_action Updates an existing custom
action.
DELETE /analytics/
custom_actions/actions/
{action_id}
action_id Deletes an existing custom
action.
GET /analytics/
custom_actions/
interpreters
elds, Range, lter Retrieves a list of available
custom action interpreters.
GET /analytics/
custom_actions/
interpreters/
{interpreter_id}
interpreter_id, elds Retrieves a custom action
interpreter based on the
interpreter ID.
GET /analytics/
custom_actions/scripts
application id Retrieves a list of meta-data for
available custom action script
les.
POST /analytics/
custom_actions/scripts
elds, le Creates a new custom action
script le.
GET /analytics/
custom_actions/scripts/
{script_id}
script_id, elds Retrieves meta-data of a custom
action script le based on
supplied script_id.
POST /analytics/
custom_actions/scripts/
{script_id}
script_id, elds, le Updates an existing custom
action script le.
Chapter 1. Developing with the QRadar app framework119
Endpoint Parameters Description
DELETE /analytics/
custom_actions/scripts/
{script_id}
script_id Deletes an existing custom action
script le.
For more information, see the API documentation page on your QRadar Console: https://
<Console_IP>/api_doc. Alternatively, see the IBM QRadar API Guide.
Custom action and QRadar rules
Use rule names and rule IDs as parameters in custom action scripts.
Pass the rule ID and rule name to custom action scripts by using the RULE_ID and RULE_NAME
environmental variables.
The following Bash script example shows how to access the rule ID and rule name of the custom rule that
triggers the custom action:
Bash script example
#!/bin/bash
# The following script shows how to access
# the id and name of the custom rule that triggered
# the custom action in bash
echo "Rule id: $RULE_ID"
echo "Rule name: $RULE_NAME"
The following Python script example shows how to access the rule ID and rule name of the custom rule
that triggers the custom action:
Python script example
#!/usr/bin/python
# The following script shows how to access
# the id and name of the custom rule that triggered
# the custom action in python
import os
rule_id = os.environ.get('RULE_ID')
rule_name = os.environ.get('RULE_NAME')
print "Rule id: " + rule_id
print "Rule name: " + rule_name
The following Perl script example shows how to access the rule ID and rule name of the custom rule that
triggers the custom action:
Perl script example
#!/bin/perl
# The following script shows how to access
# the id and name of the custom rule that triggered
# the custom action in perl
$ruleId = $ENV{'RULE_ID'};
$ruleName = $ENV{'RULE_NAME'};
print "Rule id: $ruleId\n";
print "Rule name: $ruleName\n";
120
IBM QRadar : QRadar Application Framework Guide
Custom AQL functions
You can create IBM QRadar apps that use custom Ariel Query Language (AQL) functions.
After you upload the app, you can use these custom functions in AQL statements in advanced searches,
API calls, and application apps. For more information about AQL, see the IBM QRadar Ariel Query
Language Guide.
Coding tips
Before you implement custom AQL functions, consider these items:
• Scripts are not throttled and cannot be canceled. Be careful of innite loops and resource leaks in your
code.
• Deletion of custom functions is possible, but not supported.
• QRadar parses AQL strings much more than it needs to. Expensive init_function_name
implementations that are combined with the use of your function in a literal context can be expensive.
Use with caution.
• The execute_function_name implementation must be thread-safe. Use the Utils.concurrent
library to ensure thread safety.
Custom AQL function management
Custom AQL functions are uploaded and updated by using the QRadar Extension Manager on the Admin
tab. For more information about the QRadar Extension Manager, see the IBM QRadar Administration
Guide.
The following XML le is an example of a QRadar extension that denes a custom AQL function.
<content>
<custom_function>
<namespace>application</namespace>
<name>concat</name>
<return_type>string</return_type>
<parameter_types>string string</parameter_types>
<execute_function_name>calculate</execute_function_name>
<script_engine>javascript</script_engine>
<varargs>false</varargs>
<script>
function calculate(input1, input2)
{
return input1 + input2;
}
</script>
<username>user1</username>
</custom_function>
</content>
You can also use the Content Management Tool, which is a command-line tool, to upload extensions:
/opt/qradar/bin/contentManagement.pl -a update -f my_bundle.xml
The following code samples provide examples of how you can create QRadar apps that dene custom AQL
functions for use in AQL statements.
Example: Custom functions in AQL statements
AQL statements that use custom functions use the following basic format:
SELECT <CUSTOM FUNCTION NAMESPACE>::<CUSTOM FUNCTION NAME>(<INPUTS>) FROM <TABLE>
SELECT application::concat('This is my IP: ', sourceip) FROM events LIMIT 20
Chapter 1. Developing with the QRadar app framework
121
Example: Simple addition
1. Create the following QRadar extension:
<content>
<custom_function>
<namespace>application</namespace>
<name>add</name>
<return_type>number</return_type>
<parameter_types>number number</parameter_types>
<execute_function_name>execute</execute_function_name>
<script_engine>javascript</script_engine>
<script>
function execute(input1, input2)
{
return input1 + input2;
}
</script>
<username>user1</username>
</custom_function>
</content>
2. Use the QRadar Extensions Management to upload the extension to your QRadar Console. For more
information about the QRadar Extensions Management, see “Extensions management” on page 54
.
If you have multiple hosts, wait up to 60 seconds for the function to propagate across your
deployment.
You can use this function in AQL statements as follows:
SELECT application::add(eventcount, 5) FROM events
Example: Variable argument concatenation
1. Create the following QRadar extension:
<content>
<custom_function>
<namespace>application</namespace>
<name>concat</name>
<return_type>string</return_type>
<parameter_types>string</parameter_types>
<varargs>true</varargs>
<execute_function_name>execute</execute_function_name>
<script_engine>javascript</script_engine>
<script>
function execute()
{
var result = "";
for(var i=0; i<arguments.length; i++)
result = result + arguments[i];
return result;
}
</script>
<username>user1</username>
</custom_function>
</content>
2. Use the QRadar Extension Manager to upload the extension to your QRadar Console. For more
information about the QRadar Extension Manager, see “Extensions management” on page 54
.
If you have multiple hosts, wait up to 60 seconds for the function to propagate across your
deployment.
You can use this function in AQL statements:
SELECT application::concat(sourceip, ':', sourceport) FROM events
122
IBM QRadar : QRadar Application Framework Guide
Example: Complex initialization that uses a remote API
1. Create the following QRadar extension:
<content>
<custom_function>
<namespace>application</namespace>
<name>isFlaggedIP</name>
<return_type>boolean</return_type>
<parameter_types>host</parameter_types>
<execute_function_name>isFlaggedIP</execute_function_name>
<init_function_name>onInit</init_function_name>
<script_engine>javascript</script_engine>
<script>
var flaggedIPs;
function onInit()
{
var properties = Utils.config.readNamespacePropertiesFile('my_api.properties');
var ip = properties.get('ip');
var url = 'https://' + ip + '/my_api/flagged_ips';
var username = properties.get('username');
var token = properties.get('token');
var headers = {'SecurityToken': token};
var jsonResponse = JSON.parse(Utils.http.invokeHTTP("GET", url, 200, headers, null,
null));
flaggedIPs = [];
for(var i in jsonResponse)
{
flaggedIPs.push(jsonResponse[i]);
}
}
function isFlaggedIP(ip)
{
return (flaggedIPs.indexOf(ip) >= 0);
}
</script>
<username>user1</username>
</custom_function>
</content>
2. Use the QRadar Extension Manager on the Admin tab to upload the extension to your QRadar Console.
For more information about the QRadar Extension Manager, see “Extensions management” on page
54.
If you have multiple hosts, wait up to 60 seconds for the function to propagate across your
deployment.
3. Create a properties le with the following content in the /store/custom_functions/
namespaces/application/my_api.properties le.
ip=<ip for remote API server>
username=<your username for remote API server>
token=<your token for remote API server>
You can use this function in AQL statements:
SELECT application::isFlaggedIP(sourceip)
AS is_flagged_qradar_ip, sourceip FROM events
Custom AQL function elds
Multiple elds are available to custom AQL functions.
namespace and name
Required: Yes
Default:
Case-sensitive: No
Whitespace- sensitive: Yes
The following table describes the namespace and name elds for custom AQL functions.
Chapter 1. Developing with the QRadar app framework
123
Table 51. Namespace and name elds
Field Description
namespace The rst component that makes up the identier of a custom AQL function.
name The second component that makes up the identier of a custom AQL function.
Both values are case-insensitive and must be unique from all other custom functions. The Ariel database
uses a concatenation of these elds to expose the custom function through AQL. For example:
• namespace: :MyNamespace
• name::MyFunction
• AQL: MyNamespace: MyFunction
When you specify your custom function through AQL, you must employ double quotation marks when
white space or special characters are used.
return_type
You use the return_type eld to declare the script type that your custom function returns.
Required: Yes
Default:
Case-sensitive: No
Whitespace- sensitive: No
Example: String
The return value is automatically converted to the internal Java type that is interpreted by Ariel
(QRadar_type).
The following table describes acceptable script types for the return_type eld.
Table 52.
return_type eld acceptable script types
Type Script type QRadar type
STRING String java.lang.String
NUMBER Number java.lang.Number
LONG Number java.lang.Long
HOST String com.q1labs.core.dao.util.Host
PORT Number com.q1labs.frameworks.nio.Port
BOOLEAN Boolean java.lang.Boolean
parameter_types
You use the parameter_types eld to declare the type of each parameter that your custom function
accepts.
Required: Yes
Default:
Case-sensitive: No
Whitespace- sensitive: No
Example: String, Number, Boolean
The incoming Java object is automatically converted to your declared script type.
The following table describes acceptable script types for the parameter_types eld.
124
IBM QRadar : QRadar Application Framework Guide
Table 53. parameter_type eld acceptable script types
Type Script type QRadar type
STRING String java.lang.String
NUMBER Number java.lang.Number
LONG Number java.lang.Long
HOST String com.q1labs.core.dao.util.Host
PORT Number com.q1labs.frameworks.nio.Port
BOOLEAN Boolean java.lang.Boolean
Generally, when you pass parameters from AQL, most values are interoperable. If you nd they are not,
you can use AQL casting functions such as LONG and PORT.
Note: You can use an empty string if you accept no parameters.
varargs
If "true", variable arguments are used with your parameter_types value. You can specify the last type in
your parameter_types string zero or more times.
If your parameter_types value is empty, this value has no meaning.
Required: No
Default: false
Case-sensitive: Yes
Whitespace- sensitive: Yes
Example: true
The way that you handle variable arguments depends on the script engine that you use. For JavaScript,
you can use the built-in arguments variable:
function myFunction() {
for(var i=0; i<arguments.length; i++)
{
//Do something with arguments[i]
}
}
execute_function_name
The value of this eld maps to the execution function in your custom function script. The Java
programming language uses the parameters in your AQL string to call this function. It then uses the
value that is returned in the calculations.
The execution function is called concurrently. It must be thread-safe.
Required: Yes
Default:
Case-sensitive: Yes
Whitespace- sensitive: Yes
Example: calculate
init_function_name
The value of this optional eld maps to the initialization function in your custom function script. The Java
programming language must call this function only once for a search. Place your expensive initialization
Chapter 1. Developing with the QRadar app framework
125
code in this function so that your execution function is faster. Because this function is called once, it does
not need to be thread-safe.
Required: No
Default:
Case-sensitive: Yes
Whitespace- sensitive: Yes
Example: onInit
finish_function_name
The value of this optional eld maps to the nish function in your custom function script. The Java
programming language calls this function only once for a search. However, there might be some situations
in which it is never called. Close any resources that you hold onto within your script to prevent resource
leaks. Because this function is called only once, it does not need to be thread-safe.
Required: No
Default:
Case-sensitive: Yes
Whitespace- sensitive: Yes
Example: onFinish
script_engine
The value of this eld indicates the script engine that is used to interpret and invoke your script. The only
supported script engine is JavaScript.
Required: Yes
Default:
Case-sensitive: No
Whitespace- sensitive: No
Example: javascript
script
The value of this eld is the code for your custom function. It is interpreted based on the
script_engine that you specied.
You can place any code in here that you like, including other functions. However, the
execute_function_name must exist and must be a valid function.
Required: Yes
Default:
Case-sensitive: Yes
Whitespace- sensitive: Yes
Example: function addOne(value) {return value + 1;}
username
The value of this eld currently has no implementation. It makes reference to your IBM QRadar user
name.
Required: Yes
Default:
Case-sensitive: Yes
Whitespace- sensitive: Yes
Example: administrator
126
IBM QRadar : QRadar Application Framework Guide

Custom AQL function utilities
Use custom AQL function utilities.
Utils.concurrency.readLock
/**
* Acquire a read lock against the global lock.
*
* If the write lock is not held by another thread, this returns immediately.
* If the write lock is held by another thread then the current thread becomes
* disabled for thread scheduling purposes and lies dormant until
* the read lock has been acquired.
*/
void readLock()
JavaScript example:
Utils.concurrency.readLock();
try { /*Do something*/ }
finally { Utils.concurrency.readUnlock(); }
Utils.concurrency.readLock(String name)
/**
* Acquire a read lock against the given name.
* If a lock by the given name does not exist yet, it will be created.
*
* If the write lock is not held by another thread, this returns immediately.
* If the write lock is held by another thread then the current thread becomes
* disabled for threadscheduling purposes and lies dormant until
* the read lock has been acquired.
*
* @param name The name of the lock to acquire a read lock against.
* If null, global lock is used.
*/
void readLock(String name)
JavaScript example:
Utils.concurrency.readLock("my_lock");
try { /*Do something*/ }
finally { Utils.concurrency.readUnlock("my_lock"); }
Utils.concurrency.tryReadLock(long timeoutMsec)
/**
* Attempts to acquire a read lock against the global lock.
*
* If the write lock is not held by another thread, this returns immediately.
* If the write lock is held by another thread, this will wait
* a maximum of timeoutMsec millisecondsto acquire the read lock.
*
* @param timeoutMsec The maximum time to wait (in milliseconds) to acquire the lock
* <= 0 can be used to return immediately if the read lock can not be acquired.
* @return True if the read lock has been acquired, false otherwise.
*/
boolean tryReadLock(long timeoutMsec)
JavaScript example:
if(Utils.concurrency.tryReadLock(1000))
{
try { /* Lock acquired */ }
finally { Utils.concurrency.readUnlock(); }
}
else
throw "Failed to acquire lock in reasonable time";
Chapter 1. Developing with the QRadar app framework
127

Utils.concurrency.tryReadLock(String name, long timeoutMsec)
/**
* Attempts to acquire a read lock against the given name.
*
* If the write lock is not held by another thread, this returns immediately.
* If the write lock is held by another thread, this will
* wait a maximum of timeoutMsec millisecondsto acquire the read lock.
*
* @param name The name of the lock to acquire a read lock against.
* If null, global lock is used.
*
* @param timeoutMsec The maximum time to wait (in milliseconds)
* to acquire the lock.
* <= 0 can be used to return immediately if the read lock can not be acquired.
*
* @return True if the read lock has been acquired, false otherwise.
*/
boolean tryReadLock(String name, long timeoutMsec)
JavaScript example:
if(Utils.concurrency.tryReadLock("my_lock", 1000))
{
try { /* Lock acquired */ }
finally { Utils.concurrency.readUnlock("my_lock"); }
}
else
throw "Failed to acquire lock in reasonable time";
Utils.concurrency.readUnlock()
/**
* Releases the global read lock held by the current thread.
* You must currently be holding the global read lock,
* or an exception occurs.
* If the number of read locks held by all threads is now 0,
* then the lock is made available for write lock attempts.
*/
void readUnlock()
JavaScript example:
Utils.concurrency.readLock();
try { /*Do something*/ }
finally { Utils.concurrency.readUnlock(); }
Utils.concurrency.readUnlock(String name)
/**
* Releases the read lock against the given name held by the current thread.
* You must currently be holding the read lock by the given name,
* or an exception occurs.
* If the number of read locks held by all threads is now 0,
* then the lock is made available for write lock attempts.
*
* @param name The name of the lock to acquire a read lock against.
* If null, global lock is used.
*/
void readUnlock(String name)
JavaScript example:
Utils.concurrency.readLock("my_lock");
try { /*Do something*/ }
finally { Utils.concurrency.readUnlock("my_lock"); }
128
IBM QRadar : QRadar Application Framework Guide

Utils.concurrency.writeLock()
/**
* Acquire a write lock against the global lock.
*
* If neither the read nor write lock are held by another thread,
* this returns immediately.
*
* If the write lock is held by another thread,
* then the current thread becomes disabled for thread
* scheduling purposes and lies dormant until
* the read lock has been acquired.
*/
void writeLock()
JavaScript example:
Utils.concurrency.writeLock();
try { /*Do something*/ }
finally { Utils.concurrency.writeUnlock(); }
Utils.concurrency.writeLock(String name)
/**
* Acquire a write lock against the given name.
*
* If neither the read nor write lock are held by another thread,
* this returns immediately.
* If the write lock is held by another thread then the current thread
* becomes disabled for threadscheduling purposes and lies dormant
* until the read lock has been acquired.
*
* @param name The name of the lock to acquire a write lock against.
* If null, global lock is used.
*/
void writeLock(String name)
JavaScript example:
Utils.concurrency.writeLock("my_lock");
try { /*Do something*/ }
finally { Utils.concurrency.writeUnlock("my_lock"); }
Utils.concurrency.tryWriteLock(long timeoutMsec)
/**
* Attempts to acquire a write lock against the global lock.
*
* If neither the read nor write lock are held by another thread,
* this returns immediately.
* If either the read or write lock is held by another thread,
* this will wait a maximum of timeoutMsec milliseconds
* to acquire the write lock.
*
* @param timeoutMsec The maximum time to wait (in milliseconds)
* to acquire the lock
* <= 0 can be used to return immediately,
* if the write lock can not be acquired.
* @return True if the write lock has been acquired, false otherwise.
*/
boolean tryWriteLock(long timeoutMsec)
JavaScript example:
if(Utils.concurrency.tryWriteLock(1000))
{
try { /* Lock acquired */ }
finally { Utils.concurrency.writeUnlock(); }
}
Chapter 1. Developing with the QRadar app framework
129
else
throw "Failed to acquire lock in reasonable time";
Utils.concurrency.tryWriteLock(String name, long timeoutMsec)
/**
* Attempts to acquire a write lock against the given name.
*
* If neither the read nor write lock are held by another thread
* this returns immediately.
* If either the read or write lock is held by another thread,
* this will wait a maximum of timeoutMsec milliseconds
* to acquire the write lock.
*
* @param timeoutMsec The maximum time to wait (in milliseconds)
* to acquire the lock.
* <= 0 can be used to return immediately if the write lock can not be acquired.
*
* @param name The name of the lock to acquire a write lock against.
* If null, global lock is used.
*
* @return True if the write lock has been acquired, false otherwise.
*/
boolean tryWriteLock(String name, long timeoutMsec)
JavaScript example:
if(Utils.concurrency.tryWriteLock("my_lock", 1000))
{
try { /* Lock acquired */ }
finally { Utils.concurrency.writeUnlock("my_lock"); }
}
else
throw "Failed to acquire lock in reasonable time";
Utils.concurrency.writeUnlock()
/**
* Releases the global write lock held by the current thread.
* You must currently be holding the global write lock, or an exception occurs.
* If the number of write locks held by all threads is now 0,
* then the lock is made available for write lock attempts.
*/
void writeUnlock()
JavaScript example:
Utils.concurrency.writeLock("my_lock");
try { /*Do something*/ }
finally { Utils.concurrency.writeUnlock("my_lock");
Utils.concurrency.createAtomicBoolean()
/**
* @return A new instance of java.util.concurrent.atomic.AtomicBoolean
*/
java.util.concurrent.atomic.AtomicBoolean createAtomicBoolean()
JavaScript example:
var atomicBoolean = Utils.concurrency.createAtomicBoolean();
if(atomicBoolean.getAndSet(true))
return "Value has not changed";
Utils.concurrency.createAtomicInteger()
/**
* @return A new instance of java.util.concurrent.atomic.AtomicInteger
130
IBM QRadar : QRadar Application Framework Guide

*/
java.util.concurrent.atomic.AtomicInteger createAtomicInteger()
JavaScript example:
var atomicInt =
Utils.concurrency.createAtomicInteger();atomicInt.set(5);
Utils.concurrency.createAtomicLong()
/**
* @return A new instance of java.util.concurrent.atomic.AtomicLong
*/
java.util.concurrent.atomic.AtomicLong createAtomicLong()
JavaScript example:
var atomicLong =
Utils.concurrency.createAtomicLong();atomicLong.set(5)
Utils.concurrency.createAtomicDouble()
/**
* @return A new instance of java.util.concurrent.atomic.AtomicDouble
*/
java.util.concurrent.atomic.AtomicDouble createAtomicDouble()
JavaScript example:
var atomicDouble = Utils.concurrency.createAtomicDouble();
atomicDouble.set(5);
Utils.concurrency.createAtomicIntegerArray(int size)
/**
* @param Size of the array. Must be >= 0
* @return A new instance of java.util.concurrent.atomic.AtomicIntegerArray
* with the given size
*/
java.util.concurrent.atomic.AtomicIntegerArray createAtomicIntegerArray(int size)
JavaScript example:
var atomicIntArray = Utils.concurrency.createAtomicIntegerArray(5);
atomicIntArray.set(0, 25);
Utils.concurrency.createAtomicLongArray(int size)
/**
* @param Size of the array. Must be >= 0
* @return A new instance of java.util.concurrent.atomic.AtomicIntegerArray
* with the given size
*/
java.util.concurrent.atomic.AtomicIntegerArray createAtomicIntegerArray(int size)
JavaScript example:
var atomicLongArray = Utils.concurrency.createAtomicLongArray(5);
atomicLongArray.set(0, 25);
Chapter 1. Developing with the QRadar app framework
131

Utils.concurrency.createAtomicDoubleArray(int size)
/**
* @param Size of the array. Must be >= 0
* @return A new instance of java.util.concurrent.atomic.AtomicDoubleArray
* with the given size
*/
java.util.concurrent.atomic.AtomicDoubleArray createAtomicDoubleArray(int size)
JavaScript example:
var atomicDoubleArray = Utils.concurrency.createAtomicDoubleArray(5);
atomicDoubleArray.set(0, 25);
Utils.concurrency.createConcurrentMap()
/**
* @return Returns a new instance of
* java.util.concurrent.ConcurrentHashMap.ConcurrentHashMap,
* which is a thread safe map that accepts any key or value
*/
java.util.concurrent.ConcurrentHashMap.ConcurrentHashMap createConcurrentMap()
JavaScript example:
var myMap = Utils.concurrency.createConcurrentMap();
myMap.put("some_key", "some_value");
myMap.put("some_other_key", 25);
Utils.concurrency.createConcurrentSet()
/**
* @return Returns a new thread safe set that accepts any value,
* backed by java.util.concurrent.ConcurrentHashMap.ConcurrentHashMap
*/
java.util.concurrent.ConcurrentHashMap.ConcurrentHashMap createConcurrentSet()
JavaScript example:
var mySet = Utils.concurrency.createConcurrentSet();
mySet.add("something");
mySet.add(25);
Utils.crypto.aesEncrypt(String data)
/**
* Given a String, the frameworks AES encryption protocol will be invoked
* to return an encrypted String.
*
* @param data The String that will be encrypted.
* @return The encrypted String. Null if null data was provided.
*/
String aesEncrypt(String data)
JavaScript example:
var myEncryptedData = Utils.crypto.aesEncrypt
("my plaintext data,
preferably not stored here as a string");
Utils.crypto.aesDecrypt(String data)
/**
* Given an String that is encrypted by the frameworks AES encryption protocol,
* return the decrypted value.
*
132
IBM QRadar : QRadar Application Framework Guide

* @param data The String that was encrypted by the framework's
* AES encryption protocol.
* @return The decrypted String. Null if null data was provided.
*/
String aesDecrypt(String data)
JavaScript example:
var myData = Utils.crypto.aesDecrypt("my encrypted data");
Utils.general.base64Decode(String value)
/**
* Given a String encoded as base64, return the original value
* @param value The base64 value to decode
* @return The decoded value. Null if value was null
*/
String base64Decode(String value)
JavaScript example:
var myAuth = Utils.general.base64Decode("my base64 encoded auth
Utils.config.readNamespaceFile(String relPath)
/**
* Given the path to a file relative to the namespace configuration
* directory for the function assigned to this utility,
* read it and return a String representation,
* decoded using default character set of this JVM (typically UTF-8).
* The file must exist, or an exception is thrown.
* The file must be readable, or an exception is thrown.
* If the relative path leads to a file that is not a child
* of the proper configuration directory, an exception is thrown.
*
* The full path structure is:
* /${CUSTOM_FUNCTION_CONFIG_DIR}/namespaces/${namespace}/${relPath}
*
* @param relPath The path to the file, relative to the namespace configuration
* directory for the function assigned to this utility
* @return A String representing the file's content in the default character set.
*/
String readNamespaceFile(String relPath)
JavaScript example:
var myFileContent = Utils.config.readNamespaceFile("test.txt");
Utils.config.readNamespaceFile(String relPath, boolean
forceExist)
/**
* Given the path to a file relative to the namespace configuration
* directory for the function assigned to this utility,
* read it and return a String representation,
* decoded using default character setof this JVM (typically UTF-8).
* The file must be readable, or an exception is thrown.
* If the relative path leads to a file that is not a child
* of the proper configuration directory, an exception is thrown.
*
* The full path structure is:
* /${CUSTOM_FUNCTION_CONFIG_DIR}/namespaces/${namespace}/${relPath}
*
* @param relPath The path to the file, relative to the namespace configuration
* directory for the function assigned to this utility
*
* @param forceExist If true, and the file does not exist, an exception if thrown.
* If false, and the file does not exist, an empty Map is returned.
* @return A String representing the file's content in the default character set.
* An empty String if forceExist was false and the file does not exist.
Chapter 1. Developing with the QRadar app framework
133

*/
String readNamespaceFile(String relPath, boolean forceExist)
JavaScript example:
var myFileContent = Utils.config.readNamespaceFile("test.txt", false);
Utils.config.readNamespaceFile(String relPath, boolean
forceExist, String charset)
/**
* Given the path to a file relative to the namespace configuration
* directory for the function assigned to this utility,
* read it and return a String representation,
* decoded using the given character set.
* The file must be readable, or an exception is thrown.
* If the relative path leads to a file that is not a child
* of the proper configuration directory, an exception is thrown.
*
* The full path structure is:
* /${CUSTOM_FUNCTION_CONFIG_DIR}/namespaces/${namespace}/${relPath}
*
* @param relPath The path to the file, relative to the
* namespace configuration directory for the function assigned to this utility
*
* @param forceExist If true, and the file does not exist, an exception if thrown.
* If false, and the filedoes not exist, an empty Map is returned.
*
* @param charset The character set (encoding) to use when reading the file.
* If null, the JVM default is used, usually UTF-8.
*
* @return A String representing the files content in the given character set.
* An empty String if forceExist was false and the file does not exist.
*/
String readNamespaceFile(String relPath, boolean forceExist, String charset)
JavaScript example:
var myFileContent = Utils.config.readNamespaceFile("test.txt", false, "UTF-8");
Utils.config.readNamespacePropertiesFile(String relPath)
/**
* Given the path to a file relative to the namespace configuration
* directory for the function assigned to this utility,
* read it and return a Map of properties.
* The format is assumed to be the Java compatible key/value pair format.
* The file must exist, or an exception is thrown.
* The file must be readable, or an exception is thrown.
* If the relative path leads to a file that is not a child
* of the proper configuration directory, an exception is thrown.
*
* The full path structure is:
* /${CUSTOM_FUNCTION_CONFIG_DIR}/namespaces/${namespace}/${relPath}
*
* @param relPath The path to the file, relative to the namespace configuration
* directory for the function assigned to this utility.
*
* @param forceExist If true, and the file does not exist, an exception if thrown.
* If false, and the file does not exist, an empty Map is returned.
*
* @return A map of properties read from the file
*/
Map<String, String> readNamespacePropertiesFile(String relPath)
JavaScript example:
var myProperties = Utils.config.readNamespacePropertiesFile("test.properties");
var myValue = myProperties.get("my_key");
134
IBM QRadar : QRadar Application Framework Guide

Utils.config.readNamespacePropertiesFile(String relPath, boolean
forceExist)
/**
* Given the path to a file relative to the namespace configuration
* directory for the function assigned to this utility,
* read it and return a Map of properties.
* The format is assumed to be the Java compatible key/value pair format.
* The file must be readable, or an exception is thrown.
* If the relative path leads to a file that is not a chil
* d of the proper configuration directory, an exception is thrown.
*
* The full path structure is:
* /${CUSTOM_FUNCTION_CONFIG_DIR}/namespaces/${namespace}/${relPath}
*
* Charset used will be the default charset in this JVM
*
* @param relPath The path to the file, relative to the namespace configuration
* directory for the function assigned to this utility.
*
* @param forceExist If true, and the file does not exist, an exception if thrown.
* If false, and the file does not exist, an empty Map is returned.
*
* @return A map of properties read from the file.
* An empty map if forceExist was false and the file does not exist.
*/
Map<String, String> readNamespacePropertiesFile(String relPath, boolean forceExist)
JavaScript example:
var myProperties =
Utils.config.readNamespacePropertiesFile("test.properties", false);
var myValue = myProperties.get("my_key");
Utils.config.readNamespacePropertiesFile(String relPath, boolean
forceExist, String charset)
/**
* Given the path to a file relative to the namespace configuration
* directory for the function assigned to this utility,
* read it using the given character set and return a Map of properties.
* The format is assumed to be the Java compatible key/value pair format.
* The file must be readable, or an exception is thrown.
* If the relative path leads to a file that is not a child
* of the proper configuration directory, an exception is thrown.
*
* The full path structure is:
* /${CUSTOM_FUNCTION_CONFIG_DIR}/namespaces/${namespace}/${relPath}
*
* @param relPath The path to the file, relative to the namespace configuration
* directory for the function assigned to this utility.
*
* @param forceExist If true, and the file does not exist, an exception if thrown.
* If false, and the file does not exist, an empty Map is returned.
*
* @param charset The character set (encoding) to use when reading the file.
* If null, the JVM default is used, usually UTF-8.
*
* @return A map of properties read from the file.
* An empty map if forceExist was false and the file does not exist.
*/
Map<String, String>
readNamespacePropertiesFile(String relPath, boolean forceExist, String charset)
JavaScript example:
var myProperties =
Utils.config.readNamespacePropertiesFile
("test.properties", false, "UTF-8");
var myValue = myProperties.get("my_key");
Chapter 1. Developing with the QRadar app framework
135

Utils.http.urlEncode(String value)
/**
* URL encodes the given value
* @param value The value to encode. Null returns null
* @return The URL encoded value
*/
String urlEncode(String value)
JavaScript example:
var myEncodedPathParam = Utils.http.urlEncode("my Path parameter");
Utils.http.invokeHTTP(String method, String uriStr, Integer
expectedResponseCode, Map<String, String> headers, Map<String,
Object> parameters, String body)
/**
* This method is purposely monolithic. It will be deprecated when we provide
* a proper (and reliable) HttpClient implementation directly
*
* Perform an HTTP request with the given parameters
* and return the response body as a String.
*
* IMPORTANT: All request content (parameters, and body)
* is assumed to be UTF-8.
*
* @param method The HTTP method to use:
* [GET, PUT, POST, DELETE, OPTIONS, TRACE, HEAD, PATCH].
* If null or empty, GET is used.
* If not recognized, RuntimeException is thrown.
*
* @param uri The address, which is not already escaped.
* Query parameters should only be provided as part of this address
* if the parameters parameter is not specified.
*
* @param expectedResponseCode The response code you expect,
* or null if you don't care.
* Throws RuntimeException if response code does not match.
*
* @param headers A map of headers. Note that they are case
* and whitespace insensitive.
*
* @param parameters A map of parameters.
* If the request method does not supporta request body,
* they will be included in the URI.
* If the request method does support a request body,
* they will be translated to URLFormEncoded,
* and use the application/x-www-form-urlencoded
* content type; the payload will also be ignored.
*
* @param body The raw request body as a String.
* Will only be used if the request supports a request body.
* A Content-Type header should always be provided,
* but Content-Length is automatically calculated.
* IMPORTANT: This is not compatible with extremely large data sets.
* No streaming implementation is provided either.
*
* @return Content The response body as a string.
* The character encoding used to construct it will be that which was
* specified by the response Content-Type header.
* If none is available, it will default to UTF-8
*/
String invokeHTTP(String method, String uriStr, Integer expectedResponseCode,
Map<String, String> headers, Map<String, Object>
parameters, String body)
JavaScript example:
var responseBody = Utils.http.invokeHTTP
("GET", "https://myServer/api/my_endpoint",
200, {"Token":"MyToken"}, {}, null);
136
IBM QRadar : QRadar Application Framework Guide

Utils.concurrency.createConcurrentList()
/**
* @return Returns a new thread safe list implemented by
* java.util.concurrent.CopyOnWriteArrayList
*/
java.util.concurrent.CopyOnWriteArrayList createConcurrentList()
JavaScript example:
var myList
= Utils.concurrency.createConcurrentList(); myList.add("something");
myList.add(25);
Utils.log.info()
/**
* Log the given message through QRadar using a log level of INFO.
* @param msg The message to log.
* Will be prefixed with relevant state and script information.
*/
void info(String msg)
JavaScript example:
Utils.log.info("My message");
Utils.log.warn()
/**
* Log the given message through QRadar using a log level of WARN.
* @param msg The message to log.
* Will be prefixed with relevant state and script information.
*/
void warn(String msg)
JavaScript example:
Utils.log.warn("My message");
Utils.log.error()
/**
* Log the given message through QRadar using a log level of ERROR.
* @param msg The message to log.
* Will be prefixed with relevant state and script information.
*/
void error(String msg)
JavaScript example:
Utils.log.error("My message");
Utils.log.debug()
/**
* Log the given message through QRadar using a log level of DEBUG.
* Typically this log will be ignored unless enabled
* through QRadar logging configuration.
* @param msg The message to log.
* Will be prefixed with relevant state and script information.
*/
void debug(String msg)
Chapter 1. Developing with the QRadar app framework
137
JavaScript example:
Utils.log.debug("My message");
Note:
When you use JavaScript, you also have access to standard ECMA utilities such as "JSON". For
more information, see the Mozilla Developer Network (https://developer.mozilla.org/en-US/docs/Web/
JavaScript/Reference/Global_Objects/JSON/parse).
Resources
Use various resources to help you to build apps with the IBM QRadar GUI Application Framework
QRadar documentation
• QRadar SIEM (http://www-01.ibm.com/support/docview.wss?uid=swg27048741) documents in PDF
format.
• QRadar Vulnerability Manager (http://www-01.ibm.com/support/docview.wss?uid=swg27048729)
documents in PDF format.
• QRadar Risk Manager (http://www-01.ibm.com/support/docview.wss?uid=swg27048730) documents
in PDF format.
• QRadar Incident Forensics and Packet Capture (http://www-01.ibm.com/support/docview.wss?
uid=swg2704873) documents in PDF format.
QRadar API resources
• QRadar API Guide
(http://public.dhe.ibm.com/software/security/products/qradar/documents/7.3.0/en/
b_qradar_api.pdf) in PDF format
• QRadar API video tutorial: Learn to use the QRadar API in six minutes .
• QRadar API samples on Github (https://github.com/ibm-security-intelligence/api-samples).
Flask API
• http://www.flaskapi.org/ (http://www.flaskapi.org/)
• Flask Tutorials (https://blog.miguelgrinberg.com/post/the-flask-mega-tutorial-part-i-hello-world)
Jinja2 templates
• http://jinja.pocoo.org/docs/dev/
(http://jinja.pocoo.org/docs/dev/)
138
IBM QRadar : QRadar Application Framework Guide

Notices
This information was developed for products and services offered in the U.S.A.
IBM may not offer the products, services, or features discussed in this document in other countries.
Consult your local IBM representative for information on the products and services currently available in
your area. Any reference to an IBM product, program, or service is not intended to state or imply that
only that IBM product, program, or service may be used. Any functionally equivalent product, program, or
service that does not infringe any IBM intellectual property right may be used instead. However, it is the
user's responsibility to evaluate and verify the operation of any non-IBM product, program, or service.
IBM may have patents or pending patent applications covering subject matter described in this
document. The furnishing of this document does not grant you any license to these patents. You can
send license inquiries, in writing, to:
IBM Director of Licensing
IBM Corporation
North Castle Drive
Armonk, NY 10504-1785 U.S.A.
For license inquiries regarding double-byte character set (DBCS) information, contact the IBM Intellectual
Property Department in your country or send inquiries, in writing, to:
Intellectual Property Licensing
Legal and Intellectual Property Law
IBM Japan Ltd.
19-21, Nihonbashi-Hakozakicho, Chuo-ku
Tokyo 103-8510, Japan
INTERNATIONAL BUSINESS MACHINES CORPORATION PROVIDES THIS PUBLICATION "AS IS"
WITHOUT WARRANTY OF ANY KIND, EITHER EXPRESS OR IMPLIED, INCLUDING, BUT NOT LIMITED
TO, THE IMPLIED WARRANTIES OF NON-INFRINGEMENT, MERCHANTABILITY OR FITNESS FOR A
PARTICULAR PURPOSE. Some jurisdictions do not allow disclaimer of express or implied warranties in
certain transactions, therefore, this statement may not apply to you.
This information could include technical inaccuracies or typographical errors. Changes are periodically
made to the information herein; these changes will be incorporated in new editions of the publication.
IBM may make improvements and/or changes in the product(s) and/or the program(s) described in this
publication at any time without notice.
Any references in this information to non-IBM websites are provided for convenience only and do not in
any manner serve as an endorsement of those websites. The materials at those websites are not part of
the materials for this IBM product and use of those websites is at your own risk.
IBM may use or distribute any of the information you provide in any way it believes appropriate without
incurring any obligation to you.
Licensees of this program who wish to have information about it for the purpose of enabling: (i) the
exchange of information between independently created programs and other programs (including this
one) and (ii) the mutual use of the information which has been exchanged, should contact:
IBM Director of Licensing
IBM Corporation
North Castle Drive, MD-NC119
Armonk, NY 10504-1785
US
Such information may be available, subject to appropriate terms and conditions, including in some cases,
payment of a fee.
©
Copyright IBM Corp. 2016, 2020 139
The licensed program described in this document and all licensed material available for it are provided by
IBM under terms of the IBM Customer Agreement, IBM International Program License Agreement or any
equivalent agreement between us.
The performance data and client examples cited are presented for illustrative purposes only. Actual
performance results may vary depending on specic congurations and operating conditions..
Information concerning non-IBM products was obtained from the suppliers of those products, their
published announcements or other publicly available sources. IBM has not tested those products and
cannot conrm the accuracy of performance, compatibility or any other claims related to non-IBM
products. Questions on the capabilities of non-IBM products should be addressed to the suppliers of
those products.
Statements regarding IBM's future direction or intent are subject to change or withdrawal without notice,
and represent goals and objectives only.
All IBM prices shown are IBM's suggested retail prices, are current and are subject to change without
notice. Dealer prices may vary.
This information contains examples of data and reports used in daily business operations. To illustrate
them as completely as possible, the examples include the names of individuals, companies, brands, and
products. All of these names are ctitious and any similarity to actual people or business enterprises is
entirely coincidental.
Trademarks
IBM, the IBM logo, and ibm.com
®
are trademarks or registered trademarks of International Business
Machines Corp., registered in many jurisdictions worldwide. Other product and service names might be
trademarks of IBM or other companies. A current list of IBM trademarks is available on the Web at
"Copyright and trademark information" at www.ibm.com/legal/copytrade.shtml.
UNIX is a registered trademark of The Open Group in the United States and other countries.
Java
™
and all Java-based trademarks and logos are trademarks or registered trademarks of Oracle and/or
its afliates.
Terms and conditions for product documentation
Permissions for the use of these publications are granted subject to the following terms and conditions.
Applicability
These terms and conditions are in addition to any terms of use for the IBM website.
Personal use
You may reproduce these publications for your personal, noncommercial use provided that all proprietary
notices are preserved. You may not distribute, display or make derivative work of these publications, or
any portion thereof, without the express consent of IBM.
Commercial use
You may reproduce, distribute and display these publications solely within your enterprise provided
that all proprietary notices are preserved. You may not make derivative works of these publications, or
reproduce, distribute or display these publications or any portion thereof outside your enterprise, without
the express consent of IBM.
140
Notices

Rights
Except as expressly granted in this permission, no other permissions, licenses or rights are granted, either
express or implied, to the publications or any information, data, software or other intellectual property
contained therein.
IBM reserves the right to withdraw the permissions granted herein whenever, in its discretion, the use
of the publications is detrimental to its interest or, as determined by IBM, the above instructions are not
being properly followed.
You may not download, export or re-export this information except in full compliance with all applicable
laws and regulations, including all United States export laws and regulations.
IBM MAKES NO GUARANTEE ABOUT THE CONTENT OF THESE PUBLICATIONS. THE PUBLICATIONS
ARE PROVIDED "AS-IS" AND WITHOUT WARRANTY OF ANY KIND, EITHER EXPRESSED OR IMPLIED,
INCLUDING BUT NOT LIMITED TO IMPLIED WARRANTIES OF MERCHANTABILITY, NON-INFRINGEMENT,
AND FITNESS FOR A PARTICULAR PURPOSE.
IBM Online Privacy Statement
IBM Software products, including software as a service solutions, (“Software Offerings”) may use cookies
or other technologies to collect product usage information, to help improve the end user experience,
to tailor interactions with the end user or for other purposes. In many cases no personally identiable
information is collected by the Software Offerings. Some of our Software Offerings can help enable you
to collect personally identiable information. If this Software Offering uses cookies to collect personally
identiable information, specic information about this offering’s use of cookies is set forth below.
Depending upon the congurations deployed, this Software Offering may use session cookies that collect
each user’s session id for purposes of session management and authentication. These cookies can be
disabled, but disabling them will also eliminate the functionality they enable.
If the congurations deployed for this Software Offering provide you as customer the ability to collect
personally identiable information from end users via cookies and other technologies, you should seek
your own legal advice about any laws applicable to such data collection, including any requirements for
notice and consent.
For more information about the use of various technologies, including cookies, for these purposes,
See IBM’s Privacy Policy at http://www.ibm.com/privacy and IBM’s Online Privacy Statement at http://
www.ibm.com/privacy/details the section entitled “Cookies, Web Beacons and Other Technologies”
and the “IBM Software Products and Software-as-a-Service Privacy Statement” at http://www.ibm.com/
software/info/product-privacy.
Notices
141
142 IBM QRadar : QRadar Application Framework Guide
IBM®
