
Ladibug
TM
3.0
Document Camera Image Software
User Manual - English

1
Table of Contents
1. Introduction ................................................................................................... 3
2. System Requirements .................................................................................. 3
3. Install Ladibug™ ........................................................................................... 4
3.1. Install with Windows Vista/7/8/10 ............................................................................... 4
3.2. Install with MAC ......................................................................................................... 6
4. Connection to the Hardware ....................................................................... 10
5. Start to Use Ladibug™ ............................................................................... 10
5.1. Use the USB cable to connect the camera to the computer ..................................... 10
5.2. Connect the Wireless Document Camera ................................................................ 11
5.3. Use the image sharing server to connect to the computer and camera ................... 12
6. Operation Interface Description .................................................................. 14
6.1. Windows interface .................................................................................................. 14
6.2. MAC interface .......................................................................................................... 23
7. Function Descriptions - For Windows ......................................................... 32
7.1 Turn on/off camera ................................................................................................. 32
7.2 I would like to optimize the image .......................................................................... 32
7.3 I would like to freeze the live image ....................................................................... 32
7.4 I would like to turn on/off the lamp .......................................................................... 32
7.5 I would like to zoom in/out images ......................................................................... 32
7.6 I would like to adjust the brightness ....................................................................... 32
7.7 I would like to capture images ................................................................................ 32
7.8 I would like to capture images continuously ........................................................... 33
7.9 I would like to record .............................................................................................. 33
7.10 I would like to annotate the displayed image .......................................................... 33
7.11 I would like to add textual annotation to images ..................................................... 34
7.12 I would like to use the mask mode ......................................................................... 35
7.13 I would like to use the spotlight mode .................................................................... 35
7.14 I would like to manage stored image ...................................................................... 35
7.15 I would like to change the operating languages of the software ............................. 36
7.16 Change firewall settings ......................................................................................... 36

2
8. Function Descriptions - For MAC ............................................................... 38
8.1 I would like to turn on/off camera ........................................................................... 38
8.2 I would like to optimize the image .......................................................................... 38
8.3 I would like to freeze the live image ....................................................................... 38
8.4 I would like to turn on/off the lamp .......................................................................... 38
8.5 I would like to zoom in/out images ......................................................................... 38
8.6 I would like to adjust the brightness ....................................................................... 38
8.7 I would like to capture images ................................................................................ 38
8.8 I would like to capture images continuously ........................................................... 39
8.9 I would like to record .............................................................................................. 39
8.10 I would like to annotate the displayed image .......................................................... 39
8.11 I would like to add textual annotation to images ..................................................... 40
8.12 I would like to use the mask mode ......................................................................... 40
8.13 I would like to use the spotlight mode .................................................................... 40
8.14 I would like to manage stored image ...................................................................... 41
8.15 I would like to change the operating languages of the software ............................. 42
8.16 Change firewall settings ......................................................................................... 42
9. Troubleshooting .......................................................................................... 44

3
1. Introduction
After installing the Ladibug™ application, you can use the software to:
Control the Document Camera.
Capture and record images.
Annotate the image, highlight important details and save it.
Support the full screen function.
2. System Requirements
Windows Vista / 7 / 8 / 10
Min CPU: Intel Core 2 Duo 2 GHz or above
Min Memory: 1GB (32-bits)/2GB(64-bits) RAM
Supporting Direct X 9 (WDDM 1.0 or later)
Min Resolution 1024 x 768
Min Hard Drive Space: 1GB
MAC OS X 10.7 / 10.8 / 10.9 / 10.10 / 10.11 / 10.12
Min CPU: Intel Pentium® 2GHz Intel Core 2 Duo
Min Memory: 1 GB DDR2 667 Hz RAM or above
Min Resolution 1024 x 768
24-bit color display monitor
Min Hard Drive Space: 1GB
QuickTime 7.4.5 or above
4
3. Install Ladibug™
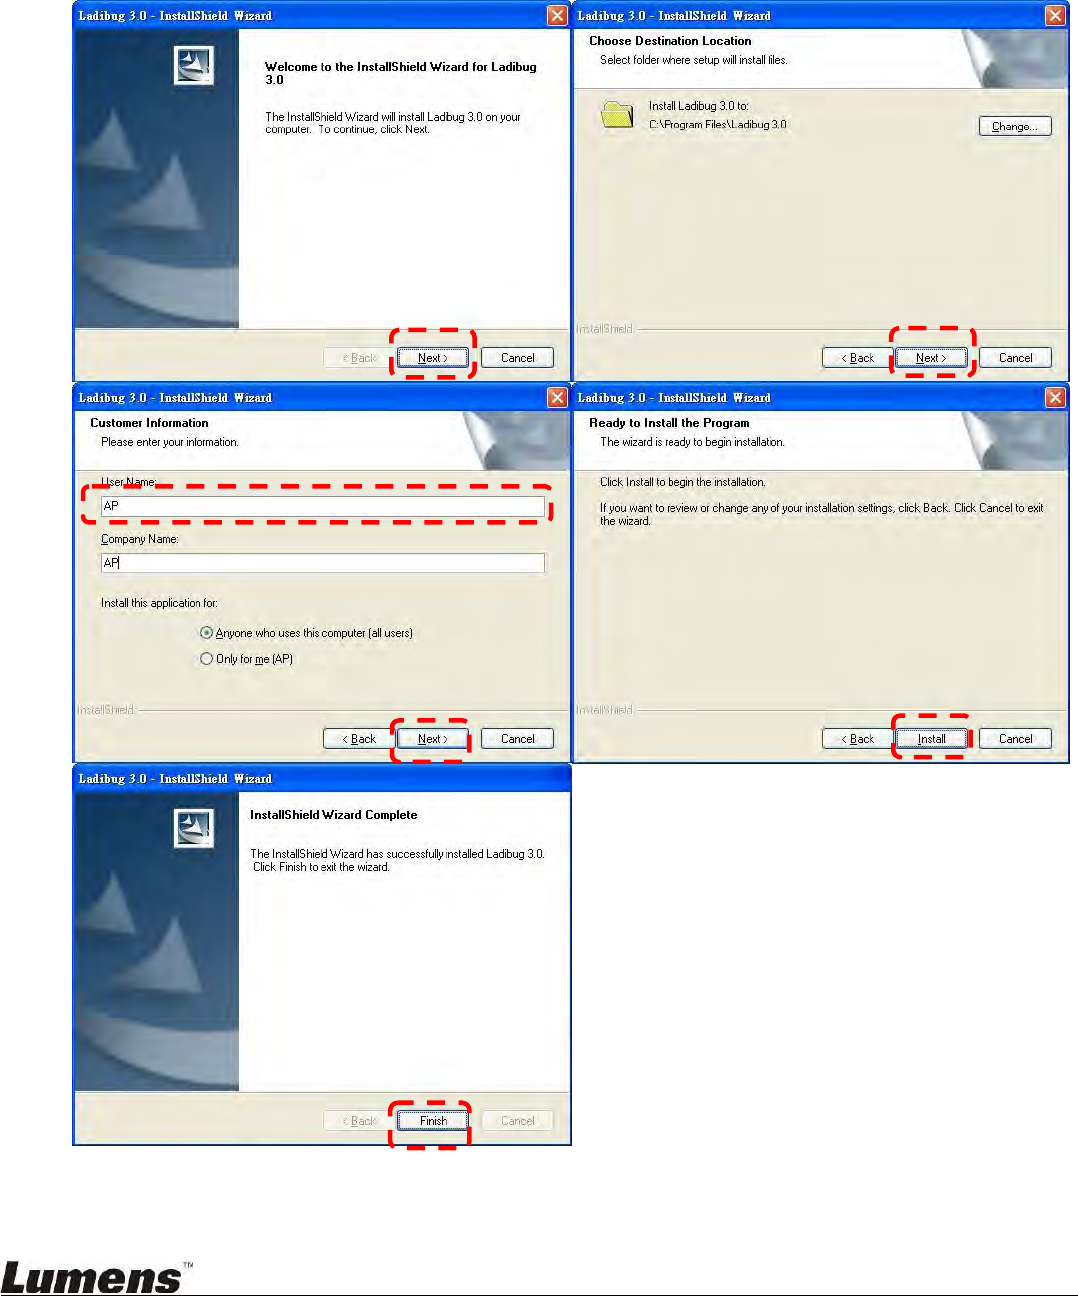
3.1. Install with Windows Vista/7/8/10
1. Please download Ladibug™ software at Lumens website.
2. Extract the file downloaded and then click [Ladibug] to install.
3. The installation wizard will guide you through the process. Please follow the on-screen
instructions and press [Next] for the next step.

5
4. Press [Yes] to create Ladibug™ shortcut on your desktop.
5. Once the installation is completed, press [Finish] to restart the computer.

6
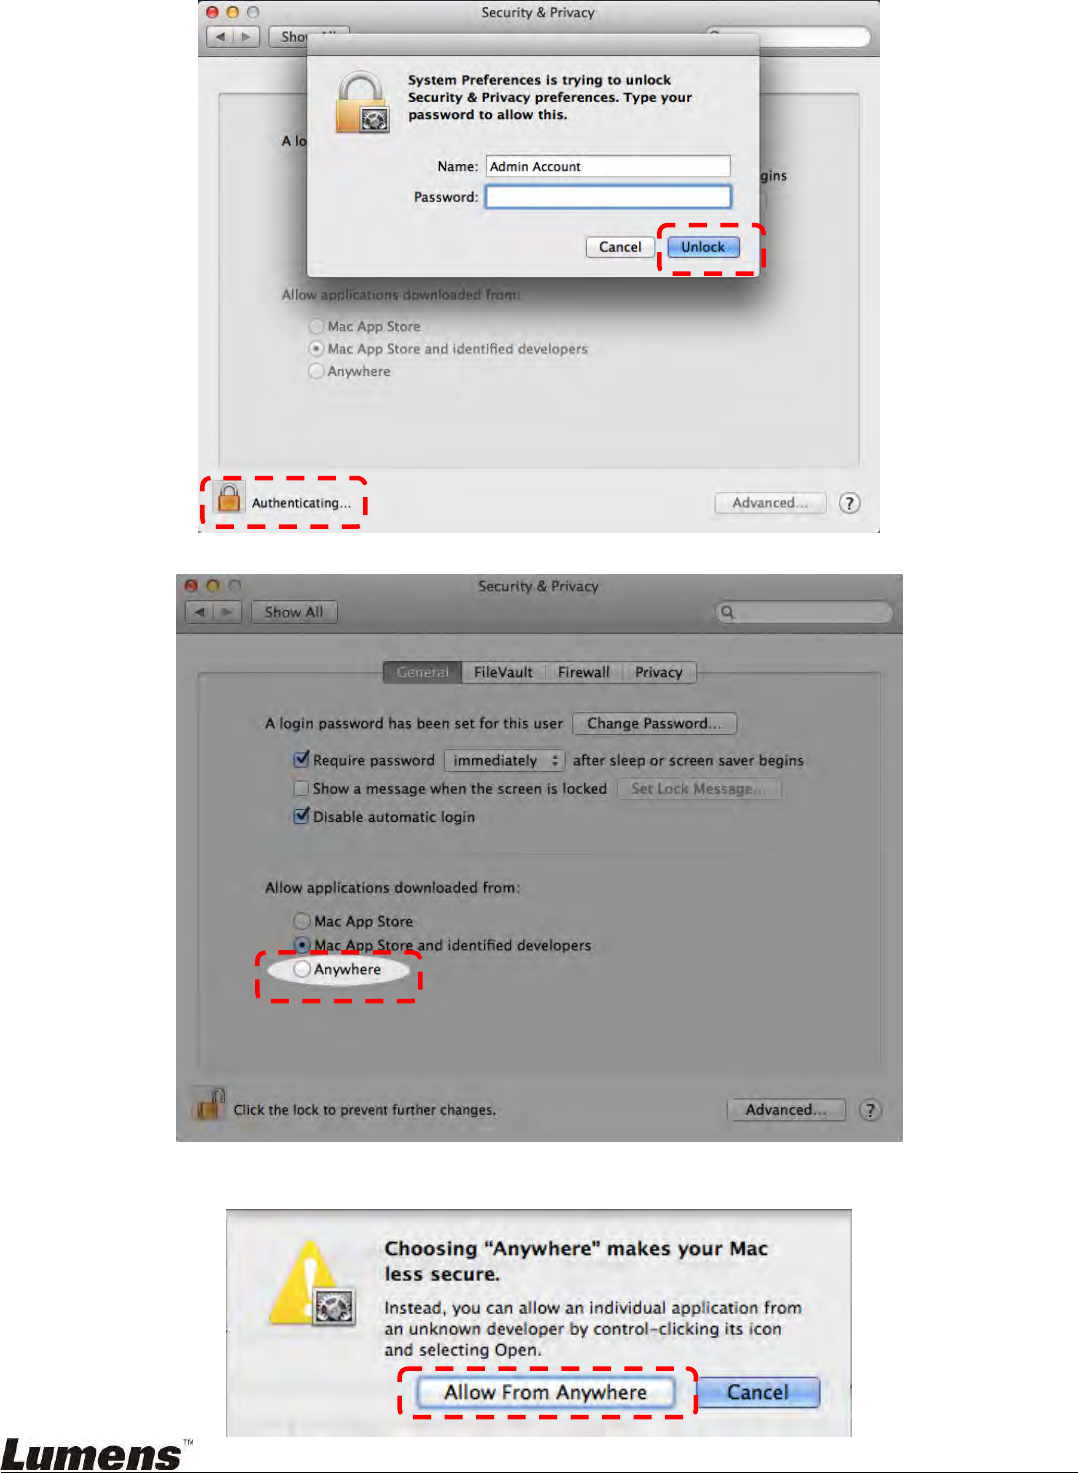
3.2. Install with MAC
1. Unlock software authentication: Due to the limitation of MAC system, please follow steps
below to unlock software authentication. If unlocked, please skip to Step 2 to start the
installation.
1.1 Select [System Preferences] in the Apple Menu.
1.2 Click on the [Security & Privacy].
7
1.3 Click on the Authenticating icon on the lower left corner to unlock the panel, and enter
the username and password of the Administrator.
1.4 Click on the [Anywhere] option as shown below.
1.5 Select [Allow From Anywhere], and confirm not to proceed with the authentication. Upon
completion, start the installation.
8
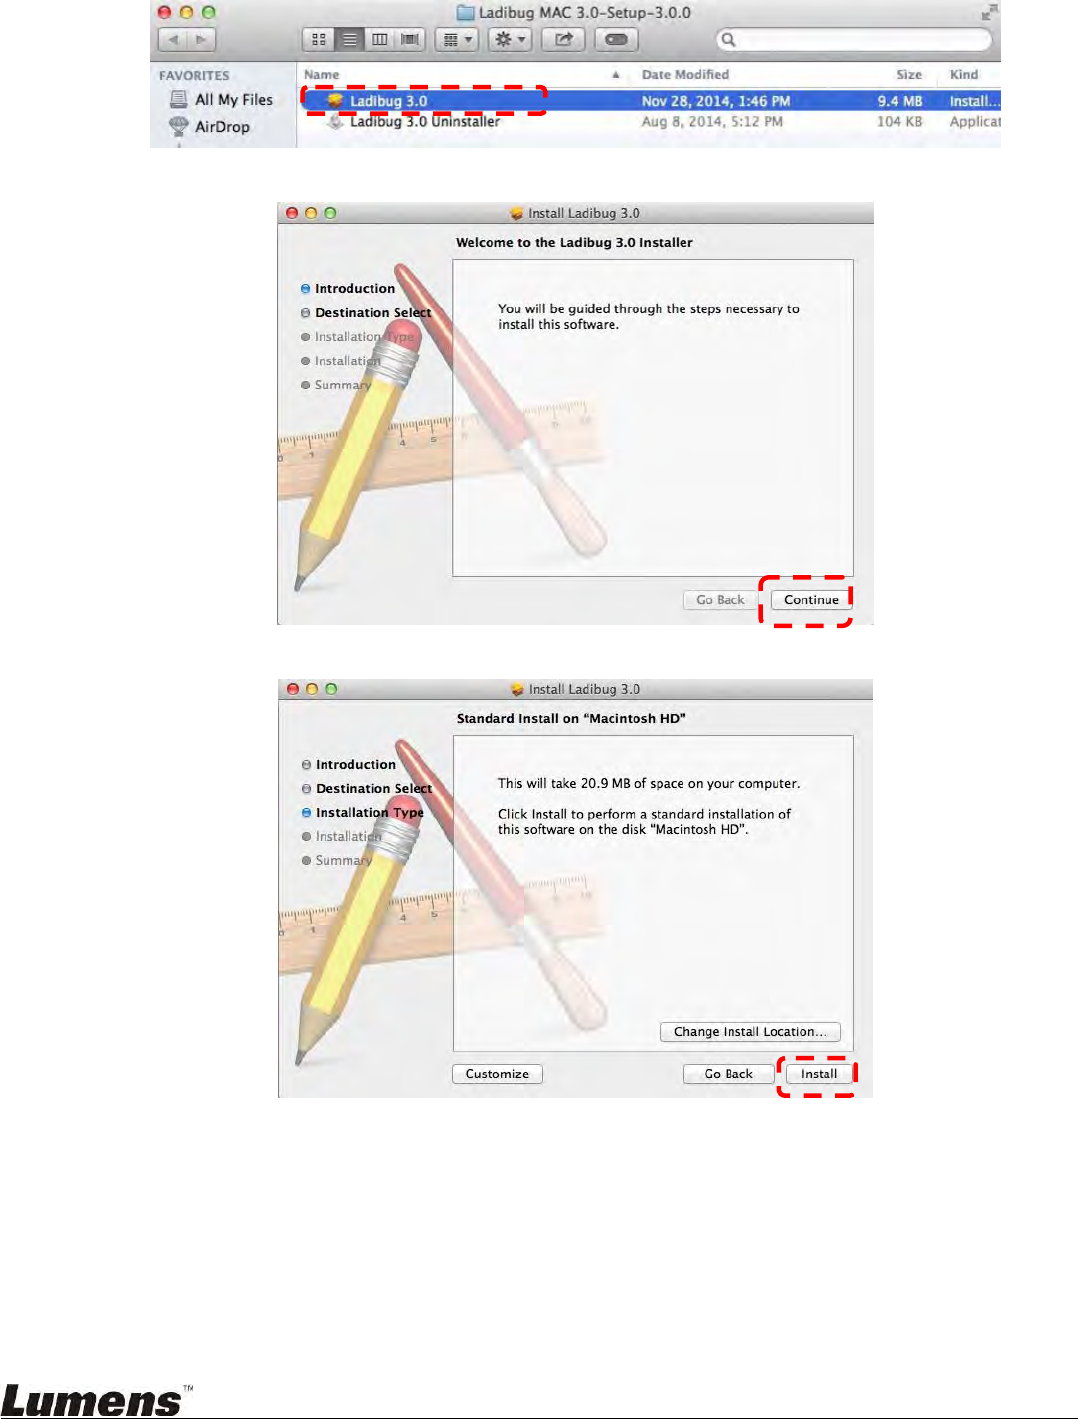
2. Please download Ladibug™ software at Lumens website.
3. Extract the file downloaded and then click [Ladibug] to install.
4. Please finish the installation by following the on-screen instructions.
5. Click [Continue].
6. Click [Install].
9
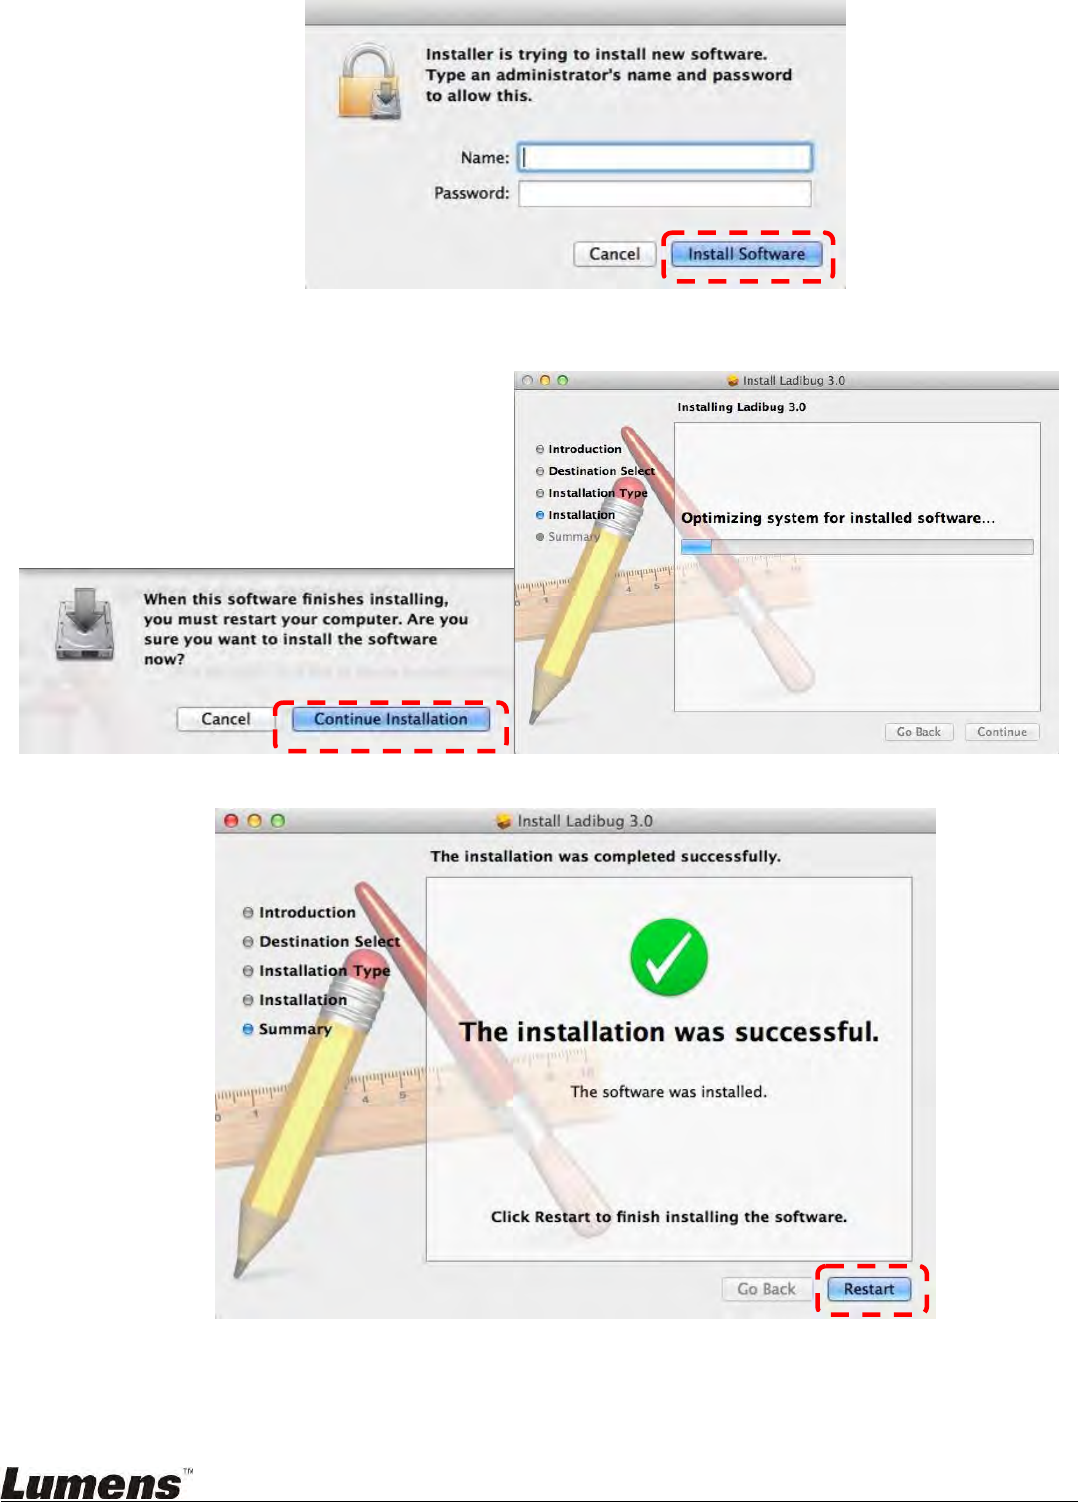
7. Enter the username and password, and then press [Install software].
8. Click [Continue Installation].
9. Press [Restart] to finish the software installation.
10
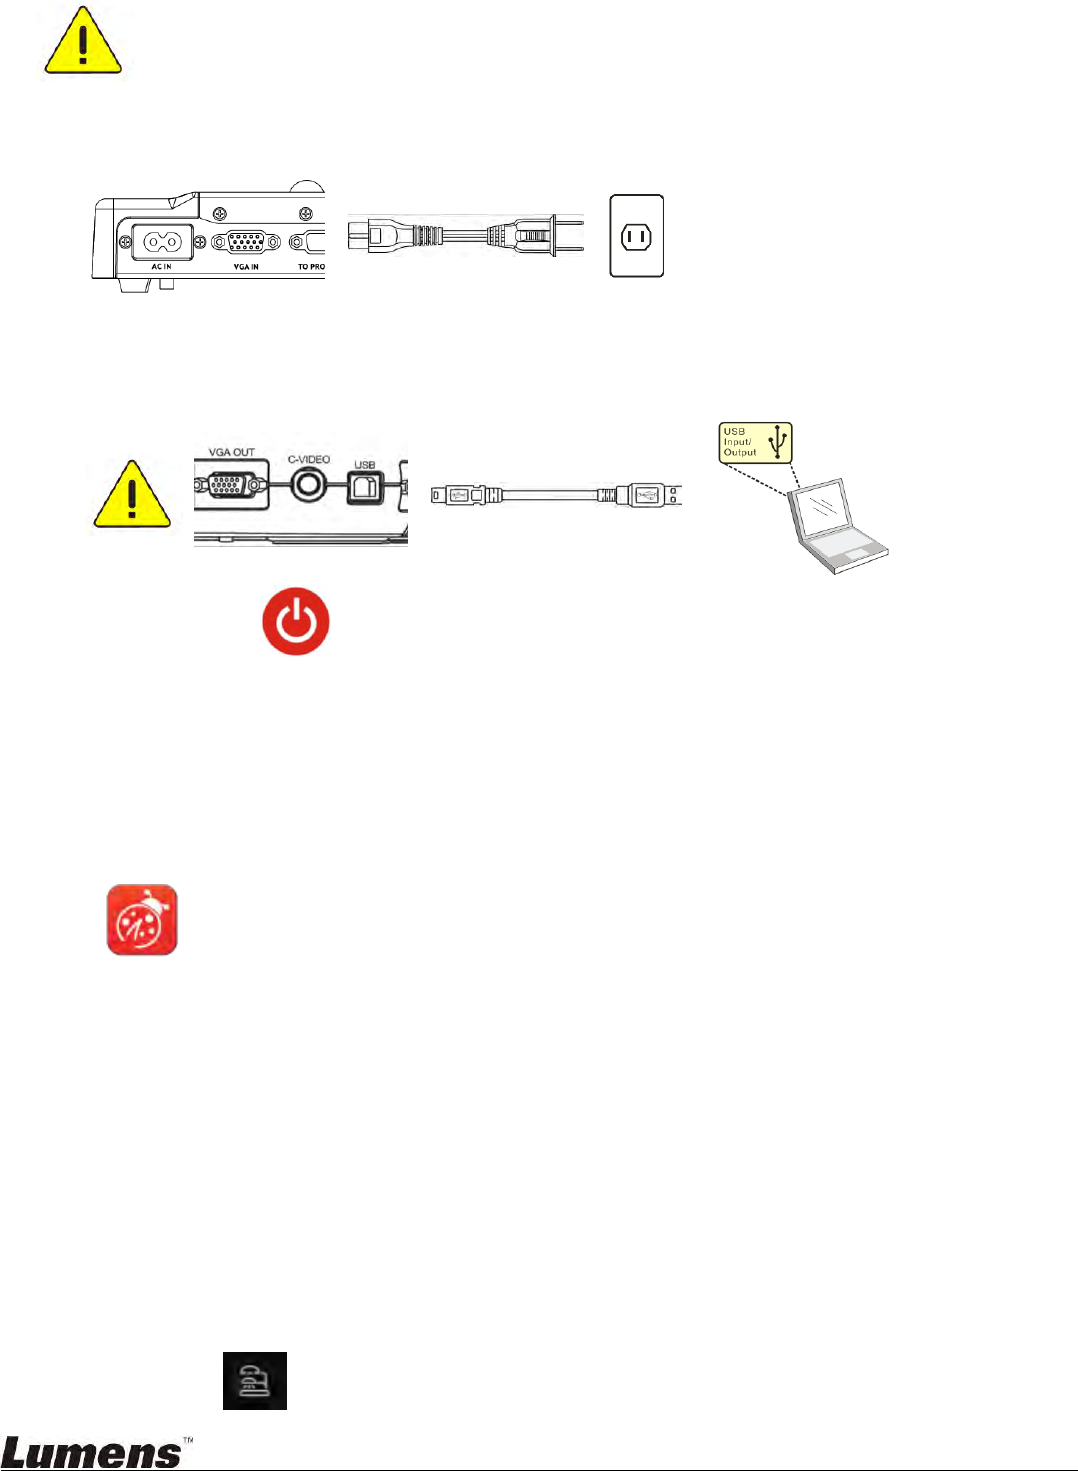
4. Connection to the Hardware
<Very Important> To ensure successful installation, please follow each of the
following steps.
4.1. Connect the power cord of the Document Camera.
AC outlet
<Note> Appearance may vary depending on country/region.
4.2. Connect USB cable to the Document Camera and your computer.
4.3. Turn on Power .
5. Start to Use Ladibug™
Instructions for connecting Ladibug to the camera are provided below:
5.1. Use the USB cable to connect the camera to the computer
5.1.1. Double-click the [Ladibug] icon to launch Ladibug™.
5.1.2. If firewall warning occurs in the first use, please check the [LAN] and then press [Allow
to Access].
Safety Alert: Click [Unblock].
POWER Frequency setting page, please complete the settings following the instructions
on the screen.
A live image is displayed when the setting is finished.
Note: You are advised to confirm the local voltage/frequency before setting the POWER
Frequency. For example, 60 Hz is applicable for America, Taiwan, Japan, etc; 50 Hz is
applicable for Europe or other regions.
5.1.3. Start Using.
Note: If no image is displayed, follow the instructions to establish a connection:
Click , open [Search Window], and select [USB Document Camera].
11
5.2. Connect the Wireless Document Camera
Firstly use this method to connect the computer to the Wireless Document Camera, for details
please refer to
DC-W50 User Manual
Equipment requirements
One computer with WLAN Card
One Wireless Document Camera
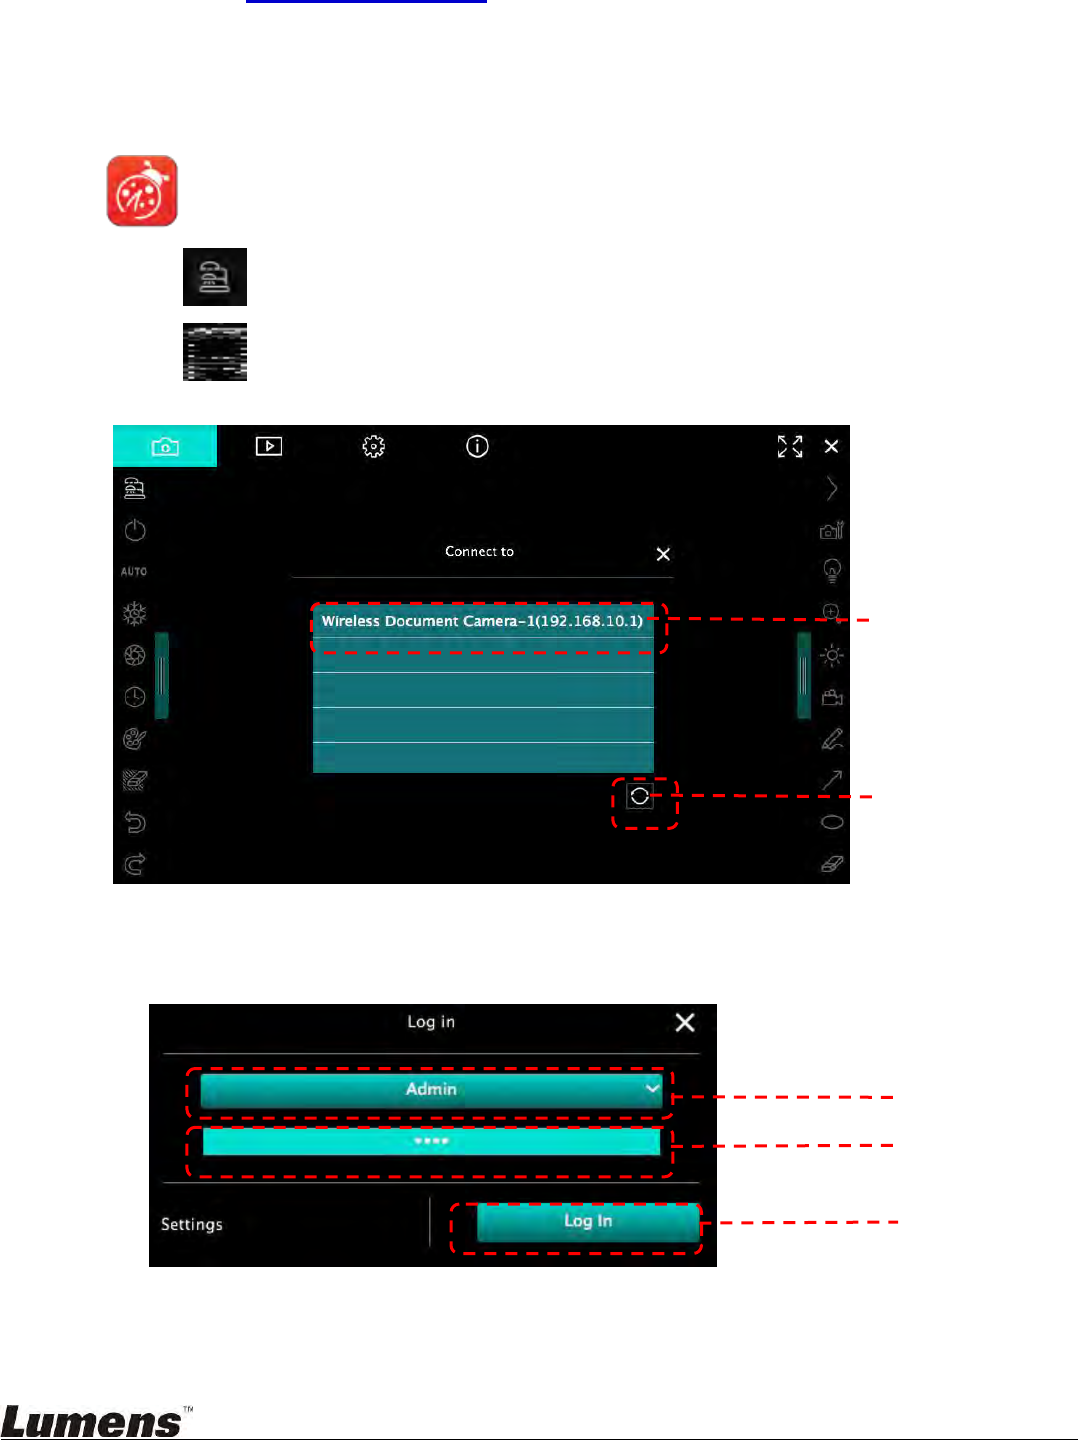
5.2.1. Double-click the [Ladibug] icon to launch Ladibug™.
5.2.2. Click , open [Search Window], and select [Wireless Document Camera].
5.2.3. Click , and when completing searching, select one Wireless Document Camera in
the list.
5.2.4. Select administrator (Admin) or viewer (Viewer) to log in, administrator shall enter
the password [1234] (default)
5.2.5. Press [Log In] to connect and to start operation.
12
5.3. Use the image sharing server to connect to the computer and camera
Complete image sharing settings for the camera before implementing this method
Equipment requirements
Two computers with Internet access
One camera
5.3.1. Turn on the image sharing function
Connect one of the computers to the camera using a USB cable and turn on the image
sharing function according to the following instructions:
To connect using a USB cable, please refer to 5.1 Use the USB cable to connect the
camera to the computer
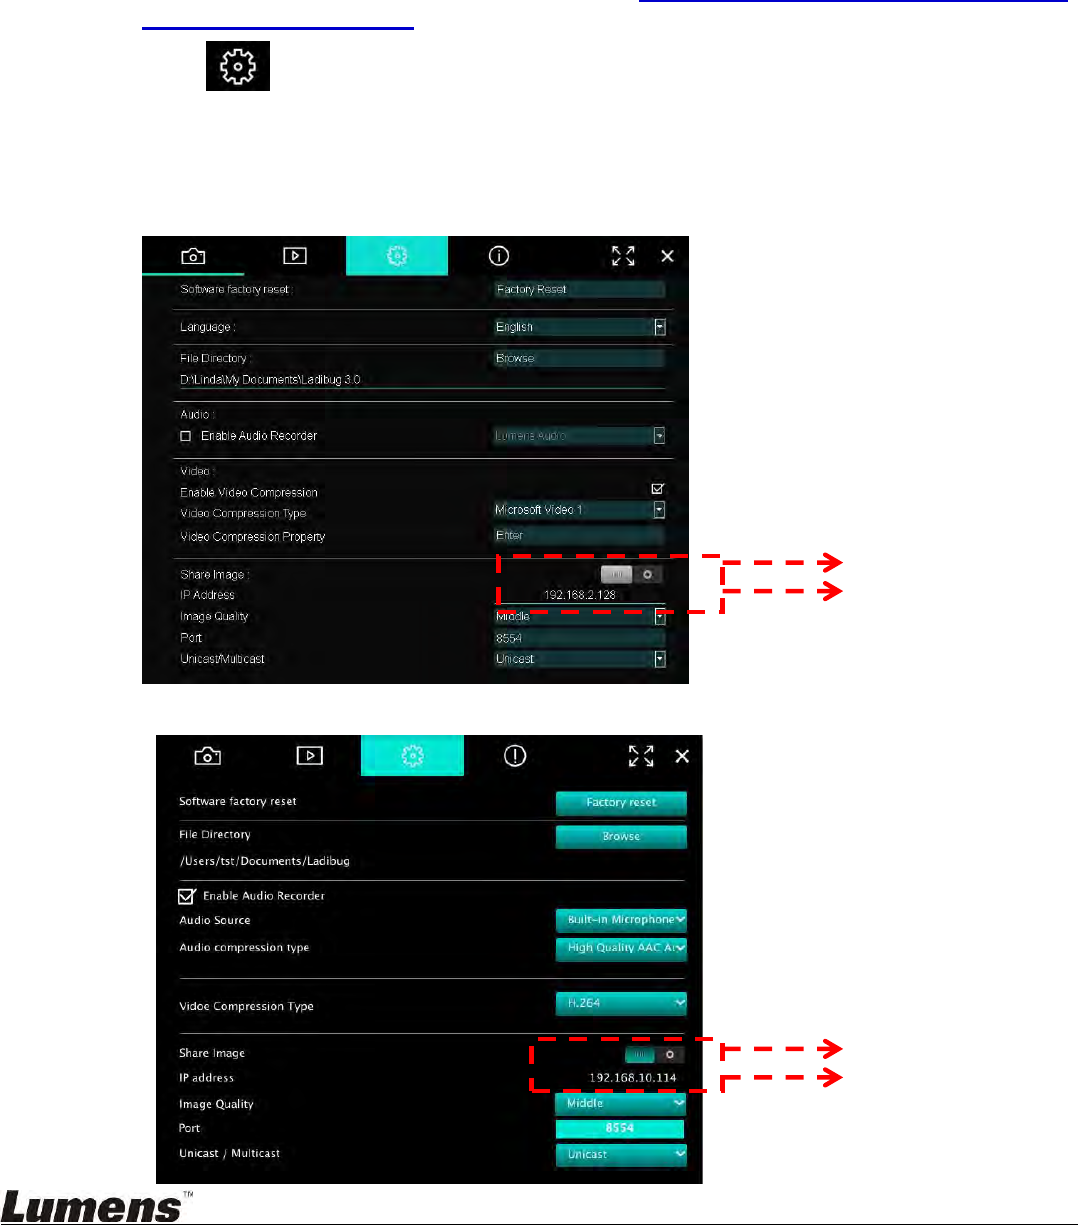
Click to switch to the function settings page.
Click [Share Image] to activate image sharing.
[Remark] Take note of the server address for image sharing, manually input the address
on computers with different network segments to connect.
▼Windows interface
▼MAC interface
Turn image sharing on/off
server address for image
sharing
Turn image sharing on/off
server address for image
sharing
13
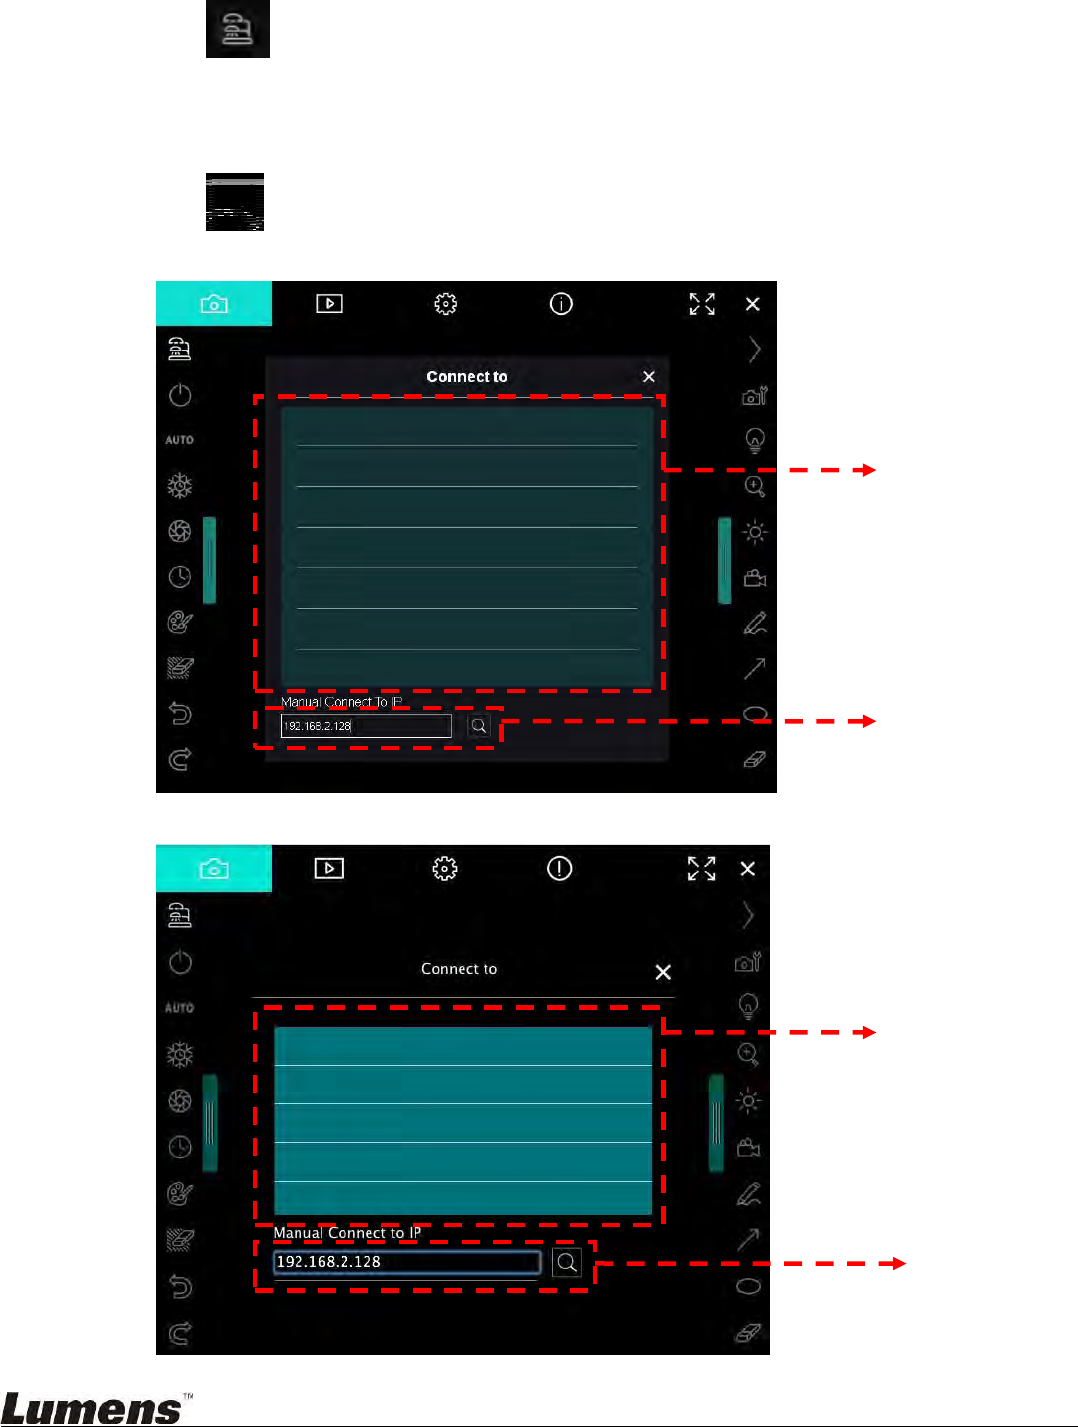
5.3.2. Connect to the image sharing server
Use the Internet to connect the camera to the image sharing server through the following
steps:
Click , to open [Search Window].
Select [Image Sharing Server].
After automatic search is completed, select camera from the table to connect.
If the camera does not appear on the table, manually input the IP address of the image
sharing server (e.g. 192.168.2.128)
Click to connect
▼Windows interface
▼ MAC interface
Automatic search
table
Automatic search
table
Manually input
connection address
Manually input
connection address
14
6. Operation Interface Description
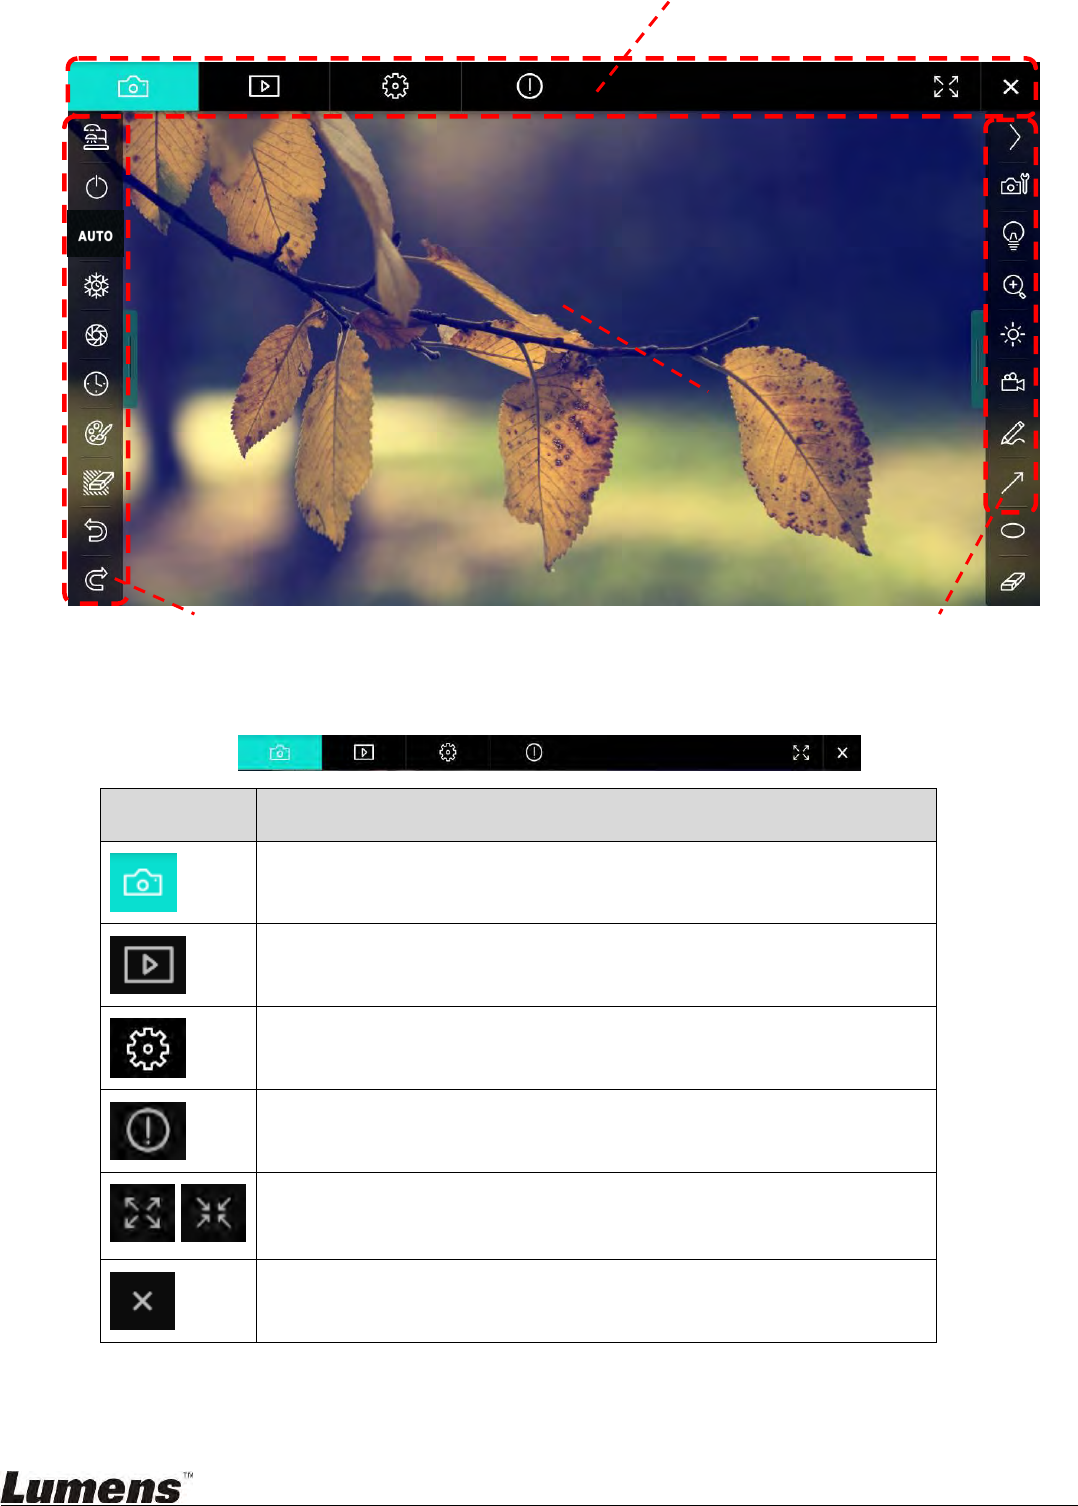
6.1. Windows interface
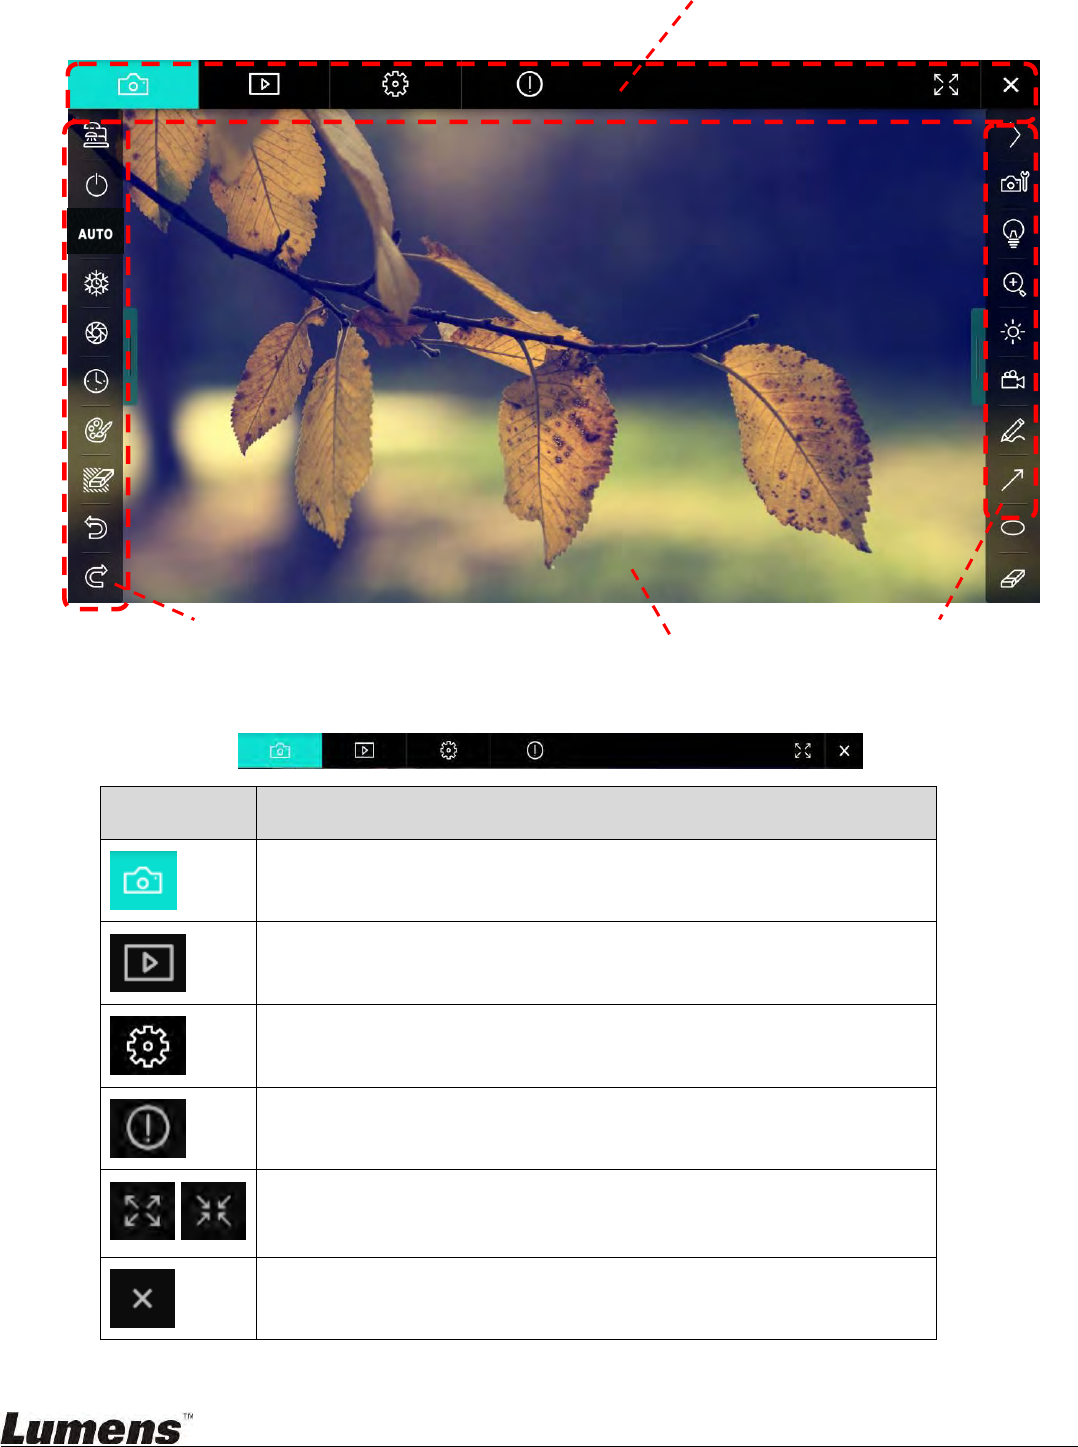
6.1.1. Windows Software Screen Introduction - Camera
1. Preview window
2. Page switch
Icon
Function Descriptions
Real-time image
Image browser page
Function settings page
Software information page
/
Switch to Full Screen
Disable Ladibug
15
3
3
.
.
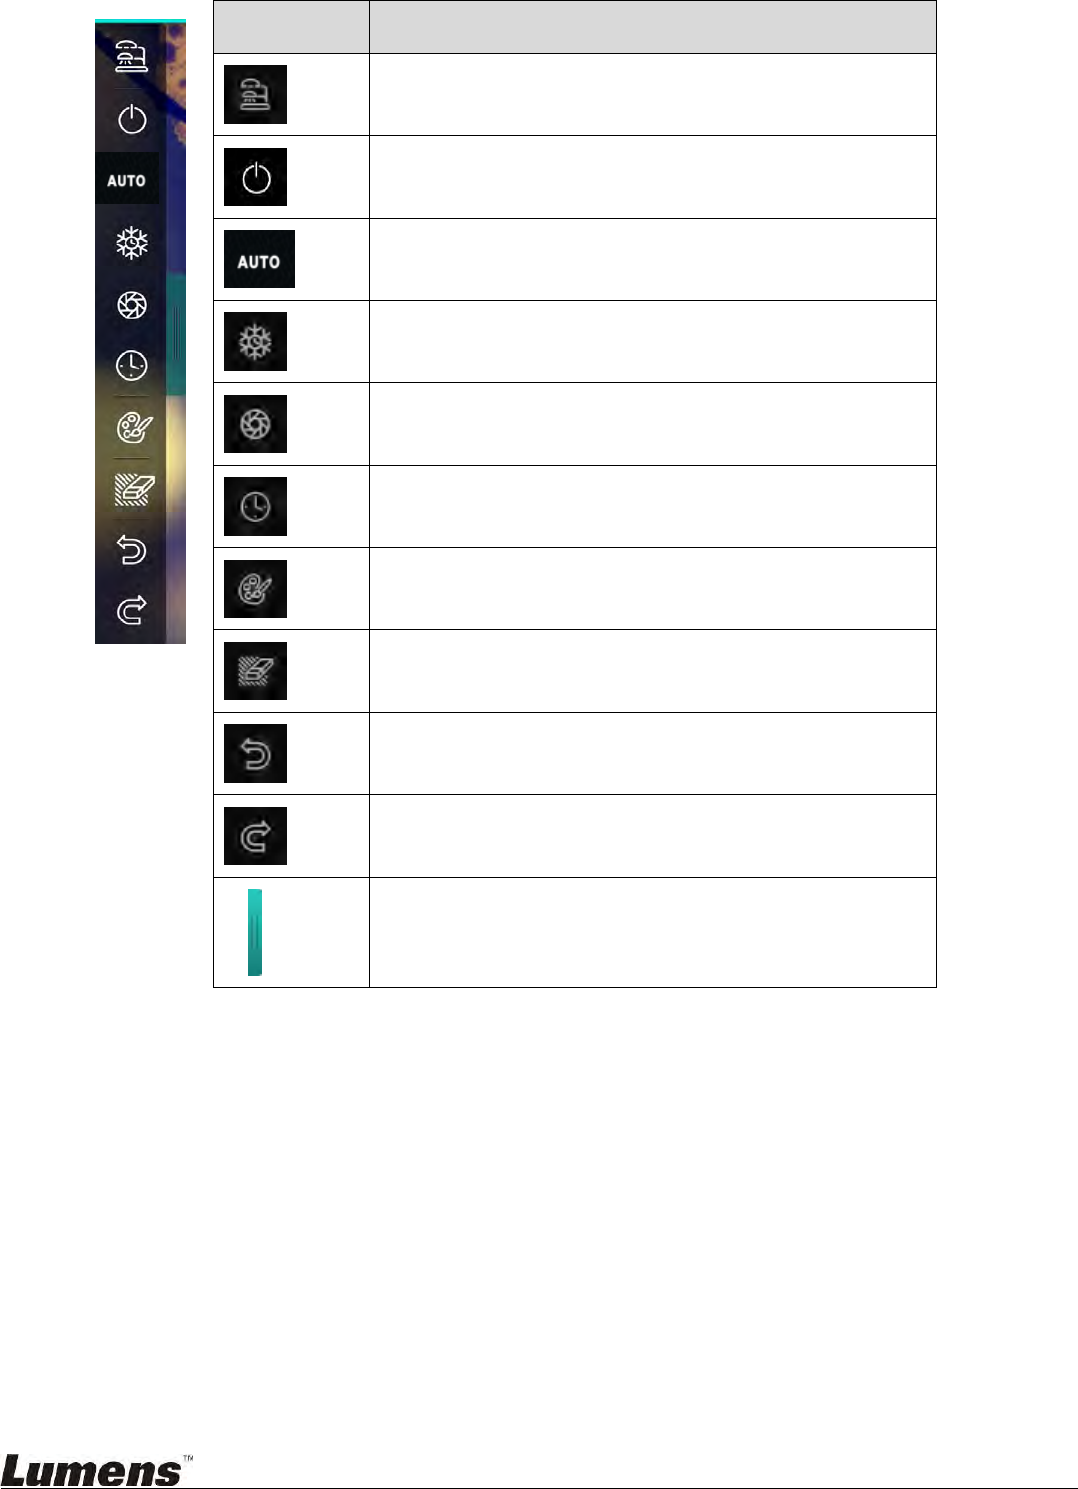
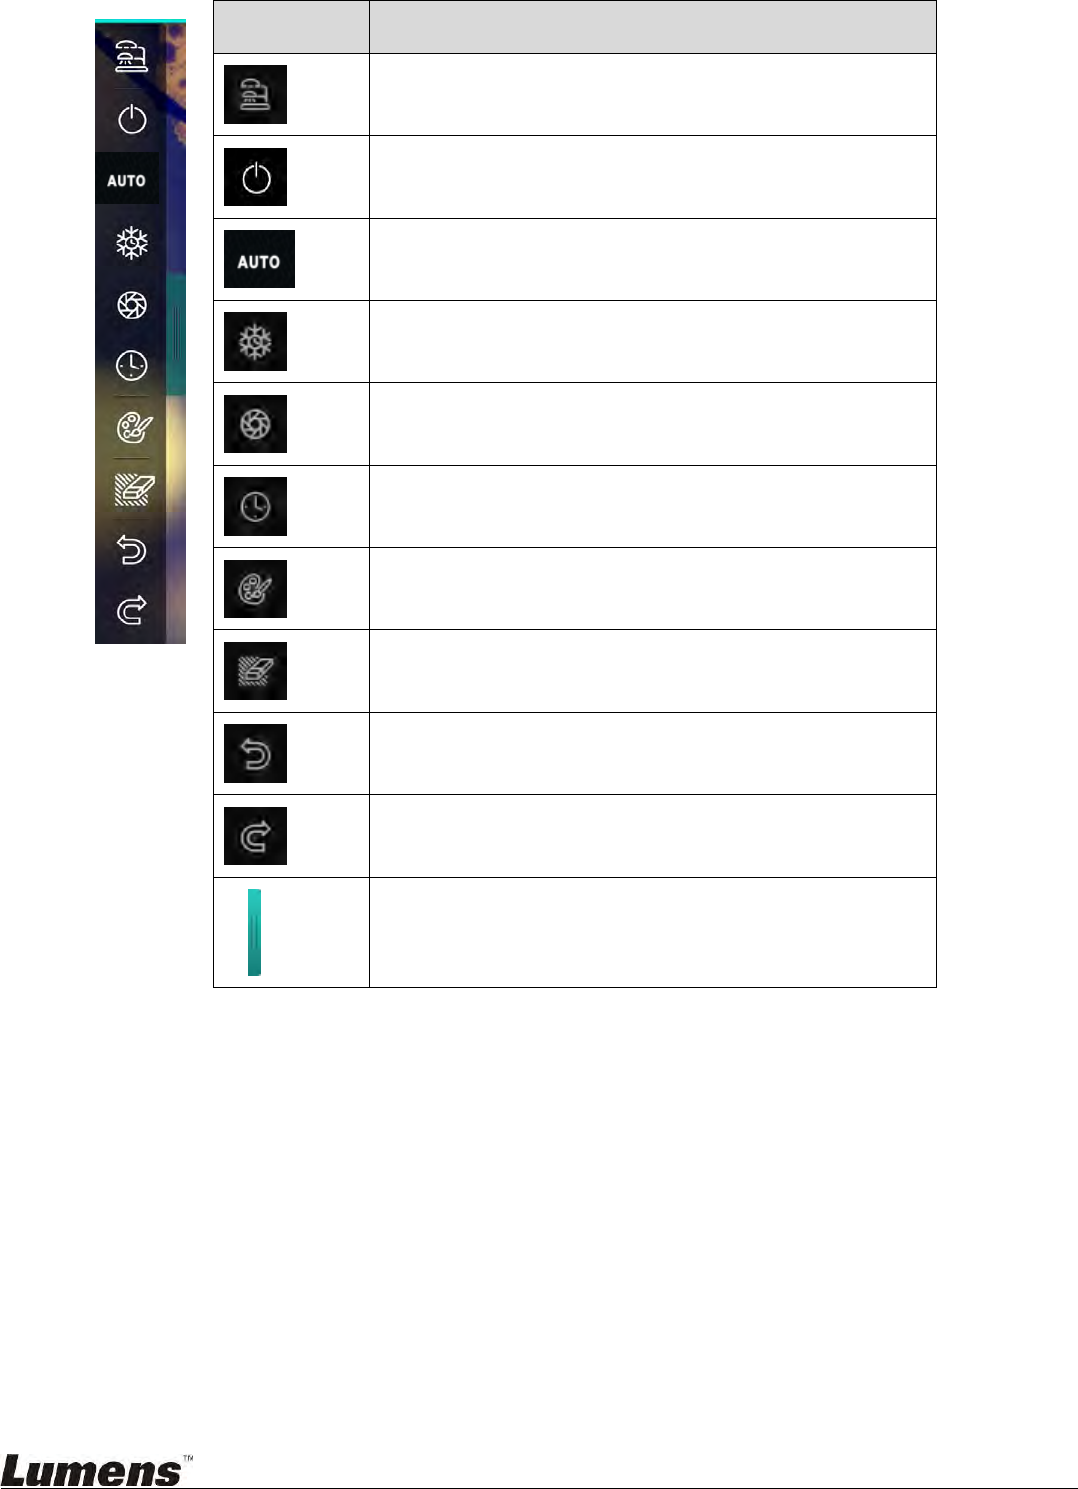
Left function menu
Icon
Function Descriptions
Select the connection mode of camera
Turn on/off the Document Camera (does not
support USB models)
Auto focus
Freeze
Capture
Time Lapse
Setting of annotation tool
Eraser (Clear all the objects)
Recover
Redo
Fold the menu

16
4. Right function menu
Icon
Function Descriptions
Switch function menus
Image setting
Lamp On/Off
Zooming in/out the image
Brightness
Recording; this function is not supported in
Wireless mode and Share Image mode
Free-hand drawing tool
Arrow
Circling tool
Eraser
Draw a rectangle
Draw a line
Edit text
Mask Mode
Spotlight Mode
Fold the menu
17
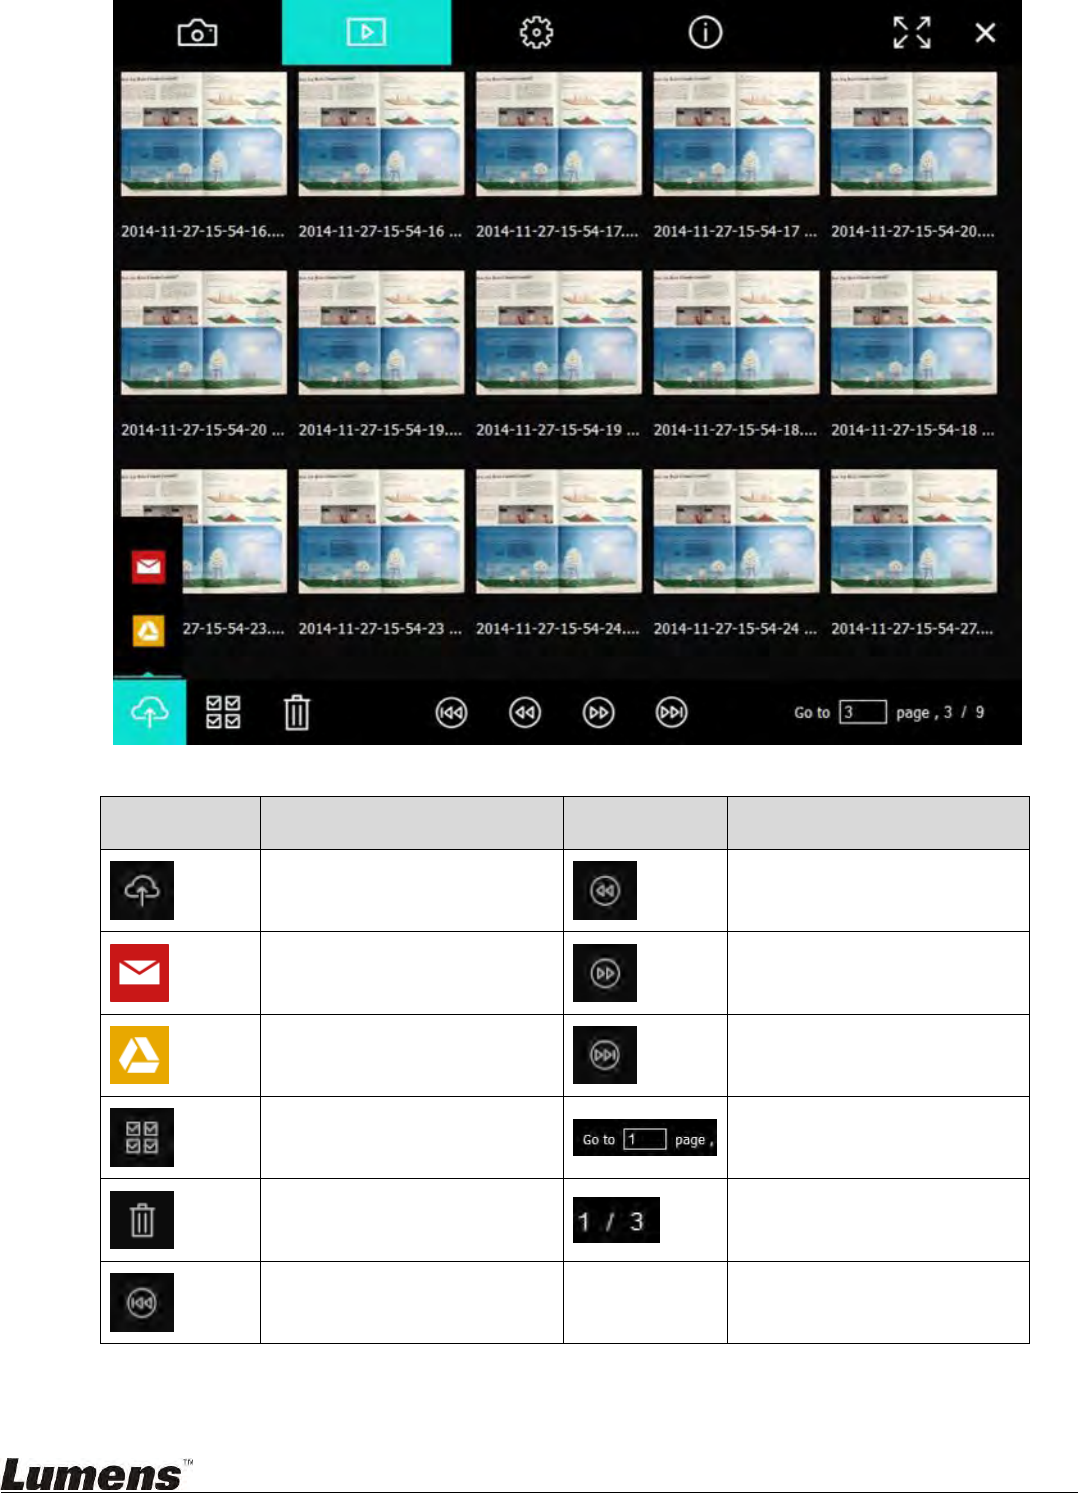
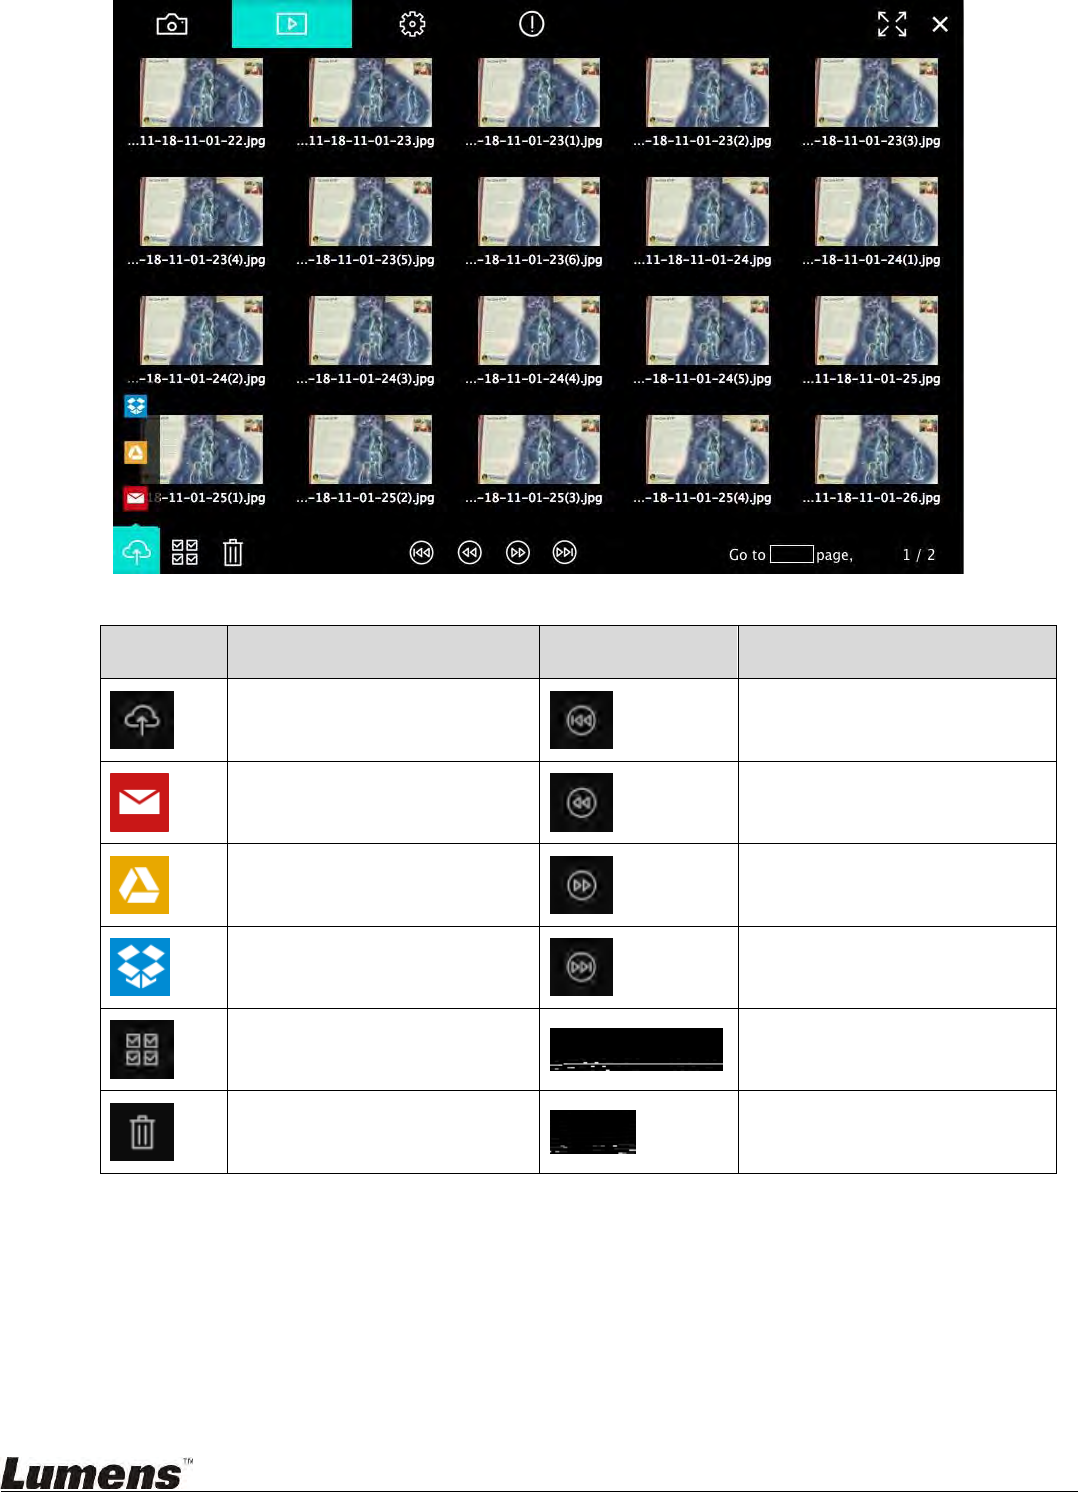
6.1.2. Windows Software Screen Introduction - Image Browser Thumbnail
Icon
Function Descriptions
Icon
Function Descriptions
Upload the file to the
cloud
Move to the previous page
Send e-mail
Move to the next page
Upload to Google Drive
Move to the last page
Select All
Move to a given page
Delete
Current page/total number
of pages
Move to the first page

18
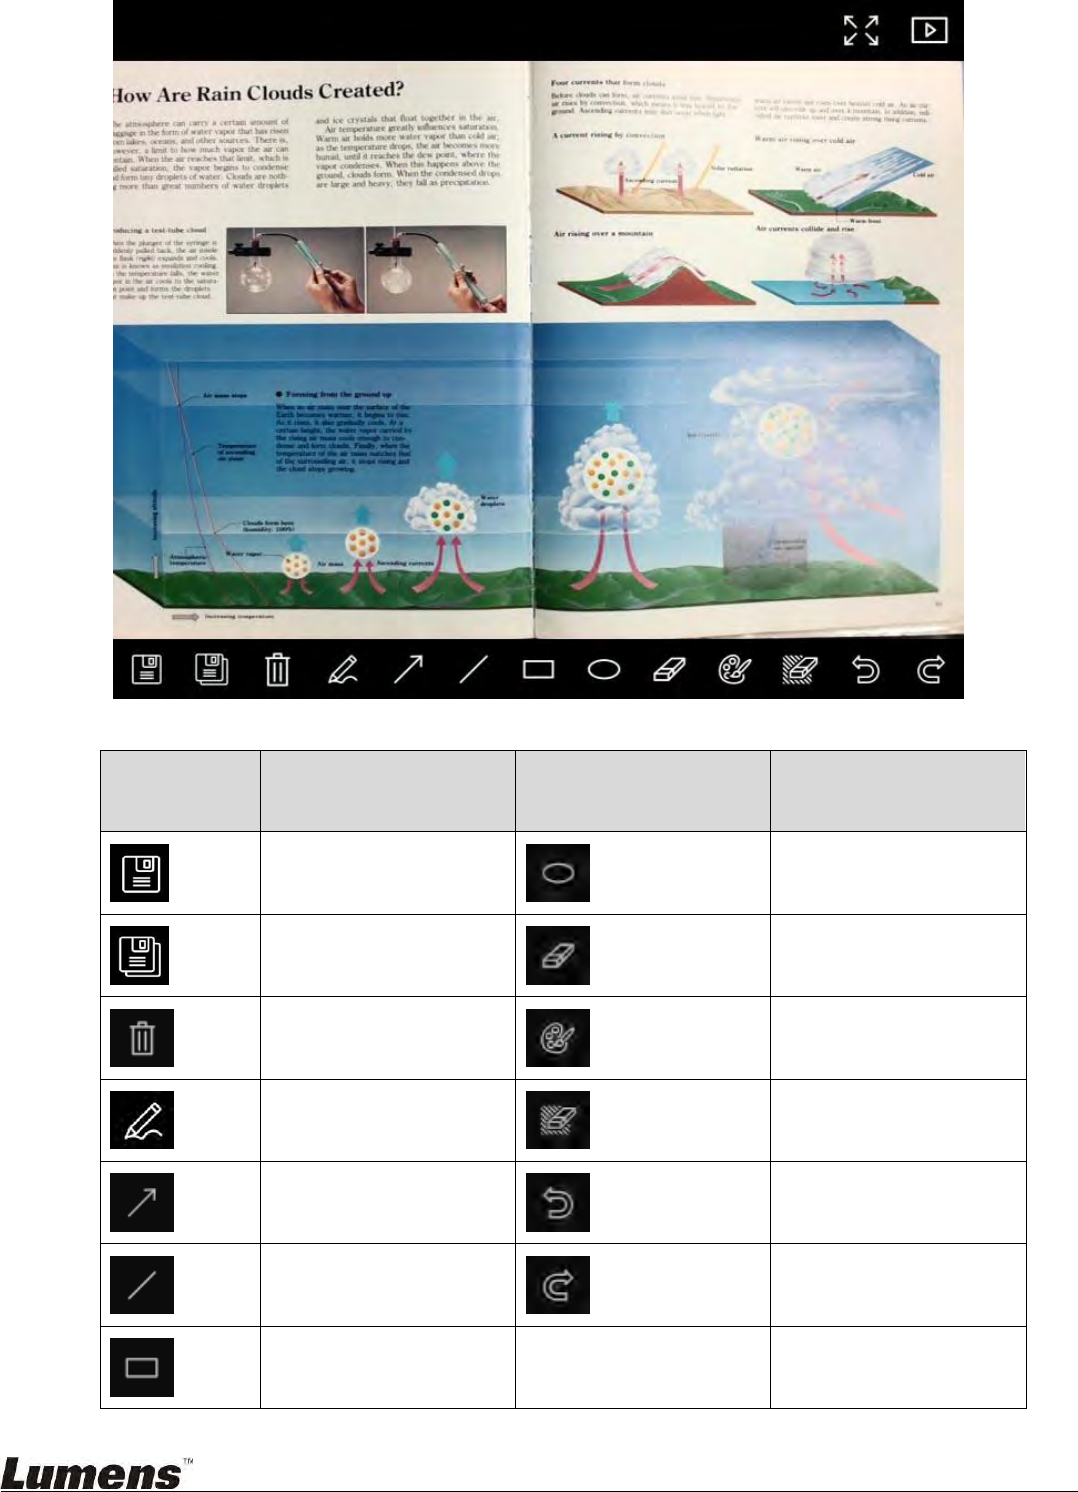
6.1.3. Windows Software Screen Introduction - Large Picture Of Image
Browser
Icon
Function
Descriptions
Icon
Function
Descriptions
Save files
Circling tool
Save as a new file
Eraser
Delete
Setting of annotation
tool
Free-hand drawing
tool
Eraser (Clear all the
objects)
Arrow
Recover
Draw a line
Redo
Draw a rectangle
19
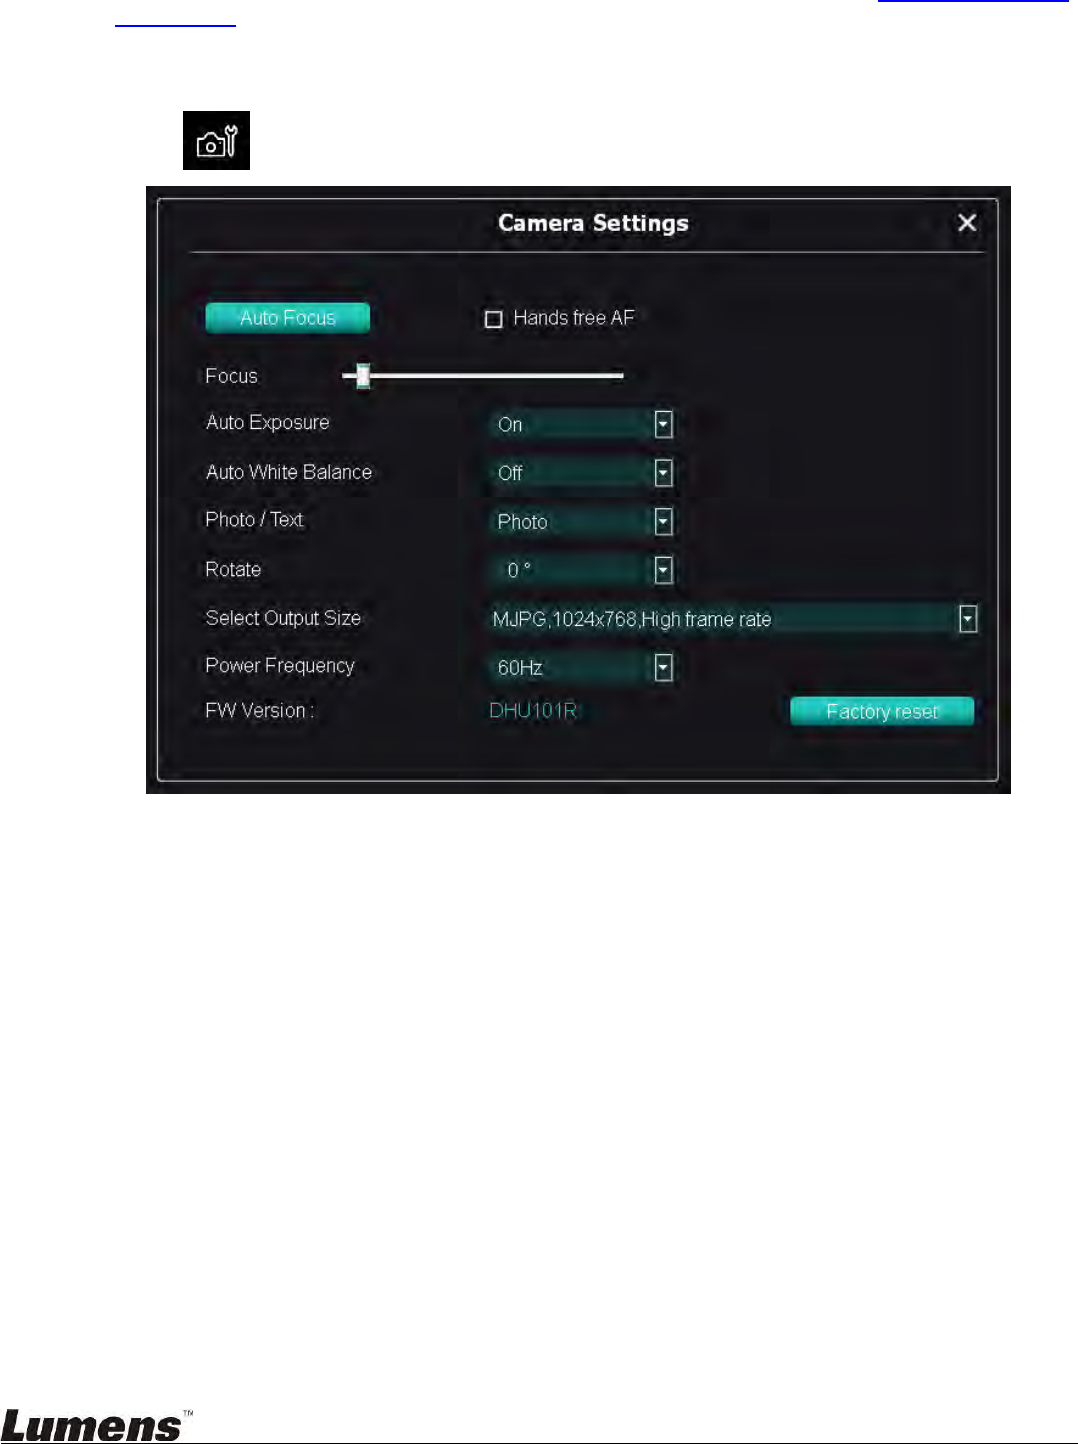
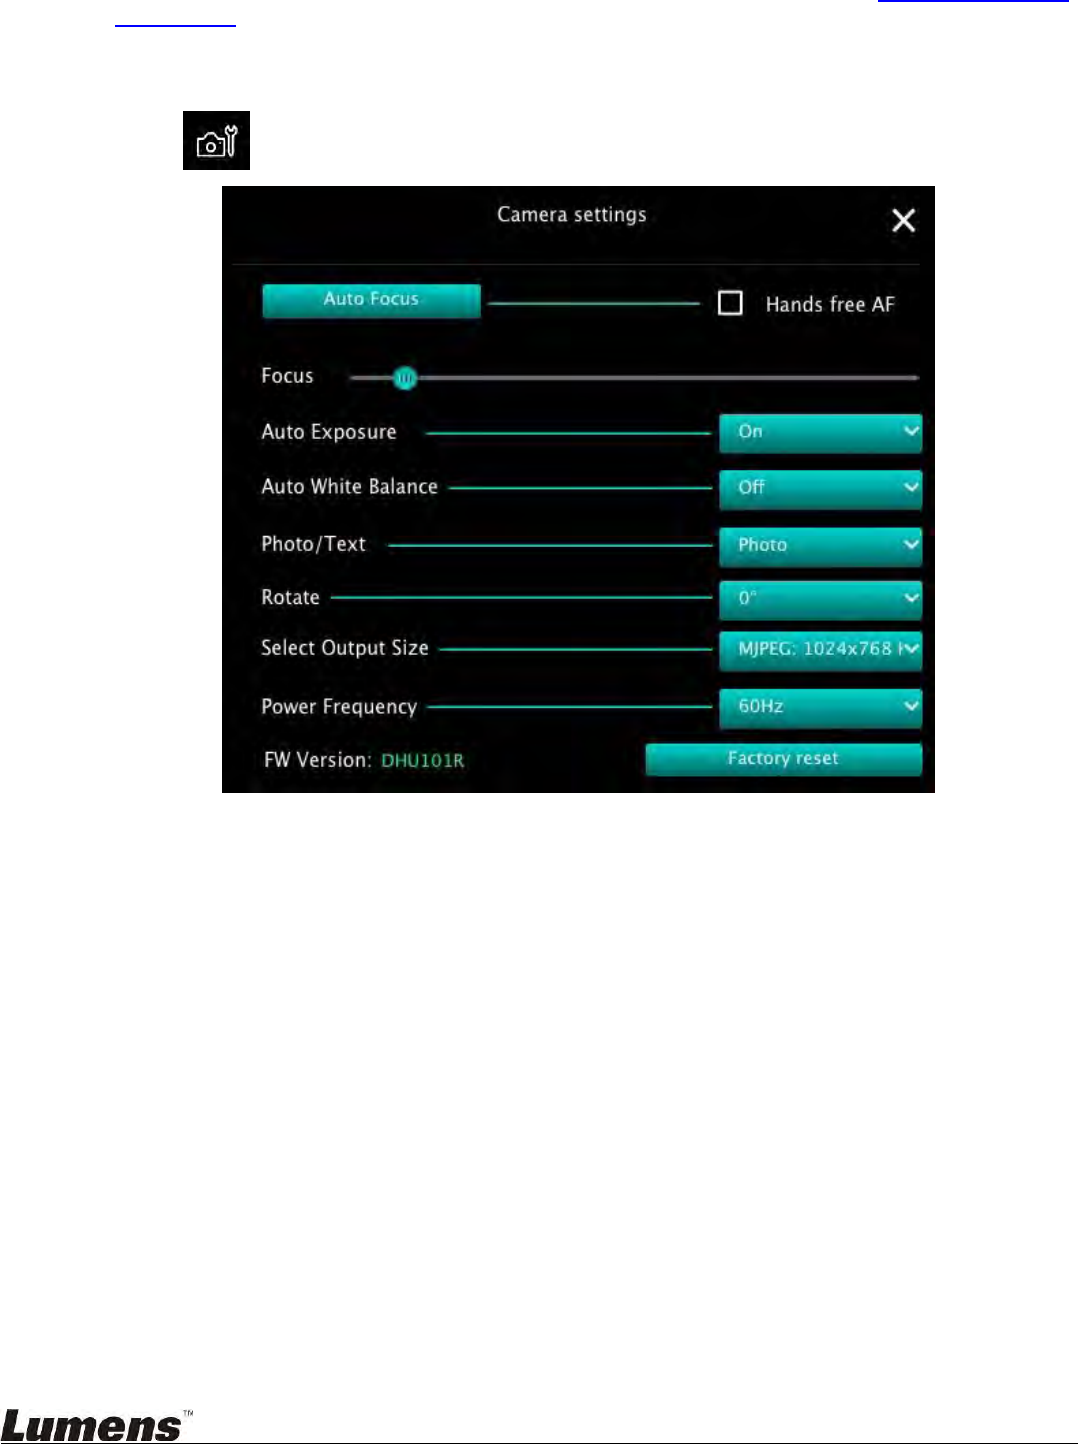
6.1.4. Camera Settings
Control the live image via the Camera Settings interface. The operating procedure is the same as
the control panel and remote control of the Document Camera. Refer to the Document Camera
user manual for more information.
<Remark> The display of the button may vary depending on product functions.
An inactive button will grey out.
Click to open Camera Settings interface
1. Auto Focus: Adjust the best focal length.
2. Hands free AF: Automatically adjust the best focal length.
3. Focus: Manually adjust focal length on an object.
4. Auto Exposure: Set on/off.
5. Auto White Balance: Set on/off.
6. Photo/Text: Set up Photo/Text mode.
7. Rotate: Rotate the image by 0/180 degree.
8. Select Output Size: Set output resolution.
9. Power Frequency: The power frequency may vary with countries. Please check it
before using.
<Remark> In most parts of the world, it is 50 Hz. In the America, however, it is
typically 60 Hz.
10. FW Version: FW version of the Document Camera.
11. Factory Reset: Reset the factory default of Document Camera; That is not
supported for Wireless model.
20
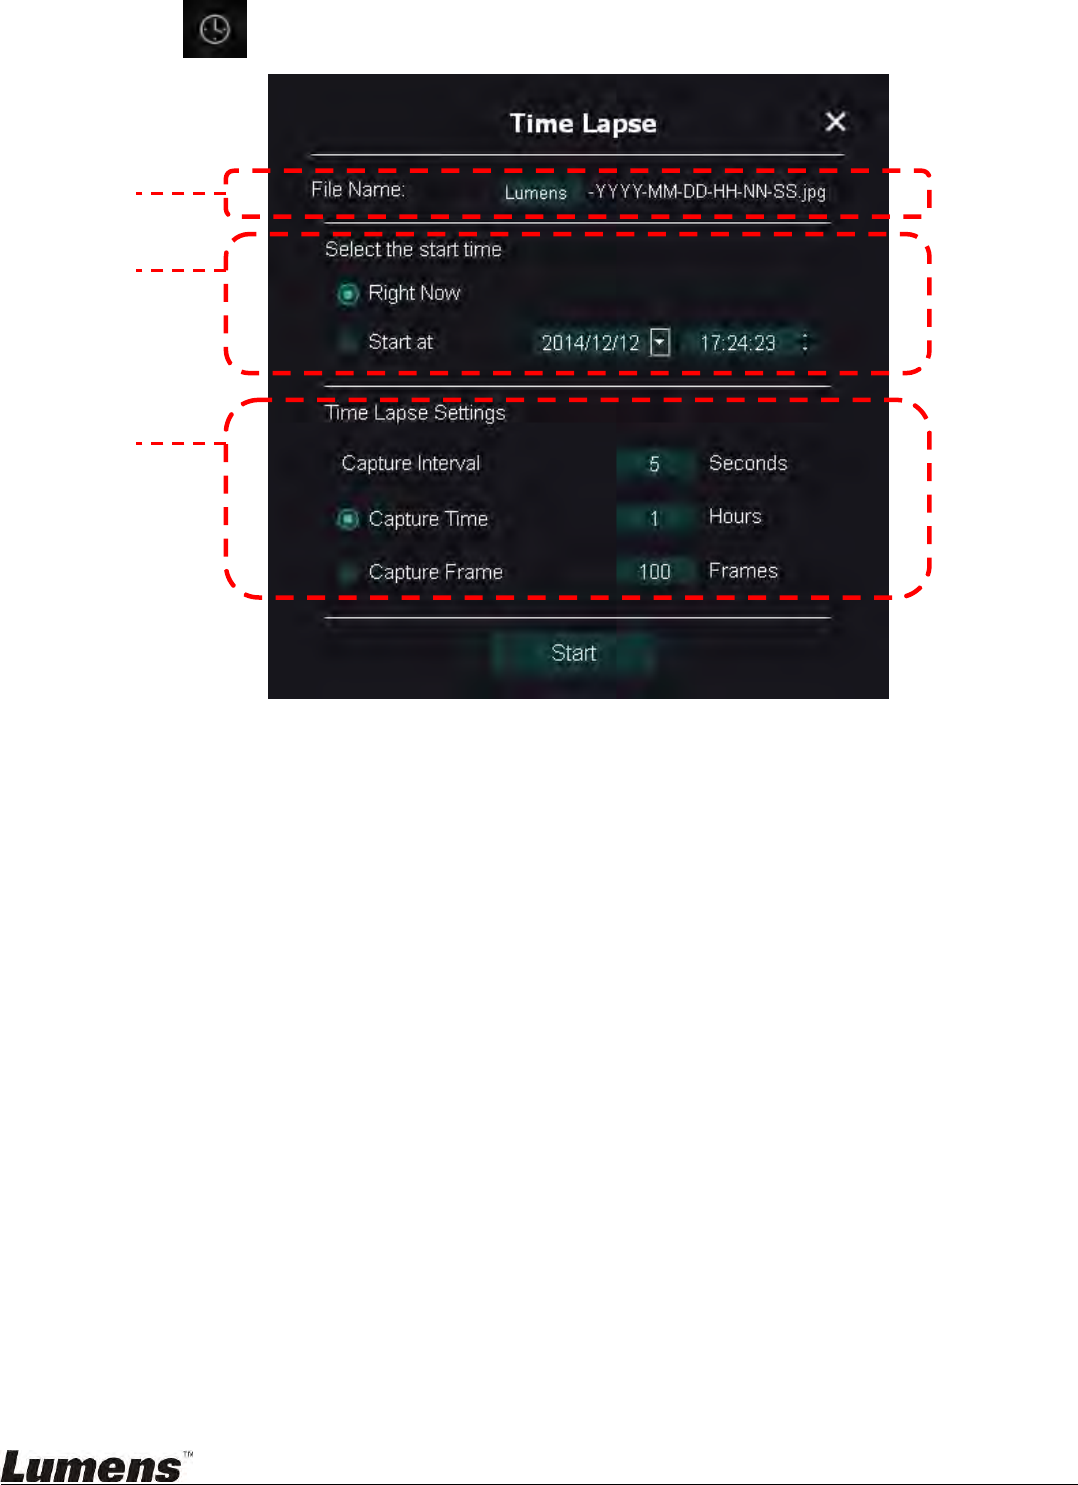
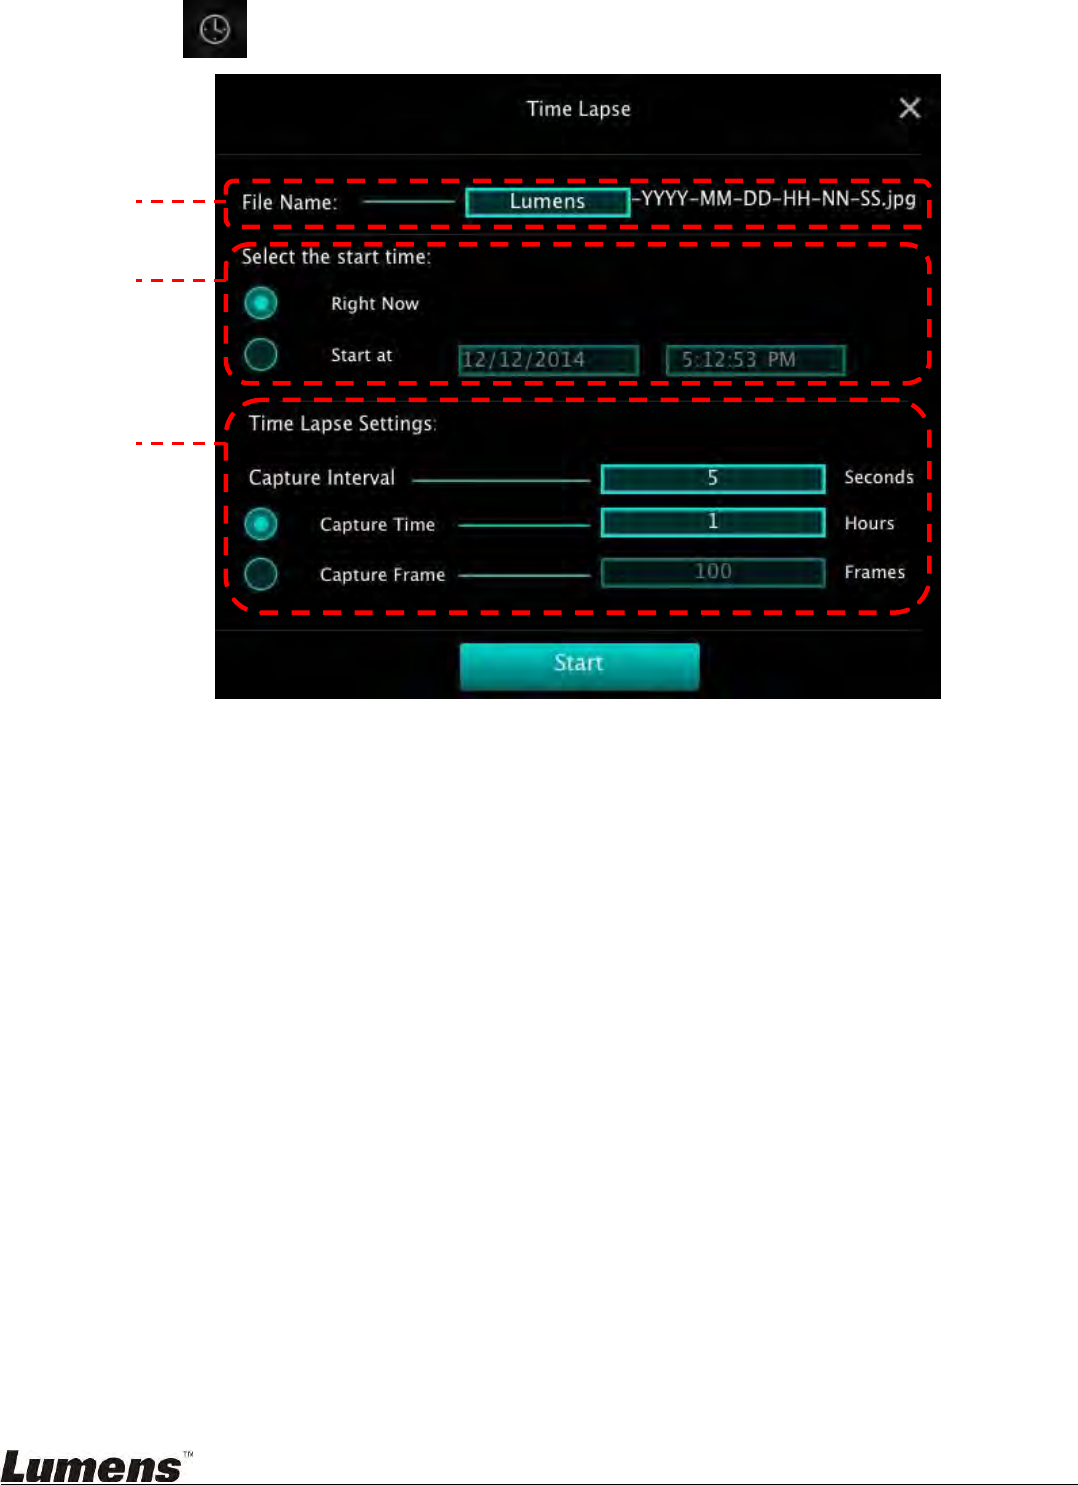
6.1.5. Time Lapse (Burst Settings)
Click to open Time Lapse menu
1. Specify a file name.
2. Set the start time.
3. Set the capture interval and the capture time.
21
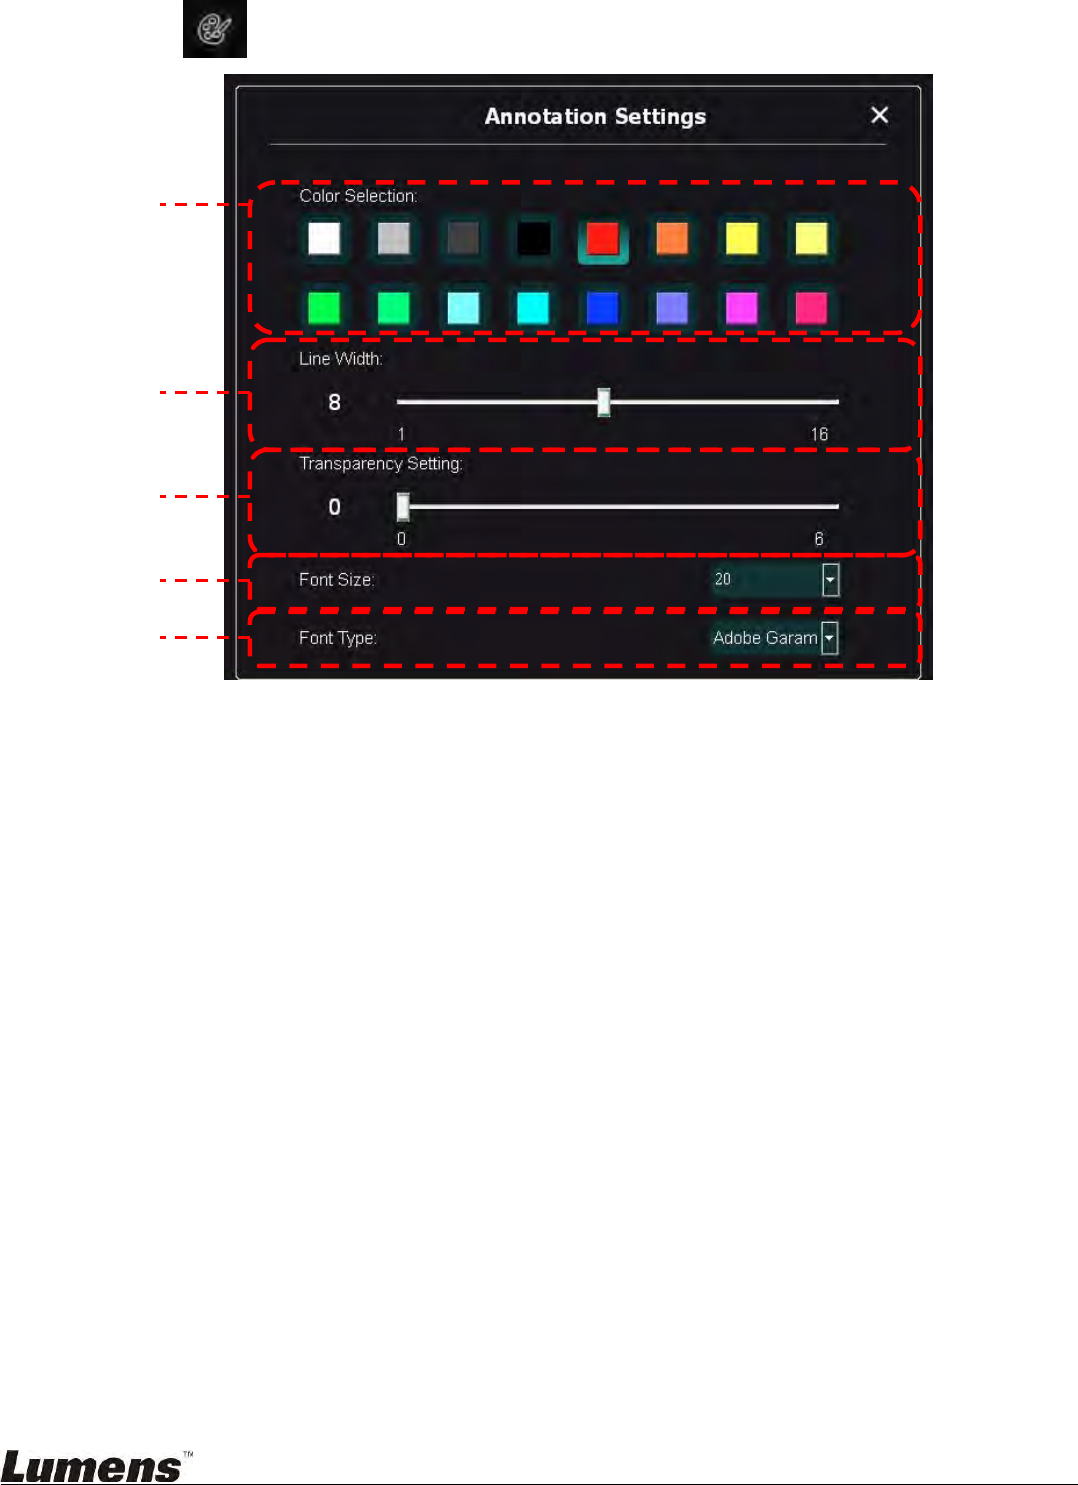
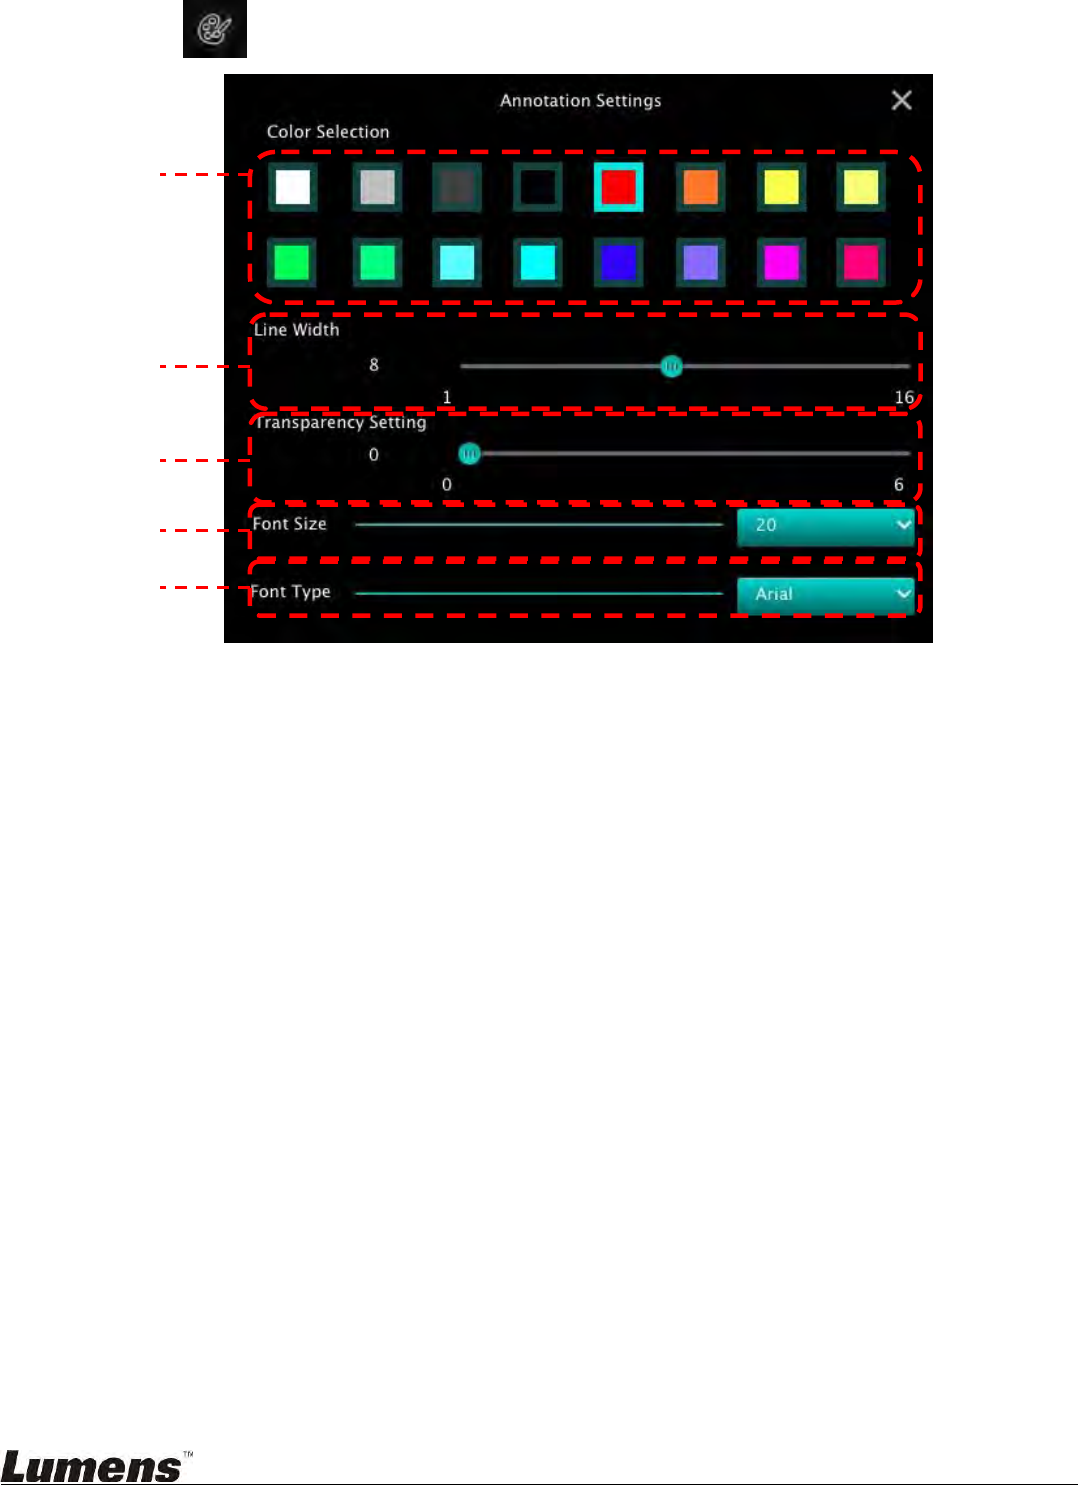
6.1.6. Setting of annotation tool
Click to open the setting menu
1. Set the pen color
2. Select the line width
3. Select the font size
4. Select the font
22
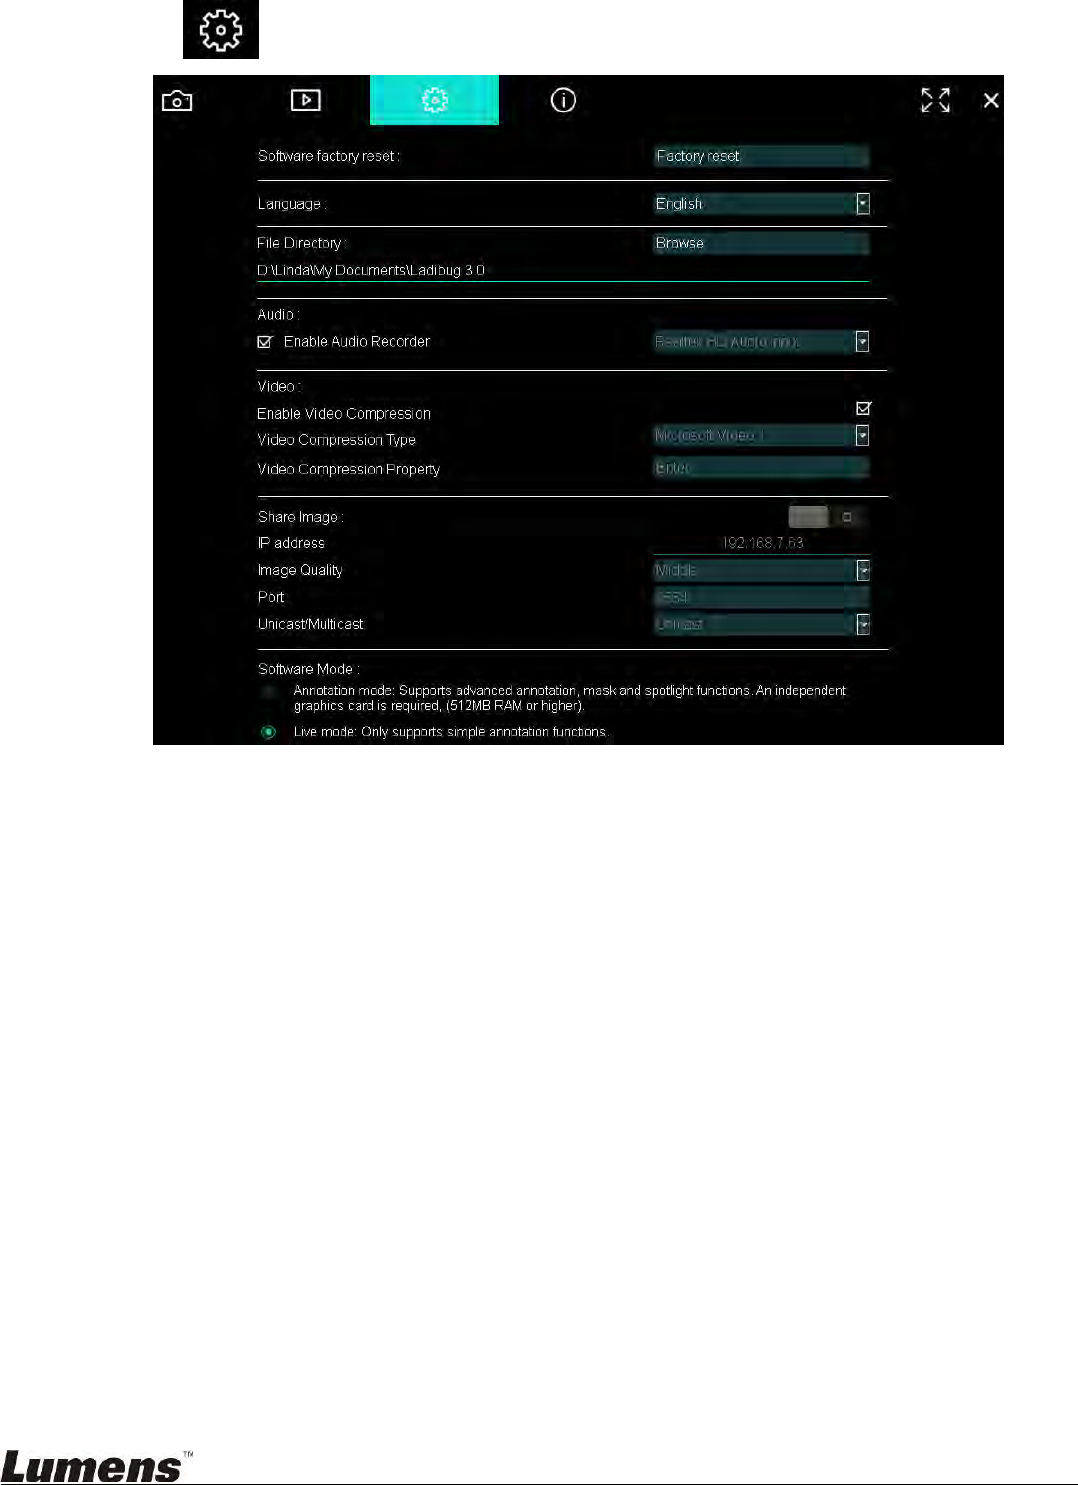
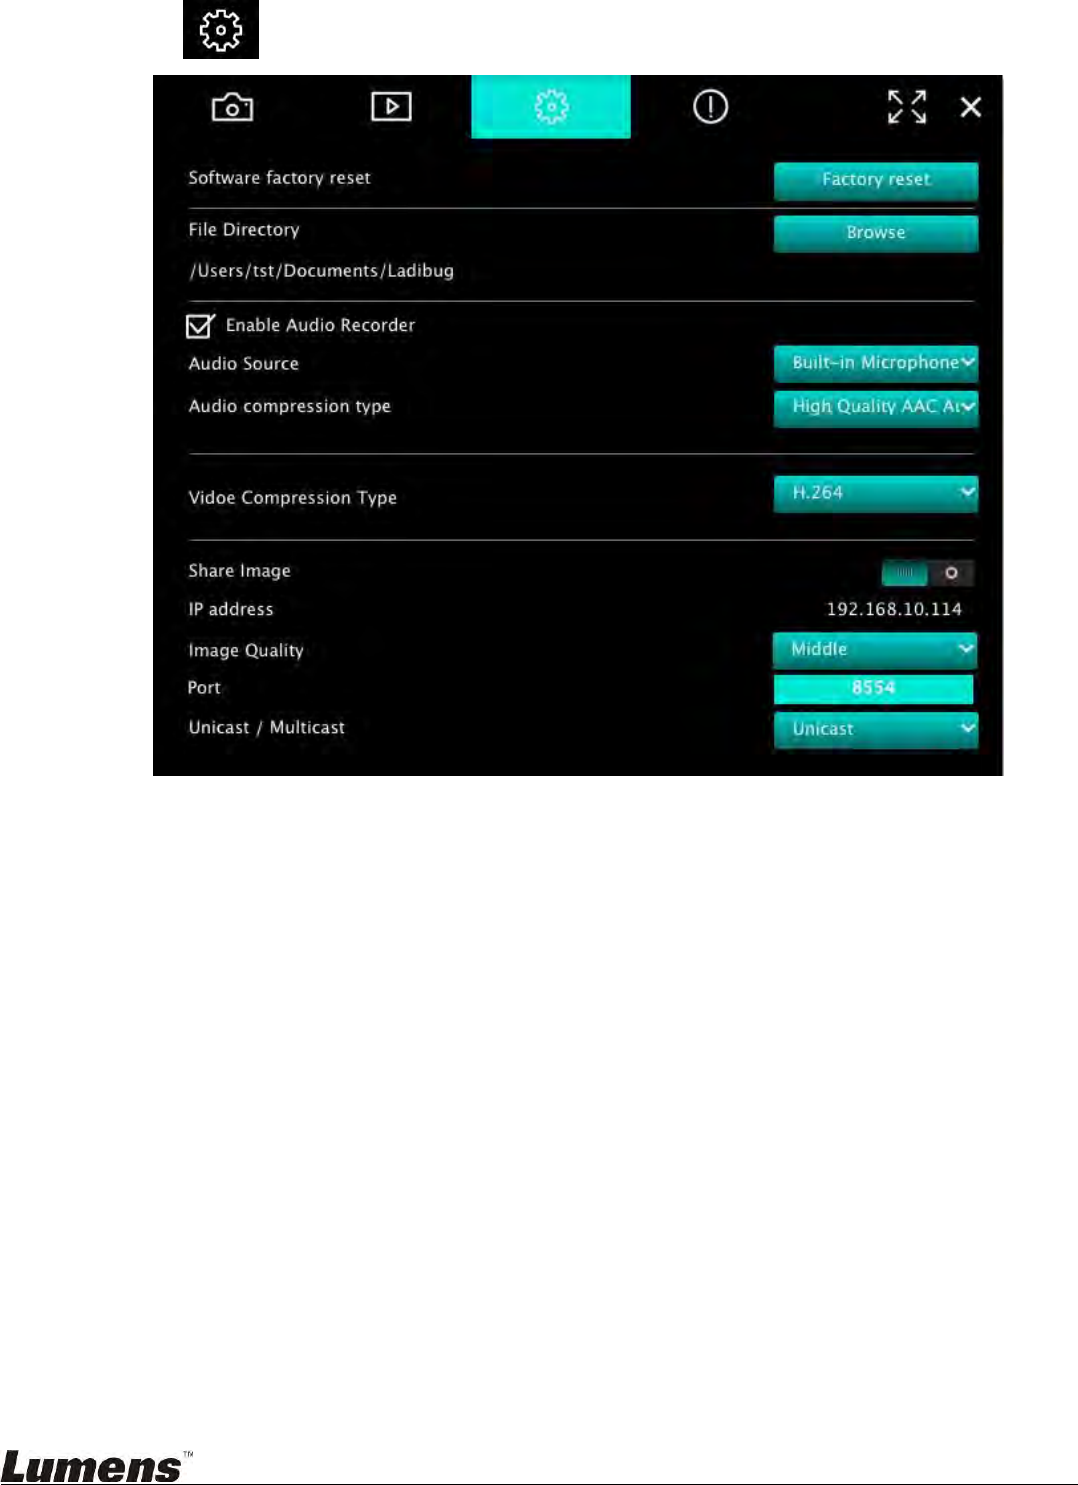
6.1.7. Setting (Advanced)
Click to open the setting menu
1. Software Factory Reset: Reset to the default value.
2. Language: Select language.
3. File Directory: File storage path.
4. Enable Audio Recorder: Activate recording function and select audio output
device.
5. Enable Video Compression: Activate video compression.
6. Video Compression Type: Set video compression format.
7. Video Compression Property: Open the advanced settings for video compression
format.
8. Share Image: Share Image; this function is not supported in Wireless mode.
9. IP Address: Server IP address for image sharing.
10. Image Quality: Select image quality (high/medium/low).
11. Port: Enter port settings (8500 ~ 9000).
12. Unicast/Multicast: Select cast type.
13. Software Mode: Change the use mode to Live mode / Annotatiom mode according
to the needs.
23
6.2. MAC interface
6.2.1. MAC Software Screen Introduction - Camera
1. Preview window
2. Page switch
Icon
Function Descriptions
Real-time image
Image browser page
Function settings page
Software information page
/
Switch to Full Screen
Disable Ladibug
24
3
3
.
.
Left function menu
Icon
Function Descriptions
Select the connection mode of camera
Turn on/off the Document Camera (does not
support USB models).
Auto focus
Freeze
Capture
Time Lapse
Setting of annotation tool
Eraser (Clear all the objects)
Recover
Redo
Fold the menu

25
4. Right function menu
Icon
Function Descriptions
Switch function menus
Image setting
Lamp On/Off
Zooming in/out the image
Brightness
Recording; this function is not supported in
Wireless mode and Share Image mode.
Free-hand drawing tool
Arrow
Circling tool
Eraser
Draw a rectangle
Draw a line
Edit text
Mask Mode
Spotlight Mode
Fold the menu
26
6.2.2. MAC Software Screen Introduction - Image Browser Thumbnail
Icon
Function Descriptions
Icon
Function Descriptions
Upload the file to the cloud
Move to the first page
Send e-mail
Move to the previous page
Upload to Google Drive
Move to the next page
Upload to Dropbox
Move to the last page
Select All
Move to a given page
Delete
Current page/total number
of pages
27
6.2.3. MAC Software Screen Introduction - Large Picture Of Image Browser
Icon
Function
Descriptions
Icon
Function
Descriptions
Save files
Circling tool
Save as a new file
Eraser
Delete
Setting of annotation
tool
Free-hand drawing
tool
Eraser (Clear all the
objects)
Arrow
Recover
Draw a line
Redo
Draw a rectangle
28
6.2.4. Camera Settings
Control the live image via the Camera Settings interface. The operating procedure is the same as
the control panel and remote control of the Document Camera. Refer to the Document Camera
user manual for more information.
<Remark> The display of the button may vary depending on product functions.
An inactive button will grey out.
Click to open Camera Settings interface
1. Auto Focus: Adjust the best focal length.
2. Hands free AF: Automatically adjust the best focal length.
3. Focus: Manually adjust focal length on an object.
4. Auto Exposure: Set on/off.
5. Auto White Balance: Set on/off.
6. Photo/Text: Set up Photo/Text mode.
7. Rotate: Rotate the image by 0/180 degree.
8. Select Output Size: Set output resolution.
9. Power Frequency: The power frequency may vary with countries. Please check it
before using.
<Remark> In most parts of the world, it is 50 Hz. In the America, however, it is
typically 60 Hz.
10. FW Version: FW version of the Document Camera.
11. Factory Reset: Reset the factory default of Document Camera; That is not
supported for Wireless model.
29
6.2.5. Time Lapse (Burst Settings)
Click to open Time Lapse menu
1. Specify a file name.
2. Set the start time.
3. Set the capture interval and the capture time.
30
6.2.6. Setting of annotation tool
Click to open the setting menu
1. Set the pen color
2. Select the line width
3. Select the transparency
4. Select the font size
5. Select the font
31
6.2.7. Setting (Advanced)
Click to open the setting menu
1. Software Factory Reset: Reset to the default value.
2. File Directory: File storage path.
3. Enable Audio Recorder: Activate recording function.
4. Audio Source: Select audio output device.
5. Audio Compression Type: Select audio output quality.
6. Video Compression Type: Set video compression format.
7. Share Image: Share Image; this function is not supported in Wireless mode.
8. IP Address: Server IP address for image sharing.
9. Image Quality: Select image quality (high/medium/low).
10. Port: Enter port settings (8500 ~ 9000).
11. Unicast/Multicast: Select cast type.

32
7. Function Descriptions - For Windows
7.1 Turn on/off camera
Click to turn on/off the camera.
<Note> For USB models, directly close the software
7.2 I would like to optimize the image
Click .
7.3 I would like to freeze the live image
Click to freeze the live image of Ladibug™.
Click once again to lift the freeze.
7.4 I would like to turn on/off the lamp
Click to turn on/off the camera lamp.
7.5 I would like to zoom in/out images
Click to open the scroll to adjust images.
Move rightward to zoom in the image, or leftward to zoom out the image.
7.6 I would like to adjust the brightness
Click to open the brightness scroll.
Move rightward to increase brightness, or leftward to decrease brightness.
7.7 I would like to capture images
Click to capture images.
<Note> When the images are captured, please view the images on the image browser
page
33
7.8 I would like to capture images continuously
Click to open burst mode setting. Click [OK] after setting.
<Note> Refer to 6.1.5 Time Lapse for more information about Time Lapse setting
<Note> When the images are captured, please view the images on the image browser
page
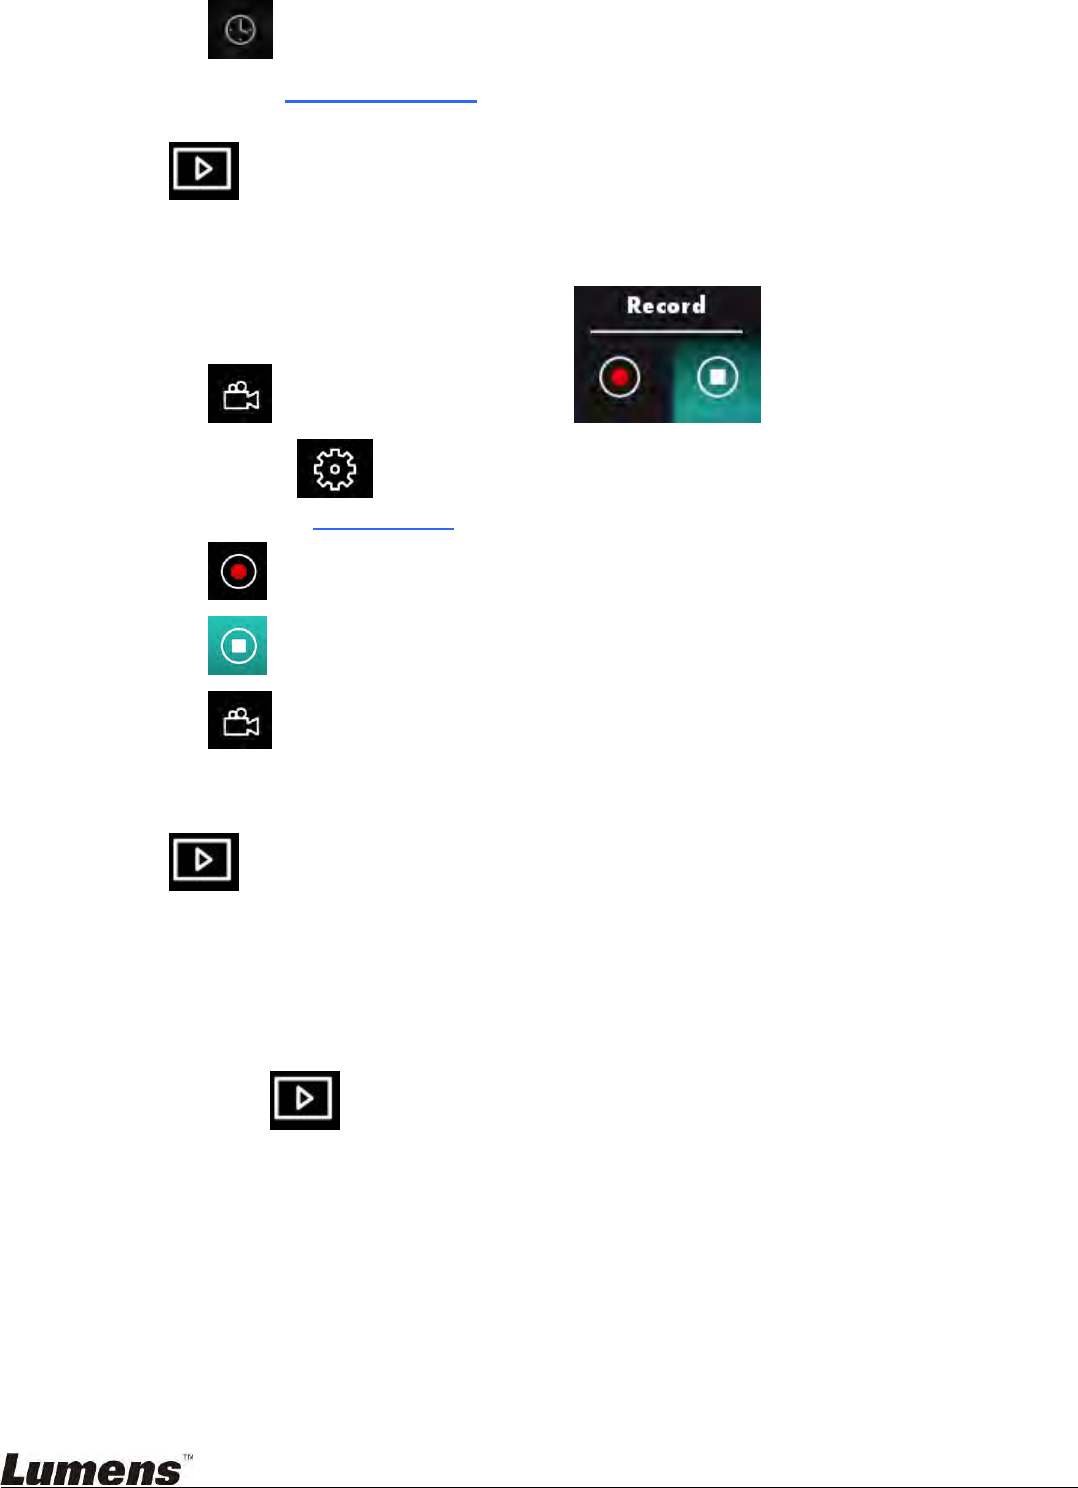
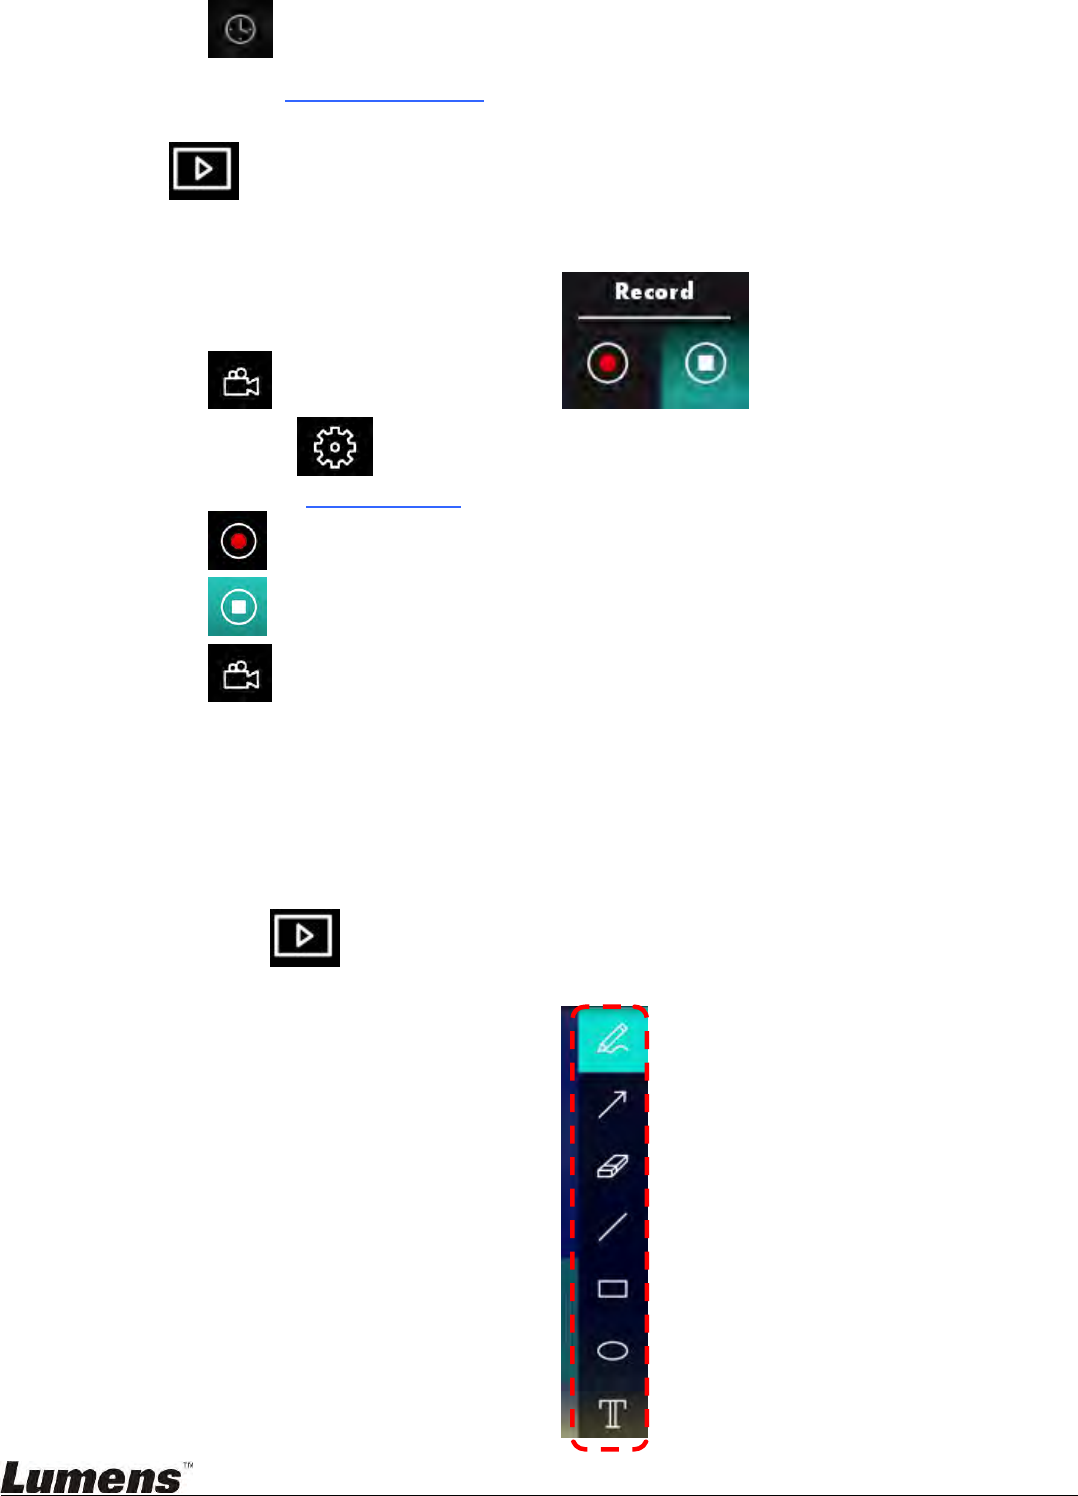
7.9 I would like to record
Click to open the recording tool.
<Note> Click to open the setting window of video format and audio source.
Please refer to 6.1.7 Setting for more information
Click to start recording.
Click to stop recording.
Click to close the recording tool.
<Note> You can add annotation when recording but cannot save it
<Note> When the images are captured, please view the images on the image browser
page
<Note> The recording function is not available when connecting to the image
sharing server or wireless network
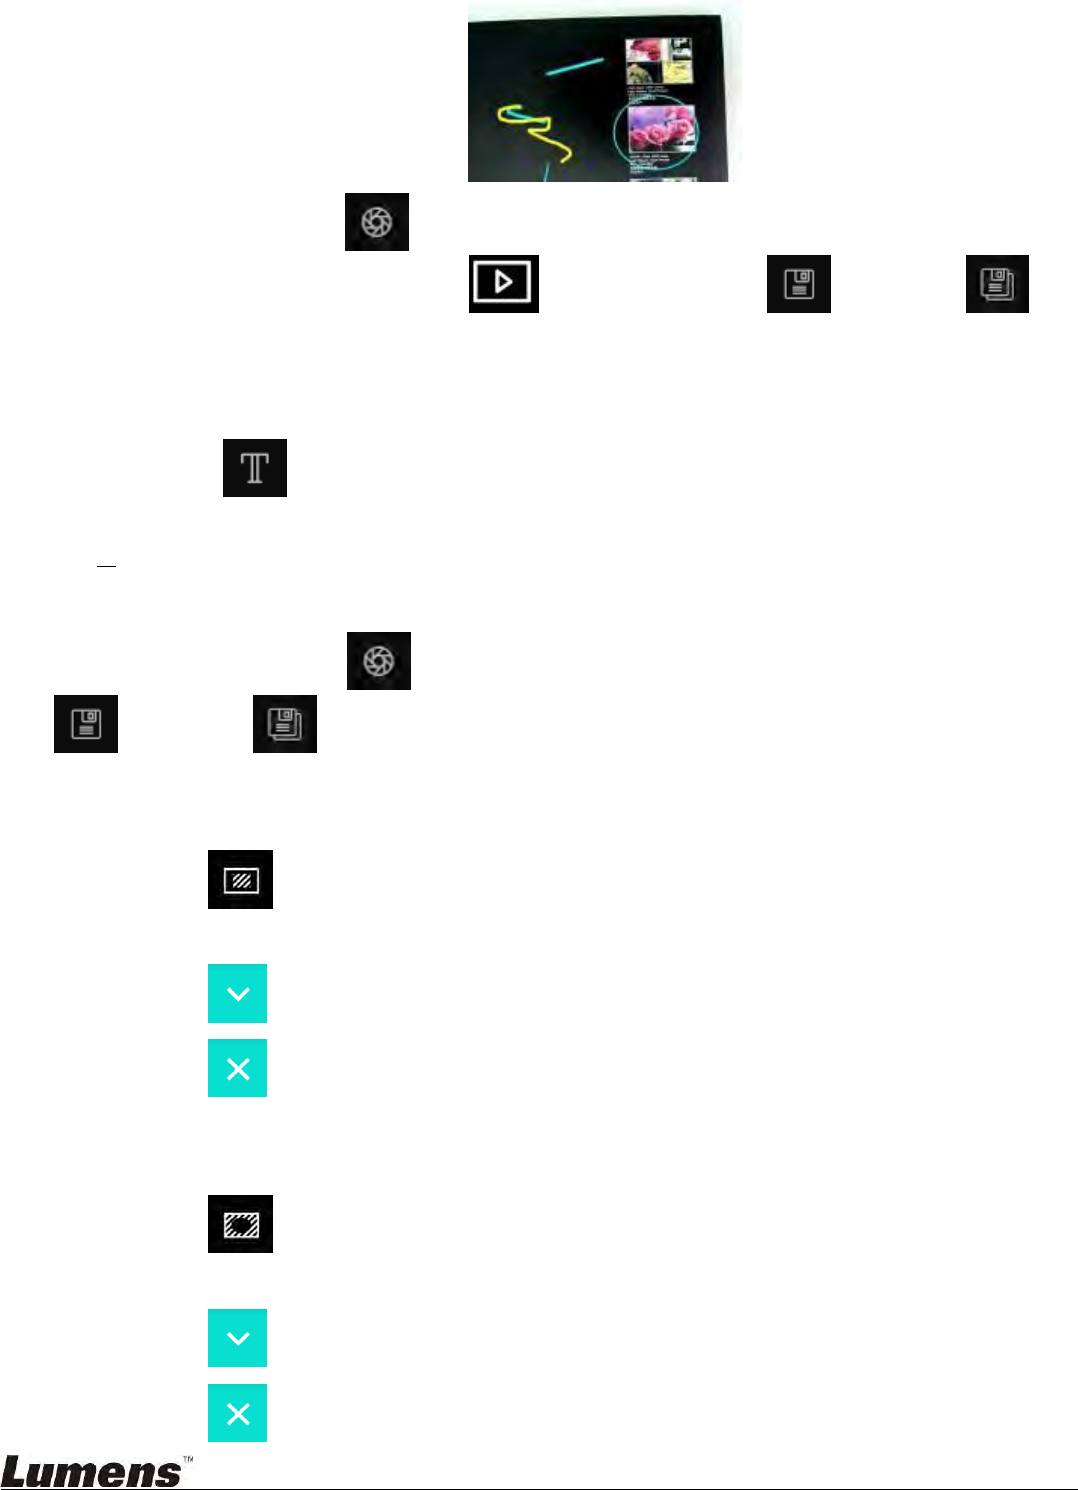
7.10 I would like to annotate the displayed image
<Note> To annotate the stored images, please open the images on the image
browser page
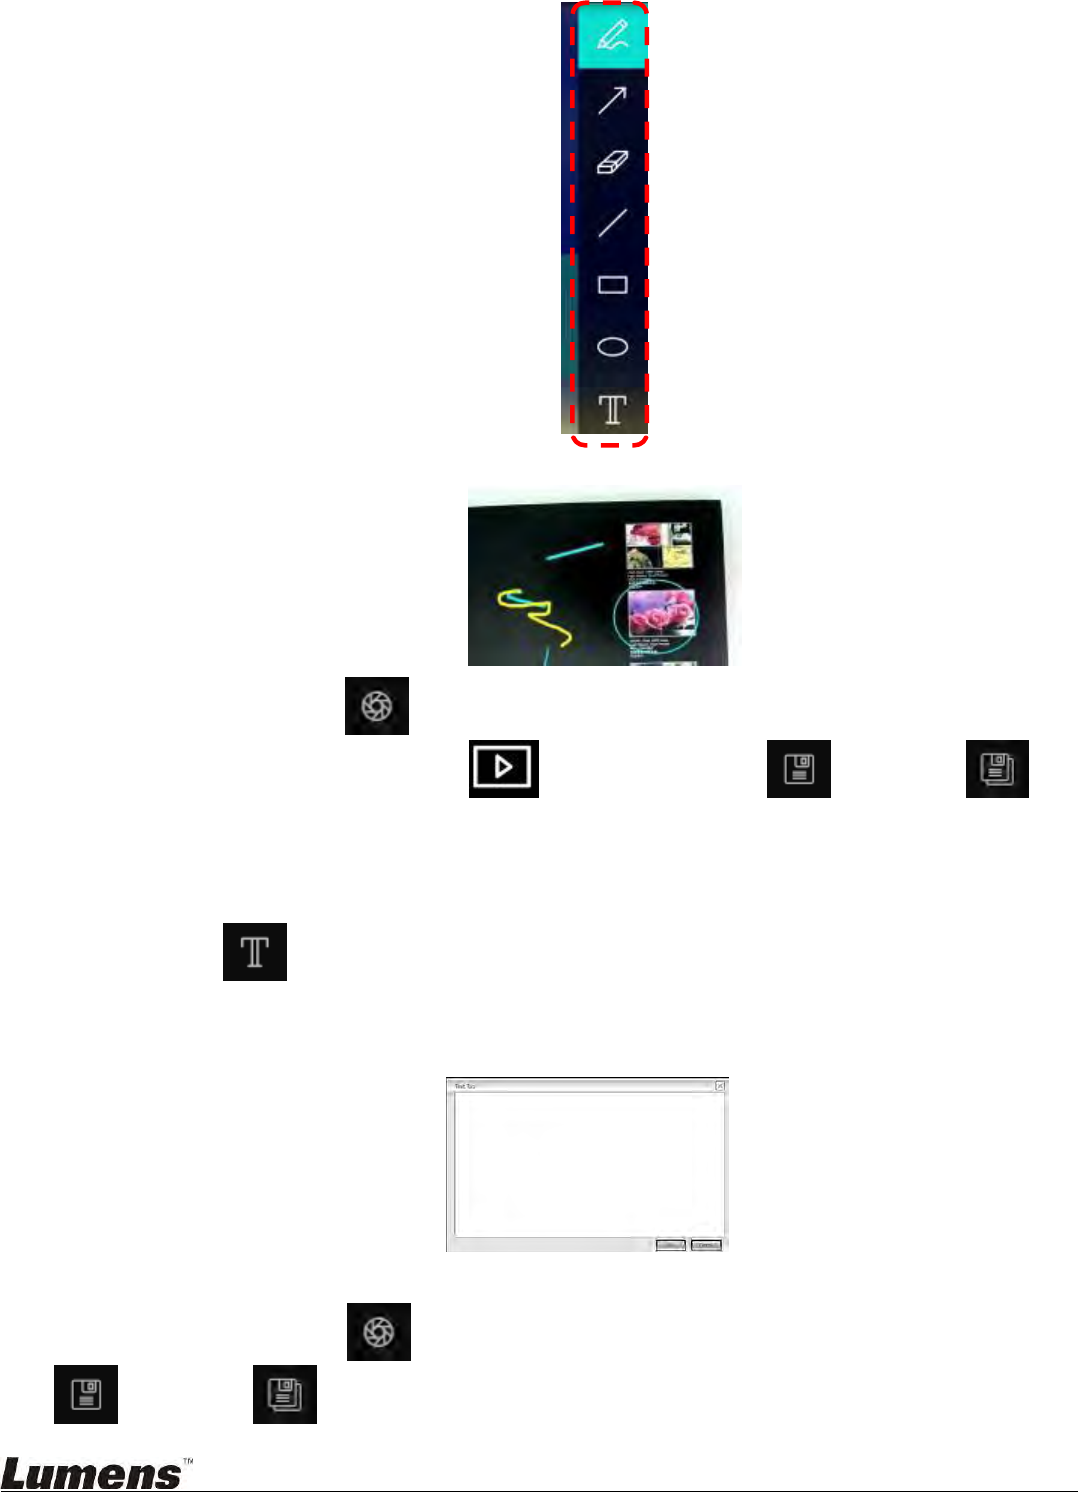
34
Select an annotation tool.
Mark or annotate the displayed image.
<Remark> You can Click to capture images if they are live images. If the image files
are opened on image browser page , you can press the [SAVE] or
[SAVE AS] to save files
7.11 I would like to add textual annotation to images
Select .
Click the screen to display the [Text Tool] window.
Enter text in the blank area and press [OK].
<Remark> You can Click to capture images if they are live images. You can click
[SAVE] or [SAVE AS] to save files if they are image files.
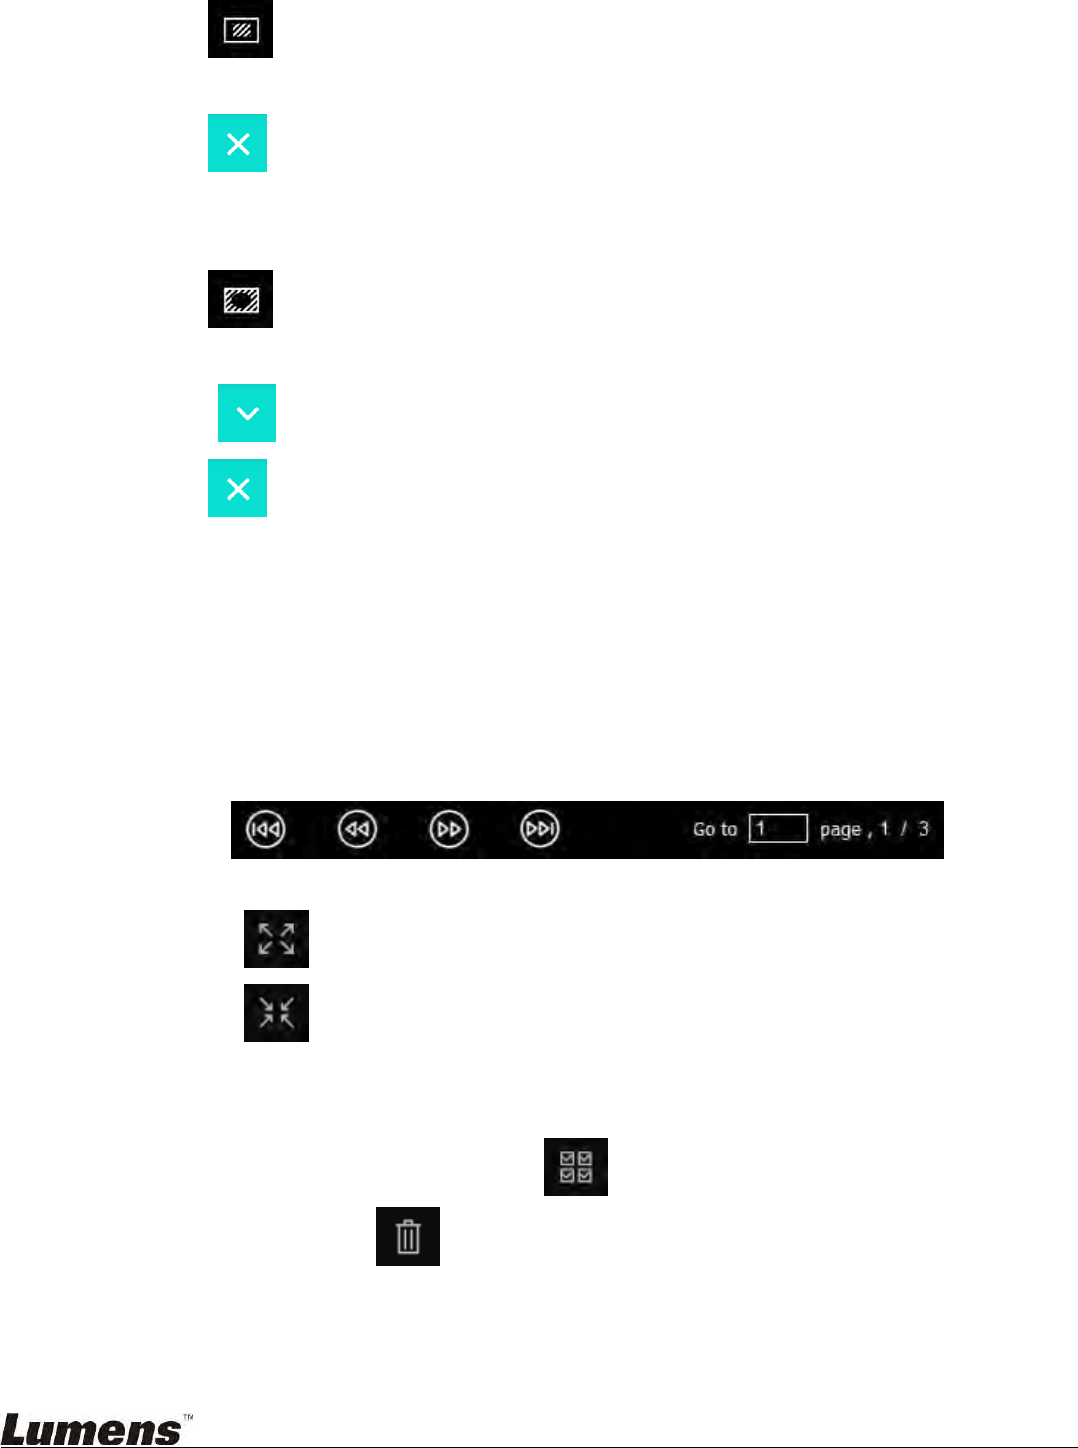
35
7.12 I would like to use the mask mode
Click to open the mask mode.
You can use the mouse to directly modify the length and the width of the block.
Click to close the mask mode.
7.13 I would like to use the spotlight mode
Click to open the spotlight mode.
You can use the mouse to directly modify the length and the width of the block.
Press to change the spotlight shape.
Click to close the spotlight mode.
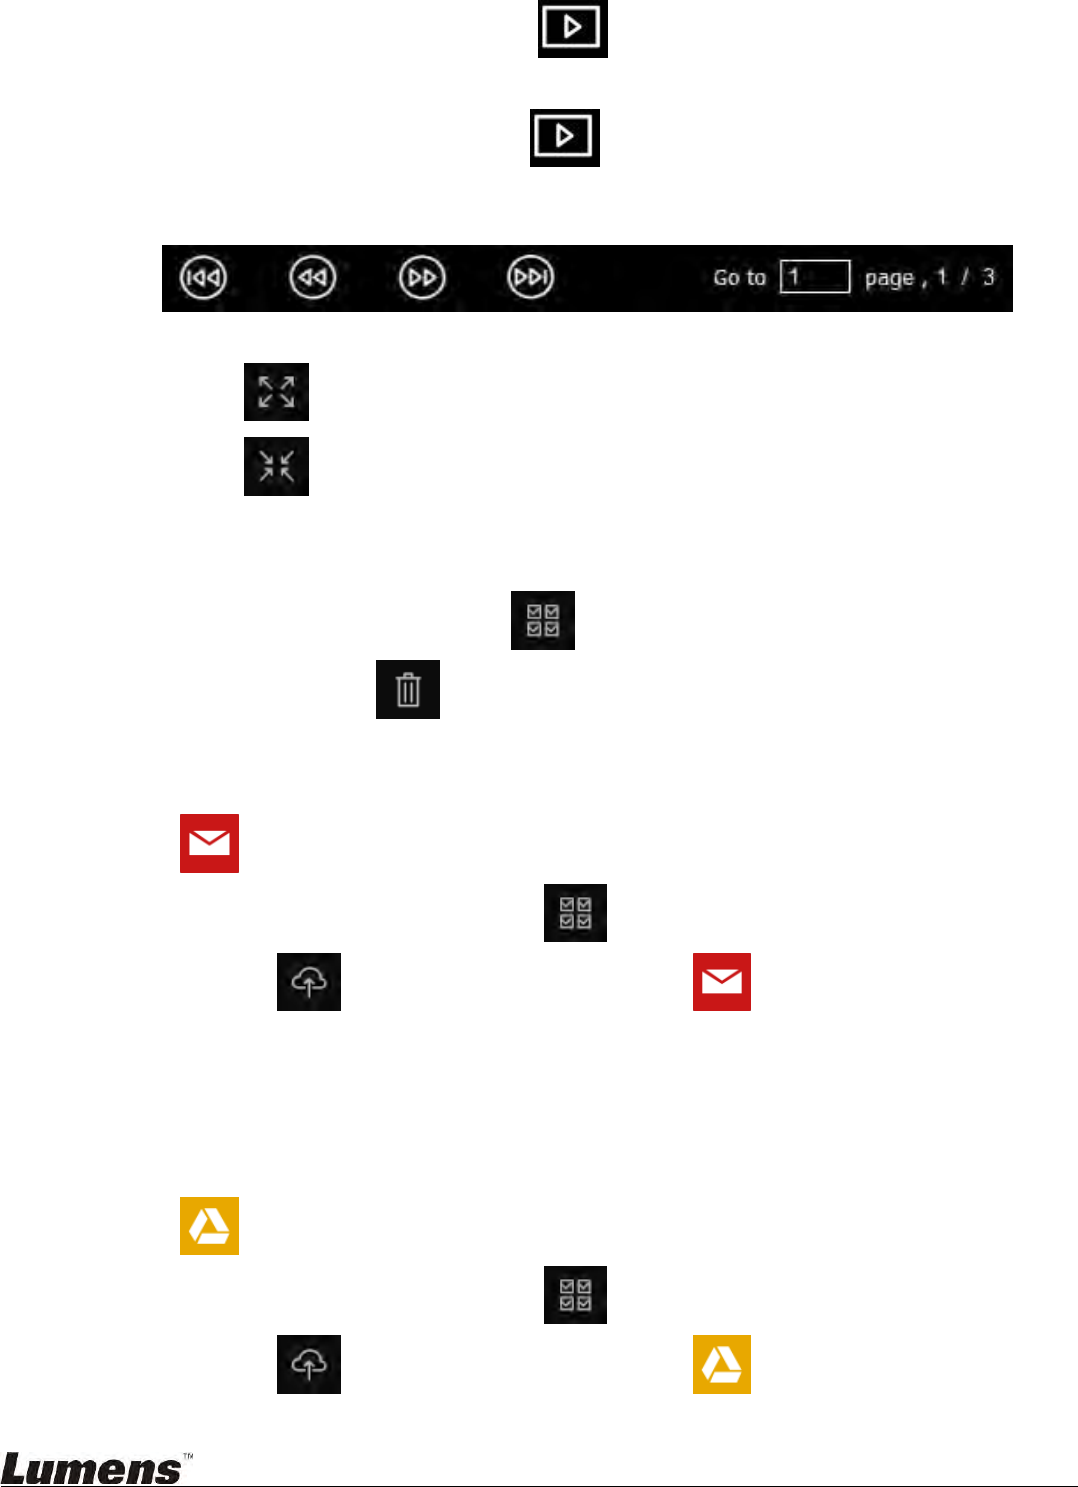
7.14 I would like to manage stored image
Please switch to Image browser page to go through the following steps
7.14.1 Browse images
Open the Image browser page to view the thumbnails of stored images
Click on the rightward/leftward icon to switch to another page, or enter numbers to
switch to a given page
Double click on the image to display a large picture
Click to switch to Full Screen
Click to return to image thumbnails
7.14.2 Delete Image
Click the image or click Select All
Then click Delete to delete the selected image.
36
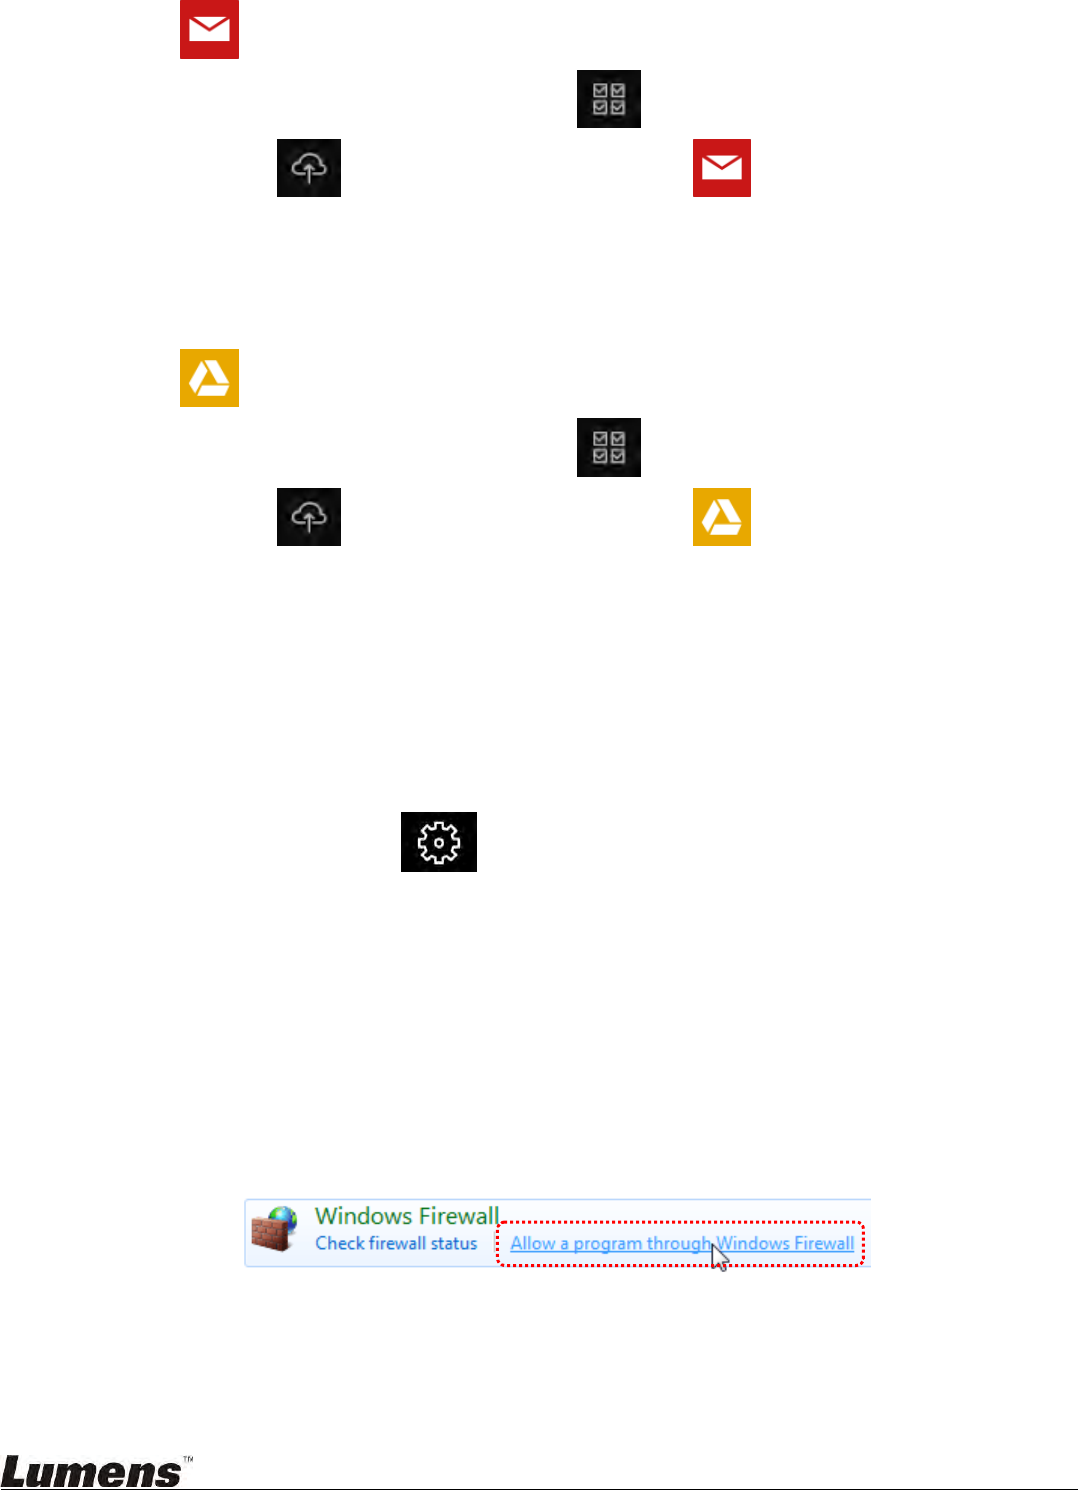
7.14.3 Share images
: Send by E-mail
a. Click the image or click Select All
b. Click to select how to upload images
c. Enter recipient, subject, and content, and click “Send”
<Remark> Email settings must be completed before sending images via
email. Change settings according to the instructions of various
operating systems and ISPs.
: Upload to Google Drive
a. Click the image or click Select All
b. Click to select how to upload images
c. Click
“Log In”
. Log in by entering your
google
username and password.
d. Click “
Accept
” to enable
Ladibug™
to access information stored in
Google
Drive
.
e. Click
“Upload”
to upload files. Upload is complete when the
“upload finished”
message is shown.
7.15 I would like to change the operating languages of the software
Switch to settings page
Select language
Restart the Ladibug™
7.16 Change firewall settings
7.16.1 Windows 7
a. Select
[Console]
in
[Start]
menu.
b. Click
[System and Security]
, and then click
[Allow a program through Windows
Firewall]
.
[Remark] Click [Windows Firewall] in the icon view of [Console].
c. Select [Change settings] in
[Allowed programs and features]
window.

37
d. Please select
Ladibug
program in the list.
e. If
Ladibug
was not listed,
please click
[Allow another program]
, and then you will
find
Ladibug
program.
f. Select
Ladibug
, and then click
[Add]
. If it was not listed, please click
[Browse]
,
select
Ladibug
program,
and then click
[Enable]
.
[Remark] Ladibug View may be displayed in the form of Ladibug.exe.
g. Click
[OK]
in
[Allowed Program]
window.
h. Close
[Windows Firewall Setting]
window.
7.16.2 Windows 8
a. Point the mouse to the upper right corner of the screen and move the mouse pointer
down, then press
[Search]
and input the firewall in the search block, click or press
[Allow the Application Program or Function to pass Windows Firewall]
.
b. Click or press
[Change Settings]
. System may ask for your system administrator
password or confirm your selection.
c. In the allowed application program list, find
Ladibug,
check the checkbox beside the
application program, and then click or press
[Confirm]
.

38
8. Function Descriptions - For MAC
8.1 I would like to turn on/off camera
Click to turn on/off the camera.
<Note> For USB models, directly close the software.
8.2 I would like to optimize the image
Click .
8.3 I would like to freeze the live image
Click to freeze the live image of Ladibug™.
Click once again to lift the freeze.
8.4 I would like to turn on/off the lamp
Click to turn on/off the camera lamp.
8.5 I would like to zoom in/out images
Click to open the scroll to adjust images.
Move rightward to zoom in the image, or leftward to zoom out the image.
8.6 I would like to adjust the brightness
Click to open the brightness scroll.
Move rightward to increase brightness, or leftward to decrease brightness.
8.7 I would like to capture images
Click to capture images
<Note> When the images are captured, please view the images on the image browser
page
39
8.8 I would like to capture images continuously
Click to open continuous mode setting. Click [OK] after setting
<Note> Refer to 6.2.5. Time Lapse for more information about Time Lapse setting
<Note> When the images are captured, please view the images on the image browser
page
8.9 I would like to record
Click to open the recording tool.
<Note> Click to open the setting window of video format and audio source.
Please refer to 6.2.7. Setting for more information
Click to start recording.
Click to stop recording.
Click to close the recording tool.
<Note> You can add annotation when recording but cannot save it
<Note> When the images are captured, please view the images on the image browser
page
8.10 I would like to annotate the displayed image
<Note> To annotate the stored images, please open the images on the image
browser page
Select an annotation tool.
40
Mark or annotate the displayed image.
<Remark> You can Click to capture images if they are live images. If the image files
are opened on image browser page , you can press the [SAVE] or
[SAVE AS] to save files
8.11 I would like to add textual annotation to images
Select .
Select range on page and enter text
<Remark> You can Click to capture images if they are live images. You can click
[SAVE] or [SAVE AS] to save files if they are image files.
8.12 I would like to use the mask mode
Click to open the mask mode.
You can use the mouse to directly modify the length and the width of the block.
Click to modify the transparency of the block.
Click to close the mask mode.
8.13 I would like to use the spotlight mode
Click to open spotlight mode.
You can use the mouse to directly modify the length and the width of the block.
Click to modify the transparency and shape of the block.
Click to close the spotlight mode.
41
8.14 I would like to manage stored image
Please switch to
Image browser page
to go through the following steps
8.14.1 Browse images
Open the
Image browser page
to view the thumbnails of stored images
Click on the rightward/leftward icon to switch to another page, or enter numbers to
switch to a given page
Double click on the image to display a large picture.
Click to switch to Full Screen
Click to return to image thumbnails
8.14.2 Delete Image
Click the image or click Select All
Then click Delete to delete the selected image
8.14.3 Share images
: Send by E-mail
a. Click the image or click Select All.
b. Click to select how to upload images
c. Enter recipient, subject, and content, and click “Send”
<Remark> Email settings must be completed before sending images via
email. Change settings according to the instructions of various
operating systems and ISPs.
: Upload to Google Drive
a. Click the image or click Select All
b. Click to select how to upload images
c. Click
“Log In”
. Log in by entering your
Google
username and password.
42
d. Click “Accept” to enable
Ladibug™
to access information stored in
Google
Drive
.
e. Click
“Upload”
to upload files. Upload is complete when the
“upload finished”
message is shown.
: Upload to Dropbox
a. Click the image or click Select All
b. Click to select how to upload images
c. Click
“Log In”
. Log in by entering your
Dropbox
username and password.
d. Click “Accept” to enable
Ladibug™
to access information stored in
Dropbox
.
e. Click
“Upload”
to upload files. Upload is complete when the
“Upload
complete”
message is shown.
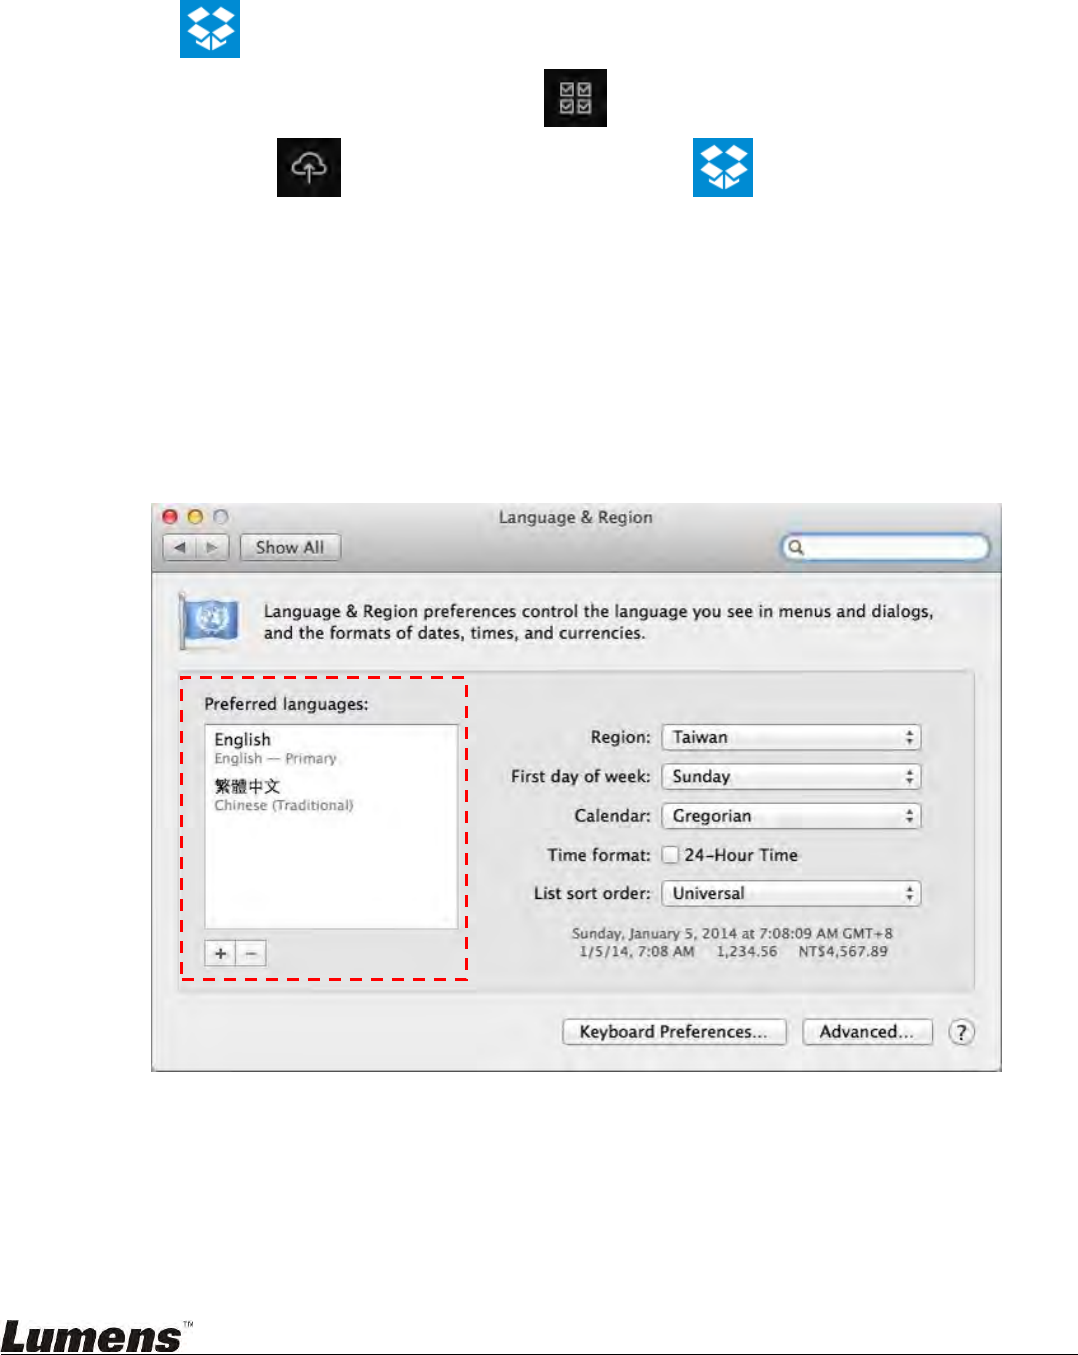
8.15 I would like to change the operating languages of the software
Open the MAC
[System Preferences]
option, select from the
[Preferred Languages]
option list in the
[Language & Region]
icon, and restart
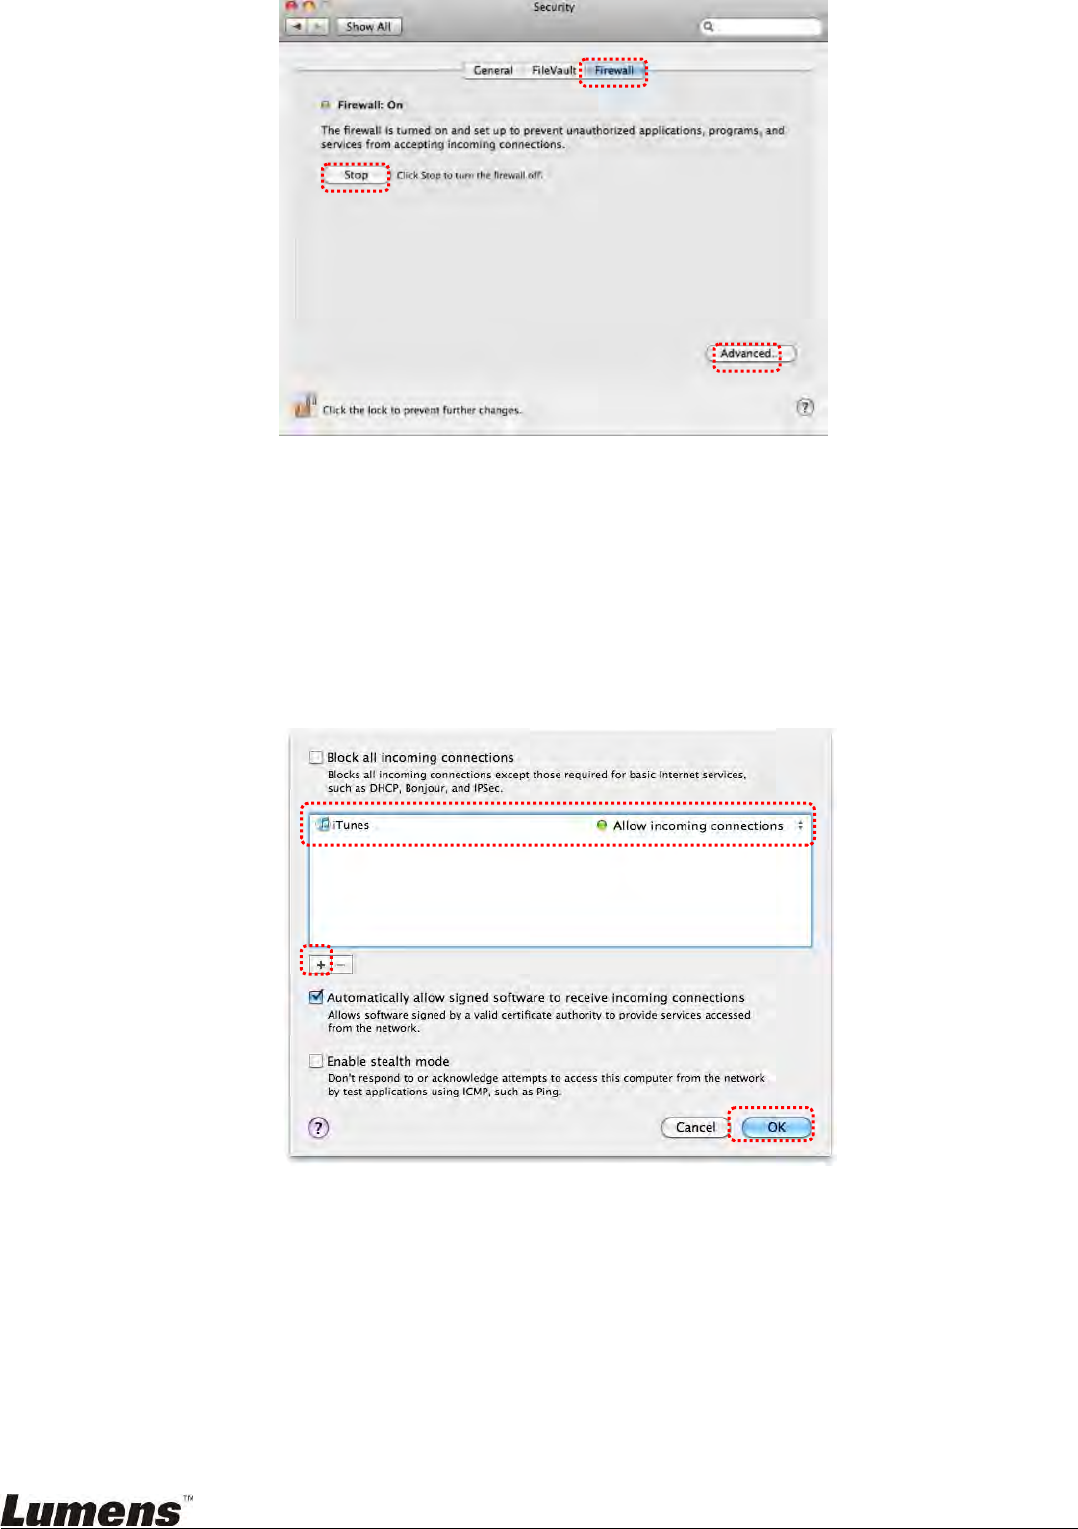
8.16 Change firewall settings
Applicable to MAC OS X v10.6/10.7/10.8/10.9
8.16.1 Select the setting of [System Preferences] in the Apple Menu.
8.16.2 Click on the [Security] or [Security and Privacy] icon.
8.16.3 Click the tab [Firewall].
43
8.16.4 Click the lock on the lower left corner to unlock the panel, and enter the username
and password of the Administrator.
8.16.5 Click [Start] or [Activate Firewall] to activate the firewall.
8.16.6 Click [Advanced] at the lower right corner.
8.16.7 Select [Automatically allow signed software to receive incoming connections].
8.16.8 Change Ladibug in the list to [Allow incoming connections]. If the software name
was not listed, please click [+] to add new programs to the list, and start to use the
software.

44
9. Troubleshooting
9.1 Question: Black screen is displayed in live image after Ladibug™ was
re-installed
Solution:
1. Remove the Ladibug™, and then restart the computer
2. Re-install the Ladibug™
9.2 Question: When the Ladibug™ is run, no image is displayed and a Ladibug
error message occurs:
“System video limitation reached. Please refer to the troubleshooting section
of the Ladibug user’s manual.”
Solution:
1. Please check if you are using an extended desktop (two monitors) hooked up to the
computer. If so, please try to move the Ladibug™ shortcut to the extended desktop (the
second monitor) and launch it; Skip to step 5 if you are not using an extended desktop.
2. If step 1 still does not work, please turn off extended desktop
3. If step 2 still does not work, please reduce the resolution of the screen
4. If step 3 still does not work, please re-install Ladibug™ software
5. Please go to our website http://www.Mylumens.com/goto.htm to download the
compressed dll file (including mfc71.dll/msvcr71.dll), and extract it to “Program
Files/Ladibug” after the download is completed. Please re-start Ladibug™.
9.3 Question: The page flashes when using Ladibug™ to connect to DC-W50
Solution:
1. Change antivirus software settings, turn off the firewall, and activate Ladibug™
9.4 Question: Some texts
44
xceed page margins
Solution:
1. Change the di
44
play settings and select default font size.
9.5 Question: Unable to connect when using the image sharing function.
Solution:
1. The system firewall settings may prevent images from being properly sent. Change
settings to permit Ladibug through the firewall. Please refer to 7.16 Change firewall
settings for Windows, and 8.16 Change firewall settings for MAC.
2. If Step 1 fails to solve the problem, change the firewall settings of the antivirus
software by permitting Ladibug through the firewall or suspending the firewall. Please
refer to antivirus software instructions to change firewall settings.
3. If step 2 still fails to solve the problem, please turn off the antivirus software.

45
9.6 Question: When the function of Time Lapse is executing, Preview screen
remains still
Solution:
1. Connecting USB Hub may result in insufficient bandwidth, which makes the machine
unable to operate normally; therefore, it is advised that the machine shall be
connected to the computer directly through USB cable instead of USB Hub.
9.7 Question: When the function of Share Image is enabled, changing the network
connection of server (e.g. from cable connection to wireless connection) will
cause the client unable to obtain the screen of camera
Solution:
1. If settings of host network are affected by the change of network connection, please
disable the Ladibug and restart the software and Share Image function again.
9.8 Question: When connected to a wireless device DC-W50, the Preview screen
has tearing and the Wi-Fi signal strength indication is low (approximately 50%).
Solution:
1. Operating with low-performance CPU may result in tearing on the screen. Please go to
the DC-W50 page, click [Streaming] page, and try to lower the Frame Rate or
Resolution.
