USER MANUAL
(Model number SC3218T)
2

3
Conventions used in this guide
In this user guide, we use the following symbols to indicate useful and important information:
NOTE:
Notes, usage tips, or additional information.
Warning
Situations that could cause injury to yourself or others.
Caution
Situations that could cause damage to your device or other equipment.
Tips
Suggestions and advice that can help in the usage of the device.

4
Index:
Basics
Contents 8
Phone overview 8
Basic operation
Battery 9
Inserting the battery
Inserting the SIM card and Micro SD card 9
Turning phone On or Off 11
Navigating your Schok flip 11
The left and right soft keys 11
The home screen and Status bar 12
Daily operation use
How to make calls 13
Make a call from the contacts list 13
Answer, accept or reject calls 14
End or reject calls 14
Recent calls 14
Switching between current calls 15
Setting up your voice mail 16
Checking your voice mail 16
Schok Virtual mouse 16
Multi-function key 17
Capture screenshots 18
Applications
Alarm 19
Aqua Mail 20
Browser 23
Battery Manager 24
Calculator 25
Calendar 26
Contacts 28
Camera app 31
Gallery app 31
Files 32
Lamp 33

5
FM Radio 33
Media 34
PDF Extra 35
Power Boost 38
RAM Cleanup 39
Tools and Settings
Tools
40
Timer 40
Stopwatch 41
World Clock 42
Wireless & Network
Airplane mode 43
Wi-Fi 43
Bluetooth 46
Tethering & Mobile Hotspot 47
Cellular Networks 49
Emergency Alerts 50
Accessibility
Readout 51
Speech rate 52
Speech pitch 52
Font size 53
Color inversion 53
Color correction 54
Persistent alerts 54
Mono audio 55
TTY 56
Real-time text (RTT) call 57
Wi-Fi calling 57
Sound settings
Master volume 58
Vibrate for calls 59
Phone ringtone 59
Vibration pattern 60
Notification sound 60
Alarm sound 61
6
Keypad volume 61
Keypad tone 62
Vibrate on keypress 62
Battery charging tone 63
Battery charged tone 63
Emergency dialing signal 64
Display settings
Brightness level 64
Wallpaper 65
Display backlight 66
Keypad backlight 67
Font size 67
Main clock 68
Secondary screen display 68
Phone settings
Language 69
Navigation keys 70
Storage 71
USB mode 71
Location 73
Security 73
Reset phone 75
Date & time 78
Advanced calling 81
Auto-rotate screen 81
External keys lock control 82
Call settings
Any key answer 82
Flip open/close 83
Auto answer 84
Quick responses 84
Speed dial setup 85
Voicemail 85
Blocked calls 87
Auto redial 87
Fixed Dialing Numbers 87

7
Call forwarding 88
Call timer 89
Assisted dialing 89
About Phone
Phone number 90
Status 91
Network 91
Hardware information 92
Software information 92
Device unlock 92
Software update 93
Schok Fast Launcher 94
Lock control 2.0
App control 95
System control 96
Change Lock Control password 98
Specifications
99
Safety and Precautions
100
Approved firmware versions
112
Information about safeguarding handsets
112
Emergency call
112
Additional information
113
Need help
113
8
Basics
Contents
The Schok flip comes with the following items included in the box:
1. Schok flip phone (SC3218)
2. Rechargeable Lithium-Ion battery (SB2000)
3. USB Type-C™ charging and sync cable
4. Quick Start Guide and Health Safety and Warranty information
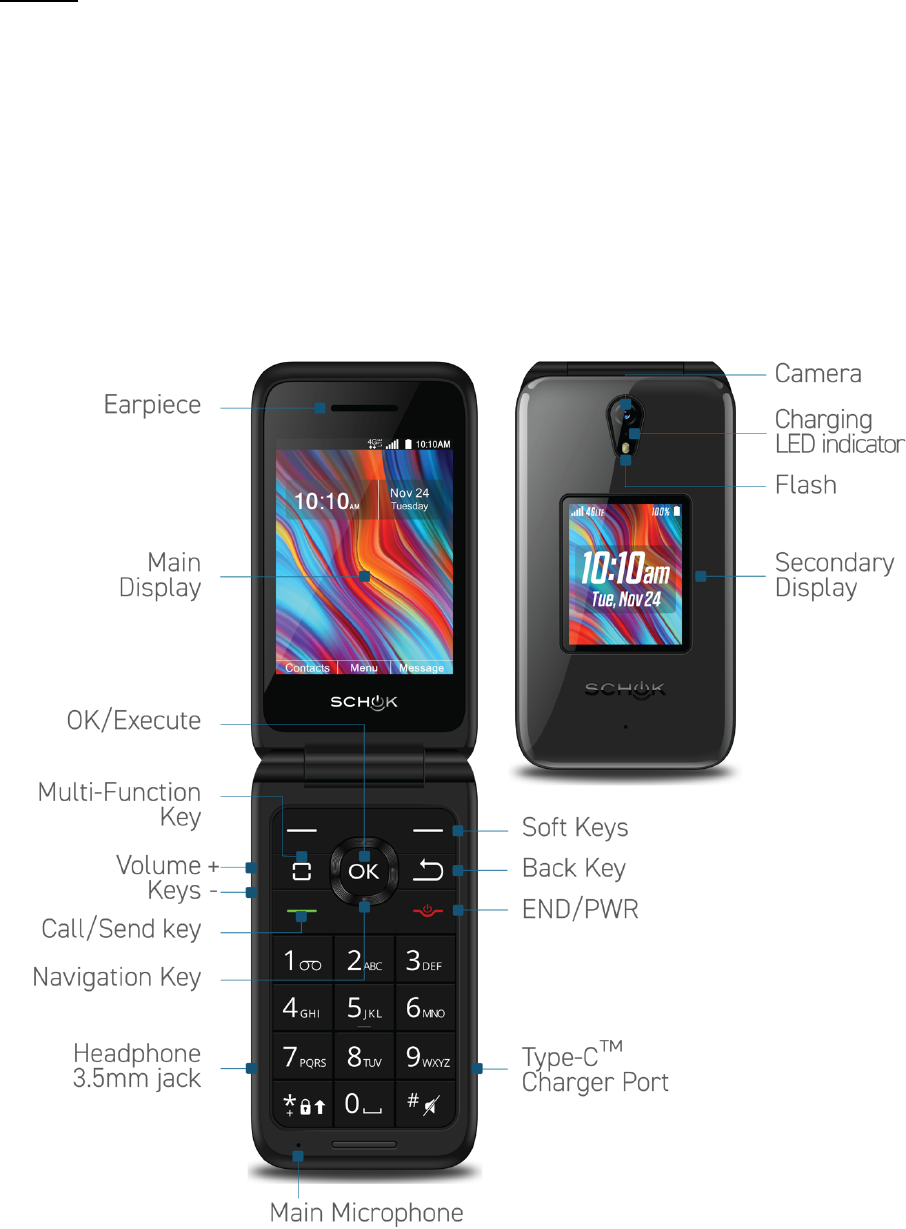
Phone Overview
9
Basic operation
Battery
TIP
Browsing the web frequently, extended data and GPS usage, being in a poor signal area, or
subjecting the device to extreme temperatures will cause the battery to discharge quicker
than normal. To increase battery life, limit your data usage or turn off location, WiFi and
Bluetooth when not required. Battery operating time gradually decreases over time.
Your battery can be fully charged in less than three hours. In order to have the battery at
optimal operation, never leave the device charging for extended periods of time. As a good
rule of thumb, disconnect the charging cable after battery has been fully charged.
Warning
The battery of the Schok flip is removable. Only use a Schok authorized replacement battery,
otherwise it can damage your phone and void its warranty. The Schok battery replacement
model number for this device is
SB2000
.
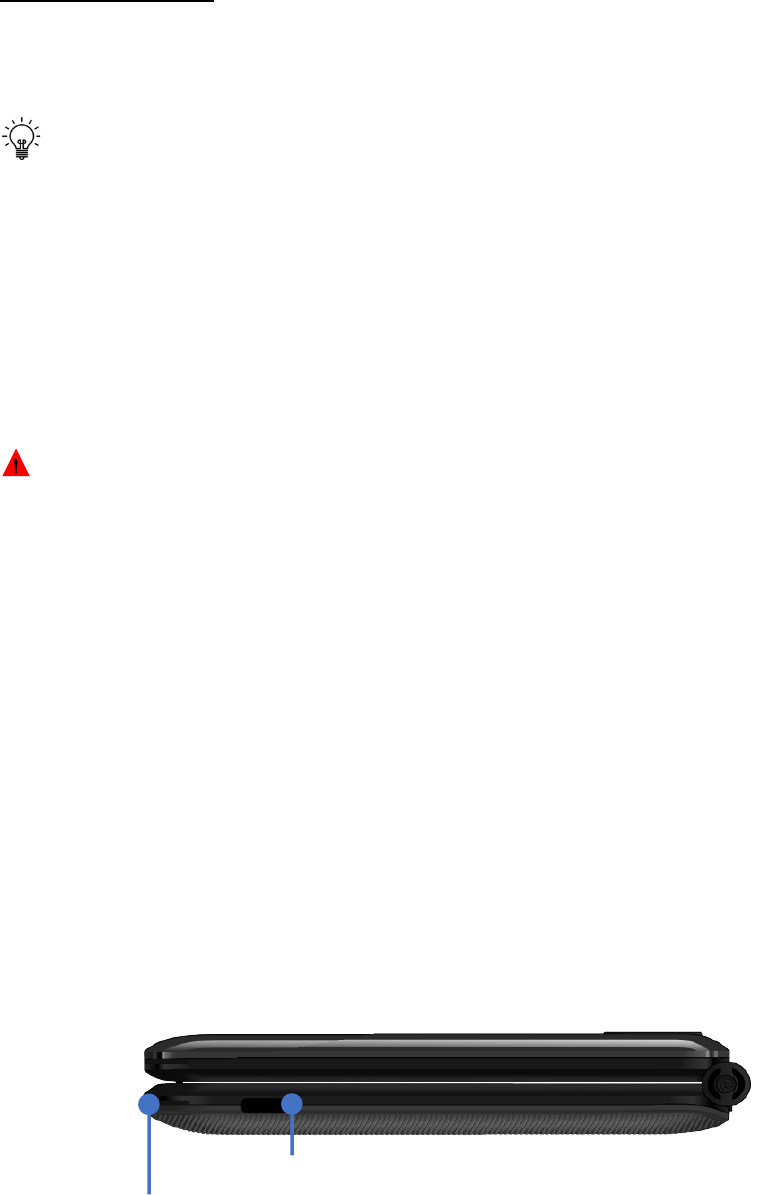
Inserting the Battery
1. With the phone facing down, insert fingernail into the notch in the back cover and
gently but firmly lift and remove the back cover.
2. Insert the removable battery making sure that the three gold connectors are lined up
to the phone’s gold connectors.
3. Put the cover back in place and press down along all the edges of the phone to secure
the cover in place.
4. Connect the USB-Type-C side of the cable to the Schok flip USB Type-C connector.
5. Connect the USB side (Larger connector) of the cable to the wall charger USB port.
6. Connect the phone wall charger to the electrical outlet.
7. Charge your device for at least two hours.
USB Type-C connector (Insert charging cable here)
Back cover notch (Insert fingernail here)
10
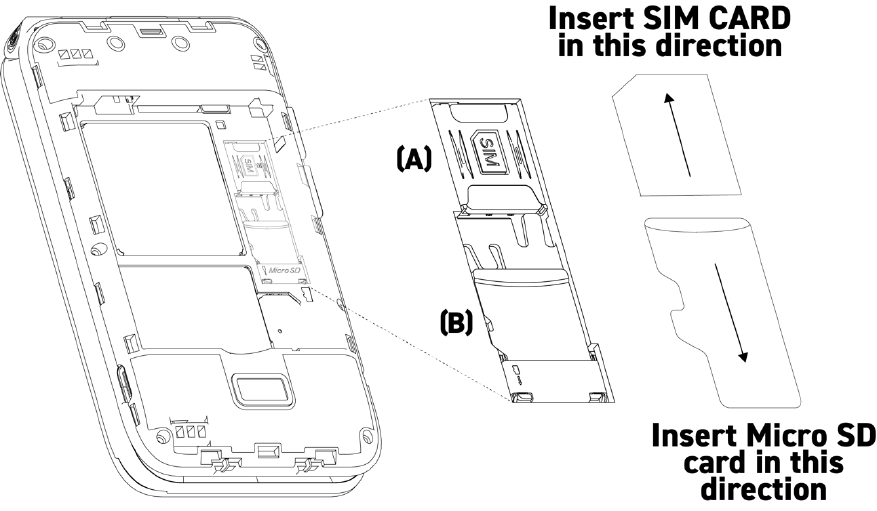
Inserting the SIM card and Micro SD card
1. Remove the back cover and remove the battery.
2. Remove the battery by inserting your fingernail at the bottom (“Pull/Jale”) and lift the
battery out.
3. Locate the slot for the Nano SIM card (A) and slide it in until it is fully inserted. The
angled cut of the SIM card must be facing the left side of the SIM card slot, the gold-
colored connectors must be facing down.
4. To insert or remove a Micro SD Memory Card repeat steps 1 and 2.
5. Locate the slot for the micro SD card (B)
6. Slide the Micro SD card in until it is fully inserted.
11
Turning phone On or Off
To turn ON:
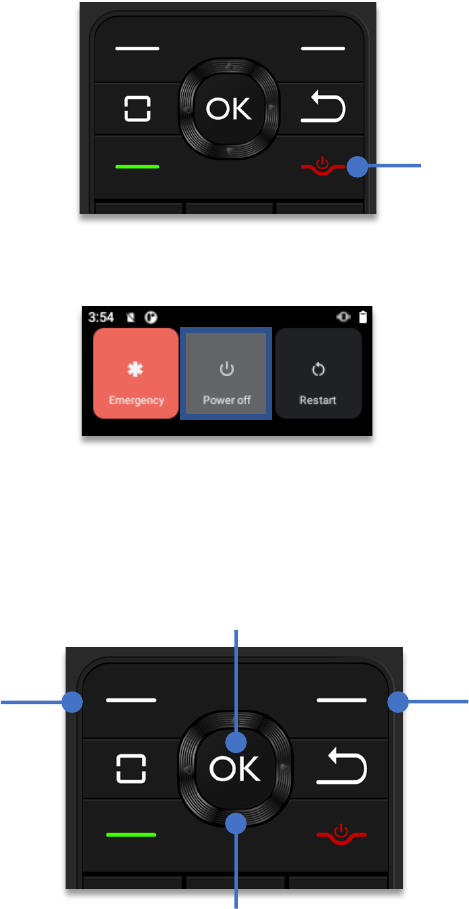
Firmly, press and hold the power button for three seconds.
To turn OFF:
Firmly, press and hold the power button for one second. Using the
Navigation
key
, highlight “Power off” and click the
OK key
.
Navigating your Schok flip
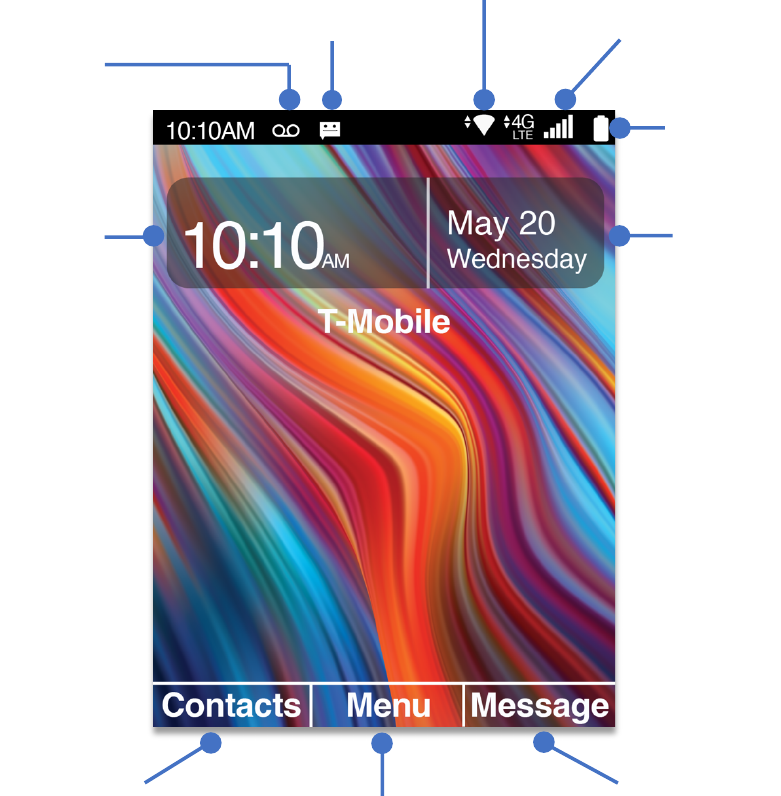
Scroll by pressing UP, DOWN, LEFT and RIGHT on the 4-way
Navigation key
. When the
desired item is highlighted, press the
OK key
to select.
The Left and Right soft keys
The soft keys are multi-function keys that allow the user to select applications or commands
at the left or the right bottom of the display.
End Call
Power ON/OFF button
Right Soft Key
Left Soft Key
OK Key
Navigation Key
12
The Home screen and Status bar
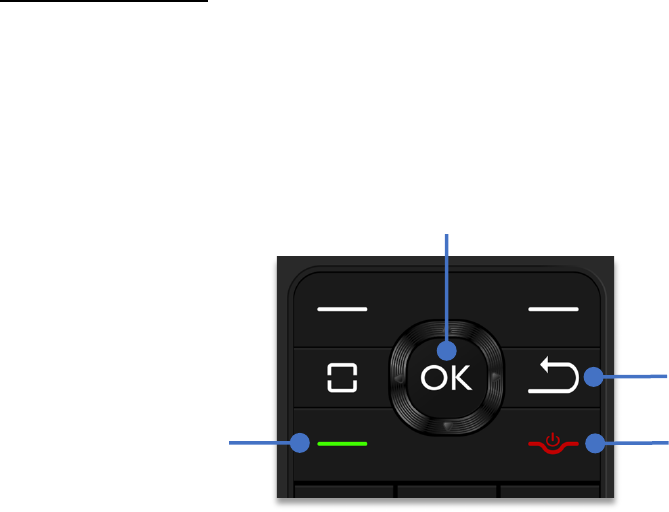
The Home Screen displays basic information such as the time and date. The user may also
access Contacts, messages or the Apps menu from this screen using the shortcuts.
The Status Bar, which resides on top of the home screen, shows phone vitals such as battery
level, signal strength, time, and notifications.
Right Soft Key
Left Soft Key
OK Key
Time
Battery level
Cellular signal
strength
WiFi signal strength
Message available
Voice mail
available
Date
13
Daily operation
How to make phone calls
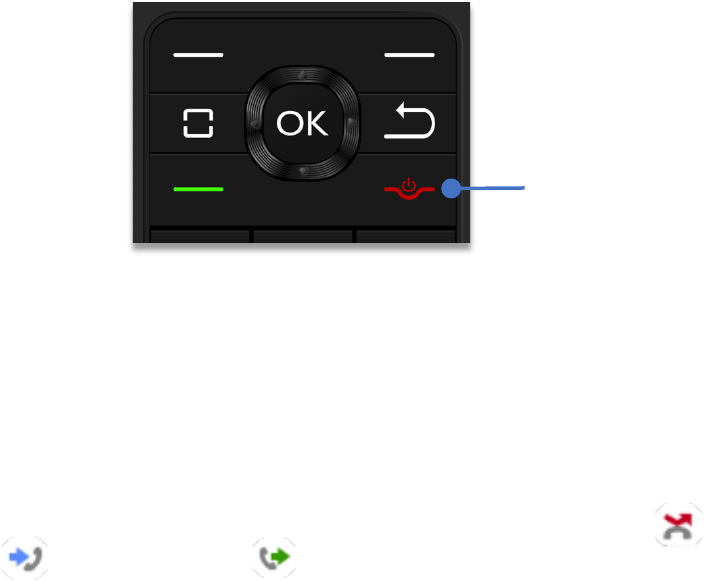
From the Home Screen, dial the phone number using the keypad and press the
OK key
to
send the call.
To make a phone call from anywhere in the system, press the
Back key
until the Home Screen
appears and then follow the steps above to place a call.
Make a call from the contacts list
There are two methods to open Contacts.
Method one:
Using the Contacts shortcut.
1. From the home screen, press the
left soft key
to open Contacts.
2. Using the
Navigation key
, scroll up or down to select a contact.
3. Press the
Answer Call
key to send the call.
Method two:
Open the Contacts application.
1. From the home screen, click the
OK key
to open the Apps menu.
2. Using the
Navigation key
, highlight
“Contacts”
and press the
OK Key
.
3. Using the
Navigation key
, scroll up or down to select a contact.
4. Press the
Answer Call
key to send the call.
Answer Call
To initiate a phone call
End Call
Back key
14
To answer, accept or reject calls
If the phone is closed when a call is incoming, the external display will show the caller ID.
To answer the call, flip the phone open.
If the phone lid is open when a call is incoming, the main display will show the caller ID, press
the
Answer call
Key to answer the call.
To end or reject a call
To end or reject a call, press the
End call key
.
Recent calls
The Schok flip keeps a log of accepted, missed or dialed calls. This list automatically updates,
deleting the oldest entries.
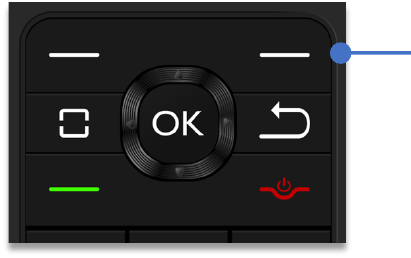
From the home screen, press the
Answer Key
. The recent calls window will appear.
Using the
Navigation key
, scroll left or right to display by type of call.
“
All calls”
is displayed by default, scrolling to the right will display
“Missed calls”
,
“
Received calls and
“Dialed Calls”
in that order.
The recent calls window will display the date, time and the phone number of the call. If the
phone number is saved to the address book (Contacts) it will show the name of the contact.
End Call
15
To access additional options related to recent calls, choose from the following options:
1. Press
Left Soft key
to send a message.
2. Press
OK key
to view more call information.
3. Press
Right Soft key
to open the options page, showing:
a. Add to contacts: Save the caller’s number as new contact
b. Delete: Delete the phone record.
c. Delete multiple: Select more than one record to delete.
d. Lock: Block or unblock calls from the selected phone number
e. Add to call rejection: Save the number to a call rejection list
Switching between current calls
If you are on a call and you receive another call, the Schok flip will beep indicating that you
have a call waiting. The caller ID will let you know who is calling.
To put the current call on hold and answer the new call, press the
Answer call
key.
To return to the first call, press the
Answer call
key again.
Three way call:
To initiate a three-way call, while on a call, press the
Right Soft Key
(Options)
, select
New Call
and dial the phone number of the second party.
When the second party answers the call, press the
Right Soft Key
(Options), then press the
number 2 Key to merge the calls.
Right Soft Key
16
Setting up your voice mail
1. Long press number one (1) on the keypad or dial your phone number and press the
Answer Call
button.
2. Follow the instructions.
Checking your voice mail
1. Long press number one (1) on the keypad or dial your phone number and press the
Answer Call
button.
2. Follow the instructions.
Schok virtual mouse
The Schok flip offers the option of using a virtual mouse. This feature is useful if you need to
control an application that was made for touch screen devices such as smartphones.
NOTE:
The virtual mouse is a software application that places a pointer on the screen. The
arrow can be controlled using the 4-way
Navigation key
to move, and the
OK key
to left click.
Operation may be slower than using a normal mouse.
To enable the virtual mouse:
1. Long press the
OK key
for 2 seconds
from any screen.
2. A pointer will appear on the screen
3. Using the
Navigation key
, move the pointer up, down, left or right.
4. When the pointer is in the correct position, simply press the
OK key
to simulate a left
click.
To disable the virtual mouse:
1. Long press the
OK key
for 2 seconds
from any screen.
2. The pointer will disappear from the screen
17
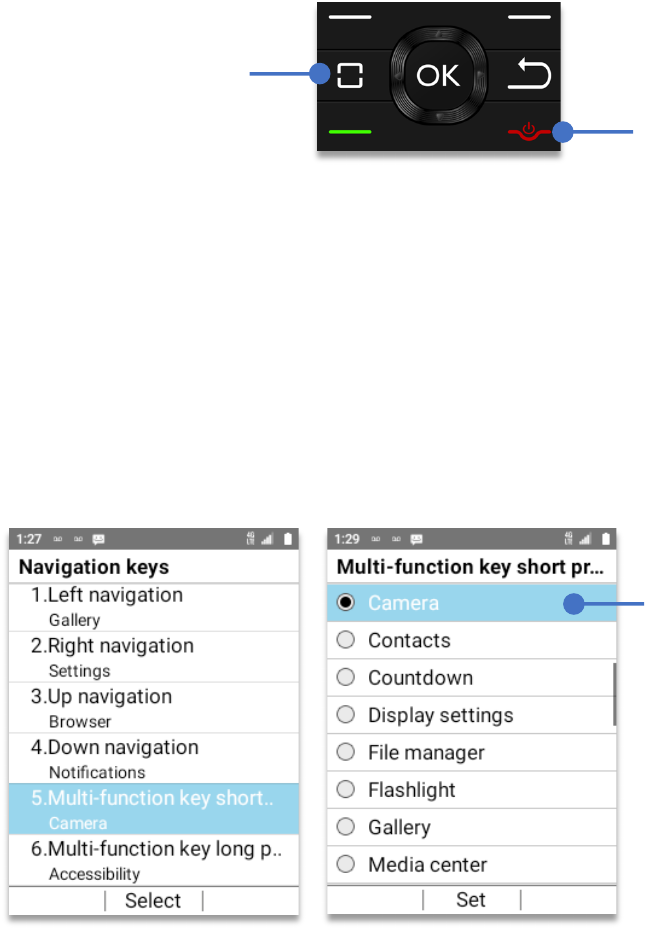
Multi-Function key
The Schok flip has the ability to use one key for different things. We call this, the Schok Multi-
Function Key. This key has two type of access, one by performing a
short press
and the other
by performing a
long press
.
Multi-function key short press:
To open a different app using the multi-function key:
• From Home Screen, press
OK Key
• Using the
Navigation key
, press
OK key
on
Tools & Settings.
• Using the
Navigation key
, press
OK Key
on
Settings
.
• Using the
Navigation key
, press
OK key
on
Phone settings.
• Using the
Navigation key
, press
OK key
on
Navigation keys.
• Using the
Navigation key
, press
OK key
on
Multi-function key short press.
Using the
Navigation key
, select the app or feature to open with the Multi-function short
press and press the
OK key
. To go to the home screen, press the
End Call / Power button
Multi-Function key
End call / Power key
Using the
navigation
key
, select the app or
feature to open when
short pressing
the
multi-function key

18
Multi-function key long press:
To access the app or feature using the multi-function key long press, press the
multi-function
key
for one full second.
To open a different app using the multi-function key long press:
• From Home Screen, press
OK Key
• Using the
Navigation key
, press
OK key
on
Tools & Settings.
• Using the
Navigation key
, press
OK Key
on
Settings
.
• Using the
Navigation key
, press
OK key
on
Phone settings.
• Using the
Navigation key
, press
OK key
on
Navigation keys.
• Using the
Navigation key
, press
OK key
on
Multi-function key long press.
Using the
Navigation key
, select the app or feature to open with the Multi-function long press
and press the
OK key
. To go to the home screen, press the
End Call / Power button.
Capture screenshots
Press and hold the
Volume down key
and the
End Call / Power Key
for two seconds to
capture the current screen. To view your screenshot:
1. From Home Screen, press
OK key
, navigate to “Gallery”, Click
OK key.
2. Using
Navigation key
, select the screenshot that you want, click the
OK Key
to open it.
Using the
navigation key
,
select the app or feature to
open when
long pressing
the multi-function key
19
Alarm
• From Home Screen, press
OK Key
• Using the
Navigation key
, press
OK key
on
Alarm.
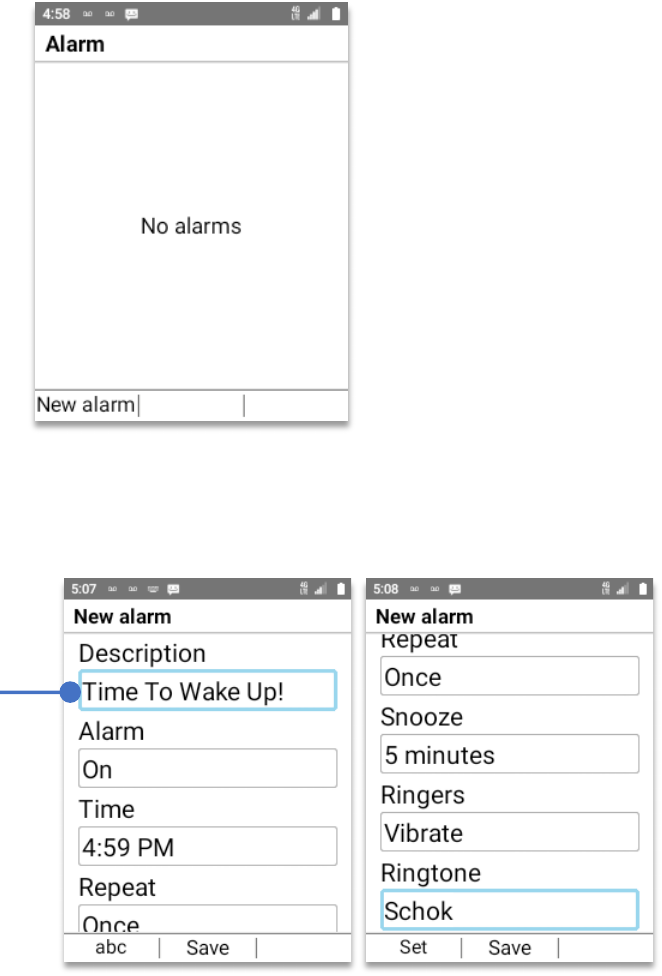
To setup an Alarm, press the
left soft key (New alarm)
Using the
keypad
and the
Navigation key
set the time, alarm day or days, ringtone, snooze
and press the
OK key
to
Save
The alarm is set and will appear with a clock icon on the top notification bar.
Using the
Keypad
and
Navigation key
you
can add any
description to your
alarm.
20
Aqua Mail
To open Aqua Mail:
• From Home Screen, press
OK Key
• Using the
Navigation key
, press
OK key
on
Aqua Mail.
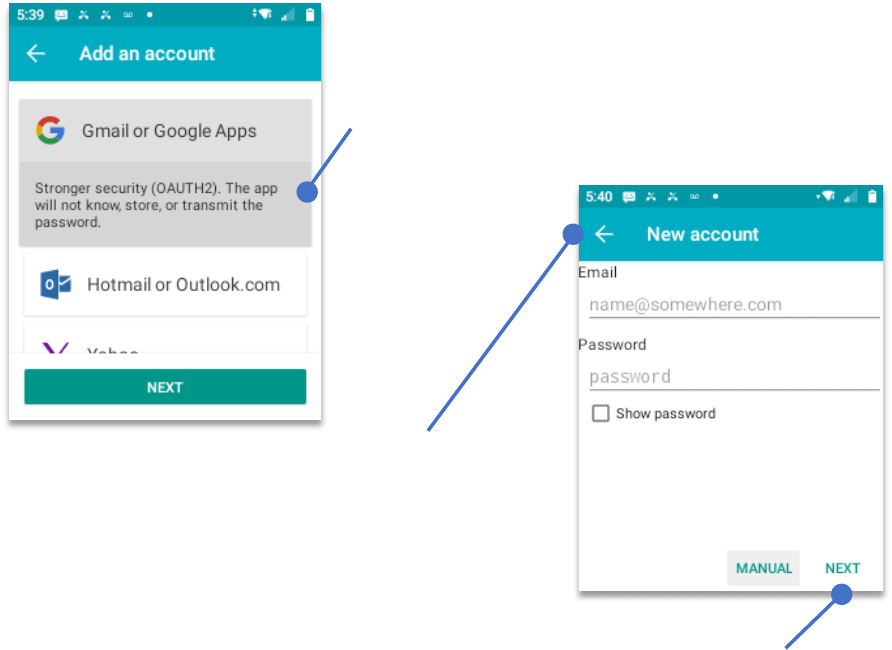
When using Aqua Mail for the first time, you will be prompted to add an email account. Either
choose your mail provider from the listed options or, if your mail provider is not listed, use
Other Mail
to manually configure the account.
NOTE: Aqua mail will not work with email platforms that needs a browser with OAUTH2 to
authorize the user id and password.
Using your
Navigation Key
, select the email platform that you will setup and press the
OK
Key.
When the email account is selected, it will appear a
small explanation of the type of encryption. Then,
using the
Navigation key
scroll down until the
“NEXT”
banner is selected. Press the
OK key
.
After pressing the
OK key
, the
New Account
window
will appear. Using the
Navigation key
select the
“Email line”
and using the
keypad
add your email
address. Using the
Navigation key
select the
“Password”
line and using the
keypad
add your
password (Passwords are always case sensitive).
After adding the Email address and the Password, using the
Navigation key
,
scroll down until
“NEXT”
is selected, press the
OK key
to jump to the next
section.
21
Opening your Inbox and emails
When only one email account is configured in the app, your account’s Inbox is the default Aqua
Mail startup screen. All received emails will be displayed in your Inbox.
• To open an email, use the
Navigation key
to select the email, press
OK key
to open.
Replying to emails
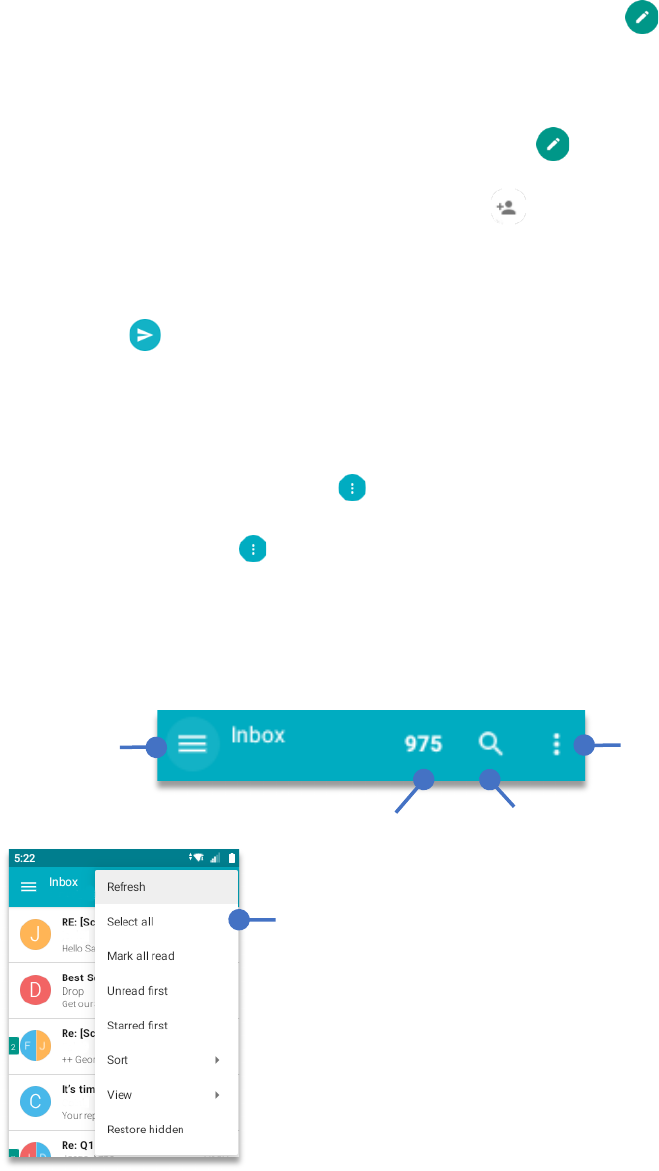
• To access the “
Navigation drawer”
situated at the bottom of each email press the
DOWN Navigation key
until the “
Navigation drawer”
is selected.
• The
Navigation drawer
allows to
Reply
,
Reply all
or
forward
an email. Also, allows to
open the
Options
⁝
menu
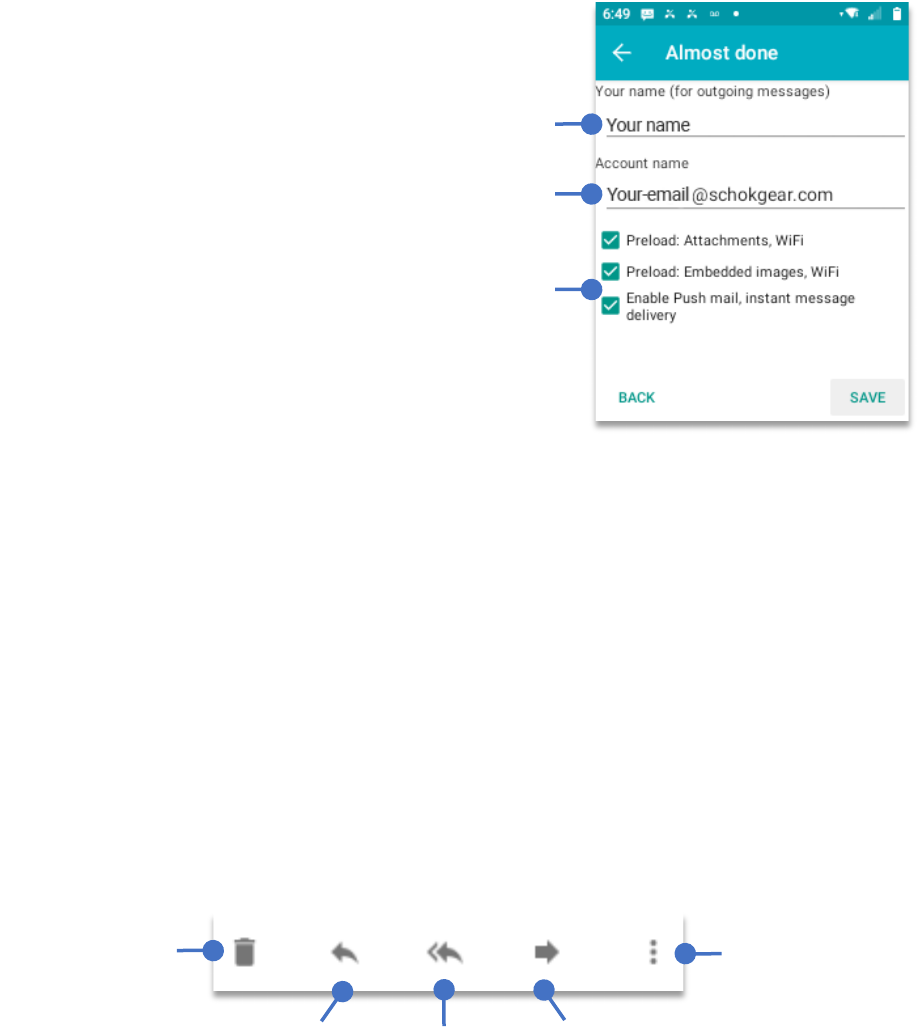
After the system verifies that the email is working,
it will ask for the name that it will be shown to the
recipient every time you sent an email.
Do not modify this line as it the email that was
verified in the previous screen.
By default the Preloads and Enable Push mail are
unchecked. This is to save battery. If you want to
receive attachments or embedded images when
connected to Wi-Fi please check these boxes.
Navigation drawer
Delete email
Options menu
Reply email
Reply all
Forward
22
Create a new email
• You can create a new email by selecting the
new email
icon.
• To select the new email icon, press the
OK key
for two seconds (Long press). This will
invoke the
Virtual mouse.
• When the pointer is displayed on the screen, using the
Navigation key
, move the
pointer and position it on top of the
new email
icon and press the
OK key
.
• To disable the
Virtual mouse
, press the
OK key
for two seconds (Long press).
• Using the physical
Keypad
, add the recipients email address and using the
Navigation key scroll down to the body of the email.
• Using the physical
Keypad
, write the email.
• Using the
Navigation key
scroll up until the selection tool jumps to the top, select the
send
icon and press the
OK key
.
Working with multiple emails.
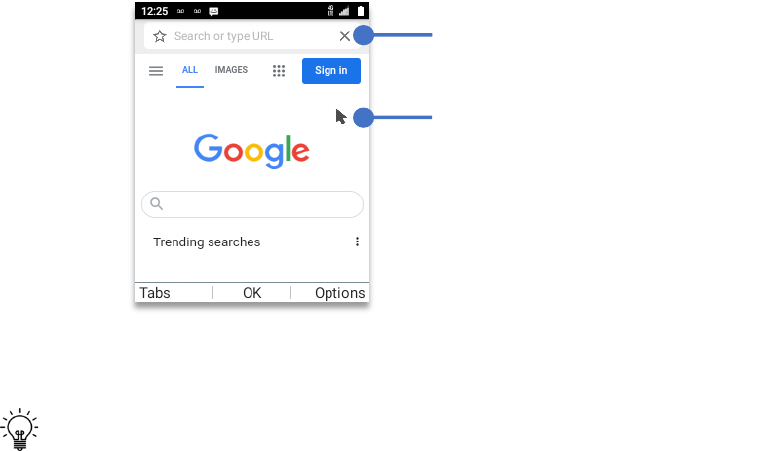
From Inbox you can delete, archive or move multiple messages at the same time. To do this,
you need to open the
“Options menu”.
To open the
“Options menu” ,
navigate to top bar. To do so, using your
Navigation Key
scroll to the top, press again to jump to the
navigation top bar
.
Using your
Navigation key
, press the
Right Navigation key
until the
“Options menu”
is
selected. Press
OK key.
Accounts menu
Options menu
Search anything under inbox
Number of emails on inbox
Options menu displaying all options
23
Browser
• From Home Screen, press
OK Key
• Using the
Navigation key
, press
OK key
on
Browser.
Using the
navigation key
move the pointer to the desired position, click the
OK key
to select.
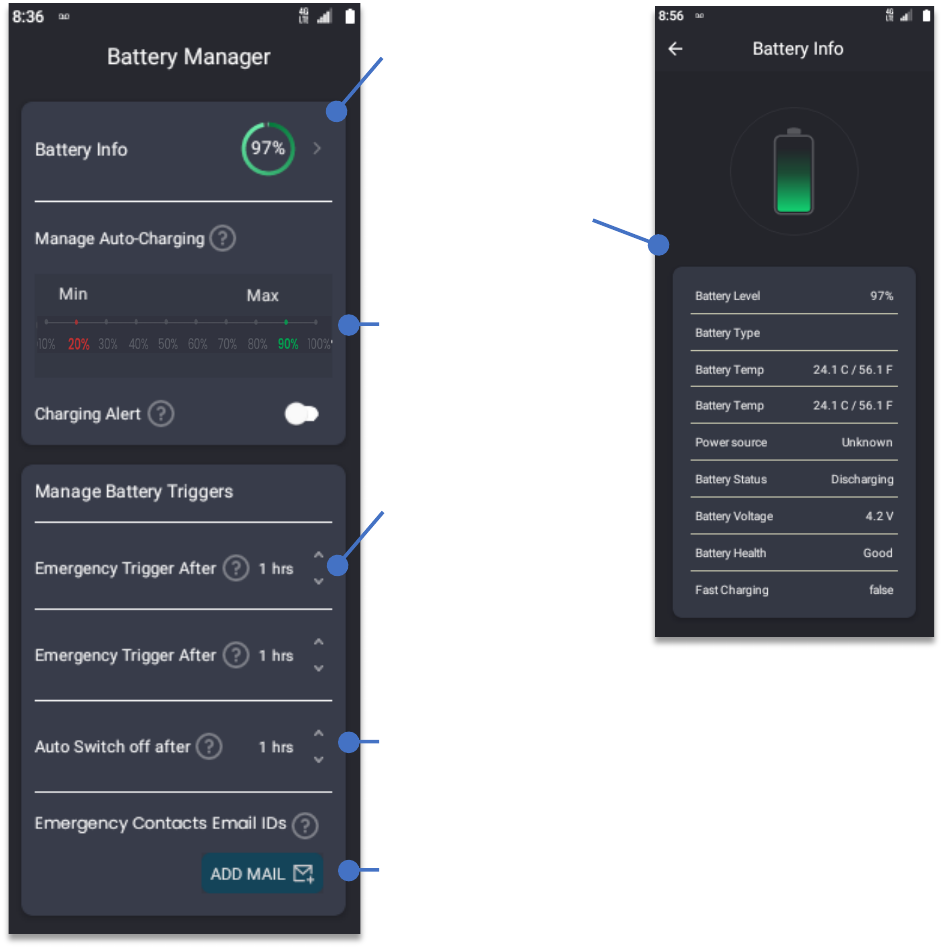
If what you want is to go to a specific web address, navigate the pointer to “Search or type
URL” at the top of the browser. Using the keypad, write the webpage to visit.
Tip:
for the correct use of keyboard and special characters:
• The @ symbol and “.” can be located by long pressing the
“#”
symbol on the keypad.
• To insert a space press the “0” key.
• To enter and uppercase character, press the
“*”
(Star) key.
• To erase any text or number simply press the Back key.
After writing the full web address press the
OK Key
to execute the command.
Tabs:
Press the
Left Soft Key (Tabs)
to view your open “Tabs.”
History:
To reload previously visited web pages. Press the
Right Soft Key
(Options)
press the
OK Key
and scroll to the desired web page.
Bookmark:
Press the
Right Soft Key (Options)
, scroll down to
“Bookmark”
, press the
OK
Key
, Scroll the desired webpage and click the
OK Key
to execute.
Top:
To go back to the top of the site, press the
Right Soft Key (Options)
and scroll down to
“Top”
, press the
OK Key
to execute.
Fast Scrolling:
Press and hold the
Navigation key
to accelerate the speed of the pointer.
Search and URL input space
Pointer
24
Battery Manager
The battery manager presents tips and statistics of device battery, also allowing to configure
the Schok flip charging levels and battery related preferences.
• From Home Screen, press the
OK Key
• Using the
Navigation key
, press
OK key
on
Battery Manager.
By selecting the
Battery info and
pressing the OK key,
a new window will
appear showing a
detailed view of the
state of the battery.
Set Min-Max Auto-
Charging limit.
TIP: Avoid the battery
going less than 20%
and avoid the battery
to charge to 100%.
Set-up an emergency
Email alert in case
the device is left on
charging for long
periods of time and
there is no motion.
Device can automatically shut down after a certain
pre-set period of time.
Can store up-to three emergency contacts to send
notifications of the state of the battery.
25
Calculator
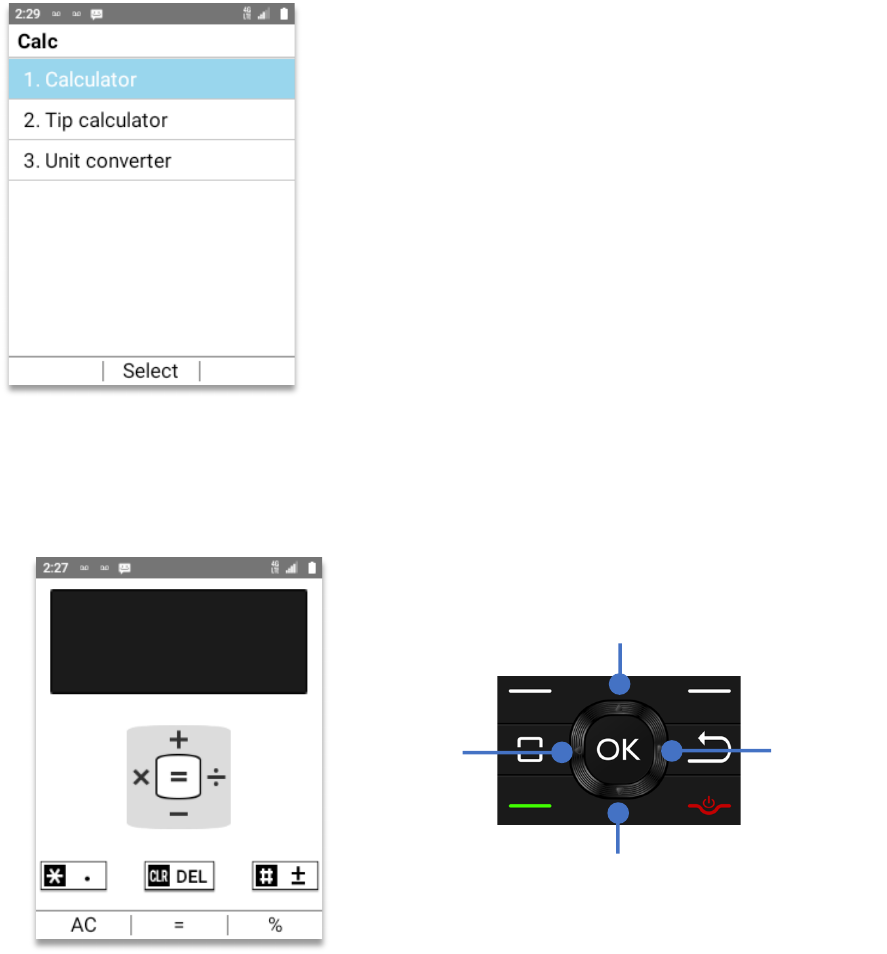
Calculate mathematical calculations using the navigation key of your device.
• From Home Screen, press
OK Key
• Using the
Navigation key
, press
OK key
on
Calc.
The calculator (Calc) app has three options: Calculator, Tip Calculator and Unit Converter.
• Use
physical keypad
to enter the number.
• Use
Navigation key
to perform the type of operation.
• Use
OK Key
to execute the mathematical operation.
Plus
Minus
Multiply
Divide
26
Calendar
The calendar app can create, organize and manage appointments and meetings.
• From Home Screen, press
OK Key
• Using the
Navigation key
, press
OK key
on
Calendar.
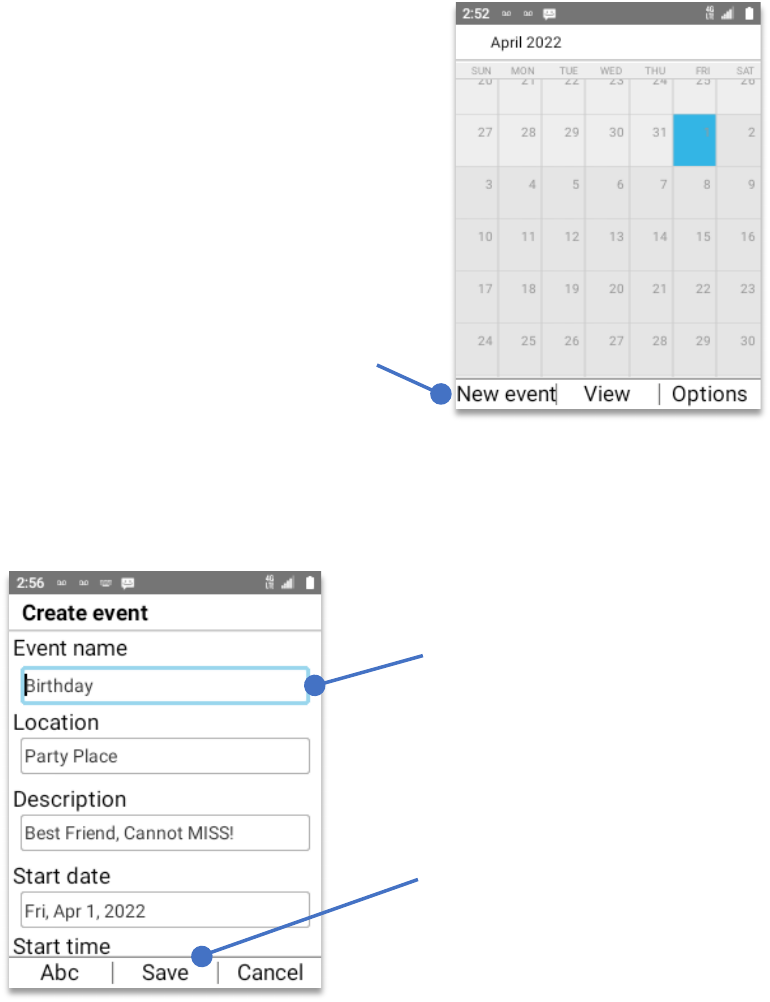
The Create event window will open. Using the
keypad
and the
navigation key
enter the event name, location and description.
Press the
Left Soft Key
“New event”
Press the
OK Key
to save
the event.
Using the
keypad
, enter the
information, to go to the next
line, use the
navigation key.
27
View Calendar events.
• From Home Screen, press
OK Key
• Using the
Navigation key
, press
OK key
on
Calendar.
View mode:
Press the
Right soft key (Options)
, a pop-up window will appear with four
options.
1. Go to Use it to go to a specific date.
2. View mode Choose the different view options (Day, Week, Month, Agenda).
3. Search event Search for a particular event from all the calendar database.
4. Settings Options to personalize the calendar app.
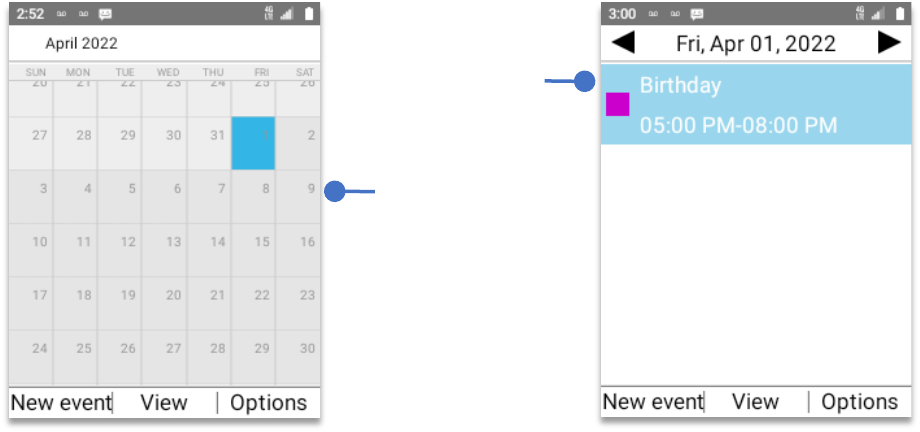
By default, the calendar will show the monthly view.
To view a specific day on that month, using the
navigation key
select the day and press the
OK Key.
Monthly view
Daily view
28
Contacts
With the Contacts application you can create, manage and save your contacts in the memory
of the device.
WARNING: If you do a factory reset all the information saved in the device will be deleted
including all your contacts. If you leave the phone without battery for an extended period of
time, your contacts may be lost. It’s recommended that you backup your contacts database
prior to erasing your device. Schok and your carrier are not responsible for lost contacts.
• From Home Screen, press
OK Key
• Using the
Navigation key
, press
OK key
on
Contacts.
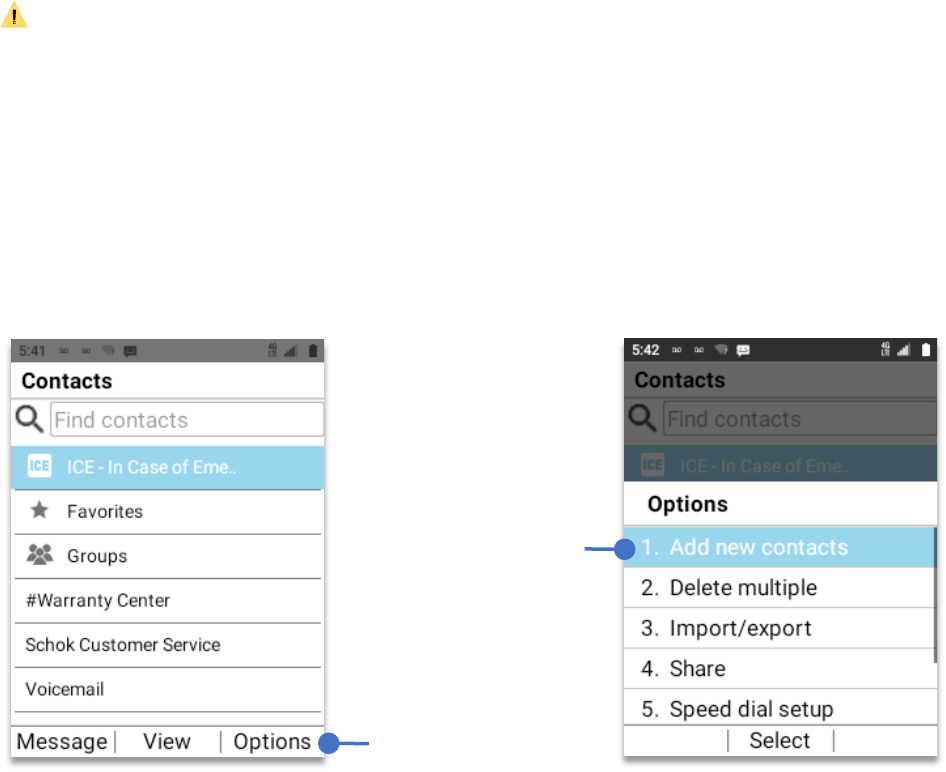
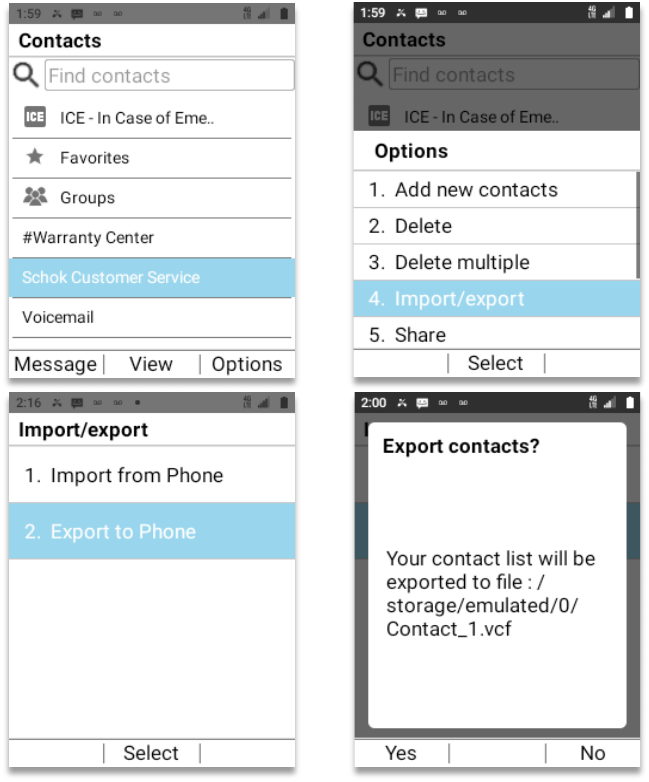
To add a new contact, press the
Right soft key (Options)
Using your
Navigation key
, select
“Add new contacts”
, press the
OK Key
.
Using the
keypad
and the
Navigation key
enter the new contact information.
You can just enter the name and the phone number or, you can enter the full contact
information such as Name, Company, Phone, Email, Address, etc..
To save the contact, press the
OK Key (Save).
Press the
Right soft
key (Options)
Select and
press the
OK Key
29
Export Contacts
• From Home Screen, press
OK key
• Using the
Navigation key
scroll to
“Contacts”
, press
OK key
.
1. Using the
Navigation key
, select the contact that needs to be exported, press the
Right soft key (Options)
.
2. The
Options
menu will open. Using the
Navigation key
, select
Import/export
and
press the
OK key
.
3. The
Import/export
menu will open. Using the
Navigation key
, select
Export to Phone
and press the
OK key
.
4. The contact has been exported to the root of the device file system.
A pop-up window will open showing the location inside the device where the contact has been
exported. This location is on the root directory where all folders are located. The file will be
saved with the extension .VCF (vCard file)
30
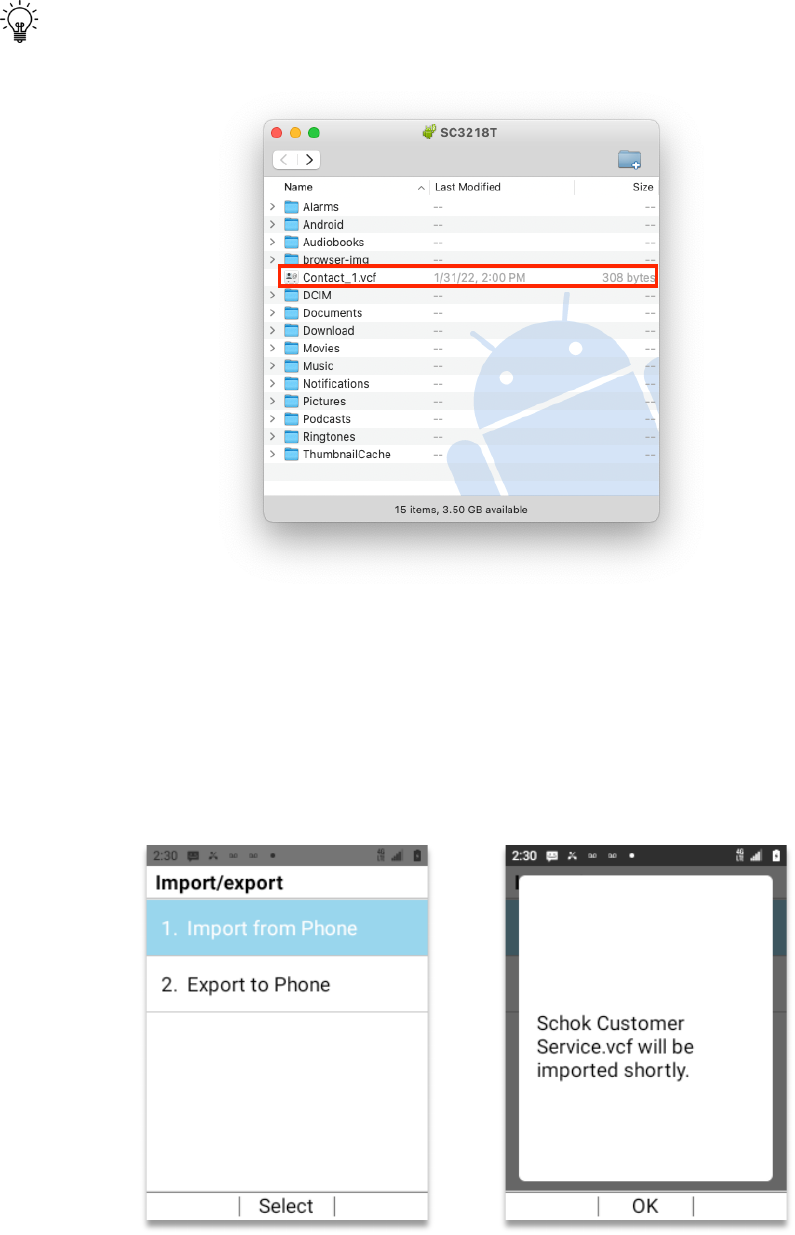
TIP:
When you connect a computer to transfer your contacts, you will find the file on the
root directory as shown below
Import contacts
1. Using
Navigation key
, select the contact that needs to be imported, press
Right soft
key (Options)
.
2.
Options
menu will open. Using
Navigation key
, select
Import/export
, press
OK key
.
3. The
Import/export
menu will open. Using
Navigation key
, select
Import to Phone
and press
OK key
.
4. All files with extension .VCF located on the root directory will be imported.
31
Camera
• From Home Screen, press
OK Key
• Using the
Navigation key
, press
OK key
on
Camera.
To take a picture, point the lens towards the object and press the
OK key
. Your picture will be
saved automatically to the Gallery App. Press the
Left Soft Key
to open the Gallery App.
Zoom In & Out: When pointing the lens towards the object, press the
Left
or
Right
Navigation
key
to Zoom in and Zoom out.
TIP:
By clicking the
Right Soft Key (Options)
you can access a menu to adjust your
camera such as; Auto Review, Self-Timer, Size, Shutter sound and Storage (Storage option is
only available if you have a memory card installed).
SELFIE:
Open Camera App, close phone lid, use secondary display as a viewfinder, press the
Volume Down key
to take the picture.
Gallery
The Gallery app shows all the pictures taken and stored in your device.
• From Home Screen, press
OK key
, navigate to “Gallery”, Click
OK key.
• Using
navigation key
, select the picture that you want to open, click the
OK Key
.
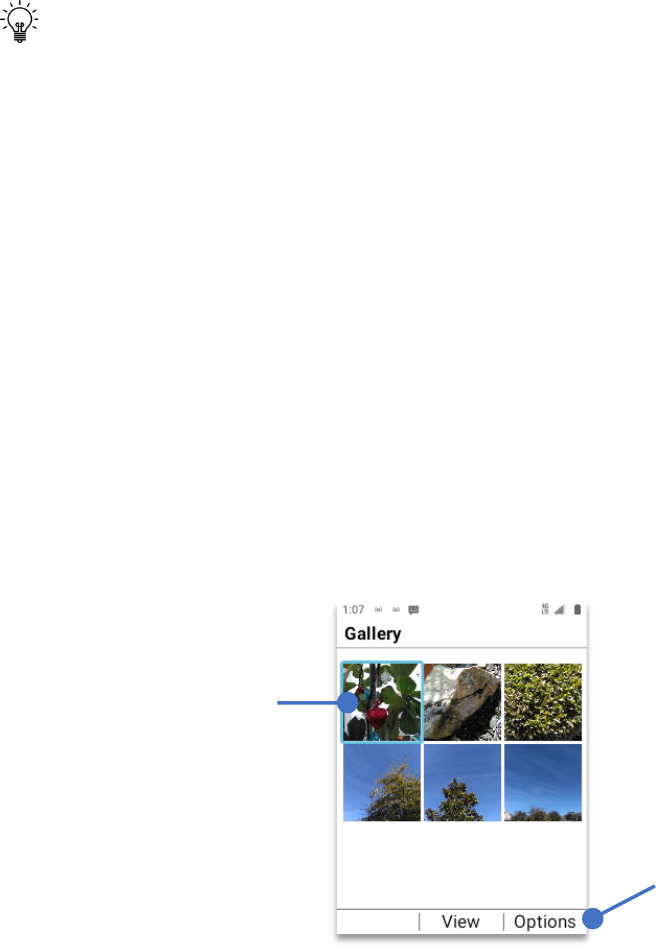
• Pressing the
Right Soft Key (Options)
you can access a menu to crop, delete, get
details, send or set as a wallpaper or contact photo.
• When viewing a picture, press the
Left Soft Key (Guide)
to access, Full Screen view,
Rotate (left), Rotate (right) and Zoom in and out. In order work on a pop-up window
please use the numbers that appear on each option.
Using the Navigation
Key, select the
picture that you
want to see and click
the OK Key (View)
Press
right soft key
to open options
32
Files
The files (file manager app) manages and transfer files between the device and a computer.
• From Home Screen, press
OK Key
• Using the
Navigation key
, press
OK key
on
Files.
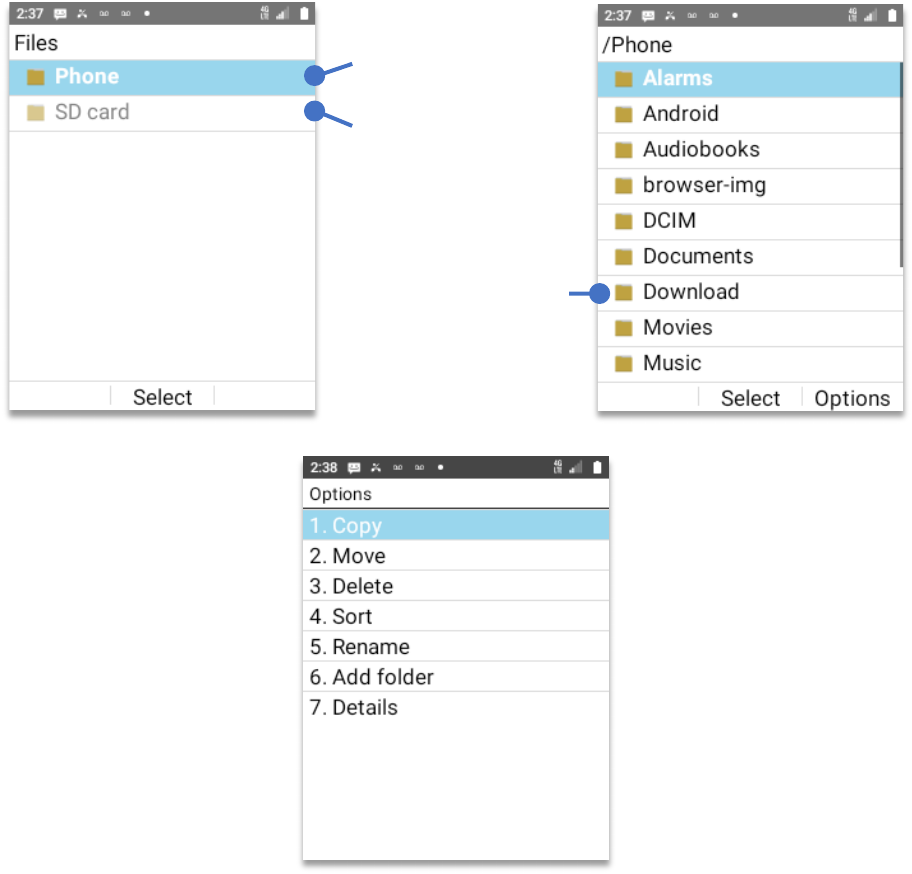
The files app will open on the root directory, which is the highest directory in the hierarchy of
your phone’s file system. You will find folders, each dedicated for a type of app or use.
By pressing the
Right soft key (Options)
the system will show all the different available
options for that particular file or folder. The options are shown below.
Grayed SD card folder
means that there is
no SD card inserted.
Or that is not properly
formatted.
Click Ok Key to open
Phone’s root directory
Using the Navigation
key scroll to select
folder, click the OK key
top open
33
Lamp
• From Home Screen, press
OK Key
• Using the
Navigation key
, press
OK key
on
Lamp.
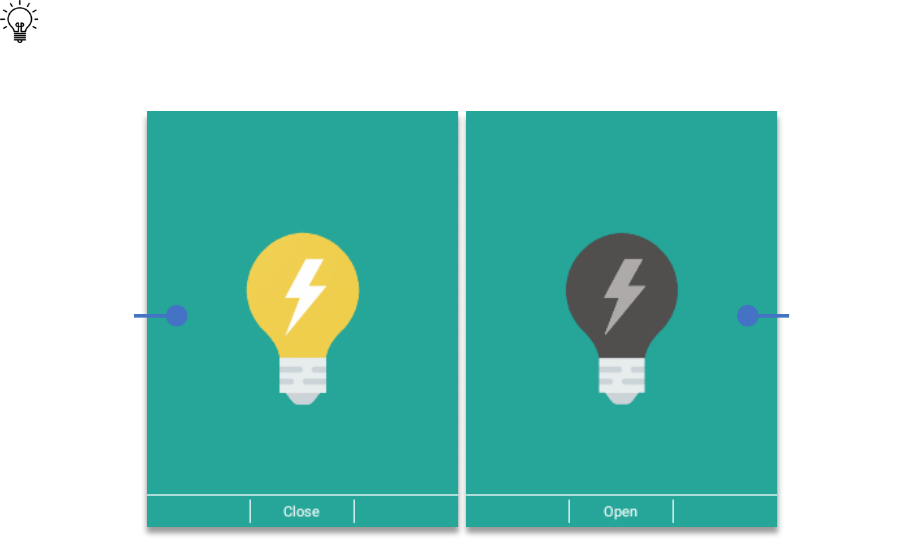
The moment the lamp app is opened, the flash will immediately turn on. To turn it off, click the
OK key (Close)
Tip:
When the Bulb icon is yellow, the lamp is ON. When is showing is gray the lamp is
OFF.
FM Radio
• From Home Screen, press
OK Key
• Using the
Navigation key
, press
OK key
on
FM Radio.
NOTE:
To use the FM Radio there must be plugged a headset on the 3.5mm jack to use it as an
antenna. The number of stations received will depend on the signal strength of the location
where the device will be used.
To create a favorite list:
1. Tune to the station, press the
Right soft key (Options)
2. Using the
navigation key
, select
“Add to favorites”
and press
OK key
.
3. Station is now set as favorite and will appear below the main frequency window.
Lamp OFF
Lamp ON
34
Media
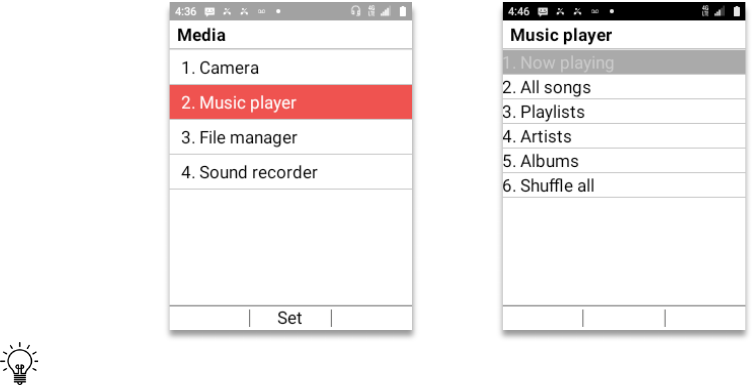
Media app is where all the pictures, music, videos and voice recordings can be played.
• From Home Screen, press
OK Key
• Using the
Navigation key
, press
OK key
on
Media.
1.
Camera:
The camera will open the camera app. After opening, press
Left Soft key
(Gallery)
to see all pictures taken by the camera app.
2.
Music:
The music player menu will open showing different music options available.
3.
File manager:
The Files app will open. Navigate to the Movies folder to watch any
movie or clip placed inside the folder.
4.
Sound recorder:
The Sound recorder app will open. You can record voice memos.
Pressing the
Right soft key (Options)
you can change the quality of the recording or
Auto save the file to a customized directory.
Tip:
When watching a movie or clip, you can set the Schok flip to automatically change the
view to horizontal. To do this, follow these steps:
• From Home Screen, press
OK Key
• Using the
Navigation key
, press
OK key
on
Tools & Settings.
• Using the
Navigation key
, press
OK Key
on
Settings
.
• Using the
Navigation key
, press
OK key
on
Phone settings.
• Using the
Navigation key
, press
OK key
on
“Auto-rotate screen”.
• Using the
Navigation key
, select
“On”
. Press the
OK key.
• Press the
End call/Power button
to exit.
Now, every time there is a video playing, by turning the phone to a horizontal position, the
video will enter automatically into horizontal mode.
35
PDF Extra
PDF Extra allows you read any file saved as a PDF. Also the applications can convert pictures
or documents to PDF and scan pictures and send them via email as a PDF file.
• From Home Screen, press
OK Key
• Using the
Navigation key
, press
OK key
on
“PDF Extra”
.
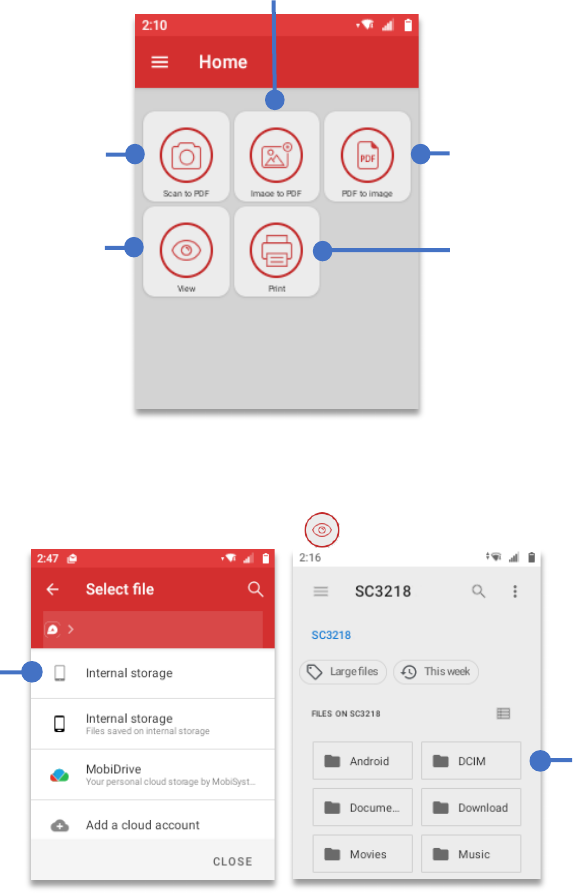
PDF Extra home screen has five different ways to interact with PDF files.
To open (View) a PDF
Using the
Navigation key
scroll and select View, press
OK Key
.
Send a PDF file to a
printer (this section
is in experimental
phase) and may be
included in future
software versions.
Take a picture of a
document and
convert it to PDF
You can use the View
section to open any
PDF saved to the
device
Any PDF file can be
converted to a JPG
image.
Convert an Image to a PDF
file
Press
“Internal
Storage”
,
press
OK key
Choose the
location where
the PDF is
located and press
the
OK key
36
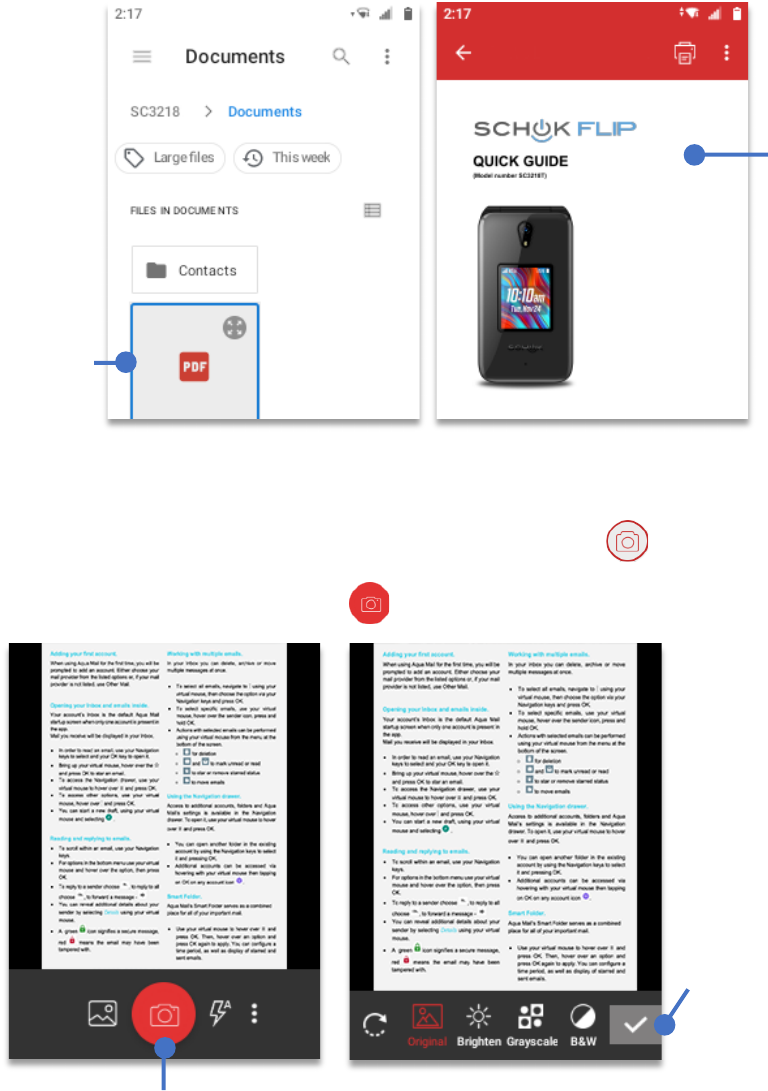
After opening the location, using your
Navigation key
select the PDF file to open and press
the
OK key
.
To Scan a Document and convert it to PDF.
• Using the
Navigation key
scroll and select
Scan to PDF
, press
OK key
.
• The built-in camera menu will open. Focus the document that you want to convert and
press the
camera shutter
icon .
Select the
desired PDF
file, press the
OK Key
to
open
After
pressing the
OK key
, the
PDF file will
be displayed
on the screen
Using the Navigation key, select the Camera shutter and
press the OK Key to scan the document.
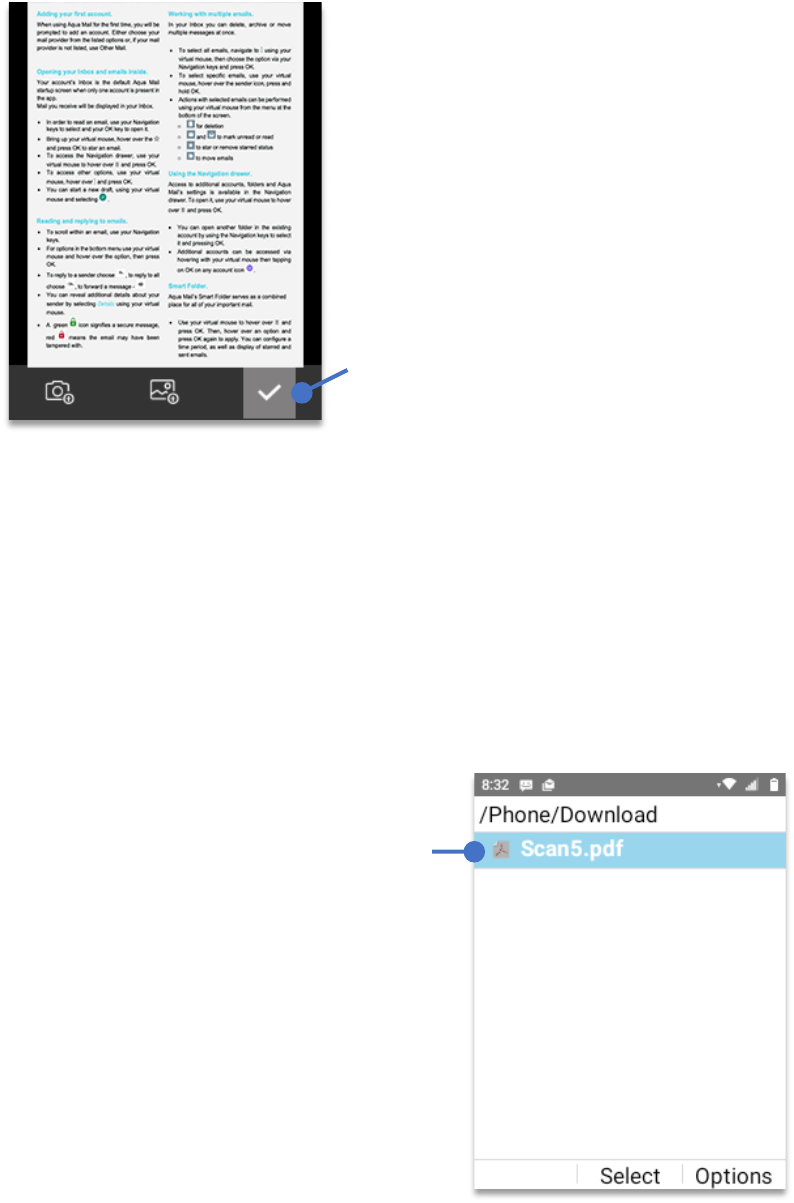
On this screen,
you can modify
the document
using the icons
on the bottom
bar. When
done, using the
Navigation key
select the
checkmark and
press the
OK
key.
37
• After pressing the
OK key
, a third window will appear. Using the
Navigation key
, select
the “
checkmark”
and press
OK key
.
The image is now converted into a PDF file and has been saved to the
“Download”
folder.
To open the converted file
• From Home Screen, press
OK key
• Using your
Navigation key
scroll to
“Files”
, press
OK key.
• Using your
Navigation key
, select
“Phone”
, press
OK key
.
• Using your
Navigation key
, select
“Download”
, press
OK key
.
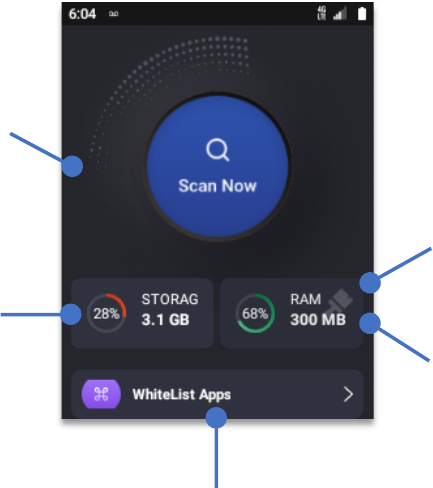
• Using your
Navigation key
, select the PDF file, press
OK Key
.
Using the
Navigation key
select the
“checkmark” to
convert the
document.
Using the Navigation key, select
the file that you want to open and
press the OK Key.
38
Power Boost
This app is used for improving memory utilization on the phone. You can free up memory to
speed up the phone.
• From Home Screen, press
OK Key
• Using the
Navigation key
, press
OK key
on
Power Boost.
• Using the
Navigation key
, select the desired action, press
OK Key.
Scan now:
Will perform a search displaying the Cache, Apps and Junk files found on the
system. After the search, the Power Boost app will display the amount of storage that can be
reclaimed by erasing Cache, certain Apps or the Junk files.
To execute the deletion of either Cache, Apps or Junk Files, navigate using the
navigation key
,
and press the
OK key
on the checkmark space besides each of the options.
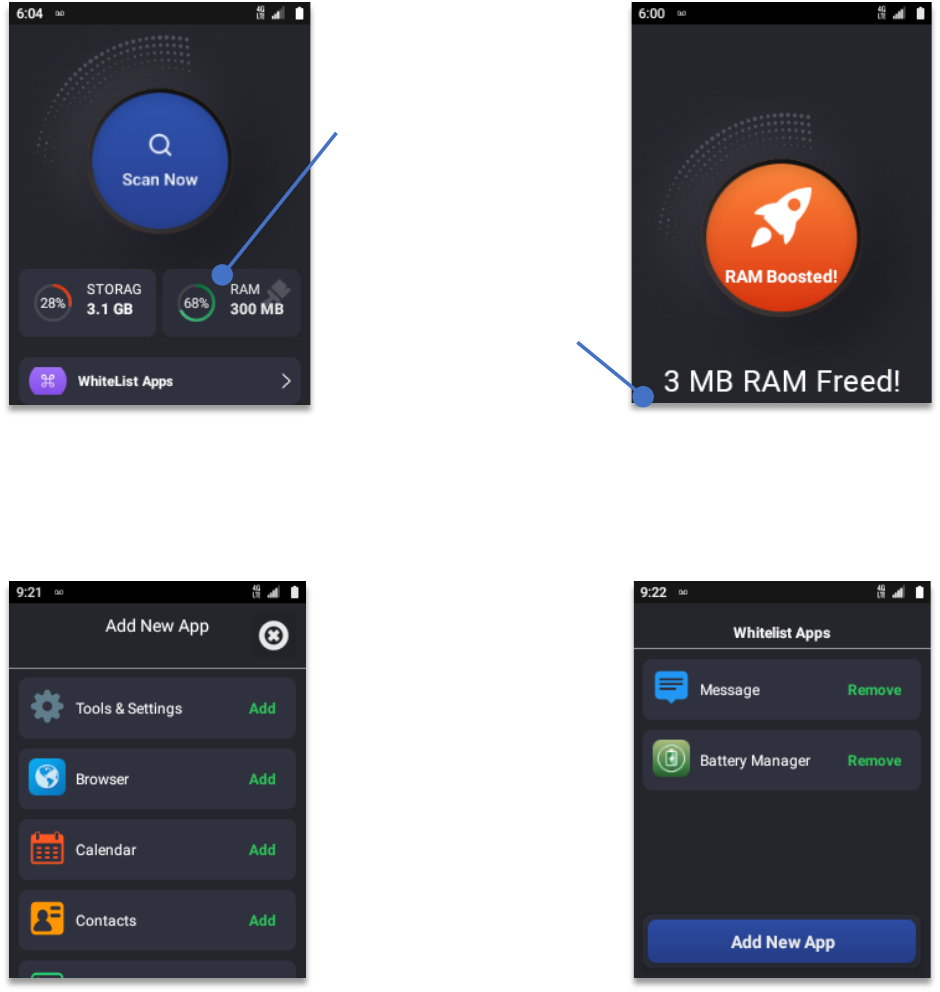
Displays the total
amount of storage
available.
Displays the total
amount of RAM
available
Whitelisted apps will
not close even by
performing a RAM
cleanup
By selecting and
pressing the OK Key,
the Power Boost will
perform a RAM cleanup
Selecting
“Scan
Now”
and pressing
OK key
, the Power
Boost app begins a
full scan of files that
can be deleted to
regain storage
space.
39
RAM Cleanup
There are times where there are a lot of active applications in the background leaving the
system with not enough memory to perform. Also, there are certain situations that an App
may crashed slowing the system.
To close all open applications, using the Navigation key select “RAM”, press OK key. The
system will immediately close all apps working on the background freeing the memory.
Whitelist Apps
Power Boost has the ability to whitelist any application installed on the device. RAM cleanup
will not close the application added to the whitelist.
Select “RAM” and
press OK key to
close all
background
applications and
free the memory of
the Schok flip.
In this example,
3MB in RAM have
been freed.

40
Settings and Tools
• From Home Screen, press
OK Key
• Using the
Navigation key
, press
OK key
on
Tools & Settings.
The menu will display three options:
1.
Tools:
You can find Calculator, Calendar, Alarm, Timer, Stopwatch and World Clock)
2.
Settings:
All the different panels to configure the device.
3.
Lock control:
Block or allow features, apps and actions and password protect them.
Tools:
NOTE:
Calculator, Calendar & Alarm were explained at the Applications section of this manual.
Timer:
• From Home Screen, press
OK Key
• Using the
Navigation key
, press
OK key
on
Tools & Settings.
• Using the
Navigation key
, press
OK Key
on
Tools
.
• Using the
Navigation key
, press
OK Key
on
Timer
.
The Timer app alerts you with an audible signal when a pre-set time has passed.
1. Using the
Navigation key
, press
OK Key
on
Tools
.
2. Using the
Navigation key
, press
OK Key
on
Timer
.
3. To add a new timer press the
Right soft key
.
4. Using the
Up
and
Down Navigation key
set the hour
“h”
5. Using the
Right Navigation key
go to minutes
“m”
6. Using the
Up
and
Down
Navigation key
set the minutes
7. Using the
Right Navigation key
go to seconds
“s”
8. Using the
Up
and
Down
Navigation key
set the “Seconds”
9. To finish and save the timer, press
OK Key (Save).
To Delete a timer
1. Using your
Navigation key
select the timer to delete.
2. Press the
Right soft key (Options)
3. Using the
Navigation key
select
“Delete”
and press
OK Key
.
41
Stopwatch:
• From Home Screen, press
OK Key
• Using the
Navigation key
, press
OK key
on
Tools & Settings.
• Using the
Navigation key
, press
OK Key
on
Tools
.
• Using the
Navigation key
, press
OK Key
on
Stopwatch
.
The Stopwatch has two modes (“
Split”
and “
Lap”
)
1. To choose “
SPLIT”
press the
Left Soft key
(Mode)
until
“SPLIT”
is showed at the left
top of the display.
2. To choose
“LAP”
press the
Left Soft key
(Mode)
until
“LAP”
is showed at the left top of
the display.
LAP mode:
1. With the mode selected press the OK key (Start)
2. To record the time for a
“Lap”
while the Stopwatch is running press the
Left Soft Key
(Lap)
The lap time will be recorded and displayed on the screen.
3. To “
stop”
the Stopwatch, press the
OK key (Stop)
4. To
“reset”
the time, press the
Right Soft key (Reset)
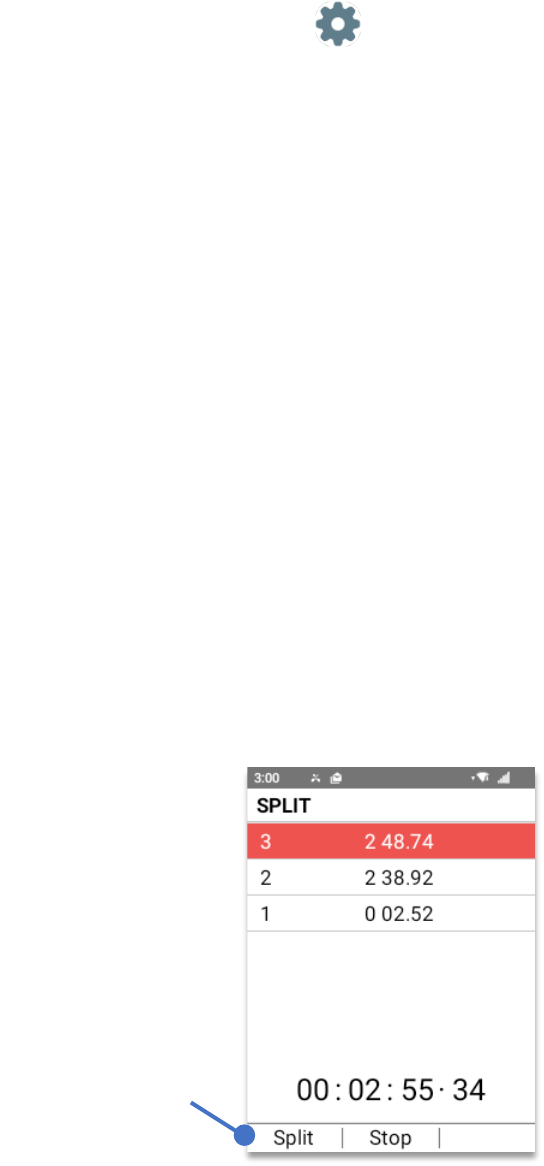
SPLIT mode:
1. With the mode selected press the OK key (Start)
2. To record the time for a
“Split”
while the Stopwatch is running press the
Left Soft Key
(Split)
The split time will be recorded and displayed on the screen.
3. To “
stop”
the Stopwatch, press the
OK key (Stop)
4. To
“reset”
the time, press the
Right Soft key (Reset)
To Split, press the
Left Soft Key.
42
World Clock:
The World Clock app displays the time for various cities around the world
• From Home Screen, press
OK Key
• Using the
Navigation key
, press
OK key
on
Tools & Settings.
• Using the
Navigation key
, press
OK Key
on
Tools
.
• Using the
Navigation key
, press
OK Key
on
World Clock
.
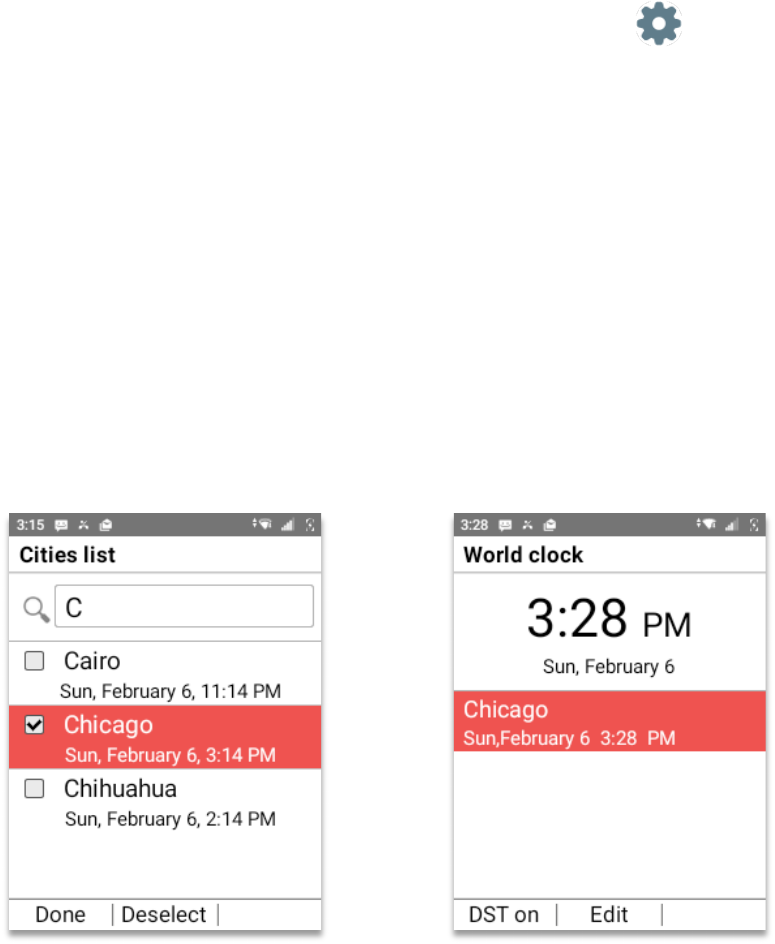
The first time you open the World Clock app it will display the current time and date in your
time zone.
To add a different time zone:
1. Press the
OK key (Add)
2. A search bar will be displayed, using your
physical
keypad
spell the first three letters
of the city that you want to add.
3. Using the
Navigation key
scroll to the city and press the
OK key
.
4. With the city selected, press the
Right soft key (Done)
.
5. The new city will be displayed below the default city. (As shown on image below)

43
Settings
Software control panel that enables the user to configure the appearance or actions that
determines the functionality of the device.
• From Home Screen, press
OK Key
• Using the
Navigation key
, press
OK key
on
Tools & Settings.
• Using the
Navigation key
, press
OK Key
on
Settings
.
Wireless & Networks
The Wireless & networks menu allows you to configure and manage your device’s wireless
radio communications.
• From Home Screen, press
OK Key
• Using the
Navigation key
, press
OK key
on
Tools & Settings.
• Using the
Navigation key
, press
OK Key
on
Settings
.
• Using the
Navigation key
, press
OK Key
on
Wireless & Network
.
Airplane mode
• From
Wireless & Networks,
using the
Navigation key
select
Airplane mode
.
• Press
OK key
• Using the
Navigation key
highlight “On” or “Off”
• Press
OK key.
• Press the
Back key
to exit.
Wi-Fi
• From
Wireless & Networks
, using the
Navigation key
select Wi-Fi
• Press
OK key
• From the
Wireless & networks
menu screen, press the 2 key Wi-Fi.
• Using the
Navigation key
select a Wi-Fi network
• Press
OK key (Connect)
• If the Wi-Fi is password protected, using the
physical Keypad
input the password.
• Press
OK key (Save)
44
To manually add a WiFi network
• From the Wi-Fi menu, press the
Right soft key (Options)
• Using the
physical keypad
enter the Wi-Fi network name (SSID)
• Using the
Navigation key
, select “password”.
• Using the
physical keypad
input the password.
• Press the
OK key (Save)
Saved Networks: Inside the Wi-Fi “Options” menu you can find the “Saved networks” which
displays all the networks that have been registered with the device.
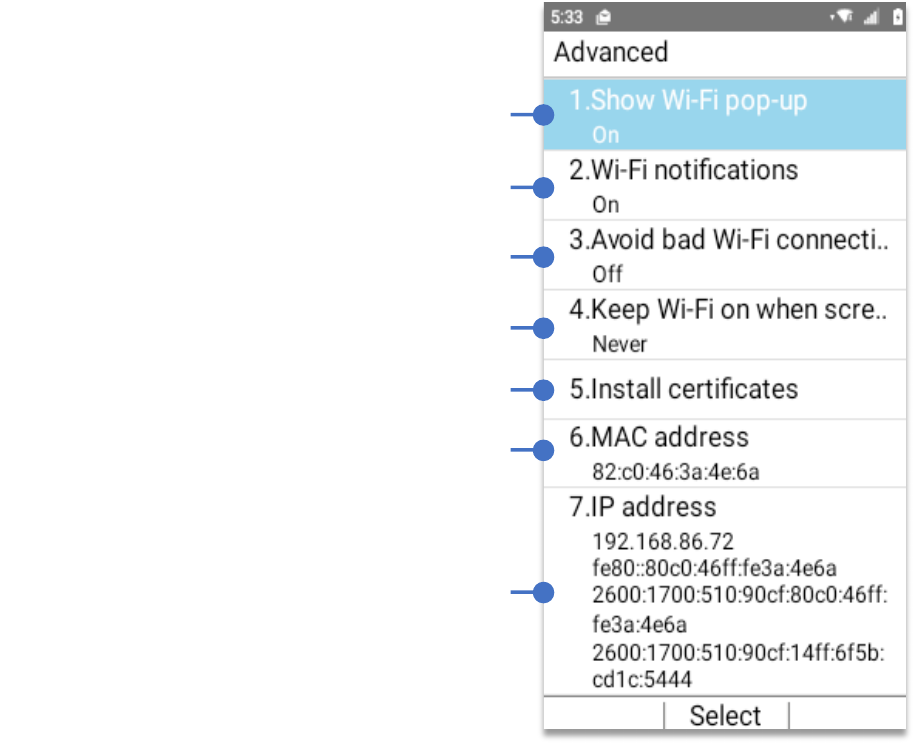
Wi-Fi Advanced menu: Provides additional specific Wi-Fi connection settings:
Enable to display pop-up window when a
Wi-Fi network is connected.
Enable to be notified if Wi-Fi networks are
available nearby.
Enable to use the mobile network when the
Wi-Fi network doesn’t have a signal
Set the Wi-Fi connection active when the
screen is off.
Allows you to install certificates from storage.
Unique ID assigned to a Network interface
controller (NIC) for use as the network address.
Unique ID that identifies a device on the internet
or local network.
45
To turn Off Wi-Fi
The Schok flip has an advanced security function called
Schok Lock Control
which allows the
user to control with a six digit password which features and applications can be disconnected.
To turn off Wi-Fi the user must first pre-configure Lock Control, fully explained on the Lock
control section of this user manual.
• From Home Screen, press
OK Key
• Using the
Navigation key
, press
OK key
on
Tools & Settings.
• Using the
Navigation key
, press
OK Key
on
Lock Control
.
• Using the
Navigation key
, press
OK Key
on
Wireless & Network
.
• If you haven’t setup Lock control, using
your physical keypad
create a 6 (six) digit
password.
• Press
OK key (OK)
to save the password.
• If you already setup Lock control, using your
physical keypad
add your password.
• Press the
OK key
.
TIP:
Immediately after setting the password, write it on a secure place that you can
remember. If you lose your password, you will not be able to use certain features of the
device, having to reset the device to regain control, losing the information that was not
previously backup.
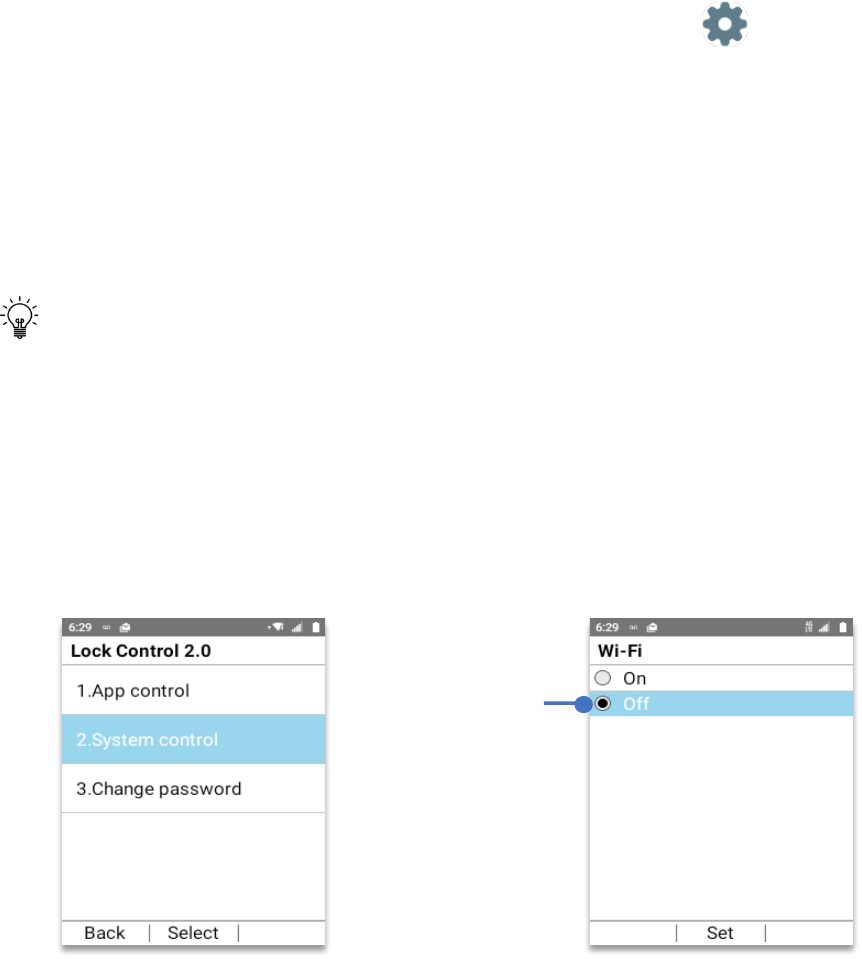
1. Using your
Navigation key
scroll to
“System control”
, press the
OK key
.
2. Using your
Navigation key
scroll to
“Allow Wi-Fi”
, press the
OK key (Select)
3. Using your
Navigation key
scroll to
“Off”
4. Press the
OK key (Set)
Your Wi-fi is now off. Without the Lock control password, it cannot be turned on.
To turn Wi-Fi Off,
Select “Off”
press
OK key
(Set)
46
Bluetooth
• From Home Screen, press
OK Key
• Using the
Navigation key
, press
OK key
on
Tools & Settings.
• Using the
Navigation key
, press
OK Key
on
Settings
.
• Using the
Navigation key
, press
OK Key
on
Wireless & Network
.
• Using the
Navigation key
, press
OK Key
on
Bluetooth
.
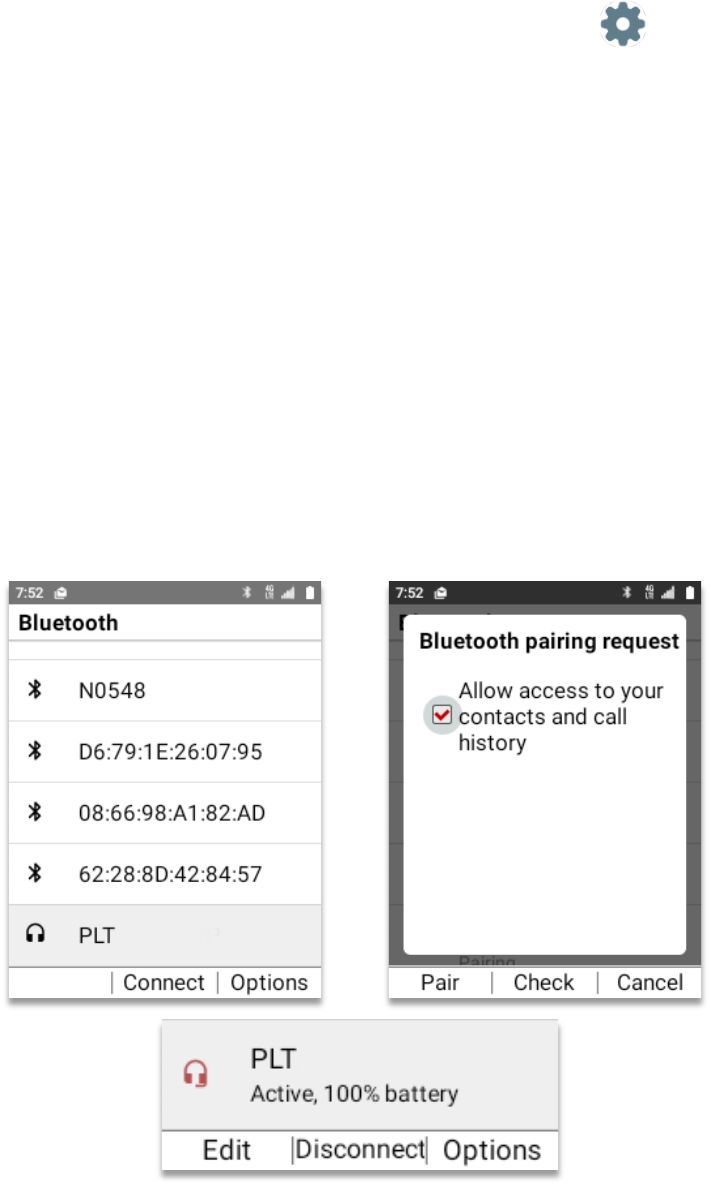
Pair a new Bluetooth device
1. Verify that Bluetooth is ON.
2. If Bluetooth is Off, turn it on by pressing
OK key (Select)
3. Using
Navigation key
scroll to “On”.
4. Press
OK key (Set)
5. Your Bluetooth external device must be in pairing mode.
6. Using
Navigation key
scroll to the Bluetooth device to connect.
7. Press
OK key (Connect)
8. Bluetooth pairing request will appear.
9. Press the
Left Soft Key (Pair)
to finalize pairing.
10. The Bluetooth external device is now paired and ready to use.
11. The Bluetooth main window will show the device is active.
47
Bluetooth options
• From Home Screen, press
OK Key
• Using the
Navigation key
, press
OK key
on
Tools & Settings.
• Using the
Navigation key
, press
OK Key
on
Settings
.
• Using the
Navigation key
, press
OK Key
on
Wireless & Network
.
• Using the
Navigation key
, press
OK Key
on
Bluetooth
.
• Press the
Right Left Key (Options)
Tethering & Mobile hotspot
• From Home Screen, press
OK Key
• Using the
Navigation key
, press
OK key
on
Tools & Settings.
• Using the
Navigation key
, press
OK Key
on
Settings
.
• Using the
Navigation key
, press
OK Key
on
Wireless & Network
.
• Using the
Navigation key
, press
OK Key
on
Tethering & Mobile hotspot
The “Tethering & Mobile Hotspot” main menu will appear. There are three main options:
1. USB Tethering option.
2. Mobile Hotspot.
3. Bluetooth tethering.
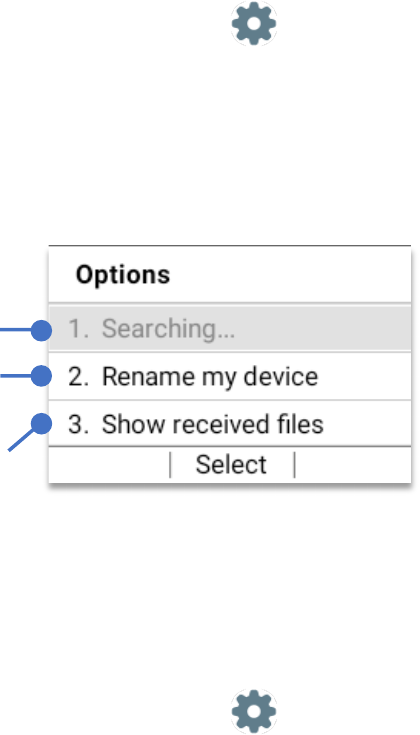
Press “Search” to refresh Bluetooth search.
Press “Rename my device” to change the
name of a paired device
Press “Show received files” to show a list of
all the files received to the device via
Bluetooth.

48
USB Tethering option:
When the mobile internet connection is shared with a connected computer by the device USB
Type-C cable, then it’s called USB Tethering. This option is used for a higher Internet speed
sharing connection versus a wireless hotspot option.
Mobile Hotspot:
The mobile hotspot feature allows you to share the cellular Internet connection to other
devices via Wi-Fi.
Configuring Mobile Hotspot:
• From Home Screen, press
OK Key
• Using the
Navigation key
, press
OK key
on
Tools & Settings.
• Using the
Navigation key
, press
OK Key
on
Settings
.
• Using the
Navigation key
, press
OK Key
on
Wireless & Network
.
• Using the
Navigation key
, press
OK Key
on
Tethering & Mobile hotspot
• Using the
Navigation key
, press
OK Key
on
Mobile Hotspot
The Mobile Hotspot menu will appear.
1. Using the
Navigation key
, press
OK Key
on
Set up Mobile Hotspot
2. Using the
Navigation key
scroll to
“Network Name”.
3. Using the
physical keypad
add the network name that you want to use.
4. Using the
Navigation key
scroll to
“Password”
5. Using the
physical keypad
add the password to use for your Hotspot network.
6. Press
OK Key (Save)
7. Using the
Navigation key
scroll to
“Mobile Hotspot”
8. Press the
OK Key (Select)
49
Turning On the Mobile Hotspot.
• From Home Screen, press
OK Key
• Using the
Navigation key
, press
OK key
on
Tools & Settings.
• Using the
Navigation key
, press
OK Key
on
Settings
.
• Using the
Navigation key
, press
OK Key
on
Wireless & Network
.
• Using the
Navigation key
, press
OK Key
on
Tethering & Mobile hotspot
• Using the
Navigation key
, press
OK Key
on
Tethering & Mobile hotspot
• Using the
Navigation key
scroll to
“On”
• Press the
OK Key (Set)
The Hotspot sharing disclaimer will appear. After reading it, press
OK key (OK)
. The Mobile
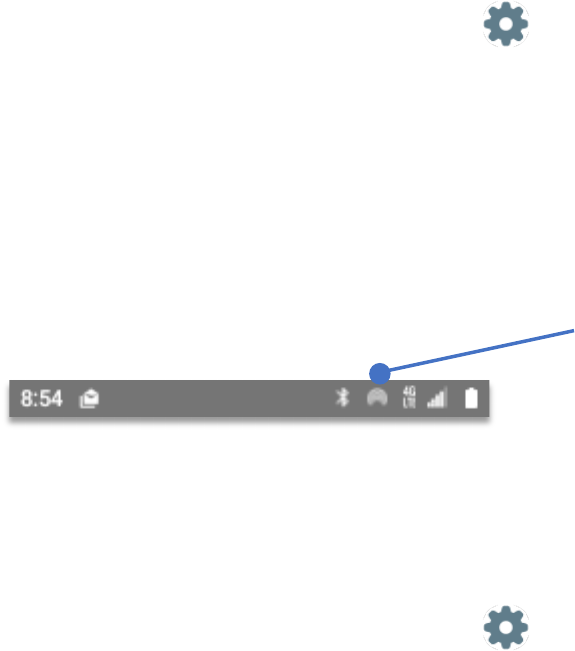
hotspot is now on and active. The device top notification bar shows an Internet sharing logo.
Bluetooth tethering:
The mobile hotspot feature allows you to share the cellular Internet connection to other
devices via Bluetooth.
• From Home Screen, press
OK Key
• Using the
Navigation key
, press
OK key
on
Tools & Settings.
• Using the
Navigation key
, press
OK Key
on
Settings
.
• Using the
Navigation key
, press
OK Key
on
Wireless & Network
.
• Using the
Navigation key
, press
OK Key
on
Tethering & Mobile hotspot
• Using the
Navigation key
, press
OK Key
on
Bluetooth tethering
• Using the
Navigation key
scroll to
“On”
• Press the
OK Key (Set)
Cellular Networks
Cellular networks menu is where you can configure different settings related to the Cellular
network such as:
1. Data Usage
2. Data Roaming
3. Network mode
4. Access Point Names
5. Network operators

50
Data Usage:
Allows you to manage your mobile data usage. You can see the network usage, disconnect
from the mobile network and set limits and alerts.
Data Roaming:
When traveling nationally and internationally you can turn off data roaming to block access to
data services.
Network mode:
Allows you to change the wireless transmission standard use by cellular networks. By default
“Automatic LTE (4G)/3G/2G” is on.
Access Point Names:
The APN or Access Point Name is the name for the settings (gateway) your phone reads to
connect to a carrier cellular network as well as the public internet.
Generally you don’t need to modify these values as your cellular carrier will send them
automatically to the device.
Network operators:
Allows you to search for different cellular networks, depending which cellular carrier you are
using, this option may be grayed by default and cannot be modified.
Emergency Alerts
Allows you to modify the emergency alerts default settings.
• From Home Screen, press
OK Key
• Using the
Navigation key
, press
OK key
on
Tools & Settings.
• Using the
Navigation key
, press
OK Key
on
Settings
.
• Using the
Navigation key
, press
OK Key
on
Wireless & Network
.
• Using the
Navigation key
, press
OK Key
on
Emergency Alerts
• Using the
Navigation key
scroll to
“On”
, press
OK Key (Set)
• To open the Settings menu, press the
Left Soft Key (Settings).

51
The Settings menu will show the different type of emergency alerts that can be turned off.
Using the
Navigation key
scroll to On or Off on each alert. Off to stop receiving that type of
alert, On to keep receive in them.
Accessibility
The accessibility menu is the place to control device features specifically made to interact with
people to get the most out of their phone. These features are:
Readout Persistent alerts
Speech rate Mono Audio
Font size TTY
Color Inversion Real-time text (RTT) call
Color correction Wi-Fi calling
Readout
When turned On, every selection will be read by the device speech engine.
To turn On this feature:
• From Home Screen, press
OK Key
• Using the
Navigation key
, press
OK key
on
Tools & Settings.
• Using the
Navigation key
, press
OK Key
on
Settings
.
• Using the
Navigation key
, press
OK Key
on
Accessibility
.
• Using the
Navigation key
, press
OK Key
on
Readout
• Using the
Navigation key
scroll to
“On”
• Press
OK Key (Set)
To turn Off this feature:
• From Home Screen, press
OK Key
• Using the
Navigation key
, press
OK key
on
Tools & Settings.
• Using the
Navigation key
, press
OK Key
on
Settings
.
• Using the
Navigation key
, press
OK Key
on
Accessibility
.
• Using the
Navigation key
, press
OK Key
on
Readout
• Using the
Navigation key
scroll to
“Off”
• Press
OK Key (Set)

52
Speech rate
Set the speed in which the device speech engine will read.
• From Home Screen, press
OK Key
• Using the
Navigation key
, press
OK key
on
Tools & Settings.
• Using the
Navigation key
, press
OK Key
on
Settings
.
• Using the
Navigation key
, press
OK Key
on
Accessibility
.
• Using the
Navigation key
, press
OK Key
on
Speech rate.
• Using the
Navigation key,
Press
OK Key
on
“Slow”, “Normal” or “Fast”
.
Speech pitch
Set the pitch tone in which the device speech engine will read.
• From Home Screen, press
OK Key
• Using the
Navigation key
, press
OK key
on
Tools & Settings.
• Using the
Navigation key
, press
OK Key
on
Settings
.
• Using the
Navigation key
, press
OK Key
on
Accessibility
.
• Using the
Navigation key
, press
OK Key
on
Speech pitch.
Using the
Navigation key,
scroll and select:
“Very low”
“Low”
“Normal”
“High”
“Very high”
Press
OK key (Set)
.

53
Font size
Change the system size of the font from normal to MagniFont.
Note: Not all menus can change size, some applications have their own fonts and cannot be
changed or modified by the device font engine.
• From Home Screen, press
OK Key
• Using the
Navigation key
, press
OK key
on
Tools & Settings.
• Using the
Navigation key
, press
OK Key
on
Settings
.
• Using the
Navigation key
, press
OK Key
on
Accessibility
.
• Using the
Navigation key
, press
OK Key
on
Font size.
Using the
Navigation key,
scroll and select:
“Normal” (Default)
“Large”
“MagniFont”
Press
OK key (Set)
.
Color Inversion
Enabling this option, you can invert the colors of the device to make it easier to read,
increasing contrast between text, images and the background.
To turn On the color inversion feature:
• From Home Screen, press
OK Key
• Using the
Navigation key
, press
OK key
on
Tools & Settings.
• Using the
Navigation key
, press
OK Key
on
Settings
.
• Using the
Navigation key
, press
OK Key
on
Accessibility
.
• Using the
Navigation key
, press
OK Key
on
Color inversion.
• Using the
Navigation key,
select
“On”.
• Press
OK Key (Set)

54
Color correction
Enabling this option, you can compensate for color blindness. There are three modes:
1. Deuteranomaly (red-green)
2. Protanomaly (red-green)
3. Tritanomaly (blue-yellow)
To turn On color correction:
• From Home Screen, press
OK Key
• Using the
Navigation key
, press
OK key
on
Tools & Settings.
• Using the
Navigation key
, press
OK Key
on
Settings
.
• Using the
Navigation key
, press
OK Key
on
Accessibility
.
• Using the
Navigation key
, press
OK Key
on
Color correction.
• Using the
Navigation key,
select
“On”.
• Press
OK Key (Set)
To change the type of color correction:
From color correction menu:
• Using the
Navigation key
, press
OK Key
on
Color correction
• Using the
Navigation key,
select
“Deuteranomaly”, “ Protanomaly” or “Tritanomaly”.
• Press
OK Key (Set)
Persistent alerts
Persistent alerts are passive notifications and generally do not require any interaction from
the user. They are triggered to keep the users informed about their activity inside applications
once they move away from it.
To modify persistent alerts:
• From Home Screen, press
OK Key
• Using the
Navigation key
, press
OK key
on
Tools & Settings.
• Using the
Navigation key
, press
OK Key
on
Settings
.
• Using the
Navigation key
, press
OK Key
on
Accessibility
.
• Using the
Navigation key
, press
OK Key
on
Persistent alerts.
55
To turn On Persistent alerts:
From the Persistent alert menu, press the
Left soft key (Turn on)
Choose which type of alert is desired:
1. Audible tone
2. Vibrate
From the persistent alert menu:
• Using the
Navigation key
, press
OK Key
on
“Audible tone” or “Vibrate”
• Using the
Navigation key
, scroll to
“On”.
• Press
OK key (set)
To turn Off Persistent alerts:
Choose which type of alert to turn off:
1. Audible tone
2. Vibrate
From the persistent alert menu:
• Using the
Navigation key
, press
OK Key
on
“Audible tone” or “Vibrate”
• Using the
Navigation key
, scroll to
“Off”.
• Press
OK key (set)
• From the
Persistent alert menu
, press the
Left soft key (Turn off)
Mono Audio
Mono audio means the left and right earphones, or speakers, play the same audio and no
stereo effect. This function can be useful for the users who have better hearing in one ear
than the other.

56
To turn On mono audio:
• From Home Screen, press
OK Key
• Using the
Navigation key
, press
OK key
on
Tools & Settings.
• Using the
Navigation key
, press
OK Key
on
Settings
.
• Using the
Navigation key
, press
OK Key
on
Accessibility
.
• Using the
Navigation key
, press
OK Key
on
Mono Audio.
• Using the
Navigation key,
scroll to
“On”
. Press
OK key (Set)
To turn it Off:
From the Mono audio menu:
• Using the
Navigation key
, scroll to
“Off”.
• Press
OK key (Set)
TTY
TTY mode is a feature of that stands for either ‘teletypewriter’ or ‘text telephone.’ A
teletypewriter is a device designed for the hearing impaired or those who have difficulty
speaking.
• From Home Screen, press
OK Key
• Using the
Navigation key
, press
OK key
on
Tools & Settings.
• Using the
Navigation key
, press
OK Key
on
Settings
.
• Using the
Navigation key
, press
OK Key
on
Accessibility
.
• Using the
Navigation key
, press
OK Key
on
TTY.
• Using the
Navigation key,
scroll to either:
“TTY full”
“TTY HCO”
“TTY VCO”
Press
OK key (Set)
To turn Off TTY:
From the TTY menu:
• Using the
Navigation key
, scroll to
“TTY Off”
• Press
OK key (Set)

57
Real-time text (RTT) call
Real-time text (RTT) lets you use text to communicate during a phone call. RTT works together
with TTY.
To turn On real-time text (RTT) call:
• From Home Screen, press
OK Key
• Using the
Navigation key
, press
OK key
on
Tools & Settings.
• Using the
Navigation key
, press
OK Key
on
Settings
.
• Using the
Navigation key
, press
OK Key
on
Accessibility
.
• Using the
Navigation key
, press
OK Key
on
Real-time text (RTT) call.
• Using the
Navigation key,
scroll to
“On”
.
• Press
OK key (Set)
To turn
Real-time text (RTT) call Off:
From the Real-time text (RTT) call menu:
• Using your
Navigation key
, scroll to
“Off”
• Press
OK key (Set)
Wi-Fi calling
Wi-Fi Calling allows you to make and receive calls over a Wi-Fi network when cellular isn't
available.
To turn On Wi-Fi calling:
• From Home Screen, press
OK Key
• Using the
Navigation key
, press
OK key
on
Tools & Settings.
• Using the
Navigation key
, press
OK Key
on
Settings
.
• Using the
Navigation key
, press
OK Key
on
Accessibility
.
• Using the
Navigation key
, press
OK Key
on
*Wi-Fi calling.
• Using the
Navigation key,
scroll to
“Off”
.
• Press
OK key (Set)
to turn it On.

58
To turn Off Wi-Fi calling:
From the Wi-Fi calling menu:
• Using your
Navigation key
, scroll to switch
“ON”
• Press
OK key
to turn it Off.
Sound Settings
This section is where you can configure the device sound features.
To open sound settings:
• From Home Screen, press
OK Key
• Using the
Navigation key
, press
OK key
on
Tools & Settings.
• Using the
Navigation key
, press
OK Key
on
Settings
.
• Using the
Navigation key
, press
OK Key
on
Sound settings
.
Sound settings is divided in:
Master volume Keypad Volume
Vibrate for Calls Keypad tone
Phone ringtone Vibrate on keypress
Vibration pattern Battery charging tone
Notification sound Battery charged tone
Alarm sound Emergency dialing signal
Master volume
To modify the master volume of the device:
• From Home Screen, press
OK Key
• Using the
Navigation key
, press
OK key
on
Tools & Settings.
• Using the
Navigation key
, press
OK Key
on
Settings
.
• Using the
Navigation key
, press
OK Key
on
Sound settings
.
• Using the
Navigation key
, press
OK Key
on
Master Volume
.

59
A pop up window will appear, using the Navigation key, press
Navigation key right
for more
volume, press
Navigation key left
to decrease the volume.
• The maximum volume will be level 7
• The minimum volume will be level 1
Still there will be three additional levels.
• One level less from 1 will silence sounds and set the device as
“Vibrate only”.
• One level less from Vibrate only, will set the device for
“Alarm only”.
• One level less from Alarm only, will set the device for
“All sounds off”
Vibrate for Calls
In addition to hear an audible ringtone when receiving a phone call, the device can also
vibrate.
To turn on vibrate for calls:
• From Home Screen, press
OK Key
• Using the
Navigation key
, press
OK key
on
Tools & Settings.
• Using the
Navigation key
, press
OK Key
on
Settings
.
• Using the
Navigation key
, press
OK Key
on
Sound settings
.
• Using the
Navigation key
, press
OK Key
on
Vibrate on calls.
• Using the
Navigation key
, scroll to
“On”
to turn
“Vibrate for calls” on
.
• Using the
Navigation key
, scroll to
“Off”
to turn
“Vibrate for calls” off
.
Phone ringtone
There are several ringtones pre-installed in the device.
To change the ringtone:
• From Home Screen, press
OK Key
• Using the
Navigation key
, press
OK key
on
Tools & Settings.
• Using the
Navigation key
, press
OK Key
on
Settings
.
• Using the
Navigation key
, press
OK Key
on
Sound settings
.
• Using the
Navigation key
, press
OK Key
on
Phone ringtone.
• Using the
Navigation key
, scroll to the desired ringtone.
• Press
OK key (Set).

60
To have no audible ringtone:
From the
“Phone ringtone”
menu:
• Using the
Navigation key
, scroll to
“None”.
• Press
OK key (Set).
Vibration pattern
To change the type of vibration the device emits when receiving a phone call.
• From Home Screen, press
OK Key
• Using the
Navigation key
, press
OK key
on
Tools & Settings.
• Using the
Navigation key
, press
OK Key
on
Settings
.
• Using the
Navigation key
, press
OK Key
on
Sound settings
.
• Using the
Navigation key
, press
OK Key
on
Vibration pattern.
• Using the
Navigation key
, scroll to the desired vibration pattern.
• Press
OK key (Set).
To have no Vibration pattern:
• From the
“Vibration pattern”
menu:
• Using the
Navigation key
, scroll to
“Off”
• Press the
OK key (Set).
Notification sound
To change the type of short sound the device emits when the device informs the user of an
app or device action.
• From Home Screen, press
OK Key
• Using the
Navigation key
, press
OK key
on
Tools & Settings.
• Using the
Navigation key
, press
OK Key
on
Settings
.
• Using the
Navigation key
, press
OK Key
on
Sound settings
.
• Using the
Navigation key
, press
OK Key
on
Notification sound.
• Using the
Navigation key
, scroll to the desired notification sound.
• Press
OK key (Set).

61
To have no notification sound:
From the
“Notification sound”
menu:
• Using the
Navigation key
, scroll to
“Off”.
• Press
OK key (Set).
Alarm sound
To change the sound the device emits when setting an alarm.
• From Home Screen, press
OK Key
• Using the
Navigation key
, press
OK key
on
Tools & Settings.
• Using the
Navigation key
, press
OK Key
on
Settings
.
• Using the
Navigation key
, press
OK Key
on
Sound settings
.
• Using the
Navigation key
, press
OK Key
on
Alarm sound.
• Using the
Navigation key
, scroll to the desired alarm sound. Press
OK key (Set).
To have no alarm sound:
From the
“Alarm sound”
menu:
• Using the
Navigation key
, scroll to
“Off”.
• Press
OK key (Set).
Keypad volume
To change the volume the keypad makes when a key is pressed.
• From Home Screen, press
OK Key
• Using the
Navigation key
, press
OK key
on
Tools & Settings.
• Using the
Navigation key
, press
OK Key
on
Settings
.
• Using the
Navigation key
, press
OK Key
on
Sound settings
.
• Using the
Navigation key
, press
OK Key
on
Keypad volume.
A pop up window will appear, using the Navigation key, press
Navigation key right
for more
volume, press
Navigation key left
to decrease the volume.
• The maximum volume will be level 7
• The minimum volume will be level 1

62
Still there will be one additional level.
• One level less from 1 will silence the keypad.
Keypad tone
To change the type of tone the device emits when the keypad is pressed.
To change the volume the keypad emits when a key is pressed.
• From Home Screen, press
OK Key
• Using the
Navigation key
, press
OK key
on
Tools & Settings.
• Using the
Navigation key
, press
OK Key
on
Settings
.
• Using the
Navigation key
, press
OK Key
on
Sound settings
.
• Using the
Navigation key
, press
OK Key
on
Keypad tone.
There are different types of Keypad tone options:
Type 1 Alarm only
Type 2 All sounds off
Vibrate only
To choose any of the above options:
From the
“Keypad tone”
menu:
• Using the
Navigation key
, scroll to the desired option.
• Press the
OK key (Set)
Vibrate on keypress
To turn on or off the vibration when a key is pressed.
• From Home Screen, press
OK Key
• Using the
Navigation key
, press
OK key
on
Tools & Settings.
• Using the
Navigation key
, press
OK Key
on
Settings
.
• Using the
Navigation key
, press
OK Key
on
Sound settings
.
• Using the
Navigation key
, press
OK Key
on
Vibrate on keypress.
• Press the
OK key.
• Using the
Navigation key
, scroll to
“On”.
• Press the
OK key (Set).

63
To turn off vibrate on keypress:
• From the
“Vibrate on keypress”
menu:
• Using the
Navigation key
, scroll to
“Off”.
• Press the
OK key (Set).
Battery charging tone
The charging tone the phone emits the moment the USB type-C cable is connected to the
device.
• From Home Screen, press
OK Key
• Using the
Navigation key
, press
OK key
on
Tools & Settings.
• Using the
Navigation key
, press
OK Key
on
Settings
.
• Using the
Navigation key
, press
OK Key
on
Sound settings
.
• Using the
Navigation key
, press
OK Key
on
Battery charging tone.
• Press the
OK key.
• Using the
Navigation key
, scroll to
“On”.
• Press the
OK key (Set).
To turn off the battery charging tone:
From the
“Battery charging tone”
menu:
• Using the
Navigation key
, scroll to
“Off”.
• Press the
OK key (Set).
Battery charged tone
The charged tone the device emits when the phone battery is fully charged.
• From Home Screen, press
OK Key
• Using the
Navigation key
, press
OK key
on
Tools & Settings.
• Using the
Navigation key
, press
OK Key
on
Settings
.
• Using the
Navigation key
, press
OK Key
on
Sound settings
.
• Using the
Navigation key
, press
OK Key
on
Battery charged tone.
• Press the
OK key.
• Using the
Navigation key
, scroll to
“On”.
• Press the
OK key (Set).

64
To turn off the battery charged tone:
• From the
“Battery charged tone”
menu:
• Using the
Navigation key
, scroll to
“Off”.
• Press
OK key (Set).
Emergency dialing signal
The phone will sound an audible tone or vibrate when dialing 911.
• From Home Screen, press
OK Key
• Using the
Navigation key
, press
OK key
on
Tools & Settings.
• Using the
Navigation key
, press
OK Key
on
Settings
.
• Using the
Navigation key
, press
OK Key
on
Sound settings
.
• Using the
Navigation key
, press
OK Key
on
Emergency dialing signal.
• Press the
OK key.
• Using the
Navigation key
, scroll to
“On”.
• Press the
OK key (Set).
• Using the
Navigation key
, scroll to either
“Alert” or “Vibrate”.
• Press the
OK key (Set).
To turn off the emergency dialing signal:
• From the
“Emergency dialing signal”
menu:
• Using the
Navigation key
, scroll to
“Off”.
• Press the
OK key (Set).
Display settings
This section is where you can configure the features related to the device main and secondary
display.
To open display settings:
• From Home Screen, press
OK Key
• Using the
Navigation key
, press
OK key
on
Tools & Settings.
• Using the
Navigation key
, press
OK Key
on
Settings
.
• Using the
Navigation key
, press
OK Key
on
Display settings
.

65
Display settings is divided in:
Brightness level Font size
Wallpaper Main clock
Display backlight Secondary screen display
Keypad backlight
Brightness level
Menu to change the level of brightness of the main display.
• From Home Screen, press
OK Key
• Using the
Navigation key
, press
OK key
on
Tools & Settings.
• Using the
Navigation key
, press
OK Key
on
Settings
.
• Using the
Navigation key
, press
OK Key
on
Display settings
.
• Using the
Navigation key
, press
OK Key
on
Brightness level.
A pop up window will appear on the top of the display, using the Navigation key, press
Navigation key right
for more brightness, press
Navigation key left
to decrease the
brightness.
• The maximum brightness level is 20
• The minimum brightness level is 1
Wallpaper
Menu to change the background image that is displayed at all times when the device is in use.
• From Home Screen, press
OK Key
• Using the
Navigation key
, press
OK key
on
Tools & Settings.
• Using the
Navigation key
, press
OK Key
on
Settings
.
• Using the
Navigation key
, press
OK Key
on
Display settings
• Using the
Navigation key
, press
OK Key
on
Wallpaper.
The wallpaper menu will appear, giving two options:
1. Gallery: Choose pictures taken by the customer and saved on the gallery app.
2. Wallpapers: Pictures that are part of the operating system.

66
To choose a picture saved on the Gallery app:
From the
“Wallpaper”
menu:
• Using the
Navigation key
, press
OK key
on
Gallery.
• Using the
Navigation key
, select picture
.
• Press the
Ok key (Select)
The Gallery app will give the option to zoom in or out. When done, Press
OK key (Done)
To choose a picture saved on the Wallpaper folder:
• From Home Screen, press
OK Key
• Using the
Navigation key
, press
OK key
on
Tools & Settings.
• Using the
Navigation key
, press
OK Key
on
Settings
.
• Using the
Navigation key
, press
OK Key
on
Display settings
• Using the
Navigation key
, press
OK Key
on
Wallpaper.
• Using the
Navigation key
, select picture
.
• Press the
OK key (Select)
Display backlight
The time the backlight of the display will remain on.
• From Home Screen, press
OK Key
• Using the
Navigation key
, press
OK key
on
Tools & Settings.
• Using the
Navigation key
, press
OK Key
on
Settings
.
• Using the
Navigation key
, press
OK Key
on
Display settings
• Using the
Navigation key
, press
OK Key
on
Display backlight.
The Display backlight menu will appear
• Using the
Navigation key
, scroll to the time that you need the device backlight to
remain on without any input from the user.
• Press the
OK key (Set)
I.e. if the display backlight is set for 1 minute (default option) and the customer doesn’t
interact with the device during this time, the display will turn off to conserve battery.

67
Keypad backlight
The time the backlight of the physical keypad will remain on.
• From Home Screen, press
OK Key
• Using the
Navigation key
, press
OK key
on
Tools & Settings.
• Using the
Navigation key
, press
OK Key
on
Settings
.
• Using the
Navigation key
, press
OK Key
on
Display settings
• Using the
Navigation key
, press
OK Key
on
Keypad backlight.
The keypad backlight menu will appear
• Using the
Navigation key
, scroll to the time that you need the physical keypad
backlight to remain on without any input from the user.
• Press the
OK key (Set)
I.e. if the physical keypad backlight is set for 1 minute (default option) and the customer
doesn’t interact with the device during this time, the physical keypad backlight will turn off to
conserve battery.
Font size
Change the system size of the font from normal to MagniFont.
Note: Not all menus can change size, some applications have their own fonts and cannot be
changed or modified by the device font engine.
• From Home Screen, press
OK Key
• Using the
Navigation key
, press
OK key
on
Tools & Settings.
• Using the
Navigation key
, press
OK Key
on
Settings
.
• Using the
Navigation key
, press
OK Key
on
Display settings
• Using the
Navigation key
, press
OK Key
on
Font size.
Using the
Navigation key,
select:
“Normal” (Default)
“Large”
“MagniFont”
Press the
OK key (Set)
.

68
Main clock
Clock that is displayed at the device home screen.
To turn Off the main clock:
• From Home Screen, press
OK Key
• Using the
Navigation key
, press
OK key
on
Tools & Settings.
• Using the
Navigation key
, press
OK Key
on
Settings
.
• Using the
Navigation key
, press
OK Key
on
Display settings
• Using the
Navigation key
, press
OK Key
on
Main clock.
• Using the
Navigation key
, select
“Off”
• Press the
OK key (Select)
To turn On the main clock:
From the main clock menu:
• Using the
Navigation key
, select
“On”
• Press the
OK key (Select)
Secondary screen display
By default, the secondary screen display will remains off while device is charging.
To keep the secondary screen display on while charging:
• From Home Screen, press
OK Key
• Using the
Navigation key
, press
OK key
on
Tools & Settings.
• Using the
Navigation key
, press
OK Key
on
Settings
.
• Using the
Navigation key
, press
OK Key
on
Display settings
• Using the
Navigation key
, press
OK Key
on
Secondary screen display.
• Using the
Navigation key
, select
“On”
• Press the
OK key (Set)

69
To turn Off the Secondary screen display while charging:
From the secondary screen display menu:
• Using the
Navigation key
, select
“On”
• Press the
OK key (Select)
Phone settings
This is the location where you can find all the settings and configuration menus related to the
communication actions of the device.
To open the phone settings:
• From Home Screen, press
OK Key
• Using the
Navigation key
, press
OK key
on
Tools & Settings.
• Using the
Navigation key
, press
OK Key
on
Settings
.
• Using the
Navigation key
, press
OK Key
on
Phone settings.
The phone menu will appear with all the phone settings options:
Language Security
Navigation keys Date & time
Storage Advanced calling
USB mode Auto-rotate screen
Location External keys lock control
Language
Menu where the user can change the language of the device
To open the Language menu
• From Home Screen, press
OK Key
• Using the
Navigation key
, press
OK key
on
Tools & Settings.
• Using the
Navigation key
, press
OK Key
on
Settings
.
• Using the
Navigation key
, press
OK Key
on
Phone settings.
• Using the
Navigation key
, press
OK Key
on
Language.
• Using the
Navigation key
, press
OK Key
on selected
Language.
70
Navigation keys
Set the action of each direction of the Navigation keys when used on the home screen, as well
as the configuration of the multi-function key.
To change the Navigation keys behavior:
• From Home Screen, press
OK Key
• Using the
Navigation key
, press
OK key
on
Tools & Settings.
• Using the
Navigation key
, press
OK Key
on
Settings
.
• Using the
Navigation key
, press
OK Key
on
Phone settings.
• Using the
Navigation key
, press
OK Key
on
Navigation keys.
The Navigation Keys menu will appear showing each of the options that can be modified,
letting you choose a different action or open a predefined application.
To change the action from the left key (Same instructions will apply for the other 3 keys):
From the Navigation keys menu:
• Using the
Navigation key
, select
“Left navigation”
• press
OK Key
.
• Using the
Navigation key
, press
OK Key
on selected
Language.
The Left navigation menu will appear with all the possible actions.
• Using the
Navigation key
, scroll to the new desired action and press
OK key (Set)
• While on the home screen, when the
Left navigation Key
is pressed, it will perform the
new action.
For Multi-function key operation, please refer to the
Daily operation use
section of this
manual.
Left Navigation Key
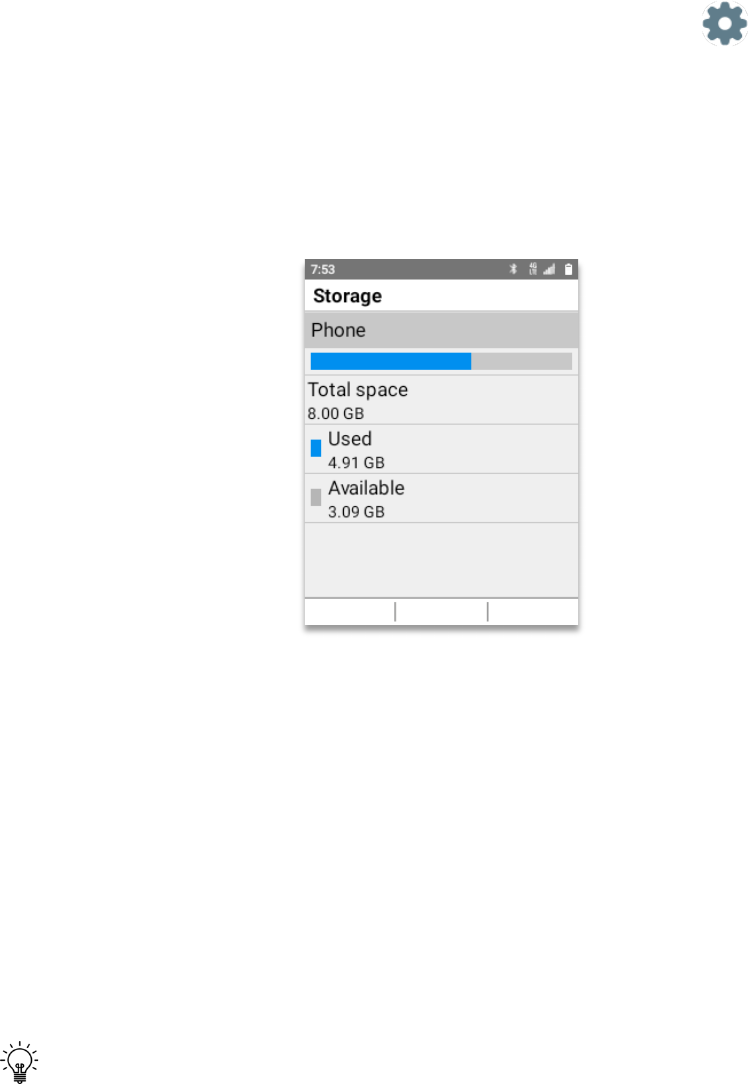
71
Storage
Shows the device total memory space
• From Home Screen, press
OK Key
• Using the
Navigation key
, press
OK key
on
Tools & Settings.
• Using the
Navigation key
, press
OK Key
on
Settings
.
• Using the
Navigation key
, press
OK Key
on
Phone settings.
• Using the
Navigation key
, press
OK Key
on
Storage.
The storage window will open showing the used capacity of the phone as well as the available
capacity.
USB mode
The USB mode will show which type of connection you have when the USB cable is connected
to the phone and to the PC.
To open the USB mode menu:
• From Home Screen, press the
OK Key
, navigate to
Tools & Settings
. press
OK Key.
• Using the
Navigation key
, press the
OK Key
on
Settings
.
• Using the
Navigation key
, press the
OK key
on
Phone settings.
• Using the
Navigation key
, press the
OK key
on
USB mode.
TIP:
If the USB mode is grayed, this means that there is no cable connected to the device
and to the PC. This mode will only work when connected to a PC or Mac.

72
There are three options:
1. Charge only
2. Media device (MTP)
3. USB tethering
Charge only
By default the moment the phone is connected to the PC or MAC it will begin to charge. This
means that it will be in
“Charge only”
mode.
Media device (MTP)
If the need is to transfer files instead of charging, the instructions are:
• From Home Screen, press
OK Key
• Using the
Navigation key
, press
OK key
on
Tools & Settings.
• Using the
Navigation key
, press
OK Key
on
Settings
.
• Using the
Navigation key
, press
OK Key
on
Phone settings.
• Using the
Navigation key
, press
OK Key
on
USB mode.
• Using the
Navigation key
, select
“Media device (MTP)”
• Press
OK Key (Set)
The device will enter into Media device (MTP) mode and the PC will open up a root folder
showing the root hierarchy (folders) of the device.
USB tethering
When the mobile internet connection is shared with a connected computer by the device USB
Type-C cable, then it’s called USB Tethering. This option is used for a higher Internet speed
sharing connection versus a wireless hotspot option.
• From Home Screen, press
OK Key
• Using the
Navigation key
, press
OK key
on
Tools & Settings.
• Using the
Navigation key
, press
OK Key
on
Settings
.
• Using the
Navigation key
, press
OK Key
on
Phone settings.
• Using the
Navigation key
, press
OK Key
on
USB mode.
• Using the
Navigation key
, select
“USB tethering”
• Press
OK Key (Set)

73
Location
Turns on the A-GPS feature of the device
• From Home Screen, press
OK Key
• Using the
Navigation key
, press
OK key
on
Tools & Settings.
• Using the
Navigation key
, press
OK Key
on
Settings
.
• Using the
Navigation key
, press
OK Key
on
Phone settings.
• Using the
Navigation key
, press
OK Key
on
Location.
• Using the
Navigation key
, press
“On”
to have the A-GPS on
• Using the
Navigation key
, press
“Off”
to have the A-GPS off.
TIP:
To save battery, its recommended to have the location feature off. When in off
position, apps that need GPS are not going to work. Turn it on when using applications that
need to work with the device location services.
Security
Protect your device and manage how the device will handle security.
• From Home Screen, press
OK Key
• Using the
Navigation key
, press
OK key
on
Tools & Settings.
• Using the
Navigation key
, press
OK Key
on
Settings
.
• Using the
Navigation key
, press
OK Key
on
Phone settings.
• Using the
Navigation key
, press
OK Key
on
Security.
The security menu is divided in:
Screen lock type Reset phone
Screen lock time Encrypt data
Call restrictions Others
Screen lock type
From the Security menu:
• Using the
Navigation key
, press
OK key
on
Screen lock type.
Three options:
74
None: Device will not have any type of lock.
PIN: Device will lock the screen, unless a 4 digit password is provided.
PASSWORD: Device will lock the screen, unless a 4 digit alphanumeric password is provided.
• Choose the option that you need, add
password
, press
OK key
.
Screen lock time
Set the time the device will enter screen lock
From the security menu:
• Using the
Navigation key
, press
OK key
on
Screen lock time.
• Choose the time that you need for the device to lock its screen.
• Press
OK key
.
Call Restrictions
Set the parameters of how the device is going to receive phone calls.
From the security menu:
• Using the
Navigation key
, press
OK key
on
Call Restrictions.
Menu will open with two options:
Incoming calls
Outgoing calls
From the Call restrictions menu:
• Using the
Navigation key
, press
OK key
on
Incoming calls.
The menu will open three options:
Allow all: All incoming calls are allowed.
Contacts only: Incoming calls not recognized by the address book are blocked.
Block all: All incoming calls are blocked.
• Using the
Navigation key
, press
OK key
on the desired action.

75
From the Call restrictions menu:
• Using the
Navigation key
, press
OK key
on
Outgoing calls.
The menu will open three options:
Allow all: All outgoing calls are allowed.
Contacts only: Outgoing calls not recognized by the address book are blocked.
Block all: All outgoing calls are blocked.
• Using the
Navigation key
, press
OK key
on the desired action.
Reset phone
This is where the device can be reset to factory settings. All data on the device will be erased,
including:
• System and app data and settings
• Music
• Photos
• Other user data
From the Security menu:
• Using the
Navigation key
, press
OK key
(Select)
on
Reset phone.
• Using the
Navigation key
, press
OK key (Select)
on
“ERASE ALL DATA”.
A new window will open explaining that the device will be erased and all its data will be lost.
• Using the
Navigation key
, press
OK key
on
“ERASE EVERYTHING”.
CAUTION:
• Prior to performing a factory reset, backup all the user information as it will be not
possible to retrieve it.
• Fully charge your battery as it can take up to 10 minutes for the system to complete
the task. Never turn off the device while the factory reset is in process.
• The device cannot be used during a factory reset.
76
Encrypt data
The device by default has all his file system and user data encrypted. Once a device is
encrypted, all user-created data is automatically encrypted before committing it to disk and all
reads automatically decrypt data before returning it to the calling process.
From the Security menu:
• Using the
Navigation key
, press
OK key
on
Encrypt data.
Note: The system is encrypted by default. There is no need for user configuration on this
menu.
Others
From the Security menu:
• Using the
Navigation key
, press
OK key
on
Others.
The others security menu is divided in:
1. SIM card lock
2. Make passwords visible
3. Trusted credentials
4. Clear credentials
SIM Card lock:
From the Others menu:
• Using the
Navigation key
, press
OK key
on
SIM Card lock.
The SIM card lock menu is divided in:
1. Lock SIM card
2. Change SIM PIN
77
Lock SIM card
From the SIM Card Lock menu:
• Using the
Navigation key
, press
OK key
on
Lock SIM card.
• Using the
Navigation key
, press
“On”
to lock the SIM card.
• Using the
Navigation key
, press
“Off”
to unlock the SIM card.
Change SIM PIN
From the SIM Card Lock menu:
• Using the
Navigation key
, press
OK key
on
Change SIM PIN.
• Using the
Physical Keypad
, add the old SIM PIN.
• Press the
OK key
.
Make passwords visible
From the Others menu
• Using the
Navigation key
, press
OK key
on
Make passwords visible.
• Using the
Navigation key
, press
“On”
to make passwords visible.
• Using the
Navigation key
, press
“Off”
to make passwords not visible.
Trusted credentials
From the Others menu
• Using the
Navigation key
, press
OK key
on
Trusted credentials.
• The device will show all the system trusted credentials
• To see the User trusted credentials, Using the
Right Navigation key
, press
OK key
on
User
.
Clear credentials
From the Others menu
• Using the
Navigation key
, press
OK key
on
Clear credentials.
• The device will open a pop-up window asking “Remove all the contents?”
• To remove all the contents, Press the
Left Soft key

78
Date & Time
This is the location where to change the settings of the Date & Time including time zones.
• From Home Screen, press
OK Key
• Using the
Navigation key
, press
OK key
on
Tools & Settings.
• Using the
Navigation key
, press
OK Key
on
Settings
.
• Using the
Navigation key
, press
OK Key
on
Phone settings.
• Using the
Navigation key
, press
OK Key
on
Date & time.
The Date & Time menu is divided in:
Automatic date & time Set time
Automatic time zone Select time zone
Set date Use 24-hours format
Automatic date & time
To turn Off automatic date & time:
From the Date & time menu:
• Using the
Navigation key
, press
OK key
on
Automatic date & time.
• Using the
Navigation key
, select
“Off”
to adjust the time manually.
• Press the
OK key (Set)
To turn On automatic date & time:
From the Date & time menu:
• Using the
Navigation key
, press
OK key
on
Automatic date & time.
• Using the
Navigation key
, select
“On”
to adjust the time automatically.
• Press the
OK key (Set)
79
Automatic time zone
To turn Off automatic time zone:
From the Date & time menu:
• Using the
Navigation key
, press
OK key
on
Automatic time zone.
• Using the
Navigation key
, select
“Off”
to adjust the time zone manually.
• Press the
OK key (Set)
• The Select time zone menu will now be open for changes.
To turn On automatic time zone:
From the Date & time menu:
• Using the
Navigation key
, press
OK key
on
Automatic time zone.
• Using the
Navigation key
, select
“On”
to adjust the time zone automatically.
• Press the
OK key (Set)
• The Select time zone menu will now be grayed and cannot be modified.
Set date
The date is automatically set by the system, to manually set the date, first turn off Automatic
Date & time.
To manually set the date:
From the Date & time menu:
• Using the
Navigation key
, press
OK key
on
Set date.
• Using the
Left or Right Navigation key
, select
“Month”, “Day” or “Year”
• Using the
Up or Down Navigation key,
adjust to the correct date.
• When the date is set, press the
OK key (Set)
80
Set time
The time is automatically set by the system, to manually set the date, first turn off Automatic
Date & time.
To manually set the time:
From the Date & time menu:
• Using the
Navigation key
, press
OK key
on
Set time.
• Using the
Left or Right Navigation key
, select
“Hours”, “Minute” or “AM or PM”
• Using the
Up or Down Navigation key,
adjust to the correct time.
• When the time is set, press the
OK key (Set)
Select time zone
The time zone is automatically set by the system, to manually set the time zone, first turn off
Automatic time zone.
To manually set the time zone:
From the Date & time menu:
• Using the
Navigation key
, press
OK key
on
Select time zone.
• Using the
Up or Down Navigation key,
adjust to the correct time zone.
• When the correct time zone is set, press the
OK key (Set)
Use 24-hours format
To display the time in 24-hours format:
From the Date & time menu:
• Using the
Navigation key
, press
OK key
on
Use 24-hour format.
• Using the
Navigation key
, select
“On”
to change to 24-hour format.
• Press the
OK key (Set)

81
Advanced calling
The advanced calling feature enables calls in “HD” and sound like you are having a
conversation with someone in the same room.
• From Home Screen, press
OK Key
• Using the
Navigation key
, press
OK key
on
Tools & Settings.
• Using the
Navigation key
, press
OK Key
on
Settings
.
• Using the
Navigation key
, press
OK Key
on
Phone settings.
• Using the
Navigation key
, press
OK Key
on
Advanced calling.
To turn On advanced calling:
From the phone settings menu:
• Using the
Navigation key
, press
OK key
on
Advanced calling.
• Using the
Navigation key
, select
“On”
to activate advanced calling.
• Press the
OK key (Set)
To turn Off advanced calling:
From the phone settings menu:
• Using the
Navigation key
, press
OK key
on
Advanced calling.
• Using the
Navigation key
, select
“Off”
to deactivate advanced calling.
• Press the
OK key (Set)
Auto-rotate screen
The auto-rotate feature allows certain applications to change the display from vertical to
horizontal view.
To turn On auto-rotate screen:
From the phone settings menu:
• Using the
Navigation key
, press
OK key
on
Auto-rotate screen.
• Using the
Navigation key
, select
“On”
to activate auto-rotate screen.
• Press the
OK key (Set)

82
To turn Off auto-rotate screen:
From the phone settings menu:
• Using the
Navigation key
, press
OK key
on
Auto-rotate screen.
• Using the
Navigation key
, select
“Off”
to deactivate auto-rotate screen.
• Press the
OK key (Set)
External keys lock control
The external keys lock control blocks the external keys to avoid any accidental operation of
the device while in the pocket
To turn On external keys lock control:
From the phone settings menu:
• Using the
Navigation key
, press
OK key
on
External keys lock control.
• Using the
Navigation key
, select
“On”
to activate external keys lock control.
• Press the
OK key (Set)
Call settings
The call settings menu is where to configure the behavior of how to handle phone calls.
• From Home Screen, press
OK Key
• Using the
Navigation key
, press
OK key
on
Tools & Settings.
• Using the
Navigation key
, press
OK Key
on
Settings
.
• Using the
Navigation key
, press
OK Key
on
Call settings.
The menu is divided in:
Any key answer Speed dial setup Fixed Dialing Numbers
Flip open/close Voicemail Call forwarding
Auto answer Blocked Calls Call timer
Quick responses Auto redial Assisted dialing
83
Any key answer
When on, any of the device key will answer the call.
To turn On any key answer:
From the call settings menu:
• Using the
Navigation key
, press
OK key
on
Any key answer.
• Using the
Navigation key
, select
“On”
to activate any key answer.
• Press the
OK key (Set)
Flip open/close
When on, by flip opening the phone the call will automatically be answered. Also, by flip
closing the phone the call will automatically end.
To turn On flip open/close:
From the call settings menu:
• Using the
Navigation key
, press
OK key
on
Flip open/close.
• Using the
Navigation key
, press
OK key
on
Open to answer.
• Using the
Navigation key
, select
“On”
to activate flip open/close.
• Press the
OK key (Set)
To turn Off flip open/close:
From the call settings menu:
• Using the
Navigation key
, press
OK key
on
Flip open/close.
• Using the
Navigation key
, press
OK key
on
Close to end.
• Using the
Navigation key
, select
“On”
to activate flip open/close.
• Press the
OK key (Set)
84
Auto answer
This feature allows for answering incoming calls automatically without touching your phone.
To turn on auto answer:
From the call settings menu:
• Using the
Navigation key
, press
OK key
on
Auto answer.
• Using the
Navigation key
, press
OK key
on
Hands free.
• Using the
Navigation key
, select the time for the device to automatically answer.
• Press the
OK key (Set)
If you want to have the auto answer feature to use the loud speaker (Speakerphone feature)
automatically:
From the call settings menu:
• Using the
Navigation key
, press
OK key
on
Auto answer.
• Using the
Navigation key
, press
OK key
on
Speakerphone.
• Using the
Navigation key
, select the time for the device to automatically answer on the
speakerphone.
• Press the
OK key (Set)
Quick responses
When receiving a text message, the device is pre-loaded with useful quick responses. This
responses can be changed to customize the quick response.
To edit the quick responses:
From the call settings menu:
• Using the
Navigation key
, press
OK key
on
Quick responses.
•
A window will appear with all the possible pre-loaded responses.
• Using the
Navigation key
, select the Quick response to edit.
• Press the
OK key (Set)
• Using the
physical keypad,
change to a desired quick response.
• Using the
Navigation key
, select
“OK”
and press the
OK key
.
85
Speed dial setup
Menu to add, view, change, move and remove your speed dial numbers.
To open the speed dial setup menu:
From the call settings menu:
• Using the
Navigation key
, press
OK key
on
Speed dial setup.
• A menu will appear with nine speed dial spaces (favorites)
.
• Using the
Navigation key
, select the space (2 to 9) where you want to save that
favorite phone number.
• Press the
OK key (Set).
• The contact app will open.
• Using the
Physical keypad
, type the contact that you want to add, using the
Navigation key
select the contact.
• Press the
OK Key (Set).
To replace one speed dial space.
From the call settings menu:
• Using the
Navigation key
, press
OK key
on
Speed dial setup.
• A menu will appear with nine speed dial spaces (favorites)
.
• Using the
Navigation key
, select the space where you want to change the favorite
phone number.
• Press the
OK key (Set).
• The contact app will open.
• Using the
Physical keypad
, type the contact that you want to add, using the
Navigation key
select the contact.
• Press the
OK Key (Set).
Voicemail
The Voicemail menu is divided by:
Voicemail number Vibrate
Sound Visual voicemail Settings
86
Voicemail number
The Voicemail number will always be grayed as this menu cannot be changed. It is just an
informative menu showing the device phone number connected to the voicemail platform.
Sound
To change the auditive alert when a voicemail is received:
From the call settings menu:
• Using the
Navigation key
, press
OK key
on
Voicemail.
• Using the
Navigation key
, press
OK key
on
Sound.
• Using the
Navigation key
, press
OK key
on the desired sound.
• Press the
OK key (Set).
Vibrate
To turn on the vibration alert when a voicemail is received:
From the call settings menu:
• Using the
Navigation key
, press
OK key
on
Voicemail.
• Using the
Navigation key
, press
OK key
on
Vibrate.
• Using the
Navigation key
, select “
On”
.
• Press the
OK key (Set).
Visual voicemail Settings
Visual voicemail lets users easily check voicemail without making any phone calls.
To turn on the visual voicemail settings (On by default) when a voicemail is received:
From the call settings menu:
• Using the
Navigation key
, press
OK key
on
Voicemail.
• Using the
Navigation key
, press
OK key
on
Visual voicemail Settings.
• Press the
OK key
to turn On.
• Press the
OK key
to turn Off.
87
Blocked calls
The blocked calls menu allows you to add numbers that are going to be blocked.
From the call settings menu:
• Using the
Navigation key
, press
OK key
on
Blocked calls.
• Press the
OK key (add)
to add a phone number to block
• Using the
Physical keypad
, add the phone number to block.
• Press the
OK key (Save)
• If that phone number calls, the device will not make any sound or vibration.
Auto redial
Feature to automatically dial a number every certain period of time until the phone number
answers.
From the call settings menu:
• Using the
Navigation key
, press
OK key
on
Auto redial.
• Using the
Navigation key
, select the time for the phone to auto dial the phone number.
• Press the
OK key (Set)
Fixed Dialing Numbers
FDN (Fixed Dialing Number) or FDM (Fixed Dialing Mode) feature allows the phone to be
"locked" to dial only certain numbers. Incoming calls are not affected.
Note: FDN only restricts calls made using the public phone network, and cannot restrict calls
made using apps which route calls over data, or VoIP.
To enable FDN:
From the call settings menu:
• Using the
Navigation key
, press
OK key
on
Fixed Dialing Numbers.
• Using the
Navigation key
, press
OK key
on
Enable FDN.
• Using the
Physical keypad
set the PIN
• Press the
OK key (OK)
88
Change PIN2
Menu to change the PIN for FDN access
From the call settings menu:
• Using the
Navigation key
, press
OK key
on
Fixed Dialing Numbers.
• Using the
Navigation key
, press
OK key
on
Change PIN2.
• Using the
Physical keypad
input the old PIN
• Press the
OK key (OK)
FDN list
Menu to manage the phone number list
From the call settings menu:
• Using the
Navigation key
, press
OK key
on
Fixed Dialing Numbers.
• Using the
Navigation key
, press
OK key
on
FDN list.
• Press the
OK key (Add contact).
• Using the
Physical keypad
add the name of the contact.
• Using the
Navigation key
, select the
Number bar.
• Using the
Physical keypad
add the phone number
• Press the
OK Key (Save)
Call forwarding
Allows any incoming call to be redirected to another phone number.
From the call settings menu:
• Using the
Navigation key
, press
OK key
on
Call forwarding.
• Using the
Navigation key
, select
“On”.
• Press the
OK Key (OK)
• Using the
physical keyboard
add phone number where all incoming phone calls are
going to be redirected.
• Press the
OK Key (Turn On)
89
To turn off Call forwarding
From the call settings menu:
• Using the
Navigation key
, press
OK key
on
Call forwarding.
• Using the
Navigation key
, select
“Off”.
• Press the
OK Key (OK)
Call timer
Menu that displays all the statistics of the phone calls made or received on the phone.
From the call settings menu:
• Using the
Navigation key
, press
OK key
on
Call timer.
To reset all statistics
From the call settings menu:
• Using the
Navigation key
, press
OK key
on
Call timer.
• press the
OK Key (All reset)
• A pop-up window will appear asking
“Reset call timer”
• Press the
Left soft Key
to erase.
Assisted dialing
Assisted dialing allows the phone to automatically assign global dialing settings.
Note: Its recommended to power cycling the device after changes are made.
To turn On assisted dialing:
From the call settings menu:
• Using the
Navigation key
, press
OK key
on
Assisted dialing.
• Using the
Navigation key
, press
OK key
on
Assisted dialing.
• Using the
Navigation key
, select
On
• Press the
OK Key (OK)

90
Current country
Select the country where the current phone is located
To select the country:
From the call settings menu:
• Using the
Navigation key
, press
OK key
on
Assisted dialing.
• Using the
Navigation key
, press
OK key
on
Current country.
• Using the
Physical keypad
, input the country.
• Press the
OK Key (Set)
Reference country
To select the reference country:
From the call settings menu:
• Using the
Navigation key
, press
OK key
on
Assisted dialing.
• Using the
Navigation key
, press
OK key
on
Reference country.
• Using the
Physical keypad
, input the country.
• Press the
OK Key (Set)
About Phone
Menu where the device information is located.
• From Home Screen, press
OK Key
• Using the
Navigation key
, press
OK key
on
Tools & Settings.
• Using the
Navigation key
, press
OK Key
on
Settings
.
• Using the
Navigation key
, press
OK Key
on
About phone.
The about phone menu is divided in:
Phone number Hardware information
Status Software information
Network Device unlock
91
Phone number:
To know the actual phone number of the device tied to the inserted SIM card.
From the About phone menu:
• Using the
Navigation key
, select
Phone number.
• Phone number will be displayed below the phone number menu
Status
From the About phone menu:
• Using the
Navigation key
, select
Status.
The status menu displays information about the device such as:
• Battery: Shows current state of the battery.
• IMEI information: Shows the unique ID of your device.
• IMEI SV: Shows the Version of your device IMEI.
• ICCID: Shows the SIM card unique ID.
• Last factory data reset: Shows when the device was reset the last time.
• Serial number: Shows the device serial number.
Network
From the About phone menu:
• Using the
Navigation key
, select
Network.
Shows the status of the radios and connection of the device
• Network: Cellular carrier the device is connected to.
• Signal strength: Shows the signal strength of the reception in DB.
• Cellular network type: Connected standard (Can be 2G, 3G, 4G, LTE)
• Service state: Active/In service means device is connected to network.
• Roaming: Informs if the device is Roaming.
• IMS registration status: Informs is VoLTE service is active or not.
• IP address: Shows the phone current IP address on the system.
• Cellular network state: Shows if the device is connected to the cellular tower.
92
Hardware information
Shows the information in relation of the device hardware
From the About phone menu:
• Using the
Navigation key
, select
Hardware information.
• Model number: Shows the device model number.
• Hardware version: Shows the hardware manufactured version
• Wi-Fi MAC address: MAC Address used when connected to the Wi-Fi
• Bluetooth address: Unique identifier of the phone Bluetooth system.
Software information
Shows the information in relation of the device software
From the About phone menu:
• Using the
Navigation key
, select
software information.
• Baseband version: Phone Modem version.
• Kernel version: Phone core program (Kernel) version.
• SW Build number: Phone software version.
Device Unlock
Menu to unlock your device. To unlock your device you need to contact your cellular carrier
and follow the steps that they are going to explain.
To open the Device unlock menu:
From the About phone menu:
• Using the
Navigation key
, select
Device unlock.

93
Software update
From time to time Schok will send software updates. These updates bring new functionalities,
security patches or bugs fixes.
To review if there is a system update:
• From Home Screen, press
OK Key
• Using the
Navigation key
, press
OK key
on
Tools & Settings.
• Using the
Navigation key
, press
OK Key
on
Settings
.
• Using the
Navigation key
, press
OK Key
on
System update.
The software update application will open.
• Using the
Navigation key
, select
“Check for updates”
• Press the
OK key
to check for software updates.
CAUTION: Prior of performing a software update, its recommended to backup all the
information saved in the device. Always do a software update with at least 50% remaining
battery. Never turn off while the software update is working as this may disrupt the software
update and brick the device. A software update can take up to ten minutes.
Menu to configure
Software update.
Menu to configure
Software update.
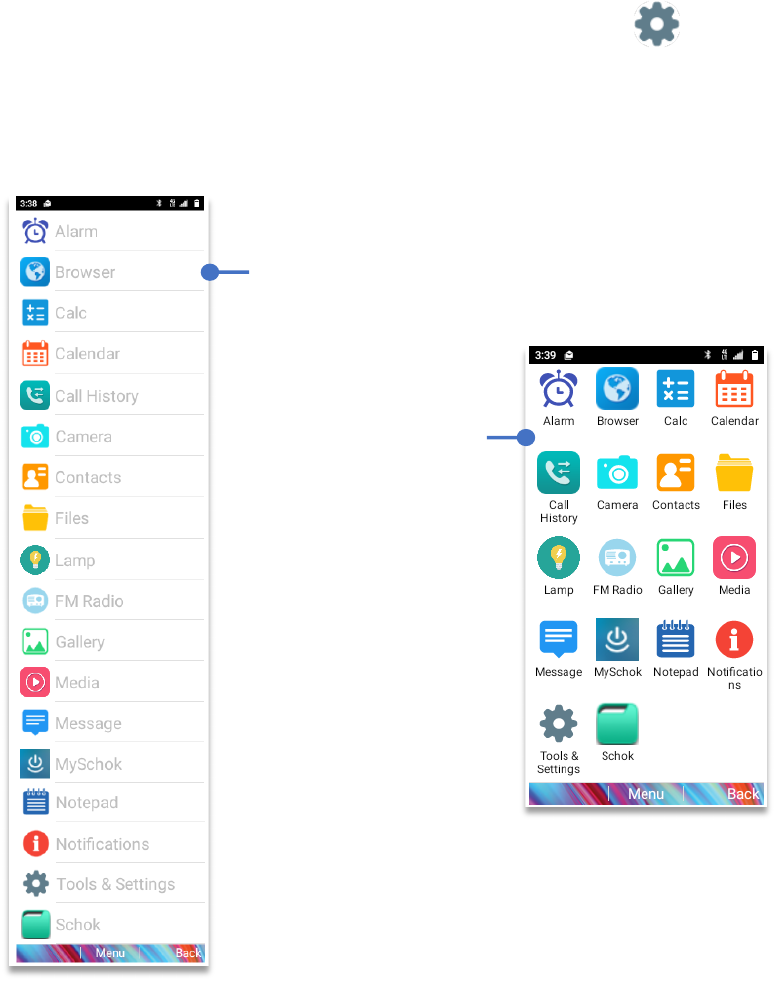
94
Schok Fast Launcher
The Schok flip has built-in a second launcher with ease of use in mind. Instead of the default
grid view, the device can have a list view which shows all the applications on a list mode, with
bigger fonts and in alphabetical order.
To turn on Schok Fast Launcher:
• From Home Screen, press
OK Key
• Using the
Navigation key
, press
OK key
on
Tools & Settings.
• Using the
Navigation key
, press
OK Key
on
Settings
.
• Using the
Navigation key
, press
OK Key
on
Schok Fast Launcher.
• Using the
Navigation key
, select
List.
• Press the
OK Key (Set)
List View
Grid View
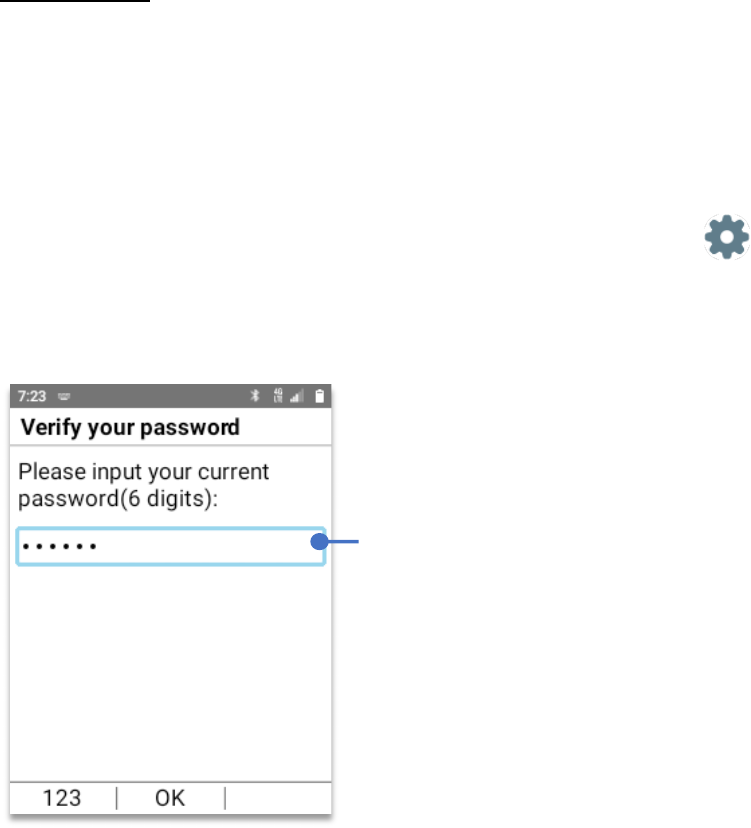
95
Lock control
The Schok flip has built-in a proprietary feature that allows the user to block and password
protect any application or hardware feature.
To open lock control:
• From Home Screen, press
OK Key
• Using the
Navigation key
, press
OK key
on
Tools & Settings.
• Using the
Navigation key
, press
OK Key
on
Lock control 2.0
.
Lock control will open a window asking to setup a 6 digit password.
After setting up the password, press the
OK Key (OK)
Lock control will open its main menu with three sub-menus:
• App control: Control which app can be accessed or blocked.
• System control: Control which system feature can be accessed or blocked.
• Change password: Change your password.
6 Digit password
NOTE:
Immediately write your 6 digit password and
put it in a safe place that you can remember.
If you lose your password, it cannot be retrieved and
you will have to do a factory reset. All information
will be lost.
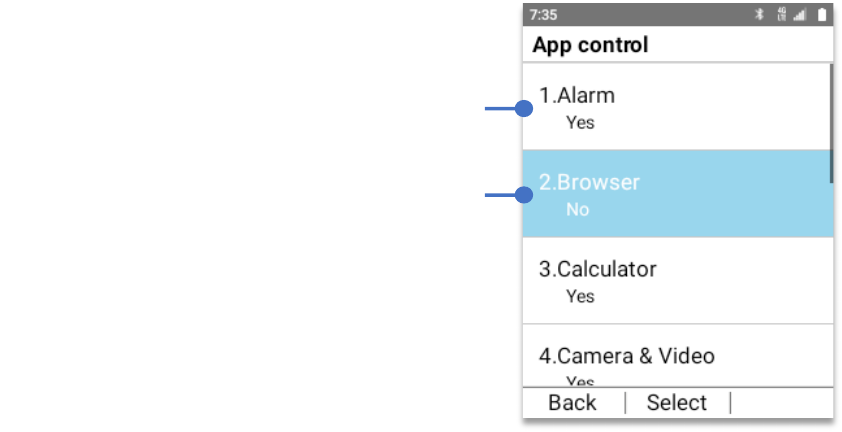
96
App control:
All applications installed on the system will show in this window.
To open App control:
From the Lock control 2.0 menu:
• Using the
Navigation key
, press
OK Key
on
App control.
As an example:
We can block the Browser to be used. This means that even if the Browser is selected it will
not be opened. To do this:
From the Lock control 2.0 menu:
• Using the
Navigation key
, press
OK Key
on
App control.
• Using the
Navigation key
, select
Browser
• Press the
OK Key
In App control, “No” means that the app will
not be accessible unless you return to the
“Lock control” menu and change it to Yes.
In App control, “Yes” means that the app will
always be accessible unless you return to the
“Lock control” menu and change it to No.
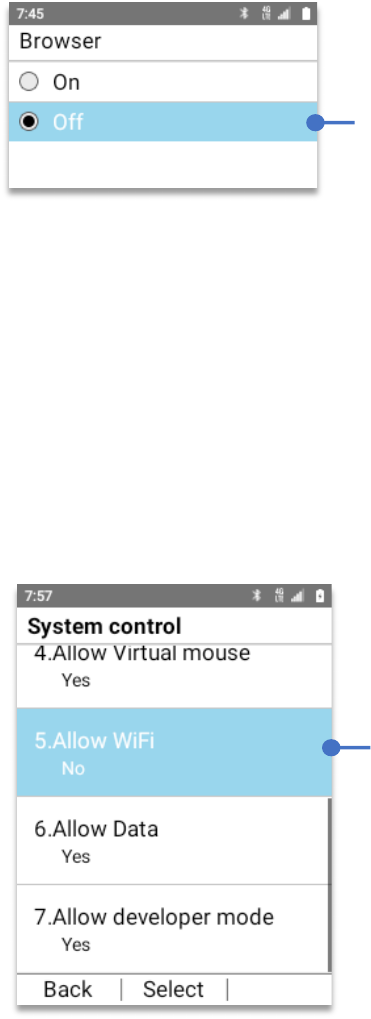
97
The Browser menu will open. By default all applications are allowed to be use, showing “On”
To block the Browser app from opening:
• Using the
Navigation key
, select “Off”, press the
OK key.
System control:
The system control menu contains all the system features that can be turned blocked.
From the Lock control 2.0 menu:
Using the
Navigation key
, press
OK Key
on
System control.
To turn On the Wi-Fi module:
• Using the
Navigation key
, press
OK Key
on
System control.
• Using the
Navigation key
, Select
“On”.
• Press the
OK Key (Set).
Select
Off
, press the
OK key.
The Browser app is
now blocked and cannot be use until changed again
to “On”.
As an example, to turn off Wi-Fi:
Using your Navigation key, select
“No”
Press the
OK key.
The Wi-Fi module is now blocked, off and cannot
be turned on until changed again to “On”.
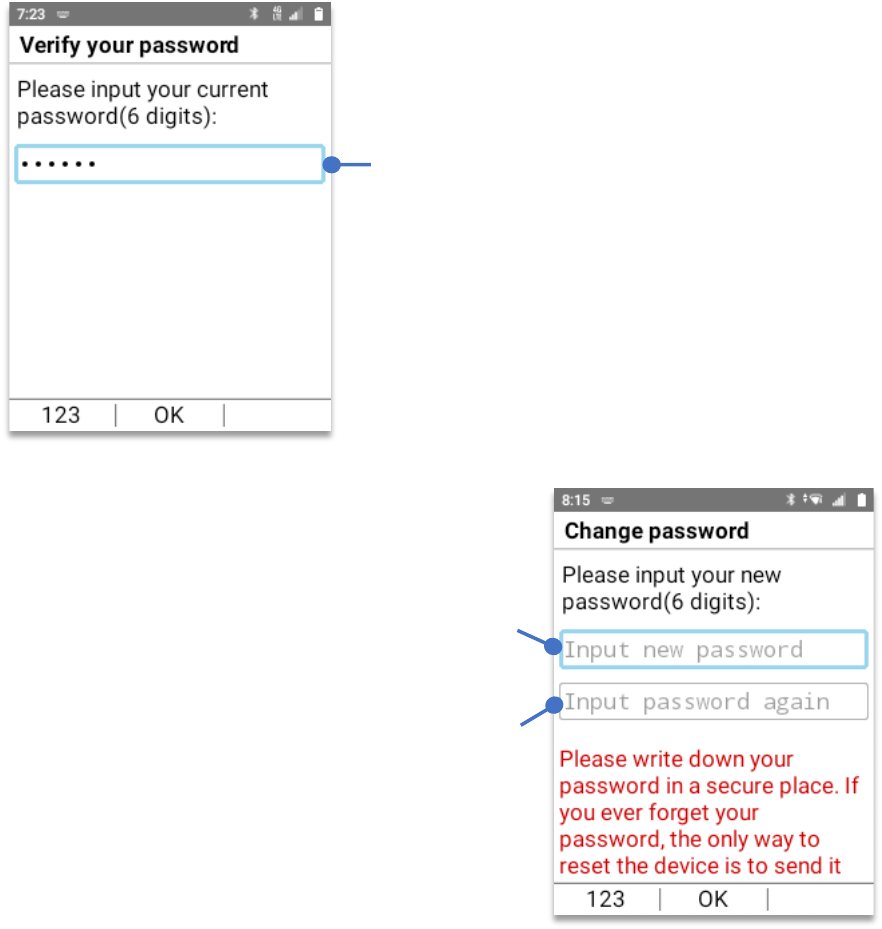
98
Change Password
To change the password of Lock control:
• Using the
Navigation key
, press
OK Key
on
System control.
• Using the
Navigation key
, Select
“On”.
• Press the
OK Key (Set).
Lock control will open the change password menu.
Using your
Physical keypad
, input the current
password.
Press the
OK key.
Using your
Physical keypad
, input the new
password.
Press the
OK key.
For security reasons, the system will ask twice
to set the new password.
Using your
Physical keypad
, input the new
password.
Press the
OK key.
99
Specifications:
Model number: SC3218T
Operating system: AOSP based on Android™ 11 Go edition
Display Size & Resolution: 3.2” 320 x 240 (QVGA) (Color)
Secondary Display: 2” 176 x 220 (Color)
Processor: Qualcomm® QM215
Processor speed and number of core: 1.2GHz / Quad-Core
Graphic processing unit (GPU): Adreno 308 @ 485MHz
Memory (RAM): 1 GB DDR 3
System and User Memory: 8 GB
SD Card Slot max capacity: 128 GB
Sim card slots and SIM size: 1 Nano SIM card
Rear Camera (primary): 5MP with flash
Front Camera: Using rear camera and 2
nd
display as viewfinder
Rear camera video recording: VGA @ 30 FPS
Battery type: Lithium ION rechargeable
Battery capacity: 3.8V 2,000 mAh / 7.6Wh
Battery limited voltage: 4.35V
Battery standard: UL2054, 1/CP6/50/59
Wi-Fi and band: 802.11/a/b/g/n. 2.4GHz
GPS: GPS & AGPS
Bluetooth: 4.2 with BR/EDR + BLE
USB port: Type-C™ connector
G-Sensor: Yes
Barometer sensor: Yes
Light and Proximity sensor: Yes
Communication standards: 4GLTE/VoLTE
2G bands: GSM 850/900/1800/1900
3G bands: UMTS Band 2/4
4G bands: 2/4/5/12/25/26/41/66/71
Hearing Aid Compatibility: M4/T3
Water rating: IPX2
Dimensions: 4.53 x 2.44 x 0.81 inches
Weight with Battery: 5.50oz / 157g
Battery weight: 1.27oz / 36g
Structure outside & Inside: Plastic
Electric input: 5.0V ± 1.0A
USB Wall charger input: 100-240V ~ 50/60Hz 0.2A
USB Wall charger output: 5.0V ± 1.0A
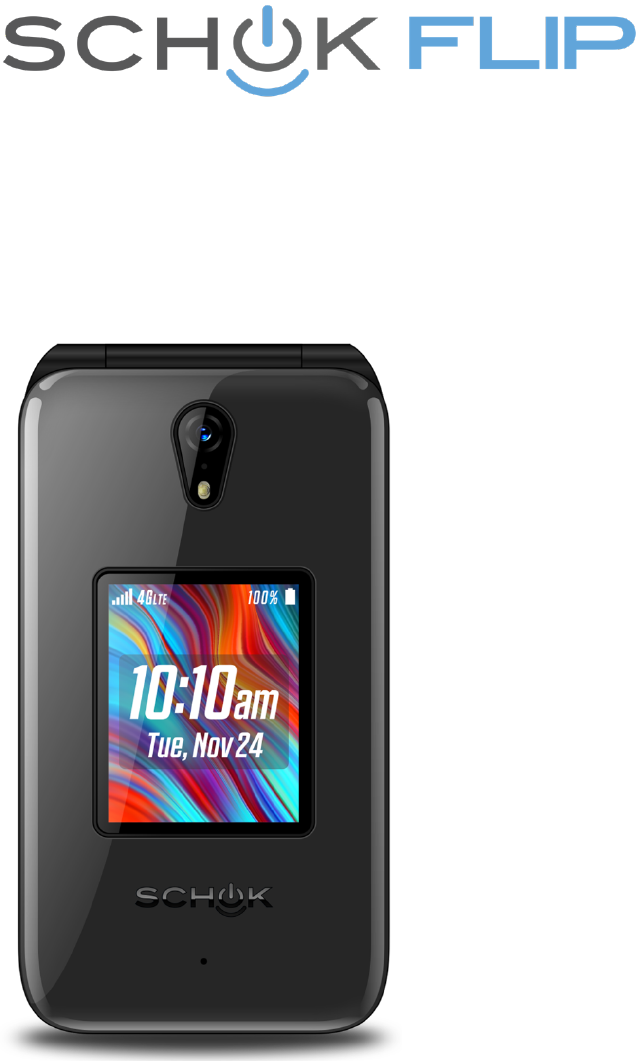
100
SAFETY AND PRECAUTIONS
(Model number SC3218T)

101
Safety and Precautions
Please read before proceeding
THE BATTERY OF THIS DEVICE IS REMOVABLE, HOWEVER, ONLY USE THE ORIGINAL
SCHOK SB2000 LITHIUM ION BATTERY. NEVER TRY TO DISSASSEMBLE OR TAKE APART
THE BATTERY, OR THE DEVICE, AS YOUR WARRANTY WILL BE VOIDED.
Privacy restrictions
Some countries require full disclosure of recorded telephone conversations, and stipulate that
you must inform the person with whom you are speaking that the conversation is being
recorded. Always obey the relevant laws and regulations of your country when using the
recording feature of your phone.
Disclaimers
ANY WEATHER, STOCK, OR OTHER INFORMATION, DATA, OR DOCUMENTATION (“ACCESSED
INFORMATION”) ARE PROVIDED “AS IS” AND WITHOUT ANY WARRANTY OR ANY TECHNICAL
SUPPORT. TO THE MAXIMUM EXTENT PERMITTED BY APPLICABLE LAW, Schok, LLC expressly
disclaim any and all representations and warranties, arising by law or otherwise, related to the
Accessed Information, including without limitation any express or implied representation or
warranty of merchantability, fitness for a particular purpose, non-infringement, quality,
accuracy, completeness, effectiveness, reliability, or usefulness. Without limiting the foregoing,
it is further understood that Schok LLC is not responsible for any use of the Accessed
Information or the results arising from such use and that you use such information at your own
risk.
Limitation of damages
TO THE MAXIMUM EXTENT PERMITTED BY APPLICABLE LAW, IN NO EVENT SHALL AMERICAN
NETWORK SOLUTIONS LLC OR ITS AFFILIATES BE LIABLE TO YOU, ANY USER, OR THIRD PARTY
FOR ANY INDIRECT, SPECIAL, CONSEQUENTIAL, INCIDENTAL OR PUNITIVE DAMAGES OF ANY
KIND, ARISING IN CONTRACT, TORT, OR OTHERWISE, INCLUDING, BUT NOT LIMITED TO,
INJURY, LOSS OF REVENUE, LOSS OF GOODWILL, LOSS OF BUSINESS OPPORTUNITY, LOSS
OF DATA, AND/OR LOSS OF PROFITS, REGARDLESS OF THE FORESEEABILITY THEREOF OR
WHETHER AMERICAN NETWORK SOLUTIONS LLC OR ITS AFFILIATES HAVE BEEN ADVISED OF
THE POSSIBILITY OF SUCH DAMAGES. AND IN NO EVENT SHALL THE TOTAL LIABILITY OF
AMERICAN NETWORK SOLUTIONS LLC OR ITS AFFILIATES EXCEED THE AMOUNT RECEIVED
FROM YOU, REGARDLESS OF THE LEGAL THEORY UNDER WHICH THE CAUSE OF ACTION IS
BROUGHT. THE FOREGOING DOES NOT AFFECT ANY STATUTORY RIGHTS WHICH MAY NOT BE
DISCLAIMED.

102
Important health information and safety precautions
When using this product, the safety precautions below must be taken to avoid possible legal
liabilities and damages. Retain and follow all product safety and operating instructions. Observe
all warnings in the operating instructions on the product. To reduce the risk of bodily injury,
electric shock, fire and damage to the equipment, observe the following precautions.
Electrical safety
This product is intended for use when supplied with power from the designated battery or
power supply unit. Other usage may be dangerous and will invalidate any approval given to
this product.
Safety precautions for proper grounding installation
Connecting to improperly grounded equipment can result in an electric shock to your device.
This product is equipped with a USB Cable for connecting with desktop or notebook computer.
Be sure your computer is properly grounded (earthed) before connecting this product to the
computer. The power supply cord of a desktop or notebook computer has an equipment
grounding conductor and a grounding plug. The plug must be plugged into an appropriate outlet
which is properly installed and grounded in accordance with all local codes and ordinances.
Safety precautions for power supply unit
1.
Use the correct external power source
. This product should be operated only from the
type of power source indicated on the electrical ratings label. If you are not sure of the
type of power source required, consult your authorized service provider or local power
company. For a product that operates from battery power or other sources, refer to the
operating instructions that are included with the product. This product should be
operated only with the following designated power supply unit(s). Travel charge: Input:
100-240V, 50/60Hz, 0.2A Output: 5V, 1000mA
2.
Handle battery packs carefully.
This product contains a Lithium-ion polymer or Lithium-
ion battery. There is a risk of fire and burns if the battery pack is handled improperly. Do
not attempt to open or service the battery pack. Do not disassemble, crush, puncture,
short external contacts or circuits, dispose of in fire or water, or expose a battery pack
to temperatures higher than
140°F (60°C).
Danger of explosion if battery is incorrectly replaced. To reduce risk of fire or burns,
do not disassemble, crush, puncture, short external contacts, expose to temperature
above
140°F (60°C),
or dispose of in fire or water. Replace only with specified SB2000
battery. Recycle or dispose used batteries according to the local regulations or reference
guide supplied with your product.

103
3.
Take extra precautions
• Keep the battery or device dry and away from water or any liquid as it may cause a
short circuit.
• Keep metal objects away so they don’t come in contact with the battery or its
connectors as it may lead to short circuit during operation.
• The phone should only be connected to products that bear the USB-IF logo or
have completed the USB-IF compliance program.
• Do not use a battery that appears damaged, deformed, or discolored, or the one
that has any rust on its casing, overheats, or emits a foul odor.
• Always keep the battery out of the reach of babies and small children, to avoid
swallowing of the battery. Consult the doctor immediately if the battery is swallowed.
• Only use the battery with a charging system that has been qualified with the system
per this standard, IEEE-Std-1725. Use of an unqualified battery or charger may
present a risk of fire, explosion, leakage or other hazard.
• Replace the battery only with another battery that has been qualified with the system
per this standard, IEEE-Std-1725. Use of an unqualified battery may present a risk of
fire, explosion, leakage or other hazard.
• Avoid dropping the phone or battery. If the phone or battery is dropped, especially on a
hard surface, and the user suspects damage, take it to a service center for inspection.
• If the battery leaks:
• Do not allow the leaking fluid to come in contact with skin or clothing. If already
in contact, flush the affected area immediately with clean water and seek
medical advice.
• Do not allow the leaking fluid to come in contact with eyes. If already in contact,
DO NOT rub; rinse with clean water immediately and seek medical advice.
• Take extra precautions to keep a leaking battery away from fire as there is a
danger of ignition or explosion.
104
4.
Safety precautions for direct sunlight
Keep this product away from excessive moisture and extreme temperatures. Do not
leave the product or its battery inside a vehicle or in places where the temperature may
exceed 140°F (60°C), such as on a car dashboard, window sill, or behind a glass that is
exposed to direct sunlight or strong ultraviolet light for extended periods of time. This
may damage the product, overheat the battery, or pose a risk to the vehicle.
5.
Prevention of hearing loss
Permanent hearing loss may occur if earphones or headphones are used at high volume
for prolonged periods of time.
6.
Safety in aircraft
Due to the possible interference caused by this product to an aircraft’s navigation system
and its communications network, using this device’s phone function on board an airplane
is against the law in most countries. If you want to use this device when on board an
aircraft, remember to turn off your RF on your phone by switching to Airplane Mode.
7.
Environment restrictions
Do not use this product in gas stations, fuel depots, chemical plants or where blasting
operations are in progress, or in potentially explosive atmospheres such as fueling
areas, fuel storehouses, below deck on boats, chemical plants, fuel or chemical transfer
or storage facilities, and areas where the air contains chemicals or particles, such as
grain, dust, or metal powders. Please be aware that sparks in such areas could cause
an explosion or fire resulting in bodily injury or even death.
8.
Explosive atmospheres
When in any area with a potentially explosive atmosphere or where flammable materials
exist, the product should be turned off and the user should obey all signs and
instructions. Sparks in such areas could cause an explosion or fire resulting in bodily
injury or even death. Users are advised not to use the equipment at refueling points,
such as service or gas stations, and are reminded of the need to observe restrictions on
the use of radio equipment in fuel depots, chemical plants, or where blasting operations
are in progress. Areas with a potentially explosive atmosphere are often, but not always,
clearly marked. These include fueling areas, below deck on boats, fuel or chemical
transfer or storage facilities, and areas where the air contains chemicals or particles,
such as grain, dust, or metal powders.
105
9.
Road safety
Full attention must be given to driving at all times in order to reduce the risk of an
accident. Using a phone while driving (even with a hands-free kit) causes distraction and
can lead to an accident. You must comply with local laws and regulations restricting the
use of wireless devices while driving.
10.
Safety precautions for RF exposure
a. Avoid using your phone near metal structures (for example, the steel frame of a
building).
b. Avoid using your phone near strong electromagnetic sources, such as microwave
ovens, sound speakers, TV and radio.
c. Use only original manufacturer-approved accessories, or accessories that do not
contain any metal.
d.
Use of non-original manufacturer-approved accessories may violate your local RF
exposure guidelines and should be avoided.
11.
Interference with medical equipment functions
This product may cause medical equipment to malfunction. The use of this device is
forbidden in most hospitals and medical clinics. If you use any other personal medical
device, consult the manufacturer of your device to determine if they are adequately
shielded from external RF energy. Your physician may be able to assist you in obtaining
this information. Turn your phone OFF in health care facilities when any regulations
posted in these areas instruct you to do so. Hospitals or health care facilities may be
using equipment that could be sensitive to external RF energy.
12.
Non-ionizing radiation
Your device has an internal antenna. This product should be operated in its normal-use
position to ensure the radioactive performance and safety of the interference. As with
other mobile radio transmitting equipment, users are advised that for satisfactory
operation of the equipment and for the safety of personnel, it is recommended that no
part of the human body be allowed to come too close to the antenna during operation of
the equipment.
Use only the supplied integral antenna. Use of unauthorized or modified antennas may
impair call quality and damage the phone, causing loss of performance and SAR levels
exceeding the recommended limits as well as result in non- compliance with local
regulatory requirements in your country. To assure optimal phone performance and
ensure human exposure to RF energy is within the guidelines set forth in the relevant
standards, always use your device only in its normal-use position. Contact with the
antenna area may impair call quality and cause your device to operate at a higher power
level than needed. Avoiding contact with the antenna area when the phone is IN USE
optimizes the antenna performance and the battery life.
106
13.
Electrical safety
Accessories
• Use only approved accessories.
• Do not connect with incompatible products or accessories.
• Take care not to touch or allow metal objects, such as coins or key rings, to contact
or short circuit the battery terminals.
Connection to a car
• Seek professional advice when connecting a phone interface to the vehicle
electrical system.
Faulty and damaged products
• Do not attempt to disassemble the phone or its accessory.
• Only qualified personnel must service or repair the phone or its accessory.
14.
General precautions
You alone are responsible for how you use your phone and any consequences of its use.
You must always switch off your phone wherever the use of a phone is prohibited. Use
of your phone is subject to safety measures designed to protect users and their
environment.
Avoid applying excessive pressure to the device
Do not apply excessive pressure on the screen and the device to prevent damaging them
and remove the device from your pants’ pocket before sitting down. It is also
recommended that you store the device in a protective case and only use the device
stylus or your finger when interacting with the touch screen. Cracked display screens
due to improper handling are not covered by the warranty.
Device getting warm after prolonged use
When using your device for prolonged periods of time, such as when you’re talking on
the phone, charging the battery or browsing the Web, the device may become warm. In
most cases, this condition is normal and therefore should not be interpreted as a
problem with the device.
Heed service markings
Except as explained elsewhere in the Operating or Service documentation, do not service
any product yourself. Service needed on components inside the device should be done
by an authorized service technician or provider.

107
Protect your phone
• Always treat your phone and its accessories with care and keep them in a clean and
dust-free place.
• Do not expose your phone or its accessories to open flames or lit tobacco products.
• Do not expose your phone or its accessories to liquid, moisture or high humidity.
• Do not drop, throw or try to bend your phone or its accessories.
• Do not use harsh chemicals, cleaning solvents, or aerosols to clean the device or its
accessories.
• Do not paint your phone or its accessories.
• Do not attempt to disassemble your phone or its accessories, only Schok authorized
personnel must do so.
• Do not expose your phone or its accessories to extreme temperatures, minimum -
4°F (-20°C) and maximum 122°F (50°C).
• Please check local regulations for disposal of electronic products.
• Do not carry your phone in your back pocket as it could break when you sit down.
If Damaged, it will require service
• Unplug the product from the electrical outlet, remove the battery and refer
servicing to an authorized service technician or provider under the following
conditions:
• Liquid has been spilled or an object has fallen into the product.
• The product has been exposed to rain or water.
• The product has been dropped or damaged.
• There are noticeable signs of overheating.
• The product does not operate normally when you follow the operating instructions.
Avoid hot areas
The product should be placed away from heat sources such as radiators, heat registers,
stoves, or other products (including amplifiers) that produce heat.
Avoid wet areas
Never use the product in a wet location.
Avoid using your device after a dramatic change in temperature
When you move your device between environments with very different temperature
and/or humidity ranges, condensation may form on or within the device. To avoid
damaging the device, allow sufficient time for the moisture to evaporate before using
the device.
NOTICE:
When taking the device from low-temperature conditions into a warmer
environment or from high-temperature conditions into a cooler environment, allow the
device to acclimate to room temperature before turning on power.
108
Avoid pushing objects into product
Never push objects of any kind into cabinet slots or other openings in the product. Slots
and openings are provided for ventilation. These openings must not be blocked or
covered.
Air bags
Do not place a phone in the area over an air bag or in the air bag deployment area.
Store the phone safely before driving your vehicle.
Mounting accessories
Do not use the product on an unstable table, cart, stand, tripod, or bracket. Any
mounting of the product should follow the manufacturer’s instructions and should use
a mounting accessory recommended by the manufacturer.
Avoid unstable mounting
Do not place the product with an unstable base.
Use product with approved equipment
This product should be used only with personal computers and options identified as
suitable for use with your equipment.
Adjust the volume
Turn down the volume before using headphones or other audio devices.
Cleaning
Unplug the product from the wall outlet before cleaning. Do not use liquid cleaners or
aerosol cleaners. Use a damp cloth for cleaning, but NEVER use water to clean the LCD
screen or any internal part of the device.
Small children
Do not leave your phone and its accessories within the reach of small children or allow them
to play with it. They could hurt themselves, or others, or could accidentally damage the phone.
Your phone contains small parts with sharp edges that may cause an injury, or which could
become detached and create a choking hazard.
Repetitive motion injuries
• To minimize the risk of RSI, when texting or playing games with your phone:
• Do not grip the phone too tightly
• Press the buttons lightly
• Make use of the special features in the handset which minimize the number of
buttons which have to be pressed, such as message templates and predictive text.
• Take lots of breaks to stretch and relax.
109
Operating machinery
Full attention must be given to operating the machinery in order to reduce the risk of
an accident.
Loud noise
This phone is capable of producing loud noises which may damage your hearing.
Emergency calls
This phone, like any wireless phone, operates using radio signals, which cannot
guarantee connection in all conditions. Therefore, you must never rely solely on any
wireless phone for emergency communications.
Regulatory agency identifications
1.
FCC Regulations:
This mobile phone complies with part 15 of the FCC Rules. Operation is subject to the following
two conditions: (1) This device may not cause harmful interference, and (2) this device must
accept any interference received, including interference that may cause undesired operation.
This mobile phone has been tested and found to comply with the limits for a Class B digital
device, pursuant to Part 15 of the FCC Rules. These limits are designed to provide reasonable
protection against harmful interference in a residential installation. This equipment generates,
uses and can radiated radio frequency energy and, if not installed and used in accordance with
the instructions, may cause harmful interference to radio communications.
However, there is no guarantee that interference will not occur in a particular installation If this
equipment does cause harmful interference to radio or television reception, which can be
determined by turning the equipment off and on, the user is encouraged to try to correct the
interference to radio or television reception, which can be determined by turning the equipment
off and on, the user is encouraged to try to correct the interference by one or more of the
following measures:
• Reorient or relocate the receiving antenna.
• Increase the separation between the equipment and receiver.
• Connect the equipment into an outlet on a circuit different from that to which the receiver is
connected.
• Consult the dealer or an experienced radio/TV technician for help.
• Changes or modifications not expressly approved by the party responsible for compliance
could void the user‘s authority to operate the equipment.
110
2.
RF Exposure Information (SAR)
This mobile phone meets the government’s requirements for exposure to radio waves. This
phone is designed and manufactured not to exceed the emission limits for exposure to radio
frequency (RF) energy set by the Federal Communications Commission of the U.S. Government.
The exposure standard for wireless mobile phones employs a unit of measurement known as
the Specific Absorption Rate, or SAR. The SAR limit set by the FCC is 1.6W/kg. Tests for SAR
are conducted using standard operating positions accepted by the FCC with the phone
transmitting at its highest certified power level in all tested frequency bands. Although the SAR
is determined at the highest certified power level, the actual SAR level of the phone while
operating can be well below the maximum value. This is because the phone is designed to
operate at multiple power levels so as to use only the power required to reach the network. In
general, the closer you are to a wireless base station, the lower the power output.
The highest SAR value for the model phone as reported to the FCC when tested for use at the
ear is
0.36 W/Kg
and when worn on the body, as described in this user guide, is 1.06
W/kg
(Body-worn measurements differ among phone models, depending upon available accessories
and FCC requirements.)
While there may be differences between the SAR levels of various phones and at various
positions, they all meet the government requirement.
The FCC has granted an Equipment Authorization for this model phone with all reported SAR
levels evaluated as in compliance with the FCC RF exposure guidelines. SAR information on this
model phone is on file with the FCC and can be found under the Display Grant section of
http://www.fcc.gov/oet/ea/fccid after searching on FCC ID: 2ALZM-SC3218T.
For body worn operation, this phone has been tested and meets the FCC RF exposure guidelines
for use with an accessory that contains no metal and the positions the handset a minimum of
1.5 cm from the body. Use of other accessories may not ensure compliance with FCC RF
exposure guidelines. If you do not use a body-worn accessory and are not holding the phone at
the ear, position the handset a minimum of 1.5 cm from your body when the phone is switched
on.
111
3.
HEARING AID COMPATIBILITY HAC FOR WIRELESS TELECOMMUNICATIONS DEVICES
THIS PHONE HAS A HAC RATING OF M4/T3. WHAT IS HEARING AID COMPATIBILITY?
The Federal Communications Commission has implemented rules and a rating system designed
to enable people who wear hearing aids to more effectively use these wireless
telecommunications devices. The standard for compatibility of digital wireless phones with
hearing aids is set forth in American National Standard Institute (ANSI) standard C63.19. There
are two sets of ANSI standards with ratings from one to four (four being the best rating): an “M”
rating for reduced interference making it easier to hear conversations on the phone when using
the hearing aid microphone, and a “T” rating that enables the phone to be used with hearing
aids operating in the tele-coil mode thus reducing unwanted background noise.
HOW WILL I KNOW WHICH WIRELESS PHONES ARE HEARING AID COMPATIBLE?
The Hearing Aid Compatibility rating of this smartphone is M4/T3. A phone is considered
Hearing Aid Compatible for acoustic coupling (microphone mode) if it has an “M3” or “M4” rating.
A digital wireless phone is considered Hearing Aid Compatible for inductive coupling (tele-coil
mode) if it has a “T3” or “T4” rating.
HOW WILL I KNOW IF MY HEARING AID WILL WORK WITH A PARTICULAR DIGITAL
WIRELESS PHONE?
• You’ll want to try a number of wireless phones so that you can decide which works the best
with your hearing aids.
• You may also want to talk with your hearing aid professional about the extent to which your
hearing aids are immune to interference, if they have wireless phone shielding, and whether
your hearing aid has a HAC rating.

112
Approved firmware versions
This device will only operate with firmware versions that have been approved for use by our
wireless carrier and the device manufacturer. If unauthorized firmware is placed on the device,
it will not function.
Information about safeguarding handsets
We encourage customers to take appropriate measures to secure their devices and invite them
to take advantage of the features available on this device to help secure it from theft and/or
other unauthorized access and use. This device has a locking function (e.g., user-defined codes
or patterns) that can serve as a first line of defense against unauthorized use or access to stored
information. Preloaded security applications that allow customers to track or locate misplaced
devices can be found on several devices. Lost or stolen devices should be immediately reported
to your wireless carrier so that proper measures can be taken to protect accounts. For
additional information, visit your wireless carrier’s Privacy Policy.
Emergency call
If your phone has network coverage, dial the emergency number and press the
Answer call
key
to make an emergency call. This works without a SIM card and without typing the PIN
code.
Although all devices are equipped with 9-1-1 emergency calling, this device may or may not
permit its location to be approximated during a 9-1-1 call.*
* Availability of this feature depends on upgrades to the (a) wireless network and (b) 9-1-1 calling system
that are required to be installed by the local 9-1-1 response agency or public safety answering point
(PSAP); these upgrades may not be available everywhere within our wireless coverage area or your
roaming area. This approximation of the device’s location and the transmittal of location information are
subject to emergency situations, transmission limits, network problems/limitations, interconnecting
carrier problems, your device, buildings/tunnels, signal strength and atmospheric/ topographical
conditions, and may be curtailed, interrupted dropped or refused. The device’s approximate location is
transmitted to the local 9-1-1 response agency or PSAP while the call is in progress; this approximation
is intended solely to aid the PSAP in dispatching emergency assistance or to limit the search area for
emergency services personnel. You should not rely solely on a device for essential communications
(such as a medical or other emergency). Please see your wireless carrier’s Terms and Conditions and
Privacy Policy for additional service restrictions and details.

113
Additional information
Use of some content or features may require qualifying service, or access to a Wi-Fi connection.
Devices and screen images are simulated.
Coverage
not available in some areas. See
Terms
and Conditions (including arbitration provision)
at
t-mobile.com
,
sprint.com
or
metrobyt-
mobile.com
, for additional information, restrictions and details, including important limitations
on availability and reliability of 9-1-1 emergency service when using Wi-Fi calling. T-Mobile, the
T logo are registered trademarks of Deutsche Telekom AG. © 2022
T-Mobile USA, Inc.
1 YEAR LIMITED WARRANTY
Your device has one year limited warranty. For information, visit:
https://www.schokgear.com/warranty.php
NEED SOME HELP?
OPTION ONE:
The MySchok application installed in your Schok flip device is the portal where you can find
statistics of your device, diagnostics, manuals and an always updated FAQ list. (MySchok app
will be included in the first maintenance release software (MR).
OPTION TWO:
Visit
www.schokgear.com
OPTION THREE:
Call us at
1-888-48-SCHOK
.
©2022 Schok LLC. All rights reserved. SC3218T–DOC-UM-V1.00
