
ACUMATICA FRAMEWORK
DEVELOPMENT GUIDE
DEVELOPER GUIDE
Acumatica ERP 2019 R2
| Contents | 2
Contents
Copyright.................................................................................................................8
Acumatica Framework Guide...................................................................................9
Acumatica Framework Overview........................................................................... 10
Acumatica Cloud xRP Platform....................................................................... 10
Acumatica Framework Development Tools........................................................14
Runtime Architecture of an Application Based on Acumatica Framework...............18
Getting Started with Acumatica Framework..........................................................21
Data Querying..............................................................................................22
Business Logic Controller Declaration.............................................................. 24
Data View and Cache....................................................................................25
Data Modification Scenarios........................................................................... 26
Business Logic Implementation...................................................................... 35
Designing the Application..................................................................................... 38
Designing the Database Structure and DACs....................................................38
System and Application Tables................................................................... 39
Table and Column Naming Conventions....................................................... 39
Common Columns and Data Types..............................................................41
Primary Key.............................................................................................42
Foreign Keys and Nullable Columns............................................................ 43
Audit Fields..............................................................................................44
Concurrent Update Control........................................................................ 45
Attachment of Additional Objects to Data Records........................................ 45
Preservation of Deleted Records................................................................. 45
Multitenancy Support................................................................................ 46
Designing the User Interface......................................................................... 48
Development Environment Options............................................................. 48
Form and Report Numbering...................................................................... 49
Item Grouping on the Form Toolbar............................................................ 50
Naming the Graphs and Event Handlers.......................................................... 51
Graph Naming..........................................................................................51
Naming Conventions for Event Handlers Defined in Graphs............................ 52
Configuring ASPX Pages and Reports....................................................................53
Overview of ASPX Pages in Acumatica Framework............................................ 53
Technical Overview of the User Interface..................................................... 54
Processing of a Button Click.......................................................................59
Configuring the ASPX Page............................................................................ 63
Configuration of the Datasource Control...................................................... 64
Configuration of Callback Commands.......................................................... 64
Configuration of Callbacks......................................................................... 66
| Contents | 3
Configuring Containers.................................................................................. 67
Configuration of Container Controls............................................................ 67
Use of the DataMember Property of Containers............................................ 68
Use of the SkinID Property of Containers.....................................................69
Use of the Caption Property of Containers................................................... 70
Use of Multiple Data Views for Boxes in Containers....................................... 71
Use of the PXPanel Container.....................................................................71
Configuring Tables........................................................................................ 72
Configuration of Grids............................................................................... 72
Use of the SyncPosition Property of PXGrid.................................................. 74
Use of the DisplayMode Property of PXGridColumn........................................74
Use of the Type Property of PXGridColumn.................................................. 75
Controls for Joined Data Fields................................................................... 76
Configuring Tabs...........................................................................................77
Conditional Hiding of a Tab Item................................................................ 77
Configuring Boxes.........................................................................................78
Input Controls..........................................................................................78
Use of the CommitChanges Property of Boxes.............................................. 80
Use of the DataField Property of PXGroupBox...............................................81
Use of the Caption Property of PXGroupBox................................................. 81
Use of the RenderStyle Property of PXGroupBox........................................... 81
To Enable Callback for a Control................................................................. 82
Configuring Layout and Size.......................................................................... 83
Predefined Size Values.............................................................................. 83
Use of the StartRow and StartColumn Properties of PXLayoutRule................... 84
Use of the ColumnWidth, ControlSize, and LabelsWidth Properties of
PXLayoutRule........................................................................................... 86
Use of the ColumnSpan Property of PXLayoutRule.........................................87
Use of the Merge Property of PXLayoutRule................................................. 88
Use of the GroupCaption, StartGroup, and EndGroup Properties of
PXLayoutRule........................................................................................... 89
Use of the SuppressLabel Property of PXLayoutRule...................................... 91
Maintaining Reports...................................................................................... 92
Display of Reports.................................................................................... 92
Display of Analytical Reports......................................................................97
Accessing Data.................................................................................................... 100
Querying Data in Acumatica Framework........................................................ 100
BQL and LINQ........................................................................................ 101
Data Access Classes................................................................................103
PXView and PXCache of the Data View...................................................... 106
PXView Type and Views Collection.............................................................108
| Contents | 4
Data View Delegates............................................................................... 109
Data Query Execution..............................................................................111
Translation of a BQL Command to SQL...................................................... 115
Merge of the Records with PXCache.......................................................... 119
Comparison of Fluent BQL, Traditional BQL, and LINQ..................................120
Fluent BQL and Traditional BQL Equivalents................................................122
To Execute BQL Statements..................................................................... 130
To Process the Result of the Execution of the BQL Statement........................135
Creating Fluent BQL Queries........................................................................ 136
Fluent Business Query Language.............................................................. 137
Data Access Classes in Fluent BQL............................................................ 139
Search and Select Commands and Data Views in Fluent BQL........................ 141
Constants in Fluent BQL.......................................................................... 142
Parameters in Fluent BQL........................................................................ 144
To Select Records by Using Fluent BQL...................................................... 146
To Use Parameters in Fluent BQL Queries.................................................. 150
Creating Traditional BQL Queries.................................................................. 155
Traditional Business Query Language.........................................................156
Data Access Classes in Traditional BQL...................................................... 156
PXSelect Classes.....................................................................................157
The Classes That Compose BQL Statements............................................... 160
Parameters in Traditional BQL Statements..................................................163
Traditional BQL and SQL Equivalents......................................................... 164
To Select Records By Using Traditional BQL................................................ 166
To Filter Records.....................................................................................170
To Order Records.................................................................................... 175
To Query Multiple Tables.......................................................................... 177
To Group and Aggregate Records..............................................................180
To Use Parameters in Traditional BQL........................................................ 181
To Use Arithmetic Operations................................................................... 186
To Compose a BQL Statement from an SQL Statement................................ 188
Creating LINQ Queries.................................................................................194
LINQ in Acumatica Framework..................................................................194
Deferred LINQ Query Execution................................................................ 196
Fallback to the LINQ to Objects Mode........................................................198
To Select Records by Using LINQ.............................................................. 199
To Append LINQ Expressions to BQL Statements.........................................202
Defining Relationships Between DACs............................................................203
Master-Detail Relationship Between Data with PXDBDefault and PXParent.......203
Relationship Between Data with PrimaryKeyOf and ForeignKeyOf...................205
Selection of the Linked Data Through the Current Property.......................... 209
| Contents | 5
To Define a Primary Key.......................................................................... 211
To Define a Foreign Key...........................................................................212
Working with Data in Cache and Session....................................................... 213
Modification of Data in a PXCache Object...................................................213
Session..................................................................................................217
Session Sharing Between Application Servers............................................. 218
Storing of Graph Data in the Session........................................................ 220
Use of Slots to Cache Data Objects...........................................................223
Implementing Business Logic..............................................................................230
Working with Events................................................................................... 230
Event Handlers....................................................................................... 231
Types of Graph Event Handlers.................................................................232
Execution of Event Handlers.....................................................................233
Override of Event Handlers...................................................................... 236
Data Manipulation Scenarios.................................................................... 237
Insertion of a Data Record.......................................................................238
Update of a Data Record......................................................................... 239
Removal of a Data Record....................................................................... 240
Saving of Changes to the Database.......................................................... 240
Sequence of Events: Insertion of a Data Record......................................... 243
Sequence of Events: Update of a Data Record............................................245
Sequence of Events: Deletion of a Data Record.......................................... 247
Sequence of Events: Display of a Data Record............................................249
Sequence of Events: Saving of Changes to the Database............................. 250
List of Events......................................................................................... 252
Cancellation of Attribute Event Handlers.................................................... 253
Validation of Field Values......................................................................... 254
Validation of a Data Record......................................................................255
Update of a Data Record on Update of a Field Value....................................256
Internal and External Presentation of Values.............................................. 257
Working with Attributes............................................................................... 258
Code Reuse Through Attributes................................................................ 259
Mandatory Attributes...............................................................................261
Use of Attributes.................................................................................... 262
Bound Field Data Types........................................................................... 263
Unbound Field Data Types....................................................................... 264
UI Field Configuration..............................................................................265
Default Values........................................................................................ 266
Complex Input Controls........................................................................... 268
Referential Integrity................................................................................ 269
Calculation of Field Values....................................................................... 269
| Contents | 6
Ad Hoc SQL for Fields............................................................................. 271
Audit Fields............................................................................................ 273
Data Projection.......................................................................................273
Access Control........................................................................................274
Notes.................................................................................................... 274
Report Optimization................................................................................ 274
Attributes on DACs................................................................................. 275
Action Attributes.....................................................................................275
Attributes on Data Views......................................................................... 276
Replacement of Attributes for DAC Fields in CacheAttached.......................... 277
Custom Attributes................................................................................... 278
Update of Data with PXAccumulator Attributes............................................288
Restrictions in the Accumulator Attribute................................................... 293
Working with Attachments........................................................................... 293
To Allow Attachments to a Particular Form................................................. 294
To Display an Attached Image on the Form................................................ 296
Configuring the UI from the Back End........................................................... 297
Data for Controls.................................................................................... 297
Configuration of the User Interface in Code................................................298
Standard Buttons of the Form Toolbar....................................................... 299
Configuration of Actions...........................................................................301
Requests for User Confirmation................................................................ 302
Determination of Whether an Action Was Initiated in the UI......................... 303
Redirection to Webpages......................................................................... 303
Configuration of Drop-Down Lists..............................................................304
Configuration of Selector Controls.............................................................307
Company/Branch Selection Menu.............................................................. 309
To Configure an Input Mask and a Display Mask for a Field...........................312
To Display a Dialog Box........................................................................... 314
Creating Particular Types of Forms................................................................316
Configuration Parameters of the Application (Setup Forms).......................... 316
Data View for the Filtering Parameters...................................................... 318
Creation of Processing Forms................................................................... 320
Implementation of Processing Operations...................................................322
To Add a Button to the Processing Dialog Box............................................ 328
To Not Display the Processing Dialog Box...................................................328
Executing Code Asynchronously....................................................................329
Asynchronous Execution.......................................................................... 329
Localizing Applications.................................................................................336
Localization............................................................................................ 336
Strings That Can Be Localized.................................................................. 337
| Contents | 7
To Prepare DACs for Localization...............................................................338
To Localize Application Messages.............................................................. 338
To Work with Multi-Language Fields.......................................................... 340
To Optimize Memory Consumption of Localized Data................................... 342
Reusing Business Logic................................................................................347
Reusable Business Logic Implementation................................................... 348
Mapped Cache Extensions and the Application Database.............................. 353
Reusable Business Logic and the Application Website...................................354
Use of Generic Graph Extensions by the System......................................... 356
Generic Graph Extensions Declared in Acumatica ERP..................................357
To Insert Reusable Business Logic That Has Already Been Declared............... 359
To Sort Multiple Generic Graph Extensions................................................. 361
To Implement Reusable Business Logic...................................................... 361
Troubleshooting Acumatica Framework-Based Applications................................365
To Debug Acumatica Framework-Based Applications........................................ 365
Glossary.............................................................................................................. 367

| Copyright | 8
Copyright
©
2019 Acumatica, Inc. ALL RIGHTS RESERVED.
No part of this document may be reproduced, copied, or transmitted without the express
prior consent of Acumatica, Inc.
11235 SE 6th Street, Suite 140 Bellevue, WA 98004
Restricted Rights
The product is provided with restricted rights. Use, duplication, or disclosure by the United
States Government is subject to restrictions as set forth in the applicable License and
Services Agreement and in subparagraph (c)(1)(ii) of the Rights in Technical Data and
Computer Software clause at DFARS 252.227-7013 or subparagraphs (c)(1) and (c)(2) of
the Commercial Computer Software-Restricted Rights at 48 CFR 52.227-19, as applicable.
Disclaimer
Acumatica, Inc. makes no representations or warranties with respect to the contents
or use of this document, and specifically disclaims any express or implied warranties of
merchantability or fitness for any particular purpose. Further, Acumatica, Inc. reserves
the right to revise this document and make changes in its content at any time, without
obligation to notify any person or entity of such revisions or changes.
Trademarks
Acumatica is a registered trademark of Acumatica, Inc. HubSpot is a registered trademark of
HubSpot, Inc. Microsoft Exchange and Microsoft Exchange Server are registered trademarks
of Microsoft Corporation. All other product names and services herein are trademarks or
service marks of their respective companies.
Software Version: 2019 R2

| Acumatica Framework Guide | 9
Acumatica Framework Guide
In this guide, you can find information about how to develop applications based on
Acumatica Framework.
In This Guide
• Acumatica Framework Overview
• Getting Started with Acumatica Framework
• Designing the Application
• Configuring ASPX Pages and Reports
• Accessing Data
• Implementing Business Logic
• Troubleshooting Acumatica Framework-Based Applications
• Glossary

| Acumatica Framework Overview | 10
Acumatica Framework Overview
Acumatica Framework provides the application programming interface (API) and tools for
developing cloud business applications. Acumatica Framework is a part of the Acumatica
Cloud xRP Platform, which provides various ways to develop the following:
• Add-on applications that interact with Acumatica ERP through the web services API
• Applications embedded into Acumatica ERP through the built-in customization tools
• Completely new applications based purely on Acumatica Framework
In this part of the guide, you can find an overview of the Acumatica Cloud xRP Platform
and the place of Acumatica Framework in this platform. This part also includes an overview
of Acumatica Framework tools and a high-level overview of the runtime architecture of
applications based on Acumatica Framework.
In This Part
• Acumatica Cloud xRP Platform
• Acumatica Framework Development Tools
• Runtime Architecture of an Application Based on Acumatica Framework
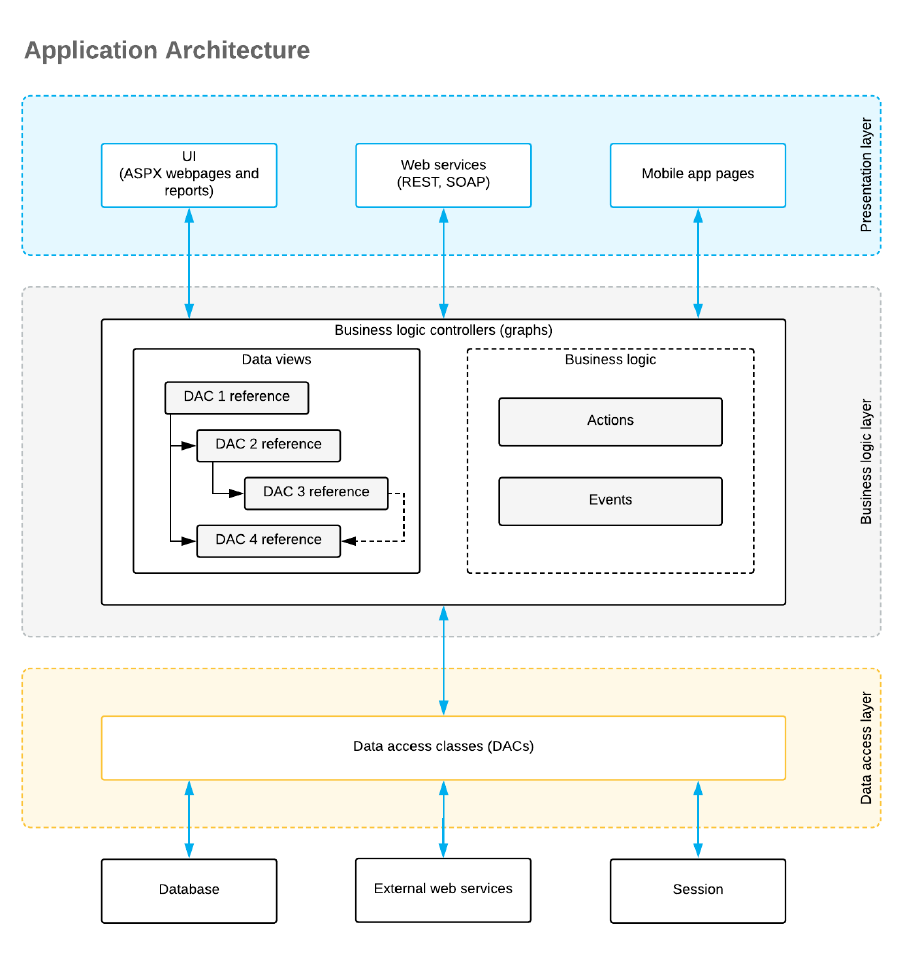
Acumatica Cloud xRP Platform
The Acumatica Cloud xRP Platform is the platform provided by Acumatica that is used to
build the Acumatica ERP application itself, any customizations of Acumatica ERP, the mobile
application for Acumatica ERP, and applications integrated with Acumatica ERP through the
web services API.
The Acumatica Cloud xRP Platform consists of a number of components, which are
highlighted with light blue in the following diagram. These components serve different
purposes, which are described in detail in this topic, and can be used either separately or
combined to achieve your business purposes.
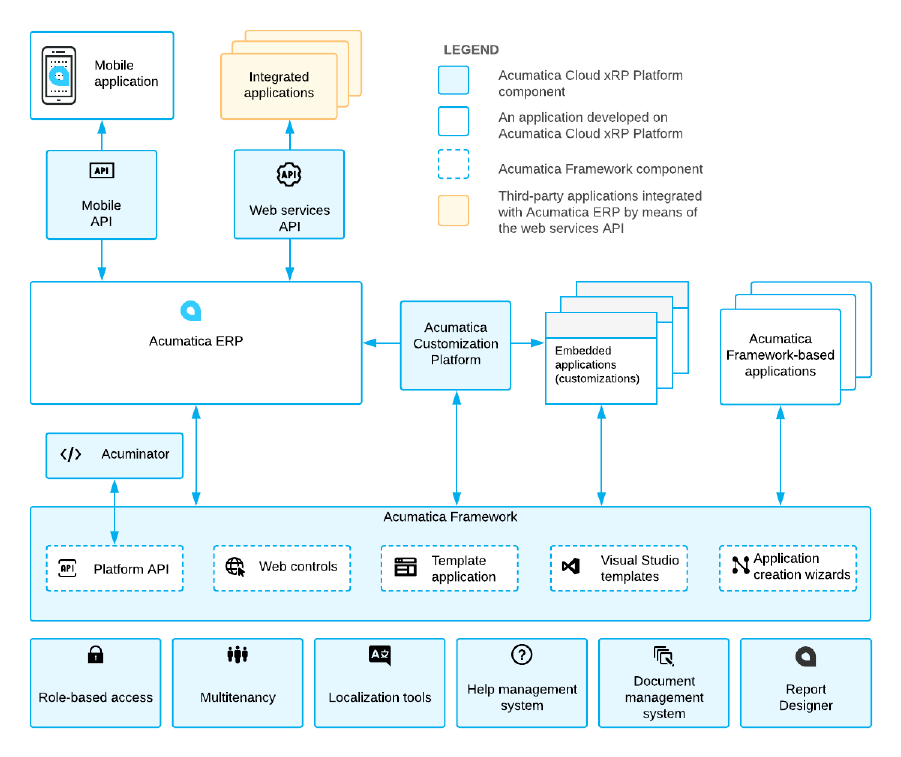
| Acumatica Framework Overview | 11
Figure: Acumatica Cloud xRP Platform
Basic Components and Tools
The base of the Acumatica Cloud xRP Platform is formed by the components and tools
that provide the basic application functionality, such as multitenancy support, role-based
access, and localization tools. These components and tools are available out-of-the-box in
Acumatica ERP, any embedded in Acumatica ERP applications, or applications based purely
on Acumatica Framework applications. This means that you do not need to worry about
implementing mechanisms similar to these components during the design or programming of
your application based on the Acumatica Cloud xRP Platform.
Acumatica Cloud xRP Platform contains the basic components and tools listed in the
following table.
| Acumatica Framework Overview | 12
Component or Tool Description
Role-based access A set of components responsible for user authorization, access
rights verification, and audit on the data access and business log-
ic levels. For more information, see Role-Based Access in the System
Administration Guide.
Multitenancy A component responsible for hosting multiple tenants on a single
application server. For details about multitenancy, see Support of
Multiple Tenants in the User Guide.
Localization tools The tools that help you to perform the localization of the application
to multiple languages. For more information about localization, see
Translation Process.
Help management
system
The integrated wiki-based help content editing, management, and
search system. For details about the help management system, see
Wiki Overview.
Document manage-
ment system
The integrated document storage and management system. For de-
tails, see Managing Attached Files.
Report Designer A separate utility (which can be installed along with Acumatica ERP
or Acumatica Framework) that you can use to design custom re-
ports. For details on this tool, see Acumatica Report Designer Guide.
Acumatica Framework
Acumatica Framework provides the platform API, web controls, and other tools for the
development of the UI and business logic of an ERP application. The platform API is used for
the development of Acumatica ERP and any embedded applications (that is, customizations
of Acumatica ERP). Acumatica Framework can also be used to develop an ERP application
from scratch. You can find detailed information about the development of applications with
Acumatica Framework in this guide.
Acumatica Framework consists of the development tools listed in the following table.
Component Description
Platform API The API for implementing application business logic.
Web controls A set of web controls implementing access to business logic through
the web UI.
Template application The application and database structures providing frameset, lay-
out, and navigation services. You can deploy a template application
along with the template website by using the Acumatica Framework
Configuration Wizard.
Visual Studio tem-
plates
The project template for the creation of a new application and a set
of page templates that automate the creation of typical page lay-
outs.

| Acumatica Framework Overview | 13
Component Description
Application creation
wizards
A set of components to automate the creation of the application da-
ta access classes from the database tables and the web forms dur-
ing application development.
For details about the development tools, see Acumatica Framework Development Tools.
Acuminator
Acuminator is a static code analysis and colorizer tool for Visual Studio that simplifies
development with Acumatica Framework. Acuminator provides diagnostics and code fixes
for common developer challenges related to the platform API. Also, Acuminator can colorize
and format business query language (BQL) statements, and can collapse attributes and parts
of BQL queries. You can find related information and download Acuminator at Visual Studio
Marketplace.
Acumatica Customization Platform
Acumatica Customization Platform provides customization tools for the development
of applications embedded in Acumatica ERP. Developers that work with Acumatica
Customization Platform use the platform API provided by Acumatica Framework.
With Acumatica Customization Platform, you can perform end-customer customizations and
create complex solutions for multiple customers. In these customizations, you can modify
the user interface, business logic, and database schema without recompilation and re-
installation of the application. Customizations are stored separately from the core application
code as metadata and can be modified, exported, or imported. Because customizations are
stored separately, they are preserved with the updates and upgrades of the core application.
For details on Acumatica Customization Platform, see Acumatica Customization Platform.
Web Services APIs
The Acumatica Cloud xRP Platform provides multiple types of web services APIs for
development of applications integrated with Acumatica ERP. These applications can perform
data migration and data import, integration of Acumatica ERP with external systems, and
execution of long-running operations.
You can use the contract-based REST API, contract-based SOAP API, or screen-based SOAP
API to access the same business logic as is accessed in the UI. All types of the web services
APIs can be used with any customization applied to Acumatica ERP. The contract-based
REST API supports the OpenAPI 2.0 (formerly known as Swagger 2.0) specification.
For details on the web services APIs, see Contract-Based Web Services API and Screen-Based
Web Services API.
Acumatica ERP supports the OAuth 2.0 mechanism of authorization for add-on applications
that interact with Acumatica ERP through application programming interfaces (APIs). For
details on the authorization of applications, see Authorizing Client Applications to Work with
Acumatica ERP.

| Acumatica Framework Overview | 14
Mobile API
Acumatica ERP provides the Acumatica mobile application, which allows a user to work with
Acumatica ERP through the mobile devices. You can customize the mobile application by
using the mobile API. For details on the mobile API, see Working with Mobile Framework.
Related Links
• Acumatica Developer Network
Acumatica Framework Development Tools
In this topic, you can find a detailed description of the development tools provided with
Acumatica Framework.
Platform API
The Platform API provided with Acumatica Framework is an event-driven programming API,
which is traditional in rich GUI applications. This model covers database access, business
logic, GUI behavior, and error handling. All coding is done with only C#.
The following code gives an example of the business logic implemented in the business logic
controller: The code updates the receipt total when one of the transactions related to the
receipt is updated.
public virtual void DocTransation_RowUpdated(PXCache cache,
PXRowUpdatedEventArgs e)
{
DocTransaction old = e.OldRow as DocTransaction;
DocTransaction trn = e.Row as DocTransaction;
if ((trn != null) && (trn.TranQty != old.TranQty ||
trn.UnitPrice != old.UnitPrice))
{
Document doc = Receipts.Current;
if (doc != null)
{
doc.TotalAmt -= old.TranQty * old.UnitPrice;
doc.TotalAmt += trn.TranQty * trn.UnitPrice;
Receipts.Update(doc);
}
}
}
When a user selects a document transaction in the table on a form and updates the settings
of the transaction, the RowUpdated event is triggered, and the code above is executed and
updates the receipt total, as shown in the following screenshots.
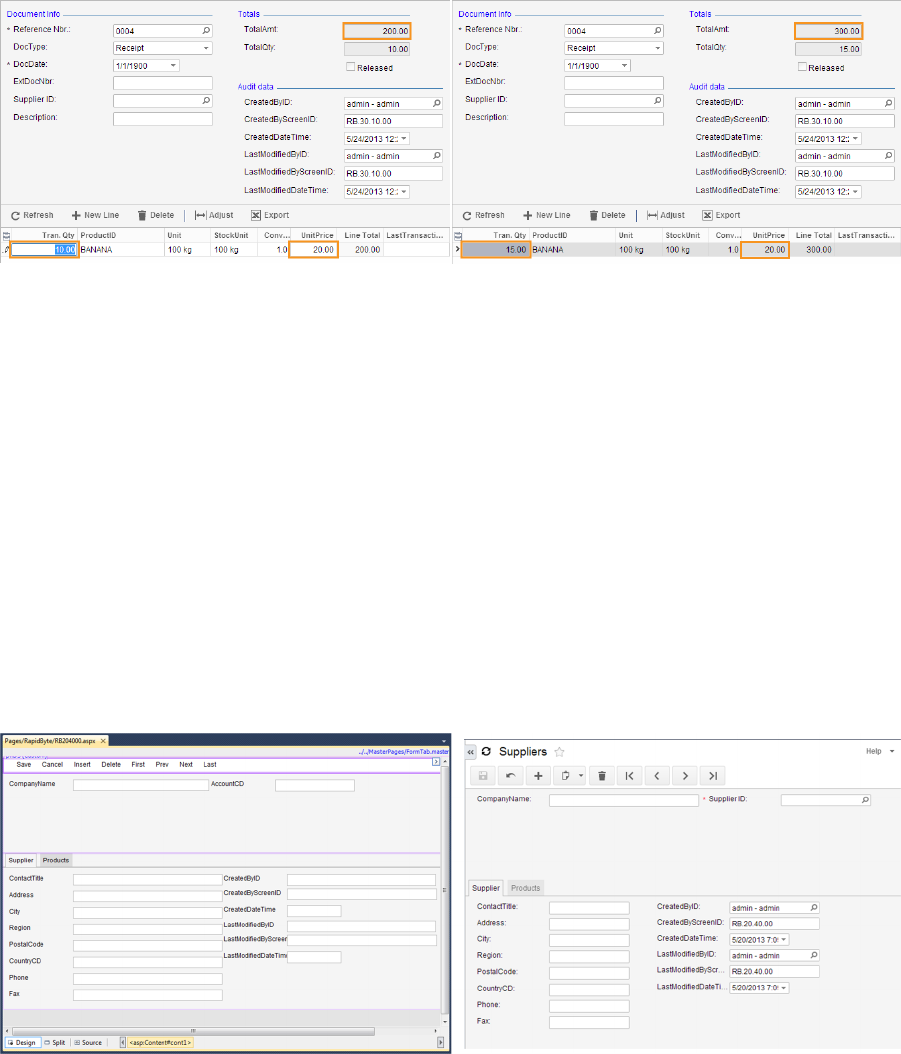
| Acumatica Framework Overview | 15
Figure: Update of document transaction details
Visual Web Designer Support
The Acumatica Framework Integrated Development Environment (IDE) is built on top of
Microsoft Visual Studio. However, the Acumatica Framework IDE implements its own set of
web controls to generate an advanced GUI in a web browser.
All of Acumatica Framework's web controls have the same rendering and a similar
appearance in design mode in the IDE and runtime mode in a web browser. Thus, the
developer can utilize all the facilities of the Visual Web Designer component of Visual Studio.
The application developer can use the convenient drag-and-drop mechanism to create an
application form layout, to perform form visual editing, and to set a control's properties
and behavior through an intuitive graphical interface. This approach does not require any
knowledge of HTML or Java Script, yet allows the developer to create a professional and
appealing web GUI.
The following screenshots illustrate the design (left) and runtime (right) rendering.
Figure: ASPX page in design and runtime mode
Master Pages, Templates, and CSS Support
The Visual Studio project and item templates provide reusable and customizable project
and item stubs that accelerate the development process, removing the need to create new
| Acumatica Framework Overview | 16
projects and items from scratch. Project templates provide the basic files needed for a
particular project type, include standard assembly references, and set the default project
properties and compiler options.
Acumatica Framework distribution includes the following:
• The project template for the creation of a new application
• A set of page templates that automate the creation of typical page layouts
The master pages mechanism in ASP.NET allows for the creation of an application that looks
and feels consistent. Master pages define the standard appearance and behavior that is
common in all application pages. You create individual content pages that refer to the master
page. When a content page is requested, it merges with the master page to produce output
that combines the layout and base functionality of the master page with the content of the
requested page.
Acumatica Framework fully supports the master pages mechanism and provides you with a
set of predefined master pages. You can design your own master pages or modify existing
ones.
A web application written with Acumatica Framework supports style modification through
Cascading Style Sheets (CSS).
Application Creation Wizards
Acumatica Framework provides a set of wizards for automating the creation of data access
classes and webpages. The use of these wizards eliminates the manual steps associated with
data access class creation and data binding configuration.
The Data Access Class Generator, which is shown in the following screenshot, provides the
application developer with a way to create and modify data access classes. It implements
the following functionality:
• Reading the data structure from a table, SQL query, or external data source
• Creating a data access class based on the data structure received from external data
source
• Reading the data access class structure from its definition and merging this structure
with the data structure received from the external data source
• Automatic mapping of application-specific attributes based on the names of the
properties of the external data source
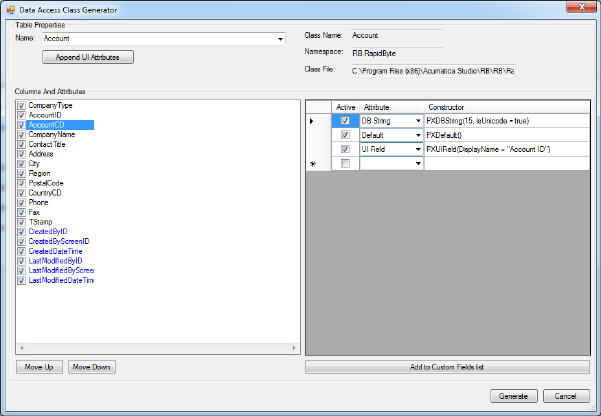
| Acumatica Framework Overview | 17
Figure: Data Access Class Generator
The Layout Editor, which is shown in the following screenshot, automates the creation of new
web forms. It uses metadata stored in the business logic controller and data access class to
help the application developer create new web forms or to modify existing ones. The Layout
Editor wizard implements the following features:
• Reading metadata from the business logic controller and the data access class and
creating a list of controls that could be added to the webpage
• Adding the controls selected by the programmer to the webpage
• Updating the webpage controls with the changed business logic controller and the data
access class metadata
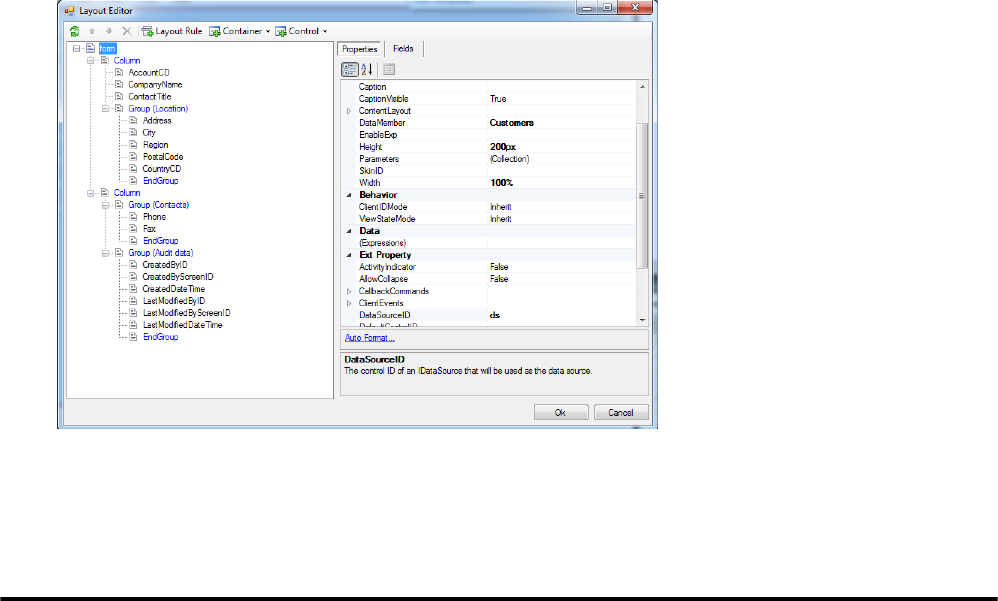
| Acumatica Framework Overview | 18
Figure: Layout Editor
Runtime Architecture of an Application Based on
Acumatica Framework
In this topic, you can review the architecture of an application created based on Acumatica
Framework, such as Acumatica ERP, customizations of Acumatica ERP, and applications
based purely on Acumatica Framework.
An application written with Acumatica Framework has n-tier architecture with a clear
separation of the presentation, business, and data access layers, as shown in the following
diagram. You can find details about each layer in the sections below.
| Acumatica Framework Overview | 19
Data Access Layer
The data access layer of an application written using Acumatica Framework is implemented
as a set of data access classes (DACs) that wrap data from database tables or data received
through other external sources (such as Amazon Web Services).
The instances of data access classes are maintained by the business logic layer. Between
requests, these instances are stored in the session. On a standalone Acumatica ERP server,
session data is stored in the server memory. In a cluster of application servers, session data
| Acumatica Framework Overview | 20
is serialized and stored in a high-performance remote server through a custom optimized
serialization mechanism.
For details about data storage in session, see Session. For details on working with the data
access layer, see Accessing Data.
Business Logic Layer
The business logic is implemented though the business logic controller (also called graph).
Graphs are classes that you derive from the special API class (PXGraph) and that are tied to
one or more data access classes.
Each graph conceptually consists of two parts:
• Data views, which include the references to the required data access classes, their
relationships, and other meta information
• Business logic, which consists of actions and events associated with the modified data.
Each graph can be accessed from the presentation layer or from the application code that
is implemented within another graph. When the graph receives an execution request, it
extracts the data required for request execution from the data access classes included in
the data views, triggers business logic execution, returns the result of the execution to the
requesting party, and updates the data access classes instances with the modified data.
For details on working with the business logic layer, see Implementing Business Logic.
Presentation Layer
The presentation layer provides access to the application business logic through the UI, web
services, and Acumatica mobile application. The presentation layer is completely declarative
and contains no business logic.
The UI consists of ASPX webpages (which are based on the ASP.NET Web Forms technology)
and reports created with Acumatica Report Designer. The ASPX webpages are bound to
particular graphs.
When the user requests a new webpage, the presentation layer is responsible for processing
this request. Webpages are used for generating static HTML page content and providing
additional service information required for the dynamic configuration of the web controls.
When the user receives the requested page and starts browsing or entering data, the
presentation layer is responsible for handling asynchronous HTTP requests. During
processing, the presentation layer submits a request to the business logic layer for
execution. Once execution is completed, the business logic layer analyzes any changes in
the graph state and generates the response that is sent back to the browser as an XML
document.
For details on the configuration of ASPX webpages, see Configuring ASPX Pages and Reports.
Web services and mobile app pages provide alternative interfaces to the application business
logic. From the side of the graph, a request from a webpage, the web services, or an mobile
app page are identical and, thus, cause the execution of exactly the same business logic.

| Getting Started with Acumatica Framework | 21
Getting Started with Acumatica Framework
In this part of the guide, you can find the information that you may need to start
development with Acumatica Framework.
System Requirements
You can find the full list of system requirements in System Requirements for Acumatica
Framework 2019 R2 in the Installation Guide.
Installation
For detailed information about the installation of Acumatica Framework, see Installing
Acumatica Framework in the Installation Guide.
Application Design
For the information about the design of the database structure and user interface of
applications based on Acumatica Framework, see Designing the Application in this guide.
Development of the Application Code
Before you begin developing application code, we recommend that you complete the
following training courses:
• T100 Development: Introduction to Acumatica Framework
• T200 Development: Acumatica Framework Fundamentals
For a quick overview of application programming, refer to the topics in this part of the guide.
In the Acumatica Framework Guide, you can find reference information and additional
information that is not covered in the training courses. This information is provided in the
following parts of the guide:
• Configuring ASPX Pages and Reports: About the development of ASPX pages
• Accessing Data: About business query language (BQL) and working with data in cache and
session
• Implementing Business Logic: About events, attributes, long-running operations, and other
topics related to business logic development
• Troubleshooting Acumatica Framework-Based Applications: About debugging the Acumatica
Framework-based applications and fixing the common errors
For a detailed description of the Acumatica Framework API, see API Reference.
| Getting Started with Acumatica Framework | 22
Website Management
If you want to modify the position of a form in the UI, add a form to a workspace, or remove
a form from the UI, you configure the UI as described in Customizing the User Interface in the
System Administration Guide.
You need to grant access rights to each new form. For details on the configuration of access
rights, see Managing User Access Rights in the System Administration Guide.
You can create help topics for any application you have developed with Acumatica
Framework by using the built-in wiki-based content management system. For details on
creating help topics, see Managing Wikis.
In This Part
• Data Querying
• Business Logic Controller Declaration
• Data View and Cache
• Data Modification Scenarios
• Business Logic Implementation
Data Querying
Acumatica Framework provides a custom language called BQL (business query language)
that developers can use for writing database queries. BQL is written in C# and based on
generic class syntax, but is still very similar to SQL syntax.
Acumatica Framework provides two dialects of BQL: traditional BQL and fluent BQL. We
recommend that you use fluent BQL because statements written in fluent BQL are simpler
and shorter than the ones written with traditional BQL. "Further in this topic, the examples
are written in fluent BQL.
You can also use LINQ to select records from the database or to apply additional
filtering to the data of a BQL query. For details, see Creating LINQ Queries.
BQL has almost the same keywords as SQL does, and they are placed in the same order as
they are in SQL, as shown in the following example of BQL.
SelectFrom<Product>.Where<Product.availQty.IsNotNull.
And<Product.availQty.IsGreater<Product.bookedQty>>>
If the database provider is Microsoft SQL Server, the framework translates this expression
into the following SQL query.
SELECT * FROM Product
WHERE Product.AvailQty IS NOT NULL

| Getting Started with Acumatica Framework | 23
AND Product.AvailQty > Product.BookedQty BQL
BQL extends several benefits to the application developer. It does not depend on the
specifics of the database provider, and it is object-oriented and extendable. Another
important benefit of BQL is compile-time syntax validation, which helps to prevent SQL
syntax errors.
Because BQL is implemented on top of generic classes, you need data types that represent
database tables. In the context of Acumatica Framework, these types are called data access
classes (DACs). As an example of a DAC, you would define the Product data access class
as shown in the following code fragment to execute the SQL query from the previous code
example.
using System;
using PX.Data;
// Types used in BQL statements should derive from special interfaces:
// table is derived from IBqlTable, and column is derived from IBqlField.
[PXCacheName("Product")]
public class Product : PX.Data.IBqlTable
{
// The property holding the ProductID value in a record
[PXDBIdentity(IsKey = true)]
public virtual int? ProductID { get; set; }
// The type used in BQL statements to reference the ProductID column
public abstract class productID : PX.Data.BQL.BqlInt.Field<productID> { }
// The property holding the AvailQty value in a record
[PXDBDecimal(2)]
public virtual decimal? AvailQty { get; set; }
// The type used in BQL statements to reference the AvailQty column
public abstract class availQty : PX.Data.BQL.BqlDecimal.Field<availQty> { }
// The property holding the BookedQty value in a record
[PXDBDecimal(2)]
public virtual decimal? BookedQty { get; set; }
// The type used in BQL statements to reference the BookedQty column
public abstract class bookedQty : PX.Data.BQL.BqlDecimal.Field<bookedQty> { }
}
Each table field is declared in a data access class in two different ways, each for a different
purpose:
• As a public virtual property (which is also referred to as a property field) to hold the
table field data
• As a public abstract class (which is also referred to as a class field) to reference a
field in the BQL command
If the DAC is bound to the database, it must have the same class name the database table
has. DAC fields are bound to the database by means of data mapping attributes (such
| Getting Started with Acumatica Framework | 24
as PXDBIdentity and PXDBDecimal), using the same naming convention as fields in the
database.
The following code demonstrates an example of how to obtain data records from the
database.
// Select Product records
PXResultset<Product> res = SelectFrom<Product>.Where<Product.availQty.IsNotNull.
And<Product.availQty.IsGreater<Product.bookedQty>>>.View.Select(graph);
// You can iterate through the result set
foreach(PXResult<Product> rec in res)
{
// A record from the result set can be cast to the DAC
Product p = (Product)rec;
...
}
Related Links
• Querying Data in Acumatica Framework
Business Logic Controller Declaration
Working with the business data in Acumatica Framework is implemented through the
business logic controller object also referred as graph (graph is a mathematical term for
a set of objects where some pairs of objects are connected by links). A graph provides the
interface for the presentation logic to operate with the business data and relies on Data
Access Layer components to store and retrieve the business data from the database.
The following example shows the declaration of a simple business logic controller.
//Declaration of the graph
public class ProductMaint : PXGraph<ProductMaint>
{
//Declaration of the data view
public PXSelect<Product> Products;
//Declaration of the actions
public PXCancel<Product> Cancel;
public PXSave<Product> Save;
}
In this example, the graph contains the following members:
• Products: The data view that can be used for querying and modifying the data
• Cancel: The action that discard all the changes made to the data and reloads it from the
database
• Save: The action that commits the changes made to the data to the database and then
reloads the committed data

| Getting Started with Acumatica Framework | 25
Data View and Cache
Data views implement the interfaces for querying the data from the database and submitting
modified data to the cache.
Data views are declared in business logic controllers as public fields of PXSelectBase-
derived type. The following data view declaration uses the SelectFrom<Type>.View class,
which is derived from PXSelectBase.
public SelectFrom<Product>.View Products;
The data view type is a business query language (BQL) statement that selects data to be
manipulated through the data view. The main DAC of a data view is the first type parameter
in the declaration. The data view that is specified as the primary view for the ASPX page
must be defined the first one in the graph. For details about, BQL, see Querying Data in
Acumatica Framework.
Based on this declaration, the system automatically instantiates the DAC cache.
A DAC cache object in the Acumatica Framework is the primary interface for working with
individual records from the graph business logic. It has two components and two primary
responsibilities:
• The Cached collection: In-memory cache that contains modified entity records. The
Cached collection is instantiated based on the corresponding DAC declaration and
managed by the cache.
• The controller: The cache component that implements basic CRUD (create, read, update,
delete) operations on the Cached collection and triggers a sequence of data manipulation
events when modifying or accessing the data in the Cached collection. These events can
be later subscribed from the graph to implement the business logic associated with the
data modification.
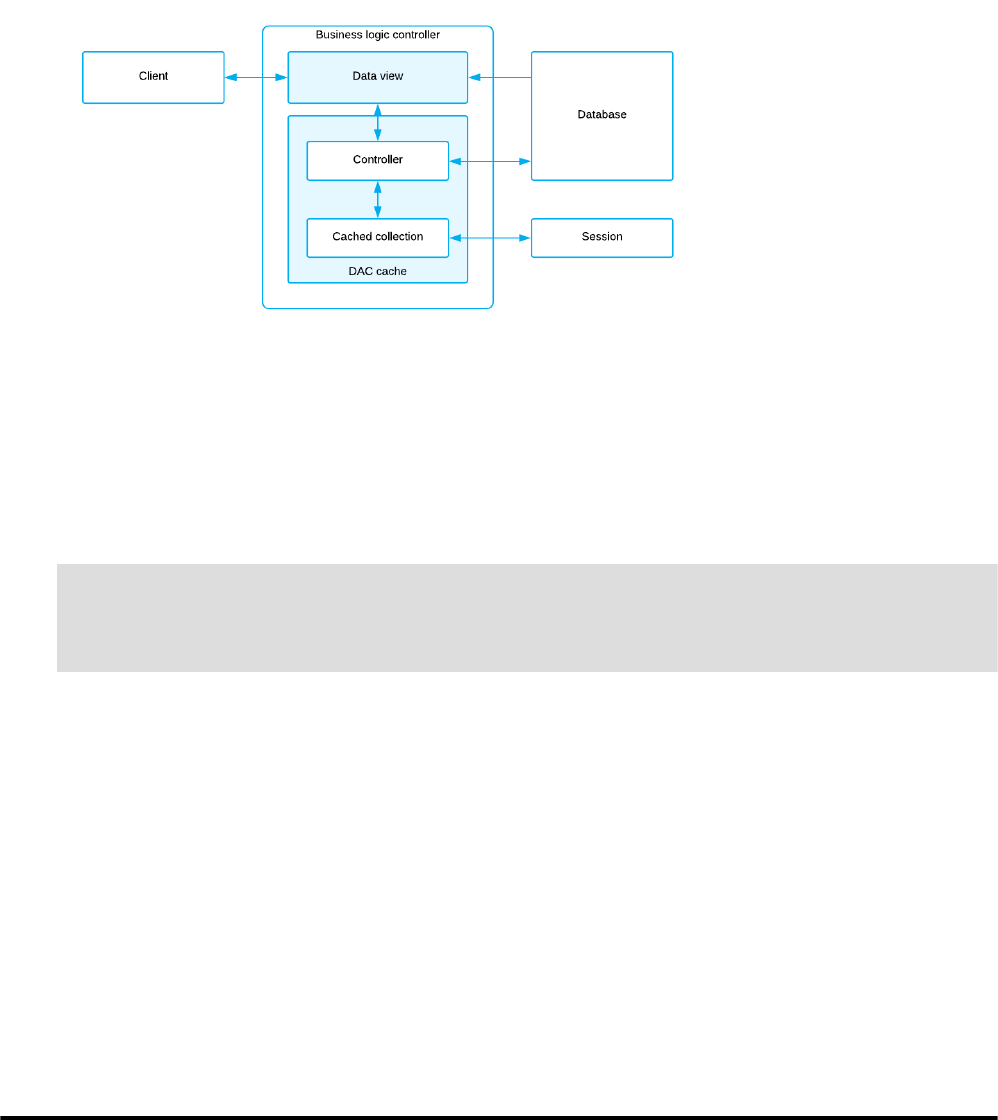
The diagram below shows the internal graph structure and responsibilities of the data view
and the cache.
| Getting Started with Acumatica Framework | 26
Figure: The graph structure
Master-Detail Relationship Between Data Views
The framework executes data views in the order requested by the form. You don't have to
execute a data view explicitly to retrieve data for the UI.
The following code shows the declaration of two data views.
public SelectFrom<SalesOrder>.View Orders;
public SelectFrom<OrderLine>.
Where<OrderLine.orderNbr.
IsEqual<SalesOrder.orderNbr.FromCurrent>>.View OrderDetails;
In this example, the framework first executes the Orders data view to retrieve the master
data record, and then executes the OrderDetails data view. To pass the OrderNbr field
value as a parameter to the OrderDetails data view, we use the Current property of the
cache that keeps the data record that is currently selected in the UI. Thus the last data
record retrieved by the Orders data view is available through the Current property of the
cache. (But we expect to have only one master record available at a time.) Also, when you
create the new master data record, it also gets available through the Current property of
the cache.
If the Current property is null or the field value is null, the parameter is replaced by the
default value.
Related Links
• Querying Data in Acumatica Framework
Data Modification Scenarios
In this topic, you can find the basic data manipulation scenarios that can be executed from
the graph business logic or from the user interface. Entity data manipulation through the
| Getting Started with Acumatica Framework | 27
user interface indirectly invokes the same methods as the direct call from the business logic
controller.
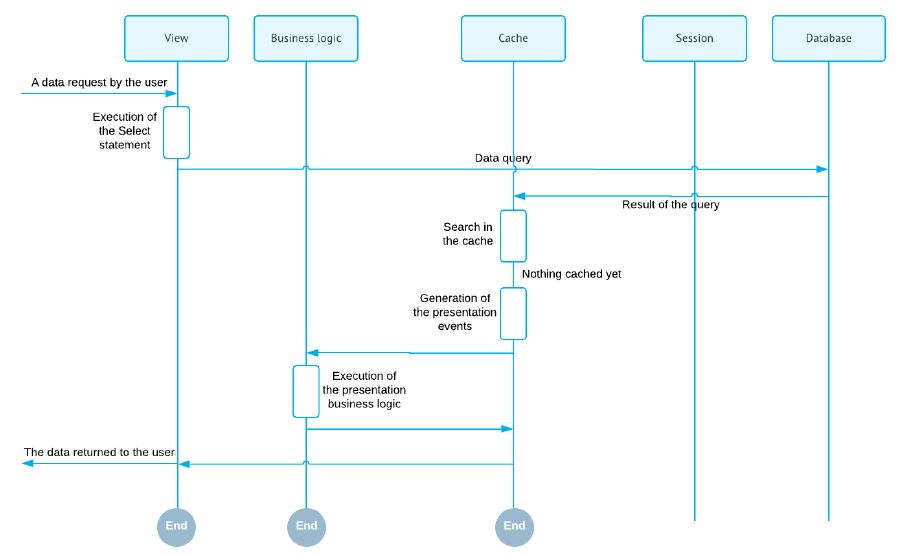
Querying the Data for the First Time
The data can be requested through the Select method of the data view. During this
operation, the systems executes BQL command from the data view declaration. The data
returned by the BQL command is passed to the requester. The following diagram illustrates
this process.
Figure: Querying the data for the first time
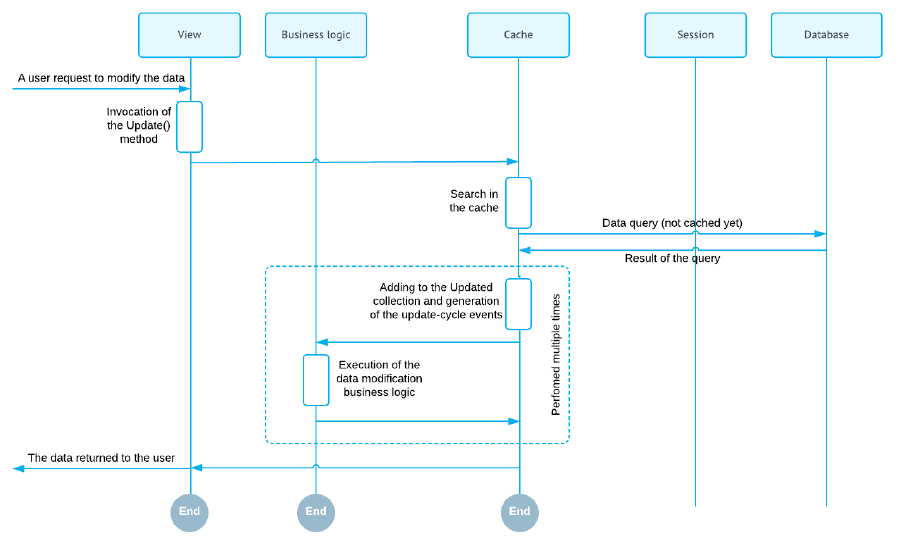
Updating an Existing Record
An existing record can be updated through the Update(record) method of the data view.
This method places the modified record into the cache.
If the data record is not found in the Cached collection, the cache controller loads the data
record from the database, adds it to the Cached collection, marks it as updated, and updates
it with the new values. The search of the data record in the Cached collection and loading
of the data record from the database is based on the DAC key fields. The diagram below
illustrates this scenario.
| Getting Started with Acumatica Framework | 28
Figure: Updating the record for the first time
If the updated record exists in the Cached collection the cache controller locates it and
updates it with the new values. The diagram below illustrates this scenario.
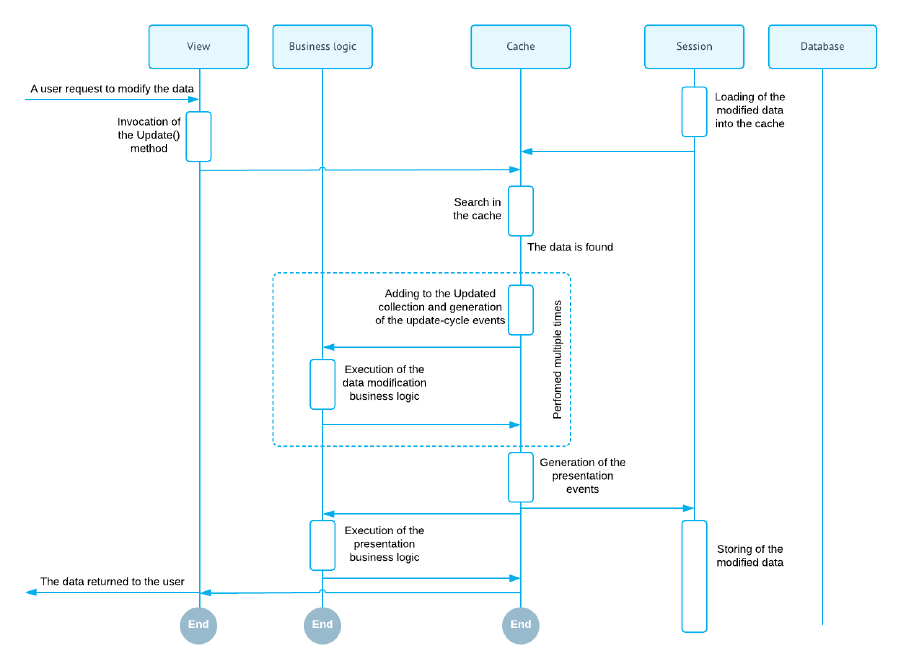
| Getting Started with Acumatica Framework | 29
Figure: Updating the cached (previously modified) record
Inserting a New Record
A new record can be inserted into the cache through the Insert(record) method of
the data view. The new inserted record is added to the Cached collection and marked as
inserted. The diagram below illustrates this scenario.
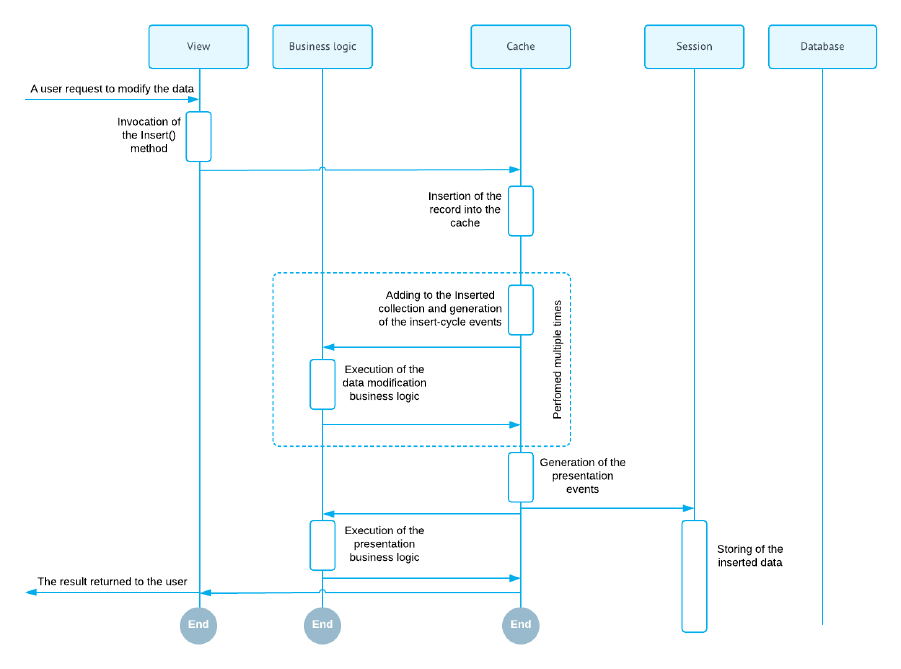
| Getting Started with Acumatica Framework | 30
Figure: Inserting the new record
Deleting an Existing Record
An existing record can be deleted from the cache using the Delete(record) method, of the
data view.
If the data record is not found in the Cached collection, the cache controller loads the data
record from the database, adds it to the Cached collection, and marks it as deleted. The
search of the data record in the Cached collection and loading of the data record from the
database is based on the DAC key fields. The diagram below illustrates this scenario.
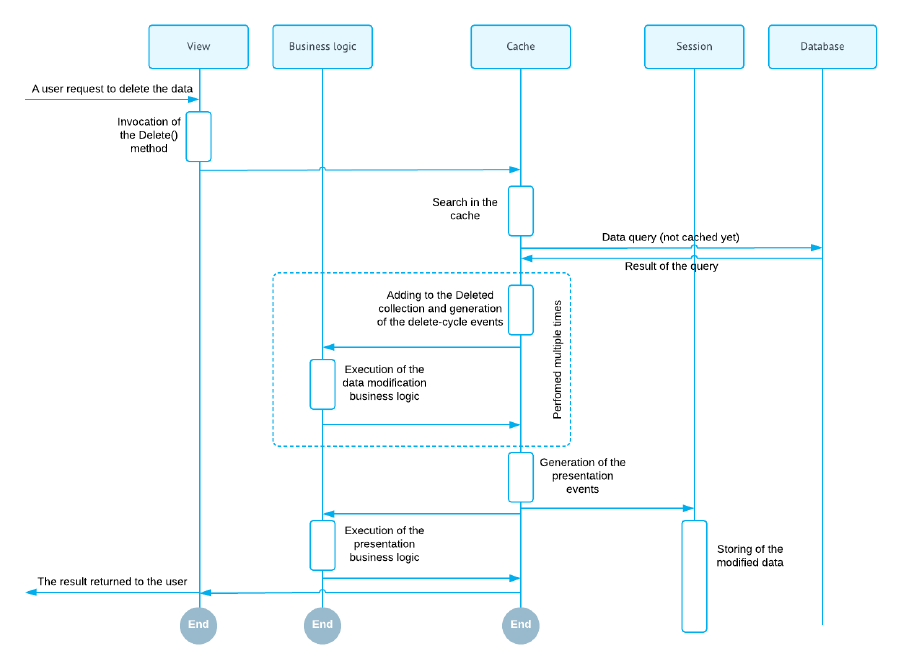
| Getting Started with Acumatica Framework | 31
Figure: Deleting the non-cached (unmodified) record
If the deleted record is found in the Cached collection, the cache controller locates it and
marks as deleted. The diagram below illustrates this scenario.

| Getting Started with Acumatica Framework | 32
Figure: Deleting of the cached (previously modified) record
Querying Updated Data
The data can be modified and then queried again. In this scenario, the data records stored in
the cache memory are merged with the result of the BQL command execution. Data record
merge is based on DAC key fields. The final result of the Select() execution incorporates
all the earlier record modifications that have not been preserved to the database yet. The
diagram below illustrates this scenario.
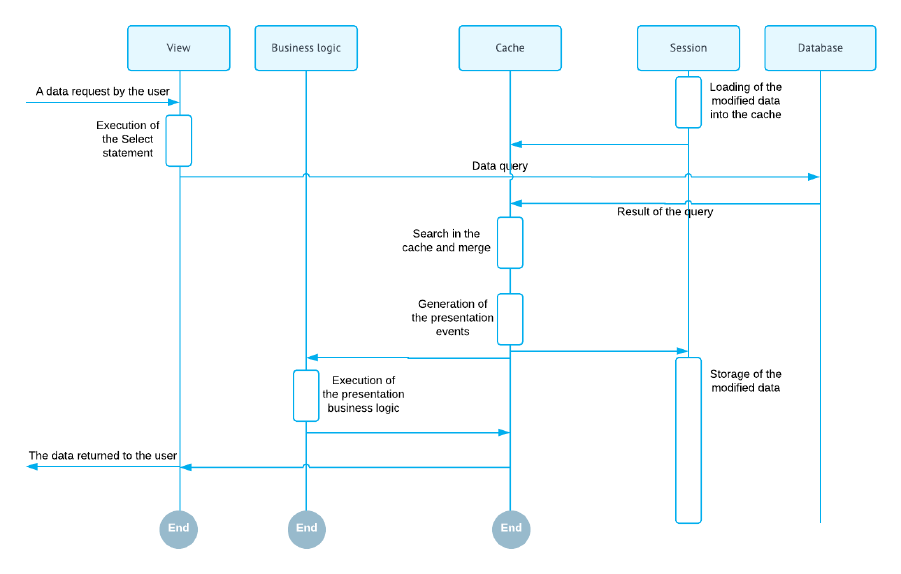
| Getting Started with Acumatica Framework | 33
Figure: Querying the modified data
Persisting Changes to the Database
When the data is modified, the system has two different versions of the data: the new one
stored in the caches memory and the original one persisted in the database. At this point
you have two options:
• Save the new version of data to the database using the Persist() method of the graph
• Discard all in-memory changes and load the original data version using the Clear()
method of the graph
From the user interface these methods are called by invocation of the Save and Cancel
actions. These actions are predefined and mapped to the Persist() and Clear() methods.
The diagram below illustrated saving of the changes to the database.
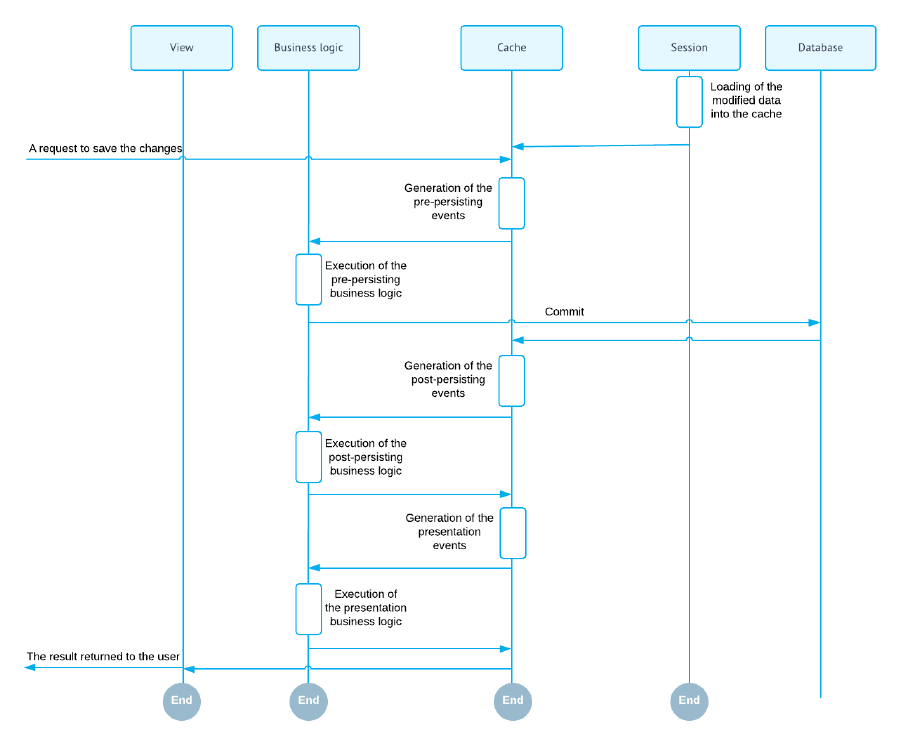
| Getting Started with Acumatica Framework | 34
Figure: Saving the changes to the database
The diagram below illustrates discarding of all in-memory entity changes.
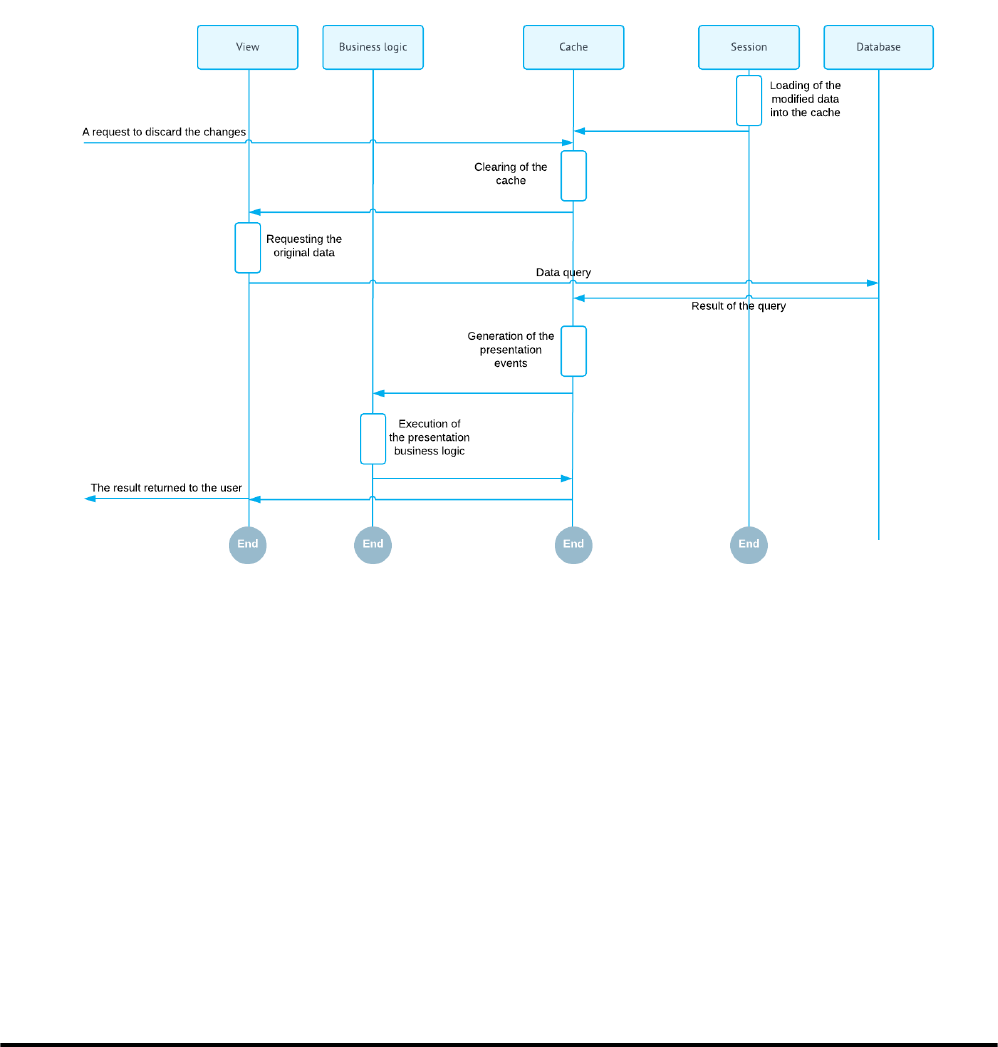
| Getting Started with Acumatica Framework | 35
Figure: Discarding the changes and loading the original data
Preserving the Data Version Between the Round Trips and Handling the
Subsequent Selects from the Views
It is important to understand that a graph is a stateless object. It is discarded after each
data request. In order to preserve the modified data version between the requests, the
cache controller serializes the Cached collection into the session state and restores it later
when the graph is instantiated on the subsequent request. In this scenario, it is very
important that the cache contains only the modified entity records, not the complete entity
record set.
Related Links
• Working with Data in Cache and Session
Business Logic Implementation
The business logic of an Acumatica Framework-based application is implemented by
overloading certain methods invoked by the system in the process of manipulating data.
For such procedures as inserting a data record or updating a data record, the PXCache
controllers generate series of events causing invocation of the methods called event
handlers.

| Getting Started with Acumatica Framework | 36
The business logic can be divided into common logic relevant to different parts of the
application and the logic specific to an application form (webpage). The common logic is
implemented through event handler methods defined in attributes, while the form-specific
logic is implemented as methods in the associated graph.
Common Business Logic
You implement the common business logic by defining event handlers in attributes. If such
attribute is added to the declaration of a data access class, attribute logic is applied to the
data records of this type for any graph used to access this table.
There are a number of predefined attributes implemented in the framework. For example, in
the following declaration of a data field for a column, the PXDBDecimal attribute binds this
field to a database column of the decimal type.
[PXDBDecimal(2)]
public virtual string AvailQty { get; set; }
The attributes that bind a field to a specific data type exist for most database data types.
Another typical example of an attribute is PXUIField. It is used to configure the
input control for the column in the user interface. This allows having the same visual
representation of the column on all application screens (unless a screen redefines it). The
following example shows the use of the PXUIField attribute.
[PXDBDecimal(2)]
[PXUIField(DisplayName = "Available Qty", Enabled = false)]
public virtual string AvailQty { get; set; }
You can also defined your own attributes, as shown in the following code.
// Application-defined attribute that implements common business logic
public class MyAttribute : PXEventSubscriberAttribute,
IPXEventNameSubscriber
{
// An event handler
protected virtual void EventName(PXCache sender,
PXRowEventNameEventArgs e)
{
...
}
...
}
These custom attributes can also be added to the DAC declaration, as shown in the following
example.
[PXDBDecimal(2)]
[PXUIField(DisplayName = "Available Qty", Enabled = false)]
[MyAttribute]

| Getting Started with Acumatica Framework | 37
public virtual string AvailQty { get; set; }
For details about attributes, see Working with Attributes.
Screen-Specific Business Logic
For a specific screen, the application can redefine the common logic or extend it. For this
purpose, you should define event handlers in the graph associated with the screen. Each
event handler method is tied to a particular table or a table field via the naming convention.
For example, you can verify a value of a column as shown in the following code.
public class ProductRecalc : PXGraph<ProductRecalc>
{
...
// Event handler verifying that the value of the AvailQty column
// in Product records is greater than 0.
// It is triggered when, for instance, a Product record is updated.
protected virtual void Product_AvailQty_FieldVerifying(
PXCache sender,
PXFieldVerifyingEventArgs e)
{
Product p = (Product)e.Row;
if (p != null && p.AvailQty != null)
{
if (p.AvailQty < 0)
throw new PXSetPropertyException<Product.availQty>(
"Value must be greater than 0.");
}
}
}
For details about events, see Working with Events.
Related Links
• Implementing Business Logic

| Designing the Application | 38
Designing the Application
During the development of Acumatica Framework-based applications, you have to perform
the following steps of application design:
• Analyze the requirements, plan the entity model of the application.
• Prepare the database schema and the data access class design.
• Plan the forms that provide the user interface of the application. You create application
forms from specific Acumatica Framework form templates.
• Plan the business logic controller (also referred as graph) for each form, which
encapsulate business processes and use-cases that should be implemented in the
application.
Each of these steps is iterated for multiple times as the development is progress.
This part of the guide contains the design guidelines for the database schema and
applications built on Acumatica Framework.
In This Part
• Designing the Database Structure and DACs
• Designing the User Interface
• Naming the Graphs and Event Handlers
Designing the Database Structure and DACs
This chapter covers the main aspects of database design used in Acumatica Framework.
In This Chapter
• System and Application Tables
• Table and Column Naming Conventions
• Common Columns and Data Types
• Primary Key
• Foreign Keys and Nullable Columns
• Audit Fields
• Concurrent Update Control
• Attachment of Additional Objects to Data Records
• Preservation of Deleted Records
| Designing the Application | 39
• Multitenancy Support
Related Links
• Designing the User Interface
• Naming the Graphs and Event Handlers
System and Application Tables
The database of your Acumatica Framework-based application consists of the following
tables:
• System tables: Those that are created by default for the application template and not
used to store your application data
• Application tables: Acumatica ERP tables (which exist if you have implemented
customization) and your own tables
Do not add columns to system tables or modify them in any other way. Such modifications
could corrupt the application and would be lost during the next database upgrade.
Regarding your own application tables, you have to design and create the needed tables that
store your application data. You then map these application tables to data access classes
(DACs) that define the object model of the application. In one table, you can keep data
records of multiple entities, each of which is defined as a separate data access class in the
application object model.
Related Links
• Designing the Database Structure and DACs
Table and Column Naming Conventions
In this topic, you can learn how you should name tables and columns in a database that is
used by an Acumatica Framework-based application.
Table Naming Conventions
When you are creating a table, you should consider the following suggestions regarding
naming conventions:
• Make sure that table and column names are valid C# identifiers, because these names
match the names of the classes and properties you declare in the application. Do not
start a table or column name with a digit.
• Do not use the underscore symbol (_) in table or column names, because it is a reserved
symbol in Acumatica Framework. For example, TenantType is a valid column name, while
Tenant_Type is invalid.

| Designing the Application | 40
• Use singular nouns for table names. Typically, a table is mapped to a data access class
that represents the entity. For instance, the SOShipment table contains data records that
represent instances of the SOShipment entity.
Acumatica Framework generates SQL statements with table and column names in
the same letter case (that is, uppercase or lowercase) as the corresponding data
access classes and fields are declared in the application. Also, the DAC Generator
tool produces data access class declarations in the same letter case as the tables
and columns are defined in the database schema.
• Use two prefixes in table names: a two-letter tenant name and then a two-letter
application module prefix. For example, the MTSVAppointment table can be used in the
Services (SV) module for the MyTenant tenant (which corresponds to the MT prefix).
These prefixes help to distinguish your application tables from Acumatica ERP tables and
tables of other vendors if you create an add-on project or extension library.
• If you add a column to an Acumatica ERP table, start the column name with the Usr
prefix followed by the two-letter tenant name. For instance, you could use UsrMTColumn
for the column of the MyTenant tenant. In this case, the column will be preserved during
upgrades. In your own application tables, there are no strict requirements to start
column names with any prefixes.
• Be sure that custom indexes on Acumatica ERP tables start with the Usr prefix followed
by the two-letter tenant name, so that the indexes will be preserved during upgrades.
Column Naming Conventions
We recommend that you use the following suffixes in column names:
• ID for surrogate keys, including database identity columns, such as CustomerID
• CD for natural keys, such as CustomerCD
• Nbr for numbering identifiers, such as OrderNbr
• Price for prices, such as UnitPrice
• Cost for costs, such as UnitCost
• Amt for amounts, such as FreightAmt
• Total for totals, such as OrderTotal
• Qty, QtyMin, and QtyMax for quantities, such as OrderQty
• Date for dates, such as OrderDate
• Time for time points and time spans, such as BillableTime
• Pct for percents, such as DiscountPct
| Designing the Application | 41
Related Links
• Designing the Database Structure and DACs
Common Columns and Data Types
You should use the following data types for columns. In the Type Attribute on the Data
Field column in the table below, you can find the most common type attributes that are
added to the corresponding data fields in the data access class declaration.
Table: Common Data Types
Value Data Type (SQL
Server)
Data Type
(MySQL)
Type Attribute on the
Data Field
Database identity int INT [PXDBIdentity]
Natural key (for exam-
ple, document num-
ber)
nvarchar(15) VARCHAR(15)
with utf8mb4
character set
[PXDBString(15, IsKey
= true, IsUnicode =
true)]
Line number int INT [PXDBInt]
Short string (for ex-
ample, a name or unit
of measure)
nvarchar(20),
nvarchar(50)
VARCHAR(20),
VARCHAR(50)
with utf8mb4
character set
[PXDBString(20, IsUni-
code = true)]
Long string (such as a
description)
nvarchar(255) VARCHAR(255)
with utf8mb4
character set
[PXDBString(255, IsUni-
code = true)]
Type or status identifi-
er (for instance, a doc-
ument type)
int or char(1) INT or CHAR(1) [PXDBInt] or [PXD-
BString(1, IsFixed =
true)] respectively
Boolean flag (for ex-
ample, active/inactive)
bit TINYINT(1) [PXDBBool]
Price or cost, mone-
tary units
decimal(19, 6) DECIMAL(19, 6) [PXDBDecimal(6)]
Amount or total, mon-
etary units
decimal(19, 4) DECIMAL(19, 4) [PXDBDecimal(4)]
Quantity, pieces decimal(25, 6) DECIMAL(25, 6) [PXDBDecimal(6)]
Maximum, minimum,
or threshold quantity,
pieces
decimal(9, 6) DECIMAL(9, 6) [PXDBDecimal(2)]
Percent, rate (for ex-
ample, discount per-
cent)
decimal(9, 6) DECIMAL(9, 6) [PXDBDecimal(2)]
Weight or volume decimal(25, 6) DECIMAL(25, 6) [PXDBDecimal(6)]
| Designing the Application | 42
Value Data Type (SQL
Server)
Data Type
(MySQL)
Type Attribute on the
Data Field
Date smalldatetime DATETIME [PXDBDate]
Time span int INT [PXDBTimeSpan(Display-
Mask = "t", InputMask =
"t")]
Coefficient (such as a
conversion factor)
decimal(9, 6) DECIMAL(9, 6) [PXDBDecimal(1)]
Related Links
• Designing the Database Structure and DACs
Primary Key
You have to define the primary key in each application table that you create. The primary
key may consist of one column or multiple columns. The primary key must include the
CompanyID column if one is defined in the table. For details on the CompanyID column, see
Multitenancy Support.
For each table, you can use one of the following typical variants of primary keys:
• One key column included in the primary key in the table and set as the key in the data
access class
• A pair of columns, with one column included in the primary key in the table and the other
column set as the key in the data access class
• Multiple columns that are included in the primary key and set as the compound key in
the data access class
In a setup table, only the CompanyID column must be included in the primary key.
One Key Column
You may use one key column for rather short tables. For instance, you can use the two-letter
country code from ISO 3166 as the key in the Country table.
A Pair of Columns with Key Substitution in the UI
If you want to represent a user-friendly key in the user interface (UI) that corresponds to
a surrogate key in the database, you can use a pair of columns and the key substitution
mechanism provided by Acumatica Framework. You can define two columns in a table, one
for the surrogate key (typically the database identity column) and one for the natural key,
and set only the surrogate key as primary in the table. In the application object model, you
set the key to only the data field that is a natural key. In this case, Acumatica Framework
provides the ability to transparently work with different keys at the database and application
levels. In the UI, users work with only the natural key while the database operates with the
surrogate key (see the graphic below, which illustrates key substitution).
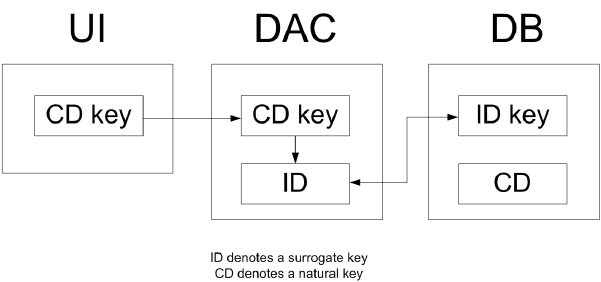
| Designing the Application | 43
Figure: Key substitution in Acumatica Framework
For instance, you can define two columns in the Product table, ProductID and ProductCD.
ProductID is the identity column that is the only column included in the primary key of
the table. ProductCD is the string key of a product instance, which is entered by the user
through the UI. The ProductCD column isn't included in the primary key and is handled as
the unique key column by Acumatica Framework.
Multiple Column Key
A compound key consisting of multiple columns may be used for complex entities. For
instance, you can include two columns, DocType and DocNbr, in the primary key for the
Document table. In the DocDetail table, you may use DocNbr and DocDetailNbr as the
compound primary key. The corresponding data fields should be also set as the key fields in
the data access class.
Related Links
• Designing the Database Structure and DACs
Foreign Keys and Nullable Columns
In the database, you have to define the primary key in each application table that you
create. The primary key defines the unique data record identifier, which provides table-level
integrity of data.
There are no strict requirements to define column-level constraints and foreign keys in
application tables. Whether you define the constraints at the database level depends on
the design approach you use. At a higher level of the application object model, which is
represented by data access classes, you can flexibly define any level of constraints, including
default values, nullable fields, and parent-child relationships between data access classes. If
you aren't sure whether a column should allow a null value, you can allow null values for it in
the database. Later, in the data access class, you can make the data field either required or
nullable; you can even make the field required on one form and optional on another.
| Designing the Application | 44
For Boolean and decimal columns, we recommend that you define default values
either in the database or in data access classes. This simplifies the application code by
helping to avoid checking of values for nulls multiple times.
Related Links
• Designing the Database Structure and DACs
Audit Fields
Audit fields keep meta information on the creation and the last change of a database record.
Audit fields are updated automatically by the framework.
To enable the tracking of audit data for a particular table, you should add the columns listed
below to the table and declare the corresponding audit data fields in the data access class.
You have to add the corresponding type attribute to each audit field. If the audit columns
are properly created in the database table and the corresponding data fields are declared
in the data access class, Acumatica Framework automatically updates audit data in these
fields every time a data record is modified from the application. The date and time values
are stored in the database in UTC.
The audit column parameters and DAC attributes are given below.
Table: Audit Columns
Database Column
Name
Data Type (SQL
Server)
Data Type
(MySQL)
Type Attribute on the
Data Field
CreatedByID uniqueidentifi-
er; not null
CHAR(36) with
ASCII character
set; not null
[PXDBCreatedByID]
CreatedByScreenID char(8); not null CHAR(8) with
ASCII character
set; not null
[PXDBCreatedByScreenID]
CreatedDateTime datetime; not
null
DATETIME; not
null
[PXDBCreatedDateTime]
LastModifiedByID uniqueidentifi-
er; not null
CHAR(36) with
ASCII character
set; not null
[PXDBLastModifiedByID]
LastModified-
ByScreenID
char(8); not null CHAR(8) with
ASCII character
set; not null
[PXDBLastModified-
ByScreenID]
LastModifiedDate-
Time
datetime; not
null
DATETIME; not
null
[PXDBLastModifiedDate-
Time]
Related Links
• Designing the Database Structure and DACs
| Designing the Application | 45
Concurrent Update Control
You can add the SQL Server time stamp column to a table to make Acumatica Framework
able to handle concurrent updates. The corresponding time stamp data field should be
declared in the data access class. If the time stamp data field is declared, Acumatica
Framework handles the time stamp column automatically. Acumatica Framework checks the
row version every time the row is modified. We recommend that you add the time stamp
column, with the parameters shown in the following table, to all tables of your application.
Table: The Time Stamp Column
Database Column
Name
Data Type (SQL
Server)
Data Type
(MySQL)
Type Attribute on the
Data Field
TStamp timestamp; not
null
TIMESTAMP(6);
not null
[PXDBTimestamp]
Related Links
• Designing the Database Structure and DACs
Attachment of Additional Objects to Data Records
You can attach additional objects to a data record—for instance, attach a text note or an
uploaded file or multiple uploaded files to a data record.
You turn on or off support for data record attachments for each particular table individually.
To turn on support for data record attachments, add a column that stores the global data
record identifier (typically, NoteID) to the table and declare the corresponding field in the
data access class. For more information on uploading files through an Acumatica ERP form,
see To Display an Attached Image on the Form. See below for the parameters of the global
identifier column and the attribute that should be added to the corresponding DAC field.
Table: The Global Data Record Identifier Column (NoteID)
Database Column Data Type (SQL
Server)
Data Type
(MySQL)
Type Attribute on the
Data Field
Global data record
identifier (typically
named NoteID)
uniqueidentifi-
er; null
CHAR(36) [PXNote]
Related Links
• Designing the Database Structure and DACs
Preservation of Deleted Records
Acumatica Framework provides a low-level mechanism (which is performed on the database
level) for preserving deleted data records in the database. With this mechanism, when an
application initiates the deletion of a data record, the data access layer generates an SQL

| Designing the Application | 46
query that marks the data record as deleted but does not permanently remove the data
record from the table. When data records are selected from the table, the data access layer
generates the SQL query, which returns only data records that are not marked as deleted.
The data records that are preserved in this way can be restored.
You can turn on or off the preservation of deleted data records for each table individually.
To preserve data records in a particular table, add the DeletedDatabaseRecord column
to the table and do not declare the data field in the data access class. When a data record
is deleted in the table, the framework automatically preserves the deleted data record
transparently to the application developer.
Table: The DeletedDatabaseRecord Column
Database Column Data Type (SQL
Server)
Data Type
(MySQL)
Type Attribute on the
Data Field
DeletedDatabaseRe-
cord
bit; not null TINYINT(1); not
null
Not declared in DAC
Related Links
• Designing the Database Structure and DACs
Multitenancy Support
Multiple tenants can work on the same instance of an Acumatica Framework-based
application with completely isolated data. The application looks identical to all tenants, but
each tenant has exclusive access to its data only. Data is isolated at the lowest level of the
application, in the data access layer that executes SQL queries for the tenant of the user
who is currently signed in.
Multitenancy Support
The following graphic illustrates how different logical tenants work with the Acumatica
Framework-based application in a multitenant configuration. They work with the same
application but have isolated data access, as if they are working with different database
instances.
Figure: Multitenant Acumatica Framework-based application
Multitenancy support is turned on or off for each particular table individually. To turn on
multitenancy support for a table, add the CompanyID column to it and include the column
in the primary key (see the column parameters in the table below) and all indexes. The
CompanyID column is handled automatically by the framework and should not be declared in
data access classes. If a table doesn't have the CompanyID column, all data from the table is
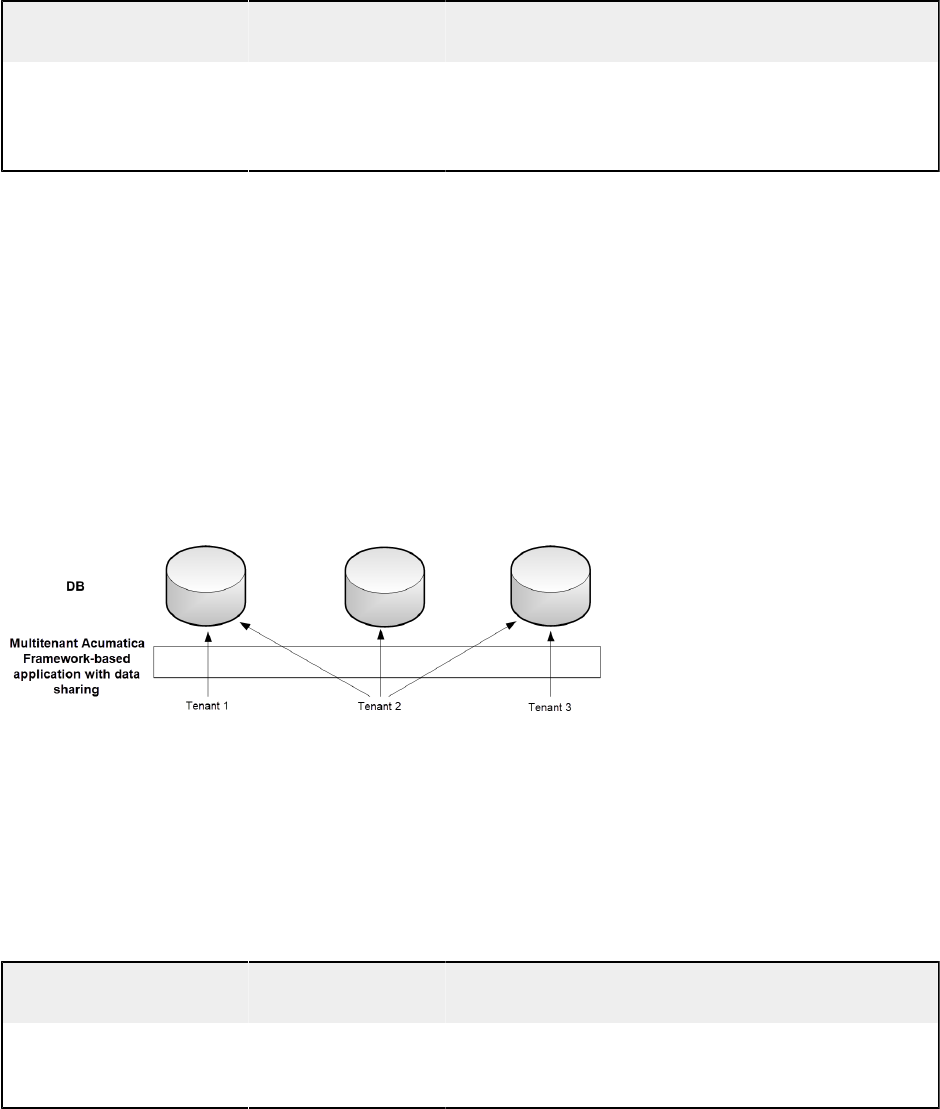
| Designing the Application | 47
fully accessible to all tenants that exist in the database. For more information, see Support of
Multiple Tenants.
Table: The CompanyID Column
Database Column
Name
Data Type (SQL
Server)
Data Type
(MySQL)
Type Attribute on the
Data Field
CompanyID int; not null; in-
cluded in primary
key and all index-
es
INT; not null; in-
cluded in primary
key and all index-
es
Not declared in DAC
Support for Shared Data Access Between Tenants
Acumatica Framework provides shared data access in a multitenant configuration. Acumatica
Framework supports a hierarchy of logical tenants that may work with a combination
of shared and individual data. In shared access mode, every tenant may work with its
individual copy of a data record; copies differ by CompanyID. All copies represent the same
logical object in the application but different data records in the database. For instance, each
tenant may use the individual settings of the application.
The graphic below shows a possible multitenant configuration with shared data access
between Tenant 1, Tenant 2, and Tenant 3. The users of Tenant 2 have access to the data
of all three tenants. The users from each of the other two tenants have access to their
company's individual data only. Physically, the data of all three tenants is stored in a single
database instance.
Figure: Shared data access in a multitenant Acumatica Framework-based application
Support for shared data access is turned on or off for each particular table individually. To
turn on support for shared data access for a table, add the CompanyMask column to the
table (see the column parameters in the table below). The CompanyMask column is handled
automatically by the framework and should not be declared in data access classes. If a table
doesn't have the CompanyMask column, shared data access is not available for this table.
Table: The CompanyMask Column
Database Column
Name
Data Type (SQL
Server)
Data Type
(MySQL)
Type Attribute on the
Data Field
CompanyMask varbinary(32),
not null, default
0xAA
VARBINARY(32),
not null, default
0xAA
Not declared in DAC

| Designing the Application | 48
CompanyMask is a 32-bit mask. In this mask, each two bits correspond to each tenant. The
first of these two bits specifies whether the record may be read by this tenant, and the
second bit specifies whether the record may be written to by this tenant. For example,
suppose that CompanyMask is set to 0xBE02 for a record. That is, it specifies the following
mask: 10 11 11 10 00 00 00 10, which designates that the record may be both read and
written to by the tenants with company IDs 2 and 3, the record may be read by the tenants
with IDs 4 and 5 and the system tenant (which has ID 1), and the record may not be read or
written to by other tenants.
CompanyMask: 10 11 11 10 00 00 00 10
CompanyID: 4 3 2 1 8 7 6 5
The default value of CompanyMask is 0xAA, which means that the record may be read by all
tenants.
Related Links
• Designing the Database Structure and DACs
Designing the User Interface
This chapter summarizes the form design and style conventions used in Acumatica
Framework.
In This Chapter
• Development Environment Options
• Form and Report Numbering
• Item Grouping on the Form Toolbar
Related Links
• Designing the Database Structure and DACs
• Naming the Graphs and Event Handlers
Development Environment Options
To create stand-alone applications with Acumatica Framework or develop customizations
for Acumatica ERP, the environment where you install and use Acumatica Framework,
should meet particular requirements that are described in System Requirements for Acumatica
Framework 2019 R2.
Web Forms Designer Settings
We recommend the following settings for the Microsoft Visual Studio environment to ensure
a uniform ASPX page appearance:

| Designing the Application | 49
1. Under the Tools > Options > Web Forms Designer > CSS section, set the following
options:
• Font and text: CSS (classes)
• Padding and borders: CSS (classes)
• Floating, positioning, and sizing: CSS (inline styles)
• Bullets and numbering: CSS (classes)
• Background: CSS (classes)
• Margins: CSS (classes)
2. Under the Tools > Options > Web Forms Designer > CSS Styling section, select
Auto Style Application, and specify the following settings:
• Only reuse classes with the prefix "auto-style": Selected
• Use width and height attributes for image instead of CSS: Selected
• Use <strong> and <em> for bold and italic text: Cleared
• Use shorthand properties when generating styles: Selected
• Change positioning to absolute for controls added using Toolbox, paste, or
drag and drop: Selected
Design Mode Settings
We also recommended that you use the following settings of the Design mode of ASPX pages
in Visual Studio:
• View > Visual Aids > CSS Display:none Elements: Cleared
• View > Visual Aids > CSS Visibility:hidden Elements: Cleared
Related Links
• Designing the User Interface
Form and Report Numbering
In this topic, you can find the guidelines for form and report numbering in Acumatica ERP.
Form Numbering
When you are numbering forms in Acumatica ERP, use the following conventions:
XX999999
| | | |_ Subscreen Sequential Number
| | |___ Screen Sequential Number
| |_____ Screen Type:
| Designing the Application | 50
| 10: Setup
| 20: Maintenance
| 30: Data Entry
| 40: Inquiry
| 50: Processing
| 60: Reports
|_______ Two-Letter Module Code
Report Numbering
When you are numbering reports in Acumatica ERP, use the following conventions in addition
to those outlined above:
XX6X9999
|
|____ Report Type:
61: Review Reports (Reports for document review prior to release)
62: Register Reports (Reports used to print audit information
on processed documents or entities)
63: Balance Reports (Reports reflecting current or historical
balance information)
64: Forms (Printed webpages)
65: Inquiry Reports (Reports that provide status information
required for operational management)
66: Statistical Reports (Reports that provide statistical or
historical information)
Related Links
• Designing the User Interface
Item Grouping on the Form Toolbar
Menu items can be grouped on the form toolbar to keep a reasonable number of buttons on
the toolbar. When you are building the menu structure, use the menus described below.
Data Entry Forms
• Actions: Use this menu to group the operations that give the user the ability to process
the document, including the actions that navigate to related data entry forms (with the
system filling in appropriate settings) so users can quickly create linked documents.
For example, see the Enter Payment/Apply Memo action on the Invoices and Memos
(AR301000) form. The most frequently used operations can be placed on the toolbar
outside any groups as separate buttons that provide quick access to the actions. For
example, notice the Release action on the Invoices and Memos form.
• Reports: Use this menu to group the actions that open related Report Designer reports
and printable forms of documents.
• Inquiries: Use this menu to group the actions that navigate to related inquiry forms.

| Designing the Application | 51
Inquiry Forms
• Actions: Use this menu to group the operations that give the user the ability to navigate
to related data entry forms.
• Reports: Use this menu to group the actions that open the related Report Designer
reports.
Maintenance Forms
• Actions: Use this menu to group the operations that update the settings of the master
record and navigate to related data entry forms.
• Reports: Use this menu to group the actions that open related Report Designer reports.
• Inquiries: Use this menu to group the actions that navigate to related inquiry forms.
Related Links
• Designing the User Interface
Naming the Graphs and Event Handlers
In this chapter, you can find the naming conventions for the graphs and event handlers.
In This Chapter
• Graph Naming
• Naming Conventions for Event Handlers Defined in Graphs
Related Links
• Designing the Database Structure and DACs
• Designing the User Interface
Graph Naming
When you are creating business logic controllers (graphs), use the following suffixes in the
names of the graphs, depending on the types of the forms they are used for:
• Maint: For the graphs for maintenance forms that are helper forms used for the input of
data on the data entry and processing forms, and for the graphs for the setup forms that
provide the configuration parameters for the application. For example, CountryMaint can
be the name of the graph for the Countries maintenance form, which provides editing of
the list of countries.
• Entry: For the graphs for data entry forms that are used for the input of business
documents. For example, SalesOrderEntry can be the name of the graph for the Sales
| Designing the Application | 52
Order data entry form, which provides the basic functionality for working with sales
orders.
• Inq: For the graphs for inquiry forms, which display a list of data records selected by the
specified filter. For example, SalesOrderInq can be the name of the inquiry form named
Sales Order Inquiry, which provides the list of documents selected by the specified
customer.
• Process: For the graphs for processing forms that provide mass processing operations.
For example, SalesOrderProcess can be the name of the Approve Sales Orders
processing form, which provides mass approval of sales orders.
Related Links
• Naming the Graphs and Event Handlers
Naming Conventions for Event Handlers Defined in Graphs
In Acumatica Framework, you must adhere to the naming conventions for an event handler
to be implemented in a graph or graph extension. The name of the event handler must
include the event type and the object to be processed by the handler.
The name of a data record event handler must have the following segments, which are
separated by the _ symbol:
1. The name of the DAC declared in the server
2. The name of the record event supported by the server
Therefore, the name of a data record event handler must be in the following format:
DACName_EventName (such as SOOrder_RowSelected).
The name of a data field event handler must have the following segments, which are
separated by the _ symbol:
1. The name of the DAC declared in the server
2. The name of the data field declared within the DAC whose name is specified in the first
segment
3. The name of the field event supported by the server
Therefore, for a field event handler, the name must be in the following format:
DACName_FieldName_EventName (such as SOOrder_CustomerID_FieldUpdated).
Related Links
• Naming the Graphs and Event Handlers

| Configuring ASPX Pages and Reports | 53
Configuring ASPX Pages and Reports
In this part of the guide, you can find information about how the forms of Acumatica ERP
or an Acumatica Framework-based application work and how to configure the ASPX code of
these forms. An ASPX page provides the UI of the application. The ASPX page consists of a
datasource control and at least one container control. The datasource control links the page
to the graph and provides interaction with the server. Container controls are bound to graph
members and give users the ability to work with data on the form.
You can also find a brief overview of reports.
In This Part
• Overview of ASPX Pages in Acumatica Framework
• Configuring the ASPX Page
• Configuring Containers
• Configuring Tables
• Configuring Tabs
• Configuring Boxes
• Configuring Layout and Size
• Maintaining Reports
Overview of ASPX Pages in Acumatica Framework
In Acumatica Framework-based applications, you can configure the appearance of forms
from the front end (that is, by configuring ASPX pages) and from the back end (that is, by
using the attributes and events provided by the Acumatica platform).
In this chapter of the guide, you can find information about how to create the ASPX code
of the forms. This chapter also includes a technical overview of the user interface of an
Acumatica Framework-based application. For information about the configuration of the UI
from the back end, see Configuring the UI from the Back End.
Technical Overview of the User Interface
The user interface of Acumatica ERP or an Acumatica Framework-based application uses
the same core technologies. To learn how the user interface works, see Processing of a Button
Click and Technical Overview of the User Interface. You can find a detailed description of the user
interface in Acumatica ERP Interface Guide.
| Configuring ASPX Pages and Reports | 54
Configuration of ASPX Pages
You can configure the appearance and behavior of forms by using the properties of the ASPX
objects that can be used on the Acumatica ERP or Acumatica Framework ASPX pages. For
details on how to work with the ASPX code of the form, see the following topics:
• To configure containers, such as PXFormView, PXGrid, PXTab, PXTreeView, and PXPanel:
Configuring Containers
• To configure tables (PXGrid and PXGridColumn): Configuring Tables
• To configure tabs (PXTab and PXTabItem): Configuring Tabs
• To configure boxes, such as PXTextEdit, PXCheckBox, and PXGroupBox): Configuring
Boxes
• To configure the layout (PXLayoutRule) and size of controls: Configuring Layout and Size
Technical Overview of the User Interface
In this topic, you can find a technical overview of the user interface of Acumatica ERP.
For more details on the elements of the UI, see Acumatica ERP User Interface in the Interface
Guide.
Technologies in the UI
The user interface of Acumatica ERP includes the following frames:
• The navigation frame, which is a webpage frame that can be used for navigation between
Acumatica ERP forms.
• The Acumatica ERP form, which is located in the inner frame, which is completely
independent of the navigation frame.
The webpage renders the navigation elements of the navigation frame and the forms
separately by using different technologies. The work of Acumatica ERP forms is based on
the ASP.NET Web Forms technology, while the navigation frame uses the ASP.NET MVC
technology with the Razor view engine.
The server side of the navigation frame uses the ASP.NET Web API framework. The client
side uses the React library, which is a JavaScript library, to render main menu items,
workspaces, tiles, and other navigation elements.
Work of the Navigation Frame
The following diagram shows how the browser renders the elements of the navigation frame.
This process is described in more detail in the remaining sections of this topic.
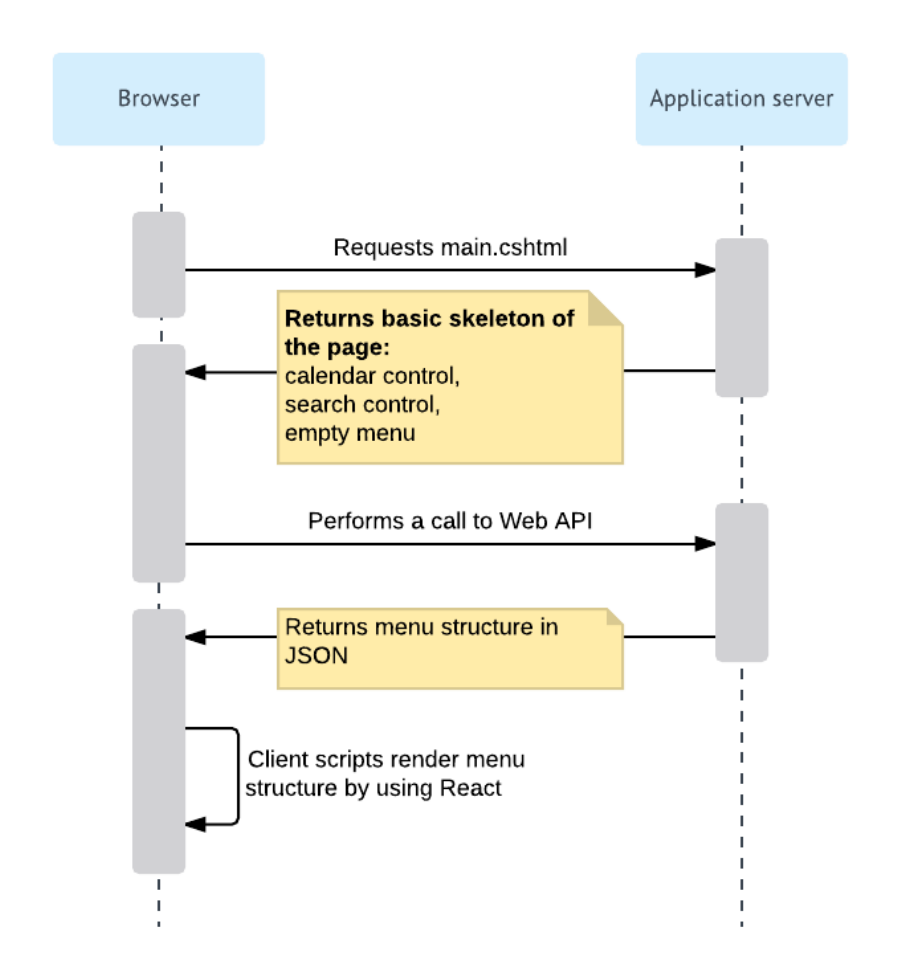
| Configuring ASPX Pages and Reports | 55
Figure: Rendering of the navigation frame
Request of main.cshtml
The browser retrieves main.cshtml, which is an ASP.NET MVC view, by sending the HTTP
GET request. On the server side, this request is processed by the MainController.Main()
method (PX.Web.UI.Frameset.Controllers), which creates a System.Web.Mvc.ViewResult
object that renders a view to the response. The returned view contains the basic skeleton of
the webpage, which includes the calendar control, the search control, and the empty menu.
| Configuring ASPX Pages and Reports | 56
Request of the Menu Structure
The getSiteMap function in site.js uses jQuery to send an AJAX request to ASP.NET
Web API of the application server. On the server side, this request is processed by the
SiteMapController class (PX.Web.UI.Frameset.WebApi.Controllers).
To match the incoming request to the appropriate processing classes, the system uses
the ASP.NET MVC attribute routing. For example, the SiteMapController class is
annotated with the [FramesetRoutePrefix("sitemap")] attribute, which defines the
"frameset/sitemap" route.
To get the site map structure, the SiteMapController class uses the SiteMapRepository
class, which implements the ISiteMapRepository interface. The SiteMapRepository class
fetches different entities of the navigation frame and assembles them in one structure, which
is then passed to the browser. The system serializes the structure to JSON format by using
the standard ASP.NET Web API classes.
The SiteMapRepository class uses other classes that have the Repository suffix in
their names, such as TileRepository and WorkspaceRepository, to retrieve the entities
that are used in the navigation frame. These classes are completely independent from
the database. To fetch the entities from the database, the Repository classes use the
classes that implement the IEntitySet interface (PX.Web.UI.Frameset.Model), such as
ScreenEntitySet. The classes use the MUIGraph graph to fetch data from the database.
(The graph performs only simple data operations, and does not contain any complicated
business logic). For each entity, there is a DAC that is used to access data in the database.
The DACs correspond to the following database tables, which are used to store data for the
elements of the navigation frame.
Table: Database Tables
Table Description
MUIWorkspace Stores information about the workspaces in the application. For more in-
formation on the workspaces, see Workspaces in the Interface Guide.
MUIFavorite-
Workspace
Stores information about the workspaces that have been pinned to the
main menu. The workspaces that are not included in this list are dis-
played when a user clicks the More Items menu item. For details about
the main menu, see Main Menu in the Interface Guide.
MUIArea Stores information about the areas to which workspaces belong. Areas
are used to group workspaces in the More Items menu by types.
MUISubcategory Stores information about the categories of Acumatica ERP forms. Cate-
gories are used to group forms in a workspace by types. For details on
the categories, see Categories.
MUIScreen Stores information about the locations of the Acumatica ERP forms in
the user interface. The table is connected to the SiteMap table by the
NoteID column.
MUIPinnedScreen Stores information about the Acumatica ERP forms pinned to work-
spaces.
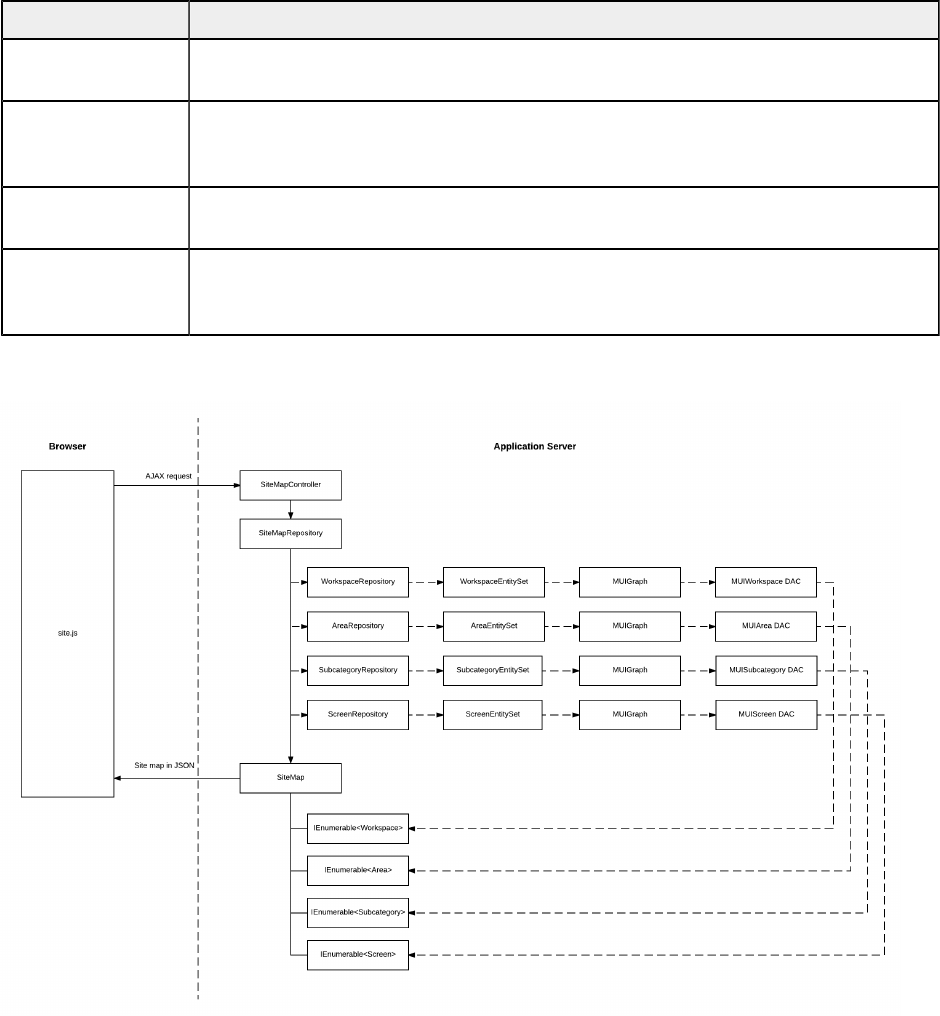
| Configuring ASPX Pages and Reports | 57
Table Description
MUIFa-
voriteScreen
Stores information about the Acumatica ERP forms that have been
added to favorites.
MUITile Stores information about the tiles in workspaces. A tile is a special but-
ton on a workspace that you click to open a form or report with prede-
fined settings. For details on the tiles, see Tiles.
MUIFa-
voriteTile
Stores information about the tiles that have been added to favorites.
MUIUserPrefer-
ences
Stores information about the position of the main menu, which can be
on the left of the browser page (default) or on the top of the browser
page.
The following diagram illustrates the process of retrieving data for the navigation frame.
Figure: Retrieval of the site map
Rendering of the Elements of the Navigation Frame
The main script that is used to render the navigation frame is site.js. It contains classes
that use the React library to render elements of the navigation frame. Each such class
includes the render method, which uses React classes to render the element. The following
tables lists the main classes and their methods.

| Configuring ASPX Pages and Reports | 58
Table: The Classes for Rendering the Navigation Frame
Class Description
MenuModules Renders the main menu (which contains the list of workspaces). For
more information on the main menu, see Main Menu in the Interface
Guide.
In addition to the render method, the class has the following methods:
• onClick: Processes the clicking of the Edit and Delete buttons for the
items of the main menu in Menu Editing mode.
• onClickFav: Processes the clicking of the Pin button in a workspace.
• onDragStart, onDragOver, onDragLeave, and onDrop: Process opera-
tions related to dragging the items of the main menu in Menu Editing
mode.
For details on menu editing, see Menu Editing Mode.
TopLinks Renders the tiles in the workspaces. For details about the tiles, see Tiles
in the Interface Guide.
In addition to the render method, the class has the following methods:
• onClick: Processes the clicking of the Edit and Delete buttons for the
tiles in Menu Editing mode and clicking of the Favorite button.
• onDragStart, onDragOver, onDragLeave, and onDrop: Process opera-
tions related to dragging the tiles in Menu Editing mode.
For details on menu editing, see Menu Editing Mode.
MenuColumn Renders a list of forms in a workspace. For the information about work-
spaces, see Workspaces in the Interface Guide.
In addition to the render method, the class has the following methods:
• onClick: Processes the clicking of the Edit and Delete buttons for a
form in a workspace in Menu Editing mode.
• onClickFav: Processes the clicking of the Favorite icon for a form in a
workspace.
• onClickPin: Processes the clicking of a check box when a user se-
lects a form in a workspace in Menu Editing mode.
For more information on menu editing, see Menu Editing Mode.
ModuleMenu Renders all lists of forms in a workspace. For details about workspaces,
see Workspaces in the Interface Guide.
In addition to the render method, the class has the following methods:
• getItemsInCol, arrangeLinks, and arrangeLinks2: Arrange links to
forms in lists.

| Configuring ASPX Pages and Reports | 59
Class Description
• onDragStart, onDragOver, onDragLeave, and onDrop: Process oper-
ations related to dragging the links to forms in a workspace in Menu
Editing mode.
The site.js script also contains webpage event handlers, such as handlers for button-clicking
events, which use jQuery to handle the events.
Customization of the User Interface
An administrator can configure the user interface to fit the work purposes of the
organization, as described in Customizing the User Interface in the System Administration
Guide.
To change the styles of the elements of the navigation frame, the developer can change the
CSS related to these elements.
If a developer has added a new form or report to the Acumatica ERP site in a customization
project, the location of the form in the user interface is included in the customization project
along with the SiteMap customization project item, which is created either automatically
or manually for the new item. For details, see To Add a New Custom Form to a Project and To
Add a Custom Analytical Report to a Project in the Customization Guide. For the custom generic
inquiries and dashboards, the information about the location in the user interface is included
in the GenericInquiryScreen and Dashboard customization project items, respectively.
Related Links
• Acumatica ERP User Interface
Processing of a Button Click
When a user clicks a button on an ASPX page, such as the Save button on the toolbar of
a form, the webpage creates a postback HTTP request to the server. When processing the
request, the application server does the following: commits changes (if required by the
operation initiated by the user), executes the operation, and collects data for the response.
Then the application server sends the response to the webpage, which renders the new
data. The following diagram illustrates this process, which is described in more detail in the
sections of this topic.
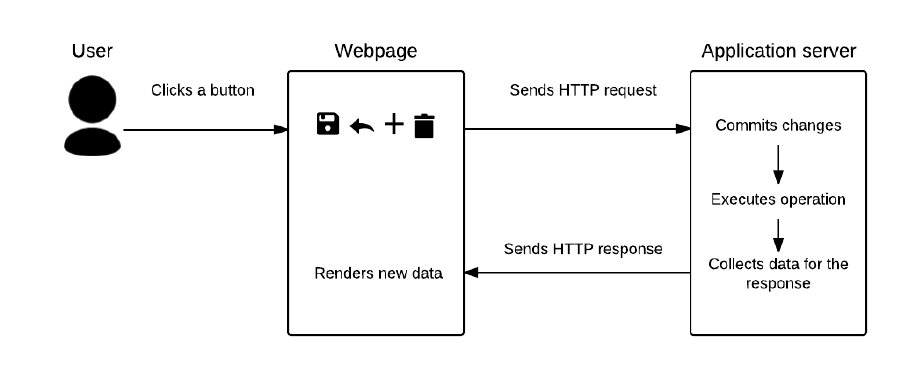
| Configuring ASPX Pages and Reports | 60
Figure: Processing a button click
Sending of the HTTP Request
When the user clicks a button on a webpage, the page creates an HTTP request to the
server. The request includes the following information:
• The values of the key fields of the record currently displayed on the page
• The changes that have been made to the data on the page
• The information on the command that was initiated by the user—the data source ID and
the callback name
The PXDataSource.TypeName property defines the graph that processes data for the page.
When the application server receives the request, the server creates a new instance of the
graph to process the data of the request. The properties of PXDSCallbackCommand, such as
CommitChanges and RepaintControls, indicate which operations should be performed on
the server in addition to the operation initiated by the user.
The diagram below shows how the HTTP request is sent to the server.
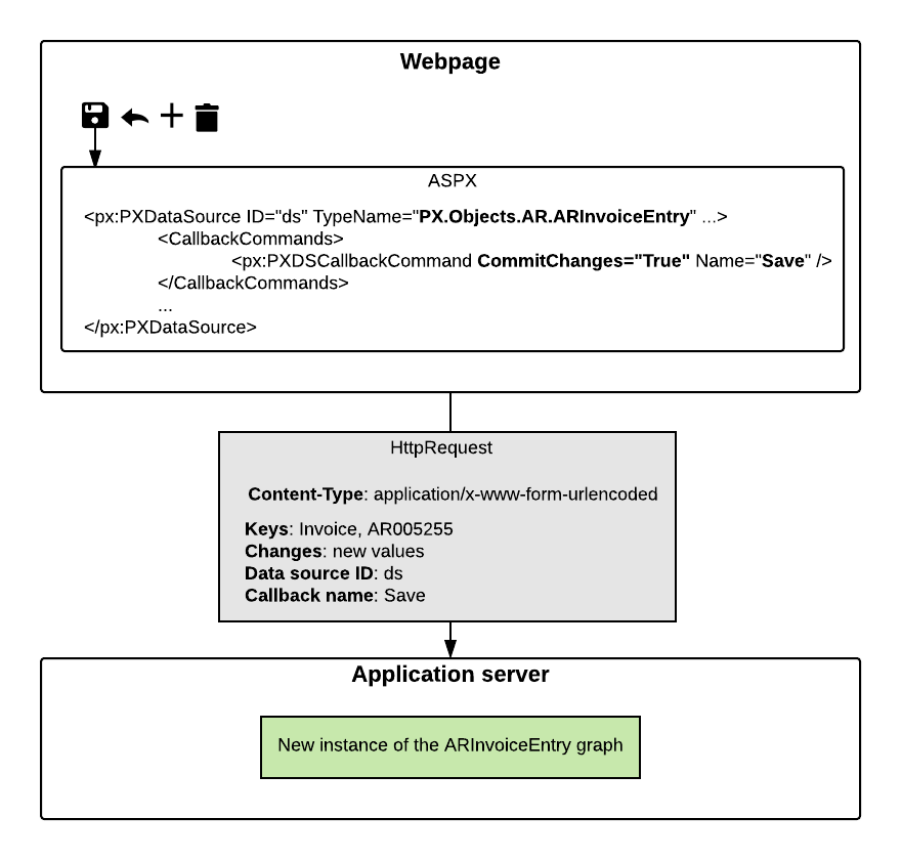
| Configuring ASPX Pages and Reports | 61
Figure: Sending the HTTP request
Commitment of Changes to the Cache
If the callback command initiated by the user has the CommitChanges property set to
true or the CommitChangesIDs property specified, the server commits the changes before
executing the command. The graph instance commits the changes to the cache in the order
in which the data views are defined in the graph, as shown in the following diagram.
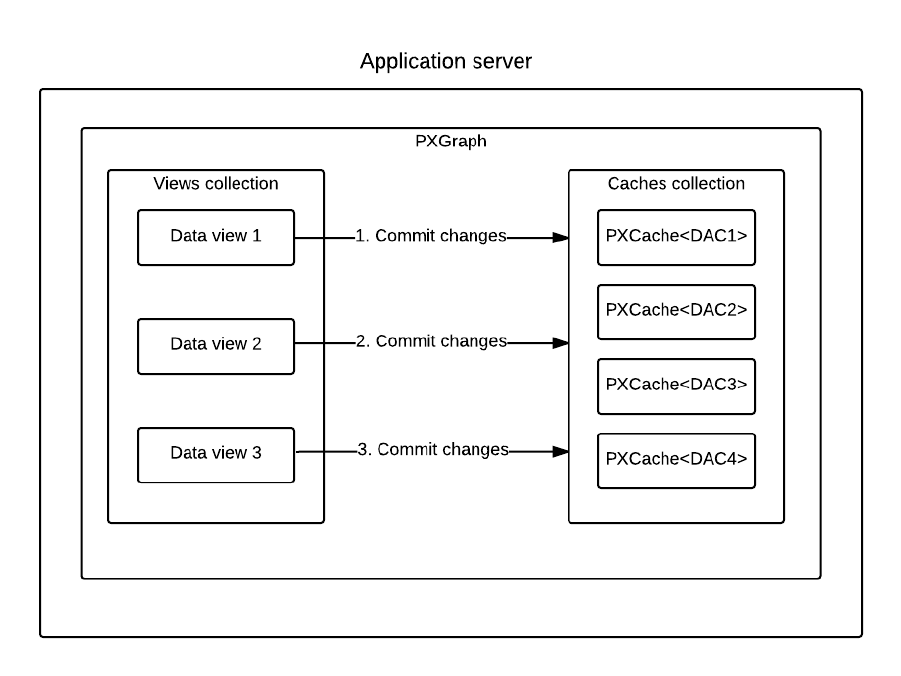
| Configuring ASPX Pages and Reports | 62
Figure: Committing changes
Execution of the Command
After the changes have been committed, the graph instance executes the operation initiated
by the user, such as saving data to the database. You can find details on the sequence of
events raised when data is inserted, updated, deleted, or saved to the database in Data
Manipulation Scenarios.
Collection of the Data for the Response
When the command execution is completed, the application server does the following:
1. If the RepaintControls or RepaintControlIDs property of PXDSCallbackCommand
specifies any controls to be repainted after the command is executed, the application
server includes in the response all information that is necessary to repaint these controls
on the webpage. (By default, the value of the PXDSCallbackCommand.RepaintControls
property is All, which means that all controls on the page are repainted.)
2. The application server executes the Select method for each data view of the graph.

| Configuring ASPX Pages and Reports | 63
Sending of the HTTP Response and Rendering of the Controls
The application server sends the response to the page. The response includes data in XML
format; the parameters that are necessary for the controls to be repainted are specified in
JSON format, as shown in the following fragment of the response.
<Controls>
<Control ID="ctl00_phF_form_edDocType"
Props="{items:"INV|Invoice|1;DRM|Debit Memo|1;CRM|
Credit Memo|1;FCH|Overdue Charge|1;SMC|Credit WO|1",
value:"FCH"}" />
<Control ID="ctl00_phF_form_edRefNbr" Props="{value:"AR005254"}" />
...
</Controls>
The scripts in the browser (the scripts from PX.Web.UI.Scripts) find the controls to be
repainted by IDs and repaint these controls by using the data provided in the response.
Most of the scripts in PX.Web.UI.Scripts contain a class that works with one control. For
example, px_textEdit.js includes the PXTextEdit class, which works with the PXTextEdit
control.
Exceptions to the Process
For the buttons not found on the main toolbar, the process described in this topic may
slightly differ.
For example, for the table toolbar buttons, which perform actions on particular rows of grids,
the scripts translate the data in XML format, which is returned in the response, to HTML
format by using XSLT.
For the buttons in dialog boxes (the PXSmartPanel control), no commit of changes is
performed. Whether data is selected from the database depends on the particular dialog
box. The data that is returned from the server is in HTML format.
Configuring the ASPX Page
In this chapter, you can find information about configuration of the PXDataSource control of
the ASPX page of Acumatica ERP or an Acumatica Framework-based application.
In This Chapter
• Configuration of the Datasource Control
• Configuration of Callback Commands
• Configuration of Callbacks
| Configuring ASPX Pages and Reports | 64
Configuration of the Datasource Control
Every ASPX page must have a single PXDataSource control. The datasource control performs
the following functions:
• Binds the ASPX page to the graph
• Handles all client-server interactions
• Is represented by the toolbar on the form that corresponds to the ASPX page
TypeName and PrimaryView
TypeName and PrimaryView are two required properties of a datasource control. For
the TypeName property, you have to specify the graph that works with the page. For the
PrimaryView property, you need to specify the data view that is used for navigation. The
navigation actions work with the main DAC of this data view. Acumatica Framework adds
callback commands to the datasource control for those actions whose data access class
(DAC) is the same as the main DAC of PrimaryView.
public class CountryMaint : PXGraph<CountryMaint>
{
// If PrimaryView is set to Countries,
// Framework adds the Cancel and Save callback commands to the
// datasource control and the corresponding buttons appear on the
// form toolbar
public PXCancel<Country> Cancel;
public PXSave<Country> Save;
public SelectFrom<Country>.View Countries;
}
Configuration of Callback Commands
A datasource control contains the collection of callback commands that are executed on the
server. A callback command is a component of the PXDSCallbackCommand type.
The callback command may be statically defined in the ASPX page markup or dynamically
added by the framework. When the server initializes the page object, it dynamically adds
additional callback commands to the datasource control. Along with system callback
commands, the server adds callback commands from the actions defined in the graph.
Callback commands are added for only those actions whose DAC is the same as the main
DAC of the data view specified in the PrimaryView property.
If the graph is derived from PXGraph<,> with two type parameters, the graph includes
the default actions, which are shown in the following code.
public class PXGraph <TGraph, TPrimary> : PXGraph
where TGraph : PXGraph
where TPrimary : class , new (), IBqlTable

| Configuring ASPX Pages and Reports | 65
{
public PXSave<TPrimary> Save;
public PXCancel<TPrimary> Cancel;
public PXInsert<TPrimary> Insert;
public PXCopyPasteAction<TPrimary> CopyPaste;
public PXDelete<TPrimary> Delete;
public PXFirst<TPrimary> First;
public PXPrevious<TPrimary> Previous;
public PXNext<TPrimary> Next;
public PXLast<TPrimary> Last;
}
The framework creates the callback commands for the default actions if the DAC in
the second type parameter of PXGraph<,> is the same as the main DAC of the data
view specified in the PrimaryView property.
The framework determines the properties of callback commands by merging the properties
specified for the callback command on the ASPX page and the properties of the PXButton
(or derived) attribute specified for the action. For example, you can set the CommitChanges
property in both the callback command and the PXButton attribute added to the action in
the graph. The system uses the logical OR to the two values: If either of the values is true,
the resulting value is true.
The datasource control provides the collection of PXDSCallbackCommand components in the
CallbackCommands property of the control. The CallbackCommands property includes the list
of callback commands that have been dynamically added to the datasource control from the
definitions of actions in the graph. You can edit these callback commands.
If you change a default property of a dynamically added callback command, the definition of
the PXDSCallbackCommand component is added to the page, as the following code shows.
<px:PXDataSource ID="ds" ...>
<CallbackCommands>
<%-- The Visible property is set to False for the standard
Next callback command --%>
<px:PXDSCallbackCommand Name="Next" PopupCommand=""
PopupCommandTarget=""
PopupPanel="" Text="" Visible="False">
The following properties of PXDSCallbackCommand are used most frequently:
• Visible: Makes the button visible (if the property is set to true) or invisible (if it is
set to false) on the toolbar. The value of this property is merged with the value of the
Visible parameter of the PXUIField attribute specified for the action. The system uses
the logical AND of the two values: If either of the values is false, the resulting value is
false. By default, this property equals true.
• CommitChanges: Enables the posting of modified data when the callback command is
invoked. Its value is merged with the value of the CommitChanges parameter of the
PXButton (or derived) attribute specified on the action. The system uses the logical OR
of the two values: If either of the values is true, the resulting value is true. By default,
this property is equal to false.

| Configuring ASPX Pages and Reports | 66
• DependOnGrid: Enables the posting of the current row selected in the grid when the
callback command is invoked. The value is the ID of the PXGrid control.
Buttons on the Form Toolbar
Acumatica Framework adds buttons to the toolbar of the form; these buttons correspond
to the callback commands of the datasource control. A button appears on the toolbar if the
Visible property of the callback command is equal to true. To make a button invisible on
the toolbar, set the Visible property to false for the appropriate PXDSCallbackCommand
component as shown in the following code.
// ActionName is the name of the PXAction<DAC> field of the graph
<px:PXDataSource ID="ds" ...>
<CallbackCommands>
<px:PXDSCallbackCommand Name="ActionName"
PostData="Self" Visible="False" />
The Visible property can also be defined in the PXUIField attribute on the action. In this
case, the system applies the logical AND to the two values: If either of the values is false,
the resulting value is false.
Configuration of Callbacks
Events are generated on the server side of your application when the client side requests
data or posts changes made by a user. When the client posts data to the server, the client is
initiating a callback to the server. Callbacks are initiated in the following cases:
• Focus is lost for an input control with the CommitChanges property set to True.
• Focus is lost for a grid column with the CommitChanges property set to True.
• A user finishes editing a row in a grid by proceeding to the next row or by pressing Ctrl
+Enter on the keyboard.
• A user clicks a button with the CommitChanges property set to True.
By default, an Acumatica Framework form executes a callback when a user clicks one of
the standard buttons on the form toolbar and when a user changes the value in a key field.
You can also enable a callback for any input control or button by setting the CommitChanges
property to True in the ASPX page. By default, the callback is off, so when a user changes a
value in some field and shifts the focus away from it, the browser doesn't post anything to
the server; it does, however, keep the change in memory.
When a callback is triggered, the client posts all the data from the whole form that has been
modified since the last callback.
For information on how to configure the callback on a control, see To Enable Callback for a
Control. For details on how to configure the callback for a button, see Configuration of Actions.

| Configuring ASPX Pages and Reports | 67
Configuring Containers
In this chapter, you can find information about the configuration of different types of
containers, such as PXFormView, PXGrid, PXTab, PXTreeView, and PXPanel.
In This Chapter
• Configuration of Container Controls
• Use of the DataMember Property of Containers
• Use of the SkinID Property of Containers
• Use of the Caption Property of Containers
• Use of Multiple Data Views for Boxes in Containers
• Use of the PXPanel Container
Configuration of Container Controls
Acumatica Framework provides the following container controls:
• PXFormView (form)
• PXGrid (grid)
• PXTab, which consists of PXTabItem (tab) elements
• PXTreeView
• PXPanel
To configure a container control, you have to specify the data binding properties for it and
add input controls to the container. The following properties are required for every container
control:
• DataSourceID: Binds the container to a datasource control
• DataMember: Specifies the data view that provides data for the container
In the DataSourceID property, you have to specify the ID of the datasource control on the
page. When you create a page from a template, this property is already specified for the
default containers added from the template. When you add a nested container, you have
to specify the DataSourceID property. By default, in all page templates, the datasourse
control has the ds ID. After you have specified a DataSourceID for the container, you can
specify the DataMember property for it. The DataMember property links the container to the
data view defined in the graph. In the container, you can define input controls for data fields
available through that data view.

| Configuring ASPX Pages and Reports | 68
Use of the DataMember Property of Containers
If you need to find out which data view provides data for a control container on a form,
perform a search to find the DataMember string in the appropriate ASPX code. The
DataMember property is used to bind a control container of a form to a data view defined in
the business logic controller (BLC, also referred as graph) of the form. The property value is
the name of the data view.
Container Types That Have the DataMember Property
In Acumatica Framework, DataMember is used to specify a data view for the following
container types:
• PXFormView
• PXGrid
• PXTab
• PXTreeView
The PXTreeView container is not supported by the tools of the Acumatica
Customization Platform.
By default, a nested container inherits the DataMember property from the parent container. If
a nested container is PXFormView, PXGrid, or PXTab, it can be bound to another data view.
If the DataMember property is available for other ASPX objects, it has a special purpose. For
example, you can specify the DataMember property for a PXSelector lookup control to define
the appropriate data view for the grid of the lookup window.
Property Value
Each DataMember property value can correspond to any data view name of the BLC. Any data
view except for the main data view can be used by an unlimited number of containers. The
main data view must be bound to a single container.
For a container to contain a box for a data field, the container must be bound to a data view
declared within a BLC for the following reasons:
• A data field is declared in a data access class (DAC). An instance of the DAC record can
exist in the cache of a BLC that contains the declaration of a data view with the DAC
reference in the BQL statement.
• Each time a data record is selected in the container, the container creates a callback to
the PXDataSource control that is specified in the DataSourceID property of the container.
The data source control creates a remote procedure call to the application server to
execute the Display operation on the data view that is specified as the DataMember for
the container. The data view checks the existence of the record in the cache; if the check
fails, the data view executes the BQL request and stores the obtained record in the
cache.
| Configuring ASPX Pages and Reports | 69
• The data view provides all data exchange operations with the database, cache, and
PXDataSource control.
Use of the SkinID Property of Containers
In the code of Acumatica ERP, predefined skins are used to assign a style and a set of
toolbar buttons to a container. The SkinID property of a container specifies which of these
skins the system should apply to the container. A skin is specific to a particular container;
you cannot share a skin setting between containers of different types. If you do not set the
SkinID property, the container uses the default skin, if one is defined.
Predefined Skins
The following table lists and describes the predefined skins that are recommended to use for
the PXFormView, PXGrid, and PXPanel containers.
UI Ele-
ment
SkinID Description Example
PXFor-
mView
Transpar-
ent
Is used to display a simple form container
that has no caption and cannot be collapsed.
The form container
on the Financial De-
tails tab item of the
Bills and Adjustments
(AP301000) form
PXGrid Attributes Is used to display a simple grid without a
toolbar. The grid contains a predefined set
of rows, which can be edited.
The Attributes grid
on the Attributes tab
item of the Non-Stock
Items (IN202000)
form
Details Is used to render a detail grid in a mas-
ter-detail data entry form. The grid has a
toolbar that holds the default actions, such
as Refresh, Add, Remove, Fit to Screen,
and Export to Excel; it can also hold cus-
tom actions. The grid has no caption and
paging is allowed.
The grid on the
1099 Settings tab
item of the Accounts
Payable Preferences
(AP101000) form
Inquire Is used to display data without rows being
added or removed. The grid has a toolbar
that contains the Refresh, Fit to Screen,
and Export to Excel default actions and can
contain custom actions. The grid has no cap-
tion, and paging is allowed.
The grid on the At-
tributes tab item
of the Customers
(AR303000) form
Primary Is used to display an editable primary grid
that does not contain its own toolbar. To
work with the grid, the user applies the ac-
tion buttons of the form toolbar. The grid
has no caption, and paging is allowed.
The grid on the En-
try Types (CA203000)
form
| Configuring ASPX Pages and Reports | 70
UI Ele-
ment
SkinID Description Example
Prima-
ryInquire
Is used to display a primary grid without the
availability to edit data. The grid does not
contain its own toolbar. To work with the
grid, the user applies the action buttons of
the form toolbar, which does not contain the
Add, Delete, and Switch Between Grid
and Form buttons. The grid has no caption,
and paging and filtering are allowed.
The grid on the Re-
lease AP Documents
(AP501000) form
ShortList Is used to display a small grid with a few
records inside a form view. The grid has a
toolbar that contains the Refresh, Add, and
Remove default actions.
The Sales Cate-
gories grid on the
Attributes tab item
of the Non-Stock Items
(IN202000) form
PXPanel Buttons Is used in dialog boxes to display a horizon-
tal row of buttons with right alignment.
The group of but-
tons in the Add PO
Receipt dialog box,
which opens if you
click the Add PO
Receipt button in
the toolbar of the
Document De-
tails tab item of the
Bills and Adjustments
(AP301000) form
Transpar-
ent
Is used to group controls in a form contain-
er. The panel has no caption.
The group of controls
on the Template
Settings tab item
of the Order Types
(SO201000) form
Use of the Caption Property of Containers
If you plan to use a container in the mobile site map, we recommend that you specify a
unique name for the Caption property of the container. Then in the mobile site map, you can
refer to the container by the specified caption in the Name attribute of the <sm:Container>
tag, as the following code shows.
<sm:Container Name="ValueOfTheCaptionProperty">
...
</sm:Container>
Otherwise, in the WSDL schema, the API web service assigns to the container the name of
the first child element. If you use this name in the mobile site map, an error may occur after
the container content is reordered because the container name might be changed in the
WSDL schema.

| Configuring ASPX Pages and Reports | 71
Use of Multiple Data Views for Boxes in Containers
The Acumatica Customization Platform supports the use of multiple data views for controls in
the same container of an ASPX page.
For example, you can create a container and set the DataMember property to the name of
the data view that provides most of the fields for boxes in the container. If you also want to
create a control for a data field that cannot be accessible through that data view but can be
accessible through another data view of the same graph specified in the TypeName property
of the PXDataSource control, you can specify the required data view immediately in the
DataField property, as follows.
<px:PXField ... DataField="DataViewName.FieldName" />
The following code snippet shows how to use the MyDataView, AnotherDataView, and
OnceMoreDataView data views declared in the same graph or in extensions for the graph to
define boxes for data fields in a PXFormView container on an Acumatica ERP form.
<px:PXFormView ... DataMember="MyDataView" ...>
...
<px:PXNumberEdit ... DataField="MyField_01" />
<px:PXSegmentMask ... DataField="MyField_02" />
<px:PXDateTimeEdit ... DataField="AnotherDataView.FieldName" />
<px:PXTextEdit ... DataField="MyField_05" />
<px:PXSelector ... DataField="OnceMoreDataView.OtherFieldName" />
...
</px:PXFormView>
Use of the PXPanel Container
PXPanel is a container that provides an independent set of controls on the form and is used
to define complex layouts. A PXPanel container has no DataMember property and cannot be
independently bound to a data view. The panel can display only fields from the data view to
which the parent form or tab control is bound. The panel is used only for defining blocks of
controls within a form. You can add layout rules to the panel to arrange the controls within
the container.
If you need to add controls that display DAC fields retrieved by an another data view, use
a nested form (a PXFormView control) instead of a panel. Unlike PXPanel, the PXFormView
control has the DataMember property and can be bound to a data view.
You can configure the appearance of a PXPanel container in the UI by specifying the
following properties of the control:
• Caption: Defines the caption for the set of controls enclosed in the panel.
• RenderStyle: Defines the panel style in the UI:

| Configuring ASPX Pages and Reports | 72
• RoundBorder (default): The panel border and caption are displayed in the UI. This
style requires the Caption property.
• Fieldset: The underlined caption is displayed in the UI. This style requires the
Caption property.
• Simple: No border or caption is displayed in the UI. This style doesn't require the
Caption property.
In the ASPX code, the PXPanel container is always nested in a form or tab item and is
defined as follows.
<px:PXFormView ID="form" ...>
<Template>
<px:PXLayoutRule runat="server" StartRow="True"></px:PXLayoutRule>
<px:PXPanel ID="PXPanel1" runat="server" Caption="Shipment Information">
...
</px:PXPanel>
</Template>
</px:PXFormView>
Configuring Tables
In this chapter, you can learn how to configure tables (grids) on ASPX pages by using the
PXGrid and PXGridColumn ASPX objects.
In This Chapter
• Configuration of Grids
• Use of the SyncPosition Property of PXGrid
• Use of the DisplayMode Property of PXGridColumn
• Use of the Type Property of PXGridColumn
• Controls for Joined Data Fields
Configuration of Grids
To configure a grid on a form, you do the following:
1. Specify the DataMember property of the grid to bind the grid to a data view that provides
data to work through the grid.
2. Add columns to the grid.
3. Specify the SkinID property of the grid, which defines a set of default grid toolbar
buttons.
| Configuring ASPX Pages and Reports | 73
4. Add input controls to the grid, if needed.
5. Enable form view mode for the grid, if needed.
6. Specify the specific properties of the grid, if needed.
You can specify the following properties of a grid (PXGrid) control:
• DataMember: Specifies the data view that provides data for the grid. This property is
required for data binding, along with the predefined DataSourceID.
• Columns: Provides the collection of columns of the grid.
• SkinID: Defines the style and behavior of the grid; this property includes a set of default
grid toolbar buttons and the rendering of parameters of the grid.
• Mode>AllowFormEdit: Enables form view mode for the grid.
• SyncPosition: Enables the synchronization of the selected row with the Current
property of the cache object. The Current property is set to each row selected by the
user in the grid.
• StatusField: Specifies the field that is displayed at the bottom of the grid as the grid
information status.
• AutoSize>Enabled: Enables the grid height to expand to the entire area of the parent
container.
• Width: Sets the width of the grid within the parent container (a standard ASP.NET
property of a control). To expand a nested grid to the entire width of the parent
container, set this property to 100%.
• AutoAdjustColumns: Makes the whole text of the column headers displayed if space
permits.
Adding Columns and Input Controls to a Grid
Columns are generally the only required items for a grid. If columns are defined, Acumatica
Framework creates input controls at runtime based on the field state of the appropriate DAC
field to provide row editing. However, you also have to define input controls for the grid in
either of the following cases:
• You want to set specific properties for an input control or use a different input control.
You may add only controls with specific properties; other controls will be generated with
default properties at runtime.
• You have to arrange the controls for form view mode of the grid.

| Configuring ASPX Pages and Reports | 74
The order of the controls in form view mode doesn't have to match the order of
the columns in the grid.
Configuring Grid Toolbar Buttons
To define the set of toolbar buttons that appear in a grid, select the needed value in the
SkinID property of the grid. For details about the SkinID property, see Use of the SkinID
Property of Containers.
The SkinID property, used primarily to define the set of toolbar buttons for a grid, also
defines a complete set of UI parameters of the control, such as the column headers and the
initial size of the control.
Configuring Form View Mode for a Grid
To configure form view mode for a grid, you have to complete the following steps:
1. Add controls to the grid, set their properties, and arrange them by using layout rules in
the same way as you do on an ordinary form.
2. Enable callbacks for input controls to trigger in form view mode, and enable callbacks
for input controls that correspond to columns with the enabled callback. To enable the
callback for an input control, set the CommitChanges property to True for the control.
3. Enable form view mode for the grid by setting the AllowFormEdit property of Mode to
True.
Use of the SyncPosition Property of PXGrid
If a form contains a grid and the form toolbar includes an action to process a single record
that is highlighted in the grid, the action delegate method must have a reference to the
highlighted record in the cache.
To use the Current property of a PXCache object to access the record highlighted in a grid,
the Current property must be synchronized with record highlighting in the grid. To force the
system to provide this synchronization, you have to set the SyncPosition property of the
PXGrid container to True.
If you need to make an action button on the toolbar unavailable, when a
grid is empty, you should set the DependOnGrid property of the appropriate
PXDSCallbackCommand object in the PXDataSource control to the value that is
specified in the ID property of the PXGrid element.
Use of the DisplayMode Property of PXGridColumn
The Acumatica Customization Platform supports the following values for the DisplayMode
property of a column in a grid.
| Configuring ASPX Pages and Reports | 75
Value Description
Value Default value. An indicator that the column cell contains the value of the
field.
Text If there is a description defined for the field, an indicator that the col-
umn cell contains the description of the field.
Hint If there is a description defined for the field, an indicator that the col-
umn cell contains both the value and the description of the field.
The priority of the Type property is higher than the priority of the DisplayMode
property. If the Type property is set, for example, to CheckBox, the DisplayMode
property is ignored.
Use of the Type Property of PXGridColumn
The Acumatica Customization Platform supports the following values for the Type property of
a column in a grid.
Value Description
NotSet The default value. An indicator that the field value is displayed in the
column as a plain string that is formed based on the field data format.
CheckBox An indicator that the field value is displayed in the column as a check
box, which is selected if the field value is True.
HyperLink An indicator that the field value is displayed in the column as a hyper-
link.
DropDownList An indicator that the column cell is rendered as a drop-down list that
contains all the values specified for the referred data field.
Icon An indicator that the field value contains an image URL and is displayed
in the column as the referred image.
Example
The following code fragment defines the grid columns on the Automation Schedule Statuses
(SM205030) form.
...
<px:PXGridColumn AllowUpdate="False" DataField="LastRunStatus" Width="40px"
Type="Icon" TextAlign="Center" />
<px:PXGridColumn DataField="ScreenID" DisplayFormat="CC.CC.CC.CC"
Label="Screen ID" LinkCommand="AUScheduleExt_View" />
<px:PXGridColumn DataField="Description" Label="Description" Width="200px" />
<px:PXGridColumn AllowNull="False" DataField="IsActive" Label="Active"
TextAlign="Center" Type="CheckBox" Width="60px" />
...
| Configuring ASPX Pages and Reports | 76
In the code, the Type property for the LastRunStatus data field (which corresponds to
the Status column shown in the screenshot below) is set to Icon. Because the field value
contains the image URL, the column cell displays the referred image.
For the IsActive data field (which corresponds to the Active column), the Type property is
set to CheckBox. As you can see in the screenshot, the column cells are rendered as check
boxes.
Figure: Viewing different types of columns on the Automation Schedules form
Controls for Joined Data Fields
You can add an input control or grid column that displays a joined data field retrieved by a
data view. If a data field is joined, the framework automatically makes the control that is
associated with that data field unavailable in the UI, because joined data cannot be edited
through the data view in which it is joined.
The following code example shows the SupplierProducts data view with a left join to
Product.
public SelectFrom<SupplierProduct>.
LeftJoin<Product>.On<Product.productID.IsEqual<SupplierProduct.productID>>.
Where<SupplierProduct.supplierID.IsEqual<Supplier.supplierID.FromCurrent>>.View
SupplierProducts;
You can add grid columns or input controls that display product information, such as the
unit price. To specify a field of a joined data access class (DAC), you use two underscore
symbols between the joined DAC name and the field name, as shown in the bolded text of
the following code.
<px:PXGridColumn DataField="ProductID" Width="140px">...</px:PXGridColumn>
<px:PXGridColumn DataField="Product__UnitPrice"
TextAlign="Right"
Width="100px">
In this case, the columns that display Product fields will be disabled on the grid, because
Product instances cannot be edited through the SupplierProducts data view. Only
SupplierProduct records can be edited through this data view, because SupplierProduct
is the main DAC of the data view.

| Configuring ASPX Pages and Reports | 77
Configuring Tabs
In this chapter, you can learn how to configure tables on ASPX pages by using the PXTab and
PXTabItem ASPX objects.
In This Chapter
• Conditional Hiding of a Tab Item
Conditional Hiding of a Tab Item
You can use the Visible property of the PXTabItem element to set the visibility of the tab
item. However, if you need to set the dependency of a tab item's visibility from a condition,
you should use one of the following approaches:
• Set the AllowSelect property of PXCache of the data view in a RowSelected event
handler.
• Use the VisibleExp and BindingContext properties of the PXTabItem element.
Using AllowSelect
In a RowSelected event handler, you can configure the AllowSelect property of PXCache
of the data view that corresponds to the tab item. In ASPX, you also need to set the
RepaintOnDemand property of PXTabItem to False.
For example, the following code makes the Applications tab of the Invoices (SO303000)
form visible or invisible depending on the document type.
protected virtual void ARInvoice_RowSelected(PXCache cache, PXRowSelectedEventArgs e)
{
...
Adjustments.Cache.AllowSelect =
doc.DocType != ARDocType.CashSale &&
doc.DocType != ARDocType.CashReturn;
...
}
Using VisibleExp
The VisibleExp property contains a condition expression that defines a Boolean value used
to set the visibility of the tab item. The expression must consist of two parts and an operator
to compare these parts. The expression can contain the values of controls that belong to the
container specified in the BindingContext property.
As an example of the conditional hiding of a tab item, on a form with form and tab
containers, if you need to set the visibility of a tab item to depend on a check box of the
form container, you can define the VisibleExp and BindingContext properties of the
PXTabItem element, as illustrated in the following ASPX code snippet.

| Configuring ASPX Pages and Reports | 78
<px:PXFormView ID="form" ...>
...
px:PXCheckBox ... ID="myControlID" ... />
...
</px:PXFormView>
...
<px:PXTab ...>
...
<px:PXTabItem ... BindingContext="form" ...
VisibleExp="DataControls["myControlID"].Value == true">
...
</px:PXTab>
In the code above, the expression uses the DataControls .NET property of the form object
as a dictionary to find the needed control by the specified ID.
Configuring Boxes
In this chapter, you can find information about the configuration of different types of boxes,
such as PXTextEdit, PXCheckBox, and PXGroupBox.
In This Chapter
• Input Controls
• Use of the CommitChanges Property of Boxes
• Use of the DataField Property of PXGroupBox
• Use of the Caption Property of PXGroupBox
• Use of the RenderStyle Property of PXGroupBox
• To Enable Callback for a Control
Input Controls
You can add input controls and columns to a container in the Screen Editor of the
Customization Project Editor or directly in the ASPX code of the form in Visual Studio. The
Screen Editor generates control definitions based on the attributes of DAC fields. It also lists
data fields and controls based on the field state.
The type of an input control correlates with the attributes of the DAC field that provides data
for the control. To define an input control, you have to add to the DAC field the attributes
that correspond to the needed type of the input control (see the table below).
In ASP.NET markup, the following properties are required for every input control in a
container:
• ID: Identifies the control within the page. This property is required by ASP.NET.
| Configuring ASPX Pages and Reports | 79
• runat="Server": Indicates that the server should create an object of the specified class.
This property is required by ASP.NET.
• DataField: Specifies the DAC field represented by the control.
Particular types of controls may need additional properties, which are shown in the following
table.
Table: Definition of Input Controls
Control Attributes on the DAC Field ASPX Definition
Text box [PX(DB)String] <px:PXTextEdit ID= ...> </px:PX-
TextEdit>
Number edit box [PX(DB)Int] or [PX(DB)Deci-
mal]
<px:PXNumberEdit ID=...> </
px:PXNumberEdit>
Mask edit box [PX(DB)String(InputMask
=...)]
<px:PXMaskEdit ID=...> </px:PX-
MaskEdit>
Drop-down list [PXStringList] or
[PXIntList]
<px:PXDropDown ID=...> </px:PX-
DropDown>
Selector [PXSelector] <px:PXSelector ID=...> </px:PXS-
elector>
Check box [PX(DB)Bool] <px:PXCheckBox ID=...> </px:PX-
CheckBox>
Date-time picker [PX(DB)Date] <px:PXDateTimeEdit ID=...> </
px:PXDateTimeEdit>
Time span edit
box
[PXDBTimeSpan] <px:PXDateTimeEdit ID=... TimeM-
ode="True"> </px:PXDateTimeEdit>
Field State
On each round trip, the system generates a field state object for each data field
that is displayed in the UI. The field state object is initialized and configured on the
FieldSelecting event, which happens each time the data is prepared for displaying in the
UI. All of the following attributes implement FieldSelecting event handlers and take part in
the configuration of the field state object:
• Attributes that define the data type of a field (such as PXString and PXDBDecimal)
• Attributes that configure special types of input controls (such as PXSelector and
PXStringList)
• The PXUIField attribute
The application can also define its own FieldSelecting event handlers.

| Configuring ASPX Pages and Reports | 80
The field state object includes properties common to the ASPX page controls. The properties
specified in the field state object have greater priority and replace the values set for the
controls on the ASPX page.
Use of the CommitChanges Property of Boxes
If you need to process the value in a box every time the user changes this value, you need
to set the CommitChanges property of the box to True to enable callbacks for the box.
If callback is enabled for a box in a container on a page, the user has changed the box
value, and focus is no longer on the box on the page, the container immediately collects all
the modified data and a callback is created to pass the data to the PXDataSource control of
the page (see the diagram below).
The PXDataSource control creates a remote procedure call to the application server to
execute the Update operation with the modified data on the data view that is specified as
the DataMember property for the container. The data view executes the sequence of events
for update of a data record (for details, see Sequence of Events: Update of a Data Record) on the
data in the cache object of the business logic controller. The cache object raises the events
that you can handle to process the modified data.
Figure: Usage of the CommitChanges property to process a modified data
| Configuring ASPX Pages and Reports | 81
Use of the DataField Property of PXGroupBox
You use a group box to display a data field with a list attribute as a set of radio buttons,
where one radio button is used to display and select each single constant value of the field.
To bind a group box to a data field, you have to specify the name of the data field in the
DataField property of the PXGroupBox element in the ASPX code, as follows.
<px:PXGroupBox ... DataField="<Field Name>" ...>
The group box must contain a radio button for each value defined in the list of the
field.
In the DataField property of the PXGroupBox element, you can specify the name of a data
field that is accessible through another data view of the same graph. See Use of Multiple Data
Views for Boxes in Containers for details.
Use of the Caption Property of PXGroupBox
You can define a caption for a group box by using the Caption property of the PXGroupBox
element in the ASPX code as follows.
<px:PXGroupBox ... Caption="Example of Group Box Caption" ...>
If the RenderStyle property of a PXGroupBox element is set to Simple, the Caption property
is ignored. See Use of the RenderStyle Property of PXGroupBox for details.
Use of the RenderStyle Property of PXGroupBox
To define the style of a group box on the form, you have to select a value of the
RenderStyle property of the PXGroupBox element in the ASPX code, as follows.
<px:PXGroupBox ... RenderStyle="StyleName" ...>
The Acumatica Framework supports the following RenderStyle values for the PXGroupBox
element.
Name Description Example
Fieldset Indicates that the group of radio
buttons can be displayed with a
caption in the same style as in a
grouping layout rule.
| Configuring ASPX Pages and Reports | 82
Name Description Example
RoundBorder The default value. Indicates that
the group of radio buttons can
be displayed with a caption in a
rounded border.
Simple Indicates that the group of radio
buttons can be displayed without a
caption and border.
To Enable Callback for a Control
If callback is enabled for an input control in a container on an ASPX page, the container
collects all the modified data and creates a callback to pass the data to the datasource
control immediately when focus is lost for the control on the form. When this callback
occurs, the datasource control posts the modified data to the application server. When
it receives the callback, the server raises events, which you handle to process the
modified data. For more details about callbacks, see Configuration of Callbacks and Use of the
CommitChanges Property of Boxes.
To Enable Callback for an Input Control
To enable callback for an input control in the form or tab item container, set the
CommitChanges property to True for the control, as the following example shows.
<px:PXFormView ID="form" ...>
<Template>
...
<px:PXDropDown ID="Status" ... CommitChanges="true">
</px:PXDropDown>
To Enable Callback for a Grid Column
Callback in a grid is enabled separately for columns and input controls. When a user works
directly in the grid (that is, in grid view mode of the grid), the callback is triggered on a
column. To enable callback for a grid column, set the CommitChanges property to True for
the column.
<px:PXGrid ID="grid" ...>
<Levels>
<px:PXGridLevel ...>
<Columns>
...
<px:PXGridColumn DataField="ProductID" ... CommitChanges="true">
</px:PXGridColumn>

| Configuring ASPX Pages and Reports | 83
To Enable Callback for a Control in Form View Mode of the Grid
To enable callback for an input control if the callback is triggered in form view mode of the
grid, set the CommitChanges property to True for the control in the grid. For more details on
grids, see Configuration of Grids.
<px:PXGrid ID="grid" ...>
<Levels>
<px:PXGridLevel ...>
<RowTemplate>
...
<px:PXSelector ID="ProductID" ... CommitChanges="true">
</px:PXSelector>
Configuring Layout and Size
In this chapter, you can learn how to configure the layout of ASPX pages by using the
PXLayoutRule ASPX object and how to configure the size of ASPX controls.
In This Chapter
• Predefined Size Values
• Use of the StartRow and StartColumn Properties of PXLayoutRule
• Use of the ColumnWidth, ControlSize, and LabelsWidth Properties of PXLayoutRule
• Use of the ColumnSpan Property of PXLayoutRule
• Use of the Merge Property of PXLayoutRule
• Use of the GroupCaption, StartGroup, and EndGroup Properties of PXLayoutRule
• Use of the SuppressLabel Property of PXLayoutRule
Predefined Size Values
You can use the predefined values described in the table below for the following properties:
• ColumnWidth, LabelsWidth, and ControlSize of the PXLayoutRule component
• LabelsWidth and Size of a control
Predefined Values
The following table shows the values in pixels that correspond to the predefined constants.
| Configuring ASPX Pages and Reports | 84
Predefined Value ColumnWidth LabelsWidth and ControlSize
of a Layout Rule; LabelsWidth
and Size Properties of a Control
XXS 100px 40px
XS 150px 70px
S 200px 100px
SM - 150px
M 250px 200px
XM 300px 250px
L 350px 300px
XL 400px 350px
XXL 450px 400px
Setting of Predefined Values
Note the following points about setting the predefined sizes of controls and their labels:
• For any property for which there are predefined values, you can specify a value in pixels,
such as 55px. (This format is mandatory if you don't use abbreviations, because the
property value can be defined only in pixels.)
• There is no predefined value for the Width property of a control. Therefore, you can
specify a value for this property by typing any value in pixels, such as 55px. Before
specifying the Width property value for a control, you must define the Size property
value for the control as Empty.
The Width property is declared in ASP.NET. The Size property is declared in
Acumatica Framework, so you can use the predefined values.
Use of the StartRow and StartColumn Properties of
PXLayoutRule
In this topic, you can find information how to organize controls on an ASPX page into rows
and columns.
Default Layout
By default, the system places all the controls of a container into a column within the
first row, as shown in the diagram below. To do this, the system initially sets to True the
StartRow property value for the uppermost PXLayoutRule component in a container.
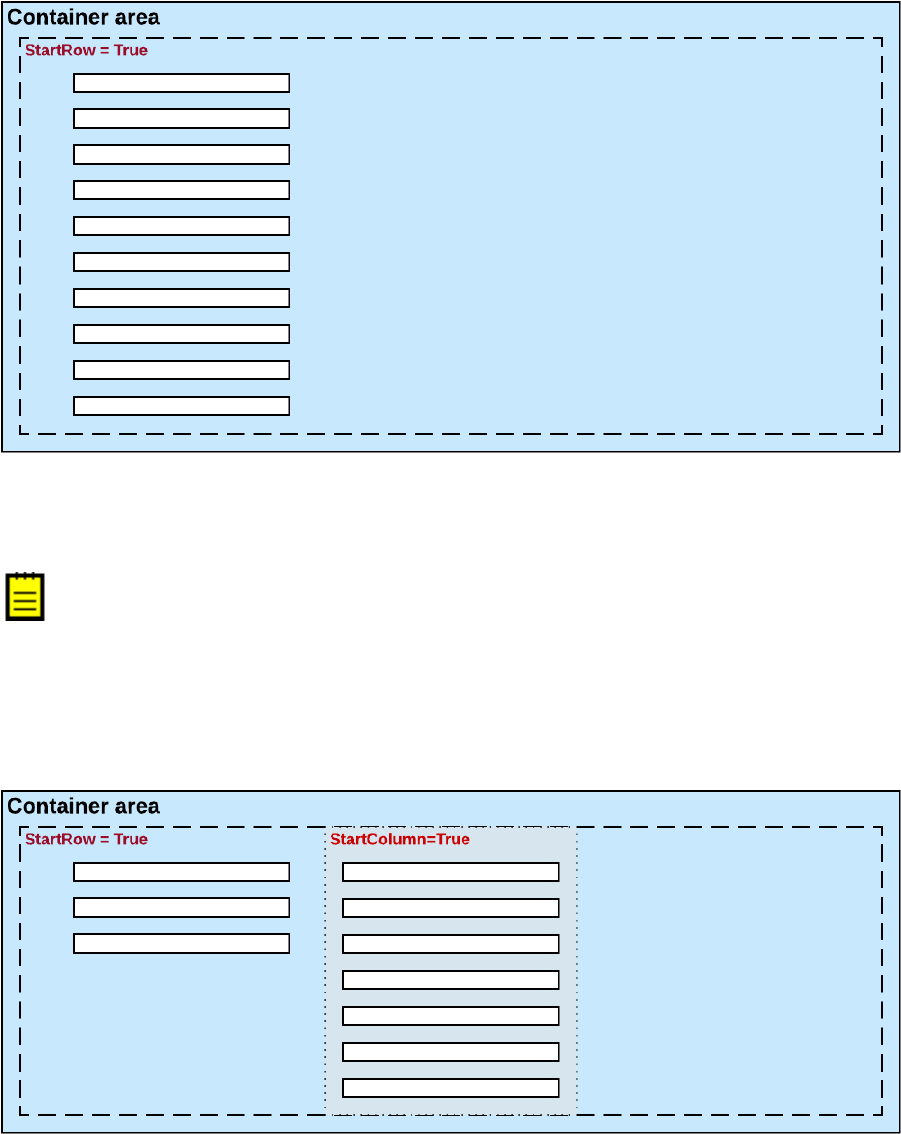
| Configuring ASPX Pages and Reports | 85
Figure: The default layout of controls of a container on a form
The controls continue to be placed within a single column until you add a layout rule with the
StartColumn or Merge property value set to True.
For the proper layout, the StartRow property value must be set to True for the
uppermost PXLayoutRule component of a container.
Splitting of Controls into Columns
You can place controls in multiple columns within a row by adding PXLayoutRule
components with the StartColumn property value set to True. This property creates a new
column of controls within the current layout row, as the following diagram shows.
Figure: Creation of a new column
The first control under this rule is the highest control in the column.
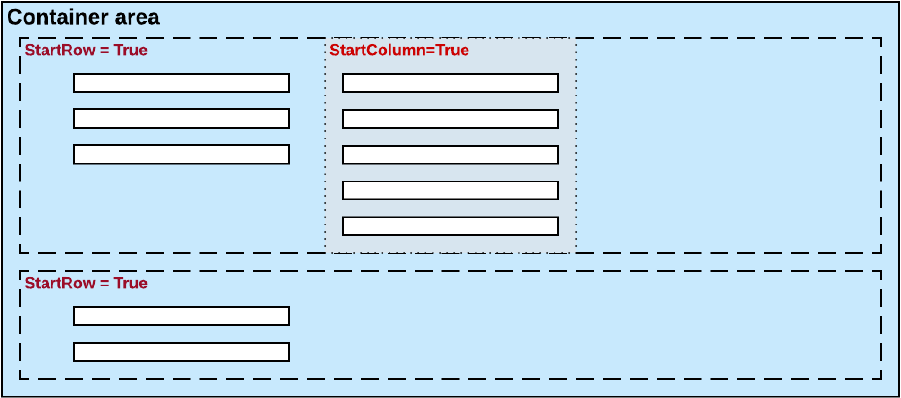
| Configuring ASPX Pages and Reports | 86
Splitting of Controls into Rows
Every new PXLayoutRule component that has the StartRow property value set to True
initializes a new independent placeholder of controls, which are placed in a single column by
default. To place controls in multiple columns within the new row, you should include in the
placeholder a new layout rule with the StartColumn property value set to True, as shown in
the following diagram.
Figure: Creation of a new row
Sizes of Rows and Columns
Because the values of the ColumnWidth, ControlSize, and LabelsWidth properties are
never inherited from the previously declared PXLayoutRule component, you might need to
define these properties exclusively for every new row and column.
Use of the ColumnWidth, ControlSize, and LabelsWidth
Properties of PXLayoutRule
You can use the PXLayoutRule components to define the sizes for every control (that is, its
input area) and its label within a column, group, or merged set of controls.
Required Properties
Every PXLayoutRule component that has the StartRow or StartColumn property value set
to True must have one of the following sets of properties defined:
• LabelsWidth and ControlSize
• LabelsWidth and ColumnWidth
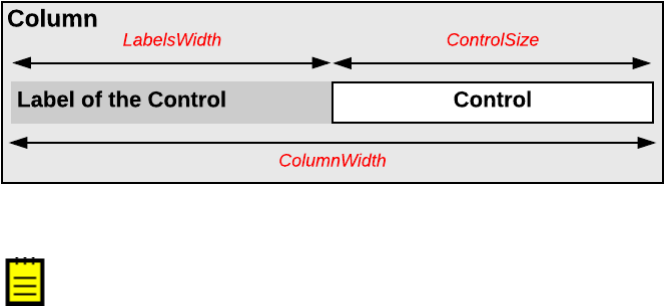
| Configuring ASPX Pages and Reports | 87
The following diagram illustrates the meaning of the LabelsWidth, ControlSize, and
ColumnWidth properties.
Figure: Use of the layout rule properties to define control sizes
You should not set property values for both ColumnWidth and ControlSize for the
same PXLayoutRule component; in this case, the system would use the value of the
ControlSize property.
Setting of the Size
Please note the following points about setting the sizes of controls and their labels:
• The values of the ColumnWidth, ControlSize, and LabelsWidth properties must be
defined exclusively for every PXLayoutRule component; they are never inherited from
the previously declared one.
• You can change the size of a single control or its label by defining values for the Size,
Width, and LabelsWidth properties of the control. Property values that are set for a
control have a higher priority than the property values of the PXLayoutRule component.
• You can assign a predefined size abbreviation (such as XXS, L, or XL) for the
ColumnWidth, LabelsWidth, and ControlSize properties of a layout rule and the
LabelsWidth and Size properties of a control. (See Predefined Size Values for details.)
• The PXDateTimeEdit and PXNumberEdit control types have a predefined Width property
value, which you cannot change by setting the ColumnWidth or ControlSize property
values for the appropriate PXLayoutRule component. To change the width of this control,
set a value for the Size or Width property of the control.
Use of the ColumnSpan Property of PXLayoutRule
You specify the ColumnSpan property value for a PXLayoutRule component by manually
typing the number of columns spanned by the first control placed below the rule.
Example
As an example of the use of the ColumnSpan property, the form container on the Customers
(AR303000) form has three columns of boxes, and there is a layout rule with the
ColumnSpan property set to 2 in the first column. This property forces the system to make
the box span two columns, as shown in the following screenshot.
| Configuring ASPX Pages and Reports | 88
Figure: The box that spans two columns on the form
Dependencies
A PXLayoutRule component with the ColumnSpan property value specified is handled as
follows:
• The LabelsWidth property value is always inherited from the previously declared
PXLayoutRule component that has the StartRow or StartColumn property value set to
True.
• If a value for the ColumnWidth or ControlSize property is specified for the component,
this value is ignored.
Use of the Merge Property of PXLayoutRule
Horizontal alignment is performed for the controls that are placed between a layout rule with
the Merge property set to True and the next layout rule. Therefore, to cancel merging for all
of the following controls, you have to add a PXLayoutRule component with or without the
Merge property specified.
Example
As an example of the use of the Merge property, the Billing Settings tab item on the
Customers (AR303000) form has three pairs of merged check boxes in the Print and Email
Settings group. This property forces the system to render the boxes in one column, as
shown in the following screenshot.
| Configuring ASPX Pages and Reports | 89
Figure: The boxes merged into a single column on the form
Dependencies
A PXLayoutRule component with the Merge property value set to True is handled as follows:
• If the ColumnWidth property value is set for the same PXLayoutRule component, the
value is ignored.
• The default values for the ControlSize and LabelsWidth properties are inherited from
the previously declared PXLayoutRule component with the StartRow or StartColumn
property value set to True. You can override these property values, if necessary, by
specifying the ControlSize and LabelsWidth property values from the predefined list of
options. (See Predefined Size Values for details.)
Use of the GroupCaption, StartGroup, and EndGroup
Properties of PXLayoutRule
You can organize controls in a container within groups to make users' work more logical.
Grouping of Controls
To group multiple controls within a column, generally you have to add two PXLayoutRule
components that have the following properties set to define the first and the last controls in
the group, respectively:
• GroupCaption and EndGroup: To create a group with the caption specified in the
GroupCaption property
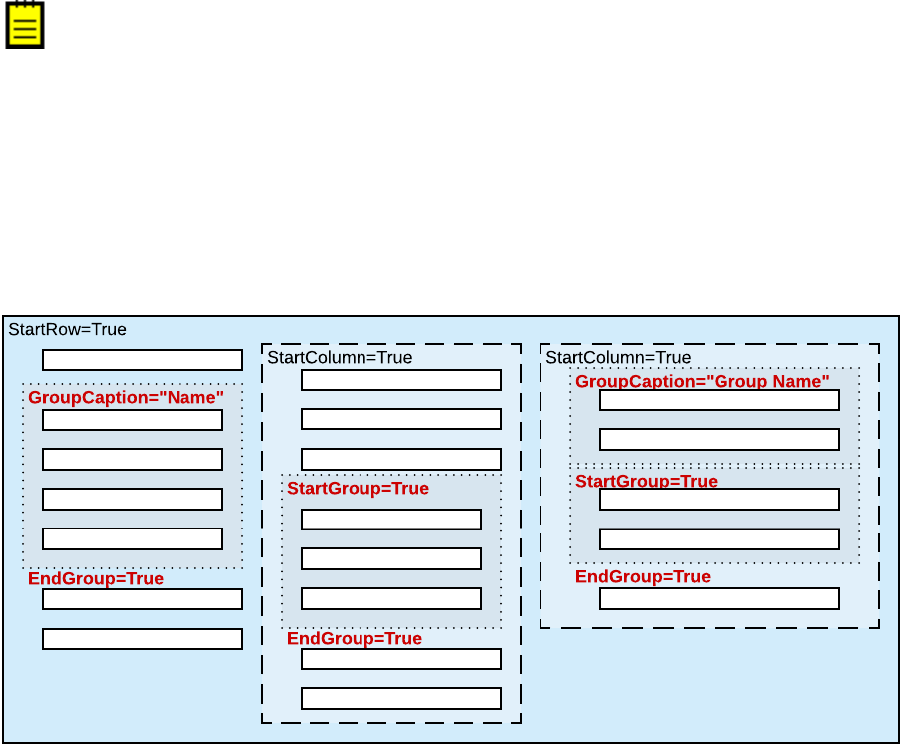
| Configuring ASPX Pages and Reports | 90
• StartGroup and EndGroup: To create a group without a caption
You can specify both the GroupCaption property and the StartGroup property for a
PXLayoutRule component that starts a group.
For example, by specifying the GroupCaption property value for the corresponding
PXLayoutRule components placed above a control, you start the group of controls and
set up the header for the group. You should also add a PXLayoutRule component with the
EndGroup property value set to True below (in the code) the last control that is included in
the group.
You end a group by using a PXLayoutRule component with a GroupCaption, StartGroup,
or EndGroup property specified. Therefore, if there is another group that starts immediately
below a group, you can omit the layout rule that ends the upper group, as shown in the third
column of the row displayed in the example in following diagram.
Figure: Possible use of layout rules with grouping properties
Dependencies
The system works as follows for all PXLayoutRule components with the GroupCaption or
StartGroup property value specified:
• If the GroupCaption, StartGroup, or EndGroup property is set for a PXLayoutRule
component, the system ignores the ColumnWidth property value specified for the
component.
• The default values for the ControlSize and LabelsWidth properties are inherited from
the previously declared PXLayoutRule component with the StartRow or StartColumn
property value set to True. You can override these property values, if necessary, by
specifying the ControlSize and LabelsWidth property values in the layout rule that
starts a group. (See Predefined Size Values for details.)
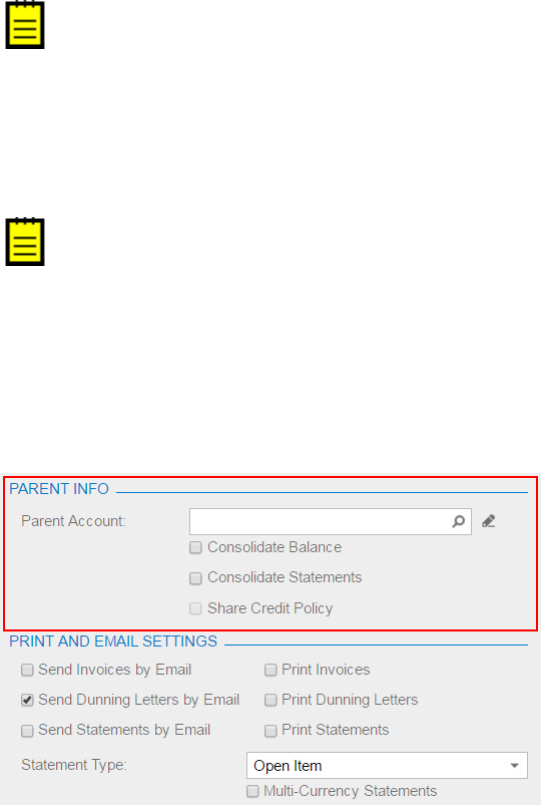
| Configuring ASPX Pages and Reports | 91
Use of the SuppressLabel Property of PXLayoutRule
Every control for a data field contains both a label and the input area of the control. The
label is displayed left of the input area, except with check boxes; the label of a check box is
displayed right of the input area of the check box. When you add a check box to a form, the
check box control is automatically aligned both left and right with other input controls in the
appropriate column. As a result, the area of the form left of a check box is empty.
SuppressLabel Property
To hide the labels of the controls placed within a column, you should set the SuppressLabel
property value of the PXLayoutRule component of the column to True. Then within the
column, all check boxes are placed without any space to the left of the input control, and the
labels of other controls are hidden.
If needed, you can left-align a check box in the column by setting to True the
AlignLeft property of the control.
The SuppressLabel property affects all of the controls of the group that are placed under
the PXLayoutRule component with the True value of this property. The SuppressLabel
property value must be defined for every PXLayoutRule component for the controls placed
beneath the component and included in the same column; this property is never inherited
from the previously declared property.
The SuppressLabel property value is never applied to PXLayoutRule components
that have the ColumnSpan property value specified.
Example
The Parent Info group on the Billing Settings tab item on the Customers (AR303000) form
is initially displayed with Parent Account displayed, as shown in the following screenshot.
Figure: A group of controls with labels
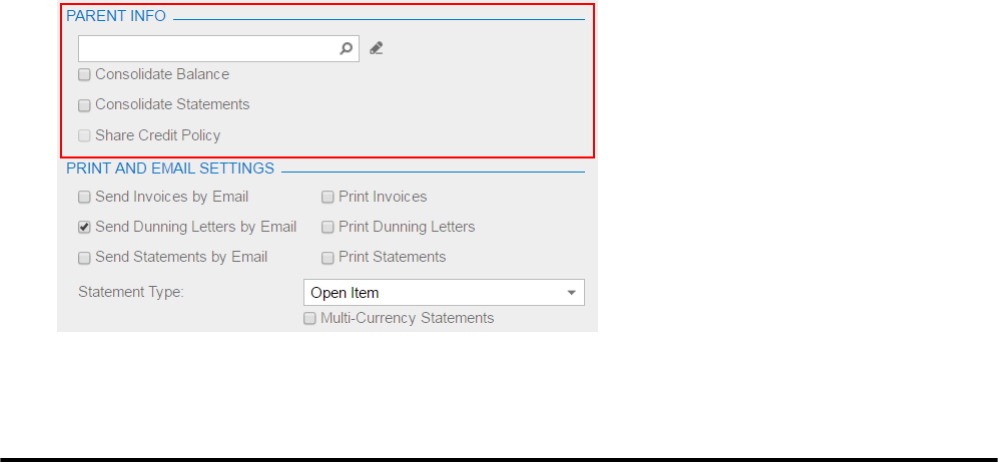
| Configuring ASPX Pages and Reports | 92
If you set the SuppressLabel property of the group layout rule to True, the label of the
Parent Account box is hidden and all check boxes are displayed without any space to the
left of the check boxes, as shown in the following screenshot.
Figure: The same group of controls after applying the SuppressLabel property to the group
Maintaining Reports
In Acumatica Report Designer, you can create custom reports or modify existing reports and
then use these reports in Acumatica ERP or an Acumatica Framework-based application.
For more information on the creation of the custom reports with the Report Designer, see
Acumatica Report Designer Guide.
In this chapter, you can find details about how the system renders reports in Acumatica ERP.
In This Chapter
• Display of Reports
• Display of Analytical Reports
Display of Reports
In this topic, you can find information about how Acumatica ERP displays reports that are
created with the Acumatica Report Designer.
What a Report Is
A report is an RPX file (which is created with the Acumatica Report Designer) that contains
the report schema in XML format—that is, the description of the data that should be
displayed in the report and the description of the report layout.(See the following diagram.)
The description of the data of the report includes the following: the database tables that
provide data for the report, the relationships between these tables, the parameters that can
be specified before the report is run, and the filtering and grouping parameters. The report
layout is a tree of headers, details, and footers.
| Configuring ASPX Pages and Reports | 93
Figure: Report schema
Reports can be saved in files on disk, or in the UserReport table of the database of an
Acumatica ERP instance. (The UserReport table uses the file name of the report as a key
and stores the schema of the report in XML format in the Xml column.)
The saved report can be published on an Acumatica ERP site—that is, added to the site map
and to any applicable workspaces so that the users can work with the report.
For details on creating reports with the Acumatica Report Designer, see the S130 Reporting:
Inquiry, Report Writing, Dashboards training course.
Acumatica ERP provides the following ways to run a report that you have created by using
the Acumatica Report Designer:
• From a report form, which is added to the site map, when the user clicks the Run
Report button on the form toolbar

| Configuring ASPX Pages and Reports | 94
• From a maintenance or entry form, when the user clicks the action button whose name is
associated with the report name
How the Report Is Launched from the Report Form
When a user opens the report form, the webpage performs the POST HTTP request to the
ReportLauncher.aspx page, passing the name of the report file as the ID query string
parameter of the request, as shown in the following example.
http://localhost/AcumaticaDB/frames/ReportLauncher.aspx?id=YF123456.rpx&HideScript=On
The ReportLauncher.aspx page contains the PXReportViewer control, whose JavaScript
objects and functions are designed to obtain the report data and display the data on the
form, and the PXSoapDataSource control, which is used to retrieve data for the report.
On the server side, an instance of the PX.Web.UI.PXReportViewer class processes the
request as follows:
1. Loads the report schema from the file on disk or from the database (by using the
LoadReport method) to a PX.Reports.Controls.Report object (which stores the report
schema in memory and provides the methods for working with this schema).
2. If the report schema is loaded successfully, performs the following:
a. Instantiates a PX.Reports.Web.WebReport object that will store data of the launched
report and assigns an instance ID to WebReport.
b. Binds the Report object to the data source that is specified by the
PXSoapDataSource control of the ASPX page. The PX.Web.UI.PXSoapDataSource
class instantiates a SoapNavigator object, which will be then used to retrieve data
for the report from the database.
The server returns an XML response with the report parameters to display and with the ID
of the instance of WebReport in the session. The browser displays the report parameters and
other options on the report form.
The following diagram illustrates how the report form is launched.
| Configuring ASPX Pages and Reports | 95
Figure: Launch of the report form
How the Report Data Is Retrieved
After the user has selected the values of the parameters of the report and clicked the
Run Report button on the form toolbar of the report form, the webpage sends the GET
request to PX.ReportViewer.axd on the server with the ID of the WebReport instance in
the session (which was created when the report was launched), as shown in the following
example.
http://localhost/AcumaticaDB/PX.ReportViewer.axd?
InstanceID=10bf4a13a38c4af39cafc80926e407f2&OpType=Report
&PageIndex=0&Refresh=True
To process the request, the server invokes the Render method of the WebReport class, which
launches the generation of the report as a long-running operation in a separate thread. For
details on how the long-running operation is processed for a report, see Processing a Report as
a Long-Running Operation.
To retrieve the data of the report from the database, the system uses the
PX.Data.Reports.SoapNavigator object (to which a reference is stored in the Report
object). SoapNavigator instantiates a PXGraph object (without a type parameter) and
composes a BQL command as an instance of the PX.Data.Reports.BqlSoapCommand class.
BqlSoapCommand inherits from the PX.Data.BqlCommand class and is optimized for retrieving
data for the reports. BqlSoapCommand has the IndexReportFields method, which uses the
PX.Data.PXDependsOnFieldsAttribute attribute to get the dependent fields of the report
recursively. For details on how BQL commands are used to retrieve data from the database,
see Translation of a BQL Command to SQL.

| Configuring ASPX Pages and Reports | 96
The system processes the data and creates a ReportNode object. That is, the system creates
the sections of the report based on the data retrieved from the database and on the report
schema from the Report object, and calculates all formulas inside the sections. Then the
system uses the resulting ReportNode object, which contains all sections with all needed
values, to render data in the needed format.
How the Report Data Is Displayed
After the long-running operation has completed, the PXReportViewer control displays the
report on the report form.
If a report is displayed in HTML format and the user turns the pages of the report, the
webpage sends the GET request to PX.ReportViewer.axd. The query string parameters of
the request are the ID of the report in the session and the number of the page, as shown in
the following request URL.
http://localhost/AcumaticaERP/PX.ReportViewer.axd?
InstanceID=008f2a8afb1a4998ade98bc64fc30ad9&OpType=Report
&PageIndex=0
The format in which the report is displayed (either PDF or HTML) is specified in the OpType
query string parameter of the request, as shown in the following request URL.
http://localhost/AcumaticaERP/PX.ReportViewer.axd?
InstanceID=008f2a8afb1a4998ade98bc64fc30ad9&OpType=PdfReport&Refresh=True
If a user turns the pages of the report or changes the format of the report, the system
creates the results of the report from the ReportNode object stored in the session by using
the renderer for the needed format. That is, the system does not retrieve the data of the
report from the database and does not processes this data to create a ReportNode object
once again.
How the Report Is Launched from the Maintenance or Entry Form
On a form, when a user clicks the action button to generate a report, the data source control
of the form creates a request to the Acumatica ERP server to execute the action delegate
defined for the button. The server creates an instance of the graph, which provides the
business logic for the form and invokes the action delegate method. The action delegate
obtains from the form the data required to define the report parameters and throws an
exception of the PX.Data.PXReportRequiredException type with the report ID and these
parameters. The system processes the exception, saves the report parameters to the
session, and redirects the user to the ReportLauncher.aspx page.
The ReportLauncher.aspx page loads the report schema and instantiates a WebReport
object, as described in How the Report Is Launched from the Report Form. Instead of retrieving
the values of report parameters from the webpage, the system opens the report with the
parameters stored in the session. The system retrieves data for the report, as described in
How the Report Data Is Retrieved.

| Configuring ASPX Pages and Reports | 97
Related Links
• Acumatica Report Designer Guide
• Asynchronous Execution
Display of Analytical Reports
In this topic, you can find information about how Acumatica ERP displays analytical reports.
What an Analytical Report Is
An analytical report is a specific type of report that you can construct in Acumatica ERP by
using the Analytical Report Manager (ARM) toolkit. You will likely want to use the ARM toolkit
rather than the Acumatica Report Designer to create the following types of reports:
• Financial reports that display data that is posted to the general ledger accounts and
accumulated in the General Ledger module. The system gets the data of the general
ledger accounts from the GLHistory table of the database.
• Project accounting reports that display data that is accumulated in the Project module.
The system gets the data for these reports from the PMHistory table of the database.
For details on analytical reports, see the F350 Reporting: Analytical Reports training course.
The schema of analytical reports are stored in a set of database tables that have RM prefix
in their names, such as RMReport, RMRowSet, and RMColumnSet. The analytical report
is identified in the system by its code, which you specify in the Code box on the Report
Definitions (CS206000) form. The report code is stored in the ReportCode column of the
RMReport table.
The schema of an analytical report can include the position of the report in the site map so
that the users can work with the report. To run the report, a user clicks the Run Report
button on the form toolbar of the report form.
How the Analytical Report Is Launched from the Report Form
When a user opens the report form of an analytical report, the webpage performs the POST
HTTP request to the RMLauncher.aspx page, passing the report code with .rpx appended
as the ID query string parameter of the request, as shown in the following example.
http://localhost/AcumaticaDB/frames/rmlauncher.aspx?id=dbsp.rpx&HideScript=On
The RMLauncher.aspx page contains the PXReportViewer control, whose JavaScript
objects and functions are designed to obtain the report data and display the data on the
form, and the ARmDataSource control, which is used to retrieve data for the analytical
report.
On the server side, the system (by using an instance of the PX.Web.UI.PXReportViewer
class) processes the request as follows:
| Configuring ASPX Pages and Reports | 98
1. Loads the parameters of the analytical report from the database (by using the
LoadReport method) to a PX.Reports.Controls.Report object as follows:
a. The system retrieves the data source of the report viewer as an
instance of the PX.CS.RMReportReader class, which is a graph (derived
from PXGraph<RMReportMaint, RMReport>) that implements the
PX.Report.ARm.Data.IARmDataSource interface.
b. By using the GetReport method of IARmDataSource, the system
retrieves the parameters of the analytical report from the database to the
PX.Reports.ARm.ARmReport object.
c. By using the CreateReport method of the PX.Reports.ARm.Data.ARmProcessor
class, the system creates a Report object with the parameters retrieved from the
ARmReport object.
2. If the report parameters are loaded successfully, performs the following:
a. The system instantiates a PX.Reports.Web.WebReport object that will store data of
the launched report and assigns an instance ID to WebReport.
b. The system initializes the ProcessMethod field of the WebReport object with the
processing function for analytical reports.
The server returns an XML response with the report parameters to display and with the ID of
the instance of WebReport in the session. The browser displays the report parameters on the
report form.
How the Data of the Analytical Report Is Retrieved
After the user has selected the values of the parameters of the analytical report and clicked
the Run Report button on the form toolbar of the report form, the webpage sends the GET
request to PX.ReportViewer.axd on the server with the ID of the WebReport instance in
the session (which was created when the report was launched).
To process the request, the server invokes the Render method of the WebReport class, which
launches the generation of the report as a long-running operation in a separate thread. For
details on how the long-running operation is processed for a report, see Processing a Report as
a Long-Running Operation.
To retrieve the data of the analytical report from the database, the system
uses the PX.Objects.CS.RMReportReaderGL (for financial reports) and
PX.Objects.CS.RMReportReaderPM (for project accounting reports) extensions of the
PX.CS.RMReportReader graph.
How the Report Data Is Displayed
After the long-running operation has completed, the PXReportViewer control displays the
analytical report on the report form.
Related Links
• Managing Analytical Reports

| Accessing Data | 100
Accessing Data
The topics in this part of the guide explain how an application based on Acumatica
Framework can access data from the application database and the data stored in the
session.
In This Part
• Querying Data in Acumatica Framework
• Creating Fluent BQL Queries
• Creating Traditional BQL Queries
• Creating LINQ Queries
• Defining Relationships Between DACs
• Working with Data in Cache and Session
Querying Data in Acumatica Framework
In Acumatica Framework, you generally use business query language (BQL) to query data
from the database. BQL statements represent specific SQL queries and are translated
into SQL by Acumatica Framework, which helps you to avoid the specifics of the database
provider and validate the queries at the time of compilation. Acumatica Framework provides
two dialects of BQL: traditional BQL and fluent BQL.
To query data from the database, you can also use language-integrated query (LINQ), which
is a part of the .NET Framework. In the code of Acumatica Framework-based applications,
you can use both the standard query operators (provided by LINQ libraries) and the
Acumatica Framework-specific operators that are designed to query database data.
This chapter explains the aspects that are common to traditional BQL, fluent BQL, and LINQ
and provides a high-level comparison of the approaches for querying data in Acumatica
Framework.
In This Chapter
• BQL and LINQ
• Data Access Classes
• PXView and PXCache of the Data View
• PXView Type and Views Collection
• Data View Delegates
• Data Query Execution
• To Execute BQL Statements
• To Process the Result of the Execution of the
BQL Statement
| Accessing Data | 101
• Translation of a BQL Command to SQL
• Merge of the Records with PXCache
• Comparison of Fluent BQL, Traditional BQL, and
LINQ
• Fluent BQL and Traditional BQL Equivalents
BQL and LINQ
When a data request occurs, the system creates an instance of a business logic controller
(also referred as a graph). The graph contains the data views that you define in code. In
these data views, you define the queries to be executed to retrieve the requested data by
using business query language (BQL), which is provided by Acumatica Framework. You also
use BQL to define the data queries directly in code and in attributes.
BQL is written in C#; it is based on generic class syntax, which is similar to SQL syntax.
Thus, BQL has almost the same keywords as SQL does, placed in the order in which they are
used in SQL. BQL offers several benefits to the application developer. BQL does not depend
on the specifics of the database provider, and it is object-oriented and extendable. Also, BQL
provides compile-time syntax validation, which helps to prevent SQL syntax errors.
You can also use language-integrated query (LINQ) provided by the System.Linq library
when you need to select records from the database in the code of Acumatica Framework-
based applications or if you want to apply additional filtering to the data of a BQL query.
However, you still have to use BQL to define the data views in graphs and to specify the data
queries in the attributes of data fields.
Fluent BQL and Traditional BQL
Acumatica Framework provides two dialects of BQL: fluent BQL and traditional BQL.
Traditional BQL was the initial language for data queries in Acumatica Framework; it provides
the benefits described above. Fluent BQL provides the following advantages as compared to
traditional BQL:
• It is easier to read and edit fluent BQL queries than traditional BQL queries because each
section of a fluent BQL query does not depend on the others and can appear in only
specific places of the query. Also, fluent BQL queries contain fewer commas and angle
brackets and do not use numbered classes (such as Select2 or Select6).
• You do not need to select a suitable class for a fluent BQL query (such as
PXSelectOrderBy<,> or PXSelectJoinOrderBy<,,>); instead, you simply start typing
the command, and IntelliSense in Visual Studio offers continuations that are relevant for
the current query state.
For a detailed list of differences between the dialects, see Comparison of Fluent BQL, Traditional
BQL, and LINQ.
The following code shows an example of a data view written in fluent BQL.

| Accessing Data | 102
SelectFrom<Product>.
Where<Product.availQty.IsNotNull.
And<Product.availQty.IsGreater<Product.bookedQty>>>.View products;
The following code shows the same data view written in traditional BQL.
PXSelect<Product,
Where<Product.availQty, IsNotNull,
And<Product.availQty, Greater<Product.bookedQty>>>> products;
Suppose the database provider is Microsoft SQL Server. Acumatica Framework translates the
fluent and traditional BQL queries shown above into the following SQL query, where [list
of columns] is the list of columns of the Product table.
SELECT [list of columns] FROM Product
WHERE Product.AvailQty IS NOT NULL
AND Product.AvailQty > Product.BookedQty
Acumatica Framework explicitly enumerates the columns of the database table in the SQL
query. For details on which columns are enumerated, see Translation of a BQL Command to SQL.
LINQ
To configure a LINQ query, you can use the following variants of syntax:
• Query expressions, which use standard query operators from the System.Linq
namespace (such as where or orderby) or Acumatica Framework-specific operators
from the PX.Data.SQLTree namespace (such as SQL.BinaryLen, which is shown in the
following example of this syntax).
ProductMaint graph = PXGraph.CreateInstance<ProductMaint>();
var goods = from p in graph.Select<Product>()
where
p.ProductCD.Length == 5 &&
p.GroupMask.Length == 4 &&
(p.WorkGroupID & 0b10) != 0
select new
{
p.ProductID,
p.ProductCD,
p.ProductName,
Len = p.ProductName.Length,
BLen = SQL.BinaryLen( p.ProductName) + 1,
p.GroupMask,
p.WorkGroupID
};
• Explicit (method-based) syntax. The arguments of the methods used in this syntax are
lambda expressions. In these expressions, you can use the standard C# operators and
Acumatica Framework-specific operators from the PX.Data.SQLTree namespace (such as

| Accessing Data | 103
SQL.BinaryLen, which is shown in the following code). The code below is equivalent to
the query expression shown above.
ProductMaint graph = PXGraph.CreateInstance<ProductMaint>();
var goods = graph.Select<Product>()
.Where( p =>
p.ProductCD.Length == 5 &&
p.GroupMask.Length == 4 &&
(p.WorkGroupID & 0b10) != 0)
.Select( p => new
{
p.ProductID,
p.ProductCD,
p.ProductName,
Len = p.ProductName.Length,
BLen = SQL.BinaryLen(p.ProductName) + 1,
p.GroupMask, p.WorkGroupID
});
Related Links
• Fluent Business Query Language
• Traditional Business Query Language
• LINQ in Acumatica Framework
• Comparison of Fluent BQL, Traditional BQL, and LINQ
Data Access Classes
The classes that represent database tables in Acumatica Framework are called data access
classes (DACs). You derive these classes from the PX.Data.IBqlTable interface. The name
of a class is usually the same as the name of the database table to which it provides access
(except with the DACs that have the PXTable or PXProjection attributes, which change
the default binding of DACs to database tables). We recommend that you add to each DAC
the PXCacheName or PXHidden attribute to specify whether and how the DAC is available in
generic inquiries and reports.
DAC Fields
For each table column, you add a data field to the corresponding data access class by
declaring the following members:
• A public abstract class (which is also referred to as a class field)
You use this class to reference the table column in a business query language (BQL)
statement. The declaration of the class field is different in the fluent BQL dialect than it
is in the traditional BQL dialect. For details about the declaration, see Data Access Classes
in Fluent BQL and Data Access Classes in Traditional BQL. We recommend that you use the
fluent BQL style of DAC declaration because it can be used both in fluent BQL and in

| Accessing Data | 104
traditional BQL. The style of class field declaration is not important for queries defined
with language-integrated query (LINQ).
• A public virtual property (which is also referred to as property field)
You bind the data field to the table column by specifying the type attribute that is derived
from the PXDBFieldAttribute class, such as PXDBString, and specifying the name
of the column as the name of the property. If you don't need to bind the property to a
database column (for example, if you want the value of the property to be calculated
from the database fields), you specify an unbound type attribute, such as PXDBCalced.
You assign the property a name that starts with an uppercase letter. For the lists of
bound and unbound type attributes, see Bound Field Data Types and Unbound Field Data
Types.
You use the property, which, in the system, holds the column data of the table, in the
queries defined with LINQ. In the SQL command generated from BQL, the framework
explicitly lists columns for all bound data fields defined in the DAC. For the unbound data
fields whose property attribute defines a BQL command, if this data field is used in a BQL
query, the system translates the BQL command of the property to SQL when the BQL
query is translated to SQL. For more information on the translation of BQL to SQL, see
Translation of a BQL Command to SQL.
The following code shows an example of the Product DAC declaration in the fluent BQL
style.
using System;
using PX.Data;
public class Product : PX.Data.IBqlTable
{
// The class used in BQL statements to refer to the ProductID column
public abstract class productID : PX.Data.BQL.BqlInt.Field<productID>
{
}
// The property holding the ProductID value in a record
[PXDBIdentity(IsKey = true)]
public virtual int? ProductID { get; set; }
// The class used in BQL statements to refer to the AvailQty column
public abstract class availQty : PX.Data.BQL.BqlDecimal.Field<availQty>
{
}
// The property holding the AvailQty value in a record
[PXDBDecimal(2)]
public virtual decimal? AvailQty { get; set; }
}
Bound and Unbound Data Fields
A data field can be bound (mapped) or unbound (not mapped) to a database column. The
type attribute on a DAC field specifies whether the field is bound or unbound. DB in the type
attribute name denotes whether the field is bound. In the code below, the OrderNbr field is
| Accessing Data | 105
bound because it has the PXDBString type attribute, while the Description field is unbound
because of the PXString attribute.
// DB means this is a bound DAC field
[PXDBString(15, IsKey = true, IsUnicode = true)]
public virtual string OrderNbr {...}
// The absence of DB means this is an unbound DAC field
[PXString(50, IsUnicode = true)]
public virtual string Description {...}
The framework provides bound and unbound types for many data types, including string,
Boolean, decimal, integer, and date and time. These types are abstracted from specific
database types.
Mandatory Attributes on Data Fields
The only mandatory attributes that you should add to DAC fields are:
• Type attributes, such as PXDBString, PXString, PXDBDecimal, and PXDecimal.
• PXUIField—for fields displayed in the UI.
Key Fields
You define the key fields in DACs independently of the database. Database key fields may
not be key fields in the DAC. To mark a field as a key field, you set the IsKey property to
true in the type attribute, as follows.
[PXDBString(15, IsUnicode = true, IsKey = true)]
[PXDefault]
[PXUIField(DisplayName = "Product ID")]
public virtual string ProductCD
{...
}
Product is the example of a DAC whose key field is different from the database key field.
The primary key of the Product table in the database consist of the ProductID field. In the
Product DAC, you mark the ProductCD field as the key field. The key fields defined in a DAC
are used to identify DAC data records in cache objects.
DACs in Acumatica ERP can include a pair of ID and CD fields (such as ProductID and
ProductCD). Typically, the ID field is represented by the identity column in the database
(automatically incremented integer) and serves as the surrogate field. The CD field is the
natural key, usually string, which is recognizable by a human.
For more information on attributes on DAC fields, see Working with Attributes.
Concurrency Management
You should add the SQL Server timestamp column to a table to make Acumatica Framework
able to handle concurrent updates.

| Accessing Data | 106
[PXDBTimestamp()]
public virtual byte[] TStamp
{
...
}
The corresponding timestamp data field should be declared in the data access class. If the
timestamp data field is declared, Acumatica Framework handles the timestamp column
automatically. Acumatica Framework checks the row version every time the row is modified.
For details about the timestamp, see Concurrent Update Control.
Related Links
• Data Access Classes in Fluent BQL
• Data Access Classes in Traditional BQL
• Translation of a BQL Command to SQL
PXView and PXCache of the Data View
Data views are graph members that are used to retrieve and modify data records of a
particular data access class (DAC). You use data views:
• To provide data retrieval and manipulation functions for the UI
• To retrieve and manipulate data from code
You define a data view with a class derived from the PXSelectBase class, such as
SelectFrom<>.View in fluent BQL and PXSelect<> in traditional BQL. The first DAC of the
data view is the main DAC of the data view. Below are the Orders and OrderDetails data
views that are defined in the SalesOrderEntry graph. Both data views provide data for
the UI. Acumatica Framework automatically instantiates the data views and invokes the
Select() method when either of these data views is requested by the client.
public class SalesOrderEntry : PXGraph<SalesOrderEntry, SalesOrder>
{
// Provides an interface for manipulation of sales orders
public SelectFrom<SalesOrder>.View Orders;
// Provides an interface for manipulation of detail lines of
// the specified order
public SelectFrom<OrderLine>.
Where<OrderLine.orderNbr.
IsEqual<SalesOrder.orderNbr.FromCurrent>>.View OrderDetails;
}
When a graph executes a data view, the graph creates the following objects:
• The PXView object, which contains the BQL command that corresponds to the data view
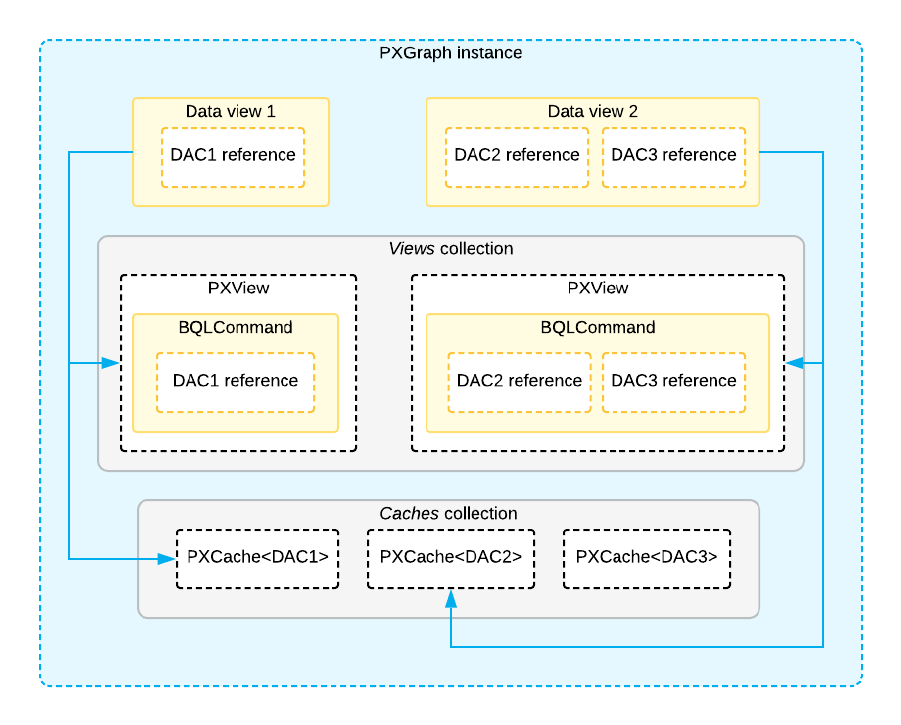
| Accessing Data | 107
• The PXCache<DAC> objects whose type parameter is defined by the data access classes
(DACs) that are used in the BQL command
The PXView object uses the BQL command to retrieve data from the database and stores the
retrieved data in the PXCache object. The data view stores references to the corresponding
PXView object and the PXCache object of the main DAC of the data view, as shown in the
following diagram.
Figure: Example of relationships between classes
PXCache<DAC> are objects that are created by the system to maintain data records retrieved
from the database and the modifications to these data records. The system serializes the
modified data records from all cache objects to the session between round trips and restores
them on each new round trip.
Each data view is connected to a cache object by the main DAC of this data view. For
example, the Orders data view from the example above is related to a cache object of
PXCache<SalesOrder> type. To insert a new data record, update an existing one, or delete
a data record, you use the data view methods, which invoke the corresponding cache
methods.

| Accessing Data | 108
Cache objects identify data records by their key fields, which are fields with the IsKey
property set to true in a type attribute.
Cache objects hold the data records that are modified but not yet saved to the database.
Each cache object holds the data records of a single DAC. In a graph, each data view
corresponds to the cache object that works with the main DAC of the data view.
For data binding, you specify a data view in the DataMember property of a UI container
control, such as a form, grid, or tab on the ASPX page.
PXView Type and Views Collection
In addition to including the Cache property, a data view includes the View property, which
references a controller object of the PXView type. A PXView object is created automatically
for each data view. This object is responsible for retrieving data from the database and
placing it into the cache object.
Each graph contains the following: a collection of cache objects, called Caches; and
a collection of PXView objects, called Views. The framework handles these objects
automatically; you don't have to initialize and control them.
A PXView object contains two main parts:
• The BQL command, which is defined by the type of the data view.
• The optional delegate, which customarily constructs the data set that is returned instead
of the result of the BQL command's execution. For details, see Data View Delegates.
PXView objects, like graphs, are initialized and destroyed on each round trip.
On an ASPX page, you bind each container control with a data view that provides data for
the container control. To bind a container control and a data view, you specify the name of
the data view in the DataMember property of the container control. When a form requests
data, the system invokes the ExecuteSelect() method of the graph with data view name
passed as an argument to execute every data view bound to the ASPX page's container
controls. The positioning of container controls on the ASPX page determines the order of
execution of the data views. Note that if a data view is not bound to any container control, it
is not executed by request from the UI.
The order in which data views are defined in a graph is important, because it defines
the order in which data is saved to the database. (This order does not, however,
define the order in which data views are executed.) The data view that you specify in
the PrimaryView property should always be defined first in the graph.
When a data record is modified on the form, the framework invokes the ExecuteInsert(),
ExecuteUpdate(), or ExecuteDelete() method of the graph, passing the name of the data
view as an argument. The graph obtains the data view by using its name and invokes the
corresponding method of the data view.

| Accessing Data | 109
You shouldn't use the ExecuteSelect(), ExecuteInsert(), ExecuteUpdate(), or
ExecuteDelete() method for purposes other than debugging.
Data View Delegates
By default, when a data view object is requested by the UI or you invoke the Select()
method on the object, the system executes the query specified in the data view type.
However, you can define a dynamic query, which is an optional graph method (called the
data view delegate) that is executed when the data view is requested. If no dynamic query
is defined in the graph, Acumatica Framework executes the BQL statement from the data
view type.
You can use the data view delegate in the following cases:
• If the query is constructed dynamically at runtime by adding Where<> and Join<>
clauses depending on some condition, typically a filter
• If the query retrieves data fields that cannot be calculated declaratively by using
attributes—for instance, if you retrieve values that are aggregated by calculated data
fields
• If the result set has data records that aren't retrieved from the database and are
composed dynamically in code
Definition of a Data View Delegate
To define the delegate for a data view, define a method that has the same name as the
data view but uses a different case for the first letter. The delegate returns an IEnumerable
object, as shown in the code below.
// The SupplierProducts data view
[PXFilterable]
public SelectFrom<SupplierProduct>.
InnerJoin<Supplier>.On<Supplier.supplierID.IsEqual<
SupplierProduct.supplierID>>.
OrderBy<SupplierProduct.productID.Asc, SupplierProduct.supplierPrice.Asc,
SupplierProduct.lastPurchaseDate.Desc>.
View.ReadOnly SupplierProducts;
// The delegate for the SupplierProducts data view
protected virtual IEnumerable supplierProducts()
{
// Implement the dynamic query
}
The framework automatically adds the delegate by its name and invokes the method when
the data view object is requested.
| Accessing Data | 110
Execution of a Data View Delegate
A data view executes the delegate by using the following rules:
• If a delegate is defined, invokes the delegate and then does the following:
• If the delegate returns null, executes the BQL command.
• If the delegate returns an object, reorders the result according to the OrderBy clause
of the BQL command.
• If a delegate is not defined, executes the BQL command.
In the delegate, you can execute any queries to get the needed data records. The result
set (PXResultset<> object) returned by the delegate must consist of objects of the same
DACs and in the same order as the classes are specified in the data view type. Thus, in
the example above, you can return a PXResult<SupplierProduct> object, but you cannot
return a PXResult<Supplier> object. To return a Supplier object from the delegate, you
have to return the PXResult<SupplierProduct, Supplier> object from the method.
The result set returned by the data view is always sorted by the OrderBy clause
specified in the type of the data view object. If you sort data records in a different
way within the delegate, the result set will be reordered before it is returned by the
data view.
Construction of a Result Set
You can dynamically construct the result set that is returned by the data view. To construct a
result set, you create an object of a generic PXResultset type and add PXResult objects to
it.
The following code creates a result set of PXResult objects than contain the joined data of
three data access classes: Supplier, OrderLine, and Product.
// Create a PXResultset typed with needed DACs
PXResultset<Supplier, OrderLine, Product> res =
new PXResultset<Supplier, OrderLine, Product>();
// Compose DAC objects, and set values for the needed fields
Supplier resultSupplier = new Supplier();
OrderLine resultLine = new OrderLine();
Product resultProd = new Product();
// Create a new PXResult object from DAC objects and add it to the result set
res.Add(new PXResult<Supplier, OrderLine, Product>(
resultSupplier, resultLine, resultProd));
A PXResultset collection implements the IEnumerable interface; you can return the
collection in a data view delegate.
protected virtual IEnumerable productRecords()
{

| Accessing Data | 111
...
// In a data view delegate, you can return the entire result set
return res;
}
Data Query Execution
The system executes a data query in the following stages, which are described in detail
below:
• Stage 1: When a developer executes a BQL statement in code, Acumatica Framework
configures a delayed query.
• Stage 2: If a language-integrated query (LINQ) statement is appended to the BQL
statement, Microsoft LINQ configures the expression tree, which includes the delayed
query.
• Stage 3: When the developer casts the result of the query to a data access class (DAC)
or an array of DACs, the system does the following:
• 3a: If the result of the query contains the expression tree created by LINQ, the
system configures the SQL query tree that corresponds to the LINQ expression tree,
and executes the SQL query tree.
• 3b: If the result of the query is created only by BQL, the system configures the SQL
query tree for the delayed query and executes this query tree.
The whole process is illustrated in the following diagram.

| Accessing Data | 112
Figure: Data query execution
Configuration of a Delayed Query
In code, you execute a business query language (BQL) statement in one of the following
ways:
• You declare a data view (a PXSelectBase-derived class) as a member in a graph, and
you specify this data view as the data member of the ASPX page control. The system
uses this data view for basic data manipulation (inserting a data record, updating a data
record, and deleting a data record) and executes the data view by calling the Select()
method.
| Accessing Data | 113
• You use the static Select() method of a PXSelectBase-derived class with a graph
object as the parameter.
• You dynamically instantiate a PXSelectBase-derived class in code and execute it by
using its Select() method. (You provide the graph object as a parameter to the class
constructor.)
• You instantiate a class derived from the BqlCommand class (such as a Select class in
traditional BQL or FromSelect in fluent BQL), create a PXView object that uses this
BqlCommand class, create a graph object, and call one of the view's Select() methods.
When the Select() method is executed, Acumatica Framework does the following:
1. Configures a delayed query by creating a PXDelayedQuery instance. The
PXDelayedQuery instance contains a reference to a PXView object, which contains
references to PXGraph and the BqlCommand object to be executed.
2. Caches the delayed query by using the PXContext.SetSlot method. (For details on the
slots, see Use of Slots to Cache Data Objects.)
3. Returns a PXResultset<T> object whose type parameter is set to the DAC specified as
the type parameter of the SelectFrom class (in fluent BQL) or as the first type parameter
of the PXSelect class (in traditional BQL). This result set contains information about the
delayed query.
You can iterate through the result set in a foreach loop, obtaining either DAC instances or
PXResult<> instances. A PXResult<> instance represents a tuple of joined records from the
result set. PXResult<> can be cast to any of the DAC types joined in the BQL statement.
For more information on the use of the PXResultset<T> class, see To Process the Result of the
Execution of the BQL Statement.
Configuration of the LINQ Expression Tree
Because the PXResultset<T> class implements the IQueryable<T> interface, developers
can modify PXResultset<T> by using LINQ. If the developer appends LINQ statements
to a result set, Microsoft LINQ incorporates the result set as an instance of the
SQLQueryable<T> class in the LINQ expression tree. The resulting expression tree is
an instance of the SQLQueryable<T> class, which contains references to an instance of
PXGraph, Microsoft LINQ expression tree, the base PXResultset<T>, and an instance of
PX.Data.SQLTree.SQLQueryProvider.
Execution of the Delayed Query
Once you cast the result of the execution of the Select() method to a DAC or an array of
DACs, or if you iterate through the DACs in the result by using the foreach statement, the
system performs the following steps:
1. The system calls the PXDelayedQuery.GetRows method for the delayed query of the
result set. This method internally calls the PXView.Select() method for the data view
referred to in the delayed query.
| Accessing Data | 114
2. If the select delegate is provided, inside the PXView.Select() method, the system
invokes the select delegate by using the PXView.InvokeDelegate method and saves the
result in the query cache of the graph. (The query cache stores the result set obtained by
the execution of a specific BQL command.)
3. Inside the PXView.Select() method, the system searches for the requested records in
the query cache by using the PXView.LookupCache method. If no records are found, the
system requests data from the database by using the PXView.GetResult method. For
details on the retrieval of records from the database, see Translation of a BQL Command to
SQL.
4. The system merges the records retrieved from the database or from the query cache
with the modified records stored in PXCache by using the PXView.MergeCache method.
For details about the merge, see Merge of the Records with PXCache.
5. The system saves the result of the query in the query cache by using the
PXView.StoreCached method.
6. The system returns the result as a List<T> type.
Execution of the LINQ Expression Tree
Once you iterate over the LINQ expression tree, the system performs the following steps:
1. The system calls the SQLQueryProvider.Execute() method, which builds
the Remotion.Linq expression tree based on the Microsoft LINQ expression
tree and calls Remotion.Linq.QueryModel.Execute() method with the
PX.Data.SQLTree.SQLinqExecutor instance as a parameter.
2. The system builds the SQL query tree from the Remotion.Linq.QueryModel by calling
the SQLinqExecutor.ExecuteCollection<T>() method. In this method, the system
executes the SQLinqQueryModelVisitor.VisitQueryModel() method, which does the
following:
a. Calls the SQLinqQueryModelVisitor.VisitMainFromClause() method,
which builds the SQL query tree for the BQL statement that corresponds
to the base PXResultset<T> of the query. This method internally calls the
BqlCommand.GetQueryInternal method, which is described in Translation of a BQL
Command to an SQL Query Tree.
b. Builds the SQL query tree for the rest of the Remotion.Linq expression tree by
calling the methods of SQLinqQueryModelVisitor for particular clauses and the
columns included in the result of the query. If the system cannot build the SQL query
tree for particular elements of the Remotion.Linq expression tree, the system falls
back to the execution of the delayed query for the base BQL statement. For details
about the fallback, see Fallback to the LINQ to Objects Mode.
3. Within the SQLinqExecutor.ExecuteCollection<T>() method, the system uses the
built SQL query tree to request the data from the database. For details about how
the SQL query tree is translated to the SQL text that is passed to the database, see
Translation of the SQL Query Tree to SQL Text.
| Accessing Data | 115
4. The system merges the records retrieved from the database with the modified records
stored in PXCache. For details about the merge, see Merge of the Records with PXCache.
5. The system returns the result as a List<T> type.
Related Links
• Translation of a BQL Command to SQL
• Merge of the Records with PXCache
Translation of a BQL Command to SQL
When the system executes a delayed query and calls the PXView.GetResult method to
retrieve the data from the database, the system converts the business query language (BQL)
command (PX.Data.BqlCommand) to the SQL query tree (PX.Data.SQLTree.Query), applies
the needed restrictions on the SQL query tree (such as company and branch restrictions),
and then converts the SQL query tree to the text of the SQL command for the target
database type. This process is described in detail in the following sections.
Translation of a BQL Command to an SQL Query Tree
To request the SQL query tree of the command, the system recursively calls the following
methods:
1. PXView.GetResult
2. PXGraph.ProviderSelect
3. PXDatabaseProviderBase.Select
4. BqlCommand.GetQuery
The BqlCommand.GetQuery method calls the BqlCommand.GetQueryInternal method, which
uses other methods as follows to prepare the SQL query tree:
1. If the BQL command contains aggregation, the BqlCommand.AppendAggregatedFields
method appends to a new Query instance the SQL expressions
(PX.Data.SQL.SQLExpression) that correspond to the fields that are surrounded with
appropriate aggregation functions. If the BQL command does not contain aggregation,
the BqlCommand.AppendFields method appends to a new Query instance the SQL
expressions that correspond to the fields to be selected. The fields to be selected are the
DAC fields that subscribe to the OnCommandPreparing event and are not restricted by
PXFieldScope.
2. For each Join clause, the IBqlJoin.AppendQuery method adds to the Query instance
the Joiner instance that corresponds to the Join clause.
The IBqlJoin.AppendQuery method obtains the type of Join and, for all classes
in the On clause that implement the IBqlCreator interface, successively executes
the IBqlCreator.AppendExpression method, starting from the On class and then
proceeding with enclosed classes, such as the Where classes and comparison classes.
| Accessing Data | 116
For the DAC fields (IBqlField-derived classes), the BqlCommand.GetSingleExpression
method obtains the SQL expression.
3. For all classes in the Where and GroupBy clauses that implement the IBqlCreator
interface, the system successively executes the IBqlCreator.AppendExpression
method, which appends to the Query instance the SQL expression that
corresponds to the classes. For the DAC fields (IBqlField-derived classes), the
BqlCommand.GetSingleExpression method obtains the SQL expression.
4. The IBqlOrderBy.AppendQuery method adds to the Query instance the list of
OrderSegment instances that corresponds to the OrderBy clause.
For each sorting class (a IBqlSortColumn-derived class) in the OrderBy clause, the
IBqlSortColumn.AppendQuery method adds to the Query instance the OrderSegment
instance that corresponds to the sorting column. For the DAC fields (IBqlField-derived
classes), the BqlCommand.GetSingleExpression method obtains the SQL expression.
If the original BQL statement does not specify ordering, the system adds to the Query
instance sorting by the DAC key fields (in ascending order).
The following diagram shows the conversion of a BQL command to an SQL query tree.
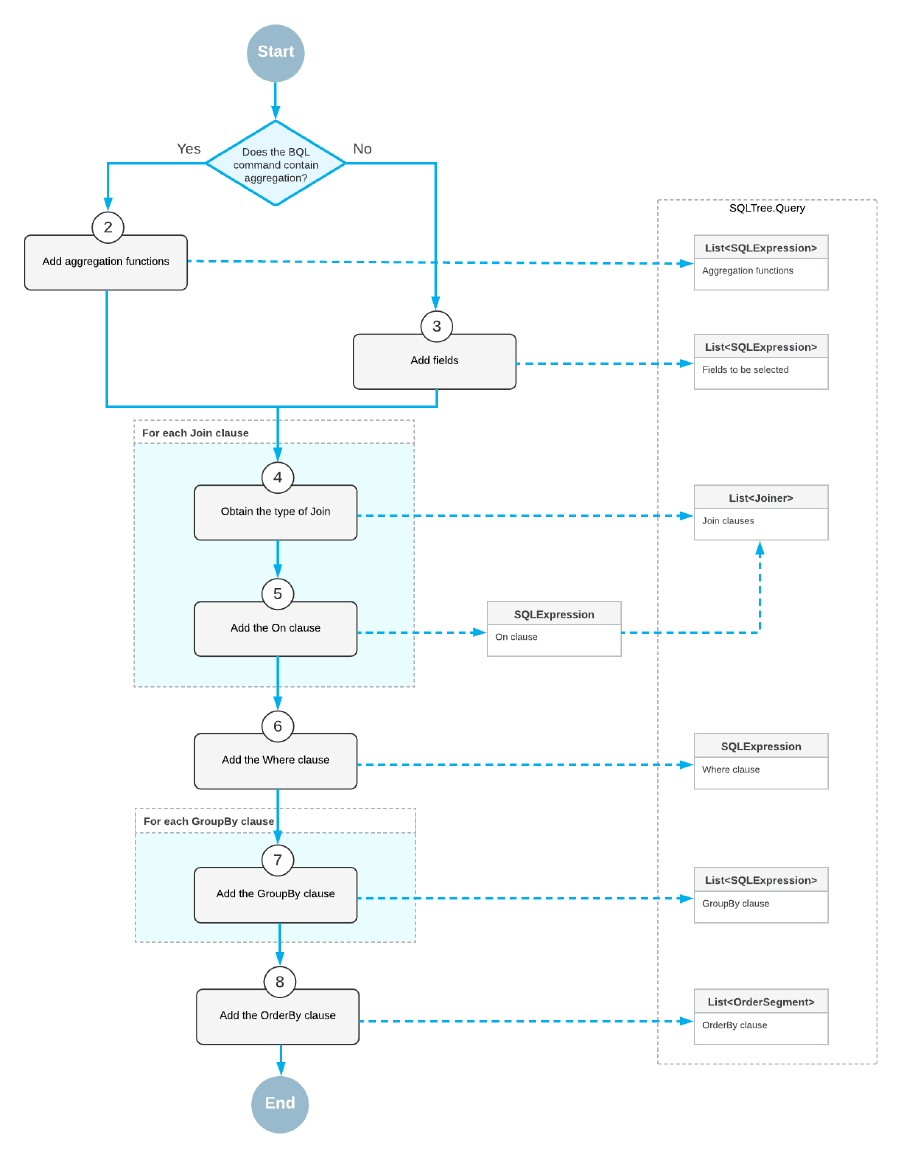
| Accessing Data | 117
Figure: Conversion of a BQL command to an SQL query tree
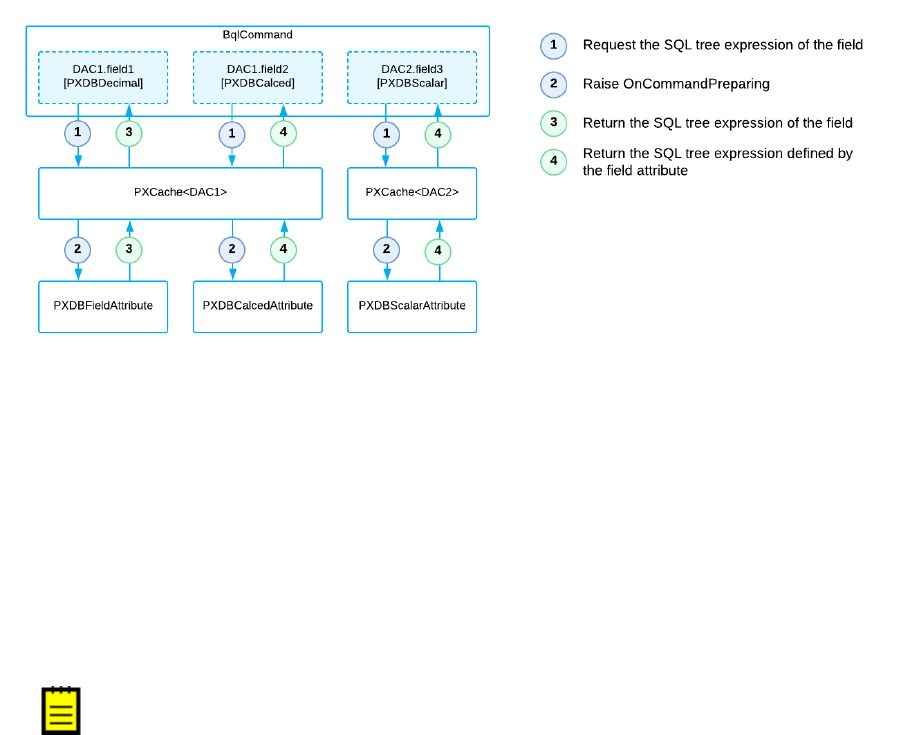
| Accessing Data | 118
SQL Tree Expression of a Field
To obtain the SQL tree expression of each field of the BQL command, the BqlCommand
instance creates a PXCache instance that corresponds to the data access class (DAC)
to which the field belongs. The PXCache instance generates the OnCommandPreparing
event with the specified PXDBOperation type (which specifies the type of the database
operation). The attribute assigned to the DAC field (that is, the attribute that implements
the IPXCommandPreparingSubscriber interface) handles the event and returns the
PX.Data.SQLTree.SQLExpression instance that corresponds to the field or to the BQL
statement that is defined by the field attribute. (For example, the PXDBCalced and
PXDBScalar attributes define BQL statements.)
The following diagram shows how BqlCommand obtains the SQL tree expression for the fields
of a BQL command.
Figure: Retrieval of the SQL tree expression for the fields of a BQL command
Translation of a BQL Command with Parameters to an SQL Query Tree
Before the system requests the SQL query tree of a BQL command, the PXView object
retrieves the values of the parameters used in the query as follows:
• For a field with FromCurrent appended (in fluent BQL) or specified in the Current
parameter (in traditional BQL), the PXView object retrieves the field value from the
Current object of the PXCache object. If the current field value is null, the PXView
object triggers the FieldDefaulting event handlers and retrieves the default value from
the PXDefault attribute value (if any).
The default value is not retrieved if FromCurrent.NoDefault is appended to the
field (in fluent BQL) or if the Current2 parameter is used (in traditional BQL).
• For a field with AsOptional appended (in fluent BQL) or specified in the Optional
parameter, if the explicit field value is specified, the PXView object triggers the
FieldUpdating event, whose handlers can transform the external presentation of the
field value to an internal value (for example, transform ProductCD to ProductID). If the

| Accessing Data | 119
field value is not specified, the PXView object retrieves the field value from the Current
object of the PXCache object. If the current field value is null, the PXView object triggers
the FieldDefaulting event and retrieves the default value from the PXDefault attribute
value (if any).
The default value is not retrieved if AsOptional.NoDefault is appended to the
field (in fluent BQL) or if the Optional2 parameter is used.
When BqlCommand creates the SQL query tree that corresponds to the BQL command,
IBqlCreator.AppendExpression (which is implemented by the ParameterBase<Field>
class) includes the parameters in the SQL query tree. After BqlCommand has created the SQL
query tree that corresponds to the BQL command, the system inserts into the SQL query
tree the actual values of the parameters retrieved by PXView.
Translation of the SQL Query Tree to SQL Text
A PXGraph instance stores information about the target database type in its SqlDialect
property. SQLTree.Query has the Connection property, which is responsible for the
conversion of the SQL query tree to the SQL text in the format of the target database. To
convert the SQL query tree to text, the system does the following:
1. Calls the SQLDialect.GetConnection method of the graph instance to retrieve the
needed SQLTree.Connection.
2. Passes this Connection instance to the SQLTree.Query.SQLQuery method, which
converts the SQL query tree to the text for Microsoft SQL or MySQL, depending on the
passed Connection.
Related Links
• Data Query Execution
Merge of the Records with PXCache
For the queries defined with business query language (BQL) or with BQL and LINQ, the
system merges the records retrieved from the database with the modified records stored in
PXCache as follows:
1. If the query is read-only, the result set is not merged with any PXCache object. The
system returns the data records as they are currently stored in the database.
A query is read-only if the IsReadOnly property of the underlying PXView object
is true. For example, the traditional BQL statements that use aggregation or are
based on one of the PXSelectReadonly classes are read-only. The fluent BQL
statements that have .ReadOnly appended are read-only.
2. If the query is not read-only and contains filtering by data access class (DAC) fields
by using LINQ (that is, only the values in specific columns of the database tables are
returned in the results of the query), the system checks whether the primary key fields
of the primary DAC (the first DAC in the BQL statement) are returned in the results of
the query. If the primary key fields are not in the results, no merge with any PXCache
object is performed. If all primary key fields are in the results, the result set is merged
with the PXCache object that corresponds to the primary DAC.
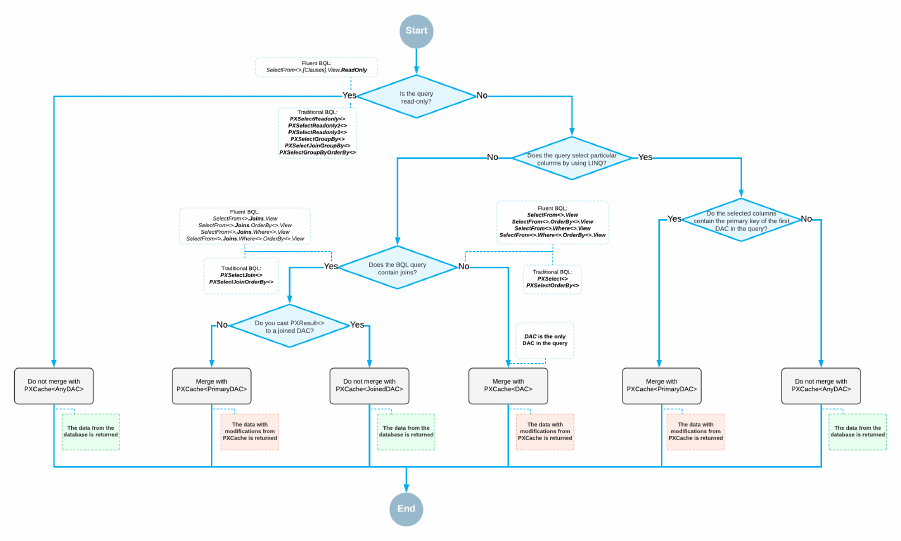
| Accessing Data | 120
3. If the query is not read-only, does not contain filtering of DAC fields by using LINQ, and
does not contain joins, the result set is merged with the contents of the appropriate
PXCache object, and the system returns the result set updated with the modifications
stored in PXCache.
4. If the query is not read-only, does not contain filtering by DAC fields by using LINQ, and
joins data from multiple tables, the result set is merged with only the PXCache object
that corresponds to the first table of the BQL statement. The PXResultset<> object,
which represents the result set, contains objects of the generic PXResult<> type. This
type can be cast to the data access classes (DACs) that represent the joined tables. The
instance of the primary DAC to which PXResult<> is cast contains the records from the
database that are updated with the modifications stored in PXCache. Casting PXResult<>
to a joined DAC returns the instance that contains values from the database and has no
relation with the PXCache instances of the corresponding DAC types.
The following diagram illustrates the database records being merged with PXCache.
Figure: Merge with PXCache
Related Links
• Data Query Execution
Comparison of Fluent BQL, Traditional BQL, and LINQ
In this topic, you can learn the main differences between the queries defined with fluent
business query language (BQL), traditional BQL, and language-integrated query (LINQ).
| Accessing Data | 121
Table: Comparison of Fluent BQL, Traditional BQL, and LINQ
Characteristic Fluent BQL Traditional
BQL
LINQ
The queries can be used to define
data views in graphs.
Yes Yes No
The queries can be defined in code. Yes Yes Yes
The queries can be defined in DAC
field attributes.
Yes Yes No
DACs are used to define database
tables in the queries.
Yes Yes Yes
The queries can be used for dy-
namic query building.
Yes Yes Yes
The queries can be parsed and
modified by the direct use of reflec-
tion—that is, by Type.GetGeneri-
cArguments().
No Yes No
Clauses (such as Join, Where, Ag-
gregate, OrderBy, and On) can be
used separately of the query.
No, but you can
pass fluent BQL
expressions to
traditional BQL
clauses
Yes No
The query language includes num-
bered classes (such as Select2
and Select6).
No Yes No
Each subsequent element of the
query is passed as a generic para-
meter of the previous one.
No Yes No
To create a query, a developer
needs to select a suitable com-
mand overload.
No Yes No
IntelliSense can offer continuations
that are relevant for the current
query state.
Yes No Yes
The queries use strongly typed
expressions, which makes com-
pile-time type checks possible.
Yes No Yes
The queries can contain explicit
brackets in conditions.
Yes No; the Where
clause can be
used instead
Yes
| Accessing Data | 122
Characteristic Fluent BQL Traditional
BQL
LINQ
You can specify particular columns
of the tables to be selected.
Yes; you have to
use PXFieldS-
cope
Yes; you have to
use PXFieldS-
cope
Yes
The query is not executed until it is
iterated over.
Yes Yes Yes
Related Links
• Fluent BQL and Traditional BQL Equivalents
• Creating Fluent BQL Queries
• Creating Traditional BQL Queries
Fluent BQL and Traditional BQL Equivalents
The fluent business query language (BQL) library defines the equivalents of traditional BQL
classes listed in the following tables.
Data View Declarations
All data views that contain aggregating are read-only.
Fluent BQL Traditional BQL
SelectFrom<>.View PXSelect<>
SelectFrom<>.View.ReadOnly PXSelectReadonly<>
SelectFrom<>.OrderBy<>.View PXSelectOrderBy<,>
SelectFrom<>.OrderBy<>.View.ReadOnly PXSelectReadonly3<,>
SelectFrom<>.AggregateTo<>.View.ReadOnly PXSelectGroupBy<,>
SelectFrom<>.AggregateTo<>.OrderBy<>.View.ReadOnly PXSelectGroupByOrder-
By<,,>
SelectFrom<>.Where<>.View PXSelect<,>
SelectFrom<>.Where<>.View.ReadOnly PXSelectReadonly<,>
SelectFrom<>.Where<>.OrderBy<>.View PXSelect<,,>
SelectFrom<>.Where<>.OrderBy<>.View.ReadOnly PXSelectReadonly<,,>
SelectFrom<>.Where<>.AggregateTo<>.View.ReadOnly PXSelectGroupBy<,,>
SelectFrom<>.Where<>.AggregateTo<>.Order-
By<>.View.ReadOnly
PXSelectGroupBy<,,,>
| Accessing Data | 123
Fluent BQL Traditional BQL
SelectFrom<>.[Joins].View PXSelectJoin<,>
SelectFrom<>.[Joins].View.ReadOnly PXSelectReadonly2<,>
SelectFrom<>.[Joins].OrderBy<>.View PXSelectJoinOrderBy<,,>
SelectFrom<>.[Joins].OrderBy<>.View.ReadOnly PXSelectReadonly3<,,>
SelectFrom<>.[Joins].AggregateTo<>.View.ReadOnly PXSelectJoinGroupBy<,,>
SelectFrom<>.[Joins].AggregateTo<>.Order-
By<>.View.ReadOnly
PXSelectGroupByOrder-
By<,,,>
SelectFrom<>.[Joins].Where<>.View PXSelectJoin<,,>
SelectFrom<>.[Joins].Where<>.View.ReadOnly PXSelectReadonly2<,,>
SelectFrom<>.[Joins].Where<>.OrderBy<>.View PXSelectJoin<,,,>
SelectFrom<>.[Joins].Where<>.OrderBy<>.View.Read-
Only
PXSelectReadonly2<,,,>
SelectFrom<>.[Joins].Where<>.Aggregate-
To<>.View.ReadOnly
PXSelectJoinGroupBy<,,,>
SelectFrom<>.[Joins].Where<>.AggregateTo<>.Order-
By<>.View.ReadOnly
PXSelectJoinGroup-
By<,,,,>
Select Commands
Fluent BQL Traditional BQL
SelectFrom<> Select<>
SelectFrom<>.OrderBy<> Select3<,>
SelectFrom<>.AggregateTo<> Select4<,>
SelectFrom<>.AggregateTo<>.OrderBy<> Select6<,,>
SelectFrom<>.Where<> Select<,>
SelectFrom<>.Where<>.OrderBy<> Select<,,>
SelectFrom<>.Where<>.AggregateTo<> Select4<,,>
SelectFrom<>.Where<>.AggregateTo<>.OrderBy<> Select4<,,,>
SelectFrom<>.[Joins] Select2<,>
SelectFrom<>.[Joins].OrderBy<> Select3<,,>
SelectFrom<>.[Joins].AggregateTo<> Select5<,,>
SelectFrom<>.[Joins].AggregateTo<>.OrderBy<> Select6<,,,>
SelectFrom<>.[Joins].Where<> Select2<,,>
SelectFrom<>.[Joins].Where<>.OrderBy<> Select2<,,,>
| Accessing Data | 124
Fluent BQL Traditional BQL
SelectFrom<>.[Joins].Where<>.AggregateTo<> Select5<,,,>
SelectFrom<>.[Joins].Where<>.AggregateTo<>.Order-
By<>
Select5<,,,,>
Search Commands
Fluent BQL Traditional BQL
SelectFrom<>.SearchFor<> Search<>
SelectFrom<>.OrderBy<>.SearchFor<> Search3<,>
SelectFrom<>.AggregateTo<>.SearchFor<> Search4<,>
SelectFrom<>.AggregateTo<>.OrderBy<>.SearchFor<> Search6<,,>
SelectFrom<>.Where<>.SearchFor<> Search<,>
SelectFrom<>.Where<>.OrderBy<>.SearchFor<> Search<,,>
SelectFrom<>.Where<>.AggregateTo<>.SearchFor<> Search4<,,>
SelectFrom<>.Where<>.AggregateTo<>.Order-
By<>.SearchFor<>
Search4<,,,>
SelectFrom<>.[Joins].SearchFor<> Search2<,>
SelectFrom<>.[Joins].OrderBy<>.SearchFor<> Search3<,,>
SelectFrom<>.[Joins].AggregateTo<>.SearchFor<> Search5<,,>
SelectFrom<>.[Joins].AggregateTo<>.Order-
By<>.SearchFor<>
Search6<,,,>
SelectFrom<>.[Joins].Where<>.SearchFor<> Search2<,,>
SelectFrom<>.[Joins].Where<>.OrderBy<>.SearchFor<> Search2<,,,>
SelectFrom<>.[Joins].Where<>.AggregateTo<>.Search-
For<>
Search5<,,,>
SelectFrom<>.[Joins].Where<>.AggregateTo<>.Order-
By<>.SearchFor<>
Search5<,,,,>
Join Clauses
Fluent BQL Traditional BQL
.InnerJoin<Table>.On<> InnerJoin<Table,On>
.InnerJoin<Table>.On<>.NextJoin InnerJoin<Table,On,NextJoin>
.InnerJoin<Table>.On<>.SingleTableOn-
ly
InnerJoinSingleTable<Table,On>
| Accessing Data | 125
Fluent BQL Traditional BQL
.InnerJoin<Table>.On<>.SingleTableOn-
ly.NextJoin
InnerJoinSingleTable<Table,On,Nex-
tJoin>
.LeftJoin<Table>.On<> LeftJoin<Table,On>
.LeftJoin<Table>.On<>.NextJoin LeftJoin<Table,On,NextJoin>
.LeftJoin<Table>.On<>.SingleTableOnly LeftJoinSingleTable<Table,On>
.LeftJoin<Table>.On<>.SingleTableOn-
ly.NextJoin
LeftJoinSingleTable<Table,On,Nex-
tJoin>
.RightJoin<Table>.On<> RightJoin<Table,On>
.RightJoin<Table>.On<>.NextJoin RightJoin<Table,On,NextJoin>
.RightJoin<Table>.On<>.SingleTableOn-
ly
RightJoinSingleTable<Table,On>
.RightJoin<Table>.On<>.SingleTableOn-
ly.NextJoin
RightJoinSingleTable<Table,On,Nex-
tJoin>
.FullJoin<Table>.On<> FullJoin<Table,On>
.FullJoin<Table>.On<>.NextJoin FullJoin<Table,On,NextJoin>
.FullJoin<Table>.On<>.SingleTableOnly FullJoinSingleTable<Table,On>
.FullJoin<Table>.On<>.SingleTableOn-
ly.NextJoin
FullJoinSingleTable<Table,On,Nex-
tJoin>
.CrossJoin<Table> CrossJoin<Table>
.CrossJoin<Table>.NextJoin CrossJoin<Table,NextJoin>
.CrossJoin<Table>.SingleTableOnly CrossJoinSingleTable<Table>
.CrossJoin<Table>.SingleTableOn-
ly.NextJoin
CrossJoinSingleTable<Table,NextJoin>
Where Clause
Fluent BQL Traditional BQL
.Where<UnaryOperator> Where<UnaryOperator>
.Where<Operand.Comparison> Where<Operand,Comparison>
.Where<Operand.Comparison.NextOpera-
tor>
Where<Operand,Comparison,NextOpera-
tor>
.Where<UnaryOperator.NextOperator> Where2<UnaryOperator,NextOperator>
| Accessing Data | 126
Aggregate Clause
Fluent BQL Traditional BQL
.AggregateTo<Function> Aggregate<Function>
.AggregateTo<TFunctions>.THaving Aggregate<TFunctions,THaving>
.Having<TCondition> Having<TCondition>
GroupBy<Field> GroupBy<Field>
GroupBy<Field>, NextAggregate GroupBy<Field,NextAggregate>
Max<Field> Max<Field>
Max<Field>, NextAggregate Max<Field,NextAggregate>
Min<Field> Min<Field>
Min<Field>, NextAggregate Min<Field,NextAggregate>
Sum<Field> Sum<Field>
Sum<Field>, NextAggregate Sum<Field,NextAggregate>
Avg<Field> Avg<Field>
Avg<Field>, NextAggregate Avg<Field,NextAggregate>
Count Count
Count<Field> Count<Field>
OrderBy Clause
Fluent BQL Traditional BQL
.OrderBy<List> OrderBy<List>
Field.Asc Asc<Field>
Field.Asc, NextSort Asc<Field,NextSort>
Field.Desc Desc<Field>
Field.Desc, NextSort Desc<Field,NextSort>
Parameters
Fluent BQL Traditional BQL
Field.FromCurrent Current<Field>
Field.FromCurrent.NoDefault Current2<Field>
Field.AsOptional Optional<Field>
Field.AsOptional.NoDefault Optional2<Field>
| Accessing Data | 127
Fluent BQL Traditional BQL
@P.AsBool Required<Field>, where the property field
of Field has the bool type
@P.AsByte Required<Field>, where the property field
of Field has the byte type
@P.AsShort Required<Field>, where the property field
of Field has the short type
@P.AsInt Required<Field>, where the property field
of Field has the int type
@P.AsLong Required<Field>, where the property field
of Field has the long type
@P.AsFloat Required<Field>, where the property field
of Field has the float type
@P.AsDouble Required<Field>, where the property field
of Field has the double type
@P.AsDecimal Required<Field>, where the property field
of Field has the decimal type
@P.AsGuid Required<Field>, where the property field
of Field has the Guid type
@P.AsDateTime Required<Field>, where the property field
of Field has the DateTime type
@P.AsString Required<Field>, where the property field
of Field has the string type
Argument.AsBool Argument<bool?>
Argument.AsByte Argument<byte?>
Argument.AsShort Argument<short?>
Argument.AsInt Argument<int?>
Argument.AsLong Argument<long?>
Argument.AsFloat Argument<float?>
Argument.AsDouble Argument<double?>
Argument.AsDecimal Argument<decimal?>
Argument.AsGuid Argument<Guid?>
Argument.AsDateTime Argument<DateTime?>
Argument.AsString Argument<string>
| Accessing Data | 128
Logical Operators and Brackets
Fluent BQL Traditional BQL
And<UnaryOperator> And<UnaryOperator>
And<Operand.Comparison> And<Operand,Comparison>
And<Operand.Comparison>.NextOperator And<Operand,Comparison,NextOperator>
And<UnaryOperator.NextOperator> And2<UnaryOperator,NextOperator>
Or<UnaryOperator> Or<UnaryOperator>
Or<Operand.Comparison> Or<Operand,Comparison>
Or<Operand.Comparison>.NextOperator Or<Operand,Comparison,NextOperator>
Or<UnaryOperator.NextOperator> Or2<UnaryOperator,NextOperator>
Not<UnaryOperator> Not<UnaryOperator>
Not<Operand.Comparison> Not<Operand,Comparison>
Not<Operand.Comparison.NextOperator> Not<Operand,Comparison,NextOperator>
Not<UnaryOperator.NextOperator> Not2<UnaryOperator,NextOperator>
Brackets<UnaryOperator> Where<UnaryOperator>
Brackets<Operand.Comparison> Where<Operand,Comparison>
Brackets<Operand.Comparison.NextOper-
ator>
Where<Operand,Comparison,NextOpera-
tor>
Brackets<UnaryOperator.NextOperator> Where2<UnaryOperator,NextOperator>
Comparisons
Fluent BQL Traditional BQL
Table.field.IsEqual<TOperand> <Table.field, Equal<TOperand>>
Table.field.IsNotEqual<TOperand> <Table.field, NotEqual<TOperand>>
Table.field.IsGreaterEqual<TOperand> <Table.field, GreaterEqual<TOperand>>
Table.field.IsGreater<TOperand> <Table.field, Greater<TOperand>>
Table.field.IsLessEqual<TOperand> <Table.field, LessEqual<TOperand>>
Table.field.IsLess<TOperand> <Table.field, Less<TOperand>>
Table.field.IsLike<TOperand> <Table.field, Like<TOperand>>
Table.field.IsNotLike<TOperand> <Table.field, NotLike<TOperand>>
Table.field.IsBetween<TOperand> <Table.field, Between<TOperand>>
Table.field.IsNotBetween<TOperand> <Table.field, NotBetween<TOperand>>
| Accessing Data | 129
Fluent BQL Traditional BQL
Table.field.IsNull <Table.field, IsNull<TOperand>>
Table.field.IsNotNull <Table.field, IsNotNull<TOperand>>
Table.field.IsIn<TOperand> <Table.field, In<TOperand>>
Table.field.IsNotIn<TOperand> <Table.field, NotIn<TOperand>>
Table.field.IsInSub<TSearch> <Table.field, In2<TSearch>>
Table.field.IsNotInSub<TSearch> <Table.field, NotIn2<TSearch>>
Table.field.IsIn<TConst1, ..., TCon-
stN>
<Table.field, In3<TConst1, ..., TCon-
stN>>
Table.field.IsNotIn<TConst1, ...,
TConstN>
<Table.field, NotIn3<TConst1, ...,
TConstN>>
Case, When, Then, and Else Operators
Fluent BQL Traditional BQL
Operand1.When<Condi-
tion1>.Else<Operand2>.When<Condi-
tion2>.[...]
Switch<Cases>
Operand1.When<Condi-
tion1>.[...].Else<Default>
Switch<Cases,Default>
Operand.When<Condition> Case<Condition,Operand>
Operand.When<Condi-
tion>.Else<Operand2>.When<Condi-
tion2>.[...]
Case<Condition,Operand,NextCase>
Arithmetic Operations and Operations with Strings and Dates
Fluent BQL Traditional BQL
Op1.Add<Op2> Add<Op1, Op2>
Op1.Subtract<Op2> Sub<Op1, Op2>
Op1.Multiply<Op2> Mult<Op1, Op2>
Op1.Divide<Op2> Div<Op1, Op2>
Op1.Concat<Op2> Concat<Op1, Op2>
Op1.IfNullThen<Op2> IsNull<Op1, Op2>
Op1.NullIf<Op2> NullIf<Op1, Op2>
Date1.Diff<Date2>.Years DateDiff<Date1, Date2, DateDiff.year>
Date1.Diff<Date2>.Quarters DateDiff<Date1, Date2, DateDiff.quar-
ter>
| Accessing Data | 130
Fluent BQL Traditional BQL
Date1.Diff<Date2>.Months DateDiff<Date1, Date2, DateDif-
f.month>
Date1.Diff<Date2>.Weeks DateDiff<Date1, Date2, DateDiff.week>
Date1.Diff<Date2>.Days DateDiff<Date1, Date2, DateDiff.day>
Date1.Diff<Date2>.Hours DateDiff<Date1, Date2, DateDiff.hour>
Date1.Diff<Date2>.Minutes DateDiff<Date1, Date2, DateDif-
f.minute>
Date1.Diff<Date2>.Seconds DateDiff<Date1, Date2, DateDiff.sec-
ond>
Date1.Diff<Date2>.Milliseconds DateDiff<Date1, Date2, DateDiff.mil-
lisecond>
DatePart<Date>.Year DatePart<DatePart.year, Date>
DatePart<Date>.Quarter DatePart<DatePart.quarter, Date>
DatePart<Date>.Month DatePart<DatePart.month, Date>
DatePart<Date>.Week DatePart<DatePart.week, Date>
DatePart<Date>.WeekDay DatePart<DatePart.weekDay, Date>
DatePart<Date>.Day DatePart<DatePart.day, Date>
DatePart<Date>.DayOfYear DatePart<DatePart.dayOfYear, Date>
DatePart<Date>.Hour DatePart<DatePart.hour, Date>
DatePart<Date>.Minute DatePart<DatePart.minute, Date>
DatePart<Date>.Second DatePart<DatePart.second, Date>
Related Links
• BQL and LINQ
• Fluent Business Query Language
To Execute BQL Statements
To send a request to the database, you call the Select() method of a PXSelectBase-derived
class and cast the result of the query execution to a data access class (DAC) or an array of
DACs, as described in this topic. The Select() method can accept additional parameters if a
business query language (BQL) statement includes parameters.
To Execute a BQL Statement That Defines a Data View
When an Acumatica ERP form requests data, you do not need to execute a data view
manually; the system executes each data view automatically. If you need to manually
execute a BQL statement that defines a data view, do the following:

| Accessing Data | 131
1. Declare a data view as a member in a graph.
2. Execute the data view by calling the Select() method of a PXSelectBase-derived class.
3. Cast the result of the query execution to a DAC or an array of DACs, or iterate through
DACs in the result by using the foreach statement. The following sample code shows the
approach of iterating through DACs. For details, see To Process the Result of the Execution of
the BQL Statement.
// Business logic controller (graph) declaration
public class OrderDataEntry : PXGraph<OrderDataEntry, SalesOrder>
{
// A data view declared as a graph member
public SelectFrom<SalesOrder>.
OrderBy<Asc<SalesOrder.orderNbr>>.View Orders;
...
public void SomeMethod()
{
// An execution of the data view in code
foreach(SalesOrder so in Orders.Select())
{
// The SalesOrder record selected by a data view can
// be modified and updated through the Update() method.
so.OrderTotal = so.LinesTotal + so.FreightAmt;
// Update the SalesOrder data record in PXCache
Orders.Update(so);
}
}
}
To Execute a BQL Statement Statically
To execute a BQL statement statically, do the following:
1. Execute a BQL statement by using the static Select() method of a PXSelectBase-
derived class. Provide a graph object as the parameter of the method.
2. Cast the result of the query execution to a DAC or an array of DACs, or iterate through
DACs in the result by using the foreach statement. The following sample code shows the
approach of iterating through DACs. For details, see To Process the Result of the Execution of
the BQL Statement.
// Business logic controller (graph) declaration
public class OrderDataEntry : PXGraph<OrderDataEntry, SalesOrder>
{
...
public void SomeMethod()
{
// Execution through the static Select() method
foreach(SalesOrder so in
SelectFrom<SalesOrder>.

| Accessing Data | 132
OrderBy<Asc<SalesOrder.orderNbr>>.View.Select(this))
...
}
}
To Execute a BQL Statement Dynamically
To execute a BQL statement dynamically, do the following:
1. Dynamically instantiate a data view in code. You should also provide the graph object as
a parameter to the data view constructor.
2. Execute the data view by using the Select() method of the instance of a PXSelectBase-
derived class.
3. Cast the result of the query execution to a DAC or an array of DACs, or iterate through
DACs in the result by using the foreach statement. The following sample code shows the
approach of iterating through DACs. For details, see To Process the Result of the Execution of
the BQL Statement.
// Business logic controller (graph) declaration
public class OrderDataEntry : PXGraph<OrderDataEntry, SalesOrder>
{
...
public void SomeMethod()
{
// Dynamic instantiation of a data view
PXSelectBase<SalesOrder> orders =
new SelectFrom<SalesOrder>.
OrderBy<Asc<SalesOrder.orderNbr>>.View(this);
// An execution of a dynamically created BQL statement
foreach(SalesOrder so in orders.Select())
...
}
}
To Execute a BQL Statement with Parameters
Use parameters (such as AsOptional, FromCurrent, and @P.As[Type] in fluent BQL and
Optional, Current, and Required in traditional BQL) to pass specific values to a BQL
statement, as shown in the following example. For more details on how to construct a BQL
statement with parameters, see To Use Parameters in Fluent BQL Queries and To Use Parameters
in Traditional BQL.
// Declaration of a BLC
public class ReceiptDataEntry : PXGraph<ReceiptDataEntry, Document>
{
// When a screen associated with this BLC is first opened,
// the Optional parameter is replaced with the default DocType value.
public SelectFrom<Document>.

| Accessing Data | 133
Where<Document.docType.IsEqual<Document.docType.AsOptional>> Receipts;
// The FromCurrent parameters are replaced with the values from
// the Current property of the PXCache<Document> object.
public SelectFrom<DocTransaction>.
Where<DocTransaction.docNbr.IsEqual<Document.docNbr.FromCurrent>.
And<DocTransaction.docType.IsEqual<Document.docType.FromCurrent>>>.
OrderBy<Asc<DocTransaction.lineNbr>> ReceiptTransactions;
public void SomeMethod()
{
// Select documents of the same DocType as the current document
// has, or of the default DocType if the current document is null.
PXResult<Document> res1 = Receipts.Select();
foreach(Document doc in res1)
...
// Select documents of the "N" DocType.
PXResult<Document> res2 = Receipts.Select("N");
foreach(Document doc in res2)
...
// Use parameter values from the current document.
PXResult<DocTransaction> res3 = ReceiptTransactions.Select();
foreach(DocTransaction docTran in res3)
...
// Use the @P.AsString parameter to provide values in code.
// The result set here is the same as the res2 result set.
PXResult<Document> res4 =
SelectFrom<Document>.
Where<Document.docType.IsEqual<@P.AsString>>.View
.Select(this, "N");
foreach(Document doc in res4)
...
}
...
}
To Execute a BQL Statement in a Data View Delegate
If the data requested from the database cannot be described by a declarative BQL
statement, implement the data view delegate that is used instead of the standard Select()
logic to retrieve data from the database; this data view delegate must satisfy the following
requirements:
• The data view delegate must have the same name as the data view except for the first
letter, which must be lowercase.
• The data view delegate must return IEnumerable, as shown in the following example.

| Accessing Data | 134
If the data view delegate is not defined or it returns null, the standard Select()
logic is executed.
The following sample code defines a data view delegate.
// A view declaration in a graph
public SelectFrom<BalancedAPDocument>.
LeftJoin<APInvoice>.
On<APInvoice.docType.IsEqual<BalancedAPDocument.docType>.
And<APInvoice.refNbr.IsEqual<BalancedAPDocument.refNbr>>>.
LeftJoin<APPayment>.
On<APPayment.docType.IsEqual<BalancedAPDocument.docType>.
And<APPayment.refNbr.IsEqual<BalancedAPDocument.refNbr>>>.View
DocumentList;
// The data view delegate
protected virtual IEnumerable documentlist()
{
// Iterating over the result set of a complex BQL statement
foreach (PXResult<BalancedAPDocument, APInvoice, APPayment, APAdjust> res in
SelectFrom<BalancedAPDocument>.
LeftJoin<APInvoice>.
On<APInvoice.docType.IsEqual<BalancedAPDocument.docType>.
And<APInvoice.refNbr.IsEqual<BalancedAPDocument.refNbr>>>.
LeftJoin<APPayment>.
On<APPayment.docType.IsEqual<BalancedAPDocument.docType>.
And<APPayment.refNbr.IsEqual<BalancedAPDocument.refNbr>>>.
LeftJoin<APAdjust>.
On<APAdjust.adjgDocType.IsEqual<BalancedAPDocument.docType>>.
AggregateTo<GroupBy<BalancedAPDocument.docType>,
GroupBy<BalancedAPDocument.refNbr>,
GroupBy<BalancedAPDocument.released>,
GroupBy<BalancedAPDocument.prebooked>,
GroupBy<BalancedAPDocument.openDoc>>.View.Select(this))
{
// Casting a result set record to DAC types
BalancedAPDocument apdoc = (BalancedAPDocument)res;
APAdjust adj = (APAdjust)res;
// Checking some conditions and modifying records
...
}
return new PXResult<BalancedAPDocument, APInvoice, APPayment>(
apdoc, res, res);
}
Related Links
• Data Query Execution

| Accessing Data | 135
• To Process the Result of the Execution of the BQL Statement
To Process the Result of the Execution of the BQL
Statement
Select() returns the PXResultset<T0> object. The type parameter (T0) is set to the first
table selected by the business query language (BQL) statement, and PXResultset<T0> is a
collection of PXResult<T0> objects. You can iterate through the result set in a foreach loop
and obtain either data access class (DAC) instances or PXResult<> instances. A PXResult<>
instance represents a whole result set record and can be cast to any of the DAC types joined
in the BQL statement.
To Get the Objects of the Primary DAC
In the foreach loop, cast each PXResult<T0> object in the collection to an object of the
main DAC. The PXResult<T0> object is implicitly converted to the T0 class. In the following
sample code, records are selected from the Document table.
// Result set records are implicitly cast to the Document DAC.
foreach(Document doc in SelectFrom<Document>.View.Select(this))
{
...
}
To Get the Objects of Joined DACs
1. In the foreach loop, cast each PXResult<T0> object in the collection to the needed
PXResult<T0, T1, T2, ...> object, where T0, T1, T2, and other type parameters are
joined DACs from the BQL statement. The PXResult<T0, T1, T2, ...> type must be
specialized with the DACs of all joined tables.
2. Cast each PXResult<T0, T1, T2, ...> item to any of the listed types to get the object
of this type.
The following sample code shows how to process the result set of a BQL statement joining
two tables.
// The static Select() method is called to execute a BQL command.
PXResultset<OrderLine> result =
SelectFrom<OrderLine>.InnerJoin<SalesOrder>.
On<SalesOrder.orderNbr.IsEqual<OrderLine.orderNbr>>.View.Select(this);
// Iterating over the result set:
// PXResult should be specialized with the DACs of all joined tables
// to be able to cast to these DACs.
foreach(PXResult<OrderLine, SalesOrder> record in result)
{
// Casting a result set record to the OrderLine DAC:
OrderLine detail = (OrderLine)record;
// Casting a result set record to the SalesOrder DAC:
| Accessing Data | 136
SalesOrder order = (SalesOrder)record;
...
}
Starting C# 7.0, you can also deconstruct the result set as shown in the following
code example.
(var line, var poLine, var _, var lotSerClass) =
(PXResult<POReceiptLine, POLine, InventoryItem, INLotSerClass>)
SelectFrom<POReceiptLine>
.LeftJoin<POLine>.On<POReceiptLine.FK.OrderLine>
.LeftJoin<InventoryItem>.On<POReceiptLine.FK.InventoryItem>
.LeftJoin<INLotSerClass>.On<InventoryItem.FK.LotSerClass>
.Where<POReceiptLine.receiptType.IsEqual<@P.AsString>
.And<POReceiptLine.receiptNbr.IsEqual<@P.AsString>>
.And<POReceiptLine.lineNbr.IsEqual<@P.AsInt>>>
.View.Select(Base, split.ReceiptType, split.ReceiptNbr, split.LineNbr);
This code example is equivalent to the following code.
var row = (PXResult<POReceiptLine, POLine, InventoryItem, INLotSerClass>)
SelectFrom<POReceiptLine>
.LeftJoin<POLine>.On<POReceiptLine.FK.OrderLine>
.LeftJoin<InventoryItem>.On<POReceiptLine.FK.InventoryItem>
.LeftJoin<INLotSerClass>.On<InventoryItem.FK.LotSerClass>
.Where<POReceiptLine.receiptType.IsEqual<@P.AsString>
.And<POReceiptLine.receiptNbr.IsEqual<@P.AsString>>
.And<POReceiptLine.lineNbr.IsEqual<@P.AsInt>>>
.View.Select(Base, split.ReceiptType, split.ReceiptNbr, split.LineNbr);
POReceiptLine line = row;
POLine poLine = row;
INLotSerClass lotSerClass = row;
Related Links
• Data Query Execution
Creating Fluent BQL Queries
To query data from the database, you use the business query language (BQL), which has
two dialects: fluent BQL and traditional BQL.
In this chapter, you can find information on how to create fluent BQL queries. For general
information about data querying, see Querying Data in Acumatica Framework. For details about
building queries with traditional BQL, see Creating Traditional BQL Queries.
In This Chapter
• Fluent Business Query Language • To Select Records by Using Fluent BQL

| Accessing Data | 137
• Data Access Classes in Fluent BQL
• Search and Select Commands and Data Views
in Fluent BQL
• Constants in Fluent BQL
• Parameters in Fluent BQL
• To Use Parameters in Fluent BQL Queries
Fluent Business Query Language
Fluent business query language (BQL), which is described in this topic, is a dialect of BQL
that is more similar to SQL than traditional BQL is. You can find all classes that can be used
in fluent BQL in the PX.Data.BQL and PX.Data.BQL.Fluent namespaces.
Fluent BQL Structure
Fluent BQL uses nesting of generic classes. That is, each section of a fluent BQL query does
not depend on the other sections and can appear in only specific places of the query. The
order of the sections is shown in the following code.
SelectFrom<>.[Joins].Where<>.AggregateTo<>.OrderBy<>
SelectFrom<> is the only mandatory part of the query. You can add to the query any
number of Join sections and the Where<>, AggregateTo<>, and OrderBy<> sections of the
query, depending on whether you need the corresponding clauses of the query.
The query defined with fluent BQL as described above is equivalent to the Select command
in traditional BQL. To compose a query for different purposes (such as to define a data
view or to define a Search command in an attribute constructor), you need to prepend
additional elements to the query or append them to the query, as described in Search and
Select Commands and Data Views in Fluent BQL. You can find the equivalents of traditional BQL
in fluent BQL in Fluent BQL and Traditional BQL Equivalents.
SelectFrom<> Section
In the SelectFrom<> section of the query, you use the SelectFrom<> class, which uses a
data access class (DAC) as the type parameter. For details on DACs, see Data Access Classes
in Fluent BQL.
Join Sections
Each Join section of the fluent BQL query consists of the following components:
• The join type (InnerJoin<>, LeftJoin<>, RightJoin<>, FullJoin<>, CrossJoin<>) with
the joined DAC as the type parameter.
• The joining condition (On<>). This condition is not specified for CrossJoin<>.
• The single table modifier (SingleTableOnly). This optional part of each Join section
forces optimization if a DAC used in the query has the PXProjection attribute.

| Accessing Data | 138
The following code fragments show the Join sections with different types of joins.
.InnerJoin<TBqlTable>.On<TJoinCondition>.SingleTableOnly
.LeftJoin<TBqlTable>.On<TJoinCondition>.SingleTableOnly
.RightJoin<TBqlTable>.On<TJoinCondition>.SingleTableOnly
.FullJoin<TBqlTable>.On<TJoinCondition>.SingleTableOnly
.CrossJoin<TBqlTable>.SingleTableOnly
Fluent BQL queries can contain any number of Join sections.
Where<> Section and On<> Subsection
Conditions in the query are defined in the Where<> section and the On<> subsections of the
Join sections. The conditions can contain the following nested components:
• Comparisons, such as Table.field.IsEqual<TOperand>
• And<> subsections
• Or<> subsections
• Brackets<> subsections
The following code fragments show examples of an On<> subsection and a Where<> section.
.On<PMTask.projectID.IsEqual<PMProject.contractID>.
And<
PMTask.approverID.IsEqual<EPActivityFilter.approverID.FromCurrent>>>
.Where<PMProject.isActive.IsEqual<True>.
And<PMTask.taskID.IsNotNull.
Or<PMProject.approverID.IsEqual<
EPActivityFilter.approverID.FromCurrent>>>>
AggregateTo<> and OrderBy<> Sections
The AggregateTo<> and OrderBy<> sections of a fluent BQL query accept non-empty arrays
of the specific base type as the only generic parameters. To make it easier for developers to
write and read of the queries, fluent BQL includes groups of aliases that embed certain array
usage. These aliases are pregenerated for arrays with up to 32 elements.
The AggregateTo<> section can also include an optional Having<> subsection. In this
subsection, you include conditions that can contain only logical operators, constants,
parameters, and aggregated fields (that is, the fields with .Averaged, .Summarized,
.Maximized, .Minimized, or .Grouped appended).
The following code fragments show examples of AggregateTo<> and OrderBy<> sections.

| Accessing Data | 139
.AggregateTo<Sum<field1>, GroupBy<field2>, Max<field3>,
Min<field4>, Avg<field5>, Count<field6>>.
Having<field5.Averaged.IsGreater<Zero>>
.OrderBy<field1.Asc, field2.Desc, field3.Asc>
Related Links
• Search and Select Commands and Data Views in Fluent BQL
• Data Access Classes in Fluent BQL
• Fluent BQL and Traditional BQL Equivalents
Data Access Classes in Fluent BQL
The data access classes (DACs) that are used in fluent BQL differ from the DACs that are
used in traditional BQL in the declarations of the class fields. For the general information
about the declaration of DACs for both traditional BQL and fluent BQL, see Data Access
Classes.
Each class field of a DAC (that is, each public abstract class of a DAC) is strongly typed,
which makes it possible to perform compile-time code checks in Visual Studio. You derive
class fields not from the IBqlField interface (as you would in traditional BQL) but from the
specific fluent BQL classes that correspond to the type of the property field as shown in the
following table. You assign the class field a name that starts with a lowercase letter.
Type of the Property Field Type of the Class Field
bool BqlBool.Field<TSelf>
byte BqlByte.Field<TSelf>
short BqlShort.Field<TSelf>
int BqlInt.Field<TSelf>
long BqlLong.Field<TSelf>
float BqlFloat.Field<TSelf>
double BqlDouble.Field<TSelf>
decimal BqlDecimal.Field<TSelf>
Guid BqlGuid.Field<TSelf>
DateTime BqlDateTime.Field<TSelf>
String BqlString.Field<TSelf>
byte[] BqlByteArray.Field<TSelf>
The following code shows an example of the Product DAC declaration.

| Accessing Data | 140
using System;
using PX.Data;
[Serializable]
public class Product : PX.Data.IBqlTable
{
// The class used in BQL statements to refer to the ProductID column
public abstract class productID : PX.Data.BQL.BqlInt.Field<productID>
{
}
// The property holding the ProductID value in a record
[PXDBIdentity(IsKey = true)]
public virtual int? ProductID { get; set; }
// The class used in BQL statements to refer to the AvailQty column
public abstract class availQty : PX.Data.BQL.BqlDecimal.Field<availQty>
{
}
// The property holding the AvailQty value in a record
[PXDBDecimal(2)]
public virtual decimal? AvailQty { get; set; }
}
Simultaneous Use of DACs in Fluent BQL and Traditional BQL
The DAC fields declared in fluent BQL style can be used in traditional BQL queries without
any modifications.
The class fields that are defined in the traditional BQL style (as described in Data Access
Classes) can be used in fluent BQL queries if you wrap these fields in the Use<>.As[Type]
class, where [Type] is one of the following: Bool, Byte, Short, Int, Long, Float, Double,
Decimal, Guid, DateTime, String, or ByteArray.
The following code shows the definition of the availQty class field in the traditional BQL
style and its use in a fluent BQL comparison.
public class Product : PX.Data.IBqlTable
{
public abstract class availQty : PX.Data.IBqlField
{
}
[PXDBDecimal(2)]
public virtual decimal? AvailQty { get; set; }
}
SelectFrom<Product>.
Where<Use<Product.availQty>.AsDecimal.IsNotEqual<Zero>>.
View AvailableProducts;

| Accessing Data | 141
Though the DAC fields in the traditional BQL style can be used in fluent BQL queries, we
recommend that you use the fluent BQL style of DAC declaration for simplicity.
Related Links
• Data Access Classes
Search and Select Commands and Data Views in Fluent BQL
You can use fluent business query language (BQL) to define data views and specify Select
and Search commands.
Data Views
You can use any of the following approaches to define a data view:
• Use the PXViewOf<> class before the fluent BQL query, as shown in the following code
example.
PXViewOf<Product>.BasedOn<
SelectFrom<Product>.
Where<Product.isActive.IsEqual<True>>>.ReadOnly ActiveProducts;
The DACs that are specified as type parameters in PXViewOf<> and SelectFrom<> must
be the same; this is checked by the compiler. You can omit .BasedOn<> if you want to
declare a view that selects all records from one table. You append .ReadOnly to the view
definition if you need to define a read-only data view.
• Append .View to the fluent BQL query, as shown in the following code example.
SelectFrom<Product>.
Where<Product.isActive.IsEqual<True>>.View.ReadOnly ActiveProducts;
You append .ReadOnly to the view definition if you need to define a read-only data view.
The data views defined with fluent BQL are equivalent to the corresponding traditional BQL
data views. For the full list of equivalents, see Fluent BQL and Traditional BQL Equivalents. Also,
the fluent BQL data views have the same static methods as the traditional BQL data views
have.
Select Commands
The query defined with fluent BQL, as described in Fluent Business Query Language, is
equivalent to the Select BQL command. For the full list of equivalents, see Fluent BQL and
Traditional BQL Equivalents.
Search Commands
You can use any of the following approaches to define a Search BQL command:
| Accessing Data | 142
• Use the SearchFor<> class before the fluent BQL query, as shown in the following code
example.
SearchFor<Product.productId>.In<
SelectFrom<Product>.
Where<Product.isActive.IsEqual<True>>>
• Append .SearchFor<> to the fluent BQL query, as shown in the following code example.
SelectFrom<Product>.
Where<Product.isActive.IsEqual<True>>.SearchFor<Product.productId>
The Search commands defined with fluent BQL are equivalent to the corresponding
traditional BQL commands. For the full list of equivalents, see Fluent BQL and Traditional BQL
Equivalents.
Dynamic Query Building
Because SearchFor<> and SelectFrom<> are derived from the BqlCommand class, they can
be used in dynamic query building through the WhereAnd, AppendJoin, and OrderByNew
functions. However, fluent BQL commands (which are derived from the FbqlCommand
class) aren't decomposed by BqlCommand.Decompose() directly. That is, the Decompose
function checks whether a command has a FbqlCommand type, retrieves the type of its
underlying BqlCommand, and decomposes this underlying BqlCommand command. Therefore,
the elements of the array produced by the Decompose function are components of the
BqlCommand, and are not components of the passed FbqlCommand.
PXViewOf<TBqlTable> also supports all dynamic query building actions that the traditional
BQL PXView supports.
Related Links
• Fluent Business Query Language
• Fluent BQL and Traditional BQL Equivalents
Constants in Fluent BQL
You can use predefined constants (such as integer Zero, datetime Now, Today, and MaxDate,
string StringEmpty, and the Boolean values True and False) in fluent BQL queries without
any changes.
If you need to use a custom constant in a fluent BQL query, you define this constant by
using the class that corresponds to the C# type of the constant. The following table lists the
constant classes that correspond to C# types.
C# Type Fluent BQL Type
bool BqlBool.Constant<TSelf>
byte BqlByte.Constant<TSelf>

| Accessing Data | 143
C# Type Fluent BQL Type
short BqlShort.Constant<TSelf>
int BqlInt.Constant<TSelf>
long BqlLong.Constant<TSelf>
float BqlFloat.Constant<TSelf>
double BqlDouble.Constant<TSelf>
decimal BqlDecimal.Constant<TSelf>
Guid BqlGuid.Constant<TSelf>
DateTime BqlDateTime.Constant<TSelf>
String BqlString.Constant<TSelf>
The following code shows an example of the decimal_0 constant declaration.
public class decimal_0 : PX.Data.BQL.BqlDecimal.Constant<decimal_0>
{
public decimal_0()
: base(0m)
{
}
}
Simultaneous Use of Constants in Fluent BQL and Traditional BQL
The predefined constants and the constants defined as described in the previous section can
be used in traditional BQL without any changes.
The constants defined in the traditional BQL style (that is, derived from the Constant<Type>
class) can be used in the fluent BQL queries if you wrap these constants in the
Use<>.As[Type] class, where [Type] is one of the following: Bool, Byte, Short, Int, Long,
Float, Double, Decimal, Guid, DateTime, or String.
The following code shows the declaration of the decimal_0 constant in traditional BQL style
and its use in a fluent BQL comparison.
publicclass decimal_0 : Constant<Decimal>
{
public decimal_0()
: base(0m)
{
}
}
SelectFrom<Table>.
Where<Table.decimalField.AsDecimal.IsEqual<Use<decimal_0>.AsDecimal>>.
View records;
| Accessing Data | 144
Although the constants in the traditional BQL style can be used in fluent BQL queries, we
recommend that you use the fluent BQL style of constant declaration for simplicity.
Parameters in Fluent BQL
If you need to specify values in a fluent business query language (BQL) statement, you use
fluent BQL parameters, which are replaced with the needed values in the translation to SQL.
For details about how BQL statements with parameters are translated to SQL, see Translation
of a BQL Command with Parameters to an SQL Query Tree.
In this topic, you can find a description of the fluent BQL parameters and the difference
between them.
Use of the Current Value of the Field from PXCache
To insert into the SQL query the field value of the Current object from the PXCache object,
you append .FromCurrent to the field name in a fluent BQL query. If the Current object
from the PXCache object is null, FromCurrent retrieves the default value of the field. If you
do not need to retrieve the default value if the Current object is null, you need to append
.FromCurrent.NoDefault to the field name in a fluent BQL query. In this case, the system
doesn't retrieve the default value and inserts null.
FromCurrent is the equivalent of the Current parameter in traditional BQL.
FromCurrent.NoDefault is the equivalent of the Current2 parameter in traditional
BQL.
By using the current field value from PXCache in the declaration of a data view, you can refer
to another view to relate these data views to each other. A typical example is referencing the
current master record on master-detail forms. For details on how the current field value is
used, see To Relate Data Views to Each Another.
Insertion of a Specific Value into the Query
To insert a specific value into the SQL query, you use the @P.As[Type] classes, where
[Type] corresponds to the C# type of the parameter. The following table lists the fluent BQL
types that correspond to C# types.
C# Type Fluent BQL Type
bool @P.AsBool
byte @P.AsByte
short @P.AsShort
int @P.AsInt
long @P.AsLong
float @P.AsFloat
double @P.AsDouble
decimal @P.AsDecimal
| Accessing Data | 145
C# Type Fluent BQL Type
Guid @P.AsGuid
DateTime @P.AsDateTime
String @P.AsString
@P.As[Type] is the equivalent of the Required parameter in traditional BQL.
By using these classes, you can pass values to the SQL query, as described in To Pass a Field
Value to the SQL Query and To Pass Multiple Field Values to the SQL Query.
Insertion of an Optional Value into the Query
To insert an optional value into the query, you append .AsOptional to the field name in a
fluent BQL query. If you specify an explicit value for this parameter during the execution
of the BQL statement, AsOptional uses the specified value. If you don't specify an explicit
value for this parameter during the execution of the BQL statement, AsOptional works
similarly to FromCurrent—that is, retrieves the field value of the Current object from the
PXCache object and uses the default value of the field if the Current object is null. You can
append .AsOptional.NoDefault to the field name in a fluent BQL query to make the system
not use the default value and insert null.
AsOptional is the equivalent of the Optional parameter in traditional BQL.
AsOptional.NoDefault is the equivalent of the Optional2 parameter in traditional
BQL.
By using AsOptional, you can pass the external presentations of the values to the SQL
query, as described in To Provide External Presentation of the Field Value to the SQL Query.
When a DAC includes more than one key field, you may need to use .AsOptional in the
primary data view of the graph. In this case, the primary data view typically filters the data
records by all of the key fields except the last one. For example, you can select documents
with the same document type as the current data record has and navigate through these
documents with different document numbers. In the following example, the Document DAC
has two key fields, DocType and DocNbr.
public SelectFrom<Document>.
Where<Document.docType.IsEqual<Document.docType.AsOptional>>.View Receipts;
.AsOptional could be replaced with .FromCurrent in the code above unless you need to
execute the Receipts data view in code to select a document with specific document type
and number.
Insertion of a Value from the UI Control into the Query
To insert a value from the UI control into the SQL query, you use the Argument.As[Type]
classes, where [Type] corresponds to the C# type of the inserted value. The following table
lists the fluent BQL types that correspond to C# types.

| Accessing Data | 146
C# Type Fluent BQL Type
bool Argument.AsBool
byte Argument.AsByte
short Argument.AsShort
int Argument.AsInt
long Argument.AsLong
float Argument.AsFloat
double Argument.AsDouble
decimal Argument.AsDecimal
Guid Argument.AsGuid
DateTime Argument.AsDateTime
String Argument.AsString
By using the Argument classes, you can pass values to the data view delegates. For more
information on how to use the Argument classes, see To Pass a Value from a UI Control to a Data
View.
Related Links
• To Use Parameters in Fluent BQL Queries
To Select Records by Using Fluent BQL
You can select records from the database by constructing a fluent business query language
(BQL) statement. To construct a fluent BQL statement, you use the SelectFrom<> class and
append the needed clauses to the statement.
This topic describes how to compose Select statements by using fluent BQL. For details
on how to adjust these statements to define data views or to specify Search commands in
fluent BQL, see Search and Select Commands and Data Views in Fluent BQL.
In a SelectFrom<> class, you configure a query to the database. The actual request
to the database is performed once you cast the result of the query execution to a DAC
or an array of DACs, or when you iterate through DACs in the result with the foreach
statement. For details, see Data Query Execution.
Before You Proceed
• Make sure that the application database has the database tables from which you are
going to request data, and that the application defines the data access classes (DACs)
for these tables. For more information on defining DACs, see Data Access Classes in Fluent
BQL.
• Add references to PX.Data.dll and PX.Data.BQL.Fluent.dll in the project.

| Accessing Data | 147
• Add the following using directives to your code.
using PX.Data.BQL.Fluent;
using PX.Data.BQL;
To Compose a Fluent BQL Statement
1. Type the SelectFrom<> class with the needed DAC as the type parameter.
For example, suppose that you need to convert the following SQL statement to fluent
BQL.
SELECT Product.CategoryCD, MIN(Product.BookedQty) FROM Product
INNER JOIN SupplierProduct
ON SupplierProduct.ProductID = Product.ProductID
INNER JOIN Supplier
ON Supplier.AccountID = SupplierProduct.AccountID
WHERE (Product.BookedQty IS NOT NULL
AND Product.AvailQty IS NOT NULL
AND Product.MinAvailQty IS NOT NULL
AND(Product.Active = 1
OR Product.Active IS NULL)
AND(Product.BookedQty > Product.AvailQty
OR Product.AvailQty < Product.MinAvailQty))
OR Product.AvailQty IS NOT NULL
GROUP BY Product.CategoryCD
ORDER BY Product.UnitPrice, Product.AvailQty DESC
You start the corresponding fluent BQL query as follows.
SelectFrom<Product>
2. If you need to include JOIN clauses in the query, for each table that you want to join, do
the following:
a. Append to the statement one of the Join classes—such as InnerJoin, LeftJoin,
RightJoin, FullJoin, or CrossJoin, which are directly mapped to SQL JOIN clauses.
b. Append to the statement the On<> clause with the joining conditions. Adhere to the
following rules when you specify the conditions:
• Use the And<>, Or<>, and Brackets<> classes to logically connect the conditions
and comparisons.
• To specify the fields that should be used in the conditions, use the class fields
defined in the DAC, such as Product.productID. (The name of the field class
starts with a lowercase letter. Do not confuse it with the property field, which has
the same name but starts with an uppercase letter.)

| Accessing Data | 148
• If you need to use constants in the fluent BQL statement, use one of the
predefined BQL constants or your own constant. (For details on using constants,
see Constants in Fluent BQL.)
• If you need to specify the values of the parameters at run time, use the fluent
BQL parameters. For information about parameters, see Parameters in Fluent BQL.
For information about how to use parameters, see To Use Parameters in Fluent BQL
Queries.
In the sample code that has been presented in this topic, you would add two Join
classes to the statement, as follows.
SelectFrom<Product>.
InnerJoin<SupplierProduct>.
On<SupplierProduct.productID.IsEqual<Product.productID>>.
InnerJoin<Supplier>.
On<Supplier.accountID.IsEqual<SupplierProduct.accountID>>
3. If you need to include a WHERE clause in the query, append the Where<> clause to the
statement and specify the conditions as follows:
• Use the And<>, Or<>, and Brackets<> classes to logically connect the conditions and
comparisons.
• To specify the fields that should be used in the conditions, use the class fields defined
in the DAC, such as Product.productID. (The name of the field class starts with a
lowercase letter. Do not confuse it with the property field, which has the same name
but starts with an uppercase letter.)
• If you need to use constants in the fluent BQL statement, use one of the predefined
BQL constants or your own constant. (For details on using constants, see Constants in
Fluent BQL.)
• If you need to specify the values of the parameters at run time, use the fluent BQL
parameters. For information about parameters, see Parameters in Fluent BQL. For
information about how to use parameters, see To Use Parameters in Fluent BQL Queries.
In the sample code that has been presented in this topic, you would append the Where<>
clause to the statement, as follows.
SelectFrom<Product>.
InnerJoin<SupplierProduct>.
On<SupplierProduct.productID.IsEqual<Product.productID>>.
InnerJoin<Supplier>.
On<Supplier.accountID.IsEqual<SupplierProduct.accountID>>.
Where<
Brackets<Product.bookedQty.IsNotNull.
And<Product.availQty.IsNotNull>.
And<Product.minAvailQty.IsNotNull>.
And<Product.active.IsEqual<True>.
Or<Product.active.IsNull>>.

| Accessing Data | 149
And<Product.bookedQty.IsGreater<Product.availQty>.
Or<Product.availQty.IsLess<Product.minAvailQty>>>>.
Or<Product.availQty.IsNotNull>>
4. If you need to group or aggregate records, append the AggregateTo<> clause to the
statement and specify the grouping conditions and aggregation functions by using the
GroupBy clauses and the Min, Max, Sum, Avg, and Count aggregation functions.
In the sample code that has been presented in this topic, you would append the
AggregateTo<> clause to the statement as follows.
SelectFrom<Product>.
InnerJoin<SupplierProduct>.
On<SupplierProduct.productID.IsEqual<Product.productID>>.
InnerJoin<Supplier>.
On<Supplier.accountID.IsEqual<SupplierProduct.accountID>>.
Where<
Brackets<Product.bookedQty.IsNotNull.
And<Product.availQty.IsNotNull>.
And<Product.minAvailQty.IsNotNull>.
And<Product.active.IsEqual<True>.
Or<Product.active.IsNull>>.
And<Product.bookedQty.IsGreater<Product.availQty>.
Or<Product.availQty.IsLess<Product.minAvailQty>>>>.
Or<Product.availQty.IsNotNull>>.
AggregateTo<GroupBy<Product.categoryCD>,
Min<Product.bookedQty>>
5. If you need to order records, append to the statement the OrderBy<> clause with the
Asc<> and Desc<> classes as the type parameters.
In the sample code that has been presented in this topic, you would append the
OrderBy<> clause to the statement as follows.
SelectFrom<Product>.
InnerJoin<SupplierProduct>.
On<SupplierProduct.productID.IsEqual<Product.productID>>.
InnerJoin<Supplier>.
On<Supplier.accountID.IsEqual<SupplierProduct.accountID>>.
Where<
Brackets<Product.bookedQty.IsNotNull.
And<Product.availQty.IsNotNull>.
And<Product.minAvailQty.IsNotNull>.
And<Product.active.IsEqual<True>.
Or<Product.active.IsNull>>.
And<Product.bookedQty.IsGreater<Product.availQty>.
Or<Product.availQty.IsLess<Product.minAvailQty>>>>.
Or<Product.availQty.IsNotNull>>.
AggregateTo<GroupBy<Product.categoryCD>,
Min<Product.bookedQty>>.
OrderBy<Product.unitPrice.Asc,
| Accessing Data | 150
Product.availQty.Desc>
Related Links
• Fluent Business Query Language
• Data Query Execution
• To Execute BQL Statements
To Use Parameters in Fluent BQL Queries
If you need to specify values in a fluent business query language (BQL) statement, you use
fluent BQL parameters, which are replaced with the needed values in the translation to SQL.
For details about how BQL statements with parameters are translated to SQL, see Translation
of a BQL Command with Parameters to an SQL Query Tree.
You may need to use BQL parameters to relate data views to each other, to pass field values
to the SQL query, to pass the external presentations of the values to the SQL query, or to
pass values from UI controls to the SQL query.
To Relate Data Views to Each Another
To relate data views to each another, in a data query, use the field value of the Current
object from the PXCache object, as shown in the following sample code.
using PX.Data;
using PX.Data.BQL.Fluent;
// The view declarations in a graph
SelectFrom<Document>.View Documents;
SelectFrom<DocTransaction>.
Where<DocTransaction.docNbr.IsEqual<Document.docNbr.FromCurrent>.
And<DocTransaction.docType.IsEqual<Document.docType.FromCurrent>>>.View
DocTransactions;
In this code, there is a many-to-one relationship between the DocTransaction and
Document data access classes (DACs), and this relationship is implemented through the
DocNbr and DocType key fields. The data views in the code connect the Document and
DocTransaction records.
Acumatica Framework translates the fluent BQL query of the second view in the
sample code to the following SQL statement. In this SQL query, [parameter1] is the
DocNbr value and [parameter2] is the DocType value retrieved from the Current
property of the DocTransaction cache; [list of columns] is the list of columns of
the DocTransaction table.
SET @P0 = [parameter1]
SET @P1 = [parameter2]
SELECT * FROM DocTransaction
| Accessing Data | 151
WHERE DocTransaction.DocNbr = @P0
AND DocTransaction.DocType = @P1
Acumatica Framework explicitly enumerates the columns of the database table in
the SQL query. For details on which columns are enumerated, see Translation of a BQL
Command to SQL.
To Pass a Field Value to the SQL Query
To pass a specific value to the SQL query, do the following;
1. Use the @P.As[Type] class of the needed type in the BQL statement, where [Type]
is one of the following: Bool, Byte, Short, Int, Long, Float, Double, Decimal, Guid,
DateTime, or String.
2. Specify the needed value as the Select() method argument. The value passed to
Select() must be of the same type as the type of the specified field.
The @P.As[Type] class must be used only in the BQL statements that are directly
executed in the application code. The data views that are queried from the UI will not
work if they contain this class.
The code below shows the execution of a BQL statement with a specific value passed in
code.
using PX.Data;
using PX.Data.BQL.Fluent;
using PX.Data.BQL;
// Suppose an event handler related to the Product DAC
// is being executed.
Product product = (Product)e.Row;
// Select the Category record with the specified CategoryCD.
Category category =
SelectFrom<Category>.
Where<Category.categoryCD.IsEqual<@P.AsString>>.View.
Select(this, product.CategoryCD);
Acumatica Framework translates the previous fluent BQL query to the following SQL
statement. In this SQL query, [parameter] is the value of the product.CategoryCD
variable at the moment the Select() method is invoked; [list of columns] is the
list of columns of the Category table.
SET @P0 = [parameter]
SELECT * FROM Category
WHERE Category.CategoryCD = @P0
| Accessing Data | 152
Acumatica Framework explicitly enumerates the columns of the database table in
the SQL query. For details on which columns are enumerated, see Translation of a BQL
Command to SQL.
To Pass Multiple Field Values to the SQL Query
To pass multiple values to the SQL query, do the following:
1. Use multiple @P.As[Type] classes of the needed type in the fluent BQL statement, where
[Type] is one of the following: Bool, Byte, Short, Int, Long, Float, Double, Decimal,
Guid, DateTime, or String.
2. Specify the needed values as the Select() method arguments in the order in which the
parameters are specified in the BQL statement. The number of @P.As[Type] classes
must match the number of parameters passed to the Select() method.
The @P.As[Type] classes should be used in only the BQL statements that are
executed in the application code.
The following code shows an example of a fluent BQL statement with two Required
parameters.
using PX.Data;
using PX.Data.BQL.Fluent;
using PX.Data.BQL;
// Suppose an event handler related to the DocTransaction DAC
// is being executed.
DocTransaction line = (DocTransaction)e.Row;
Document doc =
SelectFrom<Document>.
Where<Document.docNbr.IsEqual<@P.AsString>.
And<Document.docType.IsEqual<@P.AsString>>>.View.
Select(this, line.DocNbr, line.DocType);
Acumatica Framework translates the previous fluent BQL query to the following SQL
statement, where [list of columns] is the list of the columns of the Document
table.
SET @P0 = [line.DocNbr value]
SET @P1 = [line.DocType value]
SELECT * FROM Document
WHERE Document.DocNbr = @P0
AND Document.DocType = @P1
| Accessing Data | 153
Acumatica Framework explicitly enumerates the columns of the database table in
the SQL query. For details on which columns are enumerated, see Translation of a BQL
Command to SQL.
To Pass a Value from a UI Control to a Data View
To pass a value from a UI control to a data view, do the following:
1. Define a data view with the Argument.As[Type] class, where [Type] specifies the data
type of the expected value, as shown in the following sample BQL query.
using PX.Data;
using PX.Data.BQL.Fluent;
SelectFrom<TreeViewItem>.
Where<TreeViewItem.parentID.IsEqual<Argument.AsInt>>.
OrderBy<Asc<TreeViewItem.parentID>>.View GridDataSource;
Acumatica Framework translates the previous fluent BQL query to the following
SQL statement. In this SQL query, [parameter] will contain the value received
from the UI control and passed to the Select() method; [list of columns] is
the list of columns of the TreeViewItem table.
SET @P0 = [parameter]
SELECT [list of columns] FROM TreeViewItem
WHERE TreeViewItem.ParentID = @P0
ORDER BY TreeViewItem.ParentID
Acumatica Framework explicitly enumerates the columns of the database table in
the SQL query. For details on which columns are enumerated, see Translation of a
BQL Command to SQL.
2. Define the data view delegate with parameters through which you can access the values
passed from the UI. (You can find more information on how to use data view delegates in
To Execute a BQL Statement in a Data View Delegate.)
When a BQL statement with the Argument parameter is executed in code, the
value must be specified in the parameters of the Select() method.
To Provide External Presentation of the Field Value to the SQL Query
To substitute a value in the SQL query, do the following:
1. Add the PXSelector attribute with a substitute key to a DAC field, as shown in the
following example.
using PX.Data;
using PX.Data.BQL.Fluent;
[PXSelector(typeof(SearchFor<Product.productID>.In<SelectFrom<Product>>,

| Accessing Data | 154
new Type [] {
typeof(Product.productCD),
typeof(Product.productName)
},
SubstituteKey = typeof(Product.productCD))]
public virtual int? ProductID { get; set; }
In this example, PXSelector replaces the ProductID field in the user interface with
the human-readable ProductCD field. In the UI control for this field, the user enters
a ProductCD value. The PXSelector attribute implements the FieldUpdating event
handler, which replaces the ProductCD value with the corresponding ProductID value.
2. Use the AsOptional class to select records by the external presentation of the field
value, as shown in the following code for OrderLine records.
using PX.Data;
using PX.Data.BQL.Fluent;
// p is a Product data record.
// To select OrderLine records, pass the ProductCD value
// to the Select() method.
PXResultset<OrderLine> details =
SelectFrom<OrderLine>.
Where<OrderLine.productID.IsEqual<OrderLine.productID.AsOptional>>.
View.
Select(this, p.ProductCD);
3. In the Select() method, provide values for all AsOptional, @P.As[Type], and
Argument.As[Type] parameters up to the last @P.As[Type] or Argument.As[Type]
parameter in the fluent BQL statement, as shown in the following sample code.
using PX.Data;
using PX.Data.BQL.Fluent;
// P is a Product data record.
// od is an OrderLine data record.
// At least three values (in addition to the graph reference) must
// be passed to the Select() method below.
// The second AsOptional parameter here will be replaced with the
// default UnitPrice value.
PXResultset<OrderLine> details =
SelectFrom<OrderLine>.
Where<OrderLine.productID.IsEqual<OrderLine.productID.AsOptional>.
And<OrderLine.extPrice.IsLess<@P.AsDecimal>>.
And<OrderLine.unitPrice.IsGreater<@P.AsDecimal>>.
And<OrderLine.taxRate.IsEqual<OrderLine.taxRate.AsOptional>>>.View.
.Select(this, p.ProductCD, od.ExtPrice, od.UnitPrice);
| Accessing Data | 155
Acumatica Framework translates the fluent BQL query in the code to the following
SQL statement, where [list of columns] is the list of columns of the OrderLine
table.
SET @P0 = [line.ProductID value or default]
SET @P1 = [line.ExtPrice value]
SET @P2 = [line.UnitPrice value]
SET @P3 = [Default TaxRate value]
SELECT [list of columns] FROM OrderLine
WHERE OrderLine.ProductID = @P0
AND OrderLine.ExtPrice < @P1
AND OrderLine.UnitPrice > @P2
AND OrderLine.TaxRate = @P3
Acumatica Framework explicitly enumerates the columns of the database table in
the SQL query. For details on which columns are enumerated, see Translation of a
BQL Command to SQL.
Creating Traditional BQL Queries
To query data from the database, you use the business query language (BQL), which has
two dialects: fluent BQL and traditional BQL.
In this chapter, you can find information on how to create traditional BQL queries. For the
general information about BQL, see Querying Data in Acumatica Framework. For details about
building queries with traditional BQL, see Creating Traditional BQL Queries.
In This Chapter
• Traditional Business Query Language
• Data Access Classes in Traditional BQL
• PXSelect Classes
• The Classes That Compose BQL Statements
• Parameters in Traditional BQL Statements
• Data Query Execution
• To Select Records By Using Traditional BQL
• To Filter Records
• To Order Records
• To Query Multiple Tables
• To Group and Aggregate Records
• To Use Parameters in Traditional BQL
• To Use Arithmetic Operations
• To Compose a BQL Statement from an SQL
Statement

| Accessing Data | 156
Traditional Business Query Language
When you compose a query with the traditional business query language (BQL), you work
with the following classes:
• The classes that correspond to database tables (data access classes) and columns. For
details on data access classes, see Data Access Classes in Traditional BQL.
• The classes that define data views in a graph and select data from the database in code
(PXSelect classes). For more information on these classes, see PXSelect Classes.
• The classes that compose BQL statements, such as Select, Search, Where, OrderBy,
And, and Add. For more information on these classes, see The Classes That Compose BQL
Statements.
• The classes that pass parameters to BQL statements, such as Current, Required,
Optional, Argument. For details on BQL parameters, see Parameters in Traditional BQL
Statements.
Data Access Classes in Traditional BQL
The data access classes (DACs) that are used in traditional BQL differ from the DACs that
are used in fluent BQL in the declarations of the class fields. For details about the DAC
declaration, see Data Access Classes.
You derive each class field of a DAC (a public abstract class of a DAC) from the
IBqlField interface and assign it a name that starts with a lowercase letter.
The following code shows an example of the Product data access class declared in
traditional BQL style.
using System;
using PX.Data;
[Serializable]
public class Product : PX.Data.IBqlTable
{
// The class used in BQL statements to refer to the ProductID column
public abstract class productID : PX.Data.IBqlField
{
}
// The property holding the ProductID value in a record
[PXDBIdentity(IsKey = true)]
public virtual int? ProductID { get; set; }
// The class used in BQL statements to refer to the AvailQty column
public abstract class availQty : PX.Data.IBqlField
{
}
// The property holding the AvailQty value in a record

| Accessing Data | 157
[PXDBDecimal(2)]
public virtual decimal? AvailQty { get; set; }
}
Simultaneous Use of DACs in Traditional BQL and Fluent BQL
The class fields declared in traditional BQL style cannot be used in fluent BQL queries.
The class fields that are defined in the fluent BQL style (as described in Data Access Classes in
Fluent BQL) can be used in traditional BQL queries without any modifications. Therefore, we
recommend that you use the fluent BQL style of DAC declaration.
Related Links
• Data Access Classes
PXSelect Classes
In traditional business query language (BQL), you define a data view or request database
data in code by using one of the PXSelect classes (that is, the classes derived from
PXSelectBase).
PXSelect Classes
The instances of PXSelect classes are complex objects containing the following:
• A reference to the PXView object instantiated to process the data query
• A reference (through the PXView object) to the Select object, which is the business
query language (BQL) command to be executed
• A reference to the graph
• A reference to the cache of the data access class (DAC) type that is specified in the first
type parameter of PXSelect
That is, through the PXSelect classes, you can execute the BQL command and interact with
the cache, as illustrated in the following diagram.
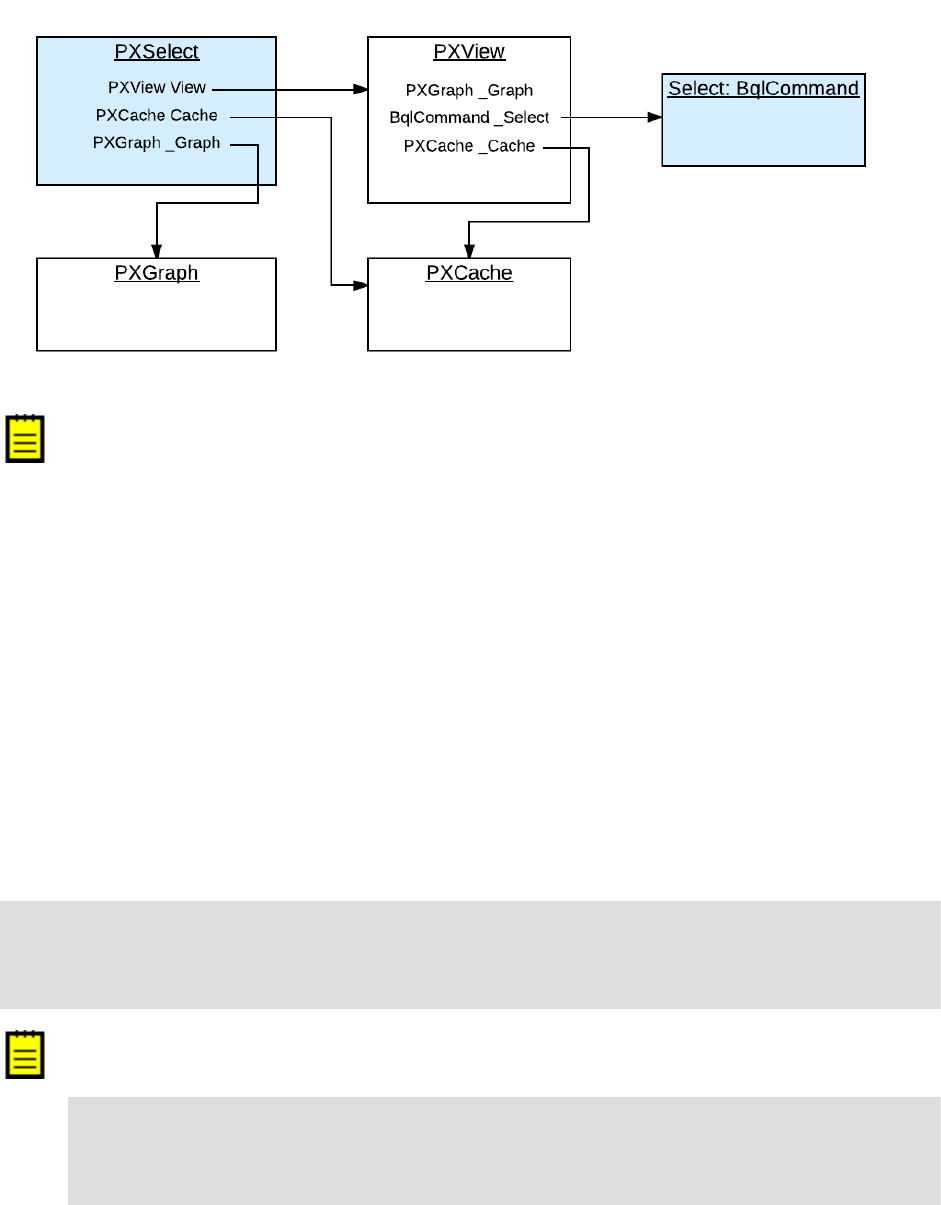
| Accessing Data | 158
Do not confuse the PXSelect classes with the Select classes. PXSelect is an
aggregate of the data view, cache, and graph. You can use PXSelect classes to read,
write, update, and delete records in the scope of a graph. Select classes simply
represent BQL commands. You cannot read records by using a BQL command without
instantiating a data view. For more information on the Select classes, see The Classes
That Compose BQL Statements.
Types of PXSelect Classes
The first type parameter of all PXSelect classes is a data access class (DAC) generally
bound to a database table. The resulting SQL query selects records from this table. Other
type parameters (such as Where, OrderBy, Join, and Aggregate) are optional and represent
clauses that can be added to the basic select statement.
Depending on the clauses that will be used in a query, you select the appropriate variant of
the PXSelect class.
For example, if you need to use the Where, OrderBy, and Join clauses, you can use the
PXSelectJoin<Table, Join, Where, OrderBy> class to create the query, as shown in the
following BQL sample code.
PXSelectJoin<Table1,
LeftJoin<Table2, On<Table2.field2, Equal<Table1.field1>>>,
Where<Table1.field3, IsNotNull>,
OrderBy<Asc<Table1.field1>>>
Acumatica Framework translates this statement to the following SQL query, where
[list of columns] is the list of columns of the joined tables.
SELECT [list of columns] FROM Table1
LEFT JOIN Table2 ON Table2.Field2 = Table1.Field1
WHERE Table1.Field3 IS NOT NULL
ORDER BY Table1.Field1
| Accessing Data | 159
Acumatica Framework explicitly enumerates the columns of the database table in
the SQL query. For details on which columns are enumerated, see Translation of a BQL
Command to SQL.
For more information on how to use the BQL clauses, see To Select Records By Using Traditional
BQL.
If you need to retrieve data as it is currently stored in the database, you
use one of the PXSelect classes that has Readonly in its name, such as the
PXSelectReadonly<Table> class, or any of the PXSelect classes that use aggregation, such
as the PXSelectGroupBy<Table, Aggregate> class. Otherwise, the data retrieved from the
database can be merged with the data currently stored in the cache. For more information
on how the data is merged with the cache, see Merge of the Records with PXCache.
The List of PXSelect Classes
Acumatica Framework provides the following PXSelect classes:
• PXSelect<Table, Where, OrderBy>
• PXSelect<Table, Where>
• PXSelect<Table>
• PXSelectGroupBy<Table, Aggregate>
• PXSelectGroupBy<Table, Where, Aggregate, OrderBy>
• PXSelectGroupBy<Table, Where, Aggregate>
• PXSelectGroupByOrderBy<Table, Aggregate, OrderBy>
• PXSelectGroupByOrderBy<Table, Join, Aggregate, OrderBy>
• PXSelectJoin<Table, Join, Where, OrderBy>
• PXSelectJoin<Table, Join, Where>
• PXSelectJoin<Table, Join>
• PXSelectJoinGroupBy<Table, Join, Aggregate>
• PXSelectJoinGroupBy<Table, Join, Where, Aggregate, OrderBy>
• PXSelectJoinGroupBy<Table, Join, Where, Aggregate>
• PXSelectJoinOrderBy<Table, Join, OrderBy>
• PXSelectOrderBy<Table, Join, OrderBy>
• PXSelectOrderBy<Table, OrderBy>
• PXSelectReadonly<Table, Where, OrderBy>
| Accessing Data | 160
• PXSelectReadonly<Table, Where>
• PXSelectReadonly<Table>
• PXSelectReadonly2<Table, Join, Where, OrderBy>
• PXSelectReadonly2<Table, Join, Where>
• PXSelectReadonly2<Table, Join>
• PXSelectReadonly3<Table, Join, OrderBy>
• PXSelectReadonly3<Table, OrderBy>
The Classes That Compose BQL Statements
This topic contains an overview of the classes that you use to compose business query
language (BQL) statements inside PXSelect and to define attributes of DACs.
Overview of the Classes
Almost all classes that compose BQL statements are derived from the IBqlCreator
interface, which inherits from the IBqlVerifier interface. These interfaces provide the
following key methods:
• IBqlCreator.AppendExpression(): Used during a BQL command preparation to
translate a BQL statement into an SQL tree expression, which is then produces the SQL
text to be sent to the database maintenance server. For more information on how this
method is used during BQL statement execution, see Translation of a BQL Command to SQL.
• IBqlVerifier.Verify(): Used during the merge of the records with PXCache to
evaluate a condition on a record retrieved from the database or calculate an expression
with the record. For details on the merge, see Merge of the Records with PXCache.
Depending on the purpose of each BQL class, the class also implements the methods of the
interfaces derived from the IBqlCreator interface. For example, the aggregation functions—
such as Sum, Avg, Min, and Max—implement the methods of the IBqlFunction interface.
The high-level overview of BQL class inheritance is illustrated in the following diagram. For
descriptions of the interfaces and classes, see the API Reference.
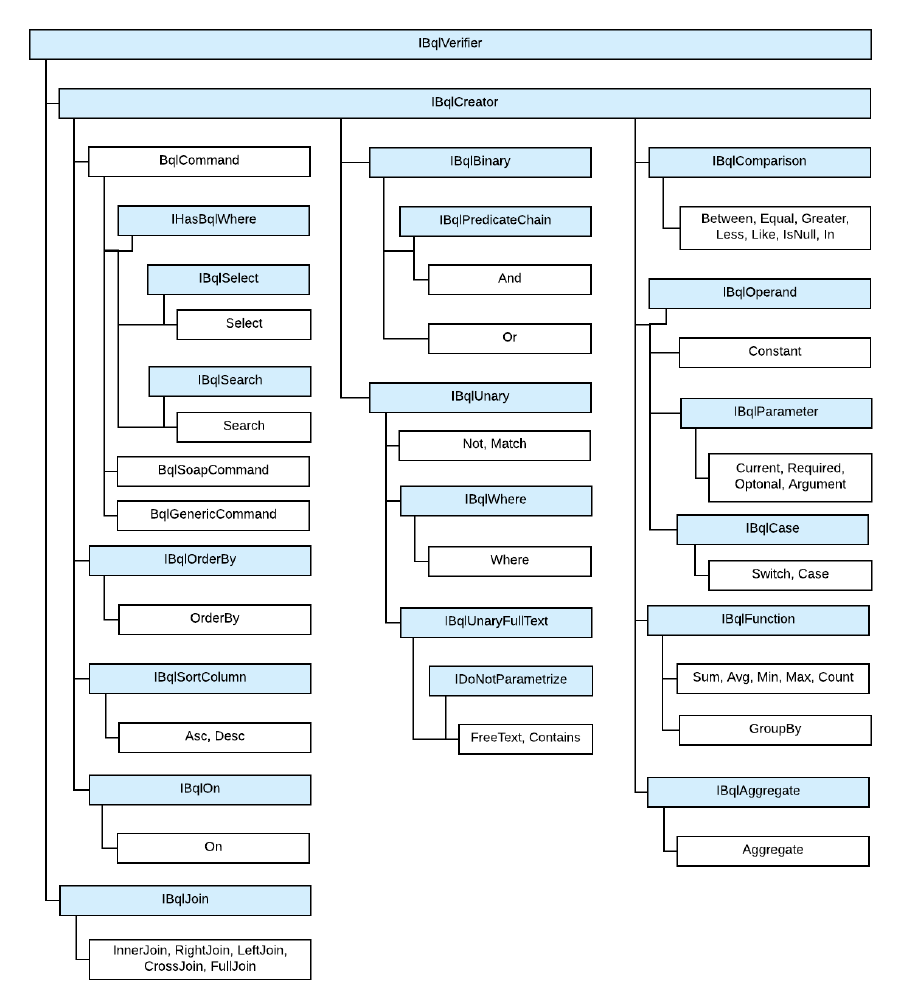
| Accessing Data | 161
Figure: BQL commands
The sections below describe the classes derived from the BqlCommand class.
Select Classes
The Select classes, which are derived from the BqlCommand class, represent BQL commands
and select all bound fields of the DAC and the unbound fields with specific attributes, such as
PXDBCalced.
| Accessing Data | 162
More specific, the Select classes select all DAC fields that are decorated with the
attributes that subscribe to the PXCommandPreparing event. For details on which
fields are selected, see Translation of a BQL Command to SQL.
In a BQL expression based on Select, the first type parameter is a DAC, as shown in the
following sample BQL statement.
Select<Product>
The Select classes can parse themselves into SQL and provide methods for modifying the
BQL command. However, you cannot directly use the Select class to execute the BQL query.
Typically, you use Select in attributes in DACs, such as the PXProjection attribute.
Search Classes
The Search classes, which are derived from the BqlCommand class, select one field of a DAC
(while the Select classes select multiple fields).
In a Search-based statement, the first type parameter is a DAC field, as shown in the
following sample BQL expression. This expression selects the Product.unitPrice field.
Search<Product.unitPrice>
These classes can parse themselves into SQL and provide methods for modifying the
BQL command. However, you cannot directly use the Search class to execute the BQL
query. Typically, you use Search in attributes in DACs, such as the PXSelector attribute.
(PXSelectorAttribute requires a Search class and not a Select because the lookup
control, which is configured by this attribute, displays precisely one field (usually a key
field), which is what Search returns.)
BqlCommand Classes
The BqlCommand classes represent BQL commands. The system uses the following types of
BqlCommand classes:
• BqlCommand: This base class for the Select and Search classes is used by the system
during the processing of data queries on the data entry forms.
• BqlGenericCommand: This class, which is derived from the BqlCommand class, is used by
the system during the processing of generic inquiries.
• BqlSoapCommand: This class, which is derived from the BqlCommand class, is used by the
system during the processing of reports. For details on report processing, see Display of
Reports.
The main purpose of BqlCommand classes is to convert BQL commands to SQL text. The
BqlGenericCommand and BqlSoapCommand classes provide additional methods for generic
inquiry and report processing.
Related Links
• Translation of a BQL Command to SQL

| Accessing Data | 163
Parameters in Traditional BQL Statements
If you need to specify values in a business query language (BQL) statement, you use BQL
parameters, which are replaced with the needed values in the translation to SQL. For details,
how BQL statements with parameters are translated to SQL, see Translation of a BQL Command
with Parameters to an SQL Query Tree.
In this topic, you can find the description of the BQL parameters and the difference between
them.
Current and Current2
The Current parameter, as well as the Current2 parameter, inserts the field value of the
Current object from the PXCache object in the SQL query. If the Current object from the
PXCache object is null, the Current parameter retrieves the default value of the field, while
the Current2 parameter doesn't retrieve the default value and inserts null.
By using the Current or Current2 parameter in the declaration of a data view, you can refer
to another view to relate these data views to each other. A typical example is referencing the
current master record on master-detail forms. For details on how the Current and Current2
parameters are used, see To Relate Data Views to One Another.
Required
The Required parameter inserts a specific value into the SQL query.
By using the Required parameters, you can pass values to the SQL query, as described in To
Pass a Field Value to the SQL Query and To Pass Multiple Field Values to the SQL Query.
Optional and Optional2
The Optional parameter works similarly to Current (as well as the Optional2 parameter
works similarly to Current2) if you don't specify an explicit value for this parameter during
BQL statement execution. However, you can also pass an explicit value of the parameter to
the SQL query.
By using the Optional or Optional2 parameters, you can pass the external presentations of
the values to the SQL query, as described in To Provide External Presentation of the Field Value to
the SQL Query.
When a DAC includes more than one key field, you may need to use Optional<> in the
primary data view of the graph. In this case, the primary data view typically filters the data
records by all of the key fields except the last one. For example, you can select documents
with the same document type as the current data record has and navigate through these
documents with different document numbers. In the following example, the Document DAC
has two key fields, DocType and DocNbr.
public PXSelect<Document,
Where<Document.docType, Equal<Optional<Document.docType>>>> Receipts;
| Accessing Data | 164
Optional<> could be replaced with Current<> in the code above unless you need to execute
the Receipts data view in code to select a document with specific document type and
number.
If a data view contains the Optional<> and Required<> parameters, you should
provide values for all Optional<> parameters that go before the Required<>
parameters. For example, if you have the following operands in the query, the number
of parameters is:
• <Required<A>>.... <Optional<B>>... <Required<C>>: Always 3 parameters
• <Required<A>>.... <Optional<B>>... <Required<C>>.... <Optional<D>>: At
least 3 parameters
• <Required<A>>....<Required<B>>.... <Optional<C>>: At least 2 parameters
Argument
The Argument parameter passes values from UI controls to the SQL query.
By using the Argument parameters, you can pass values to the data view delegates. For
more information on how to use the Argument parameter, see To Pass a Value from a UI Control
to a Data View.
Related Links
• To Use Parameters in Traditional BQL
Traditional BQL and SQL Equivalents
The traditional business query language (BQL) library defines the following SQL function
equivalents. Note that the use of the BQL equivalents may slightly differ from the use of the
corresponding SQL functions. For details on each BQL class, see the API Reference.
Table: Correspondence Between SQL and BQL
SQL Traditional BQL
Clauses
WHERE Where
INNER JOIN InnerJoin
LEFT JOIN LeftJoin
RIGHT JOIN RightJoin
FULL JOIN FullJoin
CROSS JOIN CrossJoin
ON On, On2
ORDER BY OrderBy

| Accessing Data | 165
SQL Traditional BQL
ASC Asc
DESC Desc
GROUP BY Aggregate, GroupBy
HAVING Having
Aggregation Functions
AVG Avg
SUM Sum
MIN Min
MAX Max
COUNT Count
Functions
ISNULL IsNull<Operand1, Operand2>
NULLIF NullIf
ROUND Round
SUBSTRING Substring
CONCAT Add
RTRIM RTrim
REPLACE Replace
DATEDIFF DateDiff
CASE Switch, Case
Arithmetic Operations
(Operand1 + Operand2) Add<Operand1, Operand2>
(Operand1 - Operand2) Sub<Operand1, Operand2>
(Operand1 * Operand2) Mult<Operand1, Operand2>
(Operand1 / Operand2) Div<Operand1, Operand2>
-Operand Minus<Operand>
Comparisons
= Equal
<> NotEqual
> Greater
< Less
| Accessing Data | 166
SQL Traditional BQL
<= LessEqual
<= GreaterEqual
LIKE Like
NOT LIKE NotLike
BETWEEN Between
NOT BETWEEN NotBetween
IS NULL IsNull
IS NOT NULL IsNotNull
IN In, In2, In3
NOT IN NotIn, NotIn2
EXISTS Exists
Logical Operators
AND And, And2
OR Or, Or2
NOT Not, Not2
Constants
NULL Null
Other constants Now, Today, Tomorrow, True, False, Zero,
StringEmpty, MaxDate
Full-Text Search Functions
FREETEXTTABLE FreeText
CONTAINSTABLE Contains
To Select Records By Using Traditional BQL
To select records from the database, you can construct a business query language (BQL)
statement. To construct a BQL statement, you use one of the generic PXSelect classes. You
select the needed PXSelect class depending on the statement you need to compose, as
described in the sections of this topic.
In a PXSelect class, you configure a query to the database. The actual request to the
database is performed once you cast the result of the query execution to a DAC or an
| Accessing Data | 167
array of DACs, or iterate through DACs in the result with the foreach statement. For
details, see Data Query Execution.
Before You Proceed
Make sure that the application database has the database tables from which you are going
to request data, and that the application defines the data access classes (DACs) for these
tables. For more information on defining DACs, see Data Access Classes in Traditional BQL.
To Select All Records from a Database Table
To select all data from one database table without applying any filtering conditions or
ordering, use one of the PXSelect classes that has DAC as the only type parameter, such as
the PXSelect<Table> or PXSelectReadonly<Table> class, as shown in the following sample
BQL statement.
PXSelect<Product>
In this BQL statement, you are selecting all data records (with the values of all bound fields)
from the Product table.
For example, suppose that the Product table has two columns, ProductID and
UnitPrice. In this case, Acumatica Framework translates the previous BQL statement
to the following SQL query. The framework adds ordering by the DAC key field (in
ascending order) to the end of the SQL query because the BQL statement does not
specify ordering.
SELECT Product.ProductID, Product.UnitPrice FROM Product
ORDERBY Product.ProductID
To Filter Records
To filter records in the database table to be retrieved, construct a BQL statement with
conditions by doing the following:
1. Use one of the PXSelect classes that has the Where type parameter, such as
PXSelect<Table, Where>. For the full list of PXSelect classes, see PXSelect Classes.
2. Specify the filtering conditions by using the Where clause, as described in To Filter Records.
3. To specify the fields that should be used for filtering, use the class fields defined in the
DACs, such as Product.productID. (The name of the field class starts with a lowercase
letter. Do not confuse it with the property field, which has the same name but starts with
uppercase letter.)
The following sample BQL statement selects all data records from the Product table that
have the specified value in the ProductID column.
PXSelect<Product,
Where<Product.productID, Equal<Required<Product.productID>>>>
| Accessing Data | 168
Acumatica Framework translates the previous BQL statement to the following SQL
query. In this SQL query, [list of columns] is the list of columns of the Product
table; [parameter] is the value passed to the Select() method of the PXSelect
class, which is called when the BQL query is executed.
SET @P0 = [parameter];
SELECT [list of columns] FROM Product
WHERE Product.ProductID = @P0
ORDERBY Product.ProductID
Acumatica Framework explicitly enumerates the columns of the database table in
the SQL query. For details on which columns are enumerated, see Translation of a BQL
Command to SQL.
To Order Records
To order records in the database table to be retrieved, construct a BQL statement with
ordering by doing the following:
1. Use one of the PXSelect classes that has the OrderBy type parameter, such as
PXSelectOrderBy<Table, OrderBy> or PXSelect<Table, Where, OrderBy>. For the full
list of PXSelect classes, see PXSelect Classes.
2. Use the OrderBy clause to order records, as described in To Order Records.
3. To specify the field that should be used for filtering, use the class field defined in the
DAC, such as Product.productID. (The name of the field class starts with a lowercase
letter. Do not confuse it with the property field, which has the same name but starts with
uppercase letter.)
The following sample BQL statement selects all Product data records and sorts them by the
UnitPrice field in ascending order.
PXSelectOrderBy<Product, OrderBy<Asc<Product.unitPrice>>>
Acumatica Framework translates the previous BQL statement to the following SQL
query, where [list of columns] is the list of columns of the Product table.
SELECT [list of columns] FROM Product
ORDER BY Product.UnitPrice
Acumatica Framework explicitly enumerates the columns of the database table in
the SQL query. For details on which columns are enumerated, see Translation of a BQL
Command to SQL.
To Query Multiple Tables
To join multiple tables, construct a BQL statement by doing the following:
| Accessing Data | 169
1. Use one of the PXSelect classes that has the Join type parameter, such as
PXSelectJoin<Table, Join> or PXSelectReadonly2<Table, Join>.
2. In the Join type parameter of the PXSelect class, use one of the Join clauses—
such as InnerJoin, LeftJoin, RightJoin, FullJoin, or CrossJoin—that are directly
mapped to SQL JOIN clauses, as shown in the following sample BQL statement. For more
information on the use of Join clauses, see To Query Multiple Tables.
PXSelectJoin<SalesOrder,
InnerJoin<OrderDetail,
On<OrderDetail.orderNbr, Equal<SalesOrder.orderNbr>>>>
Acumatica Framework translates the previous BQL statement to the following SQL
query, where [list of columns] is the list of columns of the joined tables.
SELECT [list of columns] FROM SalesOrder
INNER JOIN OrderDetail
ON OrderDetail.OrderNbr = SalesOrder.OrderNbr
Acumatica Framework explicitly enumerates the columns of the database table in
the SQL query. For details on which columns are enumerated, see Translation of a
BQL Command to SQL.
To Aggregate Records
To group or aggregate records, construct a BQL statement by doing the following:
1. Use one of the PXSelect classes with the Aggregate type parameter, such as
PXSelectGroupBy<Table, Aggregate>.
2. In the Aggregate type parameter of the PXSelect class, specify the grouping conditions
and aggregation functions by using the Aggregate<Function> class, the GroupBy
clauses, and the Min, Max, Sum, Avg, and Count aggregation functions, as shown in
the following sample BQL statement. For more information on the use of the grouping
conditions and aggregation functions, see To Group and Aggregate Records.
PXSelectGroupBy<Product,
Aggregate<GroupBy<Product.categoryCD>>>
Acumatica Framework translates the previous BQL statement to the following SQL
query.
SELECT Product.CategoryCD,
[MAX(Field) for other fields]
FROM Product
GROUP BY Product.CategoryCD
Related Links
• PXSelect Classes
| Accessing Data | 170
• PXSelect<Table, Where, OrderBy>
• PXSelect<Table, Where>
• PXSelect<Table>
• PXSelectGroupBy<Table, Aggregate>
• PXSelectGroupBy<Table, Where, Aggregate, OrderBy>
• PXSelectGroupBy<Table, Where, Aggregate>
• PXSelectGroupByOrderBy<Table, Aggregate, OrderBy>
• PXSelectGroupByOrderBy<Table, Join, Aggregate, OrderBy>
• PXSelectJoin<Table, Join, Where, OrderBy>
• PXSelectJoin<Table, Join, Where>
• PXSelectJoin<Table, Join>
• PXSelectJoinGroupBy<Table, Join, Aggregate>
• PXSelectJoinGroupBy<Table, Join, Where, Aggregate, OrderBy>
• PXSelectJoinGroupBy<Table, Join, Where, Aggregate>
• PXSelectJoinOrderBy<Table, Join, OrderBy>
• PXSelectOrderBy<Table, Join, OrderBy>
• PXSelectOrderBy<Table, OrderBy>
• PXSelectReadonly<Table, Where, OrderBy>
• PXSelectReadonly<Table, Where>
• PXSelectReadonly<Table>
• PXSelectReadonly2<Table, Join, Where, OrderBy>
• PXSelectReadonly2<Table, Join, Where>
• PXSelectReadonly2<Table, Join>
• PXSelectReadonly3<Table, Join, OrderBy>
• PXSelectReadonly3<Table, OrderBy>
To Filter Records
You construct business query language (BQL) statements with filtering conditions by
using the Where clause in a PXSelect class that has the Where type parameter. (For more
| Accessing Data | 171
information on selecting the PXSelect class, see To Select Records By Using Traditional BQL.)
One Where clause can contain multiple conditions chained to one another by logical operators
(Or, And, and Not) and nested Where clauses (these nested clauses are equivalent to placing
conditions in brackets).
Typically, you construct a BQL statement with a condition to compare one field with another
field or a constant, or to check if the field value has been specified (that is, to compare the
field value with null). You can also use multiple conditions in the Where clause.
To Compare a Field with Another Field
To compare one field with another field in the Where clause, do the following:
1. Select the comparison class that you need, such as NotEqual, Greater, or Less.
2. Specify the compared field in the first type parameter of the Where class and the
comparison in the second type parameter, as shown in the following sample BQL
statement.
PXSelect<Product, Where<Product.bookedQty, Greater<Product.availQty>>>
Acumatica Framework translates the previous BQL statement to the following SQL
query, where [list of columns] is the list of columns of the Product table.
SELECT [list of columns] FROM Product WHERE Product.BookedQty > Product.AvailQty
Acumatica Framework explicitly enumerates the columns of the database table in
the SQL query. For details on which columns are enumerated, see Translation of a
BQL Command to SQL.
To Compare a Field with a Constant
To compare a field with a constant in the Where clause, do the following:
1. Select the comparison class that you need, such as NotEqual, Greater, or Less.
2. Select one of the predefined constants—that is, the BQL class derived from the
Constant<Type> class (such as Boolean values True and False, integer Zero, datetime
Now, Today, and MaxDate, and string StringEmpty), or define your own constant as a
class derived from the Constant<Type> class.
3. Specify the compared field in the first type parameter of the Where class and the
comparison in the second type parameter, as shown in the following sample BQL
statement.
PXSelect<Product, Where<Product.active, Equal<True>>>
Acumatica Framework translates this BQL statement to the following SQL query,
where [list of columns] is the list of columns of the Product table.
SELECT [list of columns] FROM Product WHERE Product.Active = CONVERT(BIT, 1)
| Accessing Data | 172
Acumatica Framework explicitly enumerates the columns of the database table in
the SQL query. For details on which columns are enumerated, see Translation of a
BQL Command to SQL.
To Compare the Field Value with Null
To check whether a field value is specified, you compare the field value with null in one of
the following ways:
• To check that the field is null, use the Where<Operand, Comparison> class, as shown in
the following sample BQL statement.
PXSelect<Product, Where<Product.bookedQty, IsNull>>
Acumatica Framework translates the previous BQL statement to the following SQL
query, where [list of columns] is the list of columns of the Product table.
SELECT [list of columns] FROM Product WHERE Product.BookedQty IS NULL
Acumatica Framework explicitly enumerates the columns of the database table in
the SQL query. For details on which columns are enumerated, see Translation of a
BQL Command to SQL.
• To check that the field is not null, do one of the following:
• Use the Where<Operator> class and the logical operator Not, as shown in the
following sample BQL statement.
PXSelect<Product, Where<Not<Product.bookedQty, IsNull>>>
Acumatica Framework translates the previous BQL statement to the following
SQL query, where [list of columns] is the list of columns of the Product
table.
SELECT [list of columns] FROM Product WHERE NOT (Product.BookedQty IS NULL)
Acumatica Framework explicitly enumerates the columns of the database table
in the SQL query. For details on which columns are enumerated, see Translation
of a BQL Command to SQL.
• Use the Where<Operand, Comparison class, as shown in the following sample BQL
statement..
PXSelect<Product, Where<Product.bookedQty, IsNotNull>>
Acumatica Framework translates the previous BQL statement to the following
SQL query, where [list of columns] is the list of columns of the Product
table.
SELECT [list of columns] FROM Product WHERE Product.BookedQty IS NOT NULL
| Accessing Data | 173
Acumatica Framework explicitly enumerates the columns of the database table
in the SQL query. For details on which columns are enumerated, see Translation
of a BQL Command to SQL.
The predefined constant Null cannot be used in the Where clause with Equal to select
records with null fields. The Null constant is used in Switch conditions.
To Use Multiple Conditions in One Where Clause
To specify multiple comparisons in one Where clause, do one of the following:
• To specify multiple comparisons that are connected with the same logical operator, use
the Where<Operand, Comparison, NextOperator> class and specify its type parameters
as follows:
• In the first type parameter, specify the first compared field.
• In the second type parameter, specify the first comparison, such as NotEqual,
Greater, or Less.
• In the third type parameter, specify the logical operator, such as And, And2, Or,
or Or2. You can chain any number of comparisons to one another by using binary
operators with three type parameters, as shown in the following sample BQL
statement.
PXSelect<Product,
Where<Product.bookedQty, Greater<Product.availQty>,
Or<Product.availQty, Less<Product.minAvailQty>,
Or<Product.availQty, IsNull>>>>
Acumatica Framework translates the previous BQL statement to the following
SQL query, where [list of columns] is the list of columns of the Product
table.
SELECT [list of columns] FROM Product
WHERE Product.BookedQty > Product.AvailQty
OR Product.AvailQty < Product.MinAvailQty
OR Product.AvailQty IsNull
Acumatica Framework explicitly enumerates the columns of the database table
in the SQL query. For details on which columns are enumerated, see Translation
of a BQL Command to SQL.
• To write more complex conditional expressions with logical operators of different types,
use nested Where or Where2 clauses. For more information on writing complex BQL
statements, see To Compose a BQL Statement from an SQL Statement.
Related Links
• To Compose a BQL Statement from an SQL Statement
| Accessing Data | 174
• Where<UnaryOperator> Class
• Where<Operand,Comparison> Class
• Where<Operand,Comparison,NextOperator> Class
• Where2<UnaryOperator,NextOperator> Class
• Equal<Operand> Class
• NotEqual<Operand> Class
• Greater<Operand> Class
• GreaterEqual<Operand> Class
• Less<Operand> Class
• LessEqual<Operand> Class
• Like<Operand> Class
• NotLike<Operand> Class
• NotBetween<Operand1,Operand2> Class
• Between<Operand1,Operand2> Class
• IsNull Class
• IsNotNull Class
• In<Operand> Class
• In2<Operand> Class
• In3<Operand1,Operand2,Operand3,Operand4> Class
• NotIn<Operand> Class
• NotIn2<Operand> Class
• Constant<ConstType> Class
• Null Class
• Now Class
• Today Class
• Tomorrow Class
• True Class
• False Class

| Accessing Data | 175
• Zero Class
• StringEmpty Class
• MaxDate Class
To Order Records
You construct business query language (BQL) statements that include ordering of records
by using the OrderBy clause in one of the PXSelect classes that has the OrderBy type
parameter. (For more information on selecting the PXSelect class, see To Select Records By
Using Traditional BQL.)
By default, if the BQL statement does not specify ordering, Acumatica Framework adds
ordering by the data access class (DAC) key fields (in the order of field declaration) in
ascending order to the end of the SQL query. You can order the records by one column or
multiple columns, or by a condition.
To Order Records by One Column
To order records by one column in ascending or descending order, use the OrderBy class and
the Asc<Field> or Desc<Field> class, as shown in the following sample BQL statement.
PXSelectOrderBy<Product, OrderBy<Asc<Product.unitPrice>>>
In this statement, all Product data records are selected and are sorted by the UnitPrice
field in ascending order.
Acumatica Framework translates this BQL statement to the following SQL query,
where [list of columns] is the list of columns of the Product table.
SELECT [list of columns] FROM Product
ORDER BY Product.UnitPrice
Acumatica Framework explicitly enumerates the columns of the database table in
the SQL query. For details on which columns are enumerated, see Translation of a BQL
Command to SQL.
To Order Records by Multiple Columns
To order records by multiple columns, use the OrderBy class and the Asc<Field,
NextField> or Desc<Field, NextField> class, as shown in the following sample BQL
statement.
PXSelectOrderBy<Product,
OrderBy<Asc<Product.unitPrice, Desc<Product.availQty>>>>
Acumatica Framework translates the previous BQL statement to the following SQL
query, where [list of columns] is the list of columns of the Product table.
| Accessing Data | 176
SELECT [list of columns] FROM Product
ORDER BY Product.UnitPrice, Product.AvailQty DESC
Acumatica Framework explicitly enumerates the columns of the database table in
the SQL query. For details on which columns are enumerated, see Translation of a BQL
Command to SQL.
To Order Records by a Condition
To sort data records according to a condition, put the Switch clause inside Asc or Desc in
OrderBy, as shown in the following sample BQL statement.
PXSelectOrderBy<Product,
OrderBy<Asc<
Switch<Case<Where<Product.availQty, Greater<Product.bookedQty>>, True>,
False>>>>
In this statement, the records with AvailQty values less or equal to BookedQty values are
ordered first.
Acumatica Framework translates the previous BQL statement to the following SQL
query, where [list of columns] is the list of columns of the Product table.
SELECT [list of columns] FROM Product
ORDER BY
( CASE
WHEN Product.AvailQty > Product.BookedQty THEN 1
ELSE 0
END )
Acumatica Framework explicitly enumerates the columns of the database table in
the SQL query. For details on which columns are enumerated, see Translation of a BQL
Command to SQL.
Related Links
• OrderBy<List> Class
• Asc<Field> Class
• Asc<Field,NextField> Class
• Desc<Field> Class
• Desc<Field,NextField> Class
• Switch<Case> Class
• Switch<Case,Default> Class
• Case<Where_,Operand> Class
| Accessing Data | 177
• Case<Where_,Operand,NextCase> Class
To Query Multiple Tables
You construct business query language (BQL) statements that join multiple tables by using
one of the Join clauses in one of the PXSelect classes that has the Join type parameter.
(For more information on selecting the PXSelect class, see To Select Records By Using
Traditional BQL.) In BQL statements, you can join multiple database tables by using the
following clauses directly mapped to SQL JOIN clauses:
• InnerJoin returns all records where there is at least one match in both tables.
• LeftJoin returns all records from the left table, and the matched records from the right
table. Where there are no matched records from the right table, null values are inserted.
• RightJoin returns all records from the right table, and the matched records from the left
table. Where there are no matched records from the left table, null values are inserted.
• FullJoin returns all records when there is a match in one of the tables.
• CrossJoin returns the entire Cartesian product of the two tables.
To Join Two Tables (Inner Join, Left Join, Right Join, or Full Join)
To join two tables, use one of the Join clauses with two type parameters (such as
InnerJoin<Table, On>) and the On<Operand, Comparison> or On<Operator> class to
specify a conditional expression for joining, as shown in the following sample BQL statement.
PXSelectJoin<SalesOrder,
InnerJoin<OrderDetail,
On<OrderDetail.orderNbr, Equal<SalesOrder.orderNbr>>>>
Acumatica Framework translates the previous BQL statement to the following SQL
query, where [list of columns] is the list of columns of the joined tables.
SELECT [list of columns] FROM SalesOrder
INNER JOIN OrderDetail
ON OrderDetail.OrderNbr = SalesOrder.OrderNbr
Acumatica Framework explicitly enumerates the columns of the database table in
the SQL query. For details on which columns are enumerated, see Translation of a BQL
Command to SQL.
To Cross-Join Two Tables
To cross-join two tables, use the CrossJoin<Table> class, as shown in the following sample
BQL statement.
PXSelectJoin<Product, CrossJoin<Supplier>>
| Accessing Data | 178
Acumatica Framework translates the previous BQL statement to the following SQL
query, where [list of columns] is the list of columns of the joined tables.
SELECT [list of columns] FROM Product CROSS JOIN Supplier
Acumatica Framework explicitly enumerates the columns of the database table in
the SQL query. For details on which columns are enumerated, see Translation of a BQL
Command to SQL.
To Join Multiple Tables
To specify multiple join clauses, use the following instructions:
•
Use a Join clause with three type parameters (such as InnerJoin<Table, On,
NextJoin>). Each subsequent join clause is specified as the last type parameter of the
previous join clause, as shown in the following sample BQL statement.
PXSelectJoin<SalesOrder,
InnerJoin<OrderDetail,
On<OrderDetail.orderNbr, Equal<SalesOrder.orderNbr>>,
LeftJoin<Employee,
On<Employee.employeeID, Equal<SalesOrder.employeeID>>>>>
Acumatica Framework translates this BQL statement to the following SQL query,
where [list of columns] is the list of columns of the joined tables.
SELECT [list of columns] FROM SalesOrder
INNER JOIN OrderDetail
ON OrderDetail.OrderNbr = SalesOrder.OrderNbr
LEFT JOIN Employee
ON Employee.EmployeeID = SalesOrder.EmployeeID
Acumatica Framework explicitly enumerates the columns of the database table in
the SQL query. For details on which columns are enumerated, see Translation of a
BQL Command to SQL.
•
Use the On conditions to specify conditional expressions for joining, as shown in the
following sample BQL statement. In subsequent join clauses, the On conditions can refer
to fields from any joined table, and can contain any number of conditions chained by
logical operators as in filtering conditions.
PXSelectJoin<SalesOrder,
InnerJoin<OrderDetail,
On<OrderDetail.orderNbr, Equal<SalesOrder.orderNbr>>,
LeftJoin<Employee,
On<Employee.employeeID, Equal<SalesOrder.employeeID>>,
RightJoin<Product,
On<Product.productID, Equal<OrderDetail.productID>,
| Accessing Data | 179
And<Product.unitPrice, Equal<OrderDetail.unitPrice>>>>>>>
Acumatica Framework translates the previous BQL statement to the following SQL
query, where [list of columns] is the list of columns of the joined tables.
SELECT [list of columns] FROM SalesOrder
INNER JOIN OrderDetail
ON OrderDetail.OrderNbr = SalesOrder.OrderNbr
LEFT JOIN Employee
ON Employee.EmployeeID = SalesOrder.EmployeeID
RIGHT JOIN Product
ON (Product.ProductID = OrderDetail.ProductID AND
Product.UnitPrice = OrderDetail.UnitPrice)
Acumatica Framework explicitly enumerates the columns of the database table in
the SQL query. For details on which columns are enumerated, see Translation of a
BQL Command to SQL.
Related Links
• InnerJoin<Table,On> Class
• InnerJoin<Table,On,NextJoin> Class
• InnerJoinSingleTable<Table,On> Class
• InnerJoinSingleTable<Table,On,NextJoin> Class
• LeftJoin<Table,On> Class
• LeftJoin<Table,On,NextJoin> Class
• LeftJoinSingleTable<Table,On> Class
• LeftJoinSingleTable<Table,On,NextJoin> Class
• RightJoin<Table,On> Class
• RightJoin<Table,On,NextJoin> Class
• RightJoinSingleTable<Table,On> Class
• RightJoinSingleTable<Table,On,NextJoin> Class
• FullJoin<Table,On> Class
• FullJoin<Table,On,NextJoin> Class
• FullJoinSingleTable<Table,On> Class
• FullJoinSingleTable<Table,On,NextJoin> Class
• CrossJoin<Table> Class
| Accessing Data | 180
• CrossJoin<Table,NextJoin> Class
• CrossJoinSingleTable<Table> Class
• CrossJoinSingleTable<Table,NextJoin> Class
To Group and Aggregate Records
You construct business query language (BQL) statements that group and aggregate records
by using the Aggregate clause in one of the PXSelect classes that has the Aggregate type
parameter. (For more information on selecting the PXSelect class, see To Select Records By
Using Traditional BQL.)
To Group and Aggregate Records
To group and aggregate records, follow the instructions below:
1. Specify all grouping conditions (the GroupBy clause) and aggregation functions (such
as Min, Max, Sum, Avg, and Count) in the Aggregate clause, as shown in the following
sample BQL statement. Fields specified in GroupBy clauses are selected as is; an
aggregation function is applied to all other fields. The default Max function is used if
no function is specified for a field. If a data field has the PXDBScalar attribute, NULL is
inserted for that field.
PXSelectGroupBy<Product,
Aggregate<GroupBy<Product.categoryCD>>>
Acumatica Framework translates the previous BQL statement to the following SQL
query.
SELECT Product.CategoryCD,
[MAX(Field) for other fields]
FROM Product
GROUP BY Product.CategoryCD
2. If necessary, insert another GroupBy clause or aggregation function as the second type
parameter of the previous GroupBy clause or aggregation function, as shown in the
following sample BQL statement.
PXSelectGroupBy<Product,
Aggregate<GroupBy<Product.categoryCD,
Sum<Product.availQty,
Sum<Product.bookedQty,
GroupBy<Product.stockUnit,
Min<Product.unitPrice>>>>>>>
Acumatica Framework translates the previous BQL statement to the following SQL
query.
SELECT Product.CategoryCD, Product.StockUnit,

| Accessing Data | 181
SUM(Product.AvailQty), SUM(Product.AvailQty), MIN(Product.UnitPrice),
[MAX(Field) for other fields]
FROM Product
GROUP BY Product.CategoryCD, Product.StockUnit
Related Links
• Aggregate<Function> Class
• GroupBy<Field> Class
• GroupBy<Field,NextAggregate> Class
• Min<Field> Class
• Min<Field,NextAggregate> Class
• Max<Field> Class
• Max<Field,NextAggregate> Class
• Sum<Field> Class
• Sum<Field,NextAggregate> Class
• Avg<Field> Class
• Avg<Field,NextAggregate> Class
• Count Class
• Count<Field> Class
To Use Parameters in Traditional BQL
You may need to use BQL parameters if you need to relate data views to each other, to pass
field values to the SQL query, to pass the external presentations of the values to the SQL
query, or to pass values from UI controls to the SQL query. For more information on the BQL
parameters, see Parameters in Traditional BQL Statements.
To Relate Data Views to One Another
To relate data views to one another, use the Current parameter, as shown in the following
sample code.
// The view declarations in a graph
PXSelect<Document> Documents;
PXSelect<DocTransaction,
Where<DocTransaction.docNbr, Equal<Current<Document.docNbr>>,
And<DocTransaction.docType, Equal<Current<Document.docType>>>>>
DocTransactions;
| Accessing Data | 182
In this code, there is a many-to-one relationship between the DocTransaction and
Document data access classes (DACs), and this relationship is implemented through
the DocNbr and DocType key fields. The views in the code connect the Document and
DocTransaction records.
Acumatica Framework translates the BQL query of the second view in the sample BQL
code to the following SQL statement. In this SQL query, [parameter1] is the DocNbr
value and [parameter2] is the DocType value taken from the Current property
of the DocTransaction cache; [list of columns] is the list of columns of the
DocTransaction table.
SET @P0 = [parameter1]
SET @P1 = [parameter2]
SELECT * FROM DocTransaction
WHERE DocTransaction.DocNbr = @P0
AND DocTransaction.DocType = @P1
Acumatica Framework explicitly enumerates the columns of the database table in
the SQL query. For details on which columns are enumerated, see Translation of a BQL
Command to SQL.
To Pass a Field Value to the SQL Query
To pass a specific value to the SQL query, use the Required parameter in the BQL statement
and specify the needed value as the Select() method argument. The value passed to
Select() must be of the same type as the type of the specified field.
The Required parameter should be used only in the BQL statements that are directly
executed in the application code. The data views that are queried from the UI will not
work if they contain Required parameters.
The code below shows the execution of a BQL statement with the Required parameter.
// Suppose an event handler related to the Product DAC
// is being executed
Product product = (Product)e.Row;
// Select the Category record with the specified CategoryCD
Category category =
PXSelect<Category,
Where<Category.categoryCD, Equal<Required<Category.categoryCD>>>>
.Select(this, product.CategoryCD);
Acumatica Framework translates the previous BQL query to the following SQL
statement. In this SQL query, [parameter] is the value of the product.CategoryCD
variable at the moment the Select() method is invoked; [list of columns] is the
list of columns of the Category table.
SET @P0 = [parameter]
| Accessing Data | 183
SELECT * FROM Category
WHERE Category.CategoryCD = @P0
Acumatica Framework explicitly enumerates the columns of the database table in
the SQL query. For details on which columns are enumerated, see Translation of a BQL
Command to SQL.
To Pass Multiple Field Values to the SQL Query
To pass multiple values to the SQL query, use multiple Required parameters in the BQL
statement and specify the needed values as the Select() method arguments in the order
in which the parameters are specified in the BQL statement. The number of Required
parameters must match the number of parameters passed to the Select() function.
The Required parameters should be used in only the BQL statements that are
executed in the application code.
The following code shows an example of a BQL statement with two Required parameters.
// Suppose an event handler related to the DocTransaction DAC
// is being executed
DocTransaction line = (DocTransaction)e.Row;
...
Document doc =
PXSelect<Document,
Where<Document.docNbr, Equal<Required<DocTransaction.docNbr>,
And<Document.docType, Equal<Required<DocTransaction.docType>>>>>
.Select(this, line.DocNbr, line.DocType);
Acumatica Framework translates the previous BQL query to the following SQL
statement, where [list of columns] is the list of columns of the Document table.
SET @P0 = [line.DocNbr value]
SET @P1 = [line.DocType value]
SELECT * FROM Document
WHERE Document.DocNbr = @P0
AND Document.DocType = @P1
Acumatica Framework explicitly enumerates the columns of the database table in
the SQL query. For details on which columns are enumerated, see Translation of a BQL
Command to SQL.
To Provide External Presentation of the Field Value to the SQL Query
To substitute the value in the SQL query, do the following:
1. Add the PXSelector attribute with a substitute key to a DAC field, as shown in the
following example.
[PXSelector(typeof(Search<Product.productID>),
| Accessing Data | 184
new Type [] {
typeof(Product.productCD),
typeof(Product.productName)
},
SubstituteKey = typeof(Product.productCD))]
public virtual int? ProductID { get; set; }
In this example, PXSelector replaces the ProductID field in the user interface with
the human-readable ProductCD field. In the UI control for this field, the user enters
a ProductCD value. The PXSelector attribute implements the FieldUpdating event
handler, which replaces the ProductCD value with the corresponding ProductID value.
2. Use the Optional parameter to select records by the external presentation of the field
value, as shown in the following code for OrderDetail records.
// Product data record obtained
Product p = ...
// Selecting OrderDetail records: ProductCD value is passed
// to the Select() method.
PXSelect<OrderDetail,
Where<OrderDetail.ProductID, Equal<Optional<OrderDetail.ProductID>>>>
.Select(this, p.ProductCD);
3. In the Select() method, provide values for all Optional, Required, and Argument
parameters up to the last Required or Argument parameter in the BQL statement, as
shown in the following sample code.
// Related OrderDetail and Product records obtained
OrderDetail od = ...
Product p = ...
// At least three values (in addition to graph reference) must
// be passed to the Select() method below.
// The second Optional parameter here will be replaced with the
// default UnitPrice value.
PXResultset<OrderDetail> details =
PXSelect<OrderDetail,
Where<OrderDetail.productID, Equal<Optional<OrderDetail.productID>>,
And<OrderDetail.extPrice, Less<Required<OrderDetail.extPrice>>,
And<OrderDetail.unitPrice, Greater<Required<OrderDetail.unitPrice>>,
And<OrderDetail.taxRate, Equal<Optional<OrderDetail.taxRate>>>>>>>
.Select(this, p.ProductCD, od.ExtPrice, od.UnitPrice);
Acumatica Framework translates the BQL query in the code to the following SQL
statement, where [list of columns] is the list of columns of the OrderDetail
table.
SET @P0 = [line.ProductID value or default]
SET @P1 = [line.ExtPrice value]
SET @P2 = [line.UnitPrice value]
SET @P3 = [Default TaxRate value]
| Accessing Data | 185
SELECT [list of columns] FROM OrderDetail
WHERE OrderDetail.ProductID = @P0
AND OrderDetail.ExtPrice < @P1
AND OrderDetail.UnitPrice > @P2
AND OrderDetail.TaxRate = @P3
Acumatica Framework explicitly enumerates the columns of the database table in
the SQL query. For details on which columns are enumerated, see Translation of a
BQL Command to SQL.
To Pass a Value from a UI Control to a Data View
To pass a value from a UI control to a data view, do the following:
1. Define the PXSelect data view with the Argument parameter whose type parameter
specifies the data type of the expected value, as shown in the following sample BQL
query.
PXSelect<TreeViewItem,
Where<TreeViewItem.parentID, Equal<Argument<int?>>>,
OrderBy<Asc<TreeViewItem.parentID>>> GridDataSource;
Acumatica Framework translates the previous BQL query to the following SQL
statement. In this SQL query, [parameter] will contain the value received from
the UI control and passed to the Select() method; [list of columns] is the list
of columns of the TreeViewItem table.
SET @P0 = [parameter]
SELECT [list of columns] FROM TreeViewItem
WHERE TreeViewItem.ParentID = @P0
ORDER BY TreeViewItem.ParentID
Acumatica Framework explicitly enumerates the columns of the database table in
the SQL query. For details on which columns are enumerated, see Translation of a
BQL Command to SQL.
2. Define the data view delegate with the parameters through which you can access the
values passed from the UI. (You can find more information on how to use data view
delegates in .)
When a BQL statement with the Argument parameter is executed in code, the
value must be specified in the parameters of the Select() method.
Related Links
• Parameters in Traditional BQL Statements
• Translation of a BQL Command to SQL
• Current<Field> Class
| Accessing Data | 186
• Current2<Field> Class
• Required<Field> Class
• Optional<Field> Class
• Optional2<Field> Class
• Argument<ArgumentType> Class
To Use Arithmetic Operations
Arithmetic operations—such as Add<Operand1, Operand2>, Sub<Operand1, Operand2>,
Mult<Operand1, Operand2>, Div<Operand1, Operand2>, and Minus<Operand>—are used
primarily in attributes to calculate the value of a field from other fields. Arithmetic operations
can also be used as operands in Where and OrderBy clauses in business query language
(BQL) statements.
To Use Arithmetic Operations in Attributes
To calculate an expression in an attribute, do the following:
1. Compose the expression by using arithmetic operations. For example, you can calculate
product reorder discrepancy by using the following BQL expression, where the decimal_0
constant represents the 0 decimal value. IsNull returns the first argument if it is not
null or the second argument otherwise.
Minus<
Sub<Sub<IsNull<Product.availQty, decimal_0>,
IsNull<Product.bookedQty, decimal_0>>,
Product.minAvailQty>>
Acumatica Framework translates the previous BQL statement to the following SQL
query.
-((ISNULL(Product.AvailQty, .0) - ISNULL(Product.BookedQty, .0))
- Product.MinAvailQty)
2. Use the calculated expression in an attribute (such as PXDBCalced) to define a calculated
field that is not bound to a database column, as shown in the following sample code.
// Data field definition in a DAC
[PXDecimal(2)]
[PXDBCalced(typeof(Minus<
Sub<Sub<IsNull<Product.availQty, decimal_0>,
IsNull<Product.bookedQty, decimal_0>>,
Product.minAvailQty>>),
typeof(Decimal))]
public virtual decimal? Discrepancy { get; set; }
| Accessing Data | 187
To Use Arithmetic Operations in BQL Statements
To use arithmetic operations in a conditional expression in a BQL statement, do the
following:
1. Compose the expression by using arithmetic operations. For example, you can calculate
product reorder discrepancy by using the following BQL expression, where the decimal_0
constant represents the 0 decimal value. IsNull returns the first argument if it is not
null or the second argument otherwise.
Minus<
Sub<Sub<IsNull<Product.availQty, decimal_0>,
IsNull<Product.bookedQty, decimal_0>>,
Product.minAvailQty>>
Acumatica Framework translates the previous BQL statement to the following SQL
query.
-((ISNULL(Product.AvailQty, .0) - ISNULL(Product.BookedQty, .0))
- Product.MinAvailQty)
2. Use the calculated expression in a BQL statement, as shown in the following example.
PXSelect<Product,
Where<Minus<
Sub<Sub<IsNull<Product.availQty, decimal_0>,
IsNull<Product.bookedQty, decimal_0>>,
Product.minAvailQty>>,
NotEqual<decimal_0>>>
Acumatica Framework translates the previous BQL statement to the following SQL
query, where [list of columns] is the list of columns of the Product table.
SELECT [list of columns] FROM Product
WHERE -((ISNULL(Product.AvailQty, .0) - ISNULL(Product.BookedQty, .0))
- Product.MinAvailQty) <> .0
Acumatica Framework explicitly enumerates the columns of the database table in
the SQL query. For details on which columns are enumerated, see Translation of a
BQL Command to SQL.
Related Links
• Add<Operand1,Operand2> Class
• Sub<Operand1,Operand2> Class
• Mult<Operand1,Operand2> Class
• Div<Operand1,Operand2> Class

| Accessing Data | 188
• Minus<Operand> Class
To Compose a BQL Statement from an SQL Statement
If you are familiar with the construction of SQL statements, you may want to first construct
an SQL statement and then translate it to business query language (BQL). You can follow the
instructions described in this topic to translate SQL statements to BQL statements.
To Translate an SQL Statement to BQL
To translate an SQL statement to BQL, do the following:
1. Construct an SQL statement that selects the data you need.
For example, suppose that you need to convert to BQL the following SQL statement. In
this SQL query, we use the * sign to indicate that all columns of the Product table should
be selected.
SELECT * FROM Product
INNER JOIN SupplierProduct
ON SupplierProduct.ProductID = Product.ProductID
INNER JOIN Supplier
ON Supplier.AccountID = SupplierProduct.AccountID
WHERE (Product.BookedQty IS NOT NULL
AND Product.AvailQty IS NOT NULL
AND Product.MinAvailQty IS NOT NULL
AND(Product.Active = 1
OR Product.Active IS NULL)
AND(Product.BookedQty > Product.AvailQty
OR Product.AvailQty < Product.MinAvailQty))
OR Product.AvailQty IS NOT NULL
ORDER BY Product.UnitPrice, Product.AvailQty DESC
2. Replace the names of columns with the names of class fields that correspond to the
columns in data access classes (DACs). That is, change the uppercase letter in the name
of each column to the lowercase, as shown in the following sample code. In this sample
code, the changes are shown in bold type.
SELECT * FROM Product
INNER JOIN SupplierProduct
ON SupplierProduct.productID = Product.productID
INNER JOIN Supplier
ON Supplier.accountID = SupplierProduct.accountID
WHERE (Product.bookedQty IS NOT NULL
AND Product.availQty IS NOT NULL
AND Product.minAvailQty IS NOT NULL
AND(Product.active = 1
OR Product.active IS NULL)
AND(Product.bookedQty > Product.availQty
OR Product.availQty < Product.minAvailQty))

| Accessing Data | 189
OR Product.availQty IS NOT NULL
ORDER BY Product.unitPrice, Product.availQty DESC
3. If your SQL statement contains constants, replace it with either one of the predefined
constants or your own constant. (For details on using constants, see To Compare a Field
with a Constant and the description of the Constant<ConstType> class.) If you need to
change the values of the constants at runtime, replace the constants with parameters, as
described in To Use Parameters in Traditional BQL.
4. Find the JOIN, WHERE, GROUP BY, and ORDER BY clauses that you have in the SQL
statement. Depending on the included clauses, select one of the PXSelect classes, and
replace SELECT * FROM with this class in your SQL statement. For details on selection
of the PXSelect class, see To Select Records By Using Traditional BQL. For the list of all
PXSelect classes, see PXSelect Classes.
In the sample code that has been presented in this topic, you would use the
PXSelectJoin<Table, Join, Where, OrderBy> class, and you would change the
sample code as follows. (The changes are shown in bold type.)
PXSelectJoin<Product,
INNER JOIN SupplierProduct
ON SupplierProduct.productID = Product.productID
INNER JOIN Supplier
ON Supplier.accountID = SupplierProduct.accountID,
WHERE (Product.bookedQty IS NOT NULL
AND Product.availQty IS NOT NULL
AND Product.minAvailQty IS NOT NULL
AND(Product.active = 1
OR Product.active IS NULL)
AND(Product.bookedQty > Product.availQty
OR Product.availQty < Product.minAvailQty))
OR Product.availQty IS NOT NULL,
ORDER BY Product.unitPrice, Product.availQty DESC>
5. If your SQL statement includes JOIN clauses, do the following:
a. Replace the last JOIN clause with the corresponding BQL Join clause. You would
change the sample code of this topic as follows. (The changes are shown in bold
type.)
PXSelectJoin<Product,
INNER JOIN SupplierProduct
ON SupplierProduct.productID = Product.productID
InnerJoin<Supplier,
ON Supplier.accountID = SupplierProduct.accountID>,
WHERE (Product.bookedQty IS NOT NULL
AND Product.availQty IS NOT NULL
AND Product.minAvailQty IS NOT NULL
AND(Product.active = 1
OR Product.active IS NULL)
AND(Product.bookedQty > Product.availQty

| Accessing Data | 190
OR Product.availQty < Product.minAvailQty))
OR Product.availQty IS NOT NULL,
ORDER BY Product.unitPrice, Product.availQty DESC>
b. Chain other JOIN clauses to one another, as described in To Query Multiple Tables. You
would change the sample code of this topic as follows. (The changes are shown in
bold type.)
PXSelectJoin<Product,
InnerJoin<SupplierProduct,
ON SupplierProduct.productID = Product.productID,
InnerJoin<Supplier,
ON Supplier.accountID = SupplierProduct.accountID>>,
WHERE (Product.bookedQty IS NOT NULL
AND Product.availQty IS NOT NULL
AND Product.minAvailQty IS NOT NULL
AND(Product.active = 1
OR Product.active IS NULL)
AND(Product.bookedQty > Product.availQty
OR Product.availQty < Product.minAvailQty))
OR Product.availQty IS NOT NULL,
ORDER BY Product.unitPrice, Product.availQty DESC>
c. Replace each ON clause, as follows:
• For a single condition or groups that start with a simple condition, replace the ON
clause with On.
• For groups that start with a group of conditions, replace the ON clause with On2.
With these replacements, the sample code used in this topic would be changed to the
following code. (The changes are shown in bold type.)
PXSelectJoin<Product,
InnerJoin<SupplierProduct,
On<SupplierProduct.productID = Product.productID>,
InnerJoin<Supplier,
On<Supplier.accountID = SupplierProduct.accountID>>>,
WHERE (Product.bookedQty IS NOT NULL
AND Product.availQty IS NOT NULL
AND Product.minAvailQty IS NOT NULL
AND(Product.active = 1
OR Product.active IS NULL)
AND(Product.bookedQty > Product.availQty
OR Product.availQty < Product.minAvailQty))
OR Product.availQty IS NOT NULL,
ORDER BY Product.unitPrice, Product.availQty DESC>
6. If your SQL statement includes a WHERE clause, replace the WHERE clause and each pair
of parentheses that encloses each group of conditions in the WHERE clause with a Where,
Where2, Not, or Not2 clause, as follows:

| Accessing Data | 191
• Where is used for groups that start with a simple condition.
• Not is used for groups that start with a simple condition but are preceded with the
logical NOT.
• Where2 is used for groups that start with a group of conditions.
• Not2 is used for groups that start with a group of conditions but preceded with the
logical NOT.
With these replacements, the sample code used in this topic would be changed to the
following code. (The changes are shown in bold type.)
PXSelectJoin<Product,
InnerJoin<SupplierProduct,
On<SupplierProduct.productID = Product.productID>,
InnerJoin<Supplier,
On<Supplier.accountID = SupplierProduct.accountID>>>,
Where2<Where<Product.bookedQty, IS NOT NULL
AND Product.availQty IS NOT NULL
AND Product.minAvailQty IS NOT NULL
AND Where<Product.active = 1,
OR Product.active IS NULL>
AND Where<Product.bookedQty > Product.availQty,
OR Product.availQty < Product.minAvailQty>>,
OR Product.availQty IS NOT NULL>,
OrderBy<Asc<Product.unitPrice, Desc<Product.availQty>>>>
7. In each BQL Where or On clause, replace the logical operators (either AND or OR) to And,
Or, And2, or Or2, as follows:
a. Replace the last AND or OR in each BQL Where or On clause with the And or Or
operator, respectively, as shown in the following code. (The changes are shown in
bold type.)
PXSelectJoin<Product,
InnerJoin<SupplierProduct,
On<SupplierProduct.productID = Product.productID>,
InnerJoin<Supplier,
On<Supplier.accountID = SupplierProduct.accountID>>>,
Where2<Where<Product.bookedQty, IS NOT NULL
AND Product.availQty IS NOT NULL
AND Product.minAvailQty IS NOT NULL
AND Where<Product.active = 1,
Or<Product.active IS NULL>>
And<Where<Product.bookedQty > Product.availQty,
Or<Product.availQty < Product.minAvailQty>>>>,
Or<Product.availQty IS NOT NULL>>,
OrderBy<Asc<Product.unitPrice, Desc<Product.availQty>>>>

| Accessing Data | 192
b. In each BQL Where or On clause, if the AND or OR is located before a simple condition,
replace it with And or Or, respectively. If the condition is preceded by NOT, wrap it in
Not. With these replacements, the sample code used in this topic would be changed
to the following code. (The changes are shown in bold type.)
PXSelectJoin<Product,
InnerJoin<SupplierProduct,
On<SupplierProduct.productID = Product.productID>,
InnerJoin<Supplier,
On<Supplier.accountID = SupplierProduct.accountID>>>,
Where2<Where<Product.bookedQty, IS NOT NULL,
And<Product.availQty IS NOT NULL,
And<Product.minAvailQty IS NOT NULL,
AND Where<Product.active = 1,
Or<Product.active IS NULL>>
And<Where<Product.bookedQty > Product.availQty,
Or<Product.availQty < Product.minAvailQty>>>>>>,
Or<Product.availQty IS NOT NULL>>,
OrderBy<Asc<Product.unitPrice, Desc<Product.availQty>>>>
c. In each BQL Where or On clause, if the AND or OR is located before a group of
conditions, replace it with And2<Operator, NextOperator> or Or2<Operator,
NextOperator>, respectively. The first parameter in a logical operator is Where (or
Where2). If the condition is preceded by NOT, place Not before a group in a Where
clause. The following sample code implements these changes (shown in bold type).
PXSelectJoin<Product,
InnerJoin<SupplierProduct,
On<SupplierProduct.productID = Product.productID>,
InnerJoin<Supplier,
On<Supplier.accountID = SupplierProduct.accountID>>>,
Where2<Where<Product.bookedQty, IS NOT NULL,
And<Product.availQty IS NOT NULL,
And<Product.minAvailQty IS NOT NULL,
And2<Where<Product.active = 1,
Or<Product.active IS NULL>>,
And<Where<Product.bookedQty > Product.availQty,
Or<Product.availQty < Product.minAvailQty>>>>>>>,
Or<Product.availQty IS NOT NULL>>,
OrderBy<Asc<Product.unitPrice, Desc<Product.availQty>>>>
8. In each Where or On clause, replace the groups that use arithmetic operations with the
corresponding BQL operators, as described in To Use Arithmetic Operations.
9. In each Where or On clause, replace each comparison with the corresponding comparison
operator, such as Equal, Greater, or IsNull. For more information on constructing
comparisons, see To Filter Records.
The following sample code includes these changes (shown in bold type).

| Accessing Data | 193
PXSelectJoin<Product,
InnerJoin<SupplierProduct,
On<SupplierProduct.productID, Equal<Product.productID>>,
InnerJoin<Supplier,
On<Supplier.accountID, Equal<SupplierProduct.accountID>>>>,
Where2<Where<Product.bookedQty, IsNotNull,
And<Product.availQty, IsNotNull,
And<Product.minAvailQty, IsNotNull,
And2<Where<Product.active, Equal<True>,
Or<Product.active, IsNull>>,
And<Where<Product.bookedQty, Greater<Product.availQty>,
Or<Product.availQty, Less<Product.minAvailQty>>>>>>>>,
Or<Product.availQty, IsNotNull>>,
OrderBy<Asc<Product.unitPrice, Desc<Product.availQty>>>>
10.Align logical operators of the same level so that they have the same indentation and so
that each simple condition is placed on a separate line. Do not add line breaks before
nested Where clauses.
11.If your SQL statement includes the GROUP BY clause, do the following:
a. Replace the GROUP BY clause with the Aggregate clause.
b. Chain the GroupBy clause and aggregation functions (such as Min, Max, Sum, Avg, and
Count) to one another as described in To Group and Aggregate Records.
12.If your SQL statement includes the ORDER BY clause, do the following:
a. Replace the ORDER BY clause with the OrderBy clause. The following sample code
shows this change (with changes shown in bold type).
PXSelectJoin<Product,
InnerJoin<SupplierProduct,
On<SupplierProduct.productID, Equal<Product.productID>>,
InnerJoin<Supplier,
On<Supplier.accountID, Equal<SupplierProduct.accountID>>>>,
Where2<Where<Product.bookedQty, IsNotNull,
And<Product.availQty, IsNotNull,
And<Product.minAvailQty, IsNotNull,
And2<Where<Product.active, Equal<True>,
Or<Product.active, IsNull>>,
And<Where<Product.bookedQty, Greater<Product.availQty>,
Or<Product.availQty, Less<Product.minAvailQty>>>>>>>>,
Or<Product.availQty, IsNotNull>>,
OrderBy<Product.unitPrice, Product.availQty DESC>>
b. Chain the Asc and Desc operators to one another, as described in To Order Records.
The following sample code shows this change (with changes shown in bold type).
PXSelectJoin<Product,

| Accessing Data | 194
InnerJoin<SupplierProduct,
On<SupplierProduct.productID, Equal<Product.productID>>,
InnerJoin<Supplier,
On<Supplier.accountID, Equal<SupplierProduct.accountID>>>>,
Where2<Where<Product.bookedQty, IsNotNull,
And<Product.availQty, IsNotNull,
And<Product.minAvailQty, IsNotNull,
And2<Where<Product.active, Equal<True>,
Or<Product.active, IsNull>>,
And<Where<Product.bookedQty, Greater<Product.availQty>,
Or<Product.availQty, Less<Product.minAvailQty>>>>>>>>,
Or<Product.availQty, IsNotNull>>,
OrderBy<Asc<Product.unitPrice, Desc<Product.availQty>>>>
13.Check that the final statement is correct by doing the following:
• Check that all lines except the last line of the BQL statement end with a comma.
• Ensure that the number of closing angle brackets equals the number of opening angle
brackets.
Related Links
• Traditional BQL and SQL Equivalents
Creating LINQ Queries
To query data from the database, you can use language-integrated query (LINQ), which is
a part of .NET Framework. In the code of Acumatica Framework-based applications, you
can use both the standard query operators (provided by LINQ libraries) and the Acumatica
Framework-specific operators that are designed to query database data.
In this chapter, you can find information on how to create LINQ queries. For the general
information about data querying, see Querying Data in Acumatica Framework.
In This Chapter
• LINQ in Acumatica Framework
• Deferred LINQ Query Execution
• Fallback to the LINQ to Objects Mode
• To Select Records by Using LINQ
• To Append LINQ Expressions to BQL State-
ments
LINQ in Acumatica Framework
You can use language-integrated query (LINQ) provided by the System.Linq library when
you need to select records from the database in the code of Acumatica Framework-based
applications or if you want to apply additional filtering to the data of a BQL query. However,
you still have to use business query language (BQL) to define the data views in graphs and
to specify the data queries in attributes of data fields.

| Accessing Data | 195
For details about BQL, see Creating Fluent BQL Queries and Creating Traditional BQL Queries. For
more information about the differences between LINQ and BQL, see Comparison of Fluent BQL,
Traditional BQL, and LINQ.
Data Access Classes in LINQ
In LINQ expressions, to access data from the database tables, you use data access classes
(DACs). For details on DACs, see Data Access Classes.
You use property fields of DACs when you need to specify table columns in LINQ
expressions. (The name of the property field starts with an uppercase letter. Do not confuse
it with the class field, which has the same name but starts with lowercase letter.)
Query Syntax
To configure a LINQ query, you can use the following variants of syntax:
• Query expressions, which use standard query operators from the System.Linq
namespace (such as where or orderby) or Acumatica Framework-specific operators
from the PX.Data.SQLTree namespace (such as SQL.BinaryLen, which is shown in the
following example of this syntax).
ProductMaint graph = PXGraph.CreateInstance<ProductMaint>();
var goods = from p in graph.Select<Product>()
where
p.ProductCD.Length == 5 &&
p.GroupMask.Length == 4 &&
(p.WorkGroupID & 0b10) != 0
select new
{
p.ProductID,
p.ProductCD,
p.ProductName,
Len = p.ProductName.Length,
BLen = SQL.BinaryLen( p.ProductName) + 1,
p.GroupMask,
p.WorkGroupID
};
• Explicit (method-based) syntax. The arguments of the methods used in this syntax are
lambda expressions. In these expressions, you can use the standard C# operators and
Acumatica Framework-specific operators from the PX.Data.SQLTree namespace (such as
SQL.BinaryLen, which is shown in the following code). The code below is equivalent to
the query expression shown above.
ProductMaint graph = PXGraph.CreateInstance<ProductMaint>();
var goods = graph.Select<Product>()
.Where( p =>
p.ProductCD.Length == 5 &&
p.GroupMask.Length == 4 &&
(p.WorkGroupID & 0b10) != 0)

| Accessing Data | 196
.Select( p => new
{
p.ProductID,
p.ProductCD,
p.ProductName,
Len = p.ProductName.Length,
BLen = SQL.BinaryLen(p.ProductName) + 1,
p.GroupMask, p.WorkGroupID
});
For details about composing LINQ queries, see To Select Records by Using LINQ. In the code
examples of this guide, we use explicit syntax.
Simultaneous Use of LINQ and BQL
The Select method of all PXSelect classes of Acumatica Framework return
PXResultset<T0>, which implements the IQueryable<PXResult<T0>> interface. That is,
you can work with the query expression defined with BQL by using LINQ. The following code
shows an example of additional filtering of data of the BQL query.
//BQL statement
var Products = new PXSelect<Product,
Where<Product.productCD, Like<string_D>>>(graph);
//Use of LINQ for the result of the BQL query
var goods = Products.Select()
.Where(p => p.GetItem<Product>().StockUnit == "item");
//Execution of the query
foreach (var good in goods) {
var prod = good.GetItem<Product>();
}
However, you cannot work with the query defined with LINQ by using BQL.
For details about how to use LINQ and BQL simultaneously, see To Append LINQ Expressions to
BQL Statements.
Related Links
• Comparison of Fluent BQL, Traditional BQL, and LINQ
• To Select Records by Using LINQ
• To Append LINQ Expressions to BQL Statements
Deferred LINQ Query Execution
Queries defined with LINQ in Acumatica Framework implement the IQueryable interface—
that is, for these queries, the system generates expression trees and executes the queries
only when they are iterated over. For details about query execution, see Data Query Execution.

| Accessing Data | 197
Execution of the LINQ Query in Code
To execute the query, you do one of the following:
• Call the ToList or ToArray method for the query, as shown in the following code.
//query is a LINQ expression.
var data = query.ToList();
• Iterate the query by using the foreach statement, as shown in the following code.
//query has the IQueryable<Product> type.
//Product is a DAC.
foreach (Product record in query)
{
...
}
Explicit Merge of Records with PXCache
The system merges with PXCache the records the system has retrieved from the database by
using the LINQ queries, as described in Merge of the Records with PXCache.
You may need to explicitly merge the records retrieved from the database with a particular
PXCache object. To merge the records with PXCache explicitly, you use the Merge method, as
shown in the following code example.
ProductMaint graph = PXGraph.CreateInstance<ProductMaint>();
var query = new PXSelectReadonly<Product>(graph).Select()
.Select(r => r.GetItem<Product>())
.Where(p => SQL.Like(p.ProductName, "%d%") && p.StockUnit != null)
.OrderBy(p => p.ProductID);
var result = query.Merge(p => p).ToArray();
You also can specify that the query should not be merged with PXCache by using the
ReadOnly method, as shown in the following code example.
ProductMaint graph = PXGraph.CreateInstance<ProductMaint>();
var query = new PXSelect<Product>(graph).Select()
.Select(r => r.GetItem<Product>())
.Where(p => SQL.Like(p.ProductName, "%d%") && p.StockUnit != null);
.OrderBy(p => p.ProductID);
var result = query.ReadOnly().ToArray();
Related Links
• Data Query Execution
• Merge of the Records with PXCache
| Accessing Data | 198
Fallback to the LINQ to Objects Mode
With LINQ, you may not be able to filter records by using custom C# functions. For example,
suppose that your C# function filters records by a regular expression, which cannot be
converted to standard SQL functions. If the system cannot convert a custom C# function in
a LINQ statement to an SQL query tree, the system falls back to LINQ to Objects mode—
that is, the system executes the data query in memory, which can lead to degradation of the
application's performance.
The following code shows an example of a situation when the system falls back to LINQ
to Objects mode. In this example, the system selects from the database all records
from the CRCase table, and then, in memory, orders the retrieved records by the
Date column and selects the records that satisfy the condition specified by using the
MyHelpers.IsHighPriority function.
// MyHelpers.IsHighPriority is a custom function.
var results = graph
.Select<CRCase>()
.OrderByDescending(c => c.Date)
.Where(c => MyHelpers.IsHighPriority(c));
foreach (CRCase case in results)
{
...
}
If the system falls back to LINQ to Objects, only the results of the base PXSelectBase
query are merged with PXCache as described in Merge of the Records with PXCache. The
Merge and ReadOnly methods do not affect the merge of records with PXCache for the
queries that caused fallback.
The LINQ fallback is supported in Acumatica Framework for compatibility with previous
versions. The system writes to the trace log about all situations in which the system falls
back to LINQ to Objects mode. Therefore, we strongly recommend that you investigate the
trace log for such issues and fix the issues in one of the following ways:
• Remove the custom C# functions that cause fallback so that the full query is executed in
the database.
• Append the AsEnumerable() method to the part of the query that can be converted
to SQL, and add after it the conditions that include custom C# functions. In this case,
the system does not waste resources trying to build the SQL query tree for the whole
query. Instead, the system builds the SQL query tree for the part of the query that has
AsEnumerable() appended and performs the corresponding request to the database,
while the custom C# conditions of the query are processed in memory. For example, the
code example above can be modified as follows.
// MyHelpers.IsHighPriority is a custom function.
var results = graph
.Select<CRCase>()
| Accessing Data | 199
.OrderByDescending(c => c.Date).AsEnumerable()
.Where(c => MyHelpers.IsHighPriority(c));
foreach (CRCase case in results)
{
...
}
The system executes the following SQL query for the code above, where [list of
columns] is the list of columns of the CRCase table.
SELECT [list of columns] FROM CRCase
ORDER BY CRCase.Date DESC
Related Links
• LINQ in Acumatica Framework
To Select Records by Using LINQ
To select records from the database by using language-integrated query (LINQ), you use the
standard query operators (provided by LINQ libraries), as described in this topic. In the LINQ
queries, you use the property fields of DACs to specify the columns of database tables. (The
name of the property field starts with an uppercase letter. Do not confuse it with the class
field, which has the same name but starts with lowercase letter.)
After you have composed a LINQ expression, to execute the query defined by this
expression, you have to call the ToList or ToArray method for the query, or iterate
the query by using the foreach statement. For example, the following code executes
the query defined by a LINQ expression.
//query is a LINQ expression
var data = query.ToList();
For details about the execution of LINQ expressions, see Deferred LINQ Query Execution.
Before You Proceed
• Add the using directives shown below to your code.
using PX.Data;
using PX.Data.SQLTree;
using System.Linq;
• Make sure that the application database has the database tables from which you are
going to request data, and that the application defines the data access classes (DACs) for
these tables. For more information on defining DACs, see Data Access Classes.
| Accessing Data | 200
To Filter Records
To filter records in the database table to be retrieved, construct the LINQ expression by
using the Where LINQ method and the needed conditions. In the conditions, use the property
field defined in the DAC, such as Product.ProductID.
The following LINQ expression uses the C# logical operators (||, &&, and !) to define
multiple conditions.
ProductMaint graph = PXGraph.CreateInstance<ProductMaint>();
IQueryable<Product> query = graph.Select<Product>().Where(prod =>
prod.BookedQty > prod.AvailQty
|| prod.AvailQty < prod.MinAvailQty
|| prod.AvailQty == null);
This LINQ expression is equivalent to the following SQL query. In this SQL query,
[list of columns] is the list of columns of the Product table.
SELECT [list of columns] FROM Product
WHERE Product.BookedQty > Product.AvailQty
OR Product.AvailQty < Product.MinAvailQty
OR Product.AvailQty IsNull
To Order Records
To order records to be retrieved from the database table, construct the LINQ expression by
using the OrderBy or OrderByDescending LINQ method and the needed property fields of
the DAC, such as Product.ProductID.
The following sample LINQ expression selects all Product data records and sorts them by
the UnitPrice field in ascending order.
ProductMaint graph = PXGraph.CreateInstance<ProductMaint>();
IQueryable<Product> query = graph.Select<Product>().OrderBy(prod => prod.UnitPrice)
.ThenByDescending(prod => prod.AvailQty);
This LINQ expression is equivalent to the following SQL query, where [list of
columns] is the list of columns of the Product table.
SELECT [list of columns] FROM Product
ORDER BY Product.UnitPrice, Product.AvailQty DESC
To Query Multiple Tables
To join multiple tables, construct the LINQ expression by using the Join, LeftJoin,
GroupJoin, and FullJoin LINQ methods and the needed property fields of DACs, such as
SalesOrder.OrderNbr.
The following sample LINQ expression performs an inner join of the SalesOrder and
OrderDetail DACs by the OrderNbr field.
| Accessing Data | 201
SalesOrderEntry graph = PXGraph.CreateInstance<SalesOrderEntry>();
var query = graph.Select<SalesOrder>()
.Join(graph.Select<OrderLine>(),
ord => ord.OrderNbr, ordDet => ordDet.OrderNbr,
(ord, ordDet) => new { SalesOrder = ord, OrderDetail = ordDet });
This LINQ expression is equivalent to the following SQL query, where [list of
columns] is the list of columns of the Product table.
SELECT [list of columns] FROM SalesOrder
INNER JOIN OrderDetail
ON OrderDetail.OrderNbr = SalesOrder.OrderNbr
To Group or Aggregate Records
To group or aggregate records, do the following:
1. Construct the LINQ expression by using the GroupBy LINQ method and the needed
property fields of the DAC, such as Product.CategoryCD. (The name of the property
field starts with an uppercase letter. Do not confuse it with the class field, which has the
same name but starts with lowercase letter.)
2. Append to the expression the Select LINQ method.
You have to use the Select method after GroupBy to eliminate the number of
requests that the system performs to the database.
The following sample LINQ expression groups the records of the Product table by the
CategoryCD field.
ProductMaint graph = PXGraph.CreateInstance<ProductMaint>();
var query = graph.Select<Product>().GroupBy(prod => prod.CategoryCD).
Select(group => new { CategoryCD = group.Key });
This LINQ expression is equivalent to the following SQL query.
SELECT Product.CategoryCD
FROM Product
GROUP BY Product.CategoryCD
To Select Particular Columns of Records
To select particular columns, specify the corresponding property fields of DACs in the Select
clause.
The following example selects the values of the ProductCD and AvailQty fields for all
records of the Product table.
ProductMaint graph = PXGraph.CreateInstance<ProductMaint>();
var results = graph.Select<Product>()

| Accessing Data | 202
.Select(p => new { ProductCD = p.ProductCD, AvailQty = p.AvailQty });
The system executes the following SQL query for the code above.
SELECT Product.ProductCD, Product.AvailQty FROM Product
Related Links
• LINQ in Acumatica Framework
To Append LINQ Expressions to BQL Statements
By using LINQ, you can work with a query expression that is defined with BQL. In this topic,
you can find out how to apply additional filtering to a BQL statement and join a table to a
BQL statement by using LINQ.
Before You Proceed
• Add the using directives shown below to your code.
using PX.Data;
using PX.Data.SQLTree;
using System.Linq;
• Make sure that the application database has the database tables from which you are
going to request data, and that the application defines the data access classes (DACs) for
these tables. For more information on defining DACs, see Data Access Classes.
To Append LINQ Expressions to BQL Statements
To append LINQ expressions to BQL statements, do the following:
1. Configure a BQL query derived from PXSelectBase either in fluent BQL or in traditional
BQL.
2. Call the Select() method of PXSelectBase, and append the LINQ query to the result.
Because the result of the Select() method call is a PXResultset<> object, you need
to cast it to a DAC type by using the PXResult.GetItem<DacType>() method or direct
casting.
The following example appends LINQ joining and filtering to a BQL query.
using PX.Data;
using PX.Data.SQLTree;
using System.Linq;
using PX.Data.BQL.Fluent;
ProductMaint graph = PXGraph.CreateInstance<ProductMaint>();
//Configure a BQL query
var products = new SelectFrom<Product>.
Where<Product.productCD.IsLike<string_D>>.View(graph);
| Accessing Data | 203
//Append joining and filtering by using LINQ
var goods = products.Select().Join(graph.Select<SupplierProduct>(),
p => p.GetItem<Product>().ProductID,
sp => sp.ProductID,
(p, sp) => new { p = p.GetItem<Product>(), sp }
).Where(sp => sp.p.UnitPrice >= 0 && sp.sp.LastPurchaseDate == null);
//Execute the query
foreach (var item in goods)
{
...
}
The system executes the following SQL query for the code above. In this SQL query,
[list of columns] is the list of columns of the Product and SupplierProduct
tables.
SELECT [list of columns] FROM Product
INNER JOIN SupplierProduct
ON Product.ProductID = SupplierProduct.ProductID
WHERE Product.ProductCD LIKE 'D' AND Product.UnitPrice>=0
AND SupplierProduct.LastPurchaseDate IS NULL
Defining Relationships Between DACs
In this chapter, you can learn how to define relationships between data access classes
(DACs) by using the special classes for primary and foreign keys.
In This Chapter
• Master-Detail Relationship Between Data with PXDBDefault and PXParent
• Relationship Between Data with PrimaryKeyOf and ForeignKeyOf
• Selection of the Linked Data Through the Current Property
• To Define a Primary Key
• To Define a Foreign Key
Master-Detail Relationship Between Data with PXDBDefault
and PXParent
To set up the master-detail relationship between data access classes, you have to add two
attributes, PXDBDefault and PXParent, to the DAC fields of the detail class. You can specify
these attributes directly in the DAC or within a graph (in the CacheAttached event handler).
| Accessing Data | 204
PXDBDefault
The PXDBDefault attribute specifies the default value for a data field. You should use this
attribute to insert the default value, which is the foreign key to the master DAC.
PXDBDefault works similarly to PXDefault and obtains its value from the Current
property of the PXCache object that holds data records of the specified class. However, the
PXDBDefault attribute is specially intended to insert the default value that is the key to the
parent record. Unlike PXDefault, the PXDBDefault attribute supports the identity key field
of the master DAC and inserts the actual default value after the parent record is saved to the
database.
If you implement a master-detail relationship, you should use the PXDBDefault attribute to
bind the detail data record fields (foreign key fields) to the master data record key fields.
If the master data record is new and uses the identity key generated by the database, its
key field will be set to a real value only when the master record is saved to the database.
So if a detail data record is created before the master data record is saved for the first time,
the detail data record field will be set to the temporary value of the master identity field.
However, the PXDBDefault attribute will replace the temporary value with the actual one
when the detail data record is saved to the database.
As the following example code shows, in the SupplierProduct class, the
PXDBDefault attribute obtains the default value for its SupplierID key field from the
Supplier.SupplierID field of the current master record.
//SupplierProduct.SupplierID
...
[PXDBDefault(typeof(Supplier.supplierID))]
public virtual int? SupplierID
{...
}
PXParent
The PXParent attribute specifies the master-detail relationship between classes.
If you calculate aggregate values by using the PXFormula or PXUnboundFormula
attribute for the master DAC, you also have to add PXParent to one of the fields of
the detail DAC.
We recommend that you add the PXParent attribute to the first foreign key field of the child
DAC (although it is possible to add the attribute to any field). Because the attribute specifies
the master-detail relationship between classes, it enables cascading deletion of the child
records once a parent record is deleted.
The parent data record is defined by the BQL Select<> statement specified in the attribute.
Typically, the query includes a Where<> clause that adds conditions for the parent’s key fields
to equal the child’s key fields. In this case, to specify the values of the key fields of the child
data record, you use the Current parameter.

| Accessing Data | 205
In the following code example, PXParent specifies the current Supplier record as
the parent for the SupplierProduct record. The PXParent attribute is added on the
SupplierProduct.SupplierID field in the SupplierProduct DAC.
//SupplierProduct.SupplierID
...
[PXParent(
typeof(SelectFrom<Supplier>.
Where<Supplier.supplierID.IsEqual<SupplierProduct.supplierID.FromCurrent>>))]
public virtual int? SupplierID
{...
}
Selection of the Master-Detail Data
To select master-detail data, you define two data views in the graph (see the code below).
In this code example, the master data view selects data records of the Supplier class, while
the detail data view selects records of the SupplierProduct class. To select the details for
a particular master record, you specify the master key field in the Current parameter of the
data view type. In the Current parameter, Acumatica Framework inserts the value from the
Current property of the PXCache object that works with the specified DAC.
The order of data views in the graph defines the order of the insertion, update, and deletion
of data records in the database. The framework inserts and updates data records in the
order in which the data views are defined, and deletes the records in the reverse order.
Thus, you have to define the master data view before the detail data view to enabledetails
to be saved and deleted correctly. (The master data record is the first to be inserted in the
database and the detail data records are the first to be deleted from the database.)
// Retrieves master records
public SelectFrom<Supplier>.View Suppliers;
// Retrieves detail records by the Supplier.SupplierID of the current master record
public SelectFrom<SupplierProduct>.
LeftJoin<Product>.On<Product.productID.IsEqual<SupplierProduct.productID>>.
Where<SupplierProduct.supplierID.IsEqual<Supplier.supplierID.FromCurrent>>.View
SupplierProducts;
Relationship Between Data with PrimaryKeyOf and
ForeignKeyOf
To define a relationship between two tables, you need to define the primary keys of the
parent and child tables. Also, in the child table, you need to define the foreign key that
refers to the primary key of the parent table.
In the code of an Acumatica Framework-based application, you can define the relationship
between two tables as follows:

| Accessing Data | 206
• To define a primary key of a table, for the set of key fields of the data access class (DAC)
that corresponds to the table, you set the IsKey property of the data type attribute to
true.
• To define a foreign key of a table, in the DAC that corresponds to the table, you
mark the field that contains the foreign key with one of the following attributes:
PXForeignReference, PXSelector, or PXParent.
To select a record from the database by its primary or foreign key, you can use a Select
statement in business query language (BQL) or use the methods of the attributes mentioned
above.
Another way to define a relationship between two tables is to use the PrimaryKeyOf and
ForeignKeyOf classes that are specially designed for the definition of primary and foreign
keys.
This approach, which is described in this topic, provides the following advantages:
• These classes provide static information that a compiler can use to identify errors in the
code.
• You can use runtime information about primary keys to select records by their keys.
• These classes and methods have no other meanings and use cases; conversely, the
PXForeignReference, PXSelector, and PXParent attributes can be used for other
purposes.
• These classes and methods are optimized for the selection of records from the database;
therefore, using them improves database access performance on record selection.
Definition of a Primary Key
You define a primary key of a DAC by using the PrimaryKeyOf<Table>.By<keyFields>
class. With this class, you can define simple keys (with one key field) and compound keys
(with up to five key fields). In the primary key definition, you have to define the public
Find method, which calls the protected FindBy method. A definition of a compound key is
shown in the following example.
using PX.Data.ReferentialIntegrity.Attributes;
public partial class SOLine : PX.Data.IBqlTable
{
public class PK : PrimaryKeyOf<SOLine>.By<orderType, orderNbr, lineNbr>
{
public static SOLine Find(
PXGraph graph, string orderType, string orderNbr, int lineNbr)
=> FindBy(graph, orderType, orderNbr, lineNbr);
}
public abstract class orderType : PX.Data.IBqlField { }
public abstract class orderNbr : PX.Data.IBqlField { }
public abstract class lineNbr : PX.Data.IBqlField { }
| Accessing Data | 207
}
Definition of a Foreign Key
You can define a foreign key based on the primary key of the referenced table, as shown in
the following code.
//Definition of the primary key
public partial class SOOrder : PX.Data.IBqlTable
{
public class PK : PrimaryKeyOf<SOOrder>.By<orderType, orderNbr>
{
public static SOOrder Find(
PXGraph graph, string orderType, string orderNbr) =>
FindBy(graph, orderType, orderNbr);
}
public abstract class orderType : PX.Data.IBqlField { }
public abstract class orderNbr : PX.Data.IBqlField { }
}
//Definition of the foreign key based on the primary key
public partial class SOLine : PX.Data.IBqlTable
{
public class SOOrderFK : SOOrder.PK.ForeignKeyOf<SOLine>
.By<orderType, orderNbr> { }
public abstract class orderType : PX.Data.IBqlField { }
public abstract class orderNbr : PX.Data.IBqlField { }
}
Selection of a Record by Key Fields
If a primary key is defined for a DAC, you can select a record by using the values of the key
fields of the record, as shown in the following example.
SOLine line = SOLine.PK.Find(
this, split.OrderType, split.OrderNbr, split.LineNbr.Value);
The Find method encapsulates a PXSelectReadonly<Table,
Where<...>>.SelectWindowed(graph, 0, 1, keys) call. Therefore, the code above
can replace the following code written using BQL.
SOLine line = PXSelectReadonly<SOLine,
Where<SOLine.orderType, Equal<Required<SOLine.orderType>>,
And<SOLine.orderNbr, Equal<Required<SOLine.orderNbr>>,
And<SOLine.lineNbr, Equal<Required<SOLine.lineNbr>>>>>
>.Select(this, split.OrderType, split.OrderNbr, split.LineNbr);
You can also select a record by using a record of the same type with the key fields specified,
as shown in the following example.
| Accessing Data | 208
InventoryItem actualItem = InventoryItem.PK.Find(this, notActualItem);
If a foreign key is defined for a DAC, you can select the parent and child records, as shown
in the following code.
//Selection of the parent record
SOOrder order = SOLine.SOOrderFK.FindParent(this, soLine);
//Selection of the child records
IEnumerable<SOLine> lines = SOLine.SOOrderFK.SelectChildren(this, soOrder);
Use of Primary and Foreign Keys in Attributes
You can use static foreign keys, defined as described in Definition of a Foreign Key, for the
configuration of the PXForeignReference and PXParent attributes, as shown in the following
example.
public partial class SOLine : PX.Data.IBqlTable
{
public class SOOrderFK : SOOrder.PK.ForeignKeyOf<SOLine>
.By<orderType, orderNbr> { }
public class InventoryFK : InventoryItem.PK.ForeignKeyOf<SOLine>
.By<inventoryID> { }
public abstract class orderType : PX.Data.IBqlField { }
[...]
[PXParent(typeof(SOOrderFK))]
public virtual String OrderNbr { get; set; }
public abstract class orderNbr : PX.Data.IBqlField { }
[...]
[PXForeignReference(typeof(InventoryFK))]
public virtual Int32? InventoryID { get; set; }
public abstract class inventoryID : PX.Data.IBqlField { }
}
Because all primary keys, which are defined as described in this topic, implement the
IPrimaryKey interface, you can use primary and foreign keys in the scope of custom
attributes, as shown in the following example.
public class SomeAttribute : PXEventSubscriberAttribute, ...
{
private readonly IPrimaryKey _pk;
public SomeAttribute(Type pkType)
{
_pk = (IPrimaryKey)Activator.CreateInstance(pkType);
}
public void SomeHandler(PXCache cache, PXSomeEventArgs e)
{

| Accessing Data | 209
IBqlTable row = _pk.Find(cache.Graph, e.NewValue);
...
_pk.StoreCached(cache.graph, row);
...
row = _pk.Find(cache.Graph, row);
}
}
Related Links
• To Define a Primary Key
• To Define a Foreign Key
Selection of the Linked Data Through the Current Property
A PXCache object has the Current property, which is set to the last data record that has
been retrieved from the database or inserted or updated in the cache. The Current property
is often used to select linked data, such as the detail data, by the specified master record
key.
BQL includes an operand that you can use to insert the values of the Current data record
into a BQL query. In the code below, the Current property is used in data views to select
and retrieve linked data. The Suppliers and SelectedSupplier data views retrieve
records from the same PXCache object, because they have the same main DAC. The
SupplierProducts data view retrieves records of the SupplierProduct class that have
the specified SupplierID. The SupplierID is retrieved from the Current property of the
PXCache object for Supplier.
public SelectFrom<Supplier>.View Suppliers;
// Retrieves the same record that is current in the PXCache object for Supplier
public SelectFrom<Supplier>.
Where<Supplier.supplierID.IsEqual<Supplier.supplierID.FromCurrent>>.View
SelectedSupplier;
// Retrieves the detail records by the specified SupplierID
public SelectFrom<SupplierProduct>.
LeftJoin<Product>.On<Product.productID.IsEqual<SupplierProduct.productID>>.
Where<SupplierProduct.supplierID.IsEqual<Supplier.supplierID.FromCurrent>>.View
SupplierProducts;
Getting the Current Data Record
The framework automatically assigns the Current property to the following records:
• Each data record retrieved from the database and displayed in the UI (or requested by
the web services APIs)
• The last modified data record that has been inserted or updated from the UI, after the
updated data is posted to the server
| Accessing Data | 210
• The last modified data record that has been inserted or updated from code, after you
invoke the Insert() or Update() method on the cache object
The Current property returns the object of the main DAC type of the data view. The
Current property of the data view and the Current property of the Cache object of the data
view return the same record (see the following code).
// Get a Shipment object through the data view
Shipment shipment = Shipments.Current;
// Get a Shipment object through the PXCache object
Shipment currentShipment = (Shipment)Shipments.Cache.Current;
After you create a graph instance in the code, the Current property of all cache
objects of the graph returns null.
You can get a value from the current data record and specify it as a BQL parameter in a data
view type or in an attribute of a DAC field. In the following code, a DAC field is specified in
the Current parameter of the BQL statement in a data view.
// Select shipment lines through the data view
// where shipmentNbr equals the number of the current shipment
public SelectFrom<ShipmentLine>.
Where<ShipmentLine.shipmentNbr.IsEqual<Shipment.shipmentNbr.FromCurrent>>.
OrderBy<ShipmentLine.gift.Desc>.View ShipmentLines;
Setting the Current Data Record
You can set the Current property of a data record of the type the PXCache object works
with. When you assign the Current property of a PXCache<> object, you should select a data
record from the database by using DAC key field values. If a data record with these key field
values exists in the database, the Current property is assigned to the retrieved record. If
no such data record exists in the database, the property is set to null. Setting the Current
property gives you the ability to do the following:
• Process multiple data records by using a graph
• Open a form displaying the specified data record when you redirect to the form from
another one
We don't recommend that you set the Current property in other cases, such as in event
handlers, because doing this may cause the application to work incorrectly.
The assignment of the Current property raises the RowSelected event for the current
data record.
You must use the Search<>() generic method of a data view object to retrieve a record from
the database and assign the retrieved record to the Current property, as the following code
shows.
//The data view works with the PXCache object that holds SalesOrder data records
public SelectFrom<SalesOrder>.OrderBy<SalesOrder.orderNbr.Asc>.View Orders;

| Accessing Data | 211
...
//To search for the record in the database,
//you can use the generic Search<> method of the data view
graph.Orders.Current = graph.Orders.Search<SalesOrder.orderNbr>(order.OrderNbr);
To Define a Primary Key
You can define the primary key of a data access class (DAC) by using the
PrimaryKeyOf<Table>.By<keyFields> class. With this class, you can define simple keys
(with one key field) and compound keys (with up to five key fields) and select records by
using these keys, as described in this topic.
To Define a Simple Primary Key and Select a Record by This Key
1. In the DAC, declare a PrimaryKeyOf<Table>.By<keyFields> descendant with the
public Find method, which calls the protected FindBy method, as shown in the
following code.
using PX.Data.ReferentialIntegrity.Attributes;
public partial class InventoryItem : PX.Data.IBqlTable
{
public class PK : PrimaryKeyOf<InventoryItem>.By<inventoryID>
{
public static InventoryItem Find(PXGraph graph, int inventoryID)
=> FindBy(graph, inventoryID);
}
public abstract class inventoryID : PX.Data.IBqlField { }
}
2. Use the primary key to select a record, as shown in the following code.
InventoryItem item = InventoryItem.PK.Find(this, soLine.InventoryID.Value);
To Define a Compound Primary Key and Select a Record by This Key
1. In the data access class (DAC), declare a PrimaryKeyOf<Table>.By<keyFields>
descendant with the public Find method, which has the needed number (up to five)
of key fields. The Find method must call the protected FindBy method with the same
number of key fields, as shown in the following code.
using PX.Data.ReferentialIntegrity.Attributes;
public partial class SOLine : PX.Data.IBqlTable
{
public class PK : PrimaryKeyOf<SOLine>
.By<orderType, orderNbr, lineNbr>
{
public static SOLine Find(

| Accessing Data | 212
PXGraph graph, string orderType, string orderNbr, int lineNbr)
=> FindBy(graph, orderType, orderNbr, lineNbr);
}
public abstract class orderType : PX.Data.IBqlField { }
public abstract class orderNbr : PX.Data.IBqlField { }
public abstract class lineNbr : PX.Data.IBqlField { }
}
2. Use the compound primary key to select a record, as shown in the following code.
SOLine line = SOLine.PK.Find(
this, split.OrderType, split.OrderNbr, split.LineNbr.Value);
Related Links
• Relationship Between Data with PrimaryKeyOf and ForeignKeyOf
To Define a Foreign Key
You can define a foreign key based on the primary key of the parent data access class (DAC)
and select records by this key, as described in this topic.
To Define a Foreign Key and Use It to Select Records
1. In the DAC of the parent table, define the primary key, as described in To Define a Primary
Key. The following code shows an example of the definition of the primary key that is
used in the following code examples in this instruction.
public partial class SOOrder : PX.Data.IBqlTable
{
public class PK : PrimaryKeyOf<SOOrder>.By<orderType, orderNbr>
{
public static SOOrder Find(
PXGraph graph, string orderType, string orderNbr)
=> FindBy(graph, orderType, orderNbr);
}
public abstract class orderType : PX.Data.IBqlField { }
public abstract class orderNbr : PX.Data.IBqlField { }
}
2. In the DAC of the child table, define the foreign key based on the primary key of the
parent table, as shown below.
public partial class SOLine : PX.Data.IBqlTable
{
public class SOOrderFK : SOOrder.PK.ForeignKeyOf<SOLine>
.By<orderType, orderNbr> { }

| Accessing Data | 213
public abstract class orderType : PX.Data.IBqlField { }
public abstract class orderNbr : PX.Data.IBqlField { }
}
3. Use the foreign key to select the parent record or child records, as shown in the following
code.
//Select the parent record
SOOrder order = SOLine.SOOrderFK.FindParent(this, soLine);
//Select the child records
IEnumerable<SOLine> lines = SOLine.SOOrderFK.SelectChildren(this, soOrder);
Related Links
• Relationship Between Data with PrimaryKeyOf and ForeignKeyOf
Working with Data in Cache and Session
In this chapter, you can learn how to store graph data in the session and use slots to cache
data objects.
In This Chapter
• Modification of Data in a PXCache Object
• Session
• Session Sharing Between Application Servers
• Storing of Graph Data in the Session
• Use of Slots to Cache Data Objects
Modification of Data in a PXCache Object
To modify data from code, you can use the following methods of a PXCache object:
• Insert() and Insert(object)
• Update(object)
• Delete(object)
For Insert(object), Acumatica Framework checks whether a data record with the specified
key values already exists in the cache object. If the record exists, nothing is inserted into
the cache, and the existing record isn't modified in the cache; that is, the Insert(...)
method returns null. If the record does not exist, the new record is inserted into the cache
object; the method returns the new data record.
On Update(object), the framework checks whether a data record with such key values
already exists in the cache object. If the record exists, it is updated. If the record doesn't
| Accessing Data | 214
exist in the cache, the framework retrieves the record with such keys from the database and
places it into the cache. If there is no such record in the database, the framework invokes
Insert() for the record.
On Delete(object), the framework sets the Deleted status for the record if it exists in the
cache object. It does this in three steps. First, the framework checks whether a data record
with the key values of the provided object already exists in the cache. If the record doesn't
exist in the cache, the framework retrieves the record with these keys from the database.
If the record exists in the cache or in the database, the framework sets its status within the
cache to Deleted. The record isn't removed from the cache object.
The modified records remain in the cache object until the Persist() method of the graph
is invoked, or until the Cache.Clear() method of the data view is invoked, which removes
all records from the cache object. You can remove all records from all cache objects of the
graph by invoking the Clear() method of the graph object.
Understanding the Statuses of Data Records in a PXCache
For each of the data modification methods, the framework raises the corresponding
sequence of events and changes the status of the record in the cache object as shown in the
diagram below. Once it is retrieved from the database, a record has the Notchanged status
until it is modified. An inserted record maintains the Inserted status even if it is updated.
When the inserted record is deleted, it is assigned the specific InsertedDeleted status. If
you want to make sure that a record has been marked as deleted within the current session,
you have to check the record for both the Deleted status and the InsertedDeleted status.
To obtain the status of the record, invoke the GetStatus() method of the cache object
for the needed DAC object. The status of the record is one of the following values of the
PXEntryStatus enumeration:
• Notchanged
• Updated
• Inserted
• Deleted
• InsertedDeleted
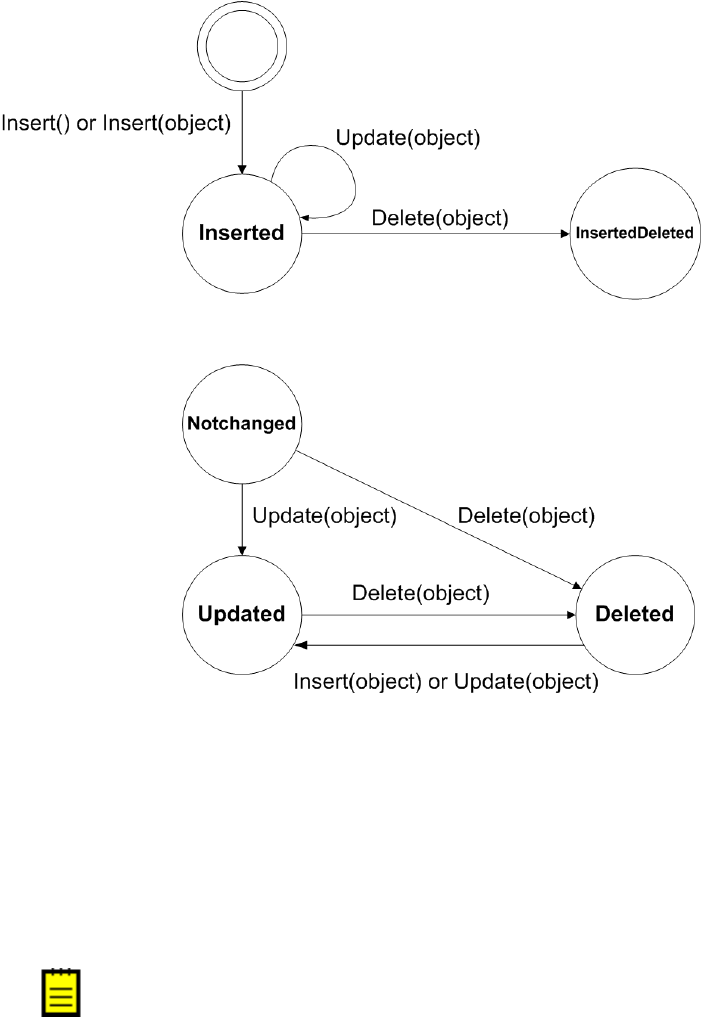
| Accessing Data | 215
Figure: Transitions between statuses of records
You can obtain the modified records from the collections of the PXCache object that
correspond to the type of modification, as follows:
• Cache.Inserted, which retrieves data records that have the Inserted status
• Cache.Updated, which retrieves data records that have the Updated status
• Cache.Deleted, which retrieves data records that have the Deleted status.
The Cache.Dirty collection is used to retrieve all data records that have the
Inserted, Updated, or Deleted status.
Records that have other statuses (such as InsertedDeleted) aren't retrieved by these
collections. For more information on these statuses, see PXCache<TNode> Class in the API
Reference.
| Accessing Data | 216
We don't recommend that you iterate through the Cached collection. For performance
optimization, this collection may not retrieve all available data records.
Updating a Data Record in a PXCache
The framework raises the applicable events and updates the status of the record in the
following cases as described:
• When you invoke the Insert(), Update(), or Delete() method of a PXCache object,
the framework raises field-level events for each field when the Insert() or Update()
method is invoked, and for only key fields when the Delete() method is invoked; the
framework then raises all row-level events for the data record.
document.DocNbr = lastNumber;
Documents.Update(document);
• When you invoke the SetValueExt<Field>() method of a cache object, the framework
raises field-level events for the specified field only. The framework doesn't invoke row-
level events and doesn't update the status of the record. You can update the status of
the record manually by invoking the SetStatus() method of the cache. However, you
should be careful with skipped field-level and row-level events because changing the
status manually may cause missing logic and incorrect data update.
view.Cache.SetValueExt<Document.docNbr>(row, lastNumber);
The framework neither raises any event nor updates the status of the record in the following
cases:
• If you assign a new value to a field without invoking Update()
document.DocNbr = lastNumber;
• If you assign a new value to a field by invoking the SetValue<Field>() method of the
cache object
view.Cache.SetValue(row, LastNumberField.Name, lastNumber);
Searching for a Data Record in a PXCache
Searching for a data record in the cache is helpful when you want to check whether the
data record has already been modified during the current user session. To search for a data
record, you can use the Locate() method, which returns the data record if it exists in the
PXCache object. The Locate() method searches for the record by key values. If the record
doesn't exist, the method returns null. No query is executed to the database in the Locate()
method.
Account account = Accounts.Locate(record);

| Accessing Data | 217
Invoking PXCache Methods
You can invoke data modification methods on a PXCache object through a data view. The
methods are invoked on the PXCache object of the first DAC specified in the data view
type (main DAC of the data view). The following code shows equivalent invocations of the
Insert() method on the PXCache object that stores ShipmentLine data records in a graph.
// ShipmentLines is a data view of the PXSelectBase<ShipmentLine> type
// defined in the graph.
// ShipmentLine is the main DAC of the ShipmentLines data view.
// Invocation through the data view
ShipmentLines.Insert(line);
// Invocation directly through the PXCache
ShipmentLines.Cache.Insert(line);
Session
The Acumatica ERP server creates a separate session for each browser tab or window that
opens an Acumatica ERP form.
The server creates the first session for a user after the user authorization when the starting
form is loading. Then the server does the following:
• Saves the user authorization data (.ASPXAUTH) and the session ID (ASP.NET_SessionID)
in the browser cookies for the website URL
• Creates the shared session data to be used for the Acumatica ERP forms opened in new
browser tabs and windows
• Saves the shared session data in the storage that is specified in the website configuration
When the user opens a form of Acumatica ERP in a new browser tab, the server creates
a new session that is based on the previous session data. To access the shared data, the
server uses the session ID from the cookies, which are added to the request by the browser.
The following diagram shows how the server of Acumatica ERP manages the shared session
data that is used for multiple sessions of a single user.
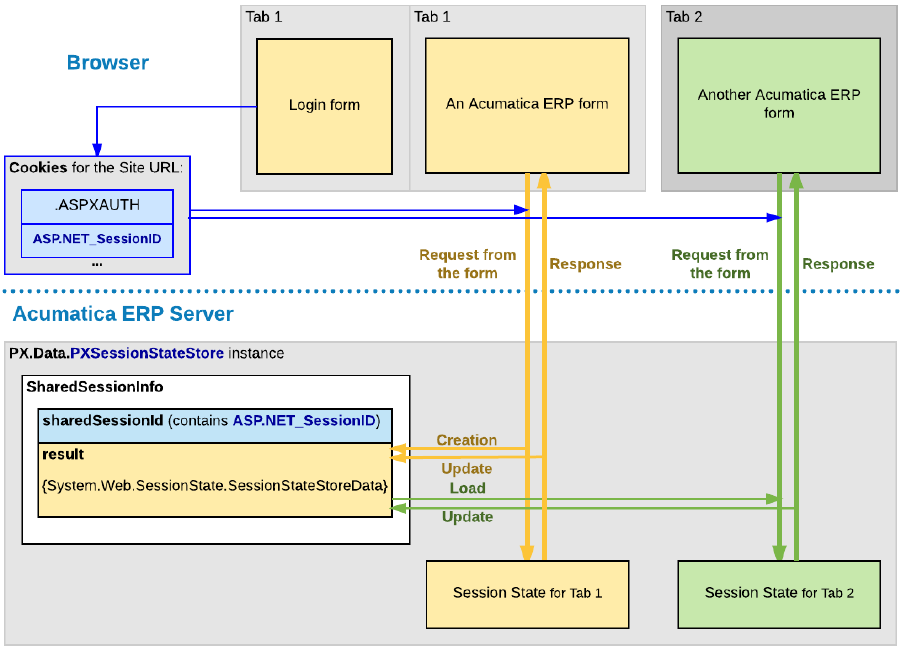
| Accessing Data | 218
Figure: Use of shared data for multiple sessions of a user
If the session data has been changed during the processing of a request, the server
updates the data in the shared session data store. For example, if the user clicks Copy on
a form toolbar to copy the form data, the data is stored in the shared session, so that it is
accessible for the Paste action in another session of the same user.
To distinguish different sessions that have the same ASP.NET_SessionID, the server adds
to each new session a unique identifier that consists of the W character and a number value
wrapped in parentheses. In the browser, you can see such an identifier in the site URL, as
with the bolded part in the following example: http://localhost/MySite/(W(3))/Main.aspx?
ScreenId=AR301000.
Session Sharing Between Application Servers
To achieve horizontal scalability and fault tolerance, an application written with Acumatica
Framework can be configured to run in a cluster of application servers behind a load
balancer. With this configuration, it is not possible to predict the application server that will
receive the next request from the client. In this model, session specific data must be shared
between the application servers.
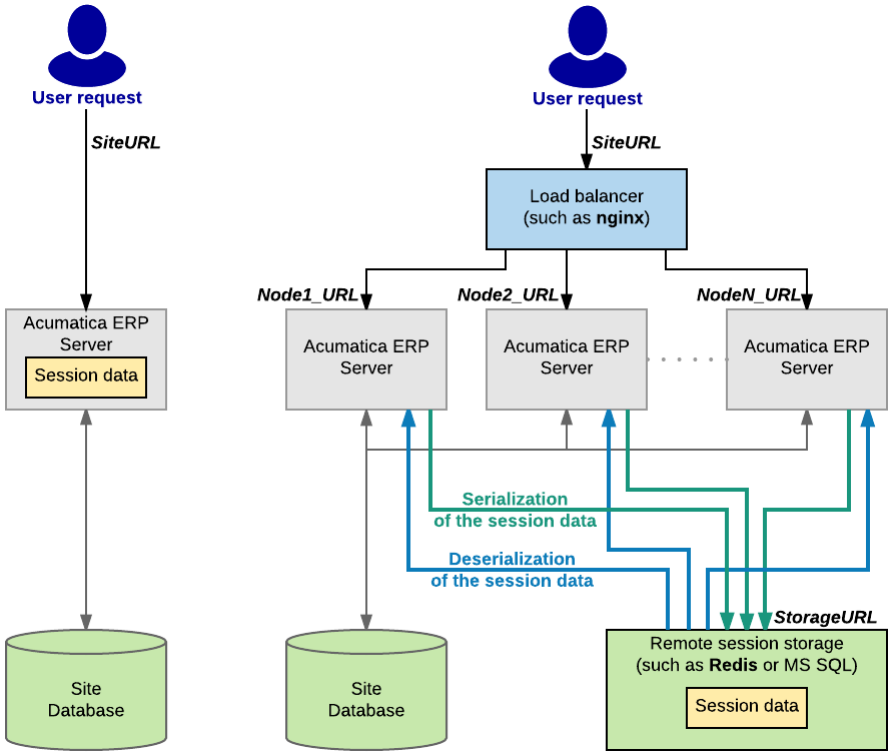
| Accessing Data | 219
The following diagram shows difference in storing session data on a stand-alone server and
in a cluster. On a stand-alone Acumatica ERP server, session data is stored in the server
memory. In a cluster of application servers, session data must be serialized and stored in a
high-performance remote server, such as Redis or Microsoft SQL.
Figure: Storing session data on a stand-alone server and in a cluster
The cost of serialization and the amount of data that need to be shared between application
servers is often the main challenge to scaling complex business applications horizontally.
Acumatica Framework implements the following techniques to address issues related to
session-state management without sacrificing performance, fault tolerance, or scalability:
• Objects on the application server are created on each request and disposed after
the request execution. The application state is preserved in the session through the
serialization mechanism.

| Accessing Data | 220
• Data serialized into the session is minimized to store only modified data (inserted,
deleted, held and modified records). (Serialization and retrieval times are directly
proportional to the size of the serialized data.)
• The rest of the data is extracted from the database on demand and built around the
session data. (A custom algorithm that extracts only the data required for the current
request execution from the database is implemented.)
• A custom serialization mechanism is implemented to serialize only relevant data and
reduce the amount of service information. (The standard serialization mechanism
implemented in the Microsoft .NET platform is generic and cannot be optimized when
used for a specific task.)
• Hash tables, constraints, relations, and indexes concerned with the execution of business
logic are created strictly on demand. This technique allows the user to avoid execution
of these operations on each request if not needed. (Creation of indexes, constrains, hash
tables, and relations consumes a significant amount of CPU and runtime memory.)
Storing of Graph Data in the Session
Acumatica ERP keeps all modified data records in the cache. Therefore, you do not change a
data record in the database directly when you modify its value in the user interface.
The system commits the changes to the database in the following cases:
• The user clicks Save.
• A request is sent through the web services APIs.
• The Actions.PressSave method is invoked on the graph instance.
• The PXAutoSaveAttribute attribute is defined for a data access class. As a
result, the PXCache<>.Unload method automatically stores in the database all the
changes of the appropriate data records at the end of each round trip.
A graph instance exists on the server only while a user request is being processed, and it
is destroyed right after this processing. The following diagram shows that a graph instance
is created to process a user request on the Acumatica ERP server and destroyed once
processing is completed.
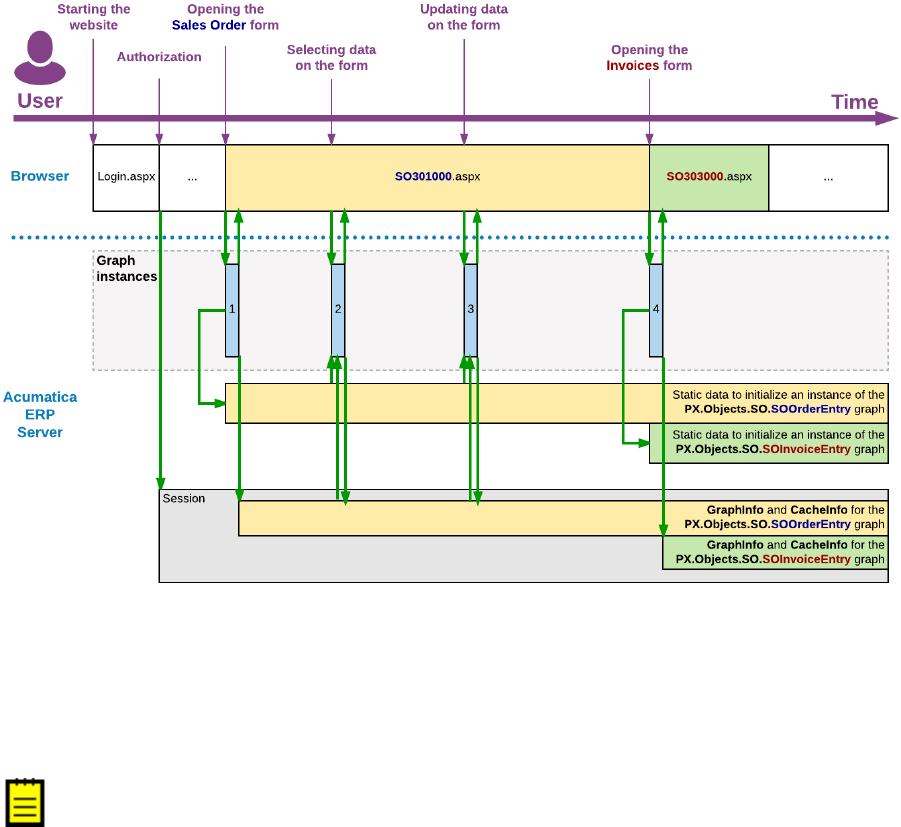
| Accessing Data | 221
Figure: Processing of user requests
In the diagram above, the blue rectangles labeled 1, 2, 3, and 4 indicate the lifetime of
graph instances. After a graph instance completes the processing of a request, the system
stores the graph state in the session. It also stores the inserted, deleted, held, and modified
records of the cache that are required to restore the state and data of the graph for the
processing of the subsequent user request on the same Acumatica ERP form.
On a stand-alone Acumatica ERP server, session data is stored in the server memory.
In a cluster of Acumatica ERP servers, session data must be serialized and stored in
external high-performance session state storage. (For more information on storing
session data in a cluster, see Session Sharing Between Application Servers.)
For a user request on an Acumatica ERP form, the following operations are executed in the
system:
1. The application server creates a graph instance that is specified in the TypeName property
of the PXDataSource control of the form. (For more information about the initialization
of graph views, caches, actions, and event handlers, see Initialization of an Event Handler
Collection.)
2. If the user session contains graph data that has been stored during a previous request,
the system loads the graph state and the cache data from the session.
3. The graph instance processes the requested data on the data view that is specified in
the ASPX code in the DataMember property of the control container for the data to be
processed. To process the data, the system invokes the ExecuteSelect, ExecuteInsert,
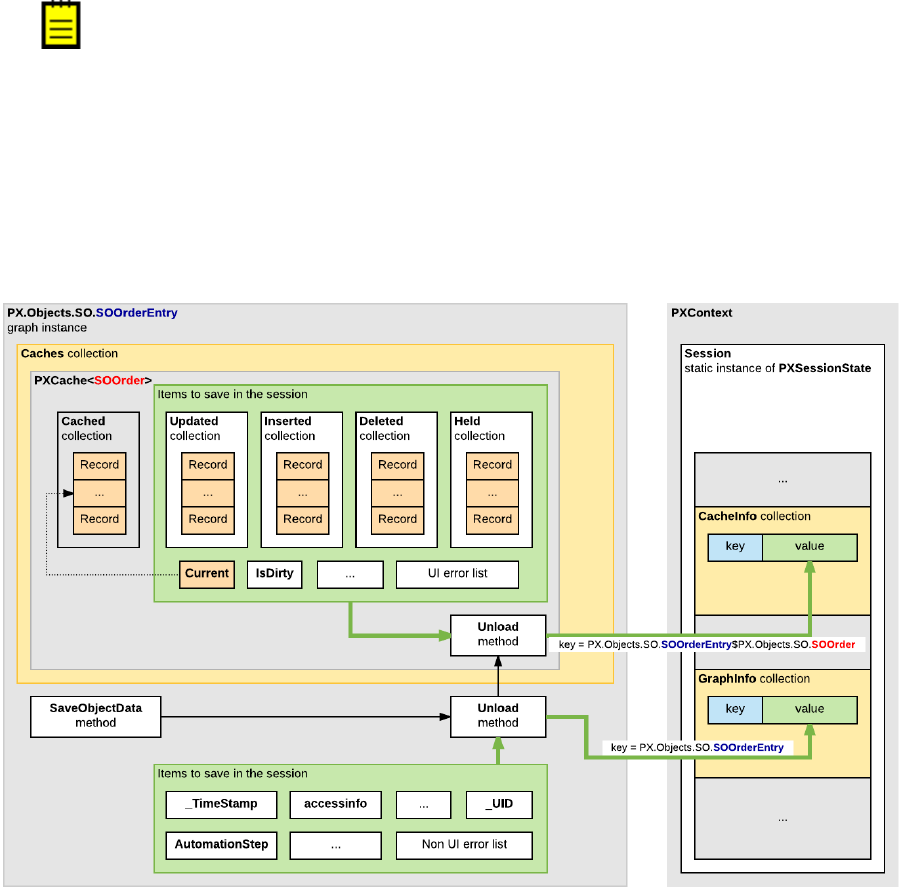
| Accessing Data | 222
ExecuteUpdate, or ExecuteDelete method of the graph, based on the request type. The
invoked method implements the logic of the appropriate scenario to add the request data
to the cache and to execute the event handlers defined for the data fields and records in
the cache. (See Data Manipulation Scenarios for details.) The cache then merges the data
retrieved from the database with the data restored from the session, and the application
accesses the data as if the entire data set had been preserved from the time of the
previous request.
4. The graph instance returns the request results to the PXDatasource control of the form.
5. The system stores in the session the graph state and the modified data of the cache.
Because the graph instance is no longer being used by the application server,
the .NET Framework garbage collector then clears the memory allocated for the
graph instance.
While a graph is instantiated, all the cached data of the graph is saved in the appropriate
PXCache objects that are created in the graph instance based on the data access class
(DAC) declarations. To preserve the modified entity data between user requests, the cache
controller saves the Updated, Inserted, Deleted, and Held collections of each PXCache
object in the session.
The following diagram shows how the graph state and cache data are stored in the Session
object.
Figure: The graph data stored in the session
In the diagram above, notice the following:

| Accessing Data | 223
• The items of the graph instance are stored in the GraphInfo collection of the Session
object as a key-value pair, where the key is equal to the full name of the graph.
• The items of a PXCache object are stored in the CacheInfo collection of the Session
object as a key-value pair, where the key consists of the following parts separated by the
$ symbol:
a. The full name of the graph
b. The full name of the DAC
When you instantiate a graph from code, the system will not load data from the
session, because you may want to perform redirection or other processing. You
can direct the system to load this data by using the PXPreserveScope class, as the
following code snippet shows.
using (new PXPreserveScope())
{
GraphName graph = PXGraph.CreateInstance<GraphName>();
graph.Load();
...
}
Use of Slots to Cache Data Objects
If you have to cache a data object from your code, you can use the slots provided by the
PXContext and PXDatabase classes. By using these slots, you can cache any type of data
object without restrictions.
A slot provided by the PXContext class exists in the memory of the application server only
during the current HTTP request. Therefore, you can use these slots for quick data exchange
between different server modules while the server processes a single request.
A slot of the PXDatabase class is stored in the server memory until you clear the slot.
Therefore, you can use such a slot to cache a data object for a long time—for example, to
read the cached data during a future HTTP request.
If a PXDatabase slot is used to cache the data that is obtained from the database tables, you
can use a special API to automatically update the data in the slot when any of these tables
has been changed.
For detailed information on using slots, see the sections of this topic.
Caching Data in PXContext Slots
If you need to keep a data object during a single HTTP request, we recommend that you
cache the object in a slot provided by the PXContext class.
You can use the following public static methods of the class to save a data object in a slot.

| Accessing Data | 224
Method Description
public static ObjectType
SetSlot<ObjectType> (Ob-
jectType value)
Stores the specified data object under the key that is creat-
ed on the base of the object type.
public static Object-
Type SetSlot<ObjectType>
(string key, ObjectType
value)
Stores the specified data object under the key that is de-
fined by the first parameter.
The following example shows how you can save the MyData object in the slot of the current
HTTP context under the key that is the same as the object type.
PXContext.SetSlot<MyDataType>(MyData);
To get a data object that is cached in the current HTTP context, you can use the following
methods of the PXContext class.
Method Description
public static ObjectType
GetSlot<ObjectType>()
Returns the data object that is cached under the key that is
created on the base of the object type.
public static Object-
Type GetSlot<ObjectType>
(string key)
Returns the data object that is cached under the specified
key.
The following example shows how you can get from the slot of the current HTTP context the
MyData object that is cached under the MyData22 key.
var MyData = PXContext.GetSlot<MyDataType>("MyData22");
The following diagram illustrates how you can use a data object cached by using a slot
provided by the PXContext class.
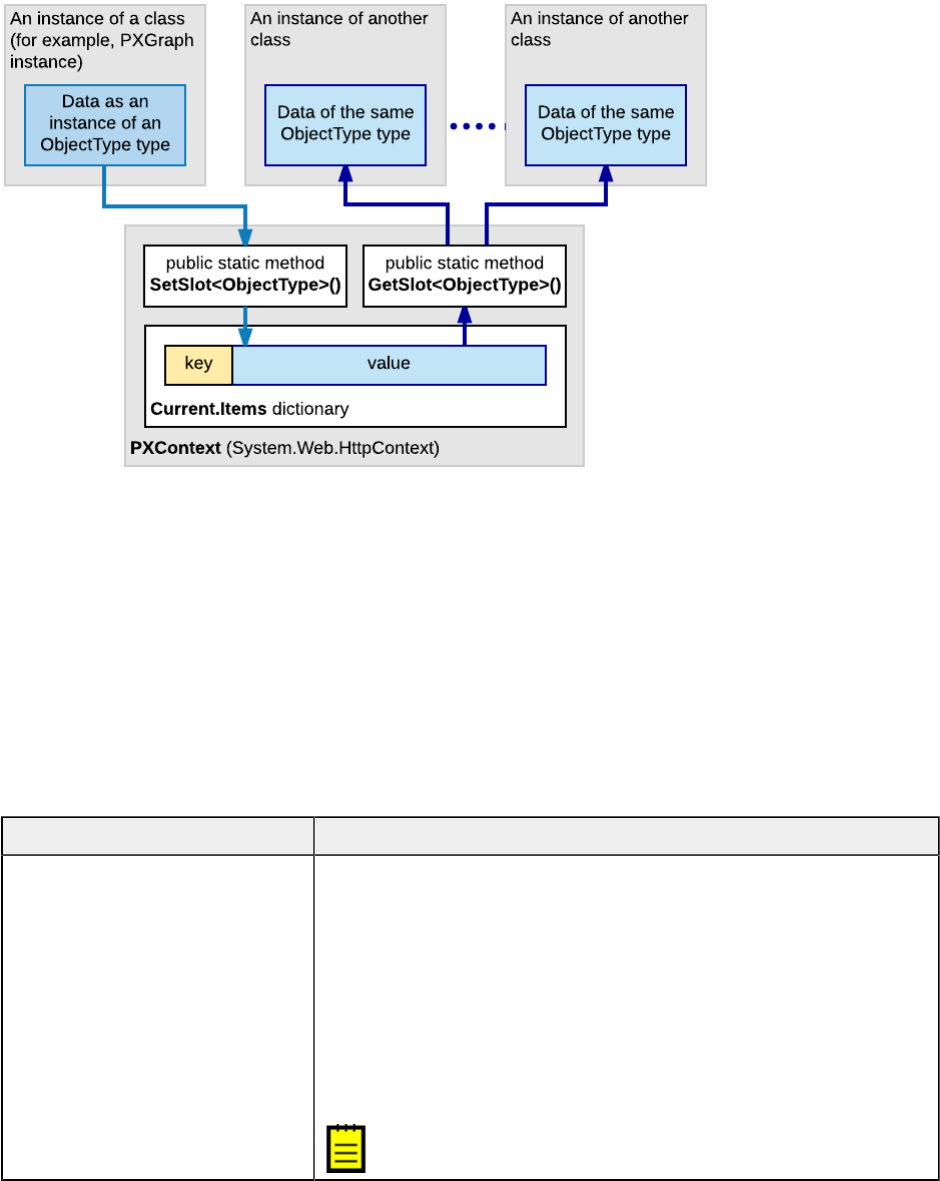
| Accessing Data | 225
Figure: Caching data in a slot of the PXContext class
You do not need to delete the data saved in the PXContext class slots, because the system
deletes these slots from the server memory along with the data of the current HTTP context
created for the current request.
Caching Data in PXDatabase Slots
If you need to keep a data object in the server memory for a long time, we recommend that
you cache the object in a slot provided by the PXDatabase class.
You can use the following public static methods of the class to cache a data object in a slot
and to get the cached object from the slot.
Method Description
public static Object-
Type GetSlot<ObjectType>
(string key, params
Type[] tables)
If the PXDatabase slots contain a valid data object of the
specified type saved under the key defined by the first pa-
rameter, returns this data object. Otherwise, the method
creates a new object of the specified type, saves this emp-
ty object in the slot under the key defined by the first para-
meter, and returns the data object that is used by the call-
ing code to save the needed data. The list of the table types
specified in the params parameter is used to invalidate the
slot if any table of the list has been changed in the data-
base.
If this method is used to cache a data object of an
ObjectType class inherited from the IPrefetch-
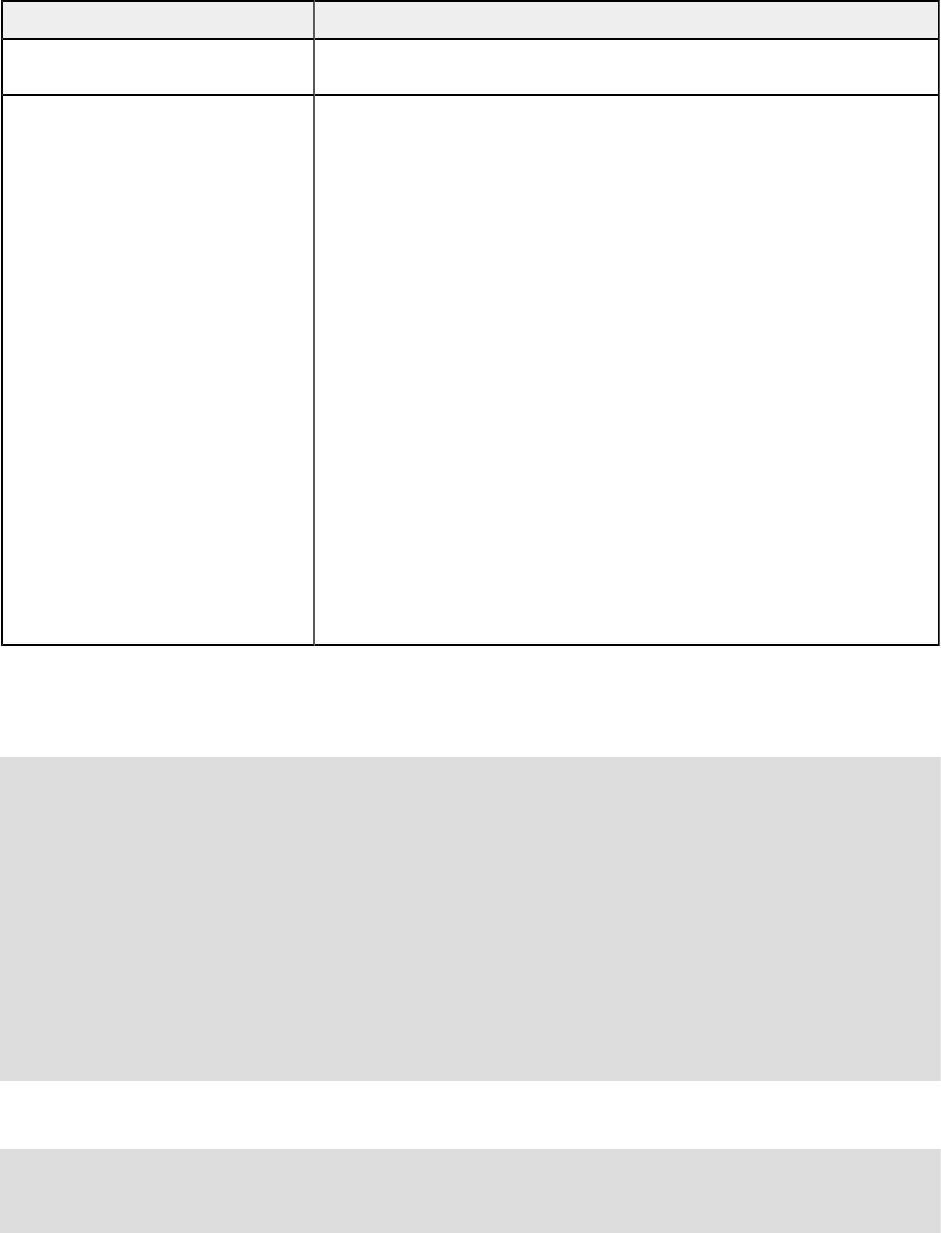
| Accessing Data | 226
Method Description
able<> interface, the GetSlot<> method invokes the
Prefetch method of the object without a parameter.
public static ObjectType
GetSlot<ObjectType, Pa-
rameter> (string key,
Parameter parameter,
params Type[] tables)
Is used for caching a data object of an ObjectType class in-
herited from the IPrefetchable<> interface to provide au-
tomatic update of the object in the slot. If the PXDatabase
slots contain a valid data object of the specified type saved
under the key defined by the first parameter, the method
returns this data object. Otherwise, the method does the
following:
1.Creates a new object of the specified type
2.To create or update data in the object, invokes the
Prefetch method with the parameter specified in the
second parameter
3.Saves this object in the slot under the key defined by the
first parameter
4.Returns the data object to the calling method
The list of the table types specified in the params parame-
ter is used to invalidate the slot in the case if any table of
the list has been changed in the database. The use of this
method is described below in the Automatically Updating Data
in a PXDatabase Slot section.
The following example shows how you can use the GetSlot<ObjectType> (string key,
params Type[] tables) method to cache data under the MyData key in the slot of the
PXDatabase class.
...
Dictionary<string, string[]> dict =
PXDatabase.GetSlot<Dictionary<string, string[]>>(
"MyData", typeof(Table1), typeof(Table2), typeof(Table3));
lock (((System.Collections.ICollection)dict).SyncRoot)
{
...
List<string> myList = new List<string>();
...
string key = "myListKey";
dict[key] = myList.ToArray();
}
...
After the data object has been cached, you can access the object by using the following
instruction.
Dictionary<string, string[]> dict =
PXDatabase.GetSlot<Dictionary<string, string[]>>(
"MyData", typeof(Table1), typeof(Table2), typeof(Table3));
| Accessing Data | 227
You can clear a slot provided by the PXDatabase class by means of the following public static
methods of the class.
Method Description
public static void Re-
setSlot<ObjectType>
(string key, params
Type[] tables)
Sets to null the value of the slot that has the specified key.
public static void Re-
setSlots()
Sets to null the value of each slot that is provided by the
PXDatabase class.
The following example shows how you can clear the slot created in the example above.
PXDatabase.ResetSlot<MyDataType>(
"MyData", typeof(Table1), typeof(Table2), typeof(Table3));
Automatically Updating Data in a PXDatabase Slot
If a data object that is to be cached depends on data in the database, we recommend
that you inherit the object class from the IPrefetchable<> interface and develop in this
class the Prefetch method, to provide automatic updating of data in the object. Then the
GetSlot<ObjectType, Parameter>(string key, Parameter parameter, params Type[]
tables) method of the PXDatabase class will use the Prefetch method to update the data
in the slot, if required. (See the description of the method in Caching Data in PXDatabase
Slots.)
For example, suppose that you need to develop a data provider that selects data from
multiple tables of the database and caches the data in PXDatabase slots. To do this, you can
develop the provider class based on the following code.
public abstract class MyProvider : ProviderBase
{
// Here you can add abstract definitions for all the methods of
// the PXDatabaseMyProvider class
}
public class PXDatabaseMyProvider : MyProvider
{
private class MyDataObject : IPrefetchable<PXDatabaseMyProvider>
{
public MyDataType MyData = new MyData();
public void Prefetch(PXDatabaseMyProvider provider)
{
// Here you can implement the code to generate data of the MyData object.
}
}

| Accessing Data | 228
private MyDataObject MyDataObj
{
get
{
return PXDatabase.GetSlot<MyDataObject, PXDatabaseMyProvider>(
"MYDATA_SLOT_KEY",
this, typeof(Table1), typeof(Table2), typeof(Table3)
/* ,... Add here the types of all tables, any change in which
should make the slot invalid. */ );
}
}
// Here you need to add the code for all the methods that are defined
// in the MyProvider abstract class.
// These methods can be used to manage the MyData object.
...
}
The code above contains declarations of the following classes:
• The MyProvider abstract class, which derives from the
System.Configuration.Provider.ProviderBase public abstract class and is used to
define implementation of the PXDatabaseMyProvider class.
• The PXDatabaseMyProvider class, which contains the following:
• The MyDataObject private class, which derives from the
IPrefetchable<PXDatabaseMyProvider> interface and contains the following
members:
• The MyData data object to be cached
• The Prefetch method, which creates or updates the data object
• An implementation of the methods that are declared in the MyProvider abstract
class and used to manage to the MyData object. To access the data object stored in
the database slot, in these methods, you can use the MyDataObject property of the
PXDatabaseMyProvider class, as the following instruction shows.
MyDataObject data = MyDataObj;
For the code above, the following diagram shows how the data object is cached and
automatically updated in the PXDatabase slot.
| Accessing Data | 229
Figure: Automatic update of the cached data
If you have discovered that a PXDatabase slot returns legacy data, you can invoke the
SelectTimeStamp() public static method of the PXDatabase class to invalidate all the
PXDatabase slots that contain data obtained from the database tables that have been
changed. Then the GetSlot method invokes the Prefetch method and updates the
data in the slot.

| Implementing Business Logic | 230
Implementing Business Logic
The topics in this part of the guide explain how to implement business logic of an application
based on Acumatica Framework.
In This Part
• Working with Events
• Working with Attributes
• Working with Attachments
• Configuring the UI from the Back End
• Creating Particular Types of Forms
• Executing Code Asynchronously
• Localizing Applications
• Reusing Business Logic
Working with Events
The Acumatica Framework provides its own event model in which events related to the
manipulation of data records and data fields are raised in a particular order within certain
scenarios. An event handler is a method invoked by the Acumatica Framework once the
corresponding event is raised.
By implementing event handlers, application developers can add business logic for the
manipulation of data within business logic controllers (BLCs). This business logic includes
the validation and calculation of field values, the management of data records (inserting,
updating, or deleting), the checks for duplicate records, and the implementation of the
presentation logic of the user interface.
In This Chapter
• Event Handlers
• Types of Graph Event Handlers
• Execution of Event Handlers
• Override of Event Handlers
• Data Manipulation Scenarios
• Insertion of a Data Record
• Update of a Data Record

| Implementing Business Logic | 231
• Removal of a Data Record
• Saving of Changes to the Database
• Sequence of Events: Insertion of a Data Record
• Sequence of Events: Update of a Data Record
• Sequence of Events: Deletion of a Data Record
• Sequence of Events: Display of a Data Record
• Sequence of Events: Saving of Changes to the Database
• List of Events
• Cancellation of Attribute Event Handlers
• Validation of Field Values
• Validation of a Data Record
• Update of a Data Record on Update of a Field Value
• Internal and External Presentation of Values
Event Handlers
The Acumatica Framework raises events in the context of a graph. An event handler can be
implemented in a graph, as well as in an attribute of a data field.
Graph and Attribute Event Handlers
Graph event handlers are defined as methods in a business logic controller (BLC) class for
a particular data access class (DAC) or a particular DAC field. See the topics in the PX.Data
Delegates section in the API Reference for each event for an example of a graph event
handler declaration.
Attribute event handlers are defined as methods in attribute classes. The logic of the event
handlers is attached to all DAC objects or data fields annotated with these attributes.
The attribute in which an attribute event handler is implemented must be derived
from the PXEventSubscriberAttribute class and must implement the interface of the
IPX<EventName>Subscriber form (where <EventName> is replaced with the name of the
needed event), as shown in the following example.
// The attribute implements handlers for the FieldVerifying
// and RowPersisting events
public class MyAttribute : PXEventSubscriberAttribute,
IPXFieldVerifyingSubscriber,
IPXRowPersistingSubscriber
{
public virtual void FieldVerifying(PXCache sender,

| Implementing Business Logic | 232
PXFieldVerifyingEventArgs e)
{
...
}
public virtual void RowPersisting(PXCache sender,
PXRowPersistingEventArgs e)
{
...
}
}
Related Links
• Naming Conventions for Event Handlers Defined in Graphs
Types of Graph Event Handlers
Acumatica Framework provides two types of graph event handlers: classic and generic. To
declare a classic event handler, you specify the DAC name, the field name, and the type of
event in the handler name. To declare a generic event handler, you specify the field name
and the DAC name as type parameters of the event type. Both types of event handlers work
the same.
We recommend using generic event handlers because they are easier to declare, use, and
validate in Visual Studio. To refactor classic event handlers into generic event handlers, you
can use Acuminator.
All examples in the subsequent topics demonstrate generic event handlers.
Classic Event Handlers
Classic event handlers have the following signature:
• For row-level events:
protected virtual void [DACName]_[RowEventName](…)
• For field-level events:
public virtual void [DACName]_[FieldName]_[FieldEventName](…)
For example, a classic handler for the RowSelected event of the CROpportunityProducts
DAC is defined as follows.
protected virtual void CROpportunityProducts_RowSelected(
PXCache sender, PXRowSelectedEventArgs e) {
…}

| Implementing Business Logic | 233
Generic Event Handlers
Generic event handlers have the following signature:
• For the row-level events:
public virtual _(Events.[RowEventName]<[DACName]> e)
For example, a generic handler for the RowSelected event of the
CROpportunityProducts DAC is defined as follows.
protected virtual void _(Events.RowSelected<CROpportunityProducts> e)
• For the field-level events:
public virtual _(Events.[FieldEventName]<[DACName], [FieldName]> e)
For example, a generic handler for the FieldUpdated event of the
CROpportunityProducts.contactID field is defined as follows.
protected virtual void _(Events.FieldUpdated<CROpportunityProducts.contactID> e)
Specifying the DAC name as a parameter is optional because the system determines it
automatically based on the field name. You should specify the DAC name explicitly if the
field is inherited and you want to declare an event handler for the inherited field. For
example, the FieldDefaulting event handler for the CurrencyInfo.moduleCode field
looks as follows.
protected override void _(Events.FieldDefaulting<CurrencyInfo,
CurrencyInfo.moduleCode> e)
You can declare more than one handler for the same event by adding a custom name (for
example, a number) after the event name as follows.
public virtual _(Events.[EventName]2<[DACName], [FieldName]> e)
The following example shows the second event handler for the FieldUpdated event of the
CROpportunityProducts.contactID field.
protected virtual void _(Events.FieldUpdated2<CROpportunityProducts.contactID> e)
However, we do not recommend declaring more that one event handler because .NET
framework does not determine the call order.
Execution of Event Handlers
In this topic, you can find information about how event handlers are executed and how to
add and remove event handlers at runtime.

| Implementing Business Logic | 234
Execution of Event Handlers
All event handlers for a particular event share the same PXCache instance that has raised
this event. The system creates a PXCache instance to control the modified data records of
a particular data access class (DAC) type. The PXCache instance is always available as the
first argument in an event handler; the second argument provides the specific data that
corresponds to the event.
Once an event is raised, the order in which the associated event handlers are executed may
differ. For some events, the chain of graph event handlers is executed before the attribute
event handlers are; the attribute event handlers are executed only if the Cancel property of
the event arguments doesn't equal true after the execution of the graph event handlers.
For other events, the attribute event handlers are executed first, and the graph event
handlers are executed next. The topics in the PX.Data Delegates section in the API Reference
for each event shows the order in which the system invokes handlers for a particular event.
Dynamic Addition of Event Handlers
A business logic controller (BLC) includes the collections of graph event handlers for all
events except CacheAttached. Each of these collections holds event handlers for a particular
event and has the same name as the event. (You can find more information about how these
collections are initialized in the Initialization of an Event Handler Collection section in this topic.)
By using the methods of these collections, you can add and remove graph event handlers in
code at runtime.
A method added as an event handler must have the signature of a graph event handler, but
doesn't need to follow the naming convention for graph event handlers. If you want to add a
method as an event handler, you invoke the AddHandler<>() method on the corresponding
collection. For example, if the event is related to a row, it is invoked as follows.
RowEventName.AddHandler<DACName>(MethodName);
The event is invoked as follows if it is related to a field.
FieldEventName.AddHandler<DACName.fieldName>(MethodName);
When the AddHandler<>() method is invoked, event handlers are added to the collection as
follows:
• Event handlers are added to the beginning of the collection for any event whose name
ends with ing except the RowSelecting event.
• Event handlers are added to the end of the collection for any event whose name ends
with ed and for the RowSelecting event.
To remove a handler, you should invoke the RemoveHandler<>() method.

| Implementing Business Logic | 235
Initialization of an Event Handler Collection
On each round trip, the PXGraph() constructor does the following while it initializes a graph
instance:
1. Creates the Cashes, Views, and Actions collections and other required collections. All of
these collections are initially empty.
2. If the graph instance is being created on the Acumatica ERP server for the first time:
a. Obtains the metadata of this graph from the appropriate assembly (which is
PX.Objects for most graphs in the application).
b. By using the metadata, emits the InitializeDelegate method, which is designed
to subscribe event handlers and to initialize graph views, caches, and actions. To
process the metadata for the fields declared in the graph, the constructor invokes the
PXGraph.ProcessFields static method. To process the metadata of the methods that
are defined in the graph, the constructor invokes the PXGraph.ProcessMethods static
method.
The ProcessMethods method processes the metadata of the methods that are
declared in the graph and all extensions of the graph. According to the naming
convention for event handlers, the _ symbol is a separator, so this method
tries to split the name of each processed method into segments. If the name
of the processed method has fewer than two segments or more than three
segments, the processed method is skipped.
If the name of the processed method adheres to the naming convention
for record event handlers, the processed method is added to the
_EventsRow collection of the PXCache<DACName> object that is instantiated
in the graph instance based on the DAC declaration. For example, the
SOOrder_RowSelected event handler is added to the _EventsRow collection of
the PXCache<SOOrder> cache object as an element with the RowSelected key.
If the name of the processed method adheres to the naming convention
for field event handlers, the processed method is added to the
EventNameEvents collection of the PXCache<DACName> object. For example,
the SOOrder_CustomerID_FieldUpdated
event handler is added to the FieldUpdatedEvents collection of the
PXCache<SOOrder> cache object as an element with the CustomerID key.
c. Saves the graph metadata and the InitializeDelegate emitted method in the
Acumatica ERP server memory as the GraphStaticInfo static object shared for the
entire application instance.
3. From the GraphStaticInfo static object, invokes the InitializeDelegate method,
which initializes graph views, caches, and actions; the method also adds event handler
delegates to the appropriate event handler collections of the relevant PXCache objects.
The following diagram shows how an instance of the PX.Objects.SO.SOOrderEntry graph
uses the PX.Objects assembly metadata to add the SOOrder_CustomerID_FieldUpdated()
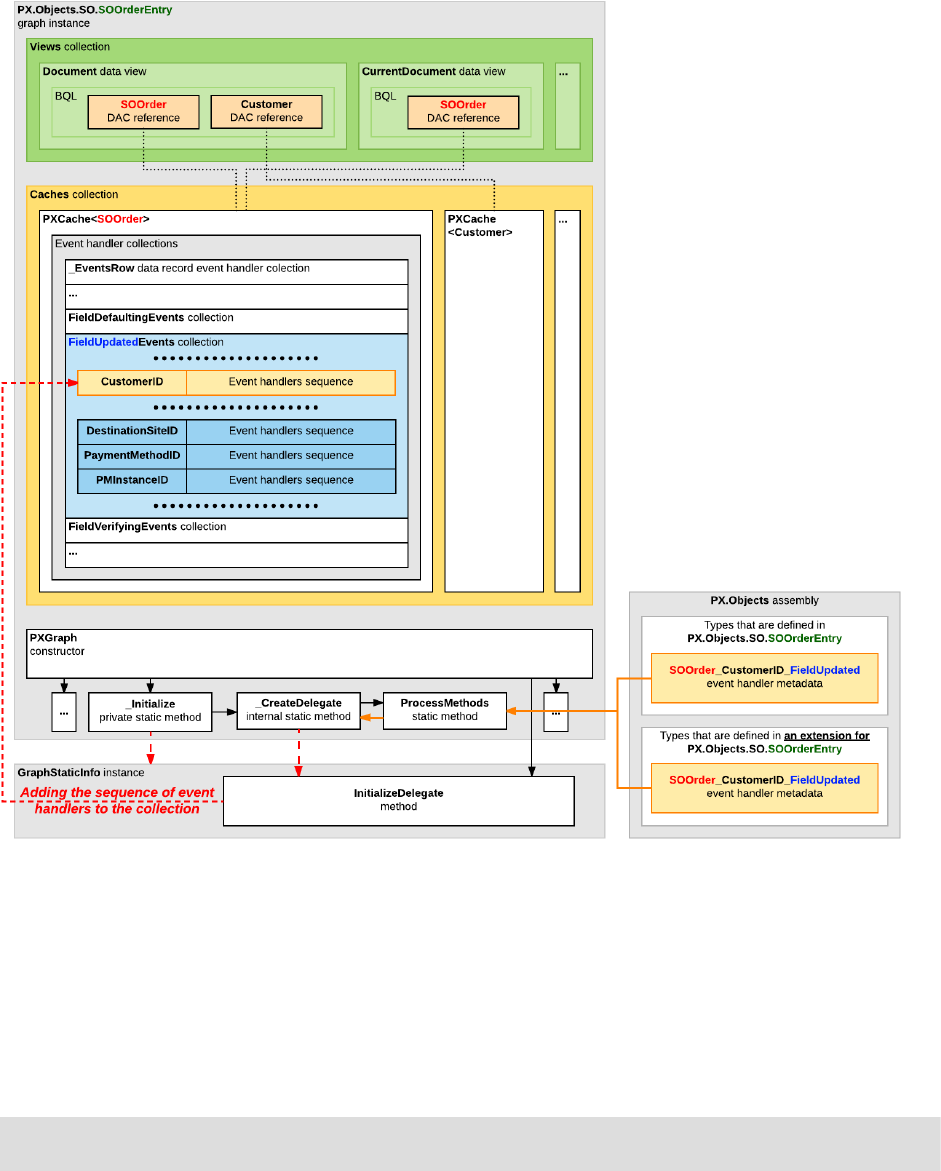
| Implementing Business Logic | 236
event handler (described in the graph and graph extensions) to the FieldUpdatedEvents
collection of the PXCache<SOOrder> cache object.
Figure: Addition of an event handler to the appropriate collection
In the collection, the CustomerID field name is used as a key, and the delegate of the event
handler sequence for the field processing is used as a value.
Override of Event Handlers
You can override an event handler by calling the base method or without calling it. To
override an event handler without invocation of the base method, use code based on the
following template.
protected virtual _(Events.[EventName]<[DACName], [FieldName]> e)
{
| Implementing Business Logic | 237
…
}
To override an event handler with invocation of the base method, use code based on the
following template.
protected virtual void _(
Events.[EventName]<[DACName], [FieldName]> e,
PX[EventName] baseMethod)
{
baseMethod(e.Cache, e.Args);
…
}
For a base method, you should provide two parameters because a base method is a
classic interceptor delegate, not a generic one. For details, see Types of Graph Event
Handlers.
For example, to override an event handler for the RowSelected event of the CurrencyInfo
class, use the following code.
protected virtual void _(Events.RowSelected<CurrencyInfo> e, PXRowSelected baseMethod)
{
baseMethod(e.Cache, e.Args);
}
Data Manipulation Scenarios
Most events are raised within common scenarios related to the manipulation of data records.
The scenarios are invoked by Acumatica Framework when users perform certain actions in
the user interface, when the corresponding requests are made to the web services API, and
when special methods are executed within the business logic controller (BLC).
The following diagram shows how different types of event handlers are invoked.
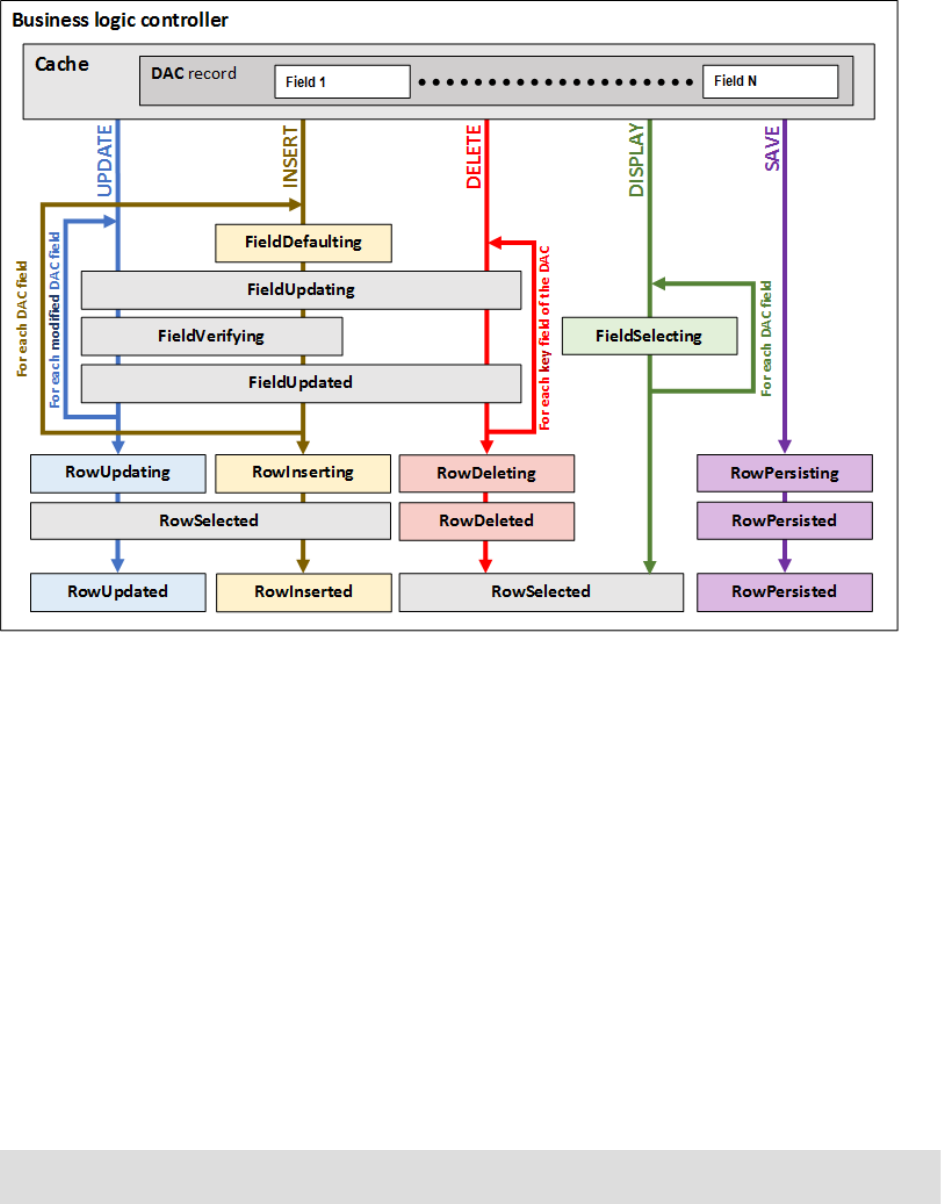
| Implementing Business Logic | 238
Figure: Use of event handlers while the basic data operations are processed
For details on how Acumatica Framework processes the basic data operations, see the
following topics:
• Sequence of Events: Insertion of a Data Record
• Sequence of Events: Update of a Data Record
• Sequence of Events: Deletion of a Data Record
• Sequence of Events: Display of a Data Record
• Sequence of Events: Saving of Changes to the Database
Insertion of a Data Record
When a user creates a new data record in the UI, the system inserts it into the PXCache.
To insert a data record into the PXCache in code, you invoke the Insert() method of the
applicable data view, as shown in the following code example.
ShipmentLine line = new ShipmentLine();
line.ProductID = card.ProductID;
| Implementing Business Logic | 239
...
ShipmentLines.Insert(line);
Keep in mind that calling the Insert() method of the data view is just a shortcut for the
Insert() method of the Cache property of the data view.
Also, in the example shown above, this method does not make the shipment line that you
insert related to the current shipment; it only inserts the shipment line into the PXCache
of shipment lines. The master-detail relationship between the new shipment line and the
current shipment is created because of the PXDBDefault attribute of the ShipmentNbr field
in the ShipmentLine DAC.
The FieldDefaulting event, which is raised for each field during the insertion of a new data
record, sets the default value for the data field.
The RowInserting and RowInserted Events
The RowInserting and RowInserted events occur during the insertion of a data record in
the cache, after the field-related events have occurred. The RowInserting event happens
right before the new data record is actually inserted into the PXCache object, but after all
field events happen for this data record. The RowInserted event happens after the actual
insertion. If, in a RowInserting event handler, you change the data fields of the data record
that are inserted, no field events will be raised for these data fields.
You use the RowInserted event to do something after a data record is inserted into the
cache. For example, you can use a RowInserted event handler of the master data record to
add a default detail data record.
For details on the order in which events are executed during the insertion of a data record
into PXCache, see Sequence of Events: Insertion of a Data Record.
Update of a Data Record
When you modify a data record in code, you should update the data record in the cache by
calling the Update() method of the data view or cache. When the user modifies data fields
in the UI and the modifications are committed to the server, the Update() method is called
automatically.
During the execution of the Update() method, the cache raises a number of events: first
the field-level events, and then the row-level events. During the update process, you have
access to the modified version of the data record through the NewRow property of event
arguments in RowUpdating event handlers or the Row property in other event handlers.
In a FieldUpdated event handler, you can modify a field of the data record passed as
e.Row. In this case, you don't have to call the Update() method; if you do, an infinite
loop will occur.
For details on the order in which events are executed during update of a data record, see
Sequence of Events: Update of a Data Record.

| Implementing Business Logic | 240
Removal of a Data Record
When a user deletes a data record through the user interface, the system calls the Delete()
method of the corresponding cache. If you need to delete a data record in code, you should
also call the Delete() method of PXCache or of the data view (which simply calls the
Delete() method of PXCache).
While a data record is being deleted, the cache raises a number of events. Before the
RowDeleting and RowDeleted events are triggered, the data record is placed in the cache
and assigned the Deleted status or the InsertedDeleted status (which means that the
data record has been inserted but has not yet been saved to the database). If the delete
operation is canceled, the data record will revert to the previous state and the RowDeleted
event won't be raised.
The sequence of events raised during the deletion of a data record is shown in Sequence of
Events: Deletion of a Data Record.
Saving of Changes to the Database
A graph provides transactional saving of changes from all cache objects to the database. The
graph commits the data to the database when you invoke the Actions.PressSave() method
of the graph or when the user clicks Save in the UI. In both cases, the Persist() method
of the graph is invoked. The Actions.PressSave() method also verifies that the Save action
exists in the graph and is enabled. The Save action then invokes the Persist() method.
To save changes on the form to the database, you should use the
Actions.PressSave() method. To save changes without pressing the Save button,
you can use the Persist() method. You should not invoke the Persist() method
on the current graph instance. (You can invoke this method for only a graph instance
created in a background operation.)
The graph commits changes from all cache objects within a single database transaction. If
any row modification fails, the entire transaction is rolled back, and no changes from any
cache object are persisted.
In the Persist() method, the system starts the database transaction (see the diagram
below). Within the transaction, the graph iterates the collection of cache objects three times:
for inserted records, for updated records, and for deleted records. First, all new records from
all cache objects are inserted, and then all modified records are updated. Finally, within the
same transaction, all deleted records are removed from the database. The graph iterates
the collection of caches so that all master records are saved and then all detail records are
saved.
For new records and updated records, the graph iterates the collection of caches
in the order in which the data views are declared in the graph. That's why in the
graph, the master data view must be declared before the detail data view. For deleted
records, the graph iterates the collection of caches in the reverse order. The graph
| Implementing Business Logic | 241
access the caches through the Views.Caches collection, which is formed from the
main DACs of all data views declared in the graph.
In each iteration, the framework raises the RowPersisting event for a data record, executes
the appropriate SQL command for this data record within the transaction, and then raises
the RowPersisted event with the Open transaction status.
When the SQL commands have been executed successfully for all modified (inserted,
updated, or deleted) data records, the graph commits the transaction. Regardless of the
result of the transaction, the graph raises the RowPersisted event, in which you can check
the status of the transaction. A successful transaction has the Completed status. If an error
or exception has occurred during the transaction, the transaction returns the Aborted status.
If the transaction fails, the modified data remains in cache objects. On the RowPersisted
event for an aborted transaction, you can revert changed records to the default values.
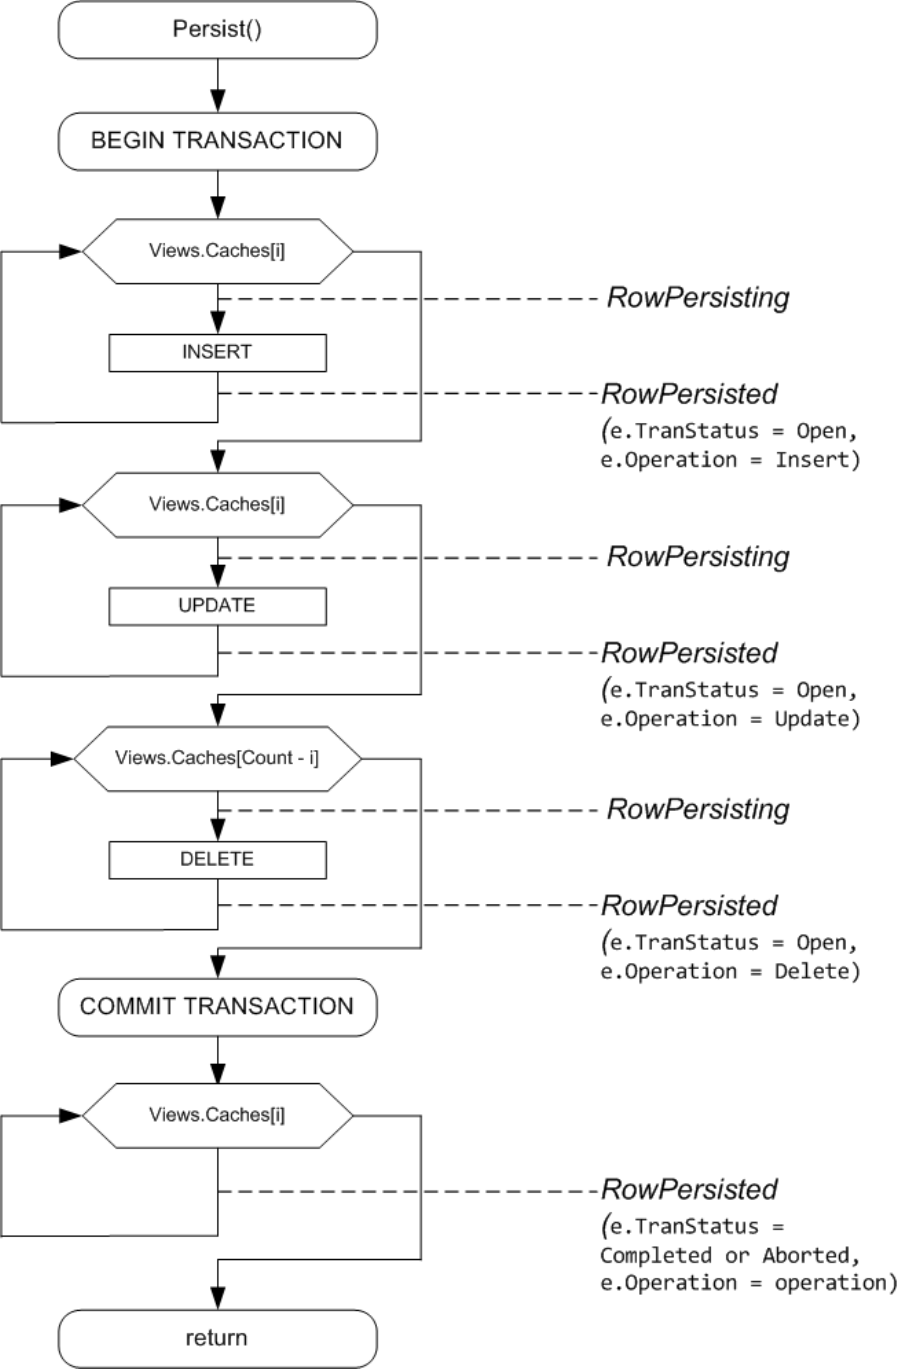
| Implementing Business Logic | 242
Figure: The process of saving changes from cache objects to the database
| Implementing Business Logic | 243
When the RowPersisting event is raised, you can cancel the saving of a particular row to
the database by setting the e.Cancel property to true in the graph handler for the event.
For the sequence of events raised for each modified row within the Persist() method of the
graph, see Sequence of Events: Saving of Changes to the Database.
Sequence of Events: Insertion of a Data Record
The figure below illustrates the sequence of events raised during the insertion of a data
record.
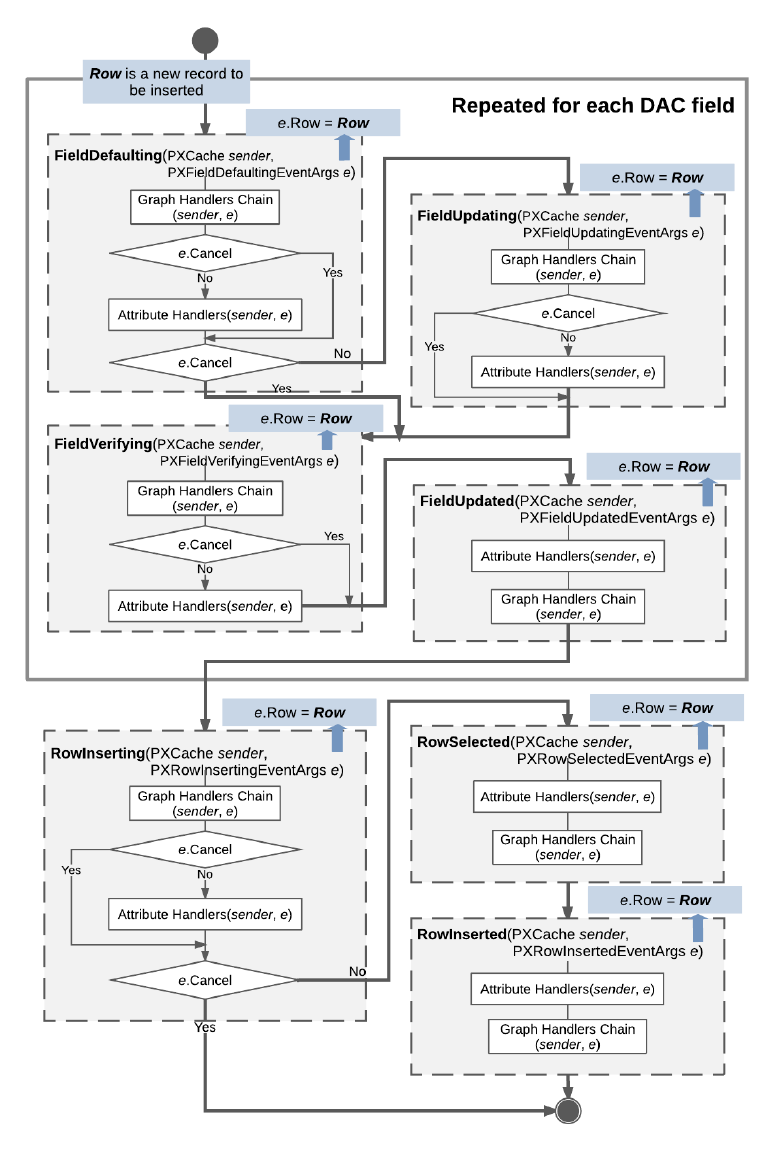
| Implementing Business Logic | 244
Figure: Insertion of a data record
| Implementing Business Logic | 245
The system inserts a data record as an instance of a data access class (DAC) when a user
creates a new data record in the user interface, a request to insert a record is sent to the
web services API, or the Insert() method of a data view is called in code. The data record
is actually inserted into the PXCache object that corresponds to the DAC of the data record.
The inserted data record has the Inserted status and is available through the Inserted and
Dirty collections of the PXCache object.
When a data record is inserted, data field events are raised for each data field in the
following order:
1. FieldDefaulting
2. FieldUpdating if the e.Cancel property equals true
3. FieldVerifying
4. FieldUpdated
Next, the following data record events are raised:
1. RowInserting (If the e.Cancel property is true, no further events are raised.)
2. RowSelected
3. RowInserted
The instance of the inserted data record is available in the e.Row property of event
arguments.
Sequence of Events: Update of a Data Record
The figure below illustrates the sequence of events raised during the update of a data
record.
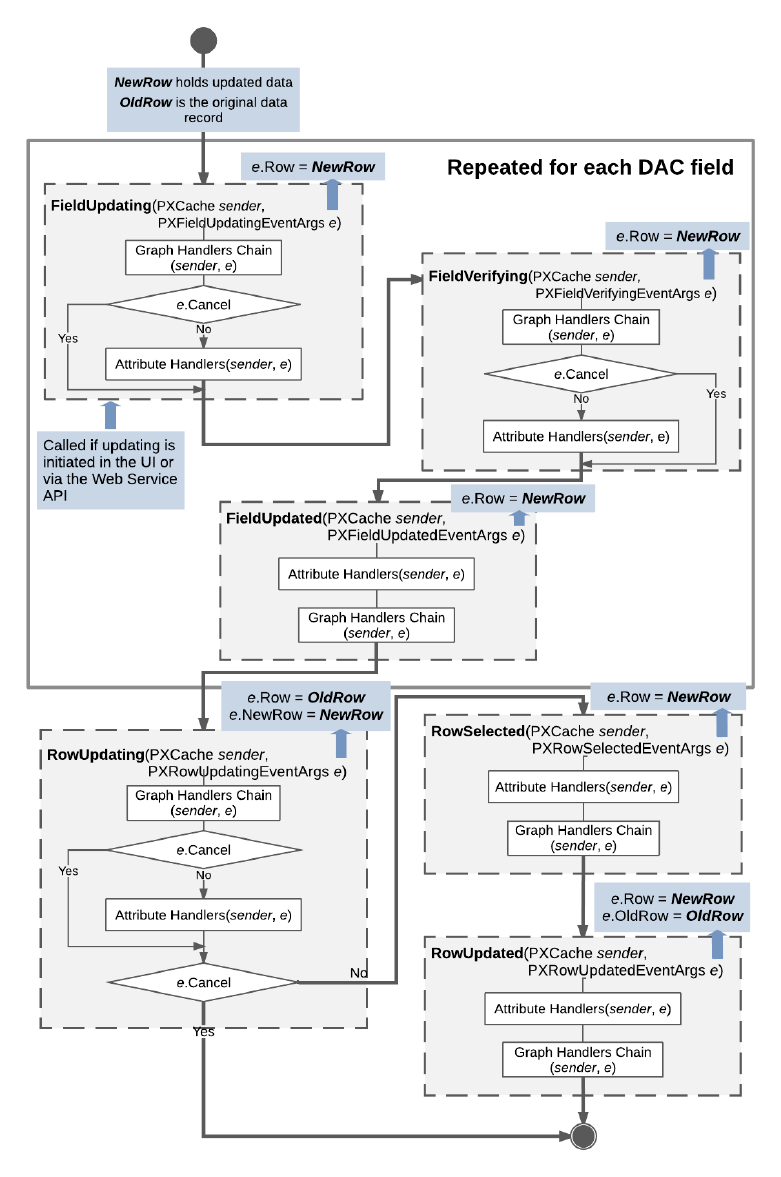
| Implementing Business Logic | 246
Figure: Update of a data record
| Implementing Business Logic | 247
A data record is updated when a user modifies the data record on the user interface, the
request is sent through the Web Service API, or the Update() method is invoked on the data
view. Updated data records, which the system gives the Updated status, are later available
through the Updated and Dirty collections of the appropriate PXCache object.
The RowUpdating event is fired before the update happens, while the RowUpdated event is
fired after the update. The developer can handle these events and has access to the updated
data record and the previous version of the data record that is kept in the PXCache object.
The actual update happens between these two events when the data record is copied to the
PXCache object.
When a data record is updated, the following data field events are raised for each updated
data field:
1. FieldUpdating
2. FieldVerifying
3. FieldUpdated
Next, data record events are raised as follows:
1. RowUpdating is raised. At this moment, in the e variable, which represents event data,
e.Row holds the data record version from the cache, while e.NewRow holds the updated
data record. You can still stop the update by throwing a PXException instance.
2. If e.Cancel doesn't equal true:
a. RowSelected is raised. Only the updated data record can be accessed through e.Row.
b. RowUpdated is raised. e.Row now holds the updated instance, while e.OldRow holds a
copy of the old data record with the previous values.
Sequence of Events: Deletion of a Data Record
The figure below illustrates the sequence of events raised during the deletion of a data
record.
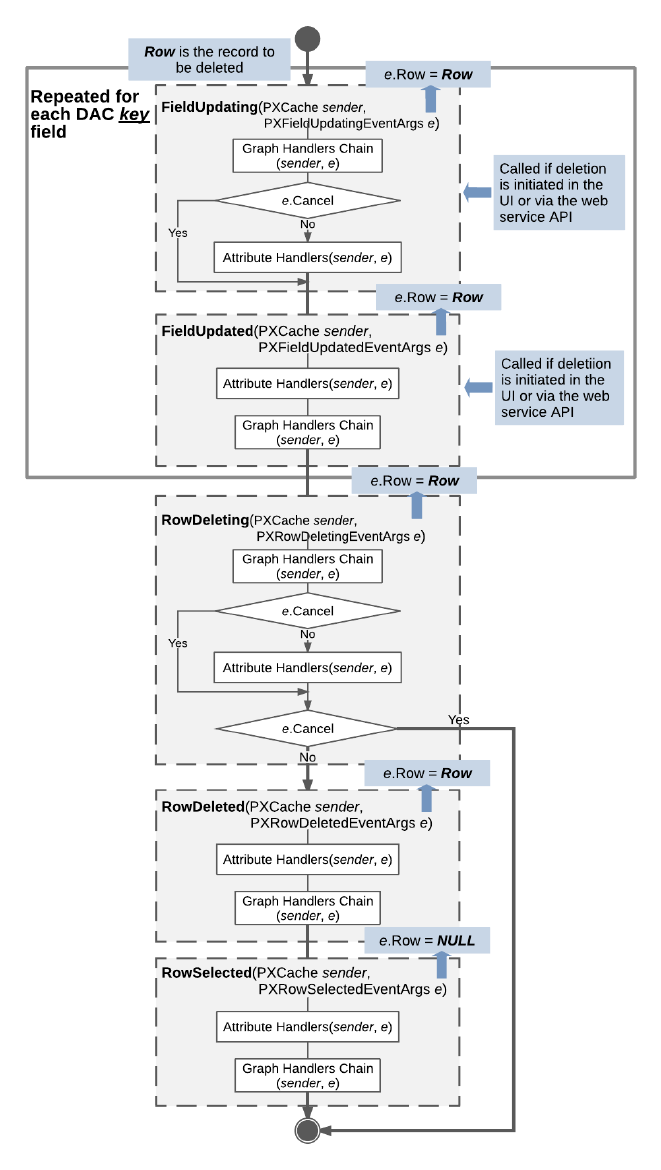
| Implementing Business Logic | 248
Figure: Deletion of a data record
| Implementing Business Logic | 249
A data record is deleted when a user deletes the record on the user interface, the deletion
request is sent through the Web Service API, or the Delete() method of a data view is
invoked in code. As a result of the deletion, the data record gets the Deleted status if it
already exists in the database, or the InsertedDeleted status if the record has just been
inserted into the PXCache object and deletion from the database is not required. The data
record is later available through the Deleted and Dirty collections of the PXCache object.
If the deletion has been initiated by a user on the UI or through the web services API, the
following field events are raised for each key data field before any other events are raised:
1. FieldUpdating
2. FieldUpdated
Next, regardless of how the deletion was initiated, data record events are raised as follows:
1. RowDeleting is raised. At this point, the developer can still stop the deletion by throwing
a PXException instance. In the e variable representing event data, e.Row holds the data
record being deleted.
2. If e.Cancel doesn't equal true:
a. RowDeleted is raised, and e.Row still holds the data record.
b. RowSelected is raised, and e.Row equals NULL.
The data record will be reverted to the previous state and the RowDeleted event won't be
raised if the delete operation is canceled.
Sequence of Events: Display of a Data Record
Each time a data record is displayed in the user interface or retrieved through the Web
Service API, the RowSelected and FieldSelecting events are raised for each data field.
For both events, the e.Row property of event arguments holds the data record that is being
displayed or retrieved.
The diagram below illustrates this process in more detail.
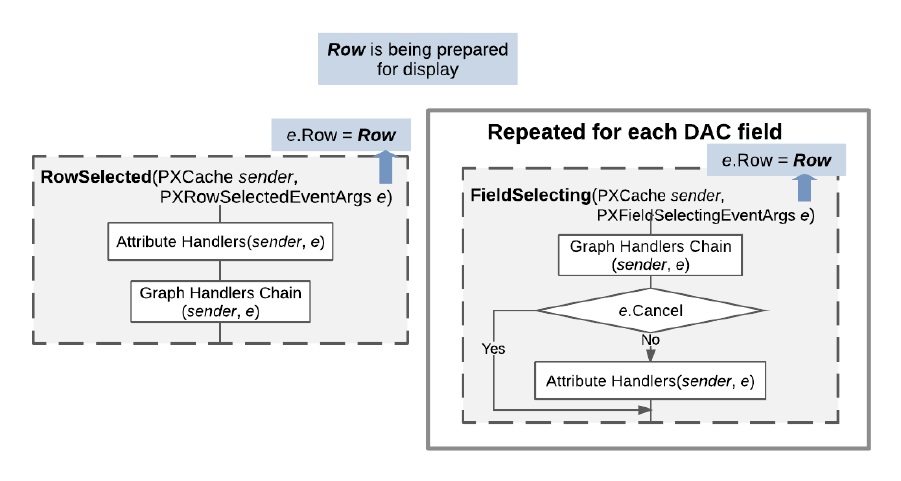
| Implementing Business Logic | 250
Figure: Display of a data record
Sequence of Events: Saving of Changes to the Database
The following figure illustrates the sequence of events that are raised when a data record is
saved.
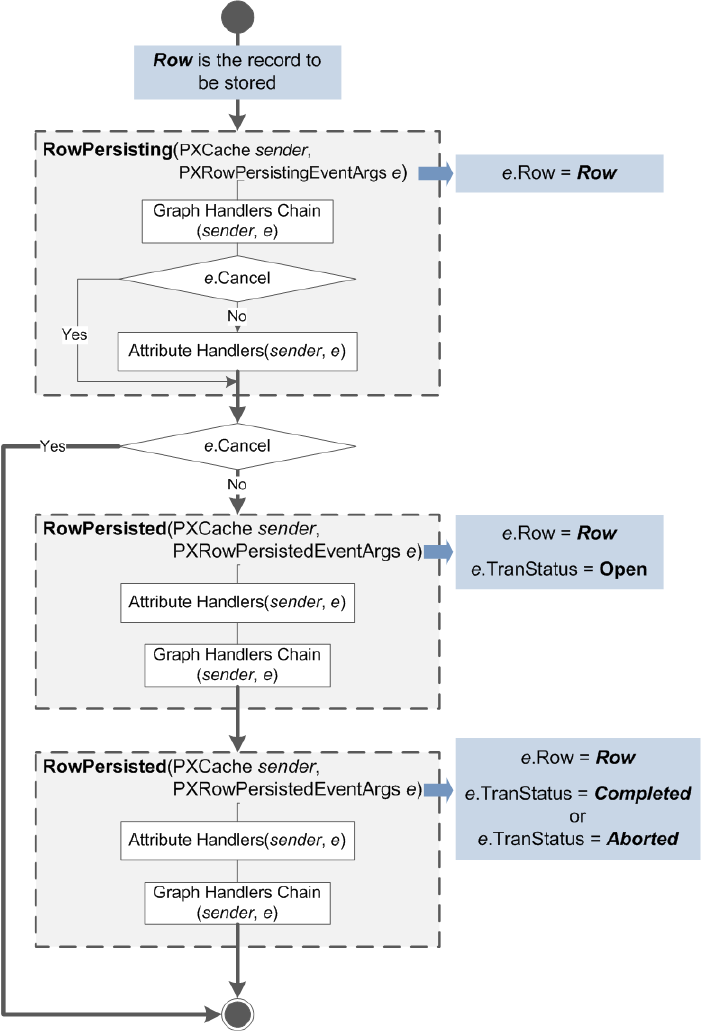
| Implementing Business Logic | 251
Figure: Save (commit) of a data record to the database
While a user is inserting, updating, or deleting a data record, no changes are committed
to the database. The system stores the modified data records in the session, and you can
access them through the appropriate PXCache object. The system commits the changes
to the database when the user clicks Save in the user interface, the save request is sent
through the Web Service API, or Actions.PressSave() is invoked on the business logic
| Implementing Business Logic | 252
controller (BLC) instance. In both cases, the Persist() method of the graph is invoked. The
Actions.PressSave() method additionally checks that the Save action exists in the graph
and is enabled. The Save action then invokes the Persist() method.
When changes are saved to the database, events are raised as follows:
1. RowPersisting is raised. At this moment, a database transaction has already been
opened. If any of the handlers sets e.Cancel to true, the process will be canceled for
the currently processed data record without an error being reported to the user. To
cancel the process of committing changes and indicate the error to the user, you should
throw the PXException exception.
2. If e.Cancel doesn't equal true:
a. RowPersisted is raised. The commit operation for the current data record (available
through e.Row in the handler) is completed, but the transaction is still open:
e.TranStatus equals Open.
b. RowPersisted is raised one more time, either with e.TranStatus equal to Completed
(if all changes have been saved successfully) or with e.TranStatus equal to Aborted
if an error has occurred and all changes have been canceled.
Related Links
• Persist() Method
• PXRowPersisting Delegate
• PXRowPersisted Delegate
List of Events
In this topic, you can find the list of all events by category. You can get more information
about any of these events by navigating to the applicable topic in the API Reference.
Data Field Events
• PXFieldDefaulting
• PXFieldVerifying
• PXFieldUpdating
• PXFieldUpdated
• PXFieldSelecting
Data Record Events
• PXRowSelected
• PXRowInserting

| Implementing Business Logic | 253
• PXRowInserted
• PXRowUpdating
• PXRowUpdated
• PXRowDeleting
• PXRowDeleted
Database-Related Events
• PXCommandPreparing
• PXRowSelecting
• PXRowPersisting
• PXRowPersisted
Exception-Handling Event
• PXExceptionHandling
Event for Overriding DAC Field Attributes
• CacheAttached
Cancellation of Attribute Event Handlers
Event handlers can be defined in a graph and in attributes. Graph event handlers and
attribute event handlers may be called in a different order, depending on the event:
• For events whose names end with ing, graph event handlers are called first. You can
prevent the execution of attribute event handlers by setting e.Cancel to true.
• For events whose names end with ed, attribute event handlers are called first.
For example, if you need to change the default value set by the PXDefault attribute for a
field, you can define a FieldDefaulting event handler in the graph. In this graph event
handler, you can assign a different default value and set e.Cancel to true to prevent the
execution of the FieldDefaulting event handler defined in the PXDefault attribute (see the
following code).
protected virtual void ShipmentLine_Gift_FieldDefaulting(
PXCache sender, PXFieldDefaultingEventArgs e)
{
ShipmentLine line = e.Row as ShipmentLine;
if (line == null) return;
Product card = GiftCard.Select();
if (card != null && line.ProductID == card.ProductID)

| Implementing Business Logic | 254
{
e.NewValue = true;
e.Cancel = true;
}
}
Validation of Field Values
If you want to independently validate a value inserted by a user, you should implement
the FieldVerifying event handler for the data field. You can use this approach to check
restrictions on the absolute value.
Generally, if validation fails, you can cancel the update of the field and restore the
control to its value before the user changed it by throwing an exception of the
PXSetPropertyException type, as is shown in the following example.
if ((decimal)e.NewValue < 0)
{
throw new PXSetPropertyException("The quantity cannot be negative.");
}
You could instead correct the entered value to a valid value as shown in the following
example.
if (product != null && (decimal)e.NewValue < product.MinAvailQty)
{
e.NewValue = product.MinAvailQty;
...
}
If you correct the entered value, you shouldn't throw an exception; instead, you should
let the method finish normally. However, we recommend that you display a warning
indicating that the value has been corrected automatically. To do this, you can invoke
the RaiseExceptionHandling<>() method of the PXCache<> type, as the following code
example shows. This method displays a warning for the validated data field but doesn't raise
an exception, so the method finishes normally and e.NewValue is set.
sender.RaiseExceptionHandling<ShipmentLine.lineQty>(
line, e.NewValue,
new PXSetPropertyException(
"The quantity has been corrected to the minimum possible value.",
PXErrorLevel.Warning));
You still have to initialize an instance of the PXSetPropertyException type. But this
time you do not throw an exception; you provide this instance as a parameter to the
RaiseExceptionHandling<>() method. You should specify the error level if you want the
message attached to the control to not be displayed with the default error sign. To attach
a warning to the control, specify PXErrorLevel.Warning in the PXSetPropertyException
constructor.

| Implementing Business Logic | 255
Validation of a Data Record
If the validation of a field value doesn't involve other fields of the same data record, you
should use the FieldVerifying event handler. For details, see Validation of Field Values.
If validation depends on other fields of the same data record, you should implement the
validation in the RowUpdating event handler. The RowUpdating event happens during the
update of a data record, after all field-related events have occurred. At the moment when
the RowUpdating event is triggered, the modifications haven't been applied to the data
record stored in the cache yet; if needed, you can cancel the update process.
The event arguments give you access to the following data records:
• e.NewRow: The modified version of the data record, which contains all changes made by
field-related events
• e.Row: The copy of the original data record stored in the cache
You can use the ObjectsEqual<>() method of the cache to compare these two data records
to find out if any of the fields specified in the type parameters of the method has changed.
For example, the event handler in the following code uses the ObjectsEqual<>() method (in
bold type) compares the new and original data records (also in bold type) for the values of
three fields.
protected virtual void _(Events.RowUpdating<ShipmentLine> e)
{
ShipmentLine line = e.NewRow;
ShipmentLine originalLine = e.Row;
if (!sender.ObjectsEqual<ShipmentLine.shipmentTime,
ShipmentLine.shipmentMinTime,
ShipmentLine.shipmentMaxTime>(line, originalLine))
{
...
}
...
}
In this example, the ObjectsEqual<>() method returns false if any of the following values
has changed: ShipmentTime, ShipmentMinTime, and ShipmentMaxTime.
To cancel the update process, you set the Cancel property of the event arguments to true.
We recommend that you generate an error message for any field whose value doesn't pass
validation. You do this by calling the RaiseExceptionHandling<>() method of the cache, as
shown in the following code example.
if (line.ShipmentTime != null && line.ShipmentMinTime != null &&
line.ShipmentTime < line.ShipmentMinTime)
{
sender.RaiseExceptionHandling<ShipmentLine.shipmentTime>(
| Implementing Business Logic | 256
line, line.ShipmentTime,
new PXSetPropertyException("The delivery time is too early."));
e.Cancel = true;
}
If the RowUpdating event handler finishes with the e.Cancel property equal to true, the
data record is not updated in the cache.
If the validation of a field depends on the field that is defined before the validated field in the
data access class (DAC), you can use the FieldVerifying event handler. The field-related
events are raised for fields in the order in which the fields are defined in the DAC. So in this
case, the FieldVerifying event handler is called for the validated field after all field-related
events have been raised for the field the validated field depends on.
In the example shown in the following code, the validation of the DeliveryDate
field depends on the ShipmentDate field. But because DeliveryDate is defined after
ShipmentDate in the Shipment DAC, it is correct to use the FieldVerifying event handler
to validate DeliveryDate.
protected virtual void _(Events.FieldVerifying<Shipment, Shipment.deliveryDate> e)
{
Shipment row = e.Row;
if (e.NewValue == null) return;
if (row.ShipmentDate != null && row.ShipmentDate > (DateTime)e.NewValue)
{
e.NewValue = row.ShipmentDate;
throw new PXSetPropertyException<Shipment.shipmentDate>(
"The shipment date cannot be later than the delivery date.");
}
}
Update of a Data Record on Update of a Field Value
You should use a FieldUpdated event handler to modify a data record when its field is
updated. The FieldUpdated event is raised when a data record is inserted or updated. When
a data record is updated, the FieldUpdated event is raised for only the updated fields. The
event is raised after other field-level events (FieldUpdating and FieldVerifying) and
before the row-level events (such as RowInserting and RowUpdating).
You should primarily use the FieldUpdated event to modify only the data record itself,
because the update (or insertion) of the data record can still be canceled in row-level events
(RowUpdating or RowInserting). If you modify other data records in the FieldUpdated
event and the update is canceled, your changes to the other data records won't be reverted.
To modify field values in a FieldUpdated event handler, follow the rules below:
• To update a field that is defined after the current field in the data access class, use the
properties of the e.Row data record as shown in the following code example.
ShipmentLine line = e.Row as ShipmentLine;

| Implementing Business Logic | 257
...
line.Description = product.ProductName;
Direct assignment of a value sets it to the given instance of the data record; no field-
level events are raised at this point.
• To update a field that is defined before the current field in the data access class, use one
of the following methods:
• SetValueExt<>(): You use this method of the cache to assign a specific value to a
field. The method raises the same field-level events for the data field as the events
raised when a data record is updated. For details about the update of a data record,
see Update of a Data Record.
• SetDefaultExt<>(): You use this method of the cache to assign the default value to
a field. The method raises the same field-level events for the data field as the events
raised when a data record is inserted. For details about the insertion of a data record,
see Insertion of a Data Record.
The code example below shows an invocation of the SetValueExt<> method.
sender.SetValueExt<ShipmentLine.ProductID>(e.Row, GiftCardID);
Internal and External Presentation of Values
The FieldSelecting and FieldUpdating events transform the field value between the
internal and external presentation. To construct the external value presentation that
is displayed in the UI, you handle the FieldSelecting event. To compose the internal
presentation that is held in the data access class (DAC) field, you handle the FieldUpdating
event.
The following parameters define the value presentation within the FieldSelecting event:
• e.ReturnValue defines the current field value, which is the internal value that is held in
the DAC field or the external value that is displayed in the control.
• e.ReturnState defines one of the following:
• The field state (a PXFieldState object) that provides the set of UI parameters for
the control. The UI control obtains all rendering parameters from the field state.
• The button state (a PXButtonState object) that provides UI parameters for the
action. The button state is constructed in the FieldSelecting event handlers of
the following attributes: the PXButton attribute, its successors, and the PXUIField
attribute defined for the action.
Every type attribute adds the event handlers for these two events, which by default
transform the field value between the internal presentation and the external one.
However, in the graph, you can define specific event handlers for the FieldSelecting and
FieldUpdating events and cancel the execution of handlers defined in attributes. Many
attributes—such as PXSelector, PXDefault, and PXUIField—handle events in which they
add specific information to the field state.

| Implementing Business Logic | 258
To specify the external presentation of the value, assign it to e.ReturnValue in the
FieldSelecting event handler. To specify the internal presentation of the value, assign it to
e.NewValue in the FieldUpdating event handler. For unbound data fields that are displayed
only in the UI, you can use only the FieldSelecting event that defines the UI presentation
of the value.
The FieldSelecting event is raised when the client requests the DAC field state to display
the field value in the UI.
The FieldUpdating event is raised every time the UI posts the updated external value to
the server.
Working with Attributes
In Acumatica Framework, you use attributes to add common business logic to the application
components.
Attributes implement business logic by subscribing to events. Each attribute class directly
or indirectly derives from the PXEventSubscriberAttribute class. In addition, an attribute
class derives from the interfaces that correspond to the event handlers it implements.
For example, the PXDefault attribute derives from the IPXFieldDefaultingSubscriber,
IPXRowPersistingSubscriber, and IPXFieldSelectingSubscriber interfaces,
which means that it implements its logic in the FieldDefaulting, RowSelecting, and
FieldSelecting event handler methods.
Attributes can be added to a data access class (DAC) definition, a data view declaration in a
business logic controller (BLC), and the BLC definition itself.
For more information on each attribute, see the API Reference.
In This Chapter
• Code Reuse Through Attributes
• Mandatory Attributes
• Use of Attributes
• Bound Field Data Types
• Unbound Field Data Types
• UI Field Configuration
• Default Values
• Complex Input Controls
• Referential Integrity
• Calculation of Field Values

| Implementing Business Logic | 259
• Ad Hoc SQL for Fields
• Audit Fields
• Data Projection
• Access Control
• Notes
• Report Optimization
• Attributes on DACs
• Action Attributes
• Attributes on Data Views
• Replacement of Attributes for DAC Fields in CacheAttached
• Custom Attributes
• Update of Data with PXAccumulator Attributes
• Restrictions in the Accumulator Attribute
Code Reuse Through Attributes
The following code implements the logic of updating a receipt total when a document
transaction is updated in the system.
public virtual void DocTransation_RowUpdated(PXCache cache,
PXRowUpdatedEventArgs e)
{
DocTransaction old = e.OldRow as DocTransaction;
DocTransaction trn = e.Row as DocTransaction;
if ((trn != null) && (trn.TranQty != old.TranQty ||
trn.UnitPrice != old.UnitPrice))
{
Document doc = Receipts.Current;
if (doc != null)
{
doc.TotalAmt -= old.TranQty * old.UnitPrice;
doc.TotalAmt += trn.TranQty * trn.UnitPrice;
Receipts.Update(doc);
}
}
}
This logic can be used in multiple forms of the application, and therefore can be moved into
an Attribute class. The attribute is used to annotate a data field in the data access class.
Then it can be reused anywhere in the code, as in the example below.

| Implementing Business Logic | 260
public class DocTransaction : PX.Data.IBqlTable
{
...
#region TotalAmt
public abstract class totalAmt : PX.Data.IBqlField
{
}
[PXDBDecimal(2)]
[PXDefault(TypeCode.Decimal, "0.00")]
[PXUIField(DisplayName = "Line Total", Enabled = false)]
[DeltaMultiply(typeof(DocTransaction.tranQty), typeof(DocTransaction.unitPrice),
typeof(Document.totalAmt)]
public virtual decimal? ExtPrice { get; set; }
#endregion
...
}
In this example, the logic of updating the receipt total on an update of the transaction is
implemented inside the DeltaMultiply attribute. This logic is triggered after each update,
delete, or insert operation on the DocTransaction data access class instance and updates
totals on the receipt level in the appropriate Document data access class instance.
Acumatica Framework provides a wide range of predefined attributes that can be used for
defining data types, database mapping, referential integrity, data format validation, and
default values for the field. The following code shows an example of how you can implement
the logic from the above example by using the predefined PXFormula attribute, which is
used for implementing calculations of data fields.
public class DocTransaction : PX.Data.IBqlTable
{
...
#region TotalAmt
public abstract class totalAmt : PX.Data.IBqlField
{
}
[PXDBDecimal(2)]
[PXDefault(TypeCode.Decimal, "0.00")]
[PXUIField(DisplayName = "Line Total", Enabled = false)]
[PXFormula(typeof(Mult<DocTransaction.tranQty, DocTransaction.unitPrice>),
typeof(SumCalc<Document.totalAmt>))]
public virtual decimal? ExtPrice { get; set; }
#endregion
...
}
Because the data access classes are shared within an application, formatting, custom
logic, and any constraints implemented in attributes are reused in each business logic
controller that utilizes each data access class. By reusing code through attributes, you can
move shared application functionality into attributes and avoid code duplication, while still
enforcing application integrity.

| Implementing Business Logic | 261
Mandatory Attributes
In this topic, you can learn about the mandatory attributes of data access class (DAC) fields
and actions.
Mandatory Attributes of DAC Fields
For each field defined in a DAC, you must specify the following attributes:
• A data type attribute, which is either a bound field data type attribute that binds the field
to a database column of a particular data type, or an unbound field data type attribute
that indicates that the field is unbound. For lists of these attributes, see Bound Field Data
Types and Unbound Field Data Types.
• The PXUIField attribute, which is mandatory for all fields that are displayed in the user
interface. For details on the PXUIField attribute, see UI Field Configuration.
The example below demonstrates a declaration of a DAC field bound to a database column
and displayed in the user interface.
// The data access class for the POReceiptFilter database table
[Serializable]
public partial class POReceiptFilter : IBqlTable
{
...
// The type declaration of a DAC field
public abstract class receiptType : PX.Data.IBqlField
{
}
// The value declaration of a DAC field
// Put attributes before this declaration
[PXDBString(2, IsFixed = true)]
[PXUIField(DisplayName = "Type", Enabled = false)]
public virtual String ReceiptType { get; set; }
...
}
Mandatory Attributes of Actions
A declaration of a method that implements an action in a business logic controller must be
preceded with the PXButton attribute or one of its successors and the PXUIField attribute.
For details on the PXUIField attribute, see UI Field Configuration.
The example below demonstrates a declaration of an action handler.
public PXAction<SalesOrder> ViewDocument;
[PXUIField(DisplayName = "View Document",
MapEnableRights = PXCacheRights.Select,
MapViewRights = PXCacheRights.Select)]

| Implementing Business Logic | 262
[PXButton]
public virtual IEnumerable viewDocument(PXAdapter adapter)
{
...
}
Related Links
• Bound Field Data Types
• Unbound Field Data Types
• UI Field Configuration
• PXUIFieldAttribute
• PXButtonAttribute
Use of Attributes
To apply the attribute business logic to an entity, you should place the attribute on the entity
declaration. At runtime, you can call the static methods of a particular attribute to adjust the
attribute's behavior.
Attributes on the Entity Declaration
An attribute may be placed on a declaration of a class or a class member, with or without
parameters. The parameters that are possible for an attribute depend on the constructor
parameters and the properties defined in the attribute. The parameters of the selected
constructor are placed first without names, and the named property settings follow them, as
shown in the following example.
[PXDefault(false, PersistingCheck = PXPersistingCheck.Nothing)]
public virtual Boolean? Released { get; set; }
Here the PXDefault attribute is created with the constructor that takes a Boolean-type
parameter (set to false). Additionally, the PersistingCheck property is specified.
Setting of Attribute Properties at Runtime
You should call static methods defined in the attribute class to change the properties at
runtime. The static methods can affect a single attribute instance or multiple attribute
instances related to a specific data record or all data records in a particular cache object.
The following example shows an invocation of a static method.
PXUIFieldAttribute.SetVisible<APInvoice.curyID>(cache, doc, true);
When calling such a method, you typically specify the cache object, a data record related to
this cache object, and the data access class (DAC) field. The method affects the attribute
instance created for this field and the specified data record. If you pass null as the data
| Implementing Business Logic | 263
record, the method affects attribute instances related to all data records in the specified
cache object.
Bound Field Data Types
The following attributes bind a data access class (DAC) field to a database column of a
specific type.
Attribute C# Data
Type
Database Da-
ta Type
Comment
PXDBBool bool? bit Boolean value
PXDBByte byte? tinyint One-byte integer value
PXDBDate DateTime? datetime or
smalldatetime
Date and time
PXDBTime DateTime? smalldatetime Time without date
PXDBDateAndTime DateTime? datetime or
smalldatetime
Date and time values represented
by separate input controls in the
user interface
PXDBDecimal decimal? decimal Sixteen-byte floating point numeric
value with a specific precision
PXDBDecimalString decimal? decimal A decimal value with a value select-
ed by a user from the list of prede-
fined values
PXDBDouble double? float Eight-byte floating point value
PXDBFloat float? real Four-byte floating point value
PXDBGuid Guid? uniqueidenti-
fier
Sixteen-byte unique value
PXDBIdentity int? int Four-byte auto-incremented integer
value
PXDBLongIdentity int64? bigint Eight-byte auto-incremented inte-
ger value
PXDBShort short? smallint Two-byte integer value
PXDBInt int? int Four-byte integer value
PXDBLong int64? bigint Eight-byte integer value
PXDBString string char, varchar,
nchar, or nvar-
char
Common string
PXDBEmail string nvarchar Email address
| Implementing Business Logic | 264
Attribute C# Data
Type
Database Da-
ta Type
Comment
PXDBLocalString string char, varchar,
nchar, or nvar-
char
Localized string
PXDBCryptString string char, varchar,
nchar, or nvar-
char
Encrypted string
PXDBText string nvarchar or
varchar
Text
PXDBTimeSpan int? int Date and time value represented by
minutes passed from 01/01/1900
PXDBTimeSpanLong int? int Duration in time as a number of
minutes
PXDBTimestamp byte[] timestamp Eight-byte unique, automatically
generated binary numbers within a
database
PXDBBinary byte[] Arbitrary array of bytes
PXDBVariant byte[] variant Variant data type
Acumatica Framework also includes other attributes that are used in special cases to bind a
DAC field to database columns.
Unbound Field Data Types
The following table contains unbound field attributes. You use unbound attributes when you
define a custom fields of your own that are not bound to any database fields.
Attribute C# Data
Type
Comment
PXBool bool? Boolean value
PXByte byte? One-byte integer value
PXDate DateTime? Date and time
PXDateAndTime DateTime? Date and time values represented by separate in-
put controls in the user interface
PXDecimal Decimal? Sixteen-byte floating point numeric value with a
specific precision
PXDouble double? Eight-byte floating point value
PXFloat float? Four-byte floating point value
PXGuid Guid? Sixteen-byte unique value
| Implementing Business Logic | 265
Attribute C# Data
Type
Comment
PXShort short? Two-byte integer value
PXInt int? Four-byte integer value
PXLong int64? Eight-byte integer value
PXString string String of characters
PXTimeSpan int? Date and time value represented by minutes
passed from 01/01/1900
PXTimeSpanLong int? Duration in time as a number of minutes
PXVariant byte[] Random array of bytes
UI Field Configuration
By using the PXUIField attribute, you can configure the layout of input controls and
buttons. The attribute is mandatory for all data access class (DAC) fields displayed in the
user interface.
Setting of the PXUIField Attribute
You can add the PXUIField attribute in the following ways:
• To a DAC field declaration to configure the field input control, as shown in the following
example
[PXDBDate()]
[PXUIField(DisplayName = "Pay Date")]
public virtual DateTime? PayDate { get; set; }
• To the declaration of a method that implements an action to configure the action button,
as shown in the following sample code
[PXUIField(DisplayName = "View Document",
MapEnableRights = PXCacheRights.Select,
MapViewRights = PXCacheRights.Select)]
[PXButton]
public virtual IEnumerable viewDocument(PXAdapter adapter)
{
...
}
The attribute's properties determine the control layout in the user interface. You can specify
the display name, specify whether the control is visible and available, set the error marker,
and specify the access rights to view and use the control.

| Implementing Business Logic | 266
Setting of the Properties of the PXUIField Attribute at Runtime
You can use the static methods (such as SetEnabled and SetRequired) of the
PXUIFieldAttribute class to set the properties of a control at runtime. The
PXUIFieldAttribute static methods can be called in the graph constructor or the
RowSelected event handlers.
The RowSelected event handler is raised when the user interface controls are
prepared to be displayed. This happens each time the form sends a request to the
server.
If you want to modify the Visible, Enabled, and Required properties for all detail rows in
a grid, you use the RowSelected event handler of the primary view DAC. If you want to set
the Enabled property of a field in particular row in a grid, you use the RowSelected event
handler of the DAC that includes this field.
If the grid column layout is configured at runtime, you set the data parameter of the
corresponding method to null. This indicates that the property should be set for all data
records shown in the grid. If a specific data record is passed to the method rather than null,
the method invocation has no effect.
If you want to change the Visible or Enabled property of PXUIFieldAttribute for a
button at runtime, you use the corresponding static methods of PXAction. You usually
use these methods in the RowSelected event handler of the primary view DAC.
Related Links
• PXUIFieldAttribute Class
Default Values
You can set the default values to data access class (DAC) fields by using the following
attributes:
• PXDefault: This attribute sets the default value and validates the field value when the
value is saved to the database. The following attributes are derived from the PXDefault
attribute:
• PXUnboundDefault behaves in the same way as PXDefault does, but the default
value is assigned to the field when a data record is retrieved from the database.
• PXDefaultValidate.
• PXDBDefault: This attribute sets the default value by using the value of some source
field, and updates the value if the source field value changes in the database before the
data record is saved.
PXDefault Attribute
The PXDefault attribute provides the default value for a DAC field. The default value is
assigned to the field when the cache raises the FieldDefaulting event. This happens when
a new row is inserted in code or through the user interface.
| Implementing Business Logic | 267
A value specified as a default can be a constant or the result of a BQL query. If you provide
a BQL query, the attribute executes it on the FieldDefaulting event. You can specify both
a constant and a BQL query; the attribute first executes the BQL query and then uses the
constant if the BQL query returns an empty set. If you provide a DAC field as the BQL query,
the attribute retrieves the value of this field from the Current property of the cache object.
The attribute uses the cache object of the DAC type in which the field is defined.
The PXDefault attribute also checks that the field value is not null before saving a record
to the database. You can adjust this behavior by using the PersistingCheck property. Its
value indicates whether the attribute should verify that the value is not null, verify that the
value is not null or a blank string, or not perform any verification.
The attribute can redirect the error that happened on the field to another field if you set the
MapErrorTo property.
You can use the static methods of the attribute to change the attribute properties for a
particular data record in the cache or for all data records in the cache.
Differences
You usually set the default value to a DAC field by using the PXDefault attribute. You
can set a constant as the default value or provide a BQL query to obtain a value from the
database or data records from the cache. The default value is assigned to the field when a
data record that includes this field is inserted into the cache.
You can use the PXDefault attribute just to make the field mandatory for input by using the
attribute without parameters.
The PXDefault attribute is not suitable when the default value is retrieved from a field that
can be auto-generated by the database (such as the identity field). In this case, you should
use the PXDBDefault attribute. It updates the value assigned to the field as the default with
the value generated by the database.
For example, if you implement a master-detail relationship, you should use the PXDBDefault
attribute to bind the detail data record fields to the master data record key fields. If the
master data record is new, its identity field is set to a real value by the database when the
master record is saved. So if a detail data record is created before the master data record is
saved, the detail data record field is set to the temporary value of the master identity field.
However, the PXDBDefault attribute replaces the temporary value with the real value when
the detail data record is saved to the database.
You can use the PXUnboundDefault attribute to set the default value to an unbound
field. The value is assigned when a data record is retrieved from the database (on the
RowSelecting event).
Related Links
• PXDBDefaultAttribute Class
• PXDefaultAttribute Class
• PXUnboundDefaultAttribute Class
| Implementing Business Logic | 268
Complex Input Controls
You can use attributes to configure complex input controls, such as drop-down lists and
lookup controls.
Drop-Down Lists
You can use the following attributes to configure a drop-down list that represents a data
access class (DAC) field in the user interface:
• PXStringList: Configures a drop-down list from which a user can select from a fixed set
of strings.
• PXIntList: Configures a drop-down list where a user can select from a fixed set
of values. The control displays strings, while the field is assigned the integer value
corresponding to the selected string.
• PXDecimalList: Configures a drop-down list where a user can select from a fixed set of
strings converted to decimal values.
• PXImagesList: Configures a drop-down list where a user can select from a fixed set of
images.
• PXDBIntList: Configures a drop-down control for an integer field. The values and labels
for the drop-down control are retrieved from the specified database table.
• PXDBStringList: Configures a drop-down control for a string field. The values and labels
for the drop-down control are retrieved from the specified database table.
Lookup Controls
You can use the following attributes to configure a lookup control that represents a field in
the user interface:
• PXSelector: Defines a lookup control for a DAC field that references a data record from
a particular table by holding its key.
• PXCustomSelector: Serves as the base class to derive custom attributes used to
configure lookup controls.
• PXRestrictor: Adds a restriction to a BQL command that selects data for a lookup
control, and displays an error message when the value entered does not fit the
restriction. The attribute works only with PXSelector and cannot be used with
PXCustomSelector.
Segmented Key Controls
A segmented key value is a string value that identifies a data record in the system and
consists of one segment or multiple segments. A segmented key is an entity that is identified
by a string (referred to as a dimension) and associated with segments. For each segment,
you can define the list of possible values. You can create a new segment when the data
records identified by the segmented key already exist in the database.

| Implementing Business Logic | 269
You can use the following attributes to configure a control to input a segmented key value in
the user interface:
• PXDimension: Defines an input control that formats the input as a segmented key value
and displays the list of allowed values for each key segment.
• PXDimensionSelector: Defines an input control that combines the functionality of
the PXDimenstion attribute and the PXSelector attribute. A user can view the data
set defined by the attribute and select a data record from this data set to assign its
segmented key value to the field or to replace it with the surrogate key.
• PXDimensionWildcard: Behaves similarly to the PXDimensionSelector attribute, but
also allows the ? character to be treated as a wildcard.
Referential Integrity
You can use the following attributes to implement referential integrity at runtime:
• PXParent: Creates a reference to a parent data record. By default, when the parent
data record is deleted, all child data records that reference it are also deleted. (You can
change this behavior by using the LeaveChildren property.)
• PXDBChildIdentity: Indicates that a DAC field references an auto-generated key field
from another table, and ensures that the field value is correct after changes have been
committed to the database.
• PXLineNbr: Generates unique line numbers that identify child data records in the parent-
child relationship.
Note that all the attributes in the list above add server-side logic used at runtime. The
referential integrity is implemented on the server side.
Calculation of Field Values
You can use the predefined attributes PXFormula and PXUnboundFormula in data access
classes (DACs) to calculate field values from the values of the same data record. You can
also calculate aggregated values over detail data records and assign an aggregated value to
a field of the master data record.
The attributes implement the RowInserted, RowUpdated, and RowDeleted event handlers to
calculate aggregates. Also, the attributes use the FieldUpdated event handler for dependent
fields. The PXFormula attribute defines the RowSelecting event handler to calculate values
for unbound DAC fields. You only need to mark a field in the DAC with an attribute; you
don't have to define any event handlers.
You use the PXFormula and PXUnboundFormula attributes as follows:
• To calculate the value of a field from other fields of the same data record, you add the
PXFormula attribute with one parameter to this field, as shown below.
[PXFormula(

| Implementing Business Logic | 270
typeof(Mult<DocTransaction.tranQty,DocTransaction.unitPrice>)]
public virtual decimal? ExtPrice
...
This code sets ExtPrice to the product of TranQty and UnitPrice.
• To calculate the value of a field from other fields of the same data record and calculate
the aggregated value from these values, you add the PXFormula attribute with two
parameters to this field. You should also add the PXParent attribute to identify the
master data record. (See the following code.)
[PXFormula(
typeof(Mult<DocTransaction.tranQty, DocTransaction.unitPrice>),
typeof(SumCalc<Document.totalCost>))]
public virtual decimal? ExtPrice
...
[PXParent(typeof(Select<Document,
Where<Document.docType, Equal<Current<DocTransaction.docType>>,
And<Document.docNbr, Equal<Current<DocTransaction.docNbr>>>>>))]
public virtual string DocType
...
This code sets ExtPrice to the product of TranQty by UnitPrice, summarizes ExtPrice
over all detail data records, and assigns the result to the TotalCost field of the parent
document.
• To calculate an aggregated value by using the value of the field, you add the PXFormula
attribute to this field with the first parameter set to null, as shown below. The PXParent
attribute is required.
[PXFormula(
null,
typeof(SumCalc<Document.totalCost>))]
public virtual decimal? ExtPrice
...
This code sets the TotalCost field of the parent document to the sum of the ExtPrice
values.
• To calculate an expression for each detail data record and aggregate the resulting values
in a field of the master data record, you add the PXUnboundFormula attribute to any
field of the detail data record, as shown in the following code. The field marked with the
attribute is not set by the attribute. The PXParent attribute is required.
[PXUnboundFormula(
typeof(Mult<DocTransaction.tranQty, DocTransaction.unitPrice>),
typeof(SumCalc<Document.totalCost>))]
public virtual decimal? ExtPrice
...
| Implementing Business Logic | 271
This code sets the TotalCost field of the parent document to the sum of the products of
the TranQty and UnitPrice values. The attribute doesn't set the ExtPrice field.
With PXUnboundFormula, you can use SumCalc<> and MaxCalc<>.
Functions and Aggregated Functions
In the first parameter of the PXFormula and PXUnboundFormula attributes, you can specify
an expression built of data fields, BQL constants, and the following BQL functions:
• Add<,> returns the sum of two values.
• Sub<,> substracts the second value from the first.
• Mult<,> multiplies two values.
• Div<,> divides the first value by the second.
• Minus<> multiplies a value by -1.
• Switch<Case<>,> returns a value selected by a condition.
In the second parameter of the PXFormula and attribute, you can specify one of the
following aggregation functions with the parent's field to hold the result as the type
parameter:
• SumCalc<> calculates the total sum.
• CountCalc<> counts the detail data records.
• MinCalc<> calculates the minimum values.
• MaxCalc<> calculates the maximum value.
The PXUnboundFormula attribute supports only SumCalc<> and MaxCalc<>.
Ad Hoc SQL for Fields
The following attributes define the database-side calculation of data access class (DAC) fields
that are not bound to particular database columns:
• PXDBCalced: Defines an SQL expression that calculates an unbound field from the fields
of the same DAC, whose values are taken from the database.
• PXDBScalar: Defines an SQL subrequest that retrieves a value for an unbound DAC field.
The subrequest can retrieve data from any bound field in any DAC.
The attributes add the provided expression and the subrequest into the SQL query that
selects data records of the given DAC.
| Implementing Business Logic | 272
PXDBScalar
The PXDBScalar attribute defines a subquery that selects the value assigned to the field on
which the attribute is specified. In the code example below, PXDBScalar selects the value
from the ProductQty.AvailQty data field and inserts it into the ProductReorder.AvailQty
field.
// The ProductReorder class
[PXDecimal(2)]
[PXDBScalar(typeof(Search<ProductQty.availQty,
Where<ProductQty.productID.IsEqual<ProductReorder.productID>>>))]
[PXUIField(DisplayName = "Available Qty", Enabled = false)]
public virtual decimal? AvailQty { get; set; }
The BQL expressions specified in the PXDBScalar attribute above adds the following
subqueries (shown in bold type) to the SQL query that selects ProductReorder
records.
SELECT ...,
(SELECT TOP (1) ( productqty.availqty )
FROM productqty ProductQty
WHERE ( productqty.productid = ProductReorder.productid )
ORDER BY productqty.availqty),
...
FROM ...
PXDBCalced
The PXDBCalced attribute defines an expression that is translated into SQL. This expression
calculates the field value from other fields of the same data record. An example of the
PXDBCalced attribute is shown in the following code.
[PXDecimal(2)]
[PXUIField(DisplayName = "Discrepancy")]
[PXDBCalced(
typeof(Minus<
Sub<IsNull<ProductReorder.availQty, decimal_0>,
ProductReorder.minAvailQty>>)
typeof(Decimal))]
public virtual decimal? Discrepancy { get; set; }
The BQL expression specified in PXDBCalced in the previous code adds the following
calculation expression to the SQL query that selects ProductReorder records.
SELECT ...,
(( -( Isnull((SELECT TOP (1) ( productqty.availqty )
FROM productqty ProductQty
WHERE ( productqty.productid = ProductReorder.productid )
ORDER BY productqty.availqty), .0)
- ProductReorder.minavailqty ) )),

| Implementing Business Logic | 273
...
FROM ...
Unlike PXDBCalced, the PXFormula attribute can be added to either an unbound or bound
data field. Also, the PXFormula attribute provides calculation of master DAC fields from child
DAC fields. For more information on PXFormula, see Calculation of Field Values.
Audit Fields
The following attributes are placed on data access class (DAC) fields used for data audit:
• PXDBLastChangeDateTime: Maps a DAC field to the database column and automatically
sets the field value to the data record's last modification date and time.
• PXDBCreatedByID: Maps a DAC field to a database column and automatically sets the
field value to the ID of the user who created the data record.
• PXDBCreatedByScreenID: Maps a DAC field to a database column and automatically sets
the field value to the string ID of the application screen from which the data record was
created.
• PXDBCreatedDateTime: Maps a DAC field to a database column and automatically sets
the field value to the data record's creation date and time.
• PXDBCreatedDateTimeUtc: Maps a DAC field to a database column and automatically
sets the field value to the data record's creation UTC date and time.
• PXDBLastModifiedByID: Maps a DAC field to a database column and automatically sets
the field value to the ID of the user who last modified the data record.
• PXDBLastModifiedByScreenID: Maps a DAC field to a database column and
automatically sets the field value to the string ID of the application screen on which the
data record was last modified.
• PXDBLastModifiedDateTime: Maps a DAC field to a database column and automatically
sets the field value to the data record's last modification date and time.
• PXDBLastModifiedDateTimeUtc: Maps a DAC field to a database column and
automatically sets the field value to the data record's last modification date and time in
UTC.
The framework binds the DAC fields to database columns and automatically assigns field
values.
Data Projection
The following attributes implement the projection of data from one table or multiple tables
into a single data access class (DAC):
• PXProjection: Binds the DAC to a random data set. The attribute thus defines a named
view, but is implemented by the server side rather than by the database.
| Implementing Business Logic | 274
•
PXExtraKey: Indicates that the field implements a relationship between two tables. The
use of this attribute enables the update of the referenced table when the projection is
updated.
Access Control
The group mask value indicates the access rights a user should have in order to use a
data record. To be able to set access rights for particular data records, you should use the
PXDBGroupMask attribute to mark the data access class (DAC) field that holds the group
mask value.
On a substitute form, to define the inheritance of access rights for an action that is
implemented in the corresponding entry form, you can use the PXEntryScreenRights
attribute.
Related Links
• PXDBGroupMaskAttribute Class
• PXEntryScreenRightsAttribute Class
Notes
By using the PXNote attribute, you can give users the ability to attach text notes, files, and
activity items to data records, and to search for an entity by using the full-text search index.
You should use the PXNote attribute in the data access class of these data records to mark
the field that stores the identifier of a note in the Note table. Notes are used to attach text
to a data record. This text is stored in the note data record in the Note table. Additionally,
you can attach files or other entities to a data record through a note. This feature is
implemented through additional tables that store the identifiers of a note and the attached
entity.
The PXNote attribute can also be configured to save the specified table fields in a note. In
this case, by using the Acumatica Framework application website search, the user will be
able to search the data records by the values saved in the note.
Related Links
• PXNoteAttribute Class
• To Allow Attachments to a Particular Form
• To Display an Attached Image on the Form
Report Optimization
The value of an unbound data access class (DAC) field can be calculated in the property
getter. The calculation can involve other fields of the same DAC. However, when the value
| Implementing Business Logic | 275
of the DAC field is requested, other fields are not guaranteed to be calculated or assigned
their values. These situations are normal when the integration services are used, copy-paste
functionality is used, or the field is used in reports.
To ensure that the fields referenced in the property getter have values when it is executed,
you should use the PXDependsOnFields attribute.
Related Links
• PXDependsOnFieldsAttribute Class
• Display of Reports
Attributes on DACs
You can place the following attributes on the data access class (DAC) declaration:
• PXPrimaryGraph: Specifies the graph that is used by default to edit a data record.
• PXCacheName: Specifies the user-friendly name of the DAC. The name is displayed in the
user interface.
• PXTable: Binds a DAC that derives from another DAC to the table having the name of
the derived table. Without the attribute, the derived DAC will be bound to the same table
as the DAC that starts the inheritance hierarchy.
• PXAccumulator: Updates the values of a data record in the database according to the
policies specified in the attribute parameters.
• PXHidden: Gives the developer the ability to hide a DAC, graph, or view from the
selectors of DACs and graphs, and from generic inquiries, reports, and the web services
API.
The PXProjection and PXTable attributes can also mark a DAC. See Data Projection for more
details.
Action Attributes
You use the following attributes to configure a button that will represent an action in the
user interface:
• PXButton: Serves as the base attribute for all other attributes, which give you the ability
to configure buttons. The successor attributes only set the base class properties to
specific values.
• PXSaveButton
• PXSaveCloseButton
• PXCancelButton
• PXCancelCloseButton
| Implementing Business Logic | 276
• PXInsertButton
• PXDeleteButton
• PXFirstButton
• PXPreviousButton
• PXNextButton
• PXLastButton
• PXSendMailButton
• PXReplyMailButton
• PXForwardMailButton
• PXTemplateMailButton
• PXLookupButton
• PXProcessButton
Also, you can use the following attributes:
• PXUIField: To configure the button layout and set access rights
• PXEntryScreenRights: On a List as Entry Point screen, to define the inheritance of
access rights for an action that is implemented in the appropriate entry screen
Attributes on Data Views
You can place the following attributes on the declaration of a data view in a graph:
• PXFilterable: Adds the control that makes it possible for a user to create filters and
save them in the database. The control is added to the grid that uses the data view to
retrieve data.
• PXImport: Adds the grid toobar button that a user clicks to load data from the file to the
grid. The attribute is placed on the data view the grid uses to retrieve the data.
• PXHidden: Hides the data view from the selectors of data access classes (DACs) and
graphs, and from the web service API clients.
• PXCopyPasteHiddenView: Indicates that the cache corresponding to the primary DAC of
the data view is not copied when the copy-paste feature is used on the form.
• PXCopyPasteHiddenFields: Indicates that the specific fields of the primary DAC of the
data view are not copied when the copy-paste feature is used on the form.

| Implementing Business Logic | 277
Replacement of Attributes for DAC Fields in CacheAttached
The attributes that you add to a data field in the DAC are initialized once, during the
startup of the domain. You can replace attributes for a particular field by defining the
CacheAttached event handler for this field in a graph. These attributes are also initialized
once, on the first initialization of the graph where you define this method.
The system stores the attributes from the DAC and graphs (domain-level attributes). On
each round trip, the system copies the appropriate domain-level attributes to the cache
object, creating cache-level attributes. Attribute constructors are not invoked; instead, the
system invokes the CacheAttached(PXCache) method for each copy of an attribute. If you
modify an attribute's properties in code for a particular data record, the cache object creates
a data-record copy of the attribute.
Attribute Replacement in a Graph
Attributes specified in a data access class apply to this class in every graph of the application
unless a graph replaces them with other attributes. In some graphs, you may need
attributes that differ from what is declared in the DAC. To replace attributes within a
particular graph, add new attributes to the CacheAttached event handler for the particular
field defined in the graph, as the following code shows. When you replace attributes, you
have to redefine all attributes, including the type attribute.
// The CustomerMaint graph
[PXDBString(40, IsUnicode = true)]
// The field label for the form that works with the CustomerMaint graph
// is set to "Company"
[PXUIField(DisplayName = "Company")]
protected virtual void _(Events.CacheAttached<Account.companyName> e)
{ // Empty method
}
In a graph, each PXCache object stores attributes for the corresponding DAC (see the
diagram below). When a PXCache object is created, the framework searches for attributes of
CacheAttached event handlers in the graph using the DAC field name. Attributes specified
for these event handlers are copied to PXCache objects. If there is no CacheAttached
event handler defined for a DAC field, the attributes are copied from the data access class.
Attributes of CacheAttached event handlers are instantiated once, on the first initialization
of the graph in which you define this event handler. In the data access class, the attributes
are instantiated when the application domain starts.
When you add an attribute to a DAC field, the attribute subscribes to certain events of
Acumatica Framework. In event handlers, the attribute processes the field value based
on the purpose of the attribute. For instance, the PXDefault attribute subscribes to the
FieldDefaulting event and sets the default value every time the event is raised for the
field. Multiple attributes can subscribe to the same event.
| Implementing Business Logic | 278
Figure: Attribute replacement in a graph
Custom Attributes
Typically, you use custom attributes for DAC fields to reuse the same behavior or business
logic in multiple places of the application.
If you want to add new functionality that can be used in multiple places of the application
(for instance, automatic numbering of documents), you can create a custom attribute from
scratch. To implement the new logic, you need to handle the events on which the logic
should be performed. Acumatica Framework automatically subscribes attribute methods that
implement interfaces to the corresponding events; you don't have to manually subscribe
these methods to events. In many cases, you can also add static methods to the attribute
class to provide the dynamic API of the attribute. By using these methods, you can change
the attribute parameters of DAC fields in a graph at runtime.
Creation of a Custom Attribute
To create a custom attribute from scratch, you do the following (see the sample code
below):
1. Derive a new attribute class from PXEventSubscriberAttribute.
2. Implement the constructor.
3. Implement the CacheAttached method (if you are reading parameters or data from the
database).
4. Implement interfaces that correspond to the events.
public class MyFieldAttribute : PXEventSubscriberAttribute,
// The FieldVerifying() method

| Implementing Business Logic | 279
IPXFieldVerifyingSubscriber
{
// Create internal objects here.
// Do not read dynamic parameters or data from the database.
public MyFieldAttribute()
{
// Code
}
// Process input parameters here; read dynamic parameters and data from
// the database so that the data is current every time the cache is
// initialized.
public override void CacheAttached(PXCache sender)
{
// Code
}
// For instance, implement the IPXFieldVerifyingSubscriber interface.
// The framework subscribes the method to the FieldVerifying event.
// You don't have to manually subscribe this method to the event.
public virtual void FieldVerifying(PXCache sender,
PXFieldVerifyingEventArgs e)
{
// Code
}
// Add static methods to modify the attribute at runtime.
// The first and second parameters are always the cache object
// and data record.
public virtual Type LastNumberField { get; private set; }
public static void SetLastNumberField<Field>(
PXCache sender, object row, Type lastNumberField)
where Field : IBqlField
{
// Search for the attributes in the provided cache object
foreach (PXEventSubscriberAttribute attribute in
sender.GetAttributes<Field>(row))
{
if (attribute is AutoNumberAttribute)
{
AutoNumberAttribute attr = (AutoNumberAttribute)attribute;
attr.LastNumberField = lastNumberField;
attr.CreateLastNumberCommand();
}
}
}
}

| Implementing Business Logic | 280
Implementation of the Attribute Constructor and CacheAttached Methods
In the constructor, you usually validate input parameters and save them to internal objects
of the attribute. However, to read data from the database or conditionally configure the
attribute, you typically use the CacheAttached() method of the attribute. When you create
a custom attribute, you should take into account that the attribute constructor is invoked
only during domain startup and on the initialization of a graph with the CacheAttached()
event handler (see Replacement of Attributes for DAC Fields in CacheAttached).
We recommend that you read the data from the database in the graph execution
context. To do this, read the data and set the actual parameters for the attribute in the
CacheAttached() method that you override in your custom attribute. From the sender
input parameter of the CacheAttached() method, you can get the reference to the graph
in whose context the attribute is used. Every time the framework initializes a cache within
a graph, the CacheAttached() method implemented in the attribute is invoked for each
attribute on a DAC field for that particular graph. The graph is created on every round trip,
so if you read data in CacheAttached(), the attribute retrieves the actual parameters every
time. Also, you might need to read data in event handlers just before you use the data in
the attribute. For instance, in Example in this topic, you retrieve the last assigned number in
the RowPersisting() method just before you calculate the new number and insert it into a
document.
Do not confuse the CacheAttached() method that you implement in attributes with
the CacheAttached() event handler that you define in a graph. The CacheAttached()
event handler of the graph has no implementation and is used as a marker to
substitute attributes on the specified DAC field in that particular graph. The
CacheAttached() method implemented in attributes is invoked on attributes that are
current for the graph when the appropriate cache is initialized.
Implementation of a Static Method of an Attribute
To implement a static method that provides dynamic configuration of the attribute, you can
define a static method, taking into account the following considerations:
1. You should pass a PXCache object and a data record as input parameters of the method.
2. To be able to get the attribute object on a particular field of a record, you should define
the generic method with the <Field> type parameter. To get the collection of attributes
on the field, invoke the GetAttributes<Field>(record) method of the PXCache object
that stores the record.
3. To find the needed attribute, you should iterate the collection of attributes to find the
object of the needed attribute type.
In the following code example, the static SetPrefix<Field> method of the
AutoNumberAttribute class sets the Prefix property of the attribute object to the specified
prefix.
// The static method of the AutoNumberAttribute attribute dynamically sets the number
prefix
public static void SetPrefix<Field>(
PXCache sender, object row, string prefix) where Field : IBqlField

| Implementing Business Logic | 281
{
foreach (PXEventSubscriberAttribute attribute in sender.GetAttributes<Field>(row))
{
if (attribute is AutoNumberAttribute)
((AutoNumberAttribute)attribute).Prefix = prefix;
}
}
// Assigning the number prefix depending on the document type
public virtual void Document_RowPersisting(PXCache cache, PXRowPersistingEventArgs e)
{
Document doc = (Document)e.Row;
if (doc != null)
{
switch (doc.DocType)
{
case DocType.R: // no prefix
AutoNumberAttribute.SetPrefix<Document.docNbr>(cache, doc, null);
break;
case DocType.N:
AutoNumberAttribute.SetPrefix<Document.docNbr>(cache, doc, "RET");
break;
}
}
}
Event Handlers Implemented in Attributes and Graphs
Event handlers implemented in graphs are stored in separate collections in the graph for
each event. The framework determines which attribute handlers an attribute defines based
on the interfaces the attribute implements.
The attribute and graph handlers that handle the same event are executed in the defined
order. In -ing events, such as FieldDefaulting, the attribute handlers are invoked after the
handlers of the graph. So if you generate the default value in a graph handler and don't want
attributes to change it, you can cancel the execution of attribute handlers for this field by
setting the e.Cancel property to true in the graph handler (see the diagram in Sequence of
Events: Insertion of a Data Record).
In the -ed events, such as RowUpdated, attribute handlers are executed before handlers
implemented in the graph. In -ed events, you typically implement some additional logic, and
you cannot cancel attribute handlers.
Example
In this section, you can find an example of the creation of a custom attribute that provides
automatic numbering of documents.
Instead of creating a custom attribute, you can use the predefined auto-numbering
attributes of Acumatica ERP, such as PX.Objects.CS.AutoNumberAttribute.
In this example, the following event handlers are implemented for the attribute:

| Implementing Business Logic | 282
• FieldDefaulting(), which inserts the placeholder into a new document.
• FieldVerifying(), which prevents users from entering a nonexistent document number
into the field. The nonexistent number is replaced with the <NEW> placeholder.
• RowPersisting(), which assigns the new document number before the record is saved
to the database and updates the last assigned number stored in the configuration.
• RowPersisted(), which checks the database transaction status and resets the default
number if the transaction fails.
As the runtime API of the attribute, the following static methods, which enable dynamic
setup of the last number field and add a prefix to the number, are implemented:
• SetLastNumberField<Field> sets the last number field for the attribute.
• SetPrefix<Field> sets the number prefix.
To implement the attribute, you would do the following:
1. Define the AutoNumber attribute as follows.
public class AutoNumberAttribute : PXEventSubscriberAttribute,
IPXFieldVerifyingSubscriber,
IPXFieldDefaultingSubscriber,
IPXRowPersistingSubscriber,
IPXRowPersistedSubscriber
{
}
The declared interfaces correspond to events that you handle in the attribute.
2. In the AutoNumber attribute, define the listed fields for the internal objects (the flag
that enables or disables automatic numbering, and the command that retrieves the last
number) and two properties (the last number field and the number prefix). See the
following code.
public const string NewValue = "<NEW>";
private bool _AutoNumbering;
private Type _AutoNumberingField;
private BqlCommand _LastNumberCommand;
public virtual Type LastNumberField { get; private set; }
public virtual string Prefix { get; private set; }
3. Define two attribute constructors, one with one Type parameter and another with
two Type parameters, and define the CreateLastNumberCommand() method. (See the
following code.)
public AutoNumberAttribute(Type autoNumbering)
{

| Implementing Business Logic | 283
if (autoNumbering != null &&
(typeof(IBqlSearch).IsAssignableFrom(autoNumbering) ||
typeof(IBqlField).IsAssignableFrom(autoNumbering) &&
autoNumbering.IsNested))
{
_AutoNumberingField = autoNumbering;
}
else
{
throw new PXArgumentException("autoNumbering");
}
}
public AutoNumberAttribute(Type autoNumbering, Type lastNumberField)
: this(autoNumbering)
{
LastNumberField = lastNumberField;
CreateLastNumberCommand();
}
private void CreateLastNumberCommand()
{
_LastNumberCommand = null;
if (LastNumberField != null)
{
if (typeof(IBqlSearch).IsAssignableFrom(LastNumberField))
_LastNumberCommand = BqlCommand.CreateInstance(LastNumberField);
else if (typeof(IBqlField).IsAssignableFrom(LastNumberField) &&
LastNumberField.IsNested)
_LastNumberCommand = BqlCommand.CreateInstance(
typeof(Search<>), LastNumberField);
}
if (_LastNumberCommand == null)
throw new PXArgumentException("lastNumberField");
}
In the constructor, you validate input parameters and ensure that each of them is a
valid DAC field type or a BQL Search<> type. The first parameter specifies the auto-
numbering flag field that enables or disables automatic numbering of documents. The
second parameter specifies the field from which the attribute will take the last assigned
number to calculate the next number for a new document. In the _LastNumberCommand
field, you construct the BQL Search<> type that selects the last number field from the
database. You will use this command to retrieve the last assigned number from the setup
parameters in the RowPersisting event handler.
4. Override the CacheAttached() method of the base PXEventSubscriberAttribute class,
as shown in the following code.
public override void CacheAttached(PXCache sender)

| Implementing Business Logic | 284
{
BqlCommand command = null;
Type autoNumberingField = null;
// Create the BqlCommand from Search<>
if (typeof(IBqlSearch).IsAssignableFrom(_AutoNumberingField))
{
command = BqlCommand.CreateInstance(_AutoNumberingField);
autoNumberingField = ((IBqlSearch)command).GetField();
}
// Otherwise, create the Bql command from the field.
else
{
command = BqlCommand.CreateInstance(
typeof(Search<>), _AutoNumberingField);
autoNumberingField = _AutoNumberingField;
}
// In CacheAttached, get the reference to the graph.
PXView view = new PXView(sender.Graph, true, command);
object row = view.SelectSingle();
if (row != null)
{
_AutoNumbering = (bool)view.Cache.GetValue(
row, autoNumberingField.Name);
}
}
In the CacheAttached() method, you retrieve the auto-numbering flag from the
database. To retrieve the flag, you create a BqlCommand object that is passed to a PXView
object. The BqlCommand object represents a BQL statement that is translated into an SQL
SELECT query and executed in the database by the PXView object.
To select the data record, you invoke the SelectSingle() method of the PXView object,
which retrieves the data from the database by using the specified command. You use
the SelectSingle() method, which generates the SQL statement with TOP 1 records to
return, which executes faster. You can select a single row because only one record in the
setup table has the configuration of the current company. If the retrieved flag is enabled,
you set the _AutoNumbering field of the attribute to true.
For details about PXView, see PXView Type and Views Collection.
5. Add the FieldDefaulting() and FieldVerifying() methods, as follows.
public virtual void FieldDefaulting(
PXCache sender, PXFieldDefaultingEventArgs e)
{
if (_AutoNumbering)
{
e.NewValue = NewValue;
}}

| Implementing Business Logic | 285
public virtual void FieldVerifying(
PXCache sender, PXFieldVerifyingEventArgs e)
{
if (_AutoNumbering &&
PXSelectorAttribute.Select(sender, e.Row, _FieldName, e.NewValue)
== null)
{
e.NewValue = NewValue;
}
}
On the FieldDefaulting event, you insert the <NEW> placeholder into the number
field for a new document. On the FieldVerifying event, you revert the number to
the placeholder if a user has entered a nonexistent document number. If the user has
entered the number of a document that exists, the document opens on the form.
6. Add the RowPersisting() method and the auxiliary GetNewNumber() method, which is
called from RowPersisting(), as shown in the following code.
protected virtual string GetNewNumber(PXCache sender, Type setupType)
{
if (_LastNumberCommand == null)
CreateLastNumberCommand();
PXView view = new PXView(sender.Graph, false, _LastNumberCommand);
// Get the record from Setup
object row = view.SelectSingle();
if (row == null) return null;
// Get the last assigned number
string lastNumber = (string)view.Cache.GetValue(
row, LastNumberField.Name);
char[] symbols = lastNumber.ToCharArray();
// Increment the last number
for (int i = symbols.Length - 1; i >= 0; i--)
{
if (!char.IsDigit(symbols[i])) break;
if (symbols[i] < '9')
{
symbols[i]++;
break;
}
symbols[i] = '0';
}
lastNumber = new string(symbols);
// Update the last number in the PXCache object for Setup
view.Cache.SetValue(row, LastNumberField.Name, lastNumber);
PXCache setupCache = sender.Graph.Caches[setupType];

| Implementing Business Logic | 286
setupCache.Update(row);
setupCache.PersistUpdated(row);
// Insert the document number with the prefix
if (!string.IsNullOrEmpty(Prefix))
{
lastNumber = Prefix + lastNumber;
}
return lastNumber;
}
public virtual void RowPersisting(PXCache sender, PXRowPersistingEventArgs e)
{
// For a new record inserted into the database table
if ( _AutoNumbering &&
(e.Operation & PXDBOperation.Command) == PXDBOperation.Insert )
{
Type setupType = BqlCommand.GetItemType(_AutoNumberingField);
string lastNumber = GetNewNumber(sender, setupType);
if (lastNumber != null)
{
// Updating the document number in the PXCache
// object for the document
sender.SetValue(e.Row, _FieldOrdinal, lastNumber);
}
}
}
On the RowPersisting event occurs, you retrieve the last number from the setup record,
increment the number, insert the new value into the document, and update the last
assigned number in the setup record. The RowPersisting event is the last event raised
before Acumatica Framework commits changed data from cache objects to the database.
To avoid duplicate numbers, you calculate the new value just before the data record is
saved to the database.
7. Define the RowPersisted() method as the following code shows.
public virtual void RowPersisted(PXCache sender, PXRowPersistedEventArgs e)
{
// If the database transaction doesn't succeed
if ( _AutoNumbering &&
(e.Operation & PXDBOperation.Command) == PXDBOperation.Insert &&
e.TranStatus == PXTranStatus.Aborted )
{
// Roll back the document number to the default value.
sender.SetValue(e.Row, _FieldOrdinal, NewValue);
// If transaction isn't successful, remove the setup record;
// it hasn't been saved because of transaction rollback.
Type setupType = BqlCommand.GetItemType(_AutoNumberingField);
sender.Graph.Caches[setupType].Clear();

| Implementing Business Logic | 287
}
}
The RowPersisted event, in which e.TranStatus may have the Completed or Aborted
value, is raised after all changes from cache objects of the graph are committed to the
database. If any error occurs during the transaction, you remove the new document
number, which hasn't been saved for a document, from the PXCache object for the
setupType DAC. For details on the process of saving changes to the database, see Saving
of Changes to the Database.
8. Define the static SetLastNumberField<Field>() method, as shown in the following
code.
public static void SetLastNumberField<Field>(PXCache sender, object row,
Type lastNumberField)
where Field : IBqlField
{
foreach (PXEventSubscriberAttribute attribute in
sender.GetAttributes<Field>(row))
{
if (attribute is AutoNumberAttribute)
{
AutoNumberAttribute attr = (AutoNumberAttribute)attribute;
attr.LastNumberField = lastNumberField;
attr.CreateLastNumberCommand();
}
}
}
The SetLastNumberField<Field>() method provides the API that dynamically
configures the attribute in graph handlers. By invoking this method in the
RowPersisting event handler in the graph, you can dynamically change the last
number field depending on some condition (in this example, the document type). In
the SetLastNumberField<Field>() method, you update the lastNumberField type
and command of the attribute. To get the attribute object, you iterate the collection of
attributes on the specified field and search for the attribute by its type.
9. Define the static SetPrefix<Field>() method of the attribute, as the following code
shows.
public static void SetPrefix<Field>(PXCache sender, object row, string prefix)
where Field : IBqlField
{
foreach (PXEventSubscriberAttribute attribute in
sender.GetAttributes<Field>(row))
{
if (attribute is AutoNumberAttribute)
{
((AutoNumberAttribute)attribute).Prefix = prefix;
}
}

| Implementing Business Logic | 288
}
The SetPrefix<Field>() method sets the prefix that is added to the number generated
by the AutoNumber attribute.
Now the AutoNumber attribute is ready, and you can use it for the numbering of documents
and sales orders. To use the attribute, add it to the document number field in the DAC, as
shown in the code below.
// Enables auto-numbering of sales orders
// in the SalesOrder.OrderNbr field
[AutoNumber(typeof(Setup.autoNumbering), typeof(Setup.salesOrderLastNbr))]
public virtual string OrderNbr
{...}
Update of Data with PXAccumulator Attributes
The use of accumulator attributes is a specific Acumatica Framework technique for fields that
are updated frequently (and often concurrently by multiple users). An accumulator attribute
changes the SQL query that is executed when the data is updated in the database. You can
use an accumulator attribute in either of the following cases:
• To update a field or multiple fields of a data record without checking for the data record
version in the database. (In an ordinary update, the framework generates the SQL
statement that checks the timestamp column, if this column exists in the table.)
• To define a specific update policy for a column—for instance, to calculate the sum of
values in a column on every update. You can also specify restrictions for a column that
will be checked by the database during update.
Implementing an Accumulator Attribute
An accumulator attribute is the PXAccumulator attribute or an attribute derived from it.
When you define a custom accumulator attribute, you typically implement the following
members:
• The attribute constructor
• The PrepareInsert() method
• The PersistInserted() method
The base PXAccumulator attribute has two parameters in the constructor. This attribute
applies the Summarize policy to the specified decimal or double fields (on each update, the
new value is added to the database value) and the Initialize policy to other fields. To
override this policy or to set restrictions, you derive a custom attribute from PXAccumulator,
in which you override the PrepareInsert() method.
In the overridden PrepareInsert() method, you first have to invoke the base
PrepareInsert() method to initialize the collection of columns. If the base
PrepareInsert() method returns true, the collection of columns is initialized. Then in the
overridden method, you can set restrictions and update policies for specific columns.

| Implementing Business Logic | 289
If you set any restrictions, you have to override the PersistInserted() method. For details,
see Implementing an Update With Restrictions below.
In the PrepareInsert() method, the columns are represented by an object of the
PXAccumulatorCollection class. To update a value or to set a restriction for a column, you
invoke the needed generic method of the columns collection. Below are the methods that
you can use in single record mode (SingleRecord = true):
1. columns.Update(): Sets the update policy for the field.
2. columns.Restrict(): Sets the value restriction for the column. The restriction triggers
the PXLockViolationException exception, which you should handle in the overridden
PersistInserted() method of the attribute.
The methods listed above and all the methods listed below can be used in default mode
(when SingleRecord = false):
1. columns.RestrictPast()
2. columns.RestrictFuture()
3. columns.InitializeFrom()
4. columns.UpdateFuture()
For reference information on methods and properties that you can use in the
PXAccumulator attribute, see PXAccumulatorAttribute Class in the API Reference.
Using Single-Record Mode
If no new values that you assign with the attribute depend on the existing ones or add
restrictions to future values, you can enable single-record mode for the attribute. In this
case, you can use only the Update() and Restrict() methods of the columns collection. In
single-record mode, the framework generates the specific SQL statement that updates an
independent record in the database. To enable single-record mode, set the _SingleRecord
field of the attribute (or the SingleRecord property in the attribute constructor) to true. By
default, single-record mode is disabled.
Understanding Update Policies
You can use one of the following update policies for columns (values defined in the
PXDataFieldAssign.AssignBehavior enumeration):
1. Replace: Assigns the specified value to the data field on every update. For this policy,
set the new value to the field in your code.
2. Summarize: Adds the specified delta (with the appropriate sign) to the data field on every
update. For this policy, set the delta to the field in your code.
3. Maximize: Assigns the maximum value in the column to the data field on every update.
For this policy, it isn't necessary to set the new value to the field in your code.

| Implementing Business Logic | 290
4. Minimize: Assigns the minimum value in the column to the data field on every update.
For this policy, it isn't necessary to set the new value to the field in your code.
5. Initialize: Assigns the specified value to the data field if the old value is null. For this
policy, set the new value to the field in your code.
In the code below, the SupplierDataAccumulator attribute initializes the SupplierPrice,
SupplierUnit, and ConversionFactor fields and replaces the values of the
LastSupplierPrice and LastPurchaseDate fields of the SupplierData class on every
update of a data record of this class.
public class SupplierDataAccumulatorAttribute : PXAccumulatorAttribute
{
public SupplierDataAccumulatorAttribute()
{
_SingleRecord = true;
}
protected override bool PrepareInsert(
PXCache sender, object row, PXAccumulatorCollection columns)
{
if (!base.PrepareInsert(sender, row, columns))
return false;
SupplierData bal = (SupplierData)row;
// The attribute updates only these fields by the specified policy
columns.Update<SupplierData.supplierPrice>(
bal.SupplierPrice, PXDataFieldAssign.AssignBehavior.Initialize);
columns.Update<SupplierData.supplierUnit>(
bal.SupplierUnit, PXDataFieldAssign.AssignBehavior.Initialize);
columns.Update<SupplierData.conversionFactor>(
bal.ConversionFactor, PXDataFieldAssign.AssignBehavior.Initialize);
columns.Update<SupplierData.lastSupplierPrice>(
bal.LastSupplierPrice, PXDataFieldAssign.AssignBehavior.Replace);
columns.Update<SupplierData.lastPurchaseDate>(
bal.LastPurchaseDate, PXDataFieldAssign.AssignBehavior.Replace);
return true;
}
}
Implementing an Update With Restrictions
When you use an accumulator attribute, you might need to check some restrictions when
the data is being updated in the database. You can specify the restriction conditions in
the accumulator attribute. The attribute adds the conditions to the WHERE clause of the
SQL query. When the framework executes the query, the record is not updated in the
database if the condition is false. In this case, the database returns no affected rows, and
the framework throws the PXLockViolationException exception.
If you update a column with a restriction, you have to override the PersistInserted()
method in the attribute and handle PXLockViolationException in it. In the overridden

| Implementing Business Logic | 291
PersistInserted() method, you first have to invoke the base method and then have
to catch the PXLockViolationException exception that can be thrown in the base
method. If the exception is thrown, you have to check the new values for restriction
conditions to compose the appropriate error message for the UI. The framework raises
the PXLockViolationException exception in a general case if the database returns no
rows affected by the UPDATE command. When you catch the PXLockViolationException
exception, you have to check whether the restriction conditions take place. If you
have found that a restriction condition is false, throw the PXRowPersistingException
exception to return the appropriate error message to the UI. Otherwise, rethrow the
PXLockViolationException exception, because it was caused by another reason. On the
PXRowPersistingException exception, the transaction is rolled back and no record is
updated in the database. If no exceptions occur in PersistInserted(), the new value is
saved to the database.
For an ordinary data update without accumulators, you can check value restrictions
at different times before the data is updated in the database. In particular, on the
FieldVerifying and RowUpdating events, you can check the values for restrictions
at the model level, before the changes are saved to the PXCache object. On these
events, you typically implement validation of the values entered by the user. If you
need to check a value immediately before it is saved to the database, you can do this
on the RowPersisting event.
Using an Accumulator Attribute
An accumulator attribute triggers only for data records that have the Inserted status in
the cache object. Thus, you have to insert a data record into the cache to trigger an update
via the accumulator attribute. Once inserted, the data record gets the Inserted status
and maintains this status until it is saved to the database, even if you update the record in
the cache. When a user saves changes to the database, despite of that the record has the
Inserted status in the cache object, the framework generates the correct SQL statement
that updates the record or inserts it into the database. By default, if there is no record with
such a key in the database, a new one is inserted. If a record with these key values already
exists, it is correctly updated in the database because of the accumulator attribute.
When you invoke Update() on an Inserted record (inserted into the cache), the
record remains Inserted. When you invoke Update() on an unchanged record that
is retrieved from the database, the record becomes Updated, and the accumulator
won't trigger on this record. For more information on the statuses of data records, see
Modification of Data in a PXCache Object.
You can insert a data record with unique key values into the cache only once. The
framework won't insert the duplicate record. After you have inserted the record, use
Update() to modify its values in the cache within the current unsaved session.
In an accumulator attribute, you can specify which database operations are allowed. By
default, the accumulator attribute inserts a new record if it doesn't exist in the database
and updates an existing record, if any. To allow only insert or update operations, set the
InsertOnly or UpdateOnly property of the columns collection in the PrepareInsert()
method before invocation of columns.Update().
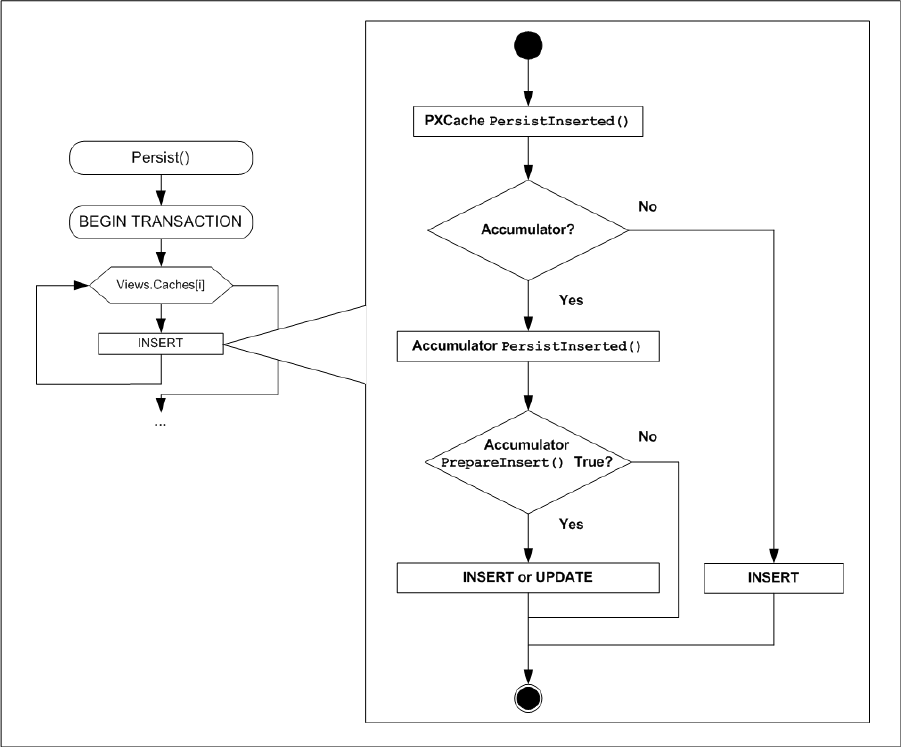
| Implementing Business Logic | 292
Understanding How an Accumulator Attribute Works
During the database transaction that applies changes from cache objects to the database,
the graph invokes the PersistInserted() method of each PXCache object. The
PersistInserted() method that is executed for the Inserted records of the cache object
checks whether an accumulator attribute is specified on the DAC. If the accumulator exists,
the PersistInserted() method of the accumulator is invoked. If there is no accumulator on
the DAC, the method executes an ordinary INSERT (see the diagram below).
The PersistInserted() method of the accumulator invokes the PrepareInsert() method,
which initializes the collection of columns, sets the restrictions, and composes the SQL
query. If the PrepareInsert() method returns true, the framework executes the composed
query, which can be INSERT or UPDATE depending on the attribute parameters and the
record. Otherwise, the framework returns false and the record isn't updated in the database.
Figure: Saving changes to the database with an accumulator attribute
| Implementing Business Logic | 293
Restrictions in the Accumulator Attribute
You can use the following ways of adding a restriction to a field value in the accumulator
attribute:
• Using the Restrict() method of the column collection in PrepareInsert(). The
condition you specify in the Restrict() method is checked against the value stored in
the database. You need to override the PersistInserted() method to throw a more
specific exception if a restriction violation occurs.
• Using the AppendException() method of the column collection in PrepareInsert(). This
method actually configures an exception that is thrown when the specified restriction is
violated. The condition you specify is checked against the result after the new value is
added to the value stored in the database.
The following code example adds a restriction to the ProductQty.AvailQty field by using
the Restrict() method.
ProductQty newQty = (ProductQty)row;
if (newQty.AvailQty < 0m)
{
columns.Restrict<ProductQty.availQty>(PXComp.GE, -newQty.AvailQty);
}
The restriction set with the Restrict() method doesn't work on insertion of the ProductQty
data record. In the code above, you compare the existing value with -newQty.AvailQty.
The following code example adds the same restriction to the ProductQty.AvailQty field by
using the AppendException() method.
ProductQty newQty = (ProductQty)row;
if (newQty.AvailQty < 0m)
{
columns.AppendException(
"Updating product quantity in stock will lead to a " +
"negative value.",
new PXAccumulatorRestriction<ProductQty.availQty>(PXComp.GE, 0m));
}
The restriction set with the AppendException() method works on both insertion and update
of the ProductQty data record. In the code above, you compare the resulting value, -
newQty.AvailQty plus the existing value, with 0m.
Working with Attachments
In Acumatica Framework-based and customized Acumatica ERP applications, you can attach
files to the records displayed on the forms. This chapter describes how to attach files to the
records and display the attached image files on the forms.
| Implementing Business Logic | 294
In This Chapter
• To Allow Attachments to a Particular Form
• To Display an Attached Image on the Form
To Allow Attachments to a Particular Form
Users of Acumatica Framework-based and Acumatica ERP applications can attach files,
notes, and activities to master records displayed on forms. They can also attach files and
notes to the detail records, which are displayed in table rows on forms. In this topic, you can
find information about how to allow attachments to a particular form and the table rows on a
specific form.
For more information about how a user can attach files and notes to forms, see To Attach
a File to a Record and To Attach a Note to a Record. For information about activities, see Tasks,
Events, and Activities.
The extensions of the files that can be uploaded to a form must be registered on the
File Upload Preferences (SM202550) form. If the required file types are not registered
on this form, you have to add them and save your changes. On this form, you can
also define the maximum size of an uploaded file (in kilobytes).
To Allow Attachments to a Particular Form
1. In the data access class (DAC) that provides data for the form, add the NoteID field, as
the following code shows.
#region NoteID
public abstract class noteID : PX.Data.IBqlField { }
[PXNote]
public virtual Guid? NoteID { get; set; }
#endregion
The database table that corresponds to the DAC must contain the NoteID column
with the uniqueidentifier data type.
2. Rebuild the project.
Once you have added the NoteID field to the DAC and rebuilt the project, the following
buttons appear on the title bar of the form:
• Notes, which users click to attach notes to the form
• Files, which users click to attach files to the form
3. Optional: To change whether each of these elements is displayed on the title bar, in the
ASPX code of the form, specify the values of the following properties of the PXFormView
control:
| Implementing Business Logic | 295
• NoteIndicator: Indicates (if set to True) that the Notes button is displayed on the
title bar.
• FilesIndicator: Indicates (if set to True) that the Files button is displayed on the
title bar.
• ActivityIndicator: Indicates (if set to True) that the Activities button is displayed
on the title bar. This button, which users click to attach activities to the form, is not
displayed by default.
The LinkIndicator property, which controlled whether the Help > Get Link
element was displayed on the title bar, is now obsolete. Help > Get Link is
always displayed on the title bar.
To Allow Attachments to Table Rows on a Form
1. In the data access class (DAC) that provides data for the table rows, add the NoteID
field, as the following code shows.
#region NoteID
public abstract class noteID : PX.Data.IBqlField { }
[PXNote]
public virtual Guid? NoteID { get; set; }
#endregion
The database table that corresponds to the DAC must contain the NoteID column
with the uniqueidentifier data type.
2. Rebuild the project.
Once you have added the NoteID field to the DAC and rebuilt the project, the following
columns appear in the table:
•
: The Notes column, which users click to attach notes to the form
•
: The Files column, which users click to attach files to the form
3. Optional: To change whether each of these columns is displayed in the table, in the ASPX
code of the form, specify the values of the following properties of the PXGrid control that
corresponds to the table:
• NoteIndicator: Indicates (if set to True) that the Notes column is displayed in the
table
• FilesIndicator: Indicates (if set to True) that the Files column is displayed in the
table
| Implementing Business Logic | 296
To Display an Attached Image on the Form
In this topic, you will learn how to display an attached image file on the form. In Acumatica
ERP, you can find an example of an image file displayed in the UI on the Attributes tab of
the Stock Items (IN202500) form.
To Display the Attached Image on the Form
1. Add the NoteID field and the field that stores the path to the image to the data access
class (DAC) that provides data for the form on which you want to display the image, as
shown in the following code.
#region NoteID
public abstract class noteID : PX.Data.IBqlField { }
[PXNote]
public virtual Guid? NoteID { get; set; }
#endregion
#region ImageUrl
public abstract class imageUrl : PX.Data.IBqlField { }
[PXDBString(255)]
[PXUIField(DisplayName = "Image")]
public virtual string ImageUrl { get; set; }
#endregion
The database table that provides data for the form on which you want to display
the image must contain the following columns:
• NoteID with the uniqueidentifier data type, to make it possible to attach
images
• The field (in this example, ImageUrl) with the varchar(255) data type, to
store the internal path to the attached image
2. In the ASPX code of the form that works with this DAC, add the PXImageUploader
control linked to the ImageUrl data field, as shown in the following code.
<px:PXImageUploader Height="320px" Width="430px"
ID="imgUploader" runat="server" DataField="ImageUrl"
AllowUpload="true" ShowComment="true"
/>
3. Rebuild the project.

| Implementing Business Logic | 297
Configuring the UI from the Back End
In this chapter, you can find information about configuration of the user interface of
an Acumatica Framework-based application that involves not only the changing of the
ASPX code of the form (as described in Configuring ASPX Pages and Reports) but also the
implementation of business logic in the corresponding graph.
In This Chapter
• Data for Controls
• Configuration of the User Interface in Code
• Standard Buttons of the Form Toolbar
• Configuration of Actions
• Requests for User Confirmation
• Determination of Whether an Action Was Initiated in the UI
• Redirection to Webpages
• Configuration of Drop-Down Lists
• Configuration of Selector Controls
• Company/Branch Selection Menu
• To Configure an Input Mask and a Display Mask for a Field
• To Display a Dialog Box
Data for Controls
In a graph, you have to define a separate data view for each container control on the ASPX
page, including nested container controls. Each data view should refer to a unique main data
access class (DAC) unless you want to display the same data record in multiple container
controls.
The two data views defined in the following code example have the same main DAC and
work with the same PXCache object, which stores the Product data records.
public SelectFrom<Product>.View Products;
public SelectFrom<Product>.
Where<Product.productID.IsEqual<Product.productID.FromCurrent>>.View
ProductDetails;
The two data views in this example can be used as data members for only UI containers
that display the same data record at the same time. In this definition of data views, the
| Implementing Business Logic | 298
first one is used to display brief information of a product on a form, and the second one is
used to display the detail information of the same product on a tab. For both data views, the
Current property of the PXCache cache object returns the same Product data record. If a
user selects a data record in one UI container, the same data record appears in the second
container.
To bind a container control with a data view, you specify the data view in the DataMember
property of the container control. Each container control should be bound to a data view. You
can bind any number of container controls to the same data view, unless the data view is
specified in the PrimaryView property of the datasource control.
Configuration of the User Interface in Code
To set up the UI presentation, you should use a RowSelected event handler or the graph
constructor. The RowSelected event happens several times during every round trip: at the
end of each insertion, update, or deletion of a data record. The graph constructor is called
once in the beginning of every round trip (before any data is selected by data views).
To disable, hide, or change a caption of a data field on the form, you use the static methods
of the PXUIFieldAttribute type, as shown in the following example.
PXUIFieldAttribute.SetEnabled<Shipment.deliveryDate>(
sender, row, row.ShipmentType == ShipmentTypes.Single);
You specify the field as the type parameter. It is mandatory to specify the PXCache object
(sender in the example above). You can provide a specific data record (row) or specify null
in the second parameter to apply the method to all data records in the cache. If you omit the
type parameter, the method will be applied to all fields that are displayed in the UI, as shown
in the following example.
// Making all fields for all data records
// read-only in the cache object
PXUIFieldAttribute.SetReadOnly(sender, null, true);
You can specify default UI options for a field in the PXUIField attribute in the data access
class (DAC) and change them if necessary in a RowSelected event handler through the
static methods of the attribute.
You shouldn't read anything from the database or write to the database in a
RowSelected event handler.
Always implement two states of a UI control (such as enabled and disabled) when
you set up the UI. Thus, when you make a data field disabled by some condition, you
have to enable the data field in the corresponding opposite condition.
For related data records (in a one-to-many relationship), you place the entire configuration
of the UI presentation in the RowSelected event handler of the master data record. You can
hide columns of the details grid only in the RowSelected handler for the master data record.
In the RowSelected event handler of the detail record displayed in a grid, you can enable or
disable data fields, but you cannot modify their visibility.

| Implementing Business Logic | 299
Using the Graph Constructor
The common UI presentation logic, which doesn't depend on particular values of the data
record, can be implemented in the constructor of the graph. In the constructor, you cannot
check the values of the currently selected data record, because no data records have been
loaded yet. To implement the UI presentation specific to a data record, you should use the
RowSelected event handler of the data record.
Working with Cache-Level and Record-Level Attributes
Acumatica Framework initializes attributes during the startup of the domain or the
first initialization of a graph that defines a CacheAttached event handler. During cache
initialization, the appropriate attributes are copied to the cache level. The system can also
create attributes of a data record level by copying cache-level attributes.
To specify the properties of a cache-level attribute, you pass null as the second argument
to the static methods of the attribute, as the following code example shows. The change to a
property will affect all data records of the corresponding cache.
PXUIFieldAttribute.SetVisible<ShipmentLine.shipmentDate>(
ShipmentLines.Cache, null, false);
To specify the properties of a record-level attribute, you pass a data record as the second
argument to the static methods of the attribute (see the following code example). The
change will affect only the data record that you pass to the method.
PXUIFieldAttribute.SetEnabled<Shipment.deliveryDate>(
sender, row, row.ShipmentType == ShipmentTypes.Single);
When you use record-level attributes for the first time during a round trip, the system
creates the record-level attributes by copying cache-level attributes. If some record-level
attributes already exist and you pass null to an attribute's method, the system applies the
change to both cache-level attributes and record-level attributes.
Standard Buttons of the Form Toolbar
The standard form toolbar buttons provide the following types of functionality for users:
• Data manipulation: Insert, Delete, Save, and Cancel
• Navigation: Next, Previous, First, and Last
• Use of the clipboard: Copy and Paste
Every toolbar button corresponds to an action declared in the graph. To add standard
buttons to the toolbar, you can use explicit or implicit declaration of these actions.
In any declaration, the DAC that you specify for actions must be the same as the main DAC
of the primary view of the form. The form toolbar manipulates data records of the main
DAC of the primary view. If the DAC specified for an action differs from the main DAC of the
primary view, the button will not appear on the toolbar.

| Implementing Business Logic | 300
Suppose that you are developing the Countries form, where users work with a table of
records and need only the Cancel and Save toolbar buttons. (The users work with a table of
records on the form and don't need the other standard buttons, such as Previous and Next
for navigation.) In the example of the CountryMaint graph (shown in the following code),
we explicitly declare two actions that correspond to the Cancel and Save standard toolbar
buttons.
// Explicit definition of the required standard buttons
public class CountryMaint : PXGraph<CountryMaint>
{
public PXCancel<Country> Cancel;
public PXSave<Country> Save;
...
}
To implicitly declare standard buttons, you need to specify the second type parameter in the
base PXGraph class, as the following code shows in bold type.
// Implicit declaration of standard actions
public class CustomerMaint : PXGraph<CustomerMaint, Customer>
{
public PXSelect<Customer> Customers;
}
The following code shows two equivalent declarations of actions for standard buttons that
work with data records of the Customer DAC. Based on these declarations, the system
automatically adds to the form toolbar the standard buttons for manipulating the Customer
records if the main DAC of the primary view specified in the datasource control on the ASPX
page is also Customer.
// Implicit declaration of standard actions
public class CustomerMaint : PXGraph<CustomerMaint, Customer>
{
public PXSelect<Customer> Customers;
}
// Explicit declaration of standard actions
public class CustomerMaint : PXGraph<CustomerMaint>
{
public PXSave<Customer> Save;
public PXCancel<Customer> Cancel;
public PXInsert<Customer> Insert;
public PXCopyPasteAction<Customer> CopyPaste;
public PXDelete<Customer> Delete;
public PXFirst<Customer> First;
public PXPrevious<Customer> Previous;
public PXNext<Customer> Next;
public PXLast<Customer> Last;
public SelectFrom<Customer>.View Customers;

| Implementing Business Logic | 301
}
Configuration of Actions
Actions are methods that can be invoked from outside of the graph, from the UI, or
through the web service API. In the user interface, actions correspond to buttons or menu
commands.
Action Declaration
The declaration of an action in a graph consists of the following:
• A field of the PXAction<> type, which is declared as follows.
public PXAction<Shipment> CancelShipment;
In the PXAction<> type parameter, you should specify the main DAC of the primary data
view. Otherwise, the action cannot be displayed on the form toolbar.
• A method that implements the action; this method has the PXButton and PXUIField
attributes. This method has the following forms of declaration:
• Without parameters and returning void: This is the usual form of declaration (shown
in the following code example).
[PXButton(CommitChanges = true)]
[PXUIField(DisplayName = "Cancel Shipment")]
protected virtual void cancelShipment()
{
...
}
This type of declaration is used for actions that are executed synchronously and are
not called from processing forms.
• With a parameter of the PXAdapter type and returning IEnumerable: See an
example in the following code.
[PXButton]
[PXUIField(DisplayName = "Release")]
protected virtual IEnumerable release(PXAdapter adapter)
{
...
return adapter.Get();
}
This type of declaration should be used when the action initiates a background
operation or is called from processing forms.
The field and the method should have the same name, differing only in the capitalization of
the first letter.
| Implementing Business Logic | 302
In the same way as a graph includes methods that invoke actions, the webpage's
datasource includes callback commands for all actions defined in the graph. For
details, see Configuration of Callback Commands.
A graph includes the Actions collection of all PXAction<> objects defined in the
graph.
Callback on the Action
When a user invokes an action through the UI, the page sends a request to the server side
of the application (that is, it executes the callback). If you need the form to send the recent
changes made on the form, set the CommitChanges property of the PXButton attribute to
true as follows.
[PXButton(CommitChanges = true)]
You should always set the CommitChanges property to true for the actions that cause
changes to be saved to the database.
Types of Actions
You typically use actions for the following purposes:
• To redirect a user to a specific form or report.
• To modify or validate data records and save changes to the database. Set the
CommitChanges property of the PXButton attribute to true for these actions.
• To start a background operation, which is executed on a separate thread.
Changing Appearance of Actions at Runtime
You can adjust the appearance of an action in the UI at runtime (for example, to disable or
hide the corresponding button on the form). To do this, you should use the methods of the
PXAction<> class, as the following code example shows.
// Disabling the CancelShipment action
CancelShipment.SetEnabled(false);
You don't use the static methods of the PXUIField attribute, because these methods work
only with the attribute copies stored in cache objects.
Requests for User Confirmation
If you want to display a dialog box that requests confirmation from the user, you should use
the Ask() method of a data view.
For example, if you need the user to confirm that deletion should occur, you should invoke
the Ask() method in the RowDeleting event handler for the data record that the user is
trying to delete.

| Implementing Business Logic | 303
if (ShipmentLines.Ask("Confirm Delete",
"Are you sure?",
MessageButtons.YesNo) != WebDialogResult.Yes)
{
e.Cancel = true;
}
For details on the deletion process, see Sequence of Events: Deletion of a Data Record.
You can use the Ask() method of a data view everywhere (that is, not only in RowDeleting)
to display the dialog box requesting the user's confirmation to continue. If the Ask() method
is used in an event handler, the event handler will be called twice. The first time, the event
handler is interrupted on Ask() invocation, and the dialog box is displayed. The second time,
after the dialog box is closed, the Ask() method indicates which button has been clicked,
and execution continues.
Determination of Whether an Action Was Initiated in the UI
In the RowInserting, RowInserted, RowUpdating, RowUpdated, RowDeleting, and
RowDeleted event handlers, you can check whether the action was initiated in the UI. You
should use the ExternalCall property of the event arguments for this.
The ExternalCall property returns true if the deletion has been initialized in the UI
or through the web services APIs. If you don't need to invoke particular logic for data
modifications made in code (such as the removal of a record), you can exit the method if the
ExternalCall property is false as follows.
if (!e.ExternalCall) return;
Redirection to Webpages
You may need to redirect a user to an another webpage. Acumatica Framework supports the
following types of redirection:
• To an another form of the Acumatica Framework-based application
• To a report created with Acumatica Report Designer
• To an inquiry form of the Acumatica Framework-based application
• To any destination URL
You can add redirection from a selector control declaratively, by adding the attributes to the
data access class and to the selector control. Such redirection is often used for opening the
data entry form from which the user can edit the record selected in the selector control. In
other cases, the code invokes the redirection by throwing one of the exceptions provided by
Acumatica Framework.
Once an exception is thrown, it interrupts the current context and propagates up the call
stack until it is handled by Acumatica Framework, which performs the redirection. You don't

| Implementing Business Logic | 304
need to implement the handling of the exceptions that are used for redirection. Also, this
mechanism doesn't affect the performance of the application.
The following exceptions are used for redirection:
• PXRedirectRequiredException opens the specified form in the same window or a new
one. By default, the user is redirected in the same window.
• PXPopupRedirectException opens the specified form in a pop-up window.
• PXReportRequiredException opens the specified report in the same window or a new
one. By default, the report opens in the same window.
• PXRedirectWithReportException opens the specified report in a new window, and the
specified form in the same window.
• PXRedirectToUrlException opens the webpage with the specified external URL in a
new window. This exception is also used for opening an inquiry form, which by default is
loaded into the same window.
Configuration of Drop-Down Lists
You use drop-down controls to give users the ability to select a value from the list of
predefined values.
Definition of a Drop-Down List
To configure a drop-down list, you use the PXStringList or PXIntList attribute in the
definition of the data field in the data access class (DAC), as shown in bold type in the
following example.
[PXDBString(1)]
[PXDefault(ShipmentStatus.OnHold)]
[PXUIField(DisplayName = "Status")]
[PXStringList(
new string[]
{
ShipmentStatus.OnHold, ShipmentStatus.Shipping,
ShipmentStatus.Cancelled, ShipmentStatus.Delivered
},
new string[]
{
"On Hold", "Shipping", "Cancelled", "Delivered"
})]
public virtual string Status
{
get;
set;
}
| Implementing Business Logic | 305
You use PXStringList when the values that are assigned to the field are strings, and
you use PXIntList when the values are integers.
In this example, ShipmentStatus is an enumeration defined in the following way.
public static class ShipmentStatus
{
public const string OnHold = "H";
public const string Shipping = "S";
public const string Cancelled = "C";
public const string Delivered = "D";
}
As parameters, you provide two arrays of strings:
• The array of values assigned to the field and saved to the database with the data record
• The array of labels displayed in the user interface
Modifying a Drop-Down List at Run Time
You can modify a drop-down list at runtime by using the SetList<>() static method of
the PXStringList attribute. You can do this in the RowSelected event handler or graph
constructor.
The following code example shows the use of the SetList<>() method.
PXStringListAttribute.SetList<Shipment.status>(
sender, row,
new string[]
{
ShipmentStatus.OnHold,
ShipmentStatus.Shipping,
},
new string[]
{
"On Hold",
"Shipping",
});
This code sets a new list of values and labels for the Status field.
In the type parameter, you specify the data field associated with the control. You also
provide the cache object, the data record that will be affected by the method, the list of
values, and the list of labels.
If the list of possible values of a drop-down control is changed dynamically at runtime, you
should use the RowSelected event handler to manage the list. Otherwise, we recommend
that you create the list in the graph constructor.

| Implementing Business Logic | 306
Insertion of a Not-Listed Value
If a drop-down list is configured with the PXStringList attribute, you can allow a user to
enter values that are not options in the list. You do this by setting the AllowEdit property
of the PXDropDown control to True on the ASPX page (see the setting in bold type in the
following code).
<px:PXDropDown ID="edStatus" runat="server" DataField="Status"
AllowEdit="True">
</px:PXDropDown>
Selection of Multiple Values
By default, a user can select one value from a drop-down list. The user will be able to select
multiple values if you do all of the following:
•
Set the AllowMultiSelect property of the PXDropDown control to True on the ASPX page
(see the setting in bold type in the following code).
<px:PXDropDown ID="edStatus" runat="server" DataField="Status"
AllowMultiSelect="True">
</px:PXDropDown>
The selected values are displayed in the control separated by a semicolon.
• Set the MultiSelect property of the PXStringList attribute to true, as shown in the
following code.
[PXString(20)]
[PXUIField(DisplayName = "Priority")]
[PXStringList(
new string[]
{
WorkOrderPriorityConstants.High,
WorkOrderPriorityConstants.Medium,
WorkOrderPriorityConstants.Low
},
new string[]
{
Messages.High,
Messages.Medium,
Messages.Low
},
MultiSelect = true)]
public virtual string Priority { get; set; }
The selected values are displayed in the control separated by a semicolon.
| Implementing Business Logic | 307
Configuration of Selector Controls
You use selector controls to provide a list from which the user can select a data record and
then to set the ID of the selected data record as the data field value.
Defining a Selector Control
To configure a selector control, you use the PXSelector attribute in the definition of the data
field in the data access class (DAC), as shown in bold type in the following example.
[PXDBInt(IsKey = true)]
[PXDefault]
[PXUIField(DisplayName = "Product ID")]
[PXSelector(typeof(Search<Product.productID>),
typeof(Product.productCD),
typeof(Product.productName),
typeof(Product.unitPrice),
SubstituteKey = typeof(Product.productCD))]
public virtual int? ProductID
...
In the first parameter, you specify a Search<> BQL query to select data records for the
control. The Search<> command has the same syntax as the Select<> command, except
that you specify the data field of the main DAC. In the Search<> command, you can specify
conditions and join data from other DACs. When a user selects a data record in the control,
the control assigns the value of the specified field to the data field.
You can omit Search<> in the first parameter of PXSelector, if you specify
only a DAC field without a complex expression that may contain WHERE, JOIN,
ORDER BY, or GROUP BY conditions. Thus, in the example above, you can specify
typeof(Product.productID) instead of typeof(Search<Product.productID>) in
the first parameter.
Defining the List of Columns
You configure the columns that should be shown in the control by providing the types of the
fields after the Search<> command; see the code in bold type in the following example.
[PXSelector(typeof(Search<Product.productID>),
typeof(Product.productCD),
typeof(Product.productName),
typeof(Product.unitPrice),
SubstituteKey = typeof(Product.productCD))]
public virtual int? ProductID
...
The code above defines three columns (see the following screenshot).
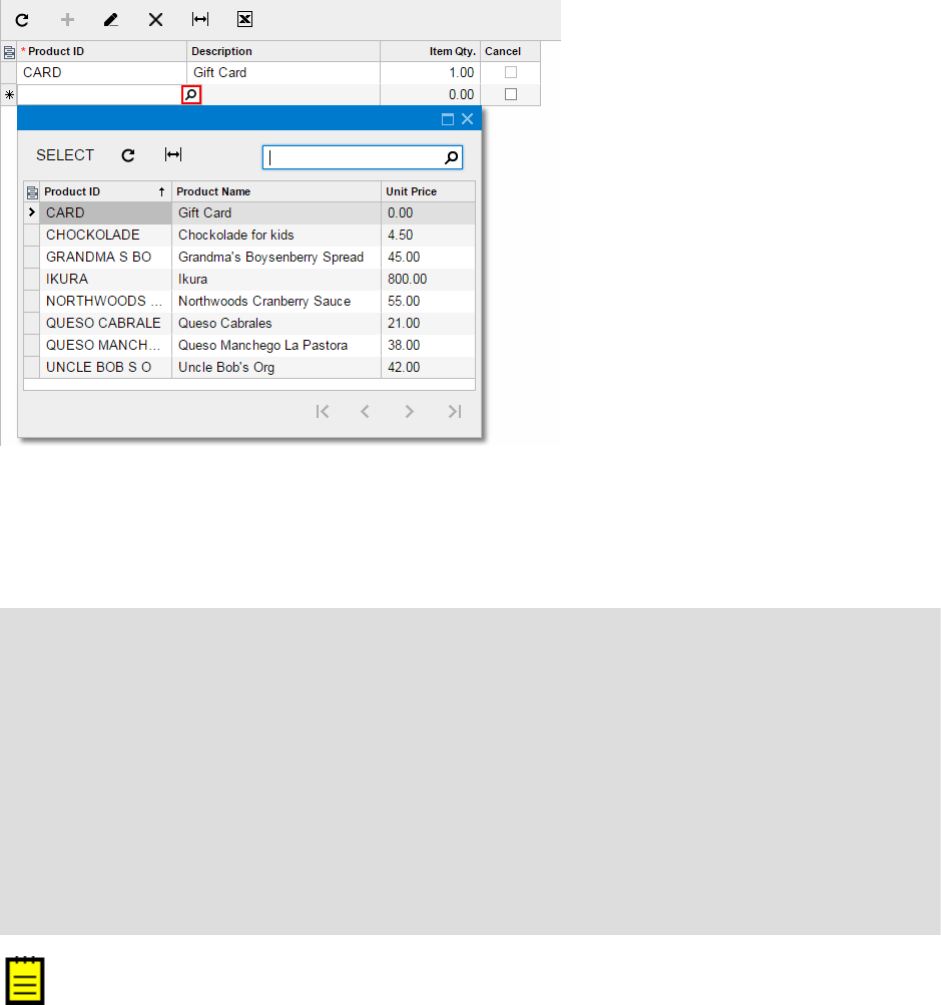
| Implementing Business Logic | 308
Figure: The selector control for Product data records
You can join multiple DACs in the Search<> command and specify fields from the joined
DACs as columns. The following code example shows in bold type the LeftJoin clause and
the fields from the joined DAC added to the selector control as columns.
[PXDBString(10, IsKey = true, IsUnicode = true, InputMask = "")]
[PXDefault]
[PXUIField(DisplayName = "Shipment Nbr.")]
[PXSelector(typeof(
Search2<Shipment.shipmentNbr,
LeftJoin<Customer, On<Customer.customerID,
Equal<Shipment.customerID>>>>),
typeof(Shipment.shipmentNbr),
typeof(Shipment.customerID),
typeof(Customer.customerCD),
typeof(Customer.companyName))]
public virtual string ShipmentNbr
...
If you don't specify any columns, the control will display all columns
that have the Visibility property of the PXUIField attribute set to
PXUIVisibility.SelectorVisible.
Replacing the Displayed Key Value
The SubstituteKey property specifies the field whose value should be shown in the control
in the UI instead of the field that is specified in the Search<> command.
The SubstituteKey property is shown in the bold type in the following code.
| Implementing Business Logic | 309
[PXSelector(typeof(Search<Product.productID>),
typeof(Product.productCD),
typeof(Product.productName),
typeof(Product.minAvailQty),
SubstituteKey = typeof(Product.productCD))]
public virtual int? ProductID
...
In the example above, the ProductID field of a shipment line stores the ProductID
value of the selected product, while in the UI. the control shows the ProductCD value.
Conversion between the ProductID and ProductCD values happens in the FieldUpdating
and FieldSelecting event handlers, which are implemented within the PXSelector
attribute.
Company/Branch Selection Menu
The Company/Branch selection menu displays all the available companies with any
branches they have as a tree to reflect the parent-child relations among these organizational
entities. This selection menu can be viewed on multiple forms, such as the AR Balance by
Customer (AR632500) form, The companies and branches an individual user can view in the
Company/Branch selection menu depend on the way security has been configured in the
system.
The Company/Branch selection menu consists of two parts:
• The PXBranchSelector control on the ASPX page, which renders the tree structure of
the companies and branches
• The OrganizationTree attribute in the data access class, which retrieves the data for
the control
In this topic, you can find information about how to work with the Company/Branch
selection menu in the code of an inquiry or processing form.
Adding the Selection Menu to a Form
To add the Company/Branch selection menu to an inquiry or processing form, you do the
following:
1. Optional: In the filter DAC, add separate fields to hold the company and branch, which
the system can fill with the company and branch identifiers when a value is selected in
the Company/Branch selection menu. The following code shows an example of the field
definitions.
If the filter DAC does not contain these fields, you can omit the corresponding
parameters in the constructor of the OrganizationTree attribute, which you will
add in the next step.
using PX.Objects.GL.Attributes;
#region OrganizationID
| Implementing Business Logic | 310
public abstract class organizationID : PX.Data.BQL.BqlInt.Field<organizationID> { }
[Organization(false, Required = false)]
public int? OrganizationID { get; set; }
#endregion
#region BranchID
public abstract class branchID : PX.Data.BQL.BqlInt.Field<branchID> { }
[BranchOfOrganization(typeof(ARHistoryFilter.organizationID), false)]
public int? BranchID { get; set; }
2. In the filter DAC, create an integer field, and add the OrganizationTree attribute to this
field, as shown in the following code example. In the constructor of the attribute, specify
the following values:
• sourceOrganizationID: The type of the field in this DAC that stores the identifier of
the company. The type can be null.
• sourceBranchID: The type of the field in this DAC that stores the identifier of the
branch. The type can be null. The value of sourceBranchID of the attribute can be
null if a company is selected in the Company/Branch selection menu.
• onlyActive: The Boolean value that (if set to true, which is the default value)
displays only the company and branch records that have the Active field set to true.
using PX.Objects.GL.Attributes;
#region OrgBAccountID
public abstract class orgBAccountID : PX.Data.BQL.BqlInt.Field<orgBAccountID> { }
[OrganizationTree(
sourceOrganizationID: typeof(organizationID),
sourceBranchID: typeof(branchID),
onlyActive: false)]
public int? OrgBAccountID { get; set; }
#endregion
Because the objects of the company and branch have different types and their
identifiers can overlap, the system identifies the entity that is selected in the
Company/Branch selection menu by the business account identifier.
3. In the ASPX code of the form, add the PXBranchSelector control, as the following code
example shows.
<px:PXBranchSelector CommitChanges="True" ID="edOrgBAccountID"
runat="server" DataField="OrgBAccountID"/>
Restricting the Values of Fields That Depend on the Company or Branch
In a selector control on a form, to display only the records that are available for the branch
or company selected in the Company/Branch selection menu, you can use the following
business query language (BQL) functions in the selector condition:

| Implementing Business Logic | 311
• Inside<>: To make sure that the branch specified by BranchID matches the entity
specified in the Company/Branch selection menu—that is, to ensure that the branch is
the same as the one selected in the selection menu or is a part of the company selected
in the selection menu. The following code shows the use of this function.
using PX.Data.BQL.Fluent;
using using PX.Objects.GL;
[PXSelector(
typeof(SearchFor<Ledger.ledgerID>
.In<SelectFrom<Ledger>
.LeftJoin<Branch>
.On<Ledger.ledgerID.IsEqual<Branch.ledgerID>>
.Where<Ledger.balanceType.IsEqual<LedgerBalanceType.budget>
.And<Branch.branchID.IsNull
.Or<Where<Branch.branchID, Inside<Optional<orgBAccountID>>>>>>
.AggregateTo<GroupBy<Ledger.ledgerID>>>),
SubstituteKey = typeof(Ledger.ledgerCD))]
public virtual int? BudgetLedgerIDByBAccount { get; set; }
• Suit<>: To check that the company specified by OrganizationID matches the entity
specified in the Company/Branch selection menu—that is, the company is the same as
selected in Company/Branch or the branch selected in Company/Branch is a part of
this company. The use of this function is shown in the following code example.
using PX.Data.BQL.Fluent;
using PX.Objects.GL;
using PX.Objects.GL.FinPeriods;
using PX.Objects.GL.FinPeriods.TableDefinition;
[FinPeriodSelector(
typeof(Search<OrganizationFinPeriod.finPeriodID,
Where<FinPeriod.organizationID, Suit<Optional<orgBAccountID>>>>),
null)]
public string FinPeriodIDByBAccount { get; set; }
Filling in the Company or Branch During Redirection to a Form
If you need to select the company or branch on an inquiry or processing form when this form
is opened during redirection from another form, you specify the value of the organization's
business account ID in the filter DAC of the target form. You do not need to specify the
values of the BranchID or OrganizationID fields, which are specified automatically by
OrganizationTreeAttribute. The following code shows an example of the code that
performs redirection to an inquiry form with the company or branch specified.
using PX.Objects.GL;
AccountHistoryBySubEnq graph =
PXGraph.CreateInstance<AccountHistoryBySubEnq>();
GLHistoryEnqFilter filter = PXCache<GLHistoryEnqFilter>.CreateCopy(

| Implementing Business Logic | 312
graph.Filter.Current);
filter.OrgBAccountID = Filter.Current.OrgBAccountID;
graph.Filter.Update(filter);
throw new PXRedirectRequiredException(graph, "Account by Subaccount");
To Configure an Input Mask and a Display Mask for a Field
In this topic, you can learn how to create a field on a form of an Acumatica Framework-
based application so that its value is displayed in a specific format and how to govern what
a user can enter as a value of this field. You can specify input and display masks for fields of
the string and date and time types. For fields of the string type, you specify only the input
mask, which defines both the format in which the user enters the value and the way the
value is then displayed. For the date and time fields, you can specify different input and
display masks.
To Specify an Input Mask and a Display Mask for a String Field
1. In the data access class (DAC), add a new field or modify an existing string field as
follows:
a. Add one of the string attributes (PXDBString or PXString) to the property field.
b. Specify the value of the InputMask property of the attribute. Use the following
conventions to define the mask:
• C or &: The user can enter any symbol.
• A or a: The user can enter any letter or digit.
• L or ?: The user can enter only a letter.
• #, 0, or 9: The user can enter only a digit.
• >: All of the characters that follow this symbol should be in uppercase.
• <: All of the characters that follow this symbol should be in lowercase.
The following example shows the use of the InputMask property.
//Users can enter only digits.
//If a user enters "1234567890", the value is displayed as "(123) 456-7890".
[PXDBString(10, InputMask = "(###) ###-####")]
[PXUIField(DisplayName = "Parameter 1")]
public virtual string Parameter1 { get; set; }
The value is stored in the database without any formatting characters.
That is, for the code example above, if a user enters 1234567890, the field

| Implementing Business Logic | 313
in the database for the corresponding record will contain the same value
(1234567890).
2. In the ASPX code of the form, add a new PXMaskEdit control or modify the control that
corresponds to the field so that it has the PXMaskEdit type, as shown in the following
code example.
<px:PXMaskEdit ID="edParameter1" runat="server" DataField="Parameter1"/>
To Specify an Input and a Display Mask for a String Field at Runtime
To specify the input mask for a string field at runtime, use a SetInputMask method of the
PXDBString or PXString attribute. You use the same conventions to define the mask as
those described for the InputMask property in To Specify an Input Mask and a Display Mask for a
String Field.
In the following example, the input mask of the AccountMask field is changed at run time.
protected virtual void GLBudgetTree_IsGroup_FieldSelecting(PXCache sender,
PXFieldSelectingEventArgs e)
{
PXStringState strState = (PXStringState)sender.GetStateExt(
null, typeof(GLBudgetTree.accountID).Name);
PXDBStringAttribute.SetInputMask(sender,
typeof(GLBudgetTree.accountMask).Name,
strState.InputMask.Replace('#', 'C'));
}
To Specify an Input or a Display Mask for a Date and Time Field
1. In the data access class (DAC), add a new field or modify an existing data and time field
as follows:
a. Add one of the date and time attributes (PXDate, PXDateAndTime, PXDBDate,
PXDBTime, or PXDBDateAndTime) to the property field.
b. Specify the value of the InputMask or DisplayMask property of the attribute. Use the
standard and custom date and time format strings.
The following example shows the use of the InputMask and DisplayMask properties.
[PXDateAndTime(DisplayMask = "D", InputMask ="d")]
[PXUIField(DisplayName = "Parameter 1")]
public virtual DateTime? Parameter1 { get; set; }
2. In the ASPX code of the form, add a new PXDateTimeEdit control or modify the control
that corresponds to the field so that it has the PXDateTimeEdit type, as shown in the
following code example.
<px:PXDateTimeEdit ID="edParameter1" runat="server" DataField="Parameter1"/>
| Implementing Business Logic | 314
You can change how the PXDateTimeEdit control is displayed (whether the control
shows a calendar selector or a drop-down list with time values) by specifying
the value of the TimeMode property. The following example causes the system to
display the list of time values.
<px:PXDateTimeEdit ID="edParameter1" runat="server" DataField="Parameter1"
TimeMode="true"/>
To Display a Dialog Box
When a user clicks a button on a form of an Acumatica Framework-based application,
you may need to display a dialog box that displays the settings related to the action to be
performed. For example, on the Companies (CS101500) form, if you click Create Ledger,
the system opens the Create Ledger dialog box, where a user can specify the setting
related to the action.
To Display a Dialog Box
1. In the graph that corresponds to the form, add the action and the delegate for the
button that opens the dialog box, as shown in the following example.
public PXAction<MainDAC> openDialogBox;
[PXUIField(DisplayName = "Open Dialog Box",
MapEnableRights = PXCacheRights.Update,
MapViewRights = PXCacheRights.Update)]
[PXButton]
public virtual IEnumerable OpenDialogBox(PXAdapter adapter)
{
return adapter.Get();
}
In this example, the MainDAC DAC is the main DAC of the primary view of the graph;
therefore, the action is added to the toolbar of the form by default.
2. If you want to specify additional properties of the action (such as CommitChanges), in the
ASPX code of the form, add the PXDSCallbackCommand tag for the action and specify the
necessary properties of the tag, as shown in the following example.
<px:PXDataSource ID="ds" runat="server" ...>
<CallbackCommands>
...
<px:PXDSCallbackCommand Name="CreateLedger" CommitChanges="true"/>
</CallbackCommands>
</px:PXDataSource>
3. In the graph that corresponds to the form, add the data view for the dialog box, as
shown in the following code.

| Implementing Business Logic | 315
[Serializable]
public class DialogBoxParameters : IBqlTable
{
public abstract class parameter1 : IBqlField { }
[PXString(10, IsUnicode = true)]
public virtual string Parameter1 { get; set; }
public abstract class parameter2 : IBqlField { }
[PXString(10, IsUnicode = true)]
public virtual string Parameter2 { get; set; }
}
PXFilter<DialogBoxParameters> OpenDialogBoxView;
In this code, we add a simple DAC with two unbound fields and use a data view based on
the PXFilter class.
4. In the ASPX code of the form, add the PXSmartPanel container with the Key property
equal to the name of the data view you created for the dialog box, as shown in the
following code. In the PXPanel container inside PXSmartPanel, add the commit buttons
of the dialog box (such as OK, Cancel).
<px:PXSmartPanel ID="pnlOpenDialogBox" runat="server"
Style="z-index: 108;" Caption="Open Dialog Box" CaptionVisible="True"
Key="OpenDialogBoxView" LoadOnDemand="true" AutoCallBack-Command="Refresh"
AutoCallBack-Target="formOpenDialogBox" AutoCallBack-Enabled="true"
AcceptButtonID="cbOk" CancelButtonID="cbCancel">
<px:PXFormView ID="formOpenDialogBox" runat="server"
DataSourceID="ds" DataMember="OpenDialogBoxView"
SkinID="Transparent">
<ContentStyle BorderWidth="0px"></ContentStyle>
<Template>
<px:PXLayoutRule runat="server" StartColumn="True"
LabelsWidth="SM" ControlSize="M" />
<px:PXTextEdit ID="edParameter1" runat="server"
DataField="Parameter1" CommitChanges="True"/>
<px:PXTextEdit ID="edParameter2" runat="server"
DataField="Parameter2" CommitChanges="True" />
</Template>
</px:PXFormView>
<px:PXPanel ID="PXPanel3" runat="server" SkinID="Buttons">
<px:PXButton ID="cbOK" runat="server" Text="OK"
CommandSourceID="ds" DialogResult="OK" />
<px:PXButton ID="cbCancel" runat="server" Text="Cancel"
DialogResult="Cancel" />
</px:PXPanel>
</px:PXSmartPanel>
5. In the button delegate, perform a call to an AskExt method of the view specified in the
Key property of the PXSmartPanel container.

| Implementing Business Logic | 316
public virtual IEnumerable OpenDialogBox(PXAdapter adapter)
{
if (OpenDialogBoxView.AskExt() == WebDialogResult.OK &&
string.IsNullOrEmpty(OpenDialogBoxView.Current.Parameter1)
== false)
{
...
}
return adapter.Get();
}
When the user clicks the button on the form, the execution interrupts on the AskExt
call and the dialog box is displayed. After the user clicks a button in the dialog box, the
AskExt method returns the dialog box result.
6. Rebuild the project.
Creating Particular Types of Forms
In this chapter, you can find information about how to create specific types of forms, such as
setup forms.
In This Chapter
• Configuration Parameters of the Application (Setup Forms)
• Data View for the Filtering Parameters
• Creation of Processing Forms
• Implementation of Processing Operations
• To Add a Button to the Processing Dialog Box
• To Not Display the Processing Dialog Box
Configuration Parameters of the Application (Setup Forms)
The configuration parameters of an application may include business settings, initial values,
options, and modes that can be enabled or disabled. Configuration parameters are stored
in setup tables. Each major part or module of an application can use its own setup tables.
For example, in Acumatica ERP, the ARSetup and APSetup tables hold the configuration
parameters for the accounts receivable and accounts payable modules or parts of the
application, respectively. Administrators specify these settings on the Accounts Receivable
Preferences (AR101000) and Accounts Payable Preferences (AP101000) forms, respectively.
A setup data access class (DAC) never has key fields. When a user navigates to a setup
form, the system displays the first retrieved data record. If no record is retrieved, the
framework creates a new record that is saved to the database when the user clicks Save
| Implementing Business Logic | 317
on the form. The next time the form is opened, the previously inserted record is retrieved.
Save and Cancel are the only buttons that are necessary on a setup form.
A record from a setup table represents a consistent set of configuration parameters—that
is, all fields of the record are specified and cannot be null (the administrative user cannot
save the record without all elements being specified, whether with default settings or those
the user has specified). You don't have to verify that each parameter has been specified
in the setup record before use of this record. Instead, you just verify the existence of the
setup record; its existence implies that all required parameters have been specified. If the
configuration parameters have not been specified and a user tries to navigate to a form
that uses these configuration parameters, you can return a specific error page that provides
the link to the setup form where a user can specify the configuration parameters (see the
following screenshot).
Figure: Error page for missing configuration data
In an Acumatica Framework-based application, the configuration parameters are used as
data fields of a Setup class. To define and use a Setup class, you perform the following
steps:
1. Create a Setup table in the database. (You add a prefix to the Setup name according
to Table and Column Naming Conventions.) Add to this table columns that represent
configuration parameters.
2. Define a Setup data access class with the same name as the name of the Setup
database table. In the data access class, add the PXDefault attribute to the required
configuration parameters.
3. Create an edit form for the Setup data record.
You should configure the UI of the setup form so that an administrative user can insert
and edit only one record, which represents the configuration of this part or module of the
application. Define only two actions, Save and Cancel, for this page.
4. Add the PXPrimaryGraph attribute to the Setup DAC. In the attribute, specify the graph
used by the setup form.
To display the error page for missing configuration data in the UI when the user tries to
navigate to a form that depends on configuration parameters, you do the following:

| Implementing Business Logic | 318
1. In the graph where you want to use configuration parameters, define the PXSetup data
view as follows.
public class ReceiptEntry : PXGraph<ReceiptEntry, Document>
{
public PXSetup<Setup> AutoNumSetup;
...
}
2. In the graph constructor, obtain the current record from the PXSetup data view, as the
following code shows.
public ReceiptEntry()
{
Setup setup = AutoNumSetup.Current;
}
Configuration Parameters in a Multi-Tenant Application
Each tenant may have its own configuration parameters that are identified by the company
ID in the setup table. To support multi-tenant configuration, the setup table should contain
the CompanyID column as the primary key in the database. The CompanyID field is not
declared in DACs. This column is transparently handled by the framework, which retrieves
records by the needed CompanyID only.
The application template provides two tenants by default: the system one and the active
one. The system tenant is read-only and has a CompanyID of 1. The second tenant, which is
active, is used for all new and updated objects. The active tenant has a CompanyID of 2. The
configuration parameters are saved to the setup table with the CompanyID of 2. Each new
tenant that you add to the application gets the next sequential ID: 3, 4, and so on.
Data View for the Filtering Parameters
The generic PXFilter type of data view is used to provide filtering parameters on the form
for user selection. The PXFilter data view always creates a single data record and never
retrieves this data record or saves it to the database. The PXFilter data view is used to
specify values used by the application logic or other data views and should never be stored
anywhere except the current user session.
The PXFilter data view always returns one record with the current values of the filtering
parameters. The PXFilter data view works only with the UI and doesn't invoke any requests
to the database. The data view object for the filtering parameters is defined in a graph, as
the following code shows.
public class ProductInq : PXGraph<ProductInq>
{
//ProductFilter is a special DAC for filtering parameters
public PXFilter<ProductFilter> Filter;
...
| Implementing Business Logic | 319
}
With the PXFilter type, you can use any data access class (DAC) that has the needed data
fields. You usually define a specific DAC for the filtering parameters because the filtering
parameters are taken from multiple DACs. Since the filter DAC isn't bound to any database
table, you define only unbound data fields in the filter DAC. Because PXFilter data views
are supposed to contain only one data record, you should not specify any key fields within a
DAC that is used to store filtering parameters.
Avoid using the PXFilter data view type with DACs that have at least one key field
defined—that is, DACs that contain fields having the IsKey=true parameter in the
type attribute.
Filter data fields are usually displayed on a form. To immediately refresh data records as
soon a user updates a filtering parameter, enable the callback for the input control that
displays the filtering parameter on the form (see To Enable Callback for a Control).
The PXFilter data view is specified in the PrimaryView property of the datasource control
of the ASPX page where the filtering parameters are used, as shown in the following code
example.
<px:PXDataSource ID="ds" ...
PrimaryView="Filter" TypeName="RB.RapidByte.ProductInq">
To clear the filtering parameters on the form, you define the Cancel action (which actually
clears all data on the form) for the filter DAC; see the following code example.
public PXFilter<ProductFilter> Filter;
// Adds the form toolbar button that clears the filtering parameters
public PXCancel<ProductFilter> Cancel;
Selecting Data with a Filter
To select data, you should specify filtering conditions in the Where clause of the data view
type (see the following code). To pass current filter values to the query, you specify the filter
DAC fields within the Current parameter. You have to define the data view that retrieves
filtered records for the UI after the definition of PXFilter.
public class SupplierInq : PXGraph<SupplierInq>
{
public PXCancel<SupplierFilter> Cancel;
public PXFilter<SupplierFilter> Filter;
// The data view must be defined after PXFilter<FilterDAC>
// because Current<FilterDAC.Field> is used.
[PXFilterable]
public PXSelectReadonly2<SupplierProduct,
InnerJoin<Supplier, On<Supplier.supplierID,
Equal<SupplierProduct.supplierID>>>,
Where2<Where<Current<SupplierFilter.countryCD>, IsNull,
Or<Supplier.countryCD,
| Implementing Business Logic | 320
Equal<Current<SupplierFilter.countryCD>>>>,
And<Where<Current<SupplierFilter.minOrderQty>, IsNull,
Or<SupplierProduct.minOrderQty,
GreaterEqual<Current<SupplierFilter.minOrderQty>>>>>>,
OrderBy<Asc<SupplierProduct.productID,
Asc<SupplierProduct.supplierPrice,
Desc<SupplierProduct.lastPurchaseDate>>>>> SupplierProducts;
}
You can use a read-only type of the data view that retrieves filtered data records. For
a read-only data view, the framework automatically disables the editing of rows in the
grid.
Creation of Processing Forms
Processing forms have a similar appearance to that of inquiry forms. A processing form
usually consists of the following components:
• The grid that displays the list of records retrieved by the specific processing data view. In
the grid, you also provide the following components:
• A column with a check box, which gives users the ability to select one record or
multiple records in the grid for processing. To add the check box, define the unbound
Selected field in the main data access class (DAC) of the processing data view and
add the column for this field to the grid.
Selected is the default name for this specific check box; you can define the
data field with any name and override the default Selected name in the graph
constructor with the SetSelected() method of the PXProcessing class.
• Optionally, a redirection button or link that can be clicked to open the data entry form
for the selected record.
• A toolbar that includes the Process, Process All, and Cancel buttons.
• The form that provides selection criteria (for narrowing the records that are listed and
may be processed) or configuration parameters (or both) for the processing method.
Processing Data View and Delegate
To provide data for the grid, you have to define a processing data view of one of the
following types:
• PXProcessing: Provides data records for processing without filtering. You can use the
Where<> and OrderBy<> clauses in this data view type.
• PXProcessingJoin: Provides data records for processing without filtering. You can also
use Join<> clauses in this data view type.
• PXFilteredProcessing: Provides data records for processing with filtering. This data
type uses two DACs as type parameters, where the second DAC specifies the filter DAC.
You can use the Where<> and OrderBy<> clauses in this data view type.

| Implementing Business Logic | 321
• PXFilteredProcessingJoin: Provides data records for processing with filtering. This
data type uses two DACs as type parameters, where the second DAC specifies the filter
DAC. You can also use Join<> clauses in this data view type.
Below is an example of the SalesOrders data view defined for the grid on the a processing
form.
public class SalesOrderProcess : PXGraph<SalesOrderProcess>
{
public PXProcessing<SalesOrder> SalesOrders;
}
You can define only one processing data view in a graph. In the graph constructor, you
have to define the processing method as the processing delegate for the data view, as the
following code shows.
public SalesOrderProcess()
{
SalesOrders.SetProcessDelegate<SalesOrderEntry>(
delegate(SalesOrderEntry graph, SalesOrder order)
{
graph.Clear();
graph.ApproveOrder(order, true);
});
}
Based on the definition of the processing data view, Acumatica Framework automatically
adds the Process, and Process All buttons to the form toolbar. These buttons invoke the
processing method specified as the processing delegate for the data view. To add the Cancel
button to the toolbar, you have to define the PXCancel action with the needed DAC (see the
following code). The Cancel button completely refreshes the data on the form.
// Definition of the Cancel action for filtered processing
public class ReorderProcess : PXGraph<ReorderProcess>
{
public PXFilter<ProductFilter> Filter;
// Main DAC of the filter data view
public PXCancel<ProductFilter> Cancel;
// Filter records in the processing data view
public PXFilteredProcessingJoin<ProductReorder, ProductFilter, LeftJoin<...>> Records;
}
// Definition of the Cancel button for processing without filtering
public class SalesOrderProcess : PXGraph<SalesOrderProcess>
{
public PXProcessing<SalesOrder> SalesOrders;
// Main DAC of the processing data view
public PXCancel<SalesOrder> Cancel;
}

| Implementing Business Logic | 322
Filter on the Processing Form
To add the filter to the form, you have to define a PXFilter data view and set this data view
in the PrimaryView property of the datasource control on the ASPX page. In the processing
data view that provides records for the grid, you have to use the PXFilteredProcessing or
PXFilteredProcessingJoin type and specify the filter DAC in the second type parameter.
In the following code example, the Filter data view provides the Discrepancy and
ActiveProducts filtering parameters, which are used in the Records data view. The Records
data view retrieves the list of deficient products that match the filter.
// The filter data view
public PXFilter<ProductFilter> Filter;
// Filter records in the processing data view
// Retrieve products of only the specified category (if any)
public PXFilteredProcessingJoin<ProductReorder, ProductReorderFilter,
LeftJoin<SupplierProduct,
On<SupplierProduct.productID, Equal<ProductReorder.productID>,
And<SupplierProduct.supplierID,
Equal<ProductReorder.supplierID>>>>,
Where<ProductReorder.discrepancy, Greater<decimal_0>,
And<ProductReorder.discrepancy,
GreaterEqual<Current<ProductReorderFilter.discrepancy>>,
And<Where<Current<ProductReorderFilter.activeProducts>,
NotEqual<True>,
Or<ProductReorder.active,
Equal<Current<ProductReorderFilter.activeProducts>>>>>>>,
OrderBy<Desc<ProductReorder.discrepancy>>> Records;
For a filtered processing form, you can specify a processing method as the processing
delegate for the data view in the RowSelected event handler for the DAC used in the
PXFilter data view. This approach can be used to pass the selected filter parameters to the
processing method.
If a processing form contains a form area with a control to select a method to process the
details, the usage of the RowSelected event handler for the main DAC of the primary view is
the only way to specify the selected method as the processing delegate in the code.
Implementation of Processing Operations
A processing operation is implemented as a method that is invoked from a processing or
data entry form. On a processing form, you specify the method that is invoked when a user
clicks Process or Process All on the toolbar. On the data entry form, you define a button
that invokes the processing method on a separate thread.
You can define a processing method in either of the following ways:
• Define a non-static method that uses a single record as the input parameter. This way
can be used to process a single record independently from other records of the same
class.
| Implementing Business Logic | 323
• Define a static method that uses a list of records as the input parameter. This way can be
used to process a list of records. In this method, you can reorder the records in the list
before processing, as well as check dependencies between records during processing.
These ways are described in more detail in the sections that follow.
You don't need to create a dedicated processing form for each processing operation;
whether to create a processing form depends on the requirements to the application.
Using a Non-Static Processing Method
In a simple case, to process a single record, you can define a non-static processing method
in the data entry graph, as the following code shows.
// The data entry graph
public class SalesOrderEntry : PXGraph<SalesOrderEntry, SalesOrder>
{
...
// A non-static processing method that works with a single record
public void ApproveOrder(SalesOrder order, bool isMassProcess = false)
{
// Process the record here
}
}
To make the system invoke the method on a separate thread, you can use the
PXLongOperation.StartOperation() method. Within the method that you pass to
StartOperation(), you have to create a new instance of the graph and invoke the
processing method on that instance, as the following code shows.
public PXAction<SalesOrder> Approve;
[PXProcessButton]
[PXUIField(DisplayName = "Approve")]
protected virtual IEnumerable approve(PXAdapter adapter)
{
Actions.PressSave();
SalesOrder order = Orders.Current;
PXLongOperation.StartOperation(this, delegate()
{
SalesOrderEntry graph = PXGraph.CreateInstance<SalesOrderEntry>();
graph.ApproveOrder(order);
});
return adapter.Get();
}
Use the PXGraph.CreateInstance<T>() method to instantiate a graph from code. Do
not use the graph constructor new T().
The method passed into PXLongOperation.StartOperation() matches the following
delegate type, which uses no input parameters.
| Implementing Business Logic | 324
delegate void PXToggleAsyncDelegate();
The anonymous method definition (delegate()) is used to shorten the code in the
example.
To invoke the non-static method on a processing form, in the graph constructor,
set the method as the processing delegate for the data view by using the generic
SetProcessDelegate<Graph>() method as shown in the following code.
public class SalesOrderProcess : PXGraph<SalesOrderProcess>
{
public PXProcessing<SalesOrder> SalesOrders;
...
public SalesOrderProcess()
{
// Set the processing delegate for a data view of
// the PXProcessing or derived type
SalesOrders.SetProcessDelegate<SalesOrderEntry>(
delegate(SalesOrderEntry graph, SalesOrder order)
{
graph.Clear();
graph.ApproveOrder(order, true);
});
}
}
In the SetProcessDelegate<Graph>() method, the processing method matches the
following delegate type.
delegate void ProcessItemDelegate<Graph>(Graph graph, Table item)
According to the ProcessItemDelegate type, you can use the specified graph and item
objects within the processing method. When the processing of records is initiated, Acumatica
Framework creates a graph instance of the specified type and invokes the delegate for each
data record that should be processed. A single graph instance is used for the processing
of all records. Therefore, you have to clear the graph state by calling the Clear() method
before the invocation of the processing method within the delegate, as shown in the code
example earlier in this section.
Using a Static Processing Method
In a general case, to process a list of records that may depend on one another, you have to
define the static processing method, as the following code shows.
// The processing graph
public class ReorderProcess : PXGraph<ReorderProcess>
{
...
// Static processing method that works with a list of records
public static void Process(List<ProductReorder> products)

| Implementing Business Logic | 325
{
// Process the records here
}
}
// The data entry graph
public class SalesOrderEntry : PXGraph<SalesOrderEntry, SalesOrder>
{
...
// Static processing method that works with a list of records
public static void ReleaseDocs(List<SalesOrder> orders)
{
// Process the records here
}
}
You can invoke the static processing method in the data entry graph, within the method
passed in the PXLongOperation.StartOperation() method, as shown in the following code
example.
public PXAction<SalesOrder> Release;
[PXProcessButton]
[PXUIField(DisplayName = "Release")]
protected virtual IEnumerable release(PXAdapter adapter)
{
Actions.PressSave();
SalesOrder order = Orders.Current;
List<SalesOrder> list = new List<SalesOrder>();
list.Add(order);
PXLongOperation.StartOperation(this, delegate()
{
SalesOrderEntry.ReleaseDocs(list);
});
return list;
}
The PXLongOperation.StartOperation() method creates a separate thread and executes
the specified delegate asynchronously on this thread.
To invoke the static method from a processing form, in the graph constructor, set the
method as the processing delegate for the data view by using the SetProcessDelegate()
method, as shown in the code that follows.
public class ReorderProcess : PXGraph<ReorderProcess>
{
public PXFilteredProcessingJoin<ProductReorder,
ProductFilter, LeftJoin<...>> Records;
public ReorderProcess()
{
Records.SetProcessDelegate(Process);
| Implementing Business Logic | 326
}
}
In the SetProcessDelegate() method, the processing method matches the following
delegate type.
delegate void ProcessListDelegate(List<Table> list);
Based on the delegate type, you can operate with the list of processed records of the
specified List<Table> type.
When you use a static processing method, you have to manually create a new graph object
once and reuse it throughout the whole static method (see the code below).
public class ReorderProcess : PXGraph<ReorderProcess>
{
...
public static void ReorderProducts(List<ProductReorder> products)
{
// Create a new graph object only once
ReceiptEntry graph = PXGraph.CreateInstance<ReceiptEntry>();
// Reordered list
List<ProductReorder> productsToProceed =
products.OrderBy(item => item.SupplierID).ToList();
// Process records
foreach (ProductReorder product in productsToProceed)
{
graph.Receipts.Insert(doc);
// Save changes within the created graph object
graph.Actions.PressSave();
// Clear the created graph state and reuse the object
graph.Clear();
}
}
}
Use the PXGraph.CreateInstance<T>() method to instantiate graphs from code. Do
not use the graph constructor new T().
Displaying Messages and Processing Errors
To display a message in the UI from a processing method, use the following static methods
of the PXProcessing class:
• SetInfo(): Displays a green check mark for the processed row in the grid, which
denotes the successful processing of the record.
• SetWarning(): Displays an exclamation mark for the processed row in the grid.
• SetError(): Displays a red X for the processed row in the grid, which denotes an error
that has occurred during processing.

| Implementing Business Logic | 327
In each of these methods, you have to specify the initial object index in the list passed to
the processing method. You can also specify the message text that appears for the row.
The same rules are applicable to the processing of errors within the delegate you pass
to PXLongOperation.StartOperation(...).
In the following example, you show the green check mark or the X icon that represents an
error in the UI for each processed data record and return the error to the UI if processing of
at least one record fails. (The code below attempts to process all records from the list.)
public static void Process(List<ProductReorder> products)
{
ReceiptEntry graph = PXGraph.CreateInstance<ReceiptEntry>();
bool erroroccurred = false;
// Reordered list
List<ProductReorder> productsToProceed =
products.OrderBy(item => item.SupplierID).ToList();
...
// Process records
foreach (ProductReorder rec in productsToProceed)
{
try
{
// Set the green check mark for the item by the initial index in
// the products list, not in productsToProceed
PXProcessing<ProductReorder>.SetInfo(
products.IndexOf(rec),
String.Format("The receipt {0} has been created",
doc.DocNbr));
}
catch (Exception e)
{
// Set the error flag
erroroccurred = true;
// Set the error for the item by the initial index in
// the products list, not in productsToProceed
PXProcessing<ProductReorder>.SetError(
products.IndexOf(rec), "A receipt cannot be created");
...
}
}
// Throw the error if at least one record hasn't been processed
if (erroroccurred)
throw new PXException("At least one product hasn't been processed.");
}
To display the error as a result of processing all records, you have to throw the error at the
end of a processing method.

| Implementing Business Logic | 328
To Add a Button to the Processing Dialog Box
When a user starts a processing operation on a processing form, such as the Release AR
Documents (AR501000) form of Acumatica ERP, the Processing dialog box opens, which
displays the status of the processing. When a processing operation is started, all elements of
the processing form become unavailable. If you need to make a button from the processing
form available during processing, you have to add this button to the processing dialog box,
as described in this topic.
To Add a Button to the Processing Dialog Box
To add a button to the processing dialog box, you can use one of the following approaches:
• For the action that corresponds to the button, in the graph, set the value of the
VisibleOnProcessingResults property of PXButtonAttribute or its descendant to
true, as shown in the following code example.
[PXUIField(DisplayName = Messages.ShowDocuments)]
[PXButton(VisibleOnProcessingResults = true)]
public virtual IEnumerable showDocuments(PXAdapter adapter)
{
ShowOpenDocuments(SelectedItems);
return adapter.Get();
}
• In the ASPX file that corresponds to the form, set the value of the
VisibleOnProcessingResults property of PXDSCallbackCommand to True, as shown in
the following example.
<px:PXDataSource ID = "ds" Width="100%"
runat="server" Visible="True" PrimaryView="Filter"
TypeName="PX.Objects.FA.FAClosingProcess" >
<CallbackCommands>
<px:PXDSCallbackCommand Name = "showDocuments"
VisibleOnProcessingResults="True"/>
</CallbackCommands>
</px:PXDataSource>
To Not Display the Processing Dialog Box
When a user starts a processing operation on a processing form, such as the Release AR
Documents (AR501000) form of Acumatica ERP, the Processing dialog box opens, which
displays the status of the processing. You can turn off the displaying of the processing dialog
box and instead display the progress and the result of the processing on the form toolbar.
To Turn Off the Displaying of the Processing Dialog Box
To not display the processing dialog box on a processing form, you can do one of the
following:
| Implementing Business Logic | 329
• To not display the processing dialog box for a custom form, override the IsProcessing
property of the graph that corresponds to the form, as shown in the following code.
public override bool IsProcessing
{
get { return false; }
set { }
}
• To not display the processing dialog box for a customized Acumatica ERP form, configure
the IsProcessing property of the graph that corresponds to the form in a graph
extension as shown in the following code.
public class AllocationProcess_Extension : PXGraphExtension<AllocationProcess>
{
public override void Initialize()
{
Base.IsProcessing = false;
}
}
• To not display the processing dialog box for all processing forms, add the
ProcessingProgressDialog key in the appSettings section of the web.config file of
the application set to False, as shown in the following example.
<add key="ProcessingProgressDialog" value="false" />
Executing Code Asynchronously
In this chapter, you can find information about how to process operations whose execution
takes long time. You execute these operations asynchronously in separate threads.
In This Chapter
• Asynchronous Execution
Asynchronous Execution
An instance of a graph is created on each round trip to process a request created by the user
on the appropriate form. After the request is processed, the graph instance must be cleared
from the memory of the Acumatica ERP server. If you implement code that might require a
long time to execute an action or to process a document or data, you should execute this
code asynchronously in a separate thread.
Using the PXLongOperation Class
To make the system invoke the method in a separate thread, you can use the
PXLongOperation.StartOperation method. Within the method that you pass to

| Implementing Business Logic | 330
StartOperation, you can, for example, create a new instance of a graph and invoke a
processing method on that instance. The following code snippet demonstrates how you can
execute code asynchronously as a long-running operation in a method of a graph.
public class MyGraph : PXGraph
{
...
public void MyMethod()
{
...
PXLongOperation.StartOperation(this, delegate()
{
// insert the delegate method code here
...
GraphName graph = PXGraph.CreateInstance<GraphName>();
foreach (... in ...)
{
...
}
...
});
...
}
...
}
If you need to start a long-running operation in a method of a graph extension, you
have to use the Base property instead of the this keyword in the first parameter of the
StartOperation method, as shown in the following code snippet.
public class MyGraph_Extension : PXGraphExtension<MyGraph>
...
public void MyMethod()
{
...
PXLongOperation.StartOperation(Base, delegate()
{
// insert the delegate method code here
...
});
...
}
...
}
Using the Custom Information Dictionary
In the delegate method of a long-running operation, you can store a data object in the
_CustomInfo dictionary of the long-running operation and get the list of records processed
by the method. You can add to the dictionary any data object needed for a long-running
operation by using a SetCustomInfo method.
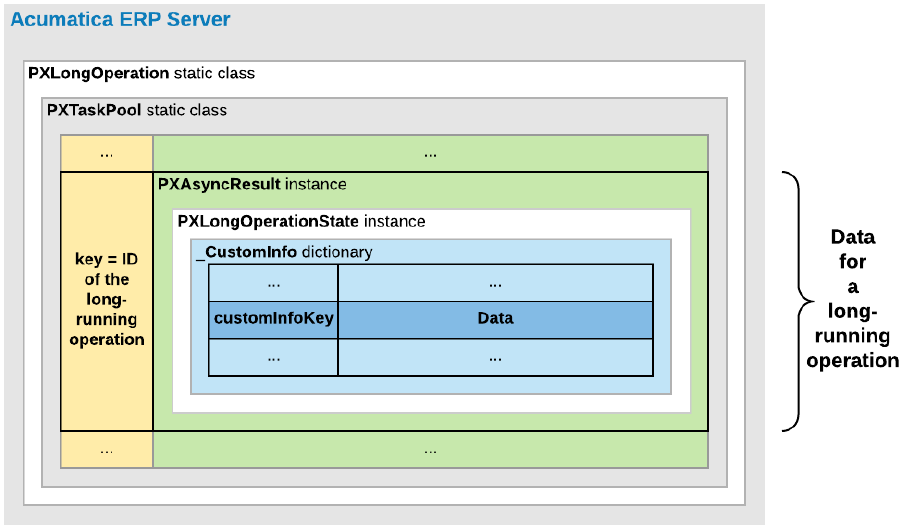
| Implementing Business Logic | 331
The following diagram shows that each long-running operation includes the _CustomInfo
dictionary, which can contain multiple key-value pairs with custom data.
Figure: Location of custom data in the memory of the Acumatica ERP server
For a processing operation, the system stores the
PXProcessingMessagesCollection<TTable> list of messages in the dictionary. Each
message in the list is of the PXProcessingMessage type, which includes a string message
and an error level that is of the PXErrorLevel type.
See New way to work with CustomInfo of PXLongOperation at for more information about the use
of the dictionary.
Executing a Processing Operation as a Long-Running Operation
When a user clicks an action button on a form to start a processing operation, the data
source control of the form generates a request to the Acumatica ERP server to execute the
action delegate defined for the button. The server creates an instance of the graph, which
provides the business logic for the form and invokes the action delegate method.
Because a processing operation is a long-running operation, in the action delegate method,
the data processing code must be included in the PXLongOperation.StartOperation
method call as the definition of the long-running operation delegate. When the action
delegate method is executed, the StartOperation method creates an instance of the
PXAsyncResult class to hold the data and state of the long-running operation; the method
also initiates the execution of the long-running operation delegate asynchronously in a
separate thread.
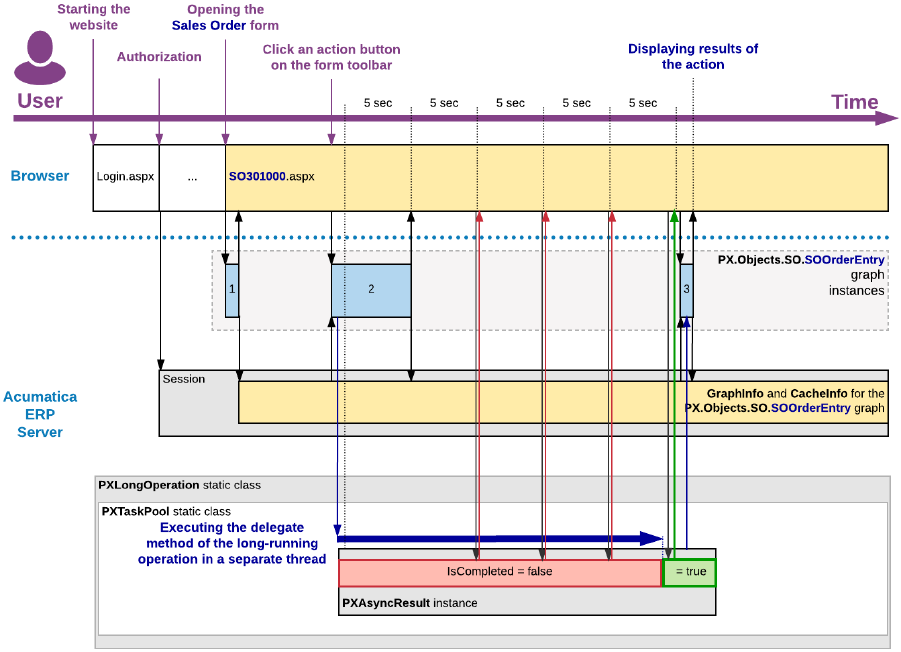
| Implementing Business Logic | 332
If the duration of the long-running operation is longer than five seconds, the server releases
the graph instance. Then the form, which is still opened in the browser, generates requests
to the server to get the results of the long-running operation every five seconds. For such a
request, the server uses the ID of the long-running operatio to check the operation status.
If the operation has completed, the server creates an instance of the graph and restores the
graph state and the cache data to finish processing the action delegate and to return results
to the form.
The following diagram shows how the server executes an action asynchronously and how it
returns the results of the action to the form.
Figure: Execution of an action that uses a long-running operation
Processing a Report as a Long-Running Operation
When the user launches a report, either from the report form or by clicking an action button
on the maintenance or entry form, the system redirects the user to the report launcher form
(ReportLauncher.aspx), which is designed to automatically run a report for the received
parameters. The ASPX page for this form contains the PXReportViewer control, whose Java
Scripts objects and functions are designed to get the report data and display the data on the
form.
| Implementing Business Logic | 333
To run the report, the report launcher creates a request to the PX.Web.UI.PXReportViewer
control on the server. To process the request, the server instantiates the
PX.Reports.Web.WebReport class and invokes its Render method, which launches the report
generation as a long-running operation in a separate thread.
The resulting report data is an object of the PX.Reports.Data.ReportNode type
stored in the _CustomInfo dictionary of the current long-running operation under the
DEFAULT_CUSTOM_INFO_KEY key. To provide quick access to the report data when the user
views different pages of the report, the system saves the report data in the session as an
object of the PX.Reports.Web.WebReport type.
After the long-running operation has completed, the PXReportViewer control gets the report
data from the dictionary and displays the report on the report launcher form. For details on
how the report is displayed and how the report data is retrieved, see Display of Reports.
The following diagram shows how the server generates a report asynchronously and how it
returns the resulting report data to the report launcher form.
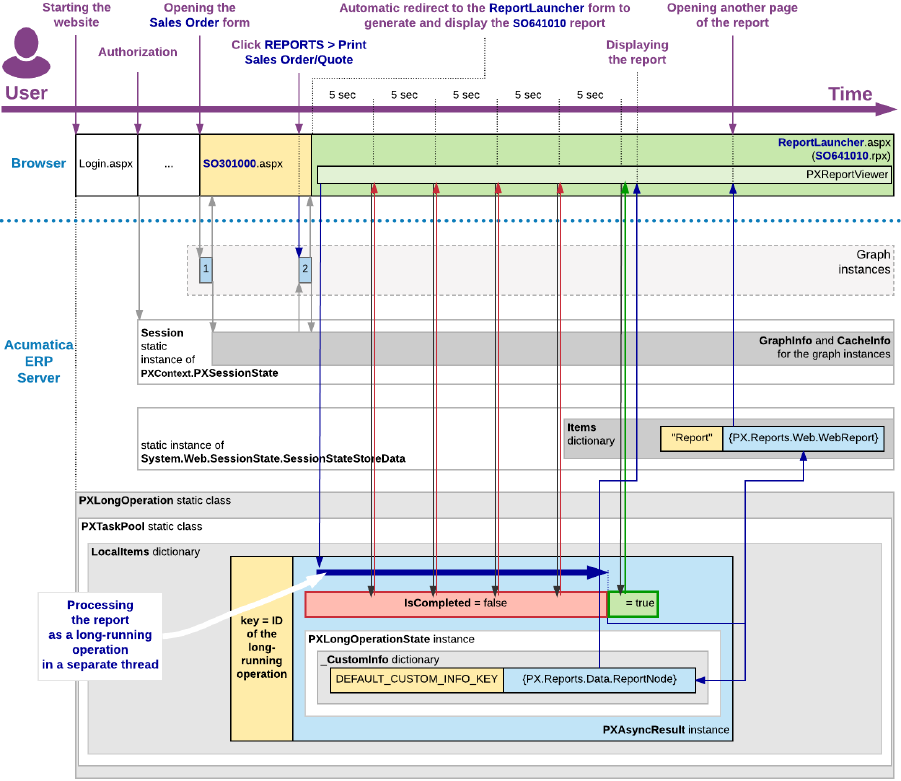
| Implementing Business Logic | 334
Figure: Execution of an action that launches the generation of a report
Executing a Long-Running Operation in a Cluster
If Acumatica ERP is configured to run in a cluster of application servers behind a load
balancer, it is not possible to predict which application server will receive the next request
from the client. In this model, session-specific data is serialized and stored in a high-
performance remote server, such as Redis or MS SQL, to be shared between the application
servers.
When the user clicks an action button on a form to start a processing operation, the load
balancer forwards the request to an Acumatica ERP server to execute the action delegate
defined for the button. The server creates an instance of the graph, which provides the
business logic for the form, and invokes the action delegate method.
When the action delegate method is executed, the StartOperation method creates
an instance of the PXAsyncResult class to hold the data and state of the long-running
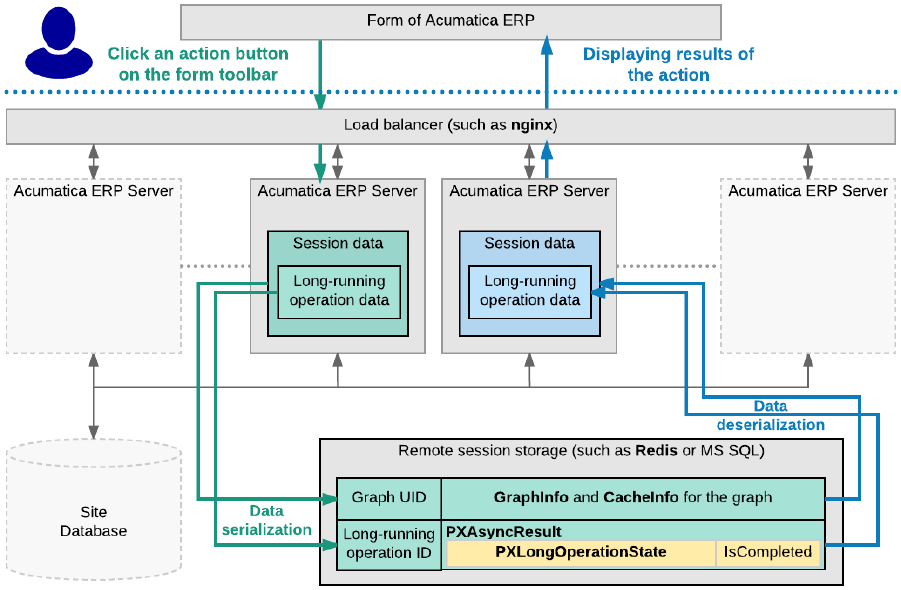
| Implementing Business Logic | 335
operation, initiates the execution of the long-running operation delegate asynchronously in a
separate thread, and stores the serialized data of the operation in the remote storage.
If the duration of the long-running operation is longer than five seconds, the server releases
the graph instance, stores the serialized data of the graph in the remote storage, and
continues processing the long-running operation in a separate thread. When the operation
has completed, this server sets the operation status to PXLongRunStatus.Completed and
updates the operation data in the remote session storage.
Until the form that is still opened in the browsers obtains the request results, it generates
requests to the site URL every five seconds to get these results. On every such request, the
load balancer selects a server to be used to process the request and forwards the request
to the server. The server uses the long-running operation ID, which is usually equal to the
graph UID, to check the operation's status. If the operation is completed, the server creates
an instance of the graph to finish processing the action delegate and to return results to the
form.
The following diagram shows how the data of a user session and of a long-running operation
are stored in the remote session storage of a cluster.
Figure: Execution of an action that uses a long-running operation in a cluster

| Implementing Business Logic | 336
Localizing Applications
Acumatica Framework provides built-in localization tools that you can use to translate
the user interface and application messages to different languages. This chapter provides
guidelines on how to prepare the Acumatica Framework application for localization efforts.
To prepare an application for localization, you must prepare data access classes (DACs) and
the application code.
In This Chapter
• Localization
• Strings That Can Be Localized
• To Prepare DACs for Localization
• To Localize Application Messages
• To Work with Multi-Language Fields
• To Optimize Memory Consumption of Localized Data
Related Links
• Translation Dictionaries
Localization
Applications created with Acumatica Framework can be localized on the presentation,
business logic, and database level owing to:
• Standard Microsoft.NET localization mechanism is implemented for localizing the
presentation layer.
• All messages returned from the business logic layer can be localized through the
dictionary mechanism. For details about how to implement message localization in your
code, see To Localize Application Messages.
• The runtime environment of Acumatica Framework supports the Unicode standard to
store and operate with data in a non-ANSI format.
• Information like addresses or product descriptions can be stored in special, language-
specific, database fields and presented in the user selected language. For details on
implementation of such fields, see To Work with Multi-Language Fields.
Acumatica Framework provides a built-in utility that makes it possible for a user to localize
the product. Once localization is entered and applied, the application does not require any
recompilation or re-installation. Also, localization can be exported, imported, and merged.
| Implementing Business Logic | 337
For more information about how to use the built-in localization mechanism, see Translation
Process in the System Administration Guide.
Related Links
• Translation Process
• Strings That Can Be Localized
Strings That Can Be Localized
By using the Translation Dictionaries (SM200540) form, you can add translations for the
string constants that are collected from the code of the application, and save them to the
database. When a user signs in with a specific language, the systems loads the translations
and displays the translated strings to the user. For more information on localization, see
Locales and Languages.
The system collects for localization the string constants that are specified in the following
items of the application:
• The DisplayName property of the PXUIField attribute of the fields of data access classes
(DACs)
• The DisplayName property of the PXUIField attribute of fields and actions of a business
logic controller (BLC) object, which override the attributes of the fields and actions of a
DAC
• The AllowedLabels properte of the PXStringList and PXIntList attributes
• The Values property of the classes that implement the ILocalizableValues interface
• Captions of form, grid, and panel controls and labels of input controls, which are
specified in ASPX
• Titles of all nodes in the site map
• Report elements (such as text box labels and diagram agendas)
• public const string fields of the classes marked with the PXLocalizable attribute
You can also translate user input to multiple languages and store translations in the
database. For more information on the localization of user input, see To Work with Multi-
Language Fields.
Related Links
• Locales and Languages
• Translation Dictionaries
| Implementing Business Logic | 338
To Prepare DACs for Localization
When the system localizes the fields of the data access classes (DACs) and DAC names, it
collects the string constants that are specified in the following code elements:
• The DisplayName property of the PXUIField attribute of the fields of DACs
• The AllowedLabels property of the PXStringList attribute or PXIntList attribute of
the fields of DACs
To prepare each DAC for localization, you need to perform the steps that are described in
this topic.
To Prepare Each DAC for Localization
1. Make sure the DisplayName parameter of the PXUIField attribute is specified for each
visible field in the DAC, as shown in the following example.
If you change the DisplayName value of the PXUIField attribute on the fly (by
creating your own PXFieldState), you should localize the string independently.
public new abstract class docType : PX.Data.IBqlField{}
[PXDBString(3, IsKey = true, IsFixed = true)]
[PXDefault()]
[PXUIField(DisplayName = "Document Type")]
public override string DocType { get; set; }
2. Specify the values that should be displayed in drop-down lists by using the
PXStringList attribute, as shown in the following example.
public abstract class lineSource : PX.Data.IBqlField{}
[PXString(1, IsFixed = true)]
[PXStringList(
new string[] { "D", "R" },
new string[] { "Draft", "Request" })]
[PXUIField(DisplayName = "Line Source")]
public virtual string LineSource { get; set; }
To Localize Application Messages
For localization of the messages in the source code, the system collects the strings from the
classes that are marked with the PXLocalizable attribute.
To make your application display localized messages, you need to perform the steps, which
are described in this topic.
| Implementing Business Logic | 339
To Display Localized Messages in Your Application
1. Move all strings that should be translated to the public static Messages class and specify
the PXLocalizable attribute for this class, as shown in the following code.
The exceptions to this requirement are field descriptions and list attributes in the
data access classes, which are handled separately. For details on how to make
field descriptions and list attributes localizable, see To Prepare DACs for Localization.
using System;
using PX.Data;
using PX.Common;
[PXLocalizable()]
public static class Messages
{
public const string FieldNotFound = "The field is not found.";
public const string InvalidAddress = "The address is not valid.";
public const string AdditionalData = "Author's title: {0}; author's name: {1}.";
}
No hyphenation is provided by the system. During the acquisition process of
localizable data, all the new-line symbols (\n\r) are to be removed. You can use
the reserved symbol (~) to cause the insertion of a new line.
2. If the message from the Messages class is used in an error or warning message,
which is displayed when an exception of the PXException type or of a type derived
from PXException is thrown, provide a non-localized message, as shown in the
following example. The system displays the localized message automatically if there is a
translation for this message in the database.
if (field == null)
{
throw new PXException(Messages.FieldNotFound);
}
3. If you need to receive the translation of a message from the Messages class within the
application code (for example, if the message is displayed in the confirmation dialog box,
which is displayed if you use the Ask() method of a data view in the code), use one of
the following methods:
• PXMessages.Localize(): The method searches for the translation of the provided
string in the database and returns the first translation found.
string msg = PXMessages.Localize(Messages.FieldNotFound);
• PXMessages.LocalizeFormat(): The method searches for the translation of the
provided string, which includes placeholders (such as {0} or {1}), in the database
and returns the first translation found.
| Implementing Business Logic | 340
• PXLocalizer.Localize(): The method returns the translation with the given key,
which you specify in the second parameter. A string may have multiple translations;
one translation for each occurrence of the string in the application. For each of the
occurrences, a key value is created. For example, if the string is declared in a class
marked with the PXLocalizable attribute, the full qualified name of the class is the
key, as the following code shows.
string localizedMsg = PXLocalizer.Localize(
ActionsMessages.ChangesWillBeSaved,
typeof(ActionsMessages).ToString());
To Work with Multi-Language Fields
With Acumatica Framework, you can create fields into which a user can type values in
multiple languages if multiple locales are configured in the applicable Acumatica Framework
application. For example, in Acumatica ERP, if an instance works with English and French
locales, a user can specify the value of the Description box on the Stock Items (IN202500)
form in English and French.
For details on multi-language fields on Acumatica ERP forms, see Managing Locales and
Languages.
To Configure a Field to Have Values in Multiple Languages
1. In the data access class (DAC) that you want to contain a multi-language field, define
the NoteID field with the PXNote attribute, as follows.
public abstract class noteID : IBqlField { }
[PXNote]
public virtual Guid? NoteID { get; set; }
2. If you want to configure a field to have values in multiple languages, annotate this field
with the PXDBLocalizableString attribute. The following code shows an example of the
use of the PXDBLocalizableString attribute.
[PXDBLocalizableString(60, IsUnicode = true)]
The PXDBLocalizableString attribute works similarly to the PXDBString attribute, but
unlike the PXDBString attribute, the PXDBLocalizableString attribute can be used
instead of the PXDBText and PXString attributes.
3. If you need to give values in multiple languages to a field with the PXDBText attribute,
replace this attribute with the PXDBLocalizableString attribute and do not specify the
length parameter, as shown in the following example.
[PXDBLocalizableString(IsUnicode = true)]
| Implementing Business Logic | 341
4. If you need to configure a field that has the PXString attribute, which is used in
conjunction with the PXDBCalced attribute, replace the PXString attribute with the
PXDBLocalizableString attribute and set the value of the NonDB parameter to true, as
shown in the following example.
[PXDBLocalizableString(255, IsUnicode = true, NonDB = true,
BqlField = typeof(PaymentMethod.descr))]
[PXDBCalced(typeof(Switch<Case<Where<PaymentMethod.descr, IsNotNull>,
PaymentMethod.descr>, CustomerPaymentMethod.descr>), typeof(string))]
To Configure the Default Value of a Multi-Language Field
If you want a multi-language field to have a default value in a specific language, use the
PXLocalizableDefault attribute instead of the PXDefault attribute and specify in its
second parameter either a BQL field or a BQL select that provides language selection.
For example, in Acumatica ERP, the SOLine line description defaulted to the appropriate
InventoryItem description based on the language that is set for a customer. The
TransactionDesr field of the SOLine DAC has the PXLocalizableDefault attribute with a
second parameter that specifies the language as follows: typeof(Customer.languageName).
See the following example of the use of the PXLocalizableDefault attribute.
[PXLocalizableDefault(typeof(Search<InventoryItem.descr,
Where<InventoryItem.inventoryID,
Equal<Current<SOLine.inventoryID>>>>),
typeof(Customer.languageName),
PersistingCheck = PXPersistingCheck.Nothing)]
To Obtain the Value of a Multi-Language Field in the Current Locale
If you want to obtain the value of a multi-language field in the current locale, use
the PXDatabase.SelectSingle() or PXDatabase.SelectMulti() method, and pass
to it the return value of the PXDBLocalizableStringAttribute.GetValueSelect()
static method instead of passing a new PXDataField object to it. (The
PXDBLocalizableStringAttribute.GetValueSelect() method takes three input
parameters: the table name, the field name, and a Boolean flag that indicates whether
strings should be returned as text with unlimited length.)
The following code shows an example of the use of the
PXDBLocalizableStringAttribute.GetValueSelect() method.
foreach (PXDataRecord record in PXDatabase.SelectMulti<Numbering>(
newPXDataField<Numbering.numberingID>(),
PXDBLocalizableStringAttribute.GetValueSelect("Numbering",
"NewSymbol", false),
newPXDataField<Numbering.userNumbering>()))
{
...
}
| Implementing Business Logic | 342
Generally, you use the PXDatabase.SelectSingle() and PXDatabase.SelectMulti()
methods for retrieving data within the Prefetch() method of a database slot. Don't
forget to add language code to the slot key when you obtain a slot, as shown in the
following example, because with the use of PXDBLocalizableStringAttribute, the
data becomes language-specific. Therefore, you need different slot instances for
different languages.
Numberings items = PXDatabase.GetSlot<Numberings>(
typeof(Numberings).Name + currentLanguage, typeof(Numbering));
To Obtain the Value of a Multi-Language Field in a Specific Language
If you want to obtain the value of a multi-language field in a specific language, use the
PXDBLocalizableStringAttribute.GetTranslation() method. Pass to the method as
input parameters a DAC cache, a DAC instance, a field name, and the ISO code of the
language.
The following code shows an example of use of the
PXDBLocalizableStringAttribute.GetTranslation() method.
tran.TranDesc =
PXDBLocalizableStringAttribute.GetTranslation(
Caches[typeof(InventoryItem)], item, typeof(InventoryItem.descr).Name,
customer.Current?.LanguageName);
To Optimize Memory Consumption of Localized Data
To optimize the memory consumption of static data, you can move the localization data
from all customer application instances to centralized storage. By default, the localization
data is kept in the database of every Acumatica ERP instance, and the total size of this
data therefore equals the number of instances times the size of the data. If you move the
localization data to centralized storage, there is only one copy of this data.
Alternatively, you can optimize the consumption of memory by disabling localization.
Whether you set up centralized storage of localization data or disable localization, you should
perform the following steps:
1. Implement a custom translation provider. Follow the instruction in To Implement a Custom
Translation Provider or To Disable Localization in this topic depending on which way of
optimization of memory consumption you select.
2. Place the assembly file with the new provider in the Bin directory of the Acumatica ERP
instance, and add the assembly to the customization project as a File element.
3. Register the new provider in the pxtranslate element of the web.config file, as
described in To Register the New Provider in Web.config in this topic.

| Implementing Business Logic | 343
To Implement a Custom Translation Provider
To implement a custom translation provider, derive a class from the PXTranslationProvider
class and override the LoadCultureDictionary() method, as the following example shows.
public class DemoTranslationProvider : PXTranslationProvider
{
public override PXCultureDictionary LoadCultureDictionary(
string locale, bool includeObsolete, bool escapeStrings)
{
PXCultureDictionary dictionary = new PXCultureDictionary();
...
// Adding a general translation for some string
dictionary.Append(
valueToTranslate,
new PXCultureValue(locale, translation));
// Adding a special translation for some string
dictionary.AppendException(
valueToTranslate,
new PXCultureEx(resourceID, locale, translation));
...
return dictionary;
}
}
The LoadCultureDictionary() method returns an instance of the PXCultureDictionary
type. Values are added to objects of this type through the Append() and
AppendException() methods. Append() adds a general translation for a string.
AppendException() adds a translation for a special case (exception) identified by the
resource key.
The code below defines a custom translation provider that loads the localization data from an
external Acumatica ERP database by using ADO.NET tools.
using System;
using System.Collections.Generic;
using System.Data.SqlClient;
using System.Linq;
using System.Text;
using PX.Data;
using PX.Translation;
namespace Demo.Translation
{
public class DemoTranslationProvider : PXTranslationProvider
{
private struct TranslationKey
{
public Guid id;
public string resKey;

| Implementing Business Logic | 344
public string locale;
}
// The connection string for the database that stores localization
// data
// Specify a specific value of the connection string
private const string connectionString = "";
// Overriding the method that returns the dictionary of
// localization data
public override PXCultureDictionary LoadCultureDictionary(
string locale, bool includeObsolete, bool escapeStrings)
{
string localizationValueSelect;
string localizationTranslationSelect;
InitializeSelectCommand(locale, includeObsolete,
out localizationValueSelect,
out localizationTranslationSelect);
Dictionary<Guid, string> localizationValue;
Dictionary<TranslationKey, string> localizationTranslation;
SelectLocalizationValues(localizationValueSelect,
localizationTranslationSelect,
out localizationValue,
out localizationTranslation);
return CreateCultureDictionary(escapeStrings, localizationValue,
localizationTranslation);
}
// Builds the SQL statement for selecting localization data
private void InitializeSelectCommand(
string locale, bool includeObsolete,
out string localizationValueSelect,
out string localizationTranslationSelect)
{
StringBuilder localizationValueSelectBld =
new StringBuilder("Select IDlv, NeutralValue" +
"From LocalizationValue");
if (!includeObsolete)
{
localizationValueSelectBld.Append(" Where IsObsolete = 0");
}
localizationValueSelect = localizationValueSelectBld.ToString();
StringBuilder localizationTranslationSelectBld =
new StringBuilder("Select IDlt, ResKey, Value, Locale" +
"From LocalizationTranslation");
if (!string.IsNullOrEmpty(locale))
{
localizationTranslationSelectBld.AppendFormat(

| Implementing Business Logic | 345
" Where Locale = '{0}'", locale);
}
localizationTranslationSelect =
localizationTranslationSelectBld.ToString();
}
// Retrieves localization data from the database by using the provided
// SQL statement
private void SelectLocalizationValues(
string localizationValueSelect,
string localizationTranslationSelect,
out Dictionary<Guid, string> localizationValue,
out Dictionary<TranslationKey, string> localizationTranslation)
{
localizationValue = new Dictionary<Guid, string>();
localizationTranslation =
new Dictionary<TranslationKey, string>();
using (SqlConnection connection =
new SqlConnection(connectionString))
{
connection.Open();
SqlCommand command = new SqlCommand(localizationValueSelect,
connection);
using (SqlDataReader reader = command.ExecuteReader())
{
while (reader.Read())
{
localizationValue.Add(reader.GetGuid(0),
reader.GetString(1));
}
}
command.CommandText = localizationTranslationSelect;
using (SqlDataReader reader = command.ExecuteReader())
{
while (reader.Read())
{
TranslationKey newTranslationKey = new TranslationKey()
{
id = reader.GetGuid(0),
resKey = reader.GetString(1),
locale = reader.GetString(3)
};
localizationTranslation.Add(newTranslationKey,
reader.GetString(2));
}
}
}
}

| Implementing Business Logic | 346
// Fills the PXCultureDictionary object with localization data by using
// the provided dictionaries of values to translate and the
// corresponding translations
private PXCultureDictionary CreateCultureDictionary(
bool escapeStrings,
Dictionary<Guid, string> localizationValue,
Dictionary<TranslationKey, string> localizationTranslation)
{
PXCultureDictionary dictionary = new PXCultureDictionary();
if (localizationTranslation.Count != 0)
{
foreach (Guid id in localizationValue.Keys)
{
IEnumerable<TranslationKey> localizationTranslationKeys =
from translationRowKey in localizationTranslation.Keys
where translationRowKey.id == id
select translationRowKey;
foreach (TranslationKey key in localizationTranslationKeys)
{
string translationResKey = key.resKey;
string translationLocale = key.locale;
string translationValue = localizationTranslation[key];
string value = escapeStrings ?
PXLocalizer.EscapeString(translationValue) :
translationValue;
if (string.IsNullOrEmpty(translationResKey))
{
dictionary.Append(
localizationValue[id],
new PXCultureValue(translationLocale, value));
}
else
{
dictionary.AppendException(
localizationValue[id],
new PXCultureEx(translationResKey,
translationLocale, value));
}
}
}
}
return dictionary;
}
}
}
| Implementing Business Logic | 347
To Disable Localization
To disable localization, implement a custom translation provider with the
LoadCultureDictionary() method that returns null, as the following code shows.
public class DemoTranslationProvider : PXTranslationProvider
{
public override PXCultureDictionary LoadCultureDictionary(
string locale, bool includeObsolete, bool escapeStrings)
{
return null;
}
}
To Register the New Provider in Web.config
Once the provider class is defined, register it in the web.config file by adding a new key
to the providers collection of the pxtranslate element and specifying the new key in the
defaultProvider property of pxtranslate. Use the add element to register the provider.
Set the name attribute to the key, which can be any unique value, and specify the type of the
custom provider in the type attribute.
The following code shows the configuration of DemoTranslationProvider, introduced in the
example above, in the pxtranslate element of the web.config file.
<pxtranslate defaultProvider="DemoTranslationProvider">
<providers>
<!--The default translation provider-->
<remove name="PXDBTranslatonProvider" />
<add name="PXDBTranslatonProvider"
type="PX.Data.PXDBTranslatonProvider, PX.Data" />
<!--The custom translation provider-->
<remove name="DemoTranslationProvider" />
<add name="DemoTranslationProvider"
type="Demo.Translation.DemoTranslationProvider, TranslationProvider"
applicationName="/"/>
</providers>
</pxtranslate>
Reusing Business Logic
In an Acumatica ERP application or an Acumatica Framework-based application, you may
need to use the same business logic in multiple places. For example, Acumatica ERP
supports the calculation of amounts in multiple currencies. Therefore, the business logic
containers (also called graphs) that implement the multicurrency logic are included in
different modules of the application.
| Implementing Business Logic | 348
With the ability to reuse business logic in Acumatica ERP or Acumatica Framework, you can
include the main business logic of particular functionality (such as multicurrency processing)
in reusable generic graph extensions and use this logic whenever you need to. If you need to
adjust this logic for the specifics of a particular module, you can override this business logic
in the implementation of this module. For example, you can assign different names for the
UI elements that are linked to the same fields of a data access class in different modules.
In this section, you can find information about generic graph extensions.
In This Chapter
• Reusable Business Logic Implementation
• Mapped Cache Extensions and the Application
Database
• Reusable Business Logic and the Application
Website
• Use of Generic Graph Extensions by the System
• Generic Graph Extensions Declared in Acumati-
ca ERP
• To Insert Reusable Business Logic That Has Al-
ready Been Declared
• To Sort Multiple Generic Graph Extensions
• To Implement Reusable Business Logic
Reusable Business Logic Implementation
Suppose that you want to use the same business logic in multiple places in your application.
That is, you have at least two graphs in which you need to insert the logic. The graphs
operate with data in the data access classes (DACs) and implement business logic through
event handlers, actions, and other methods.
You encapsulate the business logic that you want to reuse in a generic graph extension,
which is a graph extension that does not relate to any particular graph and can be used with
any base graph. The generic graph extension operates with data by using the mapped cache
extensions, which are cache extensions that are not bound to any particular DAC and can
extend any DAC.
To connect the mapped cache extensions to a particular DAC, you use a mapping class,
which maps the fields of a mapped cache extension to the fields of a DAC. To connect
the generic graph extension to a particular base graph, in the base graph, you define an
implementation class, which inherits the generic graph extension. The following diagram
shows in yellow rectangles the classes that you need to implement to reuse the business
logic.
| Implementing Business Logic | 349
Figure: Required classes
These classes are described in detail in the sections below. (For details on the
implementation of the classes, see To Implement Reusable Business Logic and To Insert Reusable
Business Logic That Has Already Been Declared.)
Mapped Cache Extension
A mapped cache extension is an analog of a data access class (DAC) for a generic graph
extension. In the mapped cache extension, you include the main fields that are used in the
reusable business logic implementation. You map the fields of a mapped cache extension
to the fields of a base DAC by using the mapping class, which is described in the following
section. The mapped cache extension can also include the fields that are not mapped to any
base DAC fields. (For details, see Mapped Cache Extensions and the Application Database.)
The class of a mapped cache extension inherits from the PXMappedCacheExtension
abstract class, which derives from PXCacheExtension and IBqlTable.
The declaration of a field of a mapped cache extension includes the following two required
members, which are the same as the required members of a DAC field:
• A public abstract class (which is also referred to as class field).
You derive the class from the IBqlField interface and assign it a name that starts with a
lowercase letter.
• A public virtual property (which is also referred to as property field).

| Implementing Business Logic | 350
You assign the property a name that starts with an uppercase letter. The system assigns
the PXMergeAttributes attribute with MergeMethod.Merge to each field of a mapped
cache extension automatically. If you define the PXMergeAttributes attribute for a field
of a mapped cache extension explicitly, the explicitly defined attribute overrides the
automatically defined. You can also define any other attributes for the property field of
the mapped cache extension, or not define the attributes at all.
The following code shows an example of a mapped cache extension.
//Mapped cache extension
public class Document : PXMappedCacheExtension
{
//BAccountID field
public abstract class bAccountID : IBqlField
{
}
protected Int32? _BAccountID;
public virtual Int32? BAccountID
{
get
{
return _BAccountID;
}
set
{
_BAccountID = value;
}
}
//CuryID field
public abstract class curyID : IBqlField
{
}
protected String _CuryID;
public virtual String CuryID
{
get
{
return _CuryID;
}
set
{
_CuryID = value;
}
}
...
}

| Implementing Business Logic | 351
Mapping Class
A mapping class is a protected class that defines the mapping between the fields of a
mapped cache extension and the fields of a DAC. In a generic graph extension, you declare
a mapping class for each mapped cache extension that you need to use in the reusable logic
implementation.
A mapping class implements the IBqlMapping interface, which has the following two
properties:
• Extension: The mapped cache extension
• Table: The DAC to which the extension is mapped
In the declaration of the mapping class, you also include declarations of the properties for
each field of the mapped cache extension that you want to map to a field of the DAC, as the
following code shows.
//A mapping class
protected class DocumentMapping : IBqlMapping
{
public Type Extension => typeof(Document);
protected Type _table;
public Type Table => _table;
public DocumentMapping(Type table)
{
_table = table;
}
public Type BAccountID = typeof(Document.bAccountID);
public Type CuryInfoID = typeof(Document.curyInfoID);
public Type CuryID = typeof(Document.curyID);
public Type DocumentDate = typeof(Document.documentDate);
}
If the name of a property field of the DAC is the same as the name of the mapping class
property, the DAC field will be automatically mapped to the field of the mapped cache
extension by the implementation class (which is described below). If the name of a property
field of the DAC differs from the name of the mapping class field, you redefine the mapping
manually in the implementation class. If no field in the DAC has the name of the mapping
class field, and no mapping is defined in the implementation class, the field of the mapped
cache extension is not mapped to any base DAC field, as shown in the following diagram.
| Implementing Business Logic | 352
Figure: Mapping declaration
Generic Graph Extension
A generic graph extension is a public abstract class that encapsulates business logic that
can be used in multiple places of an Acumatica ERP application or an Acumatica Framework-
based application. The class inherits from the PXGraphExtension<TGraph> class, as the
following code shows.
public abstract class MultiCurrencyGraph<TGraph, TPrimary> :
PXGraphExtension<TGraph>
where TGraph : PXGraph
where TPrimary : class, IBqlTable, new()
{
}
In the generic graph extension, you declare the following items:
• The mapping classes.
• The protected abstract methods that return the mapping classes. You have to override
these methods in the implementation class.
• The views that can have either mapping-based declaration or standard declaration. You
declare a mapping-based view by using the PXSelectExtension<Table> class.
• The event handlers, actions, and other methods.
Implementation Class
An implementation class defines the implementation of a generic graph extension for a
particular graph. You declare the implementation class as a class that derives from the
generic graph extension class with the following type parameters:
• The base graph to which you add reusable logic
• The main DAC of the primary data view of the base graph

| Implementing Business Logic | 353
In this class, you can override the mapping defined by the mapping class, override other the
methods of the base class, and insert your own views, methods, and event handlers, as the
following code shows.
public class MultiCurrency : MultiCurrencyGraph<OpportunityMaint, CROpportunity>
{
protected override DocumentMapping GetDocumentMapping()
{
return new DocumentMapping(typeof(CROpportunity))
{
DocumentDate = typeof(CROpportunity.closeDate)
};
}
protected override CurySourceMapping GetCurySourceMapping()
{
return new CurySourceMapping(typeof(Customer));
}
public PXSelect<CRSetup> crCurrency;
protected PXSelectExtension<CurySource> SourceSetup =>
new PXSelectExtension<CurySource>(crCurrency);
protected virtual CurySourceMapping GetSourceSetupMapping()
{
return new CurySourceMapping(typeof(CRSetup))
{
CuryID = typeof(CRSetup.defaultCuryID),
CuryRateTypeID = typeof(CRSetup.defaultRateTypeID)
};
}
protected override CurySource CurrentSourceSelect()
{
...
}
}
Related Links
• To Insert Reusable Business Logic That Has Already Been Declared
• To Implement Reusable Business Logic
Mapped Cache Extensions and the Application Database
The fields of a mapped cache extension that are mapped to the fields of a base data access
class (DAC) are used by the system to work with the database columns to which the fields of
the base DAC are bound.
| Implementing Business Logic | 354
If a mapped cache extension includes fields that are bound to database columns (with the
type attributes that are derived from the PXDBFieldAttribute class, such as PXDBString),
the database table that corresponds to the base DAC must contain these fields of the
mapped cache extension. That is, the database table must include the fields bound to a
database column that are defined both in the base DAC and the mapped cache extension, as
shown in the following diagram.
Figure: Database schema for a DAC and mapped cache extension
Related Links
• Reusable Business Logic Implementation
Reusable Business Logic and the Application Website
If the field of a mapped cache extension is mapped to a field of the base data access class
(DAC), you can use the merged field (that is, the base field that has merged attributes of the
base field and the mapped cache extension field) to configure the UI elements of the website
page. If the field of the mapped cache extension is not mapped to a field of the base DAC,
you can use the field of the mapped cache extension in the website page, as shown in the
following diagram.
| Implementing Business Logic | 355
Figure: Fields on the website page
The actions that are defined in the base graph, generic graph extension, and implementation
class are automatically added by the system on the website page, as shown in the following
diagram. The implementation class can override the actions declared in the generic graph
extension.
| Implementing Business Logic | 356
Figure: Actions on a website page
Use of Generic Graph Extensions by the System
In this topic, you will learn how Acumatica ERP or an Acumatica Framework-based
application works with generic graph extensions.
Initialization of a Graph Instance That Includes Reusable Logic
During the initialization of a graph instance that includes reusable logic, the system adds
to the collection of data views the data views that are declared in the base graph, including
those that are declared in the implementation class or the generic graph extension from
which the implementation class inherits. The mapping classes define the PXCache<Table>
objects in which the mapping-based views keep data records.
Event handlers that are declared in the base graph, implementation class, and generic graph
extension are added by the system to the collections of event handlers in the corresponding
| Implementing Business Logic | 357
PXCache object. The event handlers defined for the fields or rows of the mapped cache
extension are added to the PXCache object of the base DAC type to which the mapped cache
extension is mapped.
The following diagram illustrates the initialization of a sample OpportunityMaint graph
instance that includes reusable logic.
Figure: Intitialization of a graph instance
Generic Graph Extensions Declared in Acumatica ERP
The source code of Acumatica ERP includes the definitions of the generic graph extensions,
which are described in detail in the following sections. These graph extensions are declared
in the PX.Objects.Extensions namespace. You can use these generic graph extensions
if you want to include the implemented functionality in the forms of your application. For
details on how to include this functionality in your application, see To Insert Reusable Business
Logic That Has Already Been Declared.
Multi-Currency Extension
If you need to work with multiple currencies on a form, you can insert an implementation
of the MultiCurrencyGraph<TGraph, TPrimary> abstract class in the graph that provides
business logic for the form. For more information on the use of multiple currencies in the
system, see Currency Management in the Financial Management Guide.
| Implementing Business Logic | 358
The MultiCurrencyGraph<TGraph, TPrimary> class works with the following mapped cache
extensions:
• Document: Represents a document that supports multicurrency
• CurySource: Contains the information on the currency source
For more information on these classes, see the API Reference.
Sales Price Extension
If you need to work with multiple price lists on a form, you can insert an implementation
of the SalesPriceGraph<TGraph, TPrimary> abstract class in the graph that provides
business logic for the form. For more information on sales prices, see Managing Sales Prices in
the Financial Management Guide.
The SalesPriceGraph<TGraph, TPrimary> class works with the following mapped cache
extensions:
• Document: Represents a document that supports multiple price lists
• Detail: Represents a detail line of the document
• PriceClassSource: Provides information about the source of the price class
For more information on these classes, see the API Reference.
Discount Extension
If you need to work with discounts on a form, you can insert an implementation of the
DiscountGraph<TGraph, TPrimary> abstract class in the graph that provides business
logic for the form. For more information on discounts, see Configuring Customer Discounts in
the Financial Management Guide.
The DiscountGraph<TGraph, TPrimary> class works with the following mapped cache
extensions:
• Document: Represents a document that supports discounts
• Detail: Represents a detail line of the document
• Discount: Provides information about the discount
For details on these classes, see the API Reference.
Sales Tax Extension
If you need to apply sales taxes to amounts of a form, you can insert an implementation
of the TaxGraph<TGraph, TPrimary> abstract class in the graph that provides business
logic for the form. For more information on taxes in the system, see Taxes in the Financial
Management Guide.
The TaxGraph<TGraph, TPrimary> class works with the following mapped cache extensions:

| Implementing Business Logic | 359
• Document: Represents a document that supports sales taxes.
• Detail: Represents a detail line of the document.
• TaxTotal: Represents the tax total amount
• TaxDetail: Represents a tax detail line
For detailed descriptions of the classes, see the API Reference.
Related Links
• To Insert Reusable Business Logic That Has Already Been Declared
To Insert Reusable Business Logic That Has Already Been
Declared
In this topic, you can find information about how to insert an already-declared generic graph
extension in the application code.
To Add a Generic Graph Extension to a Graph
1. Review the generic graph extension that provides the business logic that you want to
reuse as follows:
a. Identify the mapped cache extensions the generic graph extension works with and
the list of their fields, and decide whether the default mapping (which is defined by
the mapping class of the generic graph extension) is suitable for the base data access
class (DAC) that you are going to use.
b. Identify the fields of the mapped cache extension that are bound to columns of a
database table, and make sure the database table that corresponds to the base DAC
includes the columns to store the data from the mapped cache extension.
2. In the code of the graph you need to add the reusable business logic to, add the public
implementation class that derives from the generic graph extension of the needed type.
Use the following types in the type parameters of the generic graph extension:
• The base graph to which you add reusable logic
• The main DAC of the primary data view of the base graph
In the following code, the MultiCurrency class extends the OpportunityMaint
graph. The MultiCurrency class derives from public abstract class
MultiCurrencyGraph<TGraph, TPrimary> : PXGraphExtension<TGraph>.
public class MultiCurrency : MultiCurrencyGraph<OpportunityMaint, CROpportunity>
{
}
3. In the added class, override the abstract methods of the generic graph extension as
follows:

| Implementing Business Logic | 360
• In the overridden methods of the generic graph extension that return the mapping
classes, either use the default mapping of the fields of the mapped cache extension
to the fields of the base DAC or adjust the mapping.
• In the other overridden methods, implement the required business logic. For details
on the implementation of the methods in the generic graph extension declared in
Acumatica ERP, see API Reference.
4. In the added class, adjust the reused business logic by doing any of the following:
• Override other methods of the base class.
• Add your own views, methods, and event handlers.
The following code shows a sample implementation of the MultiCurrency class, which
reuses the multicurrency business logic defined in the MultiCurrencyGraph generic
graph extension.
public class MultiCurrency : MultiCurrencyGraph<OpportunityMaint, CROpportunity>
{
protected override DocumentMapping GetDocumentMapping()
{
return new DocumentMapping(typeof(CROpportunity))
{
DocumentDate = typeof(CROpportunity.closeDate)
};
}
protected override CurySourceMapping GetCurySourceMapping()
{
return new CurySourceMapping(typeof(Customer));
}
public PXSelect<CRSetup> crCurrency;
protected PXSelectExtension<CurySource> SourceSetup =>
new PXSelectExtension<CurySource>(crCurrency);
protected virtual CurySourceMapping GetSourceSetupMapping()
{
return new CurySourceMapping(typeof(CRSetup))
{
CuryID = typeof(CRSetup.defaultCuryID),
CuryRateTypeID = typeof(CRSetup.defaultRateTypeID)
};
}
protected override CurySource CurrentSourceSelect()
{
...
}
}

| Implementing Business Logic | 361
To Sort Multiple Generic Graph Extensions
If you need to add multiple generic graph extensions to a graph, you need to define the
order in which the extensions are applied.
To define the order in which the generic graph extensions are applied, add the class inherited
from the Autofac.Module class and implement the sorting of the generic class extensions,
as the following code shows.
public class ServiceRegistration : Module
{
protected override void Load(ContainerBuilder builder)
{
builder.ActivateOnApplicationStart<ExtensionSorting>();
}
private class ExtensionSorting
{
private static readonly Dictionary<Type, int> _order = new Dictionary<Type, int>
{
{typeof(MultiCurrency), 4},
{typeof(SalesPrice), 3},
{typeof(Discount), 2},
{typeof(SalesTax), 1},
};
public ExtensionSorting()
{
...
}
}
}
To Implement Reusable Business Logic
If you need to use the same business logic in multiple modules of your Acumatica ERP
application or an Acumatica Framework-based application and this logic is not included in
the source code of Acumatica ERP, you can define your own generic graph extensions, as
described in this topic. For the list of the predefined generic graph extensions, see Generic
Graph Extensions Declared in Acumatica ERP.
To Create a Generic Graph Extension
1. In the code of your application, define the mapped cache extensions, which inherit
from the PXMappedCacheExtension abstract class. For details on the mapped cache
extensions, see Mapped Cache Extension.
//Mapped cache extension
public class Document : PXMappedCacheExtension
{
//BAccountID field

| Implementing Business Logic | 362
public abstract class bAccountID : IBqlField
{
}
protected Int32? _BAccountID;
public virtual Int32? BAccountID
{
get
{
return _BAccountID;
}
set
{
_BAccountID = value;
}
}
//CuryID field
public abstract class curyID : IBqlField
{
}
protected String _CuryID;
public virtual String CuryID
{
get
{
return _CuryID;
}
set
{
_CuryID = value;
}
}
...
}
2. In the code of your application, define the generic graph extension as follows:
a. Define a class inherited from the PXGraphExtension<TGraph> class. The following
code shows a declaration of a generic graph extension.
public abstract class MultiCurrencyGraph<TGraph, TPrimary> :
PXGraphExtension<TGraph>
where TGraph : PXGraph
where TPrimary : class, IBqlTable, new()
{
}
| Implementing Business Logic | 363
b. In the generic graph extension, for each mapped cache extension that you defined in
the first step, declare the protected mapping class, as shown in the following code.
For details on the mapping classes, see Mapping Class.
//A mapping class
protected class DocumentMapping : IBqlMapping
{
public Type Extension => typeof(Document);
protected Type _table;
public Type Table => _table;
public DocumentMapping(Type table)
{
_table = table;
}
public Type BAccountID = typeof(Document.bAccountID);
public Type CuryInfoID = typeof(Document.curyInfoID);
public Type CuryID = typeof(Document.curyID);
public Type DocumentDate = typeof(Document.documentDate);
}
c. In the generic graph extension, for each mapping class, declare the protected
abstract method that returns the mapping class, as shown in the following code.
protected abstract DocumentMapping GetDocumentMapping();
d. In the generic graph extension, define the views that use the mapped cache
extensions, as the following code shows. To define each view, you use the
PXSelectExtension<Table> : PXSelectBase<Table> class, where Table is a
mapped cache extension.
//A view that uses the mapped cache extension
public PXSelectExtension<Document> Documents;
In the generic graph extension, you can define standard views as well as the
views that use the mapped cache extensions.
e. In the generic graph extension, define the reusable event handlers, as the following
code shows.
protected virtual void _(
Events.FieldUpdated2<Document.documentDate, Document> e)
{
if (e.Row == null) return;
CurrencyInfoAttribute.SetEffectiveDate<Document.documentDate>(
Documents.Cache,
new PXFieldUpdatedEventArgs(e.Row, e.OldValue, e.ExternalCall));
}
| Implementing Business Logic | 364
f. In the generic graph extension, implement any other business logic that you want to
reuse, such as filters and actions.
Once you have defined the mapped cache extensions and the generic graph extension, you
can insert reusable business logic to any part of your application, as described in To Insert
Reusable Business Logic That Has Already Been Declared.
| Troubleshooting Acumatica Framework-Based Applications | 365
Troubleshooting Acumatica Framework-Based
Applications
In this part of the guide, you can find information about troubleshooting the applications
based on Acumatica Framework.
In This Part
• To Debug Acumatica Framework-Based Applications
To Debug Acumatica Framework-Based Applications
This topic describes how to link an Acumatica Framework-based application site to the
database and start the Acumatica Framework application in debug mode.
To Debug an Application from Visual Studio
1. In Visual Studio, open the solution of your Acumatica Framework-based application.
2. In the Site folder of the solution, open the web.config file.
3. In the connectionStrings section of the file, modify the connection string by specifying
the credentials to your development database as follows:
• For a locally installed Microsoft SQL Server that uses SQL Server authentication (line
breaks are for display purposes only)
<connectionStrings>
<remove name="ProjectX" />
<add name="ProjectX" providerName="System.Data.SqlClient"
connectionString="Data Source=(local);Initial Catalog=Project_Catalog;
User Id=User_ID; Password=User_Password"
</connectionStrings>
• For a locally installed Microsoft SQL Server that uses Windows authentication (line
breaks are for display purposes only)
<connectionStrings>
<remove name="ProjectX" />
<add name="ProjectX" providerName="System.Data.SqlClient"
connectionString="Data Source=(local);Initial Catalog=Project_Catalog;
Integrated Security=True"/>
</connectionStrings>
• For a remote Microsoft SQL Server that uses SQL Server authentication (line breaks
are for display purposes only)
connectionStrings>

| Troubleshooting Acumatica Framework-Based Applications | 366
<remove name="ProjectX" />
<add name="ProjectX" providerName="System.Data.SqlClient"
connectionString="Data Source=Server_Name; Initial
Catalog=Project_Catalog;
User Id=User_ID; Password=User_Password"
</connectionStrings>
4. In the system.web section of the file, set the debug attribute of the compilation
element to True, as shown in the following example.
<compilation debug="True" defaultLanguage="c#"
numRecompilesBeforeAppRestart="9999" targetFramework="4.7.1">
5. In Visual Studio, right-click the Site folder of the solution, and click Set as StartUp
Project.
6. Right-click the Main.aspx file in the Site folder, and click Set as Start Page.
7. Optional: If you need to debug a server error that throws an exception, do the following:
a. On the toolbar, click Debug > Windows > Exception Settings.
b. In the Exception Settings panel, which opens, expand Common Language
Runtime Exceptions, and select the check box for the exception that is thrown
(such as System.ArgumentOutOfRangeException).
8. Run the solution in the Debug mode.
| Glossary | 367
Glossary
The following table contains definitions of the basic terms used in Acumatica Framework.
Term Definition
Action An interface for executing a specific operation with data that is
implemented in a graph. An action is represented by the corre-
sponding button on the user interface.
Acumatica Cloud xRP
Platform
The platform for the development of cloud ERP applications
(such as Acumatica ERP and customizations of it), the mobile
application for Acumatica ERP, and applications integrated with
Acumatica ERP by means of the web services API.
Acumatica Customiza-
tion Platform
The part of the Acumatica Cloud xRP Platform that provides cus-
tomization tools for the development of applications embedded
in Acumatica ERP (also called customizations of Acumatica ERP).
Acumatica Framework The part of the Acumatica Cloud xRP Platform that provides the
platform API, web controls, and other tools for building ERP ap-
plications.
Acumatica Framework
Templates
A set of Visual Studio templates provided as a part of Acumati-
ca Framework for creating ASPX pages and business logic con-
trollers.
Acumatica Frame-
work-based applica-
tion
An application created by means of Acumatica Framework tools.
Analytical report A report created with the Analytical Report Manager. For details
on this tool, see Analytical Report Manager.
Bound field A data field that represents a column from a database table.
Compare to Unbound field.
BQL statement A generic BQL class specialization that represents a specific
query to the database. The type parameters specified in the BQL
statement are BQL operator classes and DACs.
Business logic con-
troller (BLC)
See Graph.
Business query lan-
guage (BQL)
A set of generic classes for querying data records from the data-
base.
Cache A collection of modified data records from the same table stored
in the user session and shared between requests.
Custom report A report created on the custom report form.
Customization of
Acumatica ERP
A modification of the user interface, business logic, and the
database scheme without recompilation and re-installation of
| Glossary | 368
Acumatica ERP. This modification is packed in a customization
project.
Customization project A container that holds the changes you have made during a par-
ticular customization of Acumatica ERP.
DAC field See Field.
Data access class
(DAC)
A class that represents a database table.
Data entry form A form that is used for the input of business documents.
Data member A data view specified as the data source for a container of UI
controls (a form, a tab, or a grid).
Data record A specific record retrieved from the database or created in code
and wrapped in a DAC instance.
Data view A BQL statement that the graph uses to access and manipu-
late data. A developer defines a data view in code by using PXS-
elect classes.
Datasource control A service control on an ASPX page that is used to bind the ASPX
page to a particular graph. This control represents the form
toolbar, which contains action buttons.
Embedded application See Customization of Acumatica ERP.
Event A way to provide notifications from Acumatica Framework to the
application. Most business logic is implemented in event han-
dlers.
Event handler A method that is invoked by Acumatica Framework when the
corresponding event is raised.
Field (DAC field) A part of the DAC definition that typically represents a database
column. A DAC field consists of an abstract class that is used to
refer to the field in BQL and a property holding the actual field
value.
Form An application page that provides the UI and business logic of
the application. Each form used in the application consists of
a declarative ASPX page created from one of the Acumatica
Framework Templates or a report form and the business logic
defined for this form in the corresponding graph.
Form template A Visual Studio template that is provided by Acumatica Frame-
work and used for creating ASPX pages.
Graph A stateless controller class that is intended for the execution of
business logic on a particular application form. A graph (also
called a business logic controller) is derived from the PXGraph
generic class.
Inquiry form A form that displays a list of data records selected by the speci-
fied filter.
| Glossary | 369
Integrated application A third-party application integrated with Acumatica ERP by
means of web services API.
Maintenance form A helper form that is used for the input of data on the data en-
try and processing forms.
Mobile API The API that is used for customization of the Acumatica mobile
application. For a description of the API, see Mobile Site Map Ref-
erence.
Multitenant applica-
tion
An application in which multiple tenants use the same Acumat-
ica Framework-based application. For each tenant, the website
looks identical and provides the same business logic. However,
each tenant has exclusive access to the tenant's individual data
and can have restricted access to the data of other tenants.
Platform API The API that is used to develop Acumatica Framework-based
applications and customizations of Acumatica ERP.
Primary graph The graph that corresponds to the default editing form of the
data record. This graph is specified in the PXPrimaryGraph at-
tribute.
Primary DAC The first data access class specified in a BQL statement.
Primary data view The first data view defined in a business logic controller.
Processing form A form that provides mass processing operations.
Report Designer A visual editor for creating report forms and printable pages.
Report form An RPX page created in Report Designer that defines the form
used for generating reports in the application.
Screen See Form.
Setup form A form that provides the configuration parameters for the appli-
cation.
Unbound field A data field that exists only on the model level in a DAC defin-
ition, and that is not bound to a column of the database table.
Compare to Bound field.
Webpage See Form.
Web services API The API for development of applications integrated with Acumat-
ica ERP through SOAP or REST.
