- 1 -
4K Vehicle Blackbox DVR
USER MANUAL
- 1 -
Thank you very much for purchasing our car dash cam!
Disclaimer:
1. Please read the set-up and usage instructions carefully
before operation.
2. You should not set/install this dash cam at a place that would
obstruct or reduce a driver’s view. Make sure your usage
comply with pertinent vehicle codes of your state, province,
territory or country.
3. You should post the required notices of recordation to
occupants inside the vehicle, if voices or other
information/signal pertaining to in-vehicle activities will be
recorded.
4. You should not change the dash cam’s setting or mode of
operation when the vehicle is in motion.
5. You should not leave the dash cam in a visible spot when no
one is inside the vehicle, to avoid attracting break-ins to steal
the unit or other property.
6. You should avoid extended exposure of the dash cam to
direct sunlight or extreme temperatures (either high or low
temperature) which tend to degrade or damage the unit and its
- 2 -
normal functionality.
7. You should examine, check and verify the dash cam at least
every 6 months, including the memory card, to ensure the video
reception and recording are working properly. For each use, you
should verify that the dash cam unit, the visible lights and the
audible sounds are working normally. If there are signs of
non-operation or malfunction, you should immediately seek to
replace the product and check to see if the product is covered
under any applicable warranty.
8. The dash cam unit may have additional functionality, such as
transmission and recordation of audible or GPS signal or other
identification information. If you have privacy concerns about
these functions, make sure you follow the instruction to disable
these functions.
9. You should use the dash cam unit in the way it is intended.
You should not use the dash cam unit in a way that would be
illegal or that tends to physically damage the unit, or tend to
cause danger to the safe operation of the vehicle or the
occupants.
10. THIS DEVICE SHOULD NOT BE ADJUSTED BY THE
DRIVER WHILE DRIVING. IN THE EVENT OF AN ACCIDENT,
- 3 -
DEVICE MAY DISLODGE AND BECOME UNSAFE FOR
PASSENGERS.
Note :
1. This user manual will detail how to use, operation, technical
specifications and precautions. Before use, please read this
manual thoroughly and fully understand, Please keep this
manual, we hope our products can meet your needs and
long-term service to you!
Using this product, enjoying the real high quality life.
2. This manual in the printing process, the machine because of
the appearance, software or hardware repair process leads to
the same part of the manual operation of non-conformance, the
Company has maintained the final interpretation!
3. Do not put the machine into the damp working condition, this
machine have no waterproof function, so please make the
machine no pour water or exposed to rain water.
4. Do not try open the shell or try repair by yourself, if the
accessories for this machine have any problem, please do to
the professional maintenance station to repair.
- 4 -
5. Do not use the thrill chemical substance, clean solvent or
cleaner to clean this machine, please use the moist soft cloth to
clean.
6. Do not use this machine under the condition that the dust and
high density, to avoid affecting the video.
7. Please protect the environment, don’t discard this machine
randomly; do not throw this machine into fire, otherwise will
have an explosion.
8. Please pay attention to clean the lens surface, use the moist
soft cloth clean the lens then use, to avoid the video is not so
good.
Tips:
1. Outdoor use Please avoid high temperature and direct sun
exposure.
2. Please use original accessories.
3. Please do not disassemble the product.
- 5 -
Content Guide
1. Product Structure
2. Product Installation Guide
3. Product Precautions
4. Product Specifications
5. App Operation Instructions
6. GPS Player Software Installation and using
Instructions
7. FAQ

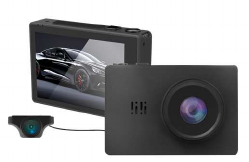
- 6 -
1. Product Structure
1. Power 2. WiFi 3.GPS 4.Micro USB
5. Speaker 6.Front Cam 7. Micro USB Port 8.Reset
9.Micro SD Card Slot 10.Dust proof Cover 11.Indicator Light
12.Charging Indicator Light 13. 3.0” OLED Touch Screen
14.Gesture Sensing 15. AV-in

- 7 -
Keys and Functions
Key Function Instruction
WiFi Turn on/ off the WiFI
1.Turn on:Short press WiFi to turn on
2.Turn off:Short press WiFi to turn off
Power Turn on/Turn off
1.Turn on:Short press Power to turn on
and indicator lighted
2.Turn off:Long press Power to turn off
and indicator off
Reset Reset
When device crashes, shot press here to
reboot
USB port
Charging/USB
storage/Web camera
1.Connect to PC by USB cable,we can
check video/photo and charge/ as the
web camera for PC
2.Connect to the charger, camera will turn
on to record and charging
2. Product Installation Guide
1.Turn off the car engine
2.Insert the TF card into the card slot of dash cam
【Attention】Please use high-speed SD card (Class10 or above,
capacity is not less than 8GB, max to 64GB, and to format the
SD card with the machine or PC before using)
3.Fix the dash cam on the windscreen of your car
- 8 -
4. Insert the car charger into the car cigarette lighter, and please
use the standard 1.5A car charger.
5.Install the rear camera on the rear of the vehicle and pay
attention to the direction of the camera when installing. Pave the
cable alongside the roof of the vehicle. After the installation is
completed, put the rear plug into the rear camera interface of
the dash cam, and connect the red reverse cable of the rear
camera to the positive pole of the reverse lamp.
6. Connect the dash cam USB interface to the car charger with
a charging extension cable.
【Attention】Pave the cable alongside the edge of windshield.
7. Adjust the lens position to ensure that the lens are level with
the ground.
8. Start the engine and check whether the machine is installed
correctly.
3.Product Precautions
1.Before installation, please check the accessories carefully to
ensure that the products and accessories are correct and
complete, and then start the installation.
2.During installation, be sure not to insert the car key into the
- 9 -
power supply, and do not insert or pull out any machine
accessories in the status of Power-on, including: rear camera,
SIM card, SD card. These actions should be completed when
power is turned off.
3.When the car key is plugged into the vehicle, the dash cam
will automatically turn on. Please check whether the function of
power on/off, the front and rear cameras and the rear view
display are normal.
4.When the machine is in use, it is forbidden and dangerous to
pull and insert the rear camera plug, GPS antenna and SD card,
which will cause the recorded video files to be damaged and the
machine to be abnormal or damaged.
5.If you need to download the recording videos and images,
press SD card directly when the car is turned off. Then insert the
SD card into the machine again when the vehicle is turned off.
6.You must use C10 high-speed card (recommended capacity
8G-32G), lower than C10 will cause problems like video stutter,
black screen, video can not be recorded or not be played or not
automatically be covered.

- 10 -
4.Product Specifications
Product Feature
4K, Dual 1080P dash cam
G
-
sensor
Built
-
in(to save the file if emergency, and can ‘t
be deleted if the collision of vehicles
happen)
Screen
3.0
”
OLED Touch Screen
Lens
1
50
Degree ultra wide angle
Photo Resolution
VGA/1.3M/2MHD/3M/5M/8M/10M/12M
Video Resolution
Single Cam:
2880x2160 P24
1920x1080 P60
1920x1080 P30
1280x720 P120
1280x720 P60
1280x720 P30
Dual Cam: 1920*1080P 30FPS + 1920*1080P
30FPS
Video Code
-
c
H.264
,
MP4
Aperture
F=1.8
Language
English/Simplified Chinese etc.
Color
Black
Loop Recording
Support
Auto turn on/off
while
vehicle power
on/off
Support
Motion detection
Support
Year/Month/Day/Ho
ur/Minute
Support
Photo Format
JPG
Memory card
TF card
,
Class 10 or above
,
Max support
64
G
B

- 11 -
MIC
Support
Speaker
Support
GPS
Built
on bracket
USB port
1
:
Storage 2
:
Charging 3.Power on and
recording
Power Interface
5V 1.5A
Battery
400mAh
Built
-
in Li
-
ion Battery
Parking Mode
Support
Working
temperature
-10°C to 60°C
5.App Operation Instructions
Downloading “LuckyCam” App
Android system mobile phone
Open the "Google play store" search "LuckyCam" to download
and install.
Open the APP "LuckyCam", click "Switch Connected Devices",
then click on "WiFi settings" .
Click WiFi Settings, enter the connection settings interface,
search the machine WiFi, then enter the password: 12345678.
Click Connect, the phone and camera will be connected, click
the back button to see the camera shooting screen.
- 12 -
iOS system Apple phone
Open the "Apple store" search "LuckyCam" to download and
install.
After the installation is completed, if you want "LuckyCam"
access to cell phone photos, please click "OK" (Note: you must
select "OK", otherwise you can not preview the pictures
download by APP )
Open the phone WiFi settings, search the WiFi Hotspot, search
the dash cam’s WiFi, enter the password: 12345678.
Using Your Dash Cam
Turn on your dash cam, and short press the WiFi key to turn on
WiFi function, then you will find the SSID and password.
Once the camera connected with your smart phone by WiFi,
enter into Luckycam App
- 13 -
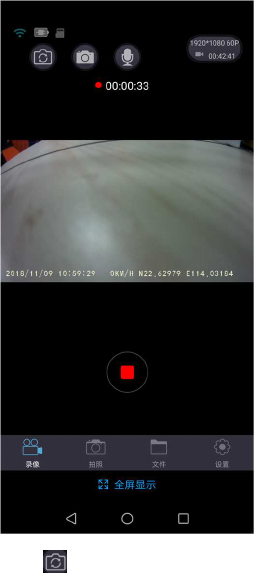
Click to exchange the preview interface of front cam and
rear cam

- 14 -
Click to take photo
Click to turn on the audio function
Click to set the video resolution
Click to stop or begin recording
Click to take photo
Click to set photo resolution
Click to check the files
Click to check videos
Click to check photos
Click to download the files
Click to delete the files
Click to set the dash cam
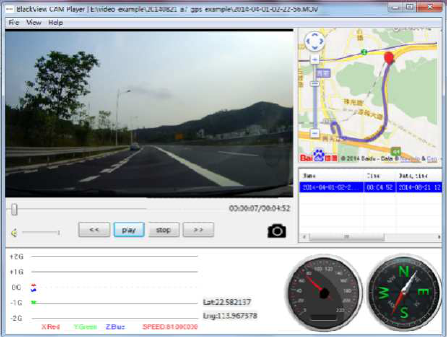
6. GPS Player Software Installation and Using
Instructions
If need check the GPS information , the professional player
must be installed firstly
1.Please install the customized video player
2.Please copy the customized video player to computer and
install.
- 15 -
Using the player software:
1.Please open the customized video player and install it for the
first time use.
2.Click File –Open to choose the file which need play, and
open the play mode directly, as below
- 16 -
7.FAQ
Under normal operating conditions, if there is problems with the
device, please refer to the following methods to solve.
Q: Cannot take picture and record
A: Please check whether there is enough space for of TF card,
or if it is locked.
Q: Stopping automatically while recording
A: Due to the huge amount of HD video data, please use
high-speed C10 TF card with SDHC compatible, there will be
the mark of C10 on the TF card.
Q: There is “wrong file” shown on LCD when replay the
photo/video
A: Because of TF card storage error, please format your TF
card.
Q: Fuzzy image
A: Please check if the lens stay with dirt, fingerprints, please
cleaned lens with paper before shooting.
- 17 -
Q
: Dark image when when shooting the scene of sky or water
A: There will have an impact on the exposure when the big
difference between the scene. Please adjust the “EV” in the
menu setting.
Q: The color is not good in the cloudy or indoor
A: Please check the “white balance” is Auto or not in the
menu.
Q: Horizontal stripes interference in the image,
A: This is due to the wrong setting of light frequency error,
please set the frequency 60HZ or 50HZ according to the local
power supply.
Q: Freezing
A: Please reset to recover when device hangs off.
FCC COMPLIANCE STATEMENT:
This device complies with part 15 of the FCC Rules. Operation is subject to the following
two conditions: (1) This device may not cause harmful interference, and (2) this device must
accept any interference received, including interference that may cause undesired operation.
Changes or modifications not expressly approved by the party responsible for compliance could
void the user's authority to operate the equipment.
The distance between user and products should be no less than 20cm
This equipment has been tested and found to comply with the limits for a Class B digital device, pursuant to Part 15 of the FCC rules. These limits are designed to provide
reasonable protection against harmful interference in a residential installation. This equipment generates, uses and can radiate radio frequency energy and if not installed and
used in accordance with the instructions, may cause harmful interference to radio communications. However, there is no guarantee that interference will not occur in a particular
installation. If this equipment does cause harmful interference to radio or television reception, which can be determined by turning the equipment off and on, the user is
encouraged to try correct the interference by one or more of the following measures:
- Reorient the receiving antenna.
- Increase the separation between the equipment and receiver.
- Connect the equipment into and outlet on a circuit different from that to which the receiver is connected.
- Consult the dealer or an experienced radio/TV technician for help.
