
FORESIGHT PRO
USER GUIDE

IMPORTANT NOTICES
Title: Foresight Pro User Guide
Software Version: 2.6.2.24
Document Version: 1
Revision: 0
Safety Vision attempts to provide information contained in this
manual based on the latest product information available at the time
of publication. However, because of Safety Vision’s policy of continual
product improvement, Safety Vision reserves the right to amend the
information in this document at any time without prior notice.
This material is confidential and the property of Safety Vision. It is shared
with your company for the sole purpose of helping you with the operation
of the described equipment.
Safety Vision makes no warranty of any kind with regard to this material,
including, but not limited to, the implied warranties of merchantability
and fitness for a particular purpose. Safety Vision shall not be liable for
errors contained herein or for incidental or consequential damages in
connection with the furnishing, performance, or use of this material.
Safety Vision expressly disclaims all responsibility and liability for the
installation, use, performance, maintenance, and support of third-party
products. Customers are advised to make their independent evaluation of
such products.
No part of this document may be photocopied, reproduced, or translated
to another language without the prior written consent of Safety Vision.
Safety Vision® is a registered trademark of Safety Vision, LLC. All other
products or name brands mentioned in this document are trademarks of
their respective owners. For more information about Safety Vision and its
products, go to www.safetyvision.com or call 800-880-8855.

CONTENTS
Overview 4
Minimum Requirements
Hardware 4
Software 4
H.265 Playback Performance Test Result 5
DVR Setup 6
Ports Description 7
Login
Advanced Settings 9
Log Out 9
Live View 10
Two-way Audio 12
Broadcast 12
Settings 12
Quality 13
GPS Cong 13
Get Version 13
Output Sensor 13
Geo Fence Settings
Set Up A Geo Fence 14
Linear Geo Fence
Saving a Linear Geo Fence File 15
Importing a Linear Geo Fence File 15
Send Message 16
Remote Format 16
Restart 16
Mosaic Settings 17
1
FORESIGHT PRO USER GUIDE

Zoom 17
Record 18
Mute 18
Snapshot 18
Alerts
Types of Alerts 19
Process 20
Vehicle Lock-On 20
Open Video 20
Talkback 20
Scene Playback 20
Playback 21
Server 21
Single Vehicle Search 21
Multiple Vehicles Search
Schedule a download 22
Online 23
Directory 23
Scene 24
Frame Information 24
Playback Control 25
Clip
Upload Evidence 26
Evidence Center 27
Evidence Search 27
Evidence Playback 28
Evidence Sharing 28
Captured Image Evidence 28
Vehicle Traffic Status List 29
Update 30
Email Settings
Report 32
System Manage
Fleet Information Conguration 33
FORESIGHT PRO USER GUIDE
2

Vehicle Device Conguration 34
Quick Add 34
User Role Conguration 35
Driver file 37
Download Center 38
Automatic Download
About Automatic Download 40
Task Manage 42
Task Monitor 45
Task Report 45
Alarm Search
Search History 46
Search Conditions 47
Alarm Conguration 48
Alarm Email 48
System Settings - Server 49
Server Test 50
System Settings - Local 51
Permission Settings - Local 52
About 53
Software Licensing Agreement 54
3
FORESIGHT PRO USER GUIDE

Overview
Foresight Pro is the powerful video management software for the Observer™ series of recorders that offers all the playback and
investigating tools you need – right at your fingertips. When paired with WIFI and cellular networking, Foresight Pro’s back-end
solution provides features such as wireless video downloading, system email health reports, custom email alerts, live video
streaming and fleet tracking. View every camera angle at once and zoom in on important details. Use the blur feature to protect
the identity of your drivers and passengers. See speed, route history, and other vehicle metadata such as turn signals, brakes,
hazard lights and much more, all synchronized with video and graphically displayed for easy analysis. A convenient Evidence
folder allows users to label, categorize, organize and generate incident reports after reviewing critical video clips. Also available as
a downloadable app, Foresight Pro may be installed onto any internet accessible mobile device or tablet.
Minimum Requirements
Hardware
• Server:
◦ Intel® Xeon® E5 (2.4GHz) or above
◦ 16GB RAM (2 × 8192)
◦ 1GB RAM on graphics card
◦ 1000Mbps LAN card
◦ 10GB free storage space for software
◦ 200MB of free disk space, per vehicle, for database
• Client:
◦ Intel® Core™ i5-2400 (6M cache, up to 3.40GHz)
◦ 4GB RAM (2 × 2048)
◦ 1GB RAM on graphics card
◦ Integrated 10/100/1000 ethernet card
Software
• Server:
◦ Microsoft® Windows Server™ 2016-2019 (64-bit)
◦ Microsoft .NET Framework® 3.5 SP1 or above
• Client:
◦ Windows® 10 (32- or 64-bit) or above
◦ Internet Explorer® 10
FORESIGHT PRO USER GUIDE
4
No.
Foresight Pro
Module
Resolution and
Framerate
Channel Quantity
CPU Consumption
(%)
RAM Consumption
(GB)
Performance
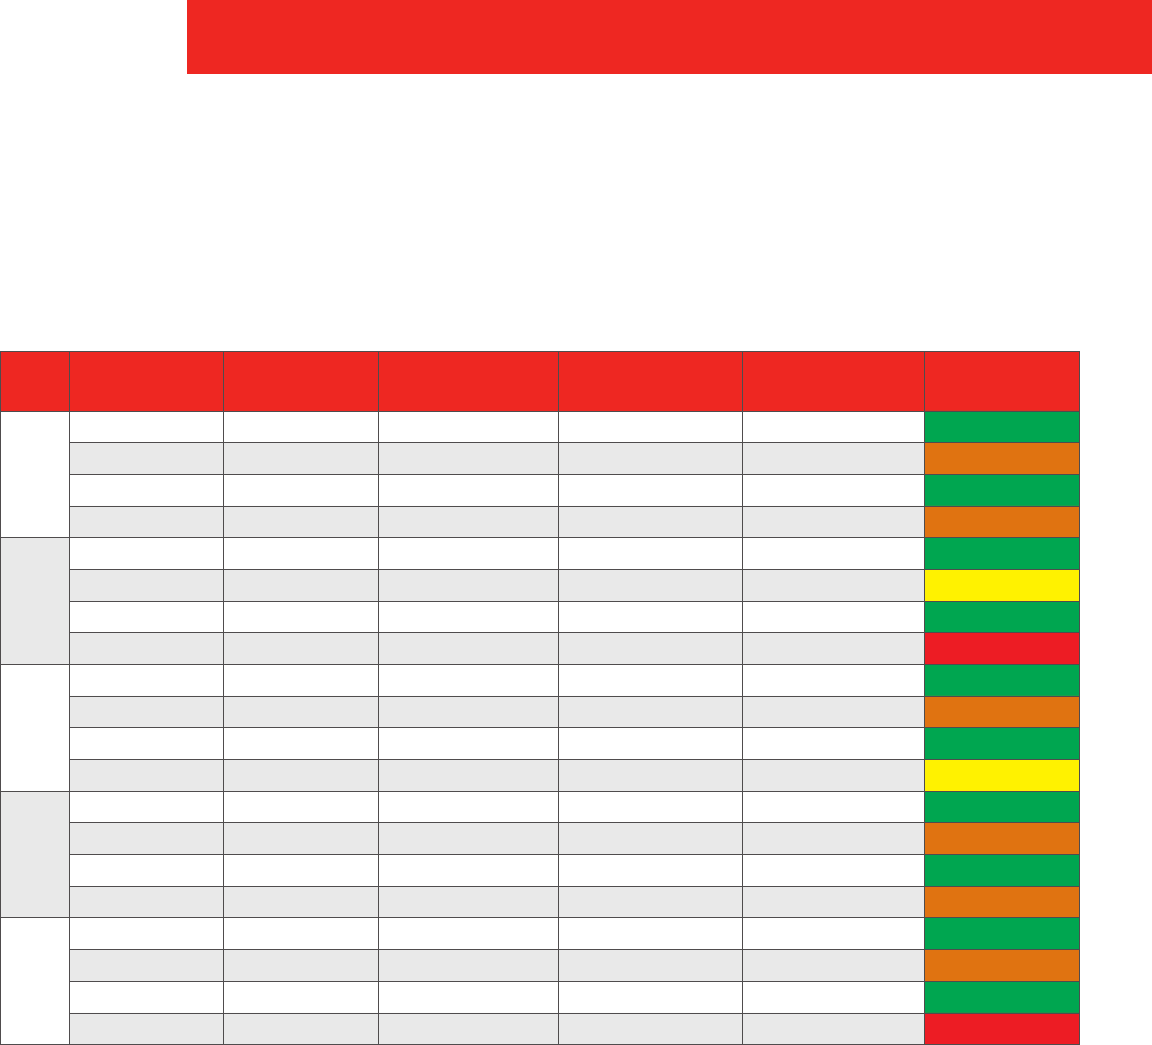
1
Live View 1920x1080 @30FPS 5 72 0.52 Fluent
Live View 1920x1080 @30FPS 6 87 0.54 Disfluency
Live View 1920x1080 @15FPS 13 75 1.08 Fluent
Live View 1920x1080 @15FPS 15 83 1.18 Disfluency
2
Server playback 1920x1080 @30FPS 4 61 0.65 Fluent
Server playback 1920x1080 @30FPS 5 75 0.71 Slight Disfluency
Server playback 1920x1080 @15FPS 11 75 1.12 Fluent
Server playback 1920x1080 @15FPS 12 \ \ Resource Limited
3
Remote playback 1920x1080 @30FPS 4 60 0.63 Fluent
Remote playback 1920x1080 @30FPS 5 78 0.68 Disfluency
Remote playback 1920x1080 @15FPS 8 55 0.91 Fluent
Remote playback 1920x1080 @15FPS 9 67 0.96 Slight Disfluency
4
HDD playback 1920x1080 @30FPS 4 75 0.71 Fluent
HDD playback 1920x1080 @30FPS 5 88 0.77 Disfluency
HDD playback 1920x1080 @15FPS 11 78 1.09 Fluent
HDD playback 1920x1080 @15FPS 12 85 1.16 Disfluency
5
Local le playback 1920x1080 @30FPS 4 66 0.63 Fluent
Local le playback 1920x1080 @30FPS 5 85 0.71 Disfluency
Local le playback 1920x1080 @15FPS 11 75 1.14 Fluent
Local le playback 1920x1080 @15FPS 12 \ \ Resource Limited
H.265 Playback Performance Test Result
Major PC parameters for testing H.265 playback
OS version: Windows 7 Professional (64bit)
CPU: Intel® Core™ i5-7500 CPU (3.4GHz)
RAM: 16 GB
GPU: Intel® HD Graphics 630 (Key GPU)
5
FORESIGHT PRO USER GUIDE

DVR Setup
The Observer series of recorders must be configured to work with OMS PRO and Foresight Pro properly. There are two important
configuration screens:
• Device Info
1. Select System, then Basic Info.
2. Ensure the Device/OMS ID eld is
identical to the OMS ID as entered in
Foresight Pro Vehicle Management.
• Server Network
1. Select Network, then Server Setup.
2. Enter and save the following:
▪ ENABLE NETWORK: Select the
appropriate network option for
your OMS Pro installation
▪ REGISTER: Select Static IP and
enter the IP address of the
Foresight Pro installation
▪ PORT: Enter 5556
▪ MEDIA SERVER: Select Static IP
and enter the IP address of the
Foresight Pro installation
▪ PORT: Enter 5556
FORESIGHT PRO USER GUIDE
6

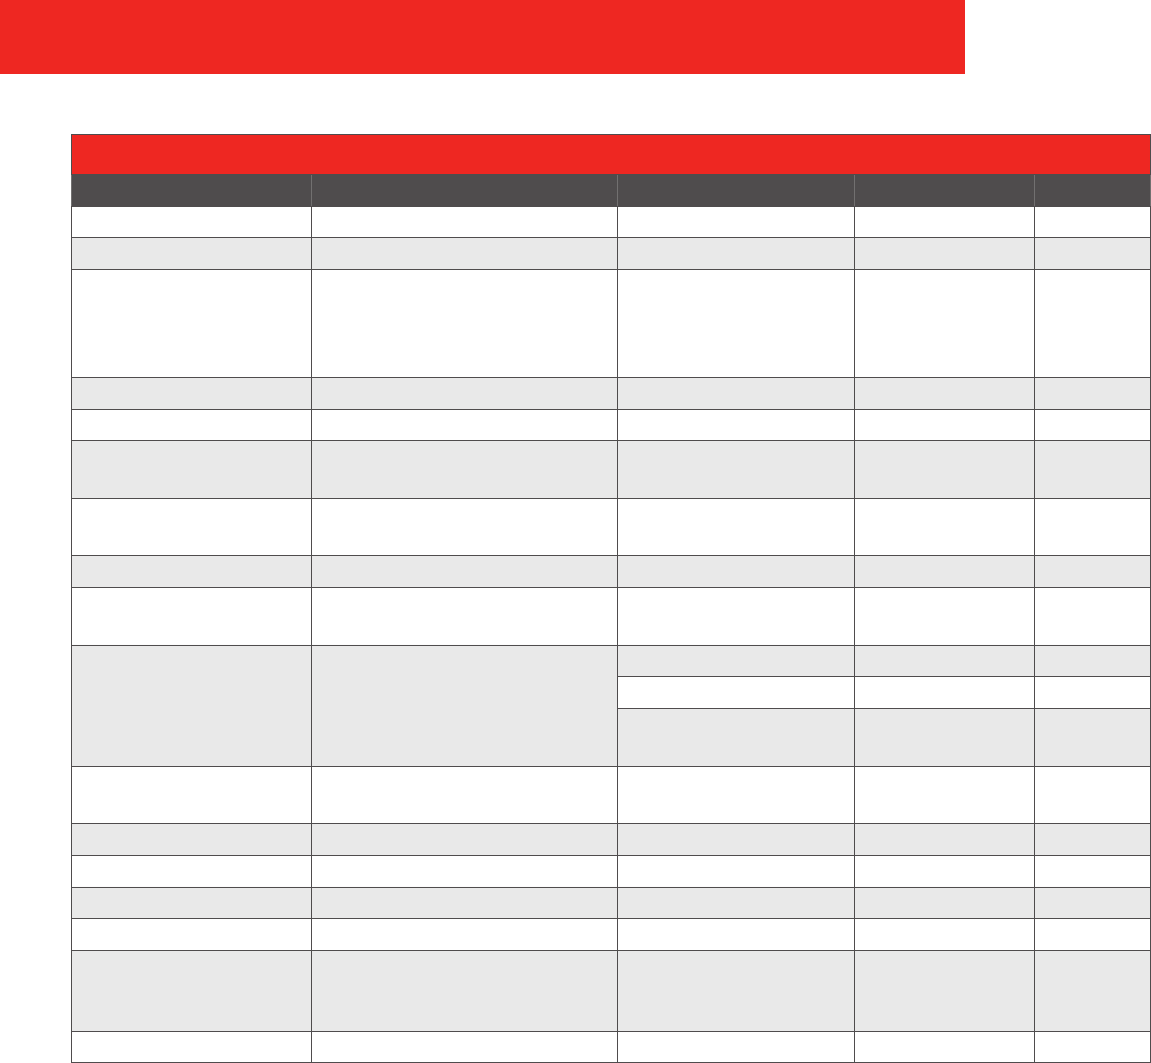
Ports Description
• Device port: Device’s access via VPN needs to be mapped to a private network port.
• Client port: The Foresight Pro client needs to be mapped to a WAN port when it is connected through WAN.
The OMS Pro port protocol is a Transmission Control Protocol (TCP) protocol. If a connection through WAN is required, a consistent
port number should be mapped.
All Ports labeled Yes under the Mapping column are ports that needed to be port forwarded.
OMS PRO SERVERPORTS LIST (based on v2.6.2)
SERVICE NAME DESCRIPTION PROCESS PORT MAPPING
DVRRTService
OMS PRO process daemon service, control
the start and stop of various services, service
restart automatically
DVRRTService.exe
MySql5.5 Storage data platform MySql5.5.exe 3306/3307
Mongodb Storage user's old black box data mongod.exe 27017
Monggodb_3.2 Storage black box data mongod.exe 27018
MessagerServer
Device registration service, device-side
registration, data reporting, and instruction(or
commands) delivery through this service
MessagerServer.exe 12012 (alarm PUSH)
5556 (device registration) YES
DVRGTService
Forwarding service, request real-time video
through the client, then retrieve the video
from the device, and then distribute it to the
client
DVRGTService.exe
12091 (server port,
OLD MDVR use this port to
connect to server)
YES
12092 (server port,
N9M MDVR use this port
to connect to server)
YES
17891 (Server port,
client uses this port to
connect server)
YES
WCMSWebCenterService
Batch upgrades and auto-add vehicles are
through this service
WCMS.Server.WindowsService.exe
Apache2.2
Old web interface, evidence center, automatic
download and other client embedded pages
httpd.exe 12055 YES
AdsServer
Automatic download service for scheduled
server download tasks
ADSServer.exe 7857/7858
ClientBalance
Load balancing service, client login
authentication, returning server IP and port
for client
ServiceProxy.exe 7264 YES
n9m_proxy Proxy for remotely congure device page
HttpProxyServerNP.exe 12050 (for client) YES
12051 (for device) YES
ARMSStorageServer
"write" service for Black box, parse the black
box data downloaded by ADS, and write to
mongodb
ARMS.StorageServer.exe
ARMSRestServer
"read" service for Black box, read the black box
data stored by monggodb
ARMS.RestServer.exe 12040 YES
7
FORESIGHT PRO USER GUIDE
OMS PRO SERVERPORTS LIST (based on v2.6.2)
SERVICE NAME DESCRIPTION PROCESS PORT MAPPING
ServiceSTPlay Playback service in Server side ServiceSTPlay.exe 12045 YES
AlarmService Alarm and GPS real-time push service AlarmService.exe 12125
ClientAccessService
"Client access server" service, used to relay
client request information and server return
information (device online and oine
information, real-time GPS, etc.)
ClientAccessService.exe 12020 YES
Redis Service Cache the Online, GPS and other data redis-server.exe 12004
PushService Push alarm to app PushService.exe
OnlineServer
Online statistics service, to get euqipments
online information
ServiceOLStatistics.exe 12035
EvidenceServer
Evidence center services:equipment uploading
evidence, evidence information processing
EvidenceService.exe 12065 YES
HttpSdkService Web interface HttpSdkService.exe 12047
ServiceSTMgr
"record live-view video" service, video will be
storaged on local client
ServiceSTMgr.exe
rm_media_service
Video playback and live video stream from
web browser.
media_service.exe 8090 (playback) YES
12060-12063 (Live View) YES
12198-12202
(MDVR integrated devices)
YES
FileZilla Server
FTP service: device gets conguration during
batch upgrade
FileZilla server.exe 21;3001-3100 YES
WCMS5 WEB client node.exe 12056 YES
WCMS5REACT Evidence center node.exe 3113 YES
* Device setting remotely for N9M2.0 nginx.exe 8081 YES
EvidenceStoreService* Device evidence upload for N9M2.0 EvidenceStoreService.exe 12048 YES
FilemanagementService*
Device evidence le mapping for N9M2.0
(evidence ID is mapped into evidecne le list of
disk)
FileManagementService.exe 12049 NO
EvidenceAnalyServer Evidence le analysis, code conversion, listing EvidenceAnalyService.exe
* If there is no N9M2.0, then there is no need mapping
FORESIGHT PRO USER GUIDE
8
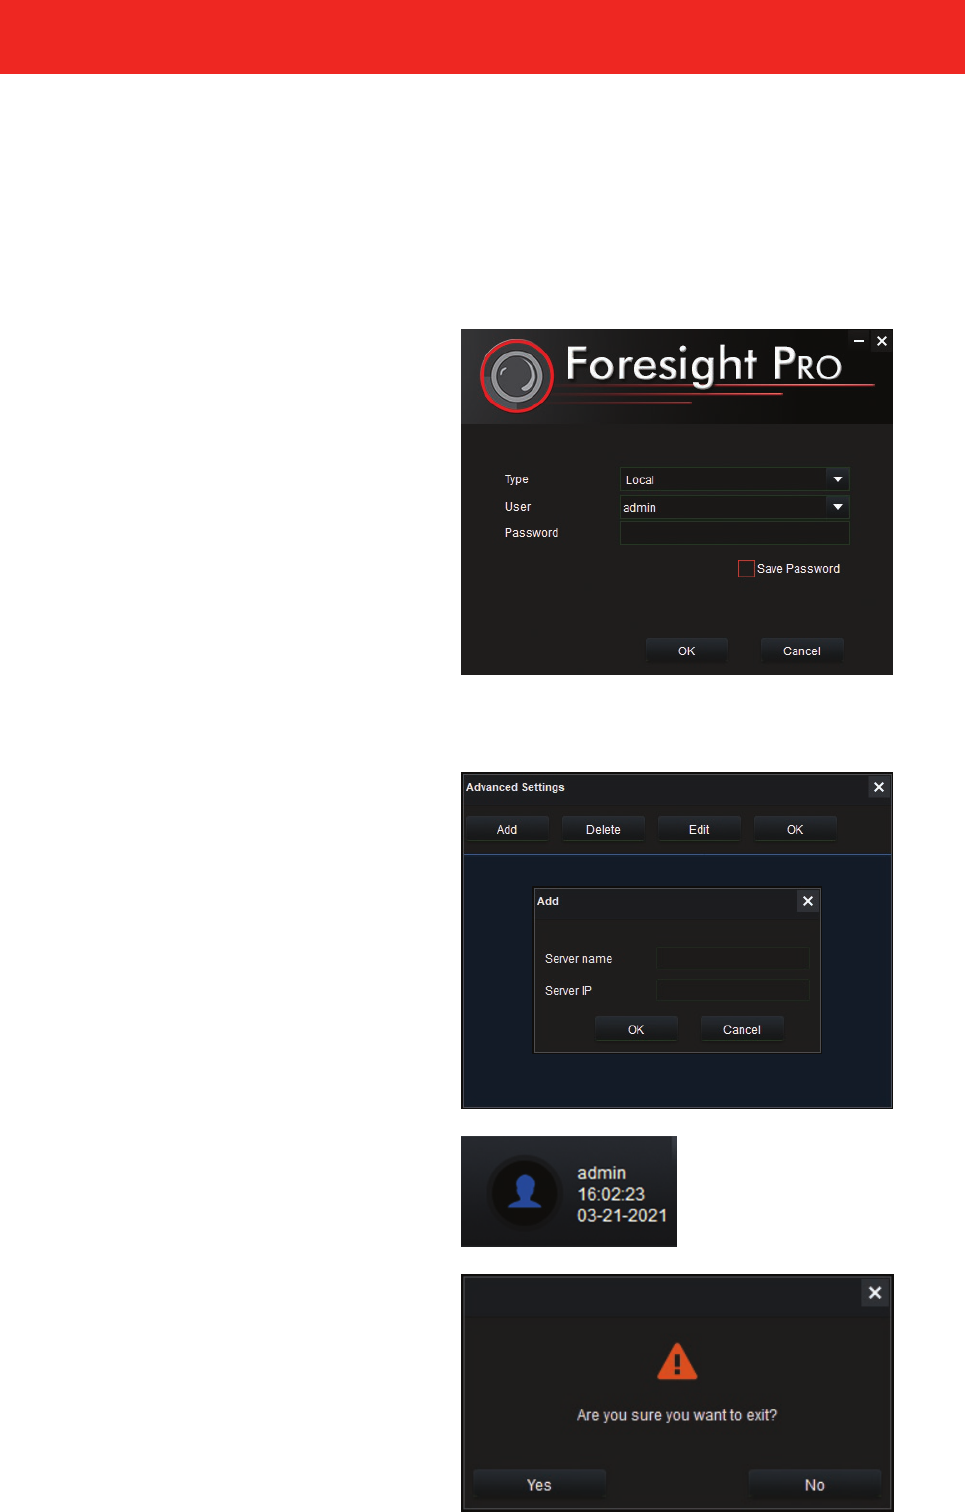
Login
Double-click on the Foresight Pro program to bring up a login dialog box.
• Type: Server (default) and Local are optional (if Local is selected, only HDD and directory retrieval playback are available);
• Server IP: Enter the server IP address (domain name is allowed) or select an added server name;
• Enter correct user ID and password.
◦ If Server is selected:
▪ The default user ID is admin
▪ The default password is admin
◦ If Local is selected:
▪ The default user ID is admin
▪ The default password is left blank
If this has been changed, contact your system administrator for your login
information.
NOTE: Default port of the server is 7264 (for access load balancing, client,
Service Proxy.exe and client balance). If the default port is modified when the
server is deployed, a new port number needs to be added after the IP address
is entered.
Advanced Settings
In the login dialog box, click Advanced to bring up the advanced settings
dialog box
• Add: Click Add, enter the server name and IP, and click OK to add a
new server address.
• Delete: Select a server alias and click Delete to delete entry.
• Edit: Select a server alias and click Edit to edit entry.
Log Out
When you have nished using Foresight Pro, ensure you log out before
leaving the computer unattended. Your login credentials appear in the
upper right of the main window. Click the user image and then click Yes
to conrm loging out of the software.
9
FORESIGHT PRO USER GUIDE
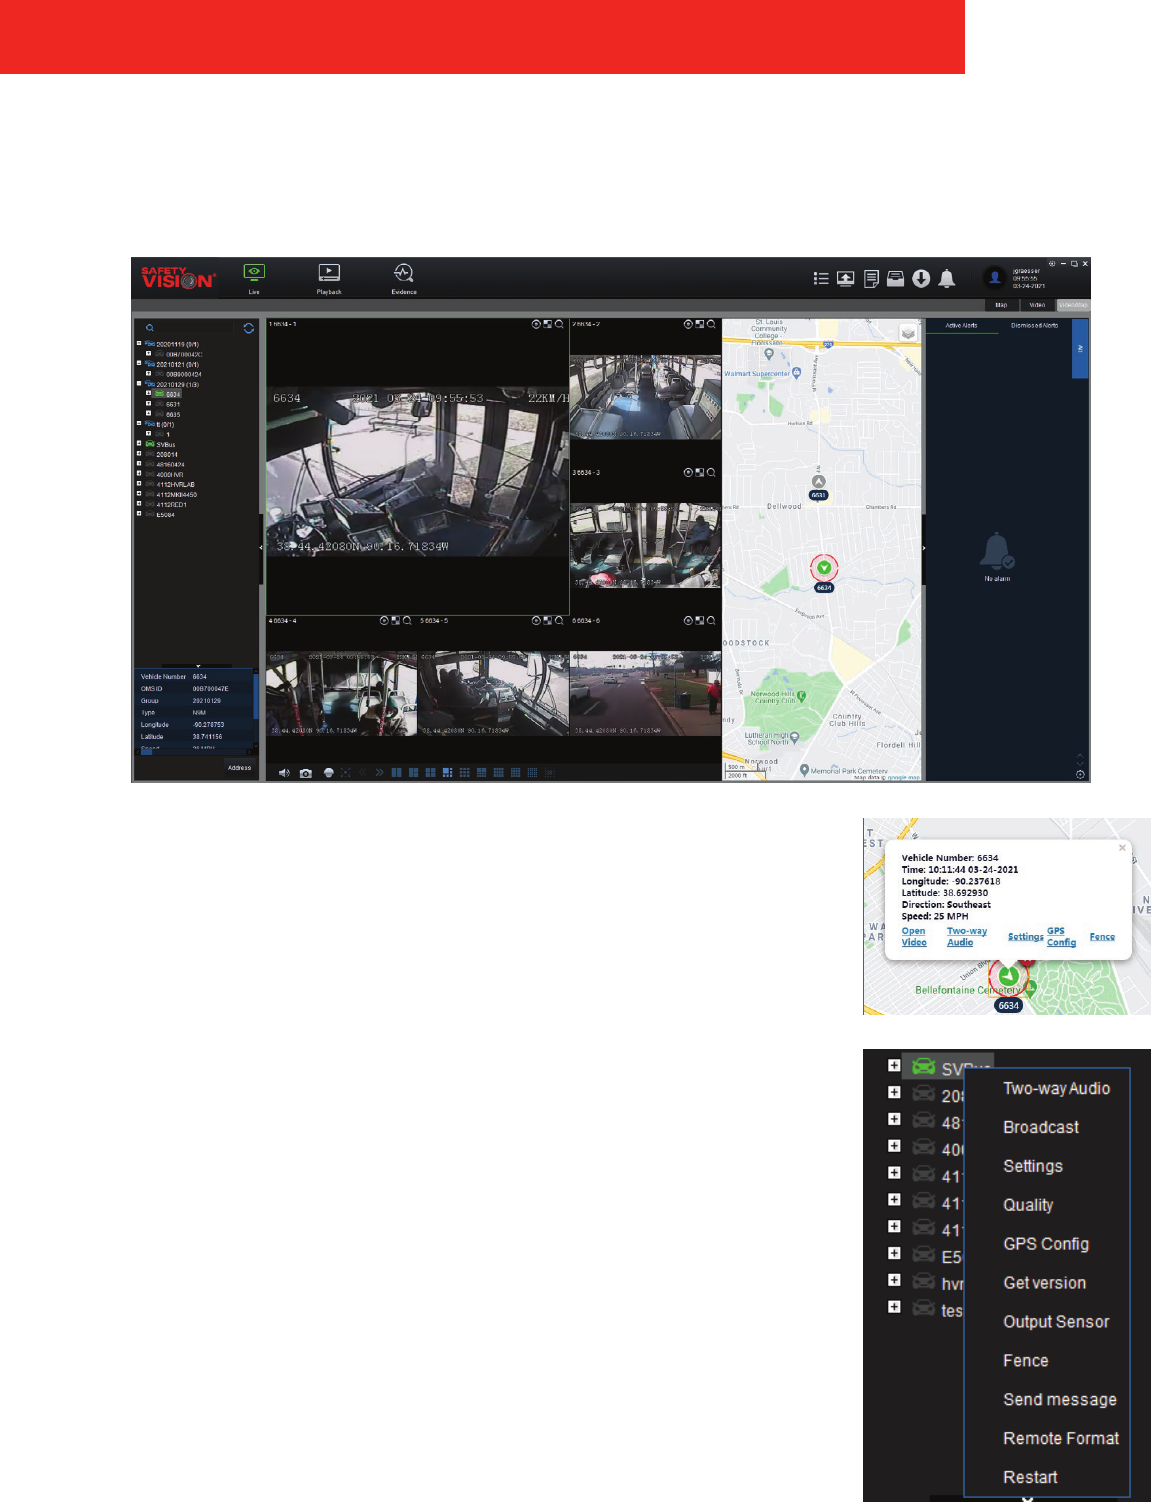
Live View
The Live View is displayed automatically upon logging in. The Live View allows you to view your active fleet at a glance. The
recorder must be connected to an external cell modem or to a local WiFi network to appear in the Live View feature.
On the left of the screen is the Vehicle List. (Vehicles are added to the Foresight Pro system in
System Manage, VehicleDevice Information.) Click a vehicle to automatically orient the map
to its location. Additionally, you can drag and zoom the map to view locations o-screen.
Click a vehicle icon on the map to view expanded information, such as the vehicle’s precise
GPS coordinates, orientation, and speed.
Right-click on a vehicle in the list, or click on a vehicle’s icon in the map to select additional
options
• Open Video
• Two-way audio ( CP4 and PTT microphone
required)
• Settings
• Fence
• Send message (CP4 required)
• Remote Format
• Restart
• Broadcast
• Quality
• Get version
• Output Sensor
FORESIGHT PRO USER GUIDE
10

(Live View cont.)
Click the expand icon, +, next to a vehicle to display all of the vehicle’s available cameras. Click on a camera to display that
camera’s live view, or click on a vehicle’s icon in the map and select Open Video to open all camera views.
NOTE: You can select to display the map, camera views, or both by selecting these options on the upper right side of the window, or
expand camera views by double-clicking them.
You can right-click a camera’s live view for additional options:
• Close Video (closes the specific live view)
• Close All (closes all open live views)
• Clear History (clears history of the specific camera)
• Clear All (clears the history of the all open camera live views)
• Main Stream (selects the main stream of specific live view)
• Sub Stream (selects the sub stream of specific live view)
• Sub Stream settings (adjust the quality of the camera’s live view, if the camera is equipped
with this capability)
• Display Scale (adjust the display scale of all live views)
◦ Original Size (default)
◦ 4:3
◦ 16:9
◦ Auto t
• Server Playback
• Remote playback device
Closing a camera simply stops video streaming. When the stream is resumed, the camera appears in the same location. Clearing
a camera’s history removes the camera’s metadata and pre-saved place in the display area.
11
FORESIGHT PRO USER GUIDE
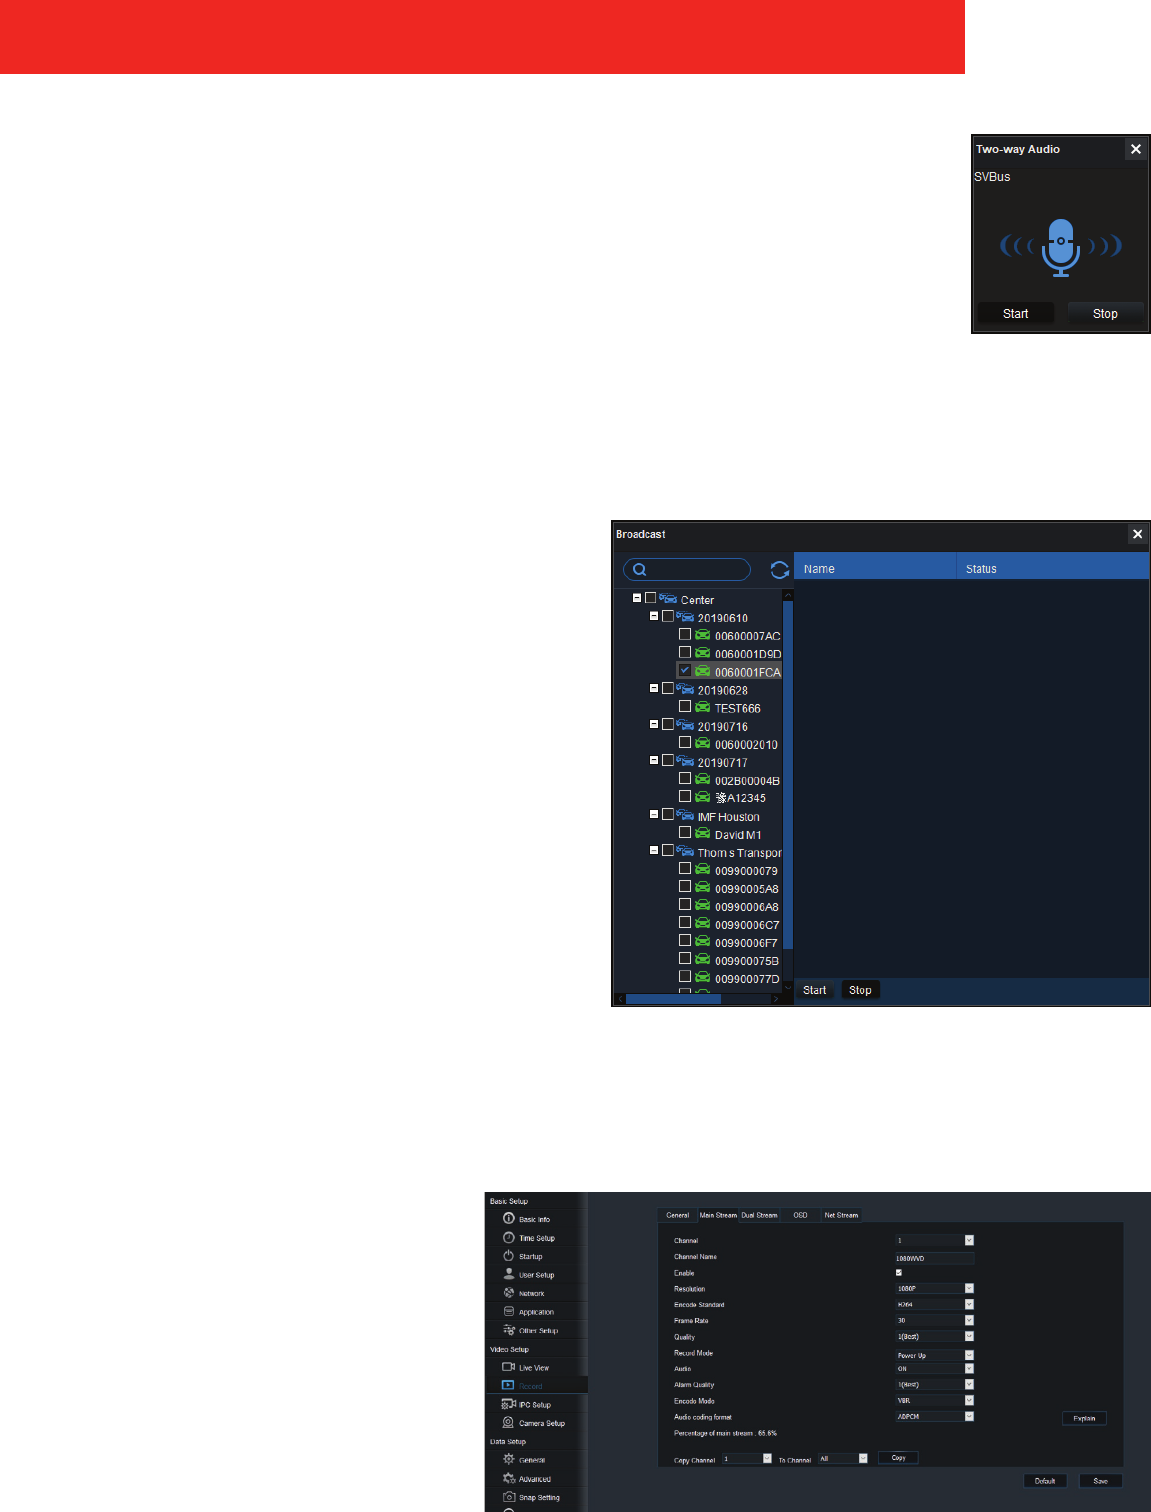
Two-way Audio
NOTE: CP4 and PTT microphone is required to use the two-way audio feature.
The Two-way Audio feature acts performs like an intercom which allows you to speak directly through
the vehicles recorder. Click Start to begin communication or Stop to end (or mute) communication.
Foresight Pro communicates to the DVR by means of a microphone and set of speakers connected to
the client PC. Ensure these devices are properly connected and configured on the PC.
Broadcast
The Broadcast feature is identical to the two-way audio
feature, except the broadcast is sent to multiple vehicles
instead of a single vehicle. Select the vehicles that should
recieve the communication and click Start to begin or Stop
to end the transmission.
Settings
Select Settings to open a window that
displays the conguration menu of the
recorder. The menus provide the same
options as accessed on an external monitor.
FORESIGHT PRO USER GUIDE
12
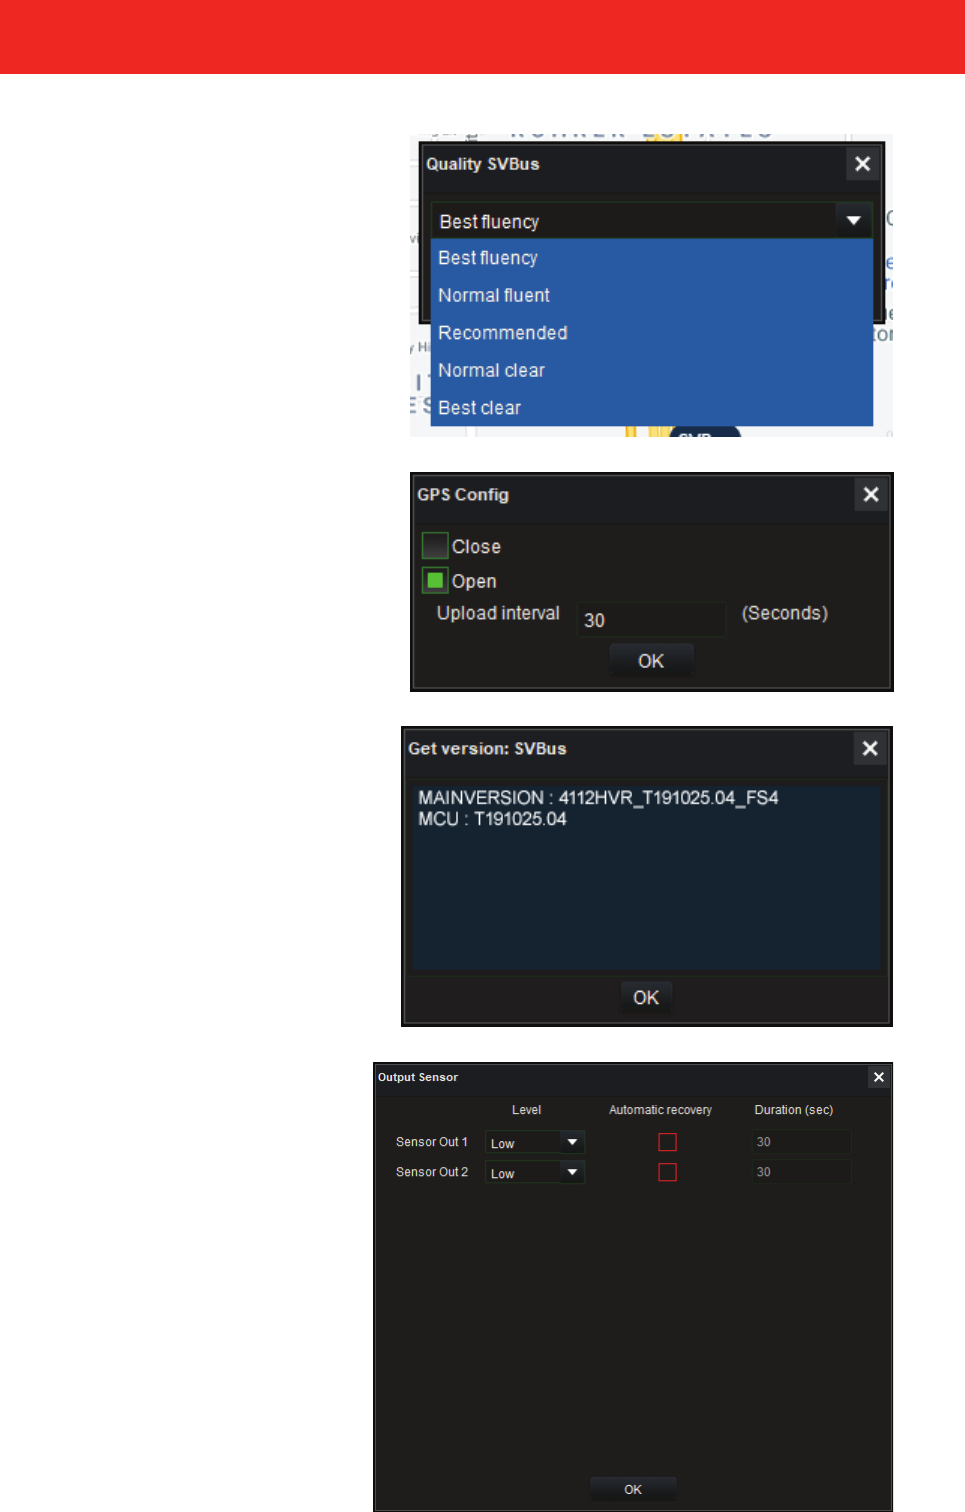
Quality
Click Quality to set the image quality options. Select the image
quality according to the network bandwidth and image quality
requirements. Generally, it is recommended to use uency AND
clear. Click OK to save any changes.
GPS Cong
Click GPS Config to set the GPS reporting time interval. Set the
time interval, in seconds, for GPS reporting according to actual
needs and card data trac (each transmission of GPS data is
approximately less than 1KB). Click OK to save any changes.
Get Version
Click Get Version to view the installed rmware version and MCU
of the of version of the device.
Output Sensor
Click IO settings to configure the alarm output settings.
IO 1 and IO 2. The output modes activate the output sensors of
the recorder and can be set for either low or high level.
If Automatic recovery is checked, then the duration can be set
(in seconds) (default is 30). Click OK to save any changes.
13
FORESIGHT PRO USER GUIDE
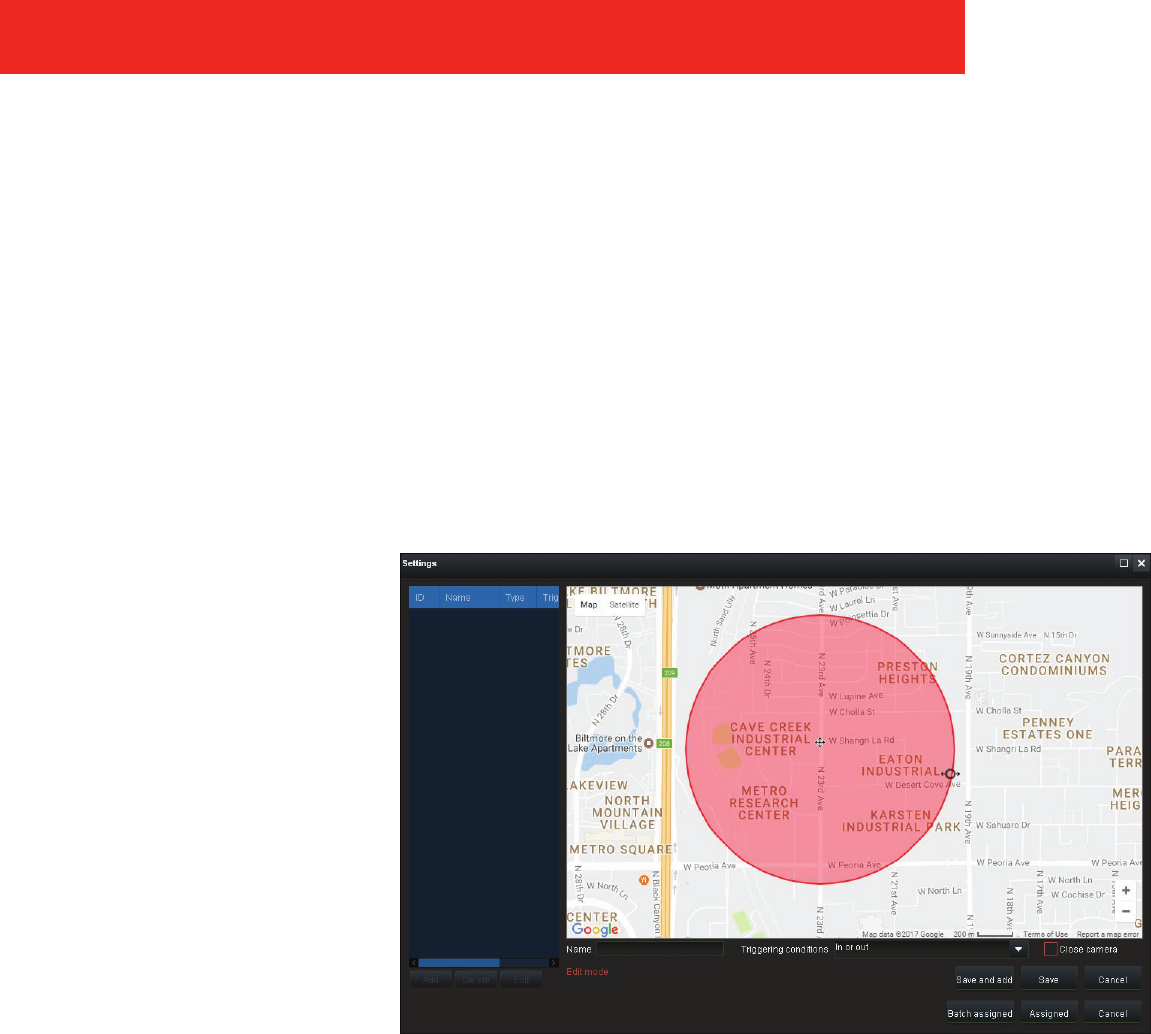
Geo Fence Settings
A geo fence is a dened area where a vehicle operates. Select Fence to configure a geo fence for the selected vehicle.
Set Up A Geo Fence
Click Add at the bottom right of the Settings window, then select Polygon, Circle, or Line.
To create a free-form, polygonal geo fence:
1. Click the polygon icon.
2. Click a location on the map, then a second. A line appears. Each click creates a geo fence “post” and the polygon is
automatically closed.
3. The fence can further be adjusted by clicking and dragging on the image “handles.”
To create a circular geo fence:
1. Click the circle icon
2. Click the map in the location
of the center of the circle.
Drag the mouse to increase
the radius, then click again.
You can further adjust the
circle radius by clicking
and dragging the image
“handles.”
For each created geo fence select:
Exit (triggers the geo fence effect
when a vehicle leaves the defined
area)
Entry (triggers the geo fence effect
when a vehicle enters it)
In and Out (triggers whenever a
vehicle simply crosses the geo fence boundries)
FORESIGHT PRO USER GUIDE
14

Linear Geo Fence
A linear geo fence can be saved from an existing vehicle’s route, which can then be imported and applied to other vehicles.
Saving a Linear Geo Fence File
1. Open the video segment with the vehicle route you want to copy.
2. Ensure the Download Blackbox option has been enabled.
3. Click on the Linear Geo Fence icon.
4. Select a start an end time by manually or using the scub bar.
5. Click OK.
6. Click Export.
7. A Windows Save File window appears.
8. Select the destination to which you want to save the le and click Save.
Importing a Linear Geo Fence File
1. Ensure the vehicle you want to import the le to is turned on and active in Foresight Pro.
2. In the Live tab, right-click on the vehicle and select Fence.
3. Click Import.
4. The Open window appears.
5. Select the linear geo fence le you want to import and click Open.
6. Select the linear geo fence options you want to use.
7. Click Assigned or Batch Assigned to deploy the fence.
8. An Operation Successful prompt appears when the process is complete.
15
FORESIGHT PRO USER GUIDE
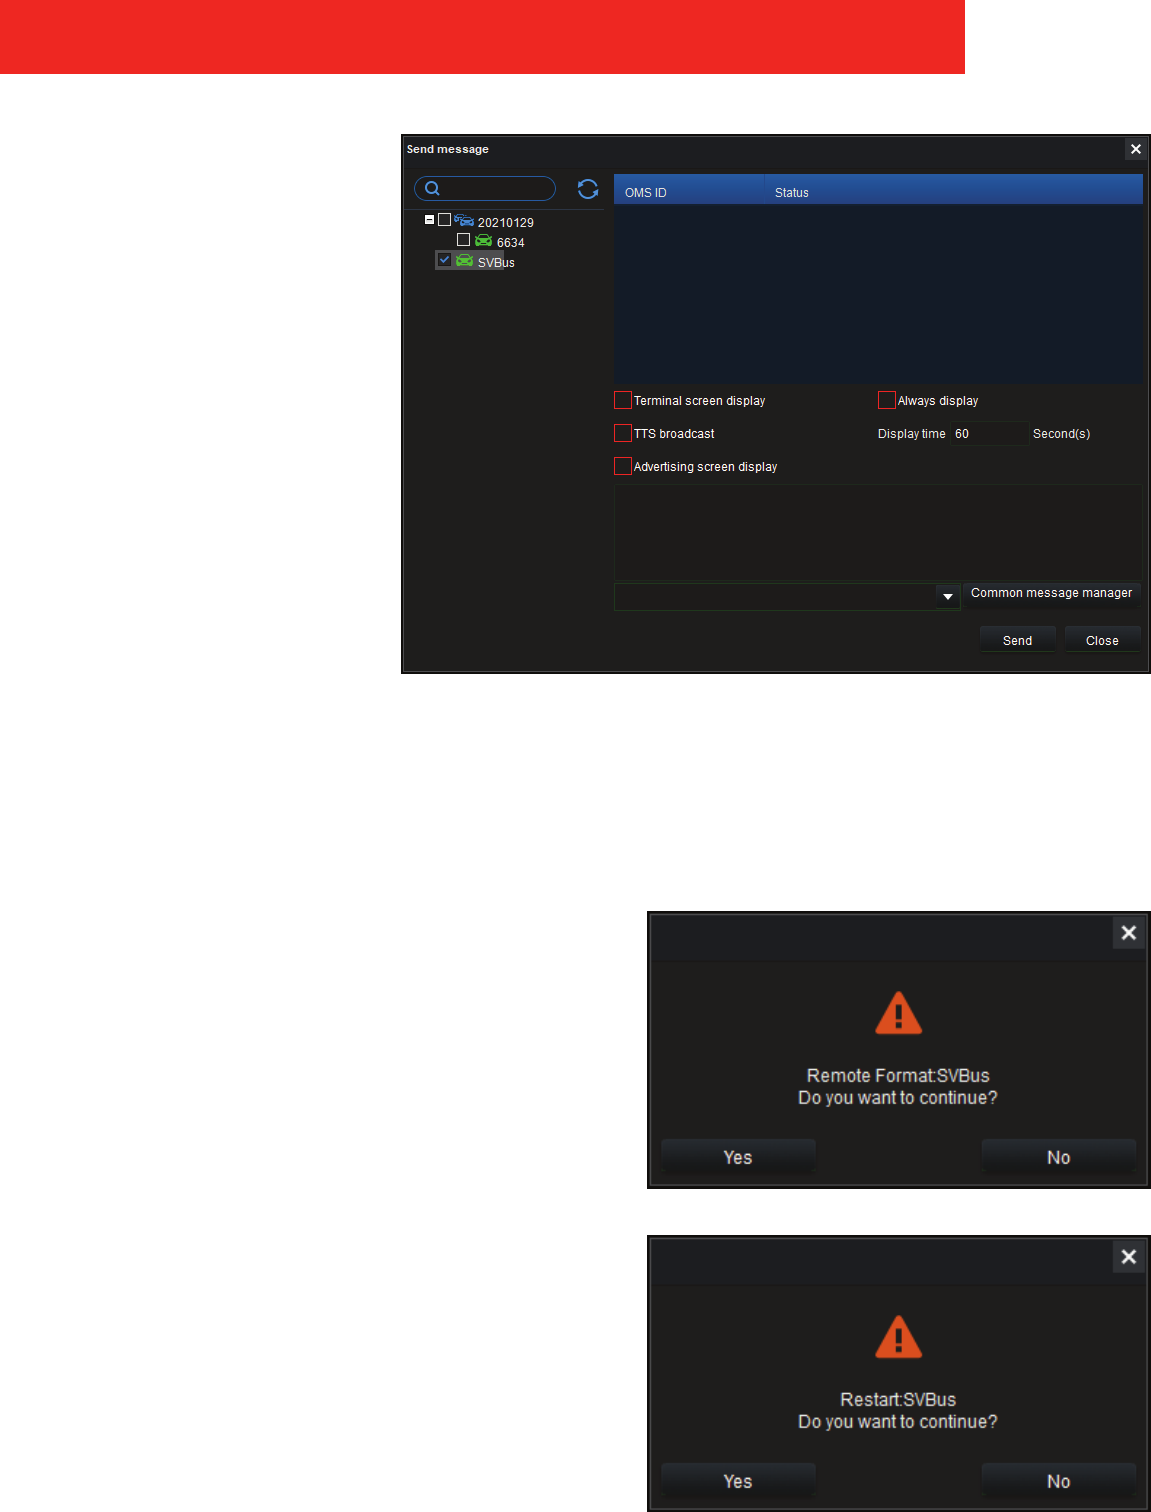
Send Message
NOTE: CP4 is required to use the
Send Message feature.
Using this feature, it is possible to
display a message on the external
monitors of selected vehicles. Click
Send message to congure the
options.
1. Select vehicle(s) from the
available selctions on the
left.
2. Select the formats you
would like the message to
appear in.
◦ Terminal screen display
◦ TTS broadcast
◦ Advertsing screen display
3. Then select Always display or enter an amount of time (in seconds) you want the message to temporarily display.
4. Enter the message you want to send in the area below and click Send. Status of the message appears automatically in the
display above.
You can also manage multiple frequently used messages by clicking Common message manager.
Remote Format
Select Remote Format to remotely format the recorder’s main
storage device.
WARNING: Formatting a device completely erases any saved data,
including recorded video.
Restart
Click Restart to reboot the recorder.
FORESIGHT PRO USER GUIDE
16
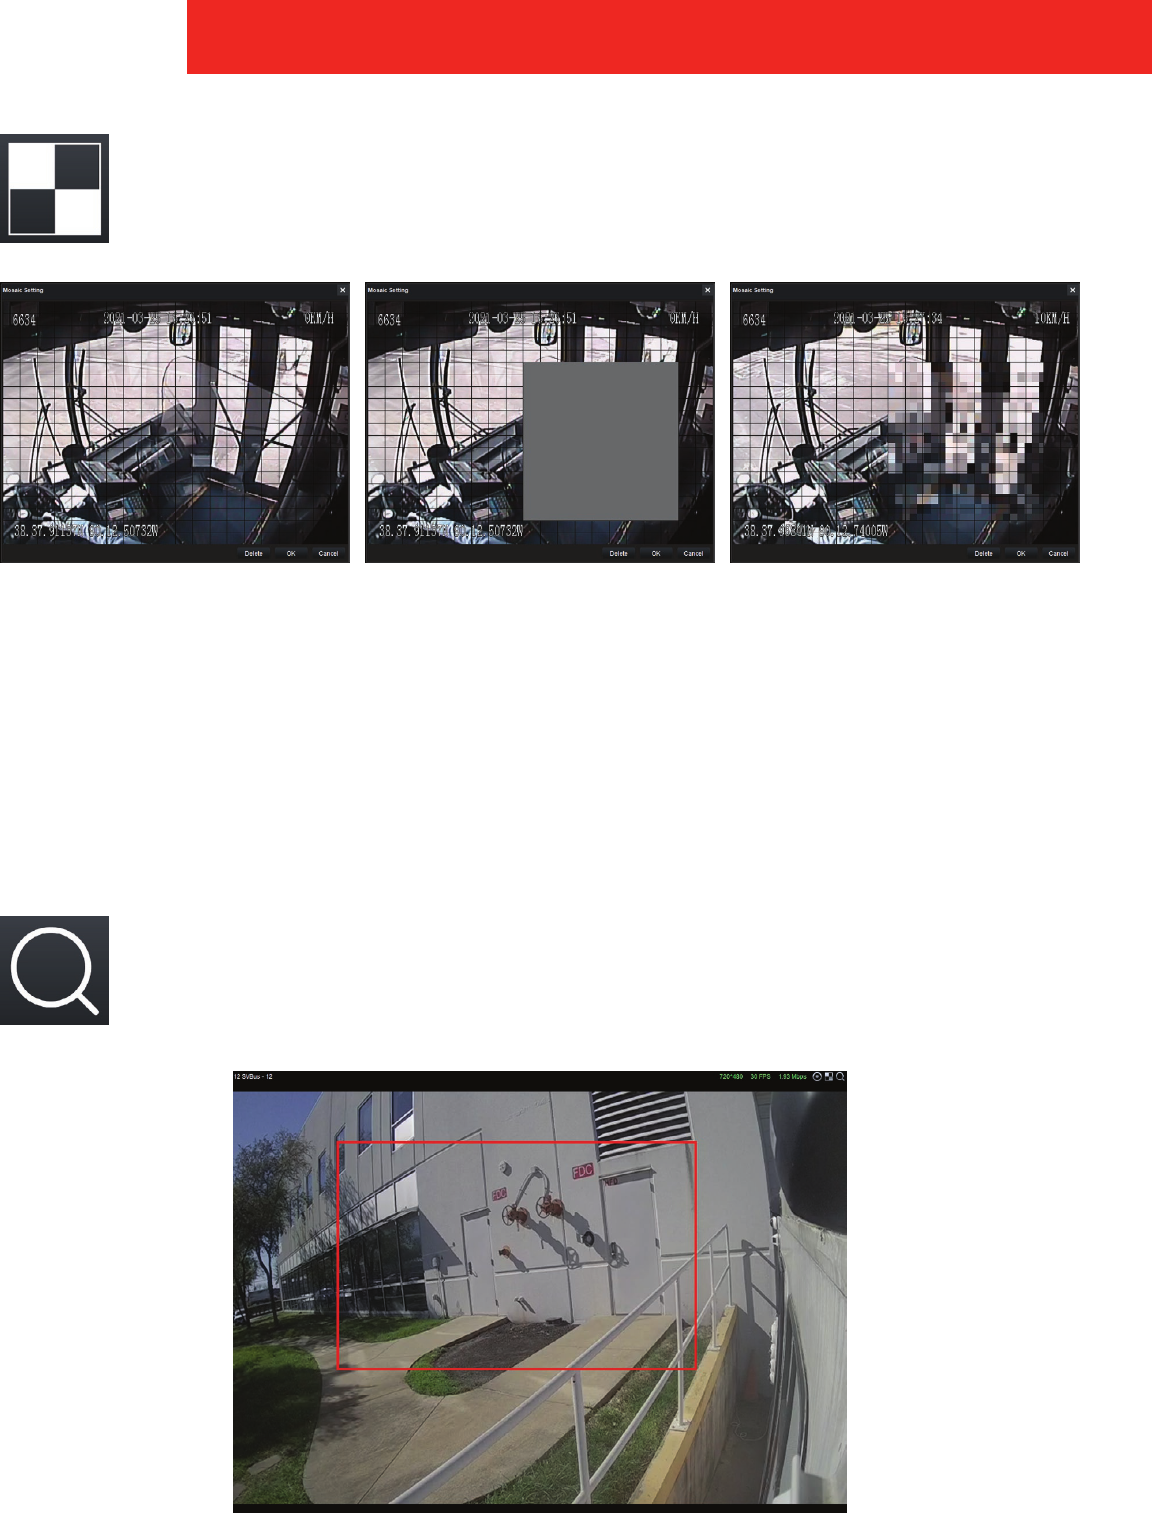
Mosaic Settings
Click the Mosaic icon to open the mosaic settings dialog box. Drag the mouse to set or clear the mosaic area, and
each window supports up to 20 points of mosaic. Clips will not save the set mosaics. They can only be set during
video playback or during real-time monitoring. If you want to remove the blurred section, click Delete.
Zoom
Click the Zoom icon at the top of the maximized video channel to use the zoom feature. The mouse cursor turns
into a cross hair. Starting at the top left, drag box (represented in red) over the area you want to zoom in on. The
video automatically zooms in. To zoom out, double-click the video channel display.
17
FORESIGHT PRO USER GUIDE
Record
Click the Record icon to record the live feed from the selected camera(s). When the icon turns red, recording
of that camera’s feed starts and is saved to the path shown under Record Path (see System Settings on pages
49 and 51).
Snapshot
Click the Snapshot icon, at the bottom of the Foresight Pro window, to take a snapshot of the selected camera
view. The snapshot will be saved to the path shown under Record Path (see System Settings on pages 49 and 51).
Mute
Click the Mute icon, at the bottom of the Foresight Pro window, to mute the sound of a of all camera feeds.
FORESIGHT PRO USER GUIDE
18
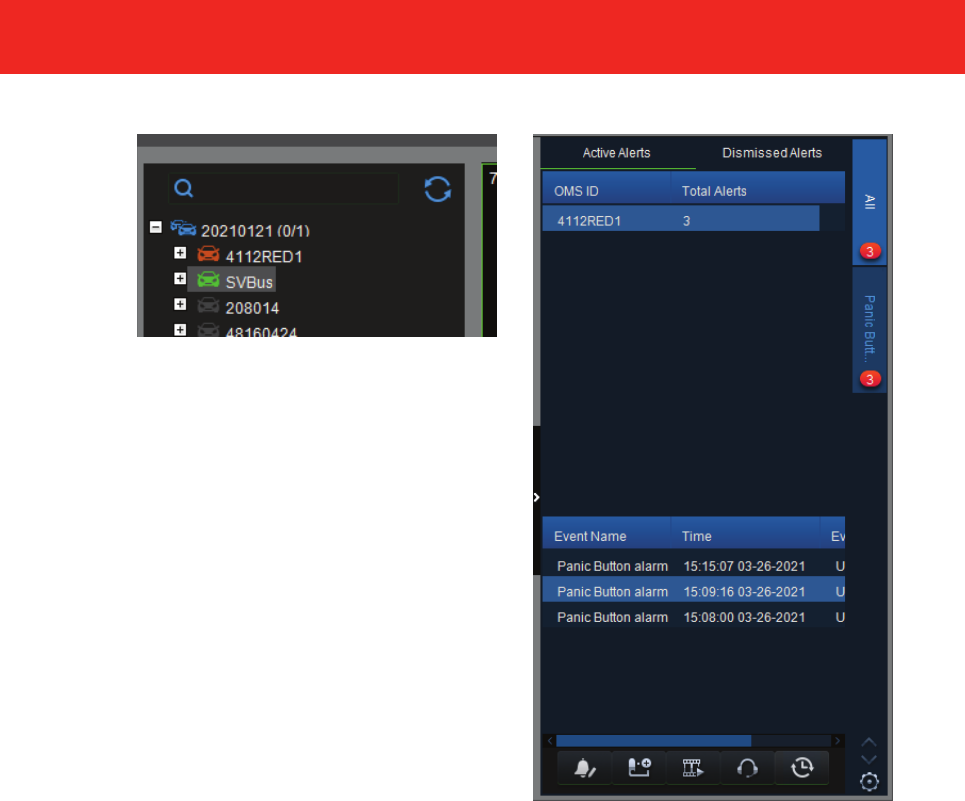
Alerts
When an alarm occurs, the alarm
message will pop up on the
right of the screen. Active alerts
are displayed and organized by
vehicle and event name. When
new alerts occur, a red notication
icon appears on the tab of the
appropriate alert type (alarm
needs to be set on the device in advance). The order alert type tabs are displayed
can be adjusted by clicking the gear icon on the bottom left of the main window
to open the Settings window. Select an alert type and click the arrow buttons
to adjust the order priority. Select an alert to highlight available options at the
bottom of the window.
Types of Alerts
• Video loss alarm
• Motion detection alarm
• Camera-covering alarm
• Storage Exception
• IO 1 - 8
• Panic Button alarm
• High-speed alarm
• Low voltage alarm
• Accelerometer Alarm
• Geo-fencing alarm
• Illegal shutdown
• Temperature alarm
• CAN Alarm
• Distance Alarm
• Alarm for abnormal temperature changes
• Fatigue driving
• No driver
• Driver making calls
• Driver smoking
• Distracted driver
• Lane departure
• Forward collision
• Abnormal boot alarm
• Too close distance
• Pedestrian detection
• Driver yawning
• Left blind spot detection
• Right blind spot detection
• Frequency anomaly alarm
19
FORESIGHT PRO USER GUIDE
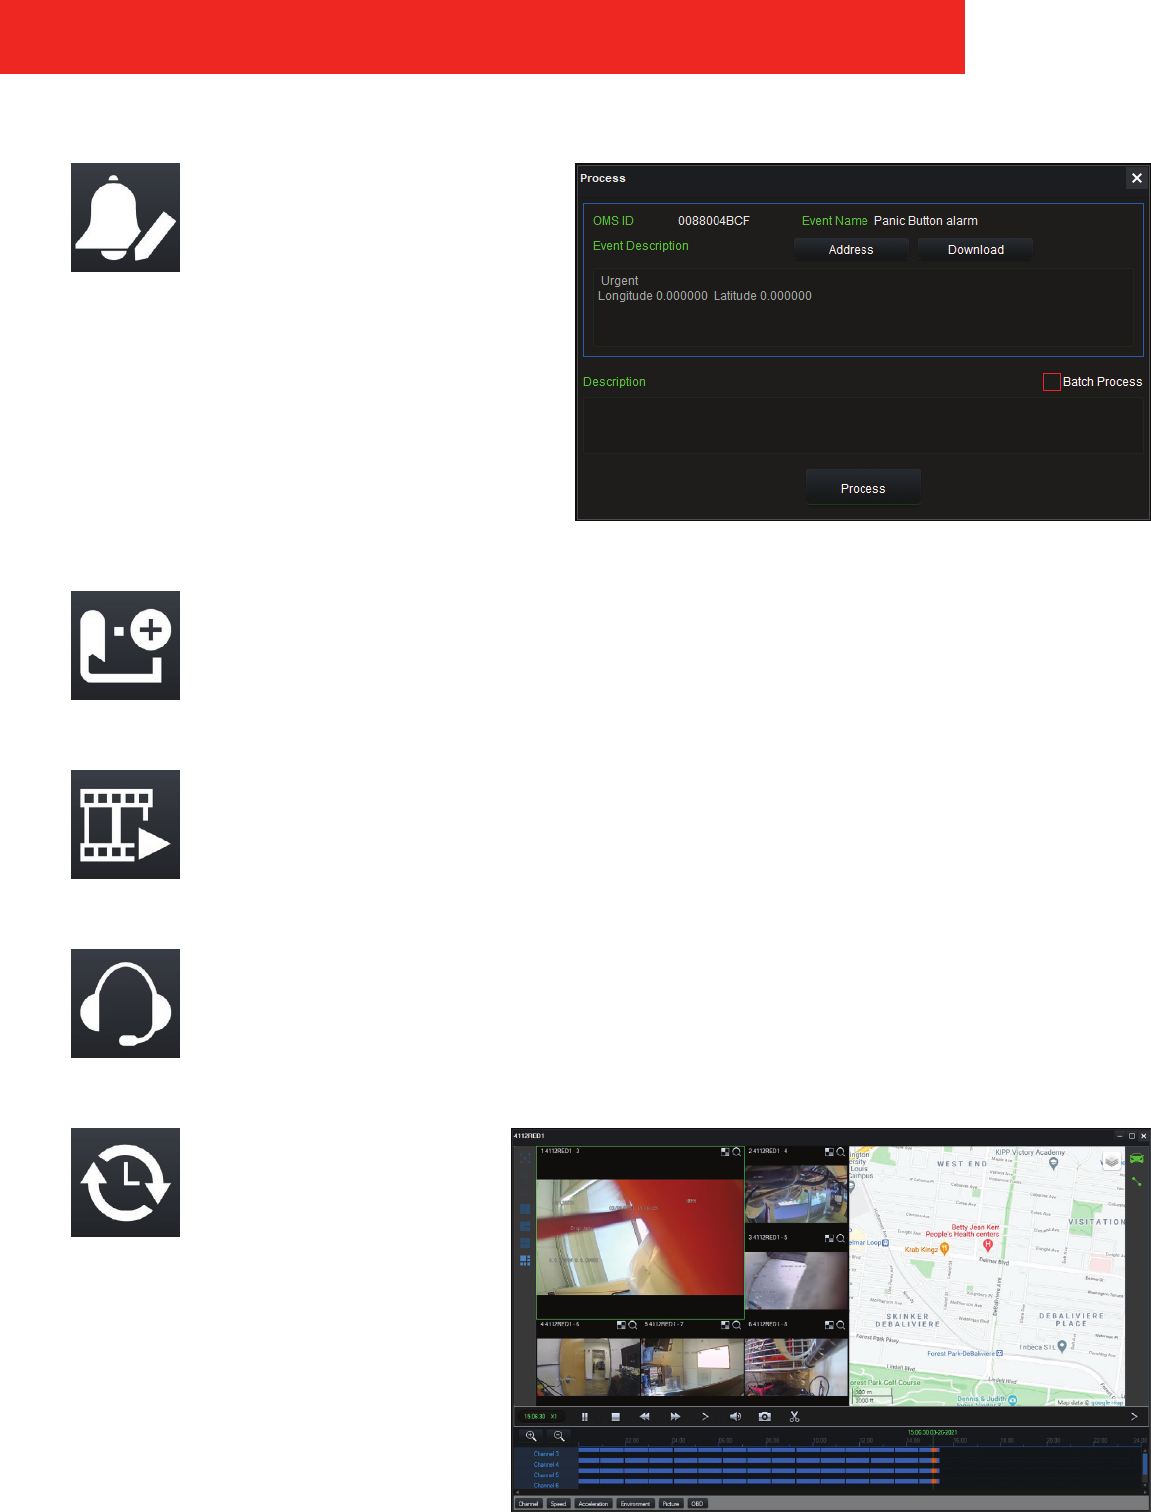
(Alerts cont.)
Process
Click the Process button to open the
Process window. Processing an alert
records the entered notes and moves it
from the Active tab to the Dismissed tab.
Click the Process button to process individual alarms, or
click Batch Processing button to process all displayed
alerts at once.
Vehicle Lock-On
Click the Vehicle Lock-On button to lock the map onto the vehicle highlighted in green.
Open Video
Click the Open Video button to open the alarming vehicle’s available camera live views.
Talkback
Click the Talkback button to open the Talkback window. Click Stop to cease or mute communication. Once
stopped, click Start to resume communication.
Scene Playback
Click the Scene Playback button to
playback the camera feeds during
the time of the alert.
FORESIGHT PRO USER GUIDE
20
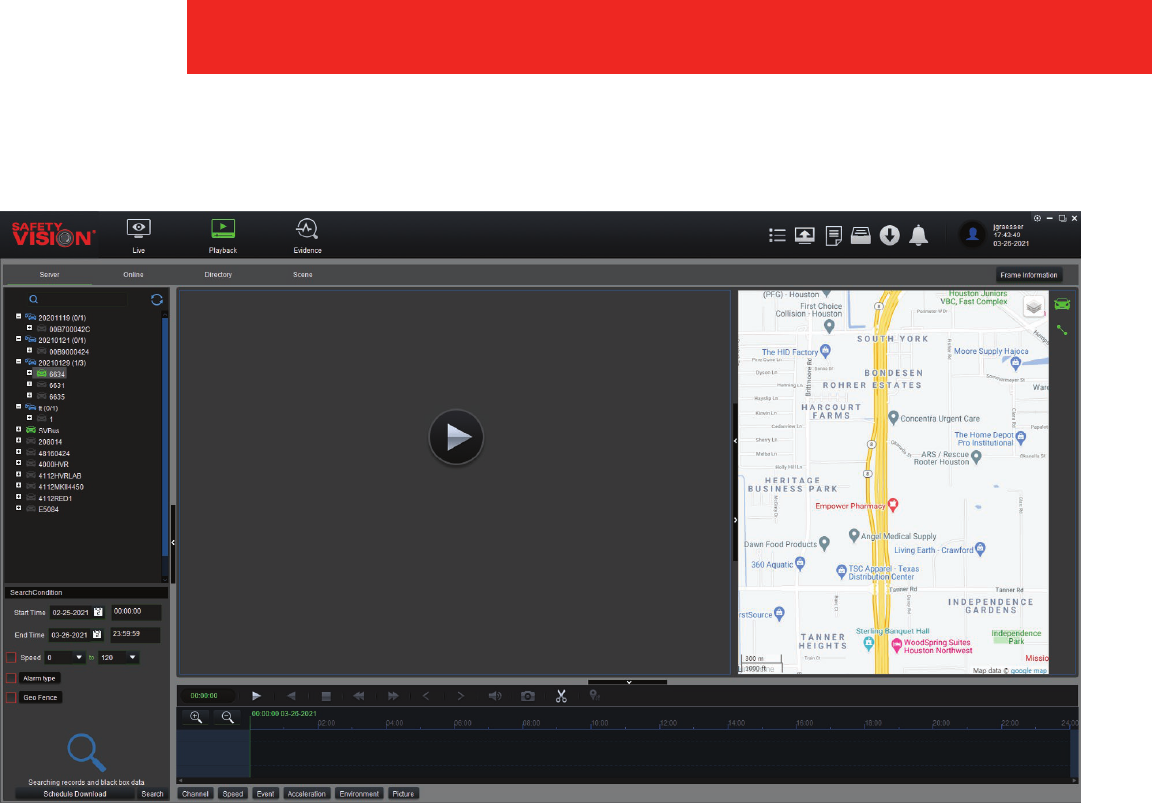
Playback
Foresight Pro can playback available video from a variety of sources. Select from the following options at the top of the window.
Server
Click Server to search video stored on the server’s database or schedule a download.
Single Vehicle Search
1. Select one of the vehicles, and then select date (default is the previous month) and conditions.
2. Double-click on the vehicle or click Search. The platform returns the calendar of the current month. If it exceeds the current
month, a left and right scroll bar appears.
3. After server search is completed, double-click on a date containing a recording in the calendar. Calenders appear for each
month and adjacent months video was searched in. Days with normal recording available appear lled in green, days that
have an alarm triggered during the recording are marked with orange. Days denoted with a red dot have blackbox data. If
there is video data, it will enter the channel selection page.
IMPORTANT: Download Blackbox must be checked BEFORE double-clicking on a date in order to have entries for firmware and
MCU versions, vehicle number, GPS, voltage, and temperature information appear in the Frame Information window.
4. Select all of the channels you want to playback (default is Select All). When there is only black box data available, it will
directly enter the map page.
5. Click the Play button to start video playback.
21
FORESIGHT PRO USER GUIDE

Multiple Vehicles Search
When performing multiple vehicles search, users can no longer operate other pages. Click the X button to end multiple vehicles
search.
1. Select multiple vehicles, and then select date (default is the previous month) and conditions
2. Click Search and the platform returns 2 pieces of data each time until all data that meets the conditions are returned, as
shown in the gure
3. Click on the vehicle terminal in the search results and the platform returns the monthly calendar with data.
4. Double-click on a date containing a recording in the calendar. Calenders appear for each month and adjacent months
video was searched in. Days with normal recording available appear lled in green, days that have an alarm triggered
during the recording are marked with orange. Days denoted with a red dot have blackbox data. If there is video data, it will
enter the channel selection page.
IMPORTANT: Download Blackbox must be checked BEFORE double-clicking on a date in order to have entries for firmware and
MCU versions, vehicle number, GPS, voltage, and temperature information appear in the Frame Information window.
5. Select all of the channels you want to playback (default is Select All). When there is only black box data available, it will
directly enter the map page.
6. Click the Play button to start video playback.
7. When performing multiple vehicles search, users can no longer operate other pages. Click the X button to end multiple
vehicles search
Schedule a download
1. Click Scheduled Download at the bottom of the window.
2. Select vehicle(s) from the list on the left side of the window.
3. Select the Date, Time Range, and specic camera channels for which you want to download.
4. Click Download.
5. The scheduled download is added to the Download window. The next time the vehicle connects to the Foresight Pro
network, the requested video is downloaded automatically.
FORESIGHT PRO USER GUIDE
22

Online
Click Online to search for video on vehicles currently active and connected to the network.
1. Click Online at the top of the window.
2. Available vehicles appear in the list on the left side of the screen.
3. Double-click on a vehicle in the list for which you want to search for video.
4. Foresight Pro searches the device for available video.
5. Calenders appear for each month and adjacent months video was searched in. Days with normal recording available
appear lled in green, days that have an alarm triggered during the recording are marked with orange. Days denoted with
a red dot have blackbox data. If there is video data, it will enter the channel selection page.
IMPORTANT: Download Blackbox must be checked BEFORE double-clicking on a date in order to have entries for firmware and
MCU versions, vehicle number, GPS, voltage, and temperature information appear in the Frame Information window.
6. Select all of the channels you want to playback (default is Select All). When there is only black box data available, it will
directly enter the map page.
Directory
Select Directory to search for video saved locally on the PC.
1. Select Directory at the top of the window.
2. Click the Add button at the top of the list on the left side of the window.
3. A navigation window appears.
4. Navigate to the directory you want to search and click Open.
5. The directory appears on the left side of the screen.
6. Select the folder you want to search in the directory.
7. Select the Date and Condition of the video for which you want to search. Select User Dened in the Date eld to search a
specic date and time range.
8. Click Search.
9. Foresight Pro searches the folder for available video.
10. Calenders appear for each month and adjacent months video was searched in. Days with normal recording available
appear lled in green, days that have an alarm triggered during the recording are marked with orange. Days denoted with
a red dot have blackbox data. If there is video data, it will enter the channel selection page.
IMPORTANT: Download Blackbox must be checked BEFORE double-clicking on a date in order to have entries for firmware and
MCU versions, vehicle number, GPS, voltage, and temperature information appear in the Frame Information window.
11. Select all of the channels you want to playback (default is Select All). When there is only black box data available, it will
directly enter the map page.
12. Click the Play button to start video playback.
(Playback cont.)
23
FORESIGHT PRO USER GUIDE
(Playback cont.)
Scene
Click Scene to search for video within a designated geo fence.
1. Click Scene at the top of the window.
2. Set the start and end time and date.
3. Type in a key word for the search to lter by.
4. Click GEO fence and the create a geo fence to search in (see pages 14and 15 on how to create different types of geo fences).
5. Click Search.
6. Select the vehicles Foresight Pro should search. Click OK.
7. Foresight Pro searches the area within the geo fence for available video from the selected vehicles.
8. If video is found meeting the search critera, video will automatically download when the vehicle is online.
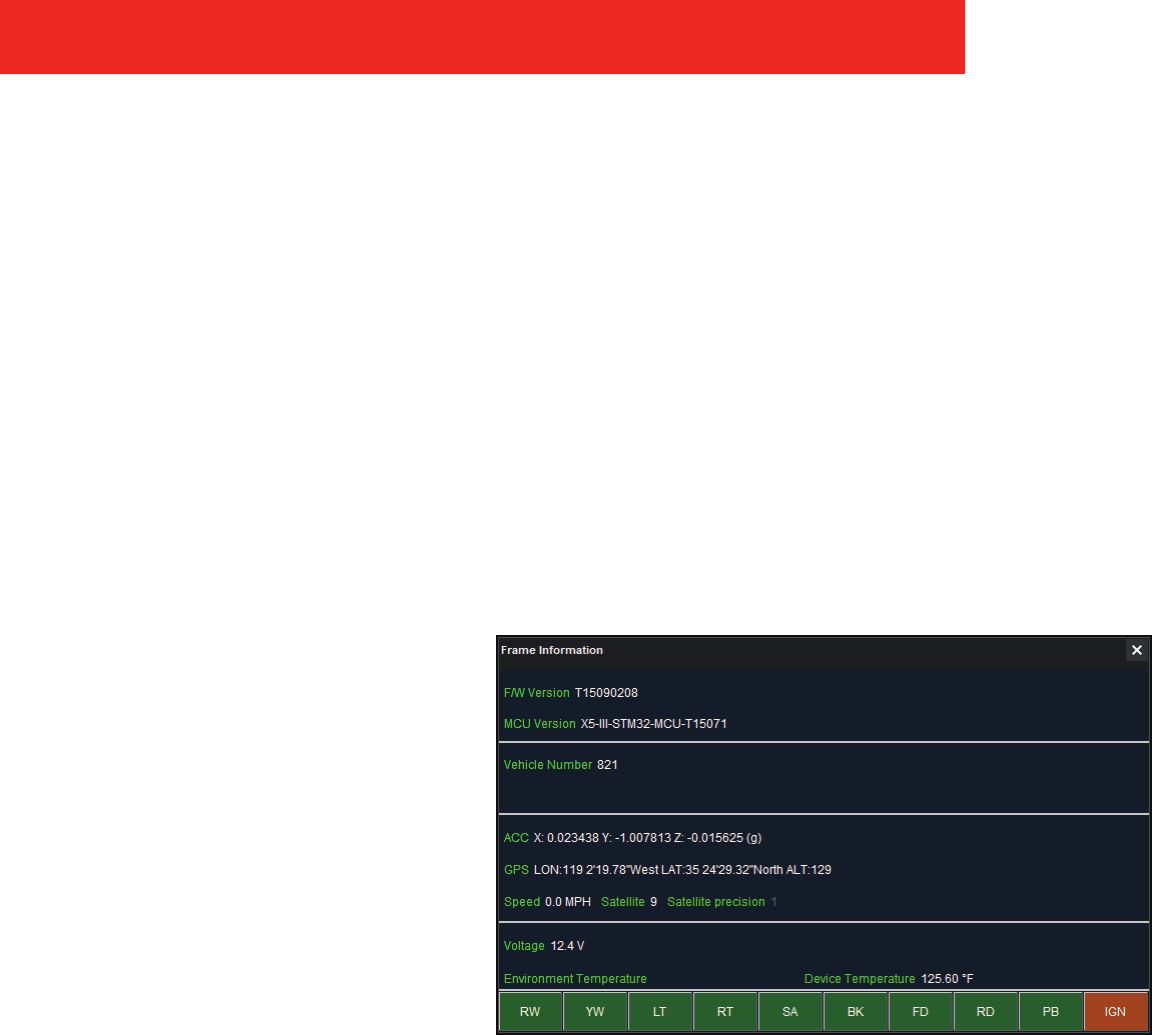
Frame Information
Click Frame Information at the top right of
the window to display the Frame Information
window. This window displays detailed
metadata information including:
• Firmware version
• MCU version
• Vehicle number
• Specic accelerometer reading
• GPS coordinates
• Vehicle speed
• Device voltage
• Environment temperature
• Device temperature
FORESIGHT PRO USER GUIDE
24
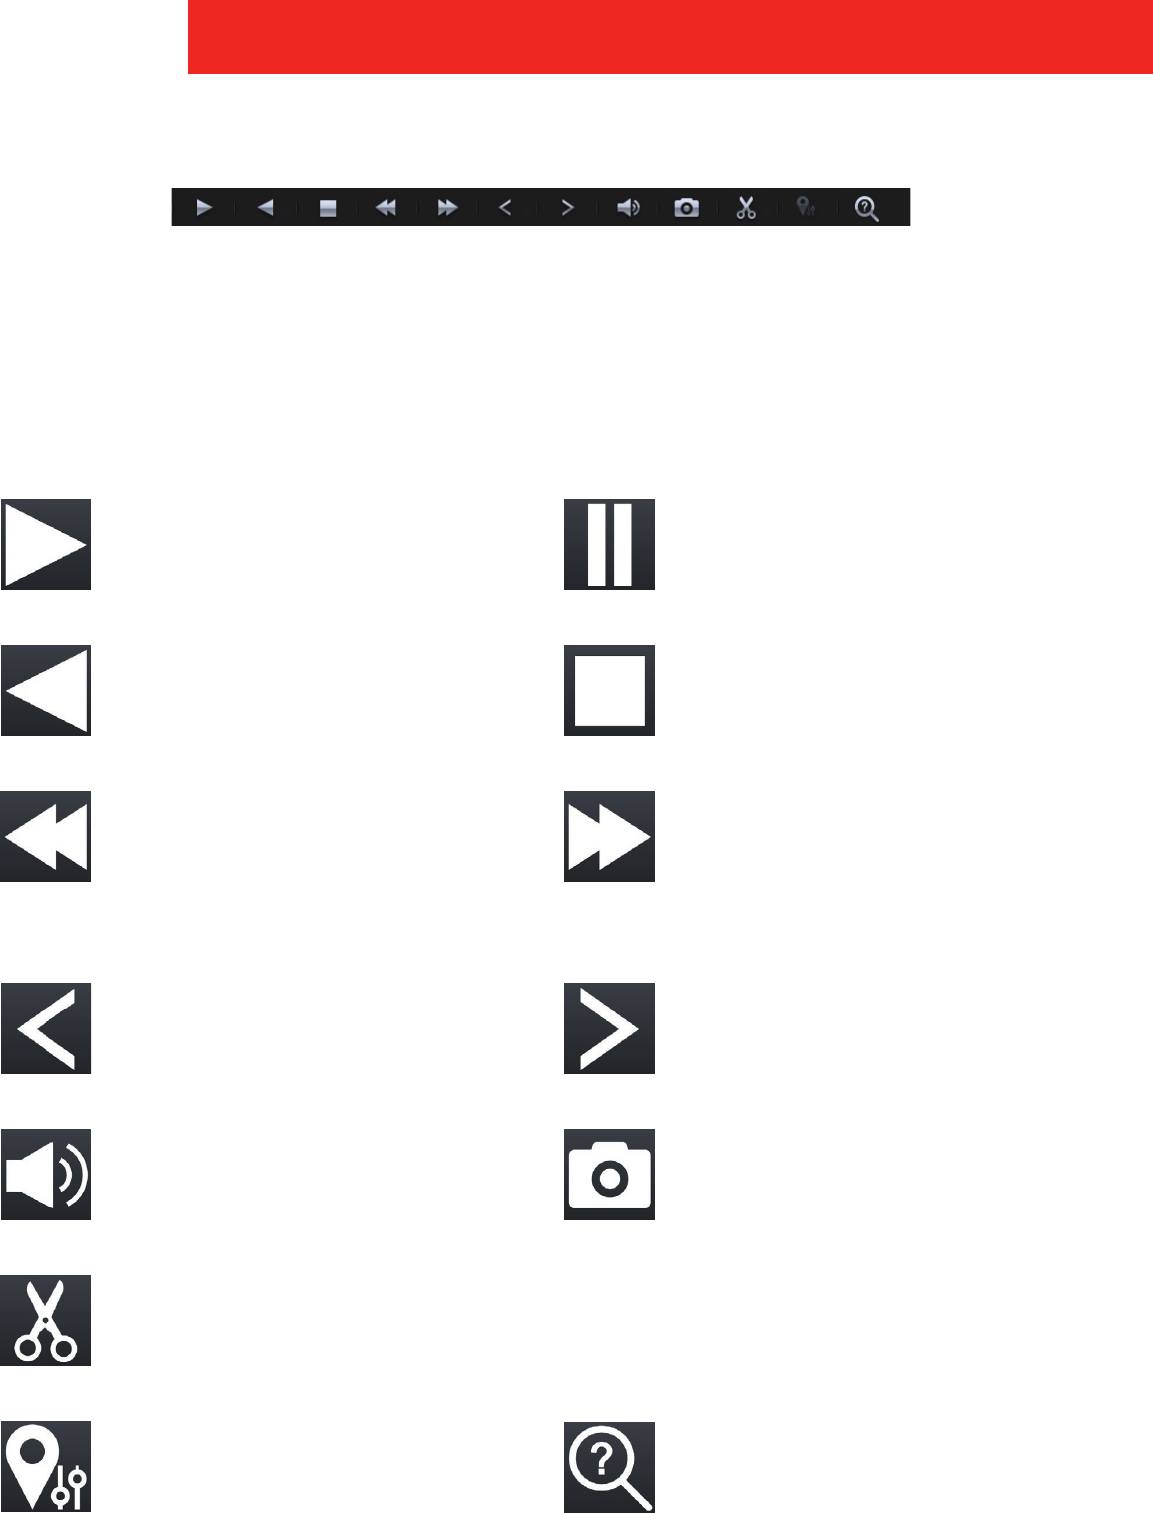
Playback Control
Clip
During playback, create a video clip from the
currently playing video.
Snapshot
During playback, click Snapshot to capture the
image of the currently selected window and
save it to the specied folder (see System Settings
on pages 49 and 51). A prompt box in the lower
right corner of the window pops up, and will be
automatically closed in about 5 seconds.
The bottom portion of the Playback screen provides playback controls as well as multiple metadata graphs. The Pause/Play, Stop,
Rewind, and Fast Forward buttons control playback speed. Additionally, the slider bar can be dragged directly to the point of the
video you want to play. The time frame represented by the slider bar/graph can be increased or decreased using the magnifying
lens icons at the top left of the slider.
Check the Download Blackbox checkbox to review video with GPS and sensor data and map breadcrumb trail. Leave unchecked
if you prefer to review the video without this data.
GPS Filter
During Playback, filters video by GPS co-
ordinates.
Video Check
Checks currently playing video for any errors.
Play
Plays current video.
Pause
Pauses current video; click a second time to
resume video playing.
Slow
During playback, click on to slow down (1/2, 1/4,
1/8, 1/16 and 1/32 of normal speed).
NOTE: If the playback only includes black box
data, this function is not supported.
Speed up
During playback, click on to speed up (X2, X4,
X8, X16 and X32 of normal speed).
NOTE: If the playback only includes black box
data, this function is not supported.
Previous Frame
Go back 1 frame in the current video.
Next Frame
Advance 1 frame in the current video.
Rewind
Plays current video in reverse.
Stop
Stops current video.
Audio Volume
Click this icon to adjust video volume.
25
FORESIGHT PRO USER GUIDE
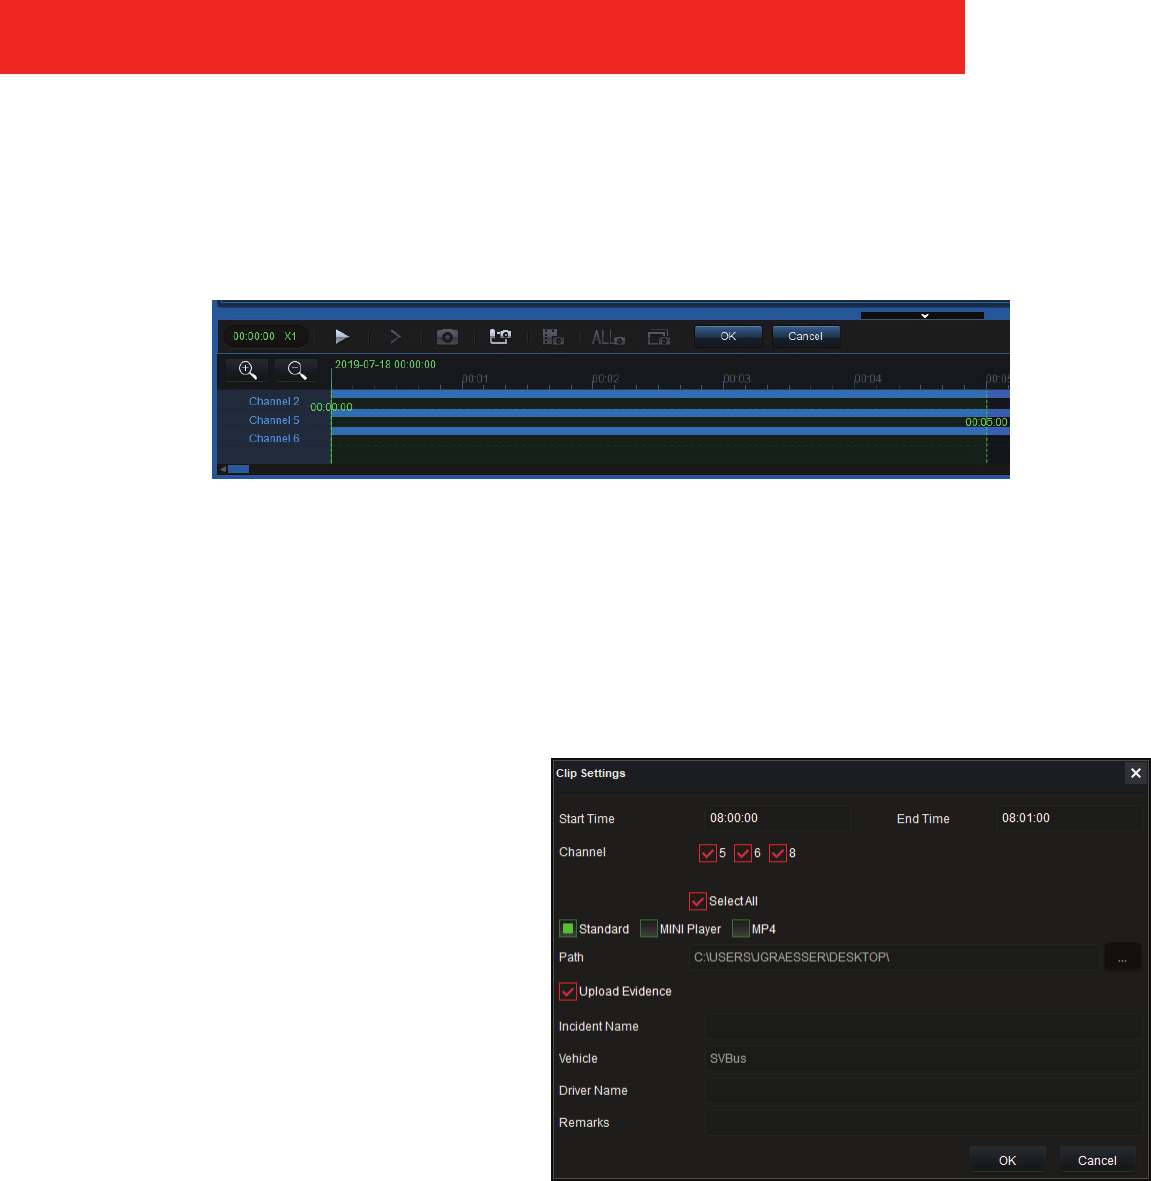
Clip
During playback, click on Clip icon to create a video clip from the currently playing video. Changes will appear in Curve Control
and Playback Control Bar.
NOTE: The leftmost green dotted line is the start time of a clip; the middle green solid line is the playback progress; the rightmost green
dotted line is the end time of a clip.
By default, the video of ve minutes before and after the current playback time point is selected. Drag the green dotted line at
start or end time point to adjust the start and end time of clip. After selecting the clip time, click OK to enter the clip settings
dialog box.
1. By default, all channels with data are selected, and the channels that need clip can also be ticked.
2. Select to save the clip as Standard (H.264 format), MINI player, or MP4 (default is standard). Click OK to download the videos
of selected channels to the specied folder.
◦ Standard clip only exports video les (H.264 format), which can be opened by a miniplayer player.
◦ If you choose MINI Player, in addition to
exporting the video le, the miniplayer player
le will be exported.
◦ If you choose MP4, the video le will be
converted to MP4 format, which can be
opened by a normal player.
3. The local save path can be modied.
4. Click OK to enter the download interface. You
can view the download progress in the local
download center.
Only standard clip allows selection of Upload Evidence,
and the Upload Evidence options appear. When you
select Upload Evidence, video files will be downloaded
to the evidence center in server.
Upload Evidence
1. In the Clip Settings window, select Standard, then check the Upload Evidence option. The following fields appear:
◦ Incident Name: name or type of incident
◦ Vehicle: vehicle on which the video clip occurred
◦ Driver Name: the name of vehicle’s driver
◦ Remarks: enter any keywords that identify the video that can easily be searched for (e.g. “complaint” or “vandalism”)
2. Once complete, click OK and the task appears in the Downloads window.
FORESIGHT PRO USER GUIDE
26
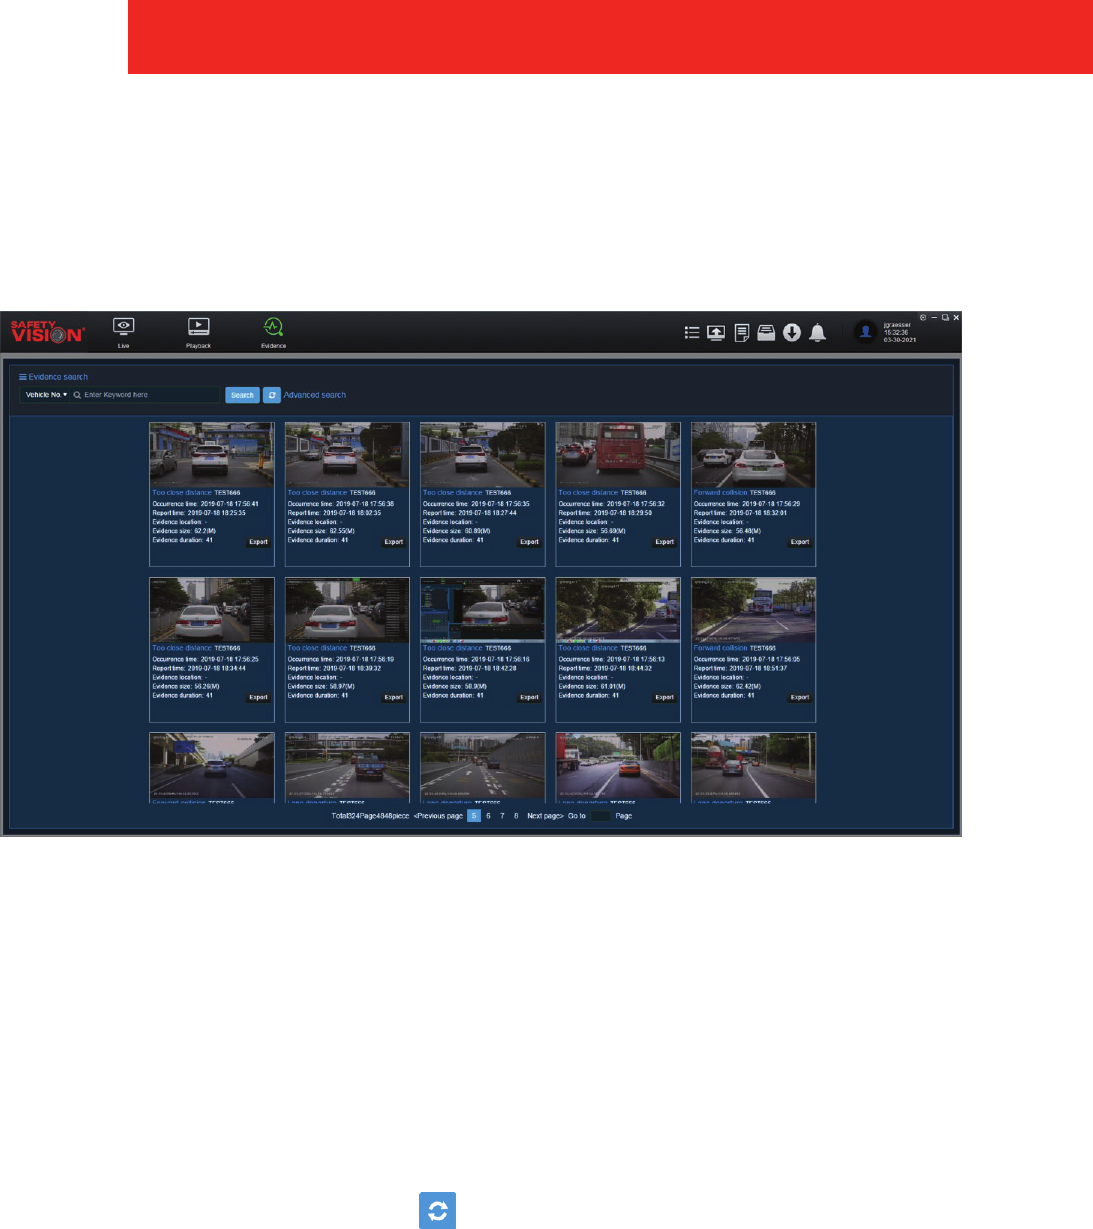
Evidence Center
The Evidence feature provides an easy way to label, categorize, organize, and generate reports on important video clips. Click
Evidence to go to the Evidence Center’s main page. By default, this will display the evidence uploaded from the current device
which will include captured pictures, generation time, upload time, vehicle information, exported evidence, etc. Users can view
and nd the corresponding evidence in detail.
Evidence Search
You can search for evidence within a few different parameters using the pulldown menu at the top left:
• Search by vehicle number: Select Vehicle No. to display evidence by vehicle number. Enter keyword in the search eld to
nd specic evidence for a vehicle.
• Search by evidence name: Select Evidence Name to display evidence by name. Enter keyword(s) to nd specic evidence by
le name.
• Search by driver: Select Driver Name to display evidence by driver name. Enter keyword(s) to nd specic evidence by driver
name.
• Click Search to search by any new criteria or click the button to reload the current search results.
• Click Advanced Search to further narrow down search results:
◦ Select Vehicle: Select specific vehicle teams or groups to search for from the drop down list.
◦ Alarm Classification: Select specific alarms from the list to include in the search.
◦ Start Time: Search for events that occur after a certain date and time.
◦ End Time: Search for events that occur before a certain date and time.
27
FORESIGHT PRO USER GUIDE
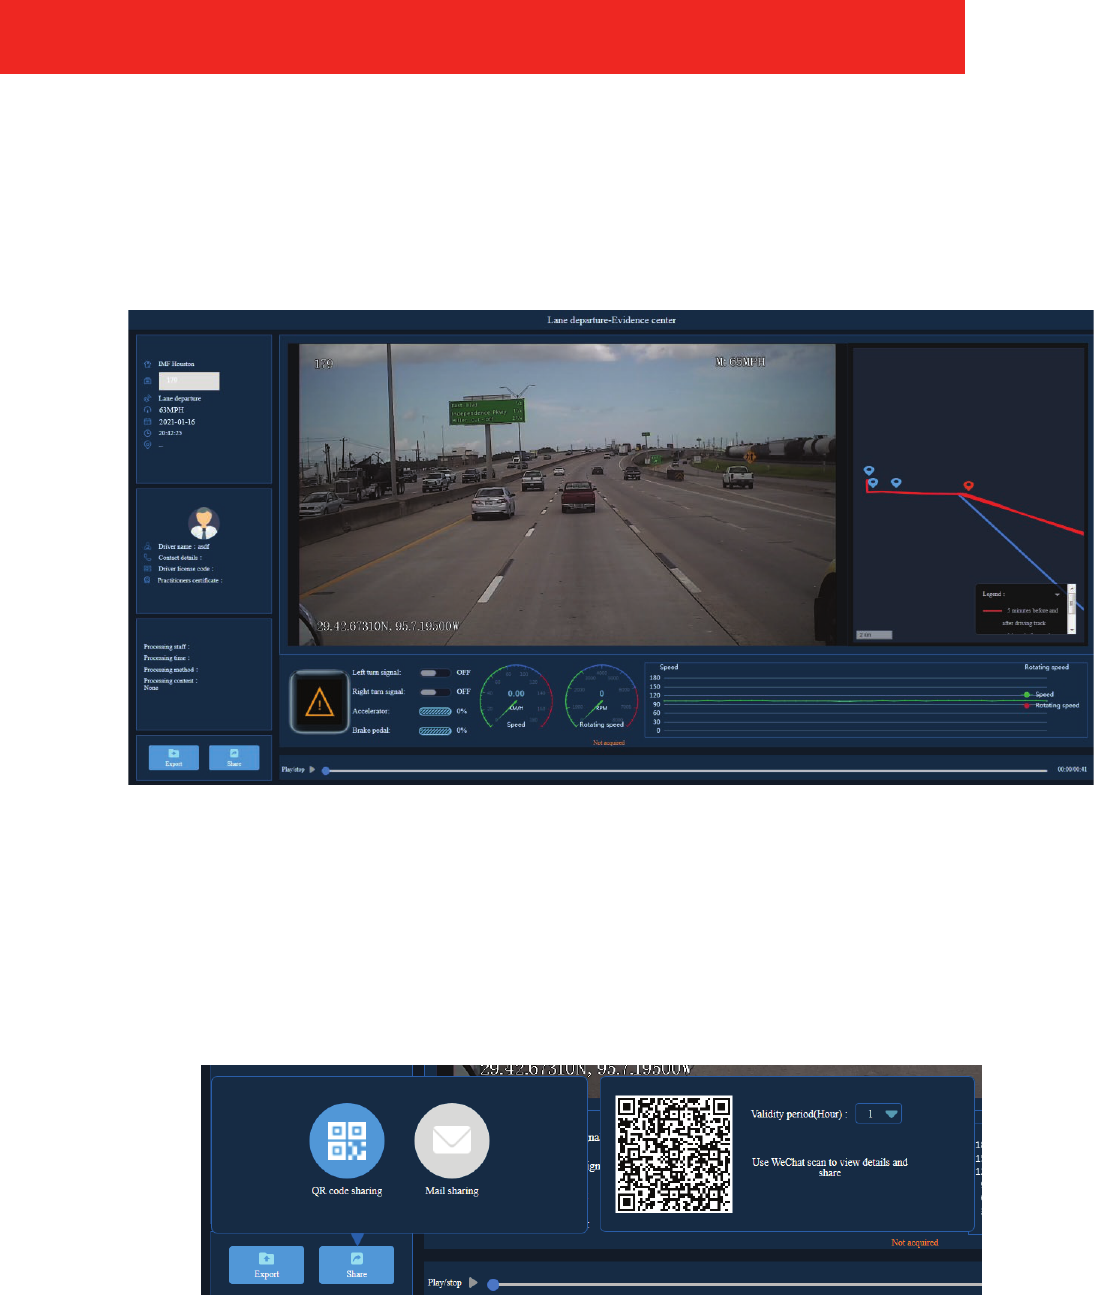
Evidence Playback
On the main page of the Evidence Center, select the evidence to be played back and click Playback View to enter the playback
page. The left side of the playback page shows the basic information of vehicle and driver, the vehicle trajectory, and the video
evidence of the vehicle and black box data. The evidence can be shared by email or QR code, and can be exported. The exported
le package contains evidence videos in MP4 format and captured images.
Captured Image Evidence
Click the + in the evidence center to view the information about a captured image.
Evidence Sharing
Evidence can be shared by means of email and QR code. Click Share at the bottom left of the page and select the length of time
the QR code is valid for or the email address the file should be sent to.
FORESIGHT PRO USER GUIDE
28
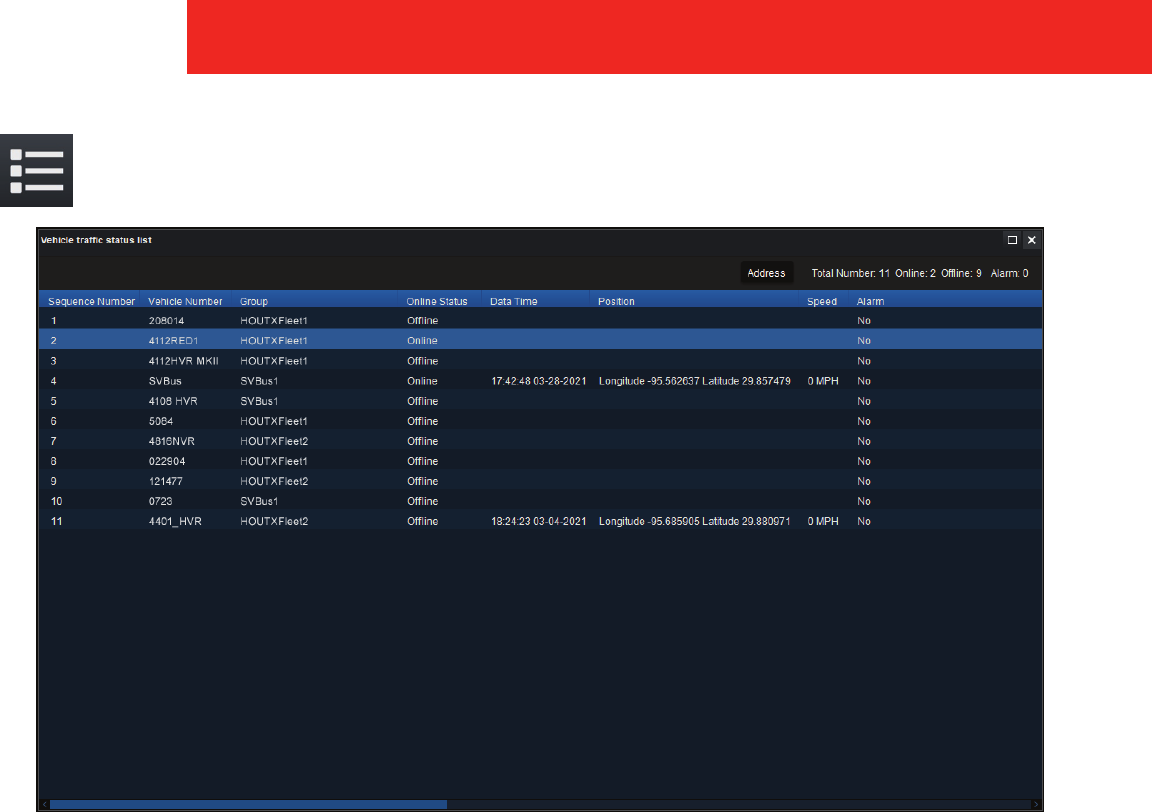
Vehicle Traffic Status List
Click Vehicle Traffic Status List to show the status of all recorders currently connected to Foresight Pro.
The Vehicle Traffice Status List displays:
• Vehicle’s sequence number
• Vehicle number
• Group the vehicle has been assigned to
• If vehicle is currently online or offline
• Last time vehicle was online
• GPS co-ordinates (if GPS is configured)
• Speed (if GPS is configured)
• If there are any alarms triggered
29
FORESIGHT PRO USER GUIDE
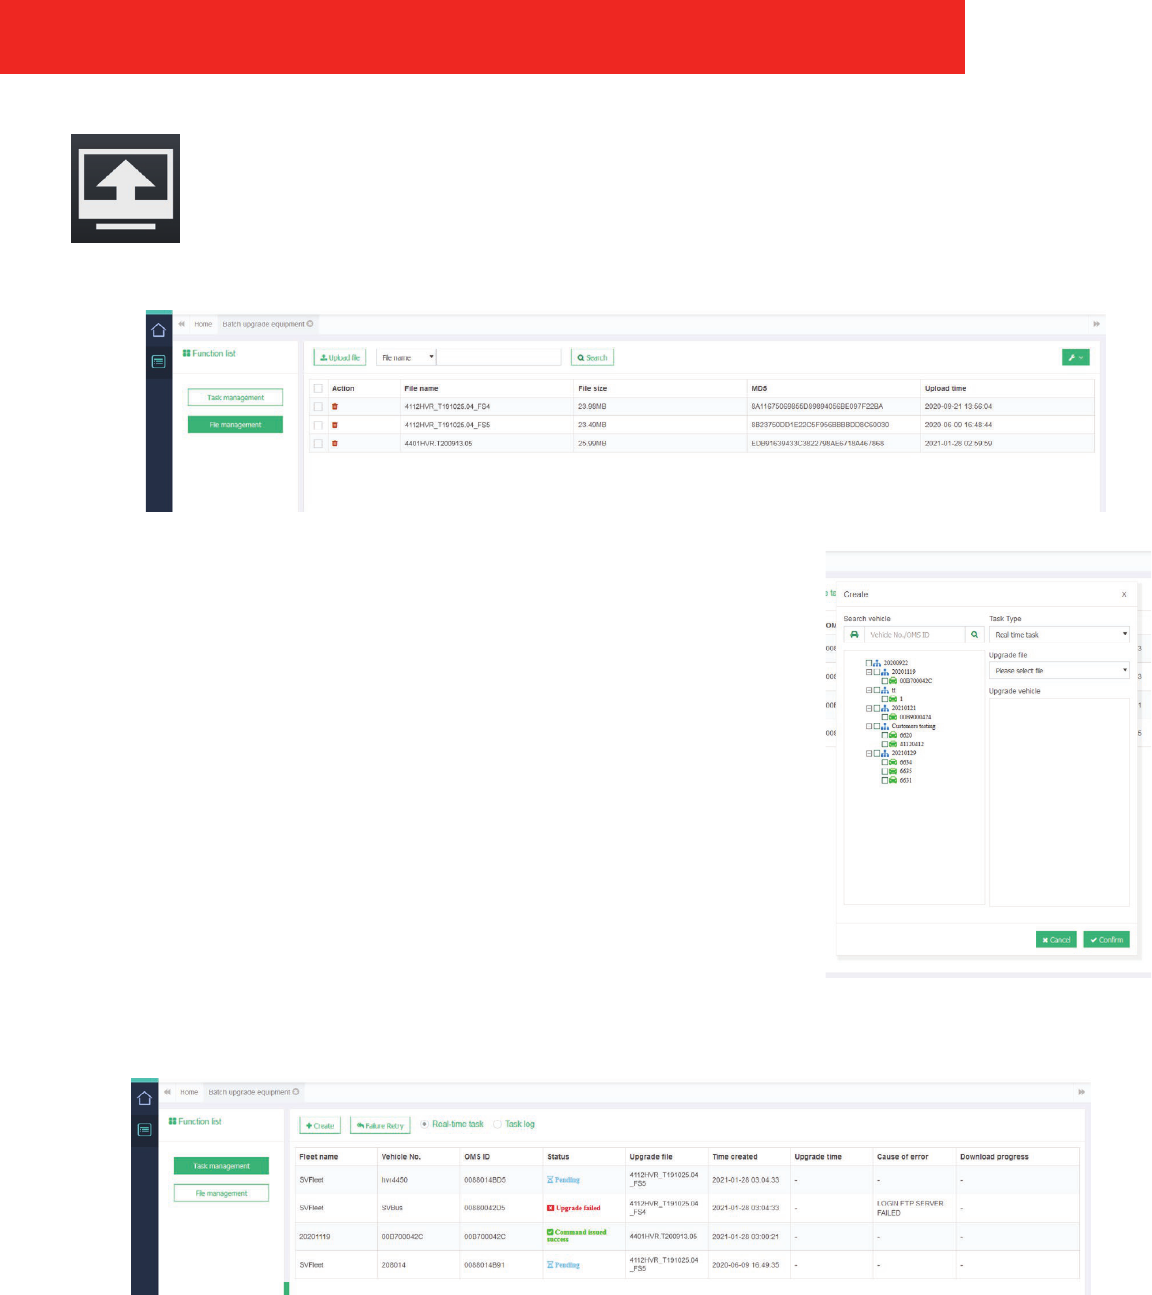
Update
The batch upgrade option provides a way to upgrade entire eets with rmware updates.
To set up a batch upgrade, either click Batch upgrade equipment in the menu bar OR click the Update icon in the
Live View interface to bring up the batch upgrade interface. Regardless of WiFi or 4G, once connected, update will
be started on time. If no network module is available, USB ash drive or EasyCheck app is needed.
To update an entire fleet’s firmware:
1. Click File management under Function list on the left side of the screen.
2. Click Upload file to upload the rmware le from your local machine to the
server.
3. Click Task management under Function list on the left side of the screen.
4. Click + Create
5. Select all vehicles to receive the upgrade
6. From the Task Type pull down menu, select either
◦ Real-time task (for an immediate push out of the upgrade) or
◦ Reservation task (to have the upgrade pushed out at a future time)
7. Select the upgrade le uploaded from step 2 that should be distributed.
8. Click Conrm to conrm the entries.
9. Once the upgrades have been pushed out, the status will appear in the Status column.
◦ Command issued success: Upgrade was pushed out successfully to specied vehicle.
◦ Pending: Upgrade has not yet been pushed out.
◦ Upgrade failed: Upgrade was unsuccessful, the reason for the failure will be listed under the Cause of error column.
FORESIGHT PRO USER GUIDE
30
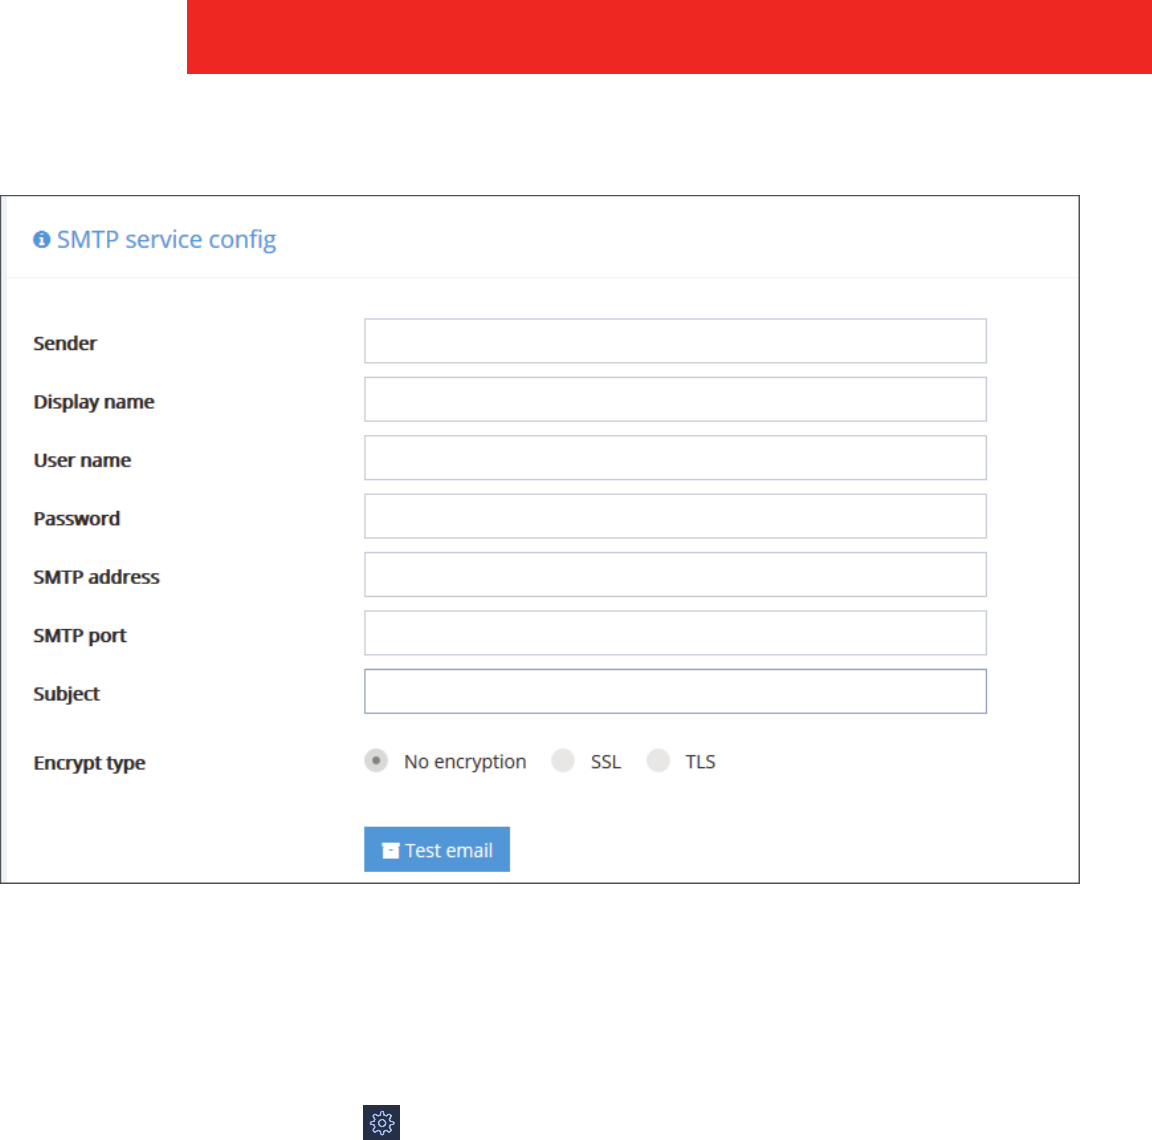
Email Settings
After setting up the email server, ll in the sender’s address and click Test email to conrm whether the email server has been set
successfully.
To send a test email:
1. Go to http://<YourServerIP>:12056
2. Enter your username and password for Foresight Pro
3. Click the System configuration icon on the left side of the screen
4. Click SMTP service config
5. Enter the requested information.
6. Click Test email
31
FORESIGHT PRO USER GUIDE
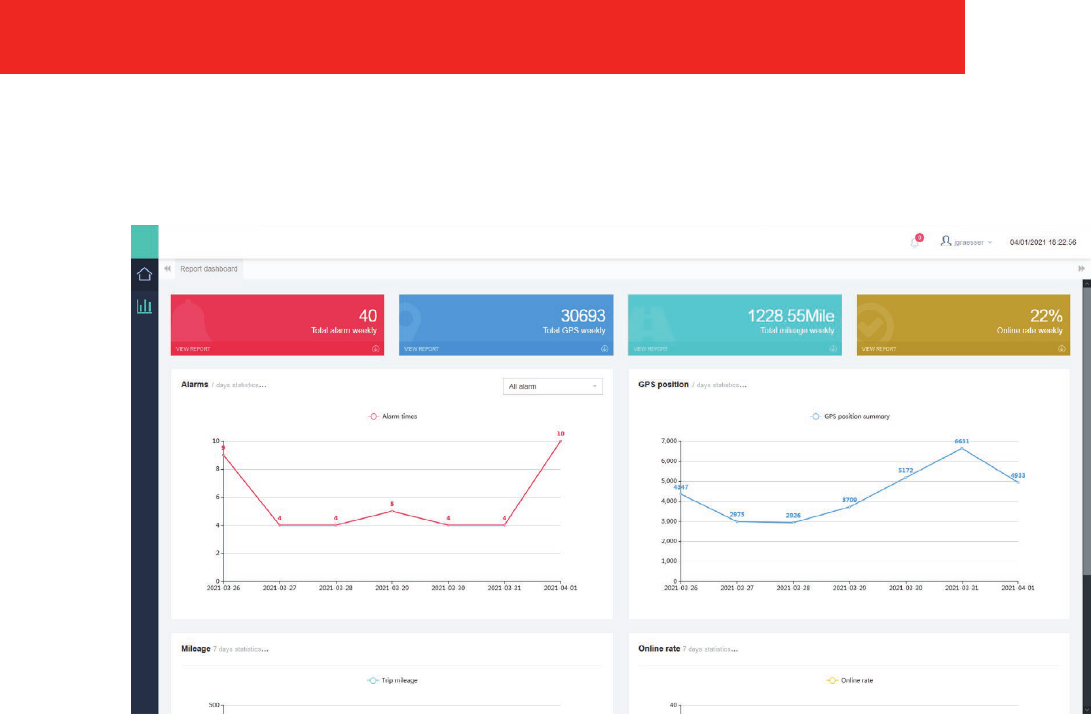
Report
Click on the Report icon to enter the online report page to view relevant basic functions and report information.
FORESIGHT PRO USER GUIDE
32
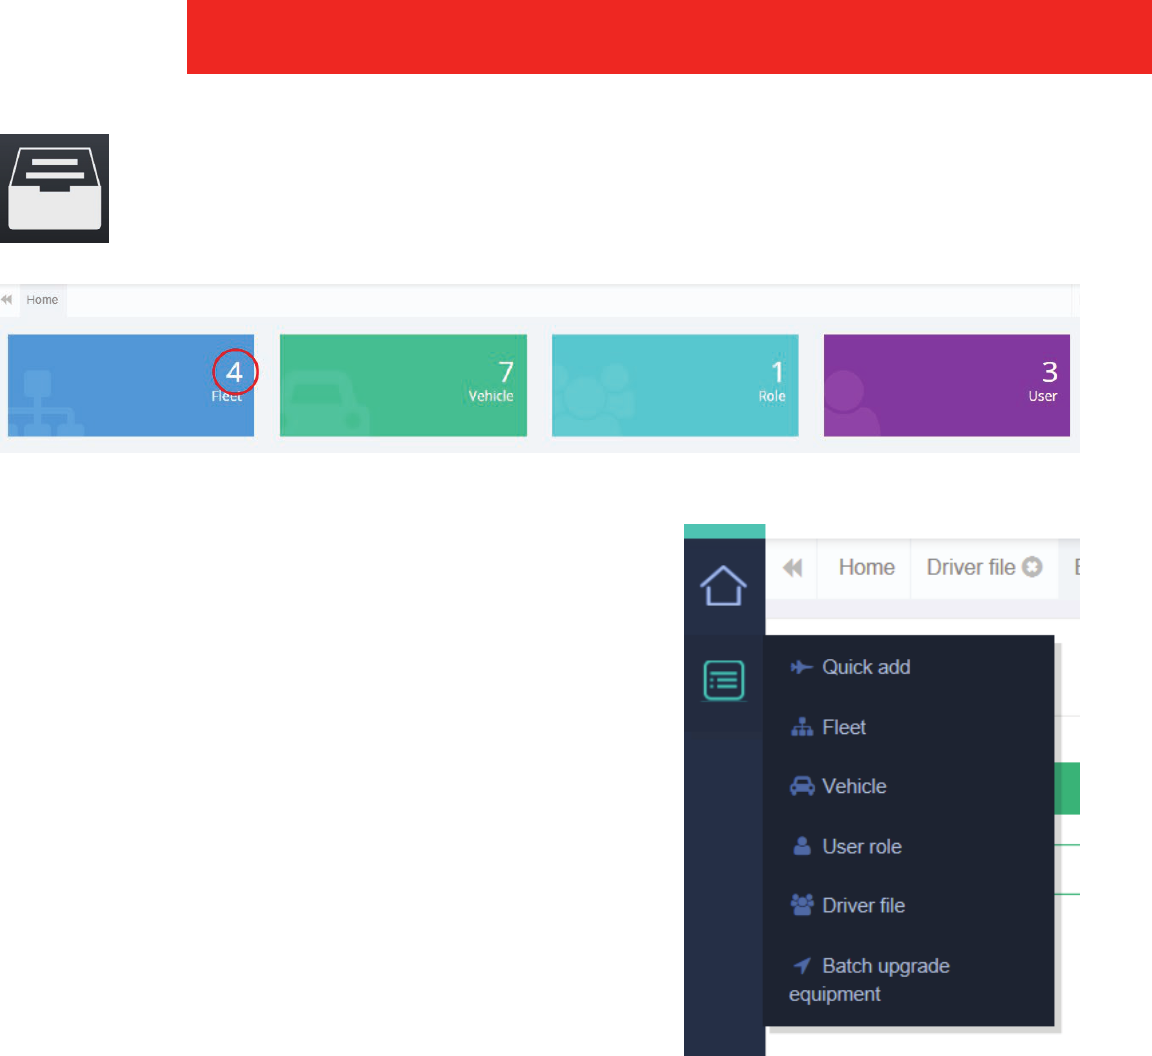
System Manage
Click the System Manage icon to enter the web client. Fleet, vehicle, user, and driver conguration changes can all
be done here. The next few sections will go over all of this in detail.
Fleet Information Configuration
There are two ways by which users can enter the fleet information
conguration interface. Either click the number of fleets on the home
page (shown above) or click Fleet on the side menu (shown at right). Click
Fleet in the menu bar to bring up the eet interface. You can add, delete,
and update the eet name.
NOTE: When you delete a fleet, the vehicle terminals under the fleet will also
be deleted.
33
FORESIGHT PRO USER GUIDE
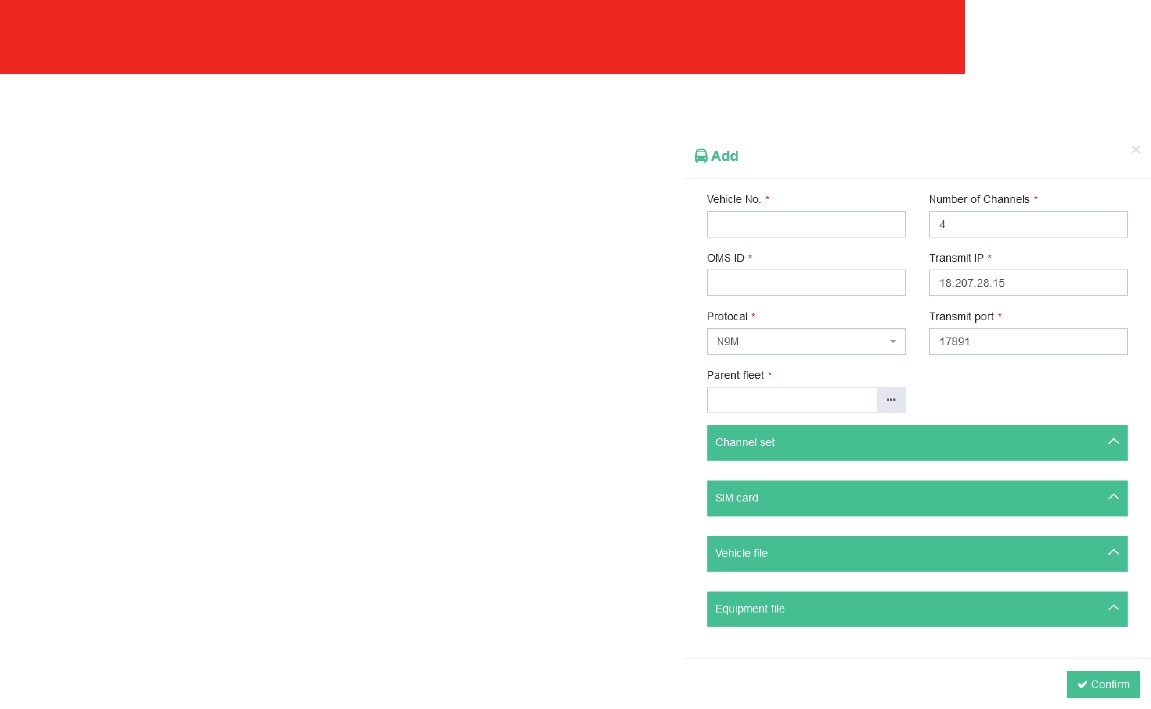
Vehicle Device Conguration
Click Vehicle in the menu bar to bring up the vehicle device interface.
Click Add to bring up the Add window. The elds marked with
asterisk (*) are required.
• Vehicle No.: Enter the agency-defined vehicle name that will be
used to identify this vehicle in the Foresight Pro system
• Number of channels: The number of a/v channels being used by
the vehicles recorder.
• OMS ID: Enter the number of the DVR that will identify this
vehicle in OMS (refer to page 5, DVR Setup for more information
about setting up the OMS ID).
• Transmit IP: Enter the IP address of the client server where video
will be transmitted to.
• Transmit port: Enter the transmit port (TCP) of the client server
(17891 is the default port and should not be changed unless the port
was changed on the client server).
• Parent fleet: Select the fleet or group the vehicle belongs to.
Click Confirm to save all entries and changes.
Quick Add
Quick add allows users to quickly add information about an entire chain.
• Fleet
• Vehicle
• User role
• User (applicable to adding the device of one customer)
FORESIGHT PRO USER GUIDE
34
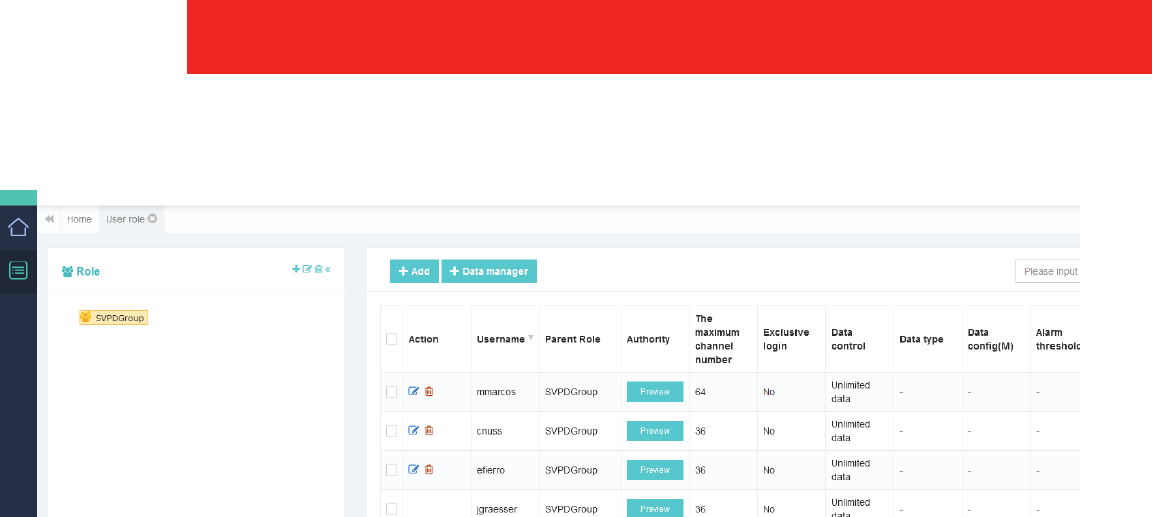
User Role Conguration
Each user is assigned to a role, and these roles are arranged hierarchically. Select a role from the list on the left to display
all child roles. Each role can only access certain fleets and system operations. Child roles can only access the fleets and
functions of their assigned parent role.
Click User role in the menu bar to bring up the user role permissions configuration interface.
To create a role:
1. Select a parent role from the left displayed on the left.
2. Click +.
3. The Add window appears. Enter the following:
◦ Name: enter an alphanumeric name for this role
◦ Parent Role Name: select the parent role of this role
4. Module tab will display by default. Check all of the permissions that will be granted to this role.
5. Click Fleet to show the available fleets. Check all of the fleets users assigned to this group have access to.
6. Click Channel authority to show all available channels. Select which channels (all, 1-16) the role is able to access in
each fleet.
Click Confirm to save all entries and changes.
35
FORESIGHT PRO USER GUIDE
(User Role Configuration cont.)
The users assigned to each parent role group appear on the right side of the interface. Click + Add to add a new user or, using the
icons to the left of the username, to edit or delete the user’s role.
• Add: Click the Add button in the menu bar to bring up the following dialog box. Enter user ID, select a role, enter the
password, mobile phone number and email address, and then click OK.
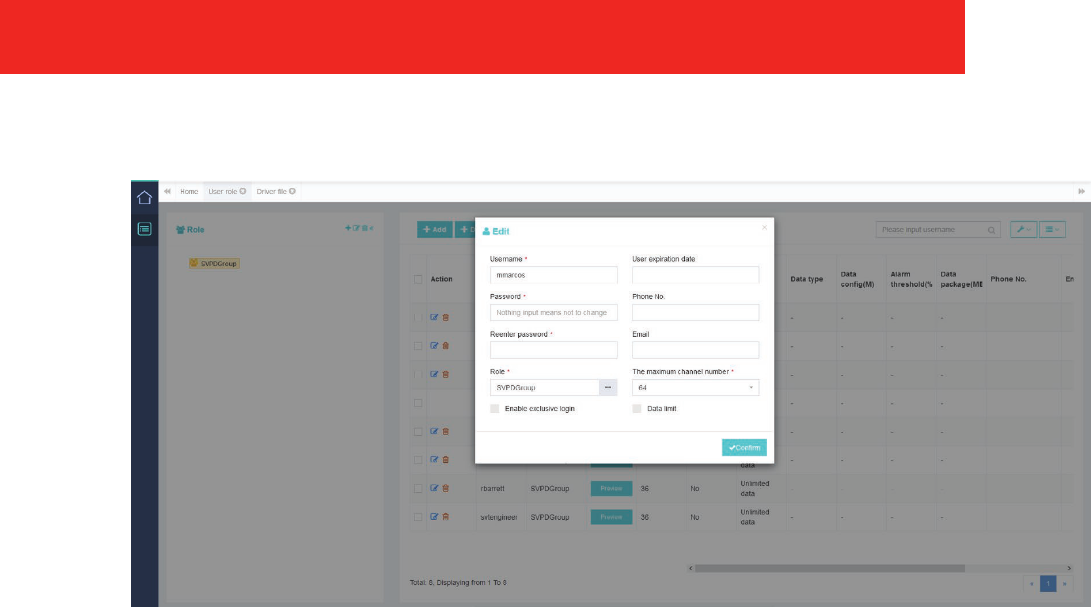
• Edit: Click the edit icon under the Action column next to the user to edit the following user information.
◦ Username
◦ Password
◦ Role assignment
◦ User expiration date
◦ Phone number
◦ Email
◦ Maximum channel number
◦ Enable exclusive login
◦ Set a data limit
Click Confirm to save all entries and changes.
• Delete: Click the delete icon under the Action column next to the user, and then click Confirm.
NOTE: The initial user cannot be deleted.
FORESIGHT PRO USER GUIDE
36
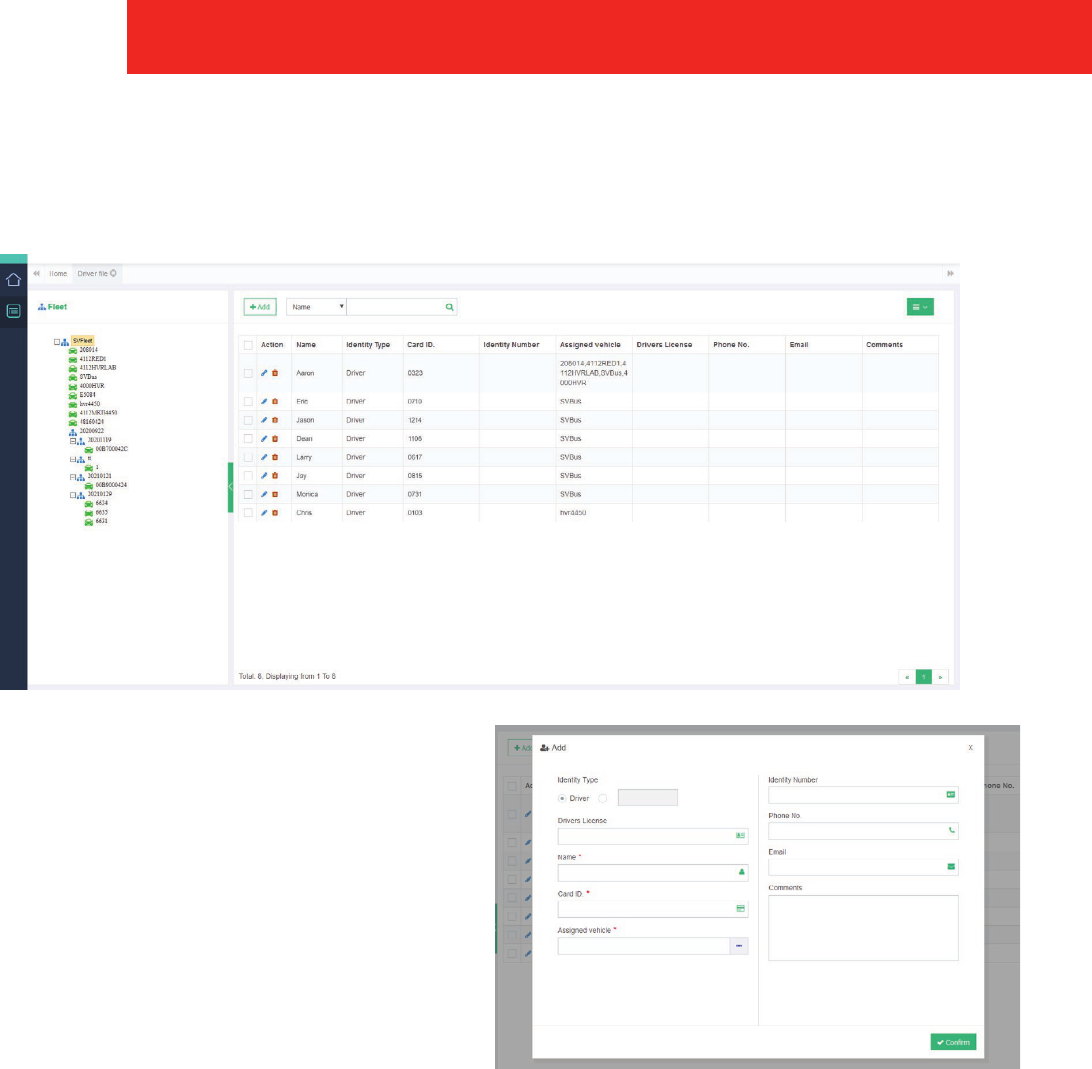
To add a driver:
1. Click + Add
2. The Add window appears. Enter the following:
◦ Identity Type: Driver or the agency-defined indentity
type
◦ Drivers License: Enter drivers state issued driver’s
license number
◦ Name: Enter the driver’s name
◦ Card ID: Enter driver’s the agency-defined ID number
◦ Assigned vehicle: Click the ... to select all the vehicles
the driver is assigned to
◦ Identity Number: Enter the driver’s user ID
◦ Phone No.: Enter the driver’s phone number
◦ Email: Enter the driver’s email address
◦ Comments: Enter any additional comments
3. Click Confirm to save all entries and changes.
Driver file
Click Driver file in the menu bar to bring up the driver le conguration interface. In this interface drivers are added and assigned
to eets, and their information can be edited or deleted.
37
FORESIGHT PRO USER GUIDE
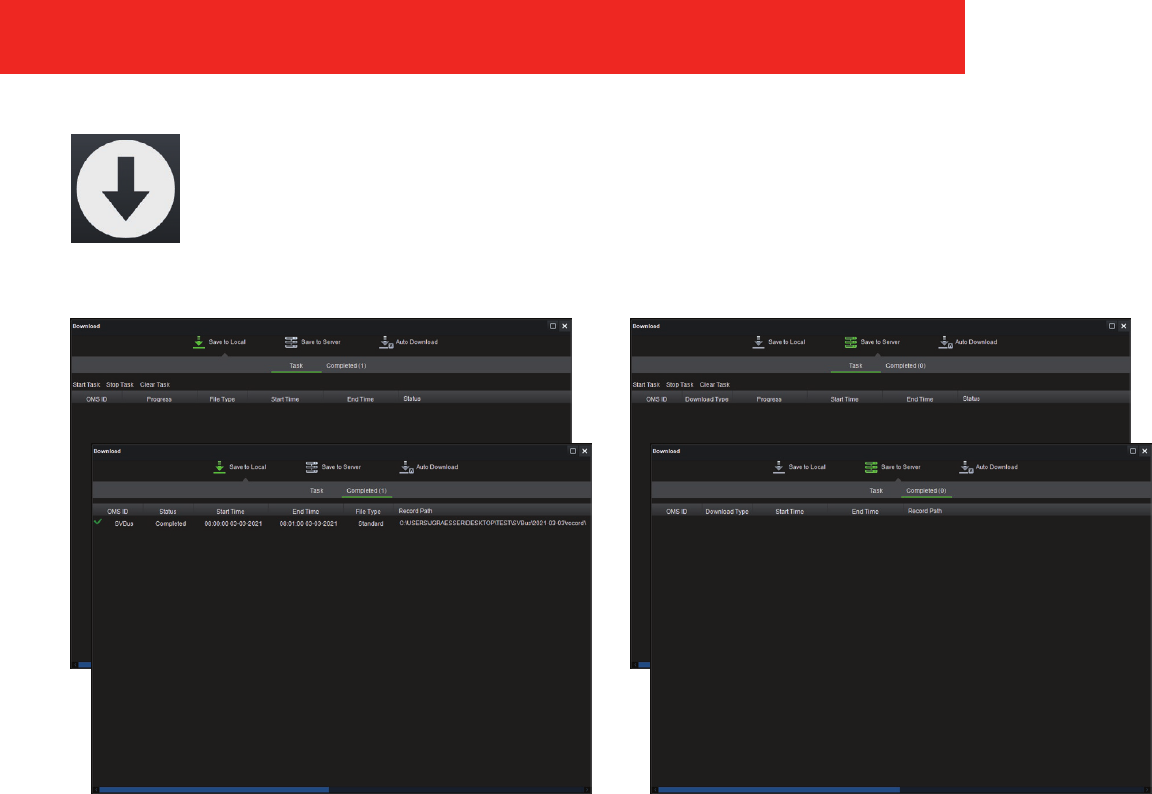
Download Center
Click the Download Center icon to enter the Download Center. The download center is divided into Save to
Local, Save to Server, and Auto Download. Both the Task and Completed tabs are for monitoring the status of the
creation of a clip.
NOTE: Save to Local only allows the download of one record at a time.
FORESIGHT PRO USER GUIDE
38
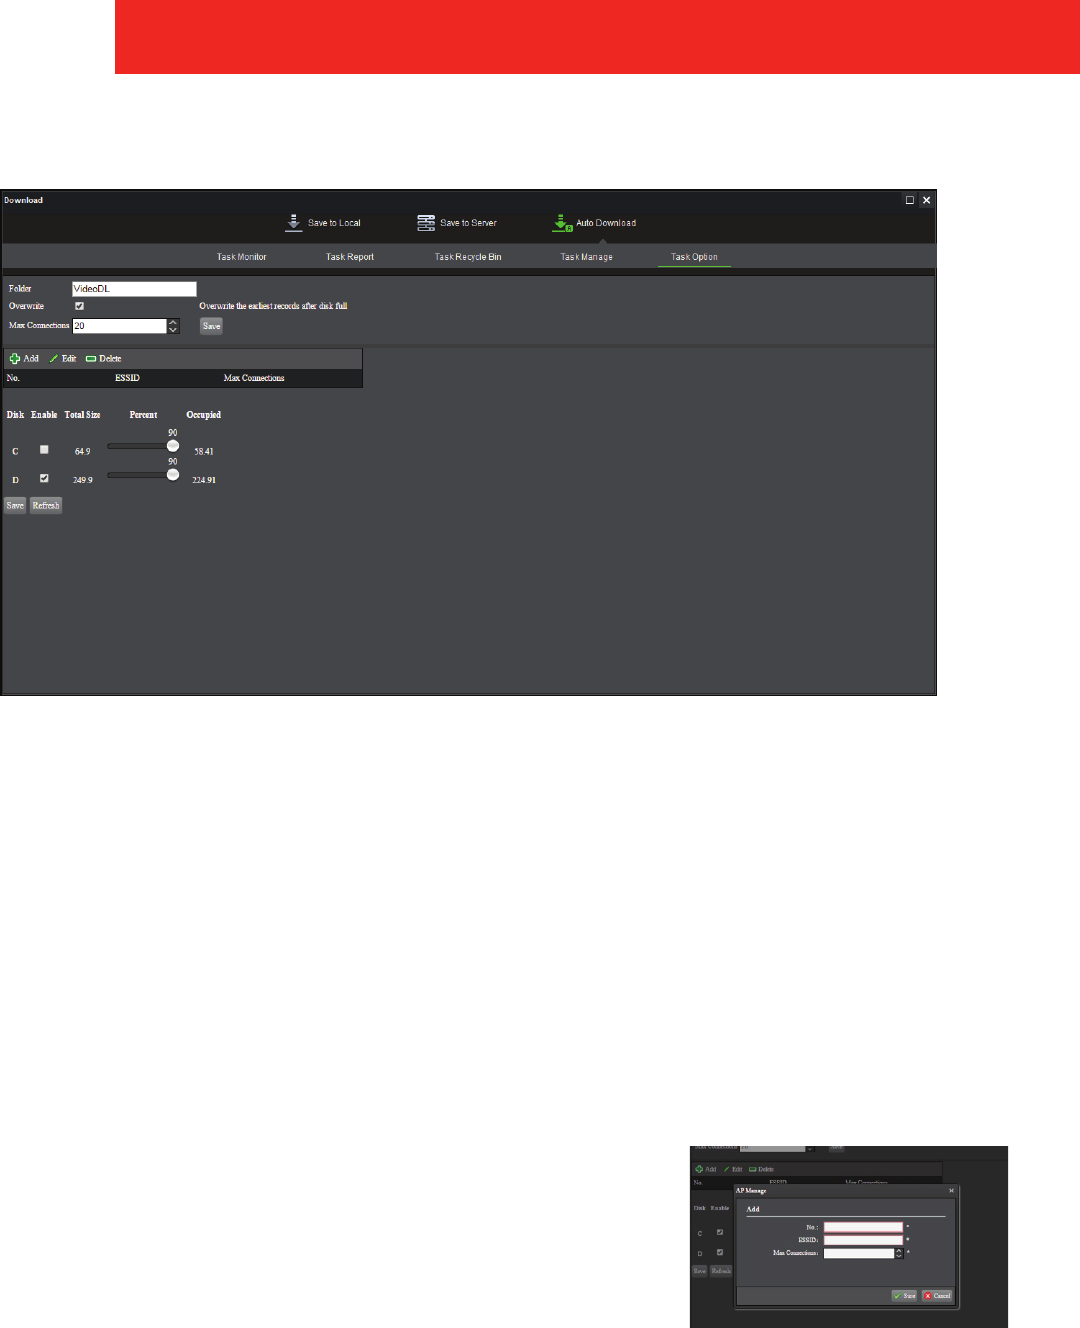
Automatic Download
Click Auto Download on the interface to enter the automatic download page. By default, it will enter the Task Monitor page. Click
Task Option to access the conguration options.
• Folder: Path for saving the downloaded le (default is VideoDL), which can be changed manually.
• Overwrite: If the disk to be congured is full, the earliest records will be overwritten. If Overwrite is not checked, the oldest
records will not be overwritten after the disk is full, but there is no space left to download other les. It is recommended to
check Overwrite.
• Max connections: The number of devices for downloading at the same time. Manual download is not restricted.
Click Save to save the changes.
Additionally, you can add/edit/delete dierent WiFi signal names that the server will accept at certain max connections (only
functions if the recorder is a WiFi client and no external router is used).
• Add: Click Add to open the AP manage window. Fill in the required information
and click Sure to add the AP.
• Edit: Click Edit to edit the selected an AP’s information.
• Delete: Click Delete to delete the selected AP.
• Disk configuration: After a disk is selected, the downloaded file will be saved on
the disk; the percentage can be adjusted.
◦ For example: if the total capacity of a disk is 100GB, after adjusted to 50%, there will be 50GB space for download
Resetting the disk will clear the previously congured data. Click Save to save your changes.
39
FORESIGHT PRO USER GUIDE

About Automatic Download
• Download priority
Between multiple devices: According to the connections limit, the recorder that is connected first will download first and so
on in the order that they were connected. When the number of connections exceeds the limit, it is in a wait state.
NOTE: The connections limit can be configured in the configuration interface.
Single device: Download according to task type priority (from largest to smallest). For tasks with the same priority, those with
earliest start time are downloaded rst. If tasks have the same start time, those with earliest end time are downloaded rst. If
tasks have both the same start and end time, those with earliest task ID are downloaded rst).
◦ Manual task
◦ Single task
◦ Daily task / weekly task / monthly task (these have the same priority)
• Task start and end time clip rules
If the task start time and end time are set during the start and end time of video file, the video file within the task time is
taken.
Example
The start and end time of a task is 8:01:00-8:02:00, if the start and end time of the video file is 8:00:00-8:03:00, the data during the
period of 8:01:00- 8:02:00 is taken.
• Server le storage
◦ Server video file directory storage structure: drive letter: \ user-dened directory \ license plate \ date \ Record \ video
le.
◦ Overwrite strategy: Each time the software runs, it automatically identies which disks are available on the server
and then lists them for user selection. Users can congure the disk usage as needed, and then dene the directory by
themselves. This will automatically generate the video le storage structure. When user conguration is completed, the
video les can be downloaded normally.
Example
The server has C, D, E drives and the user only selects the C and D drives. At this time, there are only two drives available. First, the
video files are saved in C drive. After the specified usage is reached, it is automatically switched to D drive.
• Situations where videos are not downloaded
◦ After selecting a drive, when the congured usage is less than 500MB
◦ There is no drive available to save the videos
◦ If Auto Overwrite is not selected and either of the following occur
▪ Available space is less than 1GB.
▪ Available space is greater than or equal to the drive usage minus 1GB, after videos are saved to the drive.
• Conditions for automatic deletion
1. When the size of videos saved in a drive is greater than the congured usage subtracting 1GB, deletion is started.
Example
For a 100GB drive letter, the usage is 50%, when 49GB has been used, video files will not be saved to it.
FORESIGHT PRO USER GUIDE
40

2. When the remaining space for storage of videos is less than the drive usage, that is when the remaining space is less
than 1G, deletion is started.
Example
For a 100GB drive, the usage is 50%, but there are 60GB of other files saved in the drive. At this time, only when the remaining
space is less than 1GB, deletion is started.
3. When deleting, rst search for the earliest video le directory from the drives that allow storage, and then start
deletion. When the remaining space does not meet the conditions for deletion after video les are deleted, deletion is
stopped.
Example
C drive is configured, the D drive size is 100GB and usage is 50GB. When the C drive space is insufficient, it will switch to the D
drive for video storage; when the D drive space is insufficient, deletion is started, and at this time, search for the earliest video
files in C drive. Delete the earliest video files. If the available space of the C and D drives is still insufficient, continue to search
until there is one drive allowing storage, and then stop deleting.
• Disk usage
This refers to the space where the videos can be stored.
Example
If the usage of a 100GB hard drive is 50%, there will be 50GB space available for storage of videos.
• Why deletion is started when 1GB is subtracted from the disk usage?
The reason why 1GB needs to be subtracted from the usage is that the delete thread is only started when the usage is
congured to be 100%, then there is no space for saving video les at the time of deletion, so deletion will start when there is
still some space. At this point, it does not aect the saving of video les
• Earliest directory
The directory with the earliest time found according to the date in the path is dened as the earliest directory. If the time of
le directory of all videos is the same, then nd the newly created directory to dene it as the earliest directory. At this time,
the directory and all video les in this directory will be deleted. If the deletion fails, mark the directory and then search for
other earlier directories.
• Task status description
(About Automatic Download cont.)
STATUS DESCRIPTION
Pause Task is in a pause
Connections limited At this time, the vehicles in downloading exceed the limited connections
In parsing Parse the video les to be downloaded according to task
Task not completed Task download completed, but the end time is greater than the current system time
Insucient disk space The disk for videos storage has insucient space
Waiting Waiting for download of task
Analysis succeeded Analyzing the video les to be downloaded is completed
Downloading Downloading the video les corresponding to the task
No video les
The number of video les parsed according to the task is 0 (there is no video le that meets the
conditions)
Download succeeded Task download is completed and there is no video le that failed to be downloaded
Task failed There is an exception during task parsing (such as failure to access data, abnormal data, etc.)
Task deleted Task is deleted by user
Download failed Task download is completed and there are video les that failed to be downloaded
41
FORESIGHT PRO USER GUIDE
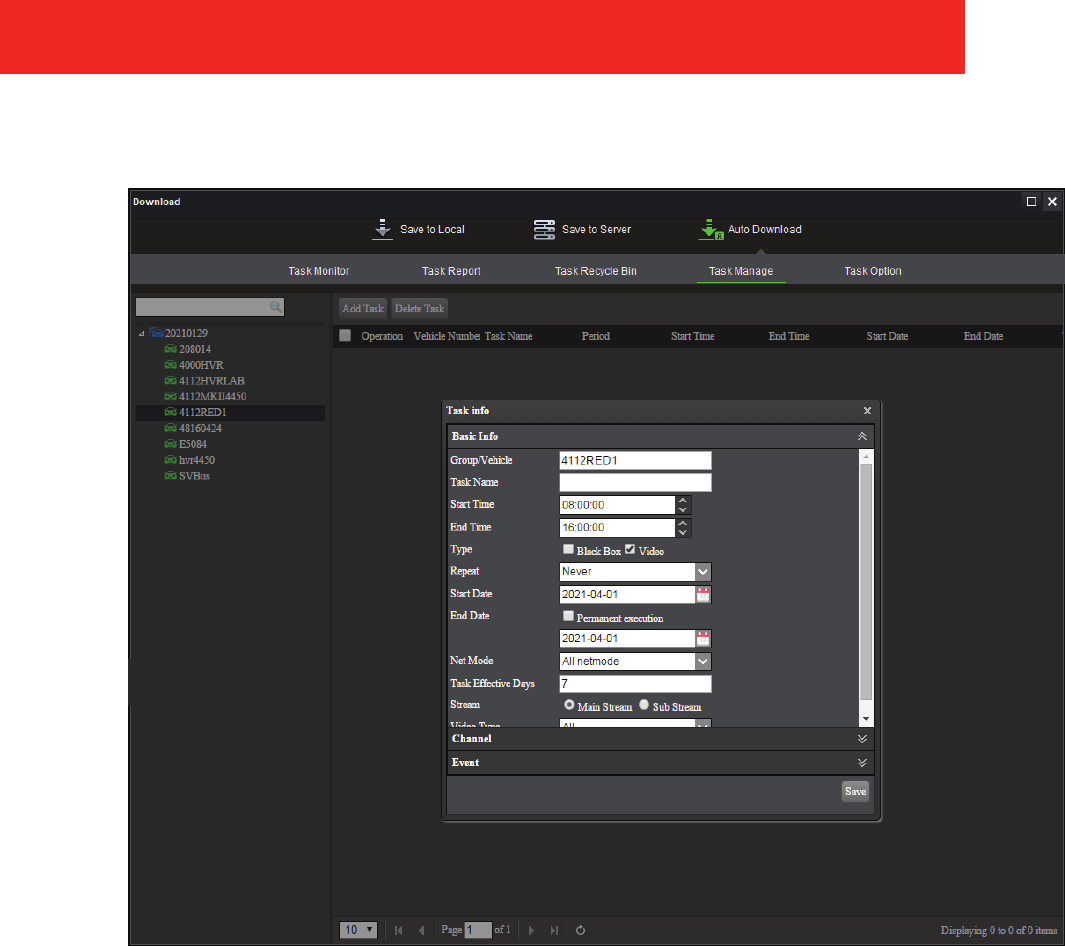
Task Manage
Click Task Manage in the menu bar to enter the Task Manage page. To add a task to a vehicle, first select a vehicle in the list on
the left of the screen and then click Add Task to bring up a dialog box. You can set the following properties to the task.
• Task Name: Input the name of the task.
• Start Time: Select a time for the task to start.
• End Time: Select a time for the task to end.
• Type: Select if the task should be applied to Black Box data, Video data, or check both boxes to apply to both.
• Repeat: Divided into Every Day, Weekly, and Monthly.
◦ Every Day: Daily tasks are executed every day during the specied times.
◦ Weekly: Weekly tasks are executed on the days selected during the specied times.
▪ If weekly is chosen, you will need to select the days at the bottom of the window.
◦ Monthly: Monthly tasks are executed on the days selected during the specied times.
▪ If monthly is chosen, you will need to select the specific dates at the bottom of the window (1-31 or Select All).
FORESIGHT PRO USER GUIDE
42
• Start Date: Select the date the task should begin.
• End Date: Select the last day the task should be run.
◦ Permanent execution: If checked, the task will be executed permanently except for single tasks otherwise the task will
be executed until the end date.
• Net Mode: Select the minimum network type required for the task to run.
◦ All netmode
◦ Wifi and LAN
◦ Wifi
◦ LAN
◦ 4G
• Task Effective Days: Enter how many days the task is eective for (default is 7).
• Stream: Select if the task should be applied to the Main Stream or Sub Stream.
• Video Type: Select if the task should be run on all video, normal video, or only on video that alarms are present.
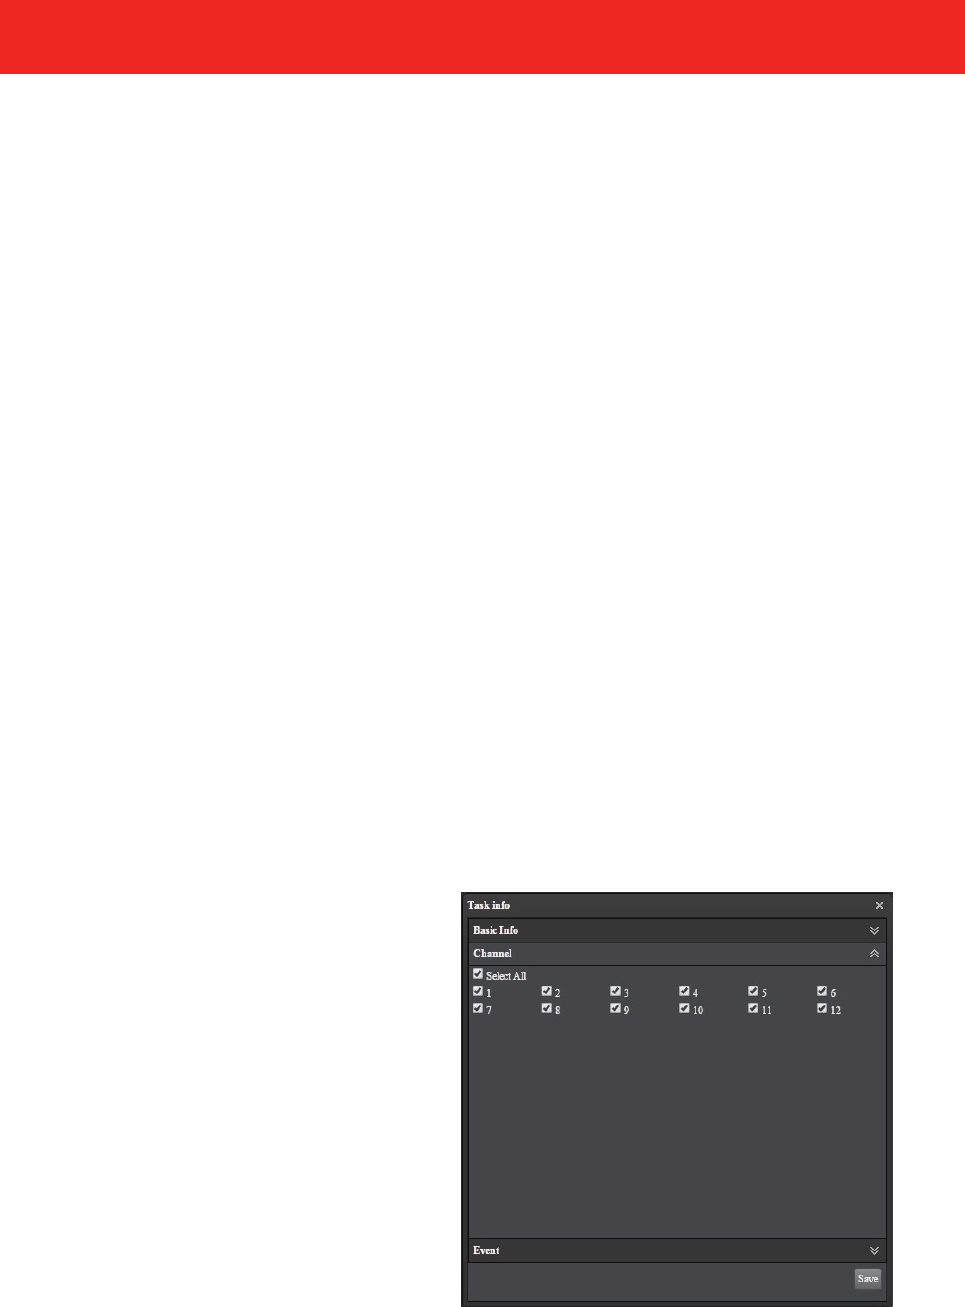
Click Channel to select which video channels should be downloaded.
Only download the videos of selected channels. The default is to
download the videos of all channels (Select All).
(Task Manage cont.)
43
FORESIGHT PRO USER GUIDE
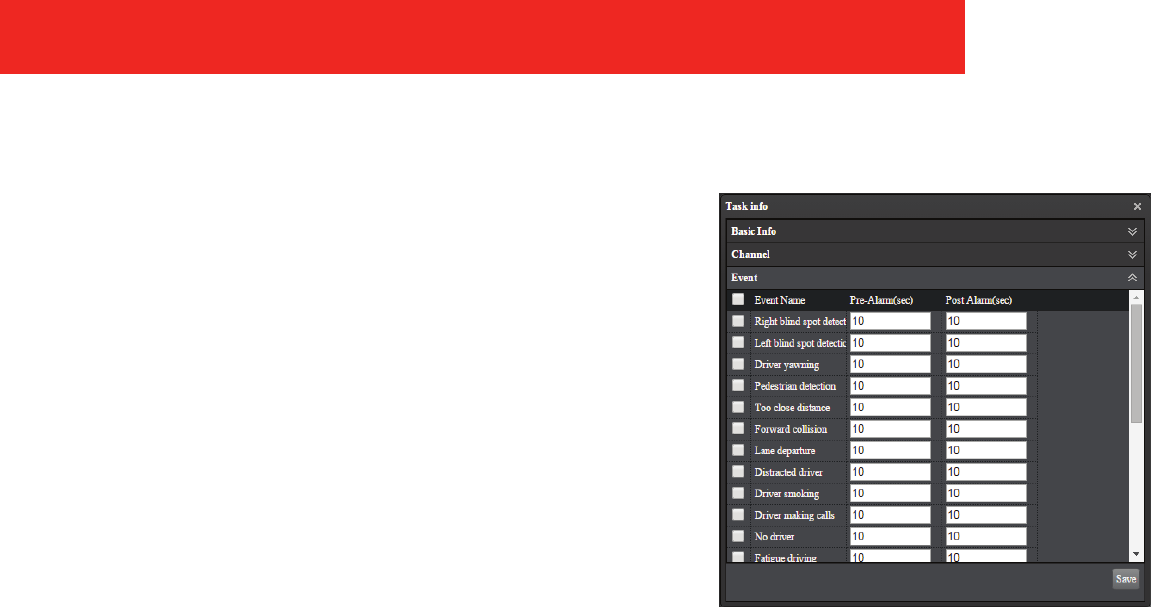
Click Event to select which video event triggers should be downloaded
and how long (in seconds) pre- and post (default is 10 seconds for for both
pre- and post event) event should be included in the download.
Click Save to save the task. The new task will now appear in the Task
Manage page. To the left of the new task are the following options:
• Copy: Click Copy in the task list to bring up a dialog box as follows,
and select the vehicles that needs task copy. If users select a eet,
tasks are copied to vehicles in the eet. Click Save to quickly copy
task to these vehicles.
• Delete: Select multiple tasks and then click Delete in the menu
bar or directly click the Delete button in the task list to bring up a
conrmation dialog box and choose OK or Cancel.
• Cascade Delete: Click Cascade Delete in the task list to bring up a
conrmation dialog box and pops up, choose OK or Cancel.
WARNING: Cascade Delete will remove ALL duplicated tasks.
(Task Manage cont.)
FORESIGHT PRO USER GUIDE
44

Task Monitor
After a task is added, users can view the download of the task on the Task Monitor interface.
• Pause: Click Pause in the task list to make the current task pause and put the task in a wait state.
• Start task: After the task pauses, click Start in front of the task to continue downloading the task.
• Delete task: Click Delete in the task list to bring up a conrmation dialog box and choose Delete or Cancel.
• High-speed download: During task downloading, the recorder stops recording during downloads .
• Low-speed download: During task downloading, the recorder still records video during downloads.
Task Report
To run a report query:
1. Click on a vehicle, or group of vehicles, on the left to query.
2. Select the Start Date and End Date.
3. Select the task status that will be included in the query (default is All Tasks).
◦ All Tasks
◦ Download Successful
◦ Failed Tasks
◦ Downloading
◦ No Download
4. Click Query to run the query and return any results.
45
FORESIGHT PRO USER GUIDE
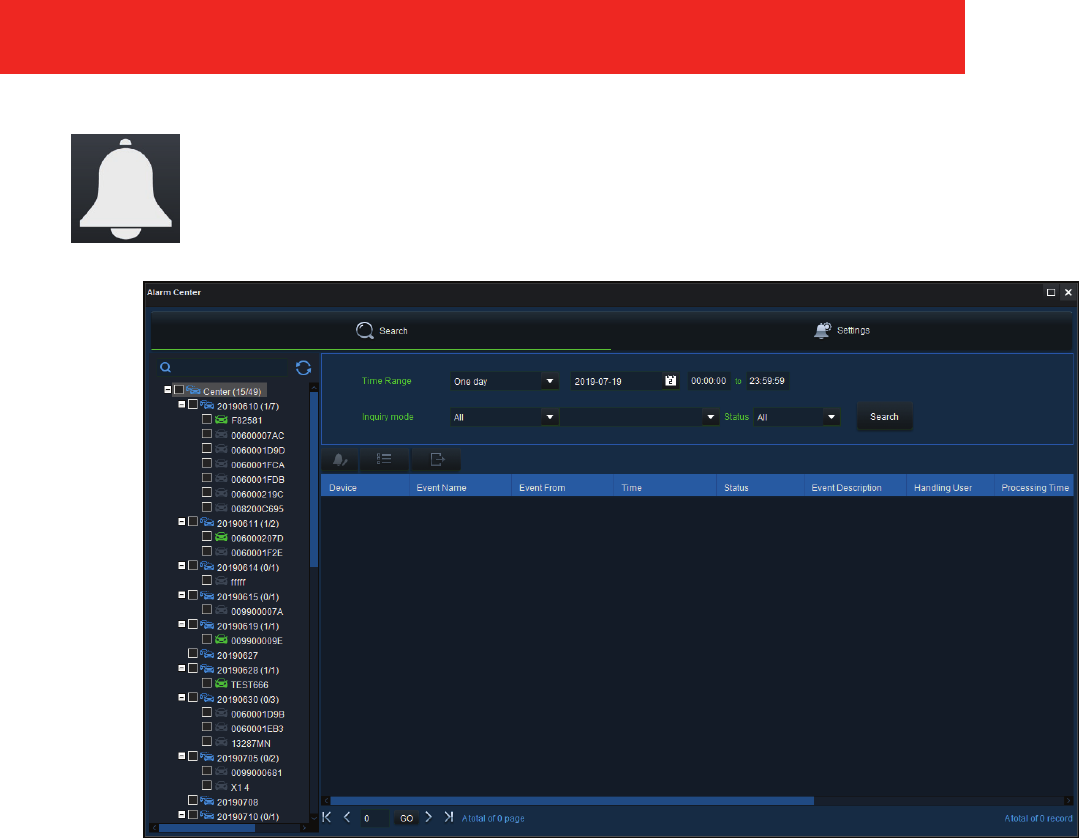
Alarm Search
Search History
Click on the Alarm Search icon enter the alarm center page.
FORESIGHT PRO USER GUIDE
46

Search Conditions
• Time range:
◦ One day
◦ 3 days
◦ 5 days
◦ 1 week
◦ 2 weeks
◦ 1 month
◦ All
◦ Custom
• Event name:
◦ All
◦ Video loss
◦ Motion detection
◦ Covered camera
◦ Storage exception
◦ IO1\IO2\IO3\IO4\IO5\IO6\IO7\IO8 emergency alarm
◦ Low speed
◦ High speed
◦ Low voltage
◦ Acceleration
◦ Electronic fence
◦ Illegal power o
◦ Illegal shutdown
• Event status:
◦ All
◦ Processed
◦ Unprocessed
• Event handle:
◦ Handle
◦ Batch handle
◦ Export alarm
47
FORESIGHT PRO USER GUIDE
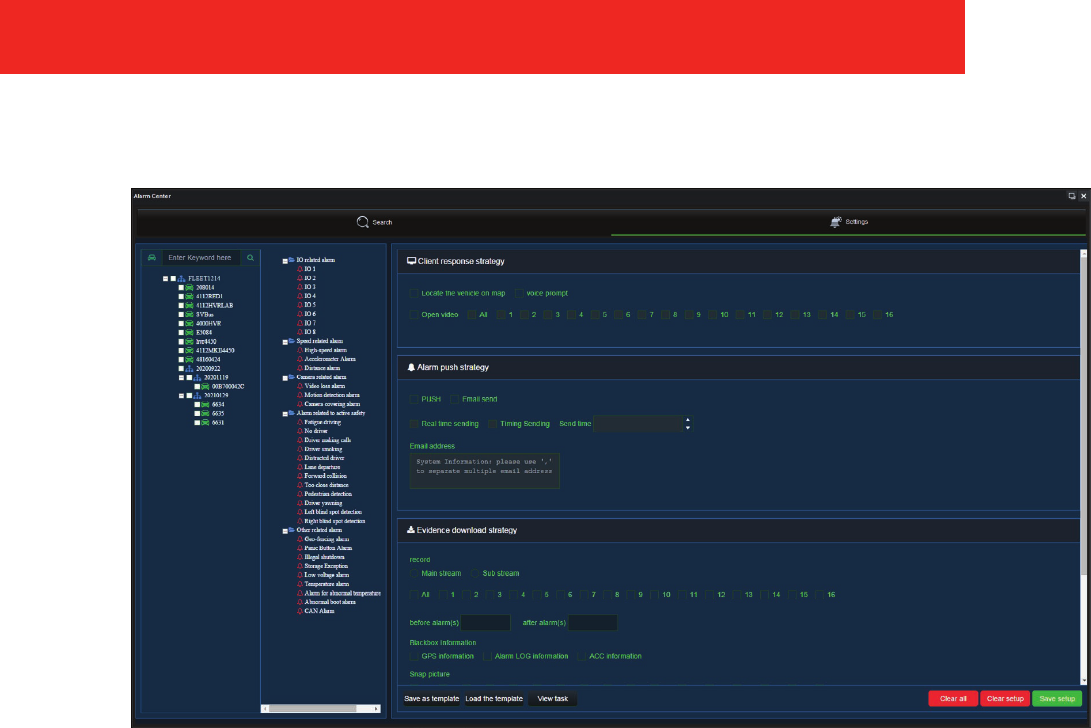
Alarm Configuration
• Locate the vehicle on map: when an alarm occurs, the vehicle is automatically located on the map
• Voice prompt: When an alarm occurs, the alarm sounds
• Open video: Choose to open all channels or select which channels to openspecied channels Opens all channels
• Server processing mode: Administrator only permission, this function is blocked for all other roles
• PUSH: When a vehicle alarm occurs, the an alarm message is pushed to the mobile app
After adding the alarm handling strategy, when the device generates the selected type of alarm, it will locate the vehicle on map
or give a voice prompt or open the video according to the strategy.
Alarm Email
Select alarm type, associated eet, send method (real-time sending and timed sending), send time, and email address.
Click Save Setup to save changes.
FORESIGHT PRO USER GUIDE
48
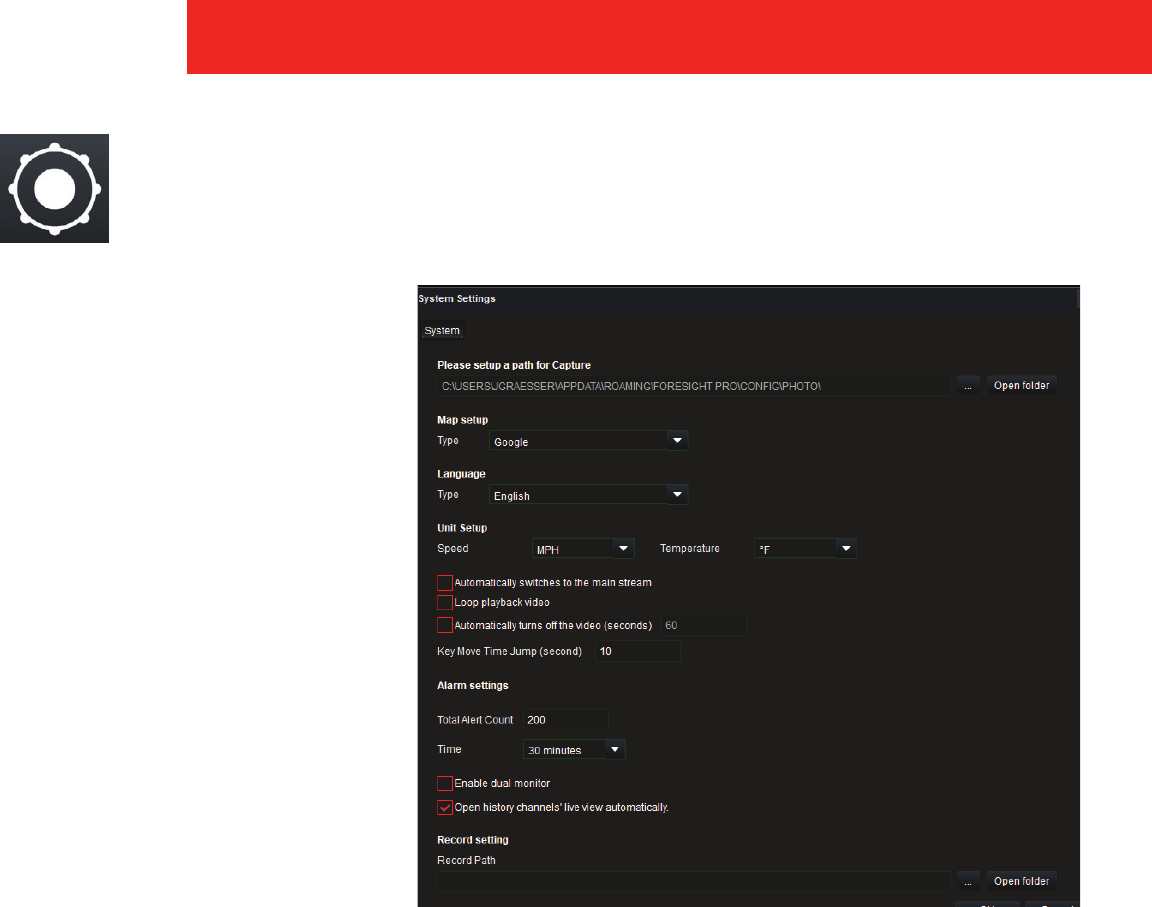
System Settings - Server
Click the Settings icon in the upper right corner and click Server Settings to enter the system settings interface,
where users can set the path to save snap shots, select a map, set language and unit, and set the path to save
recordings.
• Path for snapshot capture: Click the ...
to navigate to the folder that still images
taken using the Snapshot feature are
saved (default is ...\APPDATA\ROAMING\
FORESIGHT PRO\CONFIG\PHOTO\)
• Map setup: Select the source of mapping
information during video playback,
Google (default) or OSMap.
• Speed: Select the units vehicle speed
is displayed in, Miles per hour (MPH)
(default) or Kilometers per hour (KM/H).
• Temperature: Select the units
temperature is displayed in, Fahrenheit
(°F) (default) or .Celsius (°C)
• Automatically switches to the
main stream: Select this option to
automatically switch to the main stream
when available when viewing video
recorded with dual streams.
NOTE: Take into account network
bandwidth and SIM card data when selecting this option.
• Loop playback video: Selecting this box will allow the video to loop. When playback of a video ends, it will automatically
jump to the start point.
◦ The preview video is saved in a folder in C drive by default, and other path can be selected according to the hard drive
capacity of the computer;
◦ Other settings can be made according to actual needs, and if there is no special requirement, choose default settings.
• Key Move Time Jump (seconds): How far, forward or backward, video will be moved pressing the right or left arrow key while
watching video.
• Total Alert Count: Enter the number of past alarms that are displayed in the main window (default is 200).
• Time: Enter the oldest alarm time that is displayed in the main window (default is 30 minutes).
• Enable dual monitor: Allows the Live View interface to be displayed on dual monitors. The camera views will be displayed on
one monitor and the map will be displayed on the other.
NOTE: When selecting this option, Forsight Pro will automatically restart.
• Open history channels’ live view automatically: Open history channel live view.
• Record Path: Click the ... to navigate to the folder that recordings are saved.
49
FORESIGHT PRO USER GUIDE
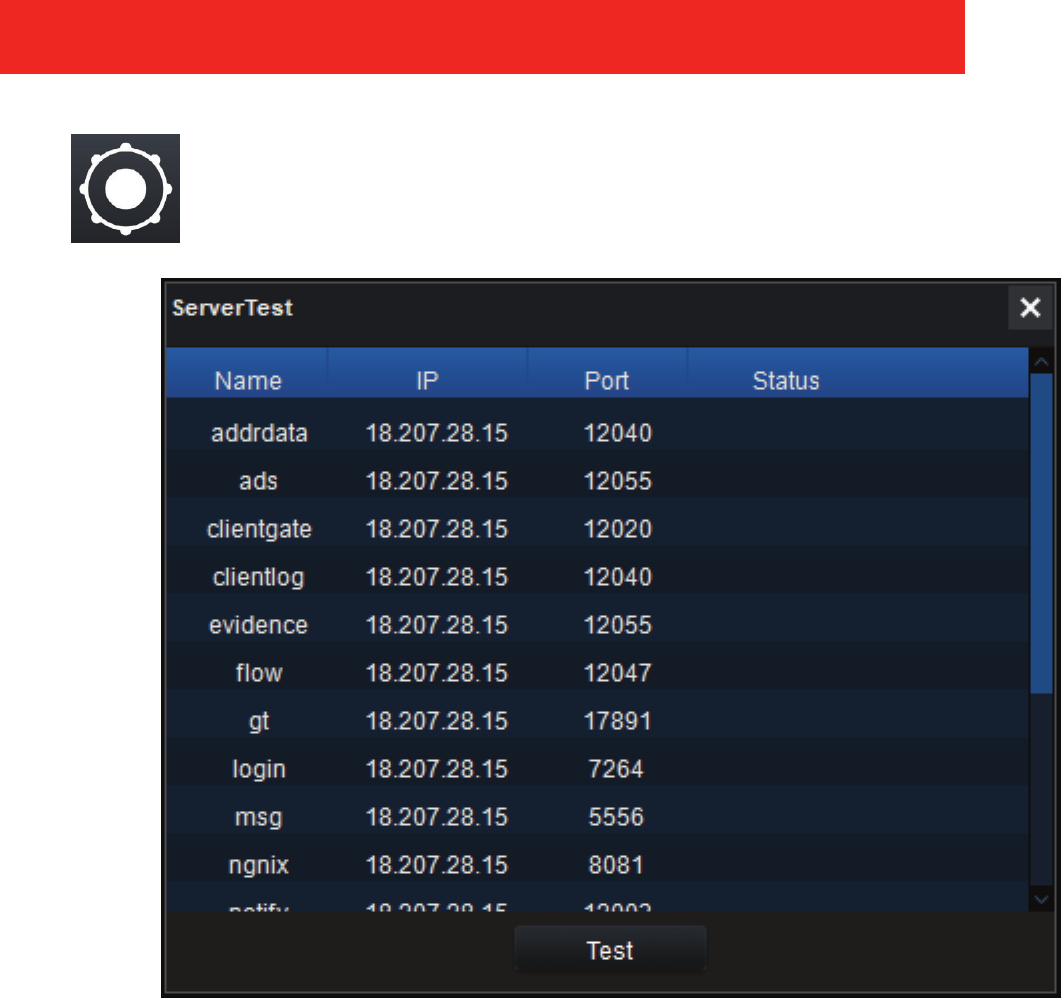
Server Test
Click the System Settings icon in the upper right corner, then click Server Test to open the Server Test window,
where users can click Test to view the server connection.
FORESIGHT PRO USER GUIDE
50
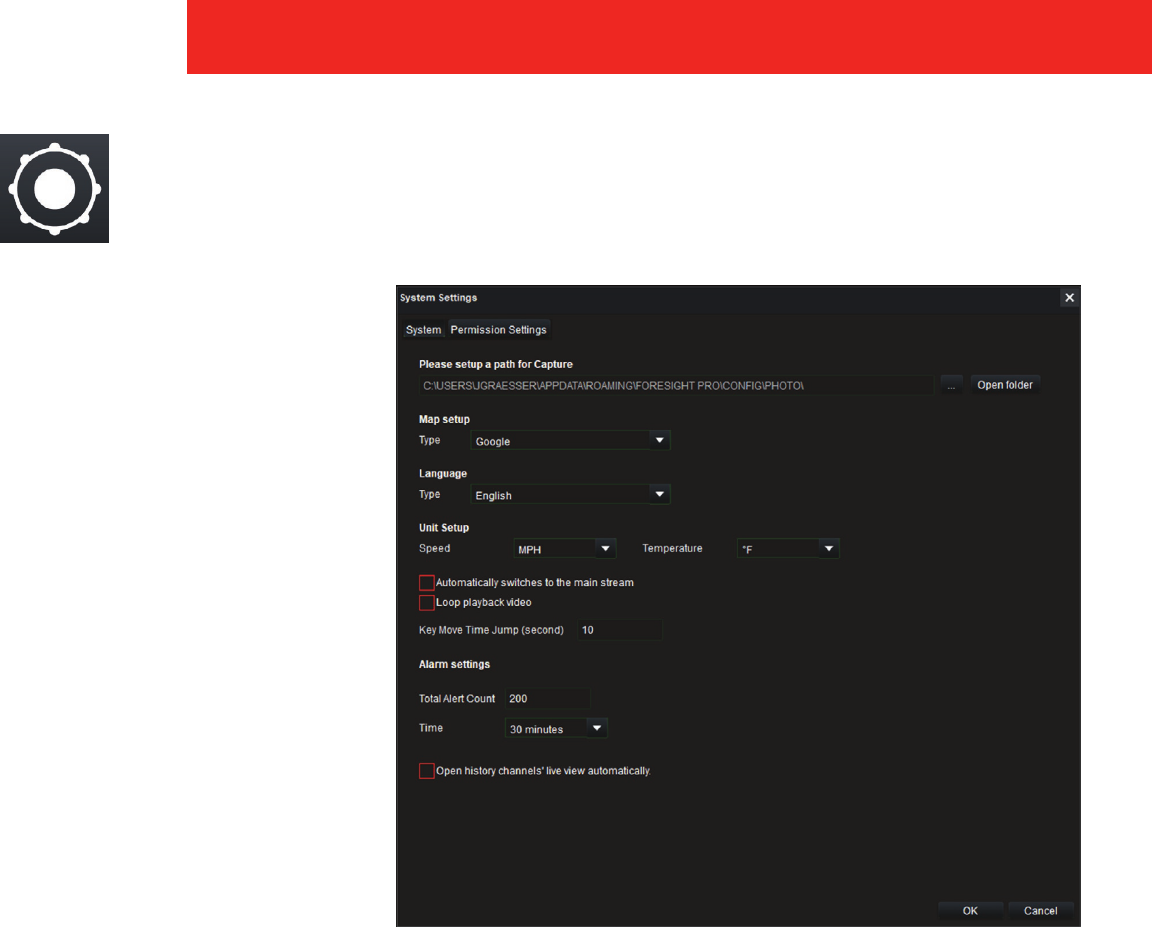
System Settings - Local
Click the Settings icon in the upper right corner and click Server Settings to enter the system settings interface,
where users can set the path to save snap shots, select a map, set language and unit, and set the path to save
recordings.
• Path for picture capture: Click the
... to navigate to the folder that still
images taken using the Snapshot
feature are saved (default is ...\APPDATA\
ROAMING\FORESIGHT PRO\CONFIG\
PHOTO\)
• Map setup: Select the source of
mapping information during video
playback, Google (default) or OSMap.
• Speed: Select the units vehicle speed
is displayed in, Miles per hour (MPH)
(default) or Kilometers per hour (KM/H).
• Temperature: Select the units
temperature is displayed in, Fahrenheit
(°F) (default) or .Celsius (°C)
• Automatically switches to the
main stream: Select this option to
automatically switch to the main
stream when available when viewing
video recorded with dual streams.
NOTE: take into account network
bandwidth and SIM card data when
selecting this option.
• Loop playback video: Selecting this box will allow the video to loop. When playback of a video ends, it will automatically
jump to the start point.
◦ The preview video is saved in a folder in C drive by default, and other path can be selected according to the hard drive
capacity of the computer;
◦ Other settings can be made according to actual needs, and if there is no special requirement, choose default settings.
• Key Move Time Jump (seconds): How far, forward or backward, video will be moved pressing the right or left arrow key while
watching video.
• Total Alert Count: Enter the number of past alarms that are displayed in the main window (default is 200).
• Time: Enter the oldest alarm time that is displayed in the main window (default is 30 minutes).
• Open history channels’ live view automatically: Open history channel live view.
51
FORESIGHT PRO USER GUIDE
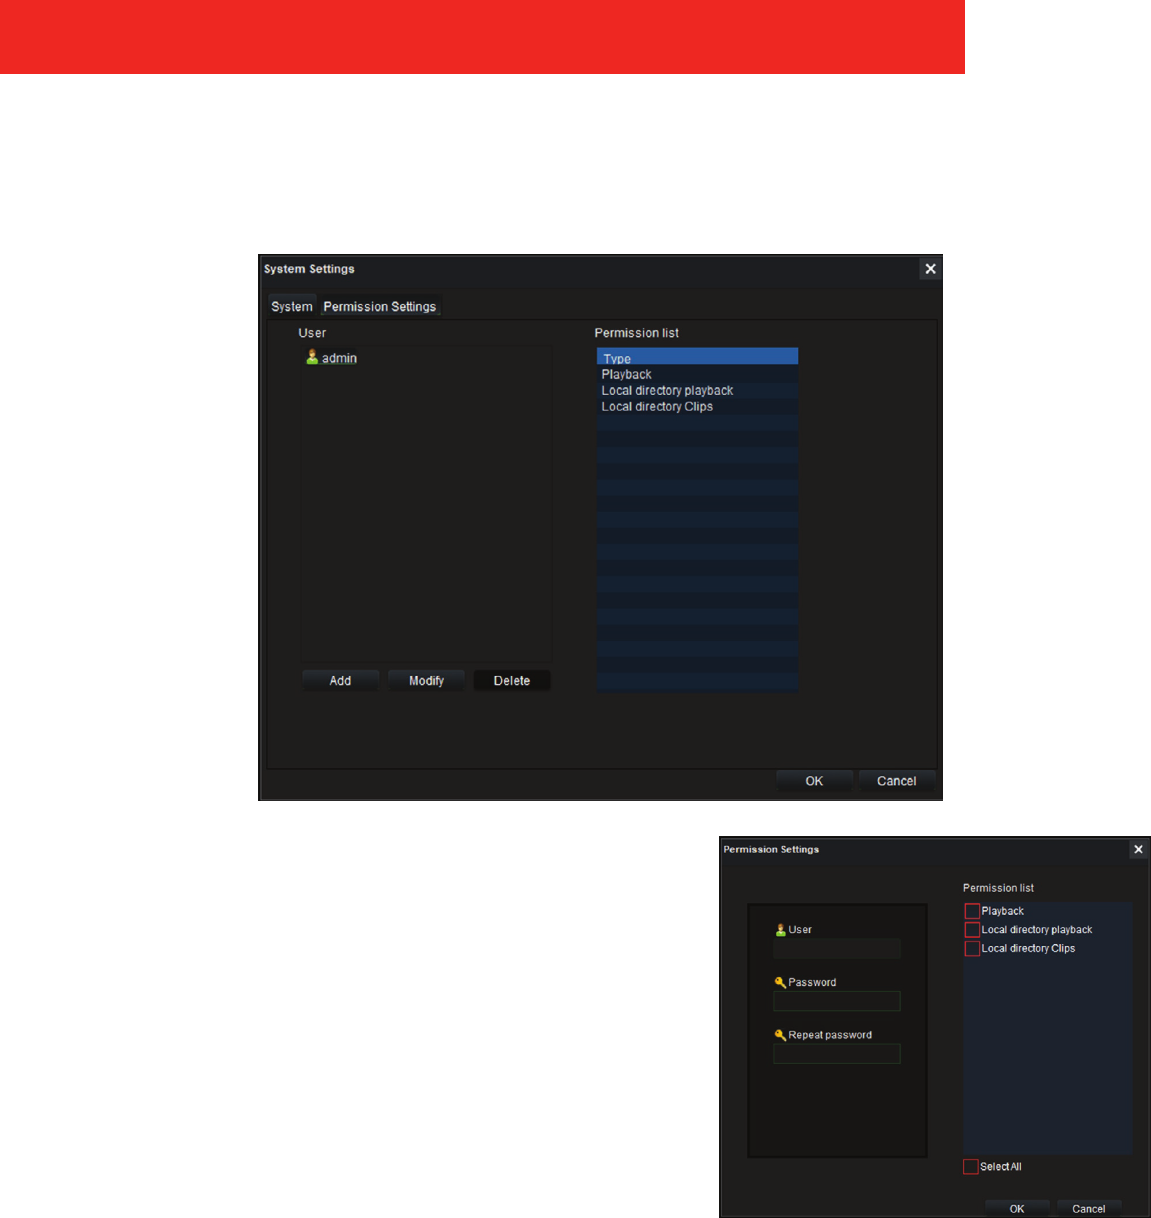
• Add: Click Add to add a user, the user’s password and select what
permissions the user has available when they log in.
NOTE: The first time a new login is used, it must be manually typed into
User field on the login screen when Local is selected.
• Modify: Click Modify to add or remove permissions or change the
user’s password.
• Delete: This will delete the selected user. The Admin user entery can
not be deleted.
Permission Settings - Local
Click Permission Settings in the upper left side of the System Settings interface. This is where an administrator can add, modify or
delete user login’s and assign permissions to each user login role.
FORESIGHT PRO USER GUIDE
52
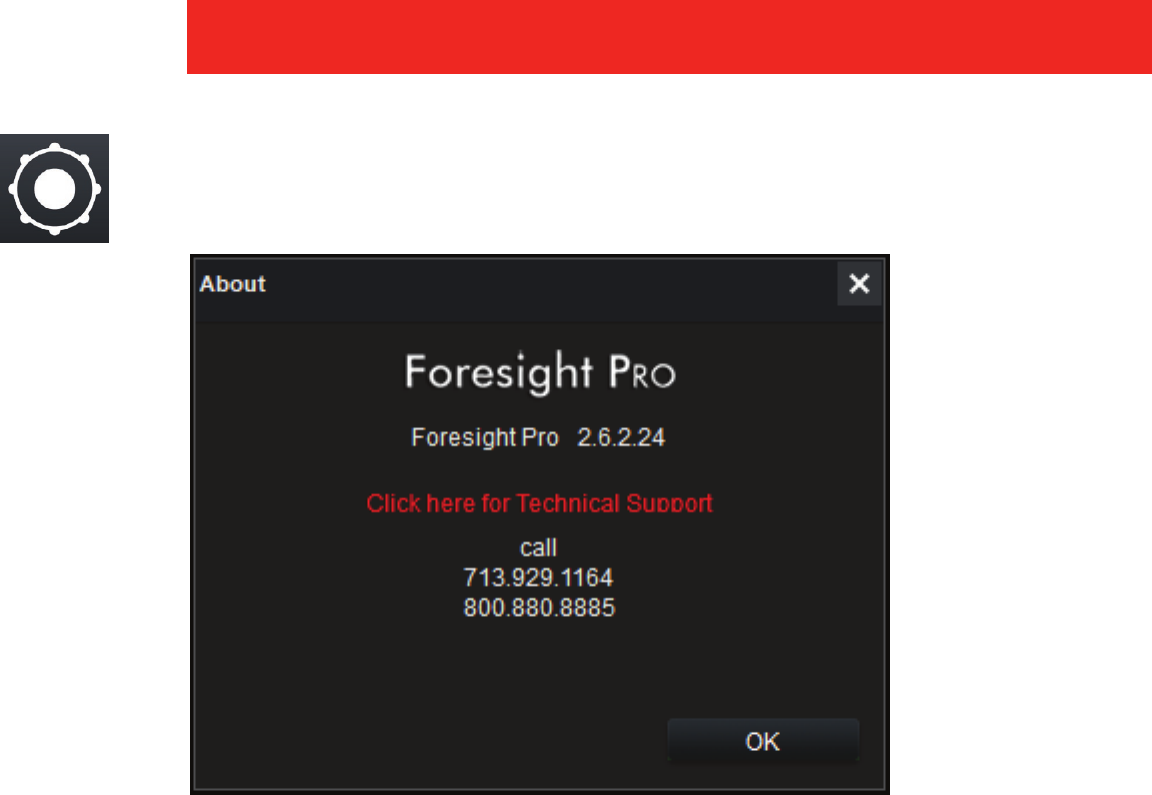
About
Click the Settings icon in the upper right corner, then click About , and bring up a dialog box, where users can
view the version information.
53
FORESIGHT PRO USER GUIDE

FORESIGHT PRO USER GUIDE
54
Software Licensing Agreement
Use of the Safety View software and other SAFETY VISION, LLC
software is subject to the accompanying software license terms.
Using the software indicates your acceptance of these license
terms. If you do not accept these license terms, you must return the
software to the manufacturer. If you do not accept these license
terms and the software is bundled with another product, you must
return the entire unused product to the manufacturer.
The following License Terms govern your use of the accompanying
Software unless you have a separate signed agreement with SAFETY
VISION, LLC.
License Grant. SAFETY VISION, LLC. grants you a license to Use
one copy of the Software. “Use” means storing, loading, installing,
executing or displaying the Software. You may not modify the
Software or disable any licensing or control features of the Software.
If the Software is licensed for “concurrent use,” you may not allow
more than the maximum number of authorized users to Use the
Software concurrently.
Ownership. The Software is owned and copyrighted by SAFETY
VISION, LLC. Your license confers no title to, or ownership in, the
Software and is not a sale of any rights in the Software.
Copies and Adaptations. You may make copies or adaptations of the
Software only for archival purposes or when copying or adaptation
is an essential step in the authorized Use of the Software. You must
reproduce all copyright notices in the original Software on all copies
or adaptations. You may not copy the Software onto any public
network.
No Disassembly or Decryption. You may not disassemble or
decompile the Software unless SAFETY VISION, LLC’s prior written
consent is obtained. In some jurisdictions, SAFETY VISION,
LLC’s consent may not be required for limited disassembly or
decompilation. Upon request, you will provide SAFETY VISION, LLC
with reasonably detailed information regarding any disassembly or
decompilation. You may not decrypt the Software unless decryption
is a necessary part of the operation of the Software.
Transfer. Your license will automatically terminate upon any transfer
of the Software. Upon transfer, you must deliver the Software,
including any copies and related documentation, to the transferee.
The transferee must accept these License Terms as a condition to the
transfer.
Termination. SAFETY VISION, LLC may terminate your license upon
notice for failure to comply with any of these License Terms. Upon
termination, you must immediately destroy the Software, together
with all copies, adaptations and merged portions in any form.
Export Requirements. You may not export or re-export the Software
or any copy or adaptation in violation of any applicable laws or
regulations.
U.S. Government Restricted Rights. The Software and
Documentation have been developed entirely at private expense.
They are delivered and licensed as “commercial computer software”
as defined in DFARS 252.227-7013 (Oct 1988), DFARS 252.211-7015
(May 1991) or DFARS 252.227-7014 (Jun 1995), as a “commercial item”
as defined in FAR 2.101(a), or as “Restricted computer software”
as defined in FAR 52.227-19 (Jun 1987) (or any equivalent agency
regulation or contract clause), whichever is applicable. You have only
those rights provided for such Software and Documentation by the
applicable FAR or DFARS clause or the SAFETY VISION, LLC standard
software agreement for the product involved.
Use of the Safety Vision Player and other SAFETY VISION, LLC
software is subject to the accompanying software license terms.
Using the software indicates your acceptance of these license
terms. If you do not accept these license terms, you must return the
software to the manufacturer. If you do not accept these license
terms and the software is bundled with another product, you must
return the entire unused product to the manufacturer.
The following License Terms govern your use of the accompanying
Software unless you have a separate signed agreement with SAFETY
VISION, LLC.
License Grant. SAFETY VISION, LLC grants you a license to Use one
copy of the Software. “Use” means storing, loading, installing,
executing or displaying the Software. You may not modify the
Software or disable any licensing or control features of the Software.
If the Software is licensed for “concurrent use,” you may not allow
more than the maximum number of authorized users to Use the
Software concurrently.
Ownership. The Software is owned and copyrighted by SAFETY
VISION, LLC. Your license confers no title to, or ownership in, the
Software and is not a sale of any rights in the Software.
Copies and Adaptations. You may make copies or adaptations of the
Software only for archival purposes or when copying or adaptation
is an essential step in the authorized Use of the Software. You must
reproduce all copyright notices in the original Software on all copies
or adaptations. You may not copy the Software onto any public
network.
No Disassembly or Decryption. You may not disassemble or
decompile the Software unless SAFETY VISION, LLC’s prior written
consent is obtained. In some jurisdictions, SAFETY VISION,
LLC’s consent may not be required for limited disassembly or
decompilation. Upon request, you will provide SAFETY VISION, LLC
with reasonably detailed information regarding any disassembly or
decompilation. You may not decrypt the Software unless decryption
is a necessary part of the operation of the Software.
Transfer. Your license will automatically terminate upon any transfer
of the Software. Upon transfer, you must deliver the Software,
including any copies and related documentation, to the transferee.
The transferee must accept these License Terms as a condition to the
transfer.
Termination. SAFETY VISION, LLC may terminate your license upon
notice for failure to comply with any of these License Terms. Upon
termination, you must immediately destroy the Software, together
with all copies, adaptations and merged portions in any form.
Export Requirements. You may not export or re-export the Software
or any copy or adaptation in violation of any applicable laws or
regulations.
U.S. Government Restricted Rights. The Software and
Documentation have been developed entirely at private expense.
They are delivered and licensed as “commercial computer software”
as defined in DFARS 252.227-7013 (Oct 1988), DFARS 252.211-7015
(May 1991) or DFARS 252.227-7014 (Jun 1995), as a “commercial item”
as defined in FAR 2.101(a), or as “Restricted computer software”
as defined in FAR 52.227-19 (Jun 1987) (or any equivalent agency
regulation or contract clause), whichever is applicable. You have only
those rights provided for such Software and Documentation by the
applicable FAR or DFARS clause or the SAFETY VISION, LLC standard
software agreement for the product involved.

Copyright © 2021 Safety Vision, LLC All Rights Reserved.
CORPORATE HEADQUARTERS
6100 W. Sam Houston Pkwy. N.
Houston, TX 77041-5113
Main: 713.896.6600
Toll Free: 800.880.8855
Fax: 713.896.6640
www.safetyvision.com
