Battery Replacement and Maintenance – tricks and tips
Thanks to Adrian Hearne (Adrian996) for initiating this DIY and his excellent tips, which I have
incorporated here. I have also extracted information from the workshop manual, courtesy of
Porsche AG. A popular battery choice is the Bosch Silver 7HN (75AH) battery, available from
Euro Car Parts or Costco for around £75. The new Bosch Silver S5 010 85Ah is also a direct
replacement.
Safety Notes:
• All loads must be switched off beforehand!
• Never disconnect battery with engine running!
• Never start engine without securely connected battery!
• The battery terminal clamps should only be attached without force to prevent damage
to the battery housing.
• Battery terminals should not be greased.
• Check that the battery is seated correctly after installation. Other dangers exist with a
loose battery such as: - Reduced service life due to vibration damage. - Damage to the
grid plates of the battery. - Damage to the battery housing through the retaining
bracket (possible acid leak, high subsequent costs). - Inadequate crash safety.
Replacing the Battery
Before you start, if you have a radio prior to the CR-23, make sure you have the radio
code. After reconnection of the battery you will need to re-enter the code. The CR-23 has a
different security system (matched to the car’s ECU) and does not need a code. If you happen
to lose the code for any reason, I have a Becker Radio Decoder, which calculates the code
from the last 4 digits of the serial number. It works in 95% of cases, otherwise it will be an
expensive trip to your OPC.
All UK C16 specification cars are fitted with a tilt sensor and alarm siren – M536 option code.
The alarm siren has a backup battery inside it, and will sense a disconnected battery and will
cause the siren to sound. It is ear-splitting, so you want to avoid this happening! In order to
avoid triggering the alarm siren (installed on right next to the battery) of vehicles with M 536,
the battery must be disconnected with the ignition switched on!
Torque wrench settings are shown in the instructions, but to be honest they aren’t really
necessary IMHO. If you have reasonable car DIY experience, you will know how tight they
need to be by feel.
Removal:
1. Switch ignition on, but do not start the car. Leave the key in this position throughout the
process.
2. Operate luggage compartment release and switch off the air conditioning, radio, and any
other loads.
3. Just to be safe, leave the door open, or make sure
you have a spare key handy. Get out and open the
luggage compartment.
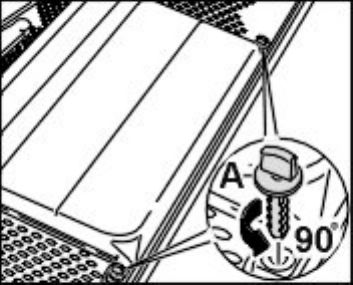
4. Open turn-lock fasteners -A- .
5. Remove battery cover.
6. First disconnect the ground strap of the battery on the
negative battery terminal. Unscrew hexagon nut and
remove terminal. You will need a 10mm open-ended or
ring spanner.
7. Undo hexagon nut on the positive battery terminal
and remove terminal.
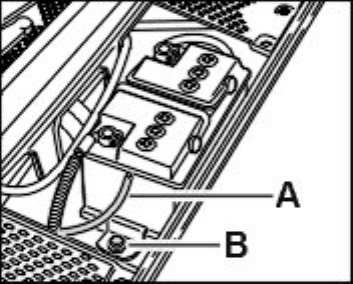
8. Pull off venting hose -A- and fix in a suitable position
with insulating tape.
9. Unscrew fastening screw -B- . You will need a socket
and extension for this.
10. Remove battery.
11. Clean battery platform
Replacement:
1. Insert battery.
2. Screw in fastening screw -B- , position battery and
tighten the fastening screw. Tightening torque: 23 Nm
(17 ftlb.)
3. Push on venting hose -A- .
4. First connect the positive cable then the negative - otherwise there is a danger of a short-
circuit! Tightening torque: 5 Nm (4 ftlb.). When you connect the negative terminal, systems
will spring into life!
5. Put on the battery cover and lock with the turn-lock fasteners.
6 Switch off ignition, or go for a spin!
Checking Acid Level
CAUTION:
• The accident prevention regulations must be observed when handling battery acids.
• Wear suitable protective clothing and protective glasses.
• Only illuminate the inside of the battery with a torch.
• Never illuminate the inside of the battery with a naked flame.
• Do not handle a naked flame or burning cigarettes near to batteries.
• Observe the disposal regulations for batteries when disposing of batteries and sulphuric
acids.
Note
Use commercially available battery filling bottle.
The correct acid level of the battery is an important factor for long and efficient operation of
the battery. When the acid level is too low, a capacity loss (performance loss) of the battery
occurs which is caused by the cell plates drying out. If the cell plates are not surrounded by
electrolyte (battery acid), it will lead to corrosion of the lead plates, the plate bridges and the
cell connectors. The result of the corrosion is that the function of the battery cannot be
guaranteed. The battery will become useless. If the acid level is too high, damage can occur
by the battery acid leaking out (sulphuric acid water mixture) outside the battery.
1. Switch ignition off and remove ignition key.
2. Remove battery cover.
3. Unscrew plugs of the battery.
4. Illuminate into the battery using a torch. The electrolyte level of the battery must be at the
protruding lug.
— If the acid level is too low, refill distilled water using the battery filling bottle.
5. Screw in plug of the battery again, ensure that it is seated correctly.
6. Remount battery cover.

Open-circuit voltage measurement
Note
Use a hand-held multimeter to measure the battery voltage.
1. Charge battery fully.
2. Switch ignition on and leave key in ignition as above.
3. Remove battery cover and disconnect ground strap on the battery.
4. Allow a waiting time of at least 2 hours during which the battery should be neither loaded
nor charged.
5. Measure the battery voltage with a hand-held multimeter.
— The battery open-circuit voltage should not fall below 12.5V.
— If the hand-held multimeter shows 12.5V or over, the battery voltage is OK.
— If the hand-held multimeter shows a battery voltage below 12.5V it may be reaching the
end of its life. Check the specific gravity to confirm, and/or have a load test done at a battery
supplier.
Checking the specific gravity of electrolyte
Read safety notes above.
Notes:
Use commercially available battery acid tester. The gravity of electrolyte test provides
information about the state of the battery in connection with a battery load test
The temperature of the battery acid must be at least 10°C .
The gravity of electrolyte must be checked in all battery cells as follows.
1. Switch ignition off and remove ignition key.
2. Unscrew all battery plugs (plugs of the battery cell).
3. Dip into the battery cell using the acid siphon or the pipette and take up the battery acid.
4. Read off the gravity of electrolyte in kg/dm³ on the scale of the battery acid tester and
compare with the following table.
Battery charging condition
in normal climatic zones
Spec. gravity
in kg/dm³
discharge 1.12
half charged 1.20
well charged 1.28
The gravity of electrolyte must be at least 1.24 kg/dm³.
— If the gravity of electrolyte is too low, charge battery.
— After charging the battery, repeat the gravity of electrolyte test.
The measured values for the specific gravity of electrolyte of the individual battery cells should
not deviate by more than 0.03 kg/dm ³ from each other.
Examples of non-permissible specific gravity of electrolyte deviations:
Battery cells: 1 2 3 4 5 6
Gravity of electrolyte per cell in kg/dm³
Example 1: 1.24 1.25 1.25 1.10 1.24 1.25
Example 2: 1.26 1.26 1.25 1.14 1.18 1.24
Example 1: The gravity of electrolyte in cell 4 is too low.
Example 2: The gravity of electrolyte in cells 4 and 5 is too low. The specific gravity of
electrolyte deviations between the battery cells is larger than 0.03 kg/dm³.
— If the nominal values are not achieved, replace battery.
— If the nominal values are achieved, screw the original plug back in.
