
Aras DevOps
User Guide
Document #: D-008576
Last Modified: 9/6/2023

2023 Aras Corporation All Copyrights Reserved. 2
Aras DevOps
User Guide
Copyright Information
Copyright © 2023 Aras Corporation. All Rights Reserved.
Aras Corporation
100 Brickstone Square
Suite 100
Andover, MA 01810
Phone: 978-806-9400
E-mail:
Support@aras.com
Website: https://www.aras.com
Notice of Rights
Copyright © 2023 by Aras Corporation and/or its affiliates. All rights reserved.
This document is protected by U.S. and international copyright laws and conventions. No copyright may be obscured or removed
from this document. This document may not be modified or altered, or reproduced or transmitted in any form, without the explicit
permission of the copyright holder.
Aras Innovator, Aras, and the Aras Corp "A" logo are registered trademarks of Aras Corporation in the United States and other
countries.
All other trademarks referenced herein are the property of their respective owners.
Notice of Liability
THIS DOCUMENT IS PROVIDED FOR INFORMATIONAL PURPOSES ONLY, AND THE CONTENTS HEREOF ARE SUBJECT
TO CHANGE WITHOUT NOTICE. THE INFORMATION CONTAINED IN THIS DOCUMENT IS DISTRIBUTED ON AN "AS IS"
BASIS, WITHOUT WARRANTY OF ANY KIND, EXPRESS OR IMPLIED, INCLUDING, BUT NOT LIMITED TO, THE IMPLIED
WARRANTIES OF MERCHANTABILITY AND FITNESS FOR A PARTICULAR PURPOSE OR A WARRANTY OF NON-
INFRINGEMENT. ARAS SHALL HAVE NO LIABILITY TO ANY PERSON OR ENTITY WITH RESPECT TO ANY LOSS OR
DAMAGE CAUSED OR ALLEGED TO BE CAUSED DIRECTLY OR INDIRECTLY BY THE INFORMATION CONTAINED IN THIS
DOCUMENT OR BY THE SOFTWARE OR HARDWARE PRODUCTS DESCRIBED HEREIN.

2023 Aras Corporation All Copyrights Reserved. 3
Aras DevOps
User Guide
Send Us Your Comments ............................................................................................. 6
1 Introduction .............................................................................................................. 7
1.1 Purpose ........................................................................................................................................ 7
1.2 Scope ........................................................................................................................................... 7
1.3 Target Audience ........................................................................................................................... 7
2 Aras DevOps Overview ........................................................................................... 7
2.1 Overview ...................................................................................................................................... 7
2.2 Centralized Development Model vs. Distributed Development Model (Aras DevOps) ................ 8
3 Customization .......................................................................................................... 9
3.1 Standard Development Environment (SDE) ................................................................................ 9
3.1.1 SDE Overview ............................................................................................................... 9
3.1.2 Azure DevOps SignOn ................................................................................................ 10
3.1.3 SDE Navigation ........................................................................................................... 11
3.2 Local Development Environment (LDE) ..................................................................................... 18
3.2.1 Connecting LDE to SDE .............................................................................................. 18
3.2.2 Obtaining Initial Baseline ............................................................................................. 19
3.2.3 Create Fork and Clone Repository .............................................................................. 22
3.2.4 Review Working Directory ........................................................................................... 24
3.2.5 Local Environment Variables Set Up ........................................................................... 25
3.2.6 Build and Deploy Locally ............................................................................................. 28
3.3 Continuous Integration and Continuous Delivery (CI/CD) ......................................................... 29
3.4 Testing ........................................................................................................................................ 30
4 Contributor Process .............................................................................................. 31
4.1 The Contribution Process Overview........................................................................................... 31
4.2 Adding Remote Reference ......................................................................................................... 31
4.3 Making Changes in Local Repo ................................................................................................. 33
4.4 Exporting Packages ................................................................................................................... 33
4.4.1 Make Required Changes in Aras Innovator Instance .................................................. 34
4.4.2 Export Package After the Changes ............................................................................. 34
4.5 Copying the Export Utility’s Output to the Local Repo ............................................................... 35
4.6 Staging Modified Files ................................................................................................................ 35
4.7 Continuous Integration Script ..................................................................................................... 36
4.8 Test the Deployment Locally ...................................................................................................... 36
4.9 Pushing Changes to Fork ........................................................................................................... 37
4.9.1 Fetching Changes/Rebasing ....................................................................................... 37
4.9.2 Pushing Changes to Fork ............................................................................................ 38
4.10 Creating a Pull Request ............................................................................................................. 38
4.11 Trigger, Build and Test ............................................................................................................... 39
4.12 Reviewing a Pull Request .......................................................................................................... 40
4.13 Merging the Pull Request ........................................................................................................... 43
5 Preparing the Project's Initial Baseline ................................................................ 45
6 Baseline Management ........................................................................................... 46

2023 Aras Corporation All Copyrights Reserved. 4
Aras DevOps
User Guide
7 Pipelines ................................................................................................................. 47
7.1 Deploy to System Integration Testing (SIT) Environment .......................................................... 47
7.2 Generate New Baseline ............................................................................................................. 49
7.2.1 Creating Tag on Last Approved Commit ..................................................................... 49
7.2.2 Running the Baseline Pipeline .................................................................................... 50
7.3 Delete Aras Innovator from SIT Environment ............................................................................ 52
8 Using Transformations .......................................................................................... 55
8.1 Transformation Overview ........................................................................................................... 55
8.2 Type of Transformation .............................................................................................................. 55
8.3 The Purpose of Transformation ................................................................................................. 56
8.4 Utilizing Transformation ............................................................................................................. 57
8.4.1 Example 1: XML Document Transformation (XDT) ..................................................... 57
8.4.2 Example 2: JSON Document Transformation (JDT) ................................................... 58
8.5 Ignore Configuration Files Transformation ................................................................................. 59
9 Packaging ............................................................................................................... 60
9.1 Summary of Modeling ................................................................................................................ 60
9.2 Review of Packaging Scenarios................................................................................................. 62
9.2.1 Case 1 ......................................................................................................................... 62
9.2.2 Case 2 ......................................................................................................................... 62
9.2.3 Case 3 ......................................................................................................................... 63
9.3 Packaging Tools and Methods ................................................................................................... 63
9.4 Create and Manage New Application ........................................................................................ 64
9.4.1 Creating a Package Definition ..................................................................................... 65
9.4.2 Export Package and Update the Imports Manifest File ............................................... 67
9.4.3 Confirming Manifest Changes in Version Control System .......................................... 67
10 Change Management and Implementation.................................................. 68
10.1 Production Countdown Sequence ............................................................................................. 69
11 Branding Customization ............................................................................... 71
11.1 Splash Screen ............................................................................................................................ 71
11.2 Change Banner .......................................................................................................................... 73
Appendix I: Local Development Environment Setup ............................................... 76
Installing Windows Powershell ............................................................................................................. 76
Installing Chocolatey using Windows Powershell ................................................................................ 76
Installing Git .......................................................................................................................................... 77
Installing Azure CLI .............................................................................................................................. 77
Required Specifications ........................................................................................................................ 78
Appendix II: Standard Solution Packaging Tools ..................................................... 79
Export.exe ............................................................................................................................................. 79
Import.exe ............................................................................................................................................. 79
Consoleupgrade.exe ............................................................................................................................ 79
Appendix III: Adding Applications to a Project......................................................... 80
Appendix IV: Using a Shared Repository and Merging Conflicts ........................... 81

2023 Aras Corporation All Copyrights Reserved. 5
Aras DevOps
User Guide
Use Shared Repository ........................................................................................................................ 81
Connect to Shared Repository ............................................................................................................. 81
Push Changes to Shared Repository ................................................................................................... 81
Fetch Changes from Shared Repository .............................................................................................. 81
Managing File Conflicts ........................................................................................................................ 81
Resolving Merged Conflicts .................................................................................................................. 82
Sharing Changes with the Remote Repository .................................................................................... 82
Using Stash .......................................................................................................................................... 82
Appendix V: Transformations .................................................................................... 84

2023 Aras Corporation All Copyrights Reserved. 6
Aras DevOps
User Guide
Send Us Your Comments
Aras Corporation welcomes your comments and suggestions on the quality and usefulness of this
document. Your input is an important part of the information used for future revisions.
o Did you find any errors?
o Is the information clearly presented?
o Do you need more information? If so, where and what level of detail?
o Are the examples correct? Do you need more examples?
o What features did you like most?
If you find any errors or have any other suggestions for improvement, indicate the document title, and the
chapter, section, and page number (if available).
You can send comments to us in the following ways:
Email:
TechDocs@aras.com
Subject: Aras Product Documentation
Or,
Postal service:
Aras Corporation
100 Brickstone Square
Suite 100
Andover, MA 01810
Attention: Aras Technical Documentation
If you would like a reply, provide your name, email address, address, and telephone number.
If you have usage issues with the software, visit https://www.aras.com/support/

2023 Aras Corporation All Copyrights Reserved. 7
Aras DevOps
User Guide
1 Introduction
1.1 Purpose
This user guide provides detailed information for contributors utilizing the Aras DevOps service to
manage and customize their locally deployed Aras Innovator and application instances.
1.2 Scope
The scope of this user guide provides instructions to define, manage, customize, and validate
locally deployed customizations, as well as outline the following:
• Contributor Process
• Branding
• Baselines
• Pipelines
• Transformations
• Packaging
• Change Management and Implementation
• Appendices which provide tool information and instructions
This user guide provides good practices to ensure proper configuration management of a solution
for business-critical operations.
Experience with these processes and procedures will determine what tools contributors already
use and prefer. The tools mentioned in this user guide are a suggestion for consistency and
practical embodiment of the concepts, not as endorsements or mandates.
1.3 Target Audience
This document is intended for contributors who are responsible for performing the instructions
outlined in this document (customizers, PLM developers and stakeholders involved in software
development and project management.)
It is the responsibility of contributors working on the implementation of solutions using the Aras
Innovator platform to adhere to the provided information and steps outlined in this user guide.
2 Aras DevOps Overview
2.1 Overview
Aras DevOps is a subscription service that provides a cloud-based set of tools, scripts, and
processes to manage Aras Innovator customizations for an Aras Innovator implementation project.
Aras DevOps is inherently part of the Aras Enterprise subscription (SaaS) but can also be
purchased separately as an Aras DevOps subscription to support customer-hosted Aras Innovator
environments.
2023 Aras Corporation All Copyrights Reserved. 8
Aras DevOps
User Guide
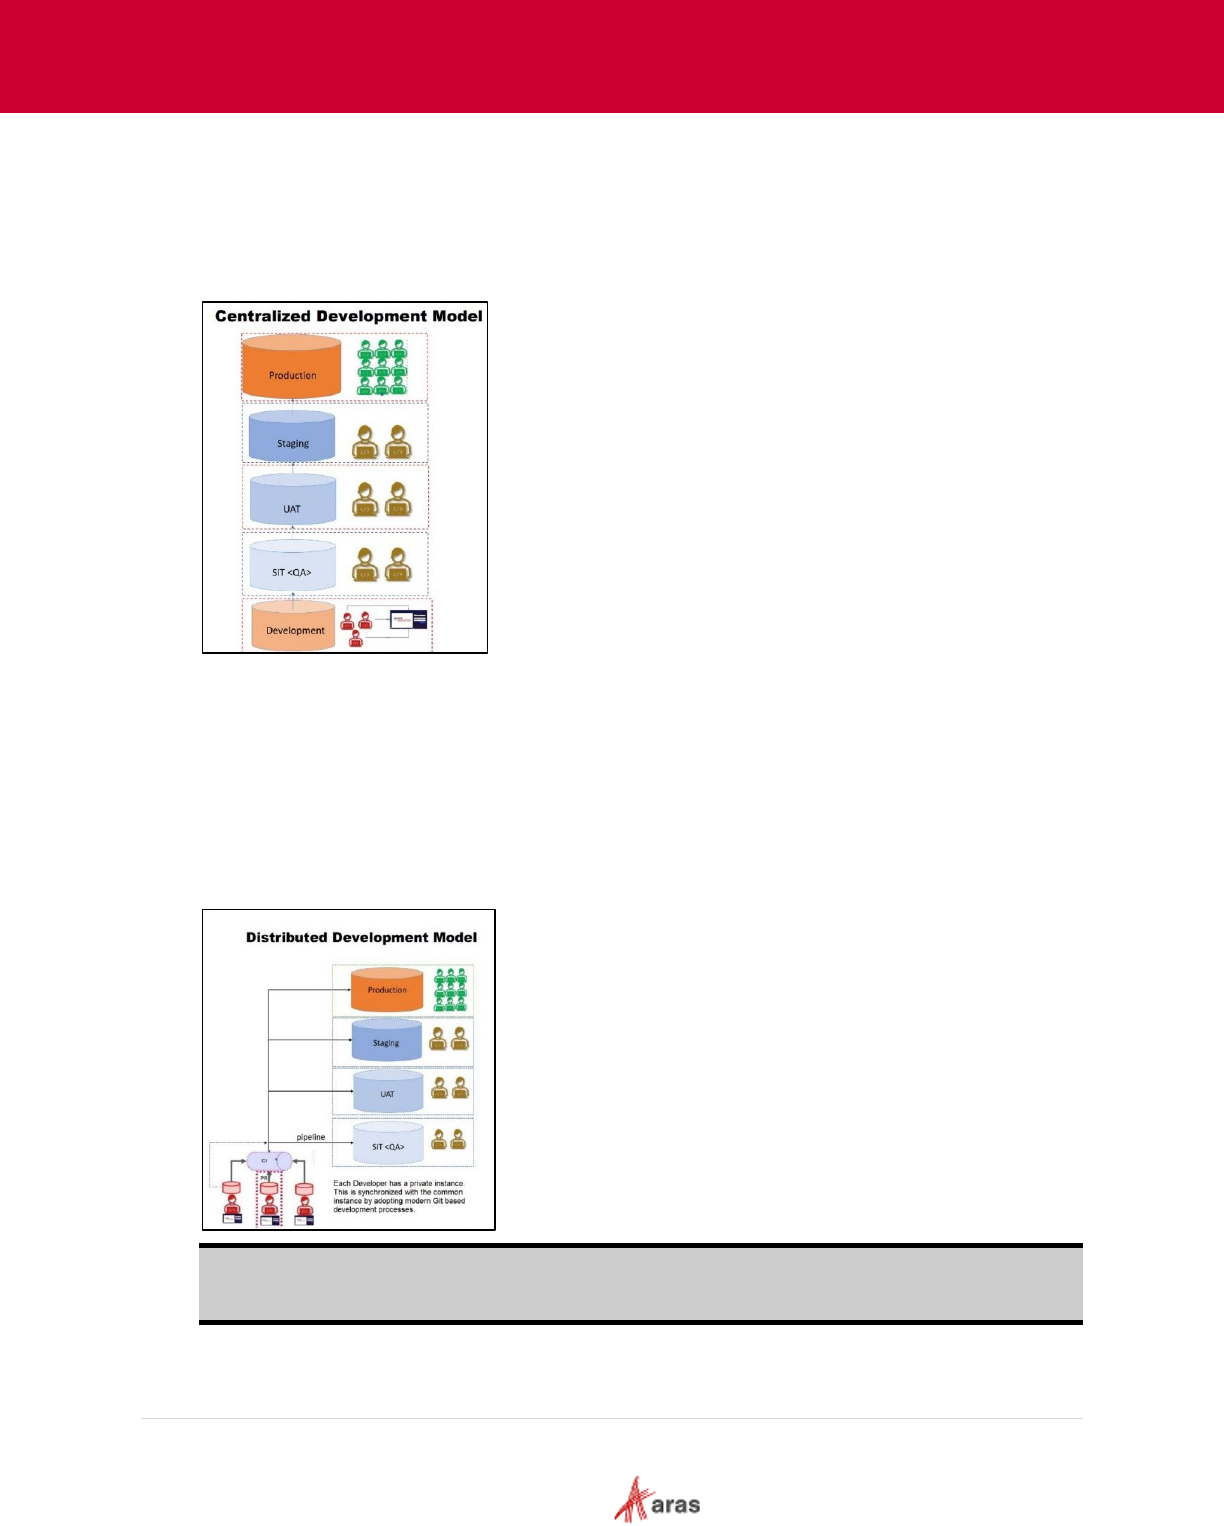
2.2 Centralized Development Model vs. Distributed Development
Model (Aras DevOps)
In the Centralized Development Model, developers collaborate and implement changes within
shared installations of Aras Innovator, such as development, testing, and production instances.
Developers export and import packages between the deployments and keep track of changes.
Aras DevOps enables developers to build and deploy an individual instance of Aras Innovator with
a Distributed Development Model. Git (version control system) is used to modify the system,
export, and store changes.
Modifications are extracted from Git to build the system. Aras DevOps is equipped to execute
automated tests, written by the development team, specifically designed for the Aras Test
Automation Framework (TAF) to verify the system's validity.
Multiple developers can contribute to the system, and Aras DevOps enables developers to identify
conflicts and merge all their contributions into a single build. This enables early detection and
resolution of conflicts, resulting in improved collaboration and development efficiency.
Note: The link to the production environment is not included for On-Premises customers who
purchased Aras DevOps as a stand-alone service. This link is included for Aras Enterprise
subscription customers.
2023 Aras Corporation All Copyrights Reserved. 9
Aras DevOps
User Guide
3 Customization
System customization consists of configurations per customer usability. The following outlines the
general contributor configurations/customizations:
• Workflow
• Reporting
• Interfacing
• Configuring lifecycles and other preferences
• Enhancing
• Forms
Contributors must set up a Local Development Environment (LDE) for local project configuration and
access to the Standard Development Environment (SDE) for contributions.
3.1 Standard Development Environment (SDE)
3.1.1 SDE Overview
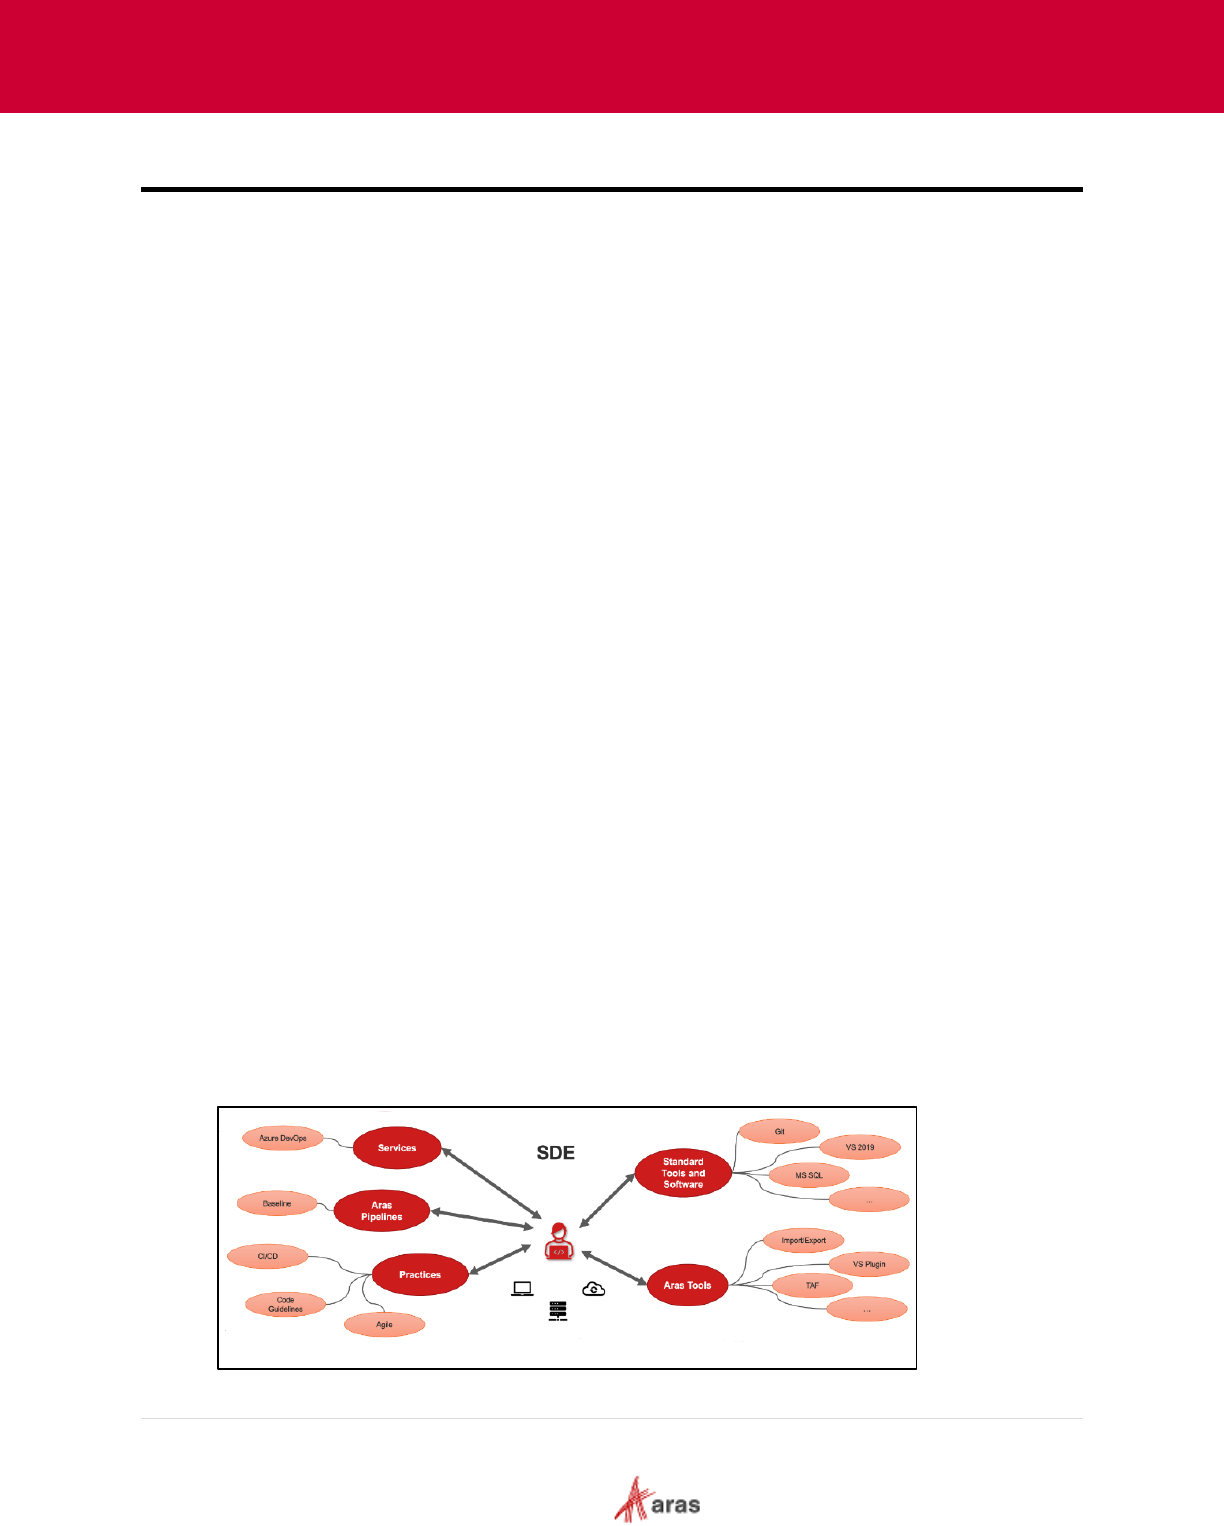
The Standard Development Environment (SDE) is included in the Aras DevOps offering which
enables contributors to streamline their customized Aras solution in a cloud environment. It
consists of the SIT and Build environment as outlined in this section.
SDE consists of tools and procedures that support contributors in implementing standard
Continuous Integration/Continuous Deployment (CI/CD) practices. This environment is specially
designed to streamline the software development process by facilitating efficient collaboration,
version control, code testing, and seamless deployment.
The following tools are provided by Aras:
• Aras Visual Studio Plugin: Allows for seamless integration between Aras and Visual Studio.
• Import/Export: Tools that facilitate the easy movement of data in and out of the system.
• Test Automation Framework (TAF): Helps in validating the functionality of the system.
To supplement these resources, the SDE uses Azure DevOps services, which provides a
development environment where contributors can commit their changes, build the applications,
and test the Aras customizations. This ensures a standardized, repeatable process, reducing the
risk of deployment errors.
The SDE incorporates Aras Pipelines, which are workflows that automate steps in the software
delivery process, such as build, test, and deployment. By integrating these different components,
the SDE provides a comprehensive suite of tools for managing the entire software development
lifecycle.
2023 Aras Corporation All Copyrights Reserved. 10
Aras DevOps
User Guide
Once access is granted by Aras, a link to the SDE implementation project is emailed to the
requester (e.g., https://dev.azure.com/{organization}/{project}
.) This link navigates to the
dedicated space within Aras DevOps. All developers should have access to this link.
The Azure DevOps environment is only available to customers who have acquired either the Aras
DevOps Subscription or the Aras Enterprise Subscription.
The local development environment configuration includes developer machine requirements
which is comprised of creating a Fork, Baseline setup, Aras repository clone, and environment
setup.
Refer to the Appendices at the end of this user guide for instructions related to tools suggested by
Aras.
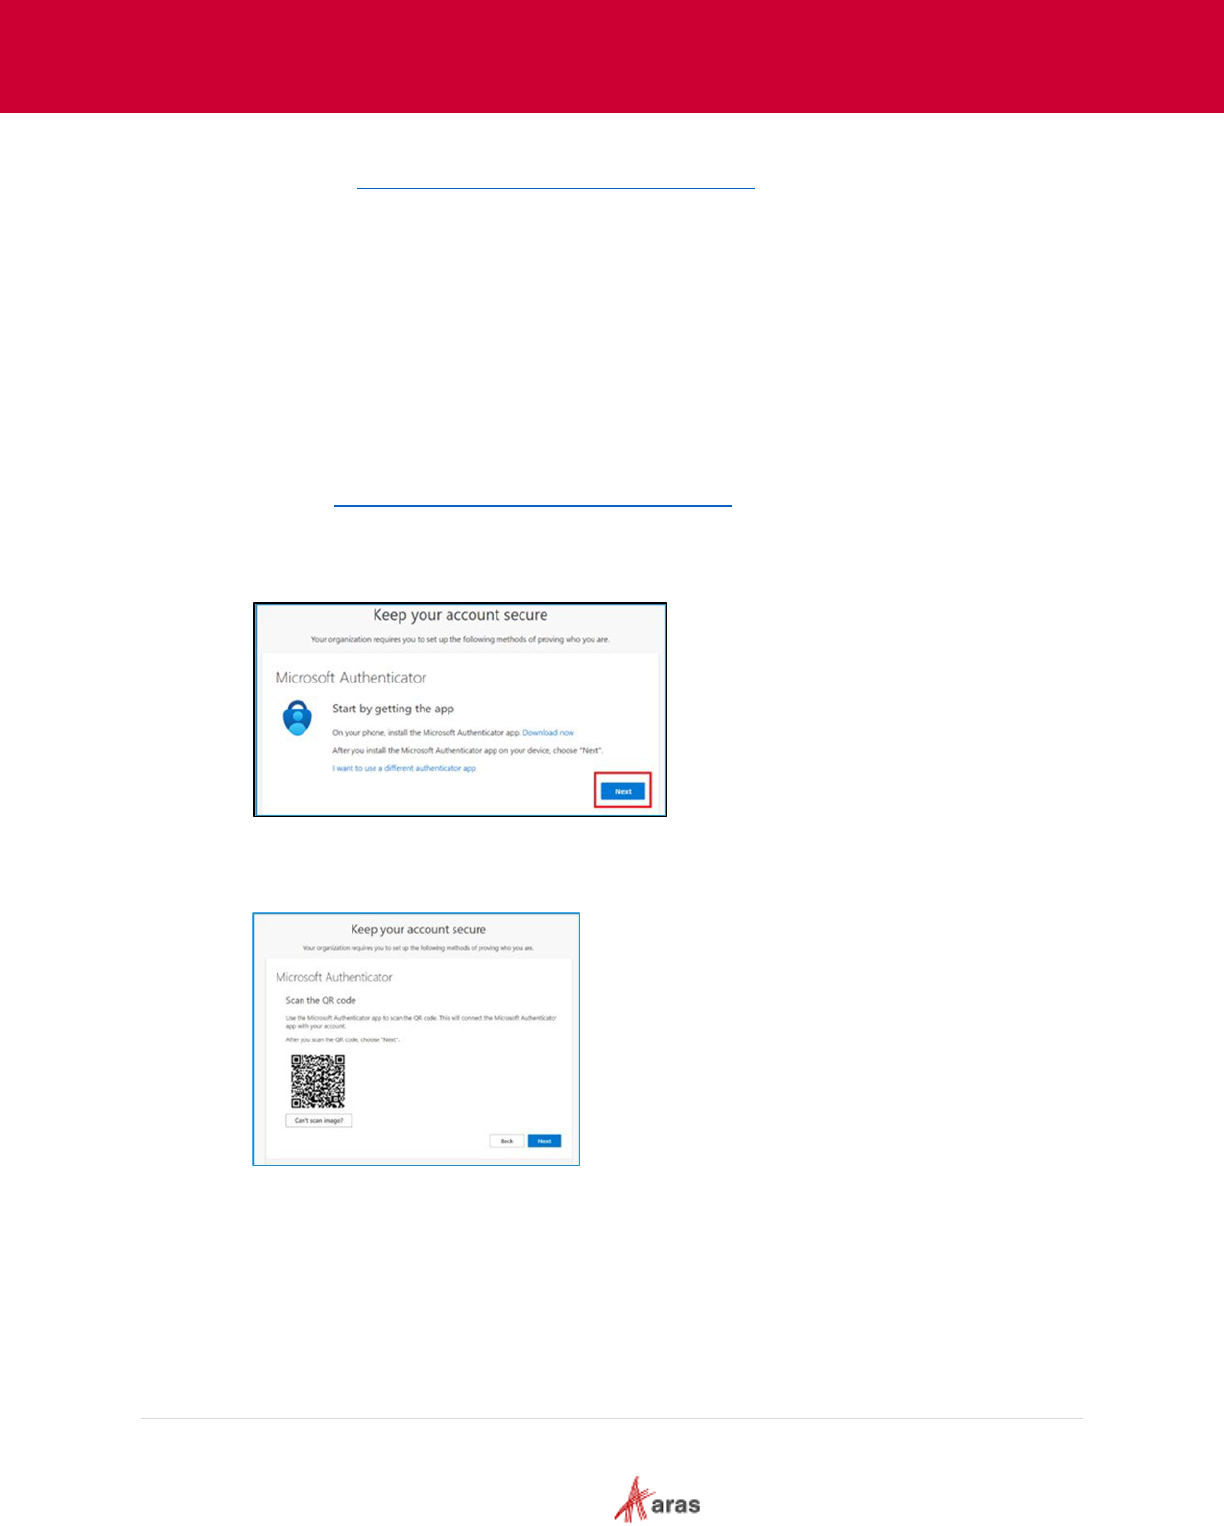
3.1.2 Azure DevOps SignOn
The following steps outline the process of signing into Azure DevOps:
1. Click the https://dev.azure.com/{organization}/{project}
link.
2. Enter the registered email address used for access.
3. Install the Microsoft Authenticator application on a mobile device.
4. Click Next on the Microsoft Authenticator dialog box.
5. Open the Microsoft Authenticator application on the mobile device and click the (+) icon.
6. Select the account and scan the QR code that appears on the computer.
7. Click Next.
2023 Aras Corporation All Copyrights Reserved. 11
Aras DevOps
User Guide
3.1.3 SDE Navigation
The URL to the SDE environment is accessible only after completion of the invitation process that
requires to set up multi-factor authentication.
When connecting to the SDE URL, the following screens appear:
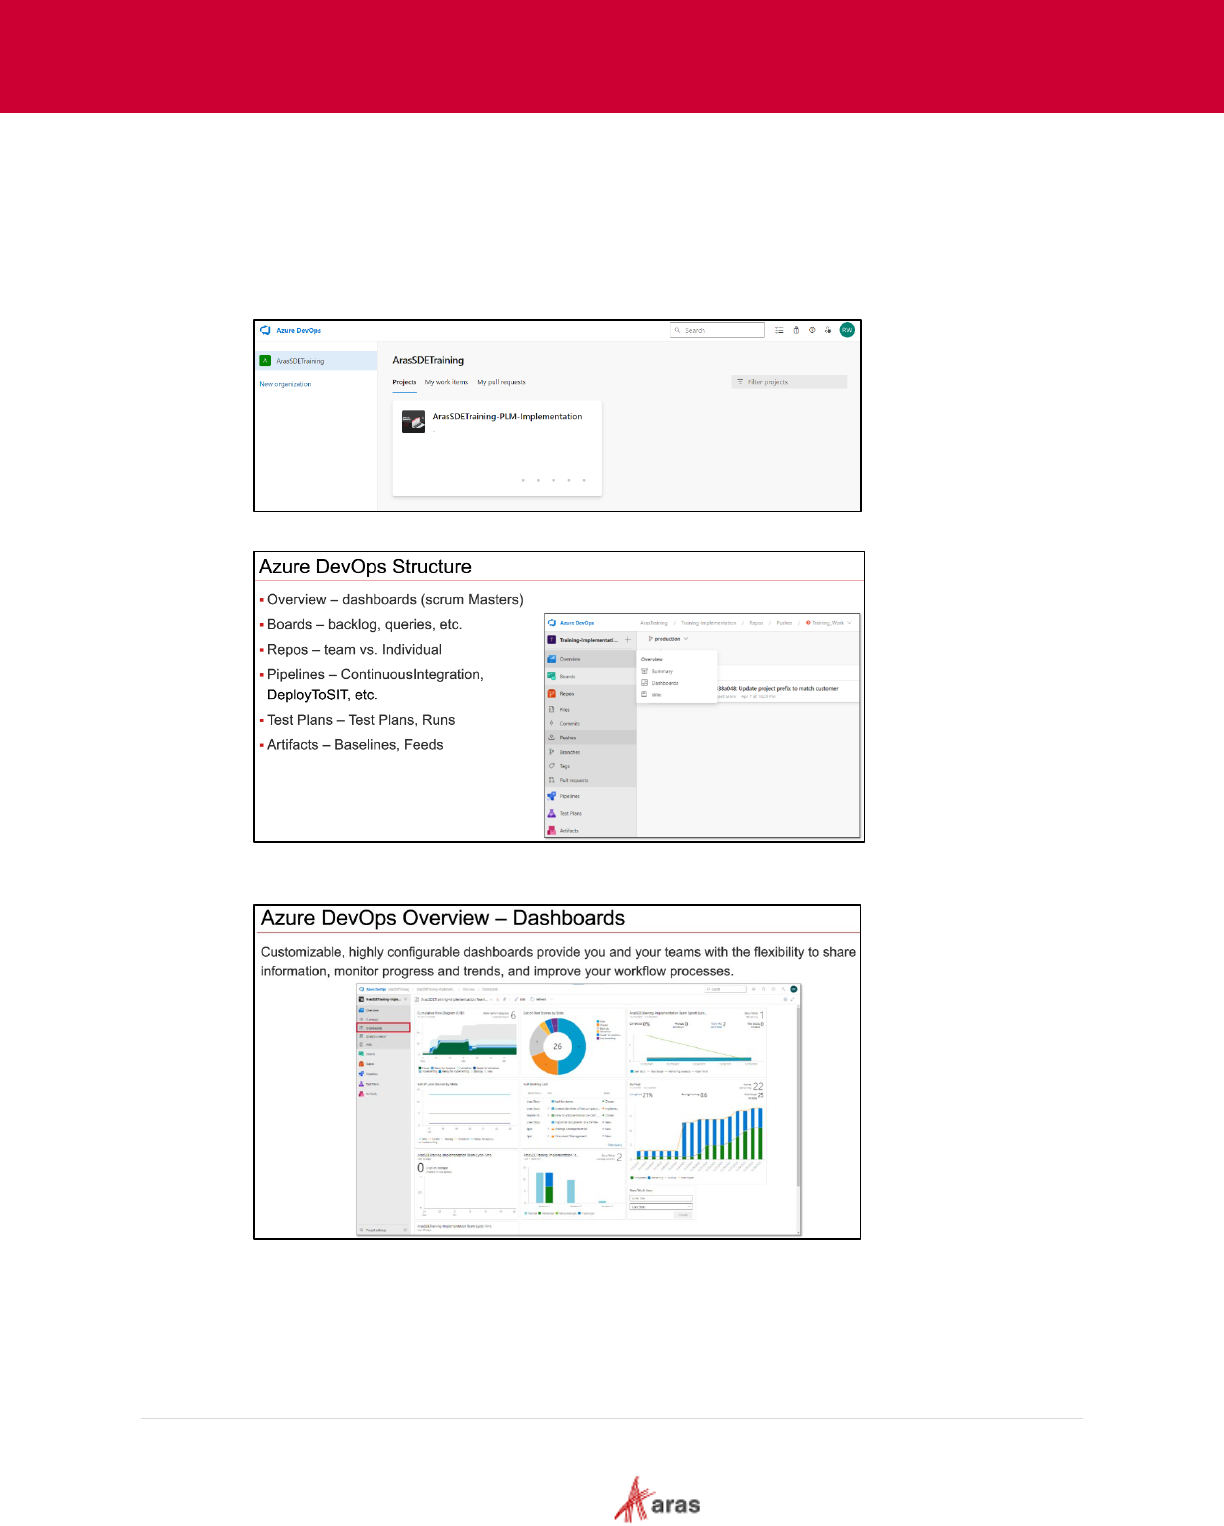
• Azure DevOps landing page: The implementation project that is visible represents the area
where the project team customizes Aras Innovator for the subscriber.
• Azure DevOps Structure: Displays required information.
• Dashboards: Scrum masters use these to track project progress for team members’ view. A
link is provided for traceability between change management and implementation.
2023 Aras Corporation All Copyrights Reserved. 12
Aras DevOps
User Guide
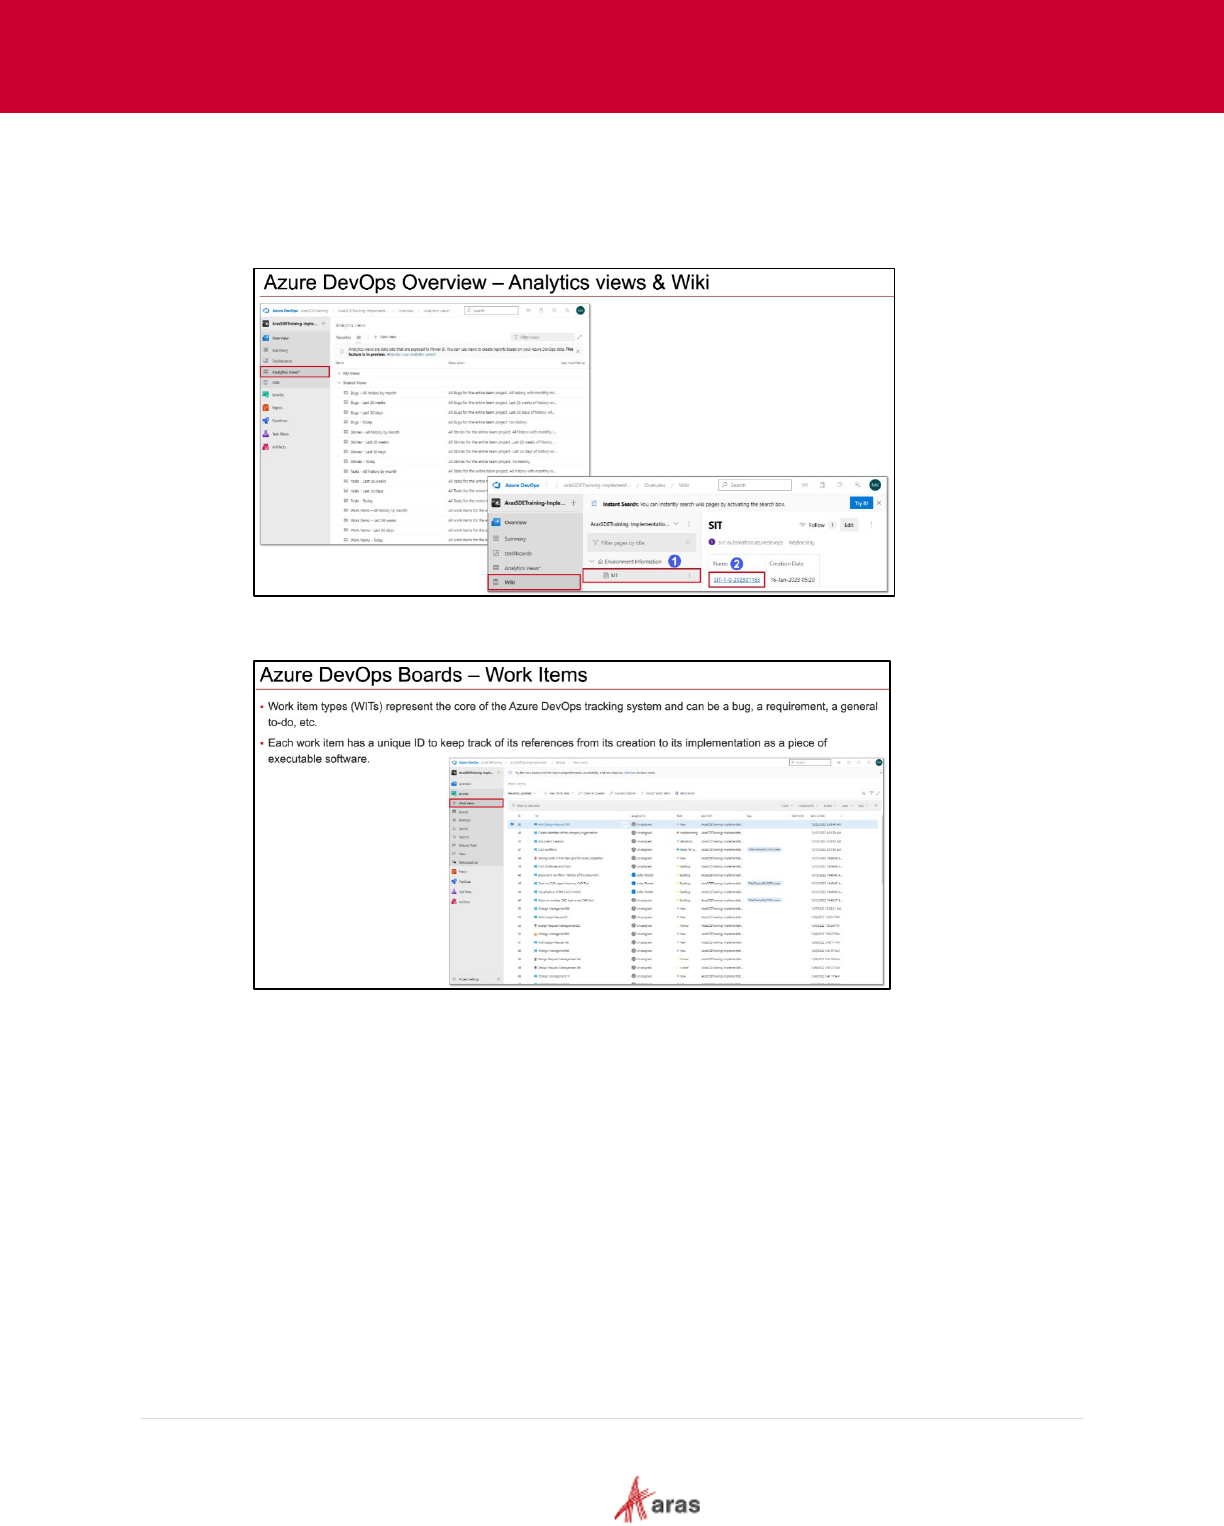
• Analytics Views and Wiki Page: The team project wiki serves as a platform for sharing
information with other team members. Provisioning a wiki from scratch initiates a new Git
repository that stores Markdown files, images, attachments, and a sequence of pages. The
wiki has the capability to support collaborative editing of both its content and structure. Aras
uses the wiki to share the URLs of SIT test instances.
• Work Items: These items are required for approved changes. This may encompass other
tasks necessitated by the project or the tracking of requests made to Aras.
2023 Aras Corporation All Copyrights Reserved. 13
Aras DevOps
User Guide
Work Item Structure: Azure DevOps manages the process by the type of definition set by
Aras Global Cloud Services (GCS). GCS continually updates the process to address
Subscriber input/feedback. The current Agile Solution Delivery version is 4.1.
Boards: The boards can be used to track a variety of work items, including features, user
stories, tasks, bugs, and more. They support both Scrum and Kanban methodologies.
Additionally, the boards include capabilities for planning sprints and managing backlogs, as
well as generating reports on work progress.
2023 Aras Corporation All Copyrights Reserved. 14
Aras DevOps
User Guide
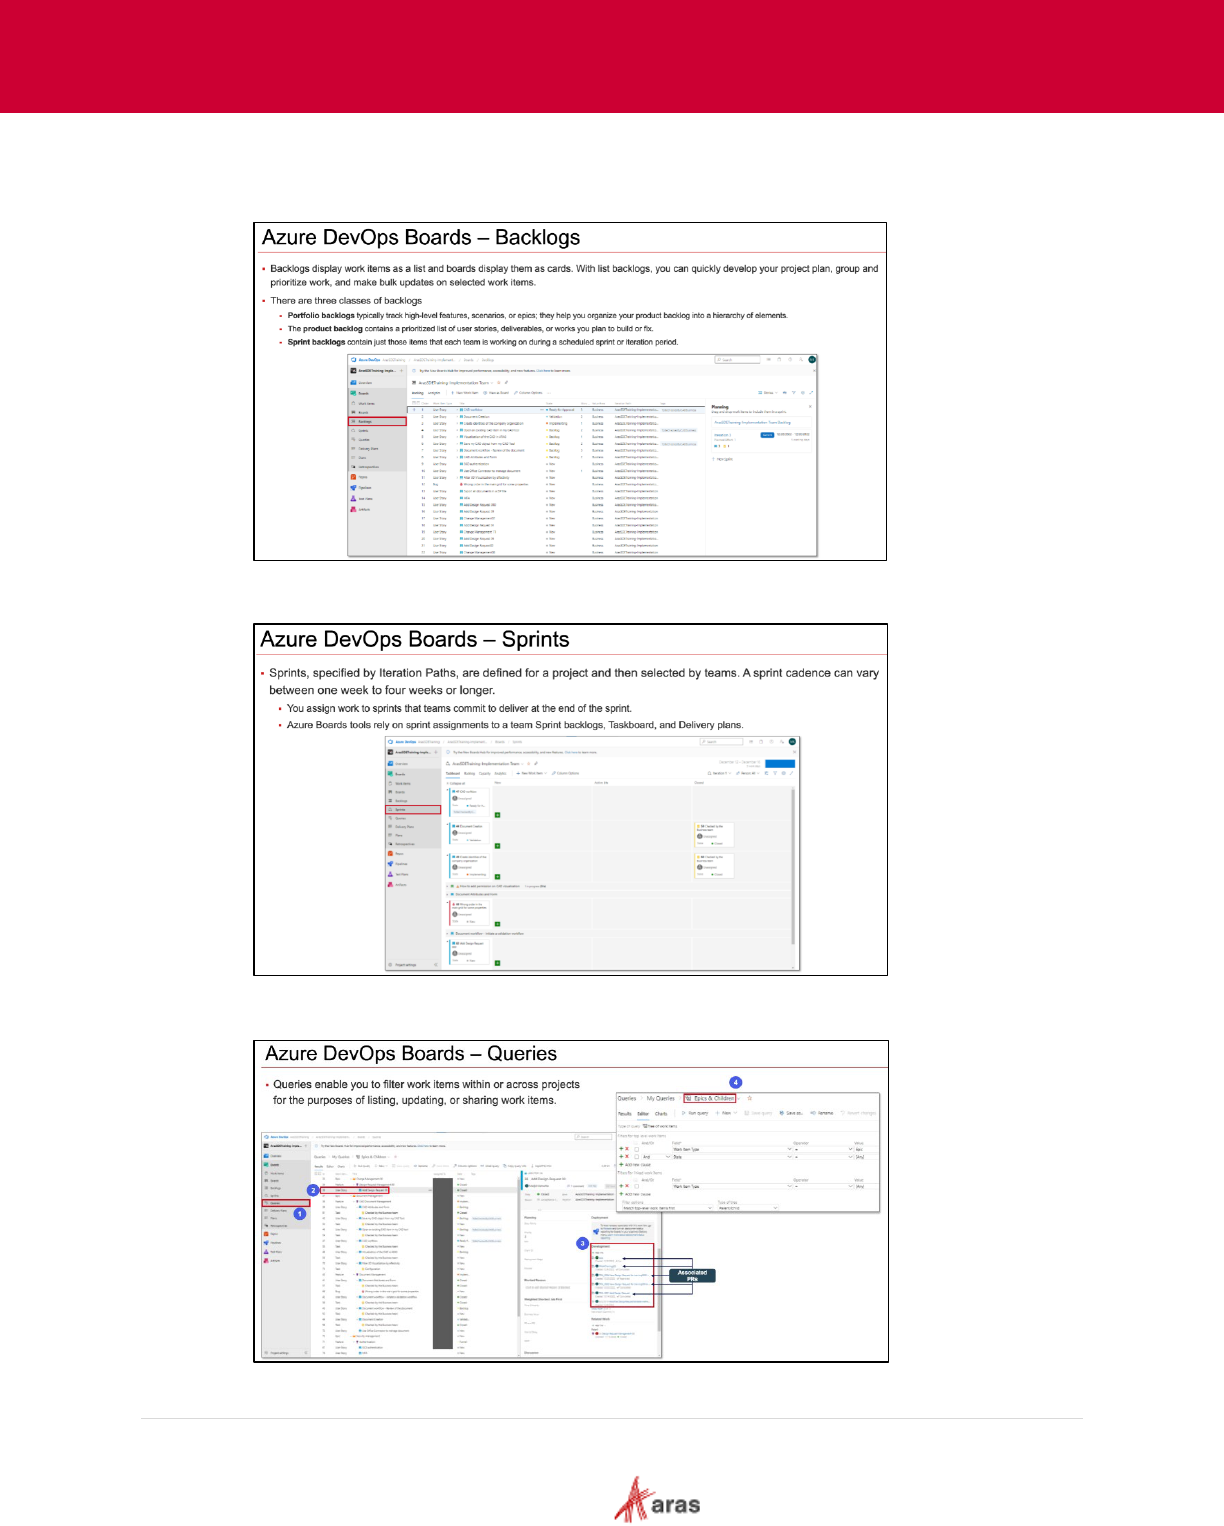
• Backlogs: Backlogs in Azure DevOps are used to manage and prioritize work items in a
queue. They provide an ordered list of work items such as user stories, features, or bugs that
the team needs to work on.
• Sprints: Sprints in Azure DevOps represent time-boxed iterations where a set amount of
work is completed.
• Queries: Queries enable users to filter work items within or across projects for listing,
updating, or sharing work items.

2023 Aras Corporation All Copyrights Reserved. 15
Aras DevOps
User Guide
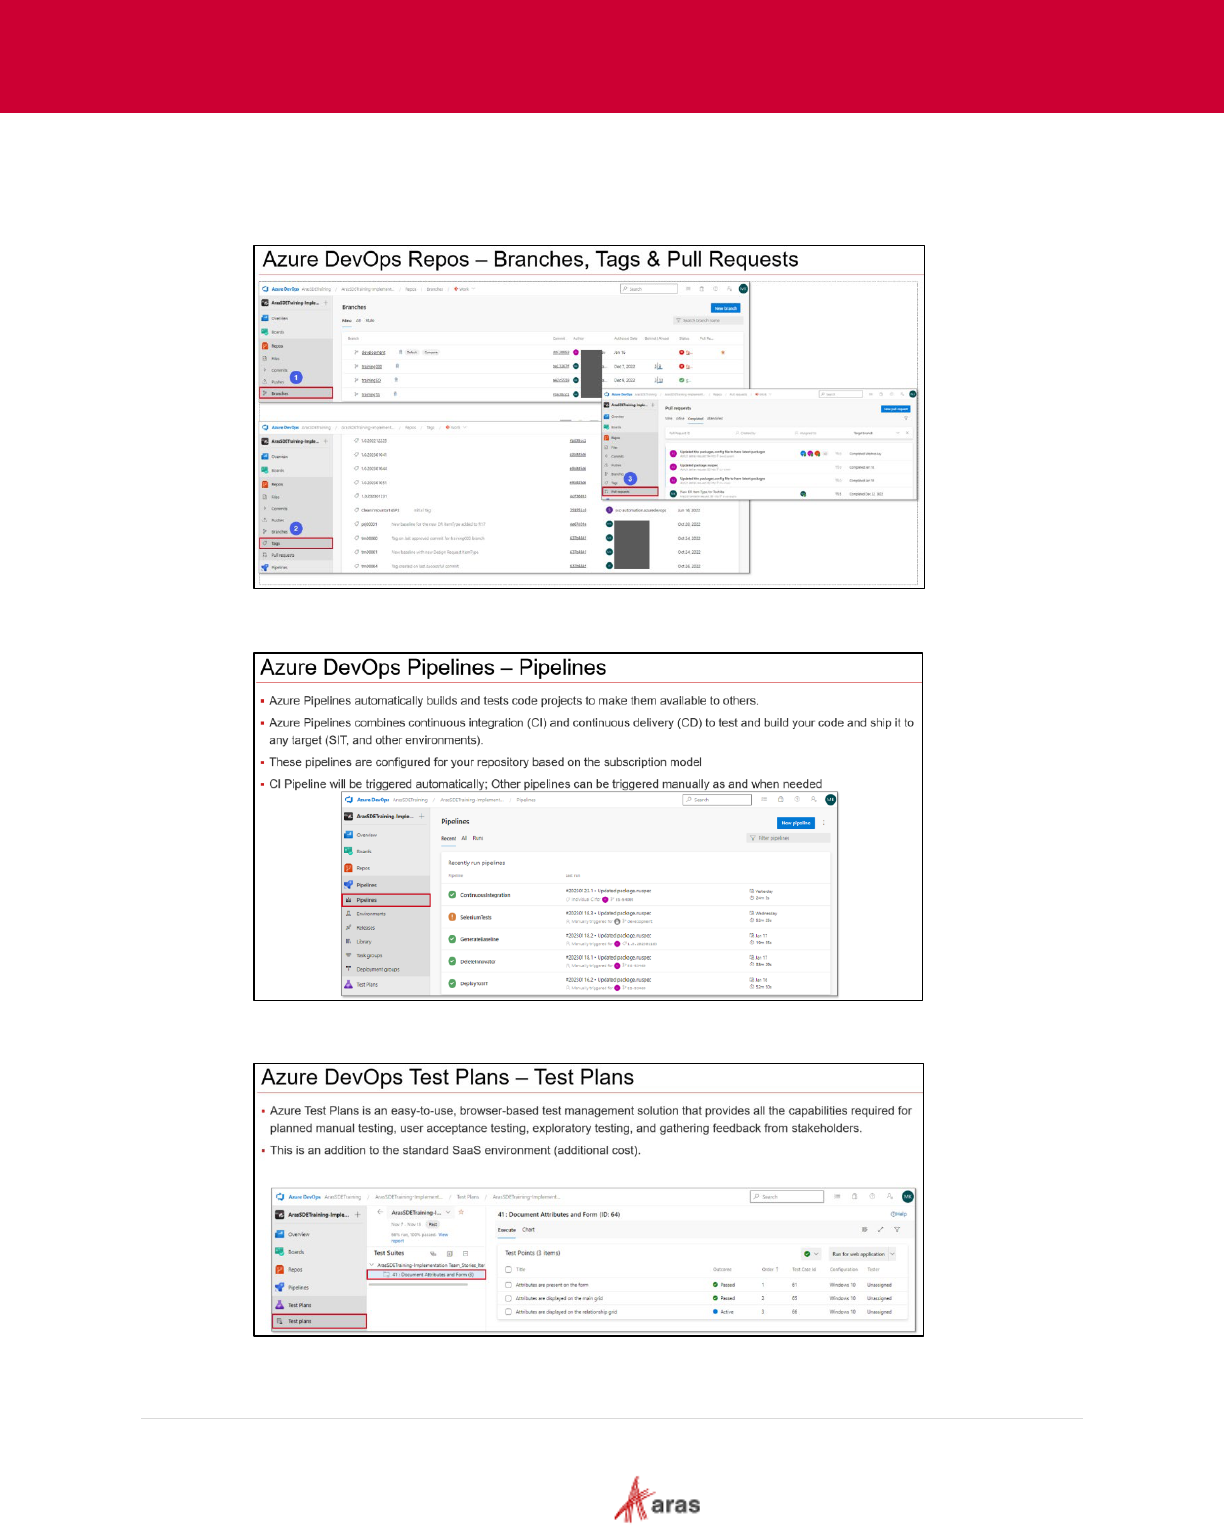
• Repos: There is only one main configuration repo per project for the Standard Development
Environment. Notice the orange and white backgrounds of the Git logo. The white
background repositories are Forks.
• Files, Commits and Pushes: In Azure DevOps, Files are the individual project components,
Commits are snapshots of changes made to those files, and Pushes are the action of
uploading these commits to a remote repository for team access and collaboration.
2023 Aras Corporation All Copyrights Reserved. 16
Aras DevOps
User Guide
• Branches, Tags and Pull Request: In Azure DevOps, Branches are separate versions of
the codebase for isolated development, Tags are reference points to specific versions of the
code, and a Pull Request is a mechanism for developers to propose, review, and merge
changes from one branch to another.
• Pipelines: Pipelines in Azure DevOps are automated workflows for continuous integration
and delivery, enabling code build, test, and deployment processes.
• Test Plans: Test Plans in Azure DevOps provide a structured approach for defining, tracking,
and managing testing activities to ensure software quality.
2023 Aras Corporation All Copyrights Reserved. 17
Aras DevOps
User Guide
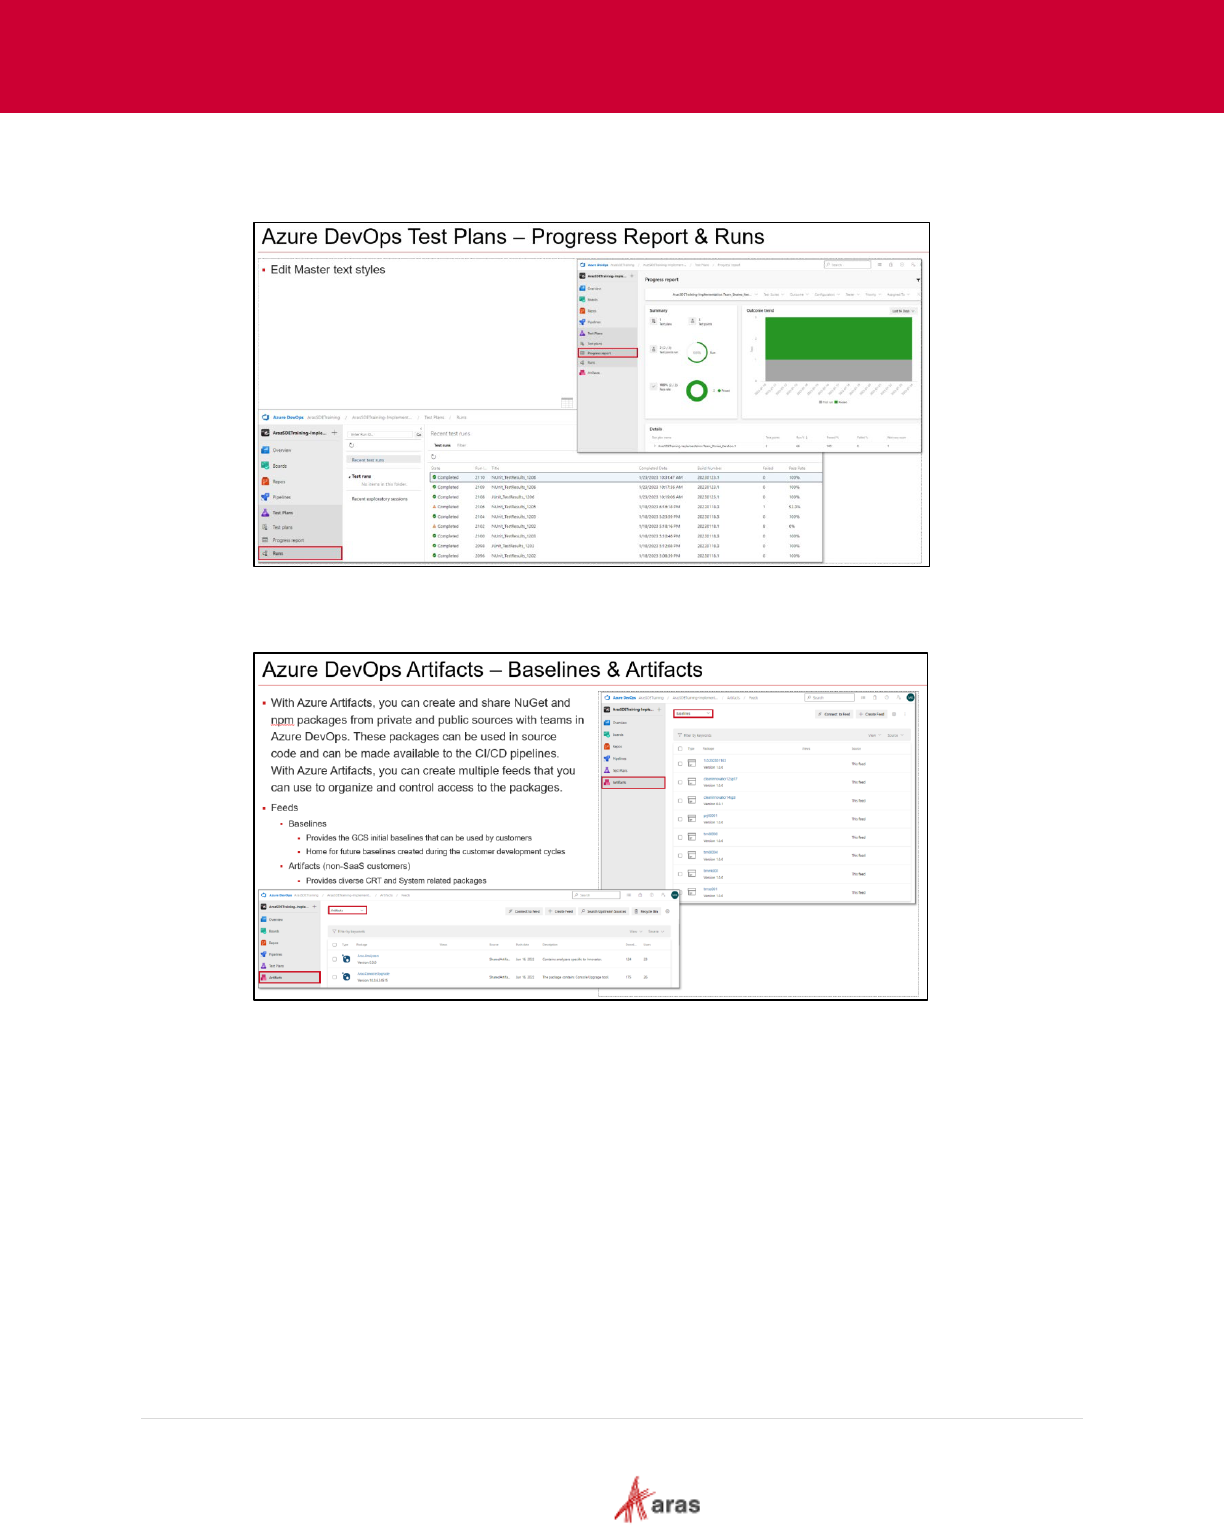
• Progress Reports and Runs: Progress Reports in Azure DevOps provide insights into the
development lifecycle and project milestones, while Runs represent individual executions of
tests, builds, or deployments.
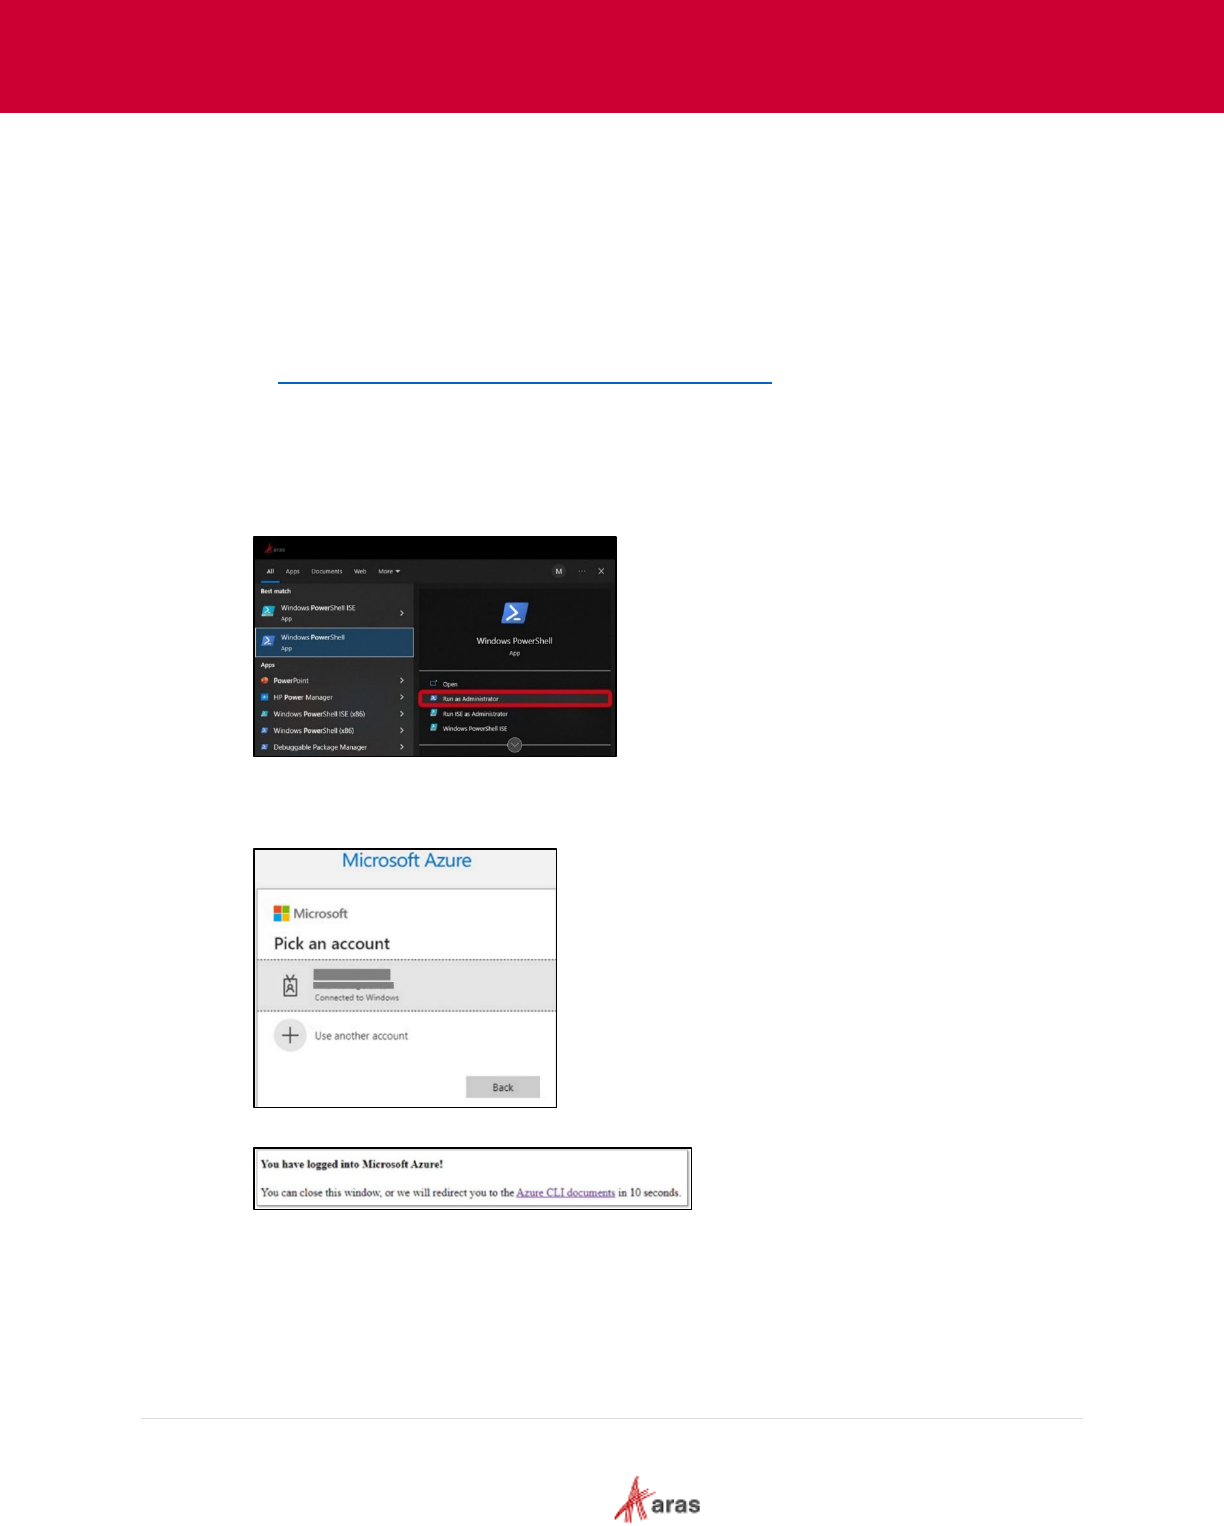
• Baselines and Artifacts: Baselines in Azure DevOps represent specific versions of the
project for comparison or recovery, while Artifacts are the output files generated from build
and release pipelines.
2023 Aras Corporation All Copyrights Reserved. 18
Aras DevOps
User Guide
3.2 Local Development Environment (LDE)
A local development environment (LDE) is a configuration of software and tools set up on a
developer's personal computer/laptop which enables developers to write, debug, and test software.
This environment often mimics the production setting as closely as possible, encompassing
programming languages, code editors, version control systems, and possibly virtual machines or
containers. The LDE provides a space for developers to make and test changes without affecting
the live application or production data.
Depending on company policies, an IT department may need to perform the below steps for users.
Refer to Appendix I: Setting Up Local Development Environment
for more details.
3.2.1 Connecting LDE to SDE
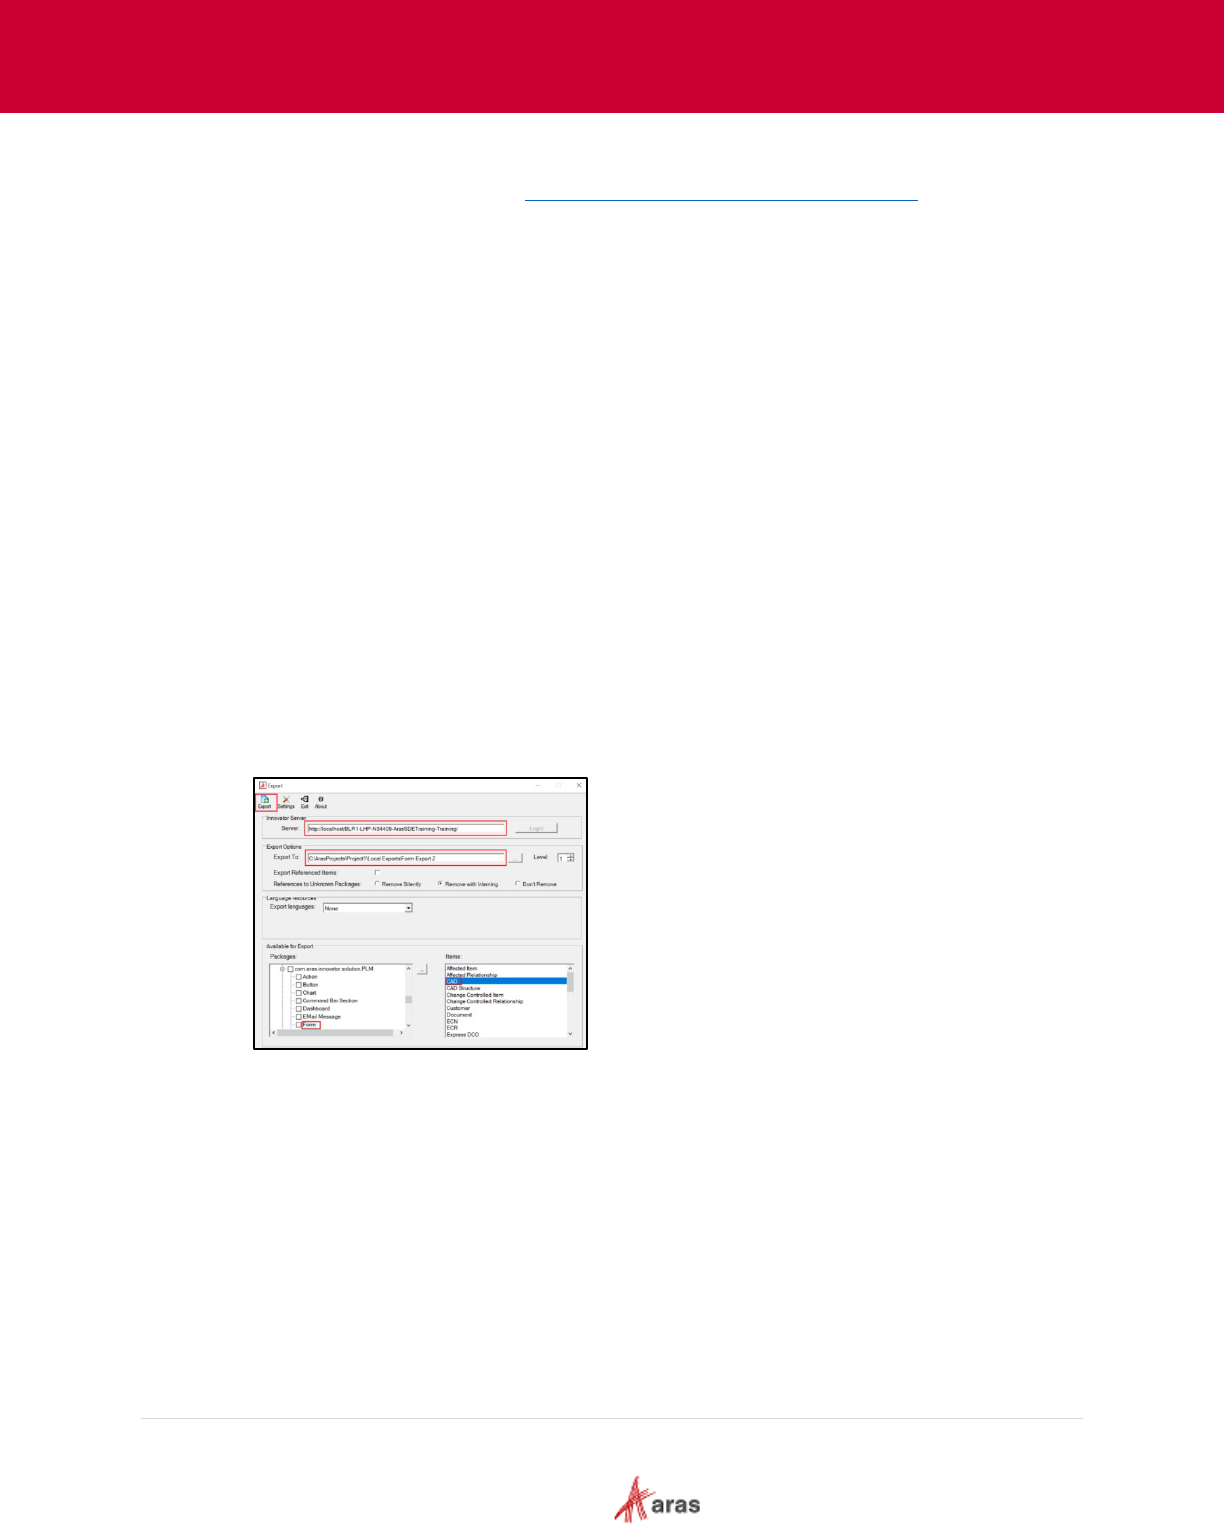
When working in the LDE, open Windows PowerShell as an administrator to connect to SDE.
The following steps outline the process for connecting to a SDE:
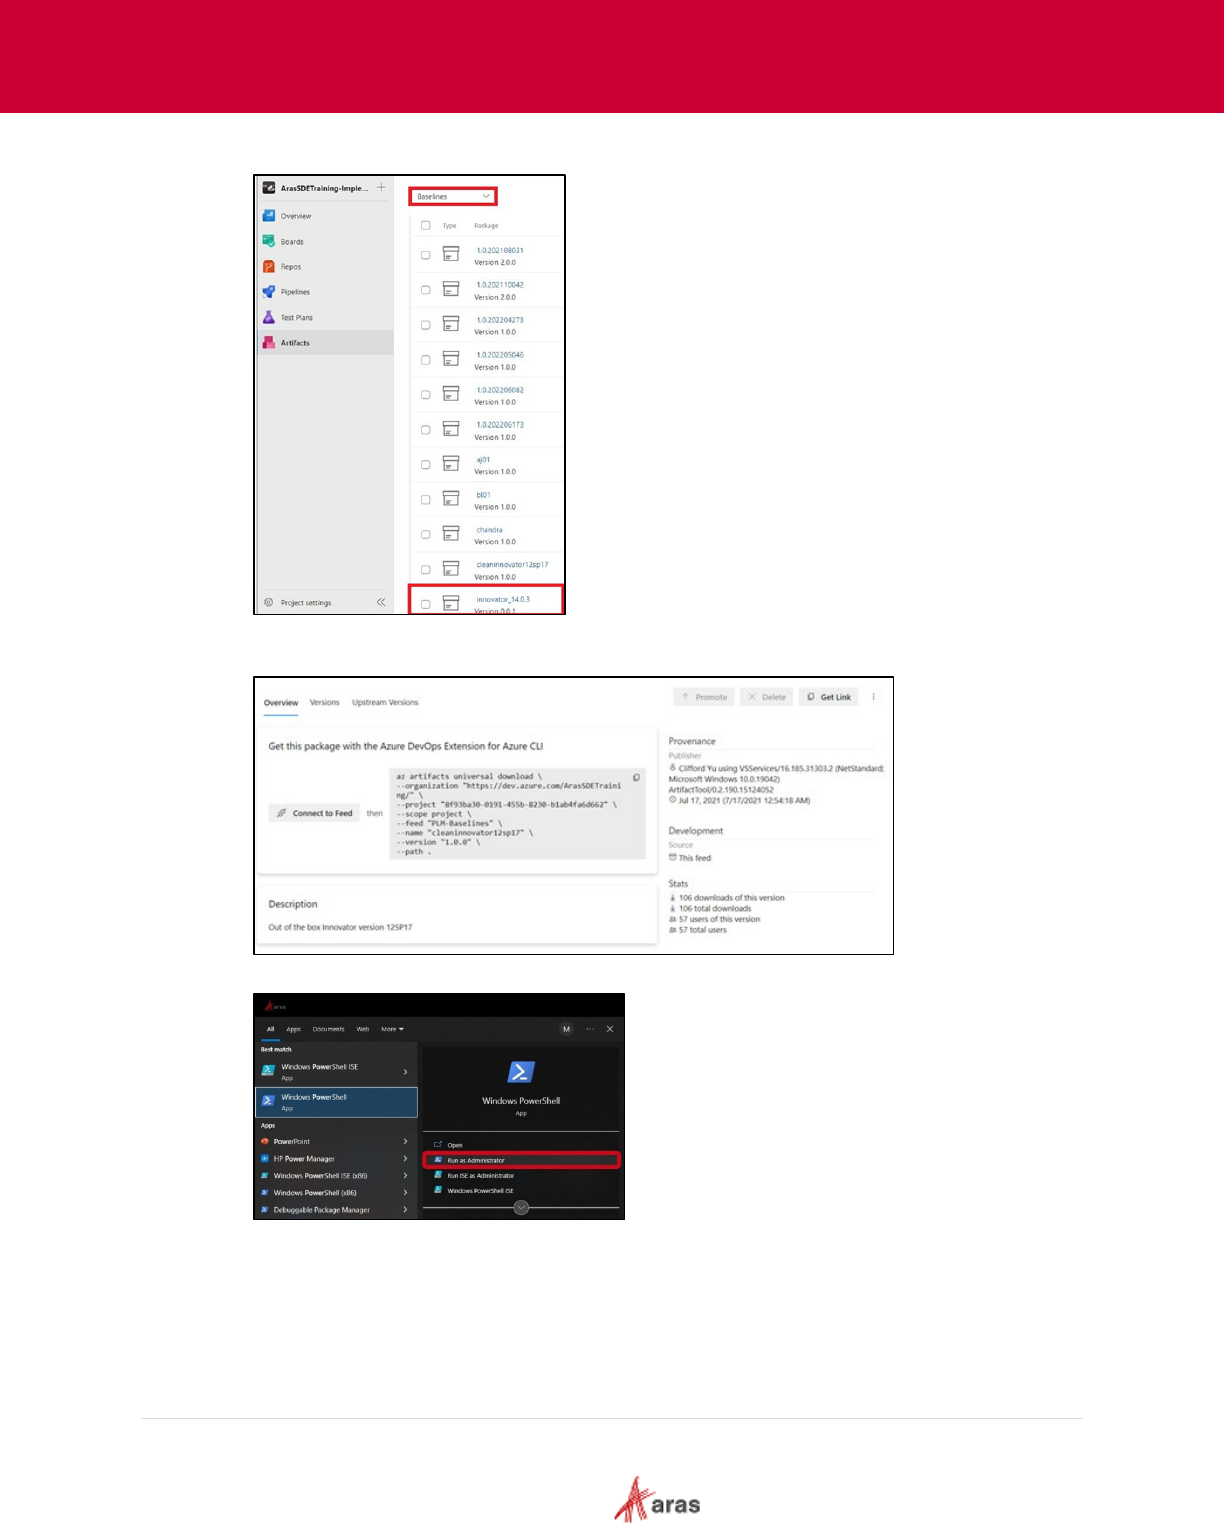
1. Run Windows PowerShell as an administrator.
Execute command: az login (if tenant level access is missing execute command:
az login --allow-no-subscriptions
The Microsoft Azure dialogue box appears.
3. Select the Microsoft Azure account to launch Azure. The following message should appear:
The utilization of az login might not consistently grant access to the specific SDE. If the az
login does not work, use of the Personal Access Token (PAT) method is recommended.
With the LDE successfully linked to the SDE, the current baseline can now be obtained and
stored.

2023 Aras Corporation All Copyrights Reserved. 19
Aras DevOps
User Guide
3.2.2 Obtaining Initial Baseline
Aras uses a baseline as a database and code tree backup. When the project starts, Aras
initializes the SDE with the current release of Aras Innovator and provides the corresponding
baseline in the Baseline feeds in the artifacts.
Projects periodically generate new baselines and may create one at the start of a project to add
applications and language packs.
The following steps outline the process to obtain the initial baseline:
1. Create a folder to save the baseline in the local machine. For example:
C:\ArasProjects\Baselines\Cleaninnovatorxxspyy.
2. From Azure DevOps, select Artifacts.
3. Select Baselines from the drop-down menu.
2023 Aras Corporation All Copyrights Reserved. 20
Aras DevOps
User Guide
4. Select the available baseline(s) for the Aras Innovator release.
Aras provides the CleanInnovatorxxSPyy baseline for every new SDE. When selecting the
baseline(s), the command line for downloading appears.
5. Run Windows PowerShell as an administrator.
2023 Aras Corporation All Copyrights Reserved. 21
Aras DevOps
User Guide
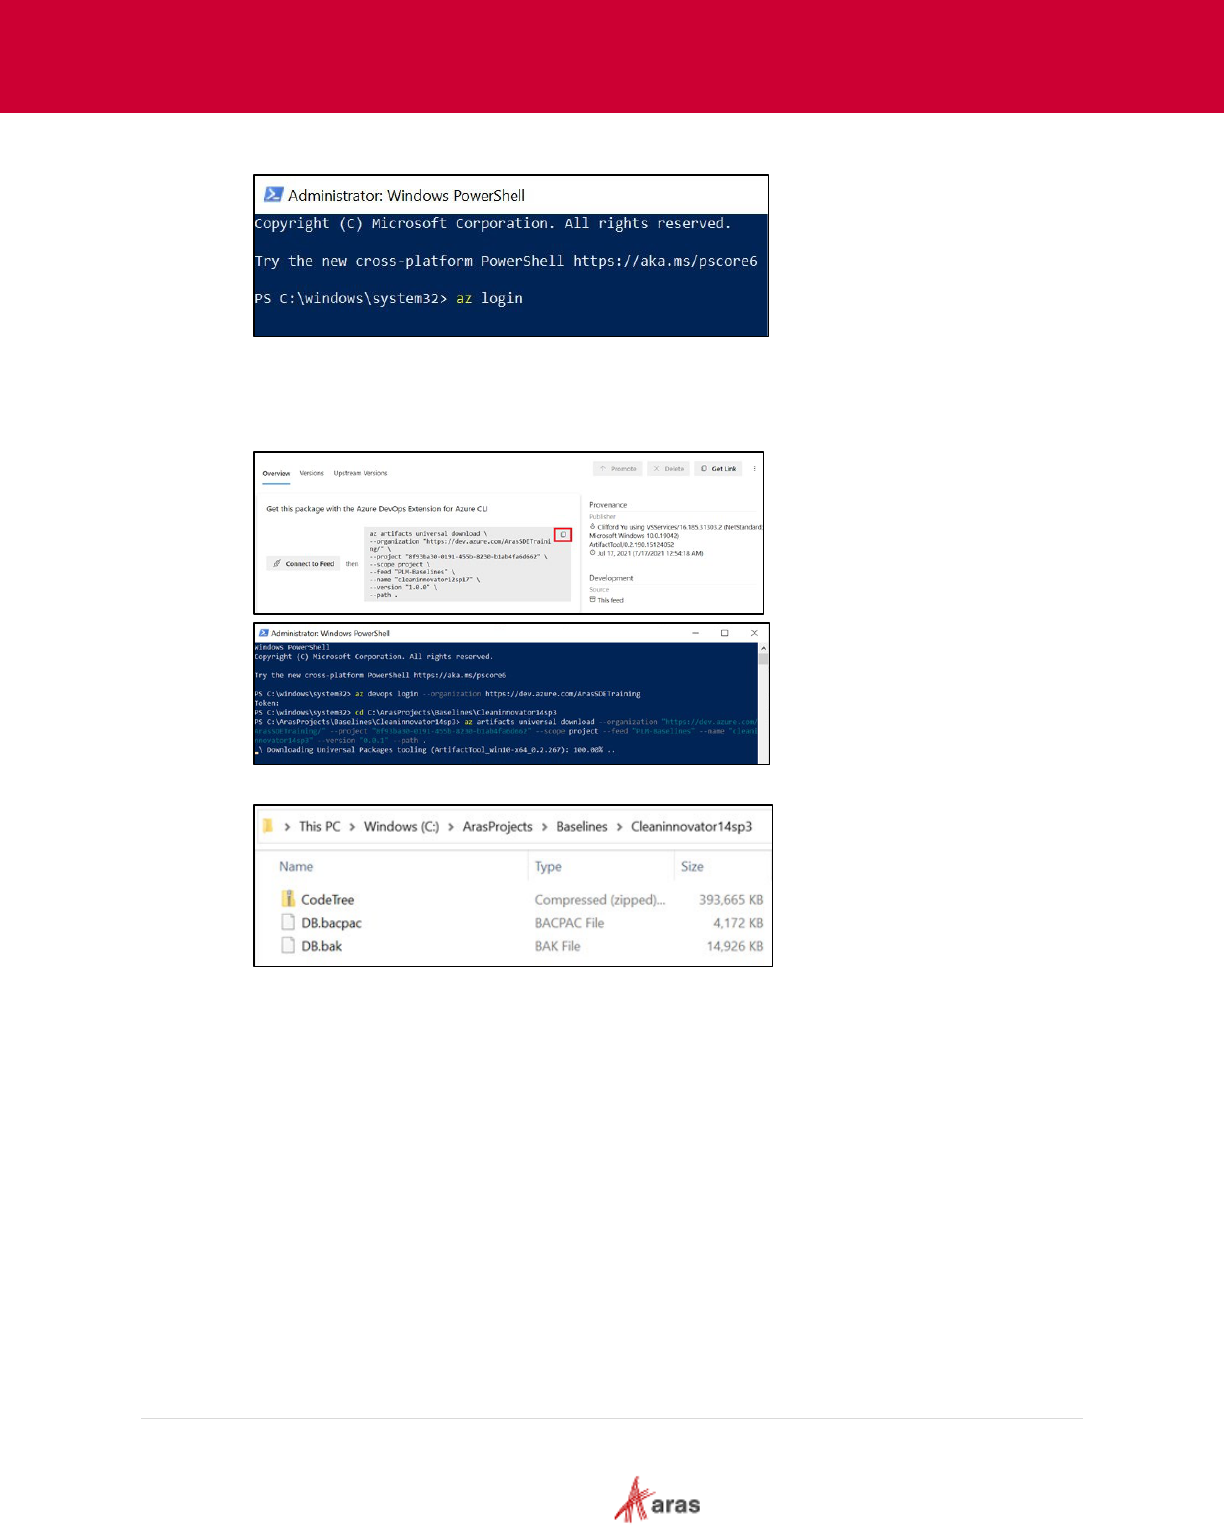
6. Execute command: az login.
7. Run the command to access the newly created folder in step 1:
cd C:\ArasProjects\Baselines\Cleaninnovator14sp3.
8. Copy the command from Azure DevOps to download the baseline and run the command in
Windows PowerShell.
The following files are visible in the newly created folder when the download is complete.
2023 Aras Corporation All Copyrights Reserved. 22
Aras DevOps
User Guide
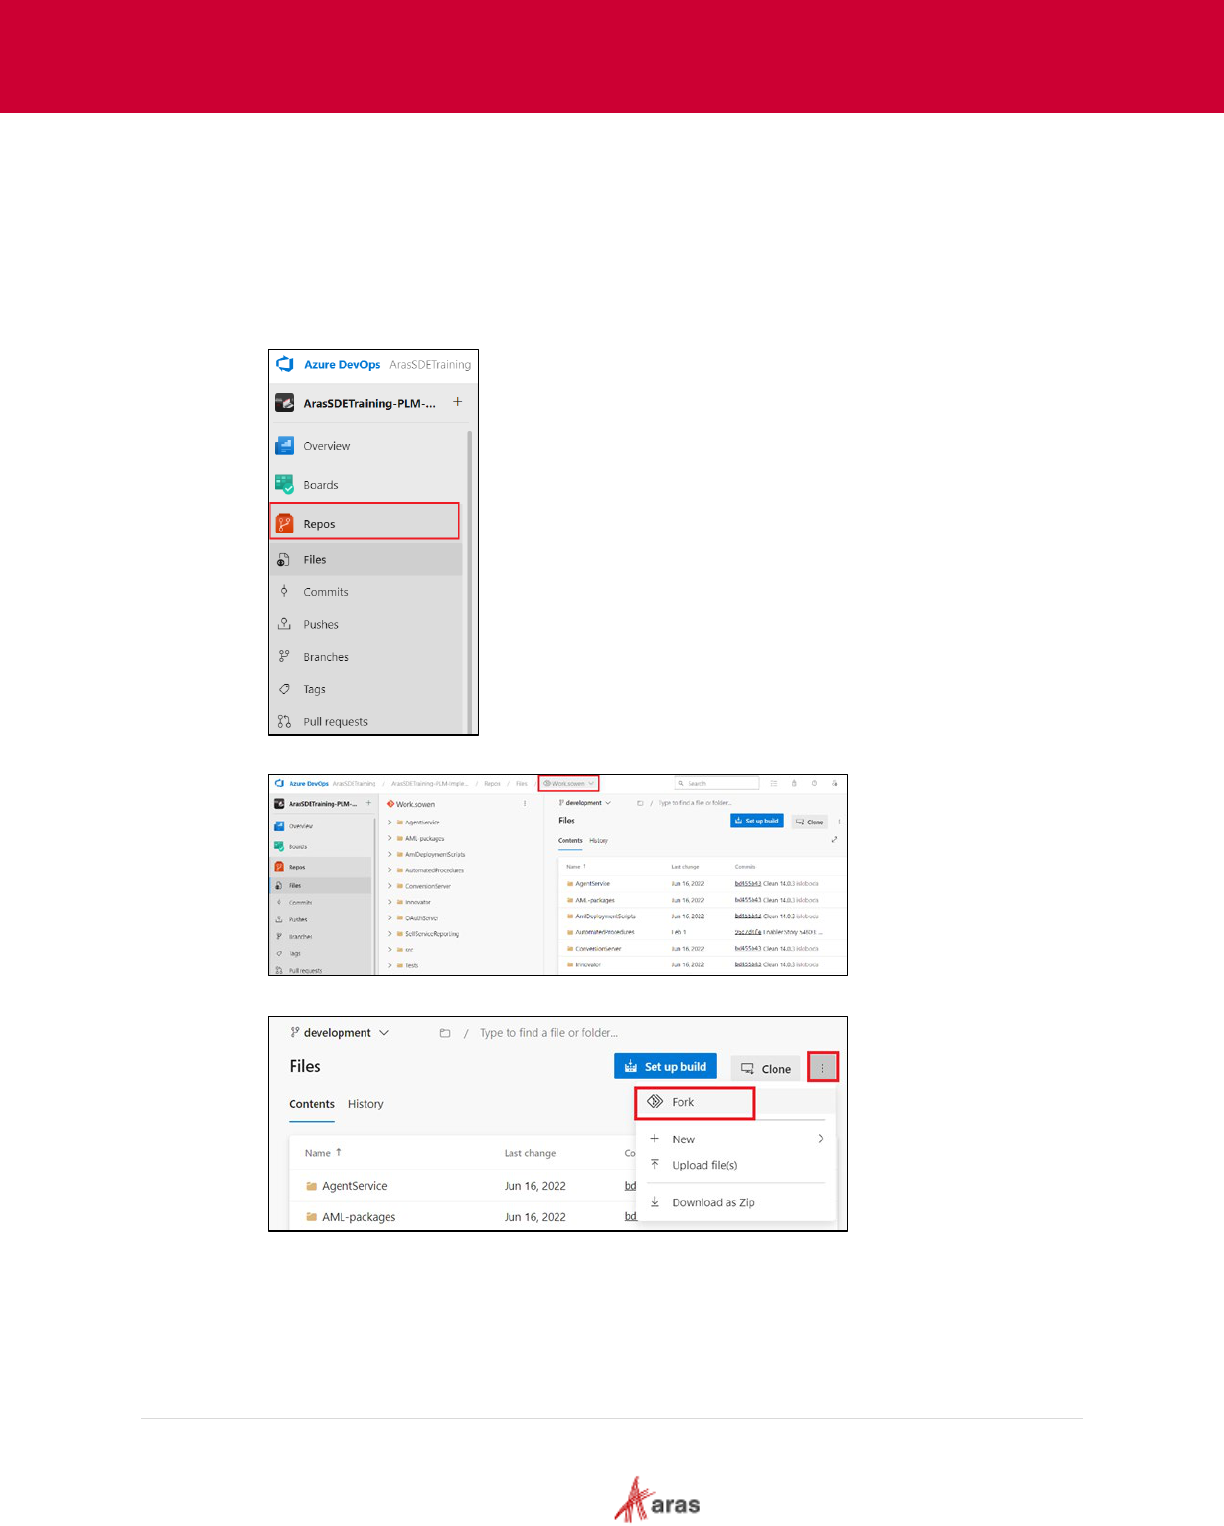
3.2.3 Create Fork and Clone Repository
3.2.3.1 Creating Forks
A Fork refers to the process of creating a copy of a repository within the same organization or
project. Forking a repository generates a new copy of the original repository, including all its
code, branches, and commit history.
The following steps outline the process to create Forks:
1. From Azure DevOps, select Repos.
2. Locate and click the Repository to Fork.
3. Click More actions and select Fork.
4. Select All branches and click Fork. The Repository name and Project is auto populated.
Change the Repository name if needed. Azure DevOps creates the forked repository and
redirects the user to its page once the process is complete. Users clone the forked
repository to the local machine for making changes and push them back to the forked
repository.
2023 Aras Corporation All Copyrights Reserved. 23
Aras DevOps
User Guide
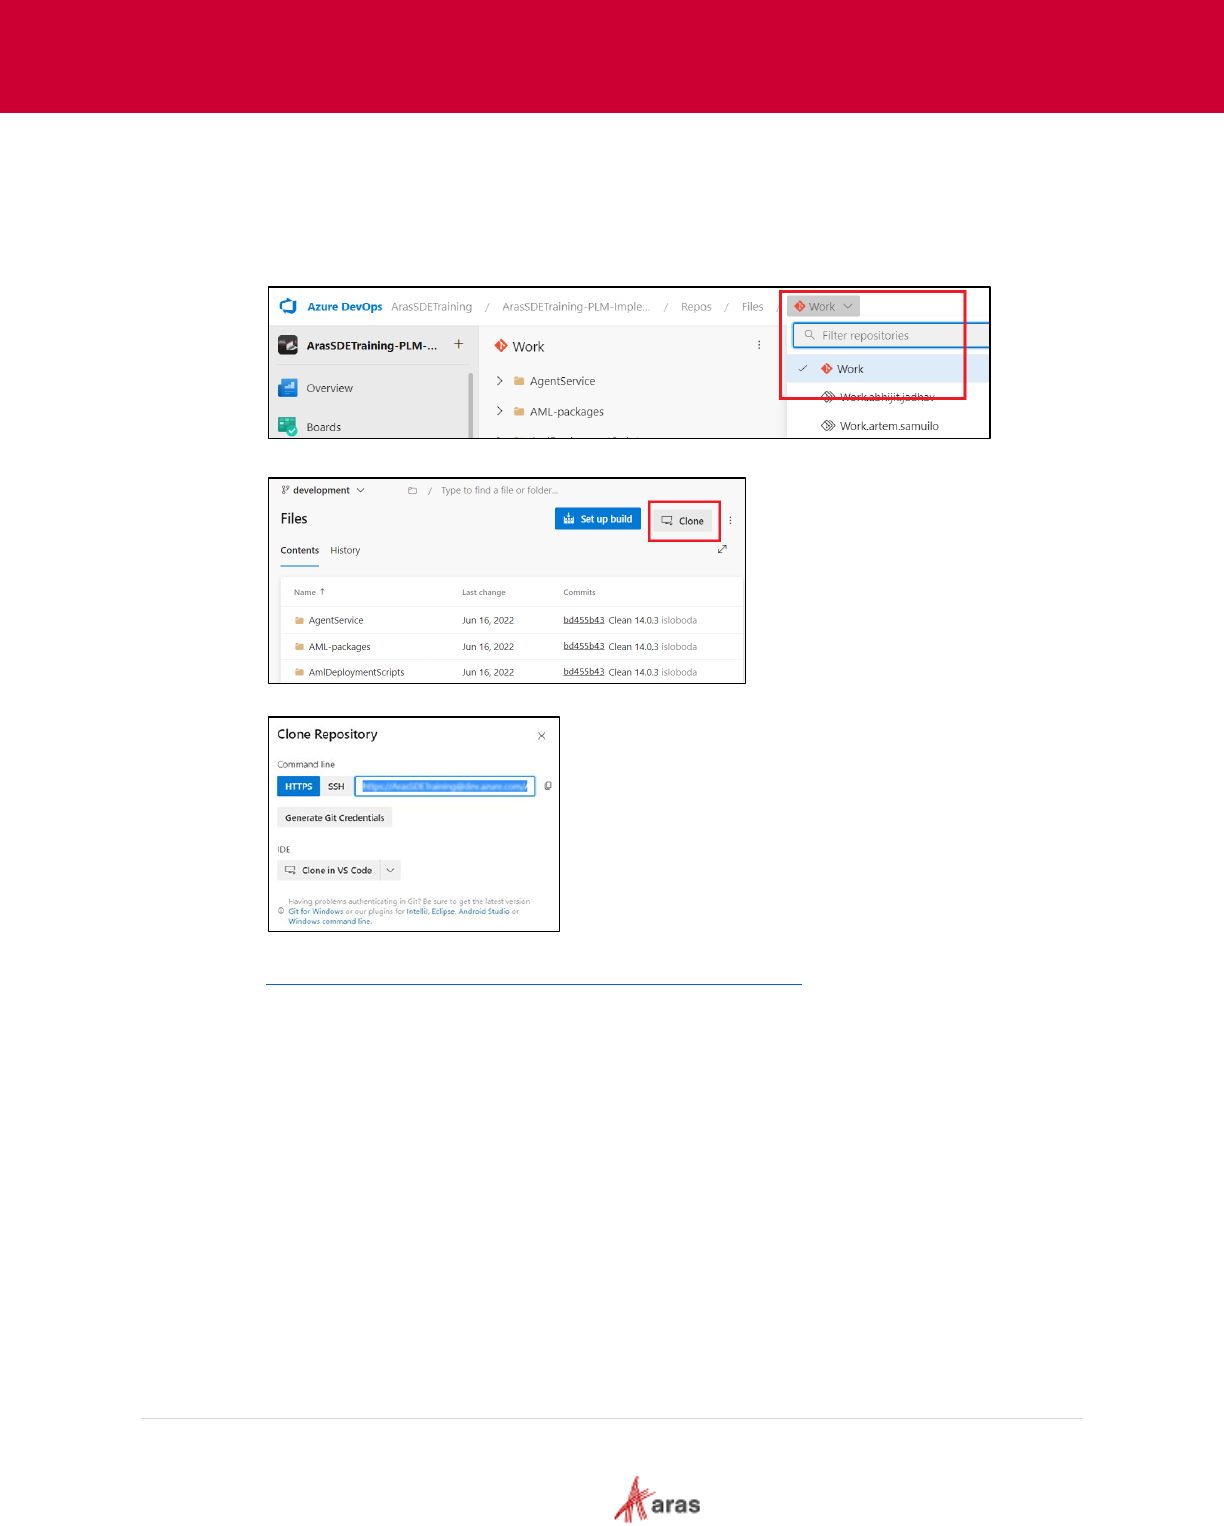
3.2.3.2 Cloning Repo to Local Working Directory
A complete copy of the project’s codebase, commit history, and related files is created on a
local machine when cloning the repository.
The following steps outline the process of cloning a repository to a local directory:
1. Select the fork to be cloned in Azure DevOps from the Work drop-down menu.
2. Click Clone.
The Clone Repository dialog box appears with the repository's clone URL.
3. Copy the clone URL (HTTPS or SSH). An example URL:
https://dev.azure.com/{organization}/{project}/_git/{repository
}. Us
e any version control tools
required to clone the repository.
4. In t
he version control tool's interface, find the option to clone or create a new repository.
5. Paste the clone URL copied from the Azure DevOps project.
6. Browse to the destination directory to clone the repository.
Optional: Depending on the tool that is used, additional configuration options are available
during the cloning process. This could include selecting branches, specifying authentication
credentials, or choosing the desired clone depth.
7. Click Clone within the version control tool.
2023 Aras Corporation All Copyrights Reserved. 24
Aras DevOps
User Guide
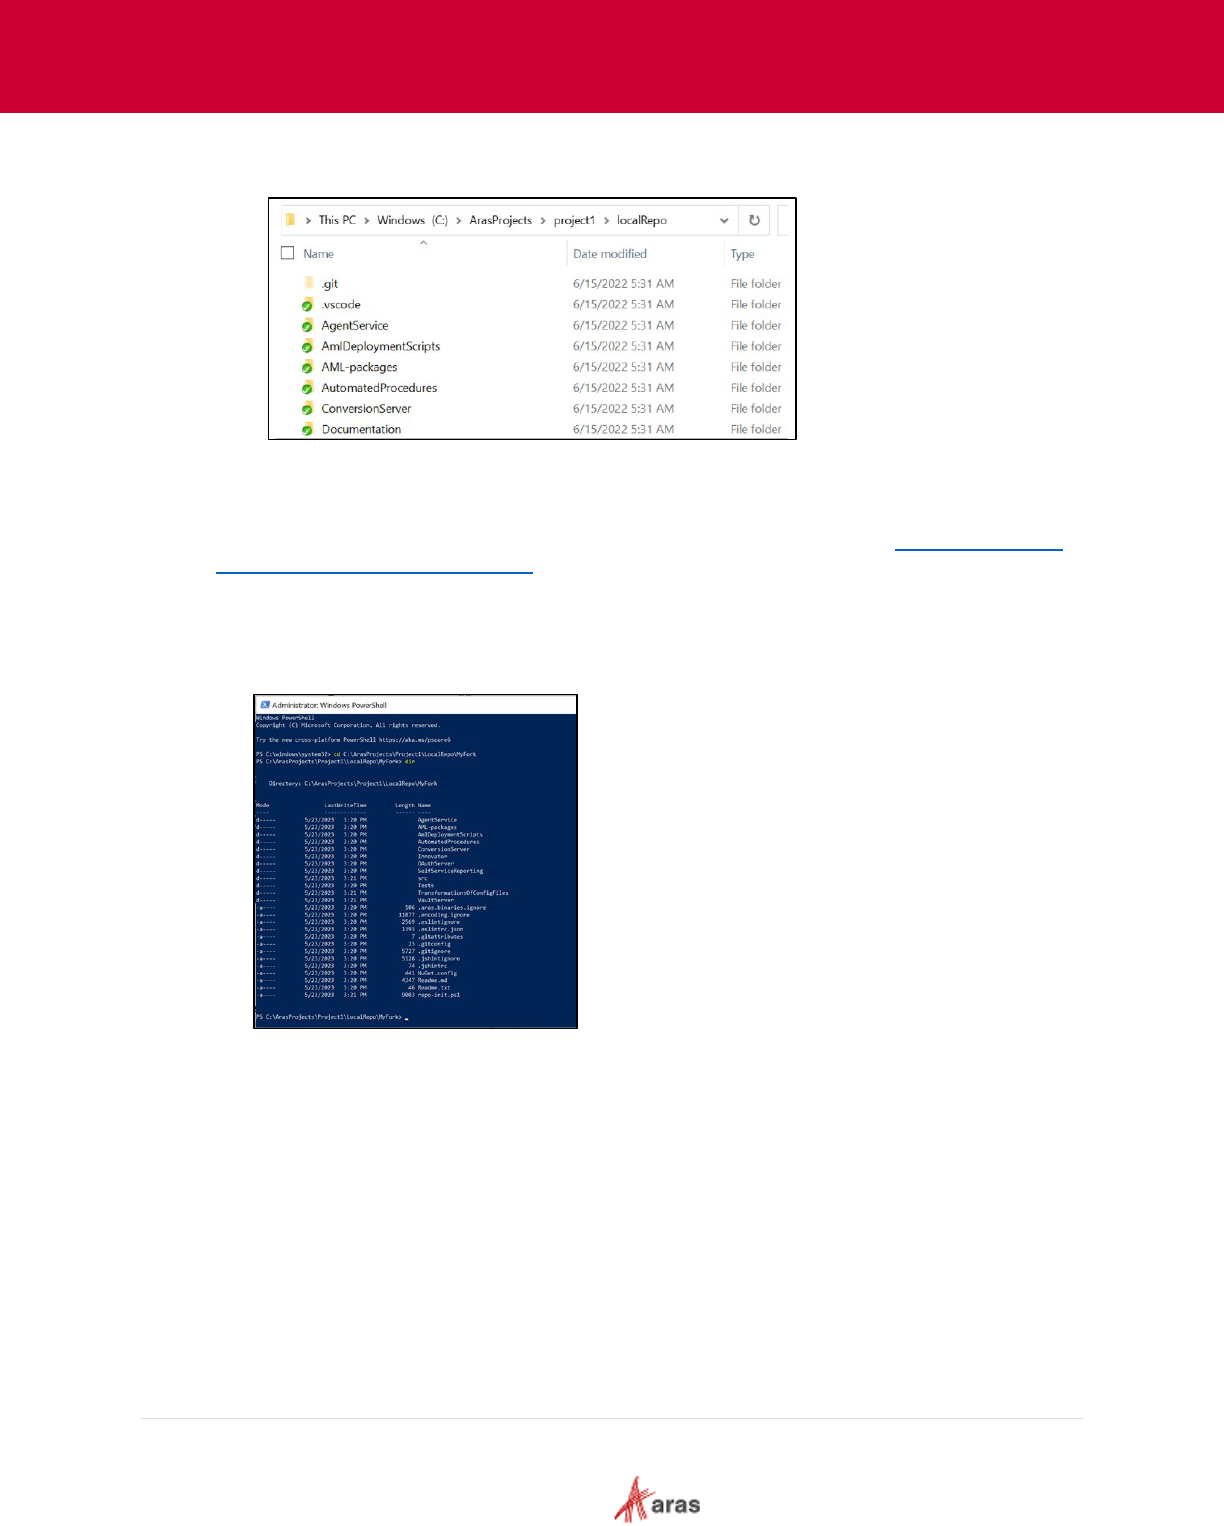
8. When the cloning is completed, confirm the contents of the localRepo folder against the
contents of the Fork in Azure DevOps.
3.2.4 Review Working Directory
Prerequisite: To continue with this section, ensure that the workstation (either a laptop or a
virtual machine) has been configured to operate within the LDE. See section Appendix I: Setting
up Local Development Environment for more details.
The following steps outline the process to set up the working directory:
1. Open a Windows PowerShell window as administrator and go to the repository. For
example: C:\ArasProjects\project1\localRepo.
2. To check the directory, execute command: dir.
2023 Aras Corporation All Copyrights Reserved. 25
Aras DevOps
User Guide
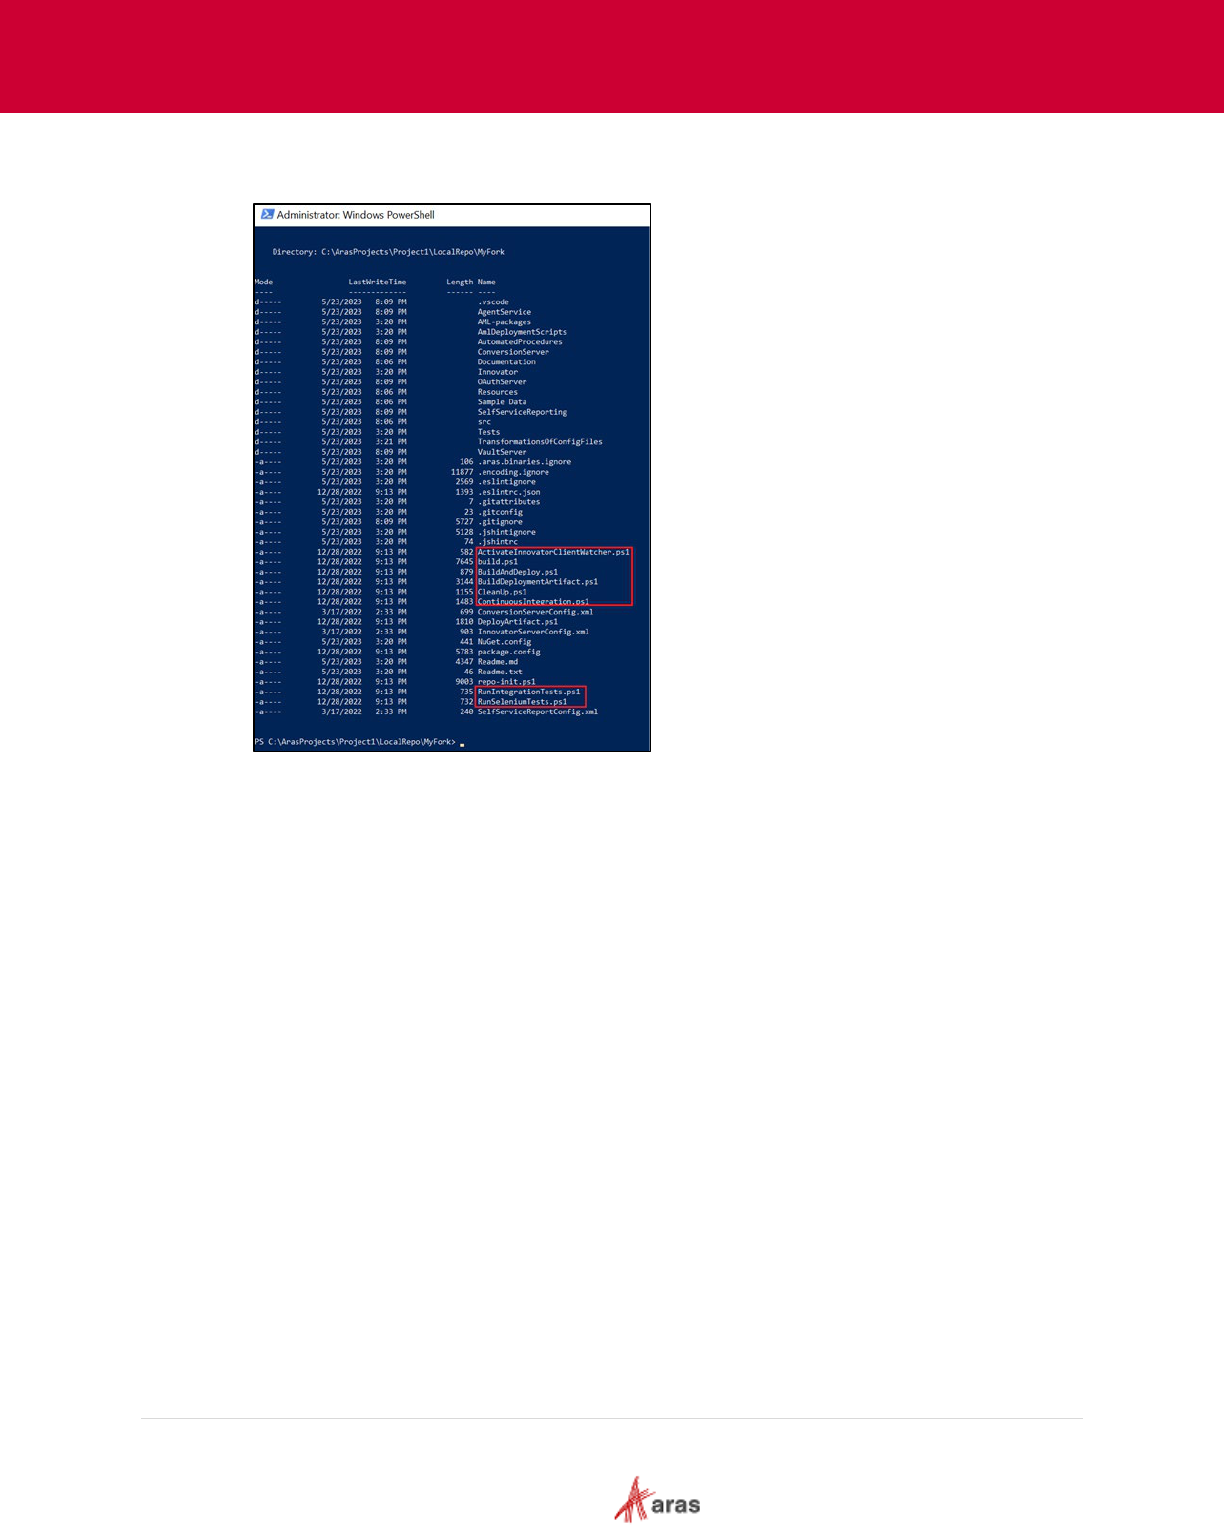
3. Run the following script: repo-init.ps1.
A few more files are added after the repo-init.ps1 script is run.
3.2.5 Local Environment Variables Set Up
A local environment is now established and connected to the Standard SDE.
The build and deployment scripts running in the SDE possess local equivalents that require
specific details related to the given environment and the associated Git branch. Property settings
provide these details.
The property values have the following precedence. They can be set or overridden based on this
precedence. The highest is evaluated last as shown.
• Default.Settings.include – this file is located in “...\AutomatedProcedures\
• Machine.Settings.include – this file is located in “c:\” or alternate root directory
• <ProjectPrefix>-<git-branch>.Settings.include – the project Prefix is set in
“Default.Settings.include” the git branch must match the branch that user check out
BuildAndDeploy.ps1 file is used to deploy Aras Innovator and the customization from the
current directory.
The following steps outline the process to run BuildAndDeploy.ps1 in a local environment:
1. Open Windows PowerShell as administrator and go to the working directory. For example:
C:\ArasProjects\project1\localRepo.
2023 Aras Corporation All Copyrights Reserved. 26
Aras DevOps
User Guide
2. Run .\BuildAndDeploy.ps1.
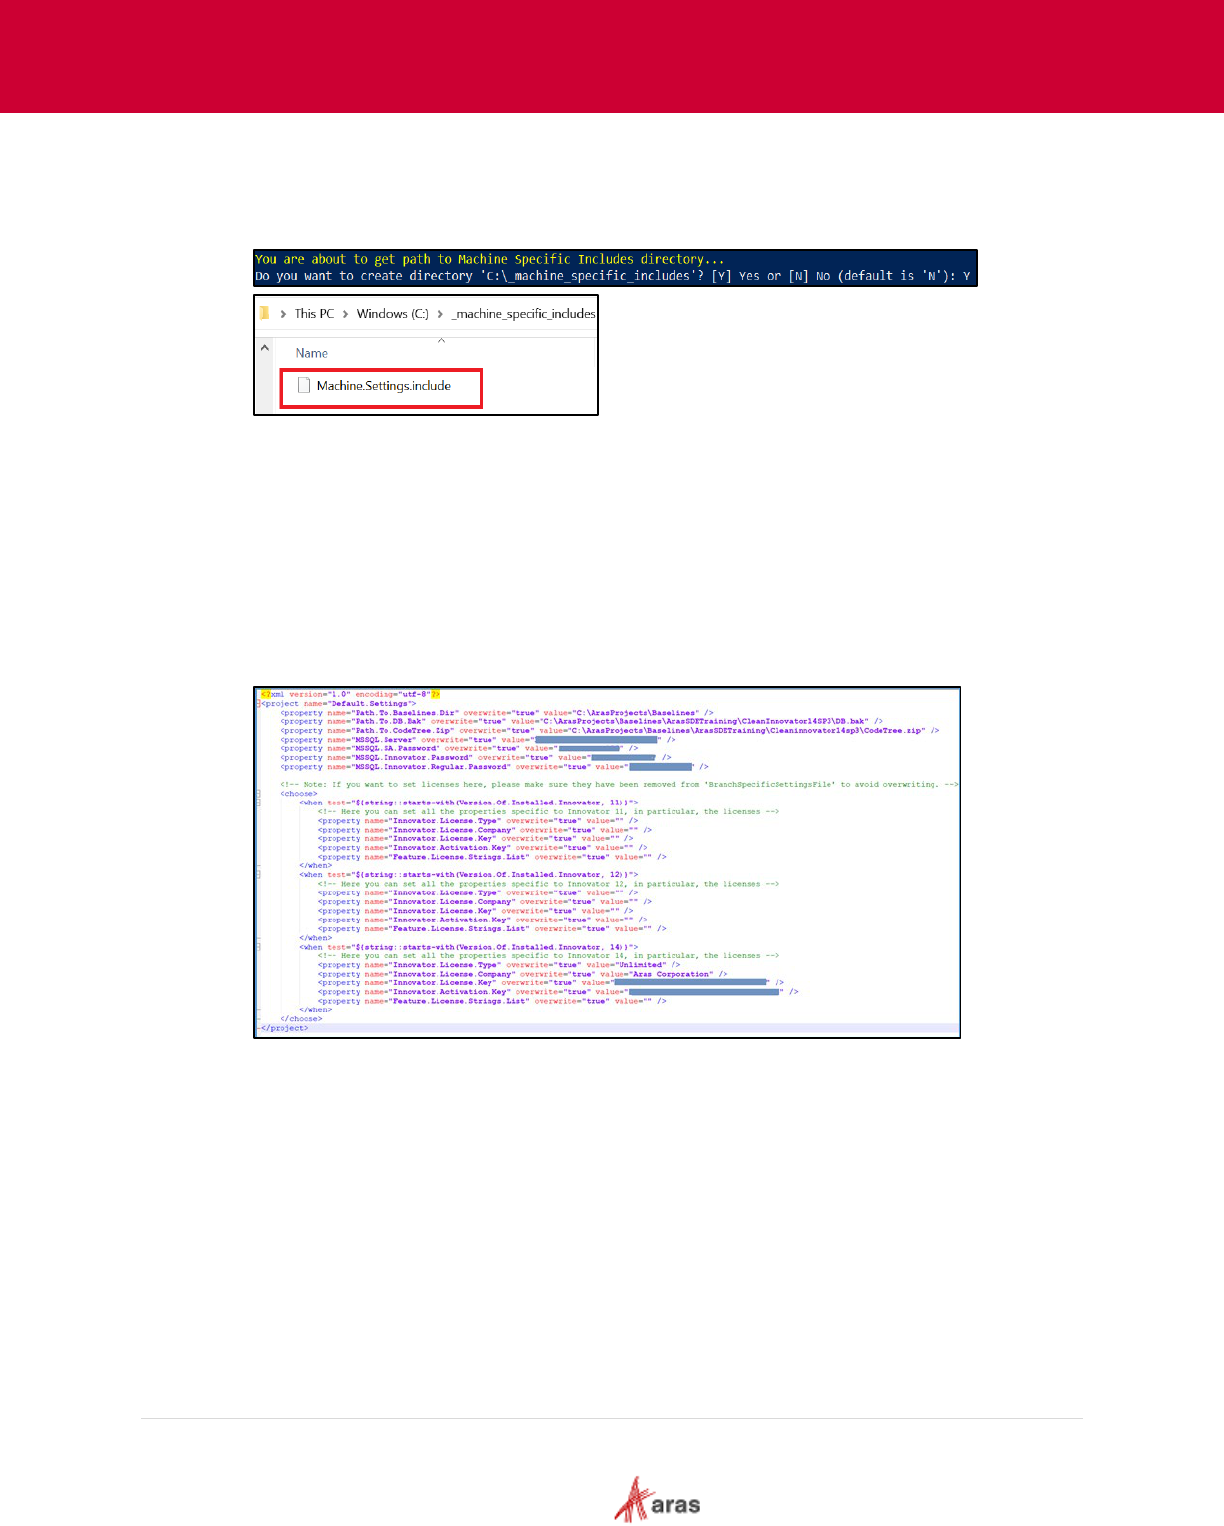
When BuildAndDeploy.ps1 script is run for the first time it does the several environment
verifications, and creates following file:
C:\_machine_specific_includes\Machine.Settings.include
The Machine.Settings.include file contains series of key/value pairs that are used by the
build process to build Aras Innovator on the local machine.
The prefix for the project and a reference to the last commit are used from an include file
which is present in the following local repository:
C:\ArasProjects\project1\localRepo\AutomatedProcedures\Default.Settings.include.
The Default.Settings.include includes all the default properties required for a project.
When executing a script, a variable is first loaded from Default.Settings.include. If the same
variable is defined into Machine.Setting.include, the value is overwritten. Finally, if the
variable is defined in a branch specific file, the value is overwritten.
3. Update the Machine.Settings.include file with the following:

2023 Aras Corporation All Copyrights Reserved. 27
Aras DevOps
User Guide
o Project Specific Settings:
Path to baseline directory: For example, C:\ArasProjects\Baselines.
Path.To.DB.Bak: File path to a “clean” copy of the Innovator solutions database. For
example, C:\ArasProjects\project1\Baselines\CleanInnovatorxxSPyy\DB.bak.
Path.To.CodeTree.Zip: A file path to the CodeTree.zip archive which contains the
code tree of production Innovator instance. E.g.,
C:\ArasProjects\project1\Baselines\CleanInnovatorxxSPyy\CodeTree.zip.
Machine Specific Properties:
Innovator.License.Type: This is typically “Unlimited”, “Version” or “Verified”
depending on the key being used for this project.
Innovator.License.Company: The licensed company name.
Innovator.License.Key: A license key to be used for the installation. This can be
obtained from http://www.aras.com/support/LicenseKeyService/
Innovator.Activation.Key: An activation key for features that have been licensed for
this project.
MSSQL.Server: Name of the SQL Server instance. (Default is thelocal machine.)
MSSQL.SA.Password: The password for the sa (system admin) login.
MSSQL.Innovator.Password: Password for the Aras admin login (default is innovator
Feature.License.Strings.List: This is an optional property. It is required only when the
user needs to set values to features such as TAF (Test Automation Framework) that is
required as part of CI/CD.
2023 Aras Corporation All Copyrights Reserved. 28
Aras DevOps
User Guide
3.2.6 Build and Deploy Locally
The cloned repository on the local machine contains the actual definition of the customization
project. It is now time to deploy it on the local machine.
The following steps outline the process of building and deploying Aras Innovator locally:
1. Open a new session on Windows PowerShell as administrator and go to the working
directory. For example: C:\ArasProjects\project1\localRepo.
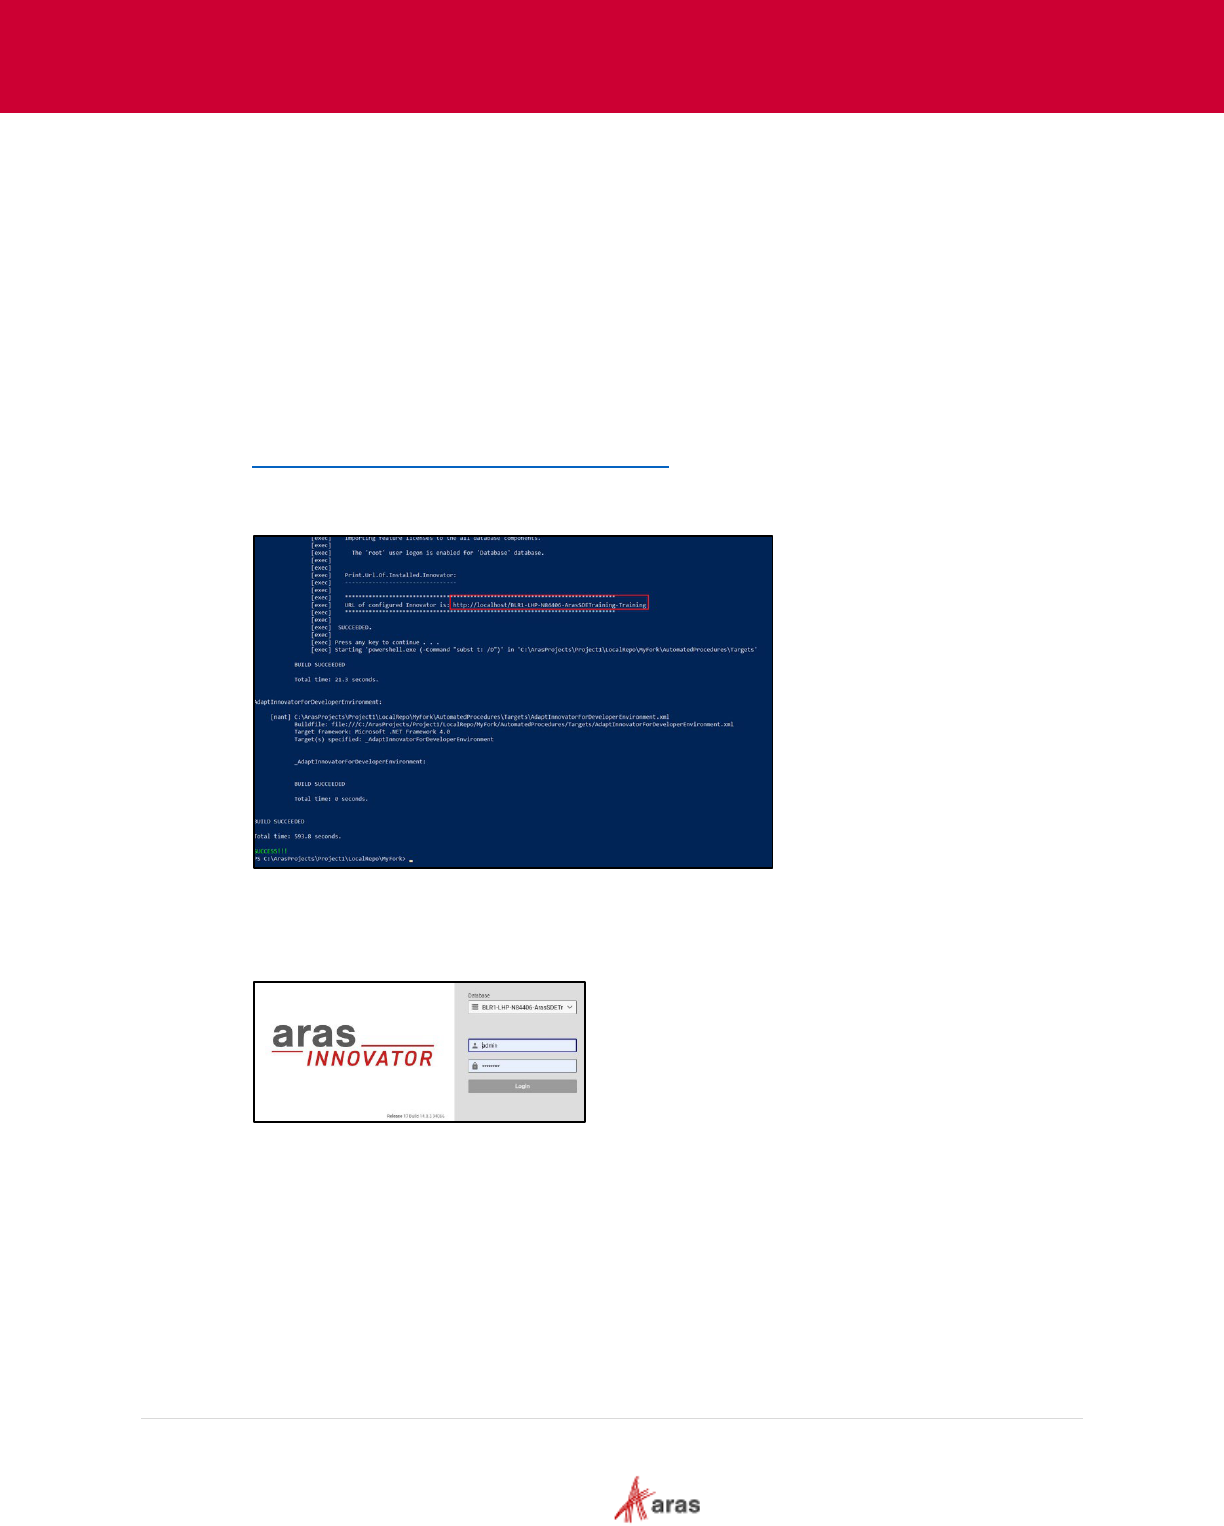
2. Run .\BuildAndDeploy.ps1. If any errors occur, make corrections in the
Machine.Settings.include file and run the same command again.
Once the process is complete, a new instance of Aras Innovator is deployed (the output from
the batch file will indicate the URL). A new database is created based on the values provided
in the settings file and Aras Innovator is ready to run.
http://localhost/[
MachineName]-[Prefix]-[branch]
SQL Server DB is restored:
[MachineName]-[Prefix]-[branch]
3. Copy the URL and paste it in the browser.
4. Log in to Aras Innovator as an administrator with the following credentials:
Username: admin
Password: innovator
At this point, contributors have a basic work environment setup and are ready to contribute as
a member of a customization project team.
As mentioned earlier, a central focus of DevOps is to instill a culture and disciple to ensure
proper management of the solution development process and the transition of a well-
managed solution configuration into business-critical operations.
The following two sections introduce two essential aspects of the DevOps culture and lean
agile development in general.
2023 Aras Corporation All Copyrights Reserved. 29
Aras DevOps
User Guide
3.3 Continuous Integration and Continuous Delivery (CI/CD)
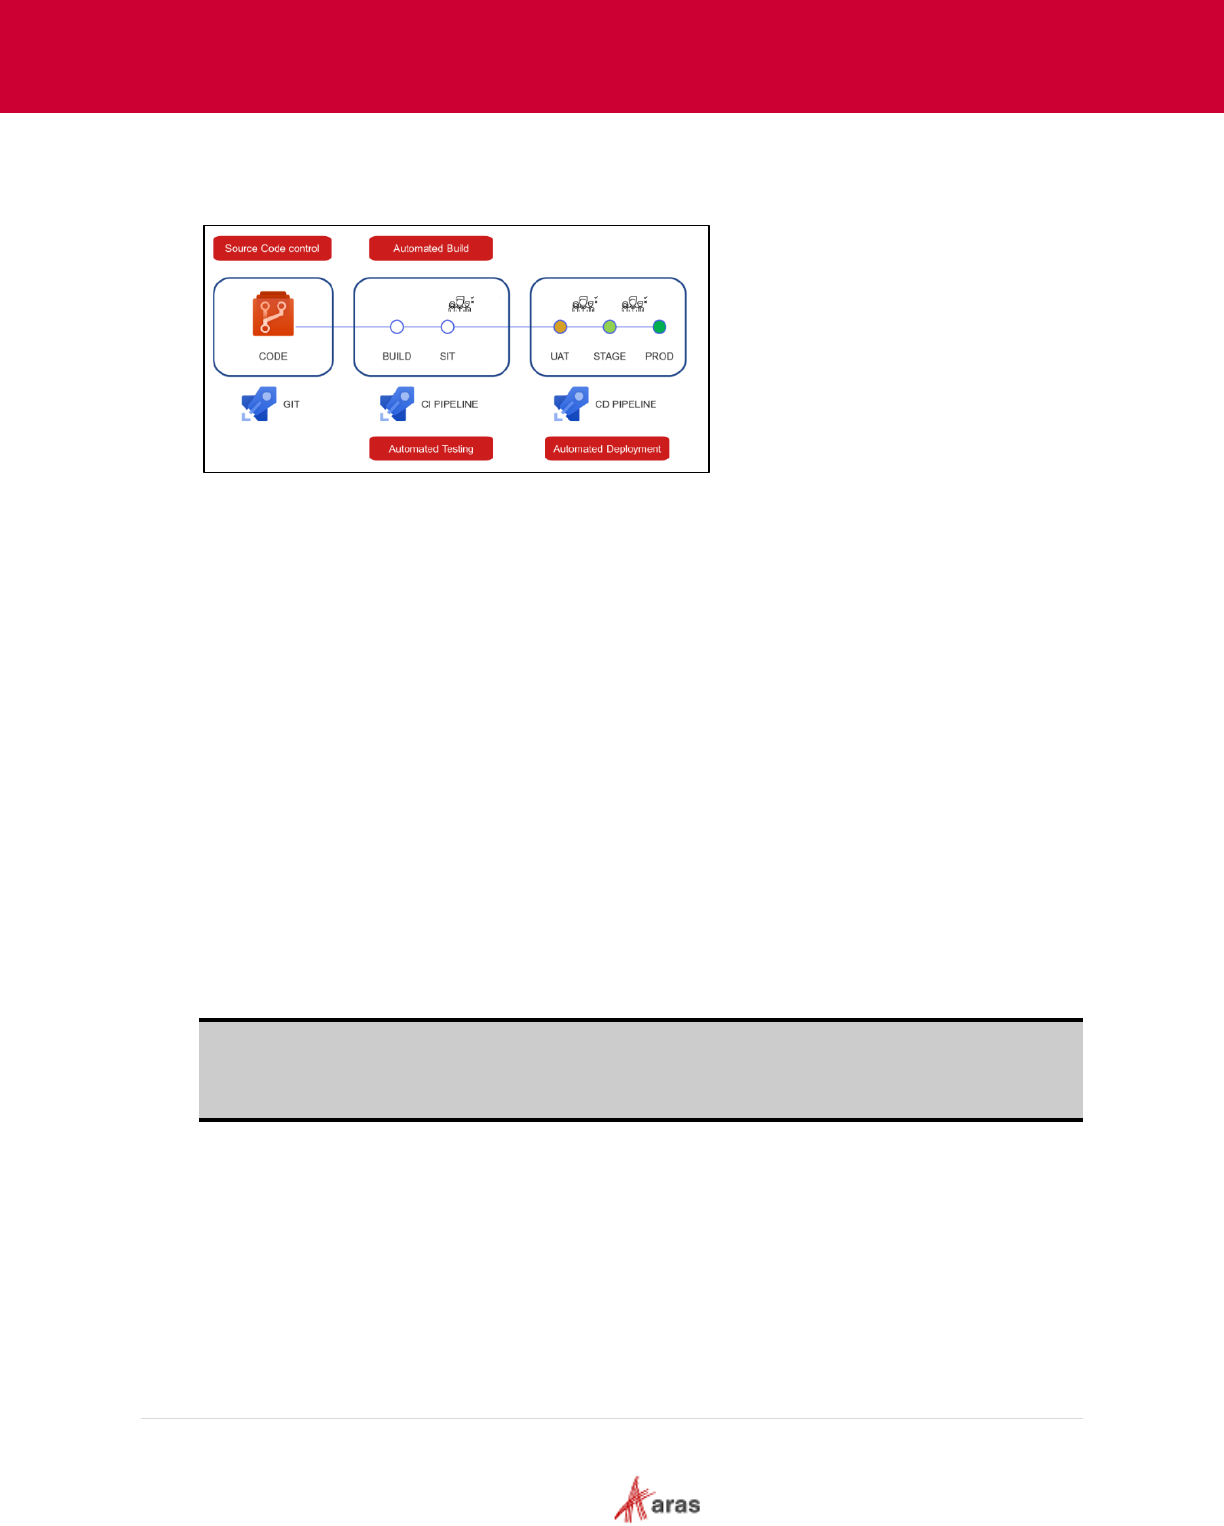
Aras DevOps is based on Continuous Integration and Continuous Delivery practices.
The above illustration shows the basic flow of Continuous Integration (CI) and Continuous Delivery
process of merging code changes from multiple contributors to a single repository.
• Code = source code control. Source code control includes items such as AML Packages,
configuration files and settings. It includes the code tree modification and the various libraries
that constitute the solution.
• Commits are means to manage changes that take solution from one configuration to the next.
• The CI Pipeline supports continuous integration where various contributors use pull requests
(PRs) to submit their contributions to the integrated solution. The system automatically builds
and runs any available automated tests written by developers. If automated tests fail, the PR
will fail. The developer will need to fix their code to successfully submit their PR. Reviewers
check the work before accepting it.
• The resulting artifact that has successful pipeline are candidate to be deployed to System
Integration Testing (SIT) instance for manual testing.
Continuous delivery is an approach where teams release quality products frequently and
predictably from source code repository to production in an automated fashion. Once code has
been tested and built as part of the CI process, continuous delivery takes over during the final
stages to ensure it can be deployed as packaged, with everything it needs to deploy to any
environment at any time.
Continuous delivery can cover everything from provisioning the infrastructure to deploying the
application to the testing or production environment.
Note: When Aras DevOps is purchased separately (as opposed to within an Aras Enterprise
subscription), the customer independently hosts the UAT, Staging, and Production
environments on their own infrastructure. The creation of these pipelines falls completely
outside the scope of Aras DevOps.

2023 Aras Corporation All Copyrights Reserved. 30
Aras DevOps
User Guide
3.4 Testing
Testing is an integral part of agile and lean methodology:
1. Continuous Improvement: Regular testing provides feedback that aids in constant product
refinement, catching bugs early, and improving quality.
2. Customer Satisfaction: Testing ensures the product meets customer requirements and
functions as expected, enhancing user experience.
3. Risk Mitigation: Testing identifies potential issues early, reducing the risk of major problems
and saving time and resources.
4. Collaboration: Testing fosters better communication and understanding between developers
and testers.
5. Rapid Delivery: Continuous testing supports Agile and Lean's emphasis on frequent,
incremental software delivery.
6. Built-In Quality: In Lean, quality is embedded in the development process, so every piece of
code is tested as it's developed.
7. Adaptability: Testing ensures changes made during the project don't negatively impact the
system.
The Aras Test Automation Framework (TAF) is a framework for writing and executing automated
tests for the Aras Innovator platform included within Aras DevOps. It is a set of APIs that abstract
the complexity of the underlying testing frameworks used – Selenium, NUnit and TestRunner. TAF
greatly reduces the brittleness of automated tests as the underlying browser and application
technologies change. The goal of TAF is to absorb the changes made by say, Google Chrome or
Aras Innovator, such that tests written on one version for a piece of functionality continue to work
on the next version of Aras Innovator for the same functionality.
TAF includes APIs for automated tests to cover:
• Web UI (Selenium)
• Integration (AML)
To support the demand of Continuous Integration and Continuous Delivery (CI/CD), automated
testing increases an organization’s ability to thoroughly test new functionality and applications as
fast as they are developed. This framework is built to work with the Aras Innovator Platform to
improve the speed, cost, and quality of the development process.
TAF has a framework for writing web functional tests and end-to-end tests that use the Aras
Innovator Web Client like a real user.
The following section details the steps for an individual contributor to make changes within their
Local Development Environment and submit it for integration into the SDE.
2023 Aras Corporation All Copyrights Reserved. 31
Aras DevOps
User Guide
4 Contributor Process
Section 3.2 Local Development Environment (LDE) introduces the LDE, explaining the configuration
process as well as the procedures for building and deploying a local instance of Aras Innovator
Now let us extend that knowledge to enable a contributor to make contributions.
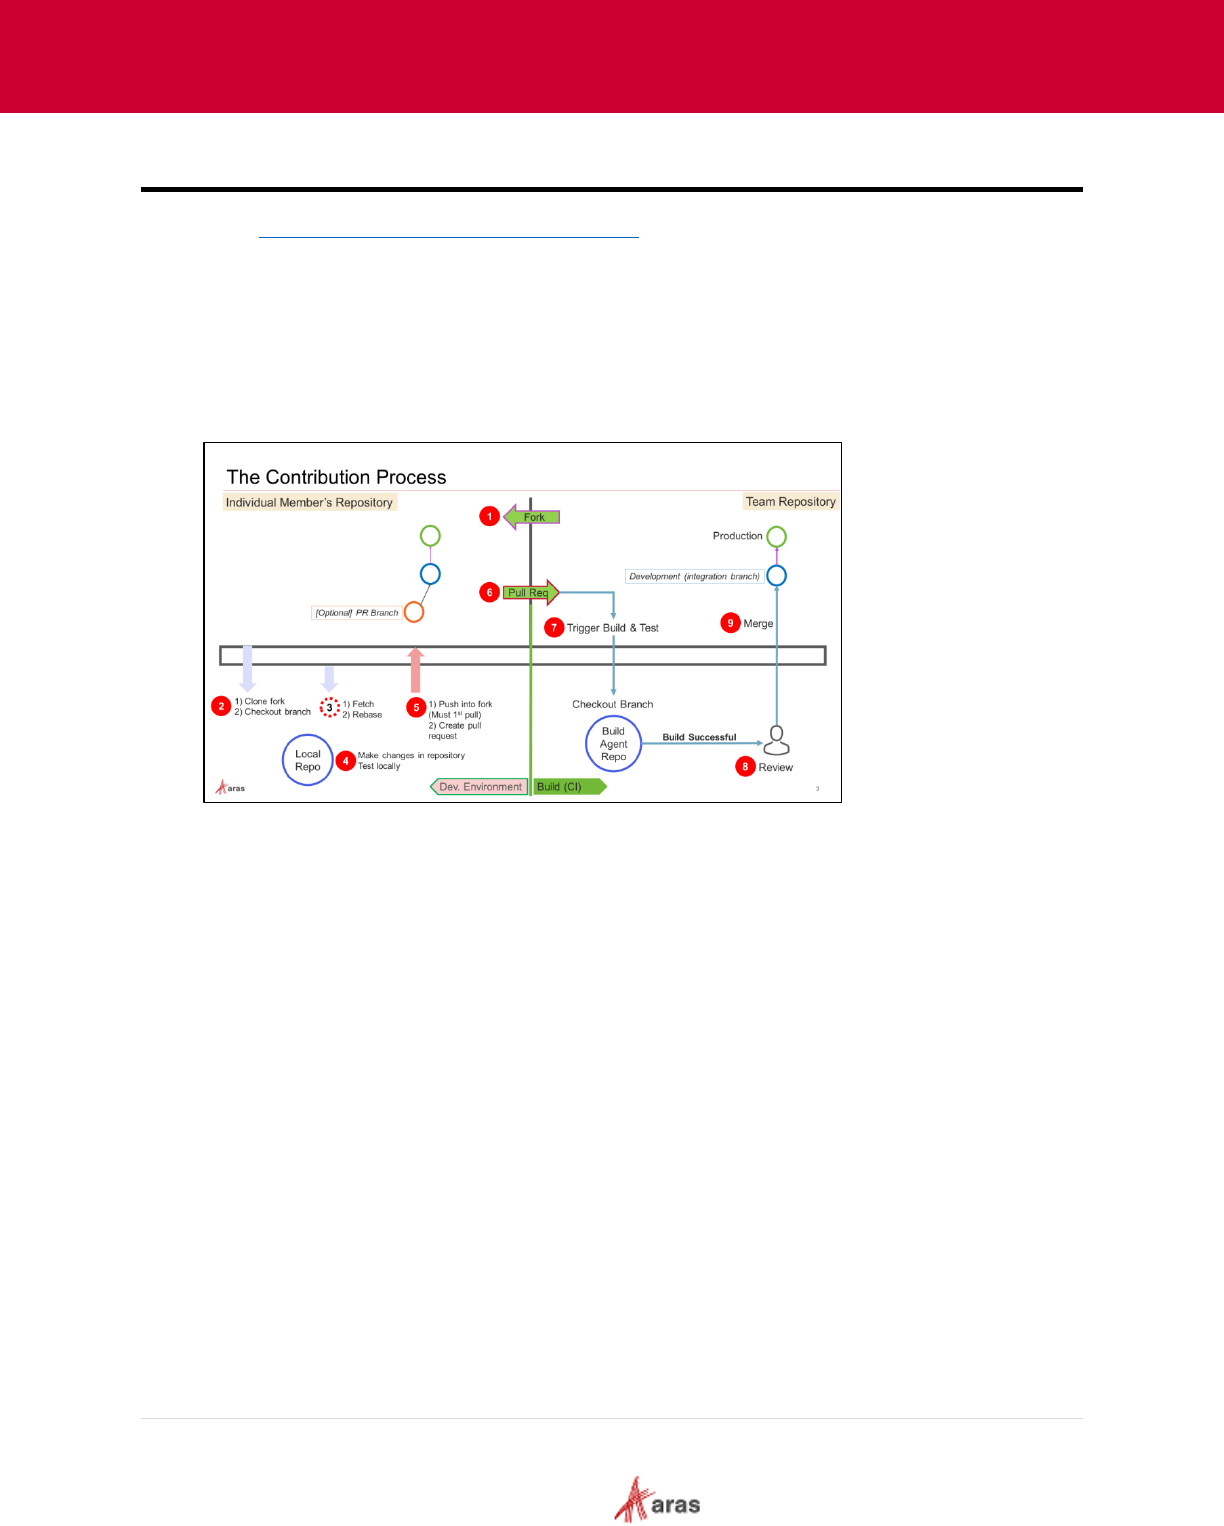
4.1 The Contribution Process Overview
The developers, test/QA engineers and other stakeholders in a team are considered Contributors.
The Contributors who may contribute source files (configuration files, source code C#, etc.) need to
create a Fork to manage their work in the environment.
1. Create a Fork (copy of the shared team repository).
2. Clone the Fork to the local environment and check out the branch to work on.
3. Add a remote reference to the team repo to fetch and rebase the current work on it.
4. Make changes in the repository and test locally by running RunIntegrateTest,
ContinuousIntegration, and other scripts.
5. Commit the changes locally and then push.
6. Create the pull request.
7. Updates to the source branch after the pull request is created and the initial creation triggers a
ContinuousIntegration pipeline based on branch policy.
8. When the ContinuousIntegration pipeline has successfully built the artifact, it will run a test and
report a green status or not. Based on that status, reviewers may approve the PR. They may
also reject it even with a green build, if some other project practice is violated.
9. When the PR is approved and merged, the branch would typically have a policy to run the
ContinuousIntegration pipeline again. This is to make sure that all PRs are still in sync. The
goal is to ensure that the common repo branch is always buildable.
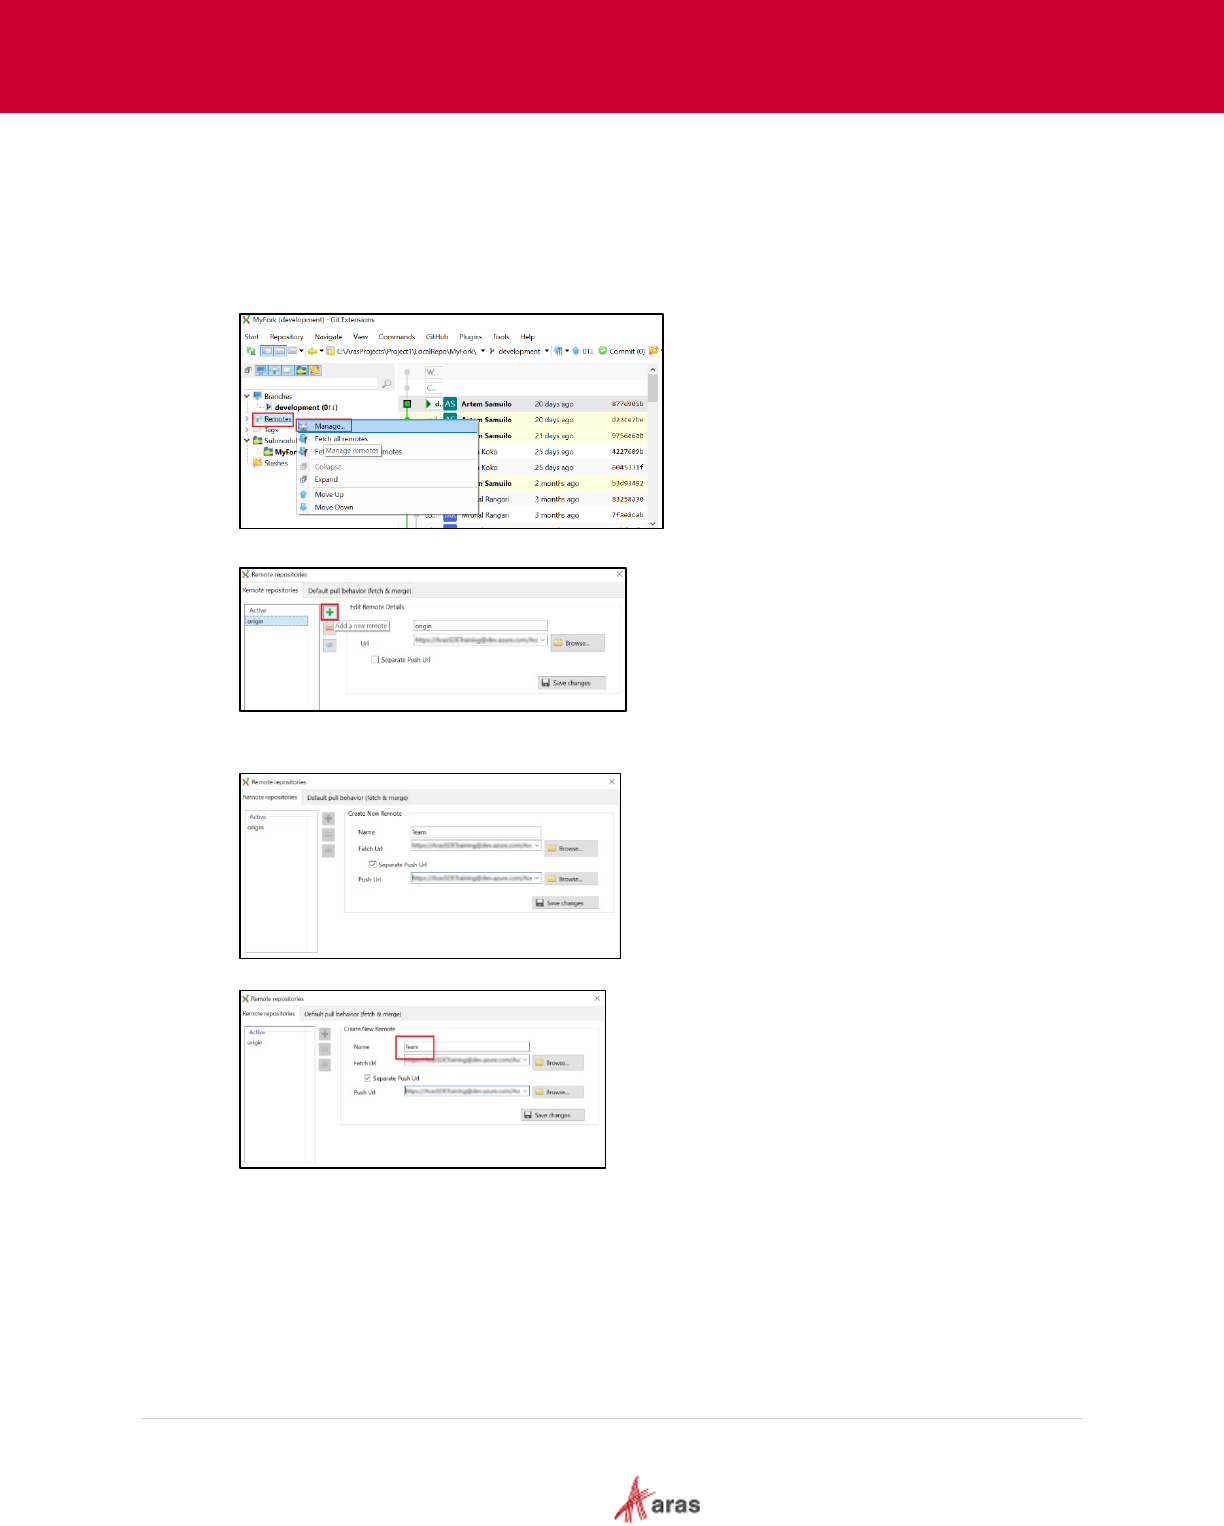
4.2 Adding Remote Reference
To incorporate the current work with the team repository and keep it up to date, the contributor
needs to establish a remote reference. By adding this reference, the contributor creates a
connection between the local repository and the shared team repository. This allows them to fetch
the latest changes made by the team and rebase contributor’s work on top of them. Cloning and
other preliminary steps have already been completed; this reference addition is specifically meant
for facilitating contributions.
2023 Aras Corporation All Copyrights Reserved. 32
Aras DevOps
User Guide
The following steps outline the process of creating addition remotes:
1. Launch the chosen Version Control tool on the local machine.
2. Use the version control tool to navigate to the local repository where user wants to add the
remote reference.
3. Find the option or command within the version control tool to add a remote reference or remote
repository.
4. Click + icon to add a new remote.
5. Enter the remote repository URL into the appropriate field or prompt within the version control
tool.
6. Optional: Assign a name to the remote reference to make it easier to reference in the future.
2023 Aras Corporation All Copyrights Reserved. 33
Aras DevOps
User Guide
7. Once the necessary details are entered and configured any optional settings Save and add the
remote reference.
8. To confirm that the remote reference has been successfully added, use the version control tool
to view the list of remote references associated with thelocal repository.
4.3 Making Changes in Local Repo
As an individual contributor, make changes in the Local Repo and test them locally before
submitting them to merge into the team's work. Modifying the local repository of Aras Innovator
involves making changes to the files and configurations stored on the local machine. These
changes can include customizations to item types, forms, workflows, reports, and other aspects of
the Aras Innovator solution.
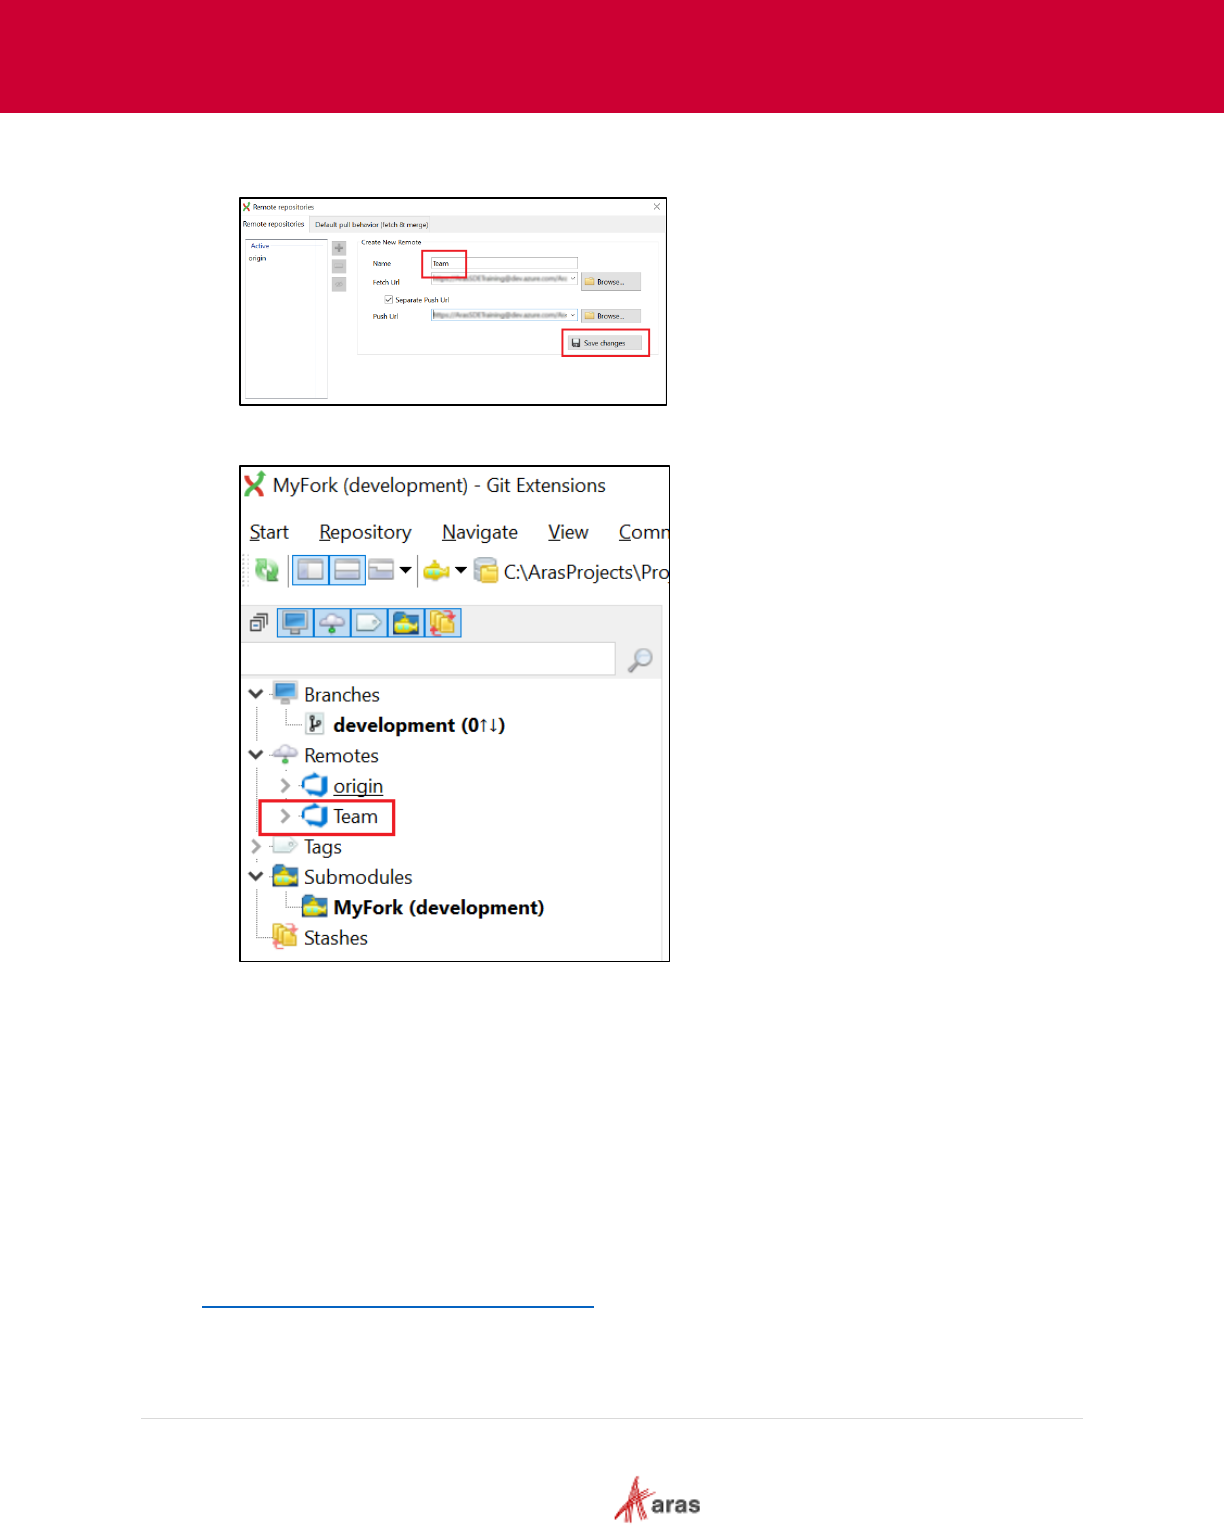
4.4 Exporting Packages
Once the changes made in the Package Definition are complete, the package can be exported
using the Export utility. This utility is a separate executable named export.exe that is available on
the Aras Innovator CD image, or that may be downloaded from
https://www.aras.com/en/support/downloads
.
The Export utility selects a Package Definition from the database and creates a package folder
structure in the file system. Each Package Group (ItemType, Form, etc.) becomes a separate
subfolder in the file. Within each subfolder, each exported Item is represented as an AML file with
the same name as the exported Item.
2023 Aras Corporation All Copyrights Reserved. 34
Aras DevOps
User Guide
The following steps outline the process of running the export utility tool:
1. Download the Export utility from https://www.aras.com/en/support/downloads
.
2. Run the export.exe as administrator.
4.4.1 Make Required Changes in Aras Innovator Instance
Login into the Innovator Instance and make customizations as per the project requirements.
4.4.2 Export Package After the Changes
Once all the changes are made to the Aras Innovator instance, it’s now time to export those
changes.
The following steps outline the process of exporting the packages after the changes:
1. Create a folder to export the changes made. For example, “C:\ArasProjects\Project1\Local
Exports\Form Export 2”.
All the data which is exported will be stored in the folder that is created in step 1.
2. On the export utility tool do the following:
• Server: Enter the Aras Innovator server URL
• Login in (fill in username admin and password, then click the login button).
• Set the new destination of the export, all the exported files will be stored in that directory.
For example: C:\ArasProjects\Project1\Local Exports\Form Export 2
• In the Packages section, click on the ellipsis button.
• Locate the package definition that is changed and select Items.
3. Click the Export button.

2023 Aras Corporation All Copyrights Reserved. 35
Aras DevOps
User Guide
4.5 Copying the Export Utility’s Output to the Local Repo
Once the changes are made and the files are exported, copy the top common folder and paste it
into the local working directory of the repository (AML-Packages). During this process, be sure to
accept any file replacement warnings that may appear.
4.6 Staging Modified Files
Modified files should be staged prior to committing them to the version control system (Git) for
review and to ensure accuracy.
The following steps outline the process of Staging the modified file:
1. In the terminal (Terminal, Git Bash, or Windows Command Prompt), navigate to repo in which
the newly exported file is copied. For example: C:\ArasProjects\project1\LocalRepo\AML-
packages\PLM.
2. Verify the status of the repository by running command.
3. Stage a file.
4. Verify now the new status of the repository.
5. Commit the file.
6. Confirm the changes in the Version Control System.
2023 Aras Corporation All Copyrights Reserved. 36
Aras DevOps
User Guide
4.7 Continuous Integration Script
An automated utility script is provided as part of each customer repository to perform final
validation and verification that a build is successful.
This script can be run by developers or system integrators manually to determine if the build
passes or fails. Automation tools are also available to provide scheduled executions of this script
on a dedicated CI server.
The CI script runs all the unit and integration tests that have been created for a project by installing
and building a new Aras Innovator instance, applying the project code and configuration, and
making sure all tests are successful.
A report indicates Success or Failure with a running log if issues need to be resolved. The script
then deletes the running instance (and database).
4.8 Test the Deployment Locally
Aras Innovator should be redeployed using the script ./BuildAndDeploy.ps1. A green success
message will appear upon successful execution.
The following steps outline the process of Rebuilding the Aras Innovator:
1. Open Windows PowerShell and run as Administrator.
2. Access the local repository: C:\ArasProjects\project1\LocalRepo.
2023 Aras Corporation All Copyrights Reserved. 37
Aras DevOps
User Guide
3. Run ./BuildAndDeploy.ps1 script.
4. Review the changes made in the newly rebuilt Innovator instance.
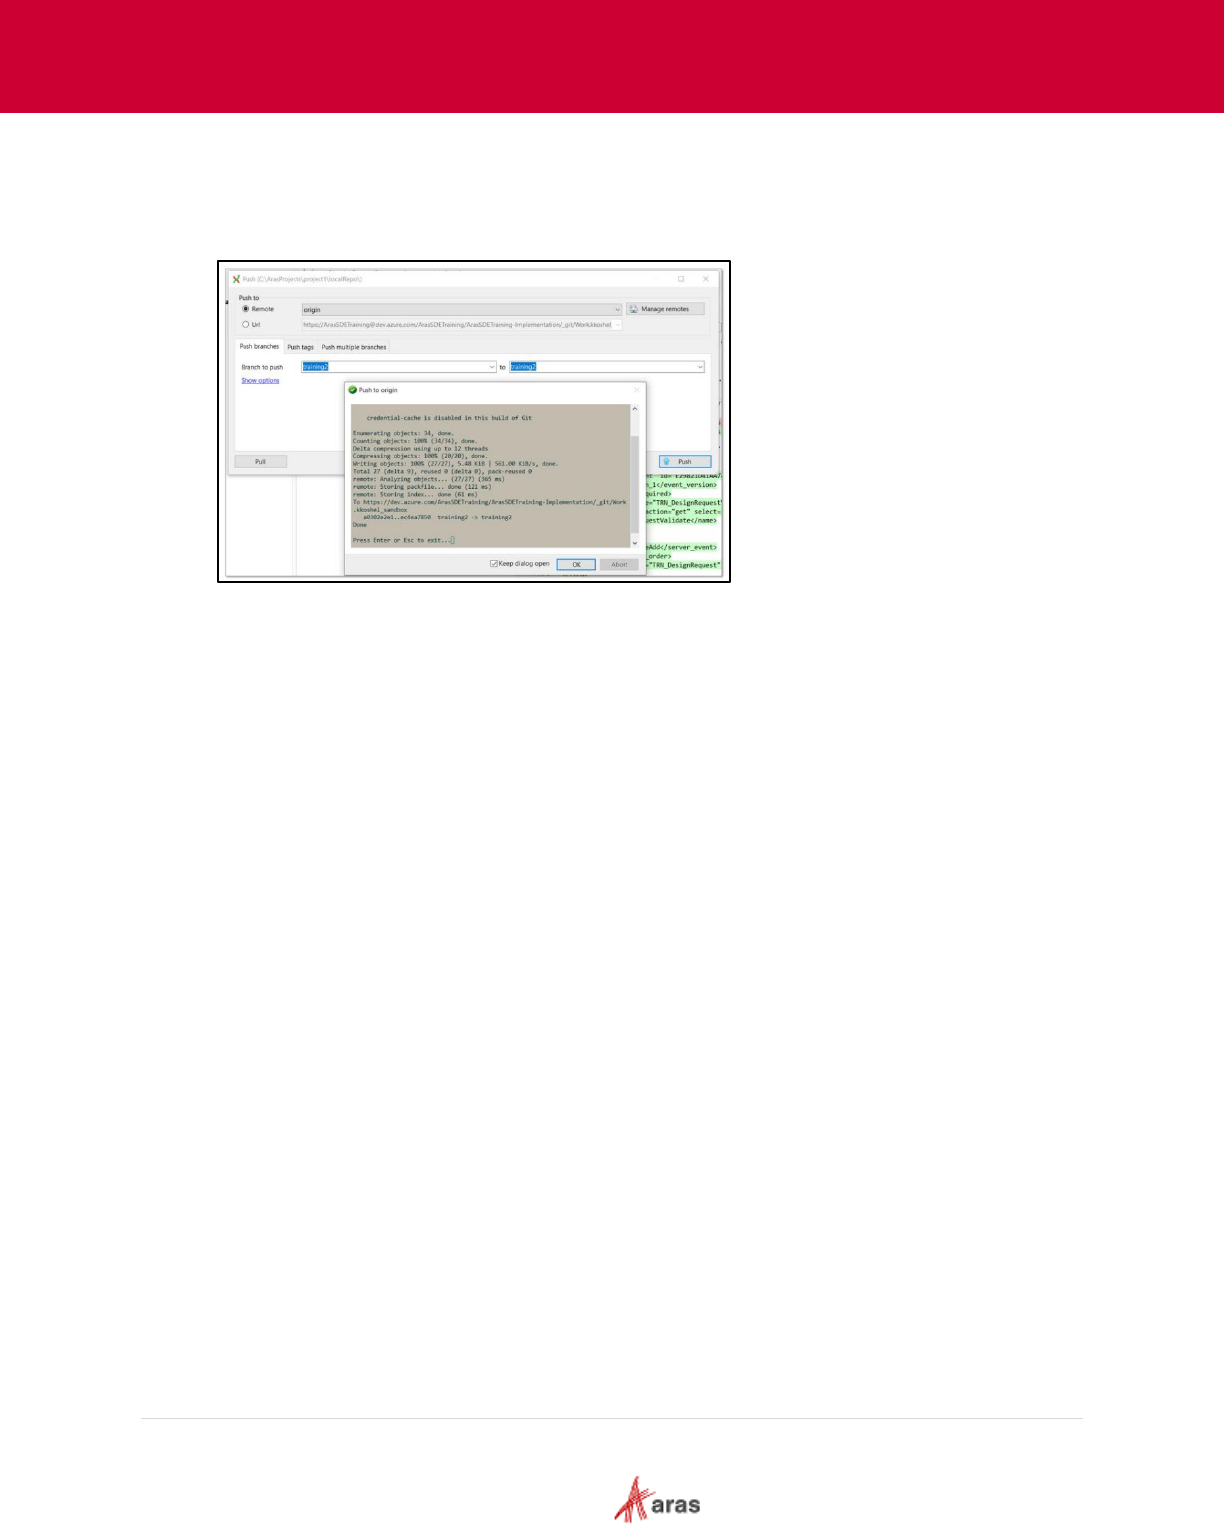
4.9 Pushing Changes to Fork
Before creating a Pull Request to share the work with the rest of the team, the developer needs to
push the changes to the Fork. By pushing the changes, a developer makes those changes
available for others to review, collaborate, and merge into the original repository if required.
A fork in Git refers to a copy of a repository that is created in a developer’s local repository. Forking
allows users to contribute to an open-source project or collaborate with others without affecting the
original repository.
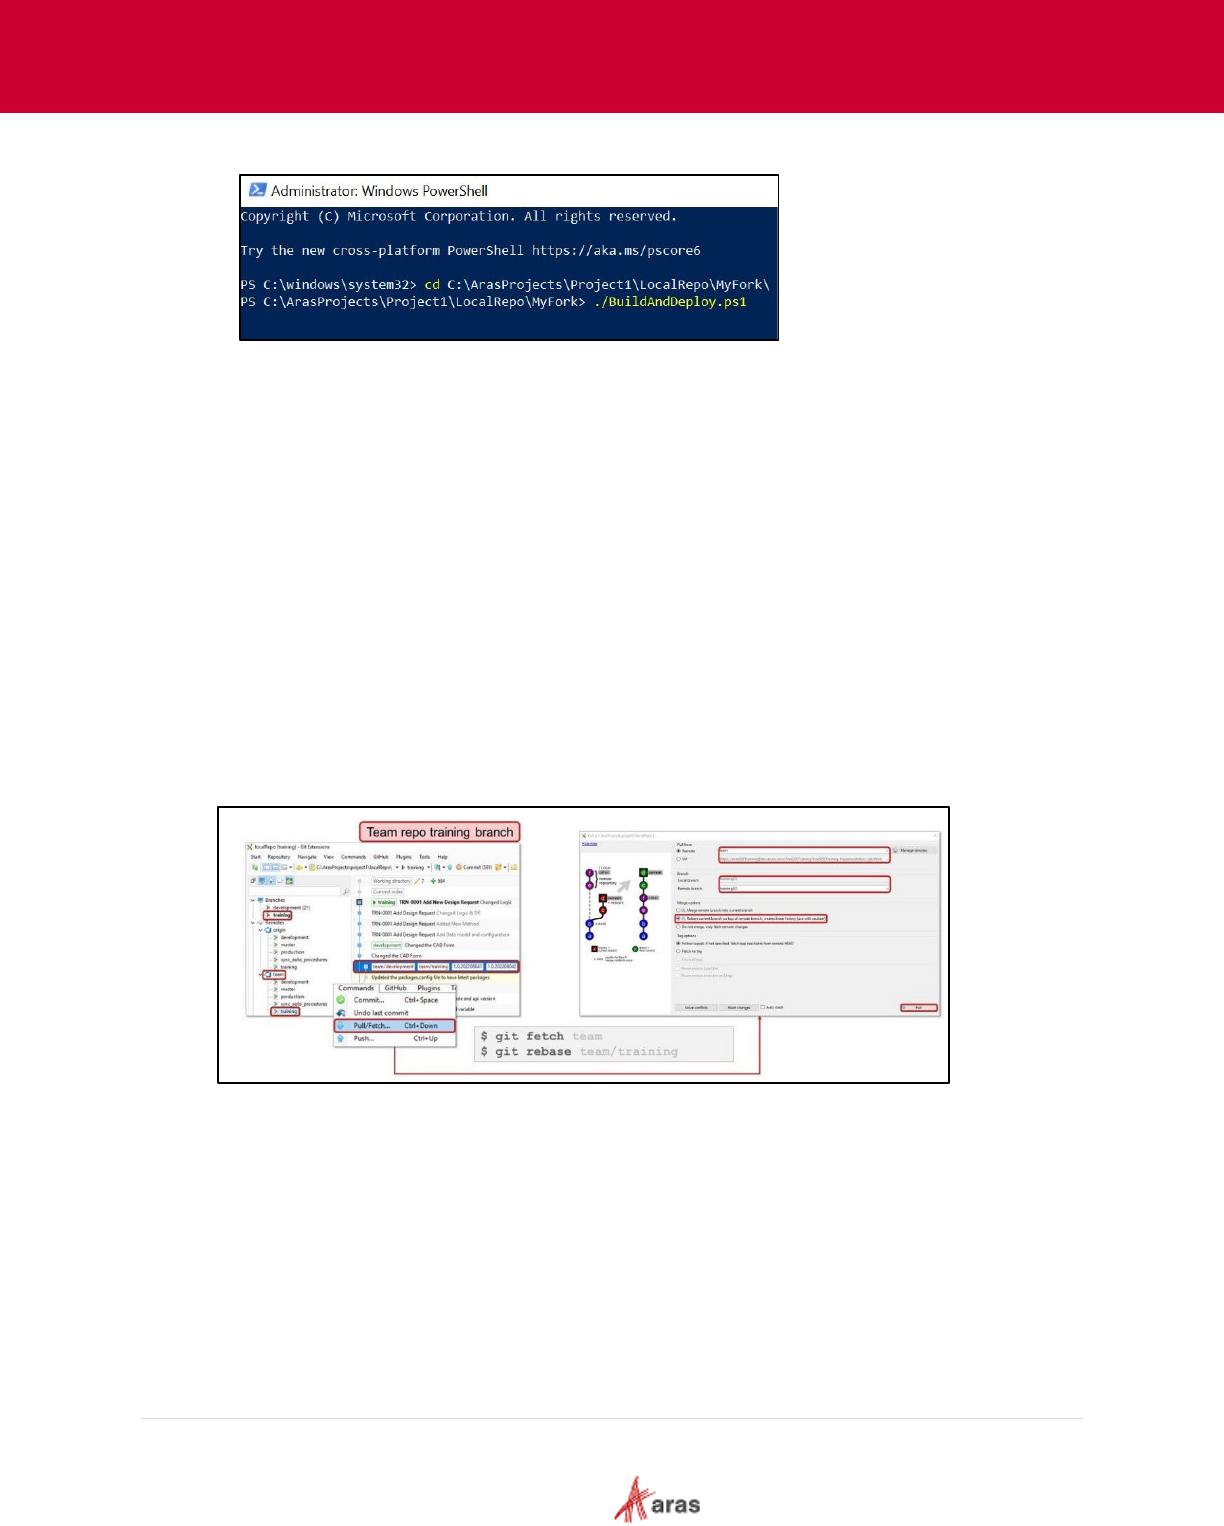
4.9.1 Fetching Changes/Rebasing
While the implementation was in progress, it is possible that modifications or updates were made
and pushed to the team repository. Hence, it is important to fetch the latest state of remote
repository and rebase our changes on top.
Using the desired version control system, fetch the changes. The screenshot provided below
serves as a visual representation, illustrating an example of the fetching process performed using
Git Extension.
2023 Aras Corporation All Copyrights Reserved. 38
Aras DevOps
User Guide
4.9.2 Pushing Changes to Fork
Before creating a Pull Request to share the work with the rest of the team, it is important to push
the changes to the Fork. The screenshot provided below serves as a visual representation,
illustrating an example of the pushing changes to Fork performed using Git Extension.
4.10 Creating a Pull Request
Pull Request Features
A pull request (PR) is a way for developers to propose changes to a codebase and collaborate with
others to review and merge those changes. Some of the key features of a pull request include:
• Code Changes: A pull request includes the changes made to the codebase by the developer.
The changes can be viewed and reviewed by other developers, and any feedback or
comments can be added directly to the pull request.
• Discussion and Feedback: Pull requests provide a platform for developers to discuss and give
feedback on the proposed changes. This allows for collaborative review and discussion of the
code, ensuring that any issues are caught and resolved before the changes are merged into
the codebase.
• Automated Tests: Pull requests can be configured to run automated tests, ensuring that the
changes don't break existing functionality. This helps to catch any issues early on before the
code is merged into the codebase.
• Reviewers: Pull requests can be assigned to specific reviewers who are responsible for
reviewing the proposed changes. Reviewers can add comments and suggestions and approve
or reject the changes before they are merged.
• Status Checks: Pull requests can be configured to include status checks, which can be used to
verify that the changes meet certain criteria before they are merged. For example, a status
check might ensure that all automated tests pass, or that the code meets certain coding
standards.
• Mergeability: Pull requests are merged into the codebase once they have been reviewed and
approved. This ensures that the changes are properly integrated into the codebase, and that
any conflicts with other changes are resolved.
2023 Aras Corporation All Copyrights Reserved. 39
Aras DevOps
User Guide
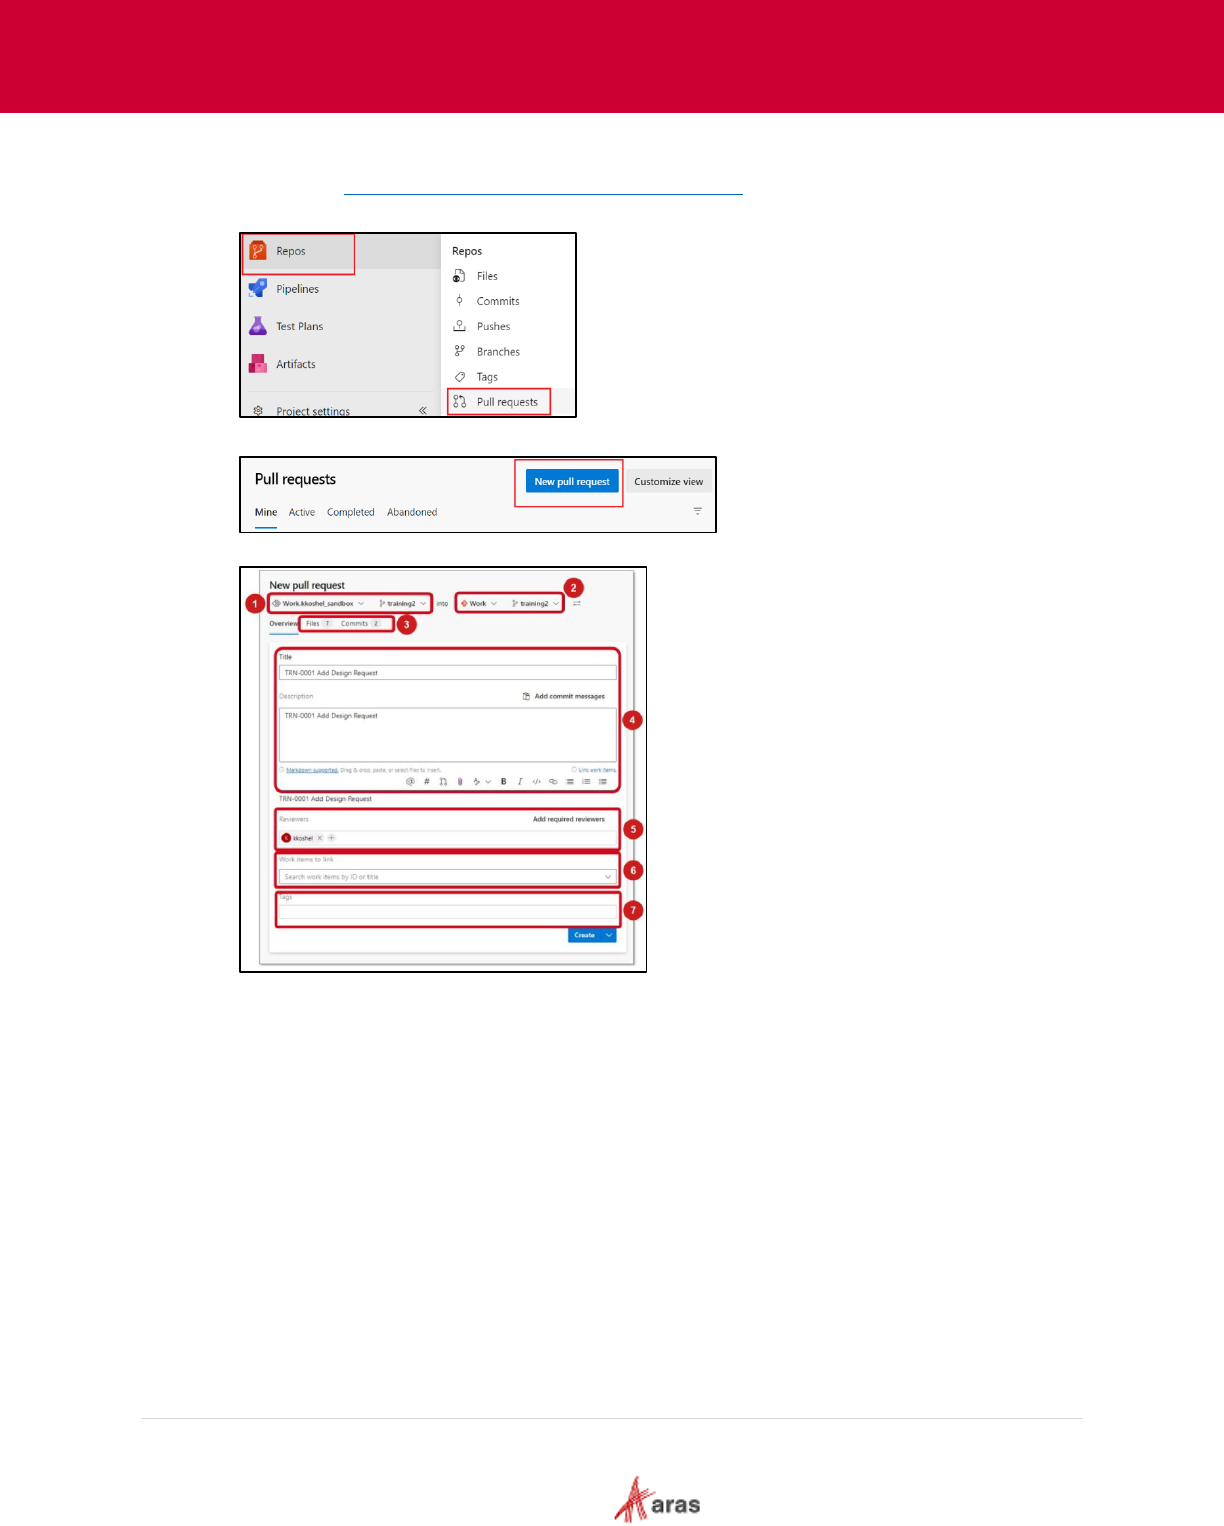
The following steps outline the process of creating a pull request:
1. Navigate to https://dev.azure.com/{organization}/{project}.
2. Go to Repo and select Pull requests.
3. Click New pull request.
The New pull request form appears as follows:
4. Enter the details as follows:
• Source Repo/branch: User’sFork
• Target Repo/branch: team repo
• Review the files/commits to be included
• Title and Description: User Story name
• Select reviewers
• Add Work items to link: Identify Work Items in the Azure DevOps as applicable
• Tags – if needed
5. Click Create.
4.11 Trigger, Build and Test
The contributor’s contribution is built and validated through the CI pipeline. The pull request will
trigger the CI pipeline, which will run tests and checks against the changes.
2023 Aras Corporation All Copyrights Reserved. 40
Aras DevOps
User Guide
4.12 Reviewing a Pull Request
Each developer does not have push (or write) access to the central remote repository, they must
issue a pull request so that code reviewers may inspect their work. The code reviewer then
examines their work, approves (or rejects) it, and applies changes to the central repository or
communicates with the developer to make corrections.
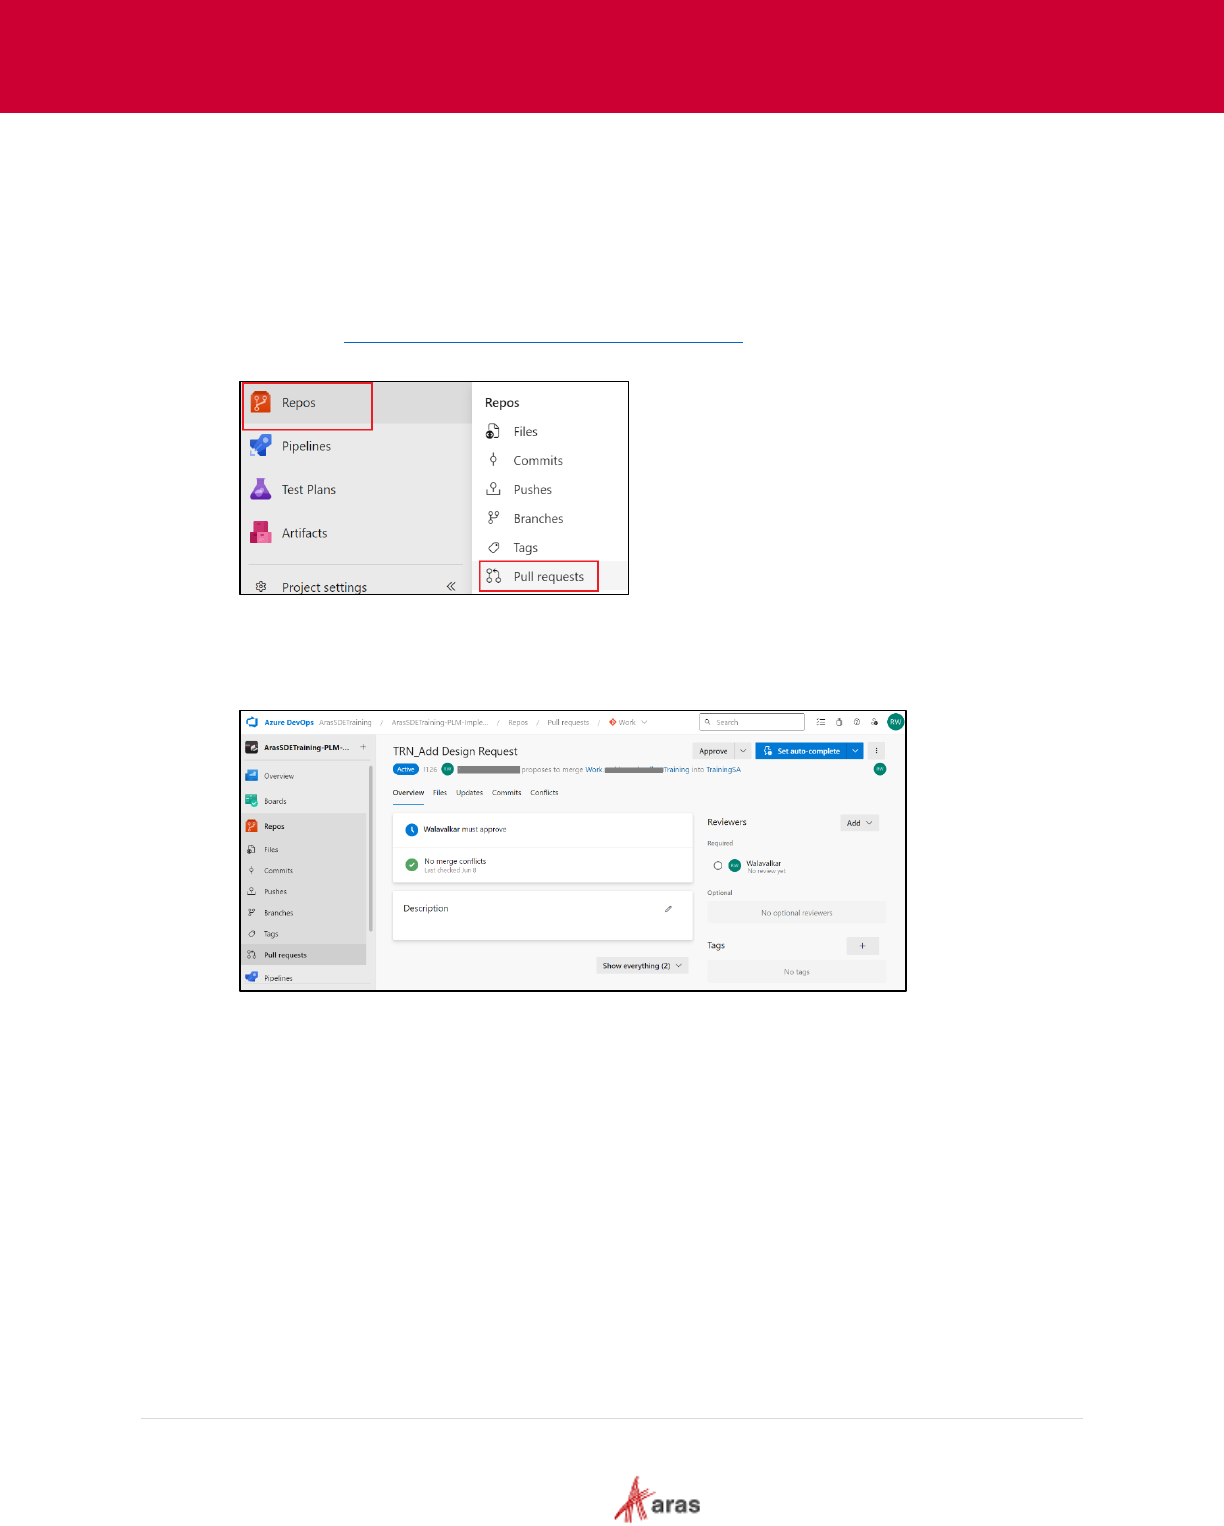
The following steps outline the process of Reviewing a Pull Request:
1. Navigate to https://dev.azure.com/{organization}/{project}
.
2. Go to Repos and select Pull requests.
3. In the Active tab select the required pull request.
4. In the Overview tab of a PR, see the title, description, reviewers, linked worked items, history,
status, and comments. Read the PR description to see the proposed changes. View the
comments to understand the issues raised by other reviewers.
2023 Aras Corporation All Copyrights Reserved. 41
Aras DevOps
User Guide
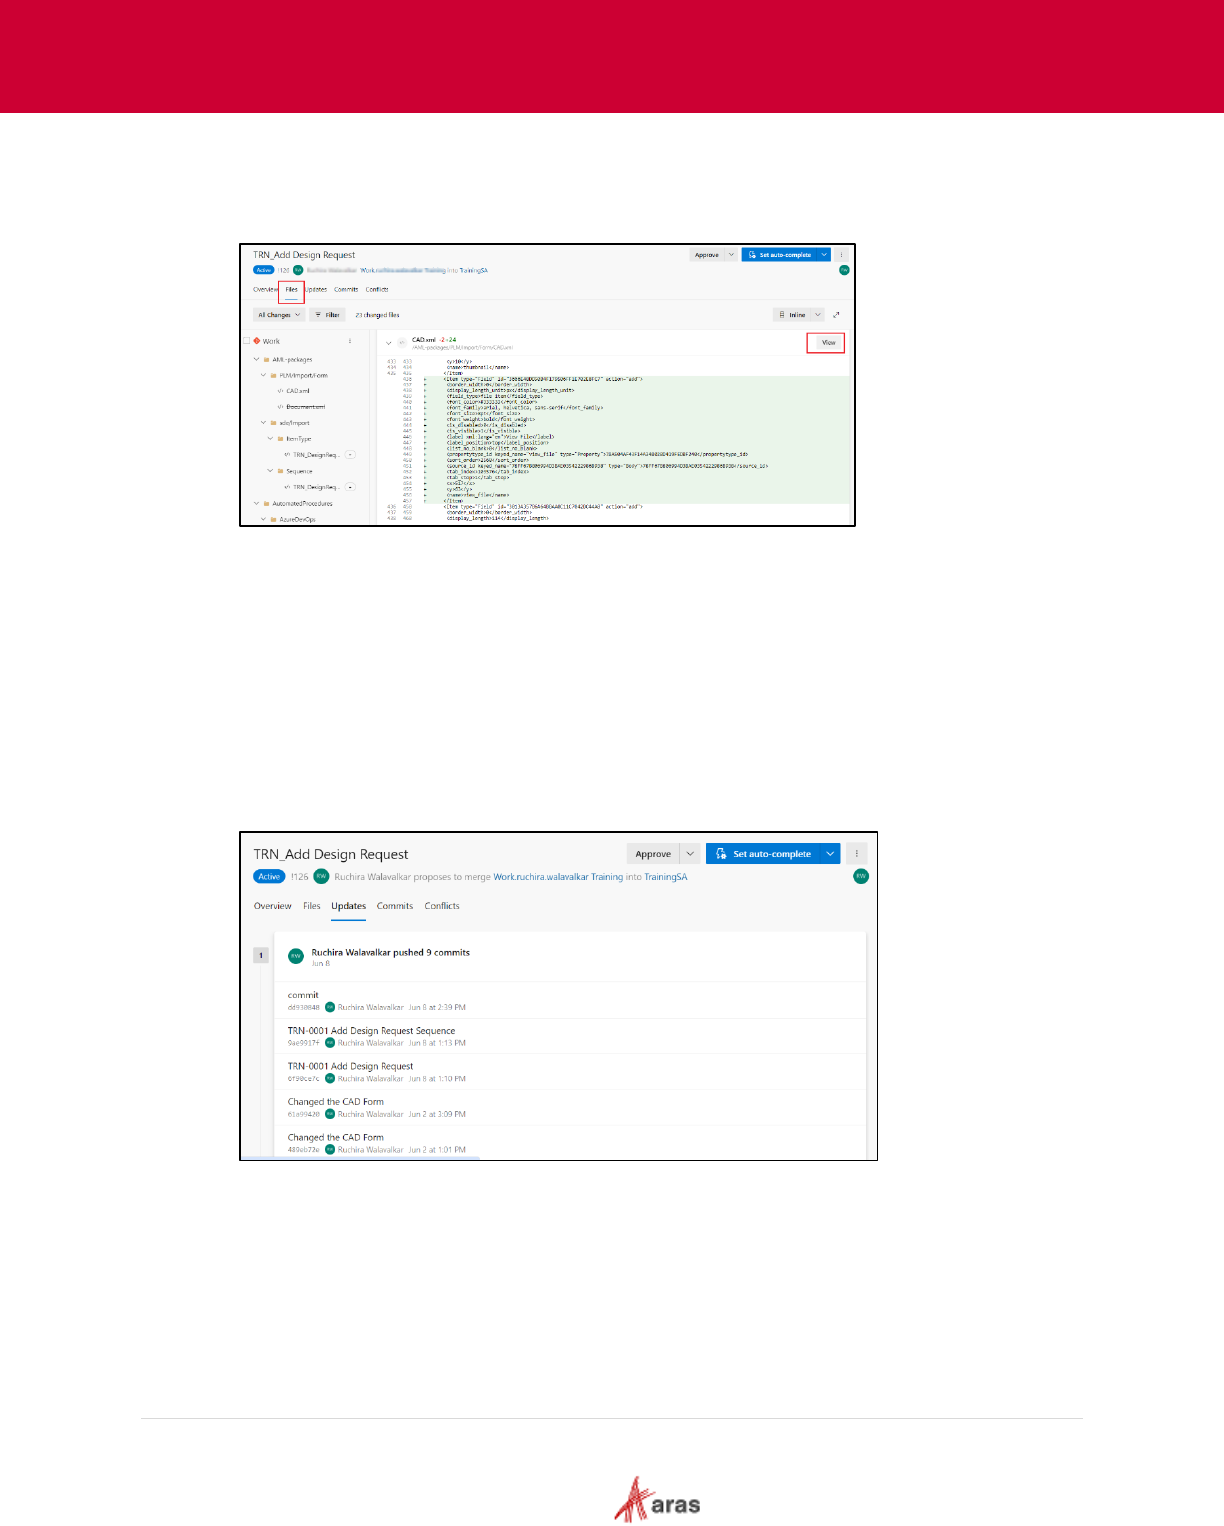
5. Select the Files tab to review all content changes in the PR's source branch. The initial view
shows a summary view of all file changes. Choose the View button next to a file to view only
that file's changes. If the file was modified, the View button opens a diff view. If the file was
added or deleted, the View button opens a content pane.
6. In a diff view for a file, select either a Side-by-side or Inline diff layout.
7. To review the changeset introduced by specific pushes to the source branch, select one or
more changesets from the changes dropdown list. When one or more changesets is selected,
the diff view updates to show only the changes from the selected changesets. This feature is
useful when changes have been pushed to the PR since the last review and the user just
wants to see the new changes. The changes dropdown list names each changeset with the
commit message from the final commit in each push operation.
8. Choose the Updates tab to view all pushed changesets to ensure any source branch changes
are not missed. The changesets are numbered and the most recent changeset appears at the
top of the list. Each changeset shows the commits that were pushed in that push operation. A
force-pushed changeset won't overwrite the changeset history and will show up in the
changeset list same as any other changeset.
2023 Aras Corporation All Copyrights Reserved. 42
Aras DevOps
User Guide
9. Choose the Commits tab to view the commit history of the source branch after it diverged from
the target branch. The commit history in the Commits tab will be overwritten if the PR author
force-pushes a different commit history, so the commits shown in the Commits tab might differ
from the commits shown in the Updates tab.
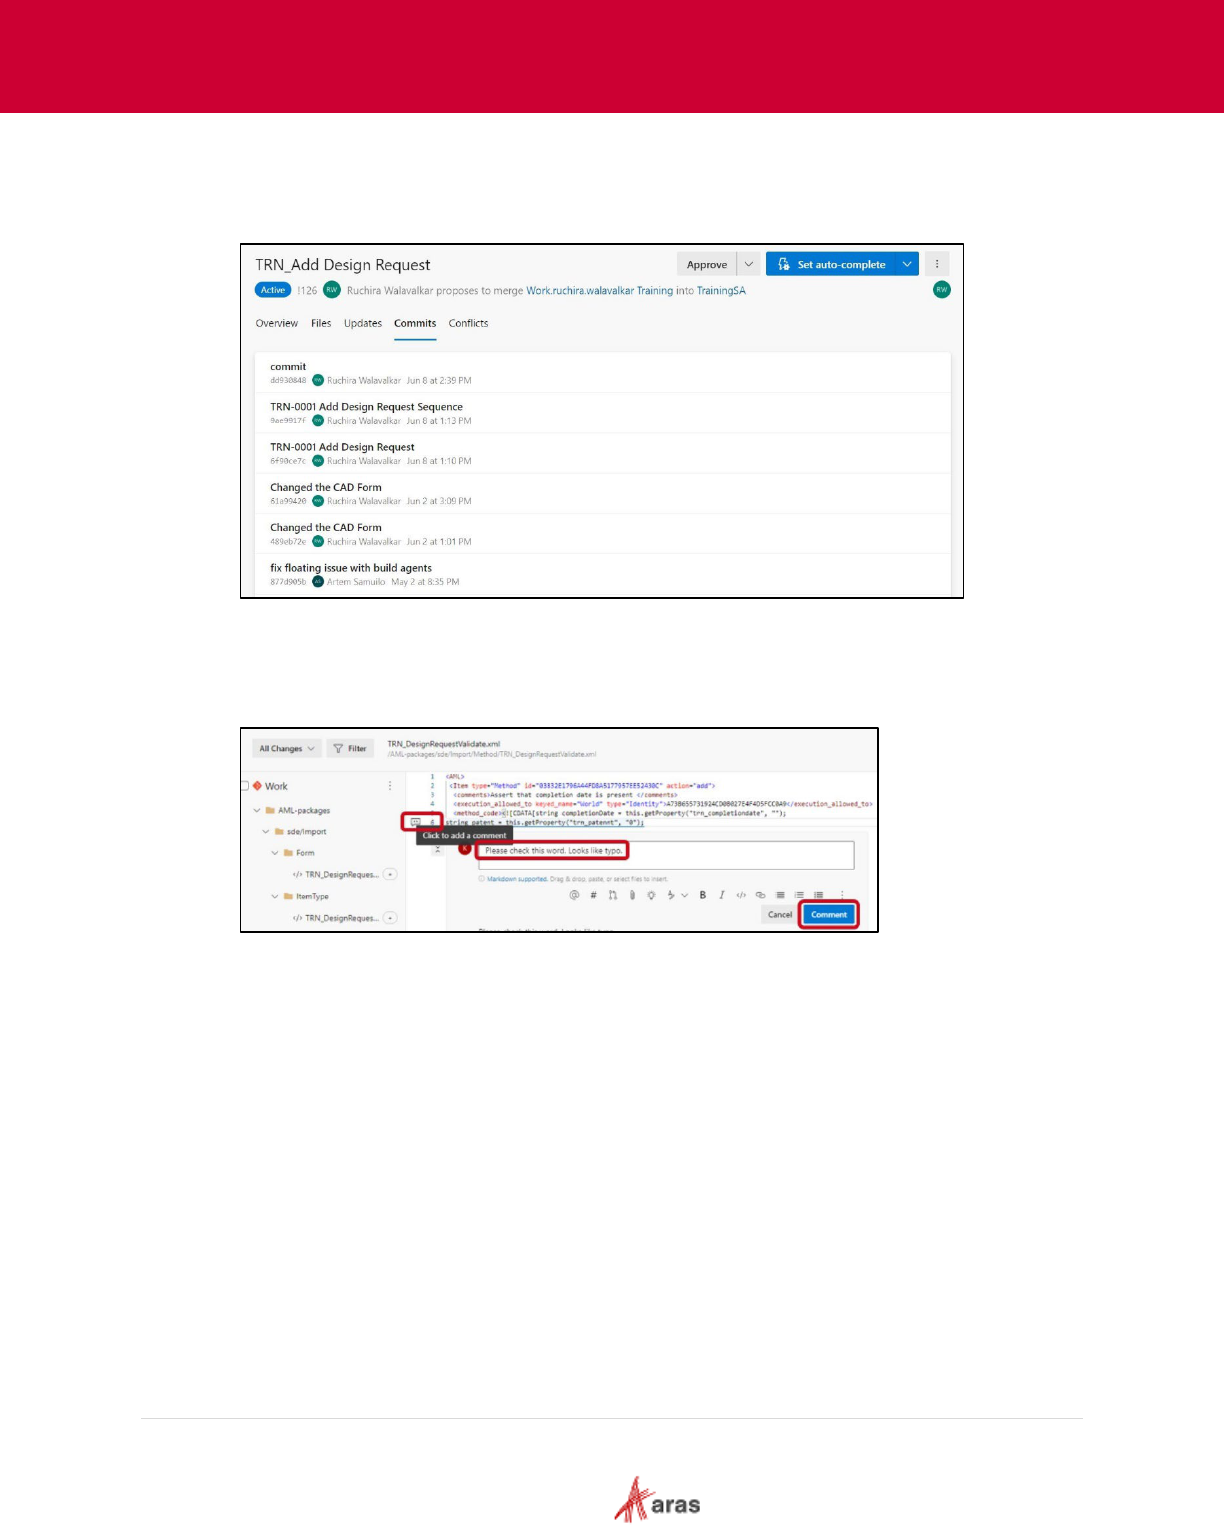
10. In case there are any issues or questions about the changes provided by the developer, the
reviewer can leave a comment for the developer. In the left panel, select the Method file and
hover over the line to comment on and select the comment button to open an inline comment
box. The user can also select multiple lines and then select the comment button that appears
when hover over those lines.
11. As the author of the PR the developer needs to resolve the comment by taking the appropriate
action, i.e., make the changes in their local repository, and then submit the change for approval
through the PR request workflow.
2023 Aras Corporation All Copyrights Reserved. 43
Aras DevOps
User Guide
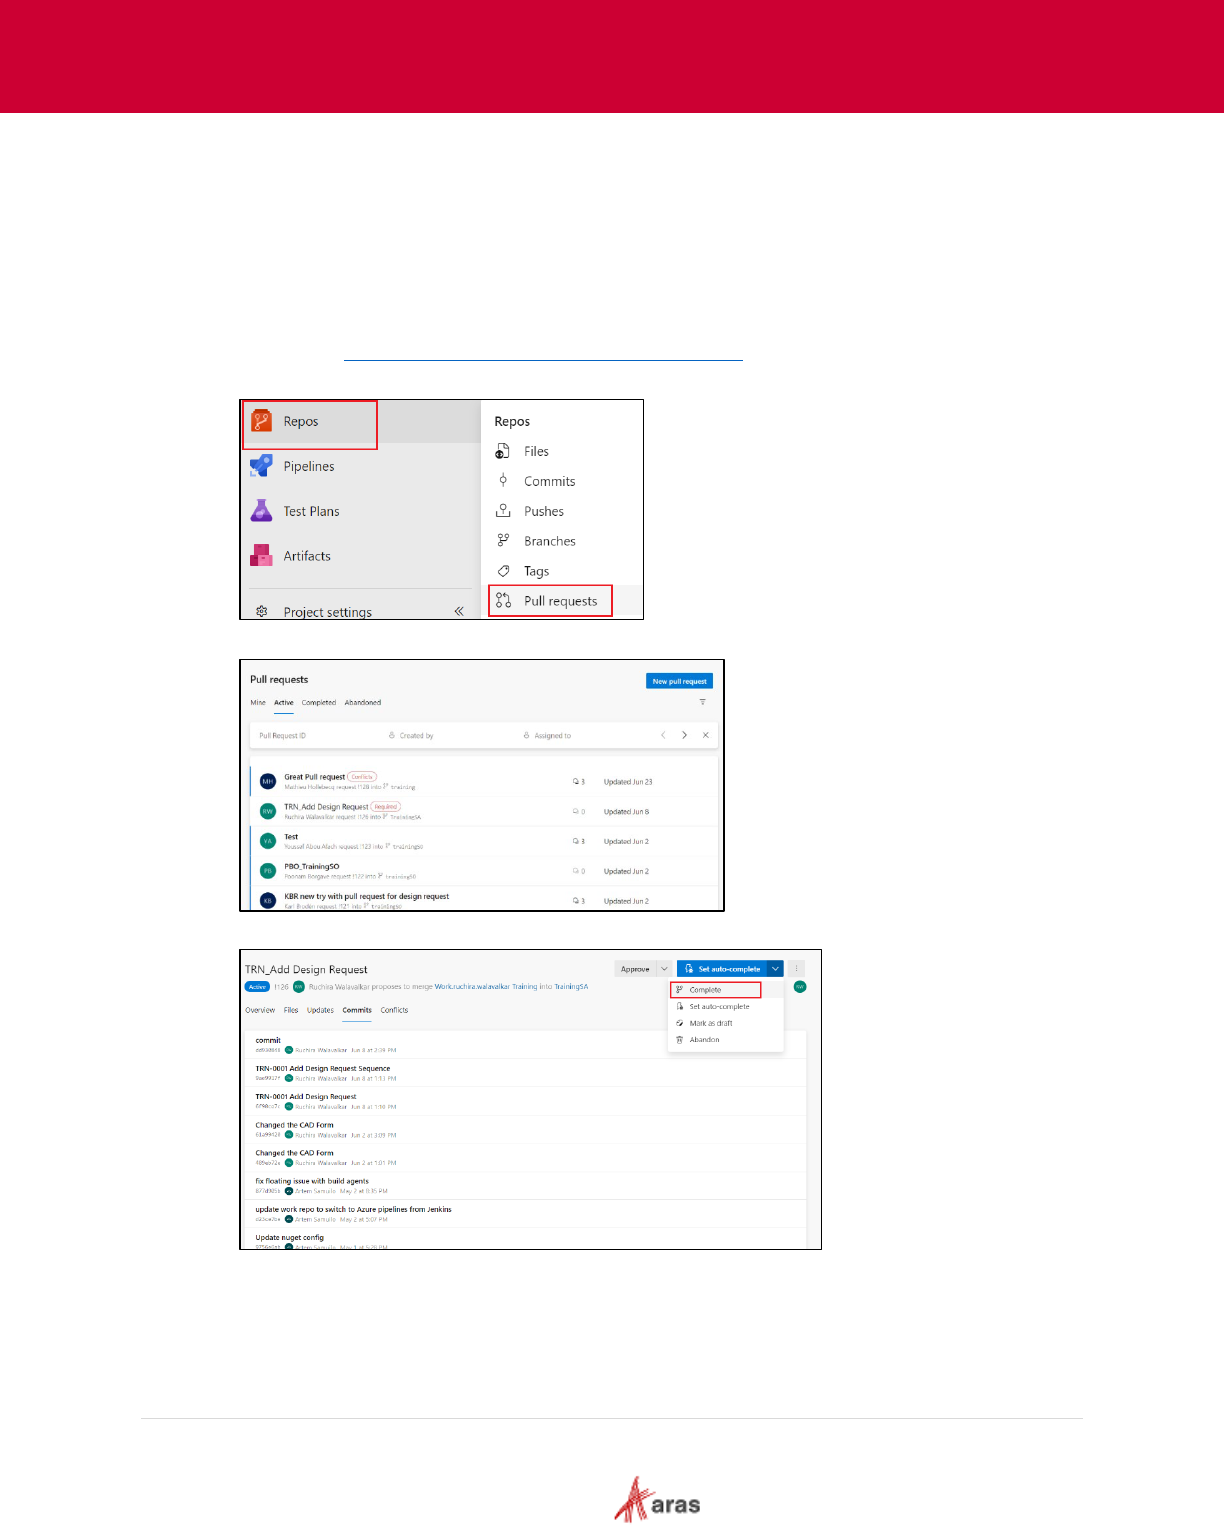
4.13 Merging the Pull Request
If the reviewer agrees with the proposed changes, the Merge operation combines changes into the
central repository.
When the Merge button is clicked by the reviewer the developers’ proposed commit(s) are then
merged into the central repository (team repo).
The following steps outline the process of Merging the Pull Request:
1. Navigate to https://dev.azure.com/{organization}/{project}
.
2. Go to Repos and select Pull requests.
3. In the Active tab select the required pull request.
4. Select Complete on the upper right to complete the PR.

2023 Aras Corporation All Copyrights Reserved. 44
Aras DevOps
User Guide
5. In the Complete pull request pane, under Merge type, select Rebase and fast-forward and
click on Complete merge.
6. The completion of the PR triggers a new build
7. Verify that the build is “green” (successful) by navigating to Pipelines > Pipelines and select
Recent tab.
2023 Aras Corporation All Copyrights Reserved. 45
Aras DevOps
User Guide
5 Preparing the Project's Initial Baseline
A Clean Baseline refers to the original or initial plan at the beginning of a project, which is free from
any changes. It represents the unaltered version of the project plan, typically provided by the project
management team or stakeholders at the beginning of the project.
A baseline serves as a reference point and a point of comparison throughout the project's life cycle.
It helps in tracking and managing project progress, identifying deviations from the original plan, and
assessing the impact of changes and risks as the project evolves.
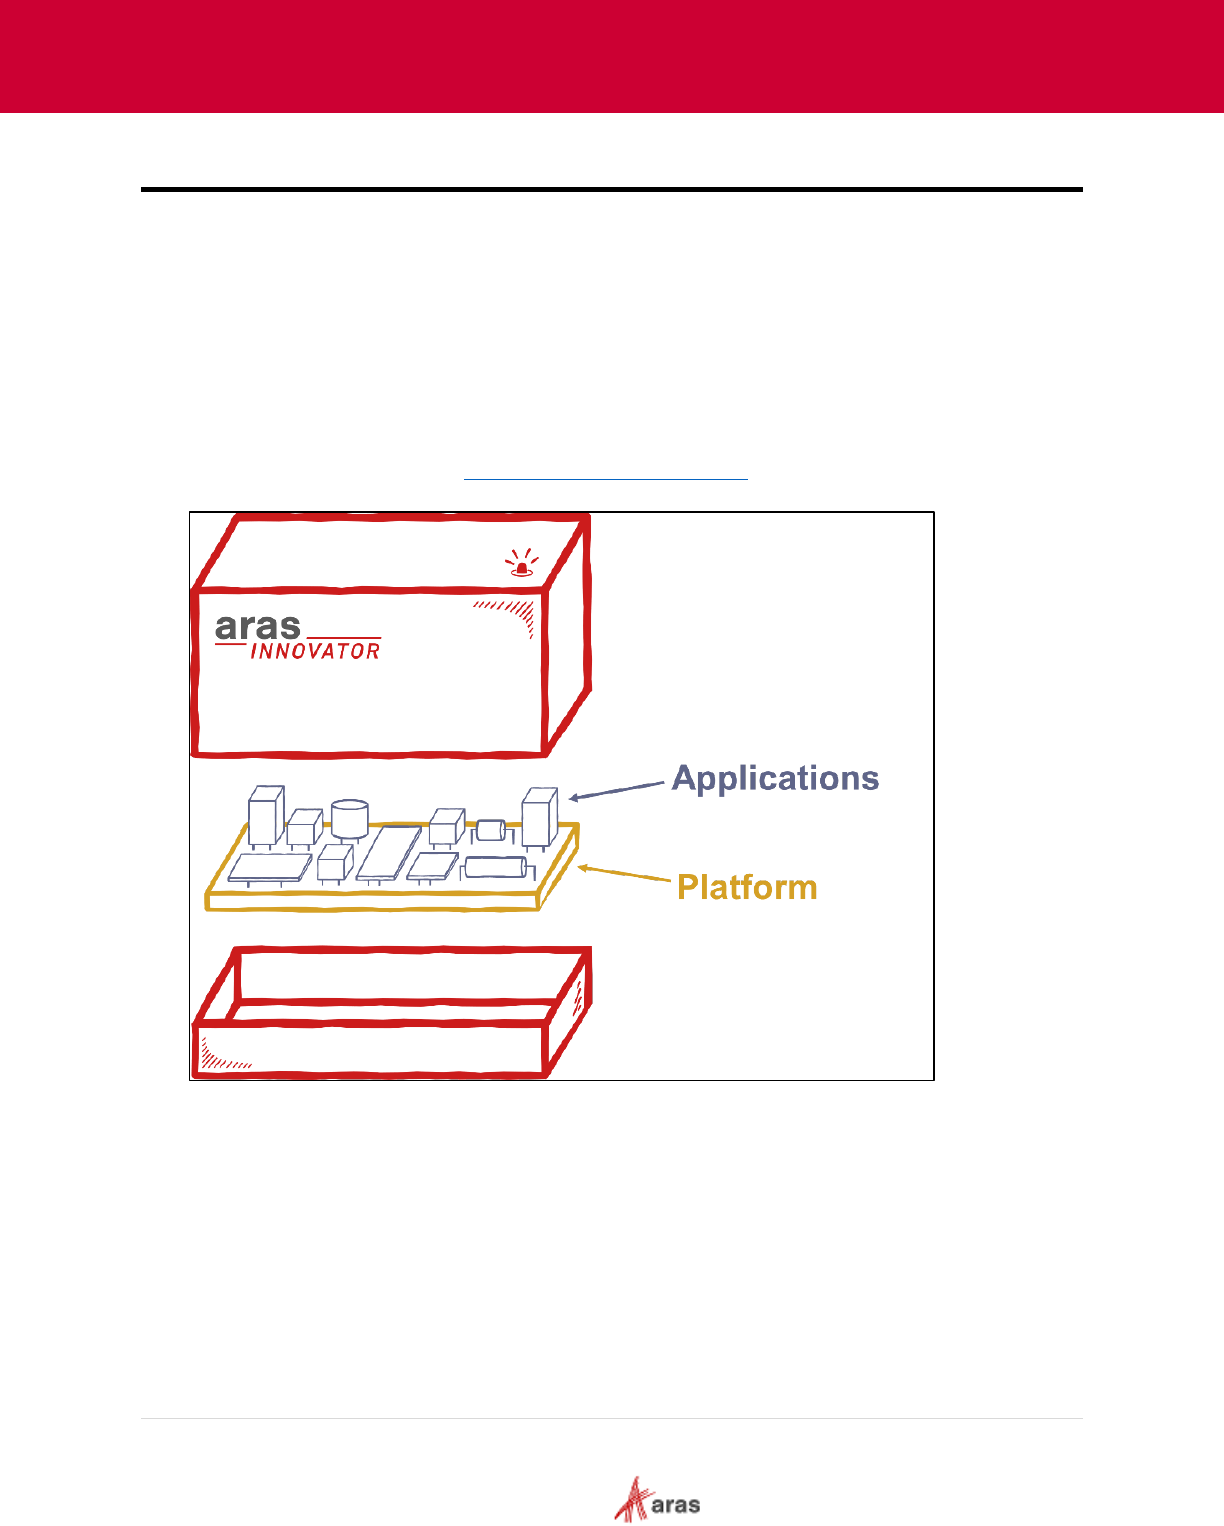
The diagram below offers an understanding of Aras Innovator's structure, comprising a platform and
various applications. When the SDE is delivered, it includes the platform, and the specific project can
choose the necessary applications and components. Making these decisions early on and creating a
new project baseline is usually advantageous. This baseline acts as the starting point for further
solution development. Refer to section 6 Baseline Management
below to understand about building
a baseline.
2023 Aras Corporation All Copyrights Reserved. 46
Aras DevOps
User Guide
6 Baseline Management
When a project team receives the SDE from Aras, a baseline is established, which acts as the
starting point for all future changes to the software. The execution of the setup script
(BuildAndDeploy.ps1) installs an initial database and sets up all required files in the code tree
directory.
The established baseline then becomes the foundation over which changes are layered each time
the setup scripts are run.
As these changes accumulate over time, they may grow significantly larger. Therefore, generally,
when the solution enters production, a fresh baseline incorporating all customizations can be set.
This new baseline will then be the starting point for the setup scripts.
After Aras has provided an initial baseline, the project team can make modifications as needed. This
may include:
• Add new application to the platform: Adding applications to a platform involves enhancing the
functionality and broadening the capabilities of the system. An example of integrating an
application into Aras Innovator is demonstrated in the section
Appendix III: Adding Applications
to a Project.
• Add Language packs: Adding language packs to software is a crucial step in making
applications accessible and user-friendly to a diverse global audience.
• Establish new baselines: A new baseline provides a snapshot of the project's status, including
what has been achieved and the resources expended to reach this point. Once established, this
new baseline serves as the starting point for subsequent phases or steps in the project. See
section 7.2 Generate New Baseline
for more details.
• Deploy build to SIT (for QA): SIT involves testing the system as a whole in an environment that
closely mirrors production to ensure that all integrated components work together as expected.
This includes making sure new applications function correctly with the existing system and that
language packs work as intended. See section
7.1 Deploy to System Integration Testing (SIT)
Environment for more details.
When an SDE from Aras is received, and a baseline is established, it isn't a final process. It is
instead an ongoing effort, and modifications to the software are carried out over time as the project
requirements evolve. These modifications might include integrating new applications, adding new
features, fixing bugs, and improving system performance among other things.
However, this process should be handled appropriately. Changes to the software must align with the
project's goals, and they should not introduce new issues or conflicts. Therefore, comprehensive
testing should be performed after each modification to verify that the changes are working as
expected.
Reducing build time is another important aspect of this process. When modifications are organized
and managed properly, the time required to build the software can be significantly reduced. This
efficiency can lead to quicker deployments and an overall shorter time to market, which can be a
significant advantage for the project.
Finally, it is essential that all these activities be carried out as part of a deployment policy. A
deployment policy outlines the standards and procedures for making changes to the software, testing
those changes, and deploying the software to the production environment. This policy helps ensure
that all changes are carried out in a controlled and consistent manner, which can contribute to the
overall quality and success of the project.
2023 Aras Corporation All Copyrights Reserved. 47
Aras DevOps
User Guide
7 Pipelines
A pipeline is a set of automated processes that allow developers to build, test, and deploy their code
consistently and reliably.
Aras provides following set of Pipelines:
1. Continuous Integration - This pipeline runs a build given a commit in the git repo. The system
triggers it in one of the following ways:
• Validation for a branch
• Validation for a pull request
• Request by a DevOps user.
Typically, the Continuous Integration (CI) pipeline is not manually initiated; rather, it's
automatically triggered by actions such as Pull Requests (PRs) and merges, governed by branch
policies.
2. DeployToSIT - This pipeline creates a deployment package from a build, deploys it to the SIT
environment, and stores a copy in the Artifacts storage.
3. DeleteInnovator - This pipeline deletes a given test instance in the SIT environment.
4. GenerateBaseline - Generating baselines establishes a starting point and facilitates tracking
changes in the projects. This pipeline generates a new baseline and stores the artifact in the
artifact storage.
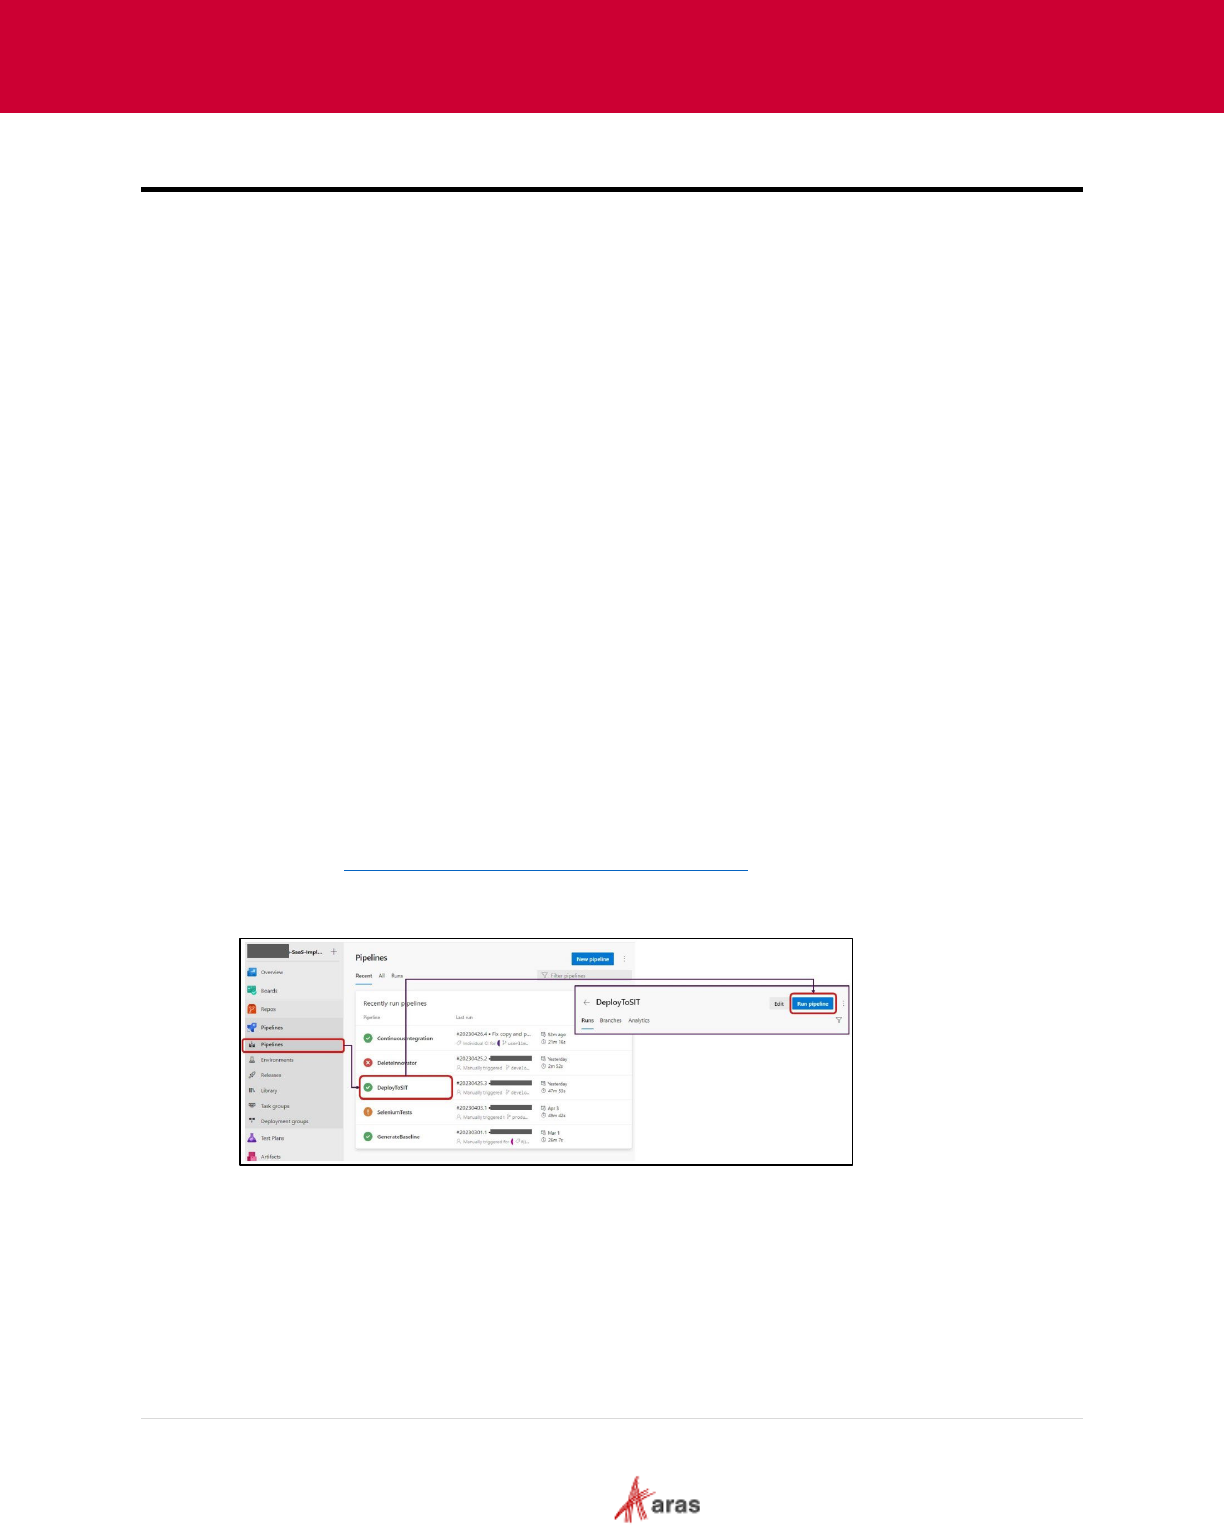
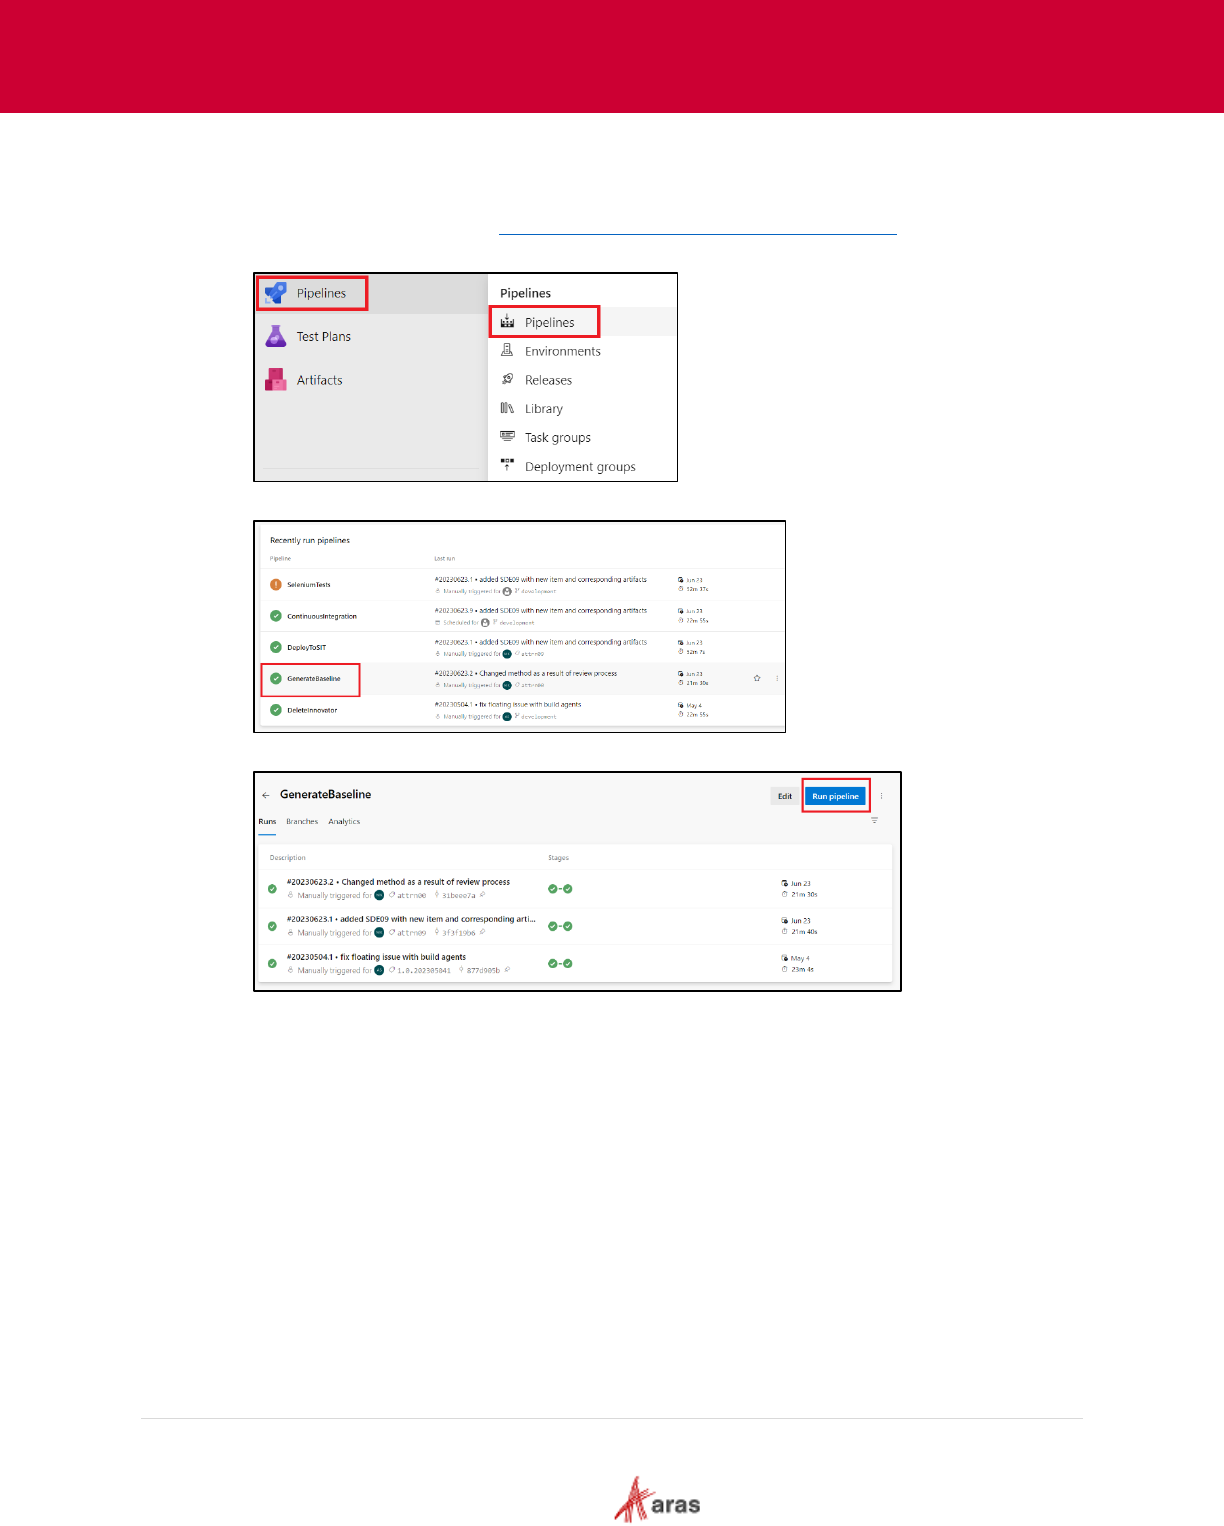
7.1 Deploy to System Integration Testing (SIT) Environment
Deploying on SIT allows developers and testers to assess the behavior and performance of the
Aras Innovator in a simulated production-like setting before it is deployed to the actual production
environment.
The following steps outline the process of deploying Aras Innovator to SIT:
1. Navigate to https://dev.azure.com/{organization}/{project}.
2. Identify the build to deploy.
3. Select the DeployToSIT pipeline and click Run Pipeline.
2023 Aras Corporation All Copyrights Reserved. 48
Aras DevOps
User Guide
4. Select the branch in the Work repo and click on Resources.
5. Click ContinuousIntegration (last successful run) and select the required run.
6. Click Use selected run.
7. Navigate back to Run Pipeline dialog box and click Run.
8. Optionally: Click Deploy link to watch the progress.
9. When the pipeline is completed, a link of the new instance should be available on the wiki page
for testing.
2023 Aras Corporation All Copyrights Reserved. 49
Aras DevOps
User Guide
7.2 Generate New Baseline
7.2.1 Creating Tag on Last Approved Commit
When the Aras Innovator is installed for the first time, a Git tag is used to mark the starting point
and it uses the following format: CleanInnovatorxxSPyy,
where xx = the version and yy = the Service Pack number of the base platform.
Define the Git Tag on the last approved commit. The pull request (PR) process must be
completed to get the tested commit that is proposed as the new baseline to the destination
(Central Repo) branch. The commit must be tagged.
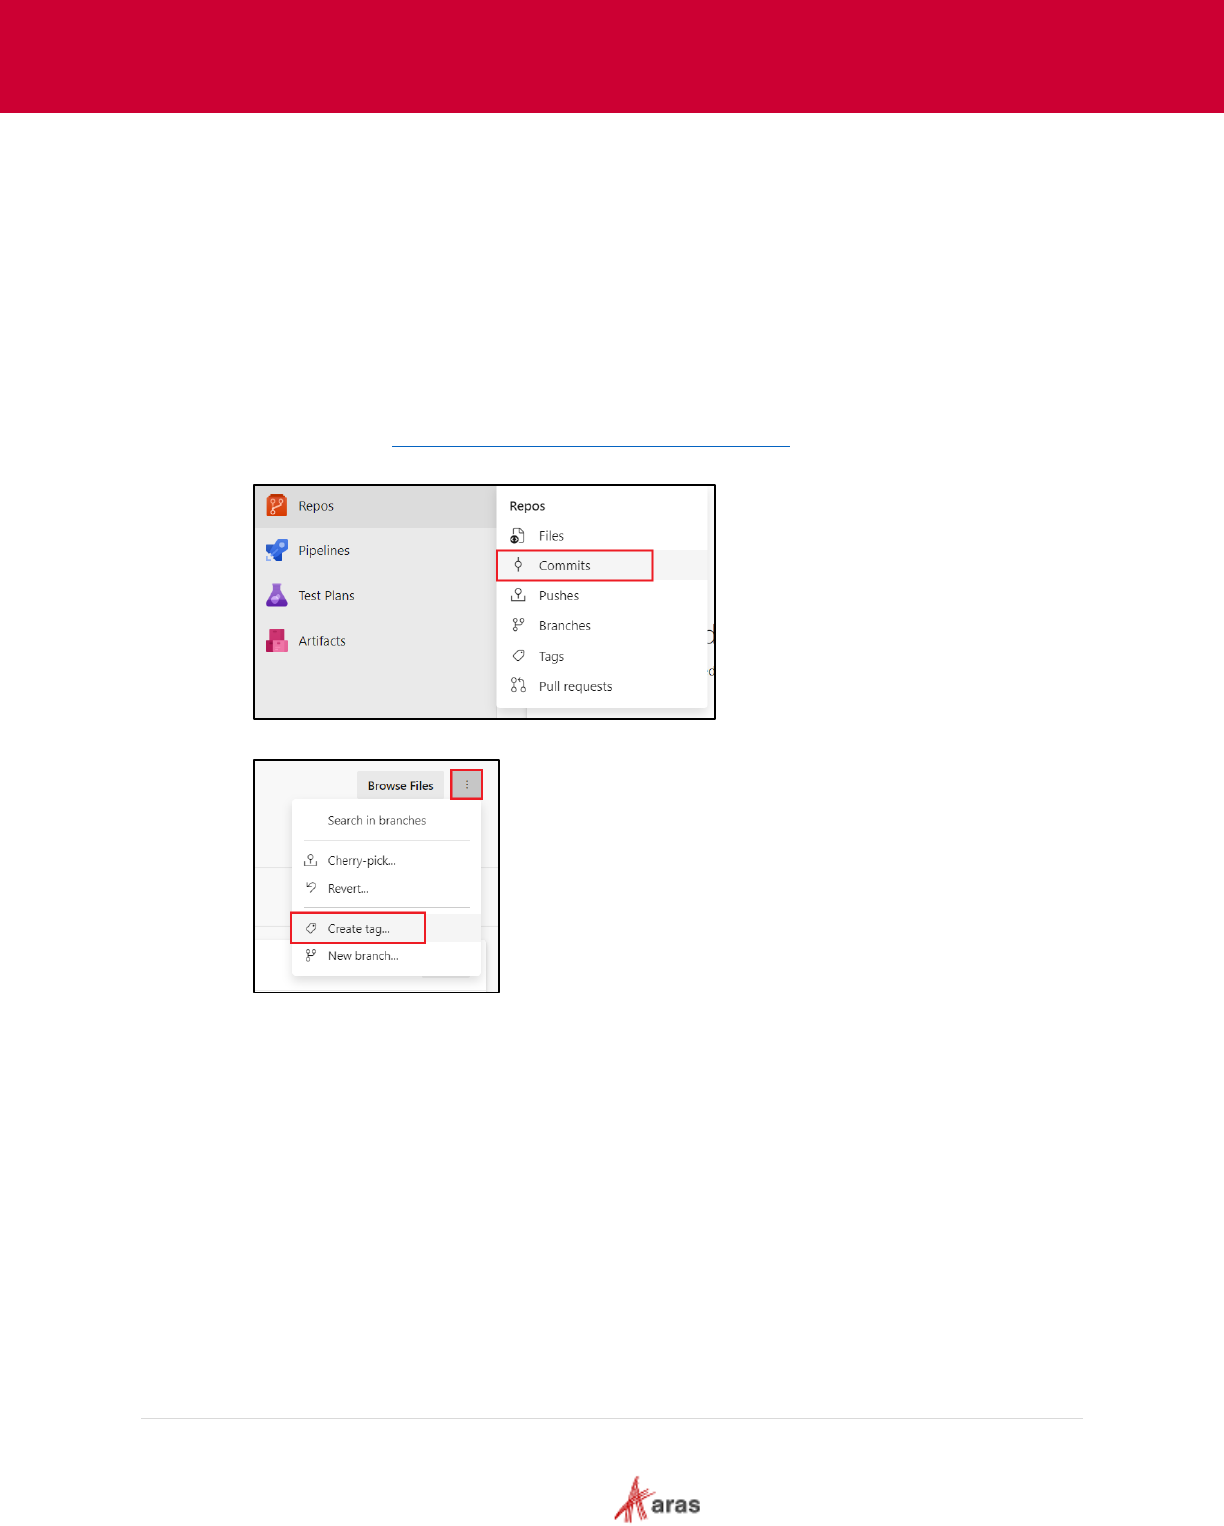
The following steps outline the process of Creating Tag on Last Approved commit:
1. Navigate to the https://dev.azure.com/{organization}/{project}
.
2. Click Repos and select Commits. Select the corresponding successful commit.
3. Click More options menu select Create tag …
4. Enter the following details in the Create a tag dialog:
• Name: Name of the tag
• Based on: Commit above
• Description: Tag Description
Select an appropriate baseline naming convention. For most projects without features it is
sufficient to use Project [prj] baseline [bl] and numbers. Example: prjbl001 – for user’s first
baseline
After each product release it is also recommended that user must have prdbl001 – production
baseline
Some projects may have several workstreams (features) with different go-live dates. For such
projects, the team may include feature designations as in the example mbsebl01 (Model-
Based Systems Engineering) bl (Baseline) 01 ➔ mbsebl01.
5. Click Create.
2023 Aras Corporation All Copyrights Reserved. 50
Aras DevOps
User Guide
7.2.2 Running the Baseline Pipeline
The following steps outline the process of running the baseline pipeline:
1. Navigate to the Navigate to https://dev.azure.com/{organization}/{project}
.
2. Click Pipelines in the left menu and select Pipelines.
3. Click GenerateBaseline pipeline.
4. Click Run Pipeline in the top right hand.

2023 Aras Corporation All Copyrights Reserved. 51
Aras DevOps
User Guide
5. In the Run Pipeline dialog, enter the following details:
• Branch/tag: Select the branch/Tag created in the above section
• Advance options: default settings
• Enable system diagnostics: unchecked
Note that the pipeline must be executed by selecting tags only.
6. Click Run.
7. The pipeline is queued by the system, and the progress can be by clicking on the Stages
and Jobs tabs in the pipeline run page.
8. The new baseline will be uploaded to the storage account and "Baselines" artifact feed
(Artifacts > Baselines dropdown).
2023 Aras Corporation All Copyrights Reserved. 52
Aras DevOps
User Guide
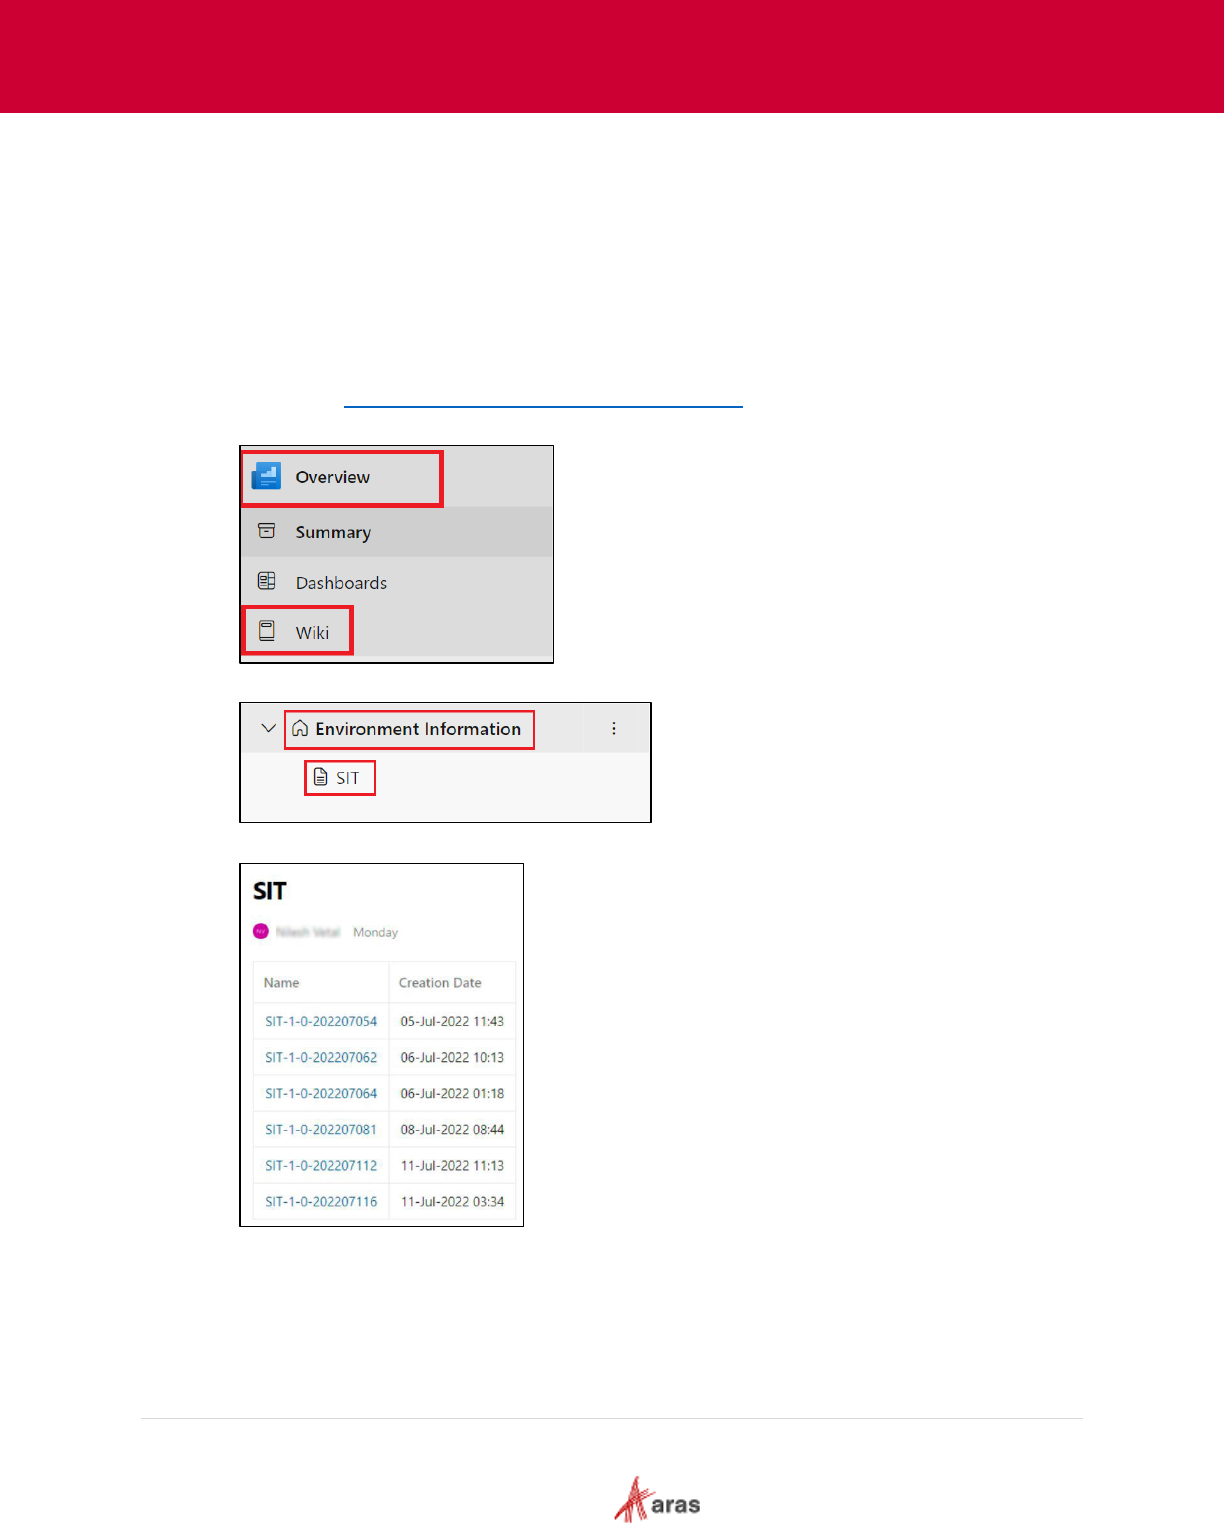
7.3 Delete Aras Innovator from SIT Environment
The SIT environment provides resources for a maximum of 10 Aras Innovator test instances. Aras
recommends keeping the number of test instances at about 3-5. To prevent potential performance
degradation, the project team should retain the latest test instances while removing older ones. The
DeleteInnovator pipeline is used to delete test instances by providing the instance name (low case)
and identifying the build.
After approximately 30 days, the system will automatically delete a build.
The following steps outline the process of deleting the Aras Innovator from SIT Environment:
1. Navigate to https://dev.azure.com/{organization}/{project}
.
2. Click Overview and select Wiki page.
3. Expand Environment Information and select SIT.
The list of available instances appears.
4. Copy the required instance.

2023 Aras Corporation All Copyrights Reserved. 53
Aras DevOps
User Guide
5. Navigate to Pipelines and select DeleteInnovator pipeline.
6. Click Run Pipeline.
7. In the Innovator instance name to delete field, paste the SIT instance which is copied in step 4.
8. Select Resources and click ContinousIntegration[Delete Innovator].
9. Select the correct build. The build name ends with a timestamp yyyyymmdd##. In the
corresponding build, the build number is separated from the date by a dot.
Note: The timestamp of SIT instance should match the timestamp of the build.
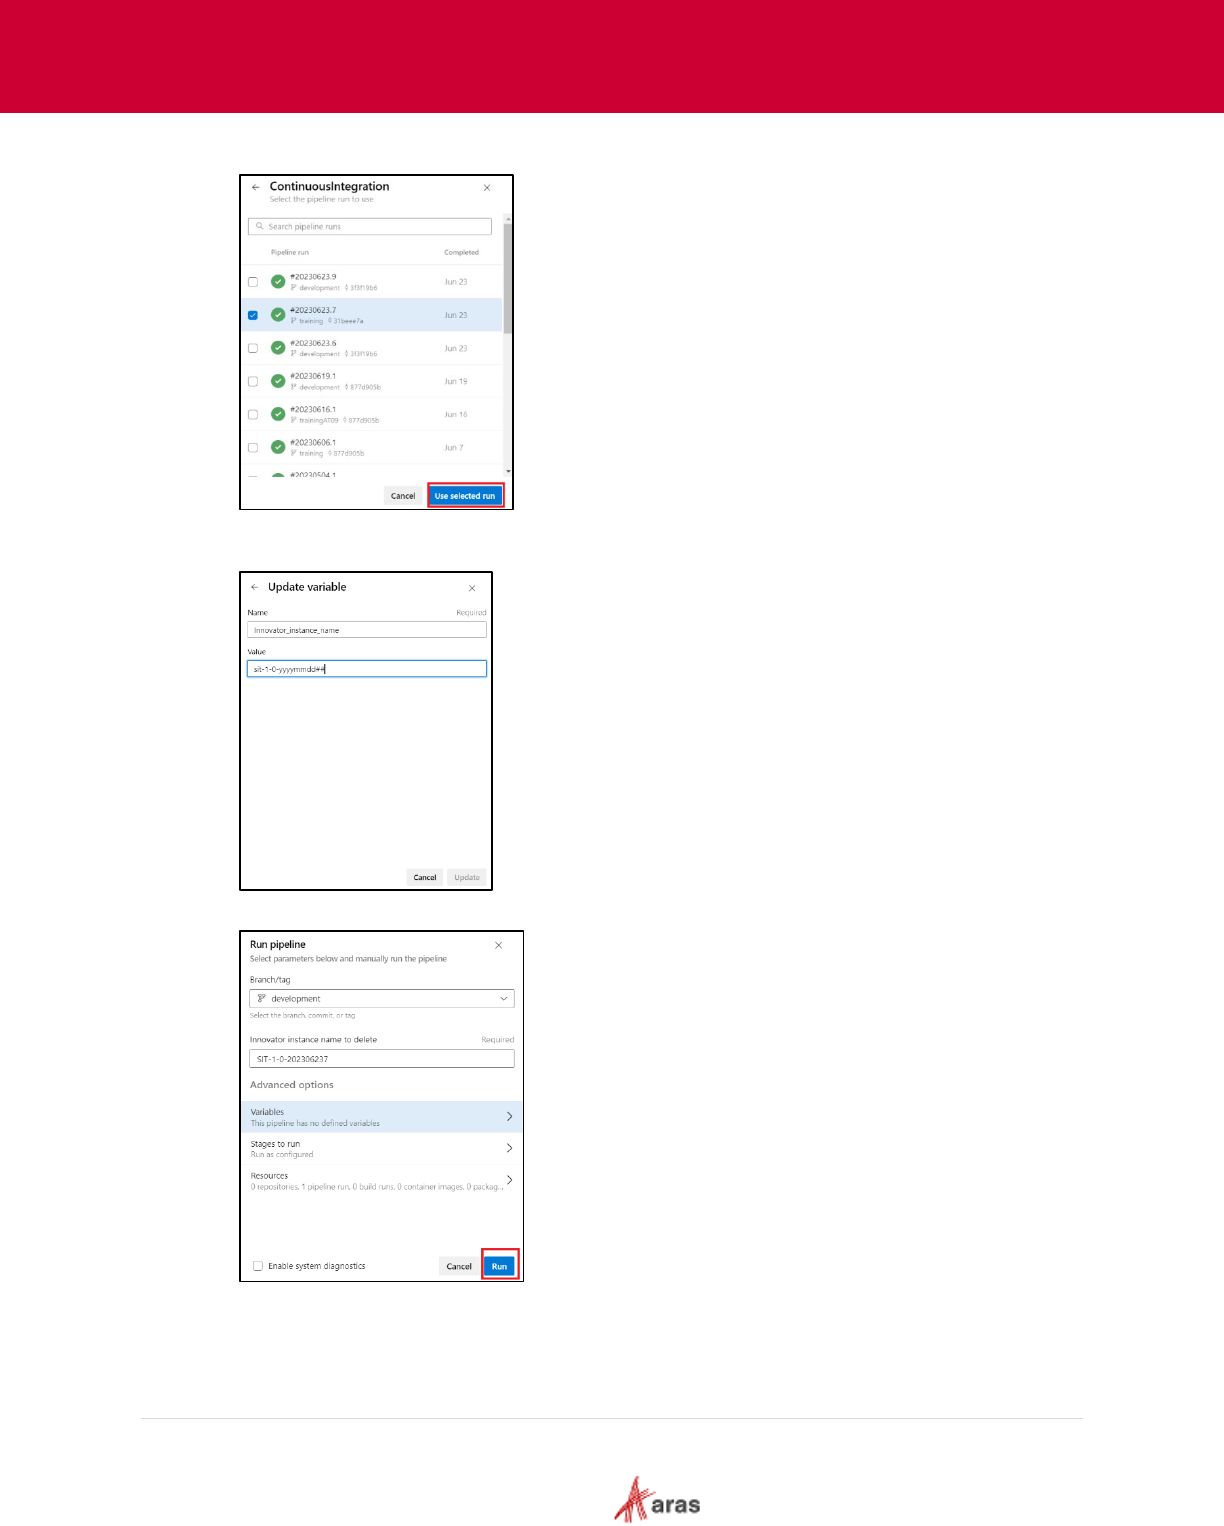
2023 Aras Corporation All Copyrights Reserved. 54
Aras DevOps
User Guide
10. Click Use selected run.
11. Select Variables enter the value in the Update Variable dialog box. Set the variable in
lowercase "sit" and click Update.
12. Navigate back to Run Pipeline pane and click run.
13. If the build has expired, select the oldest green build.

2023 Aras Corporation All Copyrights Reserved. 55
Aras DevOps
User Guide
8 Using Transformations
8.1 Transformation Overview
A transformation is a mechanism to update configuration files such as XML or JSON files of Aras
Innovator using a special syntax. Since all config files are XML or JSON, then XDT or JDT
transformation respectively is used.
This procedure is intended to be idempotent, implying that repeated application of the
transformation to a specific configuration file (like those of Aras Innovator) should consistently
result in the same state as achieved immediately after the initial transformation application.
Idempotence ensures that regardless of the number of times a transformation is applied to a
specific configuration file, the outcome remains consistent and predictable, thus eliminating the
need to manage any delta changes.
8.2 Type of Transformation
There are two following types of transformation:
1. XMl Document Transformation (XDT): This enables transforming XML file.
2. JSON Document Transforms (JDT): This enables transforming JSON files.

2023 Aras Corporation All Copyrights Reserved. 56
Aras DevOps
User Guide
8.3 The Purpose of Transformation
Only the specific configuration files are updated rather than a complete overwrite of the content.
This approach facilitates modifications only in the required sections of the configuration, ensuring
that all other settings remain unaffected.
It is the responsibility of the developer to create such transformation that might be applied many
times to the config file. It should give the same result as after the first application of the
transformation.
The standard Aras Innovator platform deployment only contains the information below in the
conversion server configuration file.
<?xml version="1.0" encoding="utf-8"?>
<configuration>
<configSections>
<section name="oauth" type="Aras.OAuth.Configuration.OAuthSection,
Aras.OAuth.Configuration" />
</configSections>
<oauth configSource="OAuth.config" />
</configuration>
To activate conversion per the requirements and entitlements of a project, the project team must
provide information in the transformation file.

2023 Aras Corporation All Copyrights Reserved. 57
Aras DevOps
User Guide
8.4 Utilizing Transformation
If any update is required in configuration file, a file with an identical name should be created within
the "TransformationsOfConfigFiles" directory, using relative path of file.
Idempotance isn't provided out of the box; utilization of specific transformation actions is required.
In the XDT framework, these operations are signified by the suffix 'IfMissing' (such as
'InsertIfMissing'). Conversely, in JDT, the 'Merge' action is the most suitable for this purpose.
Therefore, it's up to the developer to ensure their transformations are idempotent.
8.4.1 Example 1: XML Document Transformation (XDT)
Consider a scenario where a user needs to modify the file "OAuthServer\Web.config" and wants
to add an attribute to the “oauth” tag in which the value of the "configSource" attribute is equal
to "OAuth.config".
1. Create a file "OAuthServer\Web.config" in TransformationsofConfigFiles folder according
to XDT rules.
2. Fill it in according to the XDT rules.
3. Commit the changes.
Transformation is reflected in OAuthServer\Web.config after next deployment. Next time the
config file should give the same result as after first apply of the transformation.
Sample XML transformation:
```xml
<?xml version="1.0"?>
<configuration xmlns:xdt="http://schemas.microsoft.com/XML-Document-
Transform">
<oauth configSource="OAuth.config" yourNewAttribute="value"
xdt:Transform="SetAttributes" xdt:Locator="Match(configSource)" />
</configuration>
• For XDT Documentation, please visit -
https://learn.microsoft.com/en-us/previous-
versions/aspnet/dd465326(v=vs.110)
• For Web.config Transformation Syntax for Web Project Deployment Using Visual Studio,
please visit -
https://learn.microsoft.com/en-us/aspnet/core/host-and-deploy/iis/transform-
webconfig?view=aspnetcore-5.0

2023 Aras Corporation All Copyrights Reserved. 58
Aras DevOps
User Guide
8.4.2 Example 2: JSON Document Transformation (JDT)
Consider a scenario where a user needs to add a new plugin to “
"OAuthServer\OAuthServer.Plugins.json".
1. Create a file "OAuthServer\OAuthServer.Plugins.json" in directory
“TransformationsOfConfigFiles” according to JDT rules.
2. Fill it in according to the JDT rules;
3. Commit the changes.
Transformation will reflect in OAuthServer\Web.config after next deployment. Next time
config file should give the same result as after first apply of the transformation.
Sample JDT Transformation:
```json
{
"@jdt.merge": {
"@jdt.path": "$.['OAuthServer.Plugins']",
"@jdt.value": [
{
"Name": "New.Aras.Plugin",
"Enabled": true
}
]
}
}
```
• For JDT documentation, please visit-
https://github.com/microsoft/json-document-
transforms/wiki)

2023 Aras Corporation All Copyrights Reserved. 59
Aras DevOps
User Guide
8.5 Ignore Configuration Files Transformation
The need usually arises when the user does not need transformation, or any validation error
occurred at the time of implementation.
For ignore transformation add a line with file location (relative path) in the following file:
"TransformationsOfConfigFiles\.transformations.ignore".
For more details and syntax of transformation, please refer below file in cloned repository:
TransformationsOfConfigFiles\Readme.md
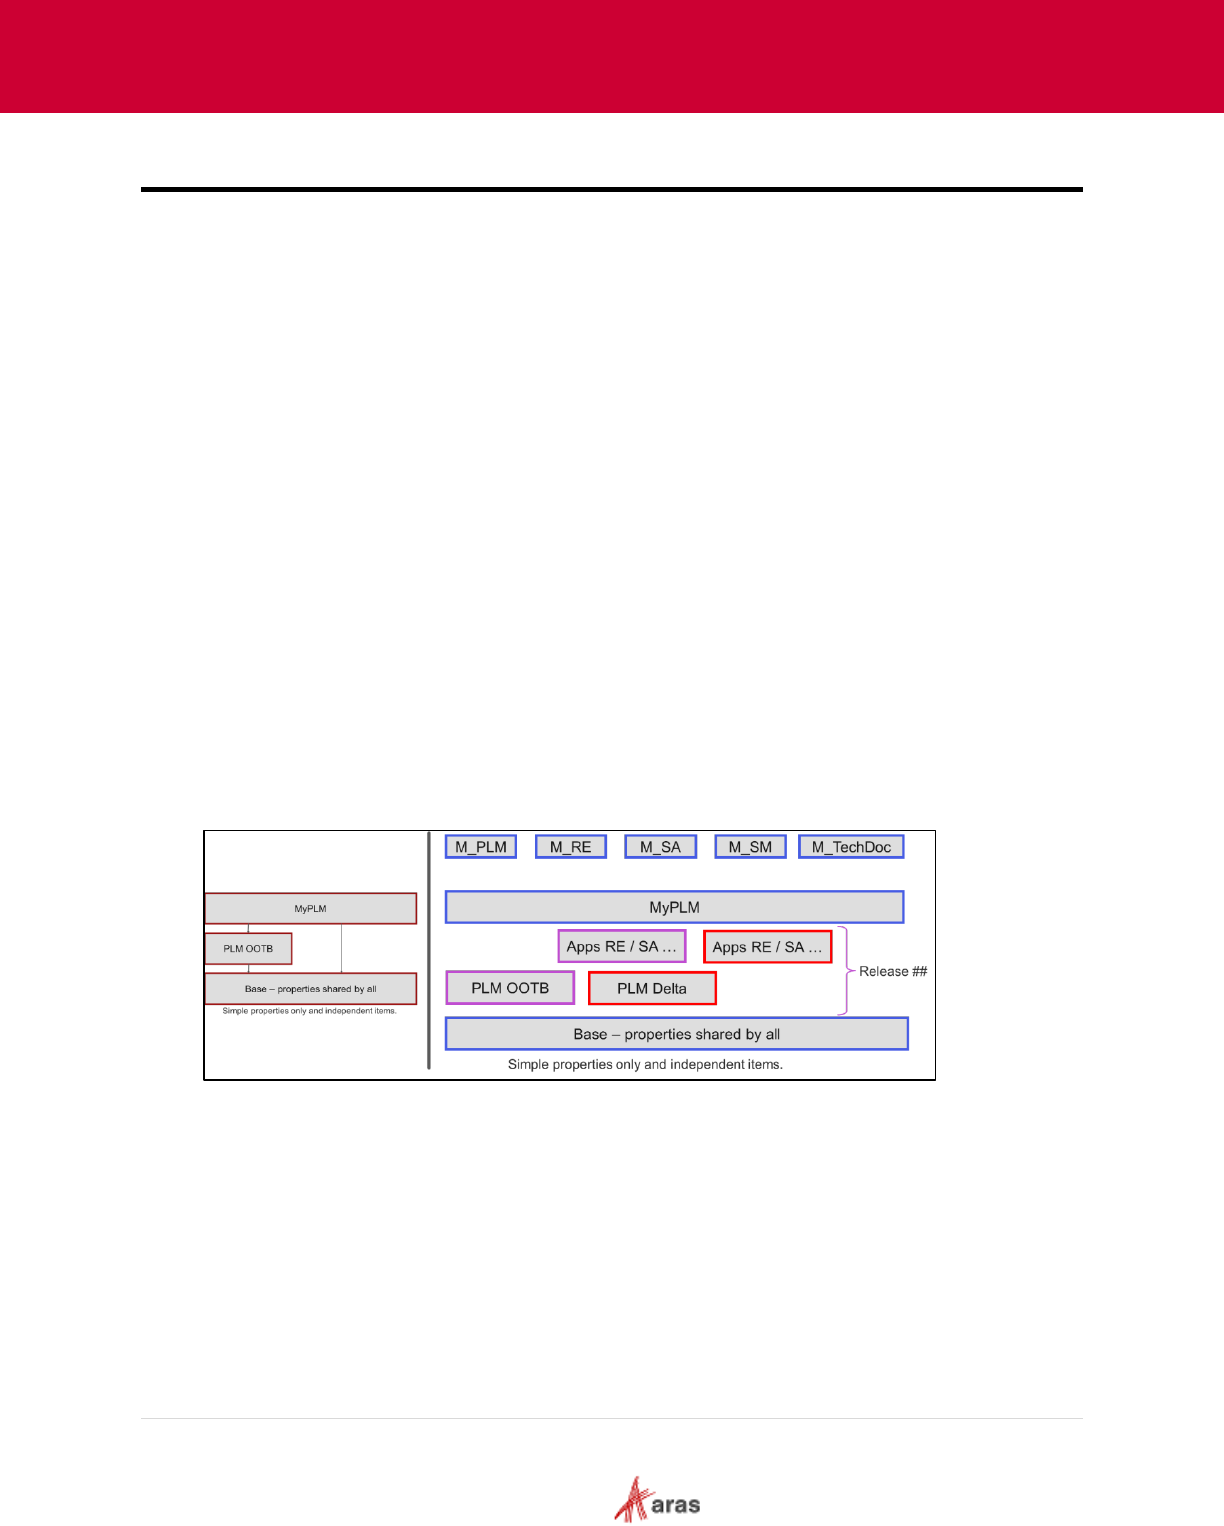
2023 Aras Corporation All Copyrights Reserved. 60
Aras DevOps
User Guide
9 Packaging
Aras Innovator is a low-code platform, which means user can add very little code to achieve
outstanding results rapidly.
It also means user can use configuration to express business rules, such as a life cycle map.
When working directly with an instance of Aras Innovator, these changes are stored anonymously
within and can reference any other items already in the system and vice versa.
Making such changes directly in a business-critical system serving users is not good practice. As
mentioned earlier, a central focus of DevOps is to instill the discipline of well-managed solution
configurations, including change management and implementation.
The following sections explain how to export these changes into named packages, define explicit
dependencies, and commit the changes for proper configuration and version control.
This way, it is ensured that the build system can replicate the swiftly accomplished interactive tasks -
thus introducing configuration and version control discipline to the low-code product.
9.1 Summary of Modeling
The process of building a new application can be divided into two primary aspects:
o Data modeling (schema)
o Interaction (business rules, UX)
This is done on an existing system with standard products from Aras, Modules from 3rd Parties, or
earlier work by the user’s company for various reasons.
The new applications must consider all the existing work when modularizing, packaging, and
building.
The two diagrams below illustrate that the new application can be simple or ambitious.
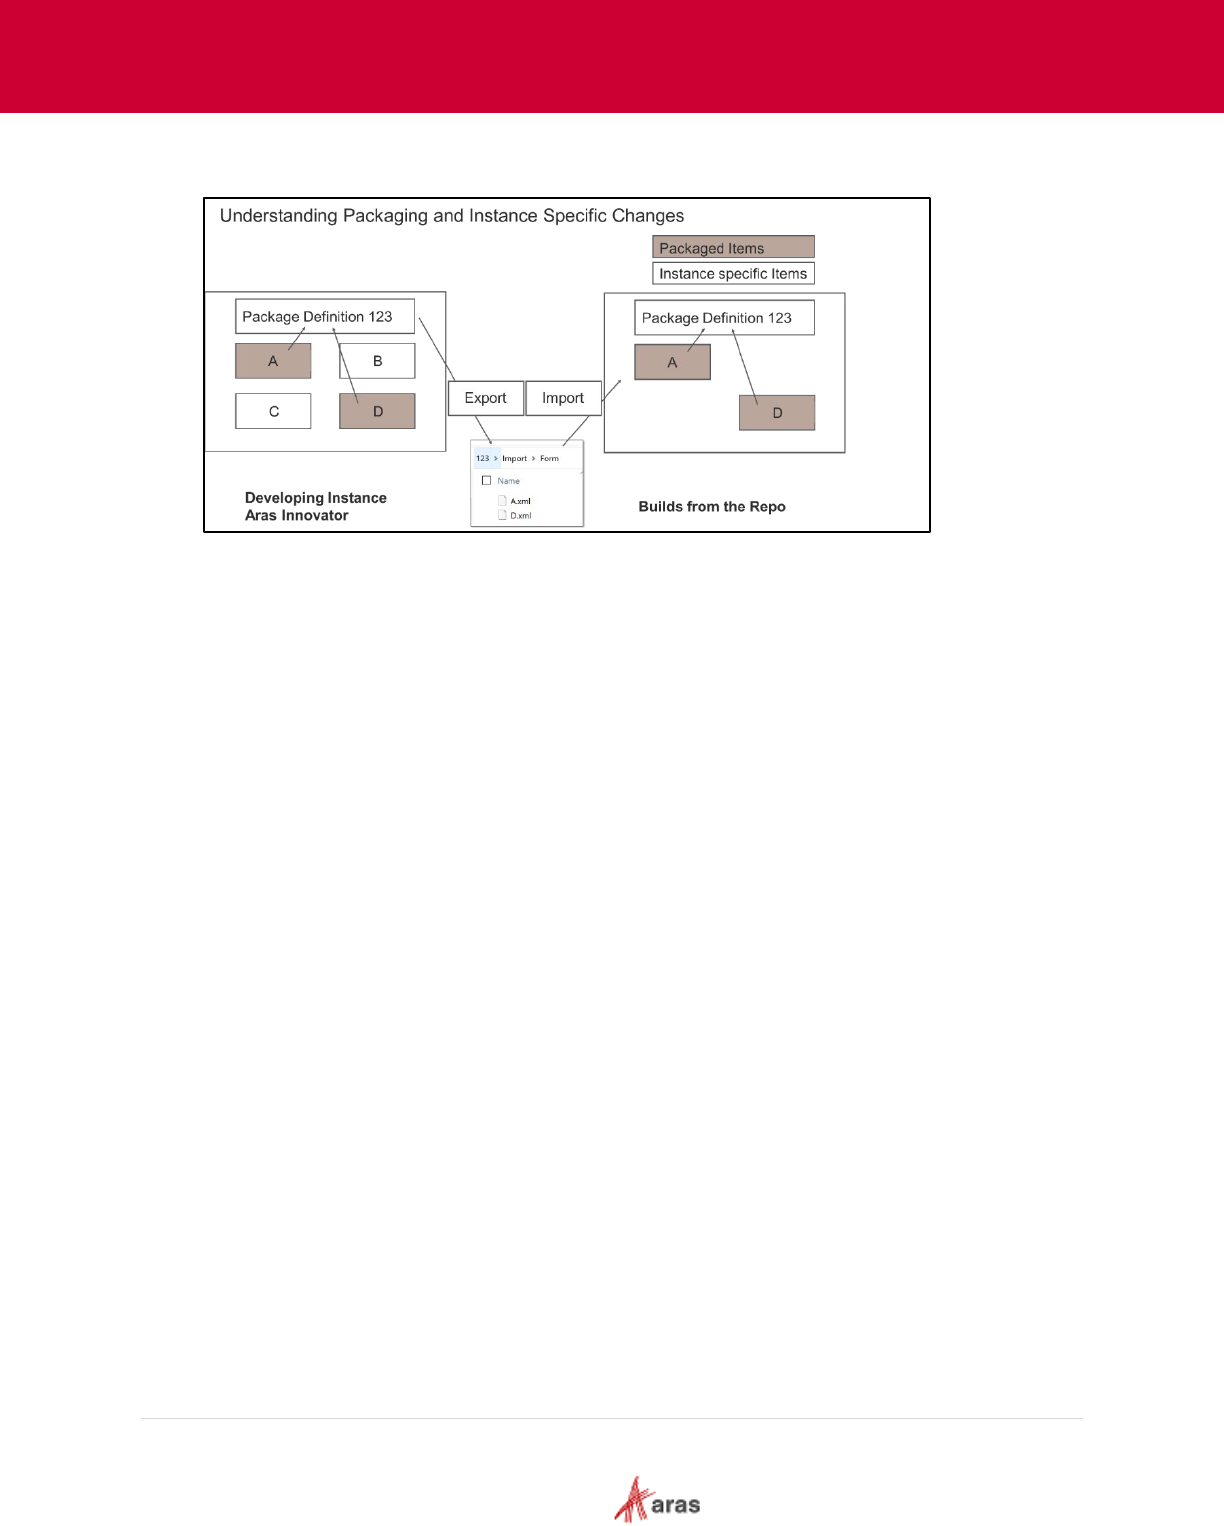
2023 Aras Corporation All Copyrights Reserved. 61
Aras DevOps
User Guide
The diagram below summarizes the impact of anonymous items in an instance and the effect of
defining, exporting, and providing packages to the build system.
On the left, the user has four items (A, B, C, and D). A, and D represent new or modified items
which are properly packaged, exported, copied, and assigned to the change control system Git. B
and C represent Innovator instance specific items which are not intended for use in the next build
and therefore consequently not packaged.
The build system then produces the instance on the right. It's important to observe that the Aras
Innovator instance on the right excludes items B & C, showcasing the capability to dictate what
DevOps builds. This capacity to specify what DevOps creates is a foundational element of utilizing
DevOps.
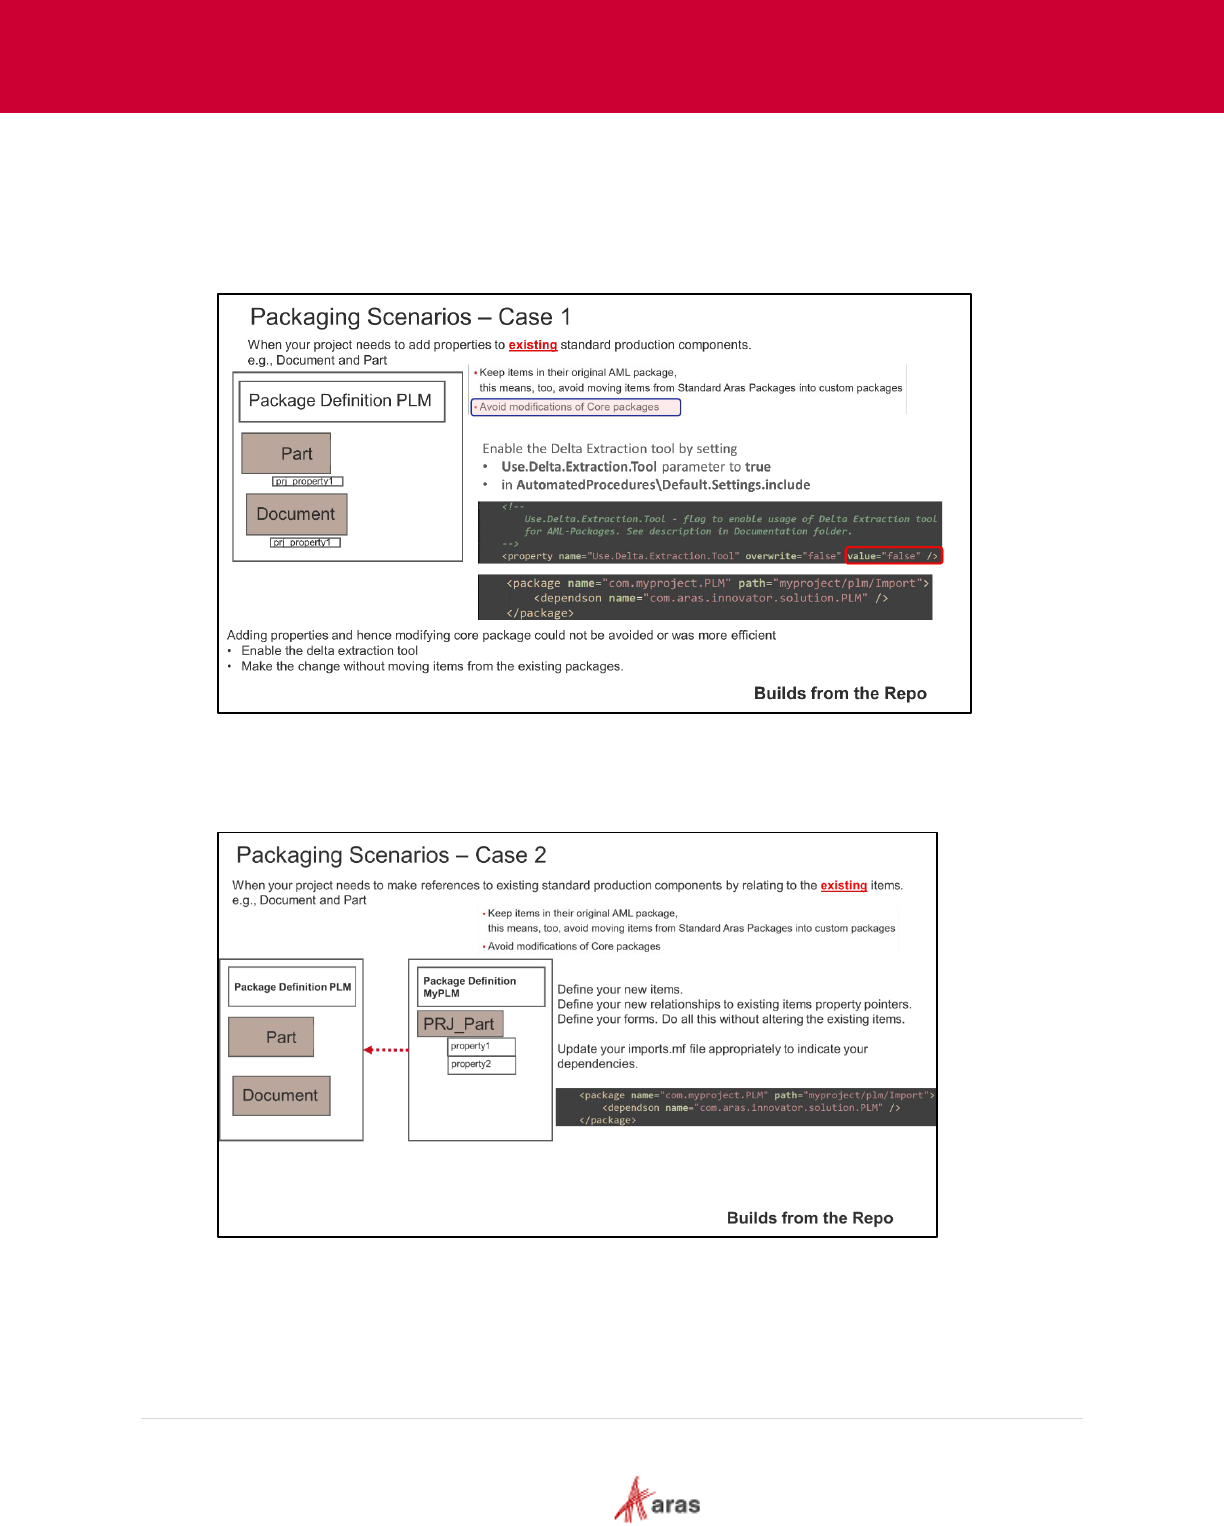
2023 Aras Corporation All Copyrights Reserved. 62
Aras DevOps
User Guide
9.2 Review of Packaging Scenarios
9.2.1 Case 1
Case 1 represents a straightforward addition of properties to standard classes for which user
must provide forms. Notice the specifications for Delta Extraction tool. By default, it is false.
9.2.2 Case 2
Case 2 represents a situation in which the user needs a relation between the new item types and
the existing item types. User must now define relationships and specify dependencies.
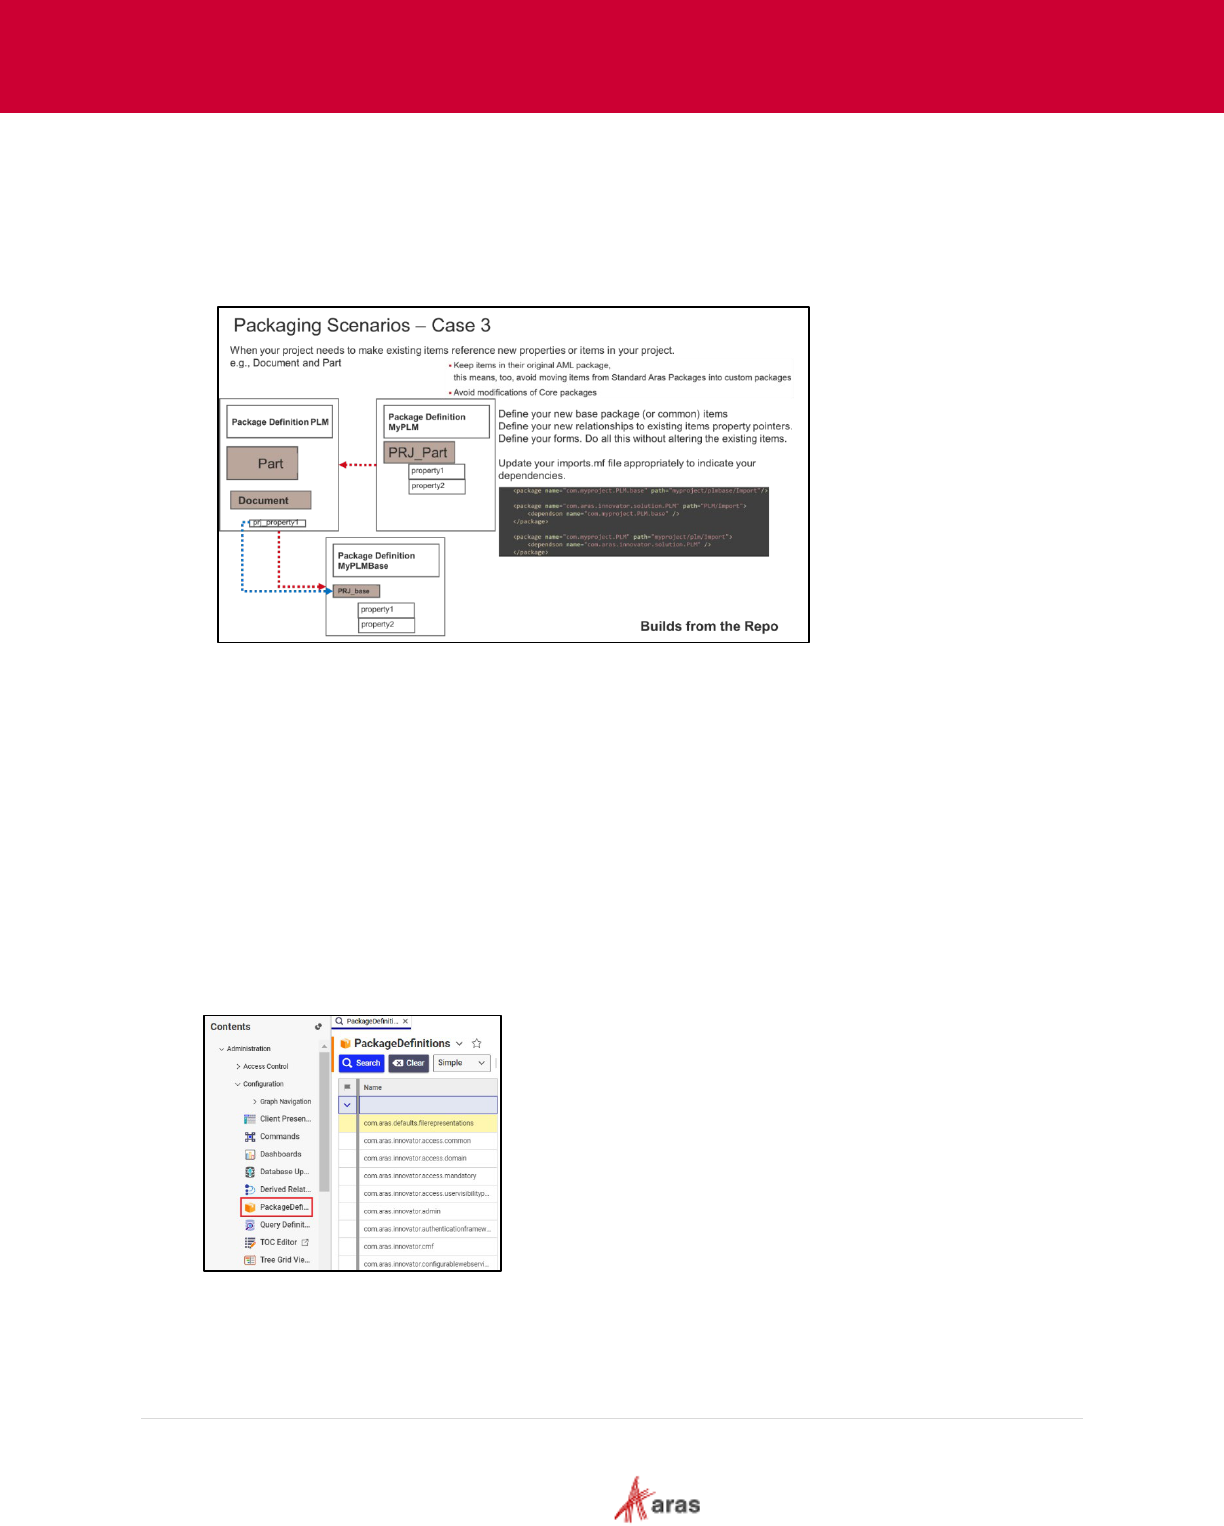
2023 Aras Corporation All Copyrights Reserved. 63
Aras DevOps
User Guide
9.2.3 Case 3
In case 3, if user has effectively introduced a circular dependency, it will not be recognized in the
Aras Innovator instance utilized for development. Aras Innovator automatically resolves all the
dependencies since all items are already present. When using a build system, if packaging and
modularization are not explicitly specified, the loading sequence can be misaligned and fail. To
avoid such failures, explicitly specify packages and their dependencies.
9.3 Packaging Tools and Methods
The Aras Innovator architecture is designed for customization of standard Aras Solutions/Apps and
for building custom Solutions.
Solution Packaging is the mechanism that allows Solution Developers to register customizations in
Packages so they can be extracted and transported to other Aras Innovator installations. For
example, from a development to a test environment.
The items are organized into packages. A package element (identified by its GUID) cannot be
added to multiple packages. Align folder names with the packages they contain for ease of
identification.
We recommend using packaging when creating items, lists, properties etc. in an Aras Innovator
instance, since packaging is mandatory for use in CI/CD. Packages can be exported and imported.
2023 Aras Corporation All Copyrights Reserved. 64
Aras DevOps
User Guide
A newly installed Aras Innovator database contains Package Definitions of two types:
• Core Packages – These packages are used to define the basic structure of every Aras
Innovator database, regardless of what solutions are used. Core packages are not meant to be
overwritten or customized.
• Solution Packages – These packages define the elements that comprise the definition and
functional rules of different custom data models created in the context of the project.
To learn about Standard Solution Packaging Tools, please see section
Appendix II: Standard
Solution Packaging Tools.
The following section provides an illustration related to the topic discussed above in the preceding
section.
9.4 Create and Manage New Application
Customization in Aras Innovator can consist of modifying existing applications, but also in creating
completely new applications needed to solve custom business needs. The goal of this section is to
describe the main steps that will need to be taken.
A new application normally results in a new AML package with its own package definition. The
package definition contains all changes made to instances of Aras Innovator.
The process of creating a new package requires several steps:
1. Create a new package.
2. Export package to the file system, locate the results properly in the repository directories and
update the manifest file to include not only the existing packages, but also the newly added
one. Modify the manifest file to include not only the existing packages, but also the newly
added one.
3. Assign the new and modified files to the Git repository with commit or stage including the
manifest file.
4. If a new package is created, it is recommended to use Java naming conventions for packages
(lowercase and dots indicating a hierarchy) and align folder names with the packages they
contain.
Note: Whenever a user has updated any sections of the repository the new or modified files
need to be staged or committed to become part of the next build.
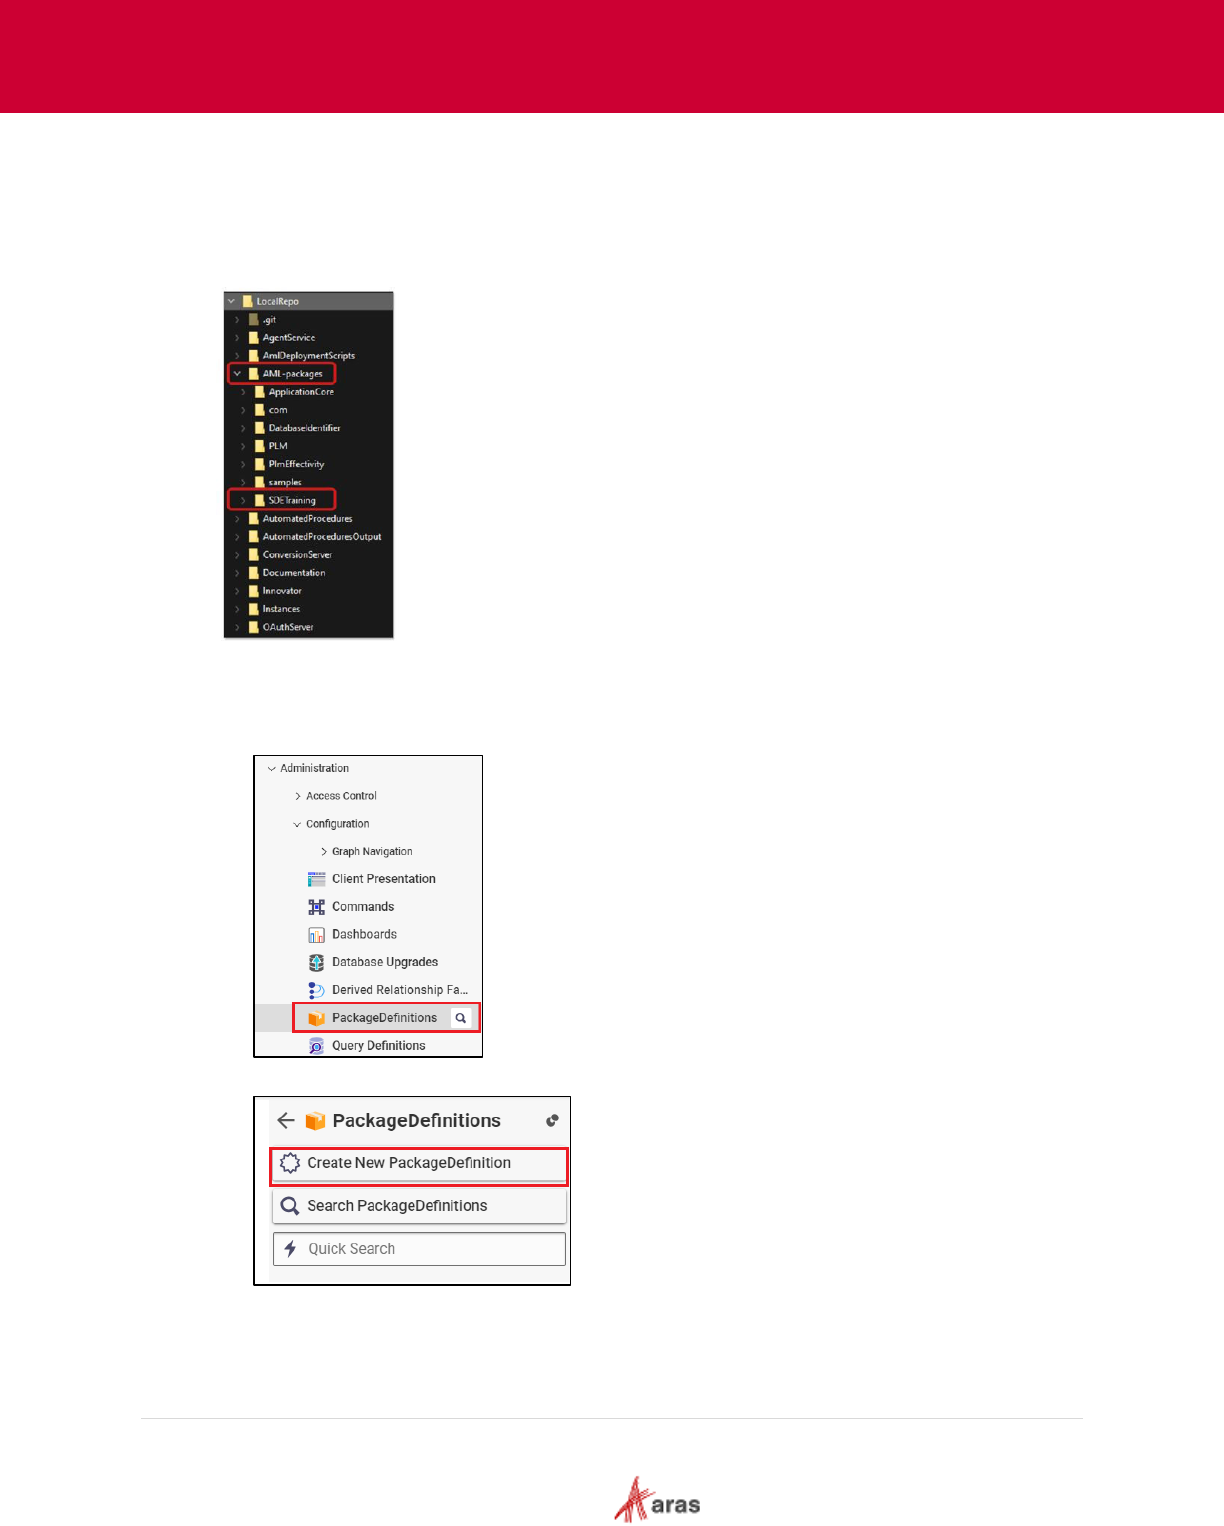
2023 Aras Corporation All Copyrights Reserved. 65
Aras DevOps
User Guide
9.4.1 Creating a Package Definition
To set up a new application on Aras Innovator, the user must create a package by first creating a
package definition with its dependencies and then export the package.
In this case the manifest file for the import must be adapted and needs commit or stage to version
control system.
The following steps outline the process of creating a package definition:
1. Login into Aras Innovator instance.
2. From the Table of Contents, expand Administration>Configuration and select
PackageDefinitions.
3. Click Create New PackageDefinition.
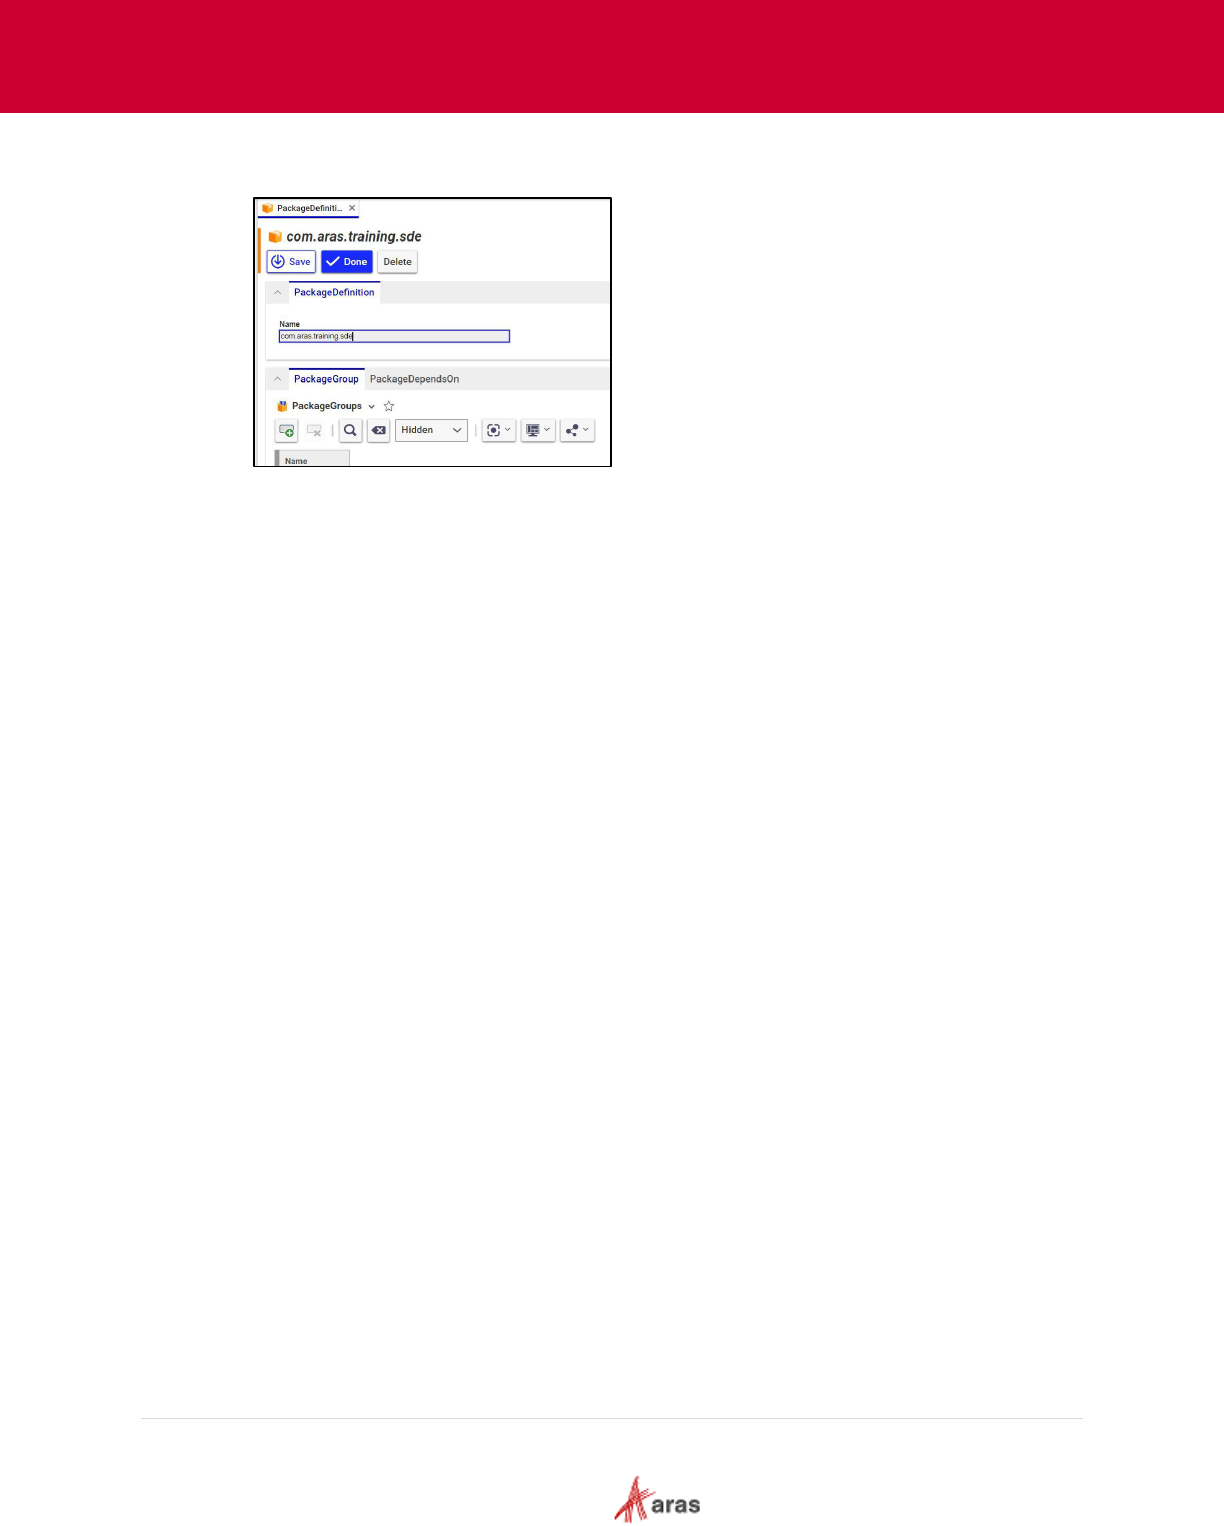
2023 Aras Corporation All Copyrights Reserved. 66
Aras DevOps
User Guide
4. On the package definition form enter the name of the PackageDefinition. For example,
com.aras.training.sde.
5. Create a test item and add it to the new package.

2023 Aras Corporation All Copyrights Reserved. 67
Aras DevOps
User Guide
9.4.2 Export Package and Update the Imports Manifest File
The Manifest file describes the list of packages that will be imported during solution deployment
and dependencies between those packages. When a custom package is created and will need to
be imported during project deployment, it needs to be included into the manifest file.
The following steps outline the process of exporting and updating the Imports Manifest File:
1. Export the new Package.
2. Open the resulting manifest file. Copy the package name from the import.mf file. For
example:
<package name="com.aras.training.sde" path="sde\Import" />
3. Open the manifest file from the local repository: C:\ {Working Directory} \AML-packages.
4. Paste the code copied in step 2 inside the import.mf file in the local repository.
For example:
<imports>
<package name="com.aras.training.sde" path="sde\Import">
<dependson name="com.aras.innovator.solution.ApplicationCore" />
</package>
</imports>
5. For cleanup, delete the test item which was the only item in the package
com.aras.training.sde.
9.4.3 Confirming Manifest Changes in Version Control System
Verify the modifications made to the manifest file before committing them to the repository. This
process ensures that the changes are accurate and in line with the contributor’s intentions.
It typically involves checking the status of the Version Control System (VCS), reviewing the
modifications made to the manifest file using the diff command specific to the VCS, and then
committing the changes if they are satisfactory. The exact steps and commands may vary
depending on the VCS which is used.

2023 Aras Corporation All Copyrights Reserved. 68
Aras DevOps
User Guide
10 Change Management and Implementation
Aras enforces a strict Solution Configuration Management discipline. The solution includes:
• Standard Aras Innovator Platform – the release is created regularly by Aras engineering and
tracked with versioning (Such as Aras Innovator Release 26, please see the support matrix
.
• Standard Aras Innovator Applications - User can include them with the base Aras Innovator
platform.
• Configuration and Customizations specified by the customer and implemented by the customer
and or customer’s agents such as Aras Solution Delivery Services and 3rd Party Systems
Integrators. These includes:
o Workflow configurations
o Reports
o Configurations such as adding new properties to items
o Forms
o Integrations to various other systems
o Enhancements (customizations for specific purposes)
The project manages all of the above to ensure comprehensive Solution Configuration
Management. Aras Cloud policy requires a project to provide the following approvals to get a
specific solution configuration into production or modify the solution.
• System Qualification Approval: The system satisfies requirements as tested in the SIT
environment.
• Functional Qualification Approval: The system configuration has been completed and is
acceptable to the user community as tested in the UAT environment.
• Data Qualification Approval: The system contains the required initial data.
• Production Qualification Approval: Approval to go live and an invitation to the user community to
use the system. Testing for this approval is conducted in the preproduction environment. The
approach of solution configuration management pertains to the initial implementation as well as
subsequent improvements, bug fixes, and any modifications that change the system’s
configuration.
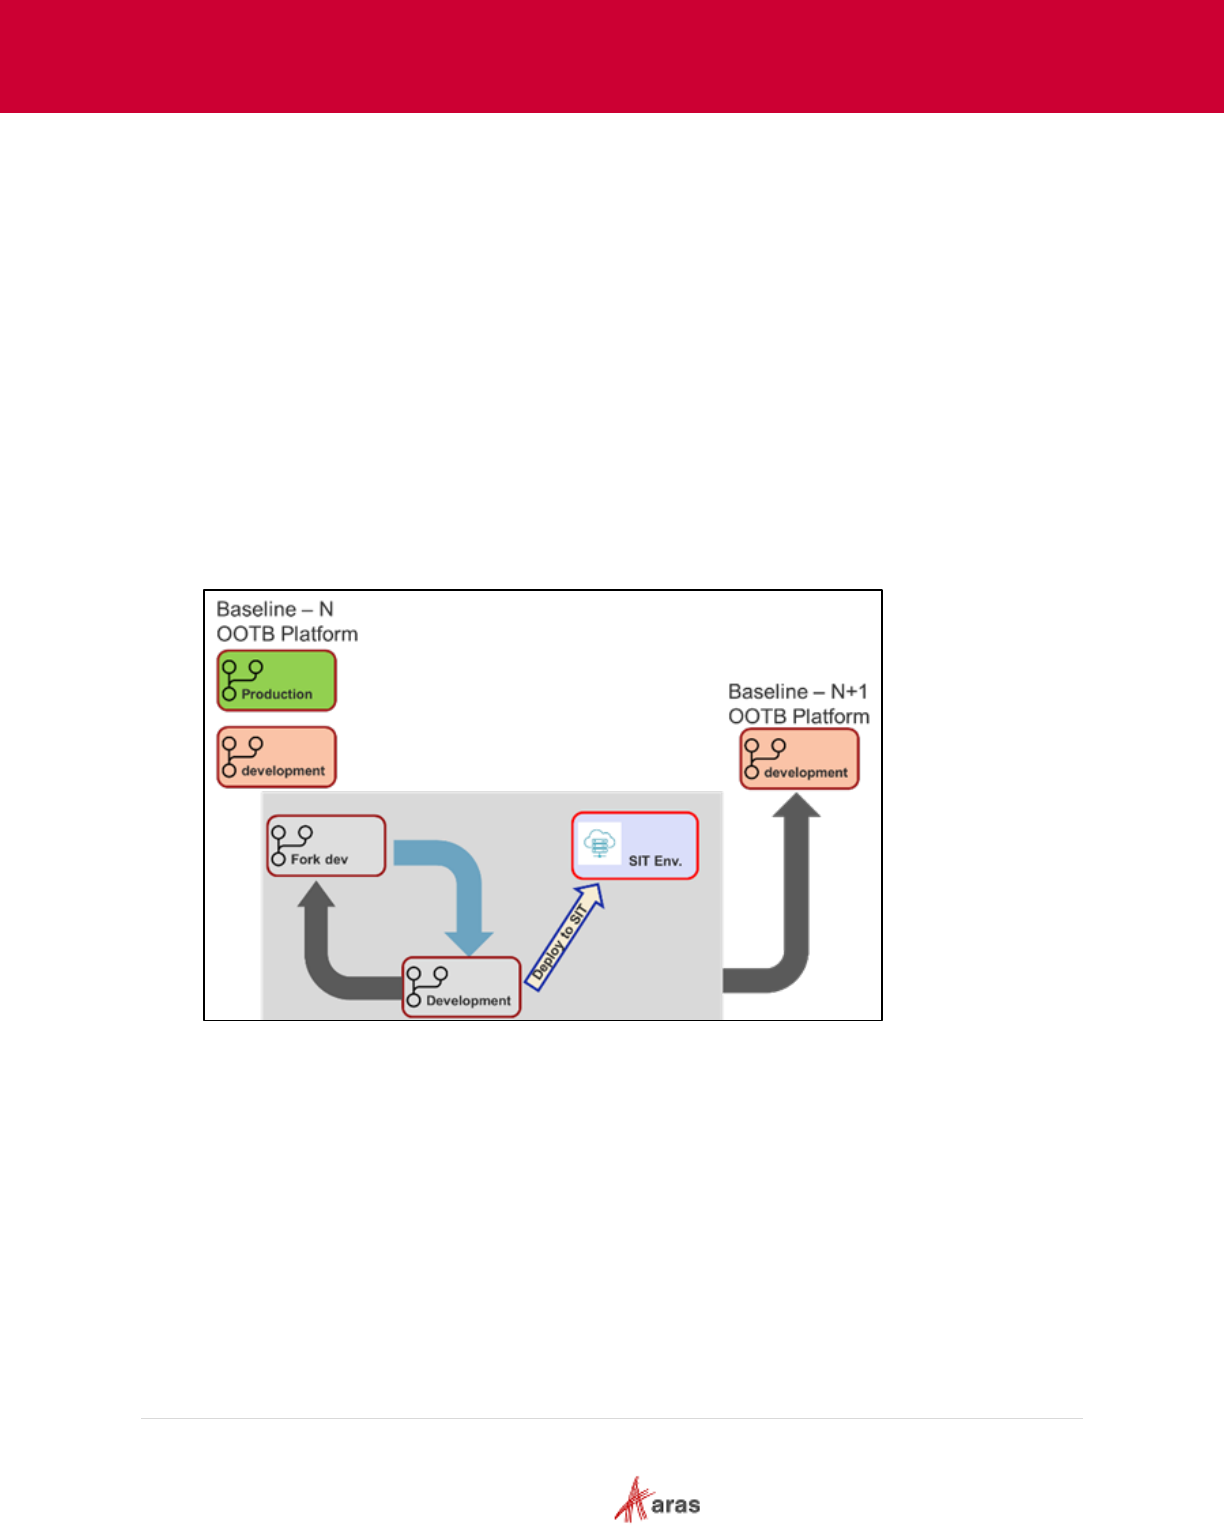
2023 Aras Corporation All Copyrights Reserved. 69
Aras DevOps
User Guide
10.1 Production Countdown Sequence
Aras understands the need for flexibility during development and will interfere with the project's
chosen practices.
However, during the countdown sequence to production deployment, Aras requires a protocol to
ensure a smooth transition and secure approvals needed.
Aras focuses on the following branches:
• Development
• SIT
• UAT
• Production
As part of the production deployment sequence, Aras mandates that the project team integrate
their release candidate from the development branch into the "sit" branch prior to deploying it in the
SIT environment.
During deployment, the project team can deploy from any Work (team) repository branch to the SIT
environment to support ongoing testing.
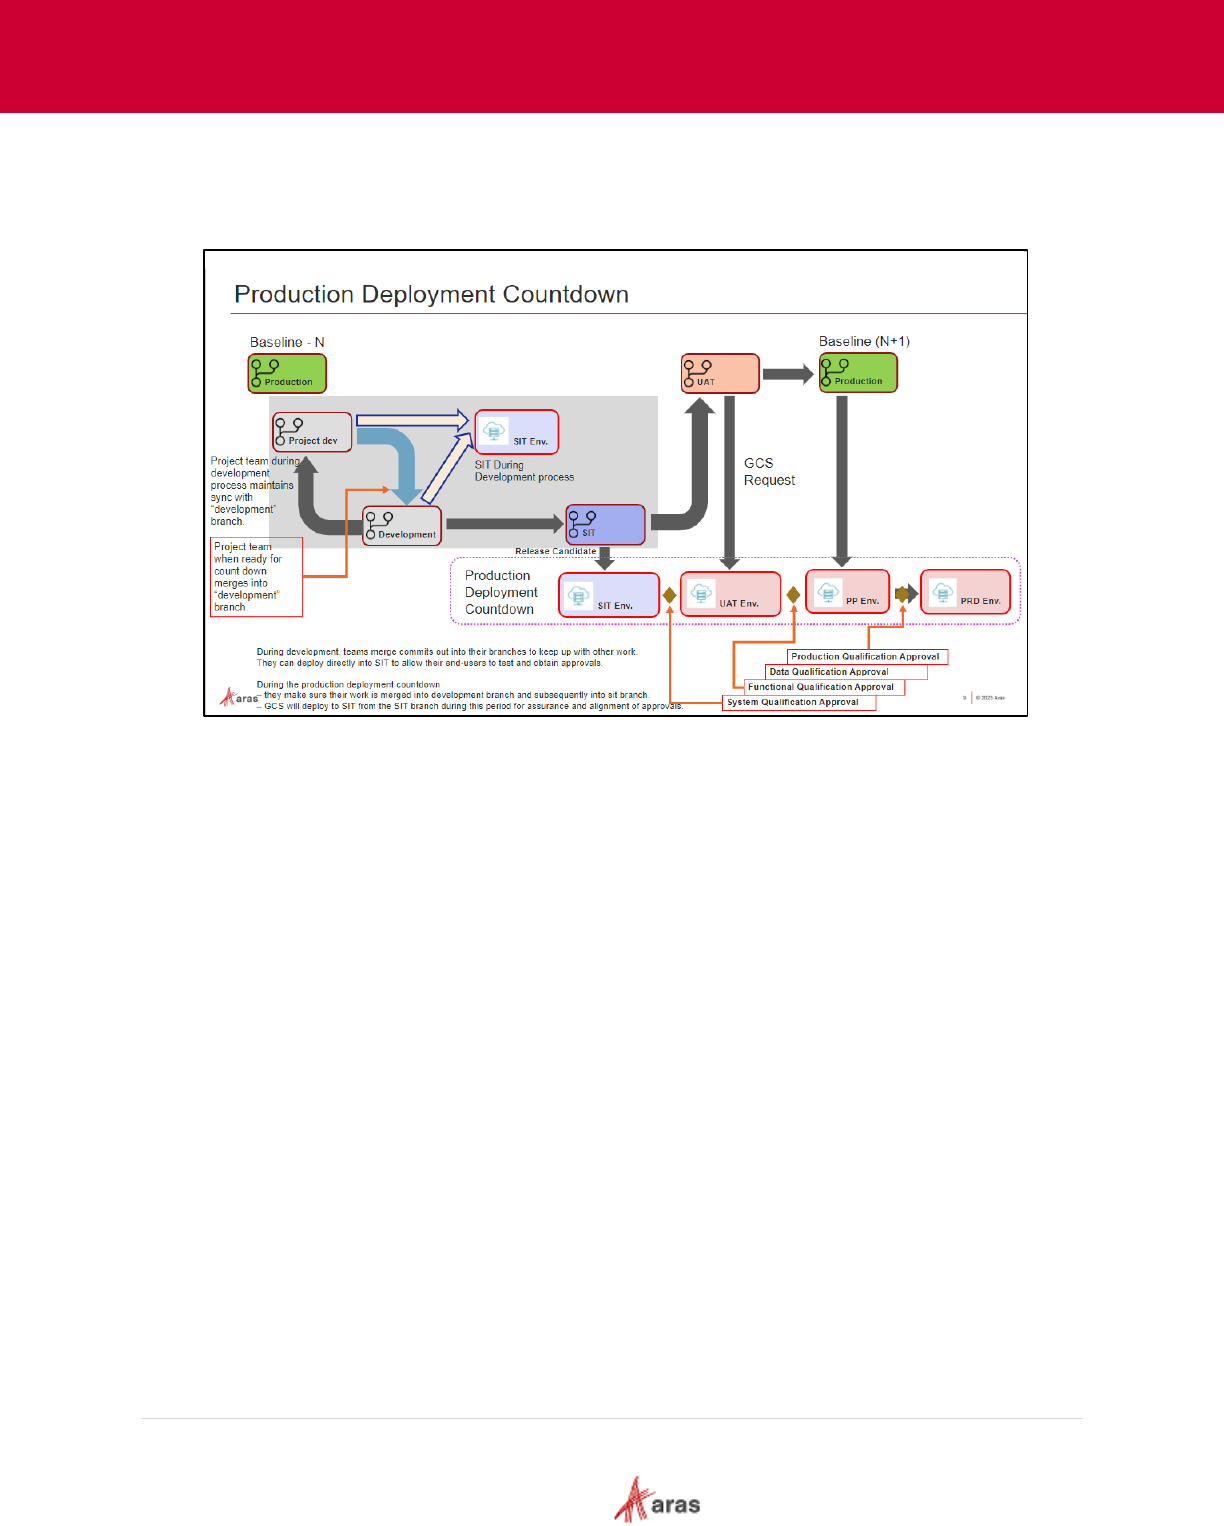
2023 Aras Corporation All Copyrights Reserved. 70
Aras DevOps
User Guide
During the countdown sequence, the change implementation policy requires the project team to
deploy to the SIT environment only from the "sit" branch. The practice of deploying to SIT only from
the "sit" branch during the countdown sequence helps ensure alignment. The customer is required
to identify the build for which they approve for System Qualification.
Aras mandates that the project team obtains a "System Qualification Approval - SQA" from the
client to conclude SIT testing. This approval signifies that the client is content with the entire
solution. As needed, all necessary integrations, SSO connections, CAD, and Office connectors
have been established.
Note that the project team may have identified a release candidate, deployed it to SIT, collected
feedback, and performed remediation to obtain System Qualification Approval. Aras does not
dictate the number of cycles, just that the customer provides SQA before deployment to UAT.
Once the "SQA" is obtained, the project team immediately asks Aras to initiate the suitable build
deployment in the UAT environment. The project team should prepare and deploy to the UAT
environment from the "uat" branch. In collaboration with the client, the project team facilitates a
system review by the end-users, leading towards the Function Qualification Approval. The client
must provide FQA before PQA.
In projects that involve data migration, the project team is required to secure Data Qualification
Approval - DQA. To obtain DQA, the project team must request production environment
provisioning and necessary endpoints to run the data import. Once the project team has imported
the data, the team must ask the customer to review the data and approve data quality.
The project team must request the UAT, staging, and production environments with the customers'
approval. The staging environment is used both for importing data from other systems and serves
as pre-production to perform final testing to secure Production Qualification Approval.
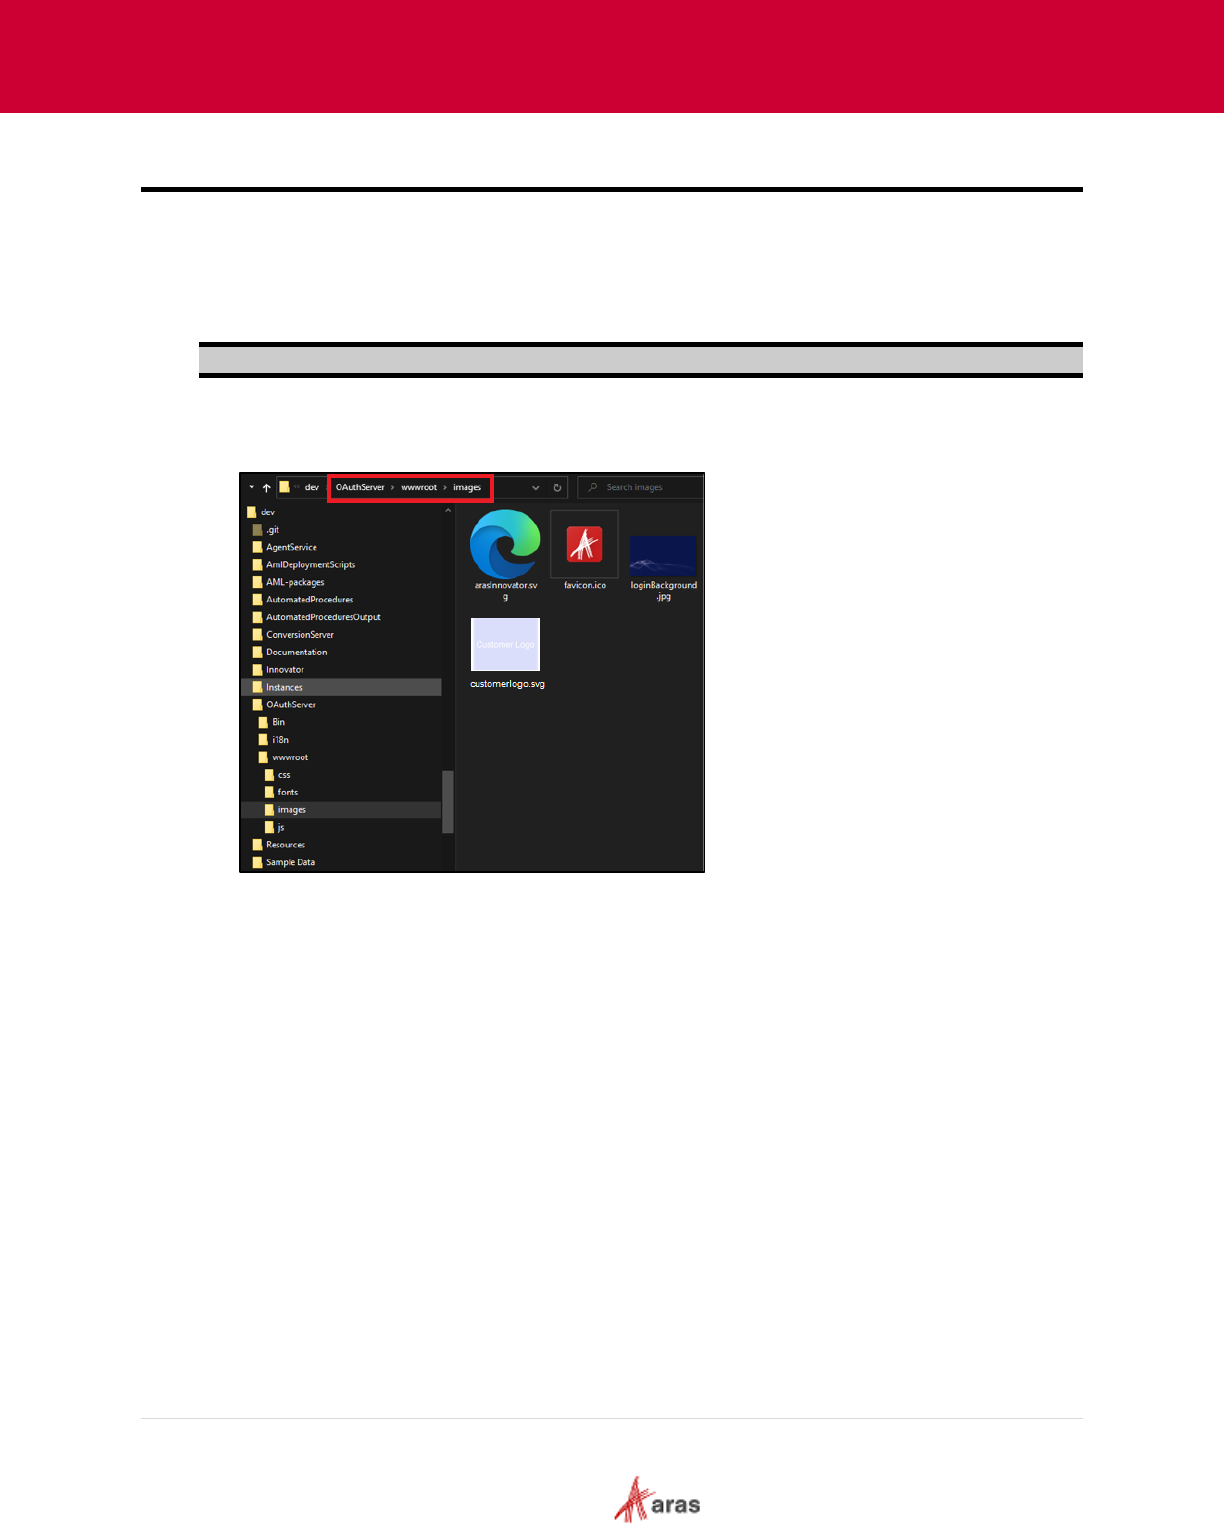
2023 Aras Corporation All Copyrights Reserved. 71
Aras DevOps
User Guide
11 Branding Customization
Branding customizations enable contributors to use their own logos and banners for Aras Innovator.
11.1 Splash Screen
The following steps outline the process to change the Aras Innovator splash screen:
Note: Contributors needs a tool to manipulate SVG images. Use any required tool.
1. Select a background Image and obtain the customer’s logo to be applied to the splash screen.
2. In the following directory add the Background image and Customer logo obtained from step 1:
C:\ {working directory}\Instances\dev\OAuthServer\wwwroot\images
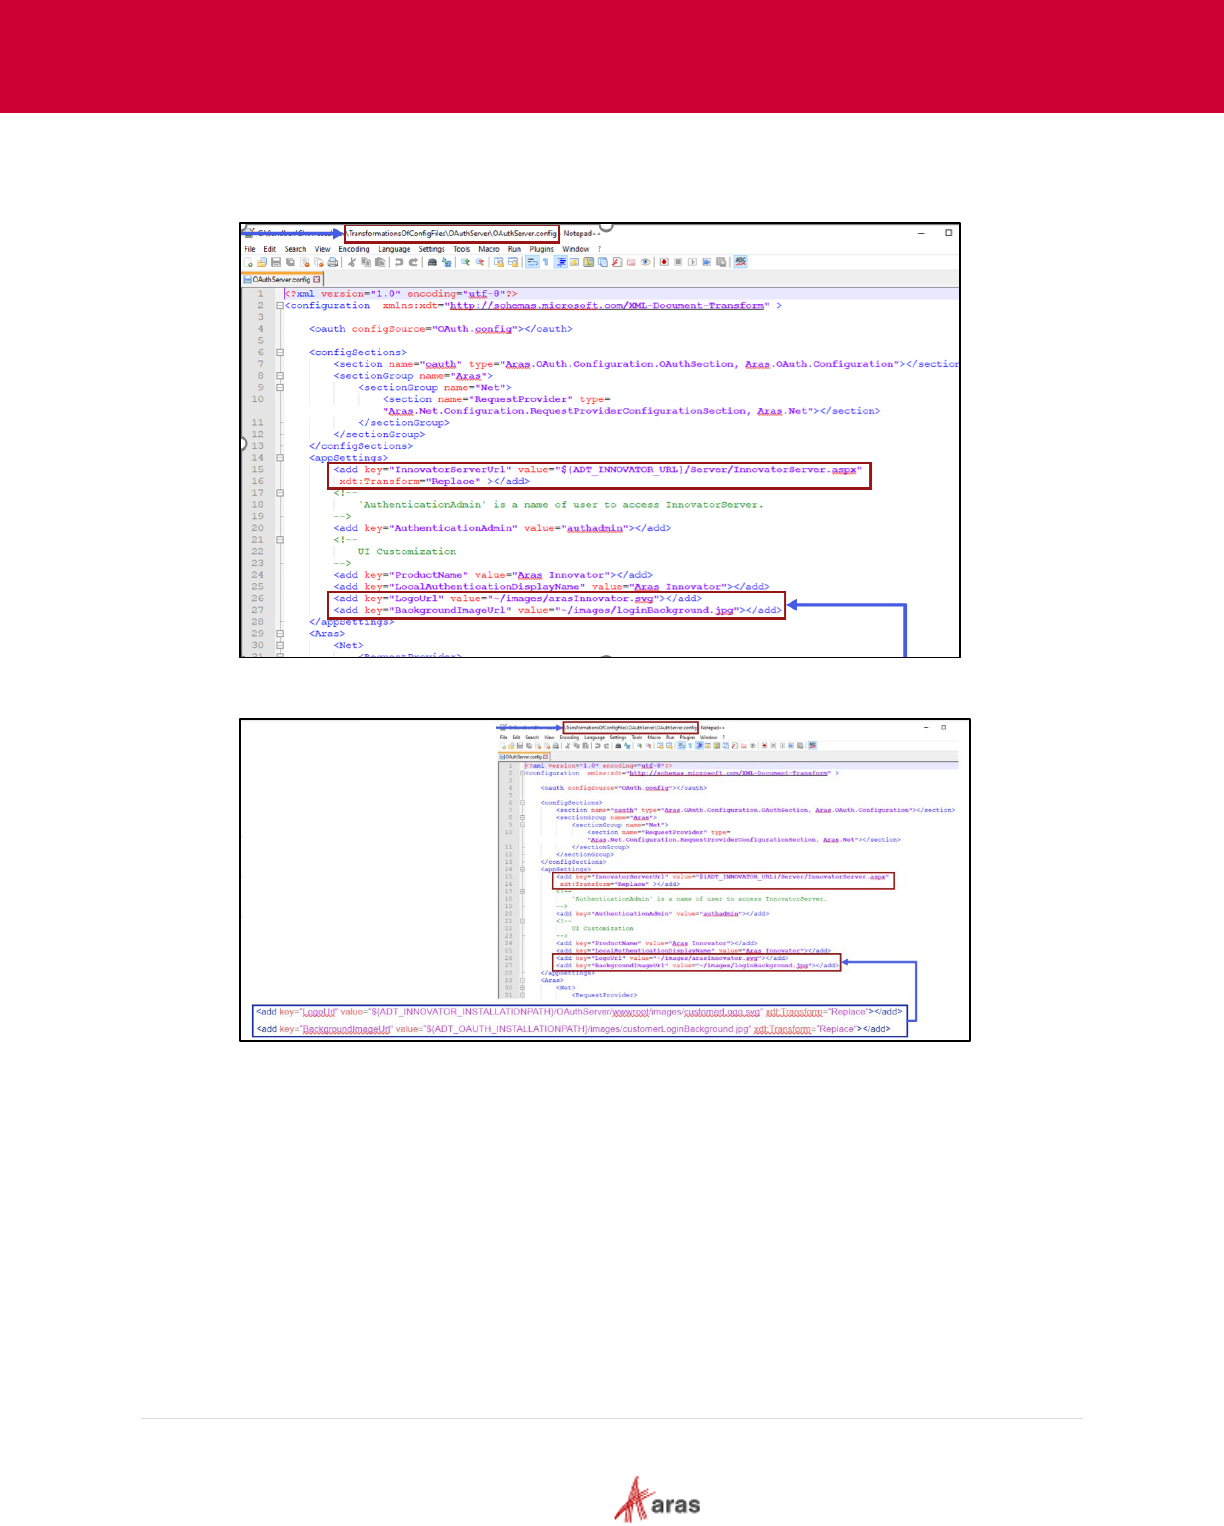
2023 Aras Corporation All Copyrights Reserved. 72
Aras DevOps
User Guide
3. From C:\{working directory}\TransformationsOfConfigFiles\ directory modify
the OAuthServer.config. Notice the location of the file to edit. It is important to do this in the
transforms folder as shown in the screenshot below:
NOTE: It is best to use the OAuth installation path directly as it may be installed differently.
ADT_OAUTH_INSTALLATIONPATH
4. Stage the changes before running the build scripts.
5. Execute ./BuildAndDeploy.ps1 to rebuild Innovator.
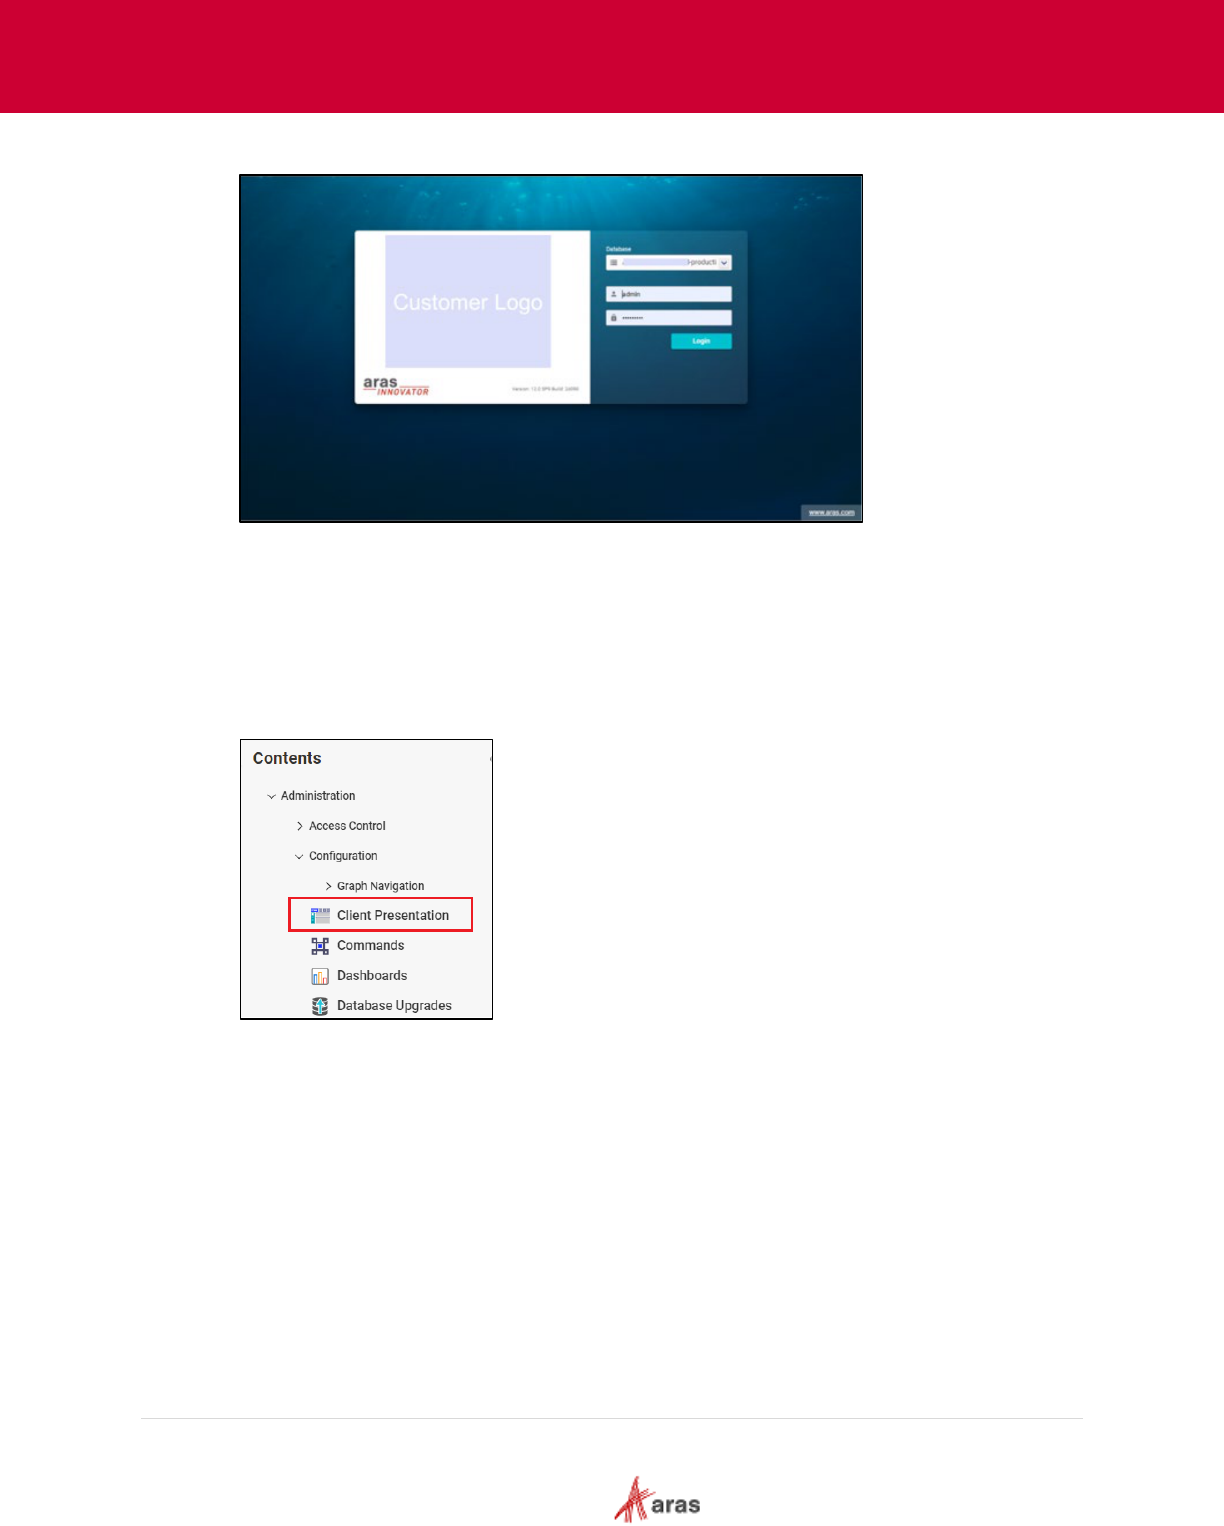
2023 Aras Corporation All Copyrights Reserved. 73
Aras DevOps
User Guide
6. Notice the changes to the login screen.
11.2 Change Banner
The following steps outline the process to update the banner logo:
1. First, start by navigating to the existing image.
2. Login into Aras Innovator instance.
3. From the Table of Contents, expand Administration, Configuration and select Client
Presentation.
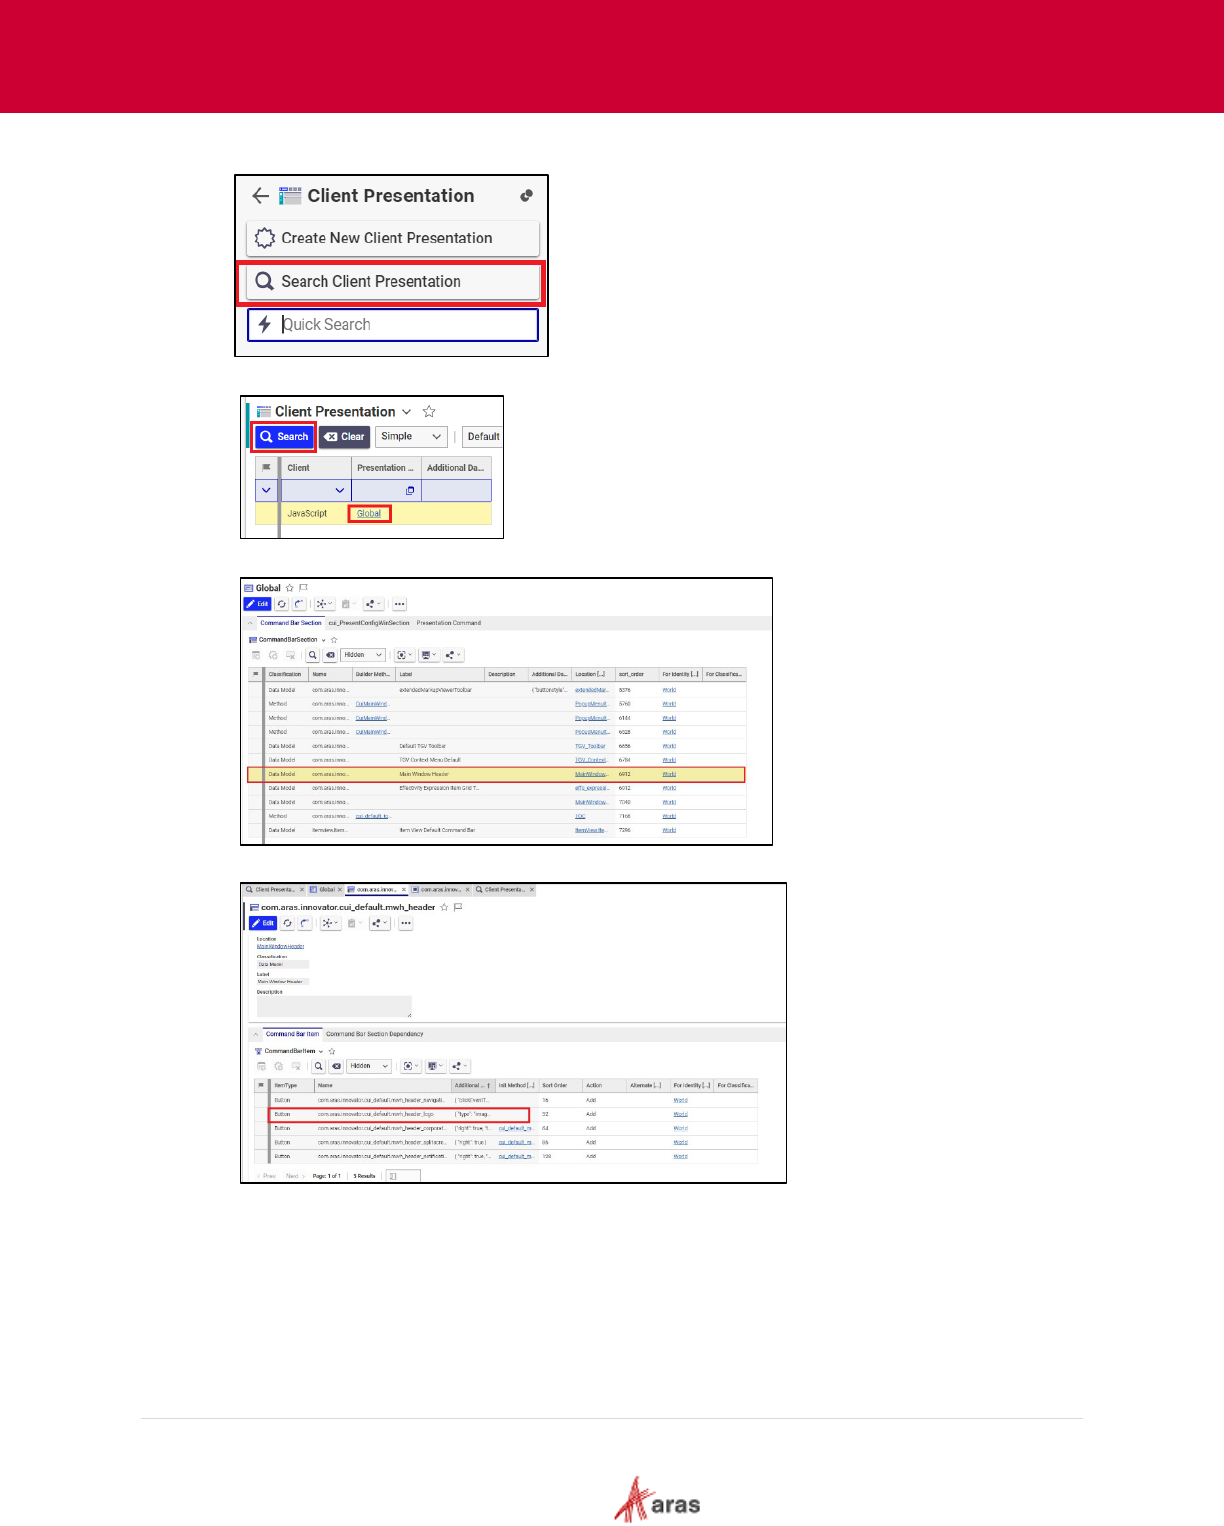
2023 Aras Corporation All Copyrights Reserved. 74
Aras DevOps
User Guide
4. From Client Presentation Table of Contents, click Search Client Presentation.
5. On Client Presentation form, click Search and click Global.
6. In CommandBarSection tab, select row with Main Window Header label.
7. Select com.aras.innovator.cui_default.mwh_header_logo.
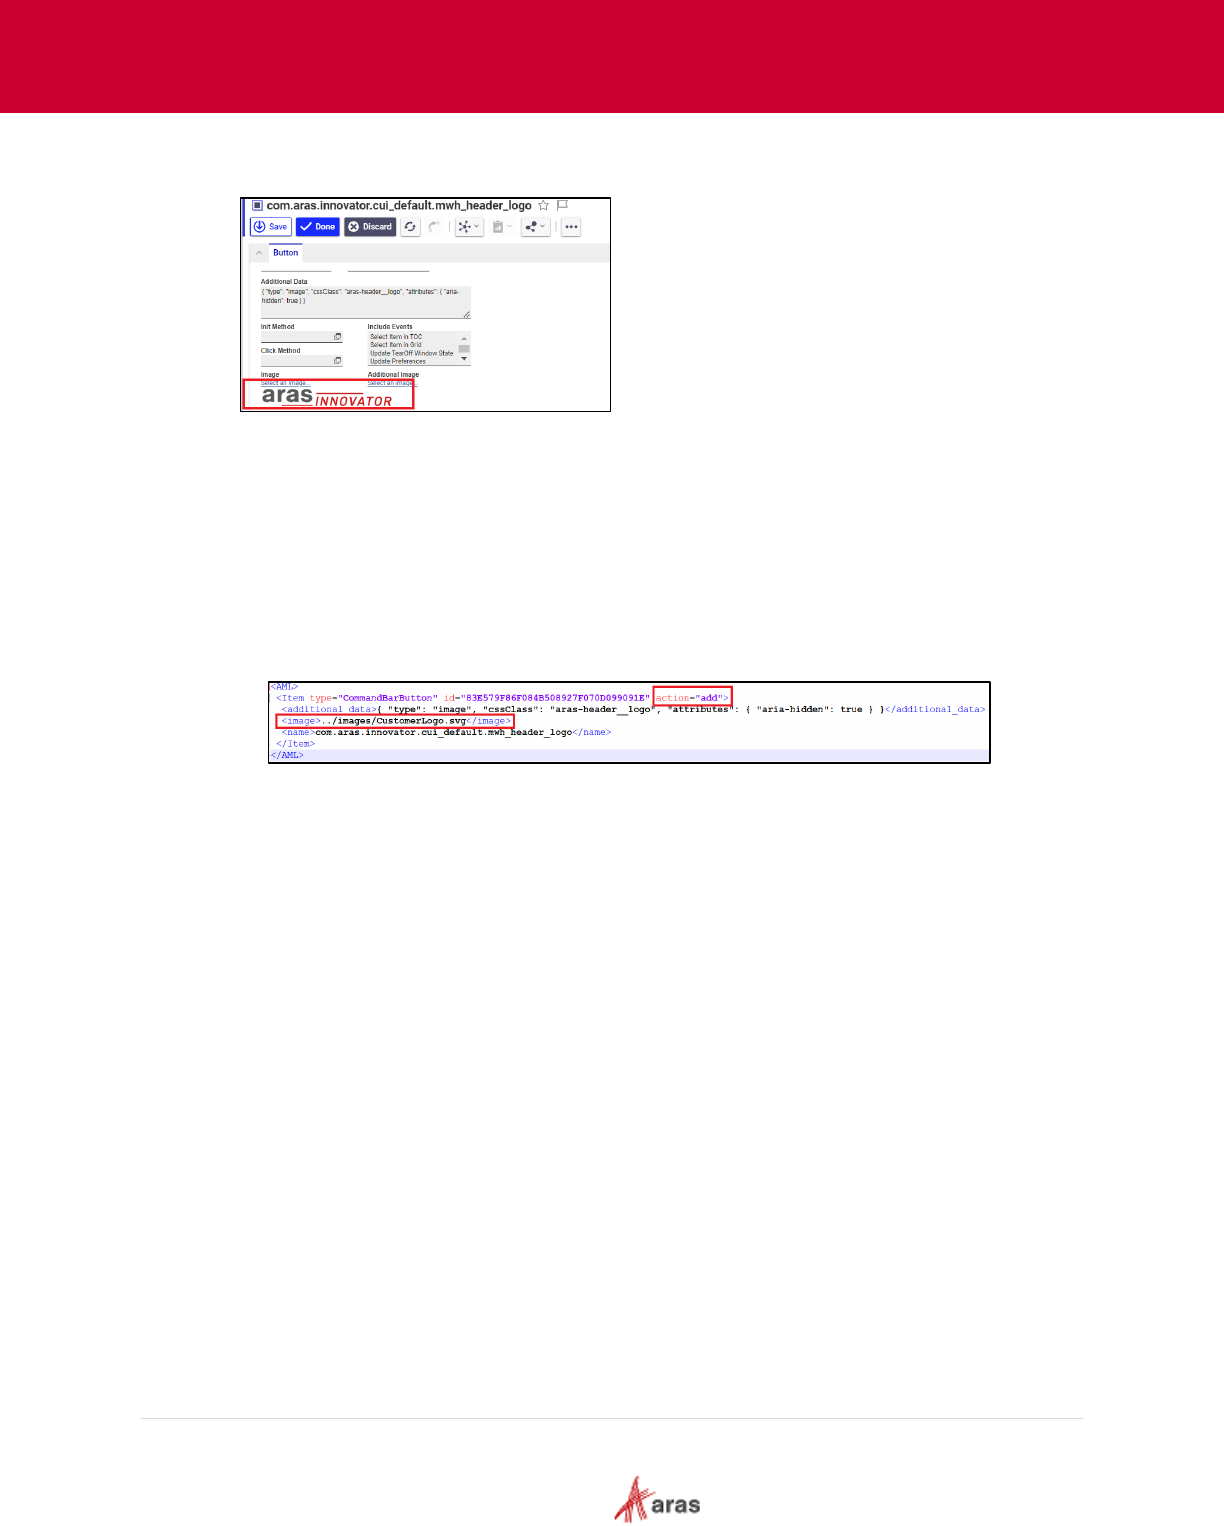
2023 Aras Corporation All Copyrights Reserved. 75
Aras DevOps
User Guide
8. Notice the existing image. The height is very important for adjusting the customer’s logo to fit
while maintaining conformity with the customer’s branding guidelines.
9. On the local machine, add the required Customer Logo in the following directory:
C:\{working directory}\Instances\dev\OAuthServer\wwwroot\images
The image should be in SVG format.
10. Navigate to the following folder: C:\{Working Directory}\AML-
packages\com\aras\innovator\cui_default\CommandBarButton
11. Open com.aras.innovator.cui_default.mwh_header_logo file.
12. In the com.aras.innovator.cui_default.mwh_header_logo file do the following:
• Change the action attribute from “add” to “edit”
• Add the CustomerLogo.svg in the Image tag. Ensure that the path is correct.
13. Execute ./BuildAndDeploy.ps1 to rebuild Innovator and notice the changes to the Banner.
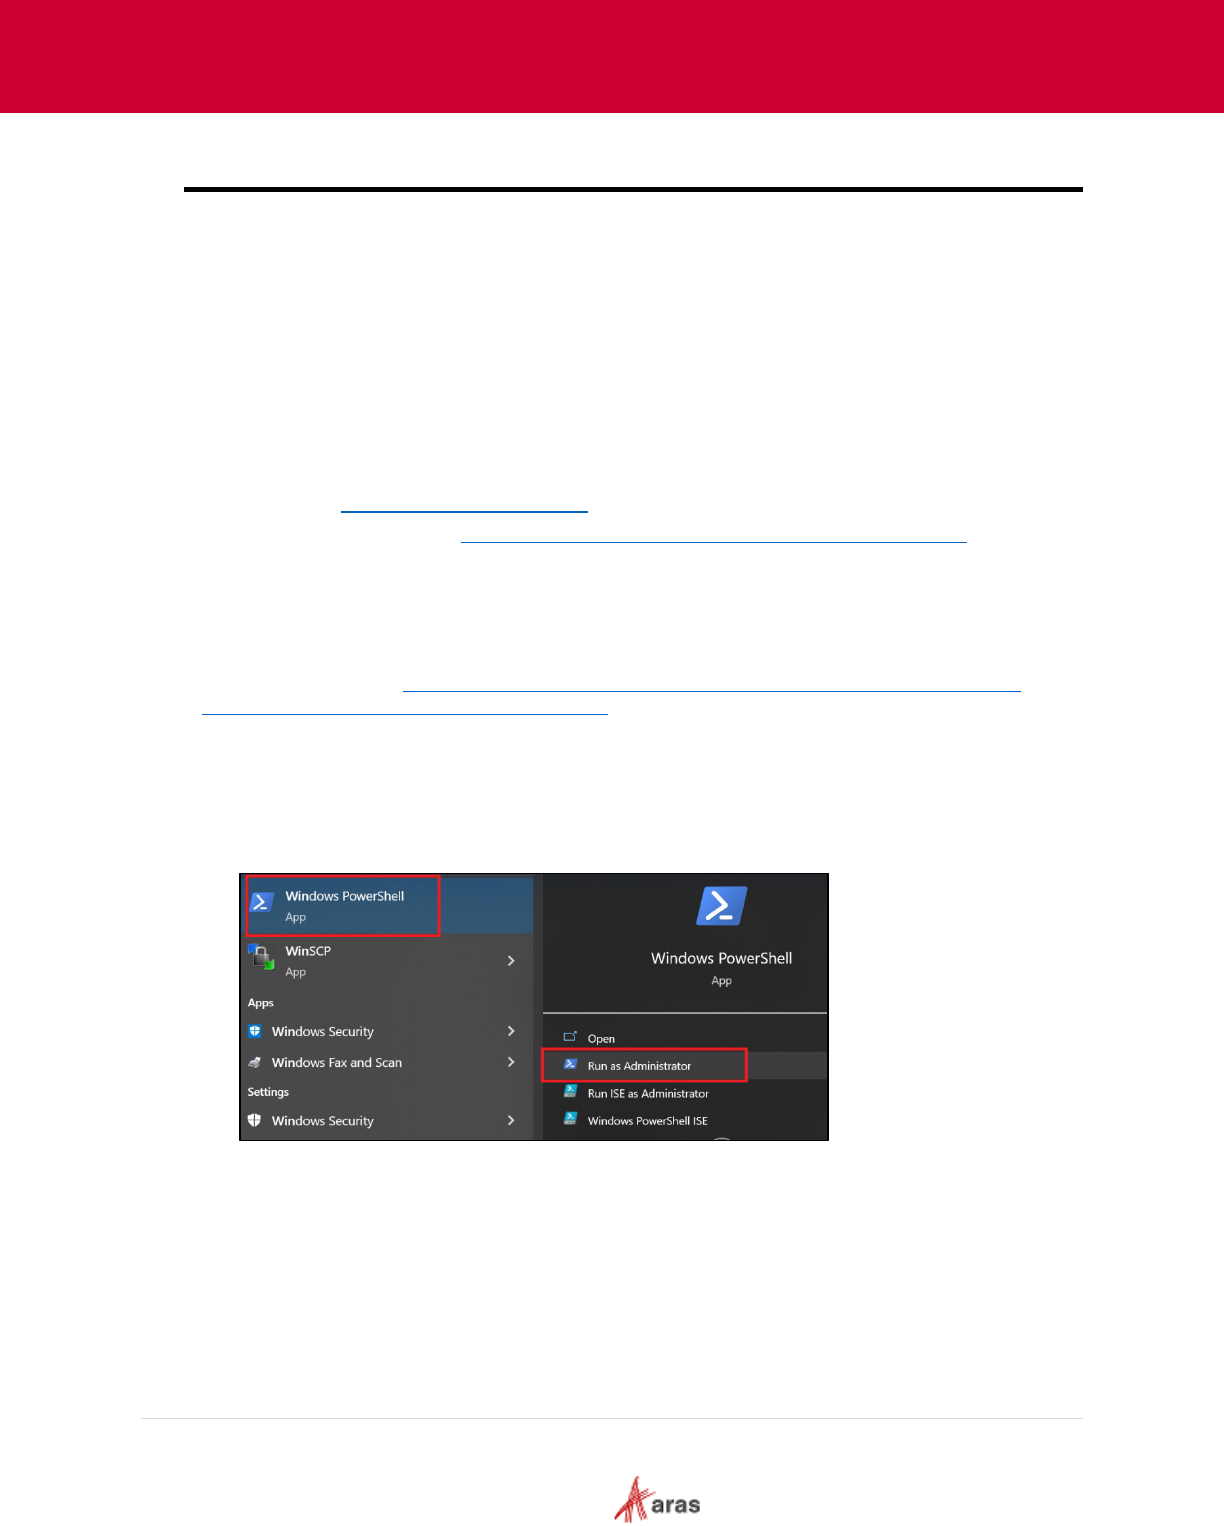
2023 Aras Corporation All Copyrights Reserved. 76
Aras DevOps
User Guide
Appendix I: Local Development Environment Setup
For a contributor to make changes and test them locally, the contributor needs an environment that
supports the various elements of a deployment such a development database server.
This section outlines the essential requirements for setting up a local development environment,
essential for making changes. It covers the necessary software, tools, and configurations needed to
create a productive and efficient development environment. By following the points below, users can
ensure that their local development setup meets the prerequisites for seamless software
development and testing.
The preparation of this environment is primarily automated; however, the following tools must be
present before running the scripts:
• Windows PowerShell (minimum version is 5.1) Please use the latest version.
• Chocolatey - https://chocolatey.org/install
(
version 0.11.0)
• choco install gitextensions https://community.chocolatey.org/packages/gitextensions
Installing Windows Powershell
If Windows PowerShell is not already installed on the system, ensure to set up the most recent
version.
To install, please visit: https://learn.microsoft.com/en-u
s/powershell/scripting/install/installing-
powershell-on-windows?view=powershell-7.3.
Installing Chocolatey using Windows Powershell
The following steps outline the process of installing the Chocolatey tool using Windows
PowerShell:
1. Open Windows PowerShell and run as Administrator.
With PowerShell, please ensure that Get-ExecutionPolicy is not Restricted. We suggest
using Bypass to bypass the policy to get things installed or AllSigned for quite a bit more
security.
Run Get-ExecutionPolicy. If it returns Restricted, then run Set-ExecutionPolicy AllSigned or
Set-ExecutionPolicy Bypass -Scope Process.
2. Copy the following command and paste into PowerShell:
Set-ExecutionPolicy Bypass -Scope Process -Force;
[System.Net.ServicePointManager]::SecurityProtocol =
[System.Net.ServicePointManager]::SecurityProtocol -bor 3072; iex ((New-Object
System.Net.WebClient).DownloadString('https://community.chocolatey.org/install.ps1'))
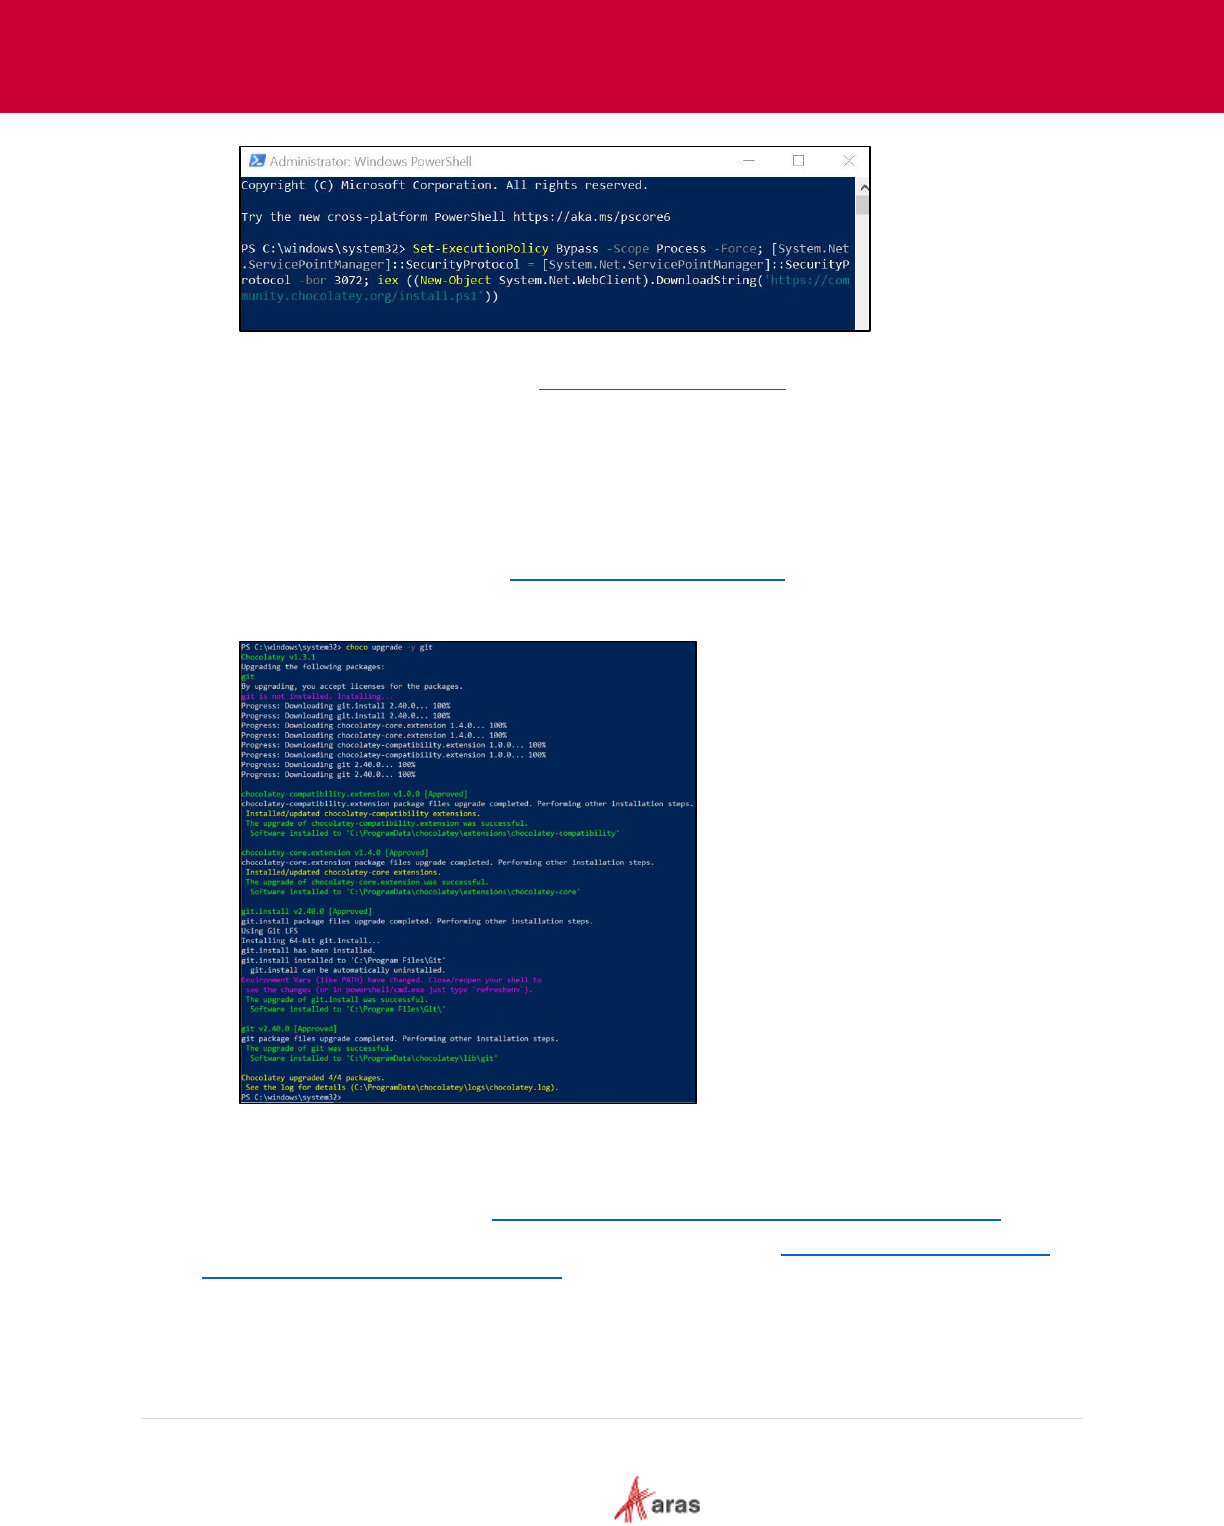
2023 Aras Corporation All Copyrights Reserved. 77
Aras DevOps
User Guide
3. Wait a few seconds for the command to complete.
4. For more information, please visit https://chocolatey.org/install
.
Installing Git
The recommended minimum Git version is 2.23.0. Please use the latest version of Git.
Install Git using any 1 method below:
1. Install Git from the official site: https://git-scm.com/downloads.
2. Using Chocolatey package manager. In PowerShell type the following command: Choco
upgrade –y git
Installing Azure CLI
To install Azure CLI, please visit https://learn.microsoft.com/en-us/cli/azure/install-azure-cli.
To install the Azure DevOps extension for Azure CLI, please visit https://learn.microsoft.com/en-
us/azure/devops/cli/?view=azure-devops.

2023 Aras Corporation All Copyrights Reserved. 78
Aras DevOps
User Guide
Required Specifications
The following specifications are required for Local Development Environments (LDE):
• MSSQL Server 2019 or 2022
The contained database authentication option must be enabled as shown:
sp_configure 'contained database authentication', 1;
GO
RECONFIGURE;
GO
• SSMS SQL Server Management Studio 2019 or 2022
The contained database authentication option can also be enabled in SSMS SQL Server
Management Studio.
• MS IIS Server
• File diff/merge tool (e.g., Kdiff3)
• Git 2.23 (Minimum Version). Please use the latest version.
• Git Extensions
• Visual Studio Community (Professional) Edition or above 2019 and 2022
• Visual Studio Code 1.77 or later

2023 Aras Corporation All Copyrights Reserved. 79
Aras DevOps
User Guide
Appendix II: Standard Solution Packaging Tools
The Package Import Export Utilities are provided with every Aras Innovator release.
Export.exe
This tool is part of the Package Import Export Utilities. The Export tool allows users to select
package elements to export to the file system as XML. These package elements can be exported
individually, as part of a Package Group, or as part of a Package Definition.
Import.exe
This tool is part of the Package Import Export Utilities. The Import tool allows users to select
predefined manifest files and import the corresponding package AMLs into a database. In a CI/CD
environment, users do not have to do any imports manually. These will be automated steps
triggered by the relevant CI/CD automations.
Consoleupgrade.exe
This tool is part of the Package Import Export Utilities. The Console Upgrade Tool is a command
line version of both the Export Tool and Import Tool described above. The command line
parameters can be found by typing ‘/?’ as the command line parameter. In a CI/CD process this
tool is part of the deployment automation and does not have to be used manually.
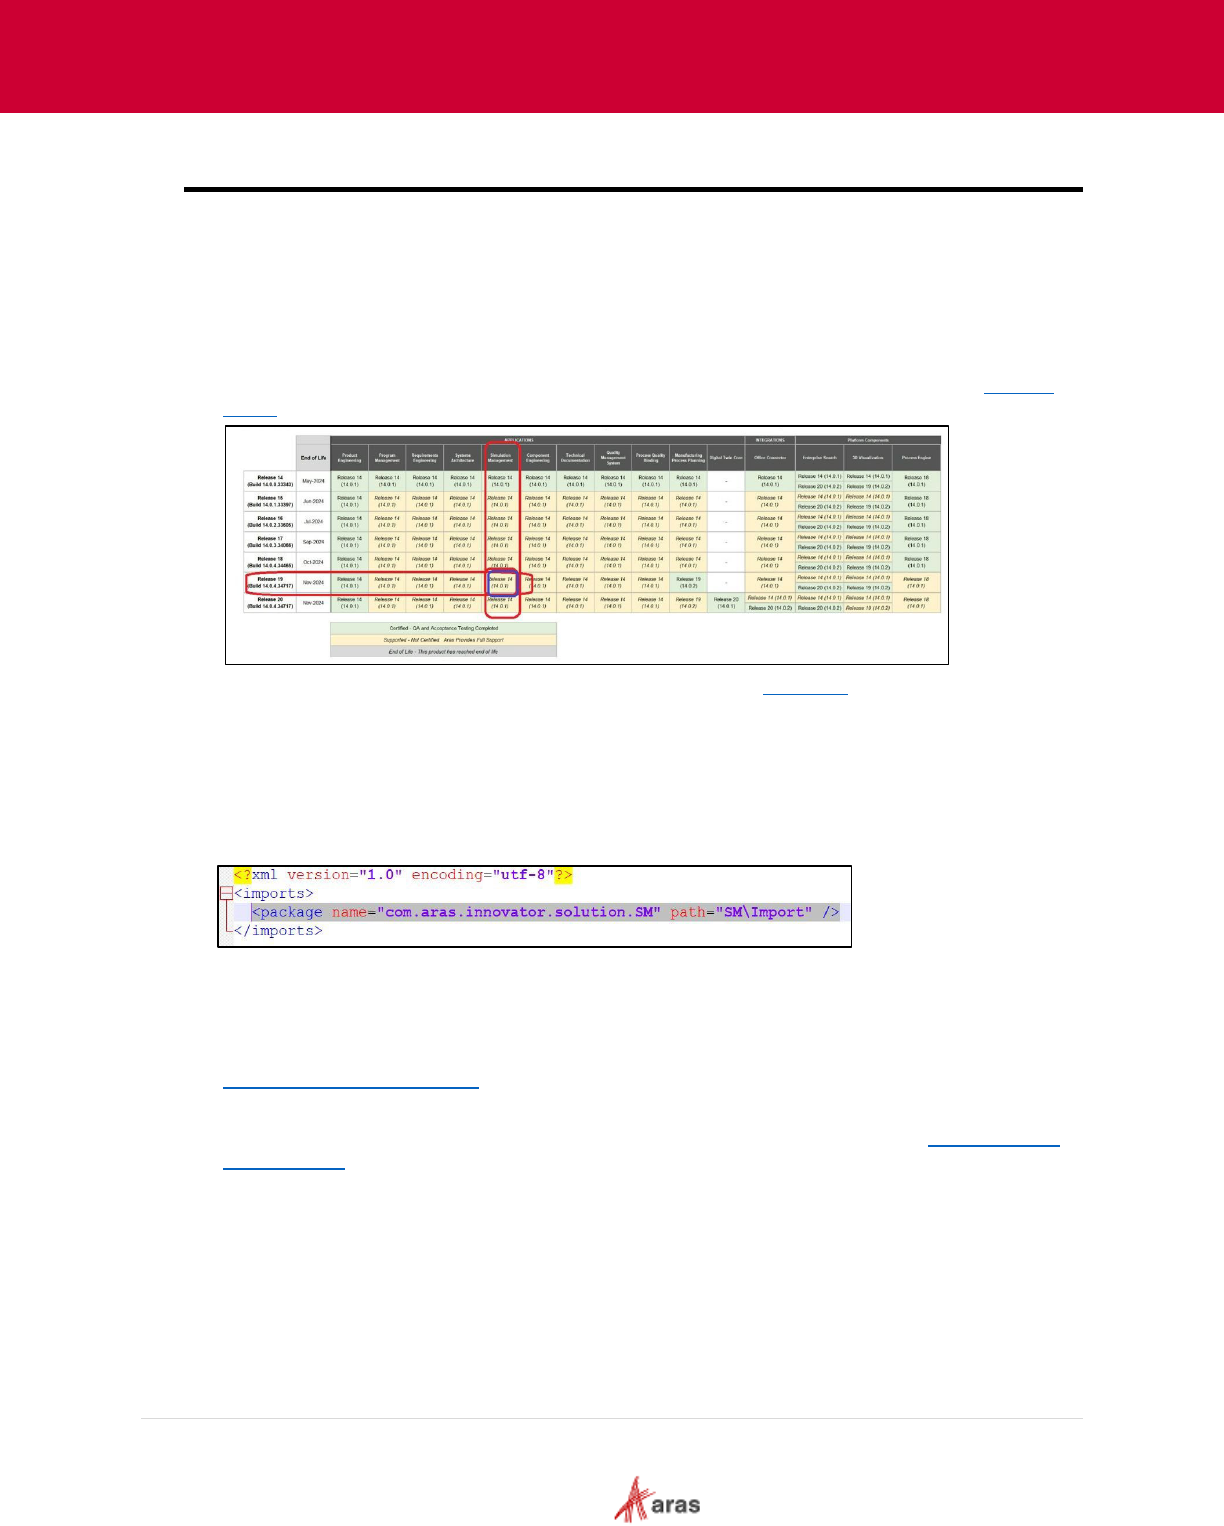
2023 Aras Corporation All Copyrights Reserved. 80
Aras DevOps
User Guide
Appendix III: Adding Applications to a Project
When a project starts, it may wish to use several applications and potentially language packages.
This section explains how to add an application in the project repository. For reference, the following
steps showcase the instructions to install Simulation Management (SM) application. The steps might
differ depending on the application user chooses to integrate with Aras Innovator.
The following steps outlines the process of adding SM application:
1. Determine the required version for application installation by comparing the version of the
current Aras Innovator with the specified name of the Application to be installed in the
Support
Matrix.
2. Download the Simulation Management CD image from the Aras FTP
site and unzip the file on
the local computer.
3. Copy the Aras Innovator folder to the repository overwriting the existing \Innovator folder and all
its contents.
4. Copy the content from the Import folder and paste it into AML Packages folder.
5. Make sure to update the Import Manifest file. The following line is present in the Import.mf file:
<package name="com.aras.innovator.solution.SM" path="SM\Import" />
6. Commit the changes with an appropriate message.
7. Run .\BuildAndDeploy.ps1 to ensure that updates build successfully.
8. After successful execution of .\BuildAndDeploy.ps1, commit and push the changes.
9. Once changes are pushed, create Pull Request (PR) and merge the changes. Refer to section
4.10 Creating a Pull Request
to learn about creating a PR.
10. Continuous Integration pipeline will execute successfully after merge.
11. To generate a new baseline, create a tag on the latest commit. Refer to section
7.2 Generating
New Baseline to learn about generating a new baseline.

2023 Aras Corporation All Copyrights Reserved. 81
Aras DevOps
User Guide
Appendix IV: Using a Shared Repository and
Merging Conflicts
Use Shared Repository
Multiple developers use a central (also called remote) repository which allows each authorized
developer to push and fetch changes from a single source. Although each developer maintains a
local copy of the repository on their machine, the remote repository collects the changes from
everyone on the team. Each developer is responsible for updating or fetching changes from the
remote repository on a regular basis.
Connect to Shared Repository
Adding a remote reference allows developers to establish a connection between their local
repository and a remote repository. It enables developers to push their changes to the remote
repository, fetch updates made by others, and synchronize their work with the rest of the team.
Push Changes to Shared Repository
Pushing changes to a remote repository allows the developer to send the local commits and
updates to the remote repository, making them accessible to others working on the project.
Fetch Changes from Shared Repository
Fetching changes from the shared repository ensures that the developers have the most recent
code updates, allowing them to incorporate the changes into the local branch and maintain a
synchronized codebase.
Managing File Conflicts
A merge conflict occurs when two or more developers make conflicting changes to the same part of
a file. For example, if Developer 1 modifies a function while Developer 2 modifies the same
function, the version control system may not be able to automatically determine which changes
should take precedence.
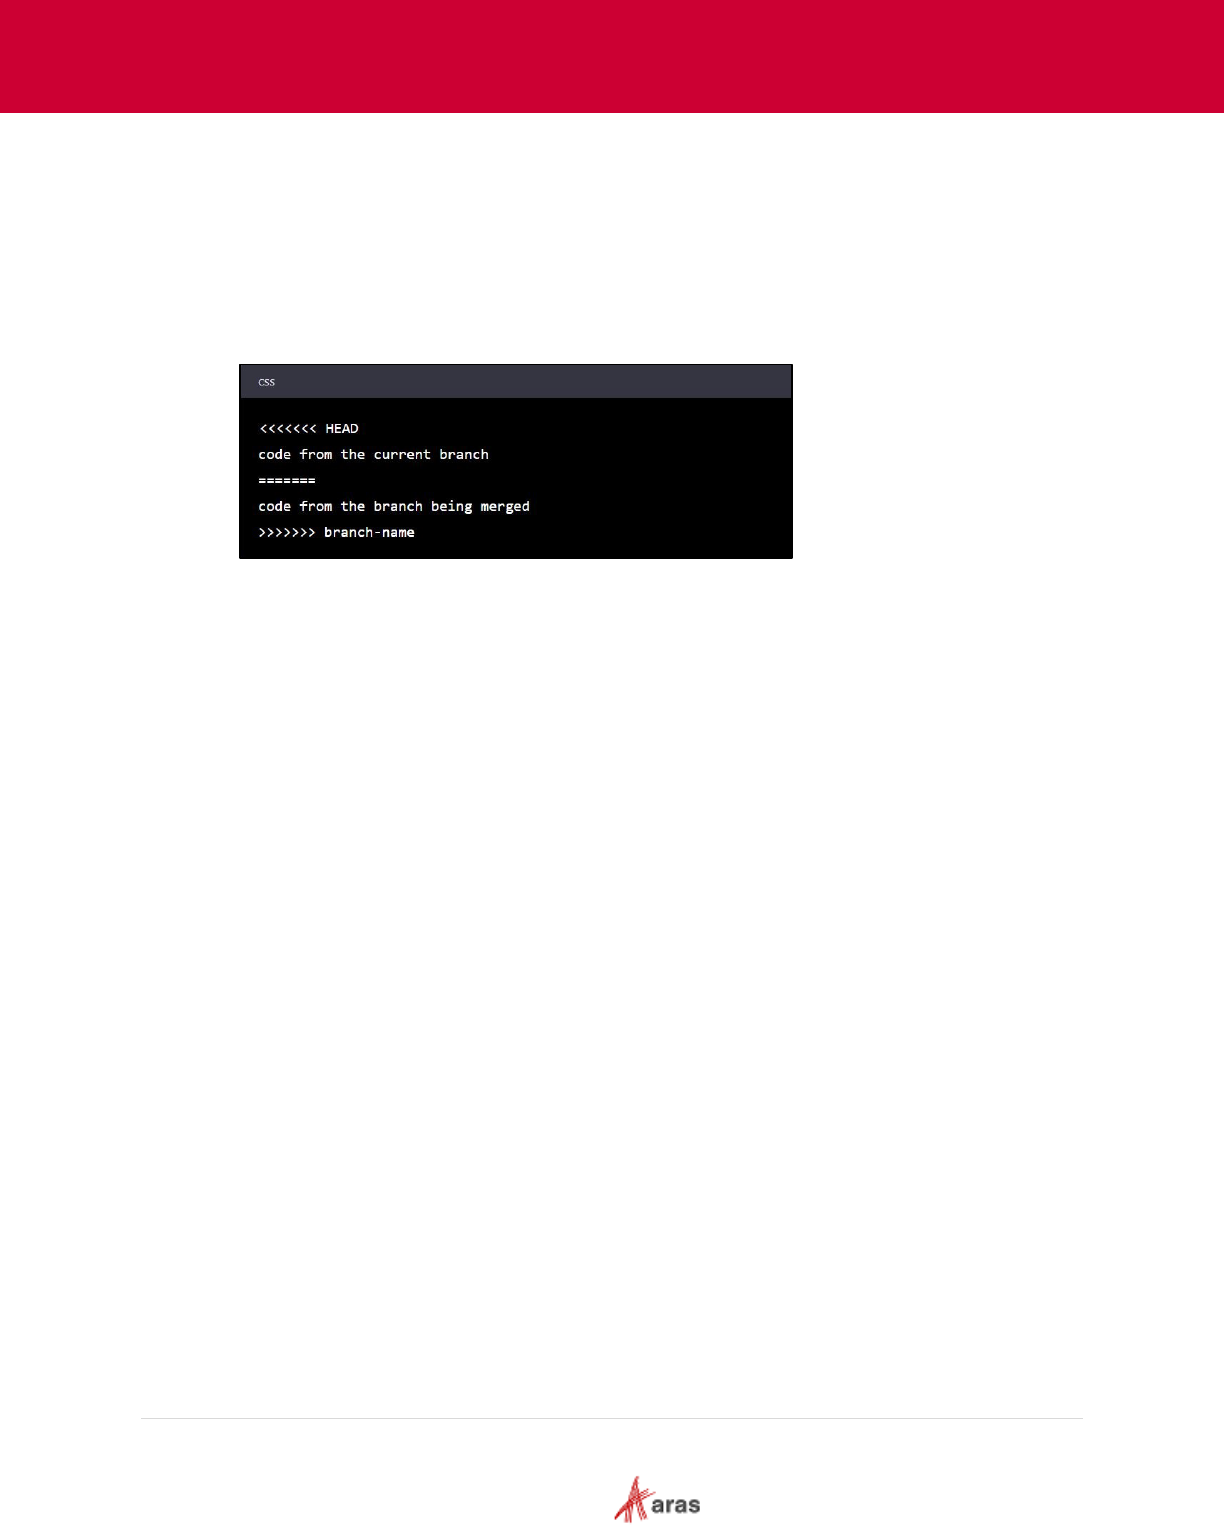
2023 Aras Corporation All Copyrights Reserved. 82
Aras DevOps
User Guide
Resolving Merged Conflicts
When working with Git, it is possible to encounter conflicts when merging two branches. This
occurs when Git is unable to automatically merge changes made to the same lines of code in both
branches.
The following steps outline the process to resolve merge conflicts:
1. Open the file(s) that have conflicts.
2. Look for the conflict markers in the file(s), which looks like below screenshot:
3. Edit the code to reflect the changes to be kept.
4. Remove the conflict markers from the file(s).
5. Save the changes to the file(s).
6. Add the modified file(s) to the staging area.
7. Commit the changes.
8. Push the changes to the remote repository.
If using a Merge tool like VS Code or SourceTree, it should have a graphical interface to help
resolve conflicts more easily. Launch the tool and follow its instructions to resolve conflicts.
It's important to note that resolving merge conflicts can be a complex and time-consuming
process, especially if there are many conflicts to resolve. It's always a good idea to carefully
review and test changes after resolving conflicts to ensure they work as intended.
Sharing Changes with the Remote Repository
Once the changes are made to the local repository and resolved any Merge conflicts, developers
need to share those changes with the remote repository. Here are few Developer responsibilities:
• Commit Changes: It is essential to commit changes locally. Make frequent well documented
commits.
• Fetch the Latest Changes: It is good practice to fetch the latest changes from the remote
repository. This ensures that the user has the most up-to-date version of the codebase and
reduces the chances of conflicts.
• Rebase: Use Rebase to update local repository with remote repository changes.
• Push Changes: Push local repository changes to the remote repository frequently.
• Verify Changes: After pushing the changes, it is essential to verify that they have been
successfully shared with the remote repository.
Using Stash
Stash allows developers to store the modifications, including both staged and un-staged changes,
in a safe place so that they can switch to a clean working directory without losing their work. It acts
as a temporary storage for their changes, enabling them to move between tasks or branches
seamlessly. Stashing is particularly useful when developers are not yet ready to commit their

2023 Aras Corporation All Copyrights Reserved. 83
Aras DevOps
User Guide
changes or when they want to work on a different task without the interference of their current
modifications.
The following points will explain the process of using stash effectively:
1. Stashing Changes: A common use case for stashing changes is when users make changes
to the working directory that are not yet committed but need to fetch changes from another
developer in the remote repository.
2. Viewing the Stash: User can view the contents of the stash at any time by using the git stash
list command. Users can also view the stash graphically by reviewing the Revision Graph
diagram.
3. Applying the Stash Changes: When ready, users can restore the stash into the current
staged snapshot and then commit the changes including the stashed changes.

2023 Aras Corporation All Copyrights Reserved. 84
Aras DevOps
User Guide
Appendix V: Transformations
This section illustrates the transformation to add converters available to the project team. The
platform includes the template shown below. The project team must complete the changes required
in an idempotent manner.
The following template is provided:
<?xml version="1.0" encoding="utf-8"?>
<configuration>
<configSections>
<!-- Common converter service configuration -->
<section name="ConversionServer"
type="Aras.ConversionFramework.ConversionServer.Configuration.ConversionSe
rverConfigurationSection, Conversion.Base" />
<sectionGroup name="ConverterSettings">
<!-- Place here class configuration section definitions for
converters -->
<section name="ArasCadConverter"
type="Aras.ConversionFramework.Converter.Hoops.Configuration.HoopsConverte
rConfiguration"/>
</sectionGroup>
</configSections>
<ConversionServer>
<InnovatorServer url="" />
<Converters>
<Converter name="Aras CAD to PDF Converter"
type="Aras.ConversionFramework.Converter.Hoops.HoopsConverter,ArasCadConve
rter"/>
</Converters>
</ConversionServer>
<ConverterSettings>
<!-- Place here configuration sections for converters -->
<ArasCadConverter>
<Application
converterPath="${Path.To.Hoops.Converter.Dir}\bin\hoops_converter.exe"/>
<Command arguments="--input_pdf_template_file
'${Path.To.Hoops.Converter.Dir}\templates\Blank_Template_L.pdf' --
output_pdf '%filepath%\%filename%.pdf' --output_png
'%filepath%\%filename%.png' --output_png_resolution '150x150' --output_hwf
'%filepath%\%filename%.hwf' --output_prc '%filepath%\%filename%.prc' --
camera_default --output_logfile '%filepath%\%filename%'"/>
</ArasCadConverter>
</ConverterSettings> </configuration>
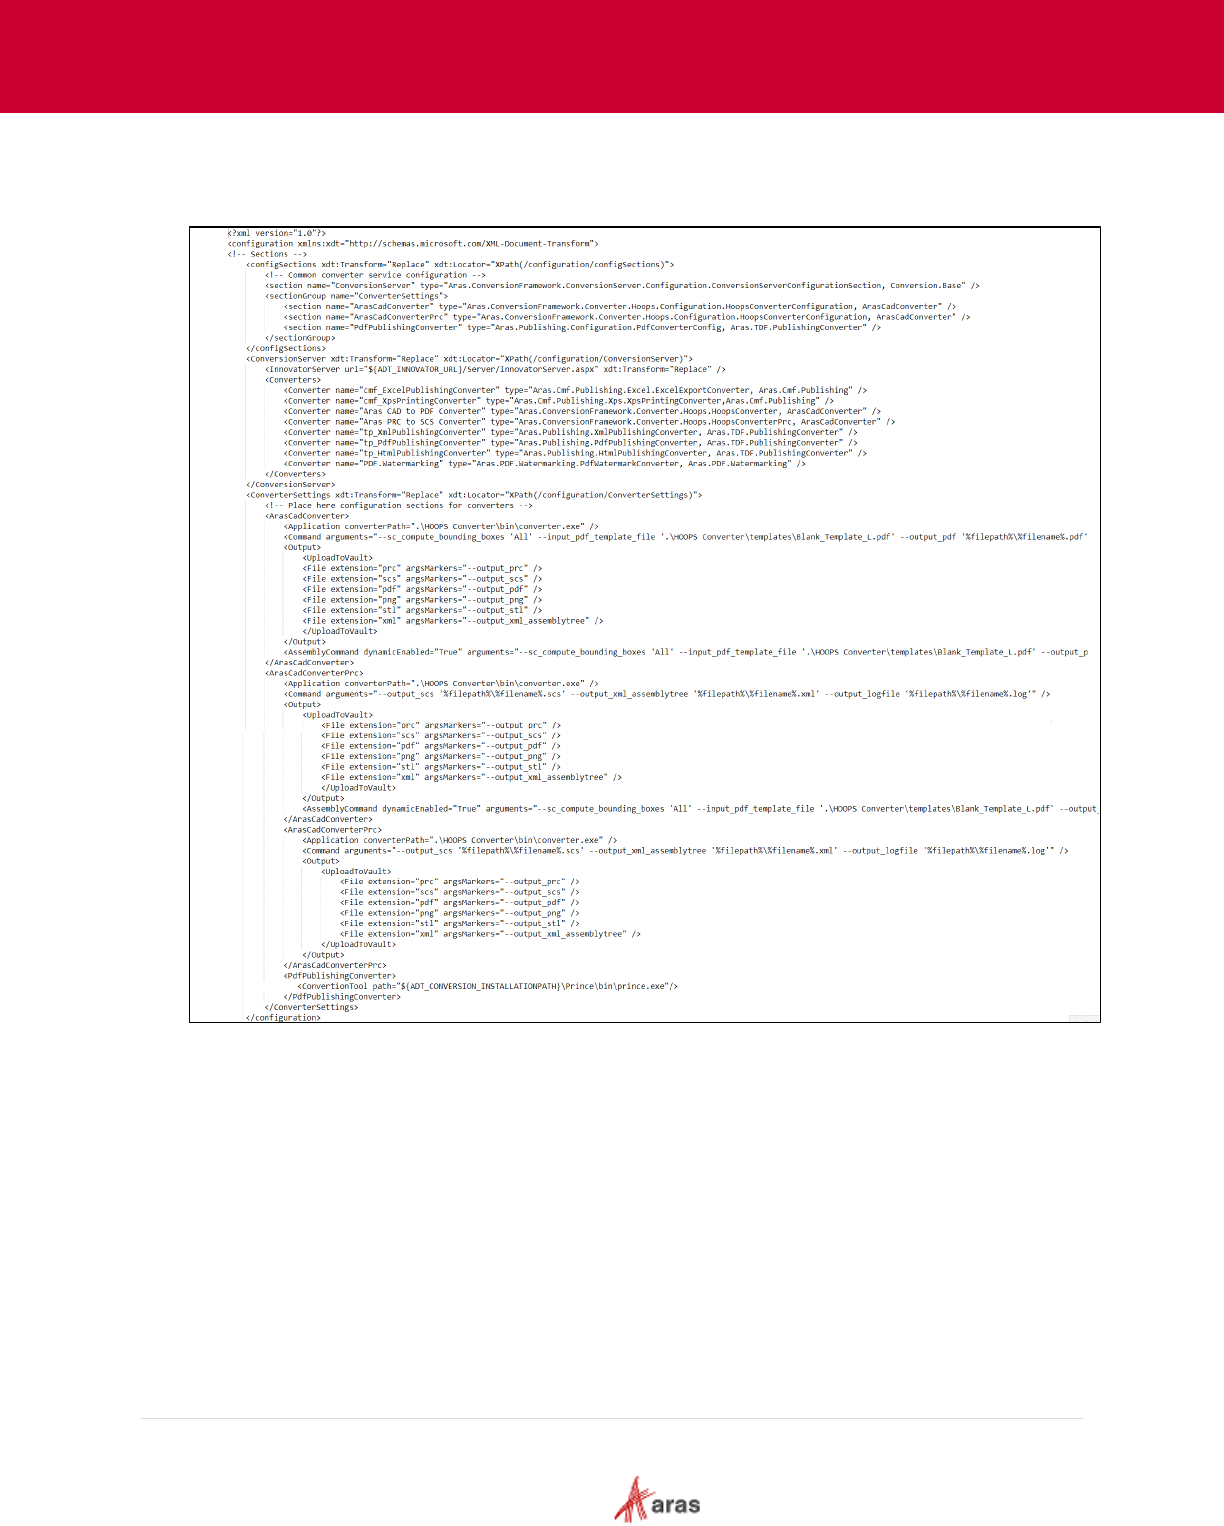
2023 Aras Corporation All Copyrights Reserved. 85
Aras DevOps
User Guide
To activate conversion per the requirements and entitlements of a project, the project team must
provide information in the transformation file.
Below is an illustration of the desired state.
For more specific information about a specific converter, please refer to the relevant product
documentation. This documentation will provide the essential specifications that need to be added.
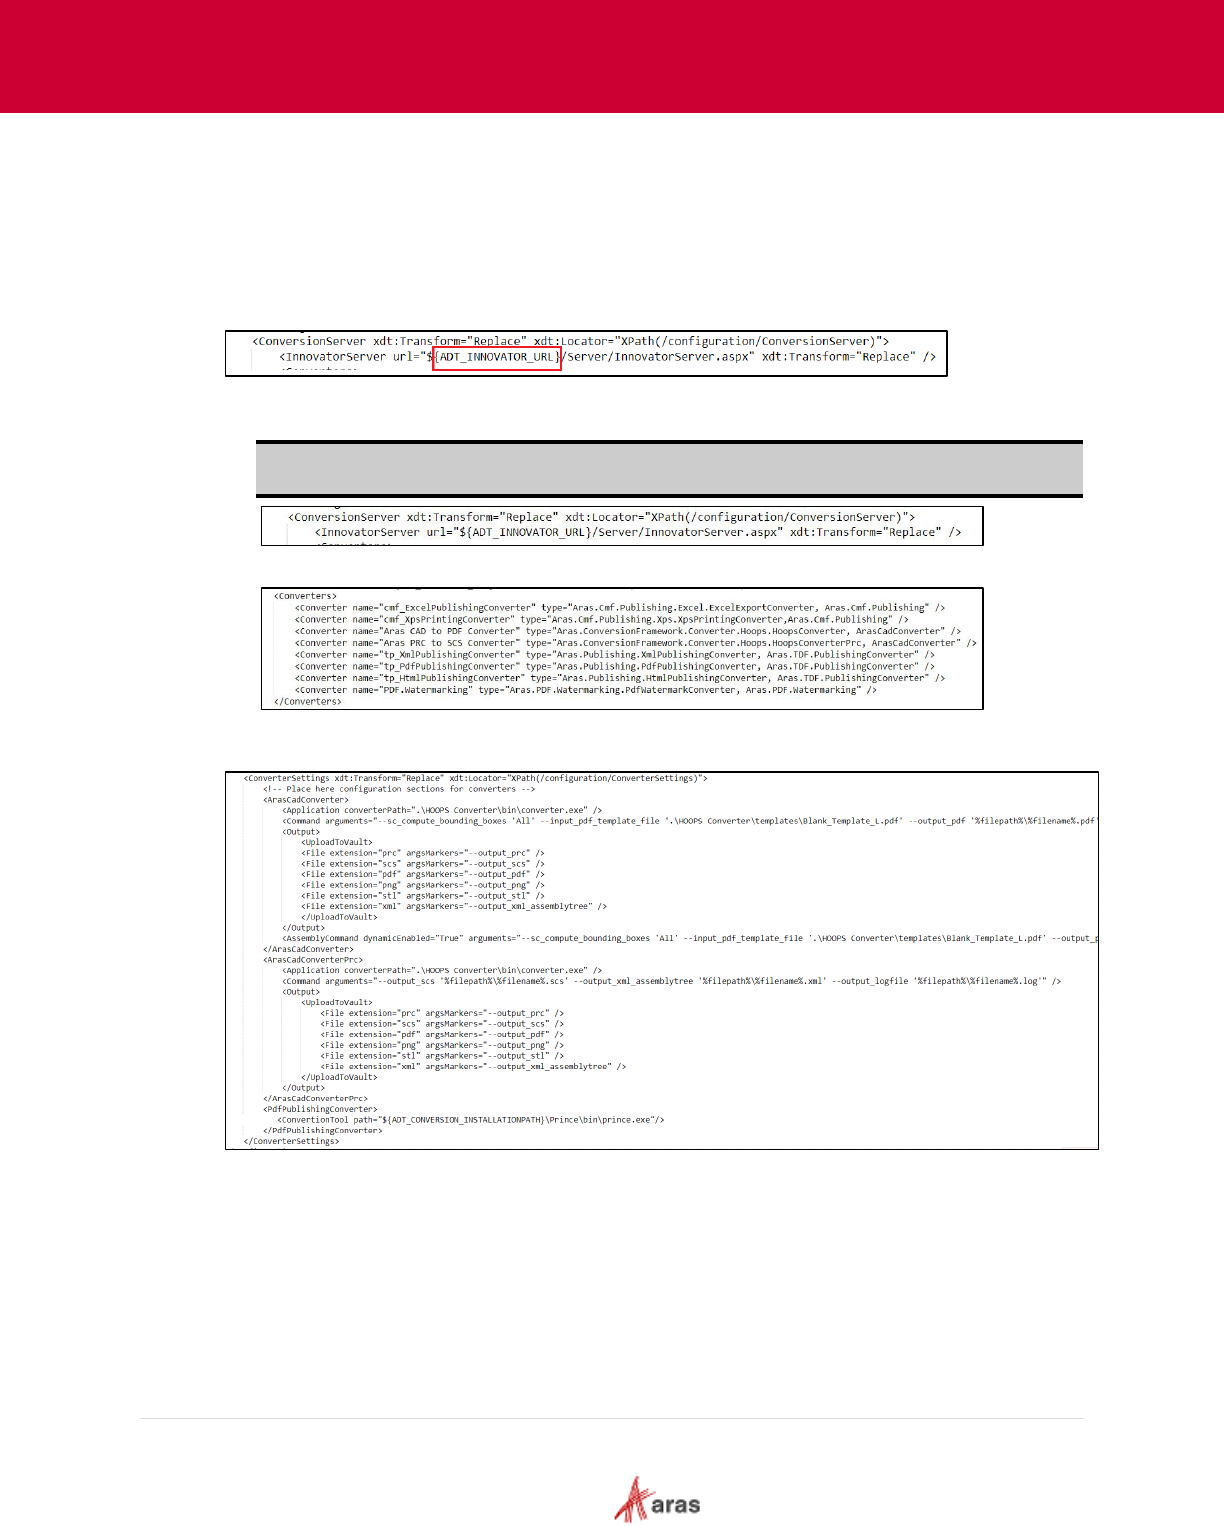
2023 Aras Corporation All Copyrights Reserved. 86
Aras DevOps
User Guide
The steps outlined below demonstrate how to convert the above template into the desired format.
1. Add the namespace specification to the document’s top-level element.
2. For each section element in the section group, use the Match("name) selector and
"InsertIfMissing" transformation.
3. Observe that a build system parameter is being utilized in the "ConversionServer" element. The
build system generates a comprehensive list of these parameters. Ensure to review this list and
use the parameters associated with the current versions.
• Element InnovatorServer: "${ADT_INNOVATOR_URL}/Server/InnovatorServer.aspx"
consider using the simpler ${ADT_DATABASE_INNOVATORSERVERASPXURL}
Note: It is important to utilize these parameters as the location of various servers in the
cloud cannot be hardcoded or predetermined.
• For "Section Group," add missing Converter elements to the "Converters" element.
4. Add converters if missing for the "ConverterSettings" element. Notice that these elements have
child elements.
