
i
Question Generator App
Project report submitted in fulfillment of major project of
BACHELORS OF TECHNOLOGY
IN
Computer Science and Engineering
By
AABHAS SINGLA (171278) SHEEL BHARDWAJ (171288)
ADITYA NEEKHRA (171258)PRAKHAR AWASTHI (171299)
DEEPESH MITTAL (171279)RITIK AGARWAL (171264)
UNDER THE SUPERVISION OF
MR. SANJEET TRIPATHI
DEPARTMENT OF COMPUTER SCIENCE AND ENGINEERING
JAYPEE UNIVERSITY OF INFORMATION TECHNOLOGY WAKNAGHAT,
SOLAN

ii
Table of Contents
Question Generator App ........................................................................................................................ i
Project Report Undertaking ................................................................................................................ iv
ACKNOWLEDGEMENT ....................................................................................................................... v
LIST OF FIGURES ................................................................................................................................ vi
ABSTRACT .......................................................................................................................................... vii
CHAPTER 1 ........................................................................................................................................... 1
1.1 Overview ...................................................................................................................................... 2
1.2 Problem Statement ...................................................................................................................... 3
1.3 Tools & Technologies Used .......................................................................................................... 3
1.4 Language Used ............................................................................................................................. 4
Chapter 2 ................................................................................................................................................. 5
Chapter 3 ................................................................................................................................................. 8
3.1 Spring Annotations ...................................................................................................................... 9
3.2 Configuring SpringBoot Application .......................................................................................... 9
3.3 Service layer in Spring ............................................................................................................... 10
3.3.1 Aspect Oriented Programming ........................................................................................... 11
3.4 Persistence Layer ....................................................................................................................... 13
3.4.1 Entity Classes ...................................................................................................................... 14
3.4.2 Spring Data ......................................................................................................................... 17
3.5 Controllers in Spring ................................................................................................................. 18
Chapter 4 ............................................................................................................................................... 19
4.1 Components ............................................................................................................................... 20
4.2 Templates ................................................................................................................................... 21
4.3 Data Binding .............................................................................................................................. 22
4.4 Directives .................................................................................................................................... 23
4.5 Pipes ........................................................................................................................................... 24
4.6 Services ....................................................................................................................................... 26
4.7 Template driven forms .............................................................................................................. 27
4.8 Reactive Forms .......................................................................................................................... 27
4.9 Routing ....................................................................................................................................... 28
Chapter 5 ............................................................................................................................................... 29

iii
5.1 Home page .................................................................................................................................. 30
5.2 Login page .................................................................................................................................. 31
5.3 Registration page ....................................................................................................................... 33
5.4 Welcome page/Quiz Selection page ........................................................................................... 35
5.5 Questions Page ........................................................................................................................... 36
5.6 Result page ................................................................................................................................. 37
5.7 Feedback .................................................................................................................................... 39
CONCLUSION ..................................................................................................................................... 41
REFERENCES...................................................................................................................................... 42
iv
Project Report Undertaking
We, Aabhas Singla (171278), Sheel Bhardwaj (171288), Aditya Neekhra
(171258), Ritik Agarwal (171264), Deepesh Mittal (171279) and Prakhar
Awasthi (171299)
Branch Computer Science and Engineering are doing our internship with
Infosys Limited from 1
st
February 2021 to 13
th
May 2021
As per procedure we have to submit our project report to the university
related to our work that we have done during this internship.
We have compiled our project report. But due to COVID-19 situation
our project mentor in the company is not able to sign our project report.
So,we hereby declare that the project report is fully designed/developed by us
and no part of the work is borrowed or purchased from any agency. And we'll
produce a certificate/document of our internship completion with the
company to TnP Cell whenever COVID-19 situation gets normal.
Signature:
Name: Aabhas Singla Name: Sheel Bhardwaj Name: Aditya Neekhra
Roll No.: 171278 Roll No.: 171288 Roll No.: 171258
Name: Ritik Agarwal Name: Deepesh Mittal Name: Prakhar Awasthi
Roll No.: 171264 Roll No.: 171279 Roll No.: 171299
Date: 20
th
May 2021
Supervisor (Dr. Aman Sharma)

v
ACKNOWLEDGEMENT
We take this opportunity to express our first and foremost gratitude to “INFOSYS
LIMITED” for the confidence bestowed upon us and entrusting our project titled
“Question Generator App”.
At this juncture, with proud privilege and profound sense of gratitude, we feel
honored in expressing our deepest appreciation to MR. SANJEET TRIPATHI,
for being a lot more than just a mentor and going beyond the call of duty in our
guidance, support, advice, and motivation throughout. He has been the source of
inspiration of come what may these issues cannot bring you down. Sincere thanks
for her insightful advice, motivating suggestions, invaluable guidance, help and
support in successful completion of this major project and also for his constant
encouragement and advice throughout our minor project work.
Special thanks to our parents for their infinite patience and understanding and
project partners for the constant support and most importantly God, who in his
mysterious ways, always made things work out in the end.
In gratitude,
Aabhas Singla (171278)
Sheel Bhardwaj (171288)
Aditya Neekhra (171258)
Prakhar Awasthi (171299)
Deepesh Mittal (171279)
Ritik Agarwal (171264)

vi
LIST OF FIGURES
HEADING
PAGE NO.
FIGURE 3.1
Different layers of spring application
10
FIGURE 3.2
Pointcut expression syntax
12
FIGURE 3.3
@Entity annotation
14
FIGURE 3.4
@Id annotation
14
FIGURE 3.5
@Table annotation
15
FIGURE 3.6
@Column annotation
15
FIGURE 3.7
@Enumrated annotation
16
FIGURE 3.8
Implementation of spring data
17
FIGURE 4.1
Components in angular
20
FIGURE 5.1
Home Page of application
30
FIGURE 5.2
Login page
30
FIGURE 5.3
Validations in Login page
31
FIGURE 5.4
Invalid email or password error
32
FIGURE 5.5
Registration page
33
FIGURE 5.6
Registration page validations
33
FIGURE 5.7
Success message after registration
34
FIGURE 5.8
Welcome page
35
FIGURE 5.9
Question component
36
FIGURE 5.10
Result page showing score
37
FIGURE 5.11
Result page for answers
37
FIGURE 5.12
Feedback form validations
38
FIGURE 5.13
Alert popup
39

vii
ABSTRACT
Quiz Generator App is a REST application (MOJO Quiz) for generating random
questions for different quizzes. The main objective of this app is to give user a real
life experience and improve his/her knowledge on various topics by taking up
quizzes on them, also the project was to design an application which should be able
to generate random questions for different quizzes. Moreover, the home page for
starting the quiz, authentication for user i.e. login and registration and the result of
the attempted quiz were to be taken into consideration. This project requires a
prerequisite knowledge of Spring and Angular. In spring (which is widely used by
organisations for developing enterprise application) JPA repository is being used
for handling all the CRUD operations of the application. The frontend of the
application was designed in angular as it provides with a variety of templates and
design to make application more attractive. Tools used for developing this
applications are VS Code and Eclipse. In VS Code the development of frontend
has taken place and Eclipse is responsible for development of the backend required
by the application. Database used in this application h2 database which is provided
by spring itself, the user just have to add a dependency of h2 database in pom.xml
file present in maven project of eclipse. Bootstrap and Angular Material is used for
improving the look and feel of the application and provide the user with a user-
friendly user interface. There is a home page which welcomes the user with a
button “Get Started”, on clicking that button user will be redirected to the login
page. If a user a new user then he/she must register first by clicking on the register
button. After registering the user can login. After logging in user will be redirected
to the welcome page which contains the list of quizzes on different topics. User can
choose any one of them. After clicking on any quiz 6 questions will come
randomly after answering all the questions user will be redirected to the result page
where he will get to know his marks and also an option for seeing which of his
answers are right and wrong. There is a feedback button which will render the user
to the feedback page, after submitting the feedback an alert will be generated and
the user will be rendered to the welcome page again and from there he/she can
logout from the application.

1
CHAPTER 1
INTRODUCTION

2
1.1Overview
As the world is suffering from the attack of Covid-19, the need for online
assessments, tests, surveys, preparation, testing knowledge has seen an exponential
rise. From schools to universities everyone is moving towards online examinations
in form of MCQs, hence all these factors leads to the increase in demand of Quiz
Generator applications. It is not only limited to conducting exams or taking
surveys, Quiz apps are an excellent example of entertainment. Mostly parents
encourage their children to play quizzes which will help them in learning new
things and will increase their knowledge about various things. Online Question
generator apps/quiz apps are need of an hour.
There are various advantages of online Quiz, some are listed below:
It increases the possibility for users to take up a quiz. All they need is a good
internet connection.
Random questions and their answers takes less time and also prevents users
from cheating.
Result part of the online quizzes also helps the users to see and inspect the
areas in which they are lagging behind, and not only participants but also the
creator of the quiz can see and analyze the difference between the
knowledge of different users.
We can also set timer on the quiz to increase the pressure on the users and
test their pressure handling skills, also adding up a time constraint also
prevents them from indulging in any mall practice which eventually waste
their time.
All these overwhelming advantages make online question generator/ quiz apps
more reliable and effective as compared to the traditional ways.

3
1.2 Problem Statement
The user is able to login to take up the Quiz on different topics present in the list.
The application should be able to generate questions of different types and each
quiz must have a time limit on it. User should see the score after taking up the quiz.
1.3 Tools & Technologies Used
For developing the question generator app we need a database, a frontend which
will interact with the user and an API which will communicate and transfer data
between the frontend and the database.
For developing the frontend,Angular is used.
o The frontend of the application was designed in angular as it provides
with a variety of templates and design to make application more
attractive.
For developing API,Spring Boot is used.
o The backend of the application was designed using Spring Framework
which is popularly used for CRUD operations for enterprise
application development.
H2 database is used for storing the data.
Tools used for developing question generator app are:
VS Code for Angular.
Eclipse for SpringBoot.

4
1.4 Language Used
We have utilized java including its libraries and also utilized the spring framework
supported by java for creating the API. We have utilized angular for creating
frontend part of the application. In angular for writing the business logic we have
utilized typescript, front code is purely written in HTM, for styling we have used
css, angular material along with bootstrap classes.

5
Chapter 2
Literature Review
As it is already known, there are different types of quizzes that can be taken apart
from the educational one. While some quizzes are considered to be the part of
assessment system, there can be other types also available on internet for self-
assessment. For a normal educational assessment the subjective or oral assessments
were considered best but now-a-days as the world is suffering from the attack of
Covid-19, the need for online assessments, tests, surveys, preparation, testing
knowledge has seen an exponential rise. From schools to universities everyone is
moving towards online examinations in form of MCQs, hence all these factors
leads to the increase in demand of Quiz Generator applications. It is not only
limited to conducting exams or taking surveys, Quiz apps are an excellent example
of entertainment. Mostly parents encourage their children to play quizzes which
will help them in learning new things and will increase their knowledge about
various things. Online Question generator apps/quiz apps are need of an hour.
For backend computation, Spring Boot is used to create Application Programming
Interface (API). In [1], a brief introduction of Spring Boot is described. It explains
basic and advanced concepts of Spring Boot Framework.
Privacy is the major concern of people in this modern era and everyone wants to
make themselves feel secure when they are surfing on web. So to make the
customers/users feel more comfortable and to make them feel more secure online
web applications use login so that only authorize person can access the data and
hence privacy is maintained. Now if a user is new to any website then he must
create a new account mandatorily to access the website and store his/her data
online. For making these features of login and registration work, we need to store
the email and password given by the user into our database. For making this thing
to work we us Entity classes provided by the spring. In [2], JPA Entities are
explained and how to create them. Different annotations are also briefed to
customize the entity further. Entity class is a class that is annotated by @Entity
annotation. This class is used to map the attributes declared in this class with the
column names of the table present in the database. While registering the data given
by the user will be saved in the database using these classes only and while logging

6
in these classes are used for fetching the data from the database. Entity classes has
various other annotations which are equally important and have their own
meanings. Some of these annotations are: Entity annotation, Id annotation, Column
annotation, Table annotation, Enumerated annotation etc.
In [3] and [4], Spring Boot annotations are explained. Further, different types
annotations are also explained and how to use them to tune Spring Boot auto-
configuration process. Also, examination of classic and specialized REST
controllers are explained present in Spring Framework. Annotations are the main
part of springBoot, they play a vital role in working of the application, there are
several annotations present in spring and each one of them has their own use.
Annotations like @SpringBootApplication are very important and core
annotations. This annotation tells us about the main class of the application which
is sometimes called as the entry point of spring application. Other annotations like
@EnableAutoConfiguration, @ComponentScan, @Autowired, and annotations for
controller classes like @Controller, @RestController, @PostMapping and may
more which are an essential part of the applications and are helpful in managing
the client-side requests.
In frontend computation, Angular is used to design the application. In [5], an
introduction is briefed on angular components and templates. Components are the
building blocks of the angular, in an angular application there is one main
component which contains several other sub components in it. It can be understood
by an example, consider question generator application, in this login, registration,
home are all different components. A component is made of four files and they are
.ts file which contains business logic, .html file also known as template and is used
for designing the view, .css file used for adding designs and animations and a
.spec.ts file which is used for unit testing. Now coming to templates, a
component’s view id defined by its corresponding view. A view is basically an
html file which instructs the angular how to render the component. Views are
responsible for handling the UI of the application.
In [6], an introduction is briefed on angular directives mainly focusing on ngIf.
ngIf directive in angular is similar to the if condition in any high level

7
programming language, if the given condition holds true only then the statements
given in ngIf will be executed else not. The default template for else clause is
blank.
In [7], an introduction is briefed on angular directives mainly focusing on ngFor.
ngFor directive in angular is similar to the for condition in any high level
programming language, template written in ngFor will display the results after
iterating on every value in given in ngFor. Suppose there are different users in a
database and we want to show them in view, for doing so we will use ngFor
directive.
In [8], an introduction is briefed on angular directives mainly focusing on
ngSwitch. ngSwitch directive in angular is similar to the switch condition in any
high level programming language, template written in ngSwitch will display the
results after matching the condtion given in ngSwitch with the values present. If no
view match with the condition then default template is shown by the angular.

8
Chapter 3
Introduction to Spring Boot
Spring Boot is a framework that helps developers build spring-based applications
easily. Spring Boot is customizable i.e we can customize it any time during our
development based on our needs. Example: In this project we have added spring
web dependency and h2 database dependency. Suppose at any given point if want
mongoDB as a database then we don’t need to rewrite the whole code again, all we
have to do is just add the dependency for mongoDB in our pom.xml file. One of
the main feature of springBoot is its starter dependencies. Spring Boot comes with
various starter dependencies. Spring Boot starters are pre-configured dependency
descriptors with widely used libraries, hence we don’t have to include them
manually spring will ensure that the necessary libraries are present for the build
[1].
There are multiple approaches to build a spring boot applications such as:
Using Spring Initializr
Using Spring Tool Suite (STS)
Using Spring Boot CLI
Using Spring Maven Project
We have used Spring Maven Project for building our question generator app.

9
3.1 Spring Annotations
@SpringBootApplication
Denotes a configuration class and activates auto-configuration and
component scanning [3]. It is the combination of 3 annotations namely:
@EnableAutoConfiguration – Enables auto configuration of
SpringBoot application which automatically configures the
application based on the dependencies added in the pom.xml file [3].
@ComponentScan–Enables spring bean dependency injection feature
by using @Autowired annotation. All application components which
are annotated with @Service, @Repository, @Controller,
@Component automatically gets registered as Spring beans [3].
@Configuration – enables java based configurations for springBoot
[3].
@Autowired
Most common annotation used for dependency injection.
3.2 Configuring SpringBoot Application
For configuring SpringBoot application there is file which is called as
application.properties. This files gets scanned automatically and does not require
any annotation. We can find this file inside “src/main/resources”.
This file contains default properties to support basic tasks like logging etc. To use a
custom property that property must be added to the application.properties file, then
Environment class should be autowired in the class where that property is required
and it must be read from environment using getProperty() method.
10
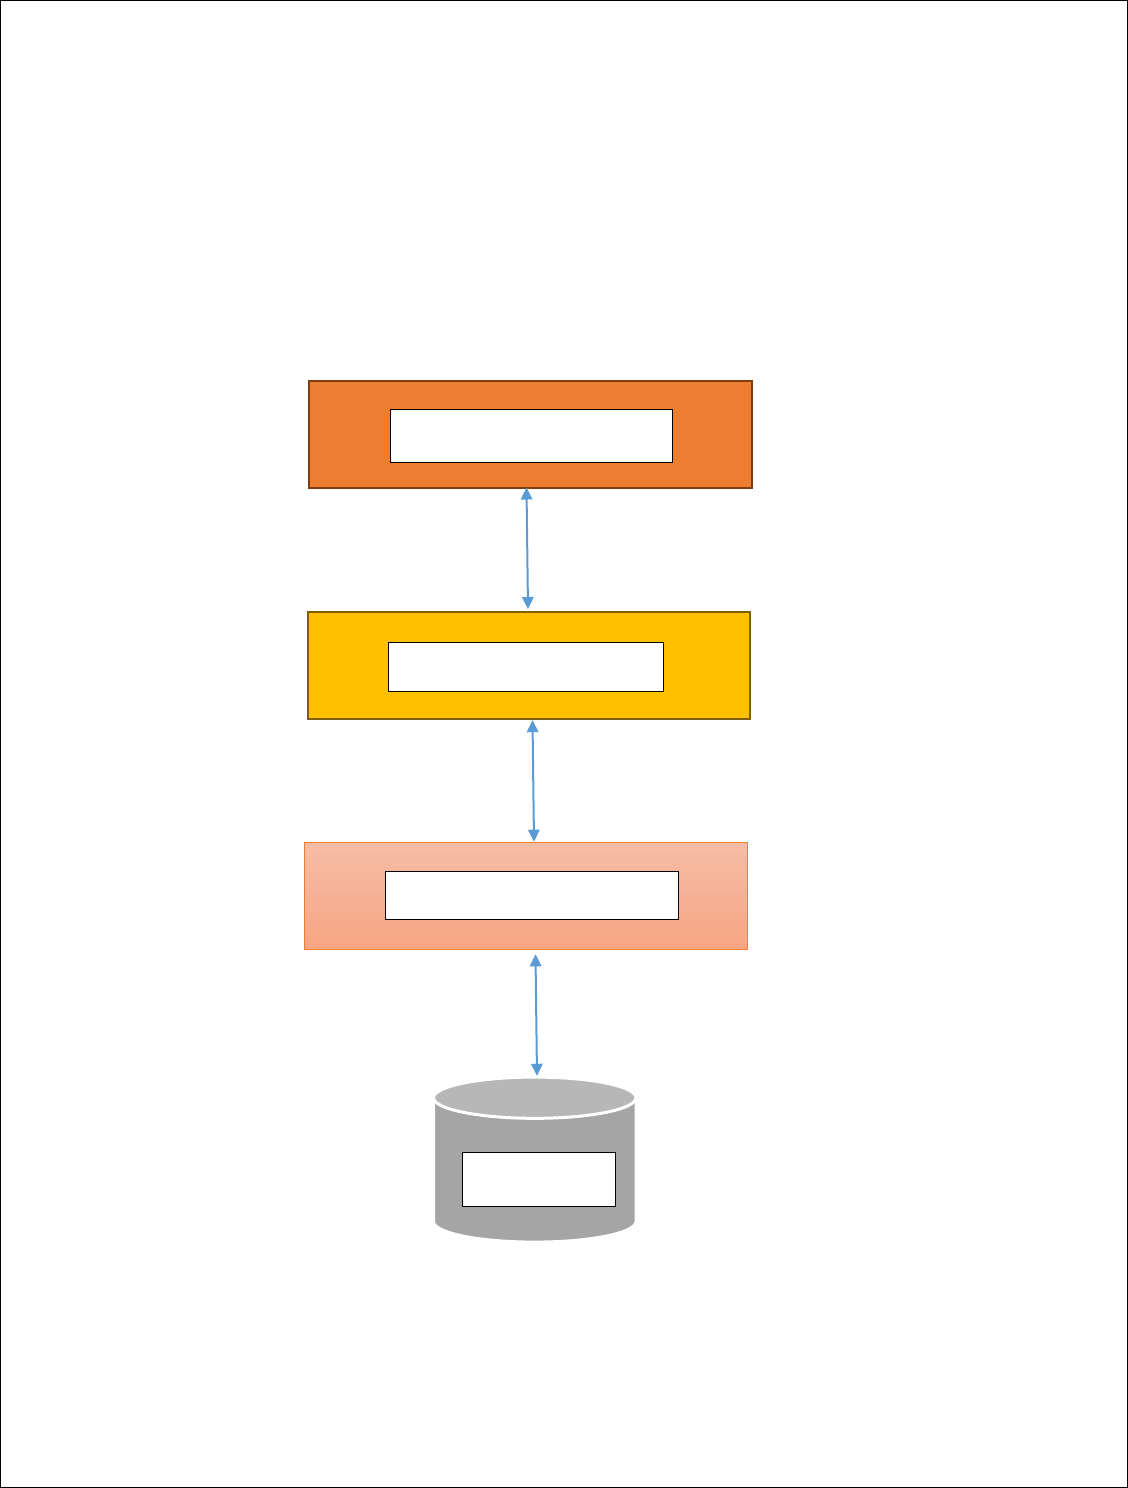
3.3 Service layer in Spring
In any enterprise application service layer is its heart. It contains all the business
logic that are needed for the smooth functioning of an application. This layer
interacts with presentation layer and the persistence layer of the application.
Fig 3.1 Different layers of spring application
Presentation Layer
Service Layer
Persistence Layer
Database

11
3.3.1 Aspect Oriented Programming
An enterprise application is made of several layers. Each and every layer has
different functionalities, but there are some functionalities that are similar in every
layer. Some of these functionalities include:
Logging
Security
Transaction management
And many more…
These type of functionalities are known as cross-cutting concerns. These
functionalities are often implemented separately in every layer but this makes our
code more difficult as cross-cutting concerns are tightly coupled. So to it is better
to keep these functionalities at one place and inject them wherever they are
necessary. This is where AOP helps us. It helps us in separating both cross-cutting
concerns and business logic code and define these cross-cutting concerns in one
place, So that we can reuse them wherever they are required.
Advantages of AOP are:
Allows keeping the code of business logic and cross-cutting concerns
separately.
Allows to create more loosely coupled application and hence helping us to
change the common functionalities without touching the main code logic.
AspectJ is a famous AOP present in the market. It allows us to use this AOP
functionality just by giving annotations hence making lives of developer very
much simpler.

12
A class is said to be an Aspect class if it is annotated by @Aspect
annotation.It implements cross-cutting concerns.
Join point is a specific point in an application such as function execution,
exception handling etc. In spring it is always the function execution.
Advice is the method of aspect that implements the cross-cutting concerns.
Spring has multiple types of Advice along with their execution points. They
are:
o Before
o After
o After Returning
o After Throwing
o Around
Pointcut expression tells the program that where the advice is needed to get
executed.
Syntax for pointcut expression is:
Fig 3.2 – Pointcut expression syntax
execution( <modifiers><return type><class name>, <method
name>(parameters))

13
3.4 Persistence Layer
The persistence layer works as a mediator between database and service layer.
Service layer gives data to the persistence layer, persistence layer performs uses
that data to perform tasks on database and then returns the results to the service
layer. (Basicallypersistence layer contains code to interact with the database).
We can develop this layer using Spring ORM.
Object Relational Mapping (ORM)
It is a method which is used for mapping object model with the relational model.
It maps java class to tables in the database.
Instance variables to the coloumn of the table.
Objects to rows in a table.
It helps the developer to not to focus on the SQL queries and to focus more on the
business logic. It is also database independent. All database vendors provide
support to spring ORM. Hence the application becomes portable.
To use ORM in applications JPA is used.
Java Persistence API is a specification that provides standard for using ORM in
java applications for talking with database. It helps in:
1. Mapping classes with tables.
2. Performing CRUD operations.
3. A query language for fetching data known as Java persistence query
language (JPQL).
14
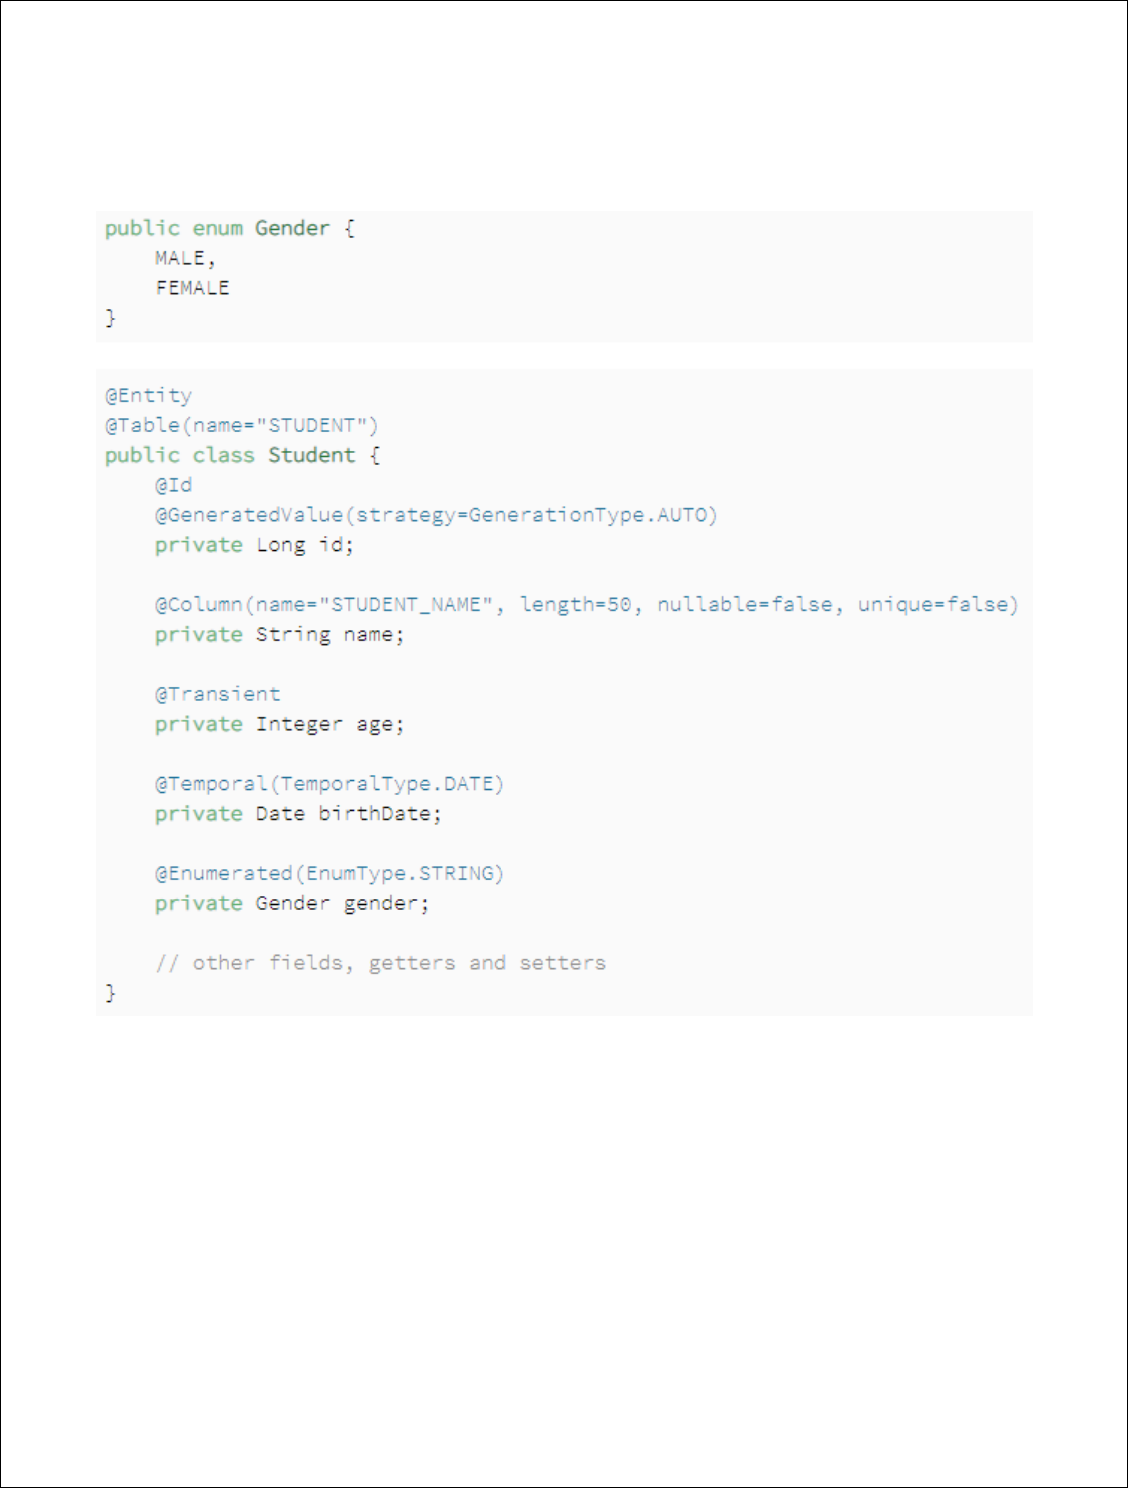
3.4.1 Entity Classes
A class with an annotation of @Entity is called an entity class. These classes are
used to map with the database tables. JPA provides annotations which are helpful
in defining the entity classes [2]. They are as follows:
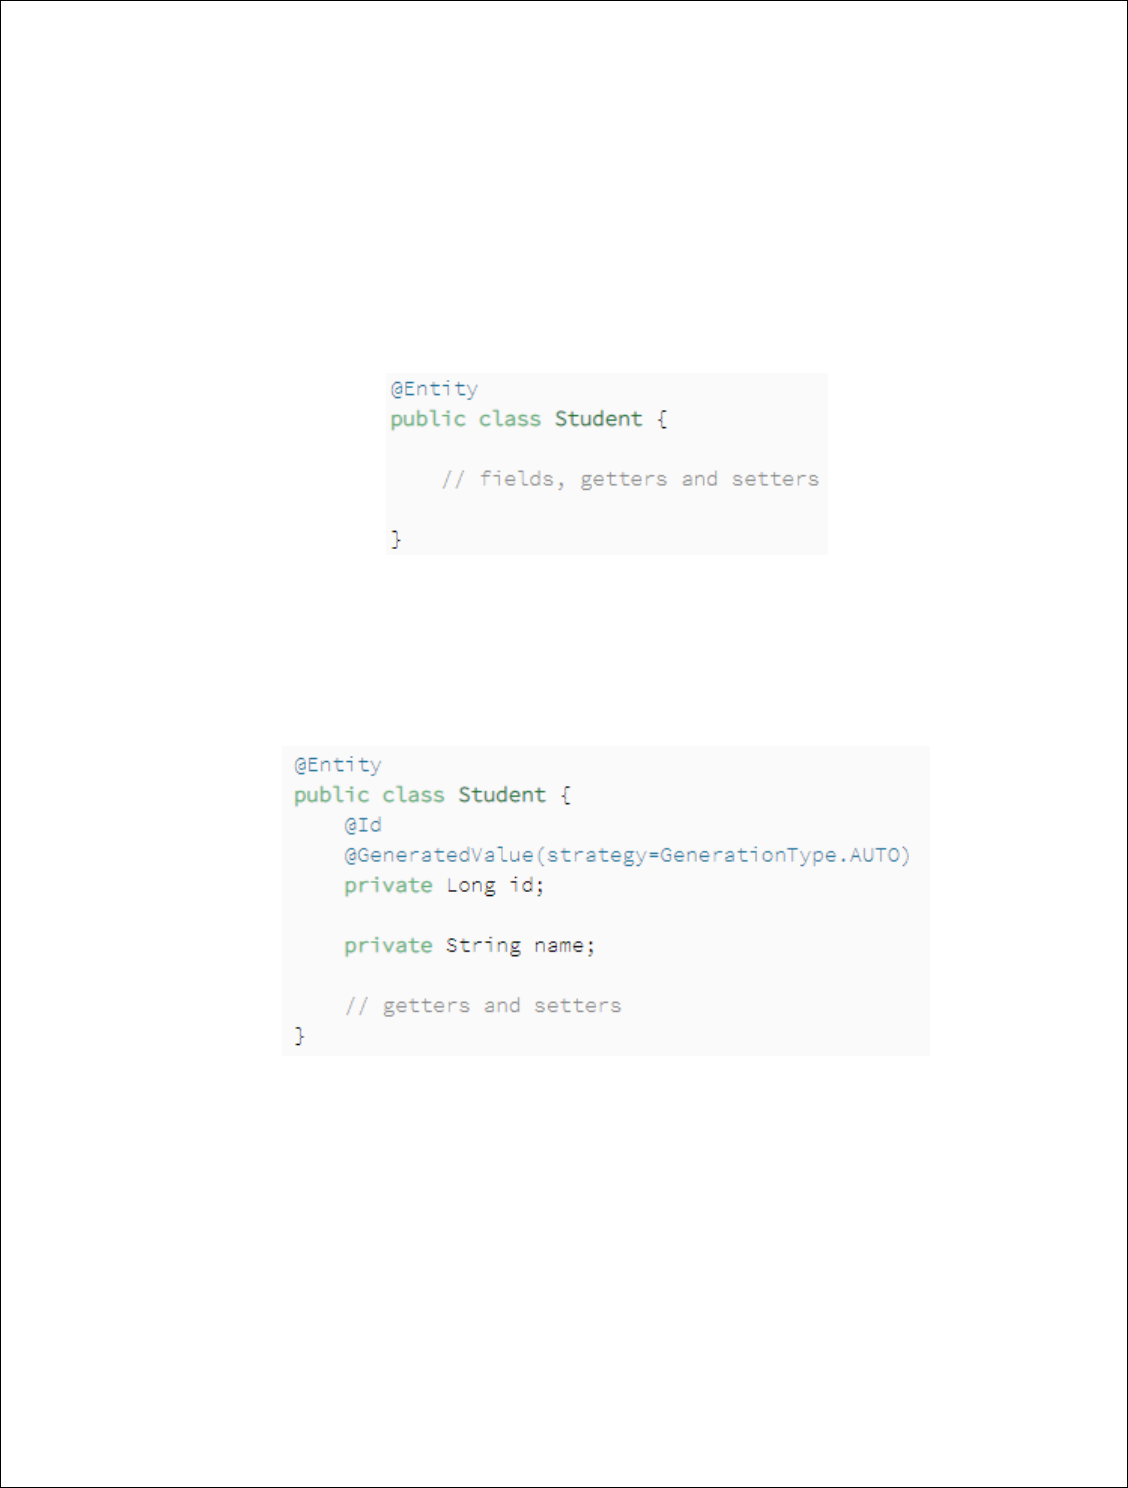
@Entity - Specifies java class as an entity class [2].
Fig 3.3 @Entity annotation [2]
@Id – Just like primary key in a database table every entity class should
also have an attribute which is uniquely identified. This attribute is mapped
with the primary key of the table in database [2].
Fig 3.4 @Id annotation[2]
@Table –It specifies the table with which the entity class is mapped. It is
only used when the entity class is needed to map with a table with different
name as of the entity class [2].
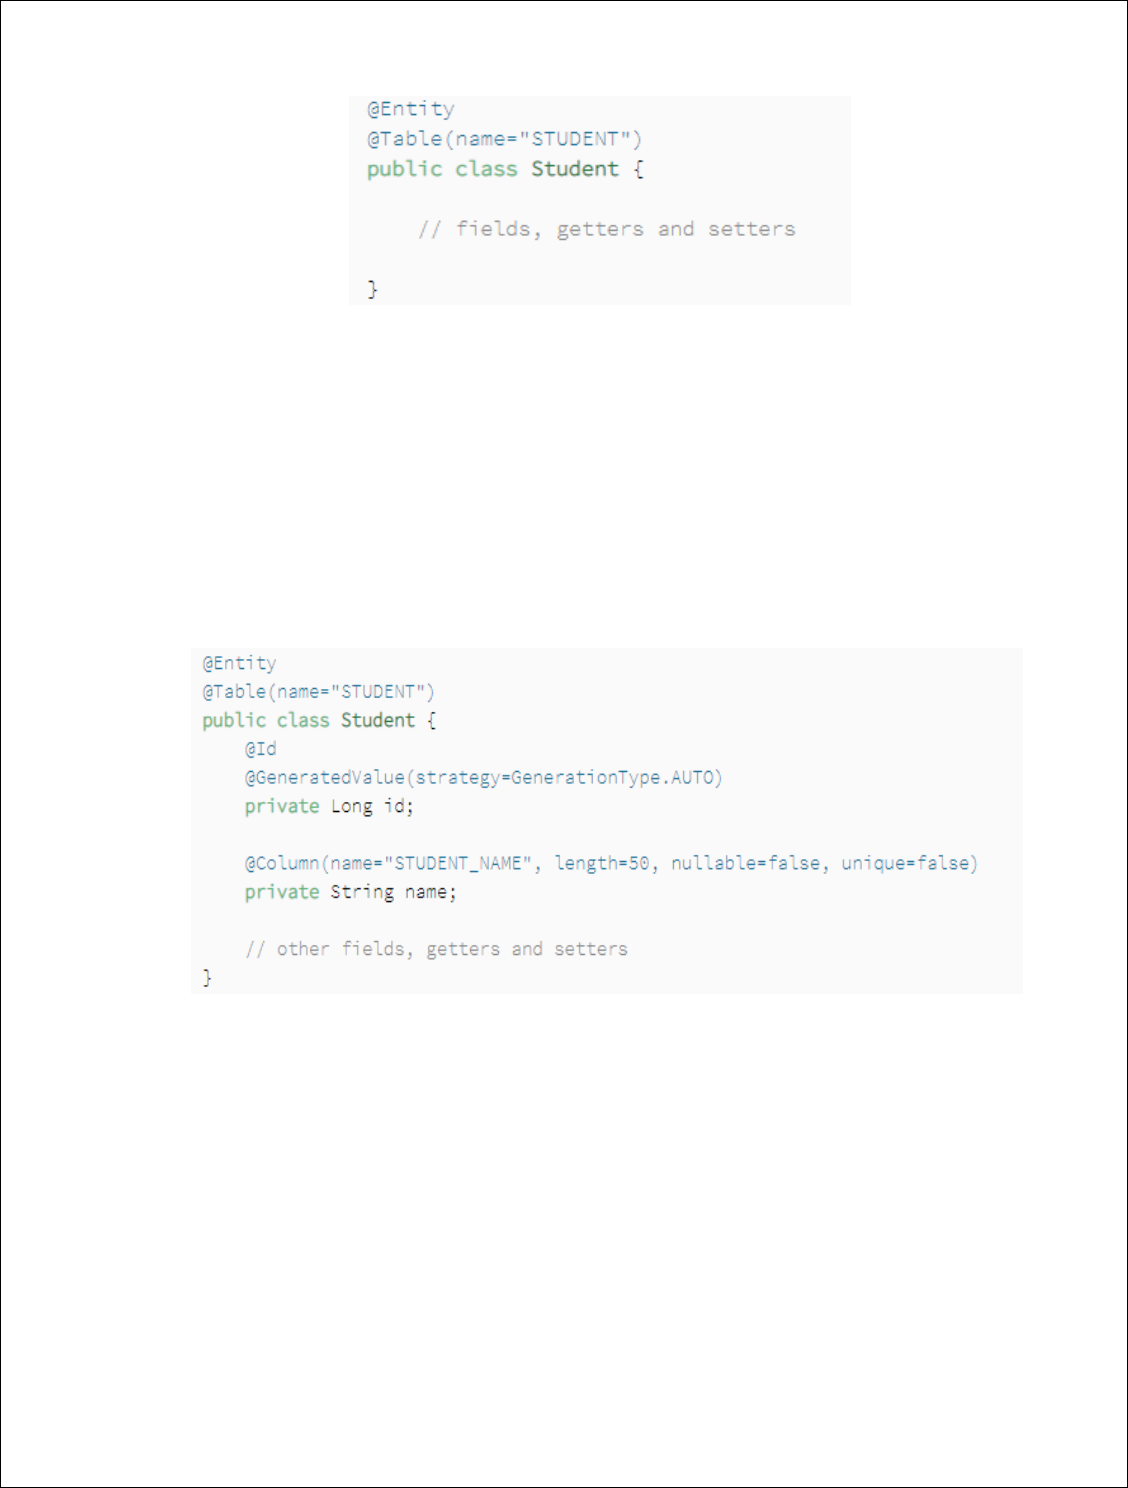
15
Fig 3.5 @Table annotation[2]
@Column - It specifies the column name with which the entity class
attribute needs to be mapped. It is only used when the attribute’s name is
needed to map with a table’s column with different name as of the attribute
[2].
Fig 3.6 @Column annotation[2]
@Enumerated–It is use to persist the enum reference present in the entity
class. In this EnumType property is used to tell how the enum value should
be saved in the database [2]. EnumType property has two possible values:
o @Enumerated(EnumType.String) specifies that enum will be
saved as string value in database.
16
o @Enumarated(EnumType.Ordinal)specifies that enum value will
be saved as integer in database.
Fig 3.7 @Enumerated annotation[2]

17
3.4.2 Spring Data
In real life a code can have multiple entity classes and for these classes we have to
make repository classes for performing nominal crud operations. This means that a
developer has to rewrite same repetitive code again, this process is very time
consuming.
So spring gives us a structure utilizing which there is no compelling reason to
compose a similar dreary code again to perform procedure on database. This
system is known as Spring Data. It gives us repositories which are interfaces
related with element and gives us various techniques to perform crud activities. To
utilize these we need to make our own repository class and expand it with the
spring repositories. Allow us to take a look at an example.
Consider a studentRepository class for Student entity.
Fig 3.8 Implementation of spring data
Given above CrudRepository interface is provided by spring data which accepts
entity class and its identifier as a parameter. It provides different methods to
perform various operations on database.
Public studentRepository extends CrudRepository<Student,
Integer>

18
3.5 Controllers in Spring
To use controllers in our enterprise applications we need to add spring-
webmvcdependency in pom.xml file. Controller class helps in managing the
request sent by the client. When a request is received controller invokes the
appropriate business logic to process that request and redirects the client to the
view in order to render the outputs [4].
If a class has an annotation@Controller, this means that the following class is a
controller class.
@ResponseBody – tells that all the handler methods in controller have their return
values written directly to the response, rather being carried in a model to a view for
rendering.
Combination of these two annotations is given by @RestController.
Controller provides us with annotations for mapping handler methods with specific
HTTP requests. We will discuss about these annotations below:
@GetMapping–In simple words we can say that for fetching data from
database @GetMapping is used.
@PostMapping –In simple words we can say that for appending data in
database @PostMapping is used.
@PutMapping –It is used for updating a value in database.
@DeleteMapping –It is used for deleting a value from database.

19
Chapter 4
Introduction to Angular
Angular a product managed by tech giant Google, is a very powerful javascript
framework which is used for building single page applications for both web and
mobile. It uses components for creating complex, customizable, responsive and
user-friendly applications. Angular is a part of MEAN stack [5].
In the project for Question Generator application we’ve used typescript instead of
javapscript. Typescript has various advantages as it supports object-oriented
features, it also supports annotations, decorators, etc. and has a good support from
various IDEs [5].
Angular has various advantages like:
Easier to learn.
Good IDE support
Familiar
Can be used to develop applications for multiple devices.
Because of its small size angular loads faster during execution.
Angular uses component based programing which is the future of web. Each
and every component is different and isolated from each other. Inside
components we can write both business file and view.
Angular is places at the client side in the complete application and provides a
complete solution for faster development. It has no dependencies and can be used
with any technology on server sidelike PHP, java, nodeJsand any database be it
Mysql or mongoDB [5].
In each component of angular there are 4 files:
.ts file
.html file
.css file
20
.spec.ts file
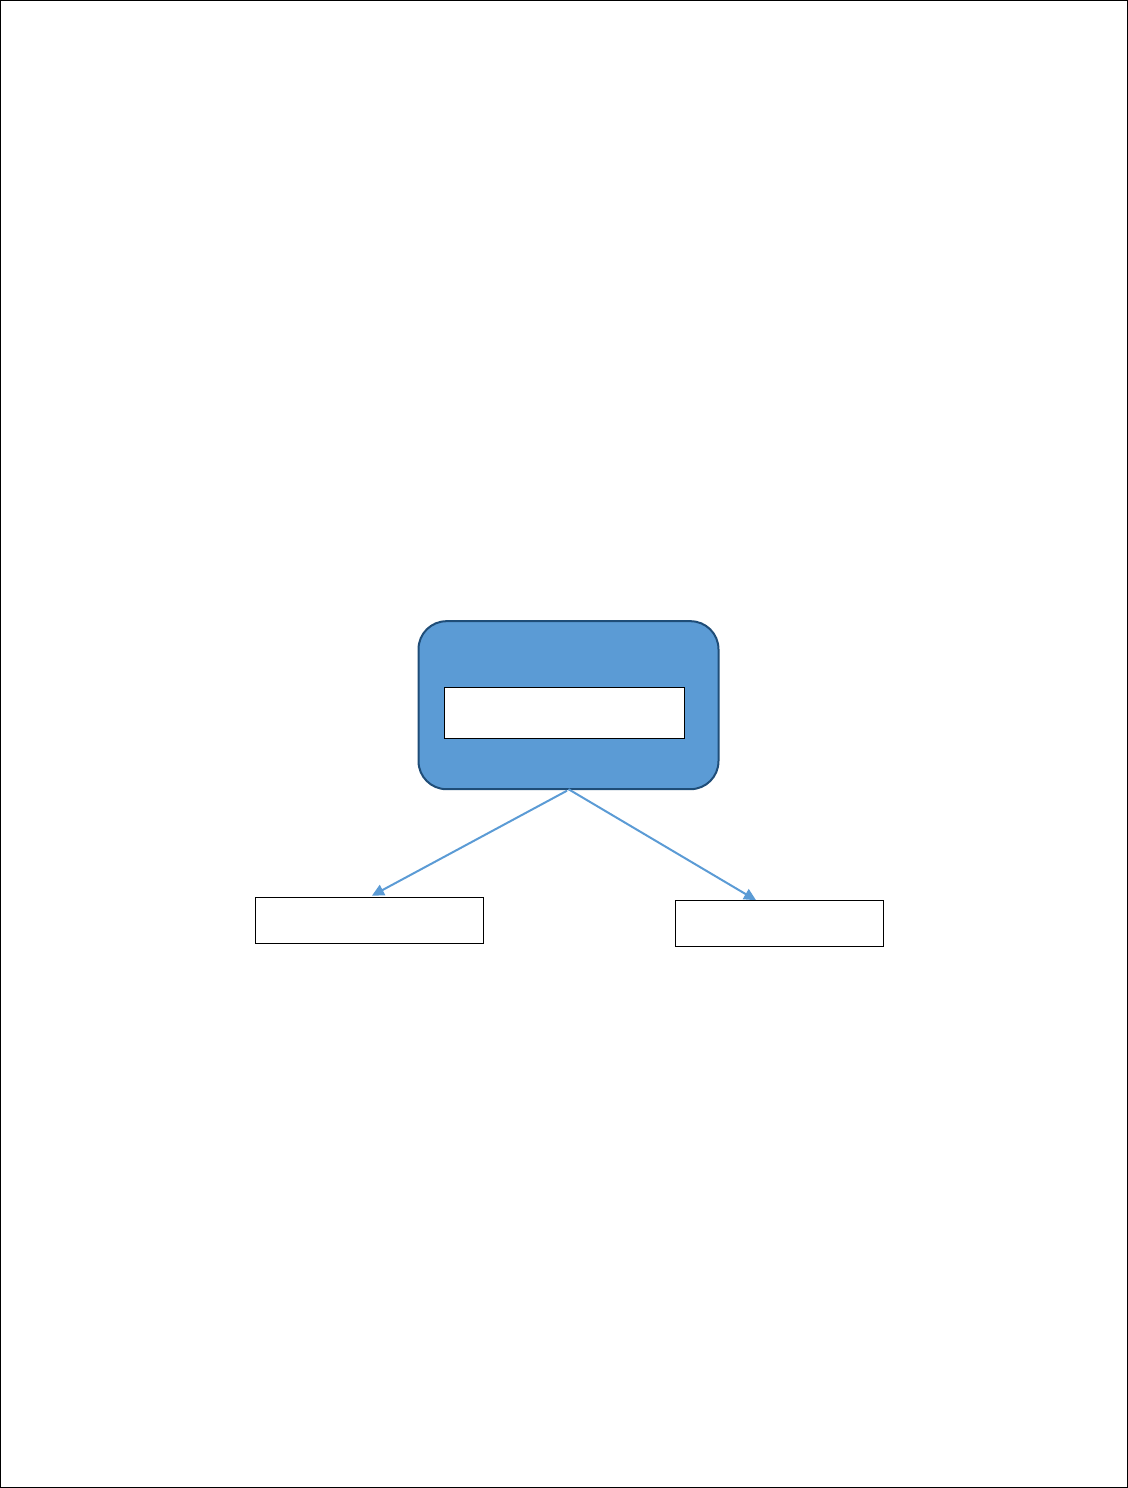
4.1 Components
We know that angular develops single page applications. It does not mean that we
have to write the whole code for an application at one place as it is not a good
design.
This is why components are used. They help us in breaking whole code in smaller
pieces, keep all the pages and their business logic separately and load them when
requested by the user.
Every Angular Application has one main component and under this main
component there are several other sub components.
Fig 4.1 Components in angular
We define the business logic for a component in .ts file. This file will interact with
the view through properties and method and thus we can say that component
controls the view. Angular creates and destroys these views as a user progress
through the application. A component is identified if a class is having
@Component decorator.
Main Component
Sub Component 1
Sub Component 2

21
4.2 Templates
Templates represent view in angular whose role is to display data whenever an
event occurs. HTML file associated with a component is known as template. We
can categorize the templates in two:
Inline Template
External Template
Inline Templates are defined inside @Component decorator using template
property. One should consider inline template when the code is of only two to three
lines.
A file having an extension of .html and is linked to the corresponding component is
called external template. One should use external template when the code to be
written is big and complex.
When we talk about templates we must talk about its elements. Template provides
various elements like interpolation, html, Template statements etc.
INTERPOLATION
Supposewe have to display a property present in a component. How do we do it?
Simple answer is by using interpolation. To display any property of component in
the view we just need to interpolate it by giving the property name in “{{}}”.
HTML
Templates in Angular use html purely.
TEMPLATE STATEMENTS
Template statements are the statements which responds to the events defined by
the user. Template statements are given using event binding. For example
(click)=“calculateScore()”, here claculateScore() is a method defined in the

22
component and whenever a “click” event occurs the following method will be
called. Event binding is always given in ‘( )’.
4.3 Data Binding
In direct words we can comprehend data binding as a correspondence. A
correspondence that occurs between the typescript and view/html that client sees
on screen.
Angular gives various ways to communicate between typescript and view such as
one-way binding (view – component), one way binding (component –view), two
way binding.
Types of binding:
Property Binding – Consider an example of a button, we want to disable
this button, but how?
For disabling a button we will use disable property of angular, this is how
property binding works.
Syntax: <buttonproperty>click</button>
Attribute Binding – Using this we can set the values of view elements
directly.
Syntax: <h2 [attr.attribute]=”exp”></h2>
Class Binding – Using this we can apply any css class to an element based
on a condition.
Syntax:<div [class.classname]></div>
Style Binding – This is used for adding inline styles to the elements.
Example: <button style= “background-color: green”>click</button>
Event Binding – This binding is used to react to user events for different
purposes like invoking a function to perform some calculations etc.
Example: <button (click)=“calculate()”>calc</button>, this will call the
calculate() method whenever the button is clicked.

23
Two-Way Binding – It is basically a group of property and event binding i.e
whenever properties are updated then UI will also get updated and vice-
versa.
We use [(ngModel)] for implementing two-way binding.
4.4 Directives
When a developer wants to make Html attributes behave in a specific way or
manner, then for doing so directives are used. Directives are classified into 3 types:
Component directives
Structural directives
Attribute directives
We have already discussed about the component directives earlier.
STRUCTURAL DIRECTIVES
They are liable for changing the plan of the DOM. They work by adding or killing
the segments from the DOM, not in any way like Attribute Directives which just
change the part's appearance and lead.
You can without a doubt isolate between the Structural and Attribute Directive by
looking at the syntax. The Structural Directive's name reliably starts with an
asterisk(*) prefix, while Attribute Directive doesn't contain any prefix.
Famous structural directives are:
ngFor – Just like for loop in any other programming language, ngFor is used
to iterate or display data using loops [7].
ngIf – It is similar to the if statement in java or c++, ngif will get executed if
the condition given it satisfies. It is utilized to make or eliminate a piece of
the DOM tree contingent upon a condition [6].

24
ngSwitch – It shows one item at a time from various other items depending
upon the switch statement. Only the chosen item is placed into the DOM by
Angular [8].
4.5 Pipes
At the point when a designer needs to arrange the information in more easy to
understand path prior to showing it to the client, he utilizes pipes. A pipe accepts
information as info and changes it into the ideal yield.
Syntax:
Pipes can either be implicit or custom, let us first see some underlying built-in
pipes:
uppercase: Data gets transformed to upper-case.
Syntax:
lowercase: Data gets transformed to lower-case.
Syntax:
TitleCase: Data gets transformed to title case.
Syntax:
JsonPipe: Data gets converted to its json format.
Syntax:
PercentPipe: Data gets transformed to percentage string.
{{expression|pipe}}
{{expression|uppercase }}
{{expression|lowercase }}
{{expression|titlecase }}
{{expression|json }}

25
Syntax:
CurrencyPipe: Data gets transformed to currency string.
Syntax:
DatePipe:Data gets transformed to date format according to the rules.
Syntax:
I18nSelectPipe: Returns the string that matches the current value of data.
Syntax:
SlicePipe: Slice the data to create a new array or a string.
Syntax:
There are various other built-in pipes provided by angular. Now lets discuss about
cutom pipes.
CUSTOM PIPES
Assume we need to execute functionalities like searching, arranging, at that point
we ought to go for custom pipes as no such underlying lines accessible. We can
make custom lines by acquiring PipeTransform interface. In this interface there is a
trasform() technique where we need to compose pipe usefulness.
tranform() technique has two contentions, initial one is the worth of the
articulation passed to the pipe and second one is a variable "contentions". We can
{{ expression |percent[: digitsInfo [: locale ]]}}
{{ expression |currency[: currencyCode]]}}
{{ expression |date[: format [: timezone [: locale ]]]}}
{{ value_expression |i18select: mapping }
{{ expression | slice: start [:end]}}

26
have different contentions dependent on the quantity of boundaries passed to the
line. The tranform() technique should return the last worth.
4.6 Services
Service helps us in making reusable and viable code. Angular doesn't furnish with
any exceptional decorator for the service class, we simply need to characterize the
class and use it any place required by utilizing reliance infusion. The assistance
segment is named as {name}.service.ts.
While utilizing services in angular we need to interface our application to backend
and speak with it, this should be possible utilizing HTTPClientModule. We need to
import it from @angular/common/http. The primary benefit of utilizing this is that
when our application is speaking with the backend, and solicitation is being
handled our screen actually stays intelligent i.e it doesn't freeze. We can utilize
HTTP for making POST, PUT, GET and DELETE orders.
When we make a request using HTTP, the request goes to the backend and then
backend gives us the result back as a collection. This getting a collection over a
particular period of time is known as observable. Observable produces data which
a user can then subscribe to use it. How do we subscribe to it?
Well it is pretty simple just by using subscribe() function. Let us understand it
using an example consider there is a milk company which delivers the milk to each
household who has subscribe to it. Only the customers who have subscribed to this
company will receive their product. Now it is up to the milk company owner to
decide when will the customers will receive their next milk bottle. It is not
necessary that every milk bottle is delivered at the same time gap. Customers may
need to wait for the next milk bottle to arrive.
Observables increases the performance of angular application. As they facilitates
asynchronous communication and if requests and responses are sent
asynchronously performance increases.

27
CROSS ORIGIN RESOURCE SHARING (CORS)
If we try to connect our backend with frontend and integrate it, it won’t work as
planned. An error will be shown in console that the “request is blocked due to
CORS”. Without using CORS server won’t send any response back to the
frontend.
4.7 Template driven forms
Forms are a vital piece of precise web application. They are broadly utilized for
taking information from clients. Template driven structures are one sort of
structure gave by precise to us.
Template driven structures use ngForm and ngModel orders to get data about the
structure and its controls and ngSubmit occasion to present the structures.
ngForm: Provides data about the present status of the structure including a
json portrayal of the structure esteem and the legitimacy condition of the
whole structure.
ngModel: Provides 2-way information restricting between the view and part.
It is additionally used to follow the state and legitimacy of the info field.
ngSubmit: Fires an occasion determined by ngSubmit when the structure is
submitted.
4.8 Reactive Forms
Model-drivenforms are exact technique for making structures in an open style.
With responsive designs, we make structure control objects in a section class and
bind them with HTML structure segments in the format.

28
As we make and control structure control fights directly in the part class, we can
drive model characteristics into the construction controls and bring customer
changed characteristics back from the design. The part can see changes in structure
control state and react to those changes.
We use formBuilder class to make responsive designs which has chipped away at
language structure. We need to import ReactiveFormsModule to make responsive
constructions.
We can use worked in validators using validators class. For example, if we need to
use required validator, it might be gotten to as Validators.required.
4.9 Routing
In a solitary page application, we change what the client sees by appearing or
concealing bits of the presentation that compare to specific segments, instead of
going out to the worker to get another page. As clients perform application errands,
they need to move between the various perspectives that you have characterized.
To make the route starting with one view then onto the next, we utilize the Angular
Router. The Router empowers route by deciphering a program URL as a guidance
to change the view.

29
Chapter 5
Working of Question Generator App
As we are moving towards the working of the question generator app, lets take a
brief look on the technologies used.
Java for backend in spring.
HTML along with CSS and Bootstrap for designing and Client end
development.
Typescript for Angular designing.
h2 Database for login and registering user.
Now lets begin with the working of the application.
To start the app we need to first start the spring application developed in eclipse.
This API contains an entity class called user in it for storing the details of the user
in the database.
Now after starting the spring API we then need to connect our h2 database. For
connecting h2 database we just have to go to the localhost port on which the
database is running and press the connect button.
When both of these things are done then we need to start our angular application
developed for the frontend of our application. By default angular runs on port
number 4200.
30
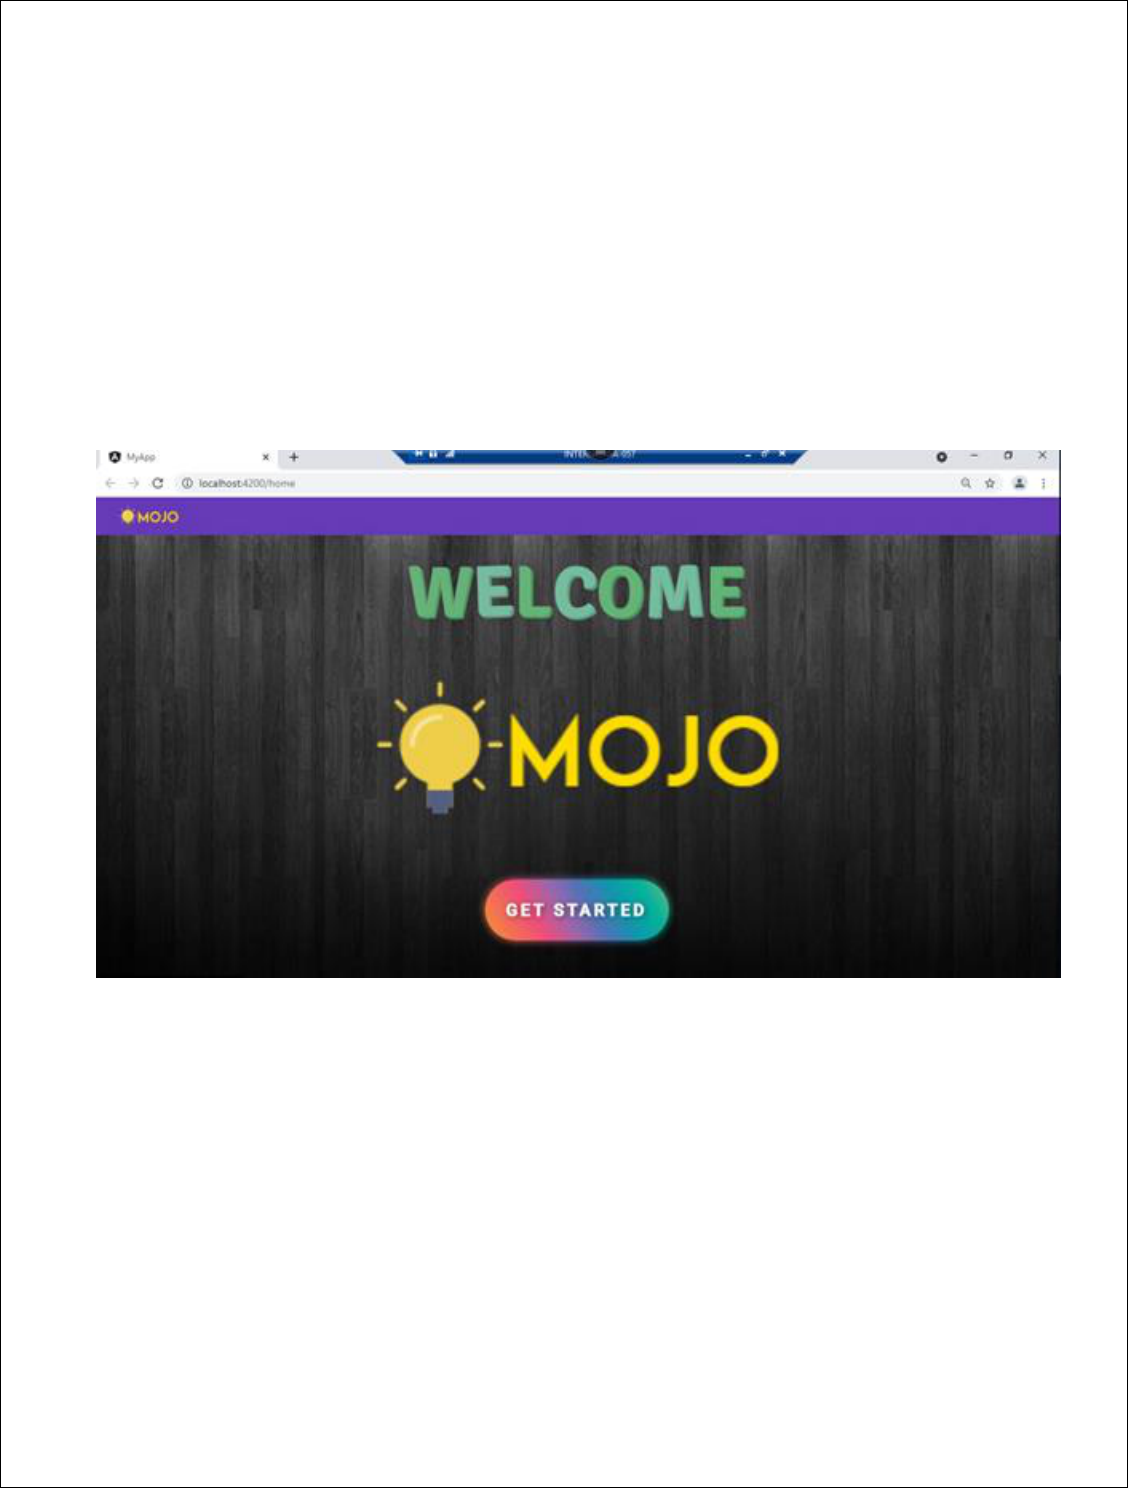
5.1 Home page
So when the app is running we will first see the home page of the application, this
home page has a navbar with “MOJO” (name of the quiz app) written on it. Below
it, it shows welcome getting displayed. This message is for welcoming the user.
There is a button located at the bottom of the page on which “GET STARTED”is
written this button has a route associated with it. On clicking this button user will
be re directed to the login page of the application. An image of home page/
component is given below.
Fig 5.1 Home page of the application.
31
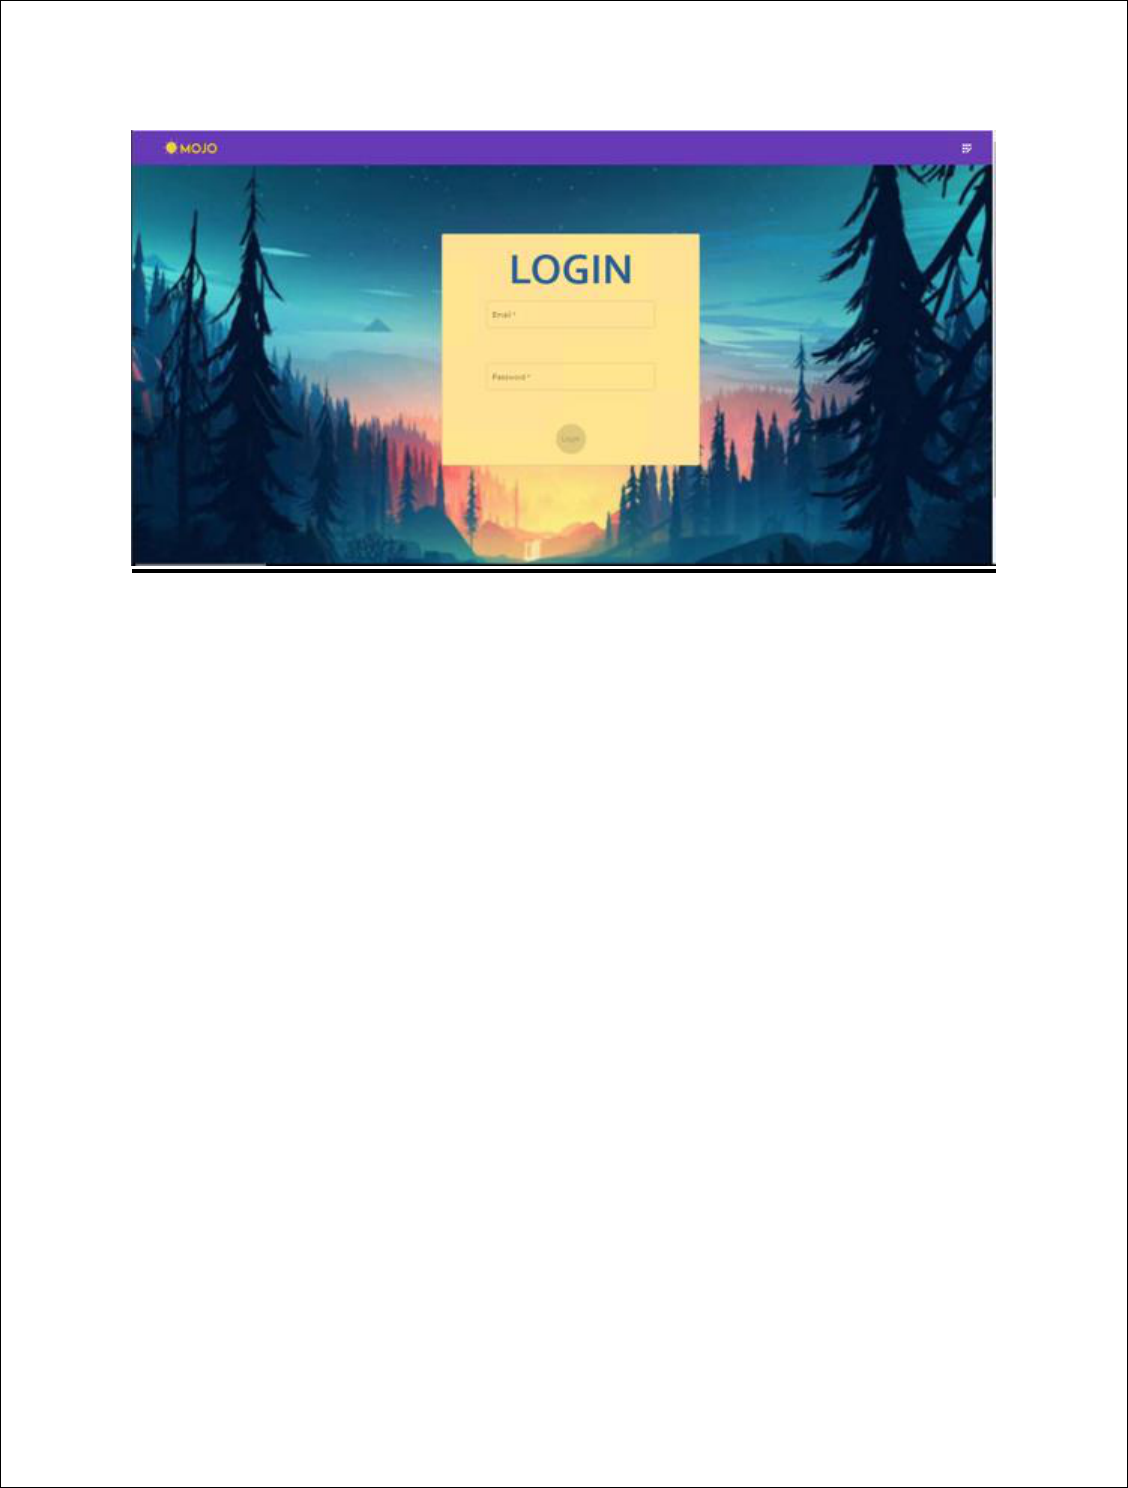
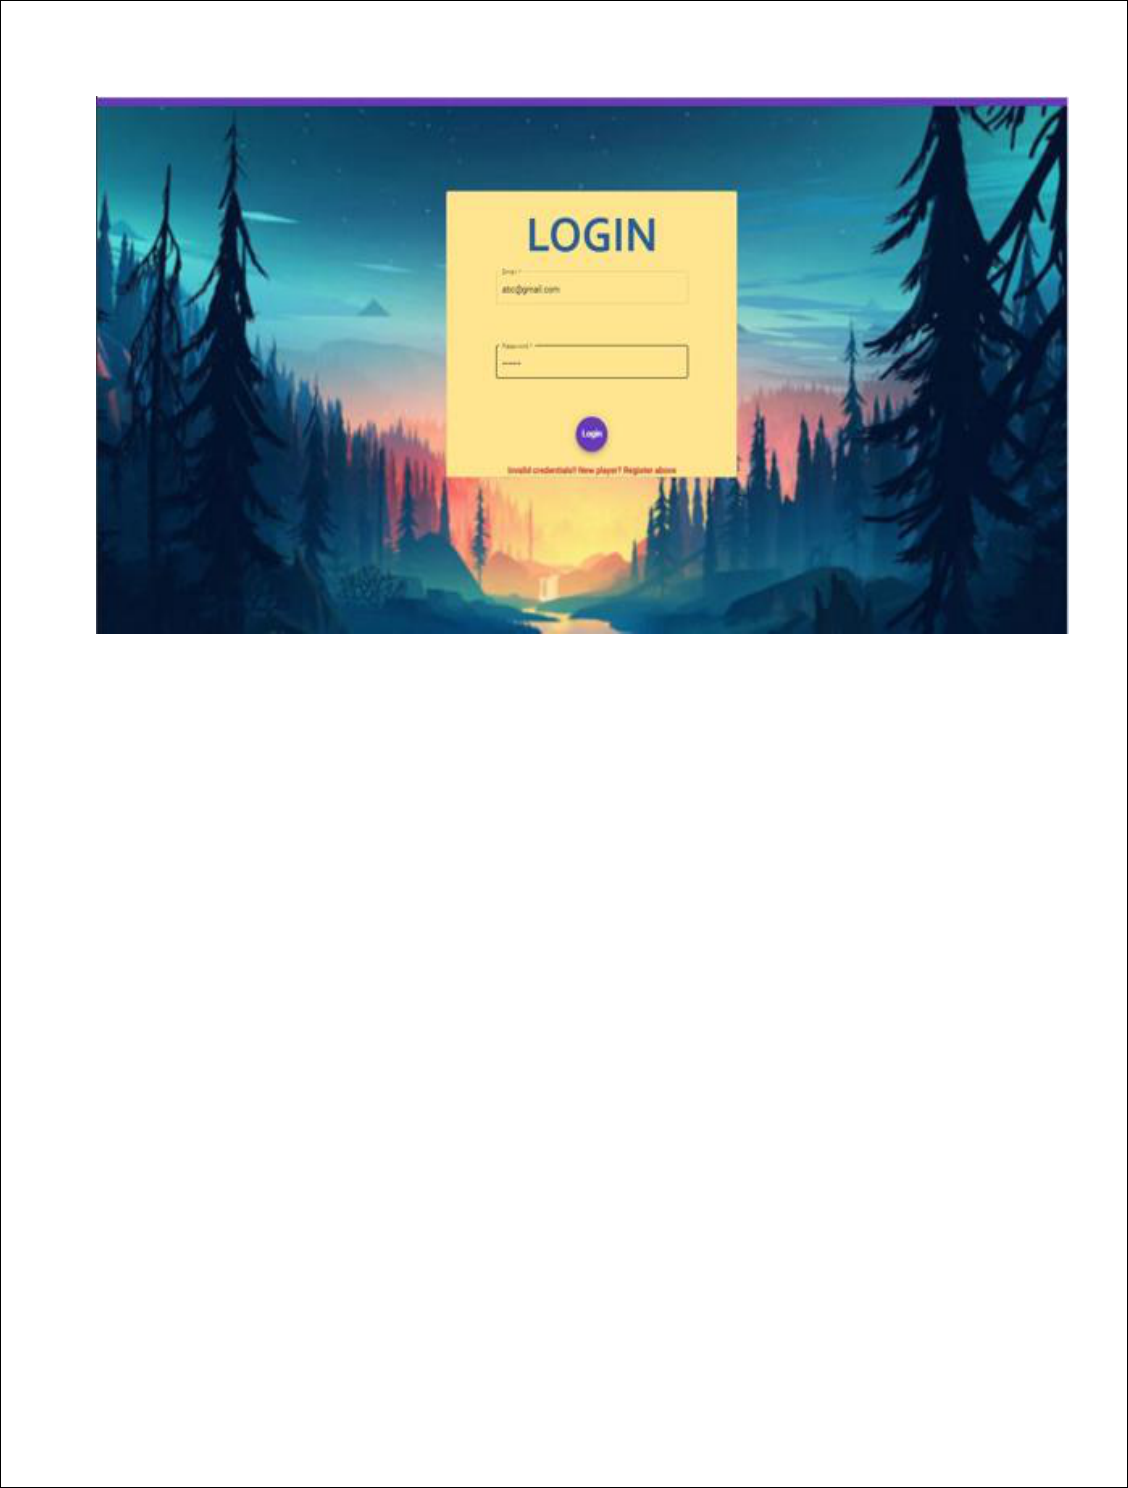
5.2 Login page
Fig 5.2 Login Page
When user clicks on “GET STARTED” button on home page then he will be
rendered to the login page. Fig 5.2 shows the login page. This page has a navbar
with logo of the quiz name at left side and an icon of registration at the right side.
This icon has a tooltip associated with it which shows “register”. Also a routerlink
is given to this button so whenever user clicks on this he will be rendered to the
registration component.
Now talking about the login page, we have used template driven form for creating
login. It has a beautiful background of mountain scenery behind it to make it look
more beautiful and appealing. At the centre of the screen a card is present which
contains 2 fields. One is of email and another one is for password. If user has an
account already then he must provide the email and password for logging in else if
he is a new user then he must register first.
We can see that the login button is disabled this is because we have added property
binding here. Till user does not enter valid email and password, button will remain
disabled.
32
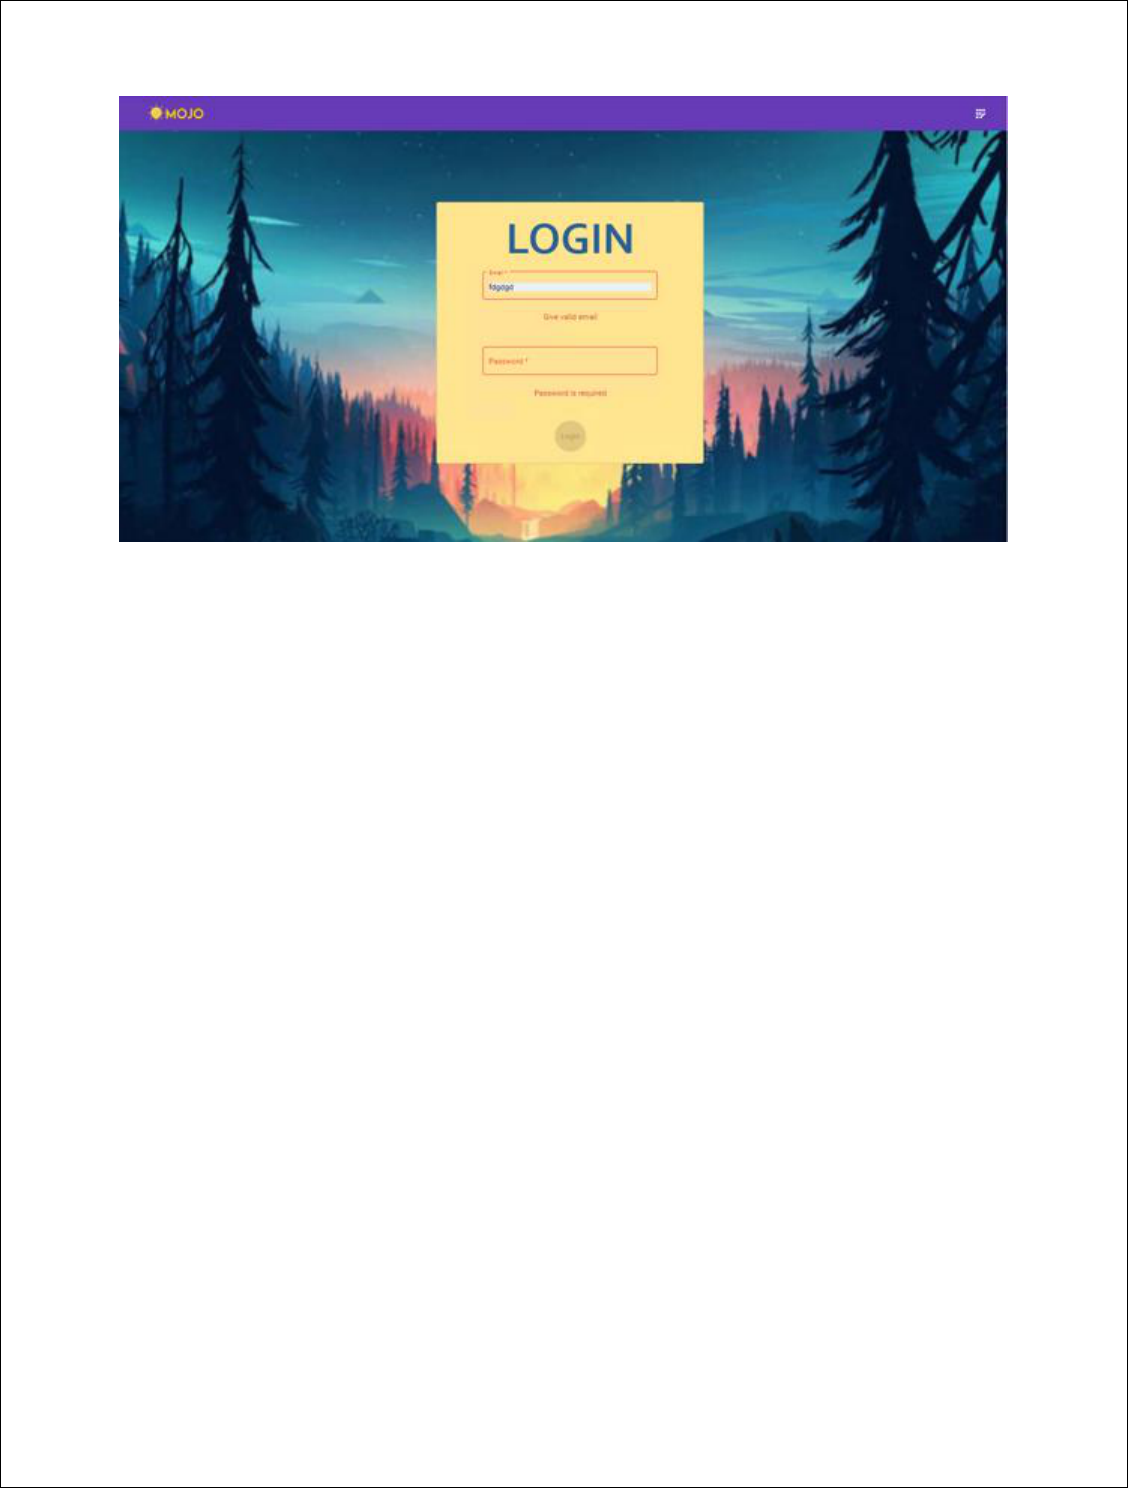
Fig 5.3 Validations in login page
Fig 5.3 shows the validations that are given to this form. Proper regex patterns are
given to both the fields. Email id must be in a format of “example@xyz.com” and
password must be minimum 8 characters long and must contain 1 digit and 1
special character. Both the fields are required fields. If the both email and
password matches with email and password present in the database then the user
will be rendered to the next page where he can choose the topic on which he wants
to play quiz. If password and email doesn’t match then the user will get an error
which is shown in fig 5.4 below.
33
Fig 5.4 Invalid email or password error.
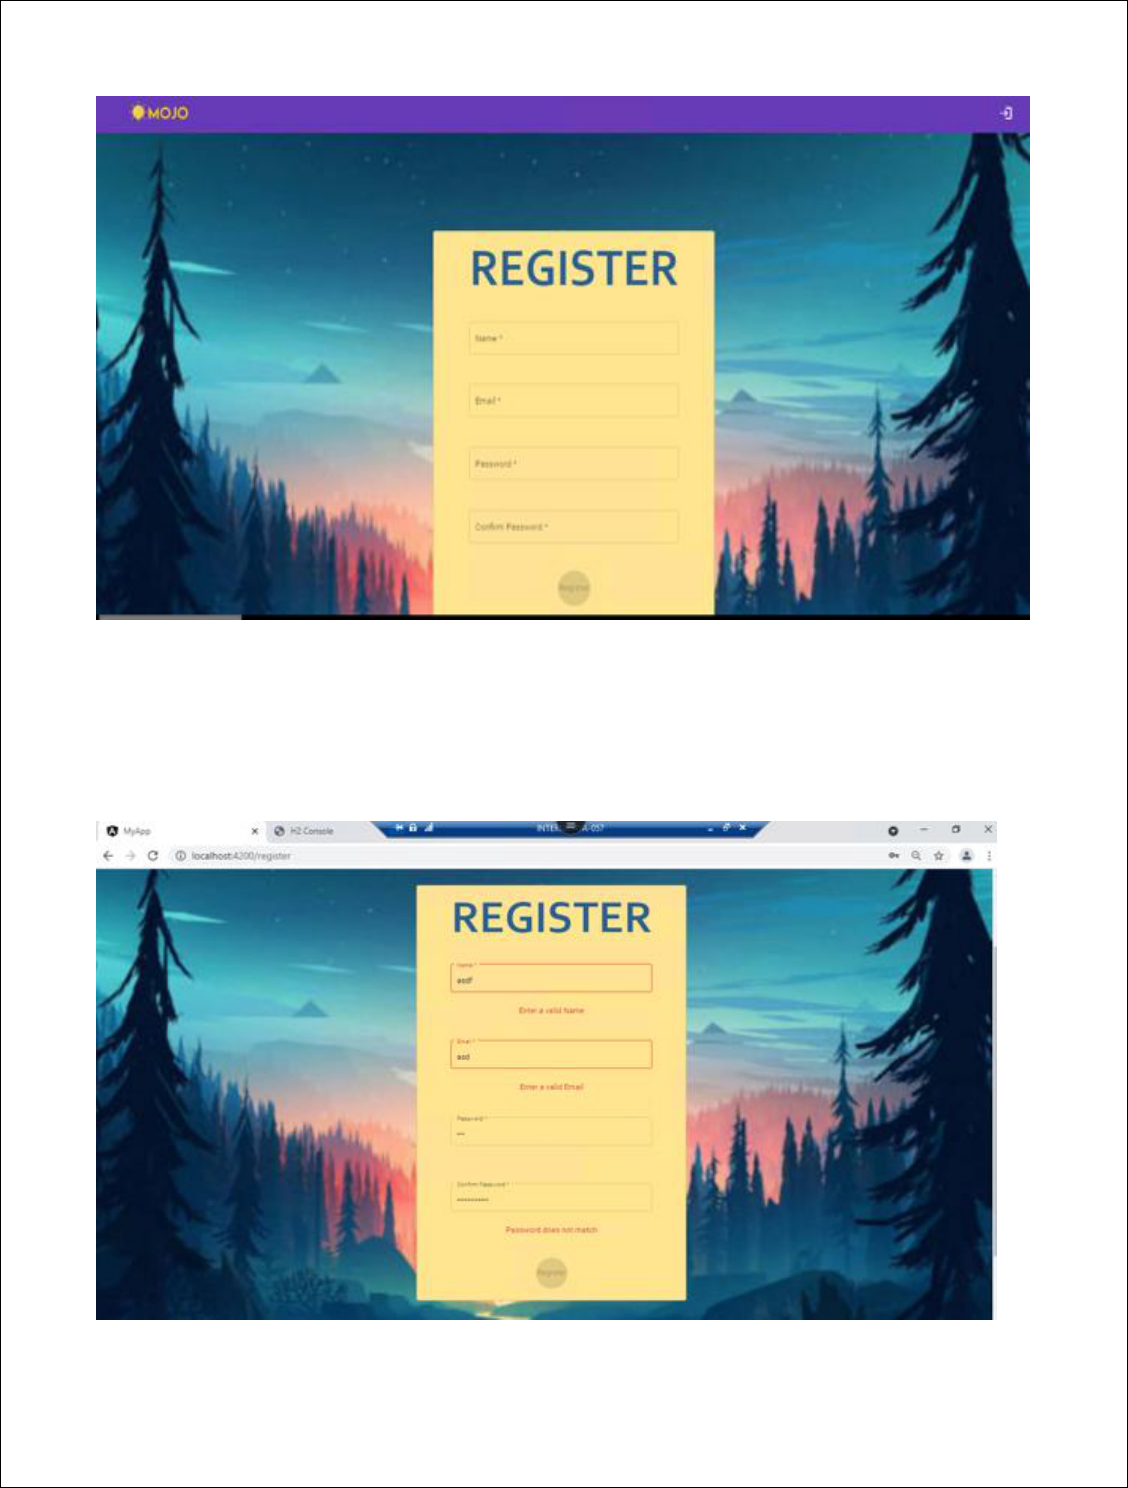
5.3 Registration page
When user clicks on the register button present in the navbar of login page, he will
be rendered to the registration component. If user has visited the website for the
first time then he can register here. Similar to the login page registration page has
the same background and similarly card having various fields is present at the
center of the page.
34
Fig 5.5 Registration page
Every field in the registration page has a validation of required. Email field and
password field have other validations also similar to the login validtions.
Fig 5.6 Registration page validations.
35
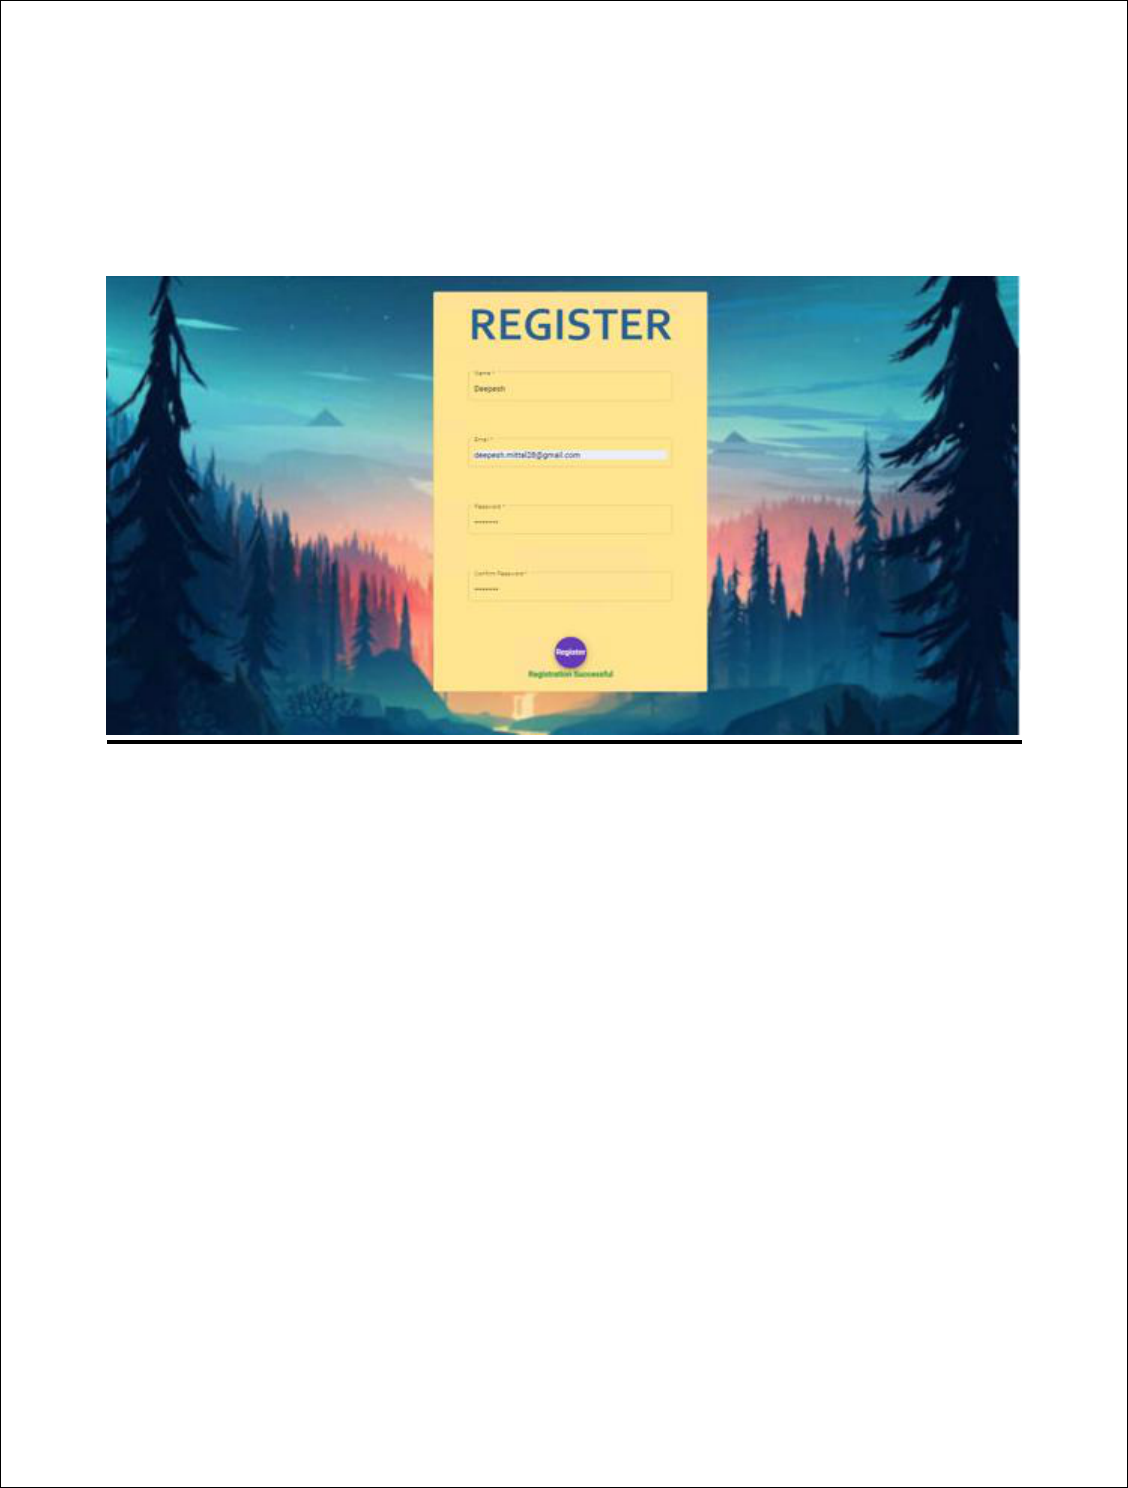
The register button will remain disabled until all the fields are correctly filed. Once
user successfully he will get a registration successful message as shown below in
fig 5.7.
Fig 5.7 Success message after registering
There is an icon present in navbar of both login and registration page, a tooltip is
added to that icon which shows home. When user clicks on that icon he will be
rendered back to the home page.
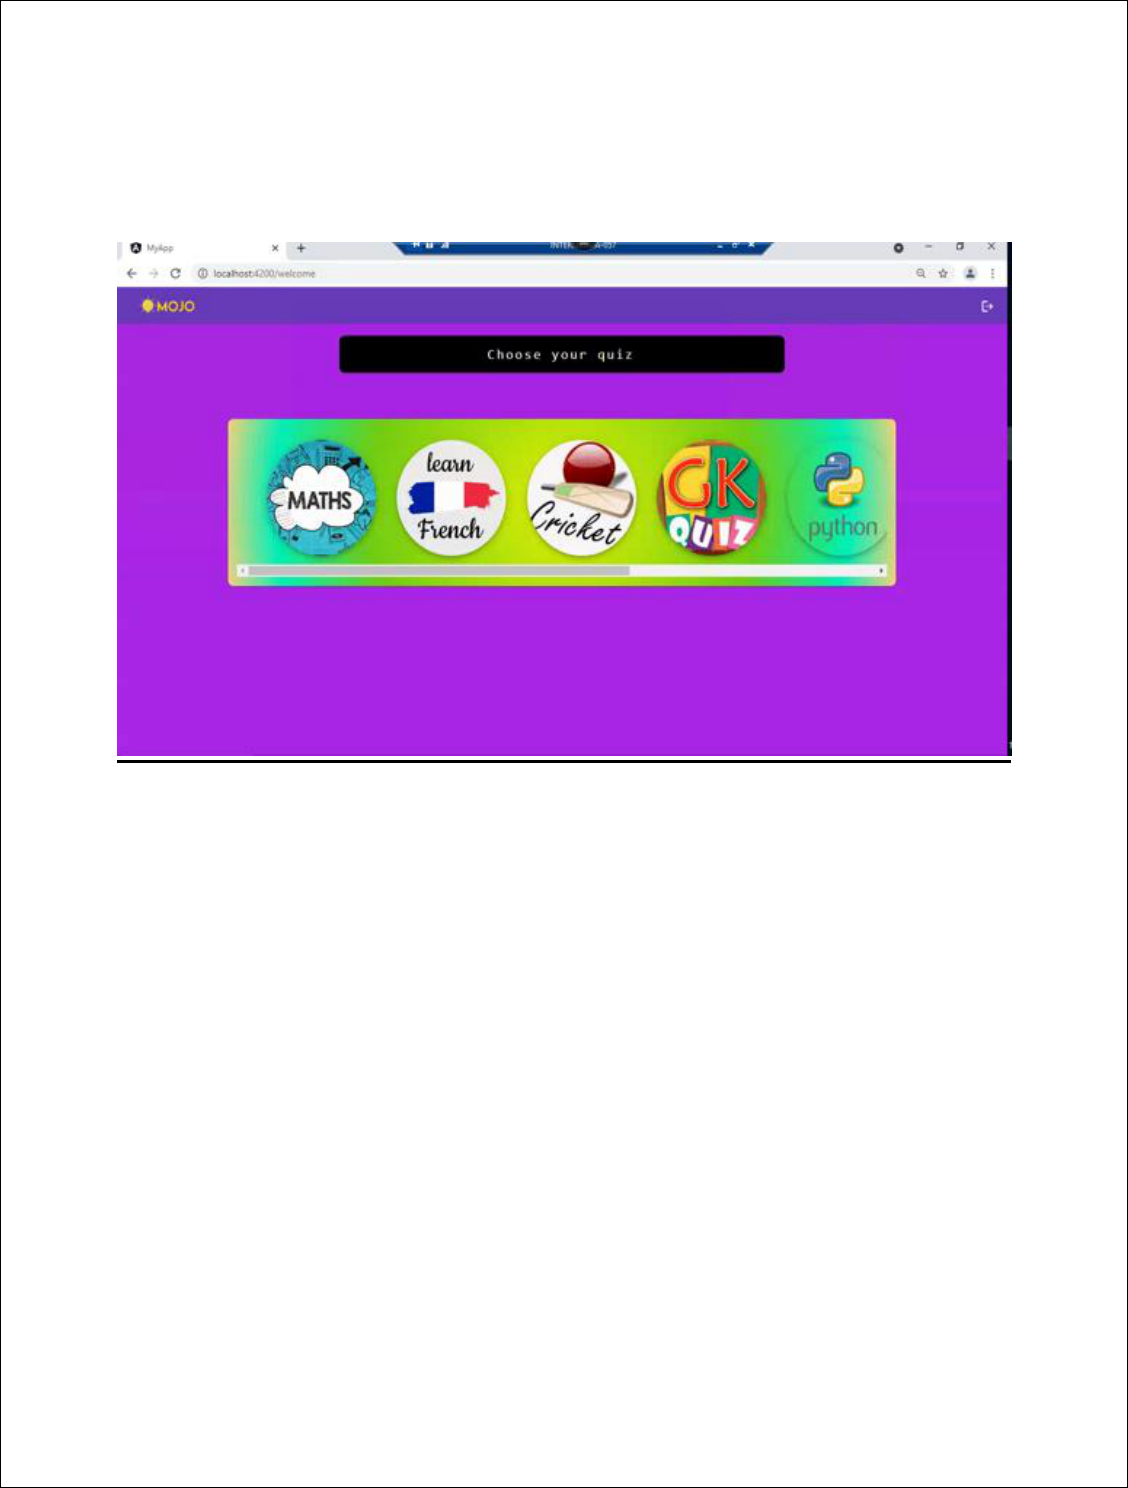
5.4 Welcome page/Quiz Selection page
When user gets logged in after providing valid email id and password he will be
rendered to the welcome component or we can say quiz selection page. There are
several topic present from which a user can select one which he likes or want to
play.
There is a navbar present in this page with the logo of the quiz on left and a logout
button on the extreme right. The sign out button is associated with a tooltip naming
“logout” and a routerlink for home page. A card is present which says “Select your
quiz”, typewriter effect is added to it in CSS file. A color changing Gif is added in
background.
36
The list quiz topics are arranged in horizontal list manner. Fig 5.8 shows the
welcome component.
Fig 5.8 Welcome component
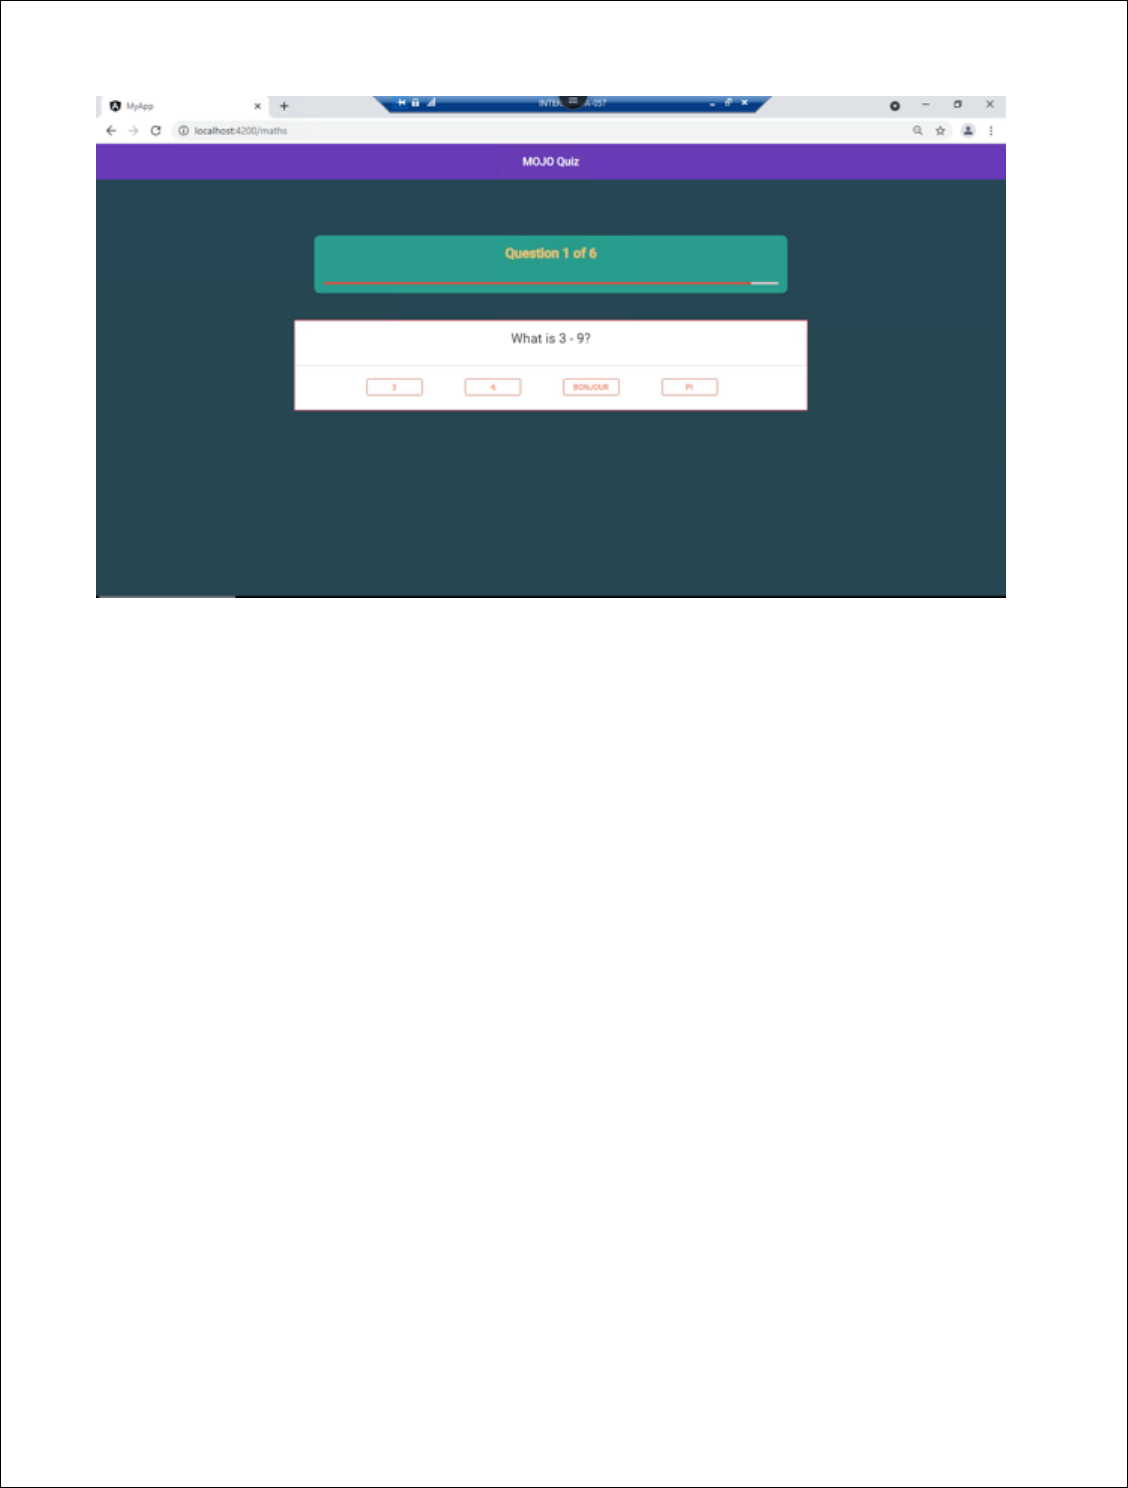
5.5 Questions Page
When user selects the quiz topic which he wants to play he will be rendered to the
questions page where randomly 6 questions will come from the topic user has
chosen. As soon as the quiz starts, a timer of 30 seconds will also get started that
means user has only 30 seconds to complete the quiz.
Here there 2 components working together for quiz questions to be displayed. First
component is question component also called parent component and the second
component is the question-form component which is also called as child
component.
When user selects the answer next question is displayed and this happens until the
last question is answered.
37
Fig 5.9 Question component
Once all the questions are answered or time gets up whichever is the case the user
will be rendered to the result component.
5.6 Result page
After coming to the result page user will get to know his score and the answers he
marked. Answers are given in an expanded panel. The correct answers are given in
green color and wrong answers are given in red color. Below the card containing
score and answers there is a feedback button which will take the users to the
feedback page. CSS for sparkle effect is given and “CONGRACTULATIONS”
written above has a typewriter effect.

38
Fig 5.10 result page showing score
Fig 5.11 Expansion panel for answers

39
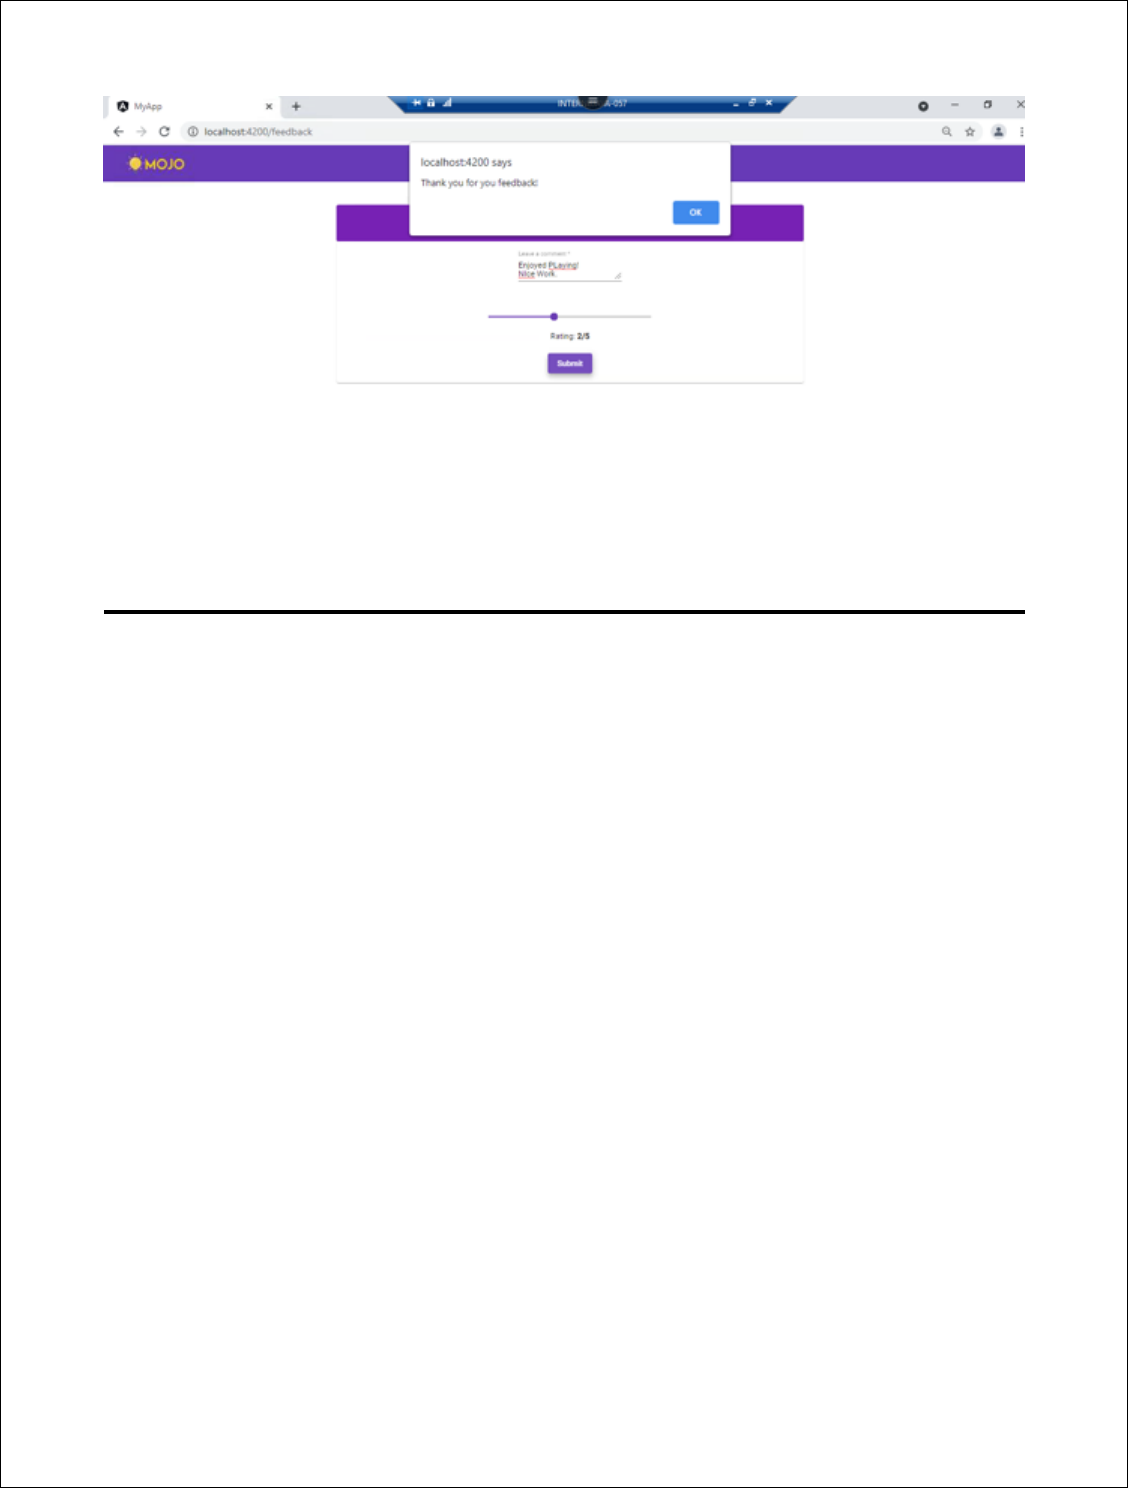
5.7 Feedback
After clicking on feedback button on result screen user will be redirected to
feedback page where a feedback form is present. This feedback form has a textarea
having validation of required. Below it there is a slider to rate the app which user
can use for rating.
The submit button will remain disabled till user does not fill all the fields.
Fig 5.12 Feedback form validations
After filling all the required fields submit button will become abled. When user
clicks the submit button an alert will popup stating “Thankyou for your feedback”
and as soon as user clicks “OK” on the popup user will be directed to quiz
selection page and from there he can logout or can play the quiz again.
40
Fig 5.13 Alert popup

41
CONCLUSION
At last we would conclude hoping our work turns out to be not only to be a
good source of knowledge but also a piece of entertainment for our users.
The project has various real time on going applications for conducting polls,
for conducting exams, etc.
Lastly, it can have future uses as well in which the questions in the quiz can
be generated in form of gifs, images and videos and much more.

42
REFERENCES
[1] "Spring Boot Tutorials | Java Development Journal", Java Development
Journal, 2021. [Online]. Available: https://www.javadevjournal.com/spring-
boot/. [Accessed: 18- May- 2021].
[2] V. Balasubramaniam, "Defining JPA Entities | Baeldung", Baeldung, 2021.
[Online]. Available: https://www.baeldung.com/jpa-entities. [Accessed: 18-
May- 2021].
[3] J. Journal, "Spring Boot Annotations", Java Development Journal, 2021.
[Online]. Available: https://www.javadevjournal.com/spring-boot/spring-
boot-annotations/. [Accessed: 18- May- 2021].
[4] "The Spring @Controller and @RestController Annotations |
Baeldung", Baeldung, 2021. [Online]. Available:
https://www.baeldung.com/spring-controller-vs-restcontroller. [Accessed:
18- May- 2021].
[5] "Angular", Angular.io, 2021. [Online]. Available:
https://angular.io/guide/architecture-components. [Accessed: 18- May-
2021].
[6] "Angular", Angular.io, 2021. [Online]. Available:
https://angular.io/api/common/NgIf. [Accessed: 18- May- 2021].
[7] "*ngFor Directive in Angular | DigitalOcean", DigitalOcean, 2021. [Online].
Available: https://www.digitalocean.com/community/tutorials/angular-
ngfor-directive. [Accessed: 18- May- 2021].
[8] "Angular", Angular.io, 2021. [Online]. Available:
https://angular.io/api/common/NgSwitch. [Accessed: 18- May- 2021].
43
