
Trend Micro Incorporated reserves the right to make changes to this document and to
the products described herein without notice. Before installing and using the software,
please review the readme files, release notes, and the latest version of the applicable user
documentation, which are available from the Trend Micro website at:
http://docs.trendmicro.com/en-us/enterprise/trend-micro-encryption-for-email.aspx
Trend Micro and the Trend Micro t-ball logo are trademarks or registered trademarks of
Trend Micro Incorporated. All other product or company names may be trademarks or
registered trademarks of their owners.
Copyright © 2014 Trend Micro Incorporated. All rights reserved.
Release Date: May 2014
Product Name and Version No.: Trend Micro™ Encryption for Email
5.9
Document Part No.: EEFM56237_131216
Protected by U.S. Patent No. not available. Patent pending.

i
Table of Contents
Preface
Preface
.................................................................................................................. v
Trend Micro Encryption for Email Documentation ................................... vi
Audience ............................................................................................................. vi
Document Branding ......................................................................................... vi
Document Conventions .................................................................................. vii
Chapter 1: Introducing Encryption for Email
Introduction ..................................................................................................... 1-2
System Requirements ............................................................................. 1-2
Installing Encryption for Email .................................................................... 1-4
Downloading the Encryption for Email Software ............................ 1-4
Completing the Installation Wizard ..................................................... 1-8
Protecting Your Email Address ................................................................. 1-20
Registering Your Email Address ........................................................ 1-20
Using Encryption for Email on Multiple Computers ..................... 1-21
Checking for Updates .................................................................................. 1-24
Periodic Auto Updates ........................................................................ 1-25
Manual Updates .................................................................................... 1-25
Viewing the Encryption for Email Modules from the About Screen
.................................................................................................................. 1-25
Chapter 2: Using the Encryption for Email Client
Using Encryption for Email .......................................................................... 2-2
Sending and Receiving Private Mail Using an Email Program ................ 2-2
Using Encryption for Email in Your Email Program ...................... 2-2
Encryption for Email Applications .............................................................. 2-8
Opening an Application in Encryption for Email ............................ 2-9

Trend Micro Encryption for Email User’s Guide
ii
Using the Encryption for Email Tray Tool Menu ..................................... 2-9
Opening the Encryption for Email Tray Tool Menu
..................... 2-10
The Encryption for Email Tray Tool Advanced Menu ................. 2-11
My Private Addresses .......................................................................... 2-13
Changing Your Password .................................................................... 2-16
Working with the Clipboard ............................................................... 2-17
Working with Windows ....................................................................... 2-25
Removing Cached Passwords ............................................................. 2-26
Closing Encryption for Email ............................................................ 2-27
Restarting Encryption for Email ........................................................ 2-27
The Encryption for Email Status Screen .......................................... 2-28
Working with Files ....................................................................................... 2-31
Making Files Private with Windows Explorer ................................. 2-31
Decrypting Files with Windows Explorer ........................................ 2-33
Opening Private Files with Windows Explorer ............................... 2-34
Chapter 3: Receiving Private Email Without the Client
Introduction ..................................................................................................... 3-2
Using the Zero Download Reader ............................................................... 3-2
Using the Zero Download Reader to Open a Private Email Message
Sent to a Registered Email Address ..................................................... 3-2
Using the Zero Download Reader to Open a Private Email Message
Sent to an Unregistered Email Address .............................................. 3-4
Reading a Private Email Message ........................................................ 3-4
Responding to a Private Message ........................................................ 3-7
Account Verification .............................................................................. 3-8
JavaScript is Disabled .......................................................................... 3-15
Registering on the Web ....................................................................... 3-16
Chapter 4: Configuring Encryption for Email
Accessing the Preferences Screen ................................................................ 4-2
Preferences Screen General Options .................................................. 4-2
Preferences Screen Email Options Tab .............................................. 4-4
Preferences Screen Password Options Tab ....................................... 4-5
Preferences Screen Automatic Update Tab ....................................... 4-7
Preferences Screen Network Options Tab ......................................... 4-9

Table of Contents
iii
Managing Encryption for Email Keys ...................................................... 4-10
Opening Key Manager ................................................................................. 4-
10
Viewing the Encryption for Email Keys .......................................... 4-13
Exporting the Encryption for Email Keys ....................................... 4-15
Deleting the Encryption for Email Keys .......................................... 4-17
Protecting a New Email Address ....................................................... 4-18
The About Encryption for Email Window .............................................. 4-19
Viewing the About Encryption for Email Window from the
Encryption for Email Menu ............................................................... 4-19
The Encryption for Email Modules Screen ..................................... 4-20
Chapter 5: Managing Your Account Online
Encryption Portal ........................................................................................... 5-2
Signing in to the Encryption Portal Website ..................................... 5-2
Managing Your Security Questions ..................................................... 5-5
Removing Encryption for Email .................................................................. 5-6

v
Preface
Preface
Welcome to the
Trend Micro™ Encryption for Email User’s Guide. It contains
information about product settings and features.
Topics in this section include:
• Trend Micro™ Encryption for Email Documentation on page vi
• Audience on page vi
• Document Branding on page vi
• Document Conventions on page vii

Trend Micro Encryption for Email User’s Guide
vi
Trend Micro™ Encryption for Email
Documentation
The Trend Micro Encryption for Email
documentation consists of the following:
Online Help: Helps you configure all features through the user interface. You can
access the online help by clicking the Encryption for Email tray icon and selecting Help
from the menu.
User’s Guide: Helps you plan for deployment and configure all product settings.
Readme File: Contains late-breaking product information that might not be found in
the other documentation. Topics include a description of features, installation tips,
known issues, and product release history.
The User’s Guide and readme are available at:
http://docs.trendmicro.com/en-us/enterprise/trend-micro-encryption-for-email.aspx
Audience
This document is targeted towards new users of
Encryption for Email, including system
administrators, operators, sensitive content contributors, information security staff,
executives, and users with other specific roles.
In order to use Encryption for Email, you need to be familiar with web browsers and
web-based user interfaces.
Document Branding
This document, including the images displayed herein, as an example, has been branded
for use by Trend Micro. The look and feel of your documentation and user interface will
appear differently depending on your company’s branding requirements.
Preface
vii
Document Conventions
To help you locate and interpret information easily, the documentation uses the
following conventions.
CONVENTION/TERM DESCRIPTION
UPPER CASE Acronyms, abbreviations, and names of
certain
commands and keys on the
keyboard.
Bold Menus and menu commands, command
buttons, tabs, options, and tasks.
Italics References to other documents.
Monospace Sample command lines, program code,
Web URLs, file names, and program
output.
Note
Configuration notes.
Tip
Recommendations or suggestions.
WARNING!
Critical actions and configuration options.
Navigation > Path The navigation path to reach a particular
screen. For example
, Scans > Manual
Scans, means, click Scans, and then click
Manual Scans on the interface.


Trend Micro Encryption for Email User’s Guide
1-2
Introduction
Trend M
icro Encryption for Email is a user-friendly, high-level privacy system.
If you know someone’s email address, you have all the information you need to send
them a message, safe in the knowledge that only they will be able to read it. You simply
click a button and send your email as usual.
Also included in the system are digital signatures so that your recipient knows that the
message has come from you and has not been tampered with. File attachments are
protected along with your email message, and you can send messages in plain text, Rich
Text Format (RTF), or HTML.
Note
T
his system is completely safe. At no point do Trend Micro employees have access to the
content of your email messages.
System Requirements
The following sections
list the hardware and software requirements for using Encryption
for Email.
Hardware and Operating System
Minimum computer requirements:
• Intel Pentium 800MHz processor
• 256MB RAM required, 512MB recommended
• 50MB available disk space
Supported operating systems:
• Microsoft Windows XP 32-bit SP3 (English) Home, Professional, Media Center
• Windows Vista 32-bit and 64-bit SP2 (English) Home Basic, Home Premium,
Business, Enterprise, Ultimate

Introducing Encryption for Email
1-3
• Windows 7 32-
bit and 64-bit SP1 (English) Home Basic, Home Premium,
Professional, Enterprise, Ultimate
• Windows 8 32-bit and 64-bit, Windows 8 32-bit and 64-bit Pro, Enterprise
• Windows 8.1 Update 1 32-bit and 64-bit, Windows 8.1 Update 1 32-bit and 64-bit
Pro, Enterprise
Email Clients
You must have one of the following email programs to encrypt email messages with
Encryption for Email:
• Microsoft Outlook 2007, 2010, or 2013 (all 32-bit, English)
• Windows Live Mail 2009, 2011, or 2012 32-bit (English)
Encryption for Email supports the following web-based email clients:
• Gmail (English)
• Hotmail (English)
• Yahoo Mail (English)
Web Browsers
Encryption for Email supports the following web browsers:
• Microsoft Internet Explorer: 7 (x86-32), 8 (x86-32, x86-64), 9 (x86-32, x86-64),
10(x86-32), 11(x86-32)
• Mozilla Firefox: 3.6 (x86-32), 4.0 (x86-32), 5.0, 12.0, 13.0 (x86-32), 29.0 (x86-32)
Mobile Operating Systems
Zero Download supports the following mobile operating systems and their built-in
browsers:
• Apple iOS: 4.28, 4.33, 5.0, 6.0, 7.1.1

Trend Micro Encryption for Email User’s Guide
1-4
• RIM
Blackberry: 6.6.0.86, 7.0
• Google Android: 2.2, 2.3, 2.3.4, 4.0.4, 4.1.2, 4.2.2, 4.3, 4.4.2
Installing Encryption for Email
The installation is a three-stage process as follows:
1. Download the Encryption for Email software
2. Complete the Installation Wizard
3. Protect Your Email Address
Downloading the Encryption for Email Software
The Trend Micro Encryption for Email installation package is available for download
from the Trend Micro Download Center.
Procedure
1. Navigate to:
http://downloadcenter.trendmicro.com/index.php?prodid=88
The T
rend Micro Encryption for Email download screen opens.
2. In the File Name column, click the Trend Micro Encryption for Email link.
Your browser prompts you to save or run the file.
3. Click Save and specify a local folder.
Your browser saves the Encryption for Email to your computer.
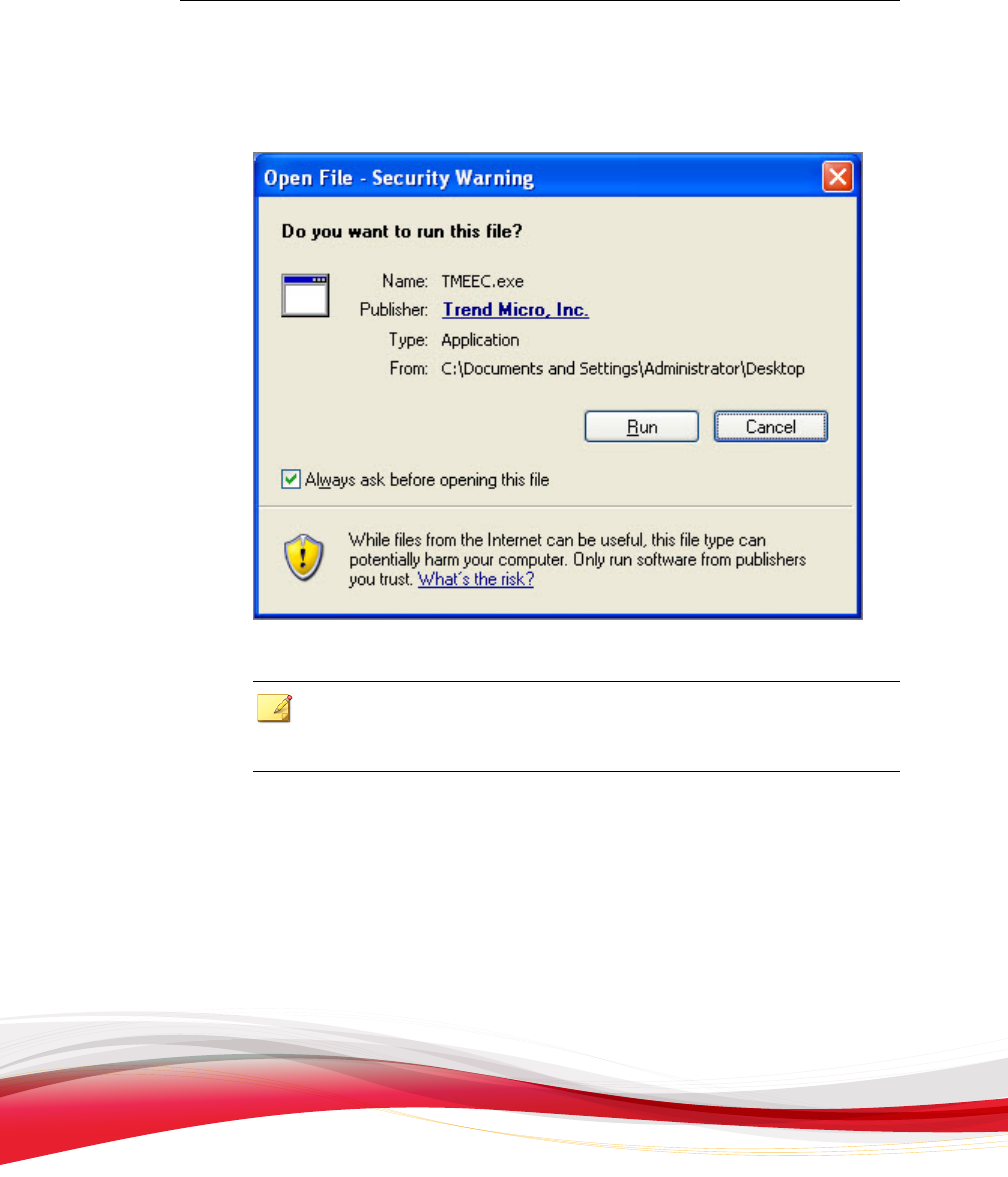
4. Double-click the installation program (TMEE.exe).
Introducing Encryption for Email
1-5
The Windows
Security Warning screen appears.
FIGURE 1-1. The Security W
arning screen
Note
To view
Encryption for Email digital signature information, click the Trend Micro,
Inc. link next to Publisher.
5. C
lick Run.
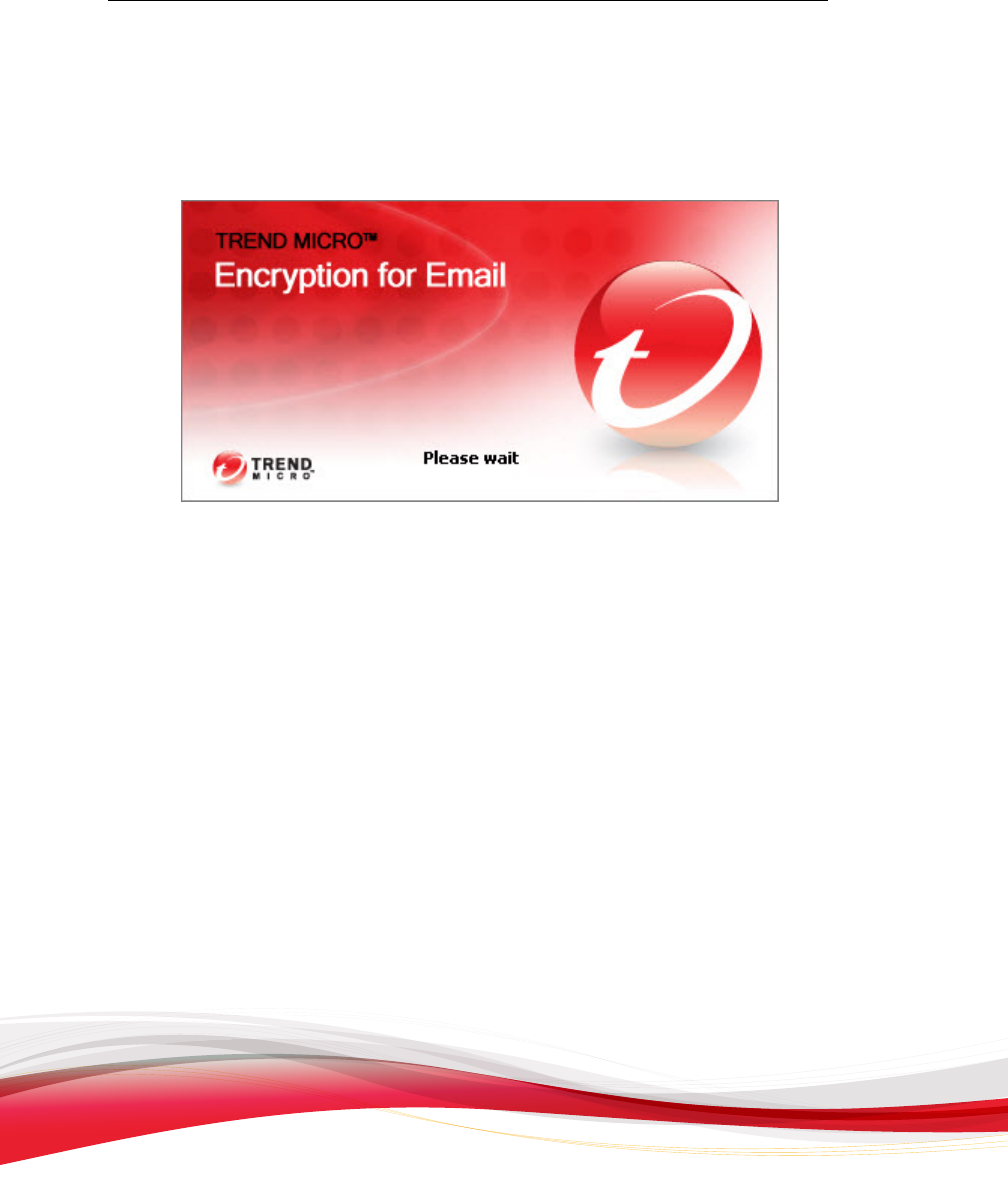
Trend Micro Encryption for Email User’s Guide
1-6
The Installation Wizard splash screen displays and Trend Micro Encryption for
Email examines your system
environment to verify whether it meets the minimal
installation requirements.
FIGURE 1-2. The I
nstallation Wizard splash screen
• If the computer does not meet the minimal requirements, the installation
stops.
• If the computer meets the minimal requirements, the Installation Wizard
starts.
• If your system currently has an installation of Microsoft Outlook Express
with an Encryption for Email plug-in, the installer displays a message

Introducing Encryption for Email
1-7
informing you that Outlook Express is no longer supported, along with a link
to
download Windows Live Messenger.
FIGURE 1-3. Outlook
Express is no longer supported
6. Click Install.
The installer checks to see if you have the latest Microsoft Outlook service pack
and, if not, recommends that you install it.
FIGURE 1-4. Outlook service pack reminder
Trend Micro Encryption for Email User’s Guide
1-8
7. If
you see the Outlook service pack reminder, click No to exit the installation.
Install the latest Outlook service pack and then restart the Encryption for Email
installation program.
Completing the Installation Wizard
The Encryption for E
mail Installation Wizard helps you to install the software quickly
and easily.
Note
B
efore installing Encryption for Email, ensure that you have closed Microsoft Outlook and
Microsoft Word and that you have an active connection to the Internet.
Procedure
1. F
ollow the steps shown in Downloading the Encryption for Email Software on page 1-4.
Introducing Encryption for Email
1-9
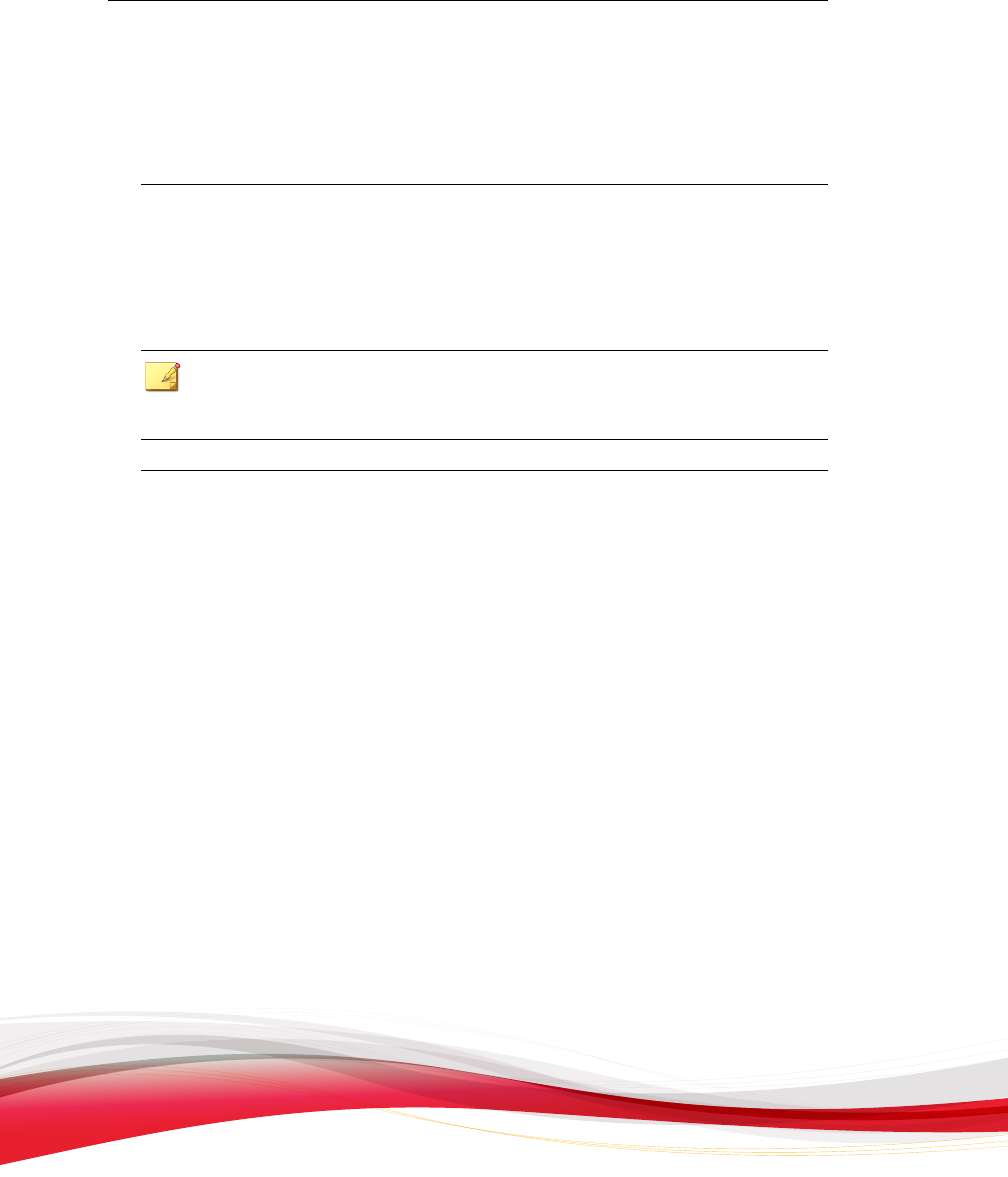
The License Agreement screen
appears.
FIGURE 1-5. The L
icense Agreement screen
2. Select your home country from the list shown.
3. Select I accept the terms in the license agreement and click Next.
Trend Micro Encryption for Email User’s Guide
1-10
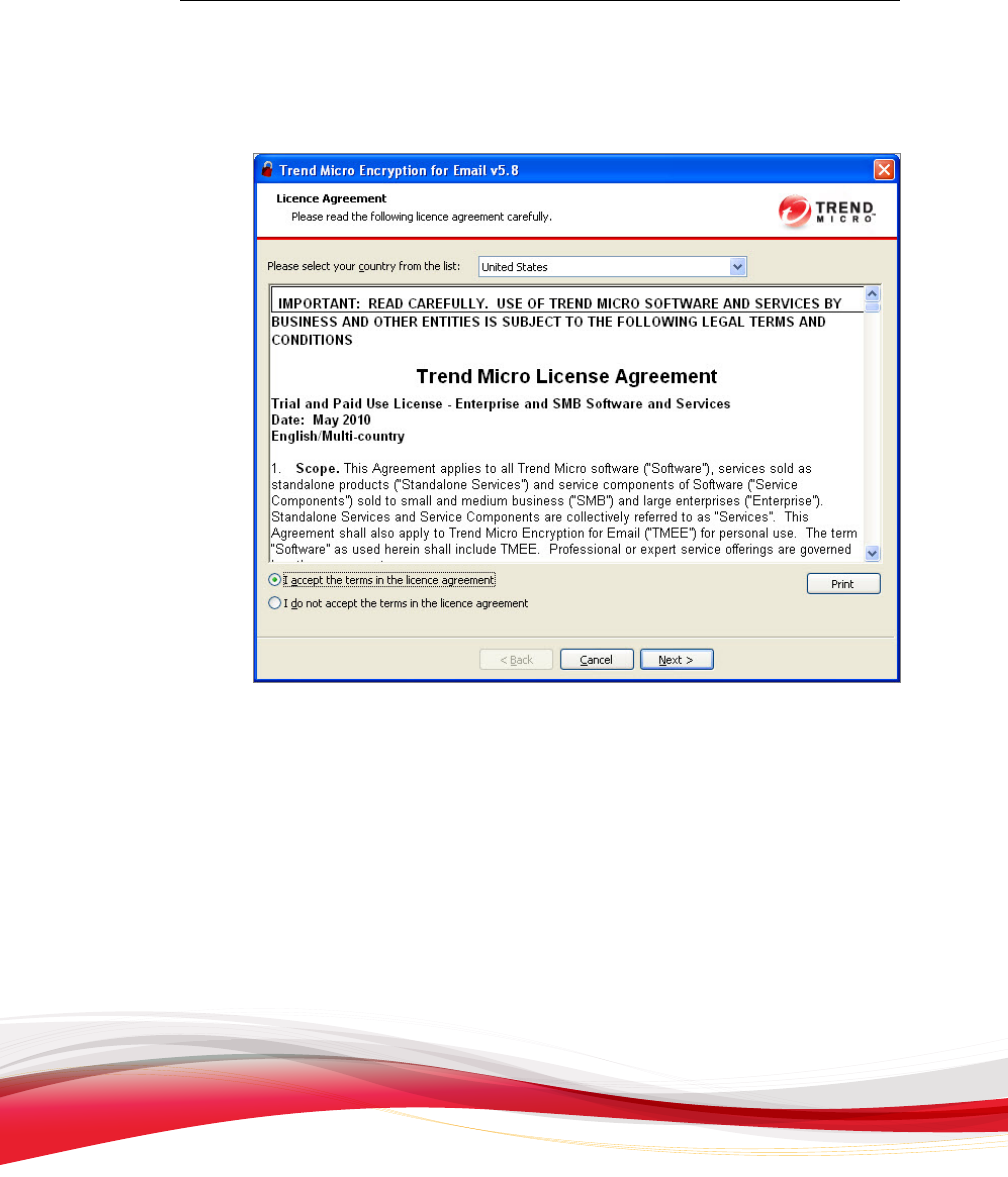
The License P
roduct screen appears.
FIGURE 1-6. The L
icense Product screen
4. Select your license type as follows:
• Home user (non-commercial use): Select this option if you are a home user
or if you are installing Encryption for Email for non-commercial use.
• Free 30-day trial: Select this option if you are installing on a trial basis.
• Enter activation code: If you have purchased Encryption for Email, select
this option and type your activation code.
See Licensing Options on page 1-19 for more information about license types.
5. Click Next.
Introducing Encryption for Email
1-11
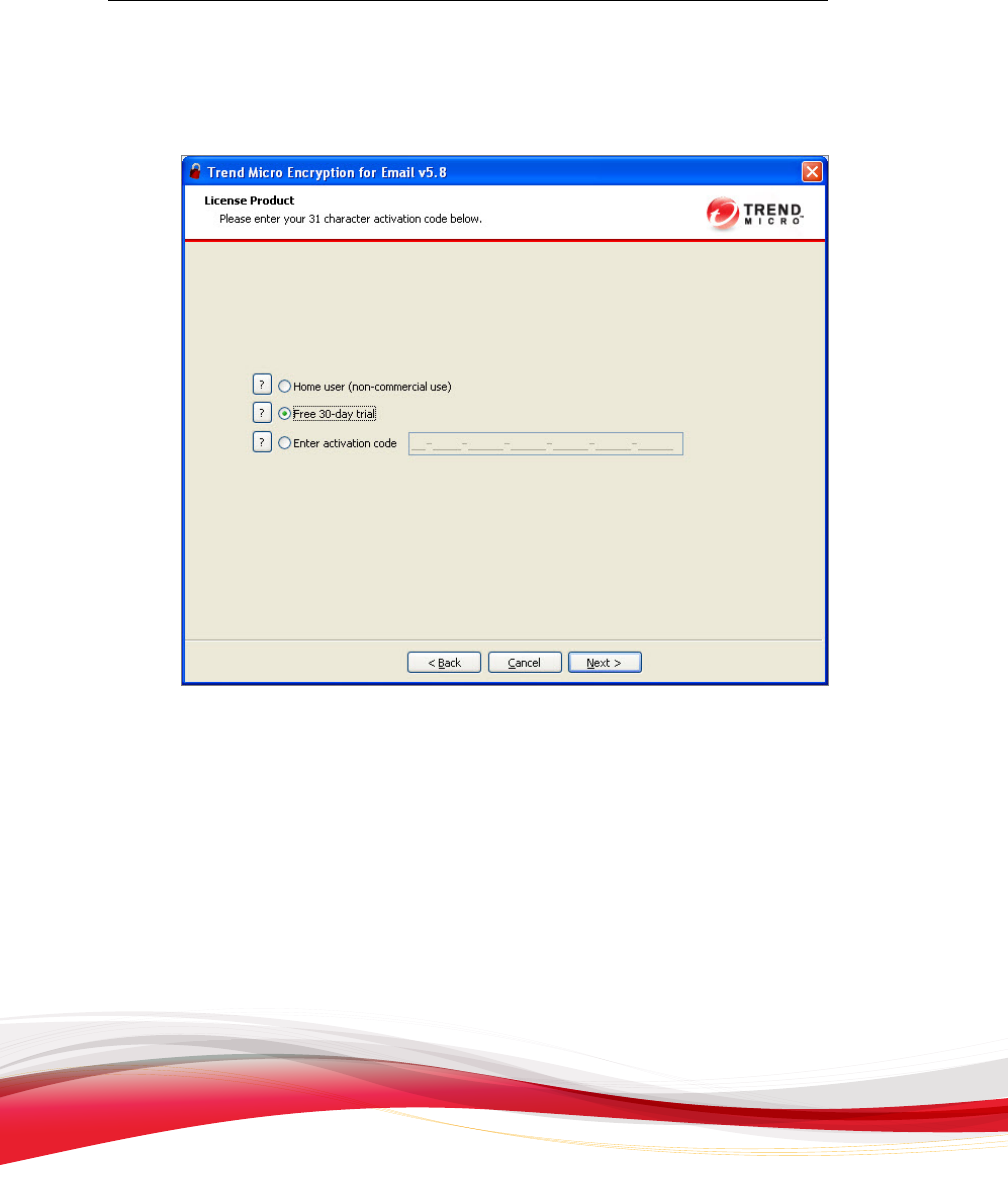
The Destination F
older screen appears.
FIGURE 1-7. The Destination
Folder screen
Note
To change
the installation path, Click Change....
6. Click N
ext.
Trend Micro Encryption for Email User’s Guide
1-12
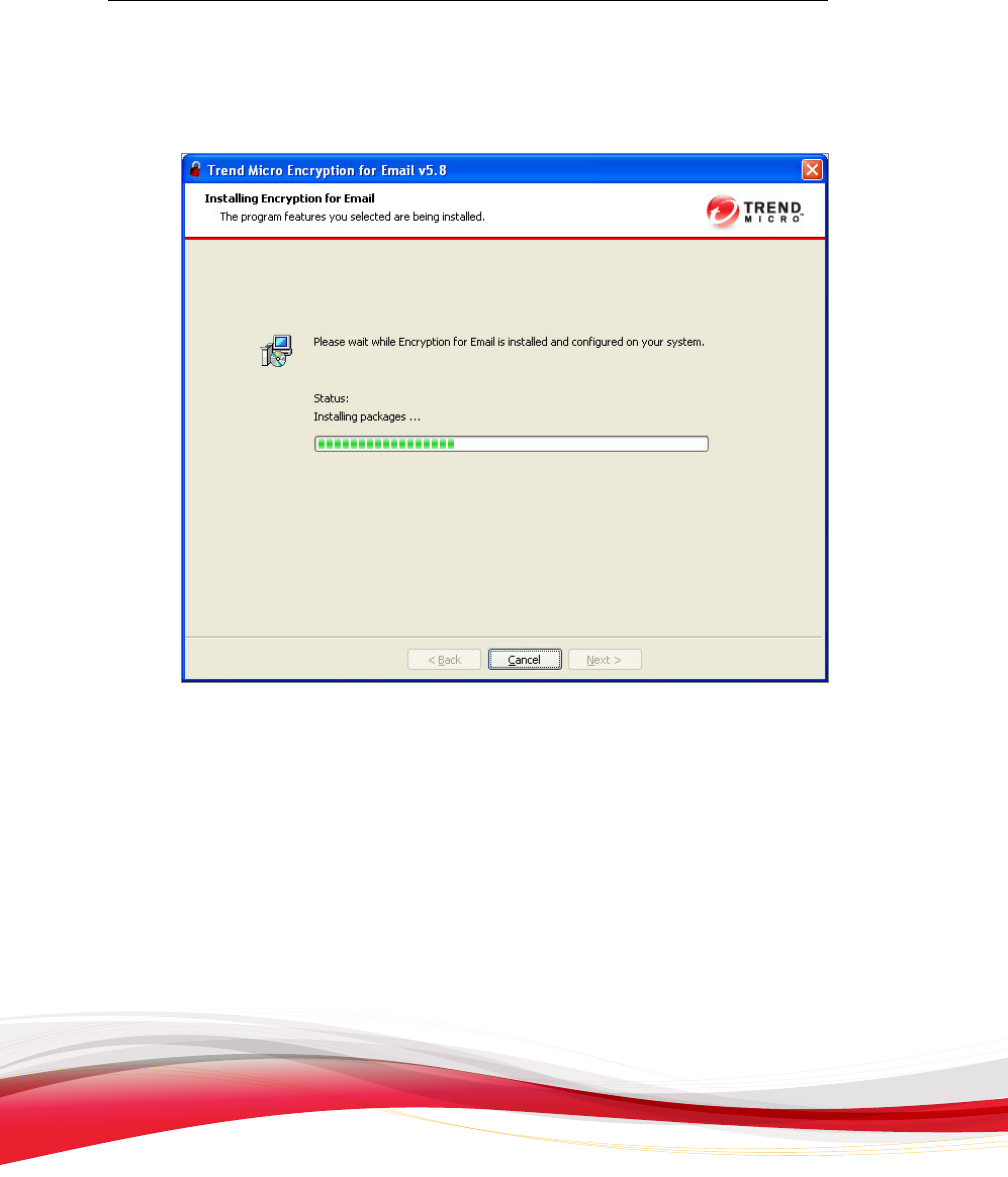
A screen appears showing the progress of the installation.
FIGURE 1-8. The installation
progress screen
7. Click Next.
Introducing Encryption for Email
1-13
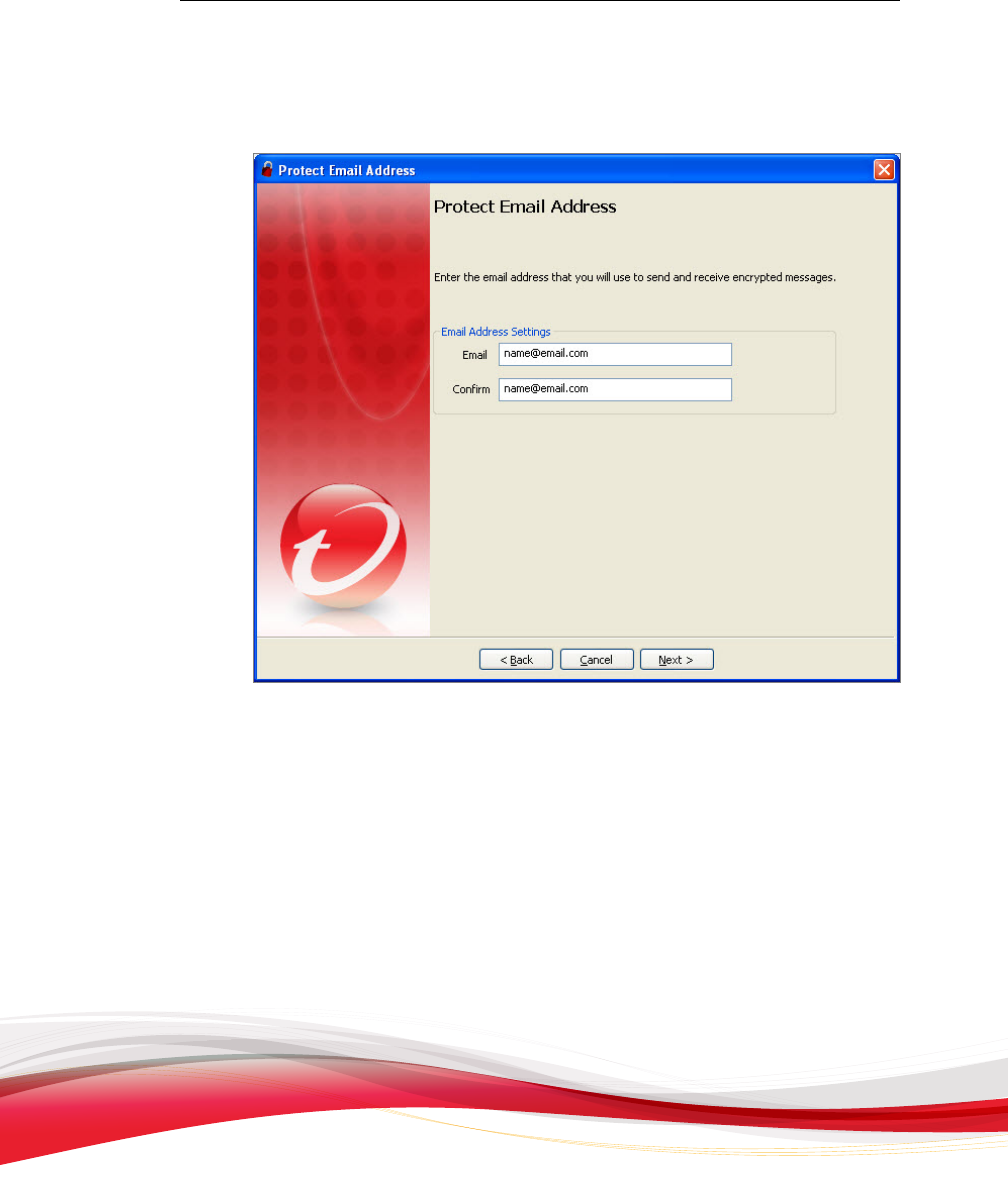
The Protect
Email Address screen appears.
FIGURE 1-9. The Protect Email
Address screen
8. Type and confirm your email address in the fields provided.
9. Click Next.
Trend Micro Encryption for Email User’s Guide
1-14
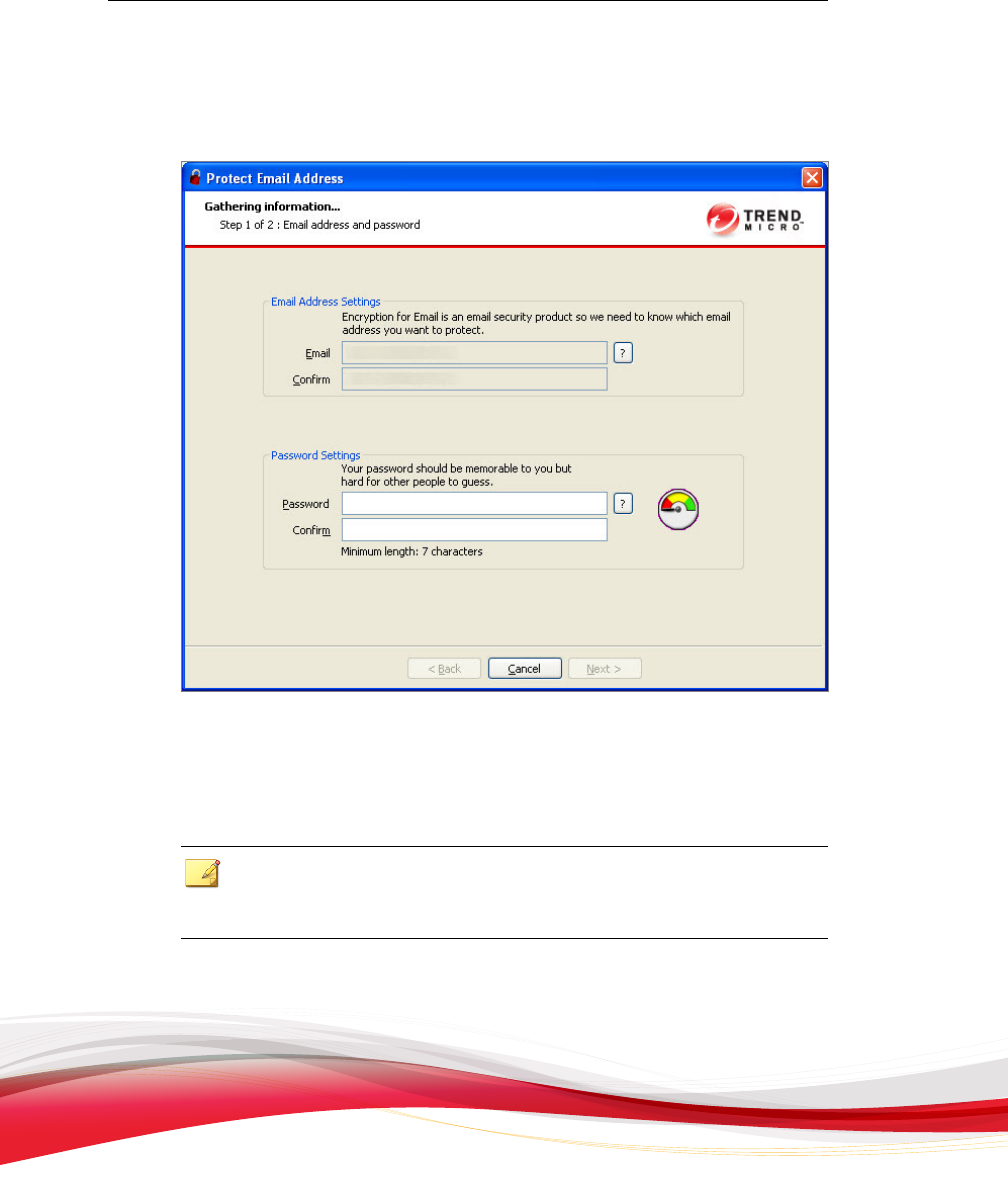
The Gathering
Information (Step 1 of 2) screen appears.
FIGURE 1-10. The Gathering Information (Step 1 of 2) screen
To register your first “identity” with Encryption for Email, you must set up your
email address and password.
Note
Depending
on how you set up your account with your service provider, your
registration process may complete at this step.
10. In the
Email Address Settings section, type and confirm your email address in
the fields provided.
Introducing Encryption for Email
1-15
11. In the
Password Settings section, type and confirm your email address in the
fields provided.
Note
Watch the
password strength meter to the right of the password fields to ensure that
you create a strong password that is difficult for a hacker to crack.
12. Click
Next.
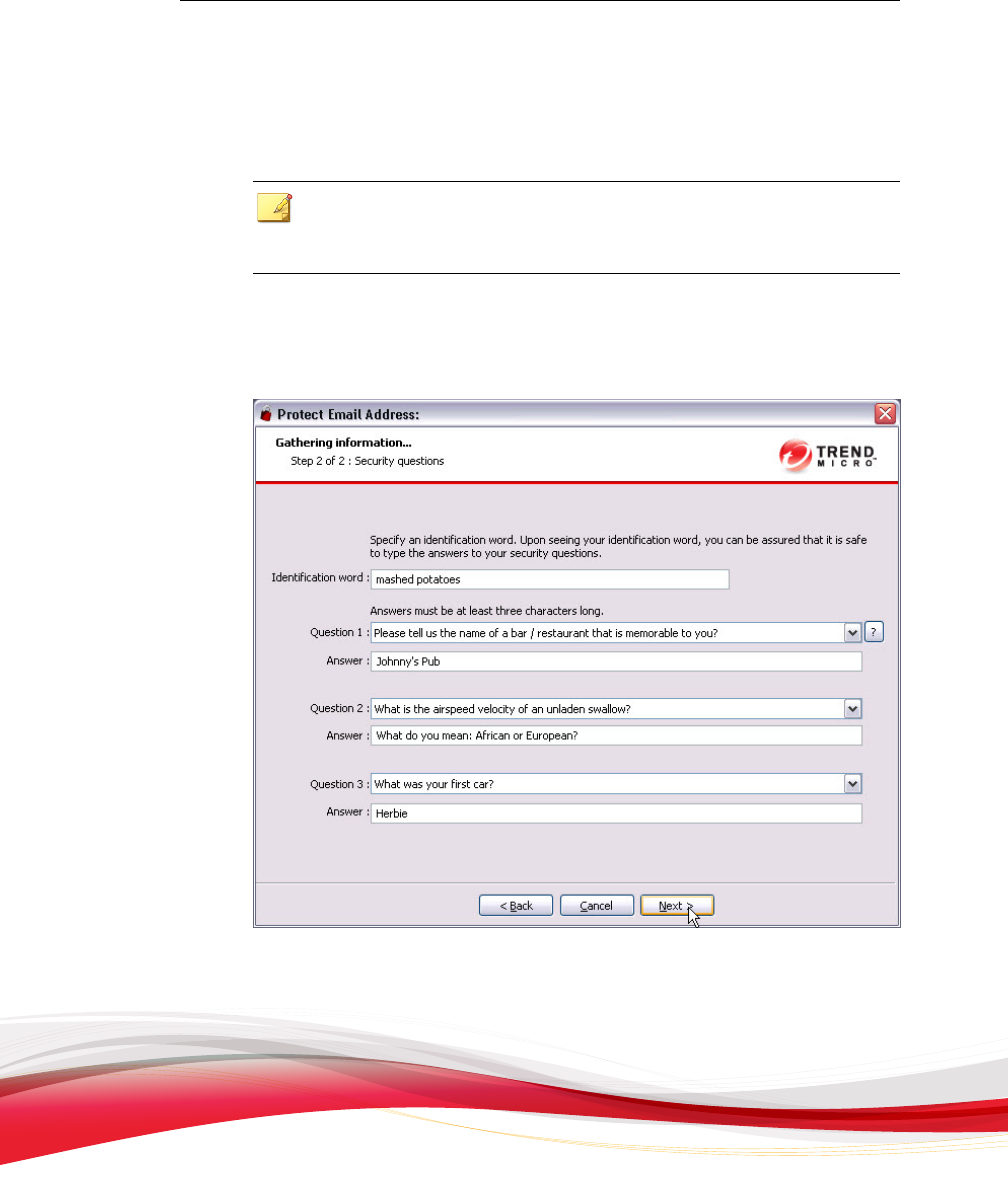
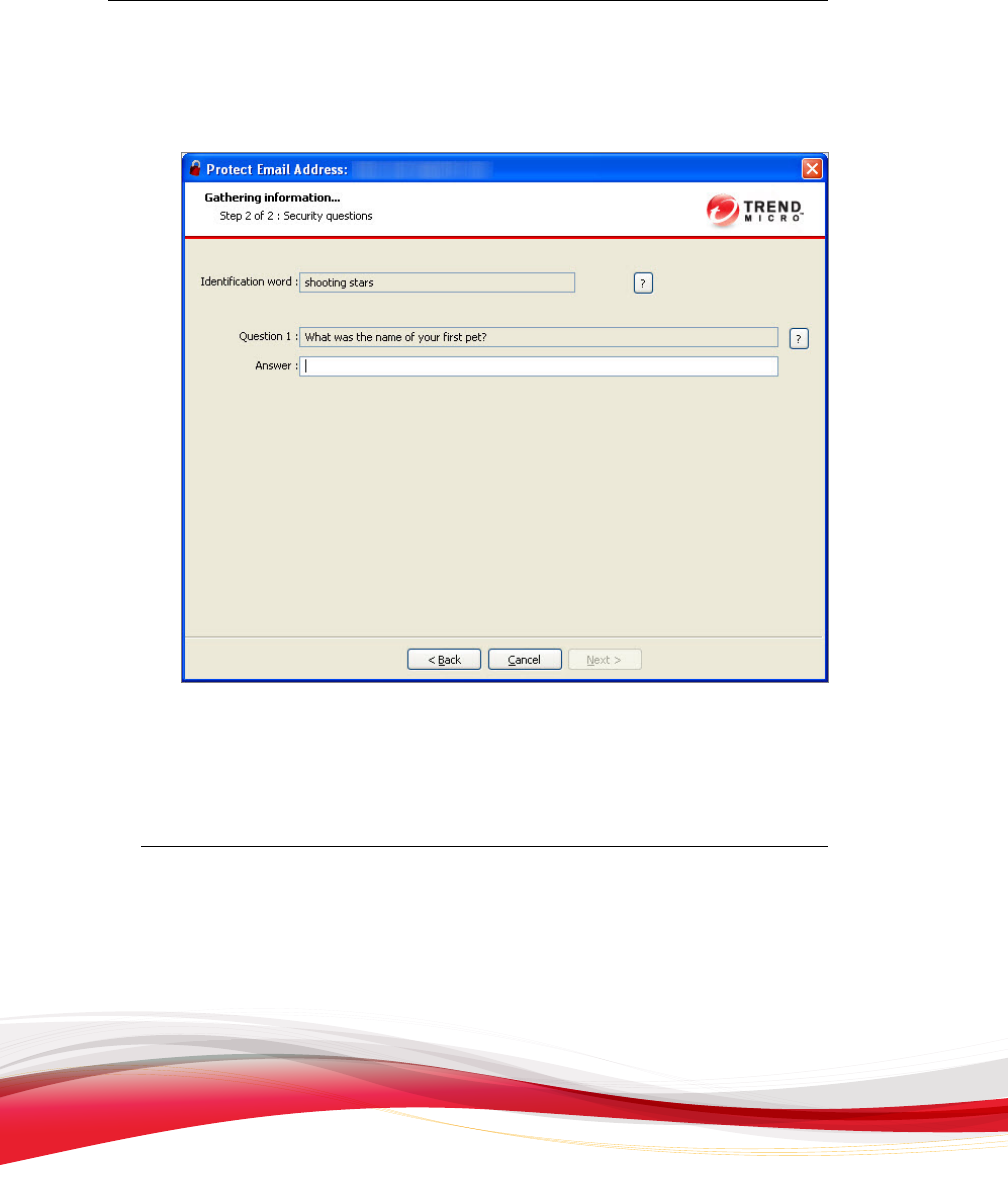
The second Gathering Information screen appears.
FIGURE 1-11. The Gathering
Information (Step 2 of 2) screen
13. Type an identification word in the Identification word field.

Trend Micro Encryption for Email User’s Guide
1-16
Note
Your
identification word is displayed whenever you sign in to the Encryption Portal
or Zero Download website. It helps you to verify that you are not viewing a phishing
site.
14. Select
a question from the Question 1 drop-down list and type your answer in the
Answer field. See Security Questions and Answers on page 1-18 for information about
why you need to set up these question/answer pairs.
Repeat for questions 2 and 3.
Note
Completing this
information does not register the product.
15. C
lick Next.
Introducing Encryption for Email
1-17
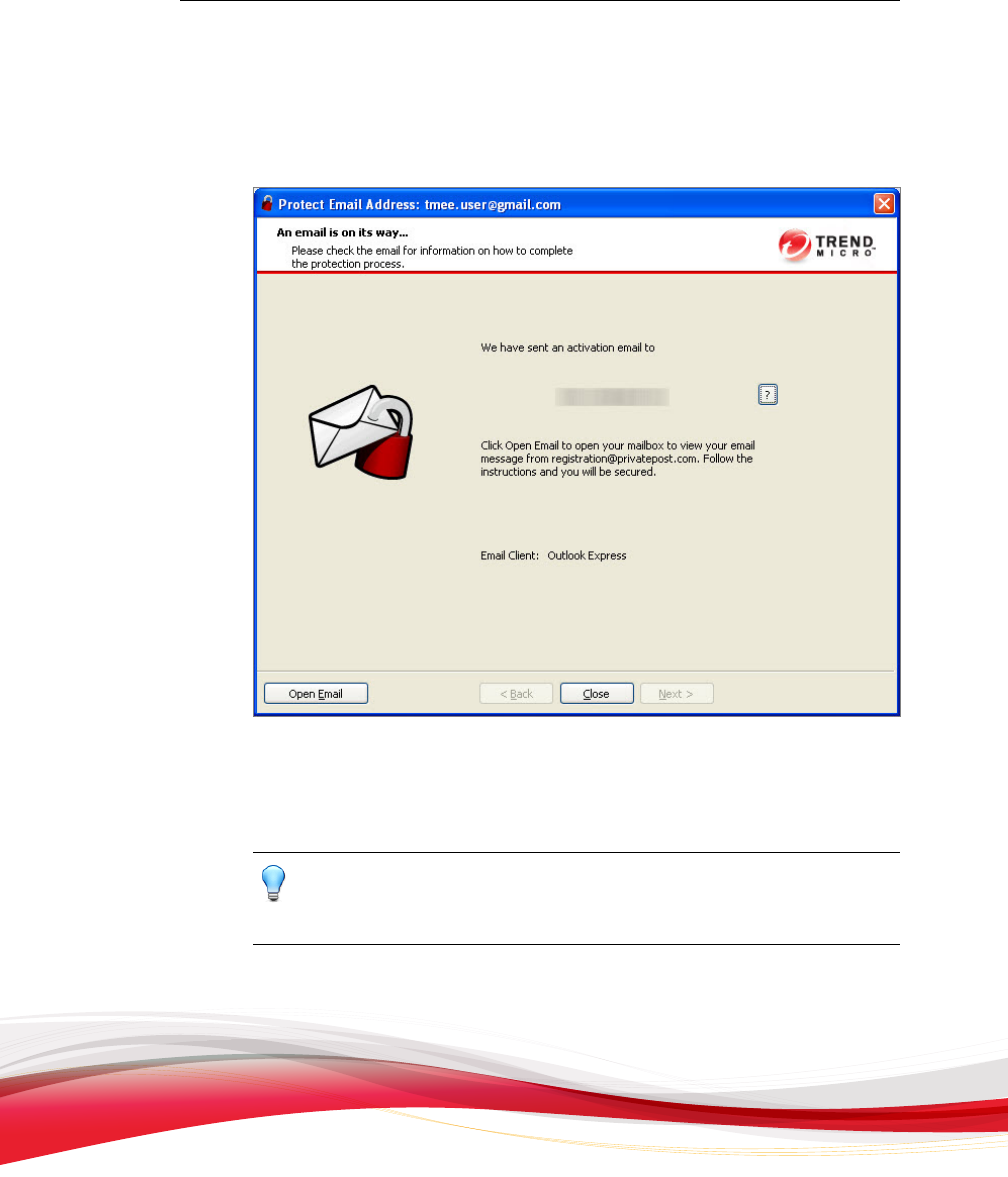
Encryption for Email sends an activation email to the specified email address and
prompts you to
access it
FIGURE 1-12. Activation email sent
16. Click O
pen Email to open your email client, and then click the activation link in
the activation email.
Tip
If you
do not receive the activation message within a minute, check your Spam folder.
Mail servers often send this type of messages to the Spam folder.
17. Encryption for
Email completes the registration process.

Trend Micro Encryption for Email User’s Guide
1-18
FIGURE 1-13. Registration complete
You can now begin sending
encrypted messages and decrypting (reading) messages
sent to you at the email address that you just registered.
Security Questions and Answers
When installing Encryption for Email and when registering an email, you must select
and answer three security questions. Select questions and answers that you can
remember easily, because you need to answer these questions again:
• When you sign in to the Encryption Portal website, as described in Signing in to the
Encryption Portal Website on page 5-2.

Introducing Encryption for Email
1-19
• When you sign in to the
Zero Download website to read encrypted messages on a
computer that does not have the client installed, as described in Using the Zero
Download Reader on page 3-2.
• If you forget your password and need to reset it.
The “identification word” displayed on the Security Questions screen is the one that
you specified when you first registered this email address with Encryption for Email.
The identification word assures you that the server that you are connecting to is actually
the Encryption for Email server.
Licensing Options
Commercial users have a number of licensing packages available to them, including
batch licensing. Contact your authorized Encryption for Email representative for
additional information on a licensing package that best suits your commercial needs.
• Trial basis
If you are installing Encryption for Email on a trial basis, select Free 30-day trial
when the License Type screen appears. When you select the free trial, you are
entitled to use Encryption for Email for up to 30 days. You can register up to five
email addresses on the same domain. For example:
• Email address lockdown
The sixth email address on the domain and any additional addresses are “locked
down” such that you cannot encrypt messages for those addresses. After the trial
period expires, all the addresses registered during the free trial will be locked down.

Trend Micro Encryption for Email User’s Guide
1-20
“Lockdown” means that an Encryption for Email account will no longer be able to
encrypt
email messages. You can still decrypt email messages, but you cannot
encrypt them or use any of the other advanced features.
Protecting Your Email Address
Trend Micro Encryption for Email requires a registered email address in order to work.
When you register an email address, Encryption for Email acquires a set of encryption
keys that are unique to you and your registered and confirmed email address. Without
these keys, Encryption for Email cannot make your email private. For a more detailed
discussion, see Managing Encryption for Email Keys on page 4-10.
Note
Your email address will
only be used for the purpose of sending you account related
notifications, such as password reset or registration notification. It will not be used for
marketing purposes, nor sold to any other party. You will not receive spam as a result of
registering Encryption for Email.
You can register as many email addresses as you like. Each address will receive a new
private
key each month. To save you time, the installation program registers the first
address for you.
When you install Encryption for Email, you automatically obtain your private key. Your
email address is then used as your unique email identity for use with the private
encryption key.
Registering Your Email Address
You may register an email address under several conditions and from different places,
for example:
• When installing the software (as described in Completing the Installation Wizard on page
1-8)

Introducing Encryption for Email
1-21
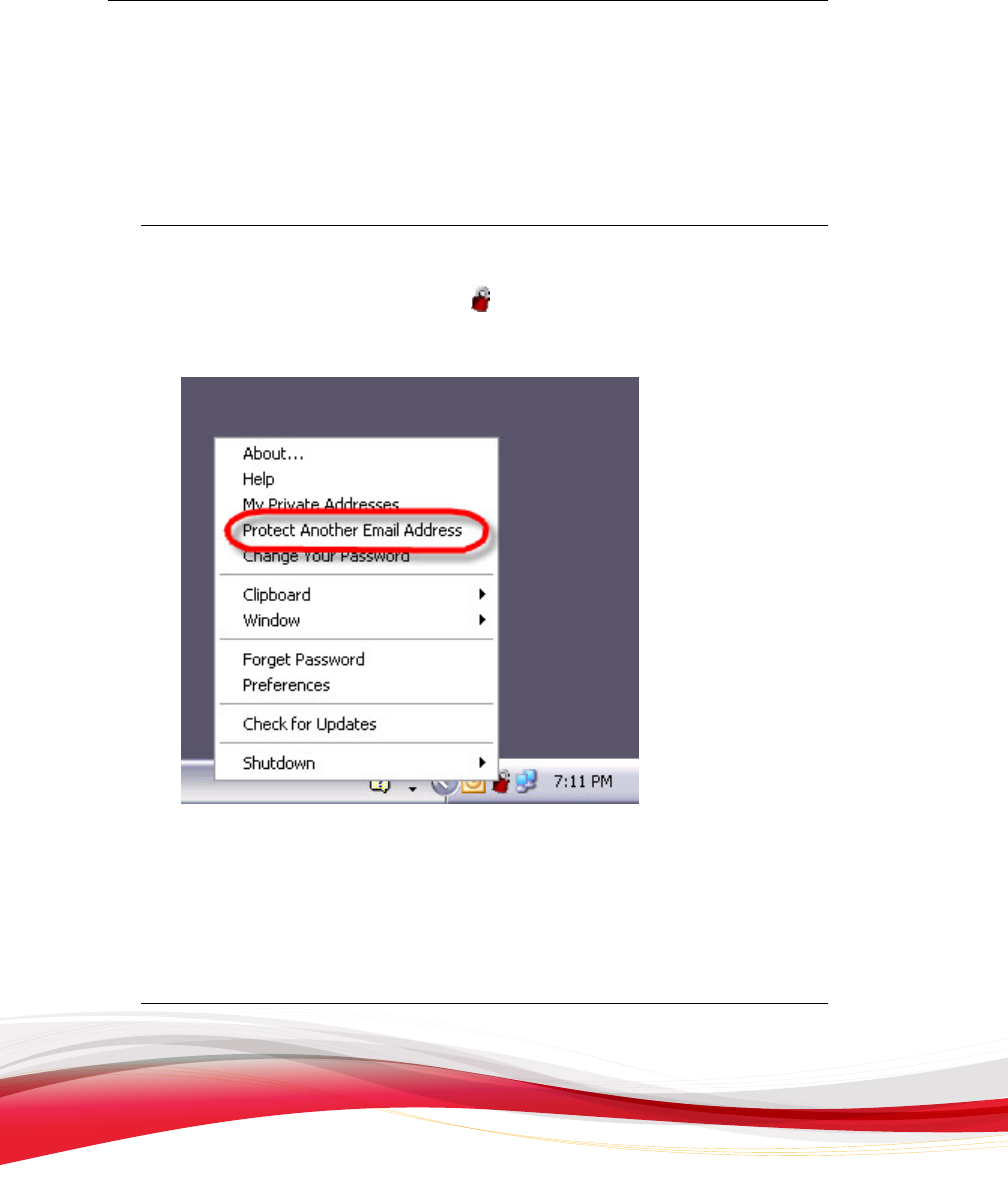
• When clicking
Protect Another Email Address from the Encryption for Email
system tray icon (
) (as described in Registering on an Existing Encryption for Email
Installation on page 1-22)
• When attempting to decrypt an encrypted email message sent to an unregistered
email address (as described in Registering on the Web on page 3-16)
You can install and obtain the Encryption for Email keys on one or more computers.
See Using Encryption for Email on Multiple Computers on page 1-21 for more information
about using the software on more than one computer.
You need to register your email address to do any of the following:
• Sign in to the Encryption Portal website to configure your personal options. See
Signing in to the Encryption Portal Website on page 5-2 for more about configurable
options.
• Sign in to the Zero Download website to read encrypted email messages using a
web browser instead of using an installation of Encryption for Email. See Reading a
Private Email Message on page 3-4 for more about this method.
• Register the same email addresses on another computer and perform an automatic
transfer of registrations.
Using Encryption for Email on Multiple Computers
It is possible to install and use Encryption for Email on more than one computer using
the same email address.
You might want to register on multiple computers if:
• You are not a registered user and want to use a computer that has an installation of
Encryption for Email
• You are a registered user but the computer you want to install on:
• Does not have an installation of Encryption for Email
• Already has an installation of Encryption for Email, which is registered to
another user
Trend Micro Encryption for Email User’s Guide
1-22
Registering on an Existing Encryption for Email Installation
Use this process if you are not an existing Encryption for Email user but the computer
you want to use for Encryption for Email already has the software installed.
Procedure
1. Click the Encryption for Email icon (
) on the Windows system tray and click
Protect
Another Email Address from the menu.
FIGURE 1-14. The Protect Another Email
Address option on the Encryption for
Email menu
The Encryption for Email Protection Wizard opens.
2. Complete the Encryption for Email Protection Wizard. See Registering Your Email
Address on page 1-20 for help with completing the Wizard.

Introducing Encryption for Email
1-23
Installing as an Existing User
Follow this process if you are an existing Encryption for Email user but the computer
you want to use does not have the Encryption for Email client installed.
Procedure
1. Install Encryption for Email, as discussed in Installing Encryption for Email on page 1-4.
2. Type your registered email address and password in the fields provided. When you
type your email address, Encryption for Email detects that this address is already in
use and requires you to sign in to transfer the registration. After the registration has
been transferred, you begin to receive your private keys, as on the other computer.
Trend Micro Encryption for Email User’s Guide
1-24
The Security
Questions screen appears.
FIGURE 1-15. The Security Questions
screen
3. In the Answer field, type the answer to the security question shown.
4. Click Next.
5. Open your email and complete the process.
Checking for Updates
Encryption for Email provides a software update facility. There are a number of ways in
which this facility is invoked:

Introducing Encryption for Email
1-25
• Periodic
auto updates
• Manual updates
Periodic Auto Updates
Encryption for Email automatically checks your local files against files on the
Encryption for Email web server:
• 10 minutes after the Encryption for Email service starts (for example, 10 minutes
after you sign in)
• Every 24 hours, if the Encryption for Email service is running continuously
This check runs in the background. You are only notified if there are updates available.
If an update requires that you restart your computer, Auto Update prompts you.
Manual Updates
You can check for updates to Encryption for Email manually whenever Encryption for
Email is running.
Procedure
1. Click the Encryption for Email icon (
) in the Windows system tray.
The
Encryption for Email Tray Tool menu appears.
2. Select Check for Updates.
Viewing the Encryption for Email Modules from the About
Screen
Procedure
1. Click the
Encryption for Email icon (
) in the Windows system tray.

Trend Micro Encryption for Email User’s Guide
1-26
The Encryption for Email Tray Tool menu appears.
2. Select
About from the menu.
The About Encryption for Email screen appears.
3. Click Modules.
The Encryption for Email Modules screen appears, displaying a list of modules
and their version numbers.

2-1
Chapter 2
Using the Encryption for Email Client
Topics include
:
• Using Encryption for Email on page 2-2
• Sending and Receiving Private Mail Using an Email Program on page 2-2
• Encryption for Email Applications on page 2-8
• Using the Encryption for Email Tray Tool Menu on page 2-9
• Working with Files on page 2-31

Trend Micro Encryption for Email User’s Guide
2-2
Using Encryption for Email
Encryption for
Email effectively puts your email in an envelope, ensuring that only the
recipient reads it. Encryption for Email enables you to:
• Send and receive private messages using a plug-in for your email program, as
described in Using Encryption for Email in Your Email Program on page 2-2
• Read private messages using a webmail service, such as Gmail, as described in Using
the Zero Download Reader on page 3-2
• Read and write private files and information on your local hard disk, as described
in Using the Encryption for Email Tray Tool Menu on page 2-9
Sending and Receiving Private Mail Using an
Email Program
You can send and receive private messages and attachments using the Encryption for
Email Toolbar that integrates with Microsoft Outlook or Windows Live Mail to provide
enhanced features.
Note
T
rend Micro Encryption for Email no longer supports Microsoft Outlook Express. You
can easily update to Windows Live Mail on the Microsoft website.
Using Encryption for Email in Your Email Program
There
are two toolbars that plug in to your email program when you have installed
Encryption for Email. They are:
• The Encryption for Email Main Menu Bar: Displays in the main window of your email
client.
• The Encryption for Email Toolbar: Displays in the Send and Receive message screens.
Using the Encryption for Email Client
2-3
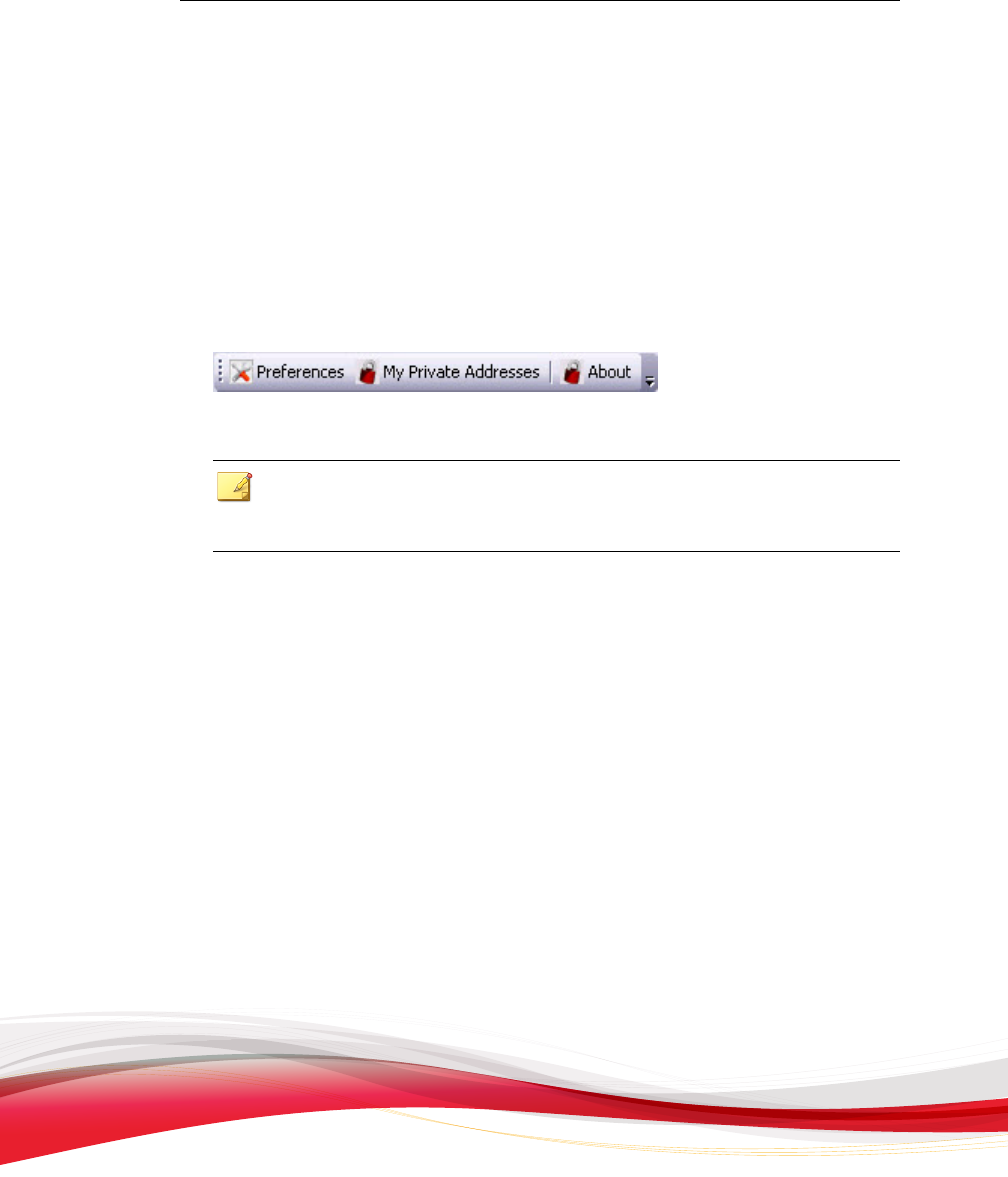
The Encryption for Email Main Menu Bar
The Encryption for Email Main Menu Bar appears on the main screen of your email
client. The features available on this menu are:
• Preferences (see Accessing the Preferences Screen on page 4-2)
• My Private Addresses (see My Private Addresses on page 2-13)
• About (see The About Encryption for Email Window on page 4-19)
FIGURE 2-1. T
he Encryption for Email menu bar
Note
T
he above Encryption for Email Main Menu Bar is from Microsoft Outlook 2007. The
appearance of this menu may vary depending on your email client and operating system.
The Encryption for Email Toolbar
The Encryption for Email toolbar appears on your Write and Read messages screens.
The features available on the toolbar vary according to whether you are:
• Sending Private Messages and Attachments on page 2-3
• About Reading Private Email on page 2-5
Sending Private Messages and Attachments
You can send private email messages using your email program. You can make email
messages and their attachments private in three ways:
• Click Send Private on the Encryption for Email Toolbar
• Click Make Private on the Encryption for Email Toolbar prior to sending the
message
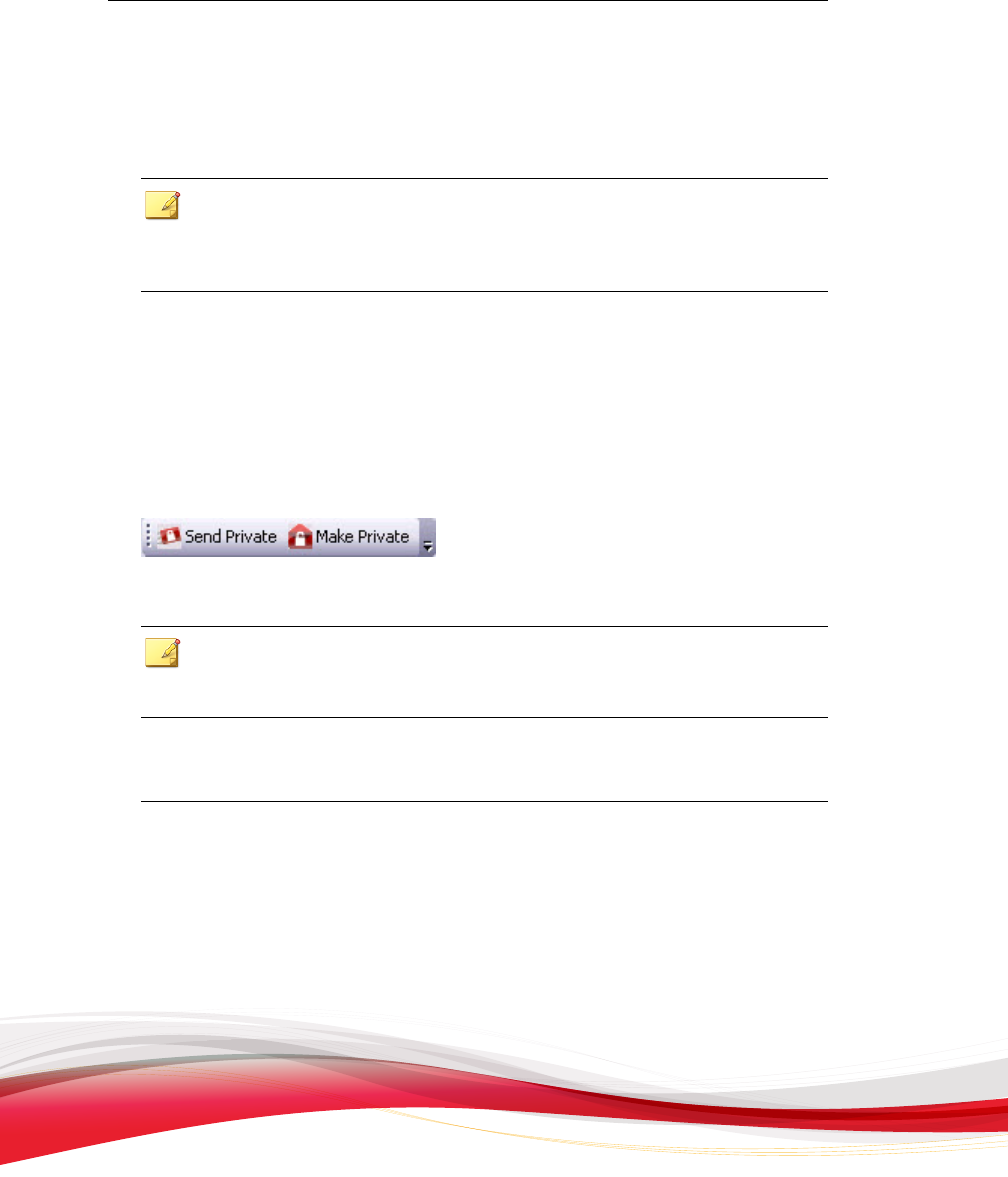
Trend Micro Encryption for Email User’s Guide
2-4
• Configure the
Email Options to make new messages private by default, as
described in Preferences Screen Email Options Tab on page 4-4
Note
If you are using Microsoft Outlook and have selected the Always check spelling before
sending option, you cannot use Send Private to send private messages. Turn off that
setting to use Encryption for Email.
The Encryption for Email Toolbar in the Write message window contains the following
functions
:
• Send Private: Makes the message and attachments private and sends the message
• Make Private: Marks the message and attachments so that they will be made
private when the message is sent
FIGURE 2-2. T
he Encryption for Email Toolbar when composing an email message
Note
T
he Encryption for Email Toolbar shown above is from Microsoft Outlook 2007. The
appearance of this toolbar may vary depending on your email client and operating system.
Sending a Private Email Using Send Private
Procedure
1. In your email program
, click New to open a new message window.
2. Type your message and add attachments if required.
3. In the Encryption for Email Toolbar, click Send Private.
Encryption for Email encrypts the message and sends the private email.

Using the Encryption for Email Client
2-5
Note
Note
: If you have not selected Enable remember of passwords in your Encryption
for Email Password Options, you must also enter your password before the email is
sent, as described in Preferences Screen Email Options Tab on page 4-4.
Sending a Private Email Using Make Private
Procedure
1. I
n your email program, click New to open a new message window.
2. In the Encryption for Email Toolbar, click Make Private.
3. Type your message and add attachments if required.
4. Click Send in your email program.
Encryption for Email encrypts the message and sends the private email.
About Reading Private Email
You can open encrypted email messages and attachments sent to you as long as you
have registered your recipient email address.
Even if you do not have the private key, if you are connected to the Internet and you
have completed the registration for that email address, Encryption for Email gets the
key from the server on demand.
You can also Reply, Reply to All, and Forward private email. Any private email that
you receive remains private when replied to or forwarded. You can forward and reply
using the regular buttons in your email program.
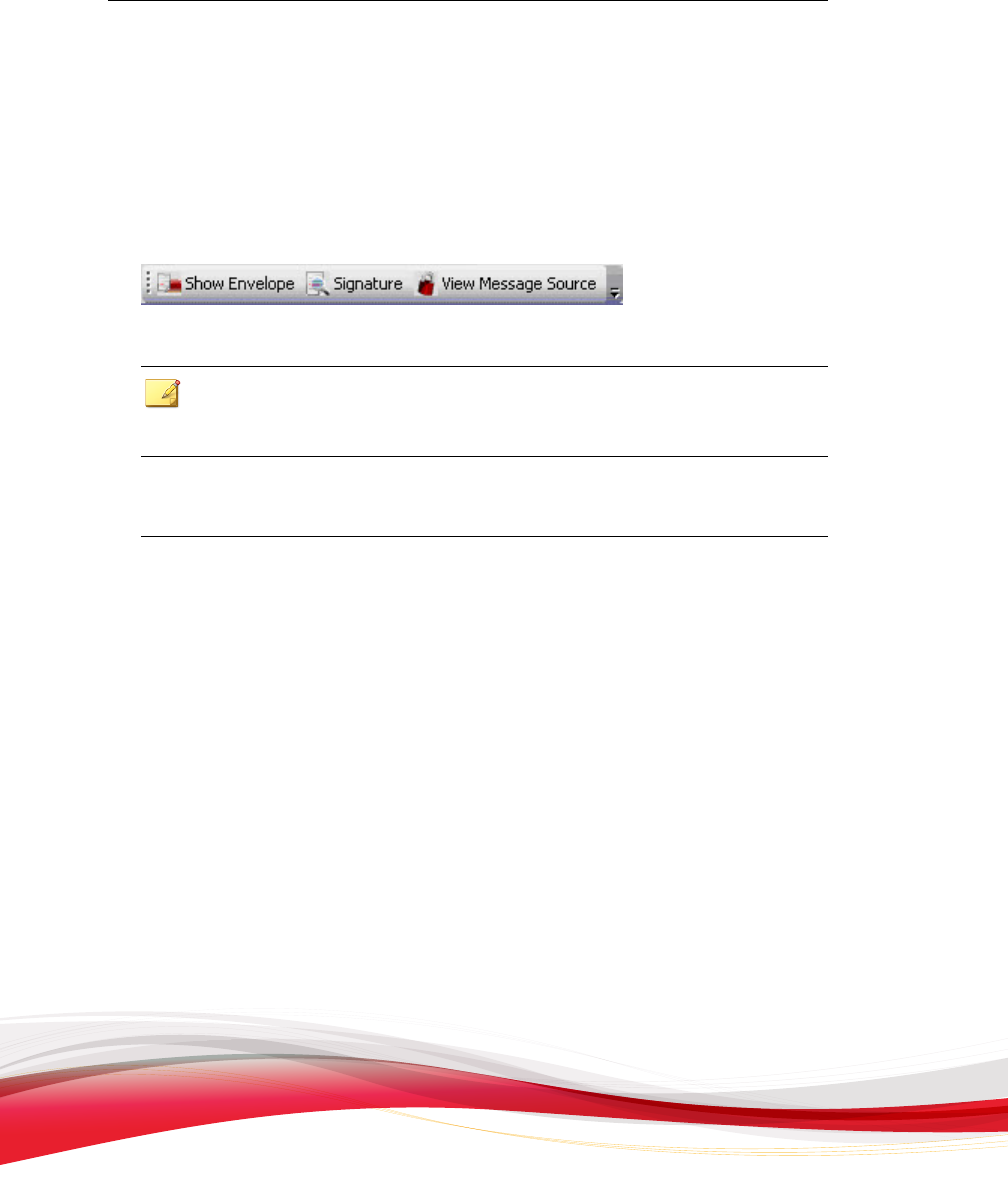
The Encryption for Email Toolbar in the Read message window provides the following
functions:
• Open/Show Envelope: Enables you to toggle between reading your private
message and hiding it behind the Encryption for Email envelope.
Trend Micro Encryption for Email User’s Guide
2-6
• Signature:
Displays the digital signature details of the sender so that you can verify
that the sender name shown is the actual sender.
• View Message Source: Displays the MIME code behind the email message. Short
for Multipurpose Internet Mail Extensions, MIME is a specification for formatting
non-ASCII messages so that they can be sent over the Internet.
FIGURE 2-3. T
he Encryption for Email Toolbar when reading private messages
Note
T
he Encryption for Email Toolbar shown above is from Microsoft Outlook 2007. The
appearance of this toolbar may vary depending on your email client and operating system.
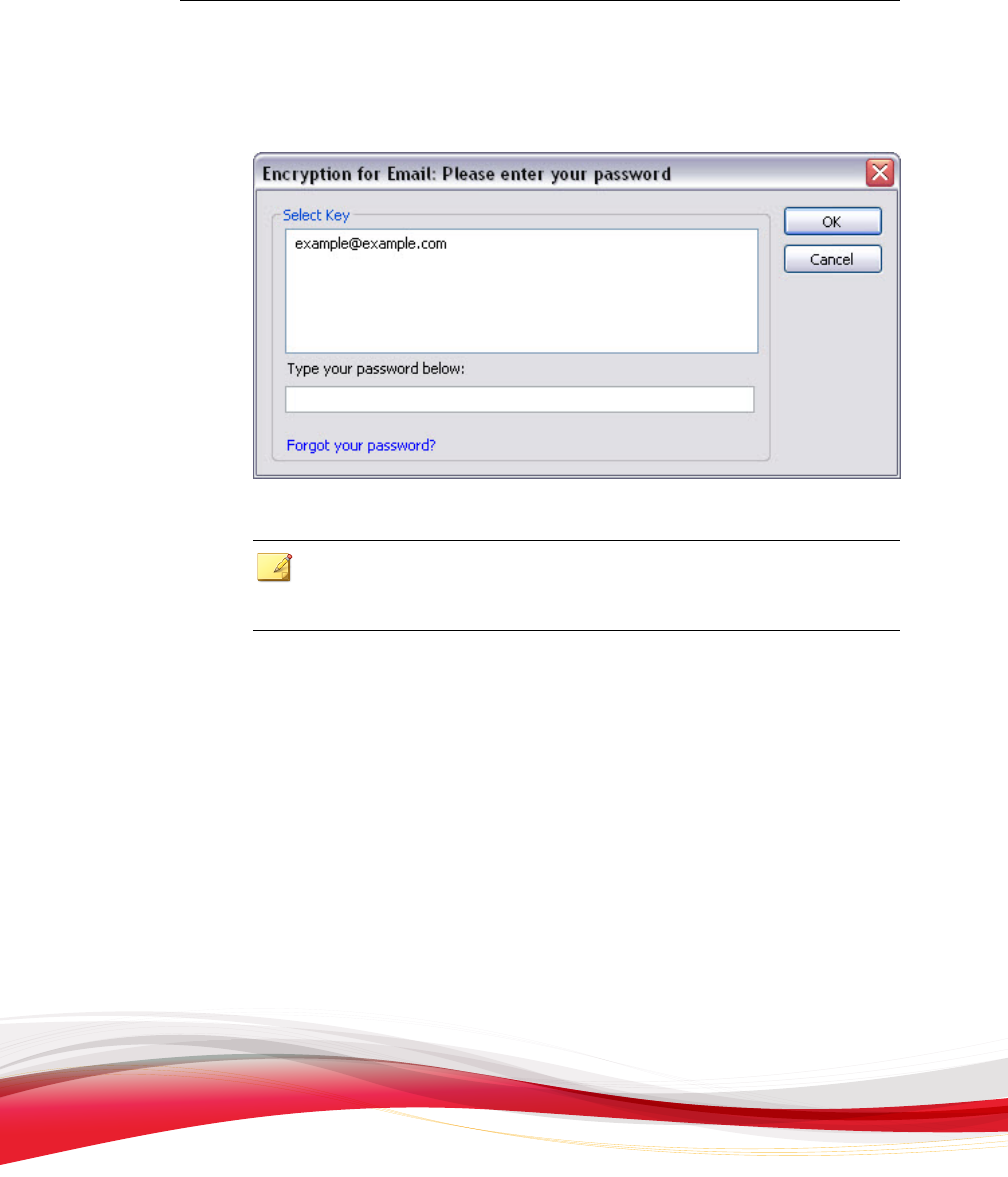
Reading a Private Email Message
Procedure
1. Open the message
containing the text to read.
Using the Encryption for Email Client
2-7
The E
ncryption for Email: Please enter your password window appears.
FIGURE 2-4. The Encryption
for Email: Please Enter Your Password screen
Note
Note
: If you have selected the Enable remember of password option (Preferences
> Password Options), the password window appears only when necessary.
2. If more than one email address is registered
for the current installation, select your
email address from the list of available email addresses.
3. Type your password and click OK.
• If you have selected the Automatically open encrypted messages option
(Preferences > Email Options), the decrypted message content displays.
• If you did not select Automatically open encrypted messages, the message
opens showing the Trend Micro envelope.
4. If the envelope is showing, click Open Envelope on the Encryption for Email
Toolbar.
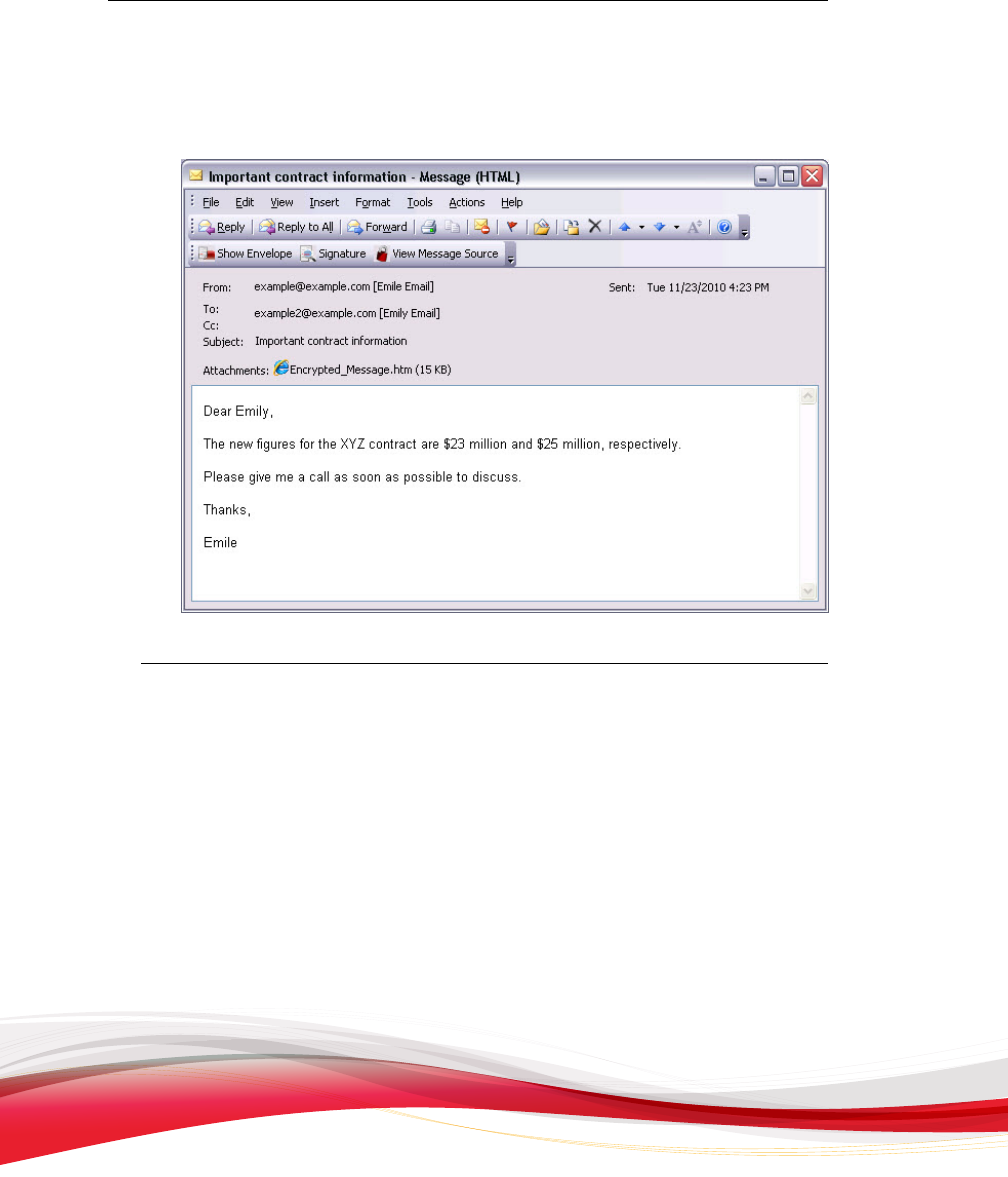
Trend Micro Encryption for Email User’s Guide
2-8
The message view switches to display the decrypted message content.
FIGURE 2-5. A decrypted message
Encryption for Email Applications
Encryption for
Email consists of the following applications:
• Encryption for Email Tray Tool, as described in Using the Encryption for Email Tray
Tool Menu on page 2-9
• Encryption for Email Protection Wizard, as described in Protecting Your Email
Address on page 1-20
• Encryption for Email Key Manager, as described in Managing Encryption for Email
Keys on page 4-10

Using the Encryption for Email Client
2-9
• Encryption for
Email Uninstaller, as described in Removing Encryption for Email on
page 5-6
After installing Encryption for Email, you can access each of these applications through
the Windows Start menu. You can also access the most commonly used Encryption for
Email applications from the Encryption for Email Tray Tool menu, as described in
Using the Encryption for Email Tray Tool Menu on page 2-9.
Opening an Application in Encryption for Email
Procedure
1. Click Windows Start.
2. Select All Programs > Trend Micro Encryption for Email.
3. Select the desired application.
Using the Encryption for Email Tray Tool Menu
Using the
Encryption for Email Tray Tool menu, you can perform several functions.
The menu contains the following choices:
• About, as described in The About Encryption for Email Window on page 4-19
• Help, opens the Online Help
• My Private Addresses, as described in My Private Addresses on page 2-13
• Protect Another Email Address, as described in Protecting Your Email Address on
page 1-20
• Change Your Password, as described in Changing Your Password on page 2-16
• Clipboard, as described in Working with the Clipboard on page 2-17
• Window, as described in Working with Windows on page 2-25
• Forget Password, as described in Removing Cached Passwords on page 2-26
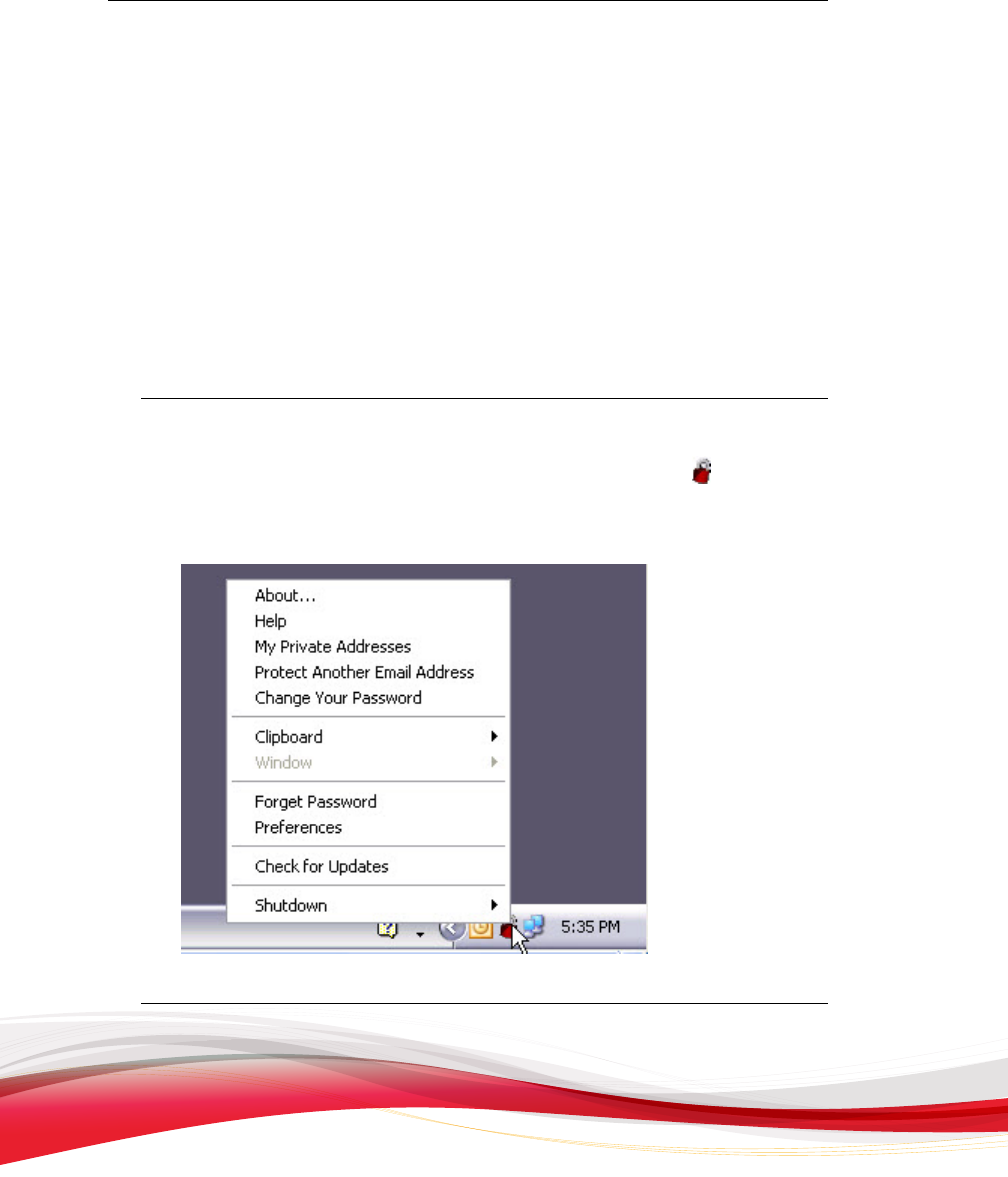
Trend Micro Encryption for Email User’s Guide
2-10
• Preferences, as described
in Accessing the Preferences Screen on page 4-2
• Check for Updates, as described in Checking for Updates on page 1-24
• Shutdown, as described in Closing Encryption for Email on page 2-27
Additional menu options are available through the Encryption for Email Tray Tool
Advanced menu, as described in The Encryption for Email Tray Tool Advanced Menu on page
2-11.
Opening the Encryption for Email Tray Tool Menu
Procedure
• In the Windows system tray, click the Encryption for Email icon (
).
The Encryption for E
mail Tray Tool menu appears.
FIGURE 2-6. The Encryption
for Email Tray Tool menu

Using the Encryption for Email Client
2-11
The Encryption for Email Tray Tool Advanced Menu
The Encryption for
Email Tray Tool Advanced menu provides access to commands
used by Encryption for Email Support for diagnostic purposes.
The advanced menu contains these additional menu choices:
• Status, as described in The Encryption for Email Status Screen on page 2-28
• Key Manager, as described in Managing Encryption for Email Keys on page 4-10
• Support Tools, as described in Support Tools on page 2-12
Opening the Encryption for Email Tray Tool Advanced Menu
Procedure
• Hold down the Ctrl key and click the Encryption for Email icon (
) in the
Windows system tray.
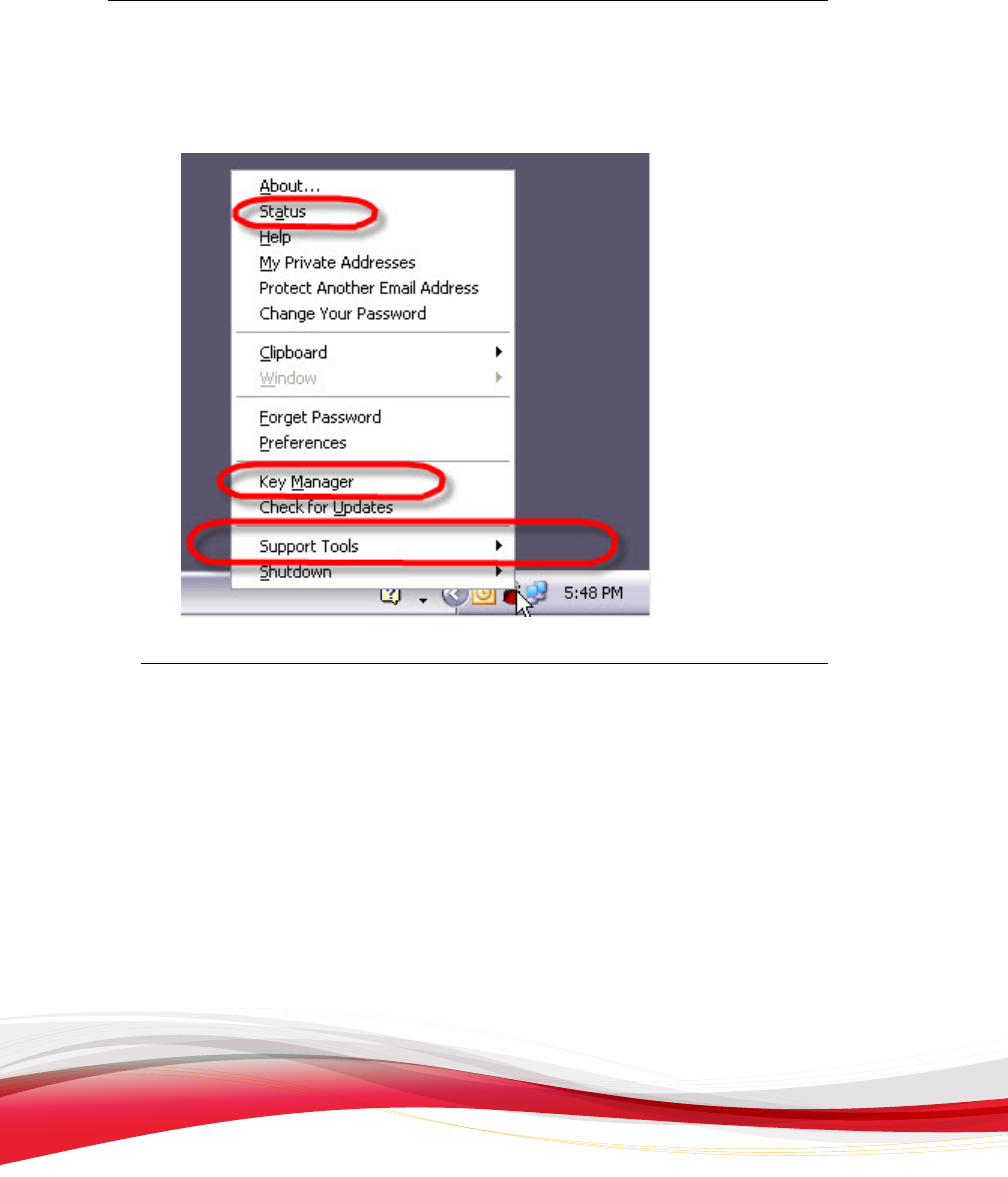
Trend Micro Encryption for Email User’s Guide
2-12
The Encryption for Email Tray Tool Advanced menu appears.
FIGURE 2-7. The Encryption
for Email Tray Tool Advanced menu
Support Tools
The Encryption for
Email Tray Tool Advanced menu includes a parent menu called
Support Tools. It contains the following two items:
• Diagnostic Tool
• Trace Log

Using the Encryption for Email Client
2-13
You do not need to use these options to use Encryption for Email. They are provided
only for use
by technical support. Do not use them unless directed to by your support
provider.
FIGURE 2-8. T
he Encryption for Email Tray Tool Advanced menu showing the Support
Tools items
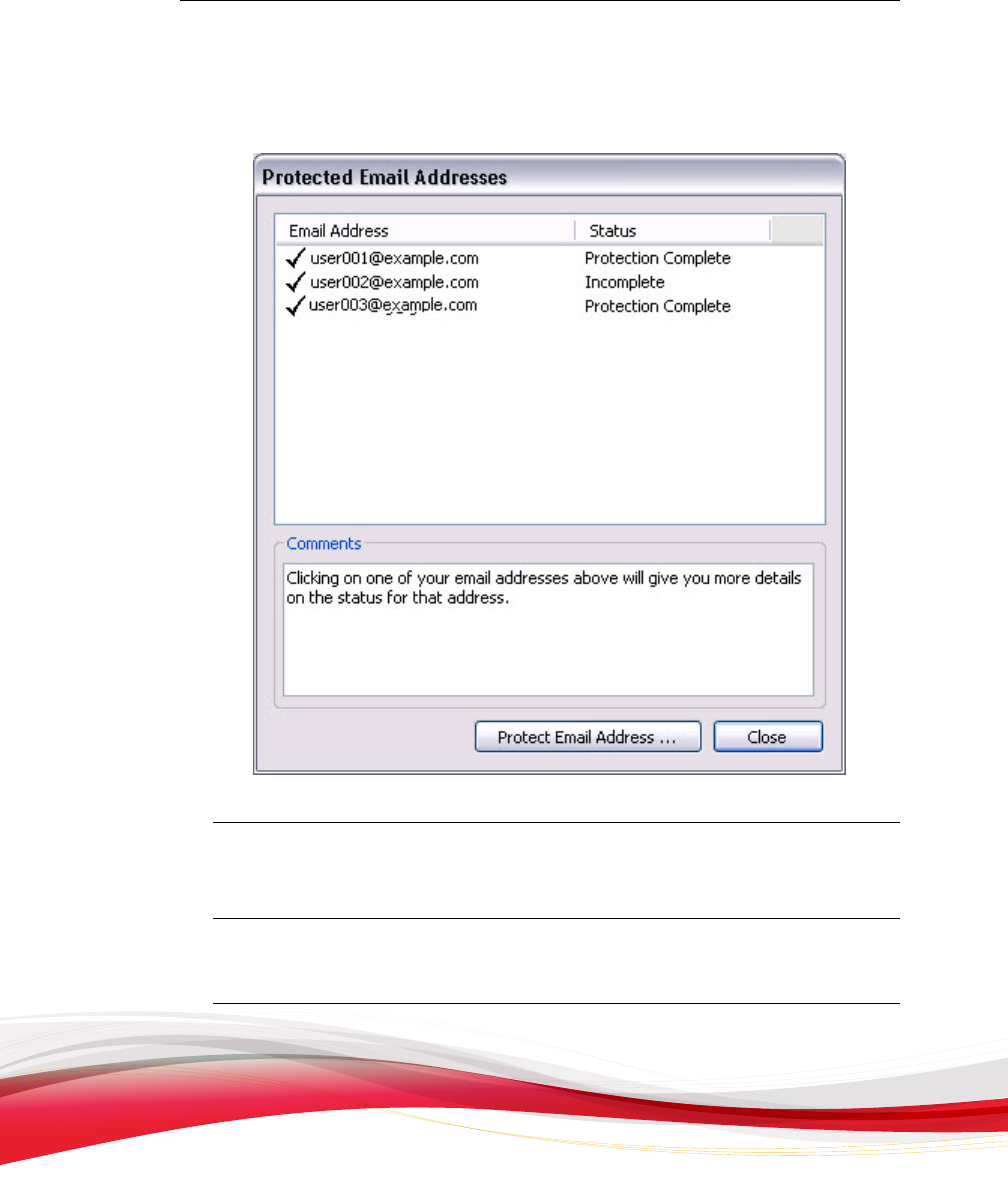
My Private Addresses
The My Private Addresses screen displays the Encryption for Email addresses that are
registered on the current computer. From this screen you can see which email addresses
have been registered for use with Encryption for Email and which ones are partially
registered. You can also launch the Encryption for Email Protection Wizard to protect a
new email address.

Trend Micro Encryption for Email User’s Guide
2-14
Viewing the My Private Addresses Screen
Procedure
1. Click the Encryption for Email icon ( ) in the Windows system tray.
The Encryption for Email Tray Tool menu appears.
2. Click My Private Addresses.
Using the Encryption for Email Client
2-15
The Protected
Email Addresses screen appears.
FIGURE 2-9. The Protected Email
Addresses screen
Launching the Encryption for Email Protection Wizard
Procedure
• F
rom the Protected Email Addresses screen, click Protect Email Address.
Trend Micro Encryption for Email User’s Guide
2-16
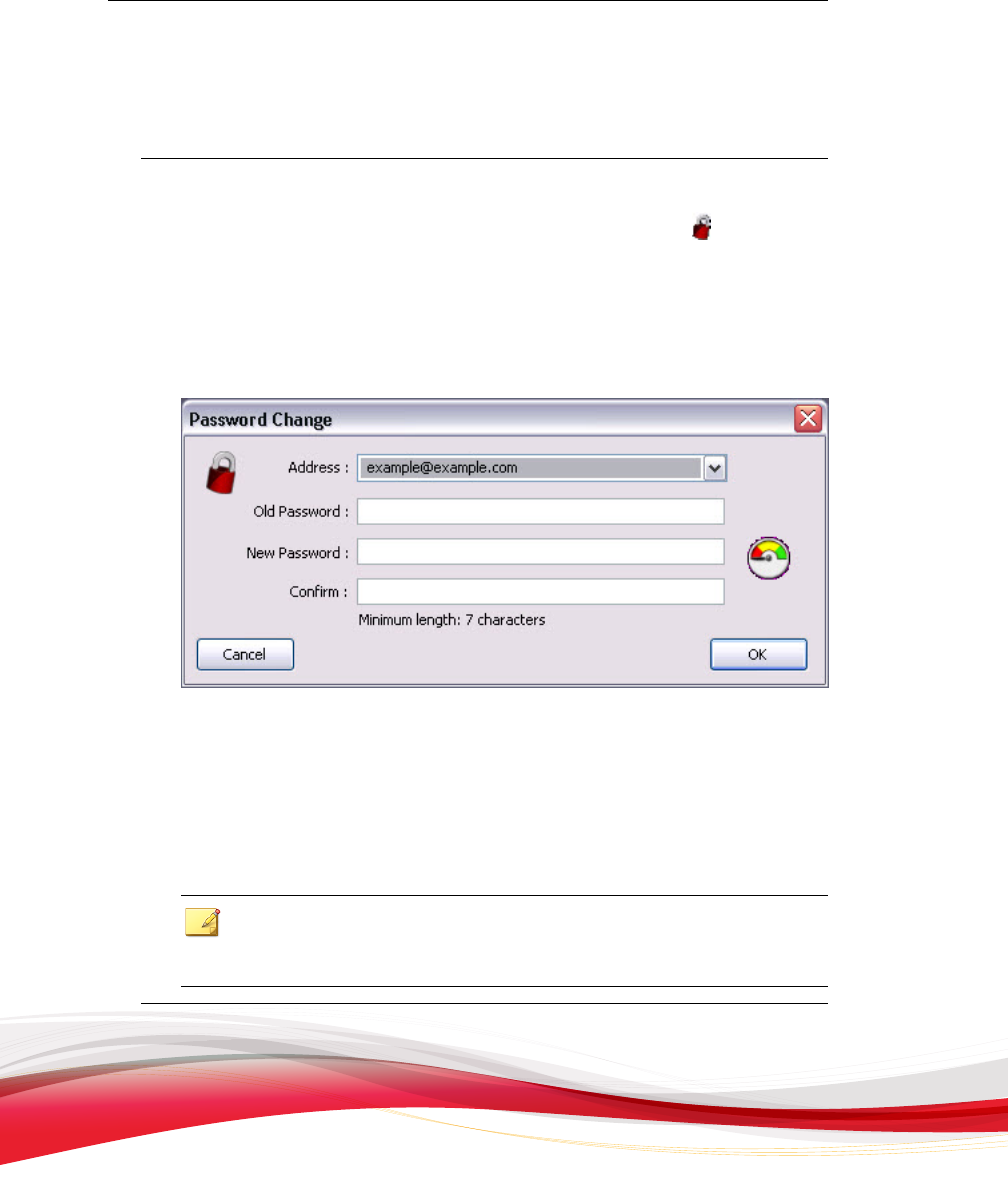
Changing Your Password
P
rocedure
1. In the Windows system tray, click the Encryption for Email icon (
).
The Encryption for E
mail Tray Tool menu appears.
2. Click Change Your Password.
The Password Change screen appears.
FIGURE 2-10. The Password Change
screen
3. If you have more than one email address registered, select the email address whose
password you wish to change from the drop-down list.
4. Type your Old Password, New Password, and then Confirm the new password.
5. Click OK twice.
Note
To change
your security questions and answers, see Managing Your Security Questions on
page 5-5.

Using the Encryption for Email Client
2-17
Working with the Clipboard
You can make the
contents of the Windows Clipboard private. You can also:
• Read contents of the Clipboard that have previously been made private
• Edit text contained on the Clipboard
• Empty the contents of the Clipboard
The Clipboard submenu contains the following options:
• Empty, as described in Emptying the Clipboard on page 2-17
• Edit, as described in Editing the Contents of the Clipboard on page 2-18
• Make Private, as described in Making the Contents of the Clipboard Private on page
2-19
• Sign, as described in Digitally Signing the Contents of the Clipboard on page 2-21
• Decrypt/Verify, as described in Reading the Contents of the Clipboard on page 2-23
Using Encryption for Email, you can make files private by using both the Encryption
for Email menu and the Make Private menu option in Windows Explorer. For a more
detailed discussion of using Windows Explorer to decrypt Clipboard content, see
Making the Contents of the Clipboard Private on page 2-19 and Making Files Private with
Windows Explorer on page 2-31.
Note
Only supported
Clipboard data formats—ANSI text or entire files—can be made private
using Encryption for Email. If an unsupported format is on the Clipboard, the menu
options will be disabled.
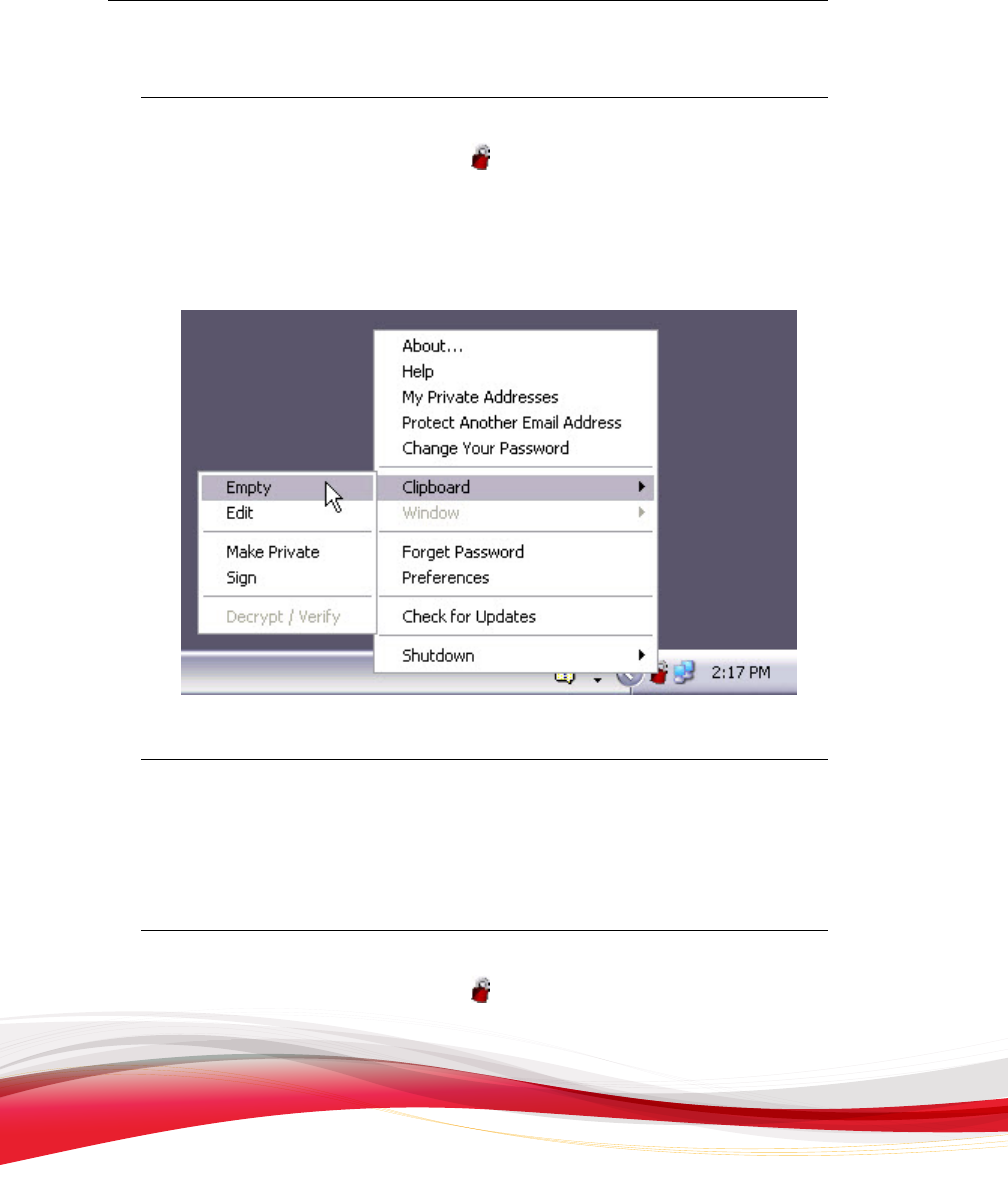
Emptying the Clipboard
Y
ou can use this feature if you have several items in the Clipboard but want to encrypt
only a specific file or piece of information. You can empty the Clipboard and then add
only the information to make private, as described in Making the Contents of the Clipboard
Private on page 2-19.
Trend Micro Encryption for Email User’s Guide
2-18
Procedure
1. Click
the Encryption for Email icon (
) in the Windows system tray.
The
Encryption for Email Tray Tool menu appears.
2. Click Clipboard > Empty.
Encryption for Email deletes all Clipboard contents.
FIGURE 2-11. The Encryption
for Email Tray Tool menu showing the Clipboard
items
Editing the Contents of the Clipboard
You can use
this feature to edit text on the Clipboard. For example, you could copy a
text document to the Clipboard and then add or remove parts of that document without
editing the original.
Procedure
1. Click the Encryption for Email icon (
) in the Windows system tray.
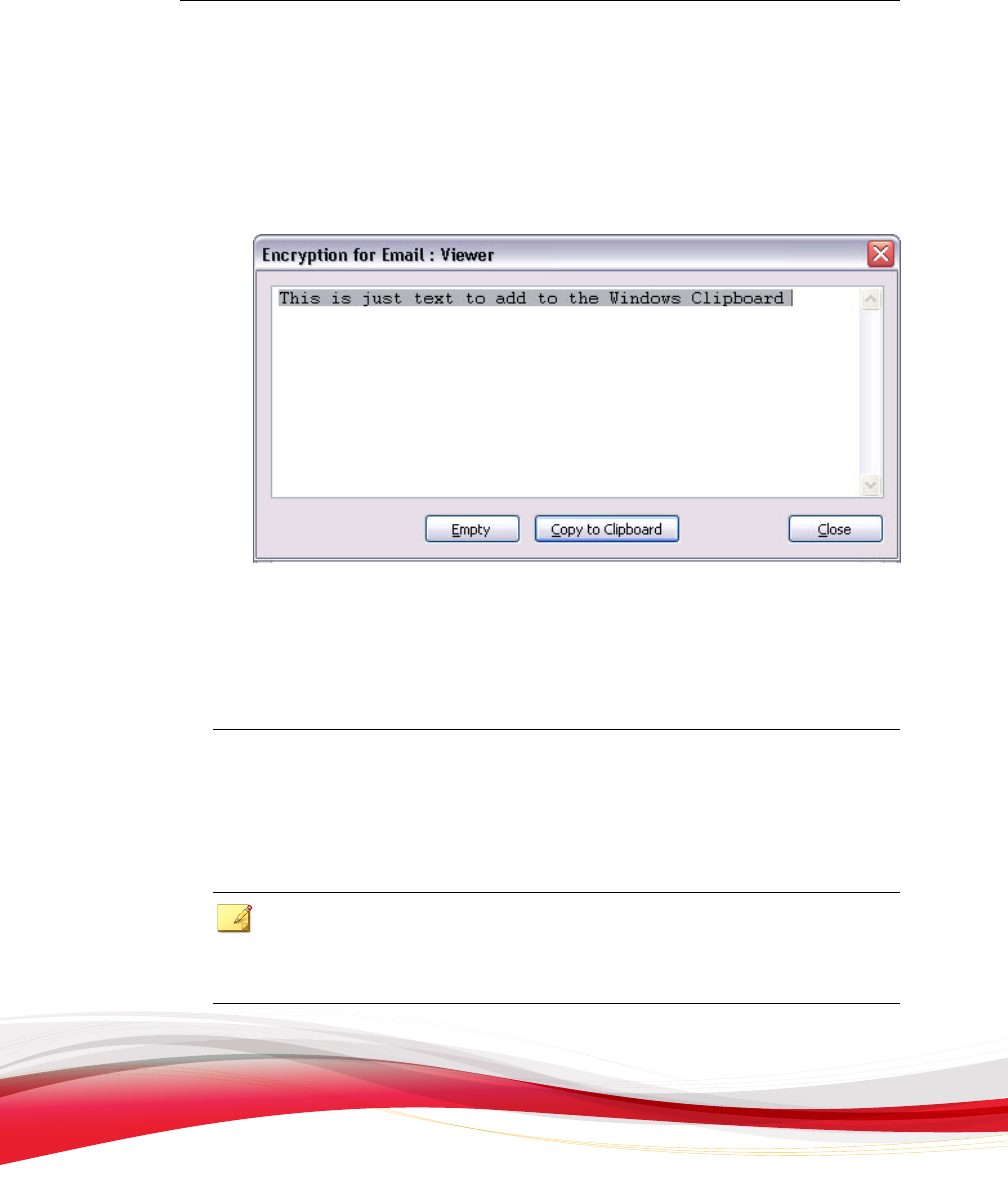
Using the Encryption for Email Client
2-19
The Encryption for Email Tray Tool menu appears.
2. Click
Clipboard > Edit.
The Encryption for Email: Viewer screen appears.
FIGURE 2-12. The Encryption
for Email: Viewer screen
3. Edit the contents of the Encryption for Email: Viewer screen.
4. Click Copy to Clipboard.
The edited text is copied to the Clipboard.
Making the Contents of the Clipboard Private
You can make the
contents of the Clipboard private using the Encryption Wizard. The
Encryption Wizard works with files or text data on the Clipboard.
Note
T
his section discusses how to encrypt content on the Windows Clipboard. To use
Windows Explorer to encrypt files that are not on the Clipboard, see Working with Files on
page 2-31.
Trend Micro Encryption for Email User’s Guide
2-20
Procedure
1. Click
the Encryption for Email icon (
) in the Windows system tray.
The
Encryption for Email Tray Tool menu appears.
2. Click Clipboard > Make Private.
The Encryption Wizard appears.
FIGURE 2-13. The Encryption
Wizard - Select Encryption Keys screen
3. Type your email address in The data will be encrypted to this Identity field and
click Add.
Note
If you
have used the Encryption Wizard previously, your email address is stored in
the identities box. Ensure that the correct identity is selected.
Using the Encryption for Email Client
2-21
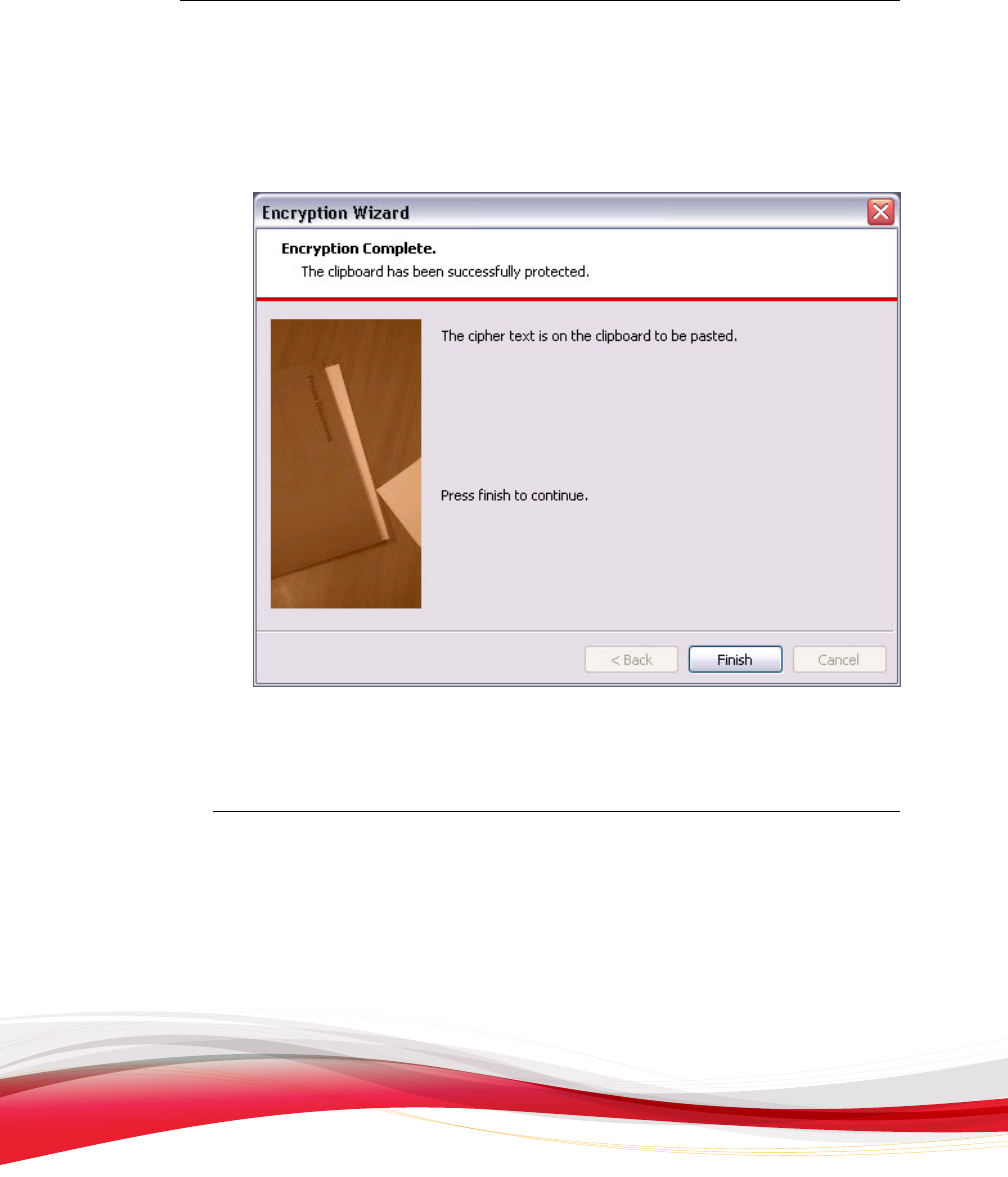
4. Click
Next.
The Encryption Complete screen appears.
FIGURE 2-14. The Encryption Wizard - Encryption Complete screen
5. Click Finish.
The encrypted text is on the Clipboard and can be pasted into any text editor.
Digitally Signing the Contents of the Clipboard
You can digitally
sign the contents of the Clipboard using the Encryption Wizard.

Trend Micro Encryption for Email User’s Guide
2-22
Note
You can only digitally
sign unencrypted Clipboard text. You cannot sign text that has
already been encrypted or that is already digitally signed.
Procedure
1. Click
the Encryption for Email icon (
) in the Windows system tray.
The
Encryption for Email Tray Tool menu appears.
2. Click Clipboard > Sign.
The Encryption Wizard appears.
FIGURE 2-15. The Encryption
Wizard - Select Encryption Keys screen

Using the Encryption for Email Client
2-23
3. F
rom the Sign with drop-down list, select the email address (key) to use when
digitally signing the text.
4. Click Next.
The Encryption Complete screen appears.
5. Click Finish.
The signed text is on the Clipboard and can be pasted into any text editor.
Reading the Contents of the Clipboard
You can read the contents of the Clipboard using the Encryption Wizard. The
Encryption Wizard works with files or text data on the Clipboard.
Procedure
1. Click the Encryption for Email icon ( ) in the Windows system tray.
The Encryption for Email Tray Tool menu appears.
2. Click Clipboard > Decrypt/Verify.
If you have not enabled password caching, the Encryption Wizard appears.
3. Click Next.
The Encryption for Email: Enter your password screen appears.
4. Select your email address from the list of available email addresses.
5. Type your password in the Password field.
Trend Micro Encryption for Email User’s Guide
2-24
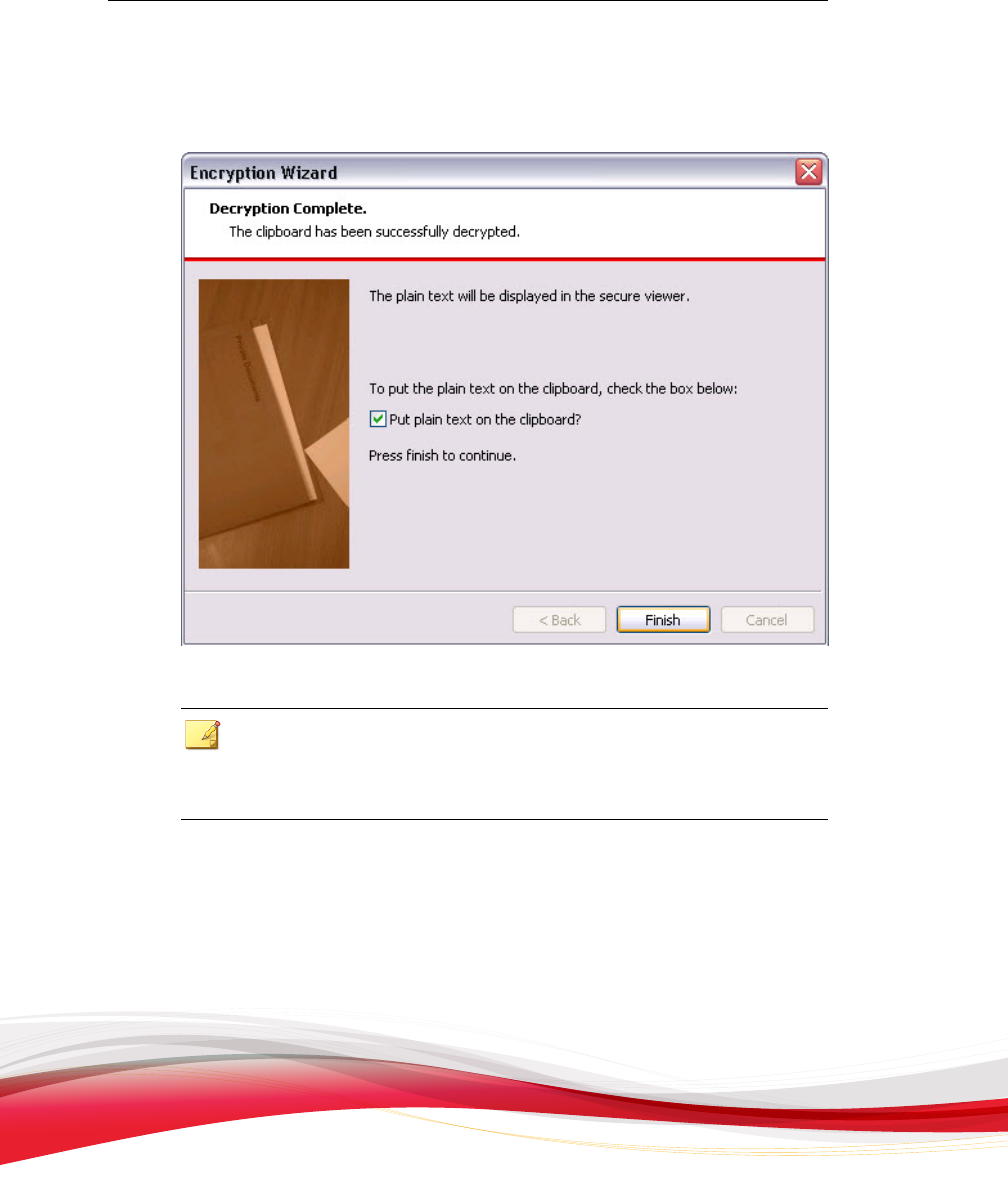
The Decryption Complete screen
appears.
FIGURE 2-16. The Encryption
Wizard - Decryption Complete screen
Note
You can copy the
decrypted text directly onto the Clipboard by selecting the Put
plain text on the clipboard check option. Alternatively, you can copy the text to
the Clipboard from the Encryption for Email: Viewer screen.
6. Click F
inish.
Using the Encryption for Email Client
2-25
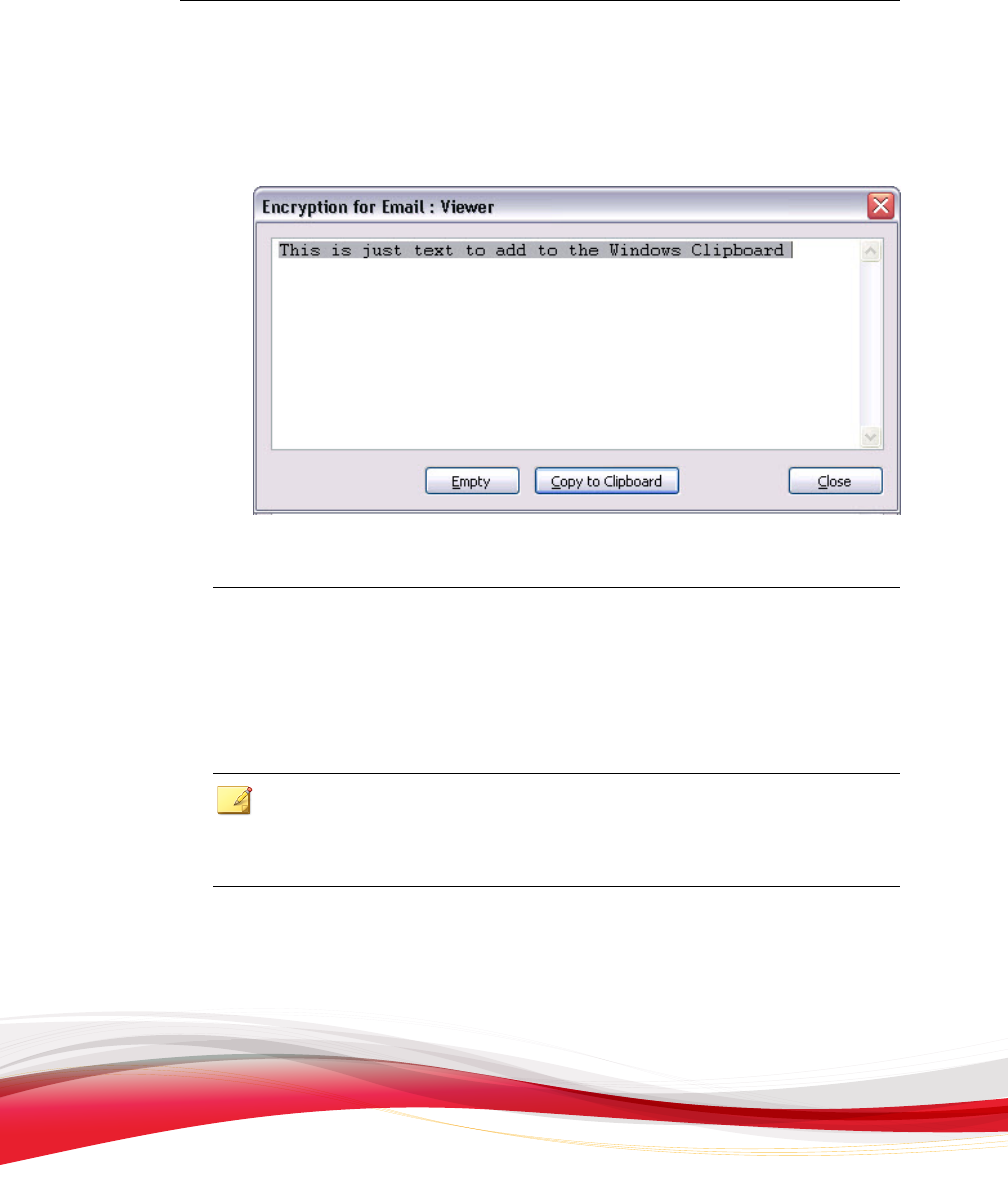
The E
ncryption for Email: Viewer screen appears showing the decrypted
message.
FIGURE 2-17. The Encryption
for Email: Viewer screen showing text decrypted
from the Windows Clipboard
Working with Windows
You can make the
contents of the active window private. You can also read contents of
windows that have previously been made private.
Note
T
he window operations are not supported on some versions of Windows. The Window
menu therefore is not always available. If the active window is not supported by
Encryption for Email, then the Window menu is unavailable.
The Window submenu contains the following option:
Sign, as described
in Digitally Signing Text in the Active Window on page 2-26

Trend Micro Encryption for Email User’s Guide
2-26
Digitally Signing Text in the Active Window
You can select and digitally sign text in the active window without first copying it to the
Clipboard.
Procedure
1. Click the window containing the text to make it the active window.
Note
Some applications, for example M
icrosoft Word, require that you highlight the text
prior to signing the text.
2. Click
the Encryption for Email icon (
) in the Windows system tray.
The
Encryption for Email Tray Tool menu appears.
3. Click Window > Sign.
The Encryption Wizard window appears.
4. Complete the Encryption Wizard, as described in Digitally Signing the Contents of the
Clipboard on page 2-21.
Removing Cached Passwords
You can remove all cached Encryption for Email passwords from your computer. You
may wish to do this, for example, if you are sharing your computer and do not want
other people to have access to your private files.
You instruct Encryption for Email to forget passwords in two ways:
• By using the Forget Password option from the Encryption for Email Tray Tool
menu
• By using the Password Options when configuring Encryption for Email, as
described in Preferences Screen Password Options Tab on page 4-5

Using the Encryption for Email Client
2-27
Forgetting Passwords Using the Encryption for Email Tray
Tool Menu
Procedure
1. Click the Encryption for Email icon ( ) in the Windows system tray.
The
Encryption for Email Tray Tool menu appears.
2. Click Forget Password and then click Yes in the confirmation message that
appears.
Your Encryption for Email passwords are removed from your computer.
Closing Encryption for Email
If you want
to close the Encryption for Email tray application, you can use the
Shutdown option in the Encryption for Email Tray Tool menu.
Procedure
1. Click the Encryption for Email icon (
) in the Windows system tray.
The
Encryption for Email Tray Tool menu appears.
2. Click Shutdown > Exit.
Encryption for Email shuts down.
Restarting Encryption for Email
If you
want to restart the Encryption for Email tray application, you can use the
Shutdown option in the Encryption for Email Tray Tool menu.

Trend Micro Encryption for Email User’s Guide
2-28
Procedure
1. Click
the Encryption for Email icon (
) in the Windows system tray.
The Encryption for Email Tray Tool menu appears.
2. Click Shutdown > Restart.
The Encryption for Email tray application restarts.
The Encryption for Email Status Screen
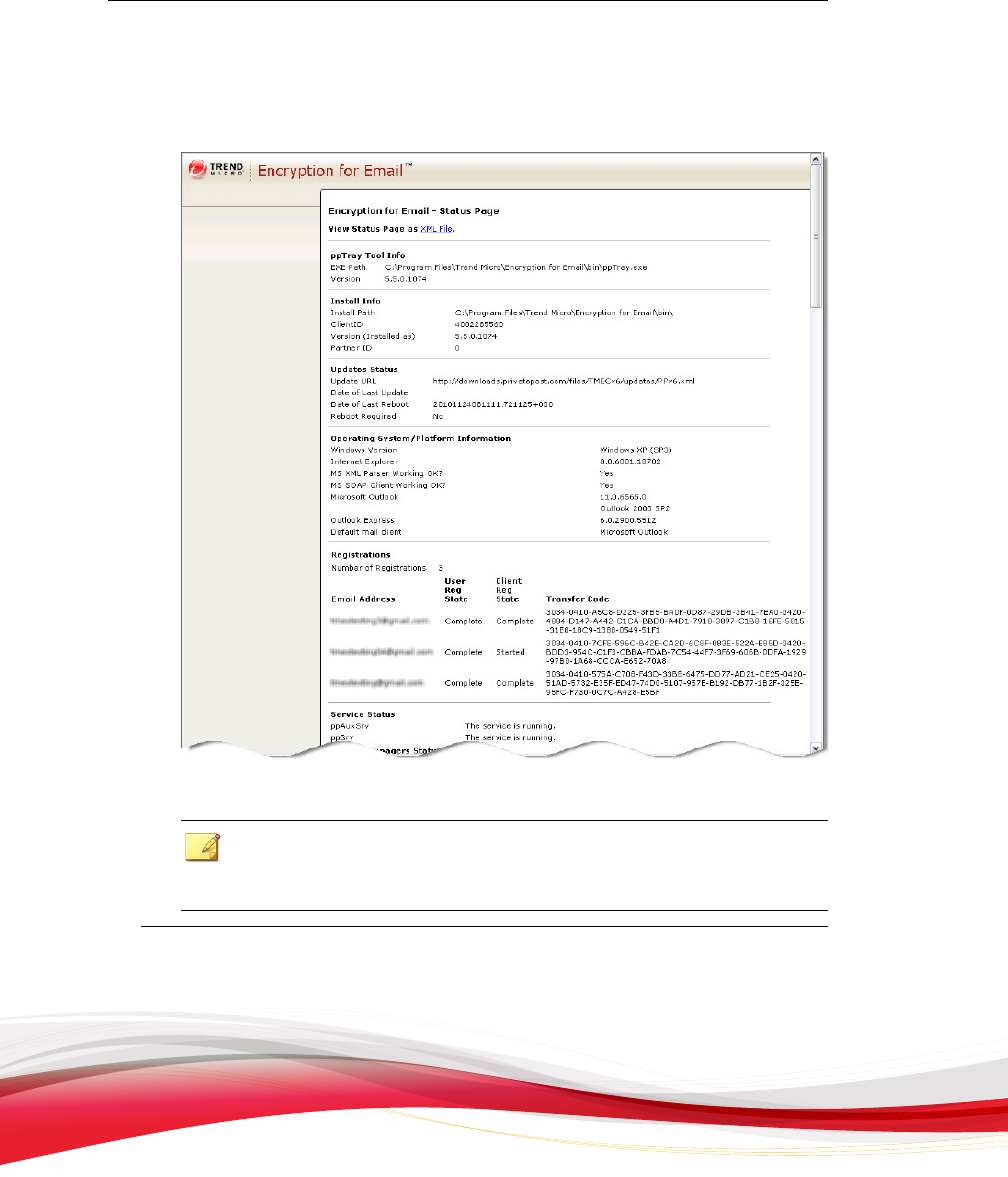
The Encryption for E
mail Status screen provides information useful for diagnosing
support issues with the Encryption for Email software and might be requested by your
support provider when troubleshooting.
Procedure
1. Hold down the Ctrl key and click the Encryption for Email icon (
) in the
Windows system tray.
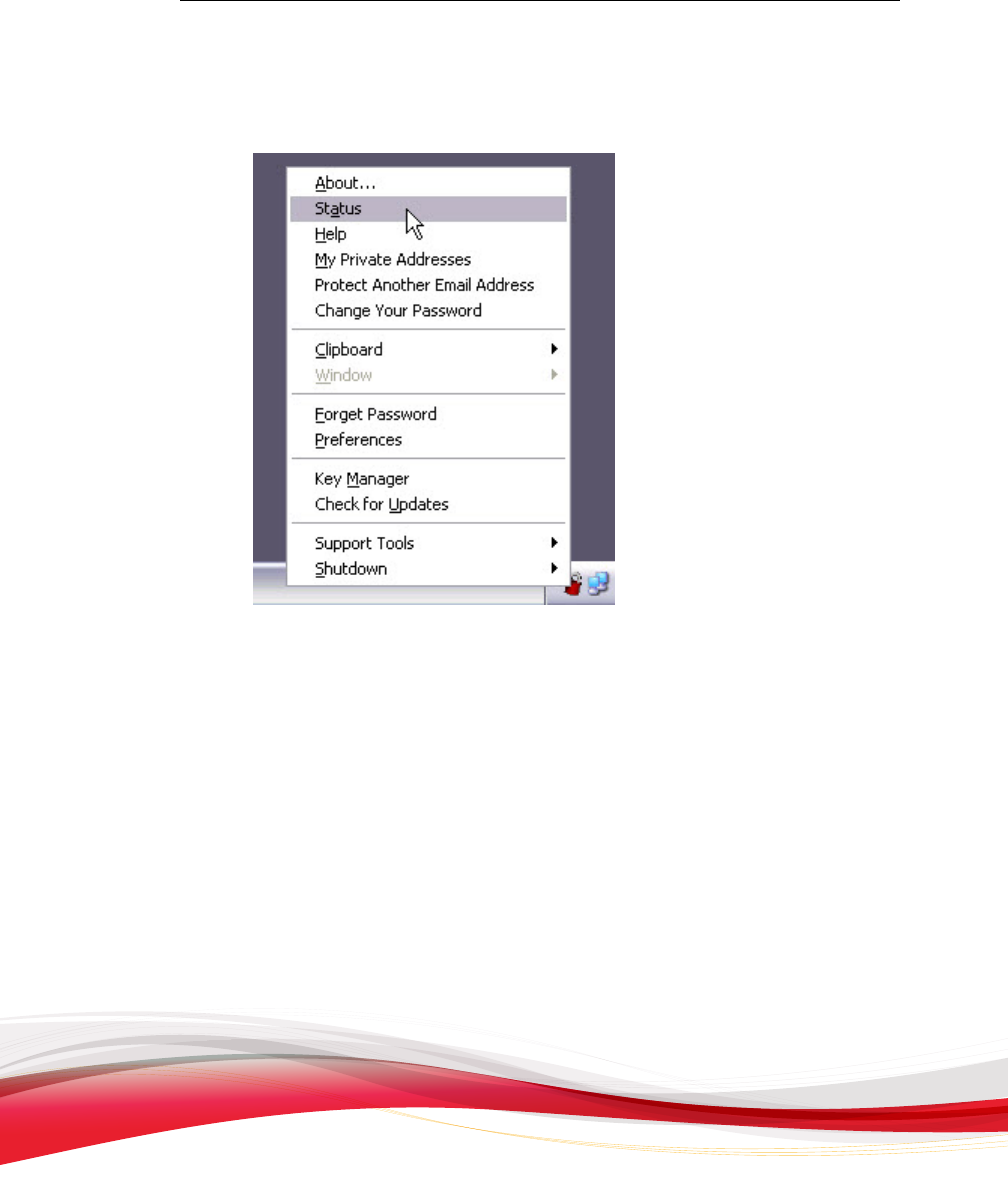
Using the Encryption for Email Client
2-29
The Encryption for Email Tray Tool Advanced menu appears.
FIGURE 2-18. The Encryption
for Email Tray Tool Advanced menu
2. Click Status.
Trend Micro Encryption for Email User’s Guide
2-30
The E
ncryption for Email Status screen appears in your default web browser.
FIGURE 2-19. The Encryption
for Email Status screen
Note
You can save
the Encryption for Email status as an XML file to send to support. Do
so by clicking on the View Status Page as XML File link.

Using the Encryption for Email Client
2-31
Working with Files
You can make
files private directly in Windows Explorer. For example, if you share a
computer you can make your files private so that no other user can open these files
without your password.
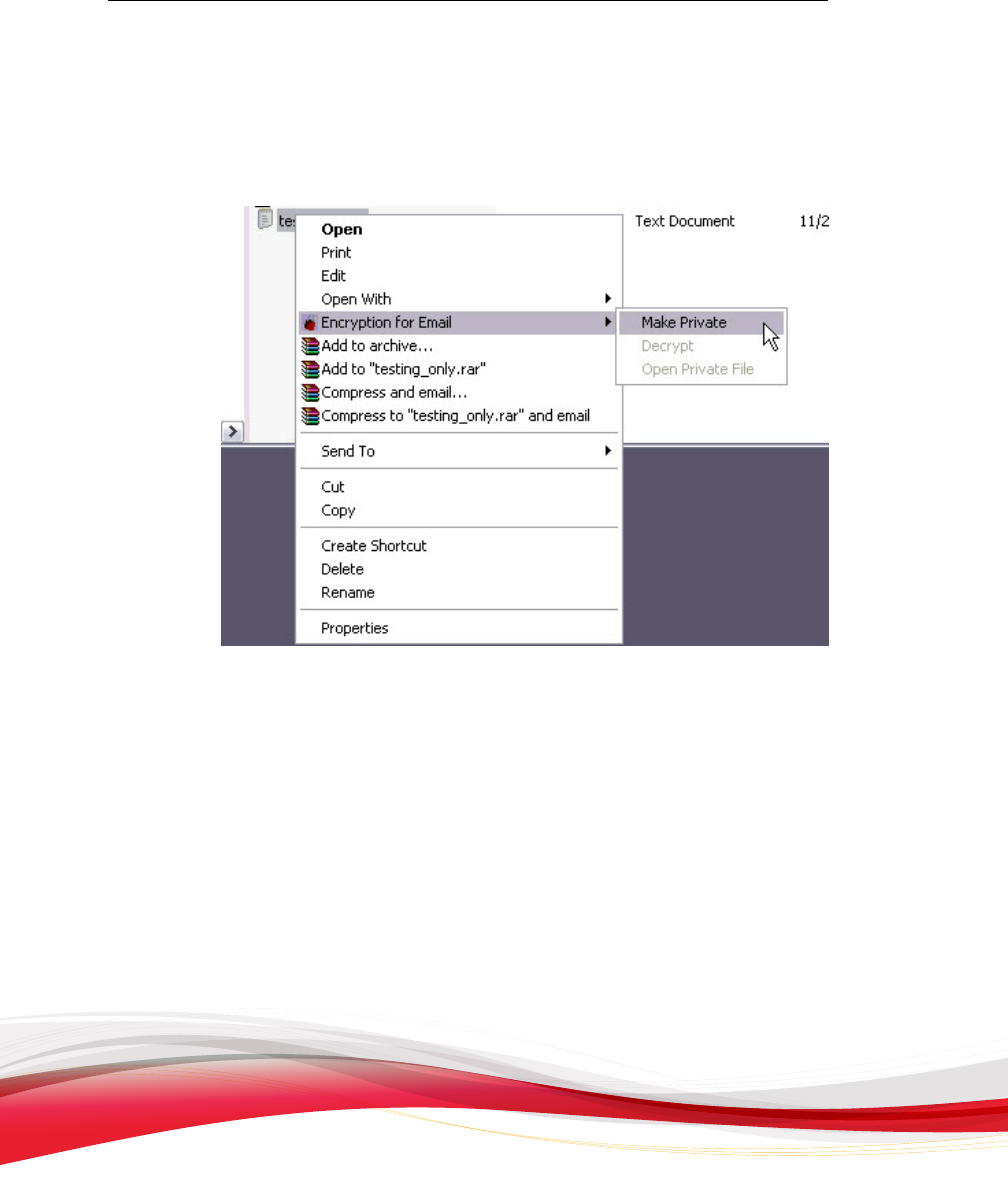
Making Files Private with Windows Explorer
Procedure
1. Open Windows Explorer.
2. Select the files to make private.
3. Do one of the following:
• Right-click the selected files and click Encryption for Email > Make
Private from the menu.
• From the Windows Explorer File menu, click File > Encryption for Email
> Make Private.
Trend Micro Encryption for Email User’s Guide
2-32
• Copy the selected
files to the Clipboard. From the Encryption for Email Tray
Tool menu, click Clipboard > Make Private, as described in Making the
Contents of the Clipboard Private on page 2-19.
FIGURE 2-20. The Encryption
for Email - Make Private submenu in Windows
Explorer
The Select a Destination screen appears.
4. Select the folder that the private files are to be saved in using Browse.
5. Click Next.
The Select Encryption Keys screen appears.
6. Type your email address in the field labeled The files will be encrypted to the
following identities and then click Add.
7. Click Next.
The Encryption Complete screen appears.

Using the Encryption for Email Client
2-33
8. Click
Finish.
A new folder window appears showing the private files in the selected folder.
Decrypting Files with Windows Explorer
Once Encryption for
Email is installed, you can decrypt private files in Windows
Explorer.
Procedure
1. Open Windows Explorer.
2. Select the private files to decrypt.
3. Do one of the following:
• Right-click the selected files and click Encryption for Email > Decrypt
from the menu.
• From the Windows Explorer File menu, click File > Encryption for Email
> Decrypt.
• Copy the selected files to the Clipboard. From the Encryption for Email Tray
Tool menu, click Clipboard > Decrypt, as described in Reading the Contents of
the Clipboard on page 2-23.
The Select a Destination screen appears.
4. Use Browse to select the folder to save the private files to.
5. Click Next.
The Encryption for Email: Enter your password screen appears unless you
selected the Enable remember of passwords option in Preferences > Password
Options.
6. Select your email address from the list of available email addresses.
7. Type your password.
Trend Micro Encryption for Email User’s Guide
2-34
The Decryption Complete screen
appears.
8. Click Finish.
A new folder window appears showing the decrypted files in the selected folder.
Note
If you
cleared the Show decrypted files check box, the folder window containing
the decrypted files does not appear.
Opening Private Files with Windows Explorer
Once you
have installed Encryption for Email, you can open private files in Windows
Explorer.
Note
When opening private files
in this way, any changes that you make to such a file will not be
saved back to the private file when you close it. To edit the file, decrypt it first, edit it, save
it, and then decrypt it again.
Procedure
1. O
pen Windows Explorer.
2. Select the private files to decrypt.
3. Do one of the following:
• Right-click the selected files and click Encryption for Email > Open
Private File from the menu.
• From the Windows Explorer File menu, click File > Encryption for Email
> Open Private File.
• Double-click the selected file.
4. If more than one email address is registered for this account, select your email
address from the list shown.

Using the Encryption for Email Client
2-35
5. If
prompted, type your password.
6. Click OK.
The private file is opened in the application associated with the file type.

3-1
Chapter 3
Receiving Private Email Without the
Client
You can receive
encrypted messages even if you have not installed Trend Micro
Encryption for Email on your computer. These Help topics explain how to access
encrypted messages using Zero Download.
Topics include:
• Using the Zero Download Reader on page 3-2
• Reading a Private Email Message on page 3-4
• Responding to a Private Message on page 3-7
• Account Verification on page 3-8
• Registering on the Web on page 3-16

Trend Micro Encryption for Email User’s Guide
3-2
Introduction
If you
do not have access to an email program that is integrated with Trend Micro
Encryption for Email, you can access private email messages securely on the web
through the Trend Micro Zero Download Reader.
You may need to read private messages without the Encryption for Email plug-in for
several reasons:
• You use webmail, such as Gmail or Yahoo Mail.
• You use an email program that cannot integrate with Encryption for Email, such as
Mozilla Thunderbird.
• You are using a computer that does not have Encryption for Email installed.
• You use a mobile device to access your email account.
Using the Zero Download Reader
If you receive an encrypted email message in your webmail account or in an
unsupported email program, you can read it using the Zero Download Reader.
You must register your email address with Zero Download before you can read a private
message sent to that address. However, someone using Encryption for Email can send
you a private message even if you have not registered yet. Zero Download detects that
the email address has not yet been registered and then helps you to register on the web
just before you open the private message.
Using the Zero Download Reader to Open a Private Email
Message Sent to a Registered Email Address
Note
Mobile device
users must forward the message to
[email protected] to receive
an
email notification with instructions on how to read your message on the device. Follow the
instructions you receive to open your message.

Receiving Private Email Without the Client
3-3
Procedure
1. Open the
message that you received in your webmail account.
The open message displays the Encryption for Email envelope.
2. Click to download the file attachment.
You are prompted to open or save the file.
3. Save and then open, or simply open the file attachment.
Your browser opens to the Zero Download website.
4. Click Open Message.
• If this message was sent to multiple recipients, the Zero Download Reader
screen appears.
• If you are the only recipient of the message, the Account Verification
screen appears. Proceed to Step 6.
Note
If you
have recently used Zero Download to read an encrypted message sent to the
same email address that you are checking, that email address may still be stored in
your browser cache. If so, you do not have to reselect your email address on the Zero
Download Reader screen; the Account Verification screen appears instead.
5. Select
your email address from the drop-down list or type it in the field and click
Continue.
The Account Verification screen appears.
6. Verify your account as explained in Account Verification on page 3-8.
The decrypted message displays in your browser window.
Trend Micro Encryption for Email User’s Guide
3-4
Using the Zero Download Reader to Open a Private Email
Message
Sent to an Unregistered Email Address
Procedure
1. Follow Step 1 through Step 3 in the procedure Using the Zero Download Reader to
Open a Private Email Message Sent to a Registered Email Address on page 3-2.
2. Click Open Message.
• If this message was sent to multiple recipients, the Zero Download Reader
screen appears.
• If you are the only recipient of the message, the Registration screen appears.
Proceed to Step 4.
3. Select your email address from the drop-down list or type it in the field and click
Continue.
4. The Registration screen appears, displaying your recipient email address as your
“identity” for encryption. Follow the registration procedure explained in Registering
on the Web on page 3-16.
Reading a Private Email Message
With the
Zero Download Reader, you can read private messages on any computer,
regardless of its operating system or whether Encryption for Email is installed.
Note
Mobile device
users must forward the message to
[email protected] to receive an
email notification with instructions on how to read your message on the device. Follow the
instructions you receive to open your message.
Procedure
1. Open the
received message as usual.
Receiving Private Email Without the Client
3-5
The opened message displays the Encryption for Email envelope.
2. Click
to download the file attachment.
You are prompted to open or save the file.
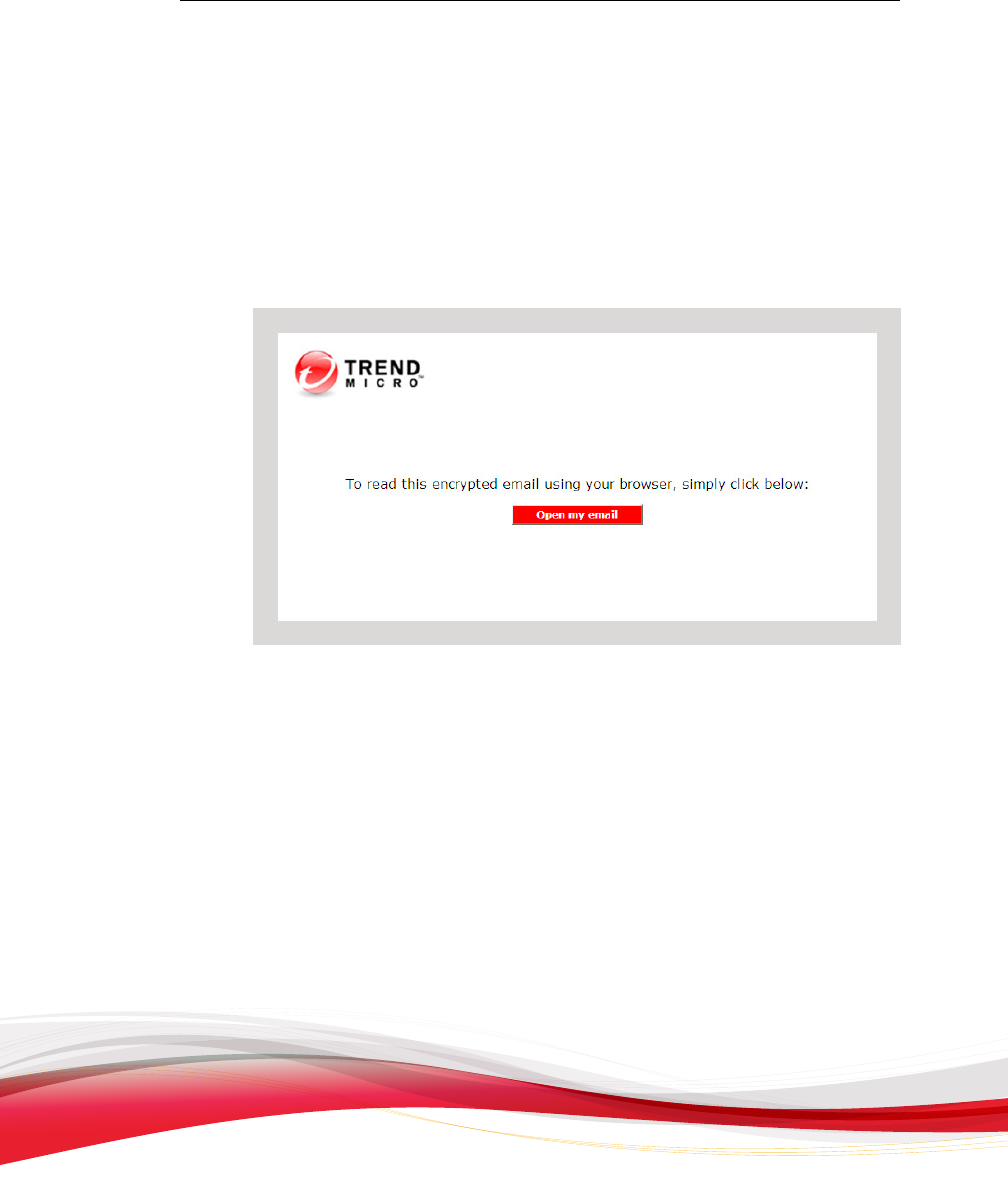
3. Save and then open, or simply open the file attachment.
Your browser opens to the Zero Download website.
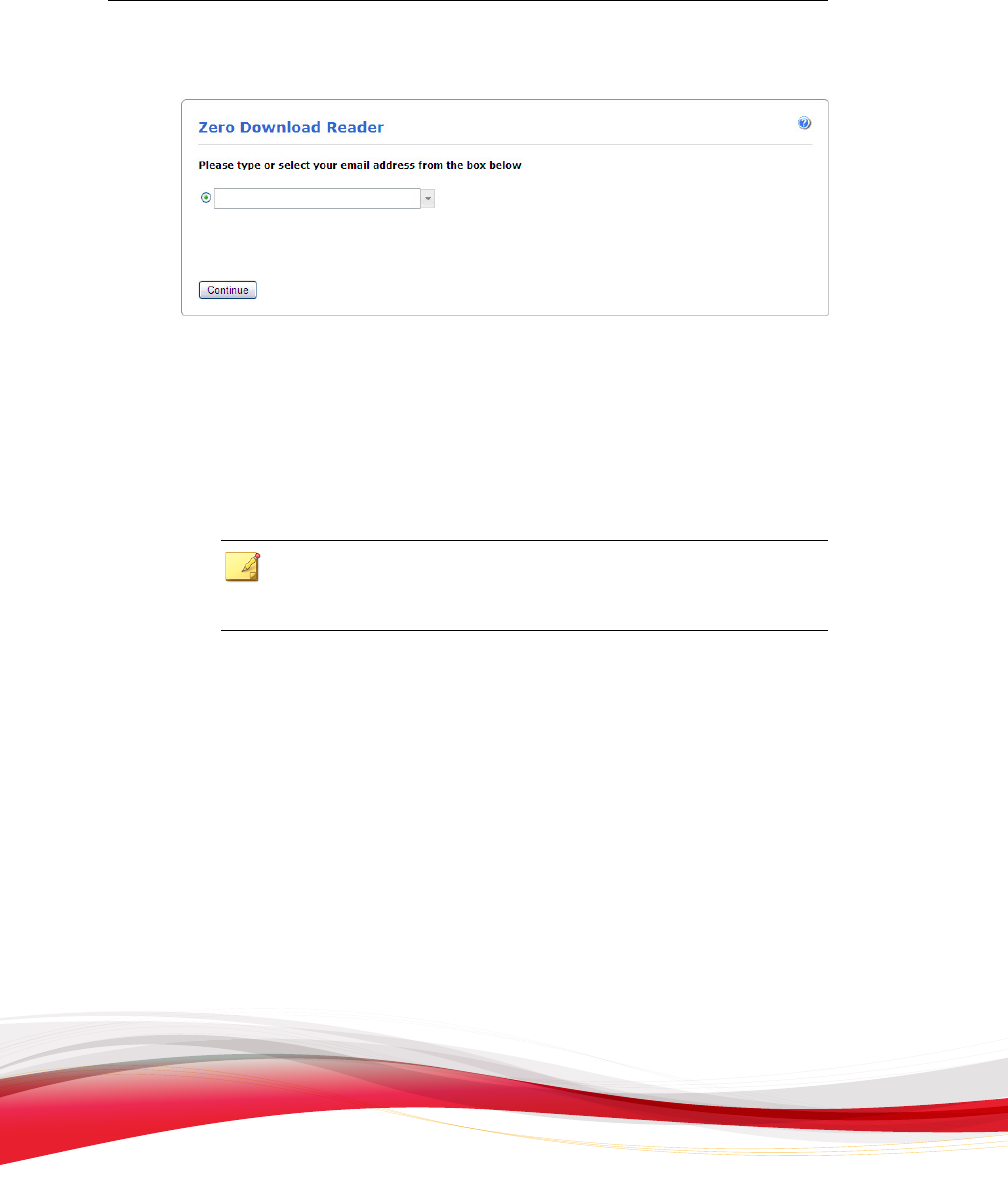
FIGURE 3-1. The Z
ero Download Reader initial screen
4. Click Open Message.
• If this message was sent to multiple recipients, the Zero Download Reader
screen appears.
• If you are the only recipient of the message, the Account Verification screen
appears. Proceed to Step 7.
5. Select your email address from the drop-down list or type it in the field and click
Continue.
Trend Micro Encryption for Email User’s Guide
3-6
FIGURE 3-2. The Z
ero Download Reader screen
6. Depending on if you have registered your email address, you see one of the
following screens:
• If you already registered this email address, the Account Verification screen
appears.
• If you did not register this email address, the Registration screen appears.
Note
If you
have not registered this address, complete the two-part registration
process, as explained in Registering on the Web on page 3-16.
7. Verify
your account as explained in Account Verification on page 3-8.
8. Click Continue.
Receiving Private Email Without the Client
3-7
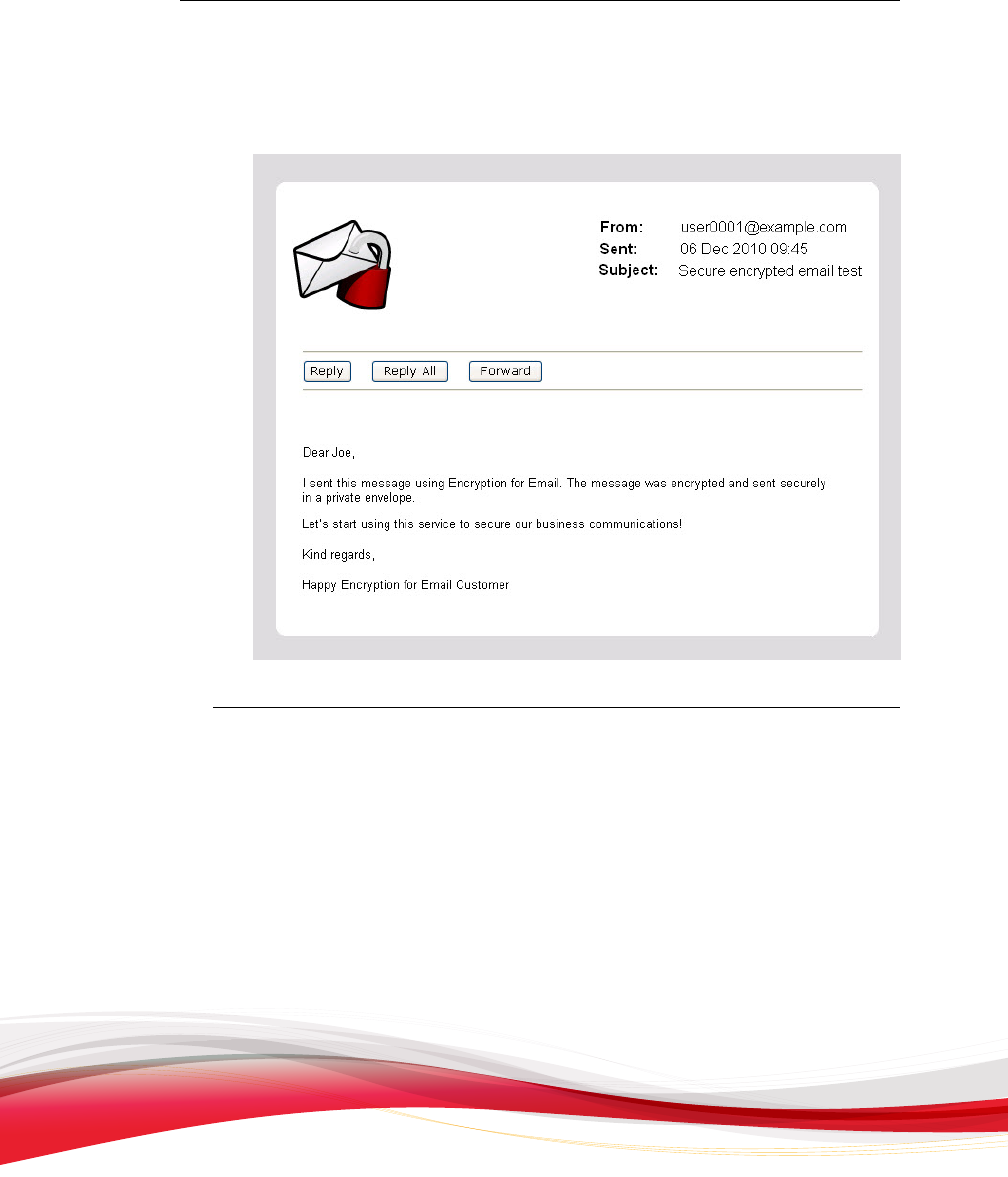
The message displays as plain text in the original window.
FIGURE 3-3. A message
decrypted using the Zero Download Reader
Responding to a Private Message
Using the Zero Download Reader, you can Forward, Reply, or Reply All to a
received encrypted message.
Send Private
The interface is very similar to other web-based email composition screens. However,
the Send button automatically encrypts the outgoing message. You can only forward or
reply to encrypted messages in encrypted form.

Trend Micro Encryption for Email User’s Guide
3-8
Different Appearance Without JavaScript
• When JavaScript is enabled, the interface contains a recognizable set of email
composition tools, arranged at the top and identified by icons and mouse-over
labels.
• When JavaScript is disabled, the interface contains only plain text.
Different Branding Design
The branding of the screen is dependent upon your service provider. Your service
provider’s colors and logo appear on the screen. The design of the received message is
also dependent on the service provider used by the sender and may look different.
Account Verification
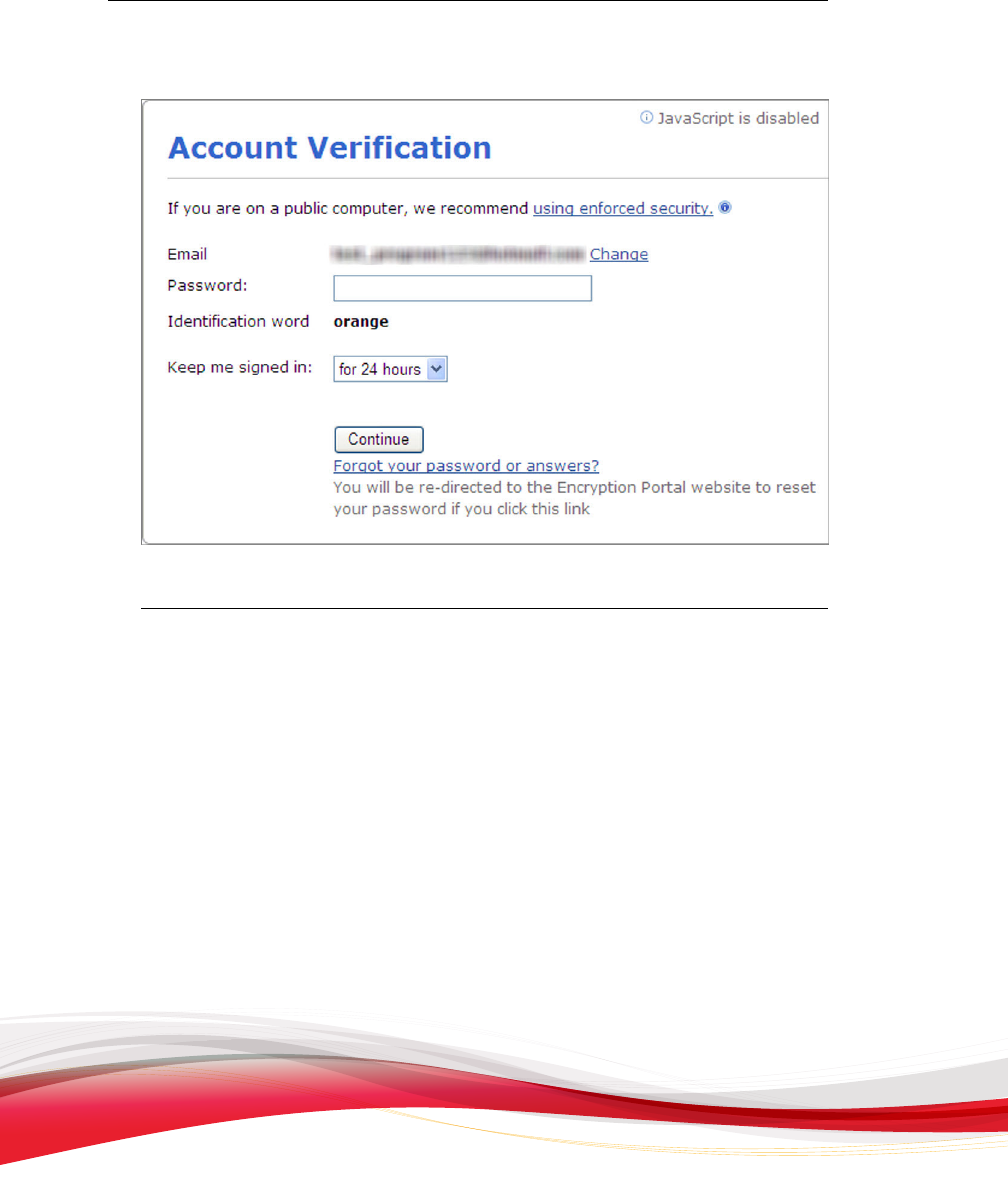
The Account Verification screen displays differently depending on whether JavaScript
is enabled in your browser. If JavaScript is disabled, the label, “JavaScript is disabled”
appears at the top right. For more information about how the user interface looks
different without JavaScript, see JavaScript is Disabled on page 3-15.
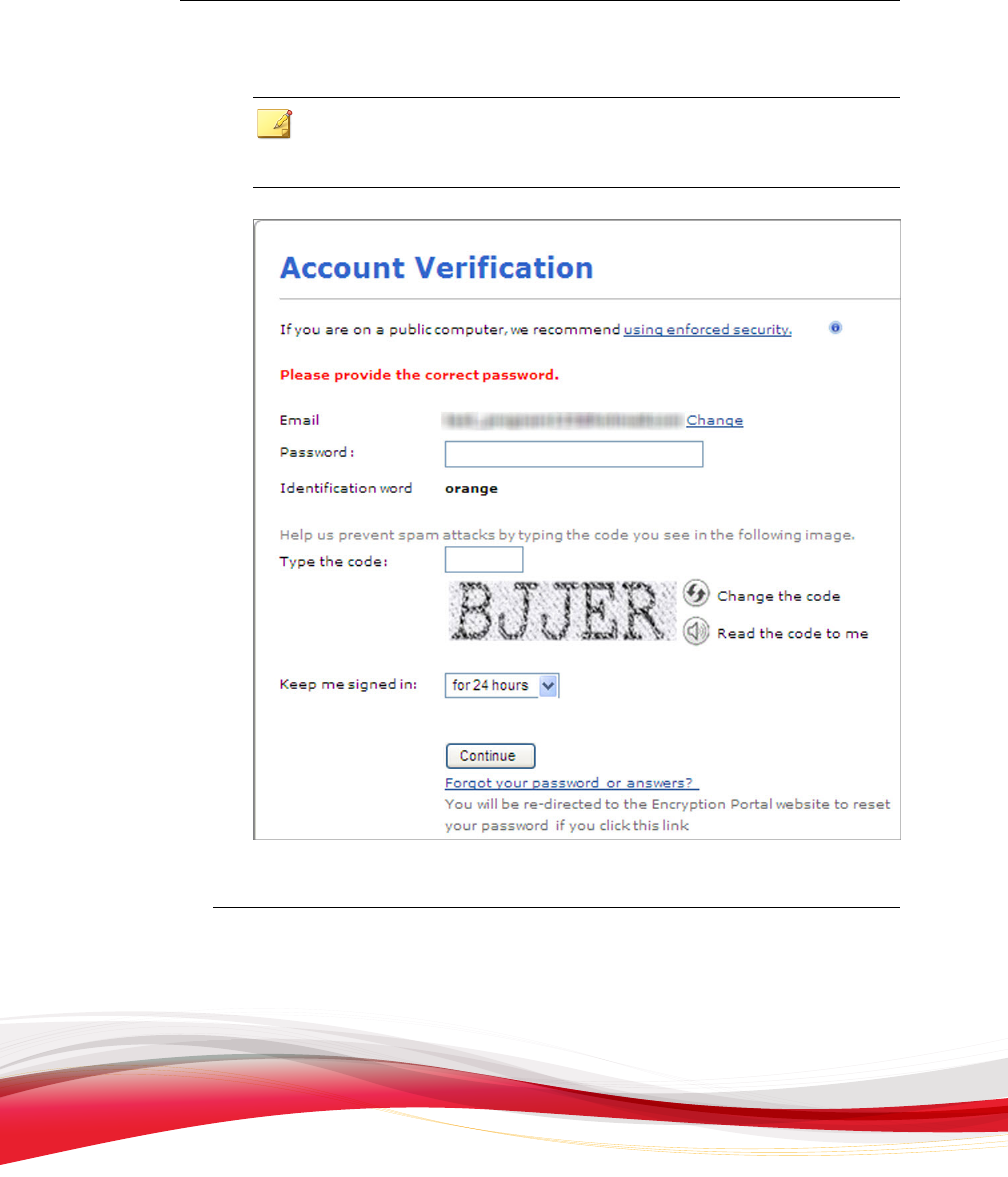
The Account Verification screen also has two views depending on security level:
• Low security view: This view provides a conventional password field, along with
an identification word and a security question.
• Enforced security view: This view provides a more complex password field with
a character-position test, as explained in Using the Password Character-Matching Test in
Enforced-Security Mode on page 3-14.
The branding of the screen is dependent upon your service provider. Your service
provider’s colors and logo appear on the screen. The design of the received message is
also dependent on the service provider used by the sender and may look different.
Receiving Private Email Without the Client
3-9
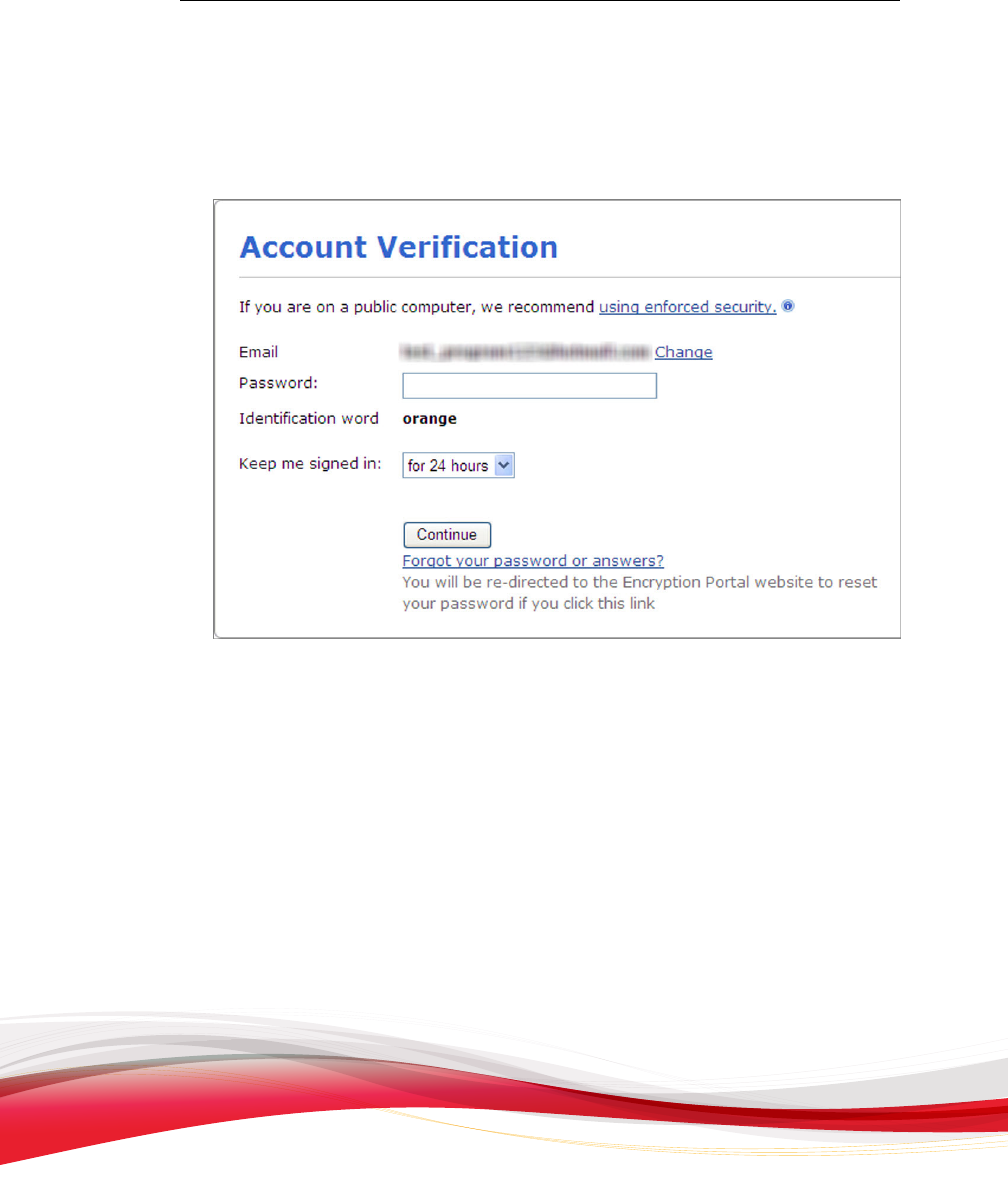
Low Security View
Use the low security view in safe places, like your home.
FIGURE 3-4. T
he Low-security Account Verification screen
Trend Micro Encryption for Email User’s Guide
3-10
FIGURE 3-5. T
he Low-security Account Verification screen with JavaScript disabled
Procedure
1. Type your password in the field provided.
2. Accept the default value of for 24 hours in the Keep me signed in field, or select
one of the other available options:
• for 12 hours
• for 48 hours
• for 7 days
• never
3. Click Continue.
The decrypted message displays in your web browser.
Receiving Private Email Without the Client
3-11
Note
After
three failed sign in attempts, the Account Verification screen displays a
CAPTCHA bot code widget for greater security.
FIGURE 3-6. The L
ow-security Account Verification screen after three failed sign
in attempts
Trend Micro Encryption for Email User’s Guide
3-12
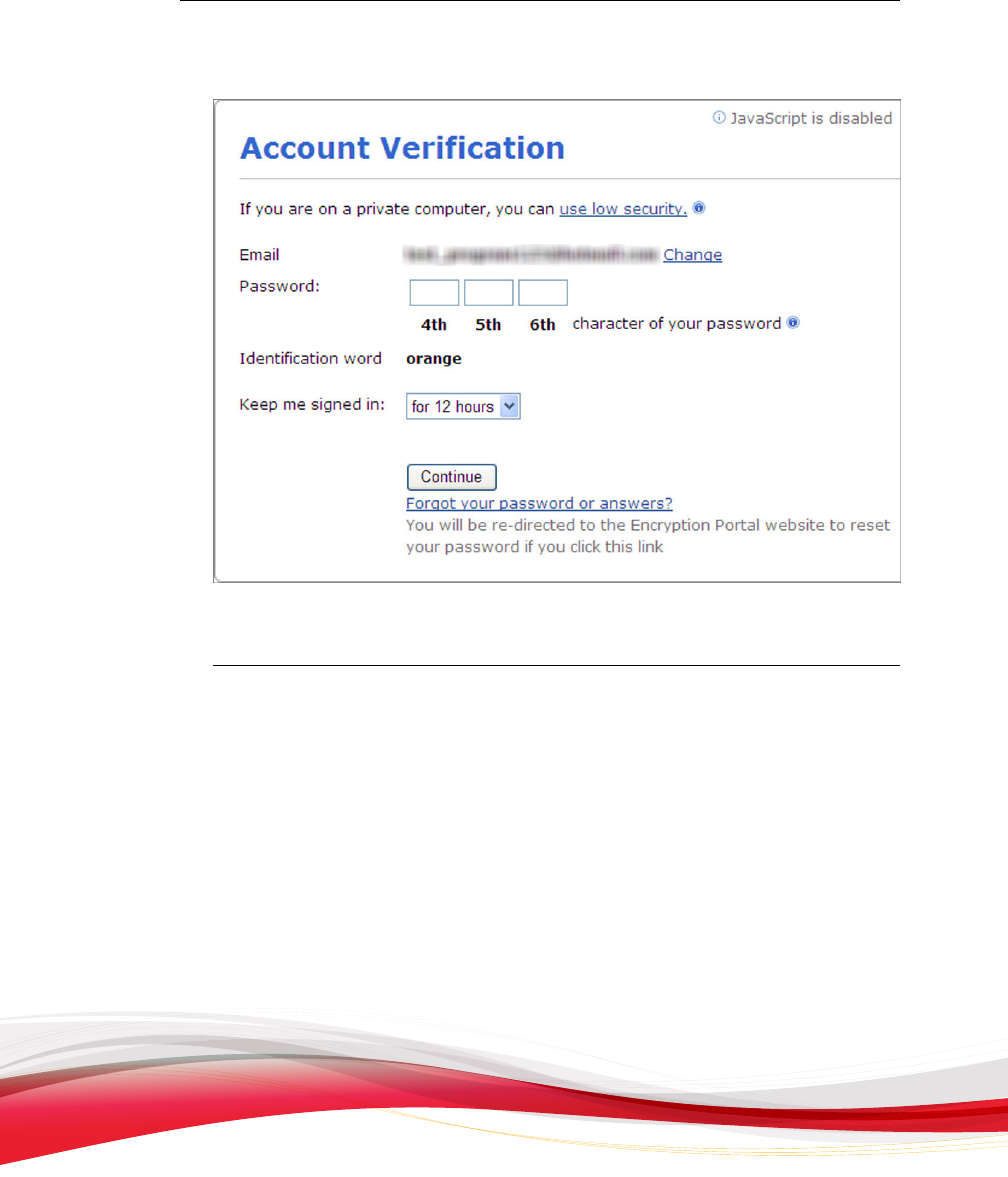
Enforced Security View
Use the enforced security view when accessing your email on a public computer or
whenever you need enhanced security.
FIGURE 3-7. T
he Enforced-security Account Verification screen
Receiving Private Email Without the Client
3-13
FIGURE 3-8. T
he Enforced-security Account Verification screen with JavaScript
disabled
Procedure
1. In the three randomly selected password-character fields, type the individual
characters of your password based on their position, as explained in Using the
Password Character-Matching Test in Enforced-Security Mode on page 3-14.
2. Accept the default value of for 12 hours in the Keep me signed in field, or select
one of the other available options:
• for 24 hours
• for 48 hours
• for 7 days
• never
Trend Micro Encryption for Email User’s Guide
3-14
3. Click
Continue.
The decrypted message displays in your web browser.
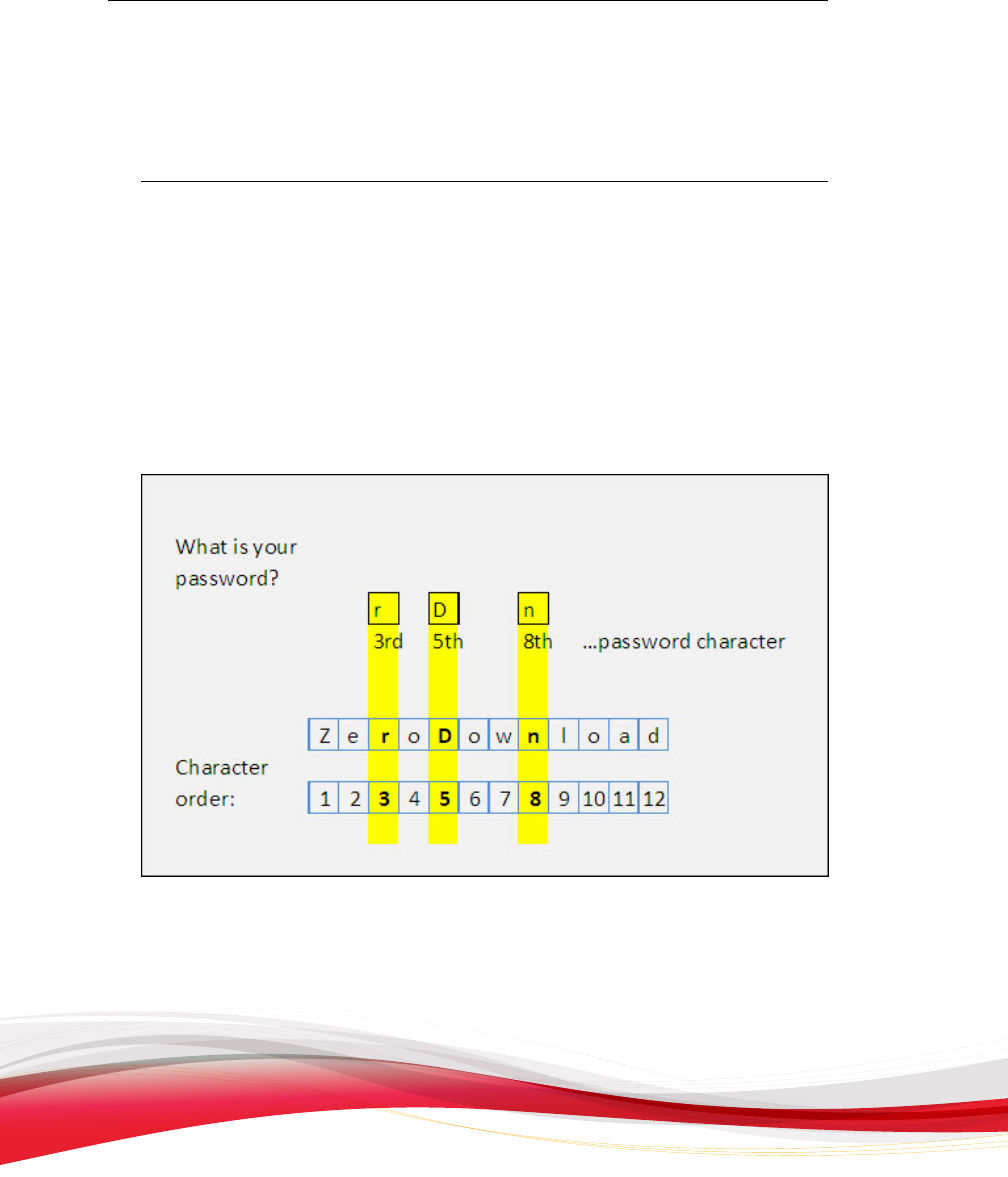
Using the Password Character-Matching Test in Enforced-
Security Mode
In “enforced
-security” mode, Encryption for Email prompts you to type only certain
characters of your password. This method prevents key loggers from capturing your
entire password even if your computer is compromised.
For example, if the form asks you to type the “3rd, 5th, and 8th” characters and your
password is “ZeroDownload,” then you would type the characters as follows:
FIGURE 3-9. Password character
-matching test (“enforced security” mode only)
In the example above, the characters shown in the What is your password fields match
the character positions requested.

Receiving Private Email Without the Client
3-15
Note
• Do not use
“ZeroDownload” as a password because it is too easy to guess.
• The password is case-sensitive.
JavaScript is Disabled
The
notation “JavaScript is disabled” displays at the top right of your screen if your
browser is set to disallow JavaScript. When JavaScript is enabled, your browser uses
ActiveX (if Internet Explorer) or a Firefox extension to do the decryption locally. When
JavaScript is disabled, Zero Download still works, but for technical reasons must post
your message to a Trend Micro server for decryption and then send it back to you in a
secure transport mode (https://).
Trend Micro securely deletes the copy of your message on the server once you have
viewed the message.
Apart from the above change in back-end processing, there are a few, minor differences
in the user interface of various screens when JavaScript is disabled.
ToolTips Function Differently
ToolTip icons (
) do not display text when you place your mouse pointer over them.
Instead, you must click them in order for the message to display, and it displays in a
small “pop-up” browser window.
No Password Strength Meter
Without JavaScript, the password-strength meter on the Register Encryption Account
screen does not appear.

Trend Micro Encryption for Email User’s Guide
3-16
Two Sign In Fields
When JavaScript is disabled, the Zero Download Reader screen displays two fields.
You can either select your email address from the first drop-down list or type into the
second field.
Registering on the Web
If you have never installed Encryption for Email but you have received a private email
message, you can register your email address to read the private message without having
to download and install the Encryption for Email client.
After you have registered on the web, you can read your private message. You can also
transfer this registration to a new or existing Encryption for Email software installation
(see Using Encryption for Email on Multiple Computers on page 1-21).
The Register Encryption Account screen consists of four main sections:
• Selecting a Service Provider on page 3-17
• Selecting a Password on page 3-19
• Selecting and Answering Your Security Question on page 3-20
• Selecting an Identification Word on page 3-20
Complete all four sections to complete your registration.
Note
F
or security reasons, registration is not supported on mobile devices.
Receiving Private Email Without the Client
3-17
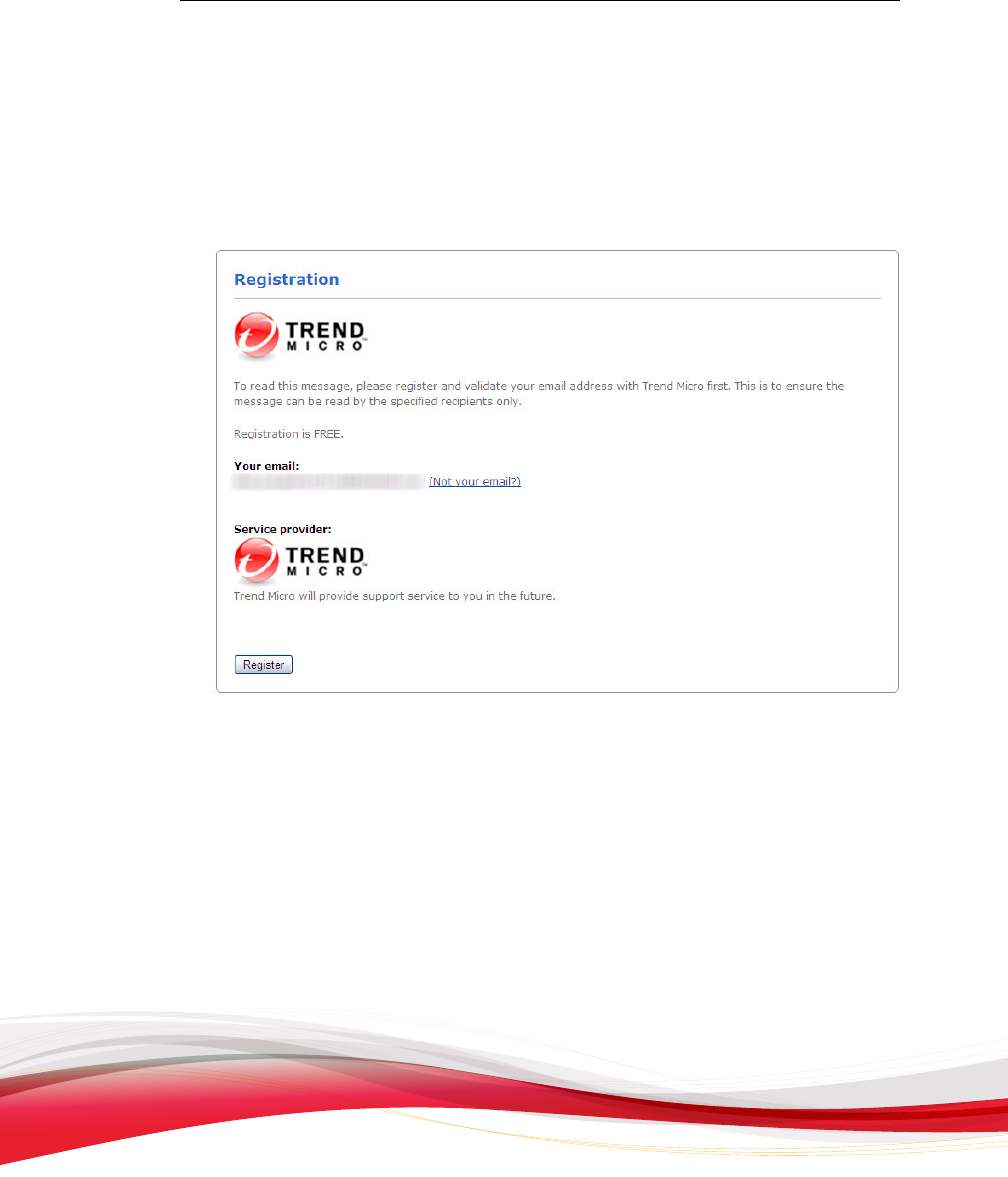
Selecting a Service Provider
This option is available when the service is supported by multiple service providers. The
Zero Download interface displays the branding elements of your selected service
provider.
FIGURE 3-10. The
Registration screen

Trend Micro Encryption for Email User’s Guide
3-18
On the Registration screen
, select a service provider from the Service provider field
and click Register. The Register Encryption Account screen appears.
FIGURE 3-11. The
Register Encryption Account screen
Receiving Private Email Without the Client
3-19
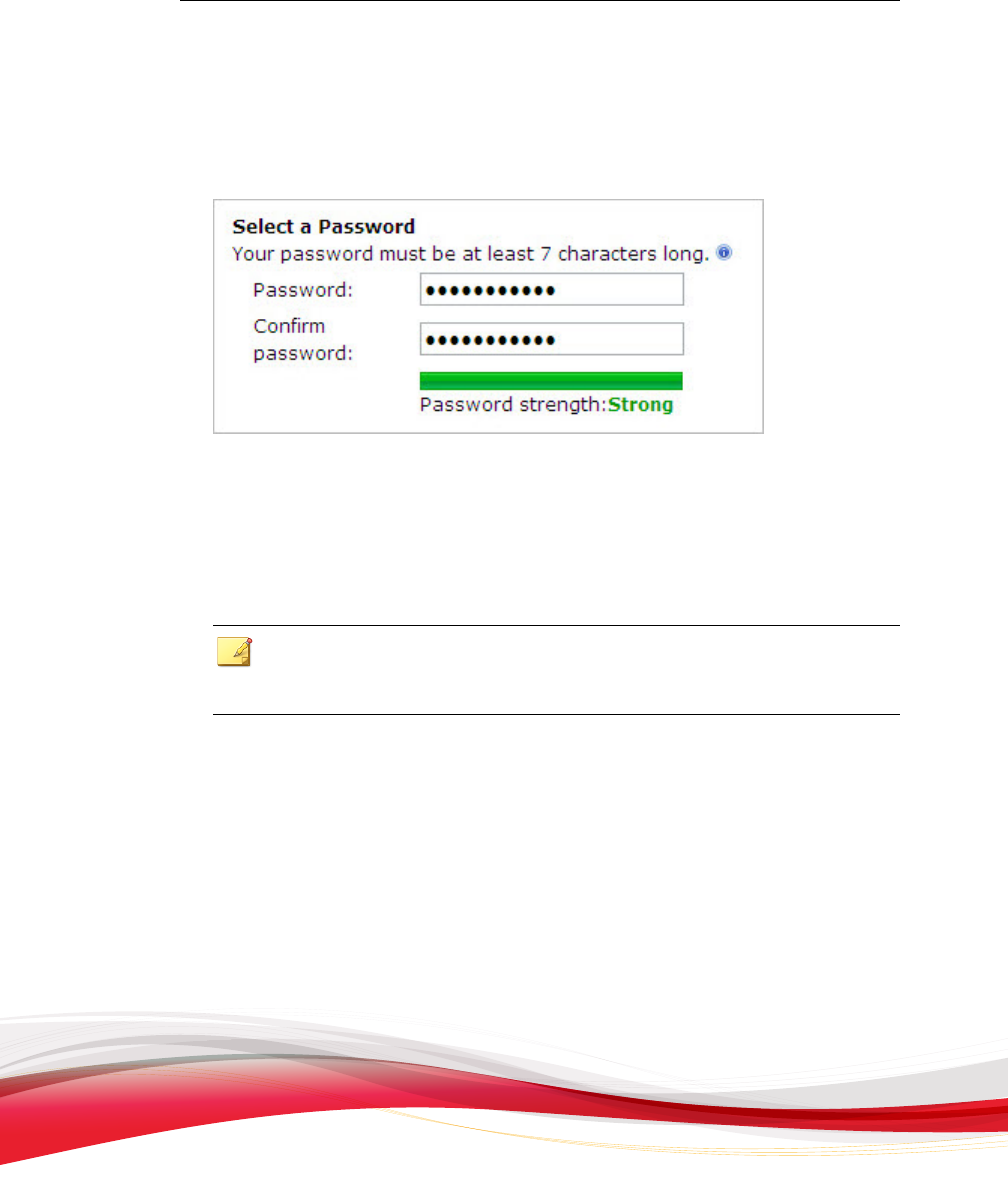
Selecting a Password
A password-strength indicator in this section helps you create a strong password.
FIGURE 3-12. The
Register Encryption Account screen - Select a Password section
Encryption for Email passwords have the following requirements:
• Must be at least seven (7) characters long
• Cannot contain spaces or ampersands (“&” characters)
Note
Your password
is case-sensitive. For a stronger password, include special characters, such
as numbers and symbols (except the ampersand [&] symbol).
Trend Micro Encryption for Email User’s Guide
3-20
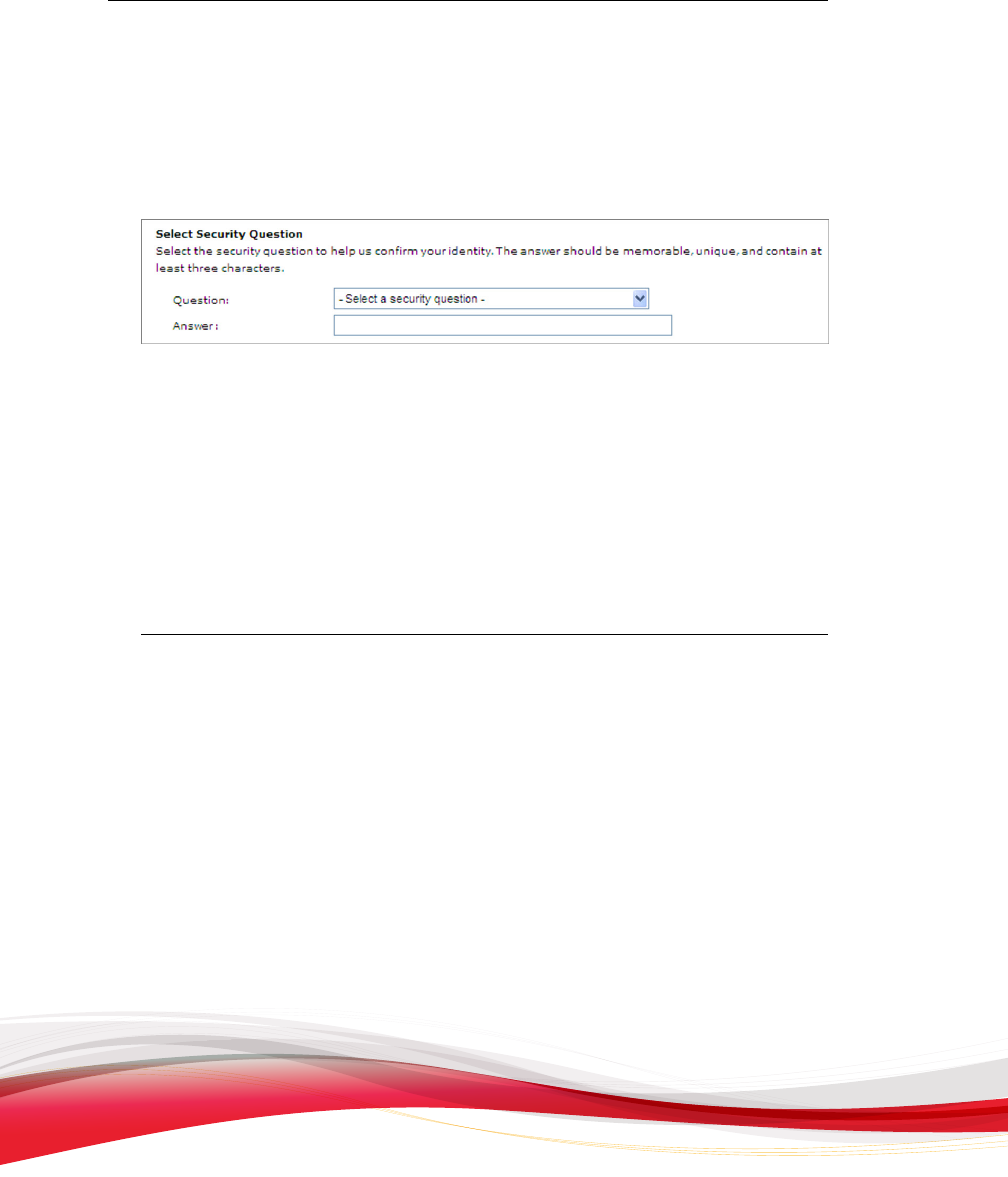
Selecting and Answering Your Security Question
In the Security Question section, you must select and answer one question. Be sure to
remember the answer to the selected question.
FIGURE 3-13. The
Register Encryption Account screen - Select Security Questions
section
Selecting an Identification Word
Your identification word helps if you need to reset a lost password. Its purpose is to
prove that the Reset Password screen that you are viewing is valid and not a phishing
site.
When you see your identification word, you know that it is safe to answer the security
questions shown.
Procedure
1. Open the received email message in your browser using your webmail account and
follow the instructions in Reading a Private Email Message on page 3-4.
Because you have not yet registered the selected email address, the Email Address
Not Registered screen appears.
2. Click Register Now.
The Register Encryption Account screen appears.
3. Optionally, to change the email address shown, click Change and select or type a
different email address in the screen that displays.
4. Type and confirm your password.
5. Select and answer three required Security Questions.

Receiving Private Email Without the Client
3-21
6. T
ype an Identification Word, which you can use if you ever forget your password.
7. In the Type the Code field, type the graphical code shown, which verifies that you
are not an automated script.
8. Click Continue.
Trend Micro sends an activation email to your webmail account.
Tip
If you
do not receive the activation message within a minute, check your Spam folder.
Mail servers often send this type of messages to the Spam folder.
9. Access
your recipient webmail account, open the activation message, and click the
Please click here to validate your identity link. Your browser is redirected to a
verification screen with password and security question fields.
10. Type your password and answer your previously selected security question.
11. Click Continue.
Your email address is now registered to read private email messages using Zero
Download.
You can now return to the downloaded file attachment and read the private message as
explained in Reading a
Private Email Message on page 3-4.

4-1
Chapter 4
Configuring Encryption for Email
After installing
Encryption for Email and registering an email address, you can configure
the software to meet your individual needs.
Topics include:
• Accessing the Preferences Screen on page 4-2
• Managing Encryption for Email Keys on page 4-10
• The About Encryption for Email Window on page 4-19

Trend Micro Encryption for Email User’s Guide
4-2
Accessing the Preferences Screen
You can access
the Encryption for Email Preferences screen:
• From the Encryption for Email Tray Tool menu, as described in Using the
Encryption for Email Tray Tool Menu on page 2-9
• From the Preferences icon in any Encryption for Email application, such as your
email program, as described in Using Encryption for Email in Your Email Program on
page 2-2
Note
When using
Encryption for Email in a corporate environment, your corporate
administrator might have set the values of some sections for you and hidden some controls
from view.
Preferences Screen General Options
T
he Encryption for Email Preferences screen contains five tabs. By default, it opens
to the General Options tab. In this tab, you can select the email address that is always
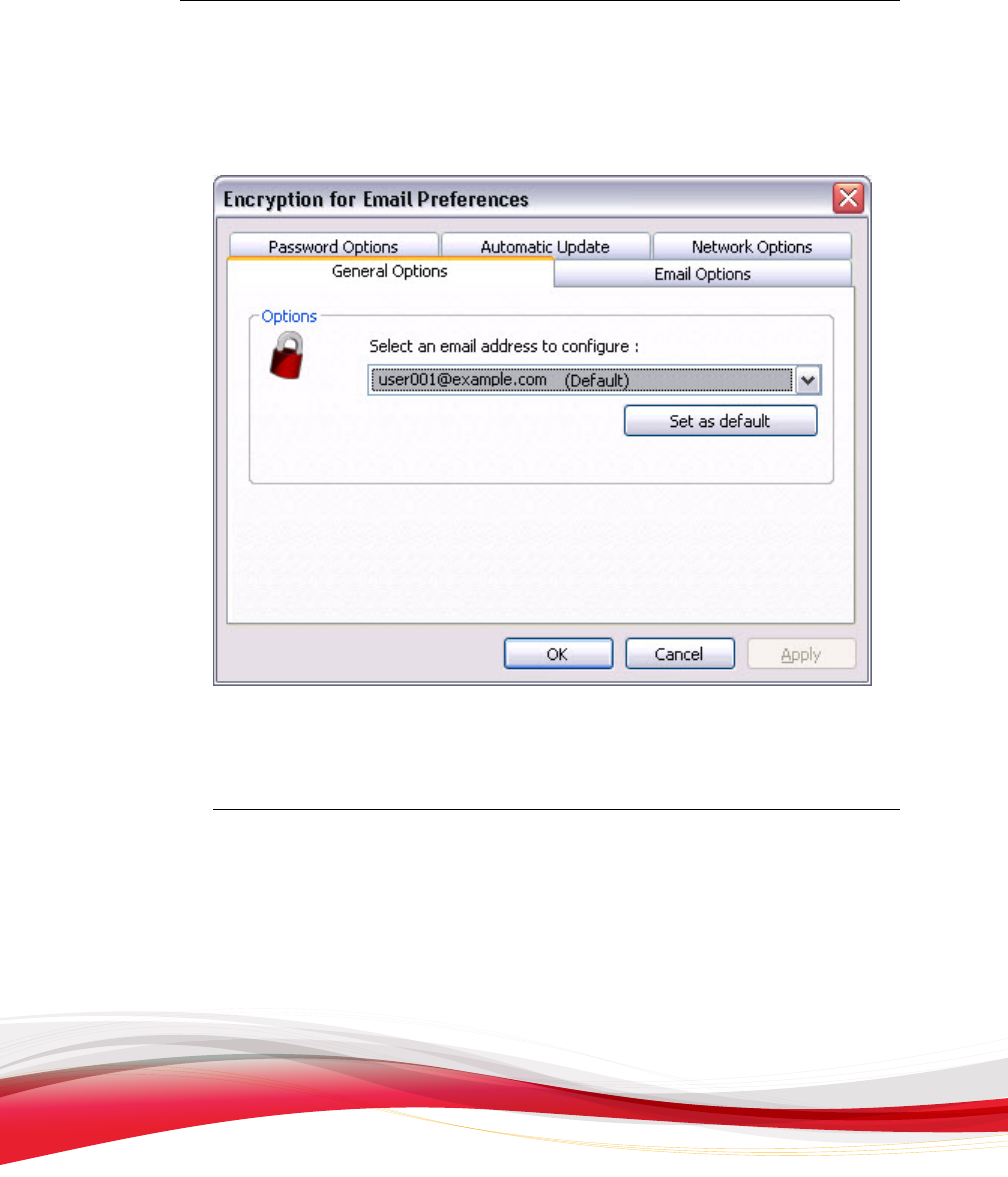
Configuring Encryption for Email
4-3
able to read private messages. There might be many email addresses on your computer if
different
users access their email from this computer.
FIGURE 4-1. T
he Preferences screen - General Options tab
Changing the Default Email Address
Procedure
1. Open the Encryption for Email Preferences screen as explained in Accessing the
Preferences Screen on page 4-2.
2. Click the General Options tab.
3. From the Select an address to configure drop-down list, select the email address
to use as the default.
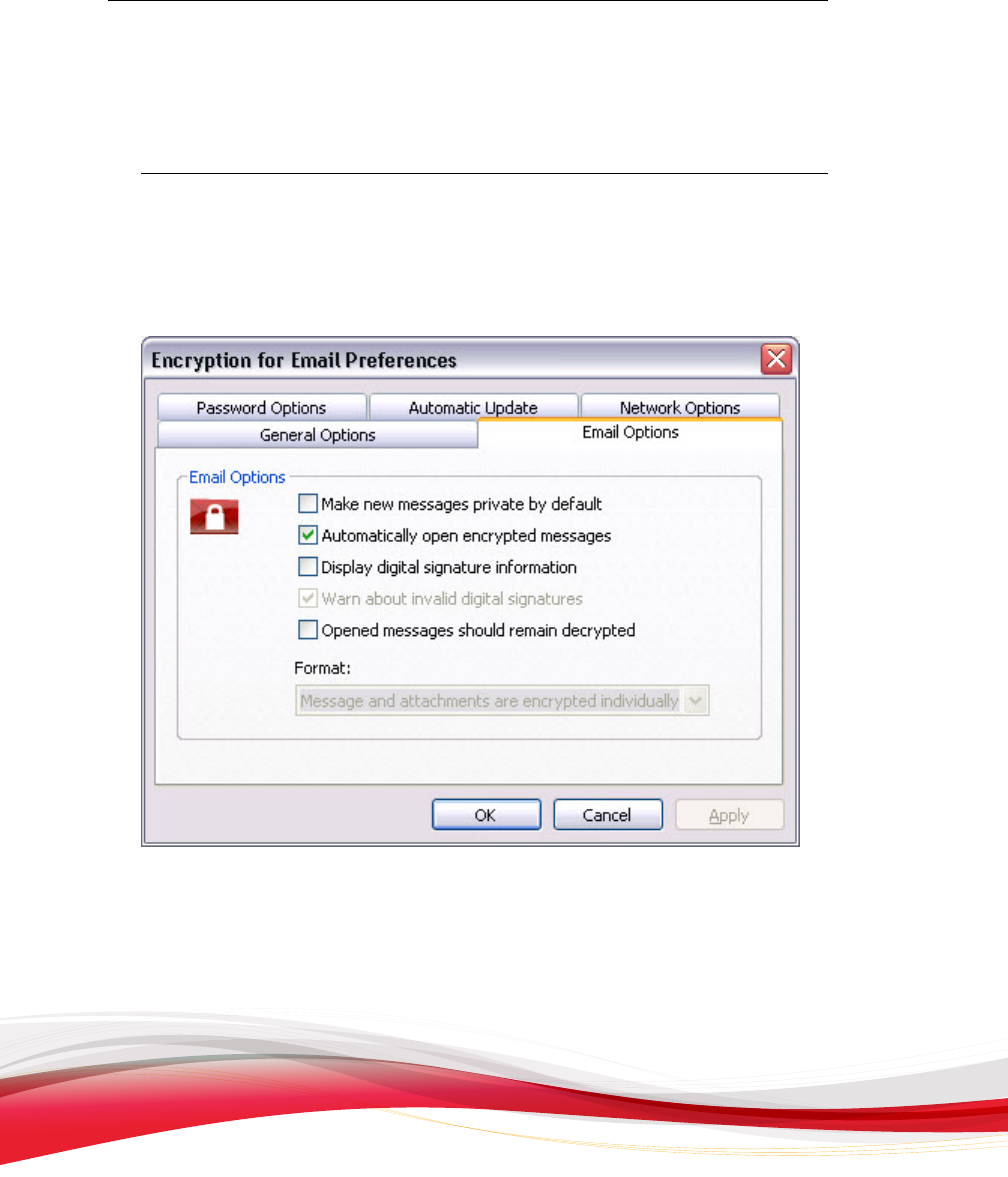
Trend Micro Encryption for Email User’s Guide
4-4
4. Click
Set as default.
5. Click Apply to save your changes.
Preferences Screen Email Options Tab
T
he options listed in the Email Options tab are only used if you have a supported
email client. (See System Requirements on page 1-2 for a full list of supported email clients.)
FIGURE 4-2. T
he Preferences screen - Email Options tab
On this tab, you can select the following options:
• Make new messages private by default
• Automatically open encrypted messages

Configuring Encryption for Email
4-5
• Display digital signature
information
• Warn about invalid digital signatures
• Opened messages should remain decrypted
• Choose between the following two message formats:
• Messages and attachments are encrypted individually
• Messages and attachments are encrypted together
Changing Any Settings in the Email Options Tab
Procedure
1. Open the Encryption for Email Preferences screen as explained in Accessing the
Preferences Screen on page 4-2.
2. Click the Email Options tab.
3. Select or clear the check box next to each option to change.
4. Click Apply to save your changes.
Preferences Screen Password Options Tab
In the
Password Options tab, you can configure:
• Whether the system automatically remembers passwords
• The length of time passwords are remembered
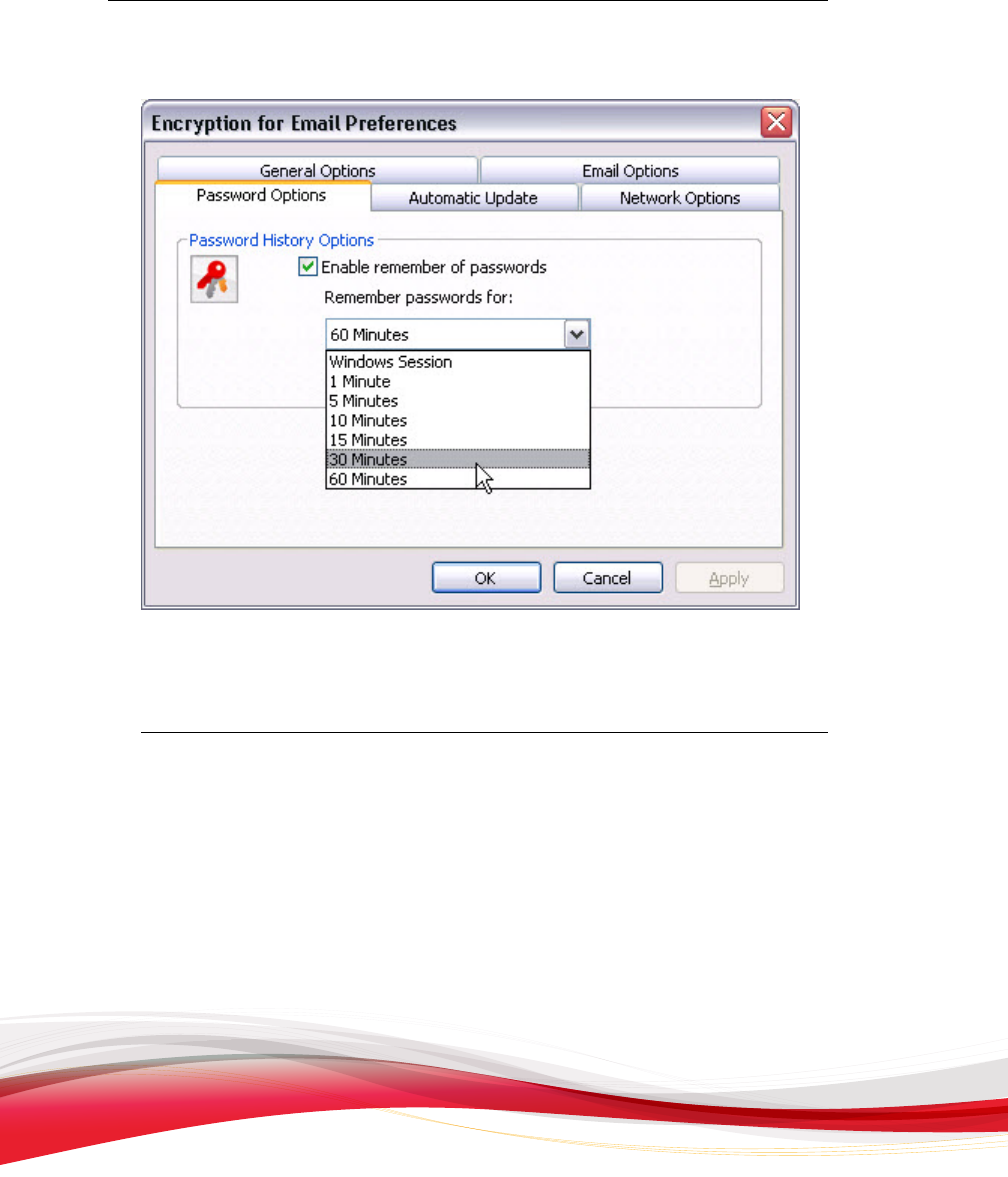
Trend Micro Encryption for Email User’s Guide
4-6
FIGURE 4-3. T
he Preferences screen - Password Options tab
Setting Encryption for Email to Remember Passwords
Procedure
1. Open the Encryption for Email Preferences screen as explained in Accessing the
Preferences Screen on page 4-2.
2. Click the Password Options tab.
3. Select Enable remembering of passwords.
4. From the Remember passwords for drop-down list, select the length of time to
remember passwords from the following options:
• Windows Session
Configuring Encryption for Email
4-7
• 1 minute
• 5 minutes
• 10 minutes
• 15 minutes
• 30
minutes
• 60 minutes
Note
If you
select the Windows Session option, you only have to enter your password
once during a single Windows logon session.
5. Click
Apply to save your changes.
Preferences Screen Automatic Update Tab
In the
Automatic Update tab, you can configure how you receive automatic software
updates.
By default, Encryption for Email checks for updates every 24 hours and immediately
after installation, as described in Checking for Updates on page 1-24.
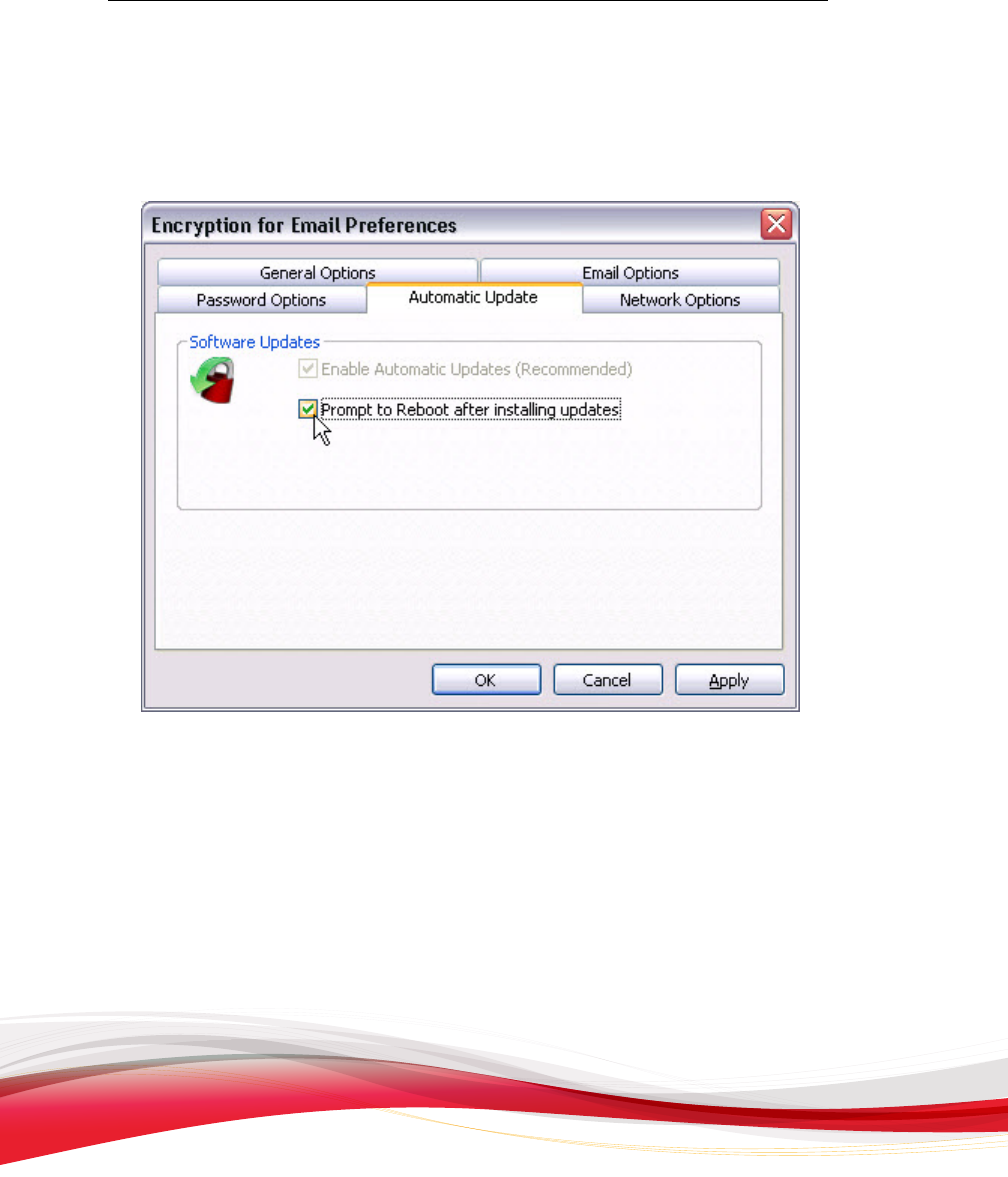
Trend Micro Encryption for Email User’s Guide
4-8
If the Enable
Automatic Updates (Recommended) option is selected, updates are
automatically downloaded and installed. If the check box is not selected, when an update
is available, you are asked whether you want to download and install the update.
FIGURE 4-4. T
he Preferences screen - Automatic Update tab
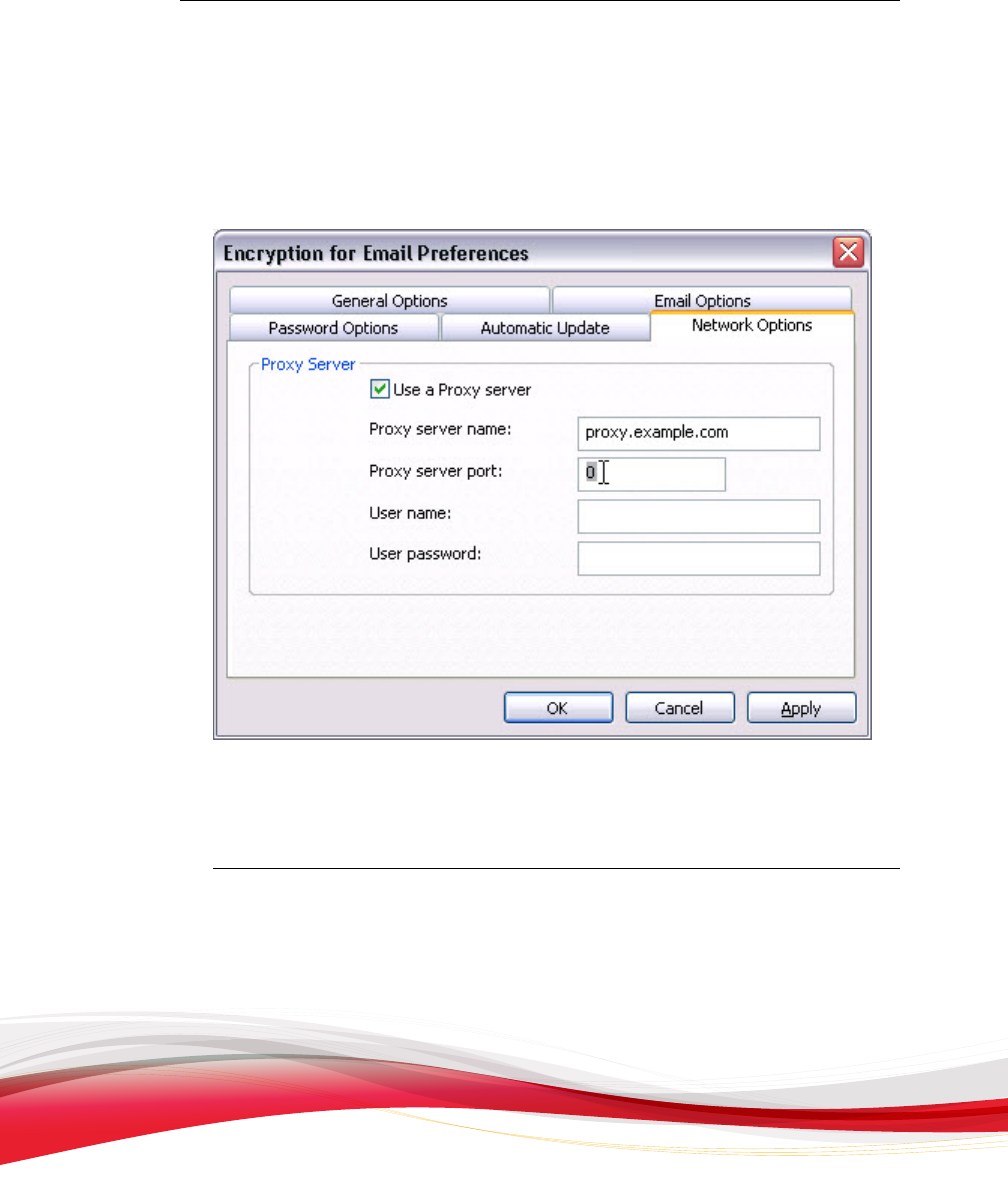
Configuring Encryption for Email
4-9
Preferences Screen Network Options Tab
In the N
etwork Options tab you cab configure your settings for accessing the Internet,
for example, proxy server settings.
FIGURE 4-5. T
he Preferences screen - Network Options tab
Using a Proxy Server
Procedure
1. Open the Encryption for Email Preferences screen as explained in Accessing the
Preferences Screen on page 4-2.
2. Click the Network Options tab.

Trend Micro Encryption for Email User’s Guide
4-10
3. Select
Use a proxy server.
4. Type the proxy server name or address.
5. Type the proxy server port.
6. If the proxy server requires credentials, type your user name and password in the
fields provided.
7. Click Apply to save your changes.
Managing Encryption for Email Keys
Encryption for
Email includes a tool for managing encryption keys. Use the Encryption
for Email Key Manager to:
• View the Encryption for Email keys on your system, as described in Viewing the
Encryption for Email Keys on page 4-13
• Export the Encryption for Email keys, as described in Exporting the Encryption for
Email Keys on page 4-15
• Delete the Encryption for Email keys, as described in Deleting the Encryption for
Email Keys on page 4-17
• Protect a new email address, as described in Protecting a New Email Address on page
4-18
Opening Key Manager
Use one of the following options to access the Encryption for Email Key Manager.
Procedure
• From the Windows Start menu, click Start > Programs > Trend Micro
Encryption for Email > Key Manager.
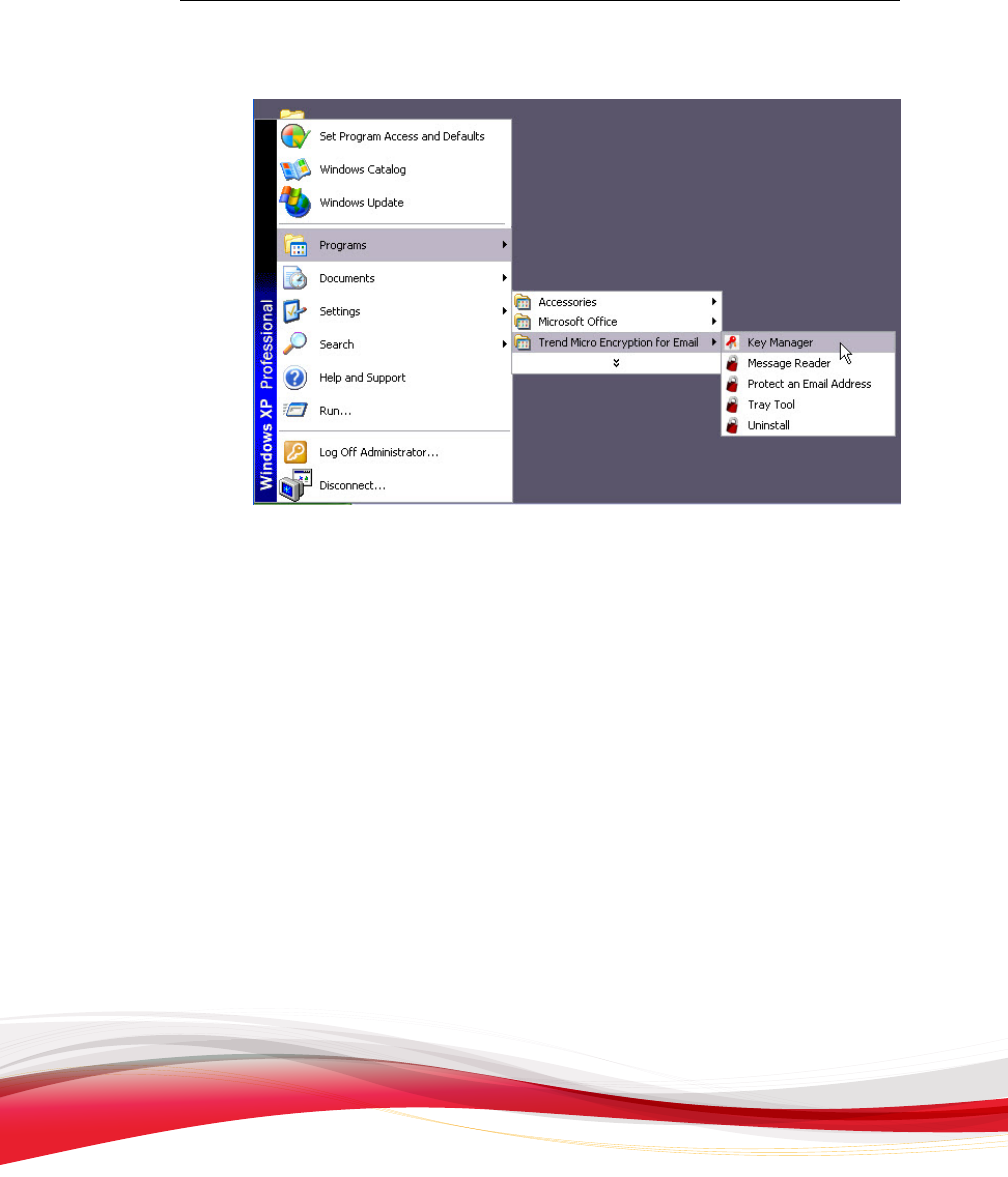
Configuring Encryption for Email
4-11
FIGURE 4-6. Accessing the Encryption
for Email Key Manager
The Key Manager screen appears.
• Alternatively, hold down the Ctrl key and click the Encryption for Email icon in
the Windows system tray to open the Encryption for Email Tray Tool Advanced
menu.
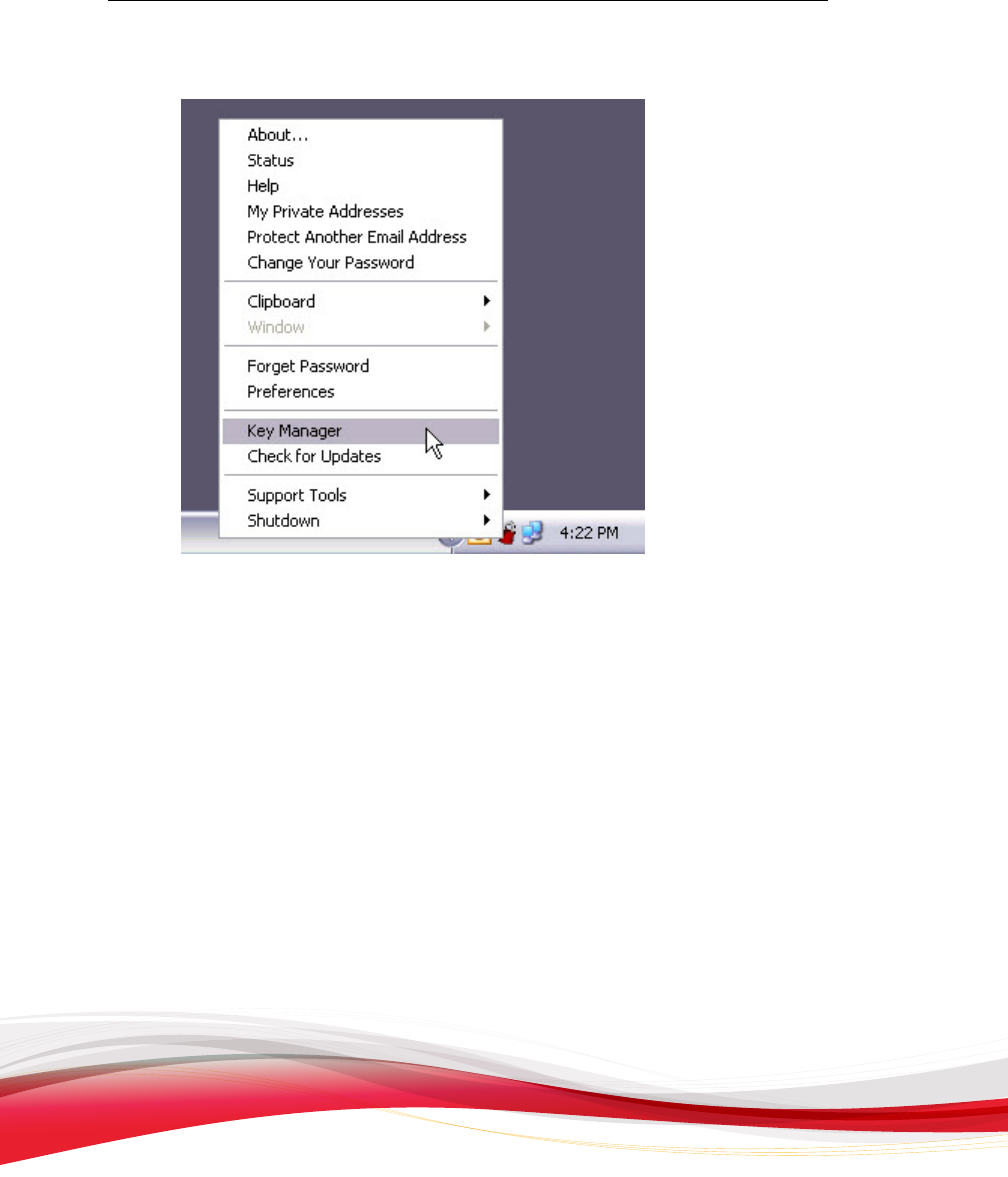
Trend Micro Encryption for Email User’s Guide
4-12
FIGURE 4-7. Accessing the Key Manager
from the Encryption for Email Tray Tool
Advanced menu
From the Encryption for Email Tray Tool Advanced menu, click Key Manager.
The Key Manager screen appears.
The Encryption for Email Key Manager screen consists of three panes:
• Left pane: Shows the key hierarchy with keys grouped by their identity
• Top right pane: Shows the individual keys within the group selected in the left
pane
• Bottom right pane: Shows the details of the selected key
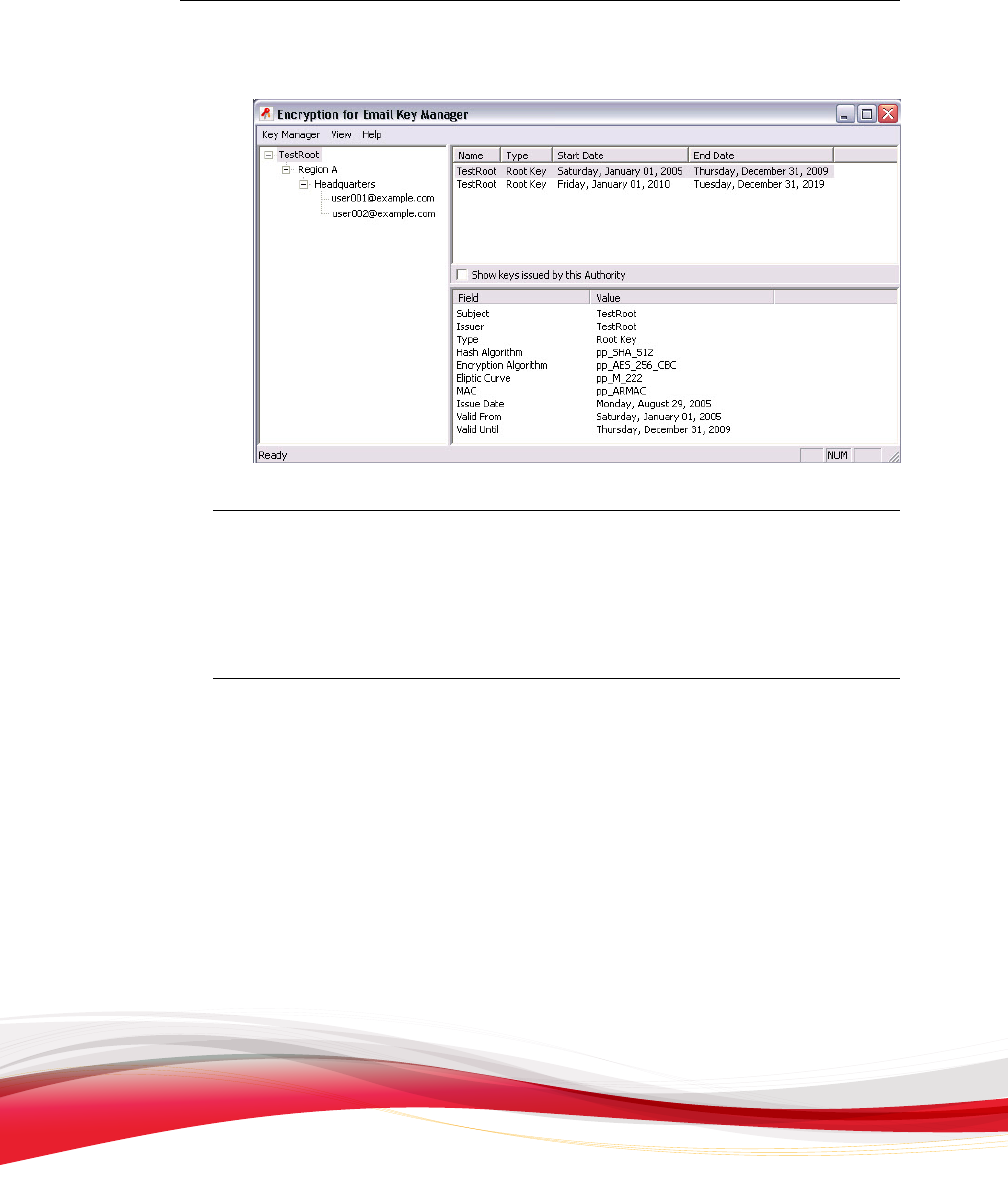
Configuring Encryption for Email
4-13
FIGURE 4-8. The Encryption
for Email Key Manager screen
Viewing the Encryption for Email Keys
Using the
Encryption for Email Key Manager, you can view the details of a private or
public key.
Procedure
1. Open the Key Manager, as described in Opening Key Manager on page 4-10.
2. In the top right pane, select the key.
3. Do one of the following:
• Right-click the selected key and click View Key from the menu.
• Double-click the selected key.
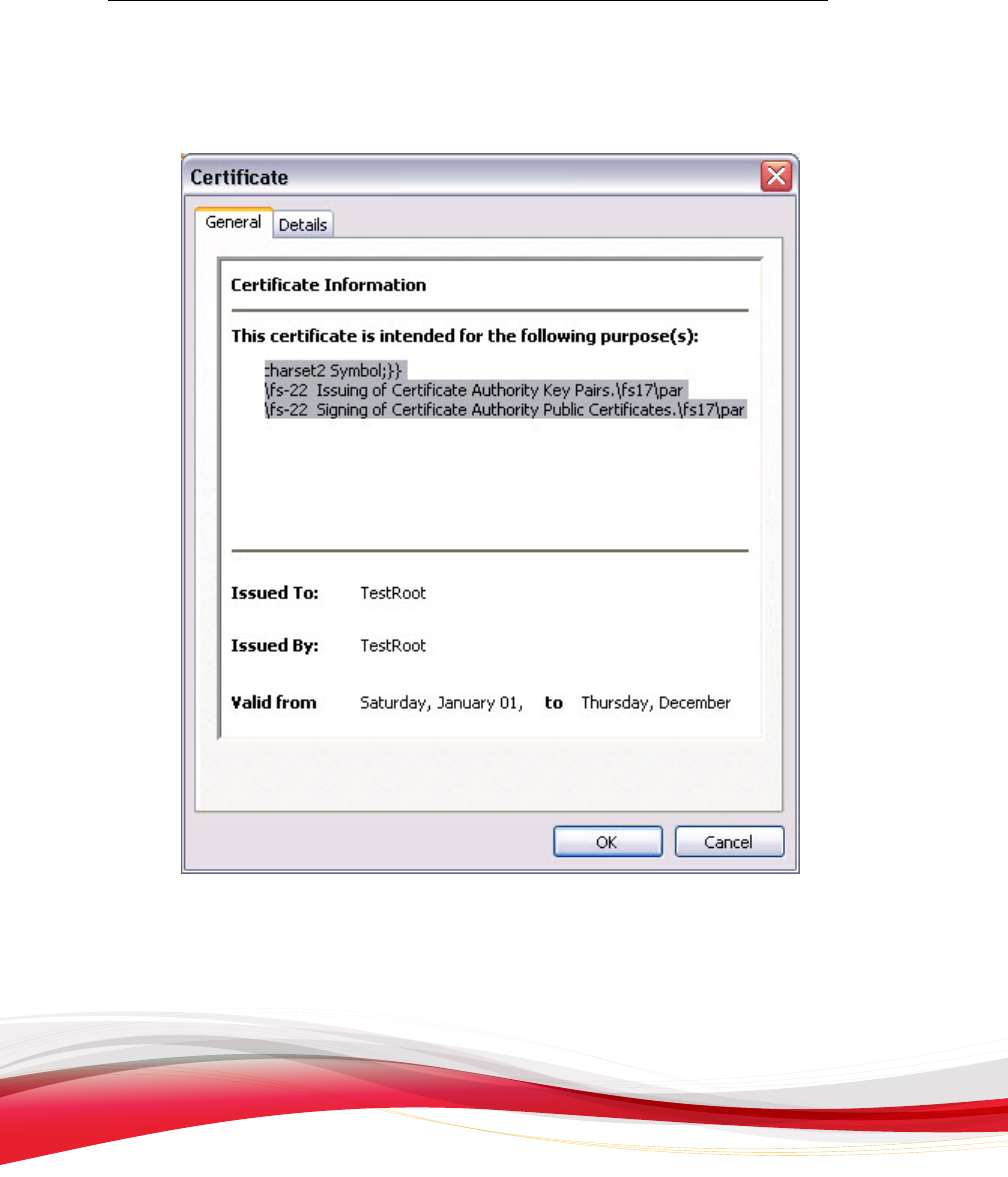
Trend Micro Encryption for Email User’s Guide
4-14
The Certificate screen
appears.
FIGURE 4-9. The Encryption
for Email Key Manager Certificate screen - General
tab
4. Click the Details tab.
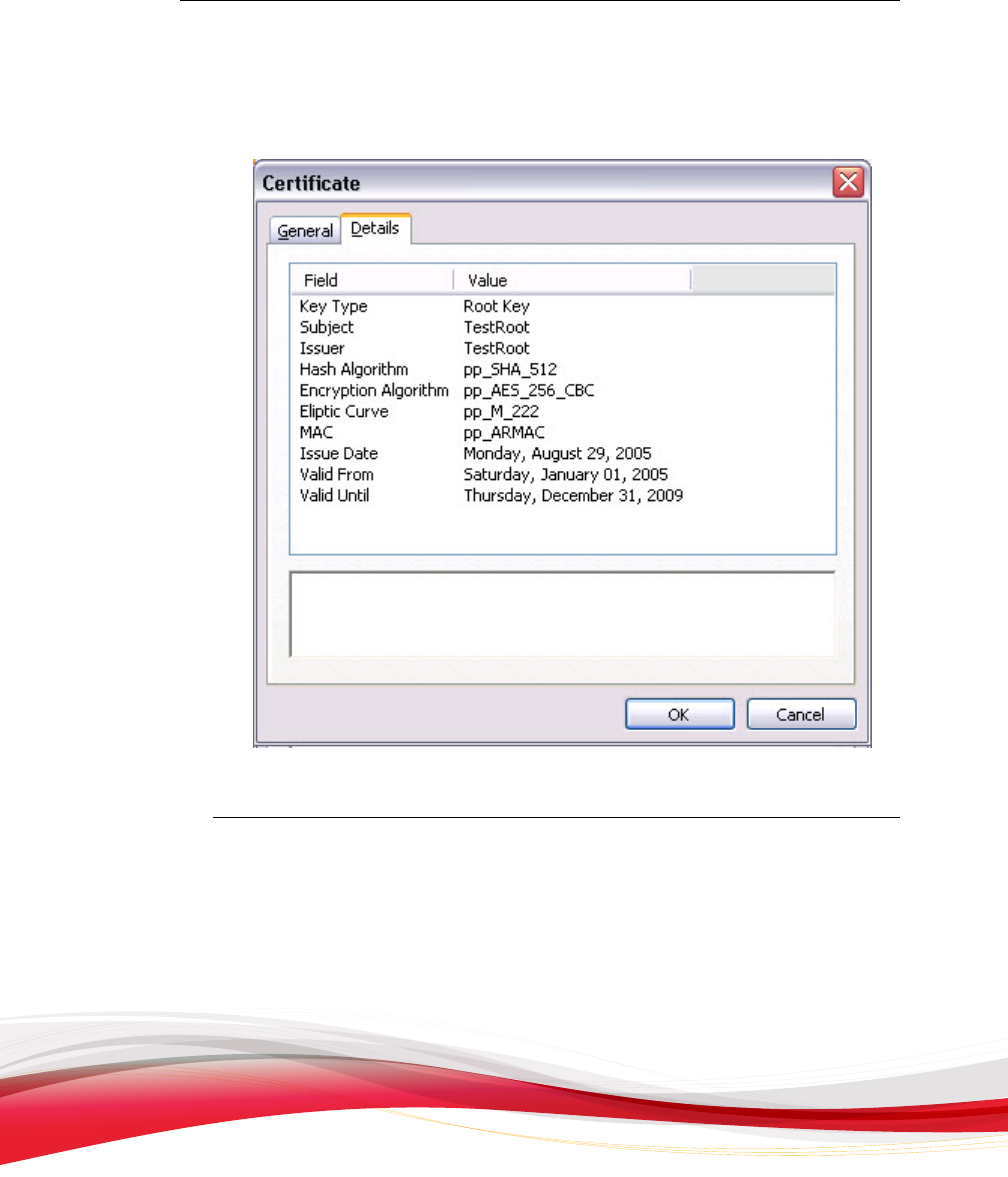
Configuring Encryption for Email
4-15
The Certificate screen
displays detailed information about the key.
FIGURE 4-10. The Encryption
for Email Key Manager Certificate screen - Details
tab
Exporting the Encryption for Email Keys
You can export
private and public keys.
You might want to export your private key if, for example, you are going to use a
computer that has no network access but you have private files saved on it. You can
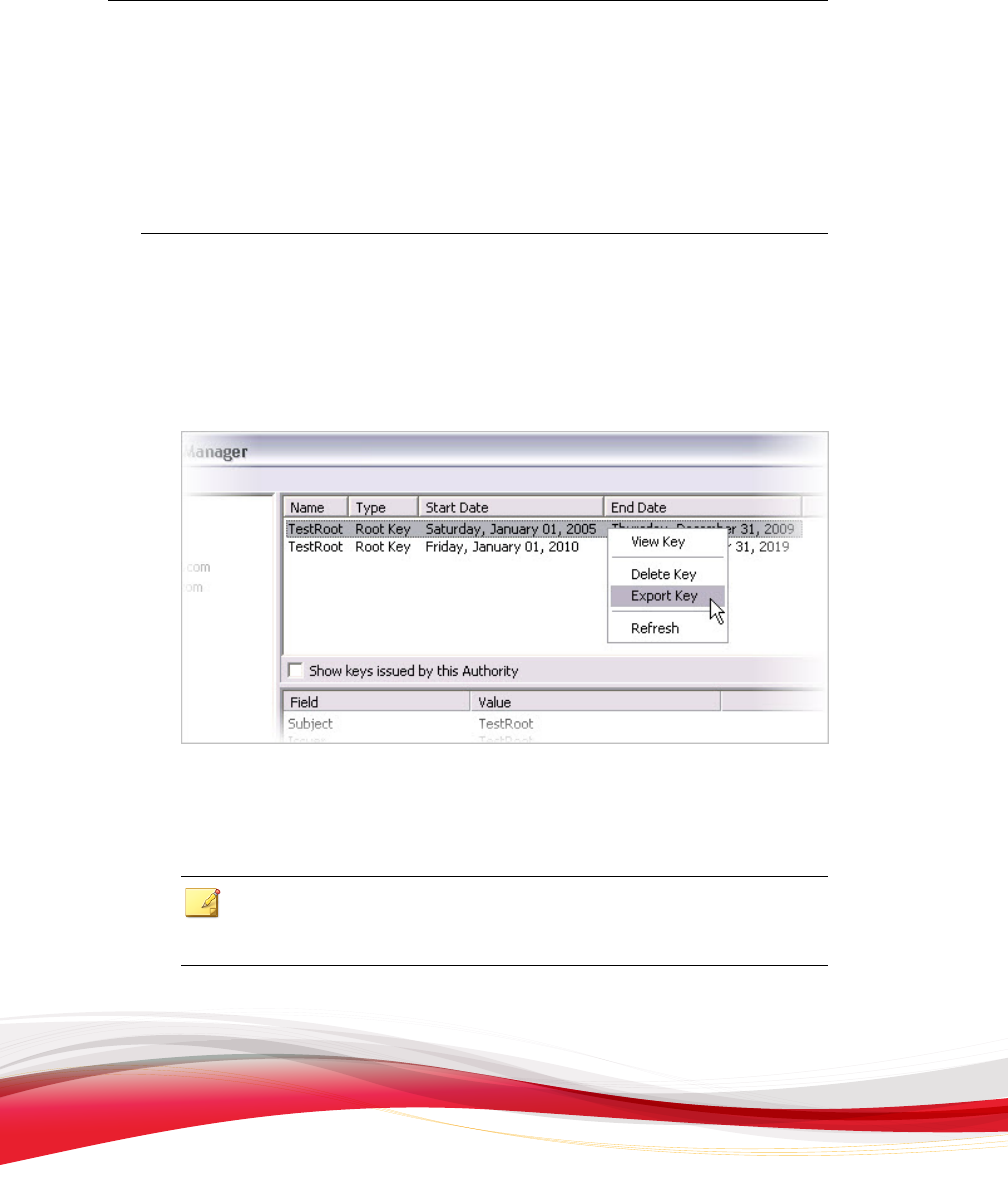
Trend Micro Encryption for Email User’s Guide
4-16
save the private key to a disk or USB drive and then import it to the offline computer
using
the Encryption for Email Key Manager.
You might want to export your public key, for example, to make files private on an
offline computer.
Procedure
1. Open the Key Manager, as described in Opening Key Manager on page 4-10.
2. Select the key to export from the key pane in the top right of the Encryption for
Email Key Manager screen.
3. Right-click the selected key and click Export Key from the menu.
FIGURE 4-11. Export a key from the Encryption
for Email Key Manager
4. The Save As screen appears.
5. Keep the key name shown or rename it before saving it locally.
Note
The Encryption for Email Key Manager saves exported keys with a *.pppub file
extension for public keys and a *.ppprv file extension for private keys.
6. Click
Save.
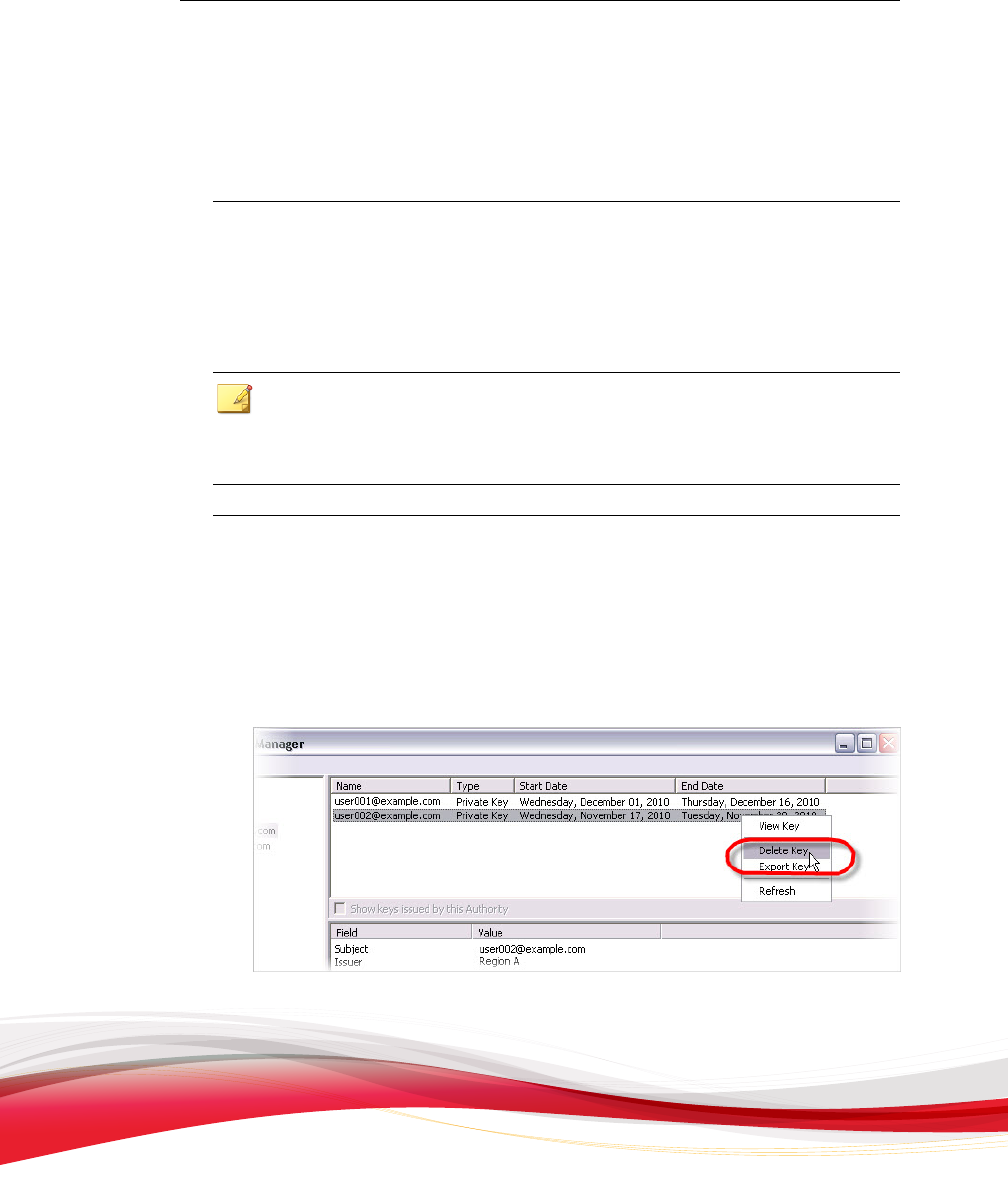
Configuring Encryption for Email
4-17
Encryption for Email exports the key and then displays a “successfully exported”
message
.
7. Click OK.
Deleting the Encryption for Email Keys
If
you are using a shared computer, you might want to delete your keys for privacy
reasons and reinstall them each time you use that computer.
Note
If
the email address of the message recipient is registered and you try to read a private
message on a computer that does not have the private key, Encryption for Email
automatically downloads the key.
Procedure
1. O
pen the Key Manager, as described in Opening Key Manager on page 4-10.
2. From the key pane in the top right of the Encryption for Email Key Manager
screen, select the key to delete.
3. Right-click the selected key and click Delete Key from the menu.
FIGURE 4-12. Delete a key
from the Encryption for Email Key Manager

Trend Micro Encryption for Email User’s Guide
4-18
4. A confirmation window appears
.
5. Click Yes.
Protecting a New Email Address
You can launch the
Encryption for Email Protection Wizard from the Encryption for
Email Key Manager.
Procedure
1. Open the Key Manager, as described in Opening Key Manager on page 4-10.
2. From the Key Manager menu, click Key Manager > Register New Email
Address.
FIGURE 4-13. Register a new email address from the Encryption for
Email Key
Manager
The Protect Email Address Wizard starts.
3. Complete the Wizard, as described in Protecting Your Email Address on page 1-20.

Configuring Encryption for Email
4-19
The About Encryption for Email Window
A
bout Encryption for Email is an informational window that displays software
installation information, copyright notices, and user information.
You can access the About Encryption for Email window:
• Through the Encryption for Email icon on the Windows system tray
• By clicking About in any Encryption for Email application or email program plug-
in
Viewing the About Encryption for Email Window from the
Encryption for Email Menu
Procedure
1. Click the Encryption for Email icon in the Windows system tray.
The Encryption for Email Tray Tool menu appears.
2. Click About.
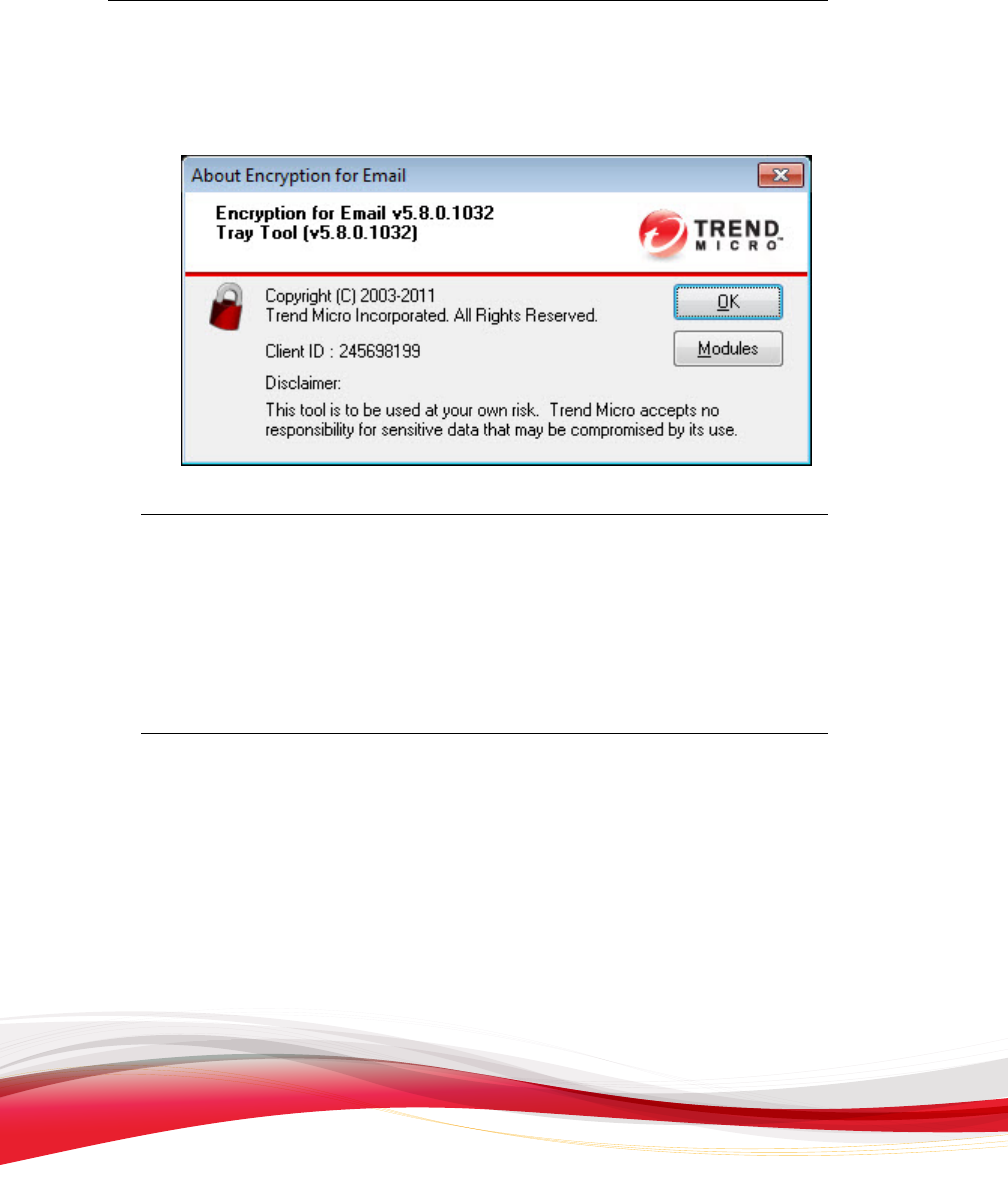
Trend Micro Encryption for Email User’s Guide
4-20
The About E
ncryption for Email window appears.
FIGURE 4-14. The About
Encryption for Email window
The Encryption for Email Modules Screen
You can access
the Encryption for Email Modules screen from the About
Encryption for Email window. It shows the versions of all files installed during the
Encryption for Email software installation. This information is provided for support
purposes only.
Procedure
1. Click the Encryption for Email icon in the Windows system tray.
The Encryption for Email Tray Tool menu appears.
2. Click About.
The About Encryption for Email window appears.
3. Click Modules.
The Encryption for Email Modules screen appears.
Configuring Encryption for Email
4-21
WARNING!
The
Modules tool is intended for use by Support staff when trouble shooting. Use
the Modules tool at your own risk. Trend Micro accepts no responsibility for
sensitive data that may be compromised if you use this tool without direct guidance
from Support.

5-1
Chapter 5
Managing Your Account Online
Using the Encryption P
ortal website, you can manage your Encryption for Email
account.
Topics include:
• Encryption Portal on page 5-2
• Signing in to the Encryption Portal Website on page 5-2
• Managing Your Security Questions on page 5-5
• Removing Encryption for Email on page 5-6

Trend Micro Encryption for Email User’s Guide
5-2
Encryption Portal
On the
Encryption Portal website, you can manage your security questions and
answers. The website also provides many useful features that are explained on the site
itself.
Signing in to the Encryption Portal Website
The Encryption Portal website requires that you sign in. After signing in, you can
manage your security questions and access other useful features.
Procedure
1. Copy and paste the following URL into the address field of your browser:
https://www.myprivatepost.com/
The Encryption Portal website
loads in your browser.
FIGURE 5-1. The Encryption
Portal website initial view
2. Click the Sign In link.
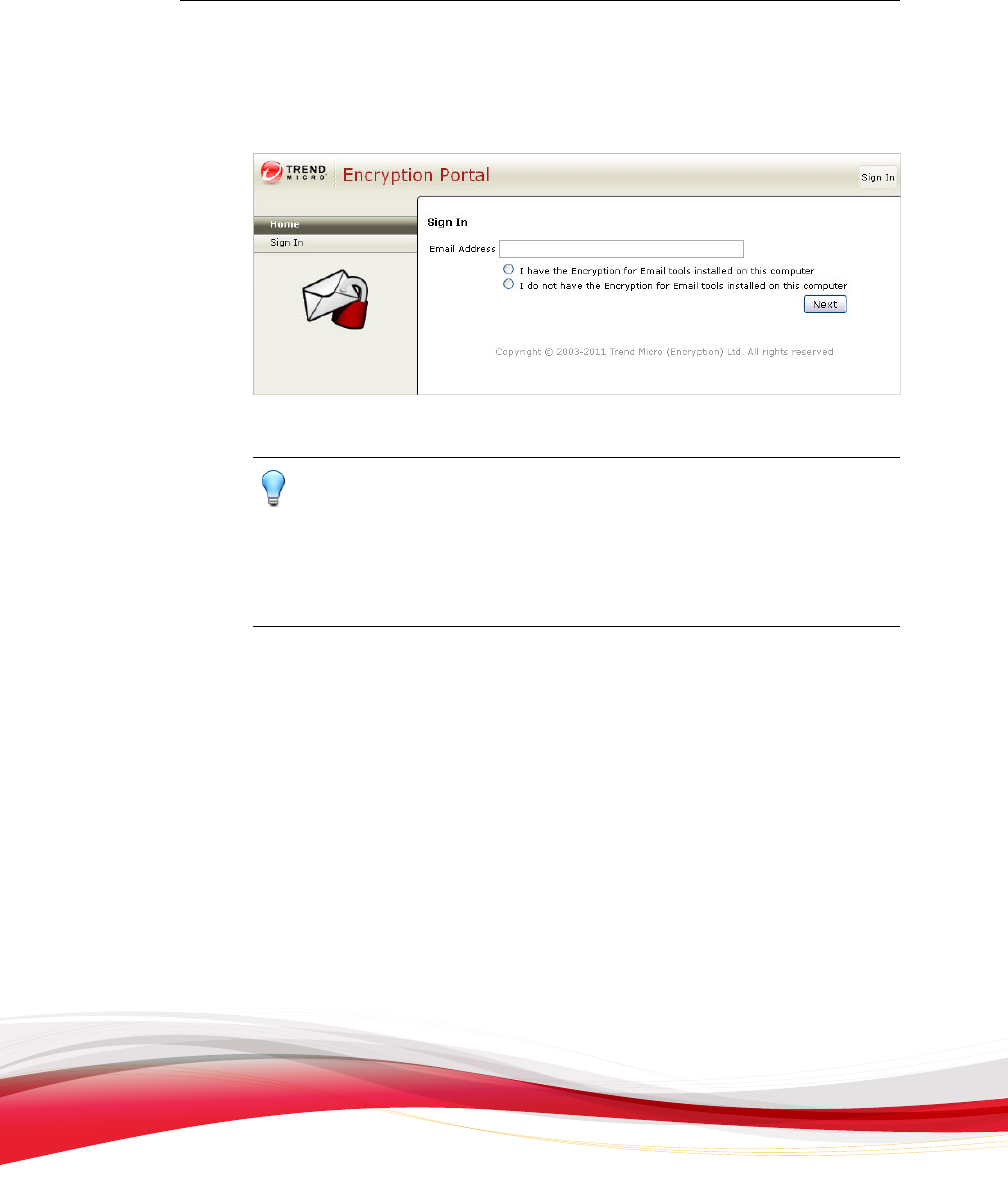
Managing Your Account Online
5-3
The Sign In screen
appears in your web browser window.
FIGURE 5-2. The Encryption
Portal Sign In screen
Tip
If you
have Encryption for Email installed and are using Microsoft Internet Explorer,
you might see the yellow information bar asking if you want to run the Encryption
for Email Sign On Control from Trend Micro.
Use of this ActiveX control enables a much easier sign-in process. For more
information about the Sign On control, see Trend Micro Sign On Control on page 5-4.
3. Type
your email address.
4. Select one of the following:
• I have the Encryption for Email tools installed on this computer
• I do not have the Encryption for Email tools installed on this computer
5. Click Next.
6. Follow the instructions on the website to complete the sign-in process. You are
now signed in to the Encryption Portal website.
7. Type your email address.
8. Select one of the following:
• I have the Encryption for Email tools installed on this computer
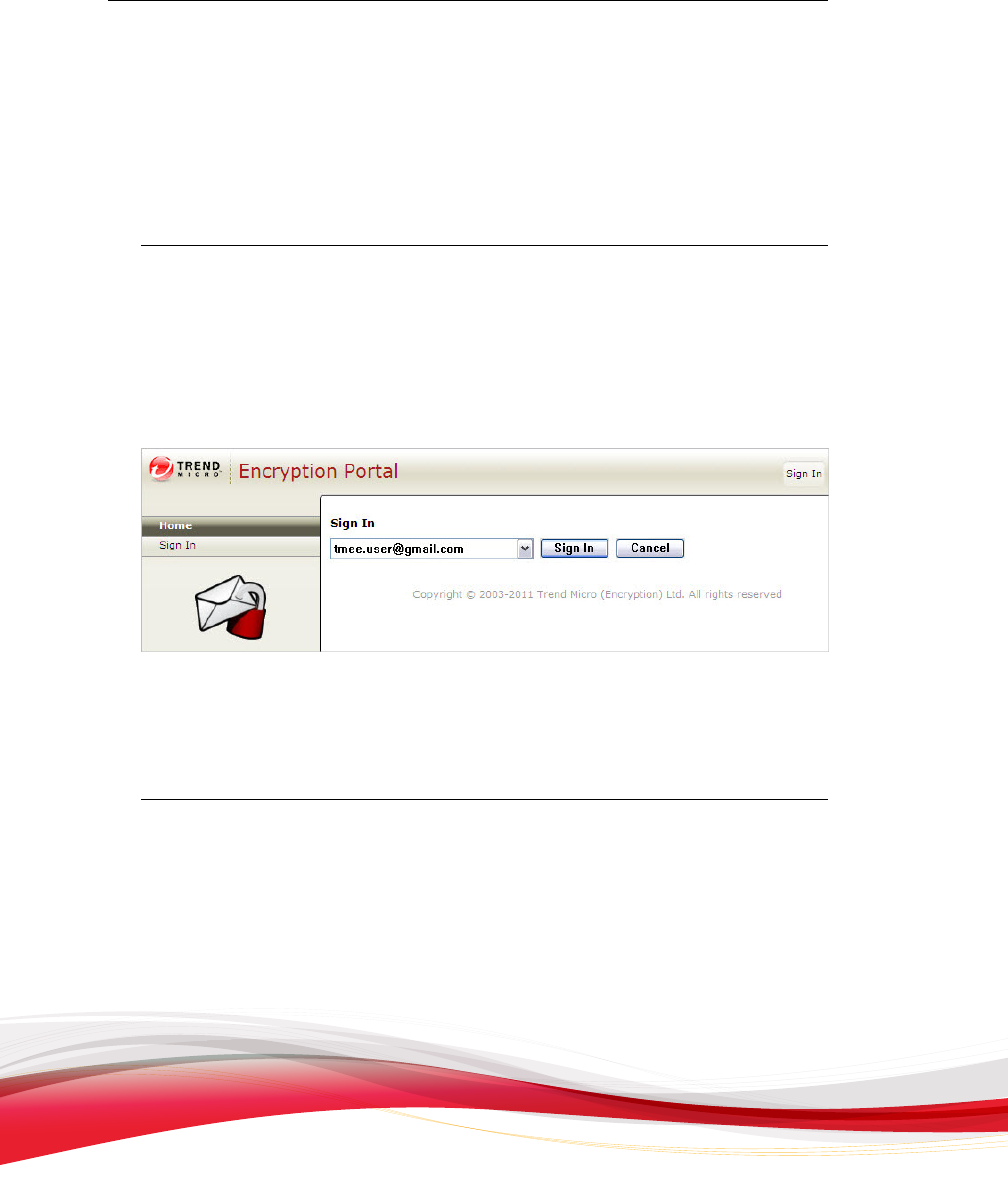
Trend Micro Encryption for Email User’s Guide
5-4
• I do not have
the Encryption for Email tools installed on this computer
9. Click Next.
10. Follow the instructions on the website to complete the sign-in process. You are
now signed in to the Encryption Portal website.
Trend Micro Sign On Control
The Trend Micro Sign On Control enables you to quickly and easily sign in to the
Encryption Portal website if you have the Encryption for Email software installed and
are using Microsoft Internet Explorer.
FIGURE 5-3. The Encryption Portal Sign In screen when using the Trend Micro Sign
On Control
Using Trend Micro Sign On Control
Procedure
1. Select your email address from the drop-down list.
2. Click Sign In.
The Encryption for Email: Please enter your password screen appears.
3. Type your password in the field provided and click OK.
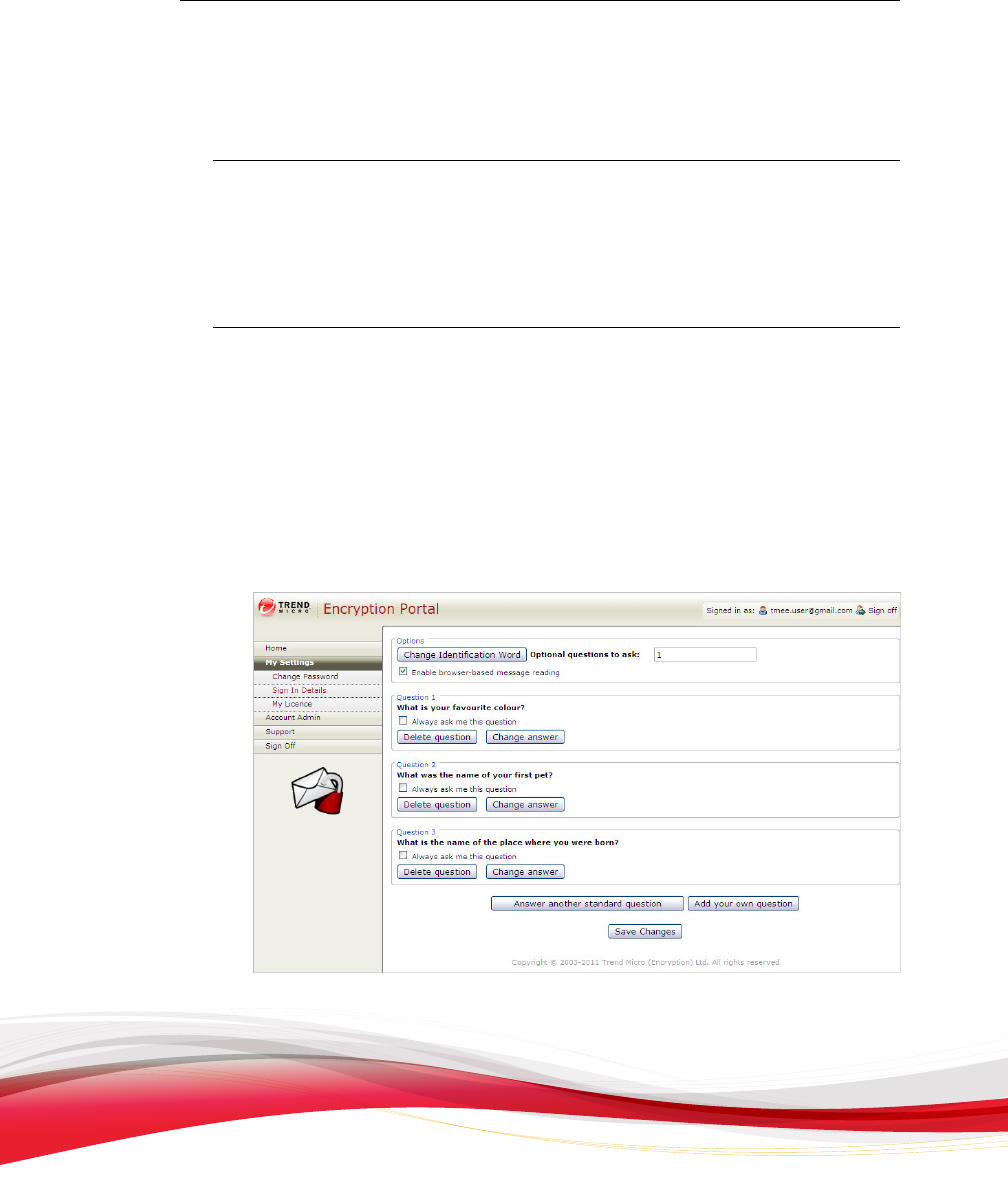
Managing Your Account Online
5-5
The E
ncryption Portal website accepts your registered email address and displays
a message indicating that you have successfully signed in.
Managing Your Security Questions
A
fter you are signed in to the Encryption Portal website, you can manage your security
questions.
Procedure
1. Sign in to the Encryption Portal website, as described in Signing in to the Encryption
Portal Website on page 5-2.
The Encryption Portal Sign In screen appears showing the message, “Thank you
- you are now signed in.”
2. On the left menu, click My Settings.
The Sign In Details screen appears.
FIGURE 5-4. The Encryption
Portal Sign In Details screen

Trend Micro Encryption for Email User’s Guide
5-6
3. Update your sign
in details by following the instructions on the website.
Removing Encryption for Email
T
o remove Encryption for Email from your computer using the Encryption for Email
Uninstall Wizard, choose one of the following options:
Procedure
• From the Windows Start menu, click Start > Programs > Trend Micro
Encryption for Email > Uninstall.
FIGURE 5-5. Uninstalling
Encryption for Email from the Windows Start menu
• Access Windows Control Panel and use the Add/Remove Programs tool to
uninstall the program.